

Page 1

LaCie 4big Quadra Enterprise Class • Design by neil Poulton Table of Contents
User Manual page 1
Table of Contents
1. Introduction .................................................................................................................. 4
1.1. Minimum System Requirements ......................................................................................................... 5
1.2. Box Content .................................................................................................................................... 6
1.3. Views of the Drive ............................................................................................................................ 7
1.4. Cables and Connectors .................................................................................................................... 9
1.4.1. USB 2.0 ................................................................................................................................ 9
1.4.2. FireWire ................................................................................................................................ 9
1.4.3. eSATA ................................................................................................................................. 10
2. Setting Up Your LaCie 4big......................................................................................... 11
2.1. Connect the Interface Cable ........................................................................................................... 12
2.2. Turn On the 4big ........................................................................................................................... 13
3. RAID ........................................................................................................................... 14
3.1. About RAID Modes......................................................................................................................... 14
3.1.1. RAID 0 ................................................................................................................................ 14
3.1.2. RAID 10 .............................................................................................................................. 15
3.1.3. Concatenation ..................................................................................................................... 15
3.1.4. RAID 3 and RAID 3+Spare ................................................................................................... 16
3.1.5. RAID 5 and RAID 5+Spare ................................................................................................... 17
3.2. Changing the RAID Mode ............................................................................................................... 18
3.3. Removing and Installing Drives ........................................................................................................ 19
3.4. Formatting and Partitioning ............................................................................................................. 20
3.4.1. File System Formats .............................................................................................................. 20
3.4.2. Windows Users ....................................................................................................................22
3.4.3. Mac Users ........................................................................................................................... 24
4. Troubleshooting ......................................................................................................... 25
4.1. LED Status Indicators ...................................................................................................................... 26
4.2. Other Troubleshooting Topics ......................................................................................................... 28
4.3. Installing New Firmware ................................................................................................................ 28
5. Contacting Customer Support ..................................................................................... 29
5.1. LaCie Technical Support Contacts ................................................................................................... 30
6. Warranty Information ................................................................................................. 31
Page 2
LaCie 4big Quadra Enterprise Class • Design by neil Poulton Foreword
User Manual page 2
Copyrights
Copyright © 2009 LaCie. All rights reserved.
No part of this publication may be reproduced, stored in a retrieval system, or transmitted in any form or by any means, electronic, mechanical, photocopying, recording
or otherwise, without the prior written consent
of LaCie.
Trademarks
Apple, Mac, and Macintosh are registered
trademarks of Apple Inc. Microsoft, Windows
98, Windows 98 SE, Windows 2000, Windows Millennium Edition, Windows XP, Windows Vista, and Windows 7 are registered
trademarks of Microsoft Corporation. Other
trademarks mentioned in this manual are the
property of their respective owners.
Changes
The material in this document is for information only and subject to change without
notice. While reasonable efforts have been
made in the preparation of this document to
assure its accuracy, LaCie assumes no liability resulting from errors or omissions in this
document, or from the use of the information
contained herein. LaCie reserves the right to
make changes or revisions in the product design or the product manual without reservation and without obligation to notify any person of such revisions and changes.
Canada Compliance Statement
This Class B digital apparatus meets all requirements of the Canadian InterferenceCausing Equipment Regulations.
Japan Compliance Statement
This is a Class B product based on the standard of the Voluntary Control Council for
Interference from Information Technology
Equipment (VCCI). If this is used near a radio
or television receiver in a domestic environment, it may cause radio interference. Install
and use the equipment according to the instruction manual.
FCC Statement
LaCie 4big Quadra
Enterprise Class
Tested to comply with FCC
standards for home or office use
This device complies with Part 15 of the FCC
Rules. Operation is subject to the following
conditions:
✦ The devices may not cause harmful in-
terference
✦ The devices must accept any interfer-
ence received, including interference
that may cause undesired operation.
NOTE: This equipment has been tested and
found to comply with the limits for a Class
B digital device, pursuant to Part 15 of the
FCC Rules. These limits are designed to provide reasonable protection against harmful
interference in a residential installation. This
equipment generates, uses and can radiate
radio frequency energy and, if not installed
and used in accordance with the instructions,
may cause harmful interference to radio communications. However, there is no guarantee
that interference will not occur in a particular installation. If this equipment does cause
harmful interference to radio or television reception, which can be determined by turning
the equipment off and on, the user is encouraged to try and correct the interference by
one or more of the following measures:
✦ Reorient or relocate the receiving an-
tenna.
✦ Increase the separation between the
equipment and receiver.
✦ Connect the equipment into an outlet
on a circuit different from that to which
the receiver is connected.
✦ Consult the dealer or an experienced
radio/TV technician for help.
Modifications to this product not authorized
by LaCie could void the FCC & Industry Canada regulations and negate your authority to
operate the product.
Manufacturer’s Declaration for CE Certification
We, LaCie, solemnly declare that this product conforms to the following European
standards: Class B EN60950, EN55022,
EN55024, EN61000-3-2: 2000, EN610003-3: 2001
With reference to the following conditions:
73/23/EEC Low Voltage Directive; 89/336/
EEC EMC Directive
This symbol on the product or
on its packaging indicates that
this product must not be disposed of with your other house-
hold waste. Instead, it is your
responsibility to dispose of your waste equipment by handing it over to a designed collection point for the recycling of waste electrical
and electronic equipment. The separate collection and recycling of your waste equipment at the time of disposal will help to conserve natural resources and ensure that it is
recycled in a manner that protects human
health and the environment. For more information about where you can drop off your
waste equipment for recycling, please contact
your local city office, your household waste
disposal service, or the shop where you purchased the product.
CAUTION: Modifications not authorized by
the manufacturer may void the user’s authority to operate this device.
CAUTION: A shielded-type power cord is
required in order to meet FCC emission limits
and also to prevent interference to the nearby
radio and television reception. It is essential
that only the supplied power cord be used.
Page 3

LaCie 4big Quadra Enterprise Class • Design by neil Poulton Foreword
User Manual page 3
Health and Safety
Precautions
✦ Only qualified persons are authorized
to carry out maintenance on this device.
✦ Read this User Manual carefully and
follow the correct procedure when setting up the device.
✦ Do not open a disk drive or attempt to
disassemble or modify it. Never insert
any metallic object into the drive to
avoid any risk of electrical shock, fire,
short-circuiting or dangerous emissions. The disk drives shipped with your
LaCie 4big contain no user-serviceable
parts. If it appears to be malfunctioning, have it inspected by a qualified
LaCie Technical Support representative.
✦ Never expose your device to rain, or
use it near water, or in damp or wet
conditions. Never place objects containing liquids on the LaCie 4big, as
they may spill into its openings. Doing
so increases the risk of electrical shock,
short-circuiting, fire or personal injury.
✦ Make sure that the computer and LaC-
ie 4big are electrically grounded. If the
devices are not grounded, there is an
increased risk of electrical shock.
General Use Precautions
✦ Power requirements 100-240 V~,
1.44 A, 50-60 Hz, (supply voltage fluctuations not exceeding ± 10% of the
nominal and transient over-voltages
according to over-voltage category II).
✦ Do not expose the LaCie 4big to tem-
peratures outside the range of 5° C to
35° C (41° F to 95° F); or to operational humidity beyond 5-80%, noncondensing, or non-operating humidity
beyond 10-90%, non-condensing. Doing so may damage the LaCie 4big or
disfigure its casing. Avoid placing your
LaCie 4big near a source of heat or
exposing it to sunlight (even through a
window). Inversely, placing your LaCie
4big in an environment that is too cold
may damage the unit.
✦ Rated cooling for altitudes up to 2000
meters.
✦ Always unplug the LaCie 4big from the
electrical outlet if there is a risk of lightning or if it will be unused for an extended period of time. Otherwise, there
is an increased risk of electrical shock,
short-circuiting or fire.
✦ Use only the power supply shipped with
the device.
✦ Do not use the LaCie 4big near other
electrical appliances such as televisions, radios or speakers. Doing so
may cause interference which will adversely affect the operation of the other
products.
✦ Do not place the LaCie 4big near
sources of magnetic interference, such
as computer displays, televisions or
speakers.
✦ Magnetic interference can affect the
operation and stability of your LaCie
4big.
✦ Never use excessive force on your
LaCie 4big. If you detect a problem,
consult the Troubleshooting section in
this manual.
✦ Protect your LaCie 4big from excessive
exposure to dust during use or storage.
Dust can build up inside the device,
increasing the risk of damage or malfunction.
✦ Never use benzene, paint thinners, de-
tergent or other chemical products to
clean the outside of the LaCie 4big.
Such products will disfigure and discolor the casing. Instead, use a soft, dry
cloth to wipe the device.
✦ Please replace defective hard drives
only with a new drive provided by LaCie. For drive removal process, see
section 3.3. Removing and Installing
Drives.
IMPORTANT INFO: Any loss, corruption
or destruction of data while using a LaCie
drive is the sole responsibility of the user, and
under no circumstances will LaCie be held
liable for the recovery or restoration of this
data. To help prevent the loss of your data,
LaCie highly recommends that you keep
TWO copies of your data; one copy on your
external hard disk, for instance, and a second
copy either on your internal hard disk, anoth-
er external hard disk or some other form of
removable storage media. If you would like
more information on backup, please refer to
our website.
IMPORTANT INFO: 1TB (Terabyte)
= 1,000GB. 1GB = 1000MB. 1MB =
1,000,000 Bytes. Total accessible capacity
varies depending upon operating environment (typically up to 10% less per TB). Capacity and cache memory vary depending
upon RAID mode.
Page 4
LaCie 4big Quadra Enterprise Class • Design by neil Poulton Introduction
User Manual page 4
1. Introduction
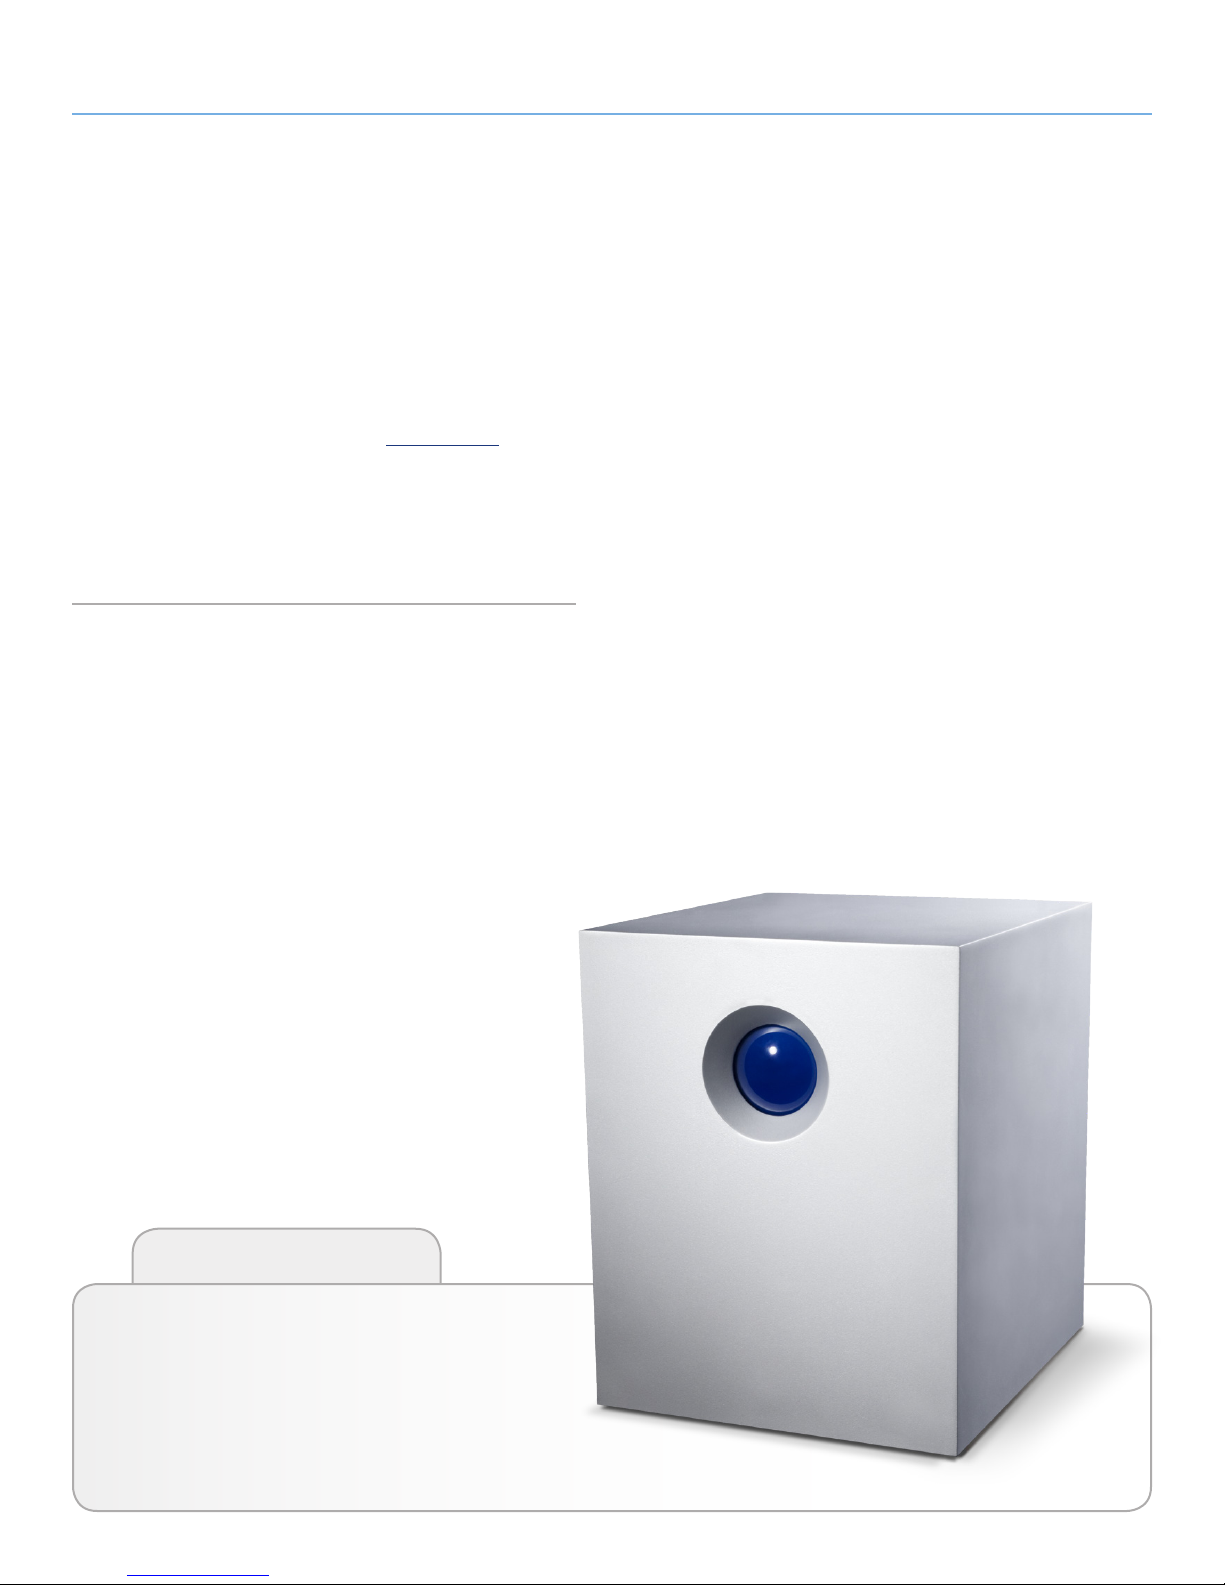
The LaCie 4big Quadra Enterprise class is the ultimate RAID solution, featuring seven flexible RAID modes for maximum security and
performance. Its convenient 128-bit AES hardware encryption, easily configured using the LaCie Desktop Manager, makes the 4big a
secure vault for your data.
Register your Enterprise Class product at www.lacie.com within 30
days of its purchase date to take advantage of LaCie Enterprise
Class Service. For no additional cost, LaCie guarantees that your
Enterprise Class product will receive the highest priority from our
Technical Support team. Please note that the term of your warranty
remains five years.
Quick Links
Click a topic:
✦ Setting Up Your LaCie 4big
✦ Changing the RAID mode
✦ Troubleshooting
Page 5

LaCie 4big Quadra Enterprise Class • Design by neil Poulton Introduction
User Manual page 5
1.1. Minimum System Requirements
Operating System Interface Port Disk Space
The latest versions
of Microsoft Windows XP*, Windows
Vista, or Windows 7
The latest versions
of Apple OS 10.4.x,
10.5.x, or 10.6.x
* Windows XP 32-bit will not recognize logical volumes with capacity greater than 2TB. For details, see section 3.4.1. File System
Formats.
**Most computers do not come from the factory with eSATA ports,
so you may need to purchase a connection card (such as PCI or PCIE) to be able to connect your LaCie 4big via the eSATA interface.
LaCie offers a wide selection of connection cards. Visit the LaCie
website at www.lacie.com/accessories.
eSATA**, FireWire
400, FireWire 800,
and/or USB 2.0
eSATA**, FireWire
400, FireWire 800,
and/or USB 2.0
Minimum of 600MB
recommended
Minimum of 600MB
recommended
Page 6
LaCie 4big Quadra Enterprise Class • Design by neil Poulton Introduction
©
2
0
0
8
L
a
C
i
e
,
a
l
l
r
i
g
h
t
s
r
e
s
e
r
v
e
d
.
w
w
w
.
l
a
c
i
e
.
c
o
m
7
1
2
4
9
0
Storage Utilities
Version 1.0
LaCie User Manuals
Utilities & Backup Software
Quick Install Guide
4big quadra
ENTERPRI SE CL ASS
eSATA 3Gbits | FireWire 800 | FireWire 400 | Hi-Speed USB 2.0
Design by Neil Poulton
SATA
SATA
User Manual page 6
1.2. Box Content
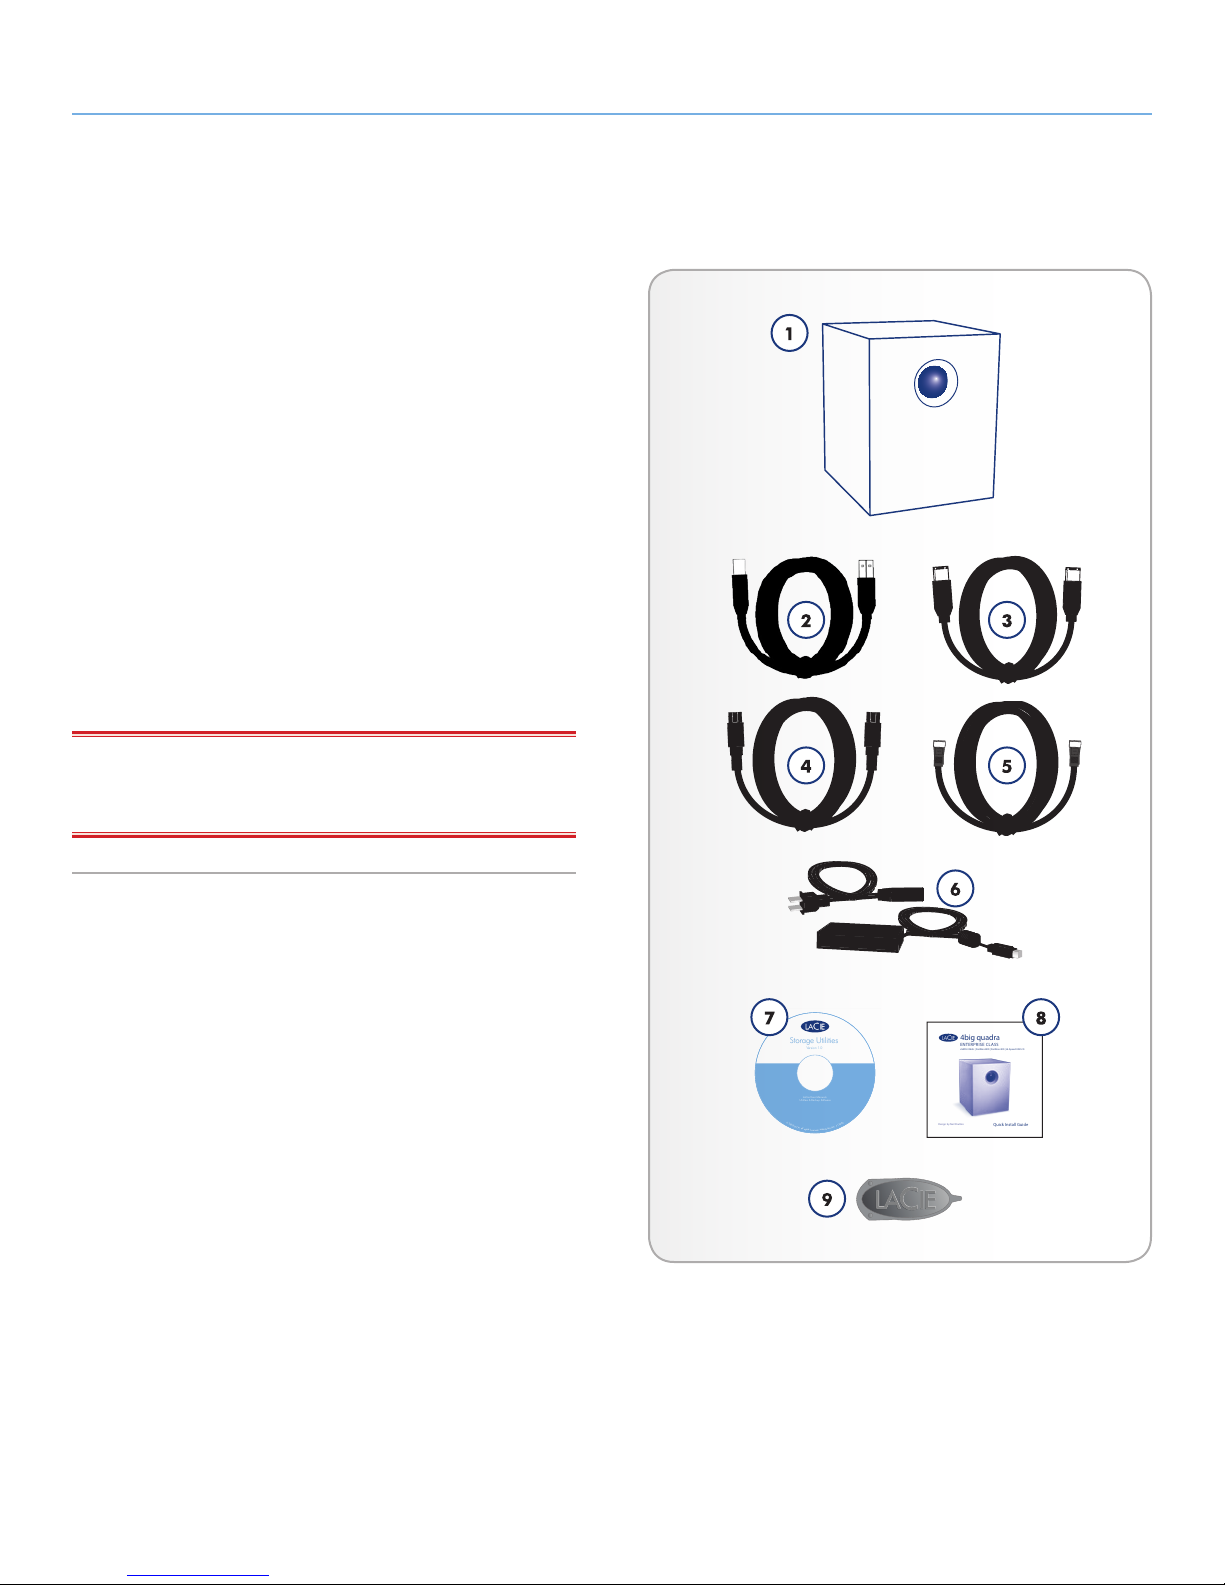
Your LaCie 4big package contains the system tower and an accessories box containing the items listed below.
1. LaCie 4big RAID system tower with four hot-swappable Enter-
prise-Class hard drives
2. Hi-Speed USB 2.0 cable
3. FireWire 400 cable
4. FireWire 800 cable
5. eSATA cable
6. External power supply
7. LaCie Utilities CD-ROM
8. Quick Install Guide
9. 2-in-1 RAID mode change and drive removal tool
IMPORTANT INFO: Please save your packaging. In the event that
the drive should need to be repaired or serviced, it must be returned
in its original packaging.
Page 7
LaCie 4big Quadra Enterprise Class • Design by neil Poulton Introduction
User Manual page 7
1.3. Views of the Drive
Front View
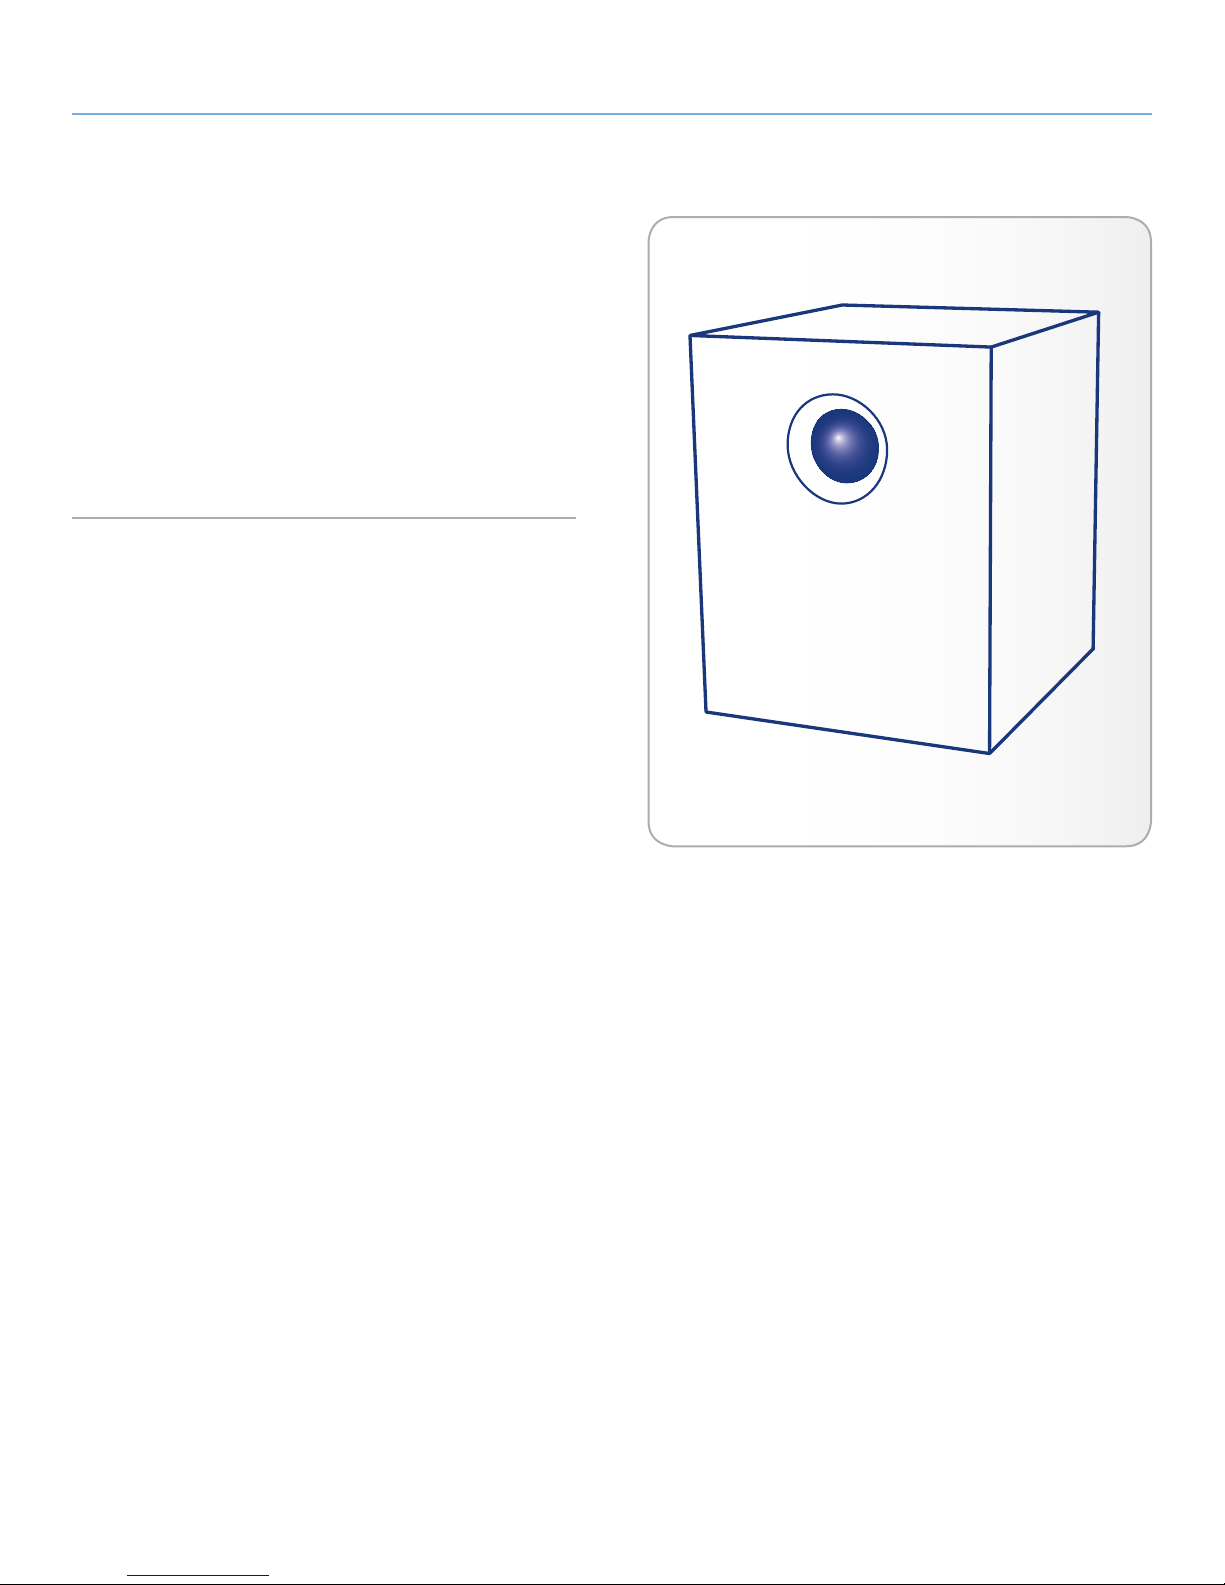
The blue button on the front of the LaCie 4big serves as a LED drive
status indicator and the LaCie Shortcut Button.
See the LaCie Desktop Manager User Manual on the CD-ROM for
more information.
See troubleshooting section 4.1. LED Status Indicators for more information.
Fig. 01
Page 8
LaCie 4big Quadra Enterprise Class • Design by neil Poulton Introduction
User Manual page 8
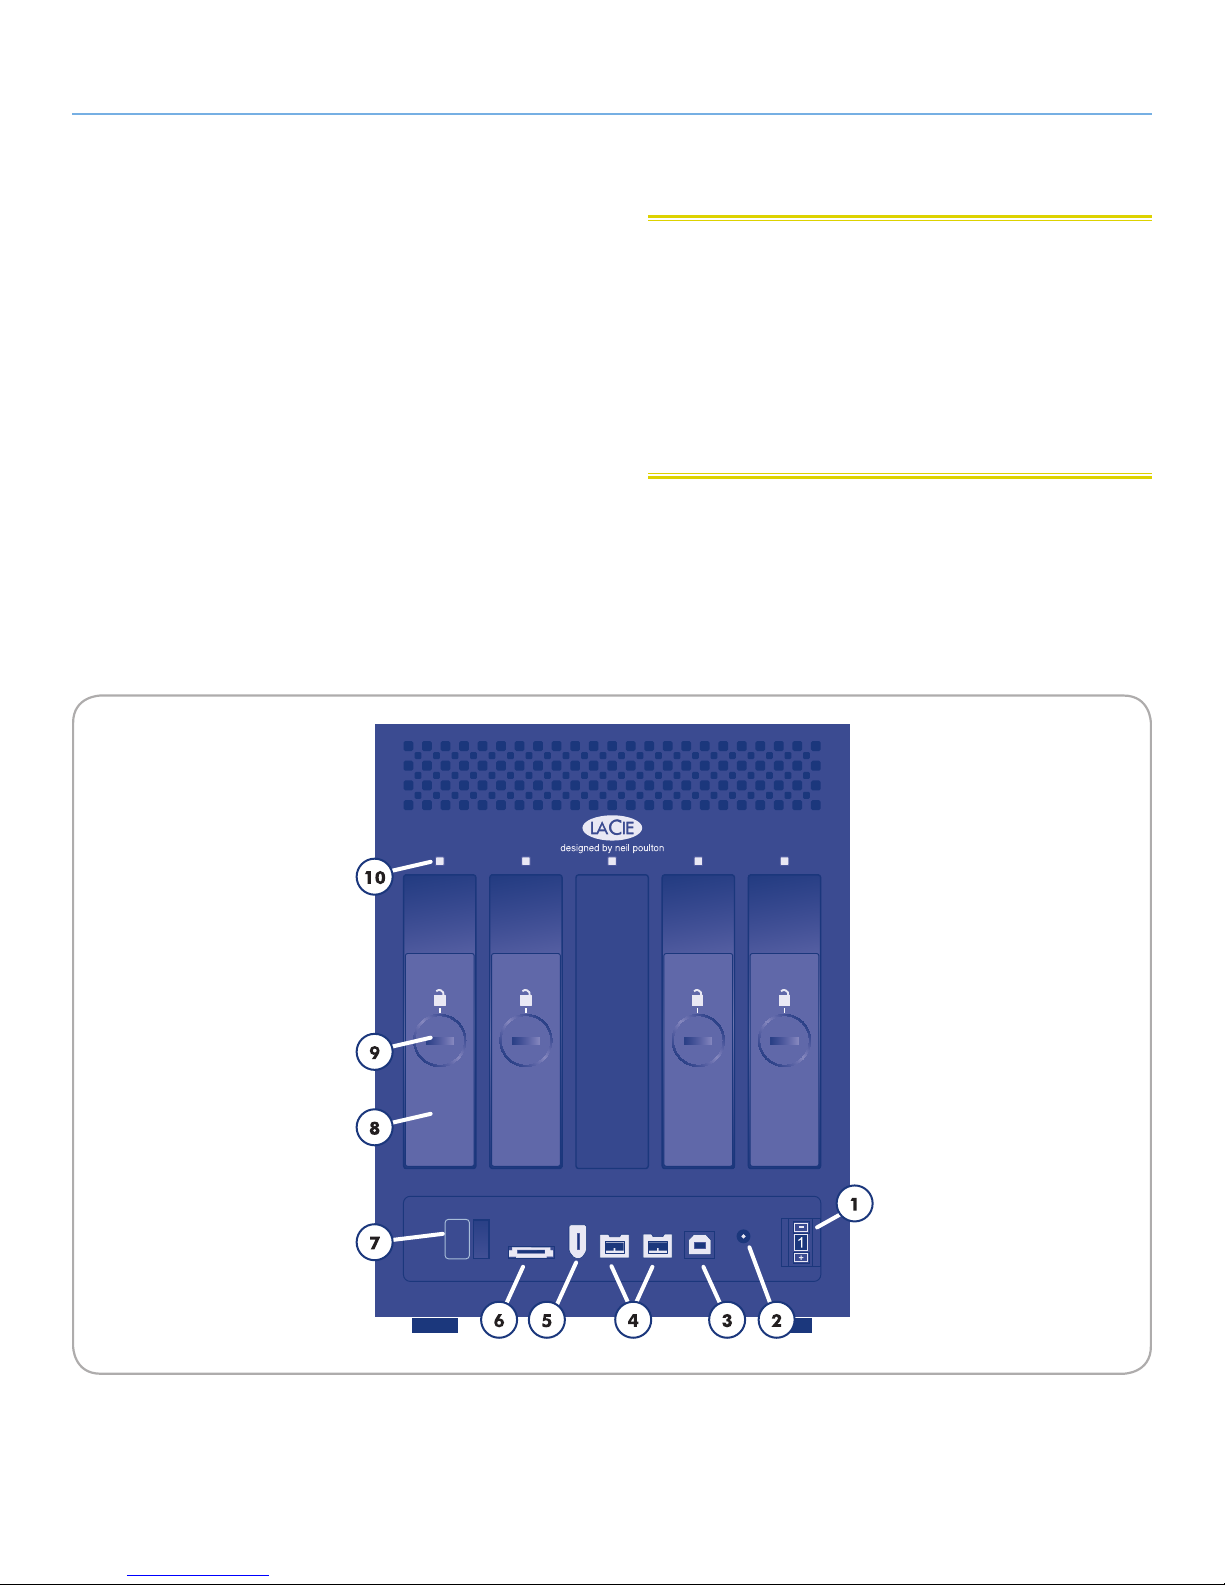
Rear View
1. RAID selection switch
2. Power input connection
3. Hi-Speed USB 2.0 port
4. FireWire 800 ports
5. FireWire 400 port
6. eSATA 3Gb/s port
7. on/auto/off power switch
8. Drive tray handle
9. Drive lock
10. Drive status LED
CAUTION: To avoid overheating, the LaCie 4big should be installed
in a well-ventilated area and in such a way as to maintain sufficient
airflow across the controller chips. Also ensure that the Ventilation Fan
is not obstructed.
Environmental Requirements:
Temperature: 0 – 35° C (32 – 95° F)
Operation Humidity: 20 – 80%, non-condensing
Storage Humidity: 10 – 90%, non-condensing
auto
on
off
Page 9
LaCie 4big Quadra Enterprise Class • Design by neil Poulton Introduction
User Manual page 9
1.4. Cables and Connectors
1.4.1. USB 2.0
USB is a serial input/output technology for connecting peripheral
devices to a computer or to each other. Hi-Speed USB 2.0 is the
latest implementation of this standard, and it provides the necessary
bandwidth and data transfer rates to support high speed devices
such as hard drives, CD/DVD drives and digital cameras.
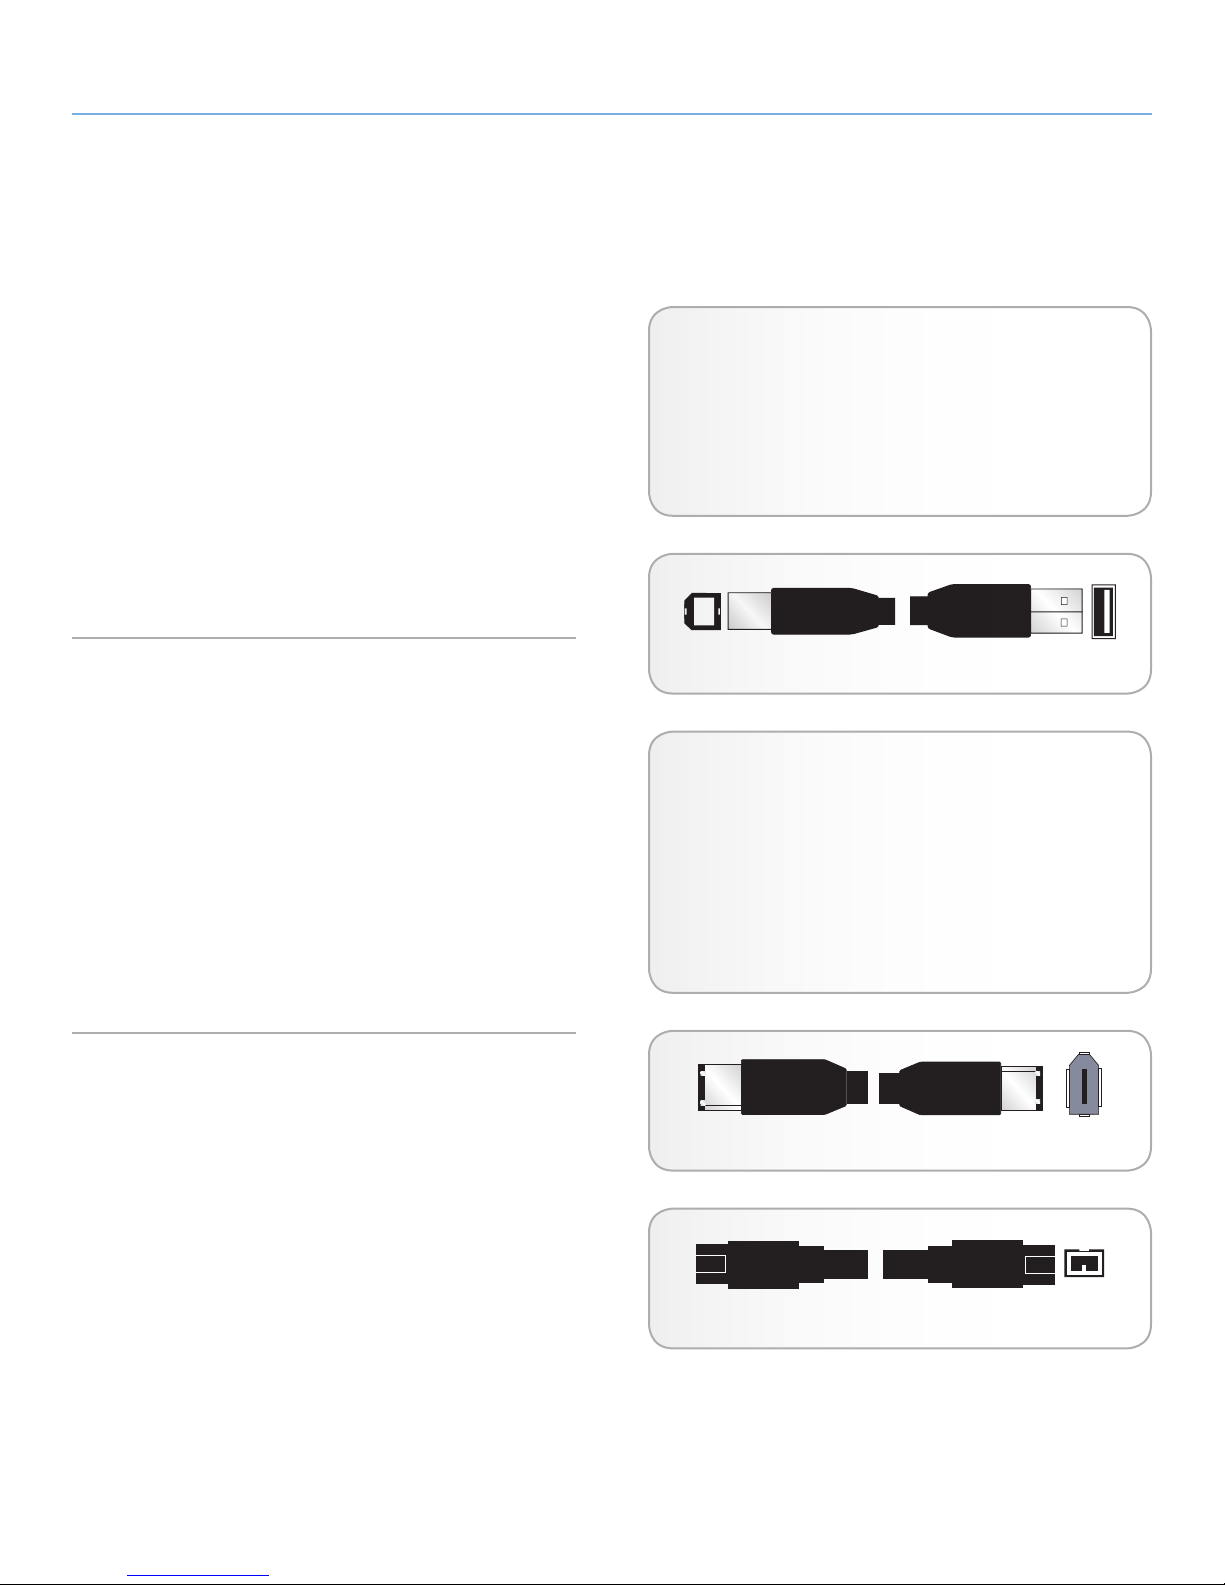
Included USB Cable
Your LaCie drive is shipped with a Hi-Speed USB 2.0 cable, to ensure maximum data transfer performance when connected to a HiSpeed USB 2.0 port. The cable will also work when connected to a
USB port, but drive performance will be limited to USB 1.1 transfer
rates.
Hi-Speed USB 2.0 Benefits
✦ Backwards compatibility: Hi-Speed USB 2.0 works
with the original USB specifications.
✦ Hot-swappable: no need to shut down or restart your
computer when adding or removing devices.
1.4.2. FireWire
FireWire 400, also known as IEEE 1394, is a high-speed serial input/output technology for connecting peripheral devices to a computer or to each other, and FireWire 800 is the implementation of
the new IEEE 1394b standard.
FireWire 800 offers increased bandwidth and extended cabling distance between devices. FireWire 800 is ideal for bandwidth-intensive applications, such as audio, video and graphics.
Included FireWire Cables
Your LaCie hard disk is shipped with a FireWire 400 cable and a
FireWire 800 cable.
Fig. 02 – USB Cable Ends
FireWire Benefits
✦ Hot-pluggable: devices can be added and removed
while the bus is active.
✦ Isochronous data delivery: no dropped frames –
FireWire supports real-time data delivery.
✦ Flexible: up to 63 devices can be connected on a
single bus.
Fig. 03 – FireWire 400 Cable Ends
Fig. 04 – FireWire 800 Cable Ends
Page 10
LaCie 4big Quadra Enterprise Class • Design by neil Poulton Introduction
S-ATA
S-ATA
User Manual page 10
1.4.3. eSATA
Your LaCie 4big Quadra uses the latest in SATA technology, allowing interface (or bus) transfer rates of up to 3 Gb/s. SATA technology was originally developed to serve as an internal interface, delivering improved performance to internal connections. Soon after,
eSATA, or external SATA was developed, allowing for the use of
shielded cables outside the PC.
eSATA technology was developed to be rugged and durable. eSATA connectors do not have the “L” shaped design of other SATA
connectors. In addition, the guide features are vertically offset and
reduced in size to prevent the use of unshielded internal cables in
external applications.
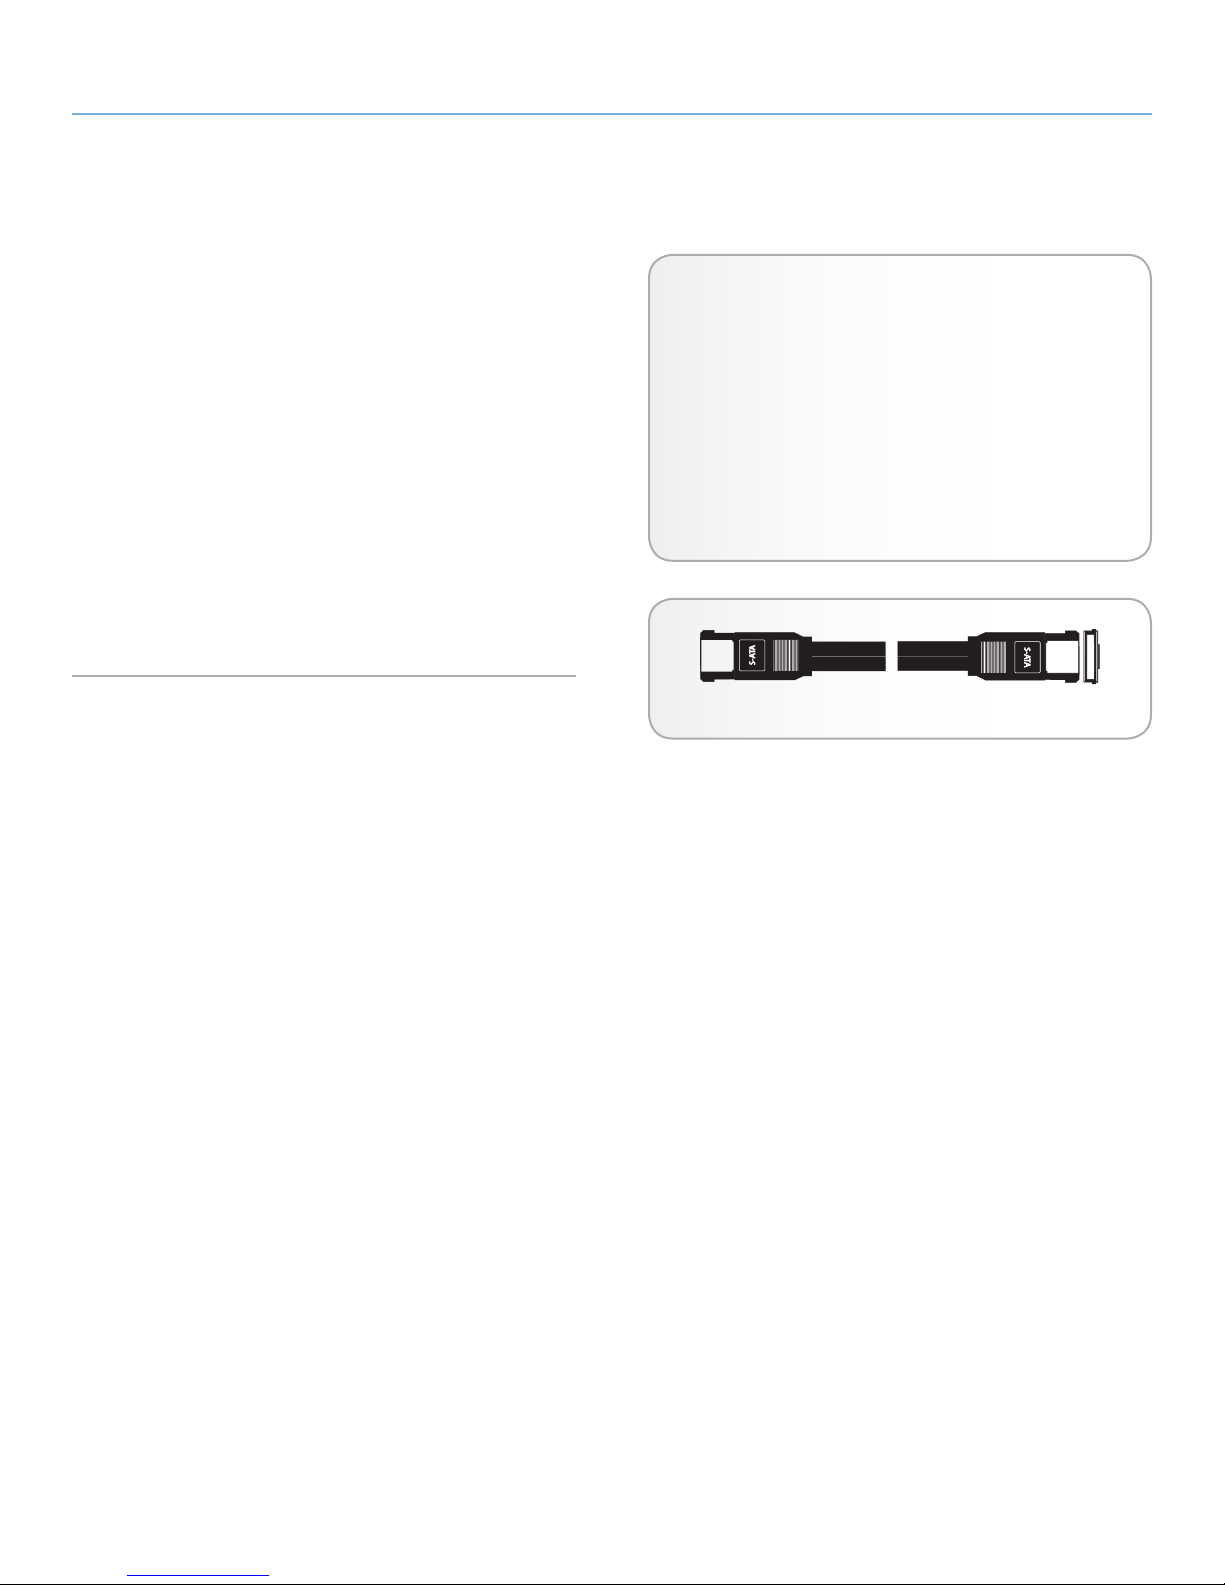
Included eSATA Cable
Your LaCie drive is shipped with an eSATA cable, to ensure maximum data transfer performance when connected to a eSATA port.
eSATA Benefits
✦ eSATA interface can achieve up to 3 Gb/s transfer
rate.
✦ Plug orientation – An extrusion on the outside of the
connector helps guide and align the connector during
insertion.
✦ Hot-plug support – eSATA enables adding and remov-
ing a drive without having to power down the system
or reboot.
Fig. 05 – eSATA Cable Ends
Page 11
LaCie 4big Quadra Enterprise Class • Design by neil Poulton Setup
User Manual page 11
2. Setting Up Your LaCie 4big
This section covers the installation and configuration of your LaCie
4big Enterprise Class. Follow the steps below to power on and configure your LaCie 4big:
Step 1 – Connect the Interface Cable (section 2.1)
Step 2 – Turn On the 4big (section 2.2)
Step 3 – Configuring RAID (section 3)
TECHNICAL NOTE: The LaCie 4big Quadra Enterprise comes with
no encryption configured. If you want to set up encryption, install the
LaCie Desktop Manager and refer that application’s user manual.
IMPORTANT INFO: LaCie Enterprise Class encryption offers a
very high level of protection for your most important data. Due to
the strength of the encryption, data recovery will not be possible in
the unlikely event of disk or part failure.
Page 12
LaCie 4big Quadra Enterprise Class • Design by neil Poulton Setup
off
on
auto
User Manual page 12
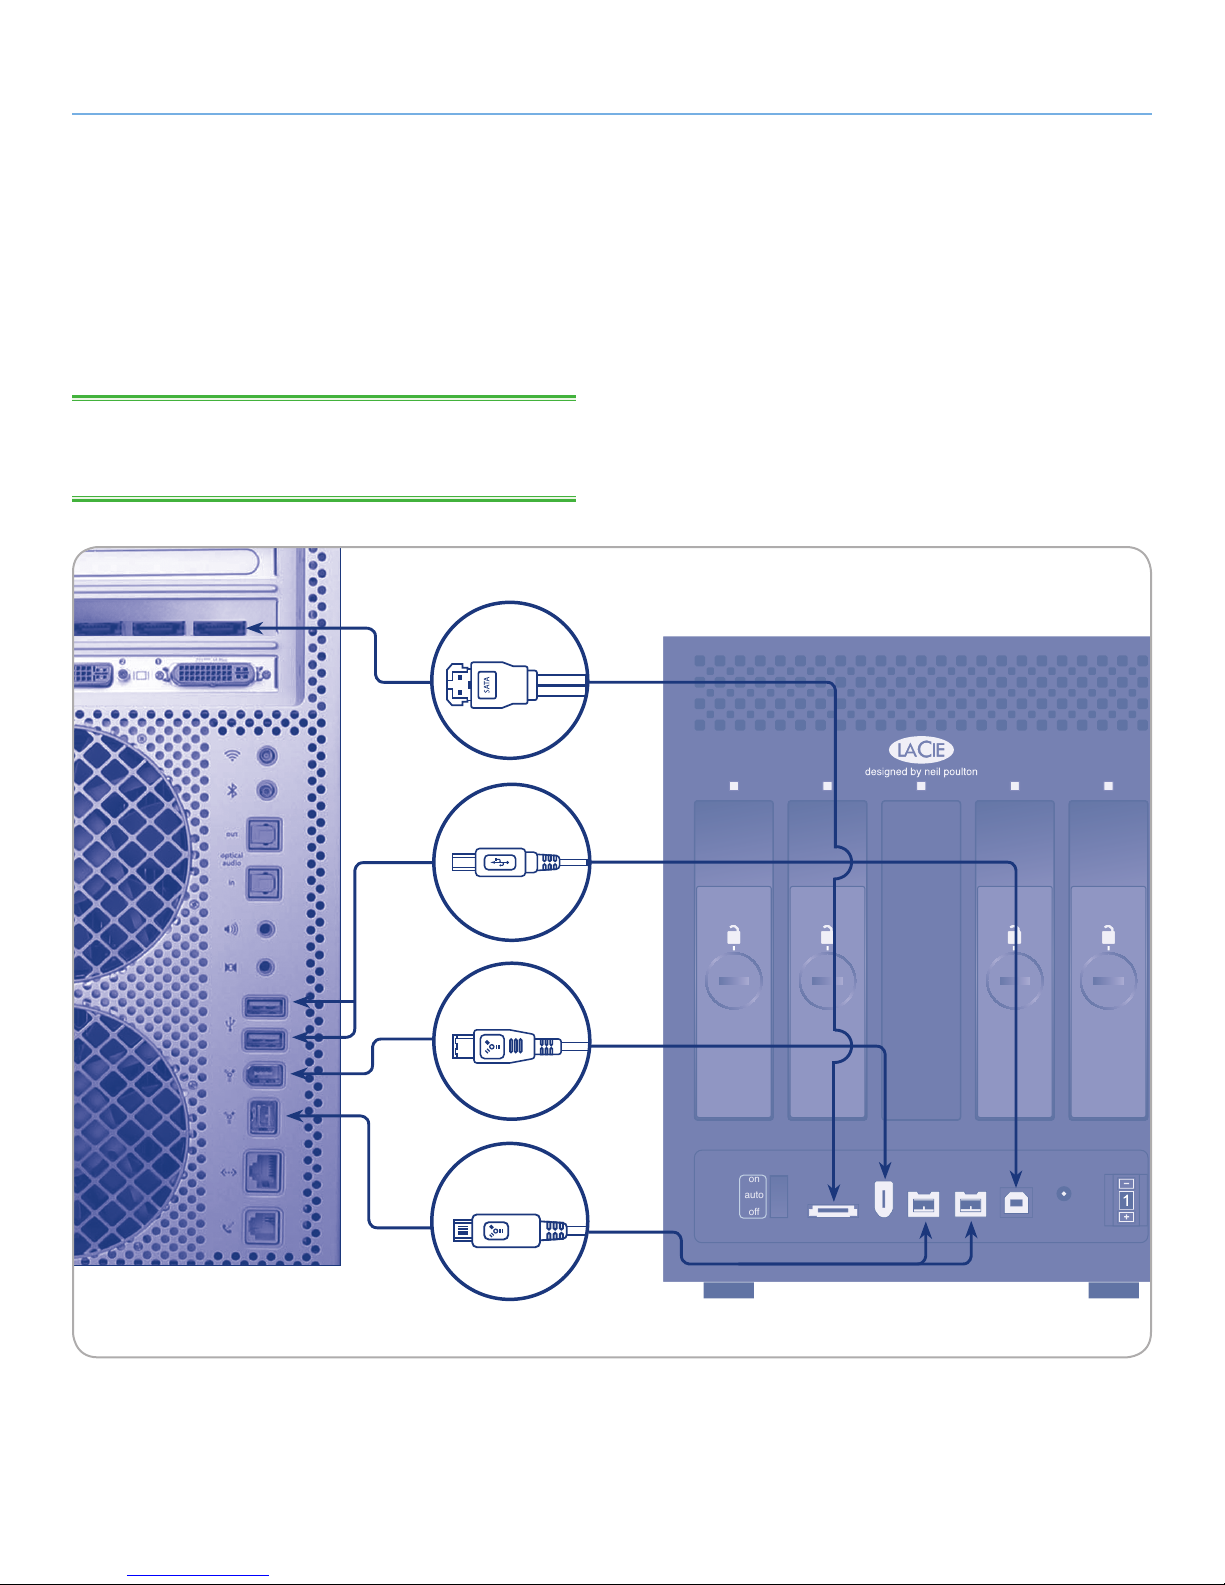
2.1. Connect the Interface Cable
1. Plug one end of the interface cable (USB, FireWire or eSATA)
into the corresponding port on your host computer.
2. Connect the other end of the cable to the matching port on the
4big.
TECHNICAL NOTE: If two interfaces are connected at the same
time, the first one connected remains active and the second will not
work.
eSATA
USB 2.0
FireWire 400
FireWire 800
Page 13
LaCie 4big Quadra Enterprise Class • Design by neil Poulton Setup
off
on
auto
User Manual page 13
2.2. Turn On the 4big
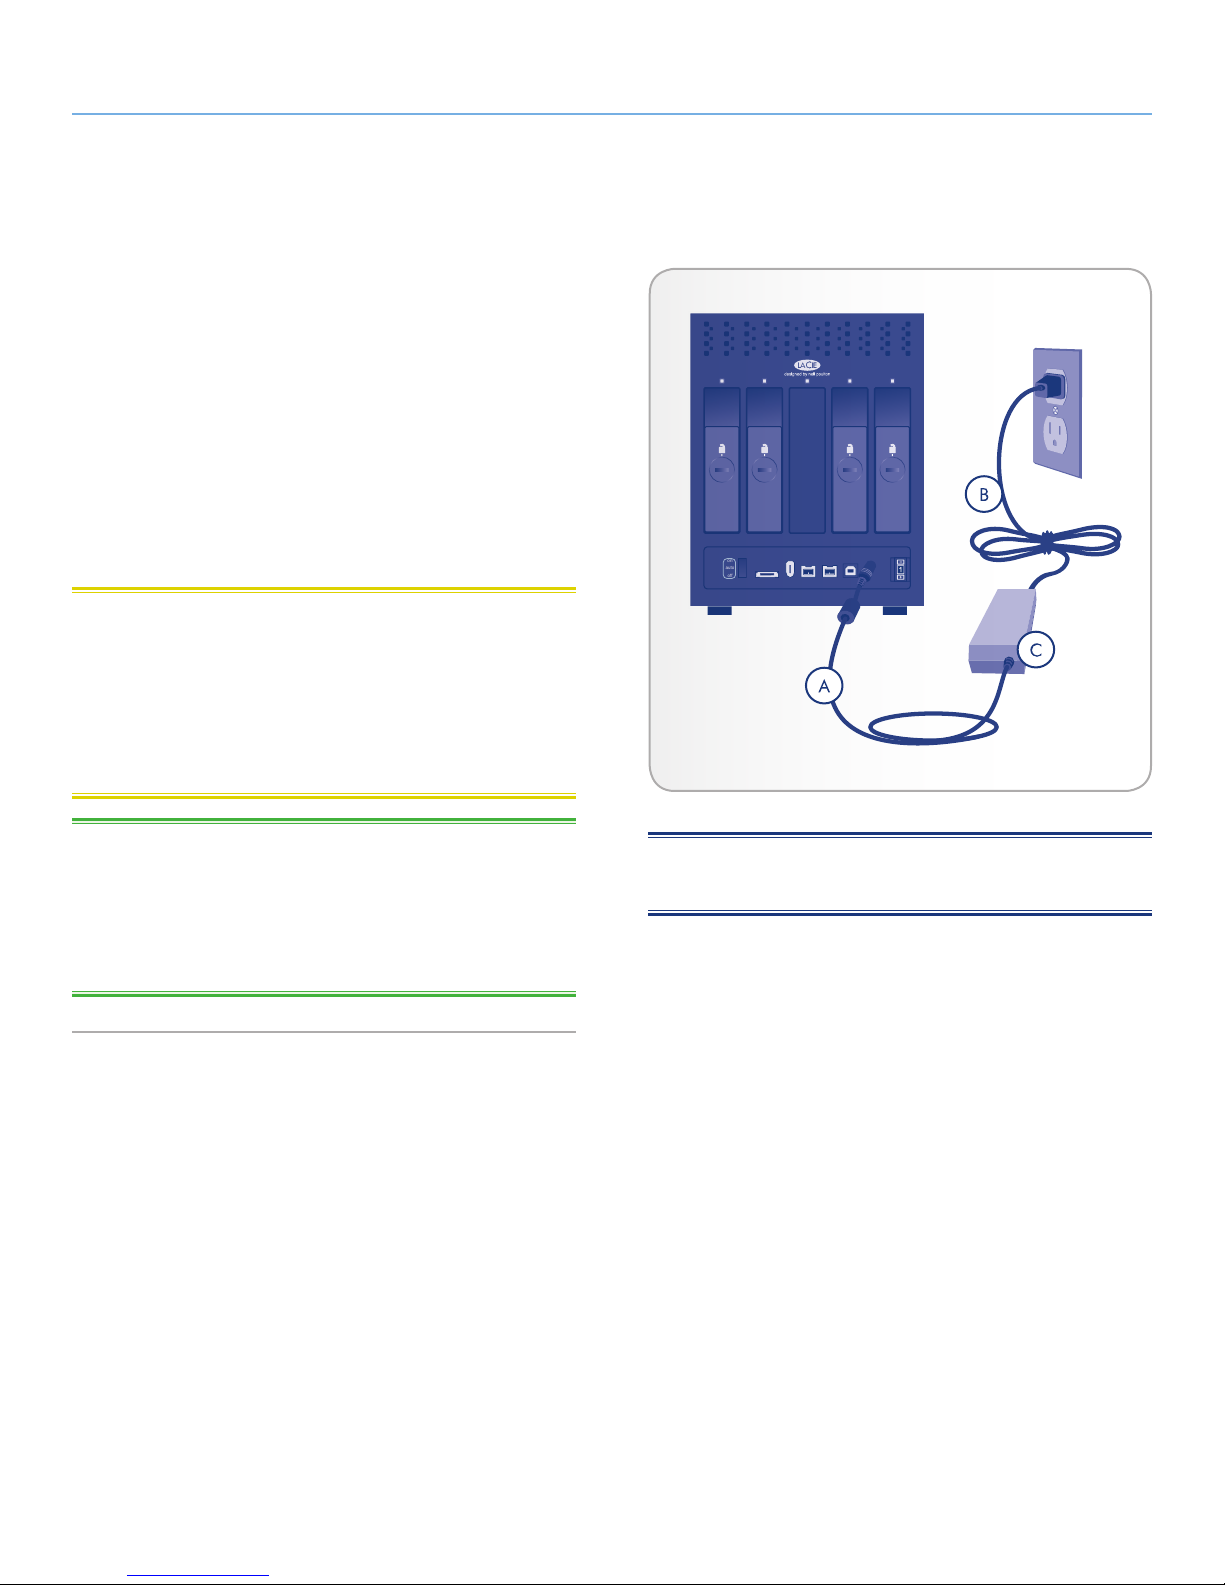
The power supply kit is composed of two cables: one cable (A) connects to the LaCie drive; and the other cable (B) connects to a power
outlet, such as a wall outlet or a surge protector (Fig. 06).
1. Connect cable A to the 4big.
2. Connect cable B to the power supply brick (C).
3. Connect cable B to a surge protector or wall outlet.
4. Turn on the drive by moving the power switch on the back of the
drive to the “on” position.
The 4big system may take up to 30 seconds to boot up.
CAUTION: Only use the AC adapter supplied with your specific La-
Cie device. Do not use a power supply from another LaCie device or
another manufacturer. Using any other power cable or power supply
may cause damage to the device and void your warranty.
Always remove the AC adapter before transporting your LaCie drive.
Failure to remove the adapter may result in damage to your drive and
will void your warranty.
Fig. 06
TECHNICAL NOTE: You may use your LaCie drive when in a for-
eign country thanks to its 100-240 Volt power supply. To be able to
use this feature, you may need to purchase an appropriate adapter
or cord. LaCie accepts no responsibility for any damage to the drive
resulting from the use of an inappropriate adapter. Using an adapter
other than one authorized by LaCie will void your warranty.
NOTE: Depending on your country, power outlet connections may
be different from the one shown above.
Page 14
LaCie 4big Quadra Enterprise Class • Design by neil Poulton RAID
A1
B1
C1
D1
A2
B2
C2
D2
A3
B3
C3
D3
A4
B4
C4
D4
RAID 0
Disk 1 Disk 2 Disk 3 Disk 4
User Manual page 14
3. RAID
3.1. About RAID Modes
This section will help you decide which RAID mode is right for your
application.
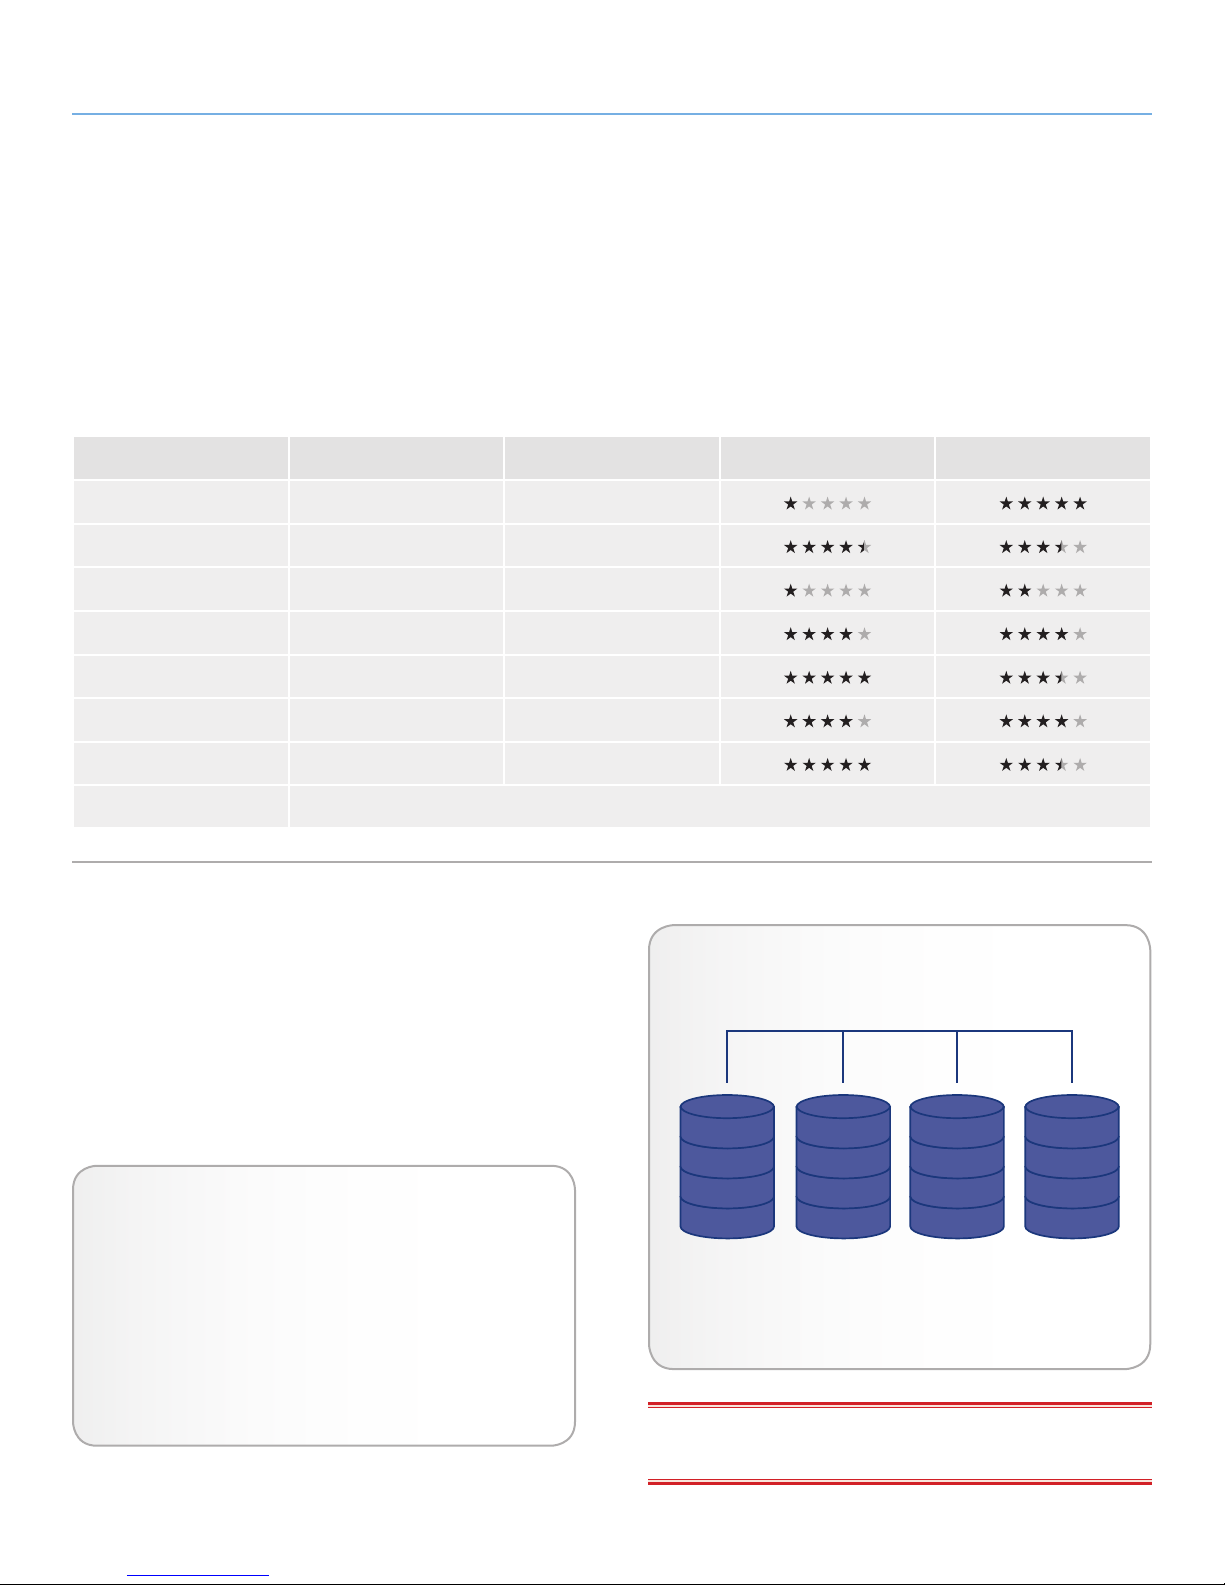
RAID Number RAID Mode Capacity Protection Speed
0 RAID 0 100%
1 RAID 10 50%
2 Concatenation 100%
3 RAID 3 75%
4 RAID 3+Spare 50%
5
6 RAID 5+Spare 50%
7 N/A (no RAID changes will take effect if 7 is selected)
RAID 5 75%
3.1.1. RAID 0
RAID 0 (also called FAST mode in some LaCie devices), is the fastest RAID mode. Requiring at least 2 drives, RAID 0 stripes data onto
each disk (Fig. 07). The available capacities of each disk are added
together so that one logical volume mounts on the computer.
If one physical disk in the array fails, the data of all disks becomes
inaccessible because parts of the data have been written to all disks.
Applications
RAID 0 is ideal for users who need maximum speed and
capacity. Video editors working with very large files may use
RAID 0 when editing multiple streams of video for optimal
playback performance. A RAID 0 array is more suited for
actively working with files (editing video, for example) and
should not be used as a storage backup.
Fig. 07
IMPORTANT INFO: Data recovery is not possible when using
RAID 0.
Page 15
LaCie 4big Quadra Enterprise Class • Design by neil Poulton RAID
RAID 1 RAID 1
RAID 0
A2
A4
A6
A8
RAID 10
A2
A6
A8
A4
A1
A3
A7
A5
A1
A3
A5
A7
Disk 1 Disk 2 Disk 3 Disk 4
Concatenation
A
B
C
D
E
F
G
H
I
J
K
L
M
N
O
P
Disk 1 Disk 2 Disk 3 Disk 4
User Manual page 15
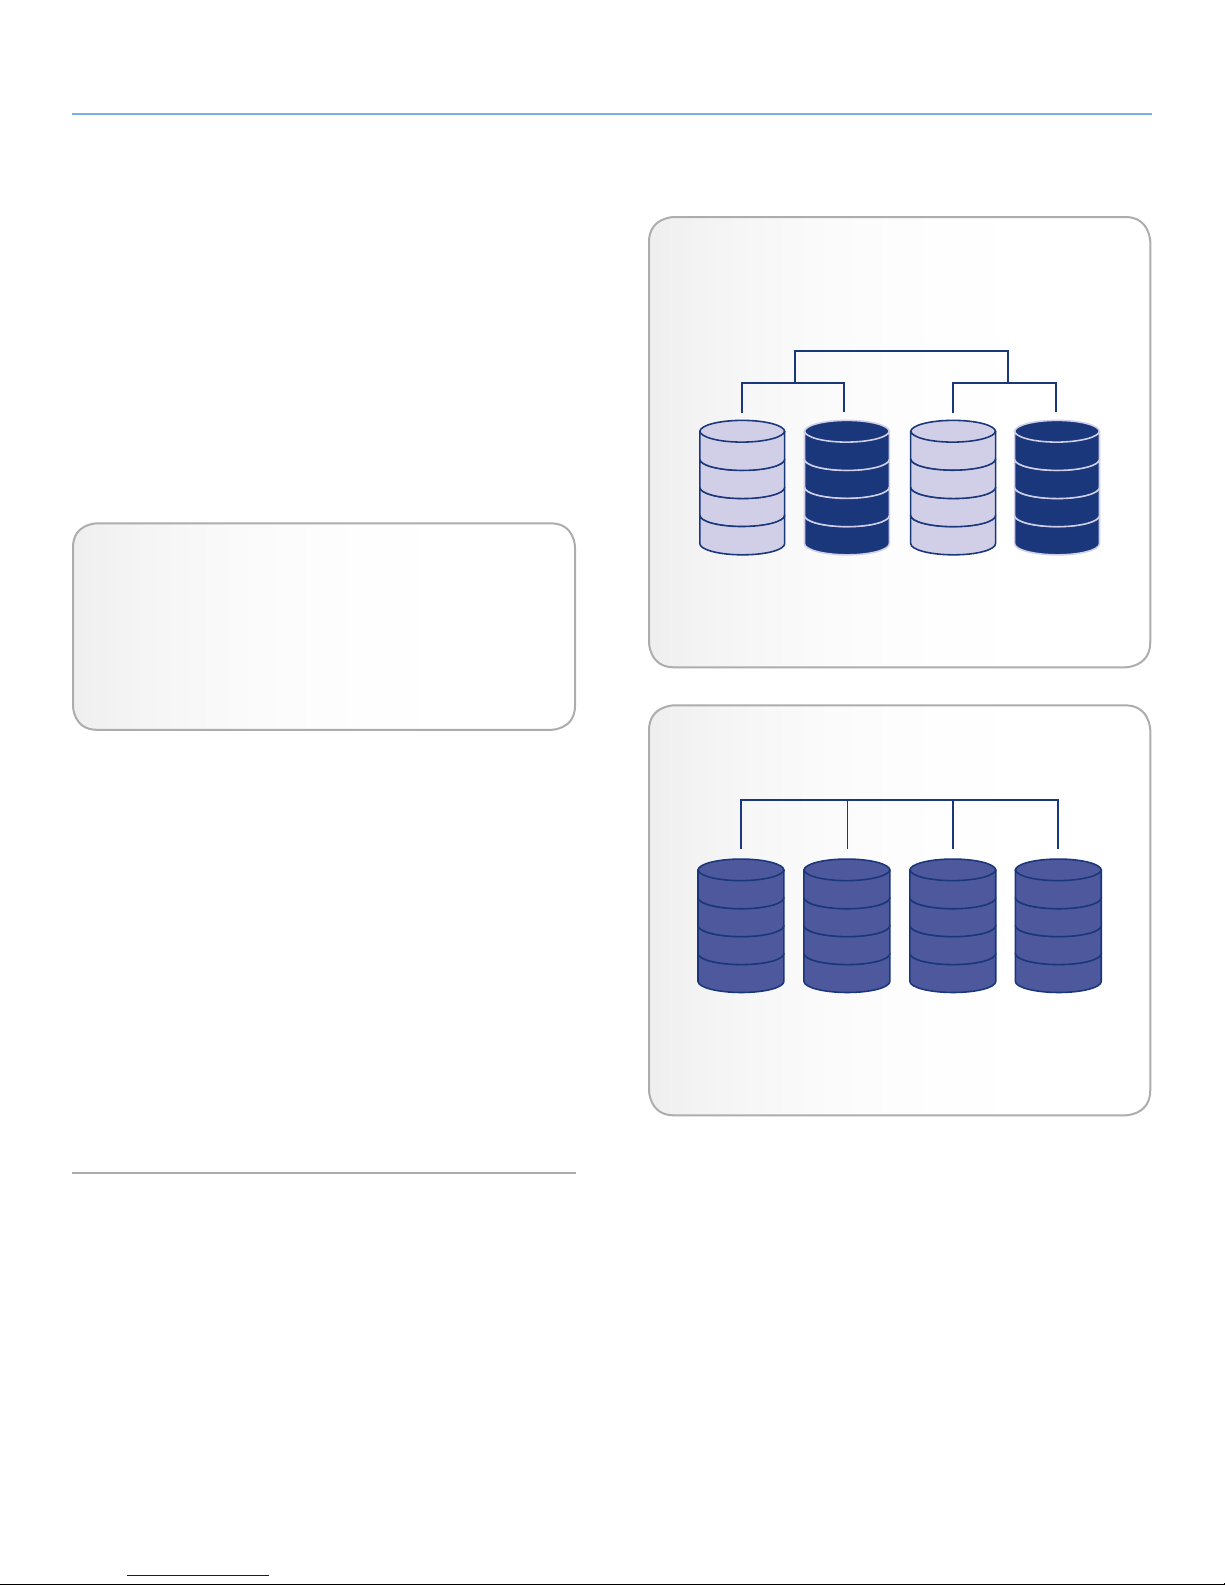
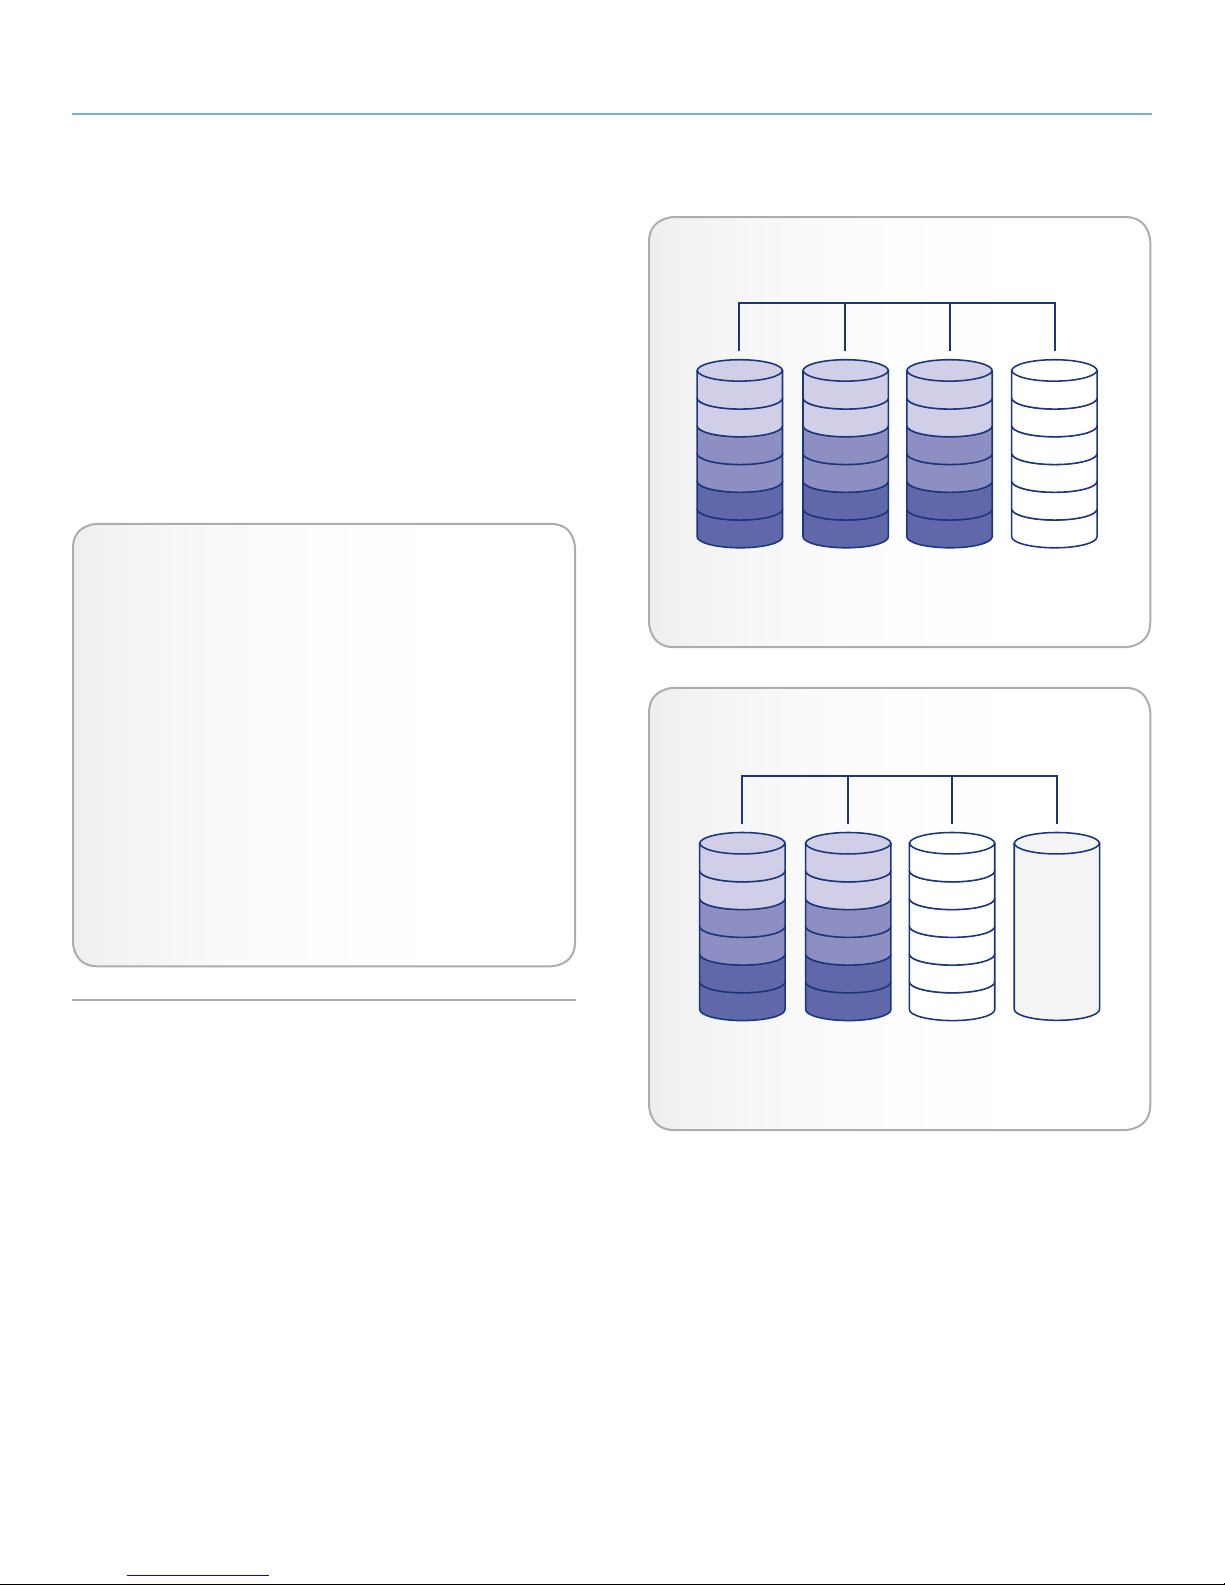
3.1.2. RAID 10
RAID 10 (also called RAID 1+0) is another RAID level that combines
the attributes of other levels, specifically RAID 1 and RAID 0. It is a
“mirror of stripes”, meaning that data is striped across two mirrored
arrays. The Striping occurs between arrays and the mirroring occurs
within the same array. See Fig. 08.
In a RAID 10 array, one disk from each mirrored pair can fail with
no data loss. However, the working disk in an array with a failed disk
becomes a weak point for the entire array. If the second disk in a
mirrored pair fails, the entire array is lost.
Applications
RAID 10 provides good speeds because of RAID 0 striping,
but cuts the available capacity of a device in half (assume all
disks in the array have the same capacity).
3.1.3. Concatenation
When disks are concatenated, their capacities are combined and
data is written to the primary disk in the array until is it full, and
then to successive disks (Fig. 09). Concatenation provides no performance advantage or added measure of data safety. It is simply a
method of combining more than one physical disk into one volume
for greater overall capacity.
Concatenation allows full use of the capacity of all disks in the array
and most data can survive a disk failure. Only data on the failed disk
and data that is partially written on the failed disk and an operative
disk is lost.
Offers the maximum possible capacity by combining the capacities
of several drives into one large volume.
Fig. 08
Fig. 09
Page 16
LaCie 4big Quadra Enterprise Class • Design by neil Poulton RAID
User Manual page 16
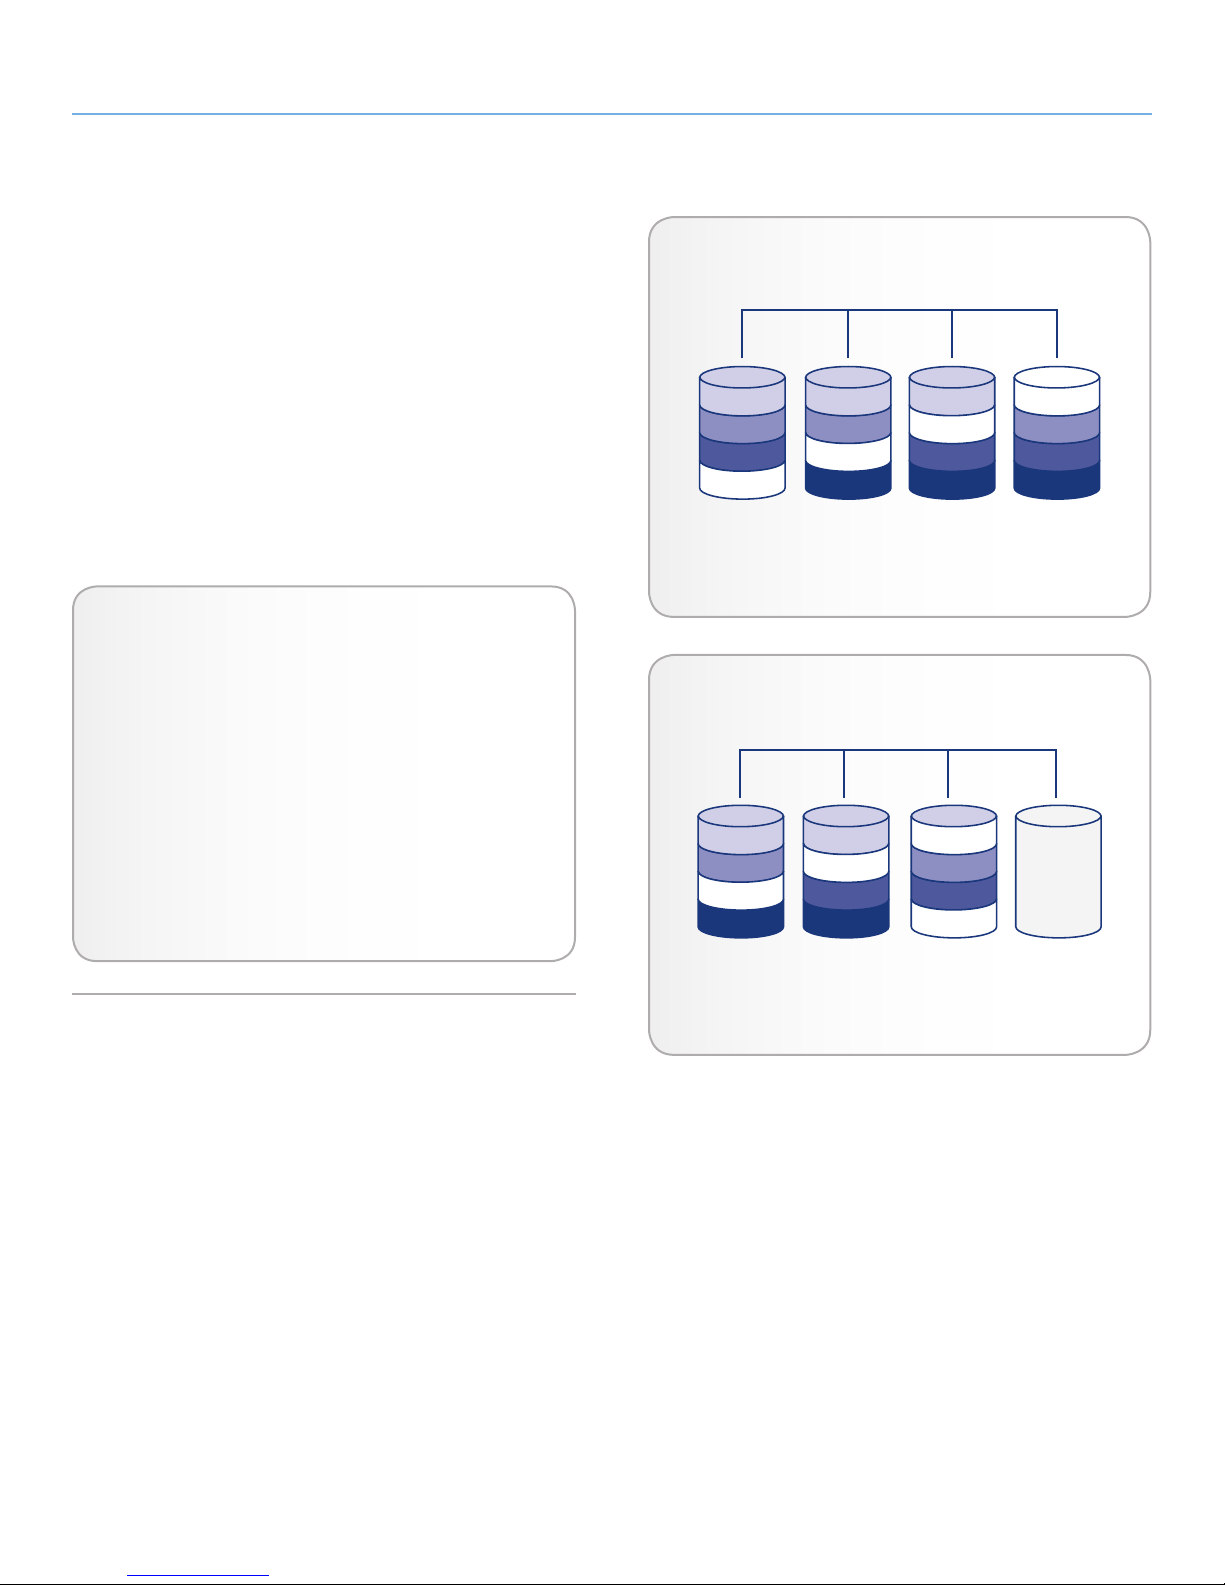
3.1.4. RAID 3 and RAID 3+Spare
RAID 3 uses byte-level striping with a dedicated parity disk (Disk 4 in
Fig. 10 and Fig. 11) so that one volume mounts on the computer.
A RAID 3 array can tolerate a single disk failure without data loss.
If one physical disk fails, the data from the failed disk can be rebuilt
onto a replacement disk. If a second disk fails before data can be
rebuilt to a replacement drive, all data in the array will be lost.
In RAID 3+Spare, one disk in the array is left empty. If a drive in
the array fails, the data from the failed disk is automatically rebuilt
to the empty or “spare” disk (Fig. 11).
Applications
RAID 3 provides good data safety for environments where
long, sequential files are being read, such as video files.
Disk failure does not result in a service interruption because
data is read from parity blocks. RAID 3 is useful for people
who need performance and constant access to their data,
like video editors. RAID 3 is not recommended for intensive
use with nonsequential files because random read performance is hampered by the dedicated parity disk
In RAID 3+Spare disk failure does not require immediate attention because the system rebuilds itself using the hot
spare, but the failed disk should be replaced as soon as
possible.
RAID 3
A1
A4
B1
B4
C1
C4
Disk 1 Disk 2 Disk 3 Disk 4
Fig. 10
A2
A5
B2
B5
C2
C5
A3
A6
B3
B6
C3
C6
RAID 3+ Spare
A1
A3
B1
B3
C1
C3
A2
A3
B2
B4
C2
C4
Ap(1-2)
Ap(3-4)
Bp(1-2)
Bp(3-4)
Cp(1-2)
Cp(3-4)
Ap(1-3)
Ap(4-6)
Bp(1-3)
Bp(4-6)
Cp(1-3)
Cp(4-6)
Spare
Disk 1 Disk 2 Disk 3 Disk 4
Fig. 11
Page 17
LaCie 4big Quadra Enterprise Class • Design by neil Poulton RAID
User Manual page 17
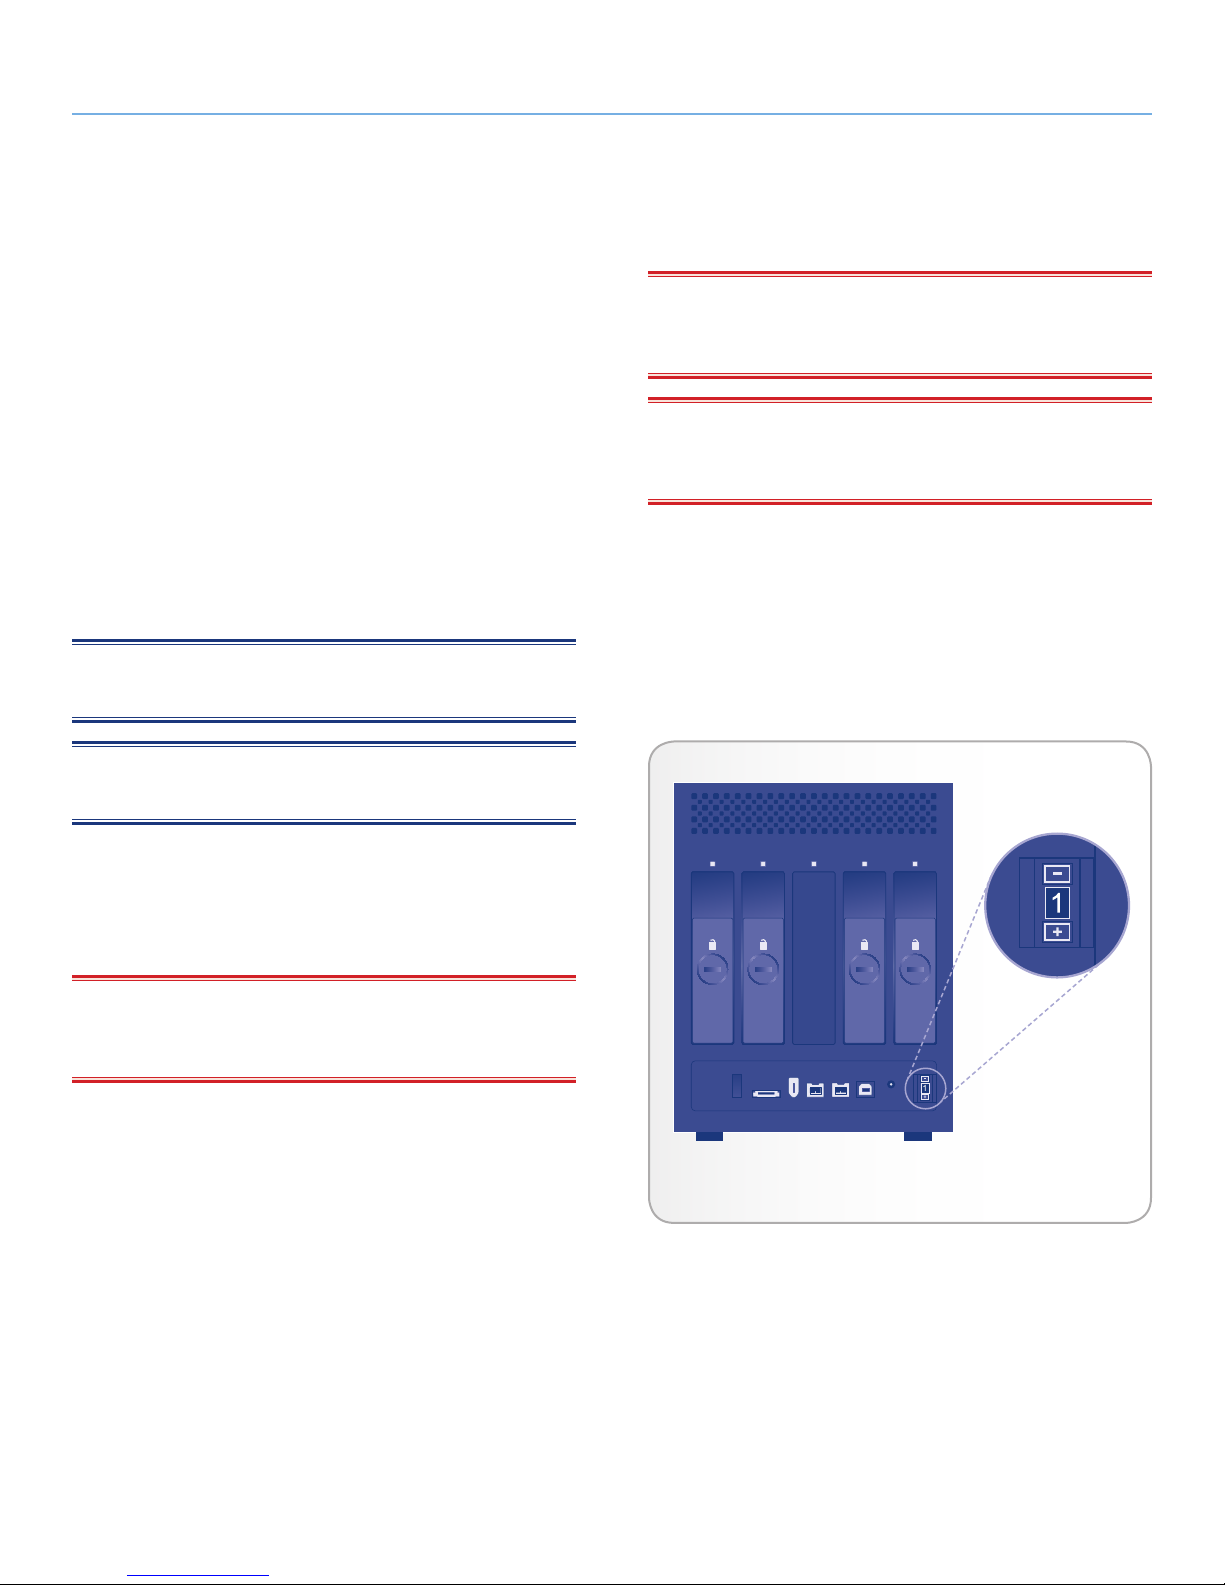
3.1.5. RAID 5 and RAID 5+Spare
RAID 5 combines the striping of RAID 0 with data redundancy in an
array with a minimum of three disks (Fig. 12).
Data is striped across all disks and a parity block (P) for each data
block is written on the same stripe. If one physical disk fails, the data
from the failed disk can be rebuilt onto a replacement disk. No
data is lost in the case of a single disk failure, but if a second disk
fails before data can be rebuilt to a replacement drive, all data in
the array will be lost.
In RAID 5+Spare, one disk in the array is left empty. If a drive in
the array fails, the data from the failed disk is automatically rebuilt
to the empty or “spare” disk (Fig. 13).
Applications
RAID 5 combines data safety with efficient use of disk space.
Disk failure does not result in a service interruption because
data is read from parity blocks. RAID 5 is useful for people
who need performance and constant access to their data,
like video editors.
In RAID 5+Spare disk failure does not require immediate attention because the system rebuilds itself using the hot
spare, but the failed disk should be replaced as soon as
possible.
RAID 5
A1
B1
C1
Dp
Disk 1 Disk 2 Disk 3 Disk 4
A2
B2
Cp
D1
Fig. 12
A3
Bp
C2
D2
RAID 5+Spare
A1
B1
Cp C2
D1
A2
Bp
C1
D2
Ap
B2
Dp
Ap
B3
C3
D3
Spare
Disk 1 Disk 2 Disk 3 Disk 4
Fig. 13
Page 18
LaCie 4big Quadra Enterprise Class • Design by neil Poulton RAID
User Manual page 18
3.2. Changing the RAID Mode
The 4big comes preconfigured in RAID 5 mode. Before you change
the RAID mode of the LaCie 4big, familiarize yourself with the 4big’s
RAID modes. See section 3.1. About RAID Modes.
To change the RAID mode:
1. Unmount or safely remove the 4big Quadra volumes from your
computer, disconnect the interface cable and switch off the
4big.
2. To enter RAID modification mode, turn ON the 4big (do not
select “AUTO”) and simultaneously press the front LED button
for 15 seconds. The front LED will blink blue and red.
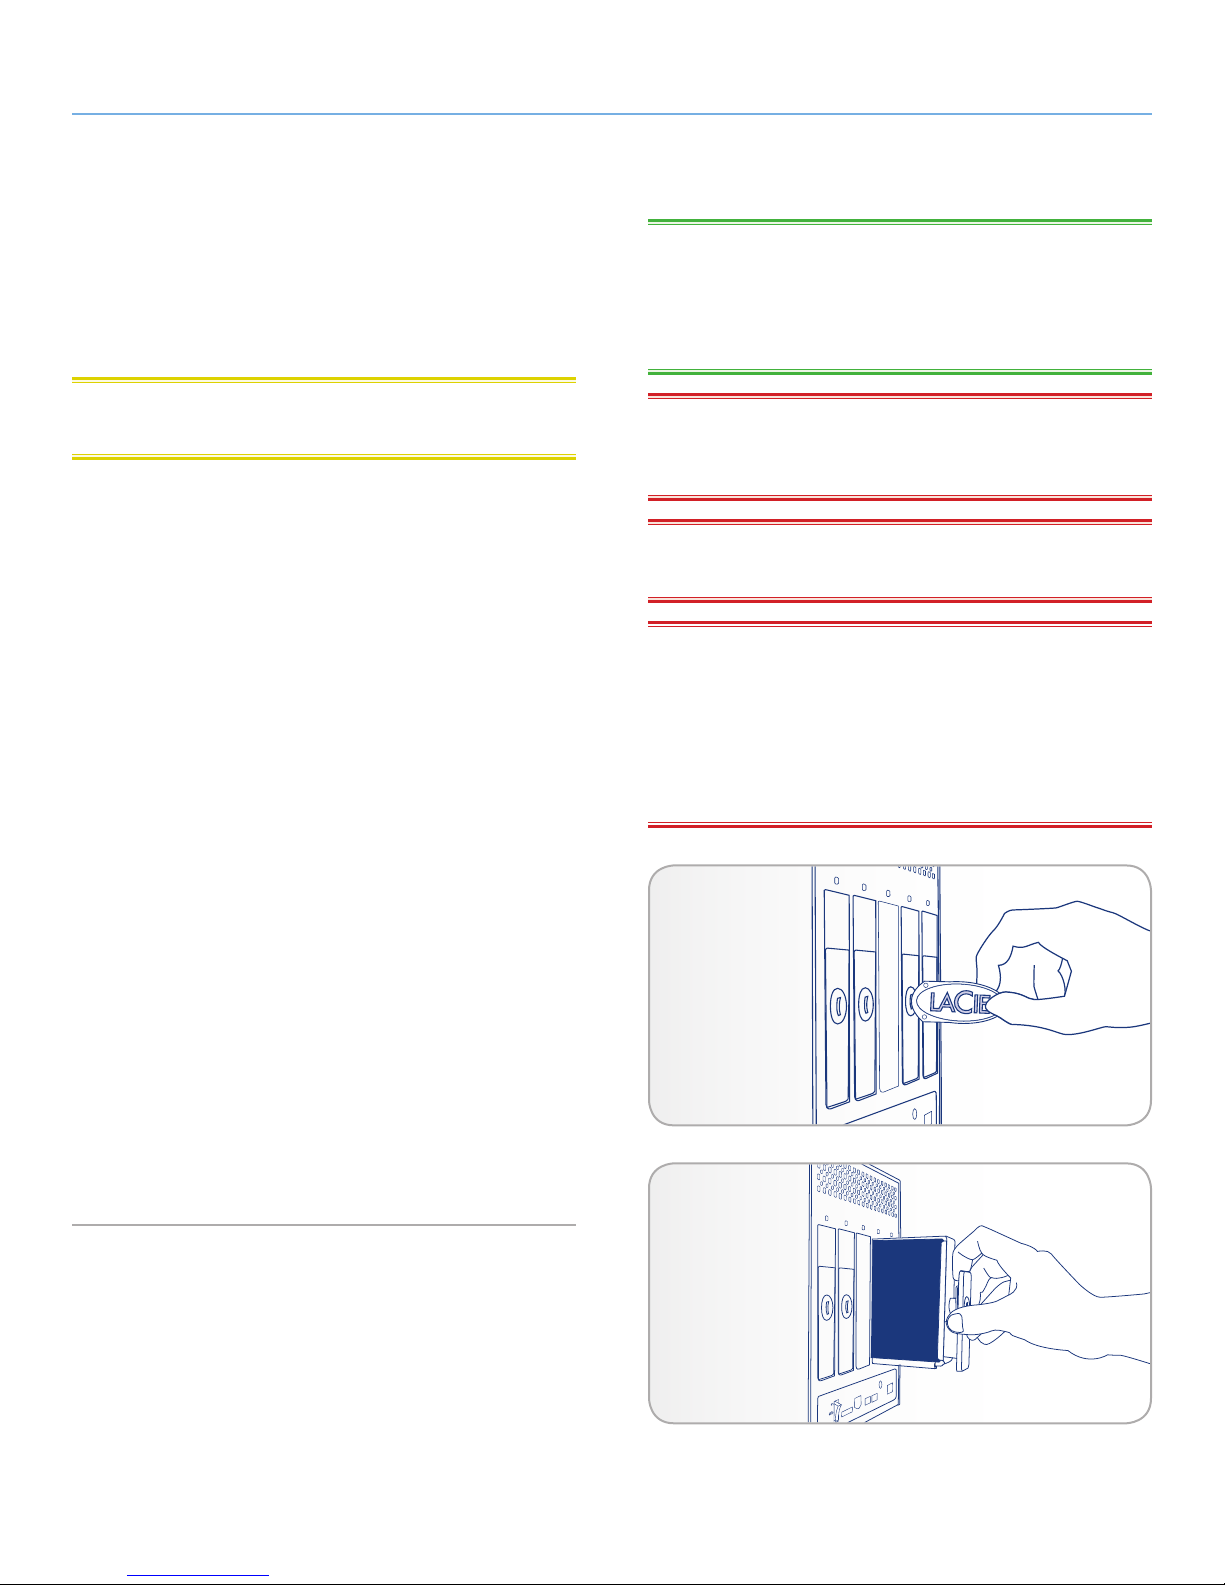
3. Push the + or - buttons on the RAID mode selector until the
desired RAID number appears (Fig. 14).
IMPORTANT INFO: Changing the RAID mode or encryption con-
figuration destroys data stored on the LaCie 4big. If you have saved
data on the drives, back it up before following these steps.
IMPORTANT NOTE: If you have encrypted your 4big, changing
the RAID mode will not change the encryption configuration (including login name and password) but will erase the encrypted data.
NOTE: 0=RAID 0, 1=RAID 10, 2=Concatenation, 3=RAID 3,
4=RAID 3+Spare, 5=RAID 5, 6=RAID 5+Spare, 7=N/A.
NOTE: Although the number 7 appears in the RAID selector, no
RAID changes will take effect if 7 is selected.
4. Validate the mode by pushing the front LED button. The 4big
will start.
5. Connect the 4big’s interface cable. The device is ready to be
reformatted (see section 3.4. Formatting and Partitioning).
IMPORTANT INFO: You must partition the disk drives after
changing the storage policy configuration. See section 3.4. Format-
ting and Partitioning.
Fig. 14
on
auto
off
Page 19
LaCie 4big Quadra Enterprise Class • Design by neil Poulton RAID
User Manual page 19
3.3. Removing and Installing Drives
In the event that an individual hard disk fails in the LaCie 4big Enterprise Class, please contact your LaCie reseller or LaCie Customer
Support. Please replace a defective hard drive only with a new drive
provided by LaCie.
CAUTION: After continuous use of the LaCie 4big, drives may be
hot. Use caution when removing.
To Remove a Drive:
1. If the 4big is in RAID 0 or Concatenation mode, turn it off and
unplug it. If the 4big is in RAID 10, 3, 3+, 5 or 5+ mode, you
can leave it turned on and continue to step 2.
2. The drive tray may be locked. To unlock it, insert the round end
of the provided 2-in-1 tool into the slot on the drive lock and
turn the lock until the slot is vertical (Fig. 15).
3. Draw out the drive tray by inserting your finger into the space
behind the drive tray handle and pulling to disengage the drive.
4. Grasp the drive tray handle and carefully extract the drive (Fig.
16).
TECHNICAL NOTE: Data are still accessible during a rebuild. In
On and Auto mode, the 4big can be disconnected from the workstation during the rebuild. In Auto mode, if the 4big is not connected or
if the computer is off, the 4big will go into standby mode when the
rebuild has completed.
IMPORTANT INFO: Drive warranty will be void if you replace the
defective drive with a drive not provided by LaCie. Drives purchased
from LaCie are shipped pre-installed in drive trays with handles.
IMPORTANT INFO: A replaced drive should not have a smaller
capacity than the drive it is replacing.
IMPORTANT INFO:
Rebuilding a RAID array can take several hours. For example, rebuilding a 1TB RAID 3 array can take up to 6 hours.
This time it takes to rebuild will be increased if you access the drives
during the rebuild.
LaCie does not recommend removing any drives during rebuild.
5. Turn the drive on to continue using the remaining drives.
To Install a Drive:
1. If the 4big is in RAID 0 or Concatenation mode, turn it off and
unplug it. If the 4big is in RAID 10, 3, 3+, 5 or 5+ mode, you
can leave it turned on and continue to step 2.
2. Carefully insert the drive tray into an empty drive bay. When the
drive tray is most of the way in and you feel resistance, press the
drive tray handle firmly until you feel the drive snap into place
and the drive tray handle is flush with the back of the 4big.
3. Use the 2-in-1 tool to lock the drive lock. Turn the locks until the
grooves are oriented vertically. The drives are locked when all
locks are horizontal.
Fig. 15
Fig. 16
Page 20

LaCie 4big Quadra Enterprise Class • Design by neil Poulton RAID
User Manual page 20
3.4. Formatting and Partitioning
The 4big Quadra comes pre-formatted in HFS+ (optimized for Mac
OS X). Please read the following information on file system formats
for Windows and Mac operating systems to determine if you need to
reformat the 4big’s disks. See sections 3.4.2 and 3.4.3 for formatting instructions.
Windows File System Formats
There are two possible file system format categories for Windows users: NTFS and FAT 32 (MS-DOS). See the table below for more information.
Use NTFS if:
3.4.1. File System Formats
Windows Users
TECHNICAL NOTE: The LaCie 4big Quadra comes preformatted
in HFS+ for optimum performance with Mac OS X.
TECHNICAL NOTE: Windows XP 32-bit does not support volumes
greater than 2TB. Windows XP x64, Windows Vista (32- and 64-bit
versions), and Windows 7 (32- and 64-bit versions) do, but in order
to create volumes bigger than 2TB from these operating systems, you
must convert the disk to GPT file system. This process is outlined in
3.4.2.
FAT 32: FAT is an acronym for File Allocation Table, which dates back
to the beginnings of DOS programming. Originally, FAT was only 16
bits, but after the second release of Windows 95 it was upgraded to 32
bits, hence the name FAT 32. In theory, FAT 32 volume sizes can range
from less than 1MB all the way to 2TB. It is the native file system of Windows 98 and Windows Me, and is supported by Windows 2000, Windows XP, Windows Vista, and Windows 7. When FAT 32 is used with
Windows 2000, Windows XP, Windows Vista, and Windows 7 though,
volume size is limited to 32GB (by the Windows partition utility, i.e. Disk
Manager), and the individual file size is limited to 4GB.
...you will be using the drive only with Windows XP, Windows
Vista, and Windows 7 (performance will generally be greater
when compared to FAT 32). This file system is compatible in
read only mode with Mac OS 10.3 and higher.
Use FAT32 if:
...you will be using your drive with both Windows and Mac
OS 9.x or 10.x. Maximum single file size is 4GB.
NTFS: This acronym stands for New Technology Filing System, and
it is the native file system for Windows NT, Windows 2000, Windows
XP, Windows Vista, and Windows 7. NTFS offers several features
that are not available with FAT 32; i.e. file compression, encryption,
permissions, and auditing, as well as the ability to mirror drives and
RAID 5 capabilities. The minimum supported volume size for NTFS
is 10MB, with a maximum of 2TB when initialized in MBR format
or without a limit when initialized in GPT format, with no limit to
file size. Volumes created in NTFS can only be directly accessed
(not through shares) by Windows NT, Windows 2000, Windows XP,
Windows Vista, and Windows 7 without resorting to help from thirdparty products.
Page 21

LaCie 4big Quadra Enterprise Class • Design by neil Poulton RAID
User Manual page 21
Mac OS X Users
Mac File System Formats
TECHNICAL NOTE: The LaCie 4big Quadra comes preformatted
in HFS+ for optimum performance with Mac OS X.
You may customize the drive by reformatting and/or partitioning the
drive with separate file system formats. For optimal performance in
Mac OS environments, format and partition the drive as one large
Mac OS Extended volume.
Mac OS Extended (HFS+): Mac OS Extended refers to the file sys-
tem used by Mac OS X. HFS+ represents an optimization of the
older HFS file system by using hard disk space more efficiently. With
HFS+, you are no longer limited by block size.
There are two possible file system format categories for Mac
users: Mac OS Extended (HFS+) and FAT 32 (MS-DOS).
See the table below for more information.
Use HFS+ if:
...you will be using the drive on Macs only; performance will
generally be greater when compared to FAT 32. This file
system is NOT compatible with Windows OS.
MS-DOS File System (FAT 32): This is the Microsoft file system, more
typically known as FAT 32. This is the file system to use if you are going to be using your LaCie Hard Drive between Macs and Windows
operating systems.
Use FAT32 if:
...you will be using your drive with both Windows and Mac
OS 9.x or 10.x or sharing the drive between Windows 2000,
XP, and 98 SE. Maximum single file size is 4GB.
Page 22
LaCie 4big Quadra Enterprise Class • Design by neil Poulton RAID
User Manual page 22
3.4.2. Windows Users
The process of formatting a drive on a computer running Windows
XP or Windows Vista consists of two steps: (1) installing a signature
on the drive, and (2) formatting the drive. These steps will erase
anything that is on the disk.
CAUTION: Following these steps will erase everything from the
4big, including encrypted data. If you have information that you
want to protect or continue to use, back up this information before
performing these steps.
TECHNICAL NOTE:
Windows XP 32-bit: These operating systems will not recognize volumes greater than 2TB in size.
Windows XP x64, Windows Vista (32- and 64-bit versions), and Windows 7 (32- and 64-bit versions): These operating systems will recognize volumes greater than 2TB in size, but the disks must be converted
to the GPT file system before partitions greater than 2TB can be created.
1. Connect the drive to the power source and to the computer via
the interface port.
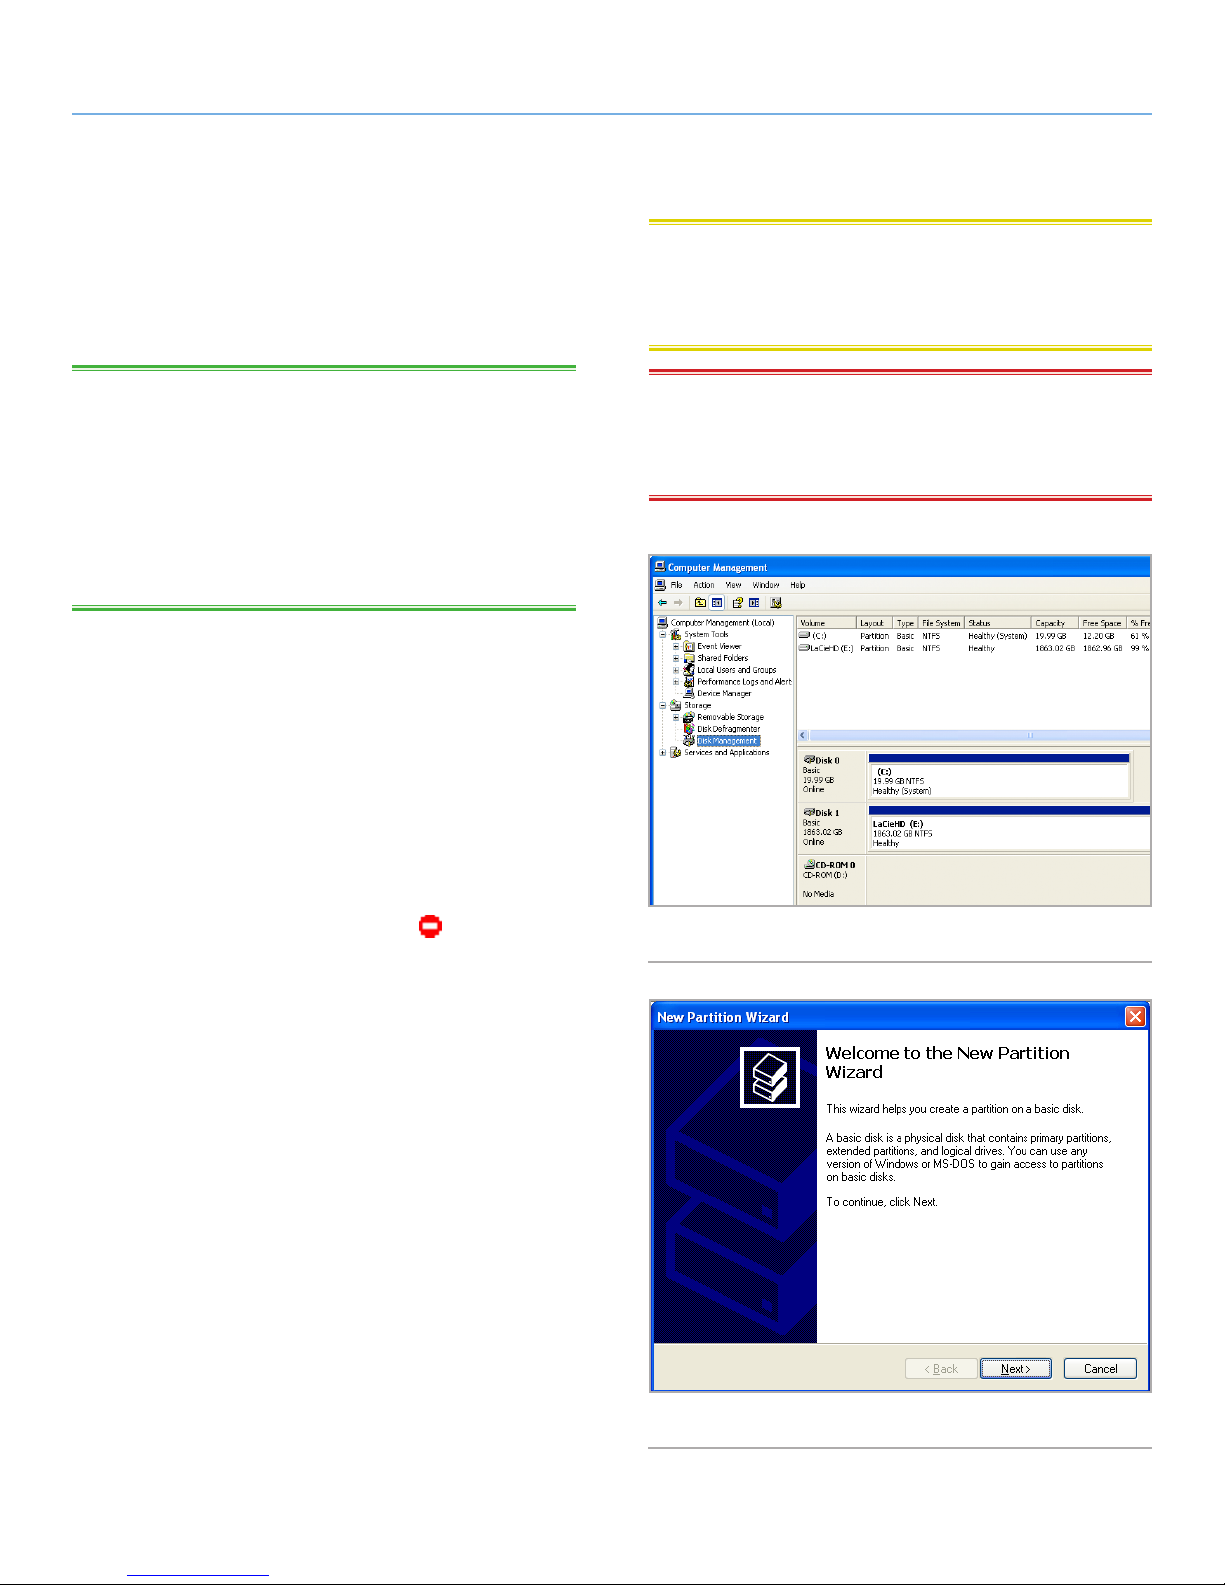
2. Right-click My Computer and select Manage.
3. From the “Computer Management” window, select Disk Man-
agement (located below the Storage group). See Fig. 17
(screens may differ slightly depending on the system).
4. If the “Initialize and Convert Disk Wizard” window appears,
click Cancel.
5. Windows will list the Hard Disks that are installed on the system.
Locate the drive that is represented by the icon. Right-click
the icon and select Initialize.
IMPORTANT NOTE: Formatting will not erase the encryption con-
figuration. If you wish to format a 4big that has been encrypted, you
will first need to unlock the device using the LaCie Desktop Manager, then follow the steps below.
Fig. 17
6. Windows XP x64, Windows Vista, and Windows 7 users only:
Right-click the disk and click Convert to GPT.
7. In the box to the right that says Unallocated, right-click and
select New Partition…
8. On the first page of the “New Partition Wizard,” click Next. See
Fig. 18 (screens may differ slightly depending on the system).
continued on next page...
Fig. 18
Page 23
LaCie 4big Quadra Enterprise Class • Design by neil Poulton RAID
User Manual page 23
9. Click Next.
10. Click Next.
11. Click Next.
12. Click Next.
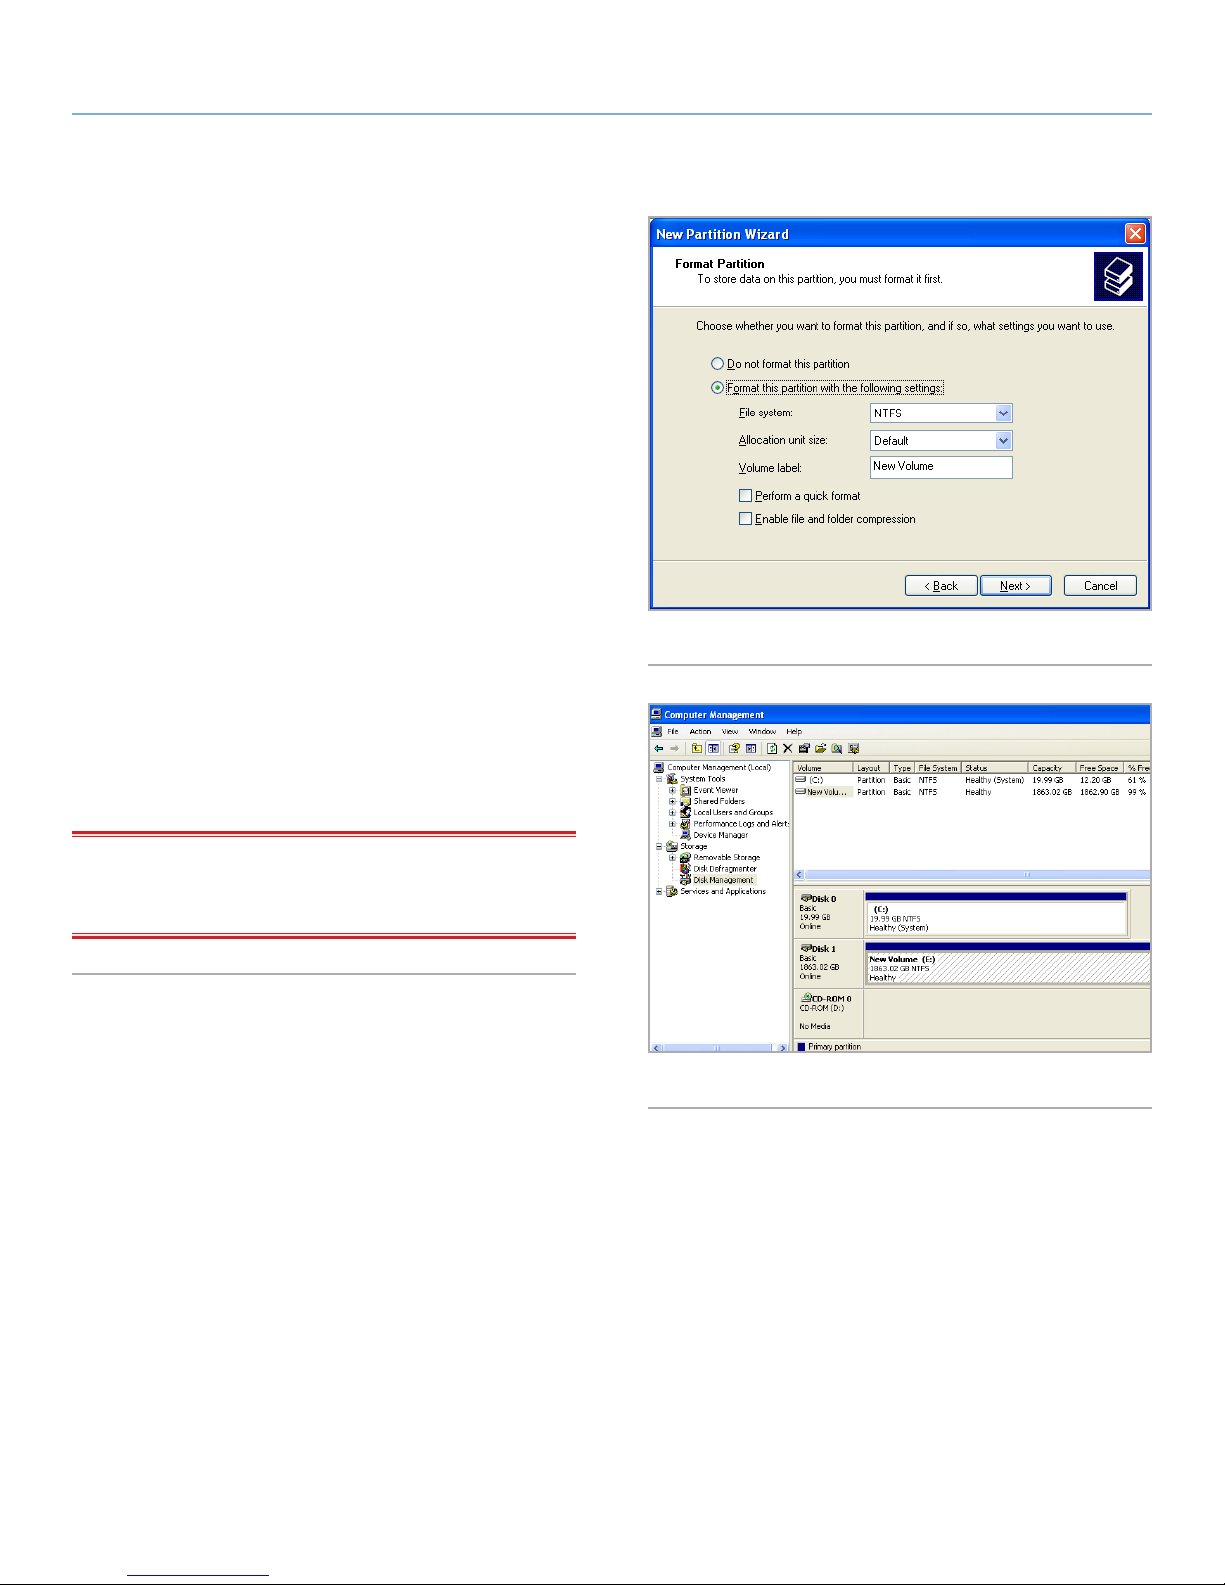
13. On the Format Partition window, select Quick Format. Click
Next (Fig. 19).
14. Click Finish to begin the formatting process.
15. Windows Disk Management will format and partition the disk
according to your settings (Fig. 20), and your drive will appear
in My Computer, ready to use.
IMPORTANT INFO: Please refer to section 3.4.1. File System
Formats, for a more detailed comparison of the various file system
formats.
Fig. 19
Fig. 20
Page 24
LaCie 4big Quadra Enterprise Class • Design by neil Poulton RAID
User Manual page 24
3.4.3. Mac Users
IMPORTANT NOTE: Formatting will not erase the encryption con-
CAUTION: Following these steps will erase everything from the
4big, including encrypted data. If you have information that you
want to protect or continue to use, back up this information before
performing these steps.
1. Connect the drive to the power source and to the computer via
the interface port.
2. Select Utilities from the Go menu in the Finder menu bar.
3. In the Utilities folder, double-click Disk Utility.
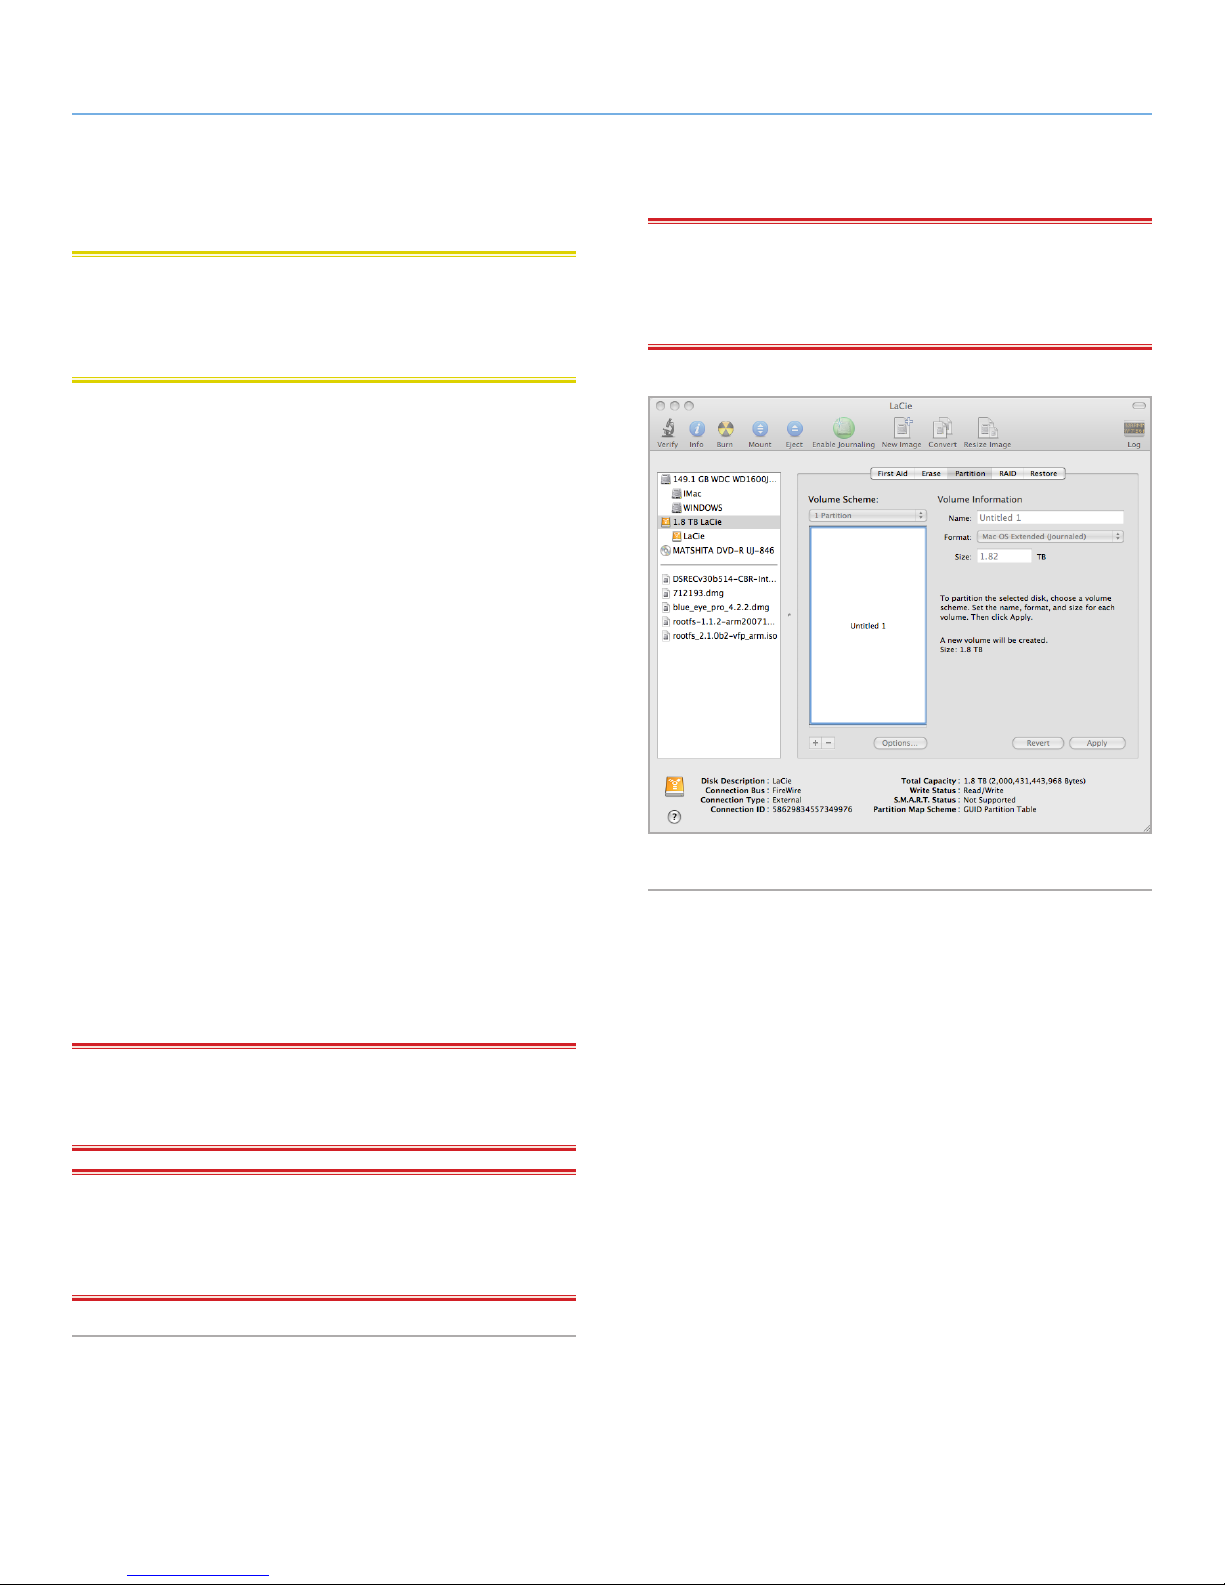
4. The Disk Utility window will open (Fig. 21). Select the volume
labeled LaCie Hard Disk from the list of available hard disks
on the left side of the window.
figuration. If you wish to format a 4big that has been encrypted, you
will first need to unlock the device using the LaCie Desktop Manager, then follow the steps below.
5. Select the Partition tab.
6. From the Volume Scheme: menu, choose the number of partitions you want to divide the drive into (Mac OS X gives you the
option of dividing the drive into at most 16 partitions). You can
adjust the size of each partition using the slide bar between the
partitions in the Volume Scheme: area.
7. In the Volume Information section, enter a name for each
volume (partition), choose the volume format.
8. Once you have finalized the volume options, click Partition.
Click Partition again when the alert message appears to continue.
9. Mac Disk Utility will format and partition the disk according to
your settings, and your drive will be ready to use.
IMPORTANT INFO: Please refer to section 3.4.1. File System
Formats, for a more detailed comparison of the various file system
formats.
IMPORTANT INFO: Apple recommends that unless you have a
specific reason to use the UNIX File System (UFS), you should use
the Mac OS Extended format because it provides a more familiar
experience to Macintosh users.
Fig. 21
Page 25

LaCie 4big Quadra Enterprise Class • Design by neil Poulton Troubleshooting
User Manual page 25
4. Troubleshooting
In the event that your LaCie 4big is not working correctly, please
refer to the table on the following page to identify the status of your
device. If you have gone through all of the points in the table and
your drive is still not working correctly, please see the FAQs that are
regularly published on our Web site – www.lacie.com. One of these
FAQs may provide an answer to your specific question. You can
also visit the drivers pages, where the most recent software updates
will be available.
If you need further assistance, please contact your LaCie reseller
or LaCie Technical Support (see section 5. Contacting Customer
Support for details).
Manual Updates
LaCie is constantly striving to give you the most up-to-date,
comprehensive user manuals available on the market.
It is our goal to provide you with a friendly, easy-to-use format that
will help you quickly install and utilize the many functions of your
new device. If your manual does not reflect the configurations of the
product that you purchased, please check our Web site for the most
current version available.
www.lacie.com
Page 26
LaCie 4big Quadra Enterprise Class • Design by neil Poulton Troubleshooting
User Manual page 26
4.1. LED Status Indicators
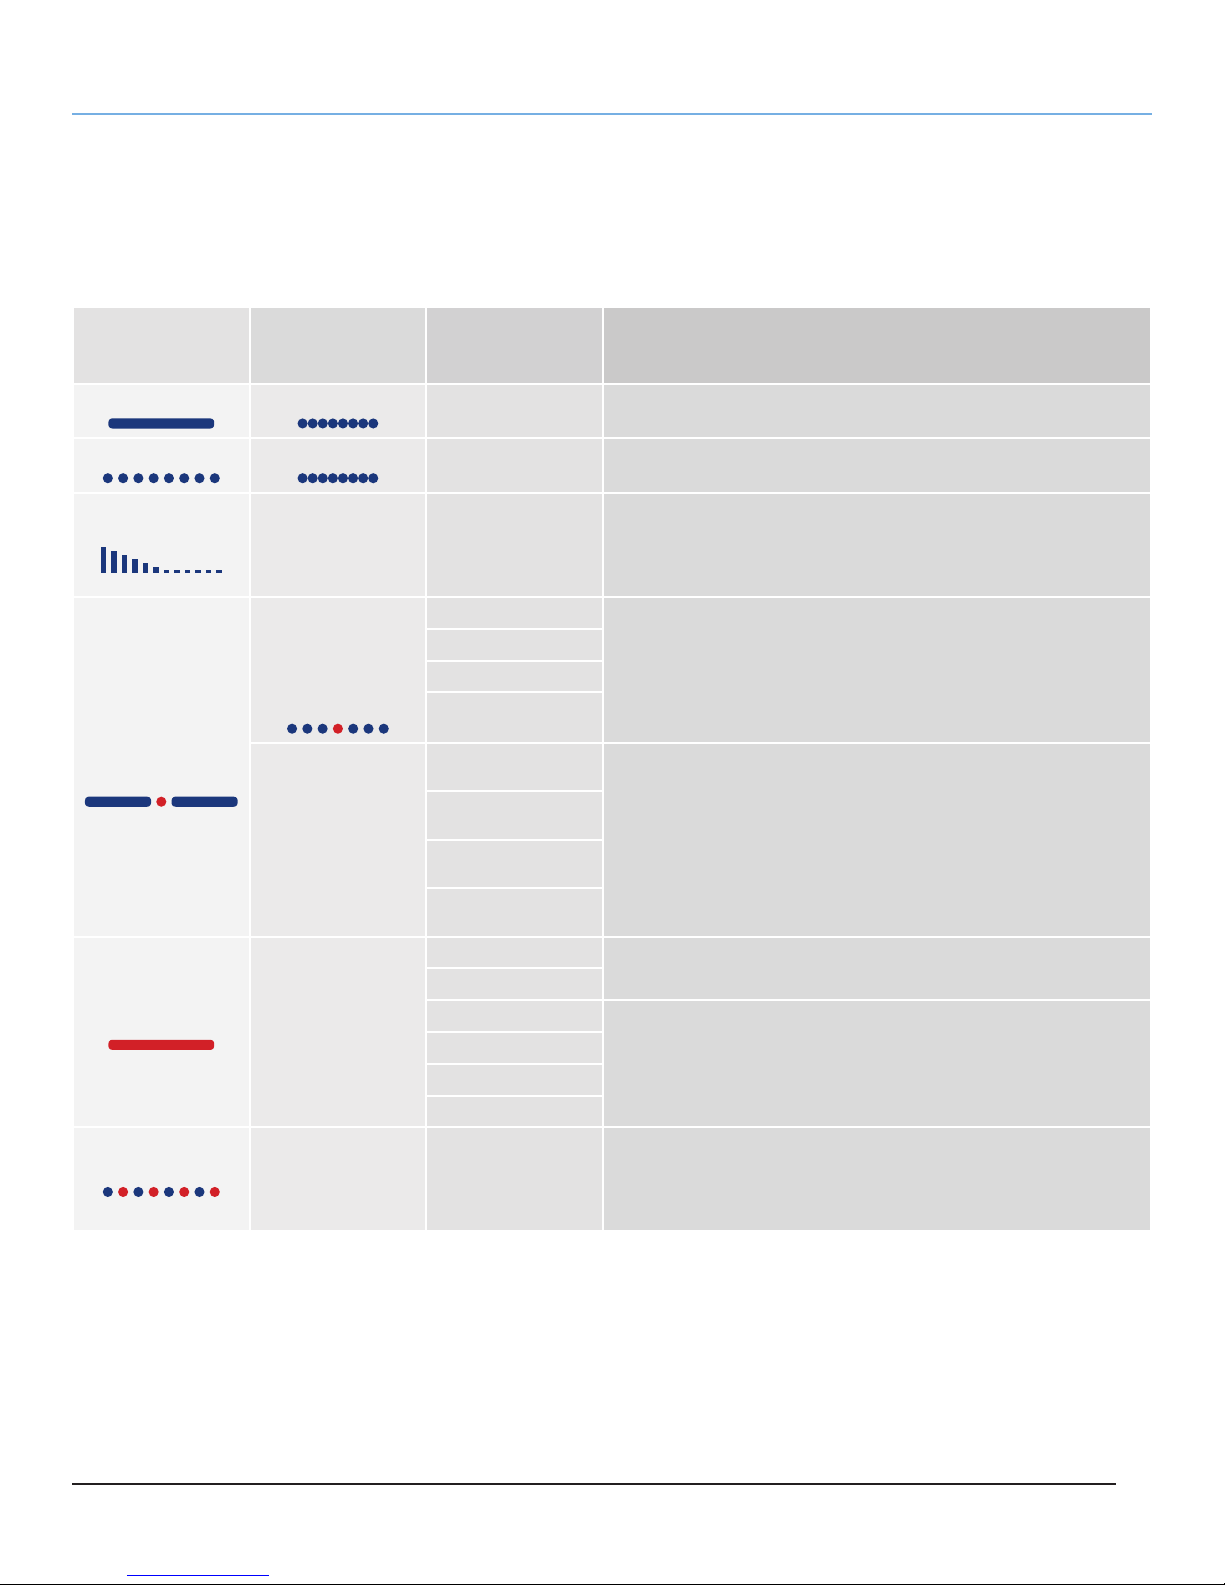
Use the 4big’s front and rear LEDs and the chart below as a reference to determine the status of your 4big:
If the front
And the rear
LED is:
Solid blue Blinking blue
Blinking blue
Dimming blue (5s)*
Alternating long blue
and short red:
Blinking blue
Three disks are
blinking blue, while
one disk is blinking 3
Solid red (failed
disks) and solid blue
(functional disks)
LED is:
Off All
blue, 1 red:
And the RAID
mode is:
All The 4big is working properly, only active disks’ LEDs blink.
All
RAID 10
RAID 3
RAID 5
RAID 3+/5+
RAID 10
RAID 3
RAID 5
RAID 3+/5+
Then:
The 4big is starting up; front LED and LEDs of functional disks become
solid blue when initialized.
The 4big is in standby mode. If the power switch is set to “auto” the
4big will enter standby when your computer is either off or in standby.
If rebuilding has begun, the process will finish before the 4big can
enter standby. After 30 minutes of standby, the LED will switch off.
RAID is rebuilding.
One drive has failed or was improperly inserted; RAID is functional but
the security of the drives has been compromised.
RAID 0
Concatenation
Solid red
Blinking blue/red
* LED dims for 5 seconds and then remains at a low intensity.
Solid red (failed
disks) and solid blue
(functional disks)
Normal LED activity All
RAID 10
RAID 3
RAID 5
RAID 3+/5+
One or more drives have failed or are improperly inserted; RAID is not
functional.
Two or more drives have failed or are improperly inserted; RAID is not
functional.
Temperature alert; allow the 4big to finish current processes and then
shut it down. Make sure the ventilation holes on the back of the 4big
are not obstructed and that there is ample room for airflow around the
unit. Allow the 4big to cool before turning it back on.
continued on the next page
Page 27
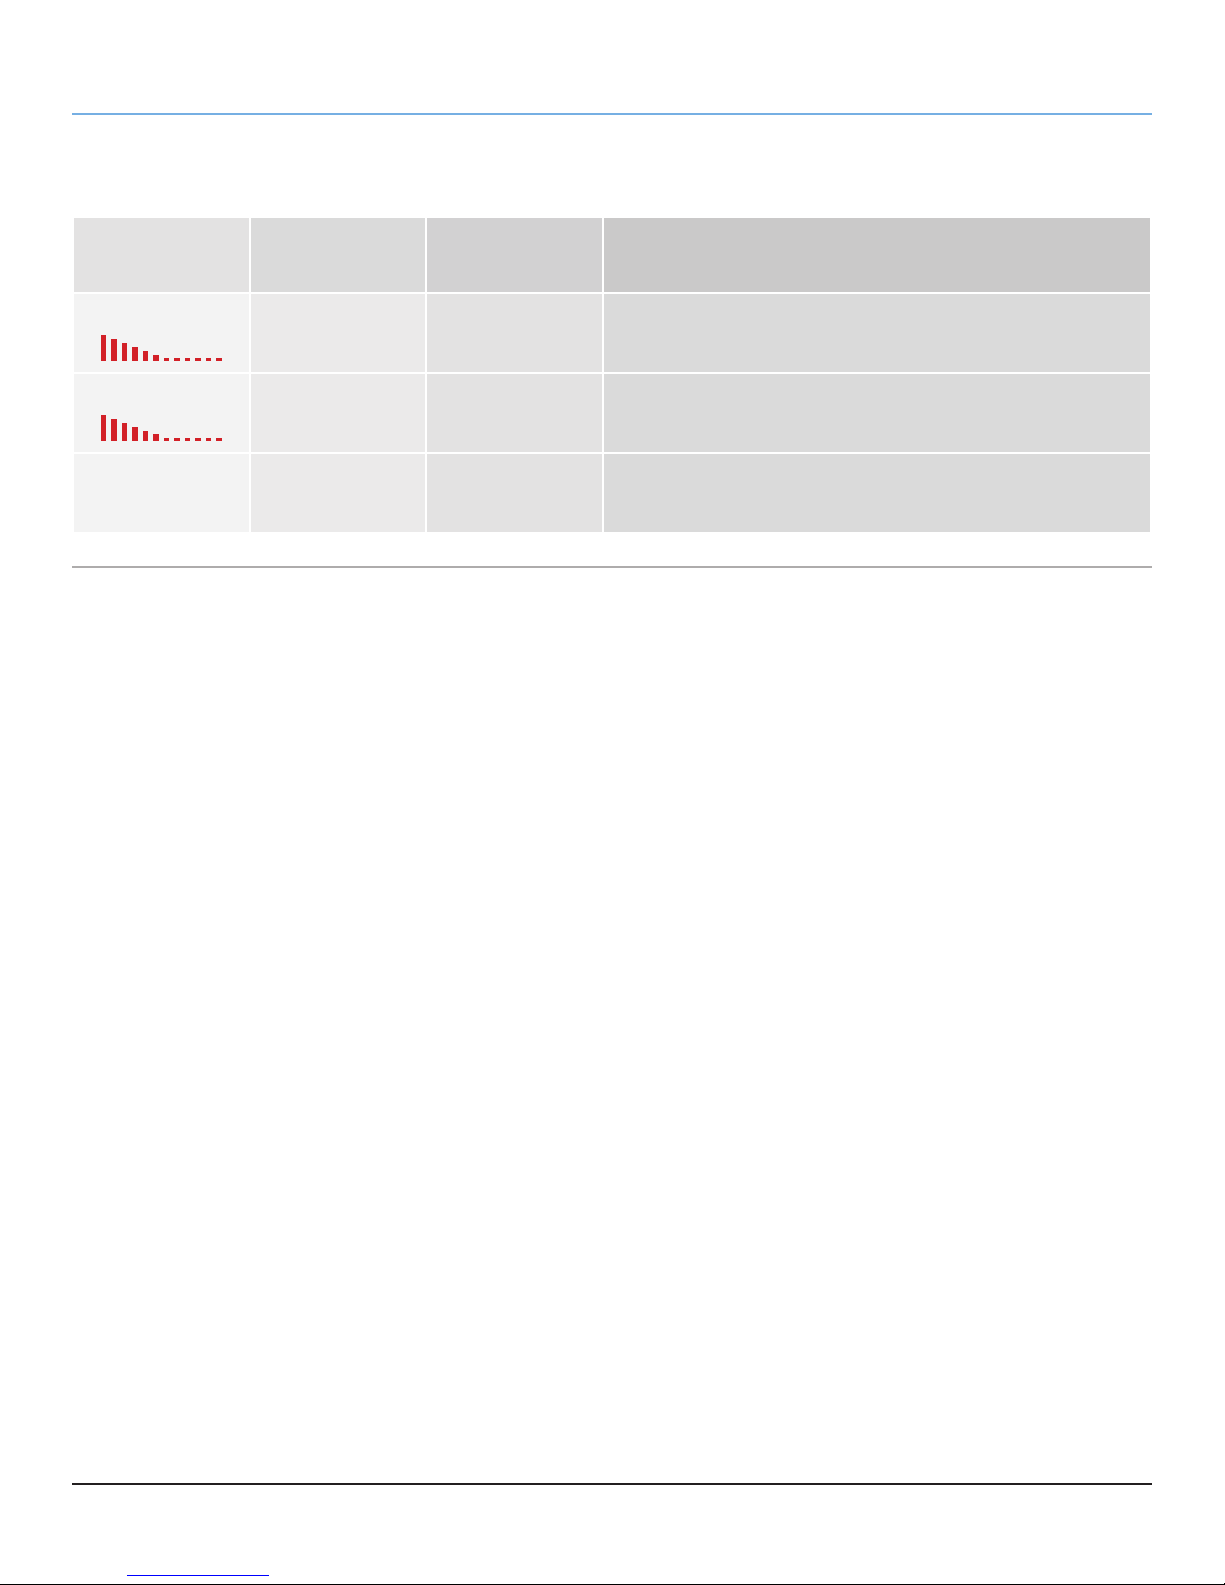
LaCie 4big Quadra Enterprise Class • Design by neil Poulton Troubleshooting
User Manual page 27
If the front
LED is:
Dimming red (5s)*
Dimming red (5s)*
Off Off All
And the rear
LED is:
Off All
Off All
And the RAID
mode is:
Then:
During standby mode, when one or more drives have failed or are
improperly inserted; RAID is not functional. Dimmed LED stays on for
30 minutes.
Temperature critical; LaCie recommends that following this event
you leave the 4big in standby for at least an hour before restarting to
prevent damage to the disks.
The 4big is either turned off, or has been in standby mode for more than
30 minutes, or system or electronic board failure; in this case, contact
LaCie customer support.
* LED dims for 5 seconds and then remains at a low intensity.
Page 28

LaCie 4big Quadra Enterprise Class • Design by neil Poulton Troubleshooting
User Manual page 28
4.2. Other Troubleshooting Topics
Problem Solutions
If there is no icon for the 4big on the desktop (Mac users) or in My Computer (Windows users):
✦ Check the interface cable connection. Check both ends of the FireWire, eSATA or USB
cables and make sure that they are fully seated in their respective ports. Try disconnecting
the cables, waiting 10 seconds, and then reconnecting them. If the drive is still not recognized, restart your computer and try again.
The 4big is not recognized by the
computer.
✦ Make sure your product is not encrypted. If so, you will need to run the LaCie Desktop
Manager software.
✦ Make sure your computer meets the minimum system requirements for compatibility with the
4big Quadra. See section 1.1. Minimum System Requirements for more information.
✦ Make sure the power supply is properly connected (see section 2.2. Turn On the 4big), that
the drive has been turned on by pressing the On/Off/Auto button the back of the drive, and
that the outlet the power supply is connected to is also turned on.
✦ Make sure that the drive has been formatted properly. Please see section 3.4. Formatting
and Partitioning.
The 4big is working slowly.
The power supply is no longer functional.
If other USB, eSATA or FireWire devices are connected to the same port or hub, disconnect the
other devices and see if the 4big’s performance improves.
Replacement power supply cords are available for purchase on the LaCie Web page:
www.lacie.com
4.3. Installing New Firmware
LaCie may periodically offer firmware updates for the 4big. Visit LaCie’s Web site, www.lacie.com, for the latest firmware update. For the procedure, please contact LaCie technical support.
Page 29

LaCie 4big Quadra Enterprise Class • Design by neil Poulton Contacting Customer Support
User Manual page 29
5. Contacting Customer Support
Before You Contact Technical Support
1. Read the manuals and review section 4. Troubleshooting.
2. Try to isolate the problem. If possible, make the drive the only
external device on the CPU, and make sure that all of the cables
are correctly and firmly attached.
If you have asked yourself all of the pertinent questions in the
troubleshooting checklist, and you still can’t get your LaCie drive to
work properly, contact us at www.lacie.com. Before contacting us,
make sure that you are in front of your computer and that you have
the following information on hand:
Information Where to Find Information
1. LaCie hard drive serial number Located on a sticker at the back of drive or on the original packaging
3. Macintosh/PC model
4. Operating system version
5. Processor speed
6. Computer memory
7. The brands and models of other internal and external
peripherals installed on your computer
Mac users: Click on the Apple icon in the menu bar and select About This
Mac.
Windows users: Right click My Computer and select Properties > General.
Mac users: Click on the Apple icon in the finder bar and select About This
Mac. Select More Info... The Apple System Profiler will launch and will list your
internal and external peripherals.
Windows users: Right click My Computer and select Properties > Hardware.
Page 30
LaCie 4big Quadra Enterprise Class • Design by neil Poulton Contacting Customer Support
User Manual page 30
5.1. LaCie Technical Support Contacts
LaCie Asia
Contact us at:
http://www.lacie.com/asia/contact/
LaCie Belgium
Contact us at:
http://www.lacie.com/be/contact/
LaCie Denmark
Contact us at:
http://www.lacie.com/dk/contact
LaCie France
Contact us at:
http://www.lacie.com/fr/contact/
LaCie Italy
Contact us at:
http://www.lacie.com/it/contact/
LaCie Netherlands
Contact us at:
http://www.lacie.com/nl/contact/
LaCie Australia
Contact us at:
http://www.lacie.com/au/contact/
LaCie Canada
Contact us at:
http://www.lacie.com/caen/contact/ (English)
LaCie Finland
Contact us at:
http://www.lacie.com/fi/contact/
LaCie Germany
Contact us at:
http://www.lacie.com/de/contact/
Japan - ELECOM CO. LTD.
Contact us at:
http://www.lacie.com/jp/contact/
LaCie Norway
Contact us at:
http://www.lacie.com/no/contact/
LaCie Spain
Contact us at:
http://www.lacie.com/es/contact/
LaCie Switzerland
Contact us at:
http://www.lacie.com/chfr/contact/ (Français)
LaCie Ireland
Contact us at:
http://www.lacie.com/ie/contact/
LaCie International
Contact us at:
http://www.lacie.com/intl/contact/
LaCie Sweden
Contact us at:
http://www.lacie.com/se/contact
LaCie United Kingdom
Contact us at:
http://www.lacie.com/uk/contact/
LaCie USA
Contact us at:
http://www.lacie.com/contact/
Page 31

LaCie 4big Quadra Enterprise Class • Design by neil Poulton Warranty Information
User Manual page 31
6. Warranty Information
LaCie warrants your LaCie 4big Enterprise Class against any defect in material and workmanship, under normal use, for the period
designated on your warranty certificate. In the event this product is
found to be defective within the warranty period, LaCie will, at its
option, repair or replace the defective LaCie 4big Enterprise Class.
NOTE: For Enterprise Class products, the tower and the disk may
have different warranty lengths.
In the event of a drive failure please contact your LaCie reseller or
LaCie customer support for drive replacement procedure.
This warranty is void if:
✦ The LaCie 4big was operated/stored in abnormal use or
maintenance conditions;
✦ The LaCie 4big is repaired, modified or altered, unless such
repair, modification or alteration is expressly authorized in
writing by LaCie;
✦ The LaCie 4big was subjected to abuse, neglect, lightning
strike, electrical fault, improper packaging or accident;
✦ The LaCie 4big was installed improperly;
✦ The serial number of the LaCie 4big or an individual Drive Bay
is defaced or missing;
✦ The broken part is a replacement part such as a pickup tray,
etc.
✦ The tamper seal on the LaCie 4big or an individual Drive Bay
casing is broken.
✦ One or two of the hard disks have been removed and re-
placed by any hard disk other than a drive provided by LaCie.
For drive removal/replacement process, see section 3.3. Re-
moving and Installing Drives.
LaCie and its suppliers accept no liability for any loss of data during
the use of this device, or for any of the problems caused as a result.
may be asked to furnish proof of purchase to confirm that the drive
is still under warranty.
All systems returned to LaCie must be securely packaged in their
original box and shipped with postage prepaid.
NOTE: Accessories, such as interface cables, are not under war-
ranty.
IMPORTANT INFO: Register your Enterprise Class product at
www.lacie.com within 30 days of its purchase date to take advan-
tage of LaCie Enterprise Class Service. For no additional cost, LaCie
guarantees that your Enterprise Class product will receive the highest priority from our Technical Support team. Please note that the
term of your warranty remains five years.
LaCie will not, under any circumstances, be liable for direct, special
or consequential damages such as, but not limited to, damage or
loss of property or equipment, loss of profits or revenues, cost of
replacement goods, or expense or inconvenience caused by service
interruptions.
Any loss, corruption or destruction of data while using a LaCie drive
is the sole responsibility of the user, and under no circumstances
will LaCie be held liable for the recovery or restoration of this data.
Under no circumstances will any person be entitled to any sum
greater than the purchase price paid for the drive.
To obtain warranty service, call LaCie Technical Support. You will
be asked to provide your LaCie product’s serial number, and you
 Loading...