

Page 1

LaCie d2 Network Table of Contents
User Manual page 1
Table of Contents
1. Introduction .................................................................................................................. 5
1.1. Box Content .................................................................................................................................... 6
1.2. Minimum System Requirements ......................................................................................................... 7
1.2.1. Windows Users ...................................................................................................................... 7
1.2.2. Mac Users ............................................................................................................................. 7
1.3. Hard Drive Heat Management .......................................................................................................... 8
1.4. Views of the d2 Network ................................................................................................................... 9
1.5. Ethernet Cable ............................................................................................................................... 10
2. Setting Up Your LaCie d2 Network ............................................................................. 11
2.1. Turning On the d2 Network ........................................................................................................... 12
2.2. Connecting the Ethernet Cable........................................................................................................ 13
2.3. Connecting Using LaCie Network Assistant....................................................................................... 14
2.4. Configuring the LaCie d2 Network on a Network Without a DHCP Server ........................................... 16
2.5. Unmounting d2 Network Volumes ................................................................................................... 17
3. Accessing & Managing Files ....................................................................................... 18
3.1. Accessing Shared Folders ............................................................................................................... 18
3.1.1. Other Connection Methods ................................................................................................... 19
3.2. FTP Access to Shares ...................................................................................................................... 21
3.3. Administration Page – Browse ......................................................................................................... 22
3.3.1. Uploading Files .................................................................................................................... 22
3.3.2. Downloading Files ................................................................................................................ 23
3.3.3. Deleting Files ....................................................................................................................... 23
3.3.4. Logging Out ........................................................................................................................ 23
3.4. Connecting an External Hard Disk ................................................................................................... 24
4. Administering Your LaCie d2 Network ....................................................................... 25
4.1. Accessing the Administration Page ................................................................................................... 26
4.1.1. Setting the Display Language................................................................................................. 27
4.1.2. Administration Home Page .................................................................................................... 27
4.2. Users ............................................................................................................................................ 28
4.2.1. Adding Users ....................................................................................................................... 29
4.2.2. Setting User Access to Shares ................................................................................................ 30
4.2.3. Setting Group Membership ................................................................................................... 30
4.2.4. About Access Privileges ......................................................................................................... 31
4.2.5. Deleting User Accounts ......................................................................................................... 31
4.2.6. Editing User Accounts ........................................................................................................... 31
4.3. Groups ......................................................................................................................................... 32
4.3.1. Adding Groups .................................................................................................................... 32
4.3.2. Setting Group Access to Shares ............................................................................................. 33
4.3.3. Deleting Groups .................................................................................................................. 33
4.3.4. Editing Groups ..................................................................................................................... 33
4.4. Shares .......................................................................................................................................... 34
4.4.1. Creating Shares ................................................................................................................... 34
4.4.2. Deleting Shares .................................................................................................................... 35
4.4.3. Editing Shares ...................................................................................................................... 35
4.5. System .......................................................................................................................................... 36
4.5.1. Active Directory .................................................................................................................... 36
4.5.2. Configuration ......................................................................................................................36
4.5.3. Network .............................................................................................................................. 37
Page 2

LaCie d2 Network Table of Contents
User Manual page 2
4.5.4. Disks ................................................................................................................................... 39
4.5.5. Status .................................................................................................................................. 41
4.5.6. Maintenance ........................................................................................................................ 41
4.5.7. System Log .......................................................................................................................... 44
4.5.8. Wake on LAN (WOL) ............................................................................................................ 45
4.6. Download ..................................................................................................................................... 46
4.7. Backup ......................................................................................................................................... 47
4.8. Browse .......................................................................................................................................... 48
4.9. Import (Snapshot) ........................................................................................................................... 48
4.10. Multimedia .................................................................................................................................... 49
5. LED Indicators ............................................................................................................ 50
6. Email Notification Triggers ......................................................................................... 51
7. Troubleshooting ......................................................................................................... 52
8. Contacting Customer Support ..................................................................................... 54
7.1. LaCie Technical Support Contacts ................................................................................................... 55
9. Warranty Information ................................................................................................. 56
Page 3
LaCie d2 Network Foreword
User Manual page 3
Copyrights
Copyright © 2009 LaCie. All rights reserved. No part of this publication may be
reproduced, stored in a retrieval system, or
transmitted in any form or by any means,
electronic, mechanical, photocopying, recording or otherwise, without the prior written consent of LaCie.
Trademarks
Apple, Mac, and Macintosh are registered trademarks of Apple Computer, Inc.
Microsoft, Windows 98, Windows 98 SE,
Windows 2000, Windows Millennium Edition, Windows XP and Windows Vista are
registered trademarks of Microsoft Corporation. Other trademarks mentioned in this
manual are the property of their respective
owners.
Changes
The material in this document is for information only and subject to change without
notice. While reasonable efforts have been
made in the preparation of this document
to assure its accuracy, LaCie assumes no
liability resulting from errors or omissions
in this document, or from the use of the information contained herein. LaCie reserves
the right to make changes or revisions in
the product design or the product manual
without reservation and without obligation
to notify any person of such revisions and
changes.
Canada Compliance Statement
This Class A digital apparatus meets all
requirements of the Canadian InterferenceCausing Equipment Regulations.
ROHS Compliance
This product is ROHS compliant (European
Directive 2002/95/EC on the Restriction of
Hazardous Substances).
FCC Statement
LaCie d2 Network
Tested to comply with FCC
standards for home or office
use
This device complies with Part 15 of the
FCC Rules. Operation is subject to the following conditions:
✦ The devices may not cause harmful
interference
✦ The devices must accept any interfer-
ence received, including interference
that may cause undesired operation.
NOTE: This equipment has been tested
and found to comply with the limits for a
Class B digital device, pursuant to Part 15
of the FCC Rules. These limits are designed
to provide reasonable protection against
harmful interference in a residential installation. This equipment generates, uses and
can radiate radio frequency energy and, if
not installed and used in accordance with
the instructions, may cause harmful interference to radio communications. However,
there is no guarantee that interference will
not occur in a particular installation. If this
equipment does cause harmful interference
to radio or television reception, which can
be determined by turning the equipment off
and on, the user is encouraged to try and
correct the interference by one or more of
the following measures:
✦ Reorient or relocate the receiving an-
tenna.
✦ Increase the separation between the
equipment and receiver.
✦ Connect the equipment into an out-
let on a circuit different from that to
which the receiver is connected.
✦ Consult the dealer or an experienced
radio/TV technician for help.
Modifications to this product not authorized
by LaCie could void the FCC & Industry
Canada regulations and negate your authority to operate the product.
Manufacturer’s Declaration
for CE Certification
We, LaCie, solemnly declare that this product conforms to the following European
standards: Class B EN60950, EN55022,
EN50082-1, EN61000-3-2
With reference to the following conditions: 73/23/EEC Low Voltage Directive;
89/336/EEC EMC Directive
This symbol on the product or
on its packaging indicates
that this product must not be
disposed of with your other
household waste. Instead, it is
your responsibility to dispose of your waste
equipment by handing it over to a designed
collection point for the recycling of waste
electrical and electronic equipment. The
separate collection and recycling of your
waste equipment at the time of disposal will
help to conserve natural resources and ensure that it is recycled in a manner that protects human health and the environment.
For more information about where you can
drop off your waste equipment for recycling, please contact your local city office,
your household waste disposal service, or
the shop where you purchased the product.
CAUTION: A shielded-type power cord
is required in order to meet FCC emission
limits and also to prevent interference to the
nearby radio and television reception. It is
essential that only the supplied power cord
be used.
Page 4

LaCie d2 Network Foreword
User Manual page 4
Health and Safety
Precautions
✦ Only qualified persons are autho-
rized to carry out maintenance on
this device.
✦ Read this User Manual carefully and
follow the correct procedure when
setting up the device.
✦ Do not open your LaCie d2 Network
or attempt to disassemble or modify
it. Never insert any metallic object
into the drive to avoid any risk of
electrical shock, fire, short-circuiting
or dangerous emissions. Your LaCie d2 Network contains no userserviceable parts. If it appears to be
malfunctioning, have it inspected by
a qualified LaCie Technical Support
representative.
✦ Never expose your device to rain, or
use it near water, or in damp or wet
conditions. Never place objects containing liquids on the LaCie d2 Network, as they may spill into its openings. Doing so increases the risk of
electrical shock, short-circuiting, fire
or personal injury.
✦ Power requirements 100-240 V~,
1.44 A, 50-60 Hz, (supply voltage
fluctuations not exceeding ± 10%
of the nominal and transient overvoltages according to over-voltage
category II).
General Use Precautions
shock, short-circuiting or fire.
✦ Use only the power supply shipped
with the device.
✦ Do not use the device near other
electrical appliances such as televisions or radios. Doing so may cause
interference which will adversely affect the operation of the other products.
✦ Do not place the device near sources
of magnetic interference, such as
computer displays, televisions or
speakers. Magnetic interference can
affect the operation and stability of
your device.
✦ Never use excessive force on your
device. If you detect a problem, see
the Troubleshooting section in this
manual.
IMPORTANT INFO: Any loss, corruption
or destruction of data while using a LaCie
drive is the sole responsibility of the user,
and under no circumstances will LaCie be
held liable for the recovery or restoration of
this data. To help prevent the loss of your
data, LaCie highly recommends that you
keep TWO copies of your data; one copy
on your external hard disk, for instance,
and a second copy either on your internal
hard disk, another external hard disk or
some other form of removable storage media. LaCie offers a complete line of CD and
DVD drives. If you would like more information on backup, please refer to our website.
✦ Do not expose your device to tem-
peratures outside the range of 5° C to
35° C (41° F to 95° F); or to operational humidity beyond 5-80%, noncondensing, or non-operating humidity beyond 10-90%, non-condensing.
Doing so may damage it or disfigure
its casing. Avoid placing your your device near a source of heat or exposing
it to sunlight (even through a window).
Inversely, placing your device in an
environment that is too cold or humid
may damage the unit.
✦ Always unplug the device from the
electrical outlet if there is a risk of
lightning or if it will be unused for an
extended period of time. Otherwise,
there is an increased risk of electrical
IMPORTANT INFO: 1GB =
1,000,000,000 bytes. 1TB =
1,000,000,000,000 bytes. Once formatted, the actual available storage capacity
varies depending on operating environment (typically 10-15% less).
Page 5
LaCie d2 Network Introduction
User Manual page 5
1. Introduction
Congratulations on your purchase of a LaCie d2 Network. Designed
to satisfy the data sharing and backup needs of small offices, the
LaCie d2 Network represents the new generation of shared storage
with security.
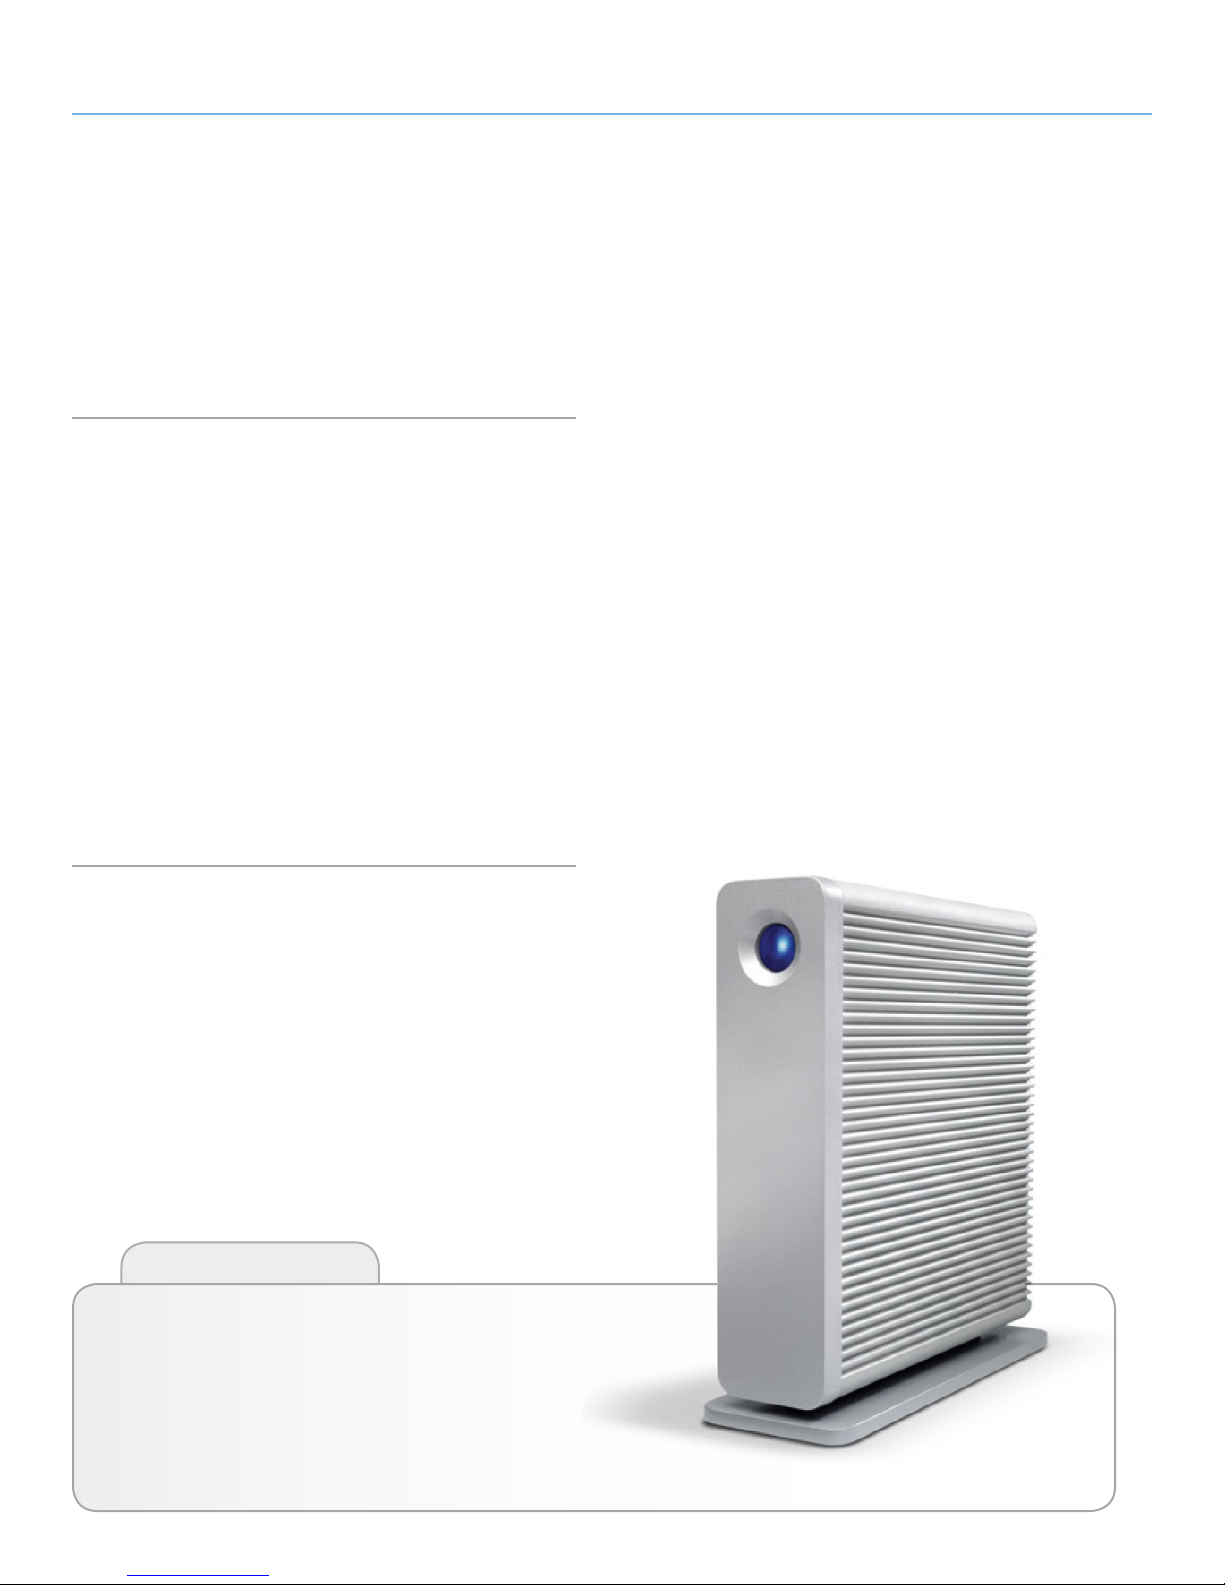
Superior Design
The advanced heat-dissipating metal casing ensures long-lasting
reliability and quiet operation. The d2 Network can be stacked
or rackmounted to conform to every work environment. The large
glowing blue button adds more than character – it functions as a
1-click data-sharing button for automatic file transfers from a USB
or eSATA hard drive. Just push the button; your data is automatically
saved to the d2 Network.
Easy Setup & Access
The new user-friendly LaCie Network Assistant makes setup simple
and enables accessing, mapping and configuring the drives on your
office’s network. The d2 Network’s compatibility with Mac®, Windows® and Linux machines without having to install drivers make it
the ideal file-sharing solution for home offices or small businesses.
Quick Links
Click a topic:
✦ Setting Up Your LaCie d2 Network
✦ Accessing & Managing Files
✦ Troubleshooting
Page 6
LaCie d2 Network Introduction
©
2
0
0
8
L
a
C
i
e
,
a
l
l
r
i
g
h
t
s
r
e
s
e
r
v
e
d
.
w
w
w
.
l
a
c
i
e
.
c
o
m
7
1
2
2
8
1
User Manual
LaCie Software Utilities
Adobe
®
Reader
®
Network Family 1.0
User Manual page 6
1.1. Box Content
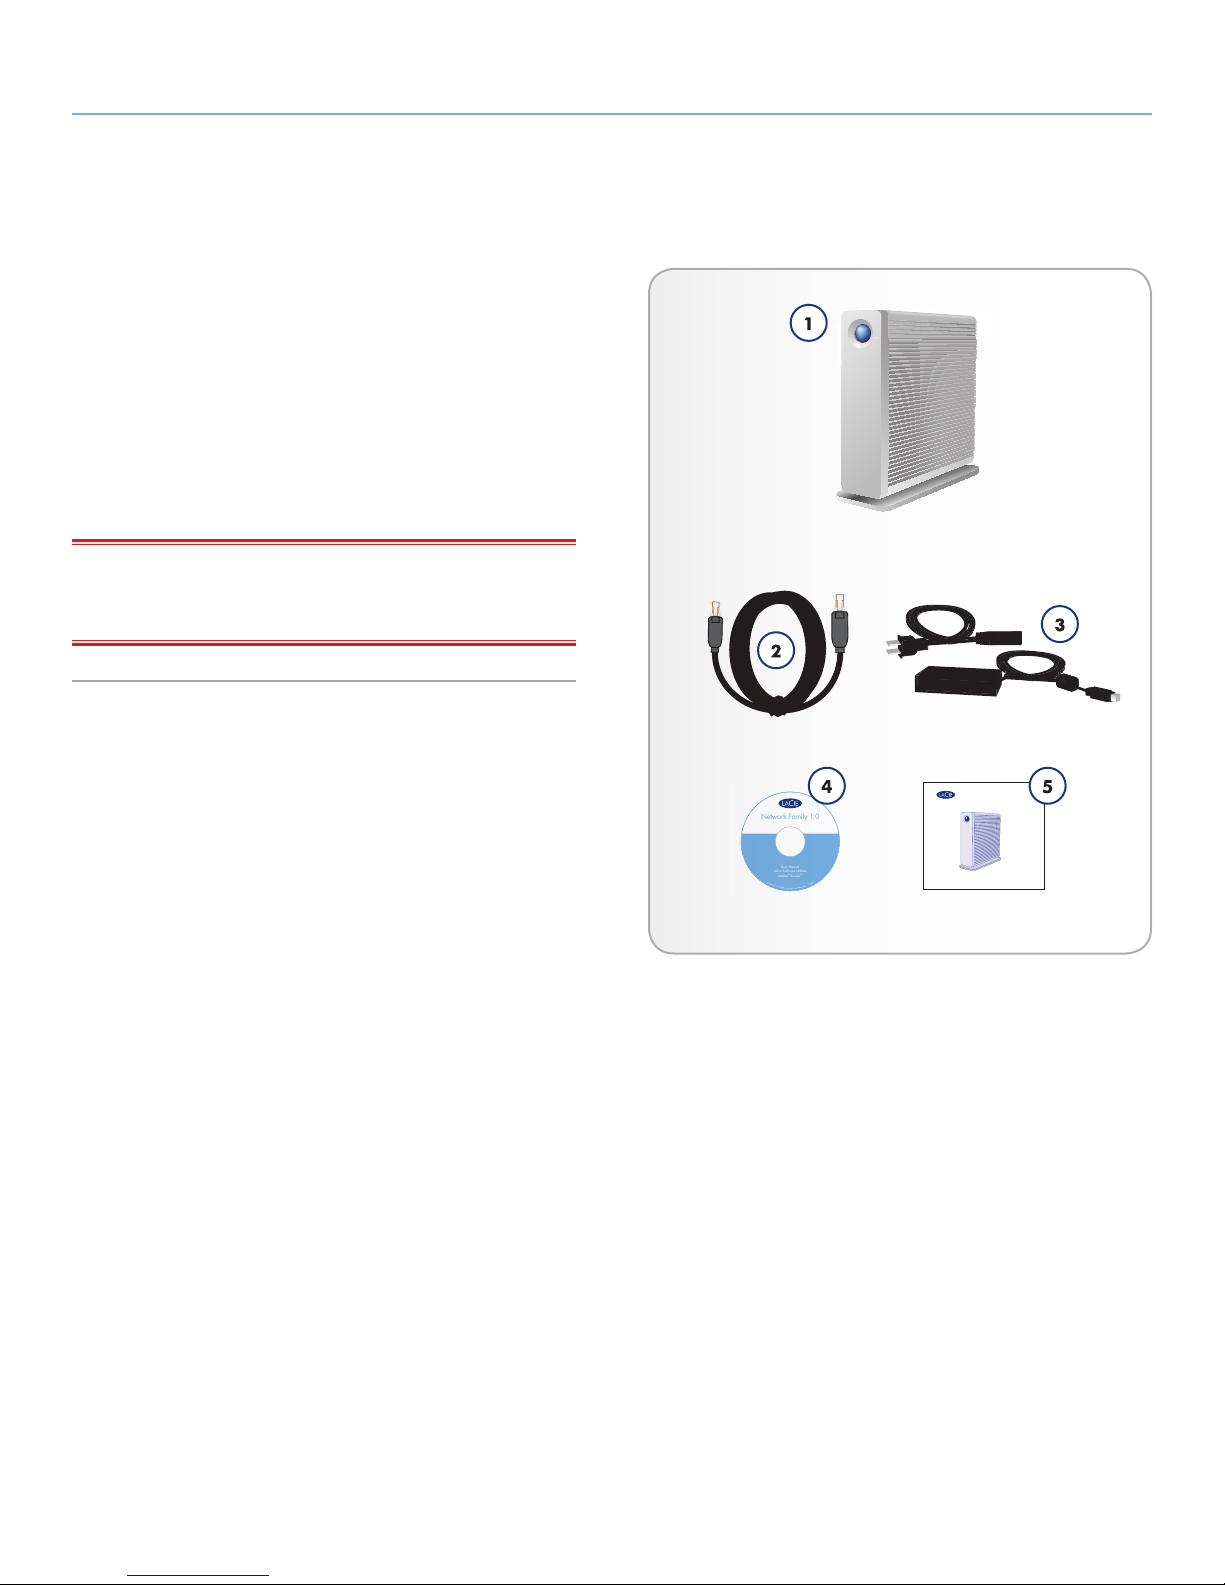
Your LaCie d2 package contains the system tower and an accessories box containing items 2-5, listed below:
1. LaCie d2 Network
2. Cat 5E Ethernet cable
3. Power supply
4. Utilities CD-ROM
5. Quick Install Guide
IMPORTANT INFO: Please save your packaging. In the event that
the d2 Network should need to be repaired or serviced, it must be
returned in its original packaging.
d2 Network
Gigabit Ethernet
Quick Install Guide
Design by Neil Poulton
Page 7

LaCie d2 Network Introduction
User Manual page 7
1.2. Minimum System Requirements
1.2.1. Windows Users
✦ Windows 2000, Windows XP or Windows Vista
✦ 500MHz processor or higher
✦ 512MB RAM or greater
✦ Ethernet switch or hub (10/100 or better)
✦ Web browser (Internet Explorer®, Firefox™)
1.2.2. Mac Users
✦ Mac OS X 10.2
✦ 500 MHz G4 or higher, G5, Intel Core Duo or Intel Core 2
Duo
✦ 512MB RAM or greater
✦ Ethernet switch or hub (10/100 or better)
✦ Web browser (Internet Explorer®, Safari™, Firefox™)
IMPORTANT INFO: The d2 Network’s performance can be af-
fected by such external forces as network activity, hardware, distance
and setup.
IMPORTANT INFO: For optimal performance, use a Gigabit Eth-
ernet router and a Gigabit Ethernet board in your host computer.
Page 8
LaCie d2 Network Introduction
User Manual page 8
1.3. Hard Drive Heat Management
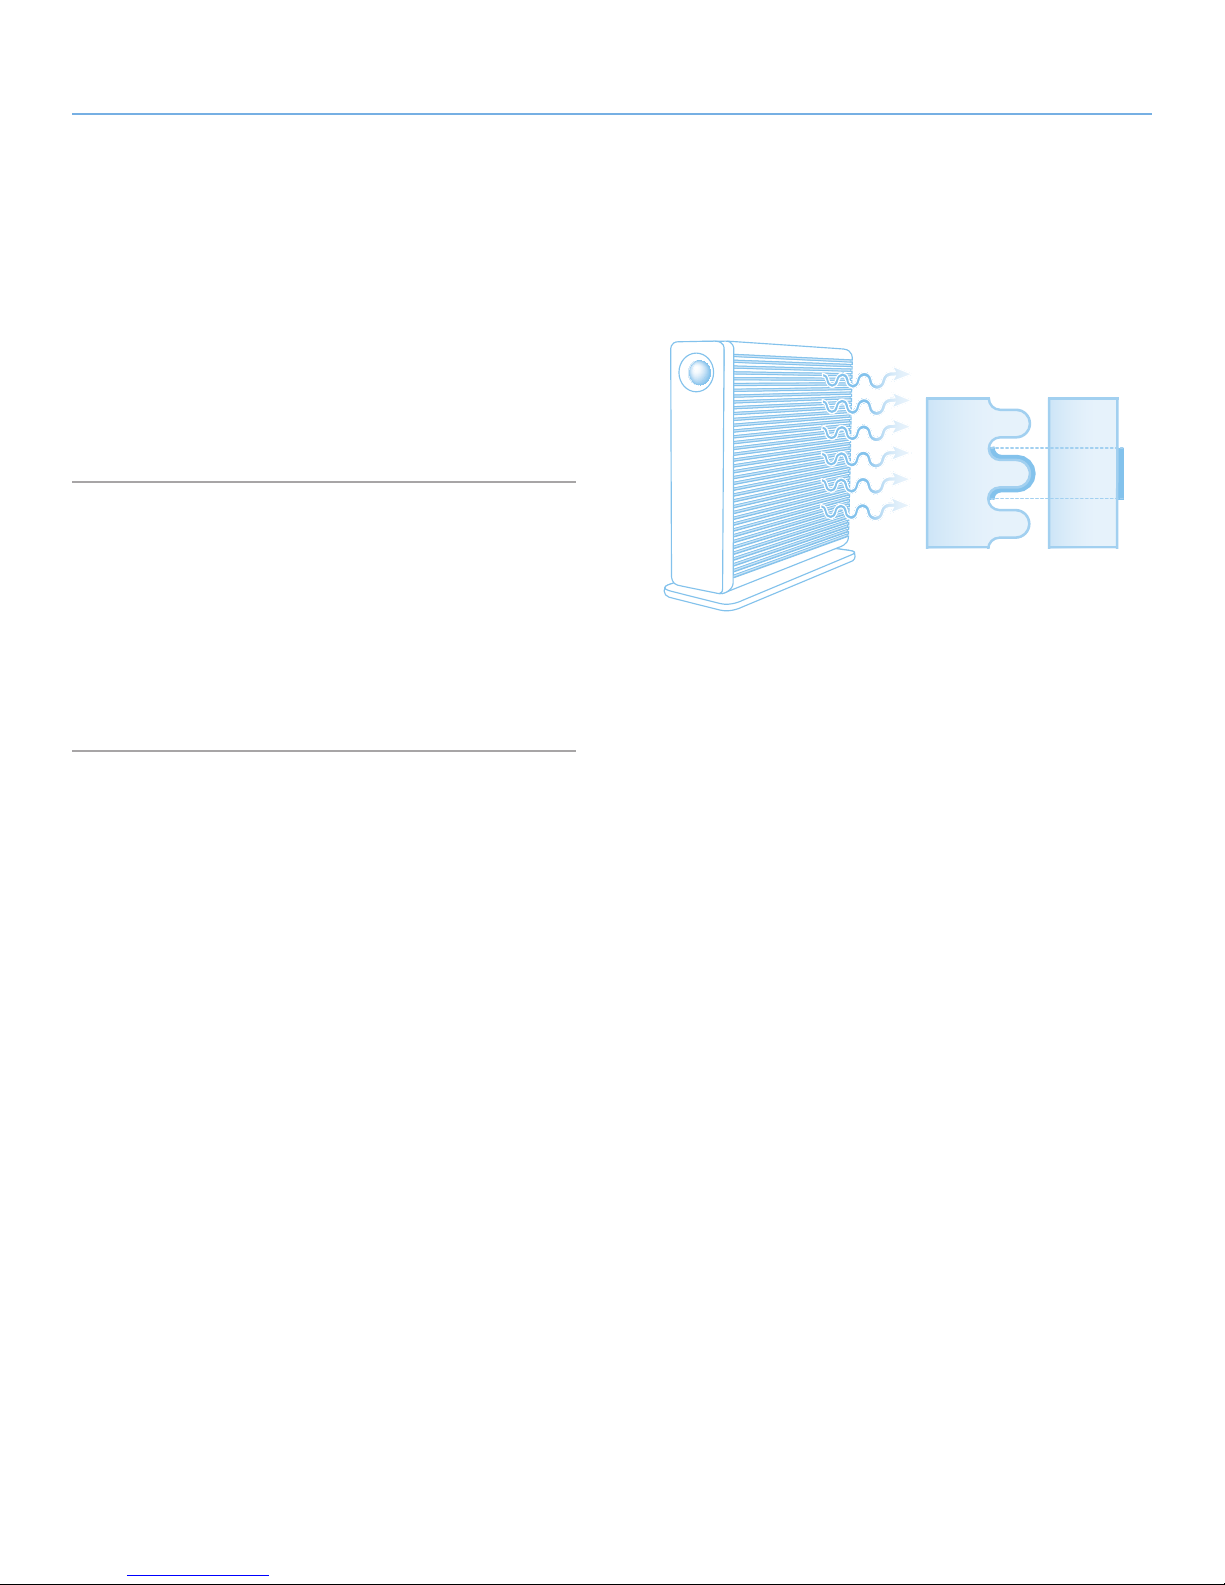
Heat Dissipation Design
The LaCie d2 Network’s metal body is ideal for naturally dissipating
internal drive heat. Its unique design actually draws heat away from
the internal drives toward the external casing. This feature takes heat
away from the internal drive, keeping it safe and prolonging its life
and reliability. As a consequence, it is normal for the external casing
to be hot to the touch.
Vertical, Horizontal & Rackmount
Heat dissipation is maximized when the drive is in the vertical position. If you have several LaCie drives stacked on each other, please
remember to attach the included rubber feet on the under side of
your drives. This will allow for some airflow between your drives so
that the heat dissipation can work effectively. LaCie does not recommend stacking or racking more than three drives on top of each
other, especially if these drives are turned ON simultaneously.
Exclusive d2 Heat Sink Design
Provides 60% more
area for heat dissipation
Heat Sink
Design
Standard
Design
Page 9
LaCie d2 Network Introduction
User Manual page 9
1.4. Views of the d2 Network
Front View
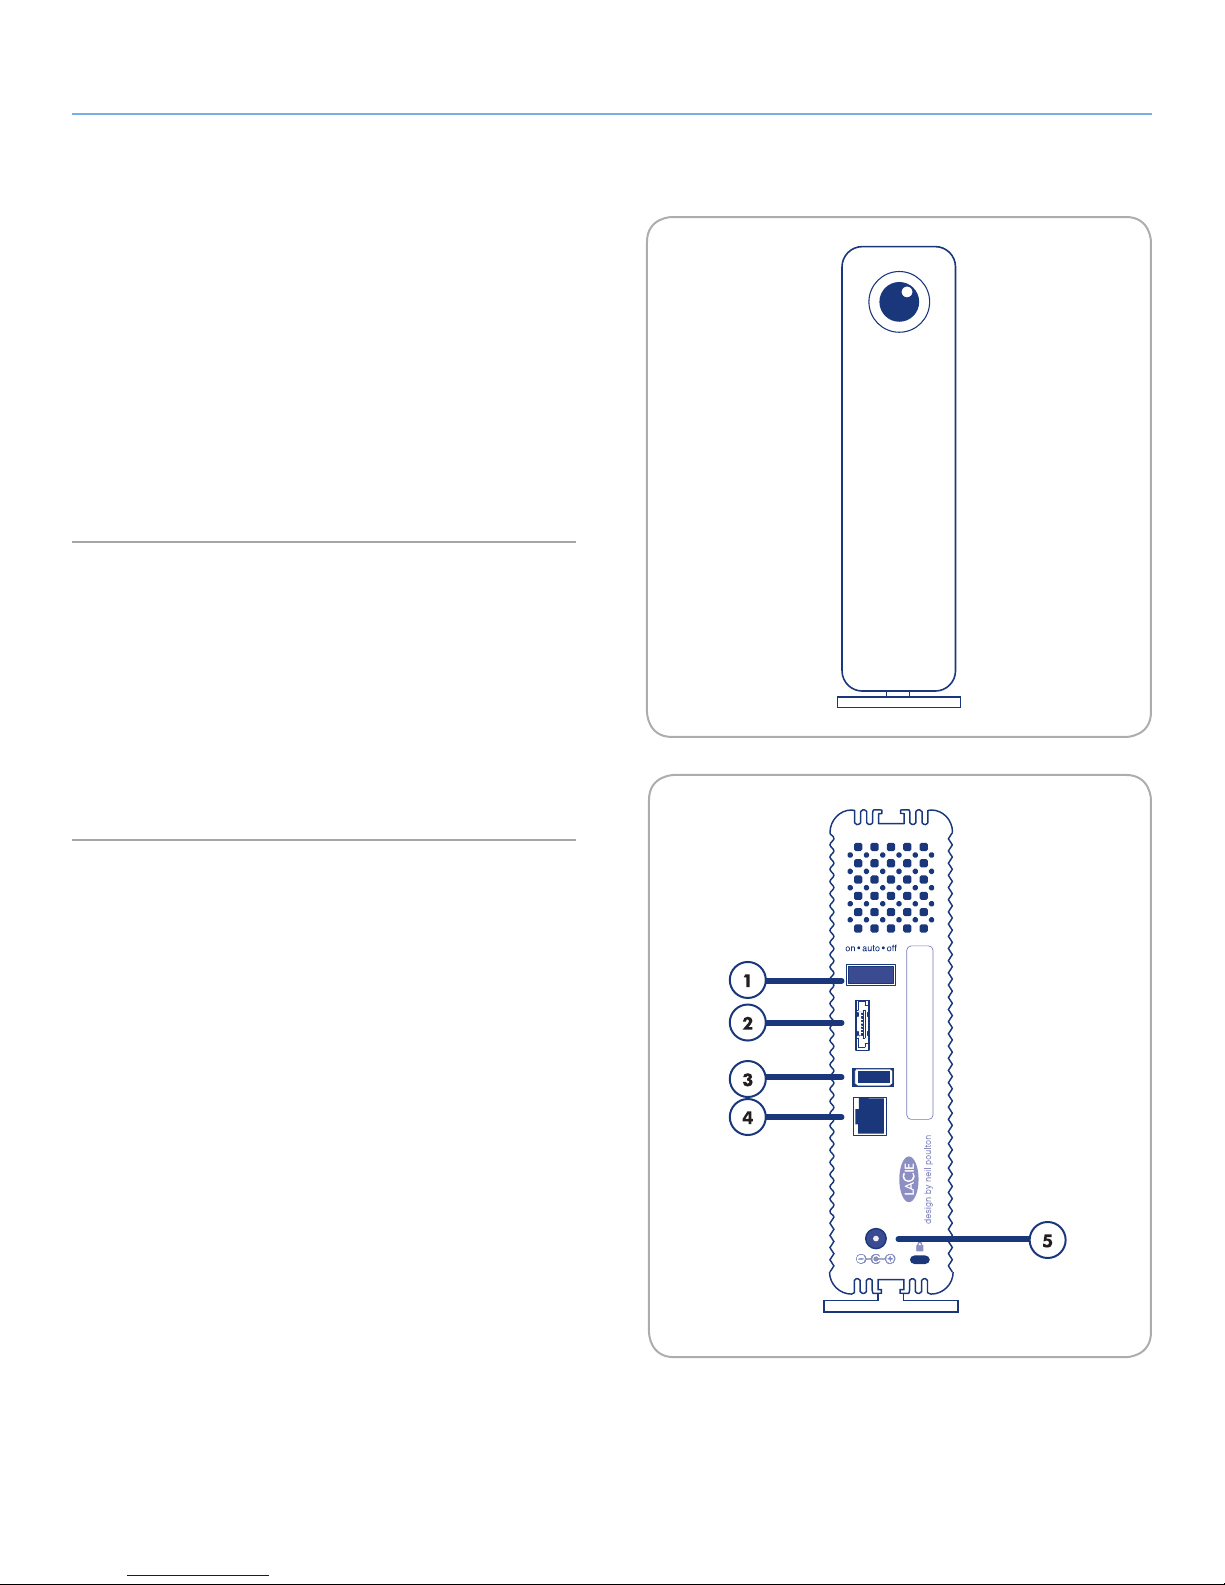
Backup Button with Activity LED (Fig. 01)
The LED remains lit to show that the drive is on.
The blue button on the front of the d2 Network allows you automatically back up an attached external hard drive onto the d2 Network.
Simply plug the hard disk into a USB or eSATA port on the back of
the d2 Network and push the button. All data on the attached disk(s)
will be automatically copied to the d2 Network.
Rear View (Fig. 02)
1. on/auto/off power switch
2. eSATA expansion ports
3. USB expansion port
4. Ethernet port
5. Power input connection
Fig. 01
Fig. 02
Page 10
LaCie d2 Network Setting Up Your LaCie d2 Network
User Manual page 10
1.5. Ethernet Cable
Gigabit Ethernet Cables And Connectors
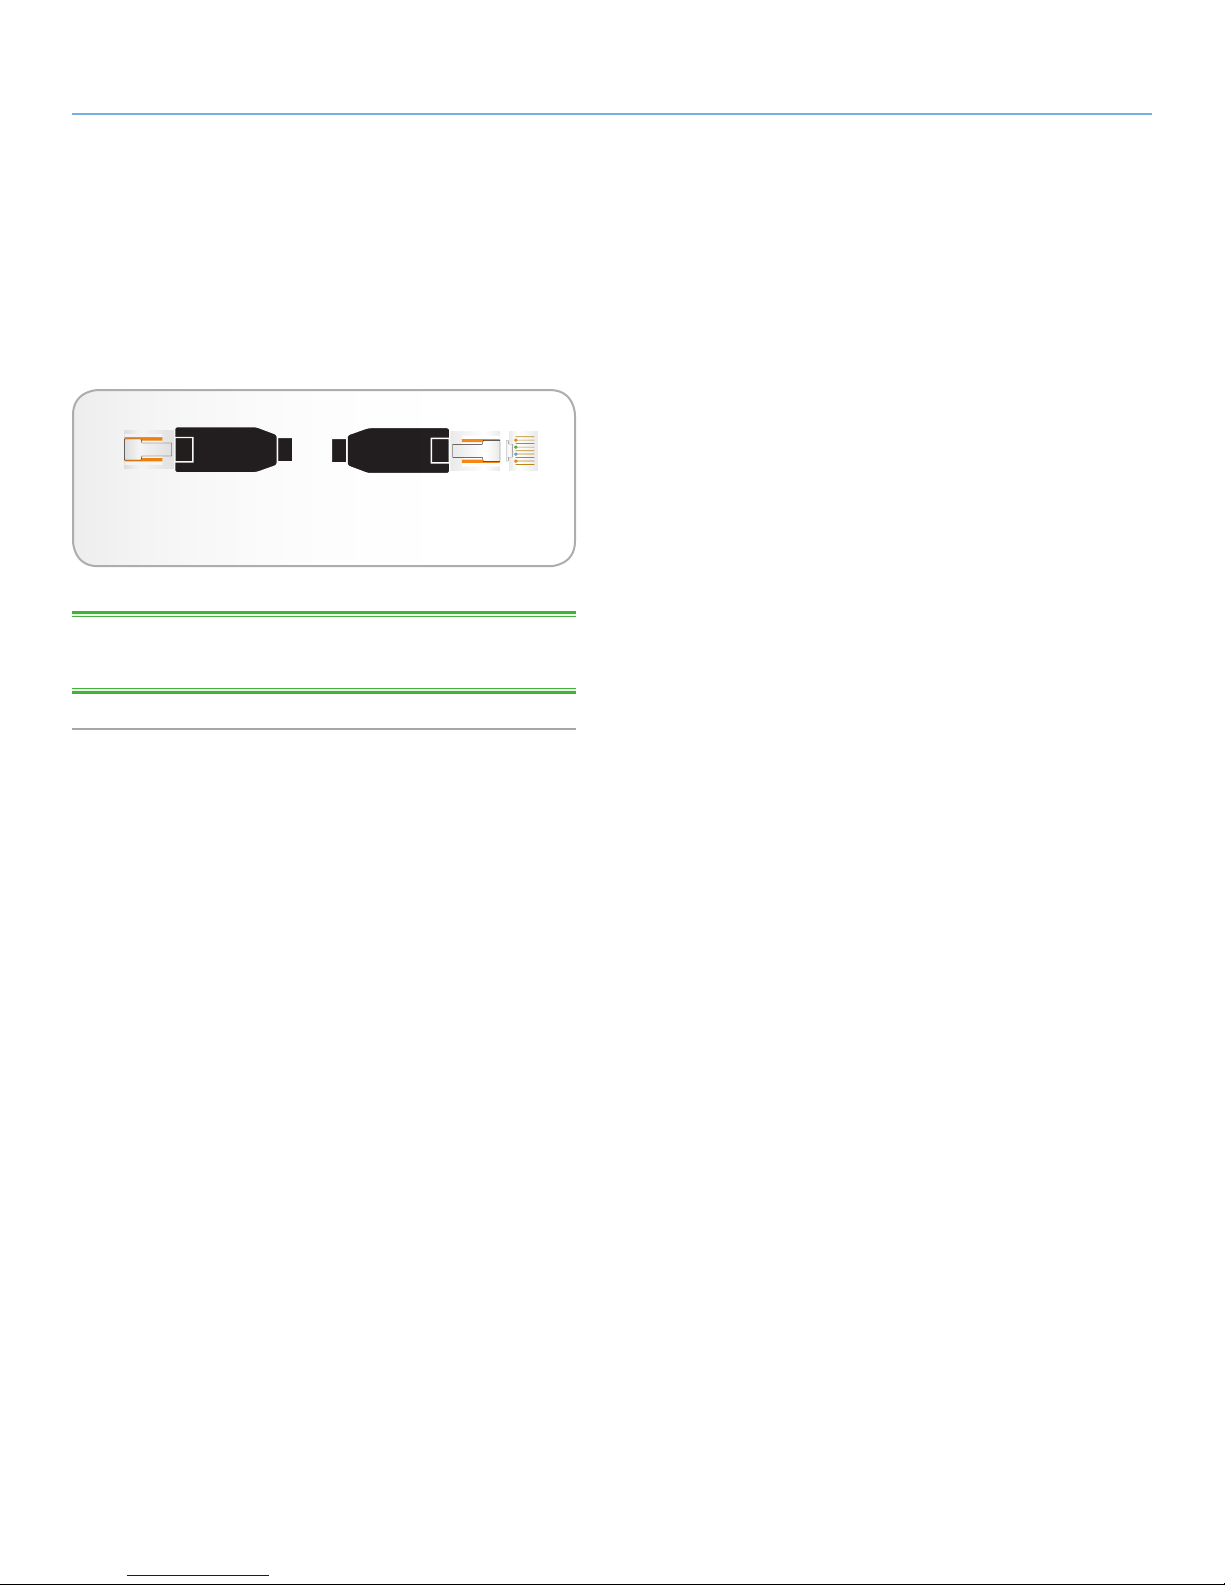
The cables and connectors used to attach Gigabit Ethernet devices
are as follows (Fig. 03 - Ethernet Cable Ends):
Fig. 03 - Ethernet Cable Ends
TECHNICAL NOTE: LaCie recommends Cat 5E or Cat 6 cables,
which support Gigabit Ethernet.
Page 11
LaCie d2 Network Setting Up Your LaCie d2 Network
User Manual page 11
2. Setting Up Your LaCie d2 Network
Follow these steps to power on the LaCie d2 Network and to log on
to the administration pages.
Step 1 – 2.1. Turning On the d2 Network
Step 2 – 2.2. Connecting the Ethernet Cable
Step 3 – 2.3. Connecting Using LaCie Network Assistant
Page 12
LaCie d2 Network Setting Up Your LaCie d2 Network
User Manual page 12
2.1. Turning On the d2 Network
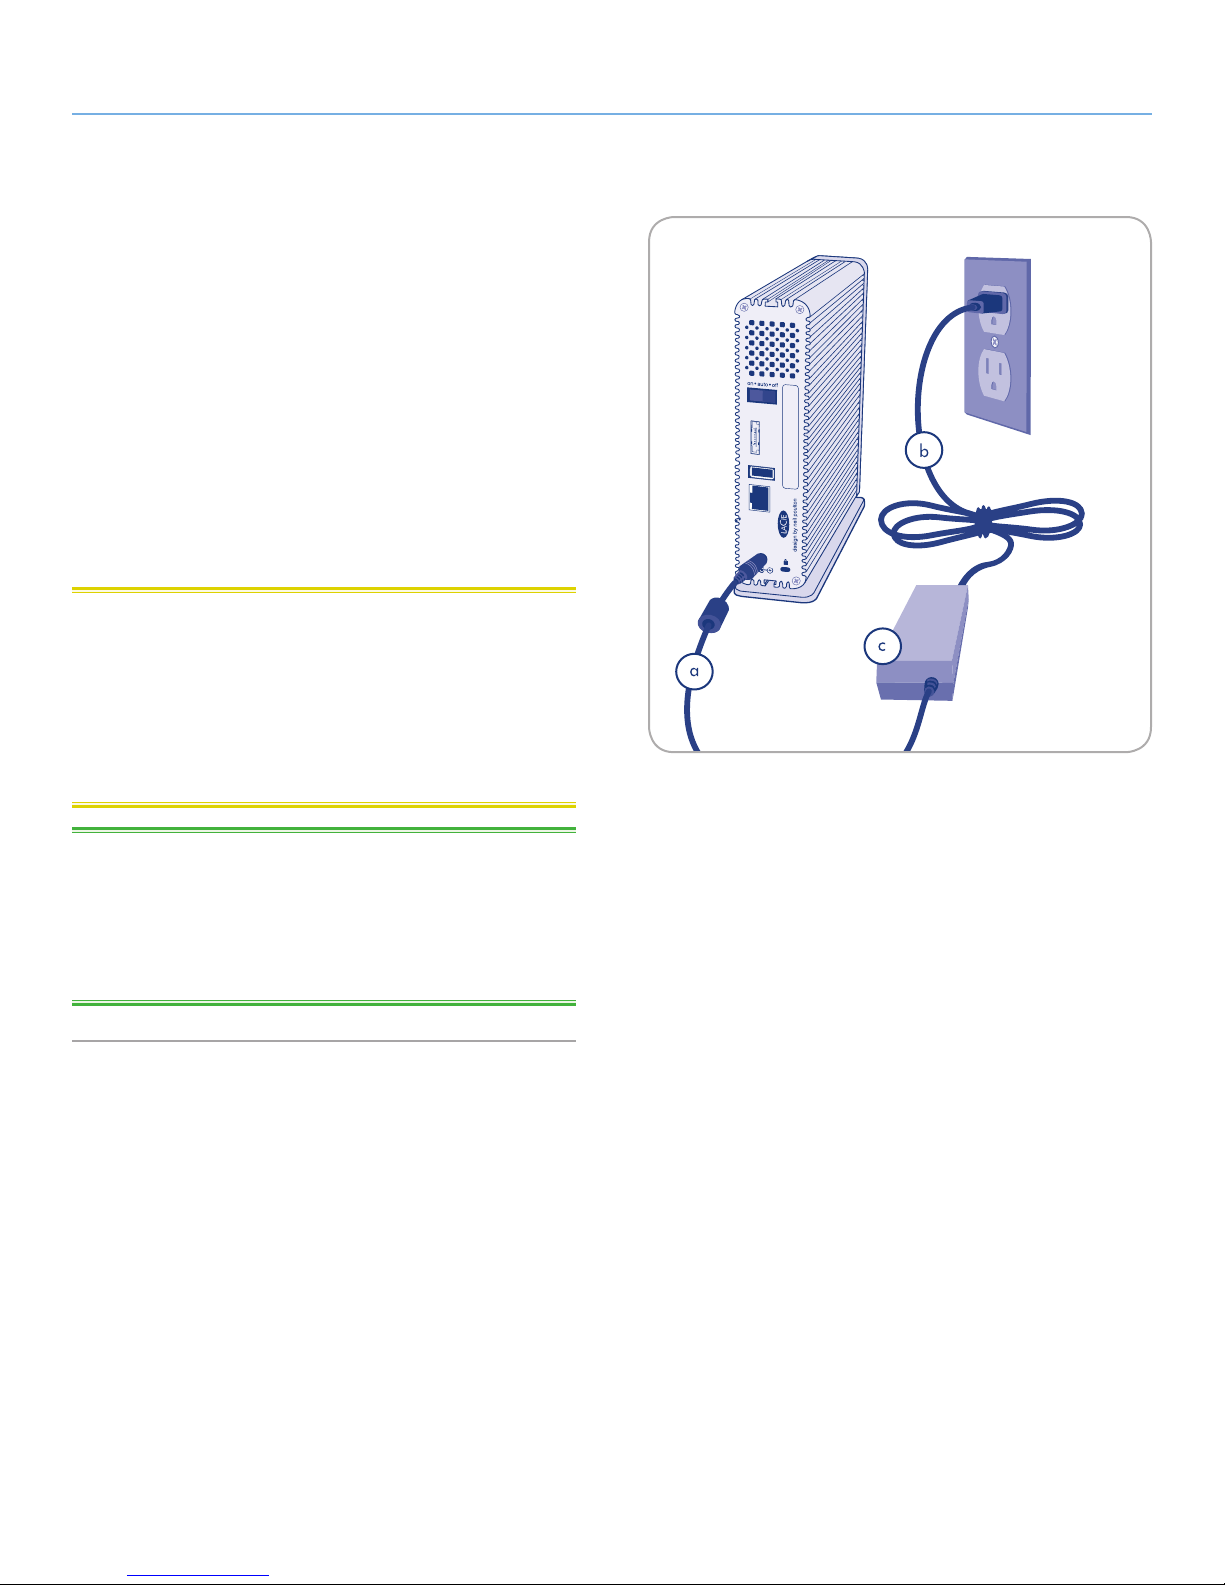
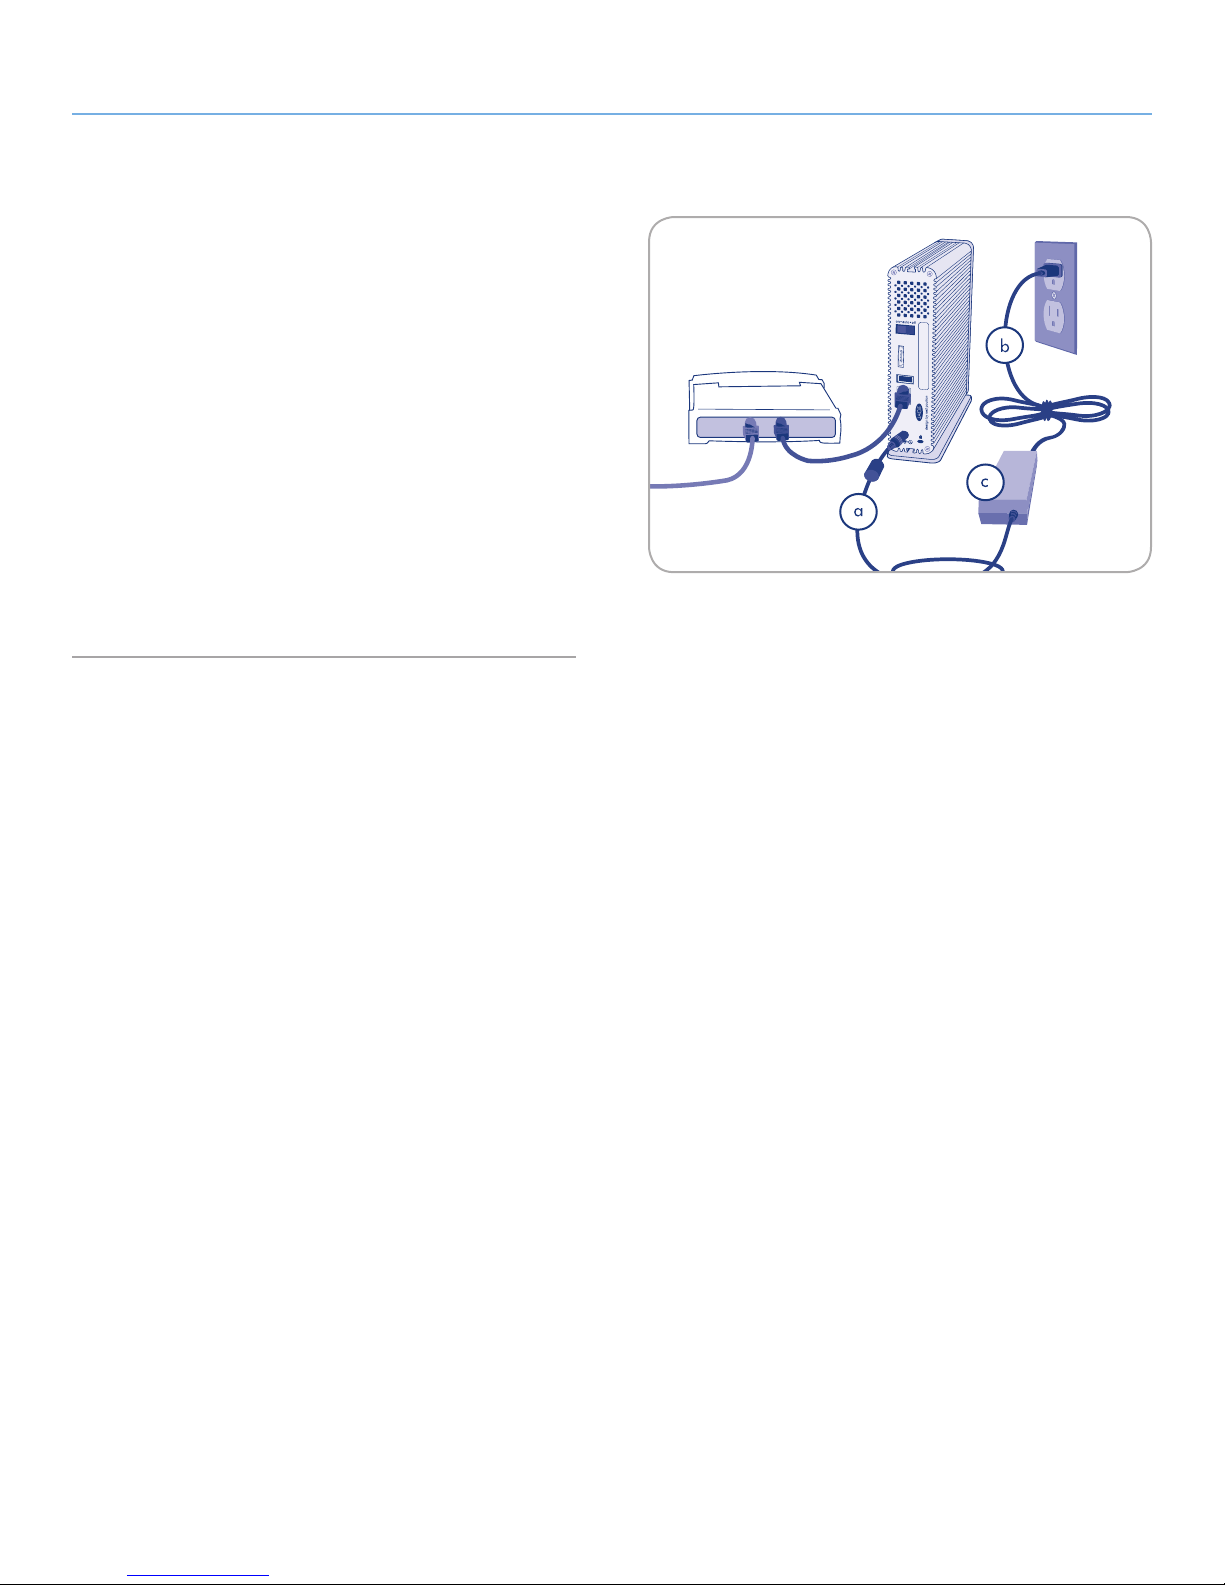
The power supply kit is composed of two cables: one cable (A) connects to the LaCie drive; and the other cable (B) connects to a power
outlet, such as a wall outlet or a surge protector (Fig. 04).
1. Connect Cable A to the d2 Network.
2. Connect Cable B to the power supply brick (C).
3. Connect Cable B to a surge protector or wall outlet.
4. Turn on the drive by moving the power switch on the back of the
drive to the “on” position.
The d2 Network may take up to 60 seconds to boot up.
CAUTION: Only use the AC adapter supplied with your specific La-
Cie device. Do not use a power supply from another LaCie device or
another manufacturer. Using any other power cable or power supply
may cause damage to the device and void your warranty.
Always remove the AC adapter before transporting your LaCie drive.
Failure to remove the adapter may result in damage to your drive
and will void your warranty.
Fig. 04
TECHNICAL NOTE: You may use your LaCie drive when in a for-
eign country thanks to its 100-240 Volt power supply. To be able to
use this feature, you may need to purchase an appropriate adapter
or cord. LaCie accepts no responsibility for any damage to the drive
resulting from the use of an inappropriate adapter. Using an adapter
other than one authorized by LaCie will void your warranty.
Page 13
LaCie d2 Network Setting Up Your LaCie d2 Network
User Manual page 13
2.2. Connecting the Ethernet Cable
Unlike regular desktop hard drives, the d2 Network is accessible
when attached to your network and does not need to connect directly to your computer (Fig. 05).
1. Turn the drive on. See 2.1. Turning On the d2 Network.
2. Connect the Ethernet cable to the Ethernet port on the back of
the LaCie d2 Network.
3. Connect the other end of the Ethernet cable into an available
Ethernet port on your router. Allow a few moments for your network to recognize the drive (it may take up to 3 minutes on
some networks).
Now move on to step 3, 2.3. Connecting Using LaCie Network As-
sistant.
Fig. 05
Page 14
LaCie d2 Network Setting Up Your LaCie d2 Network
User Manual page 14
2.3. Connecting Using LaCie
Network Assistant
LaCie Network Assistant detects all network attached storage devices on your network and gives you easy ways to connect to or
configure them.
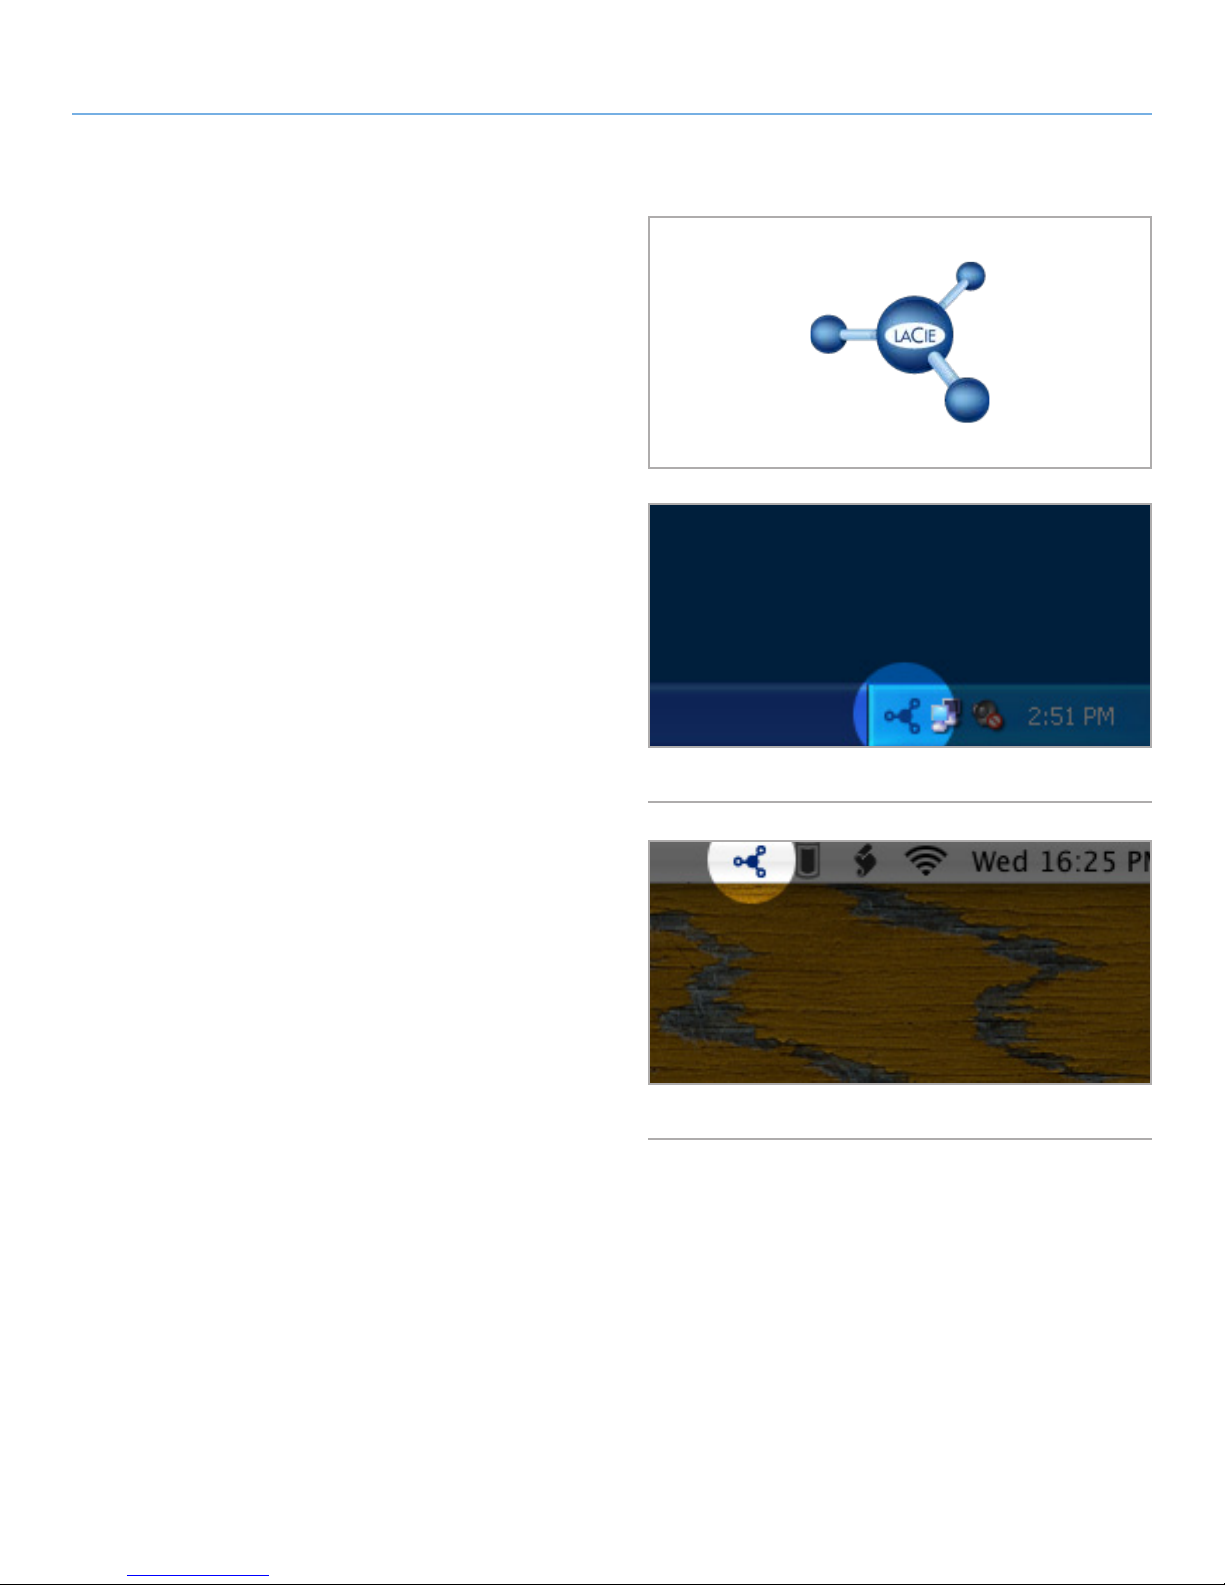
Once installed and running, Network Assistant will appear in your
task bar (Windows users, Fig. 07) or in the menu bar (Mac users,
Fig. 08) and automatically search for storage devices on your net-
work. When a new device is found, an info bubble containing the
name of the device will appear.
When Network Assistant finds your LaCie d2 Network, you can connect to any of the shares on the d2 Network, log in to the Administration Page, or configure the d2 Network’s network settings, all
from the Network Assistant menu.
Fig. 06 - LaCie Network Assistant Icon
Install LaCie Network Assistant:
1. Insert the LaCie d2 Network CD-ROM into your computer’s
CD-ROM drive.
2. Windows users, the CD should appear in My Computer. Mac
users, the CD should appear on the desktop. Double-click the
CD icon, then double-click “LaCie Network Assistant Setup”.
3. Follow the Wizard to complete installation.
(continued on next page)
Fig. 07
Fig. 08
Page 15
LaCie d2 Network Setting Up Your LaCie d2 Network
User Manual page 15
Launch the Administration Page
Windows Users
1. Select LaCie Network Assistant in Start/Programs. A Network Assistant icon will appear in the system tray and Network Assistant will
automatically detect your LaCie d2 Network and any other LaCie
storage devices on your network.
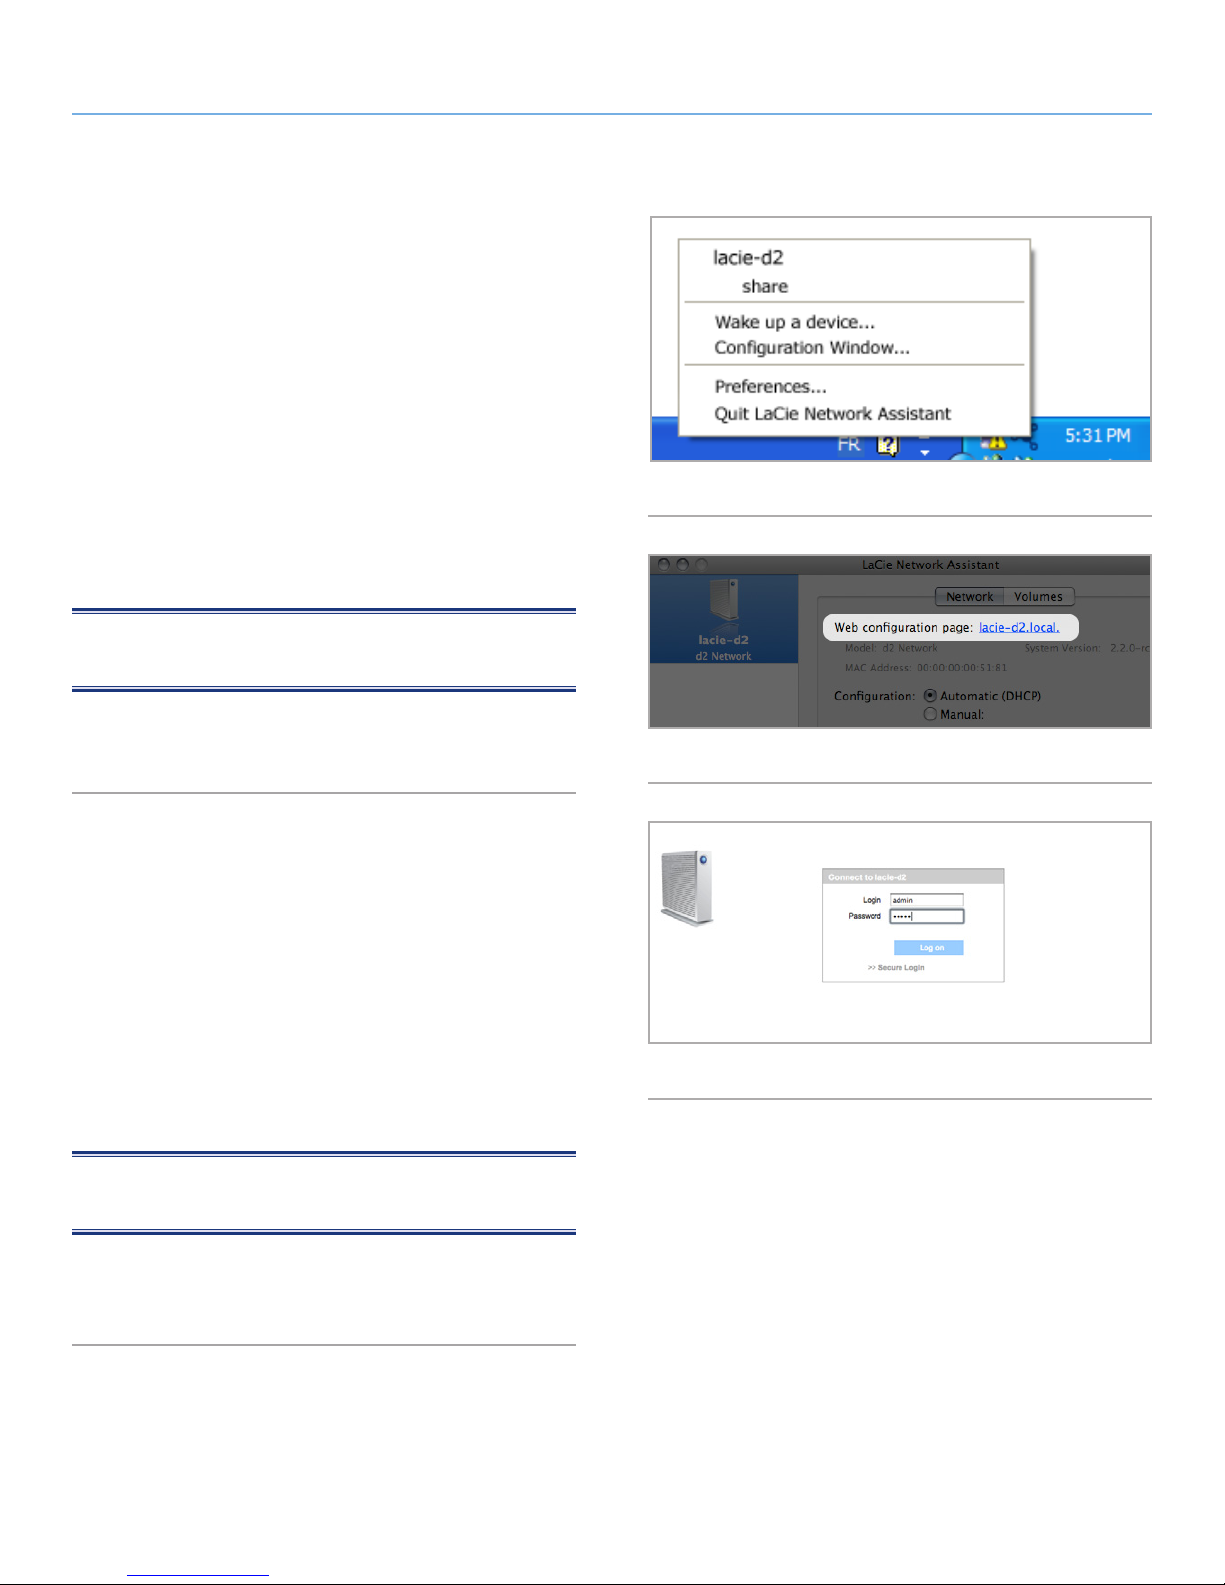
2. Click on the icon in the system tray and select Configuration Win-
dow... from the LaCie d2 Network sub-menu (Fig. 09). The LaCie
Network Assistant page will open.
3. Under the Network tab, click the Web configuration page
link (Fig. 10).
4. To log in to LaCie d2 Network administration (Fig. 11), enter:
Login: admin
Password: admin
Fig. 09
NOTE: This password can be changed from the Administration
Page (refer to 4.2. Users).
5. Click Log on.
Continue to section 4. Administering Your LaCie d2 Network.
Mac Users
1. Double click LaCie Network Assistant in your Applications folder.
An Network Assistant icon will appear in the menu bar and the
Assistant will automatically detect your LaCie d2 Network and any
other LaCie storage devices on your network.
2. Click on the icon in the menu bar and select Configuration Win-
dow.... The LaCie Network Assistant page will open.
3. On the Network tab, click the Web configuration page link
(Fig. 10).
4. To log in to LaCie d2 Network administration (Fig. 11), enter:
Login: admin
Password: admin
NOTE: This password can be changed from the Administration
Page (refer to 4.2. Users).
Fig. 10
Fig. 11
5. Click Log on.
Continue to section 4. Administering Your LaCie d2 Network.
Page 16
LaCie d2 Network Setting Up Your LaCie d2 Network
User Manual page 16
2.4. Configuring the LaCie d2
Network on a Network Without
a DHCP Server
Most home networking routers are DHCP servers, meaning the
router assigns an IP address to all devices on the network to allow
devices to find each other. If your network does not have DHCP
server, you may need to manually assign your LaCie d2 Network an
IP address and other network information.
The easiest way to modify your LaCie d2 Network’s network configuration is to use the LaCie Network Assistant. See section 2.3. Con-
necting Using LaCie Network Assistant for information on installing
the network configuration software.
1. Start LaCie Network Assistant (see section 2.3. Connecting Us-
ing LaCie Network Assistant).
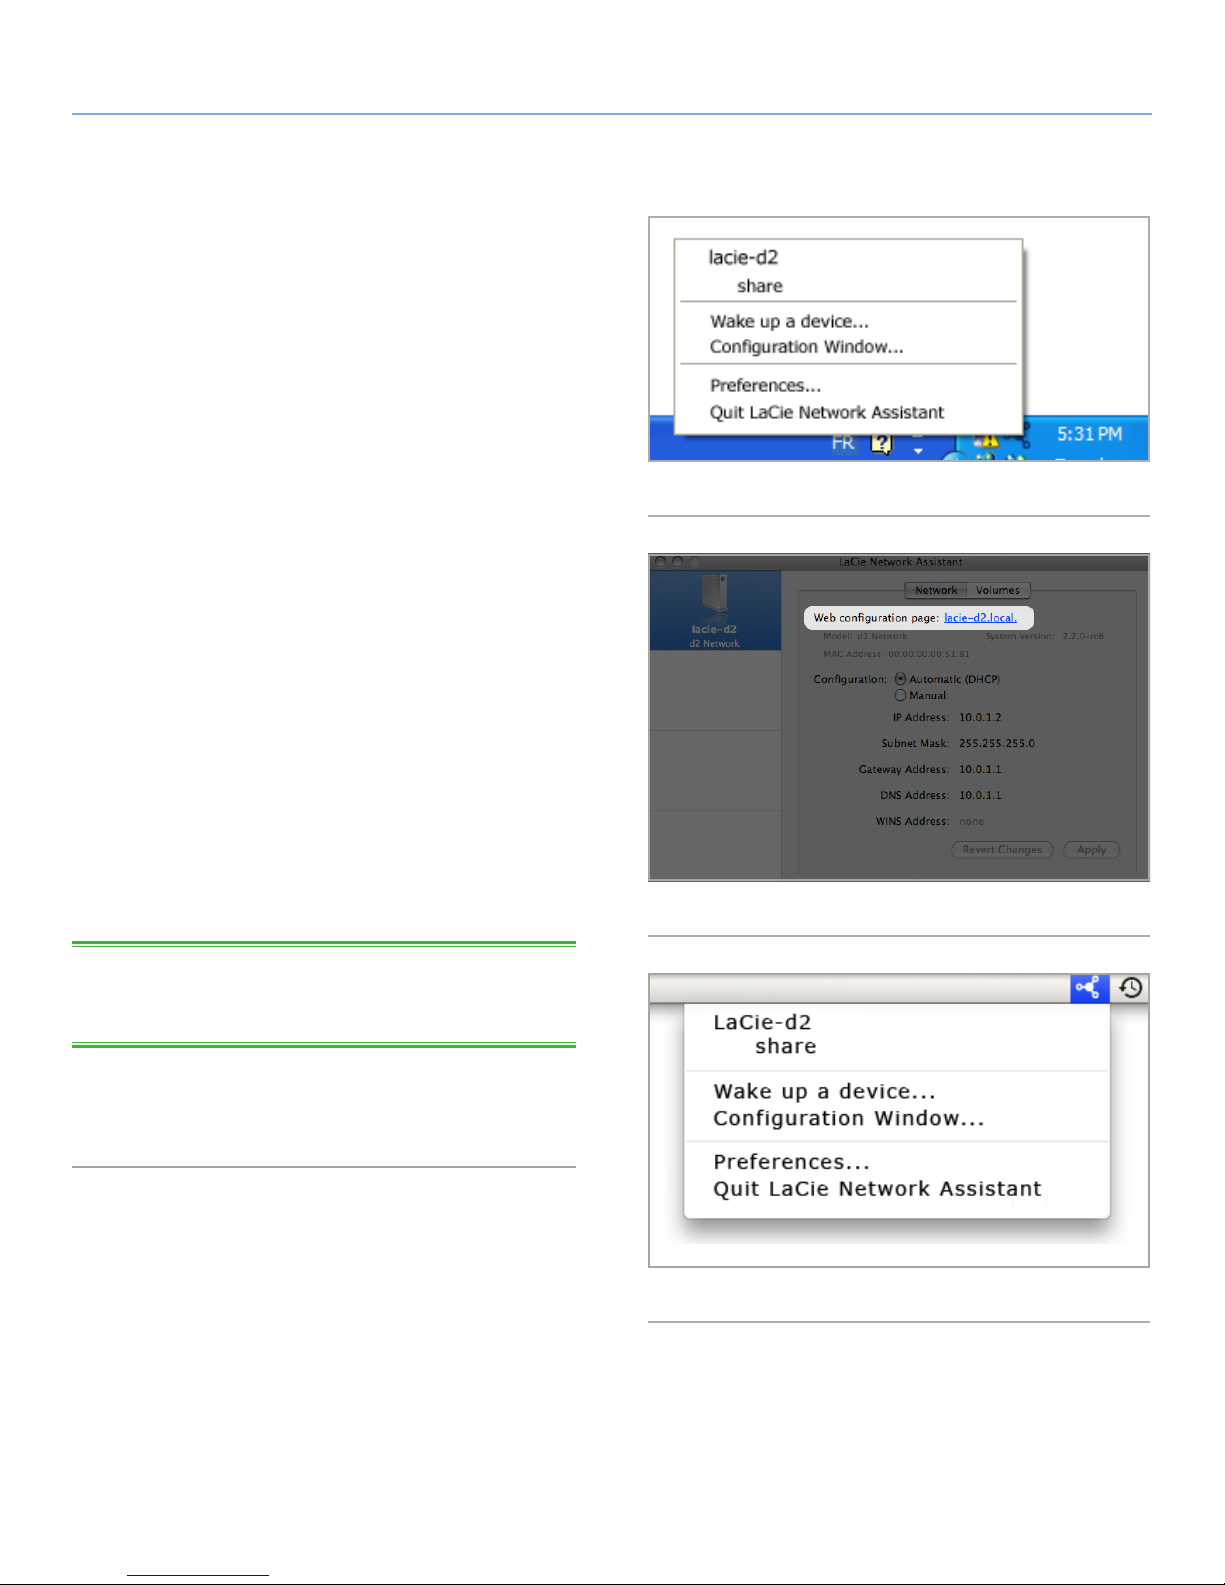
2. Windows Users: Click on the LaCie Network Assistant icon
in the system tray and select Configuration Window... (Fig.
12). The LaCie Network Assistant Configuration window opens
(Fig. 13).
Mac users: Click on the LaCie Network Assistant icon in the
menu bar and select Network Configuration... (Fig. 14). The
LaCie Network Assistant Configuration window opens (Fig. 13).
3. Click the Network tab.
4. Select Manual.
TECHNICAL NOTE: If the fields (IP address, Subnet mask, etc.) are
filled when Automatic (DHCP) is selected, you do not need to make
manual settings. Leave Automatic selected.
Fig. 12
Fig. 13
5. Modify the network settings to work with your network.
6. Click Apply.
Fig. 14
Page 17

LaCie d2 Network Setting Up Your LaCie d2 Network
User Manual page 17
2.5. Unmounting d2 Network
Volumes
To physically turn the d2 Network off, see section 4.5.6.4. Shut
Down.
Mac Users:
Drag all mounted volume icons to the trash.
Windows Users:
If you have used the LaCie Network Assistant to MOUNT volumes
(i.e. if the volume has been assigned a letter in My Computer):
1. Right-click the LNA icon in the task bar and select Network
Configuration...
2. Select the Volumes tab.
3. Right-click a volume and select Unmount.
Alternately, if the volumes are not mounted (and so do not appear
in My Computer), simply close the Windows Explorer window to disconnect from the volume.
IMPORTANT INFO: After switching off the d2 Network, it takes up
to 20 seconds for the operating system to close all services and for
all components (LEDs, disks, and boards) to power off.
Page 18
LaCie d2 Network Accessing & Managing Files
User Manual page 18
3. Accessing & Managing Files
Use LaCie Network Assistant to access your shared folder(s) (see
section 2.3. Connecting Using LaCie Network Assistant).
You can also connect an external hard drive to use as a backup
for your LaCie d2 Network or as additional storage. External drives
appear as separate shares and are accessible by anyone on the
network. For details, see 3.4. Connecting an External Hard Disk.
3.1. Accessing Shared Folders
When your computer is connected to your local area network, LaCie Network Assistant will help you quickly connect to the shared
folder(s) on your LaCie d2 Network.
Fig. 15
To access shared folders (all users):
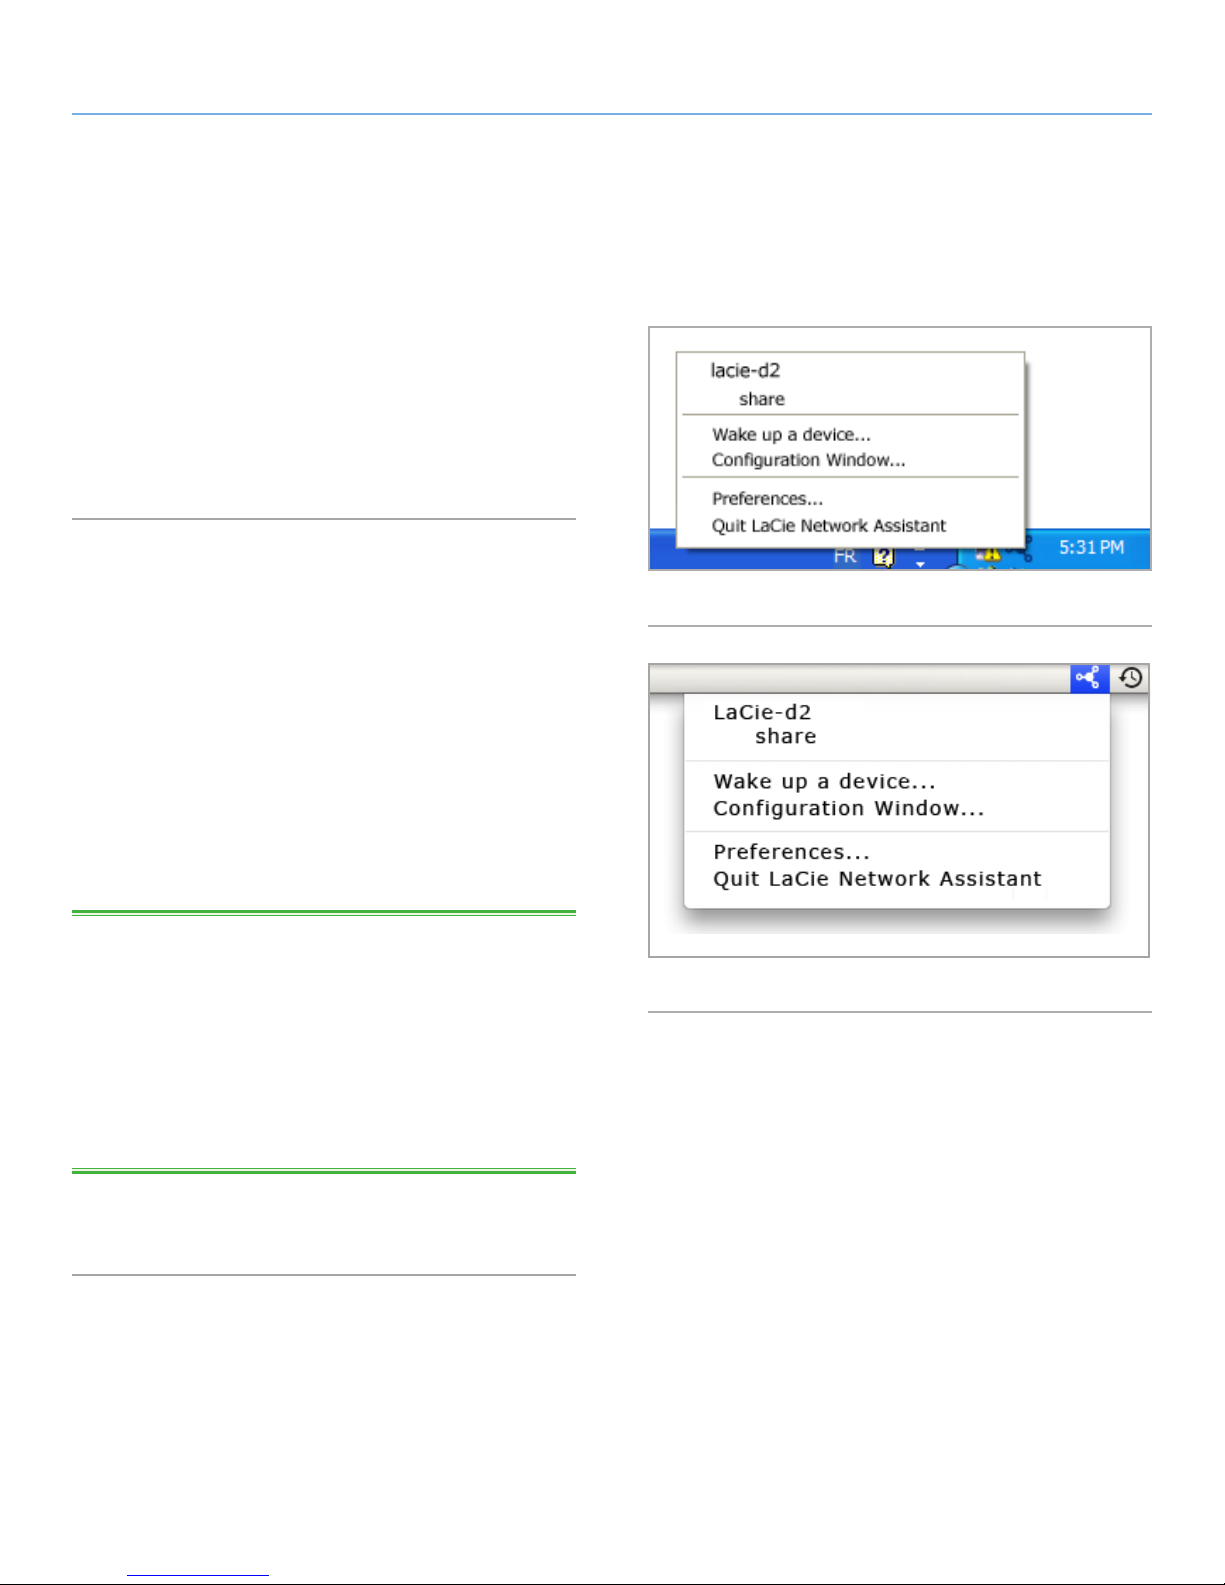
1. Run the LaCie Network Assistant (LNA). Click on the LNA icon
in the system tray (Windows users, Fig. 15) or menu bar (Mac
users, Fig. 16).
2. Select Share (default) or the name of any other share you have
created from the LNA menu. The share will open in a Windows
Explorer or Mac Finder window.
TECHNICAL NOTE: You may need to enter the username and
password for “share.” The defaults are:
Username: admin
Password: admin
Your system may remember this information and might not ask for it
during the same session.
See section 4.2.6. Editing User Accounts for information on changing
the User account information.
3. Simply drag and drop files to and from this window, just like a
regular folder.
Fig. 16
Page 19
LaCie d2 Network Accessing & Managing Files
User Manual page 19
3.1.1. Other Connection Methods
Vista/XP/2000 Users – My Network Places
IMPORTANT INFO: If you have just turned on the LaCie d2 Net-
work, it may take a few moments for it to appear on the network.
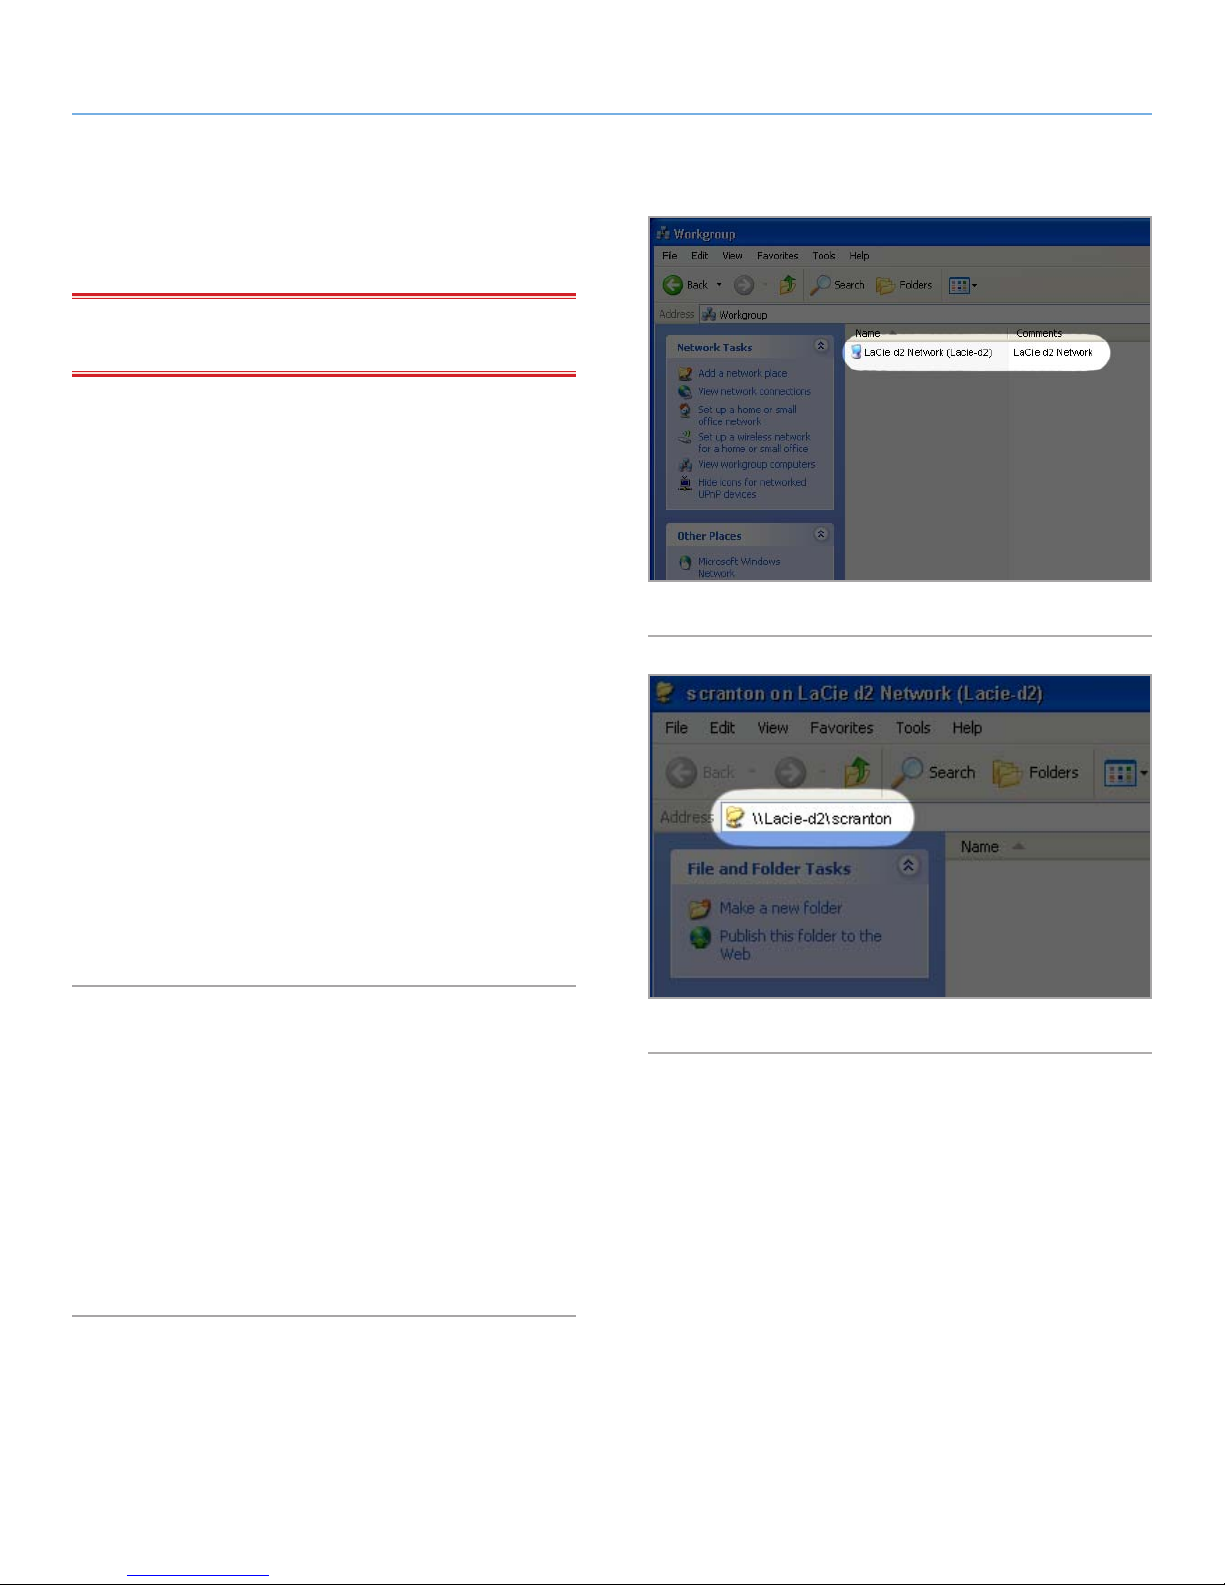
To access the share in Windows, look in My Network Places,
and select Microsoft Windows Workgroup. By default, the d2
Network will be named LaCie d2 Network (Lacie-d2 Network)
(Fig. 17).
Alternatively, you can access the share by typing the following in a
Windows explorer address field (Fig. 18.):
\\LaCie-d2\[share name]
\\[IP address]\[share name] Find the IP address by running the
LaCie Network Assistant (section 2.3. Connecting Using LaCie
Network Assistant).
For FTP access, type:
ftp://LaCie-d2 or ftp://[IP address]
Fig. 17
In the logon window that opens, type:
Login: admin
Password: admin
(This user name and password is the factory default; if you have
already created a user, input your user name and password.)
The LaCie d2 Network will appear as a drive with one share folder
on the network.
Windows Me/2000
For Windows Me and Windows 2000 users, if you cannot find the
LaCie d2 Network from your workstation, try using the Windows
search tool.
From the Start menu, select Search, and then click on For Files or
Folders. In the Search Results window, select Computers.
In the Search for Computers dialog box, enter the server name
and click the Search Now button. By default, the LaCie d2 Network
will be named “LaCie-d2” , and the share “SHARE”.
Fig. 18
Page 20

LaCie d2 Network Accessing & Managing Files
User Manual page 20
Mac OS X Users
From the Finder, select Go and then Connect to Server... In the
window that opens, type:
afp://lacie-d2.local or afp://[IP address]
And click Connect.
Mac OS 9.x Users
From the Apple menu, select Network Browser, Chooser or Connect to Server. In Chooser, click the Appleshare icon. Your server
should appear in the list with the default name “LaCie-d2”. Select
it and press OK.
Linux Users
Under KDE, open konqueror and type in the IP address of the LaCie
d2 Network into the address field:
For FTP access – ftp:// [IP address]
For HTTP access – http:// [IP address]
For SMB/CIFS access (in order for this to method to work, the services need to be properly configured) – smb:// [IP address].
Page 21

LaCie d2 Network Accessing & Managing Files
User Manual page 21
3.2. FTP Access to Shares
The FTP protocol is used to transfer files from one computer to another through a network, such as over the internet. This protocol
allows you to exchange files with your friends or relatives securely,
as only people to whom you have provided the user name and password will have access. FTP access also provides you a way to access
your files remotely.
In order to make your d2 Network accessible via the internet, configure your router to allow remote connections using FTP. This process
varies depending on the router.
For the d2 Network to be accessible through the internet, port 21
needs to be forwarded to the d2 Network.
TECHNICAL NOTE: By default, FTP is enabled and therefore Share
is fully accessible via FTP. To turn FTP service off, refer to section
4.5.5. Status.
Page 22
LaCie d2 Network Accessing & Managing Files
User Manual page 22
3.3. Administration Page – Browse
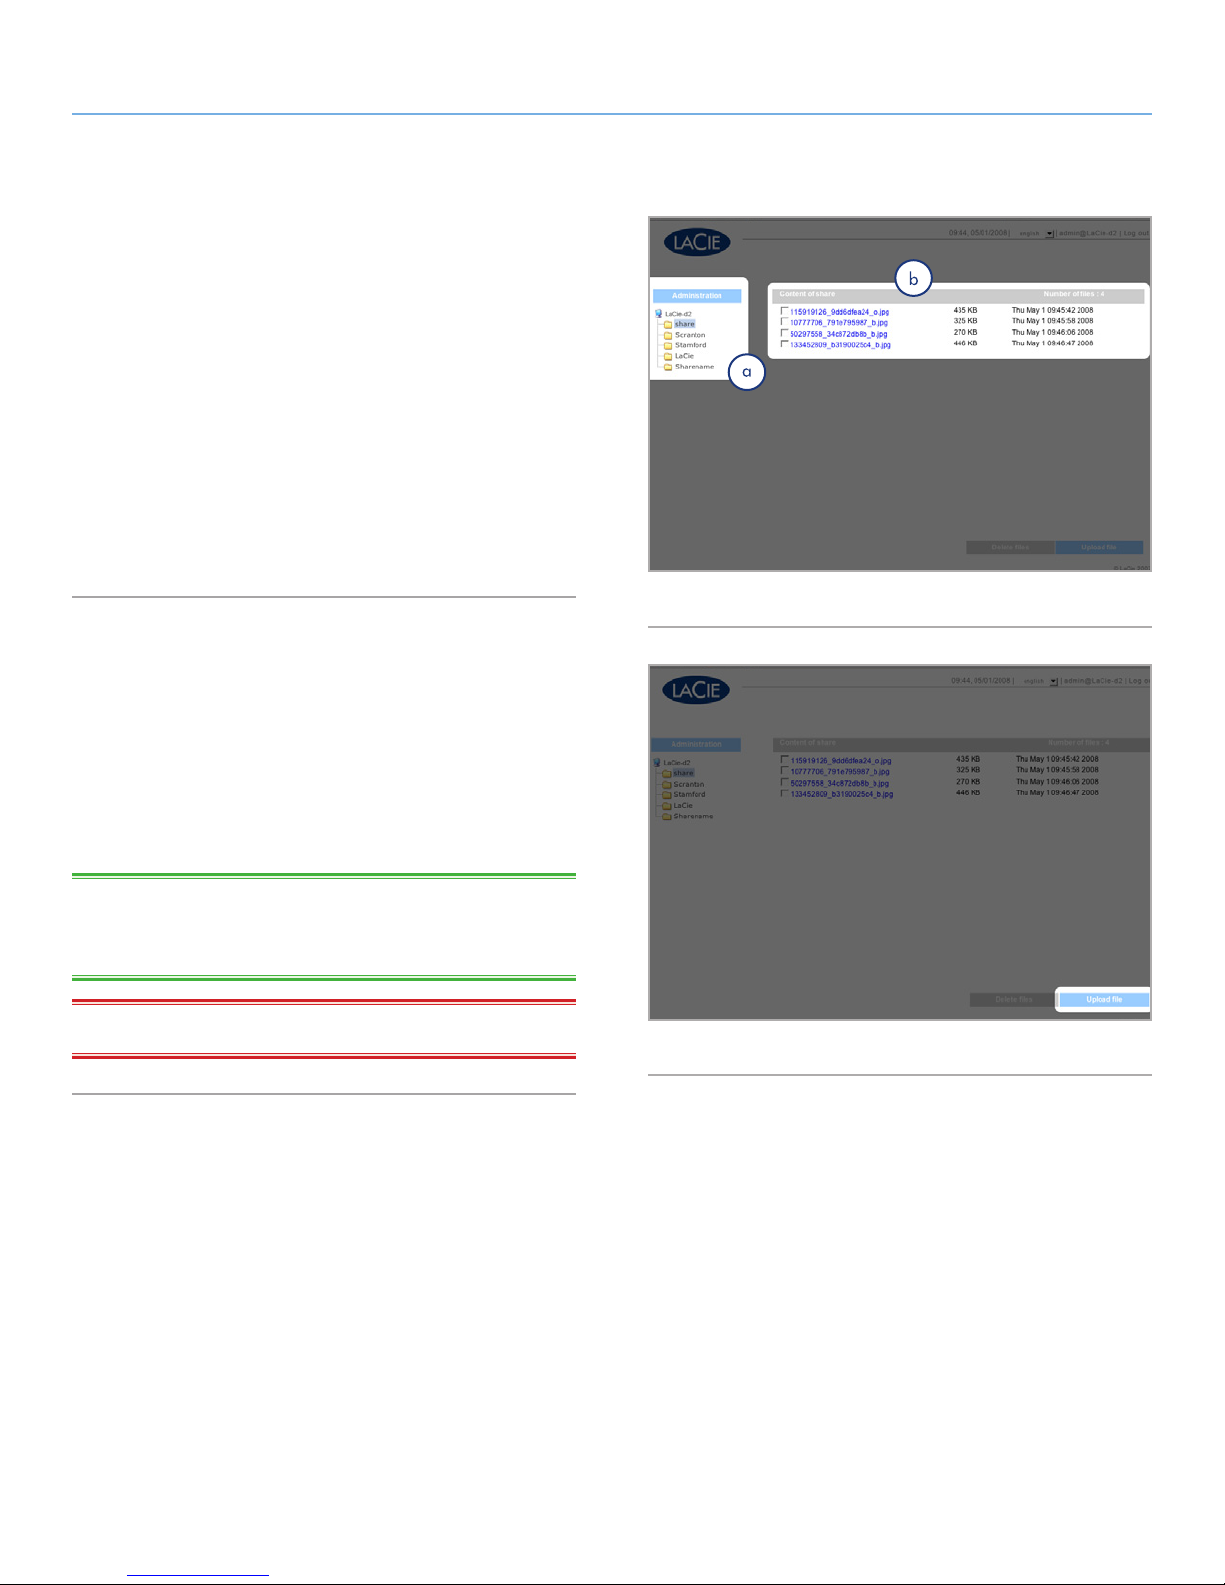
To access files from the Administration page, just log in. Regular
users will have direct access to the shares on the d2 Network (Fig.
3.3), with no access to administrative features. The administrator
can click on Browse in the navigation bar to access files stored on
the d2 Network. The administrator will have access to all files. Other
users will only have access to the files to which the administrator has
given them access.
All shares are listed on the left side of the page (a, Fig. 19). To see
the files in a share, click on the share name (b, Fig. 20).
Administrators, to return to d2 Network administration, click the Ad-
ministration button. This is not available to non-administrators.
3.3.1. Uploading Files
To upload a file to a share:
1. Click on the share (folder) you want to upload the file to.
2. Click Upload file.
3. Click Browse… a file browser opens. Select the file to upload.
4. Click Apply.
TECHNICAL NOTE: If the file does not appear in the folder after
the upload process is complete, just click on the folder name again to
refresh the view of the folder contents.
IMPORTANT INFO: Uploads are limited to 55MB.
Fig. 19
Fig. 20
Page 23
LaCie d2 Network Accessing & Managing Files
User Manual page 23
3.3.2. Downloading Files
To download a file:
1. Click on the share (folder) you want to download the file from.
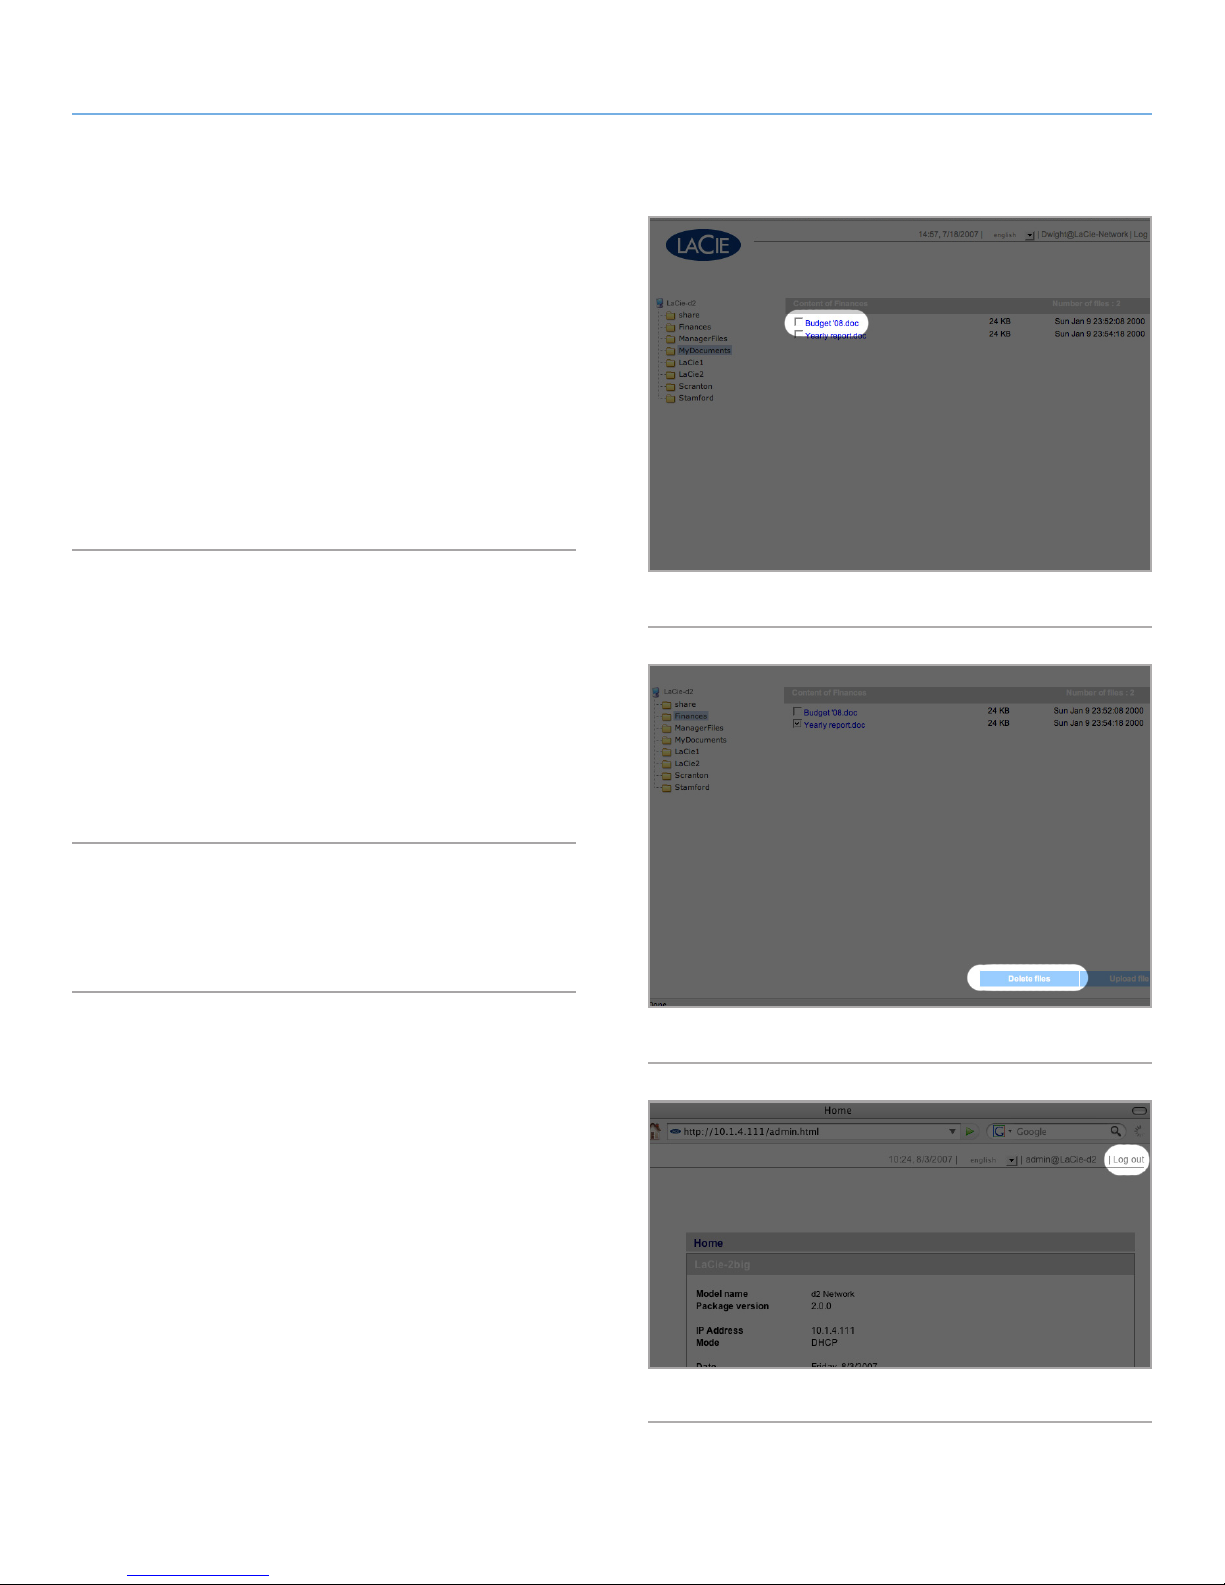
2. Click on the file’s link (Fig. 21).
3. Internet Explorer: in the security warning window, click to allow the download. File saves to the default downloads directory.
4. FireFox and Safari: File downloads to the default downloads
directory.
3.3.3. Deleting Files
To delete a file from a share:
1. Click on the share (folder) you want to delete the file from.
2. Select the file or files to delete.
3. Click Delete files (Fig. 22).
4. Click OK on the confirmation dialog.
3.3.4. Logging Out
Log out at any time by clicking Log out in the upper right corner of
the Administration Page (Fig. 23).
Fig. 21
Fig. 22
Fig. 23
Page 24
LaCie d2 Network Accessing & Managing Files
User Manual page 24
3.4. Connecting an External Hard Disk
You can connect an external USB or eSATA hard disk to back up the
data on your LaCie d2 Network or as a way to add storage capacity. Connected hard disks are accessed similarly to shared folders.
TECHNICAL NOTE: External hard disks must be formatted in one of
the supported systems in to mount on the LaCie d2 Network: FAT32,
NTFS, HFS+, EXT3, REISERFS or XFS.
In order to use an external hard drive to back up the d2 Network, the
drive must be formatted in one of the file formats listed above, with
the exception of NTFS. NTFS volumes cannot be used to back up
the d2 Network because this file system format is read-only when
connected to the d2 Network. External drives can be formatted to
XFS through the Web administration page. For details, see 4.5.4.
Disks.
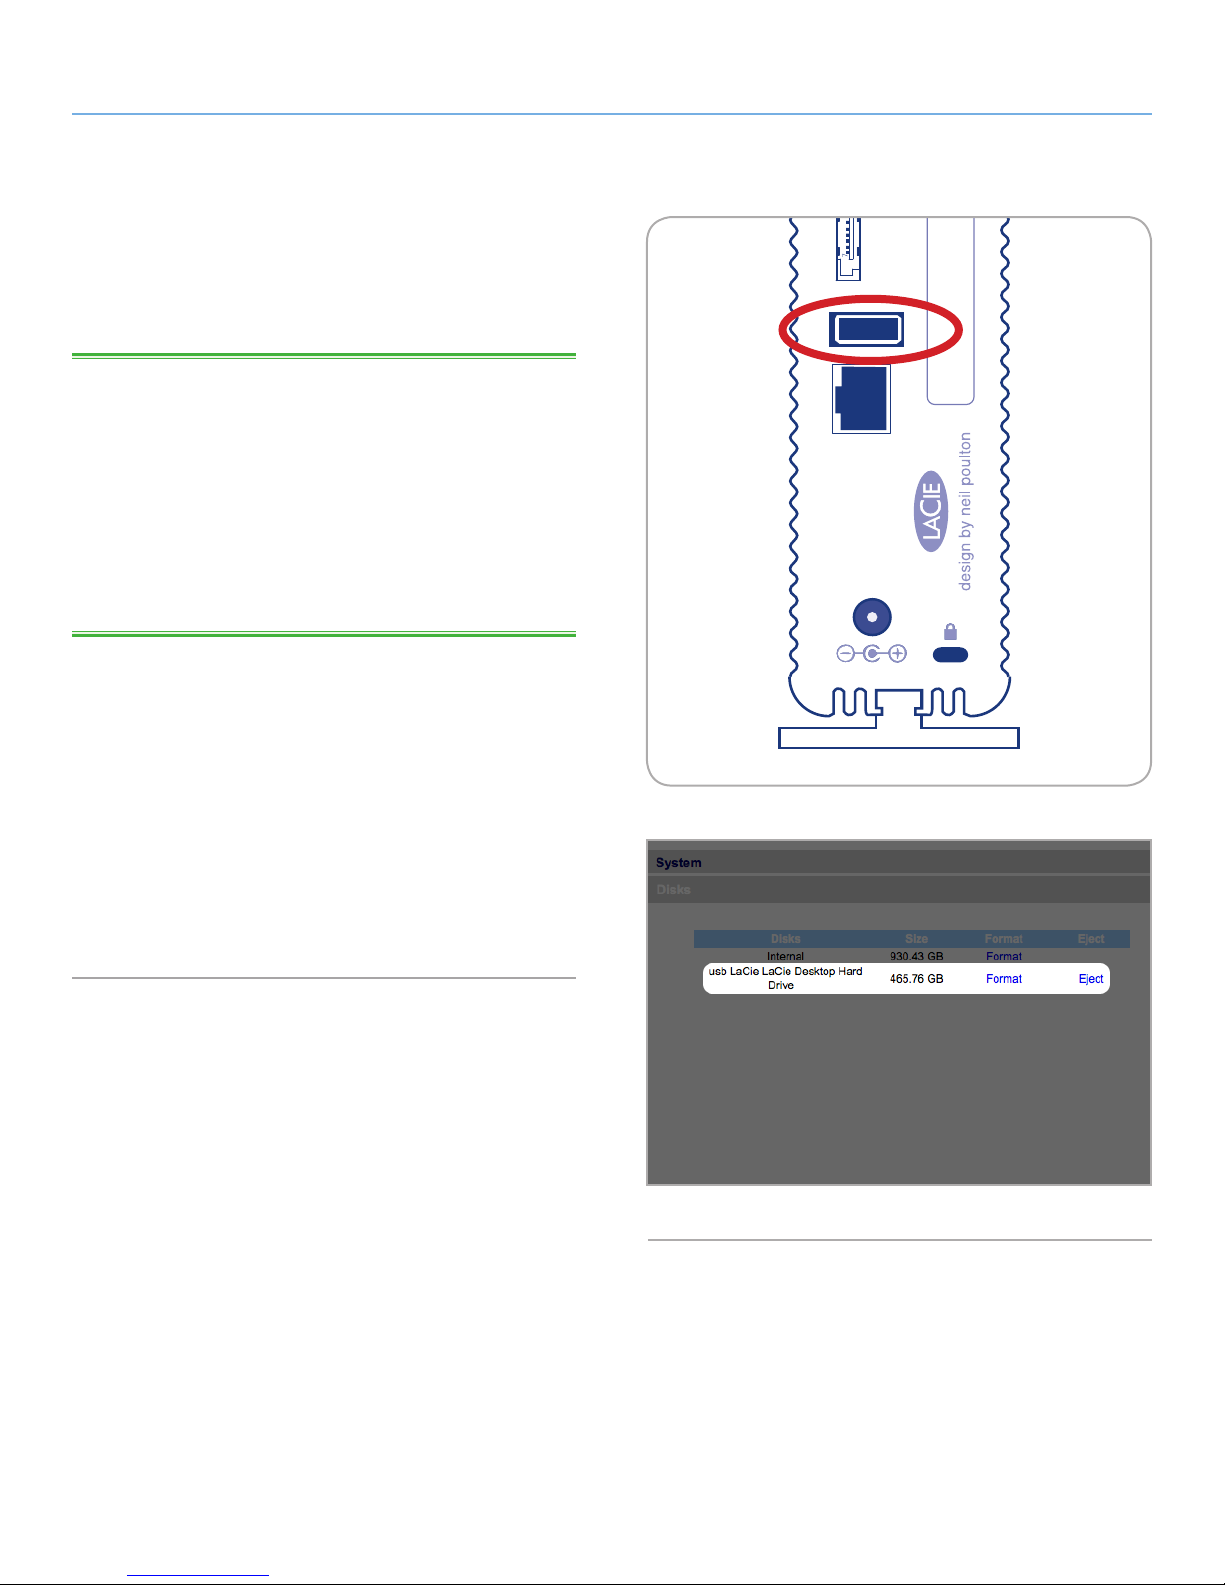
To connect an external hard disk:
1. Turn on your LaCie d2 Network.
2. Turn on the external hard disk (if it has a power button) and
connect its USB or eSATA cable to the USB or eSATA port on the
back of the LaCie d2 Network (Fig. 24).
3. In the Web Administration Page, click System and then on the
Disks tab.
The external hard drive will be listed (Fig. 25). For more information,
see 4.5.4. Disks.
Fig. 24
Fig. 25
Page 25
LaCie d2 Network Administering Your LaCie d2 Network
User Manual page 25
4. Administering Your LaCie d2 Network
The LaCie d2 Network features an easy-to-use Web-based tool for
configuring the drive and administering users, referred to here as the
Administration Page.
Accessing the Administration Page is easy, whether you’re using a
browser (all users) or the LaCie Network Assistant (LNA).
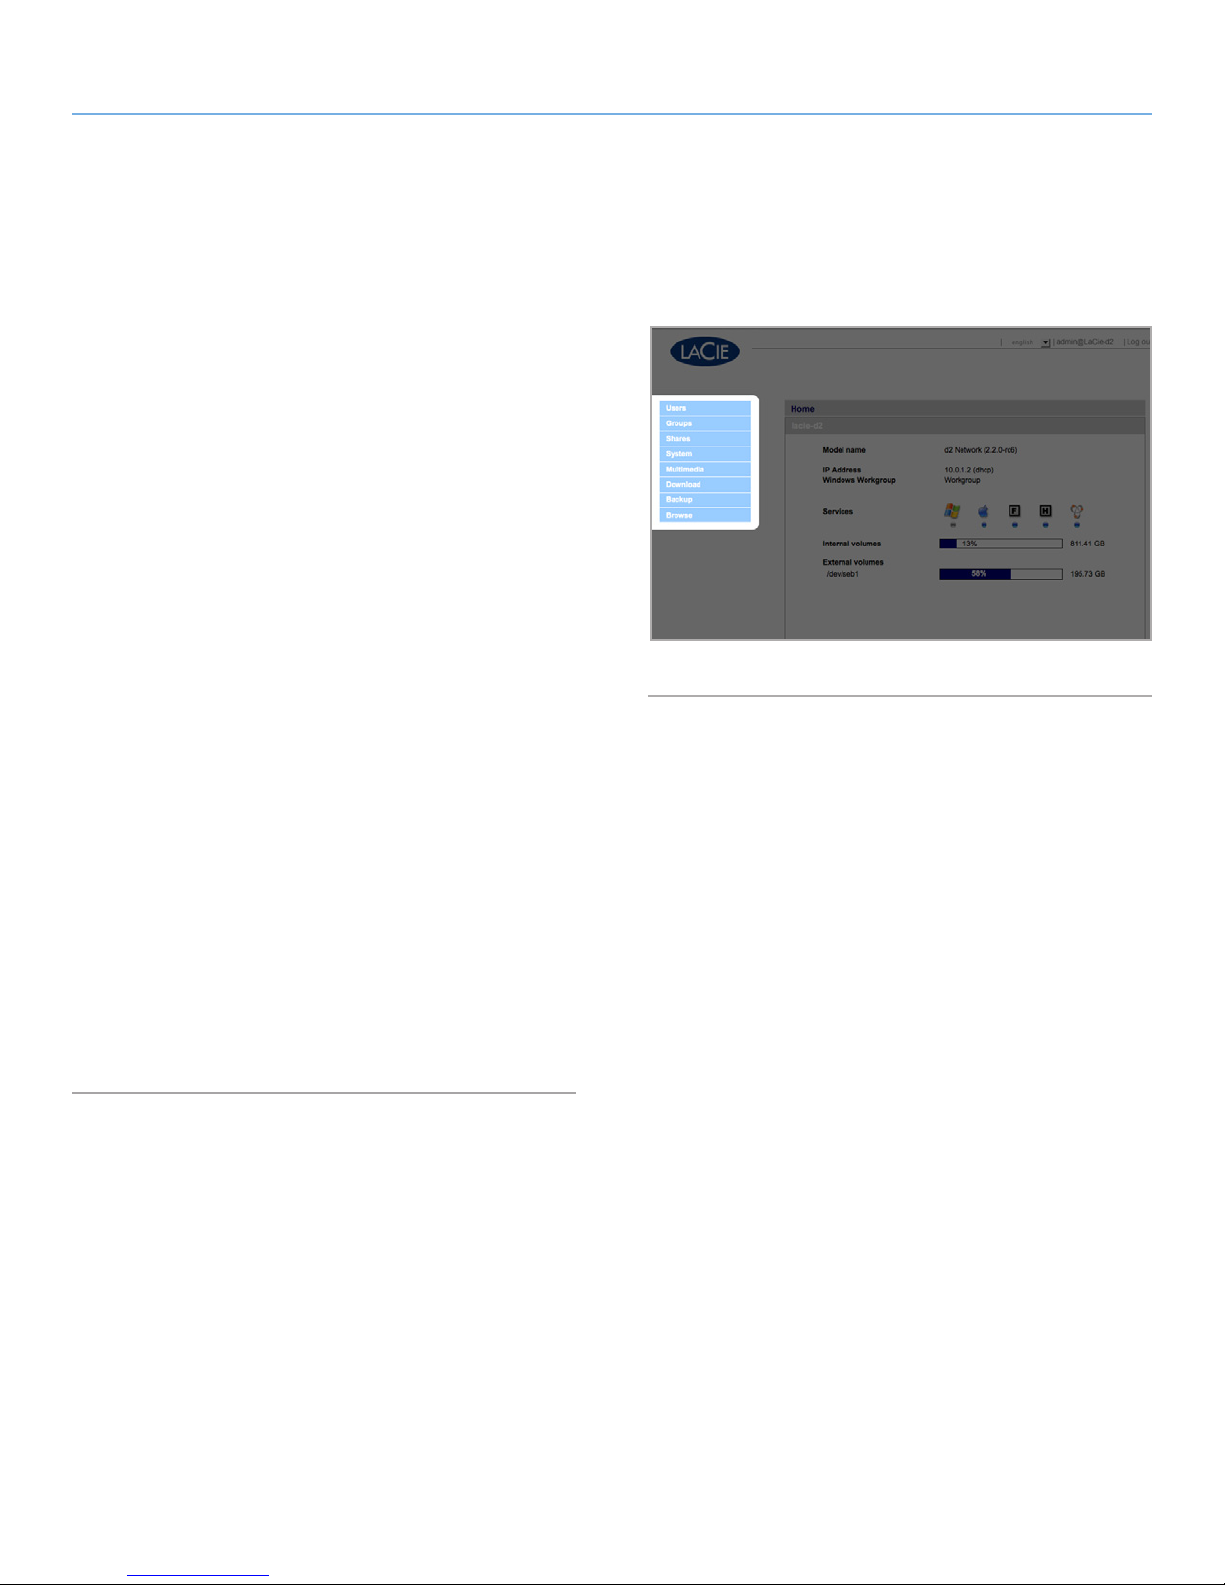
When you log in as “admin”, you will see a series of blue navigation
links on the left side of the page (Fig. 26) to help you navigate and
configure the LaCie d2 Network:
✦ Section 4.2. Users: Add, delete or edit users, including assign-
ment of folder access privileges.
✦ Section 4.3. Groups: Add, delete or edit groups, add users to
groups, assign group access privileges
✦ Section 4.4. Shares: Create, delete or edit shares, change ac-
cess restrictions
✦ Section 4.5. System: Change system settings, manage disks
and RAID settings, manage system updates
✦ Section 4.6. Download: Configure your LaCie d2 Network to
be a torrent server.
✦ Section 4.7. Backup: Back up your LaCie d2 Network onto an
external USB or eSATA hard drive
✦ Section 4.8. Browse: Access files and folders, upload and
download files, delete files
✦ Section 4.9. Import (Snapshot): Click the front button to auto-
matically import the data on an attached external hard drive
✦ Section 4.10. Multimedia: Set up your d2 Network as a multi-
media server, providing access to its files to compliant digital
media devices
Fig. 26
Page 26
LaCie d2 Network Administering Your LaCie d2 Network
User Manual page 26
4.1. Accessing the Administration Page
NOTE: The easiest way to access the Administration Page is to use
LaCie Network Assistant (see section 2.3. Connecting Using LaCie
Network Assistant).
Fig. 27
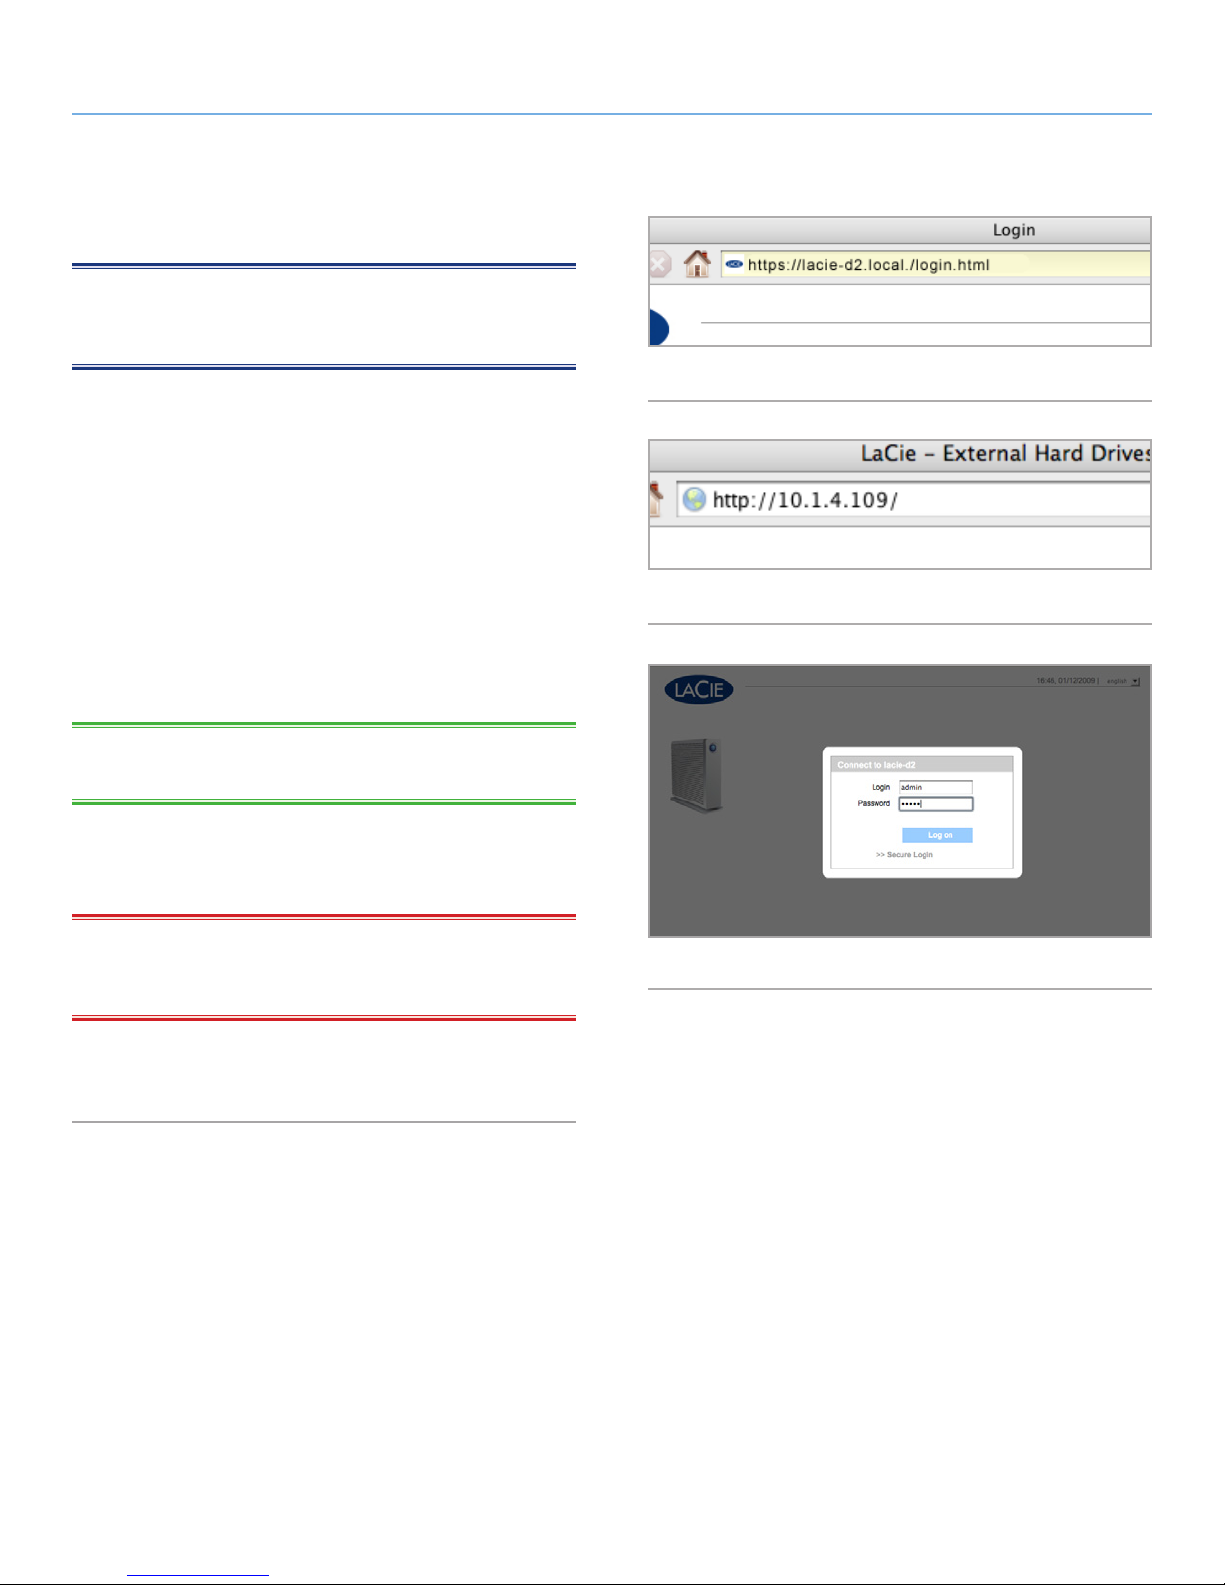
To access the Administration Page with a browser:
In your browser’s URL (web address) field, type one of the following:
Mac users: http://lacie-d2.local. (Fig. 27)
PC users: http://lacie-d2 (Fig. 27)
or
http://IP address (Fig. 28)
Find the IP address by running the LaCie Network Assistant (section
2.3. Connecting Using LaCie Network Assistant).
Fig. 28
TECHNICAL NOTE: The IP address of your LaCie d2 Network may
be different than the IP address shown in Fig. 28.
On the login page (Fig. 29), type:
Login: admin
Password: admin
IMPORTANT INFO: The login name and password are both set to
“admin” by default. The admin password can be changed, but not
the login name. See section 4.2. Users for more information.
If you are logged in as “admin”, the Administration Page will open.
For non-admin users the file browsing page will open.
Fig. 29
Page 27
LaCie d2 Network Administering Your LaCie d2 Network
User Manual page 27
4.1.1. Setting the Display Language
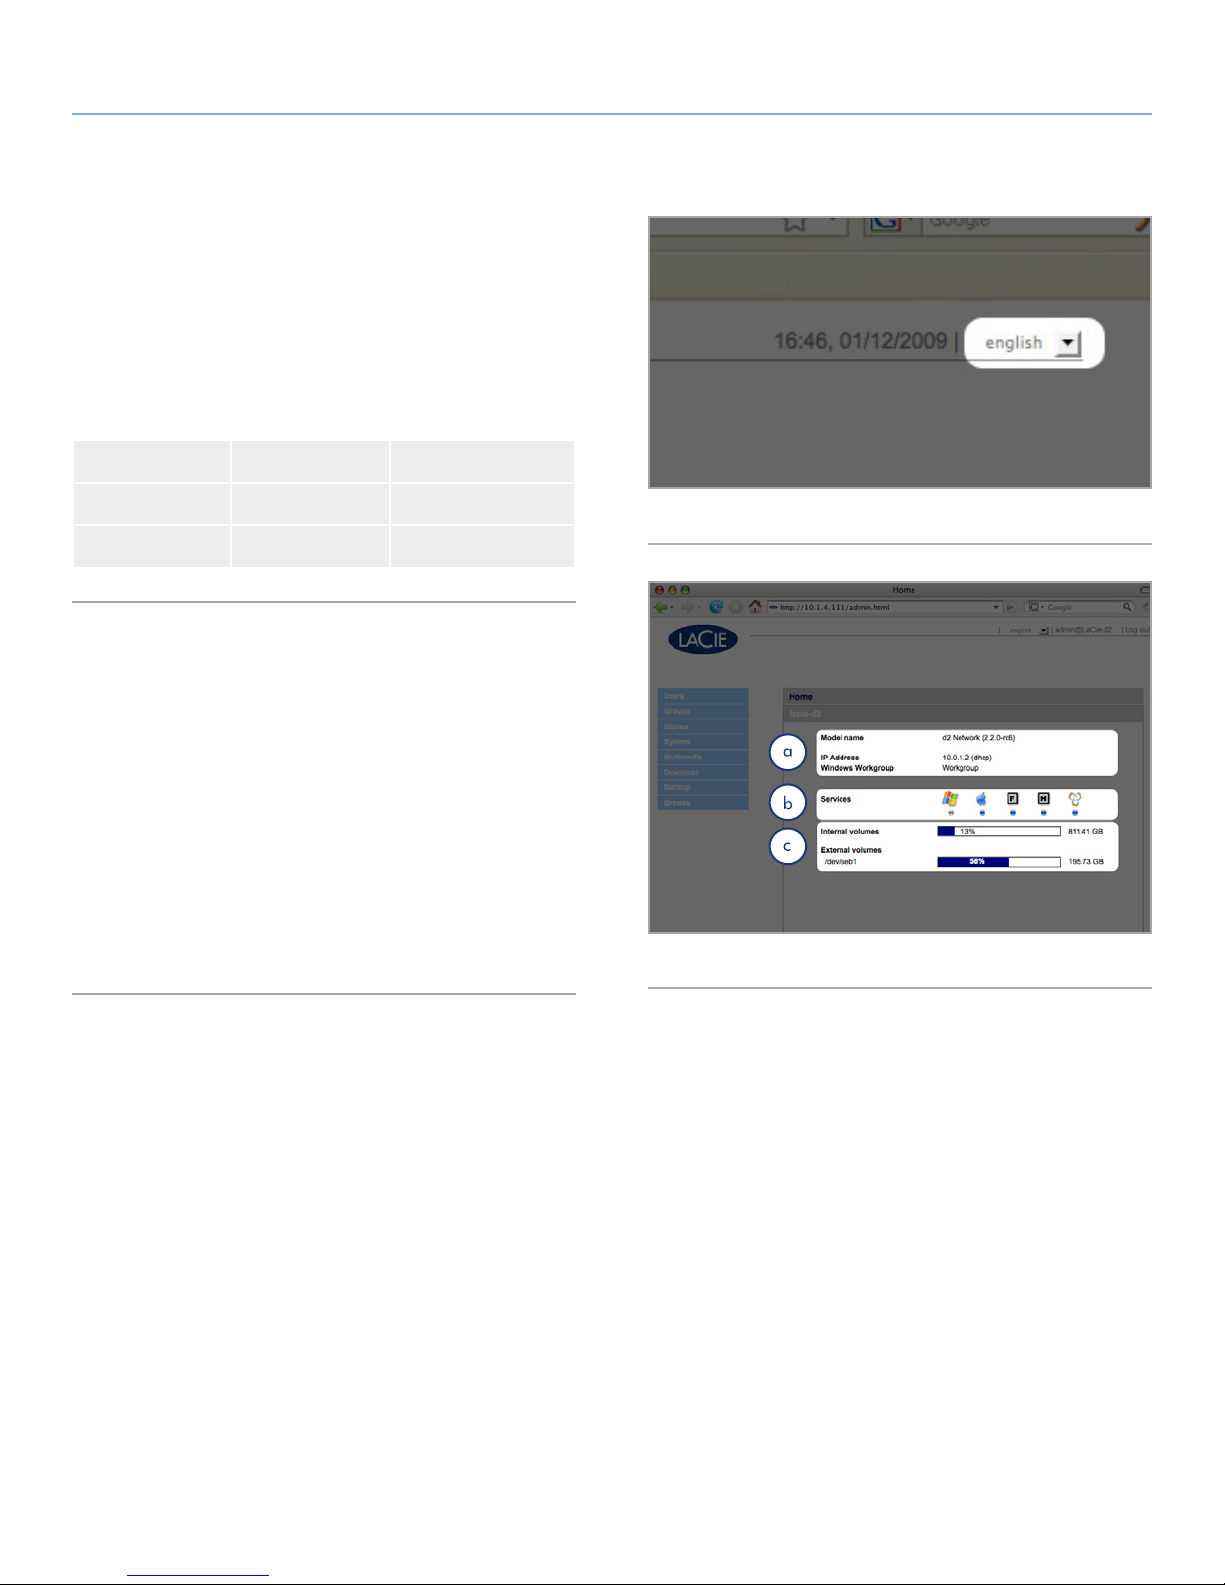
The default display language is set to your browser’s language.
If your browser’s display language is not supported, d2 Network
administration will default to English. You can change the display
language at any time by selecting a language from the menu in the
upper right corner of the administration page (Fig. 30). This can be
done from the Log On page, as shown, so you can proceed from
the beginning in your own language.
English Français Deutsch
Italiano Español Dutch
Svenska Dansk Japanese
4.1.2. Administration Home Page
When you log into LaCie d2 Network administration, the Home
page opens (Fig. 31). This page contains information about the status of the d2 Network.
✦ Fig. 31, area A: Gives the product model name, IP address,
and Windows workgroup name.
✦ Fig. 31, area B: Shows which network services are activated
(for details on how to activate or deactivate network services,
see section 4.5.5. Status).
✦ Fig. 31, area C: Indicates disk usage and whether an external
drive is connected (for details, see section 3.4. Connecting an
External Hard Disk).
Fig. 30
Fig. 31
Page 28
LaCie d2 Network Administering Your LaCie d2 Network
From:
Chris Sutton <csutton@lacie. com>
Subject:
Re: TR : [d2-Rose] LaCie email notification
Date:
August 20, 2008 3:14:26 PM GMT+03:00
To:
Edin Del Mar < edelmar@lacie.c om>
User Manual page 28
4.2. Users
Click on the Users link in the navigation bar to open the User Accounts page. Use this page to create, edit and delete user accounts.
Administrator Account
Only one user can have administrative privileges for the d2 Network. This user’s login name cannot be changed from “admin”, but
the password can be changed.
IMPORTANT INFO: The admin user can also enter an email ad-
dress to which the d2 Network can send messages about important
changes to the d2 Network’s status (see below).
To change the administrator’s password:
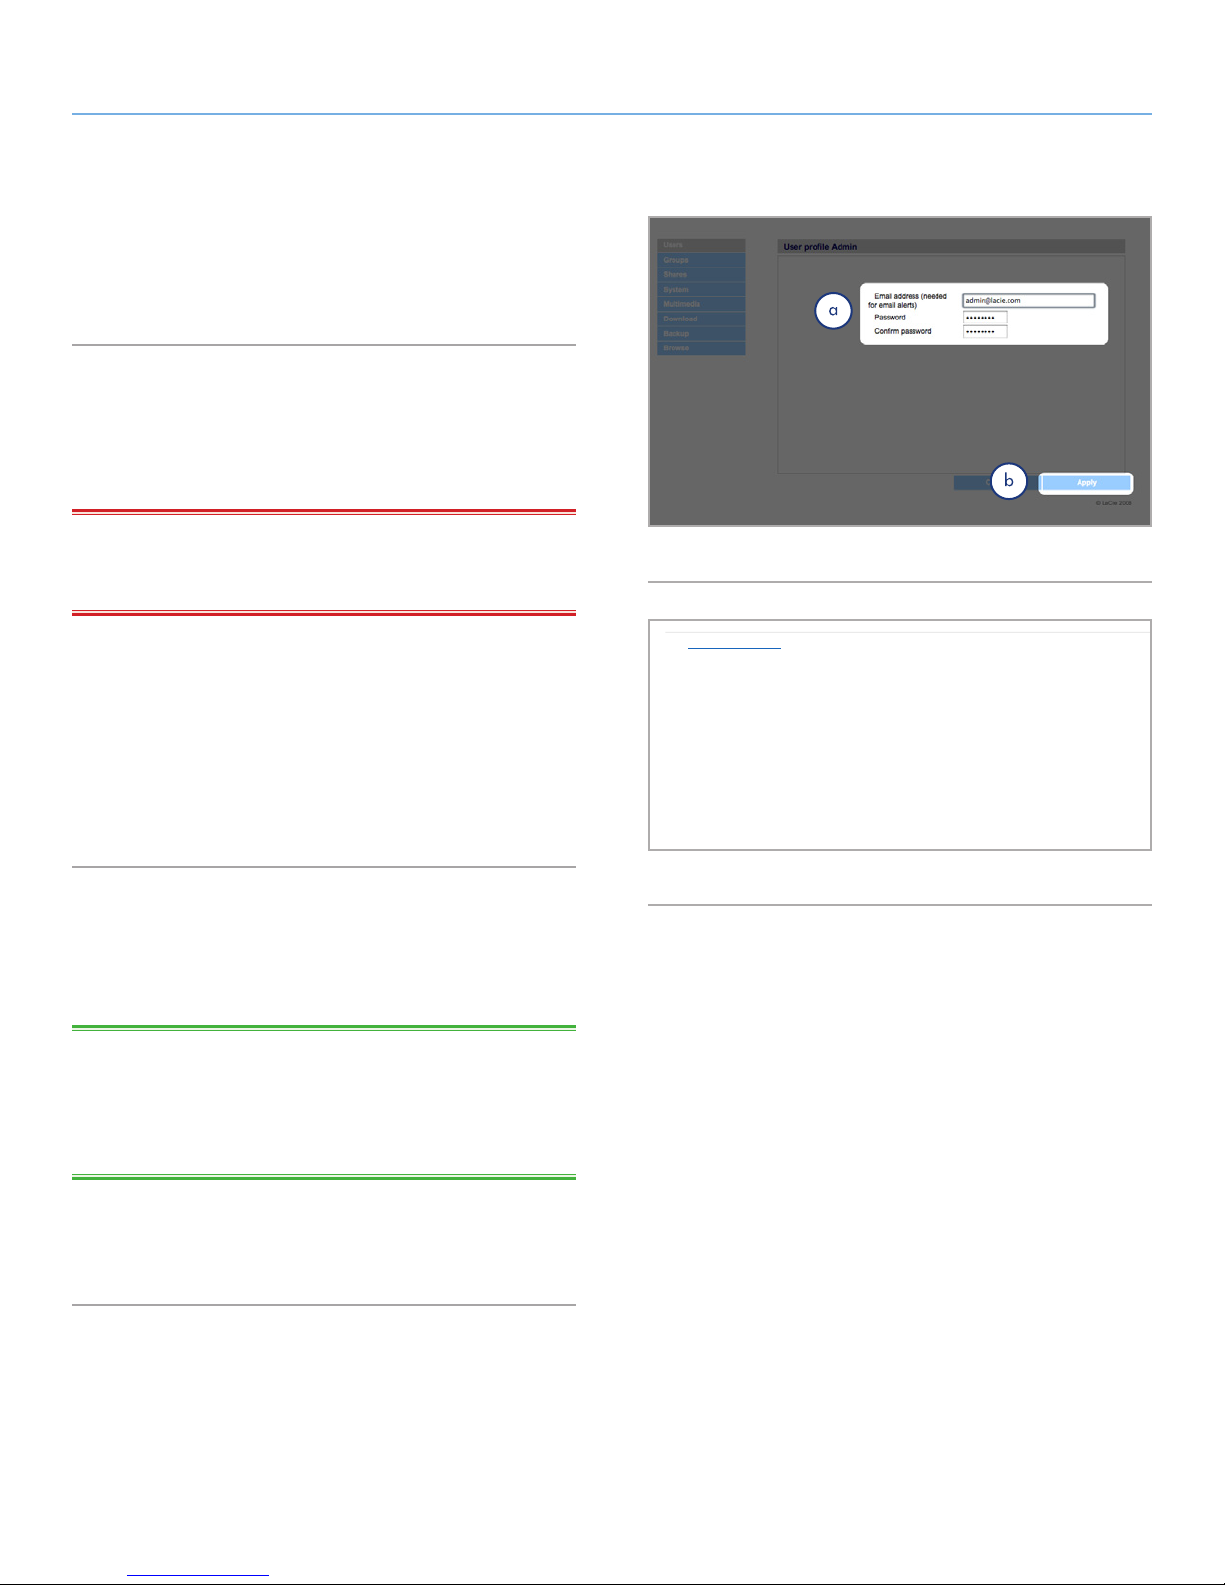
1. Click on the “admin” user in the user list on the Users page. The
“User profile Admin” page opens (a, Fig. 32).
2. Enter a new password in the “Password” field. Enter the password again in the “Confirm password” field.
3. Click Apply (b, Fig. 33).
Email Notifications
The administrator can provide an email address to which the d2
Network will send notifications of important status changes, such as
disk failure (see chart in section 6. Email Notification Triggers).
TECHNICAL NOTE: The d2 Network has an integrated SMTP server
that sends emails through port 25. This service is thus disabled if port
25 is blocked (as with Livebox, Orange, and France Telecom). As
many ISPs block this port, you must configure your router to authorize
traffic through this port in order for this service to work.
Fig. 32
De : [email protected]
Envoyé : mercredi 23 avril 2008 11:14
À : Edin Del Mar
Objet : [d2- Rose] LaCie email notication
* Machine: d2-Rose
* Model: d2 Network
* IP address: 192.168.8.48
* MAC address: 8C:00:00:00:51:81
* System time : 11:14:10 23 March 2008
This message is automatically generated by the LaCie email notication ser vice.
The temperature of the drive(s) is critical: SYSTEM WILL NOW DO AN EMERGENCY SHUTDOWN
| Temp HDD1 => 43degC Model: SAMSUNGSP2504C Serial Nb : S0YHJ1PP600041 |
Fig. 33
Fig. 33 shows an email sent informing the administrator that the d2
Network’s temperature has reached critical levels and will be automatically shutting down.
Page 29
LaCie d2 Network Administering Your LaCie d2 Network
User Manual page 29
4.2.1. Adding Users
To add a user account:
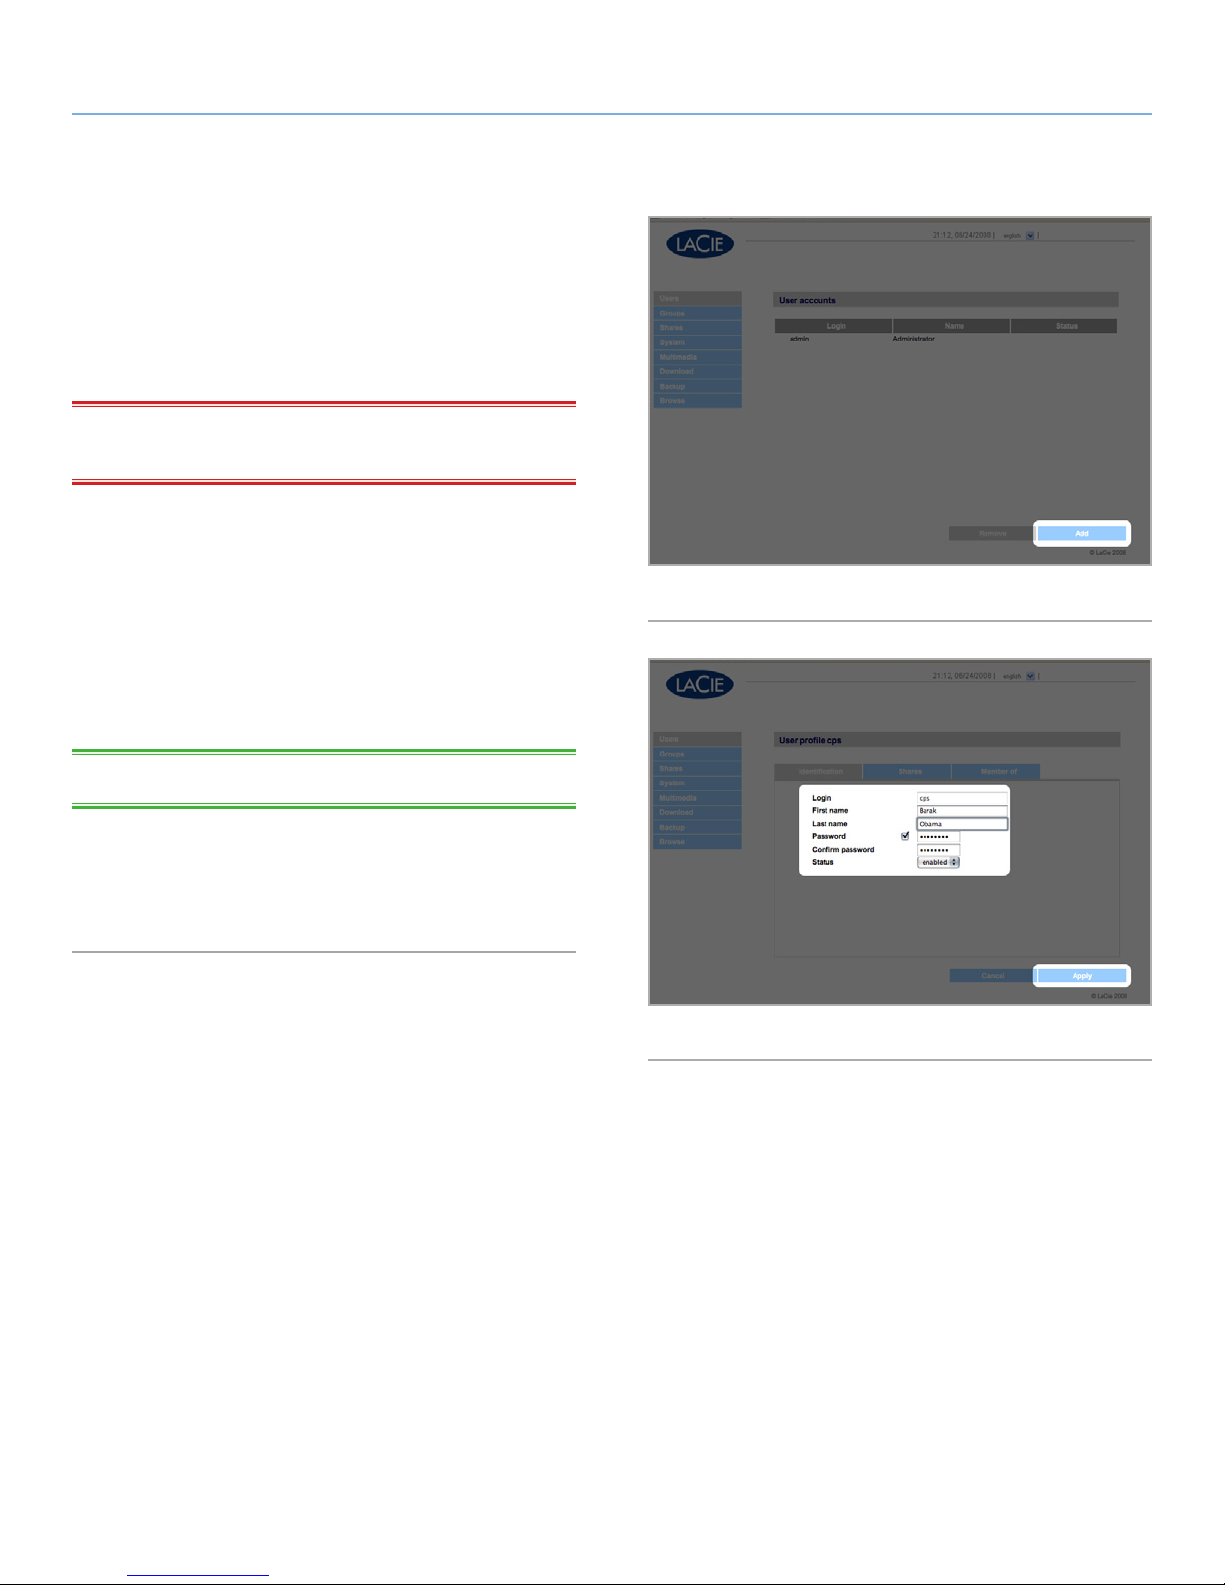
1. Click Add on the User Accounts page (Fig. 34). The User Profile
page opens (Fig. 35).
2. Enter a login name in the “Login” field.
IMPORTANT INFO: Login names are case-sensitive. (Ex. “User”
is not the same as “user”.)
3. Enter the user’s first and last name in the First name and Last
name fields. This information only appears to the administrator
as part of the User Profile on this page.
4. Check Password to require the user to log in with a password. If
the Password box is unchecked, the user can log in with a Login
name only.
Fig. 34
5. Enter a password in the “Password” and “Confirm password”
fields, if applicable.
TECHNICAL NOTE: Passwords cannot exceed 8 characters.
6. To enable the user account (allow the user to log in), select Enable from the Status menu.
7. Click the Apply button.
Fig. 35
Page 30
LaCie d2 Network Administering Your LaCie d2 Network
User Manual page 30
4.2.2. Setting User Access to Shares
All of the shares on your d2 Network are listed on the Shares tab of
each user’s profile page. Shares have three access levels:
✦ Read & Write – users with Read & Write access can upload,
download and view files
✦ Read Only – users with Read only access can download and
view files but cannot upload files
✦ No Access
See section 4.2.4. About Access Privileges for more information.
To set user access to shares:
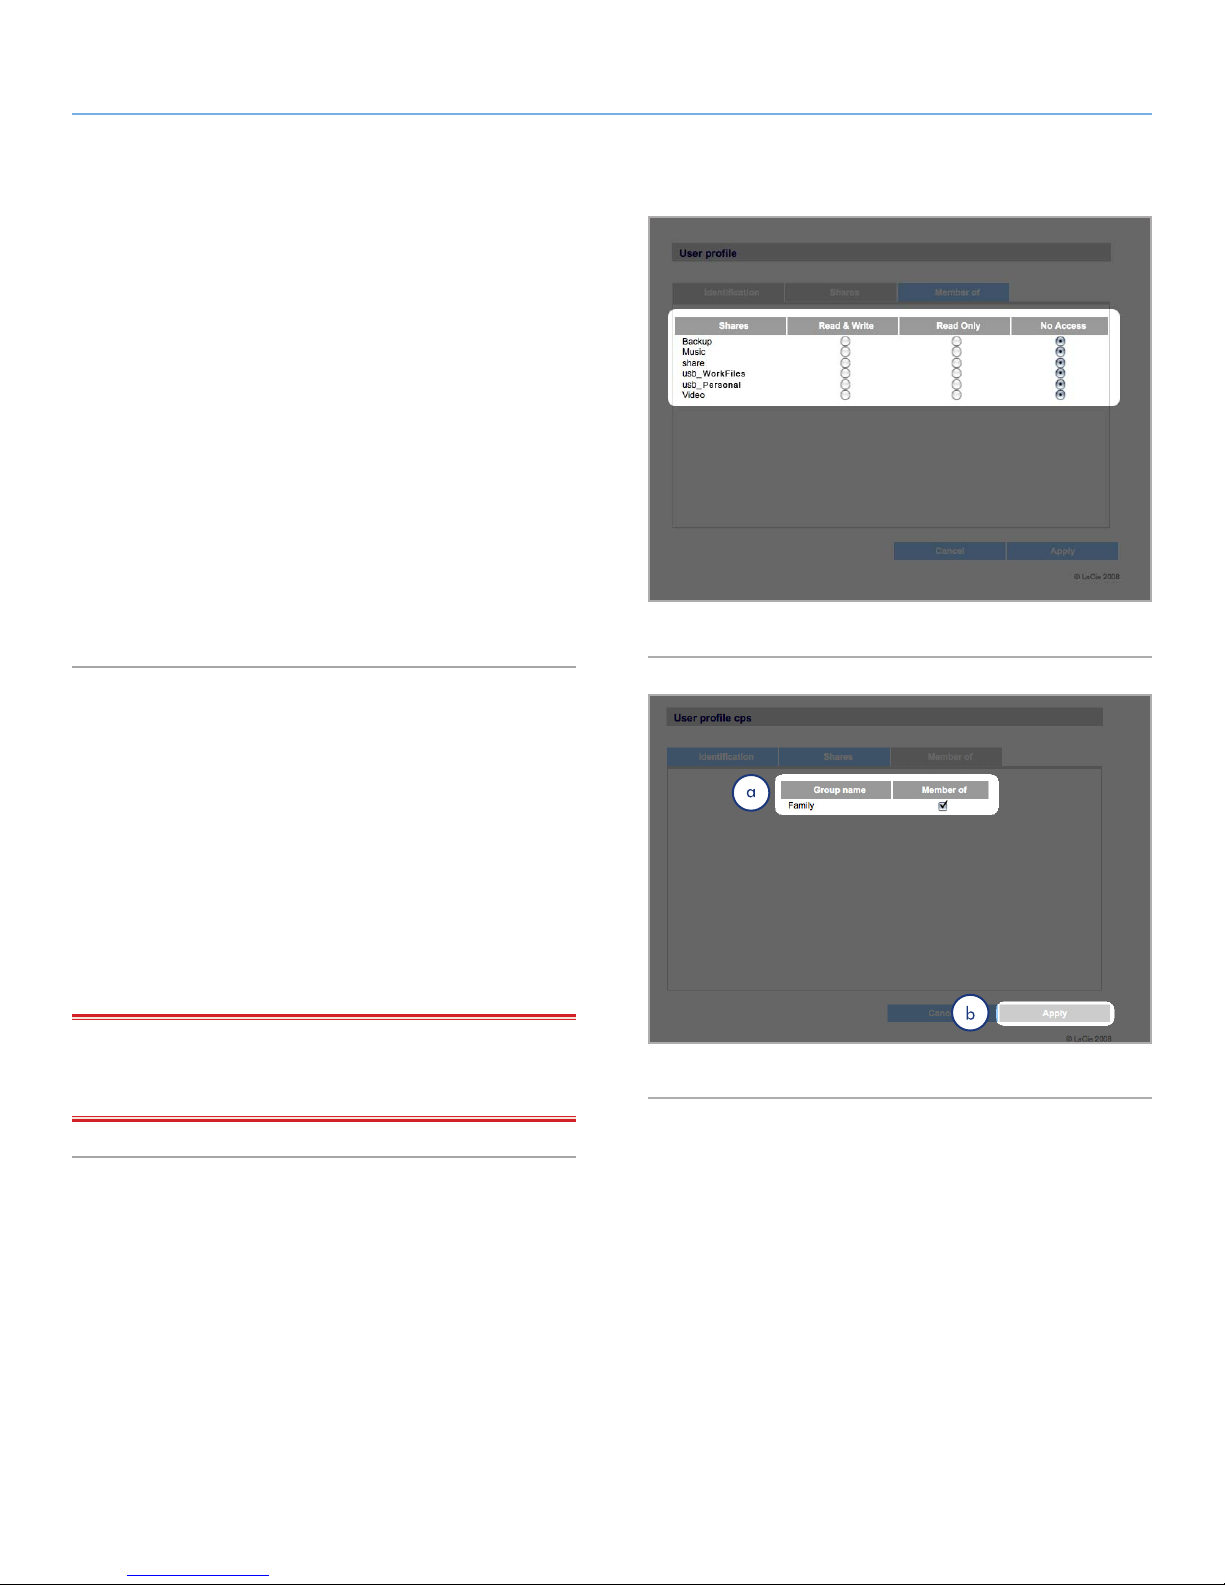
1. Click the Shares tab on the user’s User Profile page.
2. Select Read & Write, Read Only or No Access for each share
(Fig. 36). No Access is selected by default.
Fig. 36
4.2.3. Setting Group Membership
All of the groups on your d2 Network are listed on the Member of
tab of each user’s profile page. Users can belong to an unlimited
number of groups.
See section 4.2.4. About Access Privileges for more information.
To set user group membership:
1. Click the Member of tab on the user’s User Profile page.
2. Check the box for each group to which you want to assign the
user (a, Fig. 37).
IMPORTANT INFO: When you are done configuring the new user
click Apply to save your settings for the new user and to add the user
to the users list (b, Fig. 37).
Fig. 37
Page 31
LaCie d2 Network Administering Your LaCie d2 Network
User Manual page 31
4.2.4. About Access Privileges
Access privileges can be assigned to users on an individual user
basis or on a group basis. User-level access is more restrictive.
Here is an example of the way access privileges work when a user
has different kinds of access to the same share as member of a
group and as an individual:
✦ User U belongs to groups G1 and G2, and has access to
share S.
✦ If G1 has read-only access to S and G2 has read-write access
to S, then U will have read-write access to S.
✦ If U has read-only access to S and G2 has read-write access
to S, then U will have read-only access.
4.2.5. Deleting User Accounts
Fig. 38
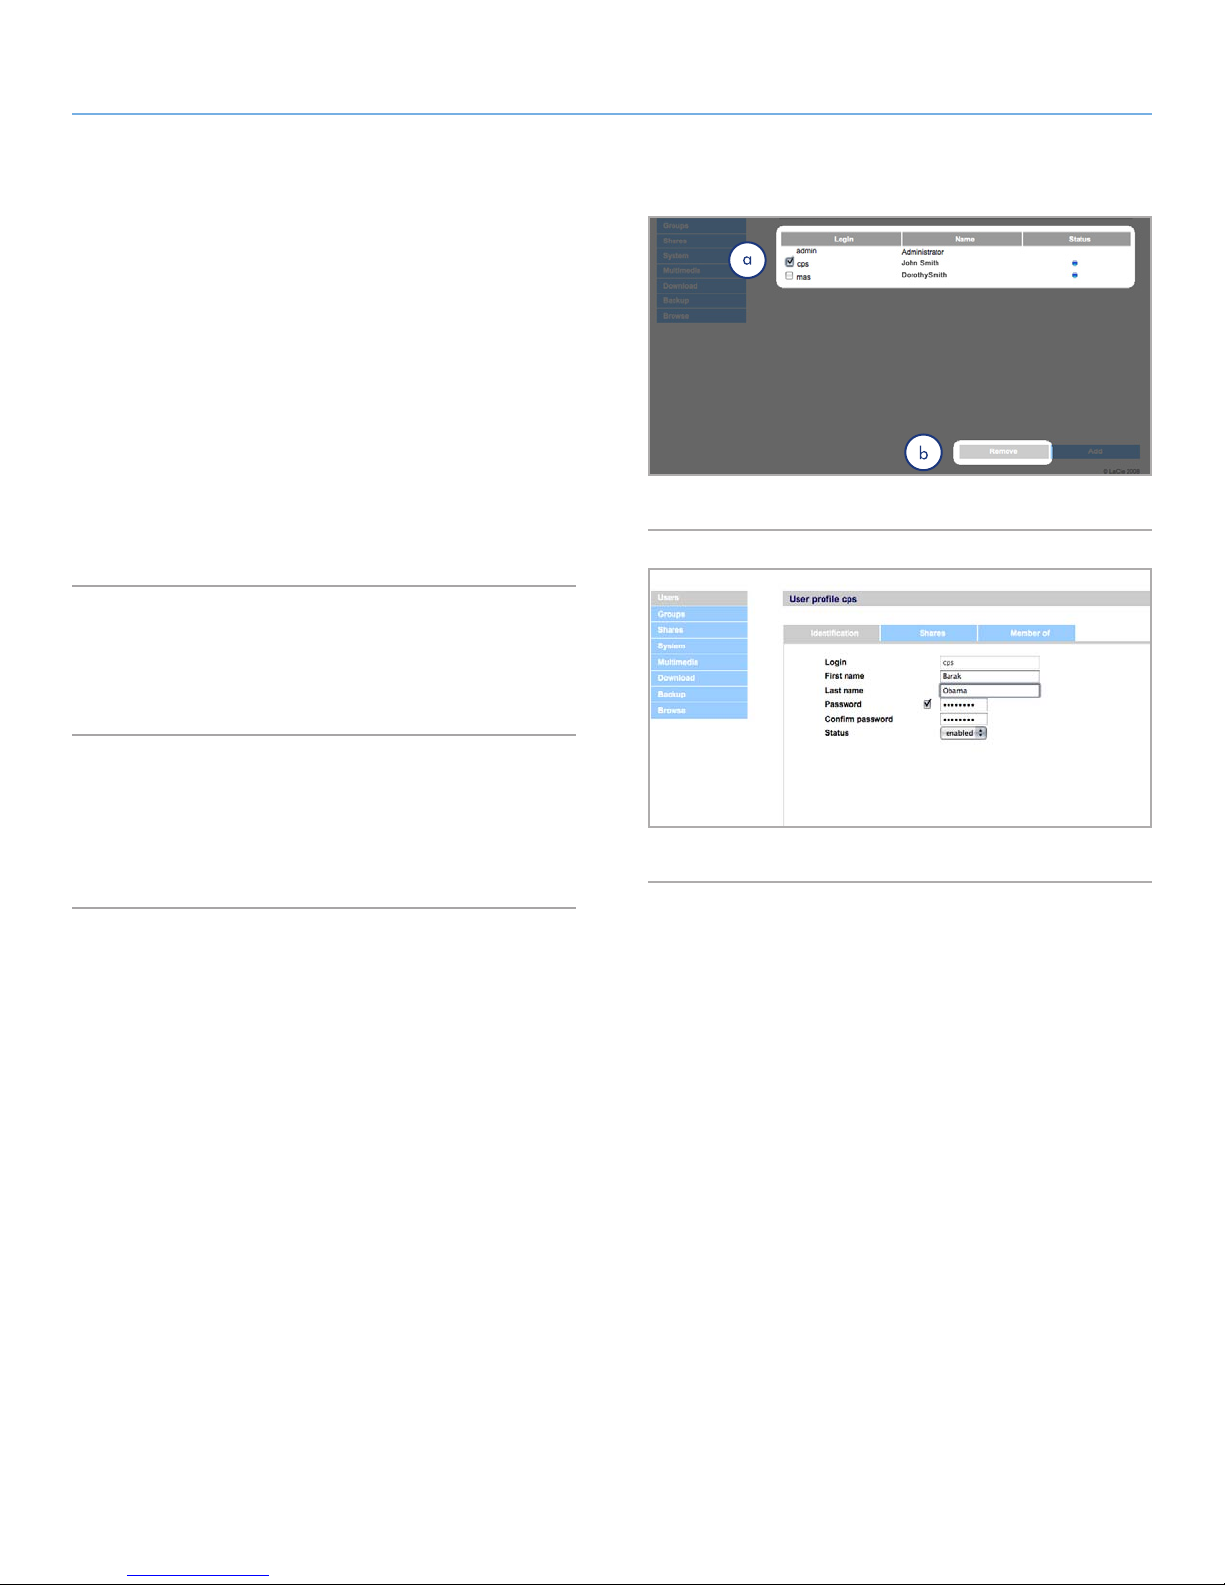
On the User Accounts page (Fig. 38), check the box beside each
user you want to delete (a) and click Remove (b).
4.2.6. Editing User Accounts
The administrator can edit the details of a user account at any time
by clicking on a user on the User Accounts page to view the user’s
profile (Fig. 39).
Fig. 39
Page 32
LaCie d2 Network Administering Your LaCie d2 Network
User Manual page 32
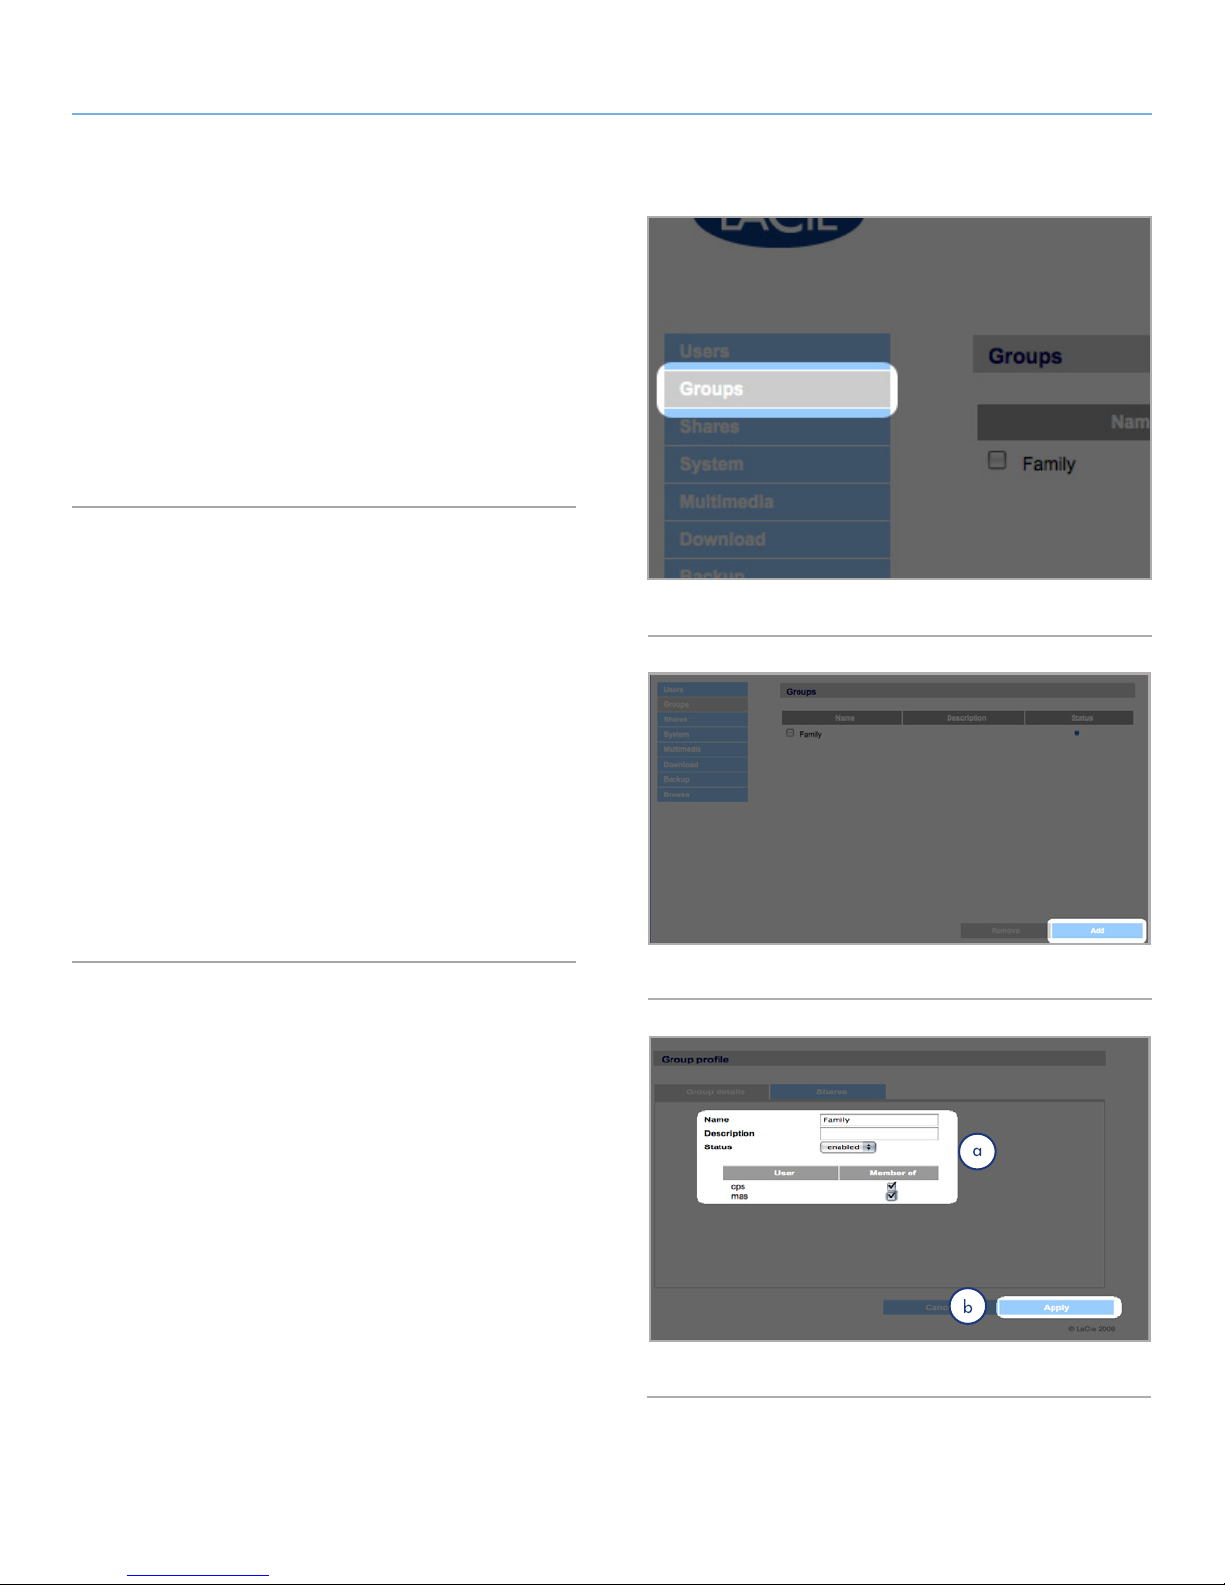
4.3. Groups
Click on the Groups link in the navigation bar to open the Groups
page (Fig. 40). Use this page to create, edit and delete groups.
If you use your d2 Network in an office setting where many different
people from different departments need to have access to the d2
Network, setting up groups is a good way to organize users and to
give the most appropriate access to shares. You can specify which
shares groups can access, which users belong to which groups and
enable or disable entire groups.
4.3.1. Adding Groups
To add a group:
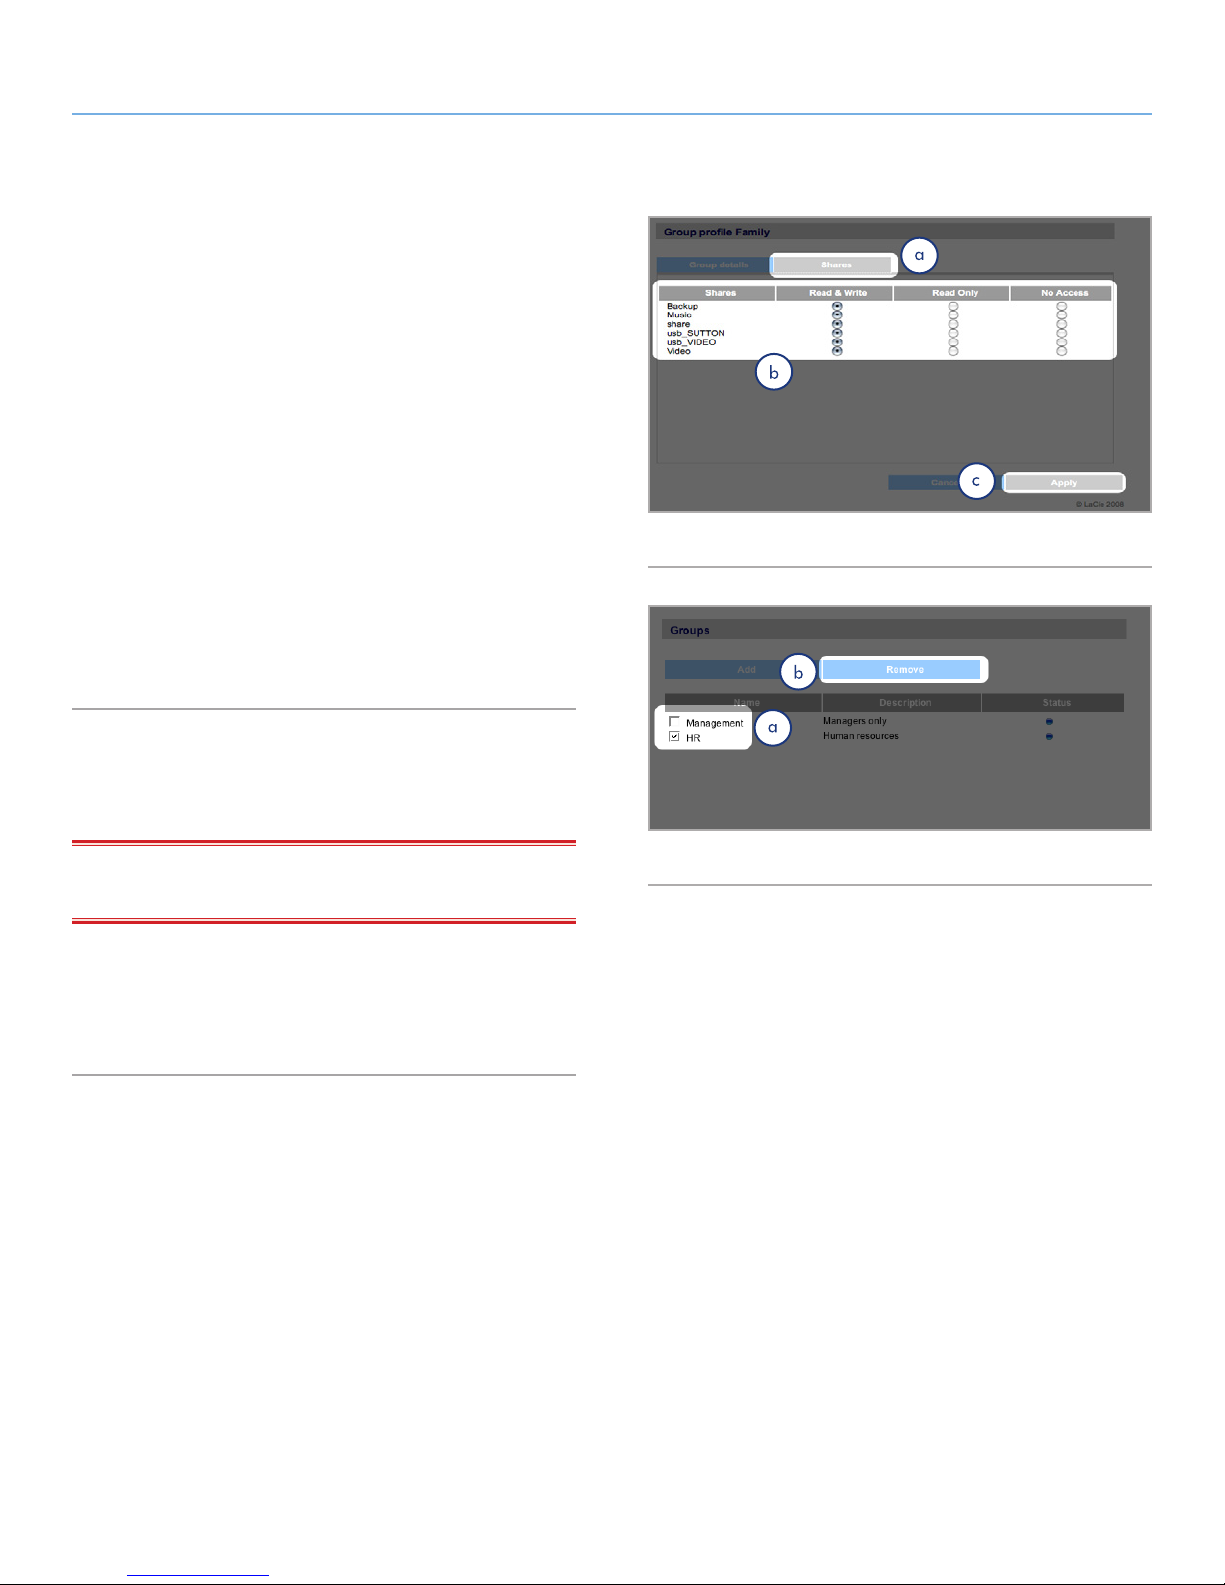
1. Click Add on the Groups page (Fig. 41). The Group Profile
page opens (Fig. 42).
Fig. 40
2. Enter a name and description for the group. The description
only appears to the administrator as part of the Group Profile
on this page (a, Fig. 42).
3. Select “enabled” to activate the group as soon as your changes
are applied.
4. All user accounts on the d2 Network are listed in the User column. Select the users you want to be in the group.
5. Click Apply (b, Fig. 42).
Fig. 41
Fig. 42
Page 33
LaCie d2 Network Administering Your LaCie d2 Network
User Manual page 33
4.3.2. Setting Group Access to Shares
All of the shares on your d2 Network are listed on the Shares tab of
each group’s profile page. Shares have three access levels:
✦ Read & Write – groups with Read & Write access can upload,
download and save files
✦ Read Only – groups with Read only access can download
and open files but cannot save files
✦ No Access
See section 4.2.4. About Access Privileges for more information.
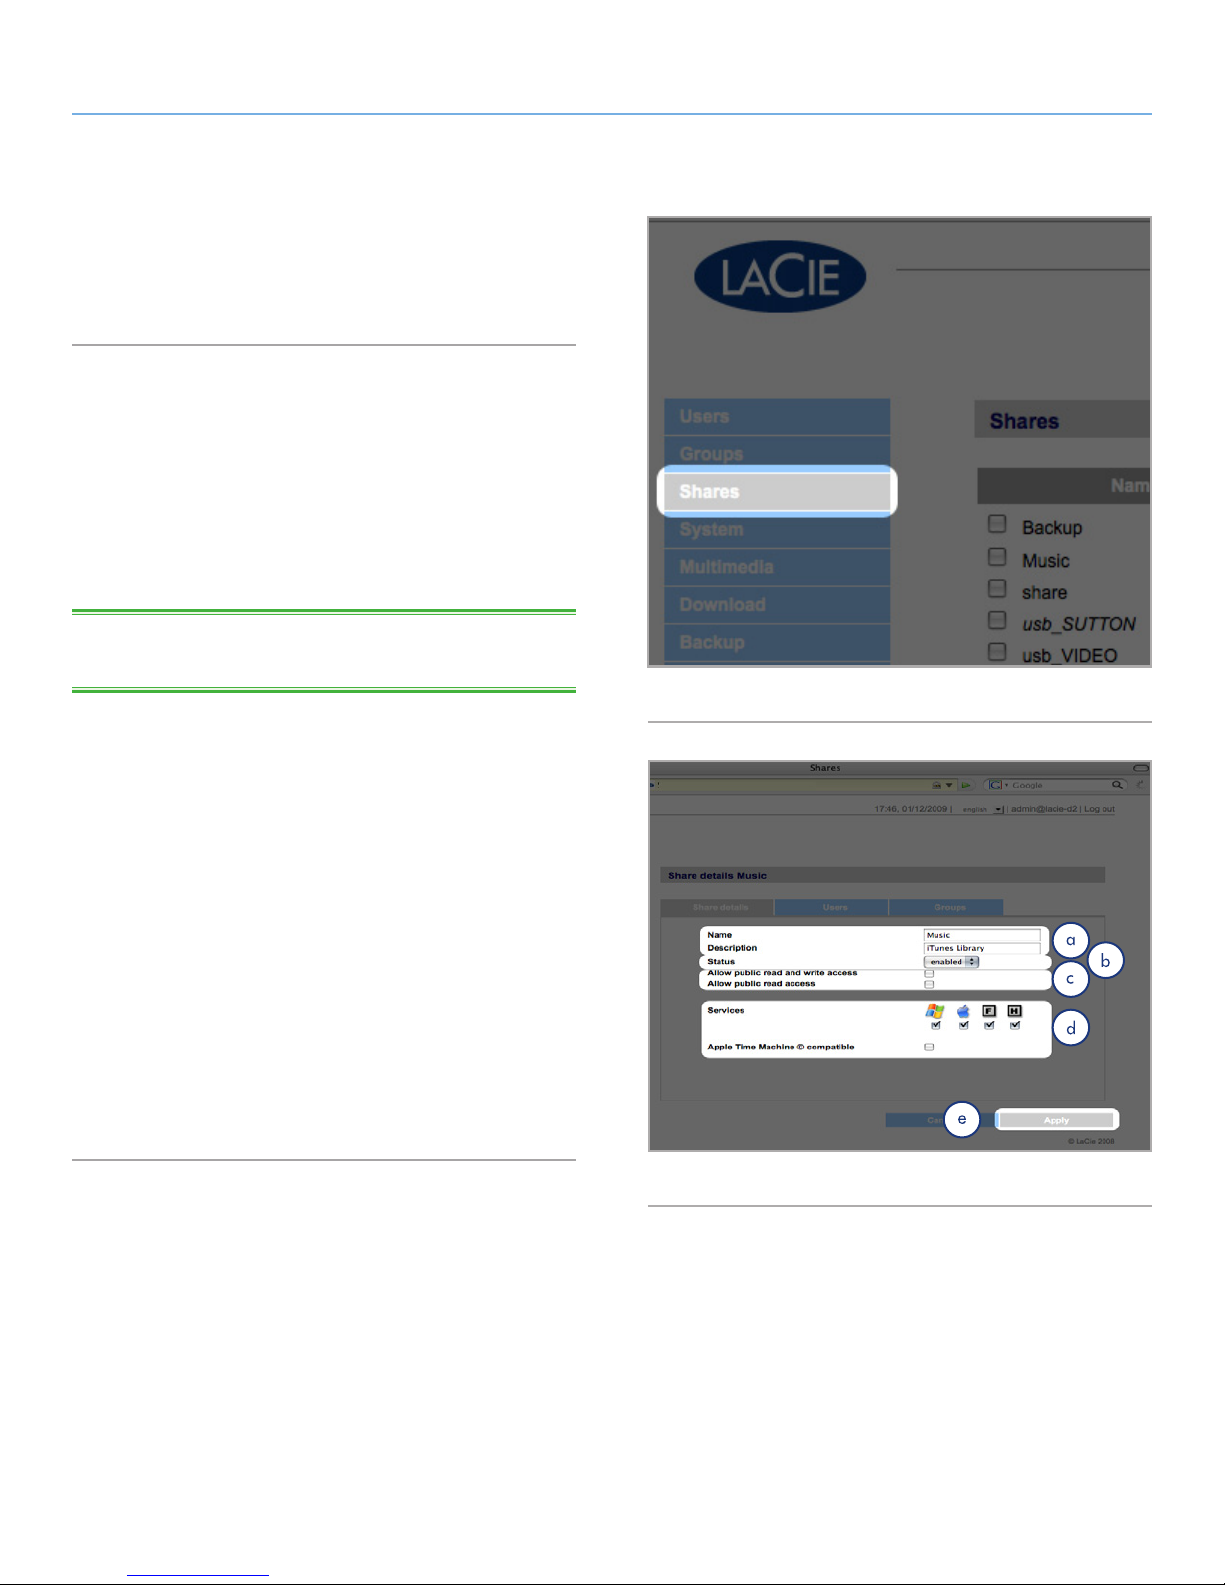
To set group access to shares (Fig. 43):
1. Click the Shares tab on the group’s Group Profile page (a).
2. Select Read & Write, Read Only or No Access for each share
(b). No Access is selected by default.
Fig. 43
3. Click Apply (c).
4.3.3. Deleting Groups
On the Groups page, check the box beside each group you want to
delete (a) and click Remove (b) (Fig. 44).
IMPORTANT INFO: Deleting a group does not delete the users
within the group. Go to the Users page to delete user accounts.
4.3.4. Editing Groups
The administrator can edit the details of a group’s profile at any time
by clicking on a group on the Groups page to view its profile.
Fig. 44
Page 34
LaCie d2 Network Administering Your LaCie d2 Network
User Manual page 34
4.4. Shares
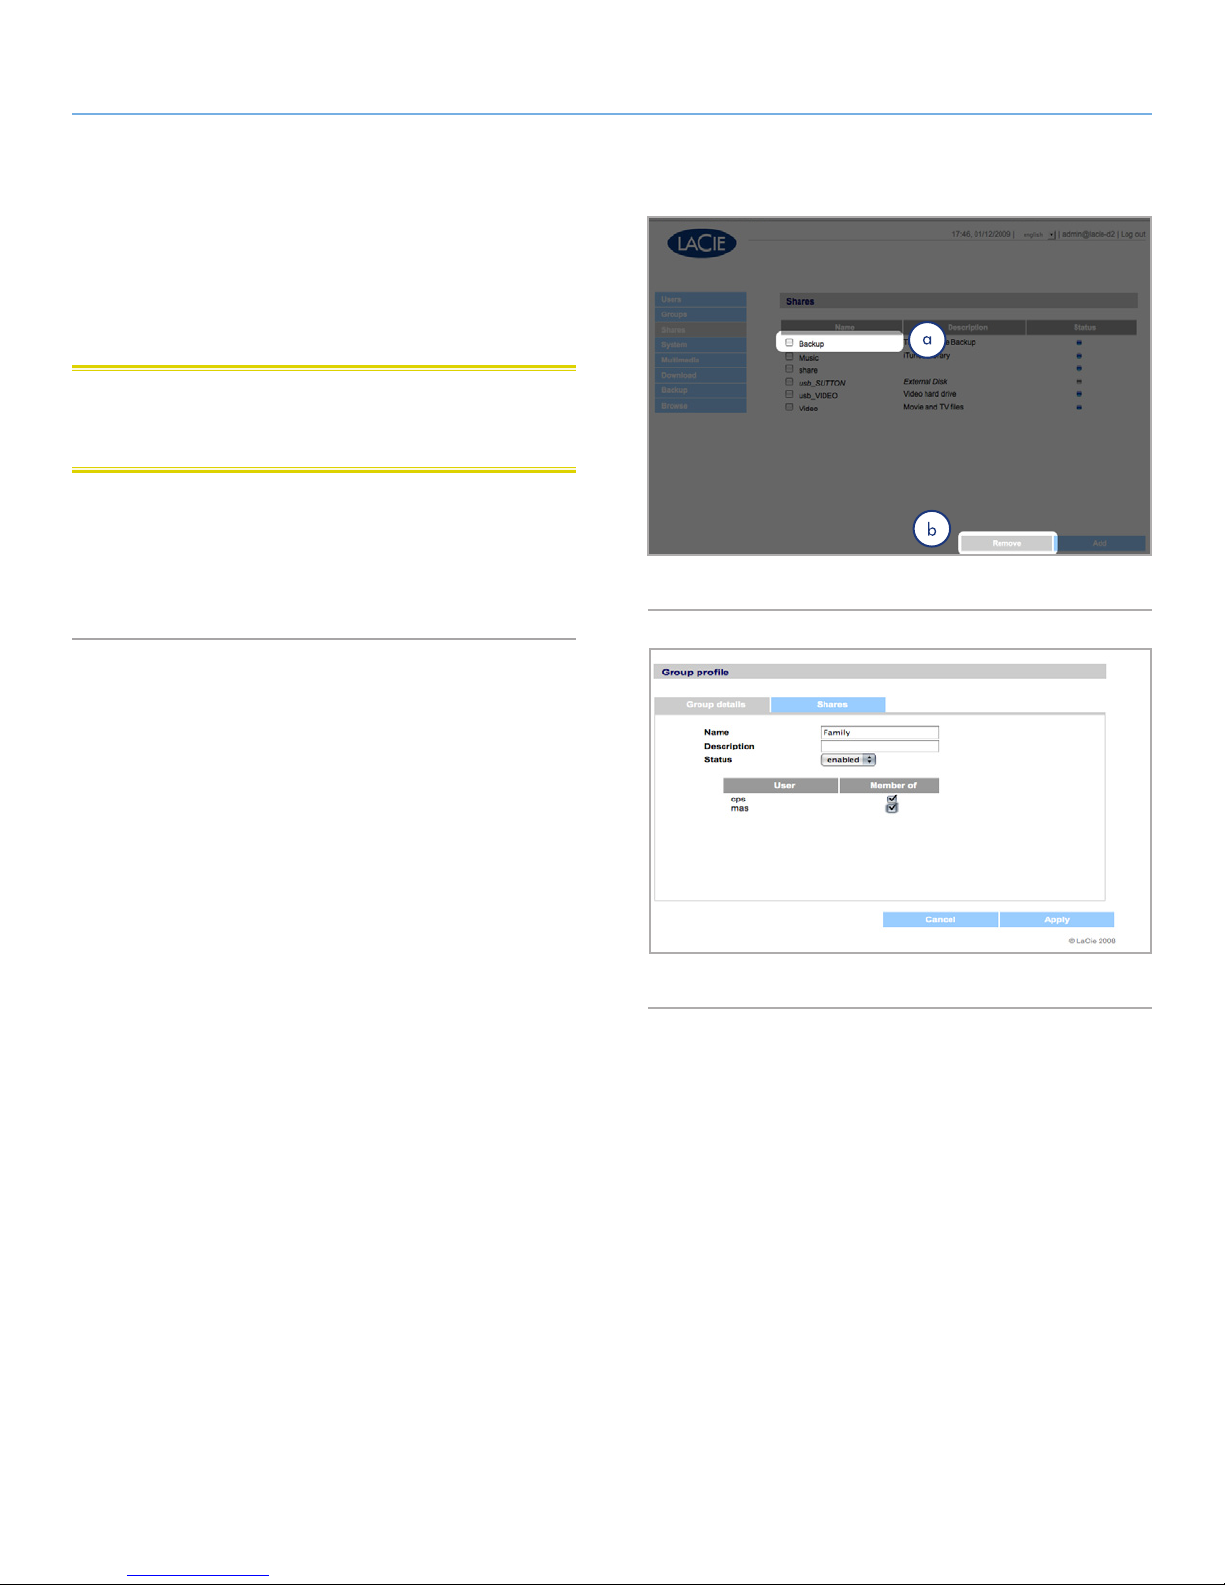
Click on the Shares link in the navigation bar to open the Shares
page (Fig. 45). Use this page to create, edit and delete shares.
4.4.1. Creating Shares
To create a share:
1. Click Add on the Shares page. The Share Details page opens
(Fig. 46).
2. Enter a name and description for the share (a). The description
only appears to the administrator as part of the Share Profile on
this page.
TECHNICAL NOTE: The share name cannot contain any of the fol-
lowing characters: \ / [ ] : | < > + = ; , ? * @ and space.
3. Select Enabled from the Status menu to make the share accessible. Select Disabled to create the share but make it inaccessible (b).
4. To make the share accessible in read/write mode to anyone,
unclick the “Allow public read access” check box and click “Allow public read and write access” (c). No password is needed
to access the share. Select “Allow public read access” to require
a password for read/write access. Anyone can access an “Allow
public read access” share in read-only mode.
5. Select the protocols which will be used to access the share. You
can choose from Windows (SMB), Apple (AFP), FTP or HTTP (d).
Click the Apple Time Machine compatible button to allow
this share to be used as a target volume for backup using Time
Machine.
6. Click Apply (e).
Fig. 45
Fig. 46
Page 35
LaCie d2 Network Administering Your LaCie d2 Network
User Manual page 35
4.4.2. Deleting Shares
On the Shares page (Fig. 47), check the box beside each share you
want to delete (a) and click Remove (b). Deletion of the share could
take just a few seconds to several minutes, depending on the size
of the share.
CAUTION: Deleting a share deletes all files contained within the
share folder. Back up any data you want to save before deleting a
share.
4.4.3. Editing Shares
The administrator can edit the details of a group’s profile at any
time by clicking on a group on the Groups page to view the group’s
profile (Fig. 48).
Fig. 47
Fig. 48
Page 36
LaCie d2 Network Administering Your LaCie d2 Network
User Manual page 36
4.5. System
In addition to the Configuration page, which is the main System
page, the System menu has four sub-sections: Network, Disks, Status and Maintenance, each accessible from the navigation bar when
you click System.
4.5.1. Active Directory
The d2 Network can join a Microsoft Active Directory. Active Directory is the directory service that is included with Microsoft Windows
Server 2003 and Microsoft Windows 2000 Server. By creating a
link between user accounts, mailbox accounts, and applications, Active Directory simplifies the task of adding, modifying, and deleting
user accounts. Integrating the d2 Network with your Active Directory
allows the d2 Network to streamline the creation of users, groups,
and access privileges.
Fig. 49
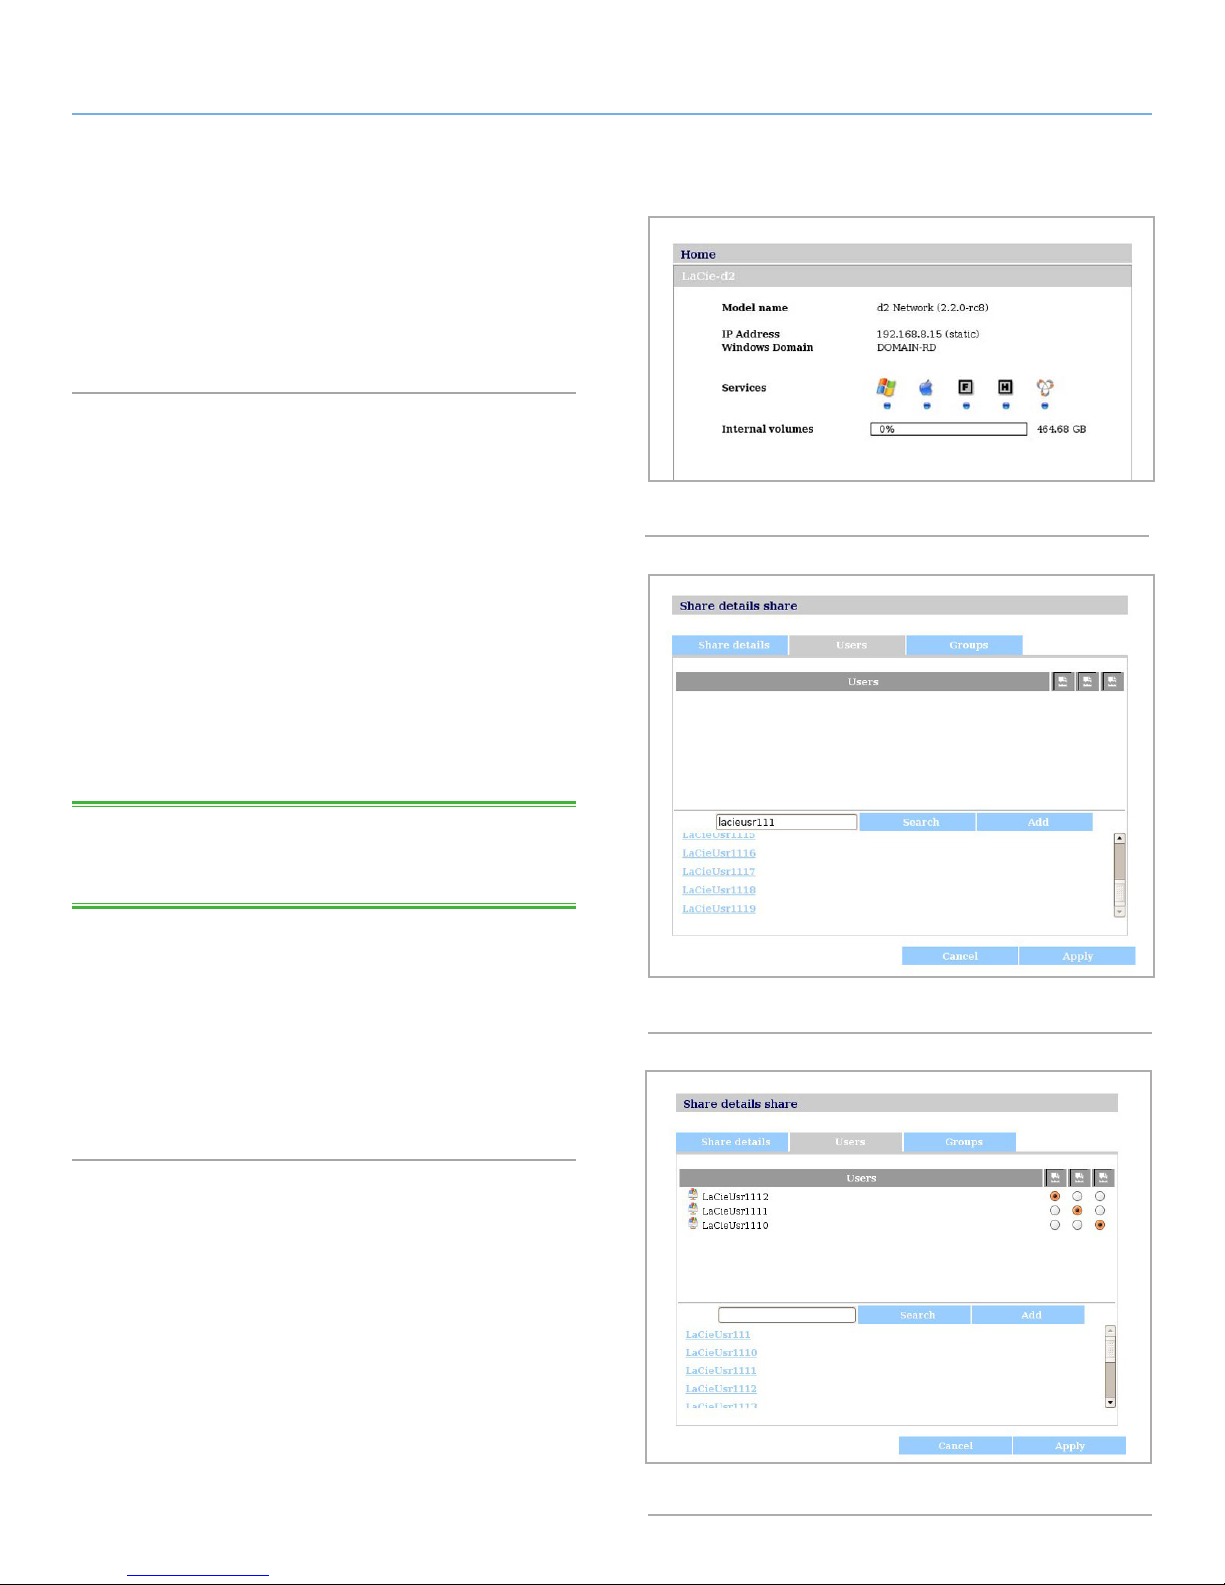
To connect, click on System > Join Domain. Enter a domain
name, username, and password and click Join Domain (Fig. 49).
Once the d2 is connected to the domain, the administrator will be
able to add users or groups in the following way:
TECHNICAL NOTE: In order to assign access to a share to a user(s)
or group(s), the “Allow public read and write access“ button must be
unchecked.
1. Navigate to the Shares page.
2. Click on the share to which you wish to add users.
3. In the search field, add a user by one of the following methods:
a. Type the name and click Add.
b. Typing a few characters of the username and click Search
(Fig. 50). In the list of found users, simply click the user.
Fig. 50
Fig. 51
Page 37
LaCie d2 Network Administering Your LaCie d2 Network
User Manual page 37
4.5.2. Configuration
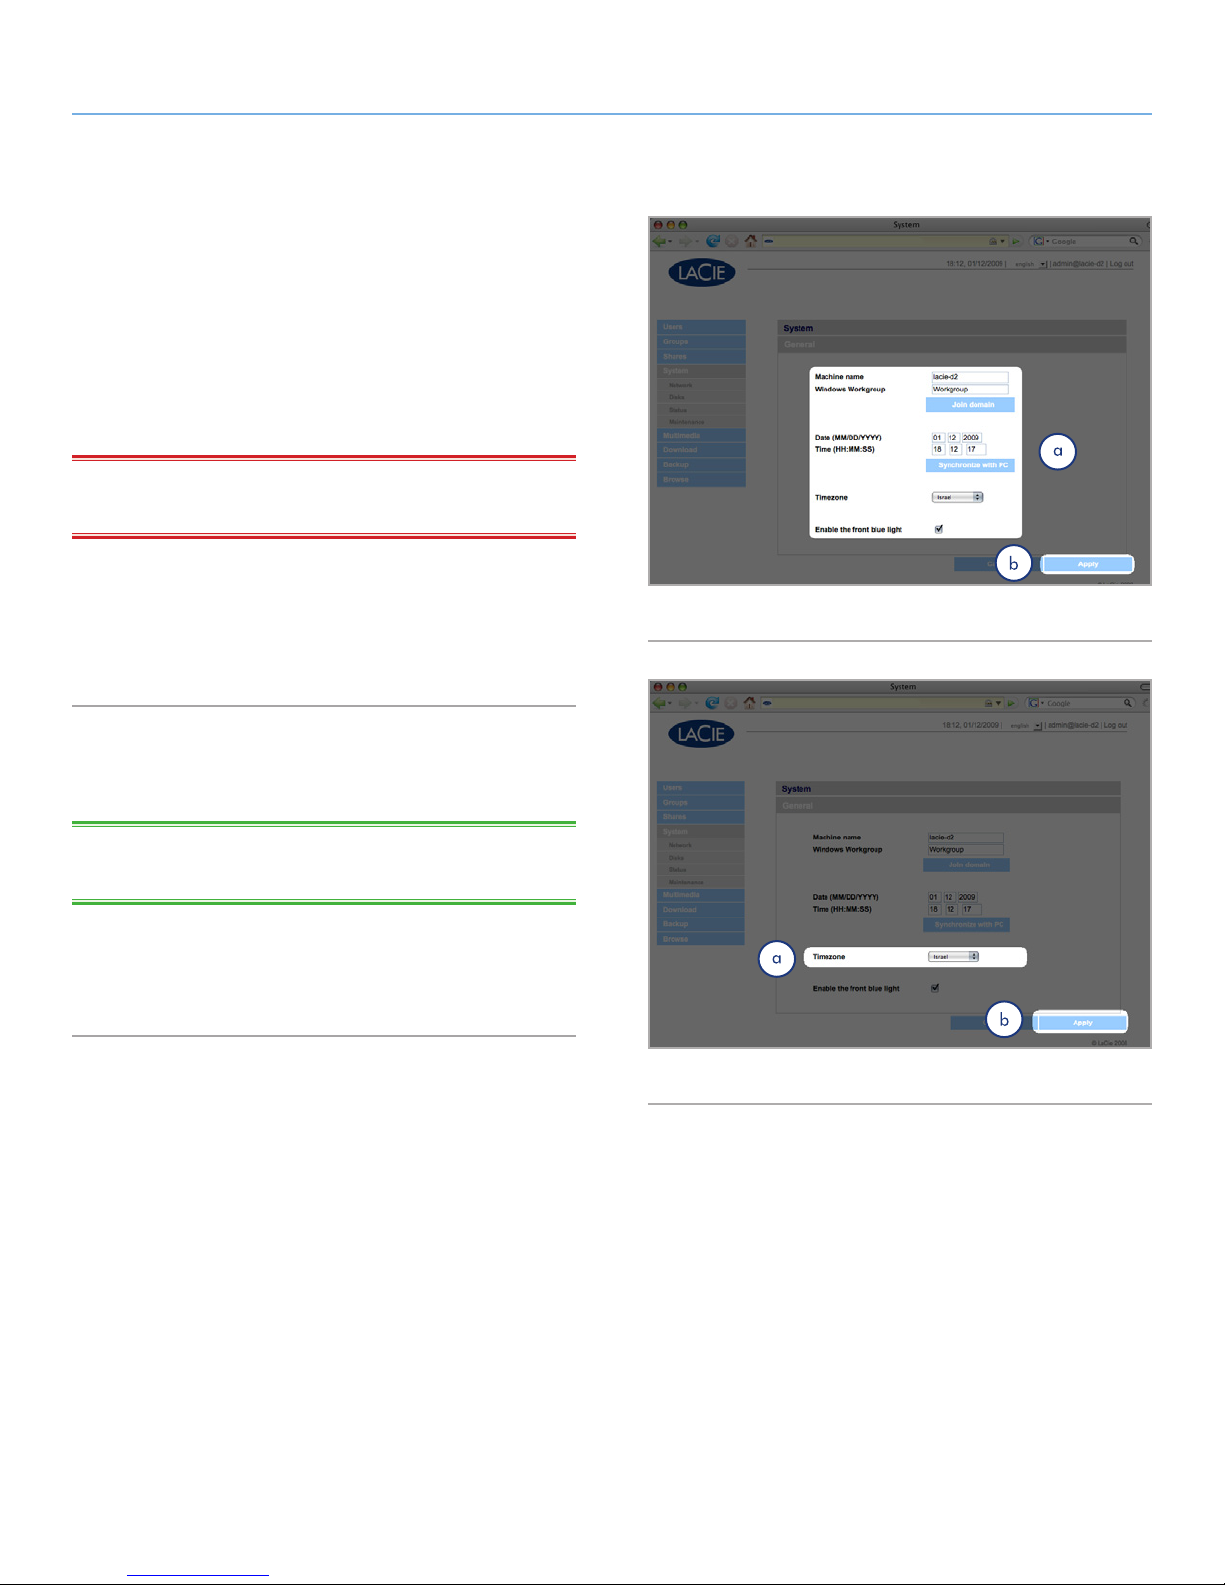
Click on the System link in the navigation bar to open the Configuration page. This page displays basic information about the d2 Network including the Machine name, the Windows workgroup, time
zone and date and time (a, Fig. 52).
To change the machine name, highlight the machine name (“LaCie-d2 Network” by default), delete it and enter a new name. Click
Apply (b, Fig. 52)
IMPORTANT INFO: The machine name can only contain the fol-
lowing characters ‘a-z’, ‘A-Z’, ‘0-9’, ‘-’ and must begin with a letter.
To change the Windows workgroup, highlight the workgroup
name, delete it and enter a new name. Click Apply (b, Fig. 52).
Click the Enable the front blue light checkbox to toggle the light
on or off.
Fig. 52
To change the time zone, click on the current time zone location
to activate the time zone drop-down menu (a, Fig. 53) and select a
location in your time zone. Click Apply (b, Fig. 53).
TECHNICAL NOTE: The d2 Network has a 30-minute time-out
cycle.
To change the date and time, select a time zone and click the
Synchronize with PC button. The date and time will automatically
synchronize with your computer. Click Apply (b, Fig. 53).
Fig. 53
Page 38
LaCie d2 Network Administering Your LaCie d2 Network
User Manual page 38
4.5.3. Network
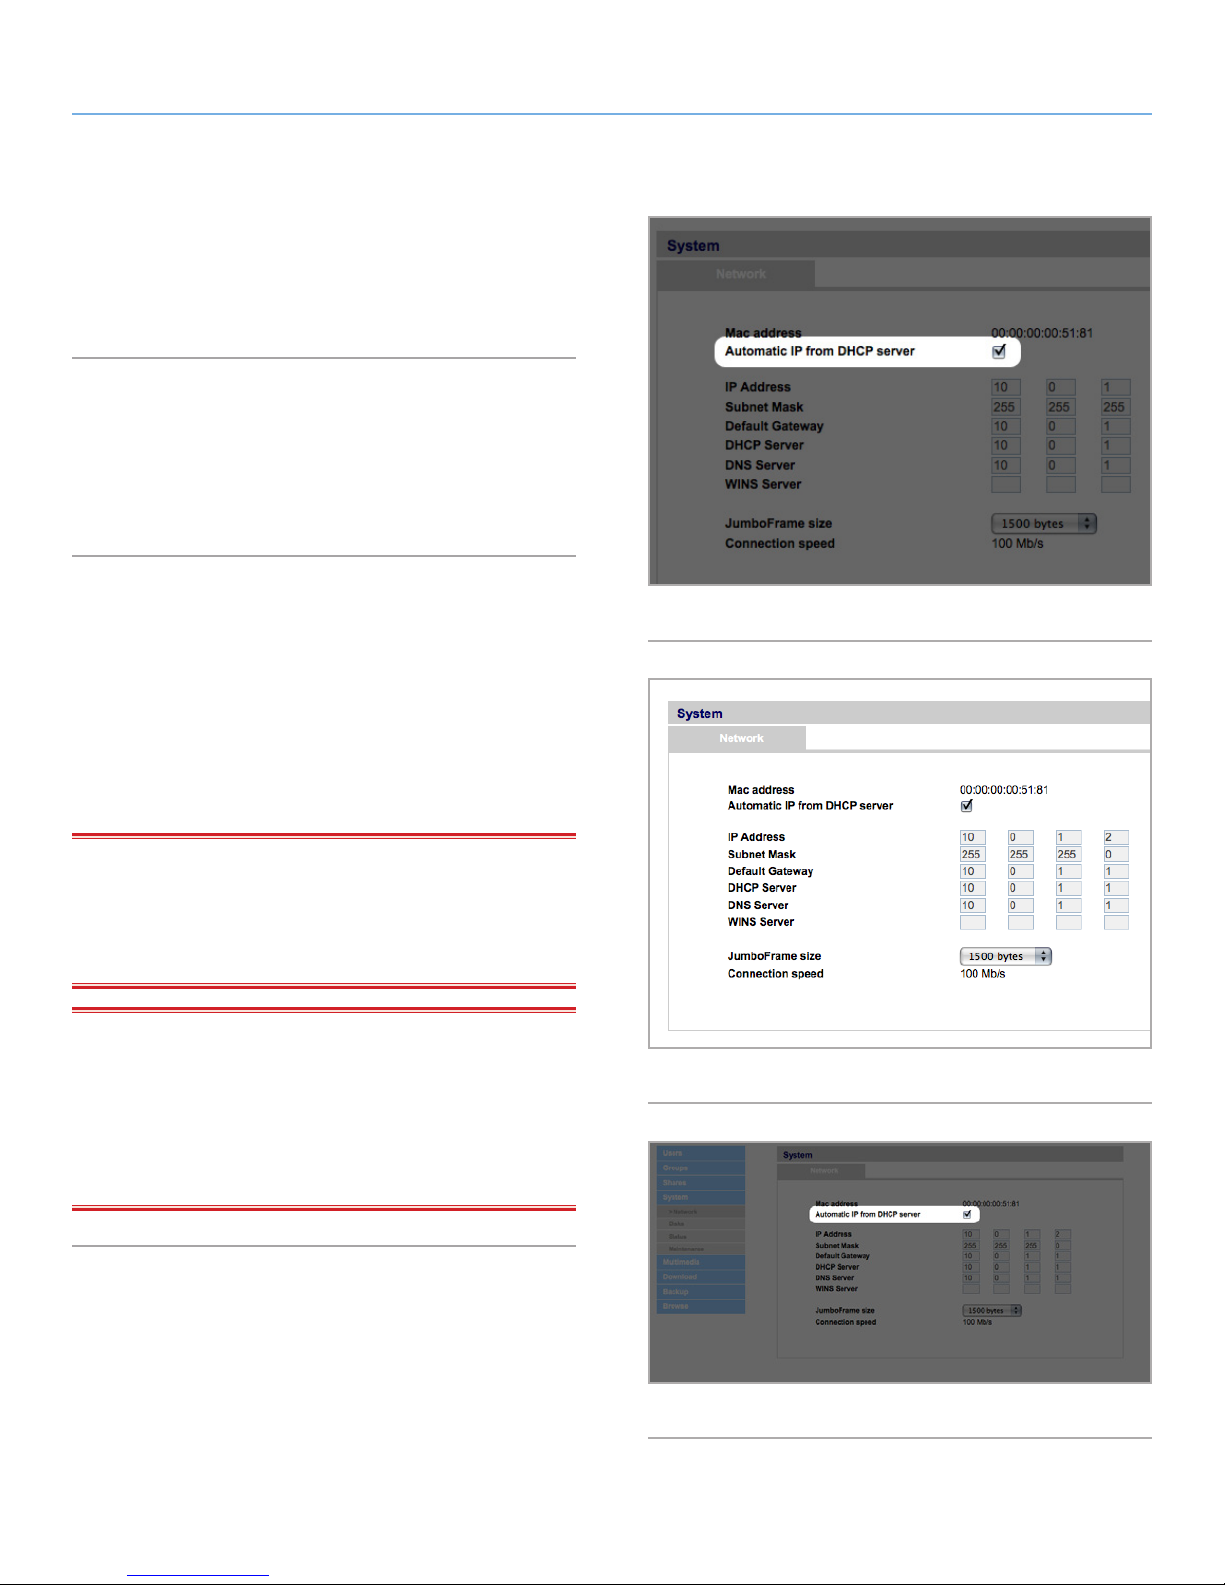
The Network page allows you to choose how the IP address of the
d2 Network is obtained, either automatically from a DHCP server on
your Network, or manually with settings that you input.
4.5.3.1. Obtain IP from DHCP Server
If your d2 Network is connected to a network with a DHCP server,
simply check the “Automatic IP from DCHP server” box (Fig. 54).
Your DHCP server will assign an IP address to the d2 Network every
time it connects to your network.
4.5.3.2. Configure IP Manually
This method is used when the LaCie d2 Network is connected to
a non-DHCP enabled network or if you have elected to manually
configure your IP (Fig. 55). In this case, you will need to manually assign the correct network settings for your LaCie d2 Network.
Please check with your network administrator for more information
about your network and which parameters you should use. For more
information, see section 2.4. Configuring the LaCie d2 Network on a
Network Without a DHCP Server.
Fig. 54
IMPORTANT INFO: If the DHCP server’s automatic IP address
configuration function is selected/activated and there is no DHCP
server on the network, the d2 Network will check first the DHCP,
then the APIPA. If no address is found, an address ranging from
169.254.1.1 to 169.254.254.254 will be assigned.
IMPORTANT INFO: The d2 Network supports frame (i.e. packets)
sizes larger than 1500 bytes on the Gigabit Ethernet interface (Fig.
56). JumboFrame capability extends supported frame size to 9000
bytes (9KB). In general, the higher the frame size, the better the
network performance. Do not modify the JumboFrame size if your
network is not configured for JumboFrame functionality. Check with
your network administrator.
Fig. 55
Fig. 56
Page 39
LaCie d2 Network Administering Your LaCie d2 Network
User Manual page 39
4.5.4. Disks
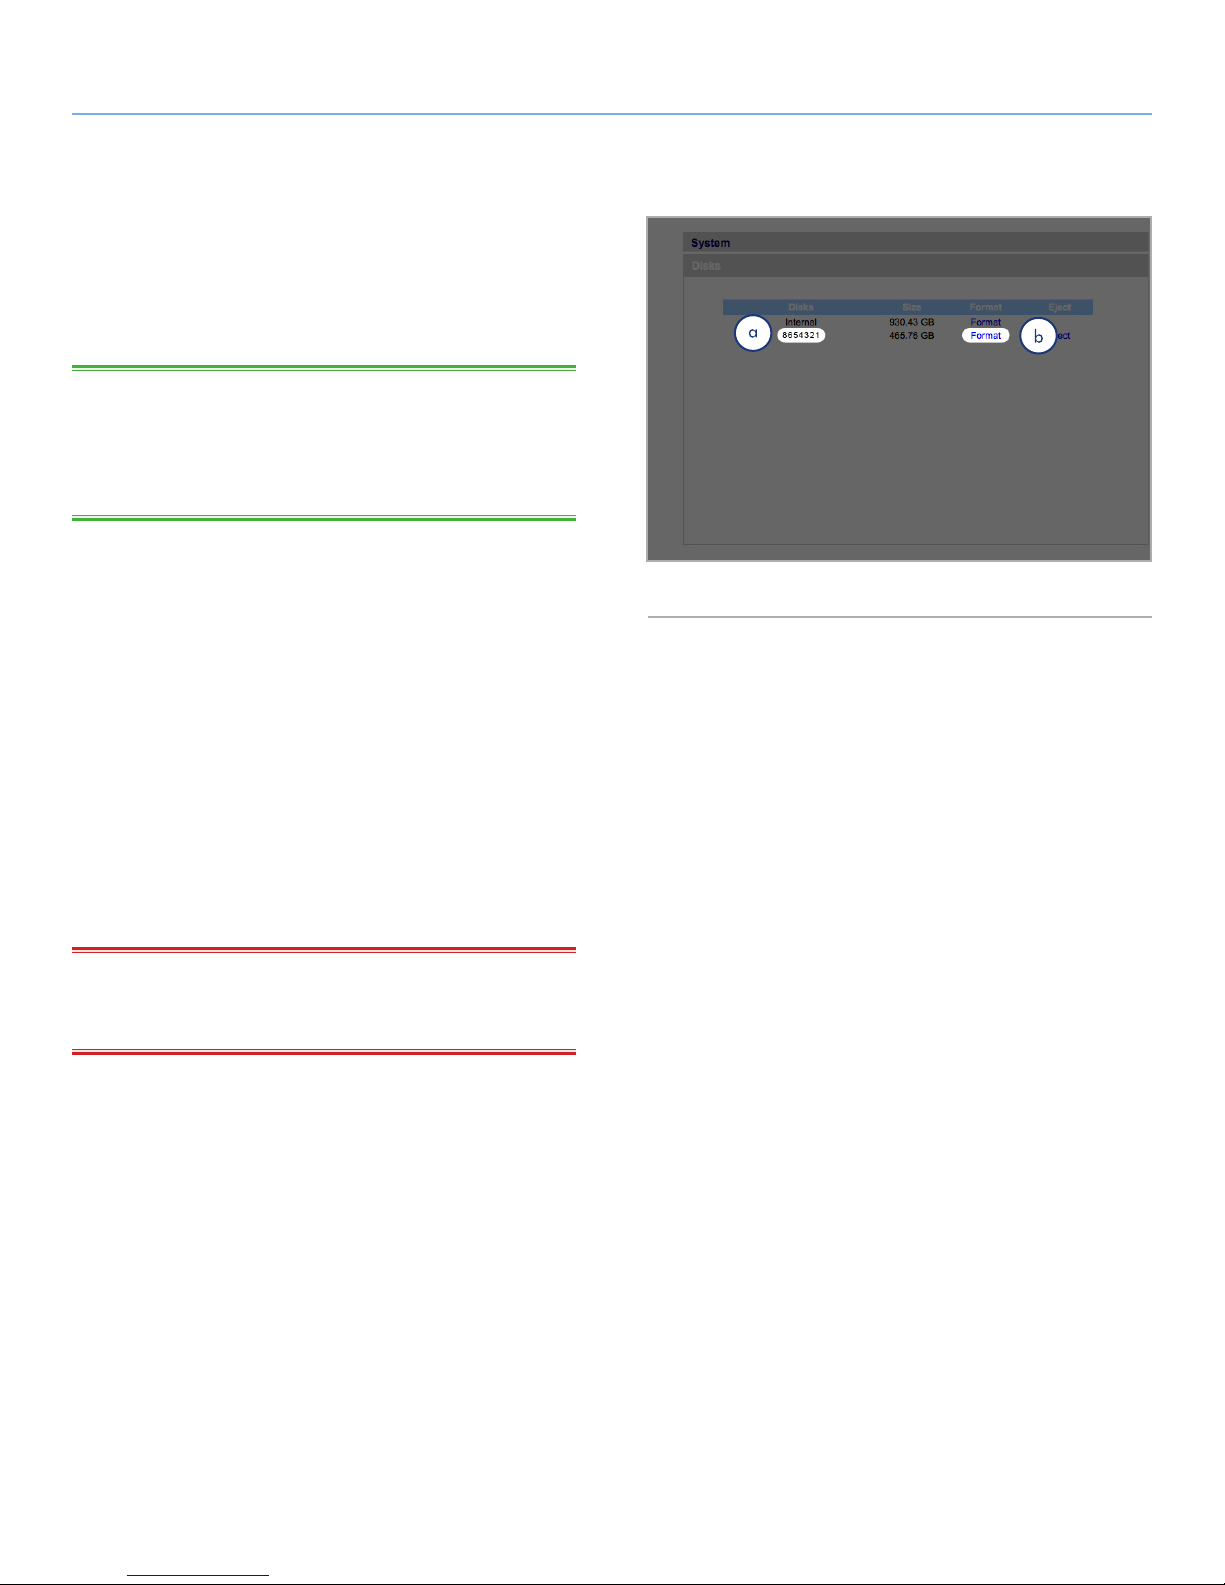
Attached external hard drives and their partitions appears as shares
on the Browse page. See section 3.1. Accessing Shared Folders.
Attaching external disks expands the available storage capacity
through the network.
TECHNICAL NOTE: When shares are created from partitioned ex-
ternal hard drive volumes, they are initially named with a series of
numbers and letters (a, Fig. 57). You can rename the shares on the
Shares page. The name of external drives will remain on the Shares
page even when the disk is not connected.
Once the drive is recognized, users can be assigned access just like
other shares (by default, users will have read/write access). See section 4.2. Users.
Fig. 57
Formatting External Disks
In order to use an external drive to back up the d2 Network, it must
be formatted in FAT32 (4GB file size limitation), FAT (2GB file size
limitation), HFS+, EXT3, EXT2, REISERFS or XFS. NTFS volumes
cannot be used to back up the d2 Network because this file system
format is read-only when connected to the d2 Network.
It is possible to format external volumes into the XFS file system using
the d2 Network Web Administration pages. To format disks in XFS
from the Web Administration pages, click System > External disks
and click the Format disk button (b, Fig. 57). The disk will subsequently become available for backups. See 4.7. Backup for details.
IMPORTANT INFO: After reformatting a disk, you may have to
reboot the d2 Network and/or the USB hard drive in order for it to
be recognized by the system.
continued on the next page
Page 40
LaCie d2 Network Administering Your LaCie d2 Network
User Manual page 40
Partitions
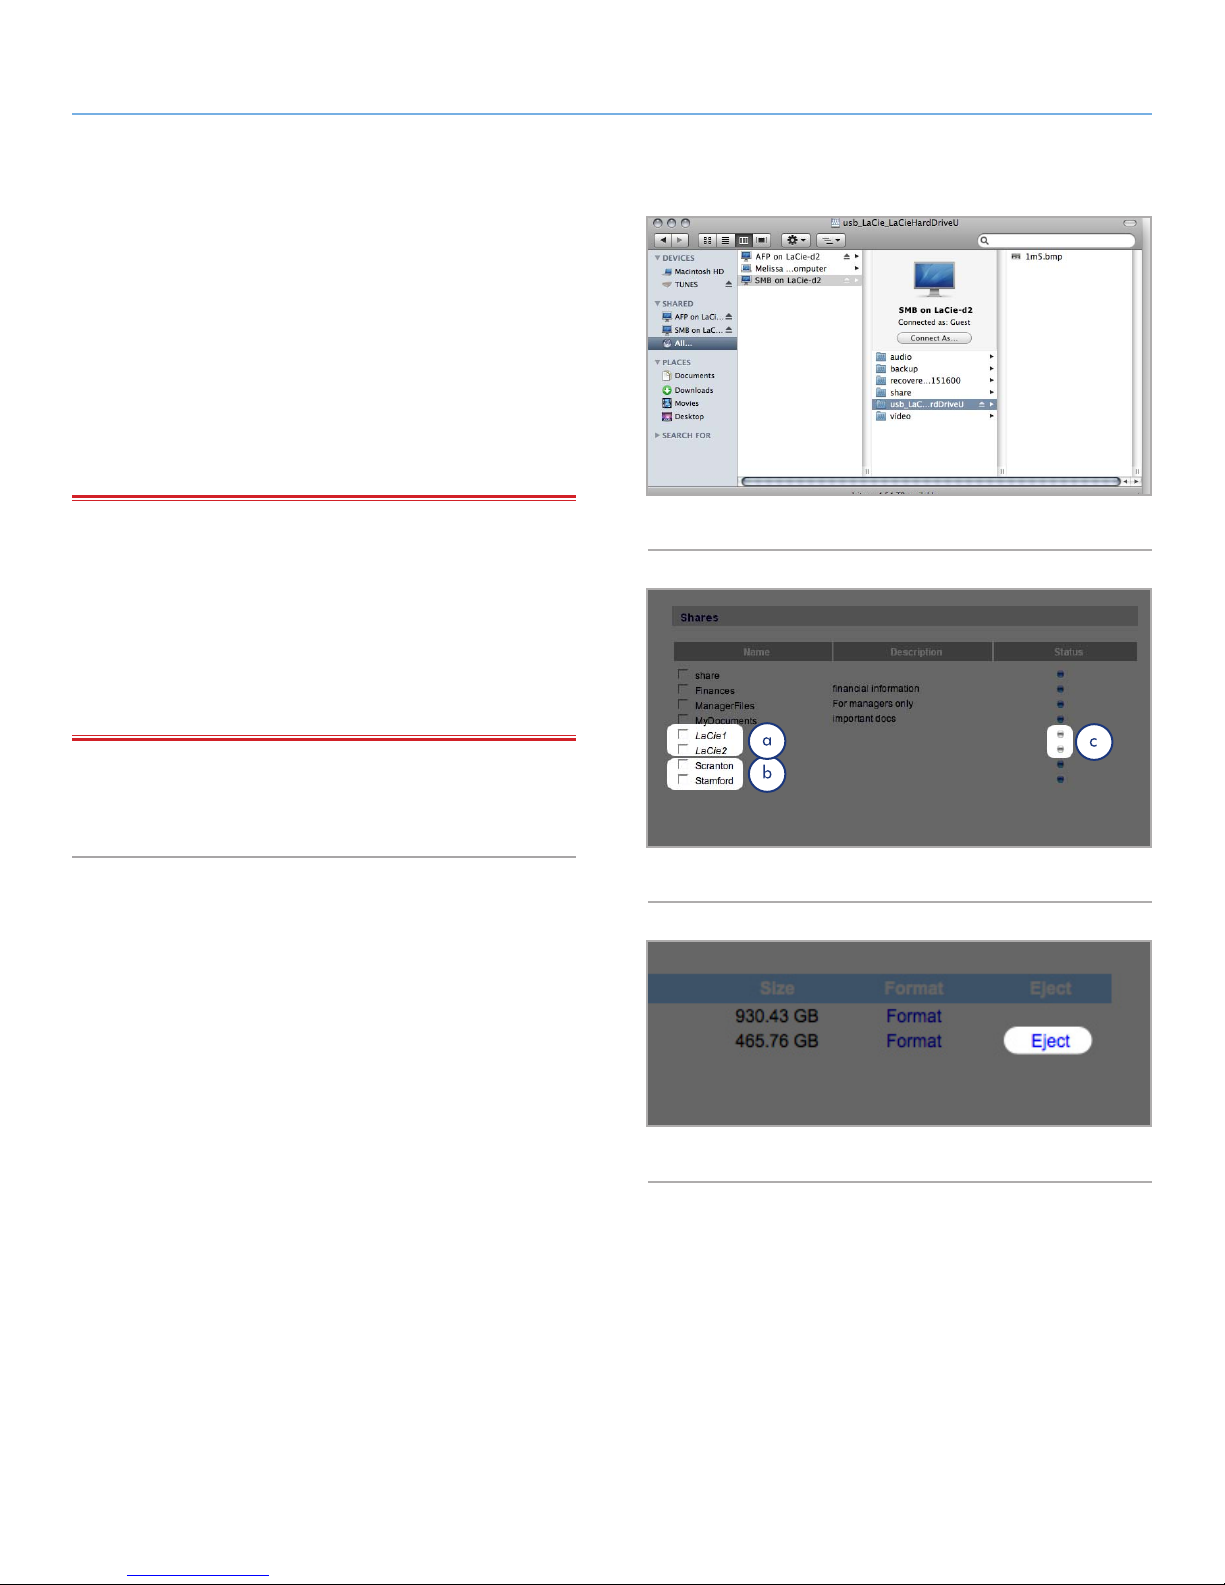
If the external drive is partitioned, each volume will appear as one
share in the d2 Network (Fig. 58). By default, services (except FTP)
are activated. Added shares can thus be accessed in an Explorer
window (Windows users) or in a Finder window (Mac users, Fig. 58).
In Fig. 59, the volumes “LaCie1” and “LaCie2” (a) are volumes
of a partitioned external hard drive that is not connected to the d2
Network, as indicated by the gray Status indicator (c) and italicized
text. The volumes “Scranton” and “Stamford” (b) are volumes of an
external drive that is currently connected, as indicated by the blue
Status indicators.
IMPORTANT INFO: External hard disks must be formatted in one
of the supported systems in order to mount on the LaCie d2 Network:
FAT32, FAT, NTFS, HFS+, EXT3, EXT2, REISERFS or XFS.
Note that you can reformat external drives to the XFS file system using the d2 Network web interface. See page 39 for formatting steps.
However, the following limitations apply: NTFS disks are read-only,
and FAT/FAT32 disks have file size limits (2GB and 4GB, respectively)
due to their file system limitations.
Ejecting External Disks
To disconnect an external hard drive from the d2 Network, simply
click the Eject button on this page (Fig. 60).
Fig. 58
Fig. 59
Fig. 60
Page 41
LaCie d2 Network Administering Your LaCie d2 Network
User Manual page 41
4.5.5. Status
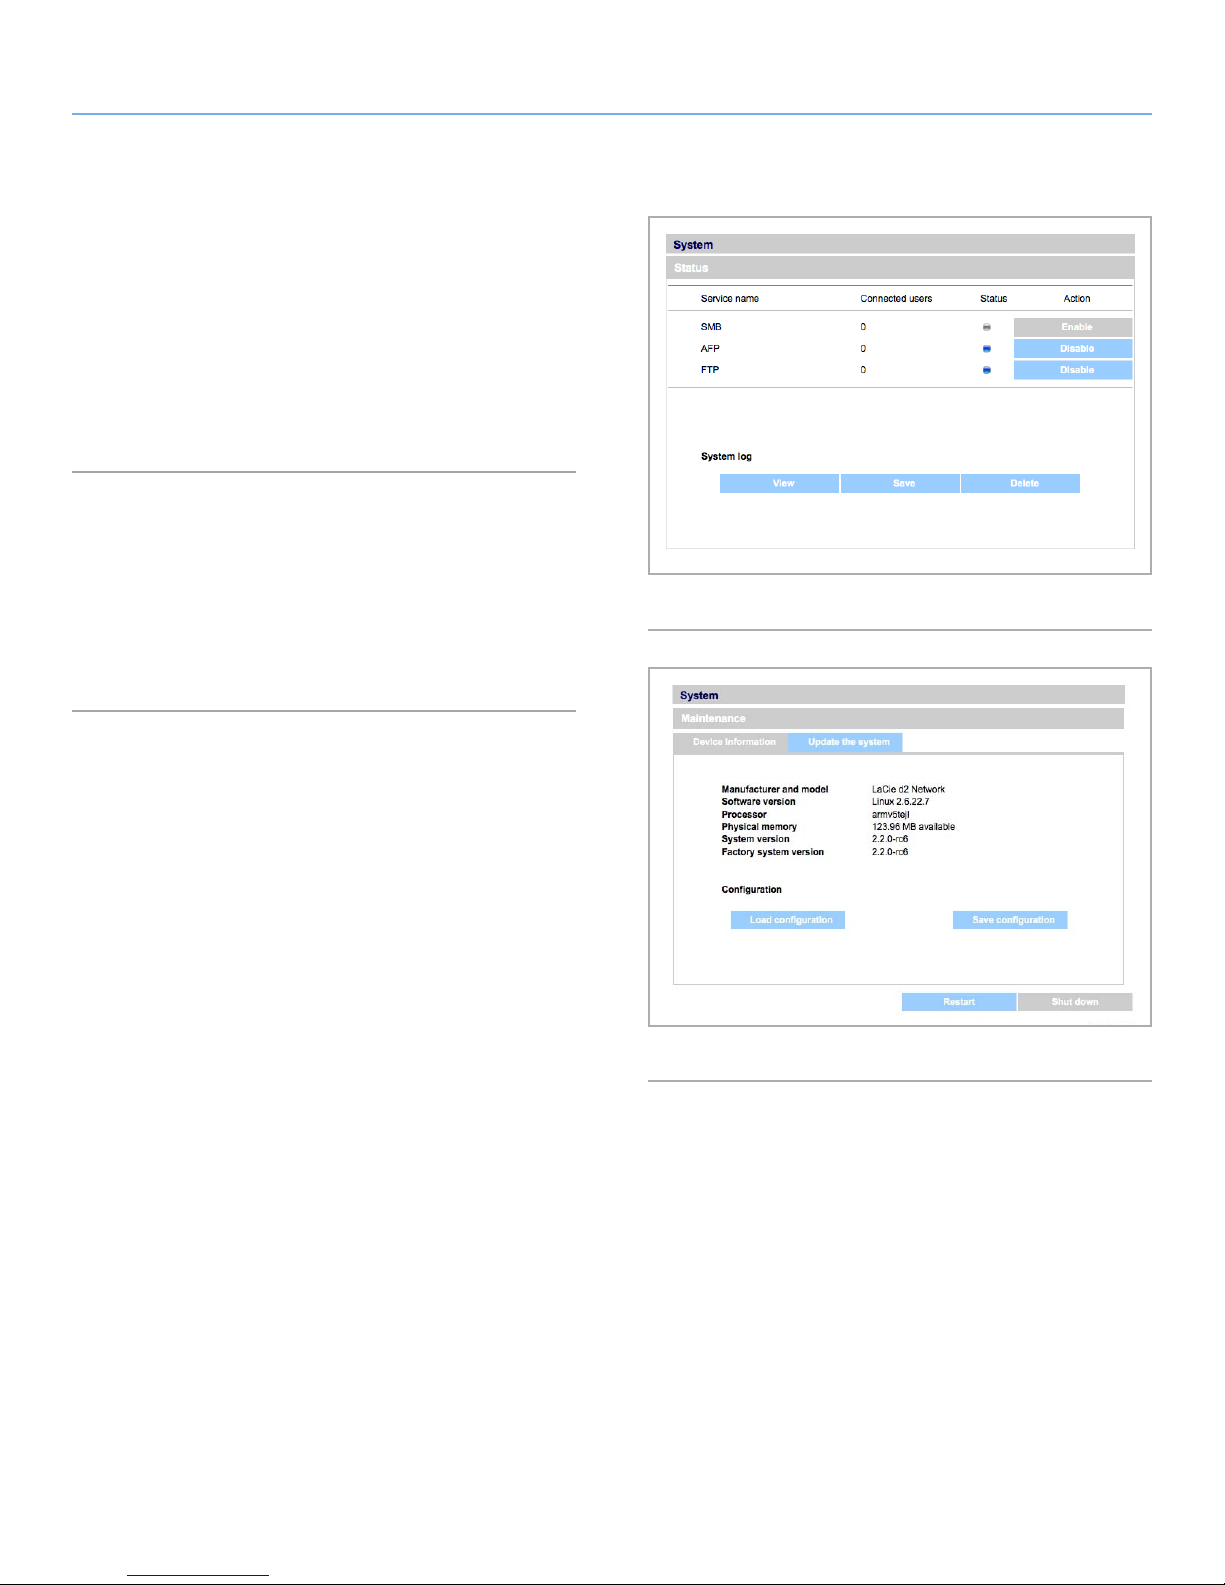
Click on Status under System in the navigation bar to display the
system Status page (Fig. 61).
On this page you can view the number of connected users, disable
file server services (SMB, AFP, and FTP) and view, download or delete the system log. To disable a service, simply click the Disable
button that corresponds to the service which you wish to disable, or
deselect it.
4.5.6. Maintenance
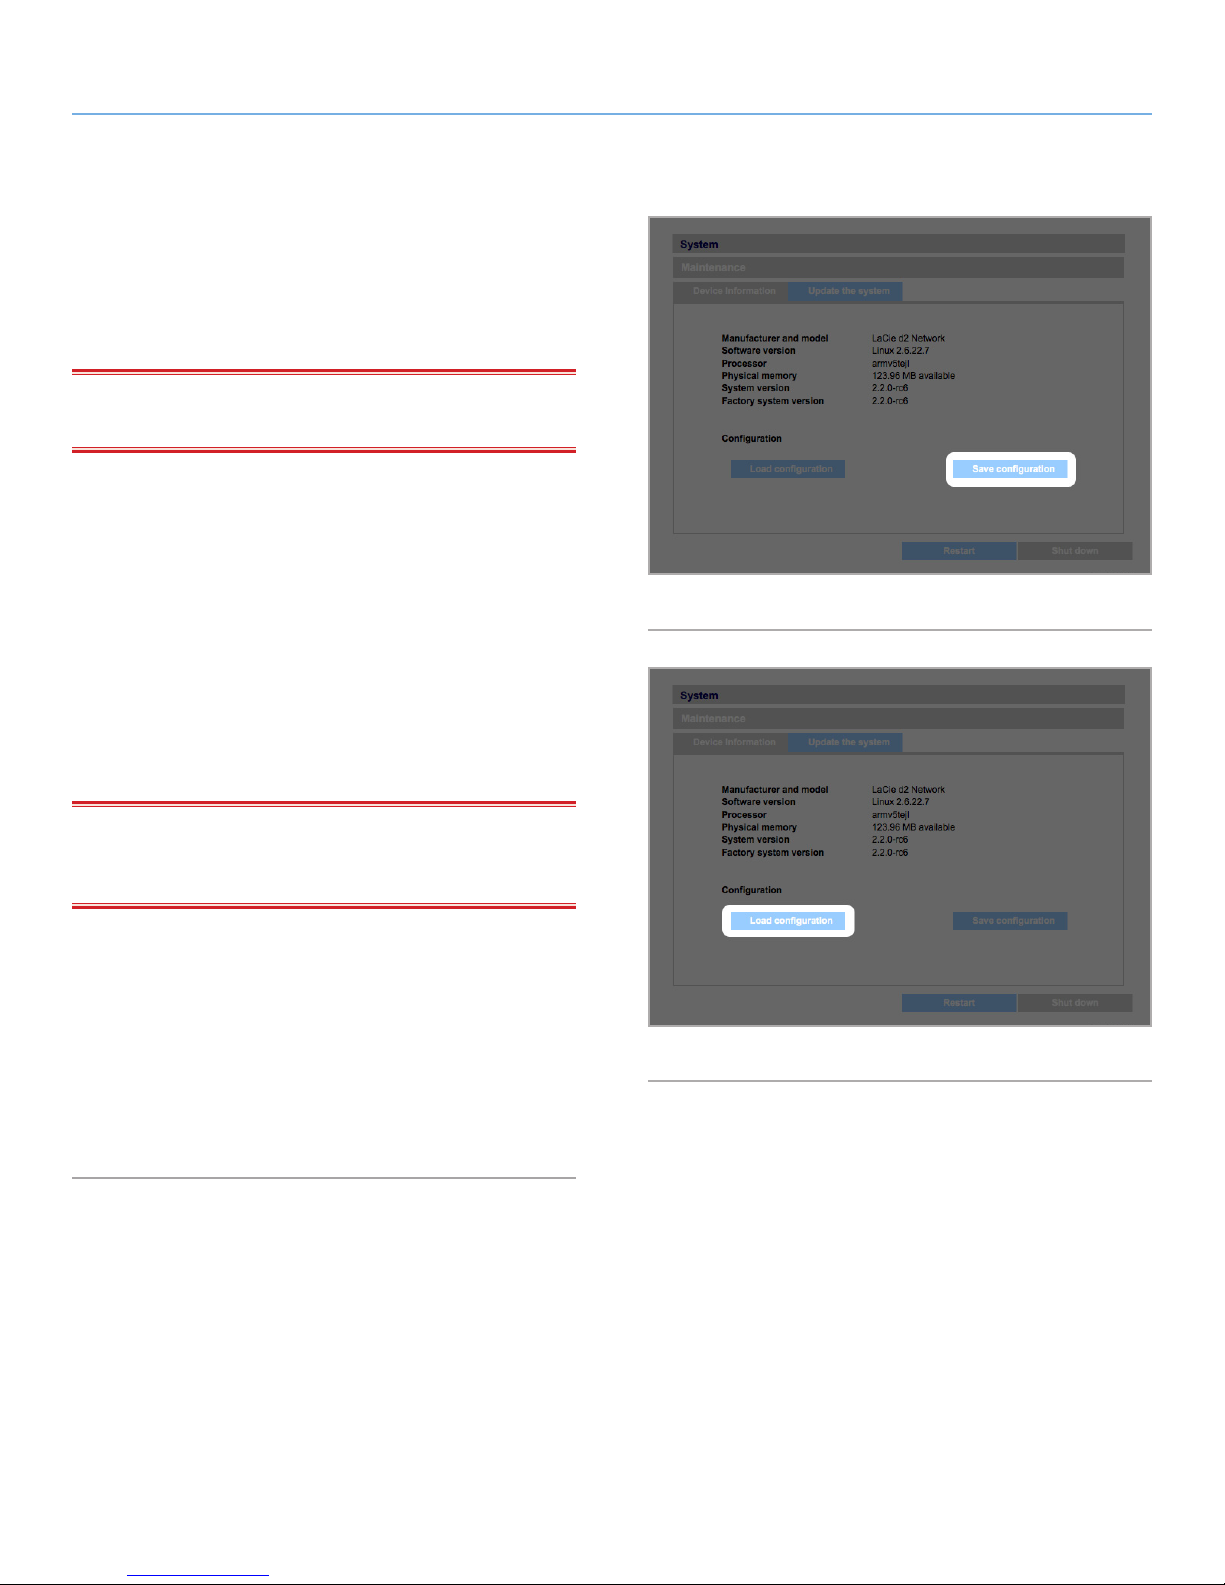
Click on Maintenance under System in the navigation bar to display the Maintenance page (Fig. 62).
On this page you can view basic system information, manage updates, restart or shutdown the system (only if the power switch is in
the AUTO position) and load new system configurations.
Fig. 61
Fig. 62
Page 42
LaCie d2 Network Administering Your LaCie d2 Network
User Manual page 42
4.5.6.1. Saving and Loading System Configurations
It’s a good idea to save your system configuration in case the d2
Network needs to be reformatted or reset. You can then reload the
configuration so that your settings, shares, groups and users are not
lost.
IMPORTANT INFO: Share content (files) is not saved in a con-
figuration file.
To save the current configuration:
1. Click on System and then Maintenance.
2. Click the Save configuration button (Fig. 63).
Internet Explorer users: The XML defining the configuration will
open in the browser window. To save the configuration, select File
> Save as… In the Save as type menu in the Save As dialog, select
XML Files (*.xml) and choose a location to save the file.
Firefox and Safari users: Your browser will save the file to the
browser’s default download location. The configuration file is an
XML file.
IMPORTANT INFO: Do not save configuration files on the d2
Network alone. If data loss occurs, the configuration file may also
be lost.
To load a saved configuration:
1. Click on System and then Maintenance.
2. Click the Load Configuration button (Fig. 64).
3. Click Browse… and select a configuration file from your computer.
4. Click Apply.
Fig. 63
Fig. 64
Page 43
LaCie d2 Network Administering Your LaCie d2 Network
User Manual page 43
4.5.6.2. Updating the System
Firmware updates may become available for the d2 Network.
To install firmware updates:
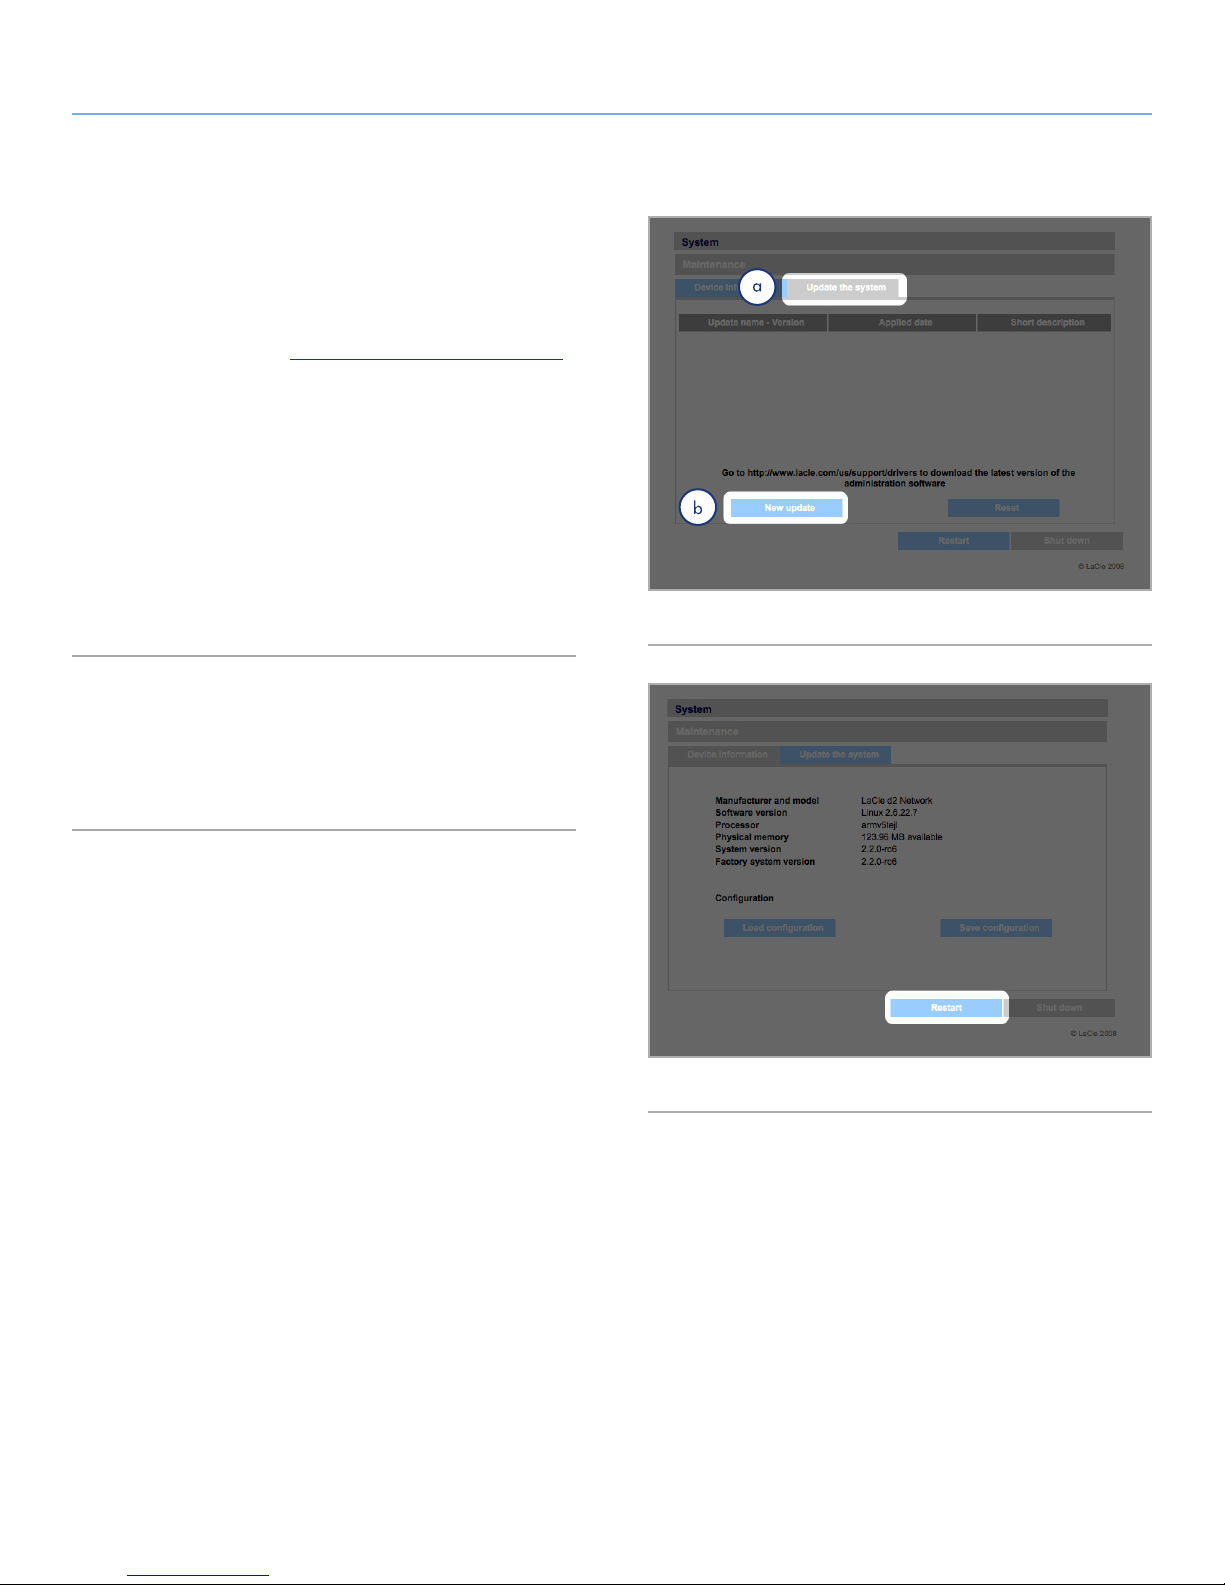
1. Download updates from www.lacie.com/support/downloads/.
2. Click the Update the system tab in Maintenance (a, Fig. 65).
3. Click New Update (b, Fig. 65).
4. Click Browse… and select an update file from your computer.
5. Click Apply.
During the system update you will not have access to the device and
users will not be able to access shares. When the update is complete, the login page will open.
Fig. 65
4.5.6.3. Restart
To restart the d2 Network, click the Restart button (Fig. 66). The restart process takes a few minutes. When the machine has restarted,
the login page will open.
Fig. 66
Page 44
LaCie d2 Network Administering Your LaCie d2 Network
User Manual page 44
4.5.6.4. Shut Down
There are two ways to disconnect the Ethernet connection:
✦ Move the power switch to the off position. The system will shut
down and power off. When the shutdown process is complete,
you can safely remove the Ethernet cable.
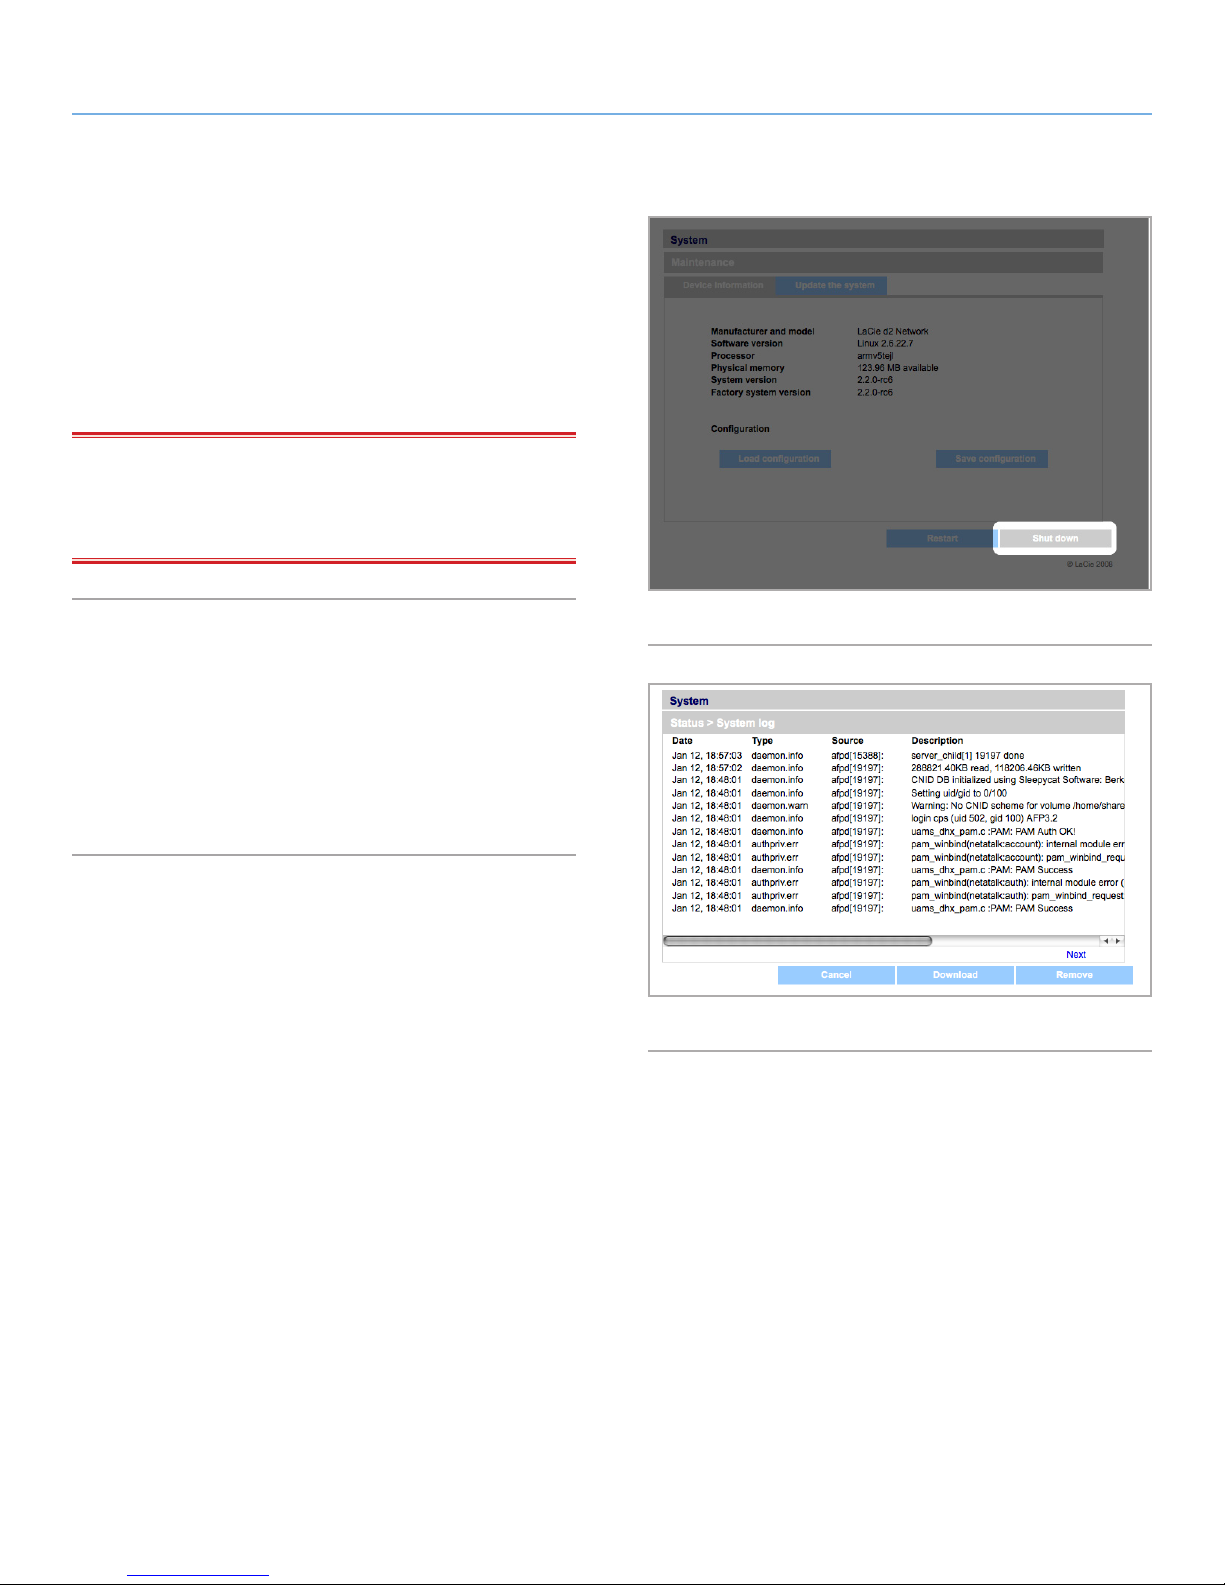
✦ Click the Shut Down button (Fig. 67). This option is available
ONLY if the power switch is set to the AUTO position.
IMPORTANT INFO: Any data transfers underway during a shut
down will be interrupted and data may be lost. Make sure no users
are connected or transferring data to or from the d2 Network before
shutting down.
Fig. 67
4.5.7. System Log
The system log allows you to review the type, date, time, source and
event ID of activities on the LaCie d2 Network (Fig. 68).
To view the system log, select System > Status > View.
Click Download to download the log or Delete to clear its contents.
Fig. 68
Page 45
LaCie d2 Network Administering Your LaCie d2 Network
User Manual page 45
4.5.8. Wake on LAN (WOL)
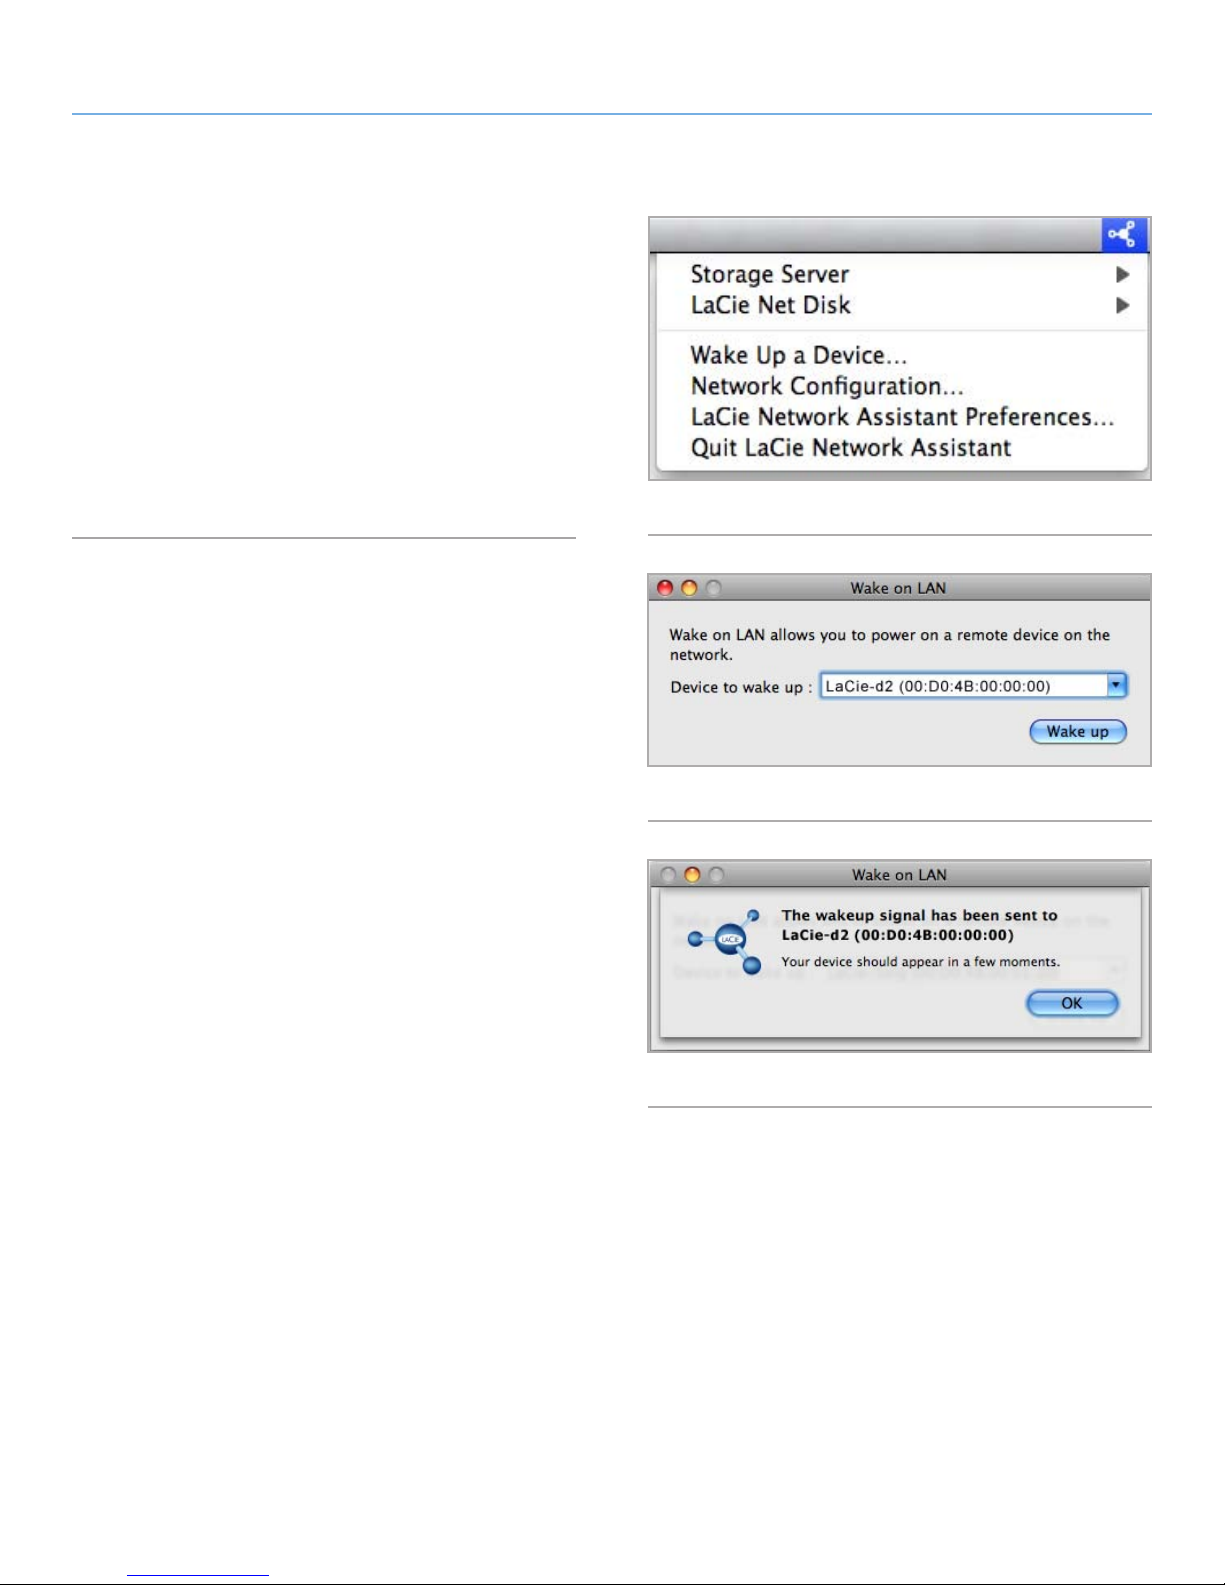
This function enables you to enable waking the d2 Network remotely
on the local area network (LAN). For WOL to work, the power
switch must be in the AUTO position. This function is accessed
using the LaCie Network Assistant software. Follow these steps to
activate WOL:
1. Click the LNA icon in your menu bar (Mac Users, Fig. 69) or
your task bar (Windows users) and click Wake Up a Device...
2. In the window that opens (Fig. 70), select the device and click
Wake up.
Fig. 69
Fig. 70
Fig. 71
Page 46
LaCie d2 Network Administering Your LaCie d2 Network
User Manual page 46
4.6. Download
The LaCie d2 Network has the capability to act as a torrent client.
Torrent is a peer-to-peer file sharing system used to share large
files. Those in possession of a file act as seeders, and those who
download files are peers. Because peers simultaneously upload
already downloaded portions as they download and because of
the decentralized nature of the system, the torrent protocol reduces
bandwidth and hardware costs associated with sharing large files
through the internet.
Torrent files, which are freely available on the internet, contain tracking information and metadata about the files to be shared. The
process of downloading files using torrents involves downloading a
torrent file using your PC/Mac and importing it into a torrent client
(in this case, the d2 Network).
Access the Download menu by clicking the Download tab in the left
navigation menu.
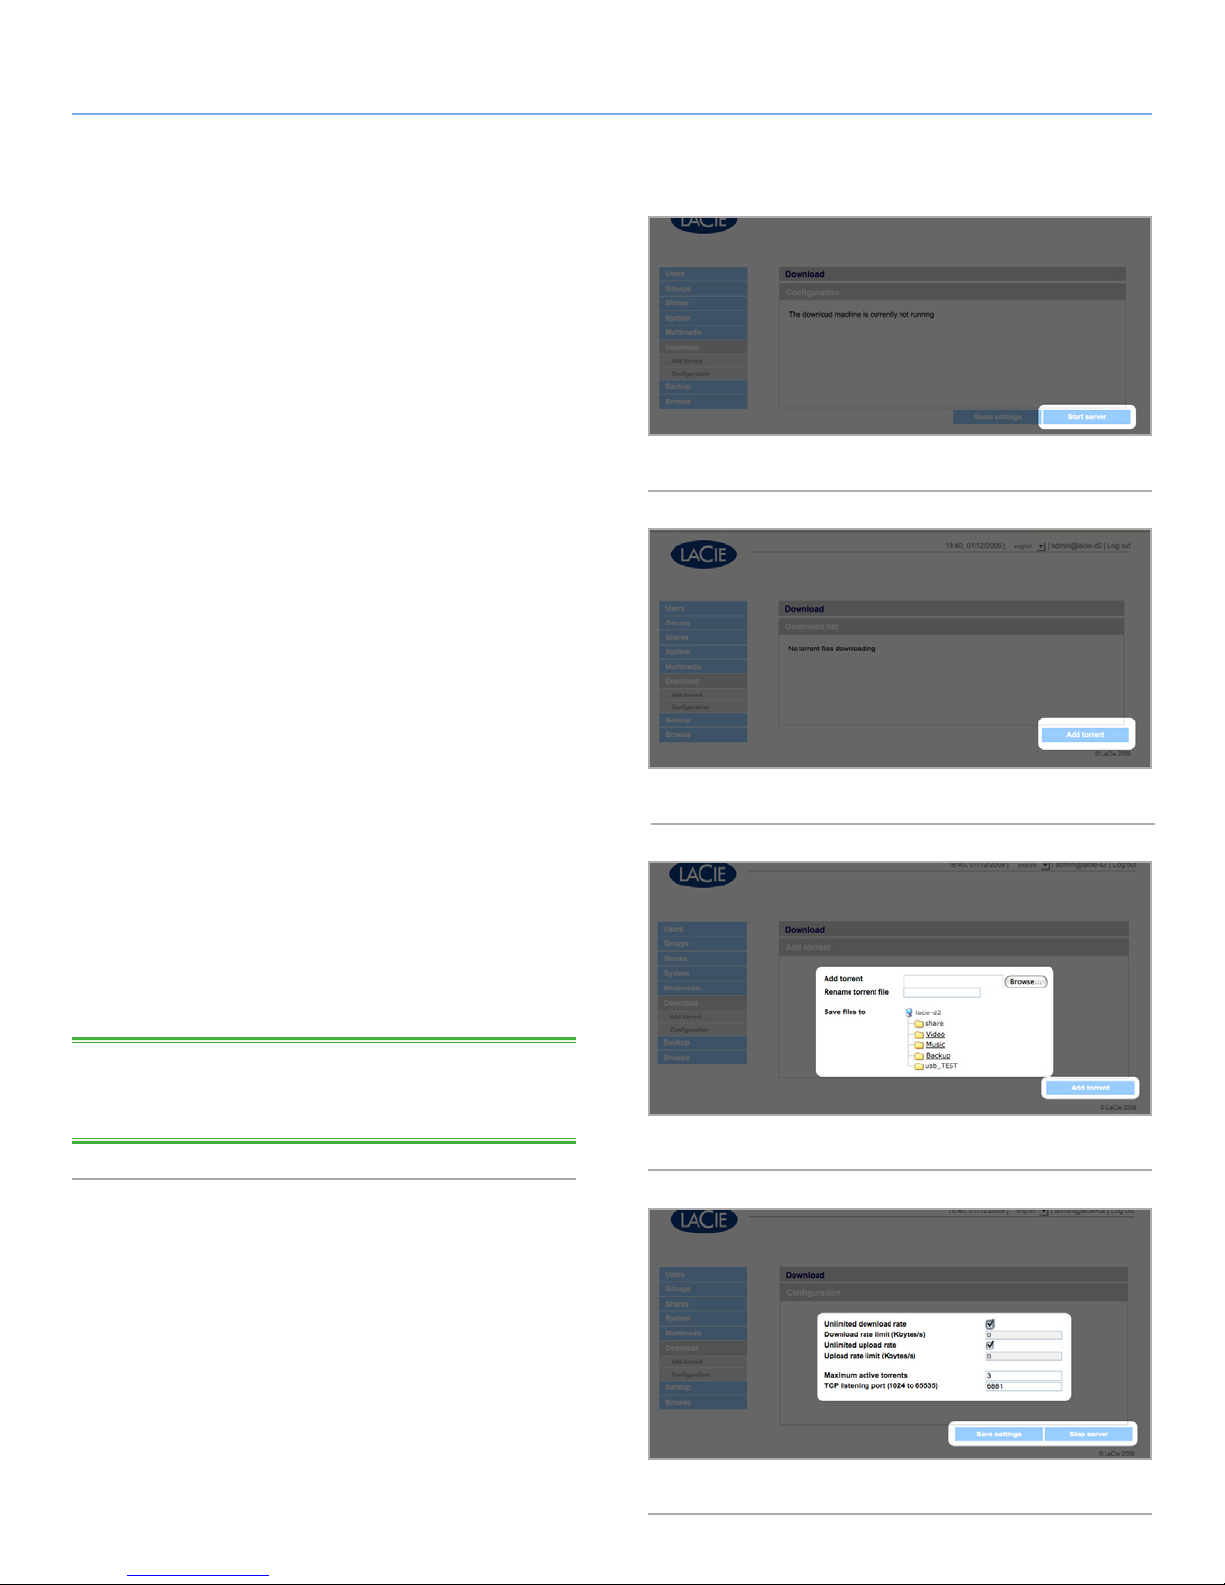
Fig. 72
Enabling and Initiating Torrent Downloads
1. Enable the service by clicking the Start Server button (Fig. 72).
2. Add a torrent by clicking the Add Torrent button (Fig. 73) In the
page that opens, click Browse to select a valid .torrent file located on your computer, rename the torrent file (optional), and
select the directory where the download will be saved (Fig. 74).
Configuring the Bittorrent Function
1. To configure the bittorrent capability of your d2 Network, click
the Configuration button on the navigation menu on the left of
the page (Fig. 75).
2. Modify the available parameters and click the Save Settings
button.
TECHNICAL NOTE: Because the torrent client service uses band-
width and system resources, multiple simultaneous downloads can
impact d2 Network performance.
Fig. 73
Fig. 74
Fig. 75
Page 47
LaCie d2 Network Administering Your LaCie d2 Network
User Manual page 47
4.7. Backup
When an external USB or eSATA hard disk is connected to your
LaCie d2 Network, you can perform manual, bidirectional backups
of your files. Copy files from your LaCie d2 Network to the external
disk, or from the external disk to the LaCie d2 Network.
IMPORTANT INFO: In order to use an external drive to back
up the d2 Network, it must be formatted in one of the supported
systems: FAT32, FAT, NTFS, HFS+, EXT3, EXT2, REISERFS or XFS.
Note that you can reformat external drives to the XFS file system using
the d2 Network web interface. See 4.5.4. Disks for formatting steps.
However, the following limitations apply: NTFS disks are read-only,
and FAT/FAT32 disks have file size limits (2GB and 4GB, respectively)
due to their file system limitations.
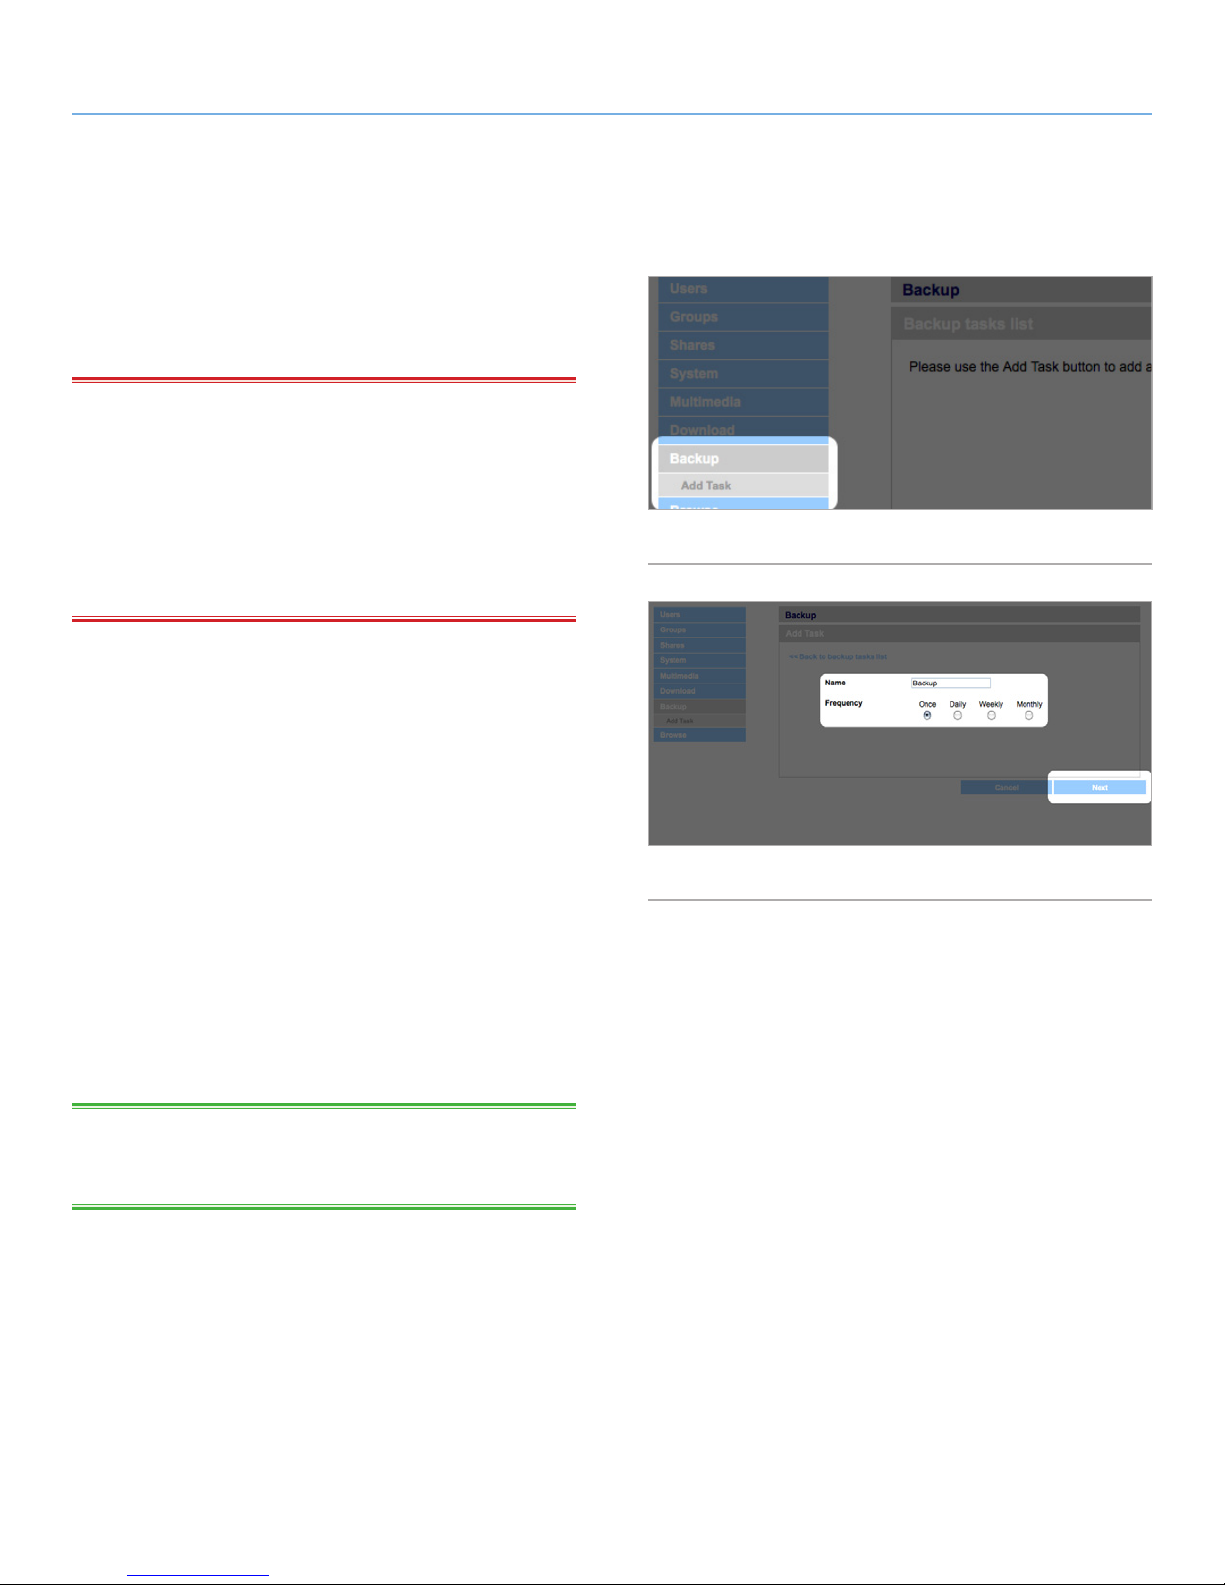
Fig. 76
To back up files:
1. Connect an external USB or eSATA hard disk (see section 3.4.
Connecting an External Hard Disk).
2. Log in to the LaCie d2 Network Administration Page (see section
4.1. Accessing the Administration Page).
3. Click Backup > Add Task (Fig. 76).
4. Give the backup a name and set its frequency (once, daily,
weekly, or monthly) and time (if the backup is recurring) (Fig.
77) and click Next.
5. Select a source folder (the folder to be backed up) and click
Next.
6. Select a destination folder (where the backed up files will be
located) and click Next.
7. Click Add job.
TECHNICAL NOTE: If copying a share to an external disk, the entire
contents of the share will be copied to a folder on the external disk
with the same name as the share.
Fig. 77
continued on the next page
Page 48
LaCie d2 Network Administering Your LaCie d2 Network
User Manual page 48
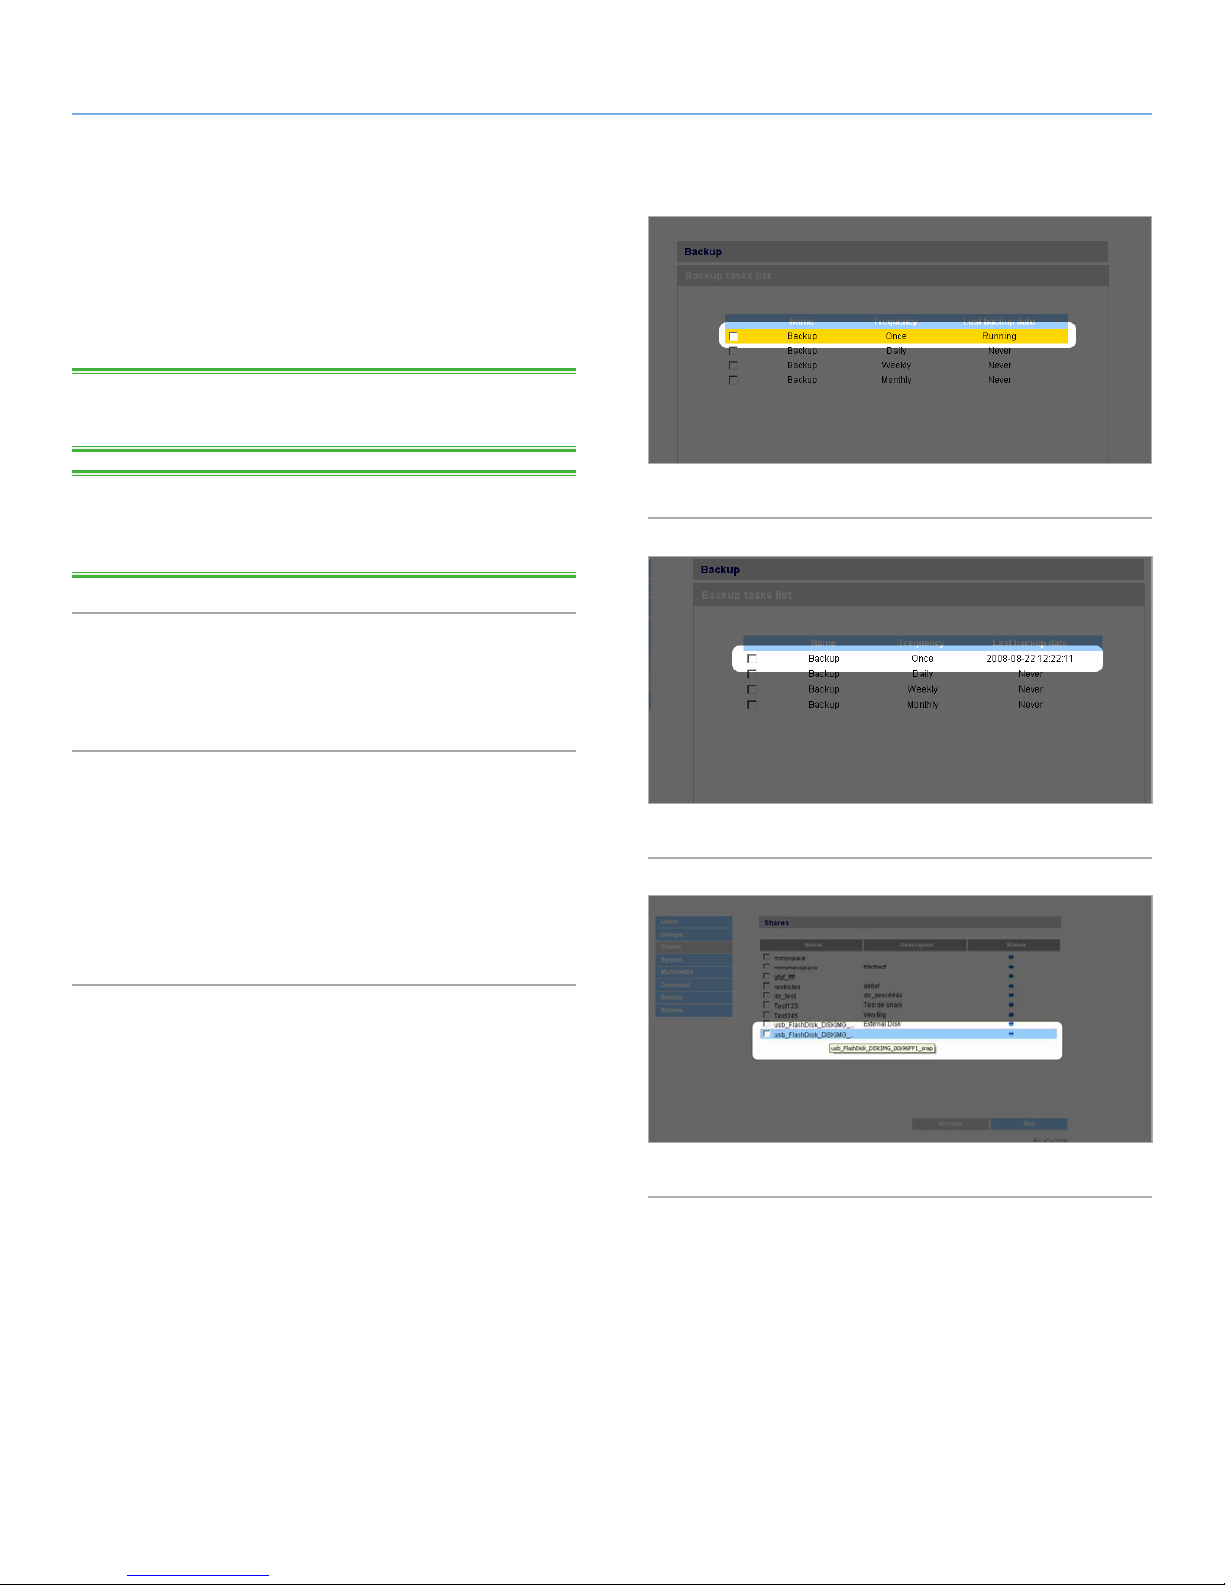
8. If the frequency is set to “Once,” the backup will begin after a
few seconds. An in-progress backup will be indicated with yellow highlighting (Fig. 78).
9. Successful backups will no longer be highlighted and will show
the date the backup was last completed (Fig. 79).
TECHNICAL NOTE: Backups are incremental, which means that
future backups will only copy new or modified files.
TECHNICAL NOTE: Backed up data is neither compressed nor en-
crypted, and can be accessed from other computers or NAS (networkattached storage).
4.8. Browse
Refer to section 3.3. Administration Page – Browse for details.
4.9. Import (Snapshot)
When you plug an external device to one of the d2 Network’s ports
and push the front button, the d2 Network will automatically import
(take a snapshot of) the data from the external device. The imported data will be copied into an automatically created share with
a unique name (Fig. 80).
Fig. 78
Fig. 79
Fig. 80
Page 49
LaCie d2 Network Administering Your LaCie d2 Network
User Manual page 49
4.10. Multimedia
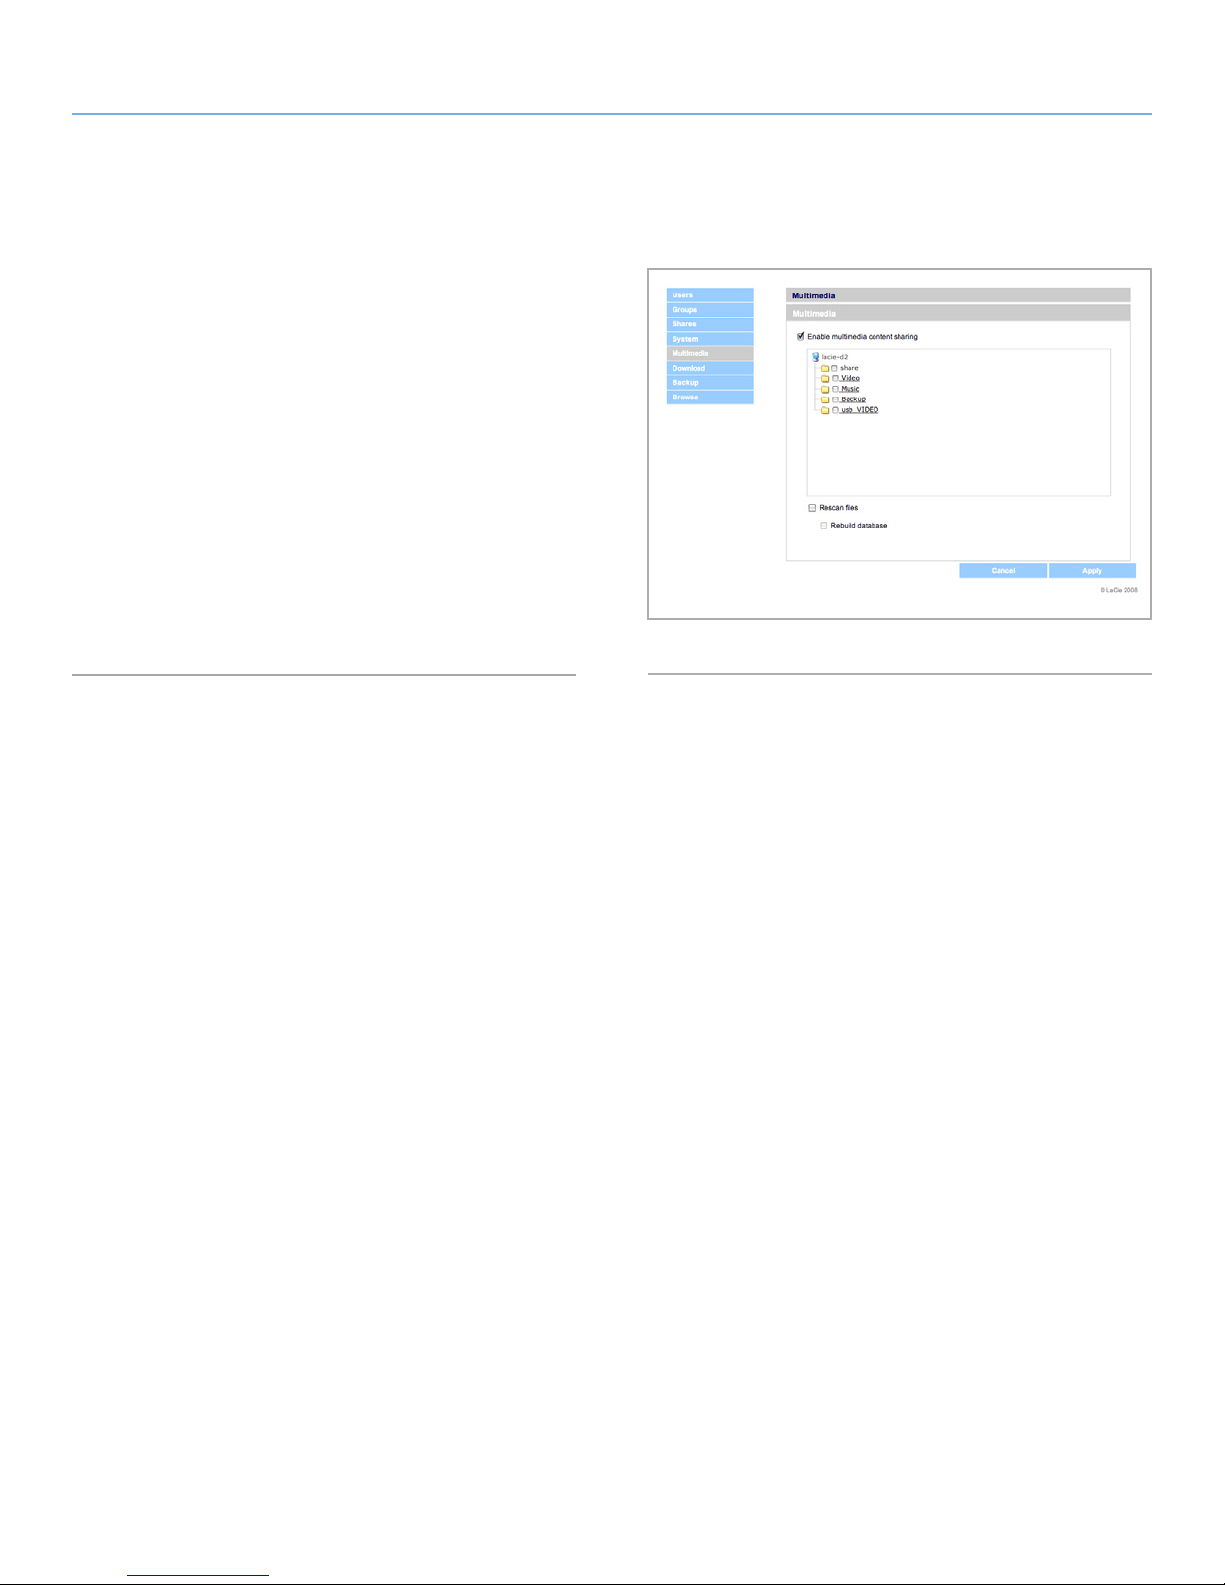
Thanks to its support of UPnP A/V and DLNA protocols, the d2 Network can act as a multimedia server, providing access to its files
to compliant digital media appliances. Such appliances include
Playstation 3, Xbox360, many LCD TV and stereos, or Digital Media
Adapters (DMA).
To activate the UPnP and DLNA protocols, follow these steps:
1. Navigate to the Multimedia tab on the Administration page
and check the Enable Multimedia Content Sharing (Fig. 81).
2. Select which share(s) you would like to share with wireless devices.
3. Check the Rescan files box.
4. Click Apply.
Fig. 81
Page 50
LaCie d2 Network LED Indicators
User Manual page 50
5. LED Indicators
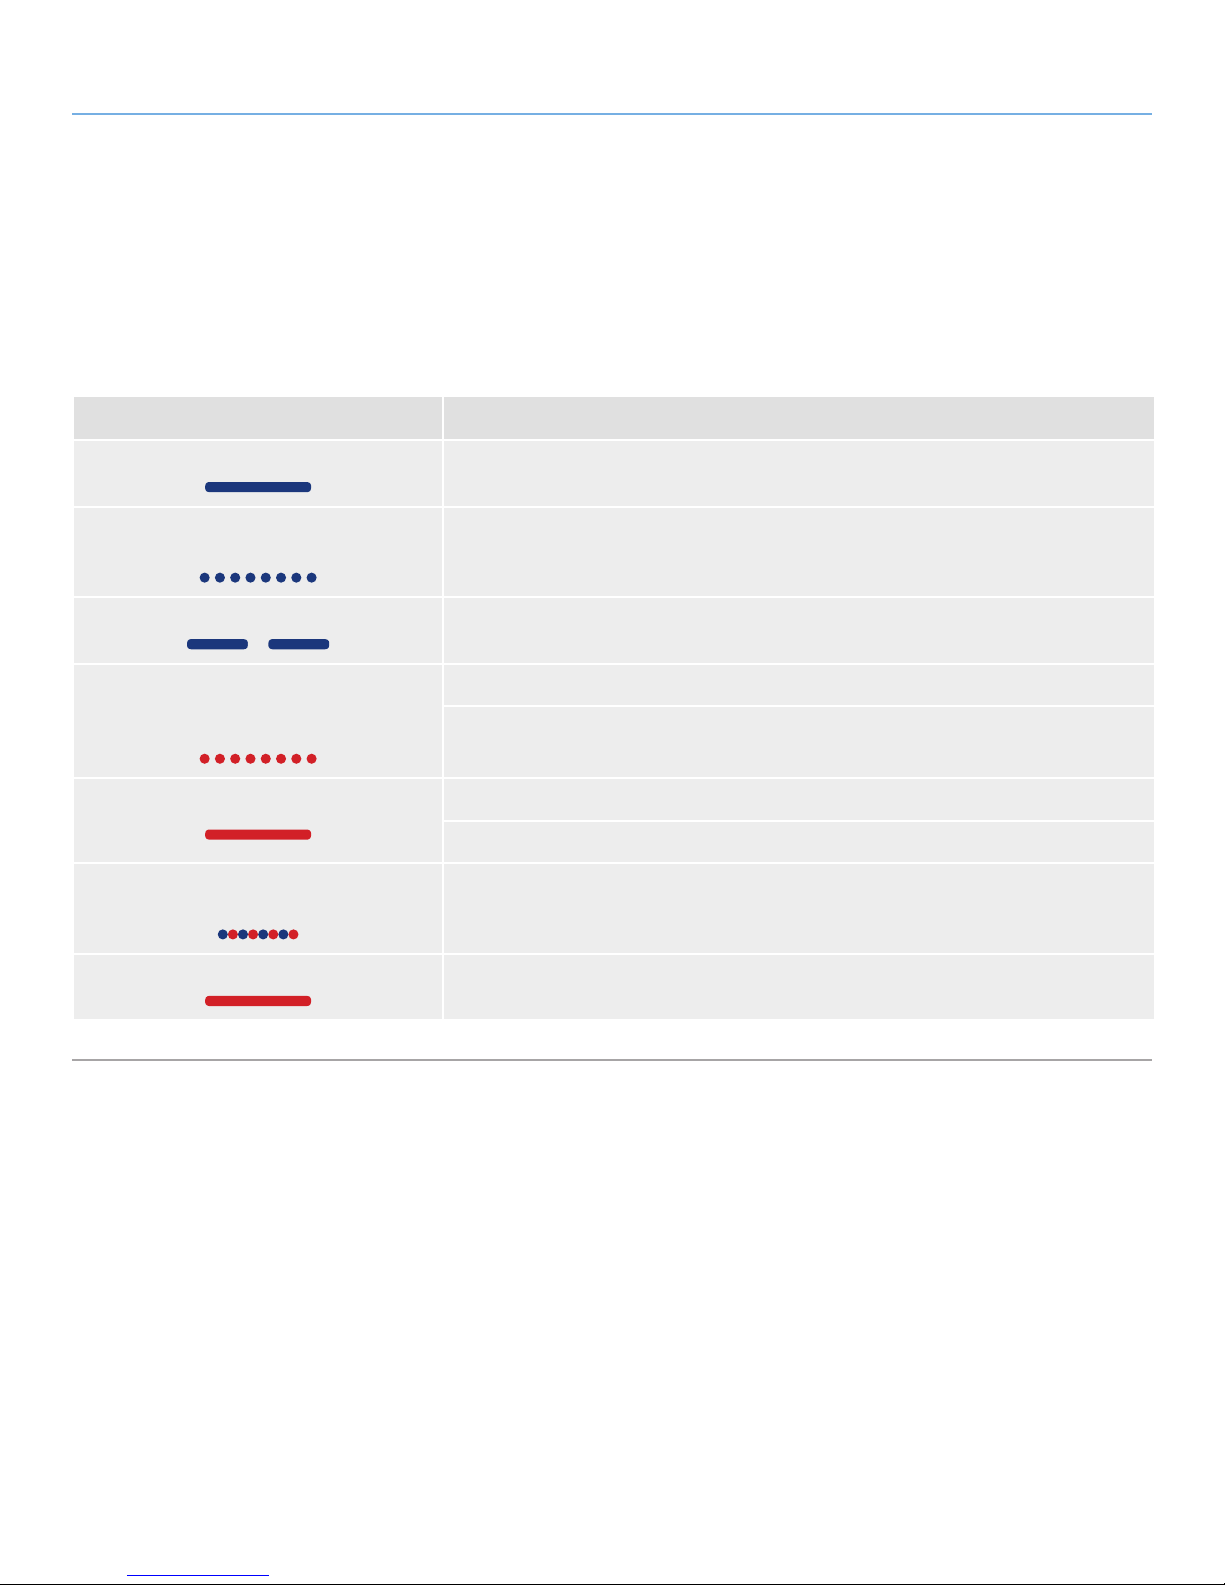
The LED indicators above the drive bays and the front LED indicate
drive status and activity. This section describes the behavior of the
LED indicators.
Front LED Color d2 Network State
Solid blue Drive working (read/write)
Blinking blue
(1s, 1s)
Long blue (2.5s), short pause (0.25s) Backup/import operation in progress; will cease once operation has concluded
Blinking red
(0.3s/0.3s)
for 3 seconds total
Solid red
Blinking blue/red
(0.3s, 0.3s)
Solid red until it goes to Stand by, then OFF Temperature alert (critic level) – the product will switch to stand by mode
Occurs as the d2 Network is booting; will cease once the drives are fully initialized
During a backup operation, the external disk is full or not formatted
During an import operation (triggered by pressing the front blue button), the external disk is
empty
Drive failure, data lost
System broken or not found.
Temperature alert (first level)
Page 51

LaCie d2 Network LED Indicators
User Manual page 51
6. Email Notification Triggers
Download Machine Temperature Snapshot
1. Download completed 1. High temperature 1. Error creating share
2. Critical temperature 2. No external devices detected
3. No temperature sensed 3. External device not yet mounted
4. Error copying
5. Copy successful
Page 52

LaCie d2 Network LED Indicators
User Manual page 52
7. Troubleshooting
In the event that your LaCie d2 Network is not working correctly,
please take a look at the Troubleshooting section on the following
pages and at the FAQs published on our web site – www.lacie.com.
One of these FAQs may provide an answer to your specific question. You can also visit the downloads page, where the most recent
software updates will be available –
www.lacie.com/support/downloads.
If you need further assistance, please contact your LaCie reseller or
LaCie Technical Support (see chapter 8. Contacting Customer Sup-
port for details).
System Log
The system log allows you to review the type, date, time, source and
event ID of activities on the LaCie d2 Network. For more information, refer to chapter 4.5.7. System Log.
Problem Question to Ask Solution
The system is not
recognized by the
computer.
Does your computer’s configuration
meet the minimum system requirements?
Is the system’s power supply connected
and is the blue light on the front of the
drive on?
Check section 1.2. Minimum System Requirements for more information.
Make sure that the power supply is properly connected (see section 2.1.
Turning On the d2 Network for details); that the system has been powered
on by moving the power switch on the back of the device to the ON position; and that the outlet the power supply is connected to is powered on
or has a sufficient supply of power.
Manual Updates
LaCie strives to give you the most up-to-date, comprehensive user
manuals possible. It is our goal to provide you with a friendly, easyto-use format that will help you quickly install and utilize the many
functions of your new device.
If your manual does not reflect the configurations of the product
that you purchased, please check our website for the most current
version available.
www.lacie.com
Is the blue light on the front of the
device flickering?
Did you follow the correct installation
steps?
Are both ends of the Ethernet cable
firmly connected?
If the blue light is flickering or will not turn on, the power supply may be
defective. Please contact your LaCie reseller or LaCie Customer Support.
Review the installation steps (2. Setting Up Your LaCie d2 Network).
Disconnect the Ethernet cable, wait 10 seconds and then reconnect.
Ensure that the interface connectors are properly aligned. The Ethernet
cable can only be inserted one way. Make sure it is correctly oriented.
Check that the Ethernet connectors are straight and fully seated in the
Ethernet ports.
Make sure that you use the Ethernet cord provided in the d2 Network box.
Page 53

LaCie d2 Network LED Indicators
User Manual page 53
Problem Question to Ask Solution
The system
doesn’t appear on
the network.
A user does not
have access to
the LaCie d2
Network.
By default the d2 Network is configured to retrieve its IP address from a DHCP server. If your network is managed
by a DHCP server and you cannot access your d2 Network, try checking your DHCP server’s log. To get the IP address, run LaCie Network Assistant, which is located on the LaCie Storage Utilities CD-ROM. If your network is NOT
managed by a DHCP server, the d2 Network uses its default IP address, which is 192.168.xx.100. To change this IP
address, use LaCie Network Assistant.
Is the IP address properly set? For more information, please see section 3.1. Accessing Shared Folders.
Is your network DHCP enabled? If your network is DHCP enabled, please refer to sections 2.3. Connect-
ing Using LaCie Network Assistant. If your network is not DHCP enabled,
you will need to manually configure the address; please see section 2.4.
Configuring the LaCie d2 Network on a Network Without a DHCP Server.
Are you using AppleTalk under Mac
OS 9.x?
Has the administrator created an account for the user?
If you are using AppleTalk under Mac OS 9.x, ensure that the LaCie d2
Network and the other clients on the network are in the same AppleTalk
zone.
In order for a another user to access the LaCie d2 Network, two conditions must be met: 1) the administrator must create and register a user
with the appropriate privileges; 2) the LaCie d2 Network must be connected to the network via Ethernet for additional users to access the drive.
Page 54

LaCie d2 Network Contacting Customer Support
User Manual page 54
8. Contacting Customer Support
Before You Contact Technical Support
Read the User Manual and review the Troubleshooting section.
Try to isolate the problem. If possible, make the drive the only external device on the CPU, and make sure that all of the cables are
correctly and firmly attached.
If you have asked yourself all of the pertinent questions in the troubleshooting checklist, and you still can’t get your LaCie drive to work
properly, contact us via the contacts on the following page. Before
contacting us, make sure that you are in front of your computer and
that you have the following information on hand:
Information Where to Find Information
LaCie d2 Network serial number Located on a sticker at the back of drive or on the original packaging
LaCie d2 Network file format Mac users: Select the hard drive icon and press Command + I, or press
the Control key and choose Get Info.
Windows users: Right click the hard drive icon and select Properties.
Macintosh/PC model
Operating system version
Processor speed
Computer memory
The brands and models of other internal and external peripherals installed on my computer
Mac users: Click on the Apple icon in the menu bar and select About
this Mac.
Windows users: Right click My Computer and select Properties >
General.
Mac users: Click on the Apple icon in the finder bar and select About
this Mac. Select More Info... The Apple System Profiler will launch and
will list your internal and external peripherals.
Windows users: Right click My Computer and select Properties >
Hardware.
Page 55
LaCie d2 Network Contacting Customer Support
User Manual page 55
7.1. LaCie Technical Support Contacts
LaCie Asia, Singapore, and Hong Kong
Contact us at:
http://www.lacie.com/asia/contact/
LaCie Belgium
Contact us at:
http://www.lacie.com/be/contact/ (Français)
LaCie Denmark
Contact us at:
http://www.lacie.com/dk/contact
LaCie France
Contact us at:
http://www.lacie.com/fr/contact/
LaCie Italy
Contact us at:
http://www.lacie.com/it/contact/
LaCie Netherlands
Contact us at:
http://www.lacie.com/nl/contact/
LaCie Australia
Contact us at:
http://www.lacie.com/au/contact/
LaCie Canada
Contact us at:
http://www.lacie.com/caen/contact/ (English)
LaCie Finland
Contact us at:
http://www.lacie.com/fi/contact/
LaCie Germany
Contact us at:
http://www.lacie.com/de/contact/
LaCie Japan
Contact us at:
http://www.lacie.com/jp/contact/
LaCie Norway
Contact us at:
http://www.lacie.com/no/contact/
LaCie Spain
Contact us at:
http://www.lacie.com/es/contact/
LaCie Switzerland
Contact us at:
http://www.lacie.com/chfr/contact/ (Français)
LaCie Ireland
Contact us at:
http://www.lacie.com/ie/contact/
LaCie International
Contact us at:
http://www.lacie.com/intl/contact/
LaCie Sweden
Contact us at:
http://www.lacie.com/se/contact
LaCie United Kingdom
Contact us at:
http://www.lacie.com/uk/contact/
LaCie USA
Contact us at:
http://www.lacie.com/contact/
Page 56

LaCie d2 Network Warranty Information
User Manual page 56
9. Warranty Information
LaCie warrants your drive against any defect in material and workmanship, under normal use, for the period designated on your warranty certificate. In the event this product is found to be defective
within the warranty period, LaCie will, at its option, repair or replace
the defective drive. This warranty is void if:
✦ The drive was operated/stored in abnormal use or mainte-
nance conditions;
✦ The drive is repaired, modified or altered, unless such repair,
modification or alteration is expressly authorized in writing by
LaCie;
✦ The drive was subjected to abuse, neglect, lightning strike,
electrical fault, improper packaging or accident;
✦ The drive was installed improperly;
✦ The serial number of the drive is defaced or missing;
✦ The broken part is a replacement part such as a pickup tray,
etc.
✦ The tamper seal on the drive casing is broken.
LaCie and its suppliers accept no liability for any loss of data during
the use of this device, or for any of the problems caused as a result.
LaCie will not, under any circumstances, be liable for direct, special
or consequential damages such as, but not limited to, damage or
loss of property or equipment, loss of profits or revenues, cost of
replacement goods, or expense or inconvenience caused by service
interruptions.
Any loss, corruption or destruction of data while using a LaCie drive
is the sole responsibility of the user, and under no circumstances
will LaCie be held liable for the recovery or restoration of this data.
Under no circumstances will any person be entitled to any sum
greater than the purchase price paid for the drive.
To obtain warranty service, call LaCie Technical Support. You will
be asked to provide your LaCie product’s serial number, and you
may be asked to furnish proof of purchase to confirm that the drive
is still under warranty.
All drives returned to LaCie must be securely packaged in their original box and shipped with postage prepaid.
IMPORTANT INFO: Register online for free technical support:
www.lacie.com/register
 Loading...