

Page 1

LaCie d2 Network 2 • DESIGN BY NEIL POULTON Table of Contents
User Manual page 1
Table of Contents
1. Introduction................................................................................................................. 6
1.1. Minimum System Requirements ...................................................................................................... 7
1.1.1. Windows users ................................................................................................................. 7
1.1.2. Mac Users ....................................................................................................................... 7
1.1.3. Linux Users ...................................................................................................................... 7
1.2. Box Content ................................................................................................................................. 8
1.3. Hard Drive Heat Management ....................................................................................................... 9
1.4. Views of the Drive ....................................................................................................................... 10
1.4.1. Front View ..................................................................................................................... 10
1.4.2. Rear View ...................................................................................................................... 10
1.4.3. LED Behavior ................................................................................................................. 11
2. Connecting to a Network .......................................................................................... 12
2.1. STEP 1: Connect the Power Supply ............................................................................................... 13
2.2. STEP 2: Connect the Ethernet Cable ............................................................................................. 14
2.3. STEP 3: Connect using LaCie Network Assistant ............................................................................ 15
2.4. STEP 4: Completing the Setup Wizard .......................................................................................... 17
2.5. Power Button Functions ............................................................................................................... 18
2.6. Assigning a Static IP Address ........................................................................................................ 19
3. Accessing and Transferring Files ............................................................................... 20
3.1. About Default Shares .................................................................................................................. 20
3.2. Accessing Shares Using LaCie Network Assistant ........................................................................... 21
3.2.1. Switching User................................................................................................................ 23
3.2.2. Map Shares ................................................................................................................... 24
3.3. Accessing Shares Using File Browser ............................................................................................. 25
3.3.1. About the File Browser .................................................................................................... 25
3.4. Accessing Shares via USB ............................................................................................................ 26
3.4.1. STEP 1: Connecting the USB cable ................................................................................... 27
3.4.2. STEP 2: Turn On the Drive .............................................................................................. 28
3.4.3. Disconnecting the USB Connection .................................................................................. 29
3.5. Accessing Shares through the Internet ........................................................................................... 30
3.6. Accessing Shares via FTP ............................................................................................................. 31
3.7. Multimedia Server ....................................................................................................................... 32
3.8. iTunes Music Server .................................................................................................................... 33
4. Administering Your LaCie d2 Network 2 ................................................................... 34
4.1. Dashboard: Accessing ................................................................................................................. 35
4.2. Dashboard: Welcome Page ......................................................................................................... 36
4.3. Dashboard: Navigation ............................................................................................................... 36
4.4. Dashboard: Logging Out ............................................................................................................ 36
4.5. Dashboard: Restart/Shutdown ...................................................................................................... 36
4.6. Dashboard: General Settings ....................................................................................................... 37
4.6.1. Active Directory .............................................................................................................. 38
4.7. Dashboard: Users ....................................................................................................................... 39
4.7.1. Adding a New User ........................................................................................................ 39
4.7.2. Deleting a User .............................................................................................................. 40
4.7.3. Editing a User ................................................................................................................ 40
4.8. Dashboard: Groups .................................................................................................................... 41
4.8.1. Adding New Group ........................................................................................................ 41
4.8.2. Editing a Group ............................................................................................................. 41
Page 2

LaCie d2 Network 2 • DESIGN BY NEIL POULTON Table of Contents
User Manual page 2
4.8.3. Deleting a Group ........................................................................................................... 42
4.8.4. Adding/Removing Users from a Group ............................................................................. 42
4.9. Dashboard: Shares ..................................................................................................................... 43
4.9.1. Adding a New Share ....................................................................................................... 43
4.9.2. Modifying a Share .......................................................................................................... 43
4.9.3. Deleting a Share ............................................................................................................ 43
4.9.4. Setting/Modifying Access Rights for Users/Groups ............................................................. 44
4.9.5. About Access Rights ........................................................................................................ 44
4.9.6. Specify Share-Level Access Protocols ................................................................................ 44
4.10. Dashboard: Network ................................................................................................................... 45
4.10.1. Standard Settings ............................................................................................................ 45
4.10.2. Advanced Settings .......................................................................................................... 46
4.11. Dashboard: Drive Information ...................................................................................................... 47
4.11.1. Formatting Your d2 Network 2 ........................................................................................ 47
4.11.2. Modifying the USB Share Capacity ................................................................................... 48
4.12. Dashboard: Eco Management ..................................................................................................... 49
4.12.1. UPS Management........................................................................................................... 50
4.12.2. Wake on LAN ................................................................................................................ 51
4.13. Dashboard: Support .................................................................................................................... 52
4.13.1. Email Notification Events ................................................................................................. 53
4.14. Dashboard: Download ................................................................................................................ 54
4.14.1. Download Page Settings ................................................................................................. 54
4.15. Dashboard: Copy ....................................................................................................................... 55
4.15.1. Creating a Backup Job ................................................................................................... 55
4.16. Dashboard: External Ports............................................................................................................ 56
4.16.1. Connecting an External Hard Drive .................................................................................. 57
4.17. Update Product Software ............................................................................................................. 58
4.17.1. Method 1: Auto-Update .................................................................................................. 58
4.17.2. Method 2: Update with LaCie Network Assistant Software .................................................. 59
4.18. Reset to Factory .......................................................................................................................... 60
4.19. Reset to Factory .......................................................................................................................... 60
5. Technical Information................................................................................................ 61
5.1. Optimizing Data Transfers ........................................................................................................... 61
6. Troubleshooting ........................................................................................................ 62
6.1. System Log ................................................................................................................................. 62
6.2. Manual Updates ......................................................................................................................... 62
6.3. Troubleshooting the Network Connection ..................................................................................... 63
6.4. Troubleshooting the USB Connection ........................................................................................... 65
6.4.1. Mac Users ..................................................................................................................... 65
6.4.2. Windows Users ............................................................................................................... 66
6.5. Troubleshooting Active Directory Connections ............................................................................... 69
6.5.1. Product / LAN Side ......................................................................................................... 69
6.5.2. Active Directory / Domain Side ........................................................................................ 72
7. Contacting Customer Support ................................................................................... 73
7.1. LaCie Technical Support Contacts ................................................................................................ 74
8. Warranty Information ............................................................................................... 75
Page 3
LaCie d2 Network 2 • DESIGN BY NEIL POULTON Foreword
User Manual page 3
Copyrights
Copyright © 2011 LaCie. All rights reserved. No part of this publication may
be reproduced, stored in a retrieval system, or transmitted in any form or by any
means, electronic, mechanical, photocopying, recording or otherwise, without
the prior written consent of LaCie.
Licences and free software
The LaCie d2 Network 2 ships with copyrighted software that are licensed under
the GPL, AFL, Apache, Apple, BSD, GNU
LGPL, MIT, OpenLDAP, OpenSSL, PHP,
Python, and Creative Common. It also
includes free software, the source code for
which can be downloaded from the LaCie
website: www.lacie.com/support/
© 2007-2008, Thomas BERNARD.
© 2006 Allan Saddi [email protected]
© 2004, Jan Kneschke, incremental.
© 2001-2006, Patrick K. O’Brien and
Contributors.
© 2003-2009 Stuart Bishop stuart@stuartbishop.net.
© 2006 Kirill Simonov.
© 1996-2006 Julian R Seward.
© 2004, 2005 Darren Tucker. All rights
reserved.
© 1997-2008 University of Cambridge.
All rights reserved.
© 2007-2008, Google Inc. All rights reserved.
© 1990-2003 Sleepycat Software. All
rights reserved.
© 1995-2004 Jean-loup Gailly and Mark
Adler.
© 2004 Micah Dowty.
® 1997-2006 by Secret Labs AB
® 1995-2006 by Fredrik Lundh.
© 1988,1990,1993,1994 by Paul Vixie.
© 2007-2009 Charles du Jeu.
This list of licenses can evolve over time
and can be found on the user interface
under the heading “Credits.”
Trademarks
Apple, Mac, Time Machine, and Macintosh are registered trademarks of Apple
Computer, Inc. Microsoft, Windows XP,
Windows Vista, and Windows 7 are registered trademarks of Microsoft Corporation. Other trademarks mentioned in this
manual are the property of their respective
owners.
Changes
The material in this document is for information only and subject to change
without notice. While reasonable efforts
have been made in the preparation of this
document to assure its accuracy, LaCie
assumes no liability resulting from errors
or omissions in this document, or from the
use of the information contained herein.
LaCie reserves the right to make changes
or revisions in the product design or the
product manual without reservation and
without obligation to notify any person of
such revisions and changes.
Canada Compliance Statement
This Class A digital apparatus meets all
requirements of the Canadian Interference-Causing Equipment Regulations.
ROHS Compliance
This product is ROHS compliant (European Directive 2002/95/EC on the Restriction of Hazardous Substances).
Manufacturer’s
Declaration for CE
Certification
We, LaCie, solemnly declare that this
product conforms to the following European standards: Class B EN60950,
EN55022, EN50082-1, EN61000-3-2
With reference to the following conditions: 2006/95/EC Low Voltage Directive; 2004/108/EC Directive
FCC Statement
LaCie d2 Network 2
Tested to comply with FCC
standards for home or office
use
NOTE: This equipment has been tested
and found to comply with the limits for
a Class B digital device, pursuant to Part
15 of the FCC Rules. These limits are designed to provide reasonable protection
against harmful interference in a residential installation. This equipment generates,
uses and can radiate radio frequency energy and, if not installed and used in accordance with the instructions, may cause
harmful interference to radio communications. However, there is no guarantee that
interference will not occur in a particular
installation. If this equipment does cause
harmful interference to radio or television
reception, which can be determined by
turning the equipment off and on, the user
is encouraged to try and correct the interference by one or more of the following
measures:
✦ Reorient or relocate the receiving
antenna.
✦ Increase the separation between the
equipment and receiver.
✦ Connect the equipment into an out-
let on a circuit different from that to
which the receiver is connected.
✦ Consult the dealer or an experi-
enced radio/TV technician for help.
✦ Modifications to this product not
authorized by LaCie could void the
FCC & Industry Canada regulations
and negate your authority to operate the product.
100202 v1.3
Page 4

LaCie d2 Network 2 • DESIGN BY NEIL POULTON Foreword
User Manual page 4
This symbol on the product
or on its packaging indicates
that this product must not be
disposed of with your other
household waste. Instead, it
is your responsibility to dispose of your
waste equipment by handing it over to a
designed collection point for the recycling
of waste electrical and electronic equipment. The separate collection and recycling of your waste equipment at the time
of disposal will help to conserve natural
resources and ensure that it is recycled in
a manner that protects human health and
the environment. For more information
about where you can drop off your waste
equipment for recycling, please contact
your local city office, your household
waste disposal service, or the shop where
you purchased the product.
Health and Safety
Precautions
✦ Only qualified persons are autho-
rized to carry out maintenance on
this device.
✦ Read this User Manual carefully and
follow the correct procedure when
setting up the device.
✦ Do not open your LaCie d2 Net-
work 2 or attempt to disassemble or
modify it. Never insert any metallic
object into the drive to avoid any
risk of electrical shock, fire, shortcircuiting or dangerous emissions.
Your LaCie d2 Network 2 contains
no user-serviceable parts. If it appears to be malfunctioning, have
it inspected by a qualified LaCie
Technical Support representative.
✦ Never expose your device to rain,
or use it near water, or in damp or
wet conditions. Never place objects
containing liquids on the LaCie d2
Network 2, as they may spill into its
openings. Doing so increases the
risk of electrical shock, short-circuiting, fire, or personal injury.
✦ Power requirements 100-240 V~,
0.9 A, 50-60 Hz, (Supply voltage
fluctuations not exceeding ± 10%
of the nominal, transient overvoltages according to over-voltage
category II).
General Use Precautions
✦ Do not expose the LaCie d2 Net-
work 2 to temperatures outside the
range of 5° C to 35° C (41° F to
95° F); or to operational humidity
beyond 5-80%, non-condensing, or
non-operating humidity beyond 1090%, non-condensing. Doing so
may damage the LaCie d2 Network
2 or disfigure its casing. Avoid placing your LaCie d2 Network 2 near
a source of heat or exposing it to
sunlight (even through a window).
Inversely, placing your LaCie d2
Network 2 in an environment that is
too cold or humid may damage the
unit. Because of heat issues, LaCie
recommends that users do not stack
multiple d2 Network 2 together.
✦ Always unplug the LaCie d2 Net-
work 2 from the electrical outlet if
there is a risk of lightning or if it will
be unused for an extended period
of time. Otherwise, there is an increased risk of electrical shock,
short-circuiting or fire.
✦ Use only the power supply shipped
with the device.
✦ Do not use the LaCie d2 Network
2 near other electrical appliances
such as televisions or radios. Doing
so may cause interference which will
adversely affect the operation of the
other products.
✦ Do not place the LaCie d2 Net-
work 2 near sources of magnetic
interference, such as computer
displays, televisions or speakers. Magnetic interference can
affect the operation and stability of your LaCie d2 Network 2.
Do not place heavy objects on top
of the LaCie d2 Network 2.
✦ Never use excessive force on your
LaCie d2 Network 2. If you detect
a problem, see the Troubleshooting
section in this manual.
IMPORTANT INFO: Any loss, corrup-
tion or destruction of data while using a
LaCie drive is the sole responsibility of
the user, and under no circumstances will
LaCie be held liable for the recovery or
restoration of this data. To help prevent
the loss of your data, LaCie highly recommends that you keep TWO copies of your
data; one copy on your external hard disk,
for instance, and a second copy either on
your internal hard disk, another external
hard disk or some other form of removable storage media. LaCie offers a complete line of CD and DVD drives. If you
would like more information on backup,
please refer to our website.
IMPORTANT INFO: 1GB =
1,000,000,000 bytes. 1TB =
1,000,000,000,000 bytes. Once format-
Page 5

LaCie d2 Network 2 • DESIGN BY NEIL POULTON Foreword
User Manual page 5
ted, the actual available storage capacity
varies depending on operating environment (typically 10% less).
IMPORTANT INFO: Some enhance-
ments brought to the product during its
lifetime may cause discrepancies between
the information and screenshots in the
manual and the actual user experience.
CAUTION: Modifications not authorized
by the manufacturer may void the user’s
authority to operate this device.
CAUTION: A shielded-type power cord
is required in order to meet FCC emission
limits and also to prevent interference to
the nearby radio and television reception.
It is essential that only the supplied power
cord be used.
Page 6
LaCie d2 Network 2 • DESIGN BY NEIL POULTON Introduction
User Manual page 6
1. Introduction
Congratulations on your purchase of a LaCie d2 Network 2. Designed to satisfy the data sharing and backup needs of small offices,
the LaCie d2 Network 2 represents the new generation of shared
storage with security.
To navigate this manual, use the PDF bookmarks or consult the
table of contents. For quick access to important sections, see the
Quick Links box below.
Quick Links
Click a topic:
✦ Connecting to a Network
✦ Accessing and Transferring Files
✦ Administering Your LaCie d2 Network 2
Page 7

LaCie d2 Network 2 • DESIGN BY NEIL POULTON Introduction
User Manual page 7
1.1. Minimum System Requirements
1.1.1. Windows users
✦ Computer with an Ethernet network adapter
✦ Windows XP, Windows Vista, or Windows 7
✦ Minimum free disk space: 600MB recommended
✦ Web browsers: Internet Explorer 7.0, Firefox 3.0, Safari 3.0,
or Chrome 2.0 or higher
1.1.2. Mac Users
✦ Computer with an Ethernet network adapter
✦ Mac OS X 10.4, 10.5, and 10.6
✦ Minimum free disk space: 600MB recommended
✦ Web browsers: Internet Explorer 7.0, Firefox 3.0, Safari 3.0,
or Chrome 2.0 or higher
1.1.3. Linux Users
✦ Computer with an Ethernet network adapter
✦ Linux 2.6 or later
✦ Minimum free disk space: 600MB recommended
✦ Web browsers: Internet Explorer 7.0, Firefox 3.0, Safari 3.0,
or Chrome 2.0 or higher
IMPORTANT INFO: The LaCie d2 Network 2’s performance can
be affected by such external forces as network activity, hardware,
distance, and setup.
IMPORTANT INFO: For optimal performance, use a Gigabit Eth-
ernet router and a Gigabit Ethernet board in your host computer.
Page 8
LaCie d2 Network 2 • DESIGN BY NEIL POULTON Introduction
User Manual page 8
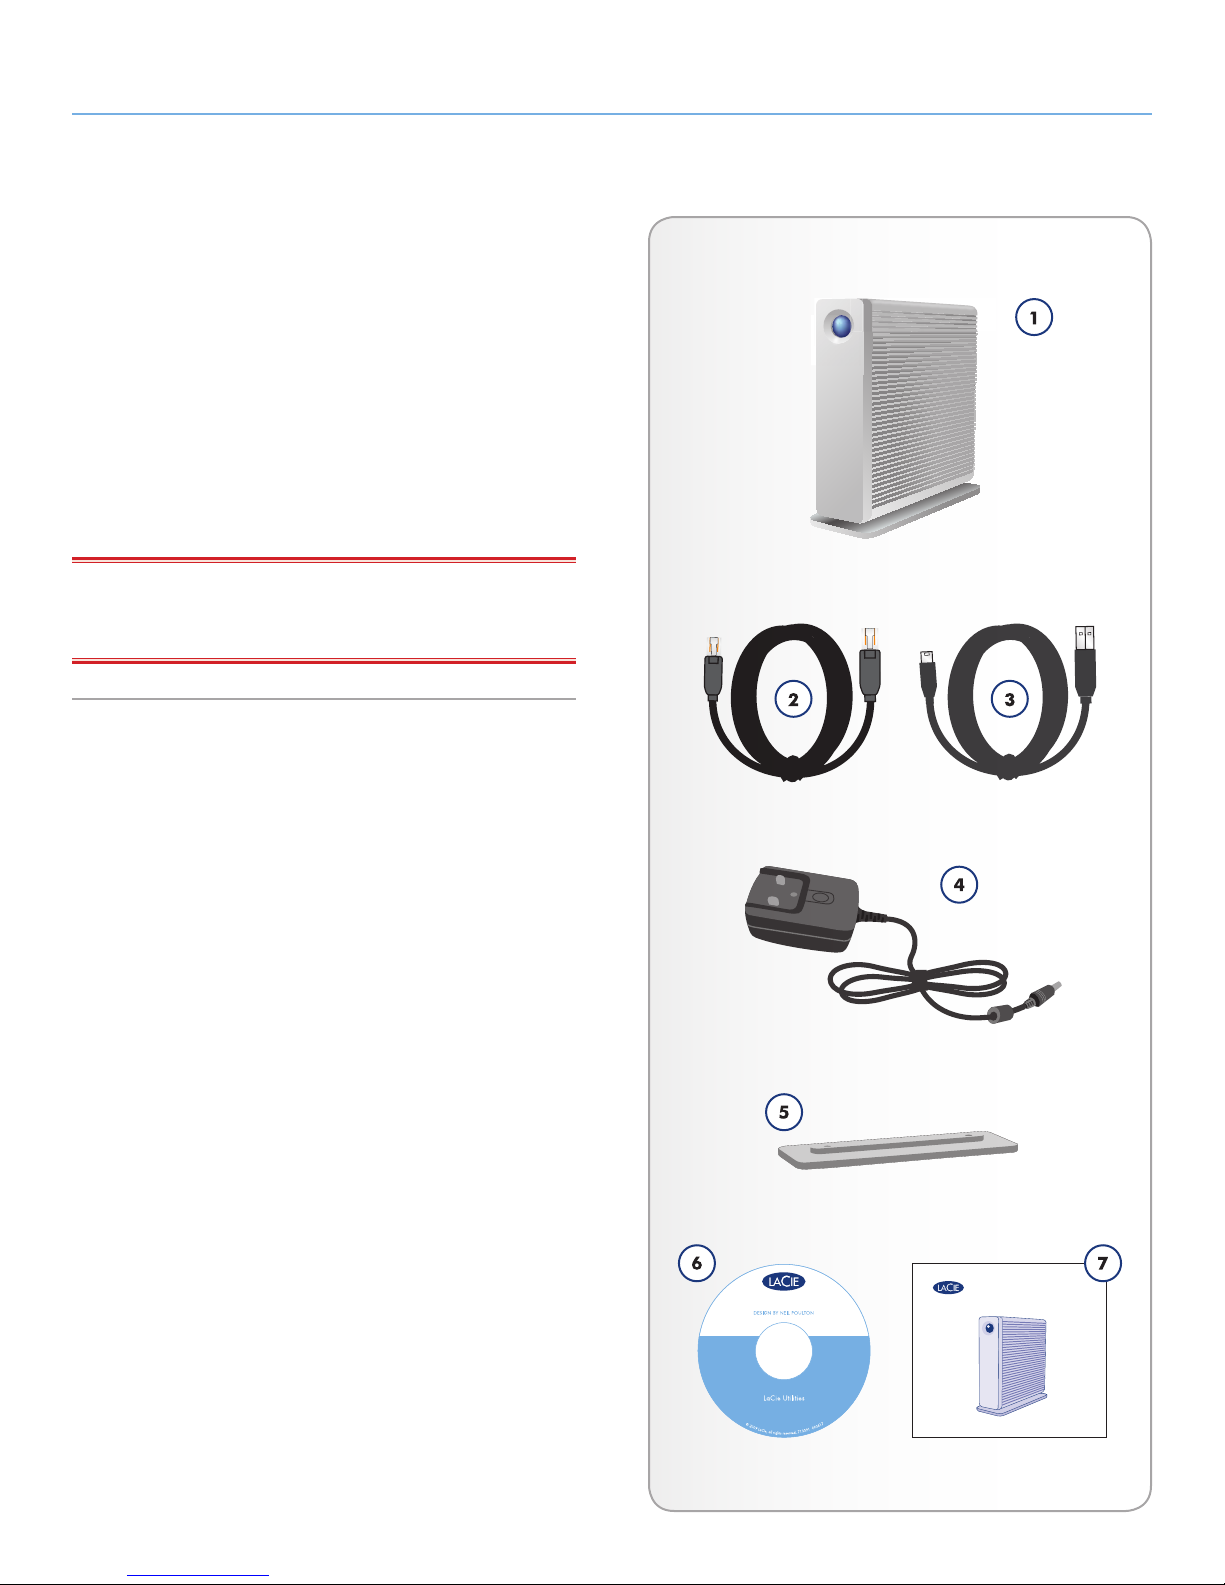
1.2. Box Content
1. LaCie d2 Network 2
2. Ethernet cable
3. USB 2.0 cable
4. External power supply
5. Drive stand for upright use
6. Utilities CD-ROM with software and User Manual
7. Quick Install Guide
IMPORTANT INFO: Please save your packaging. In the event that
the drive should need to be repaired or serviced, it must be returned
in its original packaging.
NetworkFamily
d2 Network 2
Gigabit Ethernet
DESIGN BY NEI L POULTO N
Quick Install Guide
Page 9
LaCie d2 Network 2 • DESIGN BY NEIL POULTON Introduction
User Manual page 9
1.3. Hard Drive Heat Management
Heat Dissipation Design
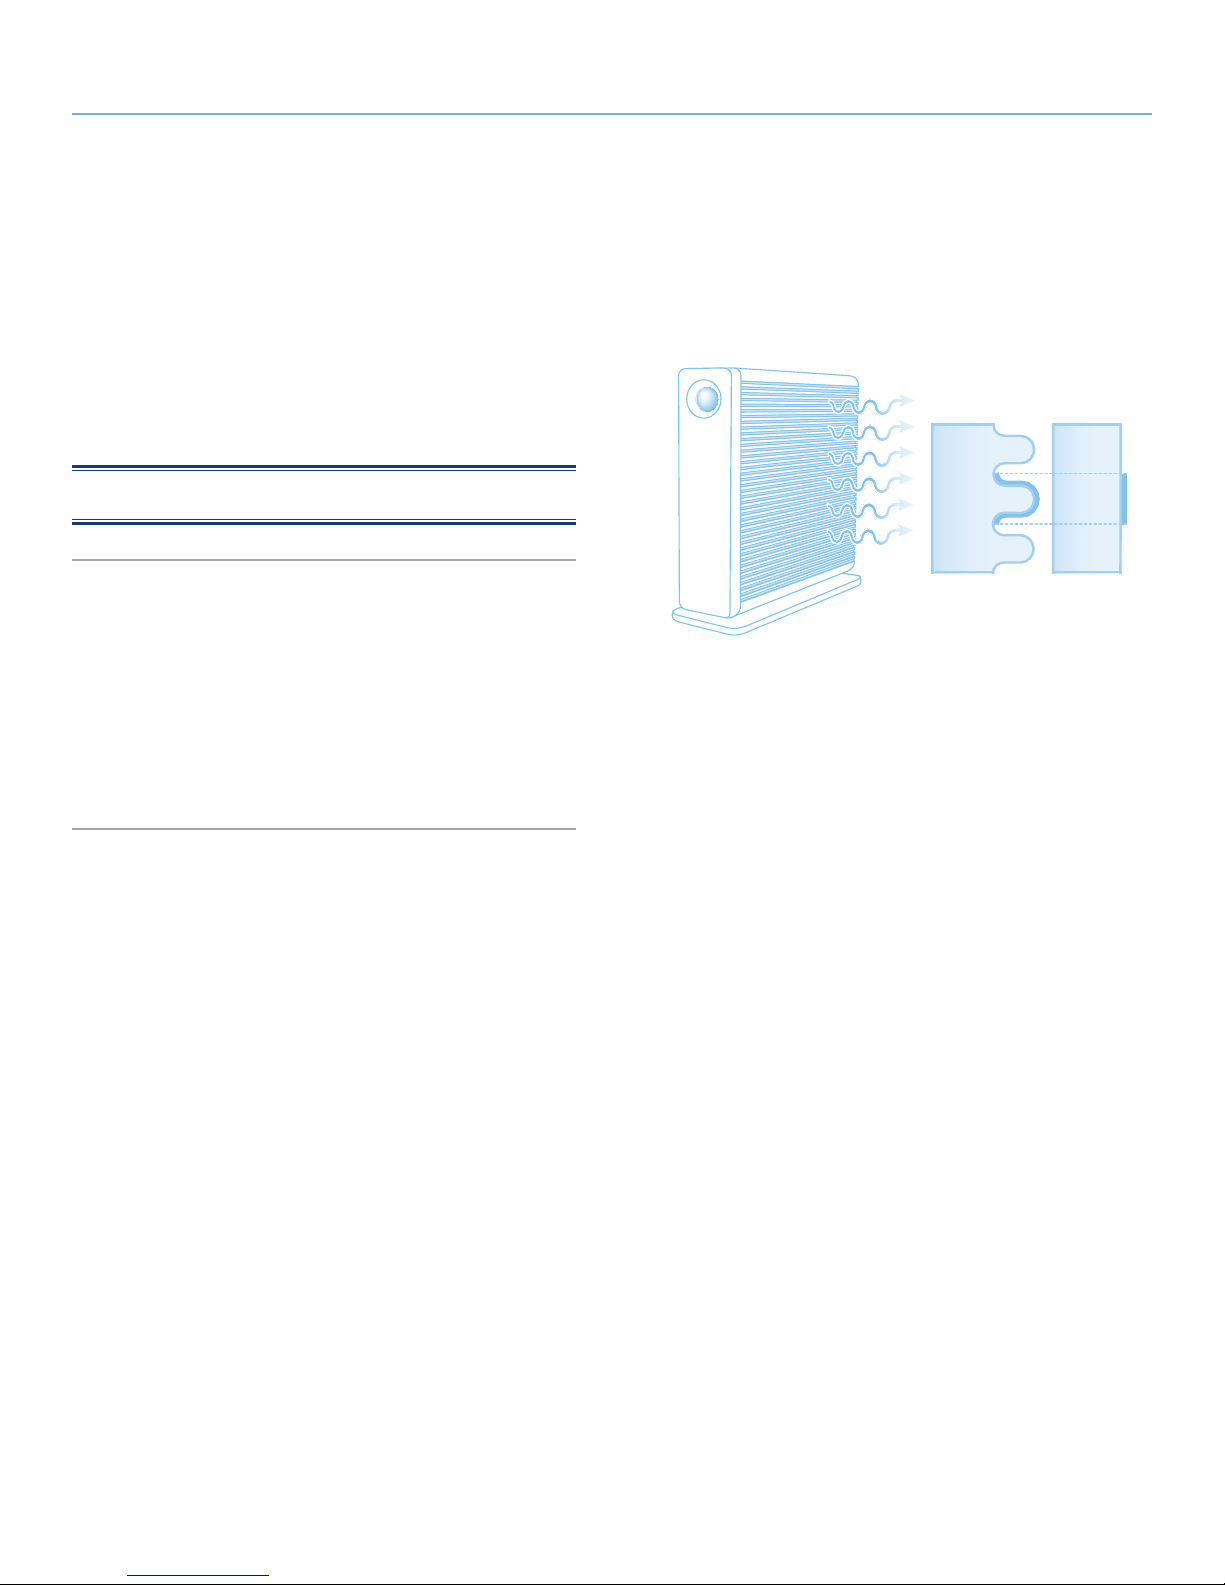
The LaCie d2 Network 2’s metal body is ideal for naturally dissipating internal drive heat. Its unique design actually draws heat away
from the internal drives toward the external casing without requiring
a fan. This feature takes heat away from the internal drive, keeping
it safe and prolonging its life and reliability. As a consequence, it is
normal for the external casing to be hot to the touch.
NOTE: The d2 Network 2 is fanless.
Vertical, Horizontal & Rackmount
Exclusive d2 Heat Sink Design
Provides 60% more
area for heat dissipation
Heat Sink
Design
Standard
Design
Heat dissipation is maximized when the drive is in the vertical position. If you have several LaCie drives stacked on each other, please
remember to attach the included rubber feet on the under side of
your drives. This will allow for some airflow between your drives so
that the heat dissipation can work effectively. LaCie does not recommend stacking or racking more than three drives on top of each
other, especially if these drives are turned ON simultaneously.
Page 10
LaCie d2 Network 2 • DESIGN BY NEIL POULTON Introduction
User Manual page 10
1.4. Views of the Drive
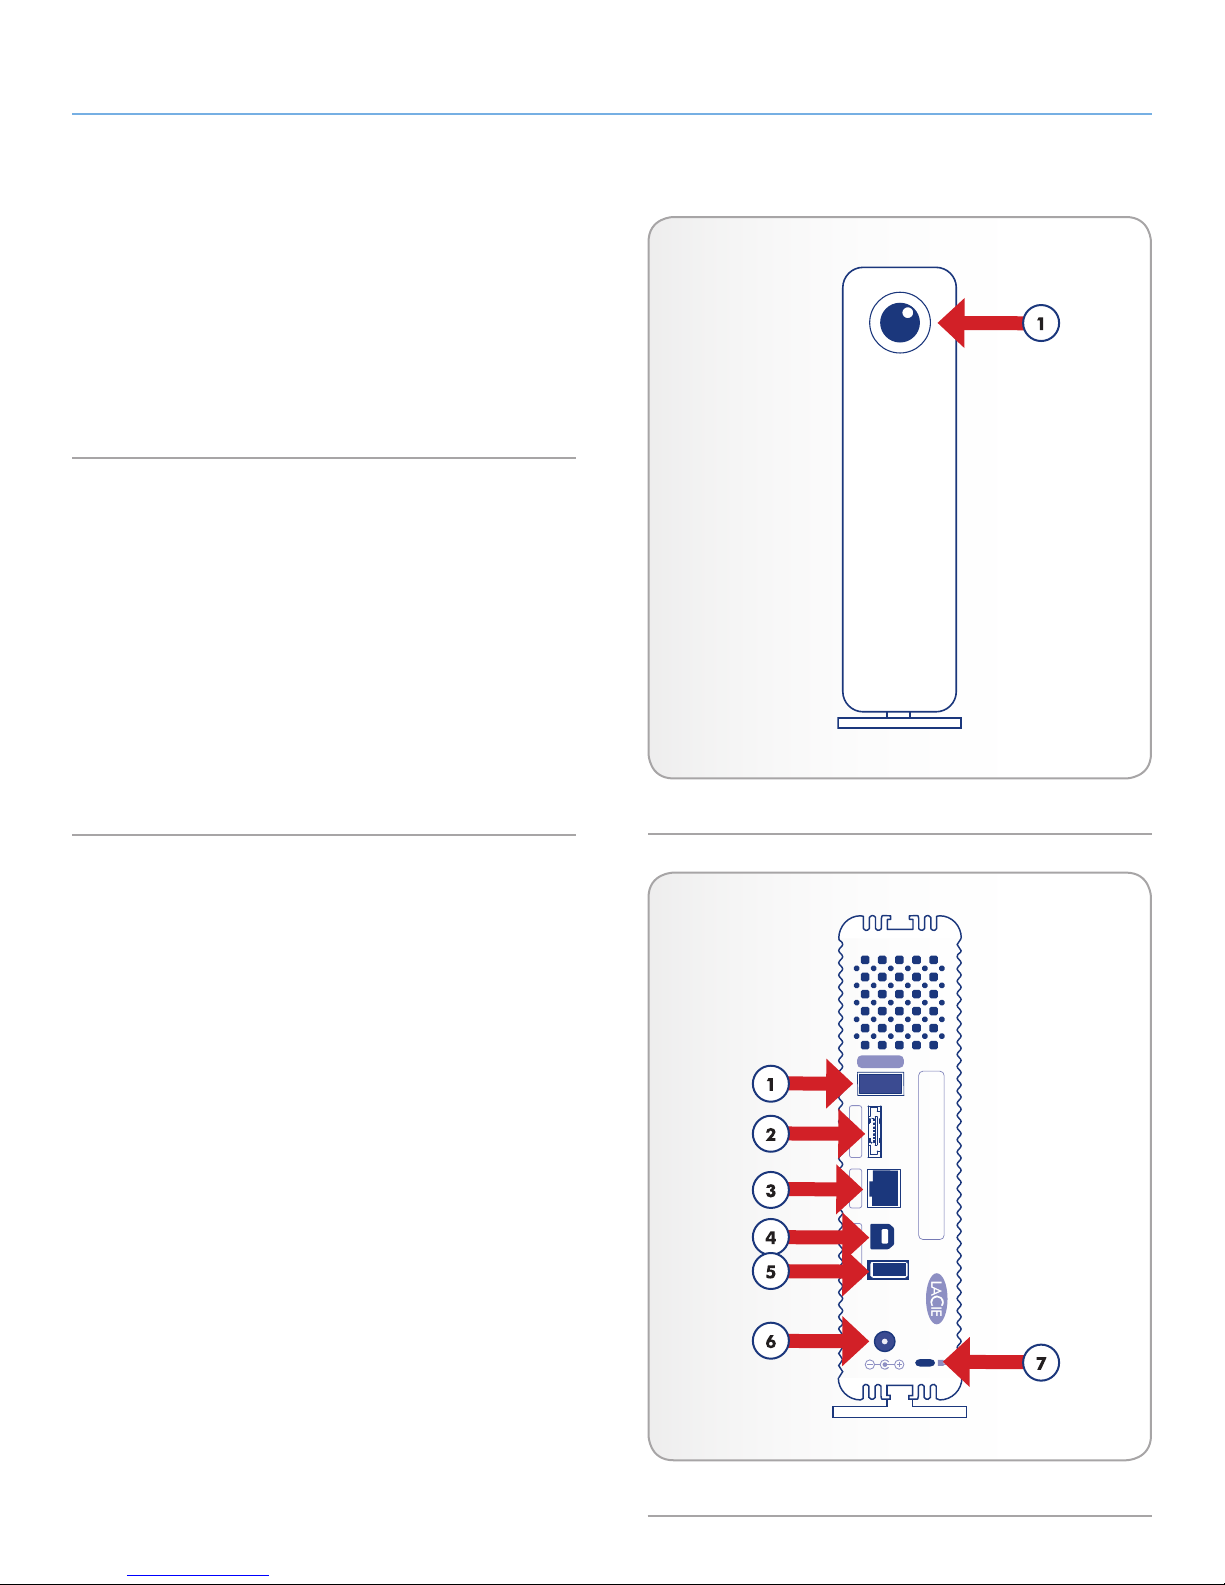
1.4.1. Front View
Button and Activity LED: The blue button stays on to show disk activity (unless you turn it off using the Dashboard, the user interface) and
can also be configured to put it to sleep or wake it from sleep. For
details, see 2.5. Power Button Functions and 4.12. Dashboard: Eco
Management.
1.4.2. Rear View
1. ON/OFF
2. eSATA Expansion
3. Gigabit Ethernet
4. USB 2.0 Direct Connection
5. USB 2.0 Expansion
6. Power Connector
7. Kensington Lock Slot
Fig. 01
ON OFF
eSATA LAN B USB A
DESIGNED BY NEIL POULTON
Fig. 02
Page 11
LaCie d2 Network 2 • DESIGN BY NEIL POULTON Introduction
User Manual page 11
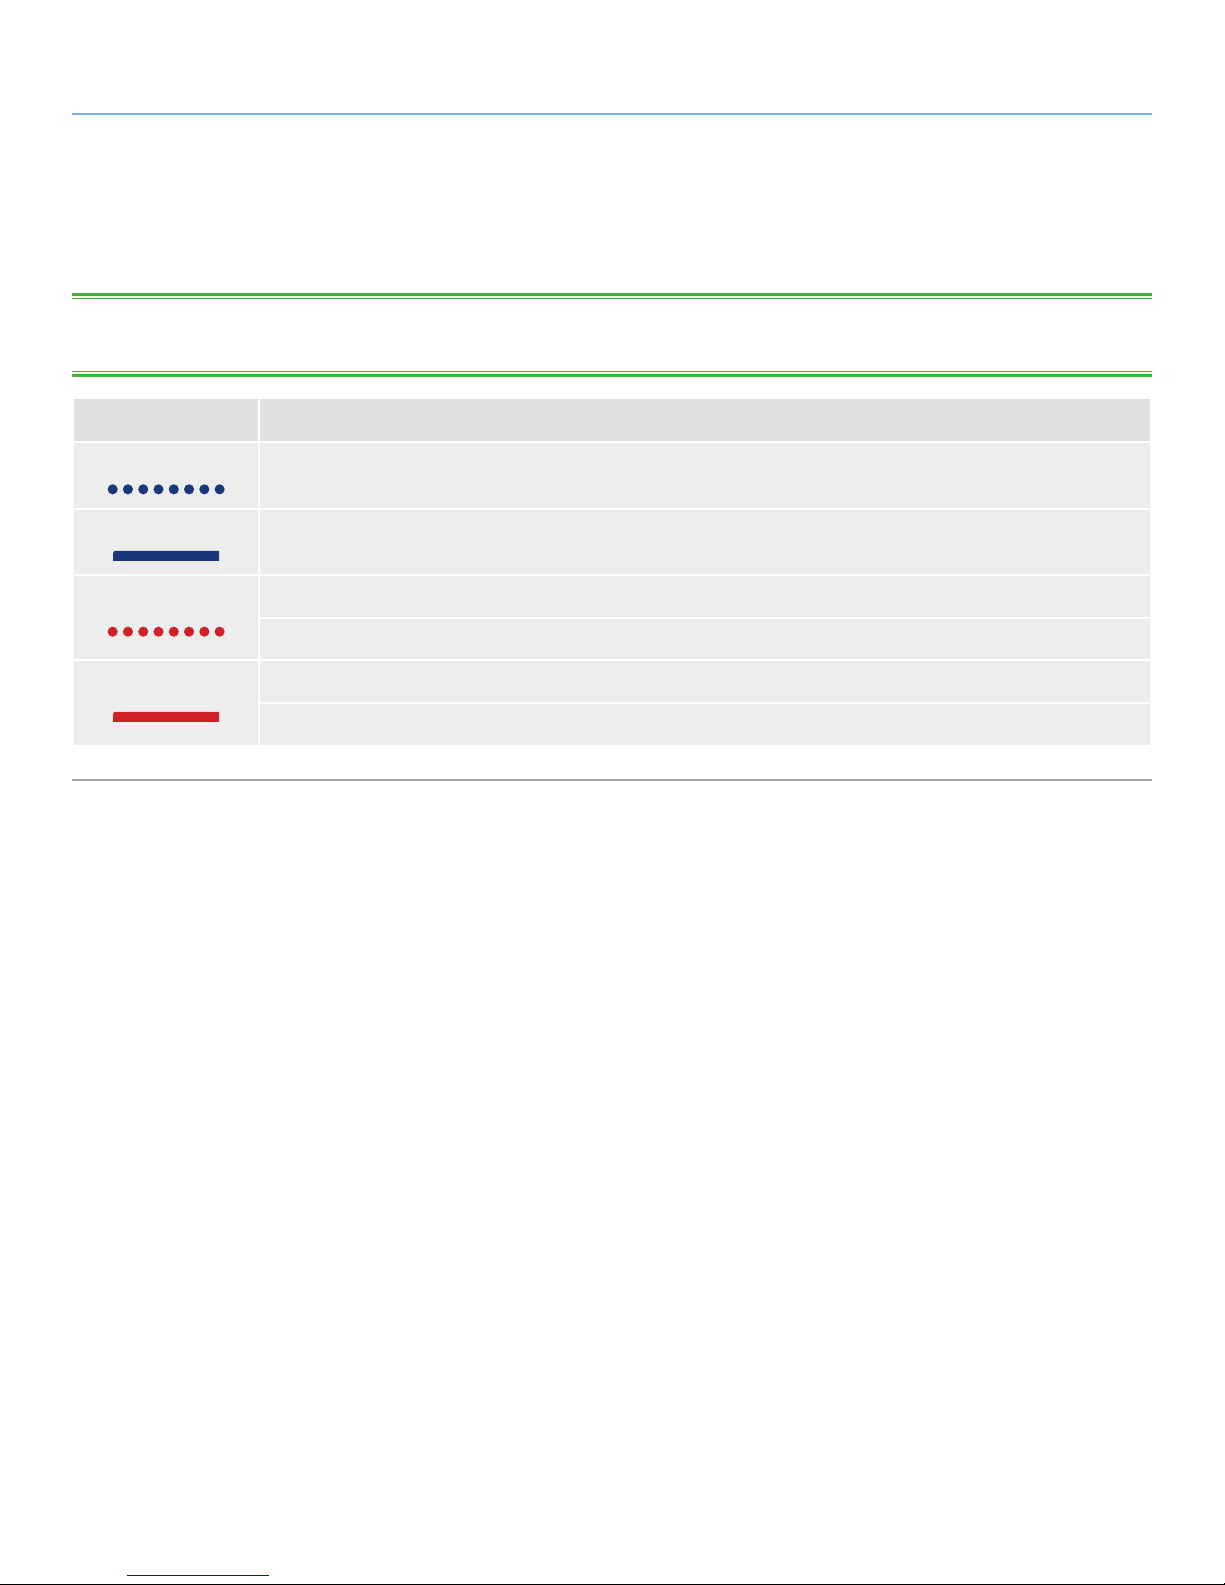
1.4.3. LED Behavior
The front LED indicates drive status and activity. This section describes the behavior of the LED indicators.
TECHNICAL NOTE: Even if you have turned off the front LED using the administration page (“Dashboard”, see 4.12. Dashboard: Eco Manage-
ment), events triggering a red light will always cause the front LED to turn on.
Front LED Color d2 Network 2 State
Blinking blue
Solid blue Drive working (read/write)
Blinking red
Solid red
Occurs as the drive is booting; will cease once the drives are fully initialized
Temperature alert (first level)
Power supply has been cut but power is still being supplied through the UPS
Temperature alert (critic level) – the product will shut off
Power supply has been cut and the UPS has run out of reserve power – the product will shut off
Page 12

LaCie d2 Network 2 • DESIGN BY NEIL POULTON Connecting to a Network
User Manual page 12
2. Connecting to a Network
The d2 Network 2 can be connected directly to a computer via USB
or to your network via Ethernet. This chapter explains how to connect your hard drive to your network. For details on connecting to a
computer, refer to chapter 3.4. Accessing Shares via USB.
Follow these steps to getting your LaCie d2 Network 2 connected
to your network:
2.1. STEP 1: Connect the Power Supply
2.2. STEP 2: Connect the Ethernet Cable
2.3. STEP 3: Connect using LaCie Network Assistant
2.4. STEP 4: Completing the Setup Wizard
Page 13
LaCie d2 Network 2 • DESIGN BY NEIL POULTON Connecting to a Network
User Manual page 13
2.1. STEP 1: Connect the Power
Supply
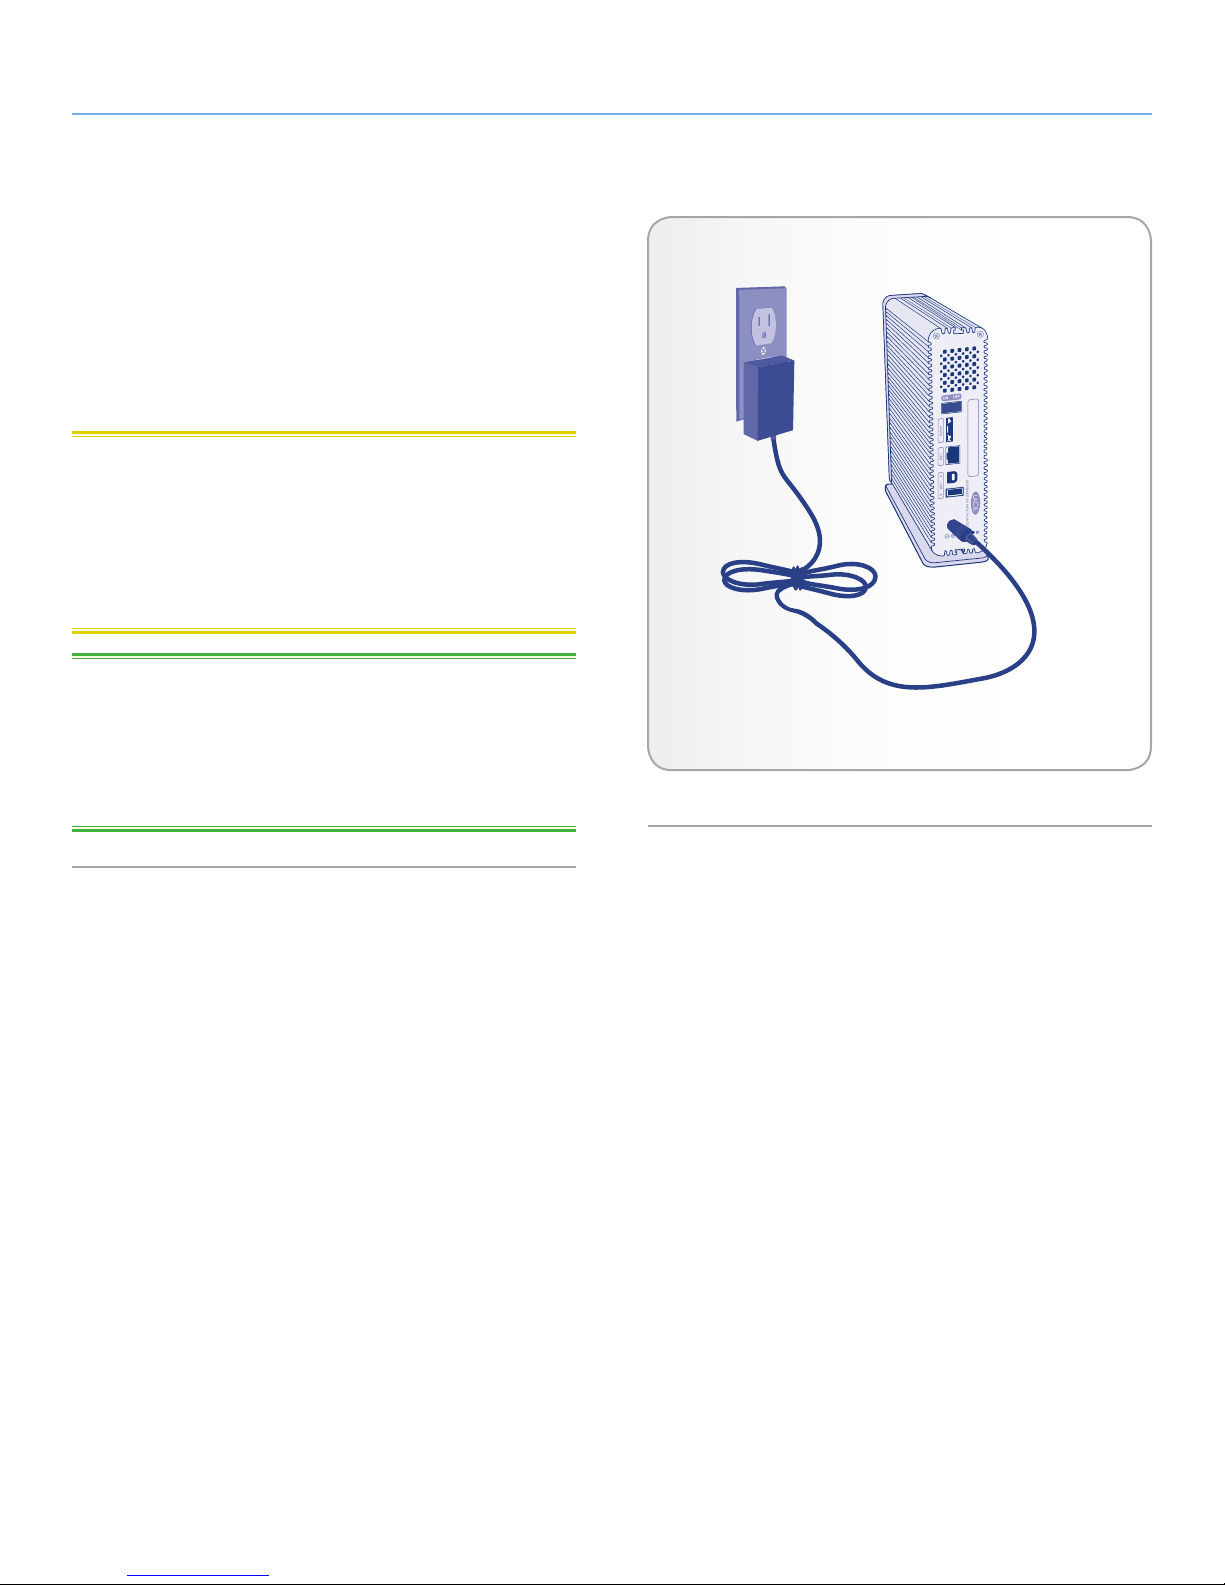
1. Connect the power supply to a wall outlet and to the LaCie d2
Network 2 (Fig. 03).
Now move on to step 2, section 2.2. STEP 2: Connect the Ethernet
Cable.
CAUTION: Only use the AC adapter supplied with your specific
LaCie device. Do not use a power supply from another LaCie device
or another manufacturer. Using any other power cable or power
supply may cause damage to the device and void your warranty.
Always remove the AC adapter before transporting your LaCie drive.
Failure to remove the adapter may result in damage to your drive
and will void your warranty.
TECHNICAL NOTE: You may use your LaCie drive when in a for-
eign country thanks to its 100-240 Volt power supply. To be able to
use this feature, you may need to purchase an appropriate adapter
or cord. LaCie accepts no responsibility for any damage to the drive
resulting from the use of an inappropriate adapter. Using an adapter other than one authorized by LaCie will void your warranty.
Fig. 03
Page 14
LaCie d2 Network 2 • DESIGN BY NEIL POULTON Connecting to a Network
User Manual page 14
2.2. STEP 2: Connect the Ethernet
Cable
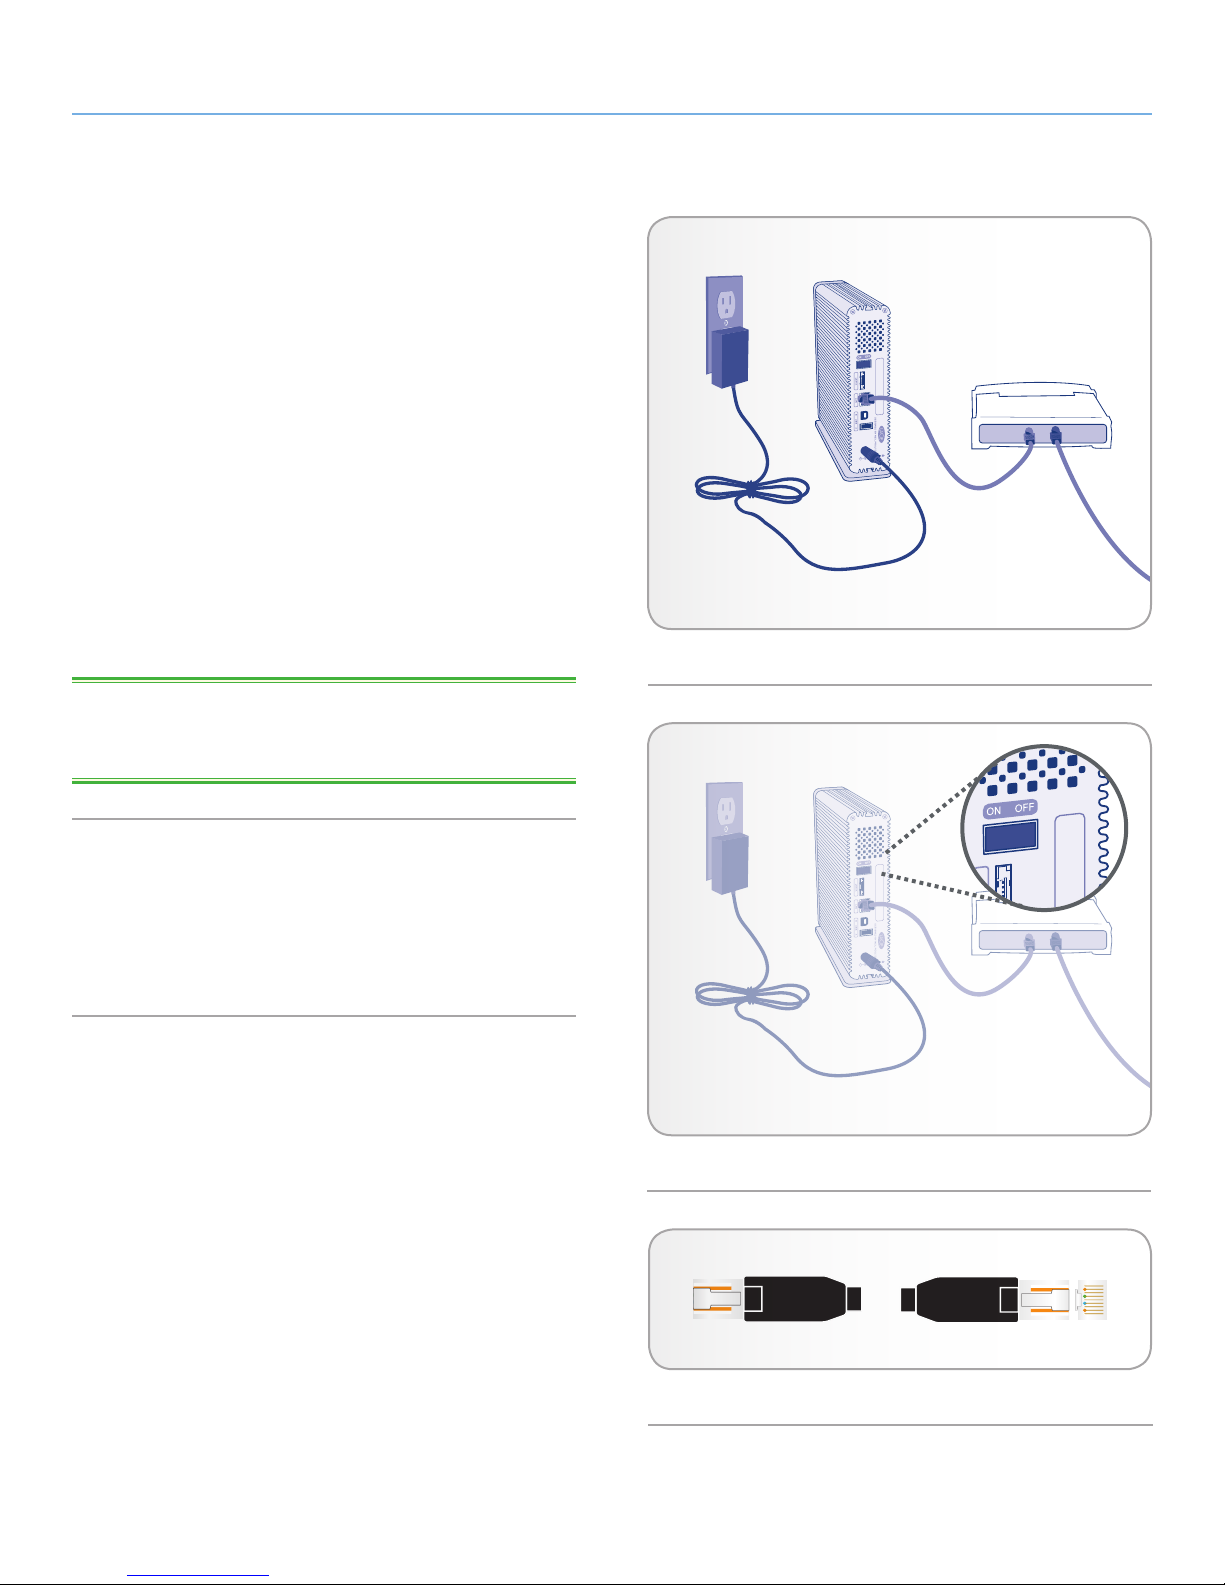
1. Connect the Ethernet cable to the Ethernet port on the back of
the LaCie d2 Network 2 (Fig. 04).
2. Connect the other end of the Ethernet cable into an available
Ethernet “out” port on your router or hub (refer to your router or
hub’s documentation if necessary).
3. Turn on the drive by pressing the power button on the back of
the drive (Fig. 05). The front LED will turn on and then begin
blinking.
The drive is ready to be accessed once the blue LED has stopped
blinking. The product may take up to 3 minutes to boot.
Now move on to step 3, section 2.3. STEP 3: Connect using LaCie
Network Assistant.
Fig. 04
TECHNICAL NOTE: Depending on your computer’s Ethernet set-
tings, you may be able to connect the d2 Network 2 directly to your
computer using the Ethernet cable.
Gigabit Ethernet Cables And Connectors
See Fig. 06 for an illustration of the Ethernet cable used to connect
your LaCie d2 Network 2 to your network device. The ends of the
Ethernet cable are the same and either end can be connected to the
LaCie d2 Network 2 or your router.
Fig. 05
Fig. 06 - Gigabit Ethernet cable ends
Page 15
LaCie d2 Network 2 • DESIGN BY NEIL POULTON Connecting to a Network
User Manual page 15
2.3. STEP 3: Connect using LaCie
Network Assistant
LaCie Network Assistant software detects all LaCie network-attached
storage devices on your network and gives you easy ways to connect
to or configure them.
Once installed and running, Network Assistant will appear in your
task bar (Windows users, Fig. 08) or in the menu bar (Mac users,
Fig. 09) and automatically search for storage devices on your net-
work. When a new device is found, the icon will blink.
When Network Assistant finds your LaCie d2 Network 2, you can
connect to any of its shares, log in to the Dashboard (user interface,
see 4.1. Dashboard: Accessing), or configure its network settings.
TECHNICAL NOTE: If you’ve installed LNA before purchasing the
d2 Network 2, make sure that you download and install the latest
version from the LaCie website.
TECHNICAL NOTE: If you can’t do don’t want to install LNA, you
can still access the Dashboard by typing http://LaCie-d2 (Windows),
http://lacie-d2.local (Mac), or http://[IP address] (either).
Install LaCie Network Assistant:
1. Insert the LaCie d2 Network 2 CD-ROM into your computer’s
CD-ROM drive.
2. Windows users, the CD should appear in My Computer. Mac
users, the CD should appear on the desktop. Double-click the
CD icon, then double-click “LaCie Network Assistant Setup”.
Fig. 07
Fig. 08
3. Follow the Wizard to complete installation.
continued on next page >>
Fig. 09
Page 16
LaCie d2 Network 2 • DESIGN BY NEIL POULTON Connecting to a Network
User Manual page 16
Connect to the LaCie d2 Network 2:
1. Launch LaCie Network Assistant and use it to open the Dashboard (user interface).
Windows Users
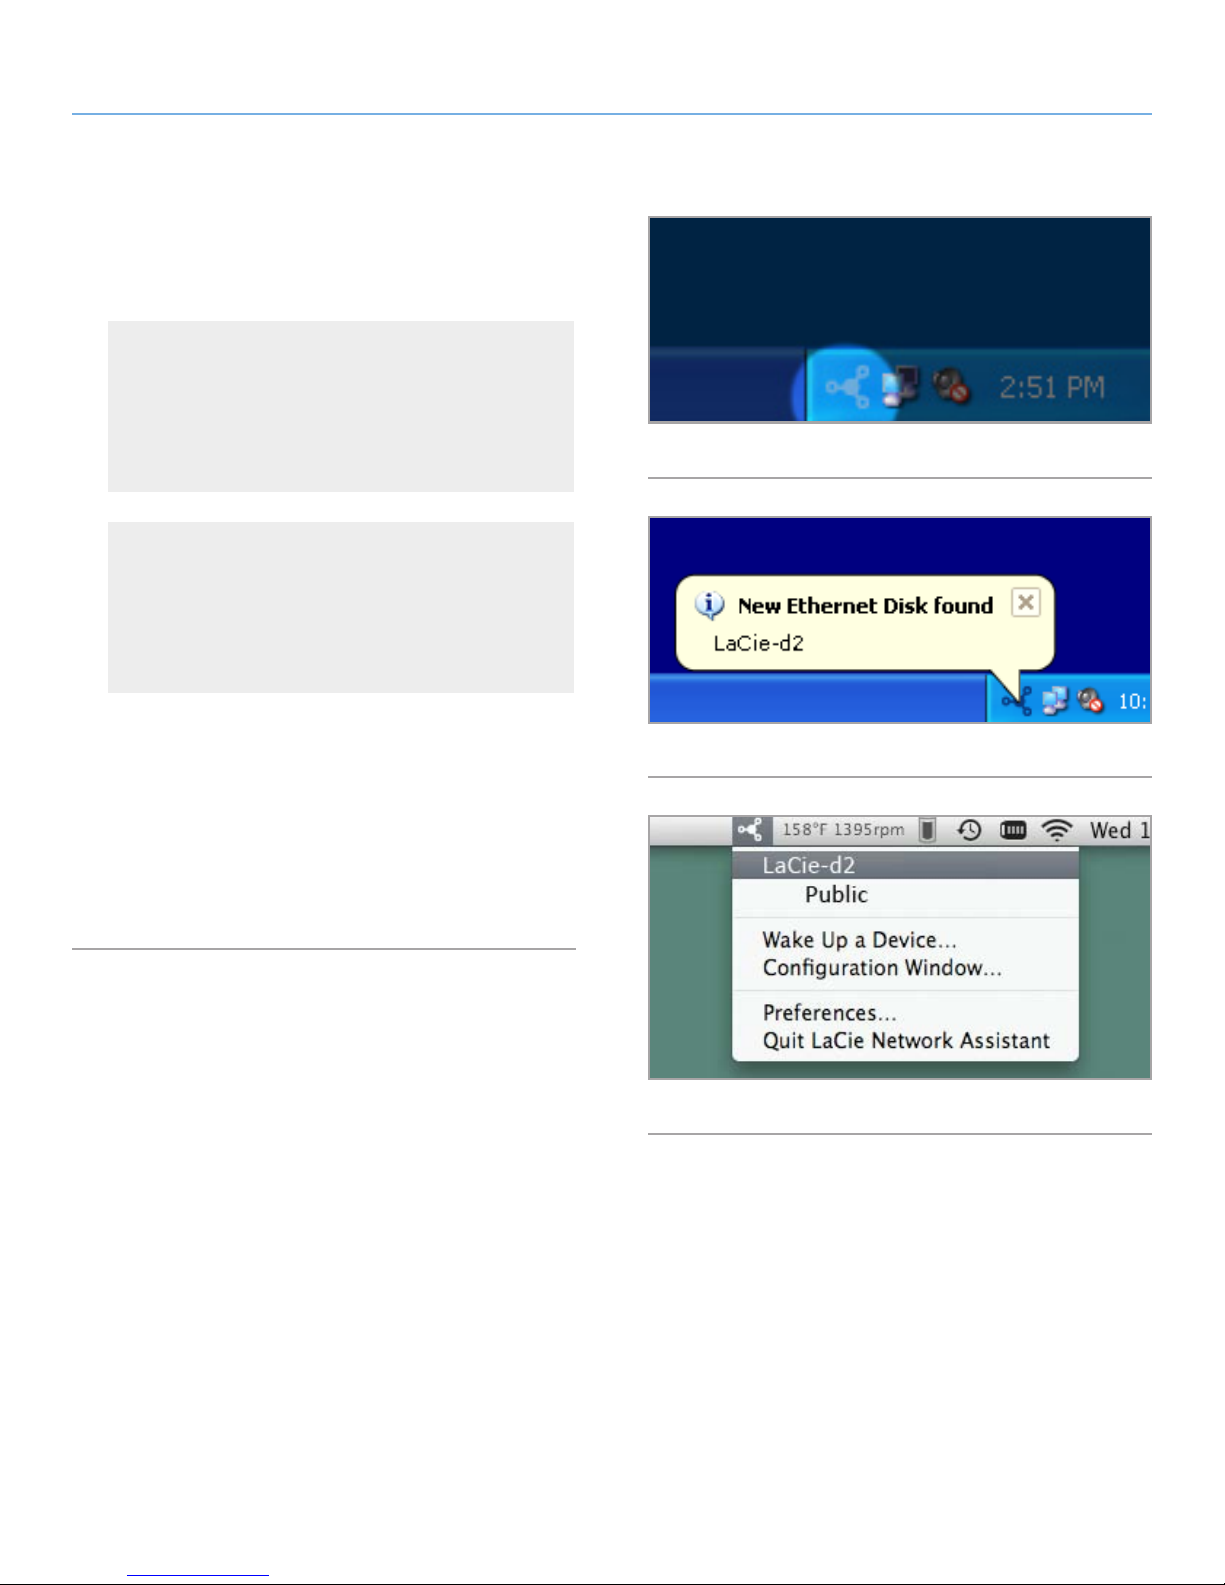
Select LaCie Network Assistant in Start/Programs. A Network Assistant icon will appear in the system tray (Fig. 10)
and Network Assistant will automatically detect your LaCie
d2 Network 2 and any other storage devices on your network (Fig. 11).
Mac Users
Select LaCie Network Assistant in your Applications folder. A Network Assistant icon will appear in the menu bar
and the Assistant will automatically detect your LaCie d2
Network 2 and any other LaCie storage devices on your
network.
Fig. 10
2. Click on the icon in the system tray (Windows) or menu bar
(Mac) and select LaCie-d2 (Fig. 12). The Dashboard will open
in your default web browser.
3. If this is the first time you’ve connected to the Dashboard, proceed to the next step, 2.4. STEP 4: Completing the Setup Wiz-
ard. For subsequent logins, refer to section 4.1. Dashboard:
Accessing.
Fig. 11
Fig. 12
Page 17
LaCie d2 Network 2 • DESIGN BY NEIL POULTON Connecting to a Network
User Manual page 17
2.4. STEP 4: Completing the Setup
Wizard
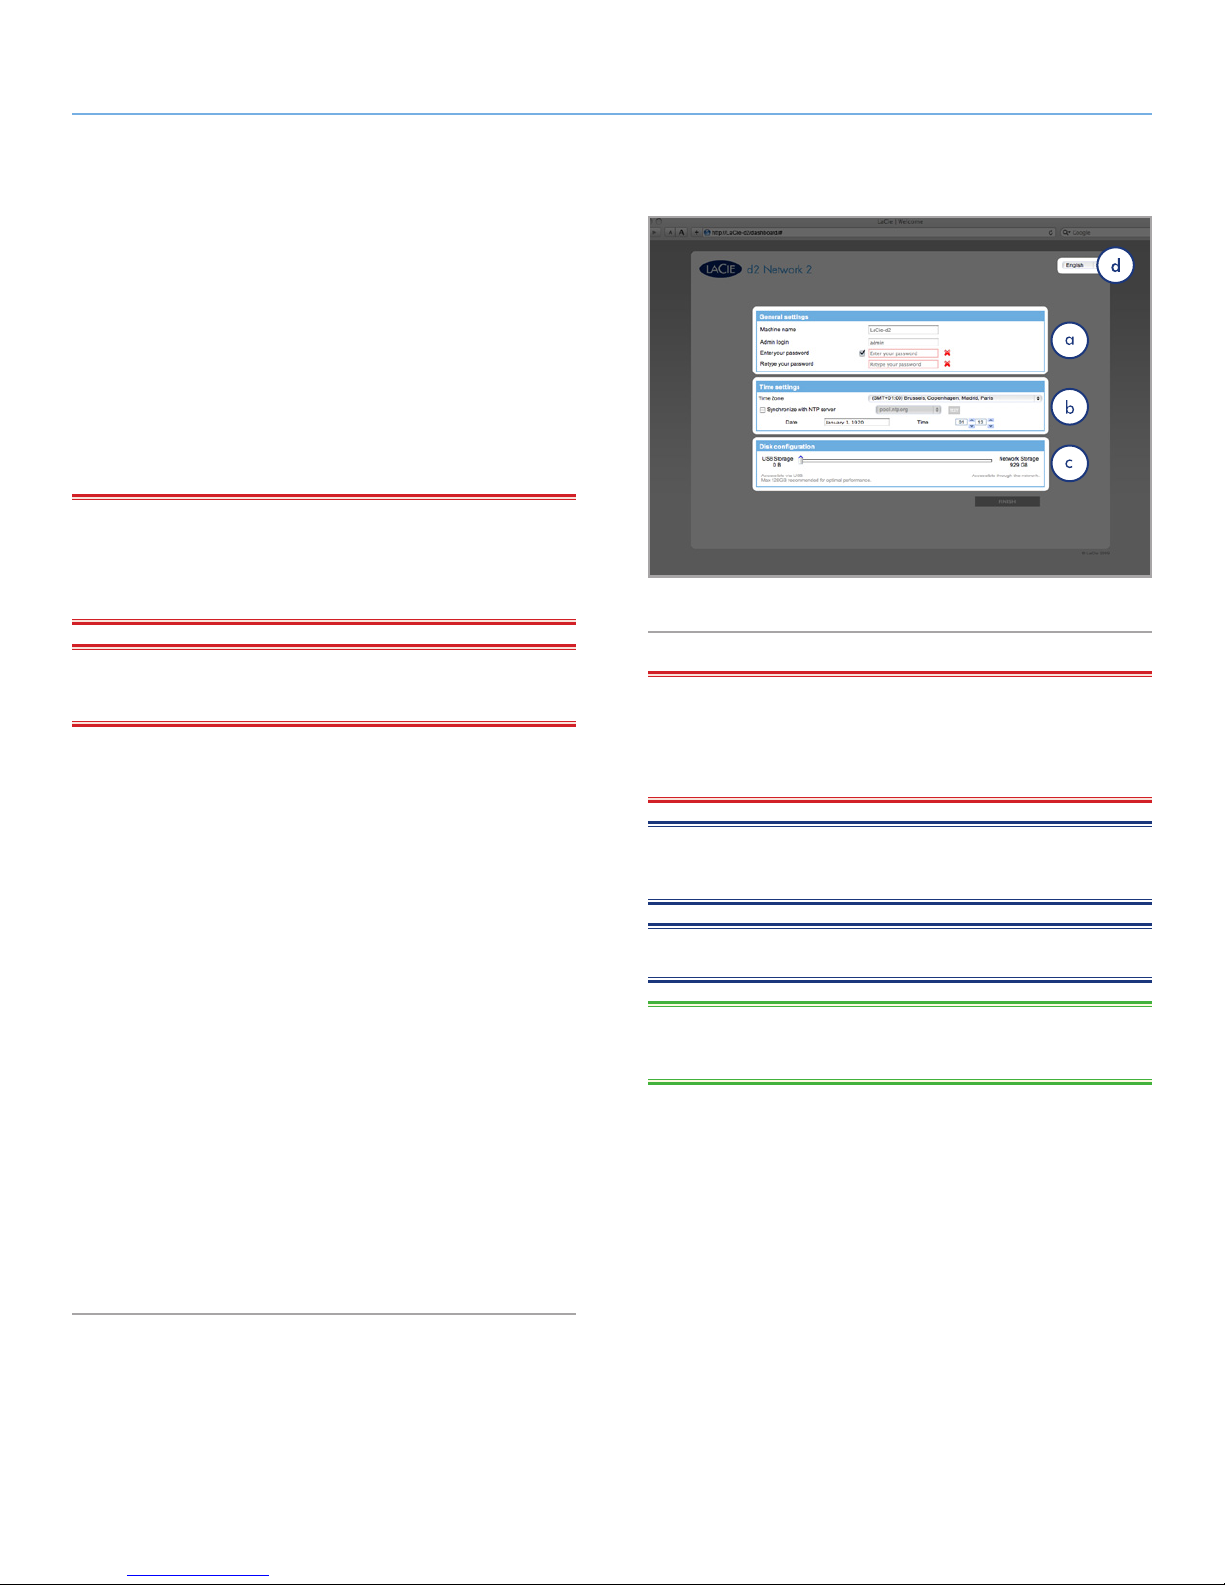
The first time you log in to the Dashboard, the Setup Wizard will load
in you browser (Fig. 13). The Setup Wizard consists of three sections
to be filled out that will help you to configure your d2 Network 2.
a. General Settings: Modify the Machine Name (optional - a
name may only contain letters (case sensitive), numbers, or
a hyphen. Maximum of 15 characters) and create the admin
login name and password (minimum 4 characters)).
IMPORTANT INFO: You may enter 4 to 20 characters using let-
ters (case sensitive), numbers, the hyphen, and the underscore. No
other symbols, punctuation, or spaces may be used. Do not begin
or end with a hyphen and/or an underscore.
Fig. 13
IMPORTANT INFO: If for whatever reason you do not complete
the Setup Wizard, the default login credentials will be admin/admin.
b. Time Configuration: Select whether the time and date should
be set manually or synchronized with a third party server.
Press the Test button to ensure synchronization is working.
When the time synchronization option is selected, you can’t
modify the time and date settings.
c. Disk Configuration: Specify how much of the total stor-
age should be made available when the drive is connected
to your computer via USB, and how much for when your
computer is connected to the network. You can modify this
amount from 0 GB to up to half the total capacity (default
is 0 GB).
If you choose to increase the USBShare size, it is necessary
to format the share. After completing the Setup Wizard, navigate to Drive Information > USB Drive and select Format (for
details, see 4.11. Dashboard: Drive Information).
Once you’ve finished, you can proceed to the Dashboard by clicking
Finish (Fig. 13).
Your d2 Network 2 is configured and ready to use. Proceed to the
following sections: 3. Accessing and Transferring Files and 4. Admin-
istering Your LaCie d2 Network 2.
IMPORTANT INFO: LaCie strongly recommends you do not in-
crease the USBShare size to more than 128 GB unless you format
USBShare to either NTFS or HFS+ using your operating system’s
native disk utility.
NOTE: The machine name can be modified later from the Dash-
board.
NOTE: You can also change the language on this page (Fig. 13, D).
TECHNICAL NOTE: If you need to assign a static IP address, refer
to section 2.6. Assigning a Static IP Address for details.
Page 18
LaCie d2 Network 2 • DESIGN BY NEIL POULTON Connecting to a Network
User Manual page 18
2.5. Power Button Functions
The multi-function front LED/button allows you to activate/deactivate sleep mode and reset to default.
✦ Activate sleep mode: This mode can be triggered by either:
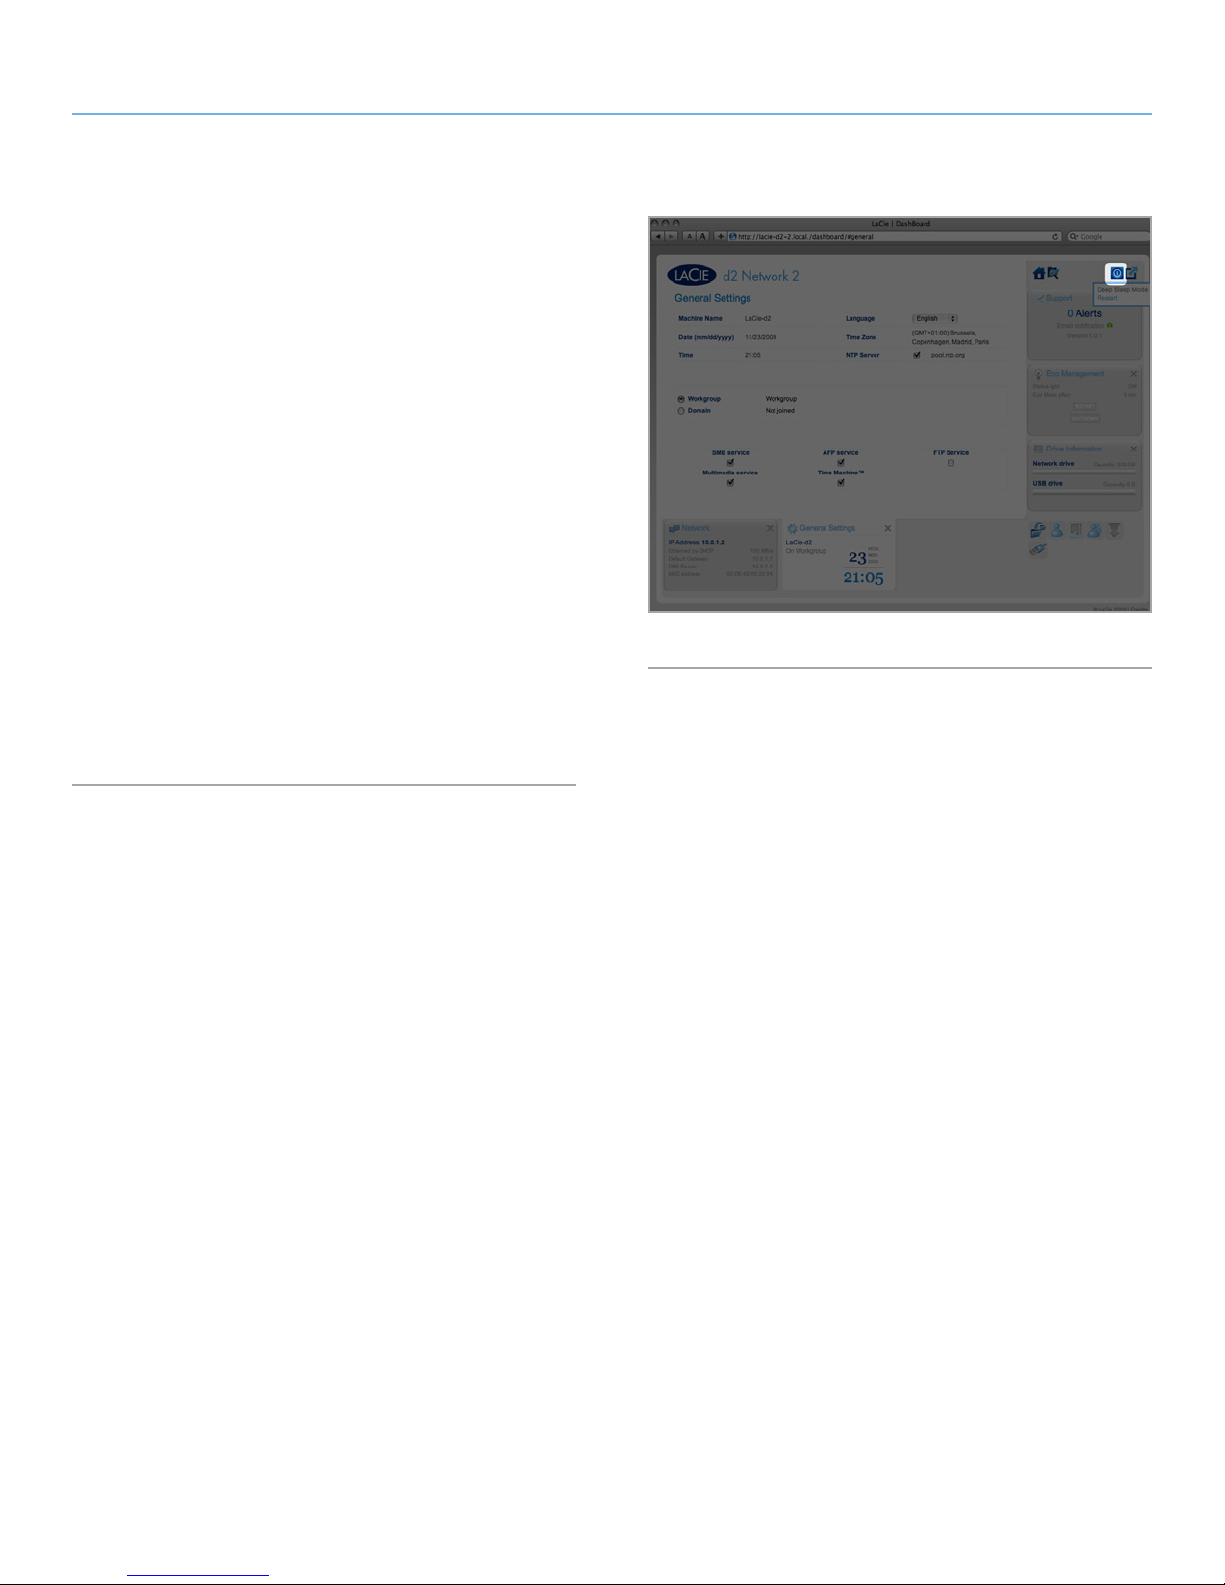
a. If Deep Sleep Mode is enabled in Dashboard > Eco Man-
agement, by clicking and holding the blue button.
b. Alternatively, if Deep Sleep Mode is enabled in Dashboard
> Eco Management, by clicking the Shut Down button in
the upper-right hand corner of the Dashboard then Deep
Sleep Mode (Fig. 14).
✦ Wake from sleep mode: Press the blue button (but do not hold
it down).
To wake the drive from Deep Sleep Mode, press the blue button or use the Wake on LAN function in the LaCie Network Assistant (see 4.12.2. Wake on LAN) (see 4.12. Dashboard: Eco
Management).
Fig. 14
✦ Reset to default: This process is explain in section 4.18. Reset
to Factory.
Page 19
LaCie d2 Network 2 • DESIGN BY NEIL POULTON Connecting to a Network
User Manual page 19
2.6. Assigning a Static IP Address
Most networking routers are DHCP servers, meaning that the router
will automatically assign the d2 Network 2 an IP address. If the network is not DHCP-managed, the d2 Network 2 will use APIPA to assign itself a valid IP address of existing network; in some cases it will
assign itself an IP address following the rule 169.254.xxx.yyy/24.
TECHNICAL NOTE: Make sure you provide an IP address on the
same subnet as your computer so that the d2 Network 2 will be visible to that computer.
Fig. 15
If your network requires devices to be assigned a static IP, follow
these steps to use the LaCie Network Assistant:
1. Make sure the LNA is installed on your computer (see section
2.3. STEP 3: Connect using LaCie Network Assistant for details).
2. Launch LaCie Network Assistant and open the Network settings
tab:
Windows Users
Select LaCie Network Assistant in Start/Programs. An
Network Assistant icon will appear in the system tray and
Network Assistant will automatically detect your LaCie d2
Network 2 and any other storage devices on your network.
Mac Users
Select LaCie Network Assistant in your Applications folder.
An Network Assistant icon will appear in the menu bar
and the Assistant will automatically detect your LaCie d2
Network 2 and any other LaCie storage devices on your
network.
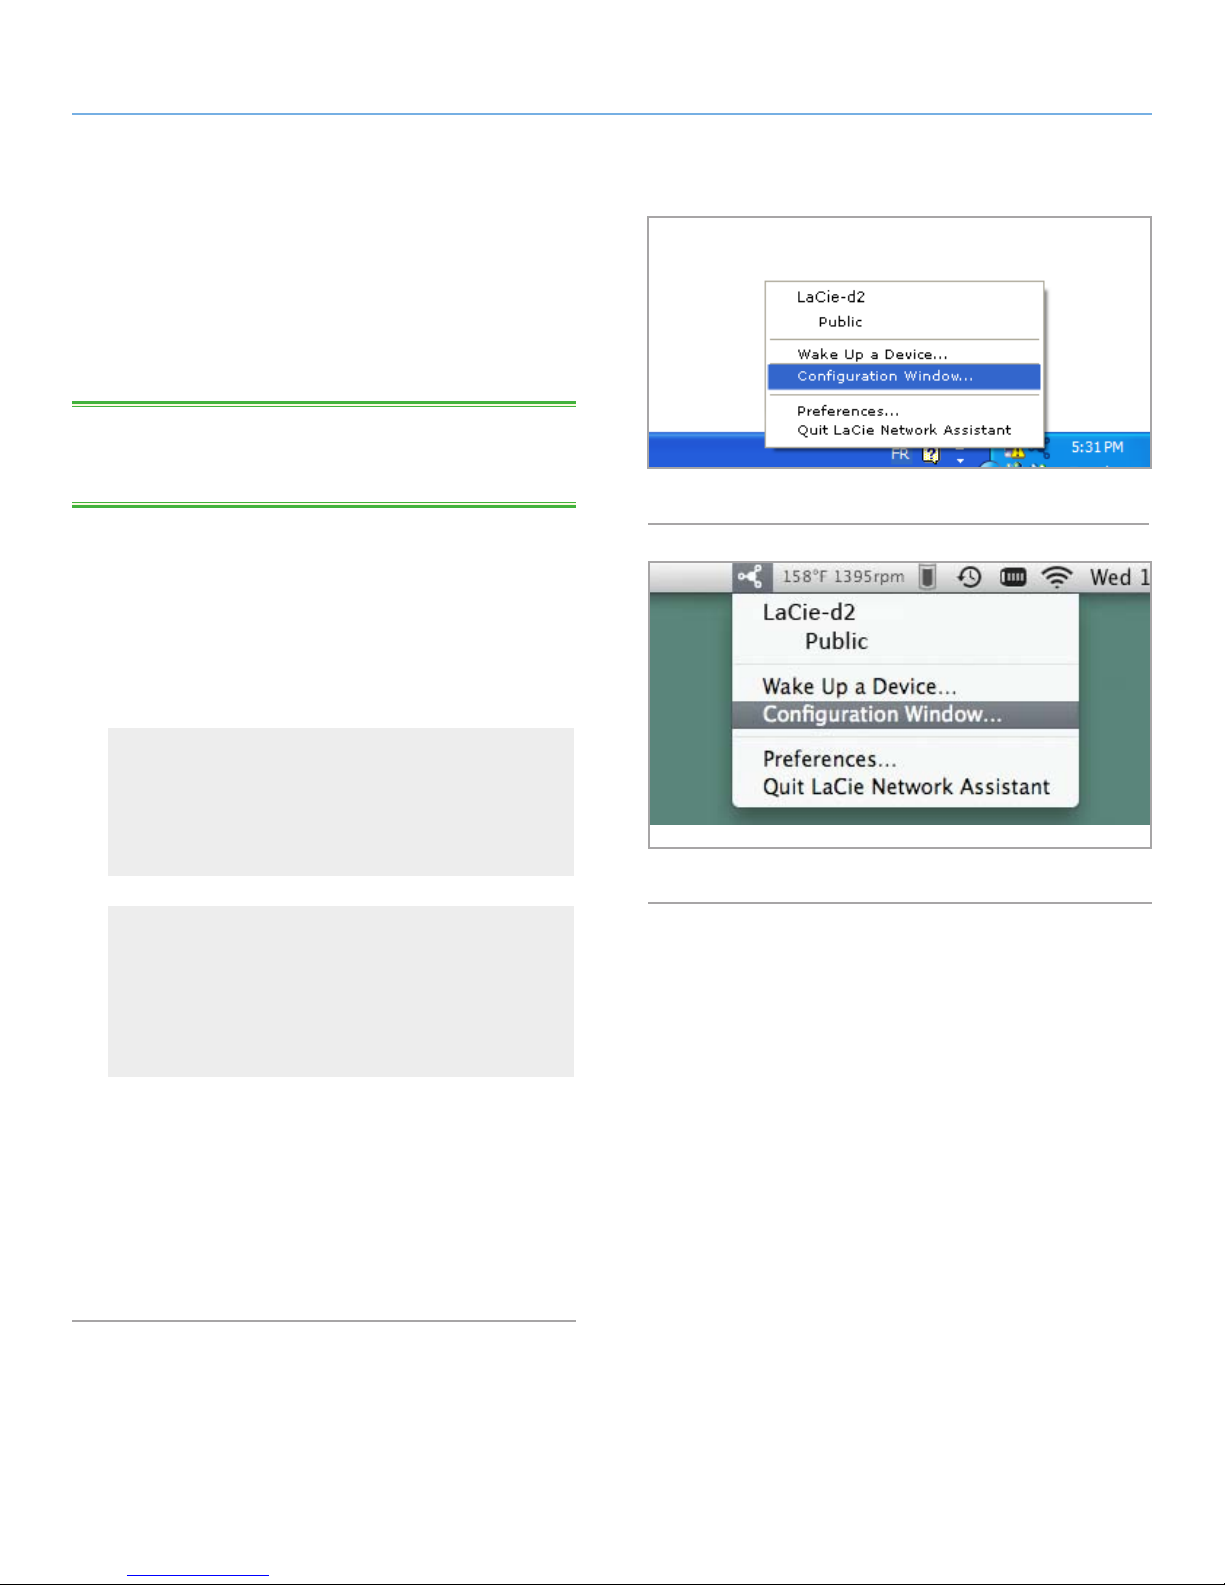
3. Click on the icon in the system tray (Windows) (Fig. 15) or menu
bar (Mac) (Fig. 16) and select Configuration Window....
4. Click the Network tab and select Manual.
5. Modify the network settings to work with your network.
Fig. 16
6. Click Apply.
Page 20

LaCie d2 Network 2 • DESIGN BY NEIL POULTON Accessing & Transferring Files
User Manual page 20
3. Accessing and Transferring Files
There are several ways to access and transfer files located on the d2
Network 2. Follow the links below for more details.
3.2. Accessing Shares Using LaCie Network Assistant
3.3. Accessing Shares Using File Browser
3.4. Accessing Shares via USB
3.5. Accessing Shares through the Internet
3.6. Accessing Shares via FTP
3.7. Multimedia Server
3.1. About Default Shares
The LaCie d2 Network 2 has three shares (similar to folders) by
default: Share, Public, and USBShare (USBShare will be created automatically when you allocate space for USB access). The following
table sums up the differences between them:
Name Accessibility Login Availability
Share Private, accessible only to admin
by default
Public Public, accessible to any user on
the network
USBShare Public (access to connected exter-
nal USB hard drive)
Thus, when the d2 Network 2 is connected to the network, all three
shares are accessible to the administrator, and Public and USBShare
to guests (USBShare will only be available if you have allocated
space to USB access). On the other hand, when the d2 Network 2 is
connected to a computer via USB, only USBShare will be accessible.
It is also possible to create new shares and/or to delete the default
shares (except USBShare). See section 4.9. Dashboard: Shares for
details.
Password-protected When connected to the network (Ethernet) and to
networked computers
None When connected to the network (Ethernet) and to
networked computers or UPnP/DLNA-certified players/adapters (if UPnP service is activated)
None When connected to the network (Ethernet) or to a
computer (USB), and through UPnP/DLNA-certified
players/adapters (if UPnP service is activated)
Page 21
LaCie d2 Network 2 • DESIGN BY NEIL POULTON Accessing & Transferring Files
User Manual page 21
3.2. Accessing Shares Using LaCie
Network Assistant
When your computer is connected to your local area network, LaCie
Network Assistant will help you quickly connect to the shared folders (Share, Public, any user share, and/or USBShare if you have
allocated space to the USB connection) on your LaCie d2 Network
2 and, if you like, make those folders immediately available every
time you log on to your computer (for this procedure, see section
3.2.2. Map Shares).
By default, you will be logged in as a guest, and will not therefore
have access to Share or any private shares you have created. In
order to access protected shares, you will have to change the login
credentials using the LaCie Network Assistant. For this process, see
section 3.2.1. Switching User.
To access shared folders:
1. Launch LaCie Network Assistant.
Fig. 17
Windows Users
Select LaCie Network Assistant in Start/Programs. A Network
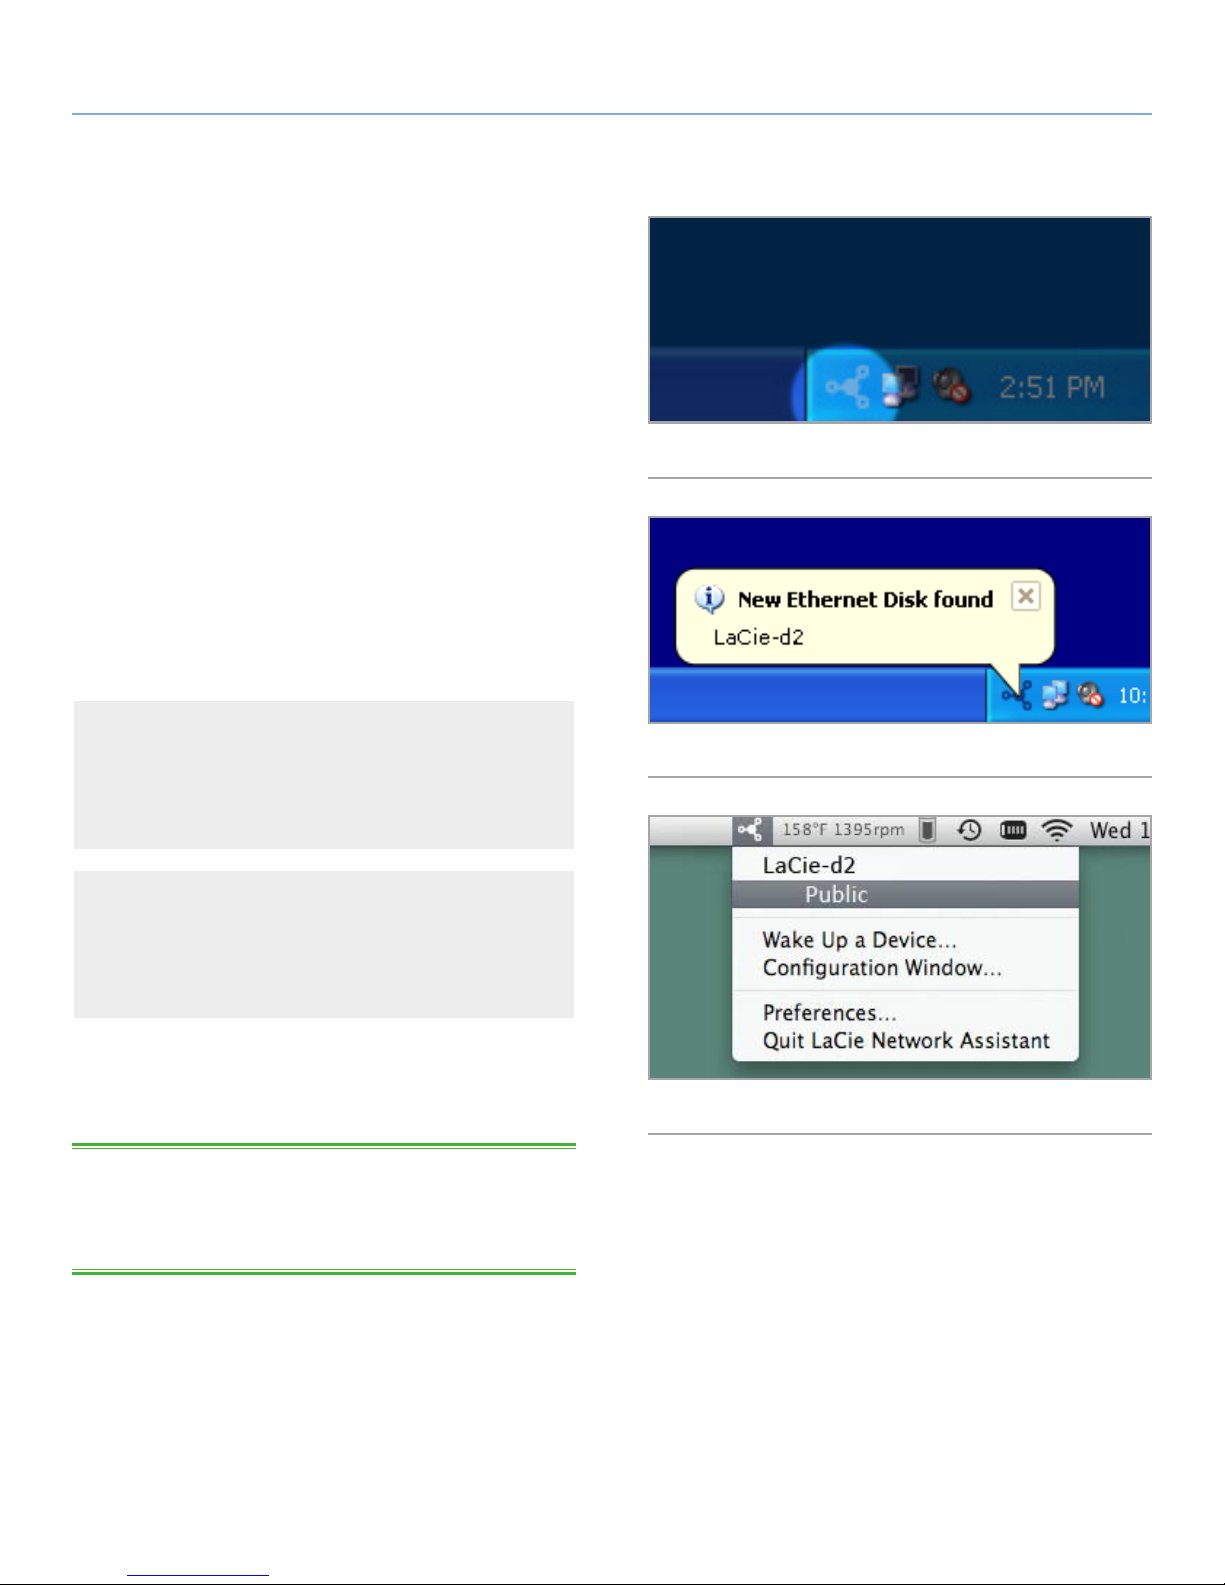
Assistant icon will appear in the system tray (Fig. 17) and Network Assistant will automatically detect your LaCie d2 Network
2 and any other storage devices on your network (Fig. 18).
Mac Users
Select LaCie Network Assistant in your Applications folder. An
Network Assistant icon will appear in the menu bar and the Assistant will automatically detect your LaCie d2 Network 2 and
any other LaCie storage devices on your network..
2. Click on the icon in the system tray (Windows) or menu bar
(Mac) and select a share from the LaCie d2 Network 2 submenu (Fig. 19).
TECHNICAL NOTE: By default, you will be logged in as a guest
and will therefore only have access to public shares. To access private shares using LaCie Network Assistant, see 3.2.1. Switching
User.
Fig. 18
Fig. 19
continued on the next page >>
Page 22

LaCie d2 Network 2 • DESIGN BY NEIL POULTON Accessing & Transferring Files
User Manual page 22
3. You will be logged on as a guest and the share will open in a
Finder window (Mac) or an Explorer window (PC).
TECHNICAL NOTE: Mac users: If the share does not open in a
Finder window, simply navigate in the Finder to Network > LaCie-
d2 > [Share name].
4. Transfer files normally from your computer to the d2 Network
2 share.
IMPORTANT INFO: If you wish to copy large amounts of data
from the USBShare to another share, LaCie recommends you use
the File Browser (3.3. Accessing Shares Using File Browser) instead
of drag-and-drop using SMB.
Page 23
LaCie d2 Network 2 • DESIGN BY NEIL POULTON Accessing & Transferring Files
User Manual page 23
3.2.1. Switching User
By default, you will be logged in as a guest, and will not therefore
have access to private shares. In order to access protected shares,
you will have to change the login credentials using the LaCie Network Assistant. Follow these steps:
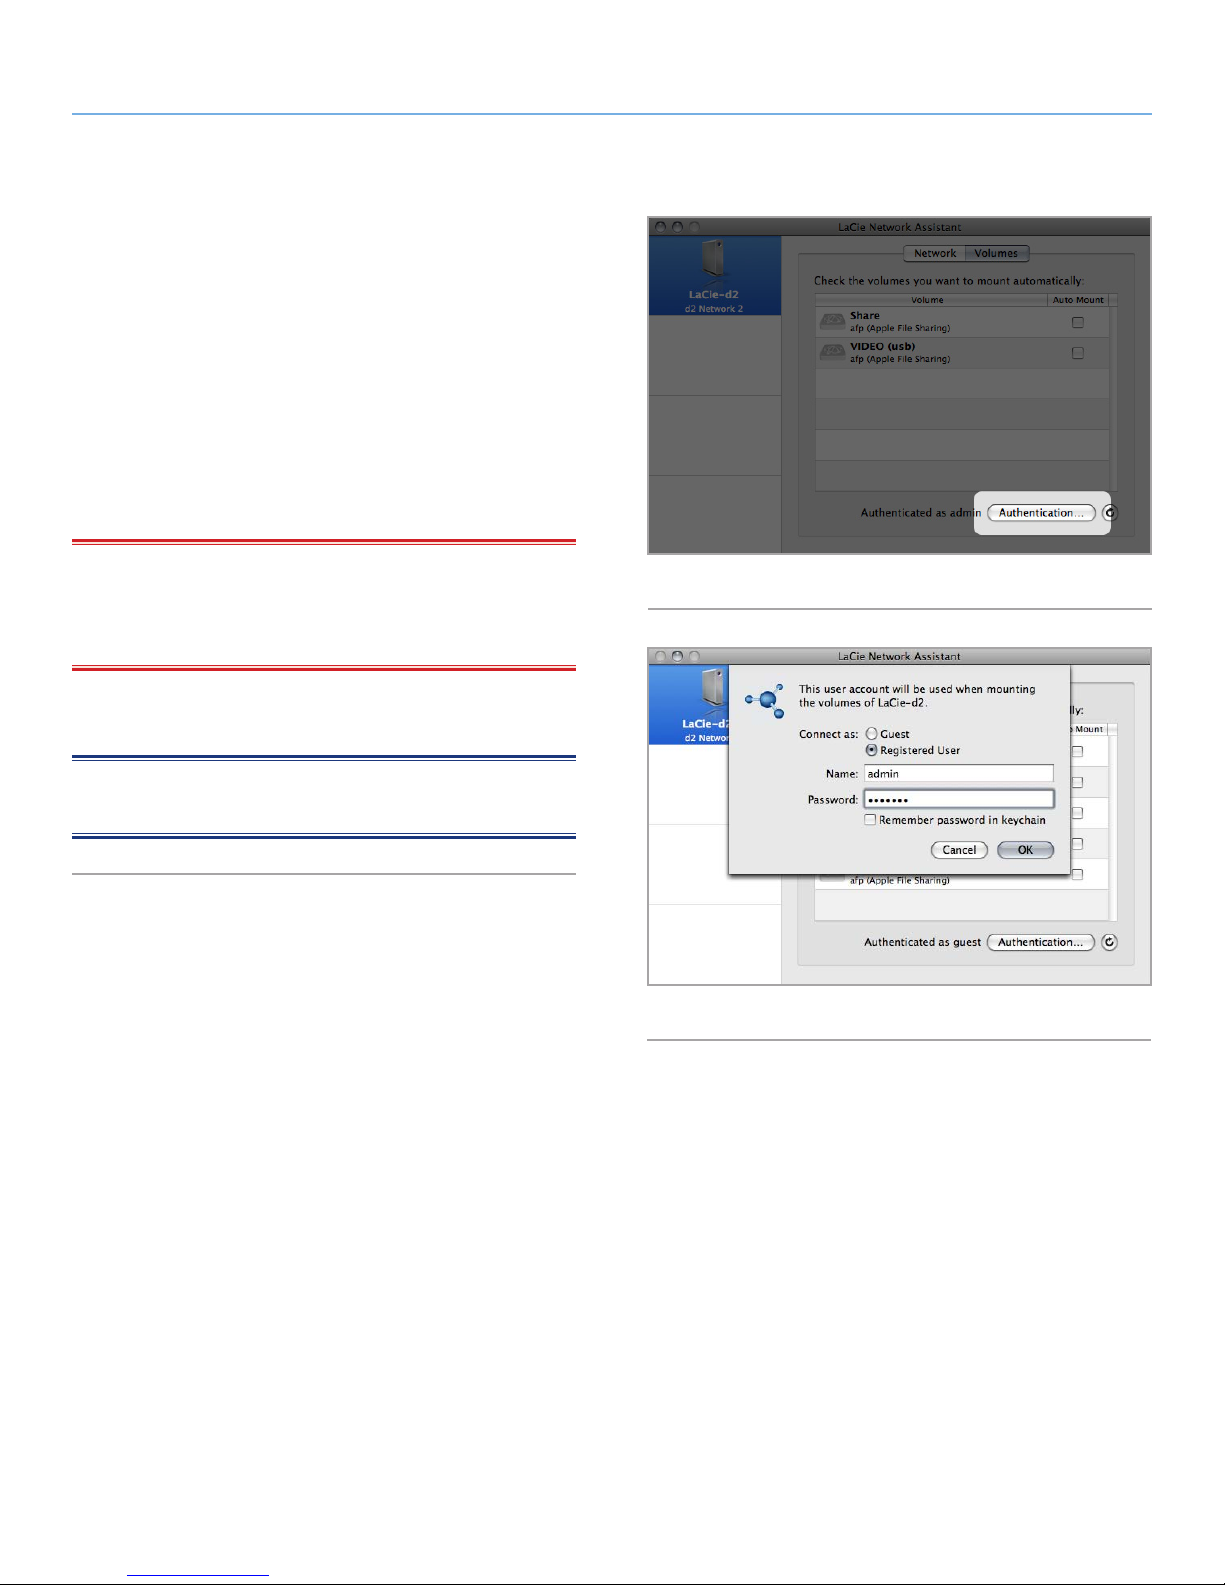
1. Click the LaCie Network Assistant icon in the Task Bar (Win-
dows) or Menu Bar (Mac) and select Configuration Window....
2. Click on the Volumes tab and then click the authentication button (Fig. 20).
3. When prompted, enter your username and password (Fig. 21).
IMPORTANT INFO: Normally you will have created an admin
account during the Setup Wizard. If for whatever reason you did not
complete the Setup Wizard, you can access the default private share
(Share) by authenticating as username=admin / password=admin.
4. Click OK. Now when you click the LNA icon, you should see a
listing of shares accessible to the authenticated user.
NOTE: The admin name and password can be changed from the
Dashboard > Home page.
Fig. 20
Fig. 21
Page 24
LaCie d2 Network 2 • DESIGN BY NEIL POULTON Accessing & Transferring Files
User Manual page 24
3.2.2. Map Shares
If you would like a shortcut to accessing d2 Network 2 shares, follow
this procedure:
TECHNICAL NOTE: Windows users: Once you log in to a private
(password-protected) share, you must log out in order to access another private share. For this reason, it is recommended for Windows
users to map private shares before mapping public ones so that you
won’t need to log out each time.
Windows Users
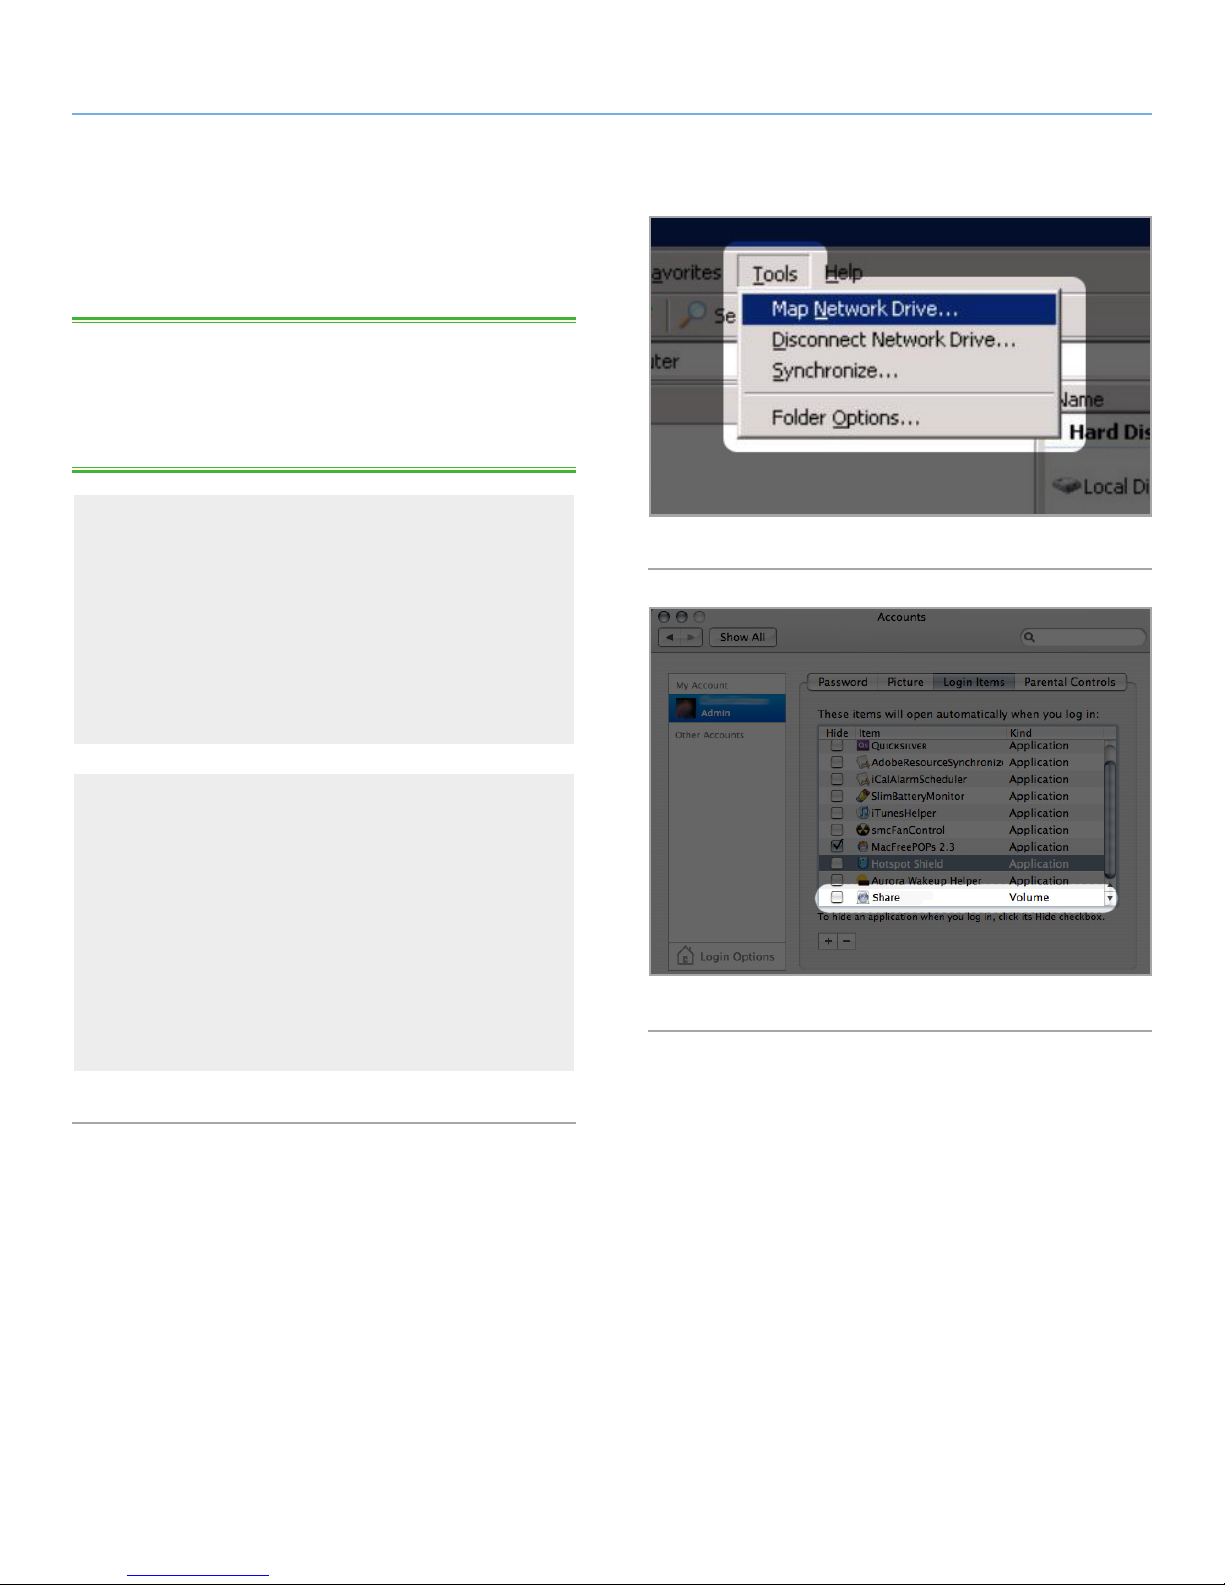
1. In an Explorer window, in the menu bar, select Tools and
then Map Network Drive (Fig. 22).
2. Select Share.
Fig. 22
3. Repeat process for other shares.
4. You will then have access to your share from an Explorer
window.
Mac Users
1. From the Apple icon in the menu bar, select System Prefer-
ences > Accounts > Login Items.
2. Drag the share’s icon from your desktop into the list of applications (Fig. 23).
3. When you log on to the Mac OS, the share(s) will automatically mount on your desktop.
Alternatively, you can drag the share icon to the Dock for easy
access.
Fig. 23
Page 25
LaCie d2 Network 2 • DESIGN BY NEIL POULTON Accessing & Transferring Files
User Manual page 25
3.3. Accessing Shares Using File
Browser
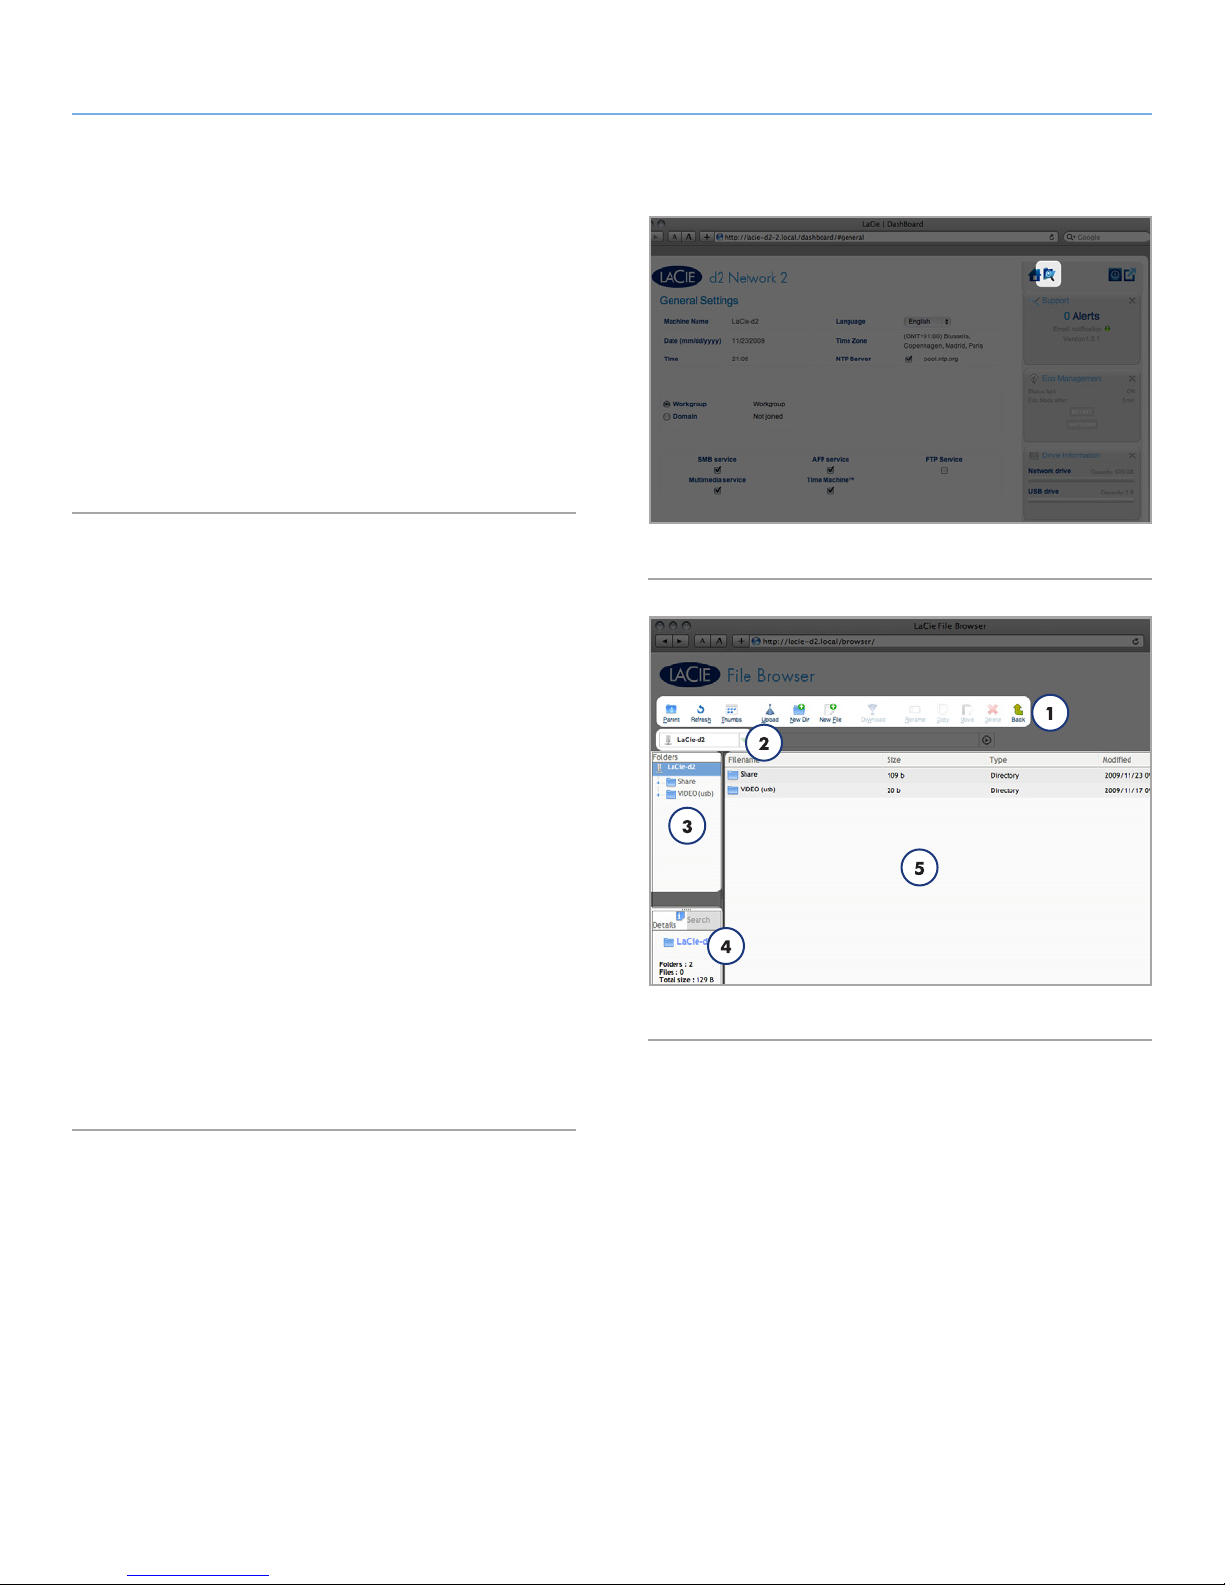
The Dashboard features an interactive file browser that allows you
to manage and transfer files via HTTP protocol. Follow these steps
to open the file browser:
1. Log in to the Dashboard (see section 4.1. Dashboard: Accessing
for details).
2. Click the File Browser button (Fig. 24).
3.3.1. About the File Browser
The File Browser allows you to transfer, copy and delete files, as well
as view photos in thumbnails and even stream multimedia content
such as mp3 or flv videos. It is thus a convenient way to interact with
files stored on the d2 Network 2’s shares, whether the connection
be through the local network or through the internet. For details on
remote connections, see 3.5. Accessing Shares through the Internet.
The File Browser is composed of five parts (Fig. 25):
1. Tool bar allows you to perform a range of functions, such as
changing the way files are displayed and uploading files to the
d2 Network 2 from your computer.
2. NAS selection lets you choose the product you wish to access.
3. Share folders shows the folder structure on the selected share.
4. File info displays information on a selected file, such as name,
file type, dimensions (photos), or duration (videos).
5. Folder contents displays the files contained in a selected fold-
er. To view the files as thumbnails, click Thumbs in the Tool
bar.
Fig. 24
Fig. 25
Page 26

LaCie d2 Network 2 • DESIGN BY NEIL POULTON Accessing & Transferring Files
User Manual page 26
3.4. Accessing Shares via USB
The d2 Network 2 can be connected to your network via Ethernet or
directly to a computer via USB. This chapter explains how to connect your hard drive to a computer. For details on connecting to
your network, refer to chapter 2. Connecting to a Network.
IMPORTANT INFO: You must successfully connect to the network
and run the Setup Wizard before connecting the d2 Network 2 to
your computer via USB. Follow the steps in chapter 2. Connecting to
a Network before continuing. Additionally, you will need to increase
the storage allocated for USB access by adjusting the USBShare size
slider (which is set to 0GB by default) (refer to 2.4. STEP 4: Complet-
ing the Setup Wizard or 4.11. Dashboard: Drive Information.
TECHNICAL NOTE: If your network is limited to 10/100 Mbit
transfer speeds or if you use WiFi, the USB connection will generally
permit faster transfer times. In this case, LaCie suggests that as a
first step you copy large quantities of files to the d2 Network 2 via
USB, then as a second step, share them throughout your network via
the Ethernet cable.
Follow these steps to getting your LaCie d2 Network 2 connected to
your computer:
3.4.1. STEP 1: Connecting the USB cable
3.4.2. STEP 2: Turn On the Drive
Page 27
LaCie d2 Network 2 • DESIGN BY NEIL POULTON Accessing & Transferring Files
User Manual page 27
3.4.1. STEP 1: Connecting the USB cable
IMPORTANT INFO: You must allocate space to USBShare before
connecting the drive to your computer. See 4.11. Dashboard: Drive
Information.
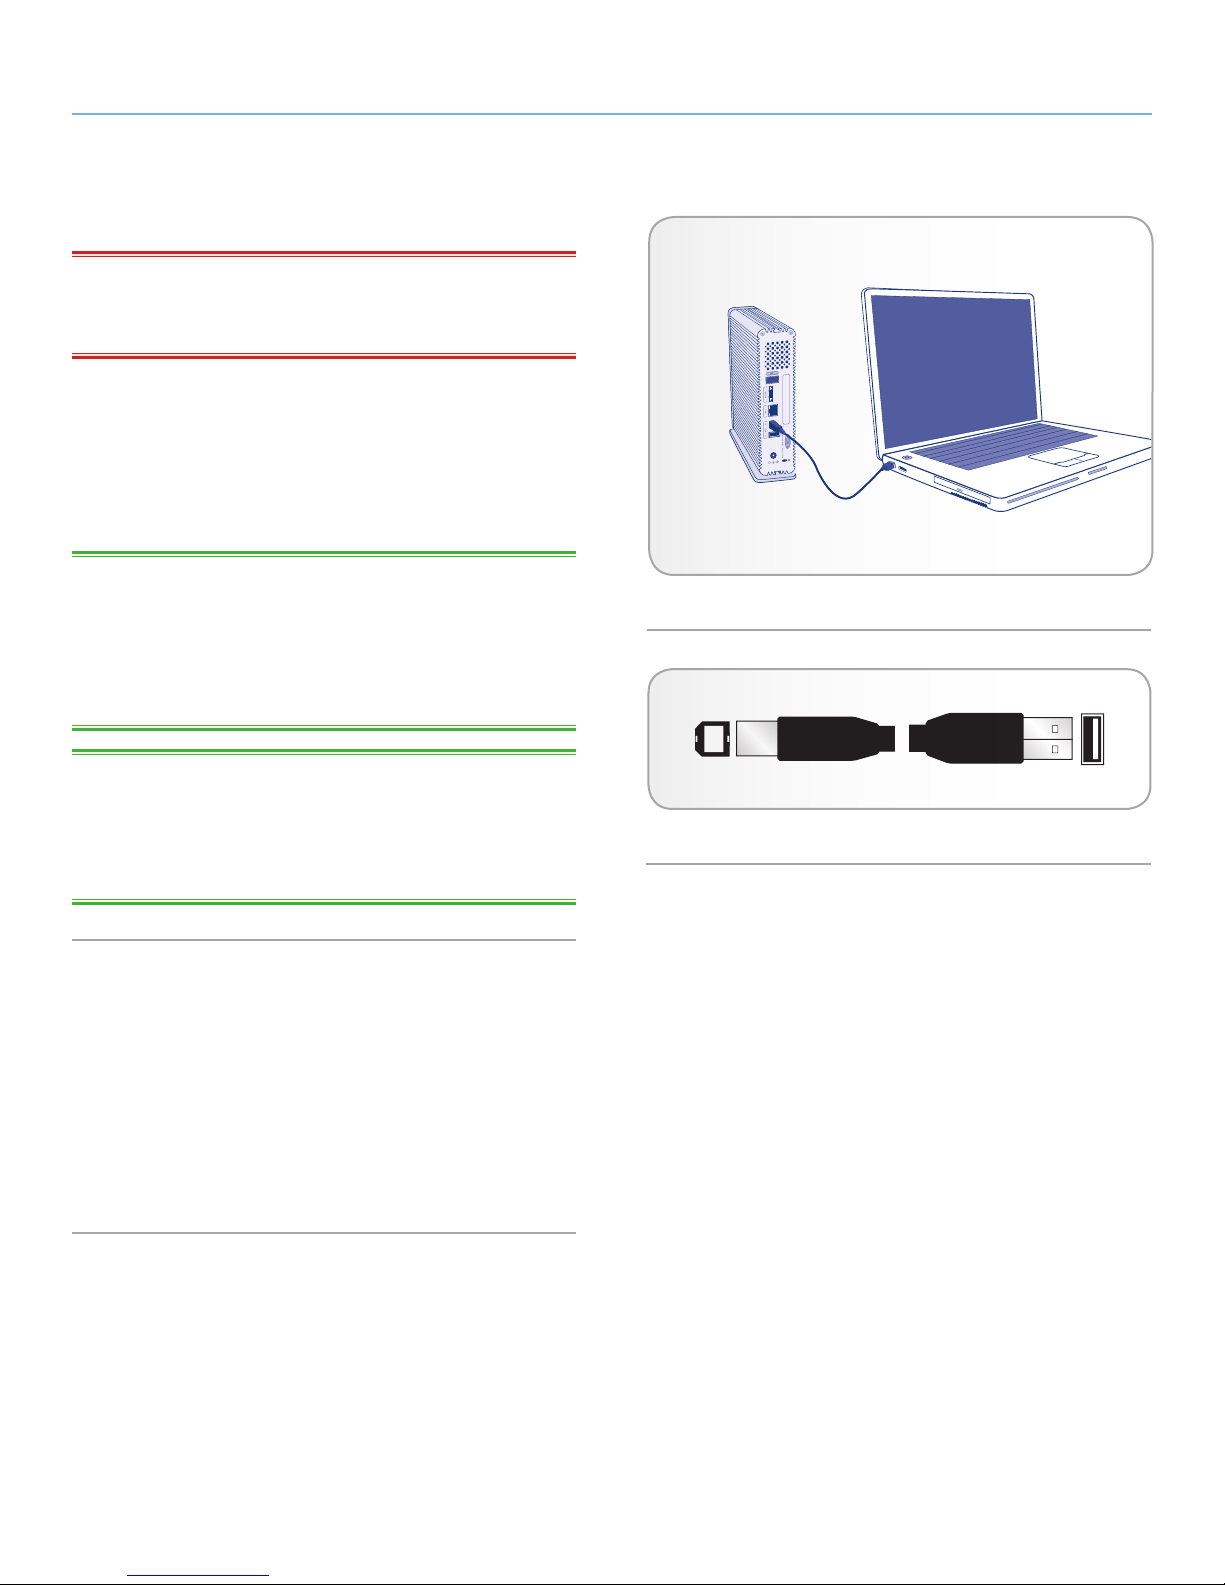
1. Attach one end of the USB cable to an available USB 2.0 port
on your computer (Fig. 26).
2. Connect the other end of the USB cable to the USB port (type B;
see Fig. 26) on the back of the d2 Network 2.
3. Move on to the next step, 3.4.2. STEP 2: Turn On the Drive.
TECHNICAL NOTE: The d2 Network 2 USBShare is formatted in
MS-DOS (FAT32) for use with PCs and Macs. You can reformat the
drive in MS-DOS (FAT32) using the Dashboard (see 4.11. Dash-
board: Drive Information for details). To format the USBShare into a
different file format (NTFS or HFS+), refer to the documentation for
your operating system’s disk management application.
Fig. 26
TECHNICAL NOTE: By default the capacity accessible when you
connect the d2 Network 2 to your computer is 0 GB. This quota can
be adjusted but it cannot be more than 500 GB (ex. for a d2 Network 2 with 2TB of storage, 500GB will be the maximum dedicated
for access via USB) (see 4.7. Dashboard: Users for details).
Hi-Speed USB 2.0 Cables And Connectors
See Fig. 27 for an illustration of the Hi-Speed USB 2.0 cable used
to connect your LaCie d2 Network 2 to your computer. USB is a
serial input/output technology for connecting peripheral devices to
a computer or to each other. Your LaCie drive is shipped with a
Hi-Speed USB cable to ensure maximum data transfer performance
when connected to a Hi-Speed USB 2.0 port. The cable will also
work when connected to a USB 1.1 port, but drive performance will
be limited to USB 1.1 transfer rates.
Fig. 27 – Hi-Speed USB 2.0 cable ends
Page 28
LaCie d2 Network 2 • DESIGN BY NEIL POULTON Accessing & Transferring Files
User Manual page 28
3.4.2. STEP 2: Turn On the Drive
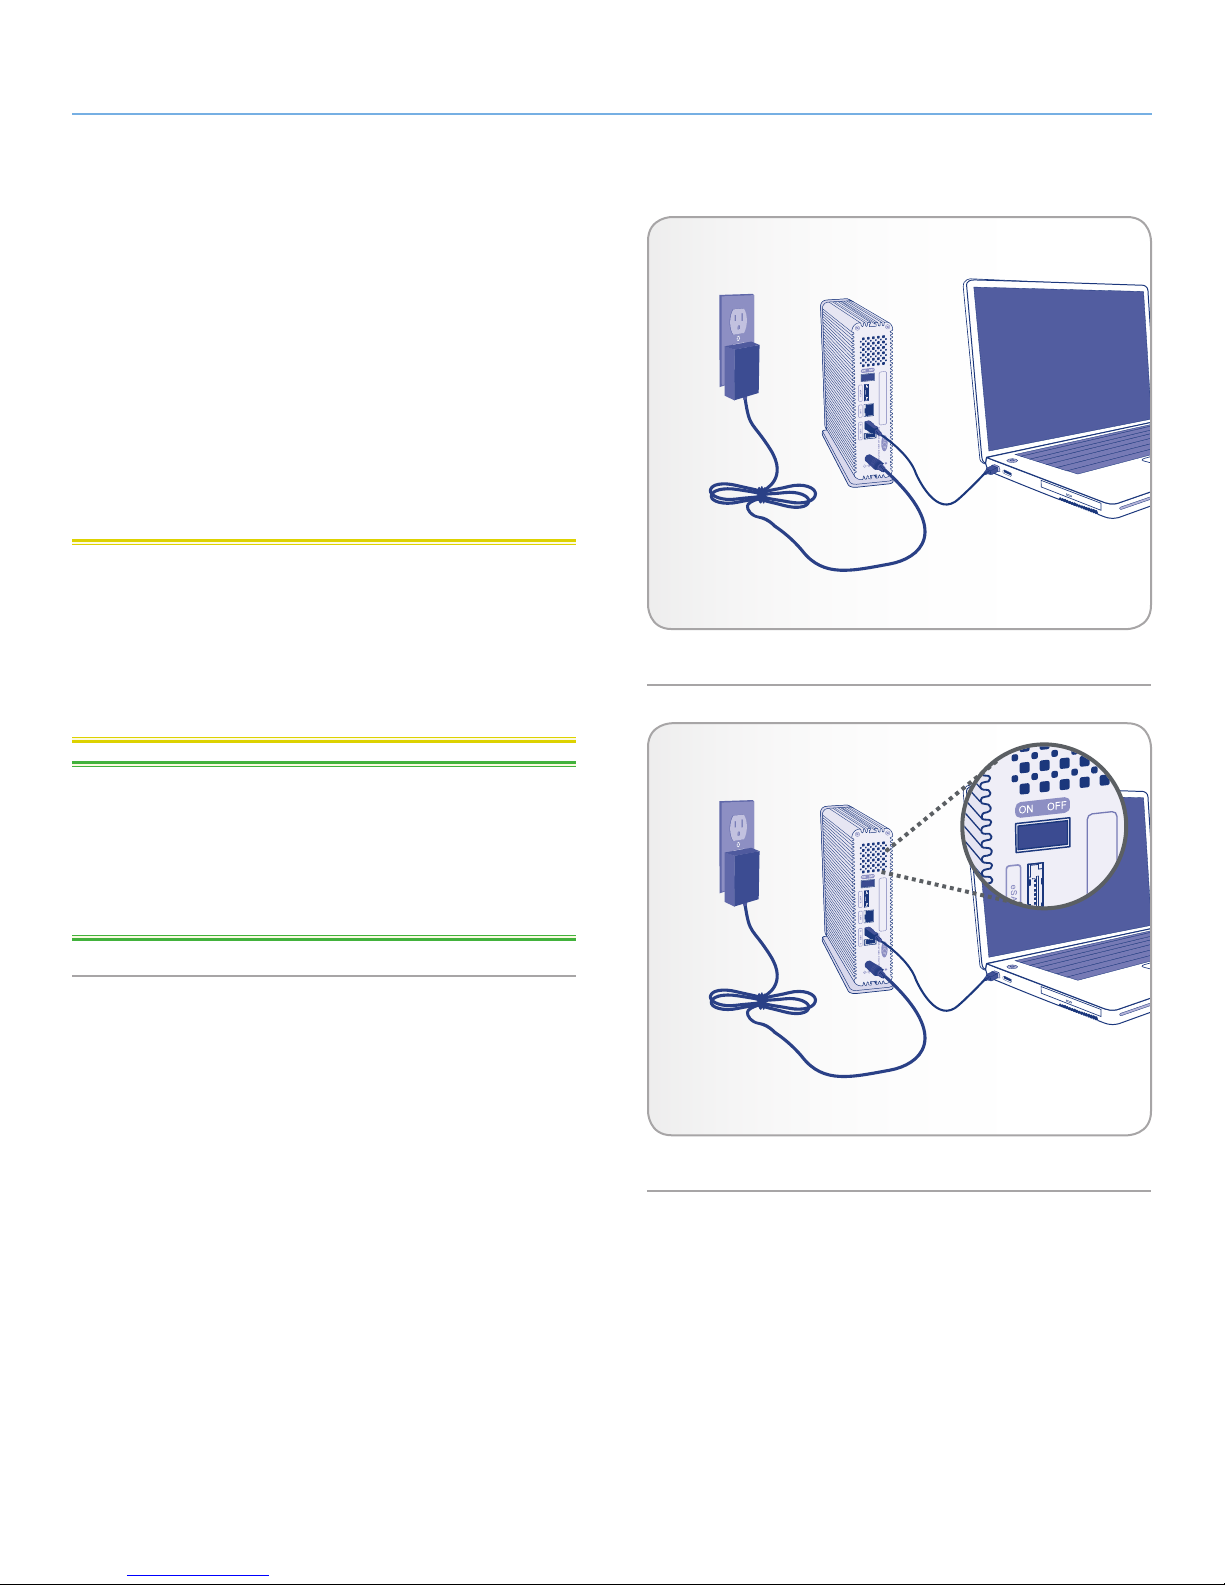
1. Connect the power supply to a wall outlet and to the LaCie d2
Network 2 (Fig. 28).
2. Turn on the drive by pressing the power button on the back
of the drive (Fig. 29) until the LED turns on. It will then begin
blinking.
3. Once the LED stops blinking, the hard disk will mount on your
computer and appear in My Computer/Computer (Windows users) or on your desktop (Mac users).
4. Transfer files from your computer normally.
CAUTION: Only use the AC adapter supplied with your specific La-
Cie device. Do not use a power supply from another LaCie device or
another manufacturer. Using any other power cable or power supply
may cause damage to the device and void your warranty. Always
remove the AC adapter before transporting your LaCie drive. Failure
to remove the adapter may result in damage to your drive and will
void your warranty.
Fig. 28
TECHNICAL NOTE: You may use your LaCie drive when in a for-
eign country thanks to its 100-240 Volt power supply. To use this
feature, you may need to purchase an appropriate adapter or cord.
LaCie accepts no responsibility for any damage to the drive resulting
from the use of an inappropriate adapter. Using an adapter other
than one authorized by LaCie will void your warranty.
Fig. 29
Page 29
LaCie d2 Network 2 • DESIGN BY NEIL POULTON Accessing & Transferring Files
User Manual page 29
3.4.3. Disconnecting the USB Connection
External USB devices feature “plug & play” connectivity, which
means that your drive can be connected and disconnected while the
computer is running. To prevent failures, however, it is important to
follow these steps when disconnecting your hard drive.
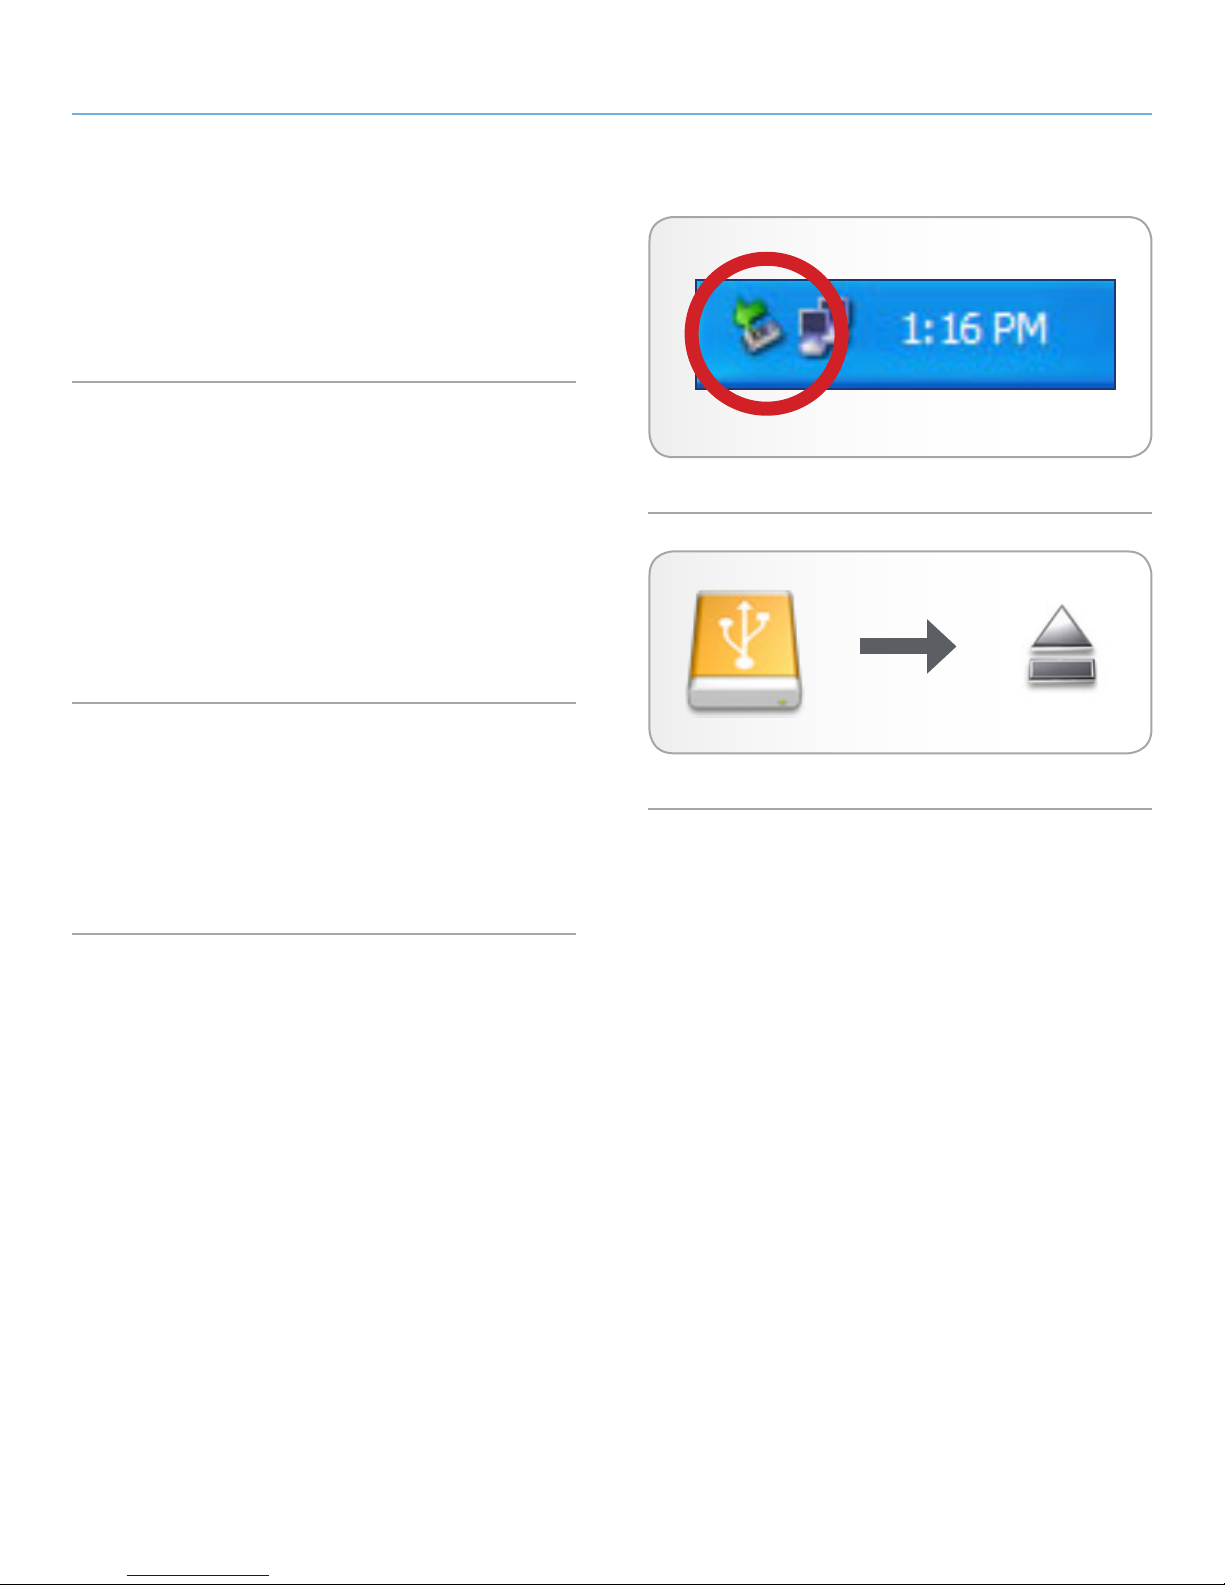
Windows Users
From the System Tray (located in the lower right-hand side of your
screen), click the Eject icon (a small green arrow over a hardware
image) (Fig. 30).
A message will appear, listing the devices the Eject icon controls
(it should say, “Safely remove...”). Click on the drive you wish to
disconnect.
This message will appear: “Safe to Remove Hardware” (or similar).
It is now safe to disconnect the device.
Fig. 30 - Windows users
Mac Users
Drag the hard drive icon to the trash (Fig. 31). (The icon pictured
below is a generic USB device icon. Your drive may be represented
by an icon that looks like the drive itself.)
When the icon disappears from the desktop, the drive can be disconnected.
Fig. 31 - Mac users
Page 30

LaCie d2 Network 2 • DESIGN BY NEIL POULTON Accessing & Transferring Files
User Manual page 30
3.5. Accessing Shares through the
Internet
You can access your d2 Network 2 through the internet. For information on establishing the connection, see 4.10. Dashboard: Net-
work.
Once connected, it is easiest to access your files using the web
browser-based File Browser. You can upload, download, and
stream most types of multimedia files such as mp3 and flv. For more
information on the File Browser, see 3.3. Accessing Shares Using
File Browser.
Page 31
LaCie d2 Network 2 • DESIGN BY NEIL POULTON Accessing & Transferring Files
User Manual page 31
3.6. Accessing Shares via FTP
The FTP protocol is used to transfer files from one computer to another through a local network or over the internet. This protocol
allows you to exchange files with your friends or relatives securely,
as only people with a user account will have access.
IMPORTANT NOTE: The FTP service is enabled by default for new
shares, but if you have disabled the service at the global or share
level, enable the service as described in sections 4.6. Dashboard:
General Settings and 4.9. Dashboard: Shares.
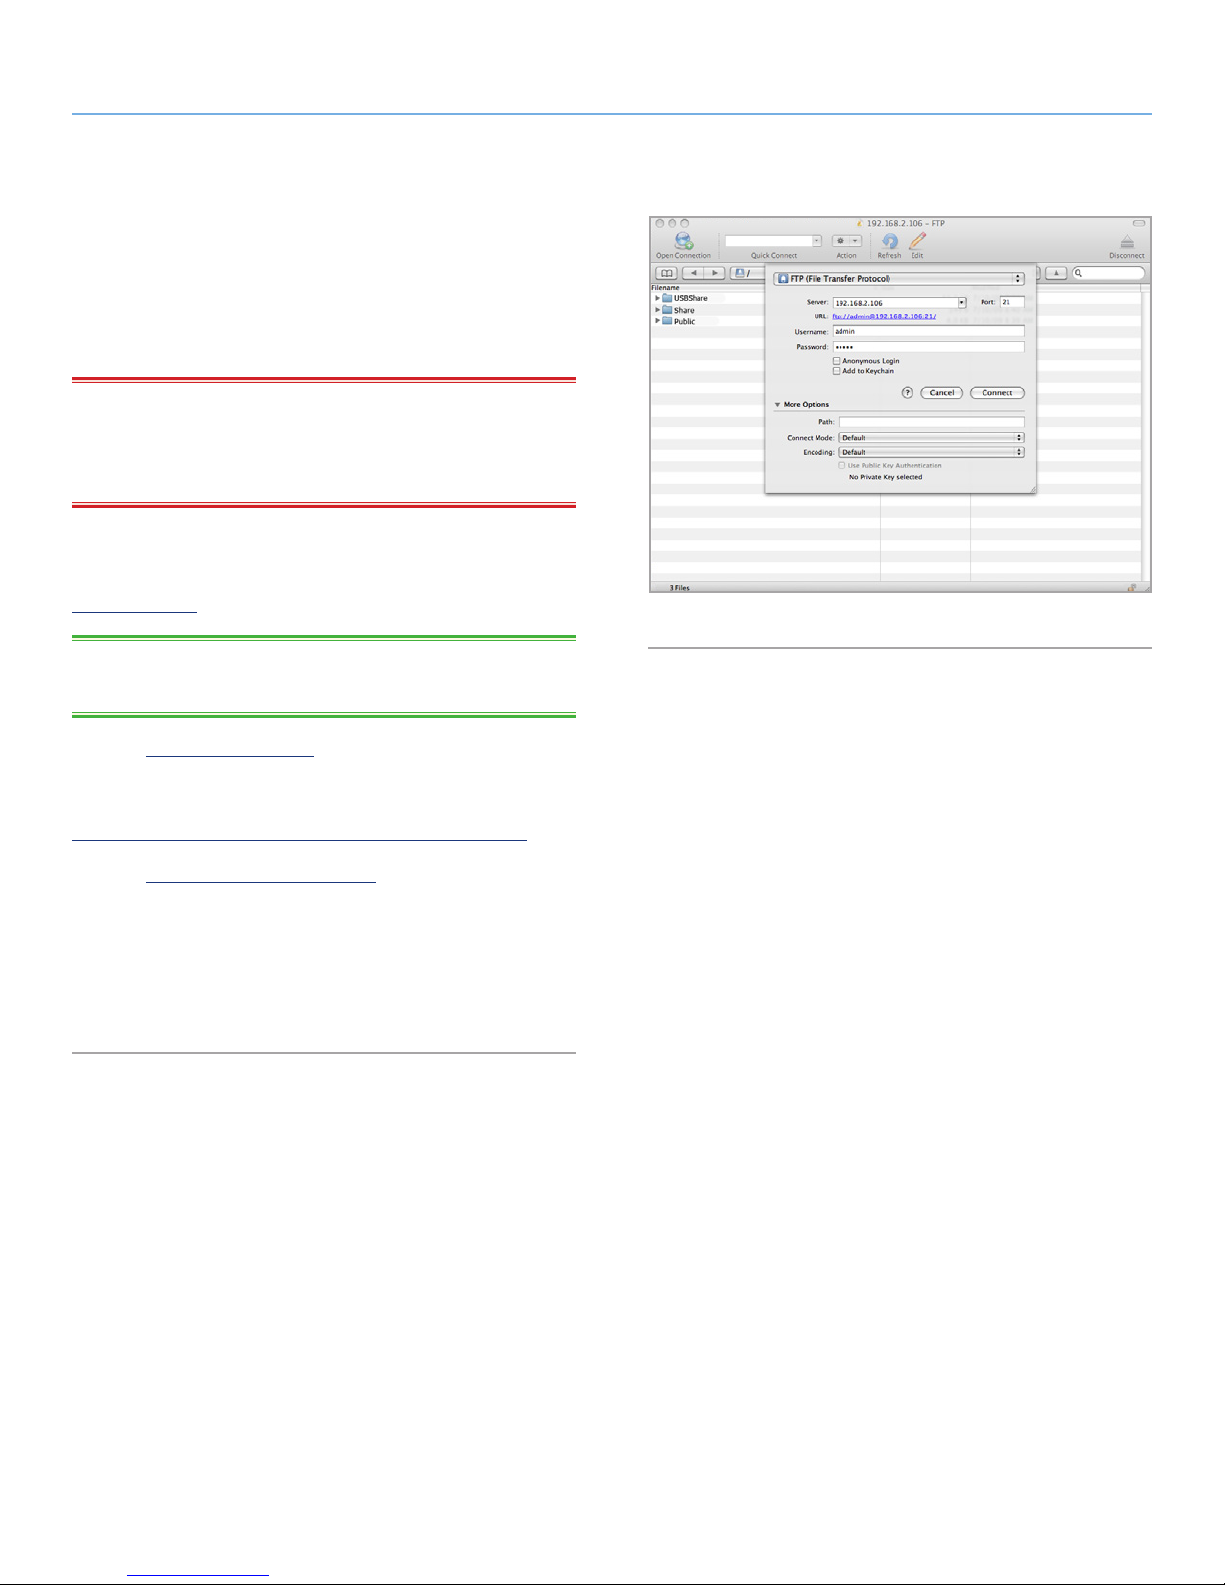
To connect to the d2 Network 2 via FTP locally on the LAN, enter in
your browser’s or FTP client’s address field:
ftp://[IP address]
TECHNICAL NOTE: See section 2.6. Assigning a Static IP Address
for instructions on finding your d2 Network 2’s IP address.
Example: ftp://192.168.10.149
OR
ftp://<username>:<password>@<ip or machine name>/
Example: ftp://ringo:4xtp23@LaCie-d2/
To login, enter the username and password you’ve set up in the
Dashboard (4.7. Dashboard: Users) or the Setup Wizard.
To remotely access the drive from a computer NOT on your network, refer to 3.5. Accessing Shares through the Internet.
Fig. 32
Page 32
LaCie d2 Network 2 • DESIGN BY NEIL POULTON Accessing & Transferring Files
User Manual page 32
3.7. Multimedia Server
Once you have established the network connection between your
computer and the d2 Network 2, you can configure your d2 Network 2 to act as a UPnP multimedia server. Follow these steps:
1. Make sure the d2 Network 2 is properly connected to your home
network as described in section 2. Connecting to a Network.
2. Choose which share(s) will be available to DLNA/UPnP devices,
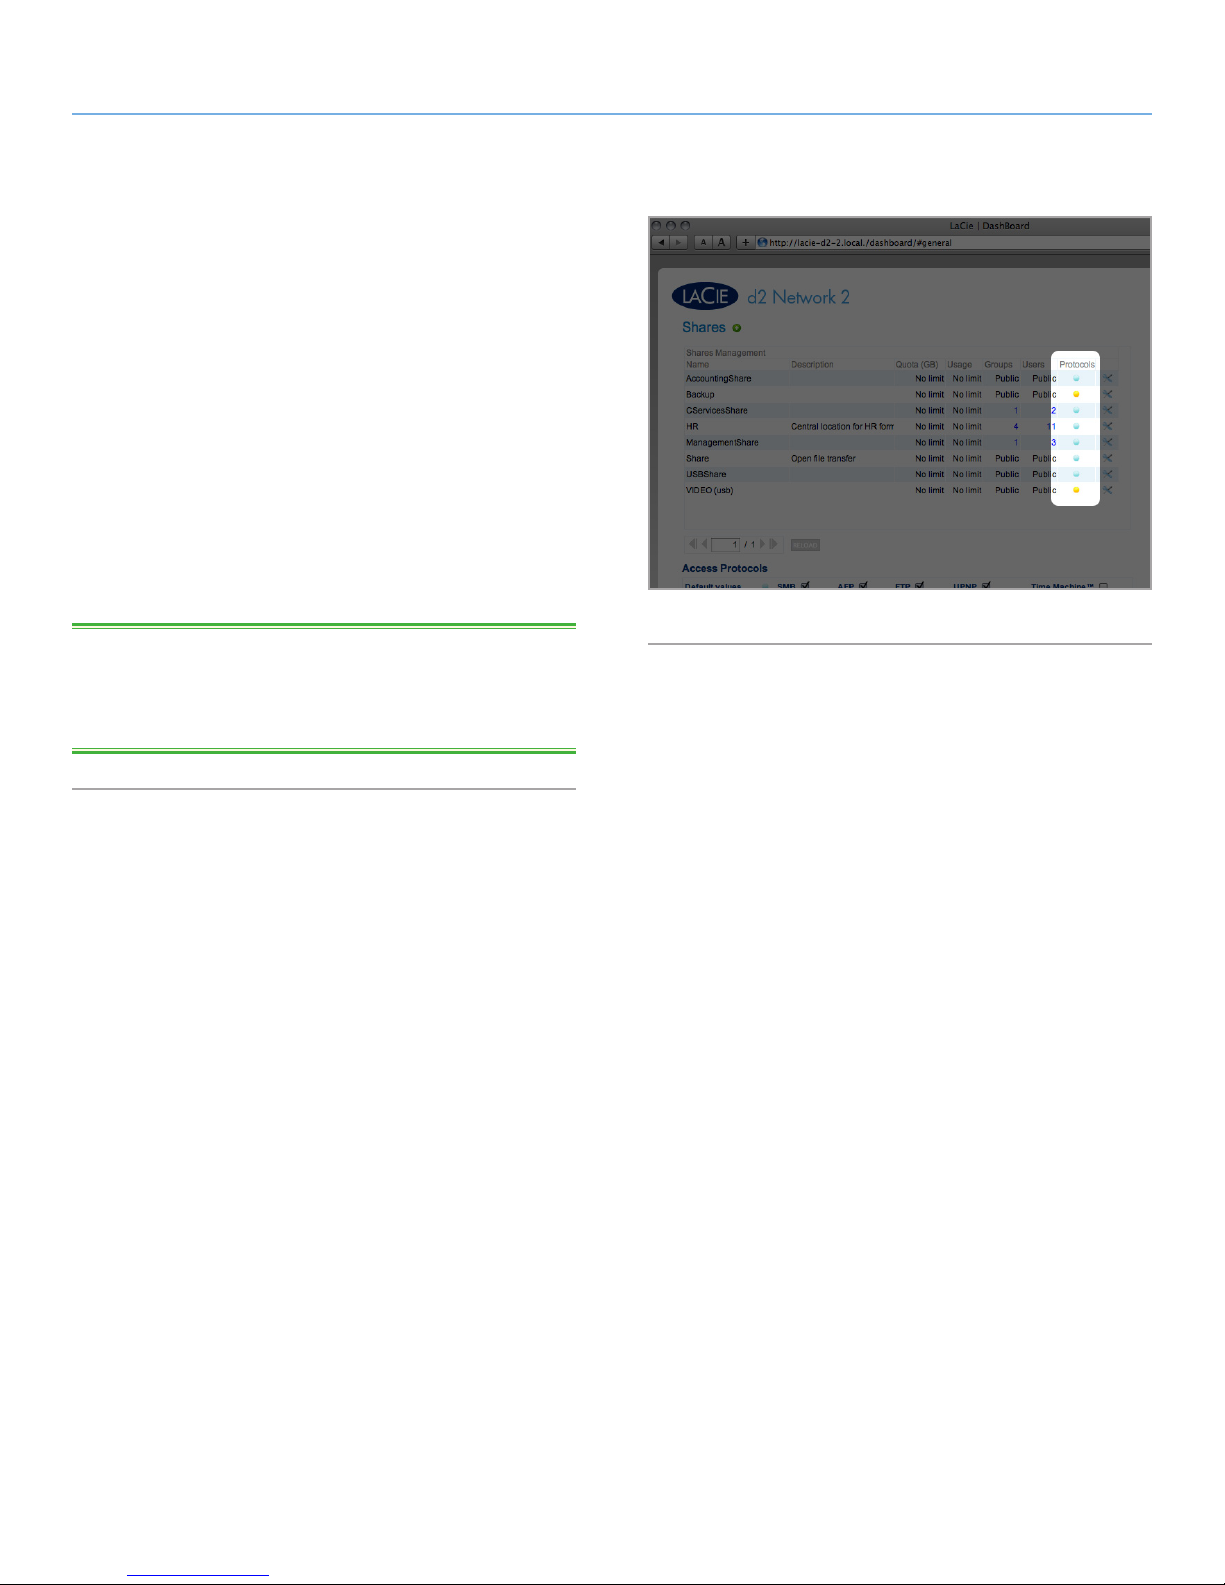
then enable UPnP for that share on the d2 Network 2 Dashboard (see section 4.9. Dashboard: Shares) (Fig. 33).
3. Now you will be able to play files located on configured shares
on your d2 Network 2 on any other UPnP/DLNA-certified player/adapter (such as an XBox 360, Play Station 3, a DLNA mobile phone, etc.).
Fig. 33
TECHNICAL NOTE: If you want your DLNA devices to be able to
access files on your external USB hard drive connected to the expansion port on the d2 Network 2, select Multimedia Indexation on the
Dashboard: External Ports page.
Page 33
LaCie d2 Network 2 • DESIGN BY NEIL POULTON Accessing & Transferring Files
User Manual page 33
3.8. iTunes Music Server
The d2 Network 2 can act as an iTunes Music server, streaming
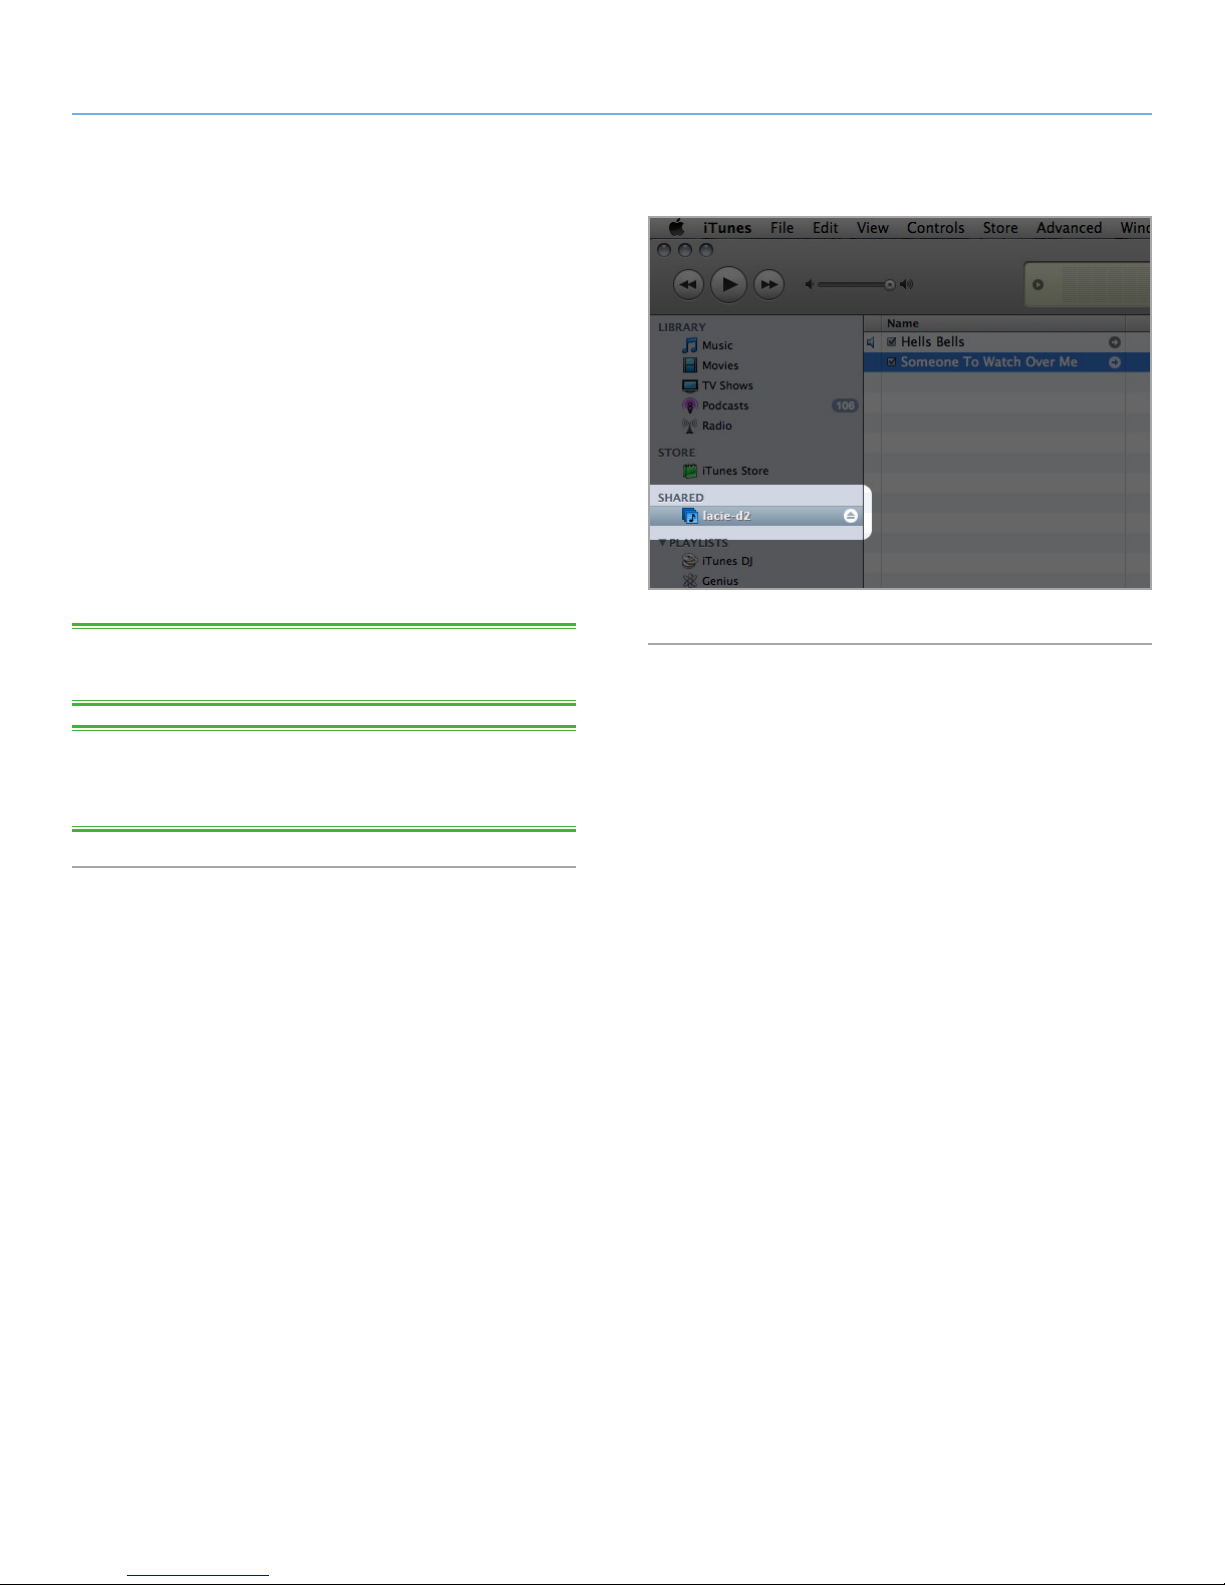
audio files located on unprotected shares to a computer on the network running iTunes. Once configured, a playlist bearing the machine name of your d2 Network 2 (by default LaCie-d2) will appear
in the Shared category within iTunes, and audio files stored on the
d2 Network 2 will be listed in this playlist. Follow these steps:
1. Make sure the d2 Network 2 is properly connected to your home
network as described in section 2. Connecting to a Network.
2. Choose which share(s) will be available to DLNA/UPnP devices,
then enable UPnP for that share on the d2 Network 2 Dashboard (see section 4.9. Dashboard: Shares) (Fig. 33).
3. Access the shared playlist in iTunes (Fig. 34).
Fig. 34
TECHNICAL NOTE: The iTunes Server Service supports the follow-
ing file types: .mp3, .wav, .aac, .pls, and .m3u.
TECHNICAL NOTE: Library sharing must be enable in the iTunes
preferences for this to work (Preferences > Sharing > Look for
shared libraries).
Page 34
LaCie d2 Network 2 • DESIGN BY NEIL POULTON Administering Your LaCie d2 Network 2
User Manual page 34
4. Administering Your LaCie d2 Network 2
The LaCie d2 Network 2 features an easy-to-use browser-based
tool for configuring the drive and administering users, called the
Dashboard. Access the Dashboard by simply typing in your drive’s
IP address or machine name into your browser or using the LaCie
Network Assistant.
When you log in for the first time, you will see the Setup Wizard (see
section 2.4. STEP 4: Completing the Setup Wizard). Subsequent
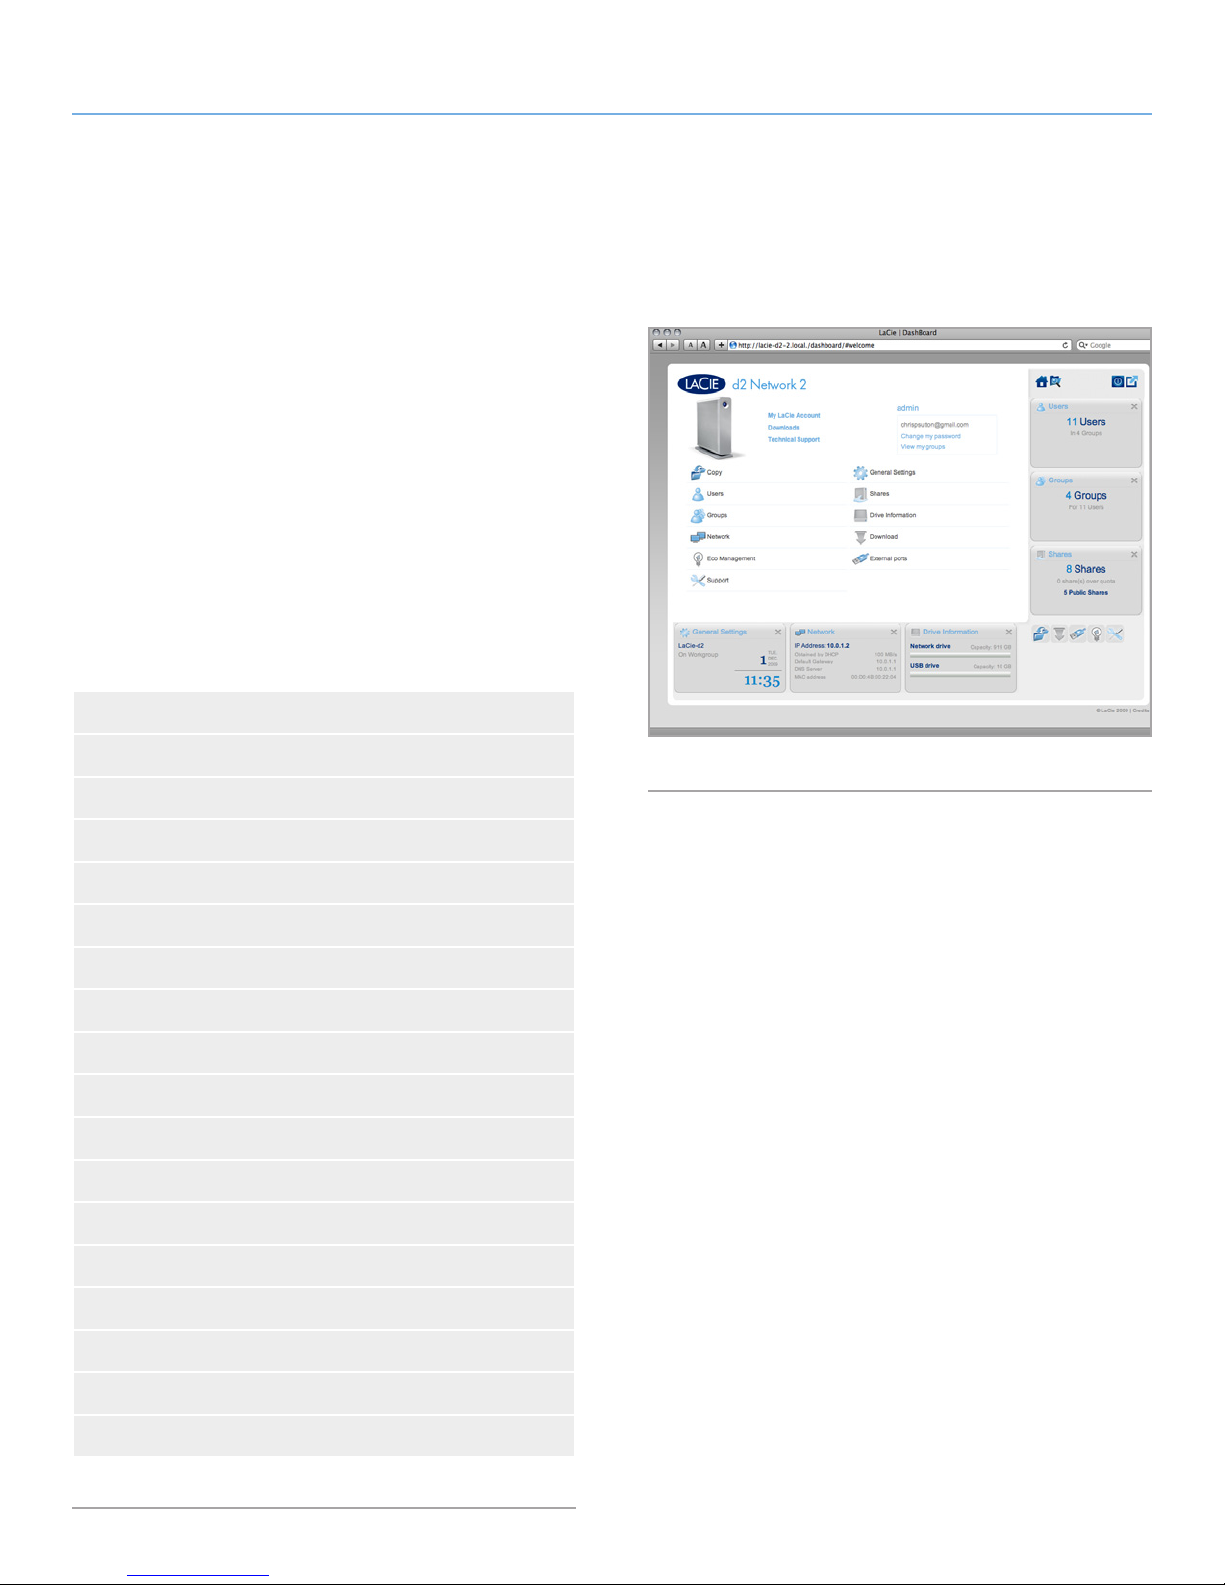
logins will take you directly to the Dashboard Home (Fig. 35). When
you log in as a registered user, you will be able to administer your
own account and manager the files located in the shares to which
you have access.
This chapter consists of the following sections to help you navigate
the Dashboard and configure your d2 Network 2:
4.1. Dashboard: Accessing
4.2. Dashboard: Welcome Page
4.3. Dashboard: Navigation
4.4. Dashboard: Logging Out
4.5. Dashboard: Restart/Shutdown
4.6. Dashboard: General Settings
4.7. Dashboard: Users
4.8. Dashboard: Groups
4.9. Dashboard: Shares
4.10. Dashboard: Network
4.11. Dashboard: Drive Information
4.12. Dashboard: Eco Management
4.13. Dashboard: Support
4.14. Dashboard: Download
Fig. 35
4.15. Dashboard: Copy
4.16. Dashboard: External Ports
4.17. Update Product Software
4.18. Reset to Factory
Page 35
LaCie d2 Network 2 • DESIGN BY NEIL POULTON Administering Your LaCie d2 Network 2
User Manual page 35
4.1. Dashboard: Accessing
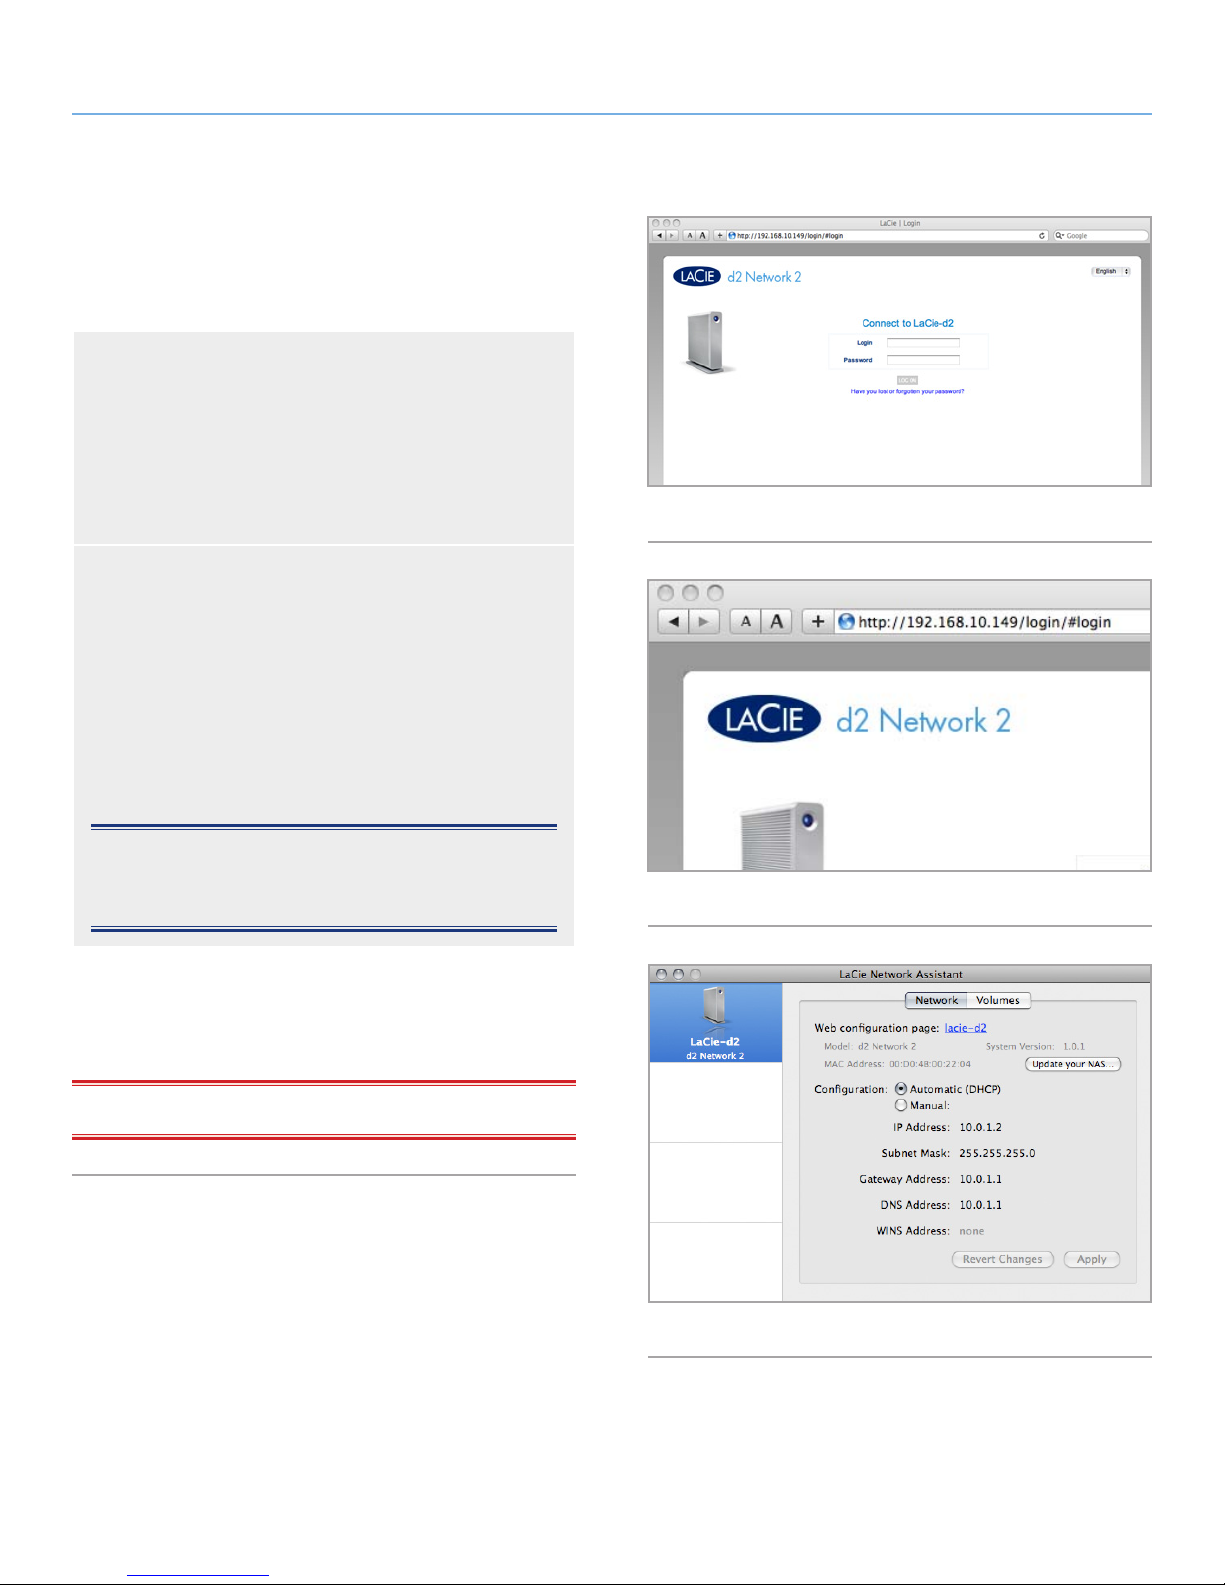
There are two ways to access the Dashboard, using the LaCie Network Assistant and using a browser.
Use LaCie Network Assistant
1. Click on the LaCie Network Assistant icon in the system
tray (Windows users) or menu bar (Mac users) and select
LaCie-d2.
The LaCie d2 Network 2 login page will open in a new
browser window or tab (Fig. 36). If your browser is not
open, LaCie Network Assistant will open it for you.
Use a Browser
1. Open your Internet browser (Firefox, Internet Explorer, Safari, etc.) and type your LaCie d2 Network 2’s IP address
or machine name (by default, LaCie-d2) in the browser’s
URL (web address) field (Fig. 37).
http://[IP address] or
Fig. 36
http://LaCie-d2 (Windows)
http://lacie-d2.local (Mac)
NOTE: The IP address of your LaCie d2 Network 2 can be
found by clicking on the Network tab of the LaCie Network Assistant network Configuration Window (Fig. 38).
2. For administrative access, in the login prompt, enter your admin
username and password.
3. Click Login.
IMPORTANT NOTE: The login and password are case-sensitive.
Fig. 37
Fig. 38
Page 36
LaCie d2 Network 2 • DESIGN BY NEIL POULTON Administering Your LaCie d2 Network 2
User Manual page 36
4.2. Dashboard: Welcome Page
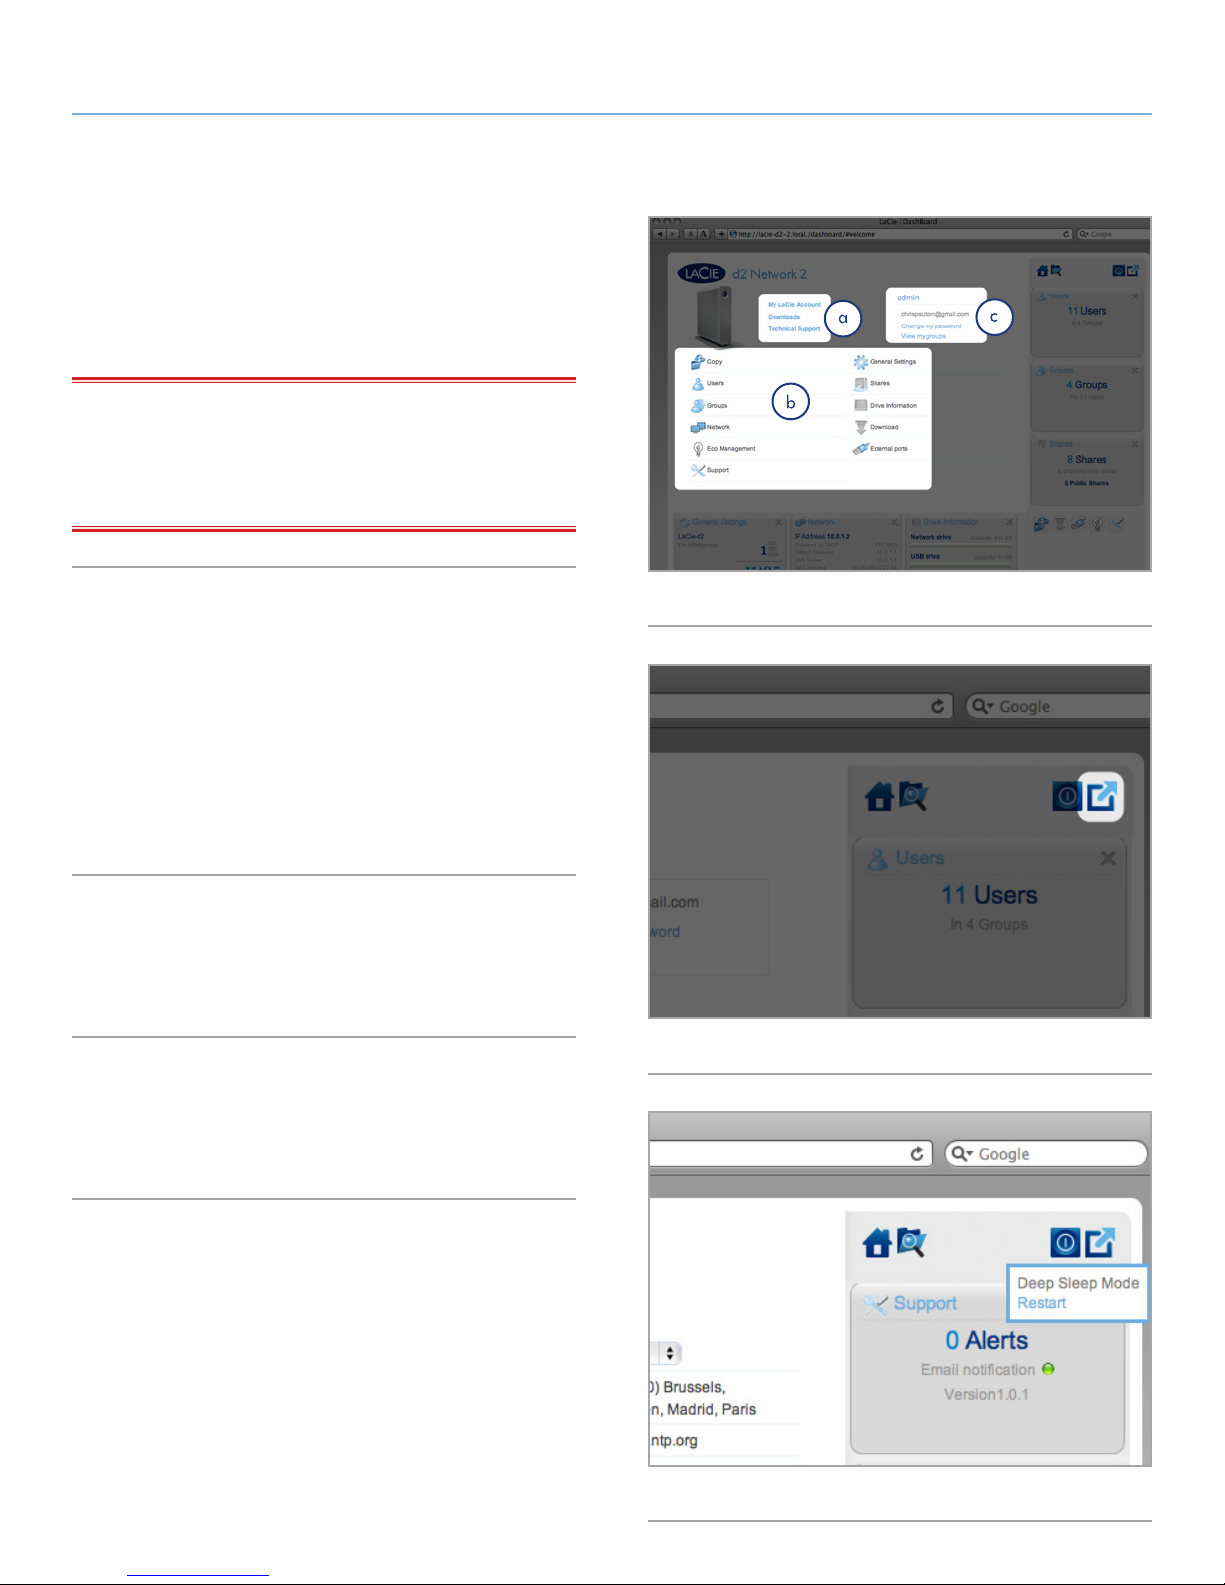
The welcome page contains links to helpful documents from the
LaCie Website (Fig. 39, a) and a table listing the different pages
that make up the Dashboard (Fig. 39, b). You can also change the
admin user data (Fig. 39, c).
IMPORTANT INFO: If you sign onto the Dashboard as an admin-
istrator, you will see the detailed Welcome page with full management capability (as in Fig. 39). If you sign in as a user, you will have
fewer options (ability to change username/password and access the
file browser).
4.3. Dashboard: Navigation
The Dashboard is made up of a central area surrounded by widgets,
or small boxes that represent the different pages that make up the
Dashboard. The widget displays a summary of the information contained in the page. For full information, navigate to the page itself.
✦ To navigate to a page, click the widget below its title.
✦ To minimize a widget, click the X next to its title.
✦ To expand a minimized widget, drag its icon over an expand-
ed widget, which replaces it.
4.4. Dashboard: Logging Out
To log out of the Dashboard, click the log out button in the upper
right-hand corner of any Dashboard page (Fig. 40).
4.5. Dashboard: Restart/Shutdown
To restart or shut down the drive, click this button, then choose between Deep Sleep Mode and Restart (Fig. 41).
Fig. 39
Fig. 40
Fig. 41
Page 37
LaCie d2 Network 2 • DESIGN BY NEIL POULTON Administering Your LaCie d2 Network 2
User Manual page 37
4.6. Dashboard: General Settings
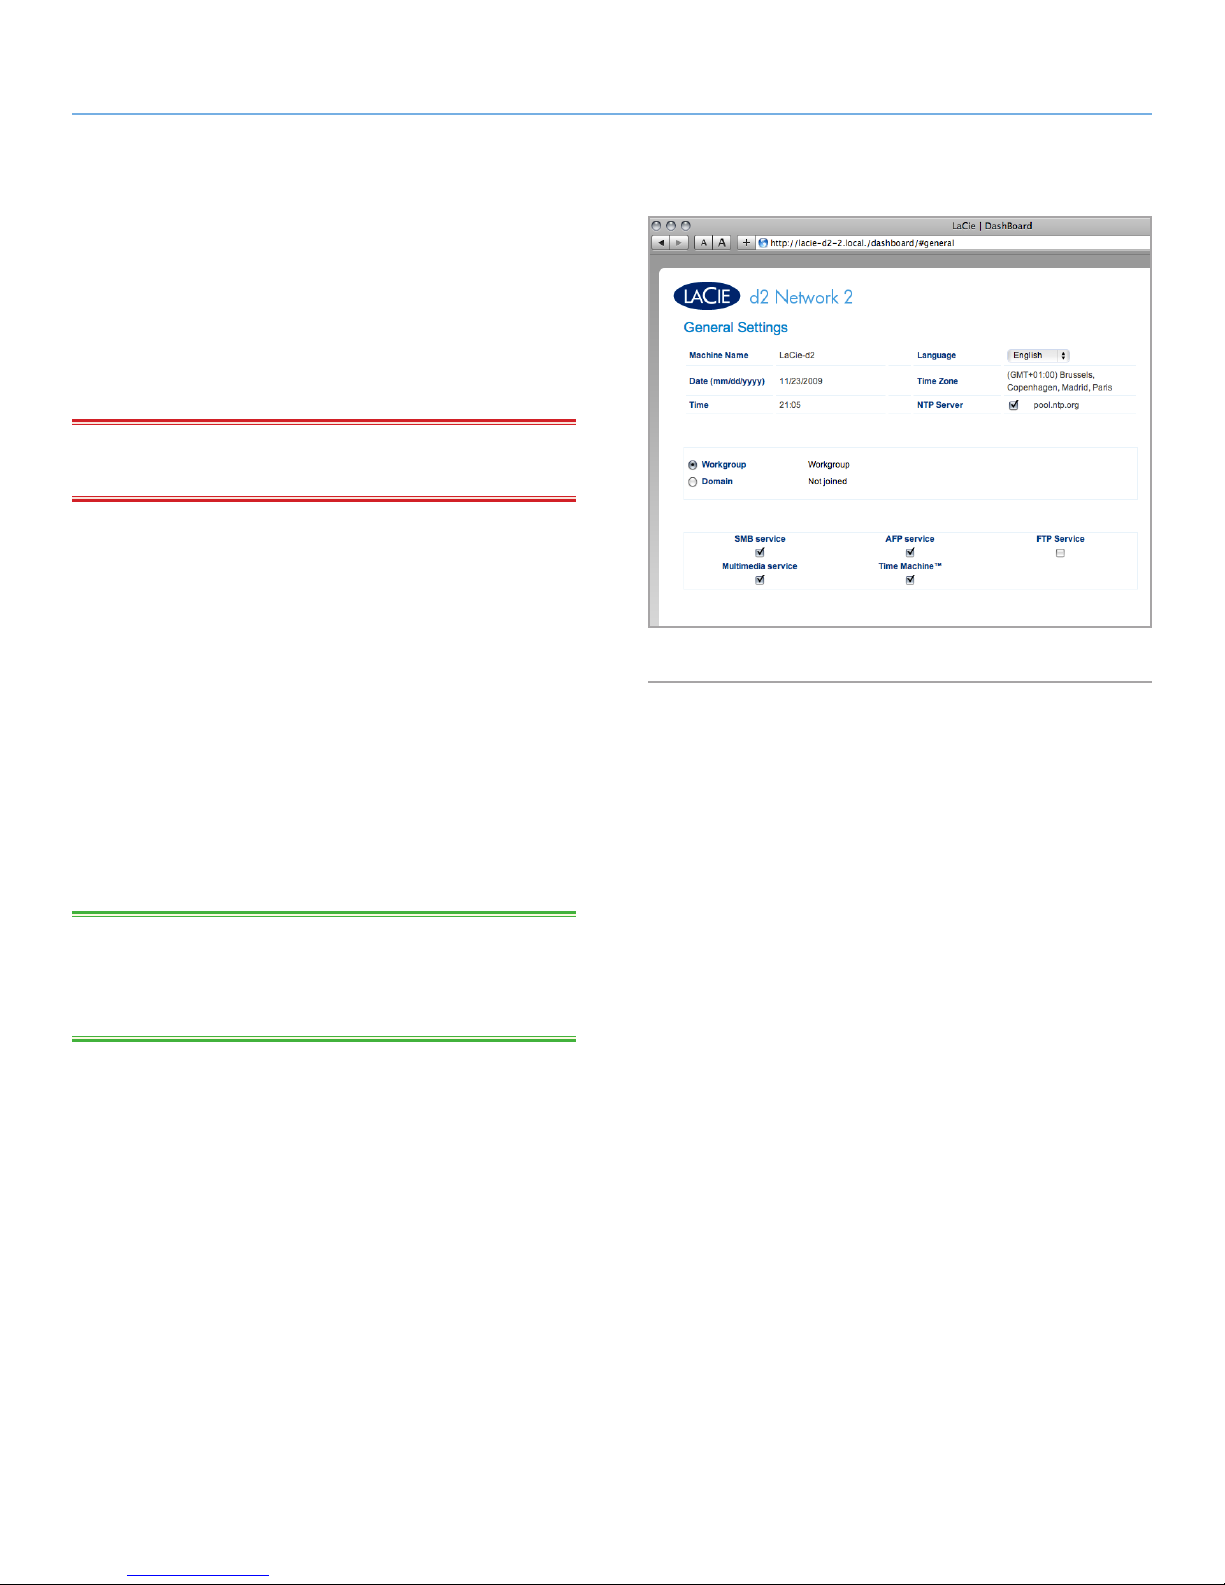
This page allows the administrator to modify some of your d2 Network 2’s general parameters.
Machine Name: Modify the machine name. The machine name
identifies your d2 Network 2 in LaCie Network Assistant and on the
local network.
IMPORTANT INFO: The machine name is limited to 15 charac-
ters.
Date (mm/dd/yy): Change the date.
Time: Change the time.
Language: Change the Dashboard language.
Time zone: Change the time zone.
NTP Server: Click the box, then click the field to the right and type
the address of a Network Time Protocol server to provide the time
for the d2 Network 2 automatically. While NTP is selected, you can’t
modify the time and date settings.
Workgroup: Modify the Windows workgroup name to set your d2
Network 2 to belong to a certain workgroup.
Domain: See section 4.6.1. Active Directory.
TECHNICAL NOTE: Mac users connected to a network with Win-
dows com puters can also access shares this way by selecting in the
Finder Network > [Workgroup] > LaCie-d2 where “[Work group]”
is the name of the Windows workgroup.
Toggle Services: Turn the various services off or on. By default, all
these services are enabled. However, UPnP and Time Machine services also need to be enabled at the share level in order to be operative (4.9. Dashboard: Shares).
This setting can be overridden at the Share level. See 4.9. Dash-
board: Shares for details.
Fig. 42
✦ SMB: Toggle this feature to activate/deactivate the SMB net-
work transfer protocol.
✦ AFP: Toggle this feature to activate/deactivate the AFP (Apple
Filing Protocol).
✦ FTP Service: Toggle this feature on/off to allow your d2 Net-
work 2 to be accessible via File Transfer Protocol (FTP). Refer
to section 3.5. Accessing Shares through the Internet for details on FTP access.
continued on the next page >>
Page 38
LaCie d2 Network 2 • DESIGN BY NEIL POULTON Administering Your LaCie d2 Network 2
User Manual page 38
✦ UPnP: This feature allows your d2 Network 2 to act as a UPnP
multimedia server. Files stored in shares where UPnP service is
active will be available to play on UPnP-enabled players (such
as cell phones, computers, and game consoles). For information on using your d2 Network 2 to stream files to your UPnP
devices, see 3.7. Multimedia Server. For information on using
the d2 Network 2 as an iTunes music server, see section 3.8.
iTunes Music Server.
✦ Time Machine: The d2 Network 2 is compatible with Apple’s
Time Machine, which backs up your Macintosh onto an external volume at regular intervals.
TECHNICAL NOTE: If you’ve just added new content to the d2
Network 2, it could take a few minutes before they are available to
UPnP/DLNA-certified players/adapters.
4.6.1. Active Directory
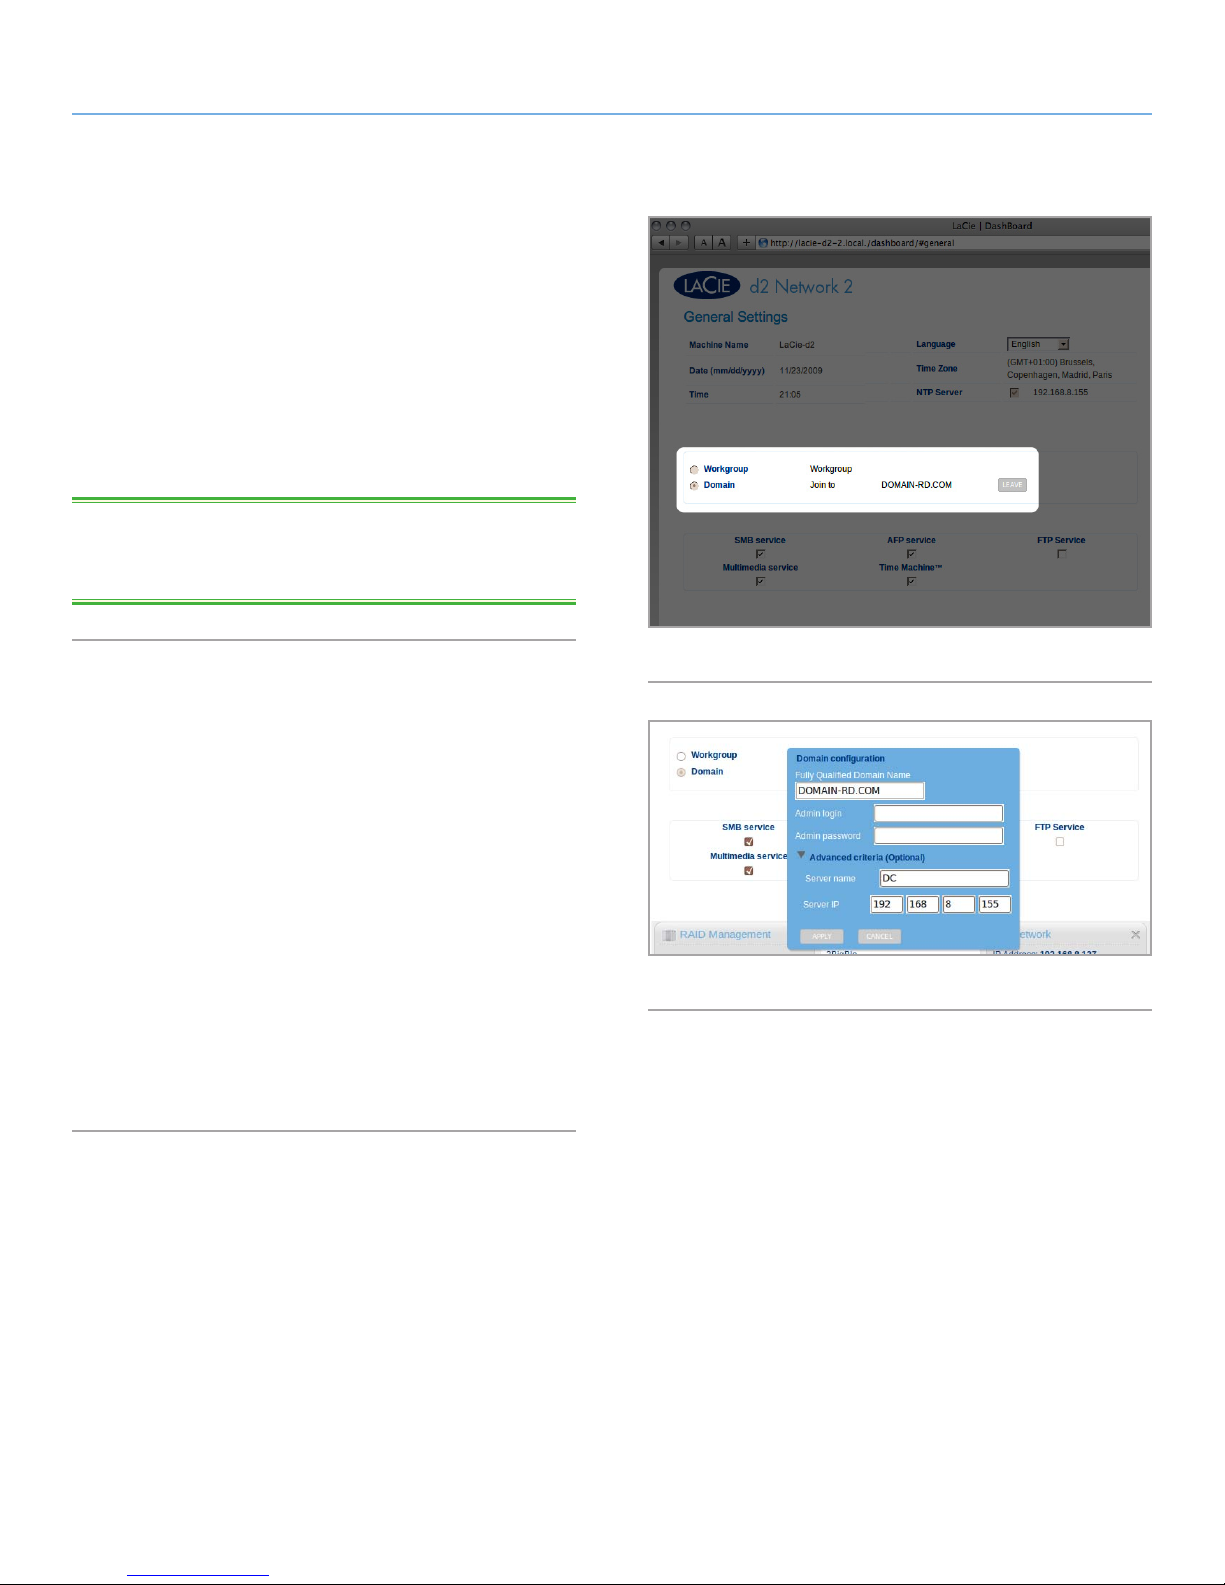
This feature allows you to join the d2 Network 2 to a Windows domain. Once connected, existing users/passwords in the domain are
respected by the d2 Network 2 and treated exactly as if they were
created in the Dashboard. You can use the Users page to assign
domain users access to the d2 Network 2’s shares.
To connect to a share, click the Domain box, then fill in the Fully
Qualified Domain Name, Admin login, and Admin password. For
more complex network configurations, click the Advanced Criteria
arrow and fill in the Server name and IP address (Fig. 43).
To leave the domain, click the Leave button, then authenticate by
inputting admin username and password (Fig. 44).
Once connected, you should see the domain’s associated users in
the Dashboard’s Users page (these users will be identified by the
word Domain in place of password).
Fig. 43
Fig. 44
Page 39
LaCie d2 Network 2 • DESIGN BY NEIL POULTON Administering Your LaCie d2 Network 2
User Manual page 39
4.7. Dashboard: Users
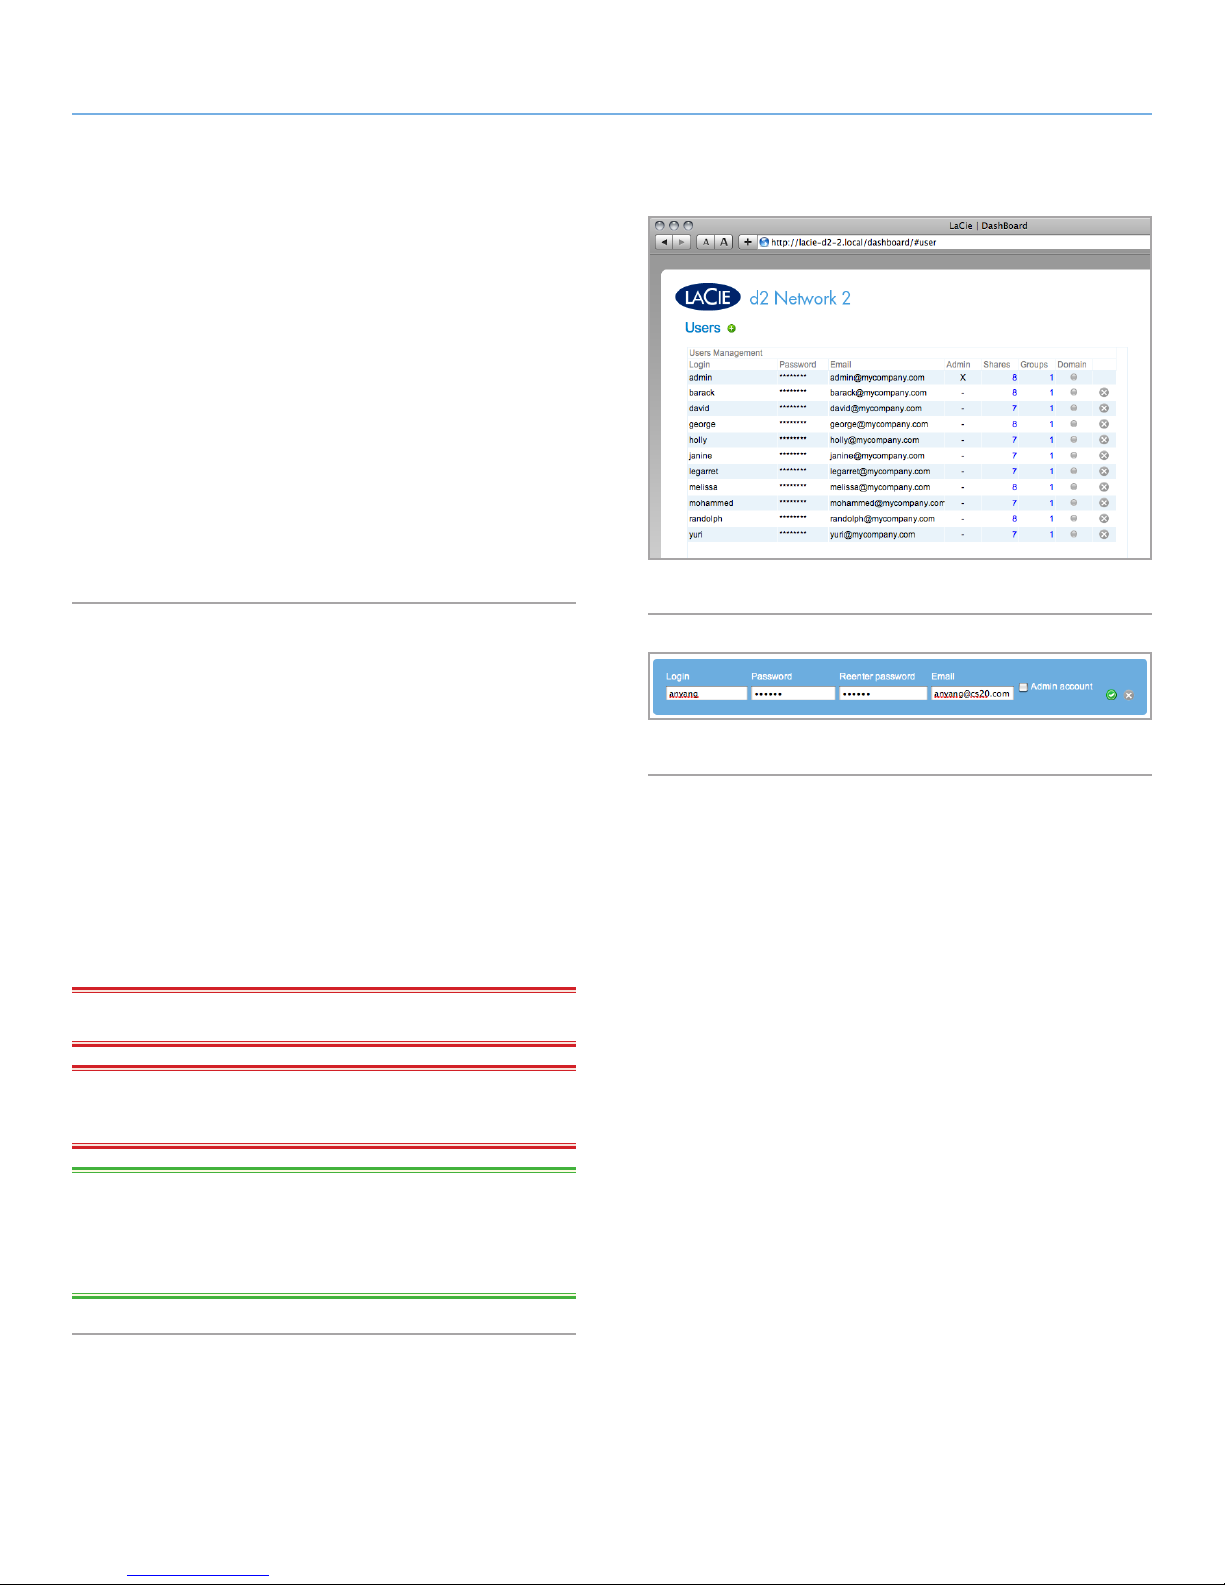
This page allows you to manage user accounts. See below to learn
how to accomplish user management-related tasks (Fig. 45).
User data is organized in a table.
✦ An X in the Admin column indicates the user has administrative
privileges.
✦ The number in the Shares column indicates to how many
shares the user has access.
✦ The number in the Groups column shows to how many groups
the member belongs.
✦ The bullet in the Domain column indicates whether the user
has been inherited from when the product joined a domain.
Fig. 45
4.7.1. Adding a New User
1. Click the green plus sign next to the page title (“Users accounts”).
2. In the box that opens, type in the username (You may enter
4 to 20 characters using letters (case sensitive), numbers, the
hyphen, and the underscore. No other symbols, punctuation, or
spaces may be used. Do not begin or end with a hyphen and/or
an underscore.), password (4 to 20 characters), confirm password, and optional fields (email address, toggle administrator
account) (Fig. 46). Click the Admin account box to give the user
admin privileges.
3. Press the green plus sign at right to create the user account.
IMPORTANT NOTE: The password is case-sensitive.
IMPORTANT INFO: The administrator password must be at least
4 characters.
TECHNICAL NOTE: Providing an email address will allow the user
to receive notifications regarding their user account sent automatically by the d2 Network 2. See section 4.13.1. Email Notification
Events for details.
Fig. 46
Page 40
LaCie d2 Network 2 • DESIGN BY NEIL POULTON Administering Your LaCie d2 Network 2
User Manual page 40
4.7.2. Deleting a User
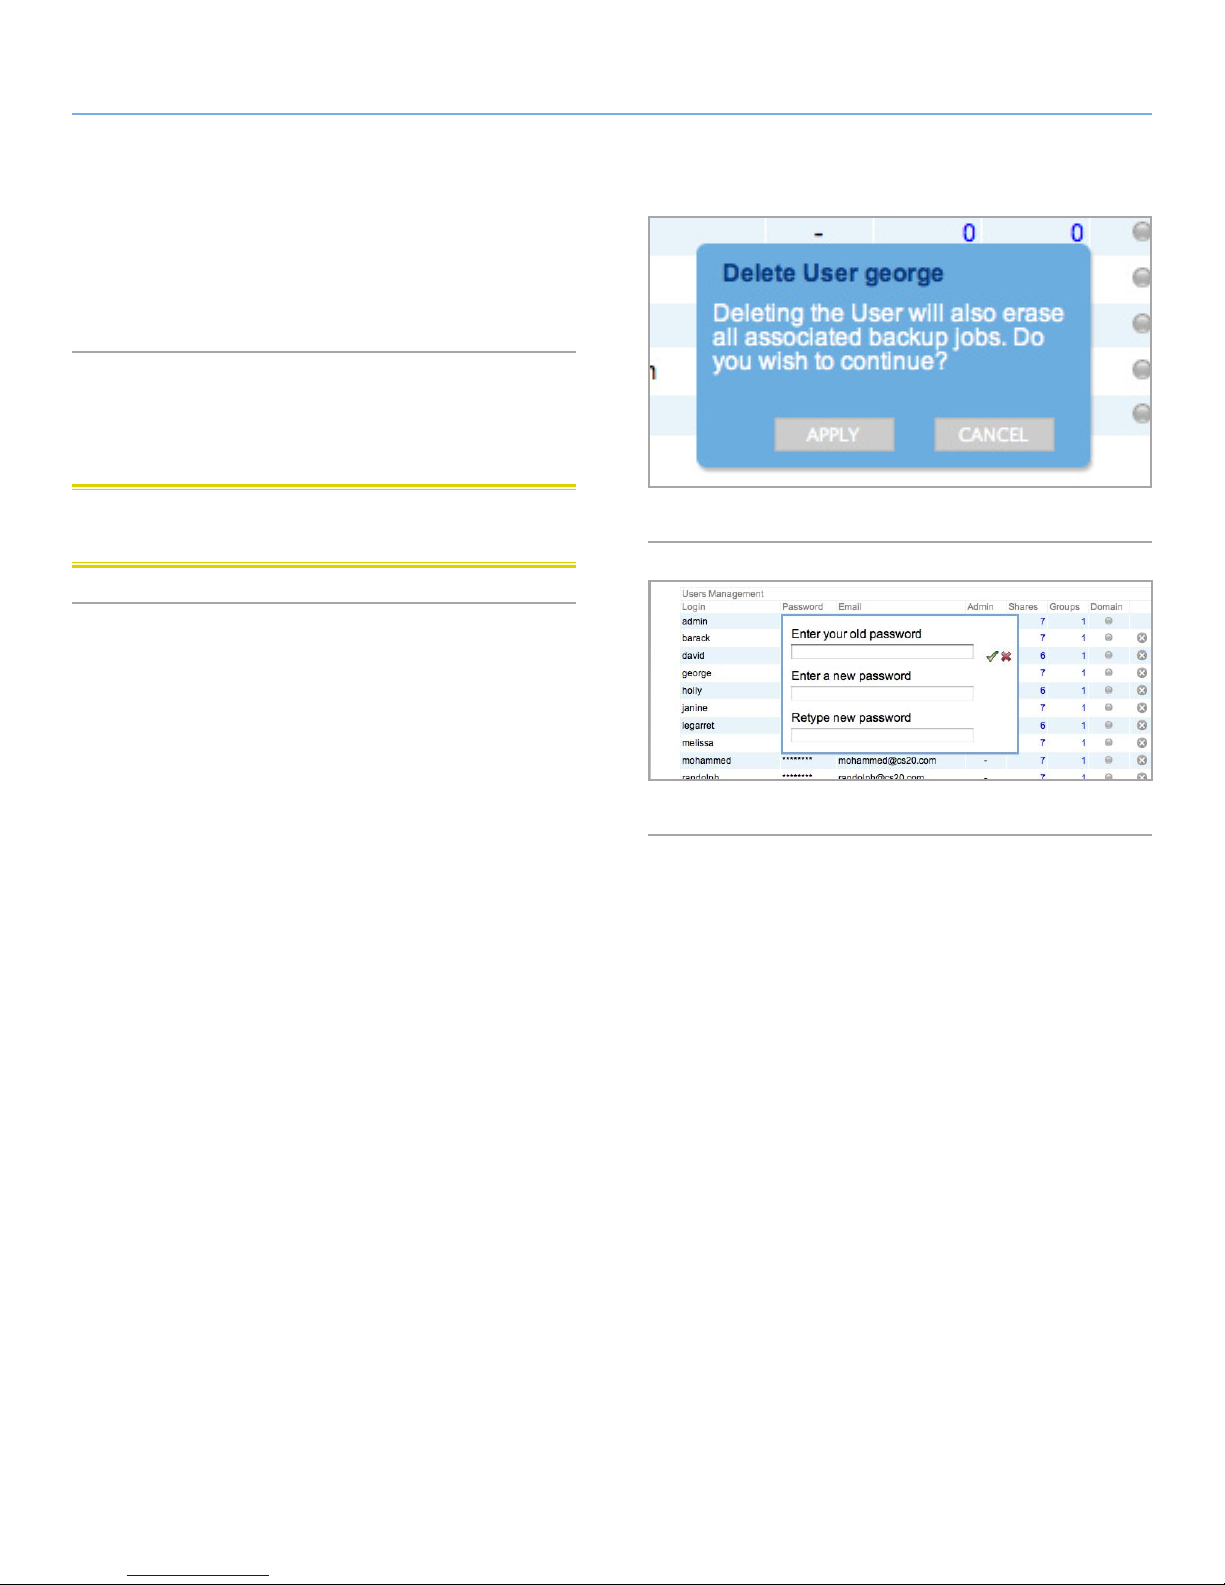
1. Click the gray “x” to the right of the user listing in the table.
2. In the confirmation box, click Delete (Fig. 47).
4.7.3. Editing a User
1. Click on the text in any field in the user table to modify a value
(Fig. 48).
CAUTION: Decreasing the capacity of a quota can cause data to
be deleted.
Fig. 47
Fig. 48
Page 41
LaCie d2 Network 2 • DESIGN BY NEIL POULTON Administering Your LaCie d2 Network 2
User Manual page 41
4.8. Dashboard: Groups
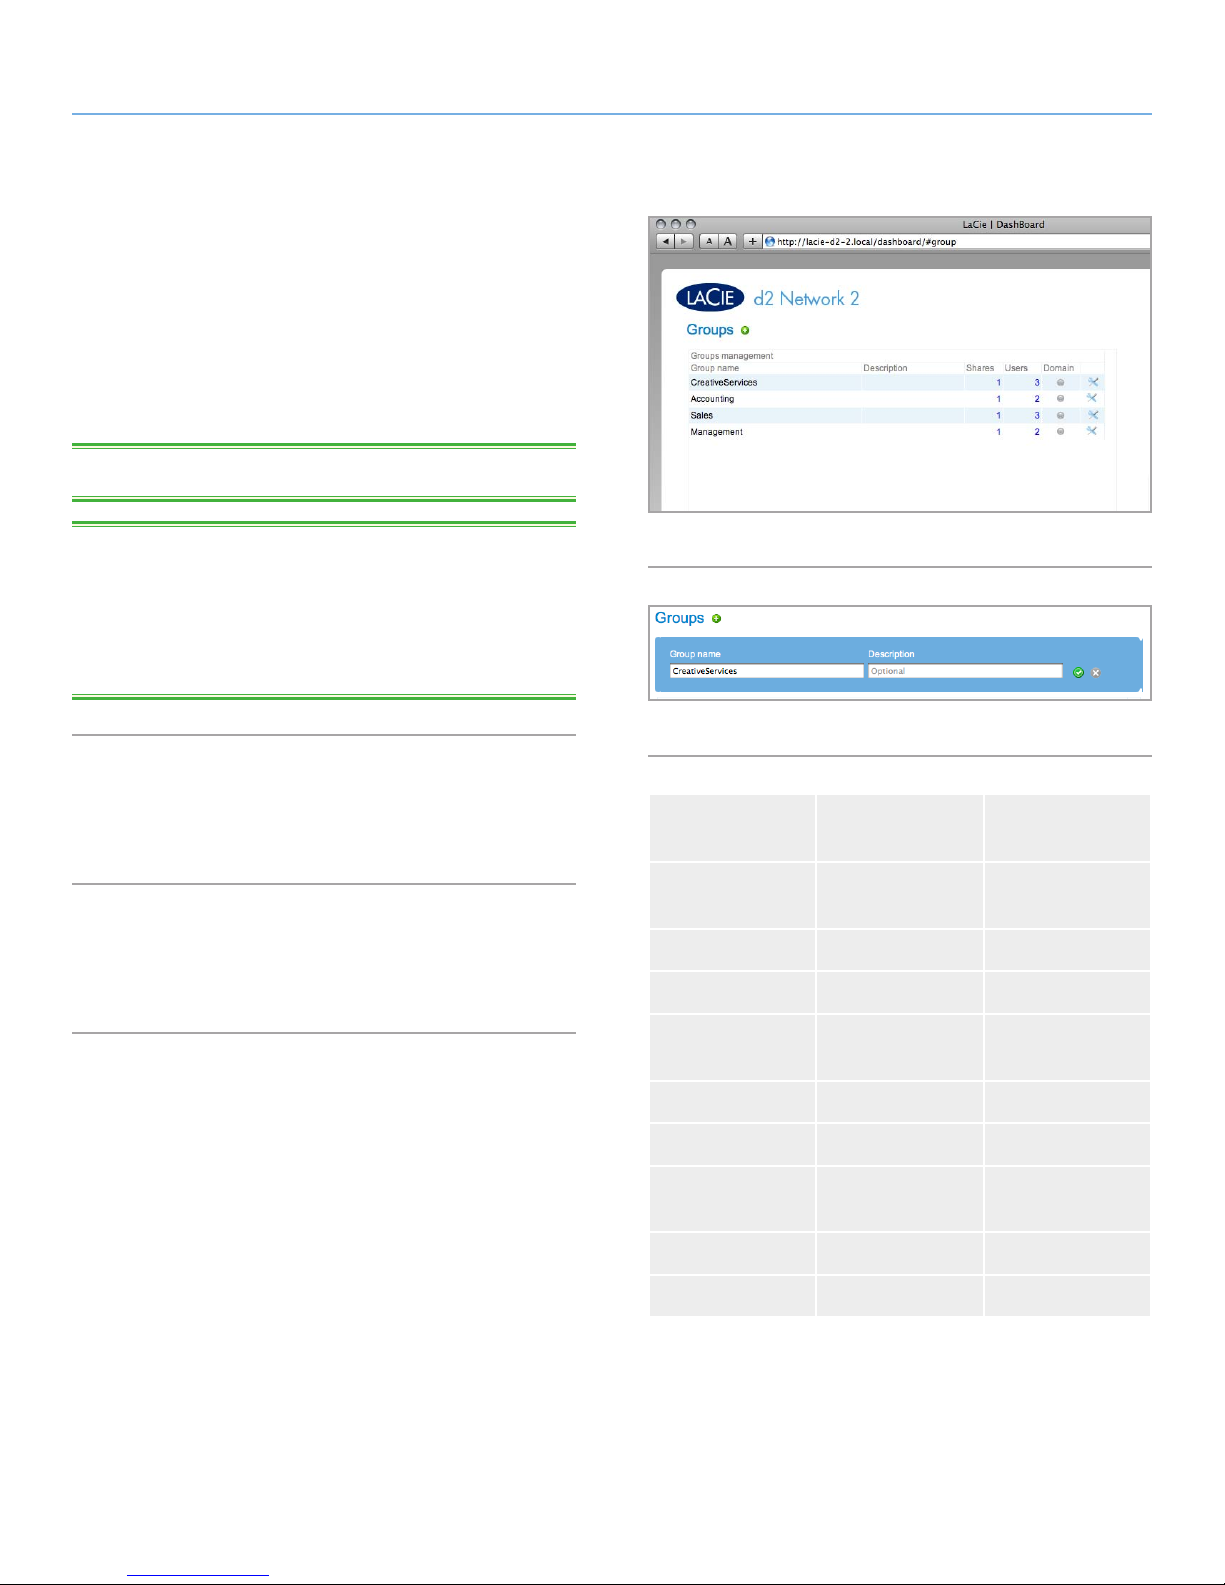
This page allows the administrator to manage groups. Groups help
to simplify users management and access to shares. They allow
administrators to change access rights to entire groups rather than
individually.
From this page, administrators can: create, modify, delete, and add
users to groups.
TECHNICAL NOTE: Users can belong to multiple groups.
TECHNICAL NOTE: If a discrepancy exists between the rights as-
signed to an individual and rights assigned to a group to which the
individual belongs, the more permissible rights prevail. For example, if a user has access to a share called “Backup” and she belongs
to a group that does not have this access, she will still have access
to “Backup” (see chart at right).
4.8.1. Adding New Group
To create a new group, click the green plus sign then fill in the group
name and description (optional) (Fig. 50).
4.8.2. Editing a Group
You can change the group name or description by clicking on the
field and typing.
Fig. 49
Fig. 50
User
permissions
Read / Write Read / Write
Read / Write Access Read Only R/W
Read / Write No Access R/W
Read only Read / Write
Read only Access Read Only RO
Group
permissions
access
access
Net access
R/W
R/W
Read only No Access RO
No Access Read / Write
access
No Access Access Read Only RO
No Access No Access NA
R/W
Page 42
LaCie d2 Network 2 • DESIGN BY NEIL POULTON Administering Your LaCie d2 Network 2
User Manual page 42
4.8.3. Deleting a Group
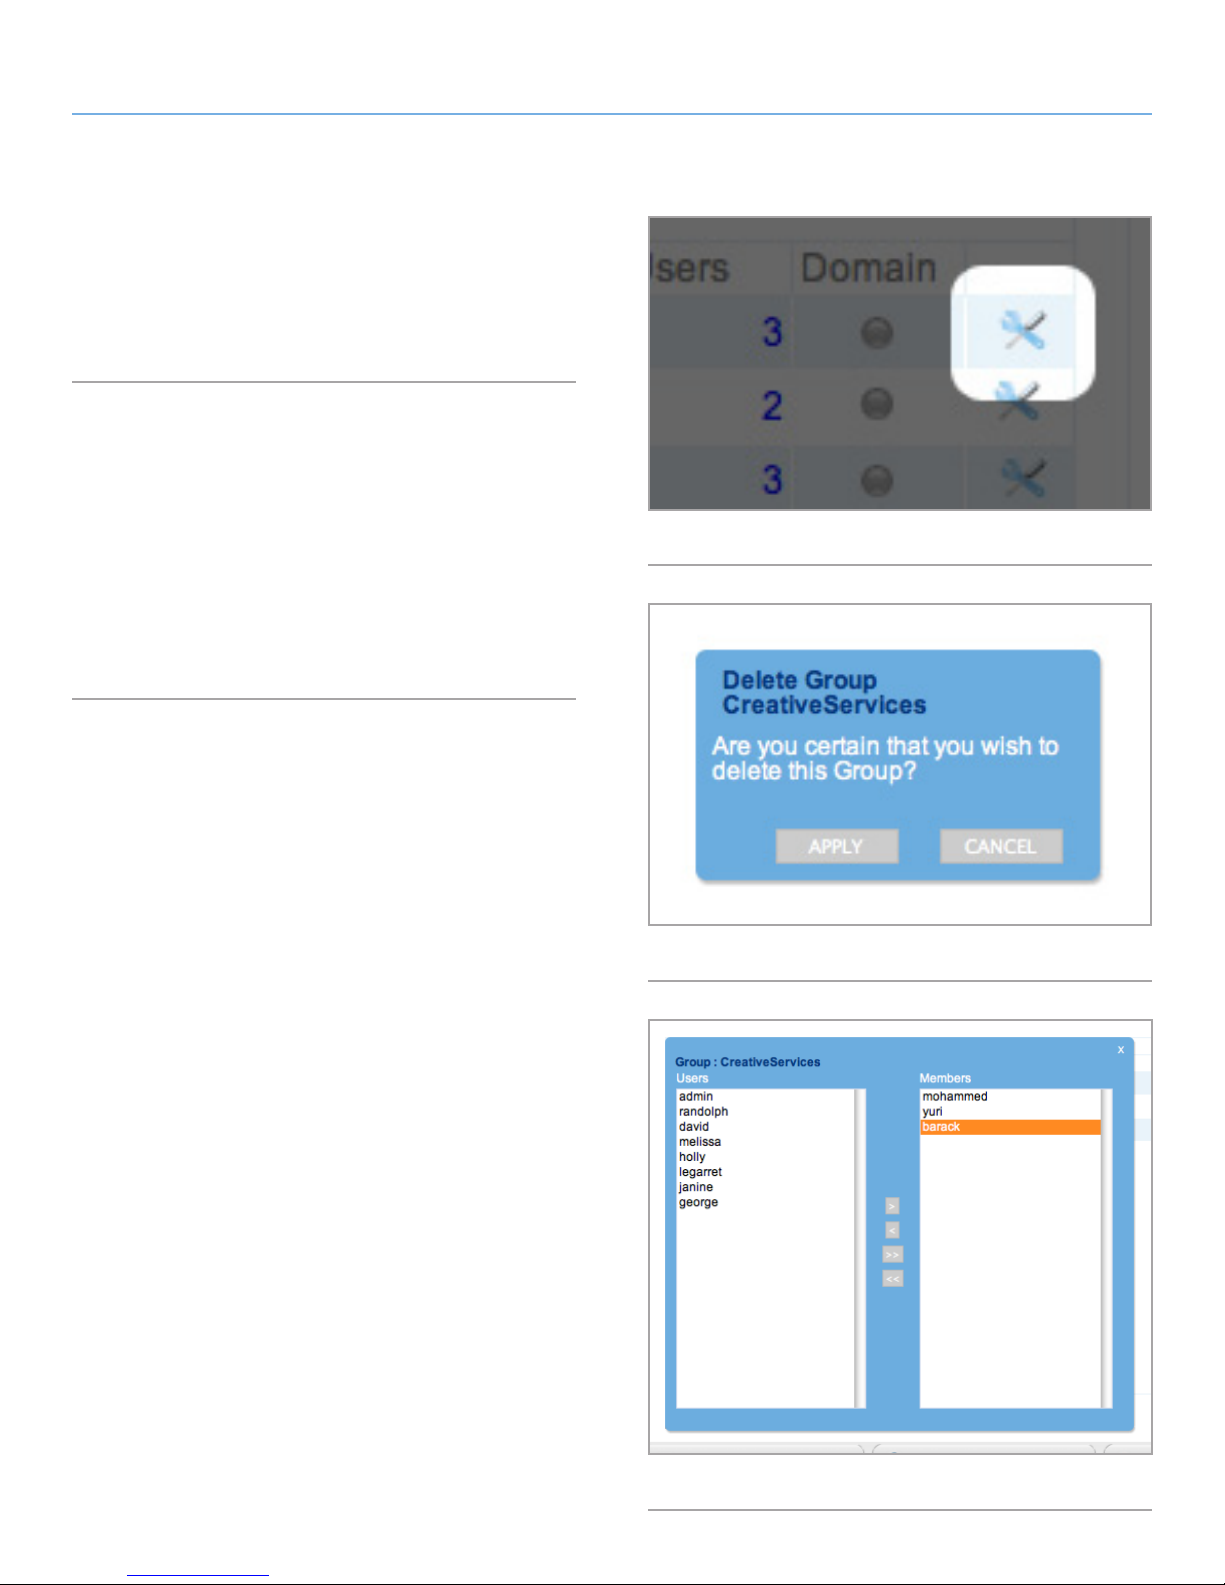
To delete a group, click the edit icon to the right of the group’s
listing (Fig. 51). In the window that opens, click Delete this group.
Confirm deletion in the dialogue window (Fig. 52). Note that this
process does not delete users assigned to the group.
4.8.4. Adding/Removing Users from a
Group
To add or remove a user from a group, click the edit icon to the right
of the group’s listing, then select Manage users (Fig. 53). To add a
user, select him/her in the Users column and click the add button.
To remove a user, select the user in the Members column and click
the remove button. To select multiple items, hold down the Ctrl key
(Windows) or Command key (Mac).
Fig. 51
You can assign a group’s access to a share using the Shares page.
Fig. 52
Fig. 53
Page 43
LaCie d2 Network 2 • DESIGN BY NEIL POULTON Administering Your LaCie d2 Network 2
User Manual page 43
4.9. Dashboard: Shares
Shares – network folders – comprise the storage capacity of the d2
Network 2. Out of the box, it has two shares, Share and Public, and
USBShare is created automatically when storage is allocated to the
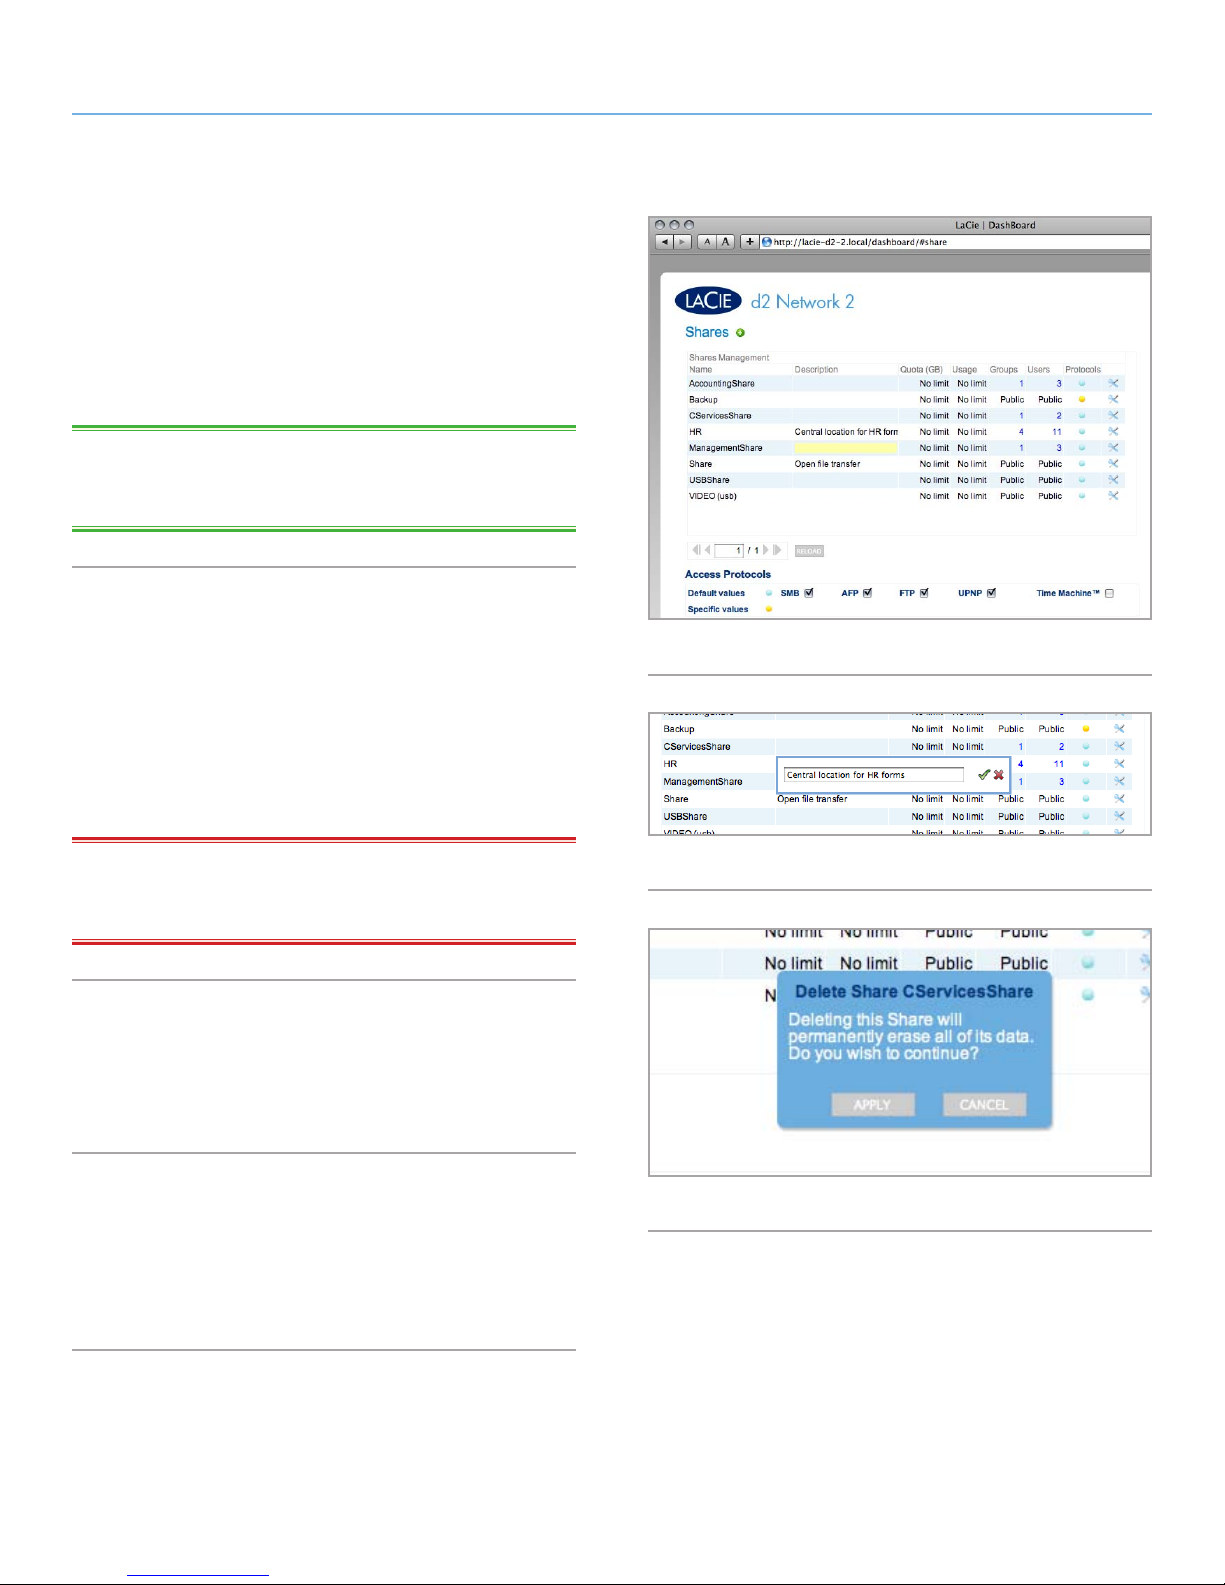
USB connection. The Shares page in the Dashboard allows the administrator to assign quotas and access rights to users and groups,
and to toggle share-level access protocols (Fig. 54).
TECHNICAL NOTE: It’s not necessary to create shares in order
to use the product. Simply use the default Share, Public, and/or
USBShare.
4.9.1. Adding a New Share
To create a new share, click the green plus sign, then fill in the group
name, description (optional), and quota (optional). If you do not set
a quota, the size allocated to the share is unlimited (until the drive
is filled).
Then, decide on whether the share will be public or private. If you
choose public, all users and guests will have Read/Write access to
the share.
IMPORTANT INFO: If you do not select the Public check box,
then no user will have access to the share until you assign access
rights.
4.9.2. Modifying a Share
To modify a share’s name, description, or quota, click on the field
and begin typing (Fig. 55). For details on changing access rights,
see 4.9.4. Setting/Modifying Access Rights for Users/Groups.
4.9.3. Deleting a Share
To delete a share, click the edit icon to the right of the share’s listing.
In the window that opens, click Delete this Share. Confirm deletion
in the dialogue window (Fig. 56). Note that deleting a share will
erase any files stored on the share.
Fig. 54
Fig. 55
Fig. 56
Page 44
LaCie d2 Network 2 • DESIGN BY NEIL POULTON Administering Your LaCie d2 Network 2
User Manual page 44
4.9.4. Setting/Modifying Access Rights for
Users/Groups
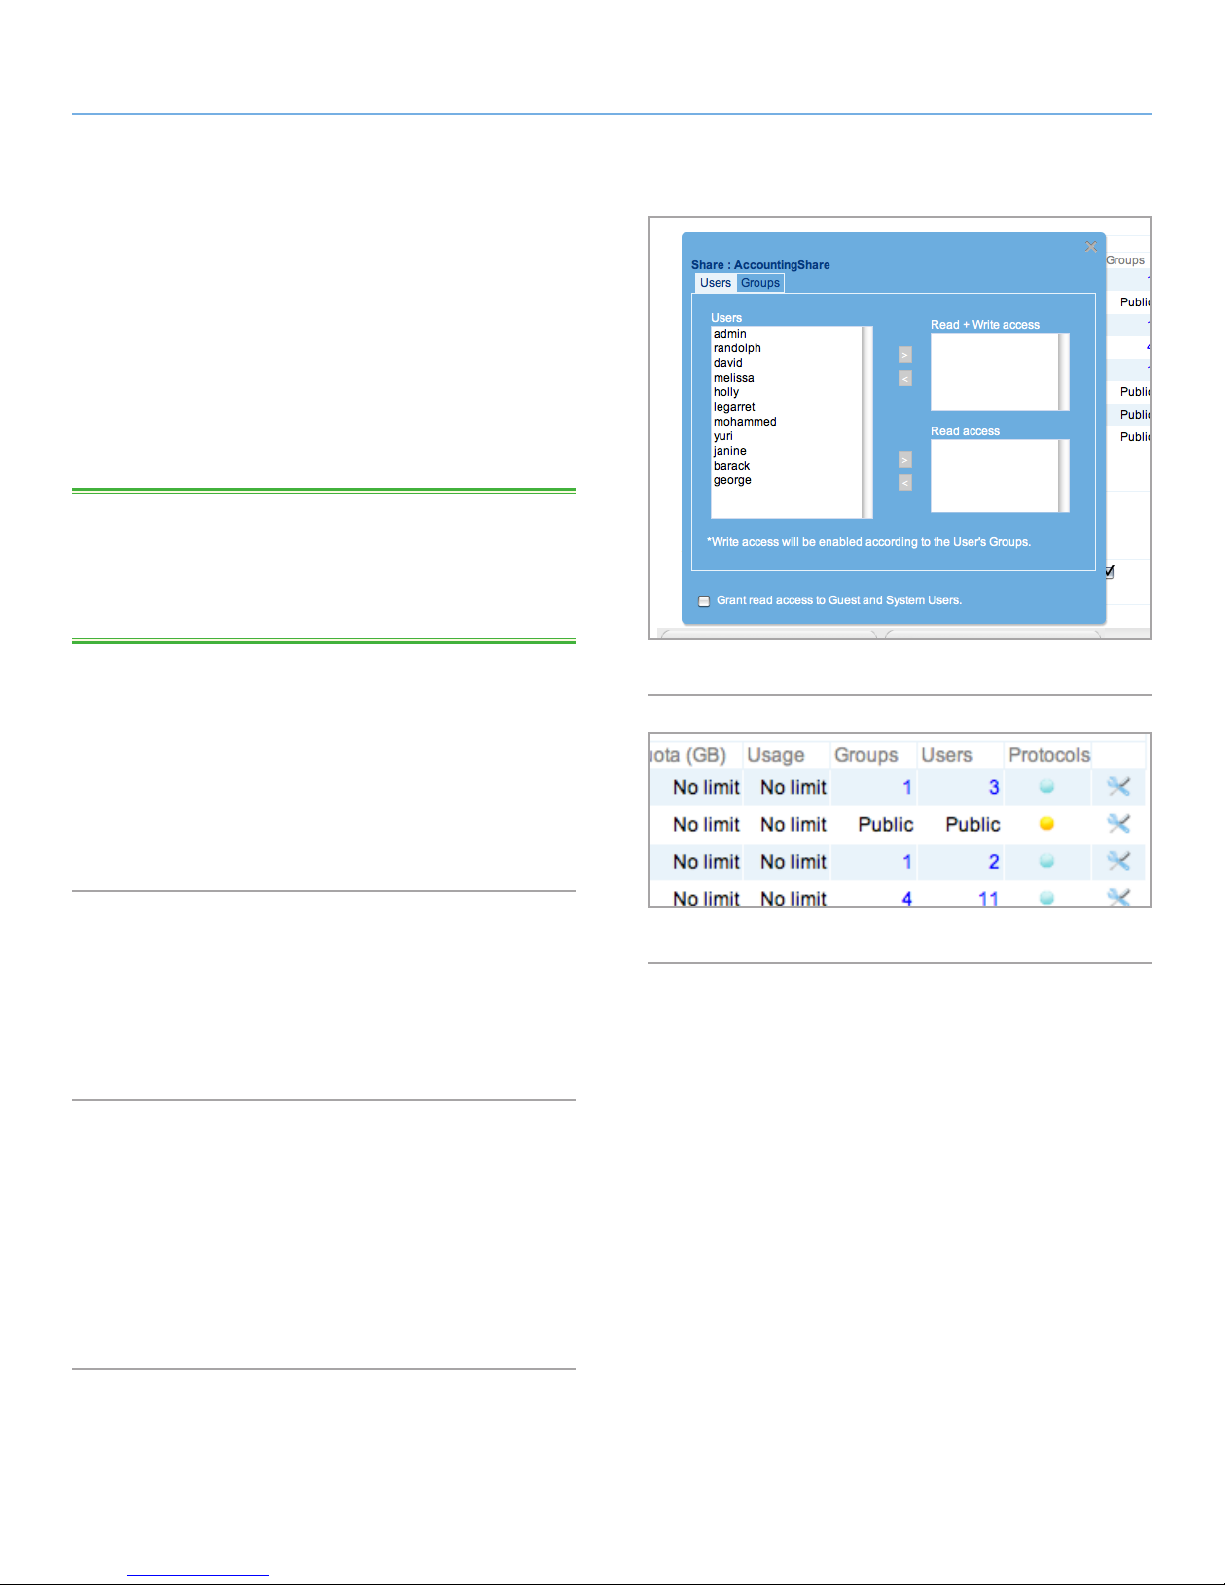
To modify access rights to the share for users or groups, follow the
instructions below (and refer to Fig. 57).
✦ Modify user access (to a private share): Click the edit icon to
the right of the share listing, then select Manage User Access.
In the window that opens, select a user in either the Read Write
or Read Only column and click the add button. To remove
a user, select the user in the Members column and click the
remove button.
TECHNICAL NOTE: If you select “Grant read access to Guest
and System users”, the Share will be accessible in RO by any user
(including guests) in addition to registered users. This will be indicated in the Shares table with a “+” next to the number of users with
access to the share.
✦ Modify group access: Click the edit icon to the right of the
share listing, then select Manage Group Access. Select a
group in either the Read Write or Read Only box in the lefthand column and click the add button. To remove a group,
select the group in the right-hand column and click the remove button.
✦ To make a share private or public: Click the edit icon to the
right of the share listing, then select either Change share to
public or Change share to private.
4.9.5. About Access Rights
✦ Read-Only means that all users can view and open files, but
they only the administrator can copy files to the share (see
table at right).
✦ Read/Write means that all users can view, modify, and copy
files to the share.
4.9.6. Specify Share-Level Access Protocols
If you click on the bullet under the Protocols column, you can modify
which access protocols are active for that share. By default, new
shares have SMB, AFP, and FTP enabled. If you want the share to
serve files to UPnP/DLNA devices and/or to act as a Time Machine
target, activate these protocols by clicking on the bullet in the Protocols column. If the default setting is overruled at the share level, the
bullet in the Services column will turn from blue to yellow (Fig. 58).
Fig. 57
Fig. 58
Page 45
LaCie d2 Network 2 • DESIGN BY NEIL POULTON Administering Your LaCie d2 Network 2
User Manual page 45
4.10. Dashboard: Network
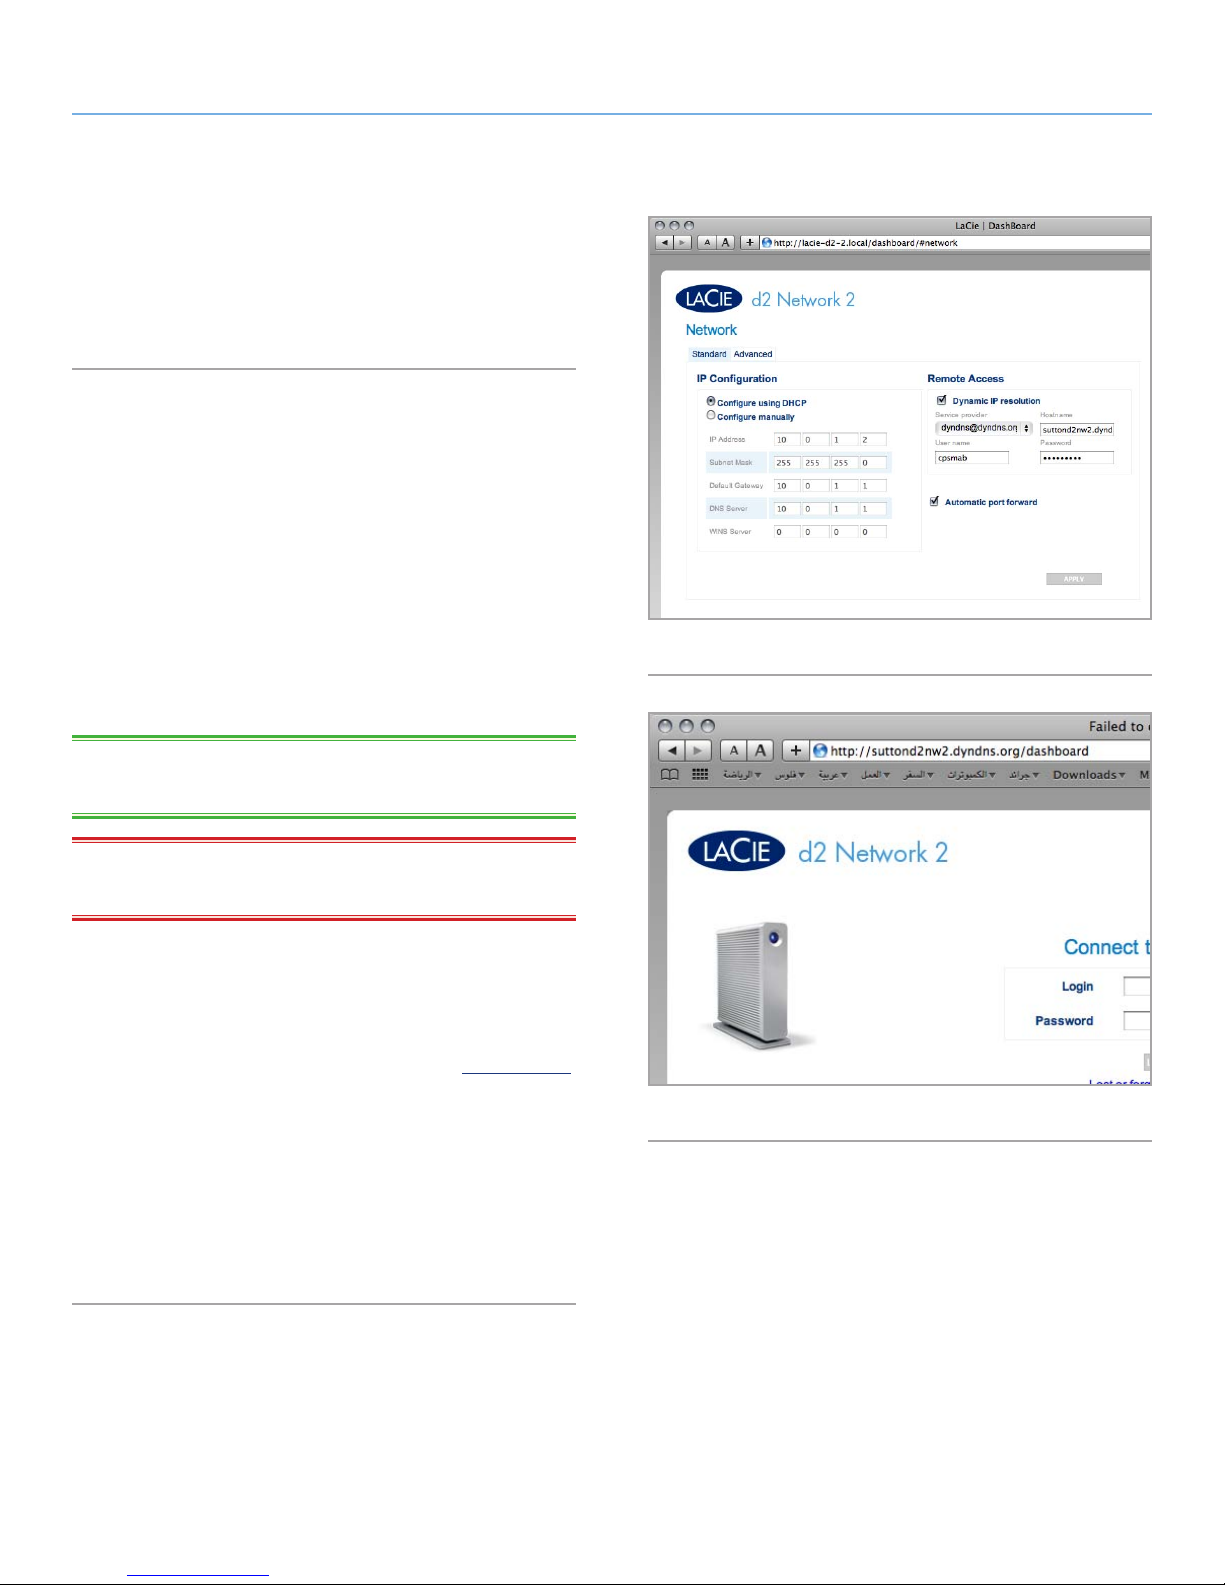
This page allows you to modify your d2 Network 2’s network settings. Note that there are two tabs to the page, standard and advanced.
4.10.1. Standard Settings
Configure using DHCP or manually: If your network is DHCP-en-
abled, as are most consumer networks, the d2 Network 2 will automatically be assigned an IP address and other values. As a result,
most users will see that the table has been filled in with values. If
you select Configure Manually, you will be able to modify the table
values.
Automatic port forward: If you want your d2 Network 2 to be ac-
cessible via the internet for remote access, you need certain ports to
be open in your router to allow proper communication. Check this
box to enable port forwarding, which uses UPnP-IGD/NAT-PMP to
automate port forwarding (if your router is compatible).
Fig. 59
TECHNICAL NOTE: The following ports need to be forwarded to
ensure proper communication: 21 (FTP) and 80 (HTTP).
IMPORTANT INFO: If you activate automatic port forward, public
shares will become accessible (read/write) through FTP.
Dynamic IP Resolution: You can use a third party Dynamic DNS
service to create an easy-to-remember URL for accessing your d2
Network 2 remotely. This service is free and no subscription is required. Follow these steps:
1. Go to a Dynamic DNS service provider such as DYNDNS.com.
2. Create an account.
3. Input the d2 Network 2’s IP address and create a hostname (ex.
smithfamily.dyndns.org).
4. On the Dashboard, open the Network page and enter the service provider, username, hostname and password you set up.
5. Click Apply.
6. From any internet connection, open a web browser and type the
hostname (Fig. 60). Your d2 Network 2 login page will open.
Fig. 60
Page 46
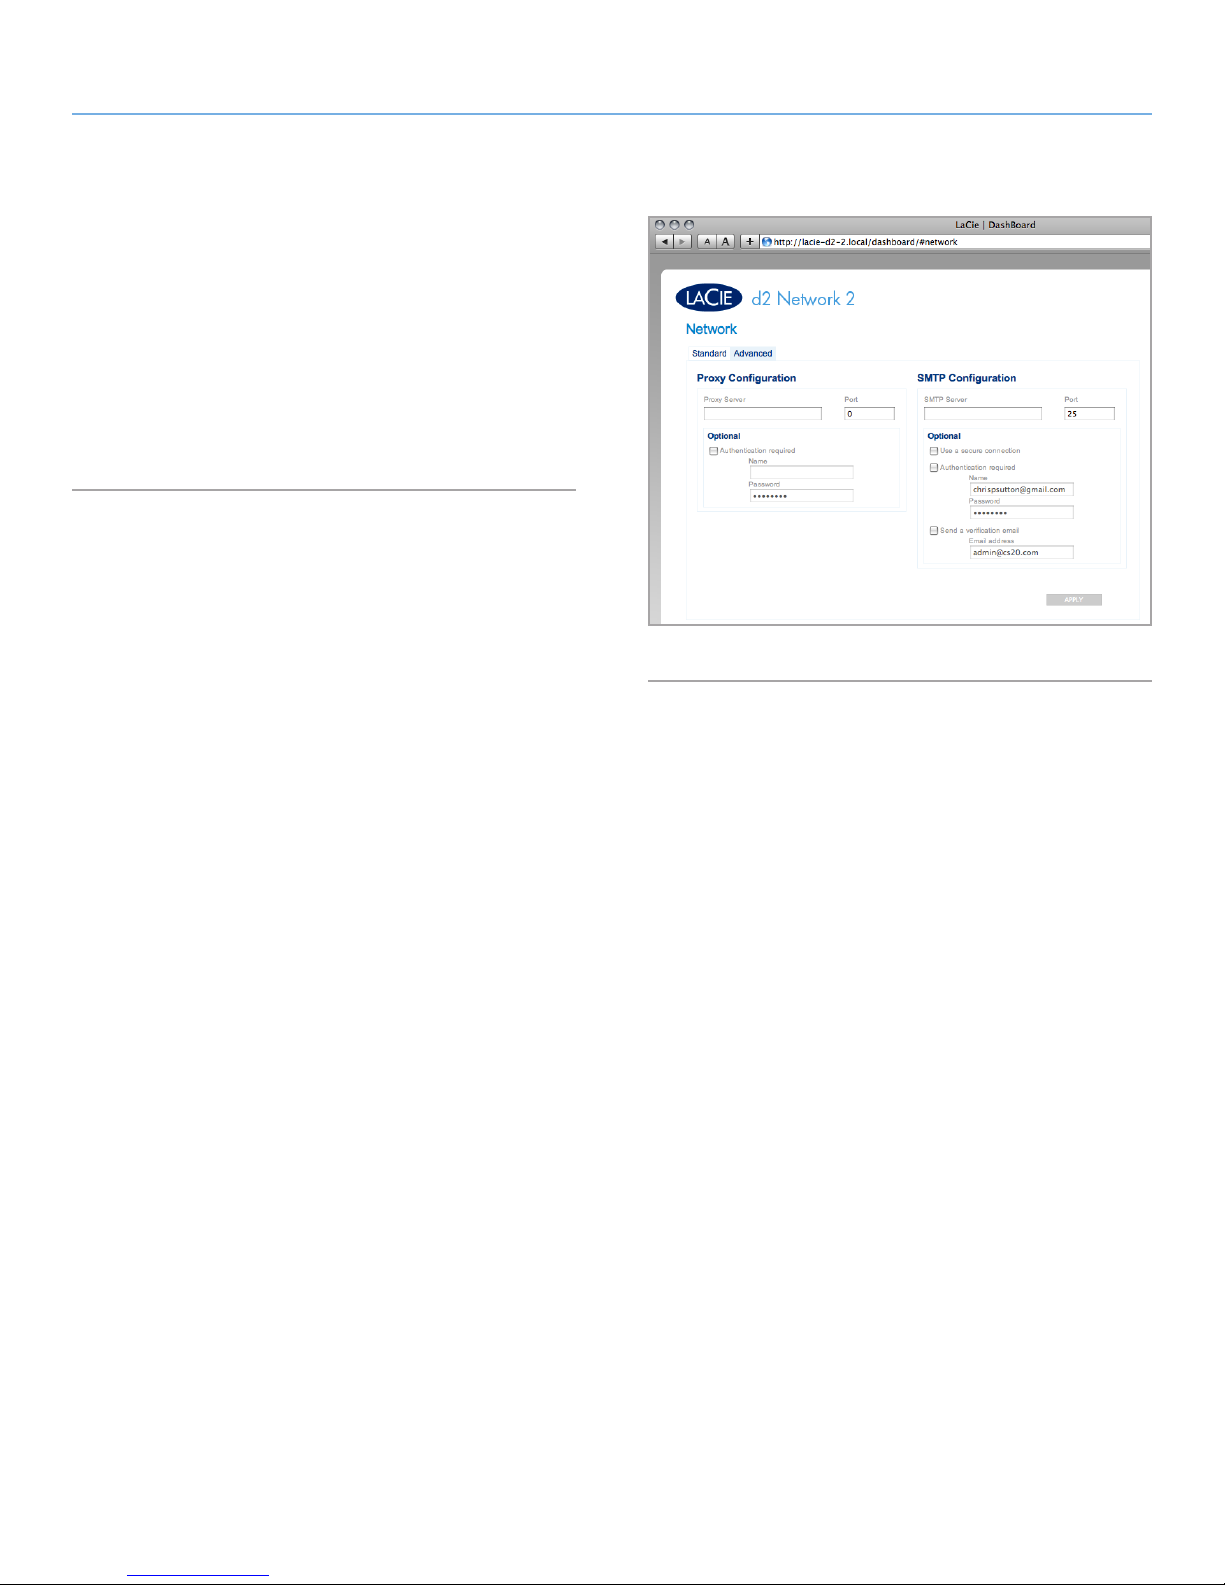
LaCie d2 Network 2 • DESIGN BY NEIL POULTON Administering Your LaCie d2 Network 2
User Manual page 46
4.10.2. Advanced Settings
Proxy Configuration: The d2 Network 2 can be configured to con-
nect to a proxy server. Fill in the server URL, port, and optional
authentication information and click Apply.
SMTP Configuration: To make sure your d2 Network 2 can send
alert emails to users, configure the SMTP settings. Verify the alert
system works by clicking the Send a verification email box.
After modifying any of the above settings, click the Apply button.
Fig. 61
Page 47
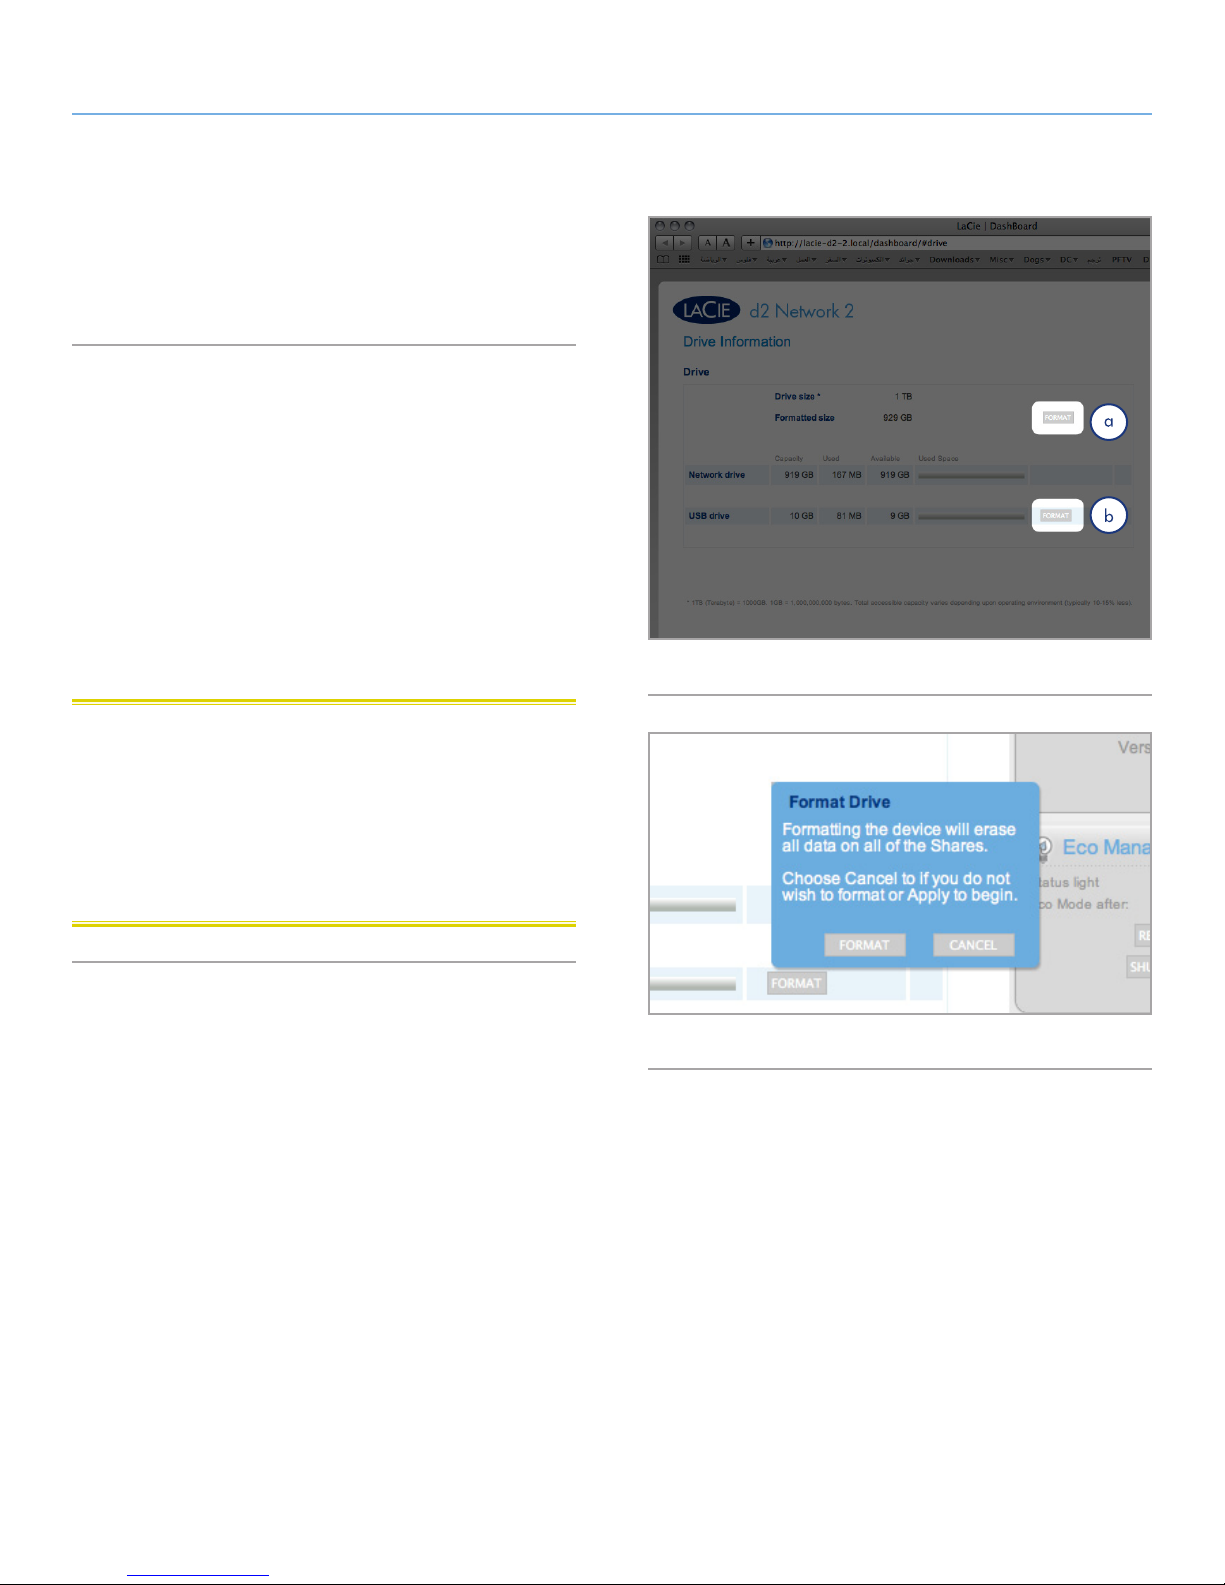
LaCie d2 Network 2 • DESIGN BY NEIL POULTON Administering Your LaCie d2 Network 2
User Manual page 47
4.11. Dashboard: Drive Information
This page shows you information about disk usage and will allow
you to reformat your drive.
4.11.1. Formatting Your d2 Network 2
When you click the top Format button (Fig. 62, a), ALL data on the
disk (including on USBShare) will be erased and the disk will be
formatted. Data on any USB or eSATA hard drive connected to the
front port will not be affected. When you click the bottom Format
button (Fig. 62, b), only the USBShare will be formatted.
To reformat:
1. Click the FORMAT button.
2. In the blue window that opens, confirm by flicking the FORMAT
button.
CAUTION: Formatting will erase all the data on your drive (but
will not remove users or settings). Make sure to back up all your
data onto another volume before proceeding. If you are formatting
USBShare and wish to back it up first onto another share, LaCie recommends you use the File Browser (see 3.3. Accessing Shares Using
File Browser) instead of using SMB/AFP (i.e. using the Finder for Mac
users or an Explorer window for Windows users). LaCie cannot be
held for responsible for the loss of data occurring during formatting.
Fig. 62
Fig. 63
Page 48
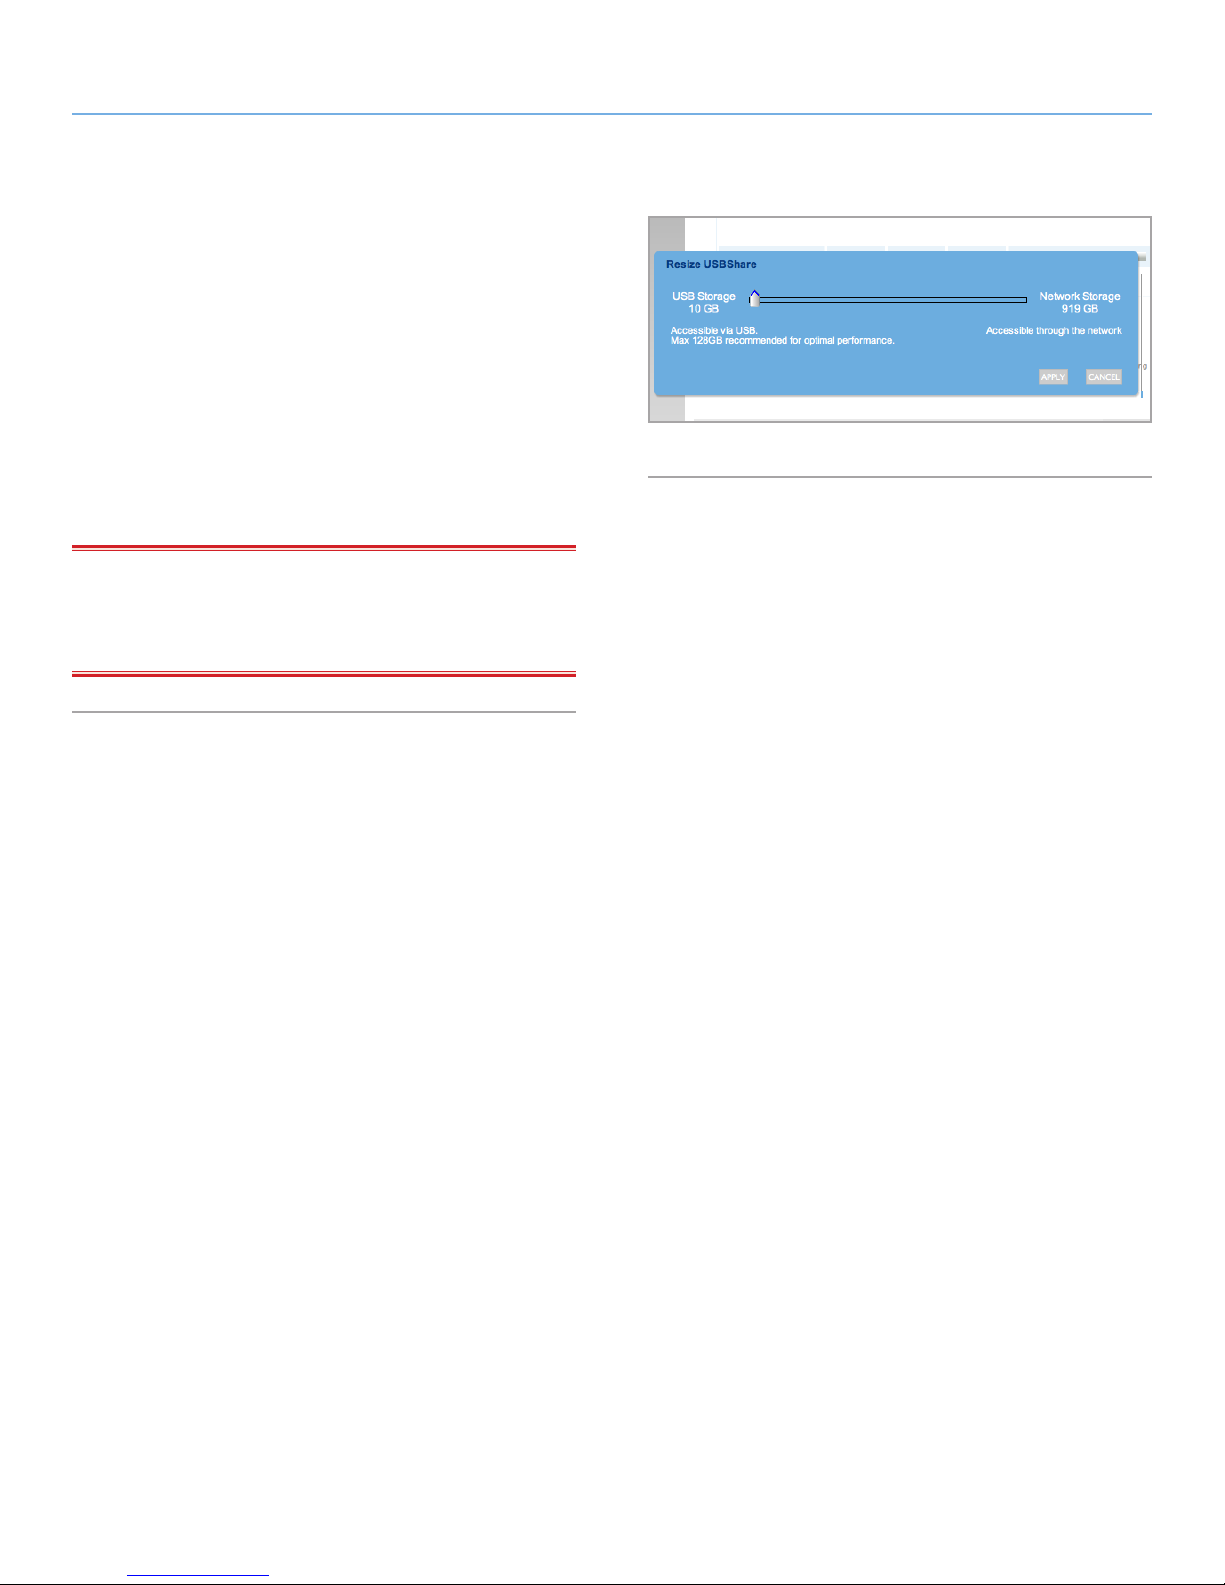
LaCie d2 Network 2 • DESIGN BY NEIL POULTON Administering Your LaCie d2 Network 2
User Manual page 48
4.11.2. Modifying the USB Share Capacity
Under the heading USB Drive, click the number under the heading
Capacity to modify the amount of capacity to be allocated for the
USB access. You can modify this proportion from 0 GB to up to 500
GB (default is 0 GB) (Fig. 64).
If you choose to decrease the share size, the volume will be reformatted automatically and all data contained on the volume will be
erased. To proceed, confirm your choice in the popup window.
If you choose to increase the USB share size, it is necessary to format
the share by clicking the Format button under the USB Drive heading.
IMPORTANT INFO: LaCie strongly recommends you do not in-
crease the USBShare size to more than 128 GB unless you format
USBShare to either NTFS or HFS+ using your operating system’s
native disk utility.
Fig. 64
Page 49
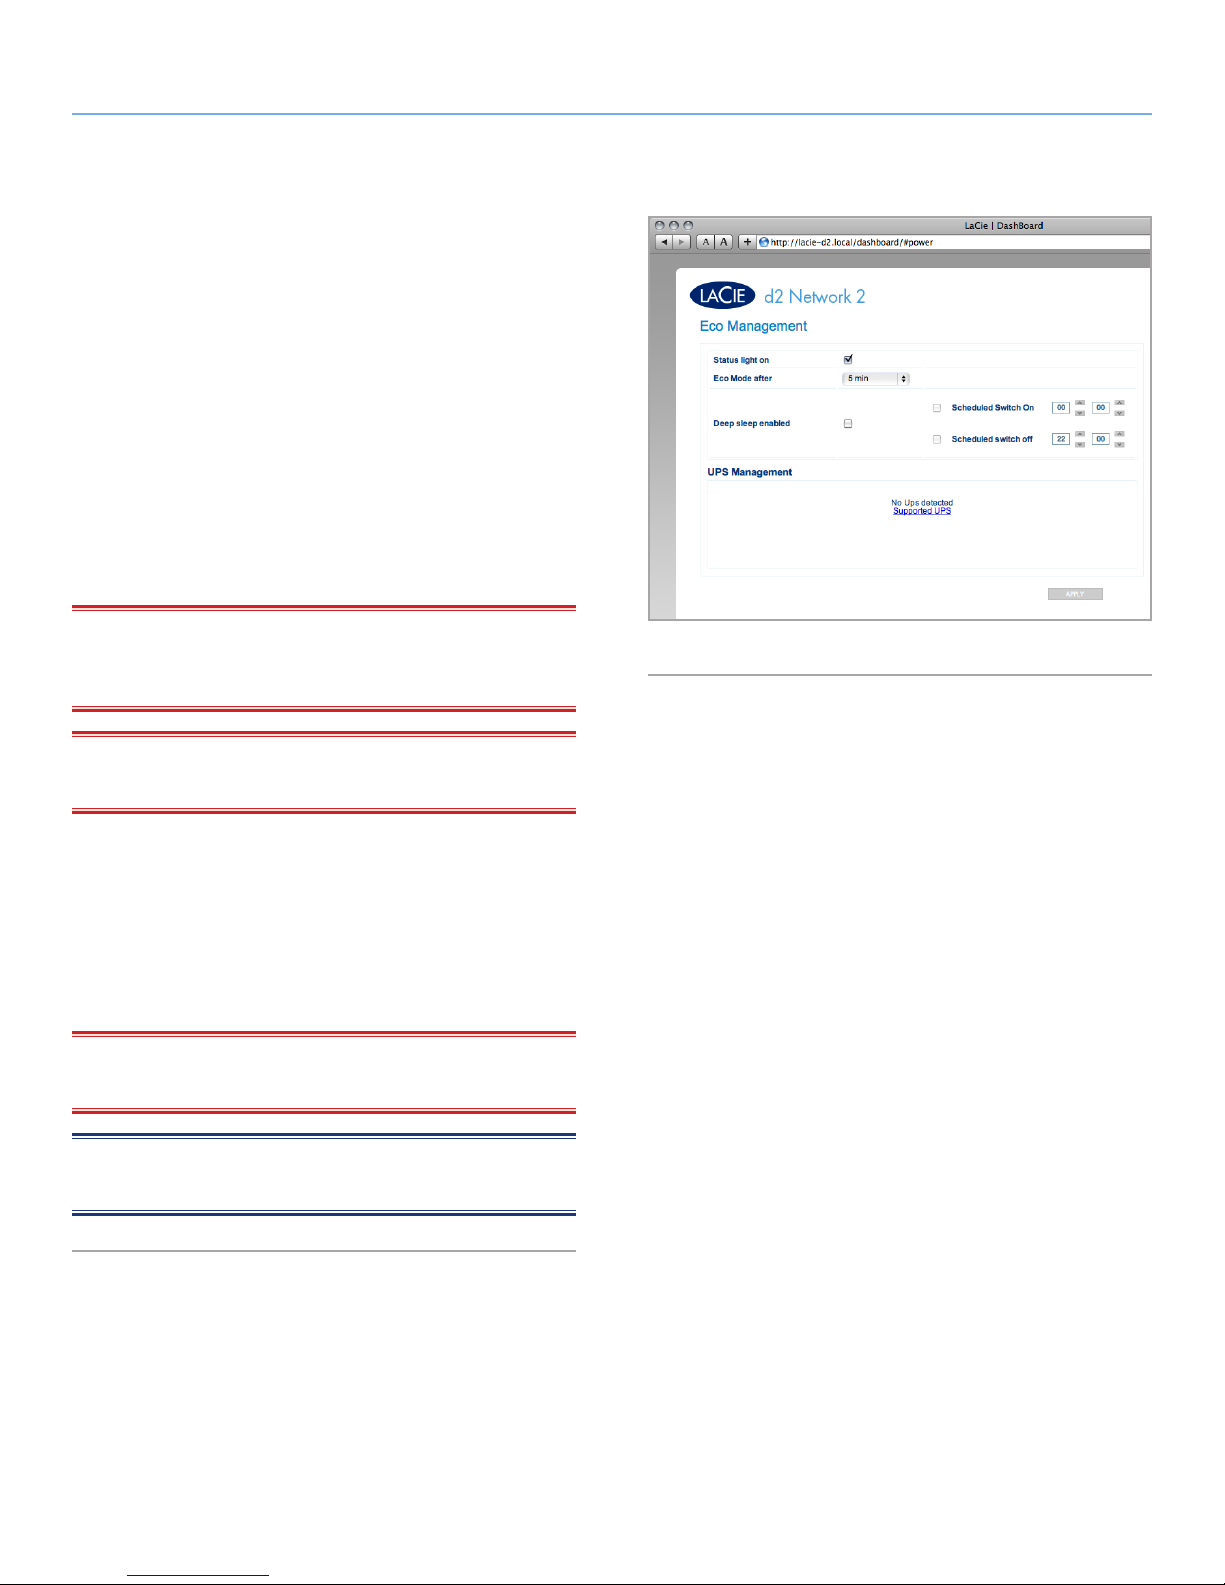
LaCie d2 Network 2 • DESIGN BY NEIL POULTON Administering Your LaCie d2 Network 2
User Manual page 49
4.12. Dashboard: Eco Management
Status light on: Uncheck this box to turn off the blue light. Note that
this will not disable warning indicators.
Eco Mode after: Set the duration of inactivity after which the drive
will revert to Eco mode, which spins down the disks and reducing
power consumption. The product leaves Eco mode automatically
when a request is sent to the drive.
Deep sleep enable: Deep sleep means that the drive will enter a very
low energy consumption mode instead of turning off when you click
the Shut Down button (see below). This mode can be triggered by
clicking and holding the front blue button. To wake the drive from
Deep Sleep Mode, press the blue button or use the Wake on LAN
function in the LaCie Network Assistant (see 4.12.2. Wake on LAN).
IMPORTANT INFO: If Deep Sleep Mode is enabled, clicking the
Shut Down button (see below) will cause the drive to enter Deep
Sleep Mode, and will NOT switch off the product.
IMPORTANT INFO: When Sleep mode is activated, all processes,
including downloads and backups, will be terminated.
Scheduled Switch On: Set the drive to activate deep sleep mode at
a certain time to save energy.
Scheduled Switch Off: Set the drive to deactivate deep sleep mode
at a certain time to save energy.
UPS Management: See section 4.12.1. UPS Management for de-
tails.
IMPORTANT INFO: After modifying any of the above parameters,
click the Apply button.
NOTE: For details on using the multi-function power button, see
section 2.5. Power Button Functions.
Fig. 65
Page 50
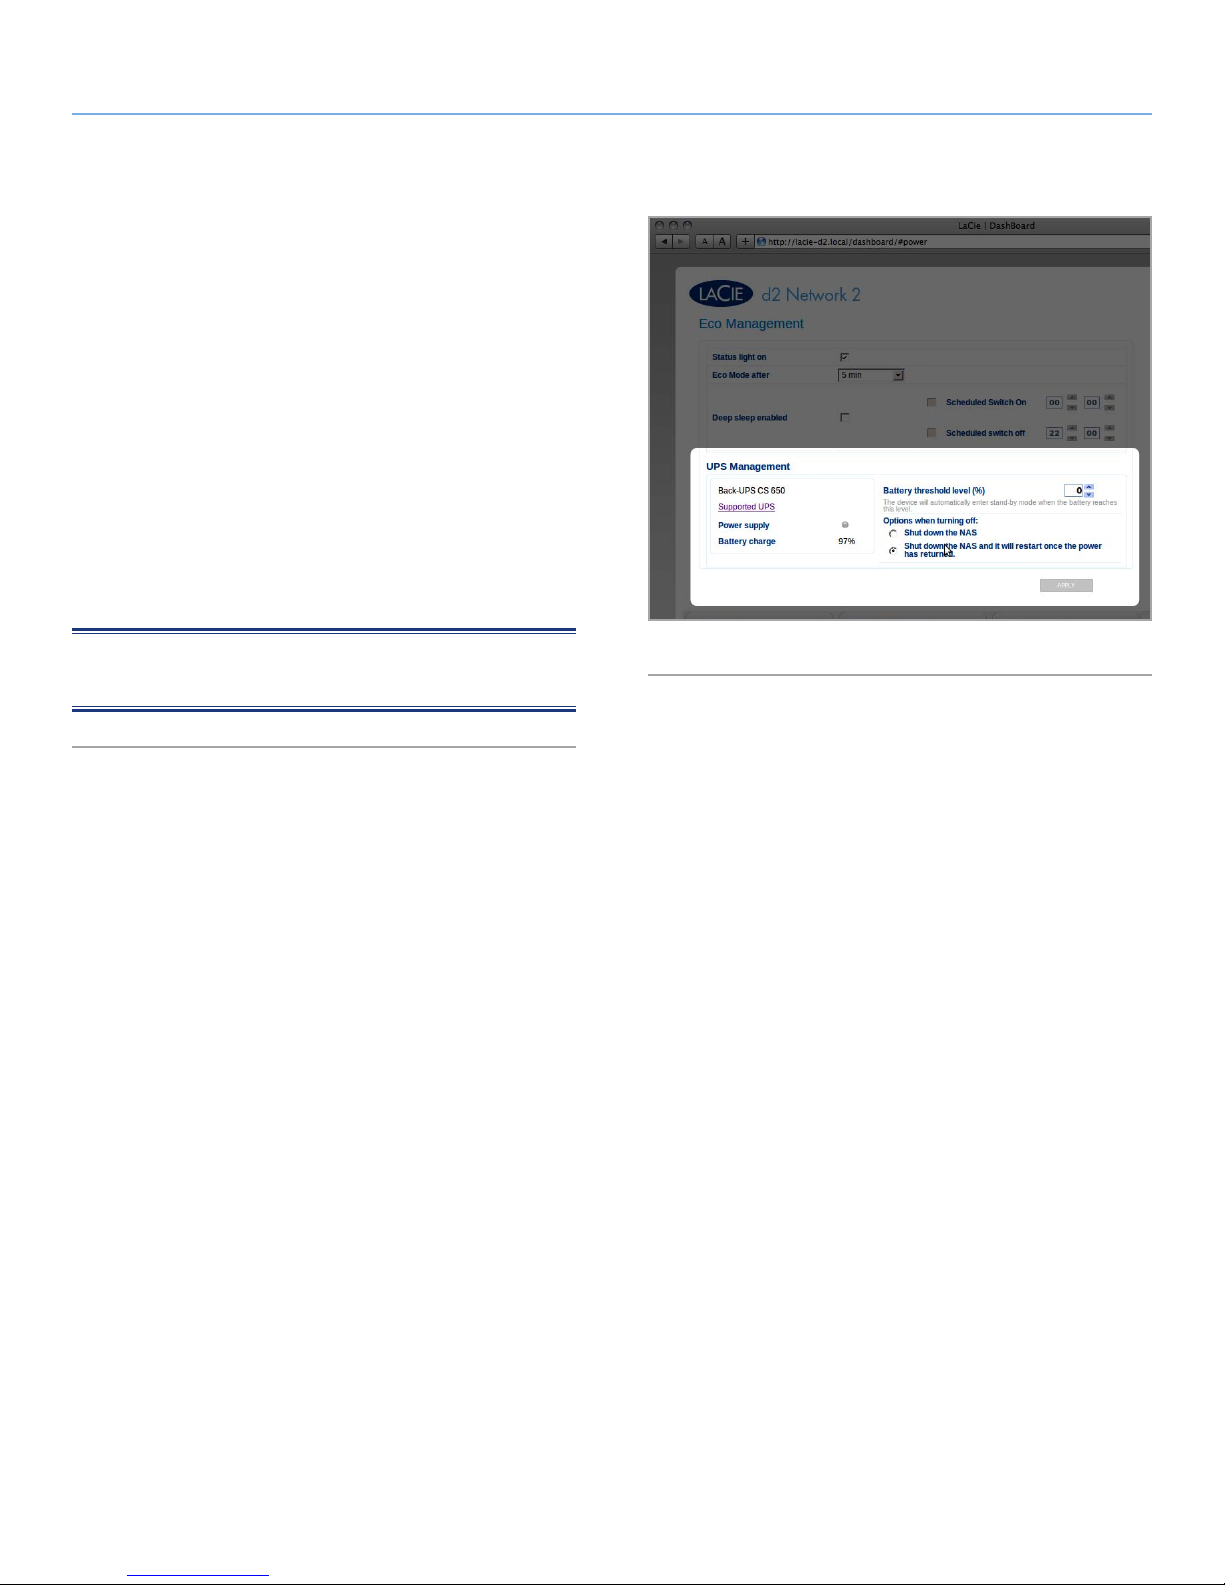
LaCie d2 Network 2 • DESIGN BY NEIL POULTON Administering Your LaCie d2 Network 2
User Manual page 50
4.12.1. UPS Management
The d2 Network 2 supports UPS (uninterrupted power supply) management. If you connect a supported UPS device to the d2 Network
2’s USB port, in the Dashboard you will see modifiable parameters.
In the left-hand column, a bullet will indicate power supply status.
✦ If green, power is being supplied through the power cable.
✦ If gray, power is not being supplied through the power cable.
On the right, under the heading Battery threshold level (%), you can
choose a minimum percentage of battery power at which the d2
Network 2 will automatically enter stand-by mode.
Below, in the case that battery power is completely drain and the
drive is automatically shut down, you can elect to have the drive
restarted once power has been restored.
NOTE: For a list of supported UPS devices, click the Supported
UPS link.
Fig. 66
Page 51
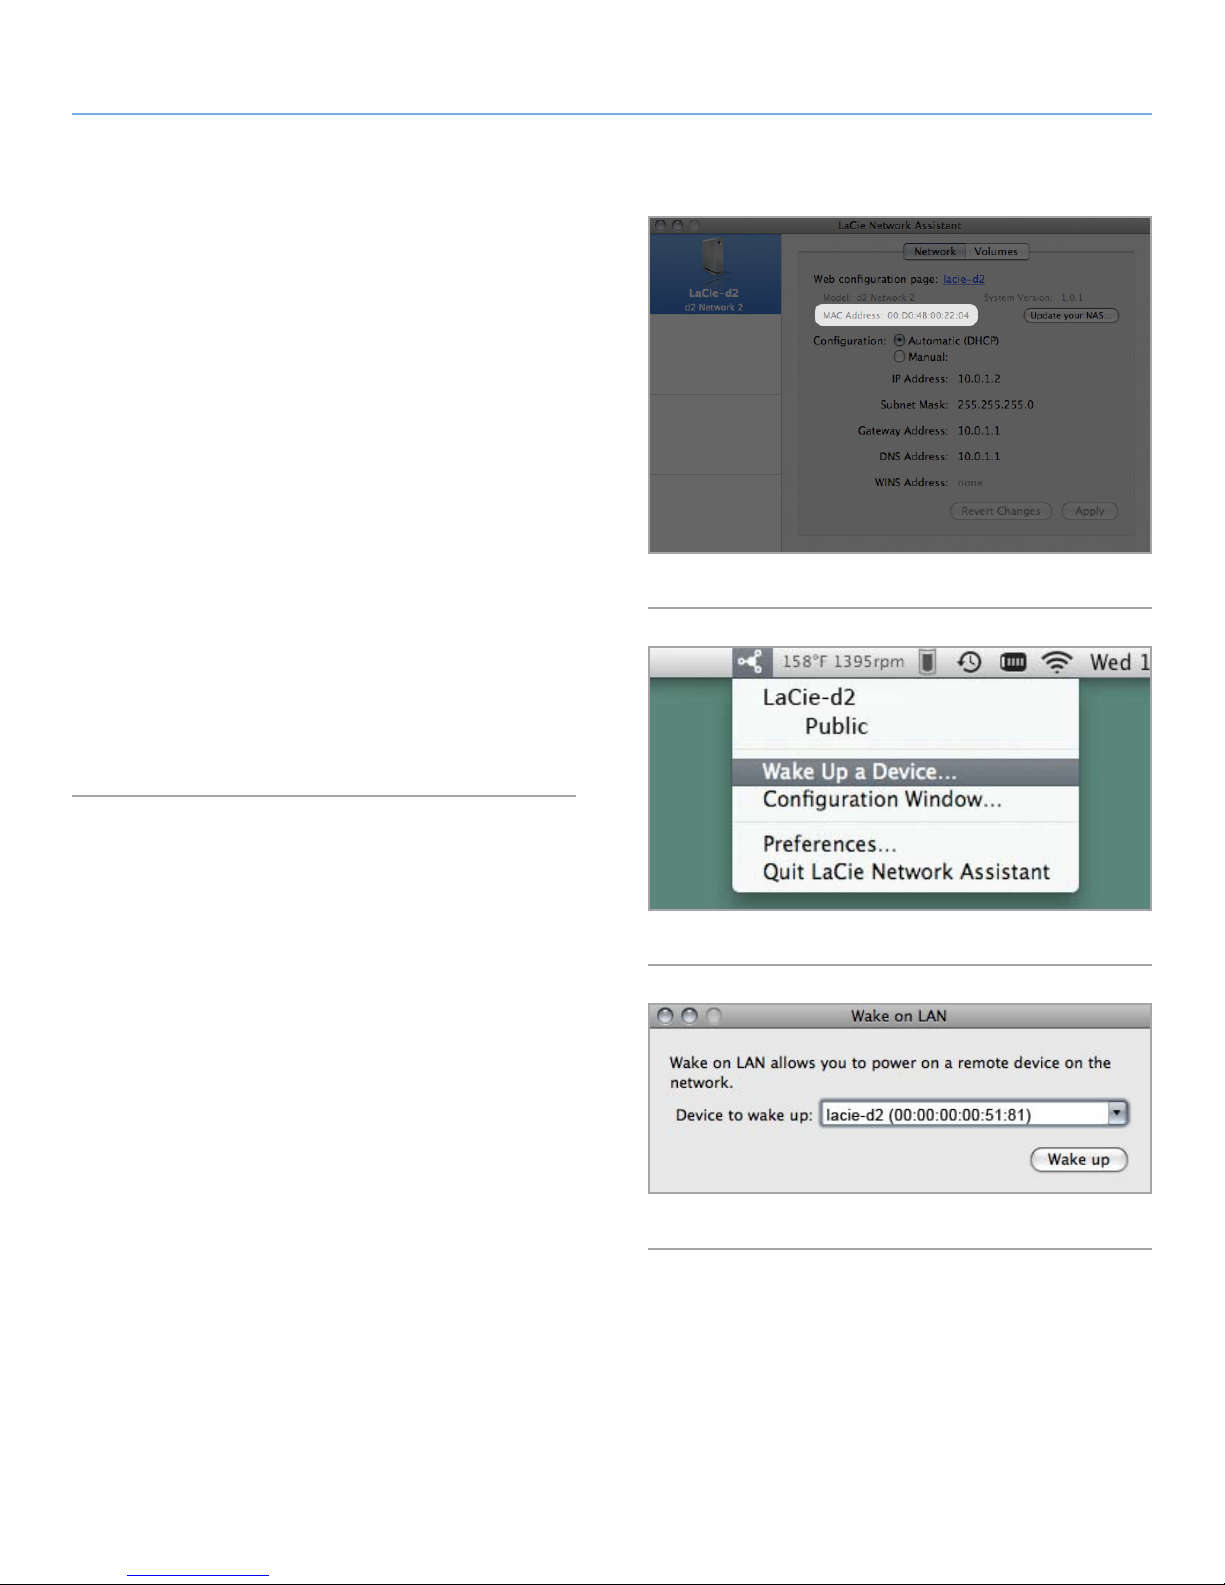
LaCie d2 Network 2 • DESIGN BY NEIL POULTON Administering Your LaCie d2 Network 2
User Manual page 51
4.12.2. Wake on LAN
You can use LaCie Network Assistant (LNA) to wake your d2 Network 2.
First time you use WOL:
1. You’ll need your drive’s MAC address. Click the LNA icon in
your system tray (Windows) or menu bar (Mac) and select Con-
figuration Window.... Select then copy the MAC address text
(Fig. 67).
2. Next, click the LNA icon in your system tray (Windows) or menu
bar (Mac) and select Wake Up a Device... (Fig. 68).
3. Paste the MAC address into the field and click Wake Up.
Subsequent use:
1. Click the LNA icon in your system tray (Windows) or menu bar
(Mac) and select Wake Up a Device... (Fig. 68).
2. Choose the NAS product you wish to wake up from the menu
(Fig. 69).
3. Click Wake Up.
Fig. 67
Fig. 68
Fig. 69
Page 52
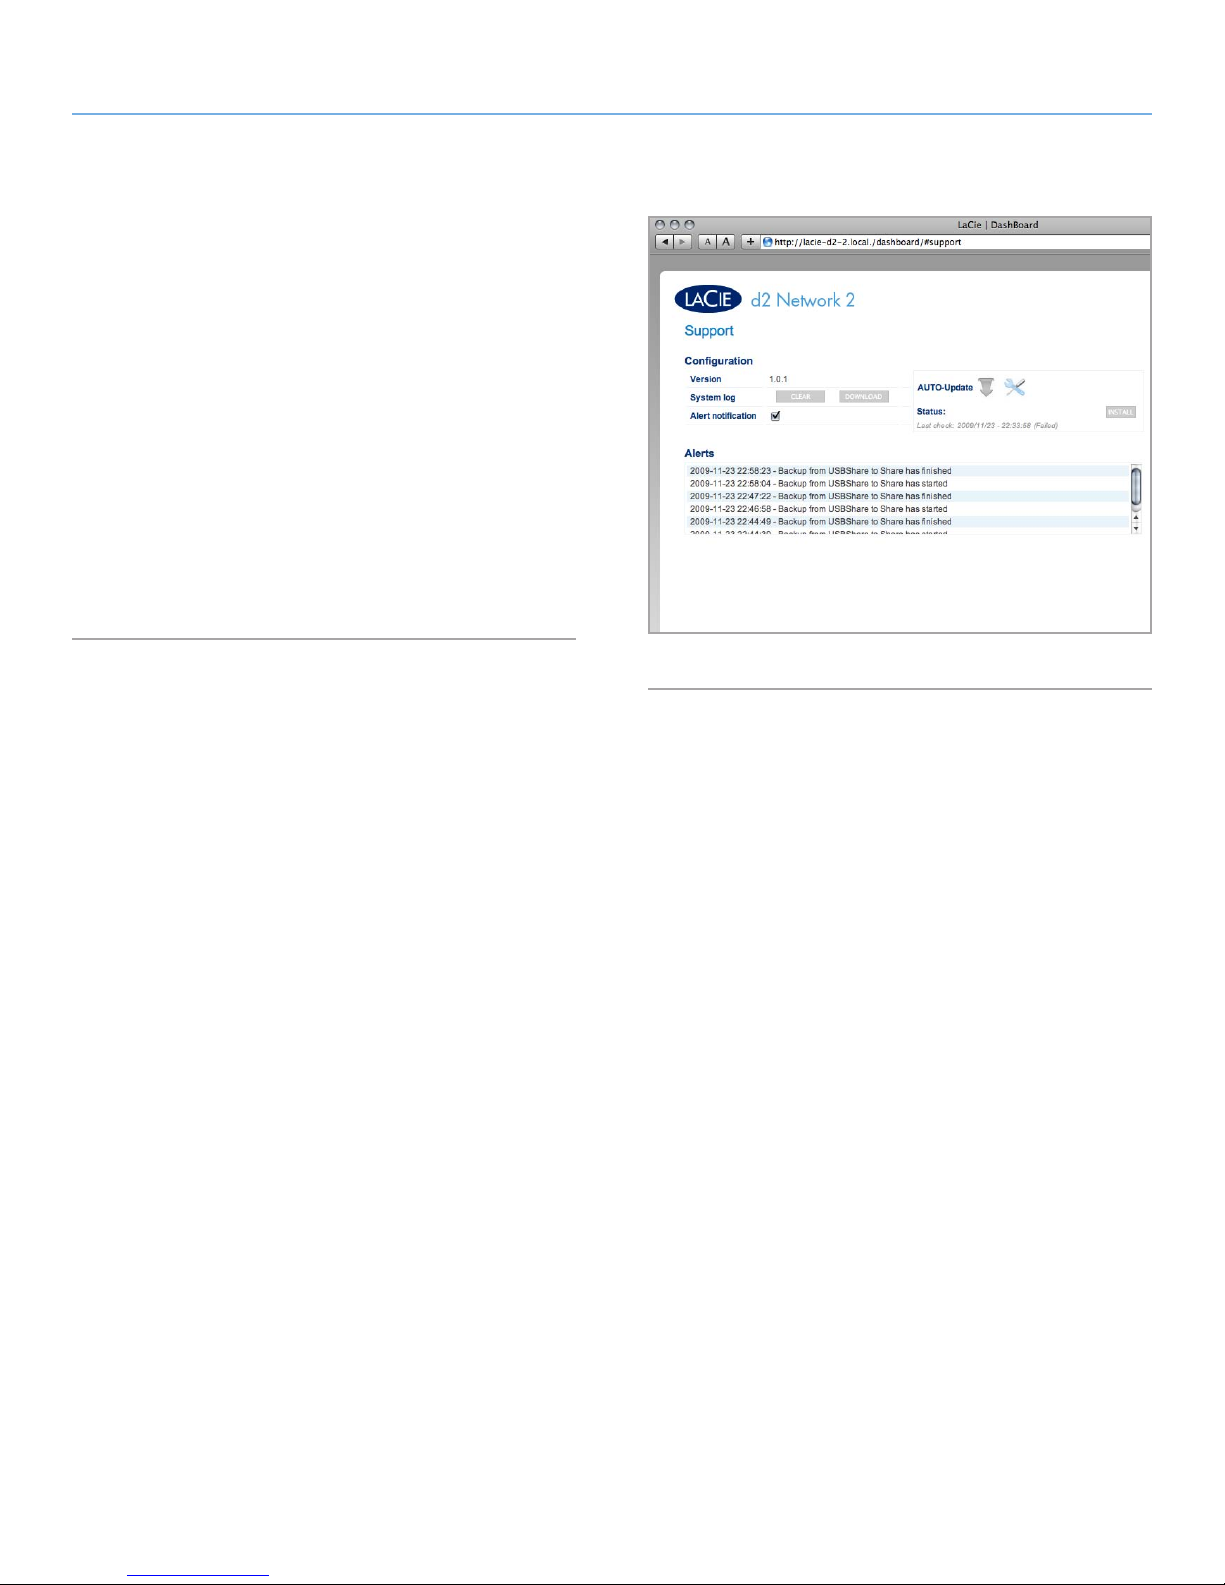
LaCie d2 Network 2 • DESIGN BY NEIL POULTON Administering Your LaCie d2 Network 2
User Manual page 52
4.13. Dashboard: Support
The support page will allow you to access the system log and set up
email alerts.
System log: Click the Clear button to purge the system log. Click the
Download button to save the log to your computer in case you need
to provide it to customer support.
Alert notification: If you toggle this box on, when significant events
occur with your d2 Network 2, the administrator will automatically
be sent an email (if he or she set an email address in the Users page,
if the drive has a connection to the internet, and the SMTP configuration has been set up). See 4.13.1. Email Notification Events for
more information.
Auto update: See section 4.17. Update Product Software for details.
Fig. 70
Page 53
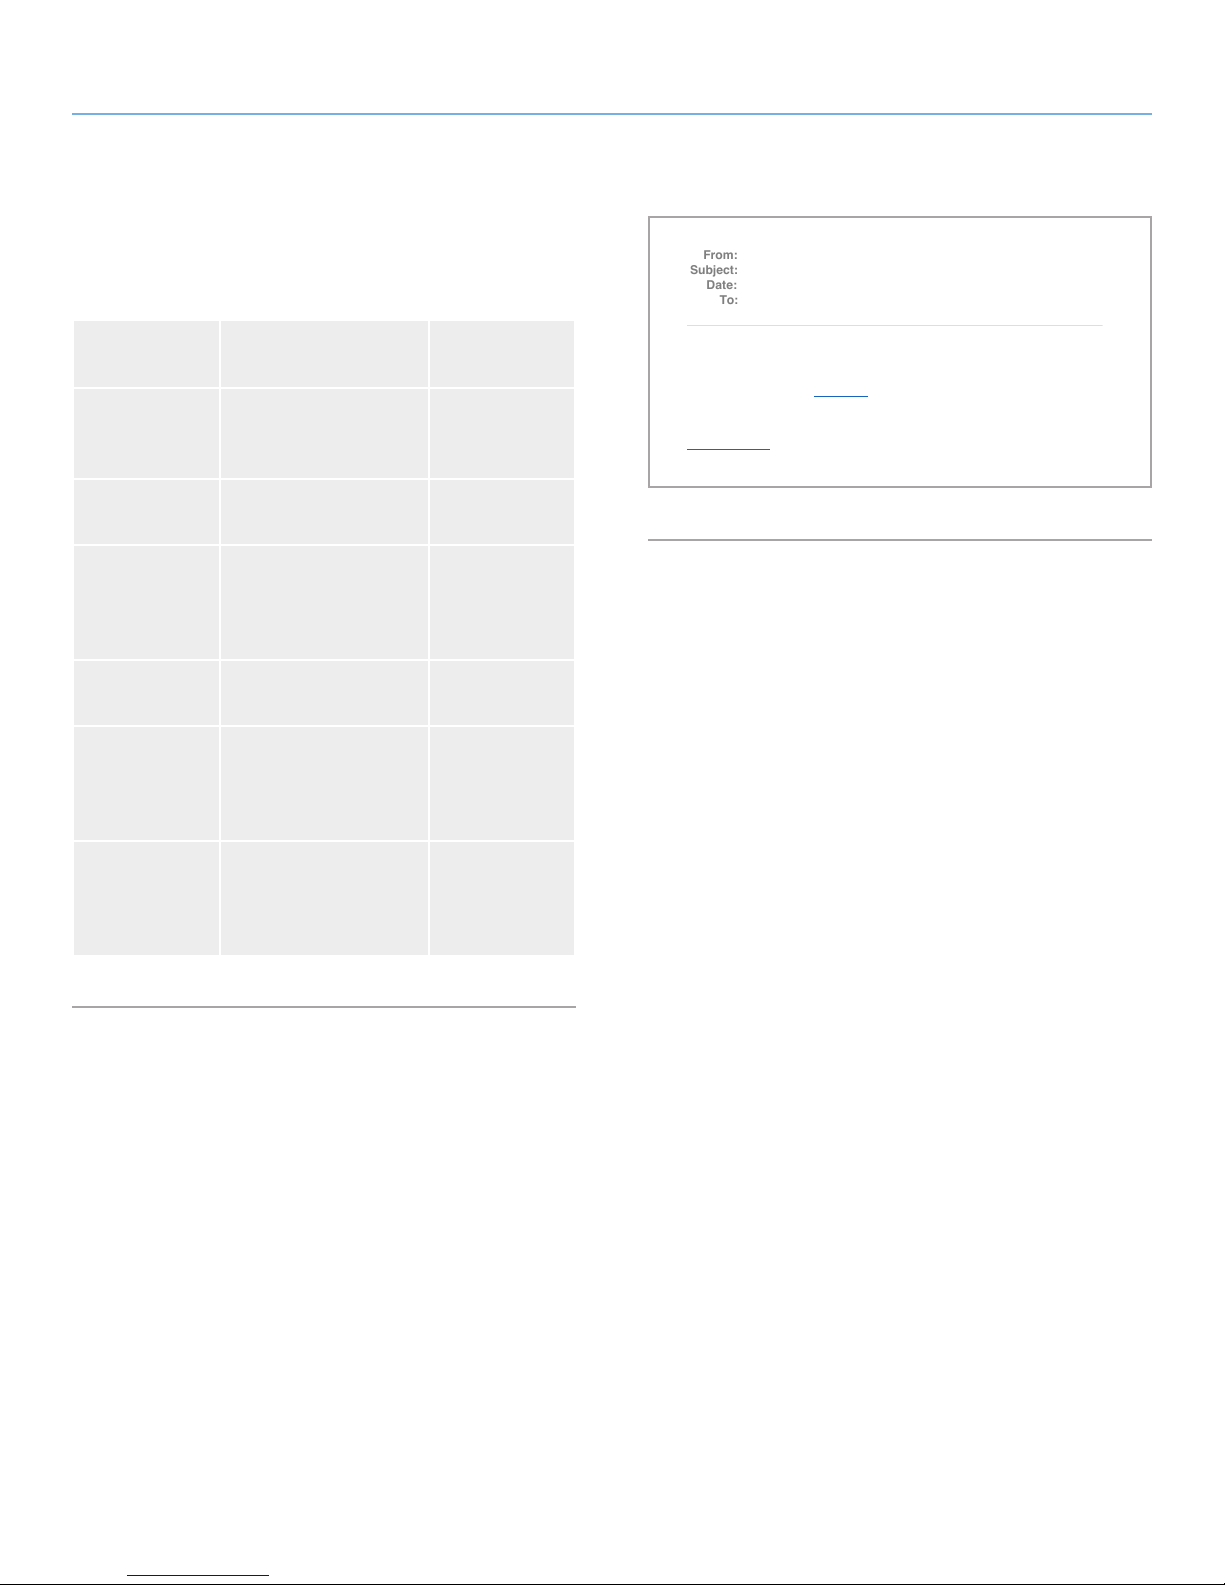
LaCie d2 Network 2 • DESIGN BY NEIL POULTON Administering Your LaCie d2 Network 2
From:
"d2 Network 2.0 - LaCie-d2" <[email protected]>
Subject:
Date:
To:
User Manual page 53
4.13.1. Email Notification Events
The following events will trigger an email notification if an email address has been provided in the User page:
Event
Description Recipient
Identifier
Capacity When the total avail-
able capacity is less
than 10GB
Quota event When the user share is
more than 80 % full
Download When a download has
completed or when a
download error has
occurred
Backup When a backup error
occurs
Temperature The product has
remained at maximum
temperature for at least
one minute
Admin
Relevant user
Admin or user
depending
on download
owner
Admin
Admin
[LaCie] Password Recovery
June 9, 2009 5:40:47 PM GMT+03:00
Host : LaCie-d2
Model : d2 Network 2.0
System Time : Tue, 09 Jun 2009 14:37:50
For password recovery Click here
================================================
[ This message is automatically generated by the LaCie email notication service ]
www.lacie.com
Fig. 71
Password
recovery
A user has recovered
his/her password
Admin or user,
depending on
who made the
request
Page 54
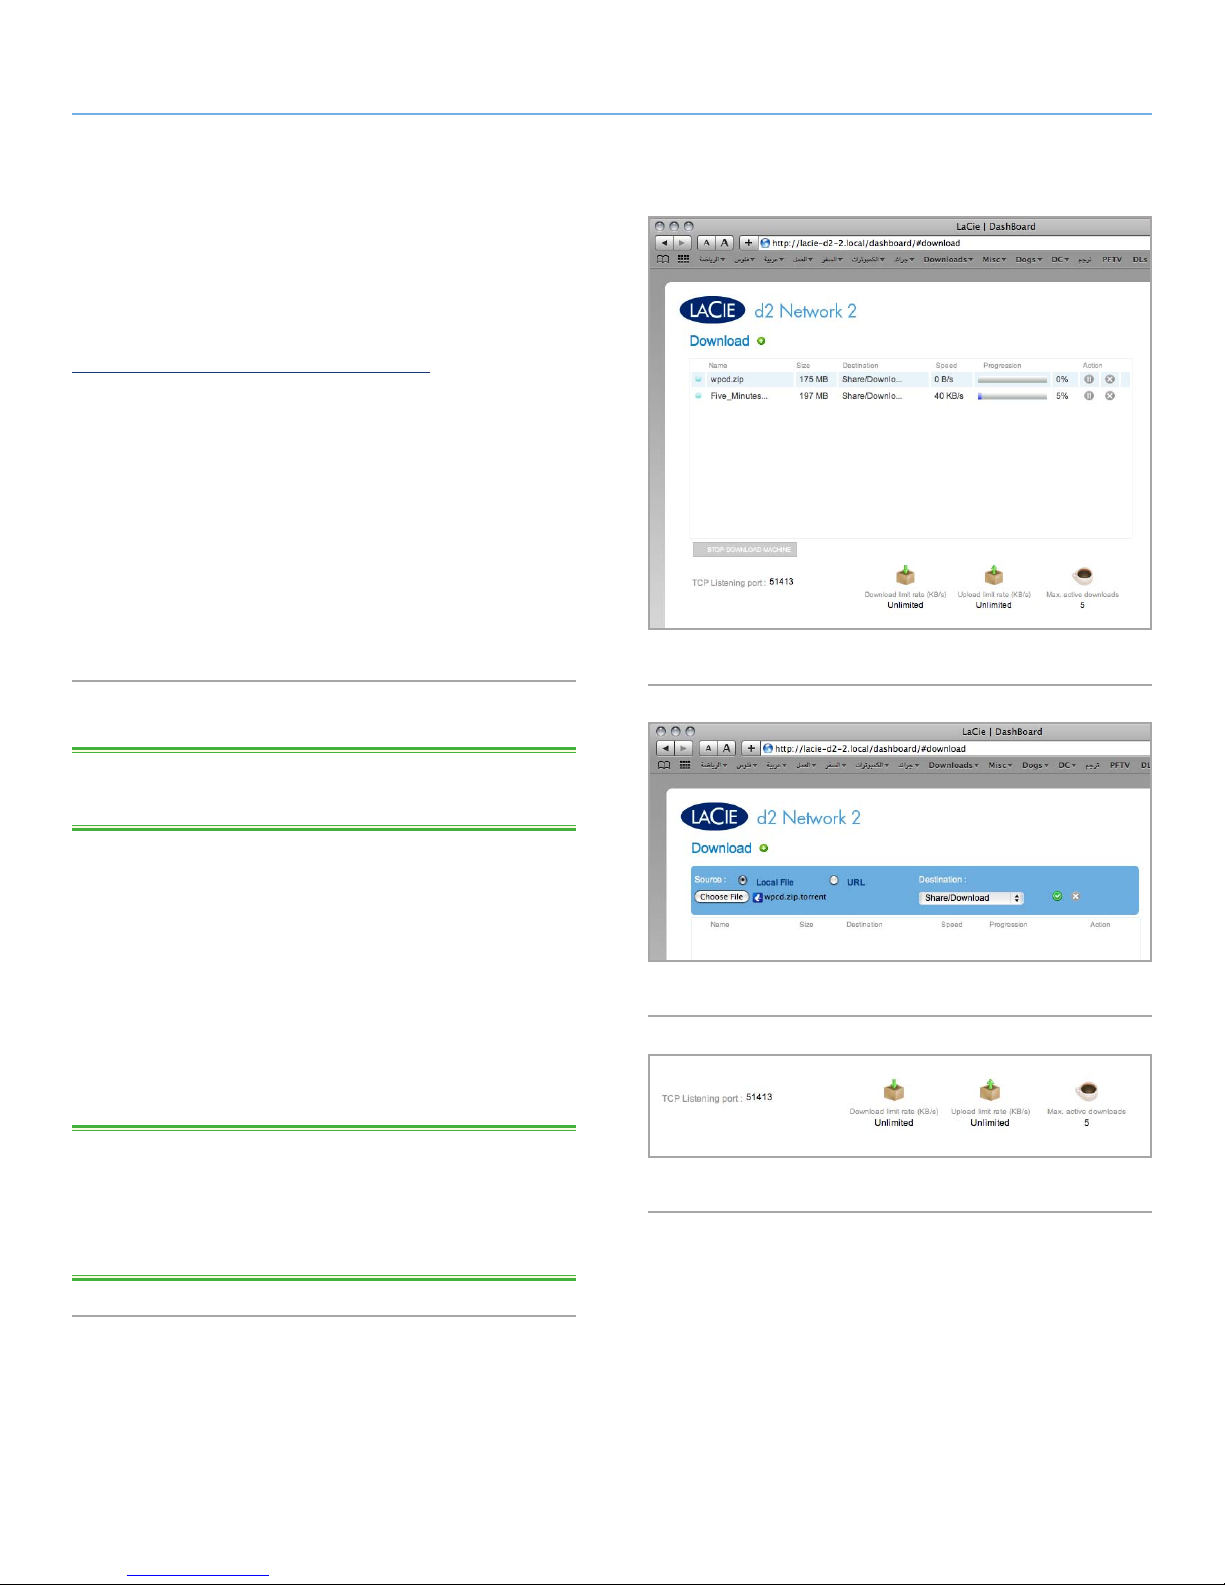
LaCie d2 Network 2 • DESIGN BY NEIL POULTON Administering Your LaCie d2 Network 2
User Manual page 54
4.14. Dashboard: Download
The d2 Network 2 Dashboard features a torrent server that will allow you to download torrent files (Fig. 72). For more information on
torrents, see:
http://en.wikipedia.org/wiki/BitTorrent_protocol
1. First click the Start Download Machine button.
2. To start a download, click the green plus sign next the page title
(Fig. 73).
3. Choose whether the torrent source is a file or a URL, then navigate to the source.
4. Choose the destination (i.e., on which share the downloaded
file will be stored) and click SUBMIT.
5. The file will begin downloading (can sometimes take a few minutes to begin).
Fig. 72
4.14.1. Download Page Settings
TECHNICAL NOTE: The download manager is only available to
administrators.
Below the list of downloads are several settings (Fig. 74).
TCP Listening port: Choose a router port through which the torrent
service will operate.
Download limit rate: Type a number here to restrict maximum down-
load rates.
Upload limit rate: Type a number here to restrict maximum upload
rates.
Max. active torrents: Type a number here to limit the number of
torrents that can download/upload simultaneously. Type zero for
no limit.
TECHNICAL NOTE: Because the torrent client service uses band-
width and system resources, multiple simultaneous downloads can
impact d2 Network 2 performance. Additionally, even after a download has completed, it may continue to use system resources if it is
uploading, as long as the torrent is active.
Fig. 73
Fig. 74
Page 55
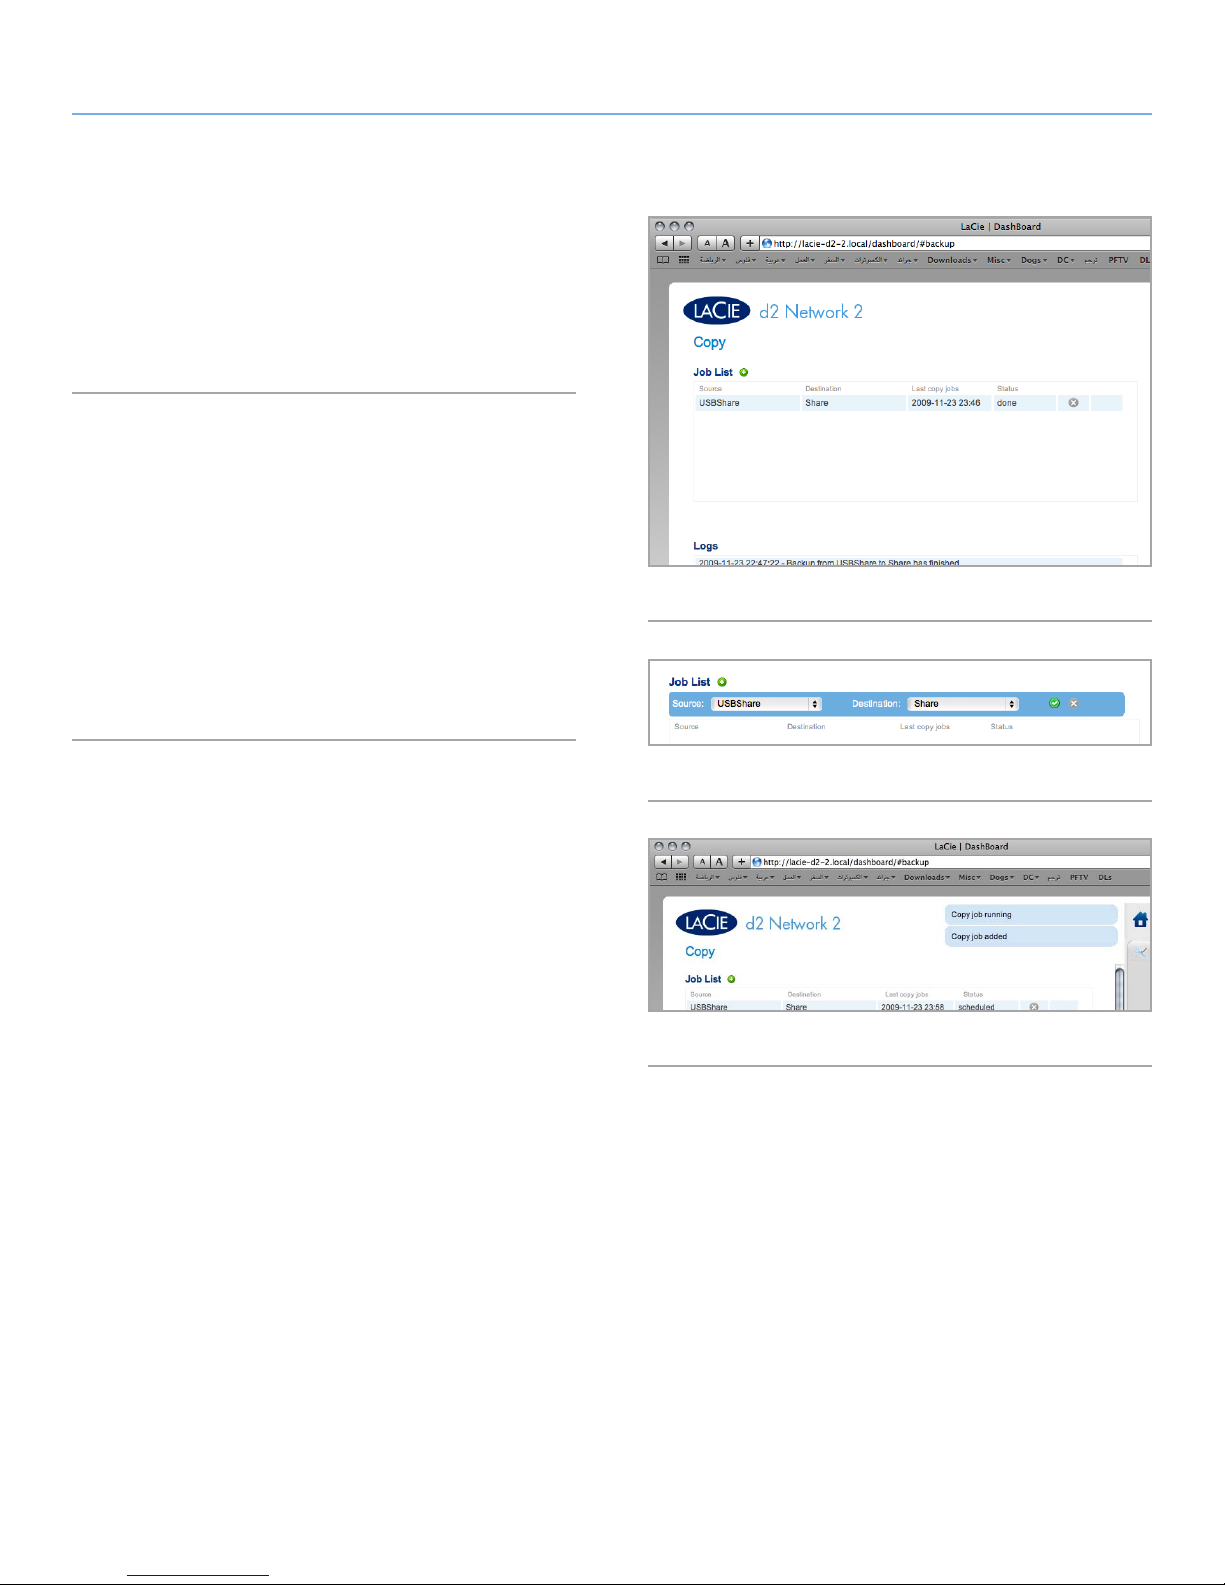
LaCie d2 Network 2 • DESIGN BY NEIL POULTON Administering Your LaCie d2 Network 2
User Manual page 55
4.15. Dashboard: Copy
This page will allow administrators to set up backups (Fig. 75). In
order to use a share for a backup, the user initiating the backup
must have Read/Write privileges for that share, or the share must
be Public.
4.15.1. Creating a Backup Job
1. Click the green plus sign to the right of the page title (“Jobs
List”) (Fig. 76).
2. Set a Source share (what you want to back up) in the left menu
and a Destination share (where you want to save the backup)
in the right menu.
3. After a moment, a message will appear saying that the backup
has begun (Fig. 77).
Fig. 75
4. A message will notify you when the backup is finished.
Fig. 76
Fig. 77
Page 56
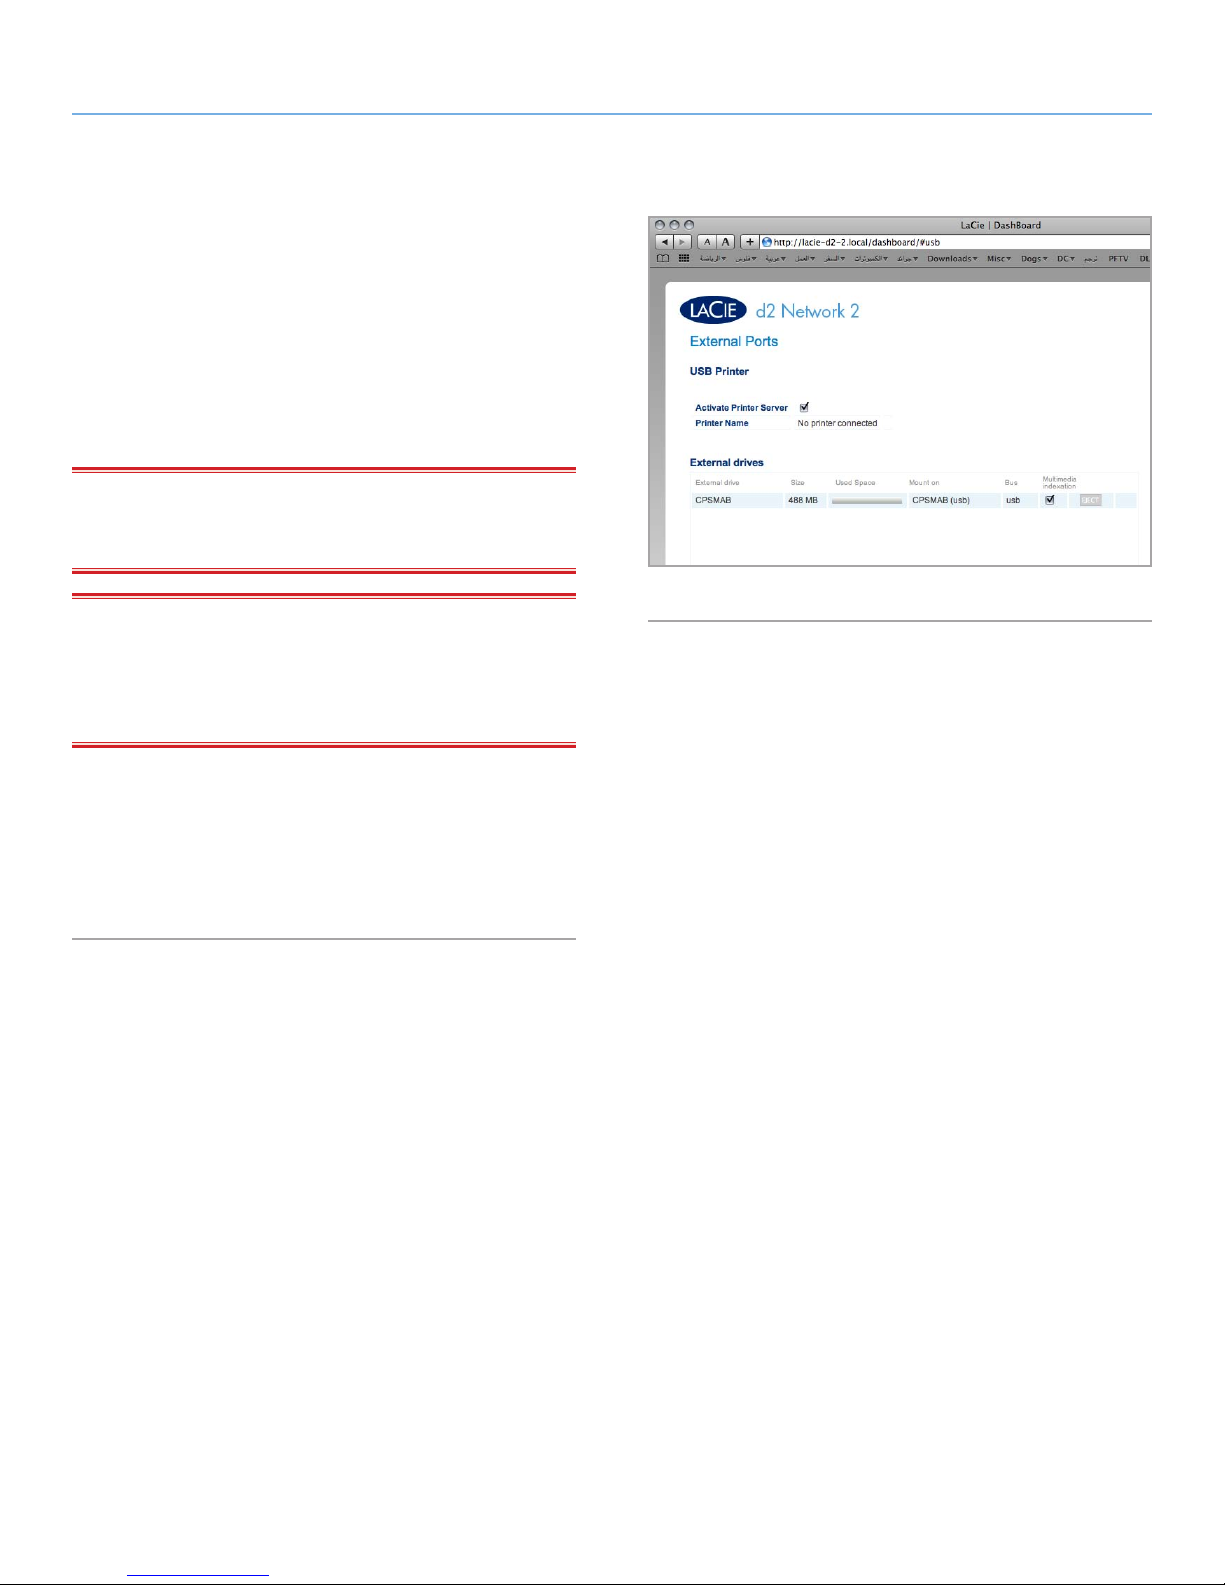
LaCie d2 Network 2 • DESIGN BY NEIL POULTON Administering Your LaCie d2 Network 2
User Manual page 56
4.16. Dashboard: External Ports
This page provides you with information on devices connected to the
d2 Network 2’s USB or eSATA expansion port.
The d2 Network 2 features a printer server. To activate it, click the
Activate Printer Server check box. You can connect a USB printer
to the d2 Network 2 via the front USB port. Once connected, the
printer will become available throughout your network. Correct
printer drivers must be installed on the host computer.
IMPORTANT NOTE: For multi-function printers, only the print
feature is supported. If your printer has a scan feature, for example,
it will not work when connected to the d2 Network 2.
Fig. 78
IMPORTANT INFO: Only PostScript printers are supported. If
your printer does not display on this page, it is likely that the printer
does not support PostScript printing. This is frequently the case with
multi-function and photo printers. LaCie can not guarantee that your
printer supports the proper protocols to make it a networked printer.
Multimedia Indexation: Click this box if you want your DLNA devices
to be able to access files on the external USB or eSATA hard drive
connected to the d2 Network 2.
For details on connecting a USB or eSATA hard drive, see 4.16.1.
Connecting an External Hard Drive.
Page 57
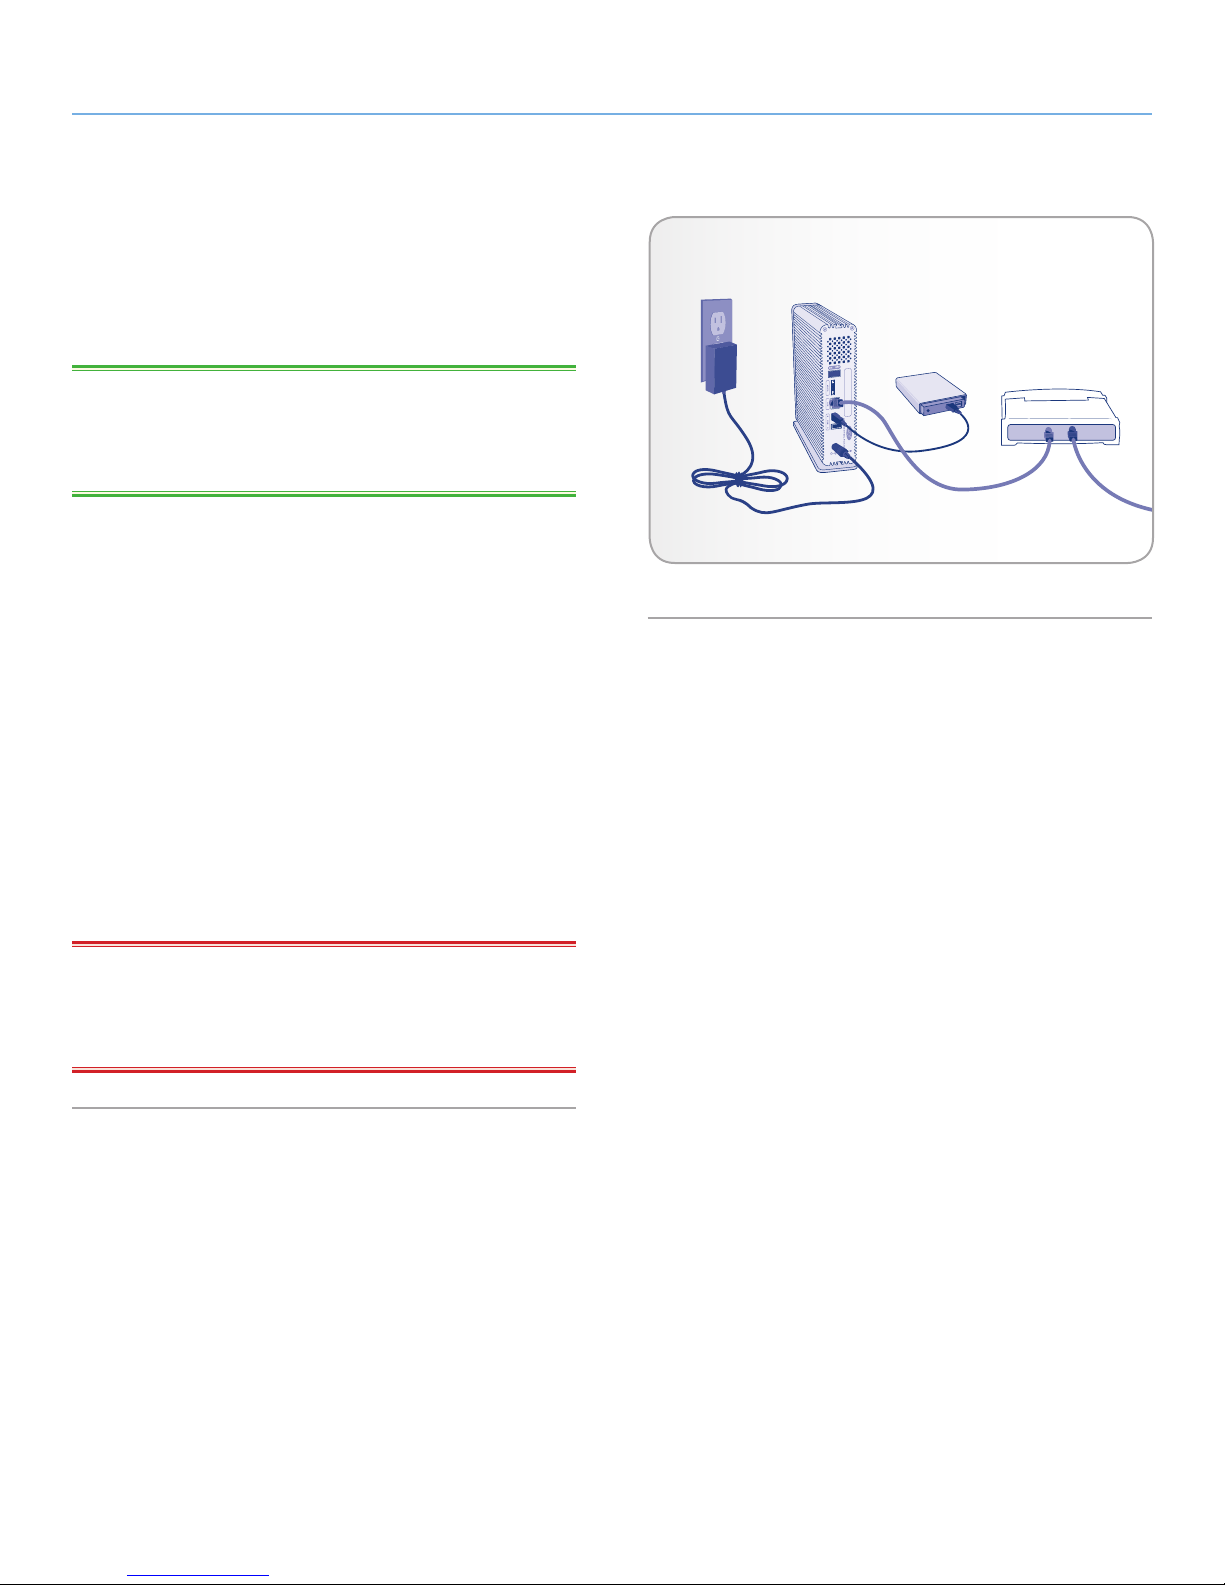
LaCie d2 Network 2 • DESIGN BY NEIL POULTON Administering Your LaCie d2 Network 2
User Manual page 57
4.16.1. Connecting an External Hard Drive
You can connect an external USB or eSATA hard disk or USB key to
back up the data on your LaCie d2 Network 2 or as a way to add
storage capacity. Connected hard disks are accessed similarly to
shared folders.
TECHNICAL NOTE: External USB or eSATA hard disks must be
formatted in one of the supported systems to be compatible with the
LaCie d2 Network 2: MS-DOS (FAT32), NTFS, HFS+ (non-journaled
only), EXT3, or XFS.
To connect an external hard disk:
1. Make sure that your LaCie d2 Network 2 is connected to your
home network.
2. Turn on the external hard disk and connect its USB or eSATA
cable to the USB port (type A; see Fig. 79) on the LaCie d2
Network 2 (Fig. 79).
Fig. 79
External USB
Hard Disk
3. In a few seconds, the disk should appear as a share in LaCie
Network Assistant and in the Dashboard. To access the files
on the hard disk, connect to it like a regular shared folder as
described in section 3. Accessing and Transferring Files (connected USB hard disks are always Public shares and are therefore Read-Write for all users).
To eject an external hard disk:
To unmount an attached USB hard drive, click the Eject button.
IMPORTANT NOTE: The maximum capacity supported for an ex-
ternal drive formatted in MS-DOS (FAT32) is 500 GB. In case the
capacity of the connected external drive exceeds this limit, the drive
will not be recognized by the d2 Network 2.
Page 58
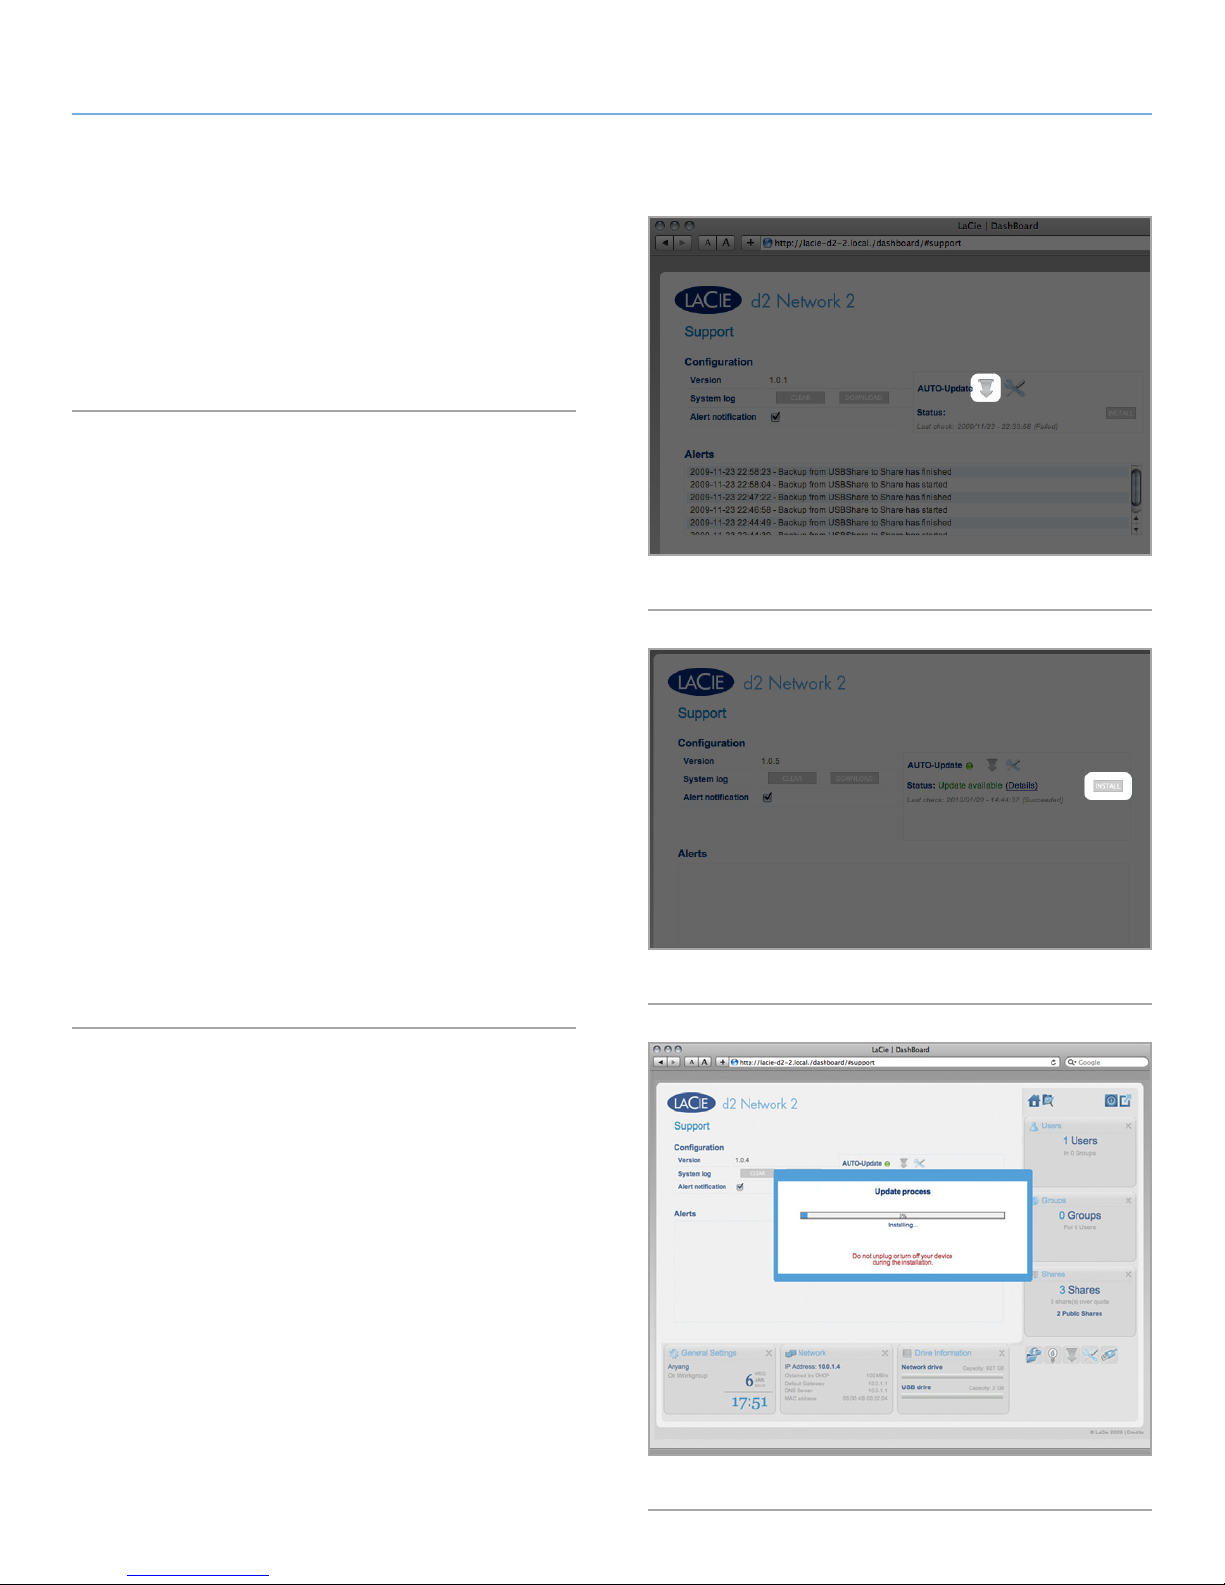
LaCie d2 Network 2 • DESIGN BY NEIL POULTON Administering Your LaCie d2 Network 2
User Manual page 58
4.17. Update Product Software
LaCie may improve your network hard drive’s software or add new
features over time. See below for updating information.
Note that you can always restore your drive to factory defaults by
following the procedure in 4.18. Reset to Factory.
4.17.1. Method 1: Auto-Update
Your network hard drive is by default configured to obtain the latest
software updates through the internet. The Support page of your
product’s Dashboard will check if updates are available and install
them if you wish.
Alternatively, if you prefer to update your drive manually or are on
a restricted network, you can accomplish this using LaCie Network
Assistant (see 4.17.2. Method 2: Update with LaCie Network As-
sistant Software).
Fig. 80
1. Open Dashboard > Support.
2. In the Auto-Update box, click the gray downward-facing arrow
to check for a new update (Fig. 80).
3. If an update is available, the download will begin automatically.
4. Once the download has concluded, click the Install button (Fig.
81).
5. The drive will reboot and will therefore disappear from the network temporarily (Fig. 82). When it reappears, you can verify the
new software version on Dashboard > Support.
Fig. 81
Fig. 82
Page 59
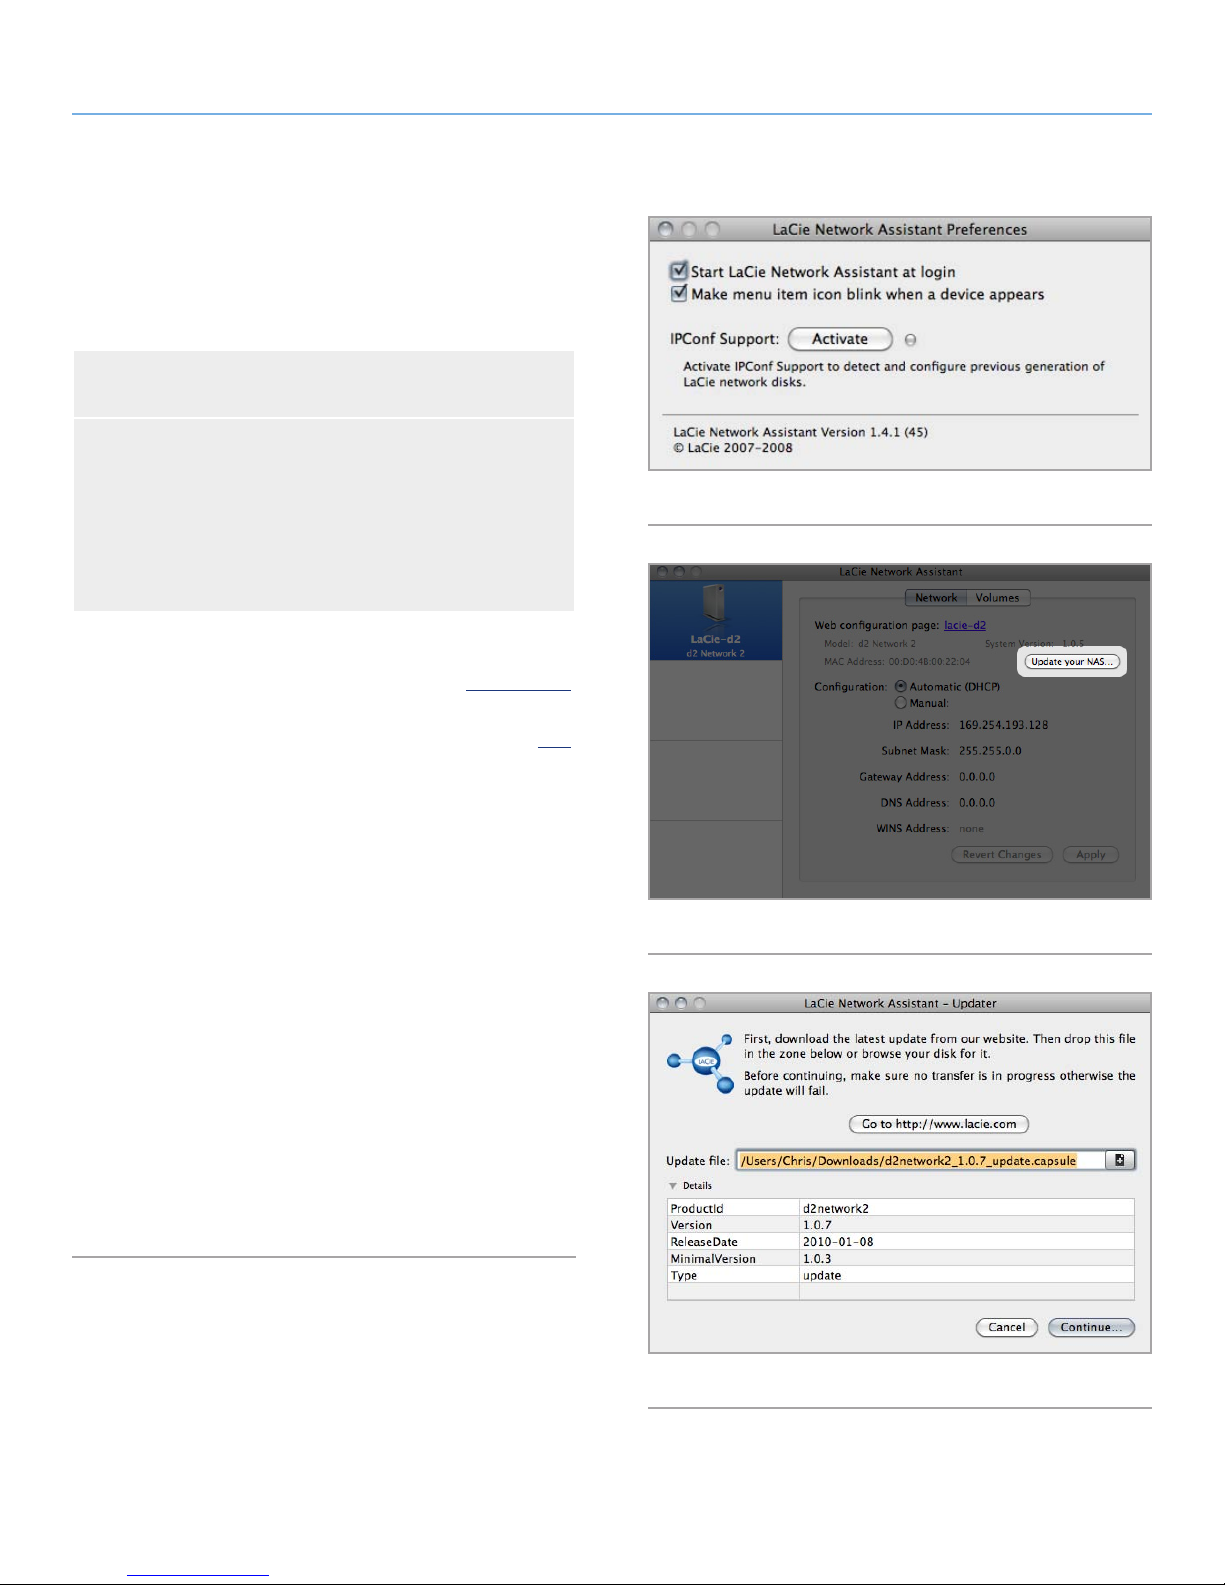
LaCie d2 Network 2 • DESIGN BY NEIL POULTON Administering Your LaCie d2 Network 2
User Manual page 59
4.17.2. Method 2: Update with LaCie
Network Assistant Software
This update procedure will not erase your configuration or files
saved to the drive.
Recommendations for Updating
Using LaCie Network Assistant
✦ Connect your PC or Mac to the network using an Ethernet
cable (turn off wireless connection)
✦ Make sure users on your network have stopped data trans-
fers to the NAS
✦ Turn off other NAS on the network except the one you wish
to update
✦ Disconnect all connections to shares on the NAS you want
to update
Fig. 83
1. Make sure you are using the latest version of LaCie Network
Assistant (minimum 1.4.1). If you download a newer version,
make sure to uninstall previous versions.
2. Download the latest software update for your product from here.
3. Run LaCie Network Assistant.
4. Go to Preferences and make sure IPConf Support is deactivated
(Fig. 83).
5. Select your product from the list on the left and click on the
Update your NAS button (Fig. 84). Enter your admin username
and password.
6. Browse to and load the update package (.capsule file) you
downloaded (Fig. 85).
7. Click on Continue... to begin update. Mac users may have to
type in their administrator’s password.
8. Once the update is complete, verify the update: Click the LNA
logo in the menu bar (Mac) or task bar (Windows) and select
Configuration Window. Click the Network tab, where the system
version will be listed.
9. If the update has failed despite the network precautions listed in
the box above, connect the drive directly to your computer using
the Ethernet cable, then try again.
Fig. 84
Fig. 85
Page 60

LaCie d2 Network 2 • DESIGN BY NEIL POULTON Administering Your LaCie d2 Network 2
User Manual page 60
4.18. Reset to Factory
If for any reason you wish to reset your LaCie product to its out-ofthe-box state, follow this procedure:
CAUTION: Resetting the product will erase all Dashboard data
such as users, groups, shares, and settings.
CAUTION: After resetting to default, all files will be moved to a
folder called Recovery in Share and so by default will be available
only to the administrator.
1. Make sure the product is turned OFF.
2. Press and hold down the front button. Without releasing the
front button, turn the product on by pressing the power switch
on the rear of the product.
3. The product will start up and the front LED will blink in a blue/
red color.
4. When the front LED becomes solid red, release the front button.
(The LED should become solid red about 10 seconds after you
turn on the product.) The front LED will become static blue.
5. Press the front button once to confirm reset. If any of the steps
are omitted, the product will boot normally without resetting.
Page 61

LaCie d2 Network 2 • DESIGN BY NEIL POULTON Technical Information
User Manual page 61
5. Technical Information
5.1. Optimizing Data Transfers
Data transfers are the flow of data that accomplishes a task, usually
related to moving data from storage to computer RAM, or between
storage devices. With external drives, such as the d2 Network 2 connected via USB cable, NOT Ethernet cable), the data is transferred
from the drive to the computer via the USB interface. The data is fed
from the drive through the USB port (type B) on the drive, and passes
to the computer through the USB host-bus adapter interface.
USB
To utilize the enhanced Hi-Speed USB 2.0 performance, your computer must be equipped with a Hi-Speed USB 2.0 host bus adapter
card (either sold separately, or integrated by your computer’s manufacturer) and the appropriate drivers. These host bus adapter cards,
which include one or more USB ports, are shipped with special HiSpeed USB 2.0 drivers that enable the computer to control the card.
These drivers must be installed in order for USB 2.0 devices connected to the port to work at their correct speeds.
Computers running Mac OS X, Windows XP, Windows 7, and Windows Vista automatically manage Hi-Speed USB 2.0 devices and
drivers.
Contact your LaCie reseller or LaCie Customer Support for information about Hi-Speed USB 2.0 PCI or PC Cards, or visit our Web site:
www.lacie.com.
Page 62

LaCie d2 Network 2 • DESIGN BY NEIL POULTON Troubleshooting
User Manual page 62
6. Troubleshooting
In the event that your LaCie d2 Network 2 is not working correctly,
please take a look at the following Troubleshooting sections and at
the FAQs published on our web site – www.lacie.com. One of these
FAQs may provide an answer to your specific question. You can also
visit the downloads page, where the most recent software updates
will be available:
www.lacie.com/support/downloads
If you need further assistance, please contact your LaCie reseller or
LaCie Technical Support (see section 7.1. LaCie Technical Support
Contacts for details).
6.1. System Log
The system log allows you to review the type, date, time, source
and event ID of activities on the LaCie d2 Network 2. Additionally,
if you ever need help from LaCie technical support, the log will be
important. For more information, refer to chapter 4.13. Dashboard:
Support.
6.2. Manual Updates
LaCie strives to give you the most up-to-date, comprehensive user
manuals possible. It is our goal to provide you with an easy-to-use
format that will help you quickly install and utilize the many functions
of your new device.
If your manual does not reflect the configurations of the product
that you purchased, please check our website for the most current
version available.
www.lacie.com
Page 63

LaCie d2 Network 2 • DESIGN BY NEIL POULTON Troubleshooting
User Manual page 63
6.3. Troubleshooting the Network Connection
Problem Question Solution
The USB drive/key or USB
printer connected to the USB
expansion port is not recognized.
I connected a USB drive to the
USB expansion port Type A,
but the drive does not mount
and is not listed in the LNA.
The system is not recognized
by the computer.
Is the drive connected to your computer
via USB type B?
Is the USB drive formatted in MS-DOS
(FAT32) and is its capacity more than
500 GB?
Does your computer’s configuration
meet the minimum system requirements?
Is the system’s power supply connected
and is the blue light on the front of the
drive on?
Is the blue light on the front of the device flickering for an inordinate period
of time?
Did you follow the correct installation
steps?
Devices connected to the USB expansion port (hard drive or
printer) are automatically unmounted when you connect the
USB cable to the USB host port. To make the hard drive or
printer accessible, disconnect the drive from your computer and
connect it to the network using the Ethernet cable.
Reformat the drive in a different file format.
Check section 1.1. Minimum System Requirements for more information.
Make sure that the power supply is properly connected (see
section 2.2. STEP 2: Connect the Ethernet Cable for details);
that the system has been powered on pushing the button on the
back; and that the outlet the power supply is connected to is
powered on or has a sufficient supply of power.
If the blue light is flickering or will not turn on, the power supply may be defective. Please contact your LaCie reseller or
LaCie Customer Support.
Review the installation steps (2. Connecting to a Network).
The system doesn’t appear
on the network.
Are both ends of the Ethernet cable
firmly connected?
By default the LaCie d2 Network 2 is configured to retrieve its IP address from a DHCP server. If your
network is managed by a DHCP server and you cannot access your LaCie d2 Network 2, try checking
your DHCP server’s log. To get the IP address, run LaCie Network Assistant, which is located on the LaCie
Storage Utilities CD-ROM. If no DHCP server detected, the product will run APIPA to assign itself an IP
address. To change this IP address, use LaCie Network Assistant.
Is the IP address properly set? For more information, please see section 4.10. Dashboard: Net-
Does your network require devices to
be assigned a static IP address?
Disconnect the Ethernet cable, wait 10 seconds and then
reconnect.
Ensure that the interface connectors are properly aligned. The
Ethernet cable can only be inserted one way. Make sure it is
correctly oriented.
Check that the Ethernet connectors are straight and fully seated
in the Ethernet ports.
Make sure that you use the Ethernet cord provided in the LaCie
d2 Network 2 box.
work.
To assign a static IP address, see section 2.6. Assigning a Static
IP Address.
continued on the next page >>
Page 64
LaCie d2 Network 2 • DESIGN BY NEIL POULTON Troubleshooting
User Manual page 64
A user does not have access
to the LaCie d2 Network 2.
I can not access my account.
I enter my login and password
and receive an error message.
I’ve noticed a delay in accessing the shares.
I cannot see the media files
stored in the LaCie d2 Network 2 on my UPnP AV media
player or adapter.
Has the administrator created an account for the user?
Is your password correct? If you input an email address in the User page, you can retrieve
Are you transferring multiple files simultaneously?
Are the media files stored on a public
share?
In order for a another user to access the LaCie d2 Network 2,
two conditions must be met: 1) the administrator must create
and provide the user with username and password; 2) the
LaCie d2 Network 2 must be connected to the network via
Ethernet for users to access the drive.
your password. To do this, click on the “forgot my password”
link on the login page. Follow the instructions to complete the
retrieval.
Access to a share can slow down during simultaneous file transfers.
UPnP AV devices will only discover media files stored on public
shares. Files stored in non-public shares are not accessible to
UPnP devices.
Page 65

LaCie d2 Network 2 • DESIGN BY NEIL POULTON Troubleshooting
User Manual page 65
6.4. Troubleshooting the USB Connection
6.4.1. Mac Users
Problem Question Solution
The USB drive/key or USB
printer connected to the USB
expansion port is not recognized.
The drive is not recognized by
the computer.
Is the drive connected to your computer
via USB?
Does an icon for the drive appear on
the desktop?
Does your computer’s configuration
meet the minimum system requirements
for use with this drive?
Is the drive’s power supply connected? Make sure that the power supply is properly connected (see sec-
Did you follow the correct installation
steps for the USB connection?
Are both ends of the USB cable securely
attached?
Devices connected to the expansion USB device port (hard drive
or printer) are automatically unmounted when you connect the
USB cable to the host USB host port. To make the hard drive or
printer accessible, disconnect the drive from your computer and
connect it to the network using the Ethernet cable.
There should be an icon for the LaCie drive on the desktop (unless you’ve set the Finder preference not to show External disks
on the desktop). If the drive does not appear, follow the rest of
the Troubleshooting tips to isolate the problem.
See section 1.1. Minimum System Requirements for more information. Also, try changing the computer you are using. Computer problems can manifest themselves in many ways. Even if
the computer appears to be working properly, this is a worthwhile test.
tion 3.4.2. STEP 2: Turn On the Drive) and that the outlet the
power supply is connected to is working.
Review the installation steps in section 3.4. Accessing Shares
via USB.
Only use a USB cable provided by LaCie. Check both ends of
the USB cable to make sure they are fully seated in their respective ports. Try disconnecting the cables, waiting 10 seconds, and
then reconnecting them. If the drive is still not recognized, restart
your computer and try again.
Is there a conflict with other device drivers or extensions?
You receive error messages
when copying files to the
drive.
Did you get an “Error –50” message
while copying to drive when connected
via USB?
Contact LaCie Technical Support for help.
When you connect the d2 Network 2 to a computer via USB, the
USB share of the drive that mounts on the computer is formatted
in MS-DOS (FAT32). Under this format, file names with certain
characters cannot be copied. These characters include, but are
not limited to:
? < > / \ :
Check your files and folders to ensure that these types of characters are not being used.
continued on the next page >>
Page 66

LaCie d2 Network 2 • DESIGN BY NEIL POULTON Troubleshooting
User Manual page 66
I cannot copy a file larger
than 4 GB to the drive.
The drive is not running noticeably faster when connected via Hi-Speed USB 2.0.
The capacity of the disk is not
the total one written on the
packaging.
The drive is making clicking
noises.
Are you connected to the computer via
USB?
Is the drive connected to a standard
USB port on your computer?
Does your computer or operating system support Hi-Speed USB 2.0?
When you connect the drive to your computer via USB, only a portion of the total capacity is available. Up
to 500GB are allocated for the USB connection (for the Share named USBShare) and the remaining capacity
is dedicated for the Ethernet connection. This can be modified; see 4.11. Dashboard: Drive Information.
Is the sound “soft clicking” or “hard clicking”?
Soft clicking can be the normal sound of the drive working. If the drive is functional, this is normal. Drives do
not typically give an indication of any problems prior to failure, so it does not mean it is about to fail if the
drive is making a clicking sound and still functioning. If the drive is non-functional, there are two possible
causes:
When you connect the d2 Network 2 to a computer via USB, the
USB share of the drive that mounts on the computer is formatted
in MS-DOS (FAT32). This format limits file sizes to 4 GB.
To transfer >4GB files to the d2 Network 2, disconnect the USB
cable and connect the Ethernet cable. See sections 3.4.3. Dis-
connecting the USB Connection then 2. Connecting to a Network. Alternatively, you can reformat the USBShare to HFS+,
which permit larger file sizes (see section 4.11. Dashboard:
Drive Information).
If your drive is connected to a standard USB port, this is normal.
A Hi-Speed USB 2.0 device can only operate at Hi-Speed USB
2.0 performance levels when it is connected directly to a HiSpeed USB 2.0 port. Otherwise, the Hi-Speed USB 2.0 device
will operate at the slower USB transfer rates. For more information, please see sections 5.1. Optimizing Data Transfers.
See sections 1.1. Minimum System Requirements and 5.1. Opti-
mizing Data Transfers for more information.
✦ The drive could be corrupted. Reformatting the drive can solve this issue.
✦ The drive could have a failure in the external power supply or power cable. Try using a different one,
if possible.
Hard clicking is a very noticeable sound, and is akin to hearing metal-on-metal impacts. This behavior usually indicative of a physical failure. If nothing traumatic happened to the drive prior to this starting, consider
it to be soft clicking, and troubleshoot the problem as suggested above.
6.4.2. Windows Users
Problem Question Solution
The USB drive/key or USB
printer connected to the USB
expansion port is not recognized.
Is the drive connected to your computer
via USB?
Devices connected to the expansion USB device port (hard drive
or printer) are automatically unmounted when you connect the
USB cable to the host USB host port. To make the hard drive or
printer accessible, disconnect the drive from your computer and
connect it to the network using the Ethernet cable.
continued on the next page >>
Page 67

LaCie d2 Network 2 • DESIGN BY NEIL POULTON Troubleshooting
User Manual page 67
The drive is not recognized by
the computer.
Does your computer’s operating system
support the file system?
Is there an icon for the drive in My Computer?
Does your computer’s configuration
meet the minimum system requirements
for use with this drive?
Is the drive’s power supply connected? Make sure that the power supply is properly connected (see sec-
Did you follow the correct installation
steps for the USB connection
Are both ends of the USB cables firmly
attached?
Check your computer’s documentation and see section 6. Reformatting the d2 Network 2.
Go into My Computer and look for an icon and drive letter assigned to the LaCie drive. If the drive does not appear, follow the
rest of the Troubleshooting tips to isolate the problem. Go into
My Computer and look for an icon and drive letter assigned to
the LaCie drive. If the drive does not appear, follow the rest of
the Troubleshooting tips to isolate the problem.
See section 1.1. Minimum System Requirements for more information. Also, try changing the computer you are using. Computer problems can manifest themselves in many ways. Even if
the computer appears to be working properly, this is a worthwhile test.
tion 3.4.2. STEP 2: Turn On the Drive) and that the outlet the
power supply is connected to is working.
Review the installation steps in section 3.4. Accessing Shares
via USB.
Check both ends of the USB cable to make sure they are fully
seated in their respective ports. Try disconnecting the cables,
waiting 10 seconds, and then reconnecting them. If the drive is
still not recognized, restart your computer and try again.
I cannot copy a file larger
than 4 GB to the drive.
The capacity of the disk is not
the total one written on the
packaging.
Is there a conflict with other device drivers or extensions?
Are you connected to the computer via
USB?
Is the drive connected to a standard
USB port on your computer?
Does your computer or operating system support Hi-Speed USB 2.0?
When you connect the drive to your computer via USB, only a portion of the total capacity is available. Up
to 500GB are allocated for the USB connection (for the Share named USBShare) and the remaining capacity
is dedicated for the Ethernet connection. This can be modified; see 4.11. Dashboard: Drive Information.
Contact LaCie Technical Support for help.
When you connect the d2 Network 2 to a computer via USB, the
USB share of the drive that mounts on the computer is formatted
in MS-DOS (FAT32). This format limits file sizes to 4 GB.
To transfer >4GB files to the d2 Network 2, disconnect the USB
cable and connect the Ethernet cable. See sections 3.4.3. Dis-
connecting the USB Connection and 2.2. STEP 2: Connect the
Ethernet Cable. Alternatively, you can reformat the USB Share
to NTFS, which permits larger file sizes (see section 4.11. Dash-
board: Drive Information).
If your drive is connected to a standard USB port, this is normal.
A Hi-Speed USB 2.0 device can only operate at Hi-Speed USB
2.0 performance levels when it is connected directly to a HiSpeed USB 2.0 port. Otherwise, the Hi-Speed USB 2.0 device
will operate at the slower USB transfer rates. For more information, please see sections 5.1. Optimizing Data Transfers.
See sections 1.1. Minimum System Requirements and 5.1. Opti-
mizing Data Transfers for more information.
continued on the next page >>
Page 68

LaCie d2 Network 2 • DESIGN BY NEIL POULTON Troubleshooting
User Manual page 68
The drive is making clicking
noises.
Is the sound “soft clicking” or “hard clicking”?
Soft clicking can be the normal sound of the drive working. If the drive is functional, this is normal. Drives do
not typically give an indication of any problems prior to failure, so it does not mean it is about to fail if the
drive is making a clicking sound and still functioning. If the drive is non-functional, there are two possible
causes:
✦ The drive could be corrupted. Reformatting the drive can solve this issue.
✦ The drive could have a failure in the external power supply or power cable. Try using a different one,
if possible.
Hard clicking is a very noticeable sound, and is akin to hearing metal-on-metal impacts. This behavior usually indicative of a physical failure. If nothing traumatic happened to the drive prior to this starting, consider
it to be soft clicking, and troubleshoot the problem as suggested above.
Page 69
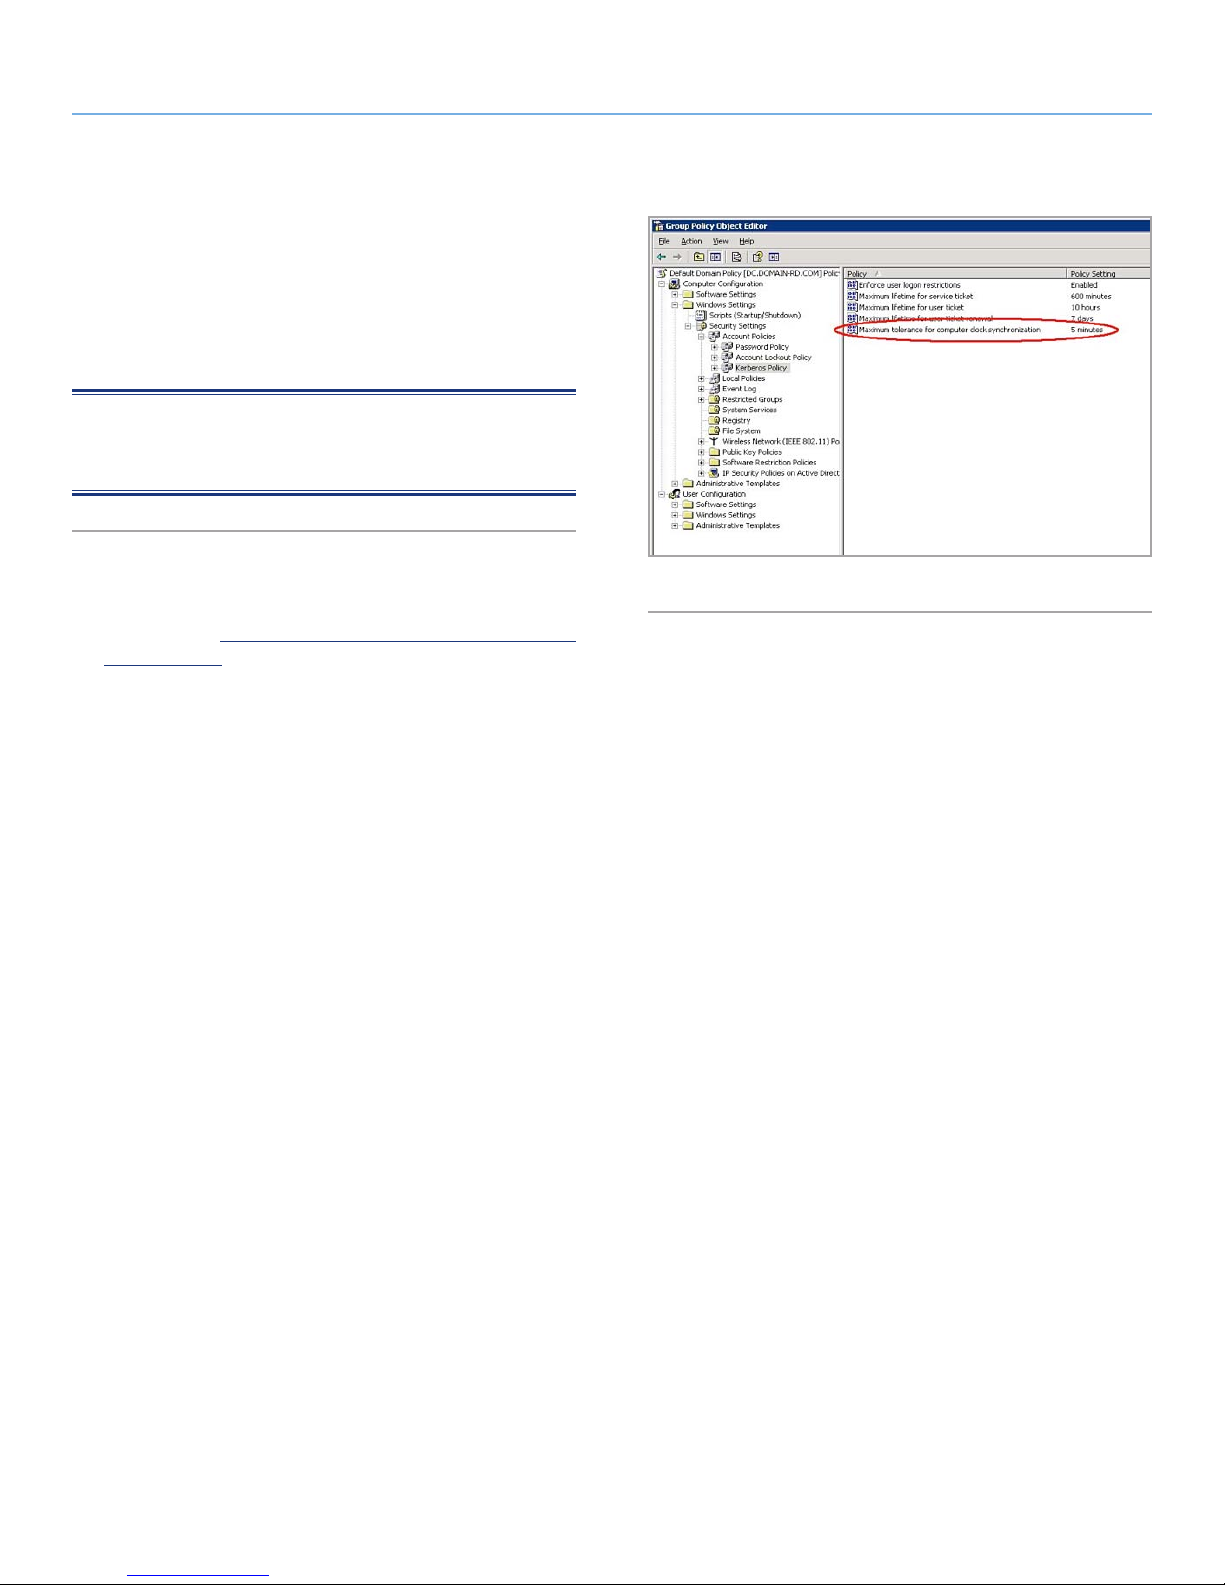
LaCie d2 Network 2 • DESIGN BY NEIL POULTON Troubleshooting
User Manual page 69
6.5. Troubleshooting Active Directory
Connections
Thousands of different network and domain configurations exist, so
these troubleshooting tips are necessarily general. However, checking the following points could help.
NOTE: While the following explanation shows screenshots from the
5big Network 2, the text is also applicable to the d2 Network 2 and
2big Network 2.
6.5.1. Product / LAN Side
1. Make sure that the latest product operating system has been installed. Check http://www.lacie.com/us/support/drivers/index.
htm?id=10007.
2. Make sure no heavy load processes are running (not mandatory
but could help), for example:
a. No RAID construction is running (wait until RAID is built)
b. No multiple downloads are running (stop or wait until down-
load is finished)
c. No multimedia database building (disable Multimedia)
d. No backups running (stop or wait until backups are finished)
3. Make sure all users are disconnected from the product (not
mandatory but could help) and that no heavy data transfers are
taking place simultaneously.
4. Make sure the product is assigned the correct date, time, and
time zone. The reason is that a time discrepancy of more than
five minutes between the domain and product may prevent
or cause disruptions to the Active Directory (AD) connection.
This tolerance is defined in Domain Controller Policy, and the
default value is usually five minutes (Fig. 86).
Fig. 86
The most precise way to set the product’s time is to use the NTP
Server feature in the Dashboard > General Settings widget. It
can also be set manually from this page.
continued on the next page>>
Page 70
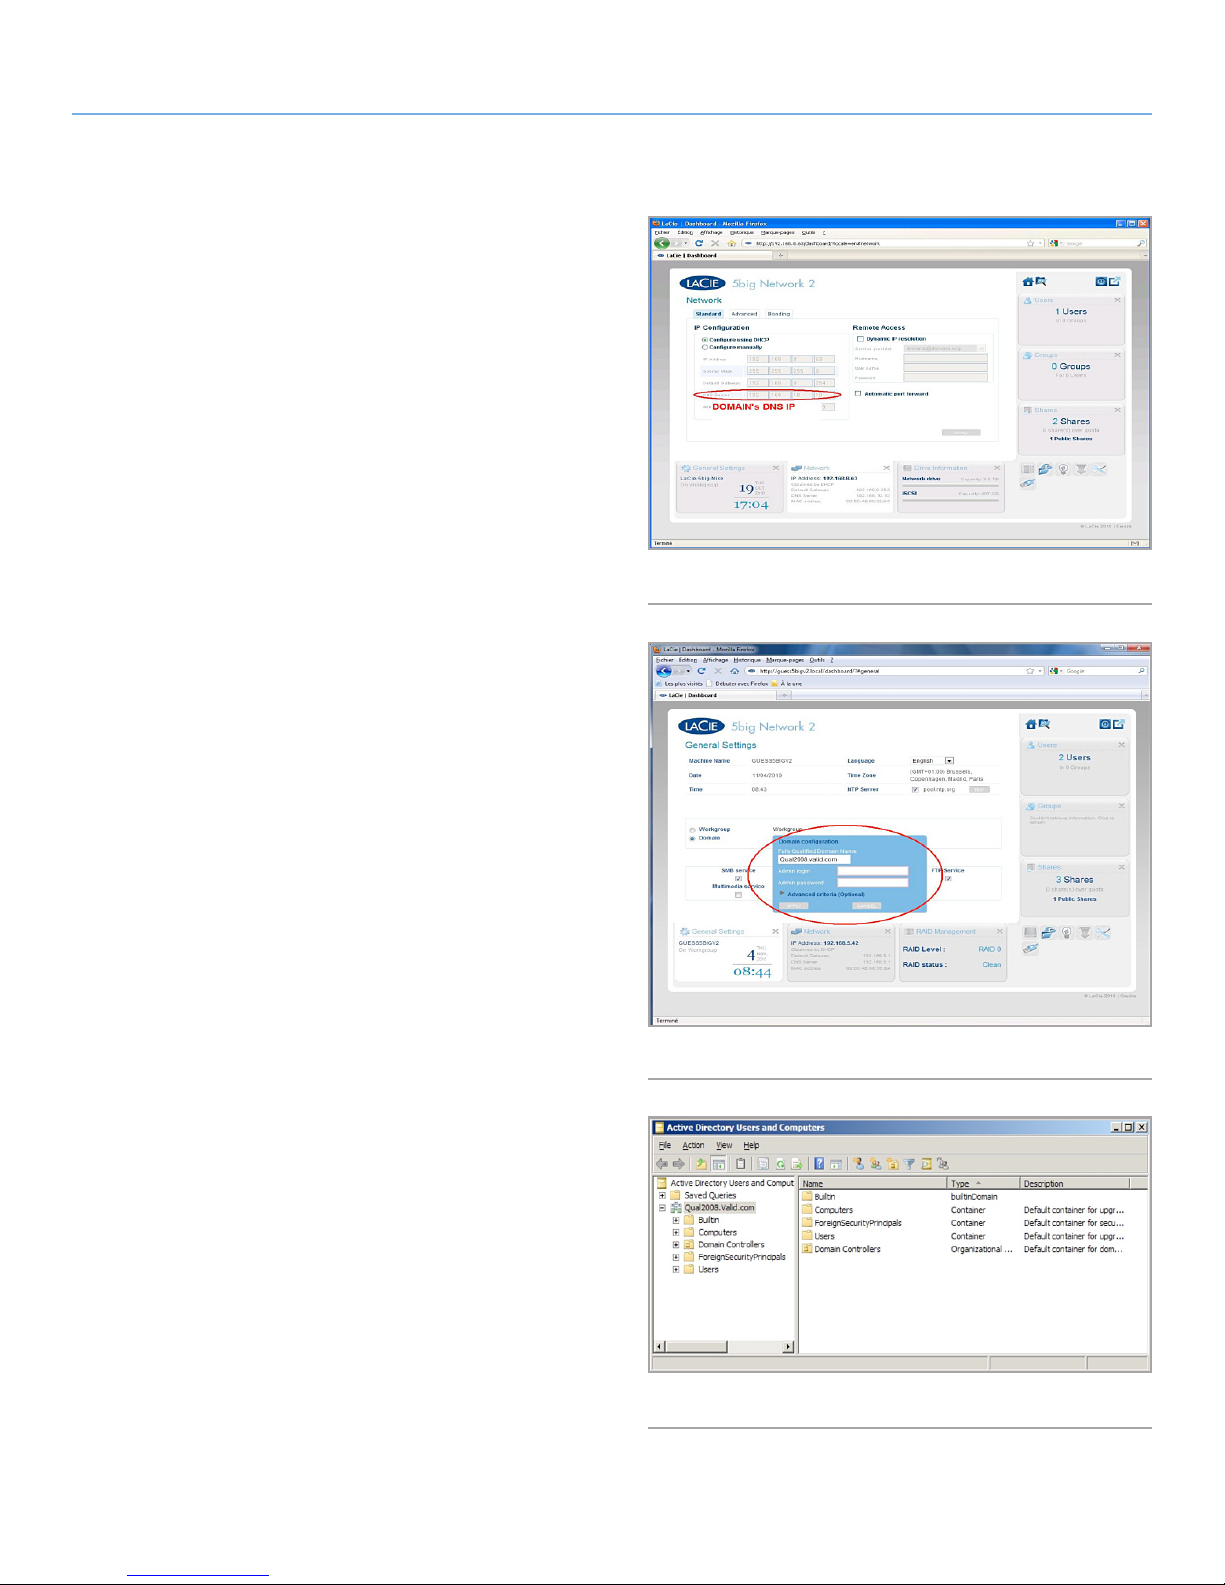
LaCie d2 Network 2 • DESIGN BY NEIL POULTON Troubleshooting
User Manual page 70
5. Make sure that the DNS server address provided to the product
is a domain DNS, NOT an internet DNS (as may be provided
by an internet provider) (Fig. 87). The product must connect to
the local network domain, not to a server on the internet.
It’s important that the product be assigned a correct and reachable DNS server IP address on the local network configuration,
because joining a domain is based on DNS resolution. Verify
the DNS IP on another computer on the same network as the
LaCie product. From this computer, attempt to ping the DNS
server.
6. Dashboard: Domain Configuration window settings (Fig. 88):
a. Enter the domain’s Full Qualified Domain Name (FQDN).
For example:
directory-example.domain.com (Active Directory Users and
Computers Tool on Primary Domain Controller) (Fig. 89)
Fig. 87
7. Admin login: Use the AD’s administrator username.
8. Admin password: Case sensitive.
continued on the next page>>
Fig. 88
Fig. 89
Page 71
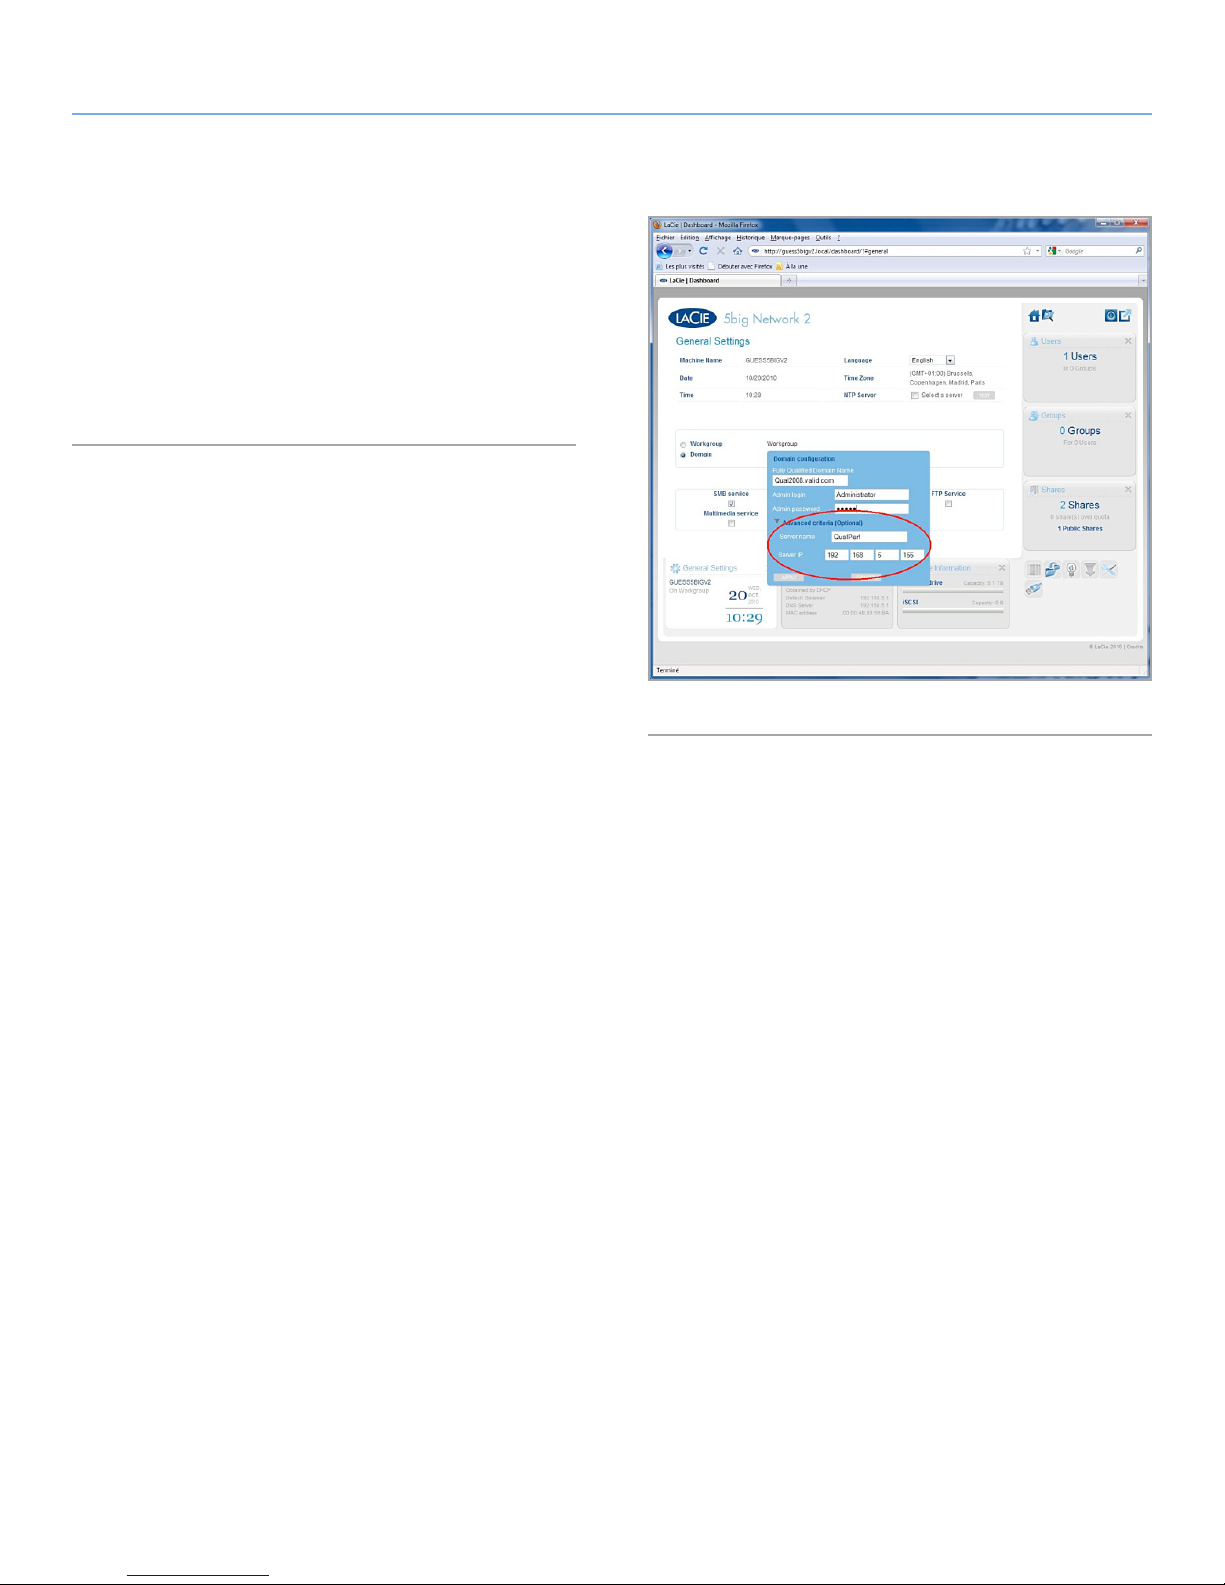
LaCie d2 Network 2 • DESIGN BY NEIL POULTON Troubleshooting
User Manual page 71
9. Optional Advanced Criteria can be input to help with joining.
a. Server Name is the Domain Controller Host Name
b. Server IP is the Domain Controller IP (Fig. 90)
All the above points must be verified, including the next section
about configuring the AD to ensure correct Domain joining. Any
incorrect configuration can cause the connection to fail.
Fig. 90
Page 72

LaCie d2 Network 2 • DESIGN BY NEIL POULTON Troubleshooting
User Manual page 72
6.5.2. Active Directory / Domain Side
On the Active Directory / domain side, the following points should
be checked by the Active Directory administrator, as configuration is
different for every customer.
1. Ask the AD administrator to verify if Kerberos Server & Time
Server are registered in the domain DNS, in order to allow the
LaCie product to connect. Kerberos Server & Time Server need
to be accessible to the LaCie product, as these servers are involved in the joining process.
2. Check the machine name object in AD. Check that it’s placed
in the right container (not the default “computer” container) and
check access rights for the machine name (such as who can
log on to it). You may also need to delete the machine name in
order to reset the object in AD.
It may be necessary for the domain administrator to create a
computer account in AD in the right container prior to joining
the LaCie product in the domain (with the computer account
name being the product’s machine name).
3. There may be an issue when joining a domain if a sub-domain
has been set up. The question to ask is whether the domain
joining was done using the correct domain/sub-domain name.
(Again, check the machine name object location/rights in AD).
Could the user belong to a different sub-domain not authorized
to access the product?
NOTE: If the LaCie product fails to connect to a properly configured
AD, you should provide LaCie technical support with the domain
network configuration log from the Dashboard > Support widget
for analysis.
Page 73

LaCie d2 Network 2 • DESIGN BY NEIL POULTON Contacting Customer Support
User Manual page 73
7. Contacting Customer Support
Before You Contact Technical Support
1. Read the manuals and review section 6. Troubleshooting.
2. Try to isolate the problem. If possible, make the drive the only
external device on the CPU, and make sure that all of the cables
are correctly and firmly attached.
If you have asked yourself all of the pertinent questions in the troubleshooting checklist, and you still can’t get your LaCie drive to work
properly, contact us at www.lacie.com. Before contacting us, make
sure that you are in front of your computer and that you have the
following information on hand:
Information Location
1. LaCie hard drive serial
number
2. Macintosh/PC model Mac users: Click on the
3. Operating system version
4. Processor speed
5. Computer memory
6. The brands and models
of other internal and
external peripherals installed on your computer
7. Web browser type and
version
Located on a sticker next to
one of the product feet.
Apple icon in the menu bar
and select About This Mac.
Windows users: Right click
My Computer and select
Properties > General.
Mac users: Click on the
Apple icon in the finder bar
and select About This Mac.
Select More Info... The Apple System Profiler will launch
and will list your internal and
external peripherals.
Windows users: Right click
My Computer and select
Properties > Hardware.
Mac users: Click application
name in menu bar and select
About [product]
Windows users: Click Help
and then About [product]
Page 74
LaCie d2 Network 2 • DESIGN BY NEIL POULTON Contacting Customer Support
User Manual page 74
7.1. LaCie Technical Support Contacts
LaCie Asia
http://www.lacie.com/cn/contact/
LaCie Belgium
http://www.lacie.com/be/contact/ (Dutch)
http://www.lacie.com/befr/contact/ (French)
LaCie Canada
http://www.lacie.com/ca/contact/ (English)
http://www.lacie.com/cafr/contact/ (French)
LaCie Finland
http://www.lacie.com/fi/contact/
LaCie Germany
http://www.lacie.com/de/contact/
LaCie Italy
http://www.lacie.com/it/contact/
LaCie Korea
http://www.lacie.com/kr/contact/
LaCie Australia
http://www.lacie.com/au/contact/
LaCie Brazil
http://www.lacie.com/us/contact/
LaCie Denmark
http://www.lacie.com/dk/contact/
LaCie France
http://www.lacie.com/fr/contact/
LaCie Ireland
http://www.lacie.com/ie/contact/
Japan – Elecom CO., LTD.
http://www.lacie.com/jp/contact/
LaCie Latin America
http://www.lacie.com/la/contact/
LaCie Netherlands
http://www.lacie.com/nl/contact/
LaCie Portugal
http://www.lacie.com/pt/contact/
LaCie Southeast Asia
http://www.lacie.com/sea/contact/
LaCie Sweden
http://www.lacie.com/se/contact/
LaCie UK
http://www.lacie.com/uk/contact/
LaCie Grand Export
http://www.lacie.com/intl/contact/
LaCie Norway
http://www.lacie.com/no/contact/
LaCie Singapore
http://www.lacie.com/asia/contact/
LaCie Spain
http://www.lacie.com/es/contact/
LaCie Switzerland
http://www.lacie.com/ch/contact/ (German)
http://www.lacie.com/chfr/contact/ (French)
http://www.lacie.com/chit/contact/ (Italian)
LaCie USA
http://www.lacie.com/us/contact/ (English)
http://www.lacie.com/uses/contact/ (Spanish)
Page 75

LaCie d2 Network 2 • DESIGN BY NEIL POULTON Warranty Information
User Manual page 75
8. Warranty Information
This Limited Warranty applies only to hardware products manufactured by or for LaCie that can be identified by the “LaCie” trademark,
trade name, or logo affixed to them. The Limited Warranty does not
apply to any non-LaCie hardware products or any software, even if
packaged or sold with LaCie hardware. Manufacturers, suppliers,
or publishers, other than LaCie, may provide their own warranties
to the end user purchaser, but LaCie, in so far as permitted by law,
provides their products “as is”. Software distributed by LaCie with or
without the LaCie brand name (including, but not limited to system
software) is not covered under this Limited Warranty. Refer to the
licensing agreement accompanying the software for details of your
rights with respect to its use.
LaCie does not warrant that the operation of the product will be uninterrupted or error-free. LaCie is not responsible for damage arising
from failure to follow instructions relating to the product’s use. This
warranty does not apply:
✦ to consumable parts, unless damage has occurred due to a
defect in materials or workmanship;
✦ to cosmetic damage, including but not limited to scratches,
dents and broken plastic on ports;
✦ to damage caused by use with non-LaCie products;
✦ to damage caused by accident, abuse, misuse, flood, fire,
earthquake or other external causes;
✦ to damage caused by operating the product outside the per-
mitted or intended uses described by LaCie;
✦ to damage caused by service (including upgrades and expan-
sions) performed by anyone who is not a representative of
LaCie or a LaCie Authorized Service Provider;
✦ to a product or part that has been modified to alter function-
ality or capability without the written permission of LaCie; or
✦ if any LaCie serial number on the product has been removed
or defaced.
To obtain warranty service, call LaCie Technical Support. You will
be asked to provide your LaCie product’s serial number, and you
may be asked to furnish proof of purchase to confirm that the drive
is still under warranty.
All drives returned to LaCie must be securely packaged in their original box and shipped with postage prepaid.
IMPORTANT INFO: Register online for free technical support: www.
lacie.com/register
 Loading...