

LaCie 301200U, 301157U - Ethernet Big Disk NAS Server, d2 Big Disk Extreme+ Hard Drive User Manual
Page 1
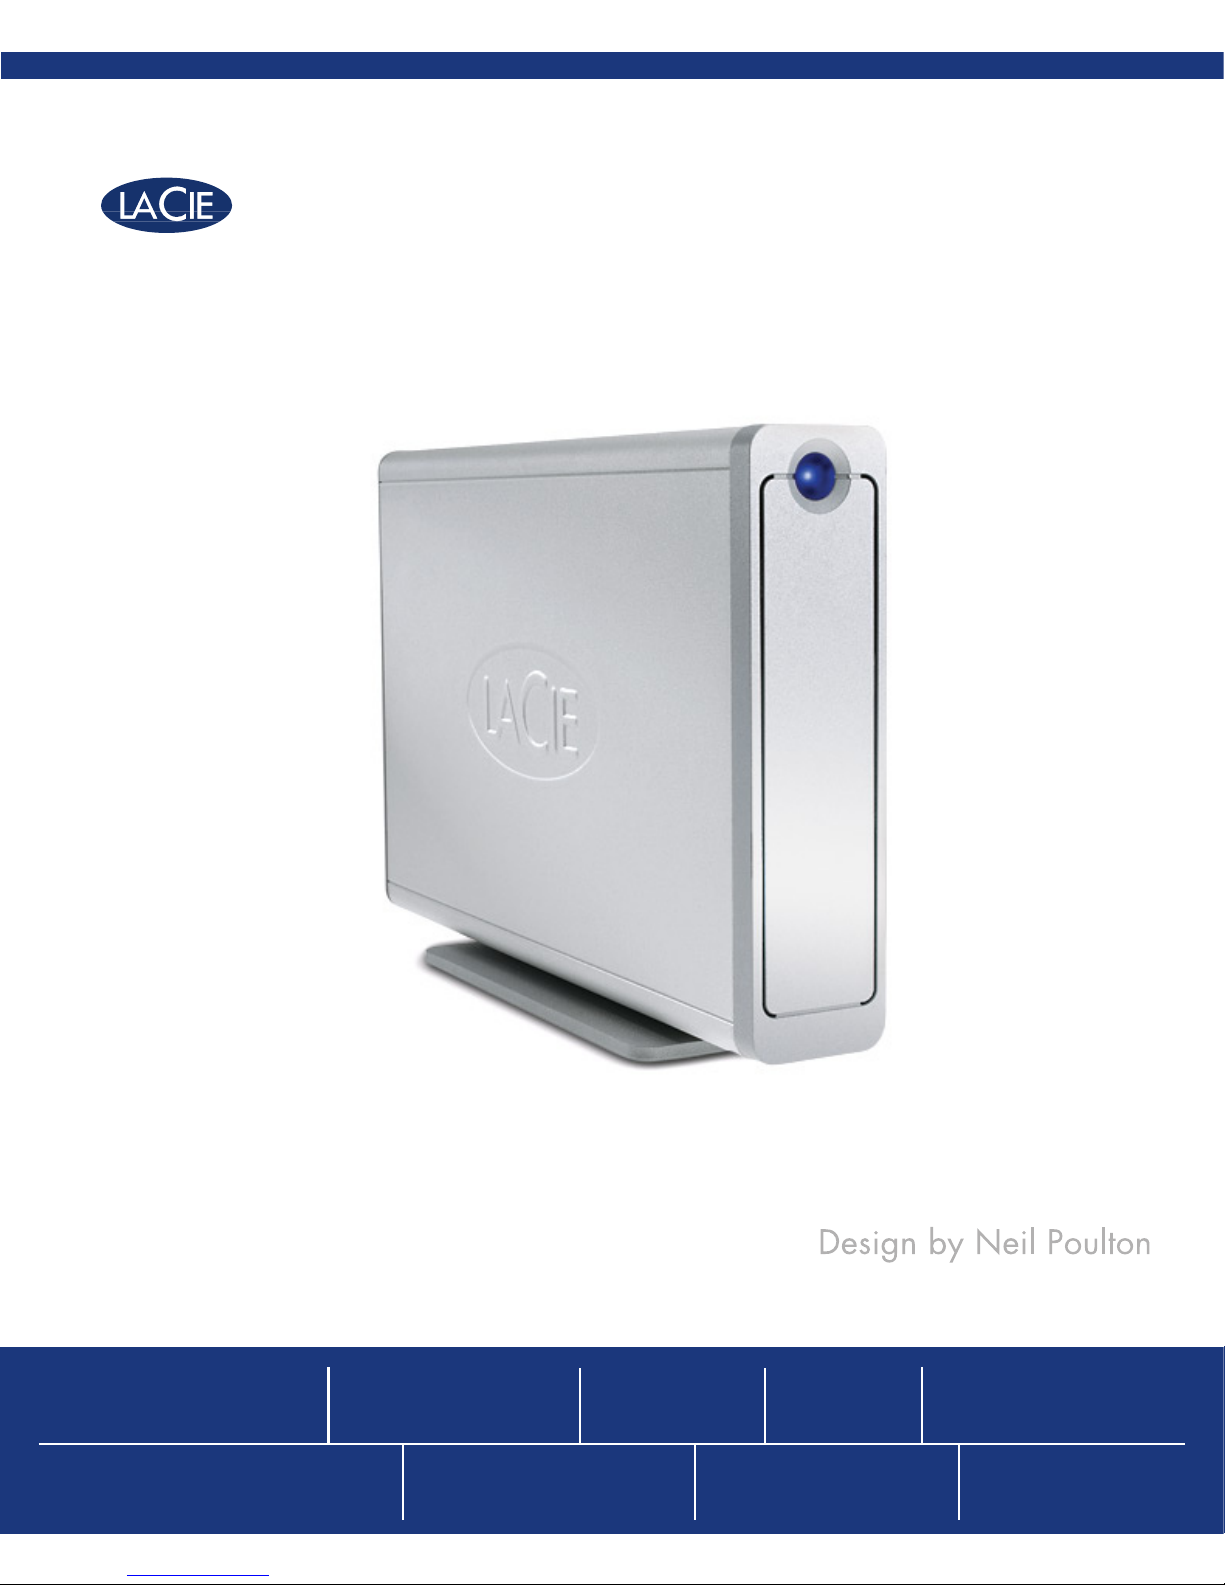
LaCie d2 Big Disk Extreme+ Hard Drive
user manual manuel utilisateur guída utente handbuch 用户手册
manual de instrucciones gebruikershandleiding ユーザー マニュアル 용자 설명서
USB 2.0 • FireWire 400 • FireWire 800
Page 2

LaCie Big Disk Extreme+
Triple Interface
page 1
Table of Contents
Table of Contents
Health and Safety Precautions 3
General Use Precautions 3
1. Introduction to the LaCie Big Disk Extreme+
5
1.1. Hard Drive Heat Management 6
2. Your LaCie Big Disk Extreme+
7
2.1. Minimum System Requirements 7
2.2. Box Content 8
2.3. Views Of e Drive 9
2.4. Cables and Connectors 11
3. Installing Your LaCie Big Disk Extreme+ 13
3.1. Connecting the Power Supply 14
3.2.a. Connecting the USB Cable 15
3.2.b. Connecting the FireWire 400 Cable 16
3.2.c. Connecting the FireWire 800 Cable 17
3.3. Connecting Multiple Devices 18
3.4. Disconnecting Your LaCie Big Disk Extreme+ 19
3.5. Switching Interfaces 19
3.6. LaCie Shortcut Button 20
4. Helpful Information 28
4.1. Formatting and Partitioning 29
4.2. Interface Comparisons 32
5. FireWire Questions & Answers 33
6. USB Questions & Answers 35
7. Troubleshooting 37
7.1. Mac Users 37
7.2. Windows Users 39
8. Contacting Customer Support 42
8.1. LaCie Technical Support Contacts 43
9. Warranty Information 44
Glossary 45
Page 3
LaCie Big Disk Extreme+
Triple Interface
page 2
Forward
Copyrights
Copyright © 2007 LaCie. All
rights reserved. No part of this publication may be reproduced, stored in a
retrieval system, or transmitted in any
form or by any means, electronic, mechanical, photocopying, recording or
otherwise, without the prior written
consent of LaCie.
Trademarks
Apple, Mac, and Macintosh are
registered trademarks of Apple Computer, Inc. Microsoft, Windows 98,
Windows 98 SE, Windows 2000,
Windows Millennium Edition, Windows XP and Windows Vista are registered trademarks of Microsoft Corporation. Other trademarks mentioned
in this manual are the property of their
respective owners.
Changes
e material in this document is
for information only and subject to
change without notice. While reasonable efforts have been made in the
preparation of this document to assure
its accuracy, LaCie assumes no liability
resulting from errors or omissions in
this document, or from the use of the
information contained herein. LaCie
reserves the right to make changes or
revisions in the product design or the
product manual without reservation
and without obligation to notify any
person of such revisions and changes.
Canada Compliance Statement
is Class A digital apparatus
meets all requirements of the Canadian Interference-Causing Equipment
Regulations.
FCC Statement
is device complies with Part 15
of the FCC Rules. Operation is subject
to the following conditions:
e devices may not cause harmful
interference
e devices must accept any interference received, including interference that may cause undesired
operation.
NOTE: is equipment has been
tested and found to comply with the
limits for a Class B digital device, pursuant to Part 15 of the FCC Rules.
ese limits are designed to provide
reasonable protection against harmful
interference in a residential installation. is equipment generates, uses
and can radiate radio frequency energy and, if not installed and used in
accordance with the instructions, may
cause harmful interference to radio
communications. However, there is no
guarantee that interference will not occur in a particular installation. If this
equipment does cause harmful inter-
1.
2.
ference to radio or television reception,
which can be determined by turning
the equipment off and on, the user is
encouraged to try and correct the interference by one or more of the following measures:
Reorient or relocate the receiving
antenna.
Increase the separation between the
equipment and receiver.
Connect the equipment into an outlet on a circuit different from that to
which the receiver is connected.
Consult the dealer or an experienced
radio/TV technician for help.
Modifications to this product not
authorized by LaCie could void the
FCC & Industry Canada regulations
and negate your authority to operate
the product.
Manufacturer’s Declaration for CE Certification
We, LaCie, solemnly declare
that this product conforms to the following European standards: Class B
EN60950, EN55022, EN55024
With reference to the following conditions: 73/23/EEC Low Voltage Directive; 89/336/EEC EMC Directive
•
•
•
•
Tested To Comply
With FCC standards
For Home or Office Use
LaCie Big Disk Extreme+
CAUTION: Modifications
not authorized by the manufacturer may void the user’s
authority to operate this device.
Page 4

LaCie Big Disk Extreme+
Triple Interface
page 3
Forward
is symbol on the product or on its packaging
indicates that this prod-
uct must not be disposed
of with your other household waste.
Instead, it is your responsibility to
dispose of your waste equipment by
handing it over to a designed collection point for the recycling of waste
electrical and electronic equipment.
e separate collection and recycling
of your waste equipment at the time of
disposal will help to conserve natural
resources and ensure that it is recycled in a manner that protects human
health and the environment. For more
information about where you can drop
off your waste equipment for recycling,
please contact your local city office,
your household waste disposal service,
or the shop where you purchased the
product.
Only qualified persons are authorized to carry out maintenance on
this device.
Read this User Manual carefully
and follow the correct procedure
when setting up the device.
Do not open your LaCie Big Disk
Extreme+ or attempt to disassemble
or modify it. Never insert any metallic object into the drive to avoid any
risk of electrical shock, fire, shortcircuiting or dangerous emissions.
•
•
•
Your LaCie Big Disk Extreme+
contains no user-serviceable parts.
If it appears to be malfunctioning,
have it inspected by a qualified LaCie Technical Support representative.
Never expose your device to rain,
or use it near water, or in damp or
wet conditions. Never place objects
containing liquids on the LaCie Big
Disk Extreme+, as they may spill
into its openings. Doing so increases the risk of electrical shock, short-
•
circuiting, fire or personal injury.
Make sure that the computer and
LaCie Big Disk Extreme+ are electrically grounded. If the devices are
not grounded, there is an increased
risk of electrical shock. Power requirements 100-240 V~, 1.5 A, 6050 Hz, (Supply voltage fluctuations
not exceeding ± 10% of the nominal,
transient over-voltages according to
over-voltage category II).
•
Health and Safety Precautions
General Use Precautions
Do not expose the LaCie Big Disk
Extreme+ to temperatures outside
the range of 5° C to 35° C (41° F to
95° F) in a configuration with one
drive (for multi-drive configurations,
please see page 6); or to operational
humidity beyond 5-80%, non-condensing, or non-operating humidity
beyond 10-90%, non-condensing.
Doing so may damage the LaCie
Big Disk Extreme+ or disfigure its
casing. Avoid placing your LaCie
• Big Disk Extreme+ near a source of
heat or exposing it to sunlight (even
through a window). Inversely, placing your LaCie Big Disk Extreme+
in an environment that is too cold
or humid may damage the unit.
Always unplug the LaCie Big Disk
Extreme+ from the electrical outlet
if there is a risk of lightning or if
it will be unused for an extended
period of time. Otherwise, there is
•
an increased risk of electrical shock,
short-circuiting or fire.
Use only the power supply shipped
with the device.
Do not use the LaCie Big Disk Extreme+ near other electrical appliances such as televisions or radios.
Doing so may cause interference
which will adversely affect the operation of the other products.
•
•
CAUTION: e LaCie Big
Disk Extreme+'s warranty may
be void as a result of the failure
to respect the precautions listed
above.
Page 5
LaCie Big Disk Extreme+
Triple Interface
page 4
Forward
Do not place the LaCie Big Disk
Extreme+ near sources of magnetic interference, such as computer displays, televisions or speakers. Magnetic interference can
affect the operation and stability
of your LaCie Big Disk Extreme+.
• Do not place heavy objects on top
of the LaCie Big Disk Extreme+ or
use excessive force on it.
Never use excessive force on your
LaCie Big Disk Extreme+. If you
detect a problem, see the Troubleshooting section in this manual.
•
•
CAUTION: A shielded-type
power cord is required in order
to meet FCC emission limits
and also to prevent interference
to the nearby radio and television reception. It is essential
that only the supplied power
cord be used.
ImpOrTANT INfO: Any loss, corruption or destruction of data while using a LaCie drive is the sole responsibility of the
user, and under no circumstances will LaCie be held liable for the recovery or restoration of this data. To help prevent the loss
of your data, LaCie highly recommends that you keep TWO copies of your data; one copy on your external hard drive, for
instance, and a second copy either on your internal hard drive, another external hard drive or some other form of removable
storage media. LaCie offers a complete line of CD and DVD drives. If you would like more information on backup, please
refer to our website.
IMPORTANT INFO: 1GB = 1,000,000,000 bytes. 1TB = 1,000,000,000,000 bytes. Once formatted, the actual available
storage capacity varies depending on operating environment (typically 5-10% less).
Page 6
LaCie Big Disk Extreme+
Triple Interface
page 5
ank you for purchasing the new LaCie Big Disk
Extreme+. Combining compatibility with high throughput rates and mammoth storage capacity, the Big Disk
Extreme+ is ideally suited for audio/video pros working with large amounts of DV and SD video or professional level 2D/3D imaging projects, or high speed data
backup.
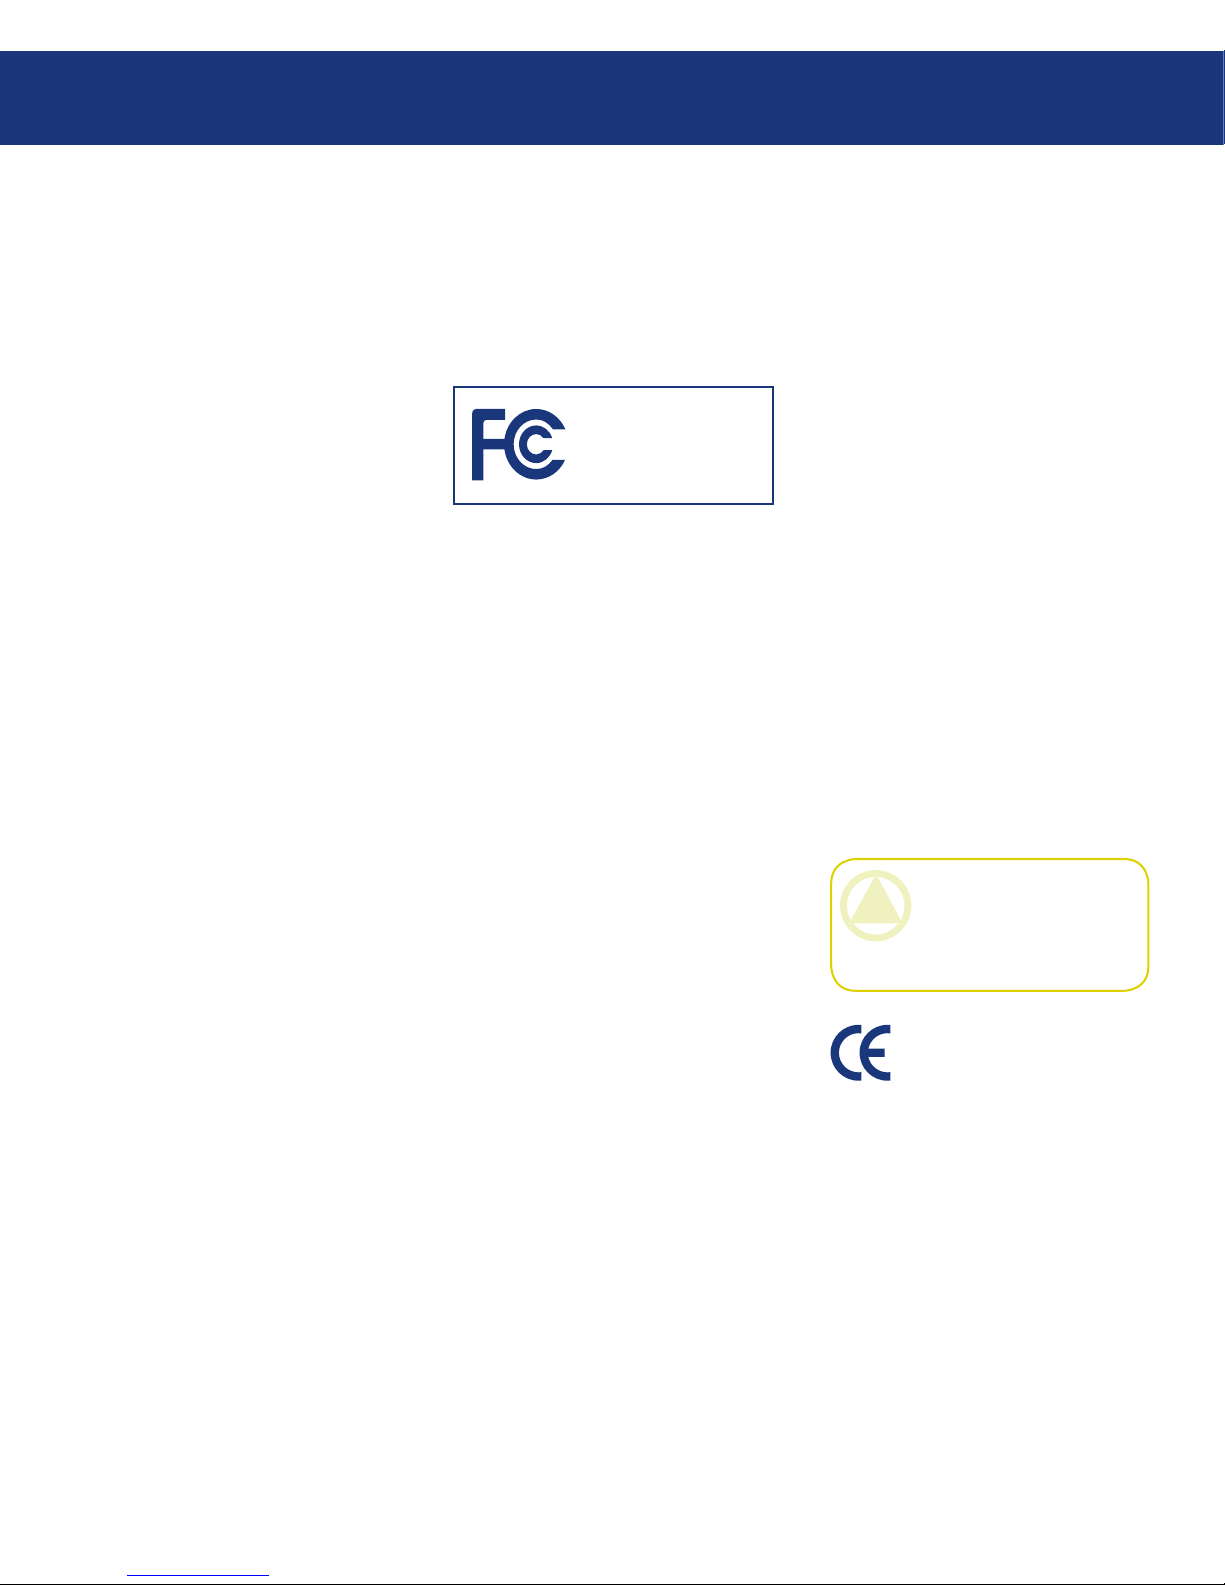
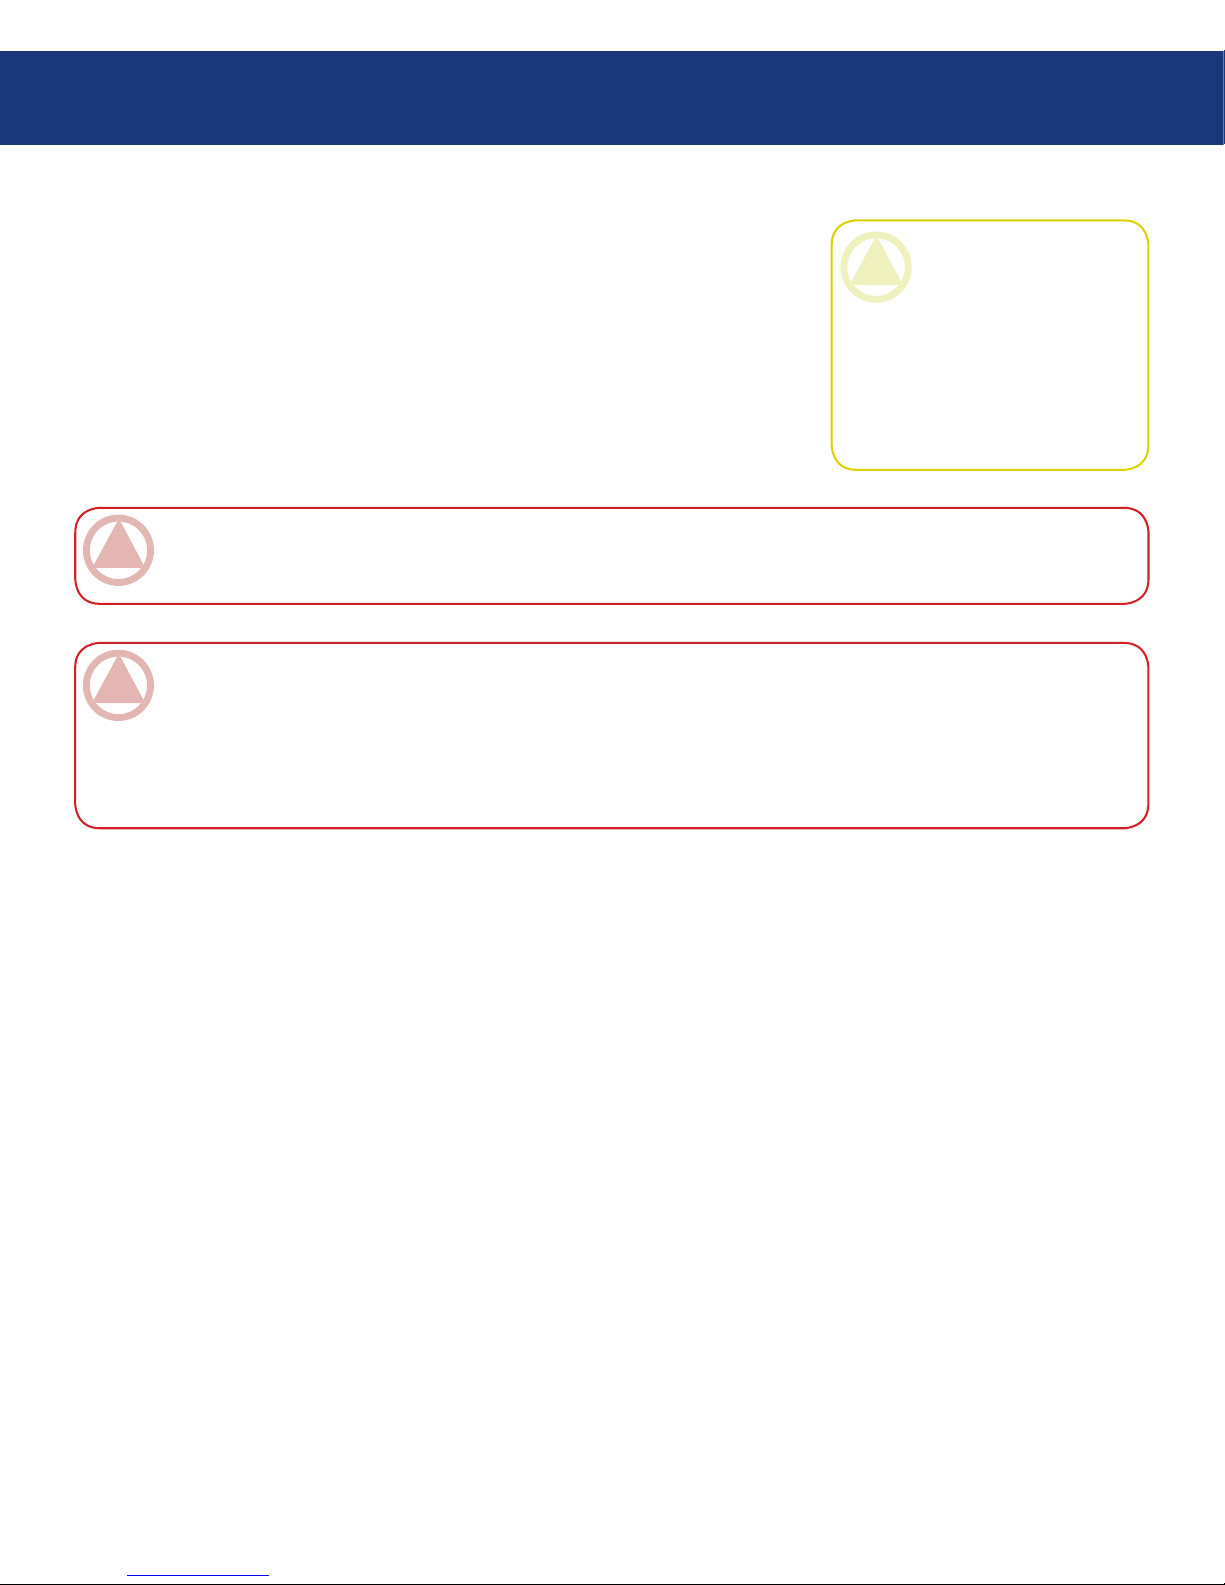
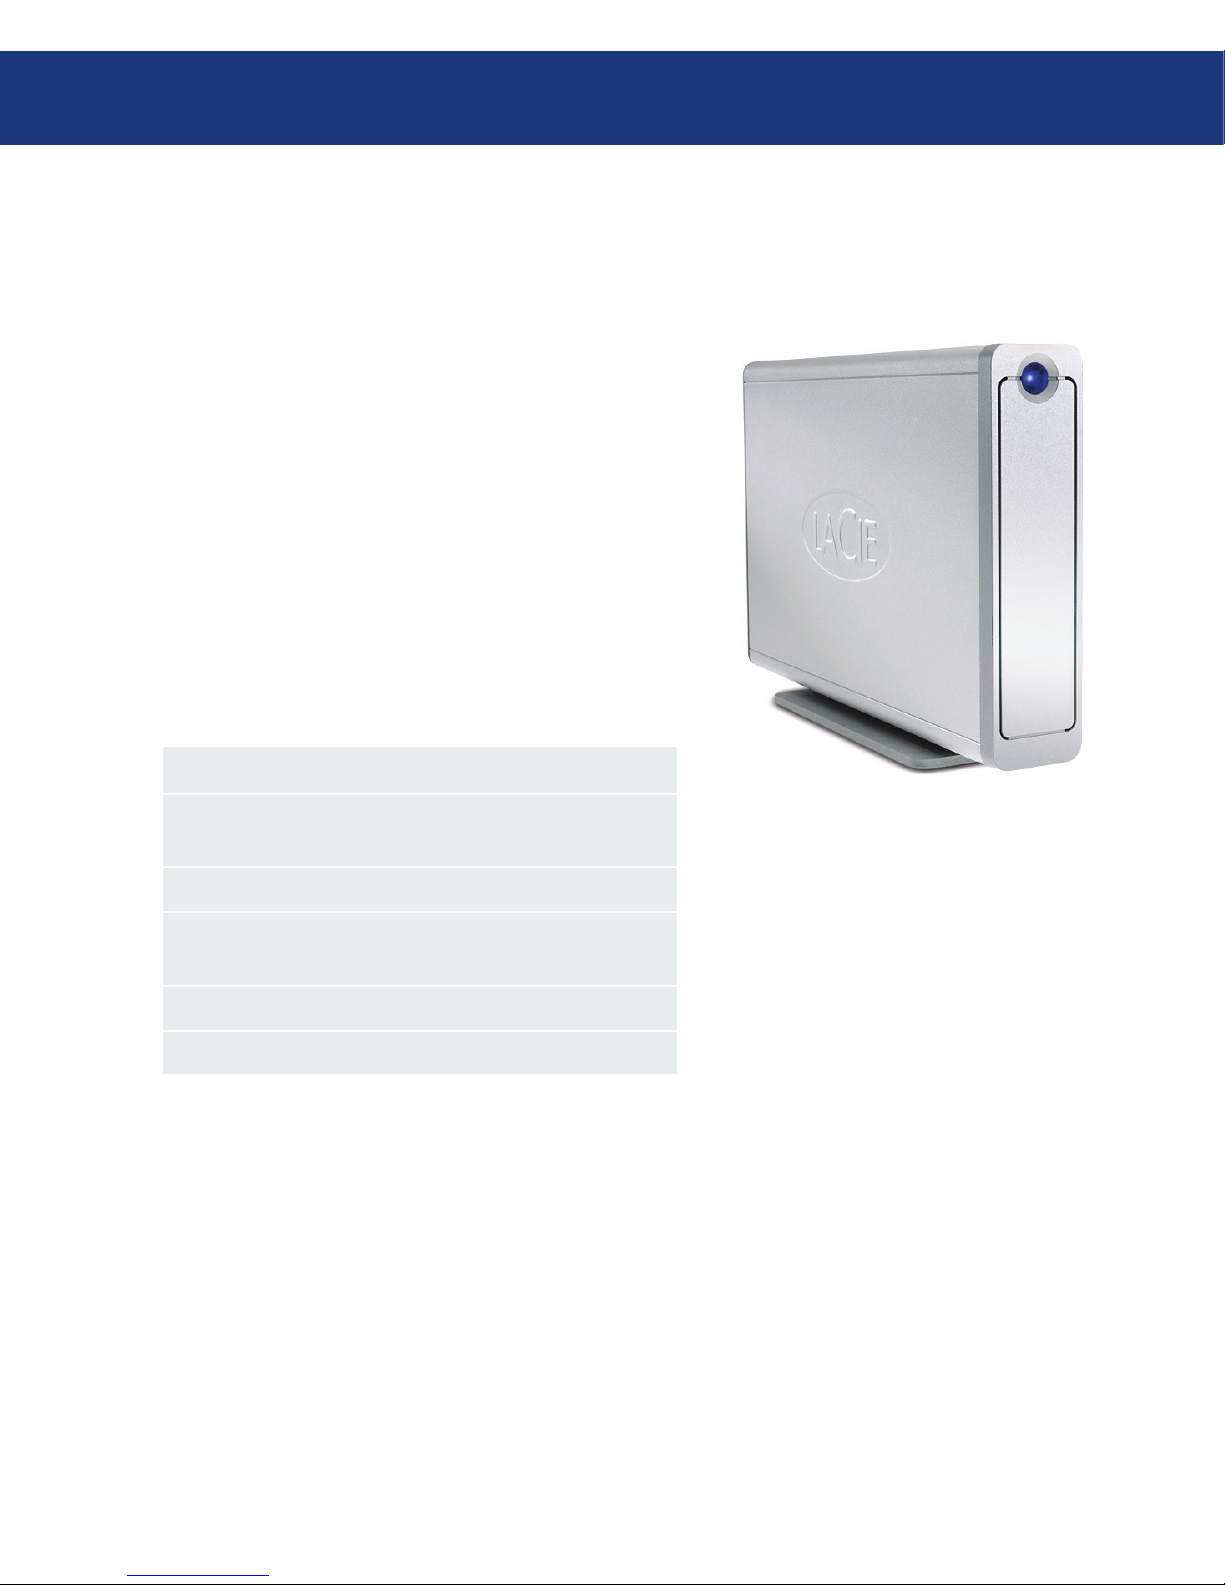
Engineered to fit seamlessly into most work environments, the LaCie Big Disk Extreme+ can be stood
vertically on the LaCie Drive Stand (included), placed
in the LaCie Desk Rack (sold separately) or incorporated into standard 19” computer equipment racks with
the LaCie Rackmount Kit (sold separately).
1. Introduction to the LaCie Big Disk Extreme+
Introduction
Your Big Disk Extreme+ Hard Drive Capabilities■
Hi-Speed USB 2.0, FireWire 400, FireWire 800 interfaces
•
Daisy-chain digital video cameras directly to the drive•
Connects to all of the FireWire and USB standard interfaces
•
Back up your computer’s internal hard drive•
Store and exchange data between several computers•
Page 7
LaCie Big Disk Extreme+
Triple Interface
page 6
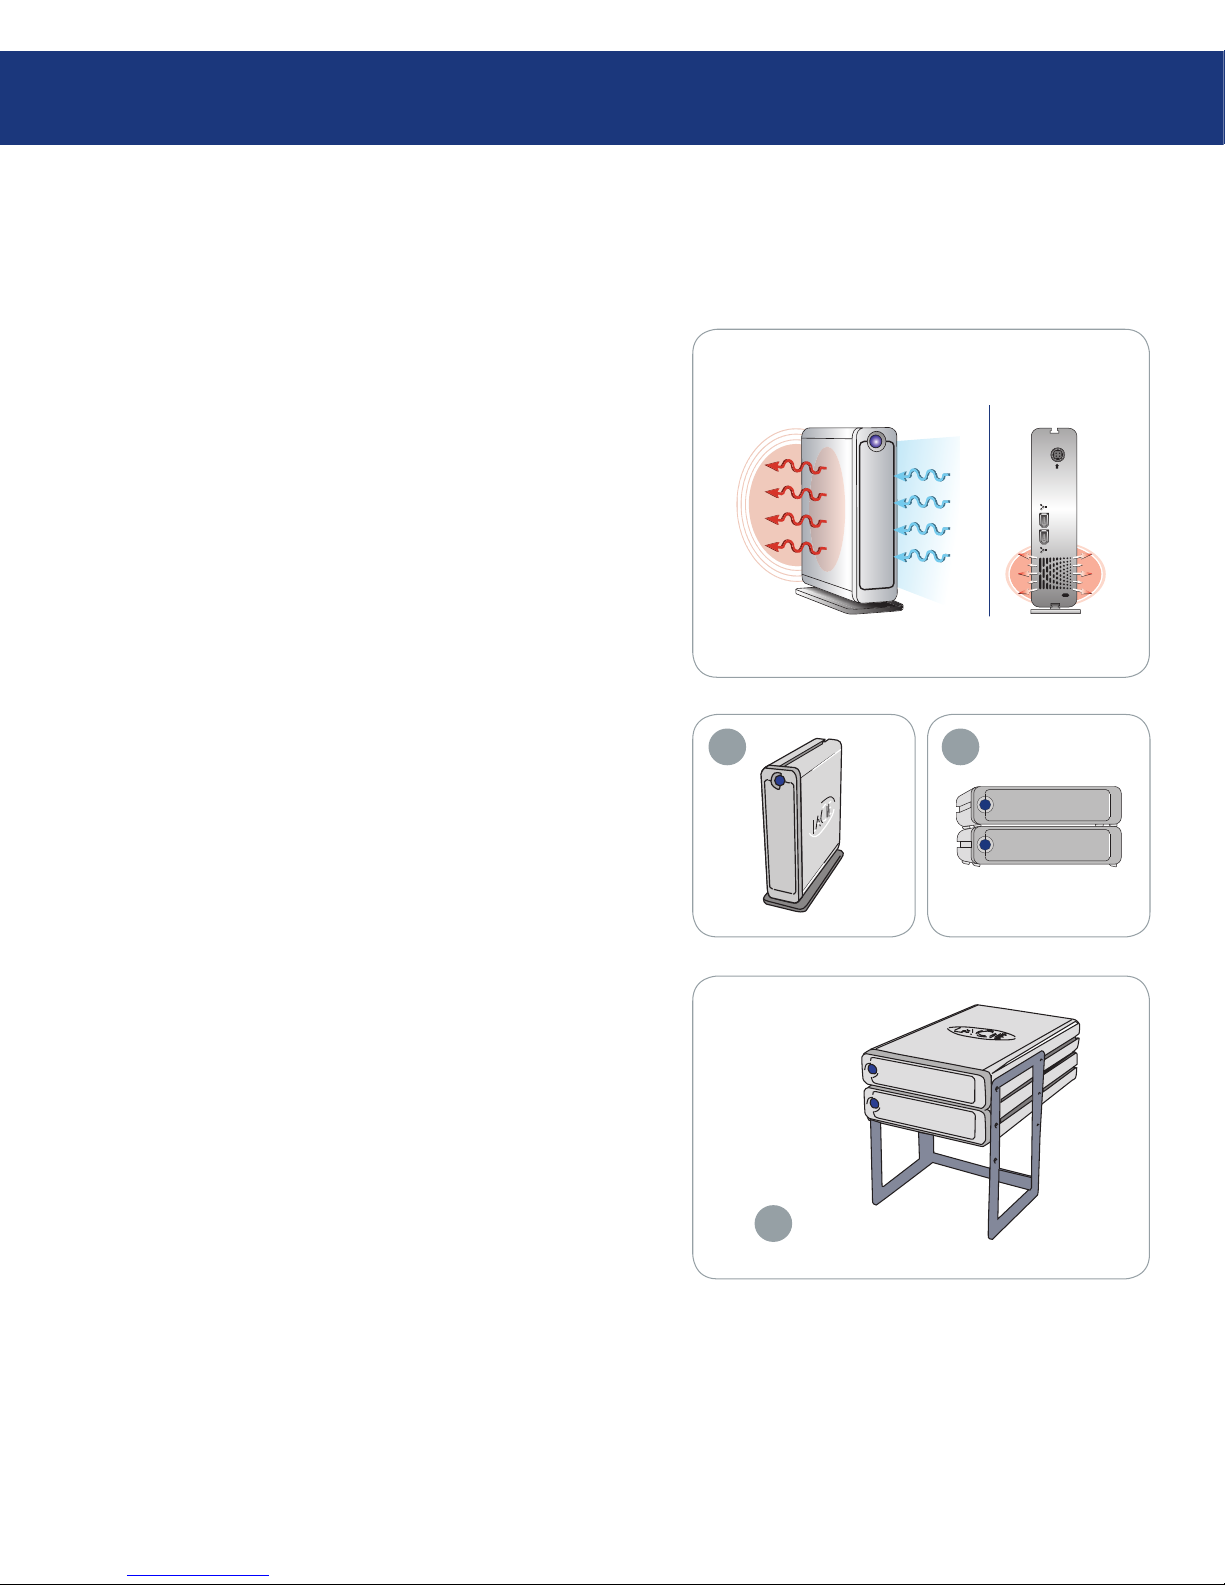
e LaCie Big Disk Extreme+’s metal body is ideal
for naturally dissipating internal drive heat. Its unique
design actually draws heat away from the internal drive
toward the external casing. e casing absorbs heat and
will take advantage of its large surface to further dissipate heat outside the casing. Because of this advantageous feature, heat is taken away from the internal drive,
keeping it safe and prolonging its life and reliability. As
a consequence, it is normal that the external casing is
hot to the touch. Please make sure that the vents of the
back-bezel and front-bezel are not obstructed so that
there is a natural airflow across the casing.
1.1. Hard Drive Heat Management
Heat Dissipation Design■
Introduction
Smart Fan Technology■
1 2
3
e casing alone is a great way to dissipate heat without the need of a fan. erefore, currently, most drives do
not require a fan. Only the largest capacity drives may
need a fan. To find out if your drive includes a fan, please
refer to the item number and product datasheet.
Some models of the Big Disk Extreme+ have a
thermo-regulated “smart fan”, which activates when the
heat inside the casing reaches a certain temperature.
e smart fan adjusts automatically to changes in temperature.
Upright, Stack & Rackmount Configuration■
Heat dissipation is maximized when the drive is in
the upright position (1). If you have several LaCie drives
stacked on each other, please remember to attach the included rubber feet on the under side of your drives (2).
is will allow for some airflow between your drives so
that the heat dissipation can work effectively - especially
if your LaCie drive does not include a fan. LaCie does
not recommend stacking or racking more than 2 Big
Disk Extreme+, Big Disk USB or Big Disk Extreme
with Triple Interface drives on top of each other (3), especially if these drives are turned ON simultaneously.
When stacking two drives (or three), environment temperature should not exceed 30°C.
Page 8
LaCie Big Disk Extreme+
Triple Interface
page 7
Your LaCie Big Disk Extreme+
2. Your LaCie Big Disk Extreme+
2.1. Minimum System Requirements
Windows Users■ Mac Users■
FireWire 800, FireWire 400 or USB 2.0 port
Windows 2000, Windows XP or Windows Vista
500MHz processor or higher
Minimum 128MB RAM (512MB recommended)
•
•
•
•
FireWire 800, FireWire 400 or USB 2.0 port
Mac OS 10.2.8 or later
G4, G5, Intel 500MHz processor or higher
Minimum 128MB RAM (512MB recommended)
•
•
•
•
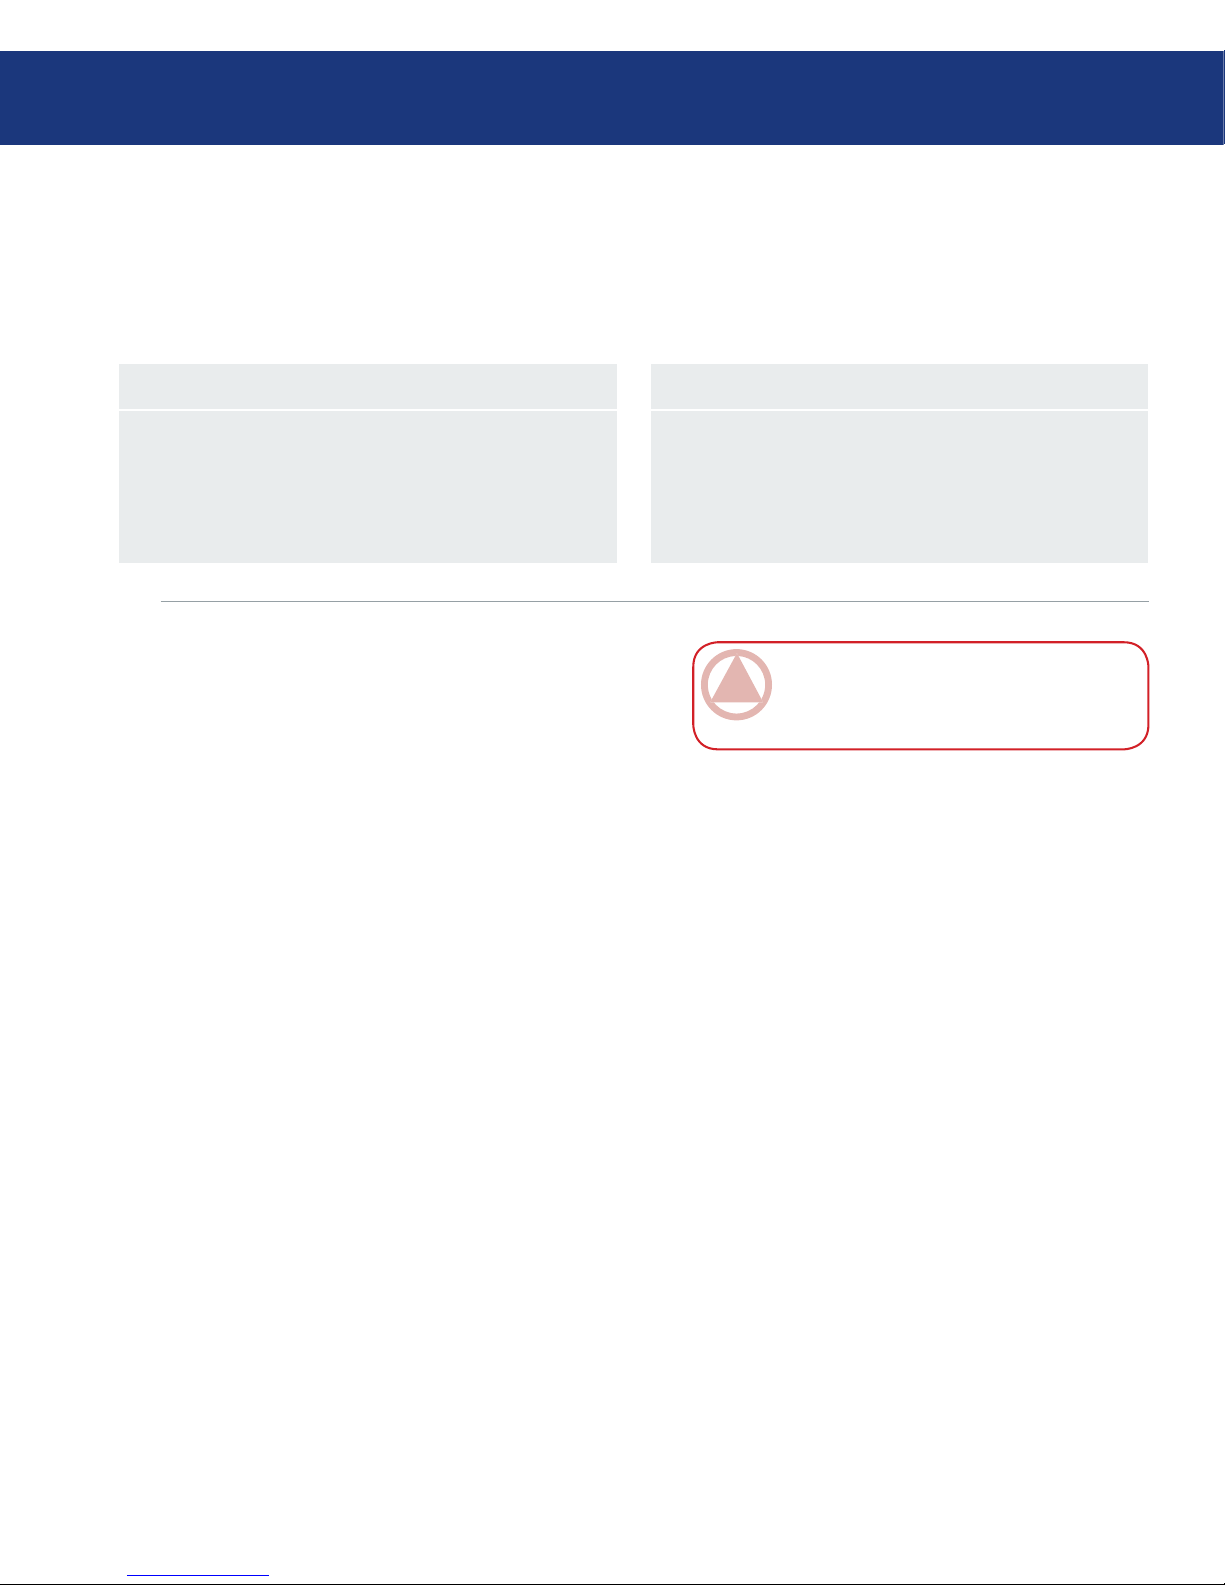
IMPORTANT INFO: e LaCie Big Disk
Extreme+ is compatible with the Intel Core processors.
Page 9
LaCie Big Disk Extreme+
Triple Interface
page 8
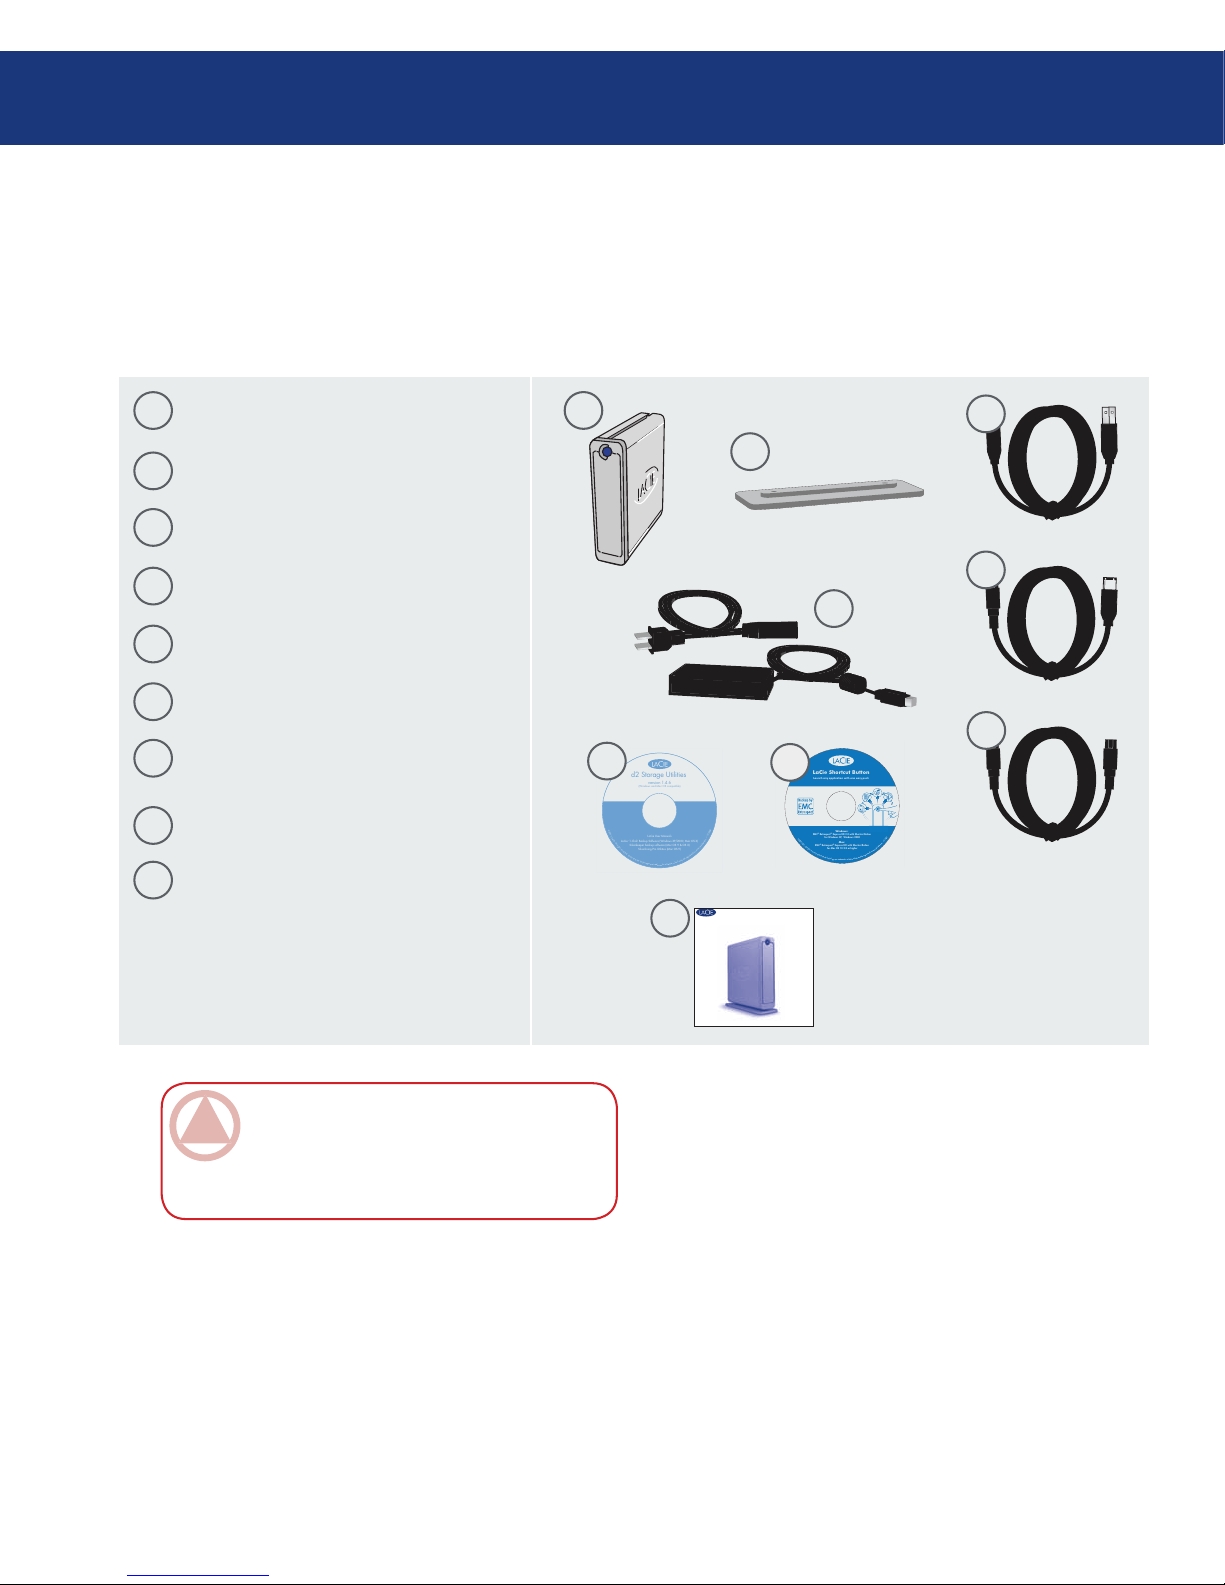
2.2. Box Content
IMPORTANT INFO: Please save your pack-
aging. In the event that the drive should need to
be repaired or serviced, it must be returned in its
original packaging.
LaCie Big Disk Extreme+
Vertical stand kit
Power supply kit
Hi-Speed USB 2.0 cable
FireWire 400 6-to-6-pin cable
FireWire 800 9-to-9-pin cable
LaCie Storage Utilities CD-ROM
(includes User Manual)
LaCie Shortcut Button CD-ROM
Quick Install Guide
1
3
5
2
4
6
7
Your LaCie Big Disk Extreme+ box should contain the following:
1
2
Your LaCie Big Disk Extreme+
8
4
6
3
5
9
LaCie User Manuals
LaCie ‘1-Click’ Backup Software (Windows XP/2000, Mac OS X)
Silverkeeper backup software (Mac OS 9 & OS X)
Silverlining Pro Utilities (Mac OS 9)
©
2
0
0
7
,
L
a
C
i
e
.
A
l
l
r
i
g
h
t
s
r
e
s
e
r
v
e
d
.
L
a
C
i
e
a
n
d
t
h
e
L
a
C
i
e
l
o
g
o
a
r
e
t
r
a
d
e
m
a
r
k
s
o
f
L
a
C
i
e
,
w
h
i
c
h
m
a
y
b
e
r
e
g
i
s
t
e
r
e
d
i
n
s
o
m
e
j
u
r
i
s
d
i
c
t
i
o
n
s
.
•
7
1
1
2
6
8
d2 Storage Utilities
version 1.4.6
(Windows and Mac OS compatible)
7
Quick Install Guide
d2 big disk extreme +
USB 2.0, FireWire 400, FireWire 800
Design by Neil Poulton
9
©
2
0
0
7
L
a
C
i
e
,
a
l
l
r
i
g
h
t
s
r
e
s
e
r
v
e
d
.
L
a
C
i
e
a
n
d
t
h
e
L
a
C
i
e
l
o
g
o
a
r
e
t
r
a
d
e
m
a
r
k
s
o
f
L
a
C
i
e
w
h
i
c
h
m
a
y
b
e
r
e
g
i
s
t
e
r
e
d
i
n
s
o
m
e
j
u
r
i
s
d
i
c
t
i
o
n
s
.
7
1
1
2
6
9
LaCie Shortcut Button
Launch any application with one easy push
Windows:
EMC
®
Retrospect® Express HD 2.0 with Shortcut Button
for Windows XP, Windows 2000
Mac:
EMC
®
Retrospect® Express HD with Shortcut Button
for Mac OS 10.2.8 or higher
8
Page 10
LaCie Big Disk Extreme+
Triple Interface
page 9
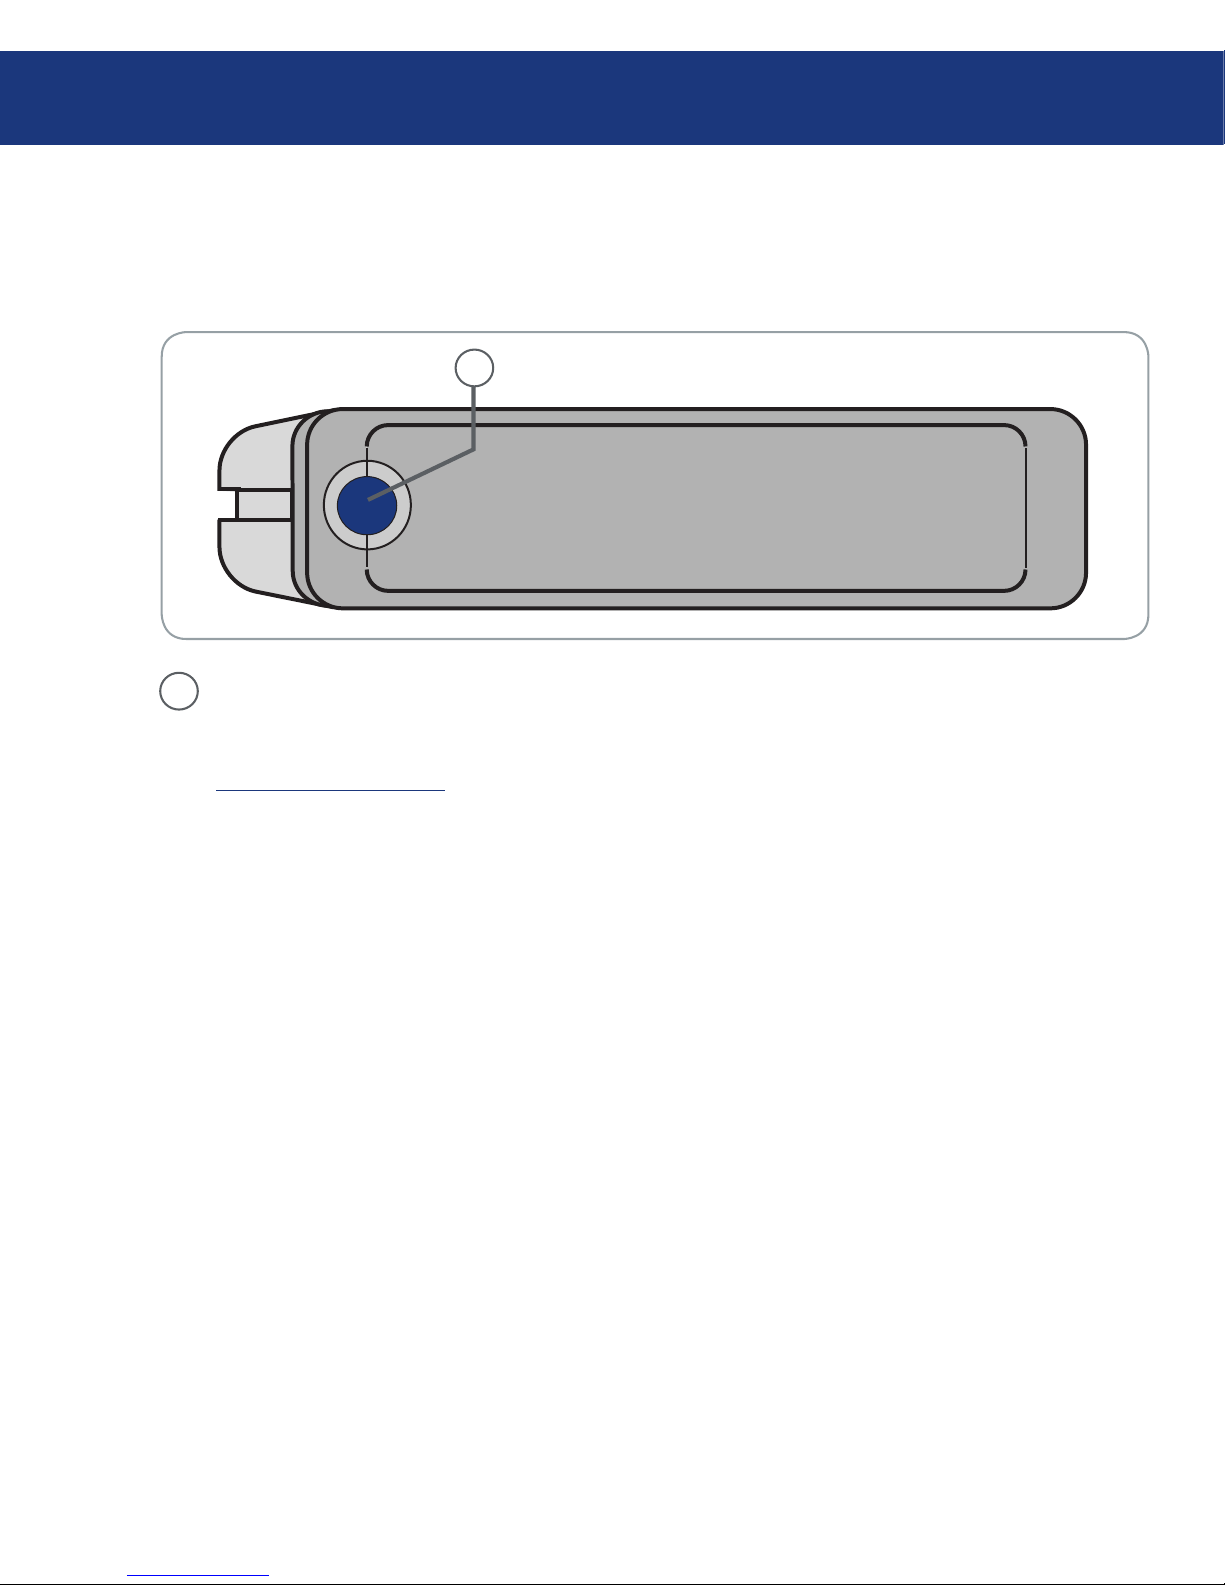
2.3. Views Of The Drive
Shortcut Button with Activity LED
Push the Shortcut Button to launch the document or application of your choice (see section
3.6, LaCie Shortcut Button for more informa-
tion).
e LED remains lit to show that the drive is
on, and blinks to indicate drive activity.
Front View■
1
Your LaCie Big Disk Extreme+
1
Page 11
LaCie Big Disk Extreme+
Triple Interface
page 10
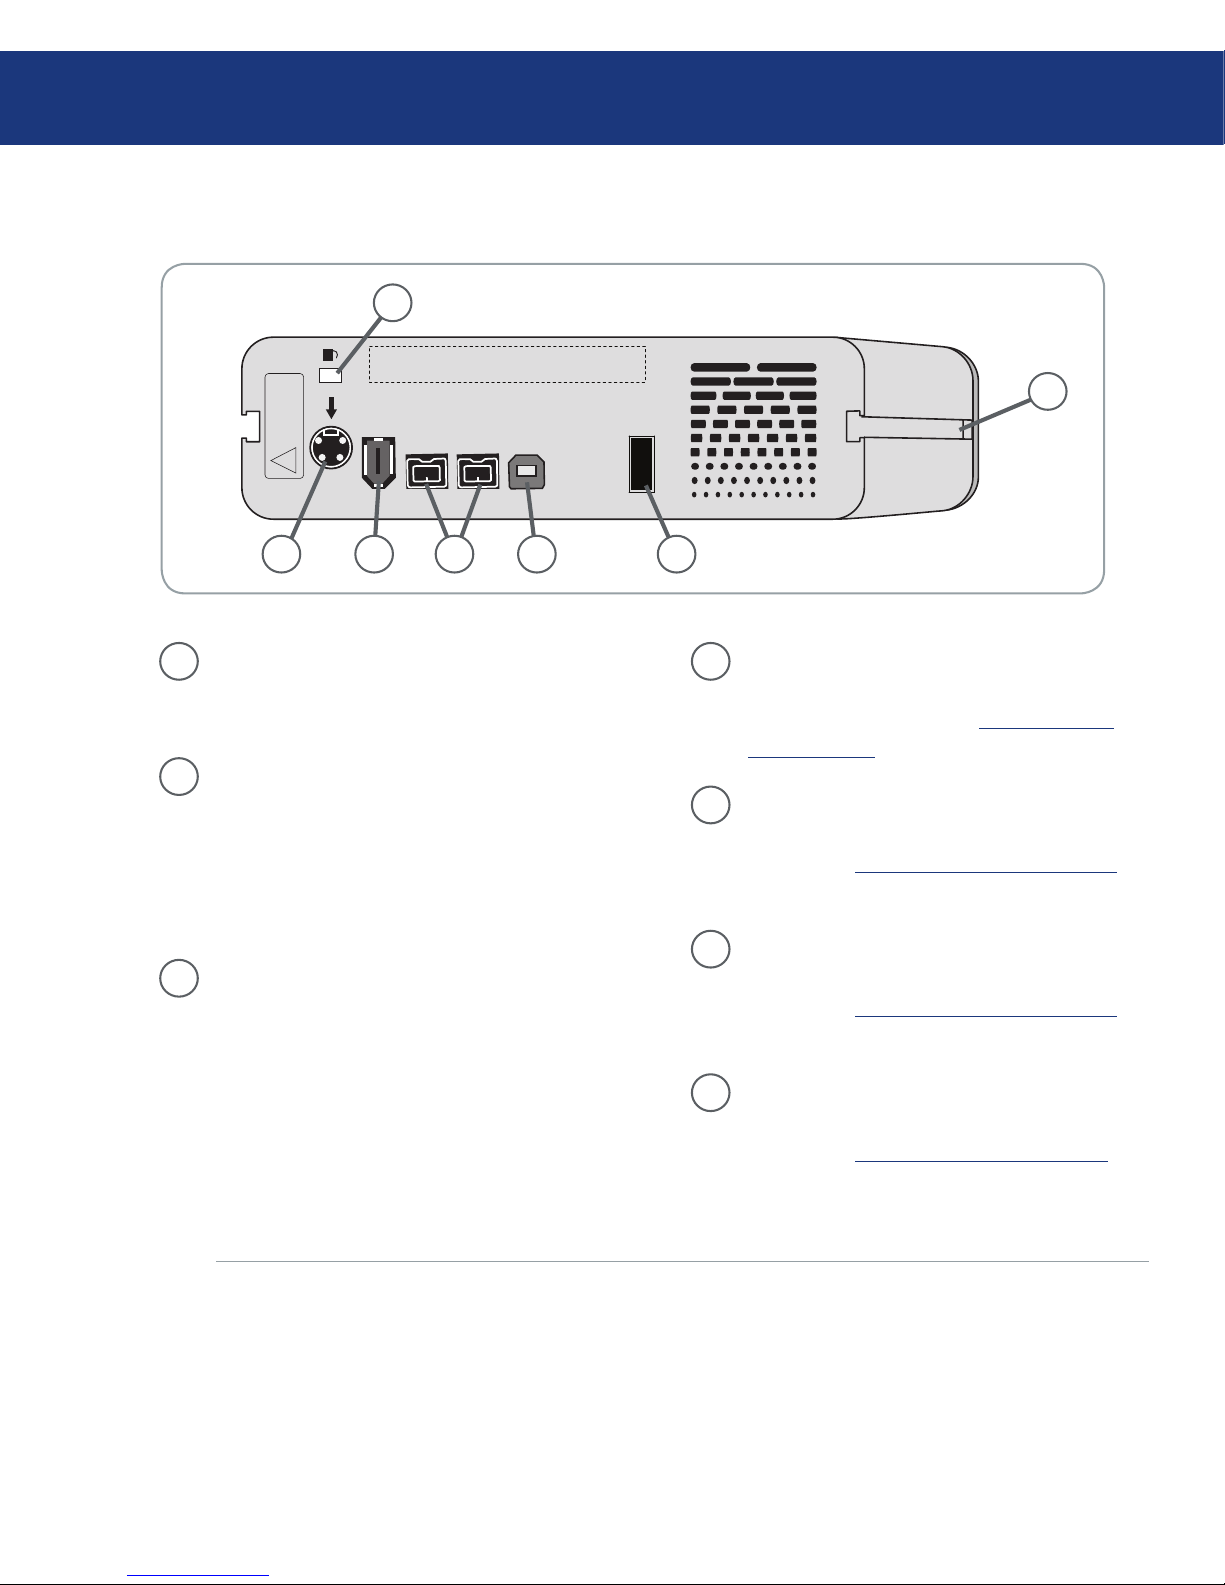
1
Lock Slot - is slot is used to connect an antitheft chain lock, such as a Kensington security
lock*, for maximum protection.
2
Rackmount Grooves - ese grooves are used
for attaching your drive to the Drive Stand,
mounting in the Desk Rack kit (sold separately)
or placing your drive in standard 19” computer
equipment racks using the LaCie Rackmount
Kit (sold separately).
3
On/Off/Auto Power Switch - e auto
position allows the drive to be powered on and
off automatically with your computer. is
feature also allows the drive to manage power
consumption. If the system’s power fan supports
it, the LaCie Big Disk Extreme+ will spin down
while in power save mode. e Big Disk
Extreme+ will then take several seconds to spin
up to full power.
4
Hi-Speed USB 2.0 Port - is is where you
plug in the Hi-Speed USB 2.0 cable furnished
with the drive. See page 15, Connecting the
Interface Cable for more information.
5
FireWire 800 Ports - is is where you plug in
the FireWire 800 cable furnished with the drive.
See page 17, Connecting the Interface Cable for
more information.
6
FireWire 400 Port - is is where you plug in
the FireWire 400 cable furnished with the drive.
See page 16, Connecting the Interface Cable for
more information.
7
Power Supply Connection - is is where you
plug in the AC adapter supplied with the drive.
See page 14, Connecting e Power Supply for
more information.
Rear View■
Your LaCie Big Disk Extreme+
* Kensington © 2007 Kensington Computer Products Group
WARRANTY VOID IF
SEAL BROKEN.
• •• ••• •••••••••••
•• • • • • •••••••
!
off
auto
on
FW4OO
FW8OO
FW8OO
USB 2.O
2
7
1
6 5 4 3
Page 12
LaCie Big Disk Extreme+
Triple Interface
page 11
FireWire 400, also known as IEEE 1394, is a highspeed serial input/output technology for connecting
peripheral devices to a computer or to each other, and
FireWire 800 is the implementation of the new IEEE
1394b standard.
FireWire 800 offers increased bandwidth and extended distance between devices. FireWire 800 is ideal
for bandwidth-intensive applications, such as audio,
video and graphics. Please see page 33, FireWire Ques-
tions And Answers for more information on FireWire.
2.4. Cables and Connectors
FireWire 400 & FireWire 800■
FireWire 800 Benefits
Resourceful architecture: FireWire 800 reduces
delays in arbitration and signal distortion, and
increases throughput.
•
Backwards compatibility: adapter cables allow FireWire 400 devices to operate under the
FireWire 800 port (at FireWire 400 speed).
•
FireWire 400 & FireWire 800 Benefits
Hot-pluggable: devices can be added and removed while the bus is active.
•
Isochronous data delivery: no dropped frames
– FireWire supports real-time data delivery.
•
Flexible: up to 63 devices can be connected on a
single bus.
•
FireWire Icons
eses icons will help you easily identify the FireWire
interface. ey appear on FireWire cables, and next to
the FireWire port connectors on certain computers.
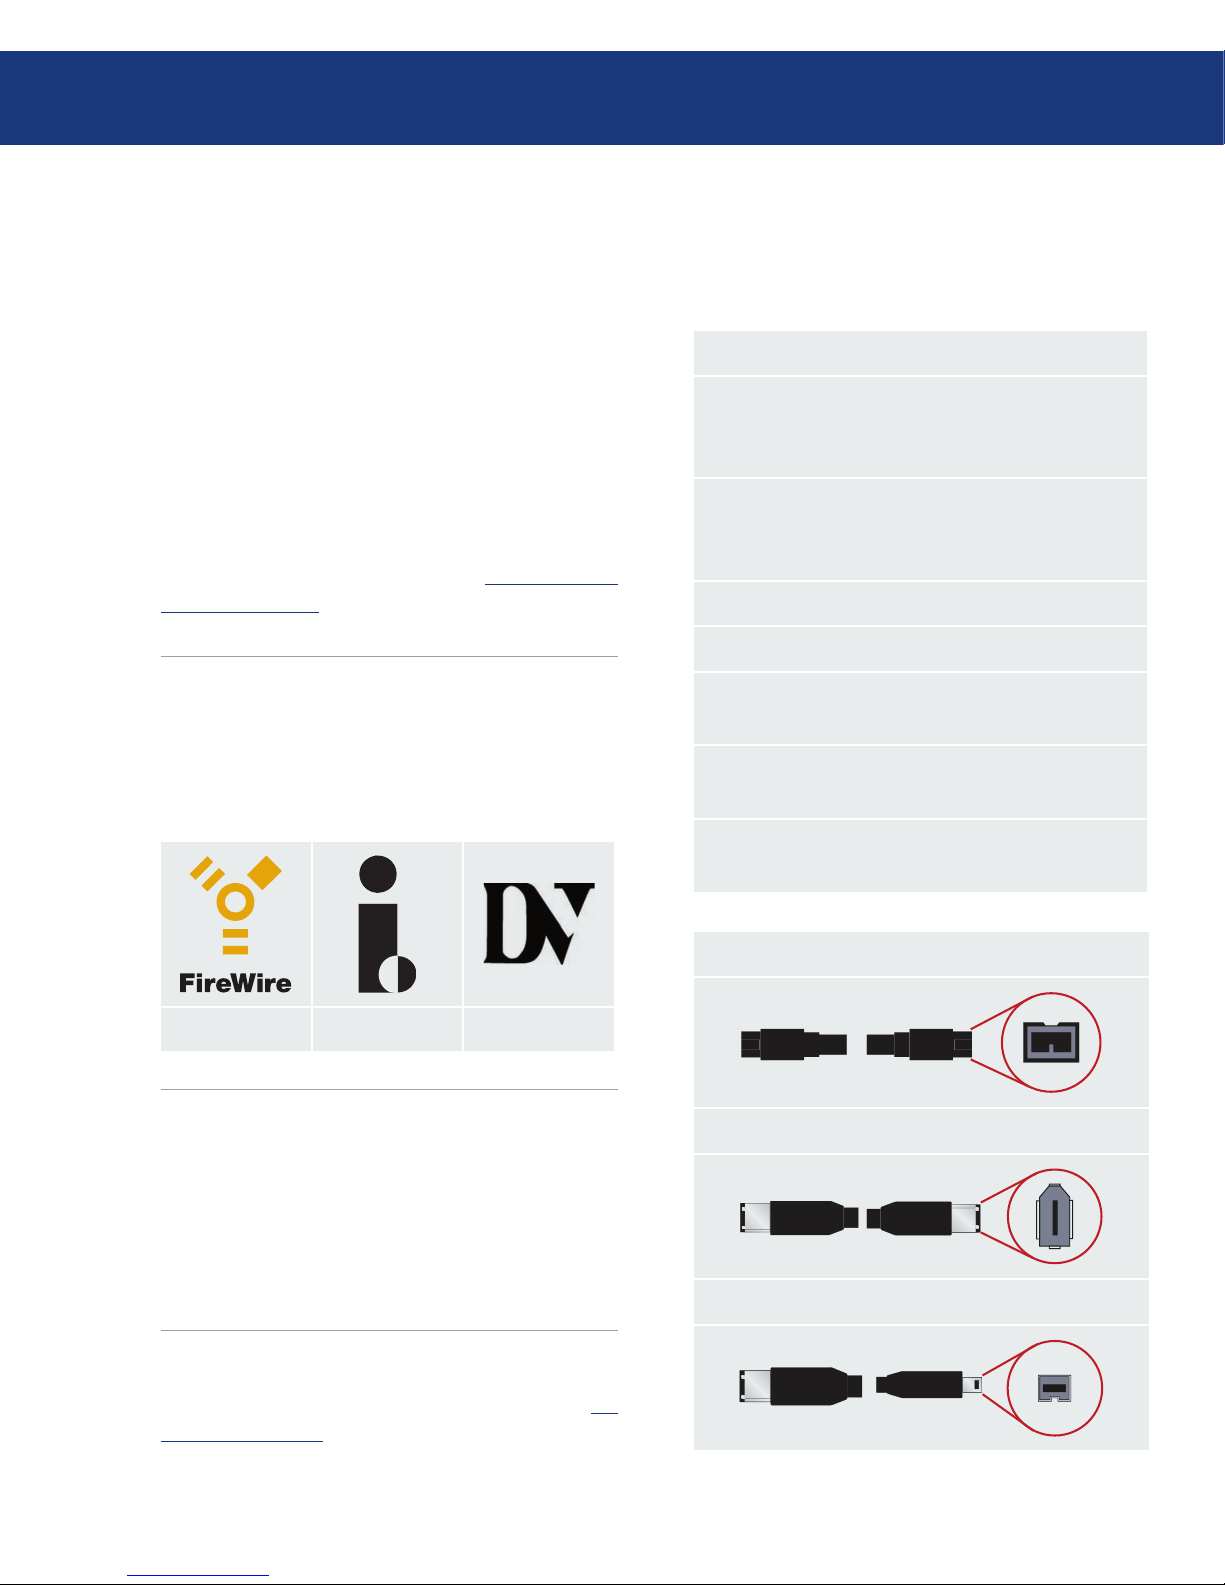
FireWire Cables
ere are two categories of FireWire cables on the
market: FireWire 800 cables, which feature the 9-to-9pin, 9-to-6-pin, and 9-to-4-pin cables; and the original
FireWire cables which feature the 6-to-6-pin and 6-to4-pin cables.
Your LaCie Big Disk Extreme+
FireWire 800 Cable and Cable End
FireWire 400 Cable and Cable End
iLink/DV Cable and Cable End (Sold separately)
For more information on the differences between
the Big Disk Extreme+’s interfaces, see chapter 4.2. In-
terface Comparison.
FireWire icon iLink icon DV icon
Page 13
LaCie Big Disk Extreme+
Triple Interface
page 12
Your LaCie Big Disk Extreme+
USB is a serial input/output technology for connecting peripheral devices to a computer or to each other.
Hi-Speed USB 2.0 is the latest implementation of this
standard, and it provides the necessary bandwidth and
data transfer rates to support high speed devices such as
hard drives, CD/DVD drives and digital cameras.
Please see page 35, USB Questions And Answers
for more information on USB’s uses and capabilities.
Hi-Speed USB 2.0■
Hi-Speed USB 2.0 Benefits
Backwards compatibility: Hi-Speed USB 2.0
works with the original USB specifications.
Hot-swappable: no need to shut down or restart
your computer when adding or removing devices.
•
•
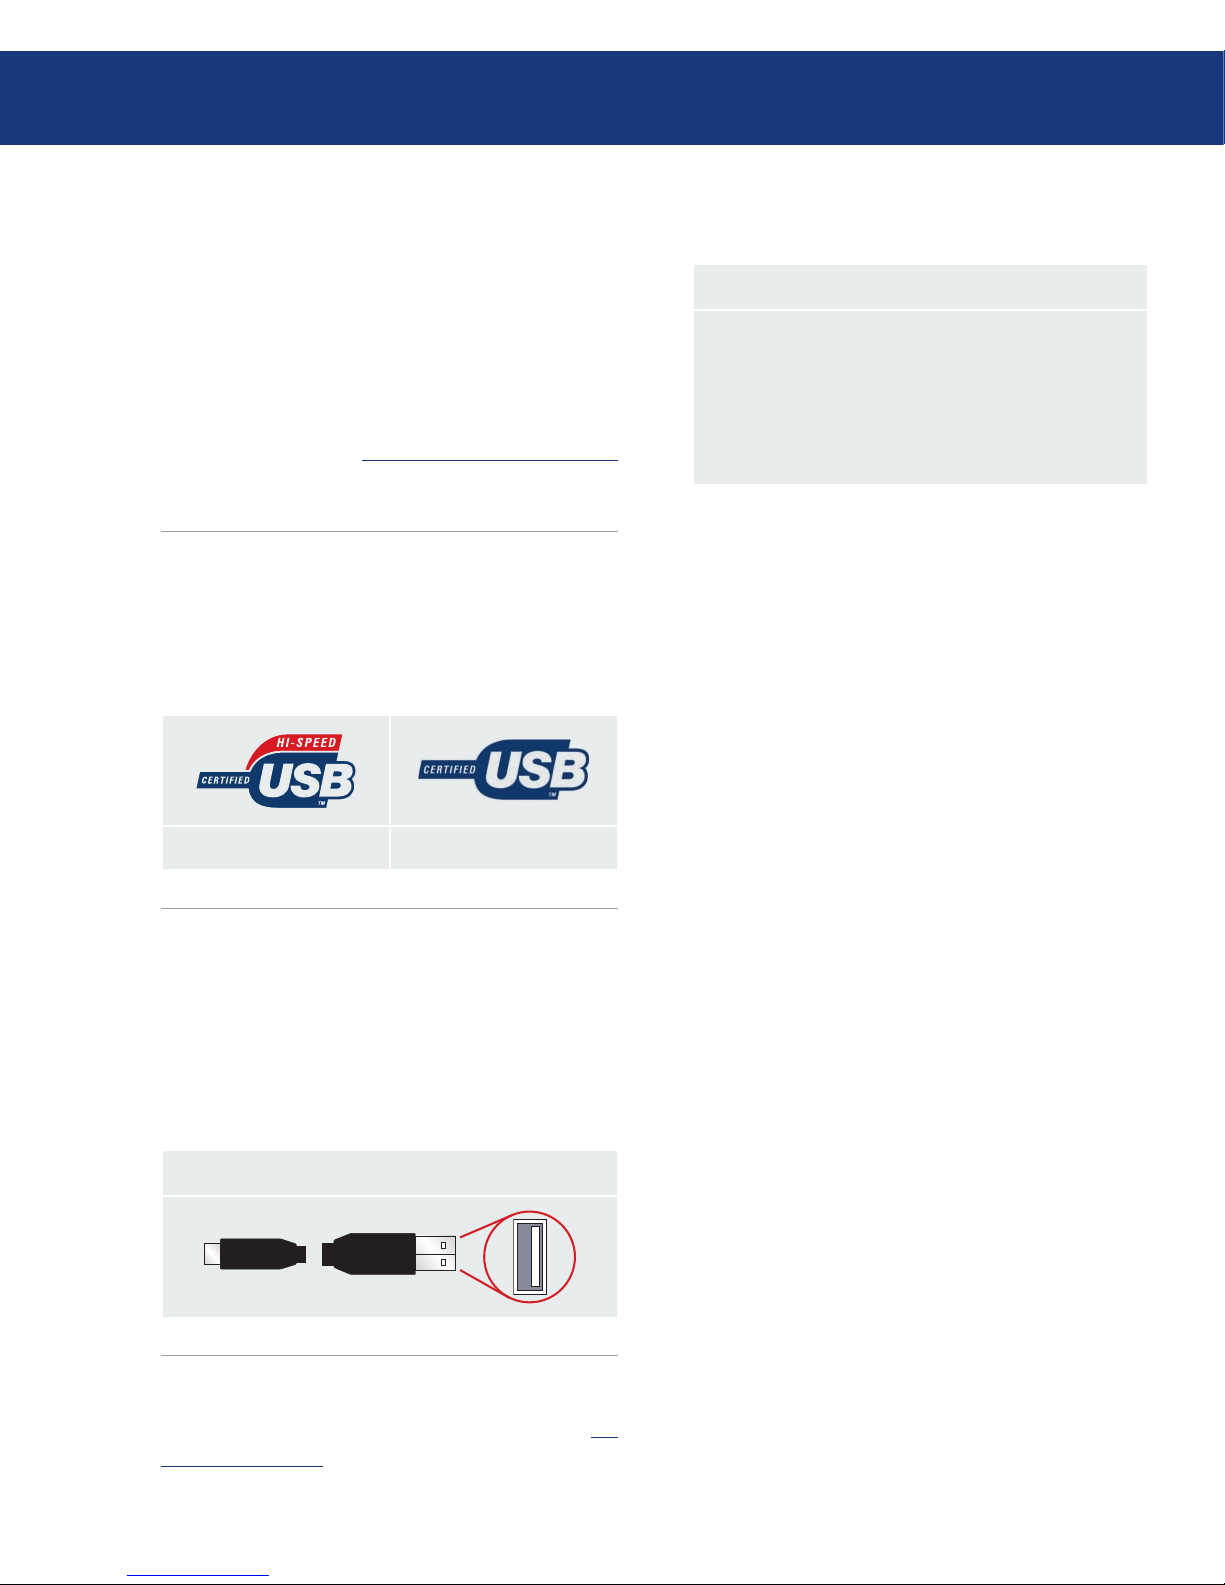
USB 2.0 icon USB 1.1 icon
USB Icons
ese icons will help you easily identify the USB
interfaces. ey appear on USB cables and next to the
USB port connectors on certain computers.
USB 2.0 Cables
Your LaCie drive is shipped with a Hi-Speed USB
2.0 cable, to ensure maximum data transfer performance
when connected to a Hi-Speed USB 2.0 port. e cable
will also work when connected to a USB port, but drive
performance will be limited to USB 1.1 transfer rates.
USB 2.0 Cable and Cable End
For more information on the differences between
the Big Disk Extreme+’s interfaces, see chapter 4.2. In-
terface Comparison.
Page 14
LaCie Big Disk Extreme+
Triple Interface
page 13
3. Installing Your LaCie Big Disk Extreme+
ere are two parts to connecting and turning on
your LaCie Big Disk Extreme+: 1) connect the power
supply to the drive and to an outlet, and 2) connecting
an interface cable to the drive and to your computer. In
about five minutes, you should be able to access your
new hard drive to back up data and to transfer files between computers and other peripherals.
anks to its support of four different interfaces and
its support of both the Mac and Windows operating
system, the LaCie Big Disk Extreme+ gives you many
connectivity options. ese steps are divided into sections by operating system (Mac or Windows) and the
type of interface cable (FireWire 800, FireWire 400, and
Hi-Speed USB 2.0).
is chapter also has helpful information about connecting digital video cameras to the LaCie drive, connecting multiple devices and special steps that need to
be followed when disconnecting the drive or switching
between the different interfaces.
Installing Your LaCie Hard Drive
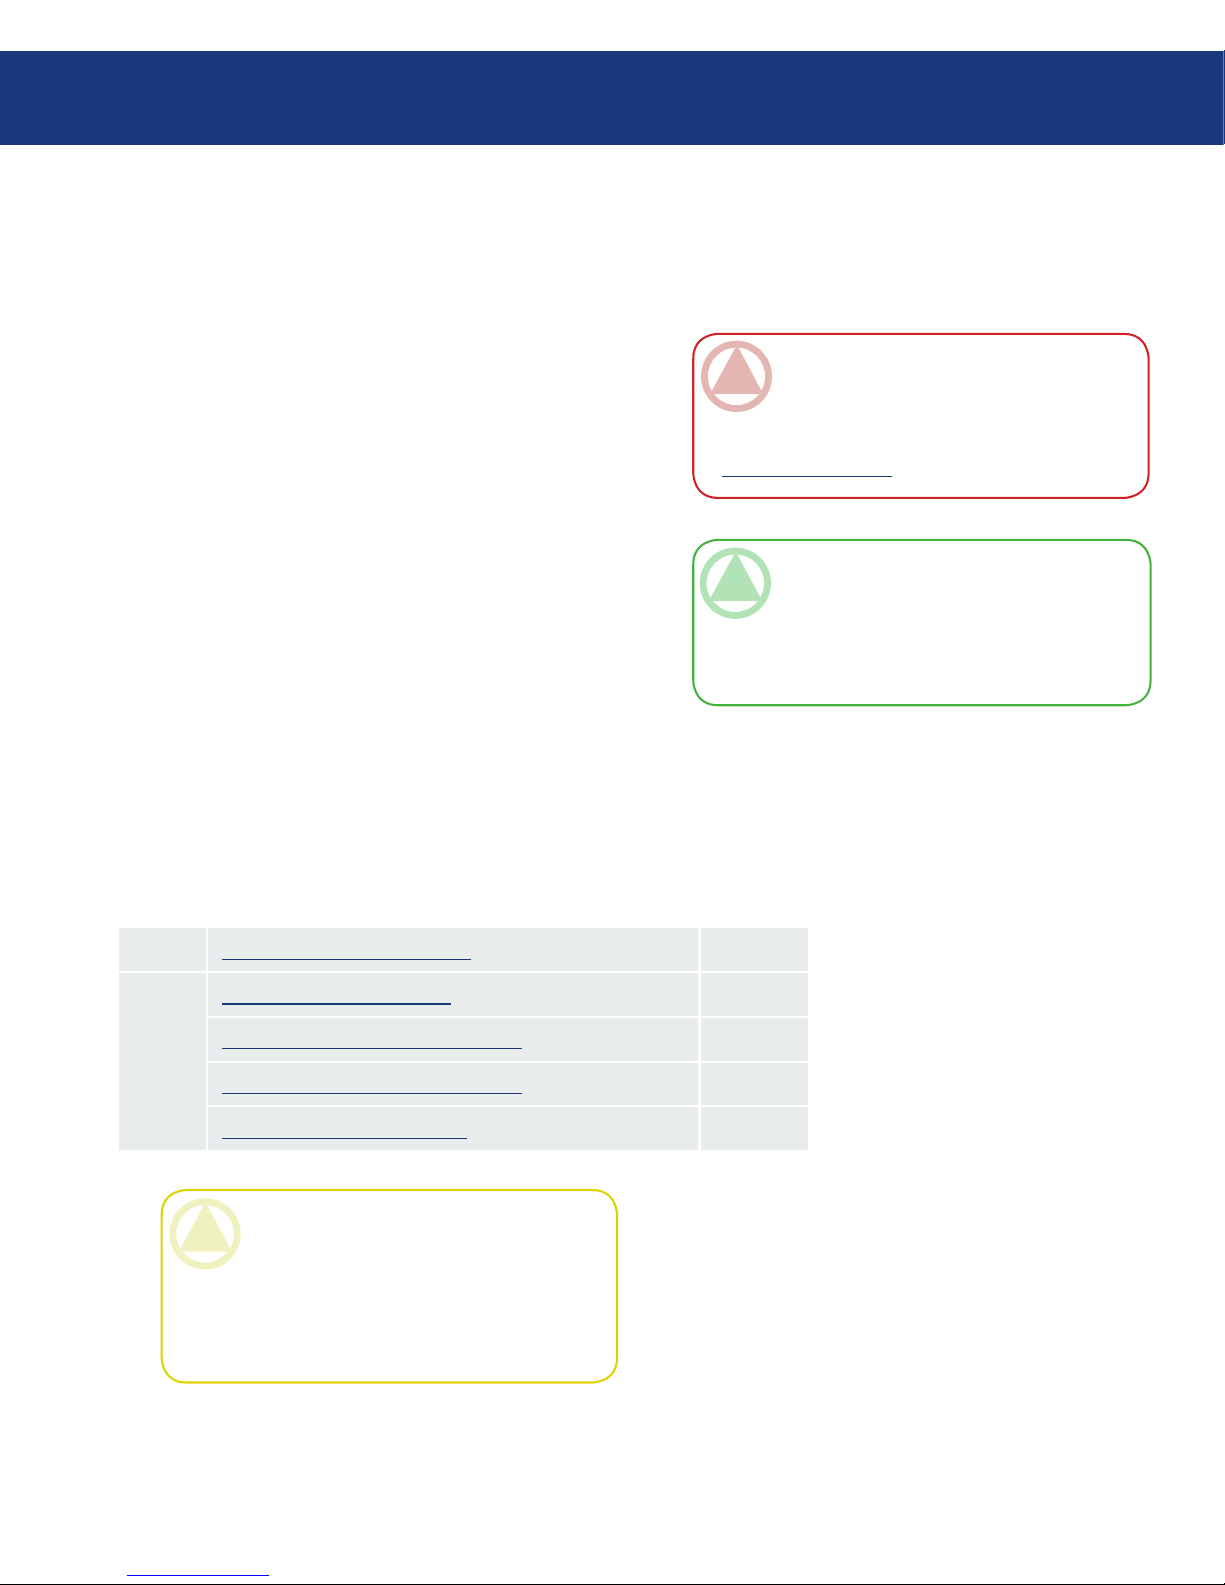
Step 1 Connecting the Power Supply Page 14
Step 2 Connecting the USB Cable Page 15
Connecting the FireWire 400 Cable Page 16
Connecting the FireWire 800 Cable Page 17
Connecting Multiple Devices Page 18
CAUTION: Your LaCie Big Disk Extreme+ re-
lies on its aluminum alloy casing to help dissipate
heat. Make sure to place your drive in a well ven-
tilated space, do not block the ventilation outlet on
the back of the drive and keep the area in front of
the drive unobstructed to allow for proper airflow.
IMPORTANT INFO: You cannot have the
FireWire and USB interfaces connected at the
same time. If you would like to switch between
interfaces, you must follow the steps on page 19,
Switching Interfaces.
TECHNICAL NOTE: If you plan to use your
drive in a cross-platform (Mac/Windows) environment, consider reformatting the drive to the MSDOS (also known as FAT 32) File System format.
See page 28 for more details.
Page 15
LaCie Big Disk Extreme+
Triple Interface
page 14
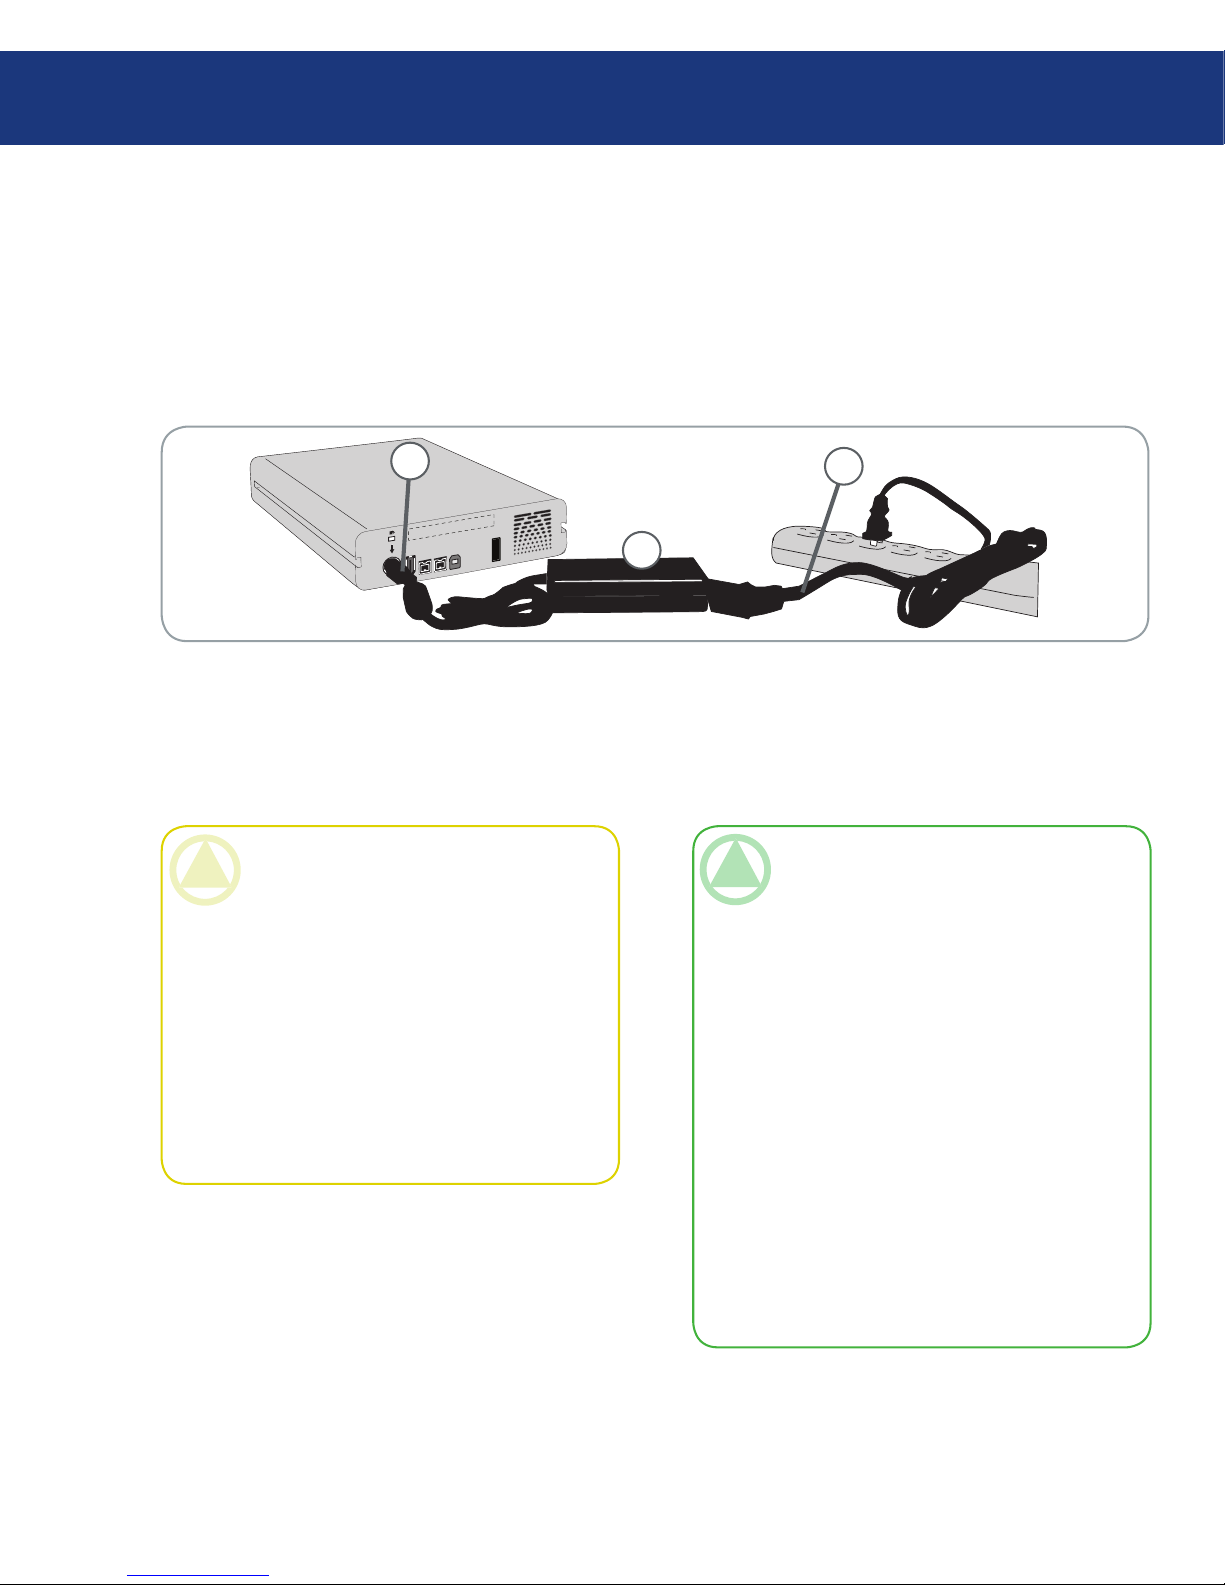
Connect Cable A to your LaCie Drive.
Connect Cable B to the Power supply brick (C).
Connect Cable B to a surge protector or wall outlet.
1.
2.
3.
On the back of the drive, turn on the drive by
flipping the power switch to ON or AUTO (drive
powers on/hibernates automatically).
4.
3.1. Connecting the Power Supply
e power supply kit is composed of two cables: one
cable (A) connects to the LaCie drive; and the other
cable (B) connects to a power outlet, such as a wall outlet or a surge protector.
o
ff
a
ut
o
o
n
F
W4
O
O
U
SB
2
.
O
F
W8
O
O
F
W8
O
O
C
CAUTION:
Only use the AC adapter supplied with your specific LaCie drive. Do not use a power supply from
another LaCie drive or another manufacturer. Using any other power cable or power supply may
cause damage to the device and void your warranty.
Always remove the AC adapter before transporting your LaCie drive. Failure to remove the adapter may result in damage to your drive and will void
your warranty.
•
•
TECHNICAL NOTE:
On/Off/Auto Power Switch:
e AUTO position allows the drive to be powered on and off automatically with your computer
(works with USB and FireWire connection only).
If the system’s power fan supports it, the LaCie
Big Disk Extreme+ will spin down while in the
power save mode. e Big Disk Extreme+ will
then take several seconds to spin up to full power.
Use this position when energy efficiency and quiet
drive operation are priorities.
e ON position is ideal for network configurations and allows quick access to your data.
e OFF position isolates your hard drive from
incorrect operation, protecting your data when
your Big Disk Extreme+ is not in use.
•
•
•
Installing Your LaCie Hard Drive
A
B
Page 16
LaCie Big Disk Extreme+
Triple Interface
page 15
Installing Your LaCie Hard Drive
3.2.a. Connecting the USB Cable
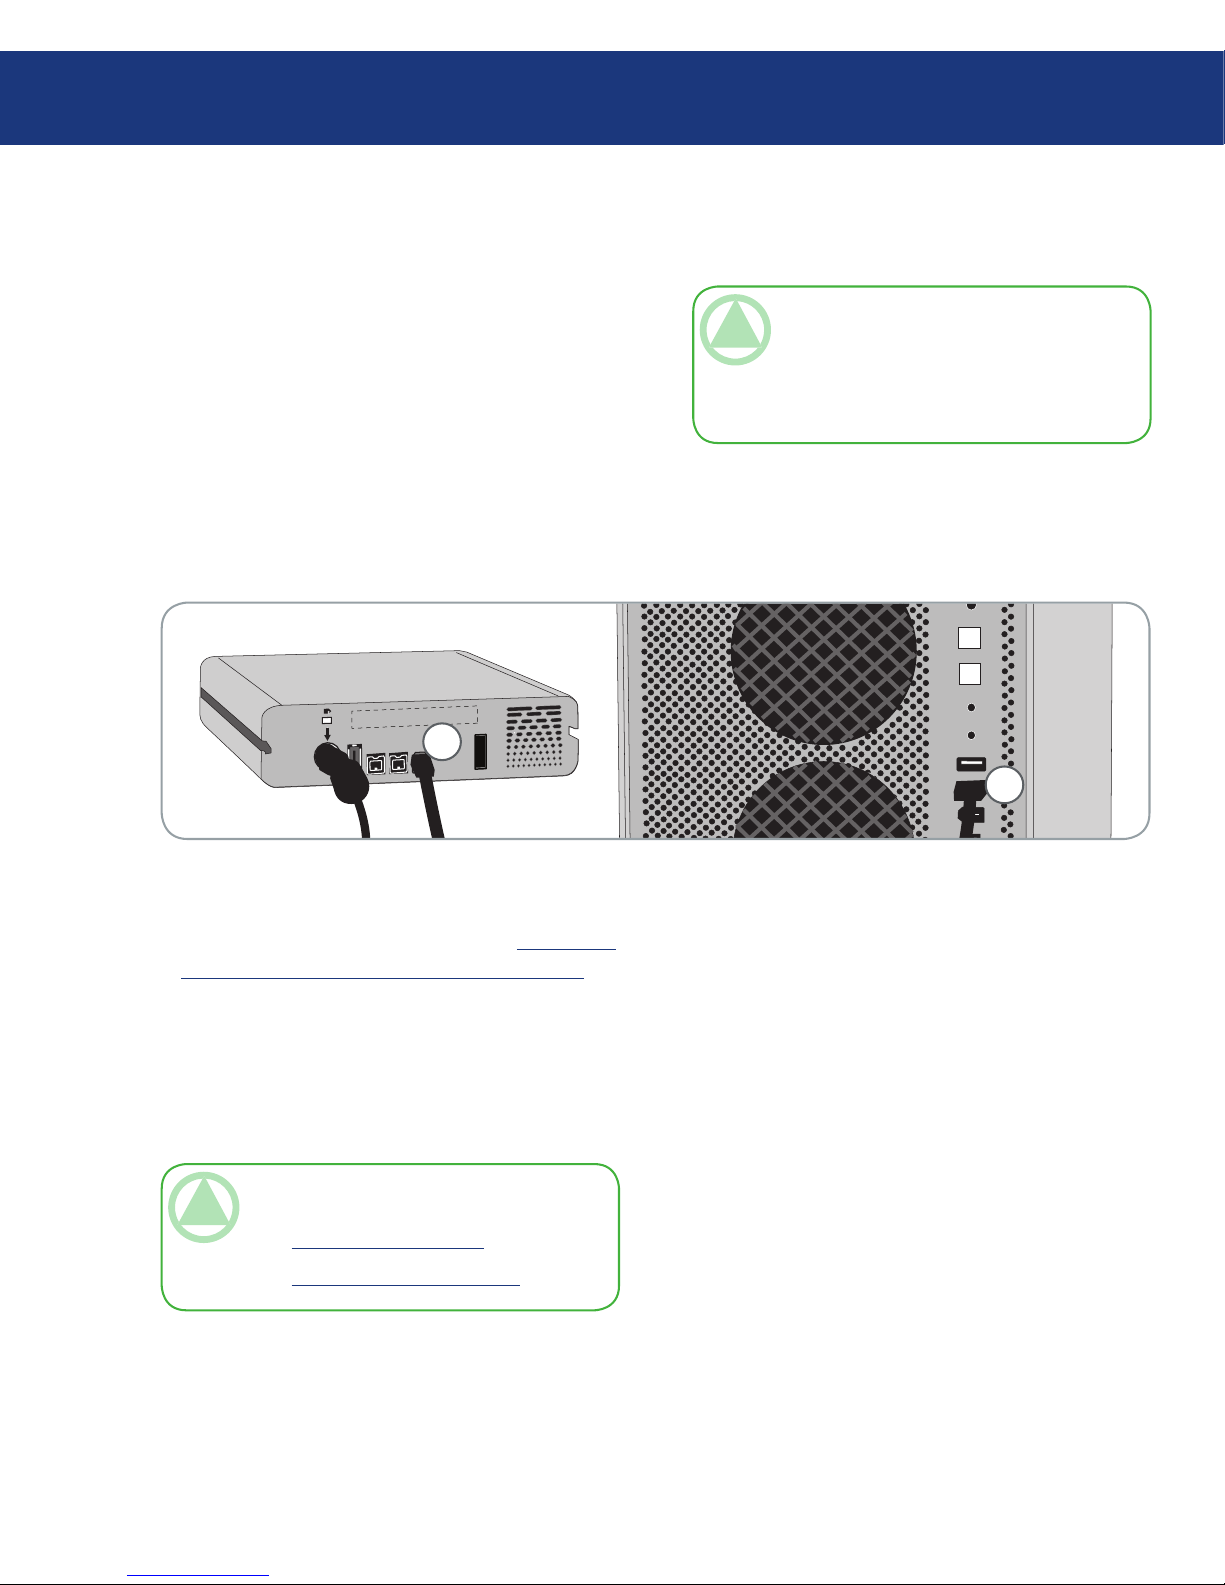
Connect the Power supply cable (page 14) and turn
on the LaCie Big Disk Extreme+ by flipping the
power switch to ON or AUTO (drive powers on/hibernates automatically).
Connect the Hi-Speed USB 2.0 cable into the HiSpeed USB 2.0 port on the back of the LaCie Big
Disk Extreme+ (A).
Attach the other end of the interface cable to an
available USB port on your computer (B).
1.
2.
3.
o
f
f
a
u
t
o
o
n
F
W4
O
O
U
SB
2
.
O
F
W8
O
O
F
W
8O
O
4 .Windows Users:
You must format the drive before it will mount in
your My Computer folder. See page 29, Formatting
and Partitioning Your LaCie Big Disk Extreme+, for
more details.
Mac Users:
e drive is pre-formatted for Mac use and should
appear on your desktop.
TeChNICAl NOTe: To achieve Hi-Speed
USB 2.0 transfer rates, you have to be connected
to a Hi-Speed USB 2.0 port on your computer.
Otherwise, you will be limited to USB 1.1 data
transfer rates.
A
B
TeChNICAl NOTe: For more information on
USB connections, see the following pages:
Page 11, Cables and Connectors
Page 35, USB Questions & Answers
•
•
Page 17
LaCie Big Disk Extreme+
Triple Interface
page 16
Installing Your LaCie Hard Drive
3.2.b. Connecting the FireWire 400 Cable
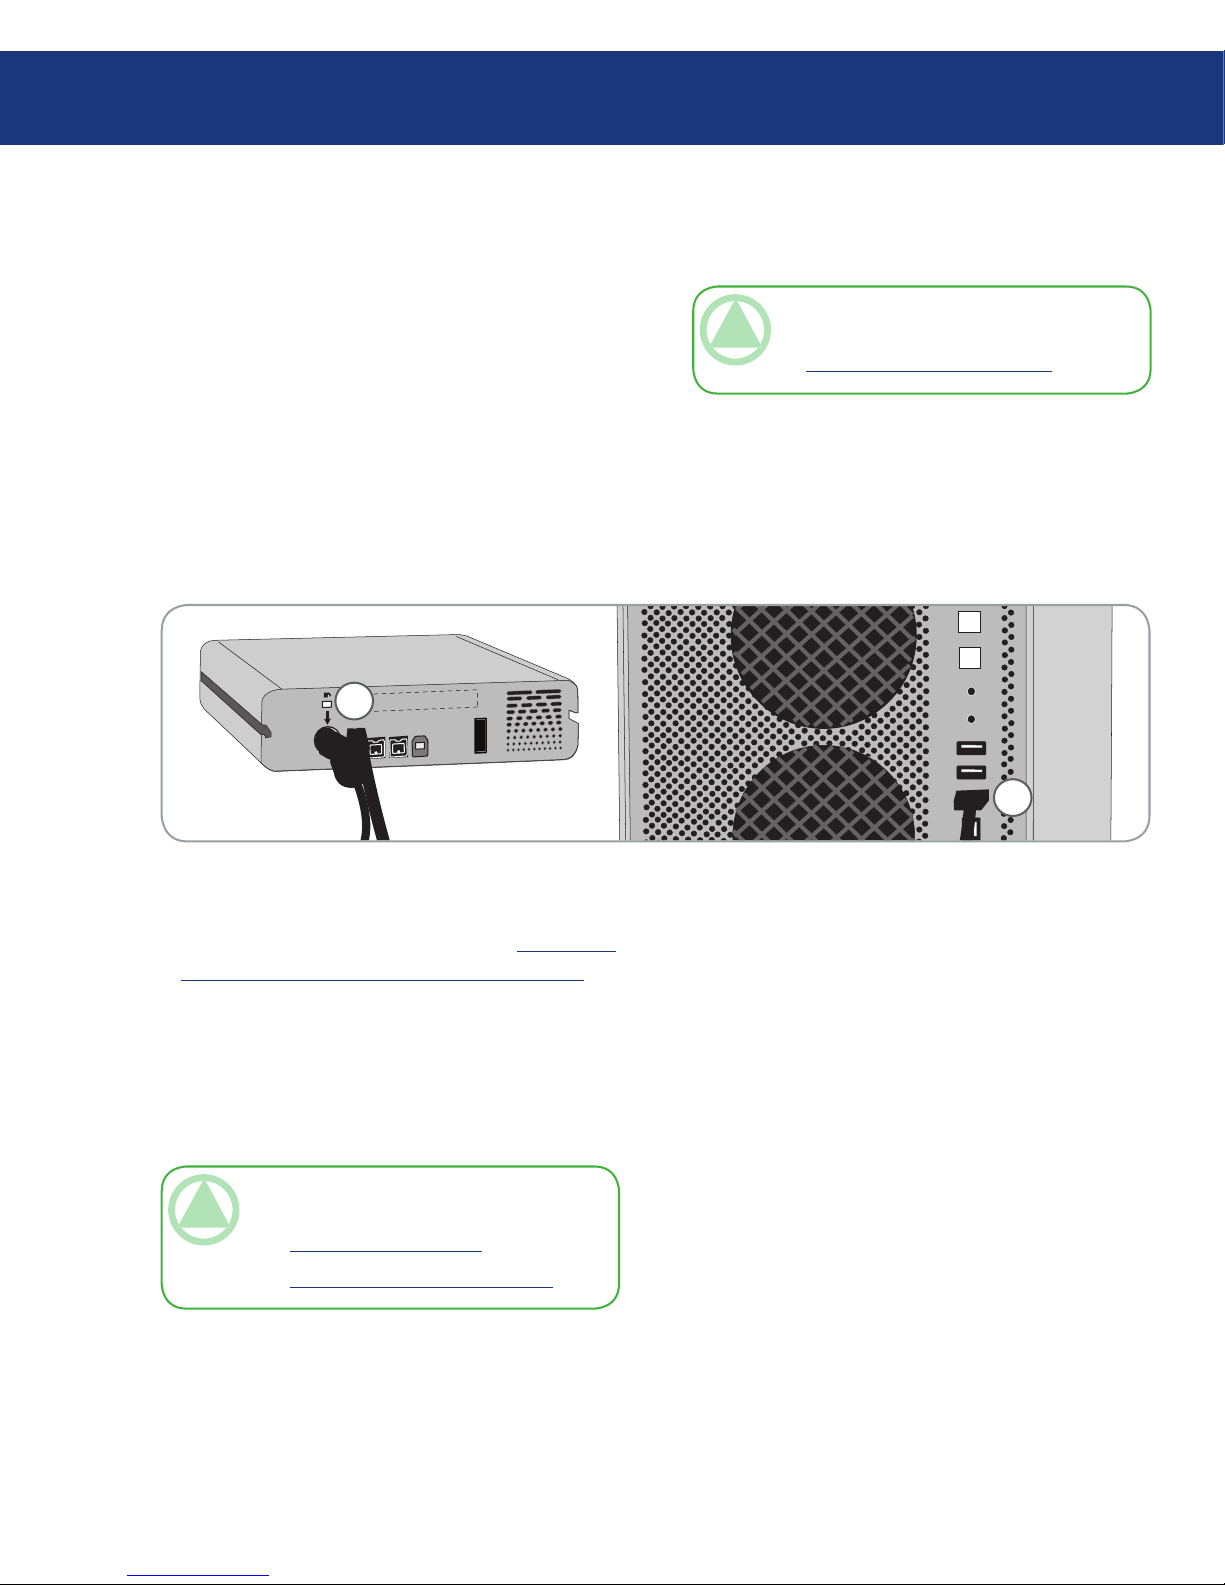
Connect the power supply cable (page 14) and turn
on the LaCie Big Disk Extreme+ by flipping the
power switch to ON or AUTO (drive powers on/hibernates automatically).
Connect the FireWire 400 cable into the FireWire
400 port on the back of the LaCie Big Disk
Extreme+ (A).
Attach the other end of the interface cable to an
available FireWire 400 port on your computer (B).
1.
2.
3.
o
f
f
a
u
t
o
o
n
F
W4
O
O
U
SB
2
.
O
F
W8
O
O
F
W
8O
O
A
B
TeChNICAl NOTe: For more information on
FireWire connections, see the following pages:
Page 11, Cables and Connectors
Page 33, FireWire Questions & Answers
•
•
TeChNICAl NOTe: For information on
daisy-chaining using the FireWire interface, see
page 18, Connecting Multiple Devices.
4 .Windows Users:
You must format the drive before it will mount in
your My Computer folder. See page 29, Formatting
and Partitioning Your LaCie Big Disk Extreme+, for
more details.
Mac Users:
e drive is pre-formatted for Mac use and should
appear on your desktop.
Page 18
LaCie Big Disk Extreme+
Triple Interface
page 17
Installing Your LaCie Hard Drive
3.2.c. Connecting the FireWire 800 Cable
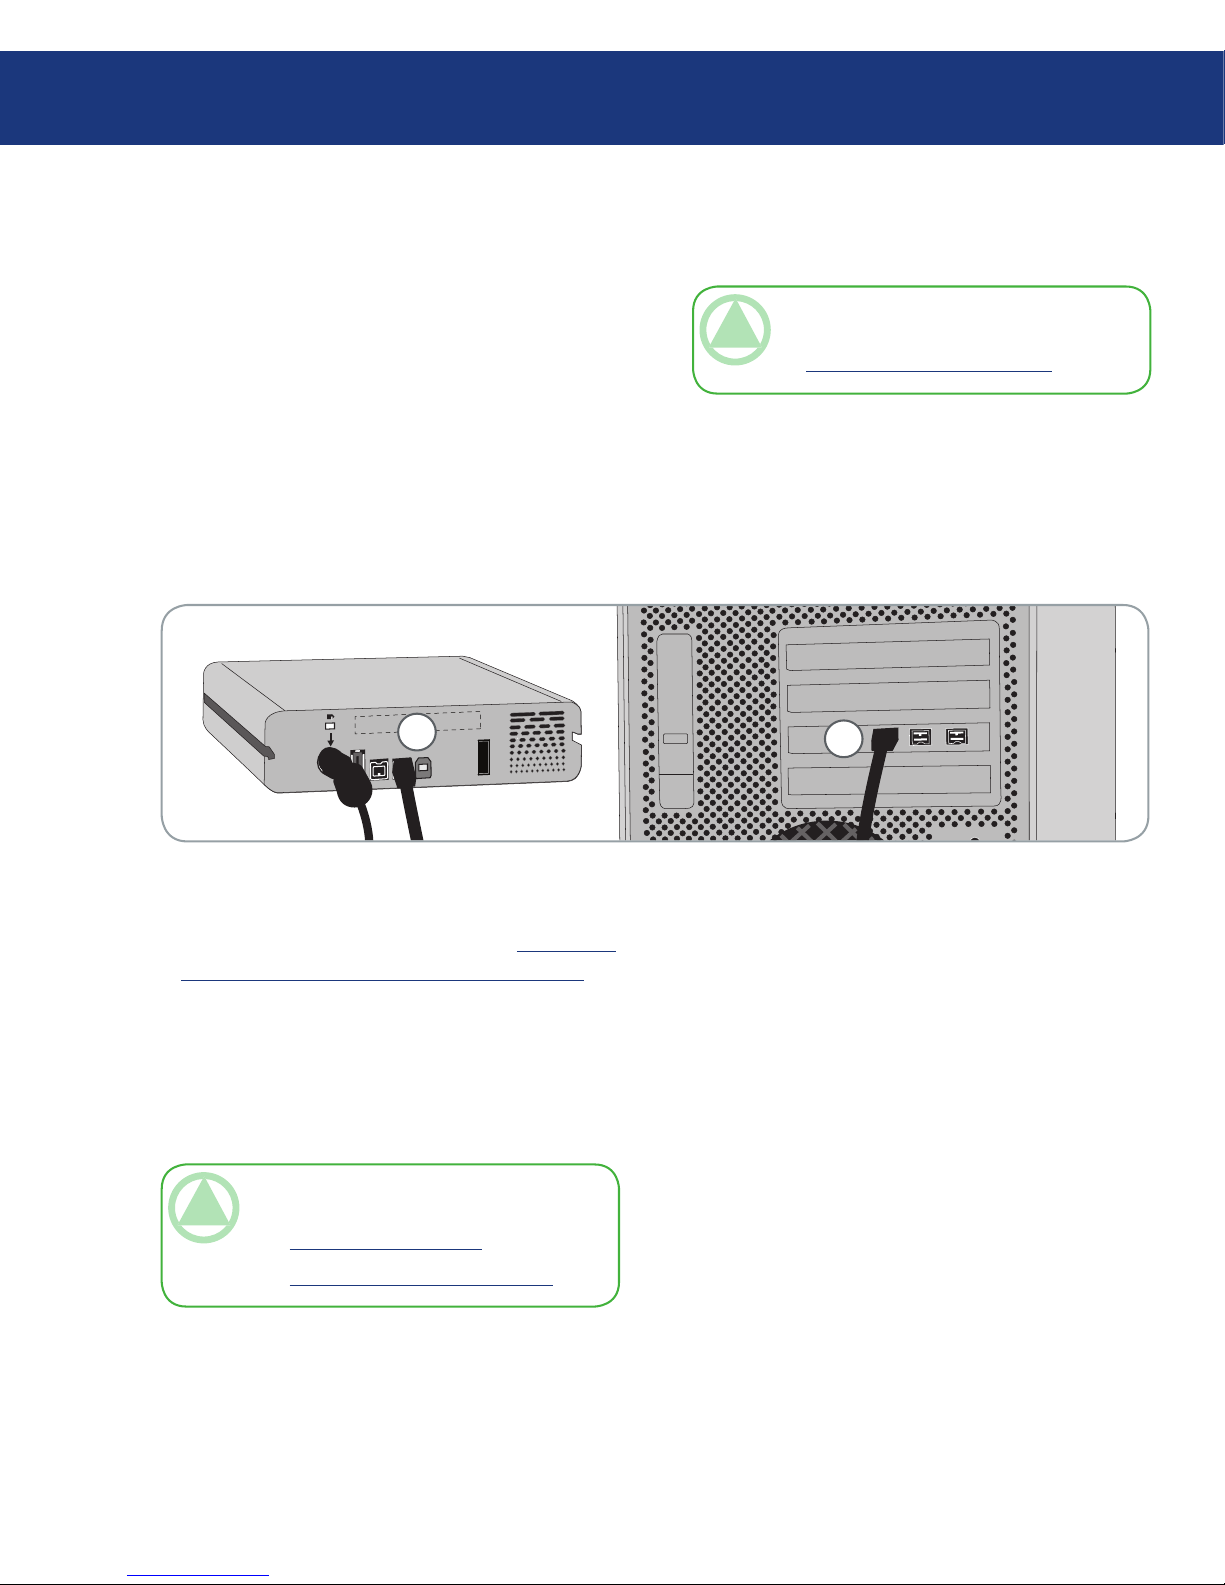
Connect the power supply cable (page 14) and turn
on the LaCie Big Disk Extreme+ by flipping the
power switch to ON or AUTO (drive powers on/hibernates automatically).
Connect the FireWire 800 cable into the FireWire
800 port on the back of the LaCie Big Disk
Extreme+ (A).
Attach the other end of the interface cable to an
available FireWire 800 port on your computer (B).
1.
2.
3.
off
auto
on
FW4OO
USB 2.O
FW8OO
FW8OO
A
B
TeChNICAl NOTe: For information on
daisy-chaining using the FireWire interface, see
page 18, Connecting Multiple Devices.
4 .Windows Users:
You must format the drive before it will mount in
your My Computer folder. See page 29, Formatting
and Partitioning Your LaCie Big Disk Extreme+, for
more details.
Mac Users:
e drive is pre-formatted for Mac use and should
appear on your desktop.
TeChNICAl NOTe: For more information on
FireWire connections, see the following pages:
Page 12, Cables and Connectors
Page 35, FireWire Questions & Answers
•
•
Page 19
LaCie Big Disk Extreme+
Triple Interface
page 18
Installing Your LaCie Hard Drive
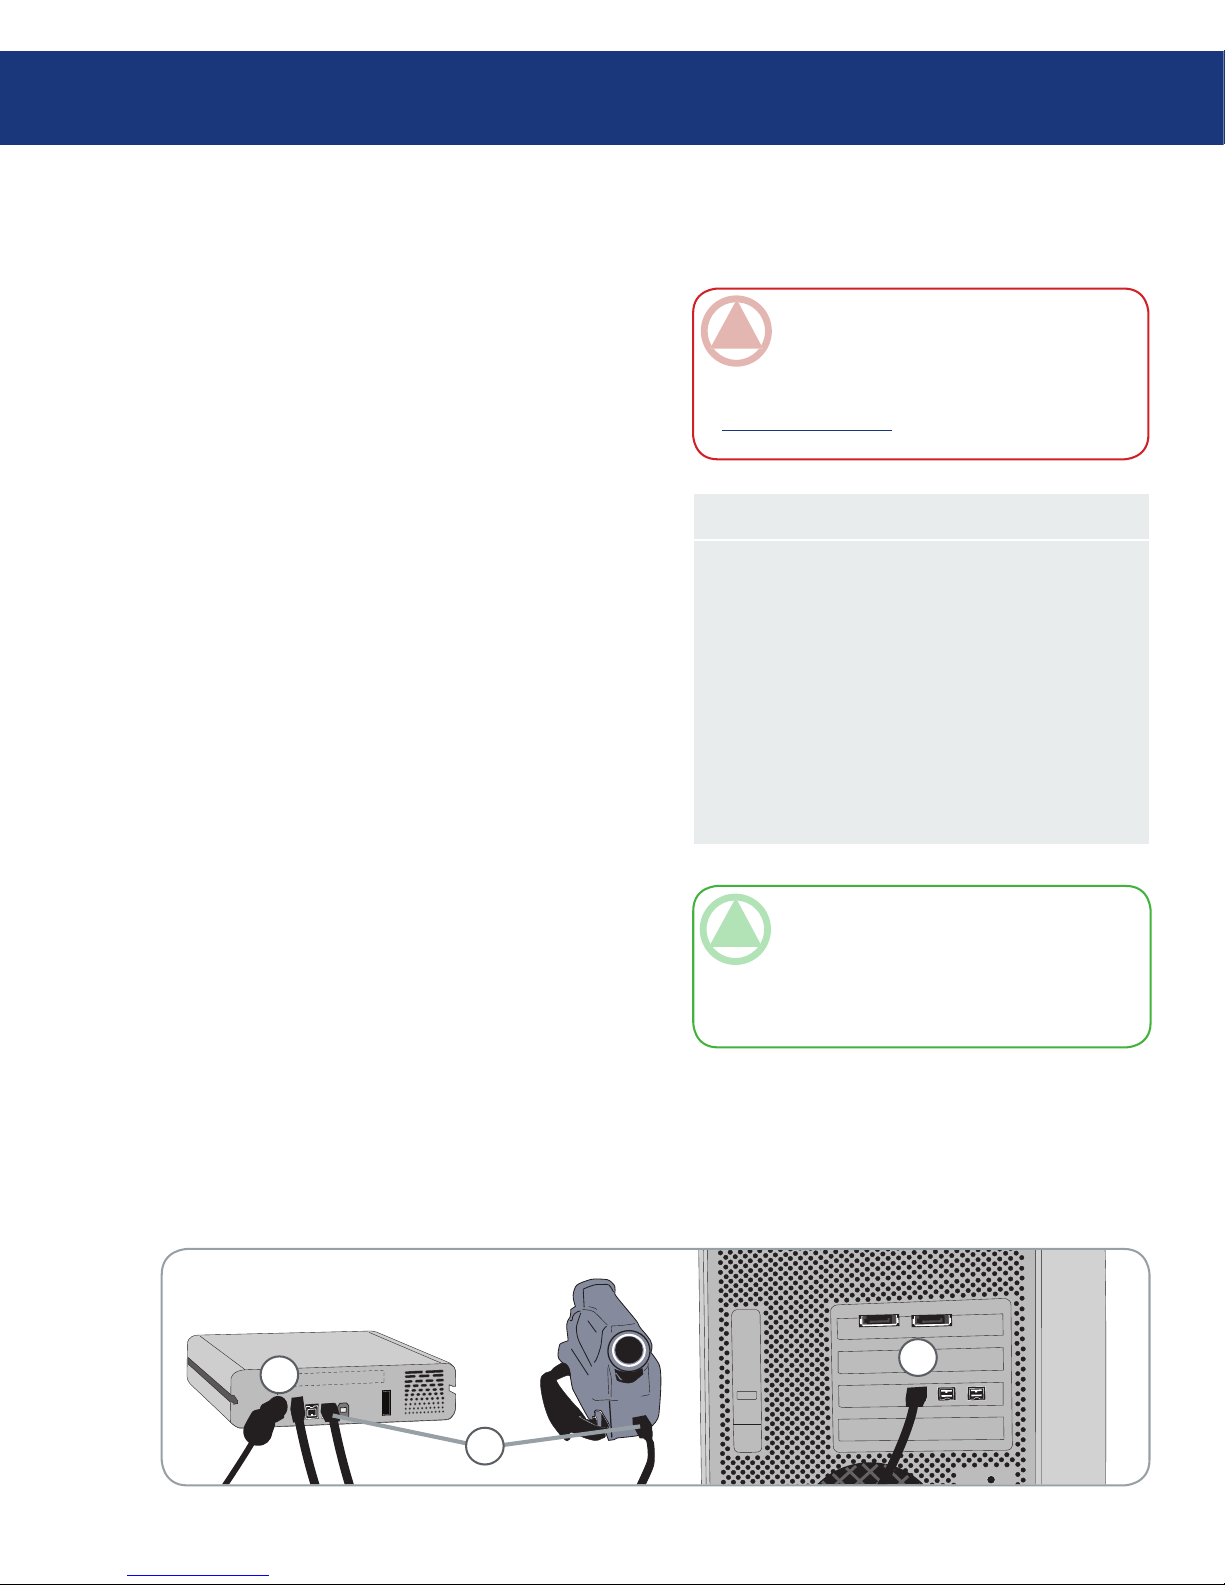
3.3. Connecting Multiple Devices
With both FireWire 400 and FireWire 800 interfaces, it is possible to connect another hard drive or digital
video camera directly to the LaCie Big Disk Extreme+
(this connection is called “daisy-chaining”).
To daisy-chain devices, you must be using the same
interface (FireWire). Your computer will not recognize
the daisy-chained device if the interfaces are mixed, i.e. a
FireWire device attached to a drive that is connected to
the computer via the Hi-Speed USB 2.0 interface.
1. Connect your LaCie Big Disk Extreme+’s power
supply and host computer interface by following the
steps on page 14 and on 16 (FireWire 400) or 17
(FireWire 800) (A/B).
2. To attach a digital video camera*:
a. Using the iLink/DV cable (sold separately), con-
nect the 4-pin end of the cable to the 4-pin port on
your digital camera.
b. Connect the 6-pin end of the iLink/DV cable to
the 6-pin FireWire port on the back of the LaCie
Hard drive (C).
To attach a FireWire peripheral:
a. Connect the FireWire 400 or 800 cable into
an available FireWire 400 or 800 port on your
FireWire peripheral.
b. Attach the other end of the FireWire 400 or 800
cable to an available FireWire 400 or 800 port on
the LaCie Big Disk Extreme+ (C).
3. e digital camera should now appear under My
Computer (Windows users) or on the desktop (Mac
users).
off
auto
on
FW4OO
USB 2.O
FW8OO
FW8OO
A
B
IMPORTANT INFO: You can not have the
FireWire and USB interfaces connected at the
same time. If you would like to switch between
interfaces, you must follow the steps on page 19,
Switching Interfaces.
Daisy-Chain Configurations■
FireWire 400 device connected directly to the
LaCie Big Disk Extreme+, which is connected to
the computer via the FireWire 800 port.
iLink/DV device connected directly to the LaCie
Big Disk Extreme+, which is connected to the
computer via the FireWire 800 port.
FireWire 800 device connected directly to the
LaCie Big Disk Extreme+, which is connected to
the computer via the FireWire 800 port.
•
•
•
TECHNICAL NOTE: When you daisy-chain
using a mix of interfaces (FireWire 400 and
FireWire 800) the resultant speed will be limited
to the lowest common denominator (FireWire 400
speeds).
* Some cameras do not support this configuration or may
downgrade your LaCie Big Disk Extreme+’s performance
C
Page 20
LaCie Big Disk Extreme+
Triple Interface
page 19
Installing Your LaCie Hard Drive
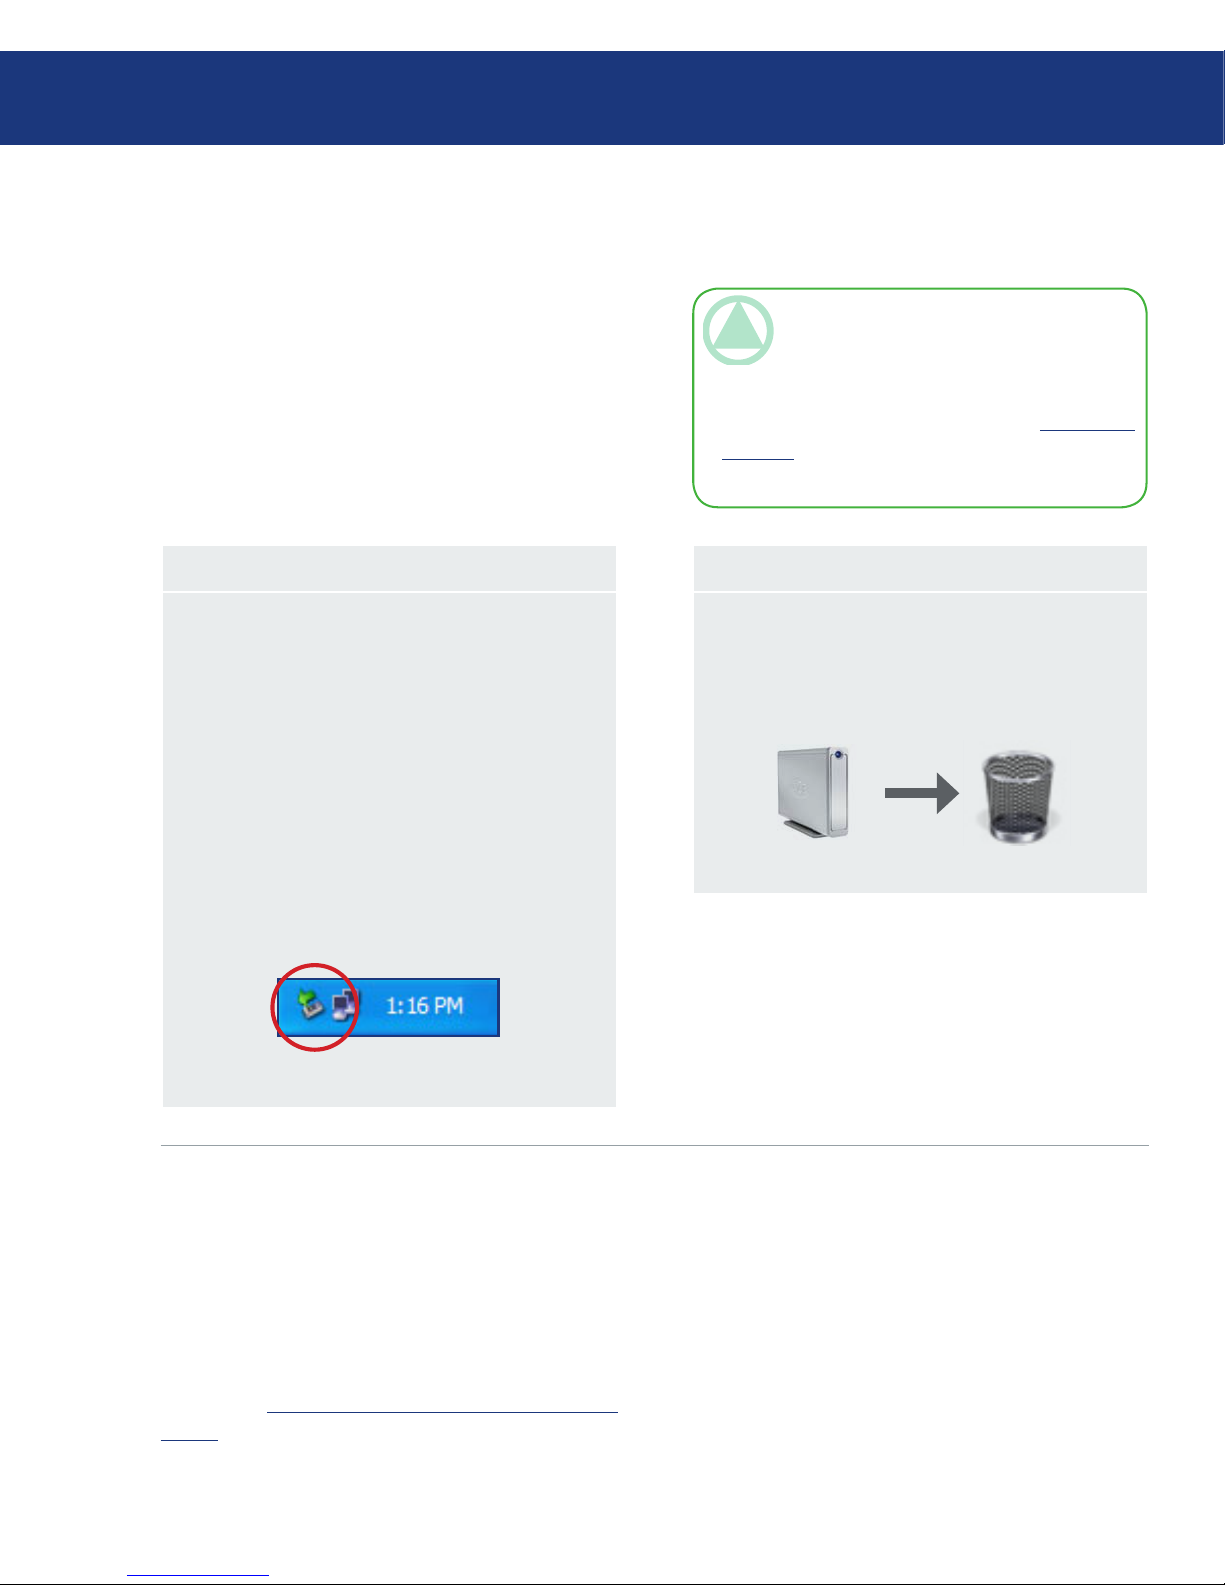
3.4. Disconnecting Your LaCie Big Disk Extreme+
FireWire and USB external devices feature “plug &
play” connectivity, which means that your drive can be
connected and disconnected while the computer is running. To prevent failures, however, it is important you
follow these steps when disconnecting your LaCie Big
Disk Extreme+.
Windows Users■
From the System Tray (located in the lower
right-hand side of your screen), click the Eject
icon (a small green arrow over a hardware image).
A message will appear, detailing the devices that
the Eject icon controls, i.e. “Safely remove...”.
Click on this prompt.
You will be then given this message: “Safe to
Remove Hardware” (or similar). It is now safe to
disconnect the device.
1.
2.
3.
Mac Users■
Drag the hard drive icon to the trash.
When the icon disappears from the desktop, the
drive can be disconnected.
1.
2.
3.5. Switching Interfaces
FireWire and USB external devices feature “plug
& play” connectivity, which means that your drive can
be connected and disconnected while the computer is
running. To prevent failures, however, it is important
to unmount your drive before switching interfaces. See
chapter 3.4. Disconnecting Your LaCie Big Disk Ex-
treme+, for the unmounting procedure.
TECHNICAL NOTE: Windows Vista Users:
Your operating system may be configured to allow FireWire devices to be disconnected without
following this procedure. LaCie recommends that
you disable this feature. See section 7, Trouble-
shooting or the Windows Vista user manual for
more information.
Page 21
LaCie Big Disk Extreme+
Triple Interface
page 20
3.6. LaCie Shortcut Button
e LaCie Shortcut Button allows you to use your
LaCie hard drive to perform a variety of automated
tasks on your computer. Instantly back up your work
files with EMC® Retrospect® Express, open a family
budget spreadsheet, or launch your most commonlyused applications simply by pushing the blue button on
the front of your drive.
LaCie Shortcut Button will help you to customize
the Button to perform the action of your choice. Setup
is easy – just install the software and push the Button on
your LaCie hard drive to set up the button action.
TECHNICAL NOTE: eSATA bus is not com-
patible with LaCie Shortcut Button. To use LaCie
Shortcut Button, connect your LaCie hard drive to
your computer via USB or FireWire.
3.6.1. Software Installation■
To install LaCie Shortcut Button and EMC Retrospect
Express:
Insert the installation CD into your computer’s
CD-ROM drive.
Double-click the CD icon.
Follow the on-screen instructions.
1.
2.
3.
TECHNICAL NOTE: EMC Retrospect Ex-
press and LaCie Shorcut Button must be uninstalled separately. Uninstalling EMC Retrospect
Express does not uninstall LaCie Shortcut Button.
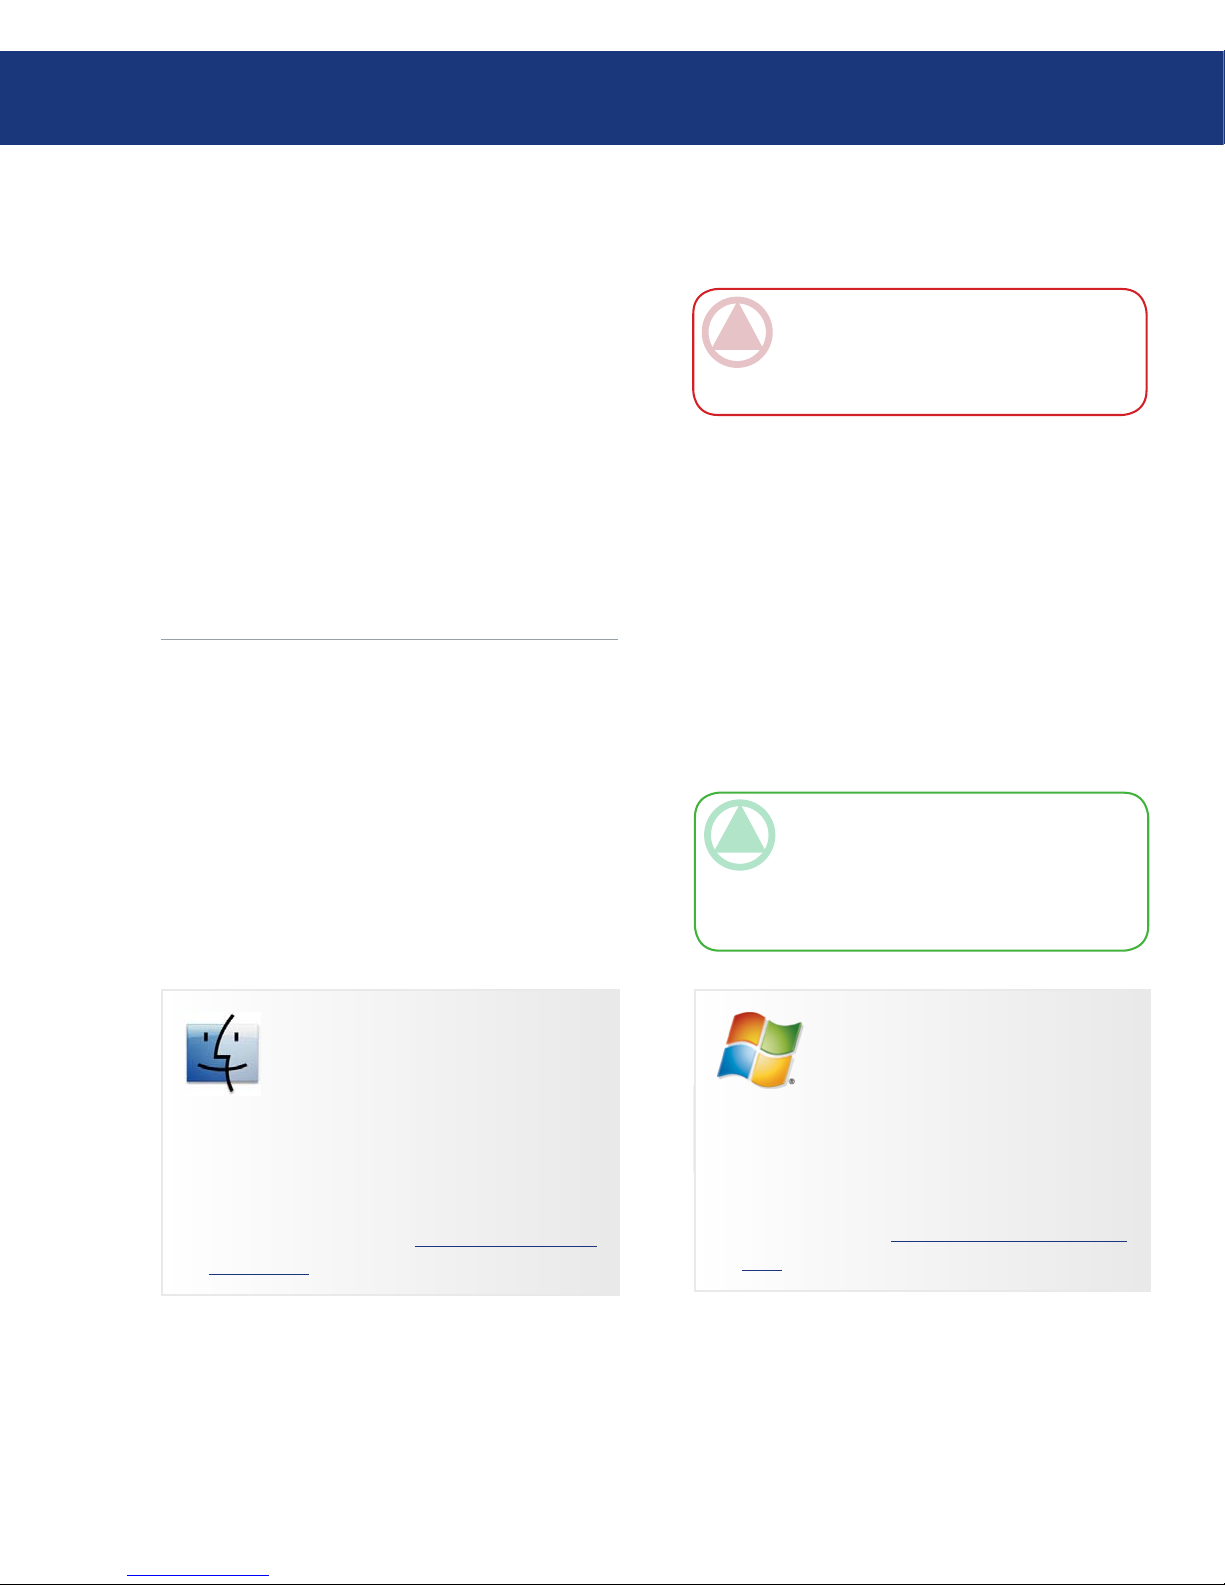
Mac Users
EMC Retrospect Express is installed in the
Applications folder.
LaCie Shortcut Button appears in System
Preferences (see section 3.6.3, Changing But-
ton Settings).
❖
❖
Windows Users
EMC Retrospect Express is installed in
C:/Program Files.
LaCie Shortcut Button appears in the Control
Panel (see section 3.6.3, Changing Button Set-
tings).
❖
❖
IMPORTANT INFO: For instructions on us-
ing EMC Retrospect Express, please see the EMC
Retrospect Express user manual, installed with the
application.
LaCie Shortcut Button
Page 22
LaCie Big Disk Extreme+
Triple Interface
page 21
You can set up the Button to automatically back up
data from your computer to your LaCie hard drive or to
perform a custom action.
Make sure your LaCie hard drive is connected to your
computer and turned on and then push the button on
the front of the drive. e LaCie Shortcut Button
Welcome screen appears. Click OK.
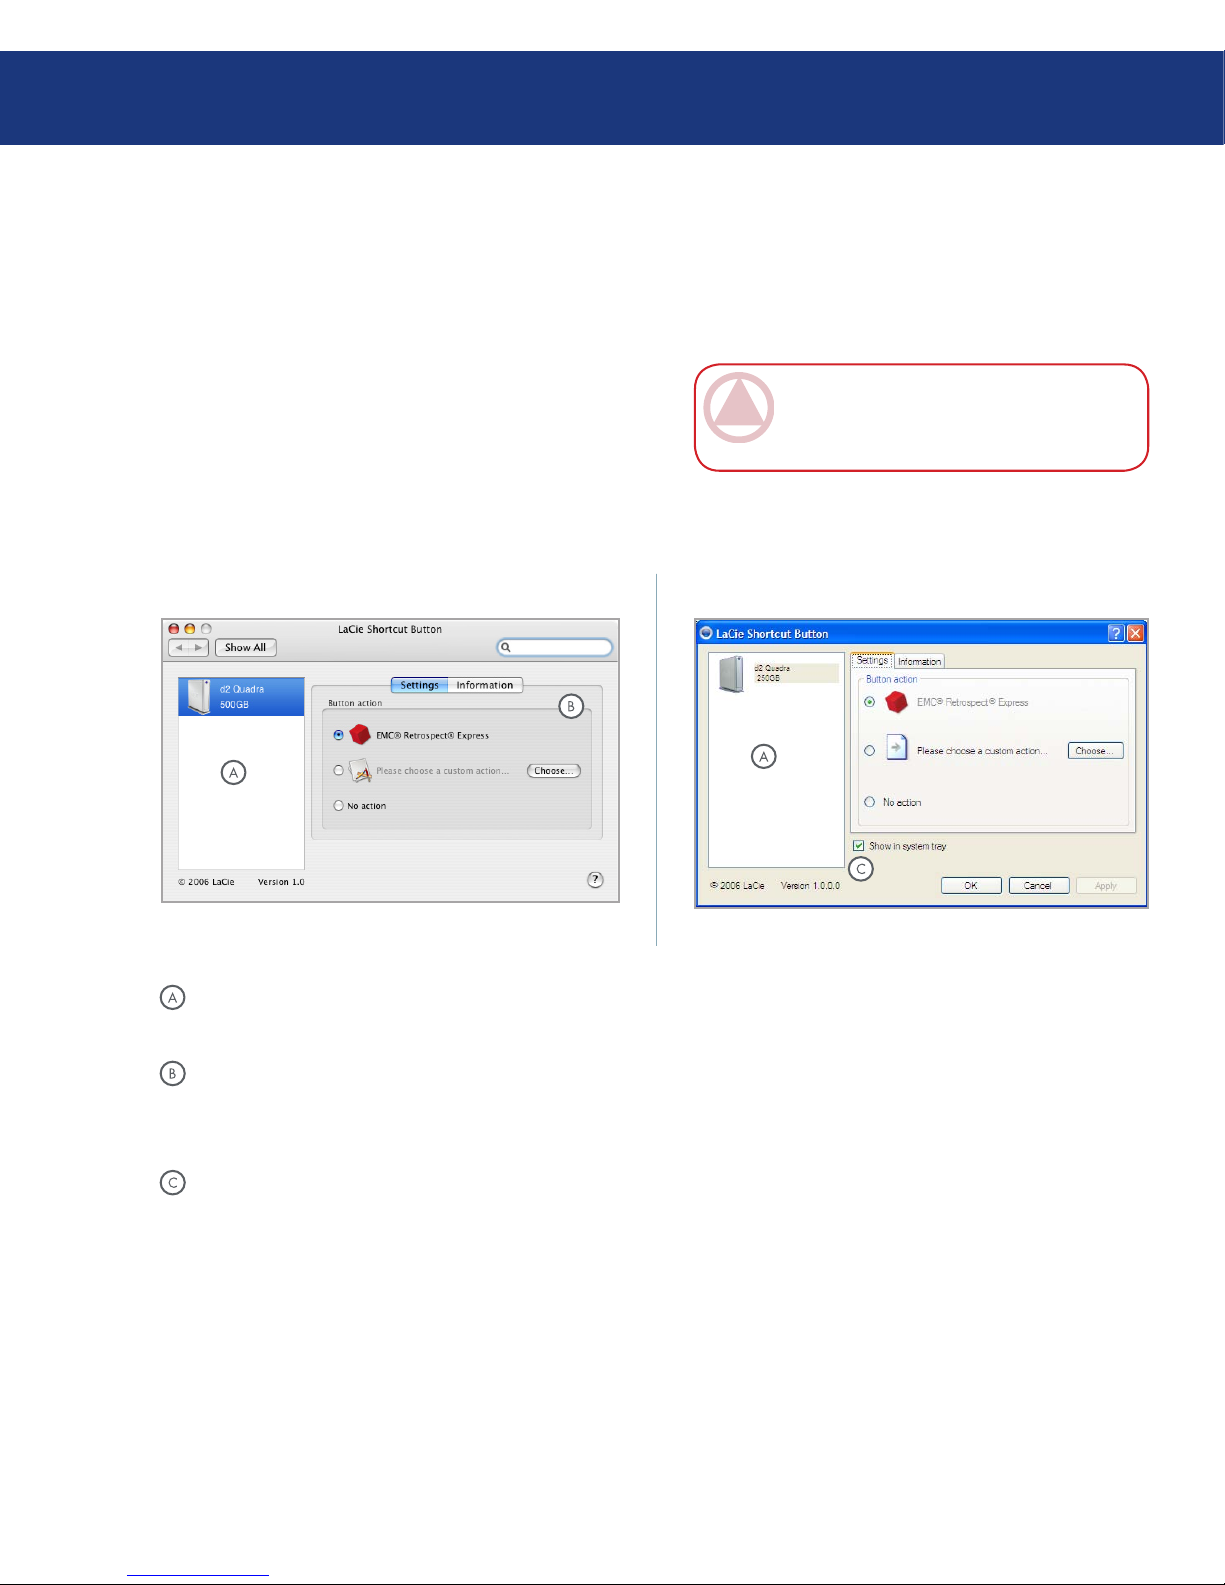
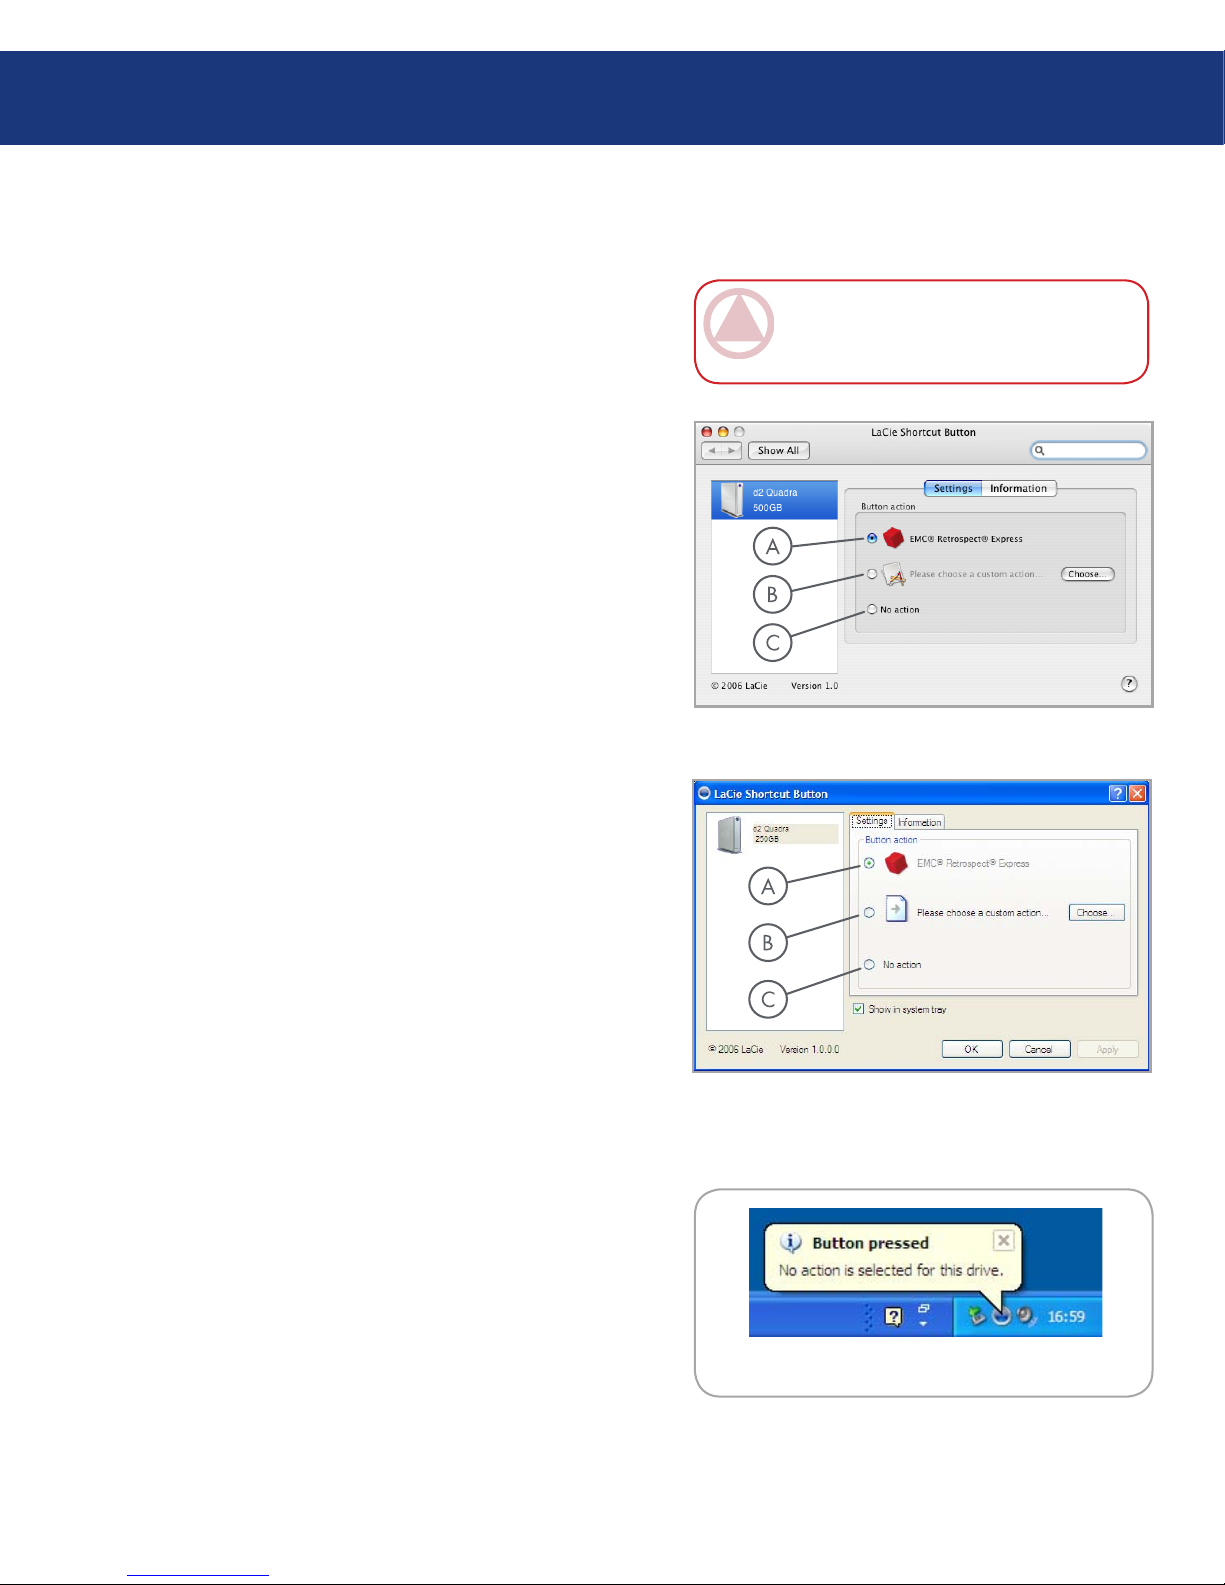
e LaCie Shortcut Button main window opens. See
Fig. 3.6.2.A (Mac) and 3.6.2.B (Windows).
1.
2.
Fig. 3.6.2.A
IMPORTANT INFO: Pushing the button
launches setup only once. After setup, pushing the
button will launch the action you specify in setup.
Mac Interface■
Fig. 3.6.2.B
Windows Interface■
Drive List – Displays all compatible LaCie drives
currently connected to your computer.
Settings and Information – Displays and modifies LaCie Shortcut Button preferences for the selected drive. Also displays drive information.
Show in system tray – Check this box to display
the LaCie Shortcut Button icon in the system tray
(Windows only).
3.6.2. Setup■
LaCie Shortcut Button
Page 23
LaCie Big Disk Extreme+
Triple Interface
page 22
Select the drive you want to modify from the drive
list.
“EMC Retrospect Express” is selected by default.
Click OK. See A in Fig. 3.6.2.C and 3.6.2.D.
EMC Retrospect Express launches. Use EMC Retrospect Express to make settings for the backup you
want to perform each time you push the LaCie Button.
After you have configured EMC Retrospect Express, each time you push the Button, EMC Retrospect
Express will automatically perform the backup operation specified in setup. To change the backup operation,
launch EMC Retrospect Express and change settings.
3.
4.
5.
Select the drive you want to modify from the drive
list.
To use a custom action, click the “Please choose a
custom action...” radio button. See B in Fig. 3.6.2.C
and 3.6.2.D.
Click the Choose... button and navigate to the application, document or script you want to launch
with the Button. Click Open.
A new icon and name are displayed for the selected
application, document or script. Click Apply. Click
OK.
3.
4.
5.
6.
Set up EMC Retrospect Express■
Set up a Custom Action■
Select the drive you want to modify from the drive
list.
To disable the Button for this drive, select “No action.” See C in Fig. 3.6.2.C amd 3.6.2. D.
Windows users, if the system tray icon is activated,
the alert in Fig. 3.6.2.E will appear when the button is
pushed.
3.
4.
Disable the Button■
Fig. 3.6.2.C
Fig. 3.6.2.D
Fig. 3.6.2.E
IMPORTANT INFO: Please consult the EMC
Retrospect Express user manual for informations
on creating and modifying backups.
LaCie Shortcut Button
Page 24
LaCie Big Disk Extreme+
Triple Interface
page 23
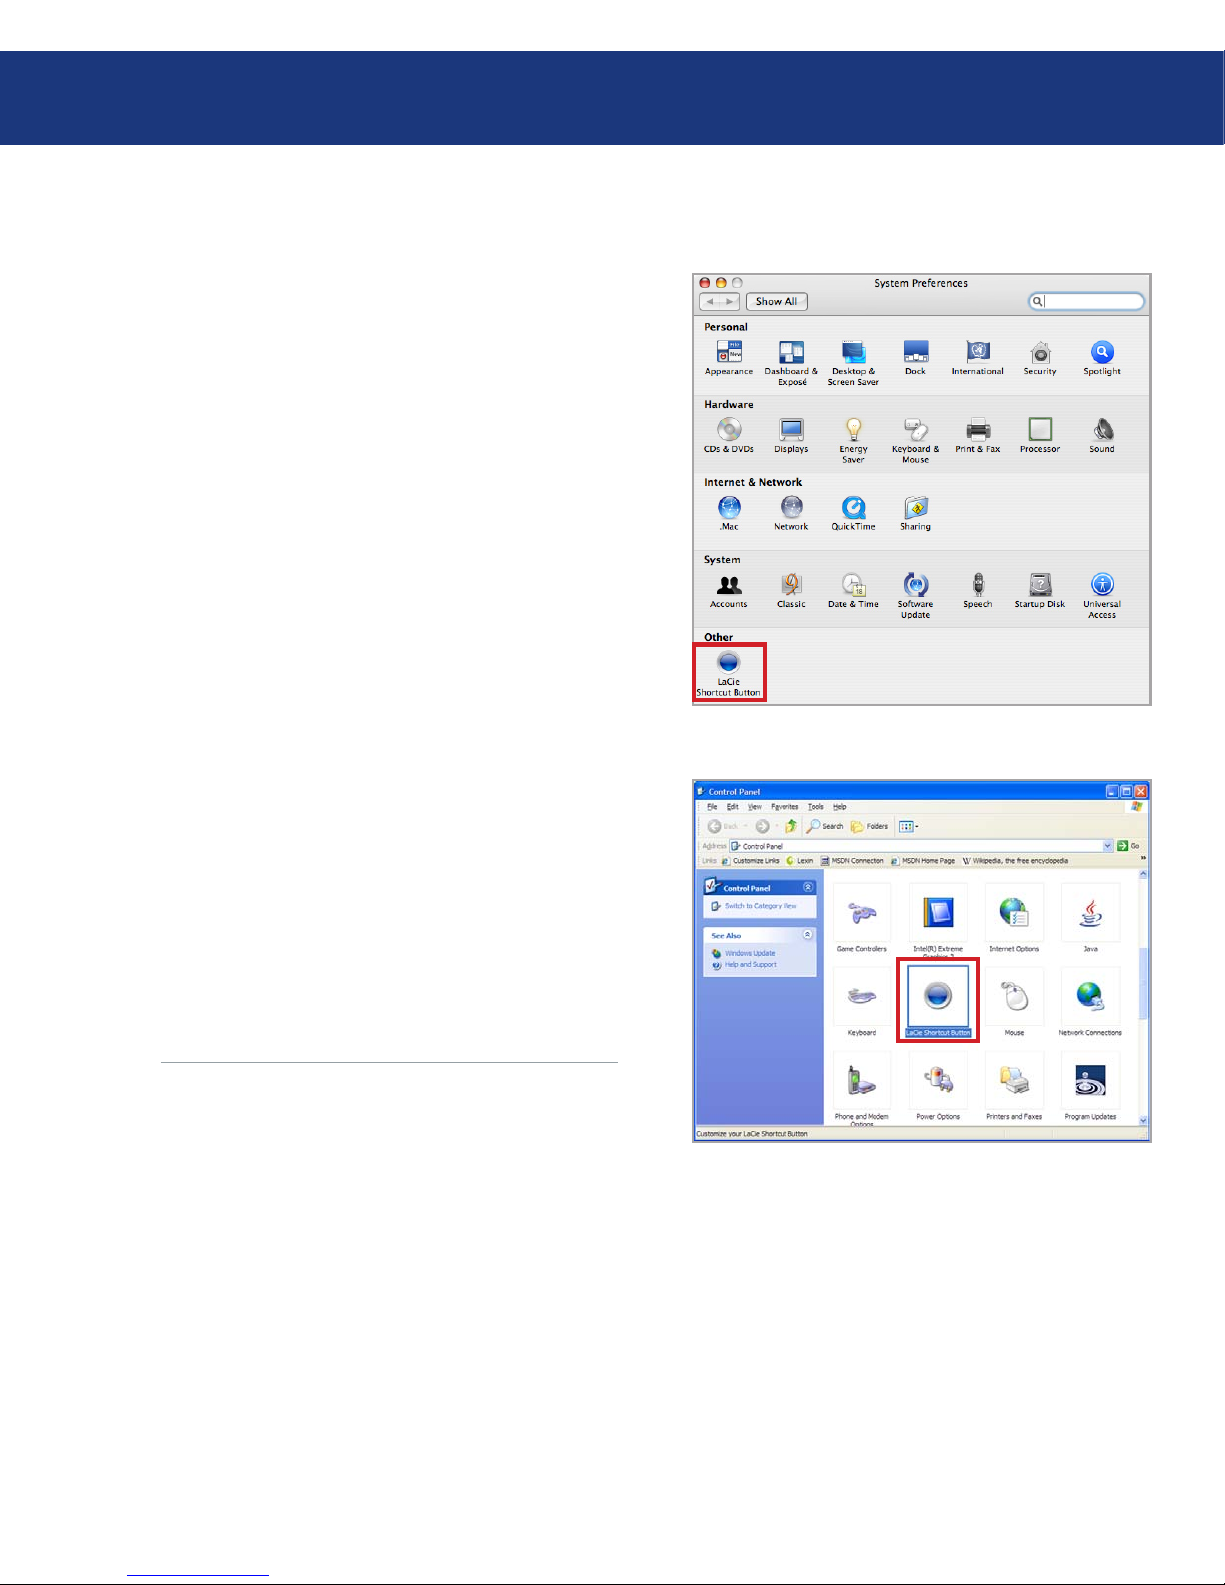
To change the action assigned to a Button, open
LaCie Shortcut Button by clicking on the LaCie Shortcut Button icon in System Preferences (Apple Menu >
System Preferences…). See Fig. 3.6.3.A.
Select the Settings tab and follow the instructions in
section 3.6.2 beginning with step 3 of the type of action
you want to activate.
Fig. 3.6.3.A
Mac Users■
Windows Users■
To change the action assigned to a Button, open
LaCie Shortcut Button by clicking on the LaCie Shortcut Button icon in the Control Panel (Start > Settings >
Control Panel). See Fig. 3.6.3.B.
Select the Settings tab and follow the instructions in
section 3.6.2 beginning with step 3 of the type of action
you want to activate.
Fig. 3.6.3.B
3.6.3. Changing Button Settings■
LaCie Shortcut Button
Page 25
LaCie Big Disk Extreme+
Triple Interface
page 24
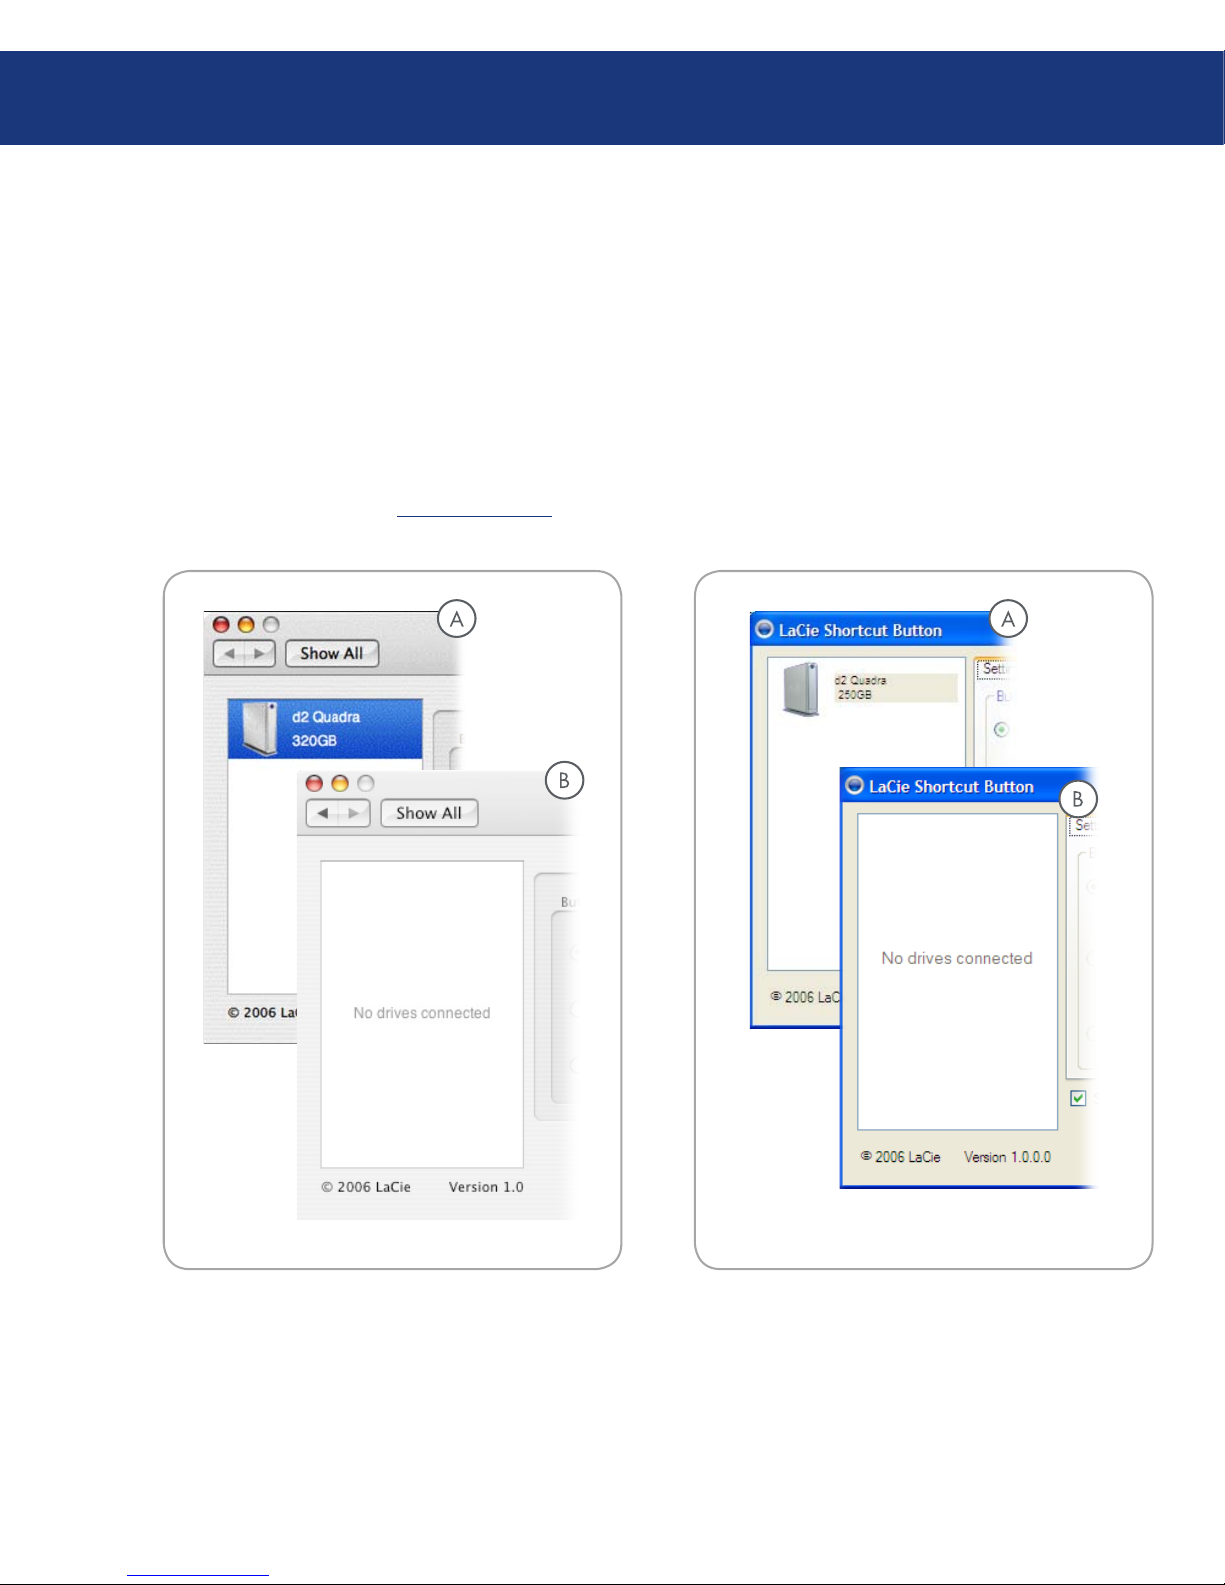
At launch, LaCie Shortcut Button will search for
LaCie Shortcut Button-compatible drives and display
them in the drive list. See A in Fig. 3.6.4.A (Mac) and
3.6.4.B (Windows).
If no drives can be detected on the USB or FireWire
bus, the list will display “No drives connected.” See B in
Fig. 3.6.4.A (Mac) and 3.6.4.B (Windows). Check your
drive’s connections and make sure it is turned on. If the
problem persists, see section 4, Troubleshooting.
Fig. 3.6.4.BFig. 3.6.4.A
3.6.4. Drive Detection■
LaCie Shortcut Button
Page 26
LaCie Big Disk Extreme+
Triple Interface
page 25
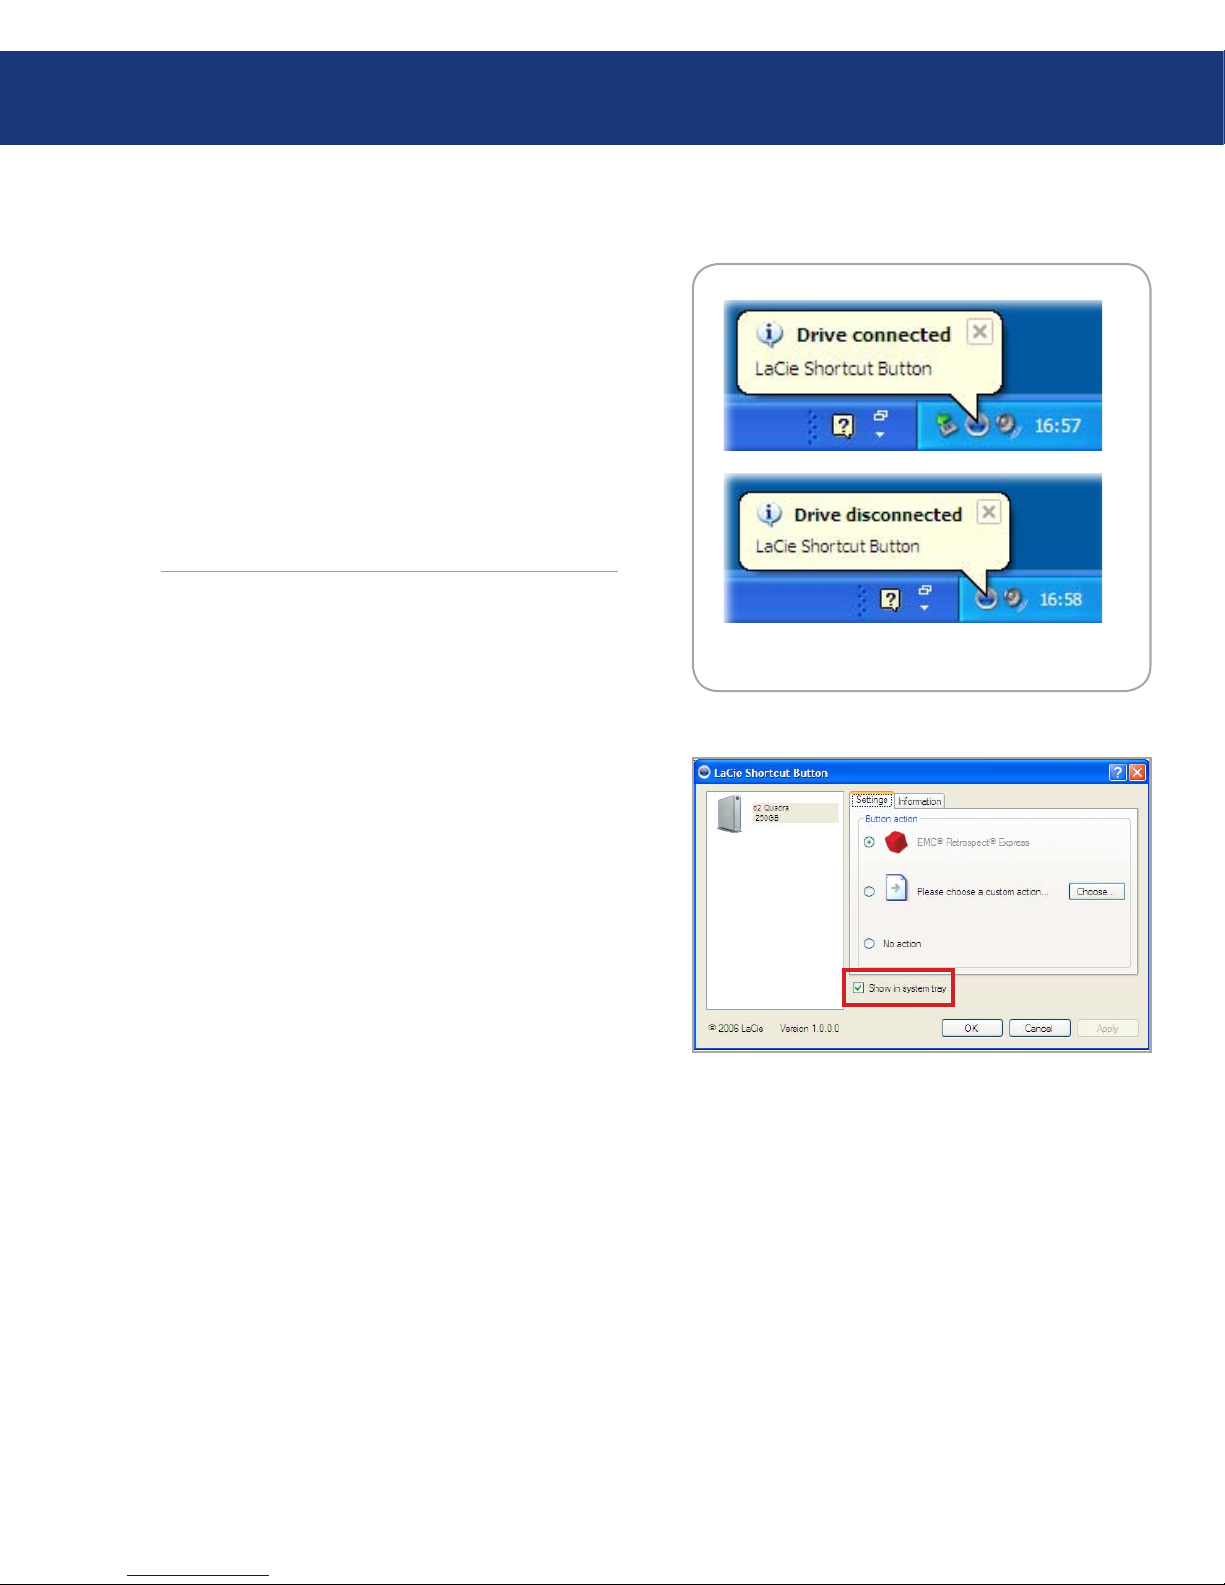
Fig. 3.6.4.C
Windows Connection Alerts■
Windows Users Only:
e LaCie Shortcut Button icon in the system tray
displays a connection message when a button-enabled
LaCie drive is connected or disconnected from the
computer. See Fig. 3.6.4.C.
To remove the LaCie Shortcut Button icon from the
system tray, uncheck the “Show in system tray” check
box on the LaCie Shortcut Button main window. See
Fig. 3.6.4.D.
Fig. 3.6.4.D
LaCie Shortcut Button
Page 27
LaCie Big Disk Extreme+
Triple Interface
page 26
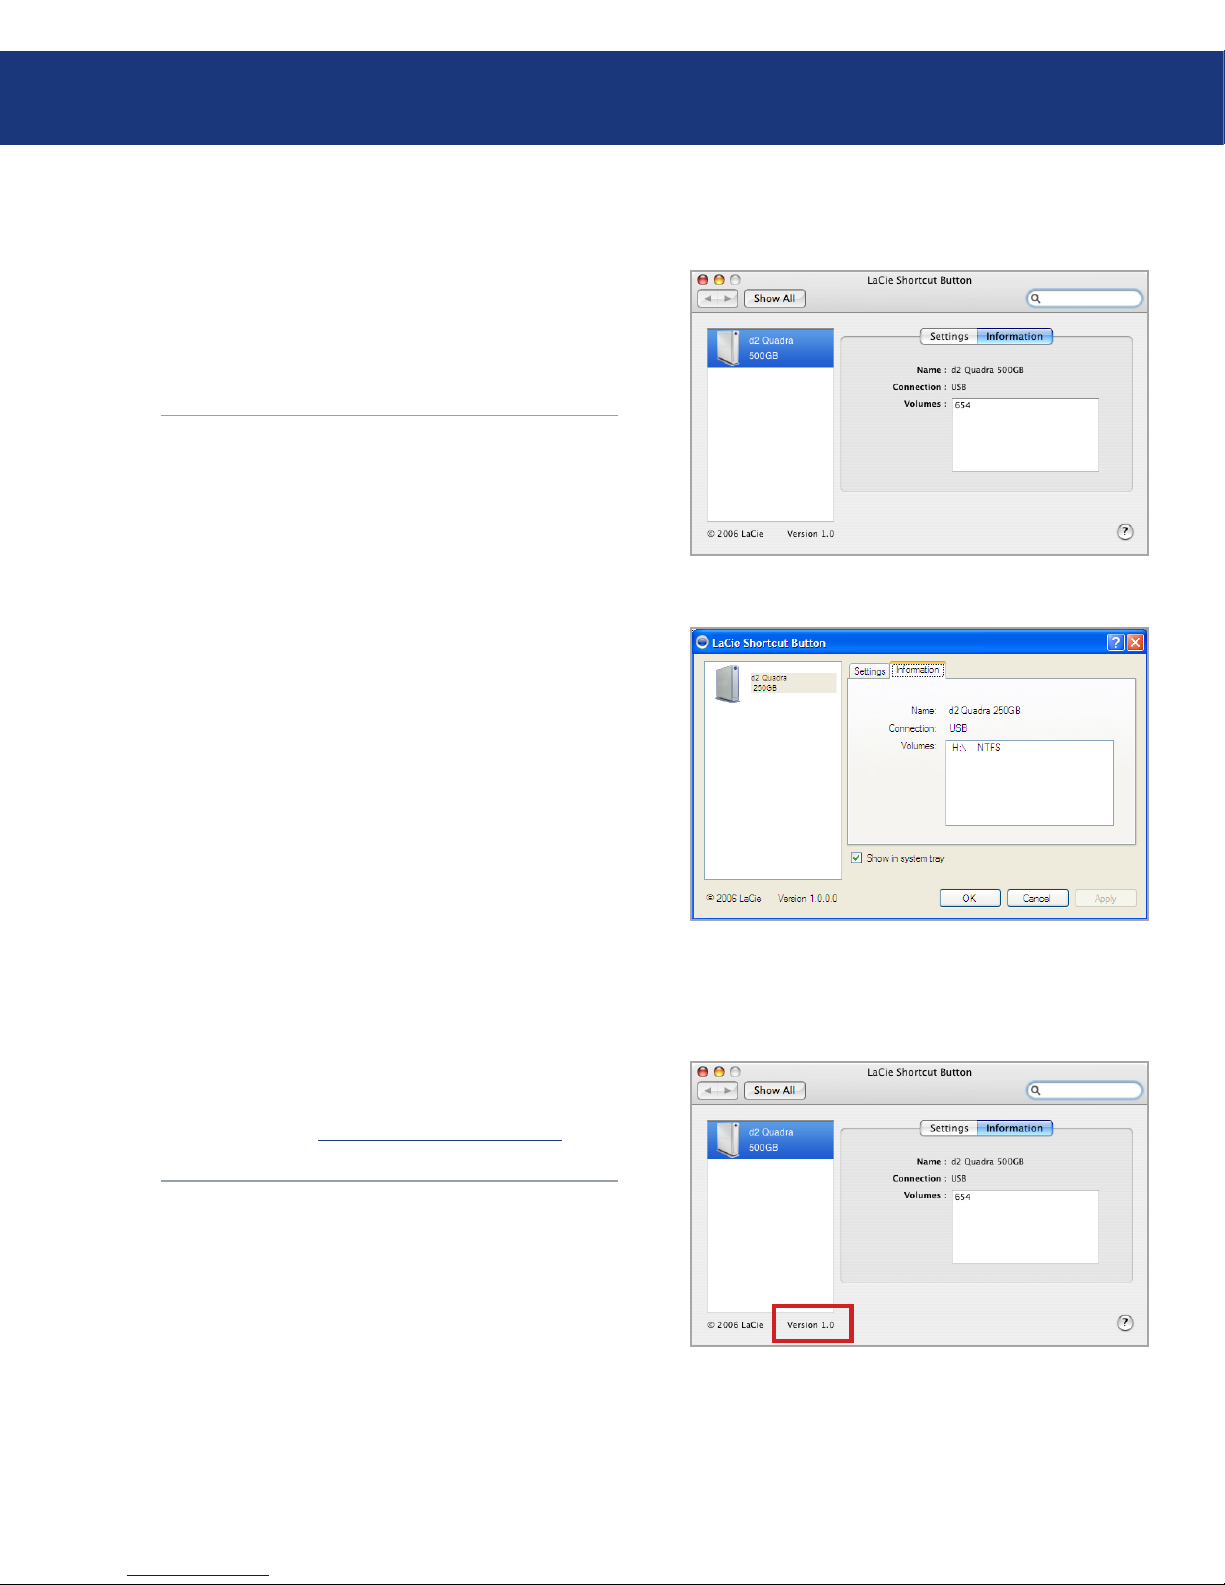
e Information tab of LaCie Shortcut Button displays basic details of the drive selected in the drive list.
Items on the Information tab are not editable. See Fig.
3.6.5.A (Mac) and 3.6.5.B (Windows).
Fig. 3.6.5.A
e software version number of the LaCie Shortcut
Button is displayed below the drive list. To search for
new updates, go to www.lacie.com/support.
Fig. 3.6.6
Fig. 3.6.5.B
3.6.5. Information■
3.6.6. Updates■
LaCie Shortcut Button
Page 28

LaCie Big Disk Extreme+
Triple Interface
page 27
Problem Solution
Drive is connected, but
“No drives connected”
message appears in the
drive list.
Check both ends of the FireWire or USB cable to make sure they are fully seated in their
respective ports. Try disconnecting the cables, waiting 10 seconds, and then reconnecting
them. If the drive is still not recognized, restart your computer and try again.
Nothing happens when
the button is pushed.
Make sure the drive is connected to your computer. See above.
Launch LaCie Shortcut Button from System Preferences.
Make sure the drive appears in the drive list.
Make sure that the “No action” button is off. If it is on, select the EMC Retrospect Express
action or a custom action.
❖
❖
“e action [“action
name”] can’t be launched”
error message when the
button is pushed.
If the application, document or script you defined as the custom action has been moved
from its location at the time you defined the action, LaCie Shortcut Button will not be able
to locate or launch it. Either redefine the action by clicking Choose... to select the application, document or script in its new location or return it to its original location.
Problem Solution
Drive is connected, but
“No drives connected”
message appears in the
drive list.
Check both ends of the FireWire or USB cable to make sure they are fully seated in their
respective ports. Try disconnecting the cables, waiting 10 seconds, and then reconnecting
them. If the drive is still not recognized, restart your computer and try again.
Nothing happens when
the button is pushed.
Make sure the drive is connected to your computer. See above.
Launch the LaCie Shortcut Button by double-clicking on the LaCie Shortcut Button
system tray icon or from Control Panel > LaCie Shortcut Button.
Make sure the drive appears in the drive list.
Make sure that the “No action” button is off. If it is on, select the EMC Retrospect Express
action or a custom action.
❖
❖
“File not found. Renew
custom action selection.”
error message when the
button is pushed.
If the application, document or script you defined as the custom action has been moved
from its location at the time you defined the action, LaCie Shortcut Button will not be able
to locate or launch it. Redefine the action by clicking Choose... to select the application,
document or script in its new location.
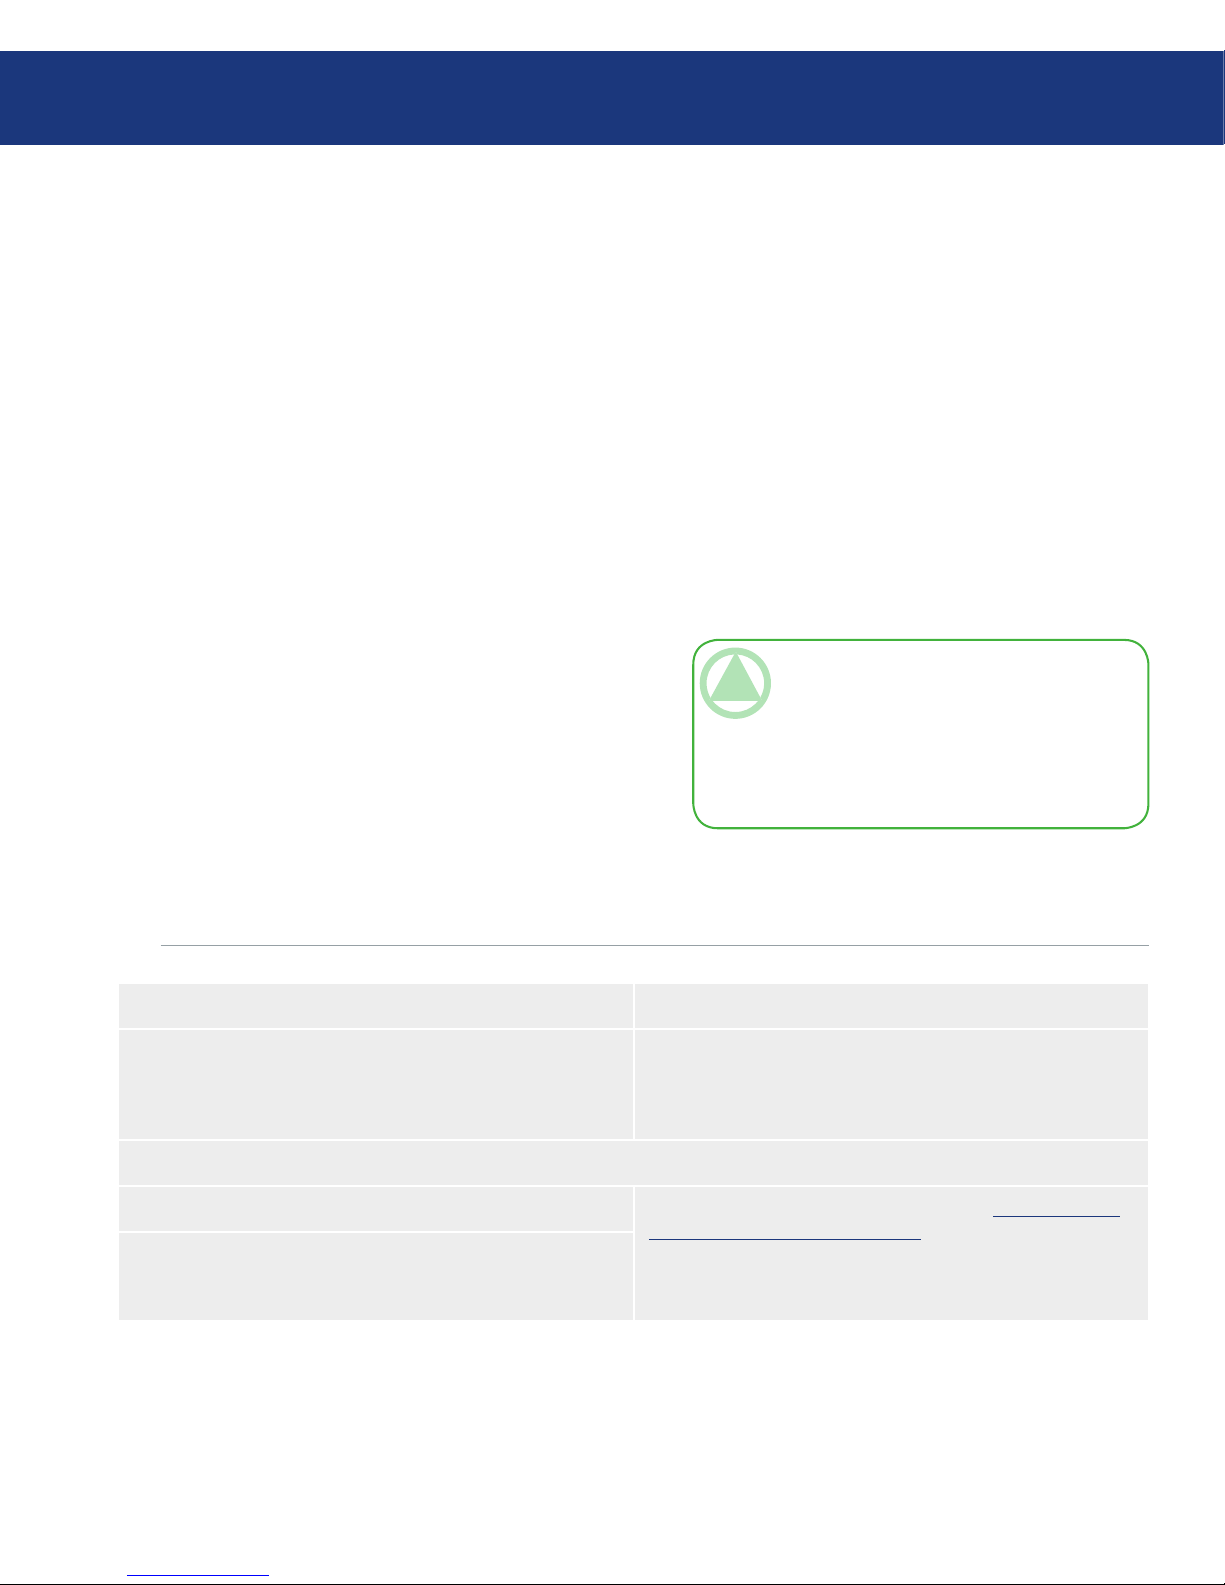
3.6.7. Troubleshooting – Mac■
3.6.8. Troubleshooting – Windows■
LaCie Shortcut Button
Page 29
LaCie Big Disk Extreme+
Triple Interface
page 28
Helpful Information
Your LaCie Big Disk Extreme+ is formatted in
HFS+. is is the most efficient format for use with your
Mac. If you would like to share this hard drive with PC
users, you will have to reformat your LaCie Big Disk
Extreme+.
What is Formatting?
Formatting a disk consists of the following: the operating system erases all of the bookkeeping information on the disk, tests the disk to make sure that all of
the sectors are reliable, marks bad sectors (i.e., those that
are scratched) and creates internal address tables that it
later uses to locate information.
File System Formats
ere are essentially three different file system formats: NTFS, FAT 32, and Mac OS Extended (HFS+).
See the following chart for more information.
■
■
Partitioning Your LaCie Big Disk Extreme+
After you’ve formatted the drive, you will have the
opportunity to divide the hard drive into sections, called
partitions. A partition is a section of the hard drive’s
storage capacity that is created to contain files and data.
For instance, you could create three partitions on your
drive: one partition for your Office documents, one for
your backup, and one for your multimedia files.v
■
4. Helpful Information
TECHNICAL NOTE: FAT 32 is recommended
for sharing a hard drive with Windows 2000, Windows XP and Windows Vista and Mac OS users.
However keep in mind that the FAT 32 format
will slow down your hard drive and single file size
is limited to 4 GB.
Use NTFS if... Use HFS+ if...
...you will be using the drive only under Windows 2000 or Windows XP (performance will generally be greater when compared
to FAT 32). is file system is compatible in read only mode
with Mac OS 10.3 and higher.
...you will be using the drive on Macs only; performance will
generally be greater when compared to FAT 32. is file system
is NOT compatible with Windows OS.
Use FAT 32 if...
For more information, please refer to page 29, Formatting And
Partitioning Your LaCie Hard Drive.
...you will be using your drive between both Windows and Mac
10.x; or sharing the drive between Windows 2000, Windows XP,
and Windows Vista. Maximum single file size: 4GB.
Page 30
LaCie Big Disk Extreme+
Triple Interface
page 29
Helpful Information
4.1. Formatting and Partitioning
Once you have setup your LaCie Big Disk Extreme+,
you can reformat it to suit your needs.
Windows Users■
Disk management utility
Disk management utility
Windows 2000, Windows XP and Windows Vista
– Use the Disk Management Utility, which is native to
the operating system.
Formatting Using Windows 2000, Windows XP
and Windows Vista
e process of formatting a drive on a computer
running Windows 2000, Windows XP or Windows
Vista consists of two steps: (1) installing a signature on
the drive, and (2) formatting the drive. ese steps will
erase anything that is on the disk.
Connect the drive to the computer via the interface
port.
Right click My Computer and click Manage.
From the Computer Management window, select
Disk Management (located below the Storage
group).
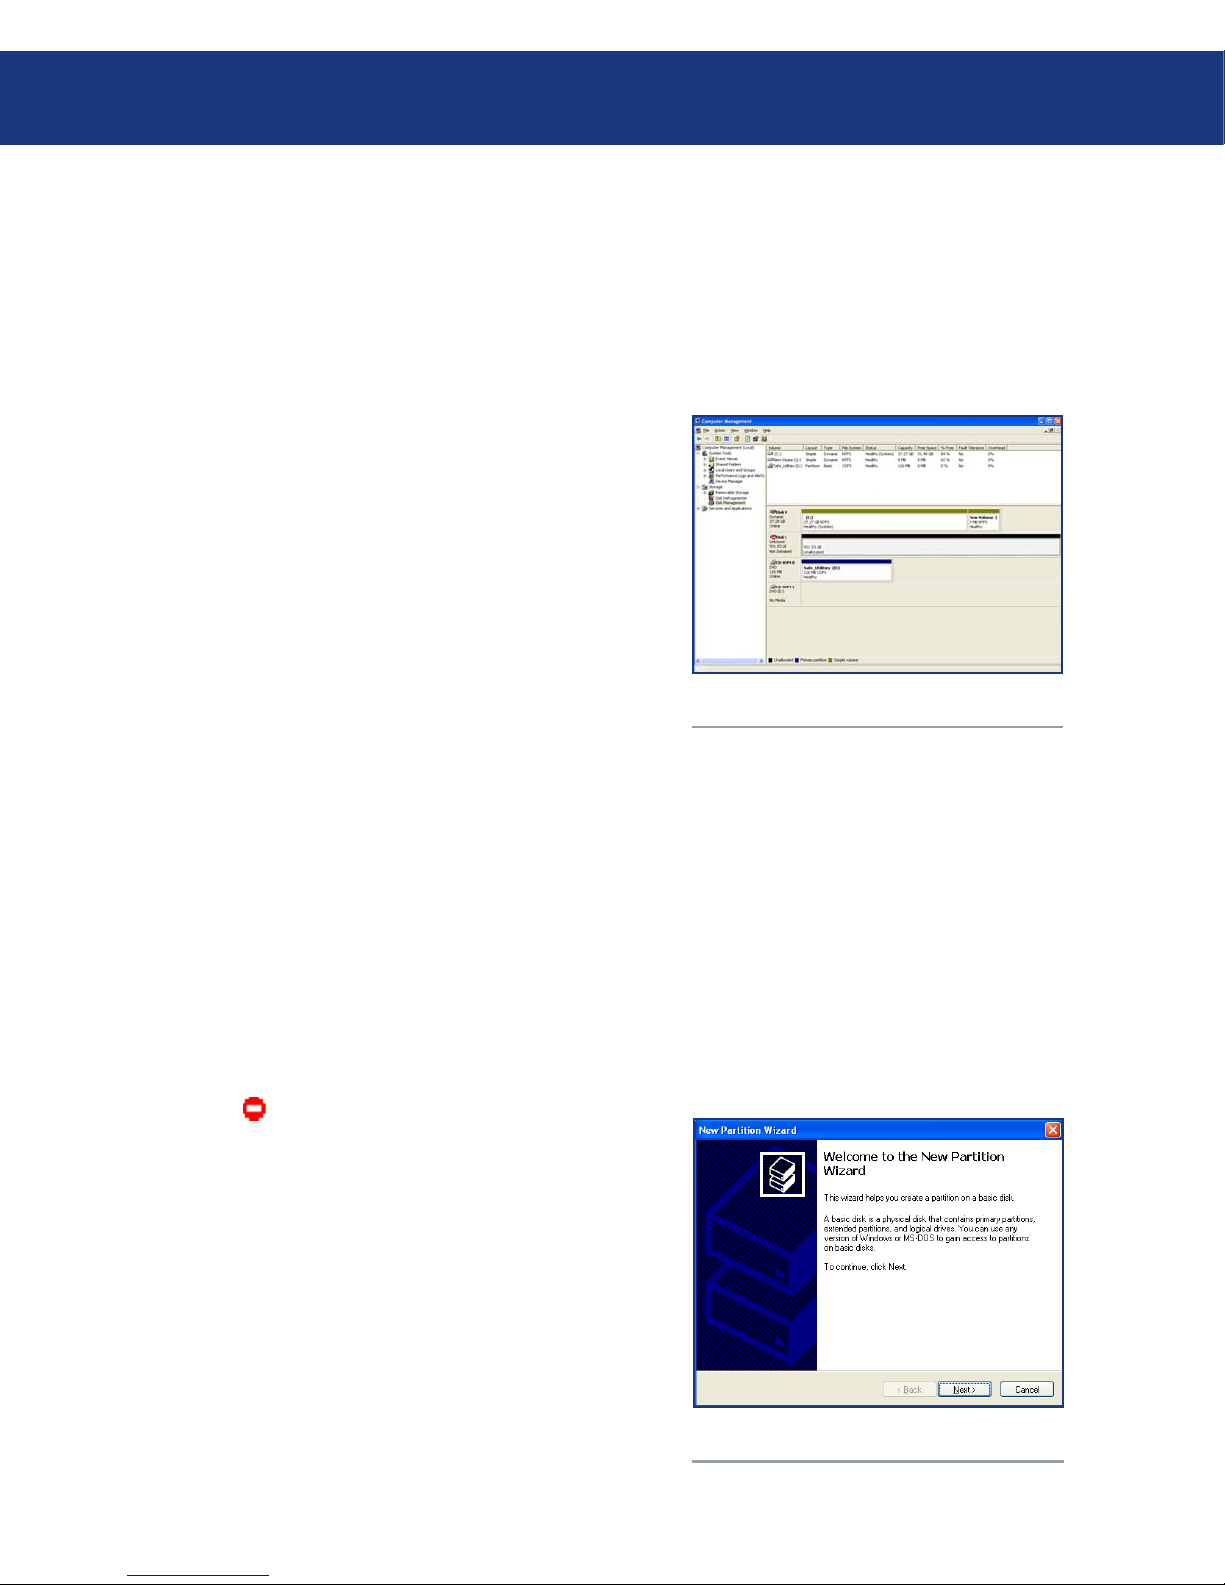
If the Initialize and Convert Disk Wizard window
appears, click Cancel.
Windows will list the hard drives that are installed
on the system. Locate the drive that is represented
by the icon. Right click the icon and select
Initialize.
In the box to the right that says Unallocated, right
click and select New Partition...
In the first page of the New Partition Wizard, click
Next.
1.
2.
3.
4.
5.
6.
7.
Page 31
LaCie Big Disk Extreme+
Triple Interface
page 30
Helpful Information
8. Click Next.
9. Click Next.
10. Click Next.
11. Click Next.
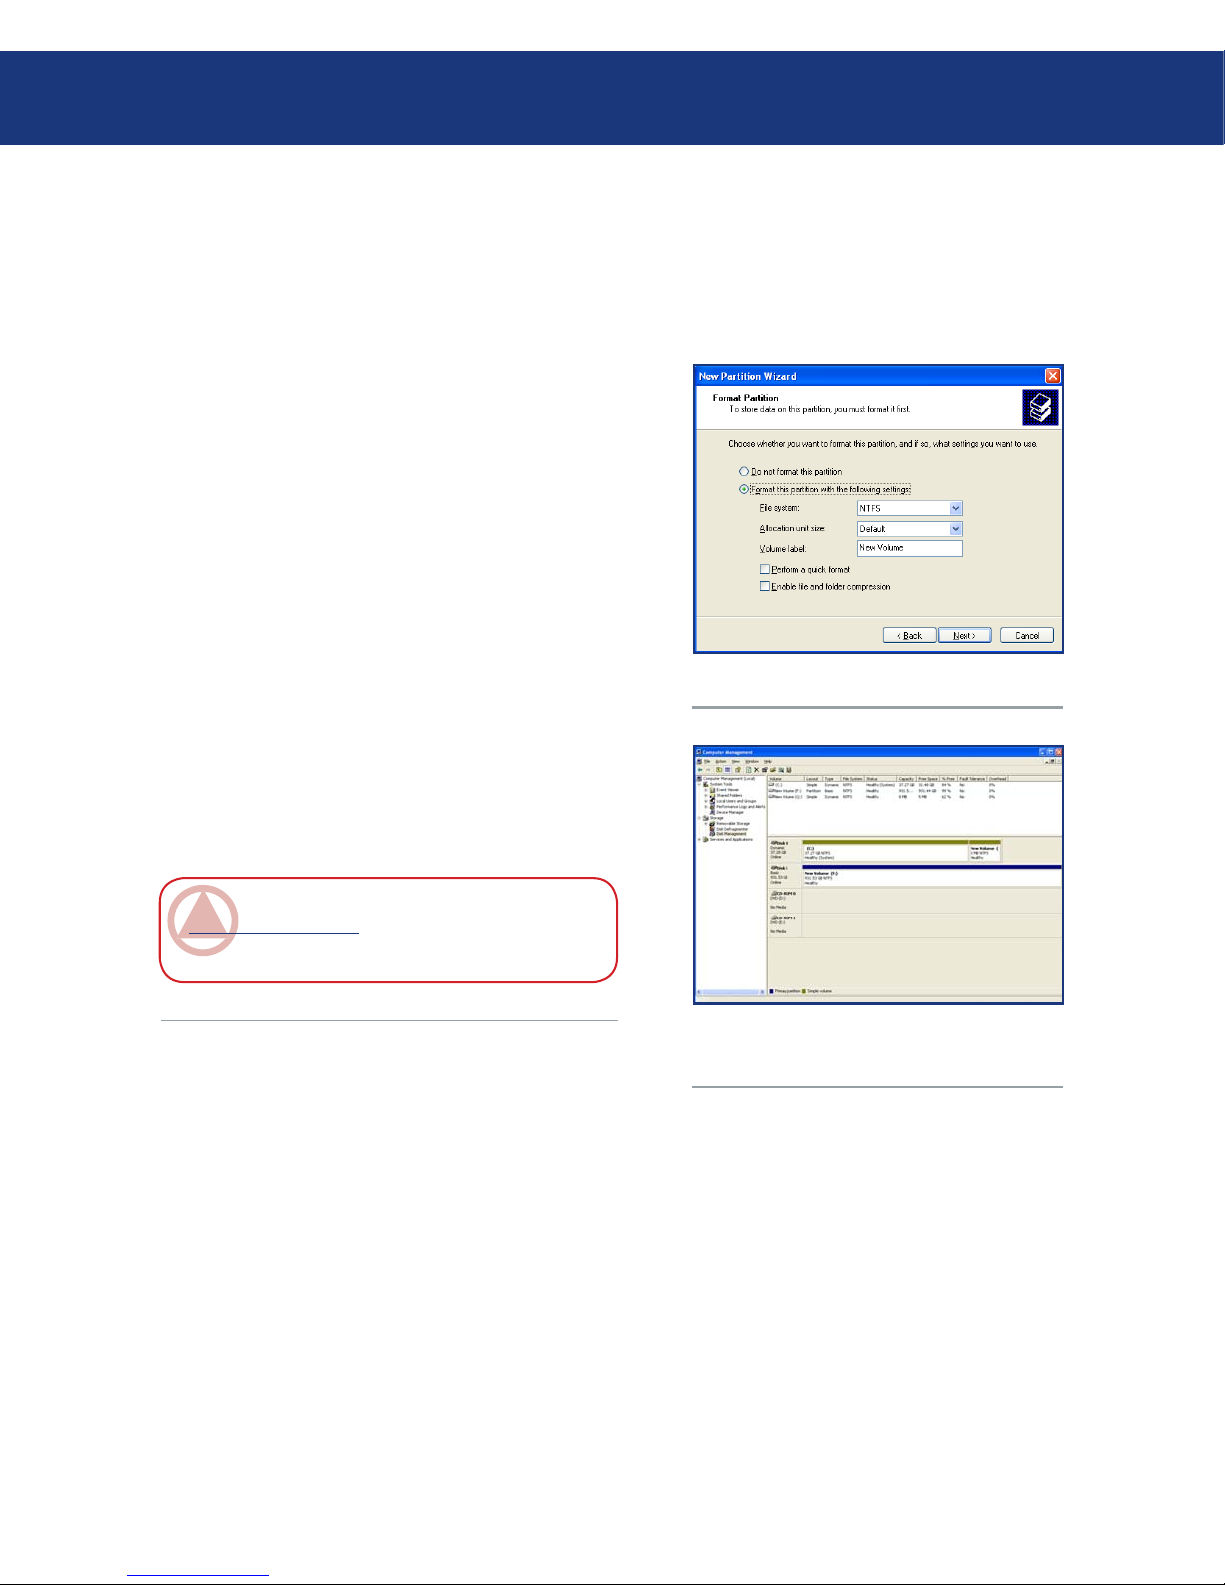
12. In this window, you have the option of selecting the
Quick Format option. is allows a much faster
format; however, this will disallow Disk Manage-
ment to check the drive for errors (recommended).
Click Next.
IMPORTANT INFO: Please refer to page 28,
Helpful Information, for a more detailed compari-
son of the various file system formats.
Disk management utility
Disk management utility
(drive ready for use)
13. Click Finish to begin the format process.
14. Your drive is ready for use and should now appear in
your My Computer.
Page 32
LaCie Big Disk Extreme+
Triple Interface
page 31
Helpful Information
Connect the drive to the computer via one of its interfaces and turn on the drive by pressing the blue
button.
Go to the Menu Bar, and open Go.
From the Go menu, click on Applications.
In the Applications menu, open the Utilities folder,
and then double-click Disk Utility from the Utilities
folder.
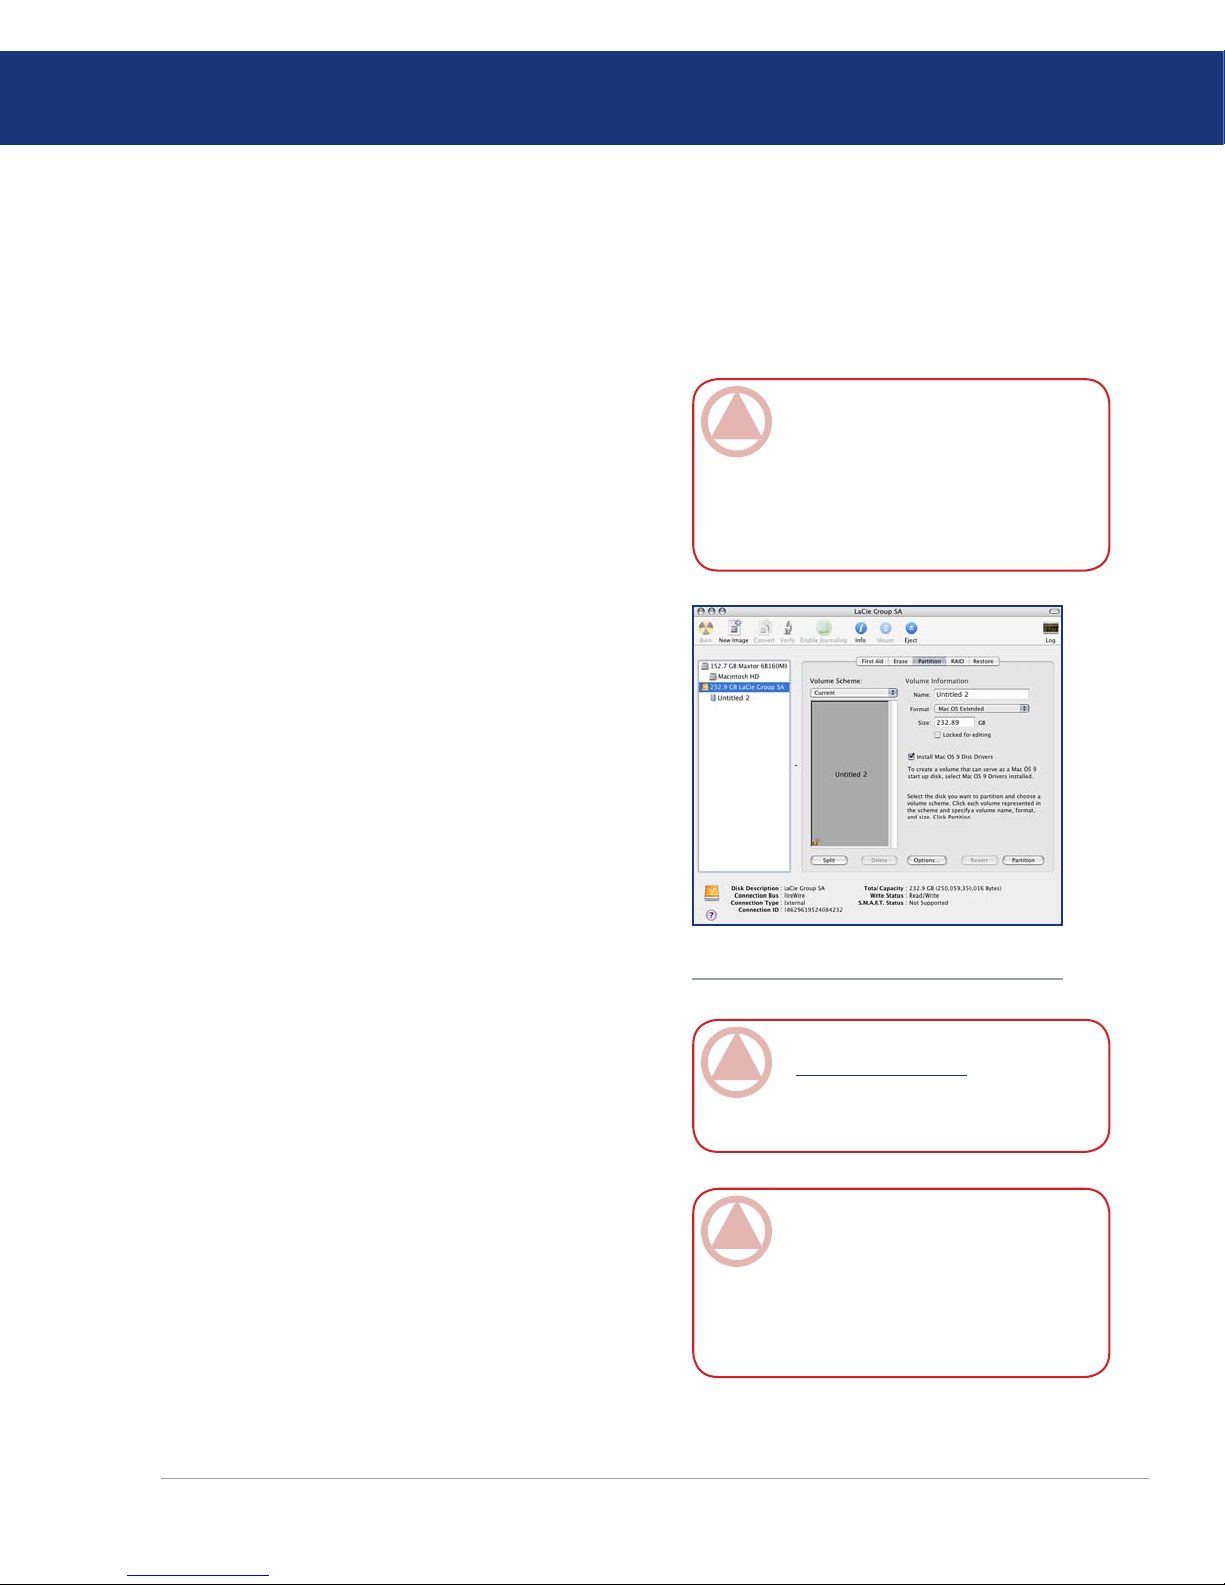
e Disk Utility window will open. In the left side
of the window will be a list of the available hard disk
drives. You should see a volume that represents your
internal hard drive, and one labeled LaCie Hard
Drive.
From the Volume Scheme: button, choose the number of partitions you want to divide the drive into by
clicking on the pull down menu starting with Cur-
rent (Mac OS 10.x gives you the option of dividing
the drive into at most 8 partitions). You can customize the size of the partitions by using the slide bar
between the partitions in the Volume Scheme: area.
In the Volume Information section, create a name
for each partition, choose the volume format (Mac
OS Extended, Mac OS Standard or UNIX File System) and the volume size.
Once you have finalized the volume format, number
of partitions, size and options, click OK. e following message will appear: Warning! Saving the new
volume will erase all existing volumes. is can
NOT be undone. Are you sure you want to do that?
Click Partition to continue.
Mac OS 10.x will automatically setup the disk with
the partitions and volume format you selected, and
your new drive will be available for use.
1.
2.
3.
4.
5.
6.
7.
8.
9.
Mac Users■
Mac OS 10.x will use the Apple Disk Utility application, which is native to the operating system.
Formatting Using Mac OS 10.x
IMPORTANT INFO: Following these
steps will erase anything that is on the hard
drive. erefore, if you have information that
you want to protect or continue to use, backup this information before performing these
steps.
Disk management utility (Mac)
IMPORTANT INFO: Please refer to
page 28, Helpful Information, for a more detailed comparison of the various file system
formats.
IMPORTANT INFO: Apple recom-
mends that unless you have a specific reason
to use the UNIX File System (UFS), you
should use the Mac OS Extended format
since it provides a more familiar experience to
Macintosh users.
Page 33

LaCie Big Disk Extreme+
Triple Interface
page 32
Helpful Information
4.2. Interface Comparisons
Deciding which interface to use, whether it be HiSpeed USB 2.0, FireWire 400 or FireWire 800 can be
a complicated decision. Depending on the interfaces
your computer has, your decision should be based on
the following:
Computer With Hi-Speed USB 2.0, FireWire 400 And FireWire 800 Ports
If your computer is equipped with these three interfaces, you have several options to consider. e key decision in this
equation is, again, speed. FireWire 800 effectively offers twice the bandwidth of both Hi-Speed USB 2.0 and FireWire
400. So, if you are running bandwidth-intensive applications, such as digital audio, video or graphics, FireWire 800 is your
clear choice.
Computer With Hi-Speed USB 2.0 and FireWire 400 Ports
If your computer is equipped with a Hi-Speed USB 2.0 port and a FireWire port, you will get noticeably better performance by using the FireWire connection. Compared to Hi-Speed USB 2.0, FireWire has higher sustained data transfer
rates, a feature especially important for audio and video editors. Also, Hi-Speed USB 2.0 will not allow you to daisy-chain
multiple hard drives to your computer.
Computer With only USB 1.1 Ports
If your computer is only equipped with a USB port, your decision is fairly simple: connect via the USB cable provided
with your drive. Hi-Speed USB 2.0 is backward compatible and can be used in USB 1.1 ports. Again, you will be limited
to USB 1.1 speeds and performance.
Another alternative is to purchase a FireWire 400,
FireWire 800 or Hi-Speed USB 2.0 host adapter card
that you would install into a PCI, PCI-X or PCI-Express slot on your computer, thereby allowing your computer to take advantage of the performances that these
interfaces have to offer. Contact your LaCie reseller or
LaCie Customer Support for information about PCI,
PC, PCI-X or PCI-Express Cards, or visit our website:
www.lacie.com.
Page 34

LaCie Big Disk Extreme+
Triple Interface
page 33
FireWire Questions & Answers
What Does IEEE 1394 Mean?
IEEE (the Institute of Electrical and Electronics
Engineers) refers to the engineering corps that developed the 1394th standard, defining the high-performance serial input/output (I/O) bus used to connect
peripheral devices. ere are now two standards:
IEEE 1394a, which refers to the original standard
adopted in 1995, and IEEE 1394b, which refers to the
new standard, adopted in 2002.
What Is The Relationship Between IEEE
1394, FireWire, iLink And DV?
ese four names all refer to the same interface:
IEEE 1394 is the term commonly used in the computer industry.
FireWire is the brand name used by Apple.
iLink is the brand name used by Sony for both consumer electronics and personal computers.
DV is short for “Digital Video,” and is used as the
logo for the interface on most video camcorders.
What Are The FireWire Interface Benefits?
e FireWire interface is a fast, cross-platform serial bus, and is ideal for digital audio, video and graphic
applications that demand plenty of bandwidth. Both
versions of FireWire offer Plug & Play connectivity, so
all you have to do is plug in your drive and you’re ready
to go. ey also allow up to 63 devices to be connected via a single bus and offer peer-to-peer connectivity,
enabling multiple computers and FireWire devices to
be connected at the same time. FireWire also supports
both isochronous and asynchronous capabilities, meaning that it can guarantee real-time data delivery, so there
is no danger of inaccurately ordered or delayed frames.
■
■
•
•
•
•
■
What Is The Difference Between FireWire
400 And FireWire 800?
Essentially, the main difference between the two interfaces is speed. FireWire 800 effectively doubles the
bandwidth of the original FireWire 400 interface. e
new FireWire 800 interface offers truly impressive results, with speeds up to 800Mb/s for a single bus, and
even greater for several buses in RAID 0 configurations.
Other key advancements include the support of increased cabling distances and a newly enhanced arbitration architecture.
Utilizing cables constructed of professional-grade
glass optical fiber, when both devices are connected via
a FireWire 800 hub, FireWire 800 can burst data across
100 meters of cable.
e new arbitration scheme greatly improves on the
existing architecture by incorporating advanced 8B10B
data encoding (based on codes used by Gigabit Ethernet and Fibre Channel), which reduces signal distortion,
and also improves the arbitration time by prepping the
arbitration while the current data packet is being sent,
so that data is sent as soon as the current transmission
is completed.
What Are The Ideal Uses For FireWire?
FireWire helped fuel a revolution for digital content
creators, and was awarded a 2001 Primetime Emmy Engineering Award by the Academy of Television Arts &
Sciences for its contribution. Due to its high bandwidth
and support of both isochronous and asynchronous data
delivery, FireWire has found a very successful place in
both the computer and consumer electronics industries.
Whether connecting game consoles, personal video
recorders, home stereo equipment, digital TVs, hard
drives, CD/DVD-RW drives, printers, scanners, tape
■
■
5. FireWire Questions & Answers
Page 35

LaCie Big Disk Extreme+
Triple Interface
page 34
FireWire Questions & Answers
drives or other digital hardware equipment, FireWire is
well suited to handle all these requirements.
For those working with digital video, the new standard will enable new bandwidth-intensive applications,
such as multiple-stream, uncompressed, standard-definition video.
Will FireWire 400 Devices Run Faster When
Connected To A FireWire 800 Port?
Unfortunately, this is not the case. In order to attain FireWire 800 speeds, both the device and port have
to be FireWire 800 enabled. For instance, an external
hard drive with a FireWire 800 9-pin connection will
only reach FireWire 800 transfer rates when it is connected to a FireWire 800 9-pin host bus adapter card
via a properly certified FireWire 800 9-pin to 9-pin beta
cable.
When a FireWire 400 device is connected to a
FireWire 800 port, the FireWire 400 device will only
operate at the original FireWire 400 speeds.
Will FireWire 800 Devices Work On
FireWire 400 Ports And Vice Versa?
e new standard was designed to be backwards
compatible, meaning that FireWire 800 devices will still
operate via the original FireWire 400 port. However,
■
■
to connect a FireWire 800 device to a FireWire 400
port, a specific adapter cable must be used. Two types of
FireWire 400 ports exist: 6-pin and 4-pin. For FireWire
800 devices to work, they must be connected by placing
the 9-pin end of the FireWire cable into the FireWire
800 port of the device, and the opposite 6-pin or 4-pin
end into the FireWire 400 port.
e same holds true for FireWire 400 devices being
connected to a FireWire 800 host port. e 4-pin or 6pin end of the FireWire cable must be connected to the
FireWire 400 port of the device, and the 9-pin end must
be connected to the FireWire 800 port.
When FireWire 400 and FireWire 800 devices are
mixed, all transfer rates revert to the original FireWire
400 speed.
What Do I Do If My Computer Does Not
Have A FireWire Port?
Most computers manufactured today incorporate
at least one FireWire port. If your computer does not
have a native port, you can install one by adding a PCI
or PCMCIA host bus adapter card. Please contact your
computer supply specialist for a specific card that will
work with your system.
For more information about PCI cards, please visit:
www.lacie.com/addons
■
Page 36

LaCie Big Disk Extreme+
Triple Interface
page 35
USB Questions & Answers
What Are The USB Interface Benefits?
Cross-platform: Use your USB peripherals on both
Mac and Windows platforms.
“Hot Swappable”: No need to shut down or restart
your computer when adding or removing a USB device. Plug it in and it’s ready to use.
Automatic configuration: Once your device is connected, your computer recognizes the device and automatically configures the necessary software.
Daisy-Chaining: with USB ports on your computer,
you can connect up to 127 peripherals using hubs.
Easy Installation: One standardized port and plug
combination makes it simple to connect.
What Is The Difference Between USB And
Hi-Speed USB 2.0?
e main difference is speed. e original version of the interface is capable of throughput up to
12Mb/s. Hi-Speed USB 2.0 supports data speeds up to
480 Mb/s, making it 40 times faster than its predecessor.
is increased bandwidth translates into higher performance in demanding applications requiring high transfer rates.
What Are The Ideal Uses For USB?
USB is perfect for more traditional connections such
as keyboards, mice, joysticks and scanners. ese types
of devices don’t require fast data transfer rates, and operate very successfully at the slower speeds.
What Are The Ideal Applications For
Hi-Speed USB 2.0?
Digital cameras, CD/DVD drives, hard drives and
■
•
•
•
•
•
■
■
■
scanners will all benefit from the added bandwidth and
performance gains of the new implementation of the
USB standard. Hi-Speed USB 2.0 provides the necessary fast data transfer rates that today’s devices require,
and combines the earlier specifications so older devices
that operated under the original USB standards will still
work with Hi-Speed USB 2.0.
Will USB Devices Run Faster When Connected To A Hi-Speed USB 2.0 Bus?
Unfortunately, no. e Hi-Speed USB 2.0 specification is specifically written to allow developers to design
higher speed peripherals that can take advantage of the
extra bandwidth. USB devices, though, will still operate
at 12Mb/s at full-speed and 1.5Mb/s at low-speed on a
Hi-Speed USB 2.0 bus. Even though USB devices won’t
run any faster, they can work alongside Hi-Speed USB
2.0 devices on the same bus. However, if you plug in a
Hi-Speed USB 2.0 device to a USB bus, the speed of
the Hi-Speed USB 2.0 device will decrease to 12Mb/s.
What Is A USB Hub?
Technically, you can connect up to 127 devices to a
single USB bus. For more than two devices, though, you
must make new connections using a peripheral called
a “hub.” A hub, which you hook up directly to a USB
connector on your computer, usually has 4 or 7 output
connections enabling you to connect the same number
of peripherals. One of the hub’s main functions is to regenerate signals that lose strength as they are transmitted via the USB cable. By connecting yet another hub to
a connector on the existing hub, you can then plug in a
new set of peripherals etc, up to a maximum of 127.
Some hubs have no power supply and others are
self-powered. When you choose a hub, opt for the selfpowered variety, as they have their own AC adapter.
e most powerful hubs provide 0.5A of power to each
■
■
6. USB Questions & Answers
Page 37
LaCie Big Disk Extreme+
Triple Interface
page 36
USB Questions & Answers
port.
If you buy a hub, make sure that it supports per-port
switching. is function prevents the entire chain of peripherals from freezing up if one of them is not working
properly or is down.
Will Hi-Speed USB 2.0 Devices Work On
USB Hubs And Vice Versa?
You can use your Hi-Speed USB 2.0 devices with
USB hubs, but the peripherals will be limited to USB
performance levels.
ere are Hi-Speed USB 2.0 hubs that are able to
communicate in three modes: high-speed (480Mb/s),
full-speed (12Mb/s), and low-speed (1.5Mb/s). HiSpeed USB 2.0 is backwards compatible, so you will
be able to connect USB devices to Hi-Speed USB 2.0
hubs; however, the USB devices will still maintain their
■
normal performance levels (i.e. 12 Mb/s).
In order to achieve the fast data transfer rates of Hi-
Speed USB 2.0, you must connect your Hi-Speed USB
2.0 device directly to a Hi-Speed USB 2.0 port on either a computer or hub.
For more information about the USB interface,
please visit: www.lacie.com/technologies
TeChNICAl NOTe:
Avoid using USB connectors found on certain peripherals such as keyboards. ese are passive (or
passthrough) connectors that lead to power loss
and unstable operation.
Only use USB cables shorter than 5 meters (approximately 15 feet). Using longer cables may
cause the peripherals to malfunction due to excessive reduction in electrical signal strength.
•
•
Page 38

LaCie Big Disk Extreme+
Triple Interface
page 37
Troubleshooting
In the event that your LaCie Big Disk Extreme+ is
not working correctly, please refer to the following checklist to find out where the problem is coming from. If you
have gone through all of the points on the checklist and
your drive is still not working correctly, please have a look
at the FAQs that are regularly published on our website –
www.lacie.com.
One of these FAQs may provide an answer to your
specific question. You can also visit the drivers pages,
where the most recent software updates will be available. If you need further assistance, please contact your
LaCie reseller or LaCie Technical Support (see page 42,
Contacting Customer Support for details).
Manual Updates
LaCie is constantly striving to give you the most
up-to-date, comprehensive User’s Manuals available on
the market. It is our goal to provide you with a friendly,
easy-to-use format that will help you quickly install and
utilize the many functions of your new device.
If your manual does not reflect the configurations of
the product that you purchased, please check our website for the most current version available.
■
7. Troubleshooting
Problem Question Answer
e drive is not recognized by the computer.
Does an icon for the drive appear
on the desktop?
ere should be an icon for the LaCie drive on the desktop. If the
drive does not appear, follow the rest of the Troubleshooting tips to
isolate the problem.
Does your computer’s configuration
meet the minimum system requirements for use with this drive?
Check page 7, Minimum System Requirements for more informa-
tion.
Is the drive’s power supply connected and turned on?
Make sure that the power supply is properly connected (see page
14, Connecting e Power Supply), that the drive has been turned
on by pressing the On/Off/Auto button the back of the drive, and
that the outlet the power supply is connected to is also turned on.
Did you follow the correct installation steps for the specific interface
and operating system.
Review the installation steps on pages 15-18, Connecting e
Interface Cable.
Are both ends of the FireWire,
eSATA or USB cables firmly attached?
Check both ends of the FireWire or USB cables and make sure
that they are fully seated in their respective ports. Try disconnecting
the cables, waiting 10 seconds, and then reconnecting them. If the
drive is still not recognized, restart your computer and try again.
7.1. Mac Users
Page 39

LaCie Big Disk Extreme+
Triple Interface
page 38
Troubleshooting
Problem Question Answer
e drive turns on
and off when you
turn your computer
on and off (USB and
FireWire connections
only).
is is normal. Your drive has an autoswitching power feature, which means that if your drive is connected
to your computer, turning the computer on will automatically turn the drive on. Likewise, turning the
computer off will automatically turn the drive off. If you wish to power off the drive while it is connected
to your computer, first make sure that your computer is not accessing the drive and then follow the steps in
page 19, Disconnecting Your LaCie Big Disk Extreme+. After you have disconnected the drive, fkip the
On/Off/Auto button on the back of the drive to turn the drive off.
e drive is not recognized by the computer.
Have the USB or FireWire drivers been installed correctly and
enabled?
Open Apple System Profiler and click on the Devices and Vol-
umes tab. If your device is not listed, recheck the cables and try the
other troubleshooting tips listed here.
Is there a conflict with other device
drivers or extensions?
Contact LaCie Technical Support for help.
Has the drive been formatted? Make sure that the drive has been formatted properly. Please see
pages 29, Formatting And Partitioning Your LaCie Big Disk Ex-
treme+ and 28, Helpful Information for more details.
Does your computer’s operating
system support the file system?
Check your computer’s documentation and see pages 29, Format-
ting And Partitioning Your LaCie Big Disk Extreme+ and 28,
Helpful Information for more information.
Error messages under
Mac OS 10.x.
Did you get an “Error –50” message
while copying to a FAT 32 volume?
When copying files or folders from Mac OS 10.x to a FAT 32 volume, certain characters cannot be copied. ese characters include,
but are not limited to:
? < > / \ :
Check your files and folders to ensure that these types of characters
are not being used.
Did you get an error message telling
you that the drive has been disconnected when coming out of sleep
mode?
Simply ignore this message. e drive will remount to the desktop.
LaCie drives conserve power by spinning down when you set your
computer to sleep mode, and when the computer is “woken” from
sleep, it does not give the drive enough time to spin-up from its
sleep mode.
Are you having problems getting
your FireWire device to be recognized?
If you are having problems with your FireWire connection under
Mac OS 10.2.x, upgrade to the latest Mac OS version.
e drive is working
slowly.
Are there other USB or FireWire
devices connected to the same port
or hub?
Disconnect any other USB or FireWire devices and see if the
drive’s performance increases.
e drive is not running noticeably faster
when connected via
Hi-Speed USB 2.0.
Are you operating in Mac OS 9.x? Apple does not support the Hi-Speed USB 2.0 standard under
Mac OS 9.x. You will be limited to the slower transfer rates of the
original USB standard.
Are you operating in Mac OS 10.x? Apple has only recently begun incorporating native Hi-Speed USB
2.0 ports in their computers. To achieve Hi-Speed USB 2.0 transfer
rates, you will need to add a Hi-Speed USB 2.0 PCI or PC card to
your computer.
Page 40

LaCie Big Disk Extreme+
Triple Interface
page 39
Troubleshooting
Problem Question Answer
e drive is not running noticeably faster
when connected via
Hi-Speed USB 2.0.
Is the drive connected to a USB
port on your computer, or to a USB
hub?
If your drive is connected to a USB port or hub, this is normal. A
Hi-Speed USB 2.0 device can only operate at Hi-Speed USB 2.0
performance levels when it is connected directly to a Hi-Speed
USB 2.0 port or hub. Otherwise, the Hi-Speed USB 2.0 device will
operate at the slower USB transfer rates. For more information,
please see page 35, USB Questions And Answers.
Is the drive connected to a HiSpeed USB 2.0 port on your
computer?
Check to see that the Hi-Speed USB 2.0 drivers for both your host
bus adapter and device have been installed correctly. If in doubt,
un-install the drivers and re-install them.
Does your computer or operating
system support Hi-Speed USB 2.0?
See page 7, Minimum System Requirements.
System fan is not
running.
Confirm the outlet is powered, verify power connections, and try an alternate power cable. e fan on the
LaCie Big Disk Extreme+ does not run continuously; it is activated at certain temperatures.
Your drive may not have a fan. e LaCie Big Disk Extreme+ comes in different capacities, and only the
highest capacities feature a drive fan.
Problem Question Answer
e drive is not recognized by the computer.
Has the drive been formatted? Make sure that the drive has been formatted properly. Please see
pages 29, Formatting And Partitioning Your LaCie Big Disk Ex-
treme+ and 28, Helpful Information for details.
Does your computer’s operating
system support the file system?
Check your computer’s documentation and see pages 29, Format-
ting And Partitioning Your LaCie Big Disk Extreme+ and 28,
Helpful Information for details.
Is there an icon for the drive in My
Computer?
Go into My Computer and look for an icon and drive letter assigned to the LaCie drive. If the drive does not appear, follow the
rest of the Troubleshooting tips to isolate the problem.
Does your computer’s configuration
meet the minimum system requirements for use with this drive?
Check page 7, Minimum System Requirements for more informa-
tion.
Is the drive’s power supply connected and turned on?
Make sure that the power supply is properly connected (see page
14, Connecting e Power Supply), that the drive has been turned
on by flipping the On/Off/Auto button on the back of the drive,
and that the outlet the power supply is connected to is also turned
on.
Did you follow the correct installation steps for the specific interface
and operating system.
Review the installation steps on pages 15-18, Connecting e
Interface Cable.
7.2. Windows Users
Page 41

LaCie Big Disk Extreme+
Triple Interface
page 40
Troubleshooting
Problem Question Answer
e drive is not recognized by the computer.
Are both ends of the FireWire or
USB cables firmly attached?
Check both ends of the FireWire or USB cables and make sure
that they are fully seated in their respective ports. Try disconnecting
the cables, waiting 10 seconds, and then reconnecting them. If the
drive is still not recognized, restart your computer and try again.
Have the FireWire or USB drivers been installed correctly and
enabled?
Windows 2000 Users:
Go to Start Menu > Settings > Control Panel > System > Hard-
ware tab > Device Manager button > USB Controller or IEEE
1394 Controller. Click on the + sign next to the controller icon,
and you should see your device listed.
Windows XP Users:
Go to Start Menu > Control Panel > Performance and Mainte-
nance > System > Hardware tab > Device Manager button > USB
Controller or IEEE 1394 Controller. Click on the + sign next to
the controller icon, and you should see your device listed.
If you still can’t see your device, recheck the cables and try the other
troubleshooting tips listed here.
Is there a conflict with other device
drivers or extensions?
Contact LaCie Technical Support for help.
e drive turns on
and off when you turn
your computer on and
off.
is is normal. Your drive has an autoswitching power feature, which means that if your drive is connected
to your computer, turning the computer on will automatically turn the drive on. Likewise, turning the
computer off will automatically turn the drive off. If you wish to power off the drive while it is connected to
your computer, first make sure that your computer is not accessing the drive and then follow the steps page
19, Disconnecting Your LaCie Big Disk Extreme+. After you have disconnected the drive, flip the On/Off/
Auto button on the back of the drive to turn the drive off.
FireWire 800 does not
work under Windows
2000.
Have you installed the Windows
2000 Service Pack 4?
In order to operate FireWire 800 devices under Windows 2000,
the Service Pack 4 update must be installed. is is a free download
offered on Microsoft’s website.
e drive is working
slowly.
Are there other USB or FireWire
devices connected to the same port
or hub?
Disconnect any other USB or FireWire devices and see if the
drive’s performance increases.
Is the drive connected via FireWire
to a computer running Windows
Vista?
Windows Vista includes a feature that allows you to disconnect
your LaCie hard drive from your computer without using the
“Safely Remove Hardware” icon in the task bar. is feature works
by disabling write caching on the disk, which can reduce the performance of your drive.
Right-click on your LaCie hard drive in My Computer and se-
lect Properties.
Select the Policies tab.
Select Optimize for performance. You should notice an im-
provement in your drive’s performance. Follow the instructions
in section 3.4 to disconnect your drive from your computer.
1.
2.
3.
Page 42

LaCie Big Disk Extreme+
Triple Interface
page 41
Troubleshooting
v
Problem Question Answer
e drive is not running noticeably faster
when connected via
Hi-Speed USB 2.0.
Is the drive connected to a USB
port on your computer, or to a USB
hub?
If your drive is connected to a USB port or hub, this is normal. A
Hi-Speed USB 2.0 device can only operate at Hi-Speed USB 2.0
performance levels when it is connected directly to a Hi-Speed
USB 2.0 port or hub. Otherwise, the Hi-Speed USB 2.0 device will
operate at the slower USB transfer rates. For more information,
please see page 35, USB Questions And Answers.
Is the drive connected to a HiSpeed USB 2.0 port on your
computer?
Check to see that the Hi-Speed USB 2.0 drivers for both your host
bus adapter and device have been installed correctly. If in doubt,
un-install the drivers and re-install them.
Does your computer or operating
system support Hi-Speed USB 2.0?
See page 7, Minimum System Requirements.
Are you using a certified Hi-Speed
USB 2.0 cable to connect your
drive?
Ensure that the cable you are using has been properly certified.
e Hi-Speed USB 2.0 cable that was shipped with your LaCie
drive has been properly certified and tested to comply with USB
standards.
Are you using Windows 98 SE or
Windows Me?
ese systems are not supported; USB will not work with either
Windows 98 SE or Windows Me.
System fan is not
running.
Confirm the outlet is powered, verify power connections, and try an alternate power cable. e fan on the
LaCie Big Disk Extreme+ does not run continuously; it is activated at certain temperatures.
Your drive may not have a fan. e LaCie Big Disk Extreme+ comes in different capacities, and only the
highest capacities feature a drive fan.
Page 43

LaCie Big Disk Extreme+
Triple Interface
page 42
Contacting Customer Support
8. Contacting Customer Support
Read the User Manual and review the Troubleshooting section.
Try to isolate the problem. If possible, make the
drive the only external device on the CPU, and make
sure that all of the cables are correctly and firmly attached.
If you have asked yourself all of the pertinent questions in the troubleshooting checklist, and you still can’t
get your LaCie drive to work properly, contact us via
the contacts on page 43. Before contacting us, make sure
1.
2.
that you are in front of your computer and that you have
the following information on hand:
Your LaCie drive’s serial number
Operating system and version
Computer brand and model
Amount of memory installed
Names of any other devices installed on your
computer, including CD/DVD burners
•
•
•
•
•
Before You Contact Technical Support■
Information to Include in Email Correspondence■
Information Where to Find Information
1. LaCie Big Disk Extreme+ serial number Located on a sticker at the back of drive or on the original packaging
2. LaCie Big Disk Extreme+ file format Mac users:
Select the Big Disk Extreme+ Hard Drive icon on the desktop and
press Command + I, or press the Control key and choose Get Info.
Windows users:
Right click the Big Disk Extreme+ Hard Drive icon and select Proper-
ties.
3. Macintosh/PC model Mac users:
Click on the Apple icon in the menu bar and select About this Mac.
Windows users:
Right click My Computer and select Properties > General.
4. Operating system version
5. Processor speed
6. Computer memory
7. e brands and models of other internal and external
peripherals installed on my computer
Mac users:
Click on the Apple icon in the finder bar and select About this Mac.
Select More Info... e Apple System Profiler will launch and will
list your internal and external peripherals.
Windows users:
Right click My Computer and select Properties > Hardware.
Page 44

LaCie Big Disk Extreme+
Triple Interface
page 43
Contacting Customer Support
8.1. LaCie Technical Support Contacts
LaCie Asia, Singapore, and Hong Kong
Contact us at:
http://www.lacie.com/asia/contact/
LaCie Australia
Contact us at:
http://www.lacie.com/au/contact/
LaCie Belgium
Contact us at:
http://www.lacie.com/be/contact/ (Français)
LaCie Canada
Contact us at:
http://www.lacie.com/caen/contact/ (English)
LaCie Denmark
Contact us at:
http://www.lacie.com/dk/contact
LaCie Finland
Contact us at:
http://www.lacie.com/fi/contact/
LaCie France
Contact us at:
http://www.lacie.com/fr/contact/
LaCie Germany
Contact us at:
http://www.lacie.com/de/contact/
LaCie Italy
Contact us at:
http://www.lacie.com/it/contact/
LaCie Japan
Contact us at:
http://www.lacie.com/jp/contact/
LaCie Netherlands
Contact us at:
http://www.lacie.com/nl/contact/
LaCie Norway
Contact us at:
http://www.lacie.com/no/contact/
LaCie Spain
Contact us at:
http://www.lacie.com/es/contact/
LaCie Sweden
Contact us at:
http://www.lacie.com/se/contact
LaCie Switzerland
Contact us at:
http://www.lacie.com/chfr/contact/ (Français)
LaCie United Kingdom
Contact us at:
http://www.lacie.com/uk/contact/
LaCie Ireland
Contact us at:
http://www.lacie.com/ie/contact/
LaCie USA
Contact us at:
http://www.lacie.com/contact/
LaCie International
Contact us at:
http://www.lacie.com/intl/contact/
Page 45
LaCie Big Disk Extreme+
Triple Interface
page 44
Warranty Information
9. Warranty Information
LaCie warrants your drive against any defect in material and workmanship, under normal use, for the period designated on your warranty certificate. In the event
this product is found to be defective within the warranty
period, LaCie will, at its option, repair or replace the
defective drive. is warranty is void if:
e drive was operated/stored in abnormal use or
maintenance conditions;
e drive is repaired, modified or altered, unless such
repair, modification or alteration is expressly authorized in writing by LaCie;
e drive was subjected to abuse, neglect, lightning
strike, electrical fault, improper packaging or accident;
e drive was installed improperly;
e serial number of the drive is defaced or missing;
e broken part is a replacement part such as a pickup tray, etc.
e tamper seal on the drive casing is broken.
LaCie and its suppliers accept no liability for any
loss of data during the use of this device, or for any of
the problems caused as a result.
•
•
•
•
•
•
•
LaCie will not, under any circumstances, be liable
for direct, special or consequential damages such as, but
not limited to, damage or loss of property or equipment,
loss of profits or revenues, cost of replacement goods,
or expense or inconvenience caused by service interruptions.
Any loss, corruption or destruction of data while using a LaCie drive is the sole responsibility of the user,
and under no circumstances will LaCie be held liable for
the recovery or restoration of this data.
Under no circumstances will any person be entitled
to any sum greater than the purchase price paid for the
drive.
To obtain warranty service, call LaCie Technical Support. You will be asked to provide your LaCie
product’s serial number, and you may be asked to furnish
proof of purchase to confirm that the drive is still under
warranty.
All drives returned to LaCie must be securely packaged in their original box and shipped with postage prepaid.
ImpOrTANT INfO: Register online for free
technical support: www.lacie.com/register
Page 46

LaCie Big Disk Extreme+
Triple Interface
page 45
Glossary
Glossary
Asynchronous – Data transfer method where the data is
transferred independently of other processes. With this
transfer method, the intervals between transmissions
can vary, and data can be resent if it is initially missed.
Backup – (1) e act of creating at least one additional
copy of data onto a different (and safe) storage device
from where it can be retrieved at a later time if needed.
(2) A copy of a file, directory, or volume on a separate
storage device from the original, for the purposes of retrieval in case the original is erased, damaged, or destroyed.
Bit – e smallest measure of computerized data, either
a 1 or a 0. Eight bits equal one byte, or one character.
Block – A very small section of the storage media comprised of one or more sectors. A block is the smallest
amount of space allocated on a drive for data storage. By
default, a sector of data consists of 512 bytes.
Buffer – RAM cache that is faster than the data that is
being delivered. Buffers are used so data may be stored
and delivered to the receiving item as it is needed.
Bus – Electronic links that enable data to flow between
the processor, RAM and extension cables (peripherals).
Byte – A sequence of adjacent binary digits, or bits, considered as a unit, 8 bits in length. ere are 8 bits in 1
byte. See also MB (Megabyte) or GB (Gigabyte).
Cache, -ing – is is an area of electronic storage (usually RAM) set aside to store frequently used data from
electromechanical storage (hard drives, floppy disks,
CD/DVD-ROM, tape cartridges, etc.) erefore, storing frequently used data in RAM can enhance your
system’s overall response to disk-intensive operations
significantly.
Configuration – When talking about a PC, configuration is understood to be the sum of the internal and
external components of the system, including memory,
disk drives, the keyboard, the video subsystem and other
peripherals, such as the mouse, modem or printer. e
configuration also implies software: the operating system and various device managers (drivers), as well as
hardware settings and options set by the user via configuration files.
Controller – is is a component or an electronic card
(referred to in this case as a “controller card,” such as
PCI or PCMCIA cards) that enables a computer to
communicate with or manage certain peripherals. e
controller manages the operation of the peripheral associated with it, and links the PC bus to the peripheral via
a ribbon cable inside the PC. An external controller is
an expansion card which fills one of the free slots inside
your PC and which enables a peripheral (CD-ROM
drive, scanner or printer, for instance) to be connected
to the computer.
Cross-platform – Term that refers to a device that is
able to be operated by both Mac and Windows operating systems.
Data Stream – e flow of data that accomplishes a task,
usually related to moving data from storage to computer
RAM or between storage devices.
Digital – Discrete information that can be broken down
to zero or one bits.
Driver (peripheral manager) – A software component
that enables the computer system to communicate with
a peripheral. Most peripherals will not operate correctly
– if at all – if the appropriate drivers are not installed on
the system.
File System – Links the physical map of a disc to its
logical structure. anks to the file system, users and
computers can easily display path, directories and files
recorded onto the disc.
Firmware – Permanent or semi-permanent instructions
Page 47

LaCie Big Disk Extreme+
Triple Interface
page 46
Glossary
and data programmed directly into the circuitry of a
programmable read-only memory or an electronicallyerasable, programmable read-only memory chip. Used
for controlling the operation of the computer or tape
drive. Distinct from the software, which is stored in random access memory and can be altered.
Folder – A list created on a disk to store files. Creating
folders and sub-folders enables you to organize the storage of your files in a logical, hierarchical manner so that
you can find and manage them more easily.
Format, -ting, -ted – is is a process where a device
is prepared to record data. In this process, the hard disk
writes special information onto its own recording surfaces into areas (blocks) that are ready to accept user
data. Since this operation causes all current user data
stored on the hard disk to be lost, this is an infrequent
operation that usually only happens at the factory that
created the hard disk. It is unusual for something to
happen to a hard disk that requires the end-user to initially perform this operation.
GB (GigaByte) – is value is normally associated with
data storage capacity. Basically, it means a thousand million or a billion bytes. In fact, it equals 1,073,741,824
bytes (or 1,024 x 1,024 x 1,024).
Hardware – Physical components of a computer system, including the computer itself and peripherals such
as printers, modems, mice, etc.
Host Bus Adapter (HBA) – A printed circuit board
that installs in a standard microcomputer and an interface between the device controller and the computer.
Also called a controller.
Initialize, -ed, Initialization – After a hard drive (or
other storage device) is formatted and partitioned, some
special data needs to be written to it that helps the Mac
and Windows create files and save data. e process is
called initialization. is process, like formatting, causes
all user data on the storage device to be lost.
Interface – e protocol data transmitters, data receivers, logic and wiring that link one piece of computer
equipment to another, such as a hard drive to an adapter
or an adapter to a system bus. Protocol means a set of
rules for operating the physical interface, such as: do not
read or write before the drive is ready.
I/O (Input/Output) – Refers to an operation, program
or device whose purpose is to enter data into or to extract data from a computer.
Isochronous – Data transfer method that ensures that
data flows continuously and at a steady rate. ese transfers provide guaranteed transmission opportunities at
defined intervals.
Kb (Kilobit) – Equivalent to 1,000 bits.
Kb/s – Kilobits per second. 480Kb/s is equal to 60KB/
s.
KB/s – Kilobytes per second. A means of measuring
throughput.
Mb (Megabit) – Equivalent to 1,000,000 bits.
Mb/s – Megabits per second. A means of measuring
throughput. 480Mb/s is equal to 60MB/s.
MB/s – Megabytes per second. A means of measuring
throughput.
Media – e material or device used to store information in a storage subsystem, such as a tape cartridge, CD,
DVD or disk drive.
Operating System (OS) – Software that controls the
assignment and use of hardware resources such as memory, processor time, disk space and peripherals. An operating system is the basis on which software (applications) run. Windows, Mac OS and UNIX are among
the most common.
Overwrite – To write data on top of existing data thus
erasing the original data.
Partition, -ing – After formatting, the hard drive is not
yet ready to store files. It must be divided into sections
that will contain special information required for a Mac
or PC to operate and other sections that will contain the
files. is process of dividing up the hard drive is called
Page 48

LaCie Big Disk Extreme+
Triple Interface
page 47
Glossary
partitioning. A partition is just one section of the hard
drive that will contain either special data put there by
Silverlining or other files and data.
Peripheral – A generic term applied to printers, scanners, mice, keyboards, serial ports, graphics cords, disk
drives and other computer subsystems. is type of peripheral often relies on its own control software, known
as a peripheral driver.
Port, hardware – A connection component (SCSI port,
for example) that enables a microprocessor to communicate with a compatible peripheral.
Port, software – A memory address that identifies the
physical circuit used to transfer information between a
microprocessor and a peripheral.
RAM (Random Access Memory) – Generally referred
to as a computer’s “memory.” An integrated circuit
memory chip that allows information to be stored and
retrieved by a microprocessor or controller. e information can be stored or accessed in any order, and all
storage locations are equally accessible.
Seek Time – e amount of time (in thousandths of a
second, or milliseconds) that it takes a hard drive’s read/
write head to move to a specific location on the disk.
Average seek, then, is the average of a large number of
random samplings all over the disk. Seek time is CPU
independent, meaning that seek time is the same for a
disk drive, whether it is attached to a computer or not.
Software – In a nutshell, software is a set of instructions for the computer. A set of instructions to perform a particular task is called a program. ere are two
main types of software: system software (an operating
system such as Mac OS or Windows) which controls
the operation of the computer and application software
(programs such as Word or Excel) which enable users
to perform tasks such as word processing, spreadsheet
creation, graphics, etc.
Storage – In computers, any equipment in which information may be kept. PCs generally use disk units and
other external storage media (diskettes, CD-ROMs,
magnetic disks, etc.) for permanent storage of information.
Striping – Spreading data evenly over multiple disk
drives to enhance performance. Data striping can be
performed on a bit, byte or block basis for optimum application performance.
Transfer Rate – e rate at which the drive sends and
receives data from the controller. Transfer rates for reading data from the disk drive may not be the same as the
transfer rate for writing data to the disk drive. Transfer
rates are CPU dependent, meaning that regardless of
how great a transfer rate your drive is capable of, the
actual transfer rate can only be as fast as the slowest of
your hard drive and computer.
Volume – A desktop mountable storage area, may be a
partition of a hard drive, a removable disk or a cartridge.
Typically measured in Megabytes or Gigabytes.
Utility – Software designed to perform maintenance
tasks on the system or its components. Examples include backup programs, programs to retrieve files and
data on disk, programs for preparing (or formatting) a
disk or and resource editors.
 Loading...