

LaCie 301136U - Ethernet Disk Mini NAS Server, 301270U - Ethernet Disk Mini, 301173U - Ethernet Disk Mini NAS Server, Ethernet Disk Mini User Manual
Page 1

LaCie Ethernet Disk mini
User Manual
Table of Contents
page 1
Table of Contents
Health and Safety Precautions 4
General Use Precautions 4
1. Introduction to the LaCie Ethernet Disk mini 6
1.1. Hard Drive Heat Management 7
1.2. Racking Options 8
2. Your LaCie Ethernet Disk mini
9
2.1. Minimum System Requirements 9
2.2. Package Content 10
2.3. Views of the Drive 11
2.4. Cables and Connectors 13
3. Setting Up Your LaCie Ethernet Disk mini 14
3.1. Installation Steps 14
3.2. Connecting the External Power Supply 15
3.3. Connecting the Interface Cable 16
3.3.1. USB Connection 1
6
3.3.2. Ethernet Connection 16
3.4. Driver Installation (USB Only) 17
3.4.1. Windows XP and 2000 Users 17
3.4.2. Mac Users 18
3.5. Installing and Running the IP Configurator Wizard 19
3.6. Configure Your Drive On a Local Area Network with no DHCP Server 20
3.7. Disconnecting Your LaCie Hard Drive (Ethernet Connection) 21
4. Accessing the Shared Storage 2
2
4.1. Windows XP/2000 Users 22
4.2. Mapping the Network Drive (Windows Users Only) 23
4.3. Mac Users 24
4.4. Linux Users 25
5. Configure Your Drive Using the NAS Administration Page 2
6
5.1. Accessing e NAS Administration Page 26
5.2. Administering e LaCie Ethernet Disk mini 28
5.2.1. Setting e User Language 28
5.2.2. Log Off 28
5.3. Configuration Menu 29
5.3.1. Machine Name 29
5.3.2. Windows Workgroup 30
5.3.3. AppleTalk Zone 30
5.3.4. Select a Time Zone 31
Page 2

LaCie Ethernet Disk mini
User Manual
Table of Contents
page 2
5.3.5. Change Date and Time 31
5.3.6. Network Synchronization 32
5.3.7. Restart/Shut Down 32
5.4. Network Menu 33
5.4.1. IP Configuration 33
5.5. Disk Menu 35
5.5.1.Reformatting the Disk 35
5.5.2.Adding Additional Storage Space 35
5.6. Shares Menu 36
5.6.1. Create New Share 36
5.6.2. Edit a Share 37
5.7. Users Menu 37
5.7.1. Add A User 38
5.7.2. Edit a User 38
5.7.3. Change Administrator Password 39
5.9. Status Menu 40
5.9.1. FTP and HTTP Protocols 40
5.9.2. System Log 40
6. Ethernet Disk mini Media Server Functionality 41
6.1. About UPnP Media Server 41
6.2. Configuring Media Server Functions 42
6.2.1. Enabling the MediaServer 42
6.2.2. Selecting Shares with Media Content 42
6.2.3. Restarting the Media Server 42
7. Troubleshooting 43
8. Contacting Customer Support 46
8.1. LaCie Technical Support Contacts 47
9. Warranty Information 48
Page 3
LaCie Ethernet Disk mini
User Manual
Copyrights
Copyright © 2006 LaCie. All
rights reserved. No part of this publication may be reproduced, stored in a
retrieval system, or transmitted in any
form or by any means, electronic, mechanical, photocopying, recording or
otherwise, without the prior written
consent of LaCie.
Trademarks
Apple, Mac, and Macintosh are registered trademarks of Apple Computer,
Inc. Microsoft, Windows 98, Windows
98 SE, Windows 2000, Windows Millennium Edition and Windows XP
are registered trademarks of Microsoft
Corporation. Other trademarks mentioned in this manual are the property
of their respective owners.
Changes
e material in this document is
for information only and subject to
change without notice. While reasonable efforts have been made in the
preparation of this document to assure
its accuracy, LaCie assumes no liability
resulting from errors or omissions in
this document, or from the use of the
information contained herein. LaCie
reserves the right to make changes or
revisions in the product design or the
product manual without reservation
and without obligation to notify any
person of such revisions and changes.
Canada Compliance Statement
is Class A digital apparatus
meets all requirements of the Canadian Interference-Causing Equipment
Regulations.
FCC Statement
is device complies with Part 15
of the FCC Rules. Operation is subject
to the following conditions:
e devices may not cause harmful
interference
e devices must accept any interference received, including interference that may cause undesired
operation.
NOTE: is equipment has been
tested and found to comply with the
limits for a Class B digital device, pursuant to Part 15 of the FCC Rules.
ese limits are designed to provide
reasonable protection against harmful
interference in a residential installation. is equipment generates, uses
and can radiate radio frequency energy and, if not installed and used in
accordance with the instructions, may
cause harmful interference to radio
communications. However, there is no
guarantee that interference will not occur in a particular installation. If this
equipment does cause harmful interference to radio or television reception,
which can be determined by turning
the equipment off and on, the user is
encouraged to try and correct the in-
1.
2.
terference by one or more of the following measures:
Reorient or relocate the receiving
antenna.
Increase the separation between the
equipment and receiver.
Connect the equipment into an outlet on a circuit different from that to
which the receiver is connected.
Consult the dealer or an experienced
radio/TV technician for help.
Modifications to this product not
authorized by LaCie could void the
FCC & Industry Canada regulations
and negate your authority to operate
the product.
Manufacturer’s Declaration for CE Certification
We, LaCie, solemnly declare
that this product conforms to the following European standards: Class B
EN60950, EN55022, EN50082-1,
EN61000-3-2
With reference to the following conditions: 73/23/EEC Low Voltage Directive; 89/336/EEC EMC Directive
ROHS Compliance
is product is ROHS compliant
(European Directive 2002/95/EC on
the Restriction of Hazardous Substances).
❖
❖
❖
❖
Tested To Comply
With FCC standards
For Home of Office Use
LaCie Ethernet Disk mini
CAUTION: Modifications
not authorized by the manufacturer may void the user’s
authority to operate this device.
Forward
page 3
CAUTION: e LaCie
Ethernet Disk mini’s warranty
may be void as a result of the
failure to respect the precautions
listed above.
Page 4

LaCie Ethernet Disk mini
User Manual
Forward
page 4
is symbol on the product or on its packaging
indicates that this prod-
uct must not be disposed
of with your other household waste.
Instead, it is your responsibility to
dispose of your waste equipment by
handing it over to a designed collec-
tion point for the recycling of waste
electrical and electronic equipment.
e separate collection and recycling
of your waste equipment at the time of
disposal will help to conserve natural
resources and ensure that it is recycled in a manner that protects human
health and the environment. For more
information about where you can drop
off your waste equipment for recycling,
please contact your local city office,
your household waste disposal service,
or the shop where you purchased the
product.
Only qualified persons are authorized to carry out maintenance on
this device.
Read this User Manual carefully
and follow the correct procedure
when setting up the device.
Do not open your LaCie Ethernet Disk mini or attempt to disassemble or modify it. Never insert
any metallic object into the drive
to avoid any risk of electrical shock,
fire, short-circuiting or dangerous
❖
❖
❖
emissions. Your LaCie Ethernet
Disk mini contains no user-serviceable parts. If it appears to be malfunctioning, have it inspected by a
qualified LaCie Technical Support
representative.
Never expose your device to rain, or
use it near water, or in damp or wet
conditions. Never place objects containing liquids on the LaCie Ethernet Disk mini, as they may spill into
its openings. Doing so increases the
❖
risk of electrical shock, short-circuiting, fire or personal injury.
Make sure that the computer and
LaCie Ethernet Disk mini are electrically grounded. If the devices are
not grounded, there is an increased
risk of electrical shock. Power requirements 100-240 V~, 1.5 A, 6050 Hz, (Supply voltage fluctuations
not exceeding ± 10% of the nominal,
transient over-voltages according to
over-voltage category II).
❖
Health and Safety Precautions
General Use Precautions
Do not expose the LaCie Ethernet
Disk mini to temperatures outside
the range of 5° C to 35° C (41° F
to 95° F); or to operational humidity beyond 5-80%, non-condensing, or non-operating humidity
beyond 10-90%, non-condensing.
Doing so may damage the LaCie
Ethernet Disk mini or disfigure its
casing. Avoid placing your LaCie
❖ Ethernet Disk mini near a source of
heat or exposing it to sunlight (even
through a window). Inversely, placing your LaCie Ethernet Disk mini
in an environment that is too cold
or humid may damage the unit.
Always unplug the LaCie Ethernet
Disk mini from the electrical outlet if there is a risk of lightning or
if it will be unused for an extended
❖
period of time. Otherwise, there is
an increased risk of electrical shock,
short-circuiting or fire.
Use only the power supply shipped
with the device.
Do not use the LaCie Ethernet Disk
mini near other electrical appliances
such as televisions or radios. Doing
so may cause interference which
❖
❖
Page 5
LaCie Ethernet Disk mini
User Manual
Forward
page 5
will adversely affect the operation of
the other products.
Do not place the LaCie Ethernet
Disk mini near sources of magnetic interference, such as computer displays, televisions or speakers. Magnetic interference can
affect the operation and stability
❖
of your LaCie Ethernet Disk mini.
Do not place heavy objects on top
of the LaCie Ethernet Disk mini or
use excessive force on it.
Never use excessive force on your
LaCie Ethernet Disk mini. If you
detect a problem, see the Troubleshooting section in this manual.
❖
CAUTION: A shielded-type
power cord is required in order
to meet FCC emission limits
and also to prevent interference
to the nearby radio and television reception. It is essential
that only the supplied power
cord be used.
IMPORTANT INFO: Any loss, corruption or destruction of data while using a LaCie drive is the sole responsibility of the
user, and under no circumstances will LaCie be held liable for the recovery or restoration of this data. To help prevent the loss
of your data, LaCie highly recommends that you keep TWO copies of your data; one copy on your external hard drive, for
instance, and a second copy either on your internal hard drive, another external hard drive or some other form of removable
storage media. LaCie offers a complete line of CD and DVD drives. If you would like more information on backup, please
refer to our website.
IMPORTANT INFO: 1GB = 1,000,000,000 bytes. 1TB = 1,000,000,000,000 bytes. Once formatted, the actual available
storage capacity varies depending on operating environment (typically 10-15% less). 1GB = 1,000,000,000 bytes. 1TB =
1,000,000,000,000 bytes.
Page 6
LaCie Ethernet Disk mini
User Manual
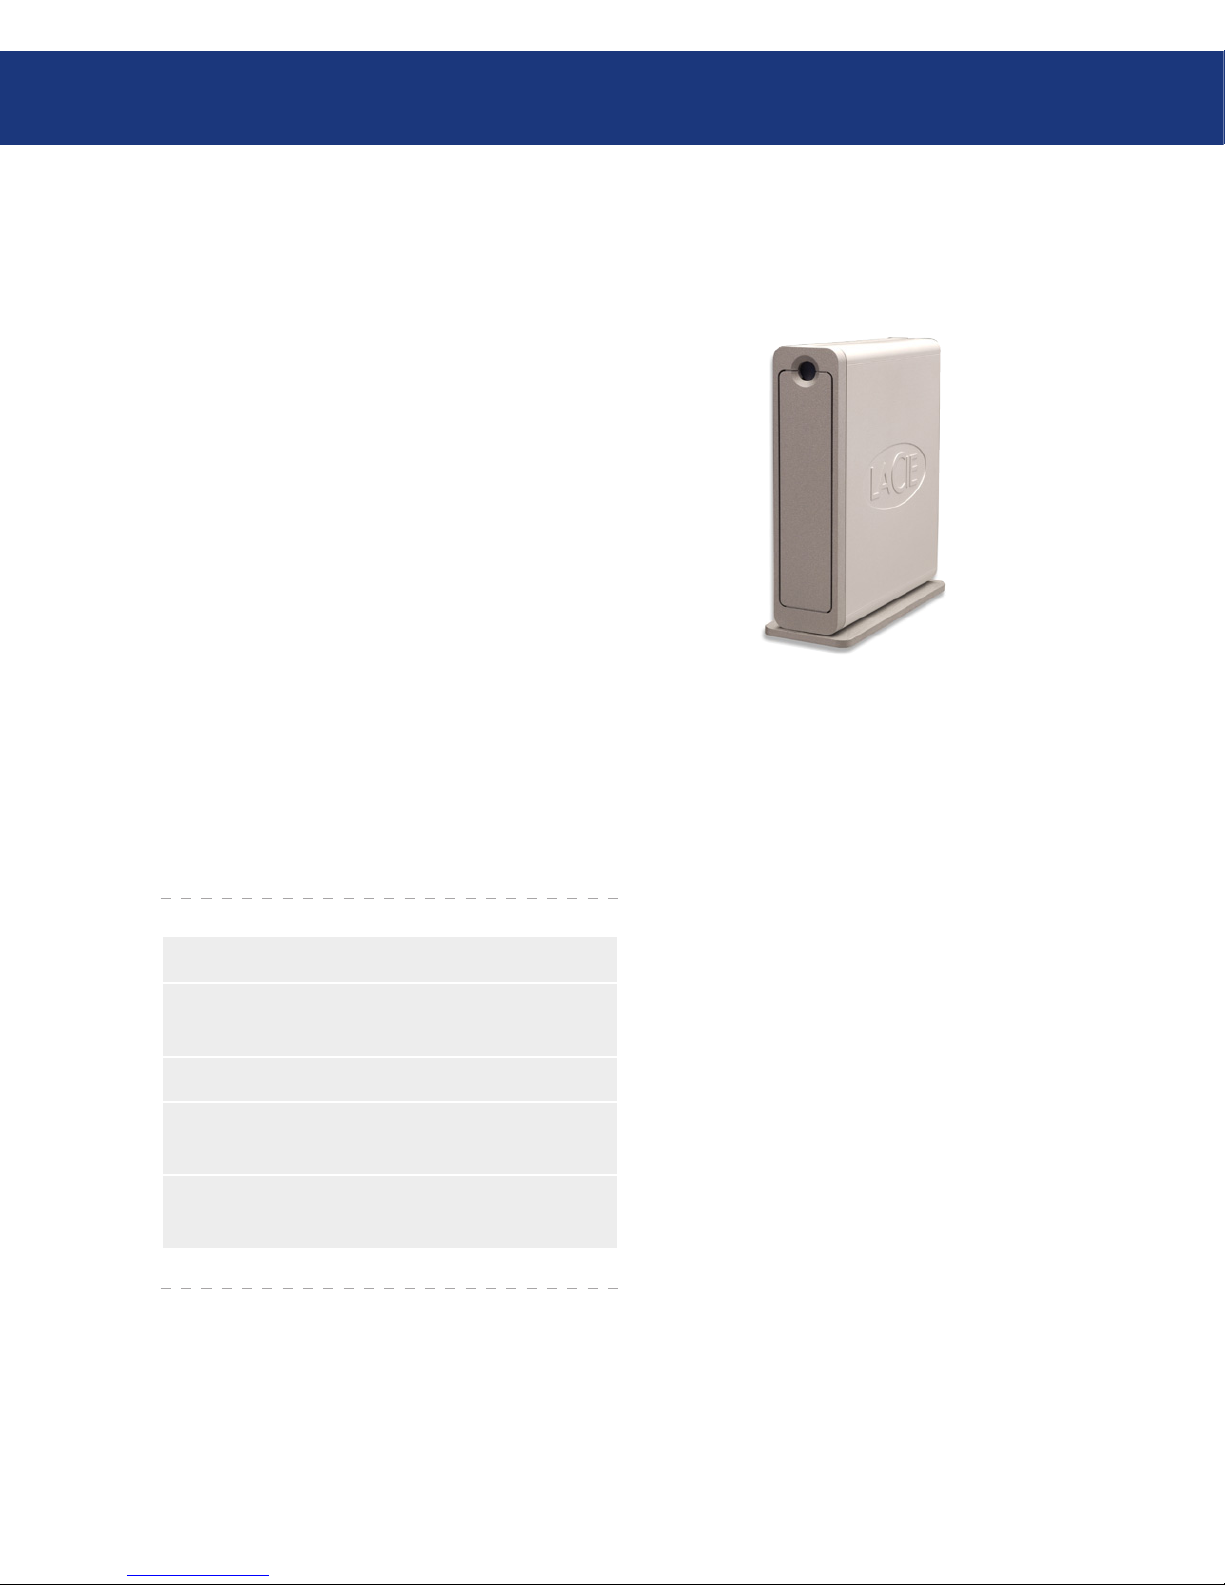
Congratulations on the purchase of your new LaCie
Ethernet Disk mini. By simply plugging the LaCie Ethernet Disk mini into your Ethernet-based network, you
can easily share documents, data or multi-media files.
Connect the LaCie Ethernet Disk mini either directly to a computer via USB, or share the drive over
your network through the Ethernet connection. When
connected through USB, the LaCie Ethernet Disk mini
performs like a standard network hard drive, and you
can also still modify and configure the network settings,
as well. When connected to a network, the LaCie Ethernet Disk mini becomes a Network Attached Storage
device, capable of supporting a limited number of users
connecting simultaneously.
You can easily manage the LaCie Ethernet Disk mini
through the Internet with the Web Administration tool
– create users, assign access rights and passwords and
configure the network parameters of your drive.
1. Introduction to the LaCie Ethernet Disk mini
Your LaCie Ethernet Disk mini Capabilities■
Back up data in a separate location, away from
the source
❖
Centralize your digital media content❖
Stream audio/video content to any media player
(UPnP DLNA compatible)
❖
Share files between Mac, Windows and Linux
clients
❖
Introduction
page 6
Page 7
LaCie Ethernet Disk mini
User Manual
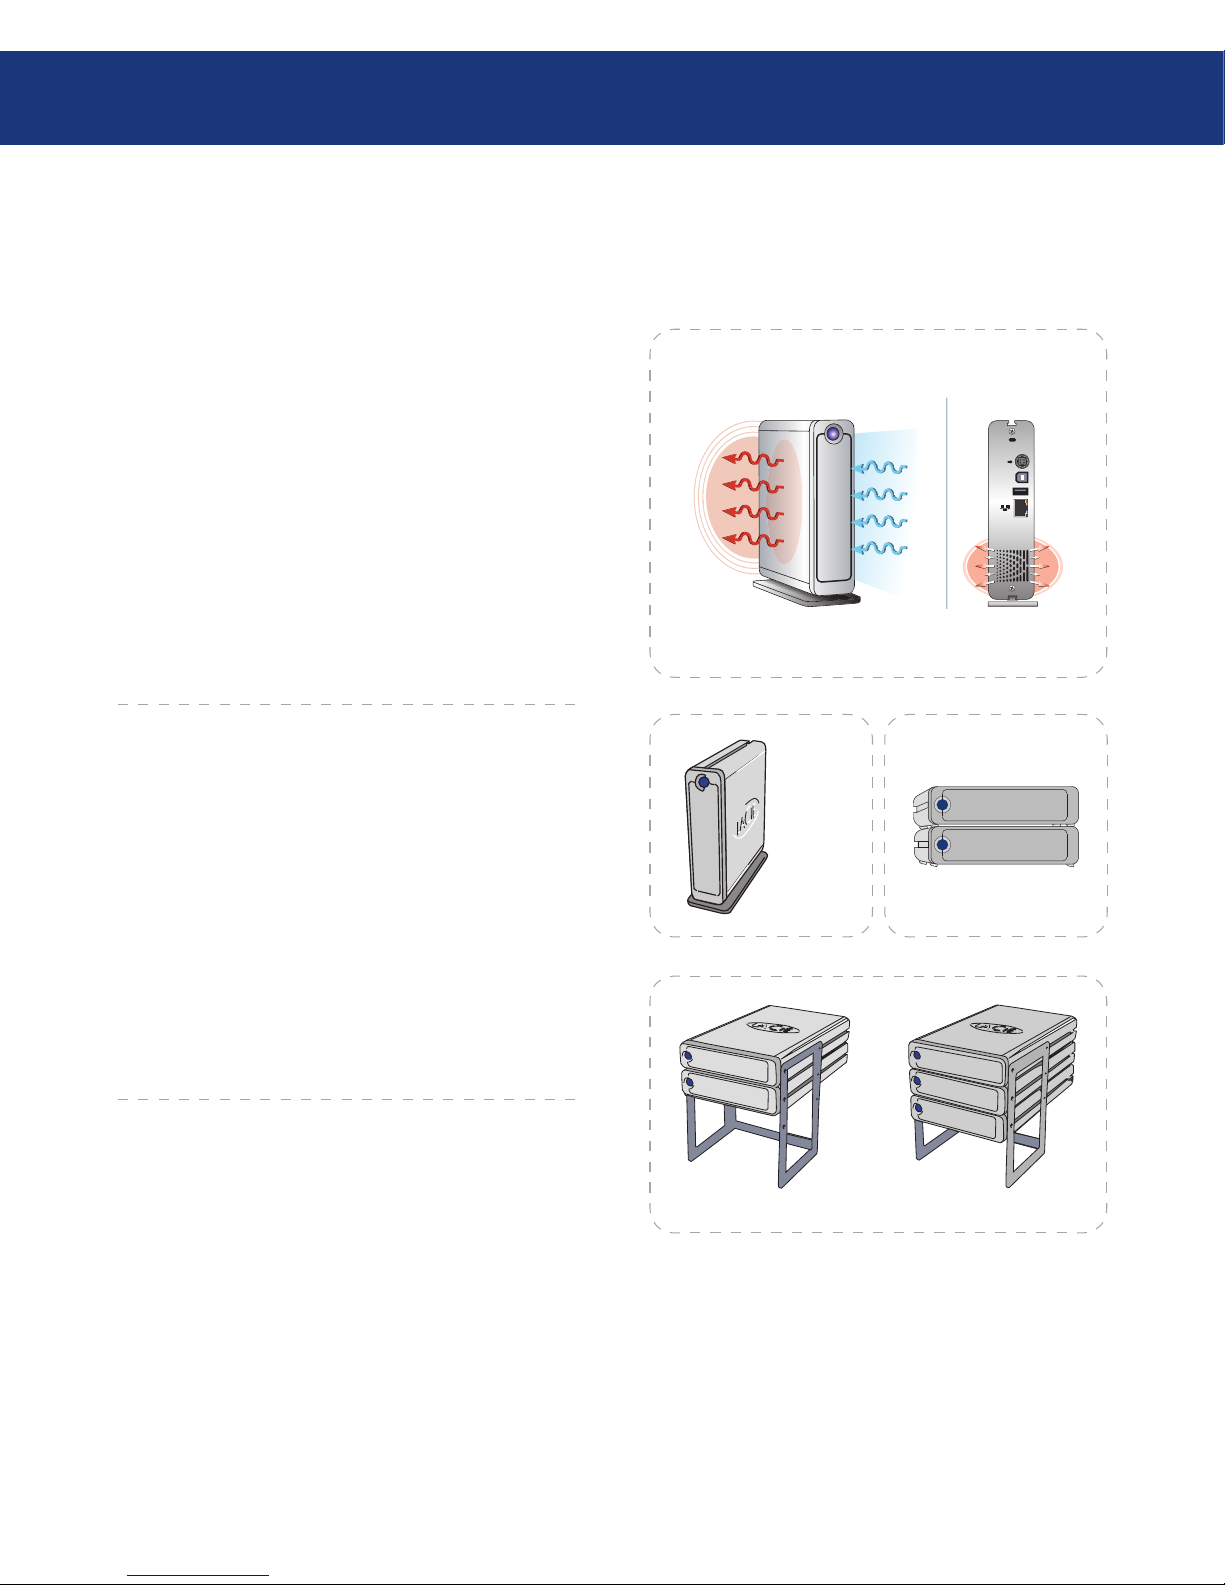
e LaCie Ethernet Disk mini’s metal body is ideal
for naturally dissipating internal drive heat. Its unique
design actually draws heat away from the internal drive
toward the external casing. e casing absorbs heat and
will take advantage of its large surface to further dissipate heat outside the casing. Because of this advantageous feature, heat is taken away from the internal drive,
keeping it safe and prolonging its life and reliability. As
a consequence, it is normal that the external casing is
hot to the touch. Please make sure that the vents of the
back-bezel and front-bezel are not obstructed so that
there is a natural airflow across the casing.
1.1. Hard Drive Heat Management
Heat Dissipation Design■
Smart Fan Technology■
USB 2.0
USB
e casing alone is a great way to dissipate heat without the need of a fan. erefore, currently, most drives do
not require a fan. Only the largest capacity drives may
need a fan. To find out if your drive includes a fan, please
refer to the item number and product datasheet.
Some models of the Ethernet Disk mini have a thermo-regulated “smart fan”, which activates when the heat
inside the casing reaches a certain temperature. e
smart fan operates at two different speeds, and adjusts
automatically to changes in temperature.
Upright, Stack & Rackmount Configuration■
Heat dissipation is maximized when the drive is in
the upright position (Fig. 1.1.B.). If you have several
LaCie drives stacked on each other, please remember
to attach the included rubber feet on the under side of
your drives. is will allow for some airflow between
your drives so that the heat dissipation can work effectively - especially if your LaCie drive does not include
a fan. LaCie does not recommend stacking or racking
more than 3 d2 drives on top of each other (Fig. 1.1.D.),
especially if these drives are turned ON simultaneously.
Fig 1.1.A
Fig 1.1.B Fig 1.1.C
Fig 1.1.D
Introduction
page 7
Page 8
LaCie Ethernet Disk mini
User Manual
Introduction
page 8
1.2. Racking Options
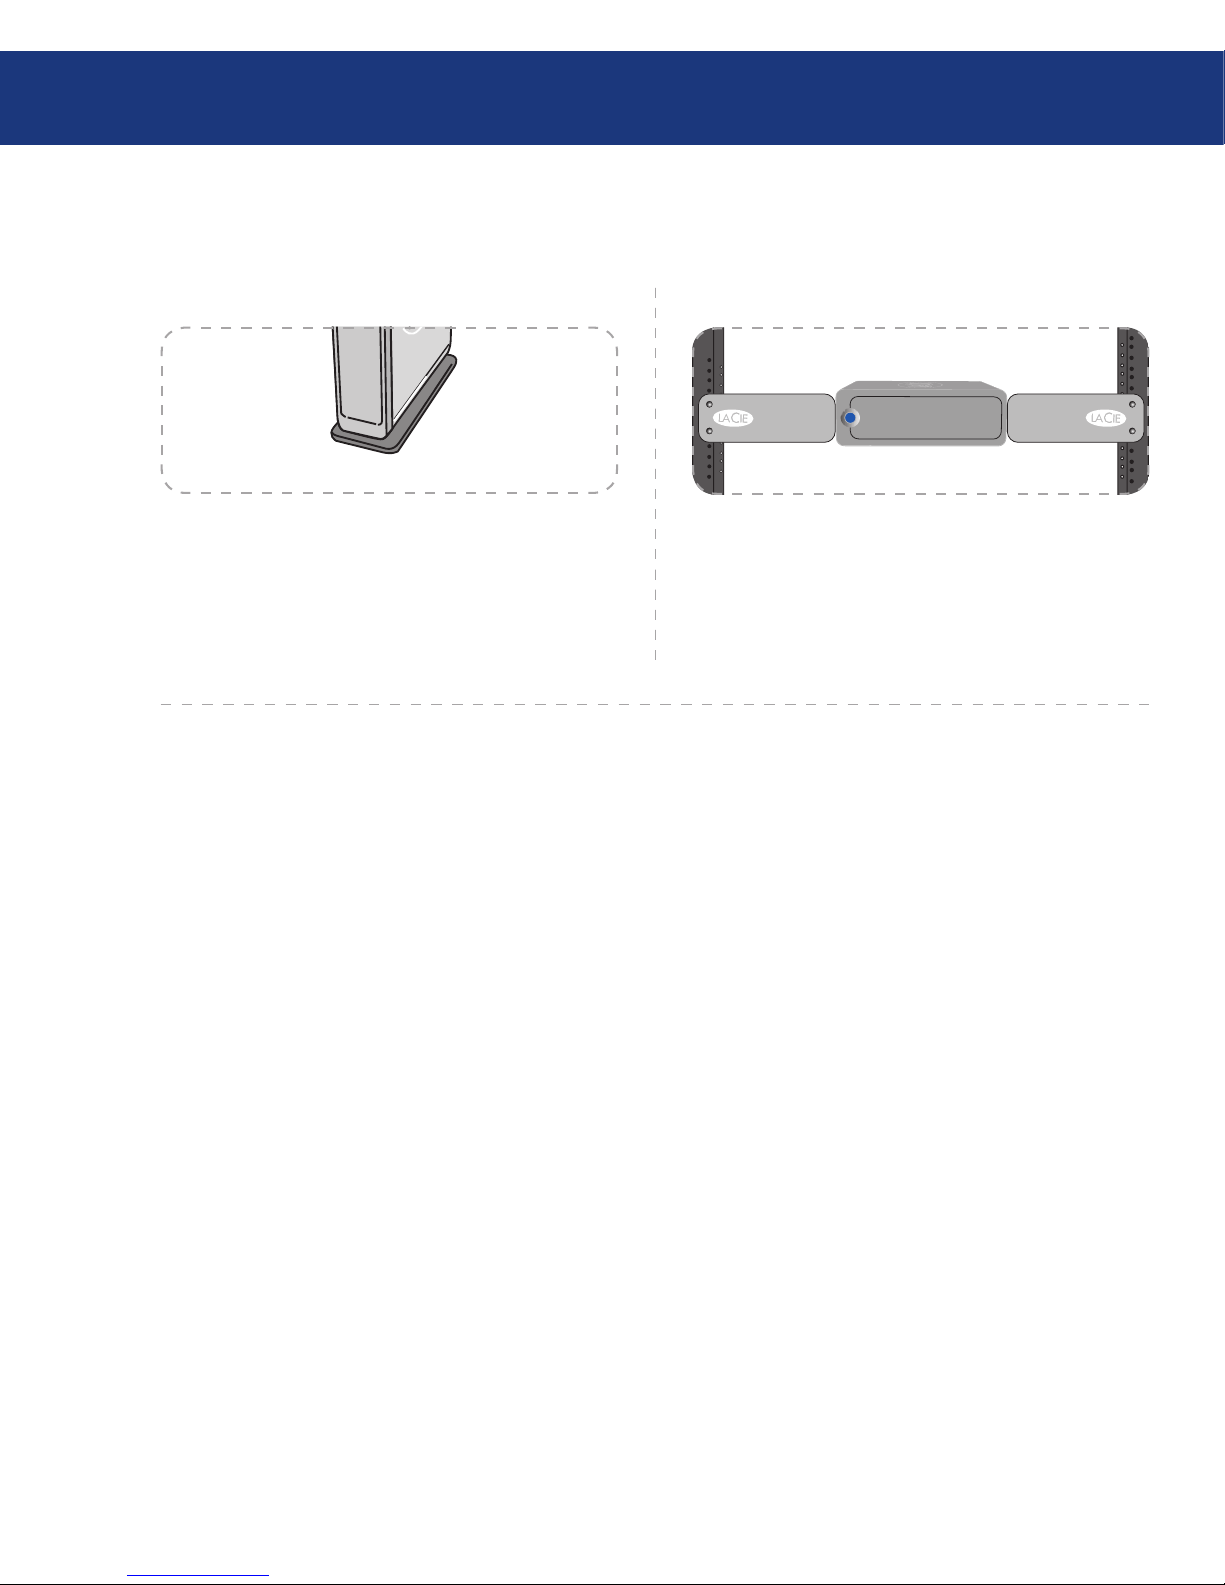
e LaCie Ethernet Disk mini includes a convenient drive stand, which allows the drive to be placed in
an upright position. Please refer to the instruction sheet
included with the drive stand for specific instructions.
e LaCie Ethernet Disk mini can be incorporated
into standard 19” computer equipment racks, using the
LaCie Rackmount Kit (sold separately). Please refer to
the instructions included with the LaCie Rackmount
Kit for specific instructions.
Fig. 1.2.A Fig. 1.2.B
Standalone Installation■ Rackmount Installation■
Page 9
LaCie Ethernet Disk mini
User Manual
2. Your LaCie Ethernet Disk mini
2.1. Minimum System Requirements
Windows Users■ Mac Users■
Pentium II 233MHz processor❖ G4 Power Mac❖
Windows 98SE, Me, 2000, XP❖ OS 9x❖
Ethernet 10/100 Network adapter❖ Ethernet 10/100 Network adapter❖
Web browser (Internet Explorer®, Mozilla™)❖ Web browser (Internet Explorer®, Safari™, Mozilla™)❖
Wired or wireless switch or router❖ Wired or wireless switch or router❖
Internet access❖ Internet access❖
IMPORTANT INFO: e LaCie Ethernet
Disk mini is compatible with the MacIntel processors.
Your LaCie Ethernet Disk mini
page 9
IMPORTANT INFO: e LaCie Ethernet
Disk mini is compatible with Gigabit and Fast
Ethernet switches and routers.
IMPORTANT INFO: e Ethernet Disk
mini’s performance is affected heavily by such
external forces as network activity, hardware, distance and setup.
IMPORTANT INFO: For optimal perfor-
mance, use a Gigabit Ethernet router and a Gigabit Ethernet board in your host PC or MAC.
Page 10
LaCie Ethernet Disk mini
User Manual
Your LaCie Ethernet Disk mini
page 10
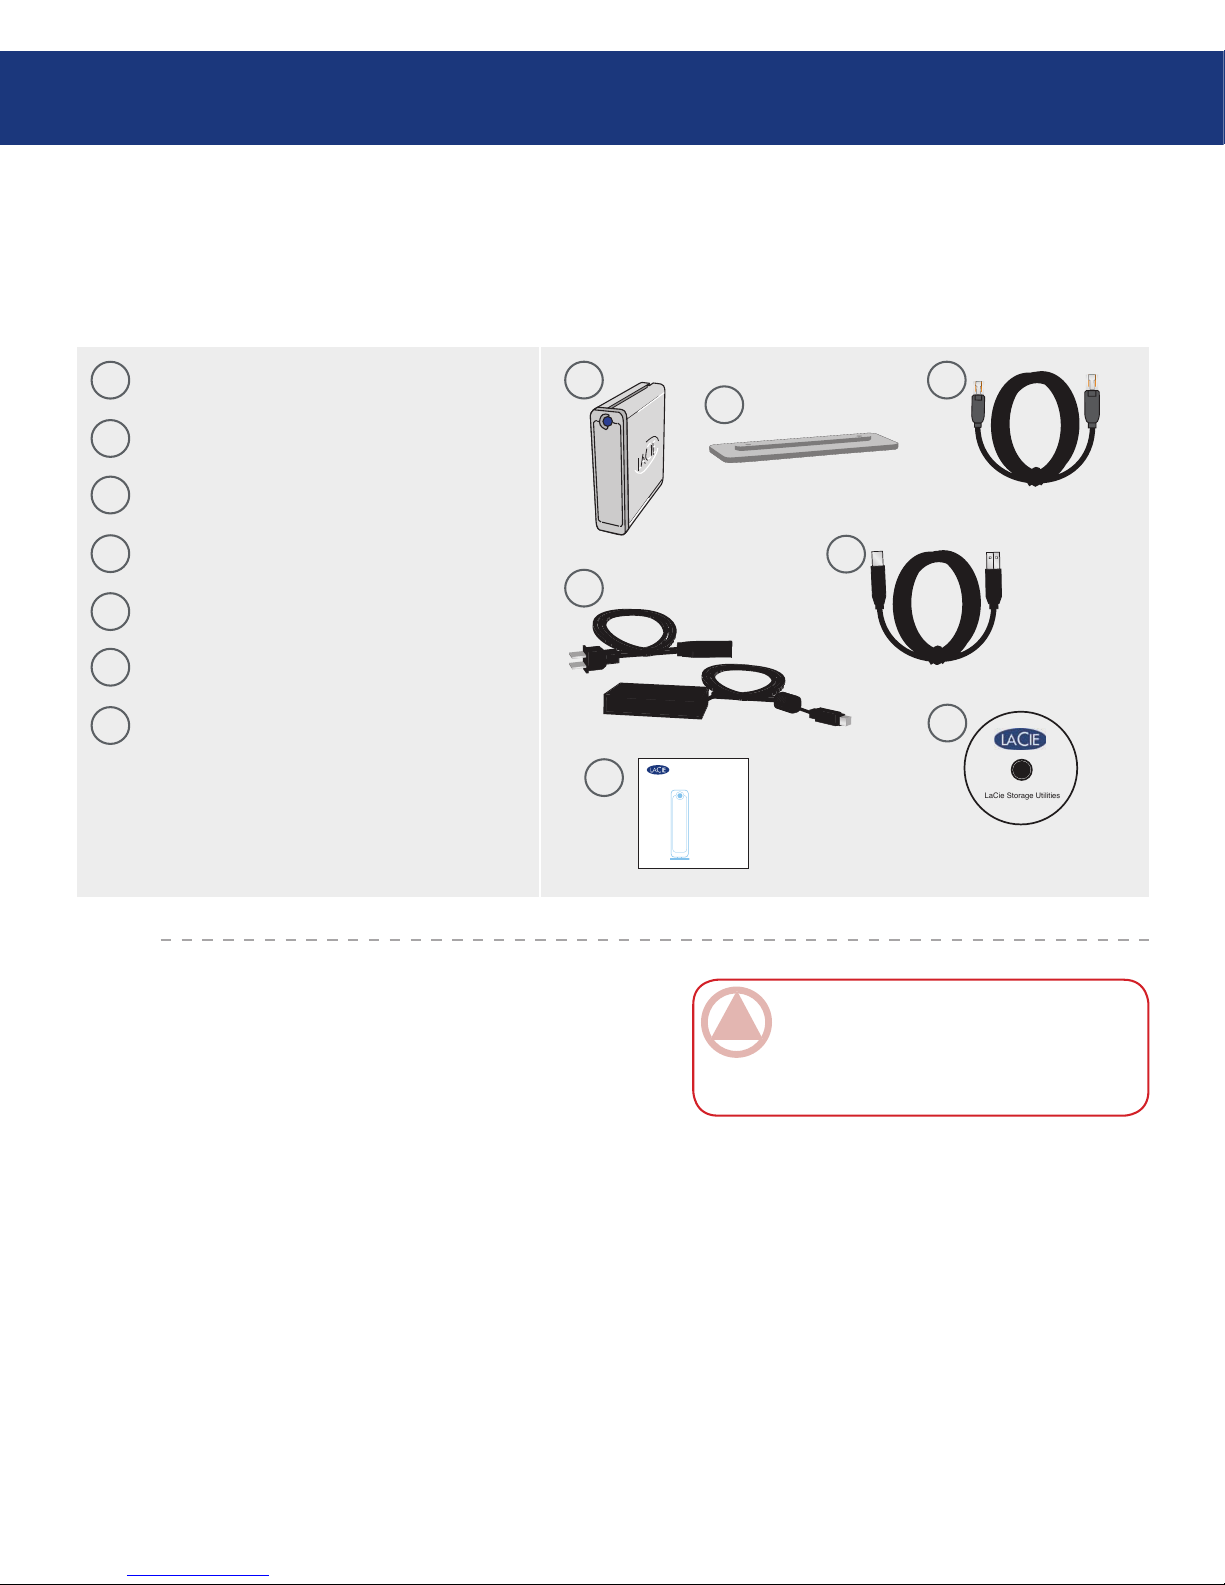
2.2. Package Content
IMPORTANT INFO: Please save your pack-
aging. In the event that the drive should need to
be repaired or serviced, it must be returned in its
original packaging.
LaCie Ethernet Disk mini
Vertical stand kit
Ethernet cable
Hi-Speed USB 2.0 cable
External power supply
Quick Install Guide
LaCie Storage Utilities CD-ROM
1
3
5
2
4
6
Your LaCie Ethernet Disk mini should contain the following:
1
LaCie Storage Utilities
7
2
3
5
Quick Install Guide
ethernetdisk mini
6
7
4
Page 11
LaCie Ethernet Disk mini
User Manual
2.3. Views of the Drive
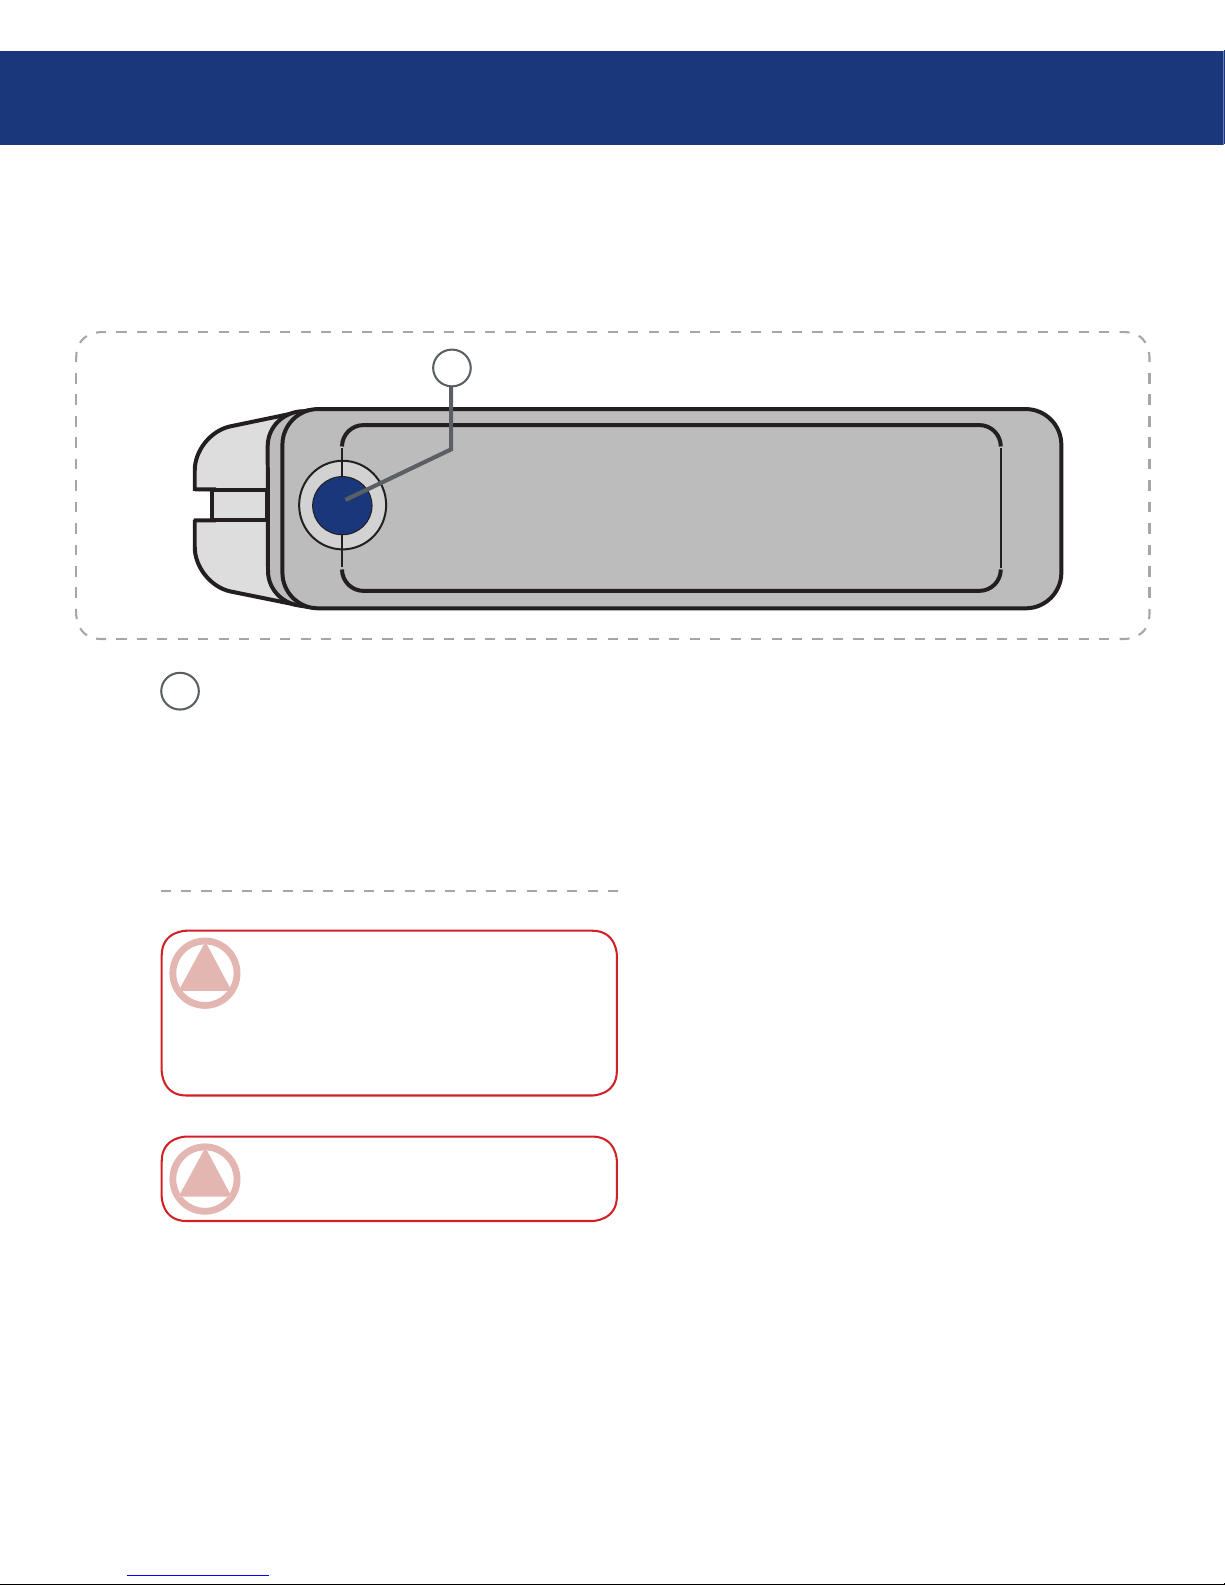
On/Off Button / Power LED /Activity LED
Press the On/Off Button to power the drive
on and off. Press the button for 5 seconds to
power off the drive. e LED remains lit to
show that the drive is on, and blinks to indicate
drive activity.
Front View■
1
1
IMPORTANT INFO: Do not unplug the
power chord or turn off the power strip to turn the
Ethernet Disk mini on or off. Press the On/Off
power button for 5 seconds to properly shut down
the drive.
Your LaCie Ethernet Disk mini
page 11
Fig. 2.3.A
IMPORTANT INFO: e Ethernet Disk mini
will restart automatically after a power failure.
Page 12
LaCie Ethernet Disk mini
User Manual
1
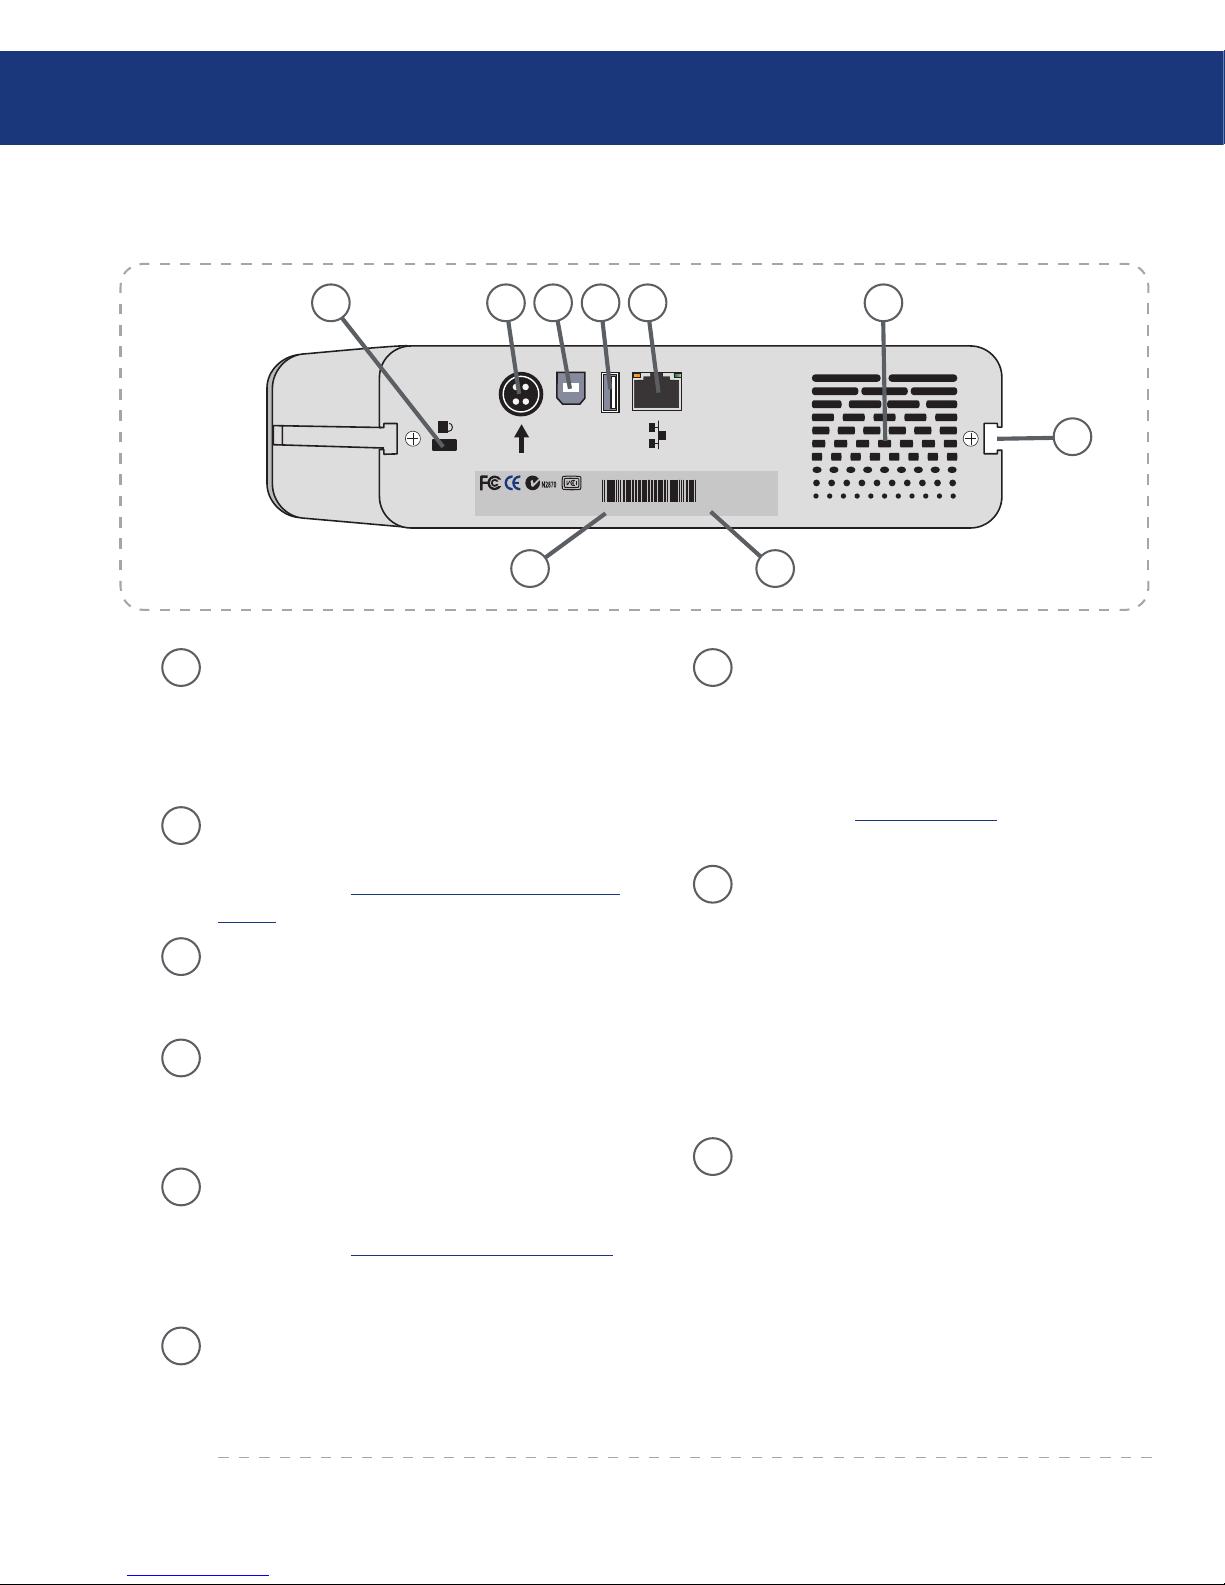
Lock Slot – is slot is used to connect an antitheft system, such as the LaCie Security Lock,
for maximum protection. Refer to your antitheft system documentation for details on how
to connect the lock.
2
Power Supply Connector – is is where you
plug in the AC adapter supplied with the drive.
See section 3.2. Connecting e External Power
Supply for more information.
3
Hi-Speed USB 2.0 Port – is is where you
plug in the USB cable that connects the drive to
your computer.
4
Hi-Speed USB 2.0 Expansion Port – is is
where you plug in the USB cable that connects
another USB external drive to the Ethernet
Disk mini to extend the storage capacity.
5
Gigabit Ethernet Port – is is where you plug
in the Ethernet cable furnished with the drive.
See section 3.3. Connecting the Interface Cable
for more information (also compatible with Fast
Ethernet 10/100).
6
Ventilation Outlet – ese holes help to keep
your drive cool during operation. Be sure not to
block these openings when using your drive.
7
Rackmount Grooves – ese grooves are used
for mounting the drive in the Desk Rack kit
(sold separately) or placing your drive in
standard 19” computer equipment racks using
the LaCie Rackmount Kit (sold separately). See
sections 1.2. Racking Options for more information.
8
Serial Number Sticker – is is where you will
find your LaCie drive’s serial number. Write
down the serial number and keep it in a safe
place, because you will need to provide the
number in the event you have to call LaCie
Technical Support for any reason in regards to
the drive’s performance. e serial number
would also come in handy if your drive is lost or
stolen.
9
MAC Address – Every network device has a
unique Mac Address (Media Access Control).
is address can be found on the back of your
Ethernet Disk mini.
Rear View■
Mac Address: 00D04B801220 SN:XXXXXXXXXX
USB 2.0
USB
1 2 5 63
7
9 8
Your LaCie Ethernet Disk mini
page 12
Fig. 2.3.B
4
Page 13
LaCie Ethernet Disk mini
User Manual
2.4. Cables and Connectors
e LaCie Ethernet Disk mini offers two different
methods for connection and usage.
Gigabit Ethernet■
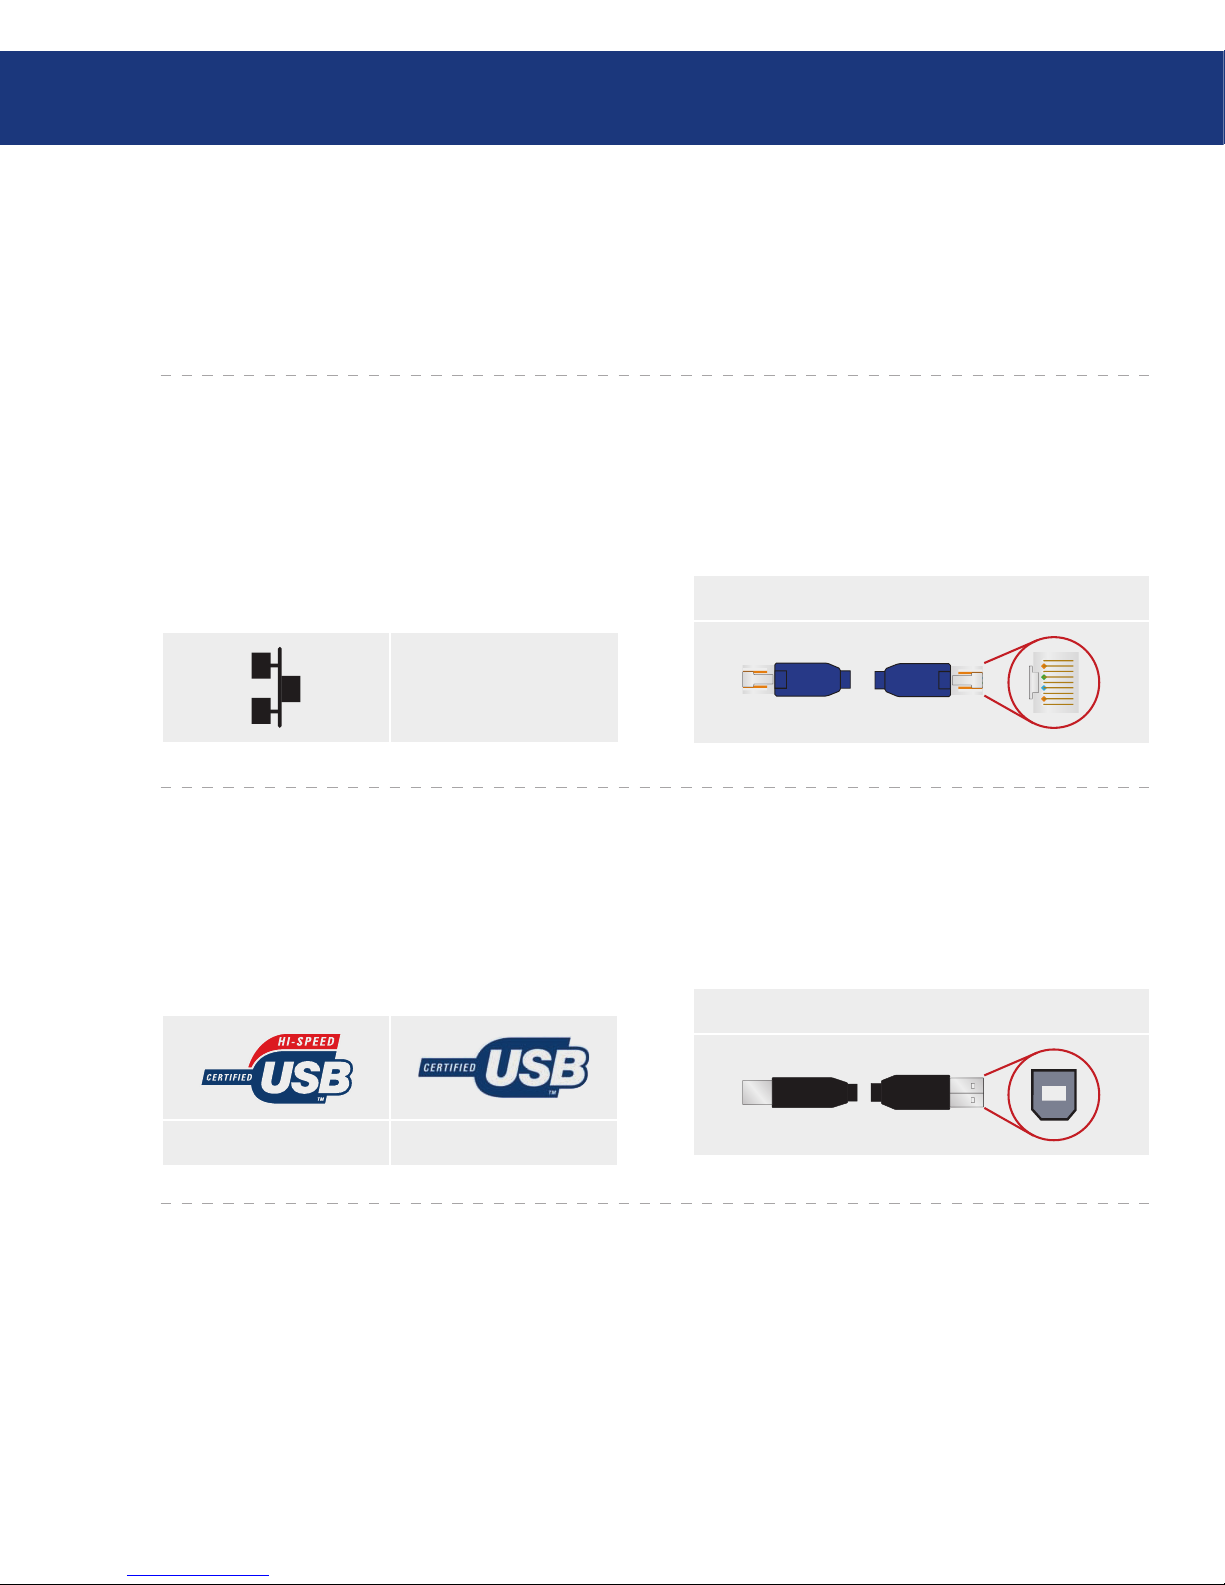
Fig. 2.4.A Ethernet icon
Ethernet Icon
is icon will help you easily identify the ethernet
interface. It appears on the back of the Ethernet Disk
mini and next to the ethernet port connectors on certain
computers.
Ethernet Hardware
is illustration will help you to identify the Ether-
net cable and port.
Fig. 2.4.B Ethernet Cable and Cable End
Your LaCie Ethernet Disk mini
page 13
Fig. 2.4.C: USB 2.0 icon Fig. 2.4.D: USB 1.1 icon
USB Icons
ese icons will help you easily identify the USB
interfaces. ey appear on USB cables and next to the
USB port connectors on certain computers.
USB 2.0 Hardware
is illustration will help you to identify the USB
2.0 cable and port.
Fig. 2.4.E: USB 2.0 Cable and Cable End
Hi-Speed USB 2.0■
Page 14
LaCie Ethernet Disk mini
User Manual
3. Setting Up Your LaCie Ethernet Disk mini
Setting Up Your Ethernet Disk mini
page 14
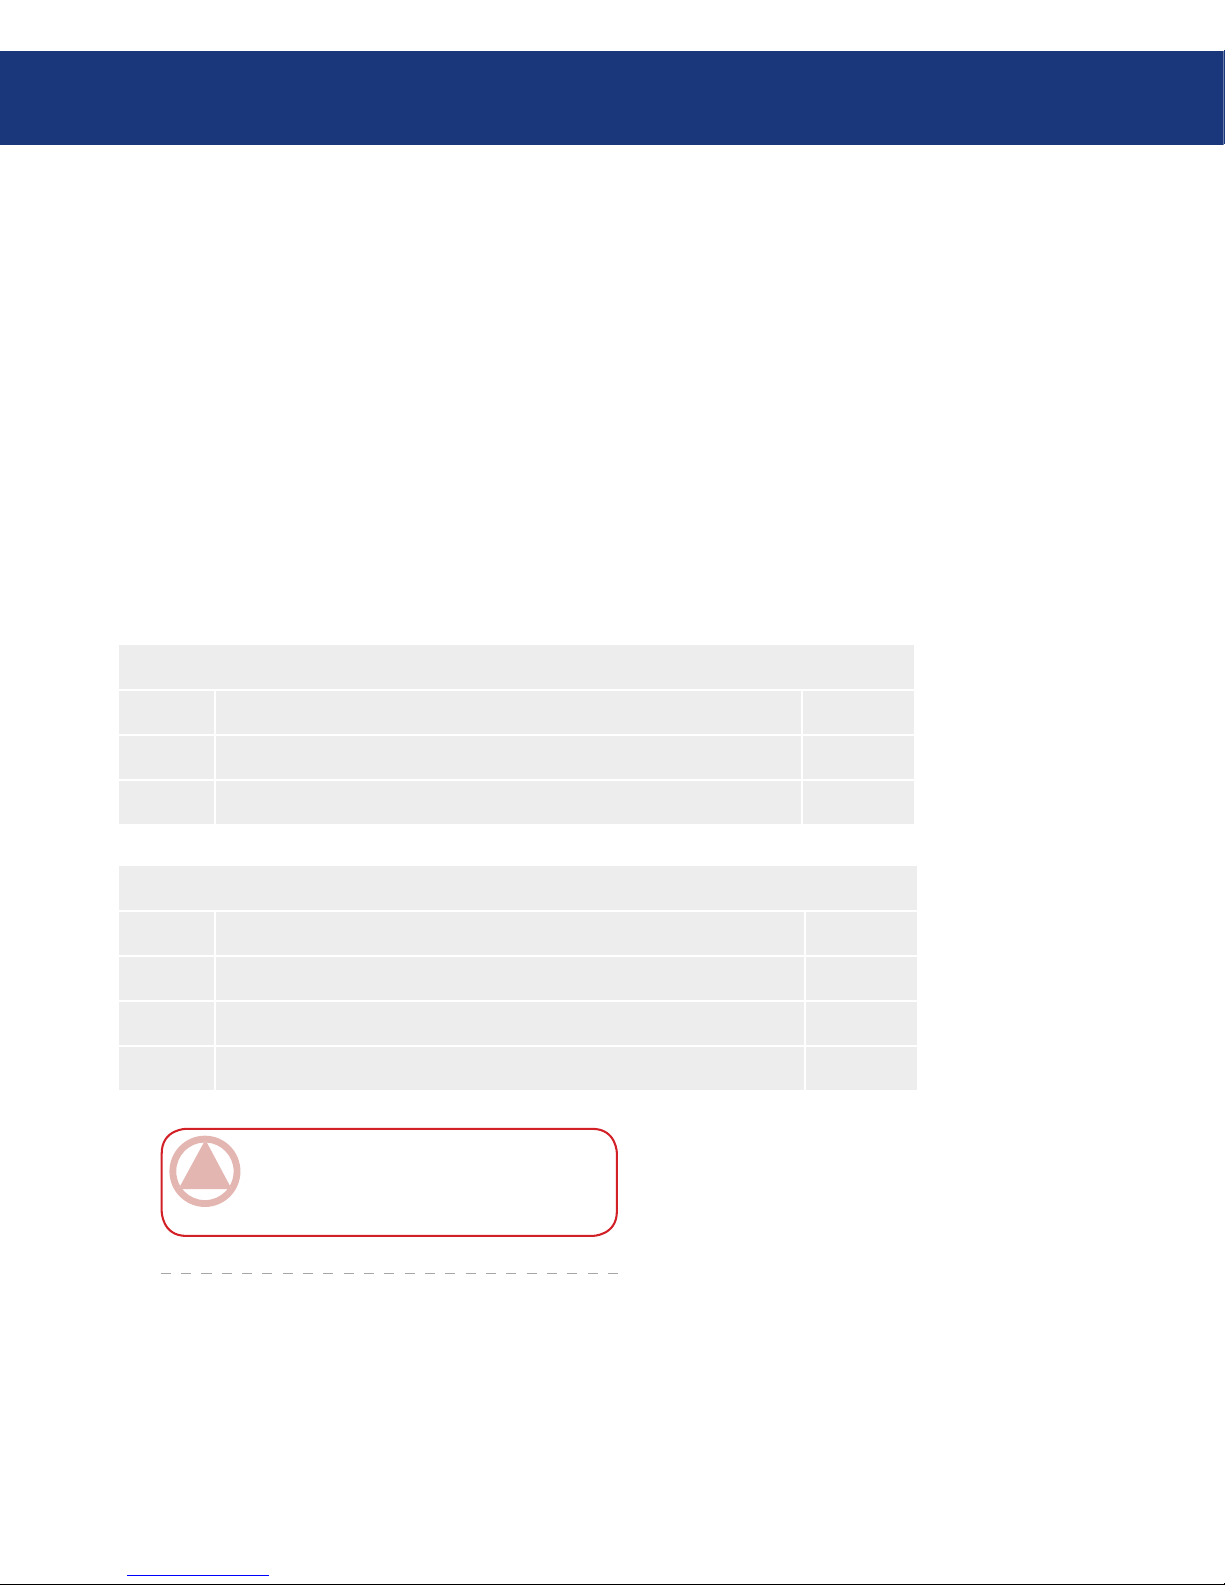
You have the option of connecting your Ethernet
Disk mini to a LAN via Ethernet (to be able to share
your drive with other computers on the network) or directly to a computer via USB (to use your drive as a
personal storage device).
For either use, there are several steps to getting your
Ethernet Disk mini up and running:
Ethernet Connection
Step 1 Connecting the External Power Supply Page 15
Step 2 Connecting the Ethernet Cable Page 16
Step 3 Installing and Running the IP Configurator Wizard Page 19
3.1. Installation Steps
IMPORTANT INFO: e Ethernet and USB
cables can be connected simultaneously only if there
is a DHCP server on the network or machine.
USB Connection
Step 1 Connecting the External Power Supply Page 15
Step 2 Connecting the USB Cable Page 16
Step 3 Driver Installation (USB Only) Page 17
Step 4 Installing and Running the IP Configurator Wizard Page 19
Page 15
LaCie Ethernet Disk mini
User Manual
Setting Up Your Ethernet Disk mini
page 15
3.2. Connecting the External Power Supply
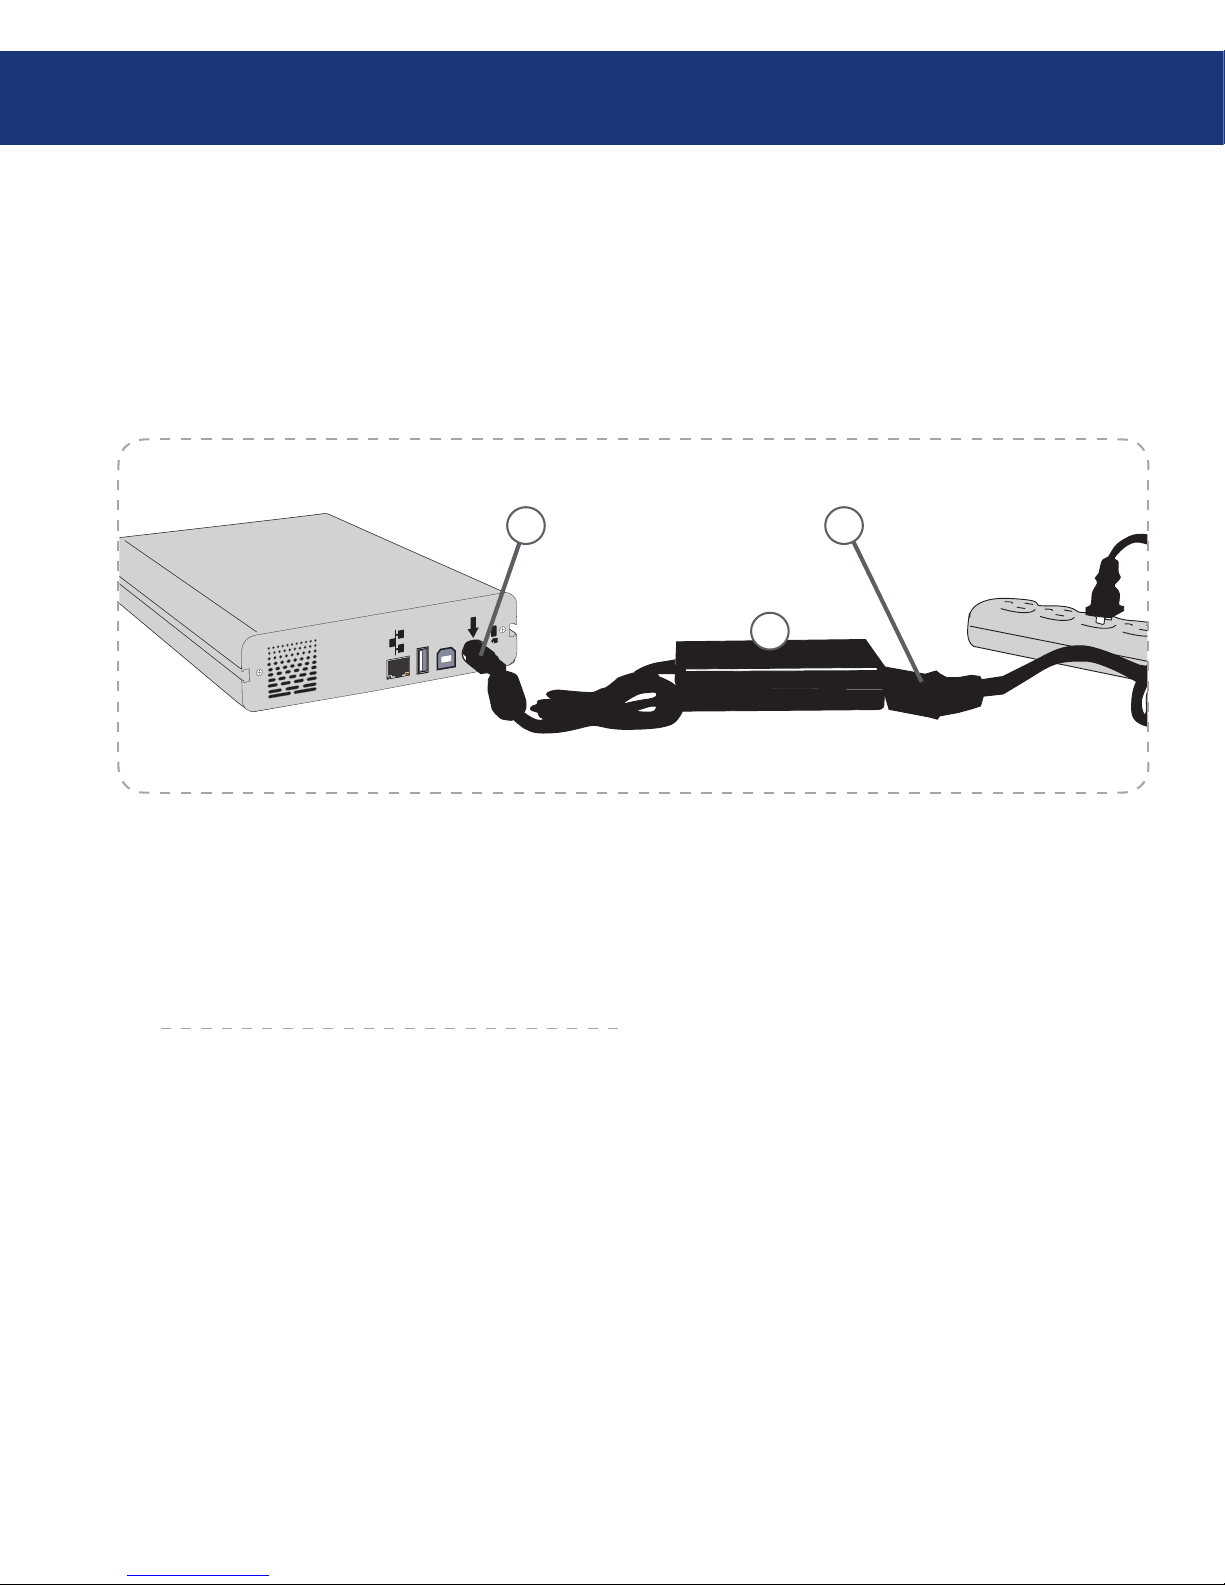
ere are two cables that are supplied with the power supply: one cable (A) connects to the LaCie Ethernet
Disk mini; and the other cable (B) connects to a power
outlet, such as a wall outlet or a surge protector.
USB 2.0
USB
C
A B
Fig. 3.2.A
Connect Cable A to your LaCie Ethernet Disk mini.
Connect Cable B to the Power Supply brick (C).
Connect Cable B to a surge protector or wall outlet.
You are now ready to connect the interface cable to
your drive and to your computer.
1.
2.
3.
Page 16
LaCie Ethernet Disk mini
User Manual
Setting Up Your Ethernet Disk mini
page 16
3.3. Connecting the Interface Cable
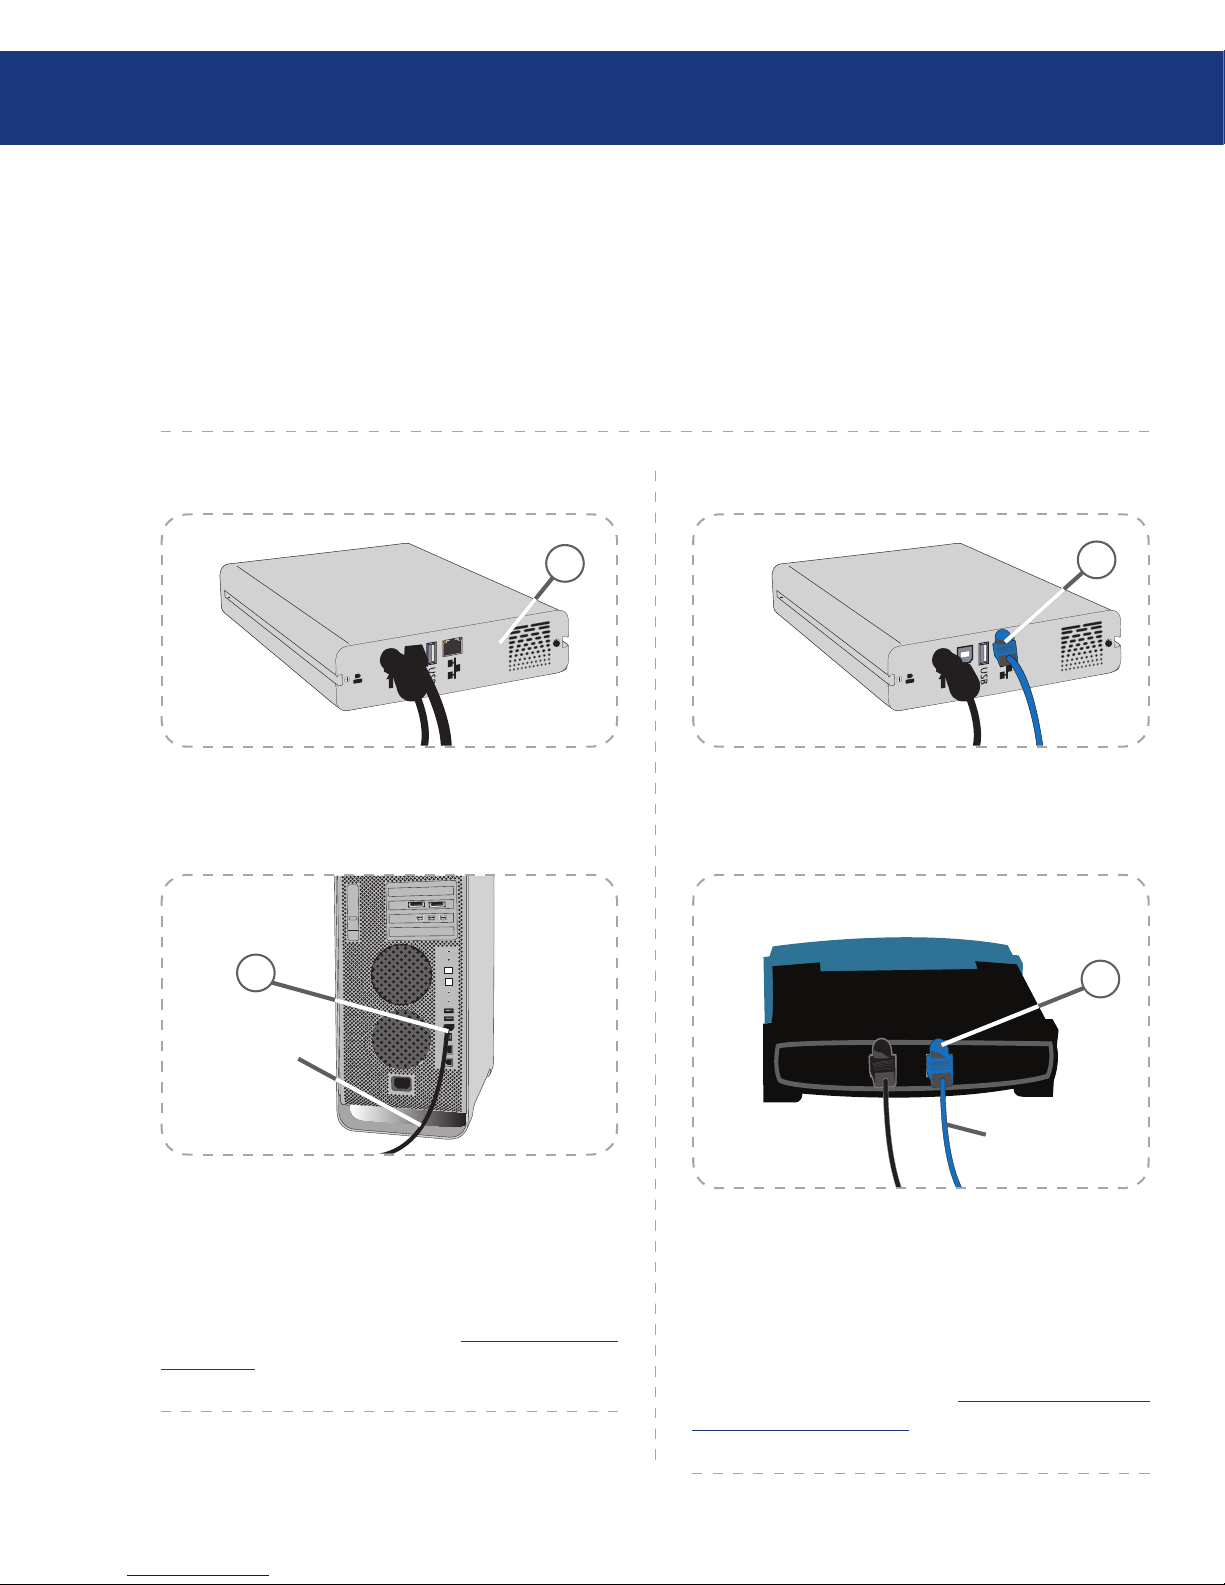
e Ethernet Disk mini gives you the option to connect either a USB or Ethernet cable. However, the Ethernet and USB cables can be connected simultaneously only
if there is a DHCP server on the network or machine.
Fig. 3.3.1.A.
3.3.1. USB Connection■ 3.3.2. Ethernet Connection■
1. Connect the Ethernet cable into the Ethernet port on
the back of the LaCie Ethernet Disk mini (A).
1. Connect the USB cable into the USB port on the
back of the LaCie Ethernet Disk mini (A).
Fig. 3.3.2.B.
Fig. 3.3.1.B.
Fig. 3.3.2.A.
A
A
B
2. Connect the other end of the Hi-Speed USB 2.0 cable
into an available USB port on your computer (B).
3. Press the blue On/Off Button on the front of the
drive.
Now move on to step 3, 3.4., Driver Installation
(USB only).
2. Connect the other end of the Ethernet cable into an
available Ethernet port on your router (B).
3. Press the blue On/Off Button on the front of the
drive. It may take a few seconds for your network to
recognize the drive.
Now move on to step 3, 3.5., Installing and Running
the Configuration Wizard.
B
To Ethernet
Disk mini
To Ethernet
Disk mini
Page 17
LaCie Ethernet Disk mini
User Manual
Setting Up Your Ethernet Disk mini
page 17
3.4. Driver Installation (USB Only)
3.4.1. Windows XP and 2000 Users
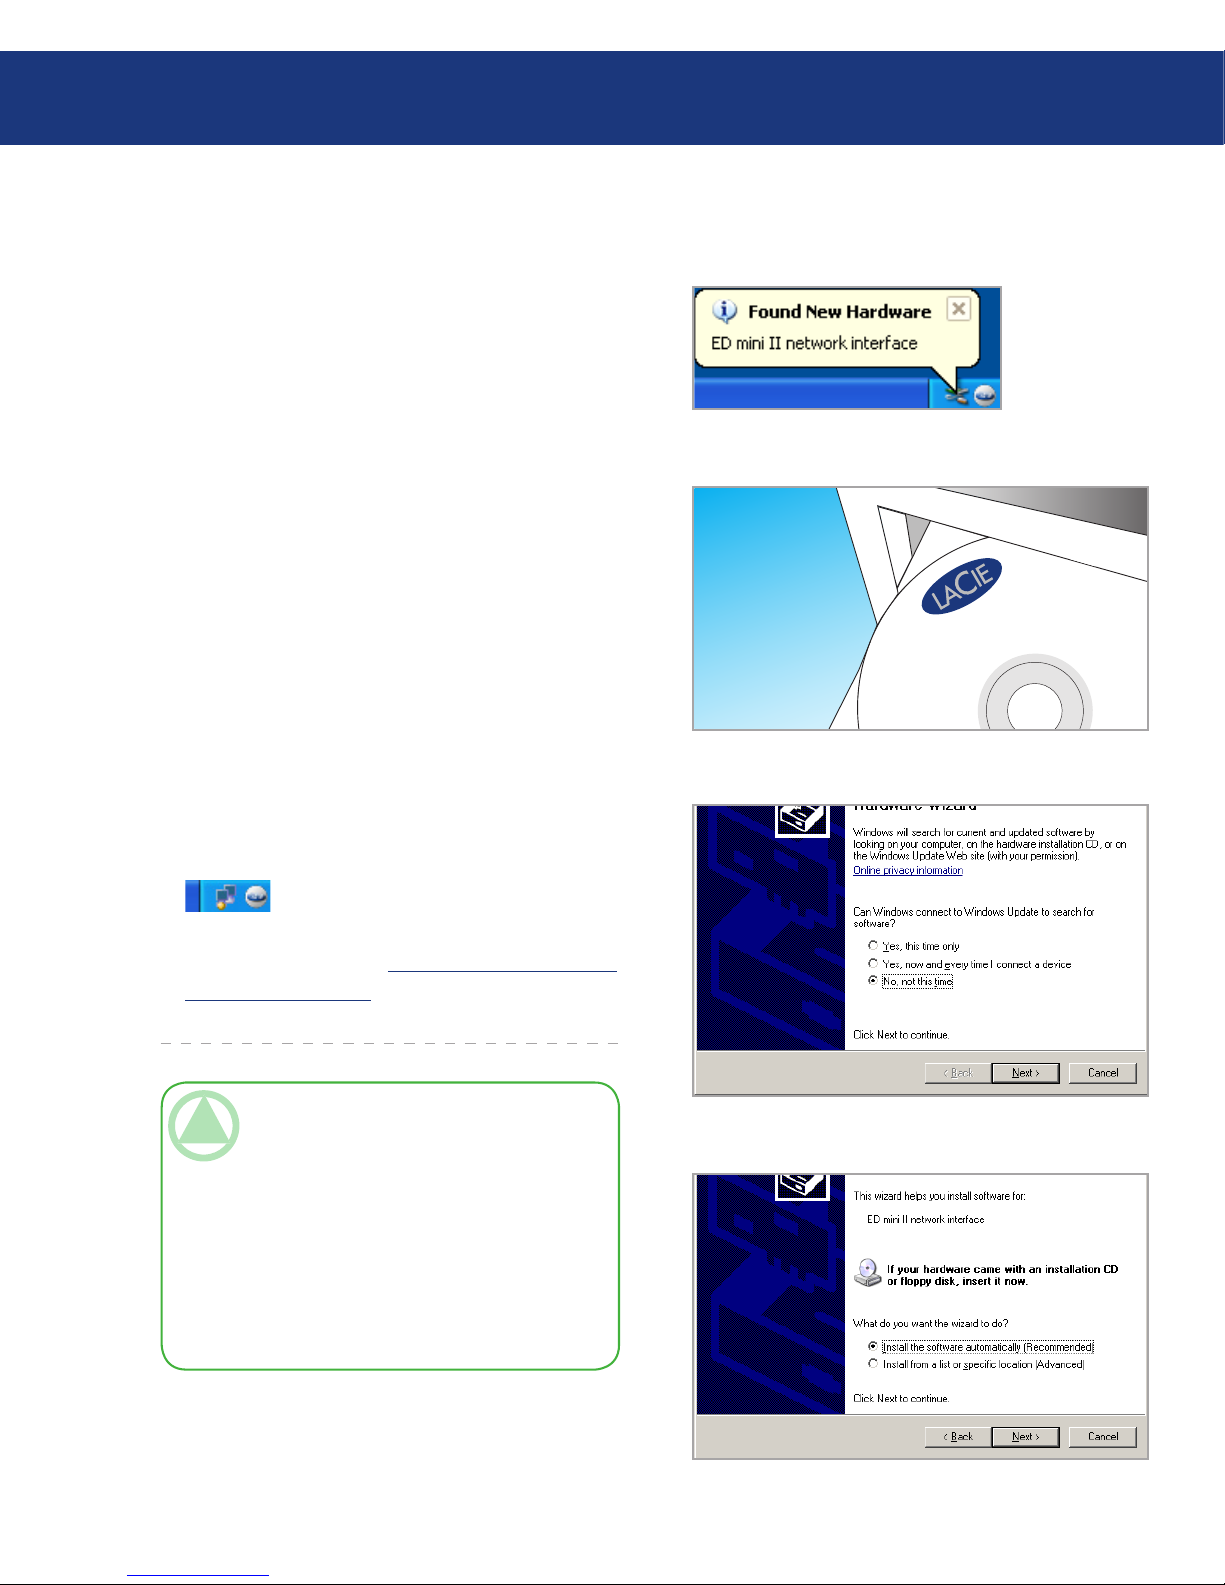
Once the Ethernet Disk mini is plugged in via USB,
a window will appear saying that new hardware has
been detected (Fig. 3.4.A.).
en, if the driver has not already been installed,
Windows will ask to install it.
When Windows asks if it can connect to Windows
Update to search for the driver, select No, not at
this time and click Next (Fig. 3.4.B.).
Insert the Ethernet Disk mini Storage Utilities
CD-ROM. When Windows asks, What do you
want the wizard to do?, select Install the Software
Automatically (Recommended) (Fig. 3.4.C.).
Once the device is detected and the driver is loaded,
the task bar in the lower right hand corner of your
screen will show the following icon, which indicates that the network interface is being initialized
either with DHCP* (if available) or with APIPA**:
Once the wizard has finished, click Finish and move
on to the next step, 3.5., Installing and Running the
Configuration Wizard.
■
1.
2.
3.
4.
5.
6.
Fig. 3.4.A.
Fig. 3.4.B.
Fig. 3.4.C.
Fig. 3.4.B.
LaCie Ethernet Disk
Ethernet Disk mini
TECHNICAL NOTE:
* DHCP is a client/server based protocol that is
used to assign IP addresses in a network.
** APIPA is a “light” protocol that is used by DHCP
clients when no DHCP servers are available
(or until the DHCP server becomes available).
APIPA is a kind of “fallback” to get an IP address compatible with the network defined by
169.254.0.0/255.255.0.0 (or 169.254.0.0/16).
Page 18
LaCie Ethernet Disk mini
User Manual
Setting Up Your Ethernet Disk mini
page 18
3.4.2. Mac Users
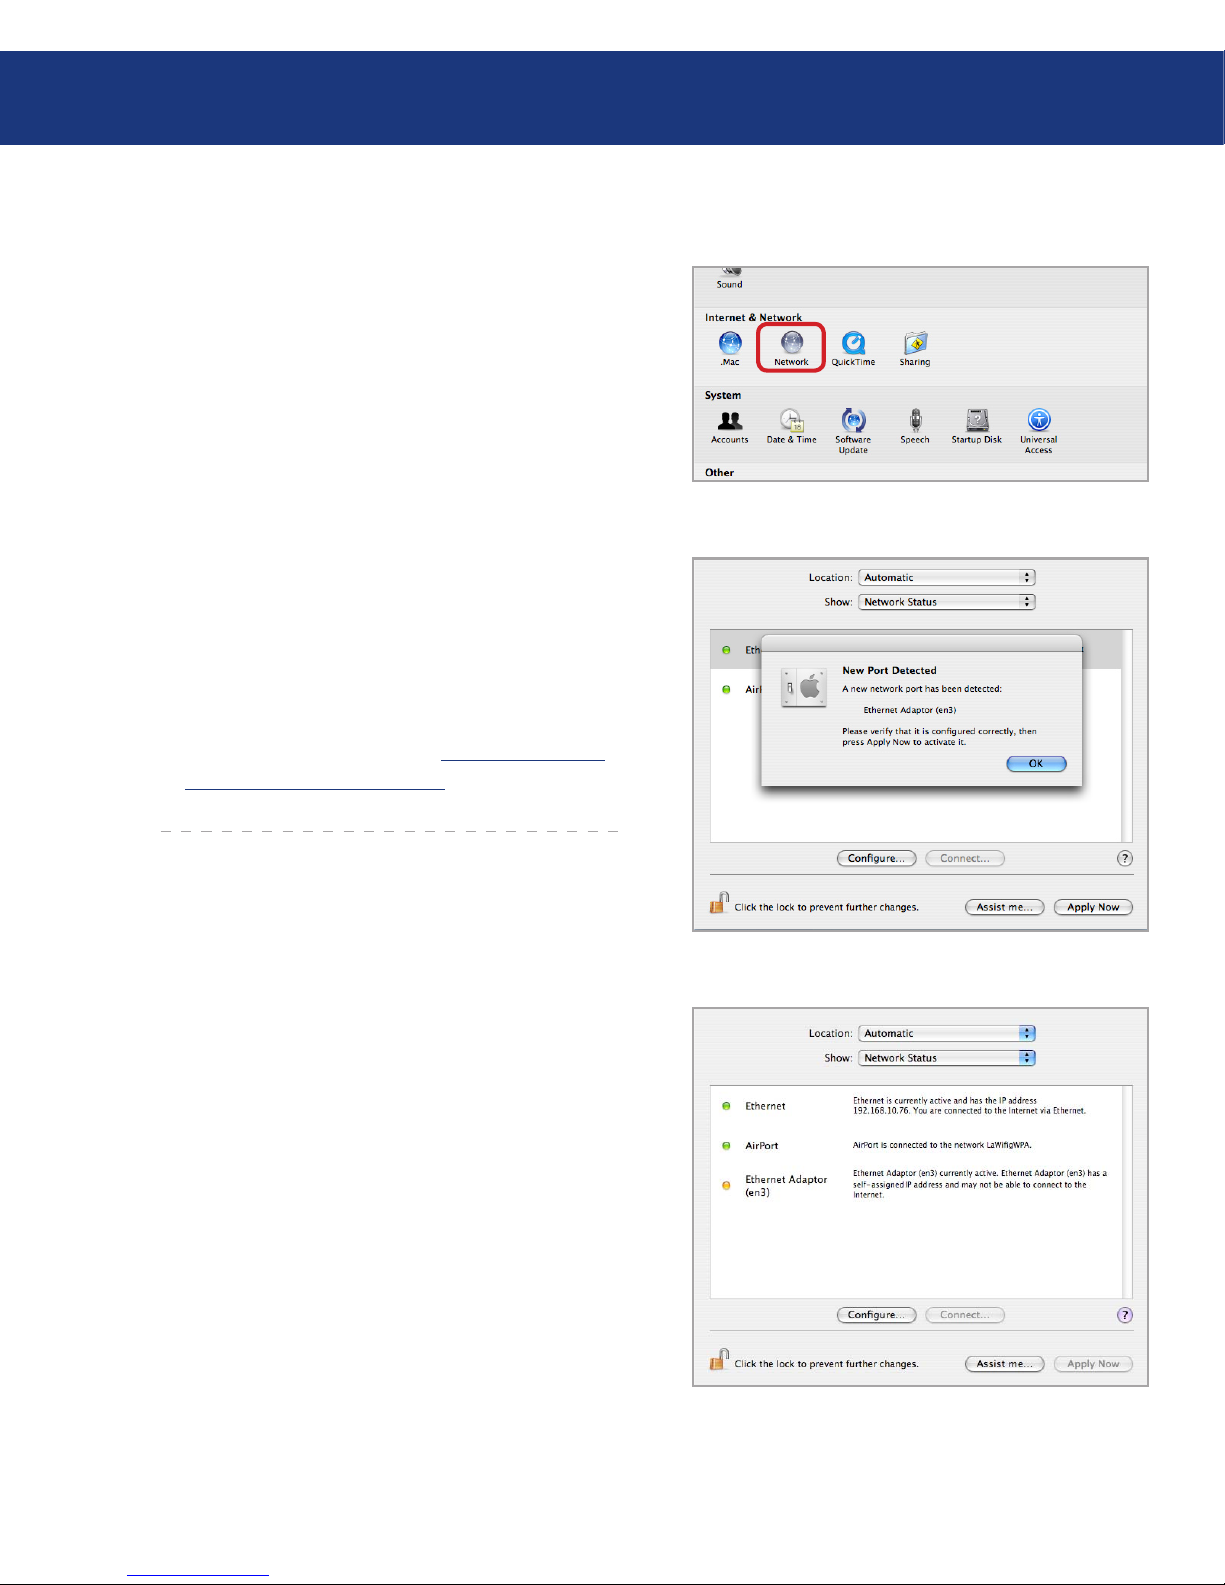
Once the Ethernet Disk mini is plugged in via USB,
open System Preferences from the Dock or your
Applications folder (Fig. 3.4.2.A.).
Select the Network icon from the Internet &
Network section.
e Network preference pane will display a message
stating that a new network interface has been recognized (Fig. 3.4.2.B.). Click OK.
e device is ready. If APIPA (see note at the bottom of page 17) has been used, the Network preference pane will say that the new interface will use a
“self-assigned IP address” (Fig. 3.4.2.C.).
You can check the IP address by clicking on the
“Configure...” button.
Move on to the next step, 3.5., Installing and Run-
ning the Configuration Wizard.
■
1.
2.
3.
4.
5.
6.
Fig. 3.4.2.A.
Fig. 3.4.2.B.
Fig. 3.4.2.C.
Page 19
LaCie Ethernet Disk mini
User Manual
3.5. Installing and Running the IP Configurator Wizard
PC Users
Insert the LaCie Ethernet Disk mini CD-ROM
into your computer’s CD-ROM drive.
In your My Computer folder, double click the CDROM drive. Double click “Install the IP configu-
rator”.
Follow the Wizard to complete installation.
If the IP configurator doesn’t open, select the program from the Start Menu.
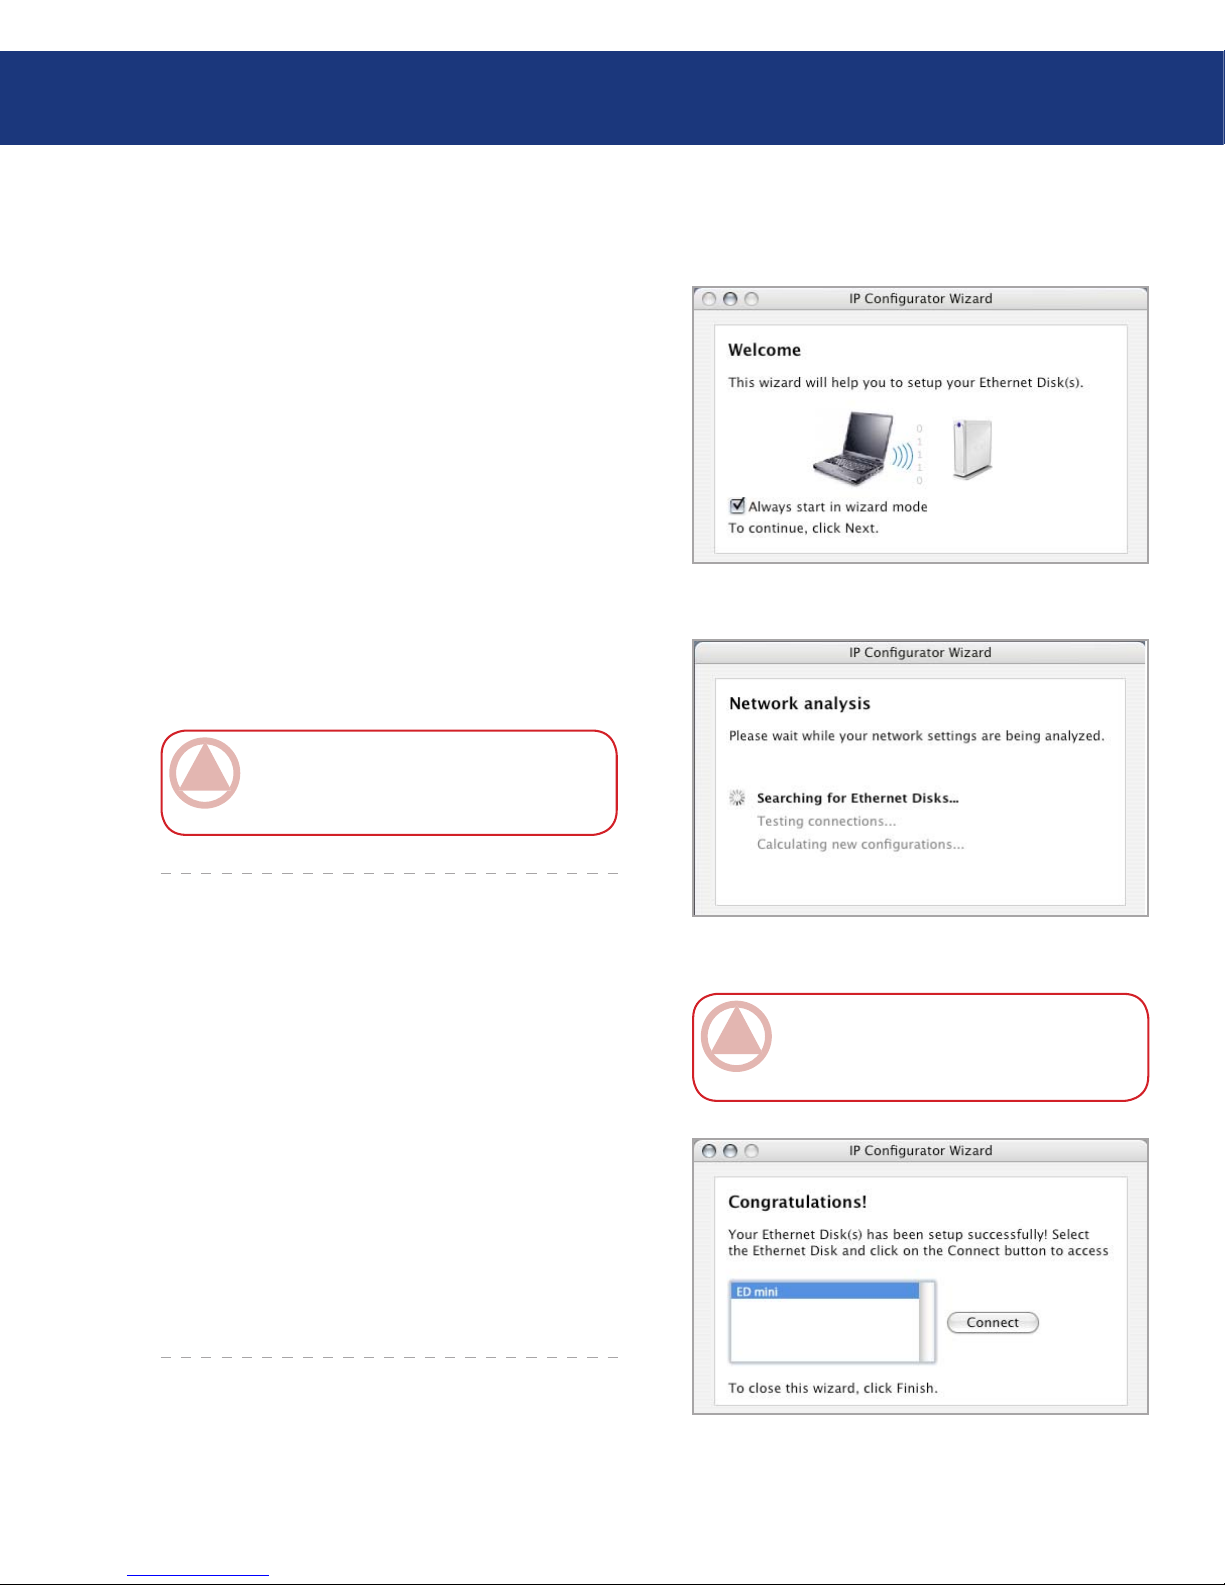
Follow the steps indicated in the Wizard. Once the
Wizard locates your Ethernet Disk mini (represented by its IP address), select it and click Connect
(Figs. 3.5.A. - 3.5.C.).
■
1.
2.
3.
4.
5.
Mac Users
Insert the LaCie Ethernet Disk mini CD-ROM
into your computer’s CD-ROM drive.
e CD should appear on the desktop. Double
click the CD icon, then double click “Install the IP
configurator”.
Follow the Wizard to complete installation.
From the application folder, open Utilities / LaCie
IP Configurator.
Follow the steps indicated in the Wizard. Once
the Wizard locates your Ethernet Disk mini (represented by its IP address), select it and click Connect
(Figs. 3.5.A. - 3.5.C.).
■
1.
2.
3.
4.
5.
Fig. 3.5.A.
Fig. 3.5.B.
IMPORTANT INFO: e Wizard installer
will requrest Administrator rights to complete
installation (Mac/PC/Linux users).
Fig. 3.5.C.
IMPORTANT INFO: e IP configurator
can be used to detect the Ethernet Disk minis
connected via Ethernet as well as USB.
Setting Up Your Ethernet Disk mini
page 19
Page 20
LaCie Ethernet Disk mini
User Manual
Setting Up Your Ethernet Disk mini
page 20
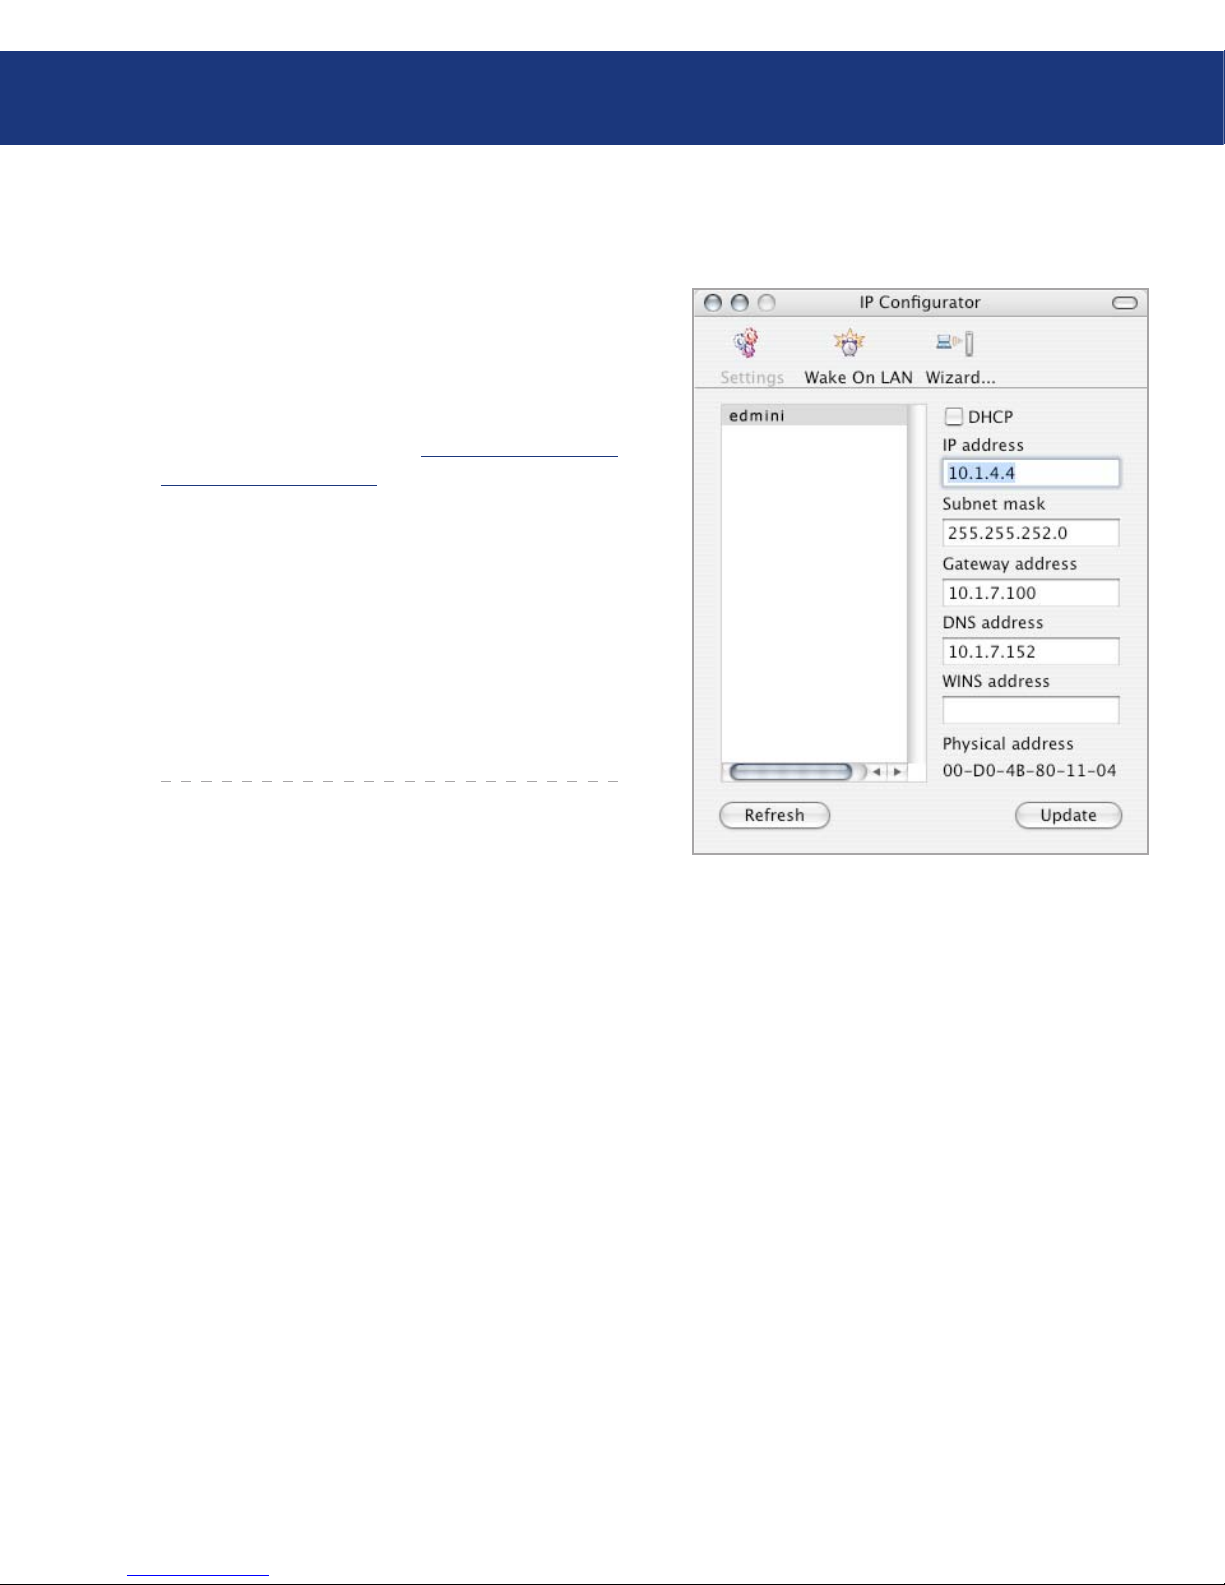
3.6. Configure Your Drive On a Local Area Network with no DHCP Server
In the case that your server is not DHCP-enabled,
you will need to manually assign the correct network
settings for your LaCie Ethernet Disk mini.
e easiest way to modify your LaCie Ethernet Disk
mini’s network configuration is to use the LaCie IP
Configurator. See chapter 3.5. Installing and Running
the Configuration Wizard for information on installing
the network configuration software.
Run the software from the Start Menu (PC users) or
the Utilities folder (Mac users).
When the Wizard opens, select Advanced Mode.
Uncheck the “DHCP” box (Fig. 3.6.A.).
Modify the network settings to work with your network.
1.
2.
3.
4.
Fig. 3.6.A.
Page 21
LaCie Ethernet Disk mini
User Manual
3.7. Disconnecting Your LaCie Hard Drive (Ethernet Connection)
Setting Up Your Ethernet Disk mini
page 21
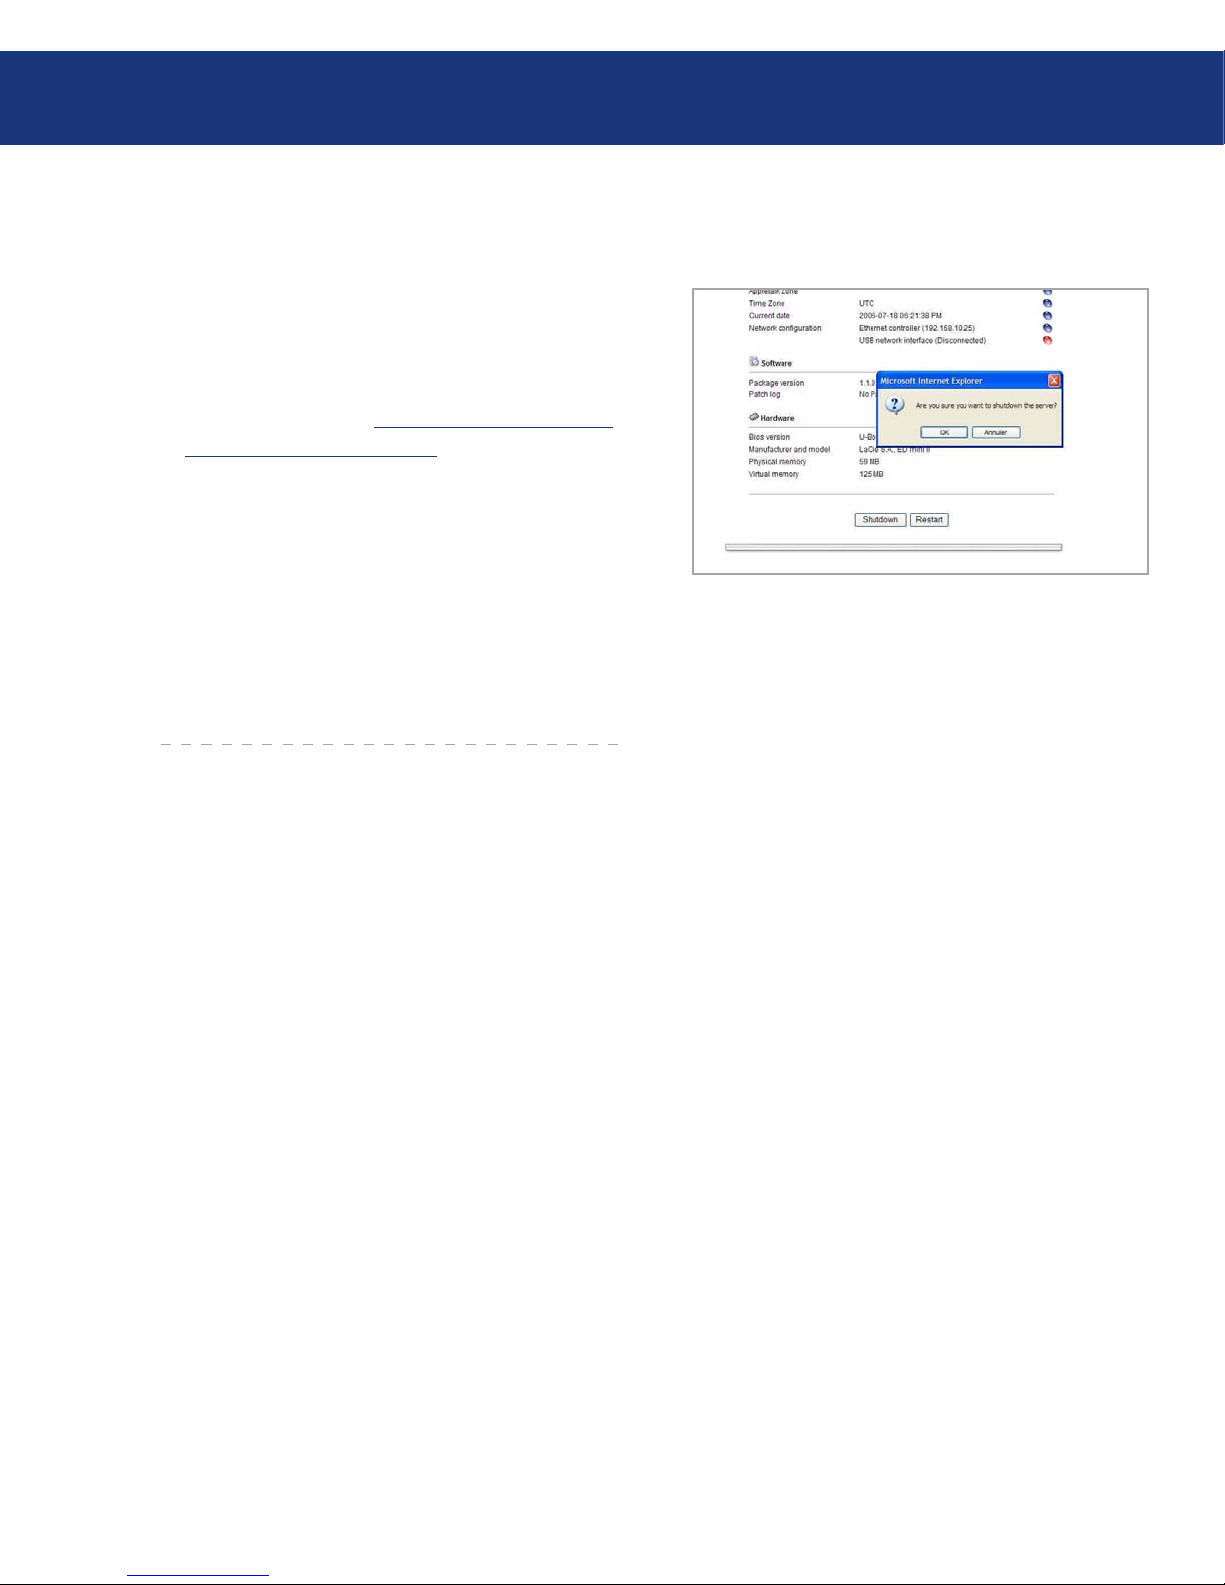
ere are two ways to disconnect the Ethernet connection.
From the Web administration page, click on the
configuration tab and then click on the shutdown
button (see chapter 5., Configure Your Drive Using
the NAS Administration Page for more informa-
tion) (Fig. 3.7.A.).
OR,
Press the On/Off button on the front of the LaCie
Ethernet Disk mini, and hold the button down for
3 seconds. e On/ Off button will flicker for a few
seconds before powering off.
❖
❖
Fig. 3.7.A.
Page 22
LaCie Ethernet Disk mini
User Manual
Accessing the Share
page 22
4. Accessing the Shared Storage
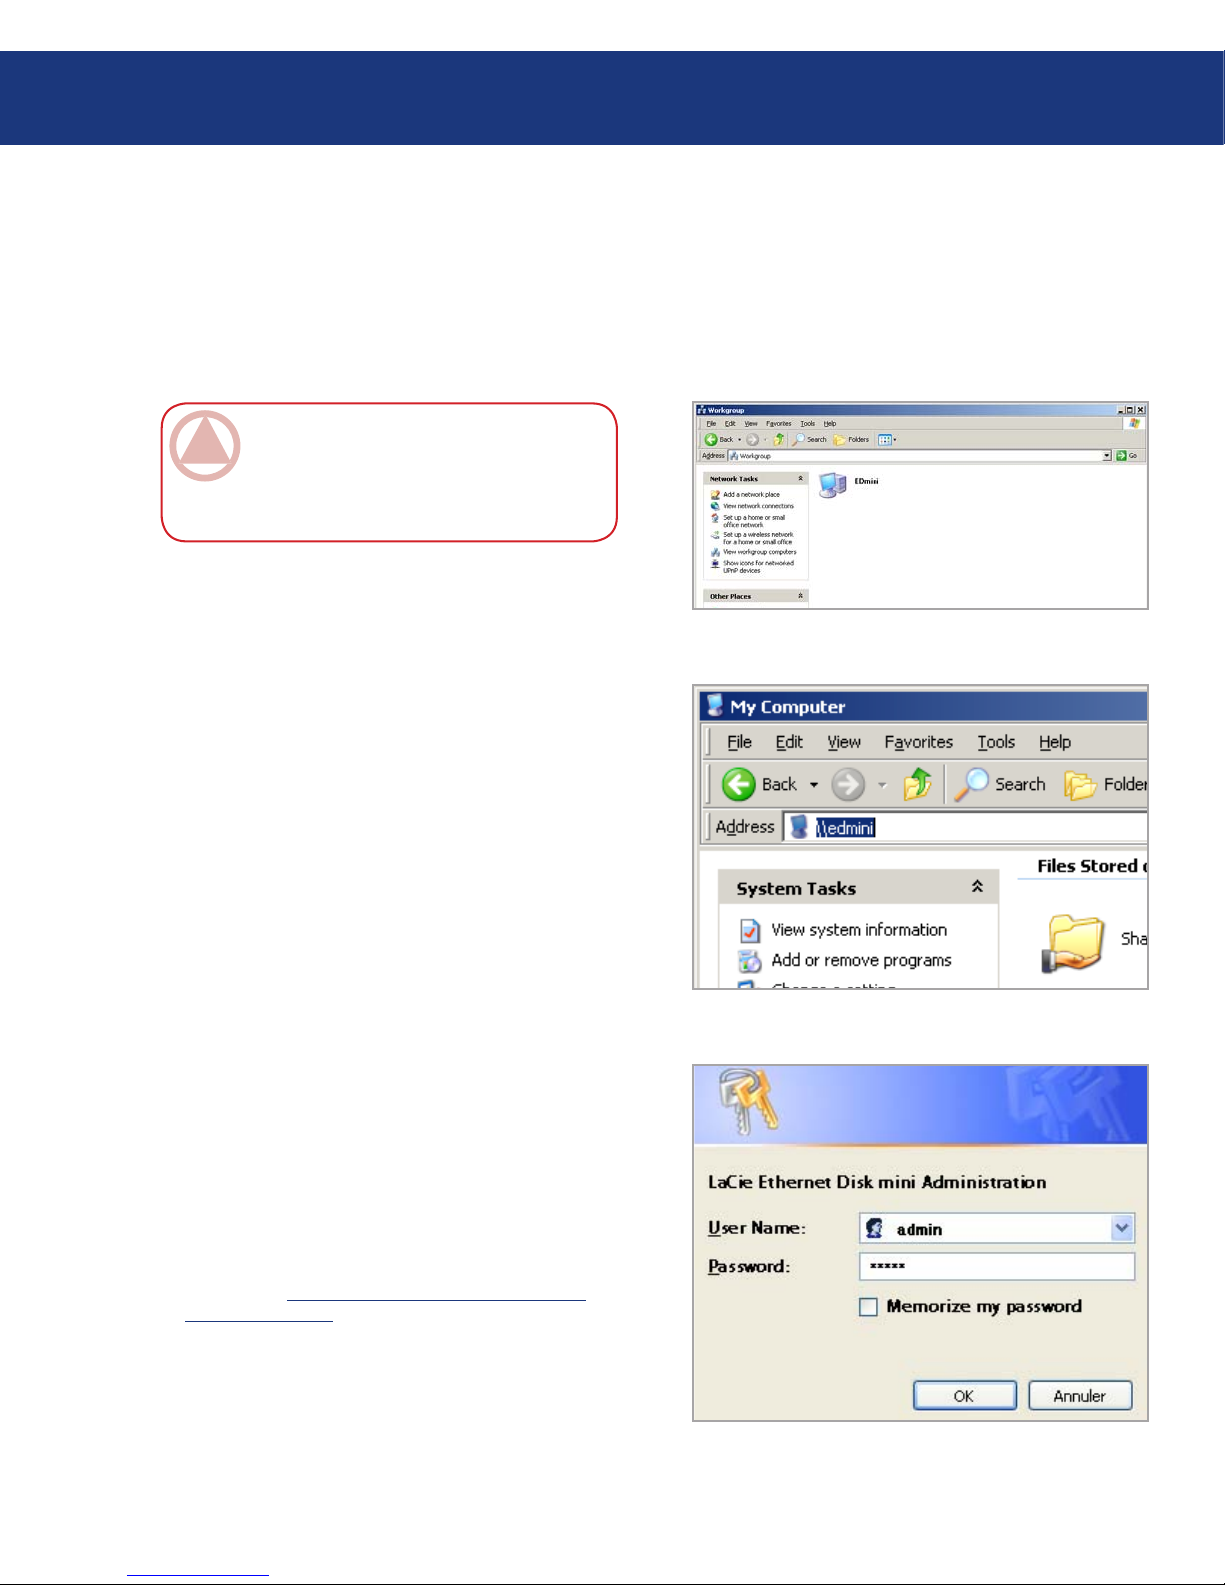
4.1. Windows XP/2000 Users
To access the share in Windows, look in My
Network Places, and select Microsoft Windows
Workgroup. By default, the Ethernet Disk mini
will be named EDmini (Fig. 4.1.A.).
Alternatively, you can access the share by typing the following in a Windows explorer address field (Fig. 4.1.B.):
\\edmini
\\[IP address] (to find your Ethernet disk mini’s IP ad-
dress, run the IP Configurator Wizard; see chapter 3.5).
For FTP access, type:
ftp://edmini or ftp://[IP address]
In the logon window that opens (Fig. 4.1.C.), type:
User Name: admin
Password: admin
(is user name and password is the factory default;
if you have already created a user, input your user
name and password.)
e LaCie Ethernet Disk mini will appear as a
drive with one share folder on the network.
For faster connections and usability, LaCie recommends you map the network drive. For details, see
chapter 4.2. Mapping the Network Drive (Win-
dows Users Only).
Windows 95/98/98SE
From the Start menu, select Find and then Computer. Enter EDmini as the server name and click Find
1.
2.
3.
■
Fig. 4.1.A.
Fig. 4.1.B.
Fig. 4.1.C.
IMPORTANT INFO: If you have just turned
on the LaCie Ethernet Disk mini, it may take a
few moments for the LaCie Ethernet Disk mini to
appear on the network.
Page 23
LaCie Ethernet Disk mini
User Manual
Accessing the Share
page 23
Now. Windows will search your system and after a little
while, the LaCie Ethernet Disk mini should appear in
the result window. Click on the icon, and you will then
be asked to enter a username and password.
Windows Me/2000
For Windows Me and Windows 2000 users, if you
cannot find the LaCie Ethernet Disk mini from your
workstation, try using the Windows search tool.
■
From the Start menu, select Search, and then click
on For Files or Folders. In the Search Results window,
select Computers.
In the Search for Computers dialog box, enter
the server name and click the Search Now button. By
default, the LaCie Ethernet Disk mini will be named
“EDmini”, and the share “SHARE”.
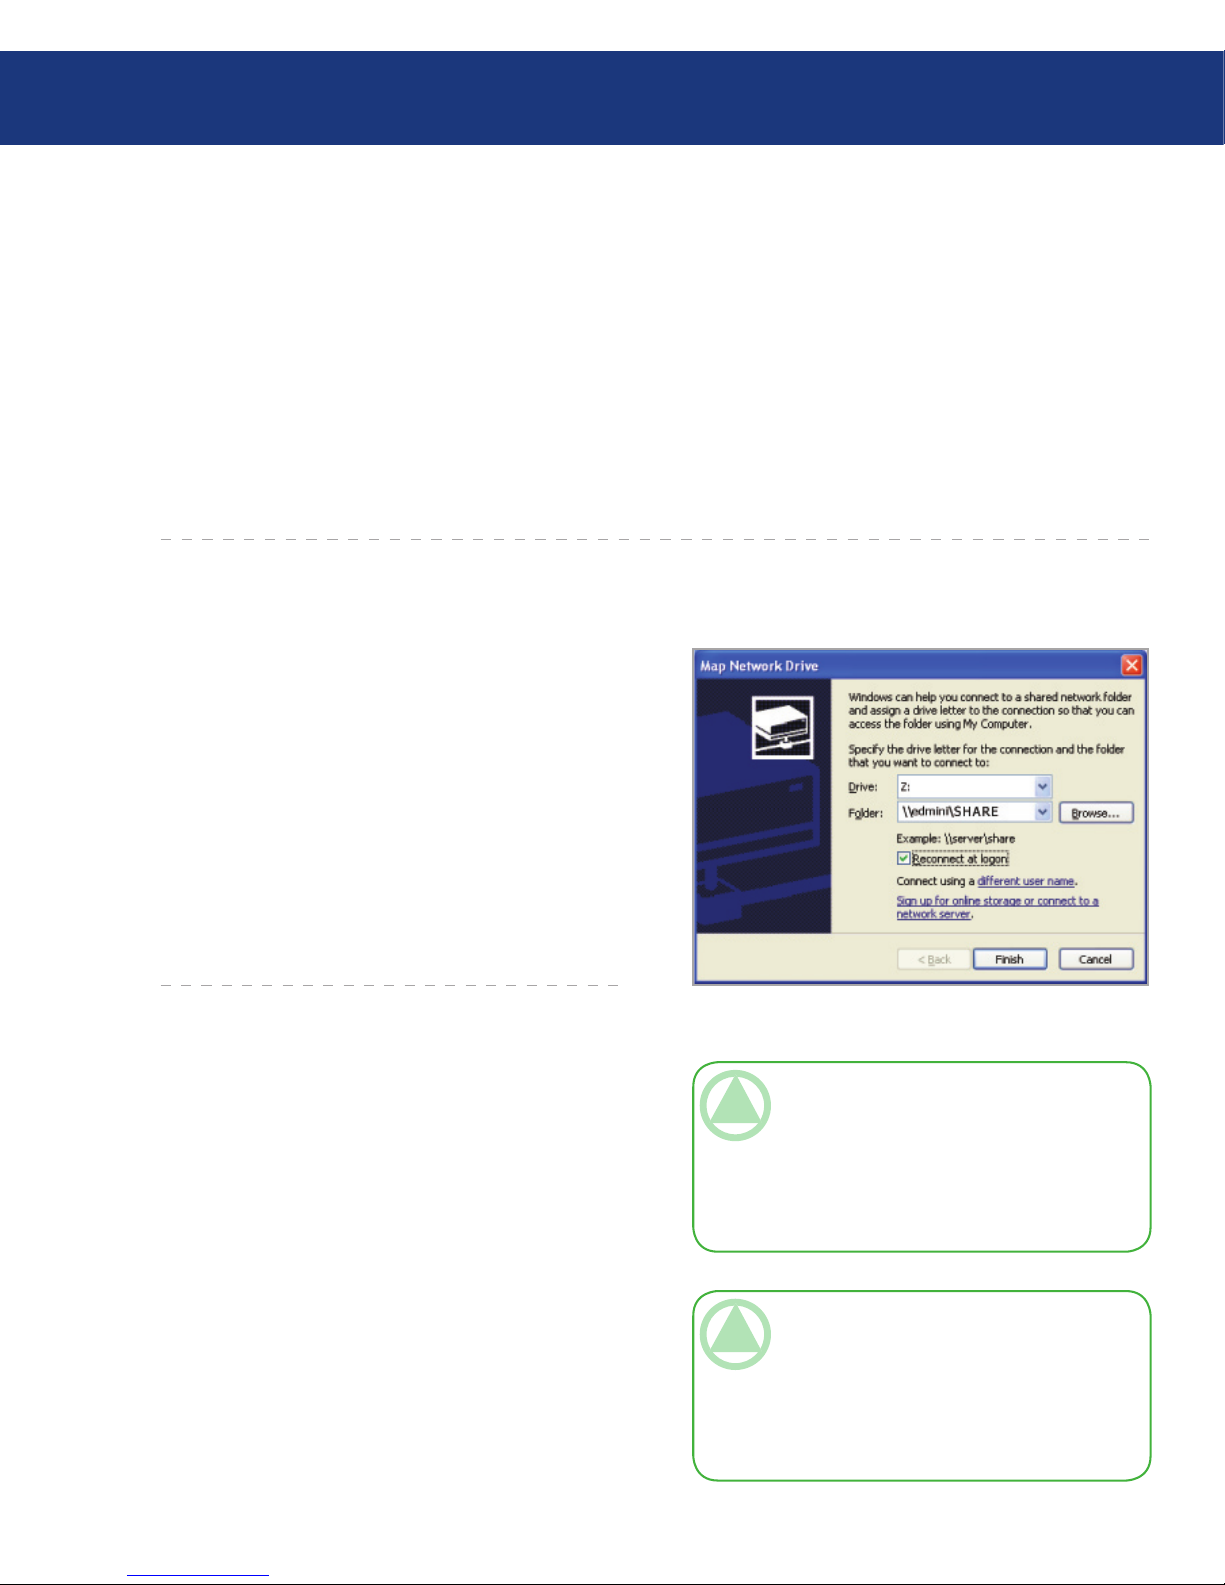
4.2. Mapping the Network Drive (Windows Users Only)
For faster time connections and usability, LaCie
recommends that you map your shared drive. To map
a shared drive:
Select the Tools menu from Windows Explorer.
Click on Map a drive.
Fill in the appropriate information (Fig. 4.2.A.)
and press Finish. is creates a direct access to the
shared drive from My Computer (for more information about drive mapping, refer to your Windows
manual).
1.
2.
3.
TECHNICAL NOTE: Windows Me Users – To
access your shares under Windows Me, the administrator will need to create a user with the same
username and password as your log in for Windows.
is is due to a limitation in Microsoft’s operating
system.
TECHNICAL NOTE: Windows 95 and 98 Us-
ers – To access your shares under Windows 95 and
98, you will need to create a user on the LaCie Ethernet Disk mini with the same user name and password as your log in for Windows. is is due to a
limitation in Microsoft’s operating system.
Fig. 4.2.A.
Page 24
LaCie Ethernet Disk mini
User Manual
Accessing the Share
page 24
Fig. 4.3.C.
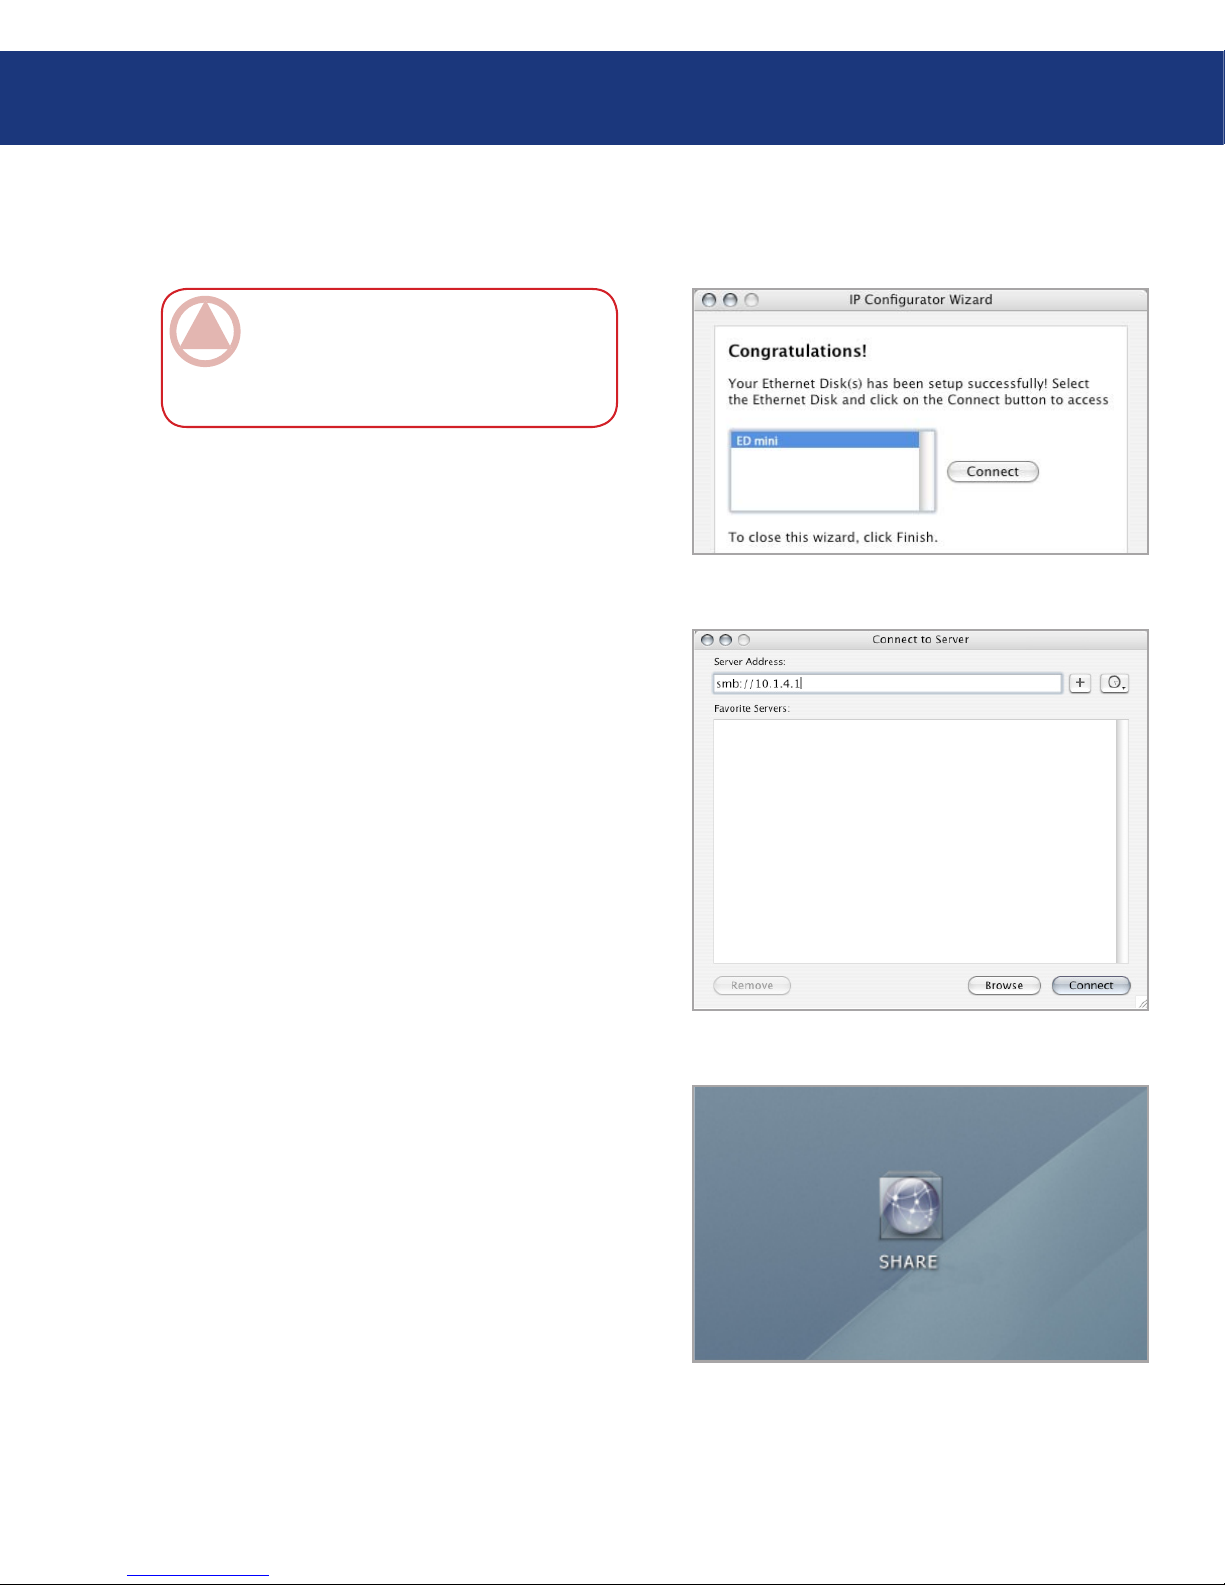
Run the Network IP Configurator Wizard.
e Wizard will search for connected Ethernet Disk
mini(s) on your network (Fig. 4.3.A.). Found Ethernet Disk minis will be represented by an IP address.
Write down this IP address (for example, 10.1.4.4).
From the Finder, click Go and select Connect to
Server...
In the Server Address field, type your Ethernet Disk
mini’s IP address and click Connect (Fig. 4.3.B.).
For SMB access, type Apple-K, and in the address
field, type smb://edmini (it is also possible to type
smb://IP address or smb://Machine name).
For FTP access, type Apple-K, and in the address
field, type ftp://edmini or ftp://IP Address.
For AFP access, type Apple-K, and in the address
field, type afp://edmini or afp://IP Address.
In the logon window that opens, type:
User Name: admin
Password: admin
(is user name and password is the factory default;
if you have already created a user, input your user
name and password.)
In the Select Volumes to Mount window, select
SHARE and click OK.
e network drive will mount on your desktop (Fig.
4.3.C.) and can be accessed for file transfer.
Mac OS 9.x
From the Apple menu, select Network Browser,
Chooser or Connect to Server. In Chooser, click the
Appleshare icon. Your server should appear in the list
with the default name “EDmini”. Select it and press
OK.
1.
2.
3.
4.
5.
6.
7.
■
IMPORTANT INFO: If you have just turned
on the LaCie Ethernet Disk mini, it may take a
few moments for the LaCie Ethernet Disk mini to
appear on the network.
4.3. Mac Users
Fig. 4.3.A.
Fig. 4.3.B.
Page 25

LaCie Ethernet Disk mini
User Manual
Accessing the Share
page 25
Under KDE, open konqueror and type in the IP address of the LaCie Ethernet Disk mini into the address
field:
For FTP access – ftp:// [IP address]
For HTTP access – http:// [IP address]
For SMB/CIFS access (in order for this to method
to work, the services need to be properly configured)
– smb:// [IP address].
❖
❖
❖
4.4. Linux Users
Page 26
LaCie Ethernet Disk mini
User Manual
5. Configure Your Drive Using the NAS Administration Page
e LaCie Ethernet Disk mini features an easy-touse Web-based tool for configuring the drive and administering users.
5.1. Accessing The NAS Administration Page
Using the NAS Administration Page
page 26
Fig. 5.1.A.
Fig. 5.1.B.
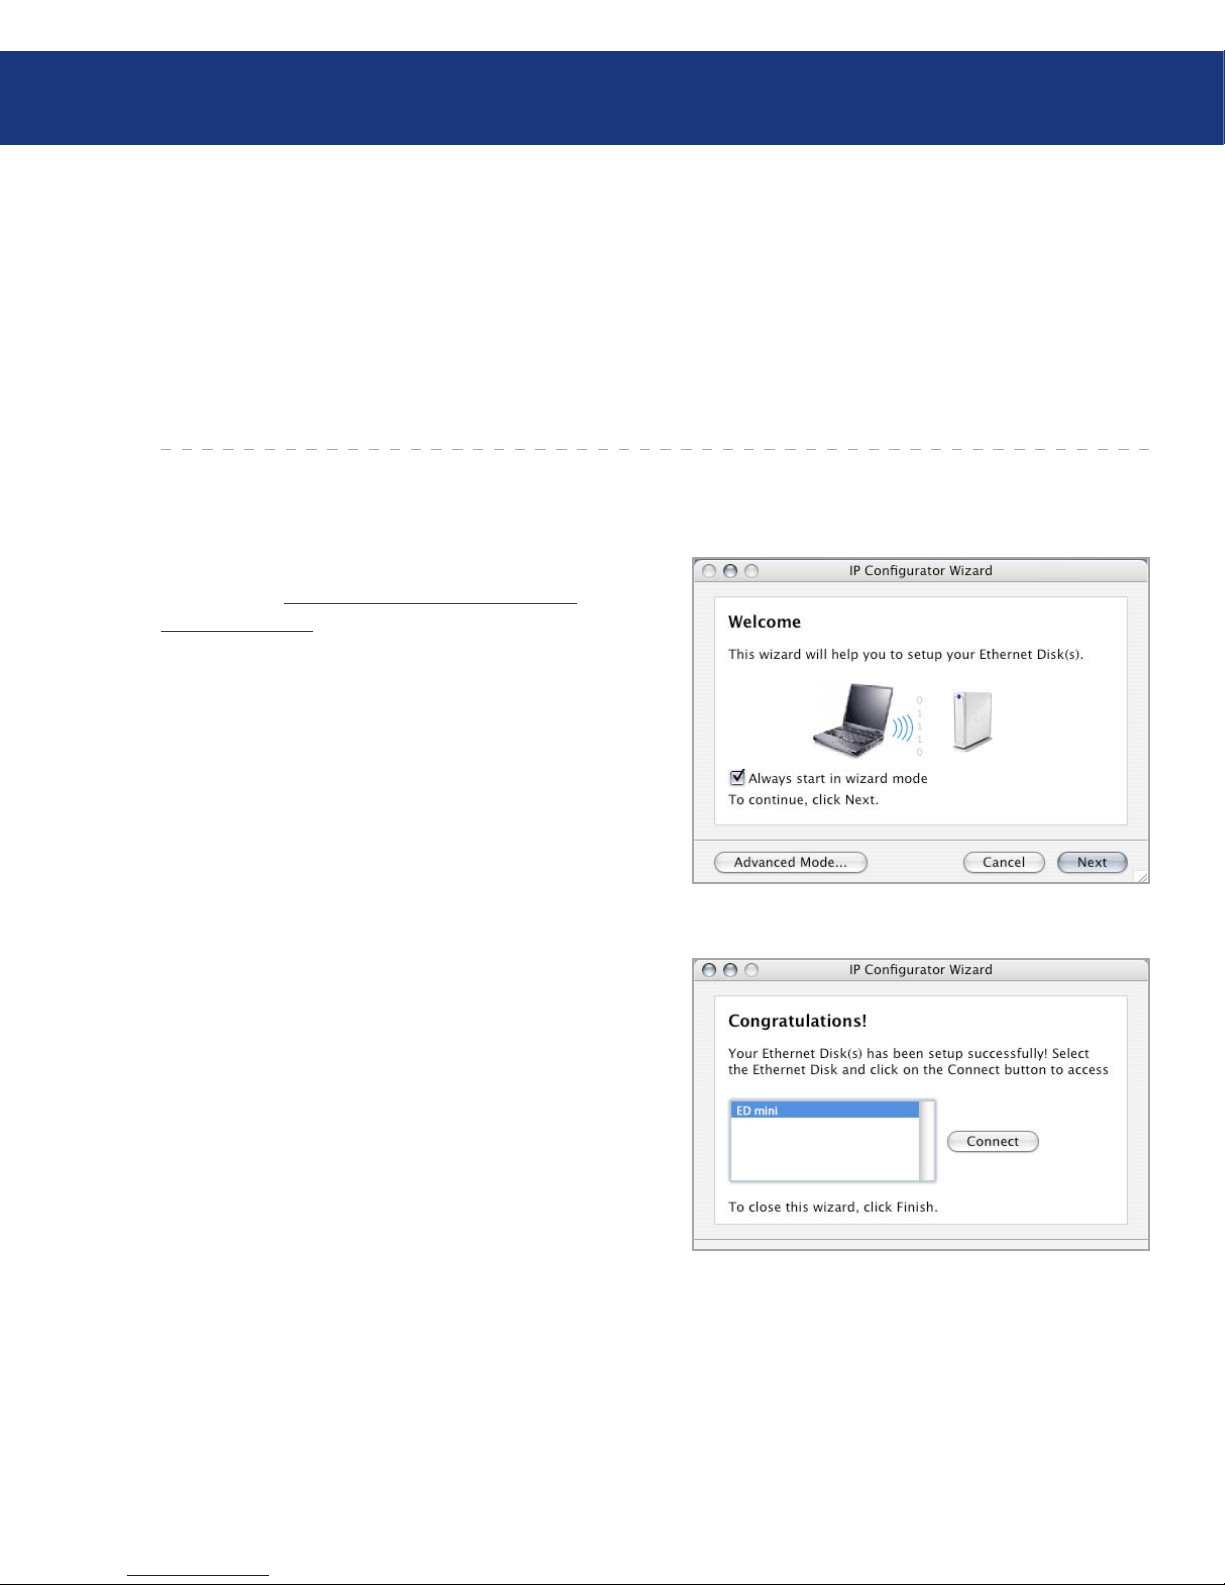
ere are two ways of accessing the NAS Administration page, Using the IP Configurator Wizard, and
Using the Browser.
Using the IP Configurator Wizard
Select the program from the Start Menu (PC users)
or from the Applications folder (Mac users).
Follow the steps indicated in the Wizard. Once the
Wizard locates your Ethernet Disk mini (represented by its IP address), select it and click Connect
(Figs. 5.1.A. - 5.1.B.).
Once the NAS Administration Page opens in your
default browser, click on the Administration link.
In the logon window that opens, type:
User Name: admin
Password: admin
(is user name and password is the factory default;
if you have already created a user, input your user
name and password. is is the administration
logon and you can change it for more security if you
choose.) e NAS Administration page will open
in your default browser.
■
1.
2.
3.
4.
Page 27
LaCie Ethernet Disk mini
User Manual
Using the NAS Administration Page
page 27
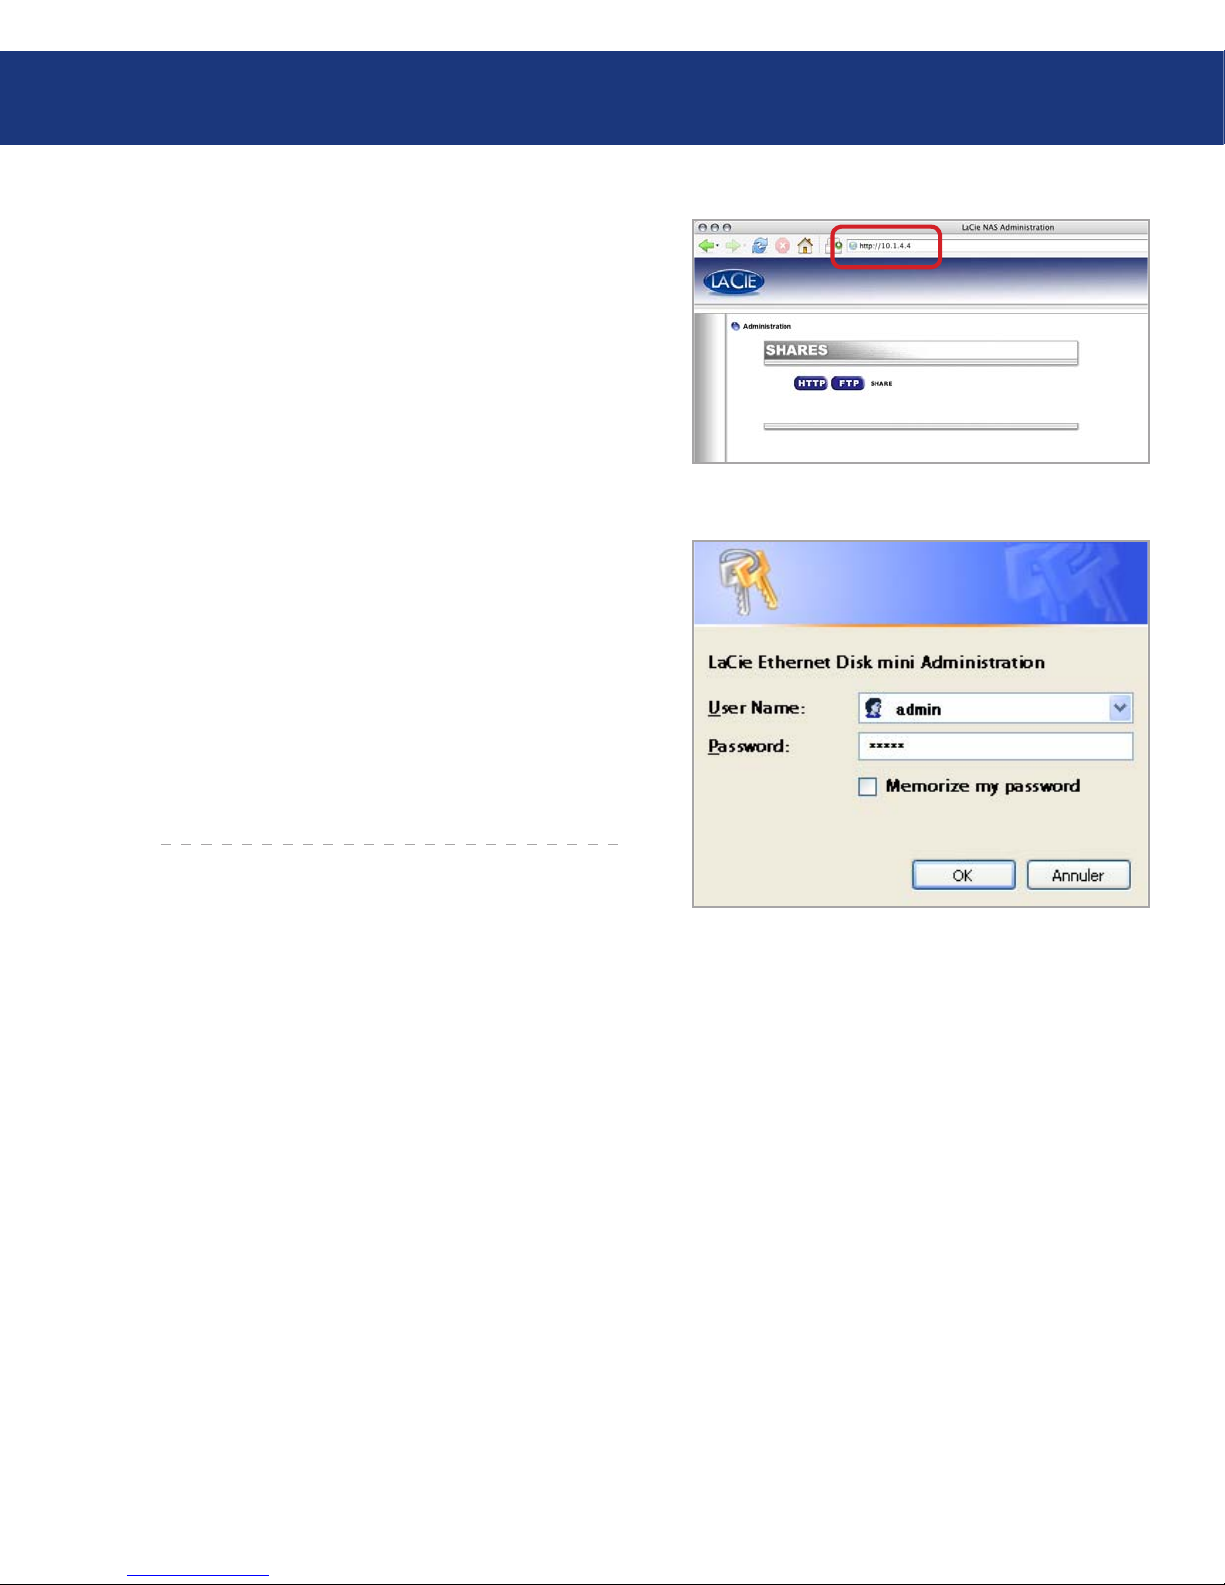
Using the Browser
In your browser’s address field, type one of the following:
http://edmini (Fig. 5.1.C.)
or
http:// + IP address (find the IP address by running
the IP Configuration Wizard)
Once the NAS Administration Page opens in your
default browser, click on the Administration link.
In the logon window that opens (Fig. 5.1.D.), type:
User Name: admin
Password: admin
(is user name and password is the factory default;
if you have already created a user, input your user
name and password.) e NAS Administration
page will open in your default browser.
■
1.
2.
3.
Fig. 5.1.C.
Fig. 5.1.D.
Page 28
LaCie Ethernet Disk mini
User Manual
5.2. Administering The LaCie Ethernet Disk mini
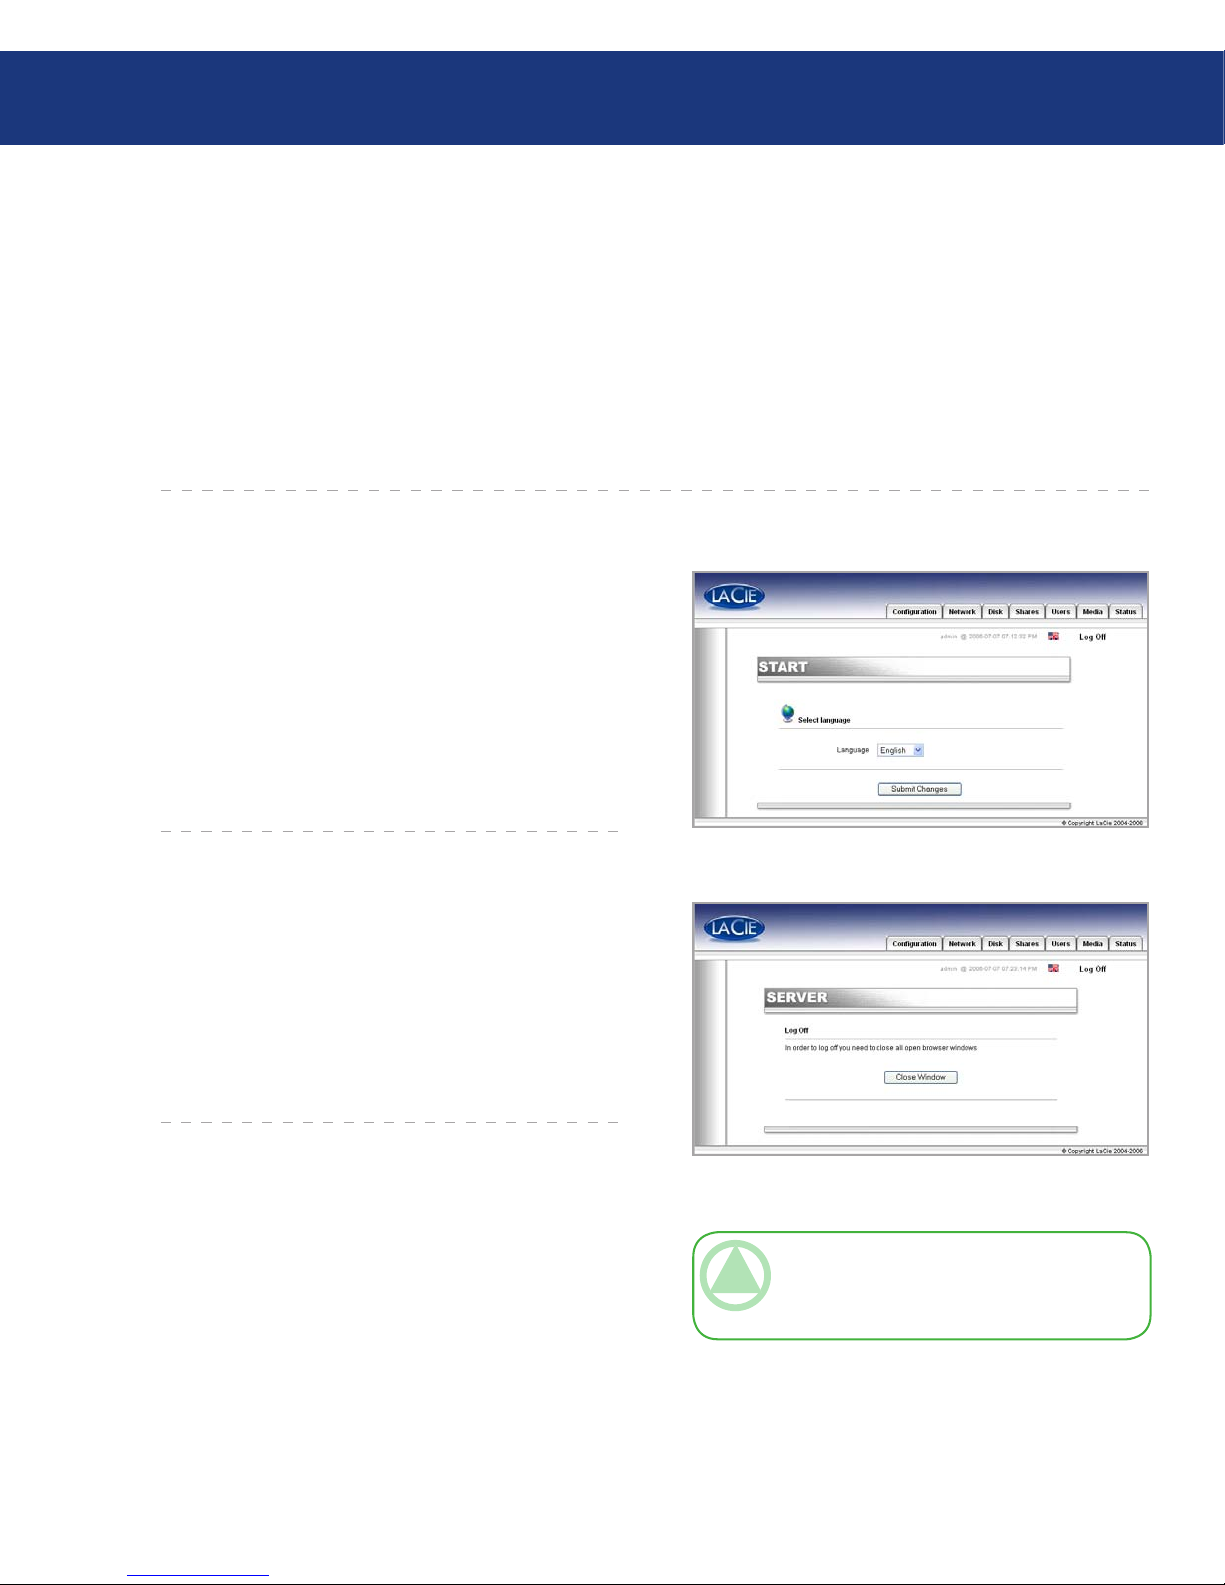
After the login is validated, you will enter the LaCie
Ethernet Disk mini’s Web Administration Page. Along
the top of the page are a series of tabs (Configuration,
Network, Disk, Shares, Users, Media and Status), from
which you can navigate and configure the LaCie Ethernet Disk mini.
e first page that appears will give you the opportunity to select the language that you wish to use for the
Web Administration Page. Simply use the pull-down
menu beside the Language selector to find your language, and then click Submit Changes to activate your
language. You may come back to this page at any time
by clicking on the language’s flag, located just below the
program tabs (Fig. 5.2.1.A.).
5.2.1. Setting The User Language■
Fig. 5.2.1.A.
Fig. 5.2.2.A.
You can close the Web Administration program at
any point while the Web page is open by clicking Log
Off, located just below the tabs in the upper-right hand
corner of the screen.
After clicking Log Off, click on the Close Window
button to leave the program (Fig. 5.2.2.A.).
5.2.2. Log Off■
TECHNICAL NOTE: Depending on your
browser settings, clicking the “Log Off ” button may
or may not close the browser window.
Using the NAS Administration Page
page 28
Page 29
LaCie Ethernet Disk mini
User Manual
Fig. 5.3.A.
5.3. Configuration Menu
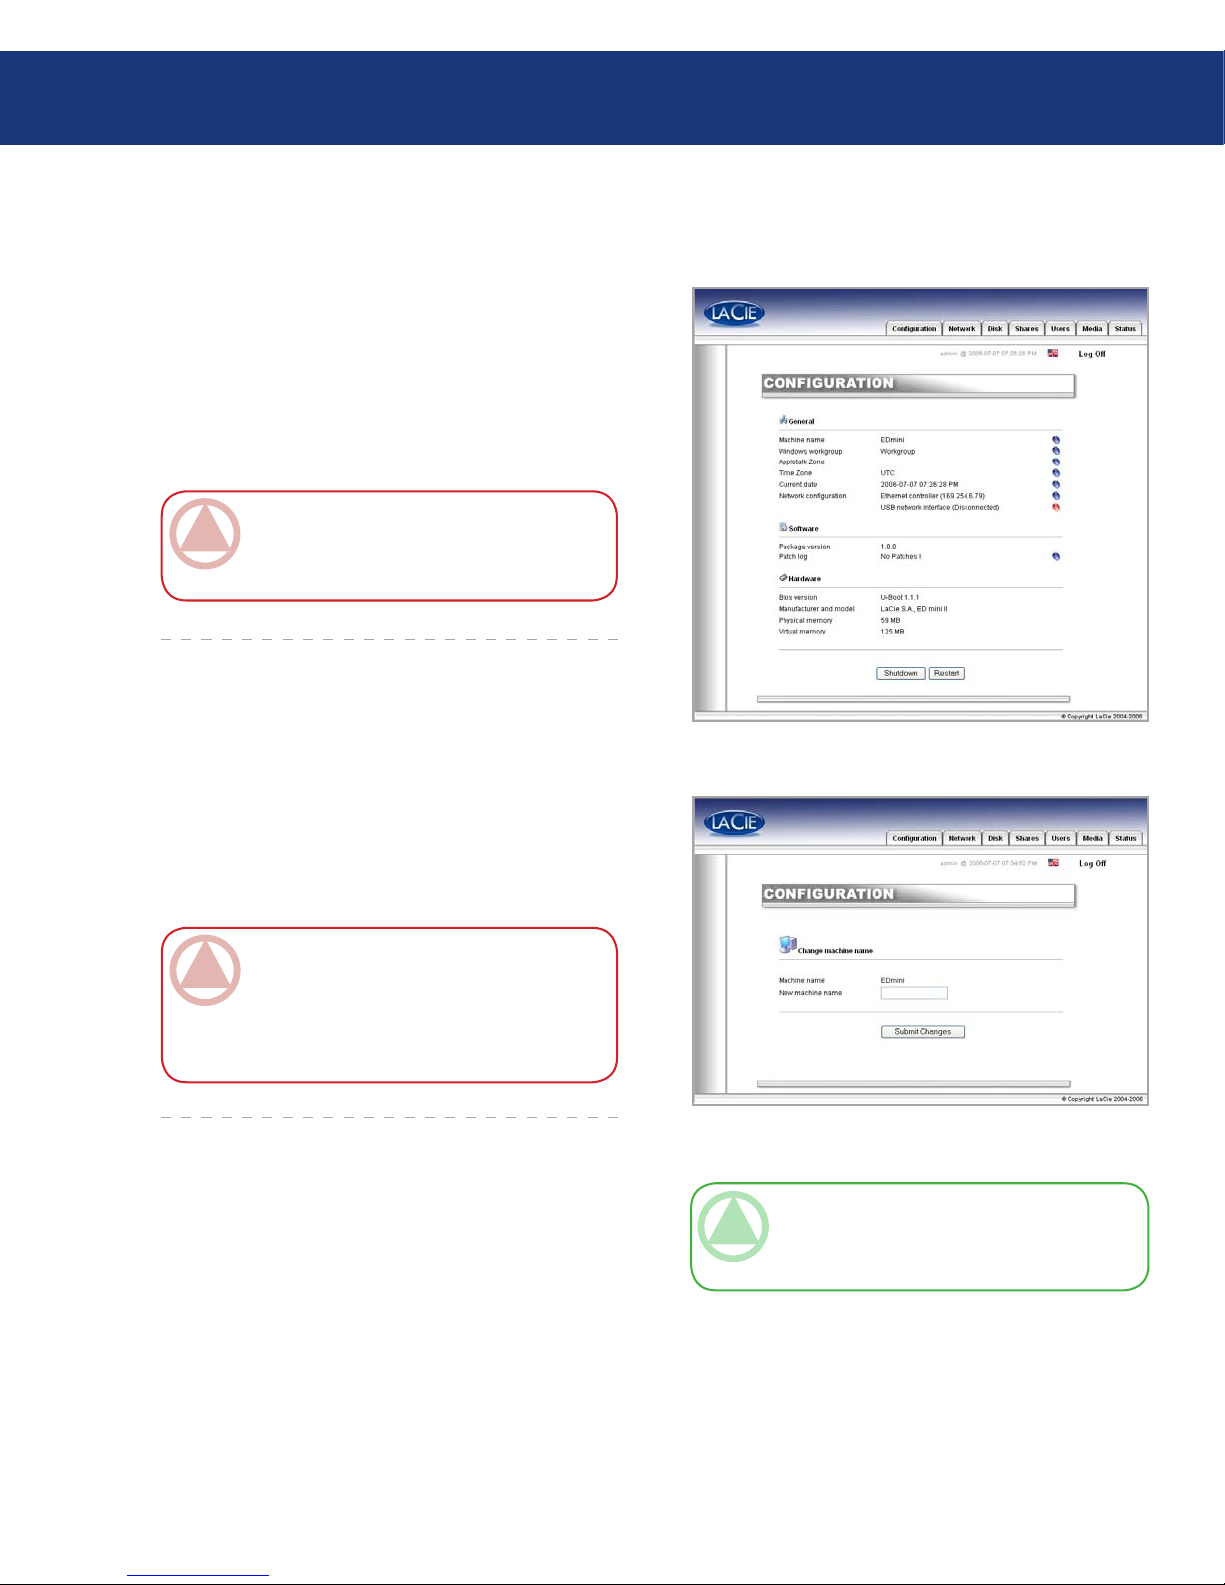
By clicking on the Configuration tab, you will be
brought to the main page of the Configuration menu.
From this window you can see details about your network, software and hardware, while also being able to
restart or shutdown your LaCie Ethernet Disk mini
(Fig. 5.3.A).
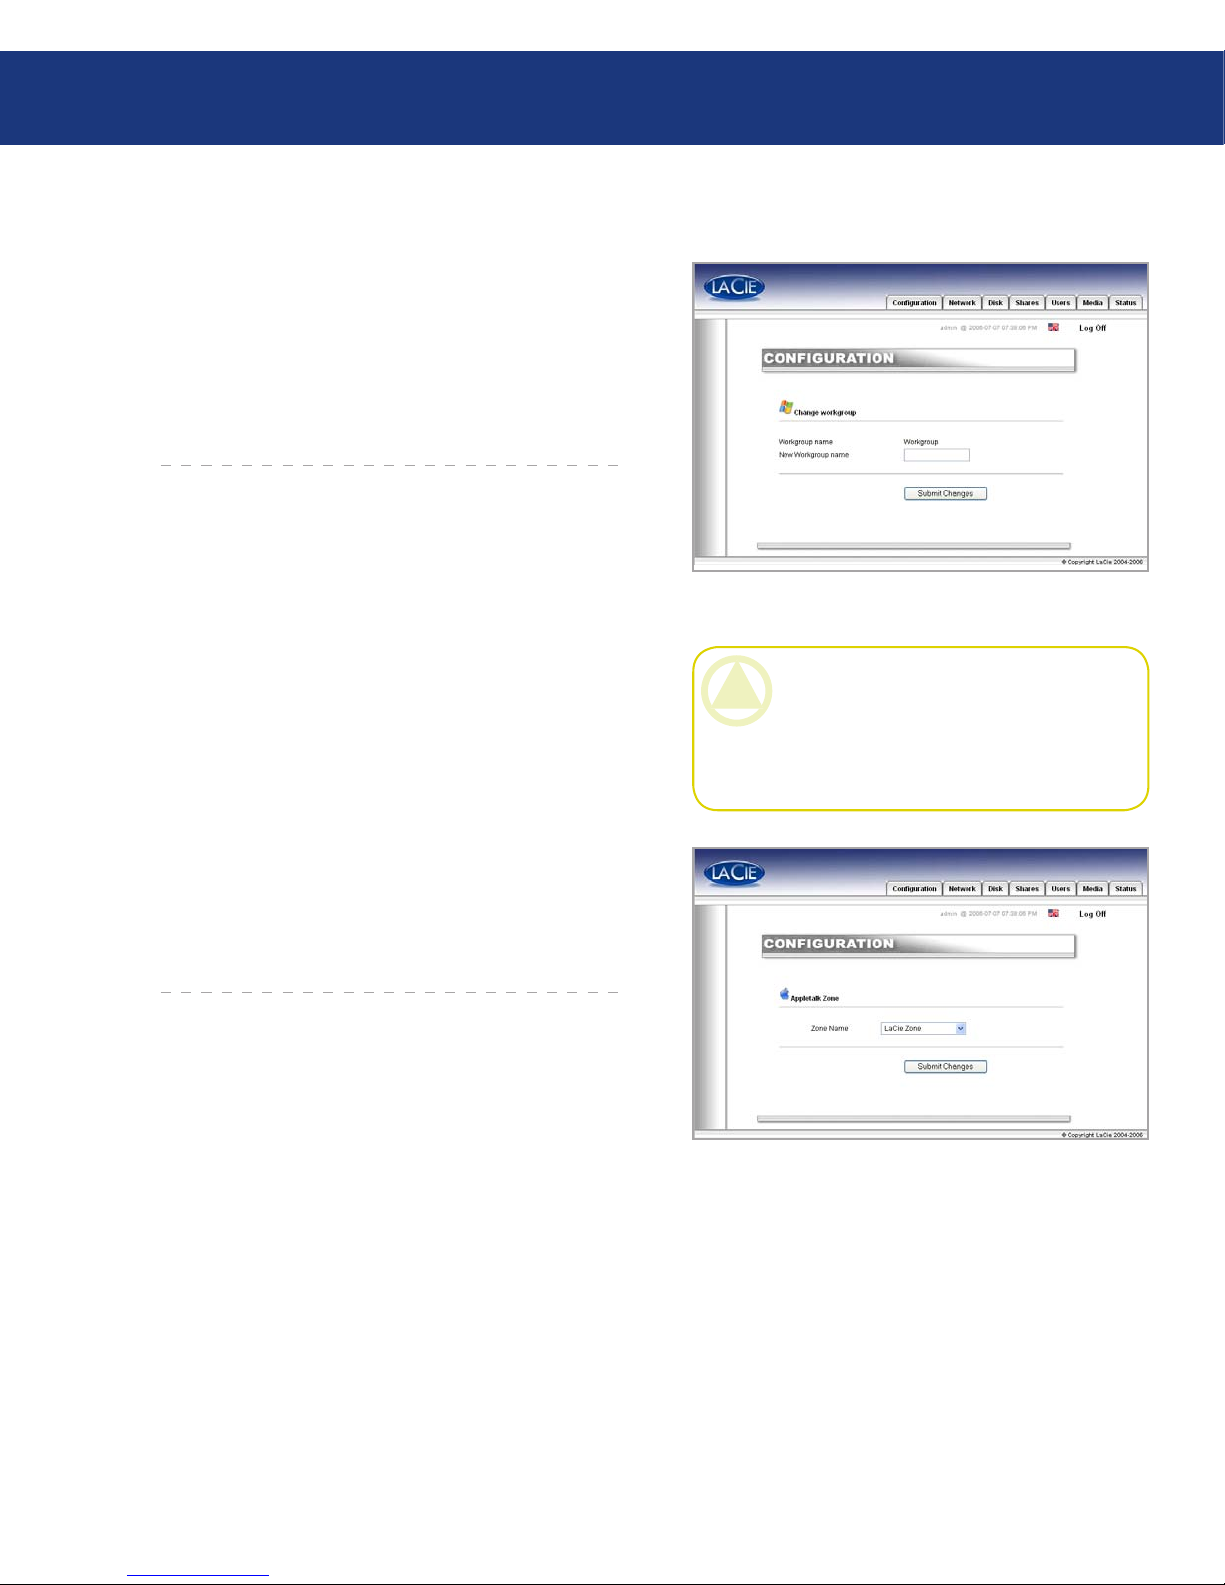
Here you can change the Ethernet Disk mini’s name.
Type the name and click the Submit Changes button.
e default machine name for the LaCie Ethernet Disk
mini is “EDmini” (Fig. 5.3.1.A.).
5.3.1. Machine Name■
Fig. 5.3.1.A.
IMPORTANT INFO: e Configuration page
allows you to check the software version of your
drive.
TECHNICAL NOTE: Machine name changes
will be registered in the local DNS servers ONLY
after a restart.
Using the NAS Administration Page
page 29
IMPORTANT INFO: If you intend to use
more than one Ethernet Disk mini on your network, you must change the default machine name.
Each Ethernet Disk mini must have a unique
name.
Page 30
LaCie Ethernet Disk mini
User Manual
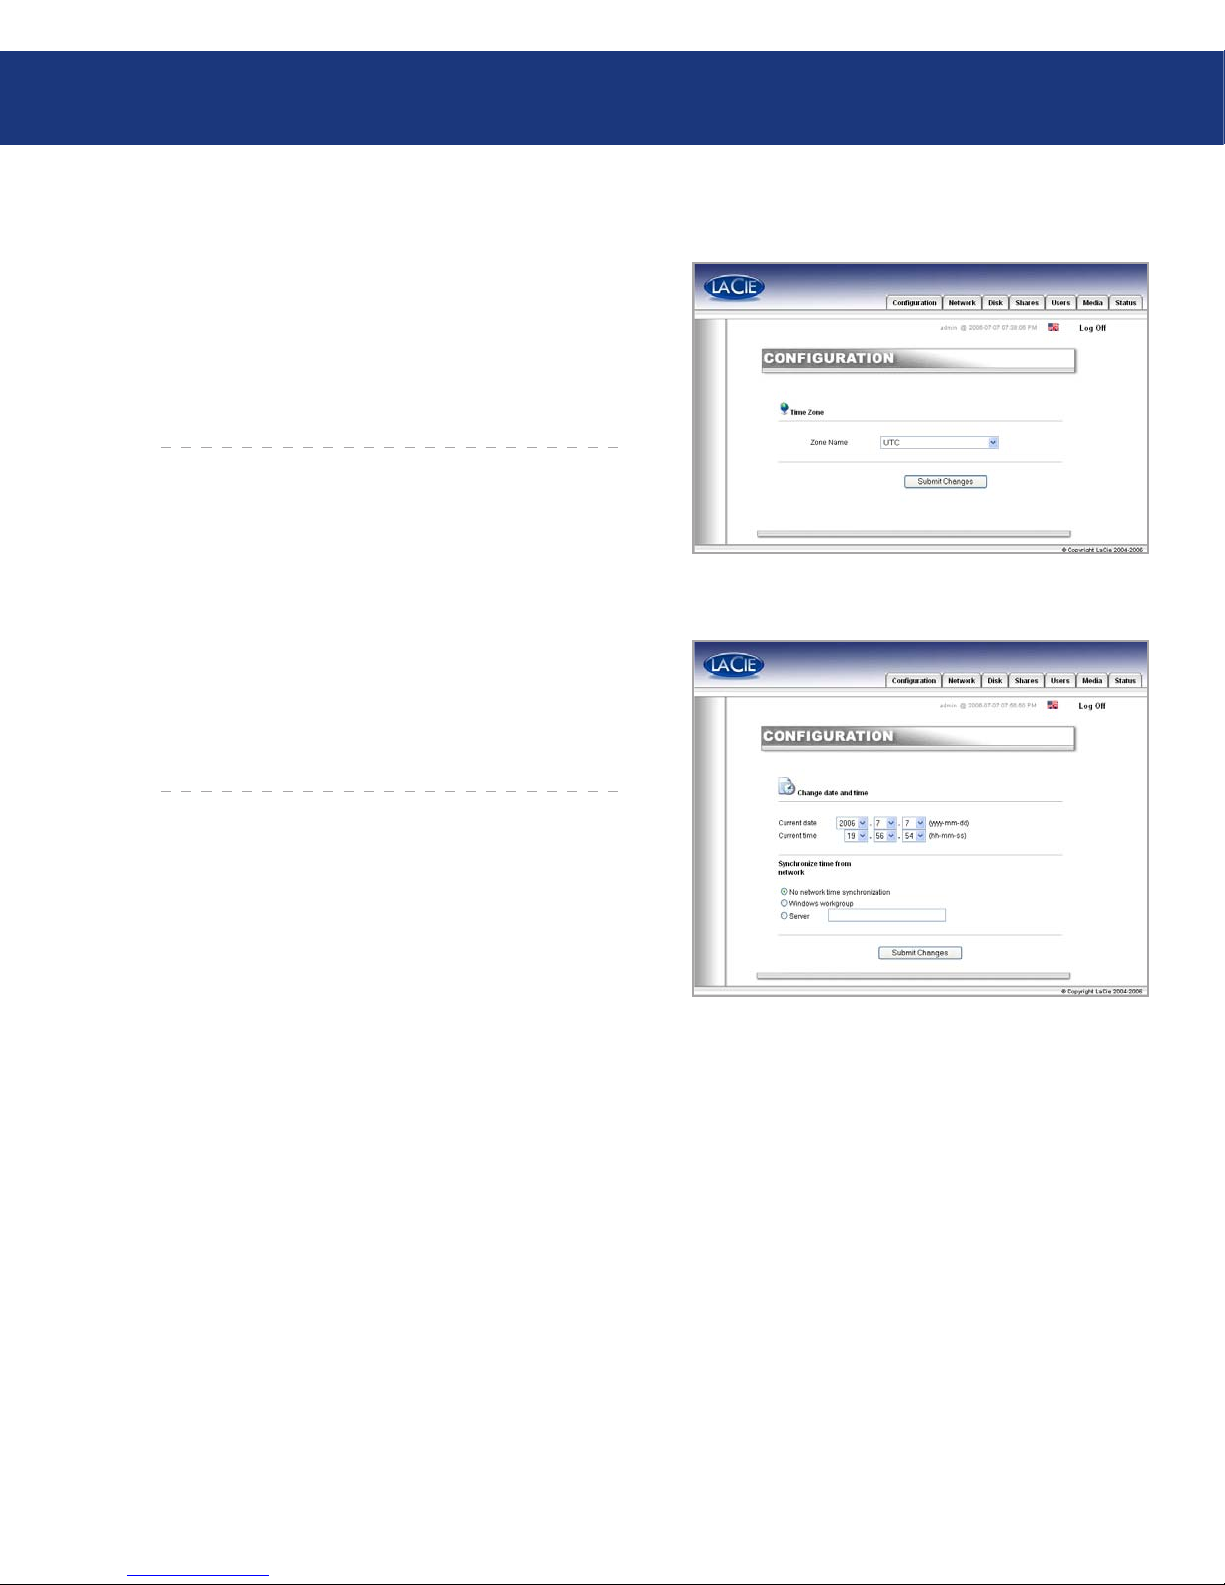
e Ethernet Disk mini is first attached by default
to the Windows Workgroup. On this page, you can
modify the workgroup to which the LaCie Ethernet
Disk mini is attached. If you have altered the workgroup, click the Submit Changes button to activate your
changes (Fig. 5.3.2.A.).
5.3.2. Windows Workgroup■
Fig. 5.3.2.A.
CAUTION: A workgroup name can contain up
to 15 characters, including letters, numbers, and
the following characters: ! @ # $ % ^ & ( ) _ - ; :
‘” , . It cannot contain any spaces, and must begin
with a letter or number.
Using the NAS Administration Page
page 30
Here you can modify the AppleTalk Zone to which
the LaCie Ethernet Disk mini is attached. If you have
altered the AppleTalk Zone, click the Submit Changes
button to activate your changes (Fig. 5.3.3.A.).
5.3.3. AppleTalk Zone■
Fig. 5.3.3.A.
Page 31
LaCie Ethernet Disk mini
User Manual
Here you can modify the Time Zone to which the
LaCie Ethernet Disk mini is attached.
If you have altered the Time Zone, click the Sub-
mit Changes button to activate your changes (Fig.
5.3.4.A.).
5.3.4. Select a Time Zone■
Fig. 5.3.4.A.
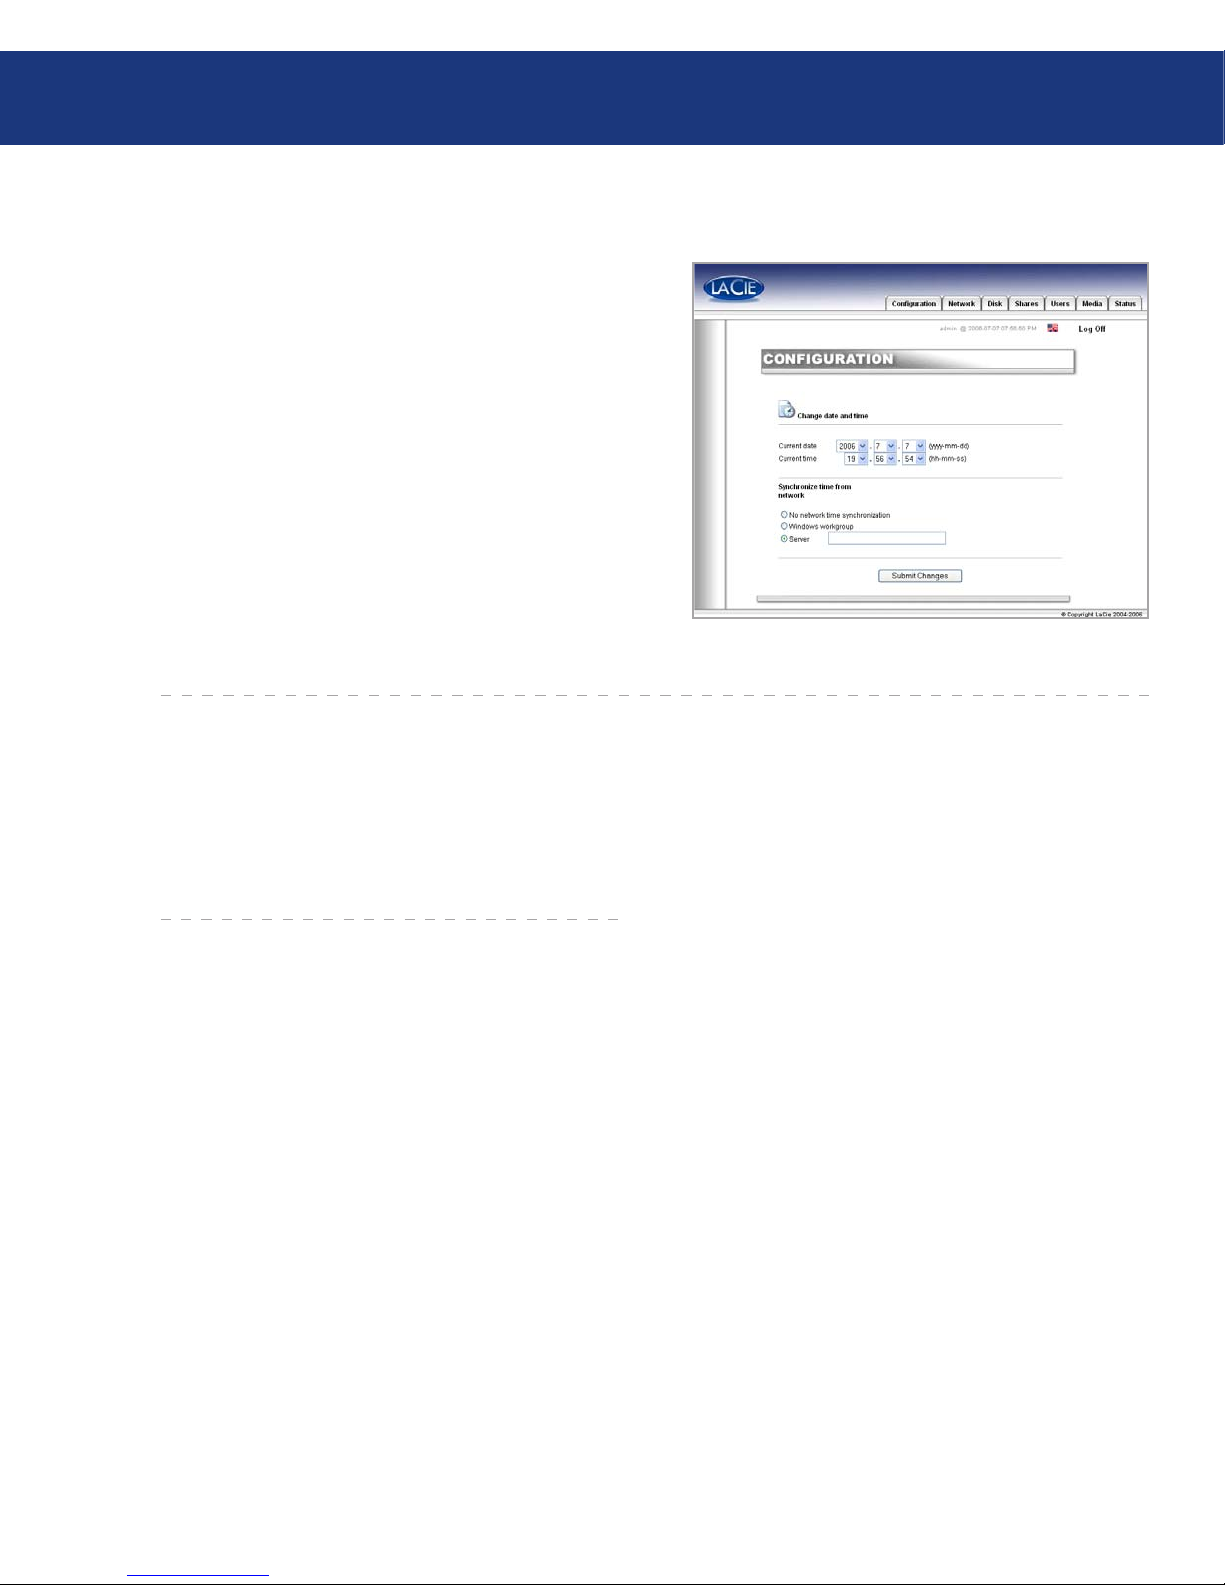
Here you can modify the date and time settings of
the LaCie Ethernet Disk mini. If you have altered the
date and time, click the Submit Changes button to activate your changes (Fig. 5.3.5.A.).
5.3.5. Change Date and Time■
Fig. 5.3.5.A.
Using the NAS Administration Page
page 31
Page 32
LaCie Ethernet Disk mini
User Manual
If you have altered the date and time, click the Submit Changes button to activate your changes.
ere are two ways to set up network synchronization (but you can’t use both ways). First, opt to manually
assign time and date settings (Fig. 5.3.6.A.):
First, input time and date settings.
en, select the source (Windows workgroup or
specify server name).
e second way to set up synchronization is to select the Windows Workgroup or server and to enter the
server name.
1.
2.
5.3.6. Network Synchronization■
Fig. 5.3.6.A.
At the bottom of the Configuration menu, you can
press either the Restart button or Shutdown button. By
clicking on either of the buttons, a prompt will appear to
alert you to which process is taking place.
5.3.7. Restart/Shut Down■
Using the NAS Administration Page
page 32
Page 33
LaCie Ethernet Disk mini
User Manual
Fig. 5.4.A.
5.4. Network Menu
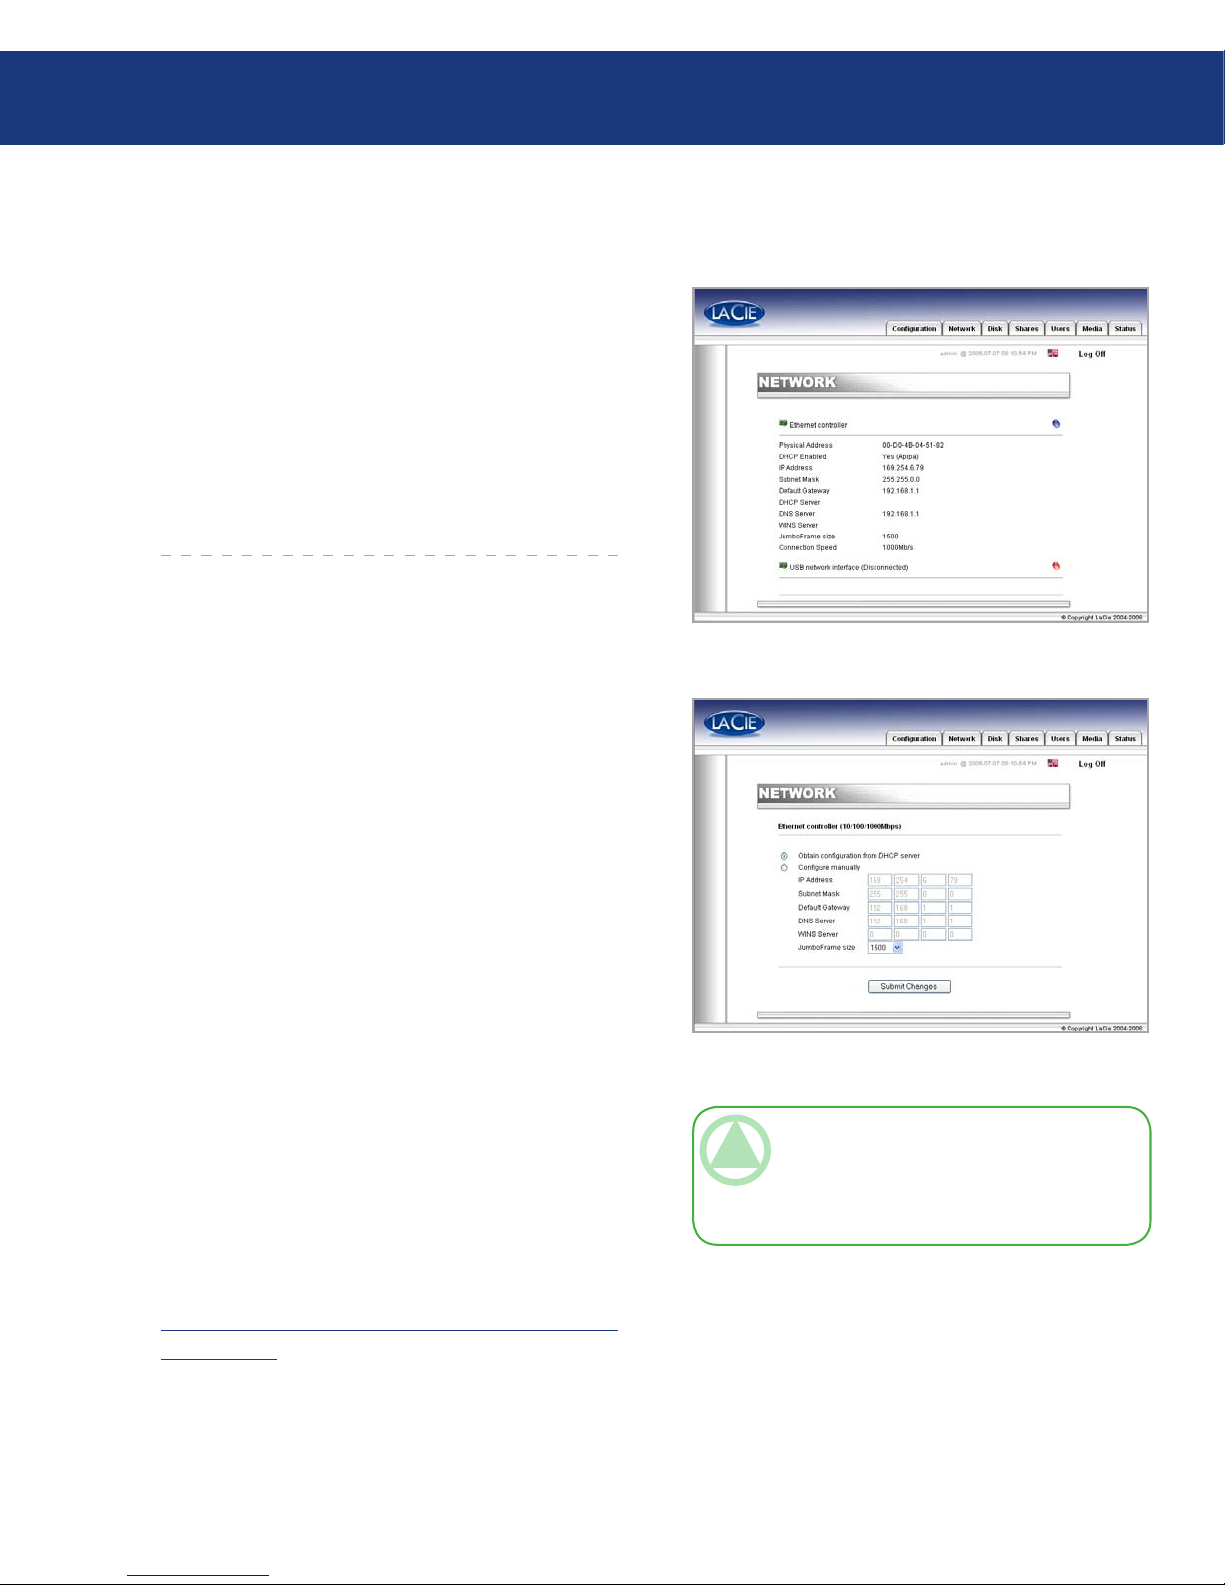
On this page you can view information about the
LaCie Ethernet Disk mini’s IP configuration. From this
page, you can also modify the IP configuration of the
LaCie Ethernet Disk mini (Fig. 5.4.A.).
On this page, the connected interface will be represented by a blue button, and the disconnected interface
by a red button. Only settings for connected interfaces
can be modified.
Using the NAS Administration Page
page 33
On this page, you can check which interface is
connected, either the Ethernet, or USB or both and
then to configure the connection.
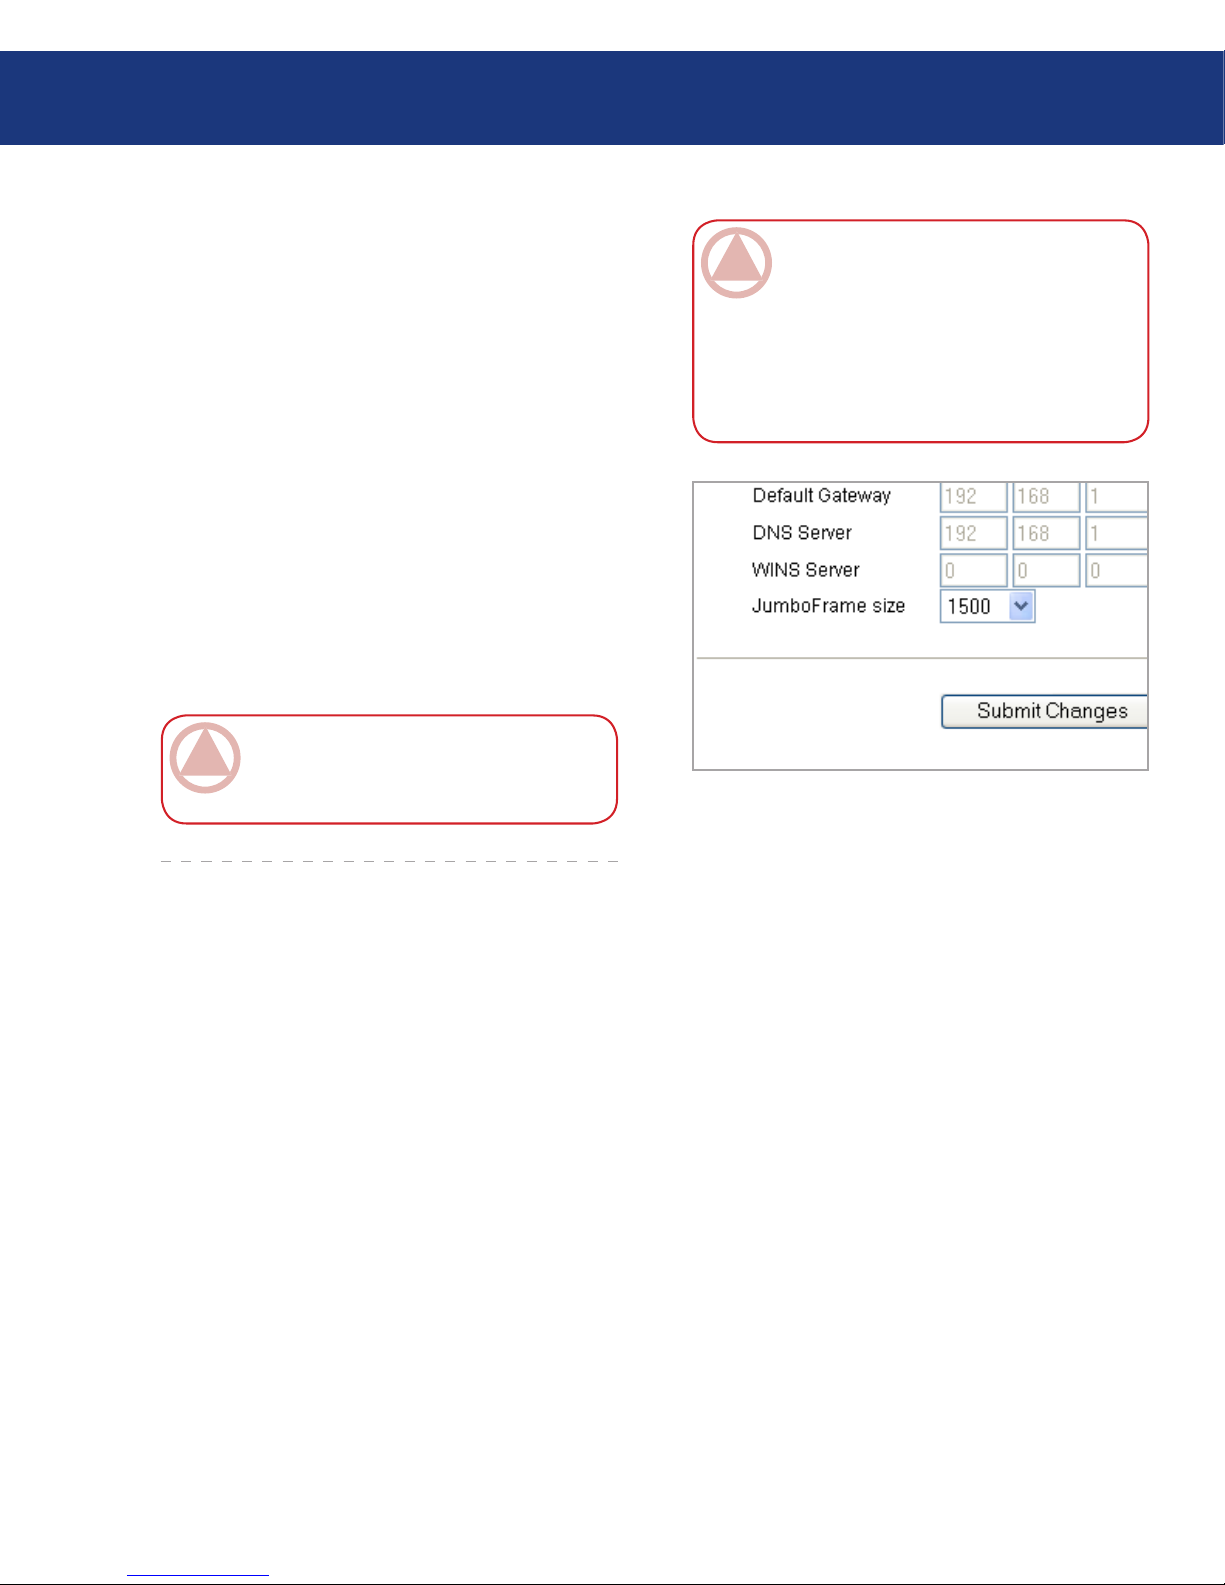
ere are two alternative methods for determining
the LaCie Ethernet Disk mini’s IP address: Obtain
Configuration From DHCP Server or Configure
Manually (Fig. 5.4.1.A.).
Obtain Configuration From DHCP Server
is method is used when the LaCie Ethernet Disk
mini is connected to a DHCP enabled network with a
DHCP server. In this case, the server automatically assigns the IP address for the LaCie Ethernet Disk mini.
Configure Manually
is method is used when the LaCie Ethernet Disk
mini is connected to a non-DHCP enabled network.
In this case, you will need to manually assign the correct network settings for your LaCie Ethernet Disk mini.
Please refer to your network administrator for more information about your network and which parameters you
should use. For more information, refer to chapter 3.6.,
Configure Your Drive On a Local Area Network with no
DHCP Server.
5.4.1. IP Configuration■
Fig. 5.4.1.B.
TECHNICAL NOTE: If you have a small home
network with a router, the Gateway and DNS
Server address will be the local IP address of your
router.
Page 34
LaCie Ethernet Disk mini
User Manual
Using the NAS Administration Page
page 34
IP Address – is is the IP address that you want to
assign to the LaCie Ethernet Disk mini.
Subnet Mask – is is the subnet mask that is associated with the LaCie Ethernet Disk mini’s assigned
IP address.
Default Gateway – is is the default IP address of
the Gateway that is available for the specified network.
DNS Server – is is the IP address of the DNS server which handles the routing and resolution of names.
JumboFrame Size - e Ethernet Disk mini supports frame (i.e. packets) sizes larger than 1500 bytes on
the Gigabit Ethernet interface. JumboFrame capability
extends supported frame size to 9000 bytes (9KB). In
general, the higher the frame size, the better the network
performance.
IMPORTANT INFO: If the DHCP server’s
automatic IP address configuration function is selected/activated and there is no DHCP server on
the network, the Ethernet Disk mini will check first
the DHCP, then the APIPA. If no address is found,
the following address: 169.254.X.X/255.255.0.0
will be assigned.
Fig. 5.4.1.C
IMPORTANT INFO: Do not modify the Jum-
boFrame size if your network is not configured for
JumboFrame functionality.
Page 35
LaCie Ethernet Disk mini
User Manual
Fig. 5.5.2.C.
5.5. Disk Menu
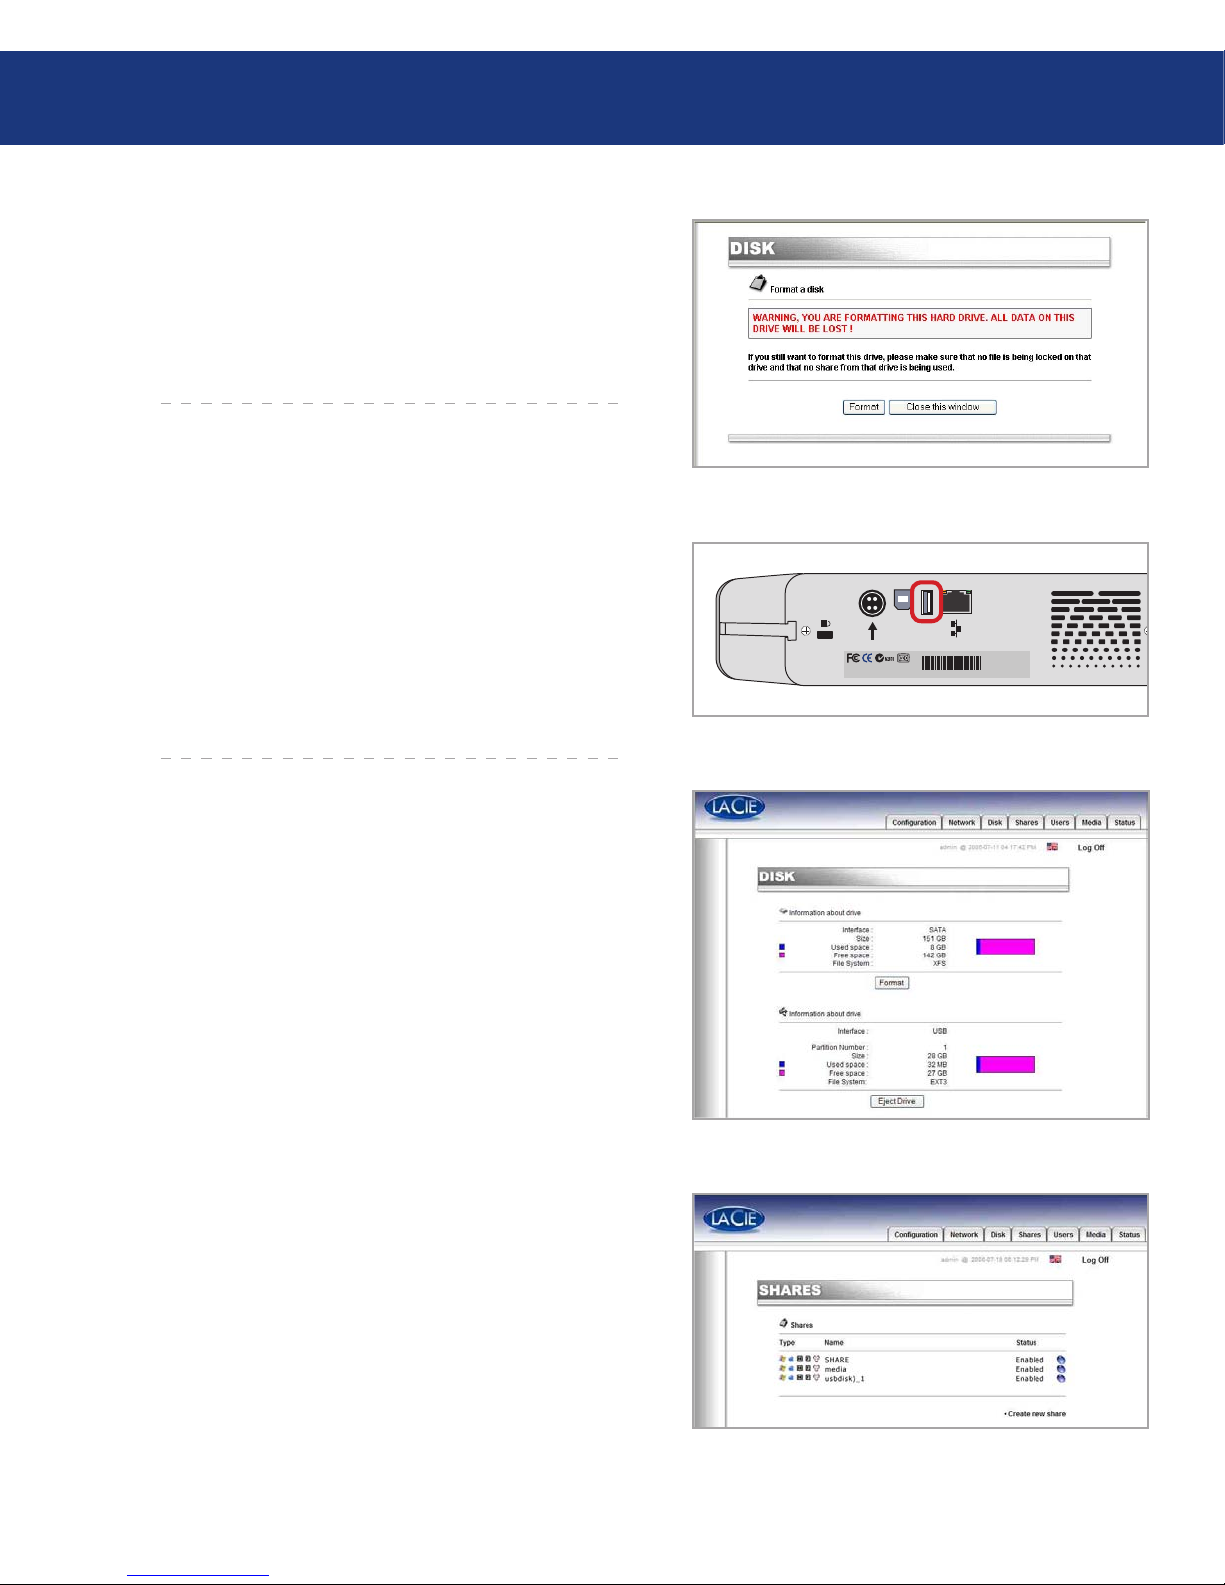
From this window you can see details about your
LaCie Ethernet Disk mini’s interface, volume size, used
and free space and file system being used (Fig. 5.5.A.).
Using the NAS Administration Page
page 35
5.5.1.Reformatting the Disk■
By clicking on the Format button, you will launch
the Format a disk window, where you will be issued a
warning about the formatting process. Read the warning before continuing.
Click the Format button to continue, or the Close
this window button to quit the process (Fig. 5.5.1.A.).
Keep in mind that the file system format cannot be
changed.
Fig. 5.5.1.A.
5.5.2.Adding Additional Storage Space■
You can add additional storage space to your LaCie
Ethernet Disk mini by connecting an external hard
drive using the Hi-Speed USB 2.0 port.
Connect the hard drive to the LaCie Ethernet
Disk mini using the Hi-Speed USB 2.0 port (Fig.
5.5.2.A.).
In the Web Administration Page, click on the Disk
tab.
One volume is automatically created that you can’t reformat from the Administration page (Fig 5.5.2.B.).
Refresh the page if necessary (under Windows in either Internet Explorer or Netscape Navigator, rightclick in the frame and click on Refresh or Reload).
A share has been added in the list on the share page
called usbdisk0_1 (Fig. 5.5.2.C.).
1.
2.
3.
4.
5.
Fig. 5.5.2.B.
Mac Address: 00D04B801220 SN:XXXXXXXXXX
USB 2.0
USB
Fig. 5.5.2.A.
Page 36
LaCie Ethernet Disk mini
User Manual
Using the NAS Administration Page
page 36
Fig. 5.6.A.
5.6. Shares Menu
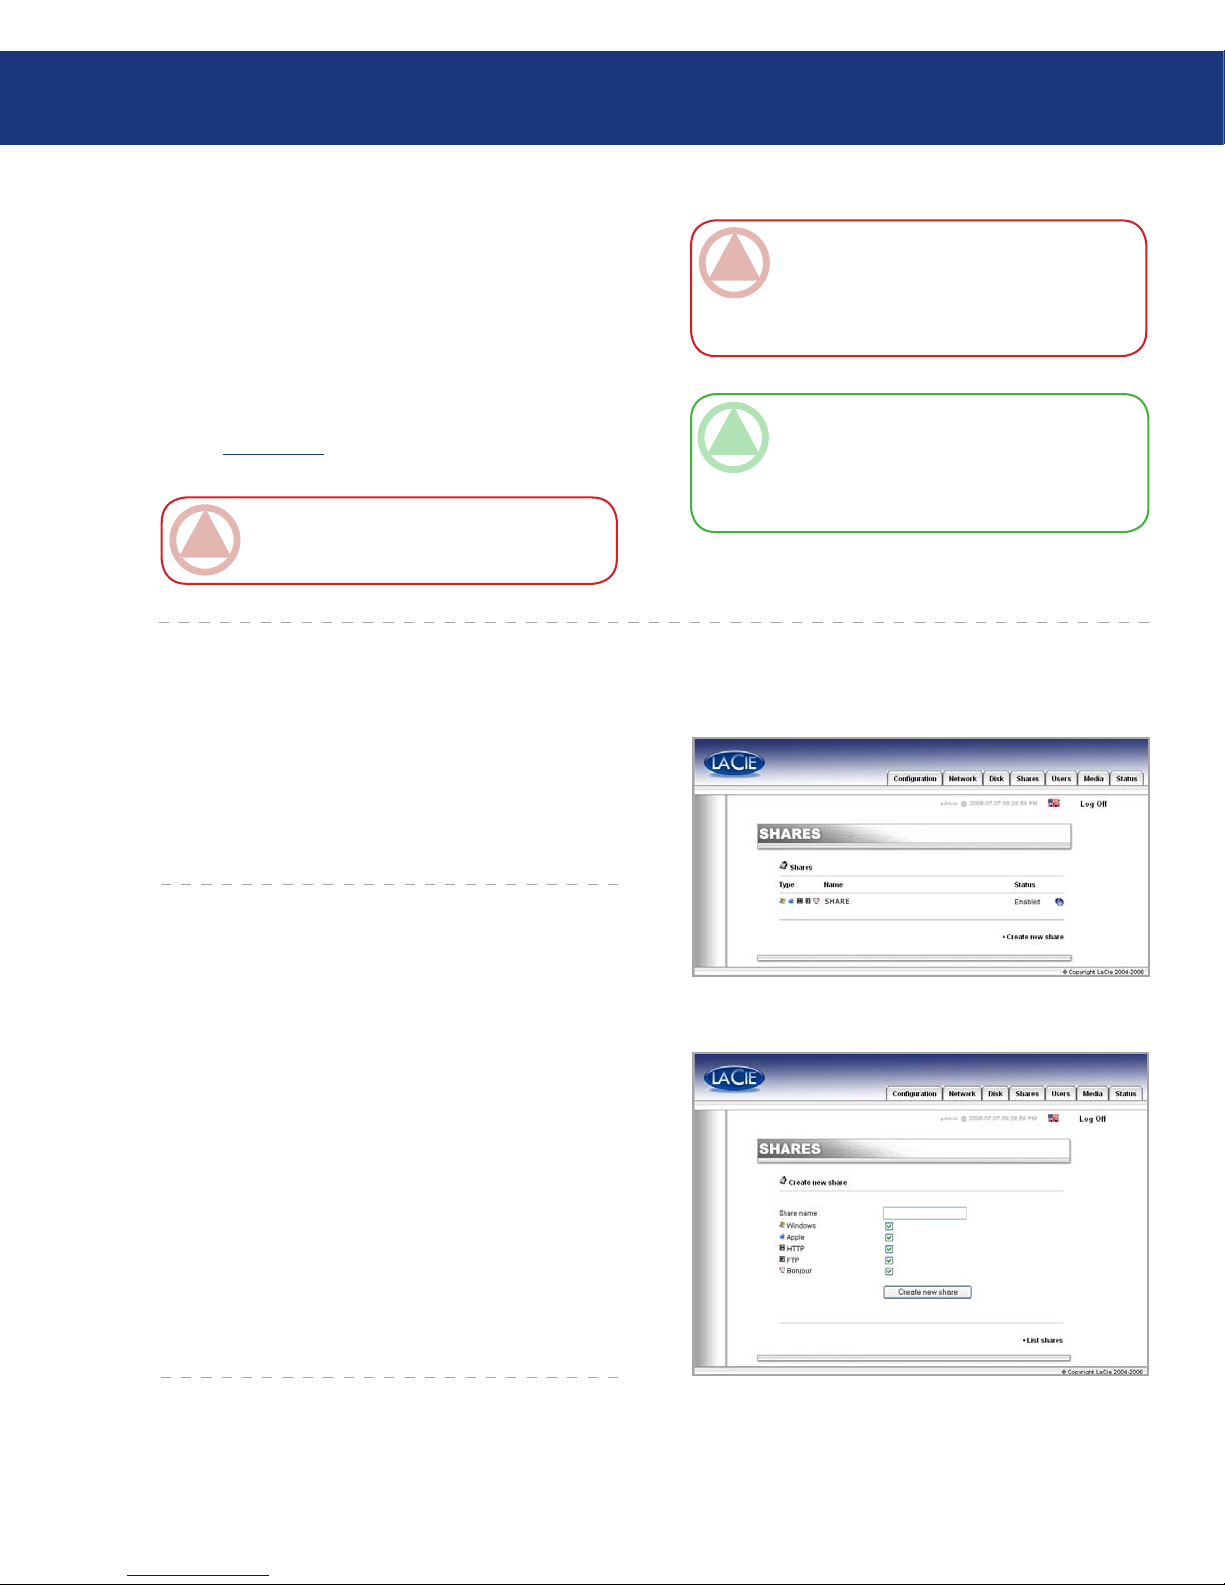
From this window you will be able to create and
to select a share and to modify its properties. You can
choose from Windows, Apple, Bonjour, HTTP or FTP
(Fig. 5.6.A.).
From this window you will be able create a share.
First, click on Create a new share..., then choose a name
for the new share, then select the protocols which will be
used to access the Ethernet Disk mini. You can choose
from Windows, Apple, Bonjour, HTTP or FTP (Fig.
5.6.1.A.).
5.6.1. Create New Share■
Fig. 5.6.1.A.
IMPORTANT INFO: e Ethernet Disk mini
supports drives formatted with the following file
systems: MS-DOS/FAT 32, HFS+ and Linux file
system formats (ext2/ext3/reiserfs)
TECHNICAL NOTE: If there is a partition on
the external USB drive, each partition will appear as
one share in the Ethernet Disk mini. By default, all
services (FTP, HTML, etc.) are activated.
Accessing External Hard Drives
Because the external hard drive appears as an Ethernet Disk mini share, access the external hard drive volume as you would for Ethernet Disk mini shares. Refer
to chapter 5.5. for details.
Once the drive is recognized, Users can be assigned
access (by default, Users will not have access). See chapter 5.7. Users Menu for details.
IMPORTANT INFO: By default, only the ad-
ministrator has access to the external storage.
Page 37
LaCie Ethernet Disk mini
User Manual
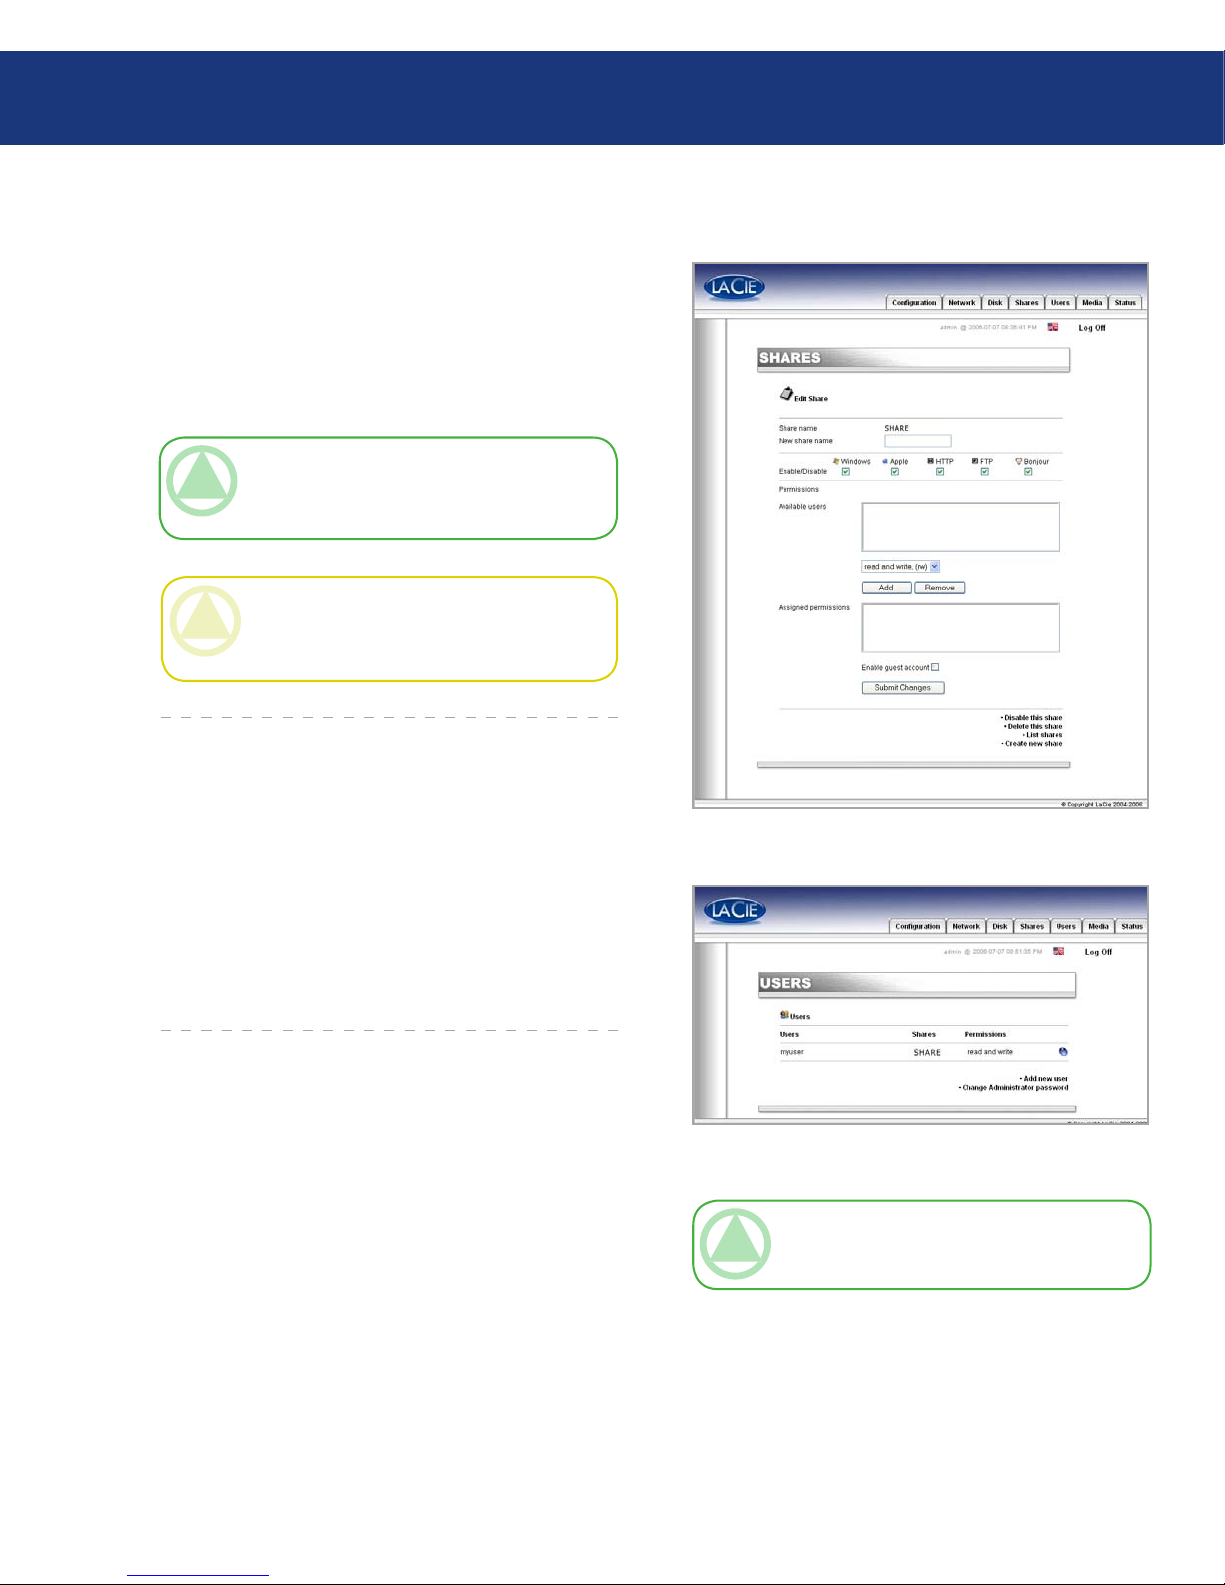
From this window you will be able to change properties of your share, such as changing the share’s name
and enabling/disabling protocols which will be used to
access the share and give users privileges (either readonly or readwrite) (Fig. 5.6.2.A.).
5.6.2. Edit a Share■
Fig. 5.6.2.A.
Using the NAS Administration Page
page 37
Fig. 5.7.A.
5.7. Users Menu
TECHNICAL NOTE: By default, newly created
users do not have access to any shares.
From this window you will be able to manage your
users by creating new users and modifying their password, as well as changing the Administrator’s password
(Fig. 5.7.A.).
TECHNICAL NOTE: e names of shares &
users will be changed automatically to lower case to
avoid any problems.
CAUTION: e name cannot contain any of
the following characters: \ / [ ] : | < > + = ; , ? * @
and space.
Page 38
LaCie Ethernet Disk mini
User Manual
5.7.1. Add A User■
Using the NAS Administration Page
page 38
Fig. 5.7.2.A.
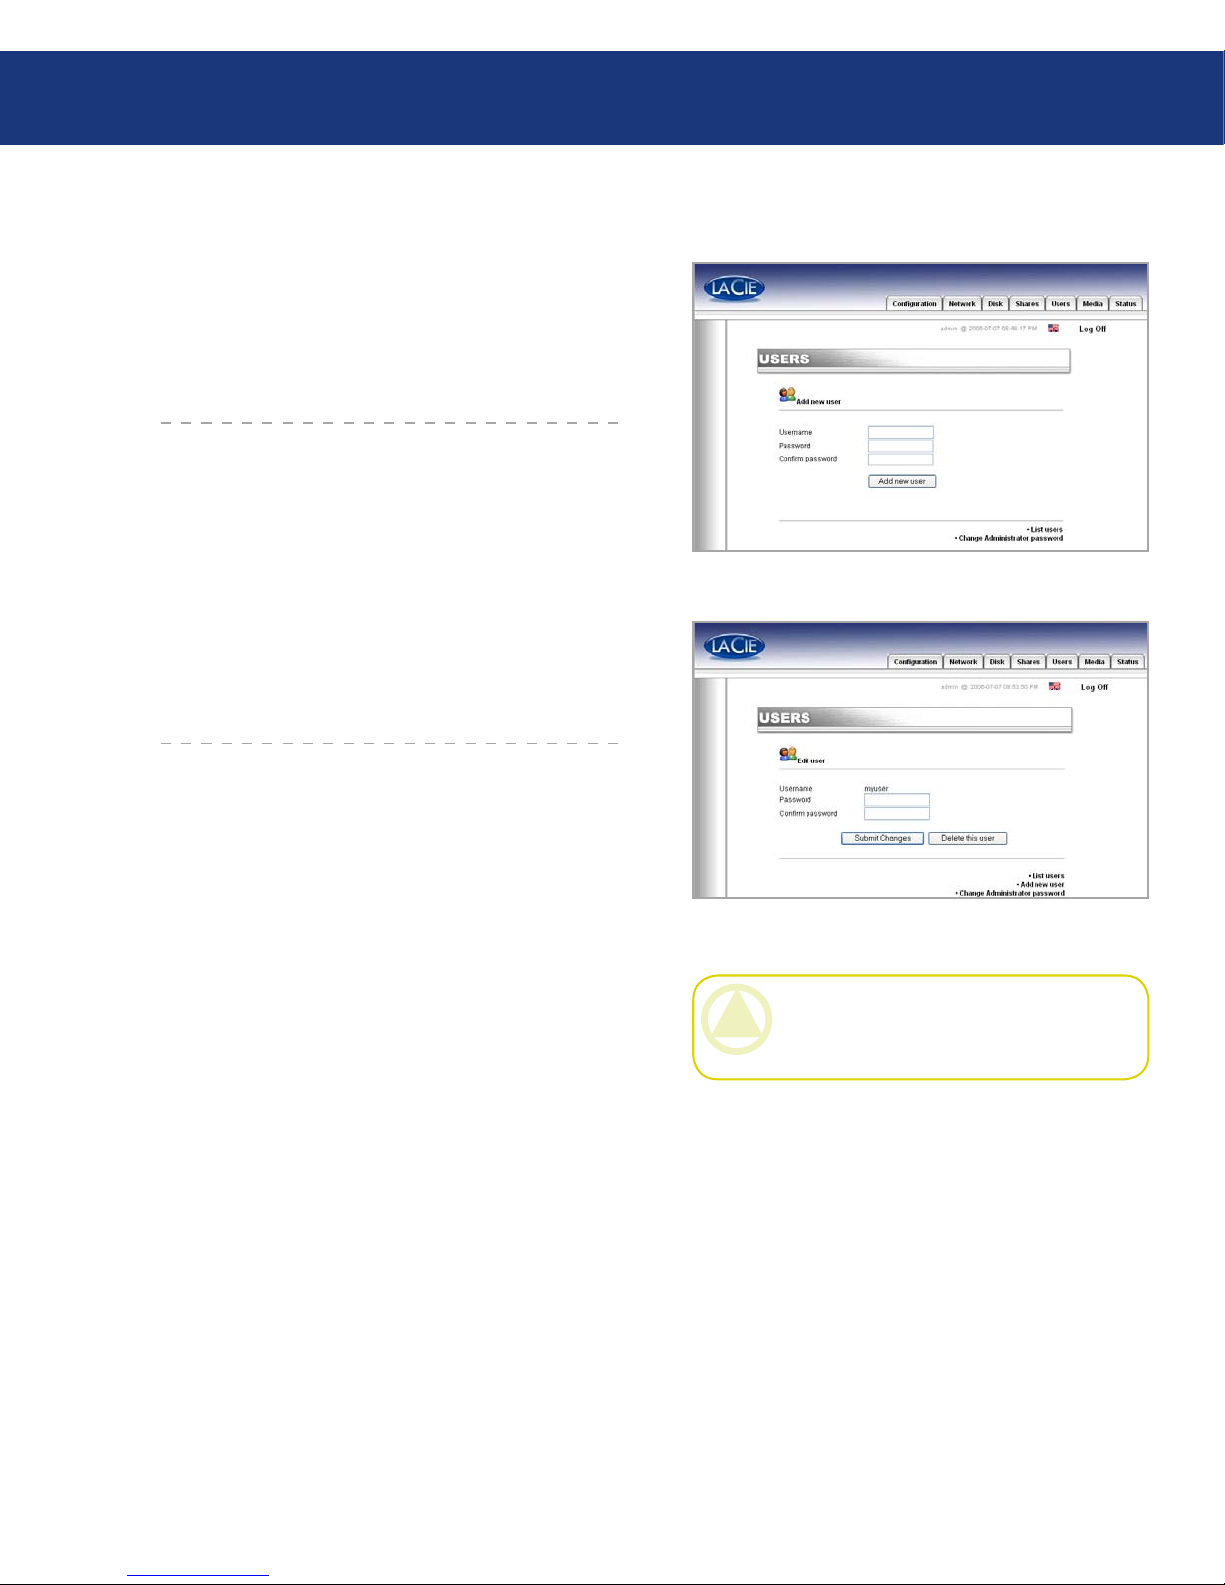
By clicking on the blue button to the right of a user’s
name, you will be able to modify passwords and to delete a user (Fig. 5.7.2.A.).
5.7.2. Edit a User■
Click on the Users tab.
By clicking on the Add new user line, you will be
able to create a new user and assign them a name,
password and access privileges (Fig. 5.7.1.A.).
1.
2.
Fig. 5.7.1.A.
CAUTION: e name cannot contain any of
the following characters: \ / [ ] : | < > + = ; , ? * @
and space.
Page 39
LaCie Ethernet Disk mini
User Manual
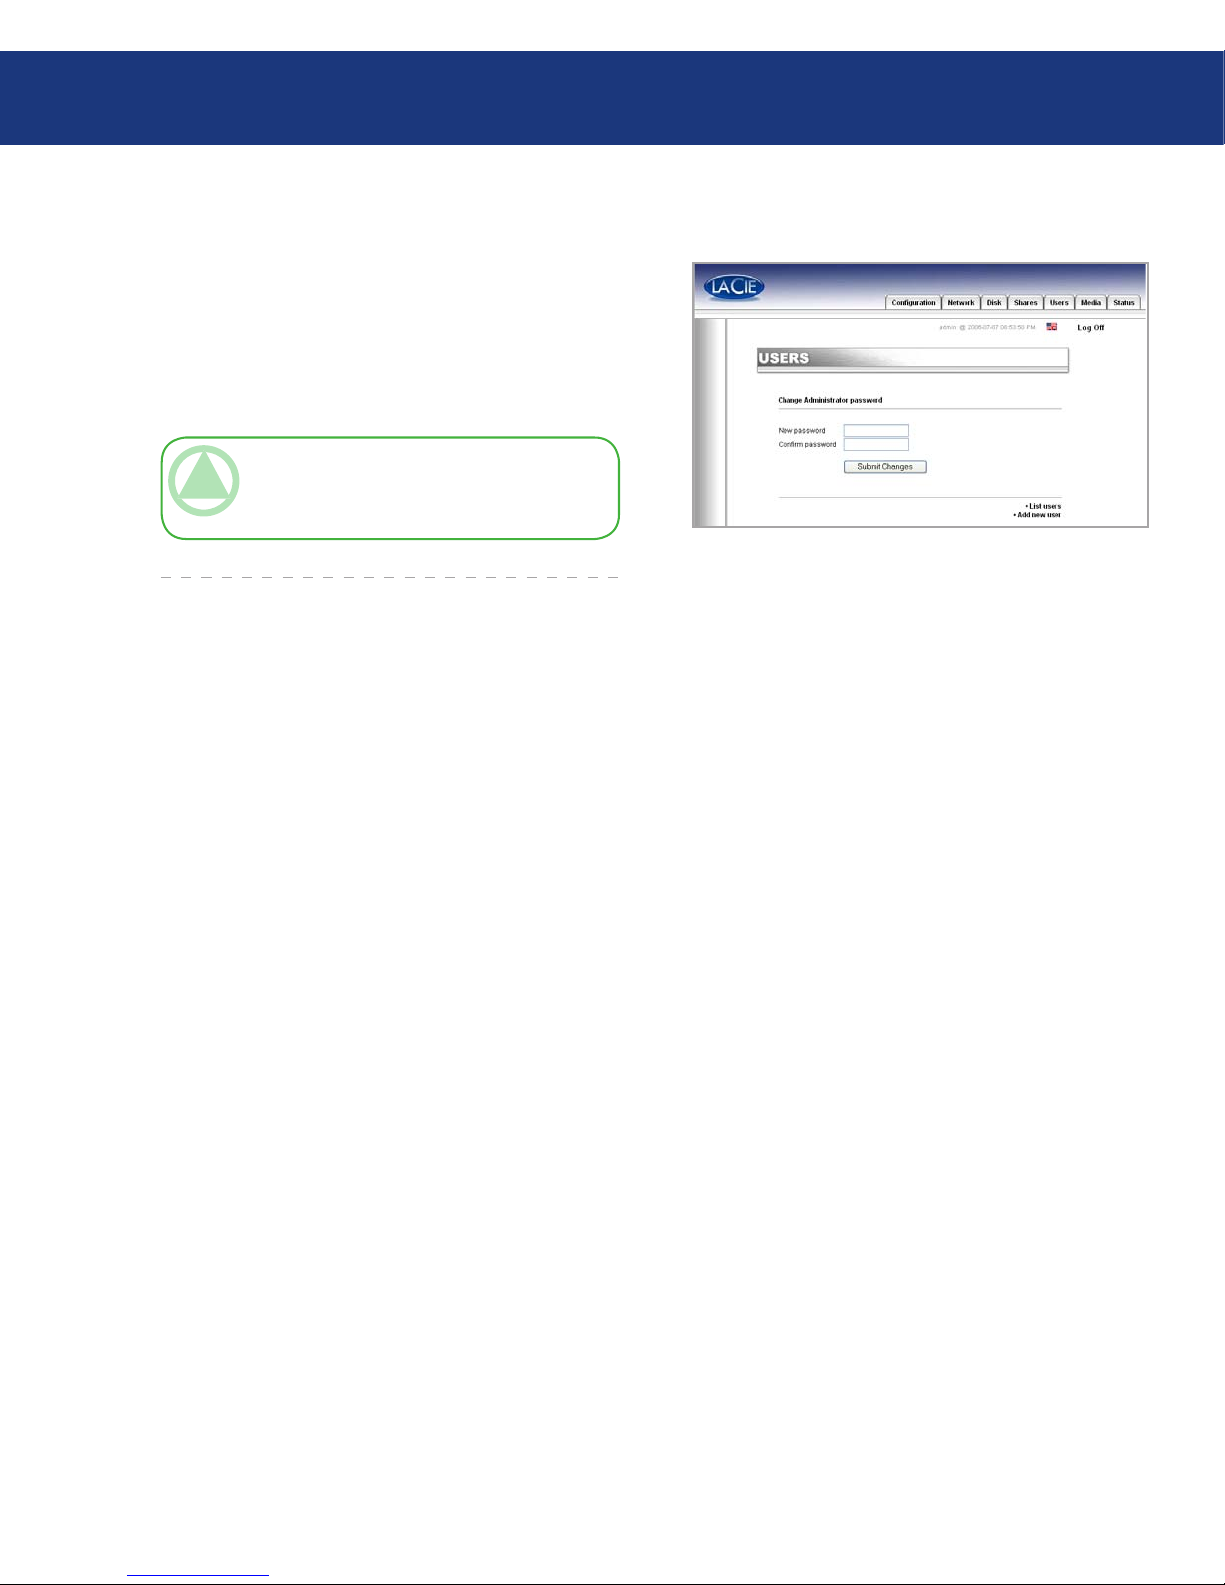
On this page, you can alter the default administrator
password to a custom password of your own choosing.
For security purposes, it is recommended that you alter
the default password, and write down and store the new
password in a secure location (Fig. 5.7.3.A.).
5.7.3. Change Administrator Password■
Fig. 5.7.3.A.
Using the NAS Administration Page
page 39
TECHNICAL NOTE: By default, the
administrator logon is “admin” and the password is
“admin”.
Page 40
LaCie Ethernet Disk mini
User Manual
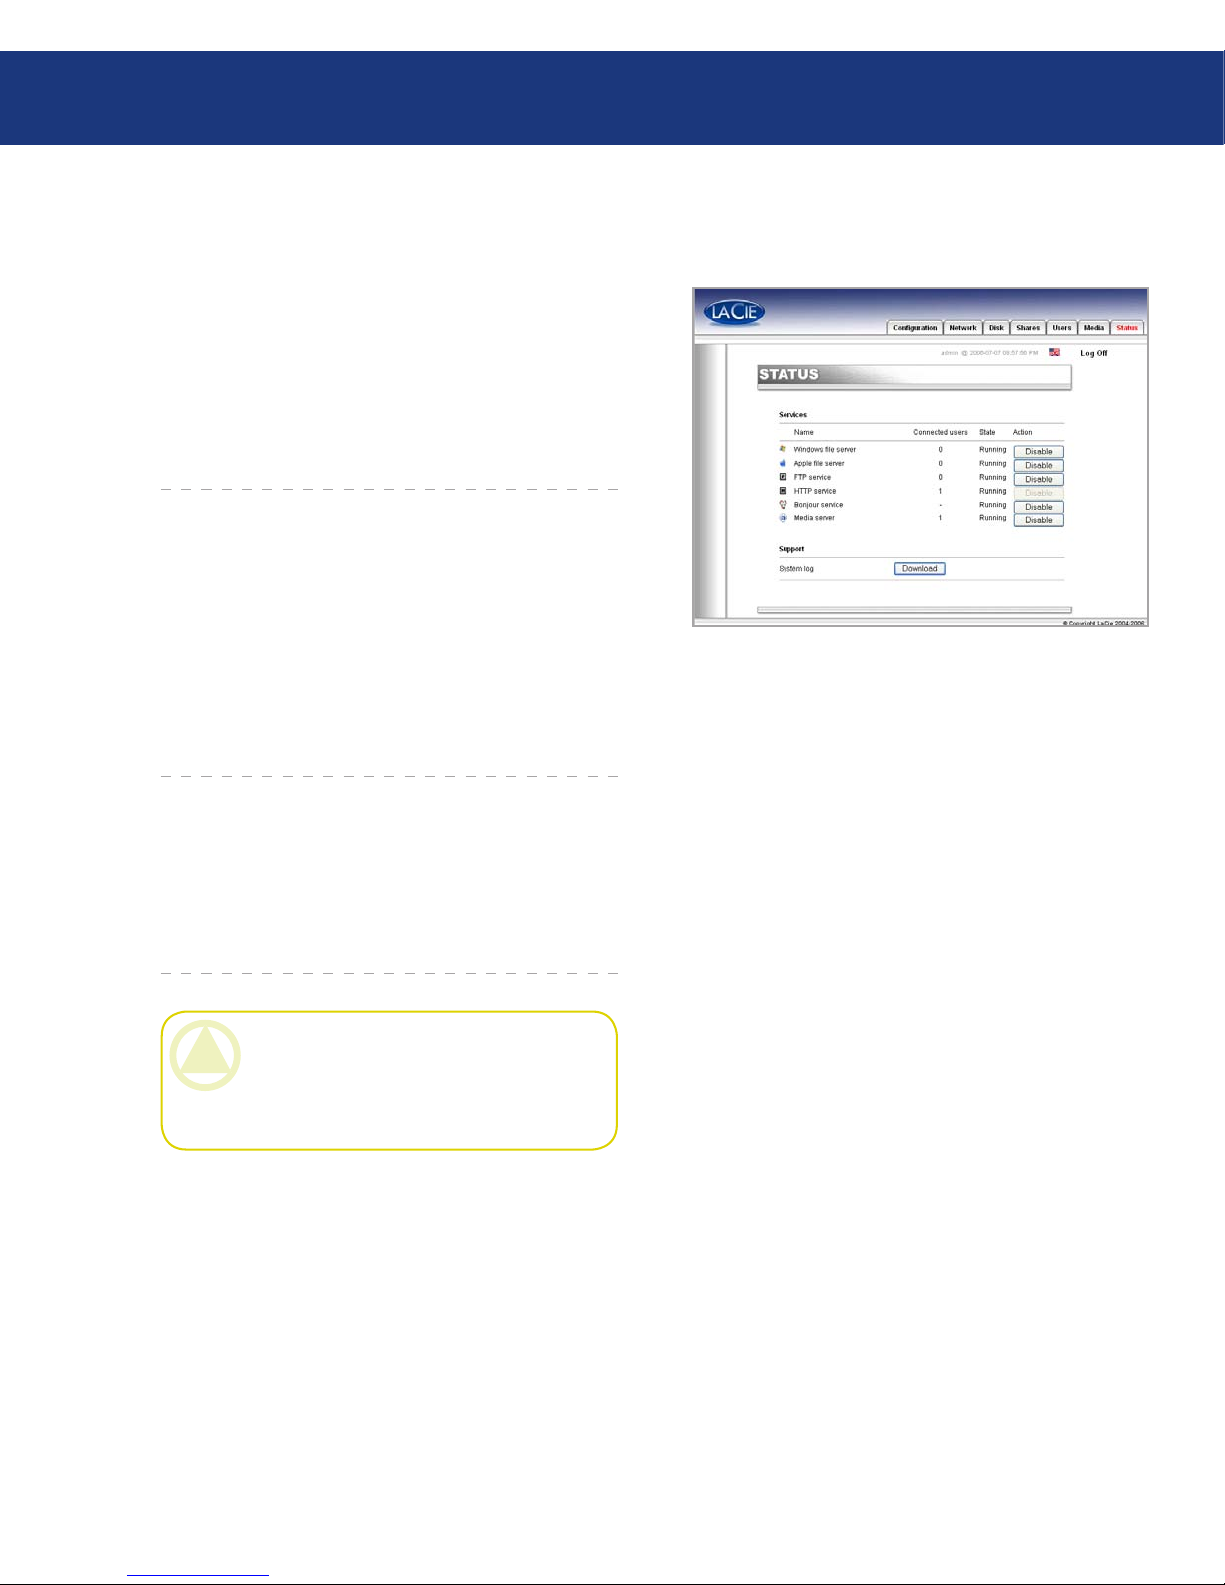
Fig. 5.9.A.
5.9. Status Menu
From this window you can view the number of
connected users, disable file server services (Windows,
Apple, HTTP, FTP, Media Server and Bonjour) and
view the system log. To disable a service, simply click the
Disable button that corresponds to the service which
you wish to disable (Fig. 5.9.A.).
5.9.1. FTP and HTTP Protocols■
HTTP (hypertext transfer protocol) is always active
and cannot be turned off. FTP (file transfer protocol),
however, can be enabled or disabled. To disable FTP for
the Ethernet Disk mini, click on the Status tab and, under Services, click the Disable button that corresponds
to the FTP service entry (Fig. 5.9.A.).
On this page, you can download a log of Ethernet
Disk mini activities. Click the Clear Log button to
start a fresh log.
5.9.2. System Log■
CAUTION: e system log gives information
for support purpose and advanced users. Sometimes warning messages can be edited which do
not affect the disk.
Using the NAS Administration Page
page 40
Page 41

LaCie Ethernet Disk mini
User Manual
6. Ethernet Disk mini Media Server Functionality
anks to the Ethernet Disk mini’s UPnP (Universal Plug and Play) compatibility, it can act as a multimedia server, managing access to content and making it
available to a digital media player (DMP).
Because the Ethernet Disk mini is UPnP, it can dynamically:
Join automatically a home entertainment network,
Convey its capabilities to other UPnP devices
Learn about the presence and capabilities of other
devices
e Ethernet Disk mini media server can stream
any content – whether it be music, videos, or photos – to
a Digital Media Adapter (DMA) connected to a display
(TV) or audio system.
e Ethernet Disk mini media server will automatically organize music, photo, video files using embedded
metadata information to allow quick and easy display
from any digital media adapter.
Once enabled and configured, the ED mini media
server will allow you to enjoy your music, photos and
video without turning on your computer.
❖
❖
❖
Media Server Functionality
page 41
Digital Home Network: Components■
Network (Ethernet or Wifi)
Media Server Computer/NAS (Ethernet Disk
mini)
Digital Media Adapter/Player (DMA) connected to TV/Stereo
Multimedia content (photos, music, videos)
❖
❖
❖
❖
6.1. About UPnP Media Server
Page 42
LaCie Ethernet Disk mini
User Manual
Media Server Functionality
page 42
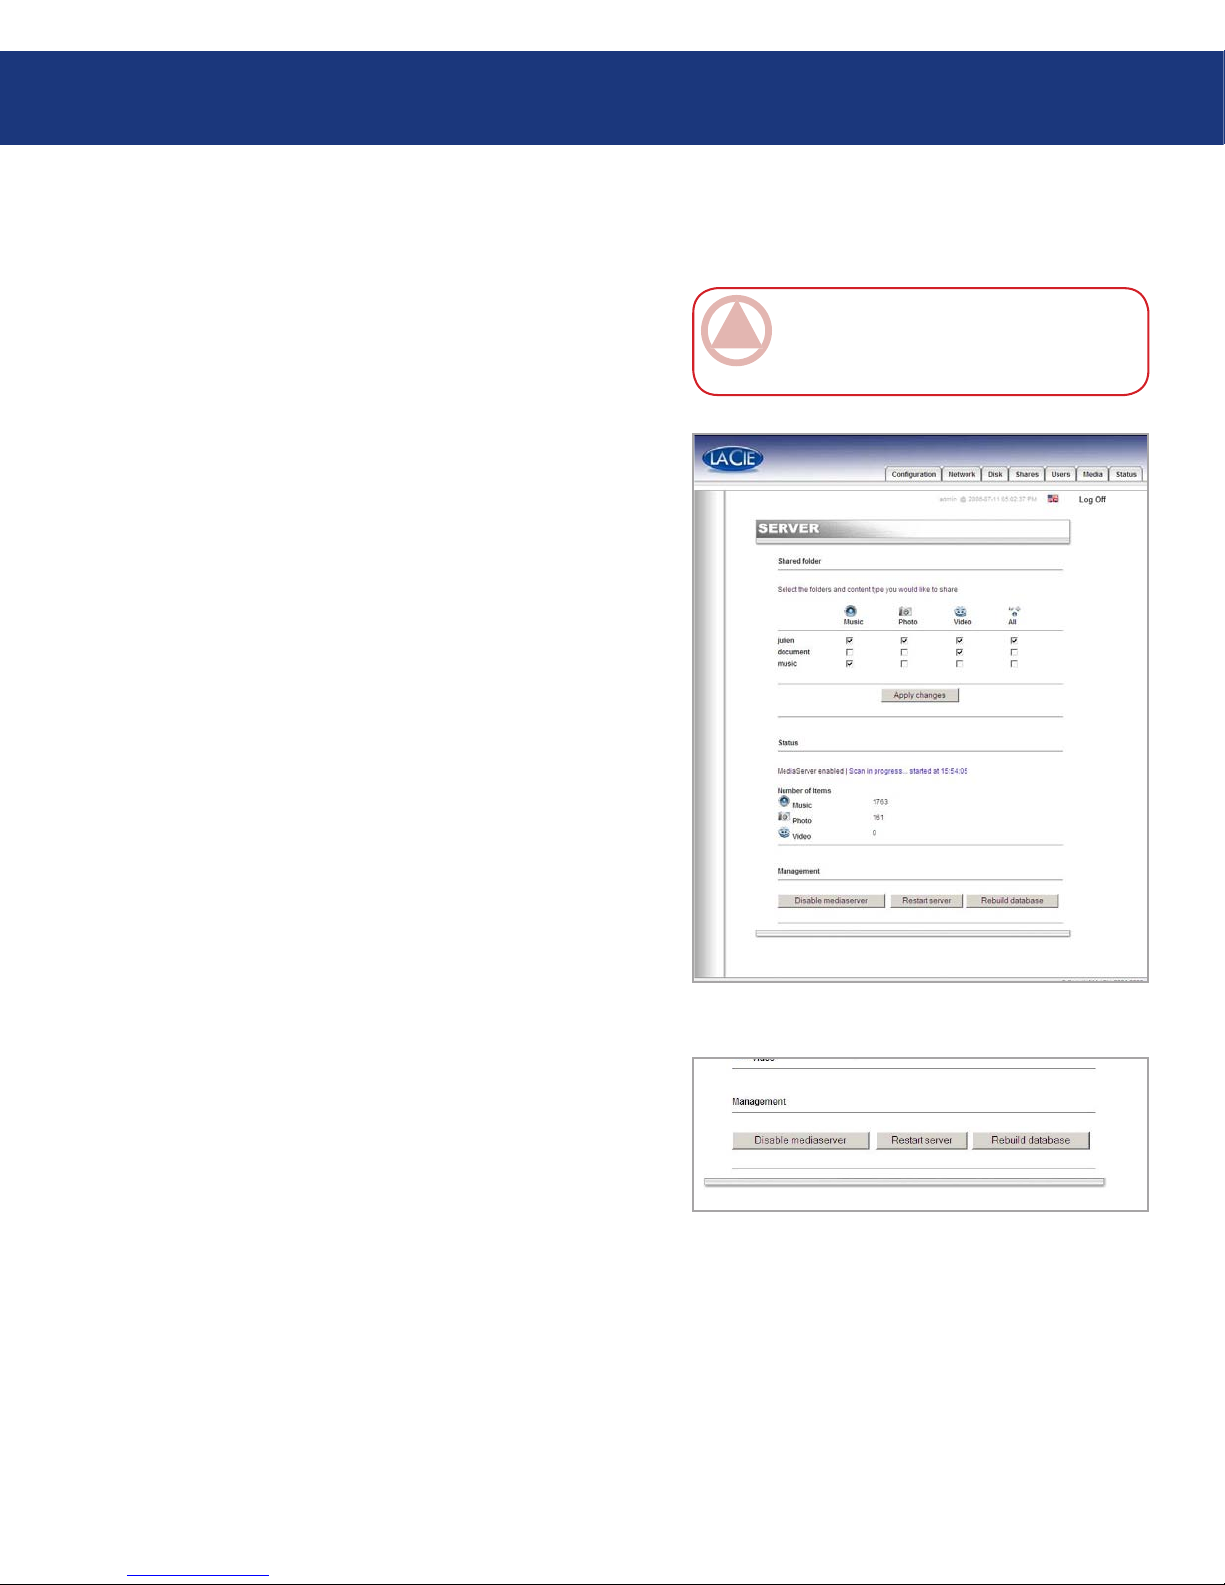
6.2. Configuring Media Server Functions
From the NAS Administration Page, select the Media tab. On this page, you can manage the Ethernet
Disk mini’s MediaServer settings (Fig. 6.2.A.).
6.2.1. Enabling the MediaServer
By default, the MediaServer is disabled. To enable
the MediaServer, click on Enable MediaServer.
6.2.2. Selecting Shares with Media Content
One easy step allows you to define which folder and
content types will be shared among the digital home audio/video network. e multimedia files located in the
selected folders will be available for playback on your
digital media player.
Select the folder by clicking All in the right-hand
column to share all content types (music, video, photos). Or, specify the content type you would like to
share by clicking on the Music, Photo and Video
box.
Click on Apply Changes to confirm your selection.
e media server will now search for the content you
elected to share in the Status section of the Media
menu page.
After a few minutes, refresh your browser and you
will see the result of the server scan. e scanned
content should now be available for playback from
your digital media adapter.
New multimedia content added to the selected
shared folders is automatically scanned, avoiding manual or scheduled rescan. e database will constantly
update itself, thereby making new content quickly available on your DMA.
6.2.3. Restarting the Media Server
Restarting the server may be necessary if you notice
a decrease in file sharing performance. During the restart, the Media Server will be temporarily unavailable
(Fig. 6.2.3.A.).
■
■
1.
2.
3.
4.
■
Fig. 6.2.A.
IMPORTANT INFO: If you do not own a digi-
tal media player, you should keep the MediaServer
function disabled.
Fig. 6.2.3.A.
Page 43

LaCie Ethernet Disk mini
User Manual
Troubleshooting
page 43
7. Troubleshooting
In the event that your LaCie Ethernet Disk mini is
not working correctly, please take a look at the Troubleshooting section on the following pages and at the
FAQs published on our web site – www.lacie.com. One
of these FAQs may provide an answer to your specific
question. You can also visit the drivers pages, where the
most recent software updates will be available, at
www.lacie.com/support/drivers.
If you need further assistance, please contact your
LaCie reseller or LaCie Technical Support (see chapter
8. Contacting Customer Service for details).
System Log
e system log allows you to review the type, date,
time, source and event ID of activities on the LaCie
Ethernet Disk mini. For more information, refer to
chapter 5.9.2. System Log.
■
Manual Updates
LaCie is constantly striving to give you the most
up-to-date, comprehensive User Manuals available on
the market. It is our goal to provide you with a friendly,
easy-to-use format that will help you quickly install and
utilize the many functions of your new device.
If your manual does not reflect the configurations of
the product that you purchased, please check our website for the most current version available
■
Problem■ Question to Ask■ Solution■
e drive is not
recognized by
the computer.
Does your computer’s configuration meet the minimum
system requirements?
Check section 2.1. Minimum System Requirements for more
information.
Is the drive’s power supply connected and is the blue light on
the front of the drive on?
Make sure that the power supply is properly connected (see
section 3.2. Connecting e External Power Supply for details);
that the drive has been powered on by pressing the blue On/Off
button on the front of the drive; and that the outlet the power
supply is connected to is powered on or has a sufficient supply of
power.
Is the blue light on the front of
the drive flickering?
If the blue light is flickering or will not turn on, the power
supply may be defective. Please contact your LaCie reseller or
LaCie Customer Support.
Page 44

LaCie Ethernet Disk mini
User Manual
Troubleshooting
page 44
Problem■ Question to Ask■ Solution■
e drive is not
recognized by
the computer.
Did you follow the correct installation steps for the specific
interface?
Review the installation steps (chapter 3). e two cables cannot
be connected at the same time.
Are both ends of the interface
cable firmly connected?
Disconnect the interface cable, wait 10 seconds and then reconnect.
Ensure that the interface connectors are properly aligned. e
interface cables can only be inserted one way. Make sure that
they are correctly oriented.
Check that the interface connectors are straight and fully seated in the interface ports.
Only use certified interface cables, such as the cables provided
with your LaCie drive. If you have followed all of these steps
and the drive is still not recognized, shut down your computer,
wait 3 to 5 minutes, restart your computer and try again. In
the event that the drive is still not recognized, take the drive
to another computer and attempt to connect the drive. If the
drive is not recognized on another computer, please contact
your LaCie reseller or LaCie Customer Support.
❖
❖
❖
❖
e drive doesn’t
appear on the
network.
By default the Ethernet Disk mini is configured to retrieve its IP address from a DHCP server. If
your network is managed by a DHCP server and you cannot access your Ethernet Disk mini, try
checking your DHCP server’s log. To get the IP address, run the LaCie IP configurator software
tool, which is located on the LaCie Storage Utilities CD-ROM. If your network is NOT managed
by a DHCP server, the Ethernet Disk mini uses its default IP address, which is 192.168.1.100. To
change this IP address, use the LaCie IP Configurator software tool.
Is the IP address properly set? For more information, please see section 4. Accessing the Shared
Storage.
Is your network DHCP enabled?
If your network is DHCP enabled, please refer to sections 3.5.
Installing and Running the IP Configurator Wizard and 5.
Configure Your Drive Using the NAS Administration Page. If
your network is not DHCP enabled, you will need to manually
configure the address; please see section 3.6. Configure Your
Drive on a Local Area Network with no DHCP Server.
Are you using AppleTalk under
Mac OS 9.x?
If you are using AppleTalk under Mac OS 9.x, ensure that the
LaCie Ethernet Disk mini and the other clients on the network
are in the same AppleTalk zone.
Page 45
LaCie Ethernet Disk mini
User Manual
Troubleshooting
page 45
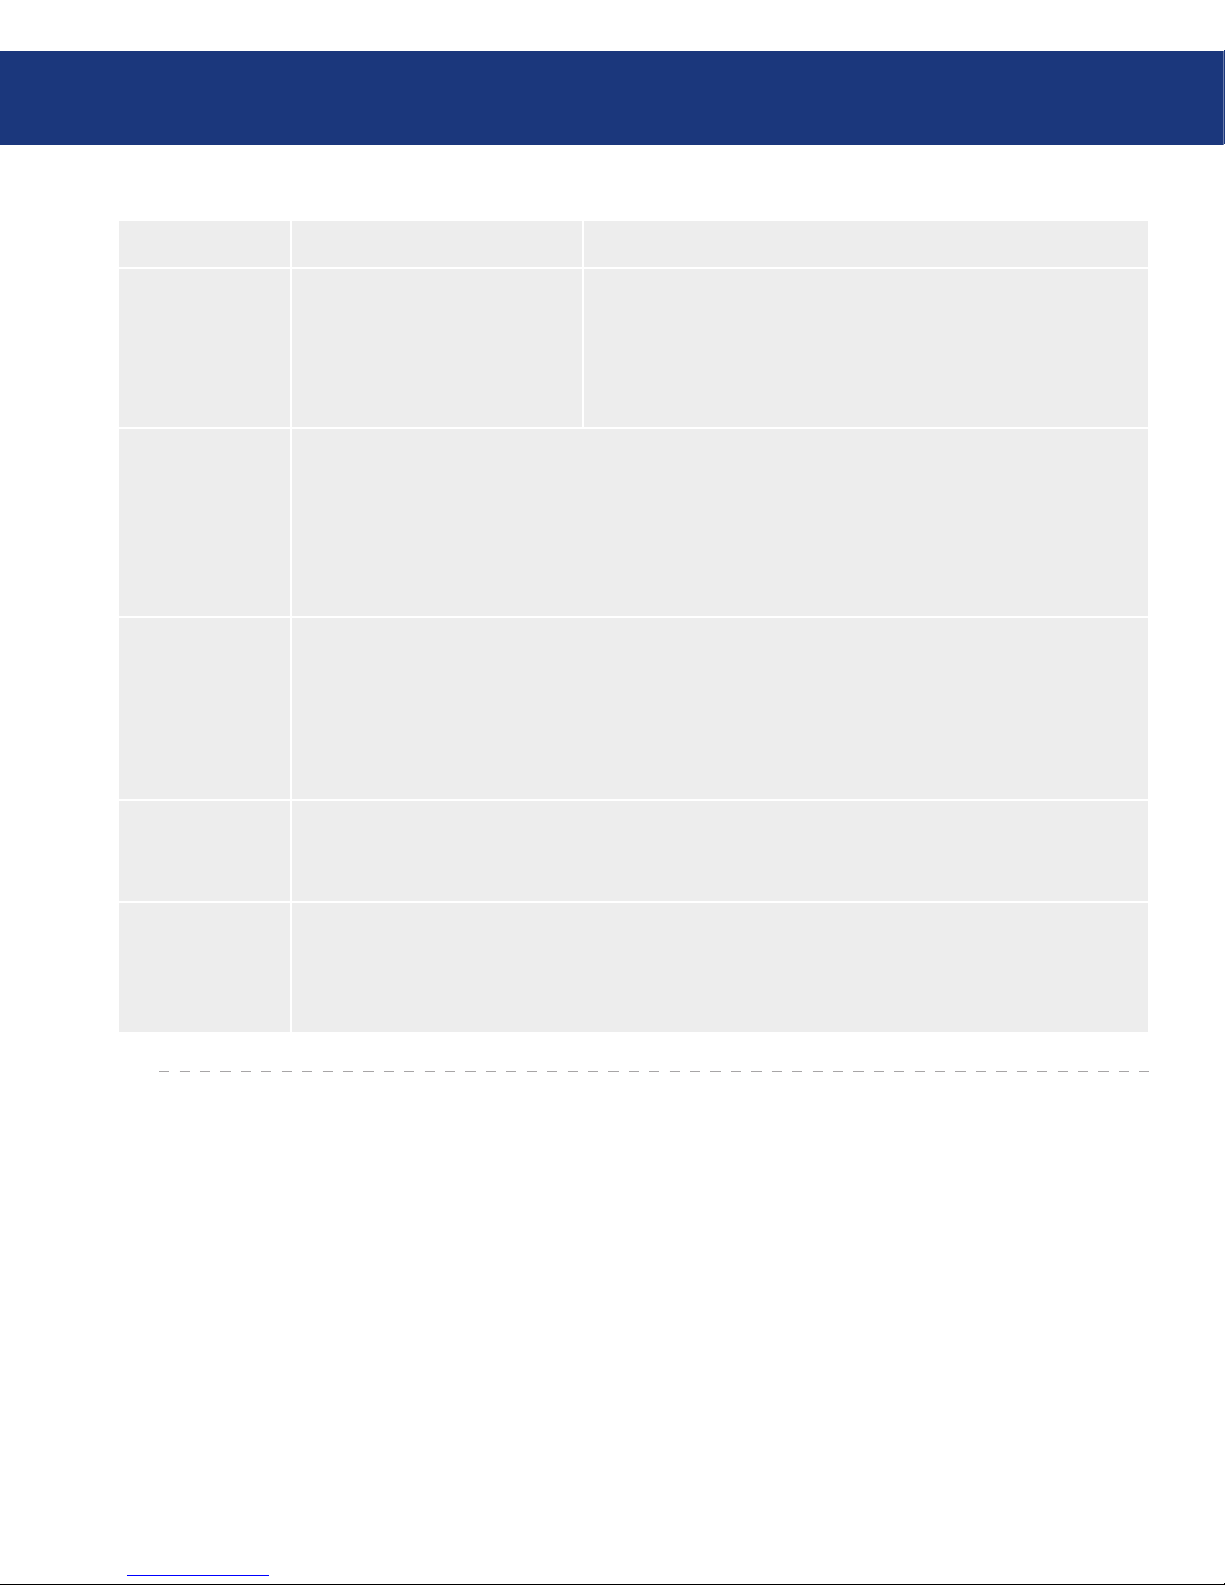
Problem■ Question to Ask■ Solution■
A user does not
have access to
the LaCie Ethernet Disk mini.
Has the administrator created
that specific user?
In order for a another user to access the LaCie Ethernet Disk
mini, two conditions must be met: 1) the administrator must
create and register a user with the appropriate privileges; 2) the
LaCie Ethernet Disk mini must be connected to the network via
Ethernet for additional users to access the drive.
e LaCie
media server
does not appear
on your DMA
available server
list.
Make sure that Ethernet Disk mini is turned on and that the media server is enabled. If not, enable the media server and select the folders to be scanned for sharing. Restart the DMA in order to
renew the server discover function on the network. Restart the media server from the management
section in the Media tab of the NAS Administration page.
Media content is
not playable on
your DMA.
Either:
Content format playback is not supported by the DMA.
e DMA might need to be updated to support new formats.
If content is protected, then the DMA cannot decrypt it. Consult your DMA specifications for
support.
1.
2.
3.
e media server
function is sluggish.
is problem can be solved by restarting the database. From the NAS Administration page, select
the Media tab. At the bottom of the page, select Restart database.
e media server
function database seems to be
corrupted.
“Corrupted” means bad or wrong media information. is problem can be solved by rebuilding the
database. From the NAS Administration page, select the Media tab. At the bottom of the page,
select Rebuild database.
Page 46
LaCie Ethernet Disk mini
User Manual
8. Contacting Customer Support
Read the User Manual and review the Troubleshooting section.
Try to isolate the problem. If possible, make the
drive the only external device on the CPU, and make
sure that all of the cables are correctly and firmly attached.
If you have asked yourself all of the pertinent questions in the troubleshooting checklist, and you still can’t
get your LaCie drive to work properly, contact us via
the contacts on the following page. Before contacting
1.
2.
us, make sure that you are in front of your computer and
that you have the following information on hand:
Your LaCie drive’s serial number
Computer brand and model
Amount of memory installed
Names of any other devices installed on your
computer, including CD/DVD burners
❖
❖
❖
❖
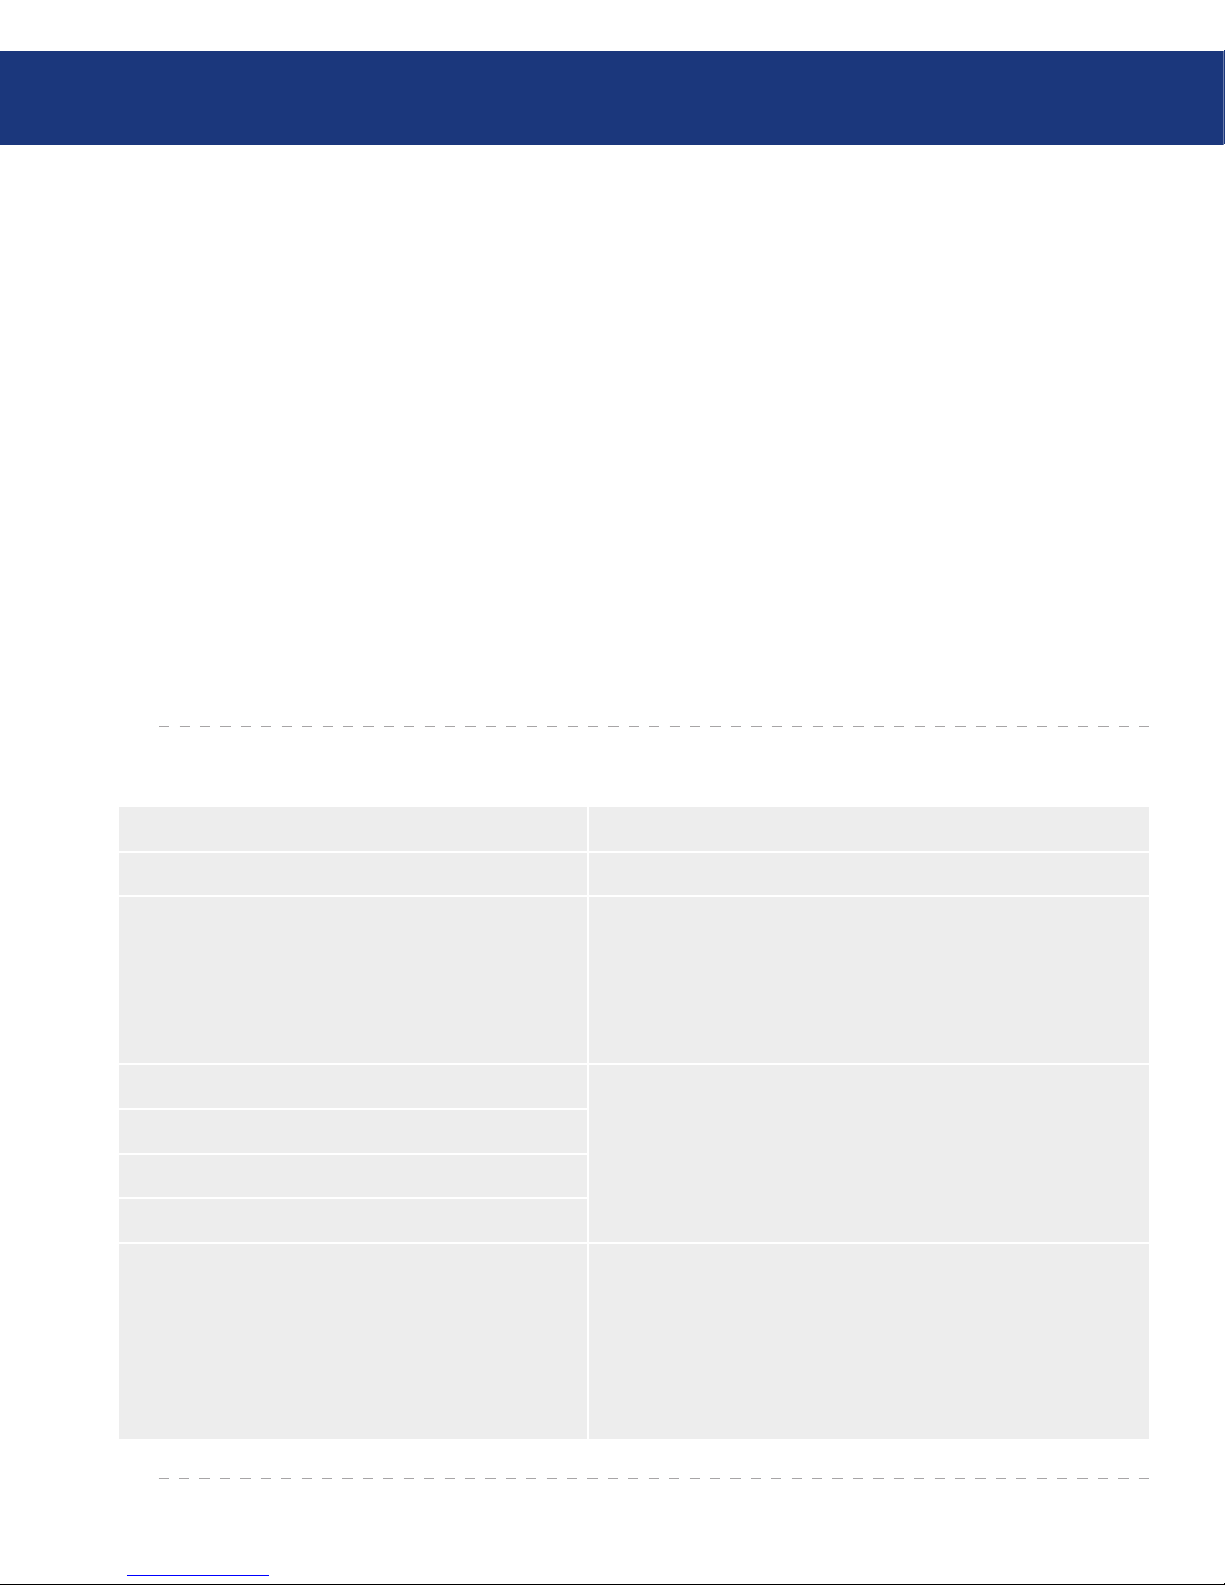
Before You Contact Technical Support■
Information to Include in Email Correspondence■
Information Where to Find Information
1. LaCie Ethernet Disk mini serial number Located on a sticker at the back of drive or on the original packaging
2. LaCie Ethernet Disk mini file format Mac users:
Select the hard drive icon and press Command + I, or press the
Control key and choose Get Info.
Windows users:
Right click the hard drive icon and select Properties.
3. Macintosh/PC model Mac users:
Click on the Apple icon in the menu bar and select About this Mac.
Windows users:
Right click My Computer and select Properties > General.
4. Operating system version
5. Processor speed
6. Computer memory
7. e brands and models of other internal and
external peripherals installed on my computer
Mac users:
Click on the Apple icon in the finder bar and select About
this Mac. Select More Info... e Apple System Profiler will
launch and will list your internal and external peripherals.
Windows users:
Right click My Computer and select Properties > Hardware.
Contacting Customer Support
page 46
Page 47
LaCie Ethernet Disk mini
User Manual
Contacting Customer Support
page 47
8.1. LaCie Technical Support Contacts
LaCie Asia, Singapore, and Hong Kong
Contact us at:
http://www.lacie.com/asia/contact/
LaCie Australia
Contact us at:
http://www.lacie.com/au/contact/
LaCie Belgium
Contact us at:
http://www.lacie.com/be/contact/ (Français)
LaCie Canada
Contact us at:
http://www.lacie.com/caen/contact/ (English)
LaCie Denmark
Contact us at:
http://www.lacie.com/dk/contact
LaCie Finland
Contact us at:
http://www.lacie.com/fi/contact/
LaCie France
Contact us at:
http://www.lacie.com/fr/contact/
LaCie Germany
Contact us at:
http://www.lacie.com/de/contact/
LaCie Italy
Contact us at:
http://www.lacie.com/it/contact/
LaCie Japan
Contact us at:
http://www.lacie.com/jp/contact/
LaCie Netherlands
Contact us at:
http://www.lacie.com/nl/contact/
LaCie Norway
Contact us at:
http://www.lacie.com/no/contact/
LaCie Spain
Contact us at:
http://www.lacie.com/es/contact/
LaCie Sweden
Contact us at:
http://www.lacie.com/se/contact
LaCie Switzerland
Contact us at:
http://www.lacie.com/chfr/contact/ (Français)
LaCie United Kingdom
Contact us at:
http://www.lacie.com/uk/support/request/
LaCie Ireland
Contact us at:
http://www.lacie.com/ie/contact/
LaCie USA
Contact us at:
http://www.lacie.com/contact/
LaCie International
Contact us at:
http://www.lacie.com/intl/contact/
Page 48
LaCie Ethernet Disk mini
User Manual
9. Warranty Information
LaCie warrants your drive against any defect in material and workmanship, under normal use, for the period designated on your warranty certificate. In the event
this product is found to be defective within the warranty
period, LaCie will, at its option, repair or replace the
defective drive. is warranty is void if:
e drive was operated/stored in abnormal use or
maintenance conditions;
e drive is repaired, modified or altered, unless such
repair, modification or alteration is expressly authorized in writing by LaCie;
e drive was subjected to abuse, neglect, lightning
strike, electrical fault, improper packaging or accident;
e drive was installed improperly;
e serial number of the drive is defaced or missing;
e broken part is a replacement part such as a pickup tray, etc.
e tamper seal on the drive casing is broken.
LaCie and its suppliers accept no liability for any
loss of data during the use of this device, or for any of
the problems caused as a result.
❖
❖
❖
❖
❖
❖
❖
LaCie will not, under any circumstances, be liable
for direct, special or consequential damages such as, but
not limited to, damage or loss of property or equipment,
loss of profits or revenues, cost of replacement goods,
or expense or inconvenience caused by service interruptions.
Any loss, corruption or destruction of data while using a LaCie drive is the sole responsibility of the user,
and under no circumstances will LaCie be held liable for
the recovery or restoration of this data.
Under no circumstances will any person be entitled
to any sum greater than the purchase price paid for the
drive.
To obtain warranty service, call LaCie Technical Support. You will be asked to provide your LaCie
product’s serial number, and you may be asked to furnish
proof of purchase to confirm that the drive is still under
warranty.
All drives returned to LaCie must be securely packaged in their original box and shipped with postage prepaid.
IMPORTANT INFO: Register online for free
technical support: www.lacie.com/register
Warranty Information
page 48
 Loading...