

Page 1

Xwave Thunder 3D
Xwave Thunder 3D™ PCI Audio Accelerator
User’s Guide
© Copyright 1999
This documentation and the accompanying software are copyright © 1999
Labway Corporation. All rights reserved.
This documentation and the accompanying software are copyright © 1999
QSound Labs, Inc. All rights reserved.
Thunder 3D is a trademark of Labway Corporation.
QSound, QEM, QSound Environmental Modeling, QMSS, Q3D, QXpander and the Q
logo are trademarks of QSound Labs, Inc.
EAX and Environmental Audio Extensions are trademarks of Creative Technology
Ltd. in the United States and other countries.
Microsoft and Windows are registered trademarks of Microsoft Corporation. DirectX
and DirectSound are trademarks of Microsoft Corporation.
All other trademarks are the property of their respective owners.
Disclaimer Statement
With respect to the information in this document, Labway Corporation makes no
guarantee or warranty of its accuracy or tha t the use of such inf ormation will not
infringe upon the intellectual rights of third parties. Labway Corporation shall not be
responsible for any loss or damage of whatever nature resulting from the use of, or
reliance upon it and no patent or other license is implied thereby. This document
does not in any way extend or modify Labway’s warranty on any product beyond that
set forth in its standard terms and conditions of sale. Labway Corporation reserves
the right to make changes in its products and specifications at any time and without
notice.
1
6/01/99
Page 2

Xwave Thunder 3D
Disclaimer Statement..................................................................................................1
1 Introduction..........................................................................................................3
1.1 Features:..........................................................................................................3
1.2 Card Figure......................................................................................................4
1.3 Connectors for Thunder 3D............................................................................4
1.3.1 External Connectors:................................................................................4
1.3.2 Internal Connectors:.................................................................................4
1.4 Audio Connectors Pin Assignment:..............................................................5
2 Installing the Thunder 3D™ PCI Sound Card into your Computer..................5
2.1 Minimum System Requirements....................................................................5
2.2 Safety Precaution............................................................................................6
2.3 Installation Notes ............................................................................................6
3 Setting Up your Sound Card...............................................................................6
3.1 Installing the Sound Card...............................................................................6
Connecting the Sound Card...................................................................................8
4 Software Driver Installation ................................................................................8
4.1 Installing Driver under Real DOS...................................................................9
4.1.1 Installing the device driver.......................................................................9
4.1.2 Launching the DOS control panel: ..........................................................9
4.2 Installing Driver under Win95/98....................................................................9
5 Configuring the Thunder 3D Joystick Driver for Windows® 95/98:..........14
6 Windows® NT® Installation..............................................................................16
6.1 Installing Device Drivers under NT4.0.........................................................16
7 Uninstalling Thunder 3D™................................................................................16
7.1 Uninstalling Device Driver under Win95/98................................................17
7.2 Uninstalling Device Driver under NT4.0......................................................17
2
6/01/99
Page 3

Xwave Thunder 3D
1 Introduction
Congratulations! You have just acquired a sound card based on the most advanced
3D PCI audio accelerator available today. Xwave Thunder 3D is a high
performance PCI audio accelerator jointly developed by Labway Corporation It
combines the most compelling 3D, quadraphonic and music synthesis technologies
available with the powerful yet cost effective ActiMedia DSP architecture. Full H/W
acceleration of DirectSound®, 3D audio, music synthesis, and gameport functions
guarantees exceptional system performance. QSound’s new Q3D algorithms not
only render exceptional 3D soundscapes for 3D applications but add a new dimension
to stereo applications using their unique stereo-to-3D and stereo-to-quad remapping
capabilities. Three available PCI DMA modes assure full SoundBlaster® Pro
compatibility on most platforms without additional hardware. The Intel AC97
architecture provides high quality audio output using a high performance AC97 codec.
1.1 Features:
• Full H/W acceleration of 64 audio sources
• Concurrent processing of up to 384 audio sources
• Up to 64 DirectSound®/wavetable sources processed in H/W
• 64 plus DirectSound® sources processed on host
• Up to 128 total DirectSound® sources
• Up to 64 3D sources
• Up to 64 H/W wavetable voices
• Up to 256 host wavetable voices
• QInteractive interactive positional 3D
• H/W DSP processing for maximum performance
• Proprietary technology eliminates crosstalk cancellation and broadens “sweet
spot”
• QSound Multi-Speaker System stereo-to-quad processing
• Transforms ordinary stereo applications to quadraphonic
• Non-3D games become immersive quad 3D games
• Enhanced DVD movie playback
• True quadraphonic music playback from CD’s, music DVD’s, MIDI files and MP3
players
• Effective with both stereo and Dolby Pro-Logic encoded material
• QSound Environmental Modeling
• Adds reverb as an additional positional queue
• EAX compatible
• QXpander and stereo to 3D remapping
• FM, MIDI stereo and MIDI quad music in Real Mode DOS
• Dual gameport accelerator with legacy and digital joy-stick modes
3
6/01/99
Page 4
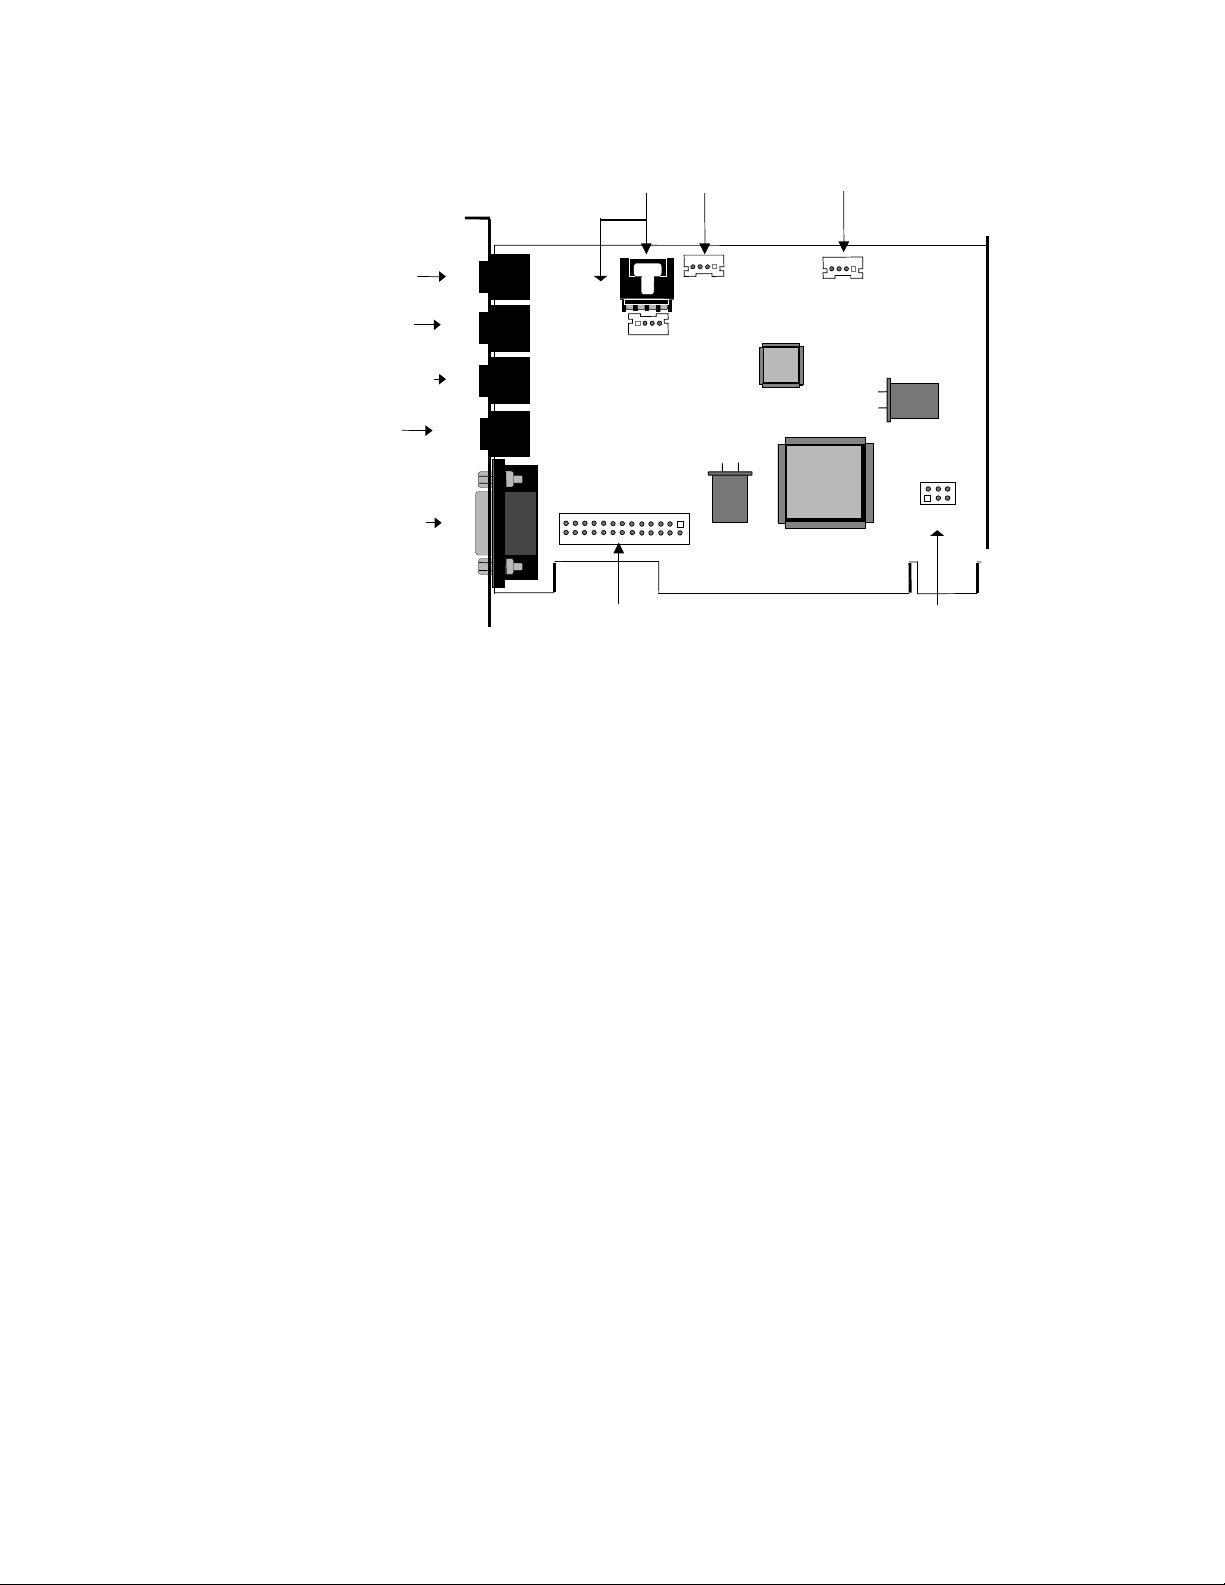
1.2 Card Figure
Xwave Thunder 3D
CD-IN
LINE IN
J1
J10
MIC IN
Front
Speaker
Rear
Speaker
MIDI/
JOYSTICK
J2
J11
J3
J4
J5
Wavetable
Connector
1.3 Connectors for Thunder 3D
TAD
J13
AUX In
J12
AC
97
VLSI
VT21702
llllllllllllllllllllllllllllllllll
J16
lllllll
PC/PCI
1.3.1 External Connectors:
J1:......................∅ 3.5m m Phone Jack for LINE IN
J2:......................∅ 3.5m m Phone Jack for MIC IN
J3:......................∅ 3.5m m Phone Jack for FRONT SPEAKER.
J4:......................∅ 3.5m m Phone Jack for REAR SPEAKER.
J5:......................Connector for MIDI/JOYSTICK
1.3.2 Internal Connectors:
J10:.................... Connector for CD AUDIO IN (ATAPI)
J11:.................... Connector for CD AUDIO IN (JST)
J12:.................... Connector for AUX IN.(optional)
J13:.................... Connector for TAD/VOICE MODEM.
J16:.................... Connector for PC/PCI Legacy Audio SIDEBAND SIGNAL.
CN2:.................. Extension connector for hardware wavetable.
(optional)
4
6/01/99
Page 5

1.4 Audio Connectors Pin Assignment:
L: LEFT CHANNEL SIGNAL
J10 (CD-IN)
LGGR
G: GROUND
R: RIGHT CHANNEL SIGNAL
Xwave Thunder 3D
J11 (CD-IN)
J12 (AUX-IN)
J13 (TAD/Voice Modem)
J16 (PC/PCI)
G L G R
R G G L
1 2 3 4
24
1
6
35
L: LEFT CHANNEL SIGNAL
G: GROUND
R: RIGHT CHANNEL SIGNAL
L: LEFT CHANNEL SIGNAL
G: GROUND
R: RIGHT CHANNEL SIGNAL
1:PHONE IN
2,3 : GROUND
4:MONO OUT
1: PCGNT #
2: GROUND
3: N.C.
4: PCREQ#
5: GROUND
6: SERIRQ#
2 Installing the Thunder 3D™ PCI Sound Card
into your Computer
2.1 Minimum System Requirements
Installation of your Thunder 3D requires the following hardware and operating
system:
• IBM® PC or compatible Pentium® system with one available PCI slot.
• 32MB RAM
• Approximately 30MB of space on your hard disk.
• CD ROM drive
• One pair of powered speakers or headphones.
• Windows® 95, Windows® 98, or Windows® NT® 4.0 with SP3.
Other optional hardware that will enable you to take advantage of some of Thunder
3D™ additional features include:
A second set of powered speakers that will give you four speaker “quad” mode for
additional 3D sound immersion.
• A microphone for external recording or karaoke.
• A joystick for gaming.
• A MIDI device for true music enthusiasts.
5
6/01/99
Page 6
Xwave Thunder 3D
2.2 Safety Precaution
• Do not remove your sound card from its protective bag until you are ready to install
it.
• Always try to hold your sound card by its edges. Avoid touching any electronic
components on your sound card.
• Static electricity can cause permanent damage to your sound card. To prevent
such damage, you must ground yourself while installing the card.
• Use a grounding strap - a coiled wire with a clip at one end and an elastic strap at
the other. Wear the strap around your wrist and attach the clip to any non-painted
metal surface of your computer chassis.
OR
• If you do not have a grounding strap, touch any non-painted surface of your
computer chassis before you begin installation.
2.3 Installation Notes
Computers come in different shapes and sizes. The installation procedures in this
manual apply generally and you should compare the illustrations here with your
computer before you start your sound card installation.
A Philips screwdriver is required for your so und card installation.
The documentation for your computer should come in handy during the installation.
Have it ready when you start the installation.
If you have an existing non Plug-n-Play sound card installed in your computer, you
must first un-install its audio drivers before you remove the card. Refer to your existing
documentation on the sound card for more details.
If your existing sound card is Plug-n-Play, you may safely proceed to install your new
sound card.
3 Setting Up y our Sound Card
Power off your computer and any connected devices before installing your
sound card!
3.1 Installing the Sound Card
You need to remove any existing sound card installed in your computer. If the sound
card is non Plug-and-Play, un-install the audio drivers before you remove the card
from your computer. Check your existing sound card documentation for details.
1. Remove the cover of your computer.
6
6/01/99
Page 7

Xwave Thunder 3D
3. Align your sound card with the selected PCI Bus-Slot
and firmly push it into the slot. If the sound card does
not slide in, do not force it. Make sure the sound card is
aligned properly and try it again.
2. Select an available PCI Bus-Slot, and if
necessary, remove its cover plate. Keep the
mounting screw to secure your sound card later.
4. Secure your sound card to the chassis of your
computer with the mounting screw removed in
Step 2.
Connect one end of the CD cable to the black
connector (MPCCD). Connect the other end to
your CD drive.
5. Put back the cover of your computer.
7
6/01/99
Page 8

Xwave Thunder 3D
3.2 Connecting the Sound Card
You may connect a variety of audio equipment to your sound card as shown in the
illustration below:
Line-In:
Connect from any external sound sources, example, from the
Line/Audio Out of your external Audio CD-ROM or minihifi. (Sound will be transmitted out from the attached speakers)
Microphone Jack:
Connect to a microphone. Example, you may want to sing
Karaoke through the microphone. (Sound will be transmitted
out from the attached speakers)
Front Speakers:
Connect a pair of active speakers to the front of your computer.
Rear Speakers:
Connect a pair of active speakers to the back of your computer.
MIDI/Game Port:
Connect to either your MIDI keyboard or joystick.
4 Software Driver Installation
8
6/01/99
Page 9

Xwave Thunder 3D
4.1 Installing Driver under Real DOS
In real DOS mode, you must have your DOS CD-ROM drivers loaded for
access to the install CD. Another way to do this is to simply run INSTALL.EXE
from a DOS box in Windows.
4.1.1 Installing the device driver
1. Run INSTALL.EXE from the DOS directory on the CD. This installation
program will create the Tbird directory on any drive you desire. Follow the screen
prompts to install the files to your hard drive. The install program will edit your
autoexec.bat file to perform automatic initialization of Thunder 3D for use in real
mode DOS .
4.1.2 Launching the DOS control panel:
1. CD to C:\TBird
2. Type TBIRDCTL and press ENTER
This application allows you to adjust volume levels, balance, input levels, synthesizer
modes, speaker modes, and midi effects in real DOS.
In DOS games that have music settings, if you select FM synthesis in the game, make
sure the synth control in the control panel is set to OPL3. For games that support
MIDI (mpu-401), select the WVTBL (wavetable) option.
NOTE: This application is for real MS-DOS mode only and should not be run under
windows. In windows, use the windows mixer for adjusting playback and recording
levels.
4.2 Installing Driver under Win95/98
Now that the hardware is installed, it is time to configure the drivers.
Plug and Play uses your system’s BIOS and the Plug and Play features of
Windows 95/98 to allocate resources for Thunder 3D .
Microsoft issued a maintenance release of Windows 95 referred to as
OSR2. This version shipped as the stock operating system on many PC’s.
Newer and recently upgraded PC’s will have the Windows 98 operating system.
Other systems will have the original Windows 95 or “Gold” version.
The following procedure describes installation using Windows 98.
If you have older versions of Windows 95 then the installation will be slightly different
than described below. However, the installation will go smoothly if you simply follow
the on screen instructions and in most cases where the system is looking for a file just
browse to the install directory of the Thunder 3D CD.
1. Turn on the computer and place the Thunder 3D CD in your CD-ROM drive.
When the Add New Hardware Wizard dialog box reports that is sees a PCI
Multimedia Audio Device, click NEXT.
9
6/01/99
Page 10

Xwave Thunder 3D
2. Select Search for the best driver for your device (Recommended).
Click NEXT.
10
6/01/99
Page 11

Xwave Thunder 3D
3. Please select Specify a location and browse to your directory where the driver
files are located, click Next>.
4. As the figure shown below which indicates windows has found the driver at the
specified location, please select NEXT to install the drivers.
5. Windows then copies the files. You may be prompted to insert your Windows
system CD, as the core sound components of the operating system may need to
be copied as well. These include audio Codecs, the Mixer and the Sound
Recorder program.
11
6/01/99
Page 12

Xwave Thunder 3D
6. Please click FINISH to continue installing the driver. The installation will continue
detecting devices and retrieving the necessary files to your system. The second
device is the PCI Audio Support Registers device. Last will be the PCI Audio
Gameport Device. Windows will finish installing the drivers for Thunder 3D
automatically.
Note: When the “DirectX® Setup” dialog box appears, please click OK to enable the
DirectSound3D Hardware Acceleration.
12
6/01/99
Page 13

Xwave Thunder 3D
7. To check if you have successfully installed the Thunder 3D™ driver, please go to
the “Device Manager” of “System Properties” in Control Panel.
13
6/01/99
Page 14

Xwave Thunder 3D
5 Configuring the Thunder 3D Joystick Driver
for Windows® 95/98:
1. Open the Control Panel and double-click on the Game Controllers icon. Select
the Advanced tab and under Port Driver Assignment select VLSI
Tbird128_GamePort Driver.
2. Select the General tab and click the Add… button. You may select any one of
the Game Controllers listed, then click OK.
14
6/01/99
Page 15

Xwave Thunder 3D
3. After making your selection, highlight the selected controller in Game Controllers
and click the Properties… button. Select Calibrate…and calibrate your joystick.
Your joystick should be installed and ready for flight!
15
6/01/99
Page 16

Xwave Thunder 3D
6 Windows® NT® Installation
6.1 Installing Device Drivers under NT4.0
This section describes the necessary procedures for installing the Thunder 3D™ device
driver under NT4.0. Please follow the steps descr ibed below to proper ly install t he dr iver.
Note: you must have the appropriate privileges in order to install the drivers.
1. Boot the system to the Windows NT desktop.
2. Click START, select RUN, In the Run d ialo g box browse to the NT folder NT40 on
the driver CD and then click Setup.exe and click OK.
3. Wait a couple of minutes while the data transfers.When the “Welcome” dialog box
appears, click Next> to continue.
4. The Setup program will copy the necessary files to the system , click Yes to restart
the computer and take effect the Thunder 3D™ driver.
7 Uninstalling Thunder 3D™
16
6/01/99
Page 17

Xwave Thunder 3D
7.1 Uninstalling Device Driver under Win95/ 98
1. Select Control Panel, Add/Remove Programs and select Thunder 3D Audio
Support Files. Click the Add/Remove… button.
2. You will be prompted to shutdown your computer after uninstalling for the changes
to take effect. Click Yes to shutdown your computer and then remove Thunder
3DTM from your system.
7.2 Uninstalling Device Driver under NT4.0
1. In Control Panel, double click the Add/Remove Programs icon, select “VLSI
ThunderBird 128 Windows NT Driver” and click Add/Remove to remove the the
chosen driver.
2. Browse to the Multimedia page in the Control Panel, click on the “Devices” tab,
under “Audio Devices” select “Audio for VLSI ThunderBird128”, and then click
the “Remove” button. Shutdown and restart your computer to remove Thunder
3D™ from your system.
17
6/01/99
Page 18

Xwave Thunder 3D
FCC COMPLIANCE STATEMENT:
This device complies with part 15 of the FCC Rules. Operation is subject to the
following two conditions: (1) This device may not cause harmful interference, and (2)
this device must accept any interference received, including interference that may
cause undesired operation.
INFORMATION TO USER:
This equipment has been tested and found to comply with the limits of a Class B
digital device, pursuant to Part 15 of the FCC Rules. These limits are designed to
provide reasonable protection against harmful interference in a residential installation.
This equipment generates, uses and can radiate radio frequency energy and, if not
installed and used in accordance with the instructions, may cause harmful
interference to radio communications. However, there is no guarantee that
interference will not occur in a particular installation; if this equipment does cause
harmful interference to radio or television reception, which can be determined by
turning the equipment off and on, the user is encouraged to try to correct the
interference by one or more of the following measures:
1. Reorient / Relocate the receiving antenna.
2. Increase the separation between the equipment and receiver.
3. Connect the equipment into an outlet on a circuit difference from that to which
the receiver is connected.
4. Consult the dealer or an experienced radio/TV technician for help.
CAUTION: Changes or modifications not expressly approved by the manufacturer
responsible for compliance could void the user’s authority to operate the equipment
18
6/01/99
 Loading...