


MachOne EV1935 - PCI SOUND CARD
APPLICATION INSTALLATION
Under
WINDOWS 95 OSR2/ WINDOWS 98 and
WINDOWS NT4.0
November 1998
MachOne EV1935 PCI Sound Card Windows 95OSR2/ 98/ NT4.0
MachOne EV1935 PCI Sound Card
How to Install “Media Rack” Application Software
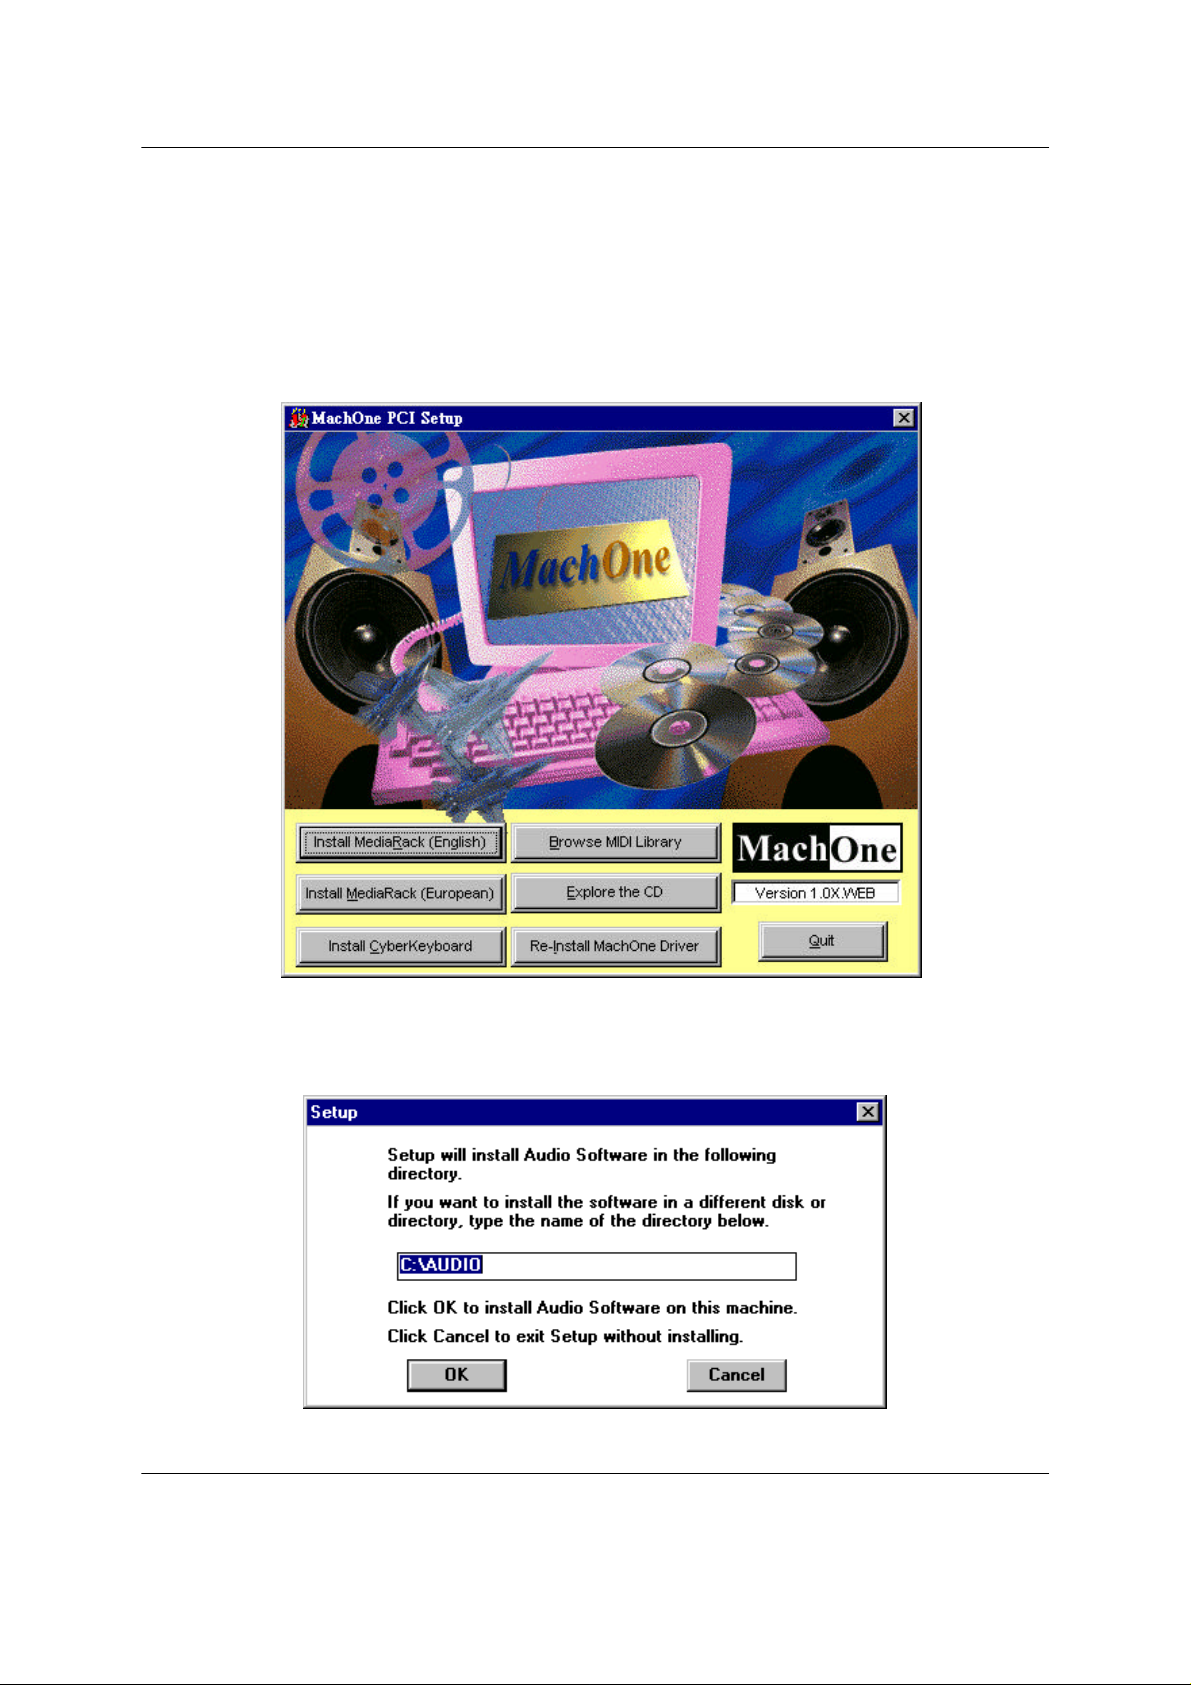
1.) To install the application software “Media Rack”, please start up your operating system.
2.) The “MachOne PCI Setup” windows will appear. If you want to install the application
software in English now, please click on the first push button on the left side “install
MediaRack (English)”. The Setup program will initialize. Before running the Setup
program please close any other Windows programs you have running.
3.) The “Setup” dialog box will appear. You may click on the OK push button to accept the
default directory "C:\Audio" as the destination location of your new Audio Software or
type the name of a directory you prefer. Click on "Cancel" to exit the Setup program
without installing.
Page - 1
MachOne EV1935 PCI Sound Card Windows 95OSR2/ 98/ NT4.0
4.) The next Setup window warns you about possible harm to your hearing. Please read the
text carefully, before using your headphones. Click on OK to proceed to the next step.
5.) Setup program informs you that the installation of your new application software has
been completed successfully. Please click on OK to finish the installation process.
6.) After you have installed the “Willow Pond Audio” application software, the "Media Rack"
program icon appears on the screen as the figure shows below.
A-120-0040
Version 1.0
Page - 2

MachOne EV1935 - PCI SOUND CARD
Configuration and Hardware
USER MANUAL
November 1998

MachOne EV1935 PCI Sound Card Configuration/Hardware
TABLE OF CONTENTS
1. DESCRIPTION...............................................................................2
1.1. FEATURES...................................................................................................2
1.2. SYSTEM REQUIREMENTS ..............................................................................3
1.3. CARD FIGURE..............................................................................................3
1.4. CONNECTORS ..............................................................................................3
1.4.1. External Connectors:.................................................................................................3
1.4.2. Internal Connectors: ..................................................................................................4
1.4.3. Audio Connectors:.....................................................................................................4
1.4.4. Audio Output Jumper Settings for JP1:......................................................................4
2. HARDWARE INSTALLATION.......................................................4
2.1. BEFORE INSTALLATION .................................................................................4
2.2. HANDLING THE PCI SOUND CARD.................................................................5
2.3. INSTALLING THE PCI SOUND CARD ...............................................................5
3. SOFTWARE INSTALLATION........................................................6
3.1. SOFTWARE CONTENTS.................................................................................6
3.2. DRIVER INSTALLATION..................................................................................6
3.2.1. Windows 95...............................................................................................................6
3.2.2. Windows 95 OSR2....................................................................................................6
3.2.3. Windows NT4.0......................................................................................................7
3.2.4. Windows 98...............................................................................................................7
3.3. APPLICATION INSTALLATION “MEDIA RACK” ....................................................8
3.3.1. Windows 95 (4.00.950B OSR2).................................................................................8
3.4. TROUBLE SHOOTING/FAQ............................................................................8
Page - 1

MachOne EV1935 PCI Sound Card Configuration/Hardware
1. DESCRIPTION
The MachOne PCI is a 16-bit stereo PCI sound card based on the MachOne
EV1935 PCI Audio controller chip. The MachOne PCI is compatible with all major PC
sound standards, including Sound Blaster™ Pro, AdLib™, MPU-401 and Windows
Sound System™. The MachOne PCI provides an integrated sound solution for
business, educational and entertainment audio, and other multimedia applications.
1.1. Features
The MachOne PCI Sound Controller card is a full-featured sound card that includes
the following:
• PCI 2.1 Plug-and-Play (PnP)
Supports the Plug-and-Play Specification in PCI 2.1 standards which allows the
system to detect and configure devices automatically that conform to the
standard. This eliminates the user having to know and configure the correct
IRQ, DMA and I/O channel settings.
• 3D Sound Enhancement
Supports 3D enhancement through Microsoft DirectSound 3D API.
• Wave Audio
Maximum recording and playback sampling rate of up to 48 KHz stereo.
• Sixteen-bit digital-to-analog and analog-to-digital converter
16-bit and 8-bit digitizing in stereo and mono mode.
• Standard 128 voices WebSynthTM Wavetable Synthesizer
Wavetable engine from award winning Faith WebSynth. Supports 128 voices
general MIDI wavetable. Special effect tuning supports reverb and chorus.
• Digital/Analog Mixer
Mix analog stereo from CD-audio, Line-In, FM music and digitized voice
sources. Digital stereo mixing from Microphone, Line-in, CD-audio and Line-out
Master volume control.
• MIDI Interface/Joystick Port
Built-in integrated MIDI MPU-401 interface with FIFO, IBM PC joystick/game
port.
Page - 2
MachOne EV1935 PCI Sound Card Configuration/Hardware
lllllll
MIC IN
CD-IN (ATAPI)
CD-IN (JST)
1.2. System Requirements
The MachOne PCI is manufactured for IBM PC compatible computers, software,
and related computer components:
• Intel Pentium, Pentium II and compatibles (eg. AMDK6) 75MHz or higher
• At least 8MB RAM
• VGA or SVGA graphics adapter and monitor
• 5MB free on hard disk for installing all MachOne PCI Sound Controller
software
• PCI slot
• External speakers, microphone or headphones (optional)
The User Manual provides instructions for the following operating system.
• Windows 95 (version 4.00.950 / 4.00.95B OSR2)
• Windows 98
• Windows NT 4.0
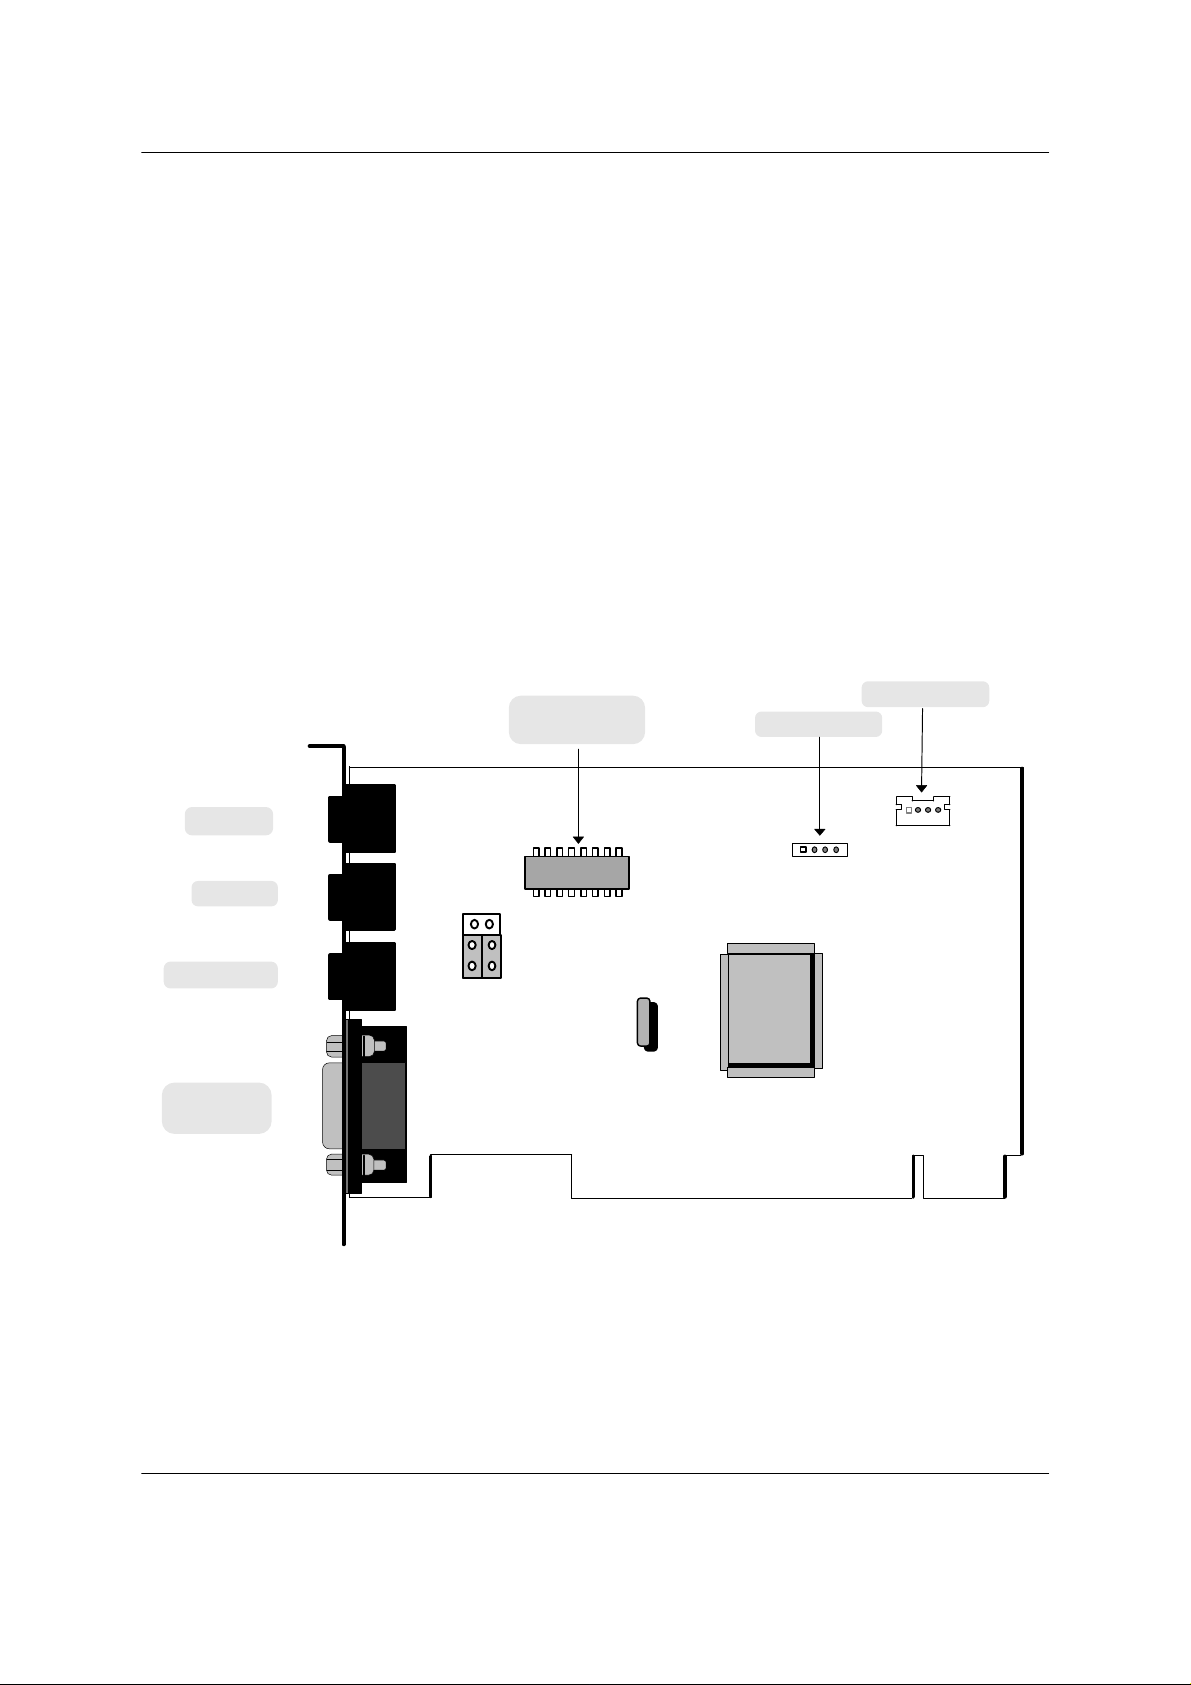
1.3. Card Figure
Power Amplifier
(OPTION)
LINE IN
J1
AMP
J2
AUDIO OUT
J4
JP1
MIDI/
JOYSTICK
J5
1.4. Connectors
1.4.1. External Connectors:
J1: ..........................í 3.5mm Phone Jack for LINE IN.
J2: ..........................í 3.5mm Phone Jack for MIC IN.
J4: ..........................í 3.5mm Phone Jack for AUDIO OUT.
J5: ..........................Connector for MIDI/JOYSTICK.
J11
J10
MachOne
EV1935
Page - 3
MachOne EV1935 PCI Sound Card Configuration/Hardware
4
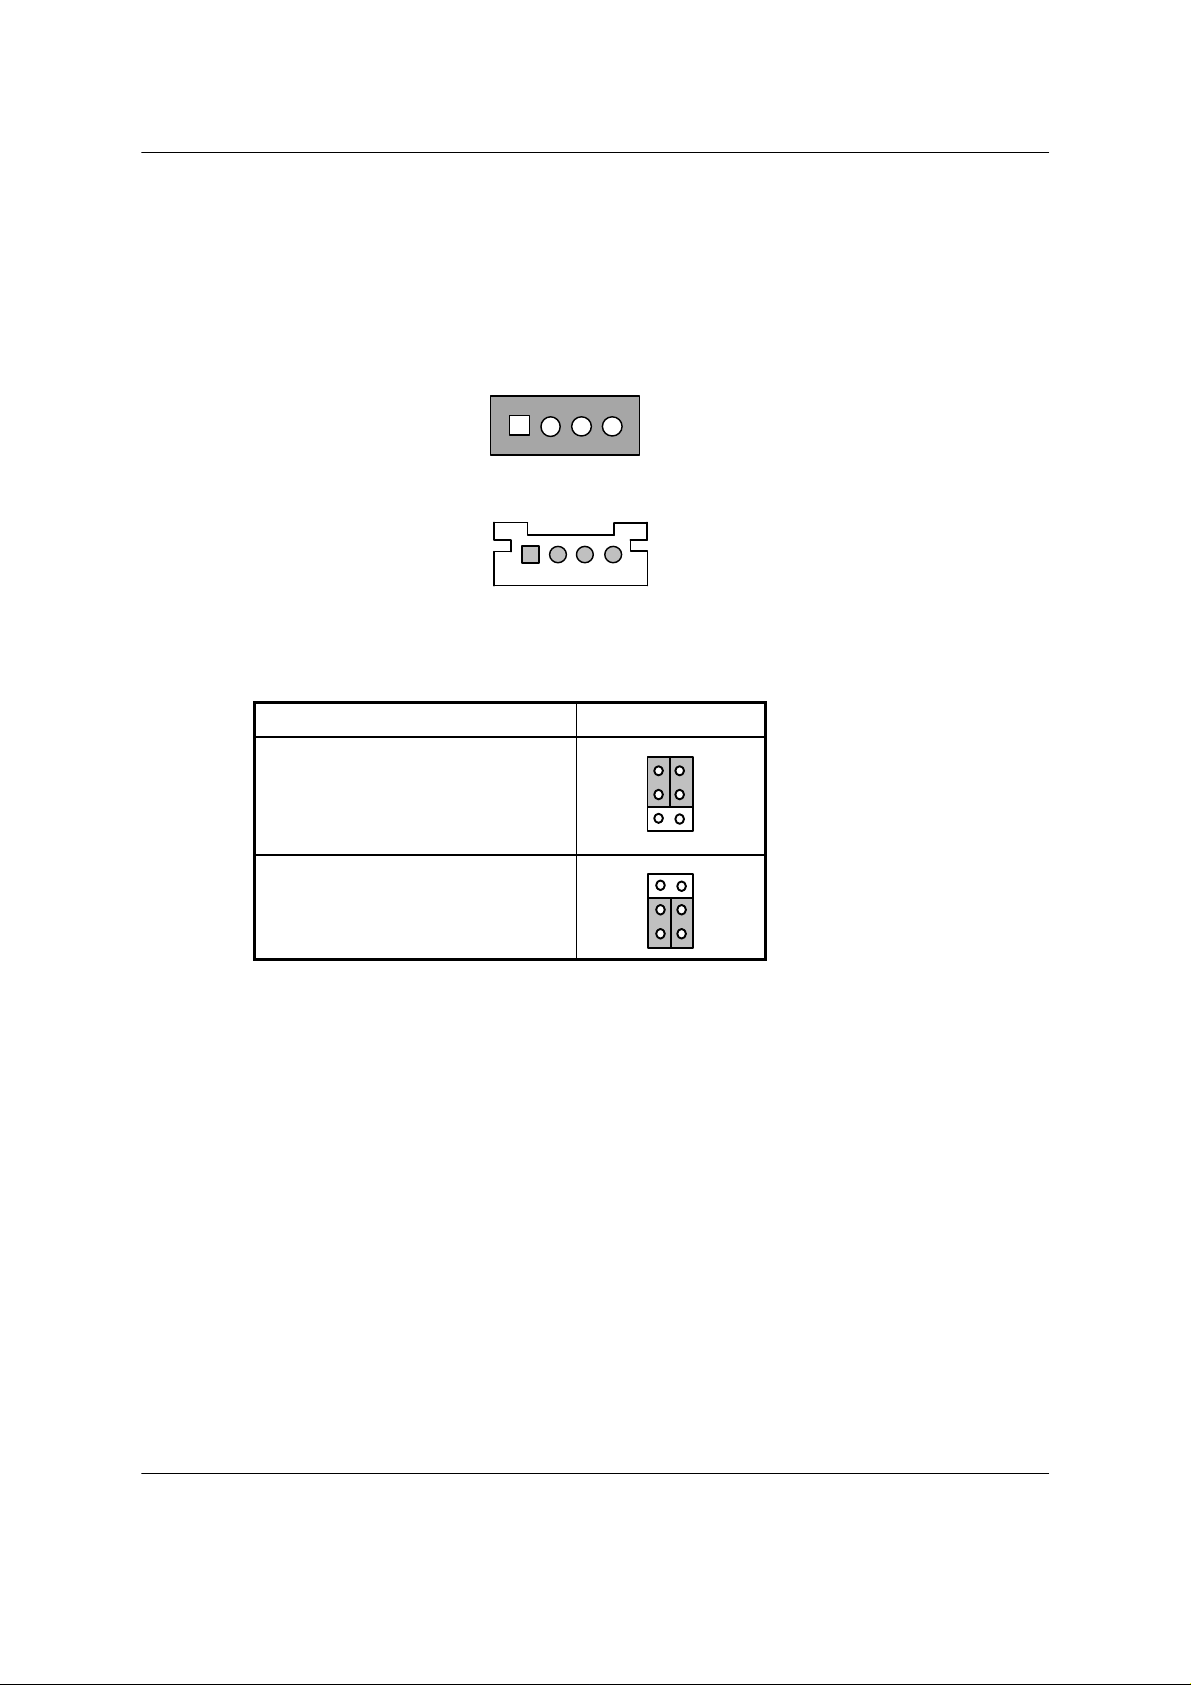
1.4.2. Internal Connectors:
J10: ........................Connector for CD-AUDIO IN. (ATAPI)
J11: ........................Connector for CD-AUDIO IN. (JST)
JP1:........................Jumper for switching between SPEAKER OUT/LINE OUT.
1.4.3. Audio Connectors:
J10: CD-Audio-In
ATAPI
L G G R
L: LEFT CHANNEL SIGNAL
G: GROUND
R: RIGHT CHANNEL SIGNAL
J11: CD-Audio-In
JST
G L G R
.
L: LEFT CHANNEL SIGNAL
G: GROUND
R: RIGHT CHANNEL SIGNAL
1.4.4. Audio Output Jumper Settings for JP1:
Audio Settting
SPEAKER OUT with
1
Power Amplifier (Default)
6
4
LINE OUT without
3
1
Power Amplifier
3
6
2. HARDWARE INSTALLA TION
2.1. Before Installation
1.) Installing MachOne PCI PCI sound card is simple and straight forward.
However, if you are not familiar with your system, please consult your dealer
or computer manufacturer for assistance.
2.) Make sure Windows 95/98, or Windows NT4.0 is installed and functioning
properly
3.) No other sound device is plugged in and installed. If an other audio chip is
built-in with your system board, try to disable the built-in audio in the BIOS.
Page - 4

MachOne EV1935 PCI Sound Card Configuration/Hardware
2.2. Handling the PCI Sound Card
WARNING: Static electricity can damage your equipment. Do not take the
card out of its static protective bag until you are ready to work with it.
Follow these precautions when handling the card:
• Before you open the static protective bag, touch it to a metal expansion slot
cover on the back of your computer. This drains static electricity from the
package and from your body.
• Do not touch any exposed printed circuitry after opening the package.
• Keep other people from touching the card. They might have a static-
electricity build-up.
• Limit your movement. Movement causes a build-up of static electricity.
2.3. Installing the PCI Sound Card
Step 1. Turn off the system and all peripheral devices.
Step 2. Disconnect the power cord and all peripheral devices from the
system.
Step 3. Remove the system cover and identify an unused PCI slot.
Step 4. Unscrew the slot cover plate, plug in the PCI Sound Card, and tighten
it with the screw.
Step 5. If you have a microphone, plug the respective cable into the J2 Jack
on the back of the Sound Card.
Step 6. If you have speakers or amplifiers, plug the cable into the J4 Jack on
the back of the Sound Card.
WARNING! To avoid temporary or permanent hearing loss or impairment due to
unexpected noise or static, always hold your headphones away from
your ears before turning on the computer. You should also lower your
speaker's volume before testing.
Step 7. Please plug the cable for your MIDI/Joystick device into the J5 Jack
on the back of the PCI Sound Card.
Step 8. Depending on what type of CD Audio cable you have connect J10 or
J11 on the Sound Card and the Audio output at the back of the CD-
ROM drive. Make sure pin 1 of J10 or J11 is connected to the leftmost
pin of the CD-ROM Audio output.
Step 9. Put back the system cover, reconnect the system power cord and all
peripheral devices. Check and make sure all connections are correct
before you turn on the system.
Page - 5

MachOne EV1935 PCI Sound Card Configuration/Hardware
3. SOFTWARE INST ALLATION
3.1. Software Contents
There is one installation CD-title which comes with this package.
This CD-title includes the necessary device driver and application software for
Microsoft® Windows® 95(OSR2)/98/NT4.0 operating system.
3.2. Driver Installation
You might need the original Windows 95/98 or NT installation disk in some of the
installation steps.
3.2.1. Windows 95
If you want to install the device driver for the first time, please follow the steps as described
below.
1. After you have installed the sound card, start up Microsoft Windows 95 operating
system.
2. The System will display the dialog box “New Hardware Found” with the message “PCI
Multimedia Audio Device”. Please choose “Driver from disk provided by hardware
manufacturer” and click on OK.
3. In the “Install From Disk” dialog box appears. Please insert now installation CD-title
into your CD-ROM drive. Assuming your CD-ROM drive is D, specify the path of the
driver files as D:\Win9x. Click on OK to continue.
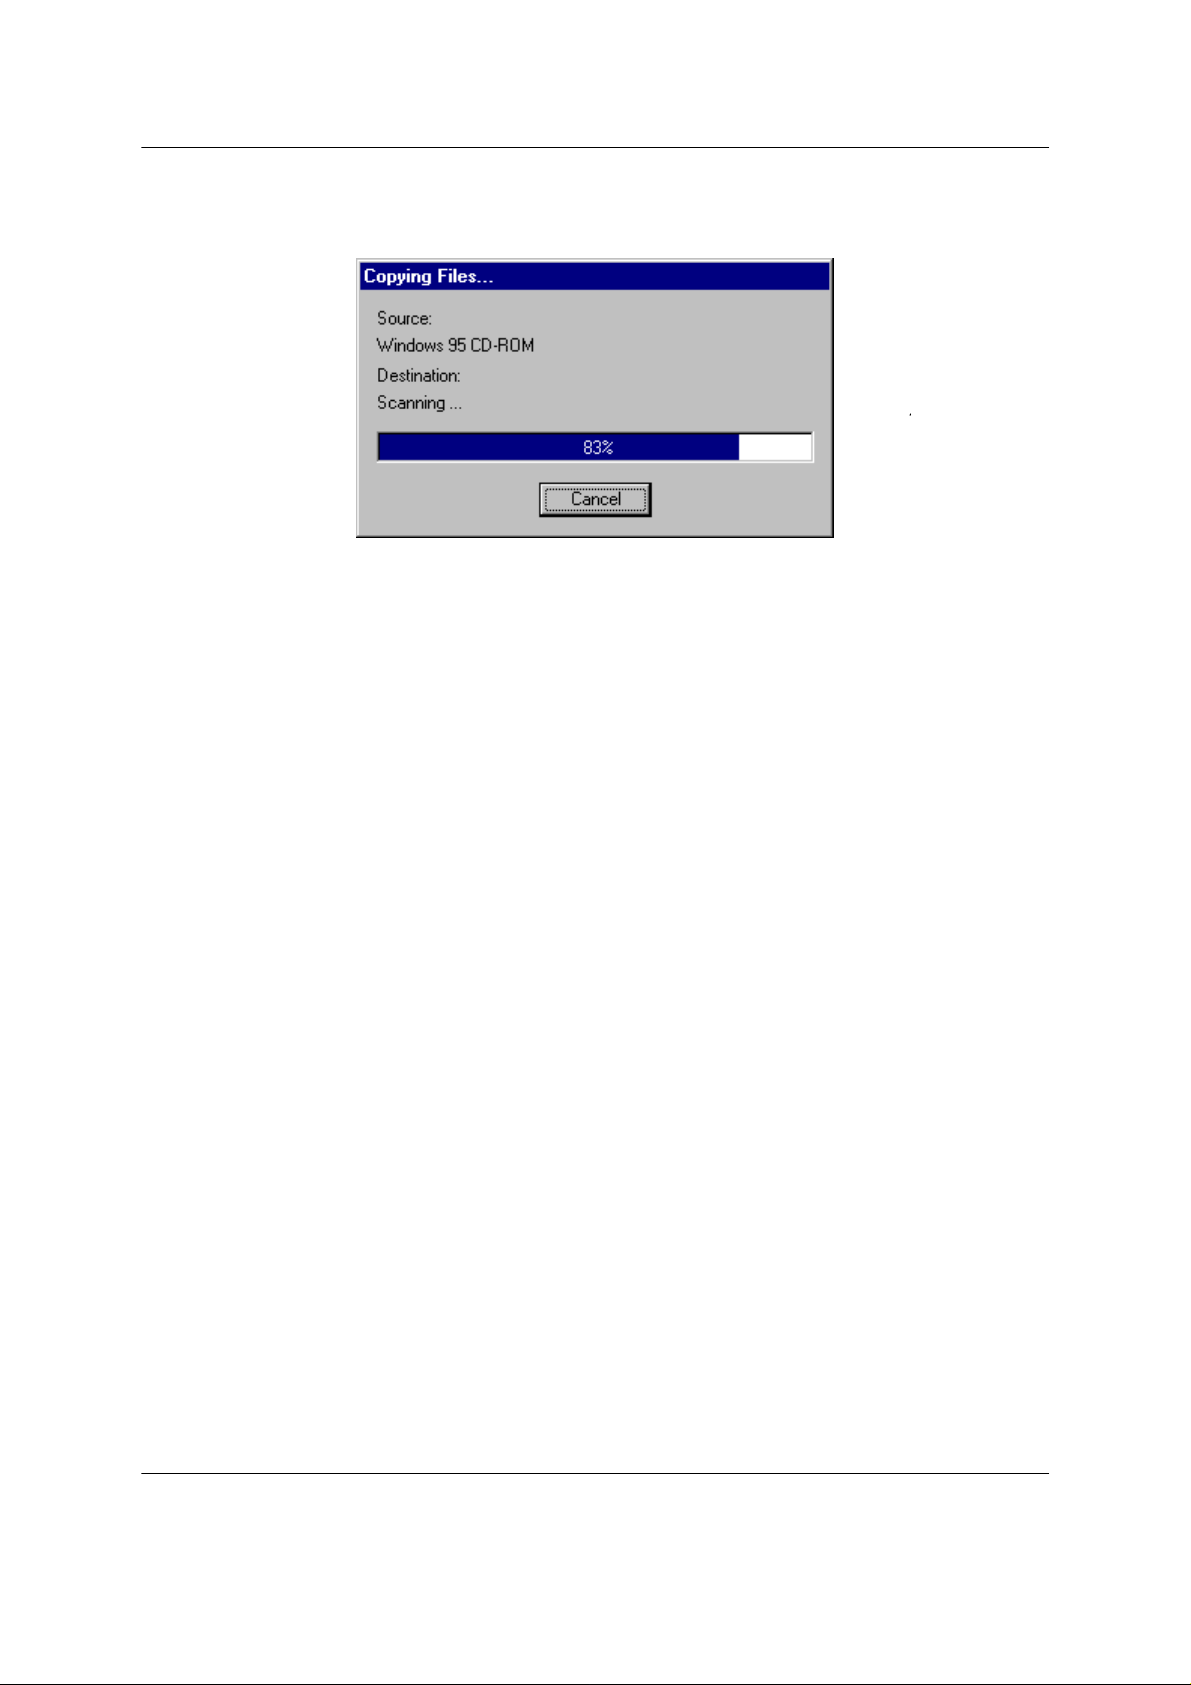
4. After the “Copying Files...” dialog box appears, wait for a moment until the installation
of the new driver is complete.
5. It is possible that the system will ask for the Windows 95 CD-ROM. Please insert it,
specify the path as D:\Win95, and click on OK.
6. System will prompt you to restart the computer. Click on “Yes” to re-boot.
3.2.2. Windows 95 OSR2
1. Start up the Microsoft Windows 95 OSR2 operating system.
2. System will launch the “Update Device Driver Wizard”. Click on “Next>” to continue.
3. After searching for the default floppy drive A, the system will prompt you “Unable to
locate the driver for this device”. Click on “Other Locations…” to continue.
4. You can either type-in the driver location, or click on “Browse” to locate the driver.
Assuming your CD-ROM drive is D, specify the path of the driver files as D:\Win9x.
Click on OK to continue.
5. Windows will find the “MachOne PCI Sound System” driver for the device, and the
location. Click on “Finish”.
6. The system will prompt you “The disk labeled “MachOne PCI Multimedia Disk” is now
required”. Insert your installation CD-title into your CD-ROM drive and click on OK.
7. You can either type-in the driver location, or click on “Browse” to locate the driver.
Assuming your CD-ROM drive is D, specify the path of the driver files as D:\Win9x.
Click on OK to continue.
7. If this is the first time installation, Windows 95 OSR2 will prompt you the “Windows 95
CD-ROM” for Game Port/Joystick during the Setup program. Click on OK and specify
the path as D:\Win95. Click on OK again.
Page - 6

MachOne EV1935 PCI Sound Card Configuration/Hardware
3.2.3. Windows NT4.0
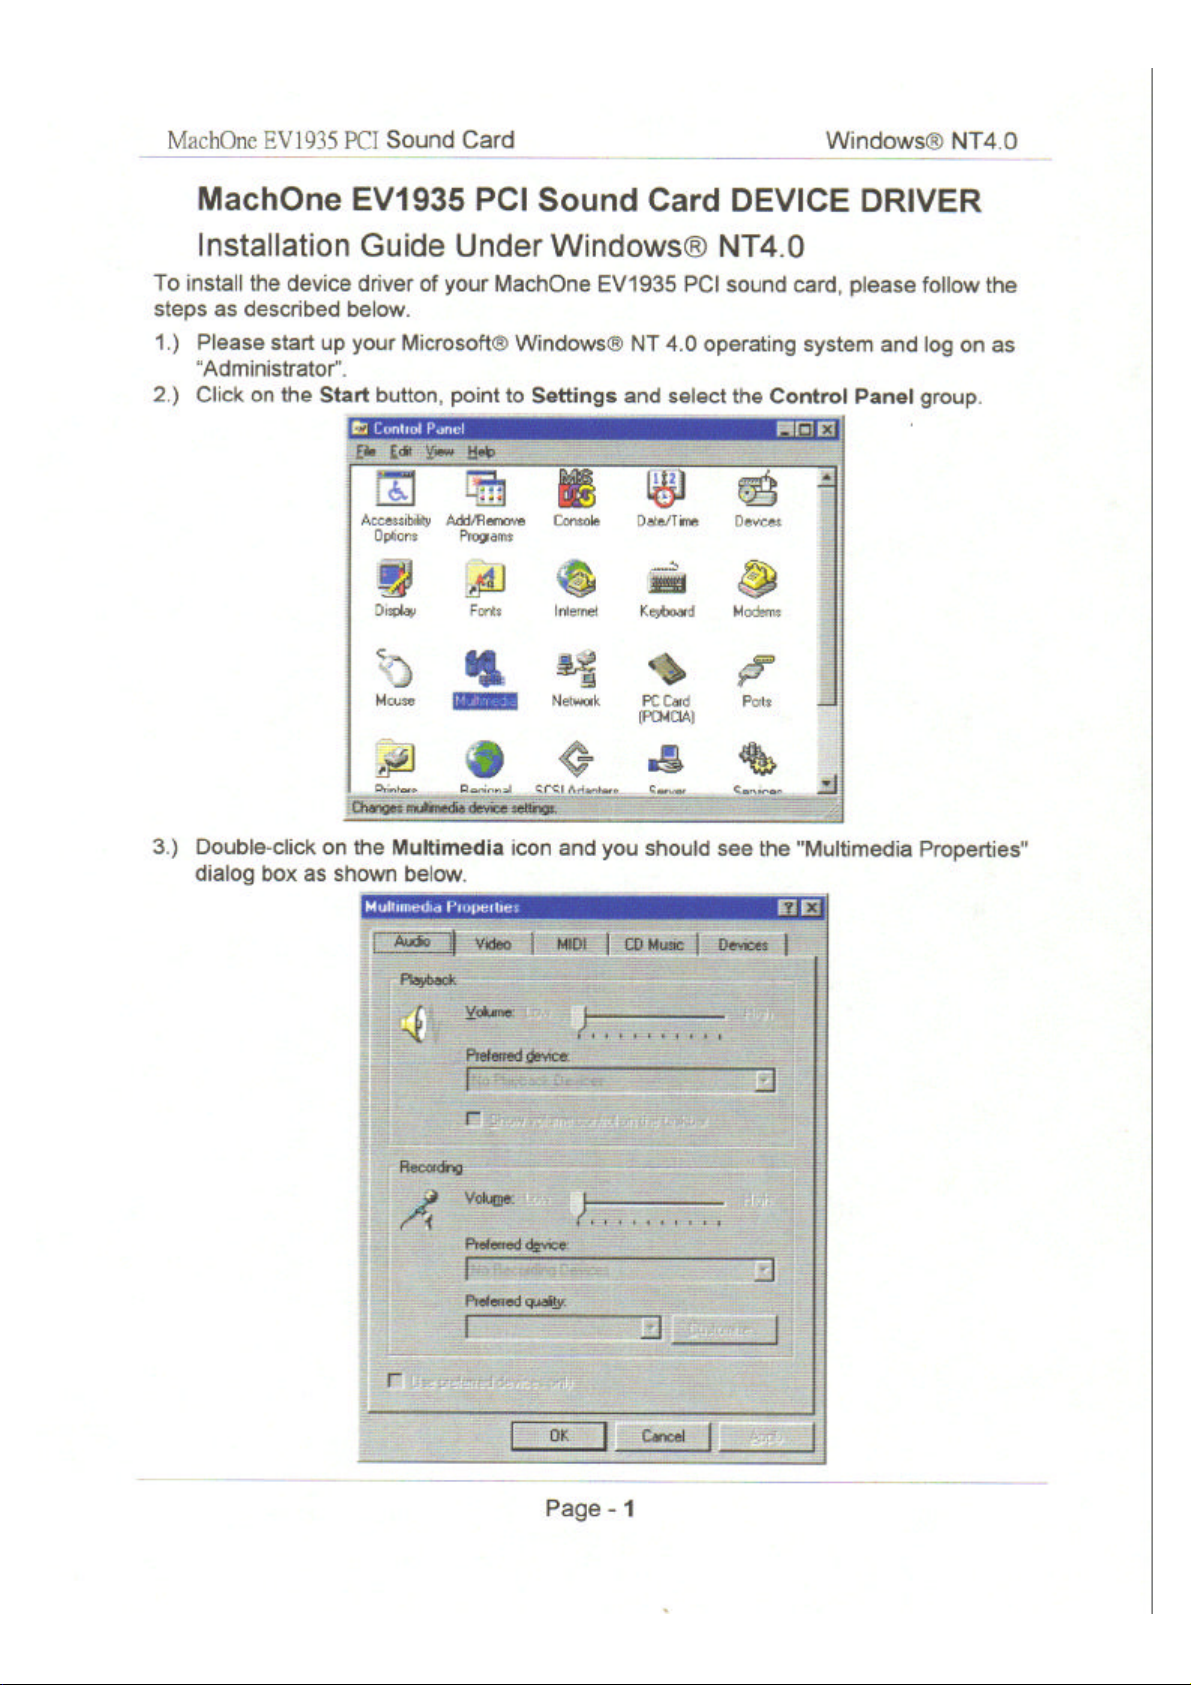
1. From the Windows Taskbar (usually located at the bottom of your screen), go to
“Start” ⇒ “Settings” ⇒ “Control Panel”, and open the “Control Panel” window.
2. Double-click on the “Multimedia” icon to open the “Multimedia Properties” window.
3. Select the “Devices” tab.
4. Click on the “Add” button. Select “Unlisted or Updated Driver” from the list box, then
click on “OK”.
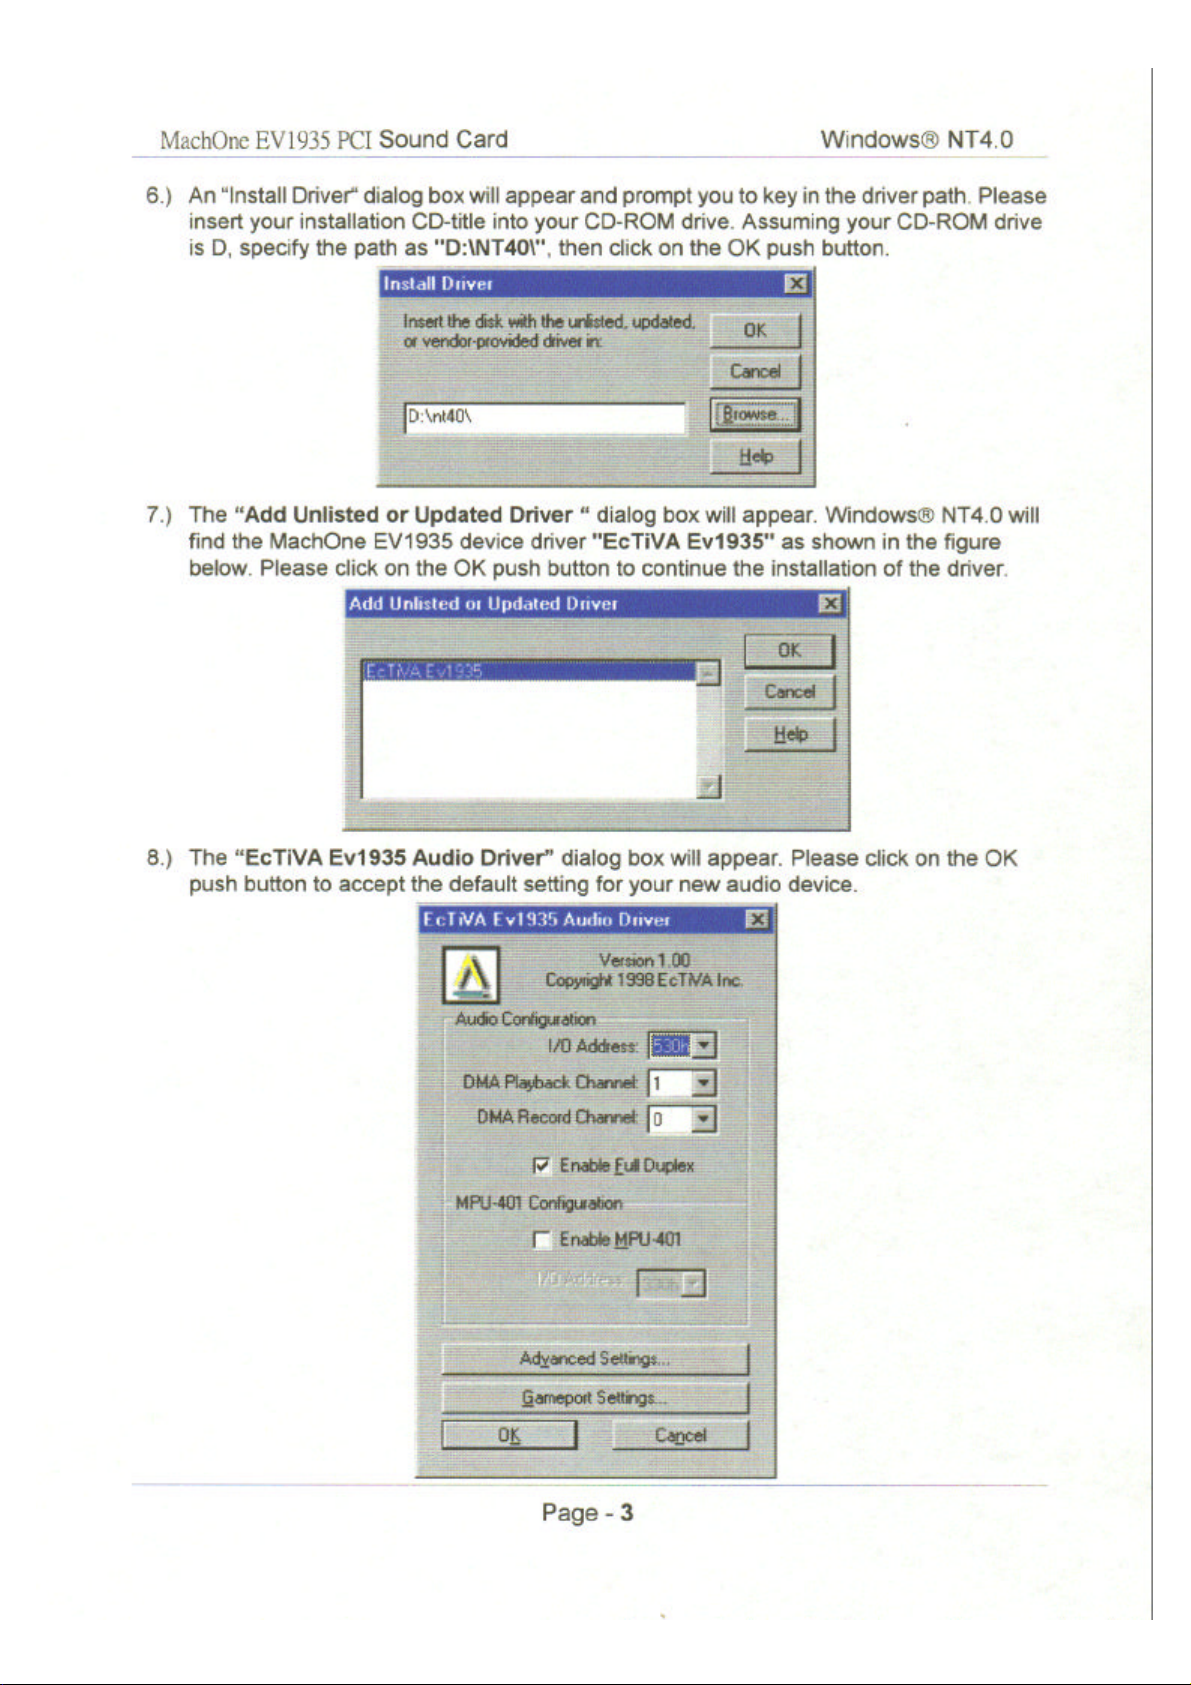
5. System will then prompt you to insert the vendor-provided driver disk. Insert the
MachOne NT4.0 driver CD (Installation CD-title) into your CD-ROM drive.
6. Locate the MachOne NT4.0 driver. Assuming your CD-ROM drive is D, specify the
driver path as D:\NT40\ and click on OK.
7. Select the MachOne PCI Audio Device “EcTiVA Ev1935” and click on OK.
8. Click on OK to accept the default setting for your new audio device.
9. System will prompt you to reboot after the driver installation. Click on “Restart Now” to
reboot.
3.2.4. Windows 98
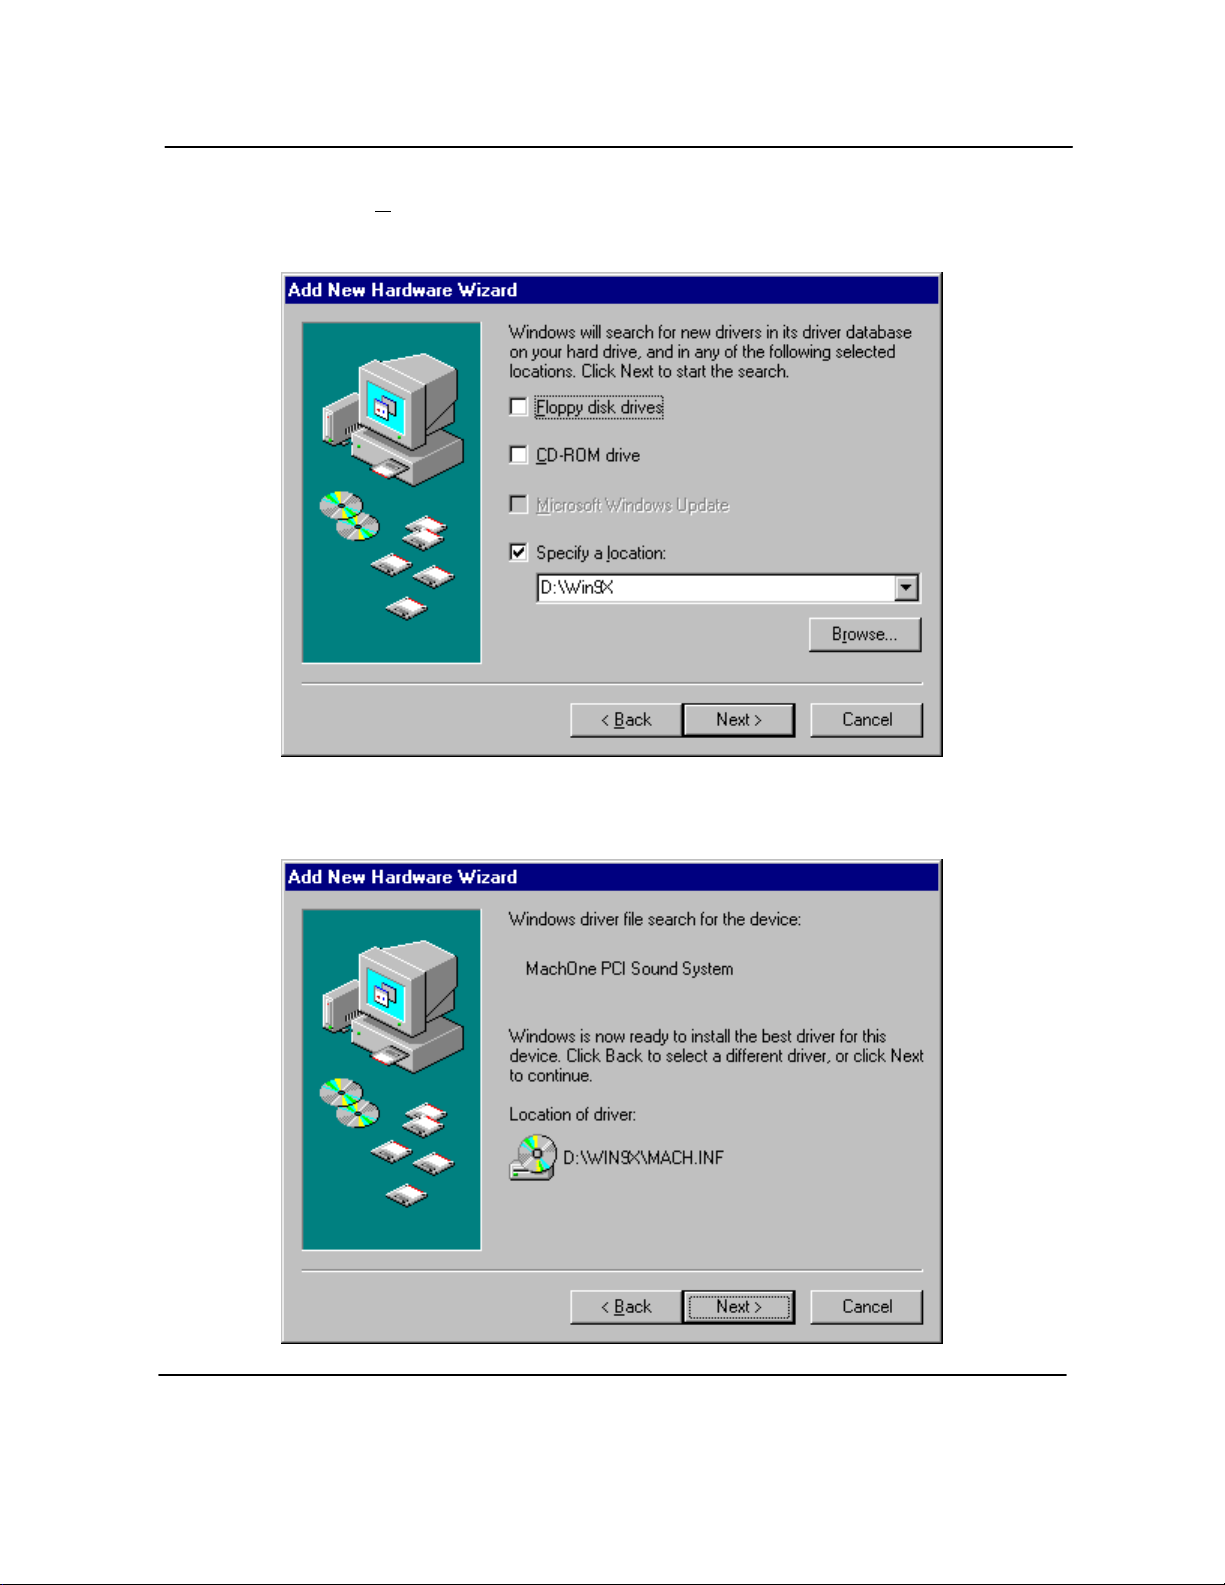
1. Upon system start, the “Add New Hardware Wizard” will be launched. Click on “Next>”
to continue.
2. Select “Search for the best driver for your device (Recommended)”. Click on “Next>”.
3. Locate the MachOne Windows 95/98 driver by selecting “Specify a location” and “CDROM drive”. You can either type-in the driver location, or click on “Browse” to locate
the driver. Assuming your CD-ROM drive is D, specify the path of the driver files as
D:\Win9x. Click on “Next>” to continue.
4. Windows will find the “MachOne PCI Sound System” driver for the device. Click on
“Next>”.
5. To complete the driver installation click on “Finish”.
For the above OS platforms, after installation reboot, it is recommended you check the
device installed.
1. Go to Start “Start” ⇒ “Settings” ⇒ “Control Panel”, and open the “Control Panel”
window.
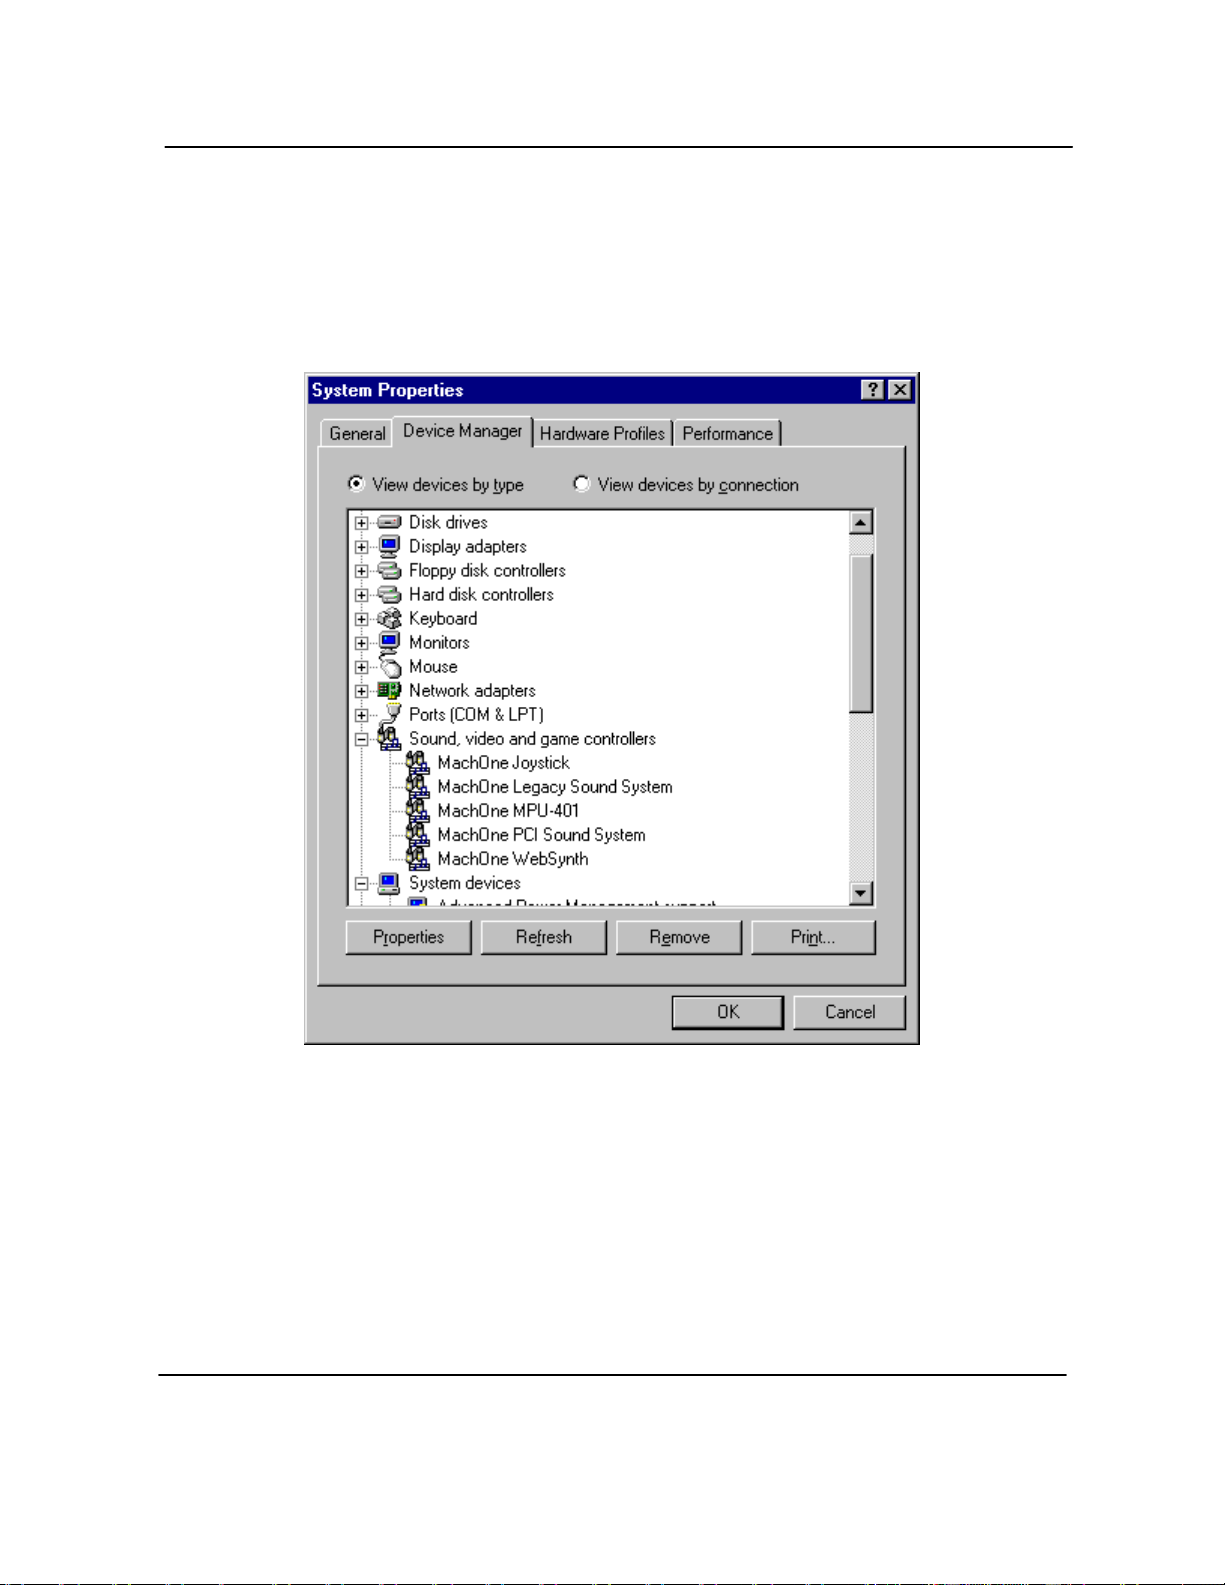
2. Double-click on the “System” icon. Launch the “System Properties” window.
3. Click on the “Device Manager” tab. In the Device Manager window, double-click on
“Sound, video and game controllers”.
4. Under “Sound, video and game controllers”, you will find five MachOne related
devices as shown below.
5. Make sure there is no yellow exclusion mark or error mark on any of the MachOne
device.
Page - 7

MachOne EV1935 PCI Sound Card Configuration/Hardware
3.3. Application Installation “Media Rack”
3.3.1. Windows 95 (4.00.950B OSR2)
1. Please start up your Microsoft Windows 95 OSR2 operating system.
2. The “MachOne PCI Setup” windows will appear. Click on the first push button labeled
“R”. The Setup program will initialize.
3. The “Setup” dialog box will appear. Click on OK to accept the default directory
"C:\Audio" as the destination location of your new Audio Software or type the name
of a directory you prefer.
4. The next Setup window warns you about possible harm to your hearing. Please read
the text carefully, before using your headphones. Click on OK to proceed to the next
step.
5. The installation of your new application software has been completed successfully.
Click on OK to finish the installation process.
6. After you have installed the “Willow Pond Audio” application software, the "Media
Rack" program icon appears.
3.4. Trouble Shooting/FAQ
1. System does not detect the device upon reboot in
Windows 95/98 or NT4.0
Windows NT4.0 does not support Plug-and-Play feature. Thus, if you are using
Microsoft Windows NT4.0, you need to add the device manually by following the
steps in the Windows NT4.0 Driver Installation section.
However, if you are using Windows 95 or Windows 98 it is abnormal for the system not
to detect the device. Check if the card is properly installed in the PCI slot.
2. There is no sound after driver installation
• Check whether the speaker connector is in the proper Line/Speaker Out jack.
• If you are using powered speaker (non-passive speaker), check whether the speaker
is powered on, and the speaker volume control enabled.
• Check the five MachOne devices in Device Manager, Control Panel. If you have a
non-PnP device, such as an old network card, you might find an exclusion mark on
the conflicted MachOne device. Please consult the non-PnP device manual to
change the occupied resource.
3. How to control the volume if using passive speakers, which do not
support volume control on speakers
You need to install the Windows 95/98/NT4.0 volume control. To install,
3.1 Go to “Start” ⇒ “Settings” ⇒ “Control Panel”, and open the “Control Panel” window.
3.2 Double-click on the “Add/Remove Programs” icon.
3.3 In the “Add/Remove Programs” window, select the “Windows Setup” tab.
3.4 Highlight “Multimedia”, then click on the “Details …” button.
3.5 Select the “Volume Control” option. Click on OK.
Page - 8
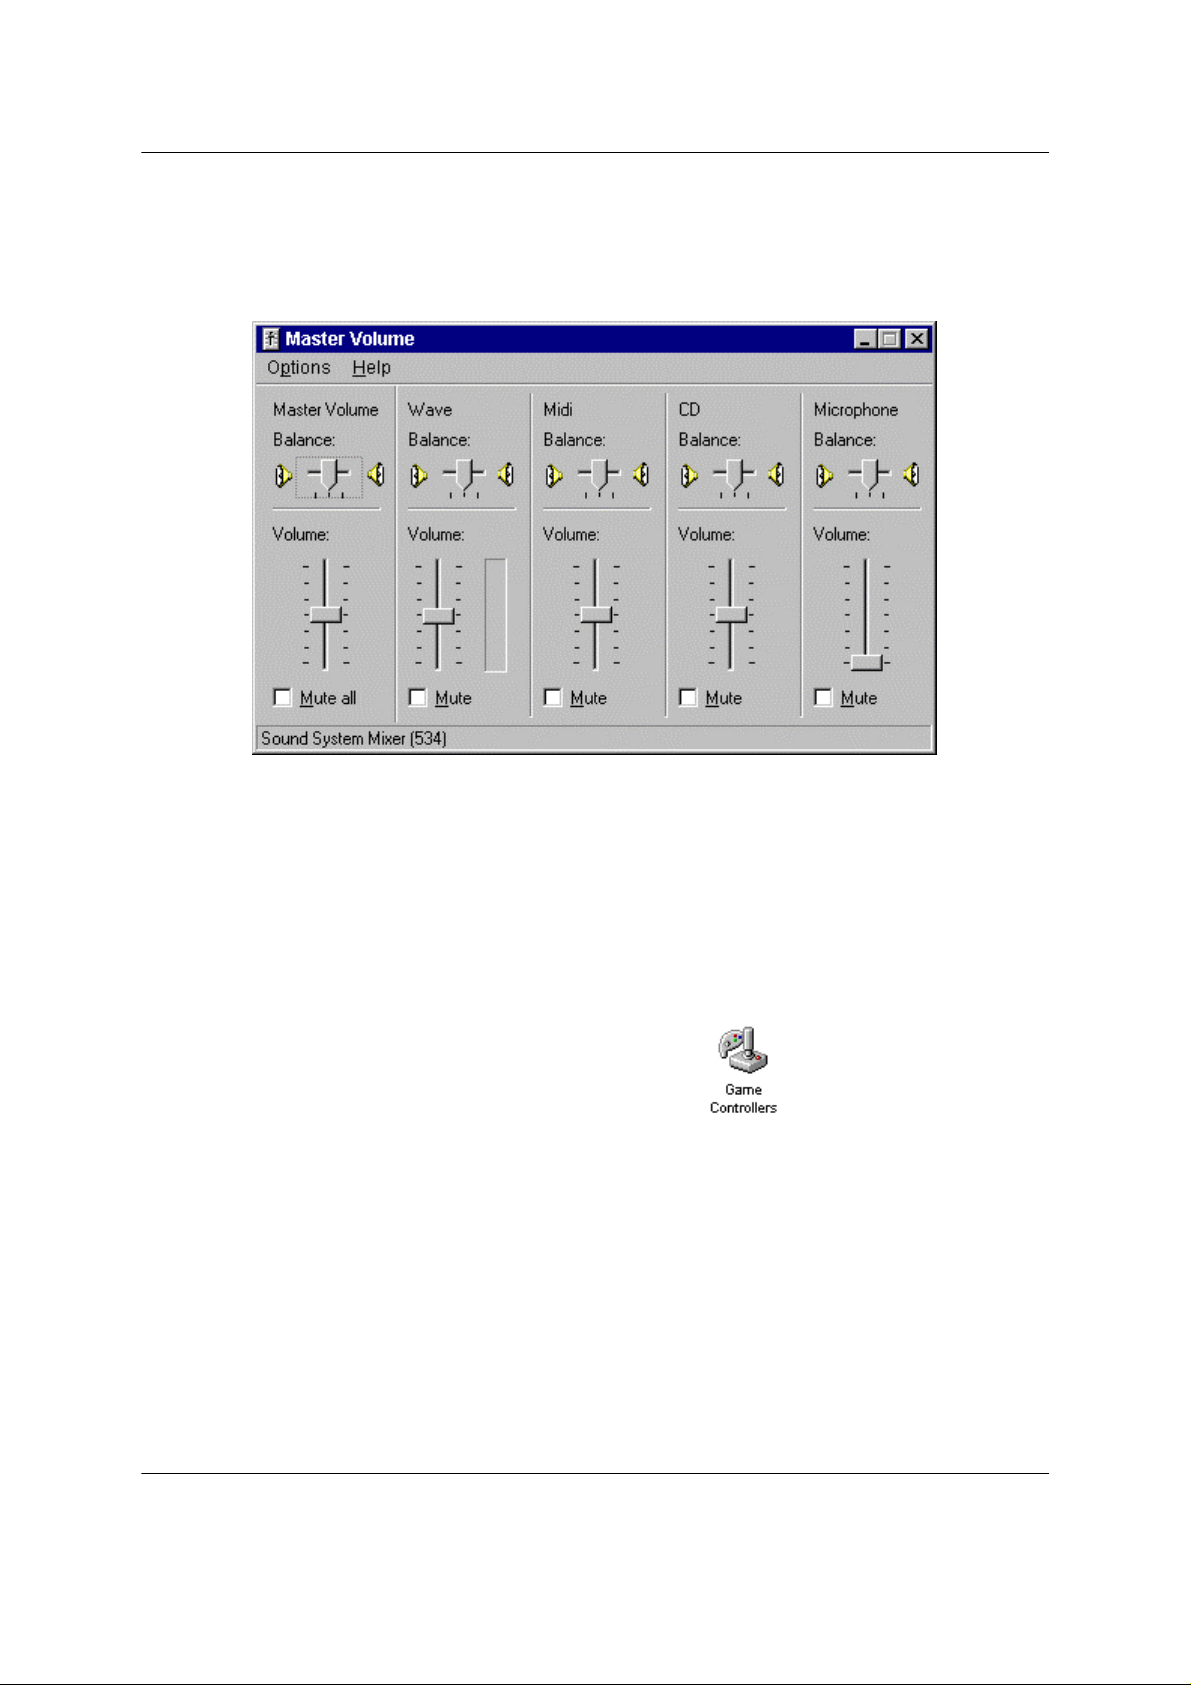
MachOne EV1935 PCI Sound Card Configuration/Hardware
3.6 System will prompt you for the Windows 95/98/NT4.0 installation disk.
3.7 After installation, double-click on the “Speaker” icon on the Windows taskbar
(usually located at the bottom of your screen). The “Speaker” icon is located in the
right corner of the Windows taskbar. The “Master volume” control window is shown
as follows.
4. The joystick/game pad is not working
• Check whether the gaming device is connected to the MIDI/Game Port properly.
• Check the MachOne MPU401 device. There should be no exclusion or error mark on
the device. Please consult the driver installation section.
• Check whether the driver for the gaming device is loaded and functioning properly.
To check,
4.1 Go to “Start” ⇒ “Settings” ⇒ “Control Panel”, and open the “Control Panel”
window.
4.2 Double-click on the “Game Controllers” icon.
4.3 In the “Game Controllers” window, you should see the gaming device name with
status “OK”.
4.4 Click on the “Properties” button to set and calibrate the gaming device.
A-120-0040
Version 1.0
Page - 9

MachOne EV1935 - PCI SOUND CARD
DEVICE DRIVER INSTALLATION
Under
WINDOWS 95 OSR2
November 1998

MachOne EV1935 PCI Sound Card Windows 95 OSR2
MachOne EV1935 PCI Sound Card DEVICE DRIVER
Installation Guide under Windows 95 OSR2
1.) The “Update Device Driver Wizard” dialog box will appear informing you that a new “PCI
Multimedia Audio Device” has been found and will guide you through the rest of the
SETUP program.
Please insert now the installation CD-title that came with your PCI sound card.
Click on the “Next>” push button to continue the installation of the device driver.
2.) The “Update Device Driver Wizard” dialog box will inform you that the system was
unable to locate the driver. Please continue with the Setup program by clicking on the
“Other Locations…” push button.
Page - 1

MachOne EV1935 PCI Sound Card Windows 95 OSR2
3.) The “Select Other Location” dialog box will appear. Please type the letter of your CDROM drive. Assuming your CD-ROM drive is D, type the command
D:\Win9x and click on the OK push button.
4.) The “Update Device Driver Wizard” dialog box will appear, informing you that the
“MachOne PCI Sound System” has been found by the system. Please continue by
clicking on the “Finish” push button.
Page - 2

MachOne EV1935 PCI Sound Card Windows 95 OSR2
5.) The “Insert Disk” dialog box will ask you to insert the “MachOne PCI Multimedia Disk”.
Please insert your installation CD-title into your CD-ROM drive and click on OK.
6.) The “Copying Files…” dialog box will inform you that some files cannot be found.
In order to complete the copying process key in the path name D:\Win9x.
All necessary files will be copied onto your system.
7.) It is possible that the “Insert Disk” dialog box will be displayed and ask for the Windows 95
CD-ROM. Just insert it and continue by clicking on the OK push button.
8.) The system will ask you for the path of your Windows 95 CD-ROM. Please enter the
following path D:\Win95 and click on the OK push button.
Page - 3
MachOne EV1935 PCI Sound Card Windows 95 OSR2
9.) The system will copy all the necessary files from the Windows 95 CD-ROM. After
several dialog boxes flash by the MachOne EV1935 PCI sound card installation has
been completed.
Congratulations! You have finished the installation of your new audio device driver
“MachOne EV1935”. You are ready to use it now. Have fun!
Page - 4

MachOne EV1935 PCI Sound Card Windows 95 OSR2
Verifying Device Driver Installation
If you want to view the correct installation of the device driver for your MachOne EV1935
PCI sound card, please follow the steps as described below.
1.) Go to >START/ >”Settings”/ >”Control Panel" and double-click on the “System” icon.
2.) From the “System Properties” window select the “Device Manager” tap and you will see
the following window displayed.
3.) Double-click on “Sound, video and game controllers” and you will see the following
five devices have been added to your system:
• MachOne Joystick
• MachOne Legacy Sound System
• MachOne MPU-401
• MachOne PCI Sound System
• MachOne WebSynth
A-120-0040
Version 1.0
Page - 5

MachOne EV1935 - PCI SOUND CARD
DEVICE DRIVER INSTALLATION
Under
WINDOWS 98
November 1998
.

MachOne EV1935 PCI Sound Card Windows 98
MachOne EV1935 PCI Sound Card DEVICE DRIVER
Installation Guide under Windows 98
If you want to install the device driver please follow the steps as described below:
1.) After you have installed your MachOne EV1935 PCI sound card, start up your
Microsoft Windows 98 operating system.
2.) The “Add New Hardware Wizard” dialog box will appear as shown below. Click on the
“Next>” push button to continue.
3.) As recommended choose “Search for the best driver for your device”.
Click on the “Next>” push button.
Page - 1
MachOne EV1935 PCI Sound Card Windows 98
4.) In the next “Add New Hardware Wizard” dialog box click on the selection box “Specify
a location” and “CD-ROM drive”. Please insert your installation CD-title into your CDROM drive now. Assuming your CD-ROM drive is D, please type the path D:\Win9x in
the command line. Click on the “Next>” push button.
5.) The next “Add New Hardware Wizard” dialog box will inform you that the wizard has
found the “MachOne PCI Sound System” audio device. Just click on the “Next>” push
button to accept the location of the new device driver.
Page - 2

MachOne EV1935 PCI Sound Card Windows 98
6.) The next dialog box will display the message “MachOne PCI Sound System”. Please
click on the “Finish” push button to complete the installation of the new device driver
software.
Congratulations! You have finished the installation of your new audio device driver
“MachOne EV1935”. You are ready to use it now. Have fun!
Page - 3
MachOne EV1935 PCI Sound Card Windows 98
Verifying Device Driver Installation
If you want to view the correct installation of the device driver for your MachOne
EV1935 PCI sound card, please follow the steps as described below.
1.) Go to >START/ >”Settings”/ >”Control Panel" and double-click on the “System” icon.
2.) From the “System Properties” window select the “Device Manager” tap and you will
see the following window displayed.
3.) Double-click on “Sound, video and game controllers” and you will see the following
five devices have been added to your system:
• MachOne Joystick
• MachOne Legacy Sound System
• MachOne MPU-401
• MachOne PCI Sound System
• MachOne WebSynth
A-120-0040
Version 1.0
Page - 4

MachOne EV1935 - PCI SOUND CARD
DEVICE DRIVER INSTALLATION
Under
WINDOWS NT4.0
November 1998


 Loading...