


Instruction Manual for
Torbal AG and AGN Series Balances
101 Witmer Road, Suite 700 • Horsham, PA 19044 • Phone 1-800-521-0754 • Fax 215-442-9202
www.labrepco.com • sales@labrepco.com

Table of Contents
…….
…...
……………………….……….
…………………….
…………………………
………….
.………….
………………..
…….………………………………….………..
………….………………………………..
……………………….………………….………
…………………………….……….
………………………….………….
……………………………….………….
………………………………………………….
………………………………………………...
…………………………...
………………
……………………………………
SQC Process Control………………………………….……………………………...
………………………………………
8.2.
…………………………………..…..
8.3.
………………………………………………...
……………………………………………...
………………………………………………….
…………………………………………………
……………………………………………….………….
…………………………..
…………………………………………….…………
……......………………………….…………
…………………..………….
……………………………..………
………………………………………….
…………………………………………….
Calibration……………………………………………………………………….………
………………………….
…………………………………
Weighing…………………………………………………………………………………
……………………………………………
Cautionary Notes and Precautions…………………………………………………….
1.
Important Handling Cautions and Warnings……………………………..…………
1.1
Specifications………………………………………………...
2.
Keys, Display Indicators and Abbreviations……………………………
3.
Parts Descriptions…………………………………………………..
4.
Unpacking Balance and Getting Started…………………………………………...
5.
External Keyboard Connection (optional)………………………………………...
6.
7. Functions, Descriptions and Definitions…………………………………….
Main Menu…………..……………………..
8.
Mode Setup……………………………………
8.1.
8.1.1.
8.1.2.
8.1.3.
8.1.4.
8.1.5.
8.1.6.
8.1.7.
8.1.8.
8.1.9.
Weighing………………………….
Parts Counting…………………………………
Check Counting………..………………………
Percent Weighing……...………………….
Totalizing………………………….
Compounding………………………
Check Weighing…………………………………………
Animal and Dynamic Weighing………………….…………………..
Display Hold…………………………………….
8.1.10.
8.1.11.
Tare Setup……………………………………
.
Units of Measure……………...…………………...
Configurations…………………………...
8.3.1.
8.3.2.
8.3.3.
8.3.4.
8.3.5.
8.3.6.
8.3.7.
8.3.8.
8.3.9.
Auto-Zero………………………………………………………………………….. 32
Print……………………………………
8.3.2.1
8.3.2.2
GLP……..…………………..
Print Details……….…………..
Filter……………………….
Power Save and LCD Contrast…………………………...
RS232………………………..
USB Configuration….………………...
8.3.6.1
PC Connection via USB…………………..……...
Time and Date Adjustment…………………….
Reset and Default Restore………………...
Erasing the Database……………………
8.4.
8.4.1.
Using Functions and Modes………………………………..
9.
Auto Calibration Setting and Adjustment…………………
9.1.
9.1.1.
Taring……………………………………
3
4
5
7
8
10
12
13
14
14
15
16
18
19
21
22
23
25
27
28
30
31
32
33
33
34
34
35
36
36
37
38
39
39
40
41
42
42
42
- 1 -

9.1.2.
……………………………………………..
……………………………………..…….………….
………………………………………………………...…………..
.……
Counting Parts which Have Been Previously Stored in the Scale’s Database……
Manual………………………………………………………………….…………..
Check Counting……………………………………………………………………………
……………………..….
…………………………………………………….
………………………………………………………………
Percent Weighing for the First Time…………………………………………….
……….…………..
…………………………………………….……………
…………
………………………………..……………….………….
……………………………………….………….
………………………………………………………..
………………….…………..
………………….
………
…………………………………..…………………
………………………………….……………………………
9.2.
9.2.1.
Clearing a Tare………………………...
Parts Counting……………………
Automatic………
9.2.1.1
Counting Parts for the First time…………..………………………………
9.2.1.2
9.2.2.
9.3.
9.3.1.
9.4.
9.4.1.
Storing a Limit Set into the Scale’s Database……………...
Percent Weighing…...……………….
Automatic…………….
9.4.1.1
9.4.1.2
9.4.2.
Totalizing…………………………………………………………………….
9.5.
Compounding……………..
9.6.
Check Weighing……………………
9.7.
9.7.1.
Animal and Dynamic Weighing…...…………….……………………………………. 63
9.8.
Display Hold…………………..
9.9.
SQC Process Control……………………………………..
9.10.
9.10.1.
Using the Scale’s Alphabet for Data Entry………………………………………………… 67
10.
Connecting and Using a Barcode Scanner with the Scale’s Database……………………... 68
11.
Connecting the Scanner………………………………………………………………...68
11.1.
Assigning Barcodes to Samples or Limit Sets………………………..
11.2.
Recalling a Previously Stored Sample or a Limit Set from the Database………
11.3.
Technical Information……………………………………………………………………… 69
12.
Common Error and Troubleshoots…………………….……...……………………………. 70
13.
Maintenance…………………………..
14.
Accessories…………………
15.
Replacement Parts……………………………………………….…………………………. 72
16.
Limited Warranty…………….….…………………………………….…………………… 72
17.
Percent Weighing with Stored Reference Weights…………
Manual…………………..
Storing a Limit Set into the Scale’s Database…….…………………….…………. 62
Storing a Limit Set into the Scale’s Database…………………………..…….…… 66
43
44
44
44
46
48
49
52
52
52
52
55
56
57
59
61
64
65
68
68
71
71
- 2 -

Chapter 1: Cautionary Notes
The TORBAL Precision scale is a sensitive and a delicate instrument. Always handle your scale with care.
The correct location and proper environment makes an important contribution to the accuracy of the weighing
results of TORBAL precision scales.
The optimum location for your scale:
• Stable, vibration-free base as horizontal as possible
• Away from direct sunlight
• Not exposed to high temperature variations
• Away from direct drafts
• The best location is on a stable bench away from direct drafts, doors, windows, radiators and air
conditioner vents.
CAUTION:
WARNING:
• The scale is designed for indoor use only..
• Do not operate the scale in hazardous areas or conditions.
• Do not use the scale in locations subject to high humidity or dust levels.
• Do not connect cables in ways other than those mentioned in this manual.
• Be sure to set the scale on a firm, stable, horizontal surface.
• Never stand on or lean on this product. Equipment may fall or collapse,
causing breakage and possible injury.
• Before moving the product, unplug it and unplug all cables connected to it.
• When storing, transporting or returning the scale for service, always use the
original packaging.
• Never attempt to repair, disassemble or modify the scale yourself. Tampering
with the scale may result in injury and cause more damage to the equipment.
• Be sure to use the specified power source.
• Do not allow foreign matter to fall into the scale.
• If water or other liquid spills into the scale, do not continue to use it. Unplug
the power cord immediately and contact technical support.
- 3 -
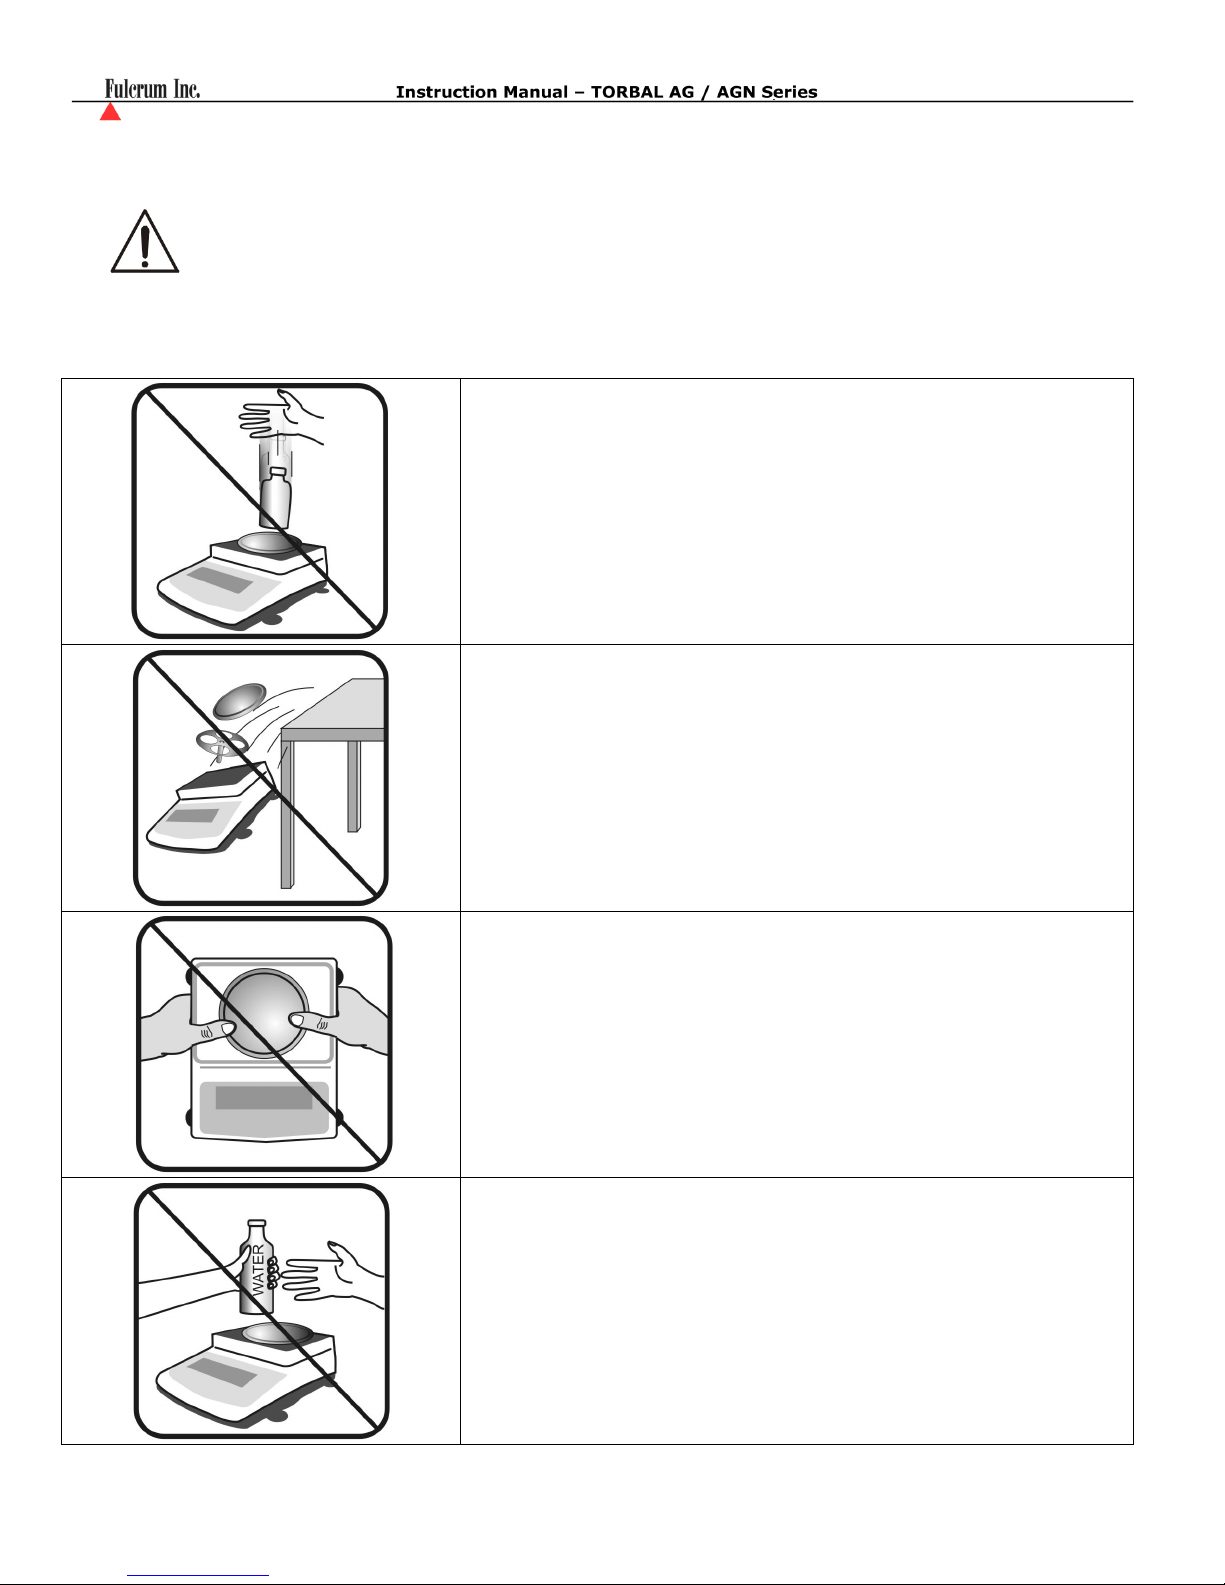
1.1. Important handling Cautions and Warnings
Always handle your scale with care. Damage caused by improper handling is
not covered under the scale’s warranty.
Never drop or throw any articles
onto the scale’s pan or onto any
other parts of the unit!
DO NOT let the scale fall or drop
from its tabletop surface!
When moving the scale do not
press or apply force onto the
scales pan!
DO NOT pass or handle liquids
directly over the scale to avoid
spillage and liquid damage!
- 4 -
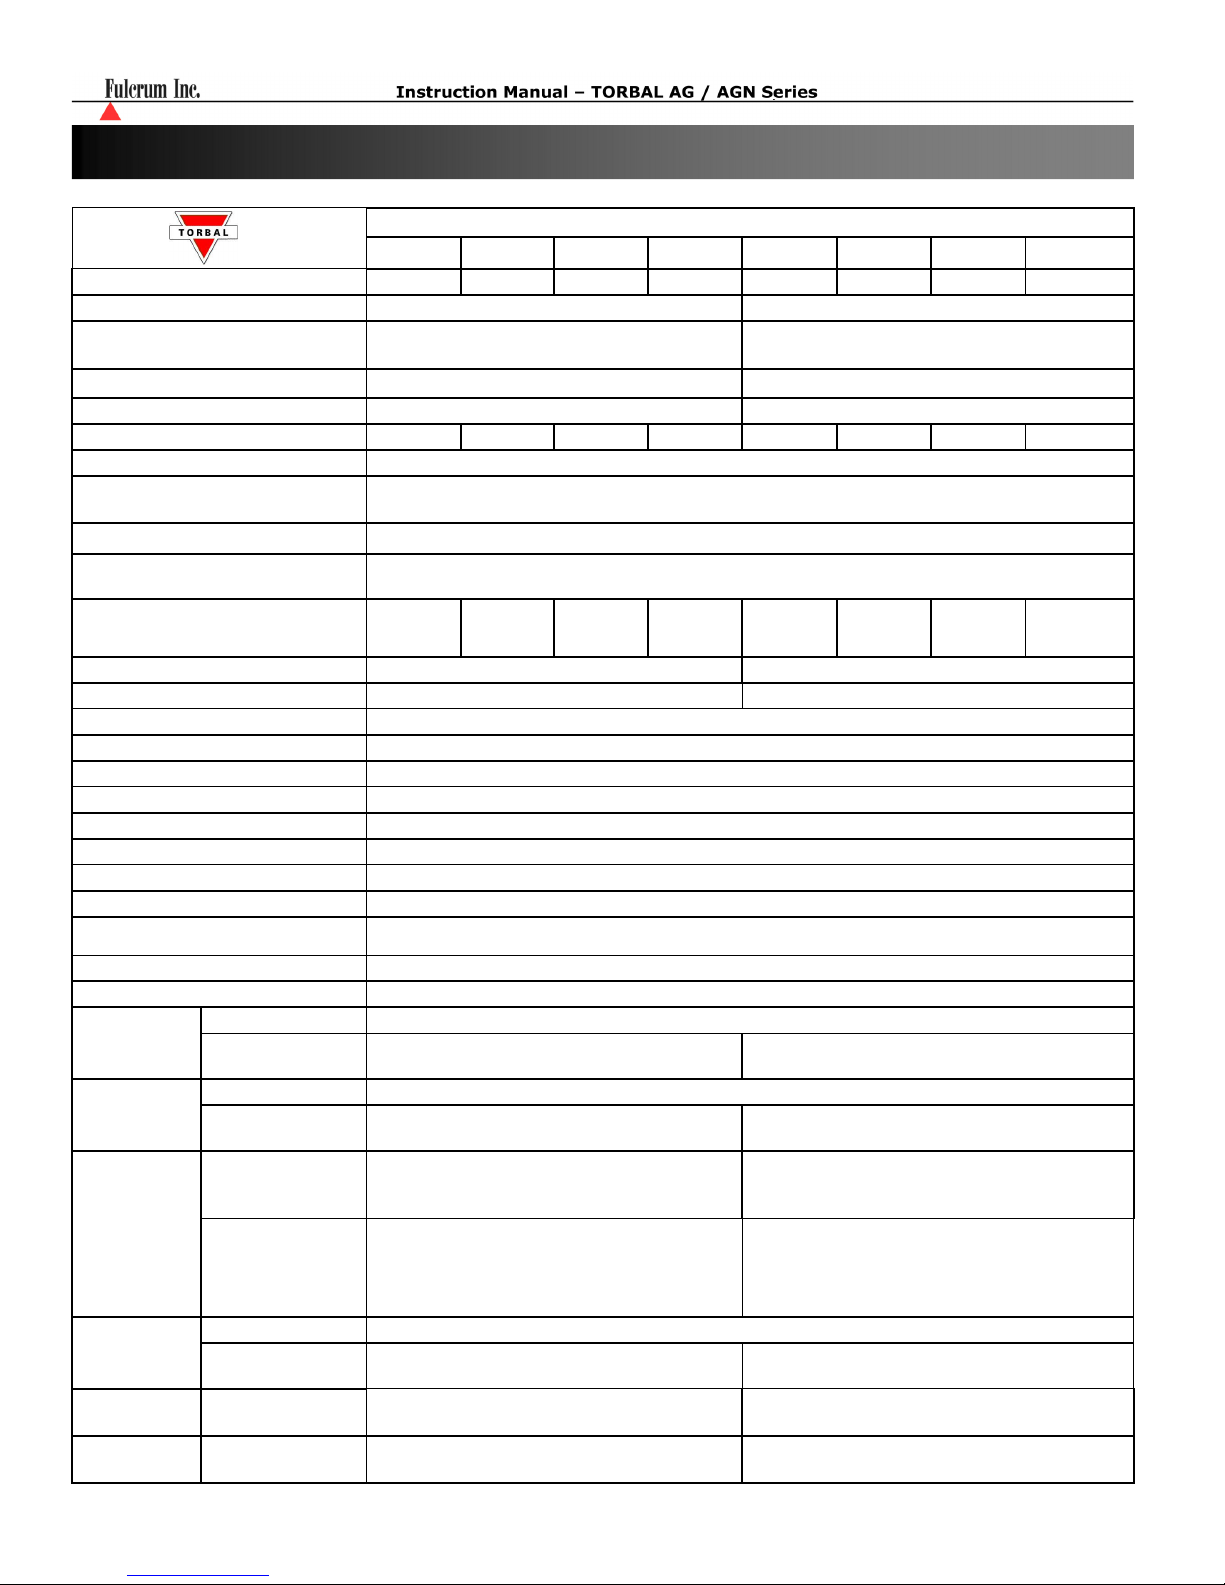
Chapter 2: Specifications
Capacity
Readability (d)
Repeatability (Standard
Divination)
Linearity
Stabilization time (typical)
Tare Range
Accuracy Class
Automatic Internal
Calibration
Time Configuration
Temperature
Configuration
Automatic Calibration
Adjustment Masses (g)
Pan Dimension
Draft Shield
Scale Dimension
Operating Temperature
PS2 Port
RS232 Port
USB
Power Supply
Display Type
Display Size
Application Modes
Weighing Units
Scale’s Net Weight (lb/kg)
Parts
Counting
Check
Counting
Percent
Weighing
Animal
Weighing
Totalizing
Display
Hold
Sample Size
Min Piece
Weigh
Sample Size
Min Piece
Weigh
Min
Reference
Weight
% Resolution
Displayed
(Reference
Weight)
Tiny Intervals
Modes (Min
Weight)
Modes (Min
Weight)
Modes (Min
Weight)
Model
AG100 AG200
100g 200g
Approx. 3 sec Approx. 3 sec
-100g -200g
20,50, 100
Weighing, Parts Counting, Animal Weighing, Check Weighing, Display Hold, Percent Weighing, Totalizing, Check
Manual, Auto (10mg), Semi-Auto (10mg) Manual, Auto (100mg), Semi-Auto (100mg)
Manual, Auto (10mg), Semi-Auto (10mg) Manual, Auto (100mg), Semi-Auto (100mg)
Manual, Auto (10mg), Semi-Auto (10mg) Manual, Auto (100mg), Semi-Auto (100mg)
50, 100,
200
Counting, Compounding, Statistics, SQC Quality Control, 512 KB Library Bank
Grams, Milligrams, Kilograms, Carats, Pounds, Newton, Grains, Ounces Troy, Pennyweight
0.1% (100mg to 7g), 0.01% (7g to 70g)
0.001% (>70g)
AG300 AG500 AG1000 AG2000 AG3000 AG4000
300g 500g 1000g 2000g 3000g 4000g
0.001g
0.001g
+/-0.002g
100, 200,
120 mm
Optional
30mg
30mg
100mg
-300 -500 -1000 -2000 -3000 -4000
I
YES
1h, 2,h, 3h, 4h, 5h, 6h
0.5°C, 1.0°C, 1.5°C, 2.0°C
300
Input: 120VAC 60Hz 15W Output: 12VDC 500mA
100, 200,
500
216 x 345 x 90 mm
1 through 100 or any
1 through 100 or any
3sec., 5sec., 10sec., 15sec.
200, 500,
1000
+15°C to +30°C
Standard
Bidirectional
Standard
Graphical LCD
30mm x 100mm
5kg/11lbs
500, 100,
0.1% (1g to 70g), 0.01% (70g to 700g)
0.01g
0.01g
+/-0.02g
1000,
2000
165 mm x 165 mm
Not Required
0.001% (>700g)
2000,
3000
300mg
300mg
1 g
1000, 2000,
4000
- 5 -
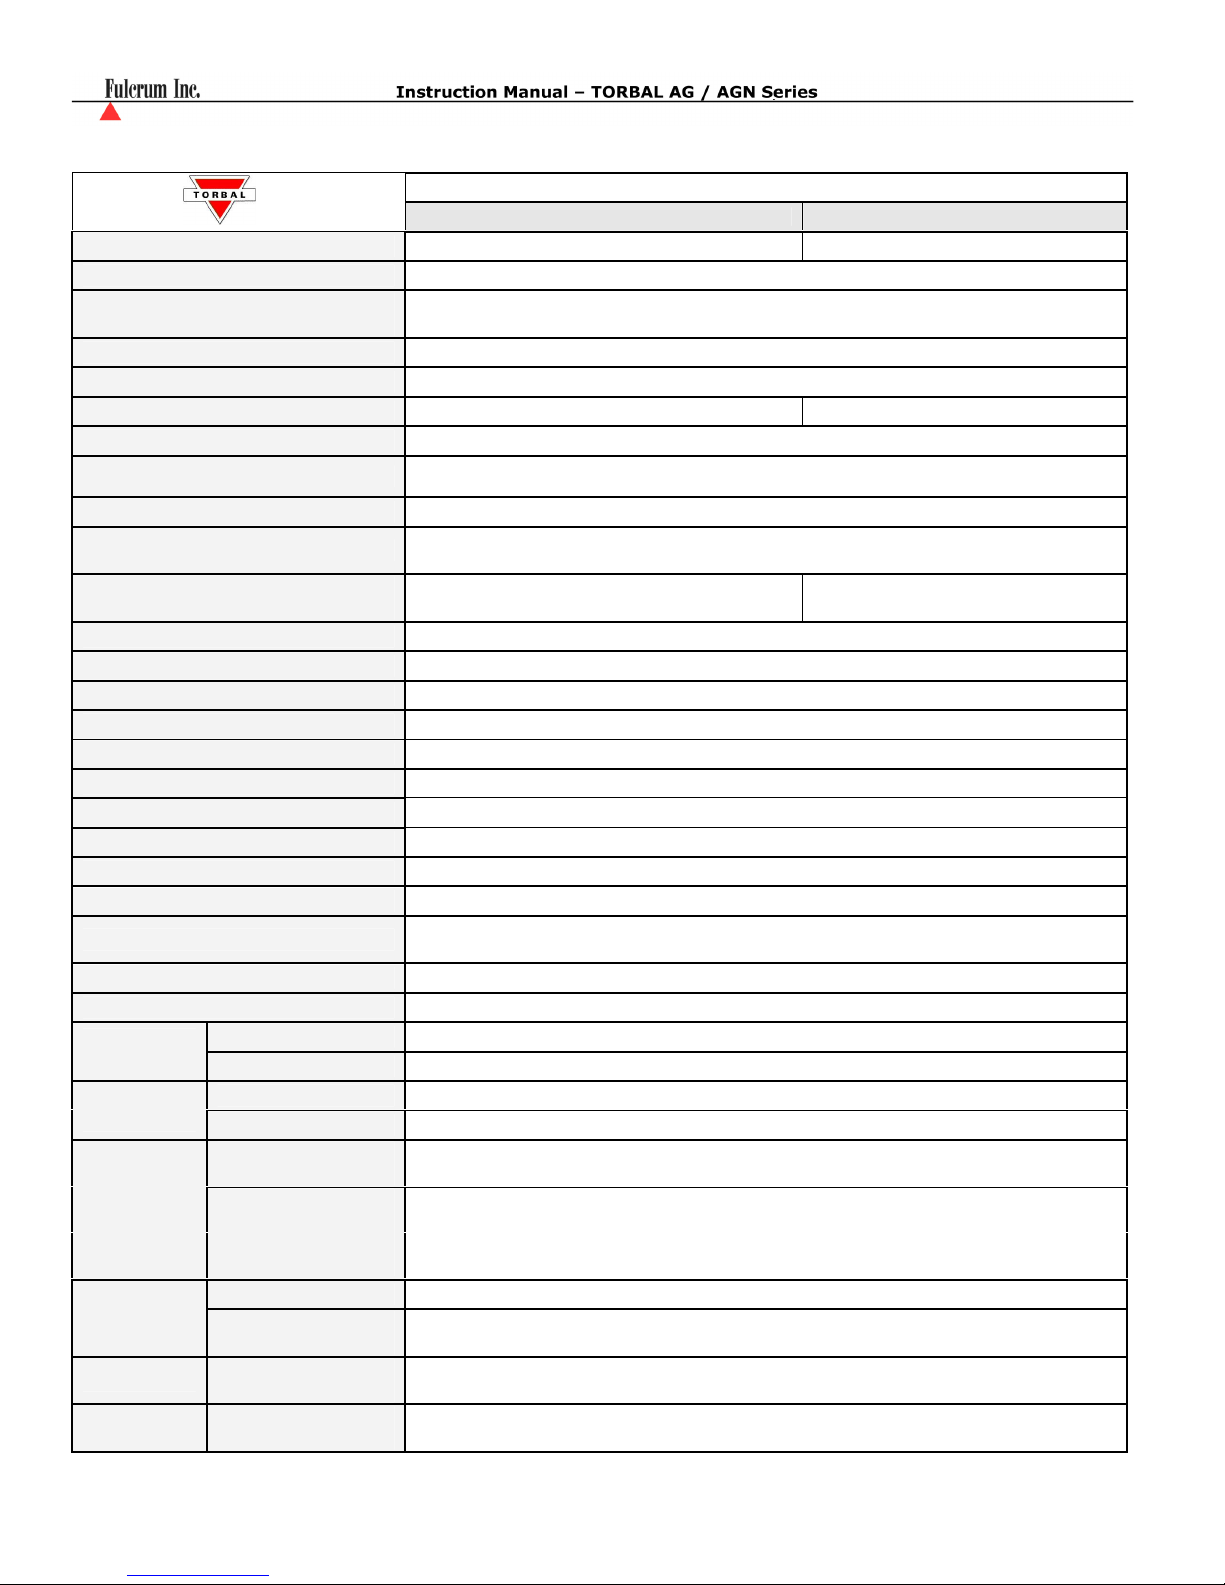
Capacity
Readability (d)
Repeatability (Standard
Divination)
Linearity
Stabilization time (typical)
Tare Range
Accuracy Class
Automatic Internal Calibration
Time Configuration
Temperature Configuration
Automatic Calibration
Adjustment Masses (g)
Pan Dimension
Draft Shield
Scale Dimension
Operating Temperature
PS2 Port
RS232 Port
USB
Power Supply
Display Type
Display Size
Application Modes
Weighing Units
Scale’s Net Weight (lb/kg)
Parts
Counting
Check
Counting
Sample Size
Min Piece Weigh
Sample Size
Min Piece Weigh
Min Reference
Weight
Percent
Weighing
% Resolution
Displayed
(Reference
Weight)
Animal
Weighing
Totalizing
Display
Hold
Tiny Intervals
Modes (Min
Weight)
Modes (Min
Weight)
Modes (Min
Weight)
Model
AGN100 AGN200
100g 200g
0.0001g
0.0001g
+/-0.0002g
Approx. 3 sec
-100g -200g
I
YES
1h, 2,h, 3h, 4h, 5h, 6h
0.5°C, 1.0°C, 1.5°C, 2.0°C
20,50, 100 50, 100, 200
120 mm
Optional
216 x 345 x 90 mm
+15°C to +30°C
Standard
Bidirectional
Standard
Input: 120VAC 60Hz 15W Output: 12VDC 500mA
Seven Segment LCD
30mm x 100mm
Weighing, Parts Counting, Animal Weighing, Check Weighing, Display Hold, Percent Weighing,
Totalizing, Check Counting, Compounding, Statistics, SQC Quality Control, 512 KB Library Bank
Grams, Milligrams, Kilograms, Carats, Pounds, Newton, Grains, Ounces Troy, Pennyweight
6kg/14lbs
1 through 100 or any
3e (30mg)
1 through 100 or any
3e (30mg)
1e (1mg)
0.1% (100mg to 7g), 0.01% (7g to 70g), 0.001% (>70g)
3sec., 5sec., 10sec., 15sec. or any
Manual, Auto 1e (1mg), Semi-Auto 1e (1mg)
Manual, Auto 1e (1mg), Semi-Auto 1e (1mg)
Manual, Auto 1e (1mg), Semi-Auto 1e (1mg)
- 6 -

Chapter 3: Keys, Display Indicators and Abbreviations
Key Primary Function
0
MENU
CLR
▲▼◄►
▼
F1
F2
F3
F4
F5
Display Indicator
Zero – used to zero the scale (Legal for Trade models only) N/A
Enter – used to accept and confirm commands N/A
Menu – used to access the main menu Number “9” key
Clear – used to clear and cancel operation N/A
Navigation Keys – used to navigate through the menus and functions N/A
Function Key – used access database and secondary function Number “0” key
Data Transfer – used to print data or transfer data to a PC via the RS232
Calibration Key - used to initialize internal calibration Number “8” key
Power On and Power Off -
Tare – used to tare the weighing pan N/A
communication port
Function Key Number “1” key
Function Key Number “2” key
Function Key Number “3” key
Function Key Number “4” key
Function Key Number “5” key
Description
Secondary
Function
Number “7” key
AUT
OFF
Diff.
SPL / SAPL
LOCK
PCS
CHKC
PERC
TOT
COMP
CHKW
ANL
HLD
SQC
Stability Indicator - The weighing result has stabilized and an accurate reading may be taken.
Zero - The scale is maintaining a “center of zero” condition. (Legal for Trade models only)
AZSM (Automatic Zero Setting Mechanism) is enabled. Always enabled in Legal for Trade models.
Power Off - The scale is turned OFF and in standby mode.
Difference
Sample or Samples
Display Locked
Parts Counting
Check Counting
Percent Weighing
Totalizing
Compounding
Check Weighing
Animal Weighing
Display Hold
SQC Process control
- 7 -
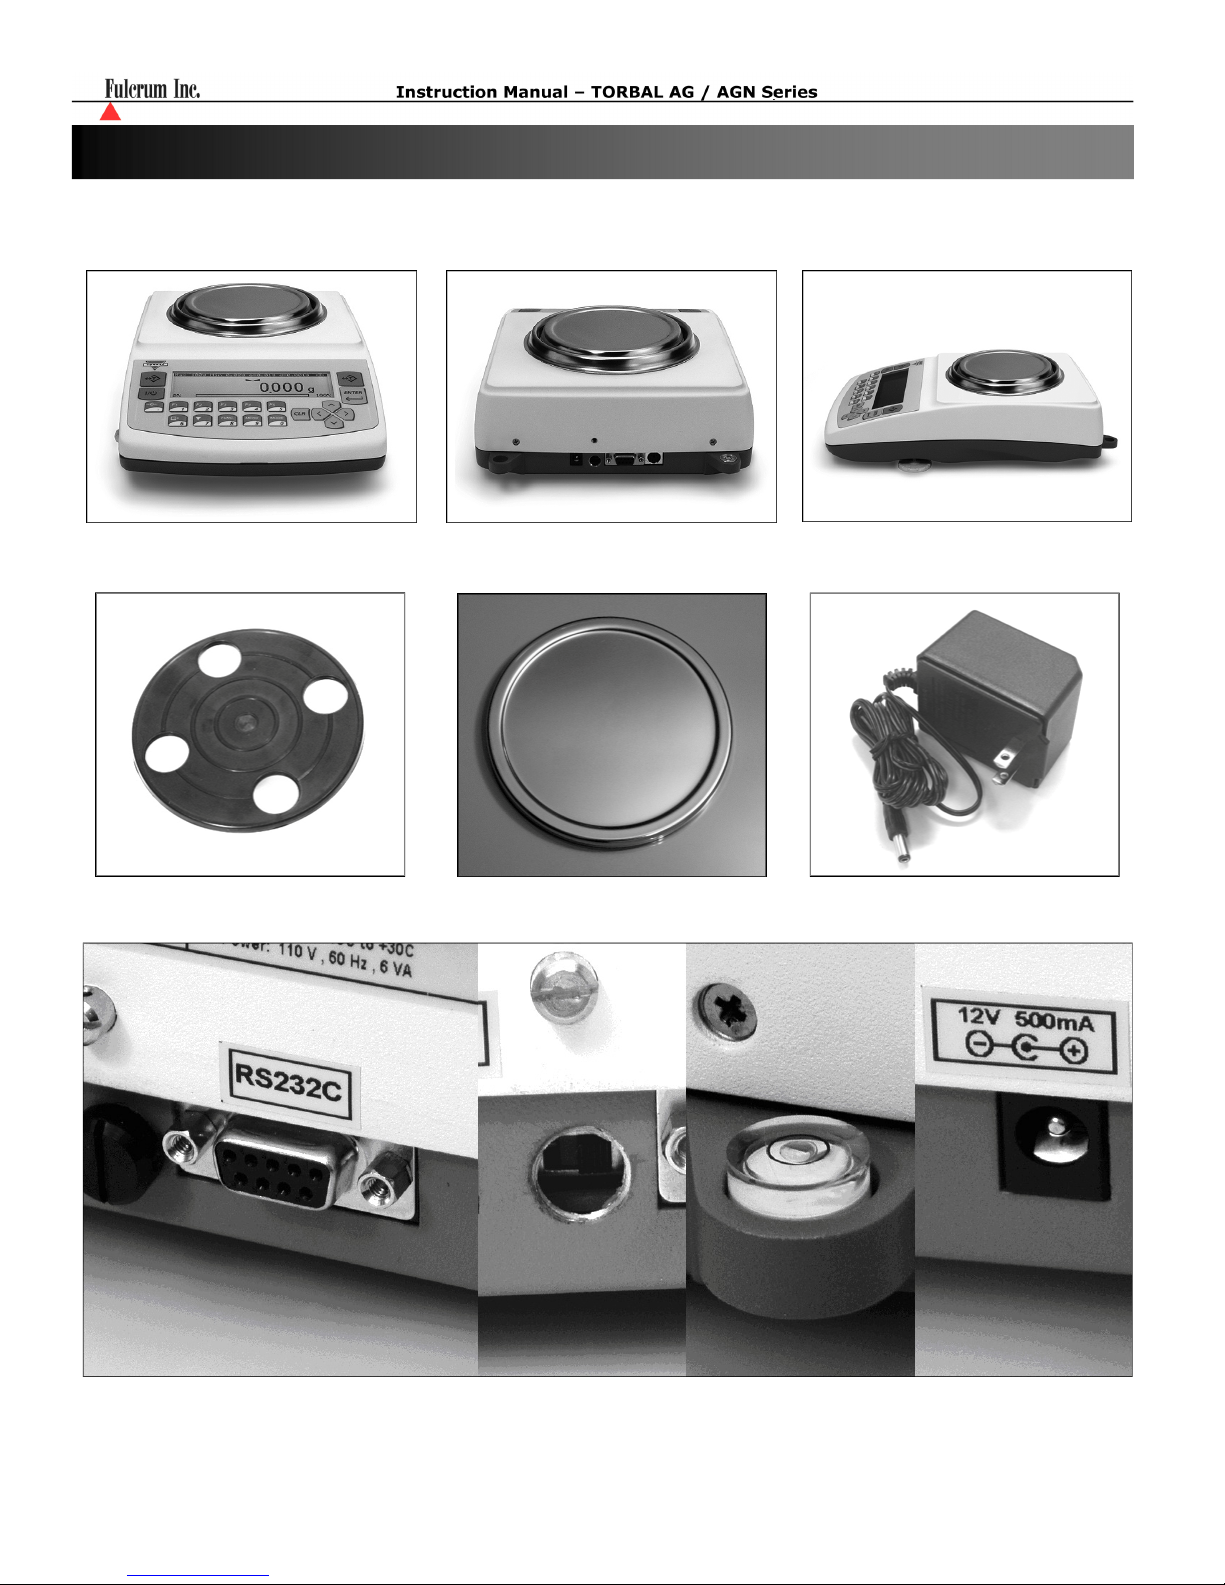
Chapter 4: Parts Description
AG Models:
Front View Rear View Side View
Pan Base Pan AC Adapter
RS232 Serial Port Service Switch Level Indicator AC Adapter Socket
- 8 -
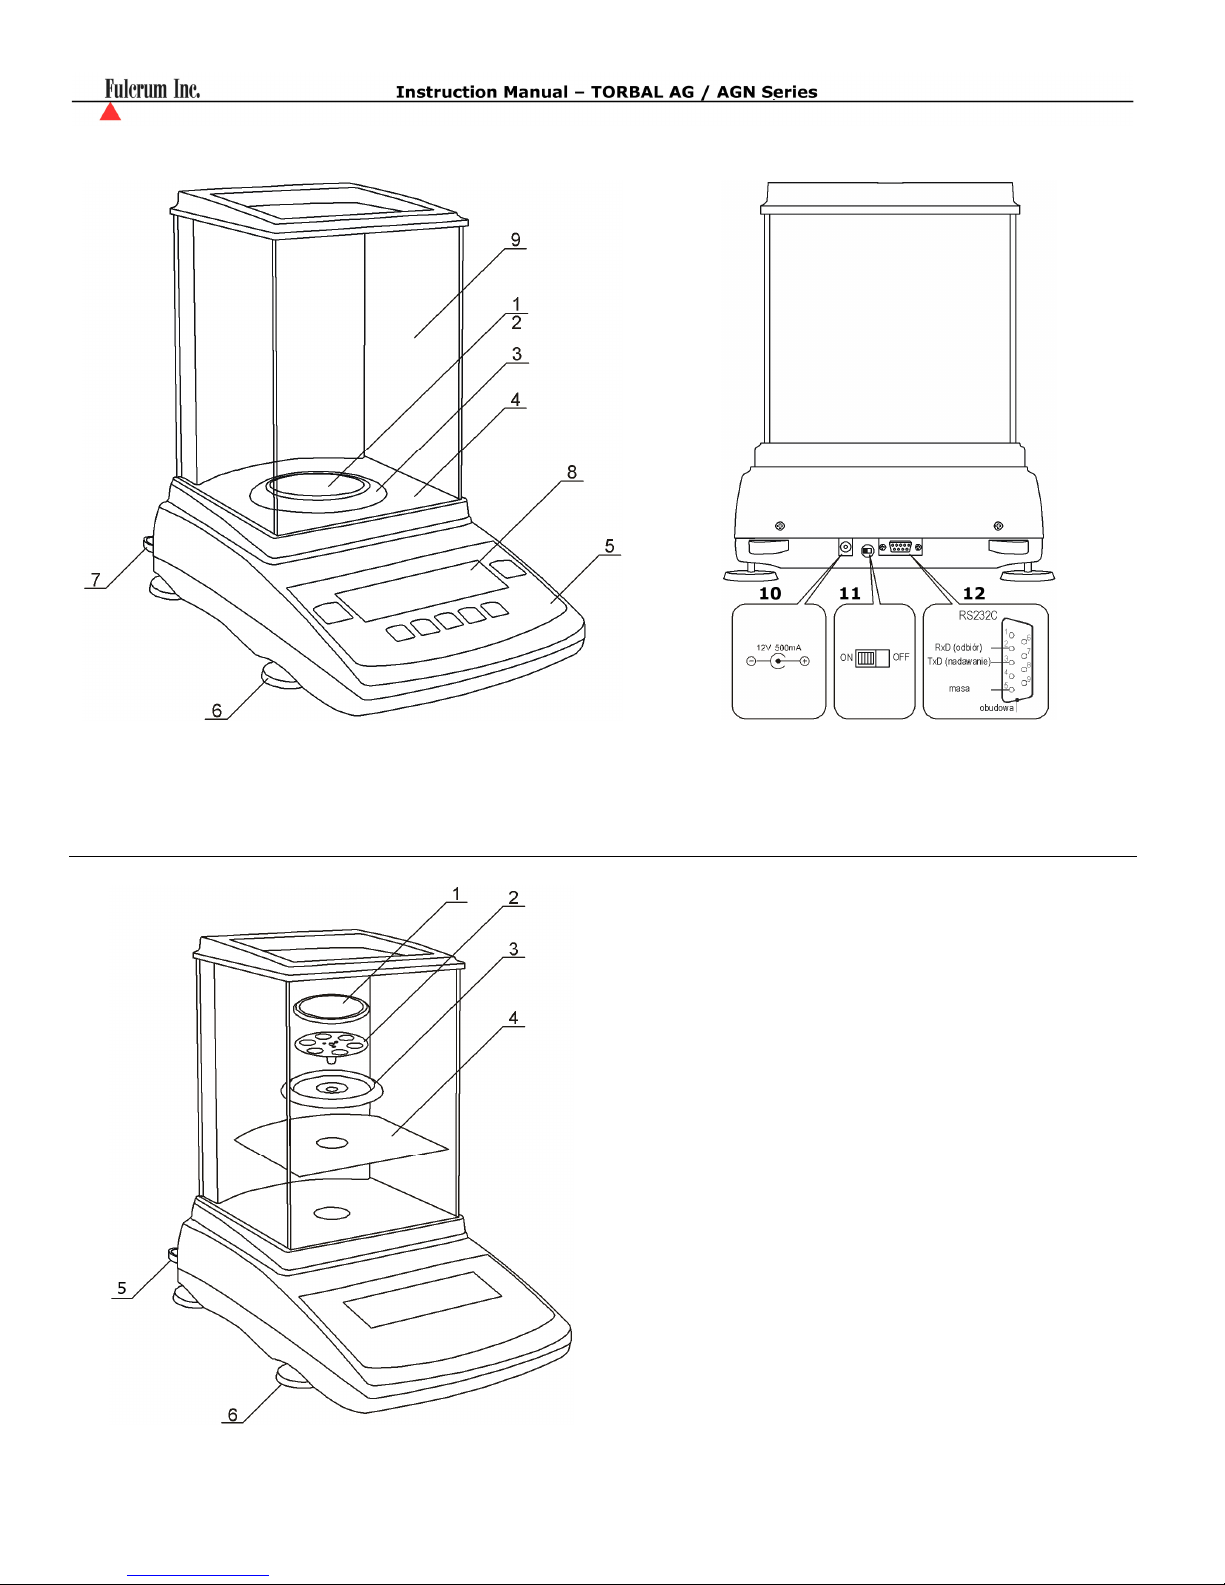
AGN Models:
1 - Pan, 2 - Pan Base, 3 - Draft Ring, 4 - Weighing Chamber Base, 5 – Keypad, 6 - Adjustable Legs,
7 - Level Indicator, 8 - LCD Display, 9 - Weighing Chamber, 10 - AC Adapter Socket,
11 – Service Switch, 12 - RS232 Serial Port
1 - Pan, 2 - Pan Base, 3 - Draft Ring,
4 - Chamber Base, 5 - Level Indicator,
6 - Adjustable Legs
- 9 -

Chapter 5: Unpacking the Balance and Getting Started
1. Carefully remove the scale, pan, and all of its components out of the
packaging and place them on a stable base where the scale will not
be affected by any mechanical vibrations or air movements.
2. AG Modes: After removing the pan base and the pan from their packaging, carefully install the pan
base onto the scale by seating it on the pan support located in the middle of the scale. Once the pan
base has been installed, carefully place the pan on the base as shown below.
AGN Models:
After removing the chamber base (4), draft
ring (3), pan base (2), and the pan (1) from
their packaging, carefully install the chamber
base (4) on the case of the balance as shown
below. Once the chamber base is in place,
install the draft ring (3). Once components 4
and 3 are in place install the pan base onto the
scale by placing it on the pan support located
in the middle of the scale. Once the pan base
has been installed, carefully place the pan on
the base as shown.
- 10 -
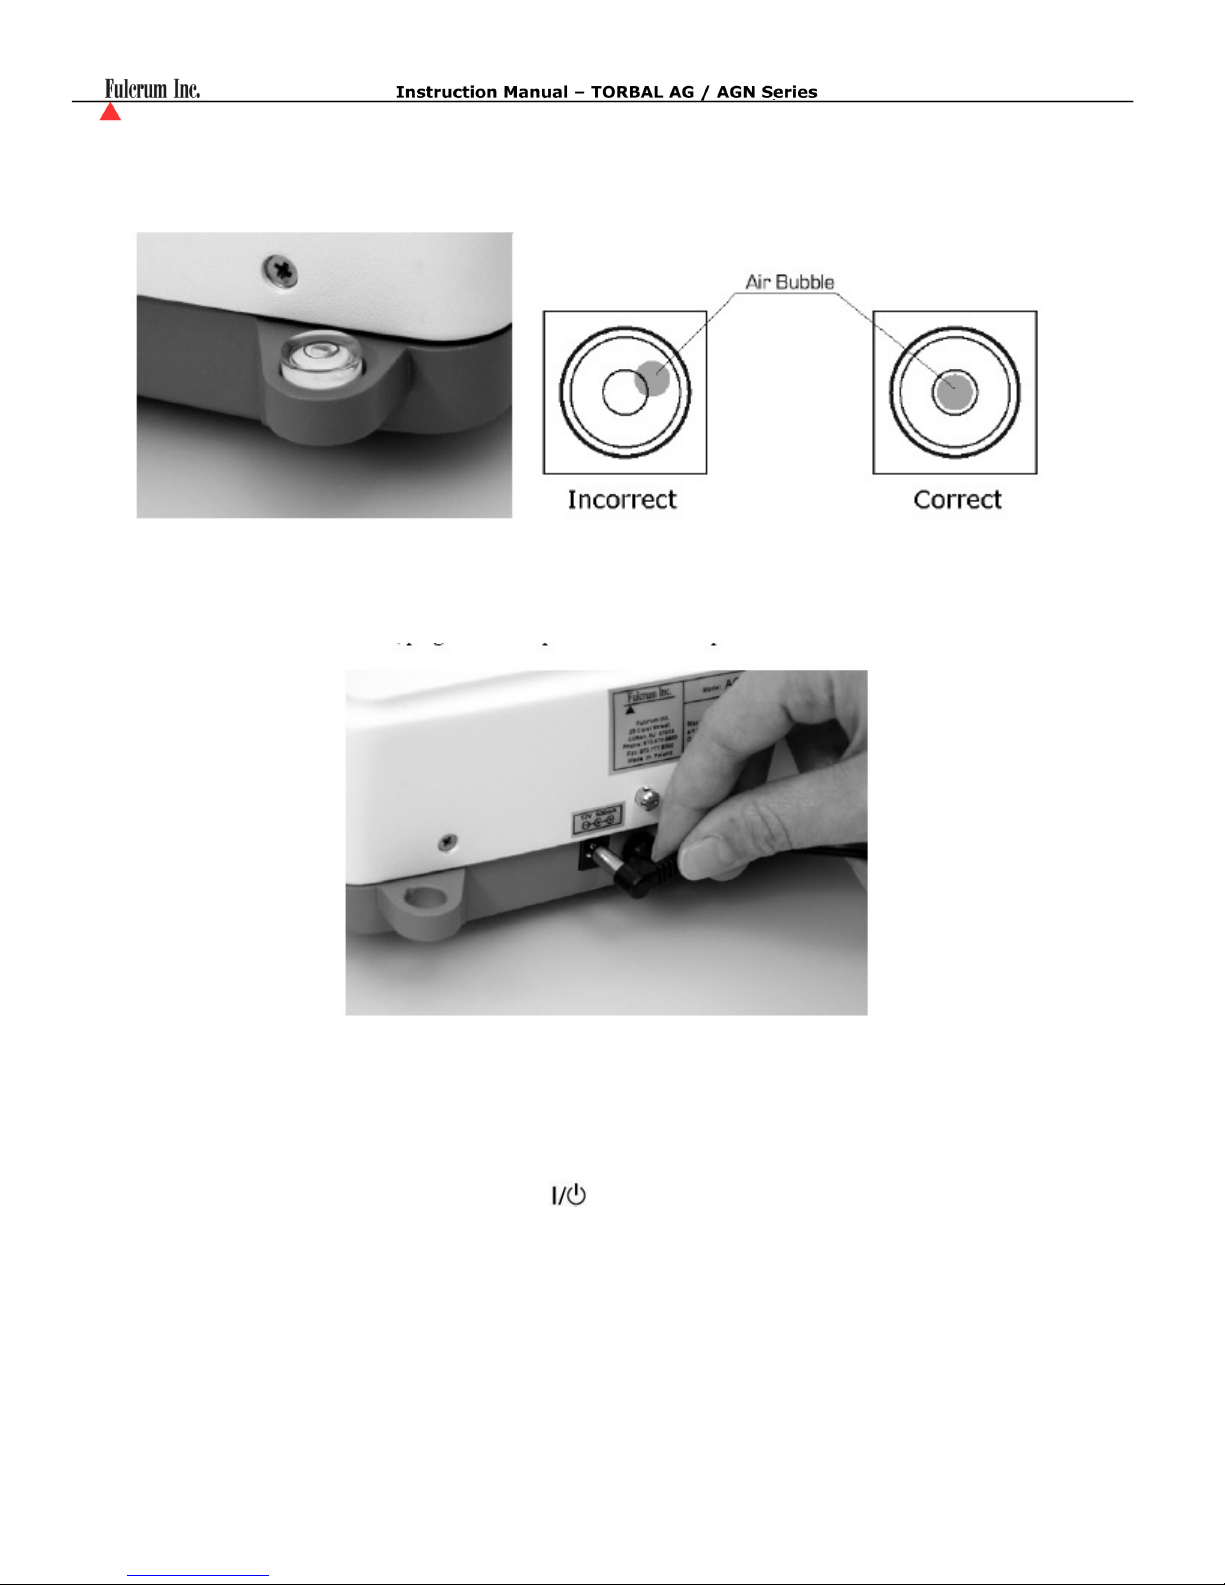
3. Once the pan has been installed, level the scale by adjusting the rear feet until the level indicator
shows the “air bubble” is in the center position of the sight glass. The level indicator is located in the
rear left side of the scale.
4. After leveling the scale, you may plug the AC adaptor to the AC adaptor socket located in the rear of
the scale.
5. When the AC adapter is plugged into the wall outlet, the scale will turn “ON” automatically, initialize
itself, perform automatic internal calibration and enter weighing mode.
6. To put the scale into standby mode, leave the AC adaptor plugged into both the scale and the wall
outlet and press the Power “OFF” button ( ). The “OFF” indicator will light up in the upper left
corner of the display signaling the scale is in standby mode.
- 11 -
Chapter 6: External Keyboard Connection (Optional)
Any PC external keyboard can be connected to the scale via the PS2. An external keyboard allows you to
input data quickly and easily. To connect a PC keyboard to the scale, follow the steps below.
1. Clear the pan and turn the scale off.
2. Locate the keyboard connection port at the rear of the scale, marked “keyboard.”
3. Insert the keyboard connector into the scale’s port.
4. Turn the scale on.
Note: Some keyboard keys remain disabled and do not work with the scale (i.e. function keys, Shift, Control
etc…). Do not use the number keypad located to the right of your keys. To key in numbers always use the
number keys in the upper row of the keyboard.
- 12 -

Chapter 7: Functions, Descriptions and Definitions
o Parts Counting is used to count parts or pieces of articles based on their average piece weight.
o Check Counting is used to verify whether a parts counting result falls within specified threshold
limits.
o Percent weighing is used to establish the relative weight of an unknown, compared to that of a stored
reference weight and expressed as a percent.
o Totalizing is used for summation of sequential weighing results of items or articles.
o Compounding is used for weighing and summing individual ingredients such as powers or liquids
during recipe making or mixing compounds.
o Check weighing is used to check whether a weight of an object falls within specified threshold limits.
o Animal and dynamic weighing is used to weigh animals or objects which are in motion while on the
pan.
o Display hold is used to lock and retain a weighing result on the display until cleared.
o Statistical quality control (SQC) is used to establish a trend analysis and statistical data of samples in
relation specified threshold limits.
- 13 -

Chapter 8: Main Menu
Main Menu is used to configure the scale and it’s weighing modes. Before entering the menu complete
and clear active functions by pressing the CLR key.
1. To enter the Main Menu press the MENU key. Once the MENU key is pressed the menu options will
be displayed.
8.1. Mode Setup
Torbal AG and AGN Scales can operate in ten application modes: Weighing, Parts Counting, Check
Counting, Percent Weighing, Totalizing, Compounding, Check Weighing, Animal Weighing, Display
Hold, and SQC Process Control. Before an application mode can be used it must be enabled and
configured. To use an application mode a quick key (Function keys F1 through F5) should be assigned
(recommended). Quick keys allow quick toggling between functions. By factory default the scale is in the
weighing mode. To enable other application modes follow the steps below.
1. From the Main Menu select “Mode Setup” and press the ENTER key. A list of available
applications and modes will be displayed.
- 14 -
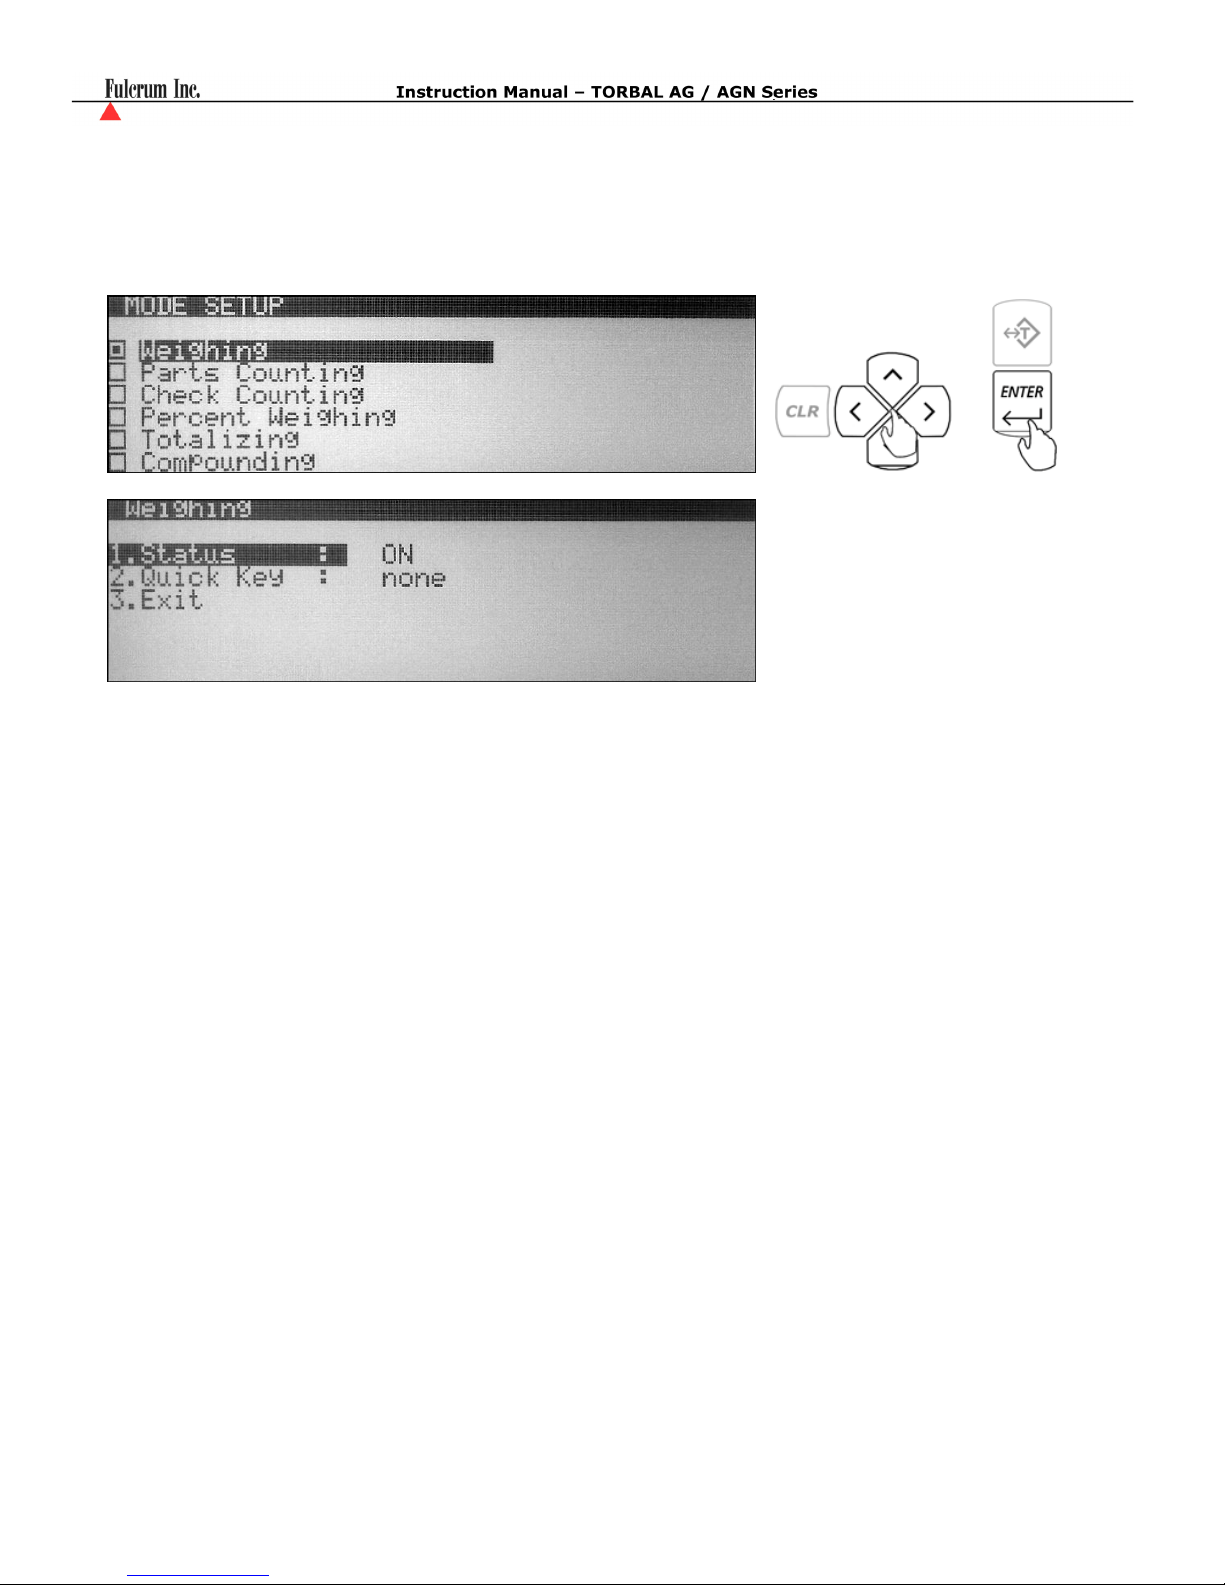
8.1.1. Weighing
1. To configure the Weighing Function use the navigation keys to select “Weighing” in “Mode Setup”
and press ENTER. The status and available weighing options will be displayed. If the function is
currently in use the status will be set to “ON”.
2. To assign a “Quick Key” use the navigation keys to select “Quick Key” and press the ENTER key.
Use the navigation keys to select a desired quick key (F1 through F5). Once the desired key is selected
press the ENTER key to accept the selection.
If the key is not available (used by a different function) a warning message will be displayed
“Warning Quick Key Already In Use!” To override the key press ENTER. To abort and select a
different function key press the CLR key.
3. To exit the Weighing set up select “Exit” and press the ENTER key.
- 15 -
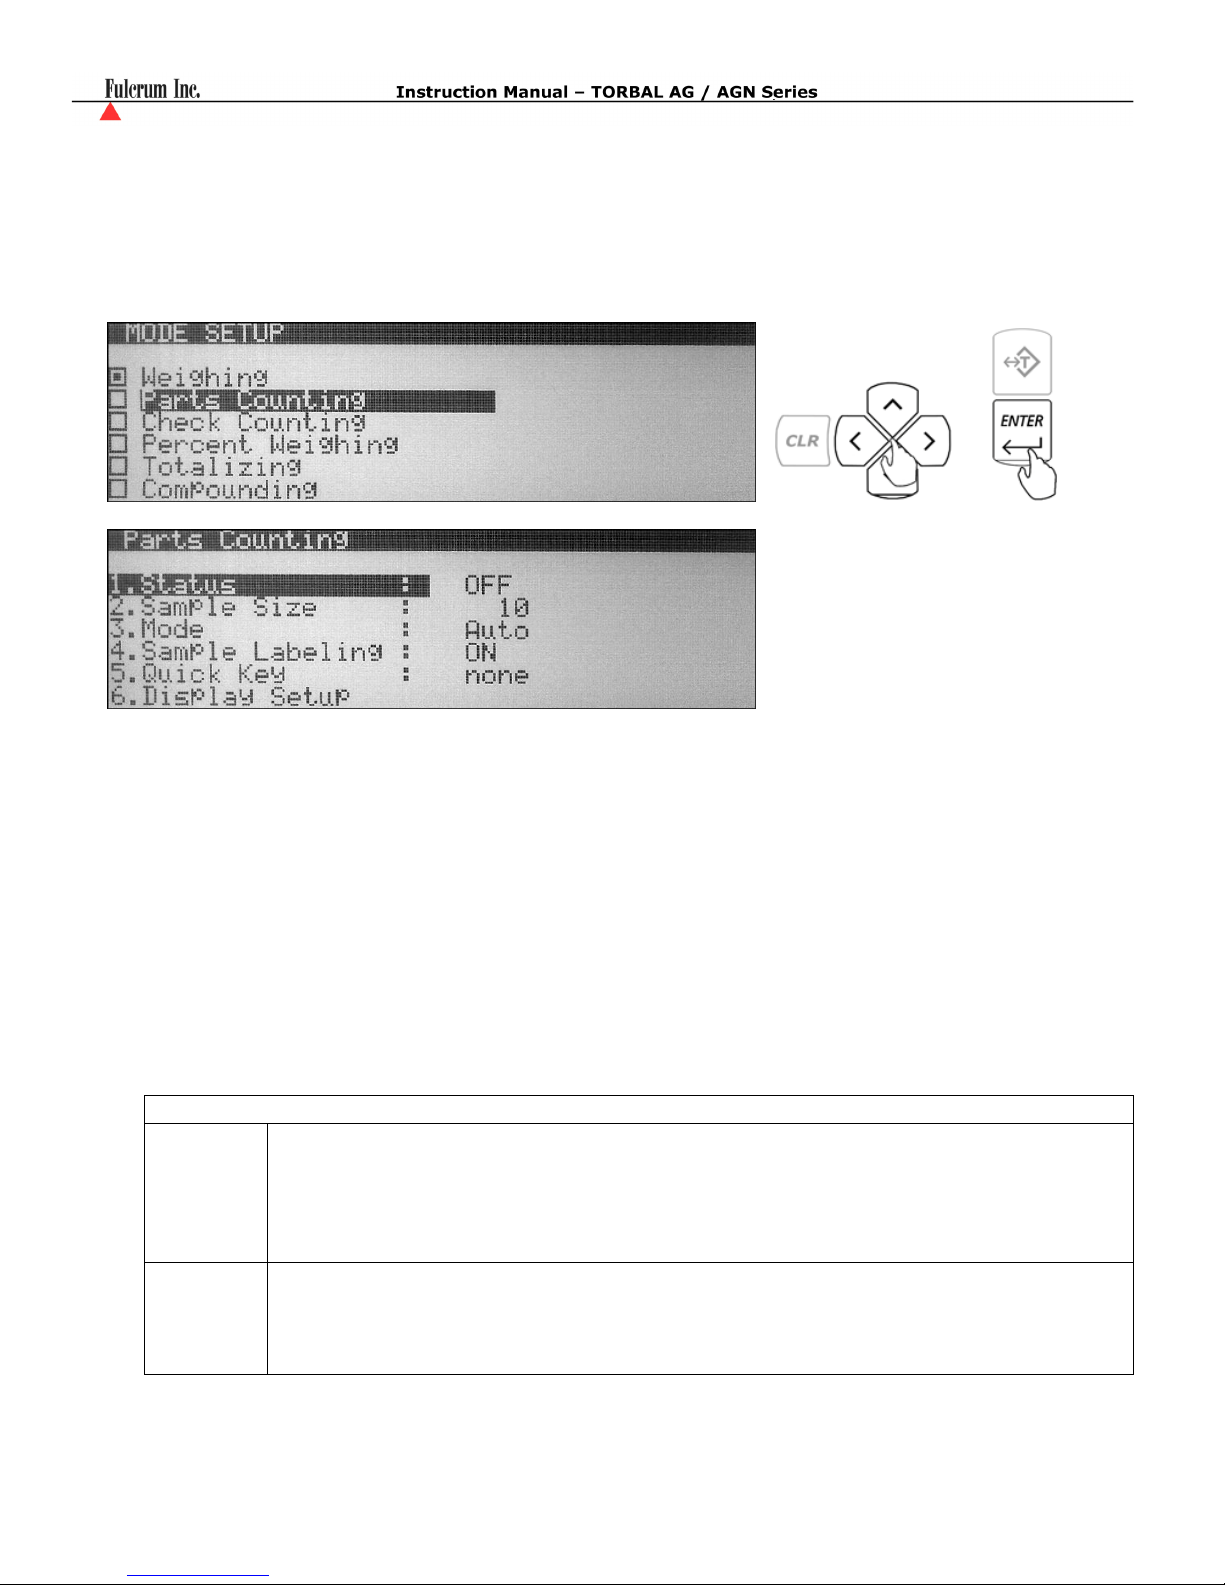
8.1.2. Parts Counting
1. To configure the Parts Counting Function use the navigation keys to select “Parts Counting” in
“Mode Setup” and press ENTER. The status and available parts counting options will be displayed. If
the function is currently in use the status will be set to “ON”.
2. To assign a default “Sample Size” that will be used in calculating the average piece weight use the
navigation keys to select “Sample Size” and press ENTER. To select a preset “Sample Size” use the
navigation keys to toggle until a desired sample size is displayed (1, 5, 10, 20, 50, 100, 200, 500). To
assign a custom “Sample Size” use the number keys on the scale’s keypad to key in a desired value.
Once the desired “Sample Size” is selected or entered, press the ENTER key to set and confirm the
selection.
3. To select an operating mode use the navigation keys to select “Mode” and press ENTER. By default
parts counting is set to “Auto” (Automatic). To operate parts counting in “Manual” use the navigation
keys to select “Manual” and press ENTER.
Parts Counting Operating Modes
When set to automatic the balance allows you to create a database of samples and
Automatic
average piece weights. Each sample can be labeled with a unique name or an alpha
numeric code and stored in the scale’s internal memory along with its average piece
weight. This eliminates the need for establishing a new average piece weight every time
a part is counted.
When using parts counting in manual, the database feature is disabled and samples size,
Manual
as well as, average piece weight is not stored in the scale’s memory. The sample size
must be manually counted and an average piece weight must be established every time
part counting is performed.
- 16 -
4. To enable sample labeling use the navigation keys to select “Sample Labeling” and press the ENTER
key. Use the navigation keys once again to enable or disable sample labeling. Once a desired selection
is made press the ENTER key.
“Sample Labeling” applies to the “Automatic Mode” only. It allows the user to assign a unique name
to a sample which is then stored in the scales database. When set to “OFF” the scale will not assign or
display names of the samples.
5. To assign a “Quick Key” use the navigation keys to select “Quick Key” and press the ENTER key.
Use the navigation keys to select a desired quick key (F1 through F5). Once the desired key is selected
press the ENTER key to accept the selection.
If the key is not available (used by a different function) a warning message will be displayed
“Warning Quick Key Already In Use!” To override the key press ENTER. To abort and select a
different function key press the CLR key.
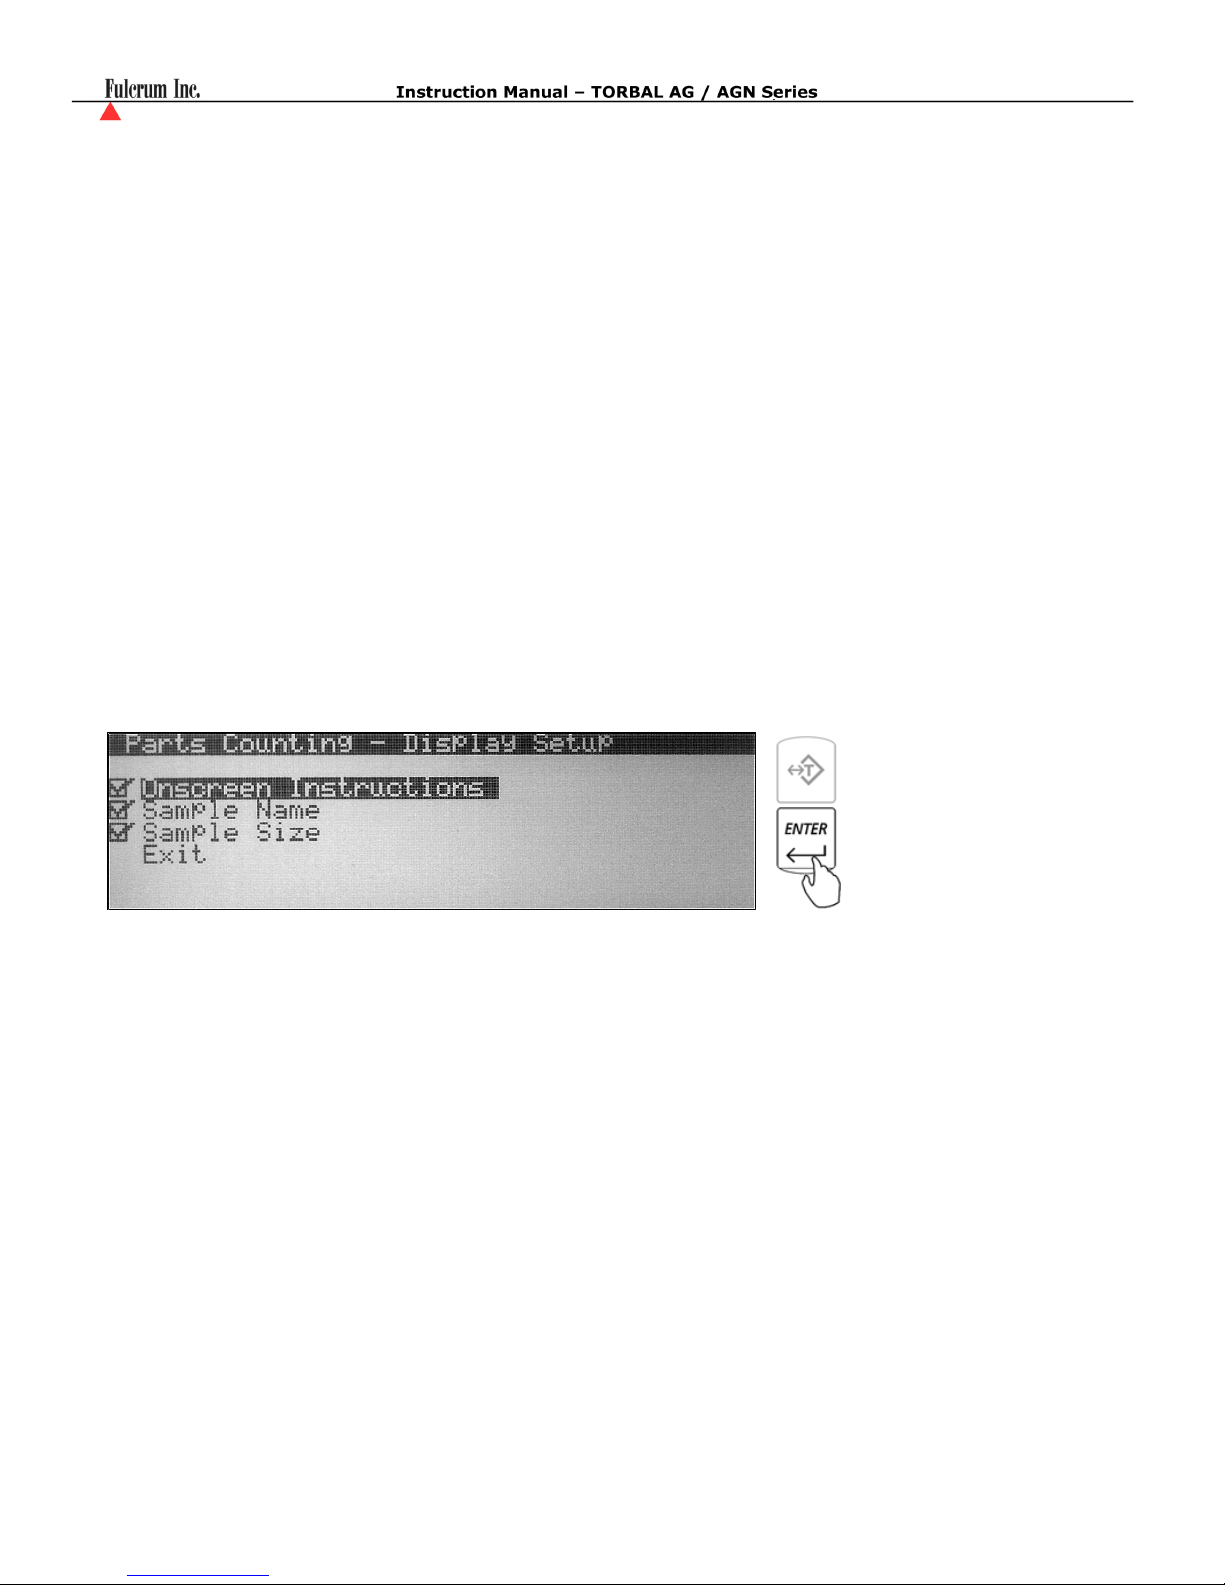
6. To configure the scale’s display during parts counting use the navigation keys to select “Display
Setup” and press the ENTER key. To disable information from displaying during the function use the
navigation keys to highlight the desired selection and press the ENTER key to remove the check mark.
Once the check mark has been removed the information will not display while performing parts
counting.
7. To exit Parts Counting set up use the navigation keys to select “Exit” and press ENTER.
- 17 -
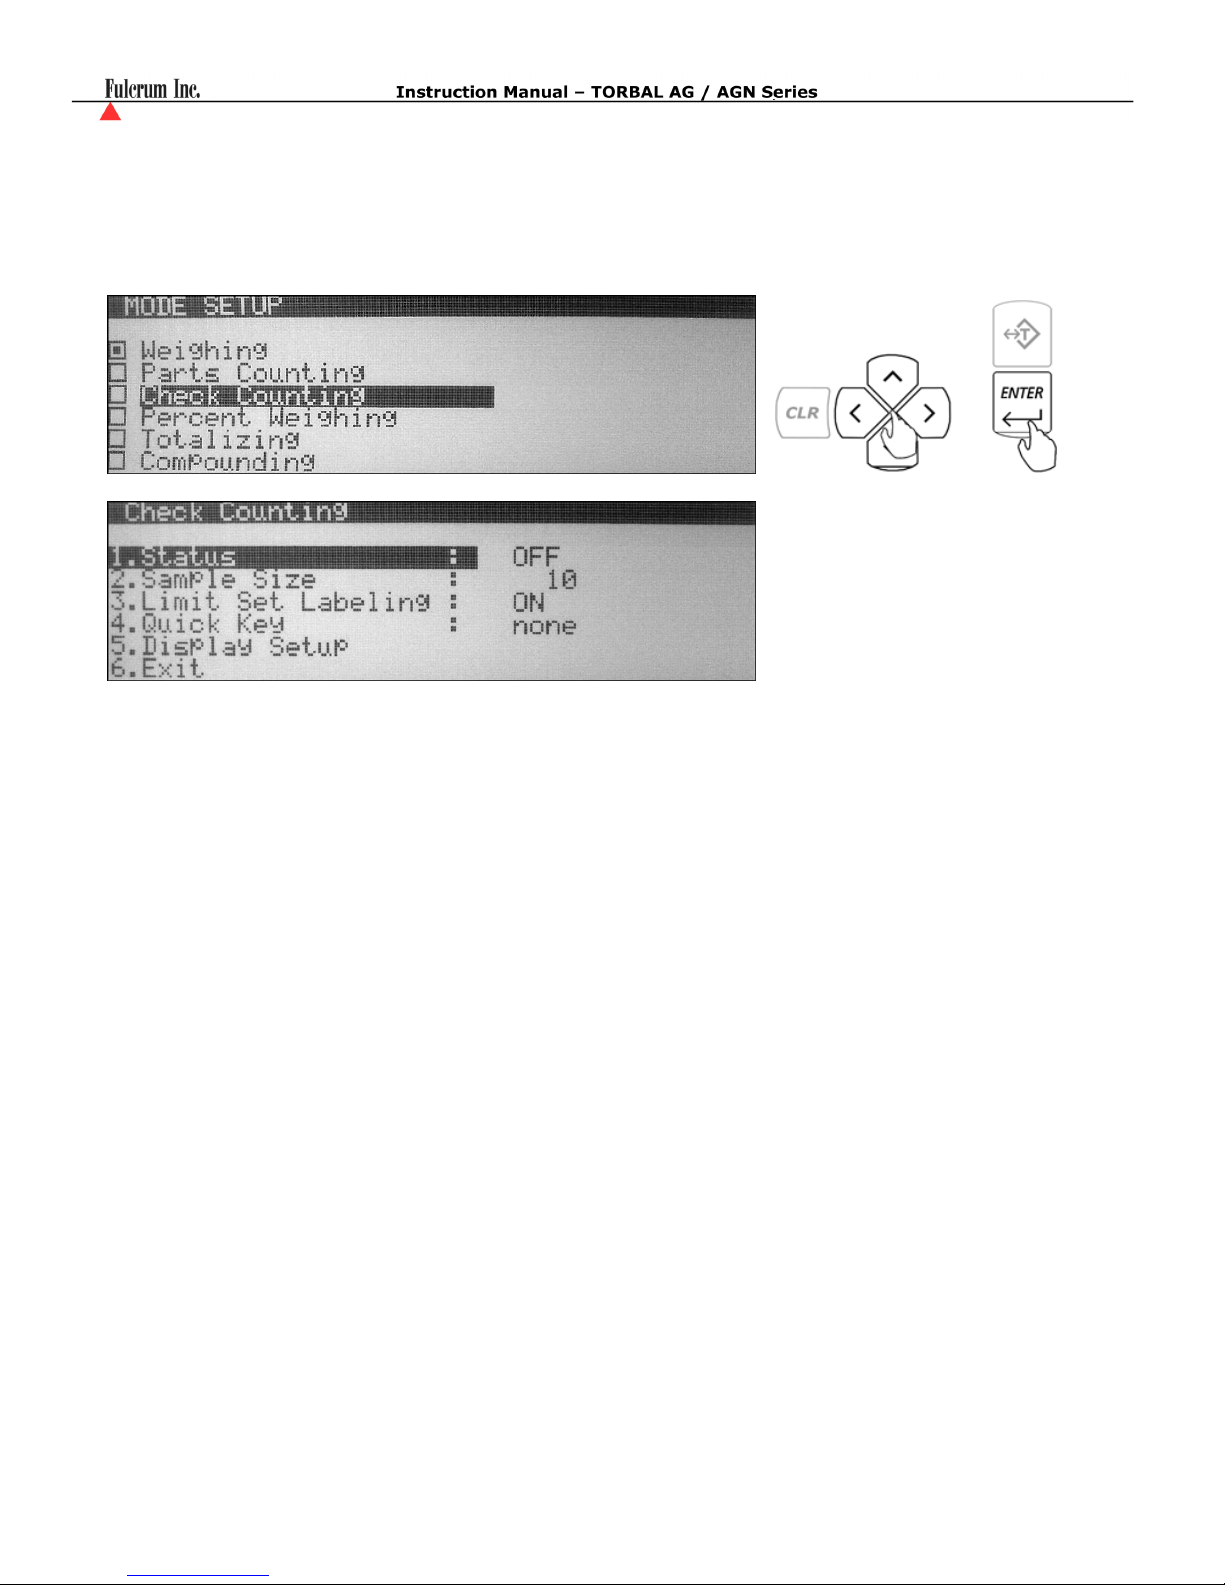
8.1.3. Check Counting
1. To configure the Check Counting Function, use the navigation keys to select “Check Counting” in
“Mode Setup” and press ENTER. The status and available Check Counting options will be displayed.
If the function is currently in use the status will be set to “ON”.
2. To assign a default “Sample Size” that will be used in calculating the average piece weight use the
navigation keys to select “Sample Size” and press ENTER. To select a preset “Sample Size” use the
navigation keys to toggle until a desired sample size is displayed (1, 5, 10, 20, 50, 100, 200, 500). To
assign a custom “Sample Size” use the number keys on the scale’s keypad to key in a desired value.
Once the desired “Sample Size” is selected or entered press, the ENTER key to set and confirm the
selection.
3. To enable Limit Set Labeling use the navigation keys to select “Limit Set Labeling” and press the
ENTER key. Use the navigation keys once again to enable or disable Limit Set labeling. Once a
desired selection is made press the ENTER key.
“Limit Set Labeling” allows the user to assign a unique name to a Limit Set which is then stored in the
scales database. When set to “OFF” the scale will not assign or display names of the Limit Set.
4. To assign a “Quick Key” use the navigation keys to select “Quick Key” and press the ENTER key.
Use the navigation keys to select a desired quick key (F1 through F5). Once the desired key is selected
press the ENTER key to accept the selection.
If the key is not available (used by a different function) a warning message will be displayed
“Warning Quick Key Already In Use!” To override the key press ENTER. To abort and select a
different function key press the CLR key.
- 18 -
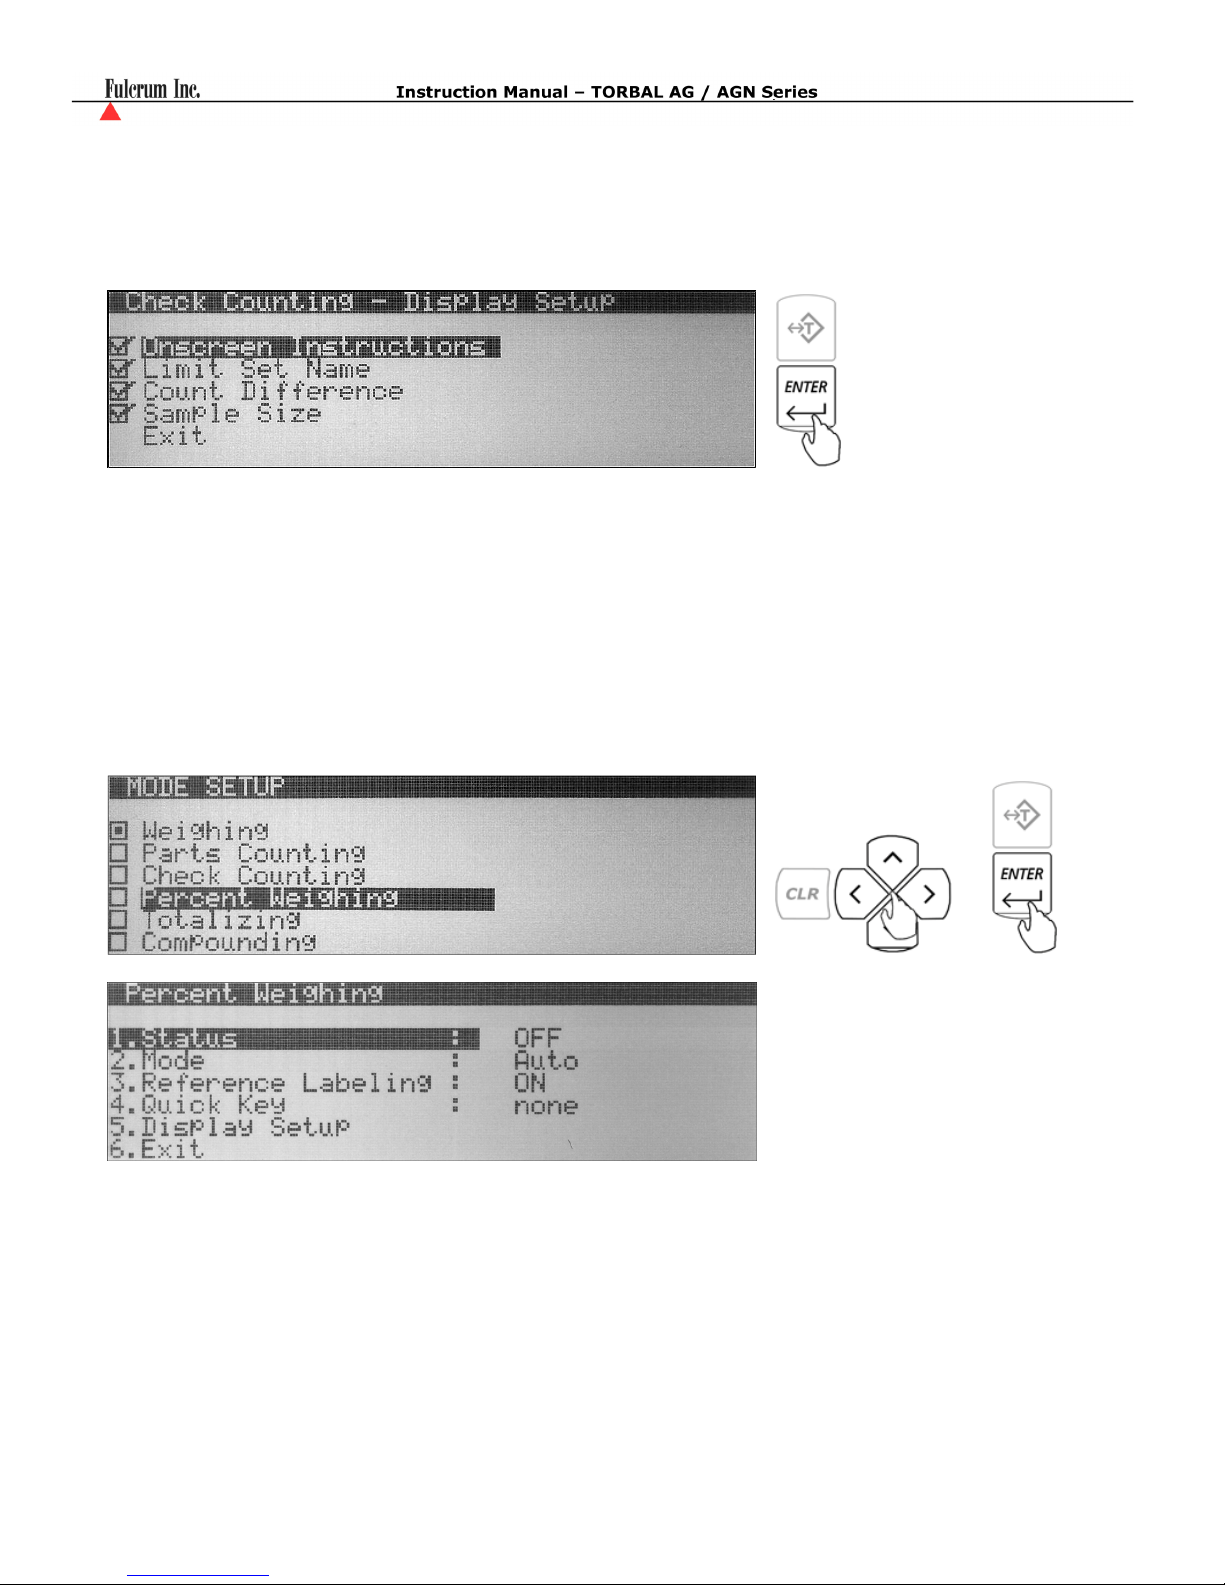
5. To configure the scale’s display during check counting use the navigation keys to select “Display
Setup” and press the ENTER key. To disable information from displaying during the function use the
navigation keys to highlight the desired selection and press the ENTER key to remove the check mark.
Once the check mark has been removed the information will not display while performing check
counting.
6. To exit Check Counting set up use the navigation keys to select “Exit” and press ENTER.
8.1.4. Percent Weighing
1. To configure the Percent Weighing Function, use the navigation keys to select “Percent Weighing” in
“Mode Setup” and press ENTER. The status and available Percent Weighing options will be
displayed. If the function is currently in use the status will be set to “ON”.
2. To select an operating mode use the navigation keys to select “Mode” and press ENTER. By default
Percent Weighing is set to “Auto” (Automatic). To operate Percent Weighing in manual use the
navigation keys to select “Manual” and press ENTER.
- 19 -
Percent Weighing Operating Modes
When set to automatic the balance allows you to create a database of reference weights.
Automatic
Each reference weight can be labeled with a unique name or an alpha numeric code and
stored in the scale’s internal memory along with its weight representing 100%. This
eliminates the need for establishing a new reference weights every time percent
weighing is performed.
When using Percent Weighing in manual the database feature is disabled and reference
Manual
weights are not stored in the scale’s memory. A reference weight equaling 100% must
be established every time Percent Weighing is performed.
3. To enable Reference Weight Labeling use the navigation keys to select “Reference Labeling” and
press the ENTER key. Use the navigation keys once again to enable or disable reference weight
labeling. Once a desired selection is made press the ENTER key.
“Reference Labeling” applies to the “Automatic Mode” only. It allows the user to assign a unique
name to a sample which is then stored in the scales database. When set to “OFF” the scale will not
assign or display names of the reference weights.
4. To assign a “Quick Key” use the navigation keys to select “Quick Key” and press the ENTER key.
Use the navigation keys to select a desired quick key (F1 through F5). Once the desired key is selected
press the ENTER key to accept the selection.
If the key is not available (used by a different function) a warning message will be displayed
“Warning Quick Key Already In Use!” To override the key press ENTER. To abort and select a
different function key press the CLR key.
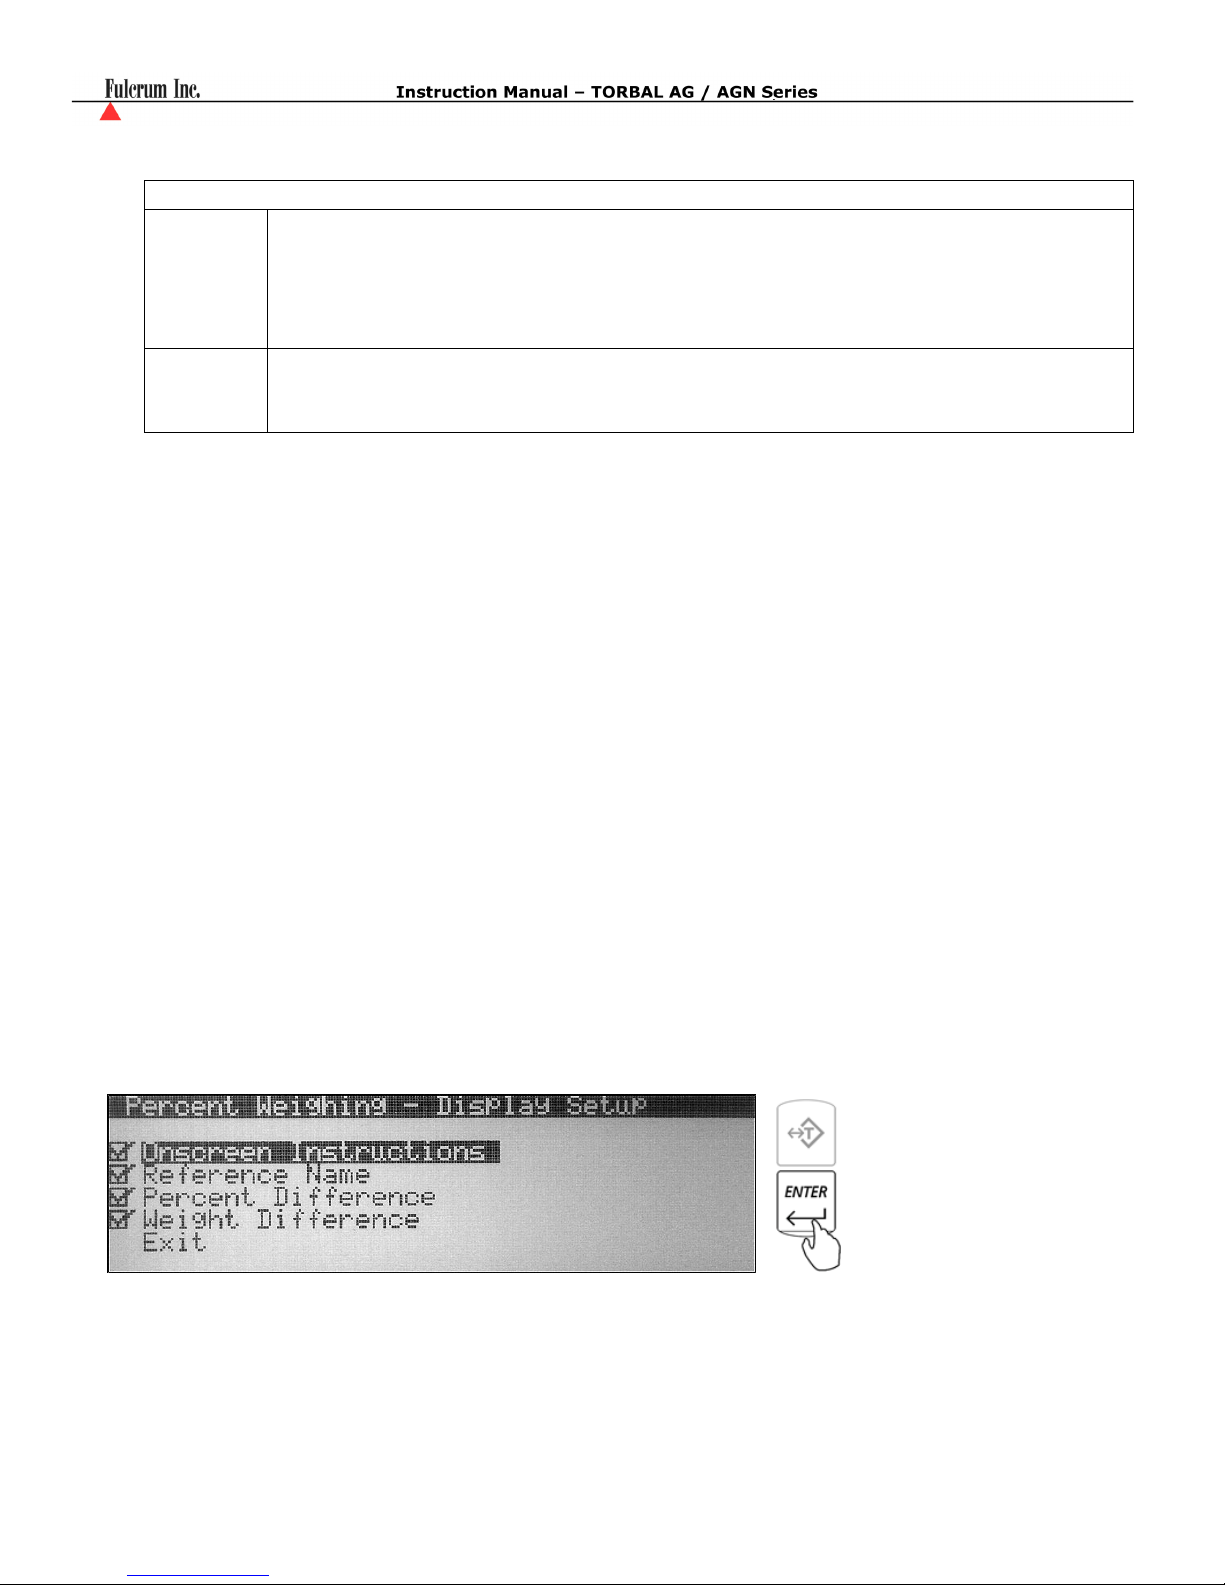
5. To configure the scale’s display during percent weighing use the navigation keys to select “Display
Setup” and press the ENTER key. To disable information from displaying during the function use the
navigation keys to highlight the desired selection and press the ENTER key to remove the check mark.
Once the check mark has been removed the information will not display while performing Percent
weighing.
6. To exit Percent Weighing set up use the navigation keys to select “Exit” and press ENTER.
- 20 -

8.1.5. Totalizing
1. To configure the Totalizing Function, use the navigation keys to select “Totalizing” in “Mode Setup”
and press ENTER. The status and available Totalizing options will be displayed. If the function is
currently in use the status will be set to “ON”.
2. To select an operating mode use the navigation keys to select “MODE” and press ENTER. By default
Totalizing is set to “Auto” (Automatic). To operate Totalizing in manual use the navigation keys to
select “Manual” and press ENTER.
Totalizing Operating Modes
Automatic Totalizing and Adding :
Automatic
When set to Automatic, the scale will automatically
add the first stable weight reading to the total.
Manual Totalizing and Adding : Manual When set to Manual each weigh has to be manually
added to the total by pressing a designated key.
3. To assign a “Quick Key” use the navigation keys to select “Quick Key” and press the ENTER key.
Use the navigation keys to select a desired quick key (F1 through F5). Once the desired key is selected
press the ENTER key to accept the selection.
If the key is not available (used by a different function) a warning message will be displayed
“Warning Quick Key Already In Use!” To override the key press ENTER. To abort and select a
different function key press the CLR key.
- 21 -
 Loading...