


www.laboamerica.com
ideas for vision
CZM6 Stereo Zoom Microscope
User Manual
To ensure proper use of this instrument as well as to avoid injury while operating
instrument, understanding this manual completely before use is highly recommended.

INSTRUCTION MANUAL
1. Introduction 1
2. Photographic View - Binocular 2
- Trinocular 3
3. Contents 4
4. Initial Set up 5
5. Operating Procedure 5
6. Fine Adjustment of Binocular Head 6
7. Changing Magnification 6
8. Changing Bulb for Incident & Transmitted light 7
9. Changing bulb for Transmitted Illumination 7
10.
11.
12. Accessories 10
13. Address Last
Fuse Replacement 8
Environmental Condition 9
INDEX
PAGE

1 Introduction
CZM6 Stereo Zoom Microscope User Manual 1
The CZM6 Microscope is a professional grade imaging system with a modern design that
incorporates both the latest in optical and mechanical advancements in stereo microscopy. The
CZM6 microscope is a versatile system which offers various configurations, each tailored for
disparate applications. A keen attention to user convenience has been incorporated in both the
mechanical and optical systems of this precision instrument. Superior levels of clarity and contrast
are provided through the 45° horizontally inclined binocular body, with both incident (12V-20W) and
transmitted (12V-10W) Halogen illumination systems. To address the requirements of advanced
applications, accessories such as our Dark-Field attachment and Polarising kit are offered as
optional upgrades.

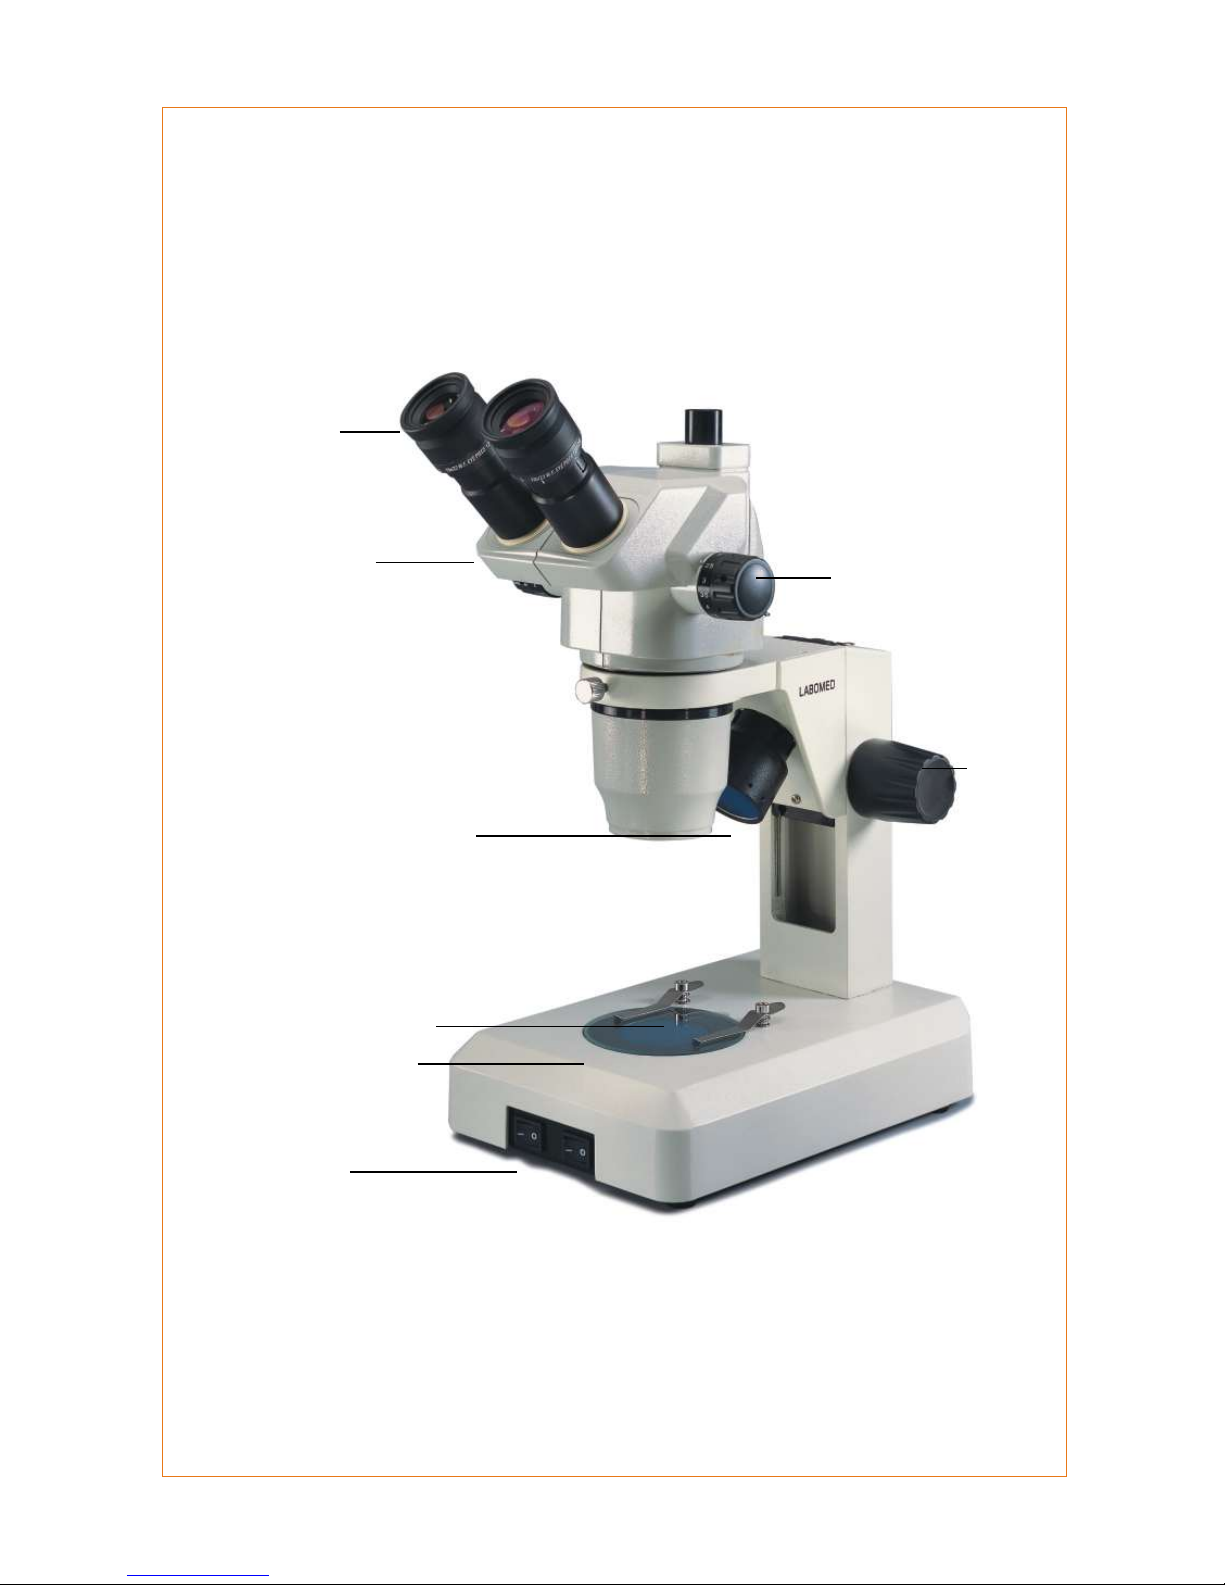
CZM 6 - BINOCULAR
Binocular
Viewing
Body
Stage
Plate
On/Off switches for
incident and transmitted
illumination
Focusable Eyepiece
Zoom
Control
Knob
Focussing
Knob
Stage
Clips
Incident Light
2 Photographic View
CZM6 Stereo Zoom Microscope User Manual 2
CZM 6 - TRINOCULAR
Trinocular
Viewing
Body
Stage
Plate
On/Off switches for
incident and transmitted
illumination
Focusable Eyepiece
Zoom
Control
Knob
Focussing
Knob
Stage
Clips
Incident Light
CZM6 Stereo Zoom Microscope User Manual 3

3 Contents
CZM6 Stereo Zoom Microscope User Manual 4
Remove the microscope components from the Styrofoam box and verify all the components of the
microscope as per product code are present, as ordered:
STAND
HL Stand, inclined light with reflector bulb 12V20W Halogen, bottom Light 12V10W
Halogen
CFL Stand, inclined light 5W CFL with black and white stage plate
Boom Stand with bonder Arm
Pole Stand
OBSERVATION HEAD
Binocular Zoom Pod 1:6.9
Trinocular Zoom Pod 1:6.9 (Optional)
EYEPIECES
10x WF FN20 Fixed type
10x WF FN20 Focusable type
10x WF FN22 Fixed type
10x WF FN22 Focusable type (Standard)
16x WF FN16 Fixed type
16x WF FN16 Focusable type
20x WF FN12 Fixed type
20x WF FN12 Focusable type
AUXILIARY OBJECTIVES (Optional)
Auxiliary Objective 0.5x
Auxiliary Objective 1.5x
Auxiliary Objective 0.75x
Auxiliary Objective 2.0x
ACCESSORIES (Optional)
Filar Micrometer
Adaptor for CCD Camera
Adaptor for Digital Camera
Darkfield attachment
Ring Light with adapter
Fiber Optic Illumination
Polarizing Kit (4121037 Polarizer & 4121035 Analyzer)
4 Initial Setup
CZM6 Stereo Zoom Microscope User Manual 5
Observation Head
Remove observation head from Styrofoam box and follow the
following steps:
(i) Loosen the Head Locking screw provided in
microscope pod.
(ii) Place the Observation Head on the pod and
secure by tightening the Head Locking screw.
Eyepieces - Insert both eyepieces into the ocular tubes
provided in the Observation Head and confirm the fitting is
secure.
Install Glass Stage or Black and White Plate on the base
cavity and hold plate down with stage clips provided.
This procedure explains how to use CZM 6 Microscope, it does not include information on general
techniques of stereo zoom microscopy.
! Place the specimen to be observed in the center of the glass plate (or Black & White Plate)
! Verify that all exposed optical surfaces are free of any particulate debris. Plug the male end of
the provided power cord into a grounded outlet and the female end into the microscope base.
Turn ON the main power supply by toggling the ON/OFF switch provided at the back of
microscope base. Switch on the incident and/or base lamps as required toggling the corre-
sponding ON/OFF switches provided on the front panel of the microscope base.
! Rotate the zoom control knob until the low magnification is achieved.
! Adjust the interpupillary distance by adjusting the two ocular tubes inwards/outwards until both
eyes are able to fixate on one common circular field while looking through the eyepiece.
! While looking through the eyepieces, adjust the microscope focus position !along the vertical
axis by adjusting the focus knob(s) provided on either side of the stands arm.
When a feature / region of interest needs augmentation, rotate the zoom control knob to adjust
the magnification.
5 Operating Procedure

Rotate the Observation Head to bring it to a convenient
position. Normally it is kept aligned and not rotated.
● Adjust interpupillary distance by bringing the
eyepiece tubes closer or apart till you see one fused
image.
● If the image from both oculars has any loss in
sharpness, you can adjust the dioptric in the
eyepieces to compensate for any refractive error in
the eye.
● Set diopter on both eyepieces / oculars to zero.
● Focus the specimen with focusing knobs.
● After best possible focus is achieved, adjust the
circular dioptric rings provided on eyepieces for
finer focus.
● For this initial setup of parfocality, please make
sure you are using a flat specimen.
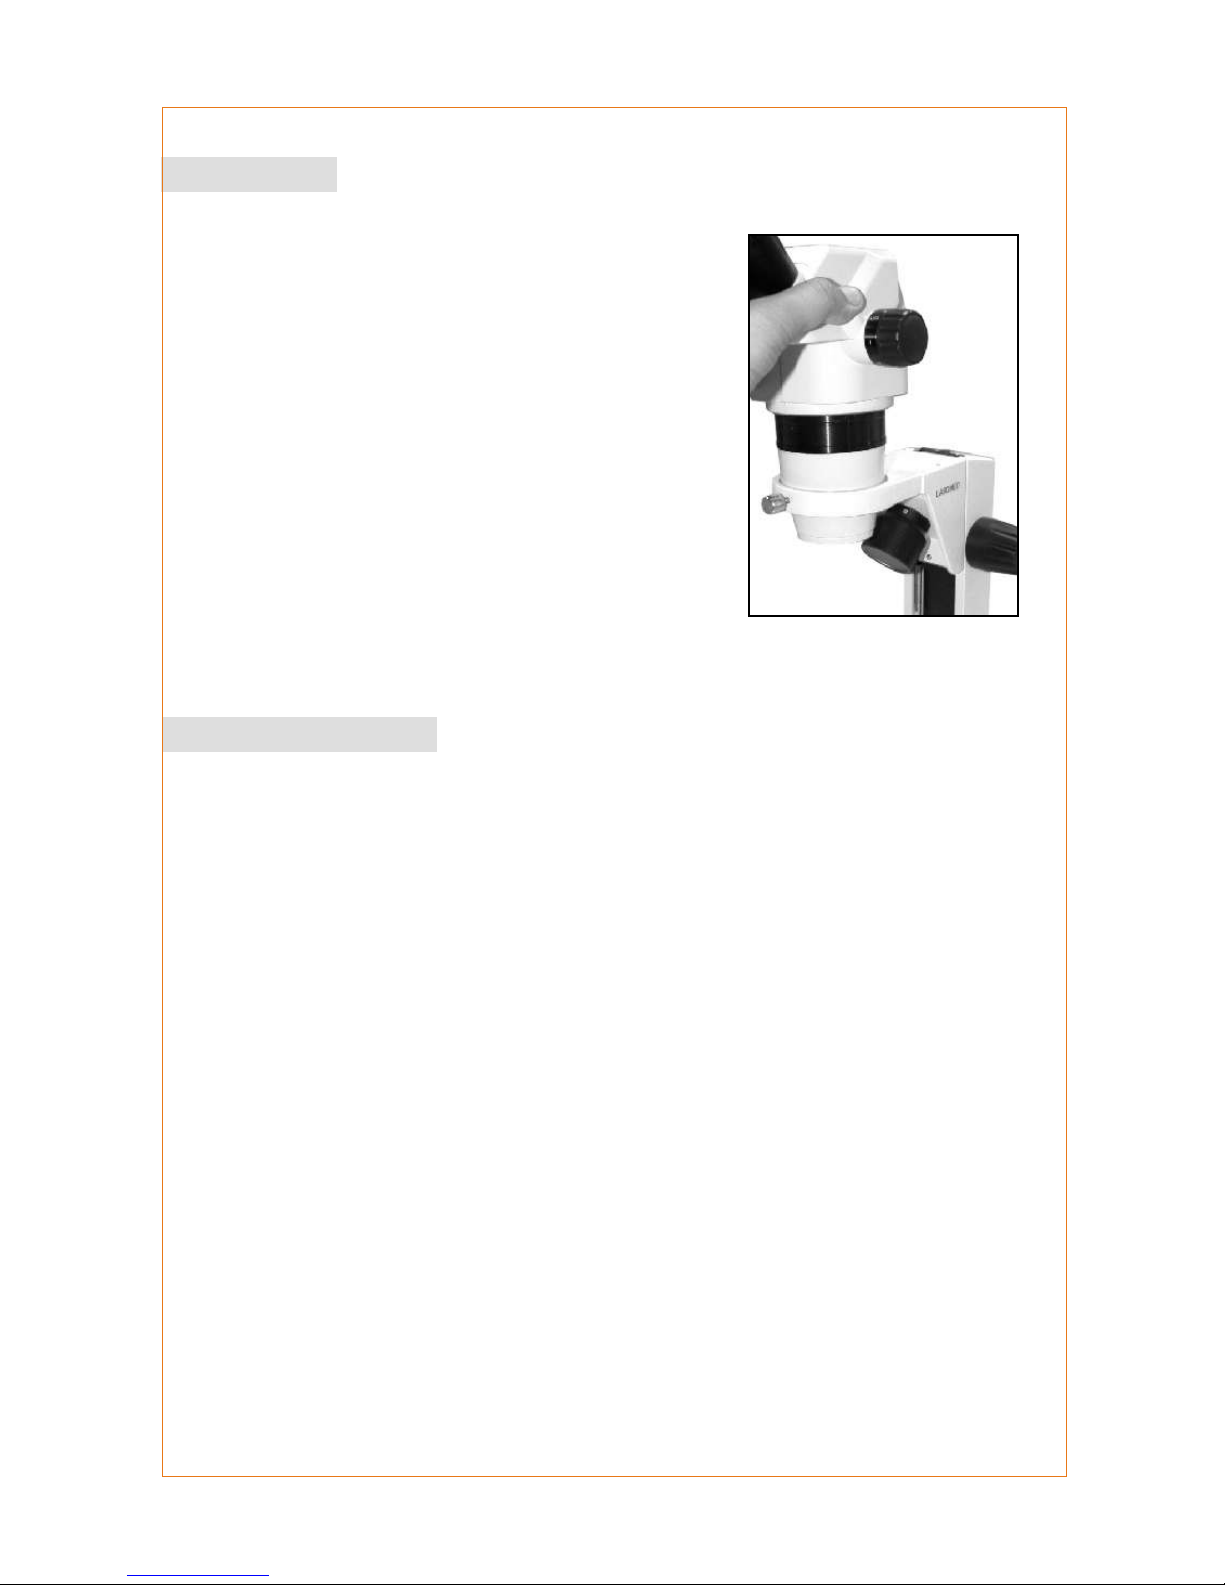
6 Fine Adjustment of Observation Head
7 Changing Magnification
CZM6 Stereo Zoom Microscope User Manual 6
Rotate the zoom control knob provided on either side of
the observation head.

Outer Cover
8 Changing bulb for incident & Transmitted Lamp
9 Changing bulb for Transmitted illumination
CZM6 Stereo Zoom Microscope User Manual 7
1 Use any 12V-20W Halogen with reflector dia 35mm
for incident light (GE, OSRAM bulbs suggested).
2 Turn the microscope OFF. Unplug the Microscope by
removing the power cord. Verify once again that the
main power switch is in OFF position.
3 Open the outer cover of the incident light housing by
anti-clockwise rotation.
4 Using tissue paper, replace the old bulb and insert
new bulb in bulb cavity.
CAUTION: To avoid any injury, please make sure
microscope has been off for at least 15 minutes
before removing old bulb.
• Use any 12V - 10W Halogen Bulb for transmitted
light (GE, OSRAM bulbs suggested)
• Repeat step 2 as mentioned above.
•
• Repeat step 4 above.
CAUTION: To avoid any injury, please make sure
microscope has been off fro at least 15 minutes
before removing old bulb.
Remove observation head and turn microscope
upside down in order to access bulb housing through
the base plate. Pull on locking knob to open the
lamp door.

The AC inlet socket on the back panel has an inbuilt fuse
compartment which houses two fuses. One fuse is live and
one fuse is a spare unit and can be replaced. Please follow
the following steps when replacing a fuse.
Remove power plug from microscope before
doing any replacement of fuse.
Use a flat Head Screwdriver to rotate and remove
the fuse holder from the AC inlet socket.
The walled fuse is the live fuse and other one is a
spare fuse.
Change the blown fuse with the new fuse and
replace the fuse holder in the AC inlet socket.
l
l
l
l
Spare Fuse
Live Fuse
10 Fuse Replacement
CZM6 Stereo Zoom Microscope User Manual 8
l
Designed for indoor use
l
Installation Category II
l
Pollution degree 2
l
Indoor use
l
Altitude : 2000 mtrs.
l
Temp. : 5º C - 40º
l
Relative Humidity : Maximum 80% at temp. upto 31º C
l Supply voltage shall not exceed 10% of the rated input voltage
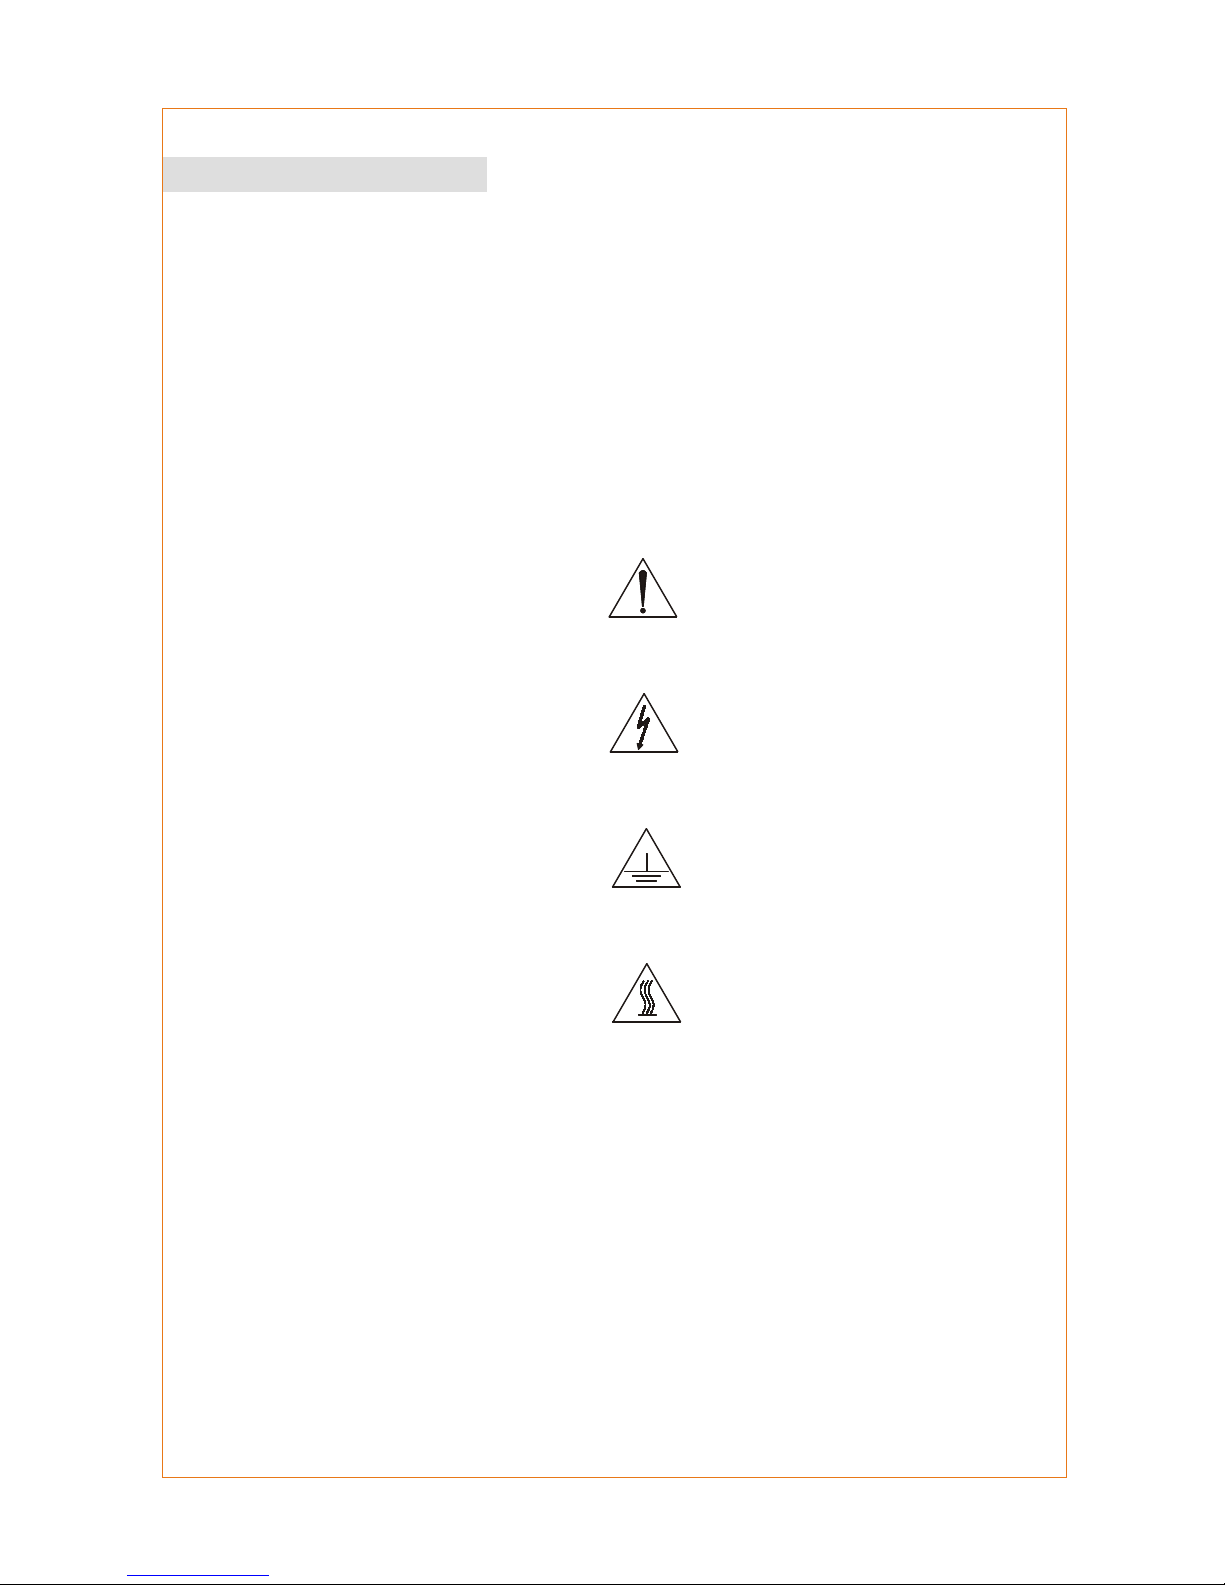
Caution : High Voltage
Fuse Replacement
Warning : High Voltage
Power Inlet
Earth
Warning : High Temp.
Bulb Replacement
11 Environmental Conditions
CZM6 Stereo Zoom Microscope User Manual 9

Pole Stand
HL Stand
Boom stand with
Bonder Arm
4122047
412085-000
4122042
Dual Light
Stand
4122086-000
SB Stand w/o
Top light
412088-000
Size: L 245 x W 175 x H 320mm Size: L 245 x W 175 x H 260mm
Size: L 245 x W 250 x H 385mm
Size: L 245 x W 175 x H 270mm
Size: L 245 x W 175 x H 235mm
12 Accessories - Stand
CZM6 Stereo Zoom Microscope User Manual 10

 Loading...