


BIOLOGICAL
MICROSCOPE
Instruction Manual
"Please read this manual carefully before using the instrument"
Labnics Equipment
LBM-100 D

This information manual will identify in a general way, the various parts and functions of
1000X Biological microscope. It is intended to familiarize the first time user with their
instrument.
These microscope are ruggedly built for classroom and laboratory use. The instruments
feature fully-coated achromatic optics and international standard DIN objectives and
eyepieces. Optically, they are excellent systems with good resolution, centering, and
paragon features. Mechanical movements are smooth and positive. Mechanical stage,
and rack stop serve to minimize damage.

Table of Content
Chapter Content Pg. No.
1 Specification 1
2 Set-up 1
2.1 Getting the Microscope Ready For Use 1
2.2 Mounting the Objective and Eyepiece 1
2.3 Illumination 1
3 Operation 2
4 Maintenance 2
5 Service Report 3
CHAPTER 1. SPECIFICATIONS:-
Magnification: 40X, 100X, 400X, 1000X.
Viewing Angle: Compensation free binocular head inclined at 45°, 360°rotatable.
Eyepiece: WF10X 18mm.
Interpupil Distance: 55mm-75mm
Illumination: Built-in 85V-230V, 6V/30W Halogen tungsten lamp and adjustable brightness.
Condenser: Abbe N.A.1.25 condenser with iris diaphragm & filter.
Stage: Double layer mechanical stage.
Stage Size: 140mm X 140mm.
Moving Range: 75mm X 50mm.
Objective: 4X, 10X, 40X (S), 100X (S, Oil).
Focusing: Coaxial coarse and fine focus adjustment.
Fine focusing scale value: 0.002mm
Catalog No.: 39480104
CHAPTER 2. SET-UP :-
2.1 Getting the Microscope Ready For Use:-
First, familiarize yourself both visually and physically with the mechanical parts of your microscope. Gently operate
each part by hand (no tools required) to see how it behaves and what result it produces.
2.2Mounting the Objective and Eyepiece:-
To put the eyepiece in place simply slide it into the eyepiece tube. The objective lenses screw into the rotating
nosepiece. If the four objectives are already mounted in the nosepiece, check to see if they are tightly held in
their place. To do this, grip the knurled ring on the objectives with your fingers and turn it to the right. Do not
tighten them with tools, they need only to be "finger tight". With all four objectives mounted in the nosepiece
the entire nosepiece can be rotated by hand. As you rotate the nosepiece you will notice that each objective
lens has a "click stop" which stops and holds the objective lens being used in its proper position relative to the
optical axis of the microscope.
2.3Illumination:-
In order to provide illumination for your new microscope, simple plug the power cord into an electrical socket
and switch your microscope "ON", and you are ready to begin your work.
- 1 -

CHAPTER 3. OPERATION:-
Once you have set up your microscope for use, follow the steps below to prepare the specimen to be studied for
viewing:-
Place the slide to be viewed onto the stage so that the stage clips hold it firmly in place.
Position the slide so that the portion of the specimen that you wish to observe is below the 4X objective.
Slowly rotate the coarse focus knob until the stage is approximately 1/8" from the objective, make sure not to let
the slide come in contact with the objective, to avoid damage to the eight or both which may occur.
When using the coarse focus knob, start with the objective as close to the stage as possible and focus from the
bottom up. This will help you to prevent any contact between the objective and the stage.
Adjust the iris diaphragm attached to the condenser to control the angle of light illumination on the specimen.
To change the magnification, first draw the objective to the position furthest from the stage. Then turn the
objective turret until the desired objective is in place. Return the objective to the point closest to the stage and
focus once again backing away from the stage.
To determine the total magnification, multiply the magnification of the objective with that of the eyepiece. (e.g.,
10X objective X 10X eyepiece = 100X magnification).
When using the objective 100X to observe, lift condenser to the highest position, then drop a little cedar oil on
the surface of 100X objective and slide, so as to keep full of cedar oil between the objective and the slide.(clear
the cedar oil with xylene after observing).
CHAPTER 4. MAINTENANCE:-
Keep the instrument in dry and cool place and keep it away from acid or alkali.
Put the dust cover over it, when not used.
Keep lenses clean, remove the dust by soft brush.
- 2 -
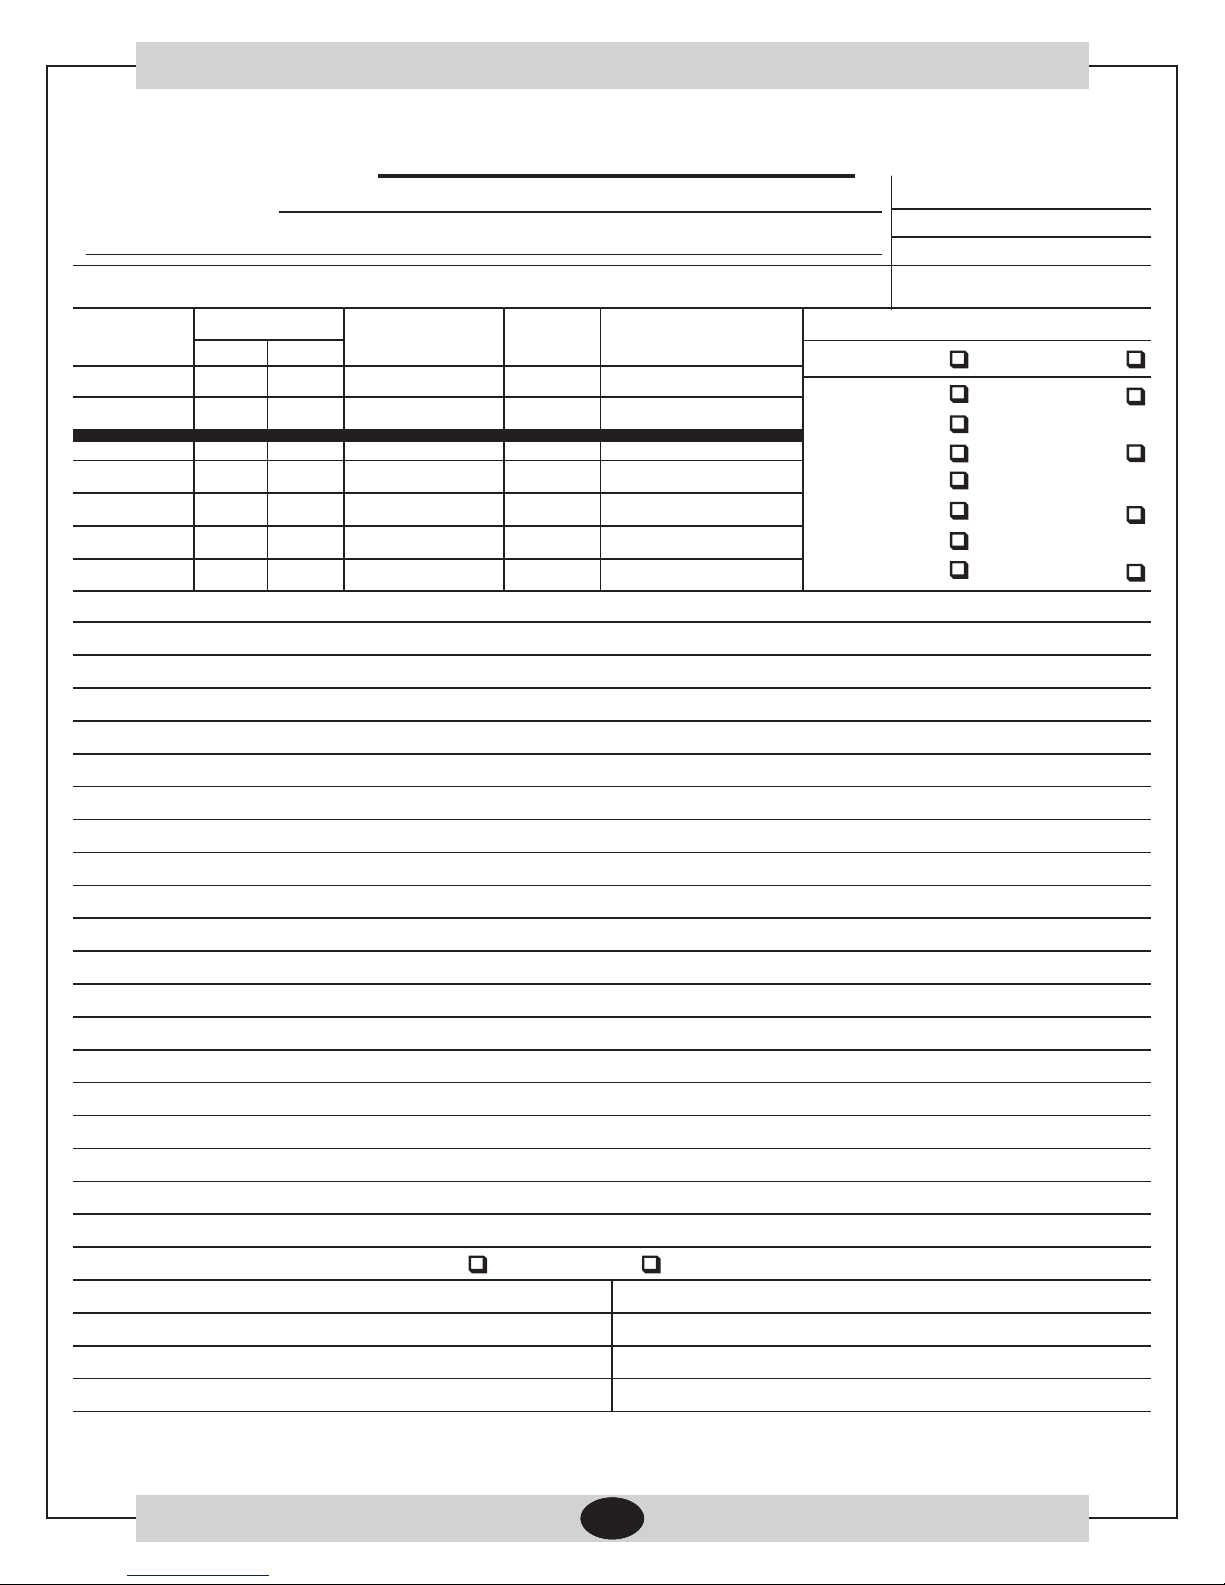
CHAPTER 5. SERVICE REPORT
Customer’s Address :
Contact Person / Designation :
Date
Nature of Problem :
Observation & Action Taken :
From
Time
To
System
Configuration
Model Serial No.
Tel.No.:
Fax No.:
Weekly Off.:
Dept.:
Date :
Status : OK
Installation
Demonstration
Maintenance
Repairs
Application
Calibration
Validation
SR. No.
Not OK
Warranty
Contract
Billable
Courtesy
Customer’s Remarks :
Parts Replaced :
Parts Recommended / Action Required : Yes
Service Engineer’s Name & Signature
No
- 3 -
Requisition Number :
Customer’s Name, Signature, Date & Stamp
Page ____ Of ____
 Loading...