

Page 1
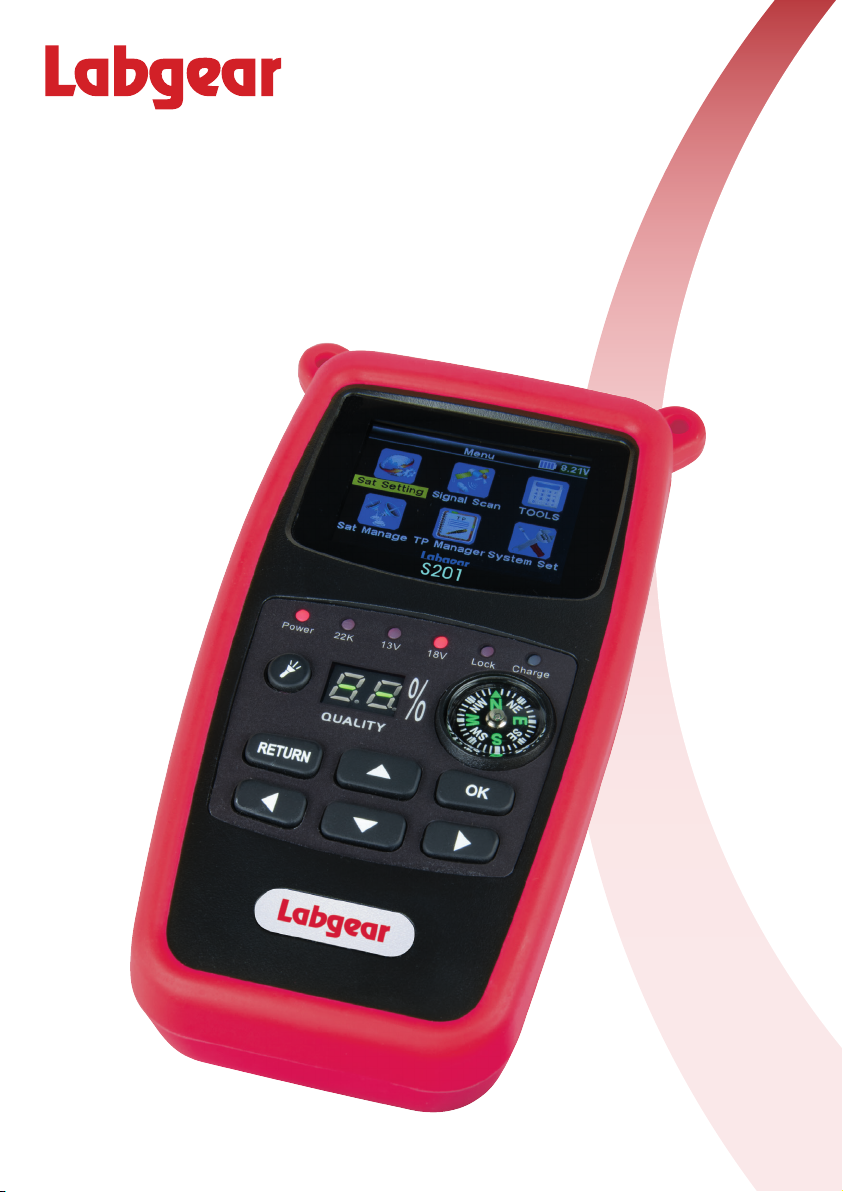
S201
Satellite Meter
User Guide
Page 2

S201 - Contents
Contents
1 Safety warnings and important information ......................................................................... 2
2 Introduction ............................................................................................................................. 3
3 Key Features ............................................................................................................................ 3
4 Product Overview .................................................................................................................... 3
5 Battery disposal....................................................................................................................... 2
6 Main Menu .............................................................................................................................. 4
7 Before You Start, set up Tools ................................................................................................... 5
8 Choose Your Preferences in System Settings ......................................................................... 6
9 Rough Alignment using the calculator in Tools .................................................................... 6
10 Measure levels and quality with Signal Scan ....................................................................... 6
11 Advanced Features ................................................................................................................ 7-8
a. Satellite Manager .......................................................................................................... 8
b. Satellite Settings ............................................................................................................. 8
c. Transponder Manager .................................................................................................. 8
1 Warning:
Do not disassemble the meter. Do not submerge in water.
Do not leave it unattended when charging.
Do not leave unused for extended periods of time. Routinely check the charge status of the
meter, and charge accordingly.
Lithium-ion batteries can explode, or cause injury if disassembled, short circuited, or exposed
to high temperature. The meter is powered by a 7.4V/800mAh Li-Ion rechargeable battery pack
and must be treated with caution and care.
To prevent the risk of re, electrical shock and personal injury, avoid using any mains charger or
12V car charger other than the one supplied with the product and avoid handling the
battery improperly. Always make sure the meter is disconnected from any power sources, and
the battery removed when performing any routine cleaning. Do not try to repair the unit or
charger yourself.
Important Information:
• Do not dispose of the battery with domestic waste, please use an appropriate recycling facility
• Do not charge the battery in a high temperature environment
• Do not let the battery become wet or immerse the battery in water
• Avoid exposing the battery to excessive shock or vibration
• Do not use a damaged battery
• Keep the battery away from children
• When charging has completed the charger must be switched off and disconnected from the
mains and the meter
• Do not pull the lead of the charger when disconnecting it from the mains power supply
• Do not use an extension lead. Plug the charger directly into an electrical socket
• Never use a damaged charger or a charger with a damaged lead. Dispose of the damaged
charger safely at your local recycling centre in the Waste Electrical and Electronic Equipment
(WEEE) disposal area, where facilities exist. Check with your local authority for recycling advice.
Contact our Customer Care line for a replacement.
• If the charger fails to operate dispose of it safely at your local recycling centre in the Waste
Electrical and Electronic Equipment (WEEE) disposal area, where facilities exist. Check with
your local authority for recycling advice. Contact our Customer Care line for a replacement.
• Charging temperature range: 0°C to 45°C
• Operating temperature range: -20°C to 60°C
2
Page 3
S201 - Introduction and Features
2 Introduction
Thank you for choosing the Labgear S201, a great aid to satellite dish and LNB alignment,
pre-loaded with masses of data and tools to make your job simpler and quicker.
Before you start please take time to read through this instruction leaet which we hope will help
you get the most out of your meter.
3 Key Features
• Digital Satellite Meter compatible with DVB-S and S2 and DiSEqC 1.0/1.1 with 22kHz tone
• Displays both signal strength and signal quality with sound and light alarms to aid alignment
• Computes Azimuth, dish Elevation and LNB Polarisation angles for all satellites based on
your location
• Stores information on 100 of the most popular satellites worldwide
• LNB short circuit protection built-in
• Includes magnetic compass to assist alignment
• 7.4V/800mAh rechargeable Li-Ion battery and mains power charger included
• Easy to carry with protective sleeve and shoulder strap
• Software upgrades possible from a PC using the USB port and cable supplied
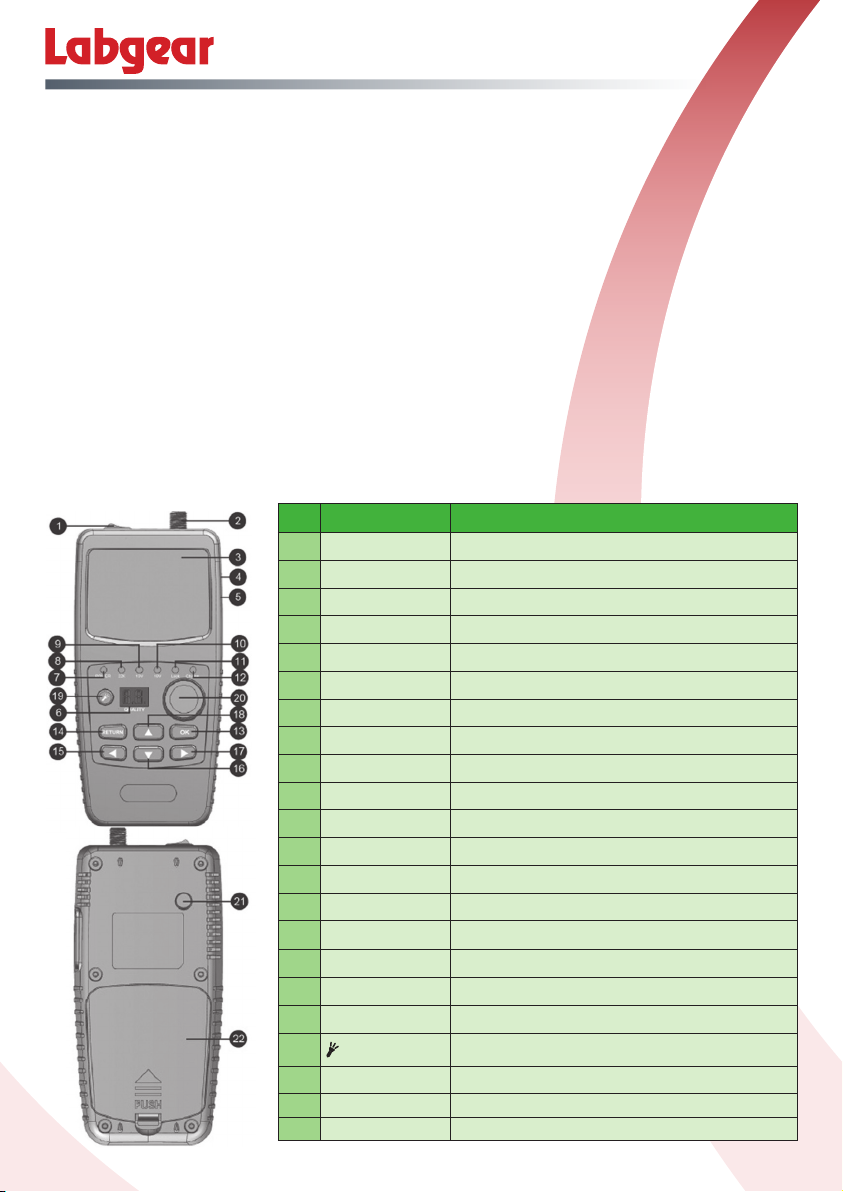
4 Product Overview
No Description Function
1 Power Switch Turn meter on/off
2 LNB IN Connect to satellite down lead
3 LCD Screen Colour display
4 Micro USB Port Connects to PC for software updates
5 DC Socket Connects to charger
6 Digital display Shows signal quality
7 Power Power indicator light
8 22KHZ 22Khz indicator light
9 13V Vertical polarization voltage output light
10 18V Horizontal polarization voltage output light
11 LOCK Signal lock indicator light
12 Charger Charging LED indicator
13 OK OK key
14 Return Return key
15
t
16
q
17
u
18
p
19
20 Compass Magnetic compass
21 To rch LED light
22 Cover Battery compartment
Left key
Down key
Right key
Up key
Torch Switch
3
Page 4

S201 - Charging and Main Menu
5 Battery Charging
1. Ensure that the meter is switched off. Connect the charger plug to the charging socket (5)
on the right hand side of the meter.
2. Plug the charger into a mains socket the charging LED indicator (12) will light up green.
3. When the battery is fully charged, the charging LED indicator (12) will go out.
4. Unplug the charger from the mains socket and disconnect the charger from the meter.
Do not leave the torch unsupervised when charging is taking place.
6 Main Menu
Switch the power ON and you will enter the
main Menu which shows battery status and has
the following options:
• Sat Setting
• Signal Scan
• TOOLS
• SAT Manager
• TP Manager
• System Setup
7 Before You Start – choose the satellite and enter your location
Use the t u keys to select TOOLS and press (OK).
The display will open with the cursor on Satellite Name. To select a different satellite press u now
scroll up or down using the pq keys until you nd the satellite you want. Satellites are listed in
order of their location angle, e.g.
No E/W Angle Name
33 E 13.0 Ku-HotBird 13
43 E 28.2 Ku-Astra 28.2
Select your satellite by pressing (OK).
Now scroll down and set your location. This is the location of the dish you are installing in
Longitude and Latitude. There are a number of places you can go to nd your coordinates
including websites like www.gridreferencender.com . Your meter will accept entries to one
decimal place, which is roughly an accuracy of +/-3miles, which for initial dish alignment is more
than accurate enough.
Information is normally given like this:
Labgear factory
Post Code MK42 0NX
Longitude: -0.5 NOTE: a minus sign means WEST of Greenwich
Latitude: 52.1 NOTE: a positive is NORTH of the equator
Use pq then (OK) to enter longitude then pq for each digit and t u to select East or West.
Repeat the steps for latitude using t uto select North or South.
4
Page 5

S201 - Alignment Settings
The screen will now display
Azimuth
From our factory Astra 28.2 has an Azimuth angle of 145.2)
which means that from magnetic North you need to point the dish
South East at an angle like this:
Elevation
(Generally the rst adjustment to make to a dish)
This is the angle that the dish points towards the sky,
offset from pointing horizontally and is usually
indicated with marks on the bracket at the back
of the dish. Astra is about 24.8 degrees above
horizontal when viewed from Labgear.
N
S
Angle
Fixing
Nut
E
Polarisation (Skew)
This is the angle of skew on the LNB/Dish to align with the satellite. If you get this wrong it not
only reduces signal levels but also signal quality as unwanted signals “bleed in” from the other
polarity. To align with Astra we would skew the LNB by 20.5 degrees to the East.
horizontal when viewed from Labgear.
Looking South
Satellite to East Satellite to West
Deg. E Deg. W
Dish
5
Page 6

S201 - Preferences and Alignment
8 Choose your preferences
Scroll to System Set and press (OK)
• Language Options
• Key Tone (ON/OFF)
• Lock Tone (ON/OFF)
• Flashlight (ON/OFF)
• PWR Units (dBµV/dBmV/dBm)
• Local Longitude (Degrees)
• Local Latitude (Degrees)
9 Rough alignment
Having set your location and chosen your satellite your Meter can calculate the required
positioning of your dish and LNB. Check that you have a clear line of sight in the direction
proposed from your location before making any adjustments and roughly align your dish.
You are now ready to check the signal.
10 Signal Scan - displays signal level and quality
First - connect the feed from the LNB to the meter,
switch ON and select Signal Scan.
All of the options on the left hand side of the screen
can be changed. The main ones that you may
need will be SAT (to change the satellite) and F
(to change the transponder you are monitoring on
that satellite). If you want to change either of these:
• Use pq to select the option you want
• Use t u to access the list, then press pq to
select the option you want.
• When all settings are ok, you can check the
LNB signal.
• Connect the f-connector at the top of the meter
to a cable feed from the LNB.
Your meter will power the LNB and display Signal Power and Quality
6
Page 7

S201 - Advanced Features
11a SAT MANAGER
Your Labgear satellite meter has been loaded with
information on 100 of the most popular broadcasting
satellites around the world but if you want to add or
amend one you can do this in the
Sat Manager option:
• Add Satellite
• Edit Satellite
• Delete Satellite
Add Satellite: the setting refer to Antenna Setup.
Edit Satellite: press pq key to page up /down;
then press t u key to select the satellite; press OK to edit satellite setting, refer to Antenna Setup.
Delete Satellite: refer to Edit Satellite then press OK to delete satellite.
11b SAT SETTING
For any of the satellites already loaded onto your
meter you can amend a wide range of settings by
entering Sat Setting
• Sat Name - press t u to select satellite.
• LNB Type - press t u to select LNB Type.
• Low Freq - press t u to select Low Frequency or
press OK, then use the pq key to input the value.
• High Freq - press t u to select Hi Frequency or
press OK, then use the pq to input the value.
• TP NUM (Transponder) - press t u to select TP number.
• Frequency - Frequency of the current transponder, input the value by using the pq keys.
• Symbrate - symbol rate of the current transponder, input the value by using the pq and
t u keys.
Use the q key to scroll down to see the rest of the Sat Setting menu options.
• Polarity - press t u to change to vertical or
horizontal polarization.
• 22K - press t u to switch the 22KHz tone; if you
select “Universal” the 22K setting is AUTO.
• DiSEqC Mode - press t u to set the
communication protocol DiSEqC1.0/1.1 or
Unicable.
• DiSEqC type & Input - If you select DiSEqC 1.0/1.1,
then press t u to set the port number. If you select
Unicable, then press t u to select the IF Channel,
and use pq to input Centre Frequency.
• LNB Power- press t u to switch LNB power ON/OFF.
When all of settings are correct, press RETURN, then press OK for save the edit.
7
Page 8

S201 - Transponder Manager
11c TP MANAGER
For each satellite that we have set-up on the meter
there are a selection of the transponders with all of
the relevant data loaded but if want to add another
or edit an existing one then use the TP MANAGER.
• Add Transponder
• Edit Transponder
• Delete Transponder
Please refer to Satellite Setup.
For further information or any queries
please contact
Technical Support:
www.labgear.co.uk/support
8
Waste electrical and electronic products should not
be disposed of with household waste. Please recycle
where facilities exist. Check with your Local Authority
for recycling advice.
© Labgear 2017 V1
 Loading...