


USER MANUAL
Label Ta c® Pro X Thermal Transfer Printer
WELCOME TO LABELTAC®- LET’S START LABELING
1 | UNBOX & CHECK CONTENTS
Included Accessories
Cleaning Swabs (2)USB Cable Power CableSoftware CD
2 | CONNECT
1 2 3
Insert the USB cable to the back of your
printer and plug the other end into a USB
port on your computer.
Connect the the two halves of the power
cable and plug into the power jack socket.
Plug the other end into an electrical outlet.
3 | INSTALL SOFTWARE
SUPPORT
Option 1: Install from CD
Put the included CD in your computer’s CD drive and
follow the prompts on your screen to install the software.
Option 2: Digital download
Head to the LabelTac® support page, select your printer
model, and download the driver for your printer.
labeltac.com/support
LabelTac® Pro X | REFERENCE GUIDE
Your LabelTac® printer includes a free, full lifetime
warranty on all par ts and labor and unlimited support by
phone, email or live chat.
Online Support labeltac.com/support
Support by phone 1-877-356-6584
Support by email support@labeltac.com
Label Squeegee
Power on your printer.
Note: It is important that your LabelTac® printer
is powered on before installing software.

HOW TO | LOAD LABEL SUPPLY
1
Open the printer using the two cover
latches. Spread the supply holders apart by
sliding the arms. Both arms will separate
evenly. Insert the roll of supply as shown.
The holders will close to retain the roll.
2
Route the supply under the supply guides.
Adjust the guides by sliding back or forth as
needed to keep the supply centered. Continue
routing the supply over the black platen roller.
The end of the supply should stick out a little
at the front of the printer.
HOW TO | LOAD PRINT RIBBON
1
2 3
Ribbon Access
Cover
Media Cover
Cover Latch
Your printer holds ribbon in place using two
black plastic cores. Insert one plastic core
into your print ribbon, and the other into the
blank core included in the ribbon box.
Check out videos on loading supplies and learn some helpful label making tips on our YouTube channel
Need some more help with your printer?
labeltac.com/support 1-877-356-6584
Open the printer. Then open the ribbon
access cover and media cover. Insert the
ribbon into the rear ribbon hub by pressing
the right side of the ribbon into the spring
loaded holder. The left side of the roll goes
onto the yellow hub.
youtube.com/labeltac
LabelTac® Pro X | REFERENCE GUIDE
Now inser t the blank core into the upper
ribbon hub in the same fashion. Pull the end
of the ribbon down through the printer and
up and over the blank core. New rolls have
an adhesive edge to attach to the blank core,
otherwise use tape. Wind the core up until
the ribbon is tight.
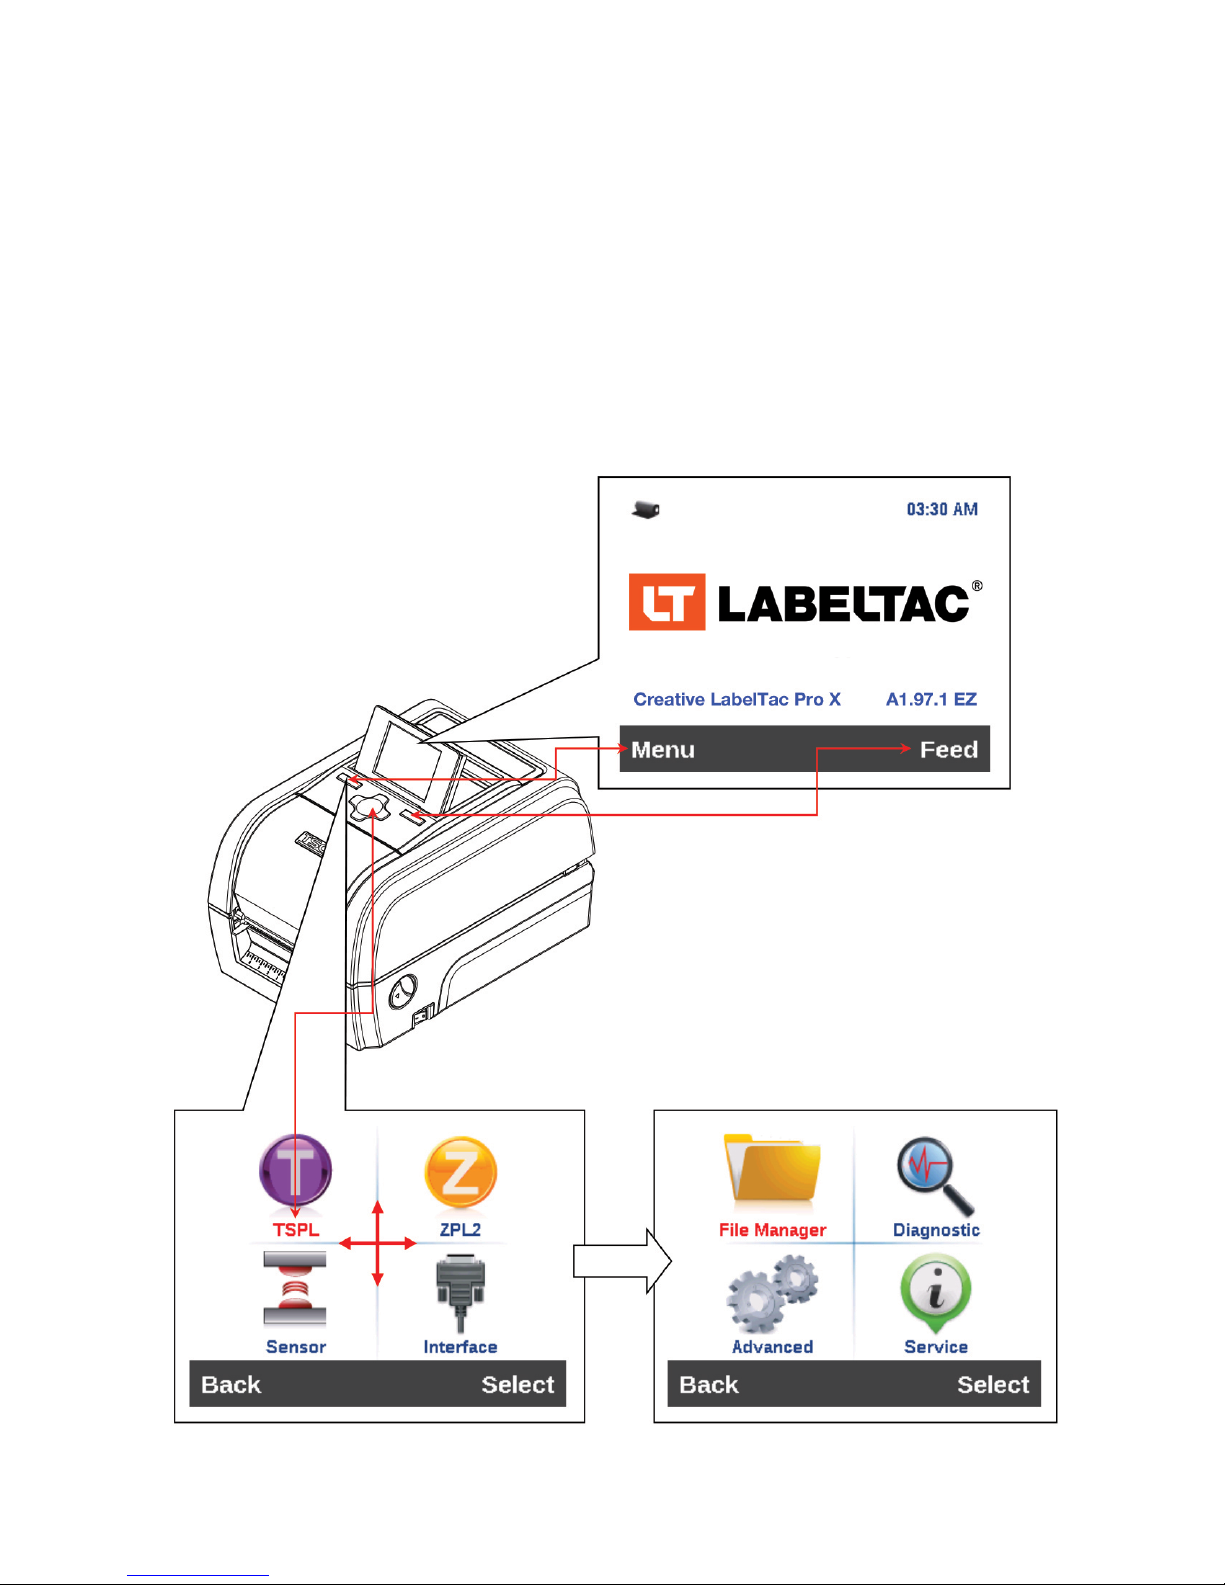
LCD Menus
LCD Menu Function
Press the “Menu” button to enter the main menu. Use the “Cross”
button to select the item on main menu. The selected item will turn
red. Press the “Feed” button to enter the setting list.
LabelTac® Pro X | REFERENCE GUIDE

Main Menu Overview
There are 8 categories for the main menu. You can easy to set the
settings of printer without connecting the computer. Please refer to
following sections for more details.
Menu
TSPL ZPL2 Sensor Interface Diagnostics Advanced
Speed Darkness
Density Print Speed
Direction Tear Off
Print Mode Print Mode
Offset Print Width Advanced
Shift X List Fonts
Shift Y List Images
Reference X List Formats
Reference Y List Setup
Code Page
Country
Control
Prex
Format
Prex
Calibration
Manual
Threshold
Detect
Maximum
Length
Auto
Setup
Serial
Comm.
Ethernet Dump Mode
Bluetooth
(option)
Wi-Fi
(option)
File
Manager
DEAM
Print Cong.
Print head
Display
Sensor
Brightness
Date & TimeFLASH
LanguageCARD
Display
Service
Initialization
Printer
Information
Contact us
Delimiter
Char
Media
Power Up
Media
Power Up
Label Top
Left
Position
Reprint
Mode
Format
Convert
LabelTac® Pro X | REFERENCE GUIDE

TSPL2
This “TSPL2” category can set up the printer settings for TSPL2.
Speed
Menu TSPL
Density
Direction
Print Mode
Offset
Shift X
Shift Y
Reference X
Reference Y
Code Page
Country
None
Batch Mode
Peeler Mode
Cutter Mode
Cutter Batch
LabelTac® Pro X | REFERENCE GUIDE
 Loading...