


© Advanced Labelling Limited July 2008
- 1 -
LabelStation Pro Series Set Up Manual July 2008
LabelStation Pro200/300
User Guide

© Advanced Labelling Limited July 2008
- 2 -
LabelStation Pro Series Set Up Manual July 2008
Contents
1. GETTING STARTED
1.1. Unpacking your LabelStation Pro Series
1.2. Equipment Checklist
1.3. Getting to Know your LabelStation Pro Series
1.3.1. LabelStation Pro Series Printer External View
•
Fig.1.
Top Front View
1.3.2. LabelStation Pro Series Printer External Rear View
•
Fig.2.
External Rear View
1.3.3. LabelStation Pro Series Printer External Label Roll Mount
•
Fig.3.
External Label Roll Mount
2. SETTING UP YOUR LABELSTATION PRO SERIES
2.1. LabelStation Pro Series to PC Connection
•
Fig.4.
Attach power supply to printer
2.2. Loading the Print Ribbon
2.2.1. Installing the Print Ribbon into the LabelStation Pro Series printer
•
Fig.5.
Ribbon Installation 1
•
Fig.6.
Ribbon Installation 2
2.3. Loading Label Stock
•
Fig.7.
Label Roll Installation
•
Fig.8.
Pull the lever to open the cover
•
Fig.9.
Correct Label Installation
2.3.1. Using the External Roll Holder
•
Fig.10.
Attaching the External Roll Holder
•
Fig.11.
External Roll Mount Label Installation 1
•
Fig.12.
External Roll Mount Label Installation 2
2.3.2. Loading Labels with the Cutter Unit Attached (optional)
•
Fig.13.
Label Installation in Cutter Mode
•
Fig.14.
Complete Label Installation in Cutter Mode
2.3.3. Closing the Top Cover
2.3.3.1. To Open
•
Fig.15.
Top Cover Support is fixed at Position 2
2.3.3.2. To Close
•
Fig.16.
Top Cover is fully open & ready to close
•
Fig.17.
Use both hands to close the Top Cover
2.4. Printing from Windows Software
3. LABELSTATION PRO SERIES SPECIFICATIONS
3.1. Power On Utilities
3.1.1. Ribbon Sensor Calibration
3.1.2. Gap Sensor Calibration Utility
3.1.3. Self Test Printout
3.1.4. Dump Mode
3.1.5. Printer Initialisation
3.2. Maintenance
3.2.1. Cleaning

© Advanced Labelling Limited July 2008
- 3 -
LabelStation Pro Series Set Up Manual July 2008
3.3. Troubleshooting
3.3.1. LED Status
3.3.1.1. No Power
3.3.1.2. The Printer is on and ready to use
3.3.1.3. The Printer is paused
3.3.1.4. The Printer is out of labels or ribbons or the printer setting is not correct.
3.3.2. Print Quality
3.3.2.1. Continuous feeding labels
3.3.2.2. No print on the label
3.3.2.3. Poor print quality
3.4. LED & Button Operation
3.4.1. LED
3.4.2. Button Operation
3.5. Specifications and Warranties
3.5.1. Printer Specifications
3.5.2. Label Stock Specifications
3.5.3. Ribbon Stock Specifications
3.5.4. Options
3.6. Compliances
3.7. Warranty Information
3.7.1. Thermal Print Head
3.7.2. Warranty Service Procedures
3.7.3. General Warranty Provision
3.7.4. Limitation of Liability

© Advanced Labelling Limited July 2008
- 4 -
LabelStation Pro Series Set Up Manual July 2008
1. GETTING STARTED
1.1. Unpacking your LabelStation Pro Series
The printer has been specially packaged to withstand damage in the shipping process. However,
upon receiving the LabelStation Pro Series printer, carefully inspect the package and the
device. In case of evident damage, contact Advanced Labelling Systems directly to specify the
nature and extent of the damage. Please retain the packaging materials in case you need to reship
the printer.
1.2. Equipment Checklist
• LabelStation Pro Series printer
• Ribbon paper core
• Ribbon supply/rewind spindle (2 pcs.)
• Label supply roll spindle (1 inch diameter core)
• Auto Switching Power supply
• Power cord
• Parallel interface cable
• USB cable
• Installation guide
• Label design software CD-ROM
If any parts are missing, please contact the customer service department of Advanced
Labelling Systems – 01202 683212
Separately purchased items may also be included, please check these items against your order or
delivery note.
These additional items may include:
• Continuous Rolls, Die Cut Labels, Cable Markers
• External Label Roll Holder
• Print Ribbon (this is usually fitted to your printer prior to dispatch).
• Memory module
• Cutter Unit (this is usually fitted to your printer prior to dispatch).
• Portable mini keyboard
• LabelStation Pro Series Industrial Symbols CD-ROM

© Advanced Labelling Limited July 2008
- 5 -
LabelStation Pro Series Set Up Manual July 2008
1.3. Getting to Know your LabelStation Pro Series
This section shows the various parts of the LabelStation Pro Series printer. We recommend
that you familiarize yourself with these parts.
1.3.1. LabelStation Pro Series Printer External View
Fig. 1. Top front view
1.3.2. LabelStation Pro Series Printer External Rear View
1. USB Interface
2. Parallel Interface
3. RS-232 DB-9 Interface
4. Power Jack
5. Power Switch
6. Rear Paper Guide
Fig. 2. External Rear View
1. Clear Window
2. Ribbon Access Window
3. LED indicator
4. Feed Button
5. Printer Top Cover
6. Cover release button
6.
© Advanced Labelling Limited July 2008
- 6 -
LabelStation Pro Series Set Up Manual July 2008
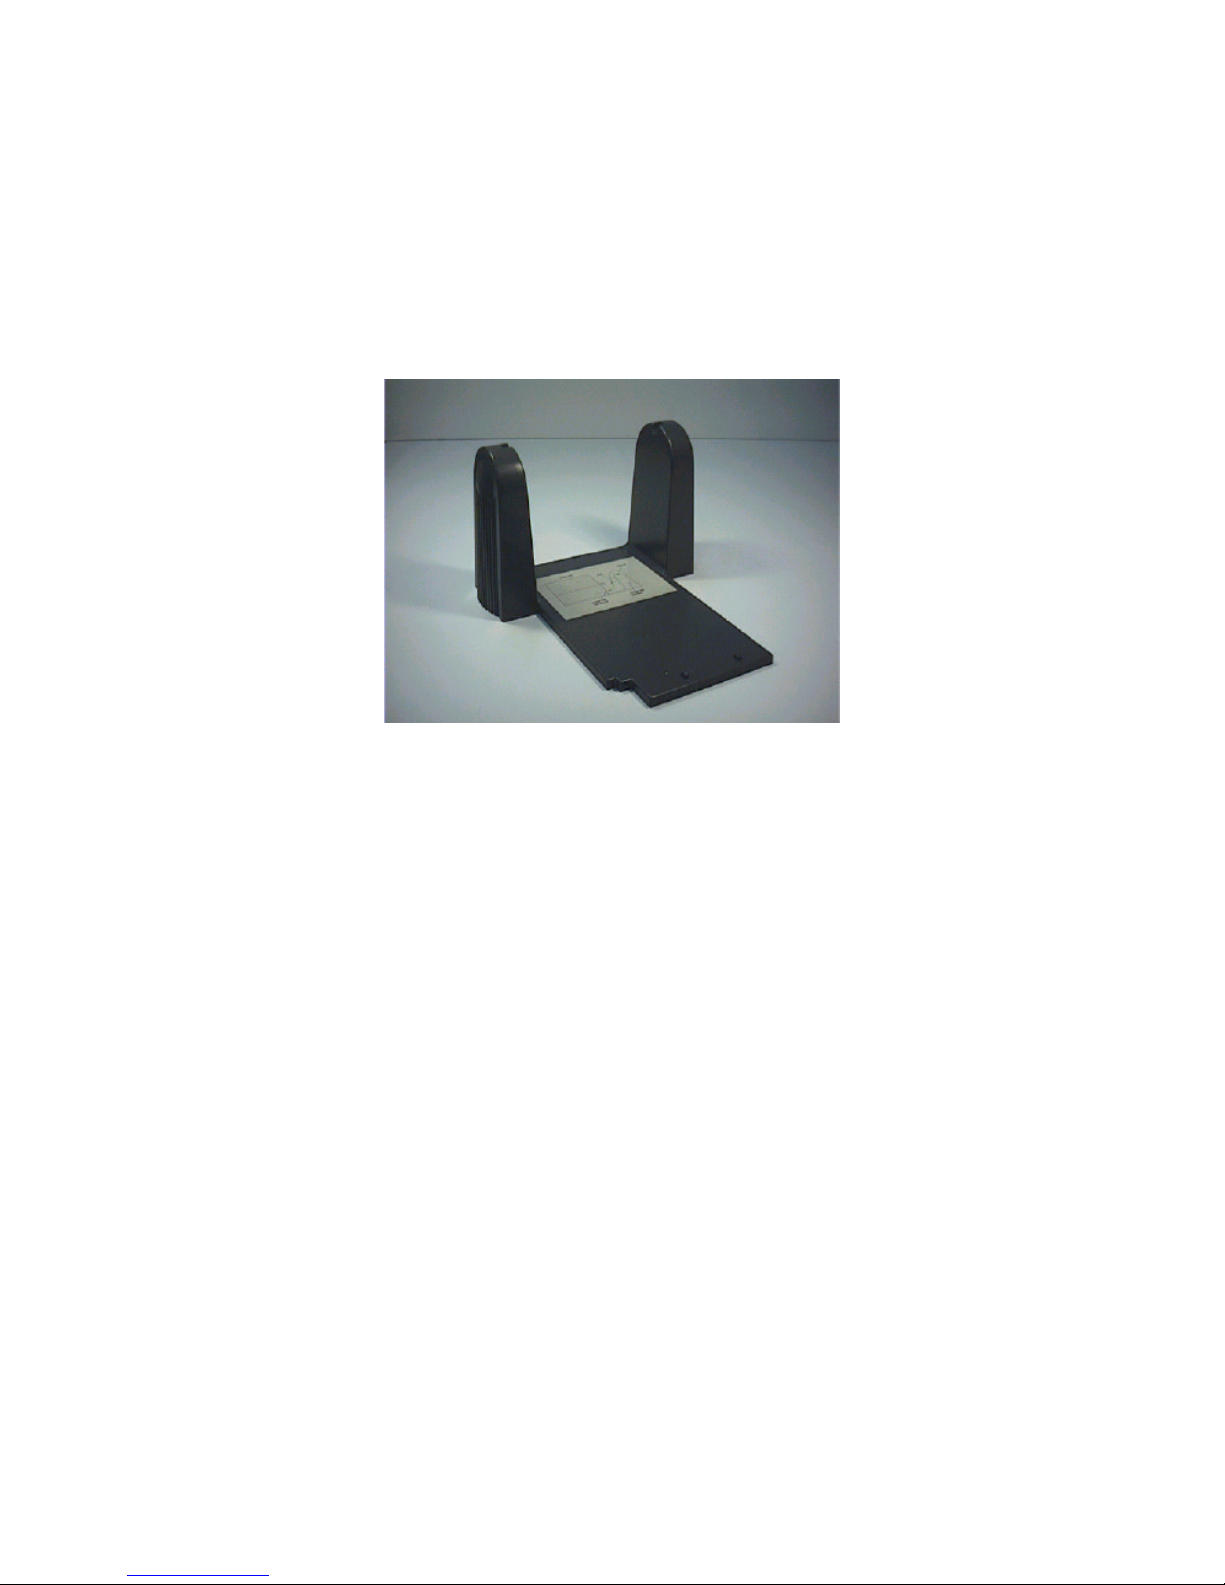
1.3.3. LabelStation Pro Series External Label Roll Mount (optional)
This is used when a larger diameter roll of labels or heat shrink tubing is being used (in excess of
100mm). The label mount sits behind the printer and the labels feed through a slot in the back of
the printer. This is an optional extra.
Fig. 3. External label roll mount

© Advanced Labelling Limited July 2008
- 7 -
LabelStation Pro Series Set Up Manual July 2008
2. SETTING UP YOUR LABELSTATION PRO SERIES
2.1. LabelStation Pro Series to PC Connection.
• Place the printer on a flat, secure surface.
• Make sure the power switch is off.
• Connect the printer to the computer with the Centronics Parallel or USB cable
PLEASE NOTE IF USING USB FOLLOW THE INSTRUCTIONS ON THE YELLOW LABEL ON THE TOP OF THE PRINTER.
• Plug the power cord into the power supply connector at the rear of the printer, and then
plug into the mains.
Fig.4. Attach power supply to printer
2.2. Loading the Print Ribbon
The printer automatically detects if a ribbon is installed after power on and will switch to thermal
transfer or direct thermal printing mode. If printer does not detect the ribbon, the motor that
drives the ribbon rewind spindle will be turned off.
If the ribbon is installed, but the printer is not winding it on, please refer to the ribbon
calibration procedure to calibrate the ribbon sensor sensitivity. (Chapter 5.1.1. Ribbon Sensor
Calibration)
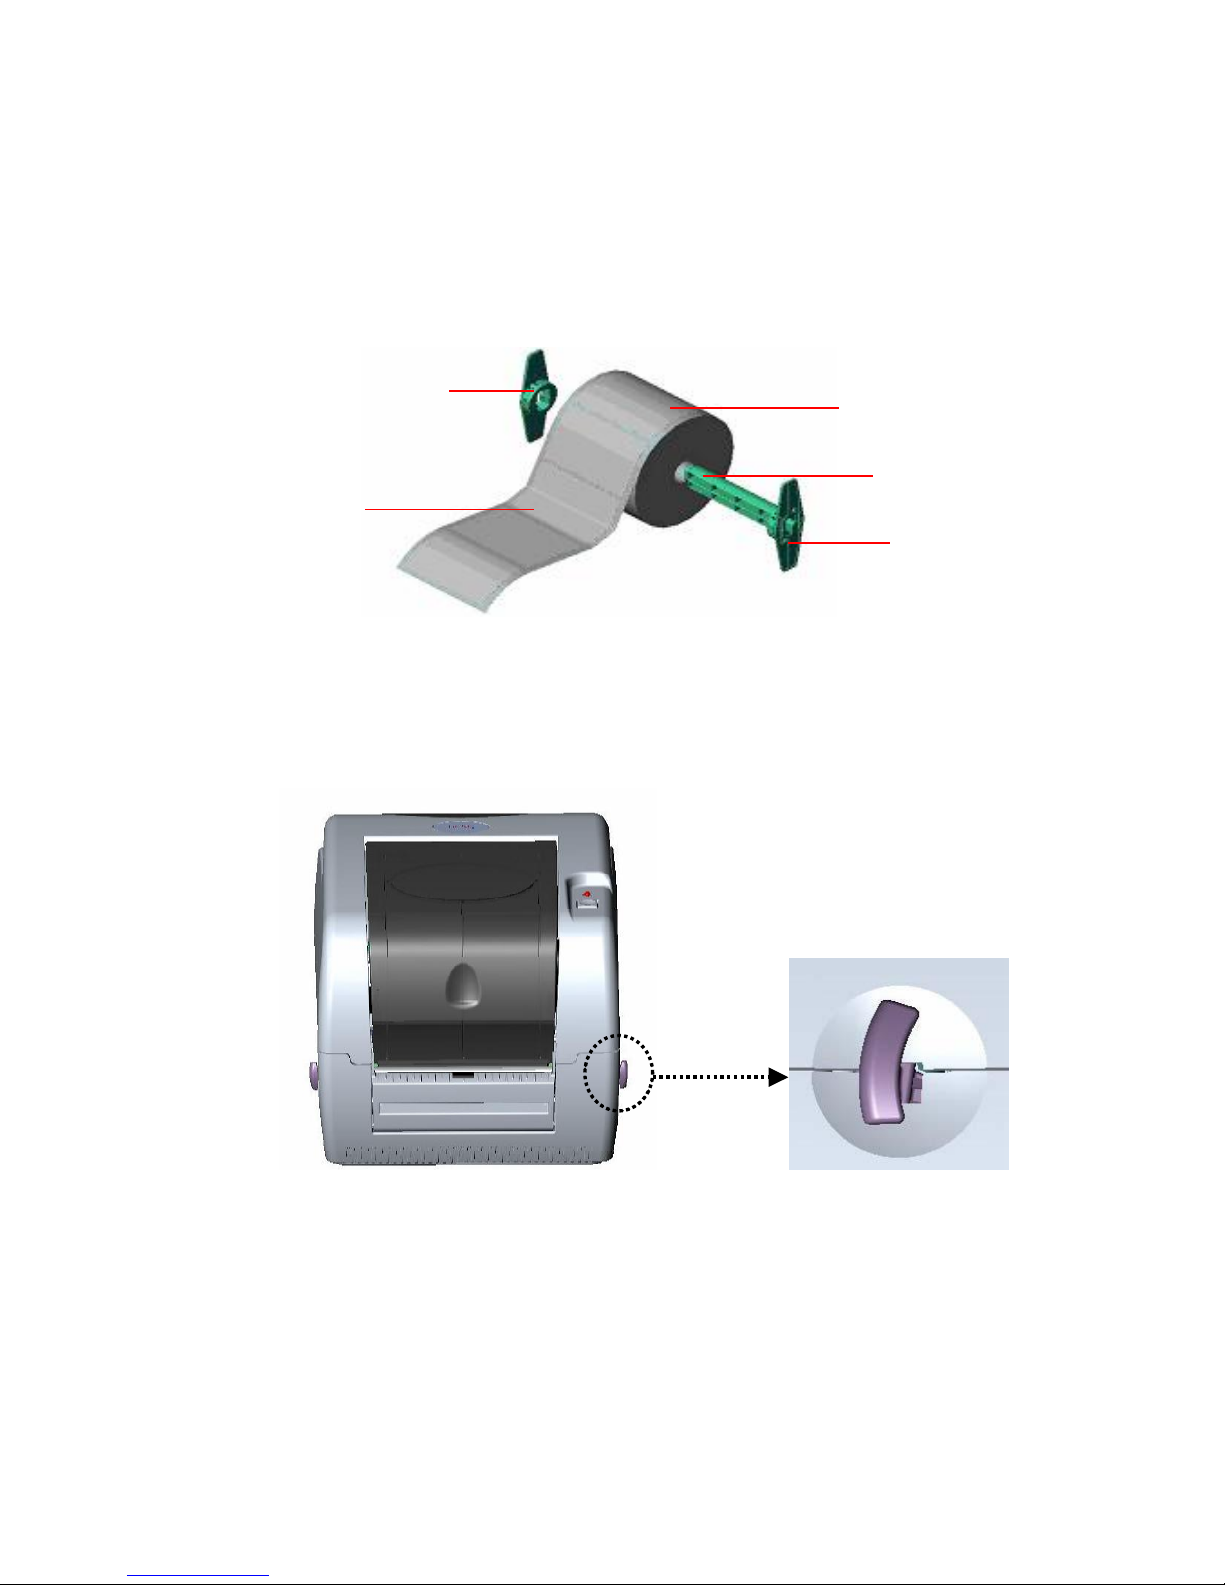
2.2.1. Installing the Print Ribbon into the LabelStation Pro Series printer.
• Push down on the ribbon access window to unlock and open the cover.
• Place a paper core onto the front ribbon rewind spindle.
• Mount this empty spindle on the front hub.
• Install a ribbon on the back ribbon supply spindle.
• Mount the ribbon supply spindle on the rear hub.
• Attach the ribbon leader to the ribbon rewind paper core.
• Rotate the ribbon rewind paper core until the ribbon leader is thoroughly, firmly
encompassed by the black section of the ribbon.
Mains Power
Plug
Power
Switch
Power supply
Power
Cable
U
SB
Centronics
Parallel
RS-232

© Advanced Labelling Limited July 2008
- 8 -
LabelStation Pro Series Set Up Manual July 2008
• Close the ribbon access window.

© Advanced Labelling Limited July 2008
- 9 -
LabelStation Pro Series Set Up Manual July 2008
Fig.5. Ribbon Installation 1
Fig.6. Ribbon Installation 2
Ribbon Access Window
Paper Core
R
ibbon Spindle
Back Hub
Front Hub
Ribbon Rewind Paper Core
Rear Hub
Ribbon Leader
Ribbon Supply Spindle
© Advanced Labelling Limited July 2008
- 10 -
LabelStation Pro Series Set Up Manual July 2008
2.3. Loading Label Stock
• Turn off the printer and open the printer cover
If your label core is 1 inch, remove the 1.5” core adapter from the fixed tab. If label width is 4
inch wide, two fixing tabs are not required.
• Slide the label supply roll spindle through the core of a label roll and attach the fixing tabs
onto the spindle.
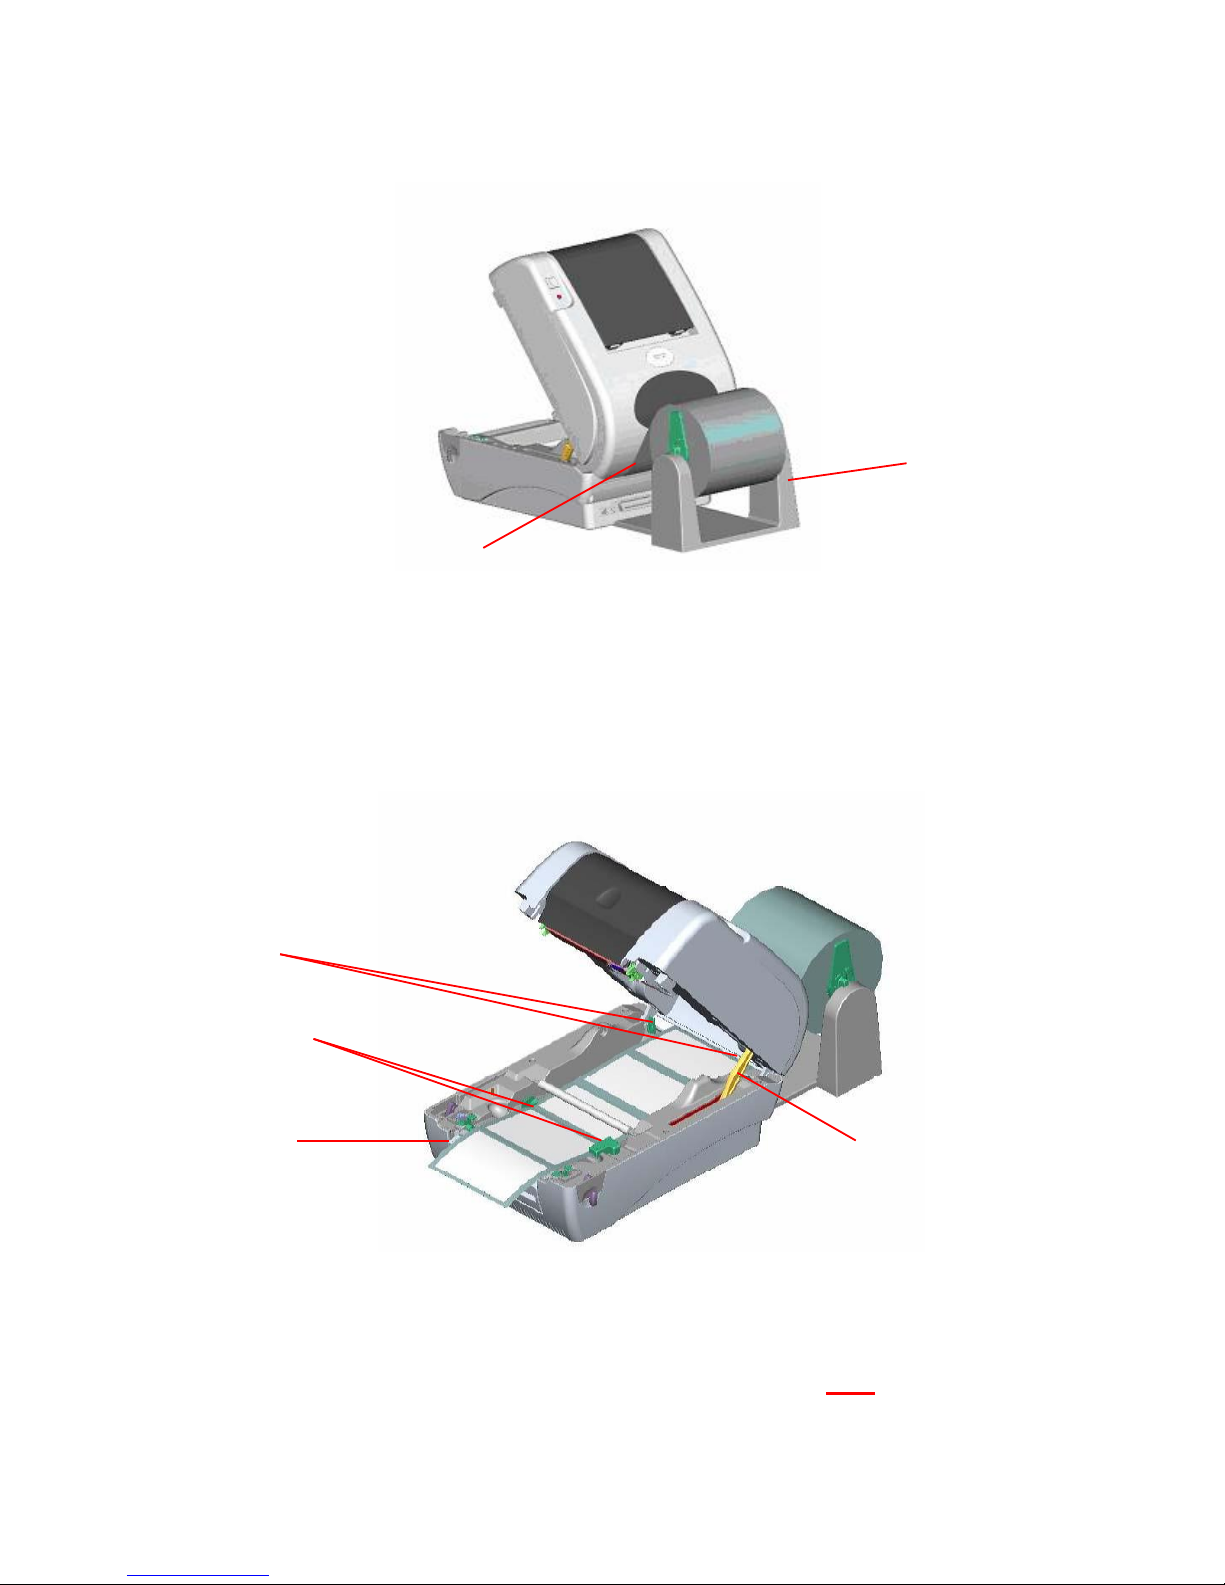
Fig. 7. Label Roll Installation
• Open the printer’s top cover by releasing the green top cover open levers located on each
side of the printer and lifting the top cover. A top cover support at the rear of the printer
will hold the printer top cover open.
• Place the loaded label spindle onto the center of the paper roll mount.
• Feed the labels, printing side face up, through the Teflon bar and the paper guide and pass
over the platen.
• Adjust the green paper guides to slightly touch the edges of the label backing paper.
• To close the printer top cover, lift the cover to the ultimate open angle then use both
hands to close the cover gently. Close the printer top cover slowly and make sure the cover
locks latch securely.
1.5” Core Adaptor
Printing Side
Face Up
Label Roll
Fixed Tab
1”
Label Spindle
Fig. 8 Pull the lever to open the cover

© Advanced Labelling Limited July 2008
- 11 -
LabelStation Pro Series Set Up Manual July 2008
M
ake sure hands are not placed in the printer when closing the top cover.
Do not free fall the top cover.
Failure to securely close and lock the cover will result in poor print quality.
Fig. 9. Correct Label installation
2.3.1. Using the External Roll Holder (Optional)
Fig.10. Attaching the External Roll Holder
• Attach an external roll holder to the bottom of the printer by lining up the notches on
the holder to the holes on the base of the printer
• Open the printer top cover by pushing forward the top cover open levers.
• The top cover support will hold the printer top cover.
• Install a roll of labels (loaded onto the label spindle) on the external paper roll mount.
• Feed the labels through the external label feed opening through the rear paper guide.
Printer Top
Cover
Teflon Bar
Support Bar
Paper Roll Mount
Top Cover Open Lever
Paper
Guide
© Advanced Labelling Limited July 2008
- 12 -
LabelStation Pro Series Set Up Manual July 2008
Fig. 11. External Roll Mount Label Installation 1
• Feed the labels, printing side face up, through the paper guide and pass over the
platen.
• Adjust the paper guides by removing them left or right to fit the paper width.
• Close the printer top cover by lifting up the support and close the printer top slowly.
Fig. 12. External Roll Mount Label Installation 2
PLEASE NOTE WHEN YOU ARE USING HORTICULTURAL LABELS
MAKE SURE THE LABELS ARE INSTALLED IN THE PRINTER SO THE
LABELS ARE COMING OFF THE BASE OF THE ROLL NOT OFF THE TOP.
THIS IS THE OPPOSITE OF THE DIAGRAM ON THE BASE
External Roll
Holder
External Label
Feed Opening
Rear Paper
Guide
Front Paper
Guides
Platen
Top Cover
Support
© Advanced Labelling Limited July 2008
- 13 -
LabelStation Pro Series Set Up Manual July 2008
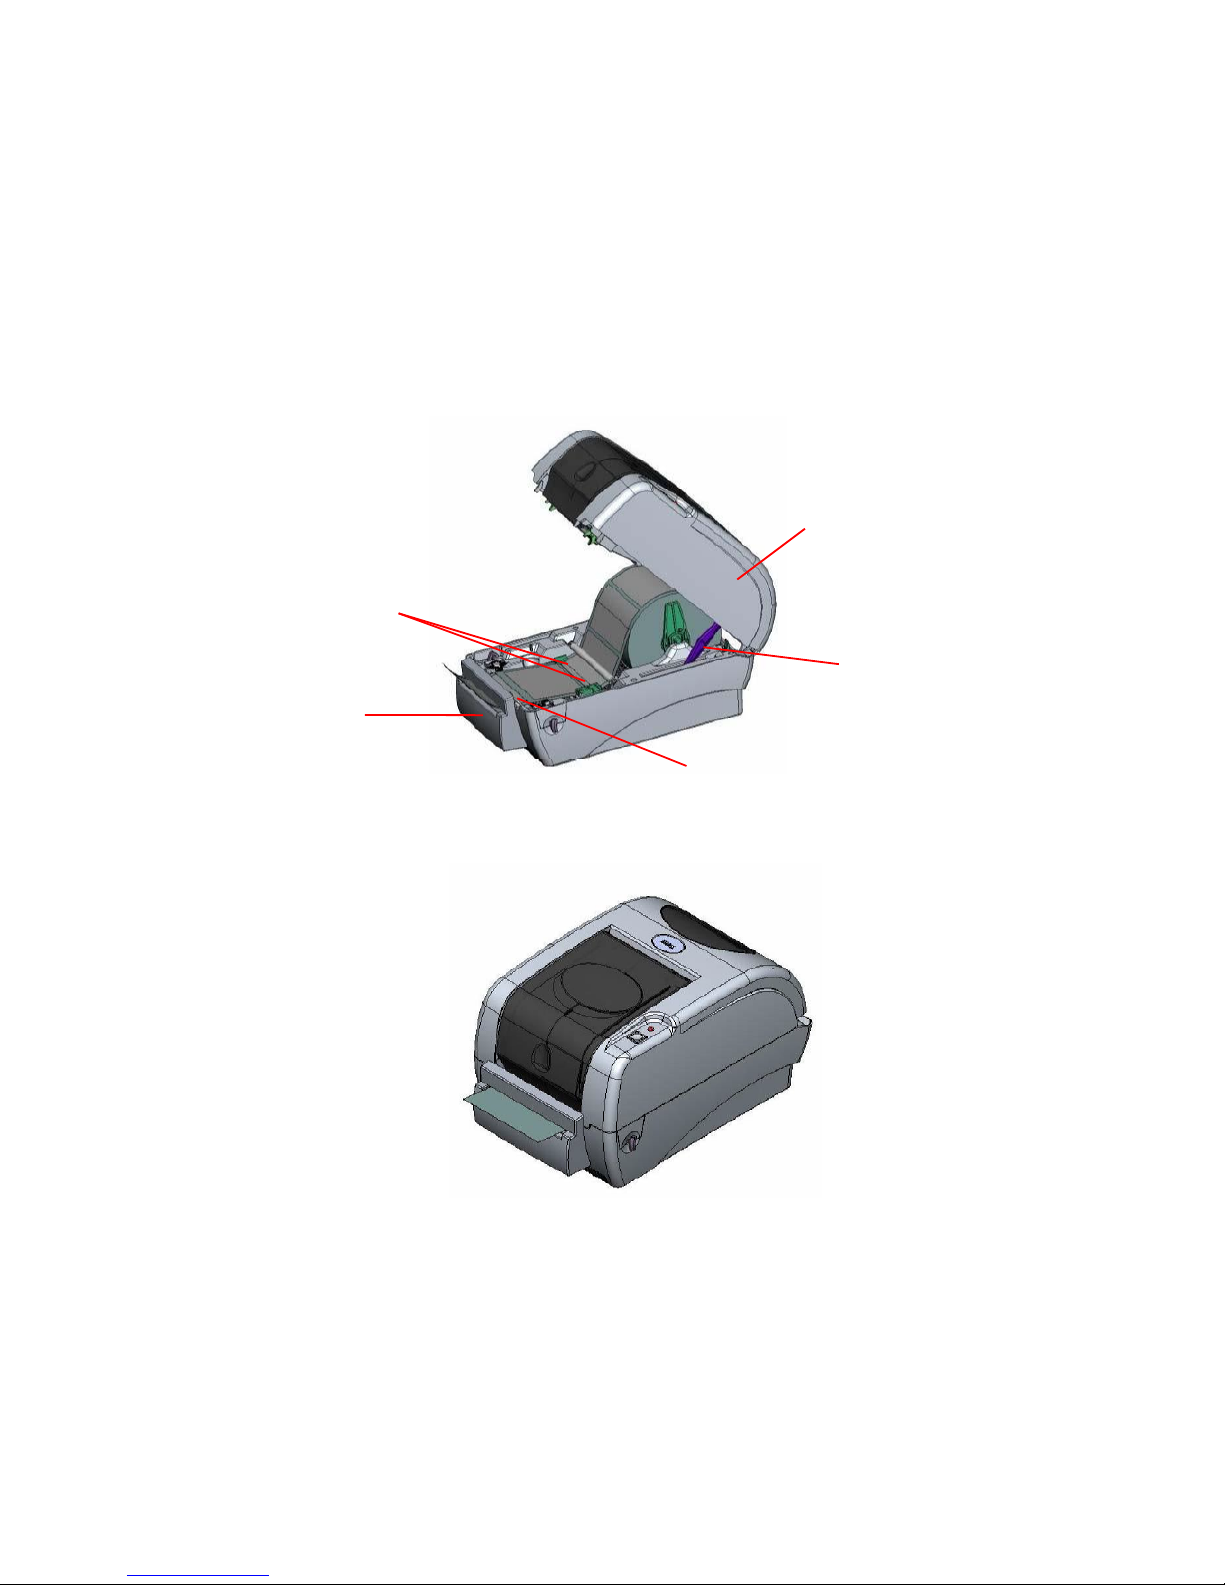
2.3.2. Loading Labels with the Cutter Unit Attached (Optional)
• Insert the label spindle into your label roll (as section 2.3.)
• Open the printer top.
• Install the label roll on the paper roll mount.
• Feed the labels, printing side face up, through the paper guide and pass over the
platen.
• Lead the labels through the cutter paper opening.
• Adjust the paper guides by moving left or right to fit the labels width.
Fig.13. Label installation in cutter mode
• Close the top cover by lifting up the top cover support and close the top cover slowly
Fig.14. Complete label installation in cutter mode
Paper Guide
Cutter
Platen
Top Cover
Support
Top Cover

© Advanced Labelling Limited July 2008
- 14 -
LabelStation Pro Series Set Up Manual July 2008
2.3.3. Closing the Top Cover
Please take care when opening or closing the printer’s top cover by carefully following
these instructions.
2.3.3.1. To Open
• When facing the front of the printer pull the cover release levers on both sides
of printer towards you.
• Lift up the top gradually.
• There are two stop positions for the top cover. Position 1 and 2 are indicated on
the label below.
To hold the cover open at position 1, you must lift the cover higher than the stopping point at
position 1 and gently lower the cover to stopping point 1. Do not let the cover free fall!
• Fully open the top cover and gently lower it to stop position 2.
Fig. 15. Top cover support is fixed at position 2
2.3.3.2. To Close
• To close the cover, lift up the top cover to the ultimate angle then close the top
cover gently and it will be kept at a stop position between 1 and 2 for a while.
• Use both hands to gently push down the top cover to close it and make sure the
cover is latched on both sides.
Fig.16. Top cover is fully open and ready to close

© Advanced Labelling Limited July 2008
- 15 -
LabelStation Pro Series Set Up Manual July 2008
Fig.17. Use both hands to close the top cover
Do not place your hands between top cover and lower cover when closing the top cover!
Do not force the cover!
If you are not sure if top cover is fixed at stop position, please do not push top cover to close it
or the top cover will be damaged.

© Advanced Labelling Limited July 2008
- 16 -
LabelStation Pro Series Set Up Manual July 2008
3. LABELSTATION PRO SERIES SPECIFICATIONS
3.1. Power On Utilities
There are three power-on utilities to set up and test printer hardware. These utilities are activated
by pressing FEED button and by turning on the printer power simultaneously.
3.1.1. Ribbon Sensor Calibration
Please follow the steps below to calibrate the ribbon sensor.
1. Turn off the power.
2. Press and hold the FEED button then turn on printer power.
3. Release the button when LED turns red (but within the 5 flashes).
The LED color will be changed as following pattern.
Orange Red (5 flashes) Orange (5 flashes) Green (5 flashes) Solid green
This will tell the printer to check if there is a ribbon loaded.
3.1.2. Gap Sensor Calibration Utility
Gap/black mark sensor sensitivity should be calibrated at the following conditions:
• A brand new printer
• Change of label stock.
• Printer initialization.
The printer will remember the sensor setting in the last print job - Please follow the steps below to
calibrate the sensor.
1. Turn off the power.
2. Press and hold the FEED button then turn on printer power.
3. Release the button when LED turns orange (within in the 5 flashes)
The LED color will be changed as following pattern:
Orange Red (5 flashes) Orange (5 flashes) Green (5 flashes) Solid green
The printer performs the following items:
• Calibrate label pitch
• Print out thermal print head check pattern
• Print out the internal settings
• Enter dump mode
Reset the printer by turning the POWER switch off and on.
© Advanced Labelling Limited July 2008
- 17 -
LabelStation Pro Series Set Up Manual July 2008
3.1.3. Self Test Printout
The Self-test printout can be used to check if there is any dot damage on the heater element,
printer configurations and available memory space.
Following the check pattern, the printer prints internal settings as listed below:
• Printer model and firmware version
• Firmware Checksum
• Mileage
• Serial port setting
• Country code setting
• Print speed setting (inch/sec)
• Print darkness
• Label size setting (inch)
• Gap distance (inch)
• Gap/black mark sensor sensitivity
• Number of Download Files
• Total and available Memory space
3.1.4. Dump Mode
After the self-test, the printer enters the dump mode. In this mode, any characters sent from the
host computer will be printed in two columns, as shown.
The characters received will be shown in the first column, and their corresponding hexadecimal
values, in the second. This is often helpful to users for the verification of programming commands
or debugging of printer programs.

© Advanced Labelling Limited July 2008
- 18 -
LabelStation Pro Series Set Up Manual July 2008
• Reset the printer by turning the POWER switch off and on.
3.1.5. Printer Initialization
Printer initialization is used to clear DRAM and restore printer settings to defaults. The only one
exception is ribbon sensitivity, which will not be restored to default.
Printer initialization is activated by the following procedures.
1. Turn off printer power.
2. Press the FEED button and then turn on power. The LED will become red, orange, green
with 5 blinking (around 5 seconds) for each colour.
3. Release the FEED button when LED becomes green (within the 5 flashes)
The LED color will be changed as following pattern:
Orange Red (5 flashes) Orange (5 flashes) Green (5 flashes) Solid green
Printer configuration will be restore to defaults as below after initialization.
Parameter Default setting
Speed 127 mm/sec (5 ips)
Density 7
Label Width 4.25” (108.0 mm)
Label Height 2.5” (63.4 mm)
Sensor Type Gap sensor
Gap Setting 0.12” (3.0 mm)
Print Direction 0
Reference Point 0,0 (upper left corner)
Offset 0
Tear Mode On
Peel off Mode Off
Cutter Mode Off
Serial Port Settings 9600 bps, none parity,
8 data bits, 1 stop bit
Code Page 850
Country Code 001
Clear Flash Memory No
Note: When printer initialization is done, please calibrate the gap sensor again – see 5.1.2 Gap
Sensor Calibration Utility.

© Advanced Labelling Limited July 2008
- 19 -
LabelStation Pro Series Set Up Manual July 2008
3.2. Maintenance
3.2.1. Cleaning
Use one or more of the following supplies that meets your needs:
• Cleaning pens.
• Cleaning swabs
• Lint-free cloth.
The cleaning process is described as following
Printer Part Method
Printer Head Let the print head to cool for one minute.
Use a cleaning pen to swab the print elements.
Platen Roller Rotate the platen roller and wipe it thoroughly
with 70% alcohol and a cleaning swab, or
lint-free cloth.
Exterior Wipe it with water-dampened cloth.
Interior Brush or air blow
3.3. Troubleshooting
This section lists the common problems you may encounter when operating the LabelStation Pro
Series printer. Also, it provides solutions.
3.3.1. LED Status
LED Status/Colour
Printer Status Solution Number
Off Off 5.3.1.1.
Solid Green On 5.3.1.2.
Green flashing Pause 5.3.1.3.
Red flashing Stopped 5.3.1.4.
3.3.1.1. No power.
• Turn on the power switch.
• Check if the green LED is lit on power supply. If it is not lit on, power supply is
broken.
• Check both power connections from the power cord to the power supply and from
the power supply to the printer power jack.
3.3.1.2. The printer is on and ready to use.
• No action necessary.
3.3.1.3. The printer is paused.
• Press the feed button to resume printing.

© Advanced Labelling Limited July 2008
- 20 -
LabelStation Pro Series Set Up Manual July 2008
3.3.1.4. The printer is out of labels or ribbon or the printer setting is not
correct
• Out of label or ribbon
o Load a roll of label and follow the instructions in 2.3. Loading the Paper then
press the feed button to resume printing.
o Load a roll of ribbon and follow the instructions in 2.2.Loading the Ribbon
then press the feed button to resume printing.
• Printer setting is not correct.
o Initialize the printer by following the instructions in “Power on Utility”.
o Label Setup is not correct.
3.3.2. Print Quality
3.3.2.1. Continuous feeding labels
• The printer setting may go wrong. Please do the Initialization and Gap/Black Mark
Calibration.
3.3.2.2. No print on the label
• Is the label or ribbon loaded correctly?
o Follow the instructions in 2.3. Loading the Paper or 2.3. Loading the Ribbon.
• Does the ribbon run out?
o Follow the instructions in 2.2. Loading the Ribbon.
3.3.2.3. Poor print quality
• Top cover is not closed properly. Close the top cover completely and make sure the
right side and left side levers are latched to top cover properly.
• Clean the thermal print head.
• Check the ribbon is fitted correctly.
• Adjust the print density setting.
• Ribbon and paper media are not compatible.
If the printer still does not function after all suggested solutions have been invoked, please
contact Advanced Labelling Systems on 01202 683212.
Emailed requests for support should be directed to info@labelzone.co.uk
Our technical support is available to you during working hours, please call with any problems you
may have. Tech Support Line – 01202 683212

© Advanced Labelling Limited July 2008
- 21 -
LabelStation Pro Series Set Up Manual July 2008
3.4. LED & BUTTON OPERATION
3.4.1. LED
LED Colour Description
Green
This indicates that the power is on and the
device is ready to use.
Orange
This indicates that the system is detecting the
paper and ribbon status
Red
This indicates a printing error, such as paper
empty, ribbon empty, or cover opened etc.
3.4.2. Button Operation
Feed Press the button when the LED is green.
• It feeds the label to the beginning of the
next label.
Pause Press the feed button during printing
• The printing job is suspended.
Ribbon Sensor
Calibration
Turn off the power switch.
Hold on the button then turn on the power
switch.
Release the button when LED becomes red and
flashing. (Any red will do during the 5 flashes).
• It will calibrate the ribbon s
ensor sensitivity.
Gap/Black Mark
Sensor
Calibration,
Label Length
Measurement,
Self Test and
Enter Dump
Mode
Turn off the power switch
Hold down the button then turn on the power
switch.
Release the button when LED becomes orange
and flashing. (Any orange will do during the 5
flashes ).
• It calibrates the sensor and measures the
label length and prints internal settings then
enter the dump mode.
REMEMBER to turn the power off and on again
to clear dump mode.
Printer
Initialization
Turn off the power switch.
Hold down the button then turn on the power
switch.
Release the button when LED turns green after
5 orange flashes. (Any green will do during the
5 flashes).
• Always do gap/black mark sensor
calibration after printer initialization.

© Advanced Labelling Limited July 2008
- 22 -
LabelStation Pro Series Set Up Manual July 2008
3.5. SPECIFICATIONS AND WARRANTIES
3.5.1. Printer Specifications
Item LabelStation Pro Series
Mechanism
Resolution
Max. Print Width
Max. Print Length
Ribbon Capacity
Printing Speed
Peeler function
Printing Method
203 dpi.
108 mm.
1000 mm ( 39” ).
300 meter with 1” core. (Max. OD 67 mm)
2, 3, 4 and 5 ips.
2, 3 ips
Direct thermal and thermal transfer printing
Enclosure
Structure
Dimension
Operation Panel
Double-walled plastic.
314mm(L) x 213mm(W) x 188mm(H)
One push switch, and one indicator LED (Green,
Orange, Red colours).
Hardware
Sensor
Memory
Interface
Power
Transmissive sensor (offset 6 mm from liner edge).
Reflective sensor (position adjustable).
Head open micro switch.
Ribbon end sensor
1M byte Flash memory
2M bytes DRAM
RS-232C (max baud rate, 19,200 bps).
USB: V1.1.
Centronics.
AC input: 100-240V universal auto switching power
supply.
DC output: 24V 3.75A.
Note: Use only the LabelStation Pro Series power
supply; failure to do so could cause serious
damage to the LabelStation Pro Series printer.
Firmware
Font Type
Rotation
Barcode Format
Command Set
8 alpha-numeric bitmap fonts, and 1 true type font.
0, 90,180 and 270 degrees.
1D Bar code
Code 39, Code 93, Code 128UCC, Code128
subsets, A.B.C, Codabar, Interleave 2 of 5, EAN-8,
EAN-13, EAN-128, UPC-A, UPC-E, EAN and UPC2(5)
digits add-on, MSI, PLESSEY, POSTNET, CPOST
2D Bar code
PDF-417, Maxicode, and DataMatrix.
TSPL2
Environment
Operation
Storage
Temperature: 5°C ~ 40°C.
Relative Humidity: 25% ~ 85% (Non condensing)
Temperature: -40°C ~ 60°C.
Relative Humidity: 10% ~ 90% (Non Condensing)

© Advanced Labelling Limited July 2008
- 23 -
LabelStation Pro Series Set Up Manual July 2008
3.5.2. Label Stock Specifications
LabelStation Pro Series is capable of printing on a wide range of media. Refer to the supplies
price list for specifications of compatible label media.
Item Specification
Type Label (Continuous, Die-cut, Fan-fold).
Wound Type Outside wound.
Width 20mm ~ 112mm (0.78” ~ 4.4”).
Length 10mm ~ 1000mm (0.4” ~ 39”).
25.4mm ~ 1000mm (1” ~ 39”). (For cutter)
Thickness 0.06mm ~ 0.19mm. (2.3~7.4 mil), max. 150g/m2
Roll Diameter 5”.
Roll Core Diameter 25.4mm ~ 76.2mm (1” ~ 3”).
Gap Height 2mm min
Black Mark Height 2mm min
Black Mark Width 8mm min.
3.5.3. Ribbon Specifications
Our print ribbons have been designed for optimum print performance with our range of label
media.
As a guide Industrial Print Ribbons are long life & highly durable when used with the appropriate
media. General Purpose Print Ribbons are ideal for paper labels and printing on polyesters or
vinyl’s where no long-term performance is required.
We cannot guarantee the performance the LabelStation Pro Series System with non-approved
supplies.
Item Specification
Type Wax, Wax / Resin, Resin.
Core Diameter 1".
Width Max 110mm.
Capacity 300m with 1" core.
Wound Type Outside wound.
3.5.4. Options
A number of different options may be added to the LabelStation Pro Series printer for even
greater convenience and versatility.
The available options include:
• Industrial Graphics CD-ROM
• Cutter for guillotining labels or sign vinyl’s
• Portable LCD keyboard

© Advanced Labelling Limited July 2008
- 24 -
LabelStation Pro Series Set Up Manual July 2008
3.6. Compliance’s
CE Class B: EMI: EN 50081-1:1998->EN55022:1998, EN 61000-3-2:2000
EN61000-4-3:1998
EMS: EN55024:1998
FCC Part 15, Class B
UL, CUL, C-Tick: Class B AS/ NZS 3584: 1997
TÜV-GS: EN60950: 2000
3.7. Warranty Information
Advanced Labelling Systems warrants to the customer, that under normal use and service, the
LabelStation Pro Series printer (with the exception of the print head) purchased hereunder shall be free
from defects in material and workmanship for a period of one year, from the date of shipment by Advanced
Labelling Systems. Expendable items or parts such as labels & ribbons are not covered by this warranty.
This warranty does not cover equipment or parts, which have been misused, altered, neglected, carelessly
handled, or used for purposes other than those for which the printer was manufactured. This warranty also
does not cover loss, damages resulting from accident, or damages resulting from unauthorised service.
3.7.1. Thermal Print Head
The warranty of the thermal print head is limited to ninety days (90) from the date of shipment to buyer.
The warranty does not cover thermal print heads, which have been misused, altered, neglected, handled
carelessly, or damaged due to improper cleaning or unauthorised repairs.
3.7.2. Warranty Service Procedures
If a defect should occur during the warranty period, the defective unit must be returned, freight and
insurance prepaid, in a suitable protective shipping container to Advanced Labelling Systems. Include a
contact name, action required and a detailed description of the problem and examples when possible.
Advanced Labelling Systems shall not be responsible for any loss or damages incurred during shipping or
any loss due to the printer being unavailable for use.
3.7.3. General Warranty Provisions
Advanced Labelling Systems makes no warranty as to the design, capability, capacity, or suitability of any of
its hardware, supplies or software. Software is licensed on an “as is” basis without warranty. Except and to
the extent expressly provided in this warranty and in lieu of all other warranties, expressed or implied,
including, but not limited to any warranties of merchantability or fitness for a particular product. Purchaser
shall be solely responsible for the selection, use, efficiency and suitability of Advanced Labelling Systems
products.
3.7.4. Limitation of Liability
In no event shall Advanced Labelling Systems be liable to the purchaser for any indirect, special, or
consequential damages or lost profits arising out of or relating to Advanced Labelling Systems products, or if
the performance or a breach thereof, even if Advanced Labelling Systems has been advised of the possibility
thereof. Advanced Labelling Systems liability, if any, to the purchaser or to the customers of purchaser
hereunder shall in no event exceed the total amounts paid to Advanced Labelling Systems hereunder by the
purchaser for a defective product. In no event shall Advanced Labelling Systems be liable to the purchaser
for any damages resulting from or related to any failure or delay of Advanced Labelling Systems in the
delivery or installation of the computer hardware, supplies, or software in the performance of any services.
The remedies set forth here are the sole and exclusive remedies available to any person for any damages of
any kind and nature including incidental, consequential, or special, whether arising from warranty (including
implied warranties), contract, negligence, tort or otherwise. In the event that any implied warranties
(including but not limited to the implied warranties of merchantability and fitness for a particular purpose)
are found to exist, such warranties are limited in duration to the period of the warranties.
 Loading...