

Labconco Labconco-1063600_rev_b_bulk_tray_dryer_installation_guide Bulk Tray Dryer Installation Guide

US
(NEMA 5-15P)
LABCONCO CORPORATION 8811 Prospect Ave, Kansas City, MO 64132
(816) 333-8811 or (800) 821-5525 • (816) 363-0130 fax • labconco.com
Bulk Tray Dryer Installation Guide
Note: This Quick Installation Guide may not provide all the information necessary for your
particular installation. Refer to the User’s Manual for details and precautions.
Preparations
Proper Electrical Supply
115V models
o 15 Amp dedicated single phase circuit.
o Properly grounded receptacle for NEMA 5-15P
plug.
230V models
o 8 Amp dedicated single phase circuit.
o Properly grounded receptacle that matches the plug supplied with the unit
(230V models are supplied with one of the following plugs):
Part Number 1063600, Rev. B, ECO L116 Page 1 of 3
US EU China UK India
(NEMA 6-15P)
o If the plug does not match the available receptacle, remove the plug and
replace it with an approved plug of the suitable style.
Note:
o Additional appliances on the same circuit may cause the current to exceed
the rating of the circuit breaker or fuse. Do not connect a Tray Dryer to the
same circuit that powers a Freeze Dryer.
o Frequency must agree with the serial tag rating. Improper frequency will
damage the compressor.
Installation
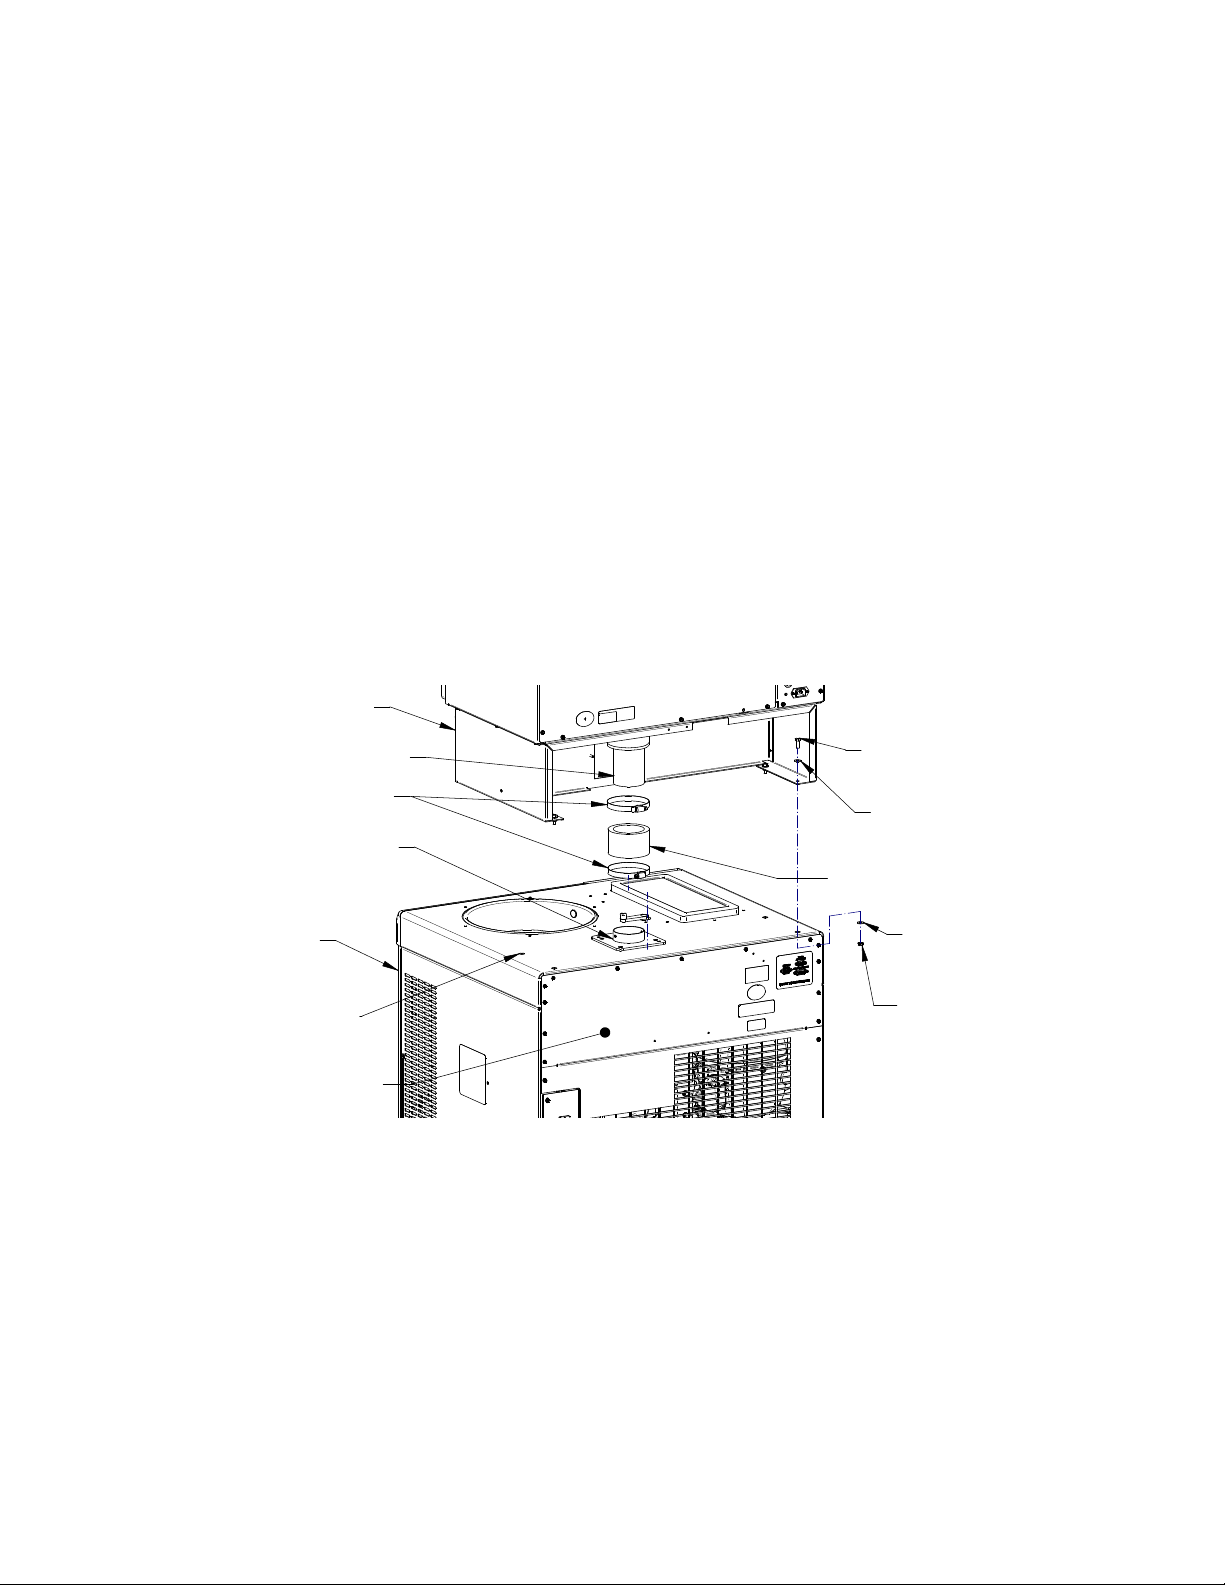
Freeze dryer
Remove flat gasket
if in place on vacuum
connection port
Stainless steel tube
Bulk tray dryer
1/4-20 x 3/4 hex head
screw (4) places
1/4" flat washer
(4) places
1/4" flat washer
(4) places
1/4-20 nut w/ integral
lockwasher (4) places
Do not remove this panel
Rubber coupling
Plastic plug
(4) places
Clamp
Remove the flat gasket if it is in place on the vacuum connection port.
Remove the 4 plastic plugs from the top of the Freeze Dryer.
Slide the lower rubber coupling up above the bottom of the stainless steel tube.
Snug both clamps on the hose.
Remove the lower back panel of the Freeze Dryer. DO NOT remove the Freeze
Dryer upper back panel.
Place the Tray Dryer on top of the Freeze Dryer aligning the 4 mounting holes and
the rubber coupling over the connection port. CAUTION: The Bulk Tray Dryer
weighs over 260 pounds (118Kg), use safe lifting procedures.
Install four screws, washers and nuts.
Loosen both clamps on the lower rubber coupling and slide the coupling downward
over the 3” connection port until it contacts the plate of the connection port. Align
the bottom edge of the lower clamp with the bottom edge of the rubber coupling,
then tighten clamp. Align the top edge of the upper clamp with the top edge of the
rubber coupling, then tighten clamp.
Part Number 1063600, Rev. B, ECO L116 Page 2 of 3

Communication
cable
Connector
clamp
Sample
Probes
Ground
Strap
Electrical Connections
Connect the power cord into the back of the Tray Dryer and tighten the screw in the
connector clamp. Connect the other end into a suitable receptacle.
Connect one end of the communication cable to the receptacle on the back panel of
the Bulk Tray Dryer marked “OUTPUT TO FREEZE DRYER”. Connect the other
end of the cable to the port on the Freeze Dryer labeled “DRYING ACCESSORY”.
Connect the Ground Strap by removing one of the screws from the Freeze Dryer
back panel and attaching the free end of the Ground Strap.
Connect the sample probes into the receptacles in the front of the shelves.
Vacuum Integrity Test
Go to Freeze Dryer Home screen and turn on the Freeze Dryer collector and allow
the collector to reach -40°C or colder.
Close and latch the Tray Dryer door.
Make sure the VAC RELEASE valve is set to CLOSE.
Start the vacuum pump (from the Freeze Dryer Home screen).
Vacuum in the system should reach at least 0.133 mbar within 30 minutes and
0.040 mbar within 18 hours (for clean & dry system).
For full operating instructions see the Bulk Tray Dryer and Console Freeze Dryer
User’s Manuals.
Part Number 1063600, Rev. B, ECO L116 Page 3 of 3
 Loading...