

Page 1

FlaskScrubber
Vantage Series
Glassware Washers
Model
4540031
Labconco Corporation
8811 Prospect Avenue
Kansas City, MO 64132-2696
800-821-5525, 816-333-8811
FAX 816-363-0130
E-MAIL labconco@labconco.com
HOME PAGE www.labconco.com
User’s Manual
Please read the User’s Manual before operating the equipment.
To receive important product updates,
complete your product registration card
online at register.labconco.com
Page 2

Copyright © 2007, 2008, 2010, 2013, 2014 Labconco Corporation. All rights reserved.
Warranty
Labconco provides a warranty on all parts and factory workmanship. The warranty includes areas of
defective material and workmanship, provided such defect results from normal and proper use of the
equipment.
The warranty for all Labconco products will expire one year from date of installation or two years
from date of shipment from Labconco, whichever is sooner, except the following;
Purifier® Logic® Biological Safety Cabinets and PuriCare® Lab Animal Research Stations
carry a three-year warranty from date of installation or four years from date of shipment from
Labconco, whichever is sooner.
SteamScrubber® & FlaskScrubber® Glassware Washers carry a two-year warranty from date
of installation or three years from date of shipment from Labconco, whichever is sooner.
Blood Drawing Chairs carry a ten year warranty.
Carts carry a lifetime warranty.
Glassware is not warranted from breakage when dropped or mishandled.
This limited warranty covers parts and labor, but not transportation and insurance charges. In the
event of a warranty claim, contact Labconco Corporation or the dealer who sold you the product. If
the cause is determined to be a manufacturing fault, the dealer or Labconco Corporation will repair or
replace all defective parts to restore the unit to operation. Under no circumstances shall Labconco
Corporation be liable for indirect, consequential, or special damages of any kind. This statement may
be altered by a specific published amendment. No individual has authorization to alter the provisions
of this warranty policy or its amendments. Lamps and filters are not covered by this warranty.
Damage due to corrosion or accidental breakage is not covered.
The information contained in this manual and the accompanying products are copyrighted and all rights
reserved by Labconco Corporation. Labconco Corporation reserves the right to make periodic design
changes without obligation to notify any person or entity of such change.
Returned or Damaged Goods
Do not return goods without the prior authorization from Labconco. Unauthorized returns will not be
accepted. If your shipment was damaged in transit, you must file a claim directly with the freight carrier.
Labconco Corporation and its dealers are not responsible for shipping damages.
The United States Interstate Commerce Commission rules require that claims be filed with the delivery
carrier within fifteen (15) days of delivery.
Limitation of Liability
The disposal and/or emission of substances used in connection with this equipment may be governed by
various federal, state, or local regulations. All users of this equipment are required to become familiar with
any regulations that apply in the user’s area concerning the dumping of waste materials in or upon water,
land, or air and to comply with such regulations. Labconco Corporation is held harmless with respect to
user’s compliance with such regulations.
Contacting Labconco Corporation
If you have questions that are not addressed in this manual, or if you need technical assistance, contact
Labconco’s Customer Service Department or Labconco’s Product Service Department at 1-800-821-5525
or 1-816-333-8811, between the hours of 7:00 a.m. and 6:00 p.m., Central Standard Time.
Part #4593300, Rev. H
ECO J160
Page 3

T
T
AABBLLEE
O
O
FF
C
C
OONNTTEENNTTSS
CHAPTER 1: INTRODUCTION 1
Safety Symbols 1
CHAPTER 2: PREREQUISITES 3
Hot Water Requirements 3
Purified Water Requirements 3
Electrical Requirements 4
Drain Requirements 4
Space Requirements 5
CHAPTER 3: GETTING STARTED 6
Unpacking Your Glassware Washer 7
Washer Components 7
Removing the Shipping Skid 8
Washer Installation 8
Installing the Leveling Feet 8
Leveling the Washer 9
Centering the Washer Door 10
Connecting the Water Services 10
Connecting the Hot Water Supply 10
Connecting the Purified Water Supply 11
Connecting the Drain Hose 13
Connecting the Power Supply 15
Connecting a Cable for Monitoring Washer Operation 17
Controller Set Up 17
Testing Your Washer 18
Running the Diagnostics 18
Filling & Purging the Liquid Detergent & Neutralizing
Acid Rinse Dispense Systems 20
CHAPTER 4: USING YOUR WASHER 22
Arranging the Washer Racks 22
The FlaskScrubber Spindle Rack 22
Loading Glassware into the FlaskScrubber 23
Page 4

The Detergent Dispenser 24
Filling the Neutralizing Acid Dispenser 26
Selecting an Operating Cycle 26
Programming and Starting a Wash Cycle 27
Interrupting a Wash Cycle 29
Alarms 29
RS-232 Computer Connection 30
CHAPTER 5: MAINTAINING YOUR WASHER 35
Maintaining the Stainless Steel Interior 35
Maintaining the Air Gap in Drain 36
Maintaining the Water Fill Valve 36
Cleaning the Sump Filter Screen 37
Replacing the HEPA Filter 38
Maintaining the Conductivity Sensor 39
CHAPTER 6: MODIFYING YOUR WASHER 41
Installing the Optional Upper Spindle Rack 41
Removing the Optional Upper Rack 43
Adjusting the Height of the Optional Upper Rack 44
Installing Optional Pipet Inserts in a FlaskScrubber 44
Installing Small Spindles 46
Installing Optional Inserts into the Spindle Rack 46
Installing the Optional Cool Drain Water Kit 47
CHAPTER 7: TROUBLESHOOTING 49
APPENDIX A: GLASSWARE WASHER ACCESSORIES 56
Consumables 63
APPENDIX B: GLASSWARE WASHER DIMENSIONS 64
APPENDIX C: GLASSWARE WASHER SPECIFICATIONS 66
DECLARATION OF CONFORMITY 70
Page 5

1
C
C
HHAAPPTTEERR
1
1
I
I
NNTTRROODDUUCCTTIIOON
N
Congratulations on your purchase of a Labconco FlaskScrubber® Vantage Series®
Glassware Washer. It is configured to be a freestanding model but may be easily
modified for undercounter installations.
Your Labconco Glassware Washer is designed and manufactured to thoroughly
clean your laboratory glassware and accessories and complies with NSF/ANSI 3
standards for sanitization. You can select pre-programmed wash cycles or
program customized wash cycles to meet your requirements.
The Glassware Washer graphic display provides operational information. A
window and light in the door allow you to visually monitor the operation of your
washer. Wash cycles may be programmed to provide steam and the use of
purified water in the rinse cycles, allowing you to choose the best conditions for
cleaning your glassware.
Safety Symbols
Your Glassware Washer was designed with safety in mind, however conditions
may exist that could be hazardous.
Product Service 1-800-522-7658
Page 6

Chapter 1: Introduction
2
Throughout this manual potentially hazardous conditions are identified using the
following words and symbols.
It is important that you understand the warnings listed throughout this manual
before you operate the Glassware Washer.
Product Service 1-800-522-7658
Page 7

3
C
C
HHAAPPTTEERR
2
2
P
P
RREERREEQQUUIISSIITTEES
S
Before you install the Glassware Washer, prepare your site for installation.
Carefully examine the location where you intend to install the Glassware Washer.
You must be certain that the area is level and of solid construction. In addition, a
hot water source, a drain, a purified water source (if applicable), and an electrical
source must be located near the installation site. A cold water source is required
when the optional Cool Drain Water Kit is installed.
Refer to Appendix C: Glassware Washer Specifications for complete Glassware
Washer electrical and environmental conditions, specifications and requirements.
Hot Water Requirements
An existing hot water supply may be used as the hot water source for your
Glassware Washer. Labconco recommends the inlet water temperature to be
greater than 120°F (49°C) to fully activate powdered detergents and raise the
glassware temperature to achieve fast and complete drying. Hotter water will
produce better washing results.
Water pressure must be between 20-120 psi (138-827 kPa) at the washer and
provide a minimum of 1.25 gallons (4.7 liters) per minute flow rate.
A shut-off valve should be installed in the water supply line plumbed to the
washer. The hot water inlet valve on the Glassware Washer is equipped with a
female 3/8" NPT fitting. A compression fitting is provided that connects to .375"
(9.53mm) OD copper tubing.
Purified Water Requirements
To use purified water for the rinse cycles, a purified water supply is required. The
washer can be connected to an in-house, pressurized, purified water tap; a water
purification system; or a non-pressurized purified water container.
The purified water system must be provided with supply piping of sufficient size
to permit at least 0.9 gallons (3.4 liters) per minute of flow. Tubing with an
internal diameter of at least .375" (9.53 mm) is recommended. The purified water
Product Service 1-800-522-7658
Page 8

Chapter 2: Prerequisites
4
inlet valve on the washer is equipped with a plastic hose barb connection to
accommodate .375" (9.53 mm) ID flexible plastic or rubber hose. Use a spring or
band hose clamp to secure the hose to the hose barb connection. The hose barb
connection may be removed from the valve to expose a male 3/4" - 11-1/2 NH
hose coupling. Rigid plastic, tin-lined, or stainless steel tubing and fitting can be
connected to the washer fitting.
An optional Connection Kit (Labconco P/N 4592200) is available for connecting
.375" (9.53mm) OD plastic tubing to the purified water inlet valve. The purified
water system connections must be airtight to prevent the washer pump from
pulling air instead of water.
If the purified water is stored in a carboy, at least 3.4 gallons (13 liters) must be
available for each rinse. If all the purified water is not available at the start of a
wash cycle, but instead is produced concurrently with the wash cycle, the
production rate must permit at least 0.9 gallon (3.4 liters) per minute to be
delivered to the washer.
Electrical Requirements
The Glassware Washer should be hard-wired directly into a junction box using
conduit. A 20 Amp circuit breaker or fuse is required.
The Glassware Washer is designed to operate at 230 VAC, single phase. It will
operate safely at nominal 208 VAC, however the heater output will be
significantly degraded as the operating voltage drops below 230V. It is
recommended that if the voltage is low that a boost transformer is used.
Drain Requirements
The drain hose, .57" (1.45 cm) ID is installed during manufacture. The hose
provides a flexible coupling to the building drain piping and can be secured with a
spring or band hose clamp. (A band hose clamp is provided with the washer.)
Tubing or pipe, 5/8" (1.6 cm) ID or larger, should be provided for the building
drain. The use of an air gap is strongly recommended to prevent siphoning of
wastewater into the washer.
Do not reduce the size of the drain plumbing.
Product Service 1-800-522-7658
Page 9

Chapter 2: Prerequisites
5
Space Requirements
If your Glassware Washer will be installed undercounter, you must ensure the
undercounter opening is the proper size to accommodate the washer. The
dimensions are shown in Appendix B.
Product Service 1-800-522-7658
Page 10

6
C
C
HHAAPPTTEERR
3
3
G
G
EETTTTIINNGG
S
S
TTAARRTTEEDD
!
Now that the site for your Glassware Washer is properly prepared, you are ready
to unpack, inspect, install, and test your washer.
You may need common plumbing and electrical installation tools in addition to a
9/16" wrench, a flat-blade screwdriver, a Phillips screwdriver, and a carpenter
level to complete the instructions in this chapter.
The Glassware Washer weighs over 225 lbs. (102 Kg). The
carton allows for lifting with a mechanical lift truck or hand
truck. If you must lift the washer manually, use at least two (2)
persons and follow safe lifting guidelines.
Product Service 1-800-522-7658
Page 11

Chapter 3: Getting Started
7
Catalog #
Washer Description
4540031
FlaskScrubber Vantage Series Glassware Washer – 230 V with
window with lower spindle rack
Plus the Following Loose Parts:
Part #
Component Description
4584600
Lower Spindle Rack with 36 Spindles
1879801
Leveling Feet (4)
4593300
User Manual
1488800
Clamp (1)
4522500
LabSolutions Powder Detergent with MSDS – 6 ounces (175 grams)
1410700
Water Connector (1)
1448700
Coupling & Sleeve (1)
4525200
Spindle – Small (10)
4414703
Clip – Spindle (10)
4425101
Plug – Spindle (36)
Unpacking Your Glassware Washer
Carefully unpack your Glassware Washer and inspect it for damage that may have
occurred in transit. If your Glassware Washer is damaged, notify the delivery
carrier immediately and retain the entire shipment intact for inspection by the
carrier.
The United States Interstate Commerce Commission rules require that claims be
filed with the delivery carrier within fifteen (15) days of delivery.
Do not discard the carton or packing material for your Glassware Washer until
you have checked all of the components and installed and tested the Glassware
Washer.
NOTE: Do not return goods without the prior authorization of Labconco.
Unauthorized returns will not be accepted. If your Glassware Washer was
damaged in transit, you must file a claim directly with the freight carrier.
Labconco Corporation and its dealers are not responsible for shipping
damage.
Do not remove the washer from its shipping skid until it is ready to be placed into
its final location. Move the washer by placing a flat, low dolly under the shipping
skid.
Washer Components
Verify that the components listed are present and undamaged.
Product Service 1-800-522-7658
Page 12

Chapter 3: Getting Started
8
If you did not receive one or more of the components listed for your washer, or if
any of the components are damaged, contact Labconco Corporation immediately
for further instructions.
Removing the Shipping Skid
After you verify the washer components, move your washer to the location where
you want to install it. Then, follow the steps listed below to remove the shipping
skid from your washer.
To remove the shipping skid:
1. Remove accessories and loose items from inside the washer. Cut tie wraps
and remove racks.
2. Gently place the washer on its back, positioning the washer on the shipping
carton or other cushioning material.
3. Remove the four screws fastening the skid to the washer.
4. Retain the shipping skid until you test the various features of the washer.
Washer Installation
After you remove the skid from your washer, you must install leveling feet on the
bottom of the washer.
Installing the Leveling Feet
1. Locate the holes on the bottom of the washer where the four skid-fastening
screws were previously attached.
2. Thread the four leveling feet into the holes.
3. Carefully move the washer into an upright position. Be careful to distribute
the weight evenly on the leveling feet when setting the washer upright.
4. Reinstall racks.
Product Service 1-800-522-7658
Page 13

Chapter 3: Getting Started
9
Leveling the Washer
After you have installed the leveling feet, level the washer by adjusting the
leveling feet.
1. Position the washer in its final installed location.
2. Place a carpenter level on the washer in the positions shown.
3. Turn the four leveling feet, as needed, to level the washer.
Product Service 1-800-522-7658
Page 14

Chapter 3: Getting Started
10
If the Glassware Washer is installed undercounter, level it side-to-side by placing
a short level on the inside top edge of the door. See the figure below for the
placement of the level on the washer. Check the level front to back by placing a
level on the rail that the lower rack slides on.
Centering the Washer Door
When the washer is level, check the operation of the washer door for alignment
with the washer tank. If the door is not centered in the opening, you must center
the door by adjusting the corresponding leveling foot. (For example, if the door
hits the right side of the tank, raise the right front corner of the washer. If the
door hits the left side of the tank, raise the left front corner of the washer.)
Connecting the Water Services
A hot water supply must be attached to your Glassware Washer. In addition, a
purified water source must be connected to your washer if pure water rinses will
be required.
Connecting the Hot Water Supply
To prevent valve clogging, thoroughly flush the hot water lines for your hot water
supply source prior to connecting the washer to the water lines. The water supply
valve to which the hot water supply is connected is located on the back of the
washer base. The back panel must be removed to access the valve.
You must provide the plumbing fittings and components needed to connect the
hot water supply source. The washer hot water supply valve is equipped with a
compression fitting for a .375" (9.53 mm) OD tube.
Product Service 1-800-522-7658
Page 15

Chapter 3: Getting Started
11
To connect the hot water supply:
1. Be certain the hot water supply piping has been thoroughly flushed prior to
connecting it to the washer. Debris in the piping can clog the washer valve.
2. Make the necessary plumbing connections to properly connect the hot water
supply to the washer.
3. It may be necessary to place a loop in the supply tube to allow the washer to
be slid in or out of its operating position. Be careful not to kink the water
supply tube when the washer is placed into its final location. If kinking
occurs, it may be necessary to replace the straight fitting on the valve with an
elbow.
Washer Back View
Connecting the Purified Water Supply
To prevent valve and pump clogging, flush all of the water lines for your purified
water supply source prior to connecting the washer to the water lines. The valve
to which the purified water supply must be connected is located on the back of the
washer base. The back panel must be removed to access the valve. Refer to the
previous figure.
The purified water inlet valve is equipped with a plastic hose barb connection to
accommodate .375" (9.53 mm) ID flexible plastic or rubber hose. The hose
connection may be removed from the valve to expose a male 3/4" – 11-1/2 NH
hose coupling. Rigid plastic, tin-lined, or stainless steel tubing and fittings may
be connected to the washer fitting.
At least 0.9 gallon (3.4 liters) per minute of purified water flow is required. At
least 3.4 gallons (12.9 liters) of purified water must be available for each pure
rinse. A .375" (9.5 mm) ID pipe is the minimum recommended.
If you do not use purified water during the rinse cycles, you may disable the
purified water pump. Refer to Controller Set-Up in this section.
Product Service 1-800-522-7658
Page 16

Chapter 3: Getting Started
12
To connect the purified water supply:
1. Make certain the purified water supply piping has been thoroughly flushed
prior to connecting it to the washer.
2. Make the necessary plumbing connections to properly connect the purified
water supply to the washer.
NOTE: If the purified water source is a carboy, complete steps 3 and 4.
3. Connect the purified water source through either the top or the bottom of the
carboy, as illustrated in the following figures. If the purified water supply
feeds directly from the carboy top, make certain the hose is submerged under
the water line. Attach a weight to the end of the tubing to keep it from
floating on top of the water and possibly allowing air into the system.
4. Make certain the top of the carboy is vented to permit proper flow from the
carboy to the washer. Make certain that all of the connections on the purified
water system are air tight. The pump must not pull air instead of water. Make
certain the supply hose is not crimped.
Example of a Bottom Feed Connection
Product Service 1-800-522-7658
Page 17

Chapter 3: Getting Started
13
Example of a Top Feed Connection
Connecting the Drain Hose
Before continuing with this section, be certain that your drain meets the
requirements detailed in Drain Requirements in Chapter 2: Prerequisites.
Be certain you conform to all local plumbing codes when you route and connect
the drain.
The drain hose is installed at the factory. The hose provides a flexible coupling to
the drain piping and can be secured with a spring or band hose clamp. (A band
hose clamp is provided with your washer.)
Tubing or pipe 5/8" (1.6 cm) ID or larger should be used for the drain.
Do not route the drain to an elevation more than 36" (91 cm) above the pump
discharge. Do not reduce the size of the drain plumbing.
Do not remove the hose from the clamp on the rear of the glassware washer.
The use of an air gap is strongly recommended for all installations to prevent the
siphoning of wastewater into the washer.
Product Service 1-800-522-7658
Page 18
Chapter 3: Getting Started
14
If an air gap is not
used, the drain line
must be elevated
above the water
level of the sink.
Air gap
Drain line
The drain piping can be routed to either a sink or a floor drain. If you route the
drain piping to a sink drain without using an air gap, the highest point of the drain
pipe must be above the highest water level in the sink, as shown below.
If you route the drain piping to a sink drain and use an air gap, refer to the figure
below for the placement of the air gap.
Product Service 1-800-522-7658
Page 19
Chapter 3: Getting Started
15
Drain trap
If you route the drain piping to a floor drain, refer to the figure below for
placement of the drain tubing and trap.
Connecting the Power Supply
Before continuing with this section, be certain your power supply meets the
requirements specified on the washer data plate and in Electrical Requirements in
Chapter 2: Prerequisites. Washers should be hard-wired directly into a junction
box. Refer to the figure below and follow the steps below to connect your washer
to the appropriate power source.
Be certain that you check and conform to all local electrical codes. Do not disturb
any internal wiring in the washer.
If you are connecting to certain legs of a 3-phase power system to obtain singlephase power, be sure to consult a professional to insure codes/standards are
followed. These professionals can determine the appropriate connections for
either a Wye or Delta connected power source.
The supply circuit must consist of number 12 AWG 3-wire cable or heavier.
Washers must be connected to a dedicated service with a 20 amp circuit breaker
or fuse. Wire must comply with all local electrical codes. Type THW or THWN
wire may be used if it complies.
Product Service 1-800-522-7658
Page 20

Chapter 3: Getting Started
16
To connect the electrical supply:
1. Remove 2 screws on each side of the middle panel.
2. Pull the middle panel forward and remove it.
3. Remove the lower panel on the washer front by removing the two screws
located at the bottom of the panel.
4. Remove the cover over the electrical junction box by removing the two
screws.
Product Service 1-800-522-7658
Page 21

Chapter 3: Getting Started
17
5. Make sure electrical power is turned off before making any connections.
6. Attach customer-supplied power wires to the brown and blue wires, using
wire connectors. Customer-supplied wires must be clamped to the hole where
they pass through the rear of the junction box, if prescribed by local codes. If
it is necessary to use a bushing with an integral clamp at the inlet to the
junction box, remove the plastic bushing supplied with the washer before
installing the new customer supplied bushing.
7. Connect the customer-supplied ground wire to the green screw.
8. Replace the cover on the electrical junction box.
9. Replace the lower panel and middle panel on the washer.
Connecting a Cable for Monitoring Washer Operation
The operation of the Glassware Washer can be monitored using a computer. See
RS-232 Computer Connection in Chapter 4. If the Glassware Washer will be
installed under a counter, the cable that connects the Glassware Washer to the
computer should be connected to the Glassware Washer prior to placing the
washer in its final location. The Glassware Washer output connector is located on
the back of the washer near the bottom on the left side.
Controller Set-Up
The washer control system has been set at the factory to agree with the
configuration of the washer as it was shipped. The control may be customized or
modified if certain optional accessories are added.
To set up the washer control:
1. Locate the control panel on the front of the washer.
2. Press and hold the ▼ button and close the handle of the washer by sliding the door
latch knob to the right. Hold for 5 seconds.
3. The display will show the SET UP screen.
4. The > on the left side will highlight TEMP UNITS.
5. Press ◄ or ► buttons to select either °F or °C which will be used on the display to
set and monitor temperature.
Product Service 1-800-522-7658
Page 22

Chapter 3: Getting Started
18
6. Press the ▼ button and DI PUMP ENABLE will highlight.
7. Press ◄ or ► buttons to YES or NO. This allows the pure water valve and pump
to be disabled if pure water will not be used for rinse cycles and prevents
inadvertently programming a cycle to have pure rinses.
8. Press the ▼ button and LIGHT will be highlighted on the display.
9. Press ◄ or ► to cause the light inside the tank to be turned on or off while the
door is latched.
10. Press the ▼ button and FACTORY RESET will be highlighted on the display.
11. Press the ◄ or ► to select YES to erase all program set points entered by the user
and to restore all set points that were active when the washer was shipped.
12. Press RUN to save all settings.
Testing Your Washer
Now that you have made the required water and electrical connections to your
washer, a series of diagnostic steps are provided in this section to test the
operation of the washer.
Before turning on the washer, make certain the water is turned on and no packing
material remains inside the washer.
If the washer is interrupted in the middle of the diagnostic steps, wait 4 to 5
seconds before opening the washer door to prevent hot water from splashing out.
The hot water and steam from the washer may cause scalding.
Running the Diagnostics
To ensure your washer is operating properly, perform the diagnostics procedure
detailed below, which will take approximately 10 minutes to complete. Refer to
the figure below to familiarize yourself with the control panel before you begin
the procedure.
Product Service 1-800-522-7658
Page 23

Chapter 3: Getting Started
19
To run the diagnostics test:
1. Press the ▲ button on the control panel and close the door and slide the door
latch to the right. Hold for 5 seconds.
2. The display will show the Diagnostics screen and the indicator on the left side
will point to TAP WATER VALVE.
3. Press either the ► or ◄ button to turn the tap water valve ON. Tap water
should enter the washer. Allow water to enter for approximately 1 minute.
Press either the ► or ◄ button to turn the water off.
4. Press the ▼ button and the arrow on the display will point to PURE WATER.
5. Press either the ► or ◄ button turn the pure water pump ON and open the
pure water valve. Allow pure water to enter the washer. After about 3
minutes the fill switch should cause the water flow to turn off.
6. Press the ▼ button and the arrow on the display will point to WASH PUMP.
7. Press the ► or ◄ button and the wash pump should energize.
8. Press the ▼ button and the arrow on the display will point to DETERGENT
CUP.
9. Press either the ► or ◄ button to energize the detergent cup. Within about 1
minute the detergent cup door should be heard to open.
10. Press the ▼ button and the arrow on the display will point to HEATER.
11. Press either the ► or ◄ button and the heater will be energized.
12. Press the ▼ button and the arrow on the display will point to DRAIN / COOL.
13. Press either the ► or ◄ button and the drain will be energized. Allow all
water to be drained from the washer. The sound of the pump will change
when all water is drained. This will take about 1-1/2 to 2 minutes. If the Cool
Drain Water Kit accessory has been installed, cool water will mix with hot
water draining from the washer.
14. Press the ▼ button and the arrow on the display will point to DRY BLOWER.
15. Press either the ► or ◄ button and the dry cycle blower will be energized.
16. The ▼ arrow in the lower right side of the display indicates that more
selections may be made. Press the ▼ button to select the next function to test.
The arrow on the display will point to LIQ DETERG PUMP.
17. Press the ► or ◄ button and the detergent pump will operate.
18. Press the ▼ button and the arrow on the display will point to LIGHT.
19. Press either the ► or ◄ button and the light inside the washer will illuminate.
Product Service 1-800-522-7658
Page 24

Chapter 3: Getting Started
20
20. Press the ▼ button and the arrow on the display will point to COOL FAN.
21. Press either the ► or ◄ button and the small fan inside the kick panel will operate.
22. Press ▼ button and the arrow on the display will point to RINSE AID PUMP.
23. Press either ► or ◄ button and the rinse aid pump will operate.
24. This completes the check of most of the washer functions. Unlatch the door
to exit from the Diagnostics mode.
25. To verify the proper operation of the overfill switch, repeat steps 1 & 2 above.
Press either ► or ◄ button and allow tap water to enter the tank until the
water flow turns off.
26. Press and hold the RUN button. Water will enter the washer and should turn
off before it overflows.
27. Press the ▼ arrow until DRAIN/COOL is highlighted.
28. Press ► or ◄ button to drain water from the washer.
29. Unlatch the door to exit from the Diagnostics mode.
Filling and Purging the Liquid Detergent and
Neutralizing Acid Rinse Dispense Systems
When liquid detergent and neutralizing acid rinse are first added to their dispense
containers or if the containers are permitted to completely empty, the dispense
pumps and supply tubing must be purged of air. If this is not done, a wash cycle
may be run with insufficient detergent or neutralizing acid rinse. When refilling
the containers follow this same procedure except it is not necessary to purge the
system (step 4) if the containers were not permitted to empty completely.
To fill and purge the dispense systems:
1. Open the equipment compartment on the left side of the Washer by pushing
on the door at the location identified.
2. The larger storage container mounted on the inside of the door is for
LabSolutions Liquid Detergent and the smaller one is for LabSolutions
Neutralizing Acid Rinse.
a. Detergent Container
Remove the cap from the container.
Grasp the plug and remove the plug with the tube and
float switch attached.
Replace the empty container with a full container of
LabSolutions Liquid Detergent (Labconco P/N 4522000)
or refill the old container.
b. Acid Neutralizing Container
Remove the cap from the container.
Grasp the cylindrical boss directly below the fitting the
hose is attached to and pull the tube out of the container.
Grasp the plug and remove the plug with the float switch
attached.
Replace the empty container with a full container of
LabSolutions Neutralizing Acid Rinse (Labconco P/N
4422200) or refill the container.
Product Service 1-800-522-7658
Page 25

Chapter 3: Getting Started
21
3. Install the tube and level switch into the full container and reattach the cap.
4. There are two methods which can be followed for filling the system with
detergent and neutralizing acid rinse.
Method 1: Run a wash cycle with no glassware in the washer. Set the detergent
dispense rate to 30 ml and the rinse aid dispense to 6 ml.
Method 2: Run a diagnostics test. When the display window shows DETERGENT
PUMP allow the pump to run for 30 seconds. When the display shows
RINSE AID PUMP, allow the pump to run one minute.
Product Service 1-800-522-7658
Page 26

22
C
C
HHAAPPTTEERR
4
4
U
U
SSIINNGG
Y
Y
OOUURR
W
W
AASSHHEERR
After your washer has passed the basic diagnostics test detailed in Chapter 3:
Getting Started, you are ready to begin using your washer.
Arranging the Washer Racks
In addition to the standard configuration of the Glassware Washer, many optional
racks and inserts are available to customize your washer to best suit your needs.
For a complete list of available rack accessories, refer to Appendix A: Glassware
Washer Accessories and Chapter 6: Modifying Your Washer.
The FlaskScrubber Spindle Rack
The FlaskScrubber Vantage Glassware Washer is equipped with a lower spindle
rack and glassware holders. The FlaskScrubber spindle rack is designed for
narrow-necked glassware such as volumetric flasks, Erlenmeyer flasks, graduated
cylinders, Kjeldahl flasks, test tubes, and digestion tubes.
Two sizes of spindles are provided with the washer: thirty-six .25" (6.35 mm) OD
and ten .125" (3.18mm ) OD spindles. The optional Forty-Eight Pin Insert
(Labconco P/N 4591601) may be positioned directly over spindles or spindles can
be removed with a screw driver and replaced with the plugs included with the
washer.
Optional top racks are available for the FlaskScrubber to expand the washer’s
capacity to accommodate many types of glassware. An Upper Spindle Rack
(Labconco P/N 4595600) is available with 30 spindles.
Product Service 1-800-522-7658
Page 27

Chapter 4: Using Your Washer
23
Loading Glassware into the FlaskScrubber
Glassware Holders are supplied with each FlaskScrubber. These holders enable
you to position glassware onto the FlaskScrubber spindles.
To use a Glassware Holder:
1. Press the glassware into the holder; the clamps should spring out and grip the
glassware. Do not use with glassware over 2.5 inches in diameter as damage
to the holder may occur.
2. The holder may be raised or lowered by squeezing the spring clip on the
bottom of the holder and then sliding the holder up or down.
3. For best results, do not allow the glassware to rest directly on top of the
spindle.
Glassware should be loaded so that it does not touch during a wash cycle. The
washer has been designed for quiet operation. To prevent noise and glass
breakage, be certain that glassware is retained.
Note: It is normal for the clamps to deform if large glassware is inserted into the
Holder and the washer is operated at high temperature.
Product Service 1-800-522-7658
Page 28
Chapter 4: Using Your Washer
24
Wash Cycle
Fill Pre-wash Cavity
Fill Main Cavity
Rinse Only
NO
NO
Plastic
NO
YES
All other cycles
OPTIONAL
YES
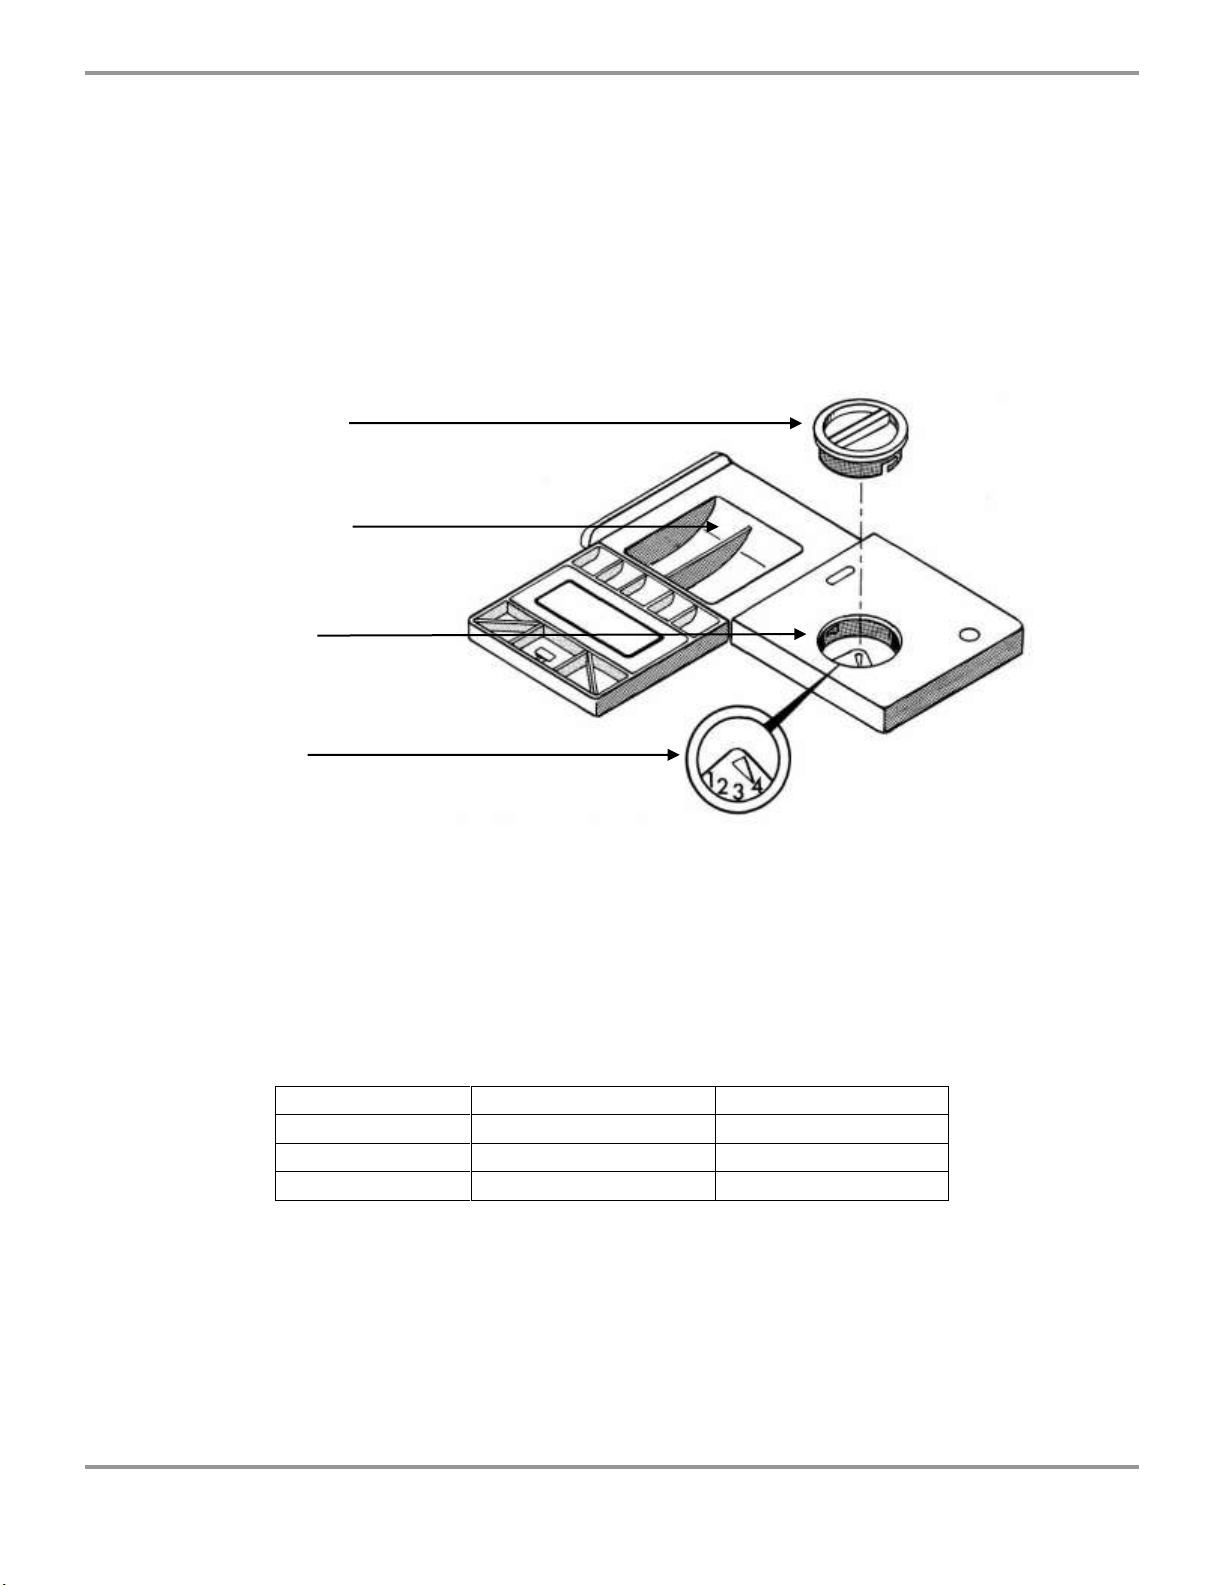
Main wash cavity
Neutralizing solution
dispenser cover
Neutralizing
solution port
Neutralizing
solution dial
The Detergent Dispenser in the Door
In addition to the bulk liquid detergent and neutralizing acid rinse dispense
systems, your Glassware Washer is equipped with a detergent dispenser in the
door that contains a main wash cavity and a neutralizing solution port. This
dispenser in the door is active only if the liquid detergent dispensed from the bulk
container is programmed to 0 ml. See “Programming and Starting a Wash
Cycle” instructions later in this section. In addition, the washer door has a
depression where powder detergent may be added for use during the first wash of
the cycle.
The detergent dispenser opens during the second wash cycle, except when the
Plastic cycle is selected, which has only one wash cycle. If your glassware is
heavily soiled, you may want to add powder detergent to the depression in the
washer door. Do not use liquid detergent in the pre-wash cavity in the washer
door. The initial drain and fill cycle flushes the liquid detergent out of the washer
prior to the first wash. Refer to the table below to determine which cavities to fill,
based on the selected wash choice. You may use either the pre-wash cavity
stamped in the washer door or the one on the lid of the detergent cup.
Product Service 1-800-522-7658
Page 29

Chapter 4: Using Your Washer
25
!
!
Do not use combustible solvents in the Glassware Washer. If
soiled glassware contains flammable compounds, rinse the
glassware thoroughly prior to placing the glassware into the
washer. Heaters in the washer are very hot and could ignite
flammable solvents.
Petroleum based compounds may degrade certain internal
washer components. Always thoroughly rinse petroleum based
compounds from glassware before placing in the Washer.
Non-foaming powder or liquid detergent formulated for labware washers, in
conjunction with adequate hot water, is essential for clean glassware. Labconco
LabSolutions Detergents are recommended. See Appendix A for ordering
information. Use detergents sparingly. Too much detergent, particularly with
softened water may cause etching of the glassware. This appears as a permanent
cloudy film on the glassware.
Fill the main detergent cavity three-fourths full if the water hardness grains per
gallon (GPG) for your water measures 0-4 GPG (soft water). Fill the detergent
cavity completely if your water measures 4 GPG or higher (medium to hard
water). If you use the pre-wash cavity stamped in the washer door, fill it
completely.
Note: To open the detergent dispenser, gently slide the white tab sideways.
The tab may break if it is pulled upward or perpendicular to the door.
Store detergent in a cool, dry place. Immediately replace the detergent container
lid after dispensing. If lumps develop due to exposure to moisture, discard the
detergent according to local regulations.
Product Service 1-800-522-7658
Page 30

Chapter 4: Using Your Washer
26
Filling the Neutralizing Acid Dispenser
If it is necessary to neutralize the alkalinity of the detergent, a mild or weak acid
may be placed in the neutralizing dispenser from which it will be dispensed
during the first rinse. This dispenser in the door is active only if the liquid
detergent dispensed from the bulk container is programmed to 0 ml. This
prevents a double portion of neutralizing solution from being dispensed. See
“Programming and Starting a Wash Cycle” instructions later in this section. The
dispenser holds approximately 170 ml and should be checked and replenished as
needed. To fill the neutralizing acid dispenser, refer to Figure 4-4 and follow the
instructions below.
To fill the neutralizing acid dispenser:
1. Twist and pull up on the cap to remove the round cover on the neutralizing
solution port.
2. Fill the cavity with LabSolutions Neutralizing Acid Rinse (Labconco P/N
4522200) 1M citric acid or 10% phosphoric acid until the level of the liquid
rises and is visible in the port.
3. Set the dial to read 4 ml.
4. Replace the cover.
Selecting an Operating Cycle
The microprocessor control on your Glassware Washer allows you to select a
factory programmed wash program, to modify the factory preset wash programs
or to customize two additional programs. The control panel is shown below.
Product Service 1-800-522-7658
Page 31

Chapter 4: Using Your Washer
27
Programming and Starting a Wash Cycle
Refer to Appendix C: Glassware Washer Specifications for complete details on
the various factory-set programs and the options available for customizing
programs. After you have decided which washer program to use, follow the
instructions below to start the washer.
Washers have the capability to wash glassware at high temperatures. Use care
when selecting high-heat programs if plasticware is being washed.
Any of the standard factory wash programs may be customized to suit specific
wash requirements. All changes made to the programs will be stored in the
washer microprocessor’s memory until it is changed again. If a FACTORY
RESET is performed, all inputs entered by the user will be erased and the
programs shipped with the washer will be reinstated. It is possible to customize
the following program parameters:
Wash 2 temperature
Wash 2 time
Wash 3 temperature
Wash 3 time
Total number of rinses
Number of purified water rinses
Final rinse temperature
Enable or disable the steam function
Dry temperature
Dry time
Liquid Detergent dispense
Rinse Aid dispense
Note: Wash 3 is available only if using the liquid dispense system rather than the
detergent dispenser in the door AND running programs INTENSE, INTENSE
PLUS, EXTREME, USER 1 or USER 2.
To program and start a wash cycle:
1. Close the washer door and slide the latch to the right. This energizes the
electronic control and the display will show the last program that was run.
2. Press RUN to select this program.
3. If a different program is desired, press DISPLAY. The available programs
will be shown on the display.
Product Service 1-800-522-7658
Page 32

Chapter 4: Using Your Washer
28
4. Press the ▲ or ▼ buttons until the desired program is indicated by the arrow
on the left side. The arrow on the lower right side means that there are
additional program selections that will be shown on the display if the ▼
button is pressed. If an arrow is visible in the upper right corner of the
display, additional program selections will be displayed when the ▲ button is
pressed.
5. Press RUN if no modifications to the program are necessary.
6. If modifications to the program are necessary or you want to see the
parameters that are entered into the program, press DISPLAY and the
elements in the program that may be altered will be displayed.
7. Press the ▲ and ▼ buttons to select the parameter that must be altered as
indicated by the arrow on the left side. Press ◄ and ► buttons to select the
appropriate set point. The arrow on the lower right side means that there are
additional parameter selections that will be shown on the display if the ▼
button is pressed. If an arrow is visible in the upper right corner of the
display, additional parameter selections will be displayed when the ▲ button
is pressed.
8. Press RUN when all parameters are satisfactory.
Product Service 1-800-522-7658
Page 33

Chapter 4: Using Your Washer
29
Interrupting a Wash Cycle
To temporarily pause a wash cycle, simply unlatch the washer door. After the
door is unlatched, wait 4 to 5 seconds before opening the door to prevent water
from splashing out of the washer.
To resume the wash cycle, close and re-latch the washer door. The washer will
pause to equalize temperatures and then the cycle will resume the interrupted
segment.
The wash cycle can be terminated at any time by pressing the Start/Cancel button.
Alarms
Throughout a wash cycle there are several abnormal events that could occur. The
washer is programmed to monitor these occurrences and provide an alarm to alert
the operator. Information is shown on the display to identify the alarm situation.
The following messages may be displayed. Certain alarm situations are signaled
with an audible sound which self cancels after 1 minute.
HOT GLASS
This displays at the end of a cycle if the temperature inside the washer is
over 122°F (50°C). The alarm cancels when the temperature cools.
PLEASE WAIT
This displays if the door is opened and then closed during a wash or rinse
segment of a cycle. The display will also show the time remaining until
the operation of the washer will resume where it was interrupted.
WATER LOW
This displays if a water fill is inadequate. The washer will cancel the
cycle and drain water that is in the washer. The alarm is canceled by
opening the door. See Chapter 7: Troubleshooting – Washer will not fill.
Product Service 1-800-522-7658
Page 34

Chapter 4: Using Your Washer
30
OVERFLOW
This displays if water is detected in the base of the washer. Water fill
valves will be closed and the washer will cancel the cycle and drain water
that is in the washer. The alarm is canceled by opening the door. See
Chapter 7: Troubleshooting – Washer leaks.
LIQ DETER
This displays if the level of the detergent in the dispense container is low.
The alarm is disabled if the detergent dispense volume is set to “0.” The
alarm is canceled when detergent is added to the container.
RINSE AID
This displays if the level of the rinse aid solution in the dispenser
container is low. The alarm is disabled if the rinse aid dispense volume is
set to “0.” The alarm is canceled when rinse aid is added to the container.
DRAIN FAIL
This displays if water fails to completely drain during a normal drain
operation. Operation of the washer is canceled. The alarm is canceled by
opening the door.
LOW TEMP
This displays if the water does not reach the set point temperature within
135 minutes. Operation of the washer continues. The alarm cancels when
the door is opened.
TEMP SENSOR
This displays if the temperature sensor is disconnected. It is canceled by
connecting an operable sensor.
RS-232 Computer Connection
The operation of the Glassware Washer can be monitored using a computer. The
computer cannot control the operation of the washer. The monitored parameters
are the water conductivity, water temperature, cycle segment, elapsed time of
each segment, and alarms. The fault alarms that are monitored include low water
fill, low detergent and rinse aid levels, low water temperature during Wash 2 and
Wash 3 and the Final Rinse, and if water is detected in the base. The RS-232 data
is constantly sent by the washer even when the front panel LCD is displaying
other information.
Connection for computer interface:
The Glassware Washer has a 6 wire telephone cable connector on the back of the
washer near the bottom on the left side. Check your computer to see which type
of serial port is provided then use a connecting cable below. To connect the
washer to a computer via a USB port, a USB to Serial Port Adapter can be used in
conjunction with one of the serial cables listed below. USB to Serial Port
Adapters are available online or at most consumer electronics stores.
Product Service 1-800-522-7658
Page 35

Chapter 4: Using Your Washer
31
Min:Sec
Mode
Temp.
Cond.
Temp
Factor
Cond
Wash
Cycle
Indicator
#1Temp
Sensor
Data
#2 Temp
Sensor
Data
Alarm
12:20
WASH 2
26
26
536
10
211
211
LW
Columns 1-5
12:20
Shows the time since washer was powered on.
Columns 7-12
Wash 2
Shows the cycle segment.
Columns 14-16
26
Shows water temperature in °C.
Columns 18-20
26
Shows the water conductivity sensor temperature factor.
Columns 22-25
536
Shows the water conductivity in micro siemens from 0-2000
referenced to 25°C.
9999 indicates a reading over 2000.
Columns 27-29
10
Shows the specific function of the washer and duration.
0 = Delayed Start
1 = First Drain & Fill
3 = Fill & Liquid Detergent Dispense
4 = Wash 1
6 = Drain After Wash 1
7 = Fill & Liquid Detergent or Detergent Cup Dispense
8 = Steam
9 = Wash 2 or Wash 3 Delay
10 = Wash 2
1. Computers with a 25 pin D-sub male serial connector should use Connect
Cable (Labconco P/N 7537801) to connect from the user’s computer to the
Glassware Washer.
2. Computers with a 9 pin D-sub male serial connector should use Connect
Cable (Labconco P/N 7537800) to connect the computer to the Glassware
Washer.
The purpose of the RS-232 interface is to send data to a data collection computer
to monitor the state and activity of the Glassware Washer.
This data is half duplex data and is only transmitted from the Glassware Washer.
The data rate and format are listed below:
1. Data Rate 2400 Baud
2. 8 Bit word length
3. 1 Start bit, 1 Stop bit
4. No parity is transmitted
5. Standard ASCII Character set
The data content of the RS-232 message from the Glassware Washer is a follows:
Sample output (please note the chart header is not shown as output):
Product Service 1-800-522-7658
Page 36

Chapter 4: Using Your Washer
32
11 = Drain After Wash 2
12 = Fill & Liquid Detergent Dispense
13 = Wash 3
15 = Drain After Wash 3
16 = Drain & Fill
18 = Fill Prior to Rinses – Includes Acid Rinse Dispense
Prior to First Rinse
19 = Final Rinse Delay
20 = Rinse
21 = Drain After Rinses
22 = Dry
23 = Cool
24 = Done
Columns 31-33
211
Raw data from temperature sensor #1
Columns 35-37
211
Raw data from temperature sensor #2
Columns 39-60
LW
Shows alarms
LW = Low water level
LD = Low detergent
LR = Low neutralizing solution
LT = Low water temperature during Wash 2 or Last Rinse
OV = Water is detected in base
PW = Please wait
DF = Drain fail
There are several commercially available software packages, which can read RS-232
data and enter the data into a computer program such as a word processor (to create a
text file) or spreadsheet (to tabulate and plot the data). Consult your laboratory
supply catalog regarding the latest software available.
The following describes how to use an IBM compatible computer with Hyper
Terminal™ software (included with Windows® 95, 98, 2000,XP operating
systems) to collect the RS-232 data from your Washer.
1. Make certain that the Washer is properly connected to the communication port
on the computer and that the communication port is enabled on the computer.
2. Open Hyper Terminal™ software.
i) Windows® 95 or 98 use:
START/PROGRAMS/ACCESSORIES
ii) Windows® 2000 or XP use:
START/PROGRAMS/ACCESSORIES/COMMUNICATIONS
The first time Hyper Terminal™ is opened, a dialogue box requesting an area code and
phone number will appear. Enter the appropriate numbers and continue. This phone
number is required to proceed, but will never be dialed when the Washer is used.
Product Service 1-800-522-7658
Page 37

Chapter 4: Using Your Washer
33
3. The “Connection Description” dialogue box will open. Type in a user defined
name and select an icon for the new connection. Press “OK.”
4. The “Connect To” dialogue box will open. Using the down arrow selection
button, select the communication port to which the cable has been connected.
Press “OK.”
5. Depending on the COM port selected (COM1, COM2, COM3 or COM4), the
“Com X Properties” dialogue box will open. Enter the appropriate data
properties and press “OK.”
Product Service 1-800-522-7658
Page 38

Chapter 4: Using Your Washer
34
6. When the door is latched on the Washer, the data will be transmitted and
updated whether a washer cycle is running or not.
Product Service 1-800-522-7658
Page 39

35
C
C
HHAAPPTTEERR
5
5
M
M
AAIINNTTAAIINNIINNG
G
Y
Y
OOUUR
R
W
W
AASSHHEERR
Under normal operation, your Glassware Washer will require little routine
maintenance to keep it functioning properly.
Maintaining the Stainless Steel Interior
The interior of your Glassware Washer is type 304 stainless steel. Never use
metal scouring pads on the stainless steel interior. Metal scouring pads can
scratch or leave metal chips that will rust.
To maintain the appearance and quality of the stainless steel interior, perform the
following tasks as needed:
If your water has a high mineral content, film or spots may develop on the washer
interior. If the procedures listed above do not eliminate the film or spots, you
may run your washer through the special cycles below.
To remove film or spots from the washer interior:
1. Remove all glassware from the washer.
2. Choose the Glass Program, Steam OFF, Pure Rinse OFF, and set the drying
3. After the first fill is complete, open the washer and carefully pour one cup of
4. Close the washer door and allow the unit to wash and drain.
Wipe the outer edges on the inside door panel to remove particles and
residue that occur during loading.
Use a sponge sprinkled with non-abrasive stainless steel cleaner to gently
wipe the washer tank and door to remove surface discoloration caused by
exposure to halogenated compounds or steel parts. In some cases, the
finish may be slightly dulled by this action.
time to zero.
chlorine bleach into the bottom of the tank.
Product Service 1-800-522-7658
Page 40

Chapter 5: Maintaining Your Washer
36
5. When the washer fills the second time, open the washer and add two cups of
4-8% acetic acid (or white vinegar) to the bottom of the tank.
6. Close the washer door and allow the unit to wash and drain without further
interruption.
Maintaining the Air Gap in Drain
If the installation included an air gap (recommended) it requires periodic cleaning.
The air gap is not part of the washer; therefore, it is not covered by the washer
warranty. The air gap protects the washer against water backing up in the event
of a clogged drain. Check the air gap for build-up any time your washer is not
draining well.
Most types of air gaps are easy to clean. Simply follow the manufacturer’s
directions for maintaining your air gap.
Maintaining the Water Fill Valve
The filter screen of the water fill valve, illustrated below, may require periodic
cleaning to remove trapped particles. A low water fill occurs if the blockage is
not removed.
To clean the water fill valve:
1. Turn off the water and electrical power to the washer.
2. Remove the rear panel.
3. Disconnect the water supply tube that is connected to the valve.
4. Remove the valve from the base.
5. Remove the four screws from the valve plate and separate the valve from the
inlet connection.
6. Remove the valve filter screen and clean it under running water.
7. Replace the screen and reassemble the valve connection. Be certain the O-ring
gasket is positioned in the groove in the fill valve body.
Product Service 1-800-522-7658
Page 41

Chapter 5: Maintaining Your Washer
37
Cleaning the Sump Filter Screen
If debris accumulates on the filter screen that is located in the washer sump, you
can remove and clean the screen. To clean the sump filter screen, refer to the
figure below and follow the instructions below.
To clean the sump filter screen:
1. Open the washer door and remove the bottom rack.
2. Remove the screw that retains the filter screen.
3. Carefully lift the screen and pull forward, using care not to drop debris into
the sump.
Product Service 1-800-522-7658
Page 42

Chapter 5: Maintaining Your Washer
38
Replacing the HEPA Filter
After an extended period of time, dirt and debris may block the air flow through
the HEPA filter. The filter may be replaced by following the instructions below:
To replace the HEPA filter:
1. Open the left door by pressing it in the center.
2. Press down on the lock tab on the top of the HEPA filter and pull the top of
the filter outwards.
3. Lift the filter out of the bottom retainer.
Product Service 1-800-522-7658
Page 43

Chapter 5: Maintaining Your Washer
39
Maintaining the Conductivity Sensor
The operation of the Conductivity Sensor may degrade if it becomes
contaminated with soil from glassware that has not been rinsed prior to being
placed into the washer or if it becomes coated with minerals from the water
supplied to the washer. If cleaning the sensor fails to correct the problem, the
sensor must be replaced. If the interior of the washer is discolored and appears to
be coated with a film, there is a good possibility that the conductivity sensor is
also coated. Follow the directions for removing film or spots from the washer
interior described previously in this chapter.
To clean the conductivity sensor:
If the soil from unrinsed glassware has coated the sensor, the sensor may be
cleaned using a solvent compatible with the soil. Remove the sump filter screw
as described previously in this chapter. Using a swab moistened with solvent,
remove the soil from metal parts inside the tubular portion.
To replace the conductivity sensor:
1. Turn off the electrical power to the washer. Turn off the circuit breaker that
services the washer.
2. Remove the cabinet back panel.
3. Unplug the sensor from the harness.
4. Unscrew the sensor from the sump housing.
5. Reverse this procedure when installing a new sensor.
Product Service 1-800-522-7658
Page 44

Chapter 5: Maintaining Your Washer
40
Product Service 1-800-522-7658
Page 45

41
C
C
HHAAPPTTEERR
6
6
M
M
OODDIIFFYYIINNG
G
Y
Y
OOUUR
R
W
W
AASSHHEERR
The configuration of your washer may be changed to accommodate your needs.
For example, you may want to install pipet inserts, install an optional top rack, or
install an optional Cool Drain Water Kit. Spindle racks can be replaced with
racks without spindles for washing wide mouth glassware. Refer to Appendix A:
Glassware Washer Accessories for the accessories that are available for your
Glassware Washer.
Installing the Optional Upper Spindle Rack
The Upper Spindle Rack expands the capability of the FlaskScrubber by
providing 30 additional spindles for washing narrow-neck glassware. The rack
may be customized by removing spindles or by installing Multi-Pin Inserts which
hold beakers or other wide mouth glassware.
To install the optional Upper Spindle Rack:
Install the upper rails and the upper spindle rack. See the figure below.
1. Remove the acorn nuts and lockwashers from both upper sides using a 3/8"
wrench. There are 4 on each side.
Product Service 1-800-522-7658
Page 46

Chapter 6: Modifying Your Washer
42
2. Position brackets on slides over the studs on the sides. The position of the
rack mounting plates must be fully extended as shown. Secure the slide
assemblies using lockwashers and acorn nuts removed in Step 1. It may be
necessary to synchronize the travel of the two slides. Pull each slide out
firmly to their maximum travel.
3. Install the Upper Spindle Rack by lowering the rack onto the rack mounting
plates. The water inlet must have its inlet toward the rear. Make sure the
latch on each side secures the rack to the rack mounting plate.
Product Service 1-800-522-7658
Page 47

Chapter 6: Modifying Your Washer
43
When the Upper Spindle Rack is in place, it limits the height of the glassware that
can be washed. If very tall glassware or long pipets are to be washed, remove the
Upper Spindle Rack.
Removing the Optional Upper Rack
The upper rack may be easily removed from the Glassware Washer to facilitate
loading the rack outside the washer or to allow very tall glassware to be loaded
and washed on the lower rack.
To remove the upper rack:
1. Slide the upper rack all the way out of the washer.
2. Grasp each side of the rack placing a thumb on the release buttons.
3. Press each release button and lift the rack straight upward.
To install the upper rack:
1. The upper rack can be replaced into the washer by first sliding each slide rail
all the way out of the washer and then lowering the rack onto the rails.
2. Press down and the latch will automatically engage the rail.
Product Service 1-800-522-7658
Page 48

Chapter 6: Modifying Your Washer
44
Adjusting the Height of the Optional Upper Rack
The height of the upper rack may be varied to suit the heights of glassware that
will be washed in the upper and lower racks.
To adjust the height of the upper rack:
1. Remove the upper rack as described in this chapter.
2. Remove the 2 nuts that retain the rack mounting plate to the slide.
3. Reposition the rack mounting plate to the slide using the other set of holes.
Replace the 2 nuts.
4. Repeat the procedure on the opposite slide.
Installing Optional Pipet Inserts in a FlaskScrubber
Two sizes of Pipet Inserts are available. The 8-place Pipet Insert, shown below
accommodates 1 ml to 10 ml pipets. Multiple Pipet Inserts may be installed, if
desired. Refer to the figure and follow the instructions below to install an 8-place
Pipet Insert.
To install an 8-place Pipet Insert:
1. Insert the tool supplied with the Spindle Rack or a screwdriver into the top of
a spindle and turn counterclockwise to remove the spindle.
2. In the position previously occupied by the spindle, thread into place the short
spindle you received with the Pipet Insert.
3. Push the Pipet Insert over the short spindle.
4. If spindles other than the one used for the short spindle are removed, the holes
must be plugged with the plastic plugs supplied with the spindle rack.
Product Service 1-800-522-7658
Page 49

Chapter 6: Modifying Your Washer
45
The 16-place Pipet Insert, shown below accommodates 1 ml to 50 ml pipets. Two
of these inserts may be installed, if desired. Refer to the figure and follow the
instructions below to install a 16-place Pipet Insert.
To install a 16-place Pipet Insert:
1. Use the tool supplied with the Spindle Rack or a screwdriver to remove the six
spindles on either the right or left side of the spindle rack. Remove others if
necessary.
2. Replace the six spindles with the six short spindles that you received with the
Pipet Insert.
3. Replace all other spindles with the plastic plugs that you received with your
washer.
4. With the support facing the center of the spindle rack, slide the Pipet Insert
over the spindles until it completely seats.
5. Push pipets into the 16 receptacles and rest them on the support.
Note: Lower spindle racks are shipped with 34 long spindles and 2 shorter
spindles. If spindles are removed and then replaced, the shorter spindles should
be located on the front row in the second and third positions form the right side.
This will allow proper function of the detergent dispenser.
Product Service 1-800-522-7658
Page 50

Chapter 6: Modifying Your Washer
46
Installing Small Spindles
Ten small spindles are included with each Spindle Rack. Since the large volume
of water which flows through the standard spindles may be great enough to force
the glassware off the spindle, small spindles should be used when small pieces of
glassware will be washed.
To install small spindles:
1. Remove the standard spindle by inserting the tool supplied with the Spindle
Rack or a screwdriver into the slot on the top and turning counterclockwise.
2. Replace the standard spindle with a small spindle.
Installing Optional Inserts into the Spindle Rack
A Multi-Pin Insert is available that can be placed directly on the FlaskScrubber
upper or lower spindle rack. It can hold beakers or wide mouth glassware. The
insert can be positioned either on the left side or right side.
To install an insert:
1. Remove all glassware, spring retainers and glassware holders.
2. Lower the insert down over the spindles. If necessary, spindles may be
removed using the tool supplied with the Spindle Rack or a screwdriver in the
slot on the top of the spindles. Be sure to replace any removed spindle with a
plug supplied.
Product Service 1-800-522-7658
Page 51

Chapter 6: Modifying Your Washer
47
Installing the Optional Cool Drain Water Kit
An optional Cool Drain Water Kit is available to reduce the water temperature of
the drain water in installations where hot drain water is not permitted. A supply
of cold water must be available. It is recommended that the cold water
temperature is colder than 54°F (12°C). Warmer water temperature will cause the
drain temperature to be higher. The cold water supply must be capable of a flow
rate of 3.5 GPM (13.2 LPM) and a pressure of 20-120 PSI (138-827 kPa). Hot
drain water will be mixed with cold water during drain operations. To install the
optional Cool Drain Water Kit, refer to the figure below and the following
instructions.
To install the optional Cool Drain Water Kit:
1. Disconnect power to the washer.
2. Remove the back panel of the washer.
3. Attach the water valve assembly to the rear flange of the base using the screws
provided.
4. Connect the wires coming from the water valve assembly to the mating
connector in the wiring harness of the washer.
5. Connect the cold water supply to the water valve assembly. Do not allow the
tube to kink when the washer is placed into its operational location. If
necessary, replace the straight fitting on the cool water valve with the supplied
elbow.
6. Replace the back panel.
7. Attach the hose from the valve to a Twin Inlet High Flow Air-gap suitable for
dishwasher applications. This Air-gap may be obtained from a plumbing
supply store.
8. Attach the drain hose from the Glassware Washer to the other inlet of the Air-
gap.
Product Service 1-800-522-7658
Page 52

Chapter 6: Modifying Your Washer
48
9. Attach the outlet of the Air-gap to the building drain.
10. Turn on the electrical power.
Product Service 1-800-522-7658
Page 53

49
C
C
HHAAPPTTEERR
7
7
T
T
RROOUUBBLLEESSHHOOOOTTIINNGG
PROBLEM
CAUSE
CORRECTIVE ACTION
Detergent cup in
door fails to open
Malfunction of cup
Replace cup.
Malfunction of relay
Check electrical continuity or replace relay PCB.
Glassware interfering
with cup door
Move glassware.
Liquid detergent
dispense > 0 ml
None
Noises during
operation
Glassware rattling
Load glassware properly. Do not allow glassware
to touch.
Door panel vibrating
Tighten panel screws.
Wash arms hitting
Check glassware loading.
Water inlet line
makes occasional
hammering sound
Check with plumber.
Purified water pump
is activated
No corrective action needed. This is normal for
about 5 minutes while pure water enters the
washer.
Door drops too far
(below door stop)
Bent door hinge
Replace door hinge.
Refer to the following table if your Glassware Washer fails to operate properly. If
the suggested corrective actions do not solve your problem, contact Labconco
Product Service for additional assistance.
Product Service 1-800-522-7658
Page 54

Chapter 7: Troubleshooting
50
PROBLEM
CAUSE
CORRECTIVE ACTION
Poor drying
Dry temperature too
low
Program warmer dry temperature.
Flask, beaker, or
labware with concave
bottoms not loaded
correctly
Tilt these articles when loading so that water
drains off.
Recondensation
If clean labware is left in the washer,
recondensation may occur. Open latch after
completion of cycle to allow moisure-laden air to
escape.
Heater(s)
disconnected or
malfunctioned
Reconnect or replace heater.
Blower disconnected
or malfunctioned
Reconnect or replace blower.
Dry time too short
Program longer time.
Poor washing
results
Water is not hot
enough
Check Wash 2 water temperature setting. Must
be at least 120°F (49°C). Recommended
temperature is 150°F (66°C).
Improper loading
Check washer loading instructions in Chapter 4 in
this manual.
Detergent too old or
amount wrong
Replace detergent or change quantity used.
Detergent caked in
cup
Clean cup. Replace with fresh detergent. Check
water inlet temperature. Must be at least 120°F
(49°C).
Insufficient wash
time
Increase wash cycle time.
Insufficient water
Check to be sure the water shut-off valve is fully
open. Check to be sure the water pressure is
between 20 and 120 psi (138-827 kPa) at a flow
rate of 1.25 gallons per minute (4.7 liters/minute).
Check water level switch.
Not draining
properly
Clogged filter
Clean sump filter.
Drain line clogged or
kinked
Disconnect drain line and clean or remove kink.
Product Service 1-800-522-7658
Page 55

Chapter 7: Troubleshooting
51
PROBLEM
CAUSE
CORRECTIVE ACTION
Purified water does
not fill
Crimp in supply hose
Refer to installation instructions for proper
purified water piping installation.
Motor wires
disconnected
Reconnect wires.
Tank and inner
door have surface
rust
Glassware is
contaminated with
mineral acids.
Pre-rinse glassware. Clean with stainless steel
cleaner and soft cloth.
Washer does not
run
No power to washer
Check fuse or circuit breaker, or door switch.
Door latch is open
Latch washer door by pushing door in.
Washer door opens
and closes badly
Cabinet opening is
not square
Correct opening with leveling feet.
Door hitting countertop mounting screws
Adjust mounting screws.
Washer leaks
Washer is not level
Adjust leveling feet.
Door not sealing
Adjust door latch.
Tank gasket loose
Check gasket and correct.
Loose connection at
hose clamps
Tighten hose clamp.
Loose connection at
fill valve
Check fill valve and correct.
Improper detergent
Use non-foaming detergent. Use only proper
amount of detergent.
Obstruction in drain
line
Remove obstruction.
Washer overfilling
Check operation of fill switch.
Washer leaks
around door seal
Improper installation
Check cabinet opening to see if it is aligned
properly with the door. Washer must be level.
Adjust feet to level unit.
Unit not level
Adjust feet to level unit.
Door opened during
operation
Allow 4-5 seconds before opening door after
unlatching.
Product Service 1-800-522-7658
Page 56

Chapter 7: Troubleshooting
52
PROBLEM
CAUSE
CORRECTIVE ACTION
Washer will not
drain
Clogged drain
Clean out drain.
Blockage of air gap
Clean the air gap by lifting the cover,
unscrewing the cap, and removing any
accumulated material. See Chapter 5.
Kink in drain hose
Check for a kink in the drain hose.
Filter blocked
Check filter in washer and clean as needed.
Drain valve or pump
not operating
Check operation.
Washer will not
fill
Fill valve clogged
Clean fill valve.
Water supply turned
off
Turn on water.
Defective fill switch
Check operation.
Washer overfills
Defective fill switch
Check operation.
Selection buttons
on control panel
inoperable or
controls
malfunction
Microprocessor
memory error
Perform "Factory Reset." Open latch on door.
Press ▼ button and simultaneously close door
latch. Release ▼ button and display will show
the set up screen. Press ▼ until FACTORY
RESET is highlighted. Press ► or ◄ until “Yes”
is displayed. Press RUN.
Key pad defective
Replace key pad.
Conductivity
reading “High”
(>2000 µs)
Water is very
conductive, detergent
has dispensed
None.
Sensor defective
Replace sensor.
Conductivity
reading “0”
Sensor not connected
Reconnect sensor wires.
Sensor defective
Replace sensor.
Sensor dirty
Clean sensor.
Conductivity
reading fluctuates
Washing action cause
bubbles
None.
Product Service 1-800-522-7658
Page 57

Chapter 7: Troubleshooting
53
PROBLEM
CAUSE
CORRECTIVE ACTION
Drain Fail Alarm
Drain Valve
inoperable
Listen for click when washer should drain.
Check for mechanical restriction of actuator arm
on top of valve.
Check for electrical power to valve.
Check for damage to valve coil.
Drain Pump
inoperable
Check if pump fan turns when washer should
drain.
Check for mechanical restriction of fan.
Check for electrical power to pump.
Drain hose not routed
properly
Hose from drain pump must slope upward and
have no low spots or horizontal runs under
washer tank.
Make sure hose is attached to the back of the
washer and has a high loop.
Hose must be attached to building plumbing pipe
¾ inch ID or larger.
Hose from washer must not be attached to another
hose.
Check for kinks in hose.
Drain hose must not be elevated more than 30
inches.
Pump lost its prime
Remove ALL water from inside drain hose.
Pump will prime when water drains from washer.
Building plumbing
defective
Check for blocked air gap.
Check for clogged drain.
Filter screen clogged
Clean screen in bottom of washer.
Defective fill level
switch
Contact Labconco Product Service.
Defective controller
Check output from PCB to drain valve and pump.
Replace PCB. Contact Labconco Product
Service.
Product Service 1-800-522-7658
Page 58

Chapter 7: Troubleshooting
54
PROBLEM
CAUSE
CORRECTIVE ACTION
Water Low Alarm
Improper water
supply
Make sure water is turned on.
Tap water pressure must be at least 20 psi
(138 kPa) and flow must be at least 1.25 gallons
(4.7 liters)/minute.
DI water supply must have flow of at least 0.9
gallons (3.4 liter)/minute.
At least 3.4 gallons (13 liters) must be available
for each DI rinse.
Defective fill valves
Clean screens inside the inlet fittings of the water
valves.
Check voltage to valves.
Replace valve if it does not operate.
Restricted flow
Check for kinks in water hoses in base of washer
to water inlet fitting on side of tank.
Defective DI water
pump
Check voltage at pump.
Listen for pump operation. Replace if necessary.
Defective hose to fill
switch
Check for splits.
Check for loose clamps.
Defective fill level
switch
Recalibrate switch. Contact Labconco Product
Service.
Replace switch.
Defective controller
Check output from PCB to both valves and DI
pump.
Replace PCB. Contact Labconco Product
Service.
Holes in filter screen
too small
Contact Labconco Product Service.
Defective grommet
where hose connects
to fill level switch
Replace grommet.
Product Service 1-800-522-7658
Page 59

Chapter 7: Troubleshooting
55
PROBLEM
CAUSE
CORRECTIVE ACTION
Low Temp Alarm
Heater inoperative
Check electrical connections.
Check voltage to heater.
Check resistance of heater. If open circuit,
replace heater.
Defective controller
Check output from PCB to heater.
Replace PCB. Contact Labconco Product Service.
Defective
temperature probe
Check electrical connections.
Contact Labconco Product Service. Replace if
necessary.
Defective high
temperature cut out
switch
Check resistance of safety cut out switch. If open
circuit at room temperature, replace switch.
Product Service 1-800-522-7658
Page 60

56
A
A
PPPPEENNDDIIXX
A
A
G
G
LLAASSSSWWAARREE
W
W
AASSHHEER
R
A
A
CCCCEESSSSOORRIIEES
S
PART #
DESCRIPTION
4595600
4595800
Upper Spindle Rack –
Stainless Steel. Contains
one upper spindle rack with
30 spindles, 30 glassware
clips, 15 plastic glassware
holders and 2 slides.
Same as above except
without slides.
4494200
8-Place Pipet Washer –
Stainless Steel. Holds
1 ml to 10 ml pipets.
Product Service 1-800-522-7658
Page 61

Appendix B: Glassware Washer Dimensions
57
PART #
DESCRIPTION
4595200
16-Place Pipet Washer –
Stainless Steel. Holds
1 ml to 50 ml pipets.
4424600
4424800
Glassware Holder – Small.
Grips wide-mouth
glassware over spindles.
Vinyl coated stainless steel
wires.
Glassware Holder –
Large. Grips wide-mouth
glassware over spindles.
Vinyl coated stainless steel
wires.
4596000
Small Spindles with Clips.
Replaces larger spindles
when washing small
glassware. 10 spindles,
10 clips, 36 plugs.
4595700
Lower Spindle Rack –
Stainless Steel. Contains
36 spindles, 18 plastic
glassware holders and 36
glassware clips. Included
with FlaskScrubbers.
Product Service 1-800-522-7658
Page 62

Appendix B: Glassware Washer Dimensions
58
PART #
DESCRIPTION
4402001
4402101
4401301
Culture Tube/Test Tube
Insert – Stainless Steel.
Insert for 15 mm to 18
mm tubes.
Culture Tube/Test Tube
Insert – Stainless Steel.
Insert for 20 mm to 25
mm tubes.
Culture tube/Test Tube
Insert – Stainless Steel.
Insert for 10 mm to 12
mm tubes. Includes
retainer top 4401401.
4401401
Retainer Top for
Culture Tube Insert –
Stainless Steel. For use
with all culture tube
inserts to keep lightweight
tubes in place under water
pressure.
4401501
10-Pin Insert – Stainless
Steel. For use with
beakers, Erlenmeyer
flasks, and other widemouth glassware.
Product Service 1-800-522-7658
Page 63

Appendix B: Glassware Washer Dimensions
59
PART #
DESCRIPTION
4401801
32-Pin Insert – Stainless
Steel. For use with
beakers, Erlenmeyer
flasks, and other widemouth glassware.
4401901
Retainer Top – Stainless
Steel. To keep
lightweight flasks in place
under water pressure. For
use with 4401801 or
4401501.
4589701
Petri Dish Insert –
Stainless Steel. For
plates, petri dishes, and
watch glasses.
4589201
BOD Rack/Beaker/
Erlenmeyer Flask Insert
– Stainless Steel. Rack
secures glassware used in
oxygen-demand
determination, beakers,
and Erlenmeyer flasks.
Product Service 1-800-522-7658
Page 64

Appendix B: Glassware Washer Dimensions
60
PART #
DESCRIPTION
4402201
Utensil Basket –
Stainless Steel. For
miscellaneous labware such
as stoppers, spatulas, small
beakers, etc. Furnished
with drop-in cover (part
number 4493801).
4591601
48-Pin Insert – Stainless
Steel. For use with
beakers, Erlenmeyer flasks,
and wide-mouth glassware.
For placement in bottom or
upper rack.
4587000
4595900
Top Rack without
spindles – Stainless Steel.
Top Rack without
spindles – Stainless Steel.
Includes 2 slides.
Product Service 1-800-522-7658
Page 65

Appendix B: Glassware Washer Dimensions
61
PART #
DESCRIPTION
4588500
Bottom Rack without
spindles – Stainless Steel.
4591500
DNA Sequencing Plate
Insert. For
electrophoresis plates 10.0
x 16.6 inches (25.4 x
42.1 cm). Holds 6 plates.
4542500
Utensil Holder. For
spatulas, spoons, scoops
& miscellaneous utensils.
4598401
Tray Holder. For trays
up to 19 x 19 x 2.5 deep
(48 x 48 x 6 cm deep)
Product Service 1-800-522-7658
Page 66

Appendix B: Glassware Washer Dimensions
62
PART #
DESCRIPTION
4542100
Bulk Tube Insert. For
vertically positioning test
tubes.
4595500
Stand. Raises washer
approximately 17 inches
(43 cm). Front opens to
provide storage
underneath washer.
4591901
(230V)
Cool Drain Water Kit.
Provides cool water to the
drain plumbing. Connects
to a cold water source.
7537800
Cable, Washer to
Computer. For
computers with 9 pin
D-sub male serial
connector.
7537801
Cable, Washer to
Computer. For
computers with 25 pin
D-sub male serial
connector.
Product Service 1-800-522-7658
Page 67

Appendix B: Glassware Washer Dimensions
63
PART #
DESCRIPTION
4592200
Connection Kit. D.I.
water inlet valve to plastic
tubing.
4546000
Test Tube Spindle Rack.
Lower rack with 150
spindles for washing test
tubes 10mm to 25mm.
4546100
4546200
4526300
10-13mm Test Tube
Holder. Holds 150 tubes.
Used with Test Tube
Spindle Rack
14-20mm Test Tube
Holder. Holds 75 tubes.
Used with Test Tube
Spindle Rack
10-13mm Test Tube
Holder. Holds 75 tubes.
Used with Test Tube
Spindle Rack
1233700
Power Boost
Transformer. For 208V
operation.
PART #
DESCRIPTION
4422000
10-lb. (4.5 kg) LabSolutions Powder Detergent
4422100
27.5-lb. (12.5 kg) LabSolutions Powder Detergent
4522000
1 gallon (3.8L) LabSolutions Liquid Detergent
4522200
34 oz. (1 liter) LabSolutions Neutralizing Acid Rinse
CONSUMABLES
Product Service 1-800-522-7658
Page 68

64
A
A
PPPPEENNDDIIXX
B
B
G
G
LLAASSSSWWAARREE
W
W
AASSHHEER
R
D
D
IIMMEENNSSIIOONNS
S
Product Service 1-800-522-7658
Page 69

Appendix B: Glassware Washer Dimensions
65
Interior – Racks Without Spindles
Interior – Racks with Spindles
Product Service 1-800-522-7658
Page 70

66
A
A
PPPPEENNDDIIXX
C
C
G
G
LLAASSSSWWAARREE
W
W
AASSHHEER
R
S
S
PPEECCIIFFIICCAATTIIOONNS
S
Glassware Washer Specifications
Electrical Specifications
This Appendix contains various specifications for the Glassware Washer,
including program times and water consumption.
Minimum fill water temperature: 120°F (49°C) recommended
Water consumption per fill: 3.4 gallons (13 liters)
Minimum feed water pressure: 20 psi (138 kPa)
Maximum feed water pressure: 120 psi (827 kPa)
Minimum purified water feed pressure: 0 psi (0 kPa)
Heat rejected from washer: less than 170 BTU/minute
Water heating rate: 2.2°F/minute (1.2°C/minute)
Operating voltage: 207/253V
Maximum amperage: 11.0 amperes
Frequency: 50/60 Hz
Phase: Single
Sump heater element power: 2,000 watts
Product Service 1-800-522-7658
Page 71

Appendix C: Glassware Washer Specifications
67
Environmental Conditions
Indoor use only.
Maximum altitude: 6562 feet (2000 meters).
Ambient temperature range: 41° to 104°F (5° to 40°C).
Maximum relative humidity: 80% for temperatures up to 88°F (31°C),
decreasing linearly to 50% relative humidity at 104°F (40°C).
Main supply voltage fluctuations not to exceed ±10% of the nominal
voltage.
Transient overvoltages according to Installation Categories II
(Overvoltage Categories per IEC 1010). Temporary voltage spikes on
the AC input line that may be as high as 1500V for 115V models and
2500V for 230V models are allowed.
Used in an environment of Pollution degrees 2 (i.e., where normally
only non-conductive atmospheres are present). Occasionally,
however, a temporary conductivity caused by condensation must be
expected, in accordance with IEC 664.
Product Service 1-800-522-7658
Page 72

68
Program Times & Water Consumption
Rinse Only Plastic Glass Glass Plus Science Science Plus Intense
Units Factory User set Factory User set Factory User set Factory User set Factory User set Factory User set
Delayed Start (hours) 0 1 to 8 0 1 to 8 0 1 to 8 0 1 to 8 0 1 to 8 0 1 to 8
Wash 1 Time (minutes) 5 None 5 None 5 None 5 None 5 None
Detergent Disp (ml) 20 0 to 40 20 0 to 40 20 0 to 40 20 0 to 40 20 0 to 40
Steam No None No Yes / No Yes Yes / No No Yes / No Yes Yes / No
Wash 2 Time (minutes) 10 10,20,30,40 10 10,20,30,40 10 10,20,30,40 20 10,20,30,40 20 10,20,30,40
Wash 2 Temp (°F) 122 100 to 140 140 100 to 199 140 100 to 199 158 100 to 199 158 100 to 199
(°C) 50 38 to 60 60 38 to 93 60 38 to 93 70 38 to 93 70 38 to 93
Wash 3 Time (minutes)
Wash 3 Temp (°F)
(°C)
Detergent Disp (ml) 20 0 to 40 20 0 to 40 20 0 to 40 20 0 to 40 20 0 to 40
Number of Rinses 1 0 to 6 2 0 to 6 3 0 to 6 3 0 to 6 4 0 to 6 4 0 to 6
No of Pure Rinses 0 0 to 6 0 0 to 6 0 0 to 6 0 0 to 6 0 0 to 6 0 0 to 6
Final Rinse (°F) 100 100 to 140 122 100 to 140 140 100 to 199 140 100 to 199 158 100 to 199 158 100 to 199
(°C) 38 38 to 60 50 38 to 60 60 38 to 93 60 38 to 93 70 38 to 93 70 38 to 93
Rinse Aid Disp (ml) 0 0 to 6 0 0 to 6 0 0 to 6 0 0 to 6 0 0 to 6
Dry Time (minutes) 0 0 or 15 to 250 15 0 or 15 to 250 30 0 or 15 to 250 30 0 or 15 to 250 40 0 or 15 to 250 40 0 or 15 to 250
Dry Temp (°F) 100 100 to 140 122 100 to 140 140 100 to 158 140 100 to 158 140 100 to 158 140 100 to 158
(°C) 38 38 to 60 50 38 to 60 60 38 to 70 60 38 to 70 60 38 to 70 60 38 to 70
Cool if > 50 None if > 50 None if > 50 None if > 50 None if > 50 None if > 50 None
Total Water
Consumption
(gallons)
3.4
3.4 to 20.4
13.6
6.8 to 27.2
17.0
6.8 to 27.2
17.0
6.8 to 27.2
20.4
6.8 to 27.2
20.4
6.8 to 27.2
(liters)
12.9
13 to 77
51.5
26 to 103
64.4
26 to 103
64.4
26 to 103
77.2
26 to 103
77.2
26 to 103
Total Wash Time
(Excluding delays for
heating water and
dry time)
(min)
10 51 86 96 116 126
Note
Times shown are for tap water rinses. Pure rinses add 1.5 minutes per rinse.
Additional time is required to allow inlet water to heat up to the set temperature.
Steam adds 10 minutes to the total program time.
Factory Program Descriptions and Possible User Set Points
Appendix C: Glassware Washer Specifications
Product Service 1-800-522-7658
Page 73

69
Intense Intense Plus Extreme Dry Only User 1 User 2
Units Factory User set Factory User set Factory User set Factory User set Factory User set Factory User set
Delayed Start (hours) 0 1 to 8 0 1 to 8 0 1 to 8 0 1 to 8 0 1 to 8 0 1 to 8
Wash 1 Time (minutes) 10 None 10 None 10 None 5 None 5 None
Detergent Disp (ml) 20 0 to 40 20 0 to 40 20 0 to 40 20 0 to 40 20 0 to 40
Steam No Yes / No Yes Yes / No Yes Yes / No No Yes / No No Yes / No
Wash 2 Time (minutes) 30 10,20,30,40 30 10,20,30,40 40 10,20,30,40 10 10,20,30,40 10 10,20,30,40
Wash 2 Temp (°F) 180 100 to 199 180 100 to 199 199 100 to 199
(°C) 82 38 to 93 82 38 to 93 93 38 to 93 60 38 to 93 82 38 to 93
Wash 3 Time (minutes) 30 0,10,20,30,40 30 0,10,20,30,40 40 0,10,20,30,40 0 0,10,20,30,40 0 0,10,20,30,40
Wash 3 Temp (°F) 180 100 to 199 180 100 to 199 199 100 to 199 60 38 to 93 82 38 to 93
(°C) 82 38 to 93 82 38 to 93 93 38 to 93
Detergent Disp (ml) 20 0 to 40 20 0 to 40 20 0 to 40 20 0 to 40 20 0 to 40
Number of Rinses 5 0 to 6 5 0 to 6 6 0 to 6 2 0 to 6 2 0 to 6
No of Pure Rinses 0 0 to 6 0 0 to 6 0 0 to 6 0 0 to 6 0 0 to 6
Final Rinse (°F) 180 100 to 199 180 100 to 199 199 100 to 199
(°C) 82 38 to 93 82 38 to 93 93 38 to 93 60 38 to 93 82 38 to 93
Rinse Aid Disp (ml) 0 0 to 6 0 0 to 6 0 0 to 6 0 0 to 6 0 0 to 6
Dry Time (minutes) 50 0 or 15 to 250 50 0 or 15 to 250 60 0 or 15 to 250 60 0 or 15 to 250 15 0 or 15 to 250 15 0 or 15 to 250
Dry Temp (°F) 140 100 to 158 140 100 to 158 140 100 to 158 140 100 to 158 140 100 to 158
(°C) 60 38 to 70 60 38 to 70 60 38 to 70 60 38 to 70 60 38 to 70 60 38 to 70
Cool if > 50 None if > 50 None if > 50 None if > 50 None if > 50 None if > 50 None
Total Water
Consumption
(gallons)
23.8
6.8 to 27.2
23.8
6.8 to 27.2
27.2
6.8 to 27.2
0 0 13.6
6.8 to 27.2
13.6
6.8 to 27.2
(liters)
90.1
26 to 103
90.1
26 to 103
103.0
26 to 103
0 0 51.5
26 to 103
51.5
26 to 103
Total Wash Time
(Excluding delays for
heating water and
dry time)
(min)
186 196 235 60 62 62
Factory Program Descriptions and Possible User Set Points
Appendix C: Glassware Washer Specifications
Product Service 1-800-522-7658
Page 74

70
Product Service 1-800-522-7658
 Loading...