

Page 1

LABCONCO CORPORATION 8811 Prospect Ave, Kansas City, MO 64132
(816) 333-8811, Fax (816) 363-0130, (800) 821-5525
Transfer Chamber Pressure Gauge Kit No. 5238100
Operation
This Transfer Chamber Pressure Gauge Kit can only be added to the Precise HEPA-Filtered
Glove Box and XPert Weigh Box. The Transfer Chamber Pressure Gauge Kit monitors
pressure/vacuum from 0 to -29 inches of mercury and includes the vacuum gauge, hose,
mounting bracket, fittings, and hardware. The installation requires drilling a 0.562" diameter
hole in the back of the transfer chamber; if needed a 0.562" hole saw (#5250603) and arbor
(#5250500) may be ordered from Labconco. Follow the installation procedure and pictorial that
follow to properly install the Transfer Chamber Pressure Gauge.
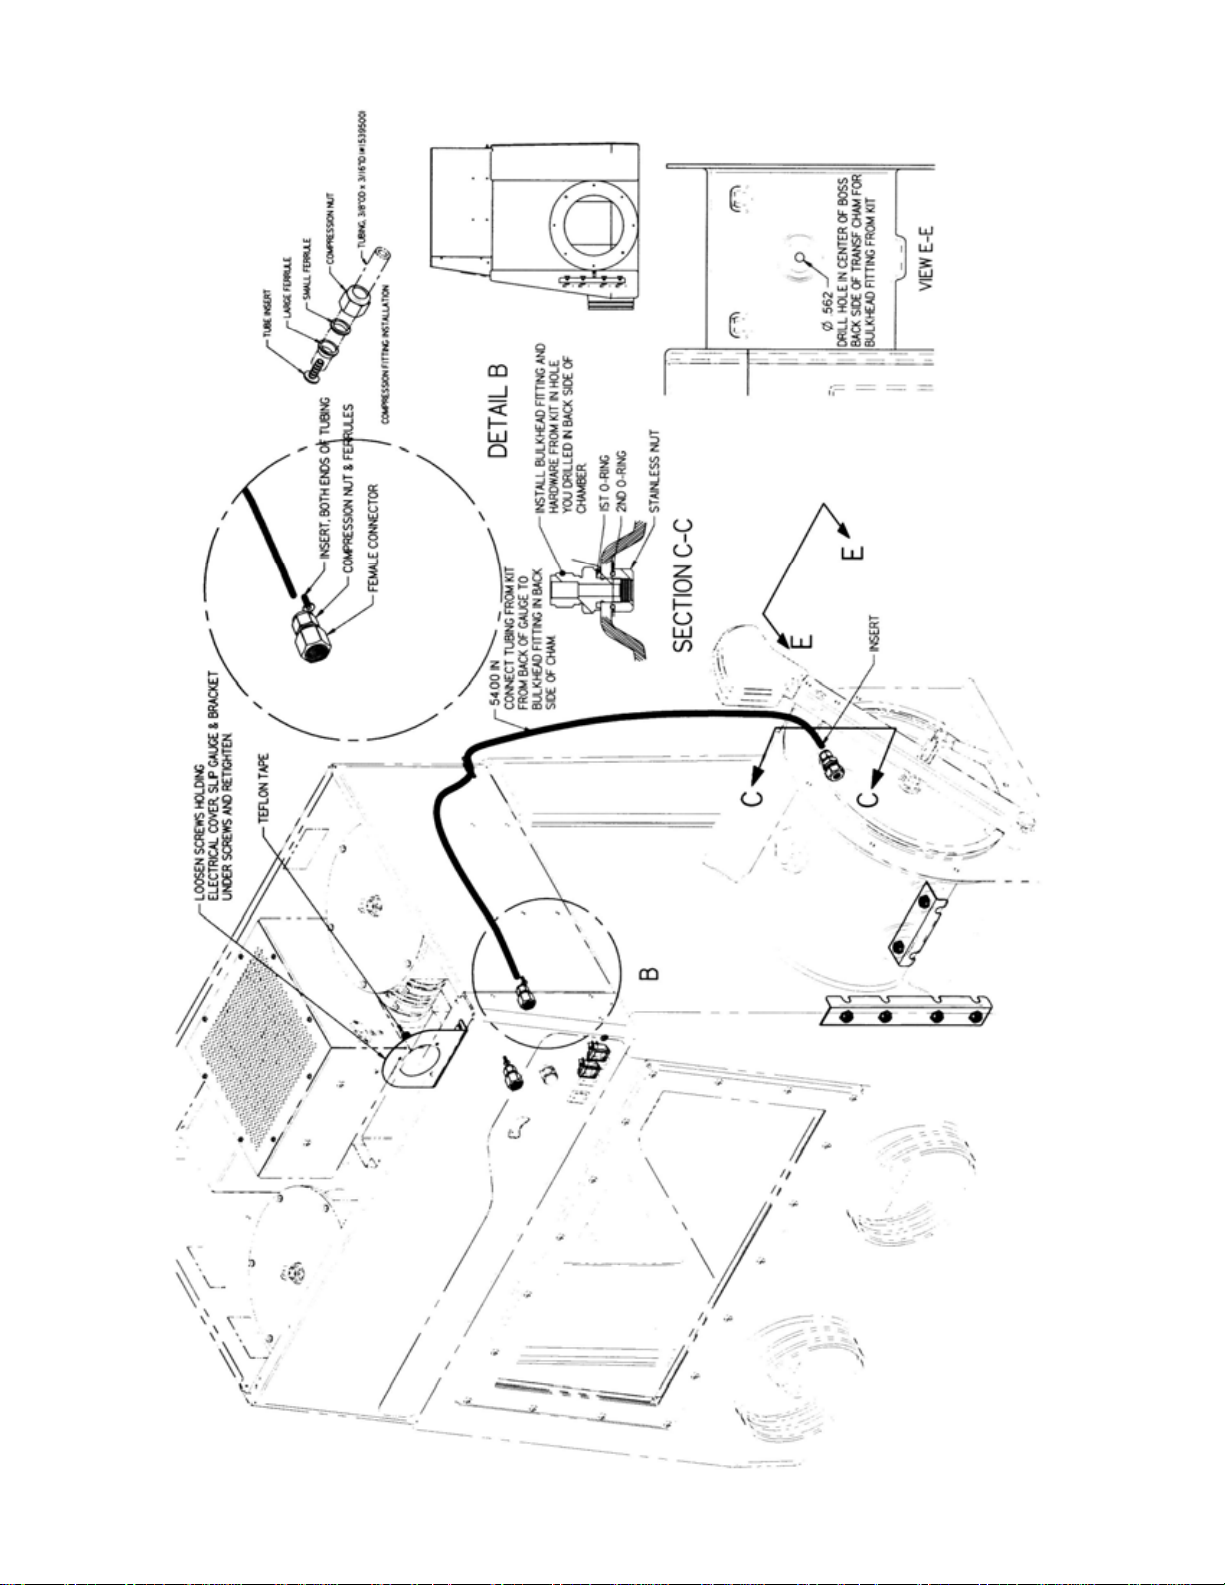
Installation Procedure
1. Refer to the pictorial and loosen the screws holding the electrical cover, slip gauge and
bracket under the screws and retighten.
2. Using two adjustable wrenches, tighten the female tube connector to the rear of the
pressure gauge using Teflon tape to prevent leaks.
3. Place tubing inserts in both ends of the 3/8 OD x 3/16 ID polyvinyl tubing with
compression nut and ferrules per the Compression Fitting Installation View. Insert one
end on to the back of the pressure gauge. Using two adjustable wrenches, tighten the
compression nut 1-1/4 turns with the tubing, ferrules and insert inside the female
connector.
4. Route the other end of the tubing through the 1/2" hole on the right side of the rear back
panel of the glove box.
5. Per view E-E, drill a 0.562" diameter hole in the center of the boss located on the rear of
the transfer chamber. If needed, a 0.562" hole saw (#5250603) and arbor (#5250500) may
be ordered from Labconco.
6. Follow Section C-C and Compression Fitting Installation View to mount the bulkhead
fitting, O-rings, and the stainless steel nut from the kit. The stainless steel nut and second
O-ring are located inside the transfer chamber. By using two adjustable wrenches, tighten
the bulkhead fitting to the transfer chamber.
7. Connect the other end of the polyvinyl tubing to the bulkhead fitting. By using two
adjustable wrenches, tighten the compression nut on the bulkhead fitting 1-1/4 turns with
the tubing, ferrules, and insert placed inside the fitting.
8. Installation is now complete and the pressure gauge kit should hold vacuum if properly
assembled.
Labconco Instruction Sheet 5238900, Rev. A, ECO E275 1 of 3
Page 2
Labconco Instruction Sheet 5238900, Rev. A, ECO E275 2 of 3
Page 3

Warranty
Labconco provides a warranty on all parts and factory workmanship. The warranty includes areas of
defective material and workmanship, provided such defect results from normal and proper use of the
equipment.
The warranty for all Labconco products will expire one year from date of installation or two years from
date of shipment from Labconco, whichever is sooner, except the following;
• Purifier® Delta® Series Biological Safety Cabinets and PuriCare® Lab Animal Research
Stations carry a three-year warranty from date of installation or four years from date of shipment
from Labconco, whichever is sooner.
• SteamScrubber® & FlaskScrubber® Glassware Washers carry a two-year warranty from date of
installation or three years from date of shipment from Labconco, whichever is sooner.
• Blood Drawing Chairs carry a ten year warranty.
• Carts carry a lifetime warranty.
• Glassware is not warranted from breakage when dropped or mi shan dl ed.
This limited warranty covers parts and labor, but not transportation and insurance charges. In the event
of a warranty claim, contact Labconco Corporation or the dealer who sold you the product. If the cause
is determined to be a manufacturing fault, the dealer or Labconco Corporation will repair or replace all
defective parts to restore the unit to operation. Under no circumstances shall Labconco Corporation be
liable for indirect, consequential, or special damages of any kind. This statement may be altered by a
specific published amendment. No individual has authorization to alter the provisions of this warranty
policy or its amendments. Lamps and filters are not covered by this warranty. Damage due to corrosion
or accidental breakage is not covered.
Returned or Damaged Goods
Do not return goods without the prior authorization from Labconco. Unauthorized returns will not be accepted. If
your shipment was damaged in transit, you must file a claim directly with the freight carrier. Labconco Corporation
and its dealers are not responsible for shipping dam ages.
The United States Interstate Commerce Commission rules require that claims be filed with the delivery carrier
within fifteen (15) days of delivery.
Limitation of Liability
The disposal and/or emission of substances used in connection with this equipment may be governed by various
federal, state, or local regulations. All users of this equipment are required to become familiar with any regulations
that apply in the user’s area concerning the dumping of waste materials in or upon water, land, or air and to comply
with such regulations. Labconco Corporation is held harmless with respect to user’s compliance with such
regulations.
Contacting Labconco Corporation
If you have questions that are not addressed in this manual, or if you need technical assistance, contact Labconco’s
Customer Service Department or Labconco’s Product Service Department at 1-800-821-5525 or 1-816-333-8811,
between the hours of 7:00 a.m. and 6:00 p.m., Central Standard Time.
Labconco Instruction Sheet 5238900, Rev. A, ECO E275 3 of 3
 Loading...