


C
HHAAPPTTEERR
C
1
1
I
NNTTRROODDUUCCTTIIOON
I
Congratulations on your purchase of a Labconco
Glassware Washer. Labconco manufactures two types
of Glassware Washers, the SteamScrubber® and the
FlaskScrubber®. Each of these washers is available in a
Mobile, Undercounter, and Freestanding model. Each
washer model is available in 115V or 230V, and with or
without a window in the door.
Your Labconco Glassware Washer is designed and
manufactured to thoroughly clean your laboratory
glassware and accessories. Using the soft-touch control
panel, you can select pre-programmed wash cycles or
program customized wash cycles to facilitate your
individual requirements.
The Glassware Washer Liquid Crystal Display (LCD)
identifies the cycle selected and details about the cycle.
Models with a window and light in the door allow you
to visually monitor the operation of your washer.
Option switches for steaming and using purified water
for the final rinses allow you to choose the best
conditions for cleaning your glassware.
N
Product Service 1-800-522-7658
1

Chapter 1: Introduction
About This Manual
This manual is designed to help you learn how to
install, use, and maintain your Glassware Washer.
Instructions for performing routine maintenance and
making minor modifications to your washer are also
included.
Chapter 1: Introduction provides a brief overview of
the Glassware Washer, explains the organization of the
manual, and defines the typographical conventions used
in the manual.
Chapter 2: Prerequisites explains what you need to do
to prepare your site before you install your Glassware
Washer. Hot water, purified water, electrical, and
drainage requirements are discussed.
Chapter 3: Getting Started contains the information
you need to properly unpack, inspect, install, and test
your Glassware Washer.
Chapter 4: Using Your Washer discusses the basic
operation of your washer. Information on how to
arrange the racks inside your washer, properly position
the glassware, fill the detergent dispenser, and select an
operating cycle is included.
Chapter 5: Maintaining Your Washer explains how to
perform routine maintenance on your Glassware
Washer. Information on how to safely clean the
interior of your washer, maintain the water fill valve,
clean the overflow dome, and replace the light bulb is
included.
Chapter 6: Modifying Your Washer describes how to
disconnect the purified water pump, how to install pipet
inserts in a FlaskScrubber, and how to install an
optional top rack in a FlaskScrubber.
2
Product Service 1-800-522-7658

Chapter 7: Troubleshooting contains a table of
problems you may encounter while using your
Glassware Washer, including the probable causes of the
problems, and suggested corrective actions.
Appendix A: FlaskScrubber and SteamScrubber
Components contains labeled diagrams of all of the
components of the Glassware Washers.
Appendix B: Glassware Washer Dimensions contains
comprehensive diagrams showing all of the dimensions
for the Freestanding, Mobile, and Undercounter models
of the Glassware Washers.
Appendix C: Glassware Washer Specifications contains
the program times and water consumption requirements
for the Glassware Washers. Wiring diagrams for both
the 115V and 230V washers are also included.
Chapter 1: Introduction
Appendix D: Glassware Washer Accessories lists the
part numbers and descriptions of all of the accessories
available for your Glassware Washer.
Typographical Conventions
Recognizing the following typographical conventions
will help you understand and use this manual:
• Book, chapter, and section titles are shown in
italic type (e.g., Chapter 3: Getting Started).
• Steps required to perform a task are presented in
a numbered format.
• Comments located in the margins provide
suggestions, reminders, and references.
• Critical information is presented in boldface
type in paragraphs that are preceded by the
exclamation icon. Failure to comply with the
information following an exclamation icon may
result in injury to the user or permanent damage
to your Glassware Washer.
!!!!
Product Service 1-800-522-7658
3

Chapter 1: Introduction
☞
☞☞
☞
M
M
F
F
U
U
• Important information is presented in
capitalized type in paragraphs that are preceded
by the pointer icon. It is imperative that the
information contained in these paragraphs be
thoroughly read and understood by the user.
• Information that is specific to a particular model
of Glassware Washer is preceded by a letter
icon. The F icon indicates the text is specific to
the Freestanding washer model. The M icon
indicates the text is specific to the Mobile
washer model. The U icon indicates the text is
specific to the Undercounter washer model.
Your Next Step
If your Glassware Washer needs to be installed,
proceed to Chapter 2: Prerequisites to ensure your
installation site meets all of the requirements. Then, go
to Chapter 3: Getting Started for instructions on how to
install your Glassware Washer and make all of the
necessary connections.
For information on the operational characteristics of
your Glassware Washer, go to Chapter 4: Using Your
Washer.
If your Glassware Washer is installed and you need to
perform routine maintenance on the washer, proceed to
Chapter 5: Maintaining Your Washer.
For information on making modifications to the
configuration of your washer, go to Chapter 6:
Modifying Your Washer.
Refer to Chapter 7: Troubleshooting if you are
experiencing problems with your Glassware Washer.
4
Product Service 1-800-522-7658

C
HHAAPPTTEERR
C
2
2
P
RREERREEQQUUIISSIITTEES
P
Before you install your Glassware Washer, you need to
prepare your site for installation. Carefully examine the
location where you intend to install your Glassware
Washer. You must be certain that the area is level and of
solid construction. In addition, a hot water source, a drain,
a purified water source (if applicable), and an electrical
source must be located near the installation site.
Carefully read this chapter to learn:
• the hot water source requirements for your
installation site.
• the purified water source requirements for your
installation site.
• the electrical supply requirements for your
installation site.
• the drainage requirements for your installation
site.
S
Product Service 1-800-522-7658
5

Chapter 2: Prerequisites
Chapter 2: Prerequisites
Refer to Appendix C: Glassware Washer Specifications for
complete Glassware Washer electrical and environmental
conditions, specifications and requirements.
Hot Water Requirements
An existing hot water supply may be used as the hot water
source for your Glassware Washer. However, the washer
requires the inlet water temperature to be greater than
120°F (49°C) to fully activate powdered detergents and
raise the glassware temperatures to achieve fast and
complete drying. For ultimate washer performance, a hot
water inlet temperature setting of 150°F (66°C) is
recommended.
Water pressure must be between 20 – 120 psi (138 - 827
kPa) at the washer and provide a minimum of 1.25 gallons
(4.7 liters) per minute flow rate.
Pressurization is not
required for the purified
water source.
A shut-off valve should be installed in the water supply
line plumbed to the washer. The hot water inlet valve on
the Glassware Washer is equipped with a female 3/8 NPT
fitting.
Purified Water Requirements
If you intend to use purified water for the final rinse cycle,
a purified water supply is required. The washer can be
connected to an in-house, pressurized, purified water tap; a
water purification system; or a purified water container.
The purified water system must be provided with supply
piping of sufficient size to permit at least 1.25 gallons (4.7
liters) per minute of flow (½" internal diameter (ID)
minimum pipe is recommended). The purified water inlet
valve on your washer is equipped with a plastic hose barb
connection to accommodate ¾" (2 cm) ID flexible plastic
or rubber hose. Use a spring or band hose clamp to secure
the hose to the hose barb connection. The hose barb
connection may be removed from the valve to expose a
male ¾" - 11-1/2 NH hose coupling. A rigid plastic, tin-
6
Product Service 1-800-522-7658

lined, or stainless steel tubing and fitting can be connected
M
to the washer fitting.
All connections on the purified water
system must be airtight so that the
!!!!
If the purified water is stored in a carboy, at least 5 gallons
(18.9 liters) must be available for each wash cycle. If all 5
gallons are not available at the start of a wash cycle, but
instead are produced concurrently with the wash cycle, the
production rate must permit at least 1.25 gallons (4.7
liters) per minute to be delivered to the washer. In
addition, all 5 gallons (18.9 liters) must be made available
over a 5-minute period.
washer pump is not allowed to pull air
instead of water.
Chapter 2: Prerequisites
Electrical Requirements
If your Glassware Washer is an Undercounter or
Freestanding model, it should be hard-wired directly into a
junction box using conduit. A 20 Amp circuit breaker or
fuse is required for models rated at 115V (60 Hz) or 230V
(50/60 Hz).
If your Glassware Washer is a Mobile model, a dedicated
electrical outlet is required. A 20 Amp circuit breaker or
fuse is required for models rated at 115V (60 Hz) or 230V
(50/60 Hz). 115V models are equipped with a 20 Amp
NEMA 5-20P plug. 230V models are equipped with a 15
Amp NEMA 6-15P plug. It may be necessary to remove
the plug and install a different plug to match the available
receptacle.
U
U
F
F
Product Service 1-800-522-7658
7

Chapter 2: Prerequisites
M
M
☞
☞☞
☞
Chapter 2: Prerequisites
Drain Requirements
U
U
U
U
F
F
F
F
The Glassware Washer drain hose connects to a fitting on
the rear side of the pump/motor assembly. The drain hose
is installed at the factory prior to shipment. The hose
provides a flexible coupling to the building drain piping
and can be secured with a spring or band hose clamp. (A
band hose clamp is provided with the washer.)
Tubing or pipe, ½" (1.3 cm) ID or larger, should be
provided for the building drain. The use of an air gap is
strongly recommended to prevent siphoning of wastewater
into the washer.
DO NOT REDUCE THE SIZE OF THE
DRAIN PLUMBING.
Mobile models drain into a sink through a hose assembly
that attaches to the faucet.
8
Product Service 1-800-522-7658
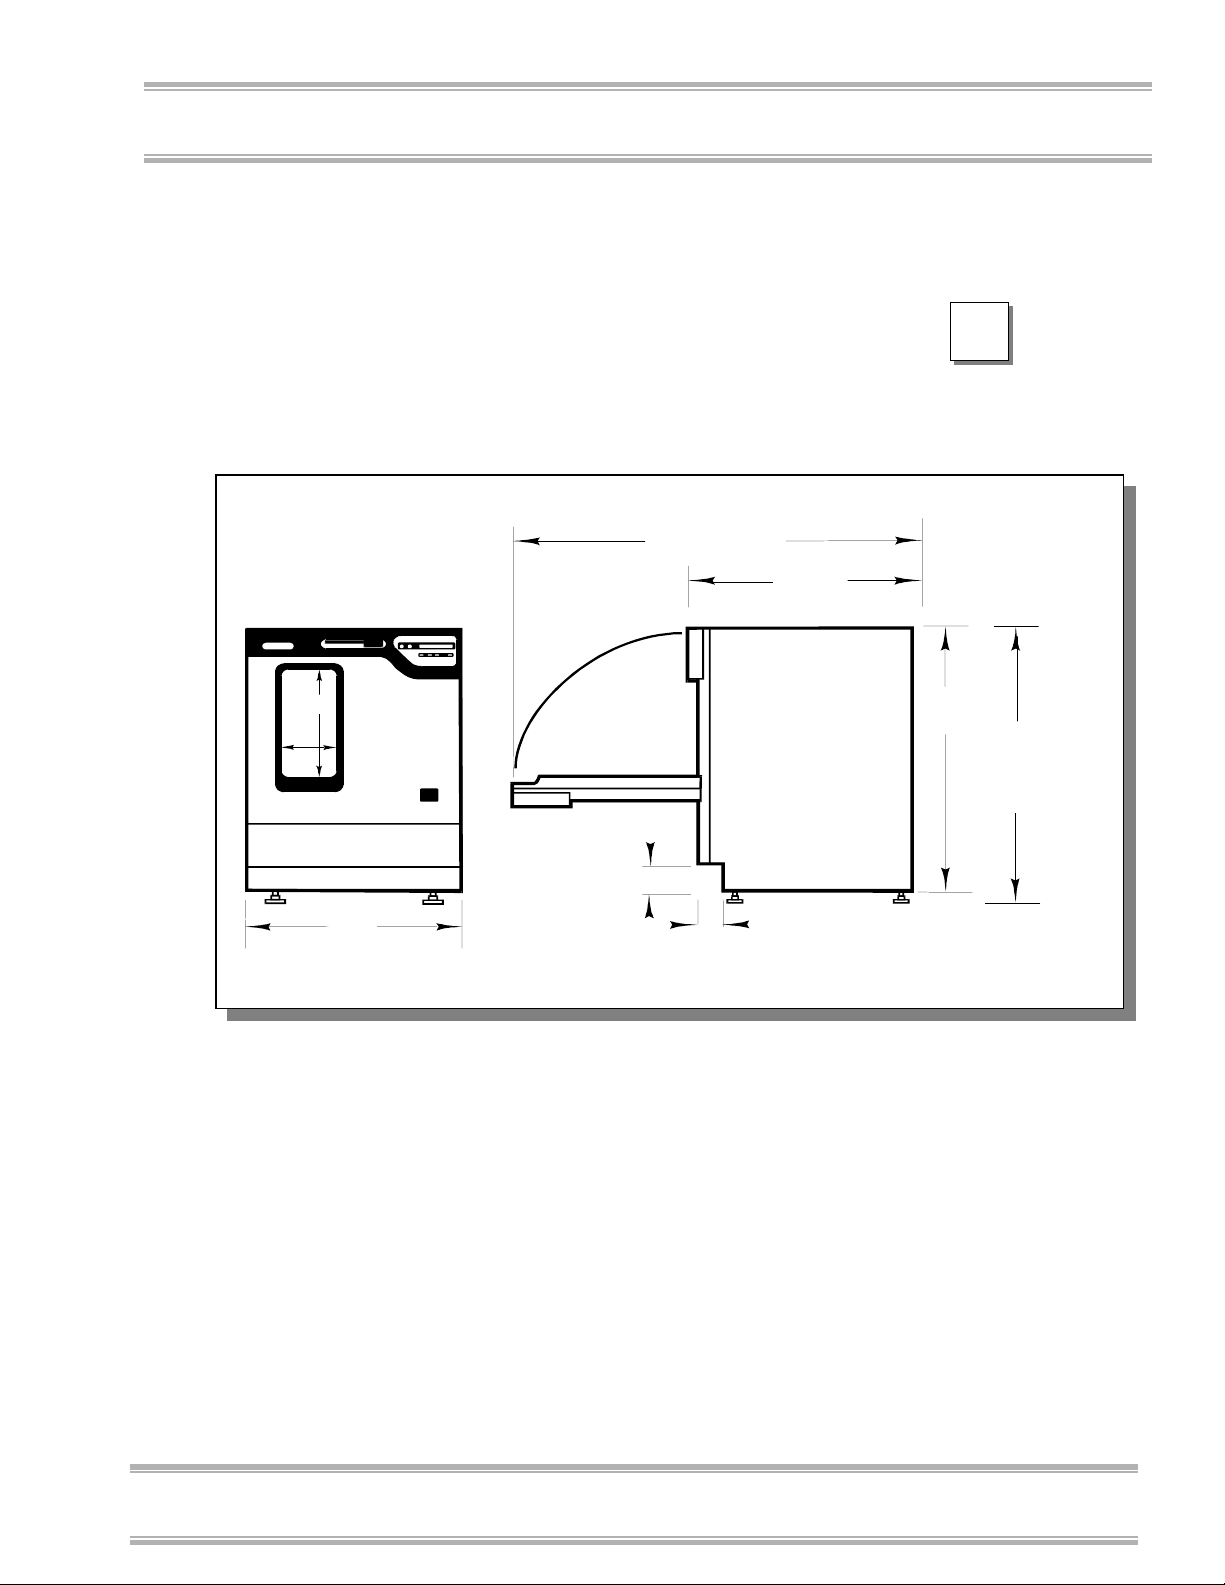
Space Requirements
If your Glassware Washer is an Undercounter model, you
must ensure the undercounter opening is the proper size to
accommodate the washer. The dimensions for the
Undercounter washer are shown below in Figure 2-2.
49.0"
124.3 cm
26.4"
67.1 cm
Chapter 2: Prerequisites
U
U
Figure 2-2
13.8''
6.3''
2.7"
6.8 cm
24.0"
60.9 cm
3.3" 8.4 cm
Your Next Step
After you have determined that the location for your
Glassware Washer accommodates the installation and
operational requirements of your washer, you are ready to
unpack and install your washer. Proceed to Chapter 3:
Getting Started.
33.4"
84.8 cm
34.3"
87.1 cm
36.3"
92.1 cm
MIN.
MAX
Product Service 1-800-522-7658
9

Chapter 2: Prerequisites
Chapter 2: Prerequisites
10
Product Service 1-800-522-7658

C
HHAAPPTTEERR
C
3
3
G
EETTTTIINNGG
G
Now that the site for your Glassware Washer is properly
prepared, you are ready to unpack, inspect, install, and test
your washer. Read this chapter to learn how to:
• unpack and move your washer.
• set up your washer.
• connect the hot water and purified water sources
for your washer.
• connect the electrical supply source to your
washer.
• properly drain your washer.
• perform set-up diagnostics on your washer.
Depending upon which model of washer you are
installing, you may need common plumbing and electrical
installation tools in addition to a 9/16" wrench, a flat-blade
screwdriver, a phillips screwdriver, and a carpenter level
to complete the instructions in this chapter.
S
S
TTAARRTTEED
D
The Glassware Washer weighs over 70
lbs. (33 Kg). The carton allows for lifting
!!!!
Product Service 1-800-522-7658
with a mechanical lift truck or hand
truck. If you must lift the washer
manually, use at least two (2) persons
and follow safe-lifting guidelines.
11

Chapter 3: Getting Started
y
☞
☞☞
☞
☞
☞☞
☞
☞
☞☞
☞
Chapter 2: Prerequisites
Unpacking Your Glassware
Washer
The United States
Interstate Commerce
Commission rules
require that claims be
filed with the delivery
carrier within fifteen (15)
da
s of delivery.
Carefully unpack your Glassware Washer and inspect the
washer for damage that may have occurred in transit. If
your washer is damaged, notify the delivery carrier
immediately and retain the entire shipment intact for
inspection by the carrier.
DO NOT RETURN GOODS WITHOUT
THE PRIOR AUTHORIZATION OF
LABCONCO. UNAUTHORIZED
RETURNS WILL NOT BE ACCEPTED.
IF YOUR WASHER WAS DAMAGED IN
TRANSIT, YOU MUST FILE A CLAIM
DIRECTLY WITH THE FREIGHT
CARRIER. LABCONCO
CORPORATION AND ITS DEALERS
ARE NOT RESPONSIBLE FOR
SHIPPING DAMAGES.
BE CERTAIN TO REMOVE ALL
PACKAGING MATERIALS,
DETERGENT SAMPLES AND ANY
MATERIALS THAT ARE NOT AN
INTEGRAL COMPONENT OF THE
GLASSWARE WASHER FROM THE
INSIDE OF THE WASHER PRIOR TO
INSTALLING THE WASHER.
12
Do not discard the carton or packing material for your
washer until you have checked all of the components and
installed and tested the washer.
Do not remove the washer from its shipping skid until it is
ready to be placed into its final location. Move the washer
by placing a flat, low dolly under the shipping skid.
Product Service 1-800-522-7658

Chapter 3: Getting Started
Washer Components
As previously mentioned, Labconco manufactures two
types of Glassware Washers, the SteamScrubber and the
FlaskScrubber. Each of these washers is available in a
Mobile, Undercounter, and Freestanding model. Each
washer model is available in 115V or 230V, and with or
without a window.
The different washer models require different assembly
components. Locate the model of washer you received in
the following group of tables. Verify that the components
listed are present and undamaged.
Catalog # Washer Description
44000-00 SteamScrubber Mobile – 115 V
44000-01 SteamScrubber Mobile – 230 V
44000-10 SteamScrubber Mobile – 115 V with window
44000-11 SteamScrubber Mobile – 230 V with window
Plus the Following:
Part # Component Description
44882-01 Four (4) Casters
45036-00 User Manual
44222-00 Three (3) ounces of LabSolutions Detergent (with MSDS)
44056-00 One (1) Aerator Adapter
44057-00 One (1) Adapter Fitting
SteamScrubber
Mobile Models
Catalog # Washer Description
44003-00 SteamScrubber Undercounter – 115 V
44003-01 SteamScrubber Undercounter – 230 V
44003-10 SteamScrubber Undercounter – 115 V with window
44003-11 SteamScrubber Undercounter – 230 V with window
Plus the Following:
Part # Component Description
18798-01 Four (4) Leveling Feet
45036-00 User Manual
44629-00 Two (2) Screws
14888-00 One (1) Clamp
44222-00 Three (3) ounces LabSolutions Detergent (with MSDS)
Catalog # Washer Description
44004-00 SteamScrubber Freestanding – 115 V
44004-01 SteamScrubber Freestanding – 230 V
44004-10 SteamScrubber Freestanding – 115 V with window
44004-11 SteamScrubber Freestanding – 230 V with window
Product Service 1-800-522-7658
SteamScrubber
Undercounter
Models
SteamScrubber
Freestanding
Models
13

Chapter 3: Getting Started
Chapter 2: Prerequisites
Plus the Following:
Part # Component Description
18798-01 Four (4) Leveling Feet
45036-00 User Manual
44680-00 One (1) Hole Plug
14888-00 One (1) Clamp
44222-00 Three (3) ounces LabSolutions Detergent (with MSDS)
FlaskScrubber
Mobile Models
FlaskScrubber
Undercounter
Models
Catalog # Washer Description
44200-00 FlaskScrubber Mobile – 115 V
44200-01 FlaskScrubber Mobile – 230 V
44200-10 FlaskScrubber Mobile – 115 V with window
44200-11 FlaskScrubber Mobile – 230 V with window
Plus the Following:
Part # Component Description
44882-01 Four (4) Casters
45036-00 User Manual
44222-00 Three (3) ounces LabSolutions Detergent (with MSDS)
44056-00 One (1) Aerator Adapter
44057-00 One (1) Adapter Fitting
Catalog # Washer Description
44203-00 FlaskScrubber Undercounter – 115 V
44203-01 FlaskScrubber Undercounter – 230 V
44203-10 FlaskScrubber Undercounter – 115 V with window
44203-11 FlaskScrubber Undercounter – 230 V with window
Plus the Following:
Part # Component Description
18798-01 Four (4) Leveling Feet
45036-00 User Manual
44629-00 Two (2) Screws
14888-00 One (1) Clamp
44222-00 Three (3) ounces LabSolutions Detergent (with MSDS)
FlaskScrubber
Freestanding
Models
14
Catalog # Washer Description
44204-00 FlaskScrubber Freestanding – 115 V
44204-01 FlaskScrubber Freestanding – 230 V
44204-10 FlaskScrubber Freestanding – 115 V with window
44204-11 FlaskScrubber Freestanding – 230 V with window
Plus the Following:
Part # Component Description
18798-01 Four (4) Leveling Feet
45036-00 User Manual
44680-00 One (1) Hole Plug
14888-00 One (1) Clamp
44222-00 Three (3) ounces LabSolutions Detergent (with MSDS)
Product Service 1-800-522-7658

If you did not receive one or more of the components
M
M
listed for your washer, or if any of the components are
damaged, contact Labconco Corporation immediately for
further instructions.
Removing the Shipping Skid
Chapter 3: Getting Started
After you verify the washer components, move your
washer to the location where you want to install it. Then,
follow the steps listed below to remove the shipping skid
from your washer.
To remove the shipping skid:
1. Make certain any loose items inside the washer have
been removed.
2. Gently place the washer on its back, positioning the
washer on the shipping carton or other cushioning
material.
3. Remove the four screws fastening the skid to the
washer.
Setting Up Your Washer
After you remove the skid from your washer, you must
install either casters or leveling feet on the bottom of the
washer. If you have an Undercounter or Freestanding
model, then you must level the washer and center the
washer door. If you have an Undercounter model, you
must also attach the washer to the countertop or
worksurface.
Move the washer by
placing a flat, low dolly
under the shipping skid.
Retain the shipping skid
until you test the various
features of the washer.
Installing the Casters or Leveling
Feet
If you have the Mobile model of the SteamScrubber or
FlaskScrubber washer, the washer must sit on a level floor.
Refer to Figure 3-1 and follow the steps below to install
the casters on your washer.
Product Service 1-800-522-7658
15
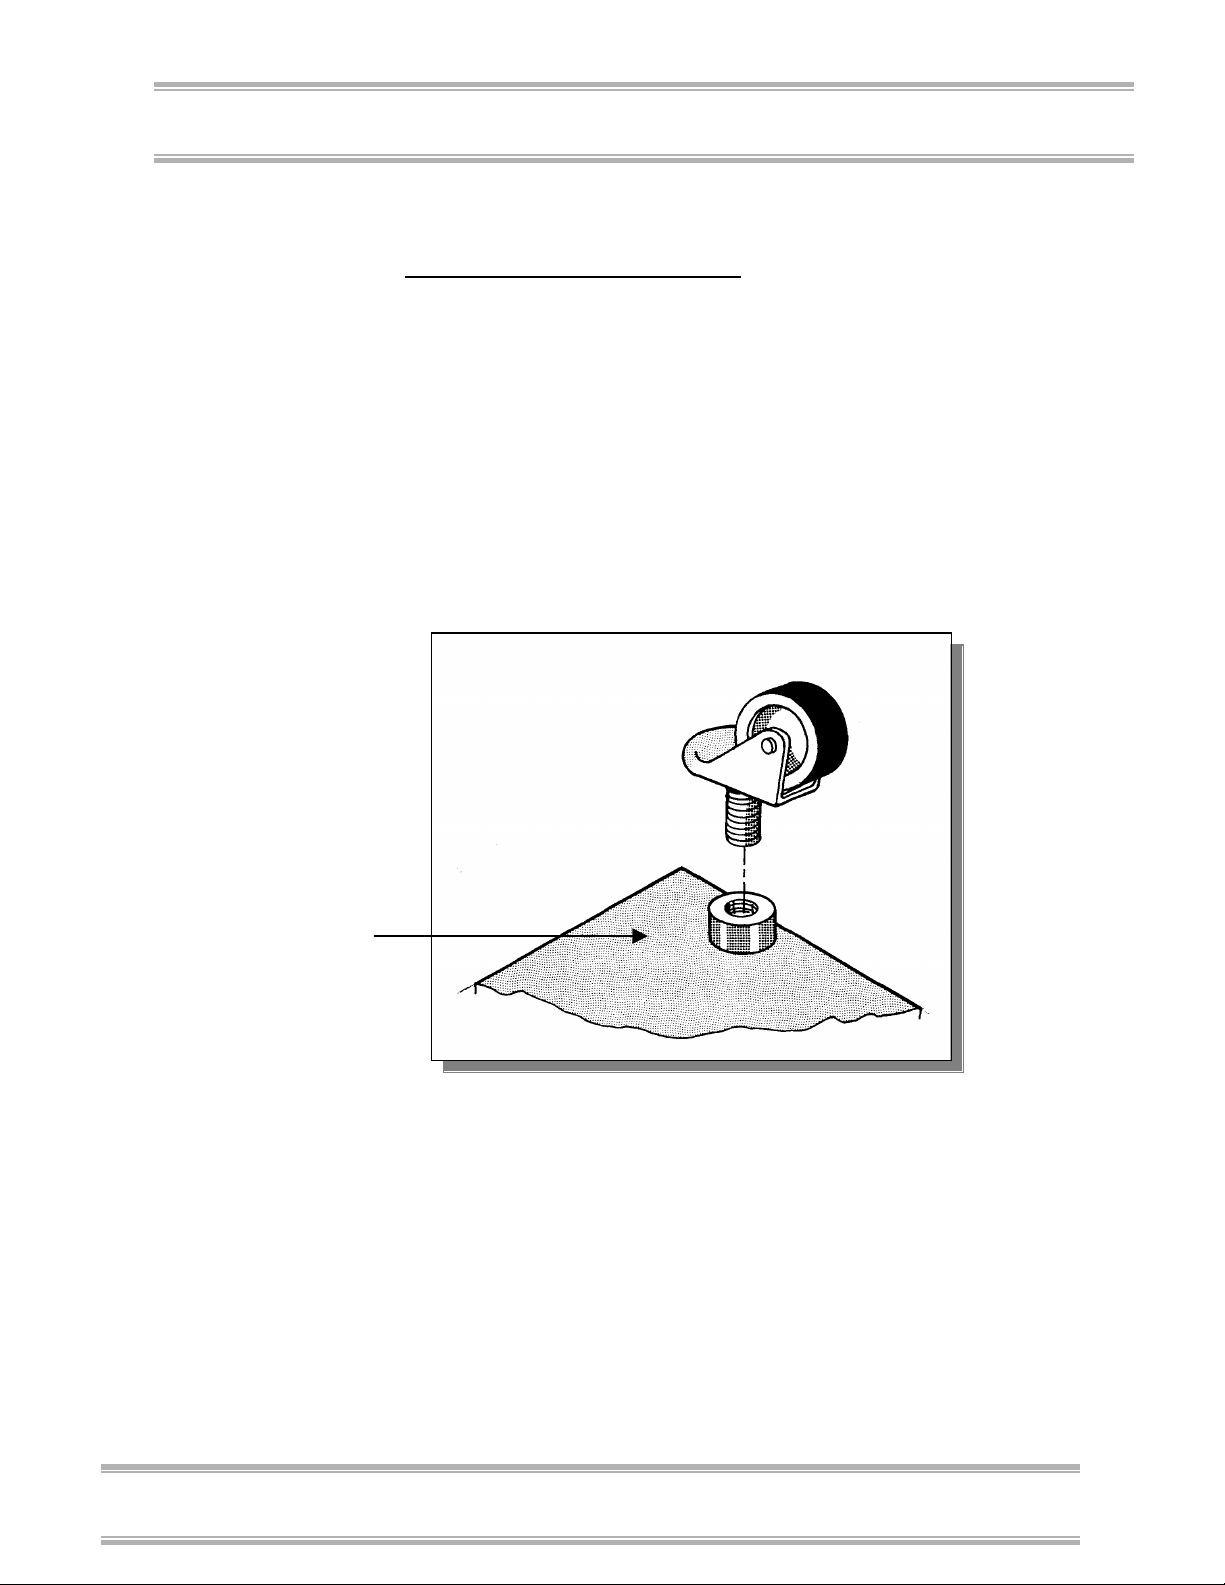
Chapter 3: Getting Started
Chapter 2: Prerequisites
To install the washer casters:
1. Locate the holes on the bottom of the washer where
2. Thread the four casters into these holes until the
3. Carefully move the washer into an upright position.
the four skid-fastening screws were previously
attached.
casters fit tightly.
Be careful to distribute the weight evenly on the
casters when setting the washer upright.
Figure 3-1
16
Bottom of
washer
Product Service 1-800-522-7658
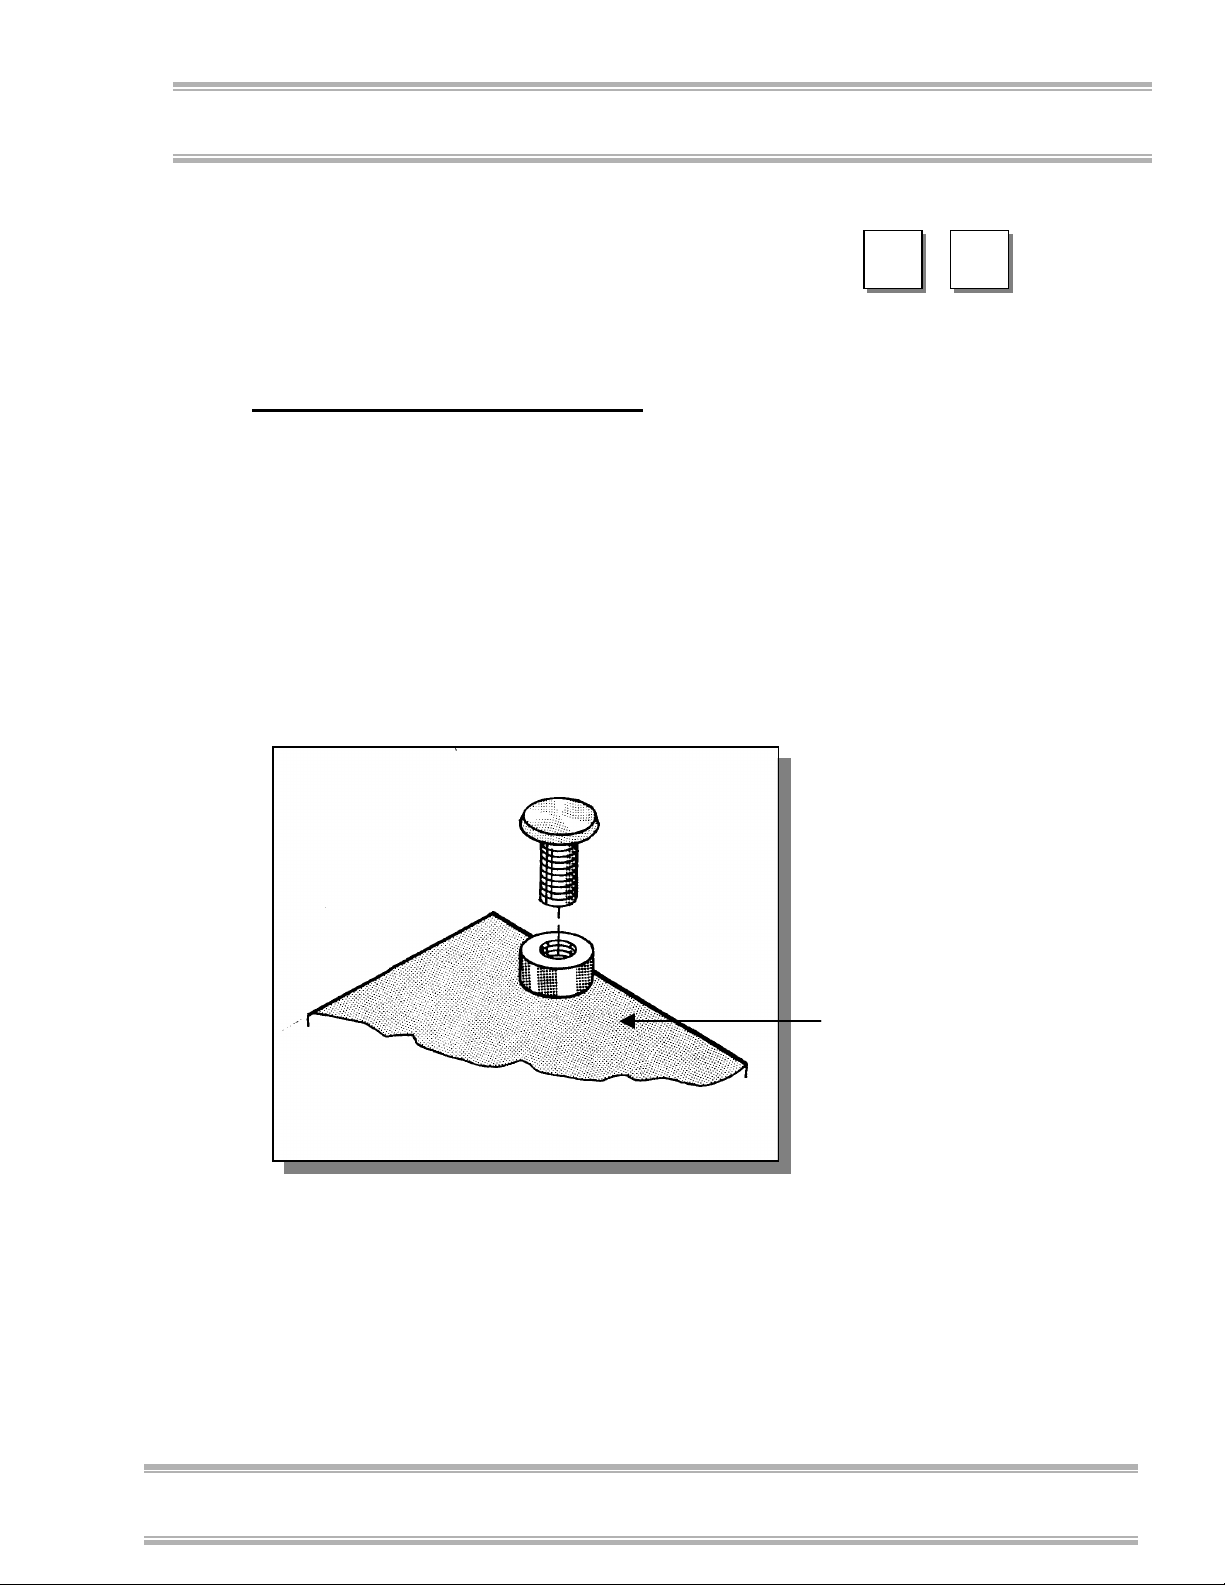
If you have the Undercounter or Freestanding model of the
SteamScrubber or FlaskScrubber washer, refer to Figure
3-2 and follow the steps detailed below to install the
leveling feet on your washer.
To install the washer leveling feet:
1. Locate the holes on the bottom of the washer where
the four skid-fastening screws were previously
attached.
2. Thread the four leveling feet into the holes.
3. Carefully move the washer into an upright position.
Be careful to distribute the weight evenly on the
leveling feet when setting the washer upright.
Chapter 3: Getting Started
U
U
F
F
Figure 3-2
Bottom of washer
Product Service 1-800-522-7658
17

Chapter 3: Getting Started
Chapter 2: Prerequisites
Leveling the Washer
If you have the Freestanding model of the SteamScrubber
F
F
or FlaskScrubber Glassware Washer, after you have
installed the leveling feet, you must level the washer by
adjusting the leveling feet.
To level the washer:
1. Position the washer in its final installation site.
2. Place a carpenter level on the washer in the positions
shown in Figure 3-3.
Figure 3-3
Position the level
in both directions
to ensure the
washer is level
front-to-back and
side-to-side.
3. Turn the four leveling feet, as needed, to level the
washer. A leveling foot is illustrated in Figure 3-4.
18
Product Service 1-800-522-7658
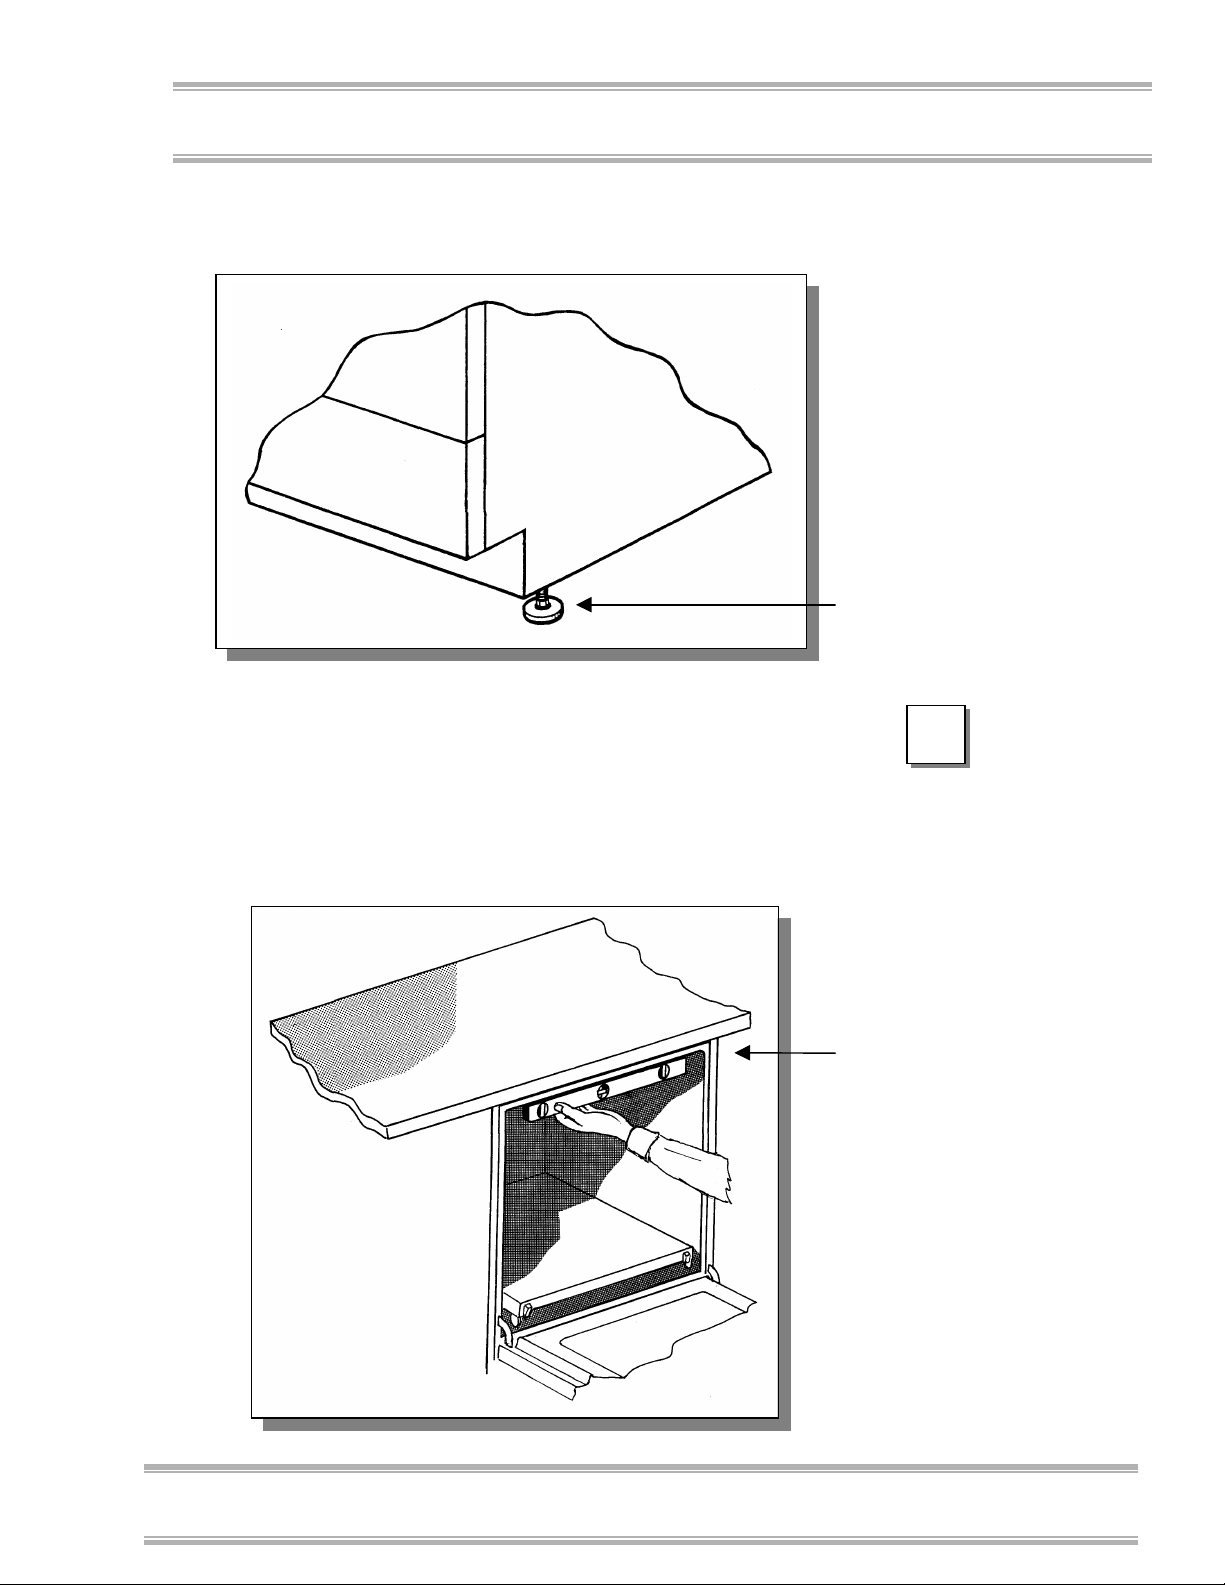
Figure 3-4
Chapter 3: Getting Started
Turn the leveling
foot clockwise to
lower the washer and
counterclockwise to
raise the washer.
Leveling foot
If you have the Undercounter model washer, you may
level it side-to-side by placing a short level on the inside
top edge of the door. Refer to Figure 3-5 for the
placement of the level on the washer.
Figure 3-5
U
U
Position the level
as shown to level
the Undercounter
model washer from
side-to-side
.
Product Service 1-800-522-7658
19
Chapter 3: Getting Started
Chapter 2: Prerequisites
Centering the Washer Door
When the washer is level, check the operation of the
washer door for alignment with the washer tank. If the
door is not centered in the opening, you must center the
door by adjusting the corresponding leveling foot. (For
example, if the door hits the right side of the tank, raise the
right front corner of the washer. If the door hits the left
side of the tank, raise the left front corner of the washer.)
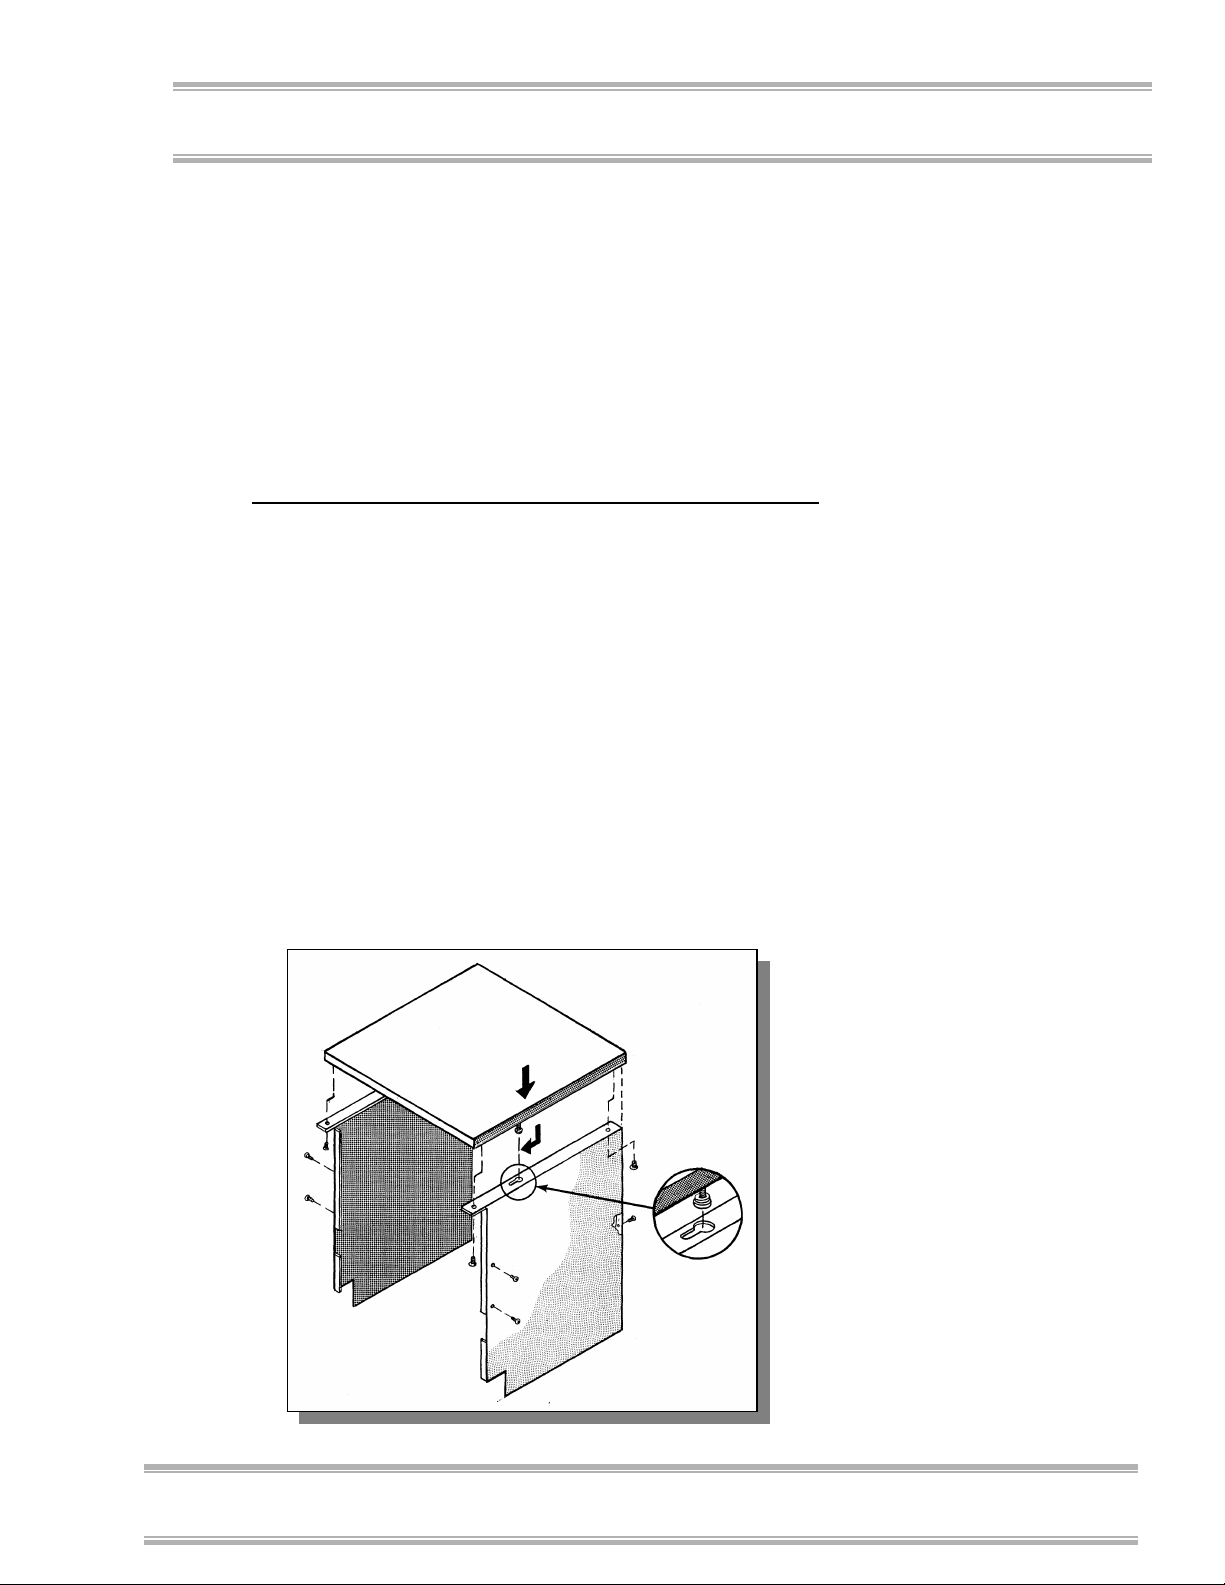
Attaching the Washer to the
Countertop
U
U
Insert the
screws through
the holes in the
clips in the
front corners of
the washer and
secure the
screws to the
countertop.
If you have an Undercounter Glassware Washer, two
screws have been provided to attach the front of the
washer to the underside of the countertop or worksurface.
After the washer is leveled in its final position and the
washer door is properly centered, install the two screws as
shown in Figure 3-6 to stabilize the unit and prevent it
from moving.
Figure 3-6
20
Product Service 1-800-522-7658
Connecting the Water
Supplies
A hot water supply must be attached to your Glassware
Washer. If you need purified water for the final rinse
cycle, then you must also connect a purified water source
to your washer.
Chapter 3: Getting Started
Connecting the Hot Water
To prevent valve clogging, flush all of the hot water lines
for your hot water supply source prior to connecting the
washer to the water lines. The water supply valve to
which the hot water supply must be connected is located in
the lower right front corner of the washer. The lower
panel of the washer must be removed to access the valve.
To remove the panel, refer to Figure 3-7 and the
instructions below.
To remove the lower panel:
1. Remove the two screws at the bottom of the lower
panel of your washer.
2. Remove the panel by lifting slightly and pulling out.
Figure 3-7
U
U
Before continuing with
this section, be certain
your hot water source
meets the requirements
discussed in Hot Water
Requirements in
Chapter 2:
Prerequisites.
F
F
Product Service 1-800-522-7658
Lift the panel slightly
before pulling out to
disengage the panel
“lip.”
Screw
21

Chapter 3: Getting Started
☞
☞☞
☞
Chapter 2: Prerequisites
After you remove the lower panel, you are ready to
connect the hot water source. Refer to Figure 3-8 and
follow the instructions below to connect the hot water.
To connect the hot water supply:
1. Be certain the hot water supply piping has been
2. Make the necessary plumbing connections to properly
YOU MUST PROVIDE THE PLUMBING
FITTINGS AND COMPONENTS
NEEDED TO CONNECT THE HOT
WATER SUPPLY SOURCE. THE
WASHER HOT WATER SUPPLY
VALVE IS EQUIPPED WITH A 3/8"
FEMALE NPT FITTING. 3/8" TUBING
OR LARGER IS RECOMMENDED FOR
THE SUPPLY PLUMBING.
thoroughly flushed prior to connecting it to the washer.
Debris in the piping can clog the washer valve.
connect the hot water supply to the washer.
Customer-
supplied
plumbing
Washer hot
water valve
Figure 3-8
22
Product Service 1-800-522-7658
Chapter 3: Getting Started
P
☞
☞☞
☞
Connecting the Purified Water
Supply
To prevent valve and pump clogging, flush all of the water
lines for your purified water supply source prior to
connecting the washer to the water lines. The water
supply valve to which the purified water supply must be
connected is located in the lower right front corner of the
washer. The lower panel of the washer must be removed
to access the valve. Refer to Figure 3-9 and follow the
instructions below to connect the purified water source.
THE PURIFIED WATER INLET VALVE
IS EQUIPPED WITH A PLASTIC HOSE
BARB CONNECTION TO ACCOMMODATE ¾" (2 CM) ID FLEXIBLE
PLASTIC OR RUBBER HOSE. THE
HOSE CONNECTION MAY BE
REMOVED FROM THE VALVE TO
EXPOSE A MALE 3/4" - 11-1/2 NH
HOSE COUPLING. RIGID PLASTIC,
TIN-LINED, OR STAINLESS STEEL
TUBING AND FITTINGS MAY BE
CONNECTED TO THE WASHER
FITTING.
Before continuing with this
section, be certain your
purified water source meets
the requirements discussed
in Purified Water
Requirements in Chapter 2:
rerequisites.
Product Service 1-800-522-7658
Figure 3-9
Customersupplied
plumbing
Hose barb
connector
supplied with
washer
Purified
water
valve
23

Chapter 3: Getting Started
☞
☞☞
☞
M
M
Chapter 2: Prerequisites
If the washer is a Mobile model and is moved to various
locations, and if purified water is used, provisions must be
made to use a flexible hose from a source of housepurified water. If a carboy is used, place the carboy on a
carboy cart and move it with the washer. Be careful not to
let the hose kink or become damaged.
To connect the purified water supply:
AT LEAST 1.25 GALLONS (4.7 LITERS)
PER MINUTE OF PURIFIED WATER
FLOW IS REQUIRED. AT LEAST 5
GALLONS OF PURIFIED WATER
MUST BE AVAILABLE FOR EACH
WASH CYCLE. A ½" ID PIPE IS THE
MINIMUM RECOMMENDED.
If you do not use
purified water during
the washer cycle, you
may want to disconnect the purified
water pump. Refer
to the section,
Disconnecting the
Purified Water Pump
in Chapter 6:
Modifying Your
Washer.
1. Make certain the purified water supply piping has been
thoroughly flushed prior to connecting it to the washer.
2. Remove the two screws at the bottom of the lower
panel of your washer, as shown in Figure 3-7.
3. Remove the panel by lifting slightly and pulling out.
4. Make the necessary plumbing connections to properly
connect the purified water supply to the washer.
NOTE: If the purified water source is a carboy, complete
steps 5 and 6.
5. Connect the purified water source through either the
top or the bottom of the carboy, as illustrated in
Figures 3-10 and 3-11. If the purified water supply
feeds directly from the carboy top, make certain the
hose is submerged under the water line. Attach a
weight to the end of the tubing, as shown in Figure 311, to keep it from floating on top of the water and
possibly allowing air into the system.
6. Make certain the top of the carboy is vented to permit
proper flow from the carboy to the washer.
24
Product Service 1-800-522-7658
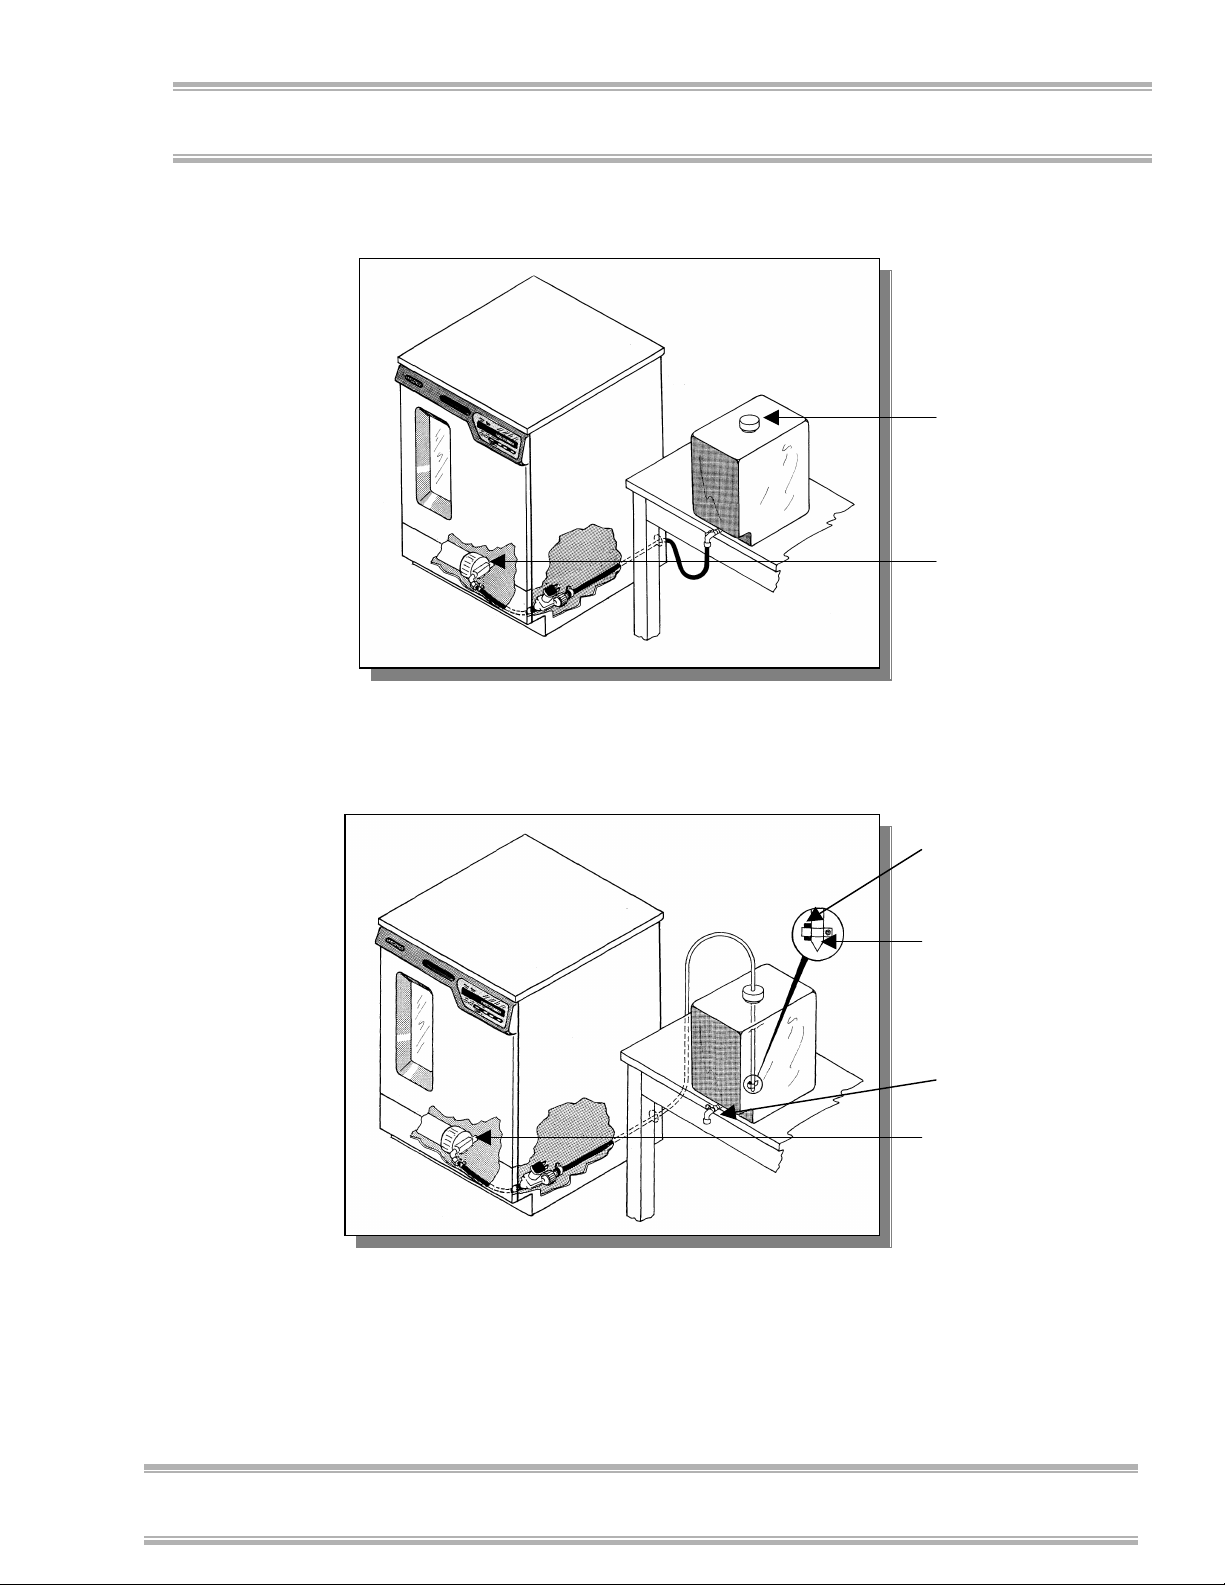
Figure 3-10
Chapter 3: Getting Started
Open for vent
Purified water pump
Example of a Bottom Feed Connection
Figure 3-11
Example of a Top Feed Connection
Clamp weight to hose
to keep it submerged.
Cut hose into a V
configuration for
siphoning.
Spigot
Purified water pump
Product Service 1-800-522-7658
25
Chapter 3: Getting Started
☞
☞☞
☞
M
M
Chapter 2: Prerequisites
Installing Faucet Adapters
If you purchased a Mobile Glassware Washer, you need to
install a faucet adapter to provide a quick disconnect highpressure coupling between the faucet and the hose-end
fill/drain connector on your washer. Examples of two
faucet adapter configurations are shown in Figure 3-12.
MAKE CERTAIN THAT ALL OF THE
CONNECTIONS ON THE PURIFIED
WATER SYSTEM ARE AIR TIGHT.
THE PUMP MUST NOT PULL AIR
INSTEAD OF WATER. MAKE
CERTAIN THE SUPPLY HOSE IS NOT
CRIMPED.
External
faucet thread
Internal
faucet thread
Aerator adapters
Hose-end
coupling
Figure 3-12
26
Product Service 1-800-522-7658

An aerator adapter and a standard-size adapter fitting are
☞
☞☞
☞
provided with your Mobile washer. If the adapter fitting
provided does not allow for a tight connection to your
faucet, a variety of internally and externally threaded
fittings are available at your local hardware store. Use
caution when installing the fittings to prevent stripping the
threads.
Attaching the Hose-End
Coupling
After you have installed the faucet adapter, the hose-end
coupling of your washer (shown in Figure 3-12) attaches
and seals to the aerator adapter by pushing the parts
together. The hose-end coupling must be snapped into
place BEFORE turning on the hot water faucet. Turn the
hot water on SLOWLY until the faucet is completely
open.
Chapter 3: Getting Started
Connecting the Drain Hose
Before continuing with this section, be certain that your
drain meets the requirements detailed in Drain
Requirements in Chapter 2: Prerequisites. The washer
drain hose is connected to a fitting on the rear side of the
pump/motor assembly.
BE CERTAIN YOU CONFORM TO ALL
LOCAL PLUMBING CODES WHEN
YOU ROUTE AND CONNECT THE
DRAIN.
The drain hose is installed at the factory. The hose
provides a flexible coupling to the drain piping and can be
secured with a spring or band hose clamp. (A band hose
clamp is provided with your washer.)
U
U
F
F
Product Service 1-800-522-7658
27
Chapter 3: Getting Started
☞
☞☞
☞
The use of an air
gap is strongly
recommended for
all installations to
prevent the siphoning of waste water
into the washer.
Chapter 2: Prerequisites
Tubing or pipe ½" (1.3 cm) ID should be used for the
drain.
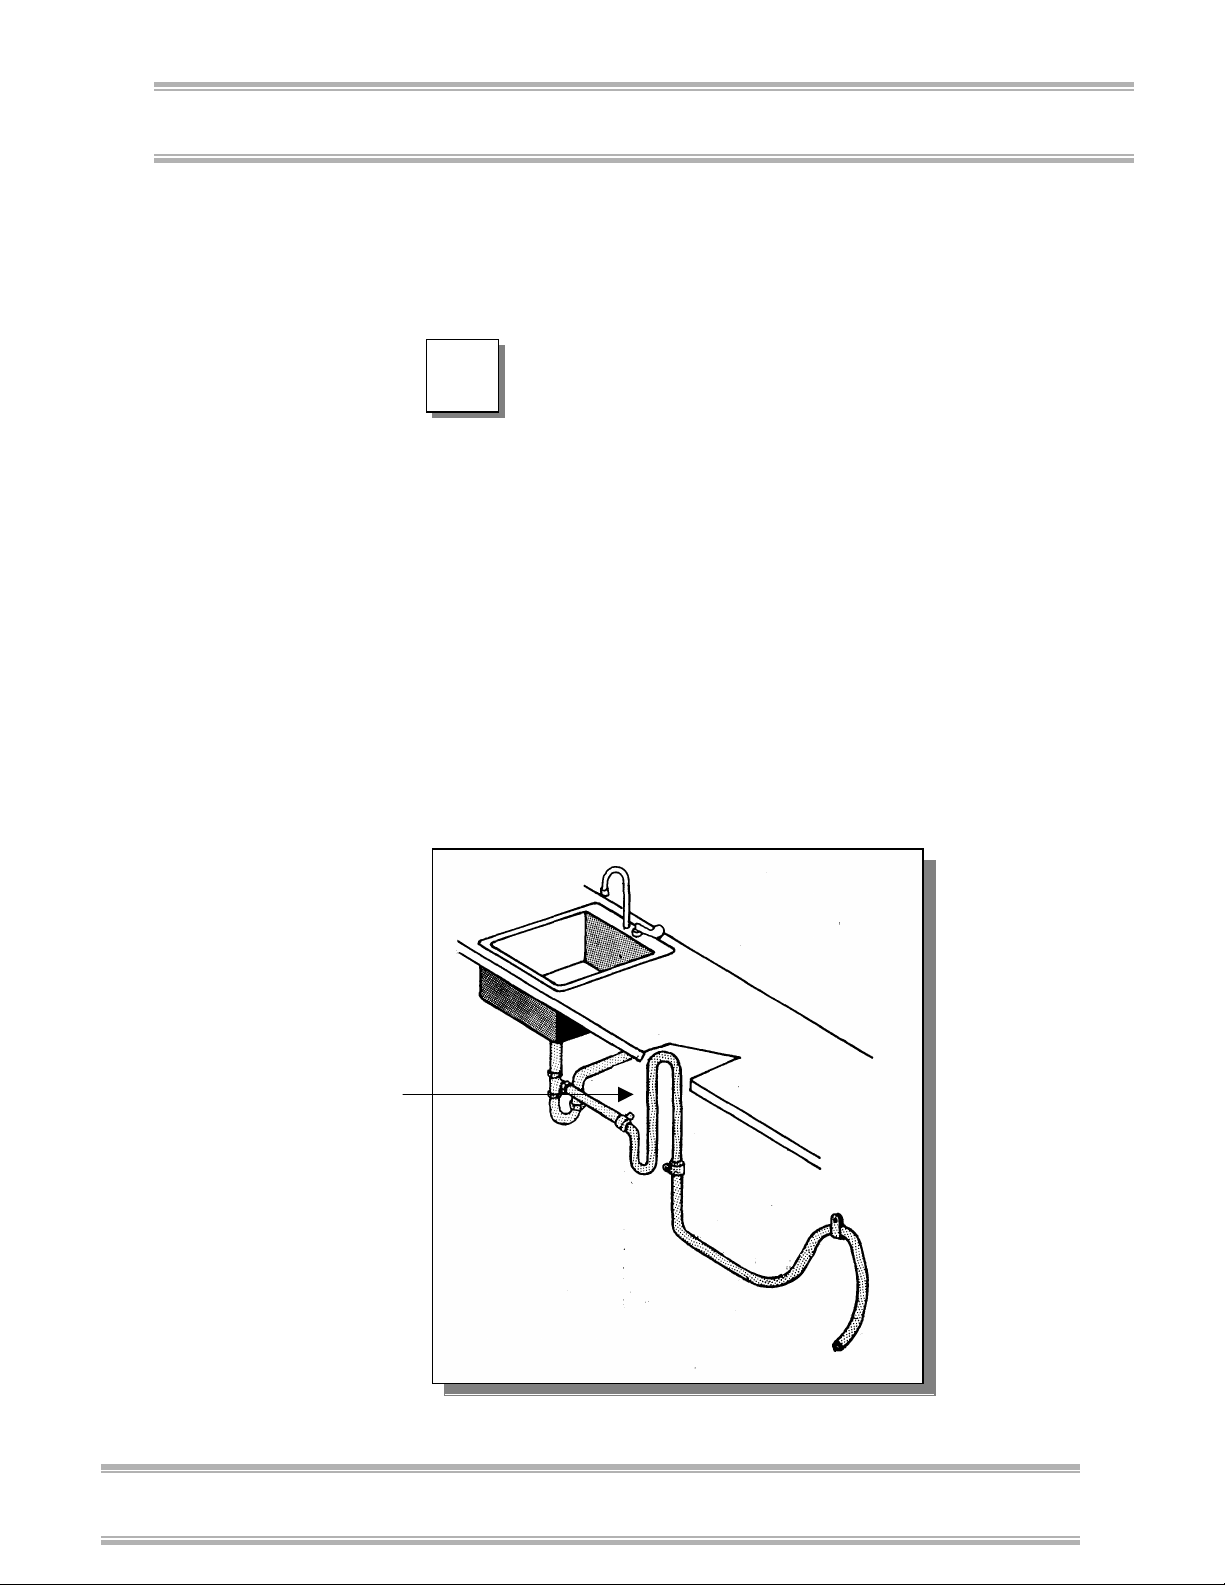
The drain piping can be routed to either a sink or a floor
drain. If you route the drain piping to a sink drain without
using an air gap, the highest point of the drain pipe must
be above the sink drain, as shown in Figure 3-13.
DO NOT ROUTE THE DRAIN TO AN
ELEVATION LESS THAN 15" (38 cm)
OR MORE THAN 30" (76 cm) ABOVE
THE PUMP DISCHARGE. DO NOT
REDUCE THE SIZE OF THE DRAIN
PLUMBING.
If an air gap is
not used, the
drain line must be
elevated above
the water level of
the sink.
Figure 3-13
28
Product Service 1-800-522-7658
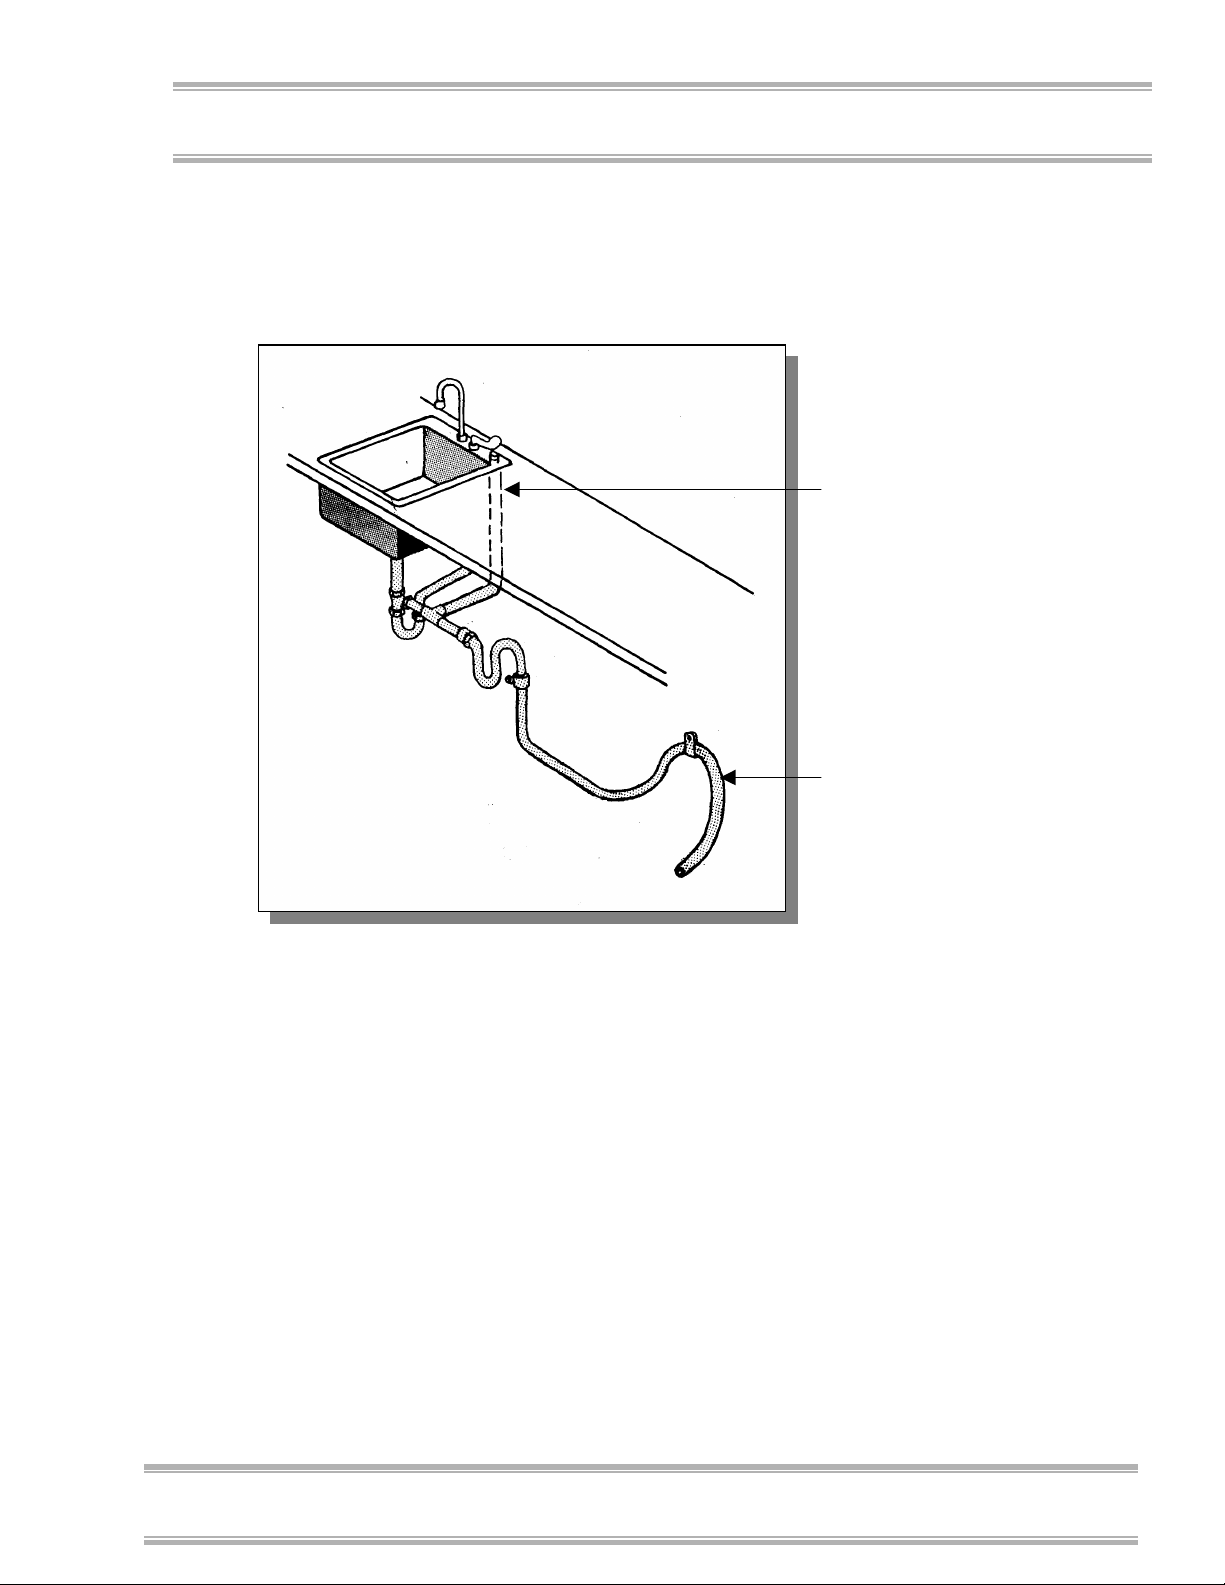
If you route the drain piping to a sink drain and use an air
gap, refer to Figure 3-14 for the placement of the air gap.
Figure 3-14
Chapter 3: Getting Started
Air gap
Drain line
Product Service 1-800-522-7658
29
Chapter 3: Getting Started
☞
☞☞
☞
Chapter 2: Prerequisites
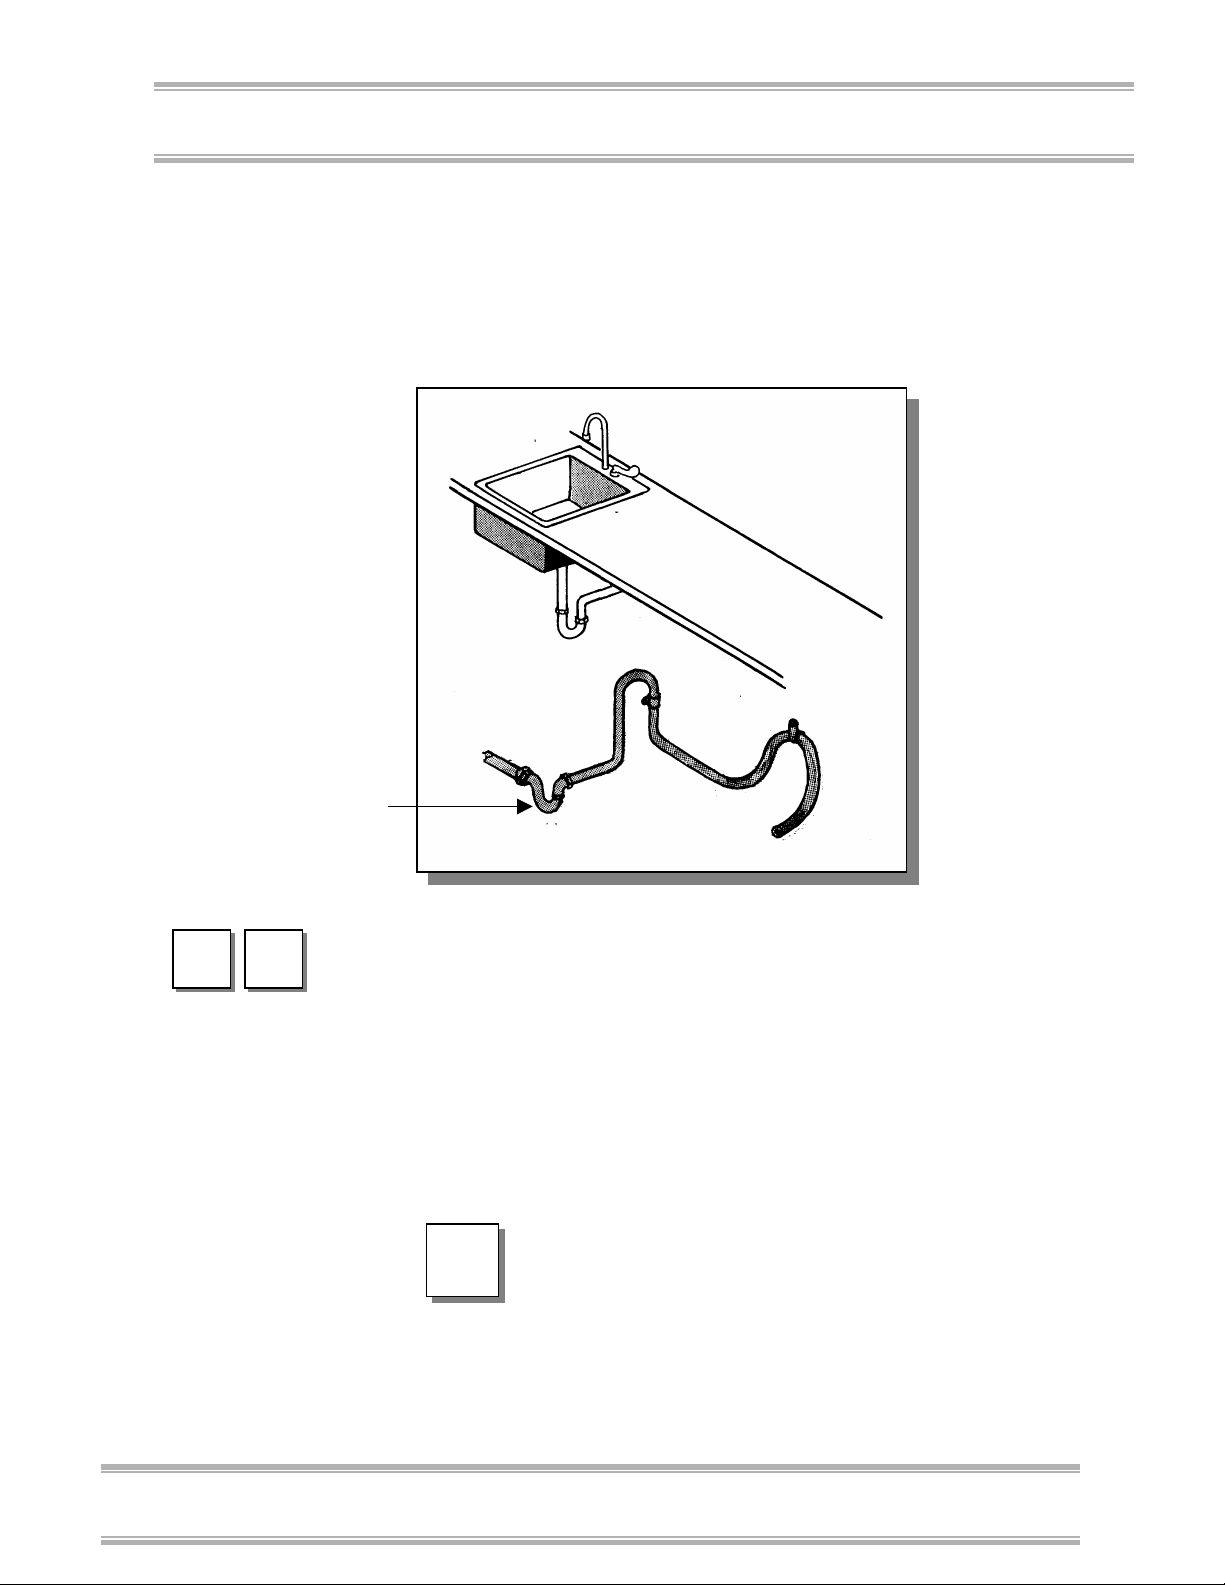
If you route the drain piping to a floor drain, refer to
Figure 3-15 for placement of the drain tubing and trap.
Figure 3-15
U
U
Drain trap
F
F
Connecting the Power Supply
Before continuing with this section, be certain your power
supply meets the requirements specified in Electrical
Requirements in Chapter 2: Prerequisites
and Freestanding Washers should be hard-wired directly
into a junction box. Refer to Figure 3-16 and follow the
steps below to connect your washer to the appropriate
power source.
BE CERTAIN THAT YOU CHECK AND
CONFORM TO ALL LOCAL
ELECTRICAL CODES. DO NOT
DISTURB ANY INTERNAL WIRING IN
THE WASHER.
.
Undercounter
30
Product Service 1-800-522-7658

THE SUPPLY CIRCUIT MUST CONSIST
☞
☞☞
☞
☞
☞☞
☞
OF NUMBER 12 AWG 3-WIRE CABLE
OR HEAVIER. WASHERS MUST BE
CONNECTED TO A SERVICE WITH A
20 AMP CIRCUIT BREAKER OR FUSE.
To connect the electrical supply:
1. Remove the lower panel on the washer by removing
the two screws located at the bottom of the panel, as
shown previously in Figure 3-7.
2. Lift the panel slightly and pull outward.
3. Remove the cover over the electrical junction box,
shown in Figure 3-16, by removing the two screws.
4. On 115V models, connect the customer-supplied
power wires to the black and white wires, using wire
nuts. On 230V models, attach customer-supplied
power wires to the brown and blue wires, using wire
nuts.
5. Connect the customer-supplied ground wire to the
green screw.
Chapter 3: Getting Started
CUSTOMER-SUPPLIED WIRES MUST
BE CLAMPED TO THE HOLE WHERE
THEY PASS THROUGH THE REAR OF
THE JUNCTION BOX, IF PRESCRIBED
BY LOCAL CODES. IF IT IS
NECESSARY TO USE A BUSHING
WITH AN INTEGRAL CLAMP AT THE
INLET TO THE JUNCTION BOX,
REMOVE THE PLASTIC BUSHING
SUPPLIED WITH THE WASHER
BEFORE INSTALLING THE NEW
BUSHING.
6. Replace the cover on the electrical junction box.
7. Replace the lower panel on the washer.
Product Service 1-800-522-7658
31
Chapter 3: Getting Started
☞
☞☞
☞
Electrical junction
box cover
Chapter 2: Prerequisites
BEFORE TURNING ON THE WASHER,
MAKE CERTAIN THE WATER IS
TURNED ON AND NO PACKING
MATERIAL REMAINS INSIDE THE
WASHER.
Figure 3-16
Electrical
junction box
Testing Your Washer
Now that you have made the required water and electrical
connections to your washer, you need to test the operation
of the washer. A series of diagnostic steps are provided in
this section.
If the washer is interrupted in the middle
of the diagnostic steps, wait 4 to 5
!!!!
seconds before opening the washer door
to prevent hot water from splashing out.
The hot water and steam from the
washer may cause scalding.
32
Product Service 1-800-522-7658

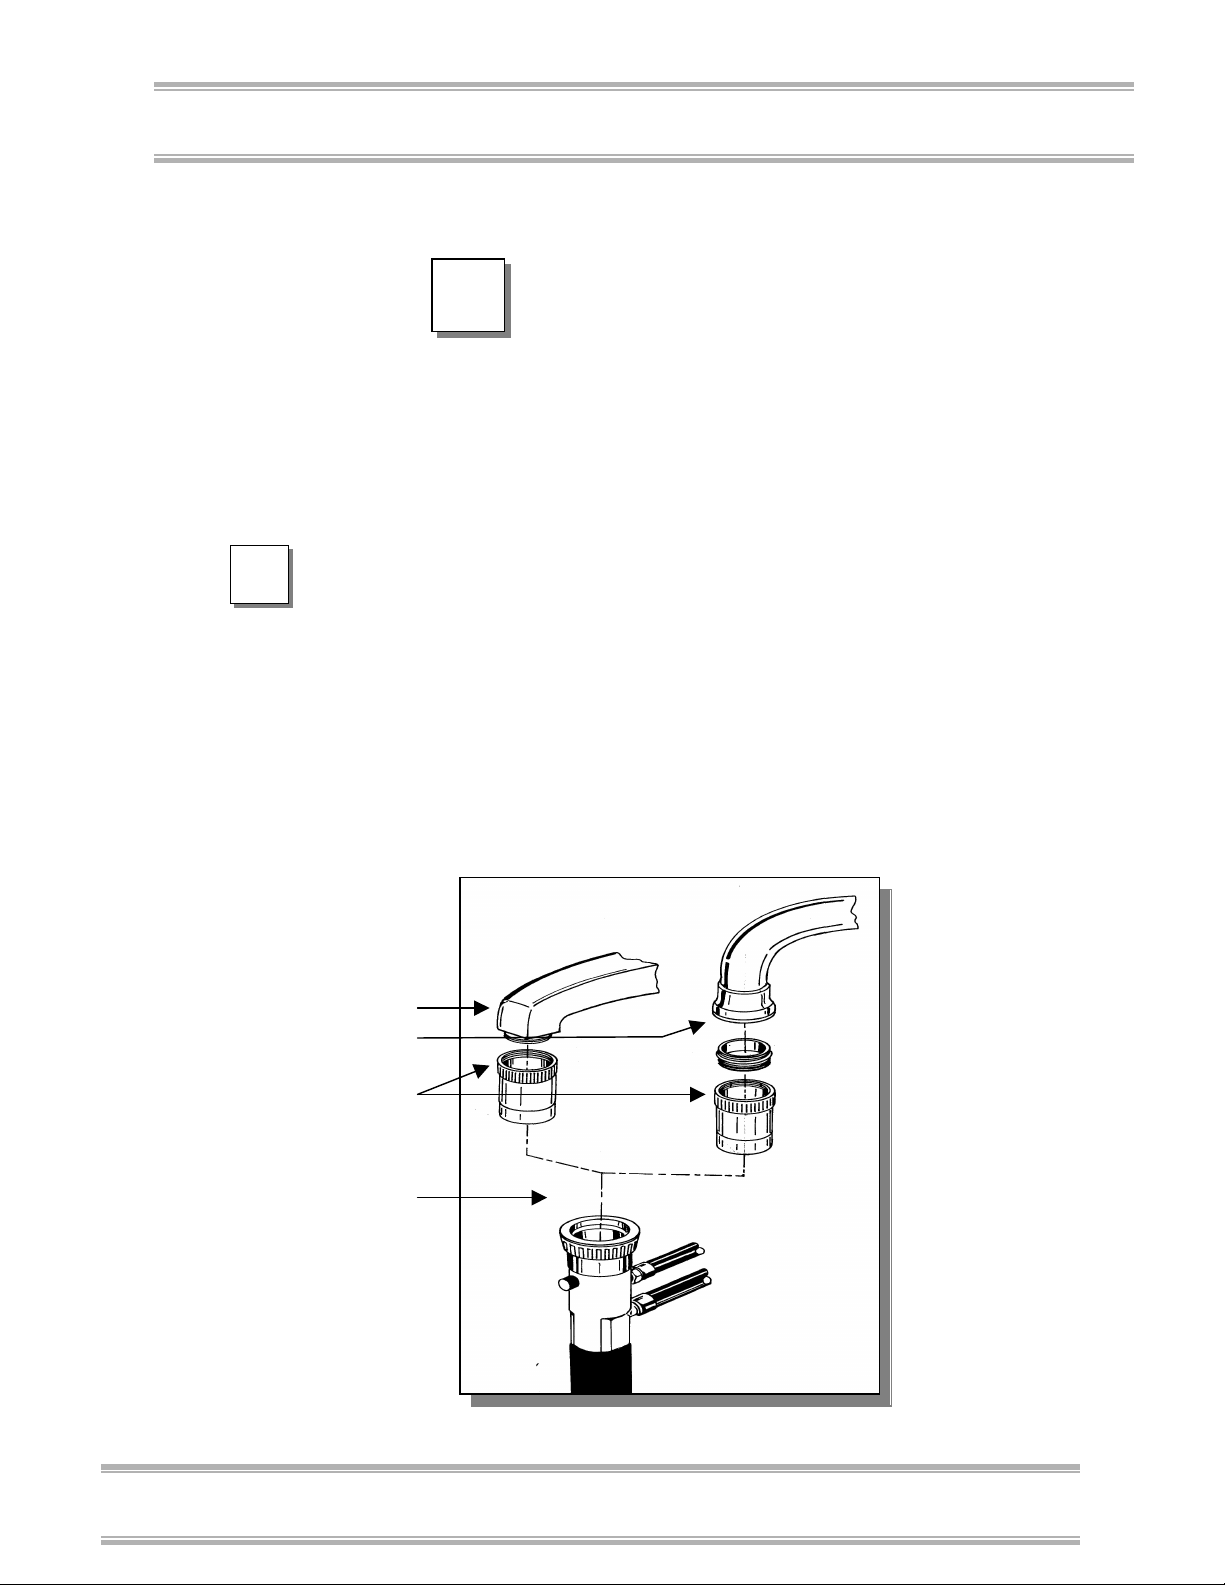
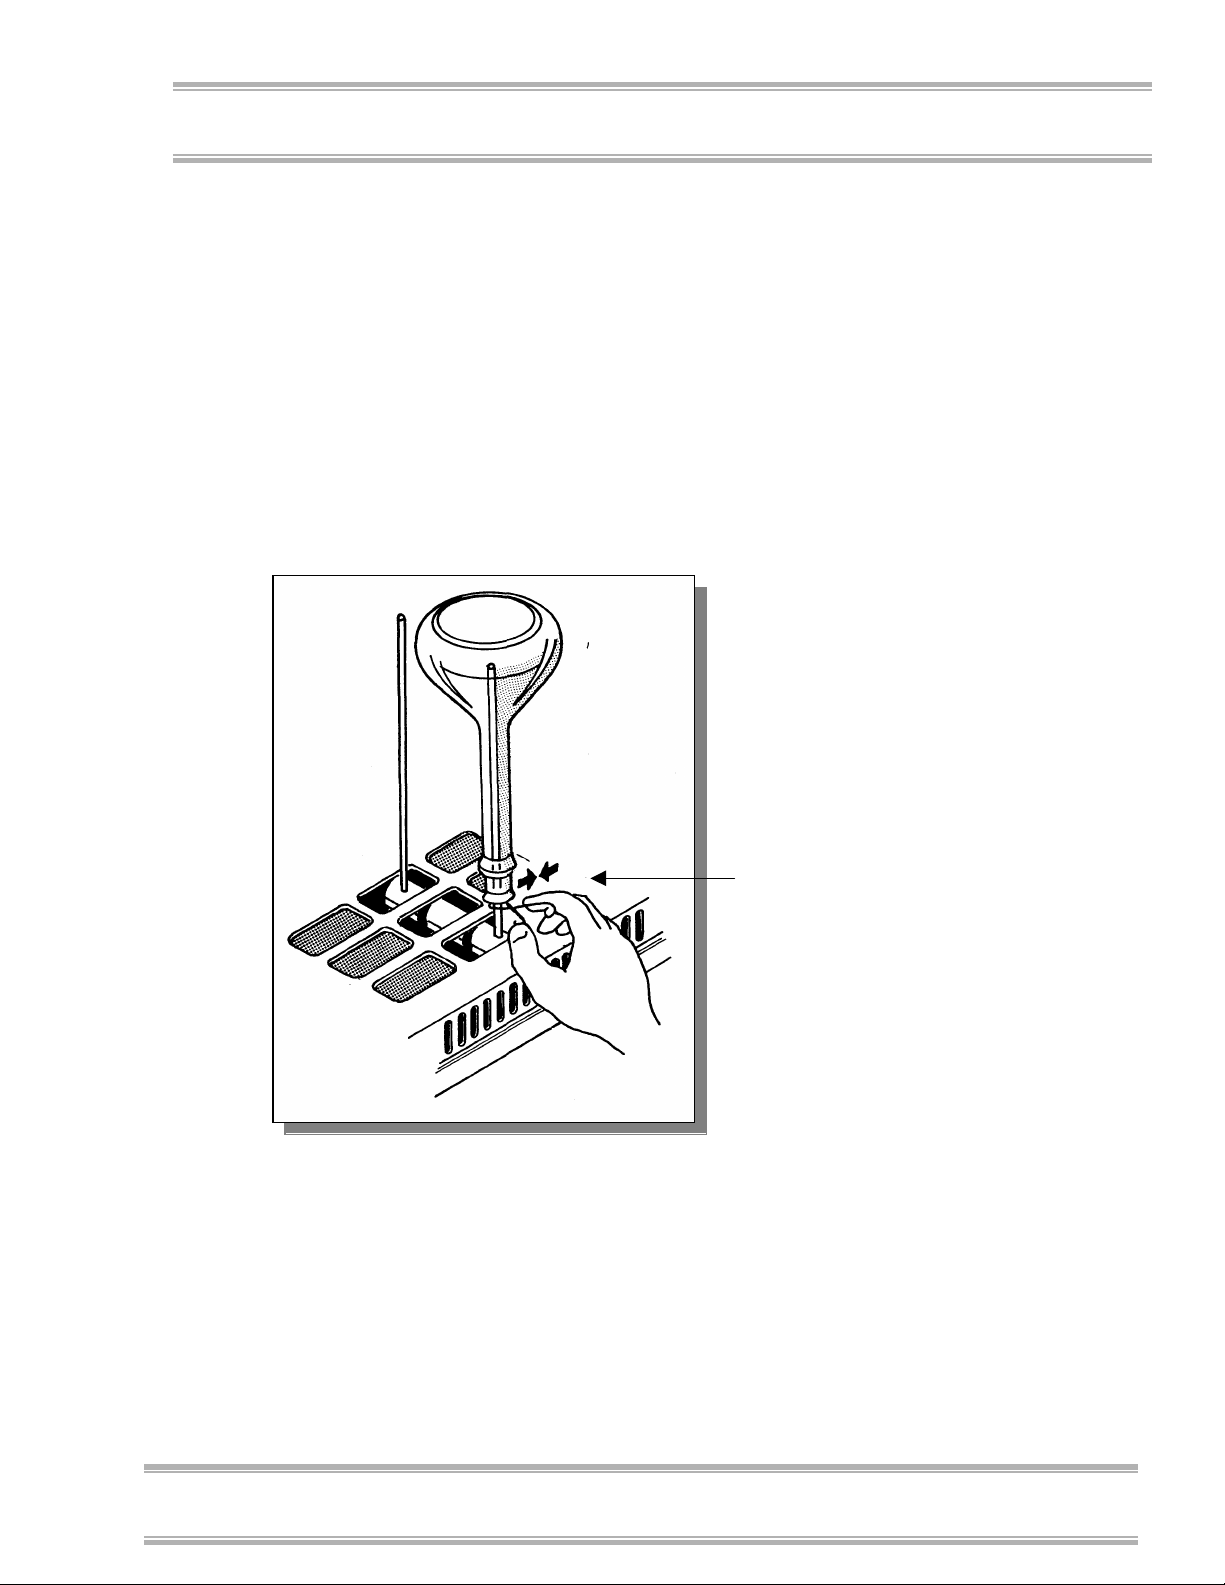
Connecting the Hose-End
M
M
Coupling
If you purchased a Mobile Glassware Washer, the first
action you must take is to connect the hose-end coupling
to the hot water faucet. Snap the hose-end coupling onto
the aerator adapter on the faucet by pushing the parts
together, as shown previously in Figure 3-12. After the
hose-end coupling is attached to the faucet, slowly turn on
the hot water faucet.
Running the Diagnostics
To ensure your washer is operating properly, it is
recommended that you perform the diagnostics procedure
detailed below, which should take approximately 10
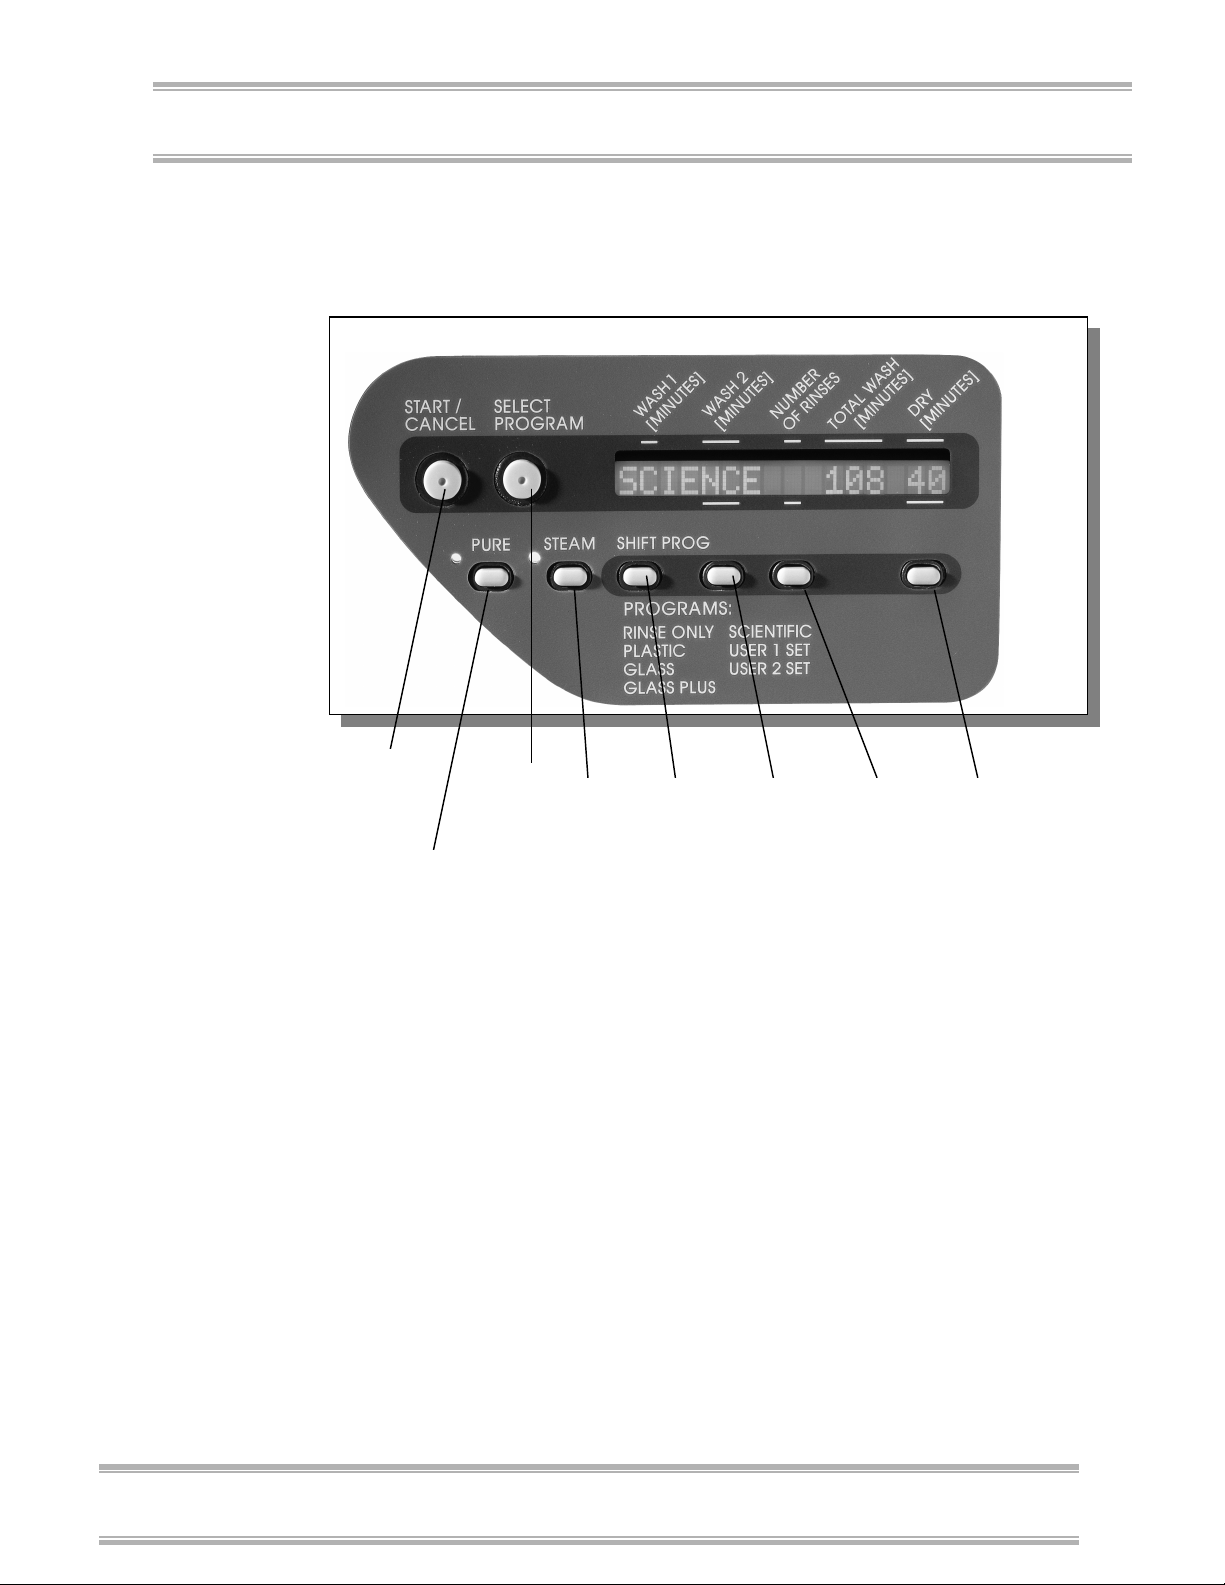
minutes to complete. Refer to Figure 3-17 to familiarize
yourself with the control panel before you begin the
procedure.
Chapter 3: Getting Started
Figure 3-17
The Scientific
wash cycle is
selected. The
wash will run a
total of 108
minutes, with a
40 minute
drying time.
Product Service 1-800-522-7658
33

Chapter 3: Getting Started
☞
☞☞
☞
Chapter 2: Prerequisites
To run the diagnostics test:
1. Locate the control panel on the front of your washer.
2. Press and hold the bottom right button and close the
3. The display window should read: PRESS SELECT:
4. Press the Select Program button.
5. The display window should read: FILL VIA TAP.
6. Press the Select Program button.
7. The display window should read: FILL VIA DE-ION.
8. Press the Select Program button.
9. The display window should read: PUMP - ON:
10. Press the Select Program button.
11. The display window should read: PAUSE. All washer
12. Press the Select Program button.
13. The display window should read: PUMP - ON:
14. Press the Select Program button.
15. The display window should read: DETERGENT CUP.
16. Press the Select Program button.
BEFORE OPERATING THE WASHER
WITH THE PURIFIED WATER OPTION
SELECTED, CHECK THE PURIFIED
WATER SUPPLY FOR AMPLE
QUANTITY.
handle of your washer by sliding the door latch knob
to the right.
TST.
Tap water should be heard entering the washer. Allow
tap water to enter for approximately one minute.
De-ionized (DI) water enters the washer and the DI
pump should be heard. After approximately one
minute the float switch should turn off the flow of DI
water.
WASH. The wash cycle should activate.
functions should be off.
DRAIN. The water drains from the washer. Allow all
the water in the washer to drain. You can tell when
this occurs when the sound of the pump changes.
Within a minute, you should hear the detergent cup lid
open.
34
Product Service 1-800-522-7658

17. If you have a 115V model, the display window should
M
M
read: HEAT STEAM DOOR, and the steam heater
activates. If you have a 230V model, the display
window should read: HEAT - SUMP: HIGH and the
sump heater activates.
18. Press the Select Program button.
19. If you have a 115V model, the display window should
read: HEAT - STEAM: SUMP and the steam heater
activates. If you have a 230V model, the display
window should read: HEAT STEAM and the steam
heater activates.
20. Press the Select Program button.
21. If you have a 115V model, the display window should
read: HEAT – SUMP and the sump heater activates. If
you have a 230V model, the display window should
read: HEAT – SUMP: LOW and the sump heater
activates.
22. Press the Select Program button.
23. The display window should read: BLOWER ON. The
washer blower should be heard.
24. Press the Select Program button.
25. The display window should read: DONE. Open the
door latch to turn off the electronics, or select a wash
cycle and use the washer.
Chapter 3: Getting Started
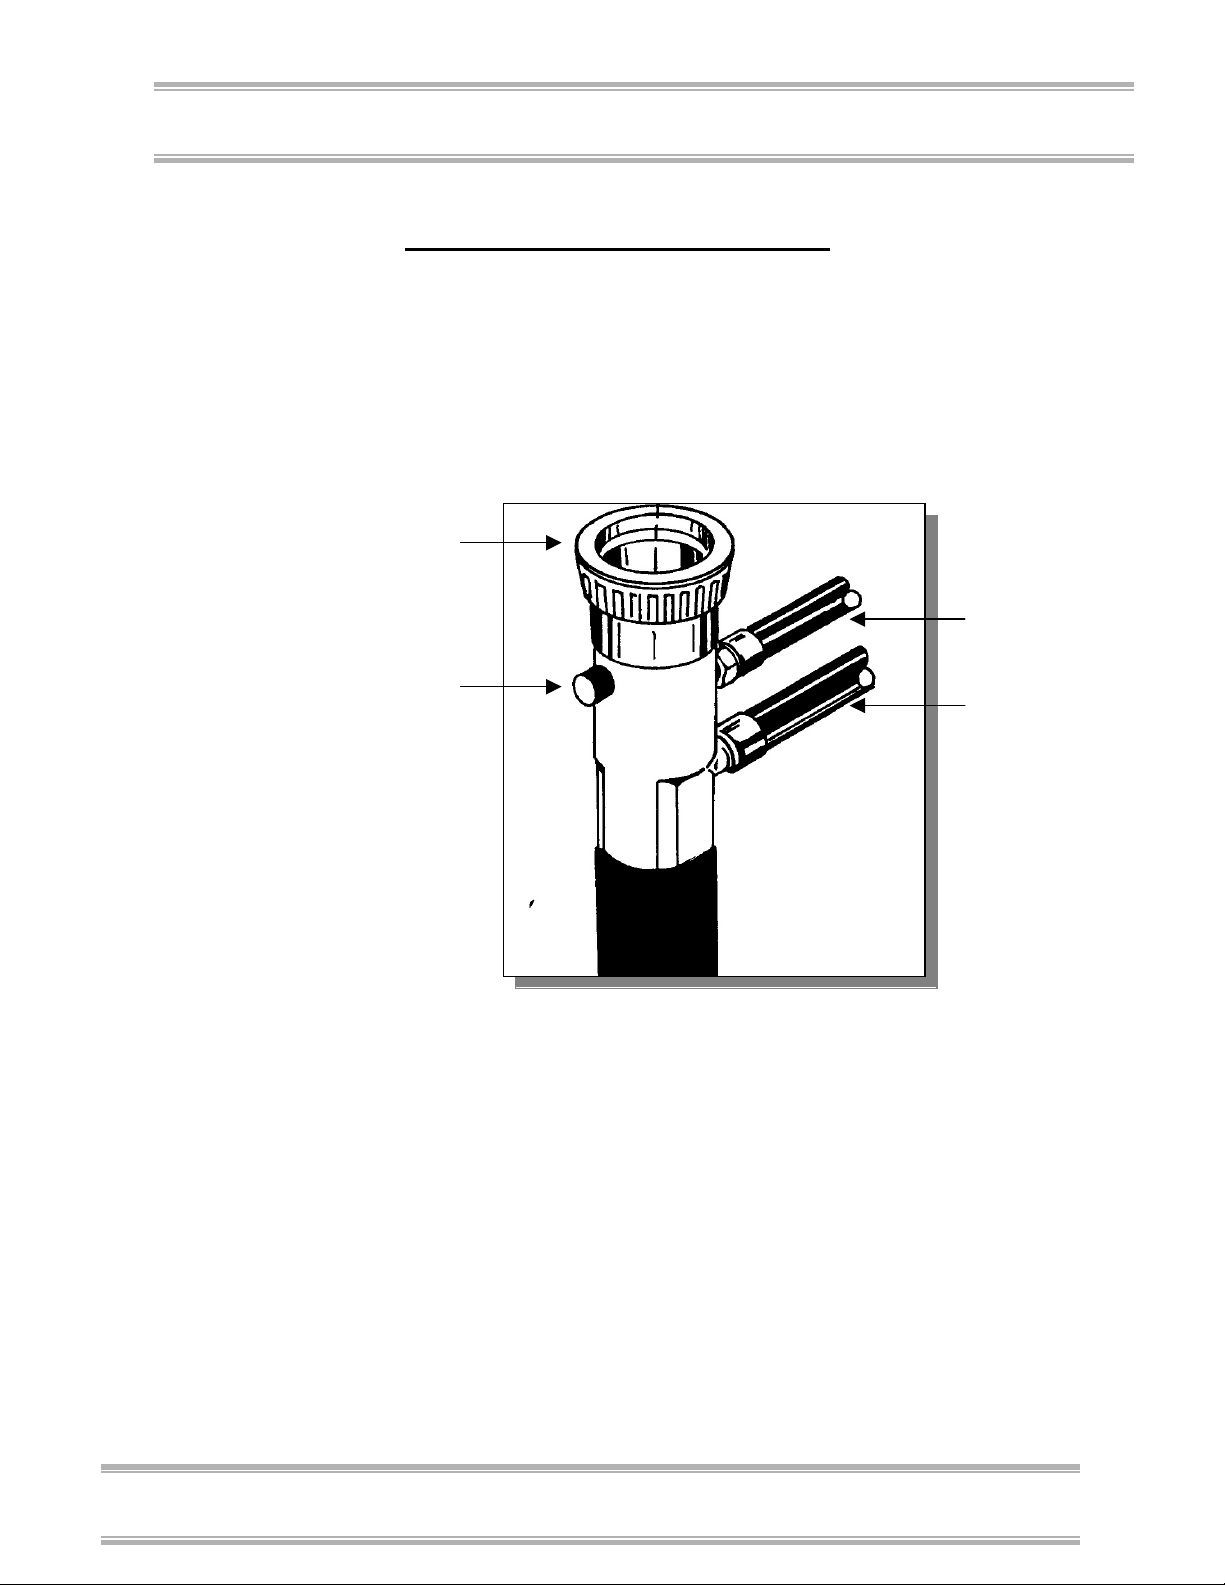
Disconnecting the Hose-End
Coupling
If you purchased a Mobile Glassware Washer, you can
choose to disconnect the hose-end coupling from the hot
water faucet after the diagnostics procedure is completed.
Refer to Figure 3-18 and the instructions below to
disconnect the hose-end coupling.
Product Service 1-800-522-7658
35
Chapter 3: Getting Started
Plastic release ring
Chapter 2: Prerequisites
To disconnect the hose-end coupling:
1. Turn off the hot water faucet.
2. Push the pressure relief button on the hose-end
3. Pull down on the plastic release ring on the hose-end
coupling to relieve the water pressure.
coupling to disconnect it from the faucet.
Figure 3-18
Fill hose
Pressure relief button
Your Next Step
The installation and setup of your Glassware Washer is
now complete. To learn how to load and operate your
washer, proceed to Chapter 4: Using Your Washer. To
make a modification to the configuration of your washer,
proceed to Chapter 6: Modifying your Washer. To
perform additional diagnostics on your washer, proceed to
Chapter 7: Troubleshooting. To learn about the
maintenance requirements for your washer, proceed to
Chapter 5: Maintaining your Washer.
Drain hose
36
Product Service 1-800-522-7658

C
HHAAPPTTEERR
C
4
4
U
SSIINNGG
U
After your washer has passed the basic diagnostics test
detailed in Chapter 3: Getting Started, you are ready to
begin using your washer. Read this chapter to learn how
to:
• arrange the racks inside your washer to meet your
specific needs.
• properly position glassware inside your washer.
• fill the detergent and neutralizing acid dispensers.
• interrupt a wash cycle after it has begun.
• select an operating cycle.
!!!!
Y
OOUURR
Y
Do not use the Glassware Washer in a
manner not specified by the
manufacturer. The electrical protection
properties of the washer may be
impaired if the washer is used
inappropriately.
W
W
AASSHHEER
R
Arranging the Washer Racks
The FlaskScrubber and SteamScrubber are equipped with
different rack configurations to accommodate the various
types of laboratory glassware. In addition to the standard
configuration of the Glassware Washers, many optional
racks and inserts are available to customize your washer to
Product Service 1-800-522-7658
37

Chapter 4: Using Your Washer
Chapter 2: Prerequisites
best suit your needs. For a complete list of available rack
accessories, refer to Appendix D: Glassware Washer
Accessories.
If you purchased a SteamScrubber, proceed to the
following section, The SteamScrubber Racks. If you
purchased a FlaskScrubber, proceed to the section, The
FlaskScrubber Racks, later in this chapter.
The SteamScrubber Racks
The SteamScrubber is equipped with two racks (a top rack
and a bottom rack), and two 10-pin inserts. The top rack
of the SteamScrubber Glassware Washer is designed to
accommodate beakers and other wide-mouth laboratory
glassware. The top rack is not recommended for narrownecked glassware.
The bottom rack of the SteamScrubber Glassware Washer
is designed to accommodate flasks, beakers, culture-tubes,
graduated cylinders, Erlenmeyer flasks, petri dishes, watch
glasses, BOD bottles, and a variety of other laboratory
glassware. In addition to the two 10-pin inserts that are
provided with your washer, there are a variety of other
inserts that are available to accommodate the various types
of glassware, as detailed in Appendix D.
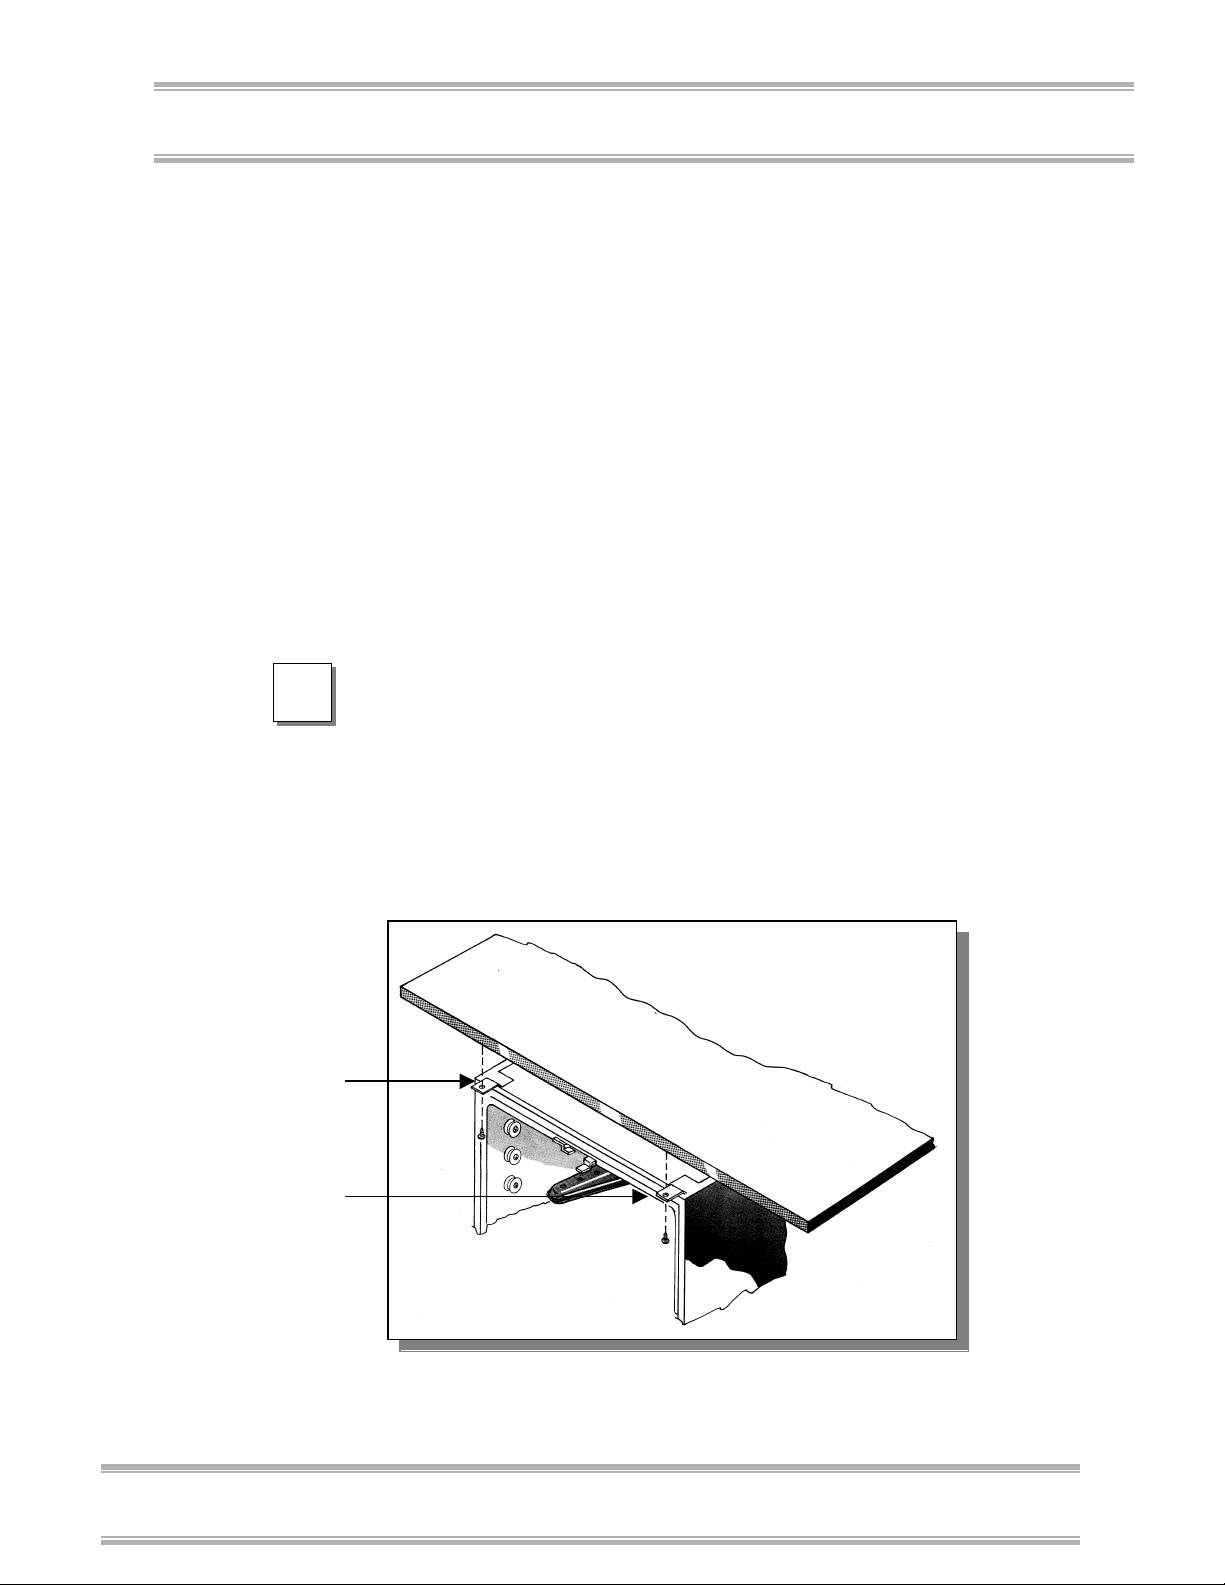
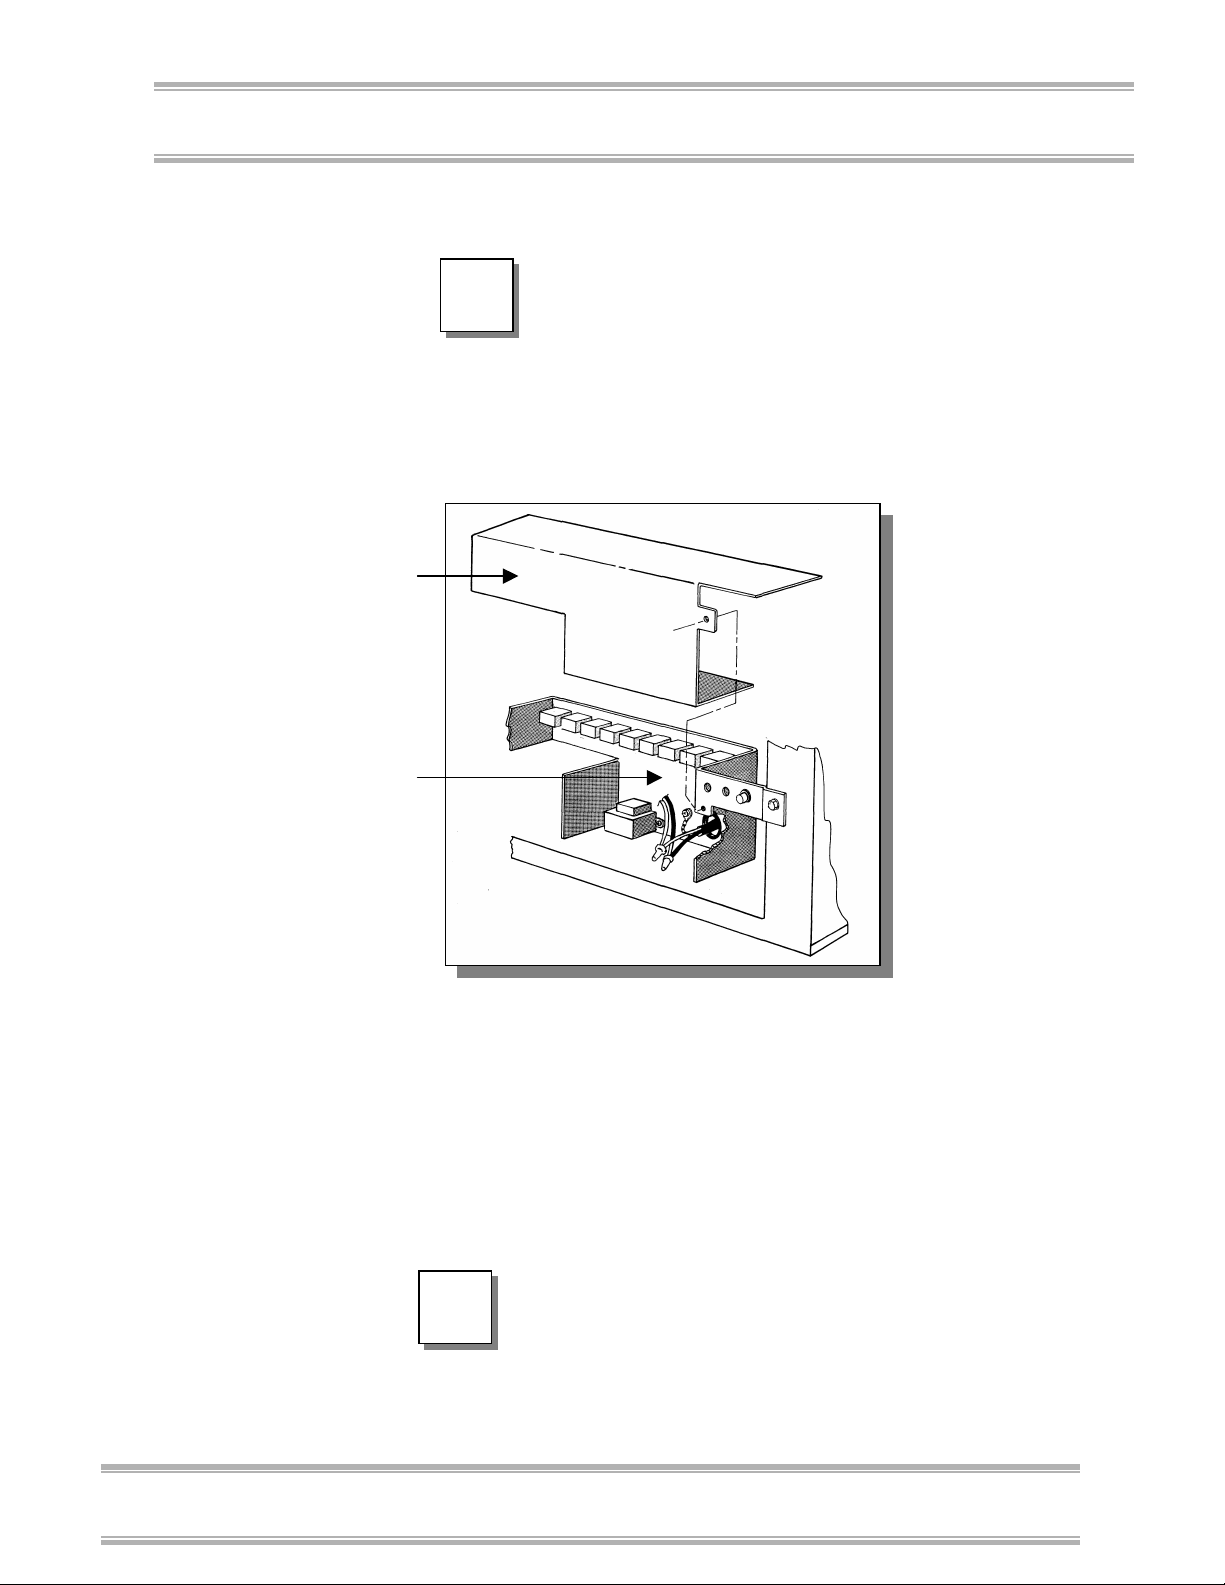
Lowering the Top Washer Arm
and Top Rack
The top rack of your SteamScrubber may be lowered to
accommodate taller glassware. Perform the steps listed
below to lower the washer arm and the top rack. Refer to
Figure 4-1 for help in lowering the washer arm. Figure 42 illustrates how to remove the rail bumpers. Refer to
Figure 4-2 for help in lowering the top rack rails.
38
Product Service 1-800-522-7658
Chapter 4: Using Your Washer
To lower the top washer arm and the top rack of
the SteamScrubber:
1. Open the washer door by sliding the latch knob to the
left. Pull the door toward you and down.
2. Depress the button on the right side of the upper wash
arm tower, as illustrated in Figure 4-1.
3. Lower the upper portion of the tower and the wash arm
by gently pushing down.
Figure 4-1
Wash arm
4. Secure the wash arm by clicking the wash arm into the
upper hole in the wash arm support tube.
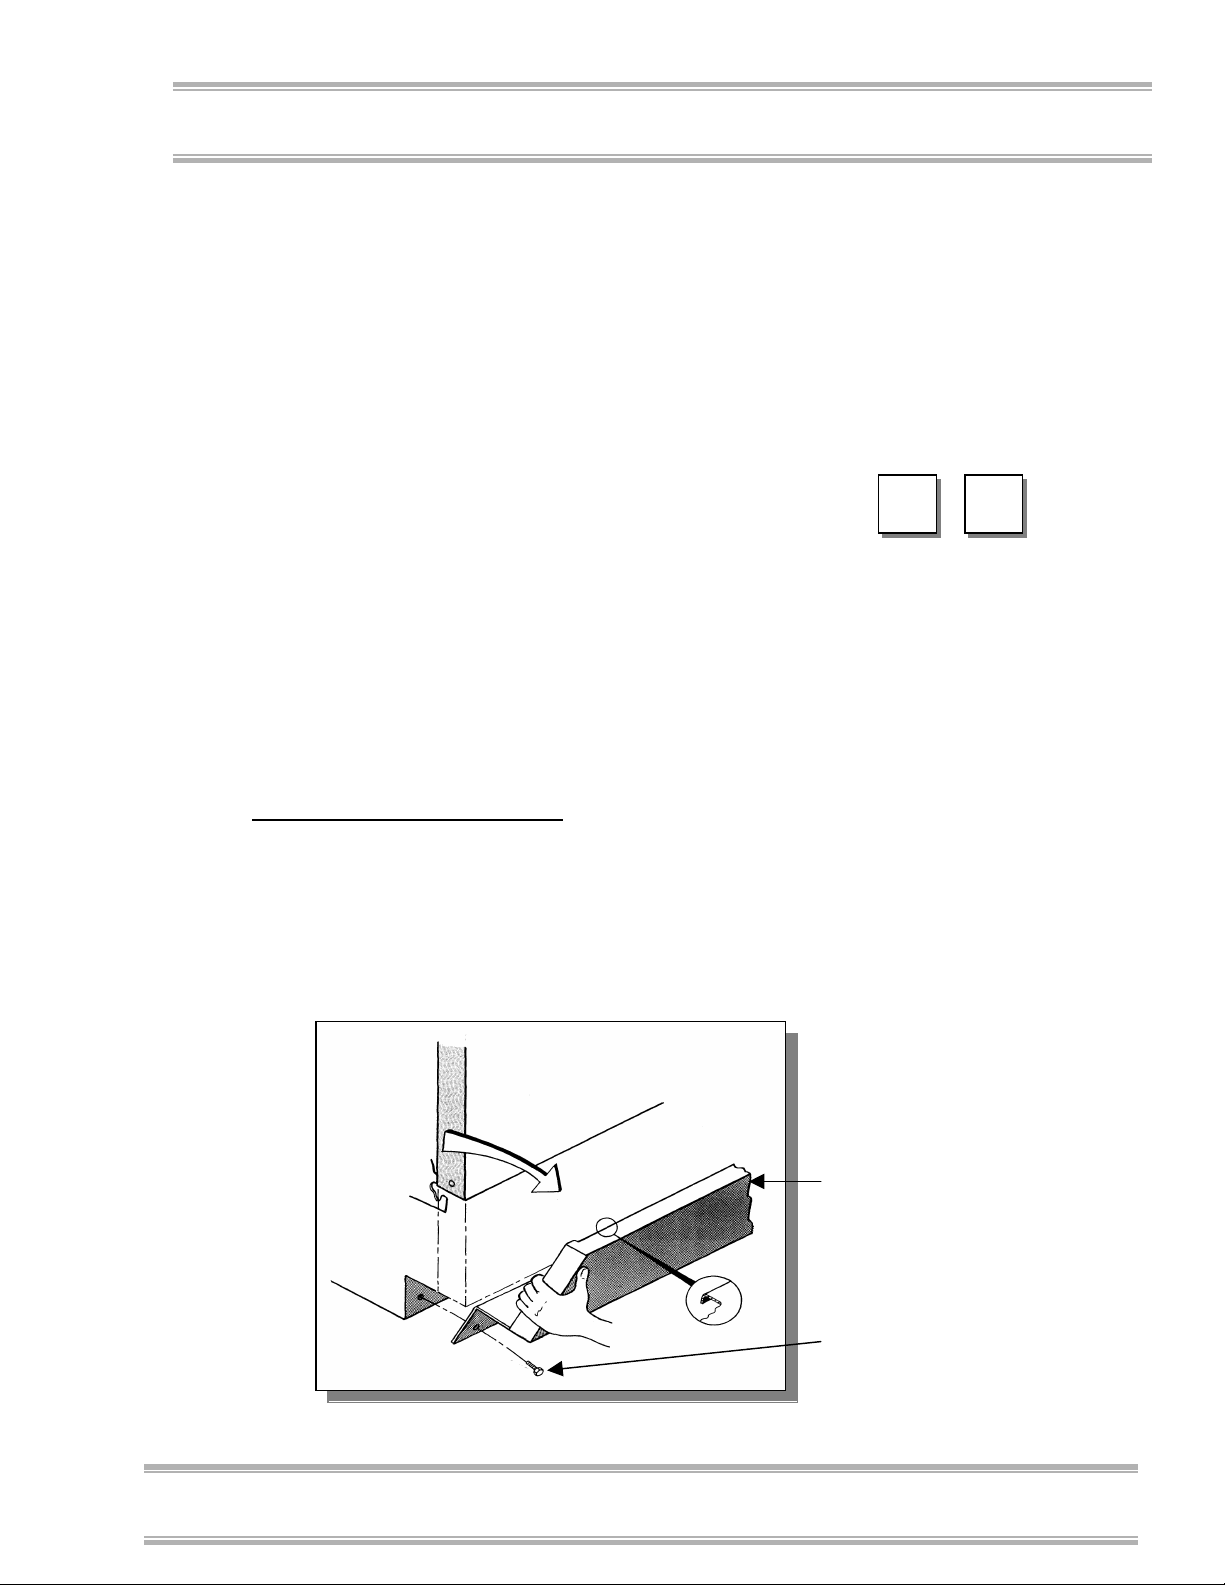
5. Remove the rubber bumper at the front of each side
rail, as shown in Figure 4-2.
Depress the button and
gently push down to
lower the wash arm.
Wash arm tower
Product Service 1-800-522-7658
39
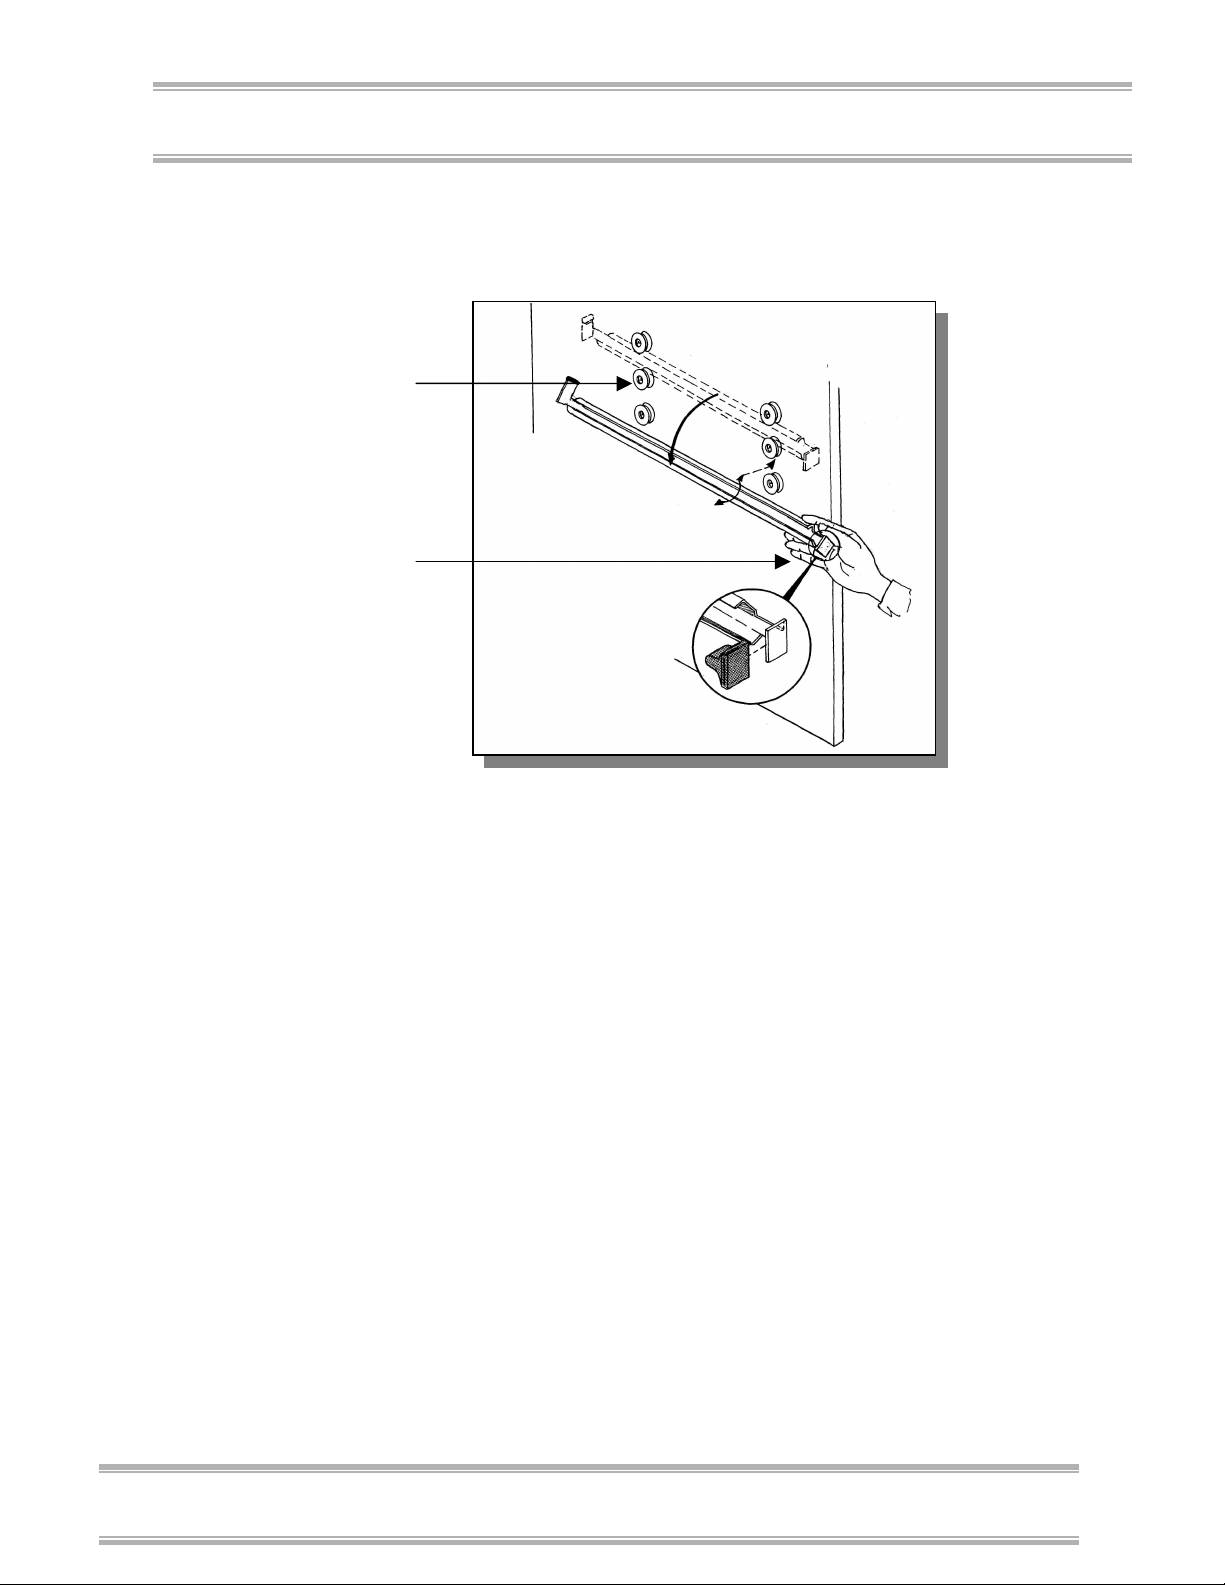
Chapter 4: Using Your Washer
Remove the rail
by twisting out
and down.
You must remove
the rubber bumper
from the front of
the rail before the
rack can be
removed.
Chapter 2: Prerequisites
Figure 4-2
6. Pull the upper rack forward and lift the front until the
wheels disengage from the track.
7. With a twisting motion, remove the rails from the
rollers on each side of the tank, as shown above in
Figure 4-2.
8. Reposition the rails on the lower set of rollers and with
a twisting motion insert them in the rollers.
9. Place the rack rollers in the rails.
10. Replace the rubber bumpers.
40
Product Service 1-800-522-7658

Chapter 4: Using Your Washer
The FlaskScrubber Racks
The FlaskScrubber Glassware Washer is equipped with a
spindle rack, four glassware holders, and a multi-pin
insert. The FlaskScrubber spindle rack is designed for
narrow-necked glassware such as volumetric flasks,
Erlenmeyer flasks, graduated cylinders, Kjeldahl flasks,
test tubes, and digestion tubes.
Two sizes of spindles are provided with the washer:
twenty-four 1/4" OD and ten 1/8" OD spindles. Twenty of
the spindles are factory installed: fourteen 1/4" OD
spindles and six 1/8" OD spindles. The front fourteen
positions on the spindle rack are threaded with nylon
plugs. You can remove the plugs to accommodate the
remaining spindles, if needed.
The glassware holders and multi-pin insert that are
included with your Glassware Washer allow for the
positioning and washing of beakers and other wide-mouth
glassware. The multi-pin insert may be positioned over
spindles. The spindles can be removed with a 9/64" hex
wrench. Figure 4-3 illustrates the placement of the multipin insert.
Product Service 1-800-522-7658
41

Chapter 4: Using Your Washer
☞
☞☞
☞
The multi-pin insert
can be placed over
spindles. The multi-
pin insert accom-
modates a variety of
glassware types
and sizes.
To remove a spindle,
insert a hex wrench
into the slot on the top
of the spindle and turn
clockwise. After
removing the spindle,
thread a nylon plug
into the resulting hole.
Chapter 2: Prerequisites
Figure 4-3
42
An optional, adjustable top rack is available for the
FlaskScrubber, to expand the washer’s capacity to
accommodate many types of glassware, particularly
beakers. The rack includes two 24-pin inserts.
IF THE MULTI-PIN INSERT IS
INSTALLED ON THE BOTTOM RACK
AND THE OPTIONAL UPPER RACK IS
USED, DO NOT HEAVILY LOAD THE
MULTI-PIN INSERT WITH WIDE
MOUTH GLASSWARE. THIS MAY
RESTRICT WATER FLOW FROM THE
LOWER DISTRIBUTION ARM TO THE
GLASSWARE IN THE UPPER RACK.
Product Service 1-800-522-7658
Loading Glassware into the
FlaskScrubber
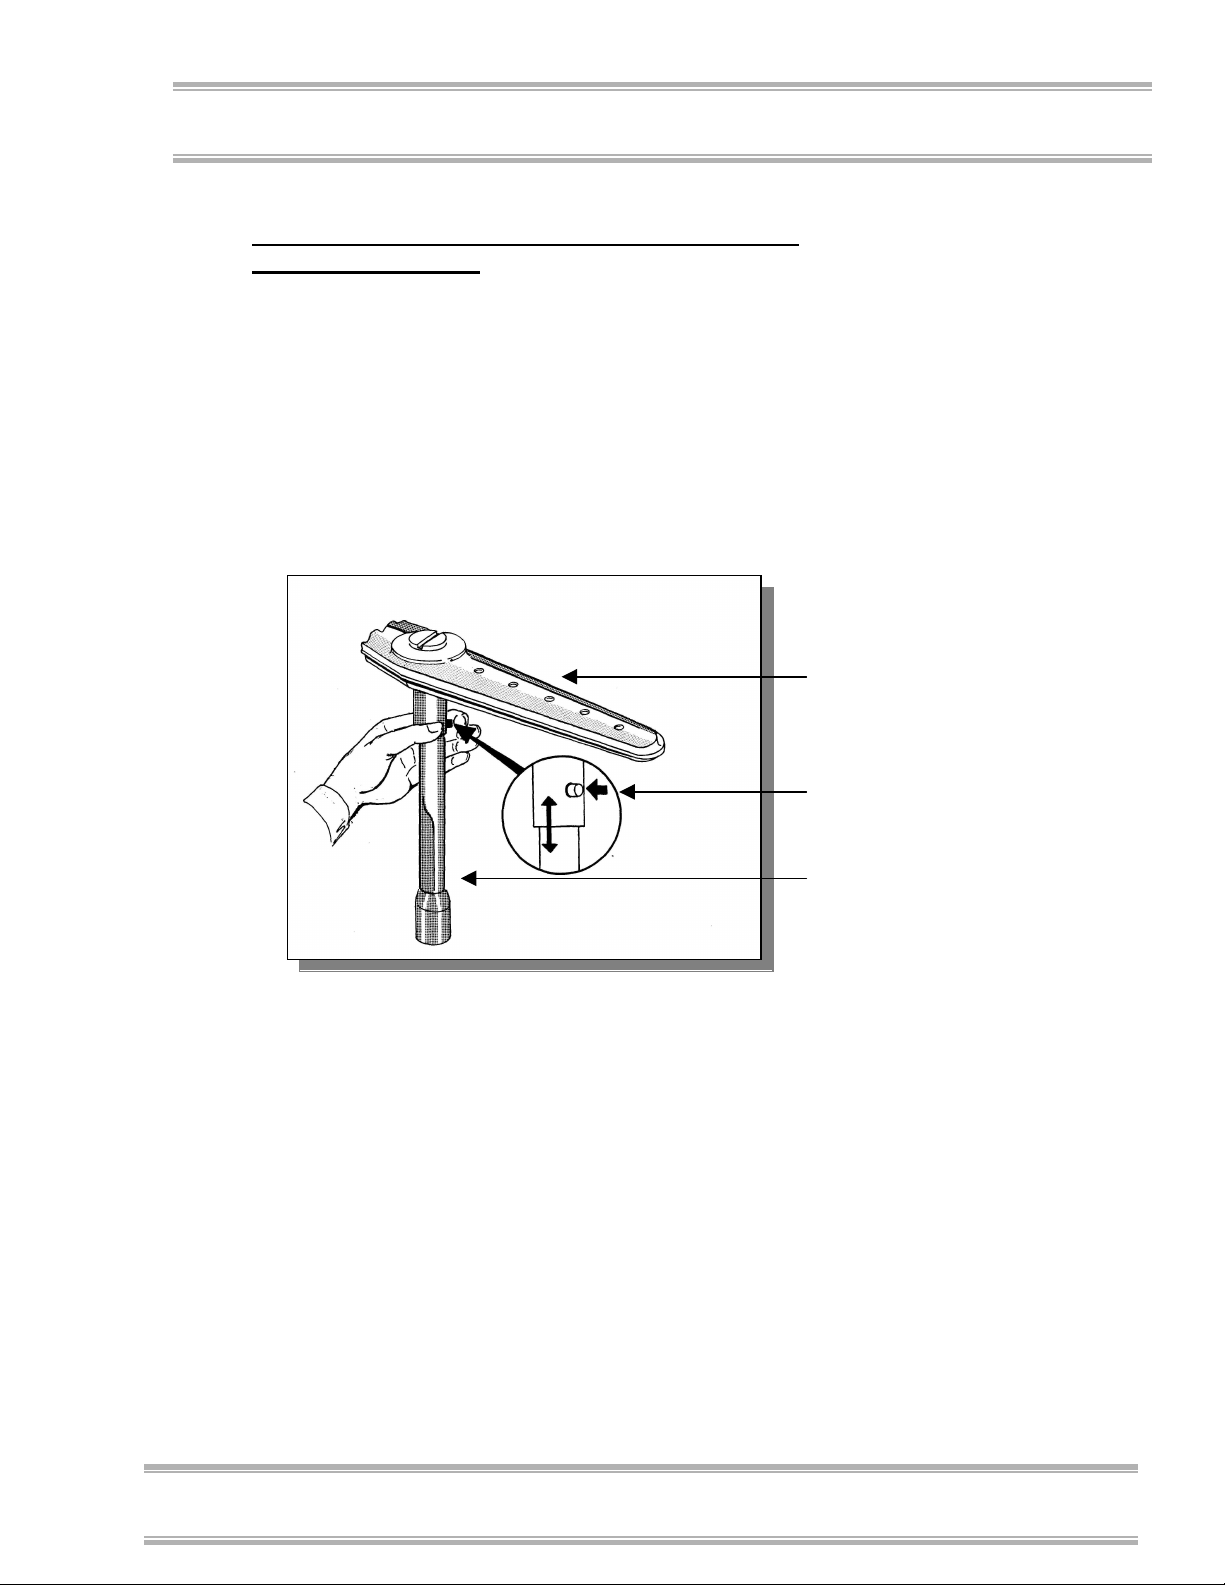
To load glassware onto a spindle, place the glassware on
the spindle and adjust the position by raising or lowering
the spring clip, as shown in Figure 4-4. The outlet of the
spindle should be as close to the center of the flask as
possible. Do not allow the glassware to rest on the end of
the spindle.
Figure 4-4
Chapter 4: Using Your Washer
Squeeze the spring clip
together and raise or
lower the clip to position
the glassware properly.
Product Service 1-800-522-7658
43

Chapter 4: Using Your Washer
Chapter 2: Prerequisites
Two large and two small glassware holders are supplied
with each FlaskScrubber. These holders enable you to
place wide-mouth glassware onto the FlaskScrubber
spindles. To position glassware in a glassware holder and
install the holder on a spindle, refer to Figure 4-5 and
follow the instructions below.
To use a glassware holder:
1. Press the glassware into the holder; the clamps should
spring out and grip the glassware.
2. Loosen the set screw in the hub, as shown in Figure 4-
5, and raise or lower the holder to position the spindle
near the center of the glassware. Do not allow the
glassware to rest on top of the spindle.
3. Re-tighten the set screw.
Press the glassware
into the glassware
holder. Then, turn
the set screw
counterclockwise to
loosen the glassware
holder hub. Position
the glassware holder
so that the spindle is
near the center of the
glassware. Turn the
set screw clockwise
to tighten the glass-
ware holder in place.
Figure 4-5
44
Product Service 1-800-522-7658

Chapter 4: Using Your Washer
Glassware should be loaded so that it does not touch each
other during a wash cycle. The washer has been designed
for quiet operation. To prevent noise and glass breakage,
be certain that the glassware does not touch.
Place heavily soiled items toward the center of the racks.
Place lightly soiled items in the corners.
The Detergent Dispenser
Your Glassware Washer is equipped with a detergent
dispenser that contains a main wash cavity and a
neutralizing solution port, as shown in Figure 4-6. In
addition, the washer door has a depression where detergent
may be added for use during the first wash of the cycle.
Figure 4-6
Neutralizing acid
dispenser cover
Main wash cavity
Neutralizing
solution port
Neutralizing solution
dial
Product Service 1-800-522-7658
45

Chapter 4: Using Your Washer
Chapter 2: Prerequisites
The detergent dispenser opens during the second wash
cycle, except when the Plastic cycle is selected, which has
only one wash cycle. If your glassware is heavily soiled,
you may want to add detergent to the pre-wash cavity.
Refer to the table below to determine which cavities to fill,
based on the selected wash choice. You may use either the
pre-wash cavity stamped in the washer door or the one on
the lid of the detergent cup.
Wash Cycle Fill Pre-wash Cavity Fill Main Cavity
Rinse Only NO NO
Plastic NO YES
Glass OPTIONAL YES
Glass Plus OPTIONAL YES
Scientific OPTIONAL YES
User 1 OPTIONAL YES
User 2 OPTIONAL YES
To achieve the best
results with your
Glassware Washer, use
Labconco’s LabSolutions Detergent.
Store detergent in a
cool, dry place.
Immediately replace
the detergent container lid after
dispensing. If lumps
develop due to
exposure to moisture,
discard the detergent
according to local
regulations.
Do not use combustible solvents in the
Glassware Washer. If soiled glassware
!!!!
contains flammable compounds, rinse the
glassware thoroughly prior to placing the
glassware into the washer. Heaters in
the washer are very hot and could cause
a fire.
Non-foaming powder or liquid detergent formulated for
labware washers, in conjunction with adequate hot water,
is vital for obtaining clean glassware. If the water is soft,
less detergent may be needed. Too much detergent with
softened water may cause etching of the glassware. This
appears as a permanent cloudy film on the glassware.
Fill the main detergent cavity three-fourths full if the water
hardness grains per gallon (GPG) for your water measures
0 – 4 GPG (soft water). Fill the detergent cavity
completely if your water measures 4 GPG or higher
(medium to hard water). If you use the pre-wash cavity
stamped in the washer door, fill it completely.
46
Product Service 1-800-522-7658

To open the detergent dispenser, gently
!!!!
slide the white tab sideways. If the tab is
pulled upward or perpendicular to the
door, it will break.
Filling the Neutralizing Acid
Dispenser
If it is necessary to neutralize the alkalinity of the
detergent, a mild or weak acid may be placed in the
detergent cup neutralizing dispenser from which it will be
dispensed during the first rinse. If pure water rinse is
selected, the last two rinses will be made with pure water.
To avoid dispensing neutralizing acid during a pure rinse,
more than two rinses should be selected. The dispenser
holds approximately 170 ml and should be checked and
replenished as needed. To fill the neutralizing acid
dispenser, refer to Figure 4-6 and follow the instructions
below.
Chapter 4: Using Your Washer
To fill the neutralizing acid dispenser:
1. Twist and pull up on the cap to remove the round cover
on the neutralizing solution port.
2. Fill the cavity with either 1M citric acid or 10%
phosphoric acid until the level of the liquid rises and is
visible in the port.
3. Set the dial to read 4 ml.
4. Replace the cover.
Selecting an Operating Cycle
The microprocessor control on your Glassware Washer
allows you to select one of four factory preset wash cycles,
to custom program two additional cycles, or to run a rinseonly cycle. The control panel is shown in Figure 4-7.
Product Service 1-800-522-7658
47
Chapter 4: Using Your Washer
Chapter 2: Prerequisites
Figure 4-7
Press to
start wash
cycle.
Press to
rinse with
pure water.
Press
to
select
the
wash
cycle.
Press to
activate
the
steam
function.
Press to
display
details
about the
selected
wash cycle.
Press to
change
the
length of
Wash 2
cycle.
Programming and Starting a
Wash Cycle
Refer to Appendix C: Glassware Washer Specifications for
complete details on the various factory-set programs and
the options available for customizing cycles. After you
have decided which washer cycle you need to use, follow
the instructions below to start your washer.
Washers built for use on 230V have the capability to wash
glassware at a temperature of 180°F (82°C). They also are
able to operate at the lower temperature of 140°F (60°C)
which is the standard temperature of the 115V models.
Selecting a high-heat operation is achieved by selecting an
appropriate program.
Press to
change
the
number
of
rinses.
Press to
change
the
drying
time.
48
Product Service 1-800-522-7658

Chapter 4: Using Your Washer
☞
☞☞
☞
On 230V models, the Glass Plus, Scientific, and User 2 Set
programs operate at the higher temperature. When one of
these programs is selected, the display window indicates
the program chosen, as well as the term, “HI HEAT.”
When the Rinse Only, Plastic, Glass, or User 1 Set
program is selected, the display window indicates the
program chosen, as well as the term, “LOW HEAT.”
USE CARE WHEN SELECTING HIGHHEAT PROGRAMS IF PLASTIC WARE
IS BEING WASHED.
To start a wash cycle:
1. Close the washer door and energize the electronic
control by sliding the door latch knob from the left to
the right position to lock the latch.
2. Press the Select Program button until the desired
program is shown on the display. To observe the
details of the program, press the Shift Prog button.
The display will then show the Wash 1 time, the Wash
2 time, the number of rinses, the total wash time, and
the drying time.
3. If you need to alter the Wash 2 time, the number of
rinses, or the drying time, press the appropriate button
directly below the displayed parameter until the
desired information is displayed.
4. If a pure water rinse is needed, press the corresponding
button. If the purified water is feeding from a nonpressurized system, make certain there is adequate
water in the reservoir (a minimum of 5 gallons or 18.9
liters).
If steam operation is needed, press the corresponding
button. In this mode, the Glassware Washer will refill
with fresh water after the completion of Wash 1. Both
the sump and steam heaters will operate for 10 minutes
to produce hot vapor to penetrate and soften dried
residue, allowing detergent and hot water to work
effectively.
5. On Mobile washers, turn the hot water on.
6. Press the Start button to begin the wash cycle.
Product Service 1-800-522-7658
49

Chapter 4: Using Your Washer
Chapter 2: Prerequisites
7. Press the Shift Program button if you want the display
to indicate details about what mode the washer is in
and the time remaining.
Interrupting a Wash Cycle
To temporarily pause a wash cycle, simply unlatch the
washer door. After the door is unlatched, wait 4 to 5
seconds before opening the door to prevent water from
splashing out of the washer.
To resume the wash cycle, close and re-latch the washer
door. The washer will pause to equalize temperatures and
then the cycle will resume at the point it was interrupted.
The wash cycle can be terminated at any time by pressing
the Start/Cancel button.
50
Product Service 1-800-522-7658

☞
☞☞
☞
C
HHAAPPTTEERR
C
M
AAIINNTTAAIINNIINNG
M
5
5
G
Y
Y
OOUUR
R
W
W
Under normal operation, your Glassware Washer will
require little routine maintenance to keep it functioning
properly. Read this chapter to learn how to:
Maintaining the Stainless
Steel Interior
The interior of your Glassware Washer is stainless steel.
AASSHHEER
• safely clean the stainless steel interior
• maintain the water fill valve
• clean the overflow dome
• remove the top and side panels of your washer
• clean the filter screen
R
NEVER USE METAL SCOURING PADS
ON THE STAINLESS STEEL INTERIOR.
METAL SCOURING PADS CAN
SCRATCH OR LEAVE METAL CHIPS
THAT WILL RUST.
Product Service 1-800-522-7658
51

Chapter 5: Maintaining Your Washer
Chapter 2: Prerequisites
To maintain the appearance and quality of the stainless
steel interior, perform the following tasks as needed:
• Wipe the outer edges on the inside door panel to
remove particles and residue that occur during
loading.
• Use a sponge sprinkled with non-abrasive stainless
steel cleaner to gently wipe the washer tank and
door to remove surface discoloration caused by
exposure to halogenated compounds or steel parts.
In some cases, the finish may be slightly dulled by
this action.
If your water has a high mineral content, film or spots may
develop on the washer interior. If the procedures listed
above do not eliminate the film or spots, you may need to
follow the steps below to run your washer through a
special cycle.
To remove film or spots from the washer interior:
1. Remove all glassware from the washer.
2. Choose the Glass Program, Steam OFF, Pure Rinse
OFF, and set the drying time to zero.
3. After the first fill is complete, open the washer and
carefully pour one cup of bleach into the bottom of the
tank.
4. Close the washer door and allow the unit to wash and
drain (approximately six minutes).
5. When the washer fills the second time, open the
washer and add two cups of 4 – 8% acetic acid (or
white vinegar) to the bottom of the tank.
6. Close the washer door and allow the unit to wash and
drain without further interruption.
52
Product Service 1-800-522-7658

Maintaining the Air Gap
Chapter 5: Maintaining Your Washer
If you employed an air gap during the installation of your
washer, you need to clean the air gap at least once a
month. The air gap is not part of the washer; therefore, it
is not covered by the washer warranty. The air gap
protects the washer against water backing up in the event
of a clogged drain.
Most types of air gaps are easy to clean. Simply follow
the manufacturer’s directions for maintaining your air gap.
Maintaining the Water Fill
Valve
The filter screen of the water fill valve, illustrated in
Figure 5-1 below, may require periodic cleaning to remove
trapped particles. A low water fill occurs if the blockage
is not removed.
Figure 5-1
Check the air gap for
build-up any time your
washer is not draining
well.
Hot water supply
Screen
O-ring
Water fill valve
Product Service 1-800-522-7658
53

Chapter 5: Maintaining Your Washer
Chapter 2: Prerequisites
To clean the water fill valve:
Refer to Figure 3-7
in Chapter 3: Getting
Started for an
illustration showing
how to remove the
lower panel of your
washer.
1. Turn off the water and electricity to the washer.
Unplug the Mobile model; turn off the circuit breaker
that services the Undercounter or Freestanding model.
2. Remove the two screws at the bottom of the lower
panel of your washer.
3. Remove the panel by lifting slightly and pulling out.
4. Place a pan under the fill valve.
5. Remove the four screws from the valve plate and
separate the valve from the inlet connection.
6. Drain the water into the pan.
7. Remove the valve filter screen and clean it under
running water.
8. Replace the screen and reassemble the valve
connection. Be certain the O-ring gasket, identified in
Figure 5-1, is positioned in the groove in the fill valve
body.
9. Tighten all screws; replace the lower panel, restore
electrical power to the washer, and turn on the water.
10. Check for leaks and adjust as needed. Replace the
lower panel.
54
Maintaining the Overflow
Dome
The overflow dome is located inside the washer in the
front left corner, as illustrated in Figure 5-2. The dome
may require periodic cleaning to remove residue from
inside the dome.
Product Service 1-800-522-7658

Figure 5-2
Chapter 5: Maintaining Your Washer
Front left corner of
washer
Gray overflow dome
To clean the overflow dome:
1. Turn off electrical power to the Glassware Washer.
2. Remove the two screws at the bottom of the lower
panel of your washer.
3. Remove the panel by lifting slightly and pulling out.
4. Locate the gray dome in the front left corner of the
washer.
5. Remove the nut from the bottom of the dome stem by
holding the dome with one hand and loosening the nut
with the other.
6. Lift the dome off and clean it with warm soapy water.
7. Clean the spot inside the washer where the dome was
positioned.
8. Replace the dome and tighten the nut until the plastic
stem is flush with the surface of the nut.
9. Replace the lower panel.
Figure 3-7 in
Chapter 3: Getting
Started illustrates
how to remove the
lower panel of your
washer.
Product Service 1-800-522-7658
55

Chapter 5: Maintaining Your Washer
Chapter 2: Prerequisites
Replacing the Washer Light
Bulb
If your Glassware Washer is equipped with a window, you
will need to periodically replace the 25-watt washer light
bulb. Refer to Figure 5-3 and follow the instructions
below to replace the washer light bulb.
To replace the washer light bulb:
1. Turn off electrical power to the Glassware Washer.
2. Remove the outer door panel by removing the two
screws located on each side of the washer, identified in
Figure 5-3.
3. Remove the bulb by pressing in on the bulb and
rotating the bulb counterclockwise.
4. Insert the new bulb and rotate clockwise into place, as
shown in Figure 5-3.
5. Replace the outer door panel.
Washer screw
Press in new bulb
and rotate clockwise.
Washer screws
Figure 5-3
56
Product Service 1-800-522-7658
Chapter 5: Maintaining Your Washer
Removing the Washer Top,
Back, and Side Panels
There may be times when you need to remove the washer
top, back, and side panels to clean, maintain, or repair your
washer. Refer to Figure 5-4 and follow the instructions
below to remove the top, back, and side panels of your
washer.
To remove the washer top, back, and side panels:
1. Turn off electrical power to the Glassware Washer.
2. Remove all of the screws from the back panel of the
washer and remove the back panel.
3. Remove the two screws in the front of the washer that
attach the washer top to the sides.
4. Remove the two screws in the back of the washer that
attach the washer top to the sides.
5. Slide the washer top toward the rear. Lift the washer
top and remove.
6. Remove the two screws from each side of the washer
at the front edge.
7. Remove one screw at the rear of the washer.
8. Remove the side panels.
Figure 5-4
Remove four
screws that attach
the top to the sides.
Then, slide the
washer top toward
the rear of the
washer and lift to
remove.
Product Service 1-800-522-7658
57

Chapter 5: Maintaining Your Washer
Chapter 2: Prerequisites
Cleaning the Sump Filter
Screen
If debris accumulates on the filter screen that is located in
the washer sump, you can remove and clean the screen.
To clean the sump filter screen, refer to Figure 5-5 and
follow the instructions below.
To clean the sump filter screen:
Refer to Figure 4-1 in
Chapter 4: Using Your
Washer for an illustration
of the SteamScrubber
wash arm and tower.
Lower wash arm
1. Open the washer door and remove the bottom rack.
2. If you have a SteamScrubber, remove the upper wash
arm. Depress the button on the wash arm tower and
lift the upper portion of the tower to remove the wash
arm. If you have a FlaskScubber, remove the plastic
clamp and rubber diaphragm from the wash tower, as
illustrated in Figure 5-5.
3. Lift and rotate the lower wash arm.
4. Remove the screw and clip at the rear of the filter
screen.
5. Carefully lift the screen, using care not to drop debris
into the pump.
Figure 5-5
Rubber diaphragm
Plastic clamp
58
Filter screen screw and clip
Product Service 1-800-522-7658

C
HHAAPPTTEERR
C
M
OODDIIFFYYIINNG
M
6
6
G
Y
Y
OOUUR
R
W
W
The configuration of your washer may need to be changed
to accommodate your needs. For example, you may want
to disconnect the purified water pump, install pipet inserts,
or install an optional top rack. Read this chapter to learn
how to:
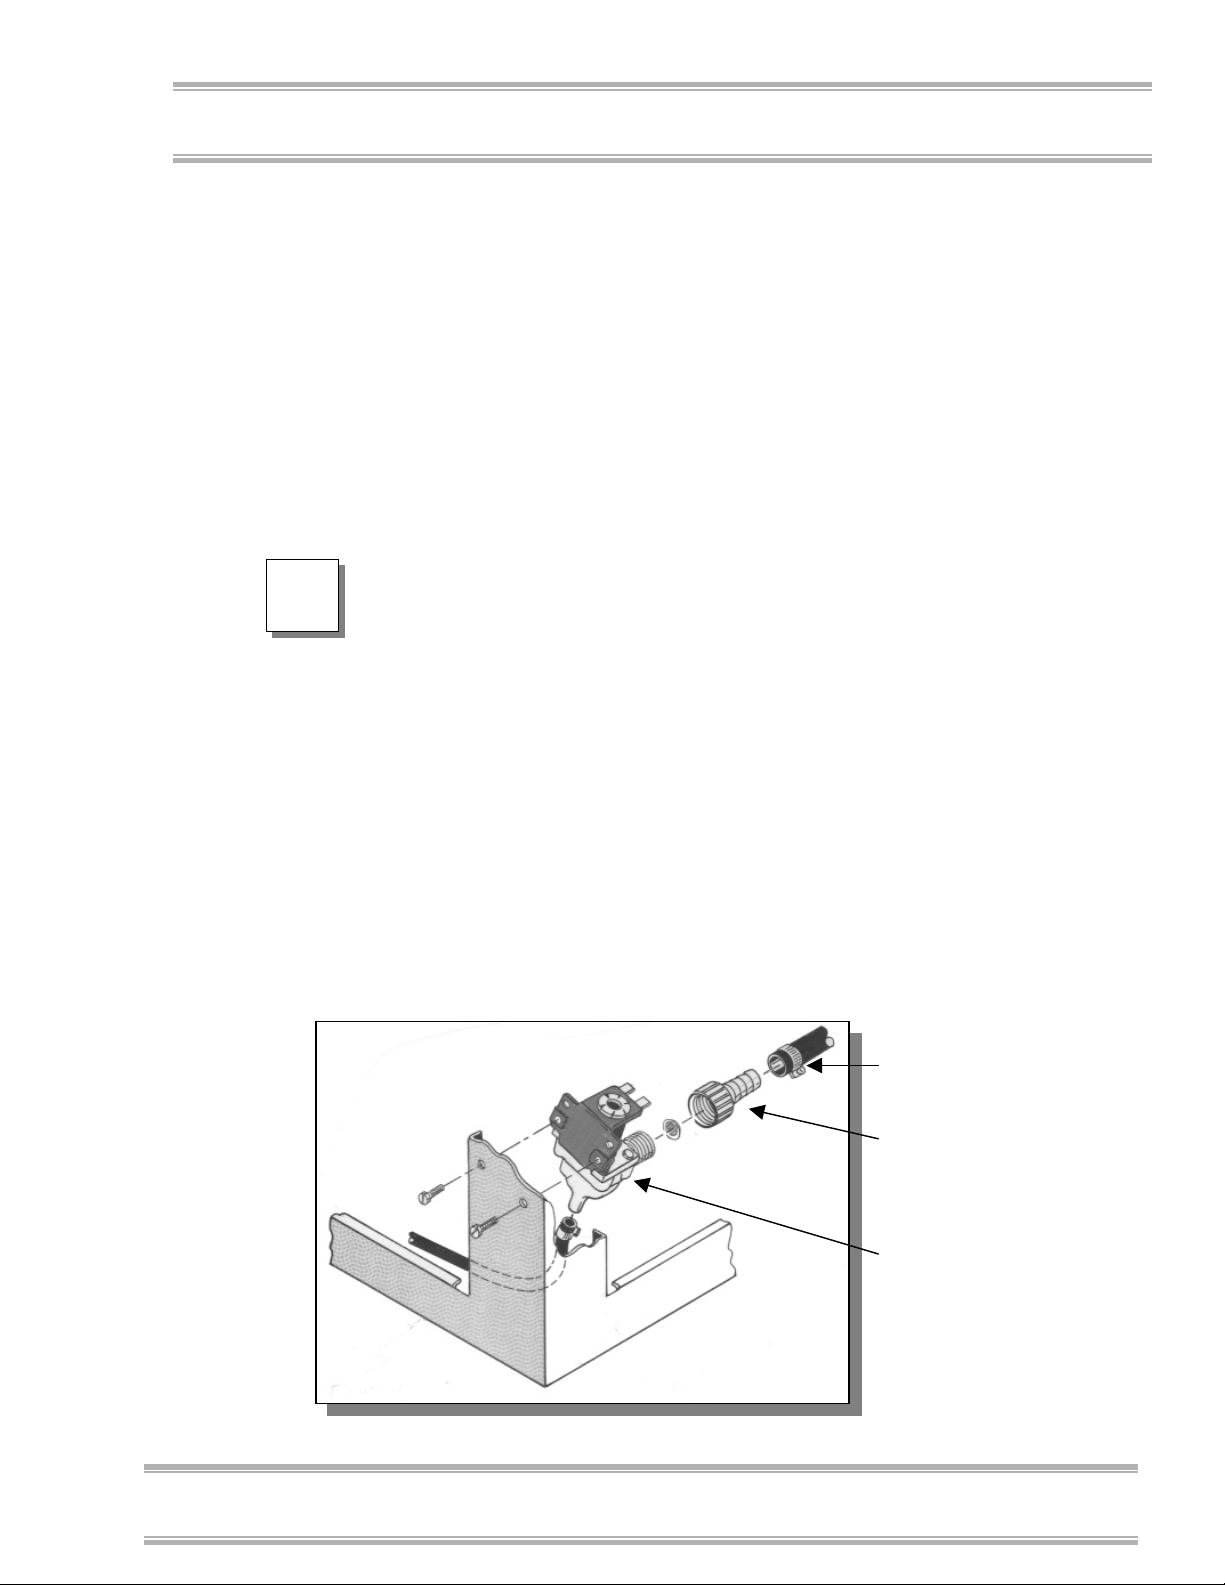
Disconnecting the Purified
Water Pump
If you have no need for the purified water pump on your
washer, you may choose to disconnect it. Refer to Figure
6-1 and follow the steps detailed below to disconnect the
purified water pump.
AASSHHEER
• disconnect the purified water pump from your
washer
• install pipet inserts in a FlaskScrubber washer
• install an upper rack in a FlaskScrubber washer
R
Product Service 1-800-522-7658
59

Chapter 6: Modifying Your Washer
M
M
Chapter 2: Prerequisites
To disconnect the purified water pump:
Refer to Figure 3-7
in Chapter 3:
Getting Started for
help in removing
the lower panel.
F
F
Purified
water pump
1. Disconnect the washer from its electrical source.
2. Remove the two screws at the bottom of the lower
panel of your washer.
3. Remove the panel by lifting slightly and pulling out.
4. If you have the Freestanding or Mobile model of the
Glassware Washer, remove the left side panel. Refer
to Figure 5-4 in Chapter 5: Maintaining Your Washer.
5. Remove the fuse from the fuse holder located on the
end of the purified water pump, as shown in Figure
6-1.
6. Replace the side and lower panels.
Figure 6-1
Remove the fuse
from the fuse
holder located on
the end of the
purified water
pump.
FlaskScrubber Options
If you purchased a FlaskScrubber Glassware Washer,
you can modify the configuration of your washer to better
suit your needs, if desired. Two pipet inserts and an
optional top rack are available. The pipet inserts are easily
installed in place of one or more spindles in the washer
and are designed to accommodate 1 ml to 50 ml pipets.
60
Product Service 1-800-522-7658

Chapter 6: Modifying Your Washer
Installing Pipet Inserts in a
FlaskScrubber
Two sizes of pipet inserts are available. The 8-place pipet
insert, shown in Figure 6-2 accommodates 1 ml to 10 ml
pipets. Multiple pipet inserts may be installed, if desired.
Refer to Figure 6-2 and follow the instructions below to
install an 8-place pipet insert.
To install an 8-place pipet insert:
1. Insert a 9/64" hex wrench into the top of any ¼"
spindle and turn counterclockwise to remove the
spindle. Small spindles may be removed by hand.
2. In the position previously occupied by the spindle,
thread into place the short spindle you received with
the pipet insert.
3. Push the pipet insert over the short spindle.
Figure 6-2
Pipet holder
Loosen set screw to slide
pipet holder to various
positions; tighten to secure
in place.
8-place pipet insert
Short spindle provided
with pipet insert.
Spindle rack
Product Service 1-800-522-7658
61

Chapter 6: Modifying Your Washer
Chapter 2: Prerequisites
The 14-place pipet insert, shown in Figure 6-3,
accommodates 1 ml to 50 ml pipets. Two of these inserts
may be installed, if desired. Refer to Figure 6-3 and
follow the instructions below to install a 14-place pipet
insert.
To install a 14-place pipet insert:
1. Use a 9/64" hex wrench to remove the three spindles
on either the right side or left side of the spindle rack.
2. Replace the center spindle with one of the plastic plugs
that you received with your washer.
3. Replace the front and back spindles with the two short
spindles that you received with the pipet insert.
4. With the support facing the center of the spindle rack,
slide the pipet insert over the spindles until it
completely seats.
14-place pipet
insert
Short spindles
supplied with
pipet insert.
Spindle rack
Figure 6-3
62
Product Service 1-800-522-7658

Chapter 6: Modifying Your Washer
Installing the Optional,
Adjustable-Height Top Rack
An optional top rack, shown in Figure 6-6, is available to
increase the capacity of the FlaskScrubber to handle many
types of labware, particularly beakers. To install the
optional top rack, refer to Figures 6-4 and 6-5 and follow
the instructions below.
To install the optional upper rack:
1. Remove all of the parts from the carton. See Appendix
D for a list of parts shipped.
2. Use a 5/16" hex wrench to remove the black plug in
the center of the spindle rack.
3. If the rack is to be located in the upper position, thread
in the longer hub-adapter assembly that you received
with the rack. If the rack is to be located in the lower
position, thread in the shorter hub-adapter. Remove
the nozzle from the longer hub-adapter assembly and
thread it into the shorter hub-adapter. Figure 6-4
illustrates the hub adapter installed in the spindle rack.
Figure 6-4
Nozzle
Hub adapter
Remove black plug
to accommodate hub
adapter.
Spindle rack
Product Service 1-800-522-7658
63
Chapter 6: Modifying Your Washer
Chapter 2: Prerequisites
Install the rails with
the slots on the bottom.
Tilt and position the top
of the rail between the
factory-installed rollers
bottom of the rail into
Install a rubber bumper on
4. Install the left and right rails by tilting the top of the
rails between the rollers on the sides of the washer tank
and push the bottoms of the rails into place, as
illustrated in Figure 6-5. Install both rails at the same
height.
Figure 6-5
and then push the
place.
the end of the rail.
64
5. Install the frame of the top rack by inserting the rollers
on the rack into the rails on the sides of the washer.
6. Push in the frame of the top rack until its rollers are
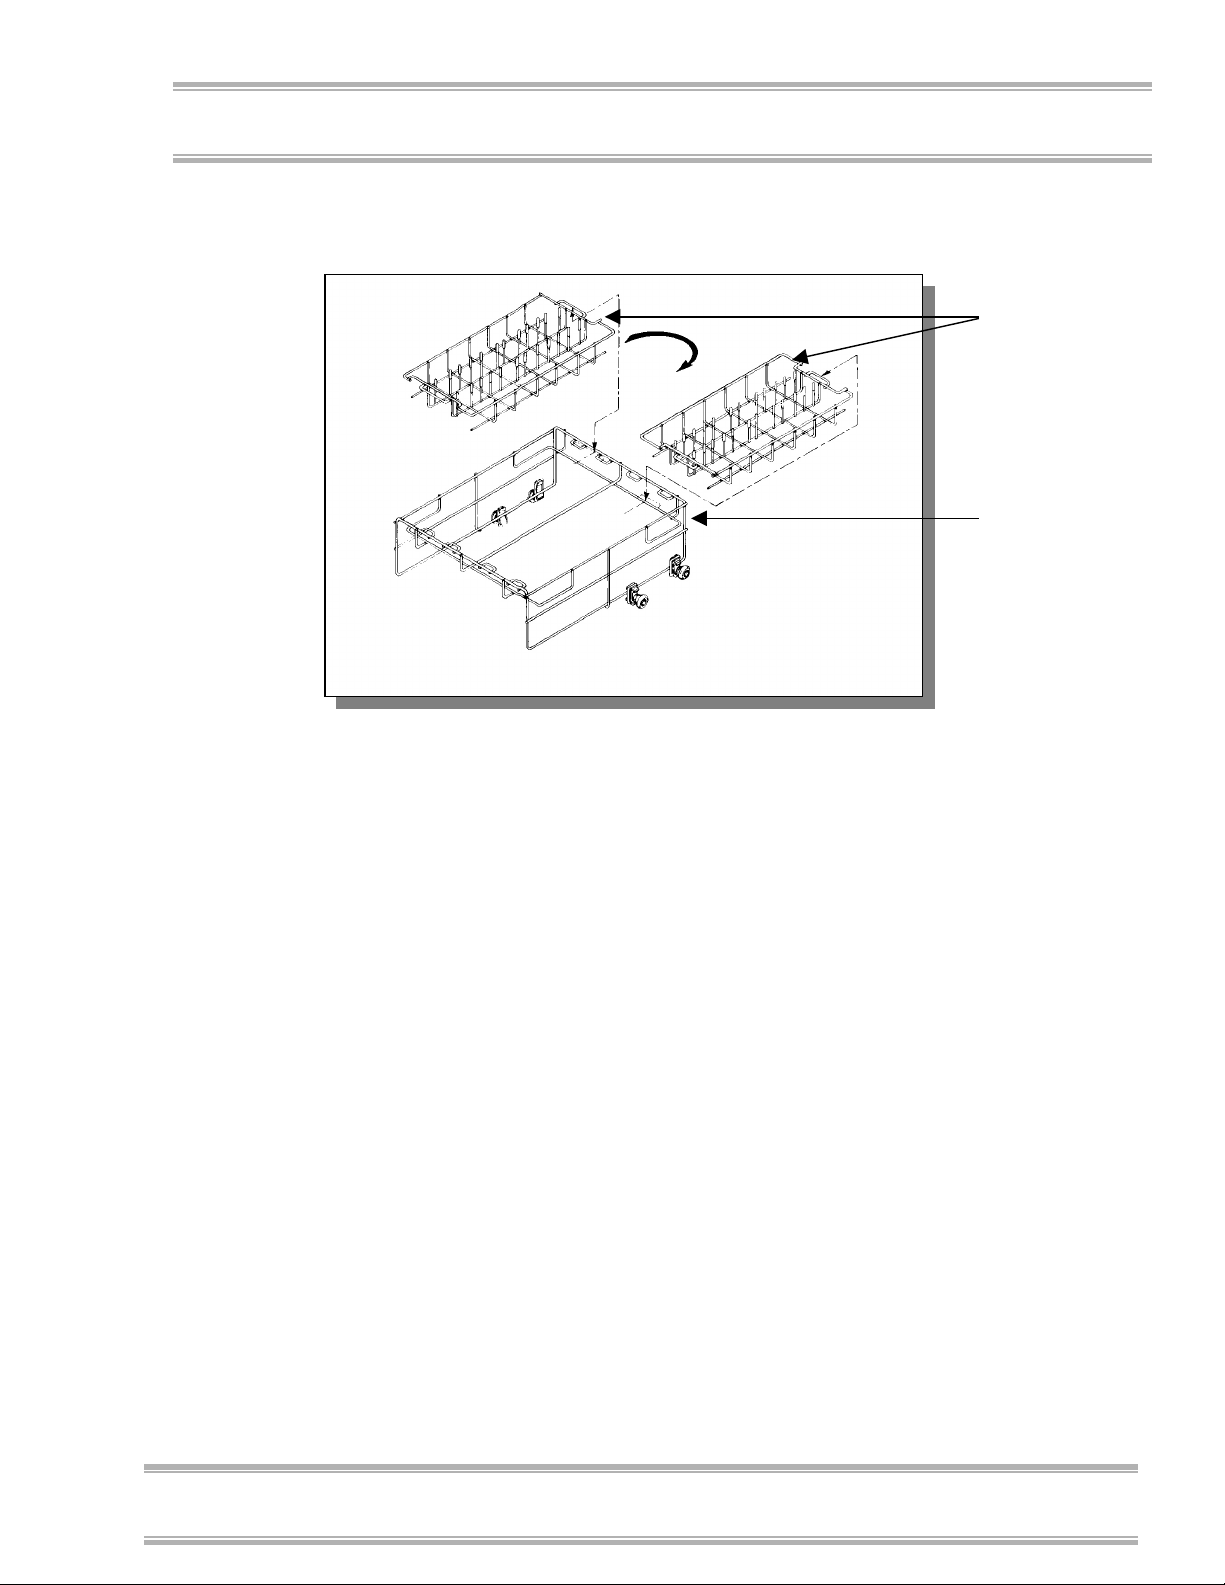
secure within the rails. Then, install the two basket
inserts, as illustrated in Figure 6-6. By rotating the
baskets 180°, they may be positioned higher or lower.
7. Install the two gray rubber bumpers on the ends of the
rails, as shown in Figure 6-5, to secure the rack rollers.
Product Service 1-800-522-7658
Chapter 6: Modifying Your Washer
Figure 6-6
Basket inserts
Top rack
frame
Product Service 1-800-522-7658
65

Chapter 6: Modifying Your Washer
Chapter 2: Prerequisites
66
Product Service 1-800-522-7658

C
HHAAPPTTEERR
C
7
7
T
RROOUUBBLLEESSHHOOOOTTIINNG
T
Refer to the following table if your Glassware Washer
fails to operate properly. If the suggested corrective
actions do not solve your problem, contact Labconco for
additional assistance.
PROBLEM CAUSE CORRECTIVE ACTION
Detergent cup
fails to open
Noises during
operation
Malfunction of
cup
Malfunction of
relay
Glassware
interfering with
cup door
Glassware rattling Load glassware properly. Do not allow
Door panel
vibrating
Replace cup.
Check electrical continuity or replace relay.
Move glassware.
glassware to touch.
Tighten panel screws.
G
Wash arms hitting Check glassware loading. Check for
Water inlet line
makes occasional
hammering sound
Purified water
pump is activated
Product Service 1-800-522-7658
damaged wash arm bushing.
Check with plumber.
No corrective action needed. This is normal
for about 2 minutes.
67

Chapter 7: Troubleshooting
Chapter 2: Prerequisites
PROBLEM CAUSE CORRECTIVE ACTION
Door drops too far
(below door stop)
Poor drying
Poor washing
results
Bent door hinge Replace door hinge.
Water is not hot
enough
Flask, beaker, or
labware with concave
bottoms not loaded
correctly
Recondensation If clean labware is left in the washer,
Heater(s) disconnected
or malfunctioned
Blower disconnected
or malfunctioned
Water is not hot
enough
Check inlet water temperature
(minimum 120° F) at the washer.
Tilt these articles when loading so that
water drains off.
recondensation may occur. Open latch
after completion of cycle to allow
moisure-laden air to escape.
Reconnect or replace heater.
Reconnect or replace blower.
Check inlet water temperature. Must be
at least 120°F. Recommended
temperature is 150°F.
Improper loading Check washer loading instructions in
Chapter 4 in this manual.
Detergent too old or
amount wrong
Detergent caked in cup Clean cup. Replace with fresh
Insufficient wash time Increase wash cycle time.
Insufficient water Check to be sure the water shut-off valve
Blocked fill valve
screen
Replace detergent or change quantity
used.
detergent. Check water inlet temerature.
Must be at least 120°F.
is fully open. Check to be sure the water
pressure is between 20 and 120 psi at a
flow rate of 1.25 gallons per minute.
Check screen in fill valve.
68
Product Service 1-800-522-7658

Chapter 7: Troubleshooting
PROBLEM CAUSE CORRECTIVE ACTION
Not draining
properly
Purified water does
not fill
Racks binding or out
of place
Tank and inner door
have surface rust
Clogged filter Clean sump filter.
Drain line clogged or
kinked
Crimp in supply hose Refer to installation instructions for
Blown fuse Replace fuse.
Motor wires
disconnected
Drain hose not
elevated above water
level.
Roller missing Replace roller.
Roller binding Adjust or replace rollers and rails.
Upper rack rail bent Replace rail.
Collects normally Clean with stainless steel cleaner and
Disconnect drain line and clean or
remove kink.
proper purified water piping
installation.
Reconnect wires.
Elevate drain hose per installation
instructions.
soft cloth.
Glassware is
contaminated with
mineral acids.
Washer does not run
Washer door opens
and closes badly
Washer leaks
No power to washer Check fuse or circuit breaker.
Door latch is open Latch washer door by pushing door in.
Cabinet opening is not
square
Door hitting countertop mounting screws
Washer is not level Adjust leveling feet.
Door not sealing Adjust door latch.
Tank gasket loose Check gasket and correct.
Split fill tube Replace fill tube.
Product Service 1-800-522-7658
Pre-rinse glassware.
Correct opening with leveling feet.
Adjust mounting screws.
69

Chapter 7: Troubleshooting
Chapter 2: Prerequisites
PROBLEM CAUSE CORRECTIVE ACTION
Washer leaks (cont.)
Washer leaks
around door seal
Washer will not
drain
Fill tube out of trap Reinstall fill tube.
Loose connection at fill
valve
Improper detergent Use non-foaming detergent. Use only
Obstruction in drain
line
Improper installation Check cabinet opening to see if it is
Unit not level Adjust feet to level unit.
Door opened during
operation
Clogged drain Clean out drain.
Blockage of air gap Clean the air gap by lifting the cover,
Check fill valve and correct.
proper amount of detergent.
Remove obstruction.
aligned properly with the door.
Washer must be level. Adjust feet to
level unit.
Allow 4-5 seconds before opening
door after unlatching.
unscrewing the cap, and removing any
accumulated material. See Chapter 5.
70
Washer will not
fill
Selection buttons on
control panel
inoperable
Kink in drain hose Check for a kink in the drain hose.
Filter blocked Check filter in washer and clean as
needed.
Improper drain
installation
Fill valve clogged Clean fill valve.
Drain hose not elevated
above water level
Microprocessor
memory error
Refer to installation instructions in
Chapter 3.
Elevate drain hose per instructions in
Chapter 3.
Perform "Factory Reset". Open latch
on door. Press "Pure" button and
simultaneously close door latch.
Release "Pure" button and display
will read "Factory Reset". Press
"Select Program" button to choose
wash cycle.
Product Service 1-800-522-7658

Chapter 7: Troubleshooting
Product Service 1-800-522-7658
71

A
PPPPEENNDDIIXX
A
A
A
F
LLAASSK
F
S
TTEEAAM
S
The following components are available for your Glassware Washer. The
FlaskScrubber components are listed first, then the SteamScrubber components.
FLASKSCRUBBER COMPONENTS
Item
1 44447-00 44447-00 1 Upper Basket Rail (R.H.)
1A 44451-00 44451-00 1 Upper Basket Rail (L.H.)
2 44352-00 44352-00 1 Overflow Dome
3 44981-00 44981-00 1 Detergent Cup
4 45038-00 45038-02 1 Controller Assembly
4A 45037-00 45037-00 1 Display Assembly
5 14804-01 14804-01 1 Drain/Water Supply Hose (Mobile) (Not Shown)
5A 44861-01 44861-01 1 Drain Hose (Undercounter, Freestanding) (Not Shown)
6 44105-00 44688-00 1 Motor Start Relay
7 44114-00 44692-00 1 Hot Water Inlet Valve (Mobile)
7A 13613-00 13613-01 1 Hot Water Inlet Valve (Undercounter, Freestanding)
8 44114-00 44692-00 1 Purified Water Inlet Valve
9 44260-00 44700-00 1 Steam Heater
10 44863-00 44863-00 1 Fill Trap
11 45048-00 45048-00 1 Vacuum Blower (FlaskScrubbers)
12 44261-00 44699-01 1 Sump Heater
13 44871-00 44871-01 1 Pump Assembly
14 44267-00 44267-01 2 Thermostats, Sump - 115V models require (2) 44267-00;
15 45060-00 45060-01 1 Purified Water Pump
16 44606-00 44606-00 1 Vacuum Duct Assembly
17 44363-00 44363-00 1 Blower Shroud Assembly
18 45163-00 45178-00 1 Power Cord (Mobile)
19 45129-00 45129-01 1 Transformer
20 13272-05 13272-06 1 Breaker, Circuit
21 45094-00 45094-01 1 Bulb - 25T8DC 120 (115V), 25T8DC 230 (230V)
22 44112-00 44112-00 1 Thermostat, Door (230V models require 2) (Not Shown)
22A 13272-07 13272-01 1 Breaker, Circuit (Mobile, Freestanding)
K
M
Part #
115V
S
CCRRUUBBBBEER
S
S
CCRRUUBBBBEER
S
Part #
230V Quantity Description
R
R
AANND
C
C
D
OOMMPPOONNEENNTTS
230V models require (1) 44267-00 and (1) 44267-01
S
72
Product Service 1-800-522-7658
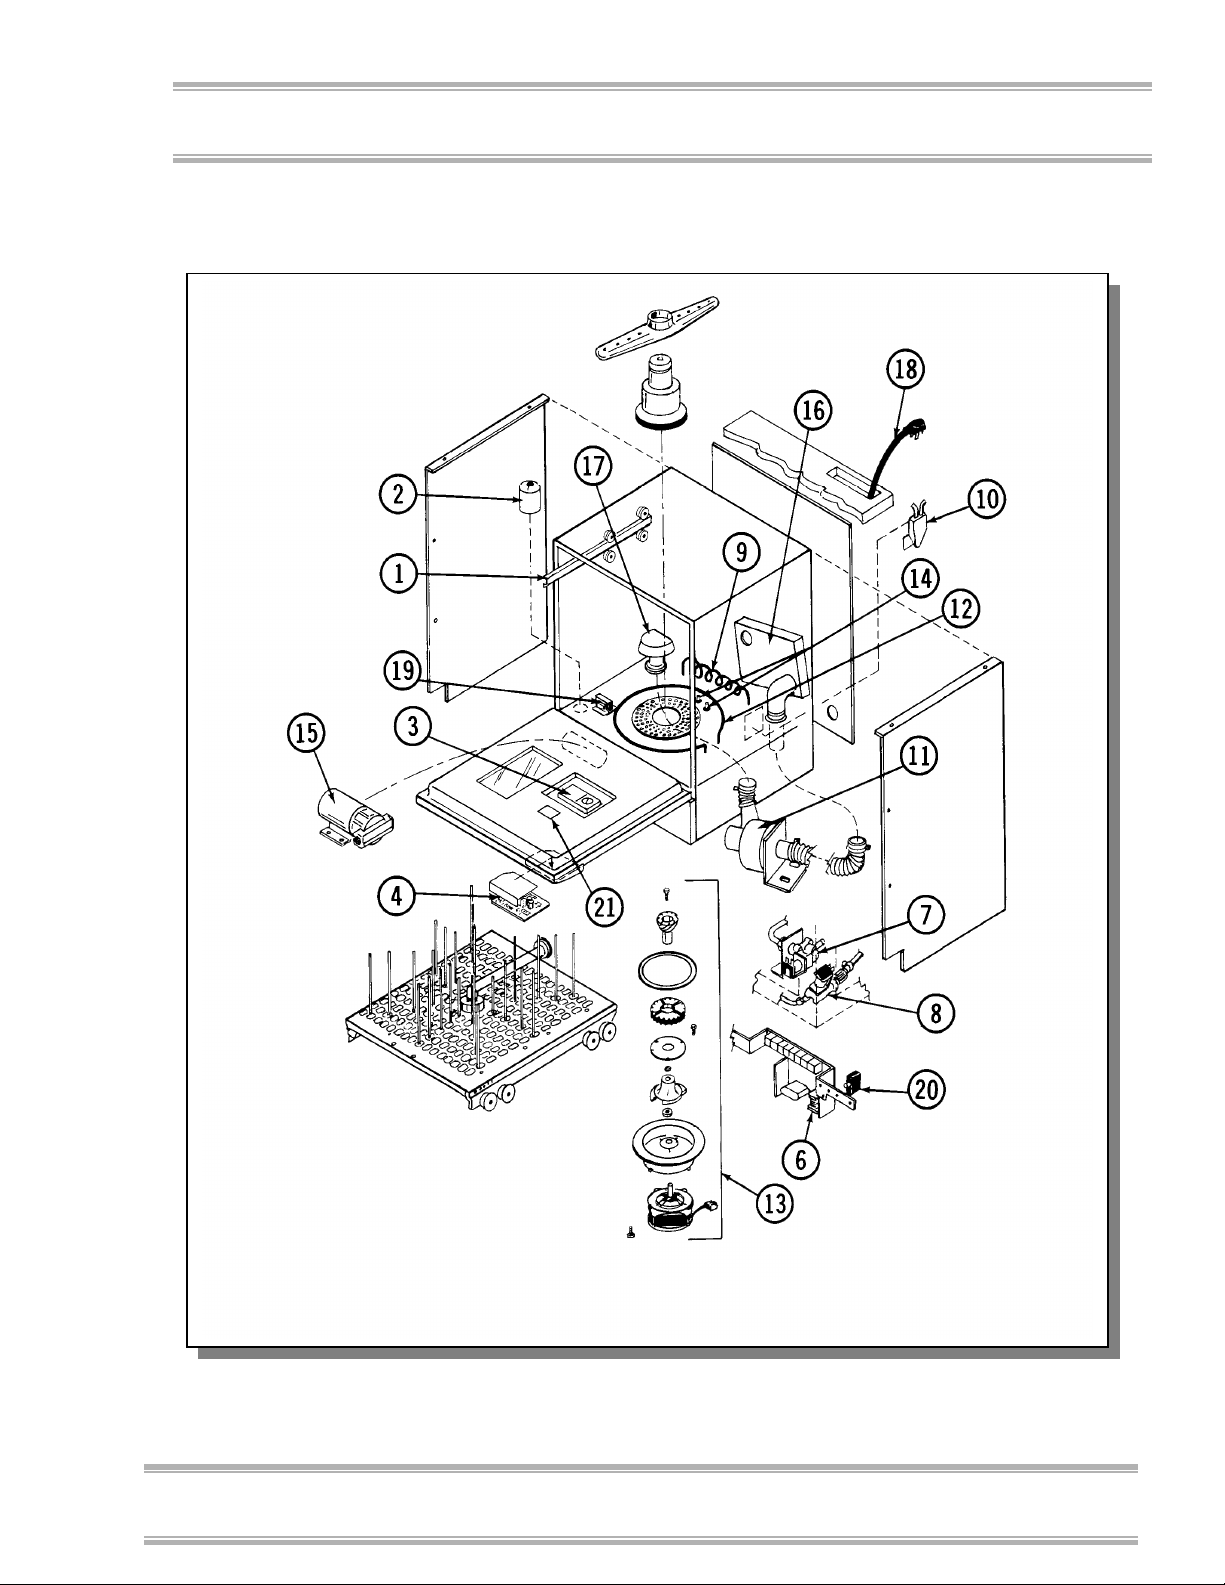
Appendix A: FlaskScrubber and SteamScrubber Components
Figure A-1
Product Service 1-800-522-7658
73

Appendix A: FlaskScrubber and SteamScrubber Components
Chapter 2: Prerequisites
STEAMSCRUBBER COMPONENTS
Part #
Item
1 44447-00 44447-00 1 Upper Basket Rail (R.H.)
1A 44451-00 44451-00 1 Upper Basket Rail (L.H.)
2 44352-00 44352-00 1 Overflow Dome
3 44981-00 44981-00 1 Detergent Cup
4 45038-00 45038-02 1 Controller Assembly
4A 45037-00 45037-00 1 Display Assembly
5 14804-01 14804-01 1 Drain/Water Supply Hose (Mobile) (Not Shown)
5A 44861-01 44861-01 1 Drain Hose (Undercounter, Freestanding) (Not Shown)
6 44105-00 44688-00 1 Motor Start Relay
7 44114-00 44692-00 1 Hot Water Inlet Valve (Mobile)
7A 13613-00 13613-01 1 Hot Water Inlet Valve (Undercounter, Freestanding)
8 44114-00 44692-00 1 Purified Water Inlet Valve
9 44260-00 44700-00 1 Steam Heater
10 44863-00 44863-00 1 Fill Trap
11 45041-00 45041-01 1 Blower
12 44261-00 44699-01 1 Sump Heater
13 44871-00 44871-01 1 Pump Assembly
14 44267-00 44267-01 2 Thermostats, Sump - 115V models require (2) 44267-00;
15 44112-00 44112-00 1 Thermostat, Door (230V models require 2) (Not Shown)
16 45060-00 45060-01 1 Purified Water Pump
17 44363-00 44363-00 1 Blower Shroud Assembly
18 45163-00 45178-00 1 Power Cord (Mobile)
19 45094-00 45094-01 1 Bulb – 25T8DC 120 (115V), 25T8DC 230 (230V)
20 13272-07 13272-01 1 Breaker, Circuit (Mobile)
115V
Part #
230V Quantity Description
230V models require (1) 44267-00 and (1) 44267-01
74
Product Service 1-800-522-7658
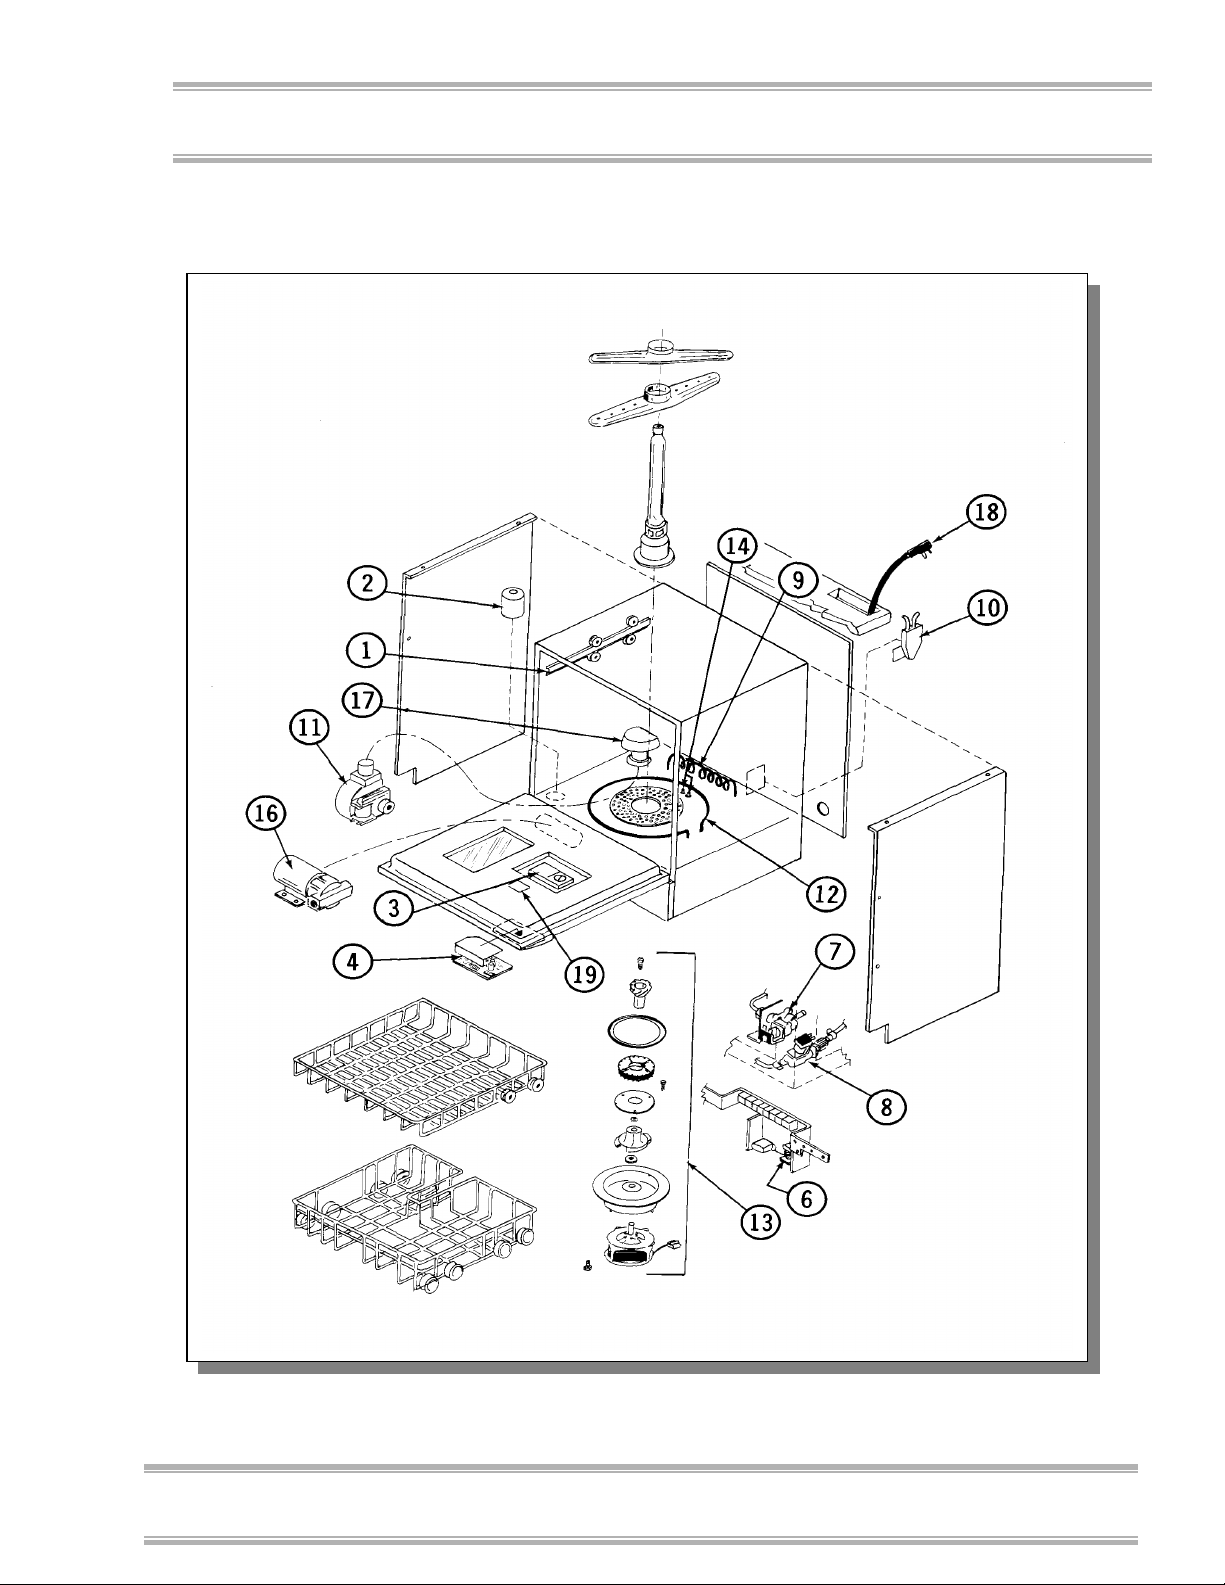
Appendix A: FlaskScrubber and SteamScrubber Components
Figure A-2
Product Service 1-800-522-7658
75

Appendix A: FlaskScrubber and SteamScrubber Components
Chapter 2: Prerequisites
76
Product Service 1-800-522-7658

A
PPPPEENNDDIIXX
A
B
B
G
LLAASSSSWWAARREE
G
Freestanding Washer
English: Inch
W
W
AASSHHEER
R
D
IIMMEENNSSIIOONNS
D
Figure B-1
S
Product Service 1-800-522-7658
Figure B-2Metric: cm
77

Appendix B: Glassware Washer Dimensions
Chapter 2: Prerequisites
Mobile Washer
English: Inch
Figure B-3
Metric: cm
Figure B-4
Interior - All SteamScrubber Models
78
Product Service 1-800-522-7658
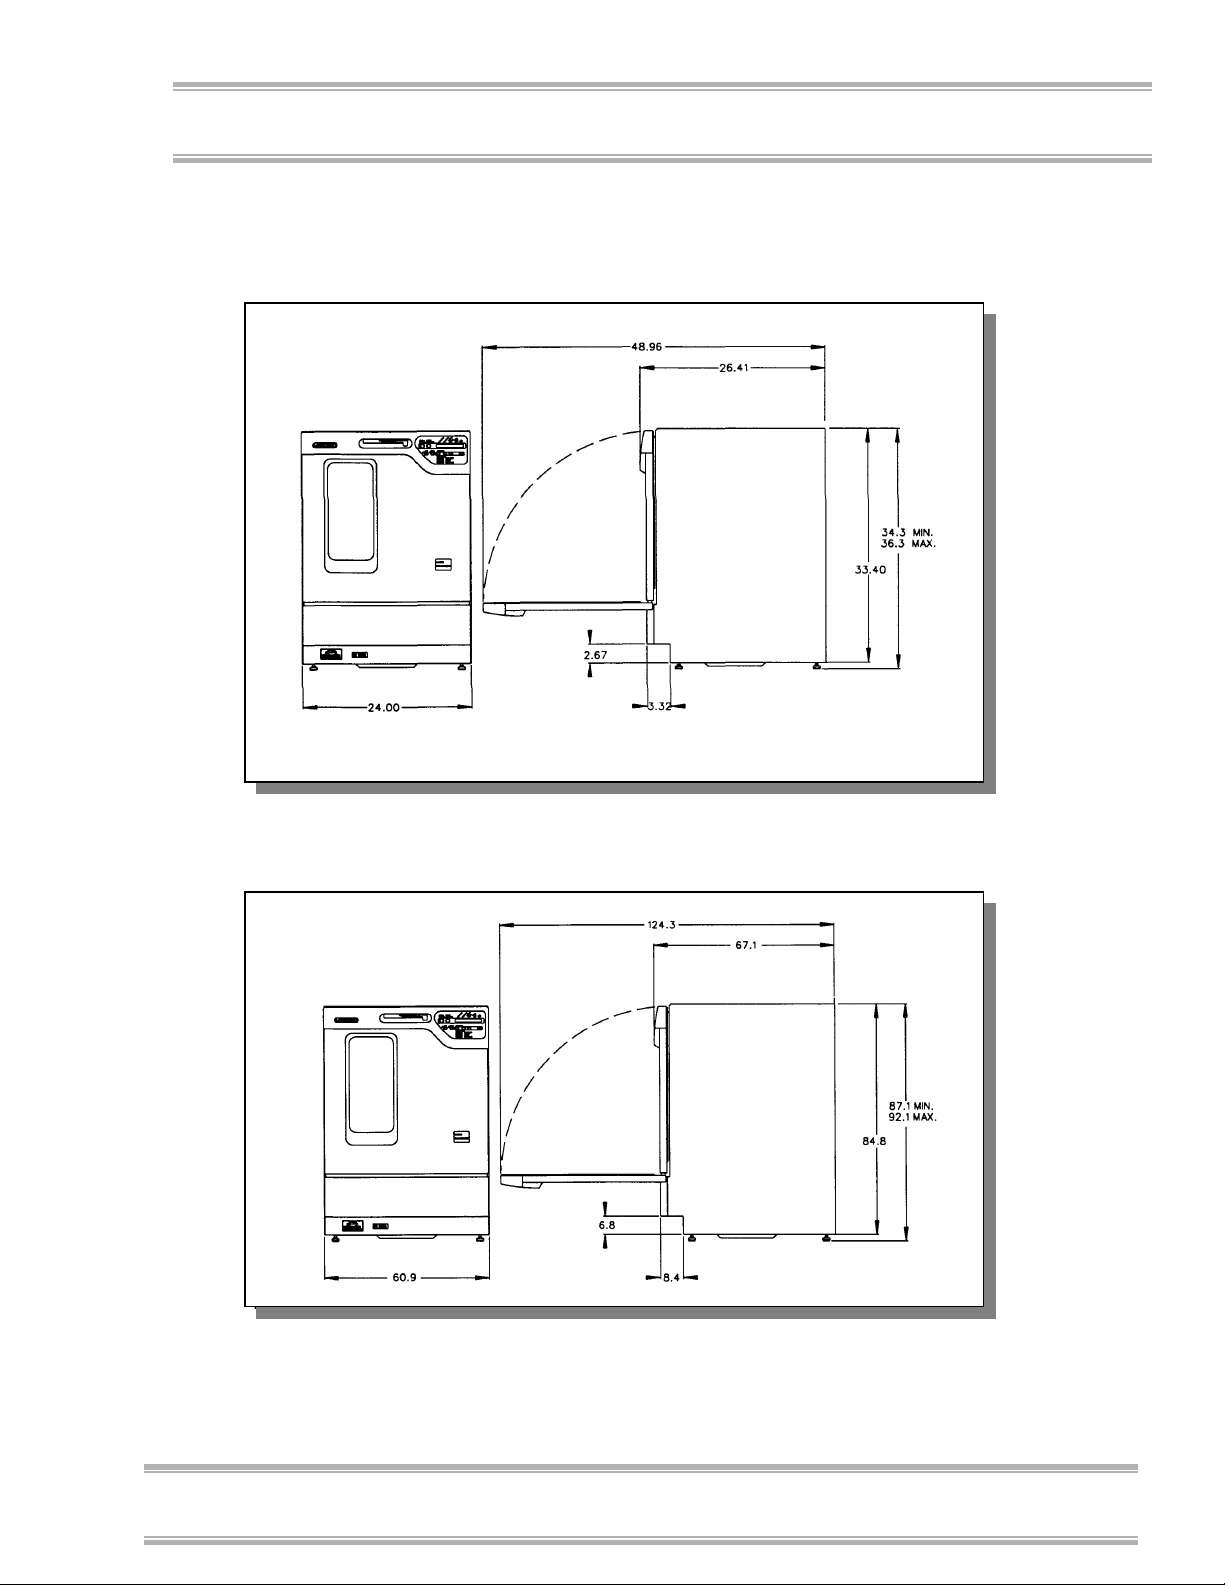
Undercounter Washer
Appendix B: Glassware Washer Dimensions
English: Inch
Figure B-5
Metric: cm
Interior - All SteamScrubber
Figure B-6
Product Service 1-800-522-7658
79
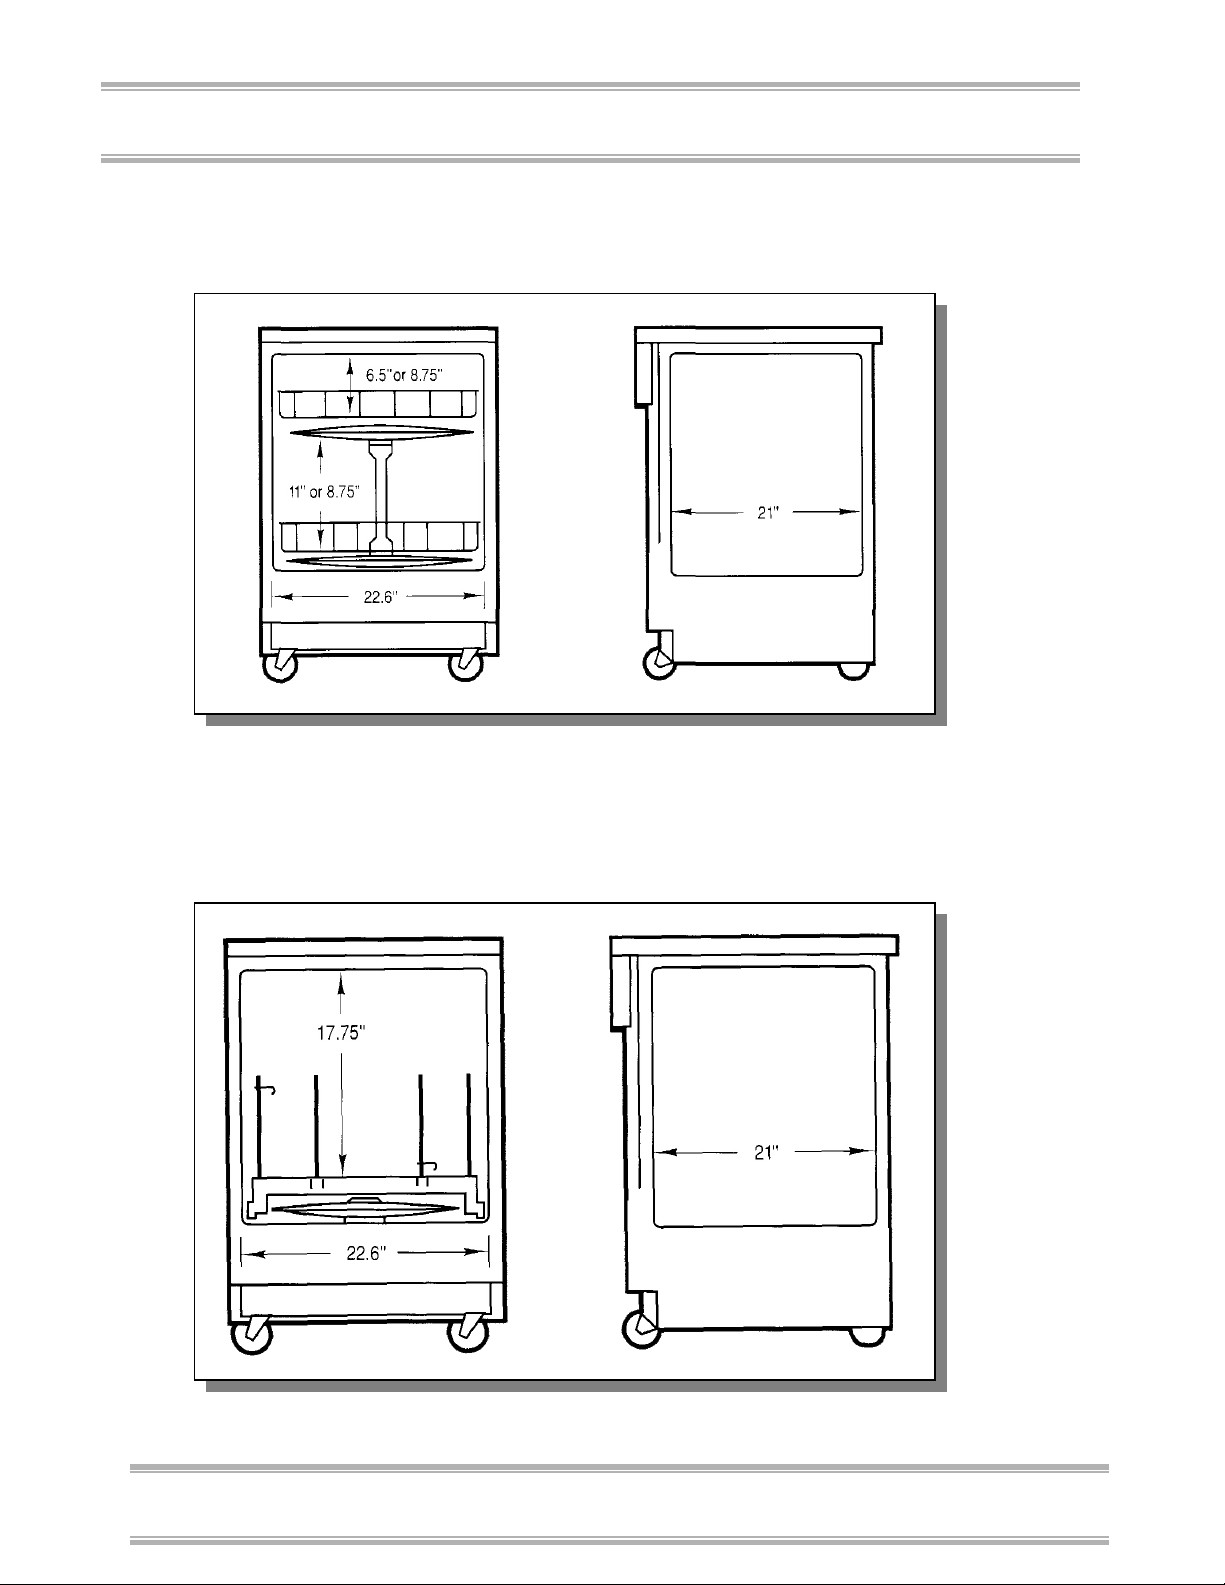
Appendix B: Glassware Washer Dimensions
Chapter 2: Prerequisites
Interior - All SteamScrubbers
Figure B-7
Interior - All FlaskScrubbers
Figure B-8
80
Product Service 1-800-522-7658
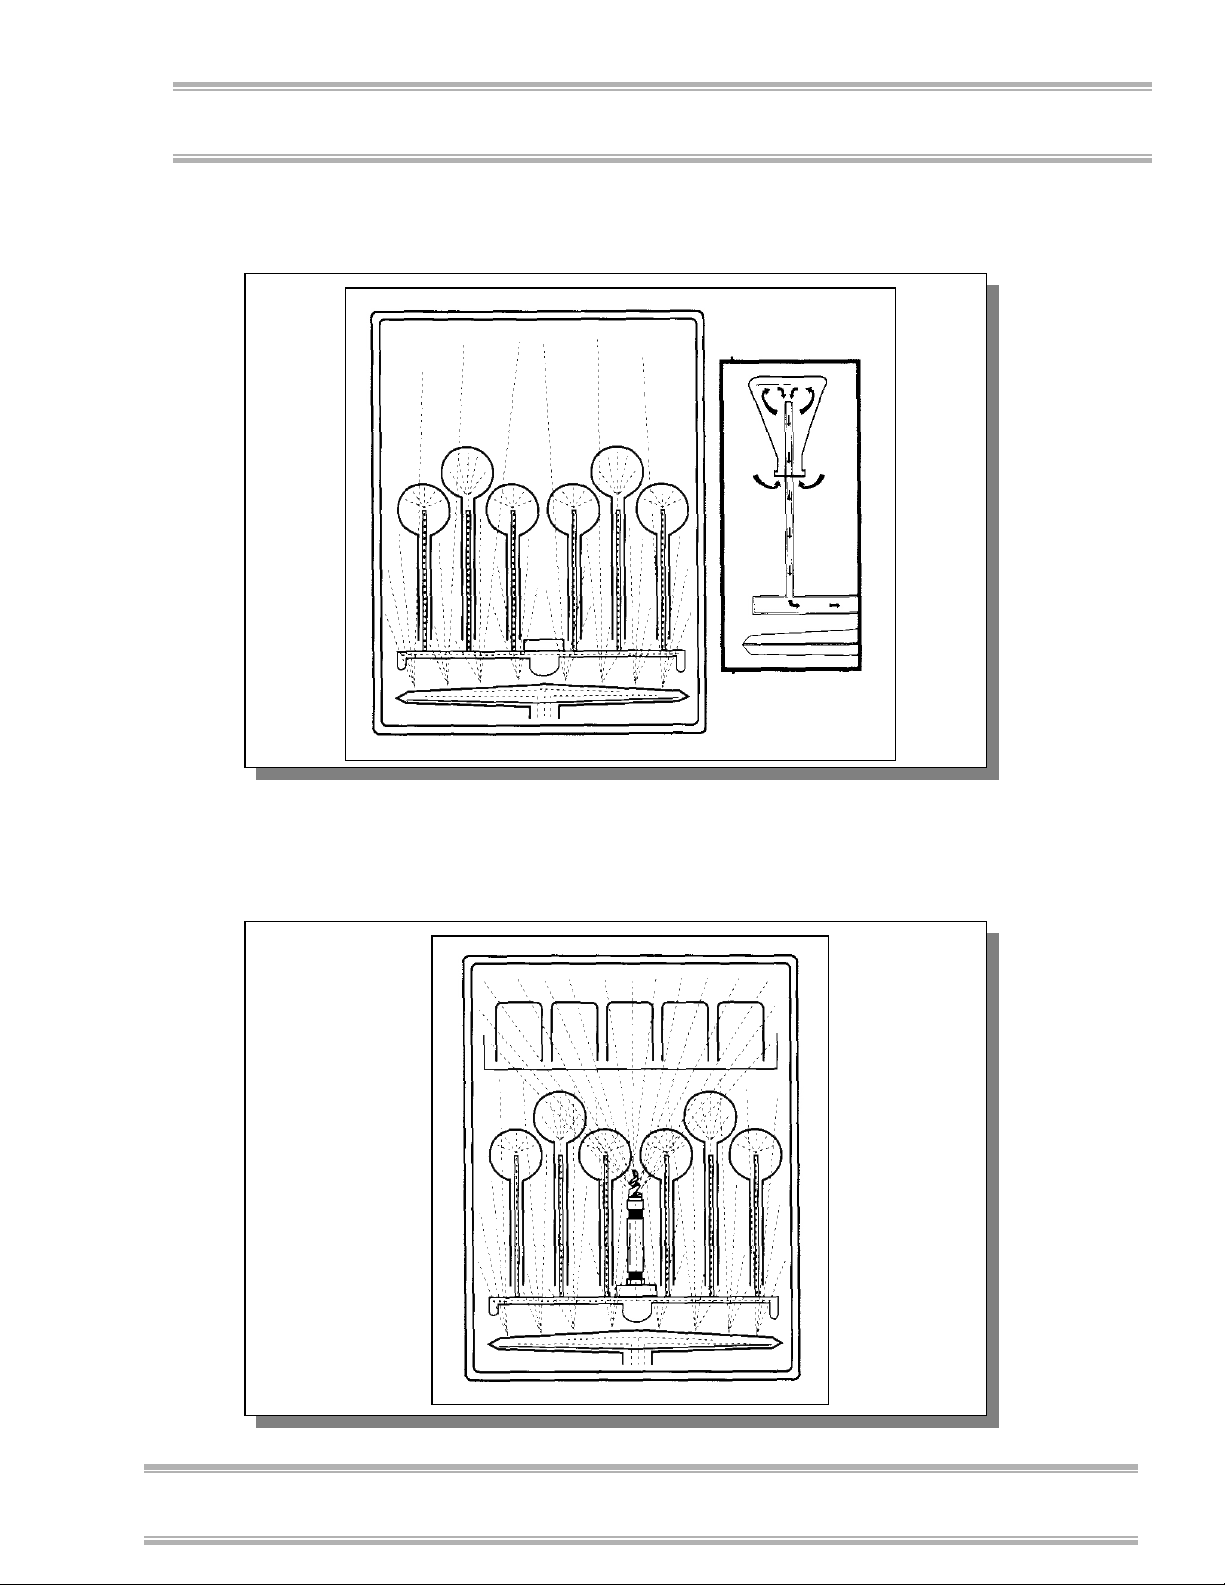
Appendix B: Glassware Washer Dimensions
FlaskScrubber Basic Spray Pattern
Figure B-9
FlaskScrubber Spray Pattern with Accessory Top
Rack and Hub Adapter
Figure B-10
Product Service 1-800-522-7658
81

Appendix B: Glassware Washer Dimensions
Chapter 2: Prerequisites
SteamScrubber Spray Pattern
Figure B-11
82
Product Service 1-800-522-7658

A
PPPPEENNDDIIXX
A
C
C
G
LLAASSSSWWAARREE
G
This Appendix contains various specifications for the Glassware Washer, including
program times and water consumption for both the 115V and 230V models, as well as
wiring diagrams for the 115V and 230V models.
Glassware Washer Specifications
• Minimum fill water temperature: 120°F (49°C)
• Water consumption per fill: 2.5 gallons (9.5 liters)
• Minimum feed water pressure: 20 psi (138 kPa)
• Maximum feed water pressure: 120 psi (827 kPa)
• Minimum purified water feed pressure: 0 psi (0 kPa)
• Heat rejected from washer: less than 104 BTU/minute (115V models); less
than 170 BTU/minute (230V models)
Electrical Specifications
W
W
AASSHHEER
R
S
PPEECCIIFFIICCAATTIIOONNS
S
S
• Maximum amperage for 115 volt washers: 16 amperes
• Maximum amperage for 230 volt washers: 13 amperes
• Frequency 115 volt washers: 60 Hz
• Frequency 230 volt washers: 50/60 Hz
• Phase: Single
• Sump element power: 750 watts (115V models); 1450 watts (230V models)
• Steam element power: 700 watts
Product Service 1-800-522-7658
83

Appendix C: Glassware Washer Specifications
Chapter 2: Prerequisites
Environmental Conditions
• Indoor use only.
• Maximum altitude: 6562 feet (2000 meters).
• Ambient temperature range: 41° to 104°F (5° to 40°C).
• Maximum relative humidity: 80% for temperatures up to 88°F (31°C),
decreasing linearly to 50% relative humidity at 104°F (40°C).
• Main supply voltage fluctuations not to exceed ±10% of the nominal voltage.
• Transient overvoltages according to Installation Categories II (Overvoltage
Categories per IEC 1010). Temporary voltage spikes on the AC input line
that may be as high as 1500V for 115V models and 2500V for 230V models
are allowed.
• Used in an environment of Pollution degrees 2 (i.e., where normally only
non-conductive atmospheres are present). Occasionally, however, a
temporary conductivity caused by condensation must be expected, in
accordance with IEC 664.
84
Product Service 1-800-522-7658

Appendix C: Glassware Washer Specifications
Program Times and Water Consumption
(115V Models)
Program Rinse
Only
Wash 1 -55555
Steam - - † † 10 † 10
Wash 2 - 10 20* 30* 40* 10* 10*
Rinse 1 4222 2 2 2
Rinse 2 **444 4 4 4
Rinse 3 ****** 4 4 ** **
Rinse 4 ****** 4 4 ** **
Rinse 5 ******** 4 ** **
Rinse 6 - ** ** ** 4 ** **
Dry 0 †† 10 †† 20 †† 30 †† 40 †† 10 †† 10 ††
Total Factory
Set Time
(minutes)
Total User Set
Time (minutes)
Total Water
Consumed w/
Factory Settings
+++
12 42 70 104 148 50 60
12 to 100 32 to 150 40 to 168 40 to 168 40 to 168 40 to 168 40 to 168
2.5 Gallons
(9.5 liters)
Plastic Glass Glass Plus Scientific User 1 Set User 2 Set
7.5 Gallons
(28.4 liters)
10.0
Gallons
(37.9 liters)
15.0
Gallons
(56.8 liters)
20.0 Gallons
(75.7 liters)
10 Gallons
(37.9 liters)
10 Gallons
(37.9 liters)
†Steam adds 10 minutes to total program time.
* Select from 10, 20, 30, or 40 minute Wash 2 time.
** Additional rinse adds 4 minutes.
††Select from 0, 10, 20, 30, 40, 50, or 60 minute Dry time.
+++Add 2.5 gallons for each additional rinse.
Product Service 1-800-522-7658
85

Appendix C: Glassware Washer Specifications
Chapter 2: Prerequisites
Program Times and Water Consumption
(230V Models)
Program Rinse
Only
Wash 1 -555 5 5
Steam - - † † 10 † 10
Wash 2 - 10 20* 30* 40* 10* 10*
Rinse 142222 2 2
Rinse 2 ** 4 4 25 25 4 25
Rinse 3 ** ** ** 4 4 ** **
Rinse 4 ** ** ** 4 4 ** **
Rinse 5 ** ** ** ** 4 ** **
Rinse 6 - ** ** ** 4 ** **
Dry 0 †† 10 †† 20 †† 30 †† 40 †† 10 †† 10 ††
Total
Factory Set
Time
(minutes)
Total User
Set Time
(minutes)
Total Water
Consumed
w/ Factory
Settings
+++
12 42 70 120 164 50 66
12 to 100 32 to 150 40 to 168 61 to 189 61 to 189 40 to 168 61 to 189
2.5
Gallons
(9.5 liters)
Plastic
Lo Heat
7.5
Gallons
(28.4
liters)
Glass
Lo Heat
10.0
Gallons
(37.9 liters)
Glass Plus
Hi Heat
15.0
Gallons
(56.8 liters)
Scientific
Hi Heat
20.0
Gallons
(75.7 liters)
User 1 Set
Lo Heat
10 Gallons
(37.9 liters)
User 2 Set
Hi Heat
10 Gallons
(37.9 liters)
†Steam adds 10 minutes to total program time.
* Select from 10, 20, 30, or 40 minute Wash 2 time.
** Additional rinse adds 4 minutes.
††Select from 0, 10, 20, 30, 40, 50, or 60 minute Dry time.
+++Add 2.5 gallons for each additional rinse.
86
Product Service 1-800-522-7658
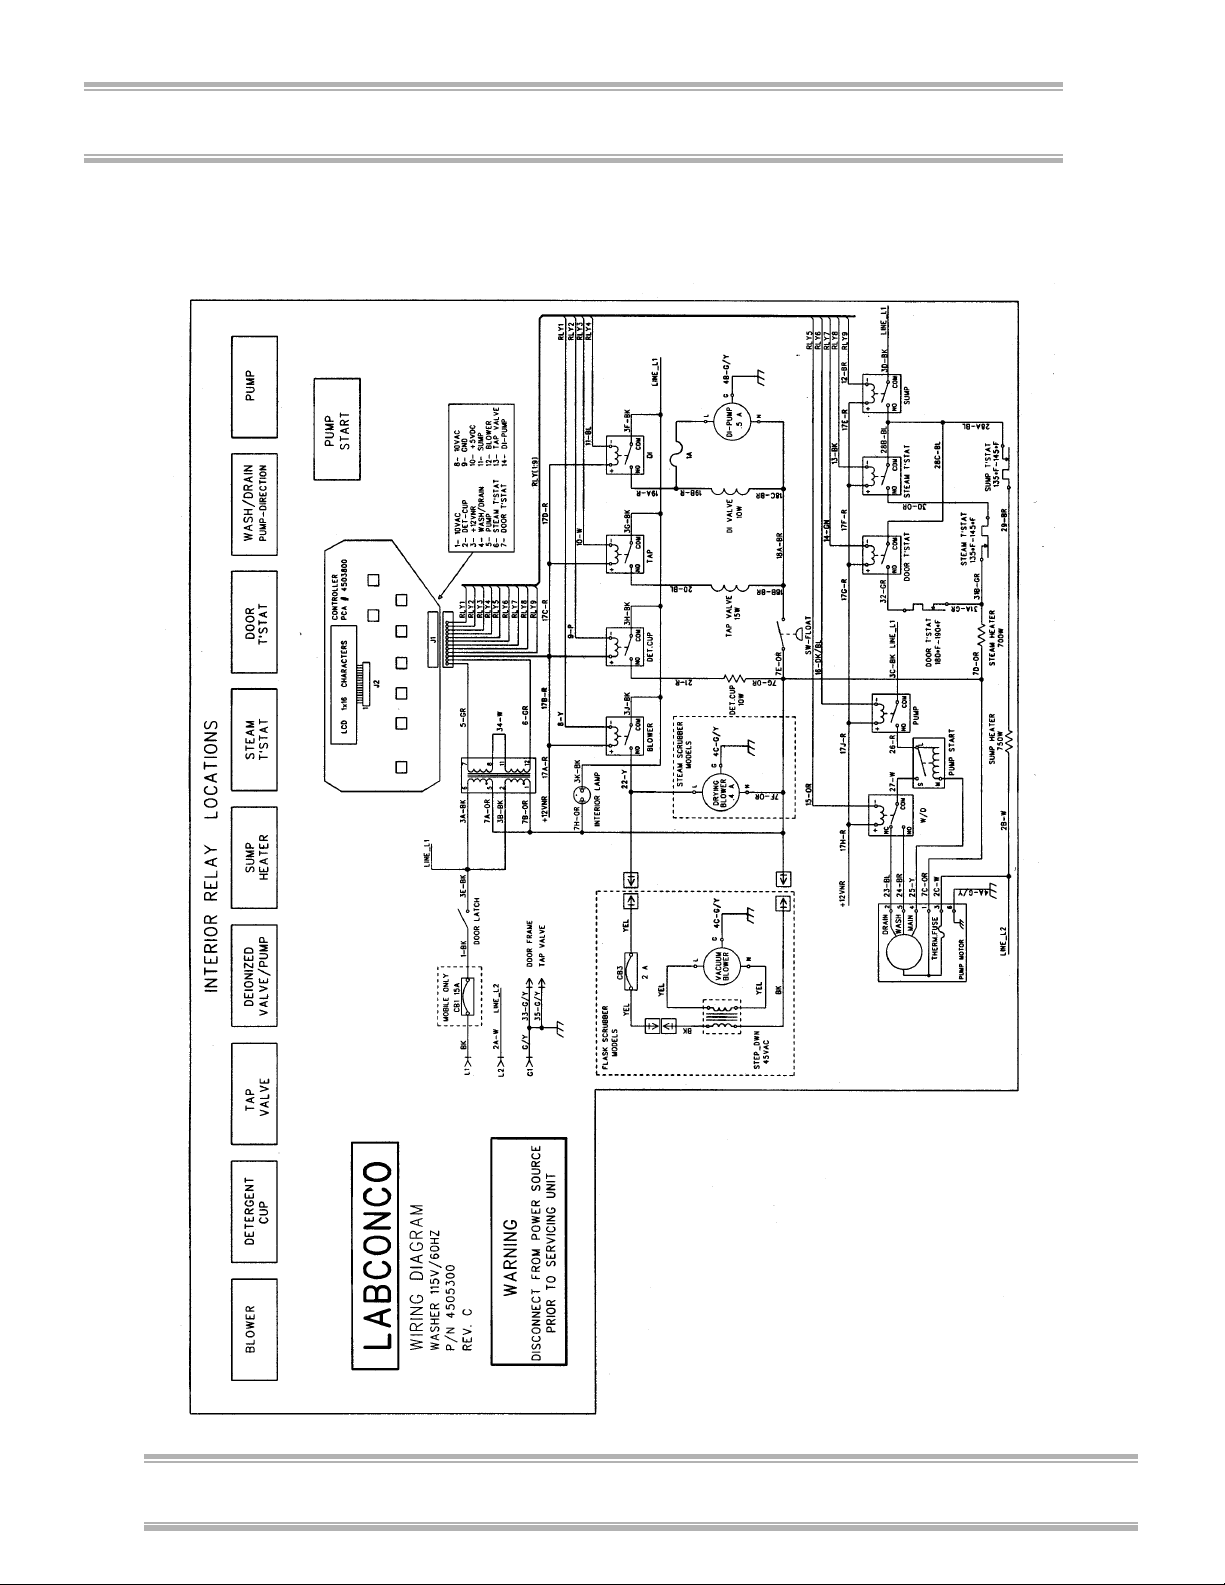
Appendix C: Glassware Washer Specifications
Wiring Diagram (115V Models)
Product Service 1-800-522-7658
87
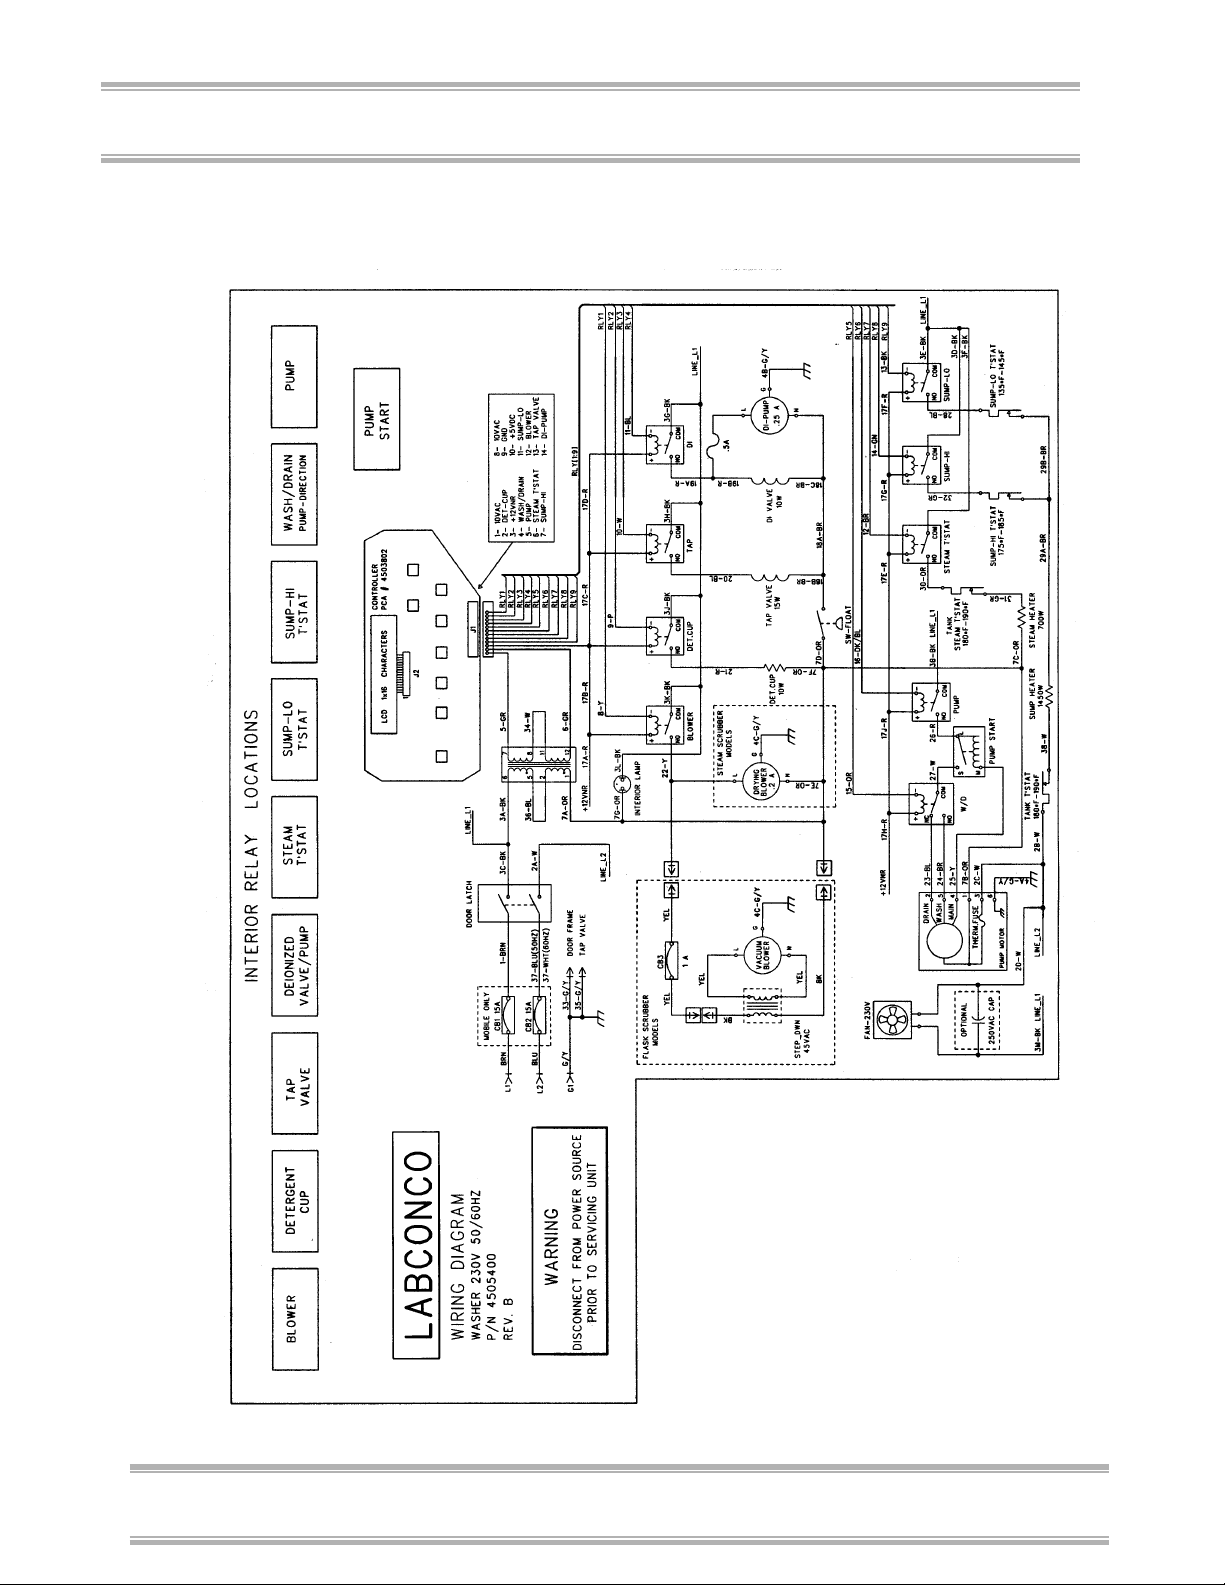
Appendix C: Glassware Washer Specifications
Chapter 2: Prerequisites
Wiring Diagram (230V Models)
88
Product Service 1-800-522-7658
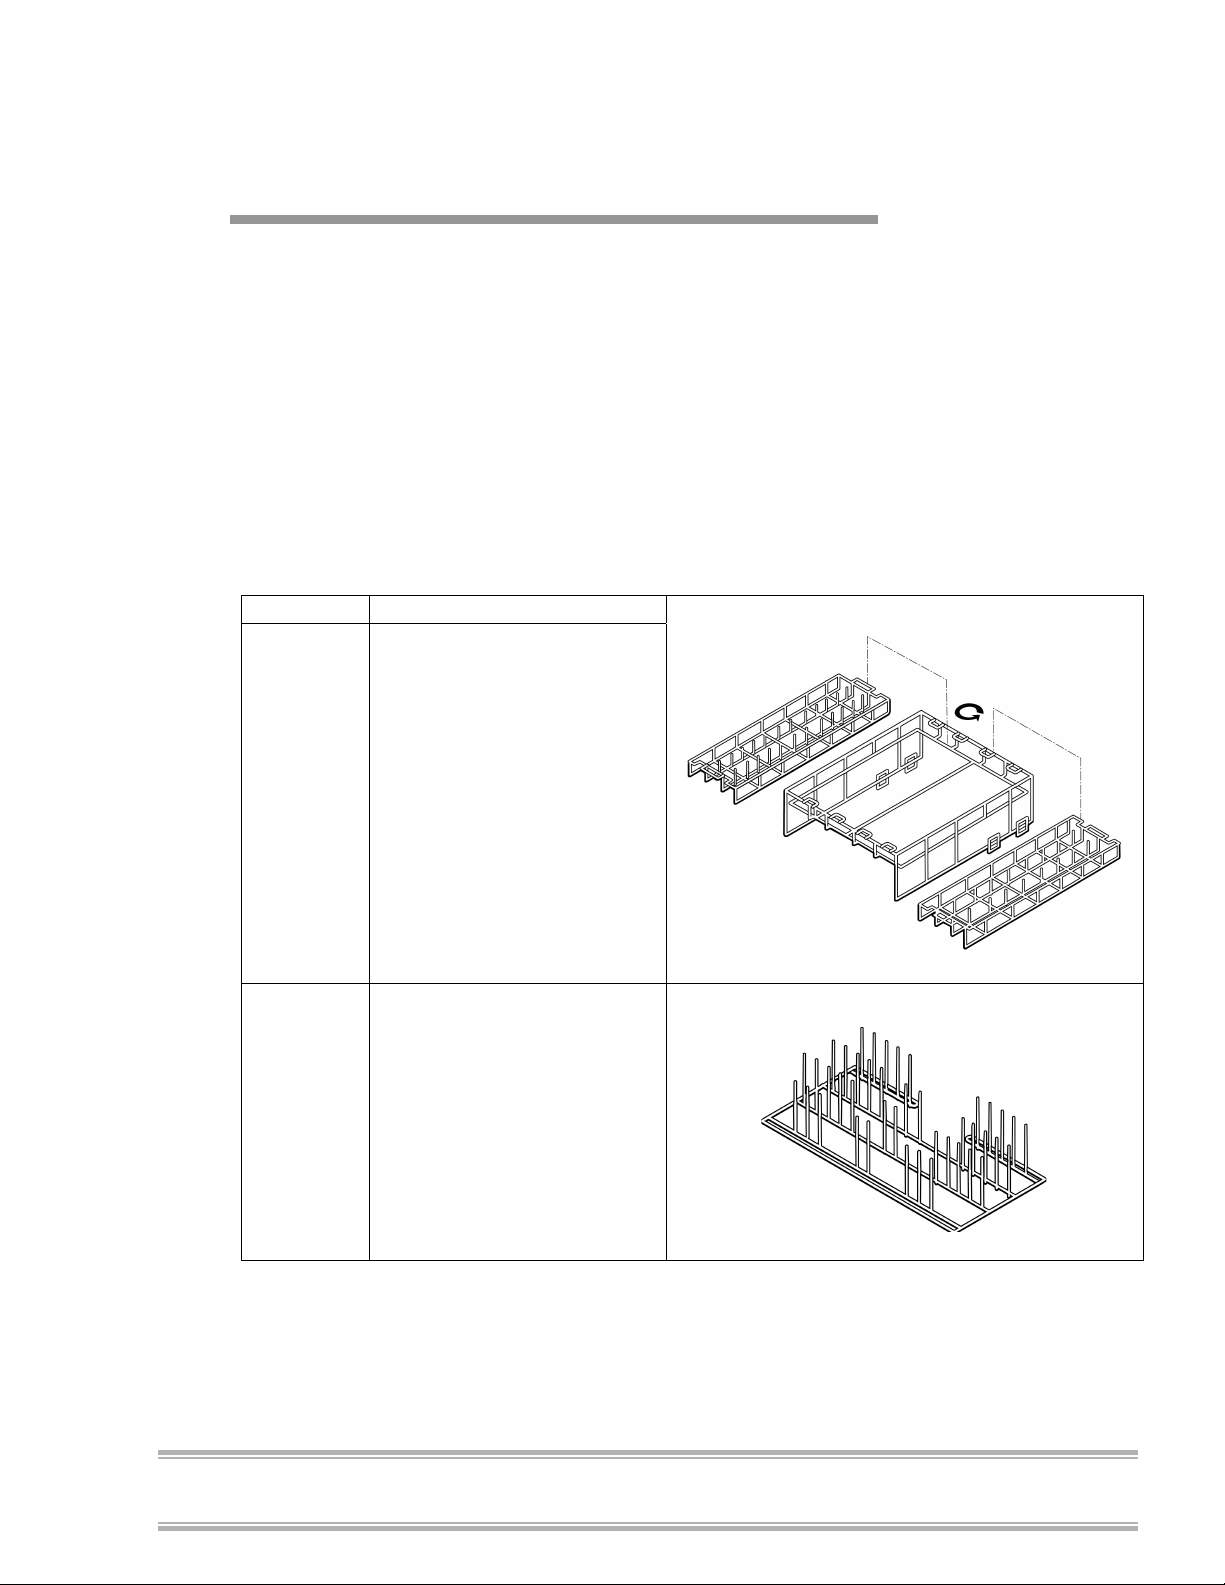
A
PPPPEENNDDIIXX
A
D
D
G
LLAASSSSWWAARREE
G
A
CCCCEESSSSOORRIIEES
A
W
W
S
AASSHHEER
R
FlaskScrubber Accessories
PART # DESCRIPTION
44944-01
44945-01
Upper Rack Assembly –
Stainless Steel. Contains
one upper rack with two
inserts, two hub adapters,
two upper rails, and two end
caps.
Upper Rack, Adjustable –
Stainless Steel. Contains
one upper rack with two
inserts.
44049-01
Product Service 1-800-522-7658
Multi-Pin Insert –
Stainless Steel. For use
with beakers, Erlenmeyer
flasks, and wide-mouth
glassware. For placement in
bottom rack. Included with
FlaskScrubber.
89

Appendix D: Glassware Washer Accessories
Chapter 2: Prerequisites
PART # DESCRIPTION
44022-01
44942-00
Utensil Basket –
Stainless Steel. For
miscellaneous labware
such as stoppers, spatulas,
small beakers, etc.
Furnished with drop-in
cover (part number
44038-01).
8-Place Pipet Washer –
Stainless Steel. Holds
1 ml to 10 ml pipets.
90
44943-01
44246-00
44248-00
14-Place Pipet Washer –
Stainless Steel. Holds
1 ml to 50 ml pipets.
Glassware Holder –
Small. Grips wide-mouth
glassware over spindles.
Glassware Holder –
Large. Grips wide-mouth
glassware over spindles.
Product Service 1-800-522-7658
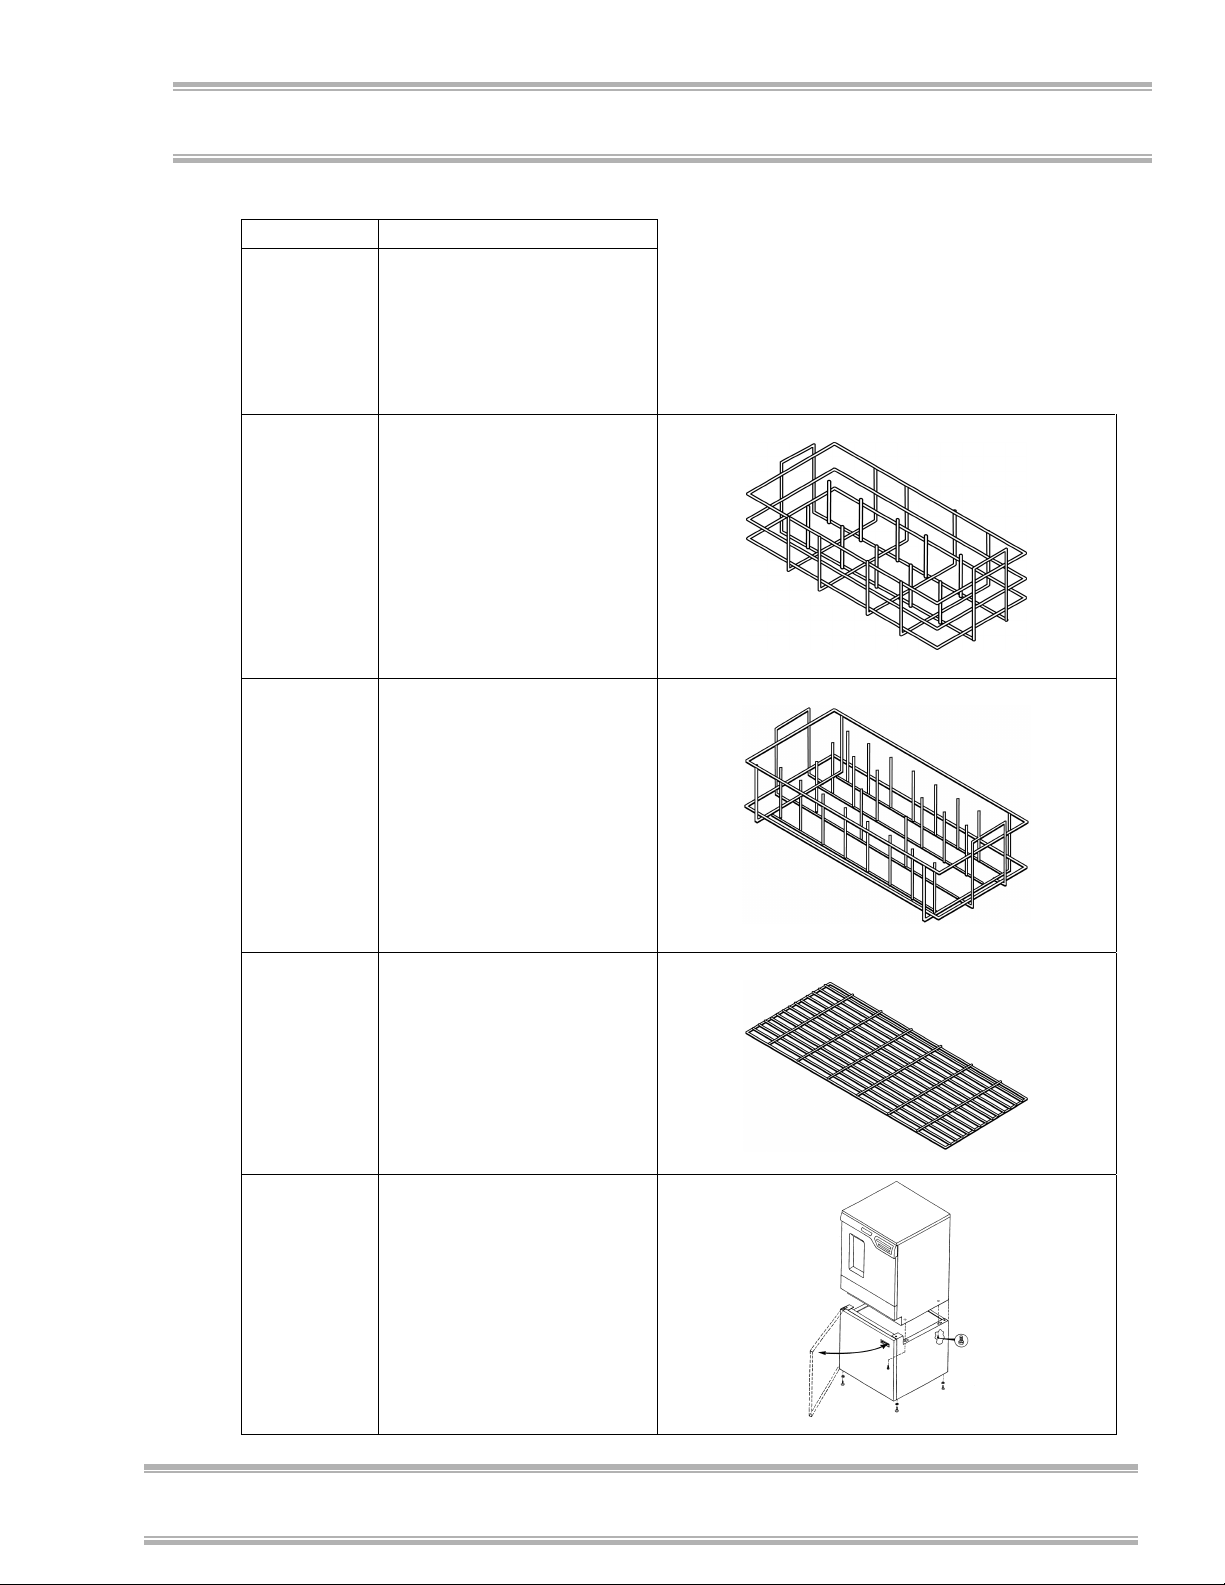
Appendix D: Glassware Washer Accessories
PART # DESCRIPTION
91002-00 Interconnect Kit. Allows
WaterPro RO Station to
be attached to the
glassware washer.
44015-01
44018-01
44019-01
10-Pin Insert – Stainless
Steel. For use with
beakers, Erlenmeyer
flasks, and other widemouth glassware. For use
in bottom rack.
32-Pin Insert – Stainless
Steel. For use with
beakers, Erlenmeyer
flasks, and other widemouth glassware. For use
in bottom rack.
Retainer Top – Stainless
Steel. To keep
lightweight flasks in place
under water pressure. For
use with 44015-01 or
44018-01.
45800-00 Stand. For use with
Freestanding and Mobile
models. Raises washer
approximately 17 inches.
Front opens to provide
storage underneath
washer.
Product Service 1-800-522-7658
91

Appendix D: Glassware Washer Accessories
Chapter 2: Prerequisites
SteamScrubber Accessories
PART # DESCRIPTION
44016-01
44020-01
44021-01
44014-01
Culture Tube/Test Tube
Insert – Stainless Steel.
Insert for 10 mm to 12
mm tubes.
Culture Tube/Test Tube
Insert – Stainless Steel.
Insert for 15 mm to 18
mm tubes.
Culture Tube/Test Tube
Insert – Stainless Steel.
Insert for 20 mm to 25
mm tubes.
Retainer Top for
Culture Tube Insert –
Stainless Steel. For use
with all culture tube
inserts to keep lightweight
tubes in place under water
pressure.
44015-01
92
10-Pin Insert – Stainless
Steel. Two included with
SteamScrubber. For use
with beakers, Erlenmeyer
flasks, and other widemouth glassware.
Product Service 1-800-522-7658

PART # DESCRIPTION
Appendix D: Glassware Washer Accessories
44018-01
44019-01
44042-01
32-Pin Insert – Stainless
Steel. For use with
beakers, Erlenmeyer
flasks, and other widemouth glassware.
Retainer Top – Stainless
Steel. To keep
lightweight flasks in place
under water pressure. For
use with 44018-01 or
44015-01.
Petri Dish Insert –
Stainless Steel. For
plates, petri dishes, and
watch glasses.
44048-01
Product Service 1-800-522-7658
BOD Rack/Beaker/
Erlenmeyer Flask Insert
– Stainless Steel. Rack
secures glassware used in
oxygen-demand
determination, beakers,
and Erlenmeyer flasks.
93
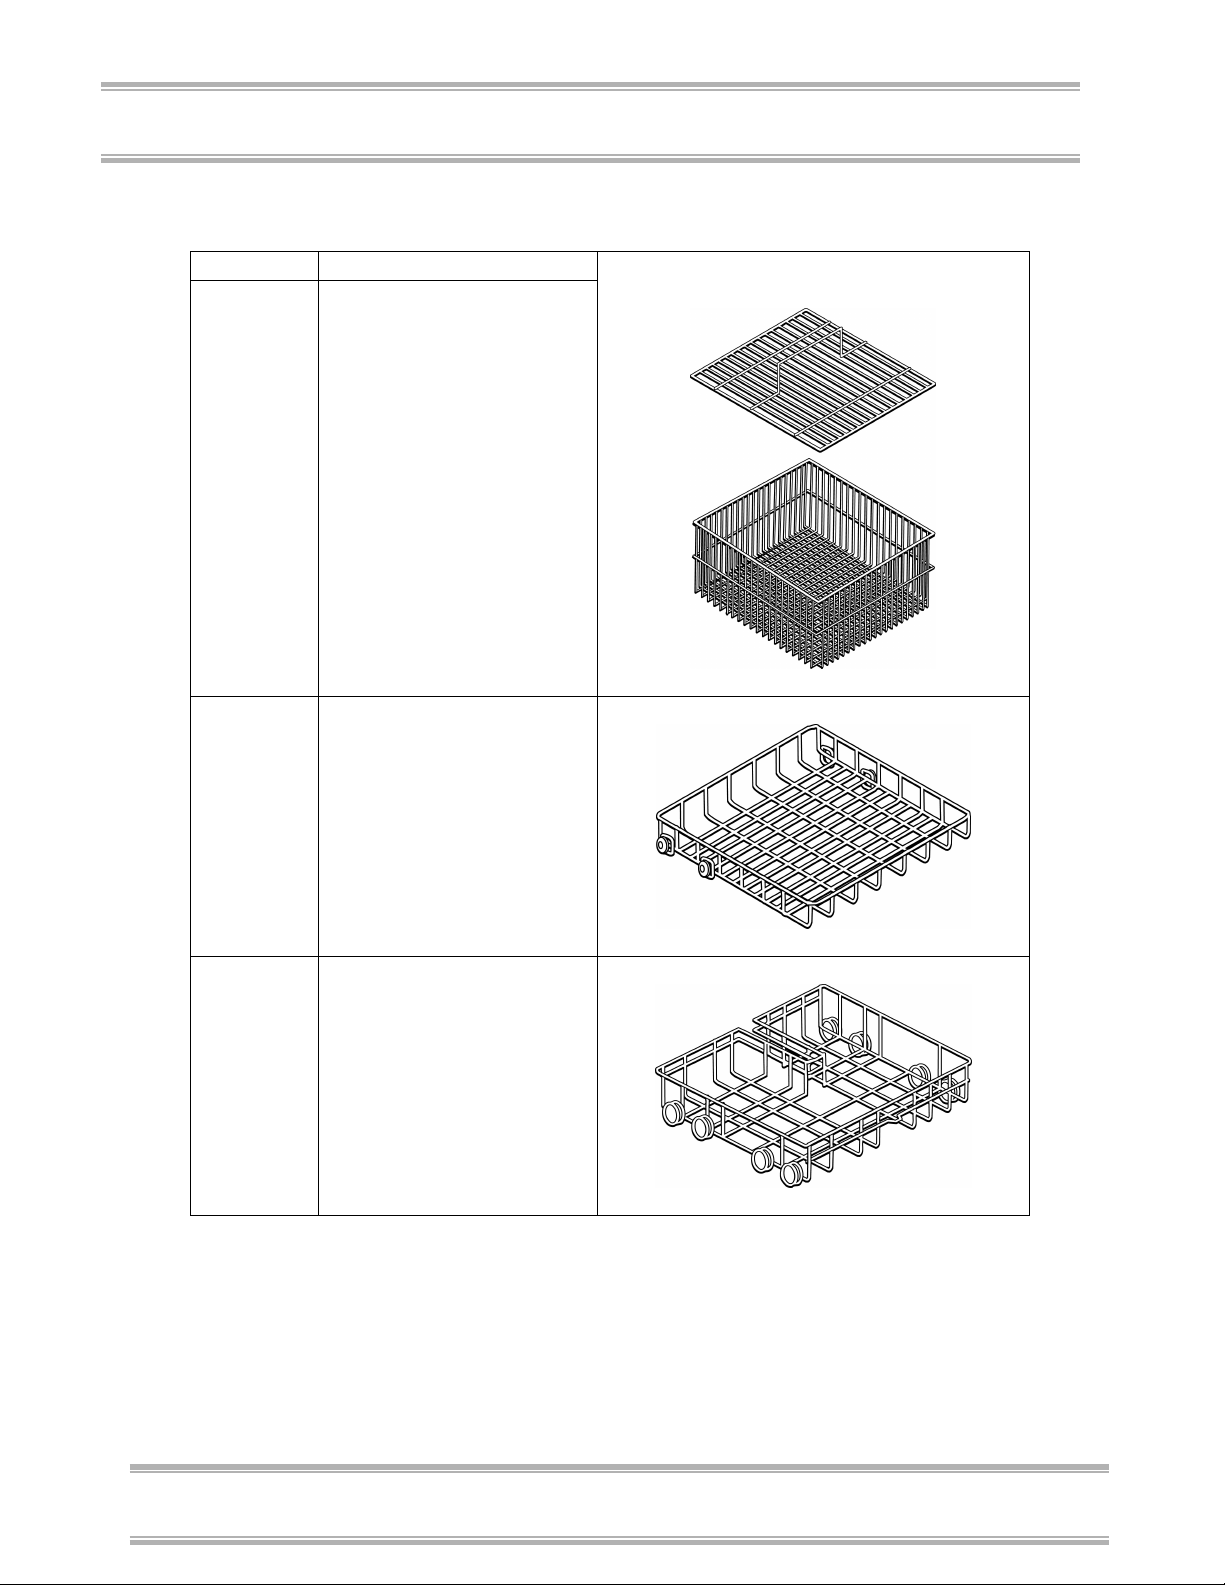
Appendix D: Glassware Washer Accessories
Chapter 2: Prerequisites
PART # DESCRIPTION
44022-01
44011-02
Utensil Basket –
Stainless Steel. For
miscellaneous labware
such as stoppers, spatulas,
small beakers, etc.
Furnished with drop-in
cover (part number
44038-01).
Top Rack – Stainless
Steel. Included with
washer.
44012-02
94
Bottom Rack – Stainless
Steel. Included with
washer.
Product Service 1-800-522-7658

Appendix D: Glassware Washer Accessories
PART # DESCRIPTION
91002-00 Interconnect Kit. Allows
WaterPro RO Station to
be attached to the washer.
45800-00 Stand. For use with
Freestanding and Mobile
models. Raises washer
approximately 17 inches.
Front opens to provide
storage underneath
washer.
EXPENDABLES
PART # DESCRIPTION
44220-00 10-lb. LabSolutions Powder Detergent
44221-00 27.5-lb. LabSolutions Powder Detergent
45220-00 1 gallon LabSolutions Liquid Detergent
45222-00 1 liter Neutralizing Acid Rinse
Product Service 1-800-522-7658
95

Appendix D: Glassware Washer Accessories
Chapter 2: Prerequisites
96
Product Service 1-800-522-7658

I
nnddeex
I
x
A
Accessories,
FlaskScrubber · 89
SteamScrubber · 92
Air gap · 53
Arranging racks · 37
Attaching,
hose-end coupling · 27
to countertop · 20
C
Casters · 15
Centering door · 20
Cleaning,
heat sump filter · 58
overflow dome · 54
stainless steel interior · 52
water fill valve · 53
Components of washer · 13, 72
Connecting,
drain hose · 27
power supply · 30
purified water · 23
water supply · 21
E
Electrical requirements · 7
Exterior panels, removing · 57
F
Faucet adapters,
installing · 26
FlaskScrubber,
accessories · 89
installing pipet inserts · 61
installing top rack · 63
loading glassware into · 43
racks · 41
Freestanding washer,
dimensions · 77
G
Glassware,
holder · 44
loading · 43
D
Detergent,
dispenser · 45
filling dispenser · 46
types and amounts · 46
Diagnostics test · 32
Dimensions,
Freestanding washer · 77
Mobile washer · 78, 79
Disconnecting,
hose end coupling · 35
purified water pump · 59
Door, centering · 20
Drain hose, connecting · 27
Drain requirements · 8
Product Service 1-800-522-7658
H
Heat sump filter · 58
Hose-end coupling, · 27
disconnecting · 35
Hot water,
connecting · 21
requirements · 6
97

Index
Chapter 2: Prerequisites
I
Installing,
casters · 15
faucet adapters · 26
leveling feet · 15
pipet inserts · 61
top rack · 63
washer · 15
Interrupting wash cycle · 50
L
Leveling feet · 15
Leveling washer · 18
Light bulb · 56
Loading glassware · 43
Lowering,
top rack, SteamScrubber · 38
wash arm, SteamScrubber · 38
M
Maintaining,
air gap · 53
overflow dome · 54
water fill valve · 53
Manual overview · 2
Mobile washer,
dimensions · 78, 79
Purified water,
connecting · 23
disconnecting pump · 59
requirements · 6
R
Racks,
arranging · 37
FlaskScrubber · 41
SteamScrubber · 38
Removing,
exterior panels · 57
shipping skid · 15
Replacing light bulb · 56
S
Selecting, operating cycle · 47
Setting up washer · 15
Shipping skid · 15
Space requirements · 9
Specifications, washer · 85
Stainless steel interior · 52
Starting, wash cycle · 48
SteamScrubber,
accessories · 92
lowering top rack · 38
lowering wash arm · 38
racks · 38
N
Neutralizing acid dispenser · 47
O
Operating cycle, selecting · 47
Overflow dome · 54
Overview of manual · 2
P
Pipet inserts · 61
Power supply,
connecting · 30
requirements · 7
Programming instructions · 48
98
T
Top rack,
installing · 63
lowering · 38
Troubleshooting · 67
Typographical conventions · 3
U
Undercounter model,
attaching to countertop · 20
space requirements of · 9
Unpacking, · 12
removing skid · 15
Product Service 1-800-522-7658

Index
W
Wash arm · 38
Wash cycle,
interrupting · 50
starting · 48
times · 83
water consumption · 83
Washer,
components · 72
specifications · 85
Water fill valve · 53
Water,
connecting · 21, 23
requirements · 6
requirements for purified · 6
Wiring diagram · 87, 88
Product Service 1-800-522-7658
99
Product Service 1-800-522-7658
100
 Loading...