

Page 1

Purifier®Filtered PCR Enclosures
User’s Manual
Labconco’s Mascot,
Labby the LABster
Models
3970202, 3970205, 3970222, 3970225,
3970302, 3970305, 3970322, 3970325,
3970402, 3970405, 3970422, 3970425
Page 2

Page 3

Labconco Filtered PCR Enclosure Manual
Warranty
Labconco provides a warranty on all parts and factory workmanship. The warranty includes areas of
defective material and workmanship, provided such defect results from normal and proper use of the
equipment.
The warranty for all Labconco products will expire one year from date of installation or two years from
date of shipment from Labconco, whichever is sooner, except the following:
• Purifier® Delta® Series Biological Safety Cabinets and PuriCare® Animal Laboratory Research
Enclosures carry a three-year warranty from date of installation or four years from date of
shipment from Labconco, whichever is sooner.
• Carts carry a lifetime warranty.
• SteamScrubber and FlaskScrubber Glassware Washers carry a two-year warranty from date of
installation or three years from date of shipment from Labconco, whichever is sooner.
• Glassware is not warranted from breakage when dropped or mishandled.
This limited warranty covers parts and labor, but not transportation and insurance charges. In the event of a
warranty claim, contact Labconco Corporation or the dealer who sold you the product. If the cause is
determined to be a manufacturing fault, the dealer or Labconco Corporation will repair or replace all
defective parts to restore the unit to operation. Under no circumstances shall Labconco Corporation be
liable for indirect, consequential, or special damages of any kind. This statement may be altered by a
specific published amendment. No individual has authorization to alter the provisions of this warranty
policy or its amendments. Lamps and filters are not covered by this warranty. Damage due to corrosion or
accidental breakage is also not covered.
Limitation of Liability
The disposal and/or emission of substances used in connection with this equipment may be governed by
various federal, state, or local regulations. All users of this equipment are required to become familiar with
any regulations that apply in the user’s area concerning the dumping of waste materials in or upon water,
land, or air and to comply with such regulations. Labconco Corporation is held harmless with respect to
user’s compliance with such regulations.
.
Part #3938200, Rev. -
ECO B731
Page 4

T
AABBLLEE
T
CHAPTER 1: INTRODUCTION 1
ISO Class 5 Definition 2
Polymerase Chain Reaction Definition 2
About This Manual 3
Typographical Conventions 4
CHAPTER 2: PREREQUISITES 5
Support, Vibration & Movement Requirements 6
Location and Air Current Requirements 6
Airflow Specifications 6
Electrical Requirements 7
Space Requirements 7
CHAPTER 3: GETTING STARTED 8
Unpacking Your Enclosure 9
Installing the Filtered PCR Enclosure on a Supporting
Structure and Work Surface 9
Verifying HEPA Filter Integrity 12
Connecting the Electrical Supply Source to the Filtered PCR
Enclosures 12
Setting the Downflow Velocity with Speed Control 13
Validating the Filtered PCR Enclosure 13
Sealing the Filtered PCR Enclosure to the Work Surface 14
CHAPTER 4: PERFORMANCE FEATURES AND
Components 16
Safety Precautions 20
CHAPTER 5: APPROPRIATE APPLICATIONS FOR YOUR
Routine Daily Work Procedures 23
Suitable Applications 24
HEPA Filter Applications, Suitability & Guidelines 25
CHAPTER 6 MAINTAINING YOUR FILTERED PCR
Routine Maintenance Schedule 27
When to Replace HEPA Filters 27
How to Install a New HEPA Filter 28
O
O
SAFETY PRECAUTIONS 15
FILTERED PCRT ENCLOSURE 23
ENCLOSURE 26
FF
C
C
OONNTTEENNTTSS
Page 5

HEPA Filter Leak Test 30
Setting the Downflow Velocity with the Speed Control Adjustment 32
Calibrate and Operate the Airflow Monitor 32
Initial Certification 36
Re-Certification 36
Fluorescent Light Replacement 36
UV Light Replacement 37
Motorized Impeller Replacement 37
Speed Control Replacement 39
CHAPTER 7 ACCESSORIZING & MODIFYING YOUR
FILTERED PCR ENCLOSURE 40
CHAPTER 8 TROUBLESHOOTING & SERVICER
OPERATING LOG 43
APPENDIX A: FILTERED PCR ENCLOSURE COMPONENTS
AND REPLACEMENT PARTS 47
APPENDIX B: DIMENSIONS 52
APPENDIX C: FILTERED PCR ENCLOSURE
SPECIFICATIONS 54
APPENDIX D: REFERENCES 59
DECLARATION OF CONFORMITY 60
Page 6

C
HHAAPPTTEERR
C
I
NNTTRROODDUUCCTTIIOONN
I
Congratulations on your purchase of a Labconco Purifier® Filtered
PCR Enclosure. Your enclosure provides a particulate free
environment for Polymerase Chain Reaction experiments. It is the
result of Labconco’s more than 30 years experience in
manufacturing filtered enclosures.
These enclosures will effectively provide product protection from
airborne particulate matter. During operation, room air is drawn
through the prefilter on top, forced through the blower and then
through the HEPA filter and diffuser. The clean air in the work
area in the enclosure meets or exceeds ISO Standard Class 5
conditions defined per ISO 14644-1 and Class 100 conditions as
defined by Federal Standard 209E. The enclosure is set to deliver
nominal downward airflow of 45-65 feet per minute. Each
enclosure uses a single HEPA filter, which is rated at least 99.99%
efficient for 0.3-micron particles. The Purifier Filtered PCR
enclosures offer many unique features to enhance performance. A
variable solid-state digital timer provides a UV light to destroy
contaminating DNA and RNA in the work area. The UV light
automatically turns off to prepare for the next experiment. To take
full advantage of all features, please acquaint yourself with this
manual and keep it handy for future reference. If you are
unfamiliar with how Filtered PCR Enclosures operate, please
review Chapter 4: Performance Features and Safety Precautions
before you begin working. Even if you are an experienced user,
please review Chapter 5: Using Your Filtered PCR Enclosure,
which describes the enclosure features.
1
1
1
Page 7
Chapter 1: Introduction
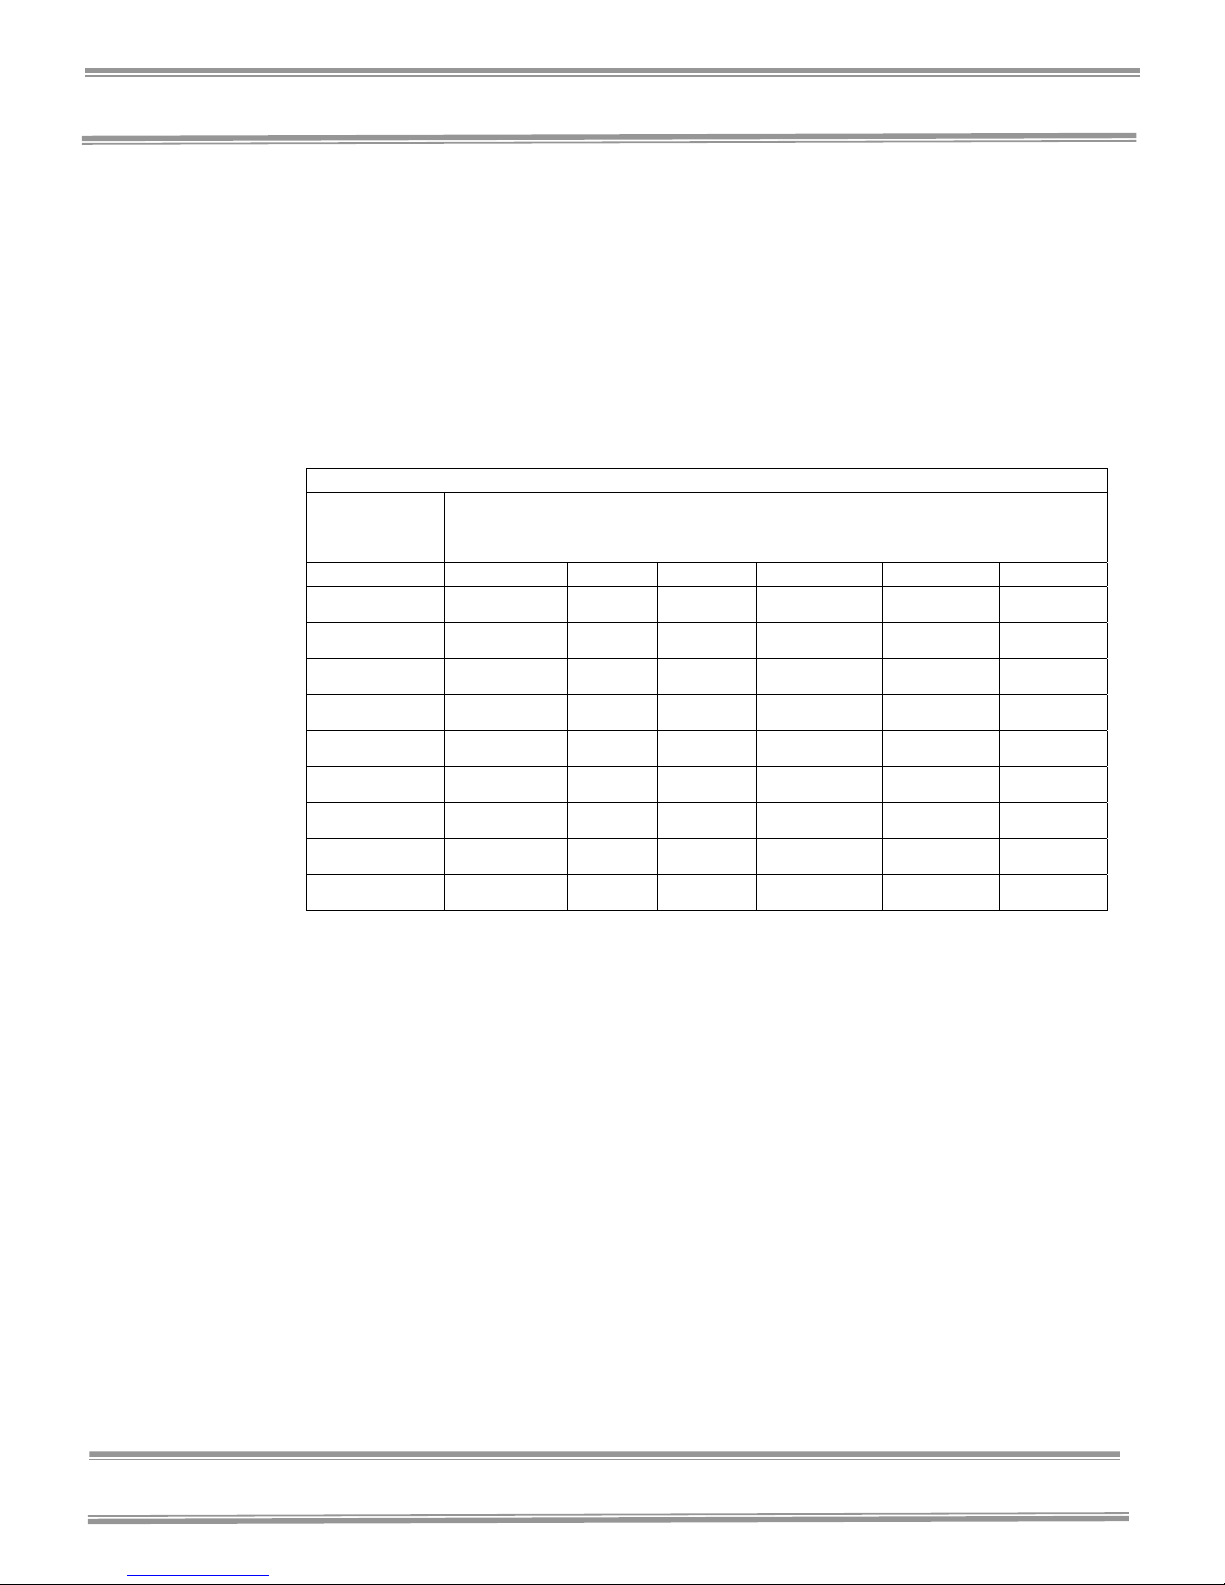
Table 1-1 Selected airborne particulate cleanliness classes for cleanrooms and clean zones.
classification
number (N)
ISO Class 1 10 2
ISO Class 2 100 24 10 4
ISO Class 5 Definition
Airborne particulate cleanliness inside any PCR Enclosure is
designated by ISO Class 5, which is equivalent to 3520 particles
0.5 µm or larger per cubic meter of air per ISO Standard 14644-1.
ISO Class 5 cleanliness is illustrated in the table to follow and is
equivalent to Class 100 air conditions as defined by Federal
Standard 209E. Class 100 is equal to 100 particles 0.5 µm or
larger per cubic foot of air.
ISO
Maximum concentration limits (particles/m3 of air) for particles equal to and
larger than the considered sizes shown below (concentration limits are
calculated in accordance with 3.2 of Standard 14644-1)
0.1 µm 0.2 µm 0.3 µm 0.5 µm 1 µm 5 µm
ISO Class 3 1 000 237 102 35 8
ISO Class 4 10 000 2 370 1 020 352 83
ISO Class 5 100 000 23 700 10 200 3 520 832 29
ISO Class 6 1 000 000 237 000 102 000 35 200 8 320 293
ISO Class 7 352 000 83 200 2 930
ISO Class 8 3 520 000 832 000 29 300
ISO Class 9 35 200 000 8 320 000 293 000
Table 1-1 ISO Classification Number (N)
Polymerase Chain Reaction
Definition (PCR)
Polymerase Chain Reaction (PCR), is a laboratory process in
which a particular DNA segment from a mixture of DNA chains is
rapidly replicated, producing a large, readily analyzed sample of a
piece of DNA. In PCR, DNA is immersed in a solution containing
the enzyme DNA polymerase, unattached nucleotide bases (the
subunits that DNA is composed of), and “primers”, short
sequences of nucleotides designed to bind with an end of the
desired DNA segment. Two primers are used: one primer binds at
one end of the desired segment on one of the two paired DNA
strands and the other primer binds at the other end but on the other
strand. The solution is heated to break the bonds between the
strands of the DNA. When the solution cools, the primers bind to
the separated strands, and DNA polymerase quickly builds a new
2
Page 8

Chapter 1: Introduction
strand by joining the free nucleotide bases to the primers. When
this process is repeated, a strand that was formed with one primer
binds to the other primer, resulting in a new strand that is restricted
solely to the desired segment. Thus, the region of DNA between
the primers is selectively replicated. Further repetitions of the
process can produce billions of copies of a small piece of DNA in
several hours. PCR was developed in 1985 by Kary B. Mullis,
who was awarded the 1993 Nobel Prize in chemistry for his work.
It is used in a broad range of applications from DNA fingerprinting
to medical tests to identify diseases from the infectious agent’s
DNA. See also nucleic acid. The Concise Columbia Encyclopedia
is licensed from Columbia University Press. Copyright © 1995 by
Columbia University Press. All rights reserved.
About This Manual
This manual is designed to help you learn how to install, use, and
maintain your Filtered (PCR) Enclosure.
Chapter 1: Introduction provides a brief overview of the Filtered
PCR Enclosure, explains the organization of the manual, and
defines the typographical conventions used in the manual.
Chapter 2: Prerequisites explains what you need to do to prepare
your site before you install the Filtered PCR Enclosure. Electrical
and service requirements are discussed.
Chapter 3: Getting Started contains the information you need to
properly unpack, inspect, install, and certify the Filtered PCR
Enclosure.
Chapter 4: Performance Features and Safety Precautions explains
how the Purifier Filtered PCR Enclosure operates and the
appropriate precautions you should take when using it.
Chapter 5: Using Your Filtered Enclosure discusses the basic
operation of how to prepare, use and shut down your Filtered PCR
Enclosure.
Chapter 6: Maintaining Your Filtered PCR Enclosure explains
how to perform routine maintenance on the PCR Enclosure.
Chapter 7: Accessorizing Your Filtered PCR Enclosure explains
acceptable modifications to the PCR Enclosure or how to add
accessories.
3
Page 9
Chapter 1: Introduction
!
☞
2'
3' 4'
Chapter 8: Troubleshooting contains a table of problems you may
encounter while using the Filtered PCR Enclosure including
probable causes and suggested corrective actions.
Appendix A: Components and Replacement Parts contains labeled
diagrams of all of the components of the Filtered PCR Enclosure.
Appendix B: Dimensions contains comprehensive diagrams
showing all of the dimensions for the Filtered PCR Enclosure.
Appendix C: Filtered PCR Enclosure Specifications contains the
electrical requirements for Filtered PCR Enclosures. Wiring
diagrams are also included.
Appendix D: References lists the various resources available
addressing clean work stations and PCR Enclosures.
Typographical Conventions
Recognizing the following typographical conventions will help
you understand and use this manual:
• Book, chapter, and section titles are shown in italic type (e.g.,
Chapter 3: Getting Started).
• Steps required to perform a task are presented in a numbered
format.
• Comments located in the margins provide suggestions,
reminders, and references.
• Critical information is presented in boldface type in paragraphs
that are preceded by the exclamation icon. Failure to comply
with the information following an exclamation icon may result
in injury to the user or permanent damage to the enclosure.
• Critical information is presented in boldface type in paragraphs
that are preceded by the wrench icon. Only a trained certifier
or contractor should only perform these operations. Failure to
comply with the information following a wrench icon may
result in injury to the user or permanent damage to your PCR
Enclosure.
• Important information is presented in capitalized type in
paragraphs that are preceded by the pointer icon. It is
imperative that the information contained in these paragraphs
be thoroughly read and understood by the user.
• A number icon precedes information that is specific to a
particular model of enclosure. The 2' icon indicates the text is
specific to the 2-foot wide model. The 3' icon indicates the text
is specific to the 3-foot model, etc.
4
Page 10

C
HHAAPPTTEERR
C
P
RREERREEQQUUIISSIITTEESS
P
Before you install the Filtered PCR Enclosure, you need to prepare
your site for installation. You must be certain that the area is level
and of solid construction. In addition, a dedicated source of
electrical power should be located near the installation site to
power the Filtered PCR Enclosure, and other apparatus.
Additionally, the enclosure should be strategically placed in the lab
to provide efficient workflow.
Carefully read this chapter to learn the requirements for your
installation site:
• The support, vibration and movement requirements.
• The location and air current requirements.
• The exhaust and blower requirements.
• The electrical power requirements.
• The space requirements.
Refer to Appendix B: Dimensions for complete enclosure
dimensions.
Refer to Appendix C: Filtered PCR Enclosure Specifications for
complete filtered enclosure electrical and environmental
conditions, specifications and requirements.
2
2
5
Page 11

Chapter 2: Prerequisites
Support, Vibration and Movement
Requirements
At a minimum, the supporting structure usually consists of a base
cabinet or base stand and chemically-resistant work surface.
Location and Air Current
Requirements
The Purifier Filtered PCR Enclosures have been designed to
provide particulate free air meeting ISO Class 5 conditions by
negating typical cross drafts and turbulence within the opening.
However, as a precautionary safety measure and a higher level of
quality management, it is recommended that the Filtered PCR
Enclosure be placed in an area away from:
• High traffic areas where walking might cause an air
• Overhead or wall HVAC diffusers, fans, radiators or other lab
• Doorways or windows that may be opened.
disturbance or be a nuisance.
equipment producing air currents.
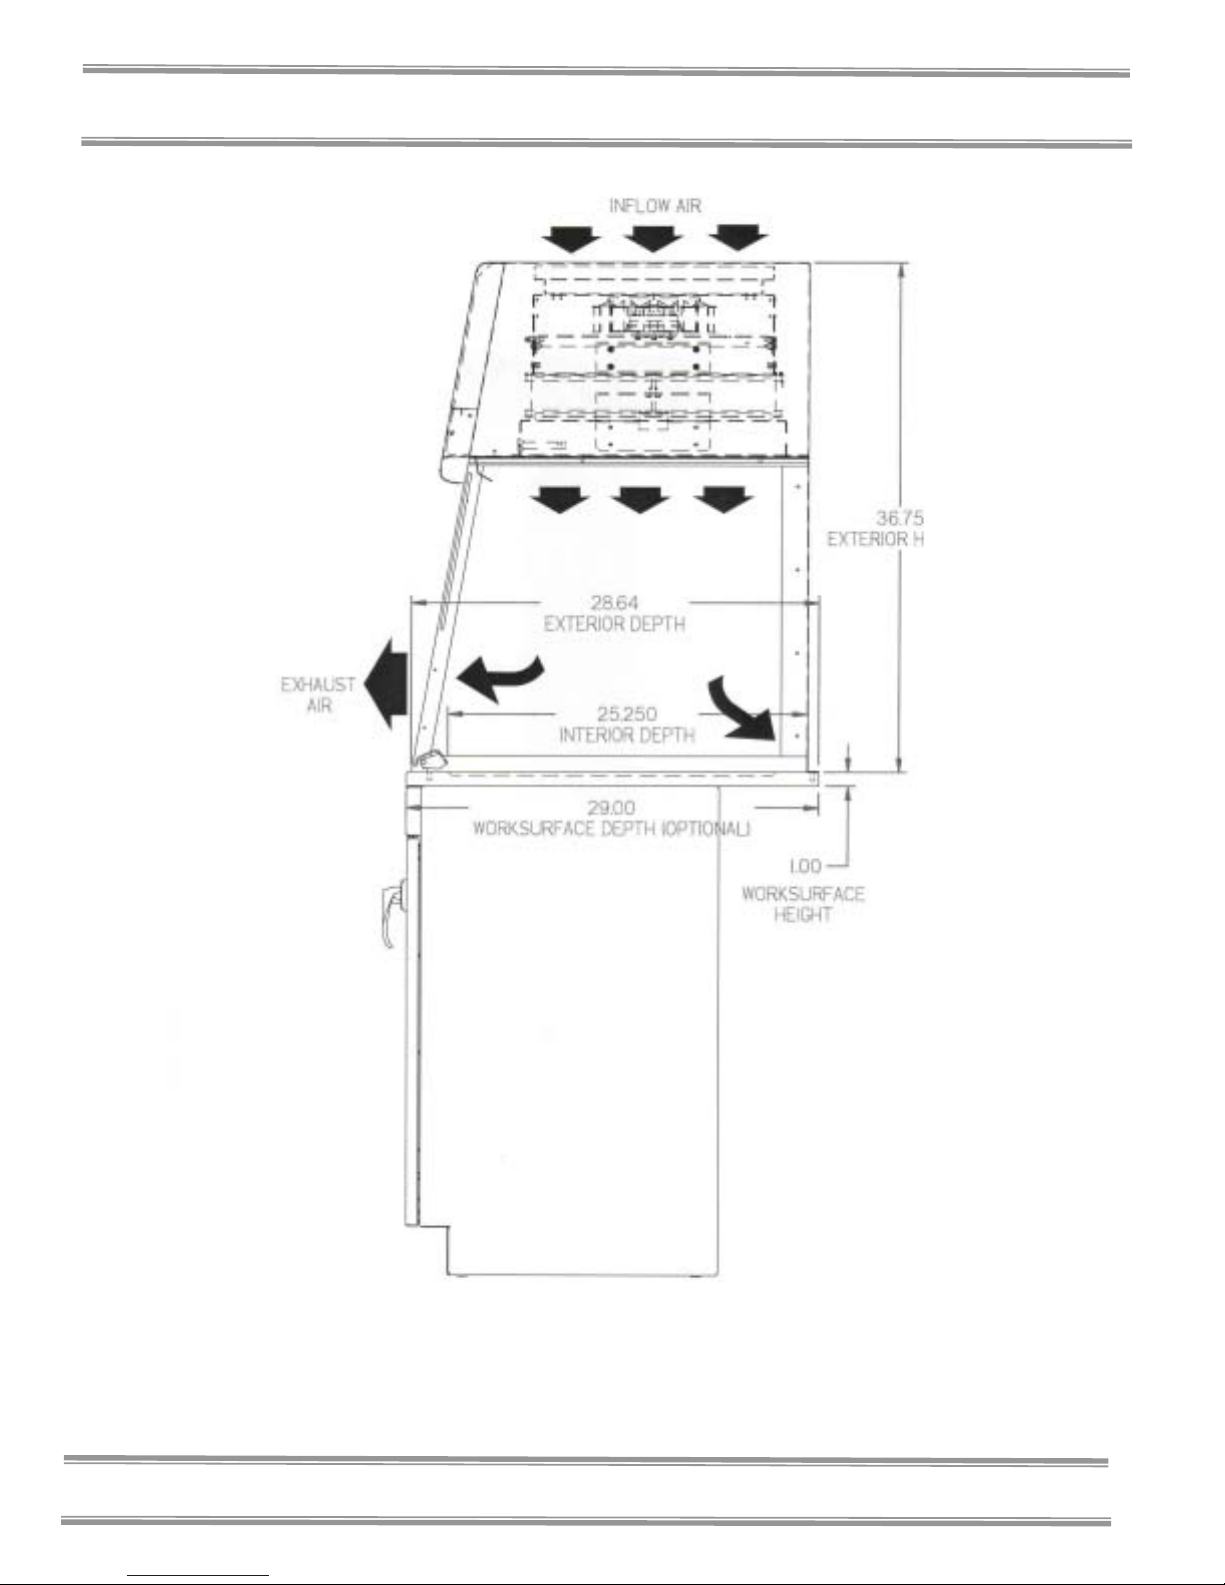
Airflow Specifications
The Purifier Filtered PCR Enclosures use an integral motorized
impeller to draw room air from the top and through the enclosure.
This room air is then pushed down through the HEPA filter. The
enclosure is factory set to deliver 45-65 fpm downflow velocity
measured 6" below the upper diffuser. The Class 5 HEPA-filtered
air flows across the work area and exits out the front and back of
the enclosure. The Filtered PCR Enclosure provides a continuous
downflow of particulate free HEPA filtered air.
Data for the outflow exhaust volume, downflow velocities and outflow face velocities are listed for each Filtered PCR model below.
6
Page 12

s
Downflow
Enclosure
Width Model Description
2'
3'
4'
2' Filtered PCR Enclosure
3' Filtered PCR Enclosure
4' Filtered PCR Enclosure
Velocity
(fpm)
Electrical Requirements
30
40
50
60
30
40
50
60
30
40
50
60
OutFlow
Exhaust
Volume
(CFM)
120
165
210
250
180
250
310
370
240
330
420
500
Chapter 2: Prerequisite
Average
Outflow
Noise
Pressure
db(A)
53-57
58-60
60-61
62-63
58-60
60-62
61-63
63-54
60-62
62-64
66-69
68-70
Face
Velocity
(fpm)
85
115
145
170
85
115
145
170
85
115
145
170
Standard duplex electrical receptacles should be nearby for
connecting the Filtered PCR Enclosure, or other equipment. The
enclosure includes iris pass-throughs to allow electrical cords
through the back of the enclosure without leaving a large hole.
Space Requirements
The dimensions for all the different models are shown in Appendix
B: Dimensions.
7
Page 13

C
HHAAPPTTEERR
C
G
EETTTTIINNGG
G
Now that the site for your Filtered PCR Enclosure is properly
prepared, you are ready to unpack, inspect, install, and validate
your enclosure. Read this chapter to learn how to:
• Unpack and move the enclosure.
• Set up the enclosure with the proper supporting structure
and work surface.
• Verify HEPA filters integrity.
• Connect the electrical supply.
• Set the downflow velocity with the speed control
adjustment.
• Validate enclosure airflow.
• Seal the enclosure to the work surface.
Depending upon which model you are installing, you may need
common mechanical and electrical installation tools in addition to
wrenches, ratchets, sockets, a nut driver set, a flat-blade
screwdriver, a Phillips screwdriver, and a carpenter level to
complete the instructions in the chapter.
Each enclosure model weighs between 125 to 195
lbs. each (55 to 85 kg). The shipping container
!
allows for lifting with a mechanical lift truck or
floor jack. If you must lift the enclosure
manually, follow safe-lifting guidelines. Do not
lift by the lower air foil.
S
3
3
TTAARRTTEEDD
S
8
Page 14

d
I
f
Unpacking the Enclosure
Chapter 3: Getting Starte
Carefully remove the shrink-wrap or carton on the enclosure and
inspect it for damage that may have occurred in transit. If
damaged, notify the delivery carrier immediately and retain the
entire shipment intact for inspection by the carrier.
DO NOT RETURN GOODS WITHOUT THE
☞
☞
Do not discard the packing material until you have checked all of
the components and tested the enclosure.
We recommend that you do not remove the enclosure from its
shipping container until it is ready to be placed into its final
location. Move the unit by placing a flat, low dolly under the
shipping skid, or by using a floor jack.
!
PRIOR AUTHORIZATION OF LABCONCO.
UNAUTHORIZED RETURNS WILL NOT BE
ACCEPTED.
IF ENCLOSURE WAS DAMAGED IN TRANSIT,
YOU MUST FILE A CLAIM DIRECTLY WITH
THE FREIGHT CARRIER. LABCONCO
CORPORATION AND ITS DEALERS ARE NOT
RESPONSIBLE FOR SHIPPING DAMAGES.
Do not move the enclosure by tilting it onto a
hand truck.
The United States
nterstate Commerce
Commission rules
require that claims be
iled with the delivery
carrier within fifteen (15)
days of delivery.
Installing the Filtered PCR
Enclosure on a Supporting
Structure and Work Surface
Use caution when lifting or moving the enclosure.
When installing the enclosure onto a chemical-resistant work
surface or benchtop, ensure that the structure can safely support the
combined weight of the enclosure and any related equipment. The
work surface should be at least as wide and deep as the enclosure
9
Page 15

Chapter 3: Getting Started
to properly support it. The front of the enclosure should be aligned
within 0.30" (8mm) of the front of the work surface. Mounting
holes are provided in the Labconco accessory work surfaces to
secure the enclosure.
Work Surface Specifications
The work surface should be smooth, rigid and durable, such as a
chemical-resistant epoxy resin. The surface should be non-porous
and resistant to the materials used in conjunction with the Purifier
Filtered PCR Enclosure. The work surface should also contain a
dished recessed area for containing primary spills.
Filtered PCR Enclosure Work Surface Installation
1. Level the base cabinet or stand and the work surface. See
Figure 3-1.
2. Position the work surface in its intended location and with
the front of the work surface towards you. (Rear mounting
holes are located close to the rear edge.)
3. Secure the work surface to the base cabinet or stand with a
structural adhesive or silicone sealant.
4. Insert the supplied mounting screws in the four holes.
Allow a minimum of 1/8" clearance under the head of the
screw for positioning the enclosure.
5. Place the enclosure on the work surface and slide the rear
flange and front air foil flanges under the mounting screw
heads.
6. Tighten the four screws to complete the installation.
10
Page 16
8
d
Chapter 3: Getting Starte
Figure 3-1
Filtered PCR Enclosure Installation
Product Service 1-800-522-765
11
Page 17
Chapter 3: Getting Started
Verifying HEPA Filter Integrity
HEPA
HEPA
The HEPA filter is shipped installed with the gasket on the
downstream side. The HEPA filter is leak checked at Labconco.
A second leak check is recommended before using the enclosure
and at least annually thereafter. Consult your Safety Officer and
Chapter 6 for the HEPA Filter Leak Test. See Figure 4-2 for
HEPA filter location, HEPA filter gasket, and filter clamp bolts.
All seams downstream of the HEPA filter are jacketed by positive
pressure. This intrinsically safe design ensures Class 5 conditions
and a particulate free environment for PCR experiments.
HEPA Filter Appropriate Use
Filter Size
2'
3'
4'
Part No.
3707900
3707901
3707902
HEPA filters are high-efficiency particulate
air filters having a particulate removable
efficiency of 99.99% for particles with a
diameter of 0.3 micron.
Connecting the Electrical Supply
Source to the Filtered PCR
Enclosure
115V Models
Simply connect the 115V power cord supplied to the IEC electrical
supply plug on the back of the enclosure. If using at 50 Hz
operations, blower performance maximum airflow will be reduced
by 17%.
230V Models
The 230V is shipped without a plug. Install the appropriate plug
for your electrical specifications per local codes.
12
Page 18

d
Chapter 3: Getting Starte
Setting the Downflow Velocity
with the Speed Control
Adjustment of the speed control gives the correct downflow
velocity and is located behind the front panel. The downflow
velocity should be from 30-65 fpm for Class 100 (ISO Class 5)
conditions. ISO Class 5 clean air conditions are maximized at a
setting within this range. The Filtered PCR Enclosure is factory
set at 55 ± 10 fpm downflow velocity. (Consult your Safety
Officer for airflow recommendations for your application).
Working at the lowest downflow velocity appropriate for the
application will give the quietest operation. Downflow velocity
measurements are made using an anemometer. An electric
anemometer can be obtained from your laboratory supply dealer.
Downflow velocity measurements should be taken 6" below the
interior upper diffuser. Using a small Phillips screwdriver, adjust
the speed control to give the required downflow velocity. See
Figures 6-1 and 6-2 in Chapter 6 to locate the speed control. The
downflow velocity is increased by turning the speed control
counterclockwise and clockwise to decrease downflow velocity.
Validating the Filtered PCR
Enclosure
To determine the actual downflow velocity, airflow velocity
readings are taken. This should be done 6" down from the upper
diffuser located inside the top of the enclosure. The “average
downflow velocity” is achieved by taking readings in three rows
across the enclosure with the readings 6" from the ends and evenly
spaced every 6". Refer to the exhaust specifications table in
Chapter 2 for proper airflow volumes and downflow velocities for
your particular model. Validation should be completed by a
certified technician.
The Purifier Filtered PCR Enclosures have been tested at
Labconco before shipment and provide ISO Class 5 clean air
conditions inside the enclosure. Labconco also performed
extensive performance testing to validate the Filtered PCR’s for
product protection under ISO Class 5 conditions. For copies of
these validation reports, contact Labconco Customer Service.
13
Page 19

Chapter 3: Getting Started
Sealing the Filtered PCR
Enclosure to the Work Surface
When the Filtered PCR Enclosure has been set in place and wired,
it may be sealed at the work surface to prevent materials from
collecting under the walls. A bead of silicone sealant is
recommended to seal the Filtered PCR Enclosure to the work
surface.
14
Page 20

C
HHAAPPTTEERR
C
P
EERRFFOORRMMAANNCCE
P
F
EEAATTUURREESS
F
P
RREECCAAUUTTIIOONNSS
P
The Purifier Filtered PCR Enclosure is designed to provide
particulate free protection from airborne matter. During
operation, room air is drawn from the top and filtered by the
HEPA filter providing Class 5 conditions inside the enclosure.
The Purifier Filtered PCR Enclosure delivers Class 5 air
conditions when operating at downflow velocities of 30 to 65
feet per minute. The HEPA filter is jacketed by negative
pressure preventing contaminated air inside the enclosure and
ensuring Class 5 air conditions inside the enclosure. After each
Polymerase Chain Reaction (PCR) experiment, the variable
timed UV light can be run to decontaminate the work area from
DNA and RNA.
4
4
A
A
E
NNDD
S
AAFFEETTYY
S
The Purifier Filtered PCR Enclosure HEPA filter is located
behind the front panel. Users are encouraged to routinely
check airflow to satisfy Class 5 air conditions inside the
enclosure or purchase a model with an airflow monitor. For
additional surface decontamination inside the enclosure, users
are encouraged to use the variable digital timed UV light and
UV sash closure.
15
Page 21

Chapter 4: Performance Features and Safety Precautions
6
10
9
Located
Behind
4
2
15
1
Figure 4-1
12
5
3
6
Located
Behind
Control Panel
16
Page 22

s
13
6
Airflow
Switch with
Adjustment
Screw
15
UV Light
(Not
Shown)
4
16, (Not
Shown)
1
Chapter 4: Performance Features and Safety Precaution
19
7
11
18
17
Figure 4-2
Filtered PCR Enclosure Airflow Diagram
17
Page 23

Chapter 4: Performance Features and Safety Precautions
16
Figure 4-3
UV Sash Closure
18
Page 24

s
Chapter 4: Performance Features and Safety Precaution
1. Aerodynamic Lower Air Foil allows air to sweep the
work surface and promote ISO Class 5 air conditions inside
the enclosure. See Figure 4-1.
2. Ergonomic Slope of 10 degrees provides maximum
visibility and comfort, reduces glare, thereby minimizing
operator fatigue. See Figure 4-1.
3. Internal Depth of 25" provides necessary depth to work
inside the enclosure. See Figure 4-1.
4. Safety Glass Sash with Spring-Loaded Latch has a
wiping seal and features a spring-loaded latch to secure
sash open for loading and cleaning. The sash must be
down for normal operation. See Figure 4-1.
5. Utility Ports with Iris allows electrical cords and data
cords to pass through the back of enclosure without leaving
a large hole. The enclosure ships with solid plugs. Iris
plugs are included with the User’s Manual. See Figure 4-1
and 4-2.
6. Optional Guardian™ Airflow Monitor continuously
monitors airflow. An audio/visual alarm alerts the user to
low airflow conditions. The Guardian™ Airflow Monitor
is an available option on all Purifier Filtered PCR
Enclosure models. See Figure 4-1 and 4-2.
7. Inherently Safe Impeller has a negative pressure plenum
that surrounds the positive pressure impeller so that if a
leak should occur, the unfiltered air is captured and
refiltered. See Figure 4-2.
8. Speed Control regulates the speed of the motorized
impeller and is used by the certifier to validate and adjust
the downflow velocity. Located behind the front panel.
See Figures 4-1 and 4-2.
9. Fluorescent Lamp is located above the work area, out of
contact with the clean air. A safety glass window beneath
the lamp distributes the light evenly across the work
surface. See Figure 4-1.
10. Filter Pressure Gauge indicates the pressure across the
HEPA filter to help predict HEPA filter loading. See
Figure 4-1.
19
Page 25

Chapter 4: Performance Features and Safety Precautions
11. Filter Clamping Bolt evenly seals the HEPA filter to the
frame of the enclosure. See Figure 4-1 and 4-2.
12. Control Panel. The control panel, which is located above
the sash, contains the filter pressure gauge, control switches
and the electronics. See Figure 4-1.
13. HEPA (High Efficiency Particulate Air) Filter is rated to
remove 99.99% of all particles 0.3 micron in size. See
Figure 4-2.
14. Lamp Ballast (Not Shown) for the fluorescent lamp is
located behind the control panel.
15. Variable Digital Timed UV (Ultraviolet) Lamp (Not
Shown), allows the operator to surface disinfect the work
area of the enclosure when it is not in use. The UV light
rays will not penetrate the plane of the sash and lower
airfoil. The UV light timer is variable with eight settings in
minutes of 5, 10, 15, 30, 60, 120, 240, and infinity. This
provides extreme flexibility for PCR protocol. It is easily
changed by, selecting the time necessary located on the
control panel. To operate, simply select the UV light
option on the light switch.
20
16. UV Sash Closure provides added safety to prevent access
inside the enclosure. See Figure 4-3.
17. Accessory Work Surface is dished and contoured to fit the
dimensions of the enclosures to contain spills.
18. Upper Diffuser Screen provides protection for the HEPA
Filter and promotes even distribution of downflow air. See
Figure 4-2.
19. Prefilter (roughing) enhances the life of the HEPA filter
by trapping large particles. It should be replaced quarterly.
Safety Precautions
1. Although the enclosure has been engineered to maintain
Class 5 air conditions, caution should always be used while
working. Prior to using the enclosure, check to make
Page 26

s
Chapter 4: Performance Features and Safety Precaution
sure that the blower is operating and periodically ensure
that air is flowing through the enclosure at its specified
downflow velocity of 30 to 65 fpm. The use of an airflow
monitor is recommended to alert the user to a problem with
airflow.
2. Use good housekeeping in the enclosure at all times. Clean
up spills immediately. Periodically clean enclosure
interior.
3. Do not overload the work surface with apparatus or work
material.
4. The Purifier Filtered PCR Enclosures should never be used
with biohazardous materials, toxins, acids, or radionuclides.
Air from the work area is dispersed directly into the
laboratory from the enclosure. A qualified Safety Officer
must carefully assess any risk associated with the use of the
Purifier Filtered PCR Enclosure.
5. Always work with your hands as far back into the enclosure
as possible. Keep all materials and apparatus inside the
lower air foil of the enclosure.
6. Do not work in this enclosure without the blower running.
7. Perchloric acid use in this enclosure is prohibited.
8. Radioactive materials are prohibited in this enclosure.
Consult your Safety Officer.
9. Avoid cross drafts and limit traffic in front of the enclosure.
Air disturbances created may disturb Class 5 conditions.
10. A qualified certification technician should test the
enclosure before it is initially used. The enclosure should
be validated annually and whenever it is relocated.
11. The sash must remain in the down position while using the
enclosure.
12. The HEPA filter provides Class 5 clean air conditions and
only provides product protection inside the enclosure. Do
not use the enclosure for personnel protection.
13. Never use flammable gases or solvents in the enclosure.
Use of an open flame must be avoided in the enclosure.
Open flames may disrupt the airflow patterns in the
enclosure, burn the HEPA filter and damage the filter’s
adhesive. Gases under high pressure should not be used in
the enclosure as they may disrupt airflow patterns.
21
Page 27

Chapter 4: Performance Features and Safety Precautions
14. HEPA filters are only effective for entrapment of
particulate matter.
15. The surface of the HEPA filter is fragile and should not be
touched. Care must be taken to avoid puncturing the
HEPA filter during maintenance. If you suspect that a
HEPA filter has been damaged DO NOT use the enclosure;
contact a local certification agency or Labconco.
16. The HEPA filter will gradually accumulate airborne
particulate matter from the room. The rate of accumulation
will depend upon the cleanliness of the room air, and the
amount of time the enclosure is operating. With normal
usage, the HEPA filters will last two to five years before
requiring replacement.
17. Avoid direct exposure to ultraviolet (UV) radiation;
NEVER work in the enclosure when the UV light is on.
18. Ensure that the enclosure is connected to an electrical
service in accordance with local and national electrical
codes. Failure to do so may create a fire or electrical
hazard. Do not remove or service any electrical
components without first disconnecting the filtered
enclosure from electrical service.
19. Increase the downflow velocity by adjusting the speed
control of the motorized impeller or change the HEPA filter
when the downflow velocity falls below acceptable limits
established by your Safety Officer.
20. Ensure only trained operators use the enclosure. New users
should review the User’s Manual and become familiar with
the operation of the enclosure.
21. Proper operation of the enclosure depends largely upon the
enclosure location and the operator’s work habits. The
enclosure should be located away from traffic patterns,
doors, fans, ventilation registers, fume hoods, and any other
air-handling device that could disrupt its airflow patterns.
Consult Chapter 2: Prerequisites and Chapter 3: Getting
Started sections of this manual for further details.
22
Page 28

C
HHAAPPTTEERR
C
A
PPPPRROOPPRRIIAATTE
A
A
PPPPLLIICCAATTIIOONNSS FFOORR YYOOUURR
A
F
IILLTTEERREED
F
E
NNCCLLOOSSUURREE
E
Now that the installation of your Filtered PCR Enclosure is
completed, you are ready to use it. Read this chapter to learn
about:
1. Routine Daily Work Procedures.
2. Suitable Applications.
3. Appropriate HEPA Filter Applications, Suitability and
Guidelines.
D
5
5
P
P
C
C
E
R
R
Routine Daily Work Procedures
Planning
• Arrange for minimal disruptions, such as room traffic or
entry into the room while the enclosure is in use.
Start-up
• Turn on blower and light. Turn off the UV light.
• Only raise the sash for loading and cleaning.
• Allow the enclosure’s blower to operate unobstructed for 1
minute.
23
Page 29

Chapter 5: Using Your Filtered PCR Enclosure and Appropriate Application
• Wear a long sleeved lab coat, rubber gloves and use
protective eyewear. Wear a protective mask if appropriate.
Consult your Safety Officer for additional personal
protective equipment recommendations.
• Wipe down interior surfaces with a mild household
detergent or disinfectant. DO NOT use abrasive cleaners,
bleach or solvents.
Loading Materials and Equipment
• Load only the materials required for the procedure. Do not
overload the enclosure.
• Do not obstruct upper air diffuser screen.
• Large objects should not be placed close together.
• After loading, wait one minute to purge airborne
contaminants from the work area.
Work Techniques
• Keep all materials inside the lower air foil, and perform all
operations as far to the rear of the work area as possible.
• Segregate all clean and contaminated materials in the work
area.
Final Purging
• Upon completion of work, the enclosure should be allowed
to operate for two to three minutes undisturbed, to purge
airborne contaminants from the work area before shutting
down the blower.
• Select the UV time for your PCR protocol and then, turn on
the UV light to decontaminate the work area as determined
by your Safety Officer.
Unloading Materials and Equipment
• All open trays, weigh vessels or containers should be
covered before being removed from the enclosure.
Suitable Applications
Suitable applications for the Purifier Filtered PCR Enclosures are
based on guidelines established by the Institute for Environmental
Sciences. Particulates are filtered by the HEPA filter before air is
returned to the room. Biohazardous materials or other hazardous
solids cannot be used with the Purifier Filtered PCR Enclosure, as
air is drawn over the work surface and out of the enclosure. The
Purifier Filtered PCR Enclosure only provides product
protection and offers no personnel protection whatsoever.
24
Page 30

Chapter 5: Using Your Filtered PCR Enclosure and Appropriate Application
Listed below are suitable applications for HEPA filters.
HEPA Filter Applications,
Suitability and Guidelines
• Procedures traditionally performed on an open bench where a
clean Class 5 air environment is now required.
• The HEPA filtered enclosure provides product protection from
particulate matter. Because air from the enclosure enters the
room during operation, this enclosure should only be used for
operations requiring sample protection from environmental
contamination.
• HEPA filters are only effective for entrapment of particulate
matter. The surface of the HEPA filter is fragile and should
not be touched. Care must be taken to avoid puncturing the
HEPA filter during installation. If you suspect that a HEPA
filter has been damaged, DO NOT use the enclosure. See
Chapter 6 for Replacing the HEPA Filter.
• The HEPA filter will gradually accumulate airborne
particulate matter from the room. The rate of accumulation
will depend upon the cleanliness of the room air, and the
amount of time the enclosure is operating. With normal
usage, the HEPA filters will last two to five years before
requiring replacement.
25
Page 31

C
HHAAPPTTEERR
C
M
F
E
Monitoring airflow and changing the filters is the primary
maintenance required. Certification and recertification is also
reviewed in Chapter 6.
Review this chapter on maintenance for the following:
1. Routine Maintenance.
2. Determination of when to replace the HEPA filters.
3. How to install a new HEPA filter.
4. HEPA filter leak test.
5. Speed control adjustment and setting the downflow velocity.
6. Operating and calibrating the airflow monitors.
7. Initial certification.
8. Re-certification.
9. Fluorescent light replacement.
10. UV light replacement, if applicable.
11. Motorized impeller replacement.
12. Speed control replacement.
AAIINNTTAAIINNIINNG
M
IILLTTEERREED
F
NNCCLLOOSSUURREE
E
D
6
6
P
P
G
C
C
Y
Y
R
R
OOUURR
26
Page 32

Chapter 6: Maintaining Your Filtered PCR Enclosure
Routine Maintenance Schedule
Weekly
Monthly (or more often as required)
Annually
• Wipe down the interior surfaces of the enclosure with a
disinfectant or cleaner, depending upon the usage of the
unit and allow to dry.
• Using a damp cloth, clean the exterior surfaces of the
enclosure, particularly the front and top to remove any
accumulated dust.
• Operate the exhaust system, noting the airflow velocity out
the front of the enclosure using a source of visible smoke.
Airflow monitors are recommended for constant
monitoring.
• Determine the actual downflow velocity 6" below the upper
diffuser of the enclosure where the average reading should
be at the specified velocity. (Use calibrated thermal
anemometer or other approved apparatus). Airflow alarms
are recommended for constant monitoring.
• All weekly activities.
• Check downflow velocity. Increase speed control or
change HEPA filter when downflow velocity of the
enclosure drops below the recommended speed for your
facility or if the airflow alarm monitor alerts you. An
airflow monitor is recommended.
• Replace UV lamps if equipped.
• Have the enclosure validated by a qualified certification
technician. See Certification and Recertification to follow
in Chapter 6.
• All monthly activities.
• Change prefilter.
HEPA
When to Replace HEPA Filters
The HEPA filter in the Purifier Filtered PCR Enclosure gradually
accumulates airborne particulate matter from the room. The rate of
accumulation will depend upon the cleanliness of the room air, and
the amount of operational time the enclosure is operating. In
typical installations and usage, the HEPA filters will last two to
five years before requiring replacement. Replace HEPA filters
27
Page 33

Chapter 6: Maintaining Your Filtered PCR Enclosure
when downflow velocity drops below the recommended 30-65 fpm
velocity and the speed control is adjusted to full speed. Replace
HEPA filter if it fails the HEPA Filter Leak Test in Chapter 6.
How to Install a New HEPA Filter
NOTE: Only a qualified certifier should service the HEPA filter.
After the HEPA filter is replaced, the enclosure MUST be
certified. See Figure 6-1.
1. Unplug the enclosure and remove the prefilter located on
top.
2. Remove the front panel by loosening the two screws that
secure it.
3. Using a 9/16" deep socket, loosen the filter clamp bolts
located on top. Refer to Figure 6-1.
4. With the clamp bolts loosened, the HEPA filter-clamping
frame should be clear of filter. Carefully pull the filter
straight out of the enclosure and discard properly.
5. Cover the surface of the new HEPA filter gasket with a
light coating of silicone grease, if desired.
6. Install the new HEPA filter by pushing it straight into the
cabinet, ensuring that it is correctly oriented with the gasket
facing down on the exhaust side of the enclosure.
7. Tighten the clamp bolts uniformly until the filter gasket is
properly compressed against the frame. Inspect the seal
thoroughly before proceeding.
8. Reinstall the front panel and prefilter.
9. Plug the enclosure in and have it check for leaks and
downflow velocity.
CAUTION: The filter clamp bolts should only be tightened
enough to ensure a proper seal at maximum tightness. The
filter gasket should be compressed 50% or less.
28
Page 34

HEPA Filter
Gasket Side
Down as Shown
Gasket
Front Panel
Chapter 6: Maintaining Your Filtered PCR Enclosure
HEPA Filter
Sealing Surface
Prefilter
Speed Control
Figure 6-1
HEPA Filter Changing Diagram & Filter Leak Test Diagram
Clamp Bolt
Adjustment
Screw
Filter
29
Page 35

Chapter 6: Maintaining Your Filtered PCR Enclosure
HEPA
HEPA Filter Leak Test
Purpose
After installing the new HEPA filter, the HEPA filter should be
leak checked. This test is performed to determine the integrity of
the HEPA filter, the filter housing, and the filter seal. Leak testing
must be done by a qualified technician with calibrated equipment.
Remove the upper perforated diffuser located inside the enclosure
by using a Phillips screwdriver to unfasten the screws. (See Figure
6-1). The filter passes the leak test at .01% or better. Reference
Leak Testing and Photometer scanning from the Institute of
Environmental Services (IES-RP-CC001.3)
Apparatus
1. An aerosol photometer ATI model 2D, 2E, 2G or
equivalent. Air Techniques Hamilton Associates Inc., 11403
Cron Ridge Dr., Owings Mills, MD 21117
2. One aerosol generator of the Laskin nozzle(s) type. An
aerosol of mineral oil or suitable liquid shall be created by
flowing air through it. The compressed air supplied to the
generator should be adjusted to a pressure of 10± 1 psig. during
operation. Air Techniques Inc. Model TDA-4A or equal. One
nozzle at 10 psig is (67.5 cfm x 100ug/l)/(Vol. of air), For the
2' at 55 fpm or 230 cfm, one nozzle @10 psig is 6750/230 cfm
= 30 ug/l. For the 3' at 55 fpm or 340 cfm, one nozzle @ 10
psig is 20 ug/l. For the 4' at 55 fpm or 460 cfm, one nozzle at
10 psig is 15 ug/l.
3. Mineral oil (Catalog #1491400).
4. Sampling Nozzle, Rectangular 1/2" x 3-1/4", Air Techniques,
Inc.
Procedure
For the ATI 2G Photometer
1. Turn on the photometer and allow it to operate for a minimum
of 5 minutes. Leave the valve in the “CLEAR” setting.
2. Press the “ENTER” keypad. Press the “REF” keypad.
3. The display will display “P1” for approximately 1 second, and
then display a numerical value.
30
Page 36

Chapter 6: Maintaining Your Filtered PCR Enclosure
4. Using the “^” or “ν” keypads, respectively, increase or
decrease the numerical value until it equals 30 (2'), 20 (3'). 15
(4') for the Purifier Filtered PCR enclosure at 55 fpm
downflow velocity.
5. Press the “ENTER” Keypad. The photometer will scan for 15
seconds, and then the “0” keypad will flash. Press the “Enter”
keypad. The unit will scan for 5 seconds, the display will read
“0000,” and the unit will sound a confirming tone.
6. Set the valve to “DOWNSTREAM.” Place the palm of your
hand over the sampling port of the pistol. There should be a
strong vacuum at this port. If the vacuum is weak, contact Air
Techniques Hamilton Associates.
7. Turn the enclosure on and let it operate for a minimum of 5
minutes.
8. If necessary, adjust the speed control of the enclosure to
maintain the following downflow airflows at 55 fpm; 2'
(230cfm), 3' (340 cfm), 4' (460 cfm.)
9. Position the aerosol generator discharge in the intake of the
prefilter on top of the enclosure.
10. Start the aerosol generator (Pressure to be 10 +/- 1 PSIG).
Ensure that one Laskin nozzle is in the “open” position.
11. Allow the generator to operate for a minimum of 15 seconds.
Scan the downstream exhaust side of the HEPA filter by
passing the sampling nozzle of the gun in slightly overlapping
strokes over the entire surface the filter, with the sampling port
not more than 1 inch from the surface of the filter media. Scan
the entire periphery of the filter and the gasket between the
filter frame and the enclosure frame. Scanning shall be done at
a traverse rate of not more than 2 inches per second.
Acceptance
Aerosol penetration shall not exceed 0.01 percent measured by the
photometer.
31
Page 37

Chapter 6: Maintaining Your Filtered PCR Enclosure
Setting the Downflow Velocity
with the Speed Control
Adjustment
1. Remove the front panel by loosening the (2) Phillips screws
on top that secure the front panel.
2. The speed control is located on the electrical subassembly
located behind the switched control panel and below the
front panel. See Figure 6-1.
3. Adjust the speed control with a small Phillips screwdriver
by turning the screw counterclockwise to increase blower
speed or clockwise to decrease the blower speed. The
speed control is very sensitive, so proceed with caution.
4. Measure the downflow velocity per the averaging
technique outlined in Chapter 3 and adjust the speed
control slowly for the desired speed. Allow the speed to
stabilize and re-measure the downflow velocity to confirm.
5. Replace the front panel and tighten the screws.
Options
Calibrate and Operate the Airflow
Monitor
Optional Guardian Airflow Monitor
Refer to Figure 6-2 for operation and calibration.
Labconco Airflow Monitor / Airflow Switch Operation
The Guardian Airflow Monitor consists of a circuit board and an
airflow switch. This switch indicates airflow as safe or low. It
does not provide an actual velocity, but a small setscrew in the
back of the sensor can adjust the airflow level that it classifies as
“good/safe” or “low/alert.”
The circuit board provides power to the sensor and also contains a
“safe (green)” and “alert (red)” airflow LED indicators, as well as
a “SILENCE ALARM” button to quiet the audio alarm. When
first powered up, the Printed Circuit Board (PCB) will light both
red and green LED indicators and sound the alarm to indicate it is
working. After 5 seconds, the air monitor will indicate either good
or bad airflow based on what the connected airflow switch detects.
For low airflow, the unit will wait for 10 seconds after low
indications before it sounds both the audio alarm and the red
“alert” LED indicator. If
32
Page 38

Chapter 6: Maintaining Your Filtered PCR Enclosure
the “SILENCE ALARM” button is pressed, the audio alarm will
be silenced, but the red “alert” LED will remain on. The alarm is
silenced indefinitely unless an airflow change is detected. If safe
airflow is later detected for 10 seconds, the green “safe” LED will
be lit and the “alert” (red) LED will be shut off. At any time the
airflow is safe/good, one can press the SILENCE ALARM test
button and the audio alarm and the red LED will turn on as long as
this button is held down. The PCB has also a two-pin connector
for use as an external output with isolated relay contacts that close
when the red/alert LED is lit (low airflow). These relay contacts
are not affected by the “SILENCE ALARM” button.
The PCB is mounted behind the front panel using standoffs and an
appropriate label is used to highlight the “SILENCE ALARM”
button with clear areas for the red and green LED’s.
By special order, the PCB can be prepared as a factory special with
an additional connector for the following external inputs, and
having the following possible functions:
• External Alarm allows an external signal to sound the alarm
from the building airflow system of a failed condition.
• Alarm Disable allows an external signal to prevent a “low”
airflow alarm from occurring.
• Night Setback allows an external signal to prevent a “low”
airflow alarm from occurring (not any different from Alarm
Disable above other than the terminology.)
• Contact Labconco for ordering information on this special
PCB.
Calibration
1. Ensure the flow switch and alarm circuit board are installed
and operational.
2. Allow the enclosure to operate for at least two minutes.
3. If factory installed, the monitor will alarm at 30±10 fpm
downflow velocity with the average outflow velocity set at
85±10 fpm.
4. To change the factory setting, set the downflow velocity to
the desired alarm condition using the speed control
adjustment procedure outlined in Chapter 6. Once the
alarm condition is set, use a small screwdriver to turn the
adjustment screw on the airflow switch counterclockwise
(facing the screw) until the “low” airflow red LED lights
and the audible flow alarm sounds.
5. Adjust the downflow velocity to the nominal operating
point required. The green “safe” LED should light.
33
Page 39

Chapter 6: Maintaining Your Filtered PCR Enclosure
6. Over time the HEPA filter will load and eventually slow
the downflow velocity. Once the alarm condition is met,
simply increase the speed control as outlined in Chapter 6
or replace the HEPA filter if the speed control is
maximized.
7. The table below lists typical alarm conditions based on
normal operating conditions. Typical alarm conditions are
set at downflow velocities of 10 to 30 feet per minute
below the normal operating conditions due to supply air
and exhaust air fluctuations, as well as room air cross
drafts. Consult your Safety Officer or Laboratory Manager
for proper operating speeds.
Enclosure Operating
Downflow Speed
55 ± 10 fpm 25-35 fpm
45 ± 10 fpm 25-35 fpm
Alarm Condition Set Point
Speed
34
Page 40

d
Light Reflector
Chapter 6: Maintaining Your Filtered PCR Enclosure
Green “Safe” LED
Silence Alarm Button
with Test/Reset
Figure 6-2
Guardian Airflow Monitor with Airflow Switch
Speed Control
Airflow Monitor
LED Circuit
Boar
Airflow Switch
with Adjustment
Screw
Control Panel
Red “Alert” LED
with Audible Alarm
35
Page 41

Chapter 6: Maintaining Your Filtered PCR Enclosure
Initial Certification
The Purifier Filtered PCR Enclosure has been certified at the
factory for an average downflow velocity of 55±10 fpm along with
the HEPA Filter Leak Test. The Purifier Filtered PCR Enclosures
should be certified for the proper downflow velocity required by
your Safety Officer. It is also a conservative recommendation to
perform the HEPA Filter Leak Test again should there be any
damage caused during transport.
Re-Certification
Under normal operating conditions, the Purifier Filtered PCR
Enclosure should be recertified at least annually. The certifier
should perform the minimum following tests:
• Downflow Velocity Test
• HEPA Filter Leak Test
In addition, the following tests should also be performed at the
user’s discretion:
• Measure of Line Voltage and Current
• Smoke Test to determine proper airflow patterns
• Lighting Intensity Test (when appropriate)
• Noise Level Test (when appropriate)
• Vibration Test (when appropriate)
Fluorescent Light Replacement
1. Disconnect the power.
2. Locate the small light reflector located under the control
3. Remove the light reflector by removing two Phillips screws
4. Rotate and remove the old fluorescent lamp.
5. Reinstall the new fluorescent lamp and light reflector in
6. Power the unit up and try the new fluorescent lamp.
36
panel.
on the bottom of the light reflector.
reverse order.
Page 42

Chapter 6: Maintaining Your Filtered PCR Enclosure
UV Light Replacement
1. Disconnect the power.
2. Locate the UV lamp located inside the enclosure.
3. Rotate and remove the old UV lamp.
4. Reinstall the new UV lamp.
5. Power the unit up and try the new UV lamp.
Motorized Impeller Replacement
The motorized impeller must be replaced as a complete unit.
When the motorized impeller is replaced, the capacitor should also
be replaced. See Appendix A for Replacement Parts Diagram. See
Figure 6-3 for an isometric view of the motorized impeller plenum
assembly. The HEPA filter rests below the motorized impeller
assembly.
1. Unplug the enclosure from the electrical outlet.
2. Remove HEPA filter per the HEPA filter removal procedure
outlined earlier in this chapter.
3. Consult the wiring diagram in Appendix C of the manual and
disconnect all the wires of the motorized impeller. Be sure to
connect wires on the new motor in the same way the old motor
was wired. The 3' and 4' enclosures have two motorized
impellers.
4. Remove four screws in each motorized impeller.
WARNING: High-speed blower. Never operate
!
5. Replace each capacitor with a new one of equal voltage and
capacity.
6. Reassemble each new motorized impeller by reversing the
assembly steps.
7. Perform a HEPA filter leak check.
impeller with housing off.
37
Page 43

Chapter 6: Maintaining Your Filtered PCR Enclosure
r
p
2' Model
Motorized
eller
Im
Wire Access
Hole
Impeller
Mounting Bracket
Hardware
Mounting Screws
for Motorized
Impelle
HEPA Filter
Capacitor
Mounted here on
Electrical
Subassembly
located behind
the Control
Panel
Front Panel
Motorized
Impellers
Wire Access
Holes
3' or 4' Models
Figure 6-3
Motorized Impeller Replacement
38
Page 44

Chapter 6: Maintaining Your Filtered PCR Enclosure
Speed Control Replacement
1. Remove the bracket that the speed control is attached to. See
Figures 6-1, and 6-2.
2. Remove the two screws holding the speed control using a
Phillips screwdriver. Refer to Appendix A for Replacement
Parts Diagram.
3. Disconnect all wires leading to the speed control. Connect
wires on new speed control in the same position as the old
speed control.
4. Reassemble to the system in the same position and with the
same screws that were removed earlier.
39
Page 45

C
HHAAPPTTEERR
C
A
CCCCEESSSSOORRIIZZIINNGG AANND
A
M
F
E
There are several ways to accessorize and modify the Filtered PCR
Enclosure for your individual requirements. These include the
addition of accessory work surfaces, airflow monitors, filters, and
storage cabinets or stands.
OODDIIFFYYIINNG
M
IILLTTEERREED
F
NNCCLLOOSSUURRE
E
1. Work Surfaces
An optional dished work surface is available to attach to the
Filtered PCR Enclosure.
Dished work surfaces are contoured to fit the dimensions of
the filtered enclosures to contain spills. Epoxy is chemical
resistant. See Figure 3-1 for installation.
Catalog # Description Dimensions (W x D x H)
3909900 Black, 2-foot wide 24" x 29" x 1"
3909901 Black, 3-foot wide 36" x 29" x 1"
3909902 Black, 4-foot wide 48" x 29" x 1"
3909903 Gray, 2-foot wide 24" x 29" x 1"
3909904 Gray, 3-foot wide 36" x 29" x 1"
3909905 Gray, 4-foot wide 48" x 29" x 1"
D
7
7
G
Y
P
P
E
Y
C
C
OOUUR
R
R
R
D
40
Page 46

Chapter 7: Accessorizing and Modifying Your Filtered PCR Enclosure
2. Guardian™ Airflow Monitor
The Guardian Airflow Monitor allows you to continuously
monitor airflow through the enclosure. The Guardian
monitor can be placed on any Purifier Filtered PCR
Enclosure.
Description Order Part #’s Individual Parts Required
Guardian Airflow Monitor
115V or 230V
1 ea. 3811500 Airflow Monitor Printed Circuit Board
1 ea. 3910700 Airflow Sensor w/ Connector
2 ea.
2 ea.
1 ea. 3935501 Upper Diffuser w/ Air cutout 2'
1 ea. 3935503 Upper Diffuser w/ Air cutout 3'
1 ea. 3935505 Upper Diffuser w/ Air cutout 4'
3. Accessory Filters
HEPA Filter
HEPA Filter is 99.99% efficient on particles 0.3 micron.
Width Catalog # Size
2' 3707900 18" x 18" x 3.31"
3' 3707901 30" x 18" x 3.31"
4' 3707902 42" x 18" x 3.31"
Prefilters (Roughing)
A prefilter to extend HEPA filter life.
1885405
1891808
Filter Catalog # Qty.
2' 3935700 1
3' 3935701 1
4' 3935702 1
#6-32 x .31” Phillips machine screw to
mount Airflow Monitor Circuit Board
#6-32 x .50” Phillips thread cutting screw to
mount Airflow Sensor
41
Page 47

Chapter 7: Accessorizing and Modifying Your Filtered PCR Enclosure
4. Storage Cabinets and Stands
Size/Description Dual Doors Right Hinge Left Hinge Dual Doors Right Hinge Left Hinge
48" 9902000 - - 9901000 - 36" 9902100 - - 9901100 - 30" 9902200 - - 9901200 - 24" - 9902300 9902400 - 9901300 9901500
18" - - - - 9901400 9901600
12" - - - - - 48" w/Self-Closing Doors 9903000 - - - - 36" w/Self-Closing Doors 9903100 - - - - 30" w/Self-Closing Doors 9903200 - - - - 24" w/Self-Closing Doors - 9903300 9903400 - - 24" ADA - 9906000 9906100 - 9905000 9905200
24" ADA w/Self-Closing
Doors
18" ADA - - - - 9905100 9905300
12" ADA - - - - - -
Size/Description Dual Doors Right Hinge Left Hinge Dual Doors Right Hinge Left Hinge
48" 9900000 - - - - 36" 9900100 - - - - 30" 9900200 - - - - 24" - 9900300 9900600 - - 18" - 9900400 9900700 - 9907000 9907100
12" - 9900500 9900800 - - 48" w/Self-Closing Doors - - - - - 36" w/Self-Closing Doors - - - - - 30" w/Self-Closing Doors - - - - - 24" w/Self-Closing Doors - - - - - 24" ADA - 9904000 9904300 - - 24" ADA w/Self-Closing
Doors
18" ADA - 9904100 9904400 - - 12" ADA - 9904200 9904500 - - -
Base Stands
- 9906200 9906300 - - -
- - - - - -
SOLVENT ACID
STANDARD BASE VACUUM PUMP
3747000 2' Telescoping Base Stand with Fixed Feet 24" w x 25.5" d x 27. 5" to 33.5" h
3746701 3' Telescoping Base Stand with Fixed Feet 36" w x 29.25" d x 27.5" to 33.5" h
3746702 4' Telescoping Base Stand with Fixed Feet 48" w x 29.25" d x 27.5" to 33.5" h
3747010 2' Telescoping Base Stand with 5" Casters 24" w x 25.5" d x 27. 5" to 33.5" h
3746711 3' Telescoping Base Stand with 5" Casters 36" w x 29.25" d x 27.5" to 33.5" h
3746712 4' Telescoping Base Stand with 5" Casters 48" w x 29.25" d x 27.5" to 33.5" h
42
Page 48

C
HHAAPPTTEERR
C
T
RROOUUBBLLEESSHHOOOOTTIINNGG AANNDD
T
S
EERRVVIICCEERR
S
L
OOGG
L
Refer to the following table if your Filtered PCR Enclosure fails to
operate properly. If the suggested corrective actions do not solve
your problem, contact Labconco for additional assistance.
PROBLEM CAUSE CORRECTIVE ACTION
Class 100 (ISO Class
5) air conditions are
not present inside the
enclosure.
External factors are
Blower won’t
operate.
Improper user
techniques for the
enclosure.
disrupting the
enclosure airflow
patterns.
Enclosure has
improper downflow
velocity.
Unit not plugged
into outlet.
8
8
O
O
PPEERRAATTIINNGG
See “Certifying the Enclosure” Chapter
3 and “Safety Precautions” Chapter 4
sections in the manual. (Ref. Appendix
D).
See “Location Requirements” Chapter
2, “Certifying the Enclosure” Chapter
3, and “Safety Precautions” Chapter 4
sections of this manual. (Ref. Appendix
D).
Have enclosure certified and check
exhaust system. Check HEPA filters for
loading. Adjust enclosure speed
control. Enclosure should have an
average downflow velocity of 30-65
fpm.
Plug the enclosure into appropriate
electrical service.
43
Page 49

Chapter 8: Troubleshooting
PROBLEM CAUSE CORRECTIVE ACTION
Blower won’t
operate.
Blower wiring is
Blower switch is
Motorized impeller
Poor internal Class
5 air conditions.
HEPA filter
Blower and lights
won’t operate.
Circuit breaker(s)
Lights do not work. Lamp not installed
Lamp wiring
Defective lamp. Replace lamp.
Light switch is
Defective electronic
UV light timer does
not work
Airflow monitor
malfunction.
No audible alarm. Alarm has been temporarily silenced
Circuit breaker(s)
or Ground Fault
Interrupter.
disconnected.
defective.
or blower is
defective.
Enclosure sash not
closed.
clogged.
Unit not plugged
into outlet.
tripped.
properly.
disconnected.
defective.
ballast.
No power.
No lights.
No display
No power.
No lights.
No display.
Reset circuit breaker.
Inspect blower wiring.
Replace switch.
Replace motorized impeller or blower.
See Chapter 6.
Close sash.
Replace HEPA filter or increase speed.
Plug enclosure into appropriate
electrical service.
Reset or replace circuit breaker.
Inspect lamp installation.
Inspect lamp wiring.
Replace light switch.
Replace ballast.
Power cable to UV light timer circuit
board is disconnected. Verify
connection. Replace circuit board for
UV light timer if it malfunctions.
Power cable to circuit board is
disconnected and needs to be
connected. Sensor cable needs to be
connected. Verify that all airflow
monitor interface cables are connected.
Check fuses on enclosure.
using “SILENCE ALARM.”
44
Page 50

g
Chapter 8: Troubleshootin
PROBLEM CAUSE CORRECTIVE ACTION
Airflow Monitor
Malfunction
(Continued)
Constant audible
Wrong alarm set
point.
alarm.
Airflow monitor was not properly
adjusted. Repeat calibration steps
outlined in this manual in Chapter 6.
Check airflow and calibration of
airflow monitor. See Chapter 6.
Continuous alarm. Check the downflow velocity of the
enclosure as the airflow of the
system may have changed. If
incorrect, adjust the speed control to
increase downflow velocity. The
HEPA filter may have become
loaded. If downflow velocity is
correct, calibrate the airflow monitor
outlined in this manual in Chapter 6.
Monitor alarms; air
way to airflow
monitor sensor is
Lightly clean the airway with clean
air. Be careful not to touch sensitive
electrical components.
blocked by insects,
dust or debris.
Audible disable
will not stay
operational.
An alarm condition must be
continuously present before the
audible alarm can be silenced. If
flow conditions fluctuate near the
alarm set point, the airflow monitor
will automatically reset it. Action
should be taken to bring the
enclosure airflow into proper
operating parameters or adjust the
alarm set point lower.
45
Page 51

Chapter 8: Troubleshooting
Service Operating Record Log
Customer Name Model Number
Date Installed Serial Number
Unit Location
Date Comments
46
Page 52

A
PPPPEENNDDIIXX
A
F
IILLTTEERREED
F
E
NNCCLLOOSSUURRE
E
C
OOMMPPOONNEENNTTS
C
R
EEPPLLAACCEEMMEENNT
R
The components that are available for your Filtered PCR Enclosure
are listed. The parts shown are the most commonly requested. If
other parts are required, please contact Product Service.
D
A
A
P
P
E
C
C
S
T
R
R
A
A
P
P
NND
D
AARRTTSS
47
Page 53

A
ppendix A: Replacement Parts
Item Qty. Part Number Description
1 1 3911000 Glass, Side
2A 1 3911900 Glass, Sash 2'
2B 1 3911901 Glass, Sash 3'
2C 1 3911902 Glass, Sash 4'
3A 1 3938900 Sash Assembly, 2'
3B 1 3938901 Sash Assembly, 3'
3C 1 3938902 Sash Assembly, 4'
4A 1 3905600 Lower Air Foil, 2'
4B 1 3905601 Lower Air Foil, 3'
4C 1 3905602 Lower Air Foil, 4'
5A 1 3907400 Bracket, Air Foil R.H.
5B 1 3907401 Bracket, Air Foil L.H.
6 2 1554500 Stop, Sash Bumper.
7A 1 6916500 Latch, Sash
7B 1 3906700 Bracket, Latch
7C 1 1927403 Spring, Compression Latch
7D 2 1893206 Screw, 8-32 x .38" Lg. Phillips Pan S.S. Type F
8 1 3945300 Printed Circuit Board, UV Light Timer
9A 2 1889316 Screw, 10-24 x 1.00 PH Phil S.S.
9B 2 1912108 Washer, Plastic .194 ID. x .380 OD
9C 2 7868402 Bushing, Spacer .31 x .63
10 1.9 Ft 6913700 Wiper, Sash Seal
11A 2 1936800 Bushing, Heyco closed 1.50 Dia.
11B 2 1934601 Bushing, Heyco w/ Flex Shutter 1.50 Dia.
12A 2 3940500 Hinge, outer
12B 2 3940501 Hinge, Inner
12C 4 1591606 Rubber Bumper
12D 2 3939600 2' and 4' Sash Closure Door
12E 2 3939601 3' Sash Closure Door
12F 2 3940700 Extension Bi-Fold Door 3'
12G 2 3940701 Extension, Bi-Fold Door 4'
13A 1 3907700 Reflector, Light 2'
13B 1 3907701 Reflector, Light 3'
13C 1 3907702 Reflector, Light 4'
13D 2 1889308 Screw, Mach. 10-24 x .50 PH Phillips
14A 1 3708300 Lamp, Fluorescent 2' Enclosure (F15T8-SP35)
14B 1 9721902 Lamp, Fluorescent 3' Enclosure (F17T8)
14C 1 9721901 Lamp, Fluorescent 4' Enclosure (F25T8)
15A 1 1270100 Lamp, UV 2' or 3' Enclosure (G15T8)
15B 1 1271300 Lamp, UV 4' enclosure (G30T8)
16A 1 3911700 Bracket, Right Reflector Support
16B 1 3911701 Bracket, Left Reflector Support
16C 4 1893108 Screw, #8 x 1/2 AB Hex Washer Head
48
Page 54

s
Appendix A: Replacement Part
Item Qty. Part Number Description
17A 1 3937900 Wiring Harness Main, 115V, 2'
17B 1 3937901 Wiring Harness Main, 230V, 2'
17C 1 3938000 Wiring Harness Main, 3' and 4' 115V
17D 1 3938000 Wiring Harness Main, 3' and 4' 230V
18A 1 3811500 Guardian Airflow Monitor Printed Circuit Board
18B 2 1885405 Screw Mach #6-32 x .31 PH Phil. S.S.
19 1 3936700 Label, Front Set
20A 1 3910700 Airflow Switch
20B 2 1891808 Screw, Thread Cutting #6-32 x .50 PH
22A 1 1307000 Switch, Rocker (2 position) - Blower
22B 1 1306300 Switch, Rocker (3 position) – UV Light Only
23A 1 3904800 Front Panel, 2'
23B 1 3904801 Front Panel, 3'
23C 1 3904802 Front Panel, 4'
23D 1 4472400 Screw, Thread cut 10-24 x .50 Type F PH Phillips
24A 1 or 2 3934500 Impeller, Motorized 2' or 3' Enclosure, 115V
24B 1 or 2 3934501 Impeller, Motorized 2' or 3' Enclosure, 230V
24C 2 3934600 Impeller, Motorized 4', 115V
24D 2 3934601 Impeller, Motorized 4', 230V
25A 1 1306900 Capacitor, 2', 115V 10 MFD
25B 2 1306900 Capacitor, 3', 115V 10 MFD
25C 2 1306600 Capacitor, 4', 115V 15 MFD
25D 2 1306800 Capacitor, 2', 230V 4 MFD (effective 2MFD)
25E 4 1306800 Capacitor, 3', 230V 4 MFD (effective 2MFD)
25F 2 1306800 Capacitor, 4', 230V 4 MFD
26A 1 1235400 Ballast, Fluorescent 2', 115V
26B 1 1235500 Ballast, Fluorescent 2', 230V
26C 1 1294000 Ballast, Fluorescent 3' or 4', 115V or 230V
27A 1 1235400 Ballast, UV 2' or 3', 115V
27B 1 1235500 Ballast, UV 2' or 3', 230V
27C 1 1233400 Ballast, UV 4', 115V
27D 1 1233600 Ballast, UV 4', 230V
28A 1 3922100 Speed Control, 115V
28B 1 3922101 Speed Control, 230V
29A 1 3935500 Upper Diffuser Screen 2' (Internal)
29B 1 3935502 Upper Diffuser Screen 3' (Internal)
29C 1 3935504 Upper Diffuser Screen 4' (Internal)
29D 1 3935501 Upper Diffuser w/ Air cutout 2'
29E 1 3935503 Upper Diffuser w/ Air cutout 3'
29F 1 3935505 Upper Diffuser w/ Air cutout 4'
49
Page 55

A
ppendix A: Replacement Parts
Item Qty. Part Number Description
30 10 1893712 Screw, #10 x .75 PH Phil. Thd. Forming
31A 2 1881196 Capscrew, 3/8 –16 x 6.0 Lg. Hx. Hd.
31B 4 1911018 Washer, Flat 3/8
31C 2 1906925 Nut, Hex 3/8 Nylon Lock
32A 1 3707900 HEPA Filter (2') 18 x 18 x 3.32 w/ Gasket
32B 1 3707901 HEPA Filter (3') 30 x 18 x 3.32 w/ Gasket
32C 1 3707902 HEPA Filter (4') 42 x 18 x 3.32 w/ Gasket
35A 1 1333800 IEC Power Inlet, 115V
35B 1 1305800 Power Cord, 115V, Right Angle
35C 1 1305900 Power Cord, 230V, Right Angle
35D
36A
36B
1
1 - (115V)
2 - (230V)
40A 1 1952500 Gauge, Pressure Mini Helic II
40B 1 3667400 Bracket, Gauge
40C 2 1905617 Nut, #10-24 KEPS
40D 2 1551700 Tubing, 3/16" ID x 5/16" OD, PBC 7.00" Lg.
40E
2, 1" Long
1339200 Receptacle, RFI Inlet 230V
1327204 Circuit Breaker, 5 AMP
1327200 Circuit Breaker, 3 AMP
3788200 Snubber, Filter Pressure Gauge
50
Page 56

s
14
40
13
8, UV
Light
Timer
Located
Behind
Control
Panel
12, Not Shown
24
26
Fluorescent
27
UV
25
23
15
7
18
17
19
5
22
4
2
Replacement Parts, Purifier Filtered PCR
Figure A-1
Appendix A: Replacement Part
35, 36
Not
Shown
28
31
32
20
29
30
11
16
9
10
1
6 3
51
Page 57

A
PPPPEENNDDIIX
A
D
IIMMEENNSSIIOONNS
D
See the following dimensions for the Purifier Filtered
PCR Enclosures.
X
B
B
S
52
Page 58

s
Appendix B: Dimensions and Exhaust Option
Figure B-1
Purifier Filtered PCR Enclosure
53
Page 59

A
PPPPEENNDDIIXX
A
F
IILLTTEERREEDD
F
E
NNCCLLOOSSUURRE
E
S
PPEECCIIFFIICCAATTIIOONNSS
S
This Appendix contains technical information about all
Purifier Filtered PCR Enclosures including electrical
specifications, environmental operating conditions and
wiring diagrams.
• 5 Amps, 115V, 60 Hz or 3 Amps, 230V, 50/60 Hz,
Purifier Filtered PCR Enclosure.
Environmental Conditions
• Indoor use only.
• Maximum altitude: 6562 feet (2000 meters).
• Ambient temperature range: 41° to 104°F (5° to
40°C).
• Maximum relative humidity: 80% for
temperatures up to 88°F (31°C), decreasing
linearly to 50% relative humidity at 104°F
(40°C).
• Main supply voltage fluctuations not to exceed
±10% of the nominal voltage.
• Transient over-voltages according to Installation
Categories II (Over-voltage Categories per IEC
1010). Temporary voltage spikes on the AC
input line that may be as high as 1500V for
115V models and 2500V for 230V models are
allowed.
• Used in an environment of Pollution degrees 2
(i.e., where normally only non-conductive
atmospheres are present). Occasionally,
however, a temporary conductivity caused by
condensation must be expected, in accordance
with IEC 664.
P
P
C
C
C
E
C
R
R
54
Page 60

s
Appendix C: Filtered Enclosure Specification
C-1
55
Page 61

A
ppendix C: Filtered Enclosure Specifications
C-2
56
Page 62

s
Appendix C: Filtered Enclosure Specification
C-3
57
Page 63

A
ppendix C: Filtered Enclosure Specifications
C-4
58
Page 64

A
PPPPEENNDDIIXX
A
R
EEFFEERREENNCCEES
R
Many excellent reference texts and booklets are
currently available. The following is a brief listing:
Bryan, D., and R.C. Marback. 1984. Laminar-airflow
equipment certification: What the Pharmacist needs to
Know. American Journal of Hospital Pharmacy. 41.1343-
1348.
General Services Administration. 1988. FED-STD-209E
Federal Standard – Clean Room and Work Station
Requirements, Controlled Environment. Washington D.C.
IES Recommended Practice: IES-RP-CC-001-86.
Recommended Practice for HEPA Filters. Mt. Prospect, IL;
Institute for Environmental Sciences. 1986.
IES Recommended Practice: IES-RP-CC-001-96. Laminar
Flow Clean Air Devices. Mt. Prospect, IL: Institute for
Environmental Sciences. 1986.
IES Document: IES-CC-011-85-T. A Glossary of Terms and
Definitions Related to Contamination Control. Mt. Prospect,
IL: Institute for Environmental Sciences. 1985.
ISO 14644-1: 1999. Cleanrooms and Associated Controlled
Environment International Organization for
Standardization.
Contamination and Sensitivity Issues with a Real-Time
Universal 16S rRNA PCR, Journal of Chemical
Microbiology. May 2000. p. 1747-1752. Vol. 38, No. 5.
Elimination of Contaminating DNA within Polymerase
Chain Reaction Reagents: Implications for a General
Approach to Detection of Uncultured Pathogens, Journal of
Clinical Microbiology. Mar. 1993. p. 646 – 652. Vol. 31,
No. 3.
D
D
S
59
Page 65

60
Page 66

 Loading...