

Page 1

BEDIENUNGSANWEISUNG
FR
NL
Instructions for use
EMW8604.0E
GB
mit Montageanweisungen
Instructions d’ utilisation
Gebruiksaanwijing
1830967
Page 2

ENGLISH
Dear Client,
First, we would like to thank you for choosing our
product. We are sure that this modern, functional
and practical microwave oven, manufactured from
the best materials, will satisfy your requirements.
Tips on environmental protection
Disposal of old electrical appliances
You are advised to read our operation manual
carefully and the enclosed pamphlet to enable you
to get the best results from your Microwave oven.
PLEASE KEEP THESE DOCUMENTS FOR FUTURE
REFERENCE.
This appliance is marked according to the European
directive 2002/96/EC on Waste Electrical and
Electronic Equipment (WEEE).
By ensuring this product is disposed of correctly, you
will help prevent potential negative consequences
for the environment and human health, which could
otherwise be caused by inappropriate waste
handling of this product.
The symbol on the product indicates that this
product may not be treated as household waste.
Instead it shall be handed over to the applicable
collection point for the recycling of electrical and
electronic equipment
Disposal must be carried out in accordance with
local environmental regulations for waste disposal.
For more detailed information about treatment,
recovery and recycling of this product, please
contact your local city office, your household waste
disposal service or the shop where you purchased
the product.
23
Page 3

Contents
Installation Instruction...............................................................................................................25
Important Information................................................................................................................26
Description of the Microwave Oven...........................................................................................27
The advantages of a microwave oven:....................................................................................... 27
How the microwave oven works .................................................................................................27
Why does the food heat up? .......................................................................................................28
Description of the appliance....................................................................................................... 29
Operating Instructions ...............................................................................................................30
Microwave Function .................................................................................................................... 31
Thawing by time (Manual)........................................................................................................... 31
Defrosting by Weight (Automatic)...............................................................................................33
General Thawing Instructions ..................................................................................................... 34
Special Function: LIQUIDS .......................................................................................................... 35
Special Function: RICE ................................................................................................................35
Special Function: POTATOES ...................................................................................................... 35
Special Function: THAW AND HEAT ............................................................................................ 36
During operation..........................................................................................................................37
Interrupting Oven Operation .......................................................................................................37
Energy Saving............................................................................................................................... 37
Adjusting the Clock......................................................................................................................38
Safety Block .................................................................................................................................38
Advice for Good Usage of the Oven ...........................................................................................39
Working with microwaves............................................................................................................ 39
Advice on the use of Cookware .................................................................................................40
Metal............................................................................................................................................. 40
Glass............................................................................................................................................. 40
Porcelain ...................................................................................................................................... 40
Glazed Ceramic Dishes ...............................................................................................................40
Plastic ........................................................................................................................................... 40
Wood............................................................................................................................................. 41
Recipient Test .............................................................................................................................. 41
Lids ...............................................................................................................................................41
Oven Maintenance......................................................................................................................42
Cleaning........................................................................................................................................ 42
Light Replacement....................................................................................................................... 42
Official Technical Assistance Service (T.A.S.)...........................................................................43
Solving Problems ......................................................................................................................... 43
Cord Replacement....................................................................................................................... 43
Technical Features .....................................................................................................................44
Description of functions .............................................................................................................. 44
Specifications............................................................................................................................... 44
24
Page 4

Installation Instruction
Remove oven from packing
Remove all packing materials and accessories from
the oven cavity.
Check whether the following parts are in good
condition:
- Door and hinges;
- Front of the oven;
- Inside and outside of oven.
Should you find any faults DO NOT USE THE OVEN,
and contact your dealer.
Place the oven on a flat stable surface able to
support its weight.
To allow efficient cooling of the microwave, its
installation is recommended in a unit with an
opening in the upper part (refer to the installation
instructions leaflet enclosed).
When the microwave oven is installed in a column
with a conventional oven, the microwave oven
must not be located underneath the conventional
oven because of the possibility of condensation
forming inside the latter.
The oven should be kept away from heat and vapour
sources (electric oven, toasters, etc.).
The oven has been supplied with a mono-phase
power supply cord. The appliance must be earthed.
The manufacturers and dealers are not liable for any
breakdowns or personal accidents should these
installation instructions not be observed by the
purchaser.
WARNING: THIS APPLIANCE MUST BE EARTHED.
25
Page 5

Important Information
WARNING: If the door or the door hinges are
damaged, the oven should not be switched on until
repaired by a qualified technician.
WARNING: It is dangerous for anyone, except a
qualified technician, to tamper with the apparatus
or try to repair it in any way by removing any lid or
covering which assures protection against the
exposure to microwave energy.
WARNING: Liquids and other food should not be
heated in airtight recipients as these can explode.
WARNING: Children should only be allowed to use
the oven without adult supervision if they have
been given the appropriate instructions so that
they can use the oven safely and understand the
dangers of its incorrect use.
WARNING: When the microwave oven is operated
in the Combination mode (microwaves + grill),
children should only be allowed to use the unit
under adult supervision due to the high
temperatures generated.
Warming up drinks in the microwave oven may result
in a delayed eruptive boiling, therefore one should
be careful when handling the recipient.
Eggs with their shell and whole boiled eggs shouldn’t
be warmed up in microwave ovens as they may
explode.
Do not use any metal utensils inside the oven unless
they were supplied with the oven and for that
purpose.
Do not warm up liquids or other food in closed
recipients as they may explode.
Do not warm up pure alcohol or alcoholic drinks.
DANGER OF FIRE.
When in doubt, choose short periods to cook, heat or
defrost food with microwaves. With long cooking
periods the food may become dry and even begin to
burn.
Do not use the oven for anything other than
warming, cooking or defrosting food.
When heating food in plastic or paper recipients,
check the oven frequently in case they ignite.
If any smoke is detected, then switch off the oven or
disconnect it and keep the door closed in order for
any flame to die out.
After warming up baby bottles or baby food jars, stir
or shake its contents and check the temperature
before feeding, to avoid burns.
Do not operate the oven without its tray nor when
empty.
Keep the oven ventilation holes open. Never cover
any air vents or openings.
26
Page 6

Description of the Microwave Oven
The advantages of a microwave oven:
In a conventional oven the heat radiated by the
resistances or gas burners, slowly penetrates the
food from the outside to the inside. There is,
therefore, a great loss of energy in the heating of the
air, oven components and recipients.
On the other hand, in microwave ovens the heat is
generated in the interior of the food itself, heating it
from the inside outwards. There is therefore no loss
of energy as the air, interior walls of the oven and
recipients (when adequate) do not heat up with
microwaves.
How the microwave oven works
In the microwave oven there is a high voltage valve
called "Magnetron" that converts electric energy to
microwave energy. These electromagnetic waves are
conducted to the inside of the oven cavity by means
of wave-guide and spread by a mode stirrer or by a
turntable.
In short, microwave ovens have the following
advantages:
1. Save on cooking time: in general there is a 3/4
reduction of the cooking time than with
conventional methods.
2. Ultra-quick defrosting that prevents bacteria
development.
3. Electricity saving.
4. Maintaining the nutritive value of the food due
to the cooking time reduction.
5. Easy cleaning.
Inside the oven the microwaves spread out in all
directions and are reflected by the metallic walls,
penetrating the food evenly.
27
Page 7
Why does the food heat up?
Most food contains water, whose molecules vibrate
with microwaves.
The friction between the molecules generates heat,
which causes a temperature rise in the food,
defrosting it, cooking it or keeping it warm.
As the heat is formed inside the food:
- It may be cooked with little or no liquid or fat;
- Defrosting, heating or cooking in the microwave
oven is quicker than in a conventional oven;
- Vitamins, minerals and nutritive substances are
preserved;
- There is no change in the natural colour and
smell of the food.
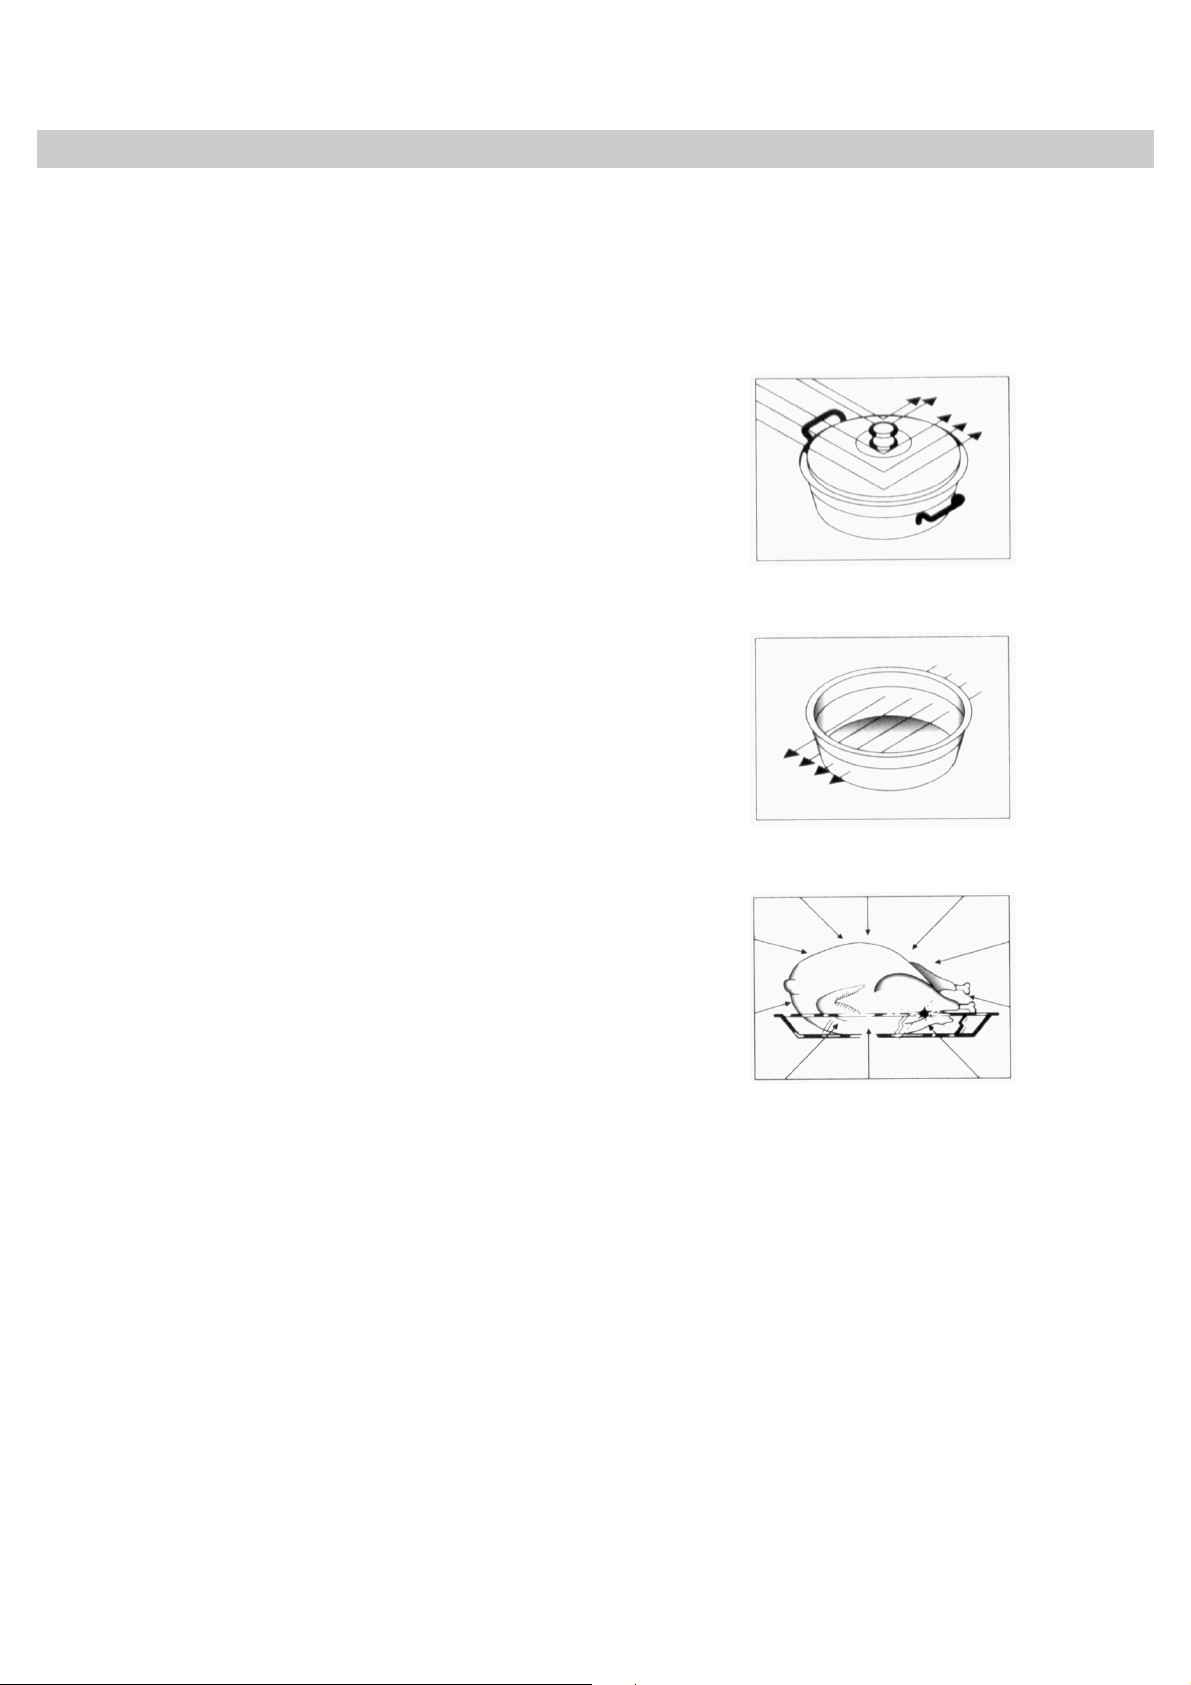
The microwaves pass through porcelain, glass,
cardboard or plastic but not through metal.
Therefore, recipients made of or containing metal
should not be used in the microwave oven.
The microwaves are reflected by the metal…
…they pass through glass, porcelain…
…they are absorbed by the food.
28
Page 8

Description of the appliance
1.
1. Glass window on the door 6.
1.1.
2.
2. Catch 7.
2.2.
3.
3. Mica covers 8.
3.3.
4.
4. Control panel 9.
4.4.
5.
5. Open button
5.5.
6. Slot for rotating base
6.6.
7. Motor coupling
7.7.
8. Rotating base
8.8.
9. Rotating plate
9.9.
29
Page 9

Operating Instructions
1.
1. Connect the oven to a suitable power source
1.1.
(see the Installation Instructions).
2.
2. Open the door by pressing the “open” button. In
2.2.
those models lacking this button, it is only
necessary to pull on the door. The oven’s
interior light should come on.
3.
3. Place the container with the food on the tray or
3.3.
grille.
4.
4. Select the desired function and cooking time in
4.4.
accordance with the description provided in the
following chapters.
5.
5. Close the door and press the START key.
5.5.
6.
6. The oven will commence operation. The digital
6.6.
screen will display the remaining operating time.
IMPORTANT NOTE
The control panel keys illuminate to facilitate the programming of the microwave oven. By default, the keys
that can be operated are illuminated in red. When one is selected it changes to green.
30
Page 10

Microwave Function
1.
1. Press the MICROWAVE key. This key will
1.1.
illuminate in green.
2.
2. Enter the operating time (for example 10
2.2.
minutes), by turning the ROTARY control in both
directions.
3.
3. To alter the microwave oven power level, press
3.3.
keys + and - . If these keys are not pressed, then
the oven will operate at maximum power.
4.
4. Press the START key. The oven will commence
4.4.
operation.
Thawing by time (Manual)
1.
1. Press the DEFROST BY TIME key. This key will
1.1.
illuminate in green.
2.
2. Enter the defrost time (for example, 10
2.2.
minutes), by turning the ROTARY control in both
directions.
3.
3. Press the START key. The oven will commence
3.3.
operation.
4.
4. When the oven switches itself off and beeps,
4.4.
open the door and stir the food. Close the door
again and press the START key in order to
continue the defrost process.
31
Page 11

Thawing by time (Manual)
The following table shows the various recommended thawing times and waiting times (to permit better
temperature uniformity) according to the type and weight of the food items.
Food Item Weight Thawing Time Waiting time Remarks
100 gm 3-4 min 5-10 min Turn once
200 gm 6-7 min 5-10 min Turn once
Pork, Beef, Veal
Chopped Meat
Minced Meat
Sausages and Cold Cuts
Poultry, and Poultry Pieces
Chicken, Turkey
500 gm 14-15 min 10-15 min Turn twice
700 gm 20-21 min 20-25 min Turn twice
1000 gm 29-30 min 25-30 min Turn three times
1500 gm 42-45 min 30-35 min Turn three times
500 gm 12-14 min 10-15 min Turn twice
1000 gm 24-25 min 25-30 min Turn three times
100 gm 4-5 min 5-6 min Turn once
300 gm 8-9 min 8-10 min Turn twice
500 gm 12-14 min 15-20 min Turn twice
125 gm 3-4 min 5-10 min Turn once
250 gm 8-9 min 5-10 min Turn once
500 gm 15-16 min 10-15 min Turn once
200 gm 7-8 min 5-10 min Turn once
500 gm 17-18 min 10-15 min Turn twice
1000 gm 34-35 min 15-20 min Turn twice
1200 gm 39-40 min 15-20 min Turn twice
1500 gm 48-50 min 15-20 min Turn twice
Fish
Trout 200 gm 6-7 min 5-10 min Turn once
Shellfish
Fruit
Bread
Butter 250 gm 8-10 min 10-15 min Turn once, keep covered
Cottage cheese 250 gm 6-8 min 5-10 min Turn once, keep covered
Cream 250 gm 7-8 min 10-15 min Remove the top
100 gm 3-4 min 5-10 min Turn once
200 gm 6-7 min 5-10 min Turn once
100 gm 3-4 min 5-10 min Turn once
500 gm 12-15 min 10-15 min Turn twice
200 gm 4-5 min 5-8 min Turn once
300 gm 8-9 min 10-15 min Turn twice
500 gm 12-14 min 15-20 min Turn three times
100 gm 2-3 min 2-3 min Turn once
200 gm 4-5 min 5-6 min Turn once
500 gm 10-12 min 8-10 min Turn twice
800 gm 15-18 min 15-20 min Turn twice
32
Page 12

Defrosting by Weight (Automatic)
1.
1. Press the DEFROST BY WEIGHT key. This key will
1.1.
illuminate in green.
2.
2. Enter the type of food, by pressing the + and -
2.2.
keys. If these keys are not pressed, the oven will
select food type 1 by default.
3.
3. Enter the food weight (for example, 1.2 kg) by
3.3.
turning the ROTARY control in both directions.
4.
4. Press the START key. The oven will commence
4.4.
operation.
5.
5. When the oven switches itself off and beeps,
5.5.
open the door and stir the food. Close the door
again and press the START key in order to
continue the defrost process.
The following table shows the various thawing programs by weight, the respective weight ranges and the
waiting time ranges (to permit better temperature uniformity).
Code
Code Food Item
CodeCode
Food Item Weight
Food ItemFood Item
Meat 0.1 – 1.5 kg 4 – 45 min 20 – 30 min
Poultry 0.1 – 1.5 kg 4 – 50 min 20 – 30 min
Fish 0.1 – 1.5 kg 4 – 45 min 20 – 30 min
Fruit 0.2 – 0.5 kg 2 – 13 min 5 – 10 min
Bread 0.1 – 0.8 kg 2 – 19 min 5 – 10 min
Weight Thawing Time
WeightWeight
Thawing Time Waiting Time
Thawing TimeThawing Time
Waiting Time
Waiting TimeWaiting Time
33
Page 13

General Thawing Instructions
1. Use suitable containers when thawing
(porcelain, glass or other material that is
suitable for using with microwave ovens).
2. The Thawing by Weight and Thawing by time
tables refer to raw food items and the weights
given do not include the containers.
3. The thawing time will vary depending on the
amount and height of the food items. Small
amounts will thaw more easily than large ones.
4. In the case of more delicate food items or those
with an irregular shape, it is recommended that
the smaller parts, such as the legs and wings of
poultry of fish fins be covered. Aluminium foil
should be used for this and removed after half
the thawing time has elapsed. The aluminium
foil should be at least two centimetres from the
microwave oven wall, otherwise it will cause
sparking.
5. Thick food items should be turned several
times.
6. The frozen food items should be evenly
distributed inside the microwave oven. Flat food
items will thaw more easily.
7. Food items containing a lot of fat, such as butter
or cottage cheese (a dairy product, which is
quite thick), together with cream, should not be
completely thawed. Only a few minutes of
waiting time are required so that these are
ready to be served and consumed. Cream that
was frozen should be whipped if there are still a
few frozen pieces remaining.
8. Poultry should be placed on a small plate upside
down so that they are able to drain better.
9. Bread should be wrapped in a serviette to
prevent it from drying out.
34
Page 14

Special Function: LIQUIDS
1. The special function key LIQUIDS should be
repeatedly pressed until the desired option
according to the following table is displayed. The
special function LIQUIDS indicator will light up.
Option Screen Preparation
Liquids 1
Liquids 2
Liquids 3
2. Press START. The micro-oven is turned on.
F 1.1
F 1.2
F 1.3
Special Function: RICE
1. The special function key RICE should be
repeatedly pressed until the desired option
according to the following table is displayed. The
special function RICE indicator will light up.
Option Water Screen Preparation
Rice 120g 225 ml
Rice 240g 480 ml
Rice 360g 675 ml
Rice 480g 850 ml
Place the liquid in a suitable container and place this
on the micro-oven tray.
F 2.1
F 2.2
F 2.3
F 2.4
Put the rice and the water in an adequate
microwave container with lid. If you want,
add salt, oil or other ingredients and mix
well. After the microwave oven stops, leave
the rice to rest for a few minutes.
2. Press START. The micro-oven is turned on.
Special Function: POTATOES
1. The special function key POTATOES should be
repeatedly pressed until the desired option
according to the following table is displayed. The
special function POTATOES indicator will light
up.
Option Screen Preparation
Potatoes, 250g
Potatoes, 500g
Potatoes, 1000g
2. Press START. The micro-oven is turned on.
F 3.1
F 3.2
F 3.3
Place the potatoes in a container, add 1-2 ladles of
water, cover and place this on the micro-oven tray.
35
Page 15

Special Function: THAW AND HEAT
1. The special function key THAW AND HEAT
should be repeatedly pressed until the desired
option according to the following table is
displayed. The special function THAW AND HEAT
indicator will light up.
Option Screen Preparation
Pre-cooked dishes
(1 ration 350-400 gm)
F4.1
Open the wrapper on the precooked dish (Cannelloni,
macaroni, gnocchi etc.) and place it on the micro-oven
tray or tip the contents out onto a plate. Cover
immediately.
Refried dishes / Stews
(Approx. 900-1000 gm)
F4.2
2. Press START. The micro-oven is turned on.
Place the refried dish/stew (for example: cabbage,
stewed chicken) into a container, cover and then place
it on the micro-oven tray.
36
Page 16

During operation...
The oven door may be opened at any time during the
cooking operation, in which case:
- THE PRODUCTION OF MICROWAVE POWER IS
IMMEDIATELY HALTED;
- The grill is switched, but remains at a high
temperature;
- The Timer is automatically stopped indicating the
remaining cooking time.
If necessary, it is now possible to:
- Stir or shake the food in order to improve
uniform cooking;
1. Select another function, by pressing the function
keys;
2. Adjust the microwave power level by pressing the
pre+ or - keys;
3. Adjust the remaining operating time by turning
the ROTARY control.
Close the door again and press the START key. The
oven will commence operation once again.
Interrupting Oven Operation
In order to stop oven operation before the end of the
programmed time, press the STOP key or open the
door.
If you do not intend to continue heating the food,
then close the door and press the STOP key once
again. The oven will beep and the Screen will display
the clock.
Energy Saving
This microwave has a special energy-saving mode
which cuts in automatically after ten minutes of
inactivity.
At the end of the operating time, the oven will switch
off, beep three times and the Screen will display the
word “End”. The beeps are repeated every thirty
seconds until the door is opened or the STOP key is
pressed.
In energy-saving mode, all the keys on the panel go
off and the display shows the time.
The energy saving mode is immediately deactivated
when a function key is pressed.
37
Page 17

Adjusting the Clock
1.
1. Press the CLOCK key until the digits start to
1.1.
flash.
2.
2. Enter the time value by turning the ROTARY
2.2.
control in either of the two directions.
3.
3. Press the CLOCK key now adjust the minutes
3.3.
value.
4.
4. Enter the minutes value by turning the ROTARY
4.4.
control in either of the two directions.
5.
5. Press the CLOCK key to end.
5.5.
Safety Block
1.
1. Oven operation may be blocked (for example, to
1.1.
prevent it from being used by children) by
pressing the STOP key for three seconds. At the
end of this time, the oven will beep and the
Screen will display four lines and oven operation
will be blocked.
2.
2. The clock may be displayed at any time by
2.2.
pressing the START key.
3.
3. To unblock the oven, press the START key for
3.3.
three seconds. At the end of this time, the oven
will beep and the Screen will display the clock
again.
38
Page 18

Advice for Good Usage of the Oven
Working with microwaves
Before using any dish, make sure that it is
appropriate for use in microwaves (SEE ADVICE ON
THE USE OF UTENSILS AND RECIPIENTS).
Always make a slit in the food's shell before cooking
it.
Whenever heating liquids use a recipient with a large
opening to allow the vapour to escape.
Remember that:
1. Larger quantities of food require more cooking
time.
2. The lower the food temperature the more
cooking time is needed.
3. Less dense foods cook faster.
4. An even distribution of the food in the oven
guarantees better results. The cooking of
different types of foods simultaneously is
possible by placing the dense food in an outside
circle and the less dense in the centre of the
plate.
5. Better results are achieved by allowing the food
to stand before serving because it continues to
cook for some time after the oven is switched
off.
6. The cooking time may be shortened and the
liquids preserved (the food doesn't dry out) by
covering the food. The lids should be
transparent to allow the microwaves through
and they should have a small opening for the
vapour to escape.
39
Page 19

Advice on the use of Cookware
Metal
Do not use metal dishes, tinned food, food wrapped
in tin foil and cutlery inside the microwave oven. The
metal reflects the microwaves and food is not
heated.
The food should be removed from its tin foil
containers and placed in dishes adequate for use in
the microwave oven. As microwaves don't penetrate
tin foil, the food heats only on the surface. By using
appropriate dishes, the heat is evenly distributed
throughout the food.
EXCEPTIONS:
EXCEPTIONS:
EXCEPTIONS:EXCEPTIONS:
To cook or defrost pieces of meat of irregular sizes,
you may cover the thinner parts with tin foil, which
should be kept at least 2 cm away from the oven
walls, otherwise these may cause an electric arc.
Metal spits may be used as long as they are smaller
than the pieces of meat.
Glass
All heat proof glass containers may be used. Crystal contains a percentage of lead, which may
cause it to crack if used in the microwave oven. The
same may happen to glass dishes with jagged
edges.
Porcelain
Porcelain dishes may be used but they should not
have hollow handles. Humidity may be formed inside
the hollow handles, which will causes an increase in
pressure that may cause them to break.
Glazed Ceramic Dishes
This type of dish may heat considerably.
Painted glazed ceramic dishes may be used if the
painting is done under the glaze.
Plastic
Plastic dishes should be heat resistant (at least
180° C) or they may be deformed when used in the
microwave. Melamine dishes are not suitable for use
in the microwave as they heat up too much.
Many glazes and colours contain metallic
substances. If this is the case they should not be
used in the microwave as they may be damaged.
Recipients with silver and gold glazes may go dark.
To cook or heat food in plastic bags, they should be
perforated to allow vapour to escape thus preventing
the bag from bursting.
40
Page 20

Wood
Wooden recipients should not be used in the
microwave. Wood contains water which evaporates
and may cause the recipient to crack.
Recipient Test
If in doubt about the use of glass, glazed ceramic or
porcelain dishes in the microwave oven, do the
following test:
1. Place the empty dish and a glass of water inside
the microwave oven.
2. Close the door.
3. Select the microwave function at maximum
power.
4. Adjust the timer to 1 minute.
Note: the oven starts
Lids
The use of glass lids, plastic lids or plastic film is
advisable because:
1. They prevent the release of excessive vapours
especially when cooking for longer periods.
2. They increase the speed of heating food.
If during this test you hear any noise along with
sparks, turn off the oven immediately.
Any kind of cookware that has this kind of behaviour
or is very hot when removed from the oven should
not be used in the microwave oven.
EXCEPTIONS:
EXCEPTIONS:
EXCEPTIONS:EXCEPTIONS:
Glazed ceramic dish recipients contain many water
molecules and heat a lot, but can be used in the
microwave oven.
If in doubt, contact the supplier of the cookware, and
make sure that they are appropriate for microwaves.
The lids should have holes to avoid pressure. Plastic
film should be perforated.
Baby bottles, baby food jars and other similar
recipients should be warmed up without lids as they
can burst.
3. They prevent the food from drying up.
4. They prevent the loss of the food aroma.
41
Page 21

Oven Maintenance
Cleaning
MAKE SURE THAT THE OVEN IS UNPLUGGED
BEFORE CLEANING THE OVEN.
DON'T USE ABRASIVE CLEANING PRODUCTS.
OUTSIDE
1. Clean the outside surface with a neutral
detergent, warm water and dry it with a damp
cloth.
2. Avoid water from entering the oven ventilation
holes.
INSIDE
1. Clean the oven walls with a damp cloth after
each use.
2. Avoid water from entering the ventilation holes
in the oven's interior.
Light Replacement
3. If some time has passed by since the last
cleaning and the oven's interior is dirty, place a
glass of water on the tray and switch on the
oven for 4 minutes on the highest setting.
Moisture will form on the oven walls that will be
easily cleaned.
4. The tray can be washed with regular dish
washing detergent or in the dishwasher.
DOOR, DOOR SEAL, AND OVEN FRONT
1. These parts should always be clean, especially
the contact surface between the door and the
oven front, to prevent microwave leakage.
2. Use neutral detergent, warm water and dry the
surface with a soft cloth.
In some models the light may be replaced by the
user. These ovens have a lid on the left-hand side.
To replace the light, do as follows:
1. Unplug the oven;
2. Remove the lid from the light compartment;
3. Replace the light bulb for a new one (25 W);
4. Replace the lid.
WARNING
WARNING: in the models without the lid to re
WARNINGWARNING
the light bulb, this should be done by the Technical
the light bulb, this should be done by the Technical
the light bulb, this should be done by the Technical the light bulb, this should be done by the Technical
Assistance Service because special tools are
Assistance Service because special tools are
Assistance Service because special tools are Assistance Service because special tools are
required.
required.
required.required.
: in the models without the lid to replace
: in the models without the lid to re: in the models without the lid to re
place
place place
42
Page 22

Official Technical Assistance Service (T.A.S.)
Solving Problems
Repairs or interventions carried out by an
unqualified serviceman can cause dangerous
situations.
Every and any kind of repair or intervention should
be done by the manufacturer, authorised agents or
qualified technicians.
Cord Replacement
If the cord is damaged, it should be replaced by the
manufacturer, authorised agents or qualified
technicians in order to avoid any dangerous situation
and also because special tools are required.
If you detect any abnormalities in the oven, check
the following before you contact T.A.S:
1. Check if the outlet into which the oven is
plugged has power. To do so, plug another
appliance into the same outlet and check if it
works.
2. If the oven lamp switches on, but the food does
not heat up, check if the door is well closed (if
the door is not properly closed, no microwaves
will be produced).
43
Page 23

Technical Features
Description of functions
Symbol
Symbol Description
SymbolSymbol
Description Power
DescriptionDescription
Power Foods
PowerPower
Foods
FoodsFoods
P 01 ------------- 160W
Slow defrosting for delicate foods, keeping food hot
Cooking at low heat, boiling rice.
P 02 ------------- 320W
Fast defrosting.
Melting butter.
P 03 ------------- 480W
Heating baby food.
Microwave
Cooking vegetables and other foods.
Cooking and heating carefully.
P 04 ------------- 640W
Heating and cooking small quantities.
Heating delicate foods.
P 05 ------------- 800W
Cooking and heating liquids and other foods fast.
Specifications
- AC voltage..................................................................................................................
- Fuse........................................................................................................................... 12 A / 250 V
- Power required.......................................................................................................... 1200 W
See rating plate
- Microwave output power.......................................................................................... 800 W
- Microwave frequency… ............................................................................................ 2450 MHz
- Outer dimensions (W×A×D)...................................................................................... 595 × 390 × 325 mm
- Cavity dimensions (W×A×D)..................................................................................... 305 × 210 × 280 mm
- Oven capacity............................................................................................................ 20 l
- Weight........................................................................................................................ 18,6 kg
44
 Loading...