

Kuppersbusch EKWE320S, EKWH320.18Z, EKWH320.14, EKWH320.18, EKWE 320.W Installation Instructions Manual
...
Installation instructions
Important - Save for the local electrical inspector’s use.
EKWE / EKWH
072596 K61

2 Installation instructions - EKWE/EKWH - USA
For your information...
Be sure to read the information in this manual carefully before
you install the honeycombs.
Please keep this manual in a safe place and pass it on to
future owners for their information and safety.
The following symbols are used in this operating manual:
[
The warning triangle will alert you about possible health
risks or things that can cause potential damage to your
appliance.
F
You’ll find useful hints and information when you see this
symbol.
Warranty
This warranty is extended to the original purchaser and
succeeding owners for products purchased for ordinary home
use. It does not cover its use in a commercial situation. Should
the appliance be sold by the original purchaser during the
warranty period, the new owner will continue to be protected
until the expiration date of the original purchaser’s warranty
period. Save your dated receipt or other evidence of the
installation/occupancy date. Proof of original purchase date is
needed to obtain service under warranty. The warranty applies
even if the owner should move during the warranty period.
KÜPPERSBUSCH does not assume any responsibility for consequential or incidental damages. This warranty provides you
with certain legal rights. You may also have other rights which
may vary from state to state.
What Is Covered
For one full year from the date of the original purchase, we
will provide parts, service and labor in your home to repair or
replace any part of the cook top that fails because of a defect
in materials or workmanship. This service is provided free of
charge. All warranty service will be provided by our authorized
Customer Care professionals during normal business hours.
What Isn’t Covered
1. Service by an unauthorized agency will not be reimbursed.
Likewise, the warranty doesn't cover any damage or
repairs due to service performed by an unauthorized
agency, or by the use of unauthorized parts.
2. Service visits to teach you how to use the appliance.
3. Service visits to correct the installation. You are
responsible for providing electrical wiring and other
connecting facilities.
4. Reset circuit breakers or replace home fuses.
5. Damage resulting from accident, alteration, misuse,
improper installation, abuse or installation not in
accordance with local electrical codes, or improper
storage of the appliance.
6. Repairs due to other than normal household use.
Disposing of the packaging
and the old appliance
Be sure to dispose of the transport packaging properly.
Disposal should not have a negative impact on the
environment. Recycling the packaging saves raw materials
and reduces the amount of waste.
Be sure to dispose of your old appliance properly, as well.
Even if it can no longer be used, it still contains useful
materials. Before discarding an old appliance, disconnect the
power cord to prevent it from becoming a hazard.
Contents
Safety instructions . . . . . . . . . . . . . . . . . . . . . . . 3
General. . . . . . . . . . . . . . . . . . . . . . . . . . . . . . . 3
Installation conditions . . . . . . . . . . . . . . . . . . . . . 3
Dimensions and distances . . . . . . . . . . . . . . . . . 4
An overview of the honeycomb dimensions . . . . . . 5
Cooking unit EKWH 320.14 / 320.18 / 320.18 Z
Control unit EKWE 320.W / S
Installing the honeycombs/honeycomb cooking units 6
Instructions for installing the honeycombs
Measuring and marking out the worktop cut-outs
Marking out the cut-out
Cut-out in worktops made of solid surface
Cut-out in stone worktops
Electrical connection. . . . . . . . . . . . . . . . . . . . . 11
Connecting the honeycomb cooking units to the
control honeycomb and to the power module
Programming the control honeycomb in
accordance with the cooking zone layout . . . . . . 13
For technical information and/or
replacement parts, please contact the
Küppersbusch Customer Care line
at
1-800-459-0844
For the most efficient assistance,
please have the Model and Serial
numbers for the appliance available.

Installation instructions - EKWE/EKWH - USA 3
Safety instructions
• Turn off the power source before installing the honeycomb cooktop.
• Do not operate the appliance until it has been properly installed within
cabinetry or into an opening in the countertop!
• Only qualified personnel should perform installations and repairs on
electrical appliances. Do not repair or replace any part of the appliance
unless specifically recommended in this manual. Do not put your safety at
risk.
• The glass ceramic surface is very durable and can easily withstand light
to medium blows and loads distributed over large areas. You should avoid
dropping concentrated loads like spice bottles onto the surface. The
impact of such items can damage the cooking surface.
• If the cooking surface becomes fractured or cracked, quit using it
immediately. Disconnect the power source and call Customer Service.
• The connecting cables must not come in contact with the hot cooking
surface.
General
Only KÜPPERSBUSCH built-in cooktops have been designed and tested for
installation above a KÜPPERBUSCH built-in oven. No other cooktops may be
used above the oven.
• Do not use a screw driver to lift the honeycombs out of the opening or
you could damage them. Instead, press the honeycombs out from the
bottom of the opening in the countertop or cabinetry.
Installation conditions
– Make sure the plastic finish or the veneer of the built-in kitchen furniture
has a heat-resistant adhesive (160 °C / 320 °F).
– The countertop must be perfectly horizontal and the opening for the
honeycomb cooktop must be cleanly cut.
– Make sure there aren't any cross bars underneath the cut-out for the
appliance. Make any necessary adjustments.
4 Installation instructions - EKWE/EKWH - USA
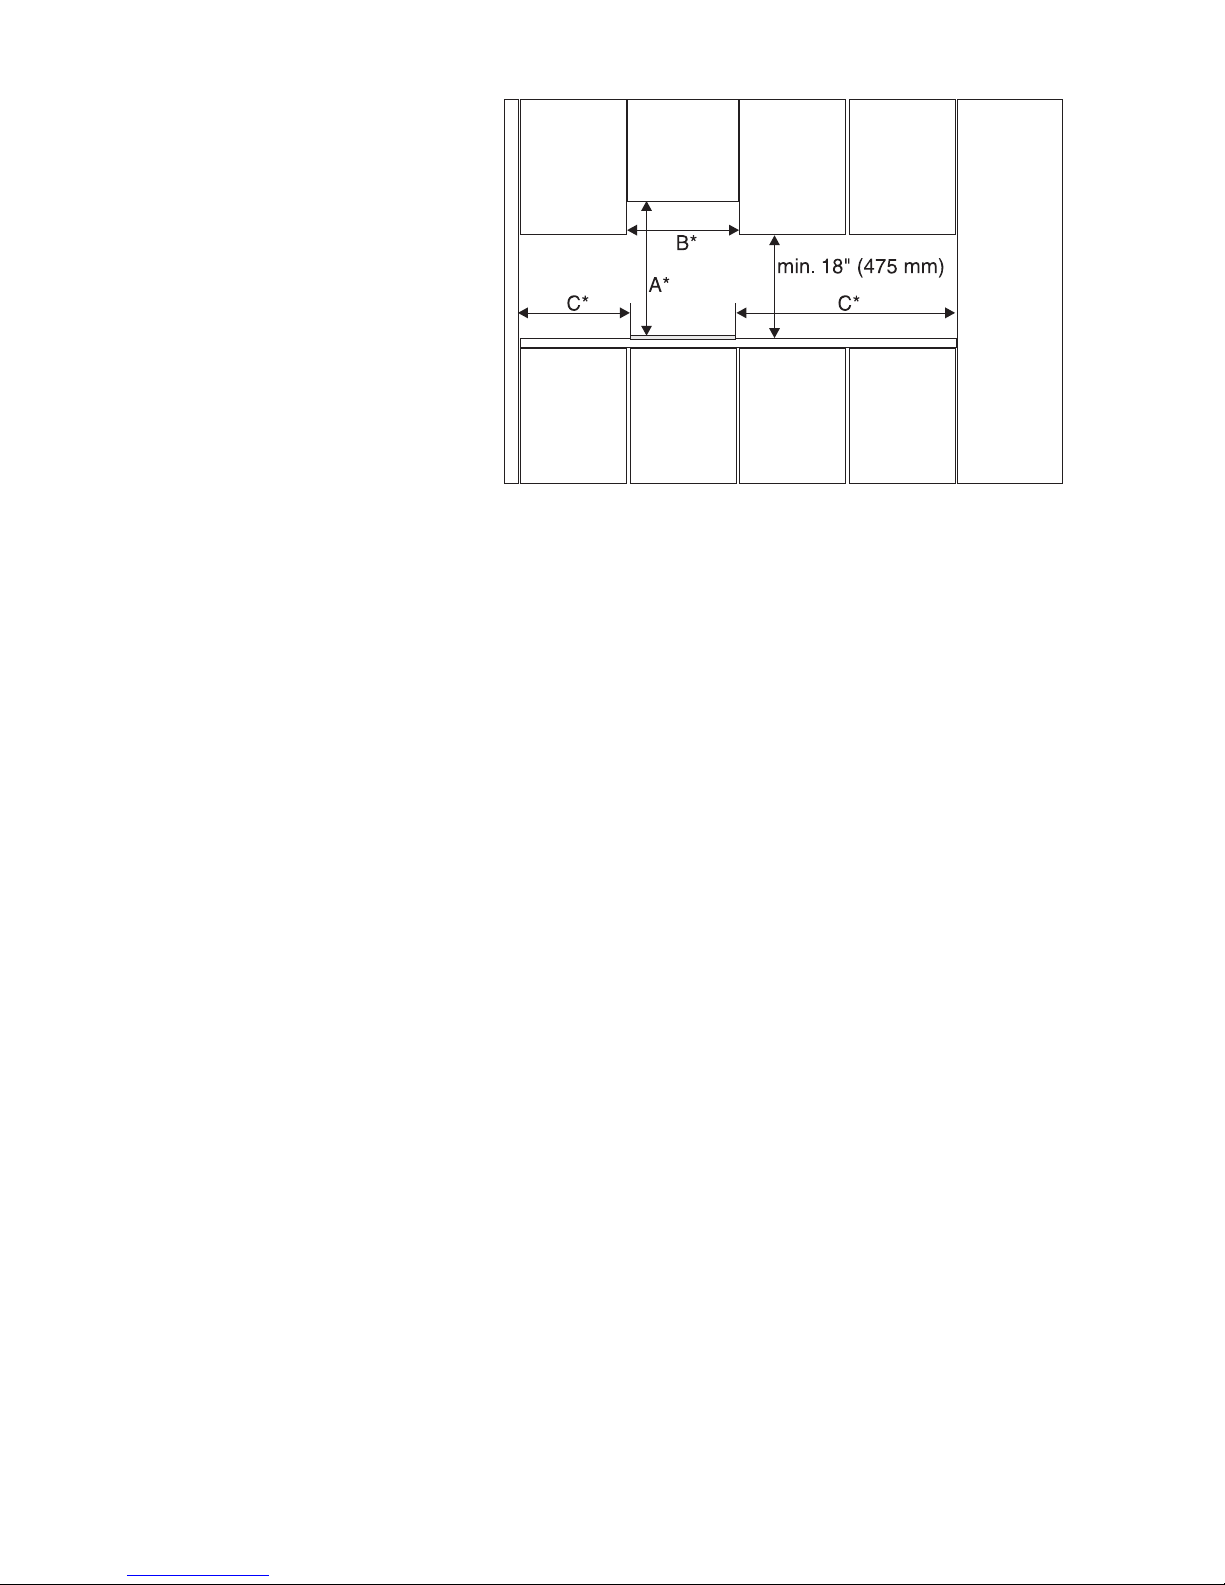
Dimensions and distances
Concerning A*: A = 30 inches minimum clearance between the top of the
cooking suface and the bottom of an unprotected wood or metal cabinet or
A = 24 inches minimum when bottom of wood or metal cabinet is protected
by not less than 1/4-inch-thick flame-retardant millboard covered with not
less than No. 28 MSG sheet steel, 0.015-inch-thick stainless steel, 0.024inch-thick aluminium, or 0.020-inch-thick copper.
Hoods above the cook top should be at least 650 mm (26") away from the
cook top.
Concerning B*: Minimum distance corresponds to the width of the appliance.
To eliminate the risk of burns or fire by reaching over heated surface units,
cabinet storage space located above the surface units should be avoided. If
cabinet storage is to be provided, the risk can be reduced by installing a range
hood that projects horizontally a minimum of 5 inches beyond the bottom of
the cabinets.
Concerning C*: This appliance can be mounted with two sides to a wall or
a cabinet side with a distance of at least 40 mm (1-9/16"). The third side
may only be positioned next to an appliance of equal height.
We recommend a horizontal distance between the appliance and mounted
cabinets of at least 300 mm (12") for ergonomical reasons.

Installation instructions - EKWE/EKWH - USA 5
An overview of the honeycomb dimensions
Cooking unit EKWH 320.14 / 320.18 / 320.18 Z
Control unit EKWE 320.W / S
Glass ceramic panel
Silicon bonding compound
Metal support
Metal base panel
Cable clamp
Side view
View from top
View from
bottom
(all dimensions in mm)
Glass ceramic panel
Silicon bonding compound
Metal support
Metal base panel
Side view
View from top
View from
bottom
(all dimensions in mm)
 Loading...