

Page 1
EKV 6800.1M
EKV 6800.1M
ISTRUZIONI DI USO E DI MONTAGGIO
USE AND ASSEMBLY INSTRUCTIONS INSTRUCTIONS DE MODE D'EMPLOI ET D'ENTRETIEN BEDIENUNGS-UND MONTAGEANLEITUNG
INSTRUCCIONES DE EMPLEO Y DE MONTAJE
Page 2
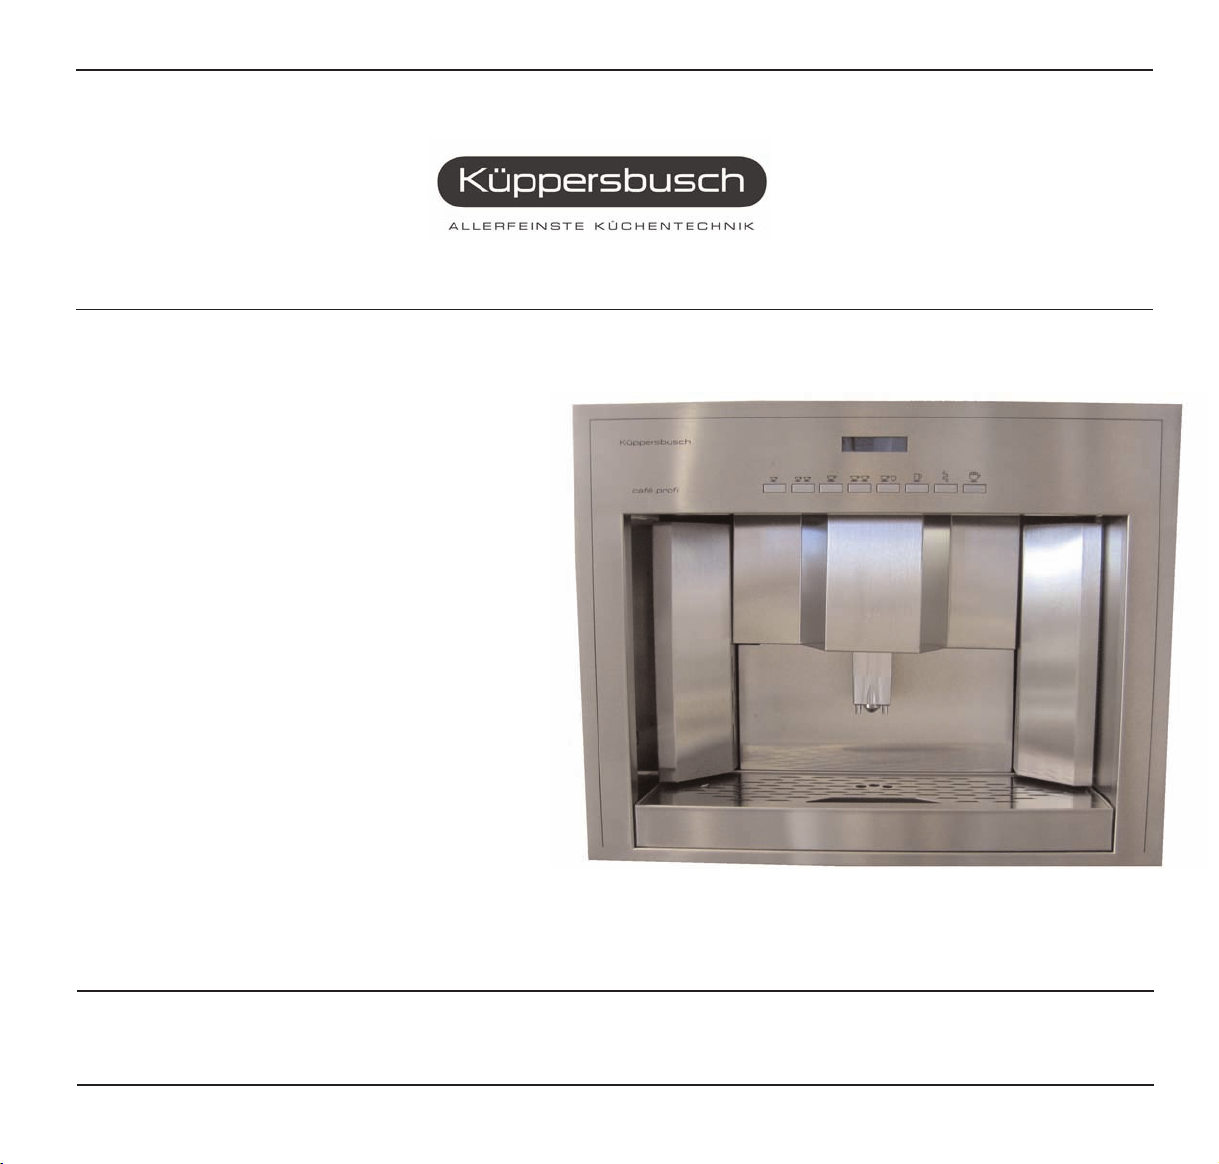
UK
Congratulations ,
upon the wise choice you have made by purchasing the EKV 6800.1M model.
Please read the information in this manual carefully before you operate the coffee machine.
Here you will find important indications regarding your safety and the care and maintenance of the appliance that will allow you satisfactory use over a
long term. Should any breakdown occur, first see the section entitled “Troubleshooting”. Often it is possible to repair small failures independently, thereby avoiding the costs of repairs.
This machine has been built in conformity with the directives EEC 89/392, EEC 89/336, EEC 73/23, EEC 89/109 and subsequent amendments.
The quality and reliability of this product are guaranteed by the fact that it has been built according to the UNI EN ISO 9001: 2000 COMPANY QUALITY SYSTEM.
With best wishes.
Küppersbusch
ENGLISH
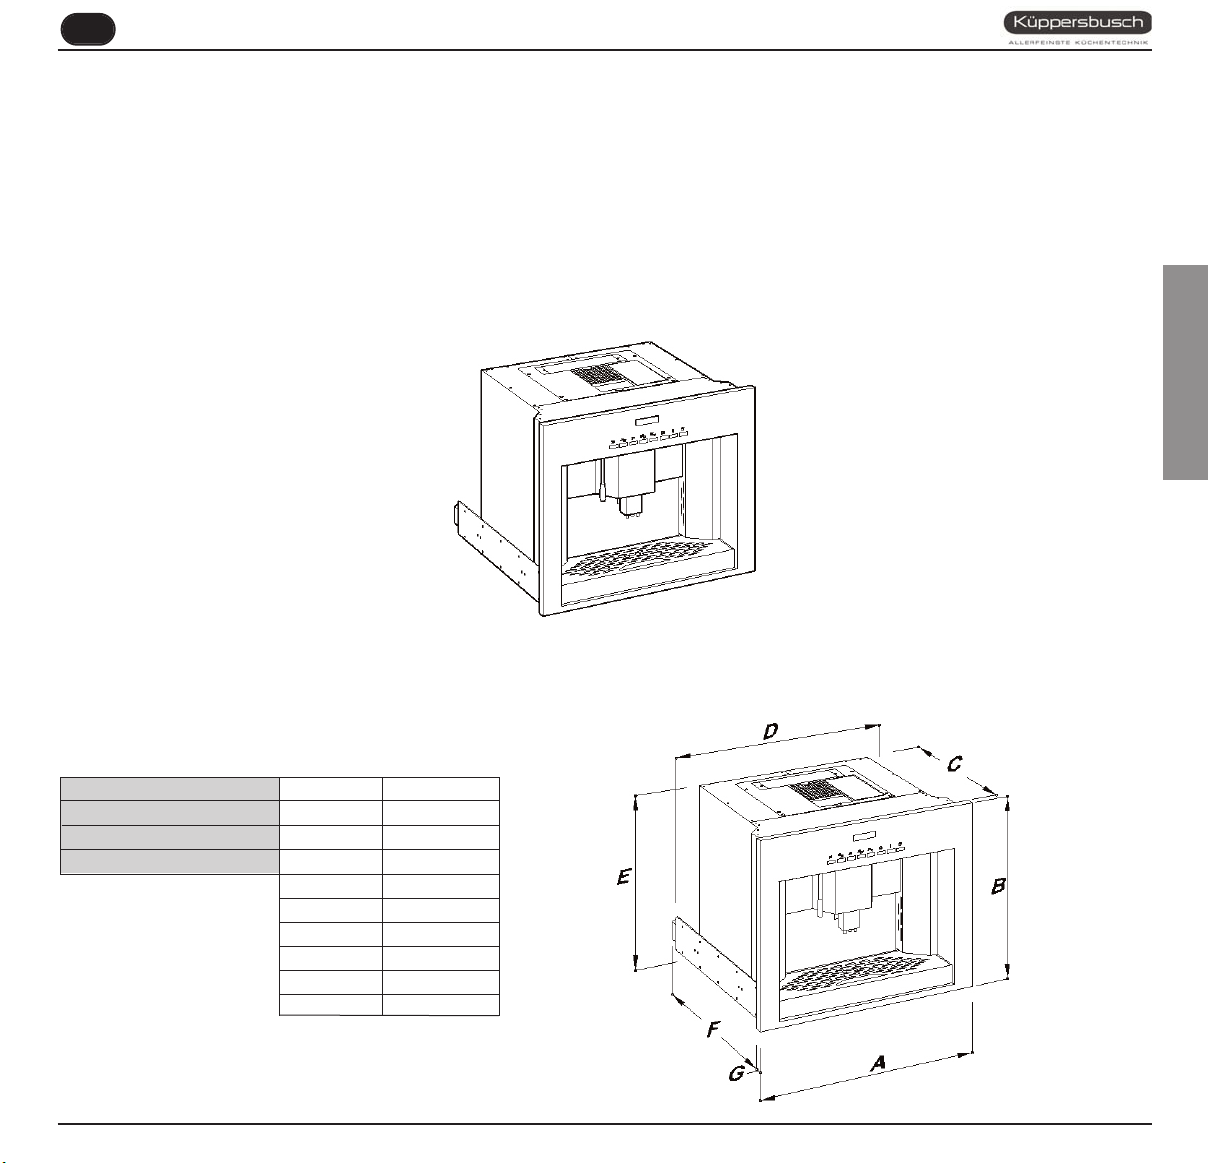
TECHNICAL CHARACTERISTICS
NET WEIGHT 52 Kg 114 Lb
GROS WEIGHT 63 Kg 139 Lb
POWER 1800 W 1800 W
A
DIMENSIONS A 596 mm
B 462 mm
C 442 mm
D 562 mm
E 445 mm
F 546,5 mmF21,52inc
G 20 mm
Rel. 00 - 2006
23,47 inc
B
18,1 9 inc
C
17,4 inc
D
22,13 inc
E
17,52 inc
E
0,08inc
EKV 6800.1M
35
Page 3
UK
1.
1.1
1.2
2.
3.
3.1
3.2
3.3
ENGLISH
4.
4.1
4.2
4.3
4.4
5.
5.1
5.2
5.3
5.4
5.5
5.6
INDEX
TECHNICAL CHARACTERISTICS . . . . .35
DESCRIPTION . . . . . . . . . . . . . . . . . . . .37
KEYBOARD DESCRIPTION (Standard configuration) . . .38
MICROBAR INTERNAL DESCRIPTION . . . . . . . . . . . . .38
SAFETY INSTRUCTIONS . . . . . . . . . . . .39
TRANSPORT AND HANDLING . . . . . . . .41
MACHINE IDENTIFICATION . . . . . . . . . . . . . . . . . . .41
TRANSPORT . . . . . . . . . . . . . . . . . . . . . . . . . . . . . . .41
HANDLING . . . . . . . . . . . . . . . . . . . . . . . . . . . . . . . . .41
PRELIMINARY OPERATIONS . . . . . . . . .42
FILLING THE APPLIANCE . . . . . . . . . . . . . . . . . . . .42
MACHINE INSTALLATION
(VERSION FOR DIRECT CONNECTION) . . . . . . . . . .42
SWITCHING ON . . . . . . . . . . . . . . . . . . . . . . . . . . . .43
SWITCHING OFF . . . . . . . . . . . . . . . . . . . . . . . . . . .44
ASSEMBLY INSTRUCTIONS FOR
QUALIFIED PERSONS . . . . . . . . . . . . . . .45
INSTRUCTIONS FOR BUILT-IN ASSEMBLY . . . . . . . .45
EKV 6800 .1M BUILT-IN UNIT DIMENSIONS . . . . . . .45
BUILT-IN INSTALLATION . . . . . . . . . . . . . . . . . . . . .45
NUMBER OF SPACER PLATES . . . . . . . . . . . . . . . . . .46
DISASSEMBLY . . . . . . . . . . . . . . . . . . . . . . . . . . . . . .46
TECHNICAL DATA . . . . . . . . . . . . . . . . . . . . . . . . . . .47
7.9
7.10
8.
8.1
8.2
8.3
8.4
8.5
9.
9.1
9.2
9.3
9.4
10.
10.1
10.2
10.3
10.4
11.
12.
HOW TO MAKE CAPPUCCINO . . . . . . . . . . . . . . . . .51
DISPENSING HOT WATER . . . . . . . . . . . . . . . . . . . . . .52
PROGRAMMING . . . . . . . . . . . . . . . . . . .53
LEGENDA . . . . . . . . . . . . . . . . . . . . . . . . . . . . . . . . . .53
PROGRAMMING . . . . . . . . . . . . . . . . . . . . . . . . . . . . .53
EXITING PROGRAMMING
PROGRAMMING CYCLE
USER MODE . . . . . . . . . . . . . . . . . . . . . . . . . . . . . . . .54
PROGRAMMING CYCLE
TECHNICIAN MODE . . . . . . . . . . . . . . . . . . . . . . . . . . .56
. . . . . . . . . . . . . . . . . . . . .54
SPECIAL MACHINE
SCALING FUNCTIONS . . . . . . . . . . . . . .60
RESETTING THE CLEANING FILTRE
LITRE COUNTER . . . . . . . . . . . . . . . . . . . . . . . . . . . .60
RESETTING WASHING CYCLES . . . . . . . . . . . . . . . .60
RESETTING MACHINE PARAMETRES . . . . . . . . . . .60
HANDLING MANUAL COFFEE DELIVERY GROUP
’ . .60
CLEANING AND MAINTENANCE . . . . . .61
CLEANING THE OUTSIDE OF THE MACHINE . . . . . .61
CLEANING THE DELIVERY UNIT
AND THE MILK FOAMER . . . . . . . . . . . . . . . . . . . . . .62
REINSTATING AN INTERRUPTED
WASHING CYCLE . . . . . . . . . . . . . . . . . . . . . . . . . . .63
CLEANING THE MILK FOAMER . . . . . . . . . . . . . . . .63
STANDARD SETTING TABLE . . . . . . . .64
MACHINE FUNCTIONS MESSAGES . . . .65
6.
6.1
6.2
6.3
7.
7.1
7.2
7.3
7.4
7.5
7.6
7.7
7.8
36
ADJUSTMENTS TO BE MADE
BY A QUALIFIED TECHNICIAN ONLY . .48
GRINDING ADJUSTMENT . . . . . . . . . . . . . . . . . . . . .48
CAPPUCCINO MAKER AIR ADJUSTMENT
(foam amount and density . . . . . . . . . . . . . . . . . . . .48
MILK FLOW ADJUSTMENT
(Temperature adjustment) . . . . . . . . . . . . . . . . . . . .48
USE . . . . . . . . . . . . . . . . . . . . . . . . . . . .49
STANDARD CONFIGURATION . . . . . . . . . . . . . . . . .49
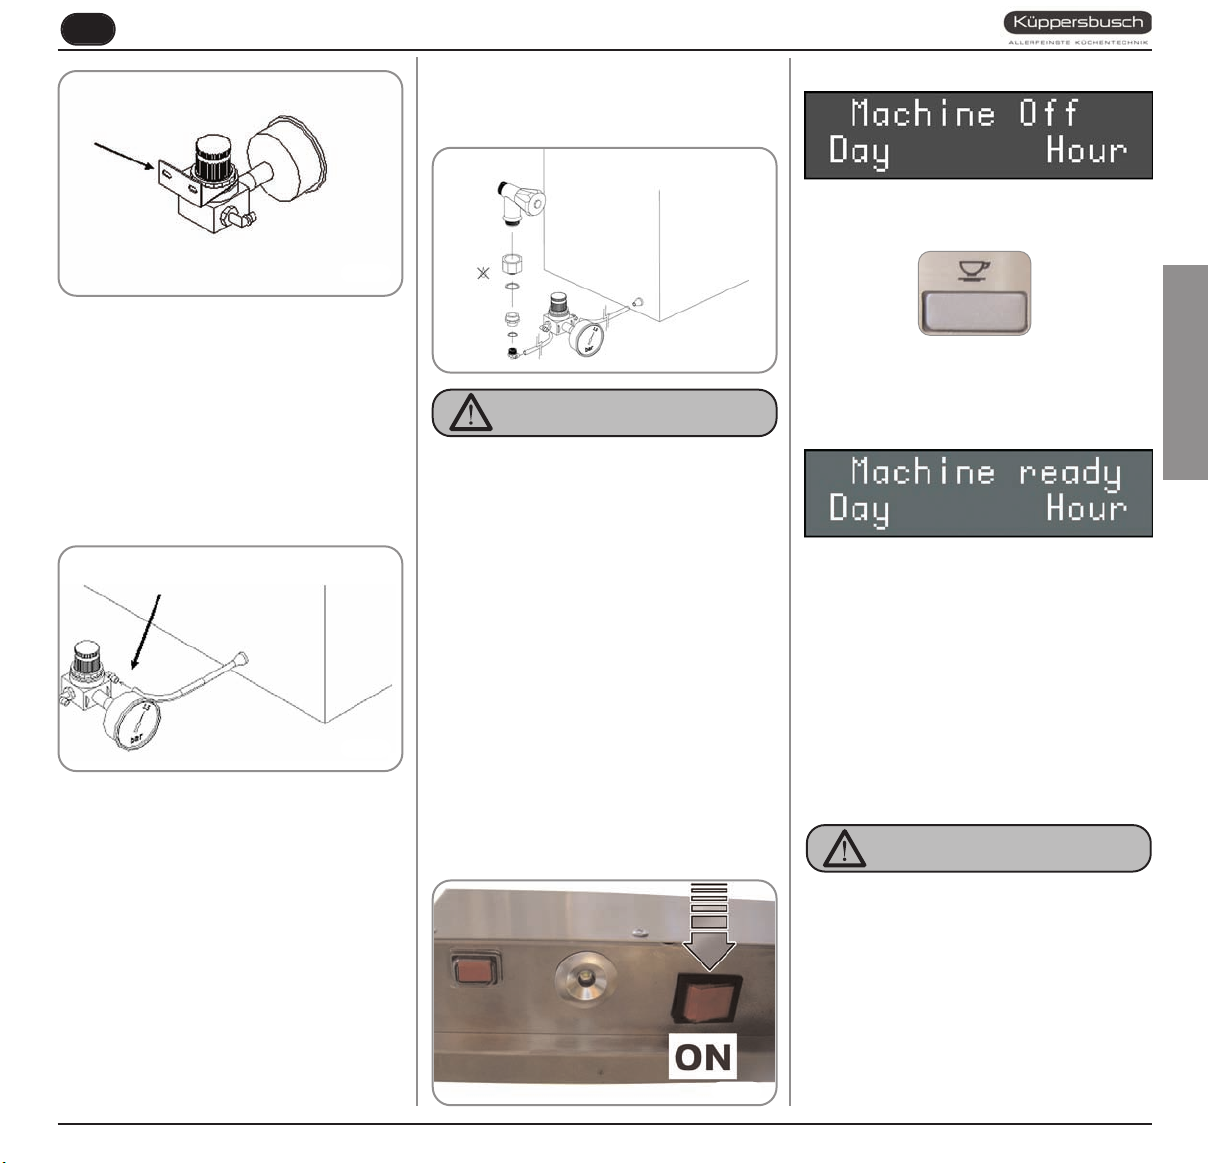
SWITCHING ON . . . . . . . . . . . . . . . . . . . . . . . . . . . . .49
SWITCHING OFF . . . . . . . . . . . . . . . . . . . . . . . . . . . .49
HEIGHT-ADJUSTABLE COFFEE DISPENSER . . . . . . . .50
HOW TO MAKE COFFEE . . . . . . . . . . . . . . . . . . . . . .50
HOW TO MAKE 2 COFFEES . . . . . . . . . . . . . . . . . . .50
PREPARING DECAFFEINATED COFFEE IN POWDER 51
PREPARING LONG COFFEE . . . . . . . . . . . . . . . . . . . . .51
EKV 6800.1M
13.
MACHINE BLOCK
ALARM MESSAGES . . . . . . . . . . . . . . . .67
Page 4
UK
1.
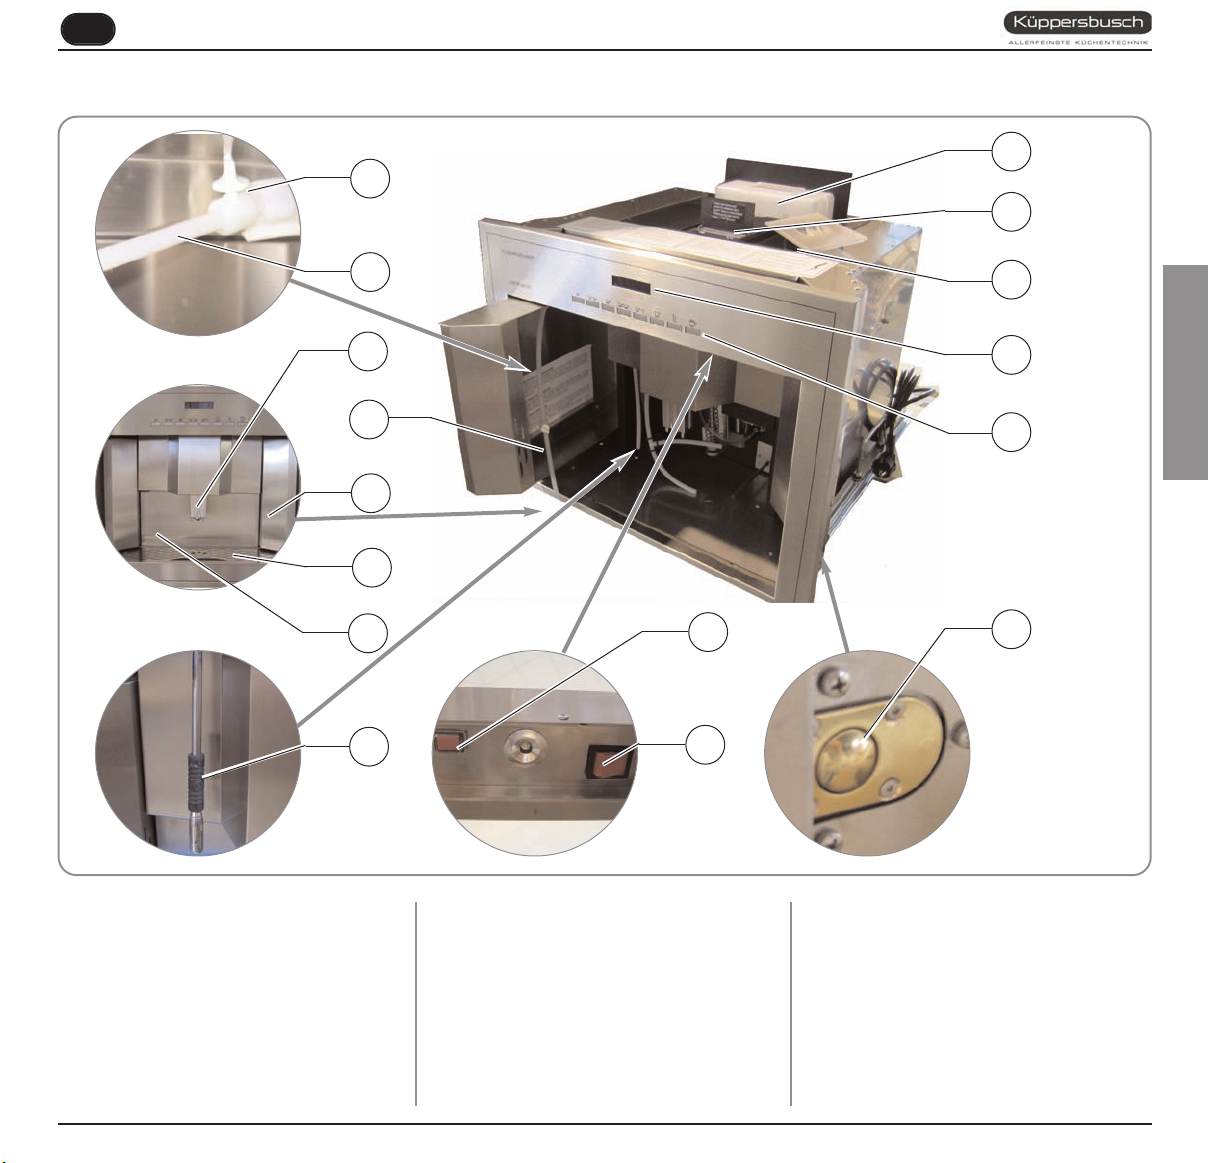
DESCRIPTION
16
1
15
2
14
ENGLISH
3
4
5
6
7
9
13
12
11
KEY
1 Adjustment valve
2 Milk suction tube
3 Coffee dispenser
4 Milk container compartment
5 Removable coffee cup compartment
6 Drip grille
8
7 Drawer for coffee grounds
8 Hot water pipe
9 LED lighting key
10 ON/OFF key
10
Fig. 1
13 Display
14 Coffee bean container
15 Ground coffee container
16 Water tank
11 Outer door release
12 Control panel
EKV 6800.1M
37
Page 5
UK
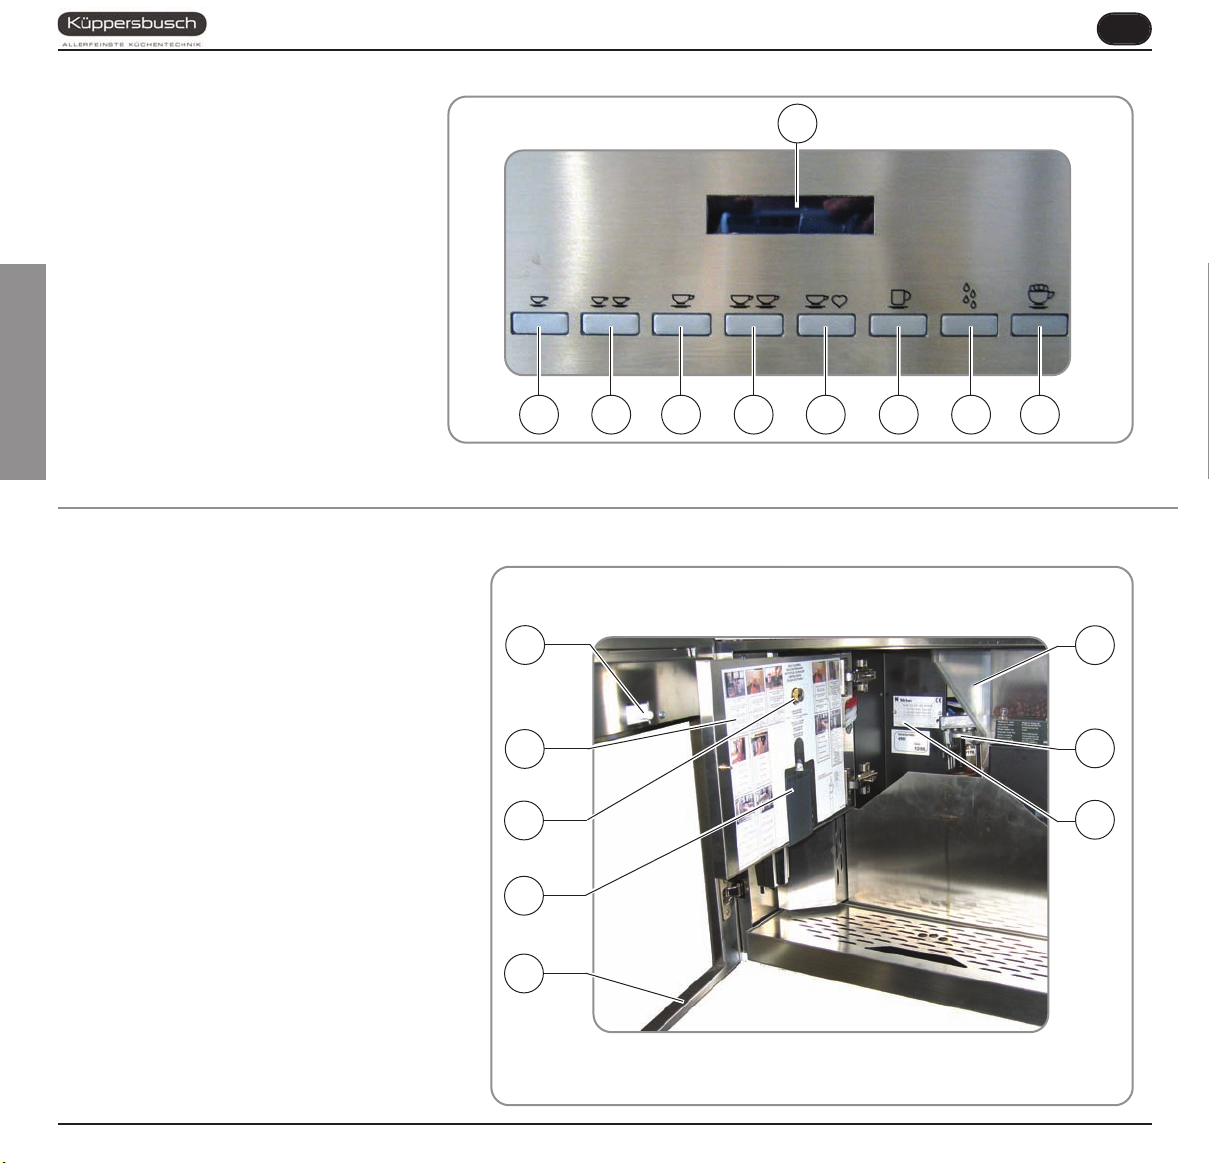
1.1
KEYBOARD
DESCRIPTION
(Standard configuration)
KEY
1
1 Espresso key
2 2 Espressos key
3 1 White coffee key
4 2 White coffees key
5 Decaffeinated coffee, Wash
cycle
6 Long coffee
7 Hot water dispensing
8 Cappuccino
ENGLISH
9 LCD display
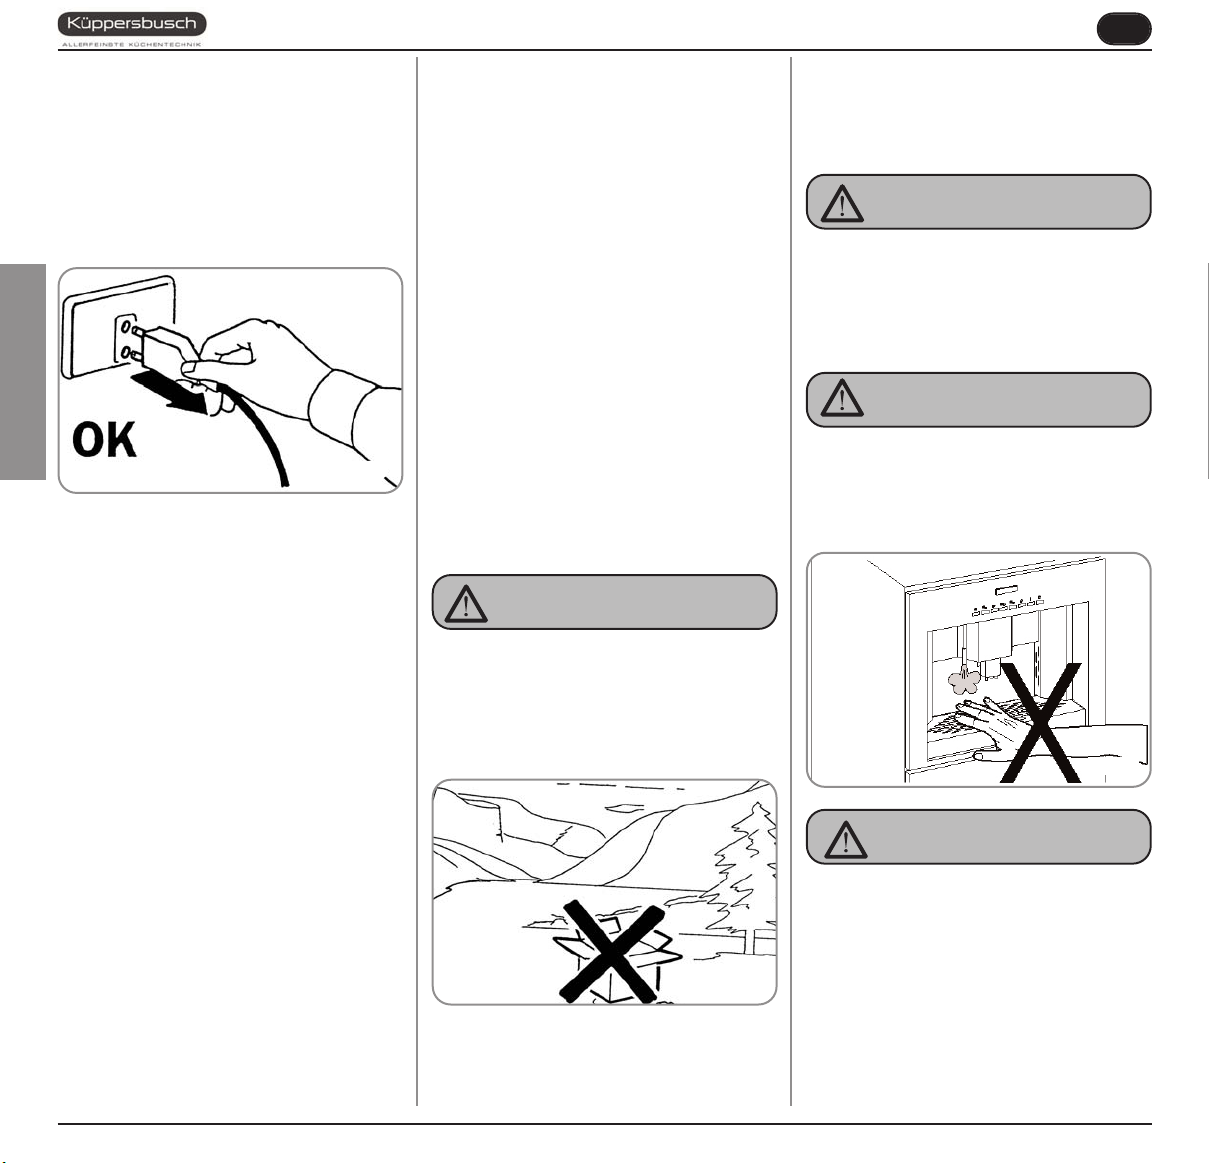
1.2
EKV 6800. 1M INTERNAL DESCRIPTION
KEY
9
87654321
Fig. 2
1
6
1 Microswitch for outer door
2 Inside door open
3 Cappuccino maker air adjustment
4 Cappuccino maker with tubes
5 Outer door open
6 Ground coffee conveyor
7 Infusion group
8 Rating plate
38
EKV 6800.1M
2
3
4
5
7
8
Fig. 3
Page 6

UK
2.
☞
☞
SAFETY INSTRUCTIONS
Parts of the packaging can be harmful to children. Danger of suffocation!
Keep packaging out of the reach of
children.
After unpacking, make sure the appliance is complete. In case of doubts,
do not use the appliance, but consult
a qualified technician.
RISK OF POLLUTION
ried out by a qualified electrician who
must ensure that the electric power
of the system is sufficient to absorb
the maximum power input stated on
the plate.
In particular you must ensure that the
size of the wiring cables is sufficient
☞
to absorb power input.
The use of adapters, multiple sockets
or extensions is strictly forbidden. If
they prove necessary, call a fully
qualified electrician.
Fig. 5
This appliance must only be used as
☞
described in this handbook. The
manufacturer shall not be liable for
any damage caused due to improper,
incorrect and unreasonable use.
Basic rules must be observed when
☞
using any electric appliance.
In particular:
• do not touch the appliance when
hands or feet are wet;
CAUTION
RISK OF ELECTRIC SHOCK
ENGLISH
Before connecting the appliance make sure the rating
☞
plate data correspond with the
mains. This plate is on the front panel
at the top right hand side of the appliance. The appliance must be
installed by qualified technicians in
accordance with current standards
and manufacturer’s instructions.
The manufacturer is not liable for any
damage caused due to failure to
ground the system. For the electrical
safety of the appliance, it is necessary to equip the system with the
proper grounding. This must be car-
Fig. 4
The machine must be installed
☞
according to the local standards in
force with regard to plumbing systems. For this reason, the plumbing
connections must be carried out by a
qualified technician.
Fig. 6
• do not use the appliance when
barefoot;
• do not use extensions in bath or
shower rooms;
• do not pull the supply cord out of
the socket to disconnect it from
the mains;
• do not leave the appliance
exposed to atmospheric agents
(rain, sun, etc.);
• do not let the appliance be used
by children, unauthorised staff or
staff who have not read and fully
EKV 6800.1M
39
Page 7
UK
Before servicing the appliance, the
☞
authorised technician must first
switch off the appliance and remove
the plug.
ENGLISH
To clean the appliance, set the
☞
machine to the “0” energy level, that
is, “WITH THE MACHINE SWITCHED
OFF AND THE PLUG REMOVED
FROM THE MAINS” and follow the
instructions in this handbook.
If the appliance breaks down or fails
☞
to work properly, switch it off. Any
intervention is strictly forbidden.
Contact qualified experts only.
Repairs should only be made by the
manufacturer or authorized service
centres. Only original spare parts
must be used. Failure to observe the
above, could make the appliance
unsafe.
For installation, the qualified electri-
☞
cian must fit an omnipolar switch in
accordance with the safety regulations in force and with 3 (0,12) or
more mm (in) between contacts.
understood the contents of this
handbook.
Fig. 7
To avoid dangerous overheating,
☞
make sure the supply cord is fully
uncoiled.
Do not obstruct the suction and/or
☞
dissipation grilles.
The user must not replace the appli-
☞
ance supply cord. If the cord is damaged, switch off the appliance and
have a qualified technician change
the cord.
If no longer using the appliance, we
☞
recommend making it inoperative;
after removing the plug from the
mains electricity, cut the power supply cable.
CAUTION
RISK OF POLLUTION
Do not dispose of the machine in the
☞
environment: to dispose of the
machine, use an authorised centre,
or contact the manufacturer for relative information.
Fig. 8
To increase ventilation to the
☞
machine, make an opening of at least
300 x 100 mm in the back of the housing.
CAUTION
RISK OF INTOXICATION
Once a machine wash cycle has been
☞
started, do not interrupt it, as detergent residues may then be left inside
the delivery group.
CAUTION
RISK OF BURNS OR SCALDING
Use the steam nozzle with care and
☞
never place hands below the jet of
steam. Do not touch the nozzle immediately after use.
CAUTION
RISK OF CUTTING
When adding coffee beans, the
☞
machine operator must not place
his/her hands inside the container.
Fig. 9
40
EKV 6800.1M
Page 8
UK
3.
3.1
Always quote the machine serial number in all
communications to the manufacturer,
Küppersbusch.
TRANSPORT AND HANDLING
MACHINE
IDENTIFICATION
Ftg-Nr 702 148 N 02 010000 22
Fig. 10
3.2
The machine is transported on a pallet, inside
boxes which are secured to the pallet with ribs.
Prior to carrying out any transport or handling
operation, the operator must:
• put on work gloves and protective footwear,
as well as a set of overalls which must be
elasticated at the wrists and ankles.
The pallet must be transported using a suitable means for lifting (e.g., forklift).
TRANSPORT
3.3
During all handling operations, the operator
must ensure that there are no persons,
objects or property in the handling area.
The pallet must be slowly raised to a height
of 30 cm (11,8 in) and moved to the loading
area. After first ensuring that there are no
persons, objects or property, loading operations can be carried out.
Upon arrival at the destination and after
ensuring that there are no persons, objects
or property in the unloading area, the proper lifting equipment (e.g. forklift) should be
used to lower the pallet to the ground and
then to move it (at approx. 30 cm (11,8 in)
from ground level), to the storage area.
Before carrying out the following operation,
the load must be checked to ensure that it is
in the correct position and that, when the
supports are cut, it will not fall.
The operator, who must first put on work
gloves and protective footwear, will proceed
to cut the supports and to storing the product. To carry out this operation, the technical characteristics of the product
must be consulted in order to know the
weight of the machine and to store it
accordingly.
HANDLING
CAUTION
RISK OF IMPACT
OR CRASHING
CAUTION
RISK OF IMPACT
OR CRASHING
CAUTION
RISK OF POLLUTION
ENGLISH
Fig. 11
EKV 6800.1M
41
Page 9
UK
4.
Do not dispose of packaging in the environment.
PRELIMINARY OPERATIONS
CAUTION
RISK OF POLLUTION
ENGLISH
Before carrying out any installation and
adjustment operations you must read and
fully understand the SAFETY INSTRUCTIONS of this handbook.
The company cannot be held responsible
for damage to things or injury to persons
caused by failure to comply with the safety
instructions and installation and maintenance instructions contained in this handbook.
CAUTION
RISK OF SHORT CIRCUITS
Fig. 12
• Take the appliance out very slowly and in
order to guarantee maximum safety, make
sure that no people or things are below it.
Fig. 13
• Pull the water tank up and especially the
first time, wash it with soapy water; then
rinse it carefully, taking care to remove all
soap residues.
• Fill the tank with water (this does not apply
to the version connected to the water mains)
• In the same way, open the coffee bean container and pour in the coffee without reaching the maximum level; then refit the coffee
container lid.
WARNING
The water hardness must be less then
4° - 6° fr (french degree).
The chlorine contents is max 100 mg per
litre (0.00000361 lb/cu in).
Otherwise the conditions of guarantee of
the machine will expire.
4.2
MACHINEINSTALLATION
(VERSION FOR
DIRECT CONNECTION)
• Remove all parts from the box of accessories (Teflon tubes Ø 4 mm, 1 pressure
reducing valve, 3 snap-on connectors, 1
pressure gauge, 1 fastening bracket, 2
threaded connectors and two gaskets). Fit
the pressure gauge and 2 connectors to the
pressure reducing valve, as illustrated in the
drawing here below.
Before connecting the machine to the mains
power supply, please check that the supply
voltage corresponds to the machine voltage.
4.1
Switch off the machine before filling or
removing the water tank.
• Partially remove the machine from its seating.
42
FILLING THE
APPLIANCE
WARNING
EKV 6800.1M
Fig. 14
Fig. 15
• Use the relevant bracket to fit the previously assembled pressure reducing valve to the
nearest point to the water mains (see drawing below).
Page 10
UK
Fig. 16
• Connect one end of the Teflon pipe (diam. 4
mm) to the machine, inserting it firmly into
the snap-on connector. To make sure that
the connection has been made properly, pull
the tube outwards (see drawing).
• Cut the other end of the tube, first making
sure that the length is sufficient to connect it
to the pressure reducing valve.
Fig. 17
NOTE: The maximum outlet pressure from the
pressure reducing valve MUST NOT
exceed 1.5 bars.
Fig. 18
WARNING
The water hardness must be less then
4° - 6° fr (french degree).
The chlorine contents is max 100 mg per
litre (0.00000361 lb/cu in).
Otherwise the conditions of guarantee of
the machine will expire.
4.3
SWITCHING ON
NOTE: in case the following procedure should-
n't take effect, see the chapter on
"PROBLEMS AND SOLUTIONS".
The LCD will then light up and read as follows:
To switch the machine on definitively, press the
“ENTER” key:
ENGLISH
the machine automatically loads the heater with
water and begins heating operations. When the
desired temperature is reached the display will
show the following message:
NOTE: the starting time is about 3 minutes.
NOTA: The appliance is endowed with a secu-
rity system that will stop the machine
after about 1.5 minutes of constant
functioning of the pump (to avoid pump
overheating). In this case, switch off the
main switch of the machine and then
turn it on again.
• After finding the arrows that indicate the
direction of the water flow in the pressure
reducing valve, connect the tube to the
water outlet. Connect the remaining end of
the tube to the other connector (water inlet)
of the pressure reducing valve. After making
sure that you have shut off the stopcock,
proceed to install the connectors and the
relevant gaskets in the mains system.
Connect the free end of the tube to the previously fitted snap-on connector.
After the preliminary operations:
• Press the machine’s main switch and turn it
to “ON”.
Fig. 19
The machine is now ready to be used.
WARNING
When installing the machine for the first
time or after water heater unit maintenance,
press the button to dispense hot water
before dispensing any coffee. repeat this
operation as required and until there is an
even flow of water from the nozzle.
EKV 6800.1M
43
Page 11
UK
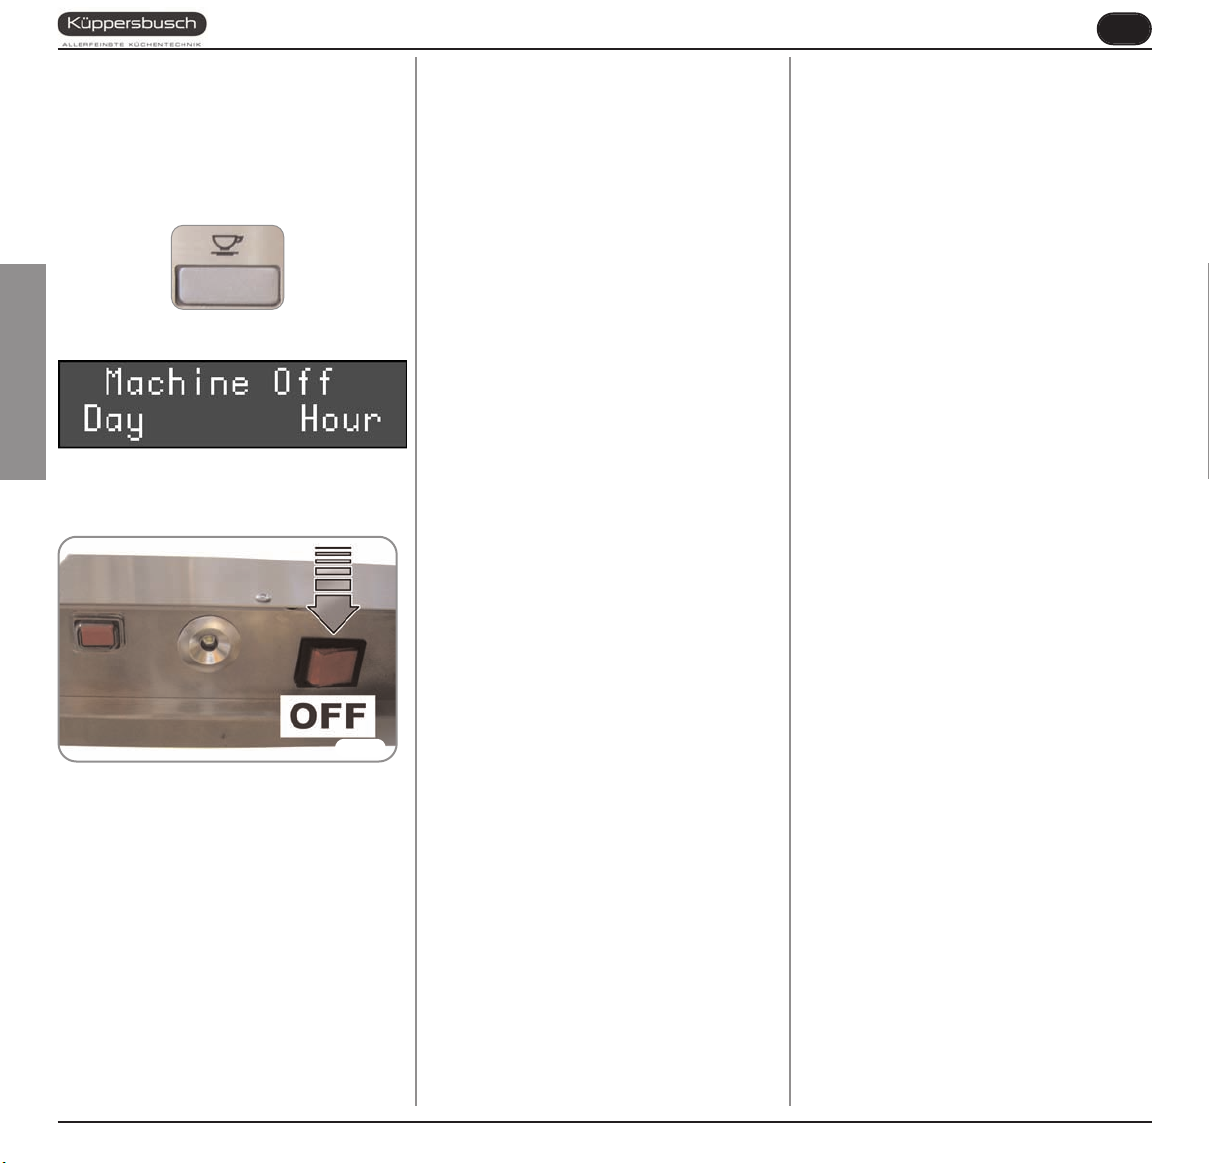
4.4
To switch off the machine, proceed as follows:
• Hold the “ENTER” key down for 5 seconds
with the machine switched on:
• The LCD will read as follows:
SWITCHING OFF
ENGLISH
• To switch the machine off fully, press the
main switch and turn it to the “OFF” position.
44
Fig. 20
EKV 6800.1M
Page 12

UK
5.
5.1
ASSEMBLY INSTRUCTIONS FOR QUALIFIED PERSONS
INSTRUCTIONS FOR
BUILT-IN ASSEMBLY
The company supplying this machine cannot
be held liable for any damage arising from
incorrect installation, insufficient or lack of
maintenance, or improper use of the appliance.
• Legal standards and connection instructions
from the local electricity supplier must be
respected.
• Before making electrical connections, make
sure that the electrical capacity of the system is suitable for the maximum power of
the appliance, as indicated on the rating
plate.
• When making connections or repairs, it is
necessary to disconnect the appliance from
the mains electricity.
• When the appliance is assembled, it must
not be possible to touch any insulated
cables enabling appliance operation.
• The unit housing the built-in coffee machine
must be suitably fixed to the floor or wall in
the room.
• To guarantee safe machine use, the unit
housing the machine must be structurally
sound and its guide attachment points must
be able to sustain a weight of three times
that of the coffee machine during the
removal phase.
5.2
EKV 6800 .1M BUILT-IN
UNIT DIMENSIONS
Fig. 21
• Place the metal plate in position in the top
part of the coffee machine housing so that it
meets with the back section of the unit.
ENGLISH
Fig. 22
• Tighten the four screws.
• Place the two corner pieces with guides on
the flat surface in the unit, fixing them into
place exactly 90 mm from the unit’s front
edge.
• The appliance is equipped to be connected
to a single plug socket, which must be fitted
in full compliance with the standards in
force. Only a qualified electrician may install
a plug socket or replace the power cord,
which must be performed in full respect of
the standards in force.
• If, after connection, it is no longer possible
to reach the plug, a separator with more
than one pole and a contact distance of at
least 3 mm must be fitted in order to comply
with safety regulations.
A 600 mm A 23,62 Inc
B da 562 a 568 mm
C 450 mm C 17,72 Inc
D da 16 a 19 mm D 063 - 075 Inc
5.3
BUILT-IN INSTALLA-
B 22,13 - 22,36 Inc
TION
• Remove the coffee machine from its packaging and make sure that it is not damaged
in any way. Should the machine show any
signs of damage, do not proceed with installation and contact the retailer.
Fig. 23
• Insert the screws into the holes of the corner
pieces, but do not tighten them.
Fig. 24
EKV 6800.1M
45
Page 13

UK
• The machine is supplied with 6 metal plates
(thickness 1 mm) that are to be placed
between the guide and the sides of the unit.
This is to fill any excess space in the event
that the unit is more than 562 mm wide.
5.4
NUMBER OF SPACER
PLATES
BUILT-IN HOUSING
ENGLISH
Width
(mm/inc)
Thick.
(mm/inc)
PLATES
562 / 22,13 19 / 0,748 0
564 / 22,2 18 / 0,708 1+1
566 / 22,28 17 / 0,669 2+2
568 / 22,36 16 / 0,629 3+3
• If necessary, insert the plates as described
above.
• Make sure that there is a distance (distance
B) of 558 mm between the corner pieces.
N°
• To prevent the machine from overheating,
make an opening in the back of the unit of at
least 300 mm x 100 mm, to allow air to circulate.
• Insert the coffee machine into the unit, fitting
the guides on the machine level into the
guides previously fixed on the unit.
The guides should slide telescopically when
a light pressure is exerted on the front of the
coffee machine; if this is not the case, it is
necessary to check the distance between
the guides again.
• When fitting into the unit, the appliance will
automatically hook onto the points A on the
guides.
A
Fig. 26
Open the lid in the top part; then remove and fill
the water tank and close the lid.
Powdered
or decaffeinated
coffee
WARNING
Only pour coffee beans into the container.
Any other type of coffee - ready ground for
example – will damage the grinder.
5.5
DISASSEMBLY
To remove the coffee machine from its housing,
it is first of all necessary to disconnect it from
the mains electricity by unplugging it.
Then press the relevant joints(B) in the guides
and remove the appliance, being sure to support it on the bottom.
B
Fig. 28
Fig. 25
• Fix the guides to the coffee machine housing, tightening all of the screws.
• Make sure that the power cord comes out
from the rear of the housing.
46
EKV 6800.1M
Fig. 27
Page 14

UK
5.6
COFFEE MACHINE CLASS I
RATED VOLTAGE 230V
ELECTRICAL
INPUT
CONNECTION
POWER CORD 1.2m / 47,24 inc
APPLIANCE
DIMENSIONS
(L X D X H)
COMPARTMENT
DIMENSIONS
(L X D X H)
NET WEIGHT 52Kg / 114Lb.
GROSS WEIGHT 63KG / 139Lb.
AMOUNT OF
WATER
TECHNICAL DATA
1800W
1.8KW (ready for connection)
594X440X464mm
23,39X17,32X18,27inc
560X550X450mm
22,05X21,65X17,72inc
5 Lt / 1,321gal.
• Classification of the control device accord-
ing to protection against electrical shocks:
incorporated into Class I equipment.
• Control device pollution levels: suitable for
use in ordinary or normal pollution environments.
• Category (Immunity against excess voltage)
CATEGORY I.
• Class and structure of software CLASS A.
• Control unit printed circuit: 100x180 mm.
ENGLISH
The card is built for use in temperature ranges
as indicated in the electrical characteristics.
Operation at temperatures over these levels is
not foreseen for the logic components in the
control unit and can therefore lead to malfunctioning.
Operation at voltages outside this range cannot
be guaranteed.
EKV 6800.1M
47
Page 15

UK
6.
6.1
ADJUSTMENTS TO BE MADE BY A QUALIFIED TECHNICIAN ONLY
GRINDING
ADJUSTMENT
WARNING
Always remove the drip compartment
before opening the outer door!
Always close the outer door and push the
drip compartment all the way in! Otherwise
the door and hinges could become damaged!
Open the outer door and then the inside one:
ENGLISH
Use the Allen wrench (supplied) on the relevant
screw:
Fig. 29
6.2
CAPPUCCINO MAKER
AIR ADJUSTMENT
(FOAM AMOUNT AND
DENSITY)
NOTE: this adjustment is possible even with
the machine switched on.
The amount of foam is factory set, but it can be
changed using the air adjustment dial on the
cappuccino maker. By making this adjustment,
which changes the density of the foam produced by the cappuccino maker, the result will
be a very creamy, a creamy or a slightly creamy
cappuccino.
• Open the outer door
• Open the inside door
• Turn the adjustment dial as shown on the
decal applied to the door to increase or
reduce air flow.
6.3
MILK FLOW ADJUSTMENT (Temperature
Regulation)
NOTE: this adjustment is possible even with
the machine switched on.
To adjust both the flow and the temperature of
the milk delivery, turn the adjusting tap as follows:
• Remove the left-hand compartment
• Insert the open milk carton and place the
milk suction tube inside it
NOTE: Always use normal pasteurised milk
with a fat content of 3.5%, or fresh milk.
• Turn the milk suction tap
CLOCKWISE/COUNTER-CLOCKWISE to
INCREASE/DECREASE the milk suction
and then DECREASE/INCREASE the temperature.
• Turn the tap until the milk reaches the
desired temperature.
Fig. 30
• turn clockwise for finer grinding or thicker
coffee;
• turn anticlockwise for coarser grinding or
more liquid coffee.
Close the doors after making these adjustments.
48
EKV 6800.1M
Fig. 31
To reduce the amount of foam, turn the dial
anticlockwise, while to increase it, turn the dial
clockwise.
• Close the doors after making these adjustments.
Fig. 32
Page 16

UK
7.
7.1
1 Dispenses 1 cup of espresso coffee
2 Dispenses 2 cups of espresso coffee
3 Dispenses 1 cup of white coffee
4 Dispenses 2 cups of white coffee
5 Dispenses 1 cup of decaffeinated coffee
6 Dispenses 1 cup of long coffee
7 Dispenses hot water
8 Dispenses 1 cup of cappuccino
USE
STANDARD CONFIGURATION
1
2
4
3
8765
Fig. 18
7.2
NOTE: in case the following procedure should-
After finishing the Preliminary Operations and
Installation processes:
• Press the main switch on the machine and
set it to “ON”. The LCD display will switch on
and read as follows:
SWITCHING ON
n't take effect, see the chapter on
"PROBLEMS AND SOLUTIONS".
• When the desired temperature is reached
the display will show the following message:
NOTE: The starting time is about 3 minutes.
NOTE: The appliance is endowed with a secu-
rity system that will stop the machine
after about 1.5 minutes of constant
functioning of the pump (to avoid pump
overheating). In this case, switch off the
main switch of the machine and then
turn it on again.
The machine is now ready to be used.
7.3
To switch off the machine, proceed as follows:
• Hold the “ENTER” key down for 5 seconds
with the machine switched on:
SWITCHING OFF
ENGLISH
IMPORTANT: Keys 1-2-3-4-6 (see 'DIS-
PLAY' description), can correspond to different drinks
according to taste and local
traditions (see PROGRAMMING and paragraph on
SELECTIONS CONFIGURATION).
• To switch the machine on definitively, press
the “ENTER” key:
The machine automatically loads the heater
with water and begins heating operations.
• The LCD will read as follows:
• To stop the machine completely, press the
main switch and turn it to the “OFF” position.
EKV 6800.1M
49
Page 17

UK
7.4
HEIGHT-ADJUSTABLE
COFFEE DISPENSER
To avoid spraying liquids, the height of the dispenser can be adjusted by hand to adapt it to
any type of cup. Carefully adjust to the required
position so as to limit the amount of space
between the dispenser and the cup.
ENGLISH
7.5
The method of preparation is the same as for
espresso and white coffee.
• Position a cup under the nozzles.
The beverages always flow from both nozzles.
HOW TO MAKE THE
COFFEE
’
Fig. 33
• Press the desired coffee delivery key once.
Fig.35
• The coffee is being made.
• According to the kind of coffee selected the
display will read.
O
Leave the cup beneath the nozzles until the
messages on the display disappear.
7.6
HOW TO MAKE TWO
COFFEES
• Position one cup under each nozzle.
Fig.36
• Press the desired coffee delivery key once.
Fig. 37
• The coffee is being made.
• According to the kind of coffee selected the
display will read.
50
O
Fig. 34
EKV 6800.1M
Page 18

UK
Leave the cup under the dispensers until the
message appears on the display.
7.7
HOW TO MAKE DECAFFEINATED COFFEE
USING GROUND COFFEE
• Partly remove the coffee machine from the
unit.
• Open the ground coffee conveyor hatch.
WARNING
Pour only ground coffee into the coffee
bean holder. Any other kind of coffee will
damage the coffee grinder.
Don't put caramelized, sugar coated, or similarly coated coffee beans, or instant coffee
or other sugary beverages because they will
harm the appliance.
Fig.38
• Insert only 1 dose of decaffeinated ground
coffee.
• Press the decaffeinated coffee key once
The display will read:
Then press the key for the type of coffee
required and the display will read as follows
(example):
Leave the cup beneath the nozzles until the
message on the display disappears.
7.8
PREPARING A LONG
COFFEE
NOTE: Use a larger cup than the one used for
white coffee.
• Place the cup under the coffee dispensers.
Beverages will always come out of both dispensers at the same time.
• press the dispensing key for the required
coffee once only.
• The display will read:
• The coffee is being made
Leave the cup under the dispensers until the
message appears on the display.
7.9
HOW TO MAKE
CAPPUCCINO
NOTE: Use a larger cup than the one used for
white coffee.
• Pull out the left-hand compartment and
insert the open milk carton.
Fig. 39
• Place the milk suction tube inside the carton.
• Use the valve on the tube to regulate the
amount of milk required.
• Place the cup under the coffee dispensers.
Beverages will always come out of both dispensers at the same time.
• Press the cappuccino dispensing key once
only.
ENGLISH
EKV 6800.1M
51
Page 19

UK
• The display will read as follows:
• the beverage is being prepared.
Leave the cup under the dispensers until the
message appears on the display.
ENGLISH
7.10
DDIISSPPEENNSSIINNGG HHOOTT
WWAATTEERR
This provides delivery of hot water for brewing
tea, chamomile-tea or herb teas.
WARNING
Before starting this operation, make sure
that there is water in the tank.
Place a suitable container beneath the hot
water nozzle.
Fig. 40
• Press the hot water delivery key once:
WARNING
RISK OF SCALDING
When hot water is being dispensed, never
allow the nozzle to come into contact with
parts of the body and never place your
hands under the nozzle. Always position the
nozzle so it is inclined downwards, towards
the cup grille.
52
• The display will read:
• Hot water will come out of the nozzle. When
you have the required amount, press the hot
water dispensing key again to interrupt hot
water delivery.
EKV 6800.1M
Page 20

UK
8.
8.1
1
2
4
3
PROGRAMMING
LEGENDA
1
ENTER key: used to enter menus
CURSOR keys: used to scroll through
RESET key: used to confirm and to
2
3
and/or to confirm values and pass on to the
next step.
the menus and to
increase / decrease
value settings.
return to the previous
step.
4
Fig. 41
LIST OF PROGRAMMABLE
FUNCTIONS
Functions that can be accessed from the USER
and TECHNICIAN modes.
1. TOT. COUNT
2. PRODUCT NAME
3. PROG. DOSES
4. PROG. GRINDER 1 S
5. MILK DOSE
6. DATE/TIME
7. PROGRAM. ON/OFF
8. ENERGY SAVING
9. LANGUAGE
Functions that can “ONLY” be accessed from
the TECHNICIAN mode.
This operation may ONLY be performed by a Specialist Technician.
Adjustments made by Unqualified
Technicians or other people may render the Guarantee null and void.
Additional functions that can be accessed from
the TECHNICIAN mode are:
10. PREINFUSION
11. TAMPING
12. GROUNDS NUMBER
13. MILK CLEAN WARN
14. CLEAN ALARM
15. SHUT DOWN CLEAN
16. GROUP SETTING
17. GRINDER SETTING
18. COFFEE TEMP.
19. STEAM TEMP.
20. PASSWORD
21. SMART CARD
22. WATER FILTER L
23. WATER HARDNESS SETTING
24 SCALE REMOVAL CYCLE
8.2
Entering the programming function gives
access to all of the USER and TECHNICIAN
mode functions.
NOTE: Can be performed with machine on.
NOTE: Always remove the drip compartment
To enter the programming mode, proceed as
follows:
• Partly remove the machine from its housing.
• Open the front door using the relevant button on the left-hand side of the machine.
• The display will read as follows:
• Press the ENTER key.
• Shut the door again
• The display will read:
The infusion group will then be positioned in
standby and the display will read as follows:
PROGRAMMING
before opening the outer door!
Always close the outer door and push
the drip compartment all the way in!
Otherwise the door and hinges could
become damaged.
ENGLISH
EKV 6800.1M
53
Page 21

UK
8.3
EXITING
PROGRAMMING
To quit the programming mode, it is sufficient to
open the door and close it again.
NOTE: Can be performed with machine on and
from any of the visualized functions.
• The display will read:
ENGLISH
• To switch the machine on definitively, press
the ENTER key.
alternatively, scroll through the functions using
the 4 key, until the display reads:
8.4
PROGRAMMING CYCLE
USER MODE
1. CUMULATIVE TOTAL
The submenus can be entered by pushing the ENTER key.
The quantity of doses delivered for each
kind of beverage will be displayed.
1 Total Ristretto
2 Total 2 Ristretto
3 Total Espresso
4 Total 2 Espresso
5 Total Cafee
6 Total 2 Cafee
7 Total Cafecream
8 Total Latte
9 Total Caffelatte
10 Total Macchiato
11 Total Cappuccino
12 Total Big Cappuccino
13 Total Deca
14 Total Cleaning
15 Total Litres
2. PRODUCT NAME:
A beverage name is assigned to each single
key (no. indicates the number of the relevant key.) The names are pre-set in the factory but it is possible to change them to suit
personal requirements. The individual setting will override the preset ones and influence all subsequent programming procedures.
Example:
In this case the beverage ‘Espresso’ is
assigned to key number 1.
The arrow keys 2 and 4 scroll the names of the
beverages on each key available in the agenda.
The RESET key is for exiting the submenu.
The ENTER key confirms the type of beverage
for the key number being taken into consideration, and then passes on to the beverage of the
next key.
The programmable keys are the following:
1
2 3 4
The machine is now ready to dispense beverages using the new stored settings.
54
EKV 6800.1M
Press the keys 2 and 4to scroll through the various totals relevant to all beverages.
Hold down the 4 key to view the total number of
doses dispensed by the machine.
In order to annul the counts, to press keys 2
and 4 at the same time.
The display will read as follows: “COUNTERS
RESET”.
The RESET key returns to the previous menu.
6
Fig. 42
Once the programming of the final key has
been completed, you pass on to the next menu
item.
NOTE: The keys can be programmed for milk-
based drinks and coffee. Keys 1 2 3
can only be programmed for coffee
drinks, while keys 4 6 and 8 can be
configured as coffee or milk-based
drinks.
8
Page 22

UK
3. WATER VOLUME CC
By pressing the ENTER key the submenus can be accessed.
The doses of water to be used for each
single drink can be programmed.
1 Water volume cc Ristretto
2 Water volume cc 2 Ristretto
3 Water volume cc Espresso
4 Water volume cc 2 Espresso
5 Water volume cc Coffee
6 Water volume cc 2 Coffee
7 Water volume cc CoffeCreme
8 Water volume cc caffelatte
9 Water volume cc macchiato
10 Water volume cc Cappuccino
11 Water volume cc Big Cappuccino
12 Water volume sec Tea
13 Maximum steam time
Keys 2 and 4 increase / reduce the amount of
water used to prepare the relevant beverage,
Press the RESET key to exit the submenu and
go back to the main menu and to confirm the
dose programming.
Press the ENTER key to scroll all the items on
the submenu and see confirmation of the dose
programmed.
5. MILK TIME
Press the ENTER key to access the submenu.
This allows you to program the milk delivery time.
1 Latte
2 Caffellatte
3 Macchiato
4 Cappuccino
5 Big Cappuccino
Keys 2 and 4 increase / reduce the amount of
time used to dispense the milk for the preparation of the relevant beverage.
Press the RESET key to exit the submenu and
go back to the main menu and to confirm the
grinding time set. Press the ENTER key to
scroll all the items on the submenu and see
confirmation of the set grinding time.
6. DATE/TIME
Press the ENTER key to access the submenu.
This is used to set the date and time to be
displayed on the machine.
1Day
2 Hour
3 Minutes
7. PROGRAM. ON/OFF
This is used to program the automatic
switching ON/OFF for the machine, only
with the machine switch in the ON position.
The default setting for the machine has all
days of the week set to “STANDBY” and
therefore, the main switch must be used
to switch the machine on and off.
Press the ENTER key to access the submenu and the display will read as follows:
Press the 2 and 4 keys to view the settings for
each day of the week.
Press RESET to set SUNDAY as the weekly
day off, which will de-activate the automatic on
and off function.
The display will read as follows:
ENGLISH
4. PROG.GRINDER 1 S
Press the ENTER key to access the submenu.
It is possible to set the grinding times for
each beverage.
1 Grind Time Ristretto
2 Grind Time 2 Ristretto
3 Grind Time Espresso
4 Grind Time 2 Epresso
5 Grind Time Coffee
6 Grind Time 2 Coffee
7 Grind Time CoffeCreme
8 Grind Time Caffellatte
9 Grind Time s. Macchiato
10 Grind Time s. Cappuccino
11 Grind Time s. Big Cappuccino
The 2 and 4 keys increase or decrease the values set for the relevant function.
The RESET key quits the submenu and returns
to the main menu without confirming the new
settings. The ENTER key scrolls through each
single item in the submenu and confirms the
new setting.
Once the date has been set, the function
returns to the main menu.
Press ENTER to reactivate the automatic on
and off function.
To confirm the setting, press the 2 key, which
will then pass to the settings for the following
day.
Press ENTER and the switch on timer will begin
to flash; use the 2 and 4 keys to increase /
decrease the time setting.
Once the required time has been set, press
ENTER to set the following day.
After SATURDAY, press the 4 key to return to
the previous menu.
EKV 6800.1M
55
Page 23

UK
8. ENERGY SAVING
This is used to set the time after which the
machine enables the energy-saving device,
while still keeping the water tank at working
temperature.
Press the ENTER key to access the submenu.
1 Hours:Minutes
Use the 2 and 4 keys to increase / decrease the
time after which the ENERGY-SAVING function
is enabled by 30-minute intervals. This function
is deactivated if the timer is left at zero.
Press the RESET to quit the submenu and
return to the main menu, confirming the new
ENGLISH
setting.
9. LANGUAGE
Press the ENTER key to access the submenu.
This sets the language for operatormachine interface, as shown on the display.
Press the 2 e 4 keys to select the required language.
The possible languages are as follows:
Italian, English, Spanish, German and French.
Press the RESET key to quit the submenu and
return to the main menu, confirming the new
setting.
8.5
TECHNICIAN MODE
PROGRAMMING CYCLE
To access the functions that can only be programmed using the TECHNICIAN MODE,
scroll through all of the functions that can be
accessed from the USER MODE until the display reads as follows:
Enter the correct password to view the first item
in the programming menu that can be accessed
from the TECHNICIAN MODE.
To access the functions reserved to the
service engineer, when entering this
mode for the first time, or if the password has not been changed, it is necessary to press the key (2) on the
machine button pad five times.
10. PREINFUSION
Press the ENTER key to access the submenu.
When keys 2 and 4 are pressed, this programs – for each single beverage – the
possibility to pre-infuse the coffee tablet
(YES or NO).
1 Preinfusion Ristretto
2 Preinfusion 2 Ristretto
3 Preinfusion Espresso
4 Preinfusion 2 Espresso
5 Preinfusion Coffee
6 Preinfusion 2 Coffee
7 Preinfusion CoffeeCreme
8 Preinfusion Caffelatte
9 Preinfusion Macchiato
10 Preinfusion Cappuccino
11 Preinfusion Big Cappuccino
Press the RESET key to quit the submenu and
return to the main menu, confirming the setting.
Press the ENTER key to scroll through each
single item in the submenu and confirm the settings.
11. PRESSING
Press the ENTER key to enter the submenu.
Press the keys 2 or 4 to program tablet
pressing (YES or NO) for each single beverage.
56
EKV 6800.1M
2
If an incorrect password is entered, the
machine will automatically quit the programming mode to enter the machine ready mode.
Fig. 43
The RESET key exits the sub-menu and
returns to the main menu, confirming the value
set.
The ENTER key scrolls through each single
item in the sub-menu and confirms the value
set.
Page 24

UK
12. GROUNDS NUMBER
Press the ENTER key to access the submenu. This allows you to program the
GROUNDS NUMBER. When the number
has been reached, a message will be displayed instructing you to empty the coffee
grounds drawer and the machine will stop
working to allow the procedure to be done
safely.
Press the keys 2 and 4 to set the number
of grounds reached before the message
to request emptying is displayed (max.
40).
Press the RESET key to exit the submenu and
go back to the main menu and to confirm the
grounds number programmed.
The ENTER key is disabled
13. MILK CLEAN WARN. H
Press the ENTER key to access the submenu. This allows you to program after
how many hours, following the last milk
delivery, the milk foamer cleaning warning
will be displayed.
Press the keys 2 and 4 to set the number
of hours after which a cappuccino maker
cleaning request is displayed.
NOTE: It is advisable to set this time to 2
hours.
Press the RESET key to exit the submenu and
go back to the main menu and to confirm the
number of hours programmed.
The ENTER key is disabled.
14. CLEAN WARNING
Press the ENTER key to access the submenu. This allows you to program the
number of cycles after which the group
clean warning will be displayed.
The arrow keys 2 and 4 increase/decrease the
amount of cycles for the display of the group
clean warning message.
Press the RESET key to exit the submenu and
go back to the main menu and to confirm the
number of cycles programmed.
The ENTER key is disabled
15. SHUT DOWNCLEAN
Press the ENTER key to access the submenu.
This programmes a cleaning cycle for the
dispenser group when the machine is
switched off.
Set to YES to enable this function.
If the function is enabled, 100 cm3(6.1024
cu in) of water will be dispensed.
Press the 2 and 4 keys to enable (YES) / deactivate (NO) cleaning at the end of service
16. GROUP SETTING
Press the ENTER key to access the submenu.
This allows you to program the group
repositioning.
The arrow keys 2 and 4 increase/decrease the
riascent of the motor.
Press the RESET key to exit the submenu and
go back to the main menu and to confirm the
programming.
The ENTER key is disabled.
17. GRINDER SETTING
Press the ENTER key to access the submenu.
This allow you to program the choice of
increasing grinding times by 0.1 seconds
every 250-1000 deliveries.
By setting the program at 0, the function is
disabled.
The arrow keys 2 and 4 increase/decrease the
number of deliveries, after which there will be
an increase in grinding time.
The available values are 0, 250,500, 750, 1000.
Press the RESET key to exit the submenu and
go back to the main menu and to confirm the
number of deliveries programmed.
The ENTER key is disabled.
18. COFFEE TEMPERAT.
Press the ENTER key to access the submenu.
This allow you to program the temperature of the coffee heater.
The arrow keys 2 e 4 increase/decrease the
temperature of the coffee heater.
La temperatura massima impostabile è 105°C
(221°F).
Press the RESET key to exit the submenu and
go back to the main menu and to confirm the
temperature programmed.
The ENTER key is disabled.
ENGLISH
EKV 6800.1M
57
Page 25

UK
19. STEAM TEMPERAT.
Press the ENTER key to access the submenu.
This allow you to program the temperature of the steam boiler.
The arrow keys 2 e 4 increase/decrease the
temperature of the steam boiler.
La temperatura massima impostabile è 130°C
(266°F).Press the RESET key to exit the submenu and go back to the main menu and to
confirm the temperature programmed.
The ENTER key is disabled.
20. PASSWORD
Press the ENTER key to access the sub-
ENGLISH
menu.
This programmes a new password to
access the functions that can be programmed in the TECHNICIAN MODE.
Enter a combination of 5 keys (from the 8
keys available on the keyboard) and set
the new required password.
Press the RESET key to quit the submenu and
return to the main menu without confirming the
setting.
Press the ENTER key to confirm the setting.
21. SMART CARD
Press the ENTER key to access the submenu.
This sets the SMART CARD reader to
enabled.
The function is enabled by setting the
parameter to YES.
Press the 2 and 4 keys to enable (YES) / deactivate (NO) the SMART CARD reader.
22. WATER FILTER
Press the ENTER key to access the submenu.
This allows you to program the number of
litres of water to be delivered for the display of the message clean water filter.
The arrow keys 2 e 4 increase/decrease the
number of litres of water delivered for the display of the message clean water filter.
Press the RESET key to exit the submenu and
go back to the main menu and to confirm the
number of litres programmed.
The ENTER key is disabled.
23. SETTING WATER
HARDNESS
It is possible to set water hardness according to
French degrees and therefore, an alarm for
performance of the de-scaling cycle.
• When the machine displays this message:
Press the ENTER key to enter the function.
The display will then read as follows:
Use the 2 e 4 è keys to set (increase/reduce)
the water hardness parameter.
Press the ENTER key to return to the main
menu and save the setting to memory.
Press the RESET key to return to the main
menu without saving the setting to memory.
The following table shows the correspondence
between the hardness setting and the number
of litres of water consumed after which the “DE-
SCALE” message appears.
WATER HARDNESS °FR
1-7
8-30
>31
_
00
NOTE:
The “DE-SCALE” alarm will not interrupt
machine operation and it will be reset as
soon as the de-scaling cycle has been completed, as will the litre counter.
If the set value is “00” the alarm will be disabled.
WATER LITRES (GAL)
1500
1000
500
Alarm disabled
24. DE-SCALING CYCLE
An automatic de-scaling cycle is performed on
the machine's boiler tanks.
• When the message:
Appears, press the ENTER key to begin the descaling cycle.
OPERATION:
• Before starting the de-scaling cycle, fill the
tank with a solution of water and de-scaling
product.
NOTE: Use at least 2 litres of solution.
• When the following message appears:
58
EKV 6800.1M
Page 26

UK
• Press the ENTER key;
• The machine will begin to suck up the solution from the tank and at the same time, to
expel hot water from the nozzle.
• The machine display will read as follows:
Once it has sucked up the first litre of solution,
the machine will stop for five minutes and then
it will start to suck up another litre of solution.
• At the end of this cycle, the display will read
as follows:
• Rinse out the tank and refill it with clean
water (without switch off the machine).
NOTE: Use at least 4 litres (1.06 gal) of solu-
tion, otherwise it will be necessary to
restart the cycle.
• Wait at least 5 minutes.
• At the end of this time, the display will read:
• When the machine has finished the 2 litres
(0,53 gal) taken from the container, the display will again read:
Press the ENTER key again for the machine to
start the second stage of the rinse cycle, taking
a further 2 litres(0,53 gal) on board from the
container. The machine display will then read:
• At the end of the rinse cycle, the machine
display will read as follows:
Leave the machine to heat up for a few minutes; at the end of this time, the machine will
return to its ready status.
WARNING
ENGLISH
• Press the ENTER key and the machine will
begin a rinse cycle, taking on board 2 litres
(0,53 gal) of water from the container and
then expelling it through the steam nozzle.
• During this stage, the machine display will
read as follows:
We advise using the steam dispensing function for a few minutes at the end of each descaling cycle.
WARNING
You may notice drops of water and steam
coming from the hot water nozzle during the
heating stage.
EKV 6800.1M
59
Page 27

UK
9.
9.1
This function allows you to reset the total
amount of water used.
Proceed as follows:
• Release voltage by turning the main switch
• Reinstate voltage by turning the main switch
SPECIAL MACHINE SCALING FUNCTIONS
RESETTING THE
CLEANING FILTER
LITRE COUNTER
off (OFF).
on (ON) and pressing down on the key:
ENGLISH
until the display reads:
until the display reads:
9.3
This function makes it possible to remove incorrect functioning data and to reinstate the
Standard Programming settings (see PRESET
SETTINGS chart).
Proceed as follows:
• Release voltage by turning the main switch
off (OFF).
• Reinstate voltage by turning the main
switch on (ON) and simultaneously pressing down on the keys ENTER and RESET;
RESETTING MACHINE
PARAMETRES
9.4
This function makes it possible to activate the
motor manually forming the automation of the
manual coffee delivery group. Proceed as follows:
• Release voltage by turning the main switch
off (OFF).
• Reinstate voltage by turning the main switch
on (ON) and simultaneously pressing down
on the arrow keys:
until the display reads:
HANDLING MANUAL
COFFEE DELIVERY
GROUP
Fig. 45
9.2
This function makes it possible to reset the total
number of washing cycles.
Proceed as follows:
• Release voltage by turning the main switch
off (OFF).
• Reinstate voltage by turning the main switch
on (ON) and pressing down on the key:
60
RESETTING WASHING
CYCLES
EKV 6800.1M
until the display reads:
Fig. 44
IMPORTANT: When the machine is switched
on, since the arrow key 4 is
used to access this site, the
piston will automatically start
to move downwards.
• Press the arrow key 4 to move the piston
DOWNWARDS.
• Press the arrow key 2 to move the piston
UPWARDS.
• Release and reinstate voltage using the
main switch to end the procedure.
Page 28

UK
10.
10.1
CLEANING AND MAINTENANCE
CLEANING THE OUTSIDE OF THE MACHINE
We recommend that you read this chapter with
care before using the appliance. The appliance
will remain in good condition if cleaned correctly and at regular intervals. Here we have listed
some suggestions about how to clean individual surfaces delicately and efficiently.
CAUTION
Before carrying out any cleaning operations, set the machine to the “O” energy
level, (machine switched off and plug
removed from the mains).
Fig. 46
CAUTION
CAUTION
RISK OF INTOXICATION.
Follow the instructions for use supplied
with all detergents.
These detergents can be ordered from the
Küppersbusch After-sales Service.
CLEANING THE CASING: Clean the casing
inside and out, using a soft damp cloth.
Clean the water-dispensing nozzle after every
use.
NEVER USE THE FOLLOWING UNDER ANY
CIRCUMSTANCES: Aggressive or whitening
products such as, for example, those containing active oxygen, chlorine or other corrosive
ingredients. Cleaning products that scratch,
such as wire wool, plastic scourers or other
items with abrasive surfaces.
CLEANING THE WATER TANK: Only appliances not connected to the mains water have a
water tank. This must be rinsed daily and
refilled with fresh water.
Only fill the tank with fresh, clean water. Never
put milk, sparkling water or other liquids into the
tank.
CLEANING THE WORK AREA:
• Remove the drip container.
• Remove the grille over the drip container.
• Release the outer door.
• Open the outer door and carefully clean the
steel, taking care not to scratch it.
• Open the inside door to make it easier to
remove the coffee grounds container.
• Remove the coffee grounds that have
deposited in the area of the dispenser.
• Remove the coffee grounds container and
clean it carefully, taking care not to scratch
the steel.
• Use a brush to remove any encrusted coffee
and residues from the gasket, piston and
infusion group area.
Fig.48
ENGLISH
Never use steam-cleaning or pressurised
appliances to clean the machine.
CAUTION
RISK OF BURNS OR SCALDING
Leave the machine to cool at least to its
average temperature before cleaning.
Fig. 47
EKV 6800.1M
61
Page 29

UK
10.2
CLEANING THE DELIVERY UNIT AND THE
MILK FOAMER
NOTE:Follow the instructions on the label
applied on the inside of the front door.
ENGLISH
NOTE:Before starting the washing cycle check
and refill the level of water in the water
tank.
The machine is equipped to wash the dispensing unit with special tablets (puly caff) and the
milk circuit with liquid detergent (puly milk).
The machine will begin a wash cycle that consists of hot water deliveries alternated with
pauses. The whole cycle lasts approximately 4
minutes.
Fig. 49
In order to execute the washing procedure proceed as follows:
• Position a container with water beside the
machine.
• Put the suction tube inside it.
• Add the specific cleaning product (20 ml
[0.005 Gal] of Puly Milk).
Fig. 50
• Press the following key:
• Keep pressing down on the key for about 5
seconds until the display reads:
• Press the following key:
The display will read:
WARNING
If the DECAFFEINATED key is not pressed,
after about 20 seconds the machine will
automatically continue the washing cycle.
NOTE:During the washing cycle the dose keys
are disabled.
• Afterwards the rinsing procedure will begin
and the display will read:
We recommend that you carry out a WASHING CYCLE at least once a day using special cleansers.
CAUTION
RISK OF INTOXICATION.
We remind you not to interrupt a washing
cycle using detergent tablets once started,
otherwise detergent residues may remain
inside the machine.
62
EKV 6800.1M
• Open the ground coffee conveyor hatch.
• Insert the cleanser tablet (puly Caff) and
close the hatch.
Fig. 51
Reposition a container only with water in it.
NOTE:During the washing and rinsing cycles
keeping a container under the delivery
unit is advisable or empty the water collector once the wash and rinse cycles
have been completed.
Page 30

UK
10.3
REINSTATING AN
INTERRUPTED WASH-
ING CYCLE
• Should the washing cycle be interrupted by
electricity failure, when the appliance is next
turned on the unit will be in rest position and
the display will read:
10.4
CLEANING THE MILK
FOAMER
NOTE:Follow the instructions applied on the
label on the inside of the front door too.
• Set the machine to the “O” energy level.
2
1
Fig. 53
• Disconnect all the tubes attached to it.
• Disassemble the milk foamer and wash it
carefully.
Fig. 54
ENGLISH
Fig. 52
• Open the door at the front and then the
inside door.
IMPORTANT: Proceed with caution.
• Remove the whole infusion group (1) (do
not pull it downwards).
• Extract the milk foamer from the delivery
group by sliding it upwards (2).
NOTE:If the pause between one cappuccino
and another is over one hour long, it is
advisable to wash the milk foamer by
fishing the milk suction tube in hot water
rather than in milk.
• To reassemble proceed inversely, attaching
the milk foamer tubes properly.
NOTE:To make the reassembling procedure
easier, an explanatory label has been
attached to the front door.
• Clean the drop collector (see paragraph
THE DROP COLLECTING TRAY GRID).
EKV 6800.1M
63
Page 31

UK
11.
ENGLISH
STANDARD SETTING TABLE
BEVERAGE WATER VOLUME GRINDING TIME MILK TIME PRE-BREWING TAMPING NUMBER
(cc) (sec) (sec)
Ristretto 40 7 No Yes
2 Ristretto 80 9 No No
Espresso 50 7 No Yes
2 Espresso 100 9 No No
Caffè 60 7 No Yes
2 Caffè 120 9 No No
Caffe Creme 100 7 No No
2 Caffe Creme 200 9 No No
Cappuccino 50 7 12 No Yes
Big Cappuccino 60 7 15 No Yes
Macchiato 50 7 12 No Yes
Caffellatte 60 7 12 No Yes
Milk 15
Hot Water 20
Steam 55
Grounds number 20
Milk cleaning warning 00
Clean warning 00
Group setting 1,8 (sec)
Coffee temperature 98 (°C)
Steam temperature 125 (°C)
Water filter 00
Grinder setting 00
Shut down clean No
Password
Smart Card No
Energy Saving 00
Water hardness°Fr 00
64
EKV 6800.1M
Page 32

UK
12.
MACHINE FUNCTIONS MESSAGES
DISPLAY CAUSA EFFECT SOLUTION NOTE
GROUNDS DRAWER FULL
GROUNDS DRAWER OUT
OF PLACE
Grounds drawer full. The
number of coffee grounds in
the drawer has reached the
number set during programming stage.
Grounds drawer out of place. Keys delivering coffee based
Keys delivering coffee based
drinks are blocked.
drinks are blocked.
Pull out the grounds drawer
and empty it into a garbage
bag. Put the drawer back into
place, when the display reads:
ENGLISH
Insert the grounds drawer
into its special slot.
Should this alarm turn on during the delivery of a coffee
based drink:
• up until brewing, the alarm
is displayed but the drink
will be delivered;
• after brewing, the cycle in
progress will be suspended.The coffee cycle will
recom-mence only when
the drawer has been put
back in its place.
FRONT PANEL POSITION
Front panel open. The machine functions are
blocked.
Should this alarm turn on during the group movement
phase:
• the movement will be
interrupted
When the drawer is back
in its place, the reset
group will be repeated.
Close the front panel.
EKV 6800.1M
65
Page 33

IDISPLAY CAUSE EFFECT SOLUTION NOTE
UK
WASHING CYCLE
IS NEEDEDGIO
WASHING THE MILK
CIRCUIT IS NEEDED
ENGLISH
SHUT DOWN CLEAN
The set number of cycles
programmed before washing,
has been exceeded.
The set number of hours programmed from time of last
milk based drink before
washing, has been exceeded.
An end of service wash was
set for the delivery unit during
the programming stage.
The message will appear on
the display but the machine
will continue to deliver drinks.
The message will appear on
the display but the machine
will continue to deliver drinks.
An end of service wash must
be performed before the
machine is switched off.
Do a washing cycle (see
paragraph WASHING THE
DELIVERY UNIT AND MILK
FOAMER).
Perform a washing cycle for
the milk foamer only. As in
the case of a complete
washing cycle, you must
keep the key pressed down
for 5 seconds without, however, inserting cleanser
tablets for this group’s washing. (See only points 1,2,3,4
of the paragraph ‘WASHING
THE DELIVERY UNIT AND
MILK FOAMER’).
Press the ENTER key as
shown on the display. The
machine will automatically
perform an end of service
wash, dispensing approx.
3
(3.0512 cu in) of water
50cm
and will then switch off.
NEED FOR DE-SCALING
CYCLE
66
EKV 6800.1M
The number of litres after
which a de-scaling cycle is
required has been exceeded.
This message is displayed
but the machine will continue
to dispense drinks.
Carry out a de-scaling cycle
(SEE the relevant section
entitled
"DE-SCALING CYCLE").
Page 34

UK
13.
MACHINE BLOCK ALARM MESSAGES
DISPLAY CAUSE EFFECT SOLUTION NOTE
UPPER PISTON MOTOR
GROUP ALARMORE
HEATER FILLING
ALARM
TURBINE ALARM
On registering the alarm, the
control unit will display a
message about the drink in
progress with the error message correspond-ing to the
function. For example:
During the group handling
phase, the upper piston
exceeded maximum set time
by 10 seconds before recognizing motor pickup.
The heater filling stage has
exceeded the 3 minute maximum time; the probe level is
uncovered.
The volume counter will not
send any impulses to the
control unit for 5 seconds.
The control unit will halt whatever cycle is on by turning off
both the movement actuator
and those for drink delivery;
the operator will not be able
to make selections on the
keyboard.
The machine will stop. If the alarm reappears
The delivery will continue for
up to 60 seconds or for as
long as any of the coffee
based drink keys are
pressed.
Open and close the machine
door.
Open and close the machine
door. The control unit will
repeat the machine starting
up procedure.
If the alarm reappears
after the second time of
taying, call the Service
Technician.
after the second time of
taying, call the Service
Technician.
In case the alarm persists, the machine can
be used as a manual
appliance.
• Press the selected
key to start the dosing;
• Once the desired
dose has been delivered in the cup,
press the same key
to halt the dose
being delivered.
Call the Service
Technician.
ENGLISH
WATER TANK EMPTY
ALARM
The water tank is empty.
ered and the dosing will be
halted while in progress.
Fill the water tank.The coffee will not be deliv-
Use the Hot Water key
to eliminate any air bubbles.
EKV 6800.1M
67
Page 35

DISPLAY CAUSE EFFECT SOLUTION NOTE
UK
CLEANING FILTER
ALARM
TEMPERATURE PROBE
MALFUNCTION ALARM
ENGLISH
COFFEE QUANTITY
ALARM
The volume counter has
reached the number of litres
of deliverable water set during programming phase.
One of the two temperature
probes is broken.
Too much coffee. Coffee will not be delivered
Coffee will not be delivered;
the dose will not be halted or
it is variable.
Coffee will not be delivered. Substitute the broken probe. This alarm blocks all
and an ejection cycle will be
effected.
Regenerate cleaning filter
salts. To erase the alarm see
paragraph on ‘RESETTING
CLEANING FILTER LITRE
COUNTER’.
Reduce the quantity of coffee.
This alarm will not halt
delivery. The cleaning
filter alarm can be eliminated by programming
the number of litres to
zero (see paragraph on
‘PROGRAMMING’).
deliveries.
68
EKV 6800.1M
 Loading...