

Küppersbusch EKI 6940, EKI 8940 Instructions For Use And Installation Instructions
228271 S61
BEDIENUNGSANWEISUNG
mit Montageanweisungen
Instructions for use and installation instructions
Instructions d'utilisation et avis de montage
Gebruiksaanwijzing en montagehandleiding
Istruzioni di uso e di montaggio
Instrucciones de uso y de montaje
Instruções de uso e de montagem
Ο∆ΗΓΙΕΣ ΧΡΗΣΗΣ ΚΑΙ ΣΥΝΑΡΜΟΛΟΓΗΣΗΣ
EKI 6940
EKI 8940
20
GB
Disposing of the packaging
Please ensure the environmentally-friendly disposal of the packaging that came with your appliance. Recycling the packaging
material saves on resources and cuts down on waste.
Disposing of old appliances
The symbol on the product or on its packaging
indicates that this product may not be treated as
household waste. Instead it must be handed
over to a collection point for the recycling of
electrical and electronic equipment.
By ensuring that this product is disposed of cor-
rectly you will help to protect the environment
and human health, which could otherwise be harmed through the
inappropriate disposal of this product. For more detailed information about recycling this product, please contact your local city
office, your household waste disposal service or the shop where
you purchased the product.
Appropriate use
The hob is to be used solely for preparing food in the home. It
may not be used for any other purpose and may only be used
under supervision.
The hob must be properly installed and connected!
The appliance may not be operated with an external timer or an
external telecontrol system.
For your information...
Please read this manual carefully before using your appliance. It
contains important safety advice; it explains how to use and look
after your appliance so that it will provide you with many years of
reliable service.
Should your appliance develop a fault, please first consult the
section on “What to do if trouble occurs?”. You can often rectify
minor problems yourself, without having to call in a service engineer.
Please keep this manual in a safe place and pass it on to new
owners for their information and safety.
Contents
Safety instructions................................................................. 21
Connection and operation..................................................... 21
Concerning the hob............................................................... 21
Concerning persons.............................................................. 21
Appliance description............................................................ 22
Operating the hob with the sensor keys................................ 23
Worth knowing about the slider (sensor field)....................... 23
Operation................................................................................ 24
The hob................................................................................. 24
Pan recognition .................................................................... 24
Operation time limit............................................................... 24
Other functions...................................................................... 24
Protection against overheating (induction)............................ 24
Cookware for induction hobs ................................................ 25
How to cut power consumption............................................. 25
Power settings ...................................................................... 25
Residual heat display............................................................ 25
Operating the keys................................................................ 26
Switching on the hob and cooking zones.............................. 26
Switching off a cooking zone ................................................ 26
Switching off the hob............................................................. 26
STOP function ...................................................................... 27
Child safety device / lock ..................................................... 27
Keep-warm function ............................................................. 27
Automatic switch-off (timer) ............................................... 28
Minute minder (egg timer) ................................................... 28
Automatic boost function ...................................................... 29
Melting function .................................................................... 29
Bridging function .................................................................. 30
Power boost setting
(cooking zones marked with a P).......................................... 30
Power management.............................................................. 30
Cleaning and care.................................................................. 31
Glass ceramic hob ................................................................ 31
Specific soiling...................................................................... 31
What to do if trouble occurs ................................................. 32
Instructions for assembly ..................................................... 33
Safety instructions for kitchen unit fitters .............................. 33
Installation............................................................................. 33
Ventilation............................................................................. 33
Electrical connection ............................................................. 35
Technical data....................................................................... 35
Start of operation .................................................................. 35

Safety instructions
GB
21
Safety instructions
Connection and operation
• The appliances are constructed in accordance with the relevant safety regulations.
• Connecting the appliance to the mains and repairing and servicing the appliance may only be carried out by a qualified electrician according to currently-valid safety regulations. For your
own safety, do not allow anyone other than a qualified service
technician to install, service or repair the product.
Concerning the hob
• Never allow the induction hob to operate unattended, as
the high power setting results in extremely fast reactions.
• When cooking, pay attention to the heat-up speed of the cooking zones. Avoid boiling the pots dry as there is a risk of the
pots overheating!
• Do not place empty pots and pans on cooking zones which
have been switched on.
• Take care when using simmering pans as simmering water
may dry up unnoticed, resulting in damage to the pot and to
the hob for which no liability will be assumed.
• It is essential that after using a cooking zone you switch it off
with the respective minus key.
• Overheated fats and oils may spontaneously ignite. Always
supervise the preparation of food with fats and oils. Never
extinguish ignited fats and oils with water! Put the lid on the
pan and switch off the cooking zone.
• The glass ceramic surface of the hob is extremely robust. You
should, however, avoid dropping hard objects onto the glass
ceramic hob. Sharp objects which fall onto your hob might
break it.
• There is a risk of electric shocks if the glass ceramic hob
develops fractures, cracks, tears or damage of any other kind.
Immediately switch off the appliance. Disconnect the fuse
immediately and call Customer Service.
• If the hob cannot be switched off due to a defect in the sensor
control immediately disconnect your appliance and call Customer Service.
• Take care when working with home appliances! Connecting
cables must not come into contact with hot cooking zones.
• The glass ceramic hob should not be used as a storage area.
• Do not put aluminium foil or plastic onto the cooking zones.
Keep everything which could melt, such as plastics, foil and in
particular sugar and sugary foods away from hot cooking
zones. Use a special glass scraper to immediately remove any
sugar from the ceramic hob (when it is still hot) in order to
avoid damaging the hob.
• Metal items (pots and pans, cutlery, etc.) must never be put
down on the induction hob since they may become hot. Risk of
burning!
• Do not place combustible, inflammable or heat deformable
objects directly underneath the hob.
• Metal items worn on your body may become hot in the immediate vicinity of the induction hob. Caution! Risk of burns!
Non-magnetisable objects (e.g. gold or silver rings) will not be
affected.
• Never use the cooking zones to heat up unopened tins of food
or packaging made of material compounds. The power supply
may cause them to burst!
• Keep the sensor keys clean since the appliance may consider
dirt to be finger contact. Never put anything (pans, tea towels
etc.) onto the sensor keys!
If food boils over onto the sensor keys, we advise you to activate the OFF key.
• Hot pans should not cover the sensor keys, since this will
cause the appliance to switch off automatically.
• Whenever possible, use the back cooking zones for large pans
so that the sensor keys are not heated up too much (touch
control overheating; error message E2).
• Activate the childproof lock if there are any pets in the home
which could make contact with the hob.
• The induction hob may not be used when pyrolysis operation
is taking place in a built-in oven.
Concerning persons
• This appliance is not intended to be used by persons (including children) with physical, mental or sensory impairments or
by persons (including children) who lack the required experience or know-how, unless such persons are supervised by a
person responsible for their safety or have been given instructions on how to use the appliance by a person responsible for
their safety.
Children should be supervised in order to ensure that they do
not play with the appliance.
• Attention:
The surfaces of the heating and cooking zones become hot
during use. Keep small children away at all times.
• Persons with cardiac pacemakers or implanted insulin pumps
must make sure that their implants are not affected by the
induction hob (the frequency range of the induction hob is
20-50 kHz).
22
Appliance description
GB
A
p
p
l
i
a
n
c
e
d
e
s
c
r
i
p
t
i
o
n
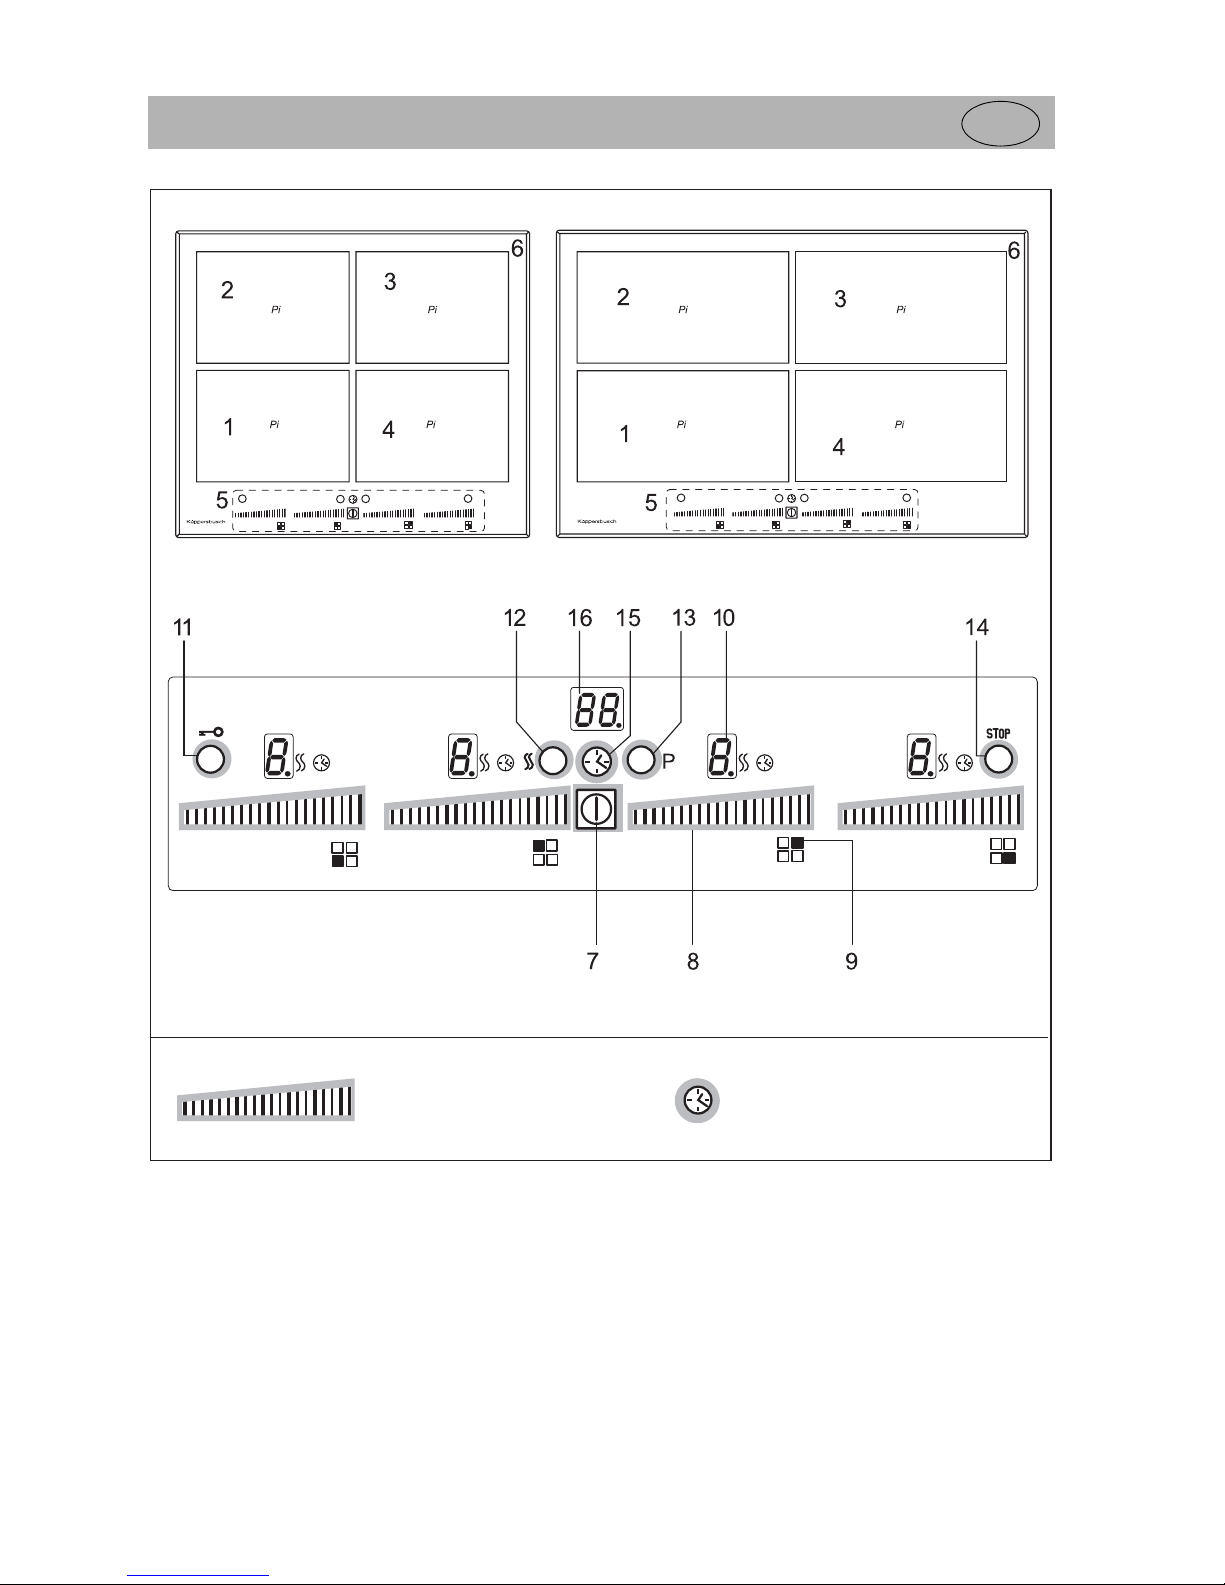
The decorative design may deviate from the illustrations.
1. Induction cooking zone front left
2. Induction cooking zone back left
3. Induction cooking zone back right
4. Induction cooking zone front right
5. Touch-control operating panel
6. Glass ceramic hob
7. ON/OFF key
8. Sensor field
9. Symbol for locating the position of a cooking zone on the
glass ceramic hob
10. Power setting display
11. Lock key
12. Melting function key
13. Power key
14. STOP key
15. Timer key
16. Timer display
Sensor key
Sensor field
Modell type 60 Modell type 80
Appliance description
GB
23
Operating the hob with the sensor keys
The ceramic glass hob is operated with touch control sensor
keys. The sensor keys are operated as follows: lightly touch a
symbol on the surface of the ceramic glass plate. A buzzer will
indicate when the controls have been operated correctly.
The touch control sensor key will be indicated as “key”.
ON/OFF key (7)
This key is used to switch the entire hob on and off. It is, as it
were, the main switch.
Power setting display (10)
The power setting display shows the power setting which has
been selected, or:
H................ Residual heat
.............. Pan recognition
A................ Automatic boost function
STOP ........ Stop function
.............. Keep-warm function
............. Bridging function (operating cooking zones
simultaneously)
Symbols
.......... Child safety device / lock
.......... Melting
.......... Timer function
.......... Power boost
Lock key (11)
The lock key can be used to lock all of the keys.
Melting function key (12)
For melting ingredients such as butter
Power key (13)
Symbol
The power boost setting makes additional power available for
induction cooking zones.
STOP key (14)
Symbol
The STOP function can be used to briefly stop the cooking proc-
ess.
Timer key (15)
For programming the automatic switch-off device (timer) and the
minute minder.
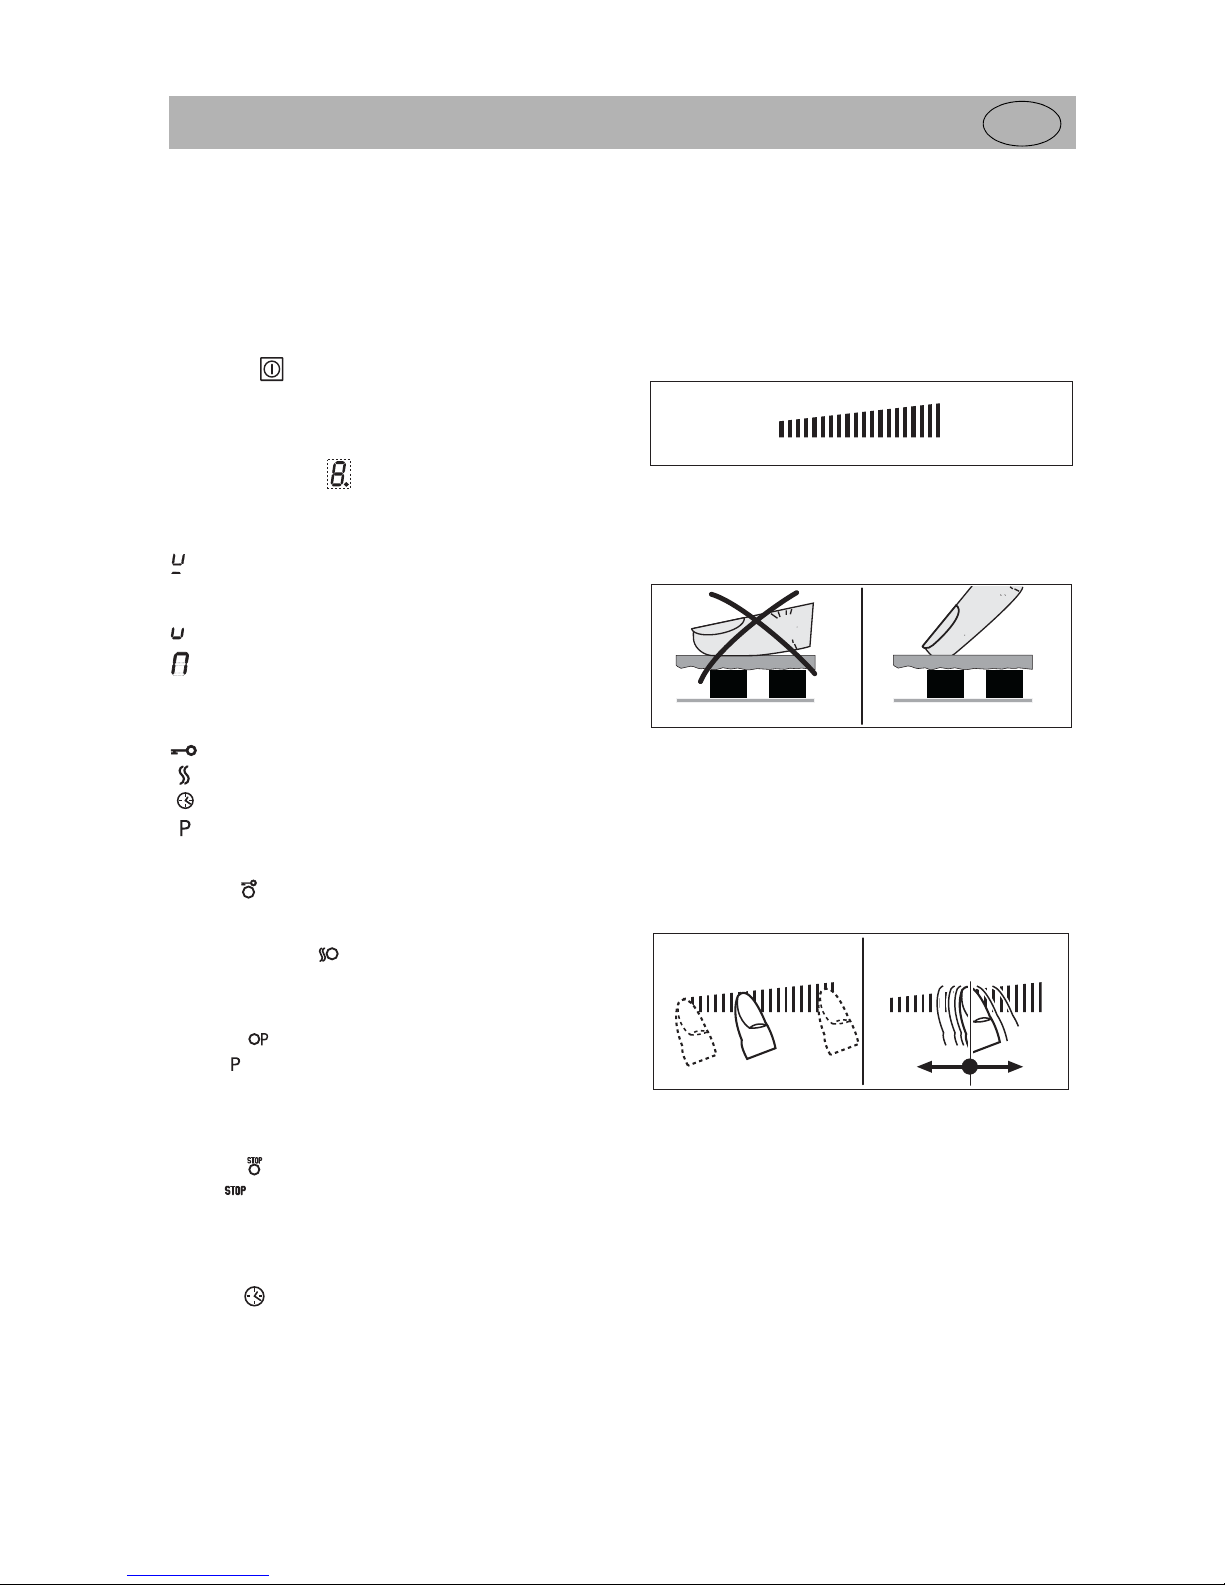
Worth knowing about the slider
(sensor field)
In principle, the slider functions the same as the touch controls;
the only difference is that you can put your finger on the glass
ceramic surface and then move it around. The sensor field recognises this movement and raises or lowers the display setting
(power level) in accordance with the movement.
The term “sensor field” is used to mean slider from now on.
What must be observed when operating sensor fields?
Your finger should not be placed flat onto the glass ceramic surface in order to avoid adjacent keys/sensor fields from reacting
by mistake.
Press the sensor field lightly or move your finger around
You can press the sensor field very lightly with your finger; when
this is done the setting on the display (power level) will gradually
change.
When you put your finger on the sensor field and then move it to
the left or right, the display setting will change progressively.
The faster the movement, the faster the change in the display.
Attention:
Pressing a sensor key and keeping it pressed (for approx.
3 seconds) may activate the automatic boost function “A”.
See the section on “Automatic boost function”.
sensor field
sensor
sensor
vitroceramic
finger
finger
sensor
sensor
vitroceramic
unsuitable right
touch move
24
Operation
GB
Operation
The hob
The hob is equipped with an induction cooking mode. An induction coil underneath the glass ceramic hob generates an electromagnetic alternating field which penetrates the glass ceramic
and induces the heat-generating current in the pot base.
With an induction cooking zone the heat is no longer transferred
from a heating element through the cooking pot into the food
being cooked; instead the necessary heat is generated directly in
the container by means of induction currents.
Advantages of the induction hob
– Energy-saving cooking through the direct transfer of energy to
the pot (suitable pots/pans made of magnetisable material are
required).
– Increased safety as the energy is only transferred when a pot
is placed on the hob.
– Highly effective energy transfer between an induction cooking
zone and the base of a pot.
– Rapid heat-up.
– The risk of burns is low as the cooking area is only heated
through the pan base; food which boils over does not stick to
the surface.
– Rapid, sensitive control of the energy supply.
Pan recognition
If a cooking zone is switched on and there is no pan on the zone
or if the pan is too small, there will be no transmission of power. A
blinking in the cooking level display points this out.
If a suitable pot or pan is placed on the cooking zone, the power
setting will switch on and the power setting display will light up.
The power supply will be cut off when the pan is removed and the
power setting display will indicate a blinking .
If the pots and pans placed on the cooking zone are of smaller
dimension, and the pan recognition still switches on, less power
will be supplied.
Pan recognition limits
Important: The minimum diameter required to activate the pan
recognition device may vary according to the type of pot or pan
used!
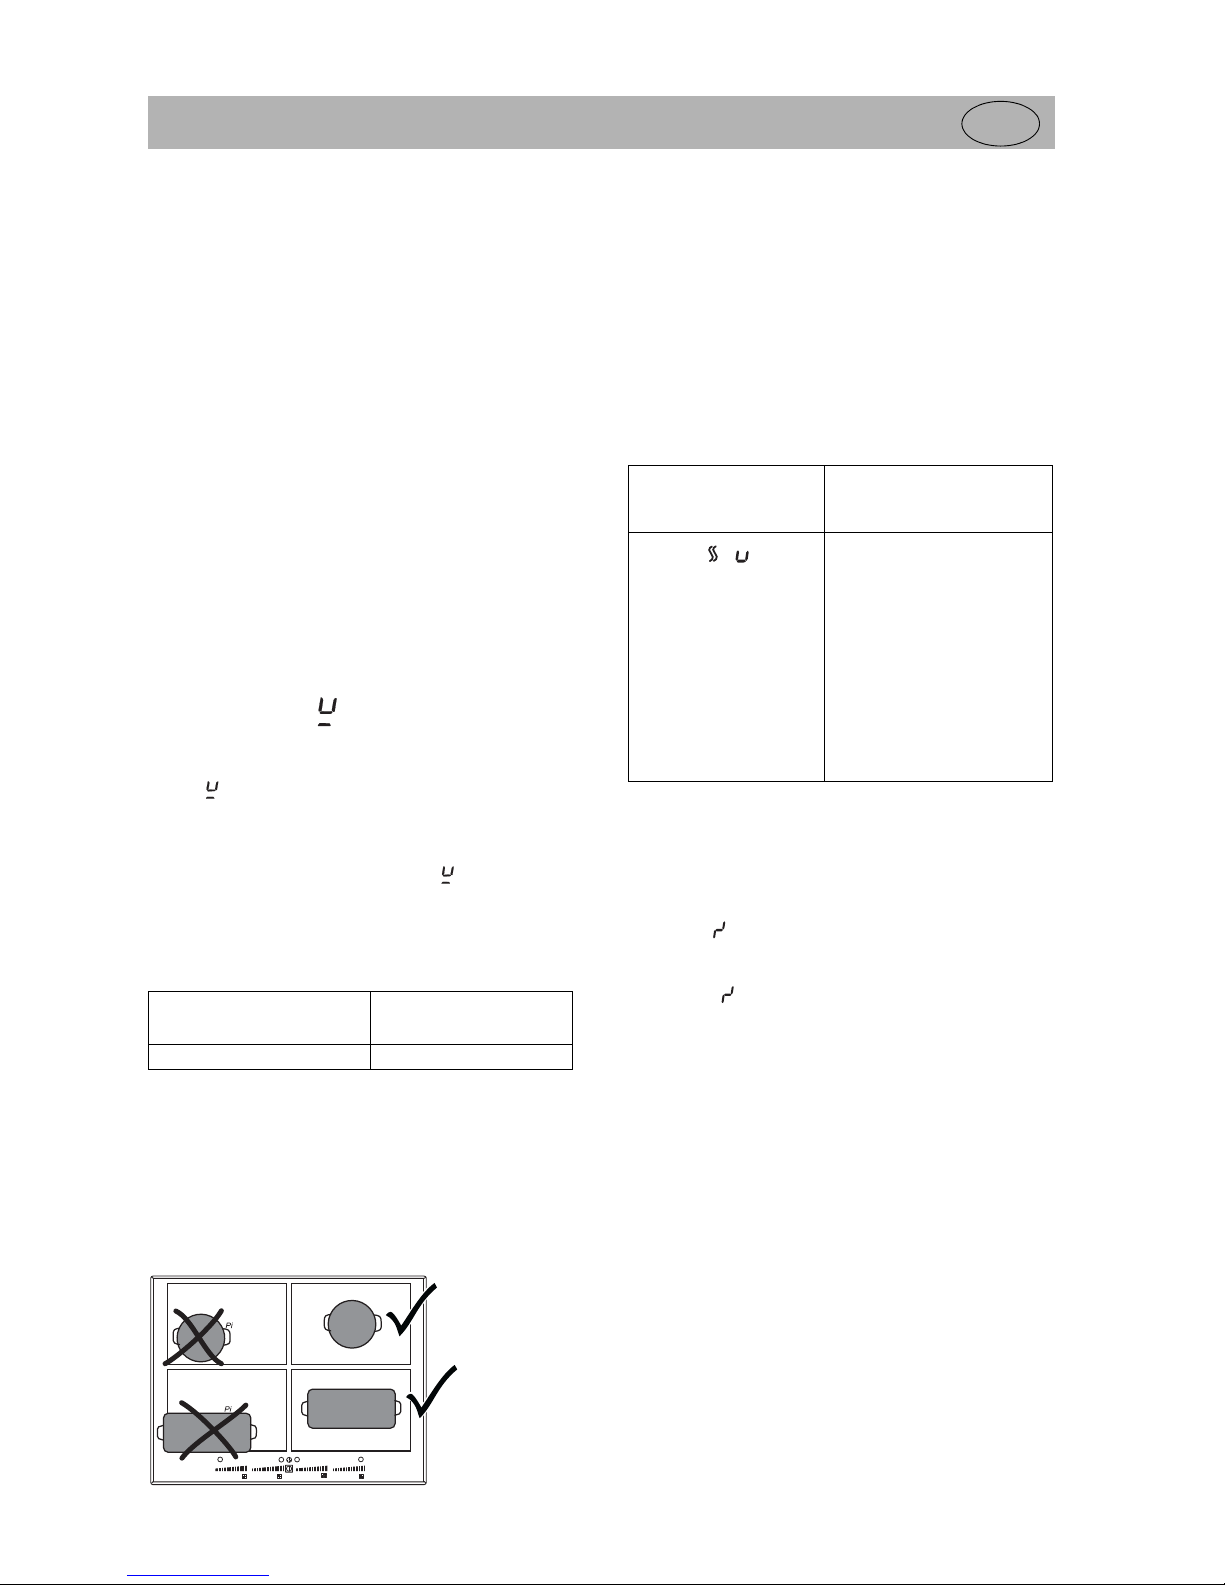
Important, please observe:
Place the pan as close to the centre of the cooking zone as
possible!
The power output will be reduced or the pan will not be
identified by the pan recognition device if it is placed
outside the centre.
Operation time limit
The induction hob has an automatic time limit function.
The duration of continuous use of each cooking zone depends on
the cooking level selected (see chart), provided that the setting of
a respective cooking zone is not adjusted during use.
If the operation time limit has been activated, the cooking zone
will switch off, a short signal will sound and an H will appear in
the display.
The automatic switch-off function overrules the operation time
limit, i.e. the cooking zone is only switched off when the period of
time of the automatic switch-off device has expired (e.g. automatic switch-off after 99 minutes and cooking level 9 is possible).
Other functions
If two or more sensor keys are pressed at the same time (e.g.
when a pan is mistakenly put onto a sensor key) no function will
be activated.
The symbol will blink and a time-limited continuous signal will
sound. After a few seconds the appliance will switch off. Please
remove the item located in front of the sensor keys.
To delete the symbol press the same key or switch the hob off
and on.
Protection against overheating
(induction)
If the hob is used at full power for a longer period, it will not be
possible to cool down the electronics system as required at a
high room temperature.
In order to ensure that no excessive temperatures occur in the
electronics system the power of the cooking zones may be
reduced automatically.
Should E2 be displayed frequently during normal use of the hob
and at normal room temperature, it is likely that cooling is not sufficient.
The reason may be that there are no openings for cooling purposes in the kitchen units. It may be necessary to check the
installation of the hob (see the section on Ventilation).
Cooking zones
Dimensions (mm)
Minimal diameter of the
saucepan bottom (mm)
185 x 220 120
Power setting
Operation time limit
in minutes
1
2
3
4
5
6
7
8
9
P
120
520
402
318
260
212
170
139
113
90
10
 Loading...