

Kuppersbusch EKDG 6550.0 W, EKDG 6550.0 User Manual

BEDIENUNGS- UND
MONTAGEANWEISUNG
EN User Manual
EKDG 6550.0
1630184

39
EN
Contents
Safety Instructions ................................................................................................................................. 40
Description of your oven ......................................................................................................................... 42
Basic settings ........................................................................................................................................ 44
Basic functions ...................................................................................................................................... 47
Regenerating & Sterilising ....................................................................................................................... 47
Auto Cooking functions ........................................................................................................................... 50
Water feeding ........................................................................................................................................ 56
Emptying the water tank .......................................................................................................................... 56
When the oven is working... .................................................................................................................... 57
Use of Acessories .................................................................................................................................. 58
Care and maintenance ............................................................................................................................ 67
Oven Cleaning ....................................................................................................................................... 70
What should I do if the oven doesn’t work? ............................................................................................... 71
Technical characteristics ......................................................................................................................... 72
Environmental protection ........................................................................................................................ 73
Installation instructions ........................................................................................................................... 74
Installation ............................................................................................................................................ 75
Dear Costumer:
Thank you for choosing this Küppersbusch product.
We ask you to read the instructions in this booklet very carefully as this will allow you to get the best results from
using it.
KEEP THE DOCUMENTATION OF THIS PRODUCT FOR FUTURE REFERENCE.
Always keep the instruction manual handy. If you lend the Steam oven to someone else give them the manual as
well!
The user manual is also available for download at www.kueppersbusch.de.

40
EN
Safety Instructions
Warning! Do not leave the oven
unsupervised.
Warning! If you see smoke or fire,
keep the door closed in order to
smother the flames. Switch off the
oven and take the plug out of the
socket or cut off the oven power
supply.
WARNING: The appliance and its
accessible parts become hot during
use.
Care should be taken to avoid
touching heating elements. Children
less than 8 years of age shall be kept
away unless continuously supervised.
This appliance can be used by
children aged from 8 years and above
and persons with reduced physical,
sensory or mental capabilities or lack
of experience and knowledge if they
have been given supervision or
instruction concerning use of the
appliance in a safe way and
understand the hazards involved.
Children shall not play with the
appliance. Cleaning and user
maintenance shall not be made by
children without supervision.
Children must be supervised to ensure
that they do not play with the
appliance. Use the safety locks.
Warning! During use the appliance
becomes very hot. Care should be
taken to avoid touching heating
elements inside the oven. RISK OF
BURNS!
Warning! Accessible parts may
become hot during use. Young
children should be kept away.
Warning! When opening the door
during or upon completion of the
cooking cycle, be careful of the flow of
hot air and/or steam and water drops
coming out of the cooking chamber.
Step back or to the side to avoid
burns.
Warning! Make sure you never catch
the power cables of other electrical
appliances in the hot door or the oven.
The cable insulation may melt. Danger
of short-circuiting!
This oven is exclusively for domestic use!
The appliance is designed for use in the
home for preparing food. No liability is
assumed for any damage caused by
improper or incorrect use.

41
EN
Safety Instructions
Avoid damaging the oven or other
dangerous situations by following these
instructions:
Please cover the socket inside the
oven as you are not using the food
probe. This will prevent possible
damages.
Only use the recommended food
probe for this oven.
This will prevent possible damages on
the appliance
Do not cover or obstruct the
ventilation openings.
Do not keep any inflammable object
inside the oven as it may burn if the
oven is switched on.
Do not use the oven as a pantry.
Do not pour spirits (e.g. brandy,
whisky, schnapps, etc.) over hot food.
Danger of explosion!
Accessories such as wire racks and
trays, etc. get hot in the cooking
space. Always wear protective gloves
or use oven cloths.
To avoid being burnt, always use oven
gloves for handling dishes and
containers and touching the oven.
Do not lean or sit on the open oven
door. This may damage the oven,
especially in the hinge zone. The door
can bear a maximum weight of 8 kg.
The racks can bear a maximum load
of 8 kg. To avoid damaging the oven,
do not exceed this load.
Cleaning:
The appliance will remain hot for
some time after it is switched off and
cool down only slowly to room
temperature. Please allow sufficient
time for the appliance to cool down
before, for instance, cleaning it.
Do not use harsh abrasive cleaners or
sharp metal scrapers to clean the
oven door glass since they can
scratch the surface, which may result
in shattering of the glass.
Do not use high pressure or steam jet
cleaning appliances.
Please follow the instructions
regarding cleaning in the section
“Oven Cleaning and Maintenance”.
Repairs:
If the power cable is damaged it
should be substituted by the
manufacturer, authorised agents or
technicians qualified for this task in
order to avoid dangerous situations.
Furthermore, special tools are
required for this task.
Repair and maintenance work,
especially of current carrying parts,
can only be carried out by technicians
authorized by the manufacturer.
42
EN
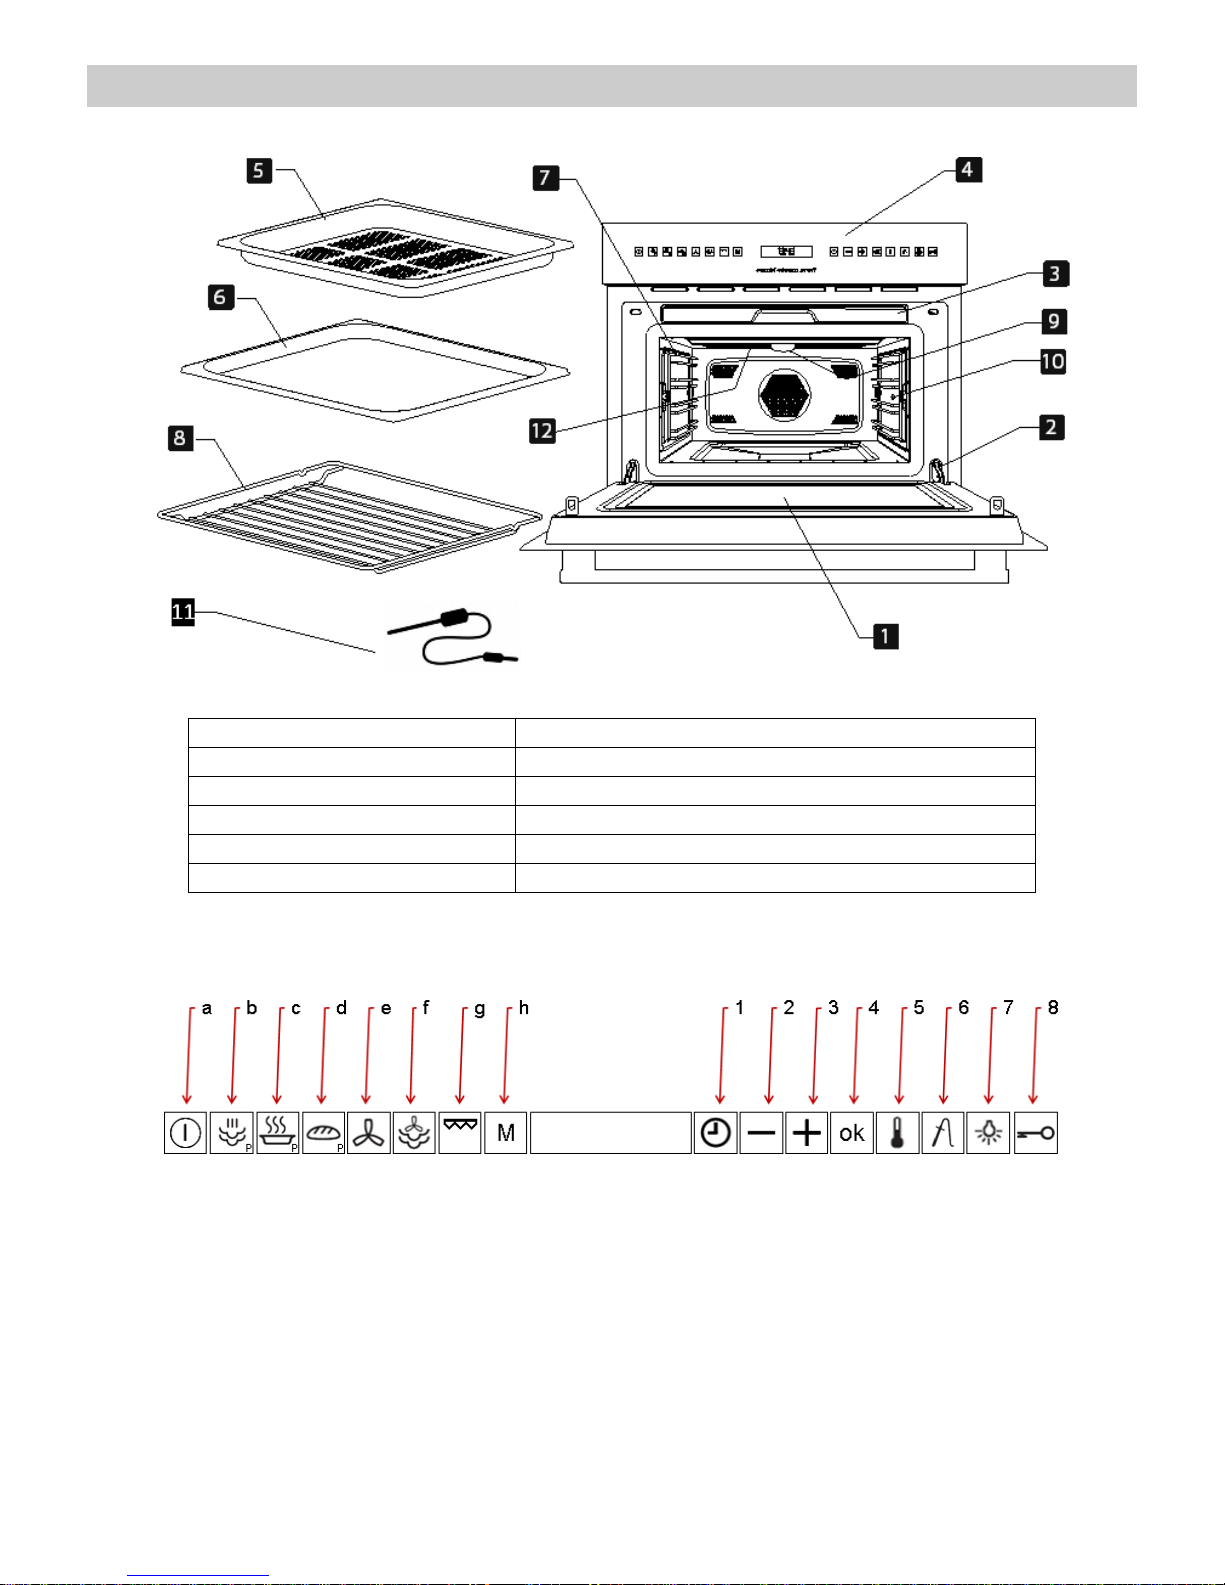
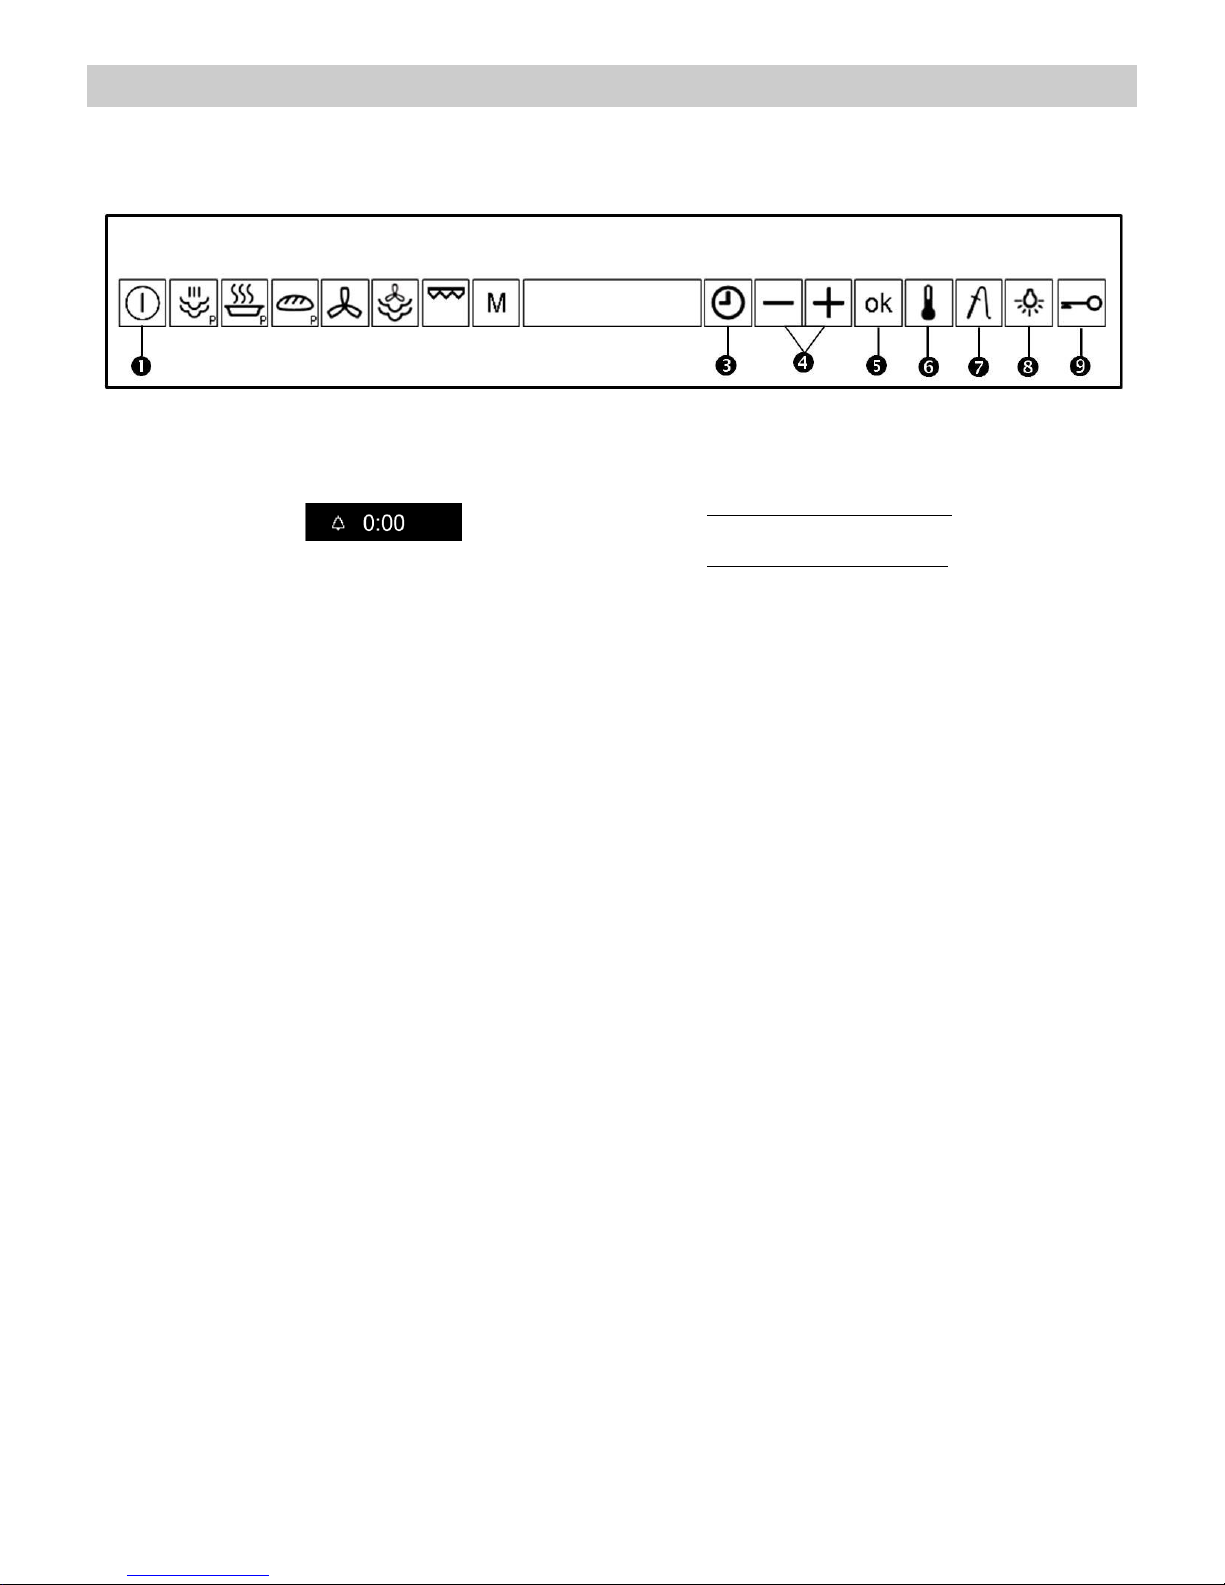
Description of your oven
1. – Door window glass
7. – Shelf guides
2. – Safety catches
8. – Rack
3. – Water tank
9. – Lamp bulb
4. – Control panel
10. – Plug socket for the Food Probe
5. – Perforated baking tray
11. – Food Probe
6. – Baking tray
12. – Grill
Control Panel
a. ON/OFF
1. Time Functions
b. Steam
2. Minus
c. Regenerating & Sterilising
3. Plus
d. “Profi” Cooking
4. Confirmation (OK)
e. Hot Air
5. Temperature
f. Hot Air + Steam
6. Food Probe
g. Grill
7.Lamp
h. Memory Functions (M1-M5)
8.Safety Block
43
EN
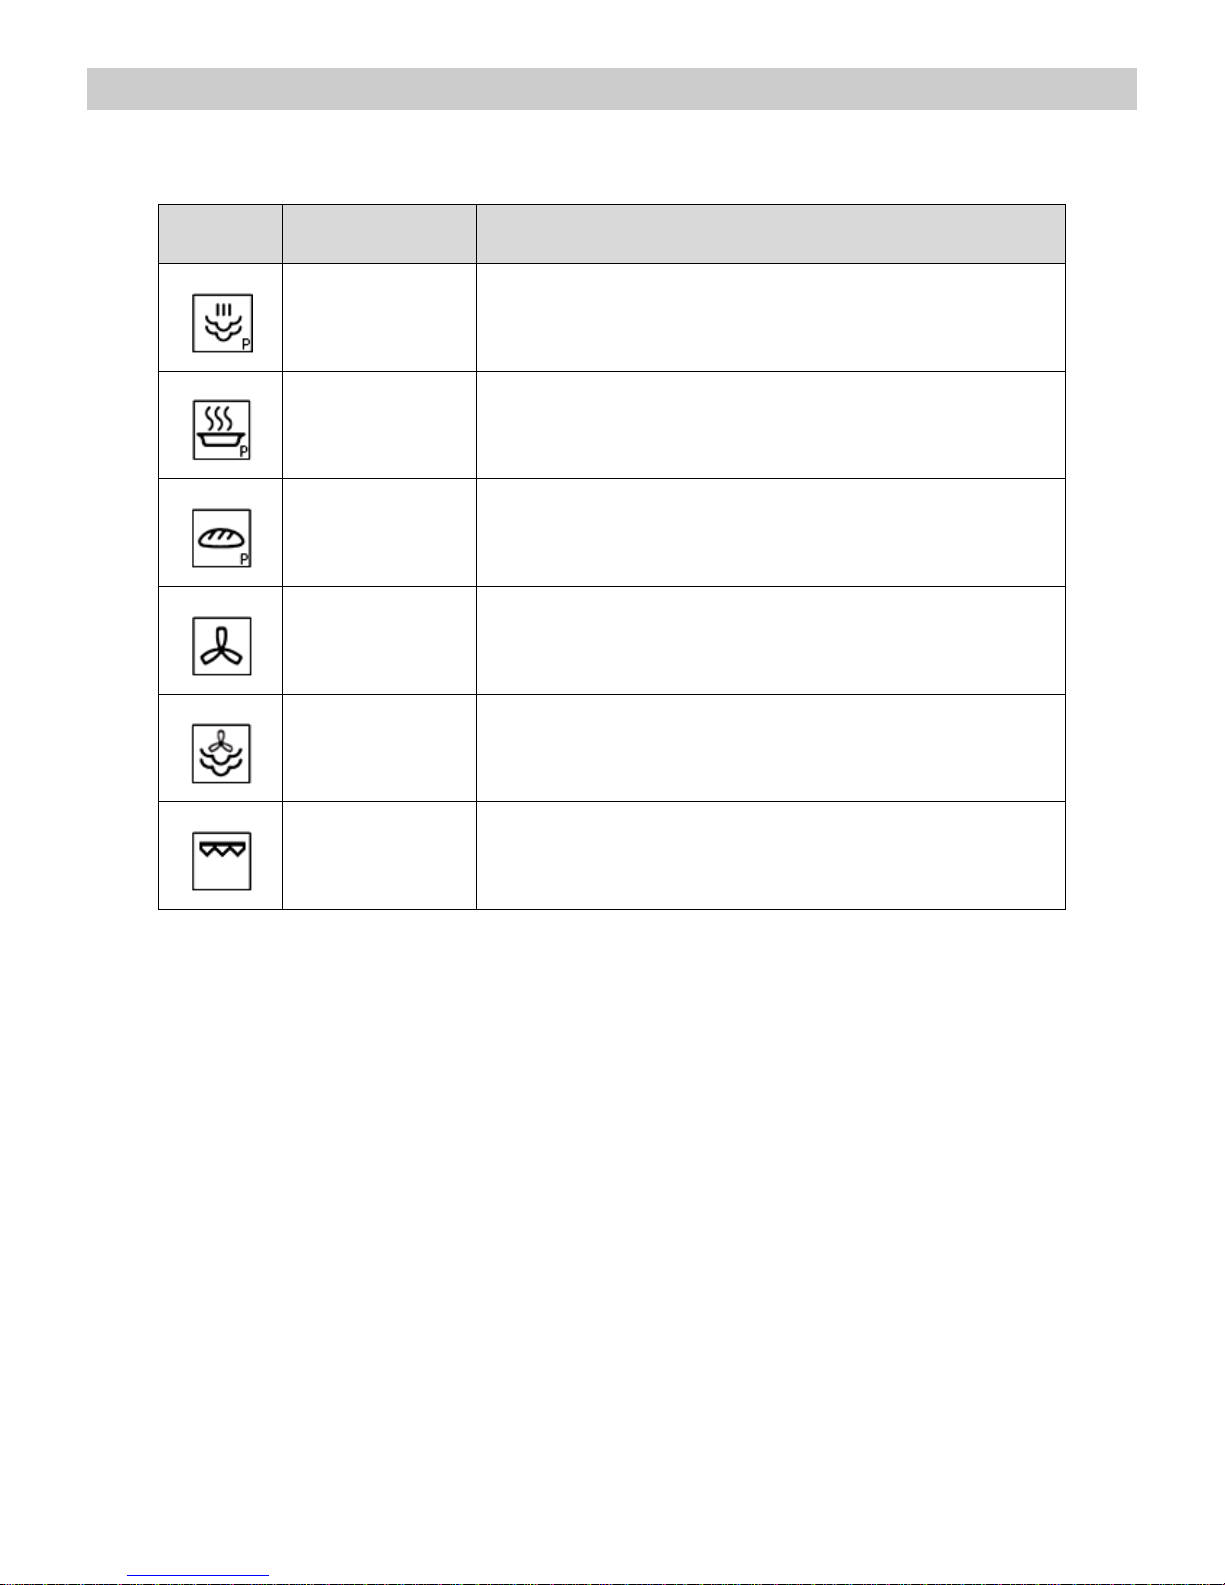
Description of your oven
Description of Functions
Symbol
Function
Foods
Steam
Cooking all sorts of vegetables, rice, cereals and meat.
Extracting juice from berries.
Simultaneous defrosting and cooking of vegetables.
Regenerating &
Sterilising
Regenerating plate dishes and ready-made meals.
Sterilising/boiling down fruit.
“Profi” Cooking
Fine pastry and cakes.
Hot Air
Roasting and baking.
Hot Air + Steam
Cooking meals with hot damp circulating air.
Cooking potatoes, rice.
Moist garnishing.
Grill
Grilling meat and fish
Grilling Potatoes – deep frozen, defrosting and roasting.
44
EN
Basic settings
Initial Settings
After your steam oven is first plugged in or after a
power failure, the clock display will flash to indicate
that the time shown is not correct.
The oven will not operate until the clock, the water
hardness parameter and the Calibration is set.
To set the clock and the water hardness parameter
value proceed as described in the following chapters.
Setting the clock
The clock display will flash if your appliance is first plugged in or after a power failure, to indicate that the time shown is not
correct. To set the clock, proceed as follows:
To set the clock, proceed as follows:
1. Press the “On/Off” key to switch the oven on.
2. Press the “Time function” key.
3. Press the “–” and “+” keys to select the desired
hour.
4. Press the OK key , to confirm the hours.
5. Press the OK key to confirm the hours. The
minutes digits will flash.
6. Press the “-” and “+” keys to set the minutes.
7. Press the OK key to confirm the minutes.
Water Hardness setting
The appliance features a system that automatically indicates
when it is time to descale.
The system can be optimized for households with very soft
water (also through using a water softening appliance) and
very hard water, by changing the user settings to the
relevant range of water hardness (see table below).
To set the water hardness parameter, proceed as follows:
1. Press the “On/Off” key to switch the oven on.
2. Press the “–” and “+” keys simultaneously
(approximately 1 second). The Water Hardness level
will start to flash on the display.
(Steps 1 and 2 are not necessary if the oven is first
plugged in or after a power failure.)
(If you hold the "-" and "+" keys for about 5 seconds
the appliance will start the descaling process. To
cancel the descaling process, press the “On/Off” .
key).
3. Press the “–” and “+” keys to select the desired
water hardness according to the table below.
4. Press the “OK” key to set the parameter. The
oven returns to the “ON” state.
45
EN
Basic settings
Type
Water hardness
Display
Ca + Mg
(ppm)
English deg. [°eH]
French deg.
[°dF]
German deg.
[°dH]
Soft water
0 to 150
0 to 11
0 to 15
0 to 8
1
Medium water
151 to 350
12 to 25
16 to 35
9 to 20
2
Hard water
501 to 500
26 to 35
36 to 50
21 to 28
3
Hiding/Displaying the Clock
If the clock display disturbs you, you can hide it by
proceeding as follows:
1. Press the “On/Off” key to switch the oven on.
2. Press the “Time” function key .
3. Press the “–” and “+” keys to navigate to the Hide
Clock function.
4. Press “OK” to validate
Safety blocking
The oven functioning can be blocked (for example, to stop it being used by children).
To block the oven proceed as follows:
1. Press the “On/Off” key to switch the oven on.
2. Hold down the “Safety Block” key for 3 seconds.
The “Safety Block” key lights up and the display
shows a key symbols. The oven will not operate
until it is unblocked.
3. To unblock the oven repeat the above procedure.
46
EN
Basic settings
Timer
The timer functions like an egg timer. It can be used at any time and independently of all other functions.
To set the Timer proceed as follows:
1. Press the “On/Off” key to switch the oven on.
2. Press the “Time” function key.
3. Press the “-” and “+” keys navigate to the
“Timer” function.
4. With the “OK” key confirm the selected function
5. Press the “–” and “+” keys to set the desired time.
6. Press the OK key to validate. The timer will start
to countdown.
When the set time has elapsed the oven will emit three
beeps that will be repeated every 30 seconds and the
Timer key will flash. Press the “Time” key .to cancel
the beeps.
While the Timer is running the Timer light is on. The
display and lights show the following:
1. If there is no active function the display shows the
Timer counting-down and the Timer key is red.
2. If there is an active function, the display and keys
show the normal function parameters. To check the
Timer’s remaining time press the Timer key. The display
will briefly show the Timer and resume the function
indications after 5 seconds or once the Timer key is
pressed again. While the Timer is shown the remaining
time can be changed with the “–” and “+” keys as
described above.
47
EN
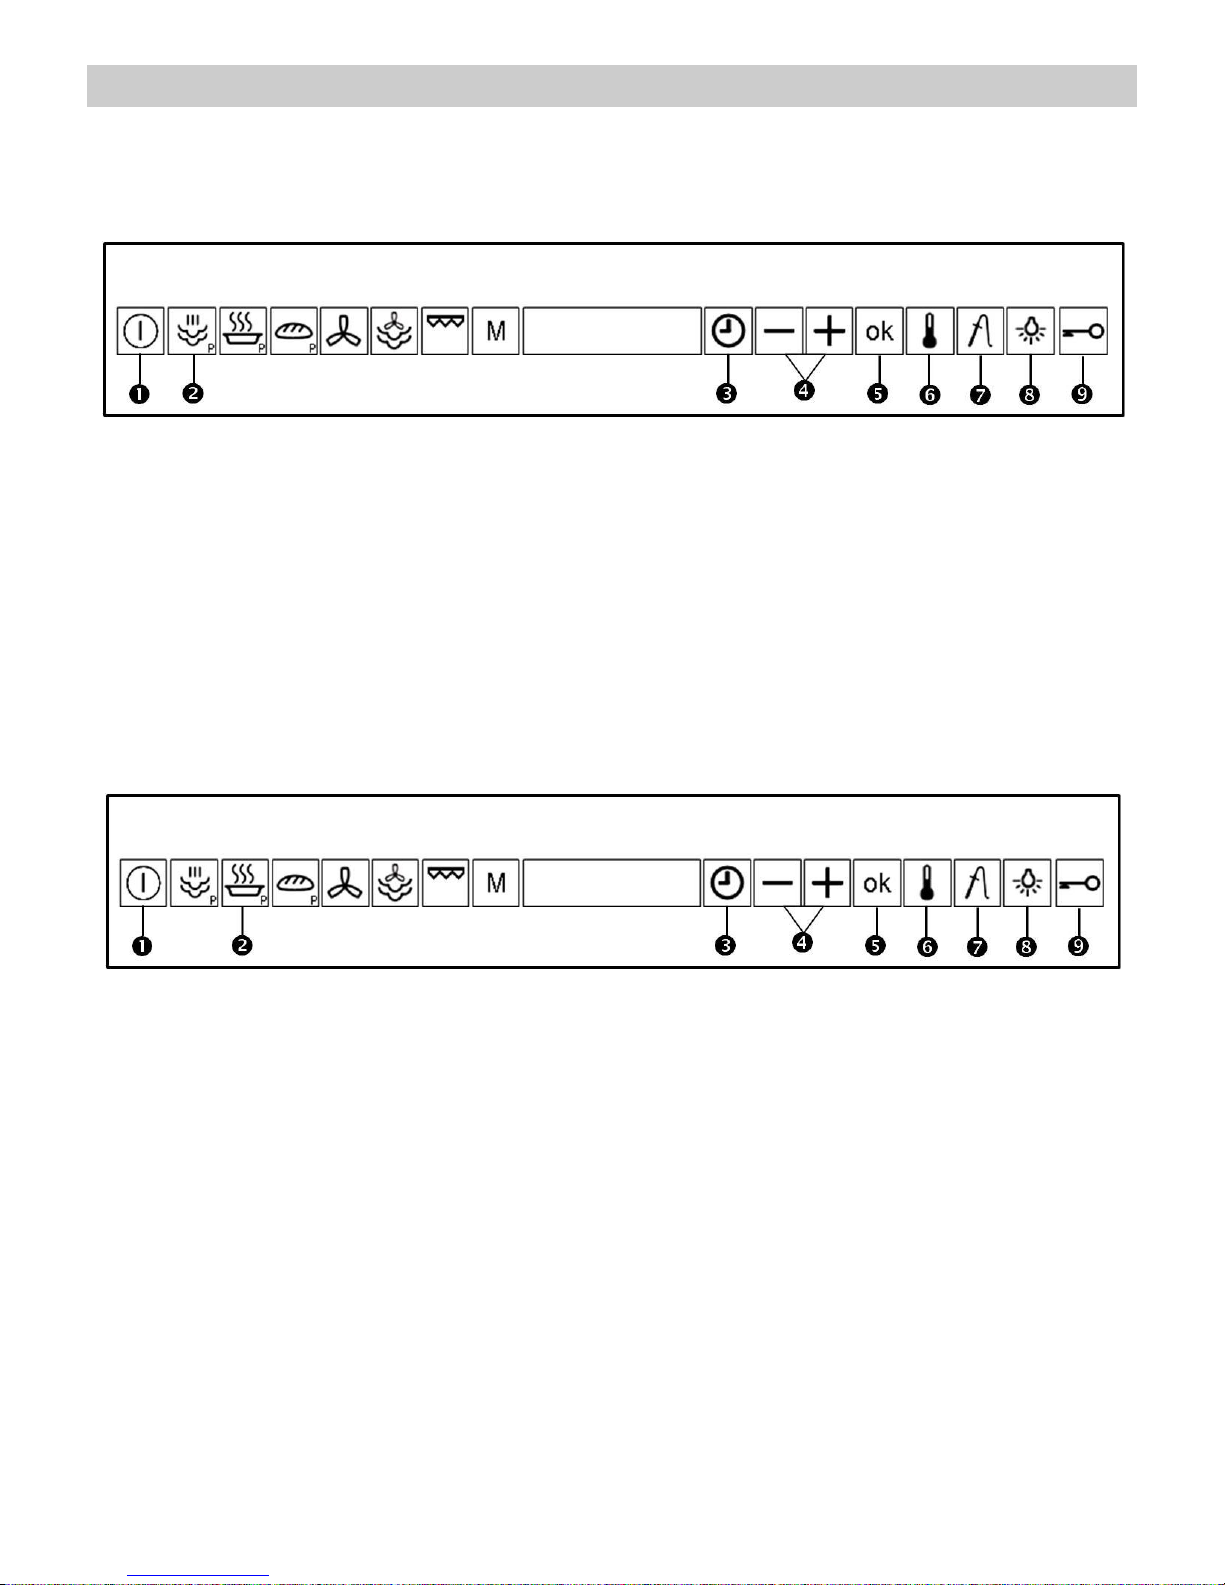
Basic functions
Steam function
Use this function to cook all sorts of vegetables, rice, cereals and meat. It is also suitable for extracting juice from
berries and for simultaneous defrosting and cooking of vegetables.
1. Press the “On/Off” key to switch the oven on.
2. Press the “Steam Function” key
3. Press the “OK” key if you wish to use the default
values (Temperature - 100ºC + Time 30 min.).
The oven will start to operate. If you wish to change
the parameters proceed to the next step.
4. Press the “Temperature” key .
5. Set the desired temperature with the “-” and “+”
key. Press the “OK” key to validate. The oven will
start to operate.
6. Press the “Time” key .
7. Press the “OK” key to enter the duration menu.
8. Set the desired time with the “-” and “+” keys .
9. Press the “OK” key to validate.
10. Press the “OK” key . The Oven will start to
operate.
Regenerating & Sterilising
Use this function to regenerate plate dishes and ready-made meals as well as to sterilise and boil down fruit.
1. Press the “On/Off” key to switch the oven on.
2. Press the “Regenerating & Sterilising” key .
3. Press the “OK” key if you wish to use the
default values.
The oven will start to operate. If you wish to
change the parameters proceed to the next
step.
4. Press the “Temperature” key .
5. With the “-” and “+” key define the desired
temperature.
6. Press the “OK” key to validate.
7. Press the “Time” key .
8. With the “-” and “+” define the desired time.
9. Press the “OK” key to validate. The Oven will
start to operate.
48
EN
Basic Functions
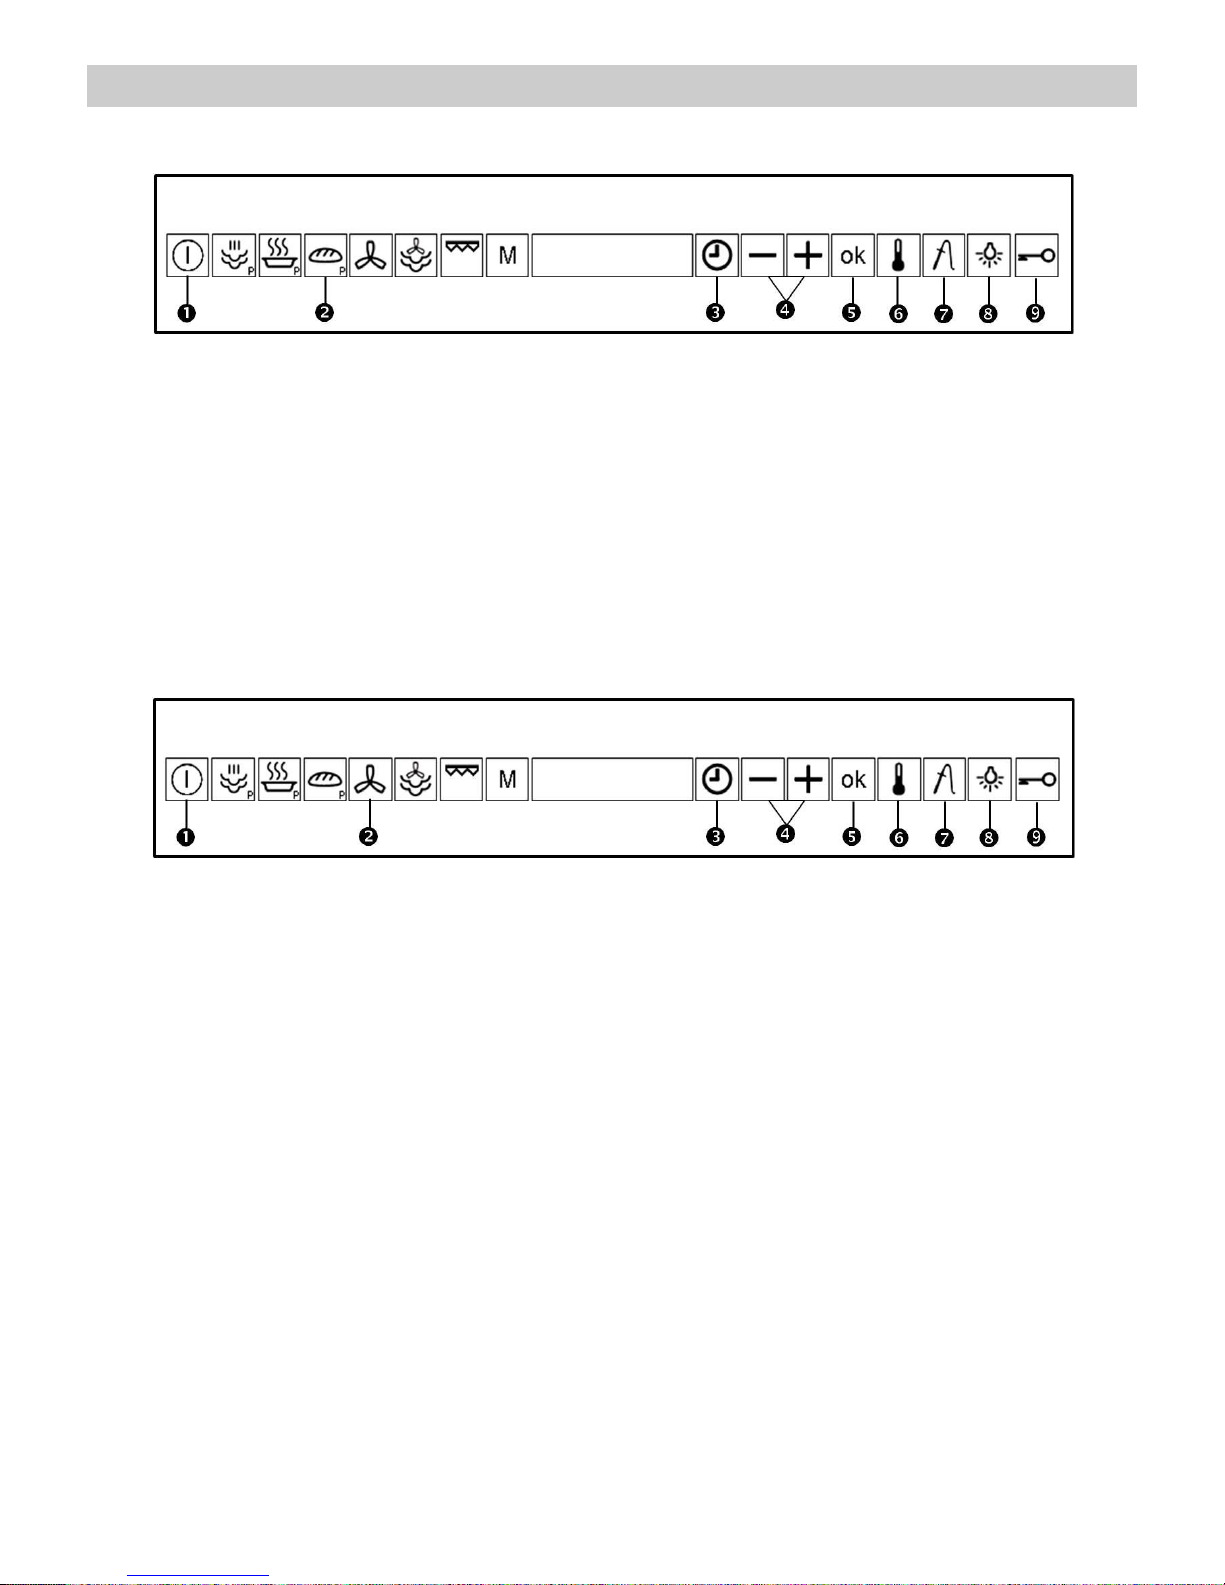
“Profi” Cooking
1. Press the “On/Off” key to switch the oven on.
2. Press the “Profi” Cooking key .
3. Press the “OK” key if you wish to use the
default values.
The oven will start to operate. If you wish to
change the parameters proceed to the next
step.
4. Press the “Temperature” key .
5. With the “-” and “+” key define the desired
temperature.
6. Press the “OK” key to validate.
7. Press the “Time” key .
8. With the “-” and “+” define the desired time.
9. Press the “OK” key to validate. The Oven will
start to operate.
Hot air
Use this function to bake and roast.
1. Press the “On/Off” key to switch the oven on.
2. Press the “Hot Air” key function key .
3. Press the “Temperature” key .
4. Press the “-” and “+” keys to set the required
Temperature.
5. Press the “OK” key to validate the
temperature.
6. Press the “Time” function key .
7. Press the “-” and “+” keys to set the desired
Time.
8. Press the “OK” key to validate the cooking
time. The oven will start to operate.
49
EN
Basic Functions
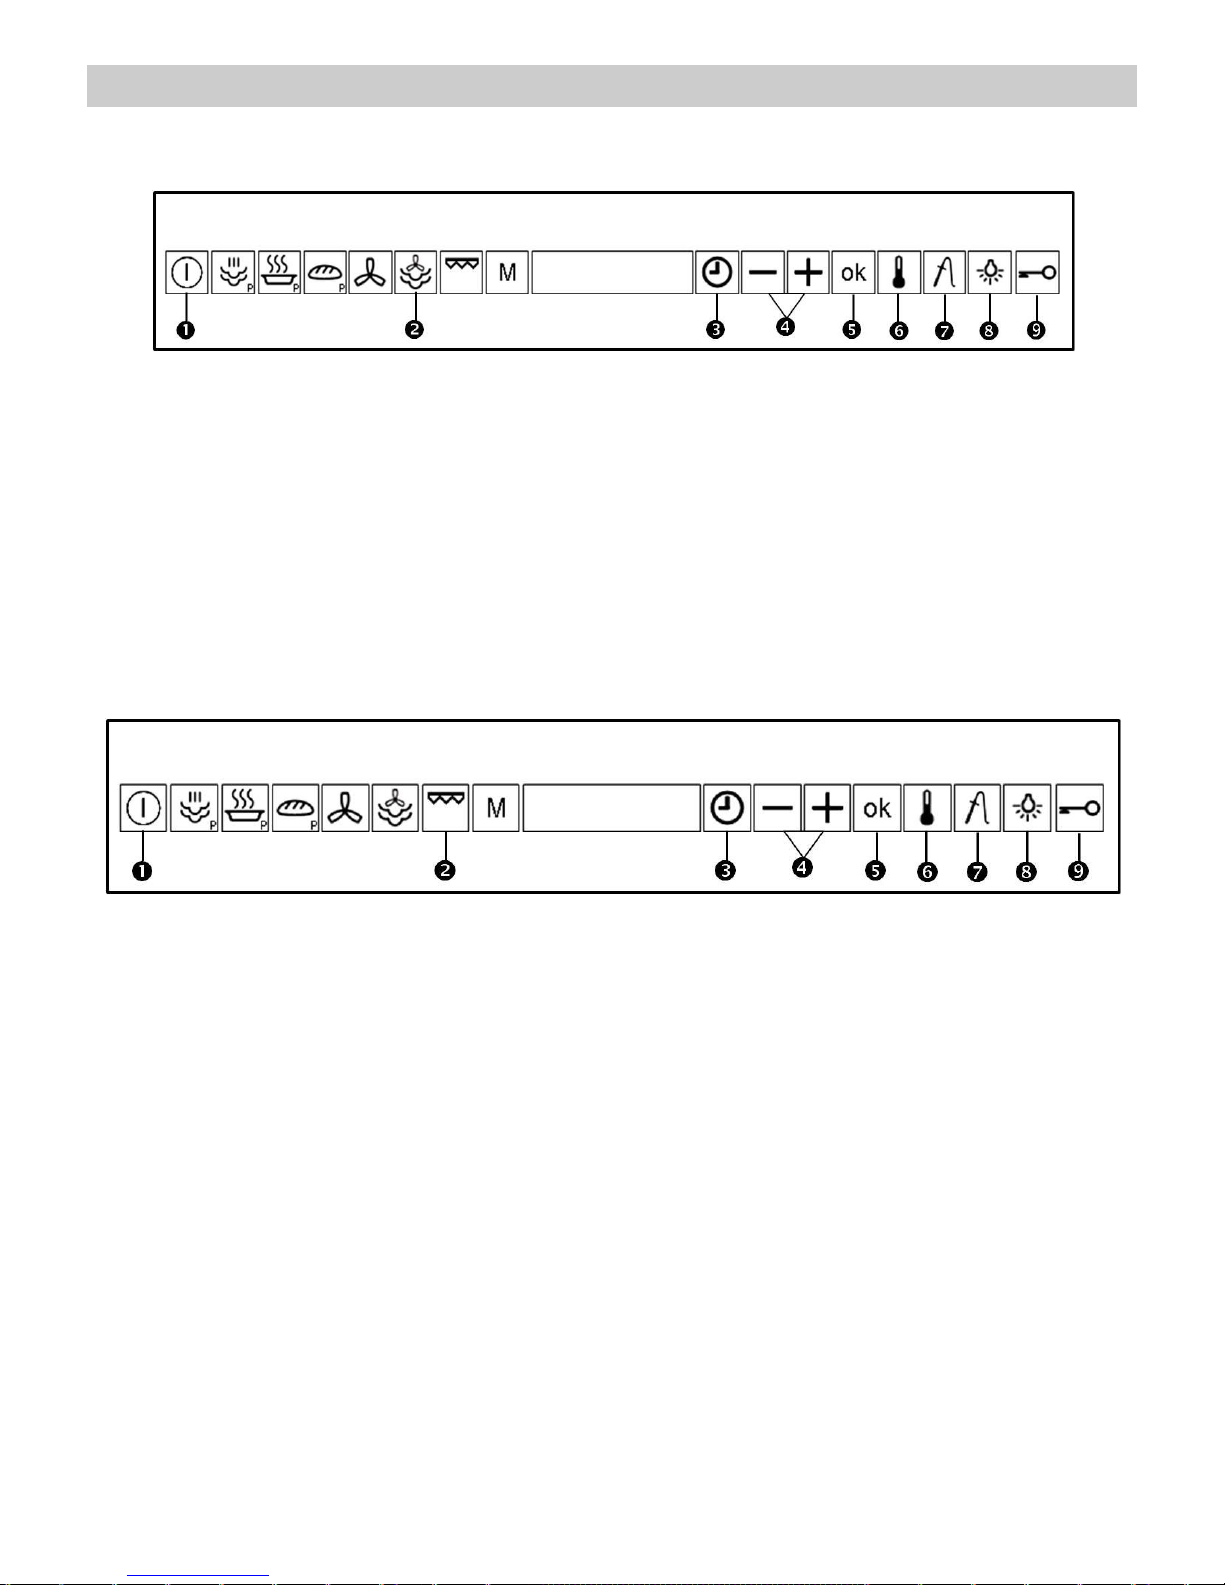
Hot Air + Steam function
1. Press the “On/Off” key to switch the oven on.
2. Press the “Hot Air + Steam” function key .
3. Press the “Temperature” key .
4. Press the “-” and “+” keys to set the required
Temperature.
5. Press the “OK” key to validate the
temperature.
6. Press the “Time” function key .
7. With the “-“ and “+” key select the timer
function.
8. Press the “OK” key .
9. Press the “-” and “+” keys to set the desired
Time.
10. Press the “OK” key to validate the cooking
time. The oven will start to operate.
Grill
Use this function to brown the top of food quickly.
1. Press the “On/Off” key to switch the oven on.
2. Press the “Grill” function key .
3. Press the “Temperature” key .
4. Press the “-” and “+” keys to set the required
Temperature.
5. Press the “OK” key to validate the temperature.
6. Press the “Time” key .
7. With the “-“ and “+” keys select the timer
function.
8. Press the “OK” key .
9. Press the “-” and “+” keys to set the desired
Time.
10. Press the “OK” key to validate the cooking time.
The oven will start to operate.
 Loading...