

Kuppersbusch EEH 6250.0, EEH 6150.0 operating instructions
BEDIENUNGSANWEISUNG
mit Montageanweisungen
Instructions for use and installation instructions
Instrucciones de uso y de montaje
EEB 6250.0
072375 H41

EEB 6250.0 17
For your information...
You should carefully read the information in this manual before you use your
oven. Here you will find important notes concerning safety and how to use,
look after and service your appliance so that it enjoys a long service life.
Should a fault arise, please first consult chapter “What to do if trouble occurs”.
You can often remedy minor faults yourself and thus save unnecessary service
costs.
Please keep this manual in a safety place and pass it on to new owners for
their information and safety.
The following symbols are used in this operating manual:
[
The warning triangle draws your attention to risks to your health or
damage that might be caused to your appliance.
F
Here you will find useful hints and information.
Conditions of guarantee
The conditions of guarantee applicable for this product are subject to those
published by the representative in the relevant country. Details regarding same
may be obtained from the dealer from whom the appliance was purchased.
For claims under guarantee the sales receipt must be produced.
Contents
Your appliance at a glance . . . . . . . . . . . . . . . . . . . . . . . 18
Safety instructions . . . . . . . . . . . . . . . . . . . . . . . . . . . . . 19
Connection and operation
Oven
Before using the appliance for the first time . . . . . . . . . . . 19
Disposing of the packaging and the old appliance
Setting the clock
Initial cleaning
Using your oven. . . . . . . . . . . . . . . . . . . . . . . . . . . . . . . 20
General
Symbols and operating modes
Turning the oven on and off
Heating-up indicator and pilot light
Oven trays
Rack levels:
backmobil
®
(acc.-no. 600)
Telescopic glide-out shelves (acc.-no. 601)
Fast preheating
Baking
Baking pizza
Tips on the table “Recommended temperatures for baking”
Recommended temperatures for baking
Grilling
Recommended temperatures for grilling
Roasting
Recommended temperatures for roasting
Defrosting
Preserving
The electronic timer with switch-off function. . . . . . . . . . . 24
Setting the clock
Setting the alarm time
Cleaning and care . . . . . . . . . . . . . . . . . . . . . . . . . . . . . 25
For all surfaces
Remove caking
Please note the information for the cleaning scraper
The use of oven sprays - information
Enamel
Stainless steel
Glass
Door sealing
Buttons
Removing and installing the oven door
Removing and installing the side racks
Folding heating element down/up
Regenerating the ökotherm
®
catalyst
What to do if trouble occurs... . . . . . . . . . . . . . . . . . . . . . 26
Replacing the oven lamp
Replacing the door sealing
Rating label. . . . . . . . . . . . . . . . . . . . . . . . . . . . . . . . . . 27
Installation instructions for fitter. . . . . . . . . . . . . . . . . . . . 27
Electrics
Installation dimensions
Installation in a fitted kitchen
18 EEB 6250.0
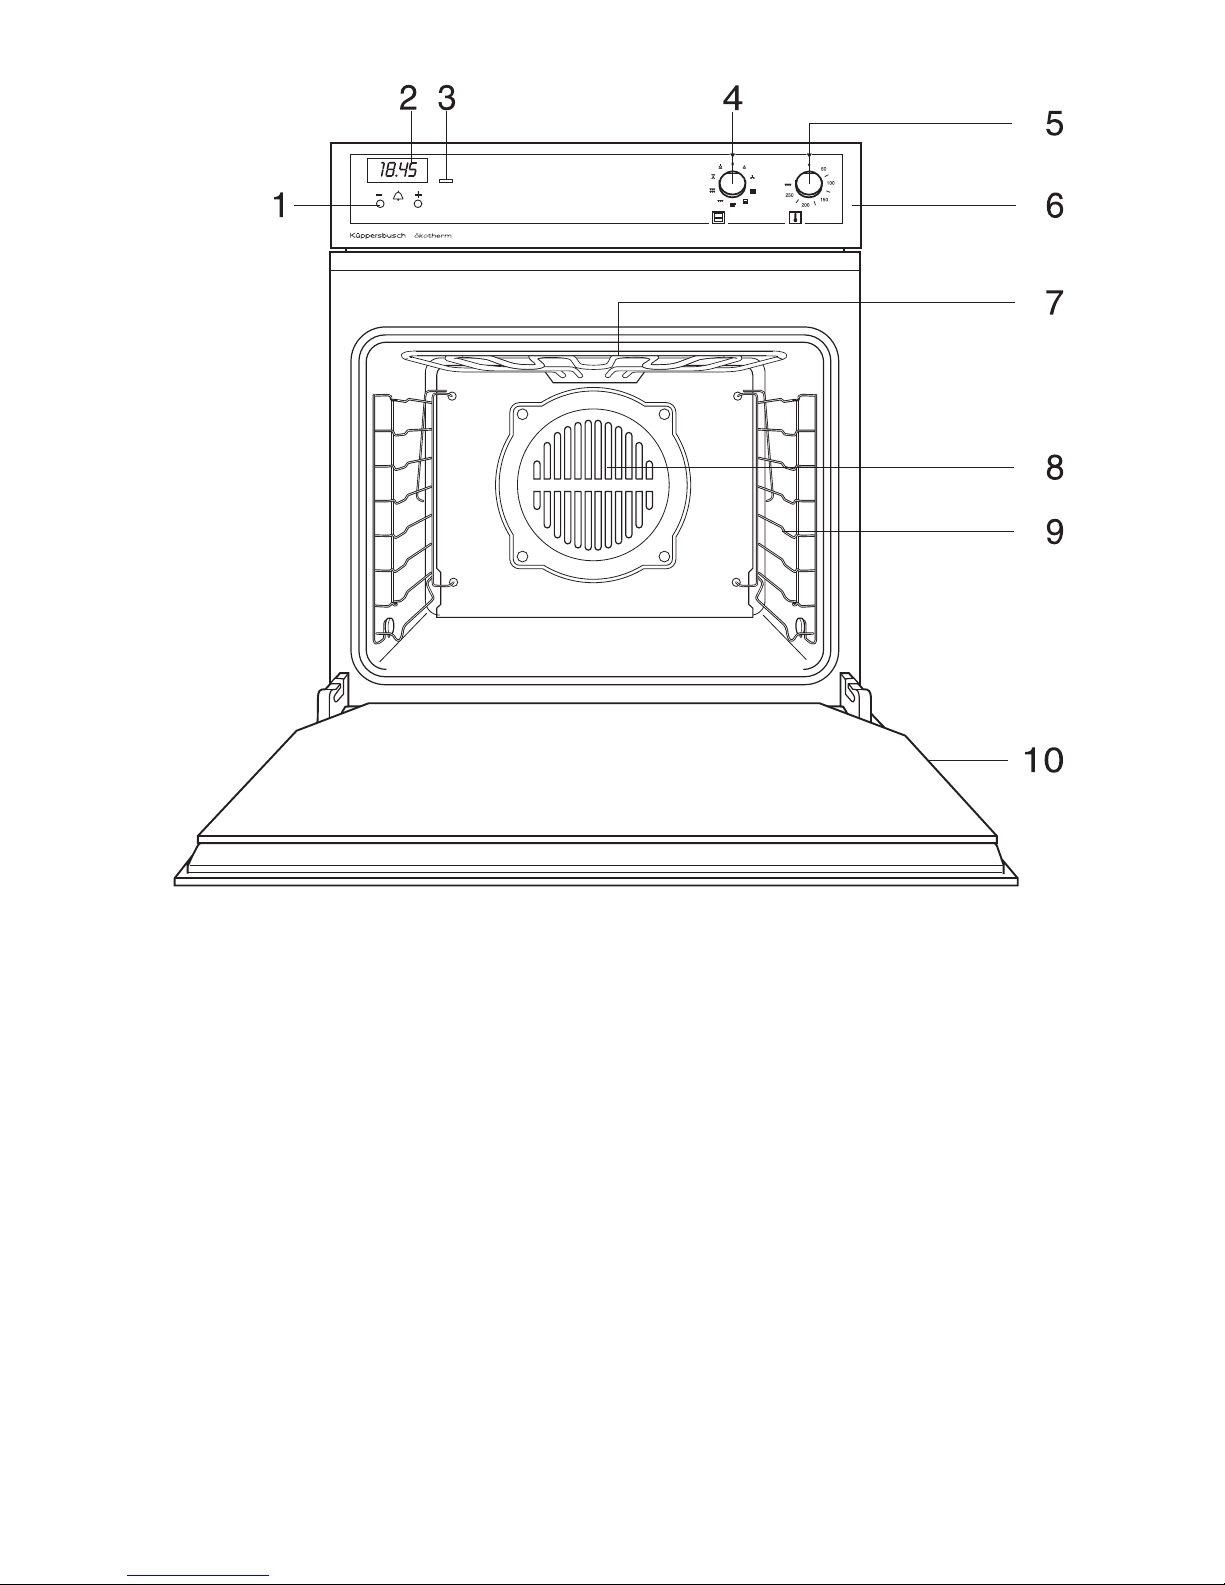
Your appliance at a glance
1 Control buttons for the timer
2 Display of the timer
3 Heating-up indicator
4 Mode selector
5 Temperature control
6 Control panel
7 Fold-down grill (top heat and grill)
8 Hot air fan
9 Rack levels
10 Oven door
Accessories supplied:
Gridiron
Baking tray (enamel)
Drip pan
Grilling rack with lifter
Accessories available:
Grilling rack with lifter (acc.-no. 125)
Pizza stone (acc.-no. 145)
Gridiron (acc.-no. 124)
Roasting tray (acc.-no. 441)
Baking tray (enamel) (acc.-no. 541)
Drip pan (aluminium) (acc.-no. 542)
Drip pan (acc.-no. 543)
backmobil
®
(acc.-no. 600)
Telescopic glide-out shelves (acc.-no. 601)
Accessories available
for the telescopic glide-out shelves (acc.-no. 601):
Gridiron, depressed, e.g. for large poultry (acc.-no. 750)
Glass drip pan, suitable only for accessory 750 (acc.-no. 751)

EEB 6250.0 19
Safety instructions
Connection and operation
■ Only KÜPPERSBUSCH built-in hobs were designed and tested for use above
a Küpperbusch fitted oven. No other hobs may be used.
■ The appliances may only be connected to the mains, maintained and
repaired by a qualified electrician according to valid safety regulations. Work
carried out incorrectly places your safety at risk.
■ Do not put the appliance into operation unless it has been built in!
■ The surface of the oven is very hot when in operation. Always keep children
away!
■ Make sure connection cables for electrical devices are not jammed in the
oven door.
■ Steam and/or pressure cleaning machines must not be used to clean the
oven! This can damage the unit resulting in risk of personal injury.
■ The appliance is to be used only for the preparation of food in the home.
Oven
■ When carrying out repairs and replacing oven light bulbs, the cooker must
be disconnected from the mains (switch off the fuse or unplug from the
mains).
■ Never store any objects in your oven which could cause a hazard if the oven
is unintentionally switched on.
■ Take special care when working in the hot oven. Use a dish cloth, oven
gloves or similar.
■ Be careful opening the door when the oven is hot: don’t lean over the open
door straight away. As soon as you open the door, hot air and even steam
will spill out through the door opening.
■ The oven door must close well. In the event of damage to the hinges or to
the glass pane, do not use the appliance until it has been repaired and
checked by a qualified person.
■ A damaged door sealing must be replaced. The oven must not be used with
damaged door sealing.
■ Always close the oven door completely when preparing food in the oven.
■ Keep it at a distance of at least 5 cm from the grill and top heat.
Before using the appliance for
the first time
Disposing of the packaging and the old appliance
Dispose of the transport packaging in such a way that it does not impact on
the environment.
If the appliance is purchased in Germany, the dealer who sold you the
appliance will dispose of the transport packaging for you. Recycling the
packaging saves raw materials and reduces the amount of waste. Disposed
appliances still contain useful materials. Dispose of your old appliance at a
collection point for recycling useful materials. Before disposing of your old
appliance ensure that it cannot be used any longer. This will prevent misuse.
Setting the clock
F
The clock must be set before first using the oven or after a loss of power
(mains). The oven will not function until the clock is set.
F
If the clock needs to be set, you will see “0.00” flashing in the display.
Set the clock as follows:
– Press the “+” and “-” keys simultaneously
for a short moment.
– Immediately set the desired time with the
“+” and “-” keys. The clock starts
immediately.
Initial cleaning
– Remove foreign matter and packaging.
– Before preparing food for the first time, the appliance must be cleaned.
Clean the baking trays, drip pan, gridiron etc. with a damp cloth and a little
detergent.
– Heating the oven.
Close the oven door.
Heat up the oven with top heat/bottom heat at 250 °C for 60 minutes.
Air the kitchen well at the same time.
.
 Loading...