

Page 1
EEBG 6400.8 MX
Hoja de Características
Folha de Caracteristicas
Technical Specifications
Fiche de caractéristiques
Datenblatt
Page 2
Modelo EEBG 6400.8 MX
1 2 3
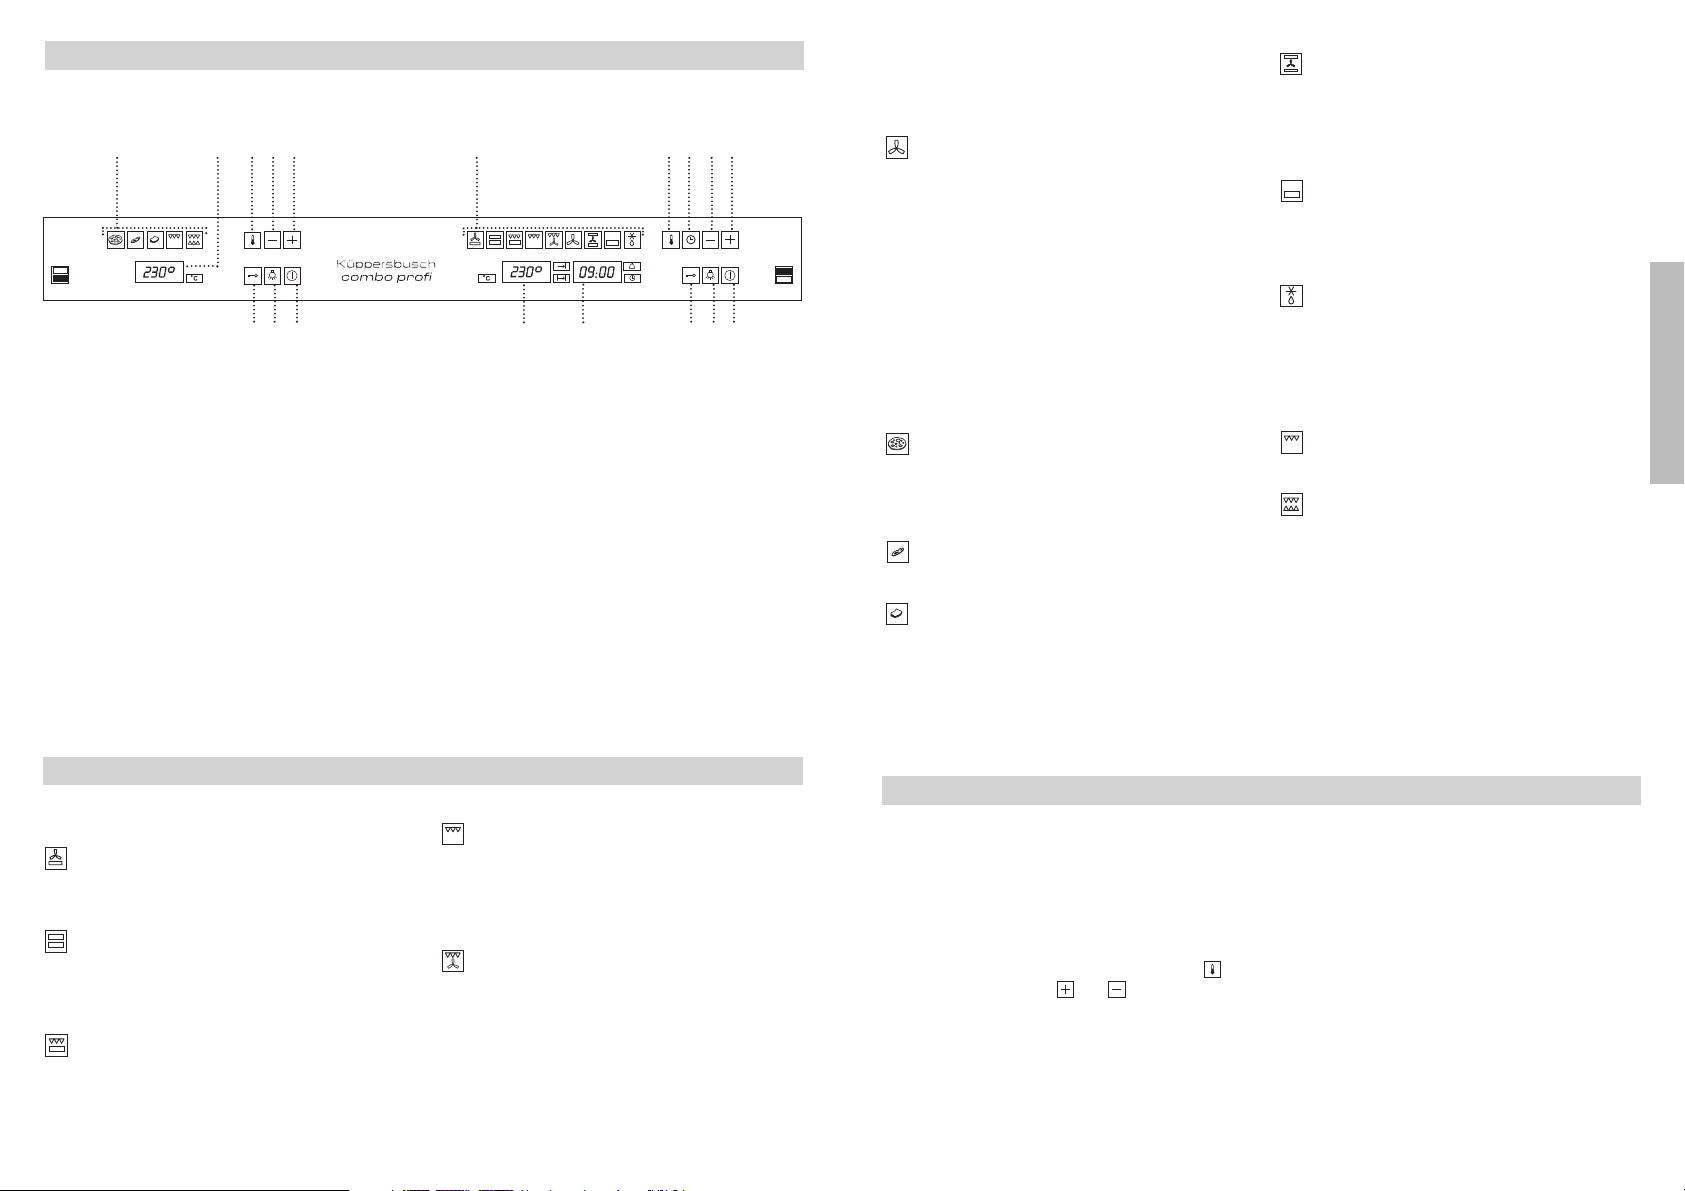
Painel de Comandos
4 5 9 12 13 14 15
6 7 8 16 17 18
10 11
Atenção
Durante a utilização da função Grill, MaxiGrill
ou MaxiGrill com Turbina a porta deve
manter-se fechada.
Turbo
A turbina reparte o calor que provém duma
resistência situada na parte traseira do forno. A
uniformidade da temperatura produzida,
permite cozinhar em 2 alturas simultaneamente.
Convencional com Turbina
Adequado para assados e pastelaria. O
ventilador reparte de forma uniforme o calor
no interior do forno, reduzindo o tempo e a
temperatura de elaboração.
Resistência inferior
Calor apenas a partir da parte inferior.
Apropriado para aquecer pratos ou levantar
massas de pastelaria e afins.
Descongelação
CAVIDADE INFERIOR
11 Funções de cozinhado
12 Indicador de temperatura
13 Sensor de temperatura
14 Sensor –
15 Sensor +
16 Função segurança crianças
17 Luz interior
18 Pôr em Funcionamento / Desligado
Funções do Forno
CAVIDADE SUPERIOR
Resistência inferior e Turbo
Especial para cozinhar empadas e bolos ou
bolos recheados com fruta.
Convencional
Utiliza-se em bolos em que o calor recebido
deve ser uniforme e para que obtenham uma
textura esponjosa.
Grill e Resistência inferior
Especial para assados. Pode utilizar-se para
qualquer peça, independentemente do seu
tamanho.
CAVIDADE SUPERIOR
19 Funções de cozinhado
10 Indicador de temperatura
11 Relógio electrónico
12 Sensor de temperatura
13 Sensor relógio electrónico
14 Sensor –
15 Sensor +
16 Função segurança crianças
17 Luz interior
18 Pôr em Funcionamento / Desligado
Grill
Gratinado e assado superficial. Permite o
dourado da camada exterior sem afectar o
interior do alimento. Indicado para peças lisas
como bifes, costeletas, peixe, tostas.
MaxiGrill com Turbina
Permite o assado uniforme ao mesmo tempo
que doura superficialmente. Ideal para
grelhados. Especial para peças de grande
volume como aves, caça… Recomenda
colocar-se a peça de carne sobre a grelha do
forno e o tabuleiro por baixo, para o
escorrimento de sucos e gordura.
CAVIDAD INFERIOR
Pizza
Especial para cozinhar pizzas. Recomenda-se
a utilização desta função sem o tabuleiro de
recolha de sucos e molhos do cozinhado.
Piedra
Especial para cozinhar carnes na pedra.
Tostas
Especial para fazer pão tostado.
Recomenda-se a utilização desta função
sem o tabuleiro de recolha de sucos e
molhos do cozinhado.
Recomendações para a Descongelação de Alimentos
A descongelação realiza-se através de um
sistema de ar quente em 2 níveis, o nível HI
para carnes em geral e o nível LO para peixes,
pastelaria e pão. Quando seleccione a função
descongelação, poderá seleccionar os níveis
HI ou LO no visualizador de temperatura,
tocando no sensor de temperatura e
depois nos sensores ou .
• Os alimentos sem embalagem devem ser
colocados sobre o tabuleiro do forno ou
sobre um prato.
PORTUGUÉS
Grill superior
Gratinado e dourado superficial.
Duplo Grill
Indicado para assar peças na grelha.
Carnes, peixes e verduras.
• Para descongelar peças grandes de carne ou
peixe deve colocá-las sobre a grelha e por
baixo um tabuleiro para recolher os líquidos.
• As carnes e peixes não necessitam de estar
totalmente descongelados para serem
cozinhados. É suficiente que a superfície
esteja mole para poder adicionar os
condimentos.
• Deve sempre cozinhar-se o alimento após
descongelação.
• Não congelar novamente um alimento já
descongelado.
10
11
Page 3
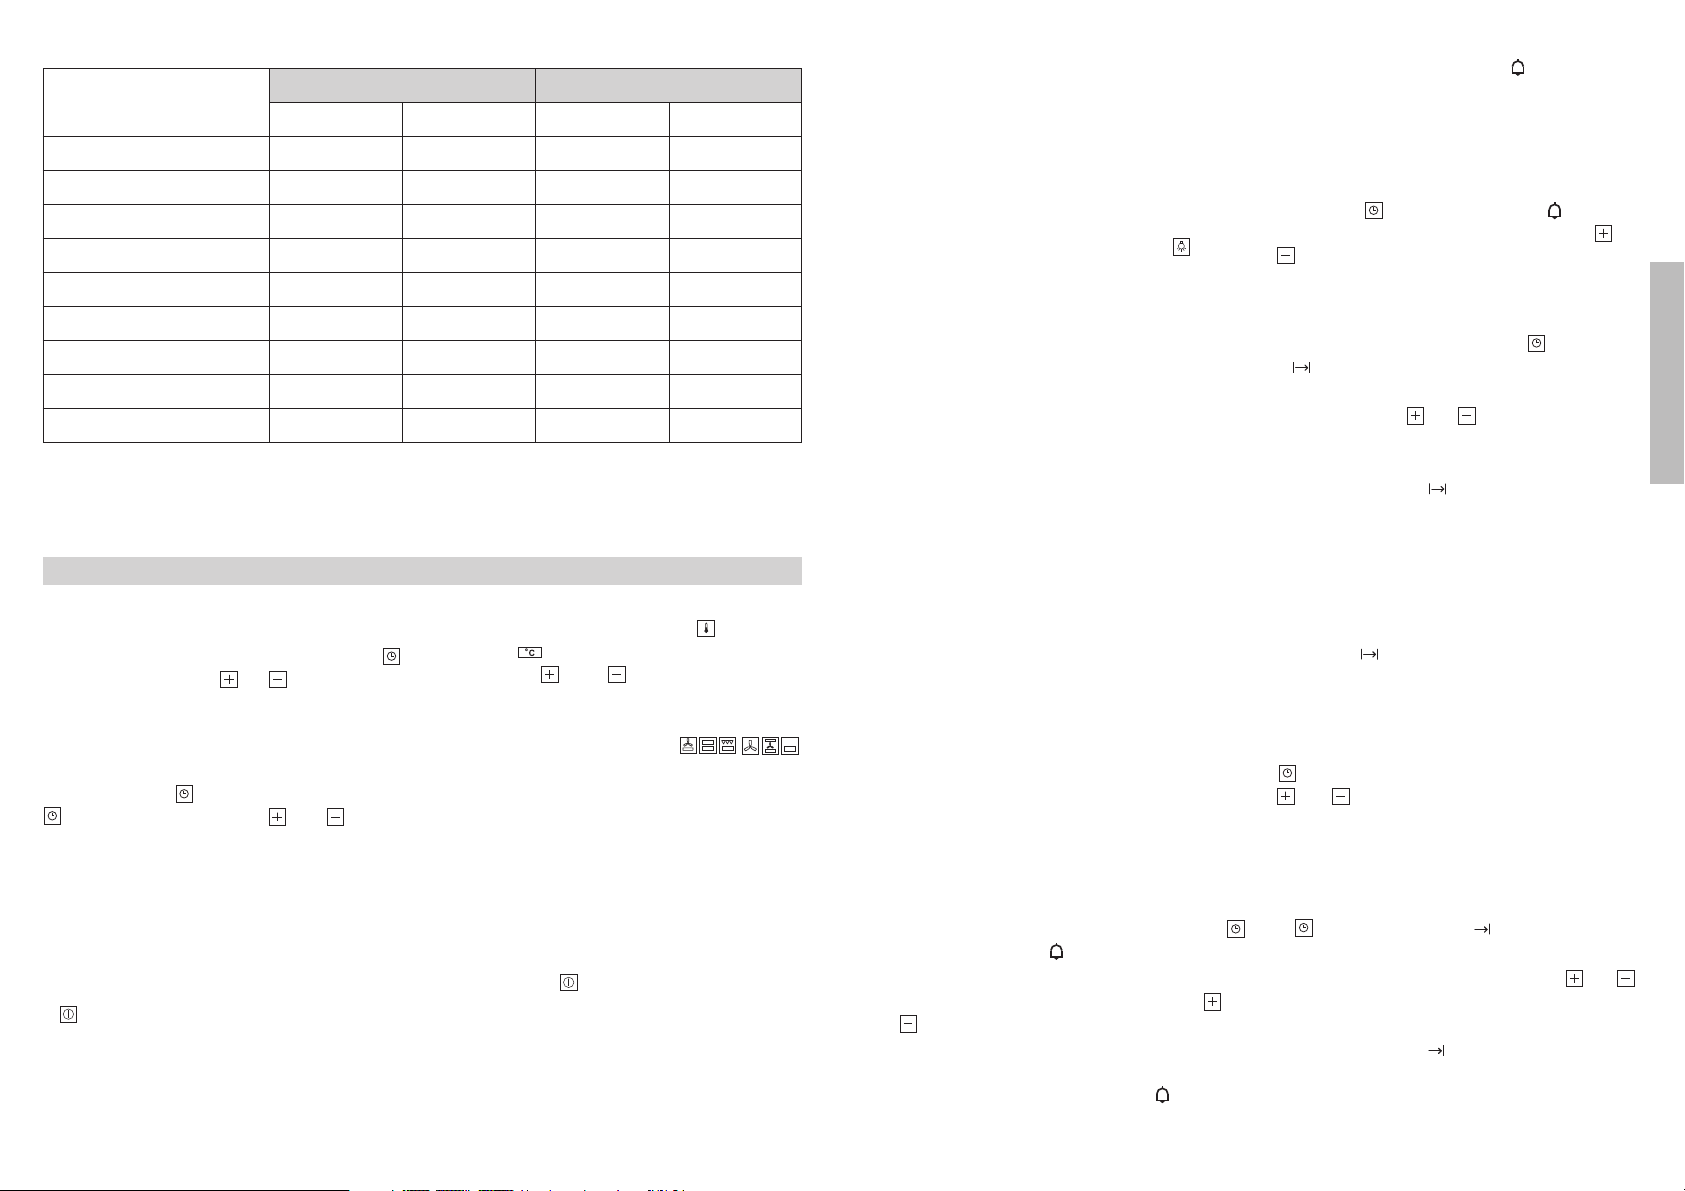
Para os tempos de descongelação e o nível a seleccionar observe a seguinte tabela:
NIVEL LO
NIVEL HI
ALIMENTO
Peso Tempo Peso Tempo
1
Pão
Bolo
Peixe
Peixe
Frango
Frango
Costeleta de novilho
Carne picada
Carne picada
/
2
1
/
2
1
/
2
1Kg
Kg
Kg
Kg
35 min
25 min
30 min
40 min
1Kg
1,5 Kg
1
/
Kg
2
1
/
Kg
2
1Kg
75 min
90 min
40 min
60 min
120 min
Os tempos apresentados na tabela são uma orientação, onde o tempo de descongelação
dependerá da temperatura ambiente, peso do alimento e grau de congelação do alimento.
Manuseamento da cavidade superior do forno
Colocar a Hora no Relógio Electrónico
Ao ligar o seu forno, observará que no relógio
aparecem a piscar as indicações 12:00 e .
Tocando nos sensores ou colocará o relógio na hora certa; em seguida escutará dois
beep seguidos como confirmação da hora
escolhida.
Se deseja modificar a hora, toque várias vezes
o sensor relógio até que pisque o indicador
. Tocando nos sensores ou poderá
modificar a hora. Finalmente escutará dois
beep seguidos como confirmação da alteração
realizada.
Funcionamento manual
Após colocar o relógio na hora certa, o seu
forno está pronto para funcionar:
1 Toque no sensor de Pôr em Funcionamento
.
2 Toque no símbolo da função de cozinhado
seleccionada.
3 O indicador de temperatura (10) mostrará
uma temperatura pré-fixada para esse
12
cozinhado. Se deseja modificá-la basta tocar
no sensor de temperatura , onde o
símbolo piscará, e em seguida toque nos
sensores ou para seleccionar a
temperatura desejada.
4 A cavidade superior do forno começará a
aquecer. Nas funções
activar-se-á a função de pré-aquecimento
rápido durante uns minutos.
Atenção: com esta função de pré-aquecimento
liga-se o motor turbo situado no fundo da
cavidade superior do forno.
5 Durante o aquecimento, o indicador O pisca
indicando a transmissão de calor ao
alimento.
6 Para parar o cozinhado deve tocar no sensor
de Desligado .
Atenção
Quando finalize o cozinhado, observará que a
refrigeração do seu forno continua a funcionar
até que o interior do forno reduza a sua
temperatura de forma apropriada.
Iluminação do forno
A luz interior acender-se-á,
• Ao abrir a porta do forno. Decorrido um cer to
tempo sem fechar a porta do forno, a luz
apagar-se-á para reduzir o consumo eléctrico.
• Quando se selecciona qualquer função de
cozinhado. Decorrido um certo tempo a luz
apagar-se-á.
Se deseja acender a luz durante o cozinhado
basta tocar no sensor de Luz Interior . Se se
premir este sensor durante um tempo
prolongado, a luz manter-se-á acesa durante
todo o cozinhado.
Funções do Relógio Electrónico
Avisador: Gera um sinal sonoro no final do
tempo, para isso não é necessário que o forno
esteja a funcionar.
Duração do Cozinhado: Permite cozinhar
durante um tempo seleccionado, acabado
esse tempo o forno desligar-se-á
automaticamente.
Hora de Finalização do Cozinhado: Permite
cozinhar até uma hora estabelecida, em
seguida o forno desligar-se-á de forma
automática.
Duração e Fim do Cozinhado: Permite
programar a duração e a hora de finalização
do cozinhado. Com esta função o forno
pôr-se-á em funcionamento de forma
automática à hora necessária para cozinhar
durante o tempo seleccionado (Duração) e
finalizando de forma automática à hora que
lhe tenhamos indicado (Fim do Cozinhado).
Função Segurança Crianças: Esta função
bloqueia o forno, evitando a manipulação por
parte de crianças pequenas.
Programação do Avisador
1 Toque várias vezes no sensor do relógio
até que o símbolo se ilumine.
2 Seleccione o tempo após o qual deseja que
o relógio avise, tocando nos sensores ou
.
3 Posteriormente soarão 2 beep seguidos,
mostrar-se-á o tempo restante até que o
relógio avise e o símbolo piscará
lentamente, indicando que o avisador já
está programado.
4 Decorrido o tempo programado, soará um
sinal sonoro e o símbolo piscará mais
depressa.
5 Toque qualquer sensor do painel de
comandos para parar o sinal sonoro.
Em qualquer momento pode modificar o tempo
seleccionado, tocando várias vezes no sensor
do relógio até que o símbolo pisque e
posteriormente tocando nos sensores ou
. Em seguida escutará dois beep seguidos
como confirmação da alteração.
Programação da Duração do Cozinhado
1 Toque no sensor do relógio , o símbolo
iluminar-se-á.
2 Seleccione a duração do cozinhado, tocando
nos sensores ou .
3 Posteriormente soarão 2 beep seguidos,
mostrar-se-á o tempo restante de cozinhado
e o símbolo piscará lentamente,
indicando que o seu forno se apagará de
forma automática.
4 Seleccione uma função e uma temperatura
de cozinhado.
5 Decorrida a duração do cozinhado, o forno
desligar-se-á, soará um sinal sonoro e o
símbolo piscará mais depressa.
6 Toque em qualquer sensor do painel de
comandos para parar o sinal sonoro.
Em qualquer momento pode modificar o tempo
seleccionado, tocando no sensor do relógio
e posteriormente tocando nos sensores
ou . Seguidamente escutará dois beep
seguidos como confirmação da alteração.
Programação da Hora de Finalização do
Cozinhado
1 Toque várias vezes no sensor do relógio
até que o símbolo se ilumine.
2 Seleccione a hora de finalização do
cozinhado, tocando nos sensores ou .
3 Posteriormente soarão 2 beep seguidos,
mostrar-se-á o tempo restante de cozinhado
e o símbolo piscará lentamente,
indicando que o seu forno se apagará de
forma automática.
13
PORTUGUÉS
Page 4

4 Seleccione uma função e uma temperatura
de cozinhado.
5 Alcançada a hora seleccionada o forno
desligar-se-á, soará um sinal sonoro e o
símbolo piscará mais depressa.
6 Toque em qualquer símbolo do frontal de
comandos para deter o sinal sonoro
Em qualquer momento pode modificar a hora
de finalização seleccionada, tocando várias
vezes no sensor do relógio até que o
símbolo pisque e posteriormente tocando
nos sensores ou . Em seguida escutará
dois beep seguidos como confirmação da
alteração.
Pode utilizar esta função mesmo que o forno já
esteja a cozinhar. Para tal siga as instruções
indicadas excepto a instrução número 4.
Programação da Duração e Fim do Cozinhado
11 Toque no sensor do relógio , o símbolo
iluminar-se-á.
12 Seleccione a duração, tocando nos
sensores ou .
13 Posteriormente soarão 2 beep seguidos,
mostrar-se-á o tempo restante de cozinhado
e o símbolo piscará lentamente.
14 Toque várias vezes no sensor do relógio
até que o símbolo se ilumine.
15 Seleccione a hora de finalização do
cozinhado, tocando nos sensores ou .
16 Posteriormente soarão 2 beep seguidos,
mostrar-se-á a hora actual e o símbolo
permanecerá iluminado.
17 Seleccione uma função e uma temperatura
de cozinhado.
18 O forno permanecerá desligado, ficando
iluminado o símbolo e com o símbolo
a piscar lentamente. No ecrã do relógio
verá a hora actual e a luz interior
permanecerá apagada. O seu forno está
programado.
19 Quando se alcance a hora de início do
cozinhado, o forno colocar-se-á em
funcionamento e realizar-se-á o cozinhado
durante o tempo seleccionado. No ecrã do
relógio ver-se-á o tempo restante de
cozinhado.
14
10 Alcançada a hora seleccionada o forno
desligar-se-á, soará um sinal sonoro e os
símbolos e piscarão.
11 Toque em qualquer sensor do painel de
comandos para parar o sinal sonoro.
Se durante o cozinhado deseja modificar a
hora de finalização, toque várias vezes no
sensor do relógio até que o símbolo
pisque. Nesse momento pode modificar a
hora de finalização tocando nos sensores
ou . Em seguida escutará 2 beep seguidos
como confirmação da alteração.
Função segurança crianças
Bloqueia o forno, evitando a sua manipulação
por parte de crianças pequenas. Para activar a
função, toque no símbolo de forma
prolongada, em seguida escutará um beep
prolongado e ver-se-ão pontos intermitentes
intercalados entre os dígitos do indicador de
temperatura (10). O seu forno estará
bloqueado.
Para desactivar a função de segurança
crianças, deve tocar de forma prolongada o
símbolo soando um beep prolongado.
Atenção
Em caso de corte de fornecimento eléctrico,
apagar-se-á toda a programação do seu
relógio electrónico e aparecerá a piscar a
indicação 12:00 no relógio. Deverá colocá-lo
na hora certa e programá-lo novamente.
Manuseamento da cavidade inferior do forno
Função Pizza
1 Introduza a pedra pizza sobre a grelha na
cavidade inferior do forno.
2 Toque no sensor de Pôr em funcionamento
e em seguida no sensor pizza .
O forno começará a aquecer até 250 °C.
3 O indicador (2) mostrará 250 °C a piscar.
Quando alcance a temperatura, soará um
sinal sonoro e é quando se deverá colocar a
pizza sobre a pedra; em seguida feche a
porta. O indicador (2) mostrará então o
tempo restante de cozinhado em minutos e
segundos.
4 Se o desejar pode modificar o tempo
pré-seleccionado de 12 minutos, tocando no
sensor e em seguida nos sensores
ou .
5 Decorrido o tempo de cozinhado o forno
desligar-se-á e soará um sinal sonoro. Toque
em qualquer sensor da cavidade inferior para
parar o sinal sonoro. Já pode finalmente tirar
a pizza.
Recomendação:
Para obter melhores resultados, cozinhe as
pizzas sem o tabuleiro de recolha de sucos e
molhos do cozinhado.
Função Pedra
1 Introduza a Pedra Grill sobre a sua própria
grelha (disponíveis ambos no Acessório
Pedra Grill) na cavidade inferior do forno.
2 Toque no sensor de Pôr em funcionamento
e em seguida no sensor Pedra , o
indicador (2) mostrará o tempo restante de
aquecimento da pedra em minutos e
segundos.
3 Decorrido o tempo programado o forno
desligar-se-á e soará um sinal sonoro. Toque
em qualquer sensor da cavidade inferior
para parar o sinal sonoro. Finalmente tire a
pedra com a sua própria grelha e cozinhe
sobre a pedra no exterior do forno.
Importante
Se o deseja pode modificar o tempo
pré-seleccionado de 25 minutos (com um
máximo de 30 minutos e um mínimo de 5
minutos), tocando no sensor e em seguida
nos sensores ou .
Função Tostas
1 Introduza o pão para tostar sobre a grelha
na cavidade inferior do forno.
2 Toque no sensor de Pôr em funcionamento
e em seguida no sensor Tostas , no
indicador (2) visualizar-se-á por defeito P1,
que será o programa pré-seleccionado desta
função.
3 Definem-se 4 programas para esta função:
P1, P2, P3 e P4. Se deseja modificar P2, P3
ou P4 toque nos sensores ou .
Chegado a P4, se voltar a tocar o sensor
seleccionará de novo P1.
4 Uma vez seleccionado o programa, o
indicador (2) mostrará o tempo restante de
cozinhado (minutos e segundos). A duração
dos programas será:
P1: 2 minutos 15 segundos
P2: 3 minutos
P3: 4 minutos
P4: 5 minutos
5 Decorrido o tempo programado o forno
desligar-se-á e soará um sinal sonoro. Toque
em qualquer sensor da cavidade inferior para
parar o sinal sonoro. Já pode finalmente tirar
as tostas.
Recomendação:
Para obter os melhores resultados, toste o
pão sem o tabuleiro para recolha dos sucos e
molhos do cozinhado, assim não será
necessário dar a volta ao pão para tostá-lo dos
dois lados.
Realize um máximo de 6 tostas com pão de
forma, assim obterá um tostado mais
uniforme.
15
PORTUGUÉS
Page 5
Funções Grill Superior e Duplo Grill
Toque no sensor de Pôr em funcionamento
e em seguida toque no sensor da função
desejada Grill Superior ou Duplo Grill .
Se necessita modificar a temperatura
seleccionada, toque no sensor e em
seguida nos sensores ou . A temperatura máxima nestas funções é de 200 °C.
Função segurança crianças
Bloqueia o forno, evitando a sua manipulação
por parte de crianças pequenas. Para activar a
função, toque no símbolo de forma
prolongada, em seguida escutará um beep
prolongado e ver-se-ão pontos intermitentes
intercalados entre os dígitos do indicador de
temperatura (2). O seu forno estará bloqueado.
Para desactivar a função de segurança
crianças, deve tocar de forma prolongada no
símbolo soando um beep prolongado.
Model EEBG 6400.8 MX
1 2 3
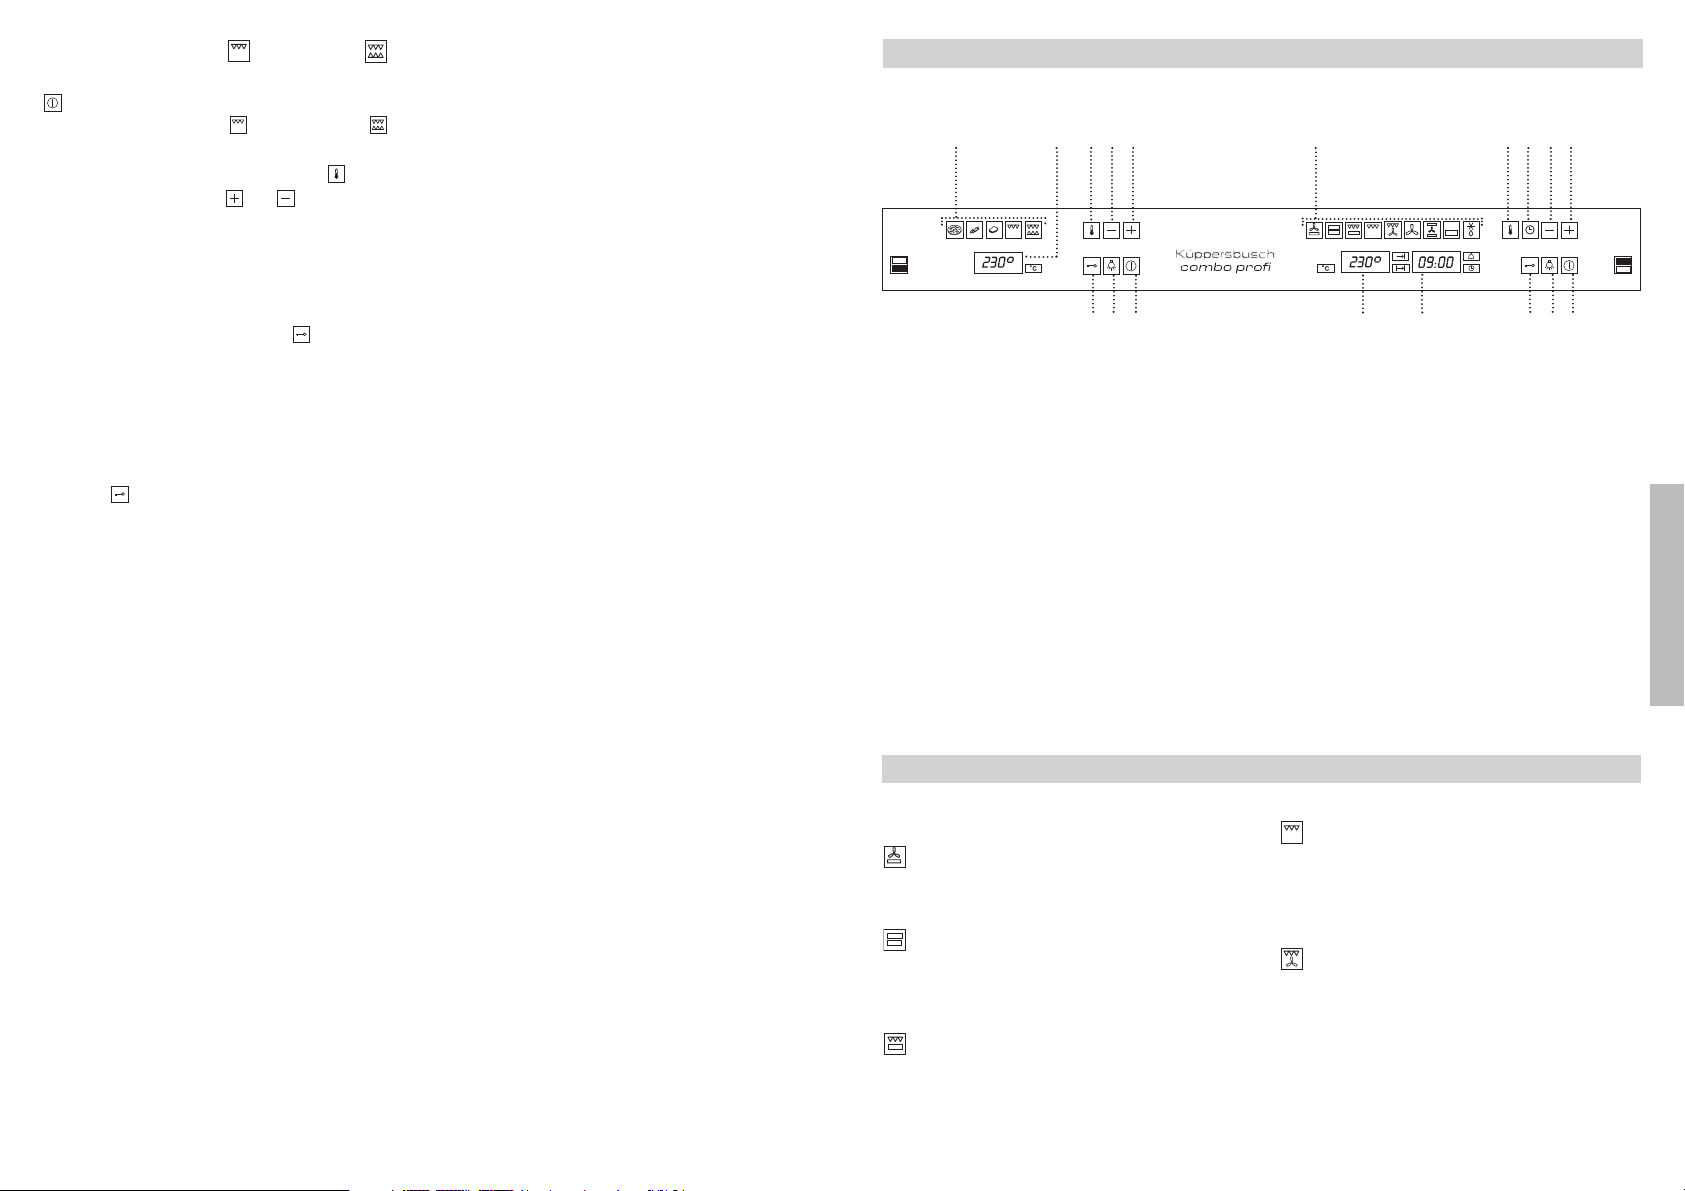
BOTTOM CAVITY
11 Cooking Functions
12 Temperature Indicator
13 Temperature Sensor
14 Sensor –
15 Sensor +
16 Child Safety Function
17 Inside Light
18 On / Off
Control Panel
4 5 9 12 13 14 15
6 7 8 16 17 18
TOP CAVITY
19 Cooking Functions
10 Temperature Indicator
11 Electric Clock
12 Temperature Sensor
13 Electric Clock Sensor
14 Sensor –
15 Sensor +
16 Child Safety Function
17 Inside Light
18 On / Off
10 11
ENGLISH
16
Oven Functions
TOP CAVITY
Lower Element and Turbo
Ideal for baking pies, pastries and fruit
sponges.
Conventional
This function is for use when baking cakes
where the heat should be even to give a
spongy texture.
Grill and Lower Element
Ideal for roasts. This function can be used with
any size joints of meat.
Grill
Toasting and browning. This function allows
the surface to be cooked without affecting the
inside of the food. Suitable for flat pieces
such as steaks, ribs, fish and toasts.
MaxiGrill with Fan
For even roasting and simultaneous surface
browning. Ideal for mixed grills. Perfect for
bulky pieces such as poultry and game. The
meat should be placed on the oven grid with
the tray below to collect meat juices.
17
Page 6

Caution
The door must be closed during use with Grill
or MaxiGrill with Fan.
Turbo
The fan spreads the heat coming from an
element located at the back of the oven. As a
result of the evenly distributed temperature, food
can be cooked on two levels at the same time.
Conventional with Fan
Suitable for roasts and cakes. The fan
spreads the heat evenly throughout the inside
of the oven to reduce cooking time and
temperature.
Lower Element
Heat only comes from beneath. Suitable for
warming plates or letting dough rise.
Defrosting
See the following chart for defrosting times and temperature levels.
LO
FOOD
Weight Time Weight Time
1
Bread
Cake
Fish
Fish
/
2
1
/
2
1
/
2
1Kg
Kg
Kg
Kg
35 mins
25 mins
30 mins
40 mins
Chicken
1Kg
HI
75 mins
BOTTOM CAVITY
Pizza
Ideal for cooking pizzas. This function is
recommended for use without the collection
tray.
Stone Grill
Special function for stone grilling meat.
Toast
Special function for toasting bread. This
function is recommended for use without the
collection tray.
Recommendations for Defrosting Food
The defrost function works by means of a
2-level system of hot air. HI is for meats in
general and LO is for fish, cakes, pastries and
bread. When selecting the defrost function,
select HI or LO on the temperature display by
pressing on the temperature sensor and
then the or sensors.
• Unpackaged food should be placed on the
oven tray or on a dish.
Upper Grill
Toasting and browning.
Dual Grill
Suitable for grilling. Meat, fish and
vegetables.
• Defrost large pieces of meat or fish by
placing them over the grid with a tray
underneath to collect any liquid.
• Meat and fish do not need to be completely
thawed before cooking. Condiments can be
added once the surface is soft.
• Food should always be cooked after
defrosting.
• Do not freeze food that has been defrosted.
Chicken
Rib steak
Minced meat
Minced meat
1,5 Kg
1
/
Kg
2
1
/
Kg
2
1Kg
90 mins
40 mins
60 mins
120 mins
The times shown in the chart are a guide. The time needed for defrosting will depend on the
temperature of the room, weight of the food and how frozen it is.
Use of the Top Oven Cavity
Setting the Electronic Clock
AWhen the oven is turned on, you will see the
clock display flashing 12:00 and . Set the
clock by touching the or symbols. You will
hear two beeps confirming the time has been
set.
To change the time, press on the clock
sensor several times until the flashes.
Change the time by pressing on the or
sensors. The two beeps you hear after that will
confirm the new time has been set.
Manual Operation
After setting the clock, the oven is ready for use:
1 Press the On sensor .
2 Press on the desired cooking function symbol.
3 The temperature display (10) will show the
preset temperature for that cooking function.
Press on the temperature sensor to
change it. The symbol will flash. Select
the desired temperature by pressing on the
or sensors.
4 The top oven cavity will start to heat up.
Functions will start the fast
preheating function for a few minutes.
Caution: this preheating function turns on the
turbo motor at the back of the top oven cavity.
5 During oven heating, the 0 display will flash to
show that the food is being heated.
6 Press on the Off sensor to stop the
cooking.
Caution
When cooking has finished, you will notice that
oven cooling feature will work until the
temperature inside the oven has been suitably
lowered.
ENGLISH
18
19
Page 7

Oven Lighting
The oven light will turn on:
• When the oven door is open. If the door is not
closed after a certain time, the light will turn
off to reduce power consumption.
• When any cooking function is selected. The
light will turn off after a certain time.
If you wish to turn on the light during cooking,
press on the Inside Light sensor . If this
sensor is pressed for a longer time, the light will
stay on for the entire duration of cooking.
Electronic Clock Functions
Timer Alarm: An audible signal is produced at
the programmed time, even if the oven is not
being used.
Cooking Time: This function allows you to
programme cooking time length, after which
the oven will turn off automatically.
Cooking Stop Time: This function allows you to
programme the time for cooking to stop, after
which the oven will turn off automatically.
Cooking Time and Cooking Stop Time: This
function allows both cooking time length and
the stop time to be programmed. The oven
switches on automatically at the set time and
operates for the cooking time it has been
programmed for. It switches itself off
automatically at the entered stop time.
Child Safety Function: This function locks the
oven, preventing small children from playing
with it.
Programming the Timer Alarm
1 Press on the clock sensor several times
until the symbol lights up.
2 Select the length of time after which you
want the alarm to sound by pressing on the
or sensors.
3 The alarm will be confirmed by two beeps
and the display will show the remaining time
before the alarm sounds and the symbol
will flash slowly indicating that the timer has
been set.
4 Once the programmed time has passed, an
alarm will sound and the symbol will
begin to flash more quickly.
5 Press on any sensor on the control panel to
stop the alarm.
You can change the programmed time at any
moment by pressing on the clock sensor
until the symbol flashes and then by
pressing on the or sensors. The two
beeps you hear after that will confirm the new
time has been set.
Programming Cooking Time
1 Press on the clock sensor . The symbol
will light up.
2 Select the cooking time by pressing the
or sensors.
3 Two consecutive beeps will then sound and
the display will show the remaining cooking
time. The symbol will flash slowly to
indicate that the oven will switch itself
automatically.
4 Select a cooking function and temperature.
5 Once the cooking time is complete, the oven
will turn off, an alarm will sound and the
symbol will flash more quickly.
6 Press on any sensor on the control panel to
stop the alarm.
You can change the programmed time at any
moment by pressing on the clock sensor
and then on the or sensors. The two
beeps you hear after that will confirm the new
time has been set.
Programming the Cooking Stop Time
1 Press on the clock sensor several times
until the symbol lights up.
2 Select the cooking stop time by pressing the
or sensors.
3 Two consecutive beeps will then sound and
the display will show the remaining cooking
time. The symbol will flash slowly to
indicate that the oven will switch itself
automatically.
4 Select a cooking function and temperature.
5 Once it is the set time, the oven will turn off,
an alarm will sound and the symbol will
flash more quickly.
6 Press on any sensor on the control panel to
stop the alarm.
You can change the programmed cooking stop
time at any moment by pressing on the clock
sensor until the symbol flashes and
then by pressing on the or sensors. The
two beeps you hear after that will confirm the
new time has been set.
You can use this function even if you are
already cooking with the oven. If this is the
case, follow all of the above instructions
except No. 4.
Programming Cooking Time and Cooking
Stop Time
11 Press on the clock sensor . The
symbol will light up.
12 Select the cooking time by pressing the
or sensors.
13 Two consecutive beeps will then sound,
and the display will show the remaining
cooking time. The symbol will flash
slowly.
14 Press on the clock sensor several
times until the symbol lights up.
15 Select the cooking stop time by pressing
the or sensors.
16 This will be confirmed by two beeps. The
current time will show on the display and
the symbol will remain lit.
17 Select a cooking function and temperature.
18 The oven will remain off with the
symbol lit and the symbol flashing
slowly. The clock will show the current time
and the inside light will remain off. The
oven is now programmed.
19 When it is time to start cooking, the oven
will turn on and will operate for the
programmed cooking time. The clock
display will show the remaining cooking
time.
10 Once it is the set time, the oven will turn
off, an alarm will sound and the and
symbols will flash.
11 Press on any sensor on the control panel
to stop the alarm.
If you wish to change the cooking stop time
while cooking is in progress, press on the
clock sensor until the symbol flashes.
You can then change the time by pressing on
the or sensors. The two beeps you hear
after that will confirm the new time has been
set.
Child Safety Function
This function locks the oven, preventing small
children from playing with it. To turn on the
function, press on the symbol until you hear
a long beep and see several flashing dots
between the digits of the temperature display
(10). The oven is now locked.
To turn off the child safety function, keep the
symbol pressed until a long beep sounds.
Caution
In the event of power failure, your electronic
clock timer settings will be erased and 12:00
will flash on the clock display. Reset the clock
and programme again.
ENGLISH
20
21
Page 8

Use of the Bottom Oven Cavity
Pizza Function
1 Place the pizza stone over the grid in the
bottom oven cavity.
2 Press the On sensor followed by the pizza
sensor . The oven will begin to heat up to
250 °C.
3 The display (2) will show 250 °C flashing.
When this temperature is reached, a signal
will sound, which is when you should place
the pizza over the stone and close the door.
The display (2) will then show the remaining
cooking time in minutes and seconds.
4 If you wish to change the preset time of 12
minutes, press on sensor followed by the
or sensors.
5 When the set cooking time is over, the oven
will turn off and an alarm will sound. Press
on any sensor on the control panel to stop
the alarm. You may then take out the pizza.
Recommendation:
For better results, cook pizzas without using
the collection tray.
Stone Grill Function
1 Place the stone grill over its own grid (both
available in Stone Grill Accessories) in the
bottom oven cavity.
2 Press the On sensor followed by the
stone grill sensor . The display (2) will
show the remaining heating time for the
stone in minutes and seconds.
3 When the set time is over, the oven will turn
off and an alarm will sound. Press on any
sensor on the control panel to stop the
alarm. Take out the stone with its grid and
stone grill outside of the oven.
NB
If you wish to change the preset time of 25
minutes (maximum of 30 minutes and
minimum of 5 minutes), press on sensor
followed by the or sensors.
Toast Function
1 Place the bread for toasting over the grid in
the bottom oven cavity.
2 Press on the On sensor 2 followed by the
Toast sensor . The display (2) will show
by default, as this is the programme
setting for this function.
3 This function has four programmes: P1, P2,
P3 and P4. If you wish to change the setting
to P2, P3 or P4, press on the or sensors. By pressing on the sensor on the
P4 setting, it will go back to P1.
4 Once the programme has been selected, the
display (2) will show the remaining cooking
time (minutes and seconds). The different
programmes have the following duration:
P1: 2 minutes 15 seconds
P2: 3 minutes
P3: 4 minutes
P4: 5 minutes
5 When the set time is over, the oven will turn
off and an alarm will sound. Press on any
sensor on the control panel to stop the
alarm. You may then take out the toast.
Recommendation:
For the better results, toast bread without
using the collection tray. In this way, it will not
be necessary to turn the bread over to toast it
on both sides.
It takes up to six slices of bread for uniform
toasting.
Top Grill and Dual Grill Functions
Press the On sensor followed by the desired function sensor – Top Grill or Dual Grill
.
Press on sensor followed by the or
sensors to change the programmed
temperature. The maximum temperature for
these functions is 200 °C.
Child Safety Function
This function locks the oven, preventing small
children from playing with it. To turn on the
function, press on the symbol until you hear
a long beep and see several flashing dots
between the digits of the temperature display
(2). The oven is now locked.
To turn off the child safety function, keep the
symbol pressed until a long beep sounds.
ENGLISH
22
23
Page 9

Contents
Before First Use
Important Safety
Instructions
Before First Use Page 28
Environmentally-Friendly Packaging 28
Important Safety Instructions 29
Cooking Chart 30
Cleaning and Maintenance 35
If Something Goes Wrong
Technical Specifications
Installation 39
38
39
Read this Instruction Manual to obtain the best
performance from your oven.
There may be traces of grease and other
substances in the oven as a result of its
manufacturing process. Remove them as follows:
• Remove all of the packaging from your
oven, including the protective plastic, if any.
• Connect oven to mains and turn on in
default setting or at 200
hour. Consult the Technical Specifications
Sheet accompanying this manual on how to
do this.
• Cool the oven with the door open so that it
ventilates and no odours remain inside it.
• Once cold, clean the oven and accessories.
During this first operation, smoke and smells
will be produced. The kitchen should be well
ventilated.
o
C for 1
Environmentally-Friendly
Packaging
The packaging is made from totally recyclable
materials and new use can be made of them.
Consult your local council regarding the
necessary procedures for disposing of these
materials.
CAUTION
The symbol on the product or packaging
indicates that this appliance cannot be disposed of as normal household waste. You must
take it to an electrical and electronic equipment
collection point for its recycling. In this way, any
negative consequences for the environment and
public health from incorrect handling can be
avoided. Contact your local council, household
waste disposal service or the establishment
you bought the product from for more information on recycling the appliance.
Electrical Safety
• Any handling or repair to the appliance,
including replacement of the feed cable,
should be carried out by authorised
Technical Ser vice Personnel using original
spare parts. Repairs or handling by others
may damage the appliance or cause
malfunctioning that could be hazardous to
your safety.
• Unplug your oven if it malfunctions.
Child Safety
• Do not allow children to come near the oven
while in use as it can reach very high
temperatures.
Safe Use of your Oven
• The oven must always be operated with the
door closed.
• The manufacturer takes no responsibility for
any use of the oven other than for the home
preparation of food.
• Only use the oven after it has been installed
inside the kitchen unit.
• Take care not to touch the elements while
using the oven.
• Do not store oil, fats or inflammable
materials inside the oven. This may be
dangerous if the oven is turned on.
• Do not lean or sit on the open oven door.
You could damage it, as well as endangering
your safety.
• Do not cover the bottom of the oven with
aluminium foil as this may affect cooking
performance and damage the enamel
inside the oven and the interior of your
kitchen unit.
• In order to cook food in the oven, place the
tray or grid shelf supplied with it over the
shelf runners inside the oven cavity. The tray
and grid have a system to make their partial
outward movement easy for food handling.
• Do not place containers or food on the
bottom surface of the oven. Always use the
trays and grid.
• Do not pour water on the bottom surface of
the oven when in use, as this may damage
the enamel.
• Open the oven door as little as possible
during cooking. This will reduce power
consumption.
• Use protective oven gloves when performing
operations inside the oven.
• Cool the oven with the door open so that it
ventilates and no odours remain inside it.
• It is normal for condensation to occur on the
oven door when cooking dishes with a high
liquid content.
• This device is not for use by persons
(including children) with reduced sensorial
or mental capacity, or those lacking experience and knowledge, except if they have
been supervised and instructed regarding
use of the device by a person responsible
for their safety.
Caution
Never cook in the bottom cavity without using
the collection tray. Keep the tray in its original
position and place the grid shelf or baking tray
over the shelf runners for cooking.
Do not place food directly inside the collection
tray. This tray is exclusively for collecting
liquids released by food during the cooking
process
ENGLISH
28
29
Page 10

Cooking Chart
Top Cavity
The times and temperatures shown in the chart are a guide. Cooking functions depend on each
model. It is generally recommended that you should preheat the oven while empty on function
or . Preheating time is complete when the heating pilot light turns off.
STARTERS
Rice casserole
Pie
Vegetables
in puff pastr y
Vegetable pie
Baked potatoes
Pizza
Quiche
Weight
(Kg)
1,0
1,2
1,0
1,0
1,0
0,6
0,8
Height
Low
Medium
Medium
Low
Medium
Low
Medium
Medium
Function
Temperat.
(oC)
180-200 25-30
170-190 20-25
170-190
160-180 30-35
190-210 25-30
180-200
170-190 35-40
190-210 55-60
170-190 45-50
180-200 55-60
180-200 40-45
190-210
170-190
180-200
160-180 35-40
Time
(min)
45-50
25-30
15-20
10-15
40-45
Recipient
Paella pan
Tray
Baking tin
Baking tin
Tray
Grid shelf
Baking tin
FISH
Sea bream
Gilthead bream
in a salt crust
Sole
Sea bass Tray
Hake Tray
Fish pie Baking tin
Salmon en papillote Tray
Trout
Fish fillet
Sardines
Weight
(Kg)
1,0 Medium
1,0 Medium
1,0 Medium
1,0 Medium
1,1
1,1 Medium
1,0 Medium
1,1 Medium
1,0 High
1,0 High
Height
Medium
Function
Temperat.
(oC)
180-200 25-30
170-190 20-25
190-210 25-30
180-200 25-30
170-190 15-20
160-180 10-15
190-210 20-25
180-200 10-15
190-210 25-30
180-200 20-25
190-210 60-65
190-210 60-65
180-200 20-25
170-190 15-20
190-210 20-25
180-200 15-20
170-190 15-20
180-200 10-15
Time
(min)
Recipient
Tray
Tray
Tray
Tray
Grid shelf
Grid shelf
ENGLISH
Stuffed tomatoes
Lasagne
30
0,8
1,0
Medium
Medium
170-190 40-45
170-190 10-12
160-180
180-200 8-10
10-12
Tray
Baking tin
31
Page 11

MEAT
Suckling pig
Weight
(Kg)
1,4 Medium
Height
Function
Temperat.
(oC)
190-210 70-75
170-190 70-75
Time
(min)
Recipient
Tray
DESSERTS
Sponge cake
Weight
(Kg)
0,5 Medium 170-190 30-35
Height
Function
Temperat.
(oC)
150-170 35-40
Time
(min)
Recipient
Baking tin
180-200 55-60
Rabbit
Lamb
Pork loin
in a salt crust
Chicken Tray
Roast beef
Beef Wellington
Skewers
Sausages
1,2 Medium
1,0 Medium 170-190 45-50
0,6 Medium
1,2 Low
0,6 Medium 180-200 25-30
1,0 Medium
0,3 High
0,6 High
170-190 45-50
170-190 30-35
190-210
180-200 50-55
170-190 35-40
170-190 40-45
190-210
170-190 45-50
190-210 30-35
190-210 30-35
180-200 35-40
160-180 30-35
180-200 10-12
190-210 10-15
50-55
50-55
Tray
Tray
Tray
Tray
Tray
Grid shelf
Grid shelf
Swiss roll
Crème caramel
Biscuits
Puff pastr y
Fairy cakes
Baked apples
Meringue
Baked bananas
0,5 Medium
0,8 Medium
1,0 Medium
0,3 Medium
0,7 Medium
0,5 Medium
0,35 Medium
0,5 Medium
160-180 30-35
170-190 10-15
160-180 10-15
160-180 55-60
150-170 50-55
160-180 20-25
150-170 20-25
170-190 20-25
160-180 15-20
160-180 20-25
160-180
180-200 30-35
170-190
100-120 70-75
100-120 60-65
180-200 20-25
170-190 15-20
20-25
20-25
Tray
Baking tin
Tray
Tray
Tray
ENGLISH
Tray
Tray
Baking tin
32
Plum cake
Apple pie
Cheesecake
0,6 Medium
0,8
0,8 Medium
Medium
170-190 55-60
Baking tin
160-180 50-55
170-190 45-50
Tray
160-180 40-45
180-200 40-45
Baking tin
170-190 40-45
33
Page 12

COOKING
Toasts
Pizza
Hamburgers
Bacon
Sausages
Skewers of meat
Cornish pasties
Grilled vegetables
Chorizo
Grilled steak
Pork chops
Lamb chops
Chicken breast
Salmon fillet
Hake fillet
Sardines
Bottom Cavity
Weight
(Kg)
0,3 6
0,8 1
0,8 8
0,25 8
16
18
0,8 20
0,4 –
114
0,6 3-4
0,7 6
0,5 7
0,5 5
0,5 6
0,5 6
0,5 8
Units
Function
Temperat.
(oC)
200
200
200
200
200
200
200
200
200
200
200
200
200
200
200
200
Time
(min)
2
12
16
6
20
20
25
20
20
25
10
15
15
15
12
12
Cleaning and Maintenance
Disconnect the appliance from mains power
supply before doing anything to it.
Cleaning the Oven Interior
• Clean the oven interior to remove traces of
grease or food, which give off smoke and
odours and cause stains to appear.
• Use nylon brushes or sponges with warm
soapy water to clean enamelled surfaces
such as the bottom of the oven. Clean when
the oven is cold. Use oven-cleaning
products only on enamelled surfaces and
always follow the manufacturer’s
instructions.
• It is recommended that the collection tray
should be cleaned whenever it is used. This
is to prevent smoking caused by the fat
collected in the tray.
• When using this cavity, avoid using fats that
are not from the actual food being cooked.
You will have better results and avoid
dirtying the inside of the oven.
Caution
Do not clean the oven interior with steam or
pressurised-water cleaning equipment. Do not
use metal scouring pads, wire brushes or any
utensil that can scratch the enamel.
Use of Fold Down Grill (Depending on Model)
To clean the top par t of the oven:
• Wait until the oven is cold.
• Turn the screw (A) and lower the grill
element as far as possible.
• Clean the top of the oven and return the grill
element to its original position.
A
• Depending on the model, the top and
bottom elements can fold down or up to
make cleaning the oven easier.
Cleaning the Oven Exterior
and Accessories
Clean the outside of the oven and accessories
with warm soapy water or with a mild
detergent.
Take great care when cleaning stainless steel
surfaces. Use only sponges or cloths that do
not scratch.
Do not try to remove controls when cleaning
the oven exterior. This can only be done with
the oven taken out of its unit.
Cleaning the Large Glass
Inner Door
Do not use metal scouring pads, wire brushes
or commercially available or abrasive powder
cleansers to clean the oven door as they could
scratch the surface and cause the glass to
break.
Instructions for Removing / Replacing Inner
Glass
1 Open the oven door.
2 Pull the glass outwards by the bottom (A).
ENGLISH
34
35
Page 13

A
3 The inside glass will become loose. Remove
it.
Caution
Be very careful when removing the inner glass,
as the oven door will close.
4 Clean the inner glass and the outer door
interior surface.
5 Return the glass supports to the upper door
slots (B).
Changing the Oven Light Bulb
Caution
Make sure the oven is unplugged before
proceeding to change the bulb.
• Detach the chrome supports by loosening the
screw (E).
E
• Release the bulb-holder glass cover with a
tool.
Changing the Bottom Oven Cavity
Service.
Caution
Make sure the oven is unplugged before
proceeding to change the bulb.
• Unscrew the bulb-holder glass cover.
• Replace the bulb and reassemble the glass
cover.
The replacement bulb must be resistant to
temperatures up to 300
Technical Ser vice.
Light Bulb
o
C. Order one from
• In order to put it back in place, rest it over the
shelf runner (A) front ends and push until it
also rests over the rear ends.
A
C
B
6 Turn the glass towards the door (C).
7 Attach the glass to the door again by pushing
the two lower supports (D) with both hands
while pushing the glass towards the door (E).
E
D
36
• Change the bulb.
• Reassemble the glass cover and ensure that
everything fits in the correct position.
The replacement bulb must be resistant to
temperatures up to 300
Technical.
o
C. Order one from
ENGLISH
Removing the Collection Tray from
the Bottom Cavity
Caution
Before removing the collection tray, first make
sure that the oven is unplugged and that the
tray is cold.
• Push upwards on the underside of the tray to
remove it.
37
Page 14

If Something Goes Wrong
Technical Specifications
The oven stops working
Check the power connection.
Check the fuses and circuit breaker
of your electrical system.
Make sure the clock is in
manual or programmed mode.
Check the position of the function and
temperature selector.
The inside light does not go on
Change the bulb.
Follow the Instruction Manual carefully
for correct assembly.
The heating pilot light does not turn on
Select a temperature.
Select a function.
It must only go on while the oven
is heating up to reach the
programmed temperature.
Oven smoking during use
Normal during first use.
Clean the oven regularly.
Remove the grease or oil falling
into the tray.
Do not use higher temperature
settings than those indicated
on the cooking chart.
The expected cooking results
are not achieved
Review the cooking chart to gain an idea
about how your oven works.
Caution
If these problems persist despite our tips,
contact Technical Ser vice.
If the appliance does not work, inform
Technical Ser vice of the kind of problem you
are experiencing and give the:
1 Serial Number (S-No)
2 Model of Appliance (Mod.)
You will find this information engraved on the
identification plate. This plate is on the bottom
of the oven and can be seen when opening the
door.
The appliance you have bought complies
with the EU Directives on Safety of Electrical
Material (73/23/EEC) and Electromagnetic
Compatibility (89/336/EEC).
Installation
This information is exclusively for the installer
who is responsible for assembly and electrical
connection. If you install the oven yourself, the
manufacturer will not accept responsibility for
possible damage.
Prior to Installation.
Observations
• To unpack the oven, pull on the tab located
at the bottom of the box.
• The opening in the kitchen unit must be that
indicated on the diagram. The minimum size
of the unit base must be 580 mm. (See
Figure 1 on Page 67)
• The rear of the unit, corresponding to the
shaded area in Figure 2 (see Page 67), must
have nothing projecting out (unit reinforcement, pipes, sockets, etc.).
• The adhesive used in the plastic lining the
kitchen units must be able to withstand
temperatures over 85
o
C.
Electrical Connection.
Legal Requirements
The installer must ensure that:
• The mains power voltage and cycles
correspond to what is marked on the
identification plate.
• The domestic wiring system can withstand
the maximum power marked on the
identification plate.
• The connection diagram is shown in the
following figure.
ENGLISH
• The electrical connection has an adequate
earth connection in accordance with
regulations in force.
• Connection must be made by means of an
omnipolar switch that is suitable for the
current drawn and with a minimum
aperture between contacts of 3 mm for
disconnection in case of emergency,
cleaning or bulb changing. Under no
circumstances must the earth wire pass
through this switch.
After making connection, check that all
electrical parts of the oven are working
correctly.
38
39
Page 15

Sommaire
Avant la première
utilisation
Oven Installation
For all ovens. After electrical connection is
made:
1 Position the oven inside the unit and
ensure that the feed cable is not trapped or
in contact with parts of the oven that
become hot.
2 Anchor the oven to the unit with the two
screws supplied, screwing them into the
unit through the two holes that can be seen
when the door is open.
3 Make sure that the body of the oven is not
in contact with the walls of the unit and that
there is at least a separation of 2 mm with
the adjacent units.
40
Avant la première utilisation Page 41
Emballage écologique 41
Consignes importantes de sécurité 42
Tableaux de cuisson 43
Nettoyage et entretien 48
En cas de panne
Information technique
Installation 52
51
52
Lire attentivement ce Manuel d’instructions pour
obtenir le meilleur rendement de votre four.
Il peut y avoir des restes de graisse et autres
impuretés dans votre four à cause du
processus de fabrication, pour les éliminer,
procédez comme suit :
• Retirez tous les éléments de l'emballage,
même le plastique de protection si votre
four est emballé.
• Connectez votre four en mode à défaut
, à 200
consultez la Fiche de caractéristiques
accompagnant ce manuel.
• Faites refroidir le four, en ouvrant la porte,
afin qu’il se ventile et ne garde pas les
odeurs à l’intérieur.
• Après le refroidissement, nettoyez le four et
les accessoires.
Lors de la première utilisation, des fumées et
des odeurs peuvent apparaître, il faut donc
assurer une bonne ventilation de la cuisine.
o
C , pendant 1 heure. Pour cela,
Emballage écologique
L’emballage est réalisé avec des matériaux
entièrement recyclables et pouvant être
réutilisés. Consultez votre mairie pour
connaître les normes municipales concernant
le recyclage de ces matériaux.
ATENCIÓN
Le symbole sur le produit ou sur
l’emballage indique que cet appareil ne peut
pas être considéré comme un déchet
ménager classique. Vous devez l'apporter au
centre de collecte des équipements
électriques et électroniques, pour qu’il soit
recyclé. Vous contribuerez ainsi à éviter les
éventuelles conséquences néfastes sur
l'environnement et la santé publique d'une
manipulation incorrecte. Pour obtenir plus
d’informations concernant le recyclage de cet
appareil, prenez contact avec la mairie de
votre ville, avec le service des déchets
ménagers ou avec l’établissement d’achat du
produit.
41
FRANÇAIS
 Loading...