

Kuppersbusch EEB 6860.1 Instructions For Use And Installation
GEBRAUCHS-
und Einbauanweisung
EEB 6860.1
3172915-000
Instructions for use and installation
Instructions d’utilisation et de montage
Gebruiks- en montageaanwijzingen
EN
FR
NL

27
What you will fi nd here
Read the instructions in this manual carefully before turning on your oven.
Here you will fi nd the most important instructions regarding the safety,
use, care and maintenance of your appliance, so that it will give you
lasting enjoyment.
If your oven becomes damaged at any time, consult the chapter
‘Assistance in the event of malfunction’ before you do anything else. You
may be able to repair small malfunctions yourself and save unnecessary
service costs.
Keep these instructions in a safe place. Give these instructions to new
owners for their information and safety.
The following symbols appear in this manual:
The warning triangle draws attention to health hazards or damage
that may be caused to the appliance.
This indicates advice and instructions.
Contents
Oven features ................................................ 28
Control Panel - Sensor keys and instructions ..................
28
Safety Warnings ............................................ 29
Connection and use
Oven
Thermoprobe
Before First Use ............................................. 29
Disposing of packaging and the old appliance
Setting the clock
First cleaning
General oven information ................................. 30
General advice
Shelf levels
Turning the oven light on and off
Oven Use ..................................................... 31
General instructions
Meaning of the lit up symbols and displays
Turning on the oven
Selecting a conventional cooking setting
Conventional oven cooking functions ................... 32
Shortcut to conventional cooking functions
Automatic cooking
Important information about automatic cooking with recipes
Changing the weight of the food to be cooked
Changing the cooking temperature
Changing/setting the cooking time
Setting the end time
Turning on and off automatically
Oven Switch-Off
Additional settings .......................................... 34
Alarm setting
Special settings ............................................. 35
Setting the language function
Adjusting brightness
Demonstration mode
Maximum Cooking Time
Active safety function
Eco-function
Fast heating mode
Memory function
Roasting ...................................................... 35
Setting a programme
Turning the roast over
Roasting on the grid shelf
Pot roasting
Roasting with conventional cooking functions
Instructions for automatic cooking recipes
Automatic cooking recipe chart
Suggested roast settings for conventional oven cooking
Thermoprobe and inside temperature function ........ 39
How to insert the thermoprobe correctly
Using the thermoprobe
Suggested temperatures for cooking with the thermoprobe
Semi-automatic cooking with thermoprobe
Slow cooking ................................................ 40
Setting the heat mode/cooking temperature
Suggested settings for slow cooking
Baking with cooking settings .............................. 42
Baking pizza
Instructions for the chart: Suggested baking settings
Suggested baking settings
Grilling
Suggested grill settings
Defrosting
Time chart for defrosting food
Making preserves
Child safety lock ............................................ 45
Turning the child safety lock on/off
Cleaning and care .......................................... 45
For all surfaces
Removing baked-on dirt
Using a scraper to clean
Using an oven spray - instructions
Chrome features
Stainless steel
Enamel
Door glass
Door gasket
Oven door assembly and disassembly
Shelf runner assembly and disassembly
Folding the heating element down/away
Regeneration of the ökotherm® catalyst ............... 47
Regeneration of the ökotherm® catalyst
Assistance in the event of malfunction .................. 47
What to do if… .............................................. 47
Maintenance ................................................. 48
Changing the oven light
Changing the door gasket
Technical information ...................................... 49
Assembly instructions for technical personnel ......... 49
Electricity
Measurements for assembly
Assembly in kitchen unit
28
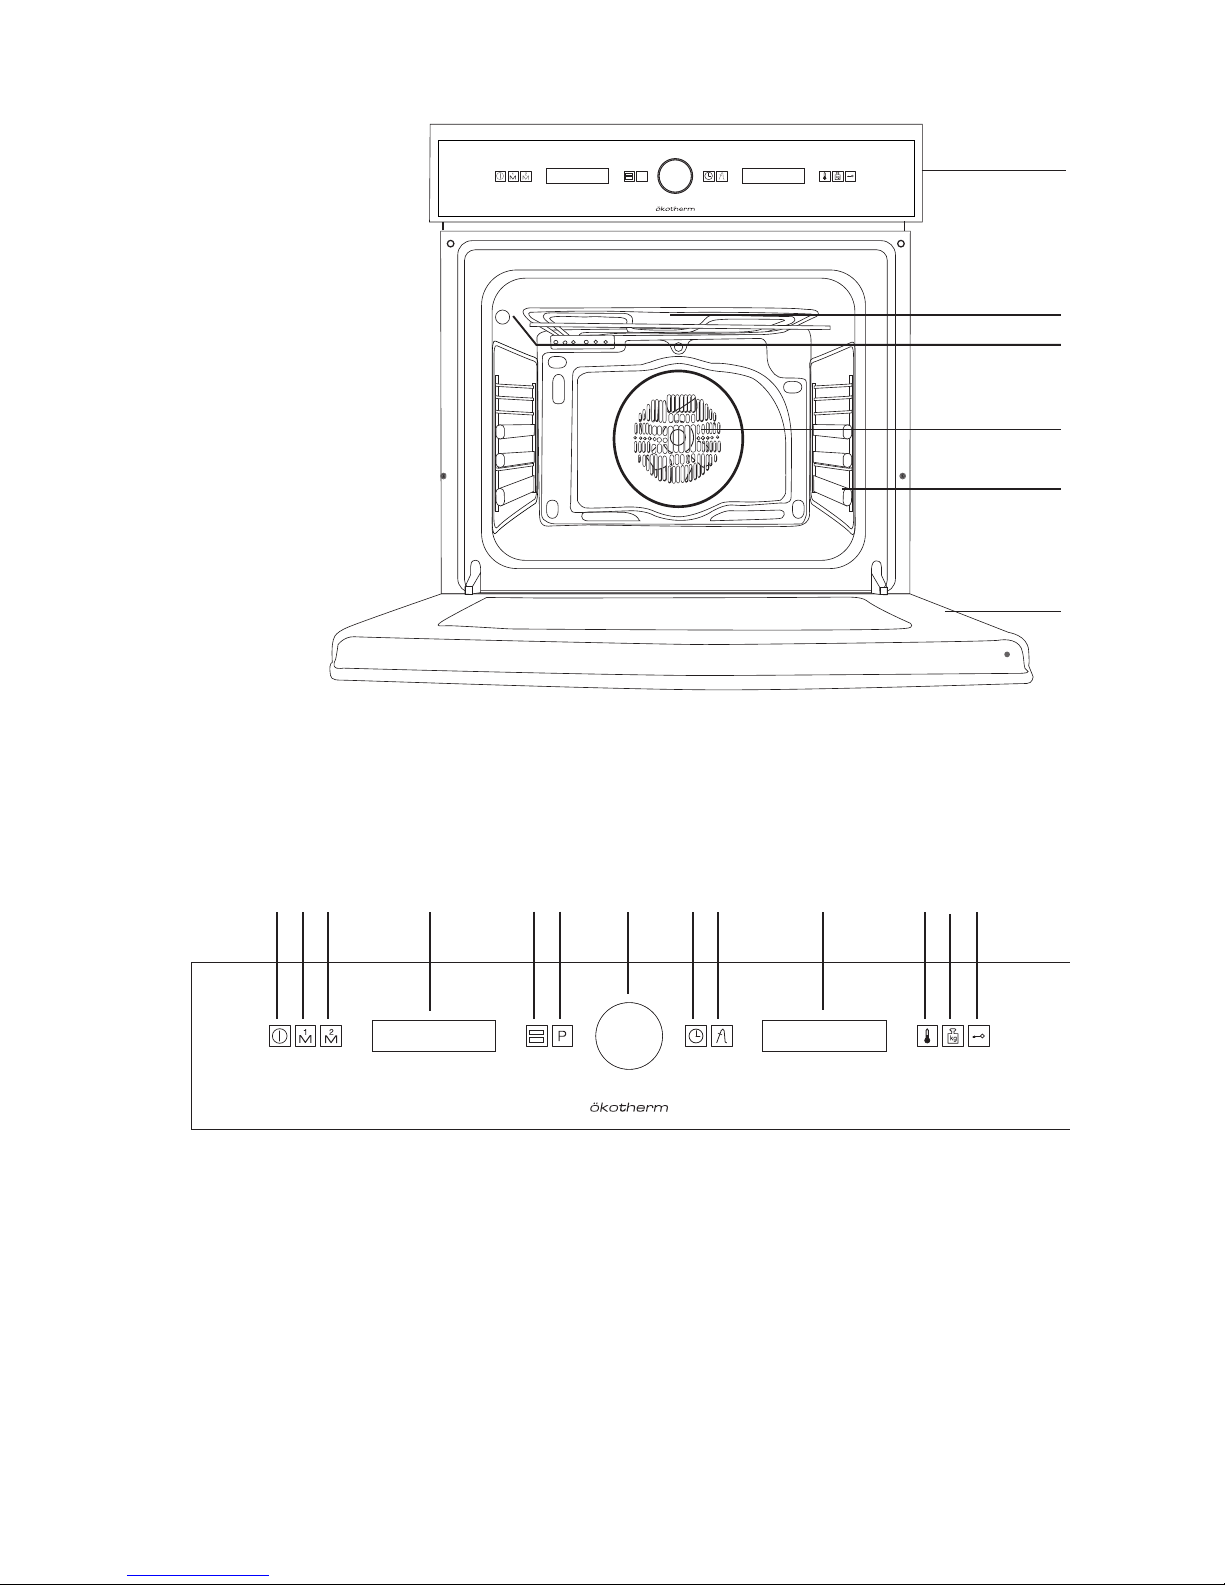
Oven features
1 Control panel
2 Fold down grill (Top heat/Grill)
3 Socket for roasting thermoprobe
4 Hot air fan
5 Shelf levels
6 Oven door
Accessories included:
Grid shelf
Enamel roasting tray
Enamel baking tray
Control Panel - Sensor keys and instructions
The control panel operates all oven settings.
1 Oven power switch
2 Memory 1
3 Memory 2
4 Information display/text
5 Conventional cooking functions menu
6 Automatic cooking functions menu
7 Menu scrolling and functions selection
8 Electronic timer functions
9 Temperature setting with roasting thermoprobe
10 Information display/symbols
11 Cooking temperature settings
12 Food weight settings
13 Safety lock
1
2
3
4
5
6
123
6 7 8 9 10 11 12 13
4
5
29
Safety Warnings
Connection and use
Only KÜPPERSBUSCH hobs have been manufactured and tested for use
over a KÜPPERSBUSCH oven. Do not use other hobs.
Any handling or repair to the appliance, including replacement of the
feed cable, should be carried out by authorised Technical Service
Personnel using original spare parts. Repairs or handling by others may
damage the appliance or cause malfunctioning that could be hazardous
to your safety.
Do not allow children to come near the oven while in use as it can reach
very high temperatures.
Children should be supervised to ensure they do not play with the
appliance.
This appliance is not for use by persons (including children) with
reduced physical, sensorial or mental capacity, or those lacking
experience and knowledge, except if they are under supervision
and have been instructed regarding use of the device by a person
responsible for their safety.
Oven
Unplug your oven if it malfunctions.
The oven must always be operated with the door closed.
The manufacturer takes no responsibility for any use of the oven other
than for the home preparation of food.
Only use the oven after it has been installed inside the kitchen unit.
Do not store oil, fats or infl ammable materials inside the oven. This may
be dangerous if the oven is turned on.
Do not lean or sit on the open oven door. You could damage it, as well
as endangering your safety.
In order to cook food in the oven, place the tray or grid shelf supplied
with it over the shelf runners inside the oven cavity. The tray and grid
shelf have a system to make their partial outward movement easy for
food handling.
Do not place containers or food on the bottom surface of the oven.
Always use the trays and grid.
Do not pour water on the bottom surface of the oven when in use; this
may damage the enamel.
Open the oven door as little as possible during cooking. This will reduce
power consumption.
Use protective oven gloves when performing operations inside the
oven.
It is normal for condensation to occur on the oven door when cooking
dishes with a high liquid content.
Thermoprobe
Only use the original thermoprobe.
Do not trap the thermoprobe cable in the oven door.
Remove from the oven if it is not being used.
Keep at a minimum distance of 5 cm from the grill and the top
elements.
Before First Use
Disposing of packaging and the old appliance
Remove packaging and recycle in an environmentally-friendly way.
In Germany, the transport packaging is returned to the store where the
appliance was purchased. By returning the packaging material, raw materials are saved and also fewer waste products are generated. Old appliances still contain valuable material. Leave your old appliance at a collection
point for valuable materials. Old appliances must be rendered inoperative
before disposing of them in order to prevent improper use.
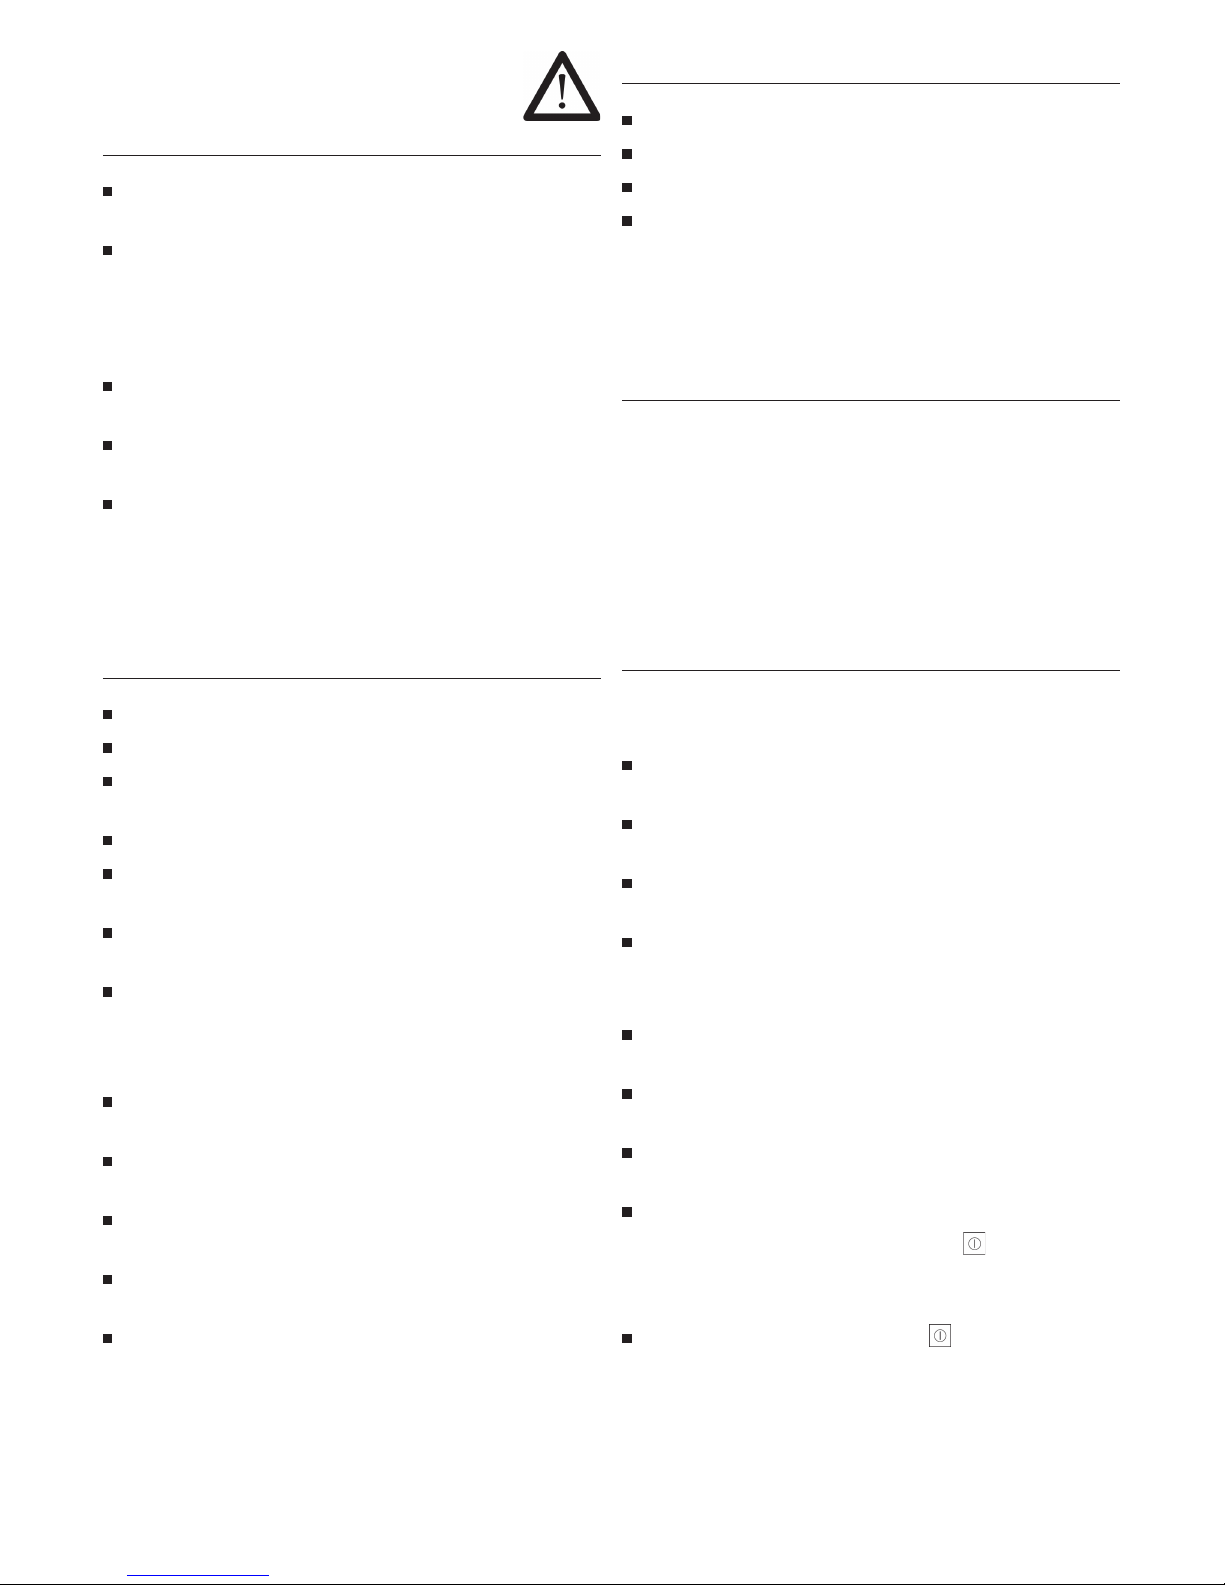
Setting the clock
The clock must be set before fi rst use and after a power failure. Whenever
this occurs, the 12:00 reading will fl ash on the display.
When you connect the oven, you will notice that 12:00 and the date
(day/month/year) will fl ash.
Select the hour by turning the function selector. Next, press the function
selector to confi rm and you will hear a beep.
Select the minutes by turning the function selector. Next, press the
function selector to confi rm and you will hear a beep.
You will then hear a double beep confi rming the time is set.
The following step is to select the date, fi rst of all indicating the year, then
the month, then the day.
Select the year by turning the function selector. Next, press the function
selector to confi rm and you will hear a beep.
Select the month by turning the function selector. Next, press the
function selector to confi rm and you will hear a beep.
Select the day by turning the function selector. Next, press the function
selector to confi rm and you will hear a beep.
You will then hear a double beep confi rming the time is set.
The oven will display the time and date set and the
symbol will be lit
up in white.
If you want to change the time:
If the oven is off, turn it on by touching the symbol.
30
Touch the symbol. This will light
up in red.
By turning the function selector you
can see the clock functions.
When you have the chosen the time
setting function , press the function
selector .
You will then see the current time on the
display.
Select the time by turning the function
selector. Next, press the function
selector to confi rm and you will hear a
beep.
Select the minutes by turning the function selector. Next, press the
function selector to confi rm and you will hear a beep.
You will then hear a double beep confi rming the time is set.
First cleaning
– Remove packaging and accessories from the oven.
– The appliance must be cleaned before preparing food in it for the fi rst
time.
Clean the oven interior, oven trays, grease tray, grid shelf etc. with a
damp cloth and a little dishwashing detergent.
– Heat the oven.
Close the oven door.
Heat the oven to 200°C with top and bottom heat
for 60 minutes.
Ensure the kitchen is well ventilated while doing this.
General oven information
General advice
Follow the safety warnings given previously!
Caution, Danger of overheating! When using the oven, do not cover
the bottom with aluminium foil or place pots, frying pans or the like
inside. If this happens, the oven will overheat, causing damage to the
enamel.
The oven becomes hot when in use. The cooling fan turns on when
the oven overheats. The cooling fan will remain on until the oven has
cooled down, even after the appliance has been turned off. The noises
made by the fan are normal and do not mean that it is damaged.
When preparing a dish with alcohol or yeast with settings that use hot
air, there may be a vinegary smell. If the smell is unpleasant, use a
function that does not include the fan, such as top/bottom heat.
The electronic clock features Touch-Control technology. To operate,
simply touch the glass control symbols with your fi ngertip. The touch
control sensitivity continuously adapts to changing conditions. Make
sure that the glass surface of the control panel is clean and free of any
obstacles when turning on the oven.
If the clock does not respond correctly when you touch the glass,
you will need to turn off the oven for a few seconds and then turn it
back on after a few seconds. Doing this causes the sensors to adjust
automatically so that they will react once more to fi ngertip control.
Shelf levels
There are 5 shelf runners
on the sides. The shelf
levels are numbered 1 to 5
from the bottom up.
Shelf runners
Shelf level 1 is the lowest shelf.
Turning the oven light on and off
The inside light will go on:
When the oven door is open. If the door is not closed after a certain
amount of time, the light will turn off to reduce power consumption.
When any cooking function is set. The light will turn off after a certain
time.
If you want to turn the light on during cooking, just press the function
selector. If you keep your fi nger on the function selector for a few
seconds, the light will stay on throughout cooking. Press the function
selector to turn off the light.
5
4
3
2
1
31
Oven Use
General instructions
The fan turns itself on and off with some settings; this does not mean
it is damaged.
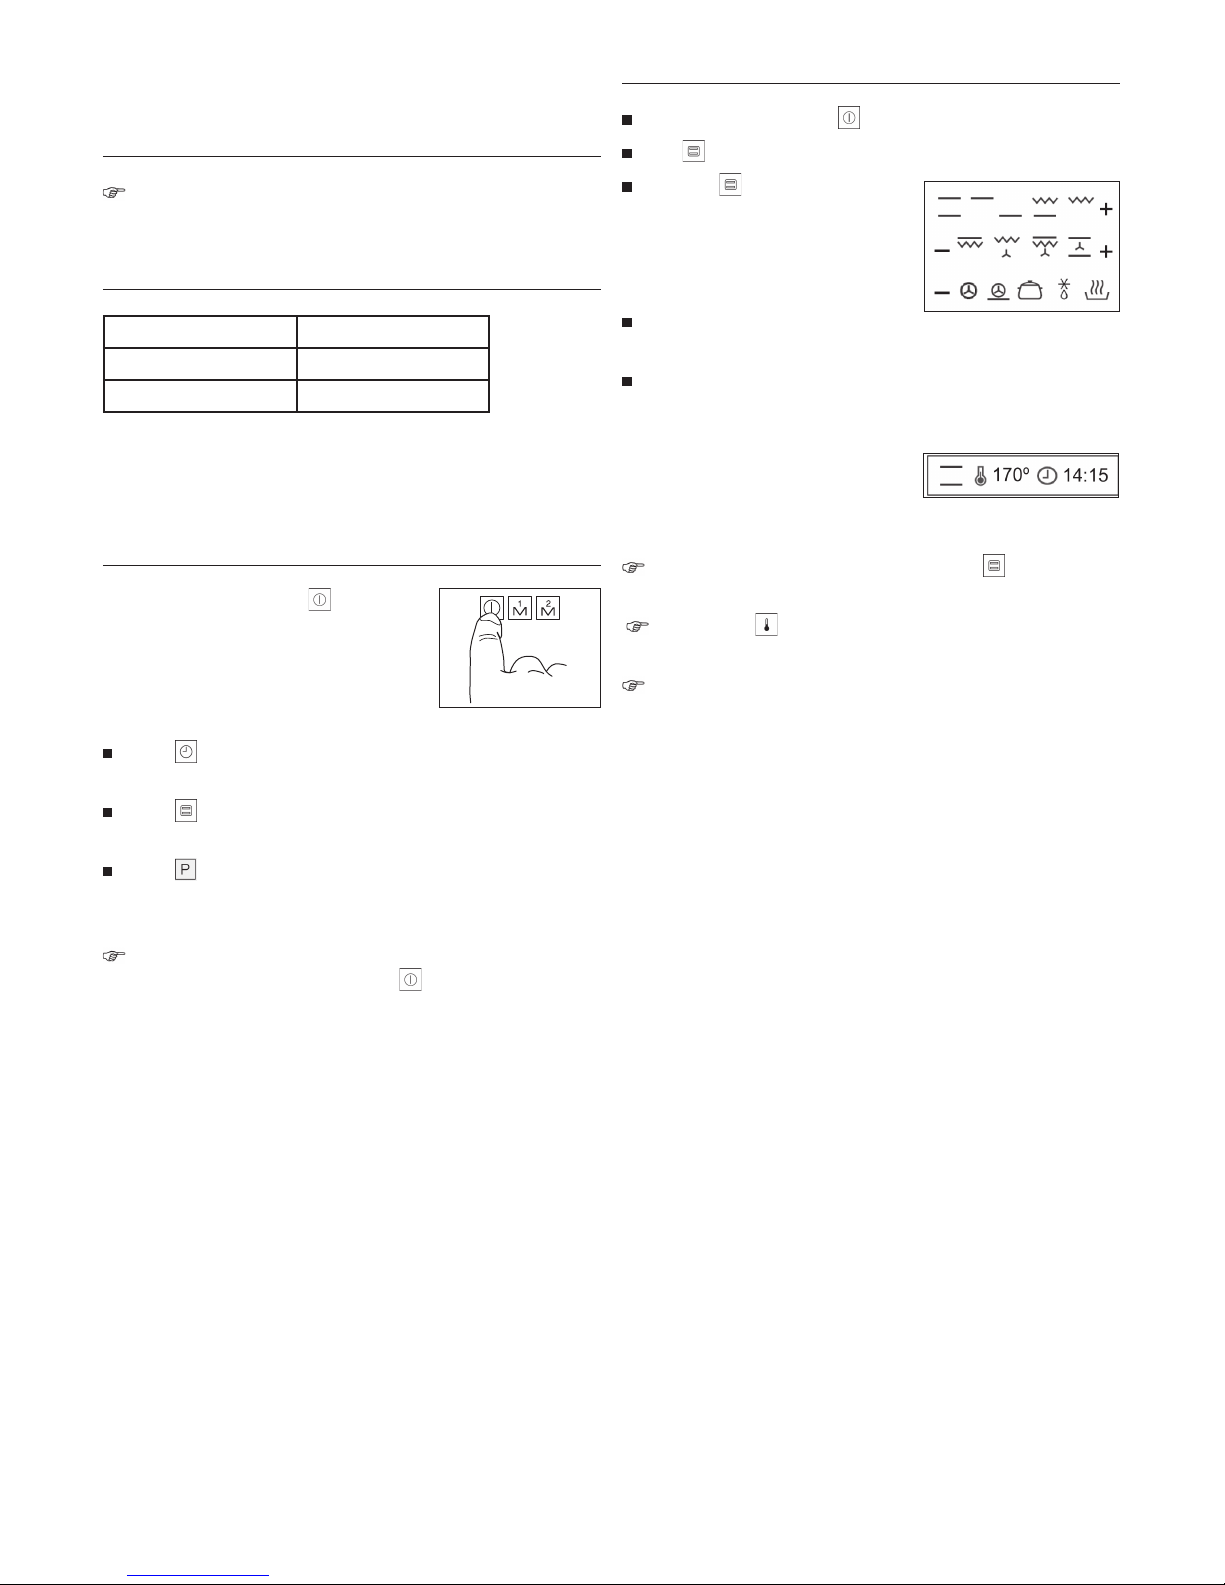
Meaning of the lit up symbols and displays
Right display: function display.
Left display: help texts.
Turning on the oven
To cook with your oven, touch . You will
then see the different oven use options lit up in
white.
Symbol : Electronic Clock Settings. These let you programme timer
functions for use with your oven.
Symbol : Selecting oven cooking settings. This enables you to
select any cooking function by combining different heat sources.
Symbol : Recipe selection. Simply put the food into the oven
and indicate its weight on the display; the oven will cook it for you
automatically.
If you do not set any function or recipe, the oven will turn itself off
again, showing the current time and the
symbol in white.
Selecting a conventional cooking setting
Turn the oven on by touching .
Touch , which will light up on the control panel.
The symbol will change to red. Turn
the function selector to the right or
left to set one of the following cooking
functions. (See Conventional oven
cooking functions below).
When you have set the desired function,
press the function selector.
You will hear a double beep confi rming the chosen function has been
set. The oven will begin cooking and in most cases you will see the
following information on the display:
The set function, the pre-programmed
cooking temperature for that function
and the clock or timer function if any
have been set.
If you wish to change the cooking function, press and follow the
above instructions.
During cooking will fl ash, indicating that the oven is transmitting
heat to the food.
After the thermostat is turned off the fi rst time, you will hear a sound
indicating that pre-heating has fi nished.
Colour
Meaning
White symbol Select
Red symbol On
32
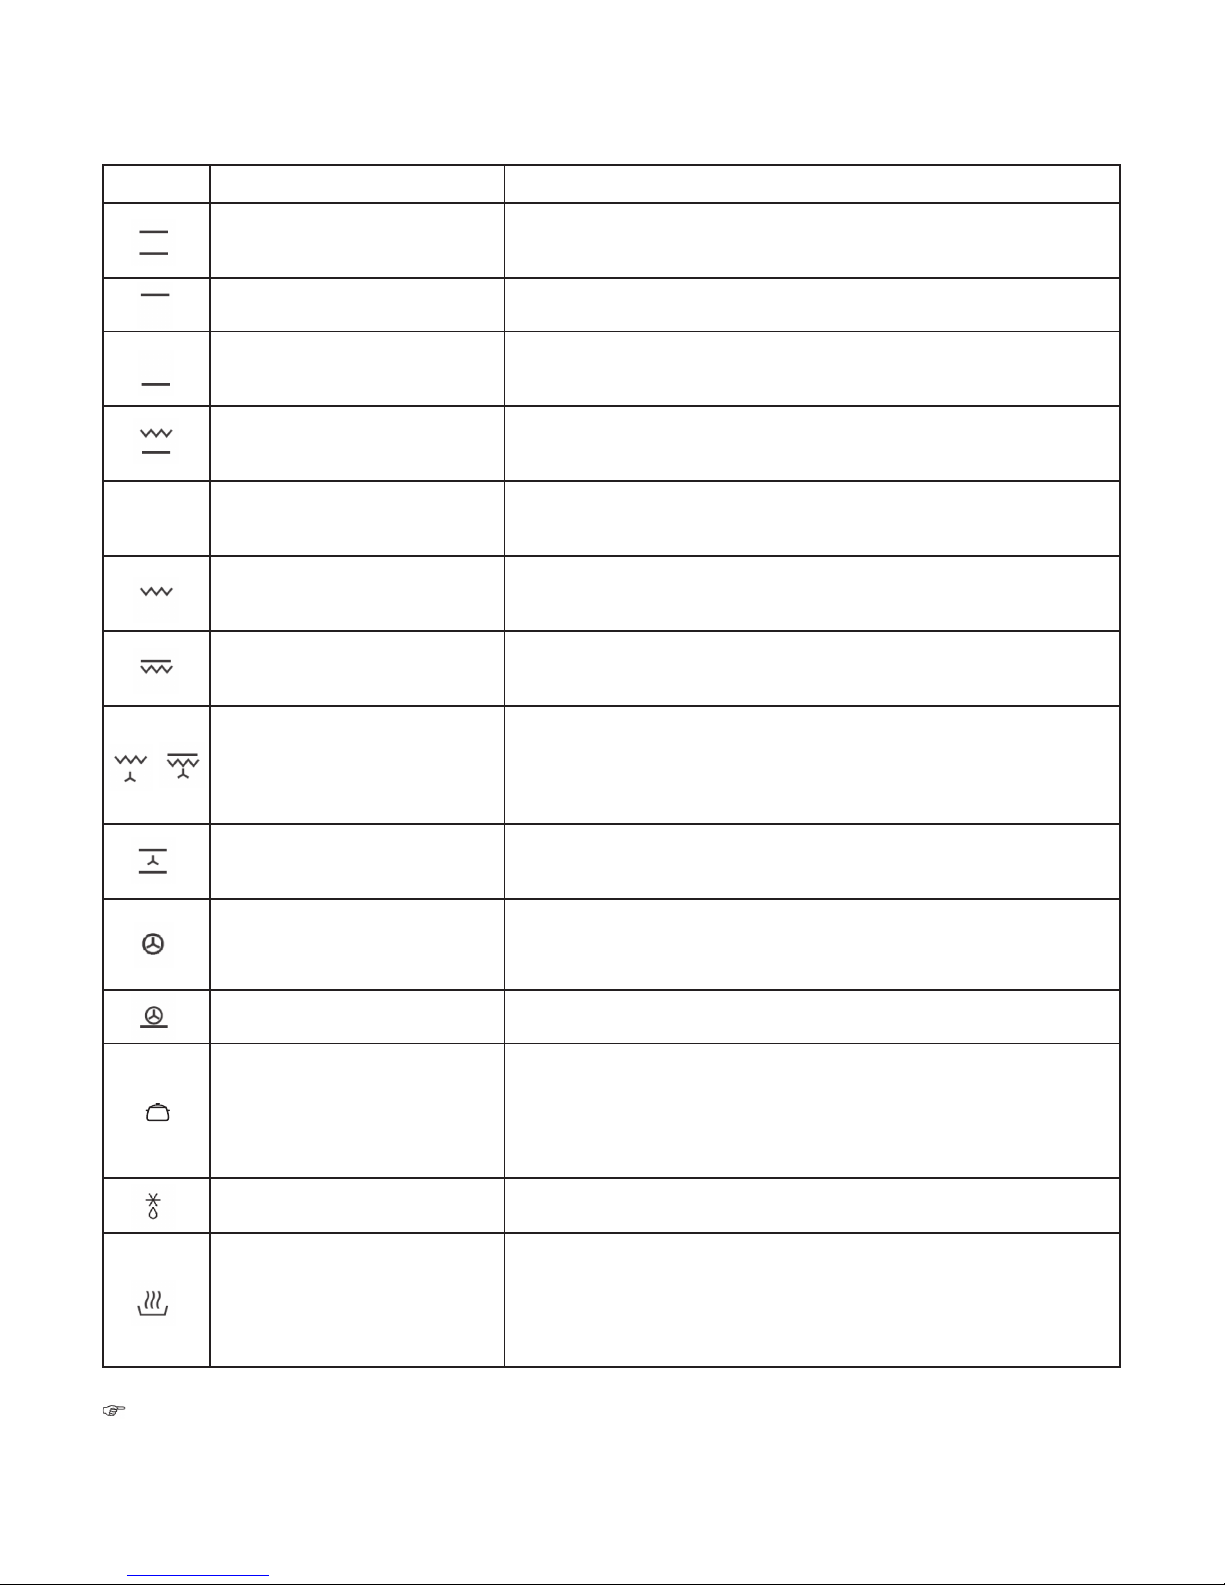
Top/bottom heat
This function is for use when baking cakes where the heat should be even to give a
spongy texture.
Top heat For when you need to heat food gently. Plate warming.
Bottom heat
Heat only comes from lower part. Suitable for warming dishes or letting dough or
similar products rise.
Grill and bottom heat Ideal for roasts. This setting can be used with any size cuts of meat.
Grill
Toasting and browning. This setting allows the surface to be cooked without affecting the inside
of the food. Suitable for fl at foods such as steaks, ribs, fi sh and open toasted sandwiches.
Larger surface grill
For toasting larger surfaces than possible with the Grill setting, in addition to greater
toasting power for faster food browning.
Fan-forced hot air
For even roasting and simultaneous surface browning. Ideal for mixed grills.
Perfect for bulky pieces such as poultry and game. The meat should be placed
on the grid shelf with the tray below to collect meat juices.
Turbo fan with top and bottom heat
Suitable for roasts and cakes. The fan spreads the heat evenly throughout the inside of
the oven to reduce cooking time and temperature.
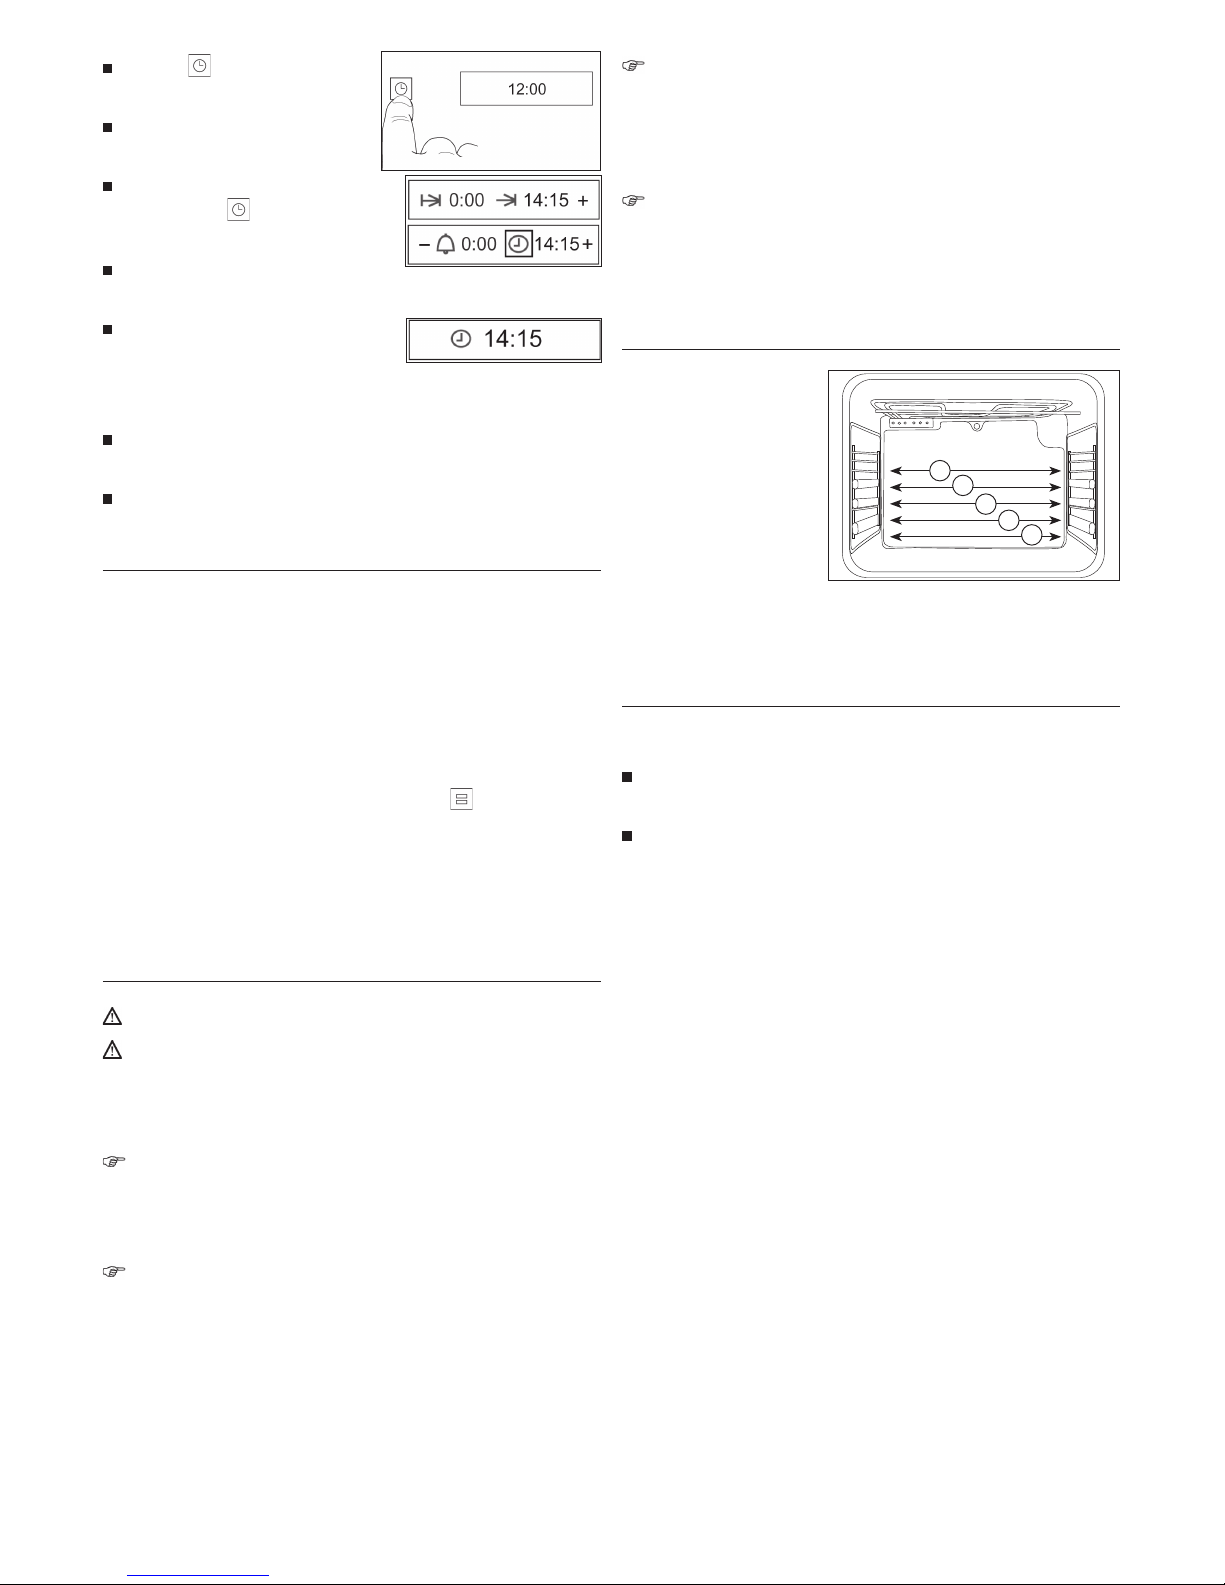
Hot air
The fan distributes the heat coming from an element located at the back of the oven. As
a result of the evenly distributed temperature, food can be cooked on two levels at the
same time.
Pizza mode Ideal for cooking pizzas and baking pies, fruit tarts and sponge cakes.
Defrosting See corresponding section
Food warming
This function provides the right level of heat to keep prepared food warm in the oven
until you are ready to serve. The interior temperature of the oven varies in this setting
between 50 and 80°C. Meat can be kept warm at 60°C inside the oven. Large cuts of
meat can be warmed for 1 to 2 hours, and smaller cuts for 30-40 minutes.
Symbol Cooking function Suitable for
Conventional oven cooking functions
There are many conventional oven cooking functions and they are described below.
The door must be closed during use with grill, larger surface grill or fan-forced hot air.
Slow cooker
Designed to cook casseroles, stews, etc, in the traditional way, and for all recipes
specifying long cooking times and low heat.
For the best results, we recommend using casserole pans with lids, fi rst making sure
they can be used in the oven.
Eco
ECO
This programme allows you to cook food with minimal energy consumption. Suitable
for fi sh and all types of oven-roasted meats.
33
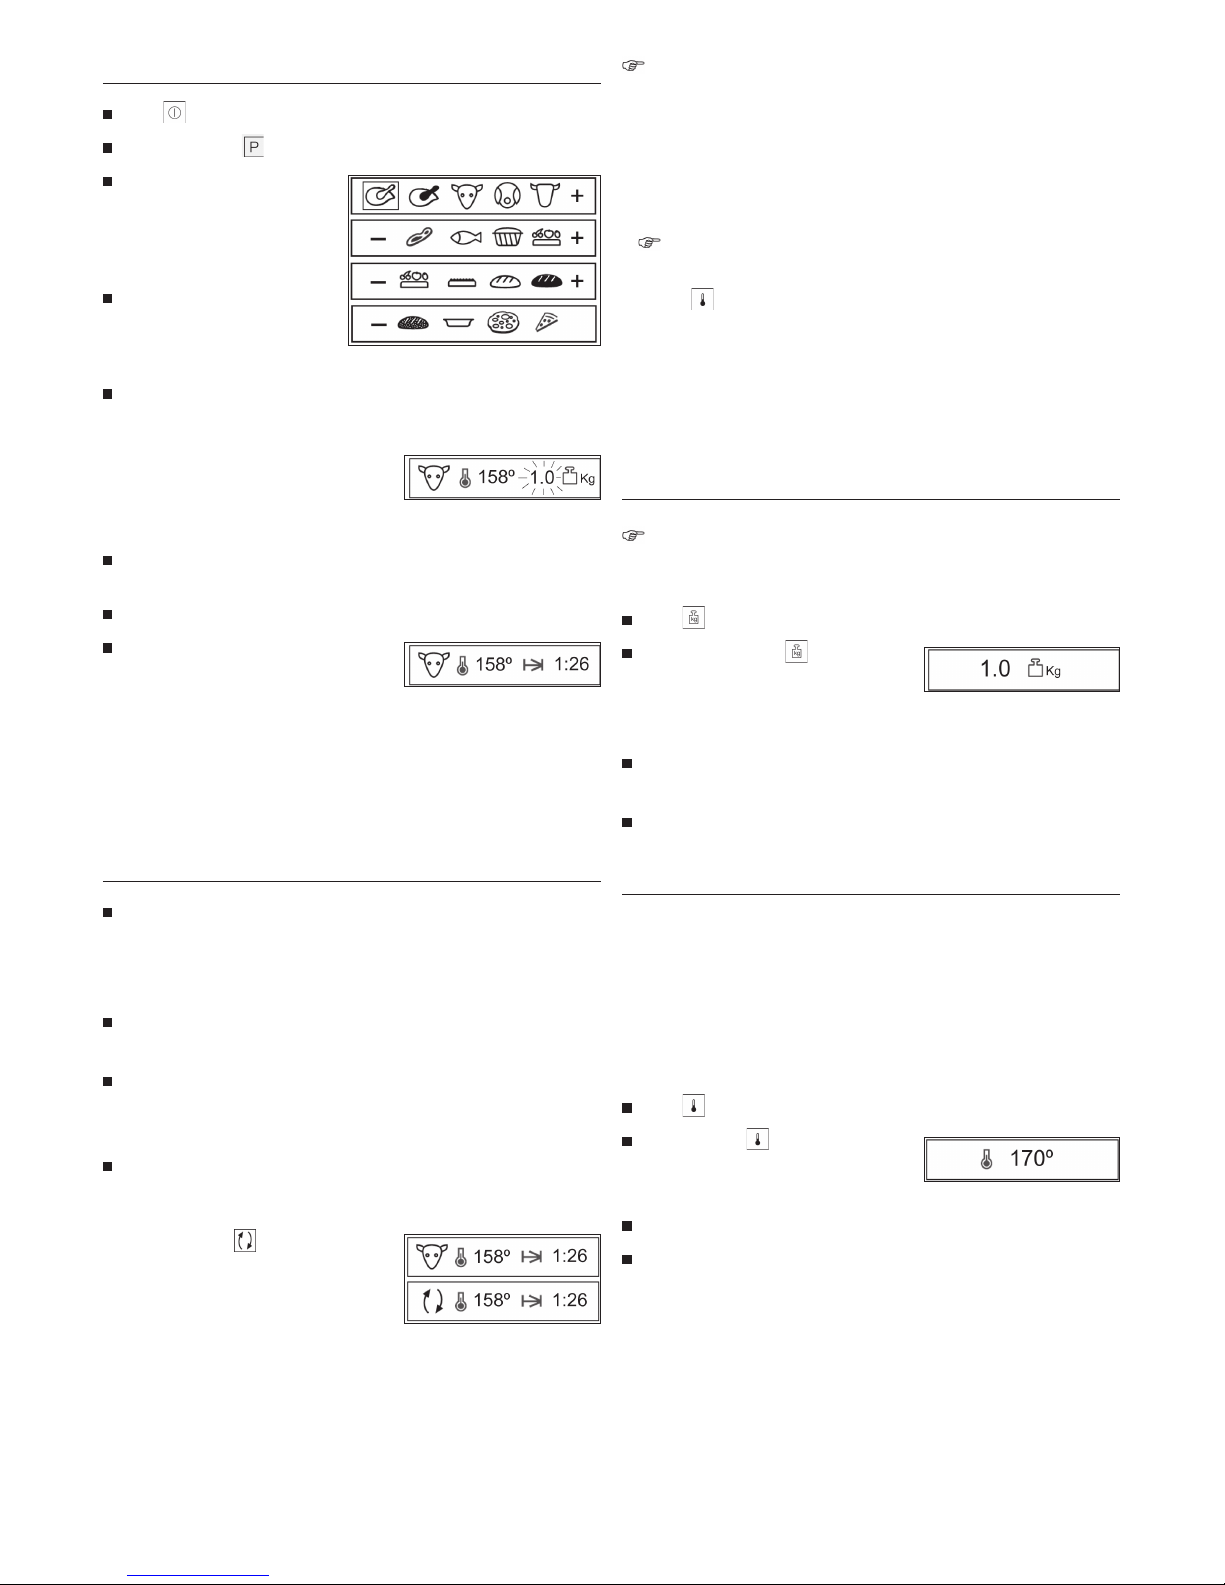
Automatic cooking
Touch to turn the oven on.
Touch the symbol . This will light up in red.
The right display will show the
different automatic cooking
recipes available with the oven:
The name of the recipe will
appear on the left display.
Turn the function selector to
the right or left to select the
desired recipe. Then press the
function selector.
You will hear a double beep confi rming the recipe that you have
chosen. The oven will begin cooking and in most cases you will see the
following information on the display:
The symbol for the chosen recipe and
its automatic cooking temperature are
shown. The pre-programmed weight for
this option fl ashes.
Turn the function selector to change the weight of the food that is to be
cooked.
Finally, press the function selector to accept the selection.
You will hear a double beep confi rming
the programmed recipe. The oven will begin cooking and you will see the following
information on the display:
The symbol for the chosen recipe, the automatic cooking temperature
and calculated cooking time will be shown.
Important information about automatic cooking
with recipes
When you select a recipe and enter a weight, the oven automatically cal-
culates the temperature and cooking time needed, but these values can
be changed. Cooking time starts from a cold oven unless pre-heating
has been specifi cally indicated.
It is very important to select the correct food weight so that the ingre-
dients will be properly cooked.
When cooking with a thermoprobe, the oven will determine the cooking
temperature only. The cooking time will depend on the temperature
setting programmed for the thermoprobe.
With roasting programmes, after a certain time has passed the oven will
advise you that the joint of meat should be turned over. When it is time
to do this, the oven will beep.
You will also see on the display
until you have turned the roast over. If
you do not turn the roast over, the oven
will continue cooking according to the
programmed automatic cooking recipe.
The oven should be pre-heated for white and rye bread and thin-crust
and thick-crust pizza base recipes. In this way the oven will be at the
ideal temperature for the best results. Pre-heating is not needed for the
other recipes.
Follow these instructions when cooking with these recipes:
– Set the recipe fi rst. The oven will begin pre-heating.
Do not put the food into the oven until the signal is given.
– During pre-heating, the symbol of the programmed recipe and the
symbol
will fl ash on the display.
– When the set temperature is reached, the oven will beep. You can now
put the food into the oven.
– The oven will continue to beep until you put the food in.
– The food will be cooked automatically according to the recipe settings.
Changing the weight of the food to be cooked
If you wish to change the food weight, the cooking time or tempe-
rature may change automatically according to the parameters of the
programmed recipe. To change the weight of the food:
Touch . This will light up in red.
The display will show and the
weight of the food to be cooked
according to the recipe you have
programmed.
Turn the function selector to change the weight of the food that is to be
cooked.
Finally, press the function selector to accept the selection.
Changing the cooking temperature
The cooking temperature is pre-programmed for all cooking functions.
It is only possible to adjust the temperature within a predetermined range
when using the automatic cooking function. The temperature can be freely
selected for conventional cooking functions in a range between 50°C
(no temperature adjustment) and 250°C.
If you want to change the cooking temperature:
Touch . This will light up in red.
You will see the symbol and the set
temperature for this cooking function
on the display.
Turn the function selector to specify the new cooking temperature.
Press the function selector to accept the selection.
34
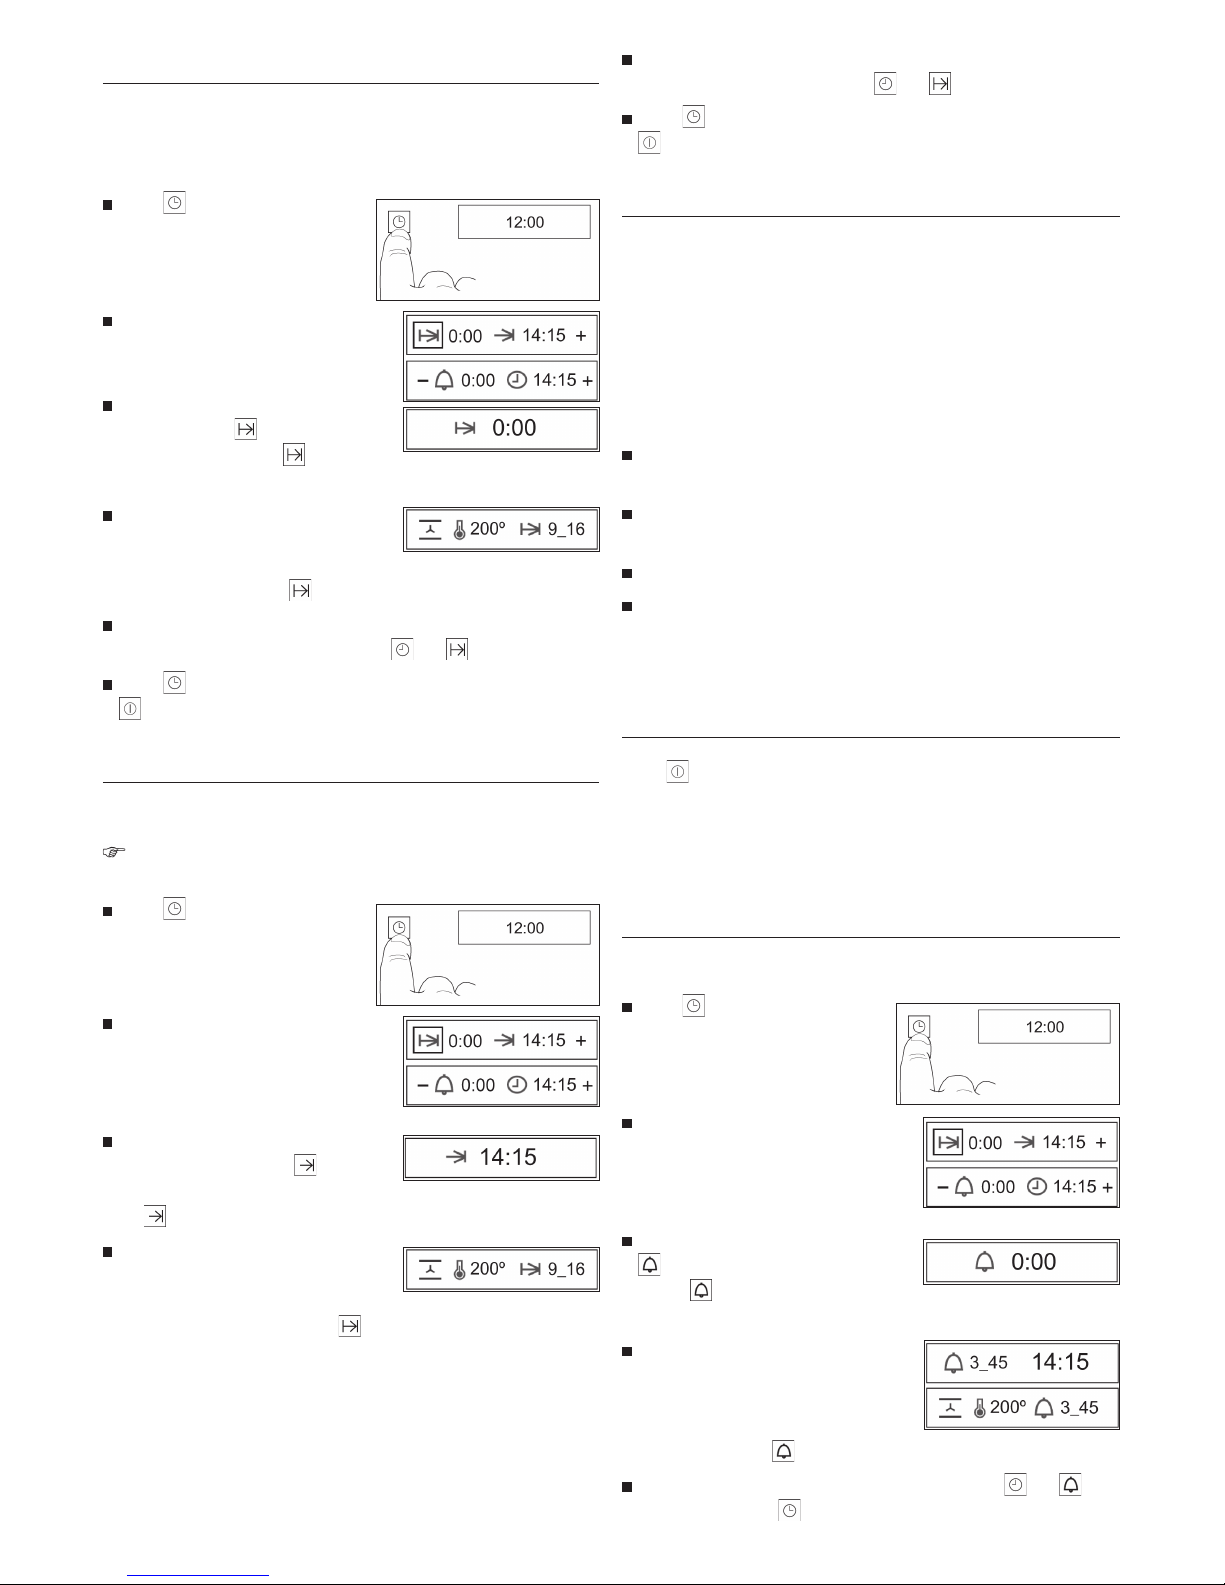
Changing/setting the cooking time
The cooking time is pre-programmed for the automatic cooking recipes
but can be changed. There is no pre-programmed time for conventional
cooking functions.
Touch . This will light up in red.
By turning the function selector you
can see the clock operating functions
on the display.
When you have the chosen the cooking
duration function , press the function
selector. You will see the symbol and
the 0:00 reading on the display
Turn the function selector to select the
cooking duration. Finally, press the
function selector. You will hear a double
beep and see the symbol and the selected cooking time.
When the programmed cooking time has fi nished, the oven will switch
itself off, an alarm will sound briefl y and and will start fl ashing.
Touch to stop the alarm. The oven will display the current time and
lit up in white. The oven is now off.
Setting the end time
The end time is when the oven turns off.
You can combine the cooking time and the end time. See “Turning on
and off automatically”.
Touch . This will light up in red.
By turning the function selector you
can see the clock operating functions
on the display.
Turn the function selector to select the
End Cooking Time setting , and then
press the function selector. You will see
the symbol and the current time on the display.
Turn the function selector to select the
end cooking time setting. Finally, press
the function selector. You will hear a
double beep and see the symbol and the cooking time.
When the programmed end time is reached, the oven will switch itself
off, an alarm will sound briefl y and and will start fl ashing.
Touch to stop the alarm. The oven will display the current time and
lit up in white. The oven is now off.
Turning on and off automatically
If you wish to use the oven at a later time, the cooking time and end
time can be combined. The cooking start time, when the oven turns on
automatically, is programmed as a combination of both settings and
cannot be set on its own.
Example:
It is 8:00 and at 13:00 you want to remove a roast from the oven that will
take 90 minutes to cook.
Enter 1:30 as the cooking time, following the instructions explained in
the section “Setting the cooking time”.
Then, change the end time from 9:30 to 13.00, following the instruc-
tions “Setting the end time”.
The settings are automatically accepted.
Set the conventional cooking or automatic cooking function. Put the
food for roasting in the oven.
The oven will turn on at 11:30 and will fi nish cooking at 13:00.
Oven Switch-Off
Touch . The oven is off. You will be able to see the correct time and the
symbol in white on the display.
Additional settings
Alarm setting
You can set an alarm on your oven, even if it is not being used.
Touch . This will light up in red.
By turning the function selector you
can see the clock operating functions
on the display.
When you have set the timer function
, press the function selector. You will
see the symbol and the 0:00 reading
on the display.
Turn the function selector to set the
time after which the alarm should
sound. Finally press the function
selector. You will hear a double beep
and see the symbol and the selected alarm time on the display.
When the set time is reached, an alarm will sound and and will
start fl ashing. Touch to stop the alarm.
 Loading...