

Küppersbusch EDG6200.0E Instructions For Use Manual

BEDIENUNGSANWEISUNG
EDG6
2
00.0E
661
mit Montageanweisungen
Instructions for use
GB

26
EN
We ask you to read the instructions in this booklet
very carefully as this will allow you to get the best
results from using your microwave oven.
KEEP THE DOCUMENTATION OF THIS
PRODUCT FOR FUTURE REFERENCE.
Always keep the instruction manual handy. If
you lend the microwave oven to someone else
give them the manual as well!
Environmental protection
Disposal of the packaging
The packaging bears the Green Dot mark.
Dispose of all the packaging materials such as
cardboard, expanded polystyrene and plastic
wrapping in the appropriate bins. In this way you
can be sure that the packaging materials will be
re-used. Keep all packaging away from small
children as it may present suffocation/choking
hazard.
Disposal of equipment no longer used
According to European Directive 2002/96/EC on
the management of waste electrical and electronic
equipment (WEEE), home electrical appliances
should not be put into the normal systems for
disposal of solid urban waste.
Outdated appliances should be collected
separately to optimise component material
recovery and recycling rates and to prevent
potential harm to human health and the
environment. The symbol of a rubbish container
superimposed by a diagonal cross should be put
on all such products to remind people of their
obligation to have such items collected separately.
Consumers should contact their local authorities
or point of sale and request information on the
appropriate places to leave their old home
electrical appliances.
Before disposing of your appliance, render it nonusable by pulling out the power cable, cutting it off
and disposing of it.

27
EN
Contents
Installation instructions ...................................................................................................................28
Before installation ...........................................................................................................................28
After installation..............................................................................................................................28
Safety Instructions ...........................................................................................................................29
Description of your oven..................................................................................................................31
Basic settings ...................................................................................................................................32
Initial Settings .................................................................................................................................32
Setting the clock .............................................................................................................................32
Hiding/Displaying the Clock............................................................................................................32
Water Hardness setting ..................................................................................................................33
Safety blocking ...............................................................................................................................33
Basic functions .................................................................................................................................34
Steam function 100 ºC....................................................................................................................34
Steam function 90 ºC......................................................................................................................34
Steam function 80 ºC......................................................................................................................35
Steam function 60 ºC......................................................................................................................35
Steam function 40 ºC......................................................................................................................36
Water feeding....................................................................................................................................37
When the oven is working................................................................................................................38
Interrupting a cooking cycle............................................................................................................38
Altering parameters ........................................................................................................................38
Cancelling a cooking cycle .............................................................................................................38
End of a cooking cycle....................................................................................................................38
Usage, Tables and Tips....................................................................................................................39
Use of accessories .........................................................................................................................39
Care and maintenance .....................................................................................................................44
Cleaning the cooking space............................................................................................................44
Removing the shelf guides .............................................................................................................44
Removing the appliance door.........................................................................................................45
Descaling........................................................................................................................................46
Suitable descaling solutions ...........................................................................................................46
Descaling procedure.......................................................................................................................47
Oven Cleaning...................................................................................................................................48
Front surface ..................................................................................................................................48
Oven interior...................................................................................................................................48
Accessories ....................................................................................................................................48
What should I do if the oven doesn’t work?...................................................................................49
Replacing the light bulb ..................................................................................................................49
Technical characteristics.................................................................................................................50
Description of Functions .................................................................................................................50
Displays..........................................................................................................................................50
Specifications .................................................................................................................................50
Installation.........................................................................................................................................51

28
EN
Installation instructions
Before installation
Check that the input voltage indicated on the
characteristics plate is the same as the voltage of
the power outlet you are going to use.
Open the oven door and take out all the
accessories and remove the packing material.
Warning! The front surface of the oven may be
covered in a protective film. Before using the
oven for the first time, carefully remove this film,
starting on the inside.
Make sure that the oven is not damaged in any
way. Check that the oven door closes correctly
and that the interior of the door and the front of
the oven opening are not damaged. If you find any
damage contact our Customer Care Centre on the
number supplied on the back cover of this
handbook.
DO NOT USE THE OVEN if the power cable or
the plug is damaged, if the oven does not function
correctly or if it has been damaged or dropped.
Contact our Customer Care Centre on the number
supplied on the back cover of this handbook.
Put the oven on a flat and stable surface. The
oven must not be installed close to any sources of
heat, radios or televisions.
During installation, make sure that the power
cable does not come into contact with any
moisture or objects with sharp edges and the
back of the oven. High temperatures can
damage the cable.
Warning: after the oven is installed you must
make sure you can access the plug.
After installation
The oven is equipped with a power cable and a
plug for single phase (household) current,
230-240V ~ 50Hz.
If the oven is to be installed on a permanent
basis it must be installed by a qualified
technician. In such a case, the oven should be
connected to a circuit with an all-pole circuit
breaker with a minimum separation of 3 mm
between contacts.
WARNING: THE OVEN MUST BE EARTHED.
The manufacturer and retailers do not accept
responsibility for any damage that may be
caused to persons, animals or property if these
installation instructions are not observed.
The oven only functions when the door is closed
correctly.
Before the first use, clean the inside of the oven
and the accessories, following the cleaning
instructions given in the “Oven cleaning” section.
During installation, follow the instructions supplied separately.

29
EN
Safety Instructions
• Warning! Do not leave the oven
unsupervised.
• Warning! If you see smoke or fire, keep the
door closed in order to smother the flames.
Switch off the oven and take the plug out of
the socket or cut off the oven power supply.
• Overheated fat and oil can easily catch fire.
Heating oil in the cooking space to sear
meat is dangerous and should not be done.
Never try to extinguish burning oil or fat with
water (danger of explosion)! Smother the
flames with a damp cloth and keep all doors
and windows closed.
• Warning! Do not use alcohol to cook in the
oven. It can cause the overheating of the
food. Danger of explosion!
• Warning! This appliance is not intended for
use by persons (including children) with
reduced physical, sensory or mental
capabilities, or lack of experience and
knowledge, unless they have been given
supervision or instruction concerning use of
the appliance by a person responsible for
their safety. Children should be supervised
to ensure that they do not play with the
appliance.
• Children must be supervised to ensure that
they do not play with the appliance. Use the
safety locks.
• Warning! During use the appliance
becomes very hot. Care should be taken to
avoid touching heating elements inside the
oven. RISK OF BURNS!
• Warning! Accessible parts may become hot
during use. Young children should be kept
away.
• Warning! When opening the door during
or upon completion of the cooking cycle,
be careful of the flow of hot air and/or
steam and water drops coming out of the
cooking chamber. Step back or to the
side to avoid burns.
• Warning! Make sure you never catch the
power cables of other electrical appliances
in the hot door or the oven. The cable
insulation may melt. Danger of short-
circuiting!

30
EN
Safety Instructions
This oven is exclusively for domestic use!
The appliance is designed for use in the home
for preparing food. No liability is assumed for
any damage caused by improper or incorrect
use.
Avoid damaging the oven or other dangerous
situations by following these instructions:
• Do not cover or obstruct the ventilation
openings.
• Do not keep any inflammable object inside
the oven as it may burn if the oven is
switched on.
• Do not use the oven as a pantry.
• Do not pour spirits (e.g. brandy, whisky,
schnapps, etc.) over hot food. Danger of
explosion!
• Accessories such as wire racks and trays,
etc. get hot in the cooking space. Always
wear protective gloves or use oven cloths.
• To avoid being burnt, always use oven
gloves for handling dishes and containers
and touching the oven.
• Do not lean or sit on the open oven door.
This may damage the oven, especially in
the hinge zone. The door can bear a
maximum weight of 8 kg.
• The racks can bear a maximum load of 8
kg. To avoid damaging the oven, do not
exceed this load.
Cleaning:
• The appliance will remain hot for some time
after it is switched off and cool down only
slowly to room temperature. Please allow
sufficient time for the appliance to cool
down before, for instance, cleaning it.
• Do not use harsh abrasive cleaners or
sharp metal scrapers to clean the oven door
glass since they can scratch the surface,
which may result in shattering of the glass.
• The door contact surfaces (the front of the
cooking space and the inside part of the
doors) must be kept very clean in order to
ensure the oven functions correctly.
• Please follow the instructions regarding
cleaning in the section “Oven Cleaning and
Maintenance”.
Repairs:
• If the power cable is damaged it should be
substituted by the manufacturer, authorised
agents or technicians qualified for this task
in order to avoid dangerous situations.
Furthermore, special tools are required for
this task.
• Repair and maintenance work, especially of
current carrying parts, can only be carried
out by technicians authorised by the
manufacturer.
31
EN
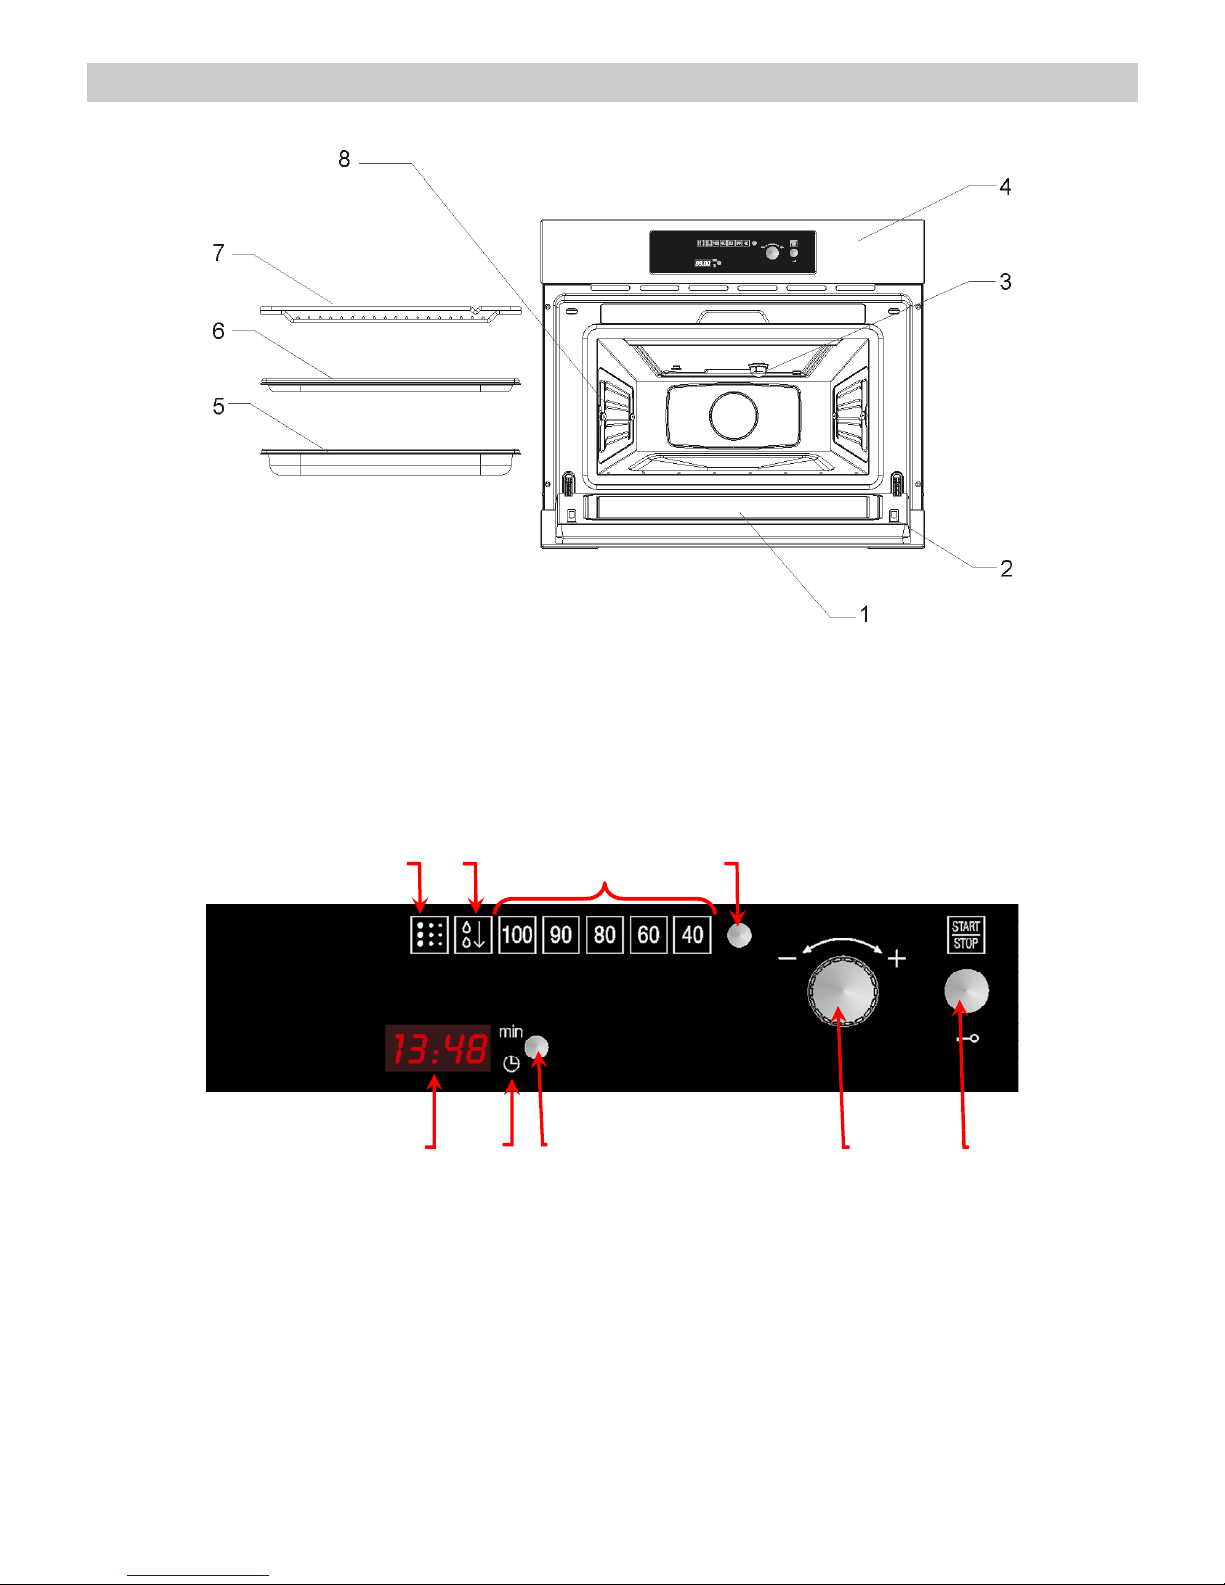
Description of your oven
1. – Door window glass 5. – Perforated baking tray
2. – Safety catches 6. – Baking tray
3. – Lamp bulb 7. – Rack
4. – Control panel 8. – Shelf guides
d
e
c
f g
h i
a b
a. – Descale light f. – Clock/Duration indication lights
b. – Water refill light g. – Clock/Duration selection key
c. – Function lights h. – Rotary knob
d. – Function selection key i. – Start/Stop/Safety blocking key
e. – Clock/Duration display
32
EN
Basic settings
Initial Settings
After your steam oven is first plugged in or after a
power failure, the clock display will flash to
indicate that the time shown is not correct.
The oven will not operate until the clock is set and
the water hardness parameter is set.
To set the clock and the water hardness
parameter value proceed as described in the
following chapters.
Setting the clock
1, 3, 5
2, 4
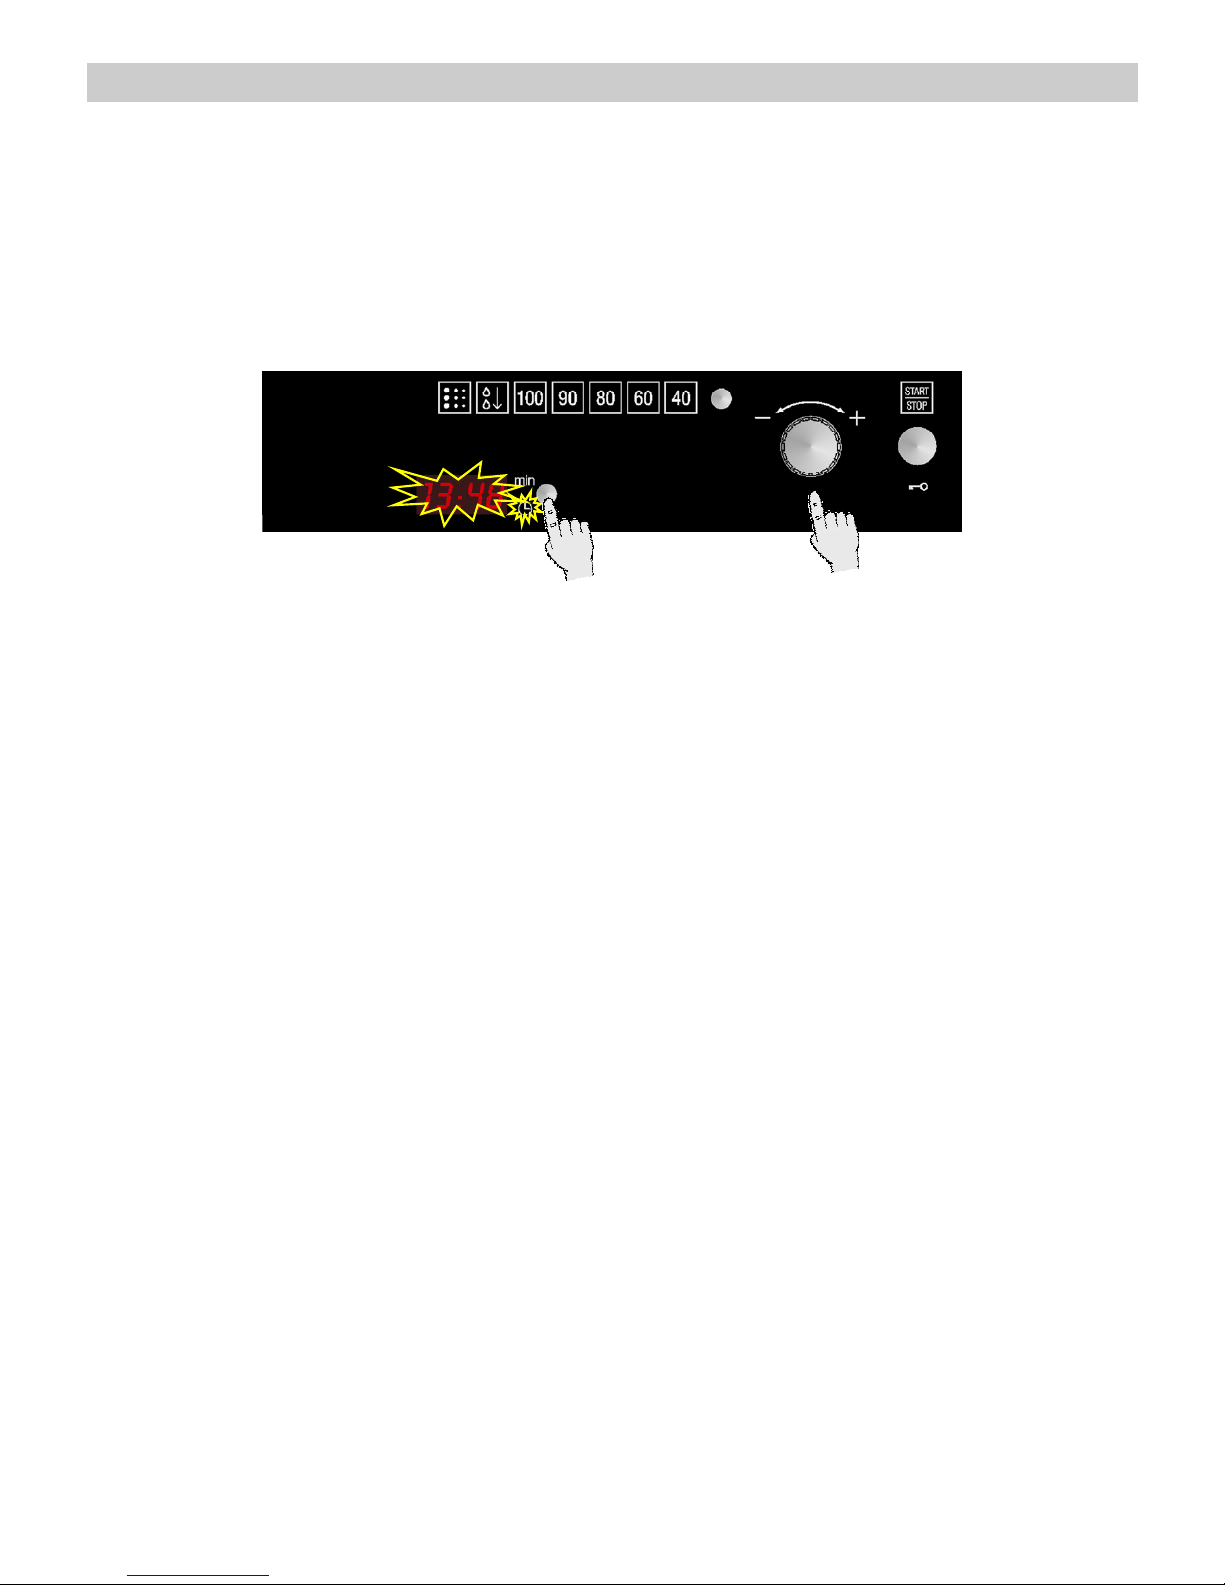
To set the clock, proceed as follows:
1. Press the Clock setting key. The hour
numbers will start to flash (not necessary if your
oven is first plugged in or after a power failure).
2. Turn the rotating knob to set the correct hour
value.
3. Press again the Clock setting key to set the
minutes. The minute numbers will start to flash.
4. Turn the rotating knob to set the correct minute
value.
5. To finish, press the Clock setting key again.
Hiding/Displaying the Clock
If the clock display disturbs you, you can hide it by
pressing the Clock setting key for 3 seconds. The
dots that separate the hours and minutes will flash
but the rest of the clock display will be hidden.
If you want to see the clock display again, press
the Clock setting key again for 3 seconds.
33
EN
Basic settings
Water Hardness setting
The appliance features a system that
automatically indicates when it is time to descale.
The system can be optimised for households with
very soft water (also through using a water
softening appliance) and very hard water, by
changing the user settings to the relevant range of
water hardness (see table below).
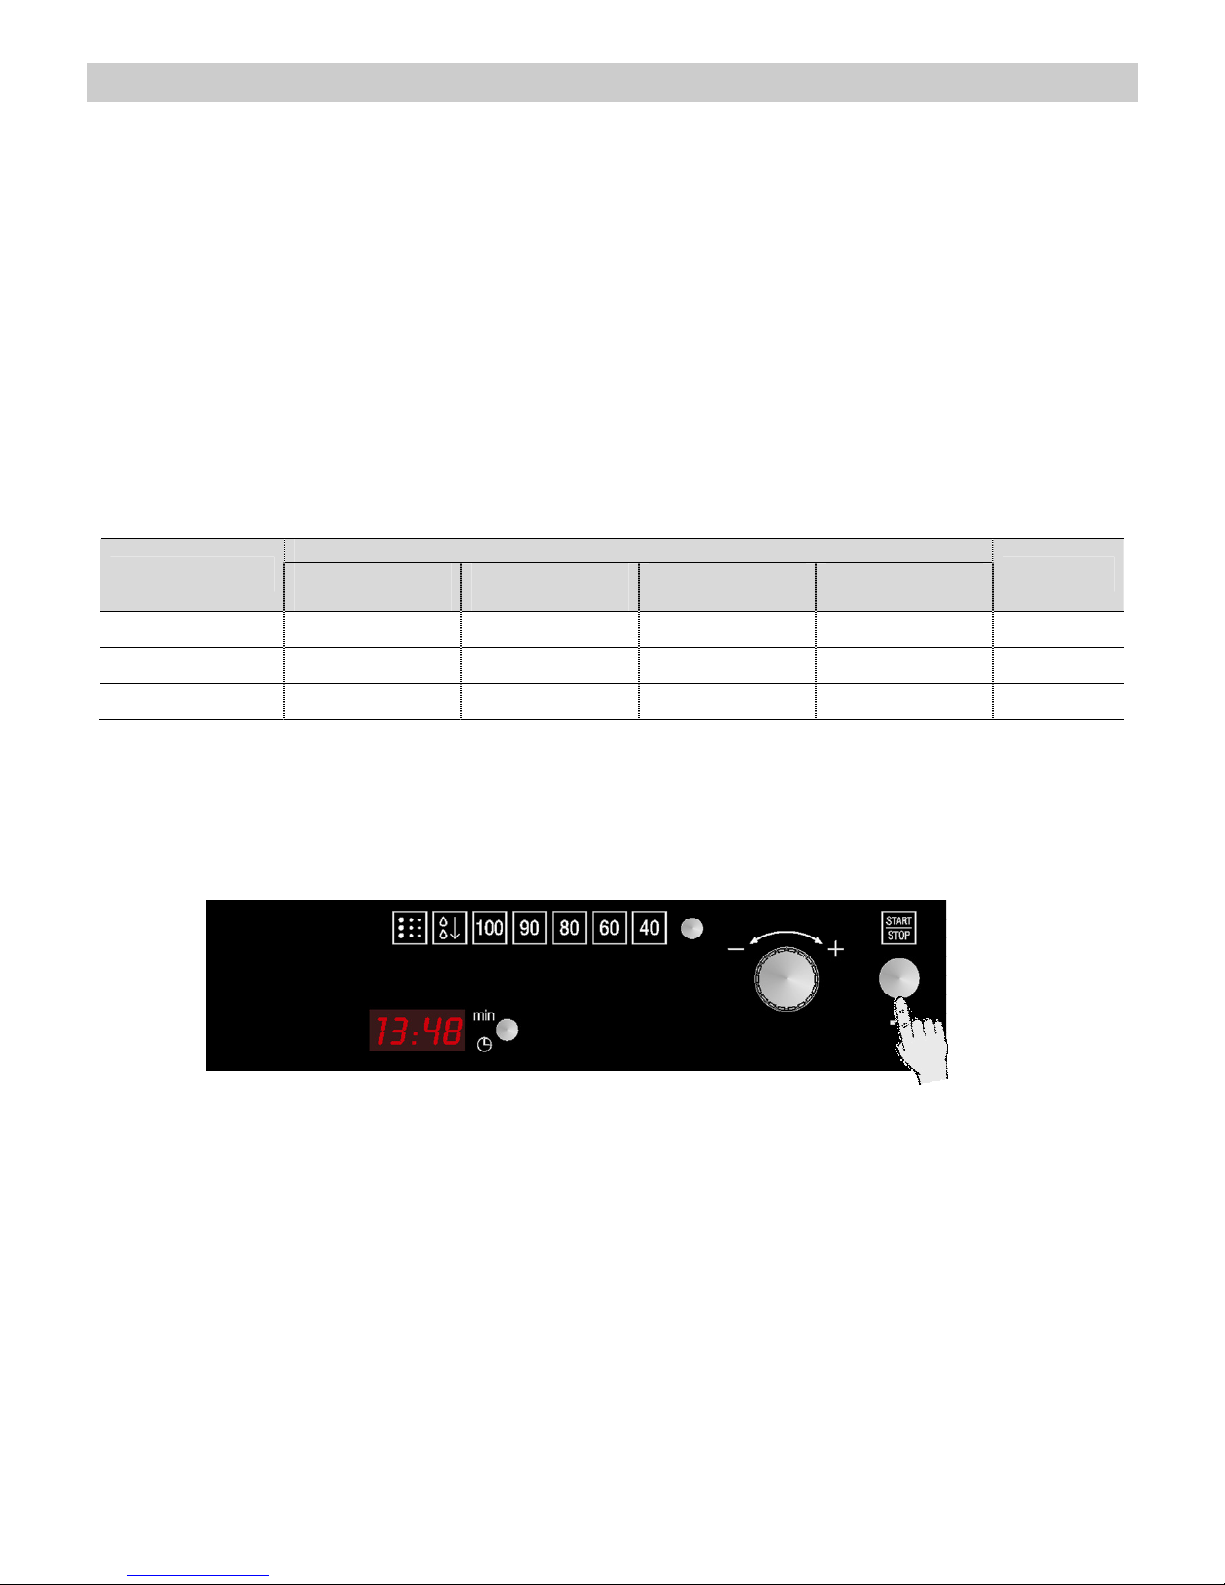
To set the water hardness parameter, proceed as
follows:
1. Press the Start/Stop key and the Function
selection key simultaneously. The hardness
number will start to flash on the display (not
necessary if your oven is first plugged in or
after a power failure).
2. Turn the rotating knob to set the correct water
hardness parameter value, according to the
below table.
3. Press the Clock key to set the parameter. The
display shows the clock.
Water hardness
Type
Ca + Mg
(ppm)
English deg.
[°eH]
French deg.
[°dF]
German deg.
[°dH]
Display
Soft water 0 to 150 0 to 11 0 to 15 0 to 8 1
Medium water 151 to 350 12 to 25 16 to 35 9 to 20 2
Hard water 501 to 500 26 to 35 36 to 50 21 to 28 3
Safety blocking
The oven functioning can be blocked (for example, to stop it being used by children).
1, 2
1. To block the oven, press the Start/Stop key for
3 seconds. You will hear a sound signal and
the display will show the word “SAFE”. The
oven is blocked in this state and cannot be
used.
2. To unblock the oven, press the Start/Stop key
again for 3 seconds. You will hear a sound
signal and the display will show the clock
again.
The clock can be seen by pressing briefly the
Start/Stop key.
 Loading...