

Page 1
224082 M91 1
GEBRAUCHS- UND
MONTAGEANWEISUNG
INSTRUCTIONS FOR FITTING AND USE
INSTRUCTIONS DE MONTAGE ET D’UTILISATION
GEBRUIKS- EN MONTAGE-INSTRUCTIES
ISTRUZIONI PER L’USO ED IL MONTAGGIO
INSTRUCCIONES PARA EL USO Y MONTAJE
MANUAL DE INSTRUÇÕES DE USO E DE MONTAGEM
œƒ«√…≈” ◊–«”«” ¡… ”’Õ¡–ÃœÀœ√«”«”
INSTRUKCJA OBSŁUGI I MONTAŻU
HASZNÁLATI ÉS BESZERELÉSI UTASÍTÁS
Einbau-Glaskeramik-Kochfeld
Built-in glass ceramic hob
Plaque de cuisson vitrocéramique à encastrer
Keramische inbouwkookplaat
Piano di cottura da incasso in vetroceramica
Encimera de vitrocerámica incorporada
Placa de cozinhar em vitrocerâmica integrável
Εντοιχιζόμενο υαλοκεραμικό πεδίο μαγειρέματος
Kuchenka szkło-ceramiczna
Beépíthető kerámia-üveg főzőlap
All manuals and user guides at all-guides.com
all-guides.com
Page 2
224082 11
You now own a glass ceramic hob.
Chapters 2 and 3 of these Operating Instructions contain informations on how you can make sure that your hob
gives many years of service.
These Operating Instructions are for use with several types of hobs. The rating label on the front of these
Instructions will show you which type you have bought.
Contents
1. General
2. For the user
2.1 Important
2.2 Function
2.3 Warming zone
2.4 Twin circuit cooking zone
2.5 Residual heat display
2.6 Choice of pots
2.7 Cleaning
2.8 Maintenance
3. For the technician
3.1 Worktop cut-out
3.2 Installation
3.3 Electrical connections (connected loads)
3.4 Maintenance and repair work
Safety instructions
Caution!
People who are not familiar with the built-in hob must only be allowed to operate it under
supervision.
Generally keep little children away from the appliance and never allow them to play with the
appliance.
Instructions on environmental protection
Disposing of the packaging
Please dispose of the packaging that came with your appliance in an environmentally friendly way.
Recycling in this way saves on resources and cuts down on waste.
Disposing of old appliances
The symbol on the product or on its packaging indicates that this product may not be treated as household
waste. Instead it shall be handed over to the applicable collection point for the recycling of electrical and electronic
equipment. By ensuring this product is disposed of correctly, you will help prevent potential negative
consequences for the environment and human health, which could otherwise be caused by inappropriate waste
handling of this product. For more detailed information about recycling of this product, please contact your local
city office, your household waste disposal service or the shop where you purchased the product.
All manuals and user guides at all-guides.com
Page 3
12 224082
1. General
These Operating Instructions are for use with several types of hobs. Read only the part that applies to your
appliance.
This appliance may only be connected to the electricity supply by an approved electrician. The plastic covering or
veneer of the built-in furniture must have been applied with a heat-resistant adhesive (150°C).
2. For the user
2.1 Important
Attention: The surfaces of the heating and cooking zones become hot during use. Keep
small children away at all times.
Always ensure that no hard objects are dropped onto the cooking surface. Under certain circumstances the
material is sensitive to mechanical stresses and strains. A heavy knock or blow in a small area can cause the
ceramic hob to break. If careless treatment results in a break, split or crack, the ceramic hob must immediately be
taken out of use and disconnected from the mains power supply. To do this, switch off the safety switch for the
oven connection in the fuse box. Customer Service must be contacted.
Do not use the glass ceramic hob as a storage area! Never prepare food in aluminium foil and plastic containers
on the hot cooking area.
Do not switch the hob on without using it for cooking. Do not place combustible, volatile or heat deformable objects
directly underneath the hob.
When preparing food with fat or oil stay nearby. Overheated oil can ignite. Never pour water into burning fat or oil.
Risk of burning! Cover the dish in order to extinguish the fire and switch off the cooking zone. Let the dish cool
down on the cooking zone.
In addition, make sure that leads from electrical appliances plugged into nearby sockets cannot come into contact
with the hotplates.
Never clean the glass ceramic hob with a steam cleaner or similar appliance!
2.2 Function
The arrangement of the individual cooking zones is indicated by pictures on the glass ceramic built-in cooking
surface.
In order to fry, cook or the like, pots should always be placed in the middle of the graphically displayed cooking
zones.
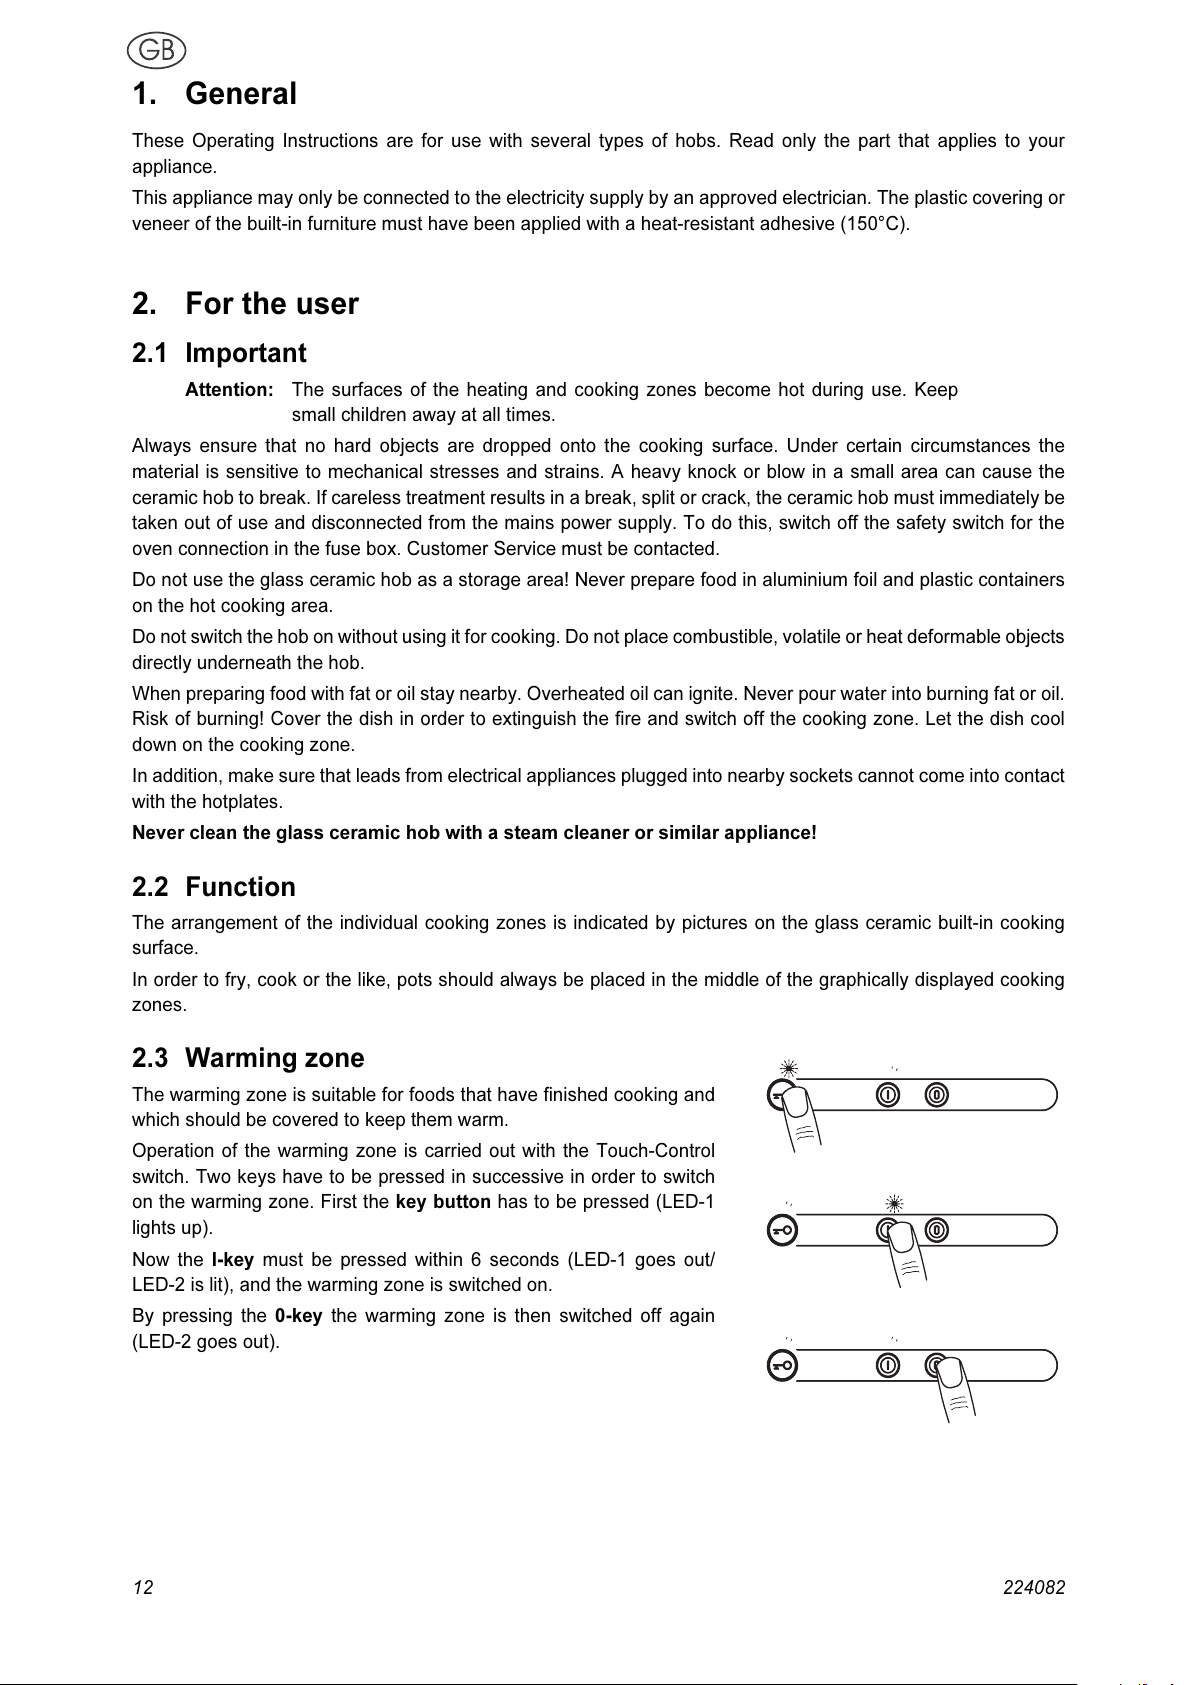
2.3 Warming zone
The warming zone is suitable for foods that have finished cooking and
which should be covered to keep them warm.
Operation of the warming zone is carried out with the Touch-Control
switch. Two keys have to be pressed in successive in order to switch
on the warming zone. First the key button has to be pressed (LED-1
lights up).
Now the I-key must be pressed within 6 seconds (LED-1 goes out/
LED-2 is lit), and the warming zone is switched on.
By pressing the 0-key the warming zone is then switched off again
(LED-2 goes out).
All manuals and user guides at all-guides.com
Page 4

224082 13
2.4 Twin circuit cooking zone
With a two-circuit cooking zone you can switch on the small heating circuit separately or add the large heating
circuit. Thus you can adapt the size of the heated cooking zone to your pot.
Please note the separate information for built-in ranges, switch boxes or electronic controls in the
separate operating instructions.
2.5 Residual heat display
As long as optical signalling appears after switching off the unit, the corresponding cooking zone is still hot and
can be used economically.
Caution! The signalling devices may fail – e.g. in the case of a lamp. Please note that there
is no warning against high temperatures in such a case.
2.6 Choice of pots
Special-purpose electrical pots with flat-polished bottoms are required. In order to work directly on the cooking
zones, you can use cooking utensils made from fireproof glass or porcelain if their bottoms are flat-polished.
Please note the manufacturer's instructions.
The size of the pots should be selected in accordance with the size of the cooking zone. In any case, the pot
diameter should not be smaller than the cooking zone diameter.
Cooking and roasting in slightly deformed cookware that fails to make complete contact with the cooking zones,
takes much longer, is uneconomical and can result in damage.
With unsuitable cookware, the inserted overheating protection switches the cooking zones off prematurely so that
the cooking temperature is not reached and/or the cooking time is extended.
You save energy if you use the right pots with covers and remove the covers as infrequently as possible during
cooking.
The following chart shows how the wrong choice of pots results in unnecessary energy losses.
right wrong wrong wrong
planed bottom, pot is too small pot bottom is according pot bottom is according
Pot is slightly larger for this cooking positions to convex interior to convex exterior
than the cooking position
greater thermal loss poor heat transmission - long cooking times
least current consumption high current consumption
All manuals and user guides at all-guides.com
Page 5

14 224082
2.7 Cleaning
Always clean the hob after it has cooled down. Even the slightest amount of
dirt will burn into the surface the next time you switch it on.
Use only recommended cleaners.
Steel wool, cleaning sponges and abrasive powders scratch the surface. Do
not use oven sprays as these are aggressive and damage the surface.
Light amounts of dirt
Use a damp cloth or a warm rinse to clean light amounts of dirt from the
surface. Rinse with cold water and then dry thoroughly.
Water spots produced by water cooking over should be removed with
vinegar and/or a lemon or lime calcium-dissolving agent. If these agents
come into contact with the frame, wipe them off with a wet cloth, otherwise
the frame loses its gloss.
Heavy dirt
Use “Sidol Special for Stainless Steel”, “Stahlfix” or “Cerafix” to remove
heavy dirt. Apply the cleaner with kitchen paper and rub it in. Leave it to take
effect, then wipe off completely with cold water and dry the surface
thoroughly. Cleaning residues on the surface can become aggressive when
the hob is reheated.
Persistent dirt and caking can best be removed with a glass scraper
Å. A
glass scraper can be obtained in household goods stores, painting and DIY
shops or from our Customer service. Pay attention to handle on purchasing.
If you buy a glass scraper, make sure that the handle is not made of plastic
as this will stick to the hot surface. Take care when using the scraper! Risk
of injury!
Food that contains sugar may permanently damage the glass ceramic
surface because they can produce scratches after they have become dry.
In order to prevent such surface damage, such substances must be
immediately removed with the glass scraper while they are still hot
Ç, É.
Changes to the colour of the ceramic surface
These have no effect on the function and stability of the glass ceramic.
These colour changes are not changes in the material but food residues
which were not removed and which have burnt in.
Metallic iridescent discolouring
Ö is caused by wear from pan bottoms
or unsuitable cleaning agents. This discolouring can be removed with great
difficulty with “Sidol Special for Stainless Steel” or “Stahlfix”. You may have
to clean several times to remove the discolouring.
Our Customer service will remove such stains for an additional charge.
Worn decoration
Ü. In time, the decoration will wear off and dark stains
will appear as a result of using aggressive cleaning agents and faulty pan
bottoms.
All manuals and user guides at all-guides.com
Page 6

224082 15
2.8 Maintenance
If cared for properly, your hob will remain beautiful for many years and cleaning will be easier.
To care for your hob we recommend that you use “Cerafix”. The high silicone percentage of this cleaner creates
a protective film which keeps off water and dirt. All dirt remains on the film and can be removed easily. Clean your
hob and the cooking zones regularly.
Never use:
Pot cleaners or scouring agents in powder form, soaped steel wool or sponges with rough emery soap. All of
these cleaning agents can scratch and scour your glass ceramic hob.
Hand wash pastes, chemical oven cleaners: These cleaning agents are corrosive and damage the surface of
your glass ceramic hob.
Rust and stain remover, bleaches: Never mix household cleaners. Chemical agents can produce very volatile
reactions if they are mixed (danger of explosion, detonation).
Never experiment with any cleaning agents, get advise from your customer representative.
If you use a wet sponge in order to wipe splashes and spilled over substances from the hot cooking surface, then
please exercise caution as this may cause excessive steam development.
Do not use sponges and dish rags that are also used for other purposes. These rags can leave a film of liquid
or coloured water on the glass ceramic hob.
Please be careful to not scratch the surface of the glass ceramic hob with sharp-edged jewellery (diamond ring).
Do not use a knife to clean the wraparound adhesive joint between the glass ceramic surface and the frame.
Do not use aluminium foil for cooking on the glass ceramic plate!
Grit and granules leave scratches when pots are pushed!
Avoid cooking in enamel pots until they are empty. The bottoms can be damaged and scratch the cooking surface
when moved
~, Ä. Pot and pan bottoms with edges and burrs scratch and scour the surface as well.
Remove melted sugar and food containing sugar immediately while still hot with a glass scraper
Å, otherwise
damage may be caused to the surface
Ç, É.
All manuals and user guides at all-guides.com
all-guides.com
Page 7

16 224082
3. For the technician
3.1 Worktop cut-out
Carry out all cutting out of furniture units and worktops before fitting the appliance. Remove all sawdust
and chips.
The dimensions of the worktop recess can be seen in the dimension drawing (figs. 1–3).
The worktop cut-out should be properly milled and sealed afterwards with heat and humidity-resistant lacquer.
Attention! If the cooking surface is located above furniture parts (side panels, drawers, etc.),
then an intermediate bottom must be inserted in order to prevent accidental
contact with the underside of the cooking surface. The intermediate bottom may
only be capable of removal by means of tools and must be attached with a
minimum distance of 20 mm to the underside of the cooking surface so that the
mains connection cable does not touch the underside of the cooking surface.
No cross-bars may be in the area of the cut-out underneath. The worktop and the hob must be fitted horizontally.
A tilted hob is under tension and this increases the danger of breaking.
3.2 Installation
Before installing the hob, check that the all-round hob seal has no gaps
(see fig.
).
If the hob is installed in a worktop with a ceramic or similar cover (tiles),
remove the hob seal and seal the hob from the worktop with a plastic
seal, such as heat-resistant silicone rubber.
The properly installed appliance should, if necessary, be protected with
a cover in such a way that accidental contact with isolated parts and connection lines between the built-in cooking
surface and the switching unit is prevented. The cover may only be removed by tools.
Place the hob carefully into the cut-out and fasten it to the worktop with the fasteners.
Screw the springs into the worktop as shown in the drawing. The hob is then pressed carefully from above into the
retaining springs (fig. 1–3).
When screwing the springs, always use the upper hole of the spring, unless the worktop is tiled.
Make sure that the worktop and the hob are horizontal. In addition, make sure that no liquids can penetrate
between the edge of the hob and the worktop or between the hob and the wall and come into contact with any
electrical appliances. Use sealing sections, strips, agents, etc.
All manuals and user guides at all-guides.com
Page 8

224082 17
3.3 Electrical connections (connected loads)
(Connected loads and model designation: see front of the operating instructions)
This appliance may only be connected to the electricity supply by an approved electrician who must ensure that
the installation complies with the statutory regulations (Germany VDE, Austria ÖVE, Switzerland SEV, etc.). The
electrician must ensure that these regulations and those laid down by the local electricity supply company are
observed.
In addition, make certain to observe the assembly instructions of the electrical appliance (e.g. built-under oven,
built-in oven or built-in switchbox) with which this cooking surface is combined.
When connecting the electrical appliance, install an all-pole disconnecting device with a contact gap of at least
3mm.
Make plug connection between the cooking zones and switches.
The protective conductor (green/yellow strand) is attached to the protective conductor pins of the switching
element.
Insert the plug connections of the oven hob (of the respective cooking zone) into the plug connection sockets
provided on the oven and/or switchbox. Make certain to observe the terminal connection diagram.
3.4 Maintenance and repair work
Always disconnect the appliance from the mains before carrying out repairs, this means the cut-out device must
be opened. If you have to contact our service department, always quote the type and make numbers. You can find
these numbers on the rating label or on page 1 of the Operating Instructions.
Each time the glass ceramic hob is removed from the worktop, check the seals and replace if necessary.
All manuals and user guides at all-guides.com
Page 9

18 224082
Types: .GK 58 .., .GK 75 ..
Type: .GK 58 ..
Fig. 1 Fig. 2
Type: .GK 75 ..
Fig. 1 Fig. 2
N Minimum distances to adjacent walls
O Cut-out dimension
P Outside dimensions of recess
Fig. 3
All manuals and user guides at all-guides.com
Page 10

224082 19
Types: FGK 58 .., FGK 75 ..
Type: FGK 58 ..
Fig. 1 Fig. 2
Type: FGK 75 ..
Fig. 1 Fig. 2
N Minimum distances to adjacent walls
O Cut-out dimension
P Outside dimensions of recess
Fig. 3
All manuals and user guides at all-guides.com
 Loading...