

Page 1
INSTRUCTIONS FOR USE
and fi tting
EN
Please read the users instructions carefully before installation
of the appliance and before starting to use it.
Please, store these instructions carefully.
Service and Customer Service
Phone: +49 -209401-631
Email: kundendienst@kueppersbusch.de
B6350.0
CB6350.0
BP6350.0
Page 2

Contents
Copyright ....................................................... 4
Amendments .............................................................4
Completeness ...........................................................4
Software ....................................................................4
Availability of the instructions.....................................4
1. Explanation for symbols and
indications ................................................ 6
2. Safety Instructions and Warnings ..........8
2.1. For connection and operation ....................................8
2.2. Switching On and Operating ......................................8
2.3. Oven ..........................................................................9
2.4. For persons .............................................................10
2.5. Before using the fi rst time ........................................10
2.6. Environmental Protection ........................................11
2.7. Energy information ..................................................11
2.8. Intended purpose. ....................................................11
3. Cleaning and care .................................13
3.1. For all surfaces ........................................................13
3.2. Cleaning the oven door ...........................................16
3.3. Pyrolytic self-cleaning of the oven ...........................17
4. Before using the fi rst time ....................17
4.1. Important instructions ..............................................18
5. Accessories ............................................19
5.1. Glide-out shelves with folding clip ...........................19
5.2. Glide-out shelves with direct clip .............................20
5.3. Cleaning the oven accessories ................................21
6. Maintenance work .................................. 21
6.1. Replacing the oven lamp .........................................21
6.2. Removing the oven door ........................................22
6.3. Dismantling/assembling the interior glass
of the door ...............................................................25
6.4. Dismantling/assembling the shelf runners ...............26
6.5. Dismantling the rear wall .........................................27
7. Overview of your oven ..........................28
7.1. Control panel - sensor keys and displays ................29
8. Basic settings .........................................30
8.1. Setting the clock ......................................................30
9. Roasting and baking charts ..................31
9.1. Guidelines for roasting .............................................34
9.2. Guidelines for grilling ...............................................36
9.3. Recommended food probe temperatures ................37
9.4. Low-temperature cooking guidelines .......................39
10. Oven functions ....................................... 41
10.1. Cooking functions ..................................................41
10.2. Special functions ...................................................42
11. Operating the oven ................................44
11.1. Switching on the oven ............................................44
11.2. Switching the oven off ............................................44
11.3. Selecting one cooking function ..............................44
11.4. Changing a setting during the cooking process .....45
11.5. Automatic programme ............................................45
11.6. Time settings ..........................................................49
11.7. Memory function ....................................................54
11.8. Rapid heating ........................................................55
11.9. Childproof lock .......................................................55
11.10. Setting the demo mode ........................................56
11.11. Factory settings ....................................................56
12. Special settings and additional
settings and functions specifi c
to models ................................................ 57
12.1. Pyrolytic function ...................................................57
13. What to do if … .......................................58
2
User's guide
Page 3

Küppersbusch Customer Service
Germany
Küppersbusch Hausgeräte GmbH
Küppersbuschstraße 16
45883 Gelsenkirchen
Phone: +49-209401-631
Fax: (02 09) 401-714 / -715
Internet: www.kueppersbusch.de
We are available as follows:
Monday to Thursday from 8.30 a.m. – 6 p.m.
Friday from 8.30 a.m. – 5 p.m.
Please inform us by fax or internet of your require-
ments outside of these offi cial hours at www.kuep-
persbusch.de.
Austria:
Teka Austria GmbH
Eitnergasse 13
1230 Vienna
Phone: +43 1 8 66 80-15
Fax: +43 1 8 66 80-50
Internet: www.küppersbusch.at
1. Please note:
We require the following details for your
request for customer service so that our
customer service technicians can be wellprepared for carrying out any repairs and
have the required spare parts available:
2. Your exact address
3. Your telephone number and, if available, your
fax number
4. When can customer service call?
5. An exact appliance designation: Model
number and production number (F-No.) (refer
to the nameplate and/or the receipt)
6. The date of purchase or delivery
7. An exact description of the problem or what kind
of service you require. Please have your receipt
available. This will help us to avoid wasting time
as well as cutting down on expenses and we will
be able to work more effi ciently for you.
We are available as follows:
Monday to Thursday from 8.00 a.m. to 5.00 p.m.
Please inform us by fax or internet of
your requirements outside of these offi -
cial hours at www.kueppersbusch.at
User's guide
3
Page 4

Copyright
This documentation is protected by copyright. Any
rights duly derived, in particular those concerning its
translation or reproduction, the extraction of images,
radio broadcasts, photomechanical or similar reproduction and its storage in data processing systems,
shall be reserved even in the event of being only partially used.
KÜPPERSBUSCH makes no representations or warranties with respect to the contents of these operating
instructions and explicitly declines to assume responsibility for any implicit claims for defects.
KÜPPERSBUSCH furthermore reserves the right to
update this publication and make amendments without entering into a commitment to inform each person
of these amendments.
Amendments
Texts, images and data comply with the technical
standard of the oven at the time of these operating
instructions going to press. We reserve the right to
make amendments in line with its further development.
A
vailability of the instructions
The operating instructions must be permanently at
the disposal of the user in order to ensure reliable
use. The instructions are to be stored in an easily
accessible place at which they can be viewed at
any time.
Completeness
This document has altogether 60 pages.
Your document is complete if all the pages you have
are numbered consecutively.
Software
Please note that these instructions apply for various
series of equipment. Details that possibly do not apply
for your appliance may be described.
4
User's guide
Page 5

Dear new Küpperbusch appliance user...
Don't worry, it's not going to be that complicated. We have made every effort structure this information
briefl y and succinctly, clearly and explicitly, and above all, logically.
In addition to the instructions given by our Customer Service, these instructions aim at enabling you to be
able to operate this appliance quickly.
The individual sections classify the instructions in individual topics to give you a better overview and faster
access. Please read the information in these instructions carefully before you use your oven for the fi rst
time. You will fi nd important guidelines about safety and information about the use, care and maintenance
of your appliance to ensure that it provides you with many years of service.
The purpose of these operation instructions
When you use the appliance for the fi rst time, the instructions will take you step-by-step through the
individual functions, applications and operation stages.
The section on "Safety Instructions and Warnings" gives you important information on your
safety and on the use, care and maintenance of your appliance and its attachments, and it informs you
about potential danger.
The section on "Operation Instructions" introduces you to the appliance, tells you what it's for,
what it can do and how it works, shows you how to set it up and shows you the menu guide.
The section on "What to do if..?" is for fi nding faults - just in case. You will fi nd useful information on
faults and errors.
Once you have had some time to become familiar with the appliance, you can look up specifi c sections or
topics if you are in any doubt. Please keep this manual in a safe place. Hand these instructions for use
over to any new owner for the purpose of their information and safety.
User's guide
5
Page 6
Explanation for symbols and indications
1. Explanation for symbols and indications
The appliance was produced according to state of the art technology. Machines nevertheless give rise to
risks which cannot be constructively avoided.
In order to guarantee suffi cient safety for the use, safety instructions are also given. These instructions are
marked by way of the highlighted texts which follow.
Suffi cient safety in operation will only be guaranteed when these instructions are observed. The designated
text passages have different meanings:
The following danger symbols are used at some points:
DANGER
Note indicating an imminent threat which may result in death or
very serious injury.
CAUTION
Note indicating an imminent threat which may result in death or
very serious injury.
DANGER
Note indicating a dangerous situation which may result in minor
injury or damage to the appliance.
HINT
Note to be observed in order to make handling the appliance easier.
The following danger symbols are used at some points:
WARNING OF ELECTRICAL ENERGY
RISK OF FATAL INJURY!
Live components have been installed near this symbol. Covers bearing this sign may only be removed by a certifi ed skilled electrician.
6
User's guide
Page 7
Explanation for symbols and indications
OBSERVE REGULATIONS FOR HANDLING ELECTROSTATICALLY SENSITIVE COMPONENTS AND MODULES (ESDS).
Electrostatically endangered components and modules are located
behind covers bearing the adjacent symbol. Never touch plug connections, strip conductors or component pins. Only qualifi ed staff
members who are familiar with ESDs are authorised to carry out any
technical intervention work.
HOT SURFACES!
This symbol has been applied to surfaces which get hot. There is a
risk of serious burning or scalding. The surfaces may also be hot
after the appliance has been switched off. This symbol warns of a
risk of burning.
Check consignment
Transport the oven to a suitable place and remove it from its packaging there. The oven may only be
assembled and installed by an electrician who complies with the respective specifi cations.
Check to ensure that the consignment is complete.
□ Check the oven for any transport damage.
□ Contact our Customer Service if the consignment is incomplete or if the oven shows any transport
damage.
CAUTION!
Never put a damaged appliance into operation!
User's guide
7
Page 8

Safety Instructions and Warnings
2. Safety Instructions and Warnings
2.1. For connection and operation
□ Only KÜPPERSBUSCH ovens have been manufactured and tested for use under a
KÜPPERSBUSCH hob. Do not use other hobs.
□ Any handling or repair to the appliance, including replacement of the power cable,
should be carried out by authorised Technical Service Personnel using original spare
parts. Repairs or handling by others may damage the appliance or cause malfunctioning that could be hazardous to your safety.
□ Statutory regulations and the connection specifications issued by the local power
supply company must be strictly observed.
□ The power supply to the appliance must be disconnected when the oven lamp is
connected, repaired or replaced. Disconnect the fuse or pull out the power plug.
□ Installation must guarantee full safety against any potential contact.
□ Changing the installation location of a plug and replacing the mains cable may only
be carried out by an electrician who complies with the respective specifications.
□ It is essential for the connection data (frequency and voltage) of the oven to comply
with that of the mains electricity supply in order for the oven not to be damaged. Compare this data when connecting the oven. If in any doubt, ask a qualified electrician.
□ Multiple sockets and extension cables do not sufficiently guarantee safety (risk of
fire). Do not use them to connect the oven to the mains electricity supply.
□ Only use the oven when it has been installed in order to guarantee that it functions
safely.
□ Make sure that no electric cable from a free-standing or built-in appliance makes
contact with the oven.
2.2. Switching On and Operating
□ Do not allow children to come near the oven while in use as it can reach very high
temperatures.
□ Children should be supervised in order to ensure that they do not play with the ap-
pliance.
8
User's guide
Page 9

Safety Instructions and Warnings
□ This appliance is not for use by persons (including children) with reduced physical,
sensorial or mental capacity, or those lacking experience and knowledge, except if
they have been supervised and instructed regarding use of the device by a person
responsible for their safety.
□ Touching live connections and modifying the electrical and mechanical construction
of the oven will put you at risk and may lead to malfunctioning of the oven. Never
open the oven casing.
□ The oven must be completely disconnected from the mains electricity supply when
installation and maintenance work or repairs are being carried out, e.g. when the
lighting inside the oven is defect (see the section on "What to do if…?")
Make sure of this by
– switching off the electrical installation fuses or
– completely screwing out the electrical installation screw fuses or
– pulling the power plug (if in place) out of the socket.
When doing so, do not pull on the mains supply cable, but on the power plug.
2.3. Oven
□ Unplug your oven if it malfunctions.
□ If the glass is broken, split or cracked: switch the hob off immediately, disconnect
it from the power supply and contact our Customer Service or your specialised
dealer.
□ Do NOT open the appliance yourself.
□ Repairs to appliances must be carried out by qualified technicians.
□ The oven must always be operated with the door closed.
□ The manufacturer takes no responsibility for any use of the oven other than for the
home preparation of food.
□ Only use the oven after it has been installed inside the kitchen unit.
□ Do not store oil, fats or inflammable materials inside the oven. This may be danger-
ous if the oven is turned on.
□ Do not lean or sit on the open oven door. You could damage it, as well as endan-
gering your safety.
□ In order to cook food in the oven, place the tray or grid shelf supplied with it over
the shelf runners inside the oven cavity. The tray and grid shelf have a system to
make their partial outward movement easy for food handling.
• Do not place containers or food on the bottom surface of the oven. Always use the
trays and grid.
User's guide
9
Page 10

Safety Instructions and Warnings
• Do not pour water on the bottom surface of the oven when in use; this may damage
the enamel.
• Open the oven door as little as possible during cooking. This will reduce power
consumption.
• Use protective oven gloves when performing operations inside the oven.
• It is normal for condensation to occur on the oven door when cooking dishes with
a high liquid content.
• When the oven is in use, it becomes hot. When the casing heats up, the cooling
fan will switch on to cool the casing down. The cooling fan will operate until the
casing has cooled down, i.e. also when the appliance has been switched off. The
noise made by the fan when it is in operation is normal; it does not indicate any
malfunctioning.
2.4. For persons
□ These appliances may be used by children aged 8 years and over and by persons
with physical, sensory or mental impairments or by persons who lack experience
and/or know-how, provided they are supervised or have been instructed in the safe
used of the appliance and have understood the risks relating to the appliance. Children may not play with the appliance. Cleaning and maintenance by the user may
only be carried out by children when they are supervised.
□ The surfaces of the heating and cooking zones become hot during use. Keep small
children away at all times.
2.5. Before using the first time
□ Remove packaging.
□ Be certain your appliance is properly installed and grounded by qualified technician.
The manufacturer cannot be held responsible for damages caused by improper installation and electrical connection of this oven. The oven should not be operated
until it has been properly installed within cabinetry.
□ This appliance may only used for the standard baking and roasting of food in a
household; it is not intended for commercial use.
□ The appliance may not be modified.
□ Safety is only guaranteed if the appliance is connected to a protective conductor
which complies with currently valid regulations.
10
User's guide
Page 11

Safety Instructions and Warnings
□ The appliance may not be connected to the power supply with an extension cable.
□ The appliance may not be installed above a dishwasher or a tumble dryer: the
steam released by these appliances may damage the electronic unit.
□ Also take note of the instructions on cleaning and care before using your appliance
for the first time.
2.6. Environmental Protection
□ Remove packaging and the old appliance
□ Remove packaging and recycle in an environmentally-friendly
way.
□ In Germany, the transport packaging is returned to the store
where the appliance has been purchased. By returning the
packaging material, raw materials are saved and also fewer
waste products are generated. Old appliances still contain
valuable material. Leave your old appliance at a collection
point for valuable materials. Old appliances must be rendered
inoperative before disposing of them in order to prevent
improper use.
2.7. Energy information
Tested to comply with the requirements of the 66/2014 (Eco-Design) and 65/2014
(Energy Labelling) regulations in accordance with Regulation EN 60350-1.
Energy consumption measurements taken under different conditions may give different
values from those indicated for your oven. Consult the User’s guide accompanying this
manual to learn about the energy consumption of your oven
2.8. Intended purpose.
□ This oven is intended for household use and in household-like installation
environments.
□ This oven is not suitable for outdoor use.
□ This oven is only to be used as a domestic household appliance for roasting,
baking, grilling, cooking, defrosting, preserving and drying foods. No other type of
application is permissible.
User's guide
11
Page 12

Safety Instructions and Warnings
□ This appliance is not for use by persons (including children) with reduced physical,
sensorial or mental capacity, or those lacking experience and knowledge, except if
they have been supervised and instructed regarding use of the device by a person
responsible for their safety. These persons may only operate the oven unattended if
it has been explained to them in such a manner that they are able to operate it safely.
They need to recognise and understand the potential risks that operation entails.
□ The oven may only be used if it has been installed in a suitable unit. Only use the
oven as described in these instructions for use. Any other use is not considered to
be intended and may result in damage to material or even injury to persons. The
manufacturer cannot be held responsible for damages caused by improper use of
this oven.
□ The oven is only intended for use in private households. It may not be used for com-
mercial purposes.
□ The oven is not suitable for heating a room.
□ The lamp in the oven has only been provided for lighting up the interior of the oven;
it does not serve as room lighting.
□ The oven door may not be used as a support, seat or step.
12
The appliance may only be used for its intended purpose!
User's guide
Page 13

Cleaning and care
3. Cleaning and care
You should carefully read this chapter before you use your appliance the fi rst time. If cleaned correctly and
looked after regularly the appliance will remain beautiful and clean for many years. The following tips will
help you to clean and care for your oven's various surfaces gently but thoroughly.
3.1. For all surfaces
DANGER TO LIFE!
Do not use steam and/or pressure cleaning devices on the oven! The
appliance could become damaged and may create a situation where there
is danger of death.
RISK OF BURNING!
Leave the appliance to cool until you can touch it with your hand before
cleaning it.
□ Clean the oven each time you use it. Stains or baked-on food that have not been removed may burn
the next time the appliance heats up. Often, these types of stains or dirt cannot be removed without
leaving marks.
To clean an oven that is not very dirty, use a damp cloth, a soft brush or a soft sponge and a weak solution
of detergent and warm water. Rinse with cold water so that there is no detergent left which might decolour
the surface or cause more stains. Dry with a cloth immediately after. Here are some instructions for more
diffi cult-to-remove stains concerning the different surfaces and elements. VSR 0-FIX-C is ideal for
cleaning glass-ceramic, enamel and the surface of the inside of the door. This cleaning powder can be
purchased from the Küppersbusch Customer service.
□ The shelf runners may be removed for cleaning. Reinstall them correctly and never use the oven
without the shelf runners installed.
□ Clean the outside surfaces of the oven and its accessories with lukewarm soapy water or a mild
detergent. Take care with rust-free and varnished surfaces and only use sponges or cloths that do
not scratch.
User's guide
13
Page 14
Cleaning and care
NEVER CLEAN WITH
□ aggressive or bleach-based cleaning agents that contain active oxygen,
chlorine or other caustic substances.
□ abrasive cleaning or scouring agents, such as steel wool, soap-impreg-
nated steel wool, stiff brushes, metal or plastic sponges or any similar
cleaners with an abrasive surface.
3.1.1 Removing dried deposits
Thick deposits must be soaked to soften them beforehand. This is best done with a wet cloth. It will then be
easier to remove the deposits.
Over time, certain types of food such as tomatoes, vinegar and salt-baked dishes may cause the enamel to
change colour. This is normal and does not affect the functioning of the oven. Do not try to remove these
stains using aggressive methods such as those described, as this could cause permanent damage to the
surface.
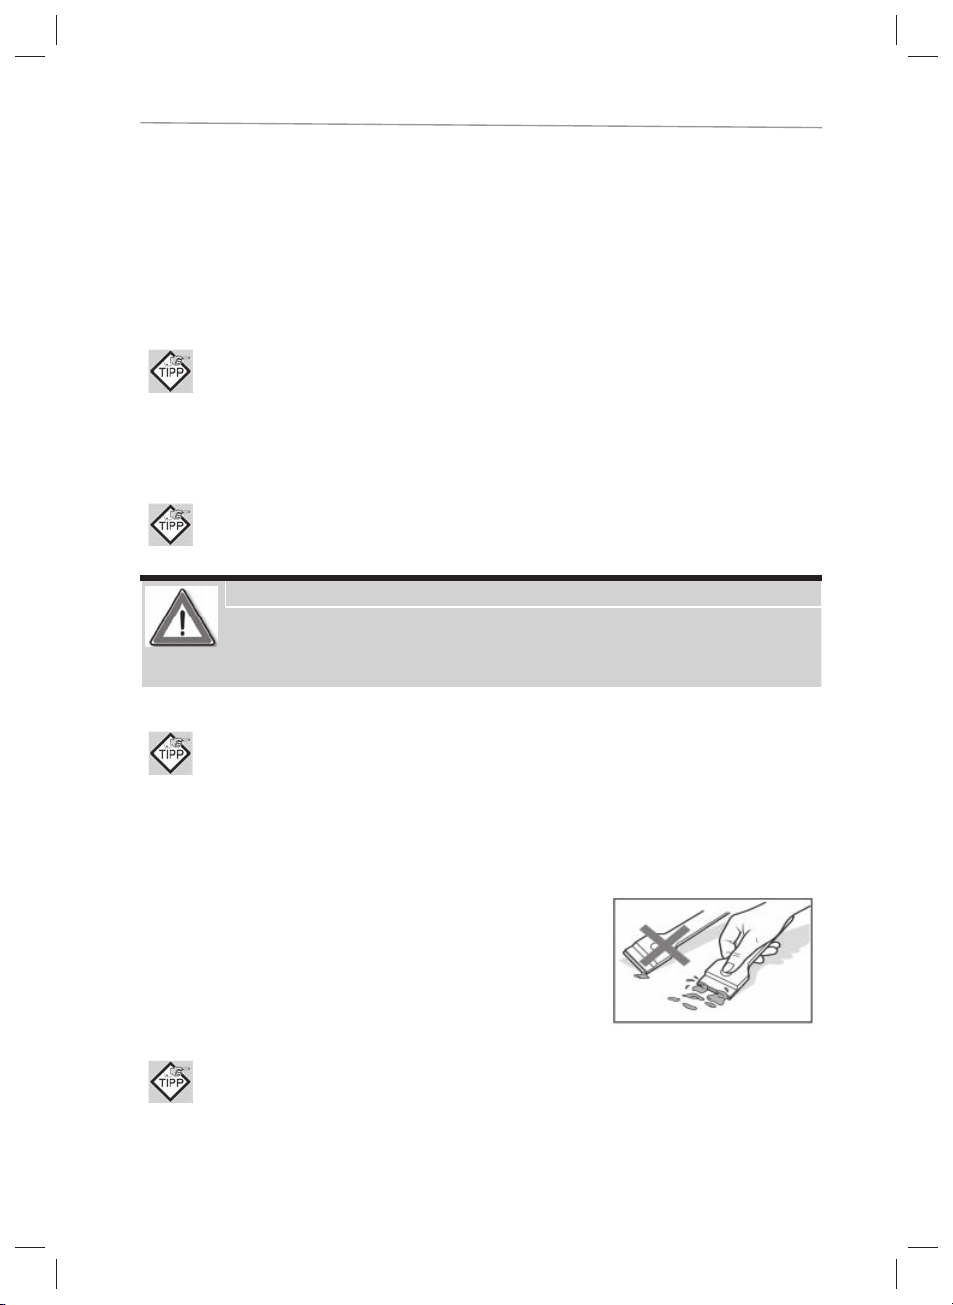
Using a cleaning scraper
CAUTION! RISK OF CUTS!
The blade of the cleaning scraper is very sharp!
Always hold the cleaning scraper fl at to the surface and push the grease away
from you.
Do not scrape with the corners of the cleaning scraper; handle it carefully to ensure that no sealing is
damaged.
3.1.2 Suggestions on the use of oven sprays
The manufacturer's instructions must always be observed.
CAUTION!
Do not spray into the fan opening on the back. The ökotherm® catalyst will be
destroyed if oven spray is used.
Oven sprays will damage aluminium and varnished and plastic surfaces.
For environmental reasons you should not use oven spray at all. If you nevertheless want to use it, only
spray it in the oven interior and on enamel baking trays.
14
User's guide
Page 15
Cleaning and care
Chromium-plated oven trimmings
Door front and handle with chromium-plated, black trimming
□ Limescaling, grease and starch deposits must be removed immediately; stains will result if they are
not.
□ These models are very sensitive to scratches and oven spray will damage them. Do not using clean-
ing scrapers, pot scourers or hard-fibre sponges.
Use a cloth or a soft sponge and rinse only with warm water and a little detergent.
Stainless steel
Stainless steel door front and control panel
Use a cloth or a soft sponge and rinse only with warm water and a little detergent.
CAUTION!
Stainless steel scratches very easily! Do not use a scraper!
Limescaling, grease and starch deposits must be removed immediately;
stains will result if they are not.
We recommend that you clean stainless steel surfaces with a standard cleaning agent for
stainless steel once a week. This will create a protective fi lm, protecting the stainless steel
from becoming discoloured.
Enamel
Oven interior, front, baking sheets
It is possible to use plastic sponges with a pot scouring part.
However, some products have grit in the pot scouring part and
this causes scratching. It is recommended that you test your
product at a point that is not clearly visible.
A cleaning scraper is ideal for removing stubborn dirt. We recommend VSR 0-FIX-C for a
thorough clean. Oven spray can also be used.
User's guide
15
Page 16
Cleaning and care
3.2. Cleaning the oven door
(*not possible for ovens with a microwave function)
Do not use any metal pot scourers, wire brushes, scouring powder or abrasives to clean the oven door, since
this may result in the surface becoming scratched or the glass breaking. Clean the outside of the door and
its accessories with lukewarm soapy water or a mild detergent. Corrosion-resistant surfaces must be treated
with care. Use only sponges or cloths that do not cause scratching.
3.2.1 Door glass
Door interior – coated glass
CAUTION!
If possible do not use any oven spray, since its regular use can
destroy the coating on the glass.
A cleaning scraper is ideal for removing stubborn dirt. We recommend VSR 0-FIX-C for a
thorough clean.
Remove residual dirt from the oven sealing.
Door front, control panel
Use a cloth or a soft sponge and warm water and a little detergent to clean the door front. Glass
cleaner may also be used.
3.2.2 Door sealing
Clean the sealing regularly to eliminate all traces of fat or food. This will prevent the seal from becoming
damaged and breaking during subsequent cooking operations.
It is advisable to clean this sealing without removing it.
16
User's guide
Page 17

Before using the fi rst time
3.3. Pyrolytic self-cleaning of the oven
(depending on the model)
This function involves a pyrolytic cleaning process which applies high temperatures in the oven interior to
trigger a process of oxidation and carbonisation process on the grease contamination.
After the pyrolytic cleaning process has been completed, all you need to do is remove the ash generated
during the process with a damp cloth. Places in the interior that are diffi cult to access are cleaned with a
non-metallic pot scourer in order not to damage the enamel coating.
The oven has 3 pyrolytic programs which run for 60, 90 and 120 minutes respectively. Choose the running
time depending on how dirty the interior of the oven is. The dirtier the oven, the longer the program should
take. It is not necessary to run the pyrolytic cleaning process every time you use the oven for baking or
roasting. We recommend running the pyrolytic program every 4.5 times the oven is used for baking or
roasting, depending on how dirty the interior of the oven is. The interior lighting in the oven will remain
switched off during a cleaning cycle.
VERY IMPORTANT!
Remove all the accessories and dishes from the oven, including the guide
rails for the baking trays and/or the glide-out shelves for the pyrolytic
self-cleaning function.
Remove food rests and excessive dirt since they may ignite, giving rise to
danger during the self-cleaning process.
4. Before using the first time
There may be traces of fat and other substances in the oven as a result of the manufacturing process.
Proceed as follows to remove them:
□ Remove all the packaging including any protective plastic film that may have been used.
□ Connect the oven and allow it to operate using function
hour.
□ Allow the oven to cool down and open the door. This will ventilate the oven and no smells will remain
in the inside.
□ Clean the oven and its accessories after it has cooled down.
Smoke and odours will be generated during initial operation, so make sure that the kitchen is well
ventilated.
User's guide
/ or / at 200 ºC for an
17
Page 18
Before using the fi rst time
4.1. Important instructions
□ Do not cover the bottom of the oven with aluminium foil as this may affect cooking performance and
damage the enamel inside the oven and the interior of your kitchen unit. Do not pour water on the
bottom surface when in use; this may damage the enamel.
□ It is normal for condensation to occur on the oven door when cooking dishes with a high liquid content.
□ When closing the oven door during cooking, the sound of the air inside it can be heard. This effect is
normal due to the pressure exerted by the door when it is closed, guaranteeing the sealing of the cavity
□ Do not place containers or food on the bottom surface of the oven. Always use the trays and racks
supplied with the oven.
□ To prepare yoghurt, place the jars on the oven floor.
□ To cook any other food, insert the tray or rack into the runners inside the oven.
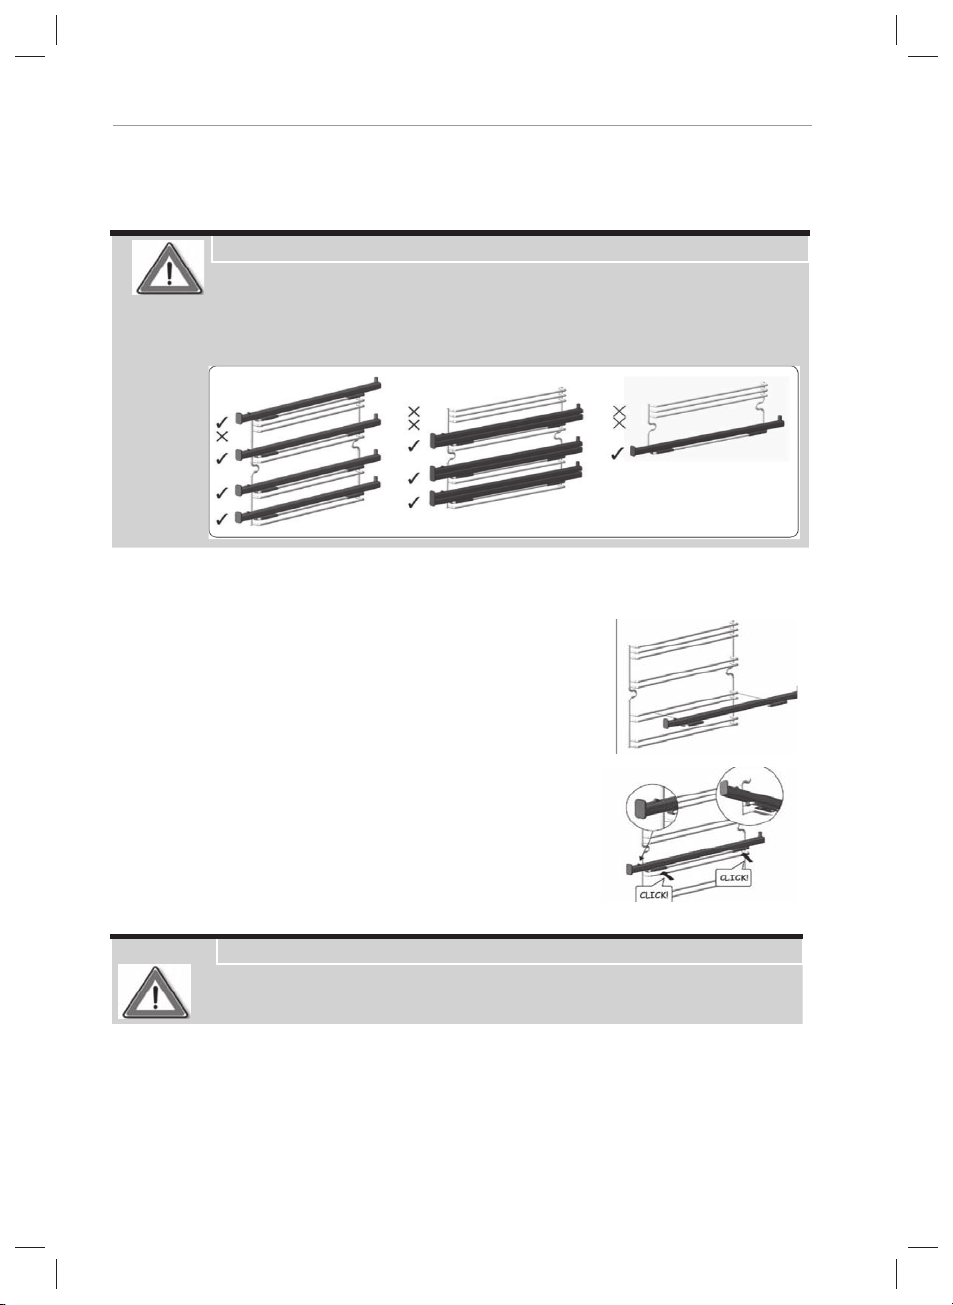
Between the two rails of the side supports or on any of the extractable
runners, if the oven has them.
□ Switch off the electrical installation fuses or
□ The rack and some of the trays have retention grooves to prevent
them from accidentally being removed Place these grooves towards the back of the oven, facing downwards.
□ The surface of the rack on which the container will rest must be
below the side rails; This prevents the container from accidentally
sliding.
□ The trays have a tab at the front to facilitate their removal. Place
the tray with the tab facing towards the outside of the oven.
18
User's guide
Page 19
Accessories
5. Accessories
Some oven models have a glide-out shelves kit accessory.
IMPORTANT!
The glide-out shelves must be placed at height 2, starting from below.
To assemble the glide-out shelves on the chrome-plated supports, proceed as follows:
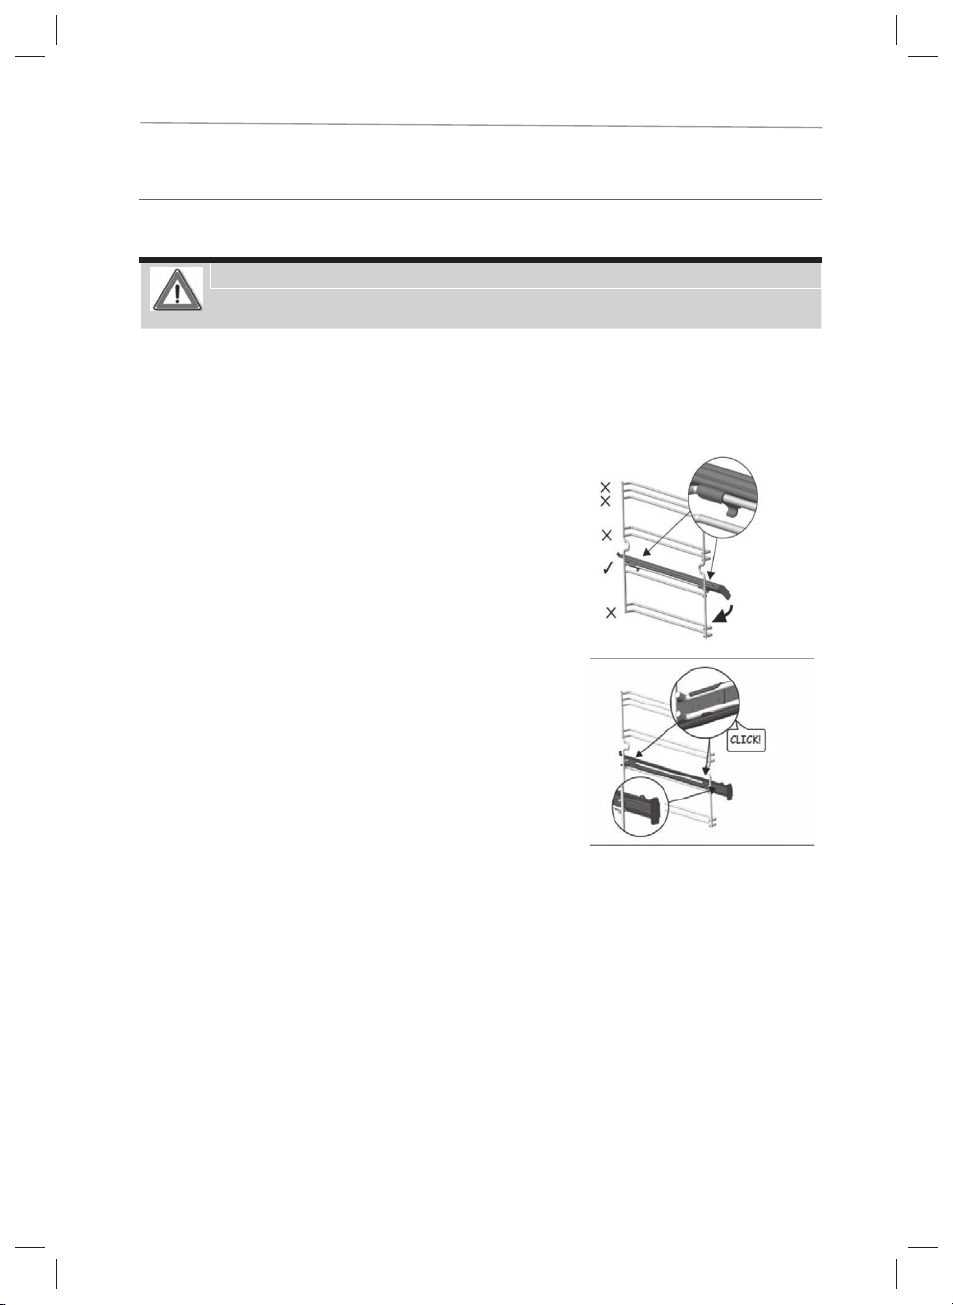
5.1. Glide-out shelves with folding clip
□ Remove the protective film.
□ Hook the large clips on the upper rail and extend the run-
ner until it hooks on the small clips on the lower rail.
□ You will hear a "click" when the glide-out shelf is correctly
secured.
□ The notch to fix the tray/support must remain at the front
part of the oven.
User's guide
19
Page 20
Accessories
5.2. Glide-out shelves with direct clip
IMPORTANT!
The single extraction shelf must be placed at heights 1, 2, 3 and 5 starting from below.
The double extraction shelves must be placed at heights 1, 2, 3 and 3 starting from below.
In 45 cm ovens, the glide-out shelves are positioned at height 1.
□ Hook the clip on the top rail at the desired level.
□ You will hear a "click" when the glide-out shelf is
correctly secured.
□ The notch to fix the tray/support must remain at
the front part of the oven.
CAUTION!
Disconnect the appliance from the mains power supply before any operation.
20
User's guide
Page 21

Maintenance work
5.3. Cleaning the oven accessories
Clean the outside of the oven and accessories with warm soapy water or with a mild detergent.
Take care with rust-free and varnished surfaces and only use sponges or cloths that do not scratch.
CAUTION!
The telescopic glide-out shelves must not be placed in the dishwasher.
This will remove the fat that enables them to slide and the runners will
become blocked, making them useless.
6. Maintenance work
6.1. Replacing the oven lamp
IMPORTANT!
Before you replace the lamp, make sure that the oven has been disconnected from the mains.
The replacement bulb must withstand temperatures up to 300 ºC. They
can be ordered from our technical Customer Service.
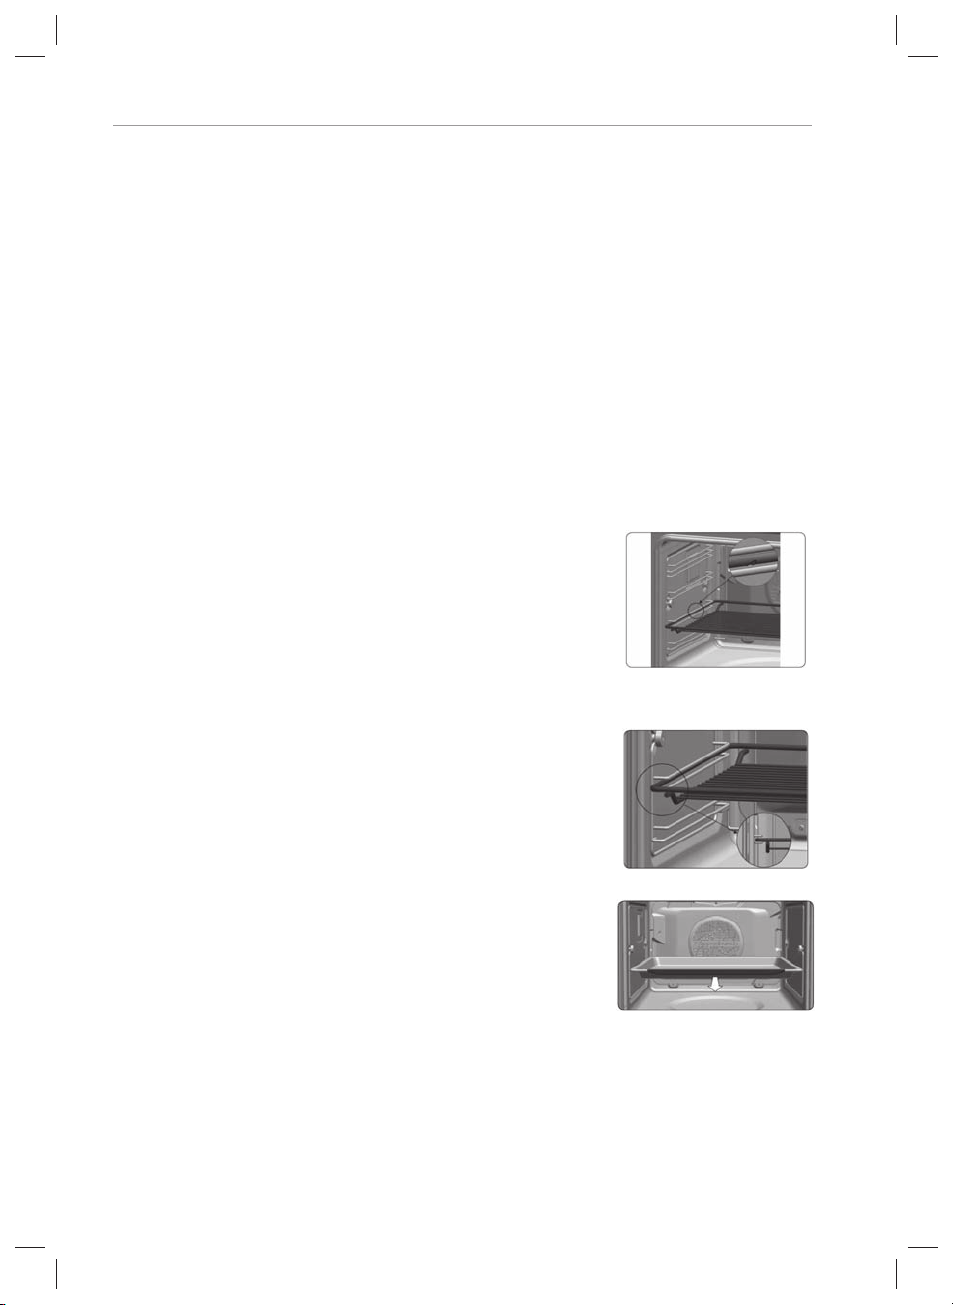
6.1.1 Changing the side bulb
□ Remove the chrome-plated runners and/or glide-out shelves
by removing the screw nuts (A).
User's guide
21
Page 22

Maintenance work
□ Use a tool to take out the glass cover of the lamp mpunting.
□ Replace the lamp.
□ Attach the glass cover again, making sure it is properly posi-
tioned.
The replacement lamp must be resistant to temperatures of up to
300°C. They can be ordered from our technical Customer Service.
6.1.2 Changing the upper bulb
□ Unscrew the glass cover of the bulb-holder.
□ Replace the bulb and reassemble the glass cover.
6.1.3 Changing the LED lamp
Call the Technical Assistance Service Department
6.2. Removing the oven door
(not possible for ovens with a microwave function)
For easy cleaning, the door can be dismantled. To do this, follow the instructions for the type of door your
oven has.
22
User's guide
Page 23

6.2.1 Door with hinge on body
Dismantling the door
□ Open the oven door as far as it will go.
□ Block the hinge by turning the latches.
□ Swing the hinge locks down towards you.
□ Close the door to the locked position.
□ Hold the door with both hands holding on to both sides,
Assembling the door
Maintenance work
□ Hold the door with both hands at the lower part of the sides,
insert the hinge arms into their housings and let the door fall
as far as it will go.
□ Open the oven door fully.
□ Turn the latches back to their original position.
CAUTION!
Make sure the door is inserted completely by turning the latches, because otherwise it could block.
If the latches are hard to turn, use a fl at tool to turn
them.
User's guide
23
Page 24

Maintenance work
6.2.2 Door with hinge on door
Dismantling the door
□ Open the oven door as far as it will go.
□ Block the hinge by turning the latches.
□ Swing the hinge locks down towards you.
□ Close the door to the locked position.
□ Hold the door with both hands holding on to both sides, lift up
and pull out the oven door until the hinges are fully detached.
□ To assemble the door, carry out the steps in the reverse order.
Assembling the door
□ Hold the door with both hands at the lower part of the sides,
insert the hinge arms into their housings and let the door fall as
far as it will go.
□ Open the oven door fully.
□ Turn the latches back to their original position.
ATTENTION!
Make sure the door is inserted completely by turning the latches, because
otherwise it could block.
If the latches are hard to turn, use a fl at tool to turn them.
24
User's guide
Page 25

Maintenance work
6.3. Dismantling/assembling the interior glass of the door
Depending on the model, your oven may have 2, 3 or 4 panes of glass. Follow the instructions for the type
of door your oven has.
Assembling
Depending on the model, your oven may have a completely closed stainless steel door. With this door it
isn't possible to remove the panes of glass.
ATTENTION!
If dismantling the glass panes with the door fi tted in the oven, always do it
with the hinge in the locked position. If not, the door will close and the
unmounted glass panes could break and cause injury.
To prevent this, dismantle the glass panes with the door removed, following the instructions in
the previous section.
□ Using your fingers, press the buttons located at the top of both
sides of the oven door.
□ Keep them pressed and pull on the plastic seal above the door.
□ Remove the glass panes from the door. Clean them with a glass
cleaner or soap and water and a soft cloth.
ATTENTION!
Pay attention to the order and position of the glass panes when removing
them as they must be reassembled in the same order and position when
you have fi nished cleaning them.
User's guide
25
Page 26

Maintenance work
□ Once clean, insert pane no. 3 into the same position so that the
TERMOGLASS indication printed on it is visible as shown in the
figure.
□ In pyrolytic ovens, the TERMOGLASS indication on panes num-
bers 3 and 4 must be visible as shown.
□ Insert pane no. 2 with the printed part facing toward the inner side
of the door.
□ Reattach the top seal of the door, making sure that the side tabs
fit into their housings.
ATTENTION!
Never switch the oven on if any of the glass panes on the door is missing.
6.4. Dismantling/assembling the shelf runners
12 rack levels are available in the side racks. Rack levels are counted from the top to the bottom from 1 to
12. Rack level 1 is the lowest rack level.
Dismantling
□ Open the oven door as far as it will go.
□ Take the accessories out of the oven.
□ Completely loosen the nut at the front of the fastening element
(A), pull the supports forward (B) and remove them.
□ Removing the side racks
26
User's guide
Page 27

□ Insert the rear notch into the rear fastening nut.
□ Fix the front fastening nut (C) in the front notch of the support.
□ Secure the support with the nut (D) and turn until it is fully ad-
justed (E).
6.5. Dismantling the rear wall
First of all remove the side runner to remove the rear wall, following the instructions in the
previous section.
□ Remove the lower four screws (1) and then the top screw (B).
To assemble rear wall, carry out the steps in the reverse order.
Maintenance work
ATTENTION!
For your own safety: Never use the oven without the rear wall!
Ovens with a folding grill
To clean the top part of the oven.
□ Take the accessories out of the oven.
□ Wait until the oven is cold.
□ Push the rail of the grill element (A) with both hands towards the
back of the oven, to release it from the upper fastening nut (B).
□ Let the element fall and clean the top part of the oven.
□ Then put the grill element back in place in its original position
and proceed in the reverse order.
User's guide
27
Page 28

Overview of your oven
7. Overview of your oven
Optional accessories:
Pizza stone
(accessory no. 145)
Oven grid
(accessory no. 124)
Baking tray
(accessory no. 541)
Cake tin (accessory no. 543)
Standard accessories:
Oven grid
Enamel baking tray
Enamel drip pan
28
1
Control panel
2
Door lock (only for pyrolytic models)
3
Grill element
4
Rack levels
5
Gridiron
6
Baking tray
7
Hinge
8
Inner glass
9
Cooling air exit
Unit mounting
10
11
Lamp
12
Rear wall
13
Hot-air fan
14
Oven sealing
15
Oven door
User's guide
Page 29
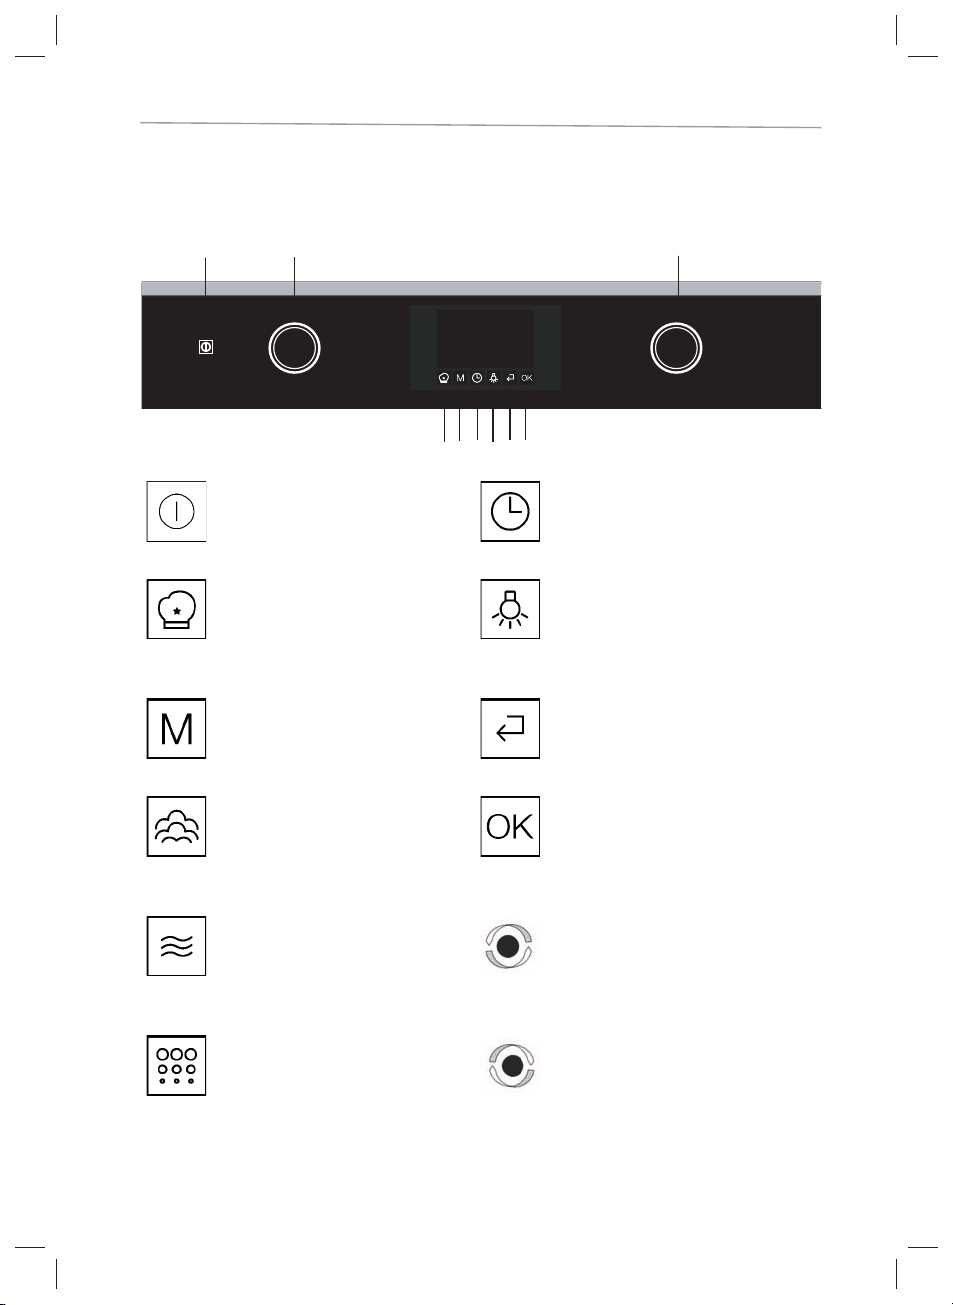
7.1. Control panel - sensor keys and displays
1
9
8
19:04
2 3 4 5 6 7
Overview of your oven
ON/OFF sensor
1
With this sensor you can
switch off an on your
Sensor Time settings / Timer
4
With this sensor you have access
to the menu Time setting.
appliance-
Sensor
Automatic programme
2
With this sensor you can
select the automatic
Light sensor
5
With this sensor you can switch off
an on the lighting of the interior of
the oven.
programmes.
Memory sensor *
3
With this sensor you have
access to the saved
Sensor back
6
With this sensor you turn to the in a
previous step.
programme.
Sensor Steam cooking
functions*
3
With this sensor you can
select the Steam cooking
Sensor OK
for selection/confi rmation
7
With this sensor you confi rm your
selection or start a process.
functions.
Sensor Microwave*
3
With this sensor you call up
Left control switch
8
...to select functions or programmes
the microwave functions or
switch on the additional
microwave function.
Sensor Pyrolytic*
3
With this sensor you can
select the pyrolitic functions.
Right control switch
9
...to select settings.
* depending on the model
User's guide
29
Page 30
Basic settings
8. Basic settings
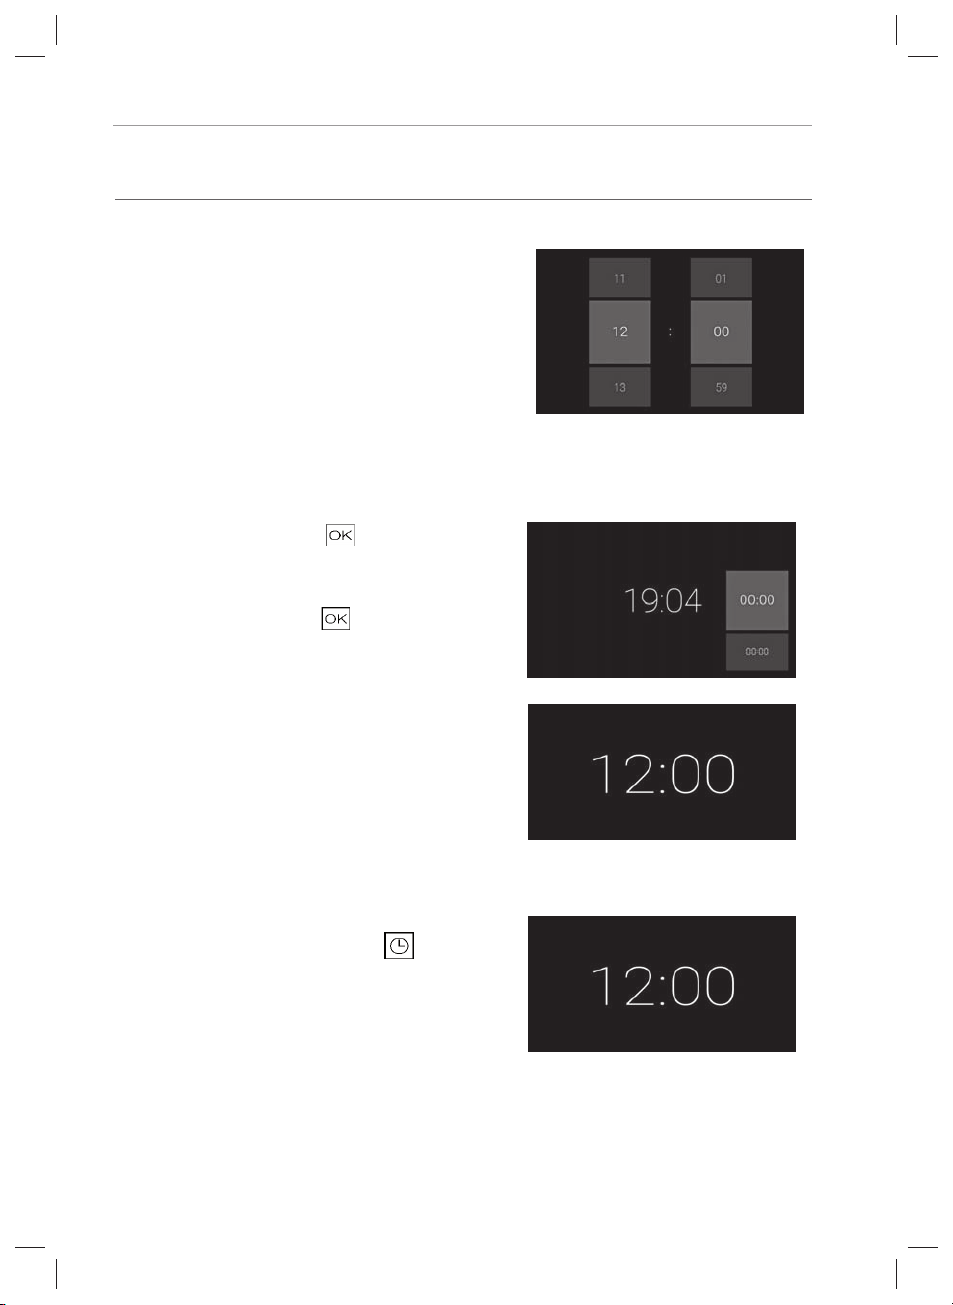
8.1. Setting the clock
The clock must be set before the oven is used and
whenever power has been disconnected to the appliance.
In such cases «12.00» will blink in the display.
When the oven is switched on, 12:00 will blink in the
display.
□ Turn the left selection switch to select an hour.
□ Turn the right selection switch to select the minutes.
□ Then confirm by pressing . You will then need to
select the clock display. Use the right switch to choose
between the standard and the retro clock display.
□ Then confirm by pressing
□ An acoustic signal will sound and the oven will switch
to the standby mode. The time that has been set will
be shown.
Should you wish to change the time:
With the oven switched off, press the symbol for 3
seconds and wait until the time setting is shown.
30
.
User's guide
Page 31

□ Turn the left selection switch to select an hour.
□ Turn the right selection switch to select the minutes.
Roasting and baking charts
□ Then confirm by pressing
.
□ You can then choose between the standard and the
retro clock. Turn the right switch and then confirm with
.
This will be followed by and acoustic signal as confi rmation.
You will return to the standby display.
The selected time will be shown.
9. Roasting and baking charts
Guidelines for baking
□ The material of your baking tins also plays a role in baking. Dark baking tins, which transmit heat
direct to food being cooked, are ideal.
□ Baking times may differ slightly due to differences in the type of ingredients used. Testing your cake
towards the end of the cooking time with a wooden skewer is ideal. If no dough sticks to the skewer,
the cake will be ready.
□ When cakes with a moist fruit topping are being baked, the development of humidity is particularly
high. Never bake more than two of this kind of cake at the same time.
□ If you are baking several cakes in baking tins at the same time, add about 5 to -10 minutes for each
additional tray used.
User's guide
31
Page 32

Roasting and baking charts
Guidelines for baking
Operating mode Hot air Top/Bottom heat Pizza mode
Hot air convection
bottom heat
Preferred settings
have a grey
background
Cakes
Cake mixture
Rack
level
Temp.
in °C
Rack
level
Temp.
in °C
Rack
level
Temp.
in °C
Baking
time in
minutes
Gugelhupf 2 170 2 170-190 60-70
Tin cake 2 170 2 170-190 50-70
Madeira cake 2 160 2 160-180 60-70
Flan bases 2 170 2 170-190 20-30
Muffi ns 2 160-170 2 170-180 20-25
Flat cakes
with a dry topping 2 160-170 2 180-200 20-35
with a moist topping 1-2 160-170 1-2 170-180 3 160-170 35-50
Kneaded dough
Flan bases 2 170-180 2 180-200 25-35
Cheese cake 2 150-160 1-2 160-170 70-80
Small biscuits 2 170 2 180-200 15-30
Flat cakes
with a dry topping 2 160-170 2 180-190 25-35
with a moist topping 1-2 160-170 1-2 170-180 2 160-170 30-50
Yeast dough
Gugelhupf 2 150-160 2 175-180 40-65
Yeast cake 2 150-160 2 175-180 40-50
Rich sweet bread
(preheated)
2 150-160 2 175-180 50-70
Small biscuits 2 140-150 2 180-200 15-30
Flat cakes
32
User's guide
Page 33

Roasting and baking charts
with a dry topping 2 150-160 2 180-190 30-40
with a moist topping 1-2 160-170 1-2 170-180 3 160-170 30-50
Sponge dough
Gateaux and fl ans
(preheat)
2 150-160 2 175-180 30-40
Rolls (preheat) 2 170-180 2 180-200 15-25
Egg white baking
Meringue 2 80-90 2 100-120 80-120
Cinnamon stars 2 100-120 2 120-140 20-40
Macaroons 2 100-120 2 120-140 20-50
Other doughs
Puff pastry 2 170-180 2 190-210 15-30
Puff pastry made
with leavened
2 170-180 2 190-210 30-40
dough
Puff pastry made
with curd cheese
2 160-180 2 180-200 30-40
Choux pastry 2 170-180 2 190-210 30-40
Dough made with
curd cheese and oil
2 150-160 2 170-180 30-40
Honey cake 2 140-150 2 170-180 20-35
Bread and pizza
Sour dough
(preheat: 230°C
2 180 2 180 50-70
prebake: 10 min.
-230°C)
Bread made with
yeast/white bread
2 180 1 or 2 200 30-60
(preheat)
Pretzels
(preheat: 230°C)
Pizza (preheat:
250°C)
2 200 2 220 15-20
1 220 8-12
User's guide
33
Page 34

Roasting and baking charts
9.1. Guidelines for roasting
□ Meat that has been well hung is best suited for roasting.
□ Make criss-cross cuts on the outer layers of fat on the meat (e.g. knuckle).
□ Roasts can all be cooked with or without the addition of fat.
□ Roast the meat on the grid with the drip pan underneath.
□ Coat poultry, such as chicken, goose or turkey, with a marinade made of oil, salt and paprika powder.
This means that meat does not have to be basted while it is roasting.
Tips for more precise results
The cooking progress, particularly of large joints, is not always easy to judge from the outside. Chefs de
cuisine and hobby cooks therefore use a roasting thermometer. This provides reliable information about the
core temperature and thus also about how far the meat has been roasted.
Guidelines for roasting
Operating mode Hot air Top/Bottom heat Hot air convection
bottom heat
Preferred settings
have a grey
background
Type of meat
Rack
level
Temp.
in °C
Rack
level
Temp.
in °C
Rack
level
Temp.
in °C
Weight
of meat
Baking
time in
minutes
Pork
Roast pork 2 170 2 170-
Pork shoulder 2 180 2 180-
Pork fi llet 2 180 2 180-
Beef
Joint of beef 2 170 2
Roastbeef 2
160 /
90*
2
34
190
200
200
170190
160 /
100*
2 160-
180
2 170-
190
2 170-
190
2,000 120
1,200 120
1,000 45
2,000 150
1,500 30
User's guide
Page 35

Roasting and baking charts
Beef fi llet 2
Veal / lamb
160 /
90*
2
Lamb roast 2 160 2
Roast veal 2 160 2
Steak
Rump steak
(browned
2 120** 2 120** 300 10
beforehand)
T-bone steak
(browned
2 180** 2
beforehand)
Poultry
Chicken 2 180 2
Duck 2 170 2
Goose 1 or 2 160 1 or 2
Turkey 1 or 2 160 1 or 2
Fish
160 /
100*
170180
170180
180200**
180200
170190
170190
170190
2
2
1 or 2
1 or 2
180200
170190
170190
170190
1,200 30
1,000 140
1,000 90
1,000 6
1,000 60
1,500 75
3,000 120
5,000 180
Whole fi sh 2 200 2
User's guide
200220
1,000 35
35
Page 36

Roasting and baking charts
9.2. Guidelines for grilling
□ The grill should be pre-heated for approx. 5 minutes before being used.
□ Put the meat that has been prepared onto the grid so that the heat from the grill body has a direct effect.
A clearance of 3 cm must be maintained.
□ Always place the drip pan under the food in order to collect dripping meat juices.
□ Food grilled on the grid will need to be turned.
□ The first side will need to be grilled a little longer than the second side.
□ Since the food generally differs in shape, thickness and consistency, you should check now and then
on whether or not the meat has been cooked as required. Specified grilling times can thus only serve
as a guide.
Tips for ideal results
Also use a roasting thermometer for low-temperature cooking. This provides reliable information about the
core temperature inside the meat and thus also about how far the meat has been roasted.
Guidelines for grilling
Operating mode Grill Large-surface grill
Rack level 1 side 2 side 1 side 2 side
Type of meat
Pork
Pork chop 4 10-12 8-10 14-15 8-10
Belly 4 12-15 8-10 16-18 10-12
Pork fi llet 4 10-12 8-10 14-16 10-12
Frying sausages 4 8-10 6-8 12-15 10-12
Fried sausage
4 10-12 8-10 10-14 9-11
coils
Kebab 3-4 9-11 7-8 15-20 10-12
Beef
Beef fi llet, rare 4 6-7 5-6 8-10 6-7
Beef fi llet, medium 4 7-9 6-7 9-11 6-9
36
User's guide
Page 37

Roasting and baking charts
Veal / lamb
Lamb chop 4 7-8 6-7 9-11 6-9
Veal steak 4 8-10 7-8 10-12 8-9
Poultry
Chicken
drumsticks
3 15-18 10-12 17-20 11-14
Chicken halfs 3 18-20 10-12 22-24 12-15
Fish
Fish fi llet 4 6-7 4-5 10-12 7-8
Whole fi sh 3 5-7 4-6 8-11 7-10
Toast
Toast 3 2-3 2-3 4-6 3-4
Toast with a
topping
3 6-8 10-12
9.3. Recommended food probe temperatures
Recommended food probe temperatures
Core temperatures in °C
Rare Medium well done
Type of meat
Pork
Pork fi llet 63 65
Roast pork / jam 68-70 75
Knuckle 80-85
Cutlet on the bone 75-80
User's guide
37
Page 38

Roasting and baking charts
Shoulder 95
Gammon 55-62 64-68
Meat loaf 75
Beef
Beef fi llet 38-55 58-65 from 65
Roastbeef 38-55 55-60 from 65
Roulades 70
Joint of beef 85-90
Boiled beef 90
Entrecote 55-58
Veal
Knuckle 80-85
Roasting 64-74
Breast 75-78
Saddle 65-70
Shoulder 75-80
Sirloin 60
Lamb
Lamb 79-85
Leg of lamb 60 70-72
Lamb chop 55
Saddle of lamb 60-62 68
Rack of lamb 55
Game
Wild boar fi llet 60-63
Roast wild boar 75-78
Leg of wild boar 75
Saddle of roe venison 50-60
Roast roe venison 65
Saddle of deer venison 54-60
38
User's guide
Page 39

Roasting and baking charts
Roast deer venison 62 75
Toast with a topping 3 6-8
Poultry
Chicken 80-90
Duck 80-90
Breast of duck 62-65
Goose 75-80 90-92
Turkey 80-90
Fish
Salmon 57 60
Pike 58 60
Zander 58 60
Tuna 55 58
Redfi sh 55 60
Cod 54 60
Trout 54 60
Yellow mackerel 54 60
9.4. Low-temperature cooking guidelines
Low-temperature cooking guidelines
Cooking time
Weight
in g
Browning time
in minutes
in minutes
(core temperature
as an alternative)
Type of meat
Pork
Pork fi llet 400-600 5 60-90 85
Roast pork / jam 1000-1500 10-12 230-250 85
Loin 1000-1500 10-12 120-150 85
Piece of rib / cutlet 800-1000 8-10 120-140 85
User's guide
Cooking
temperature
in °C
(oven
setting)
39
Page 40

Roasting and baking charts
Beef
Beef fi llet 700-1200 5-9 100-140 80
Roastbeef 700-1800 10-12 180-120 70
Point steak 1500-1800 10-15 150-200 80
Nut 1500-2000 10-12 200-230 80
Entrecote 1500-1800 10-12 150-180 80
Veal
Fillet steak 500-800 5-6 90-110 85
Nut 1500-1800 10-12 140-160 85
Saddle 1000-1500 8-10 110-120 85
Lamb
Leg of lamb 2000-2500 10-12 200-250 80
Saddle fi llet 400-600 3-5 60-80 80
Poultry
Breast of duck 400-600 4-5 70-80 85
Turkey breast 400-600 3-4 50-60 85
40
User's guide
Page 41

10. Oven functions
The functions all depend on the model in question.
10.1. Cooking functions
Top / bottom heat
Heat from the top and the bottom ensures even baking results for food placed on
one level. Ideal for baking delicate cakes and gateaus, such as yeast dough,
cheesecake, etc.
Ökotherm hot air
The fan distributes the heat generated by the ring heating element at the back of
the oven. The heat spread evenly throughout the oven makes it possible to cook
evenly at several levels without the fl avour or odour being transmitted.
Top / bottom heat with hot air
The fan distributes the heat generated by the heating elements at the top and
bottom evenly throughout the oven. Ideal for biscuits and roasts.
Ökotherm pizza setting
A combination of bottom heat and hot air is ideal for baking crispy bases with a
moist topping. Perfect for fresh pizza, biscuits or cakes with a fruit topping and
pastries and pies.
Bottom heat
With heat generated only at the bottom, this mode ensures that bases or especially crispy and/or that they are browned better on the bottom. Ideal for very
moist fruit cakes and for blind-baking cake bases.
Top heat
The heat generated by the top heating element is ideal for gratinating and browning dishes.
Oven functions
ECO
ECO makes it possible to cook dishes with a lower energy consumption than
usual. In order to save on energy, the oven switches off automatically a few minutes before the end of the cooking time and uses the remaining heat in the oven
to cook food through.
User's guide
41
Page 42

Oven functions
Ökotherm intensive hot air
The top heat switched on in addition to heating the oven up with hot air ensures
a delicious crust and intensive browning. Ideal for oven-baked potatoes, roasts
and for gratinating dishes.
Grill / bottom heat
Bottom heat in combination with the grill from the top. This mode is ideal for
cooking meat. It provides crispy results.
Large-surface grill
Perfect for cooking large quantities of food to be grilled, such as fi sh or meat.
This enables larger surfaces to be gratinated than with a grill. And the gratinating
power is higher so that food browns quicker.
Grill
Gratinating and browning. The small grill saves energy when small quantities of
food is cooked. Ideal for small quantities of fi sh and meat. Makes it possible to
brown the outer layer without infl uencing the inside of the food to be cooked.
Fan-assisted grilling
The fan distributes the heat generated by the grill throughout the oven, thus providing grilled food that has a crust and is juicy inside. Ideal for grilled chicken,
duck and roasts.
Intensive fan-assisted grilling
This combination of a large-surface grill and a fan ensures that food to be cooked
remains juicy inside and that it is beautifully crispy and brown on the outside.
Ideal for game and large poultry.
Intensive fan-assisted grilling + bottom heat
This combination of a large-surface grill, bottom heat and a fan ensures that large
food portions remain juicy inside and that they are beautifully crispy and brown on
the outside. Ideal for stuffed roasts or poultry.
10.2. Special functions
Defrosting
This function serves to gently defrost frozen food.
Low-temperature cooking
Food is cooked very gently at low temperatures, which also keep it very juicy.
Ideal for beef, pork, lamb, veal and poultry.
42
User's guide
Page 43

Keeping food warm
Food is kept warm at low temperatures, without continuing to be cooked. Ideal for
food that is to be served later on.
Frozen foods
The optimal distribution of heat that has only been slightly warmed up in the oven
makes this programme ideal for defrosting frozen food.
Warming plates
Good food just tastes better at the right temperature. This mode heats up plates
at a low temperature just before food is served. This prevents it from cooling
down so quickly when it is being put onto plates so it can be served hot.
Gratinating
This function is ideal for gratinating gratin dishes, oven bakes and souffl és.
Preserving
Ideal for preserving foods such as fruit and vegetables.
Dehydrating
With the dehydrating mode water is extracted from food to extend its shelf life.
Most vitamins and minerals are preserved. Dehydrating is ideal in the production
of dried fruit, dried meat, fruit purees and dried cod.
Baking bread
This programme is ideal for getting a light crumb texture and a beautifully
browned crust.
Oven functions
Proving
Best function for allowing dough to rise, for example.
.
Yoghurt mode
Yoghurt cultures feel really good in this mode and your yoghurt will turn out perfect.
.
User's guide
43
Page 44

Operating the oven
11. Operating the oven
The fan is switched on and off in the case of some programmes, but this is not an indication of
a fault.
11.1. Switching on the oven
In order to be able to use your oven for cooking food, you will need to press on the symbol.
If neither a function nor an automatic programme is selected, the oven will switch off again after a few seconds and show the current time of day.
11.2. Switching the oven off
Touch the symbol .
11.3. Selecting one cooking function
□ Switch the oven on by touching symbol .
□ Turn the left switch to select a cooking function.
□ Confirm your setting by turning the right switch or by pressing
drücken.
□ Turn the right switch in order to select a gar-
den temperature and confirm with
.
You will access the settings view. You can also set the cooking time or
the fi nish time. (See 11.6.1 on page 50 and 11.6.3 on page 52).
□ To confirm the settings, press
. The cooking process will be
commenced.
44
12:00
Ę
¢
1000 g
1000 g
160°C
19:04
19:04
Ø
19:04
Ø
159°C
160°C
161°C
low
medium
high
User's guide
Page 45

Operating the oven
11.4. Changing a setting during the cooking process
If you wish to change a cooking setting during the cooking process, turn the left switch; turn the right switch
if you wish to change the cooking temperature.
process, press symbol
INFO
Changes must all be actively confi rmed with OK, if they are not the screen will return to the old
display after 8 seconds and the new settings will not be saved.
, to adjust the cooking time or the fi nishing time.
Then following the instructions above.
During the cooking
11.5. Automatic programme
11.5.1 Selecting an automatic programme
□ Switch the oven on by touching symbol
□ Then touch the symbol for programmes to call up an
automatic programme.
□ Turn the left switch to select an automatic programme.
confirm, press
□ Turn the right switch again in order to select the weight and to
confirm press
or turn the right switch.
.
.
To
12:00
19:04
Ę
¢
19:04
t
Ø
H
19:04
1000 g
Ø
1100 g
User's guide
45
Page 46

Operating the oven
g
g
□ Turn the right switch again in order to select the cooking tem-
perature and to confirm press
.
(This setting depends on the programme and is not available in
some programmes.)
□ Turn the right switch again in order to select the cooking setting
and to confirm press
.
You will access the settings view. Cooking times are automatically
calculated. You can also set fi nish fi nish times.
(See 11.6.1 and 11.6.3).
□ To confirm the settings, press .
The oven will commence the cooking process.
1000 g
1000 g
160°C
1000 g
160°C
medium
25 min
«
19:04
Ø
19:04
Ø
19:04
Ø
19:04
159°C
160°C
161°C
low
medium
high
11.5.2 Important information about cooking with programmes
When a programme is activated and on the basis of the weight indicated, the temperature and
the cooking setting, the oven automatically calculates the temperature and time needed for
cooking the food. The temperature can, however, be changed. If expressly no other information
follows, the cooking time refers to a cooking time
This is why it is
very important to select the right weight of the food to be cooked, so
without pre-heating.
that it can be appropriately prepared.
For the
roasting programmes, after a specifi c time has lapsed, the oven will indicate that the
roast should be turned. To do so, the oven emits an acoustic signal for a certain length of time.
The symbol
will appear on the display until the roast has been turned. If you do not turn the
roast, the oven will automatically continue operating the programmed method of cooking after a
few minutes.
46
User's guide
Page 47

Operating the oven
s tc
The programmes for white bread, black bread and thin and thick pizza dough are operated
with pre-heating with the oven empty, i.e. before the food to be cooked is put into the oven.
This means that the oven reaches the right temperature to be able to best cook the food.
The procedure for cooking with these programmes is as follows:
□ First of all select the programme. The cooking process will then begin.
You may only put the food into the
oven when the green progress bar
appears.
«
19:04
□ For automatic programmes, which require a pre-heating phase, an orange progress bar
will appear and show the current cooking temperature. This bar will be visible until the
temperature that has been set is reached.
□ As soon as the temperature specified for the programme has been reach the oven will
emit an acoustic signal. You can now put the food into the oven.
□ The cooking process starts when the door is opened and closed, pressing the
symbol or automatically after a few minutes.
□ Cooking according to the selected programme follows. An acoustic signal is will sound
after the cooking time has expired. Press any button to stop the acoustic signal and
switch off the oven. Otherwise the oven switches itself off automatically after 7minutes.
11.5.3 Changing the weight of the food
If you wish to change the weight of the dish to be cooked, you can automatically change the duration and
temperature corresponding to the selected programme.
Proceed as follows to change the weight:
□ Touch the symbol
□ Then press the
weight setting.
□ Turn the right switch in order to change the weight and to
confirm press
User's guide
.
symbol several times until you reach
.
19:04
1000 g
Ø
1100 g
47
Page 48

Operating the oven
□ Turn the right switch again in order to select the cooking
temperature and to confirm press
.
1000 g
19:04
159°C
160°C
Ø
161°C
□ Turn the right switch again in order to select the cooking
setting and to confirm press
to save the settings.
1000 g
160°C
You will be returned to the settings view or you will return to the
cooking process. Cooking times are automatically calculated.
You can also set fi nish times and cooking time.
(See 11.6.1 and 11.6.3
1000 g
160°C
medium
25 min
INFO
If a cooking process has already been started, it will only be possible to change the cooking
settings within the fi rst 10 minutes.
11.5.4 Changing the cooking temperature
A cooking temperature has been pre-set for all of the programmes.
The temperature can only be changed within a specifi ed range in the case of the method of cooking pro-
grammes. For the functions, the temperature can be selected for a specifi c function within a range of 30°C
(no temperature setting) and 300°C.
19:04
Ø
19:04
Ø
low
medium
high
11.5.5 To change the cooking temperature:
□ Touch the symbol
□ Then press the
.
symbol several times
until you reach cooking temperature.
□ Turn the right switch again in order to select the cooking
temperature and to confirm press
.
48
1000 g
19:04
Ø
159°C
160°C
161°C
User's guide
Page 49

Operating the oven
tst
□ Turn the right switch again in order to select the cooking
setting and to confirm press
to save the settings.
You will access the settings view. Cooking times are automatically calculated. You can also set fi nish times and cooking time.
(See 11.6.1 and 11.6.3)
1000 g
160°C
1000 g
160°C
medium
25 min
19:04
Ø
19:04
Ø
low
medium
high
INFO
If a cooking process has already been started, it will only be possible to change the cooking
settings within the fi rst 10 minutes.
11.6. Time settings
11.6.1 Cooking time setting
In automatic programmes the cooking time is pre-set, but can be modifi ed. There is no default time for the
cooking functions. You can set the cooking time before or during a cooking process.
□ Touch the symbol
.
19:04
>
220°C
m
□ Select the cooking time function and press to
confirm.
19:04
«
□ Turn the right switch to set the cooking time. Then confirm
by pressing
.
>
220°C
m
User's guide
19:04
49
Page 50

Operating the oven
Turn the right switch to set the end of cooking time (when the
proposed end of cooking time is confi rmed, the cooking process
will start as soon as the setting view has been confi rmed.
Confi rm by pressing
.
You will be returned to the settings view. The settings have now
been saved.
INFO
Once the programmed time has expired, the oven will switch off and an acoustic signal will
sound. Press
to stop the acoustic signal. The oven will then show the current time of day.
The oven is switched off.
11.6.2 Changing a cooking time
□ Touch the symbol
.
>
220°C
10 min
S
>
220°C
10 min
19:04
19:04
19:04
9 min
10 min
11 min
□ Select the cooking time function and press to
confirm.
□ Turn the right switch to change the cooking time.
□ Turn the switch back to "0" to deactivate the cooking time.
□ Then confirm by pressing
.
50
19:04
«
User's guide
Page 51

Operating the oven
g
p
In the next step you will need to set the end of cooking time. Confi rm
the proposed end of cooking time to start the process immediately.
When you change the end of cooking time, you will also delay the
start of the cooking procedure (See 11.6.3).
(this step will no longer need to be carried out when the cooking
time is set during the cooking process).
□ Confirm by pressing
.
INFO
If you have deactivated the cooking time in a previous step, the cooking time will not need to be
set.
You will be returned to the settings view.
□ Confirm by pressing
ing process.
INFO!
Once the programmed time has expired, the oven will switch off and an acoustic signal will
sound. Press
The oven will then show the current time of day. The oven is switched off.
You can change the pre-set cooking time or fi nish time by pressing the clock symbol
standby mode. Change the cooking time and fi nish time with the steps described above.
. The oven will commence the cook-
to stop the acoustic signal.
10 min
#
>
220°C
10 min
19:04
19:04
20:29
20:30
20:31
in
11.6.3 Selecting a later end of cooking time
(only possible before starting the cooking process)
The end of cooking time is the time at which the oven switches off. You can use it to combine the cooking
time and the end of cooking time.
Once you have set the cooking time and confi rmed it with
(see 11.6.1), it will be possible for you to
set the end of cooking time.
User's guide
51
Page 52

Operating the oven
g
g
g
□ Touch the symbol .
□ Select the end of cooking time function and press
to confirm.
□ Turn the right switch to set the cooking time. Then confirm by
pressing
□ Turn the right switch again to change the end of cooking time.
Confirm by pressing
(this step will no longer need to be carried out when
the cooking time is set during the cooking process).
.
.
¢
Æ
£
«
S
10 min
#
19:04
19:04
19:04
19:04
9 min
10 min
11 min
20:29
20:30
20:31
You will be returned to the settings view.
□ To confirm a setting, press
to the standby mode by the time the cooking process starts.
Once the programmed time has expired, the oven will switch off and an acoustic signal will sound. Press
to stop the acoustic signal. The oven will then show the current time of day. The oven is switched off.
INFO!
You can delete a preprogrammed cooking process by pressing the
and the end of cooking time in the status display will go off.
52
. The display will have changed
20:30
c
19:04
key. A signal will sound
User's guide
Page 53

11.6.4 Setting the timer to a minute minder
□ Touch the symbol in the standby mode.
Operating the oven
12:00
Turn the right switch to set the time. Then confi rm by pressing
.
The oven will return to the standby mode.
After the expiry of the programmed set time, an acoustic
signal will sound.
□ Press the
Changing the timer to a minute minder
□ Touch the symbol in the standby mode.
□ Turn the right switch to set the time.
□ Turn the right switch back to "0" to deactivate the timer.
□ Then confirm by pressing
11.6.5 Setting the timer in connection with a cooking process
Setting the timer function during cooking process will serve as an alarm, for example when you wish
to turn your food at a specifi c point in time during the cooking process.
key to stop the acoustic signal.
. The oven will return to the standby mode.
19:04
0 min
1 min
□ Touch the
cooking process.
User's guide
symbol in the settings view or during a
19:04
>
220°C
m
53
Page 54

Operating the oven
□ Turn the left switch and select the timer function .
To confirm, press
or turn the right switch.
□ Turn the right switch to set the time. Confirm by pressing
.
You will be returned to the fi rst screen. In this case this is the
settings view. The time set will from this point on be shown in the
status display.
After the expiry of the set time, an acoustic signal will sound.
□ Press the
key to stop the acoustic signal.
INFO!
The timer setting does not depend on the cooking time and it has no infl uence on the cooking
process.
«
05:00
n
>
220°C
10 min
19:04
19:04
0 min
1 min
19:04
11.7. Memory function (depending on the model in question)
The oven is fi tted with a storage function, which makes it possible to save a cooking process an and auto-
matic programme.
11.7.1 Saving an additional programme
□ Select a function or an automatic programme.
□ Set all necessary setting.
□ Now keep the
The programme set can now be saved with
heating programme.
54
symbol pressed until the memory display appears.
and can be used like any other baking, roasting or
User's guide
Page 55

11.7.2 Opening an additional programme
Operating the oven
□ Press the
□ Touch the symbol
□ To start the cooking process, press
symbol on the initial screen to open the saved cooking process.
and then immediately the symbol to call up an automatic programme.
.
The programme called up will open. The values set can be changed without such changes being stored.
INFO
The settings in the memory function can still be changed with the steps described above. In
order to overwrite the changed cooking settings, press the
symbol, until an acoustic
signal sounds.
11.8. Rapid heating (has been activated as of the factory setting)
□ Keep the and symbols pressed for 3 seconds
until the following screen appears.
□ Turn the right switch in order to switch the rapid heating func-
tion on and off in the banking functions
the oven
.
permitted by
19:04
□ Confirm by pressing
.
Your setting will remain until you make another change.
11.9. Childproof lock
The childproof lock protects the oven against unwanted changes to the settings and offers additional protection for children. The fi gures previously set may not be changed and the oven cannot be switched on
11.9.1 Switching on the childproof lock
□ The childproof lock can be activated when the oven is off or during a cooking process.
□ Press the
signal sounds and the symbol
User's guide
and symbols simultaneously for longer than 3 seconds until a long acoustic
appears. The keys and switches will now all be disabled.
55
.
Page 56

Operating the oven
11.9.2 Deactivating the childproof lock
□ Then press the
childproof lock. A long acoustic signal will sound and the symbol
and symbols simultaneously for longer than 4 seconds to deactivate the
will no longer light up. The keys
and switches will now all be released again.
INFO
Pyrolytic ovens have a double protection system: when the childproof lock is activated, the door
will also not open.
11.10. Setting the demo mode
□ Now press the and the symbols for 3 seconds until an acoustic signal sounds and the
symbol appears in the status display.
□ Deactivate the demo mode by holding the same combination of keys for 4 seconds until an acoustic
signal sounds and the
symbol in the status display goes off.
11.11. Factory settings
□ Now keep the and symbols pressed for 3 sec-
onds until the screen shown adjacent appears.
□ Turn the right switch and select
. Confirm by pressing
. The oven goes on and all the settings will have been
reset.
19:04
□ Now keep the and symbols pressed for 3 sec-
19:04
onds until the screen shown adjacent appears.
□ Turn the right switch and select automatic confirmation
or manual confirmation
□ Confirm by pressing
.
You will return to the standby display.
You will need to confi rm each step actively for manual confi rmation. The settings are automatically taken
over after 8 seconds in the case of automatic confi rmation. While the automatic confi rmation is activated you
can also actively confi rm the settings with
the oven must be actively confi rmed with
56
. (For safety reasons all the processes that serve to heat up
.)
User's guide
Page 57

Special settings and additional settings and functions specifi c to models
g
g
g
12. Special settings and additional settings and functions
specific to models
12.1. Pyrolytic function
NOTICE
Please remove all foreign objects from the oven before you start the
pyrolytic process.
□ Touch the symbol .
□ Turn the right switch to select the pyrolytic function.
□ Confirm by pressing
. You will access the settings view.
□ To confirm a setting, press .
□ The oven will commence the cleaning process. The oven door
will be automatically locked and will remain locked during the
entire process for safety reasons. An acoustic signal is generated when the cleaning porgram has elapsed. Press
sto
stop the acoustic signal.
Ę
¢
x
x
P2
90 min
19:04
19:04
19:04
P1
60 min
P2
90 min
P3
120 min
□ You will return to the standby display. The symbol in the status
bar will remain visible until you are able to open the oven door
again.
User's guide
57
Page 58

What to do if …
13. What to do if …
Repairs may only be carried out by qualifi ed staff members!
If your appliance is faulty, please check whether you can rectify the problem yourself by consulting these
instructions for use. You may be able to rectify some problems yourself. They are described below.
If ...
...the oven does not heat up
... the lighting does not work
... neither sensors nor lighting function?
... when one or several of the sensors
do not respond to touch, but the lights
can be switched on
... one or more sensors do not even
respond when the fuse is triggered
and switched on again
What to do?
Turn the oven on.
Set the required time.
Make sure that the settings are correct.
You will fi nd more relevant information in the section on
"automatic switch-off".
See "Using the childproof lock"
Close the door carefully.
Make sure that the safety fuse is causing the problem.
Contact an authorised skilled electrician if the fuse repeatedly
triggers.
Replace the lamp.
Check: Has the mains plug been connected?
Is the fuse box in the building in an operational condition?
Power failure?
Childproof lock switched on?
Wait approx. 15 seconds or trigger the fuse and switch it on
again. You may need to repeat this procedure!
The keys then adjusted themselves, so they respond to touch
again.
Once the fuse has triggered twice and been switched on again,
trigger it once more and inform Customer Service
58
User's guide
Page 59

What to do if …
If ...
... the oven door glass cracked?
... the door sealing is damaged?
... the door sealing is damaged?
...a powerful smell develops
... the display will show F111 erscheint
... an error code which is not on the
chart appears in the display
... steam and condensation water are
deposited on food and in the inside of
the oven
What to do?
Switch off the oven and have Customer Service replace it
Replace the door sealing See «Replacing the door sealing».
Do not use the oven when the door
sealing is damaged!
The oven can still be used. Replace the halogen lamp as
quickly as possible when the oven is cold. See «Replacing the
oven lamp».
Recycle the ökotherm
®
catalyst. See «Recycle the ökotherm®
catalyst».
Insert the plug of the KT sensor as far as possible into the
socket
Switch the oven off and then on again using the safety fuse in
the home or the safety switch in the fuse box.
Contact Customer Service if the error code appears in the dis-
play again.
Do not allow food to remain in the oven for more than 15 - 20
minutes after the cooking or baking process has ended.
User's guide
59
Page 60

B6350.0
70
0.81
L
*
*
0.68
kWh/cycle*
kWh/cycle*
81
1
32 kg
Page 61

CB6350.0
44
0.67
L
*
*
0.59
kWh/cycle*
kWh/cycle*
81
1
26 kg
Page 62

BP6350.0
70
0.99
L
*
*
0.68
kWh/cycle*
kWh/cycle*
81
1
35 kg
Page 63

Page 64

K01-180170/01
Cod.: 3370686-01
Küppersbusch Hausgeräte GmbH
Postfach 10 01 32, D-45801 Gelsenkirchen,
Küppersbuschstraße 16, D-45883 Gelsenkirchen
Telefon: (0209) 401-0, Telefax: (0209) 401-303
www.kueppersbusch.de
Teka Austria GmbH
Eitnergasse 13, A-1230 Wien
Telefon: (01) 86680-15, Telefax: (01) 86680-50
www.kueppersbusch.at
 Loading...