

Kuppersbusch EKV 6600.1 E, café profi EKV6600, café profi EKV6700 Operating Instructions Manual
Page 1
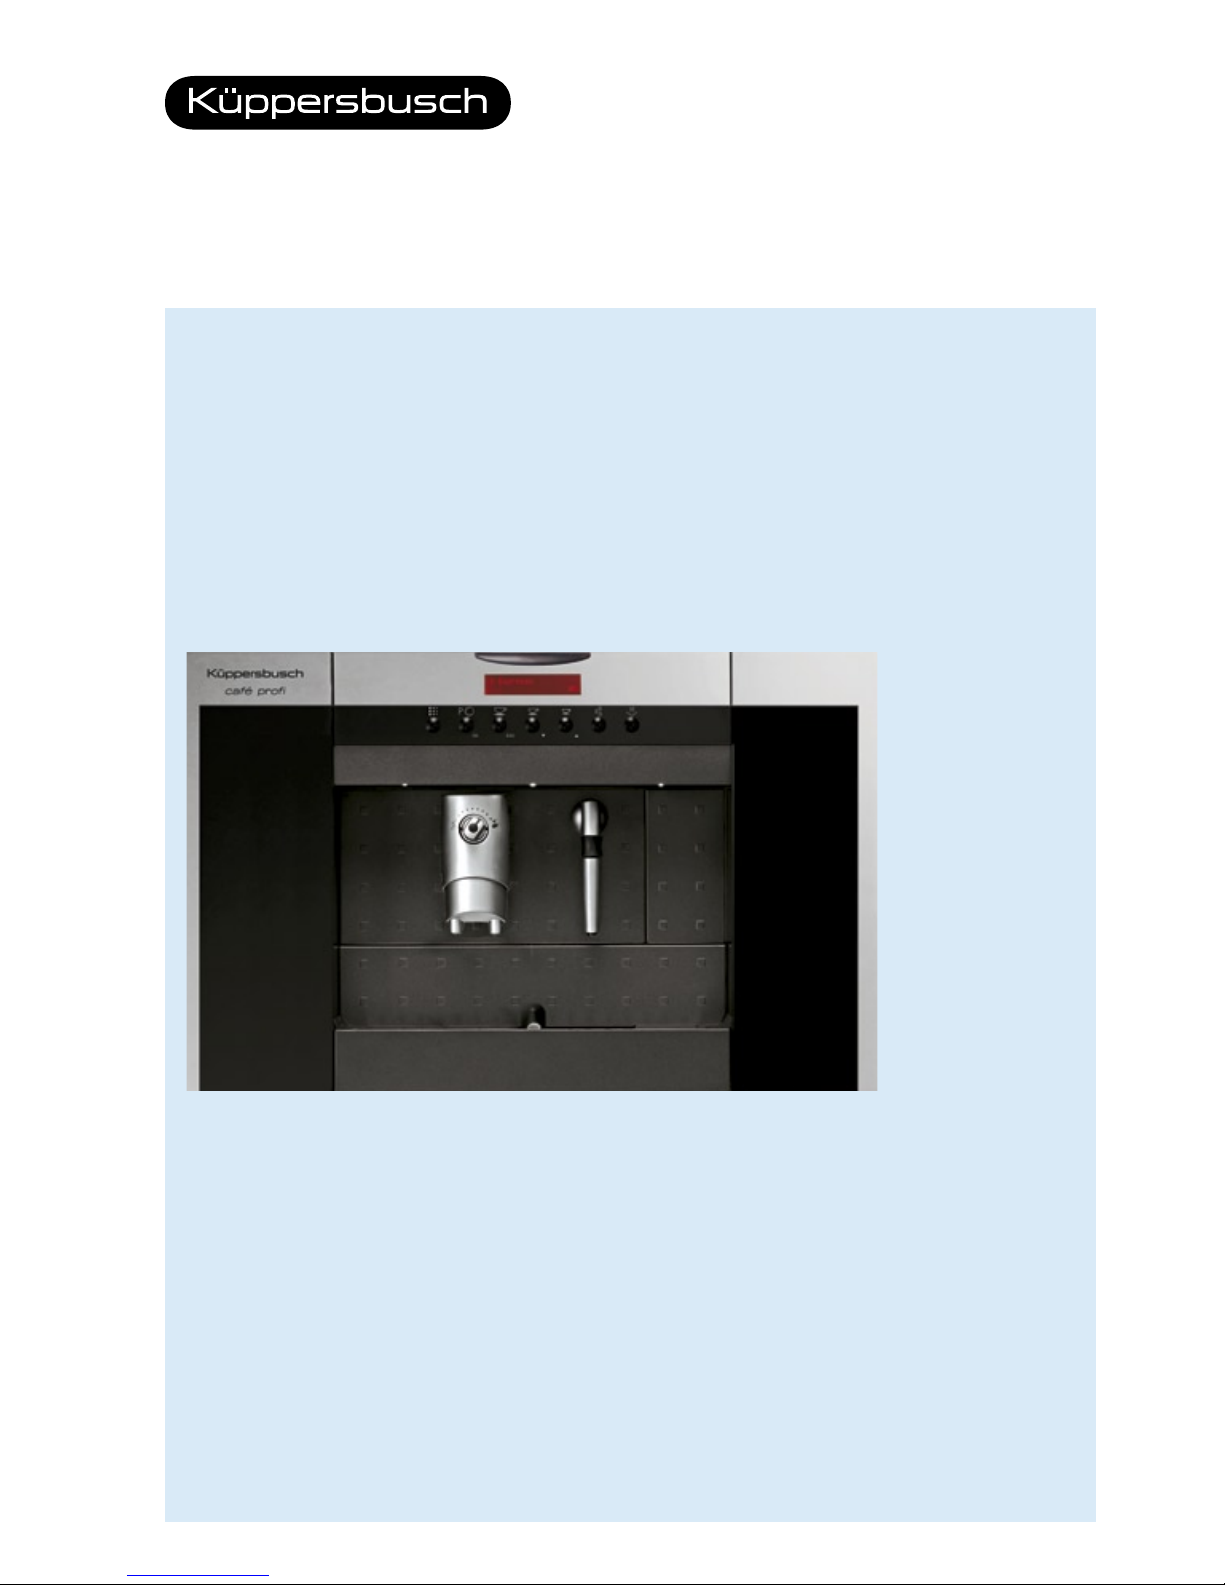
café profi
Operating instructions
Page 2
2
Dear Küppersbusch Customer,
Thank you for deciding to buy one of our products. Your appliance meets high standards,
and operation is simple. Even so, take your time when reading these operating instructions. By
doing so, you will become familiar with your appliance for optimum and trouble-free utilisation.
Please note the safety instructions.
Modifications
Text, illustrations and data are consistent with the technical status of the appliance at the time
when these operating instructions went to press. The manufacturers reserve the right to make
modifications in accordance with further developments.
Symbols used
Identifies all instructions that are important to safety.
Failure to observe these instructions can lead to injury, damage to the device or
to the system!
Ñ
Denotes steps that must be taken in sequence
n Denotes a listing
Denotes useful tips
Scope
These operating instructions apply to the following models:
Variations in the model are referred to in the text.
Model ID code
EKV6600, EKV6700 702832, 702914
Page 3

3
Contents
Safety instructions . . . . . . . . . . . . . . . . . . . . . . . . . . . . . . . . . . . . . . . . . . . . . . 4
Description of appliance 6
Operating- and display elements
. . . . . . . . . . . . . . 6
Operating panel
. . . . . . . . . . . . . . . . . . . . . . . . . 6
Behind the operating panel
. . . . . . . . . . . . . . . . . 7
Behind the service door
. . . . . . . . . . . . . . . . . . . . 7
Accessories
. . . . . . . . . . . . . . . . . . . . . . . . . . . . 7
Initial Operation 8
Water hardness
. . . . . . . . . . . . . . . . . . . . . . . . . 8
Filling the watertank
. . . . . . . . . . . . . . . . . . . . . . . 8
Filling coffee beans
. . . . . . . . . . . . . . . . . . . . . . . 8
Switching on the appliance
. . . . . . . . . . . . . . . . . 9
Venting the system
. . . . . . . . . . . . . . . . . . . . . . . . 9
User Settings/Programming 10
Preparing coffee 12
AromaControl
. . . . . . . . . . . . . . . . . . . . . . . . . . 12
Espresso
. . . . . . . . . . . . . . . . . . . . . . . . . . . . . . 12
Cappuccino
. . . . . . . . . . . . . . . . . . . . . . . . . . . 13
Drawing hot water/steam 14
Care and maintenance 15
Watertank/Bean container
. . . . . . . . . . . . . . . . . . 15
Drip tray/Coffee-grounds container
. . . . . . . . . . . . 15
Coffee spout
. . . . . . . . . . . . . . . . . . . . . . . . . . . 16
Nozzle
. . . . . . . . . . . . . . . . . . . . . . . . . . . . . . . 16
Brewing group
. . . . . . . . . . . . . . . . . . . . . . . . . . 16
Descaling 17
Cleaning cycle 19
Rectifying faults yourself 20
Technical specifications 21
Disposal 22
Küppersbusch Customer Service 23
Page 4

4
Safety instructions
The appliance is designed in accordance with acknowledged rules applicable
to engineering and the relevant safety regulations. To prevent damage and
accidents however, proper handling of the appliance is a precondition. Please
observe these operating instructions. They must be kept safely and passed on
to future owners.
Emergency n
Immediately remove plug from the mains or switch off the mains fuse.
Appliance
n Indoors.
may be used
n For preparing coffee, espresso, hot water, for frothing milk and for
exclusively
steam-heating drinks.
n For household purposes.
Never use n For other purposes other than those described above, otherwise danger
the appliance may result.
Installation n Use the appliance only after it has been installed.
n The appliance may only be fitted in accordance with separate
installation instructions and by qualified personnel and connected to
the mains.
n Before using the appliance for the first time, please read the chapter
«Initial Operation».
Mains connection
n
The appliance may be connected only to a suitable socket.
n Mains voltage must be in accordance with the details indicated on the
type plate of the appliance.
n Recommendation: connect appliance via an RCD.
Page 5

5
Safety instructions
Dangers n The appliance must not be used by children and persons not trained
in the use of the appliance.
n The appliance is dangerous to children. Keep children away from the
appliance. Switch off the appliance when unattended.
n Keep packaging material out of the reach of children.
n Do not point the steam-/hot water nozzle at yourself or others
(danger of scalding).
n Do not insert any objects into the openings of the appliance.
(Danger! High voltage!).
n
As far as it is accessible, do not touch plug with wet hands or pull plug from
the socket by the cable.
n
Caution: you may scald yourself if you come into contact with hot water,
steam or the nozzle.
n Do not remove the drip tray during preparation, otherwise you may
scald yourself with hot drinks.
Defects n Do not use appliance if it is faulty or faults are suspected, e.g. if appliance
has been dropped.
n Repairs should be carried out only by Customer Service or authorised
specialist personnel.
n Do not use appliance if mains cable is defective. Have mains cable
replaced only by customer service. (Danger: high voltage.)
n
Switch off appliance before opening service door. Danger of scalding!
Cleaning/ n Before cleaning, remove mains plug if possible and allow appliance
to cool.
Descaling
n Do not spray down appliance with water.
n
Do not dry parts of the appliance in the oven or in the microwave oven.
Before prolonged
n Empty watertank and bean container.
periods out of use
n Empty and clean drip tray and coffee-grounds container.
n Switch off appliance.
Spares n In the interest of safety, use only original spares and accessories.
Fire n
In the event of fire, use only carbon dioxide (CO2) to extinguish flames.
Page 6
6
Description of appliance
Operating- and display elements
Operating panel (can be folded out)
Rod handle
Operating panel (can be folded out)
AromaControl
Nozzle
Coffee spout
Service door
Drip tray
Coffee-grounds container
Drip mesh
Display
«Drip tray»
Descale
Programming, Standby,
User Settings
Large coffee
Coffee
Espresso
Hot water
Steam
To open panel, press rod handle
Plain text display
Select product
Ready for use
Select product
Ready for use
Page 7
7
Description of appliance
Behind the operating panel
Behind the service door
Accessories
Watertank
Bean container
Brewing group
Grinder setting
Key Brush Drip guard
Waterfilter Water-hardness
test strip
Coffee-oil
solvent
Main switch
Further accessories required can be obtained from Customer Services.
Page 8
1 2
3
4
1 2 3
8
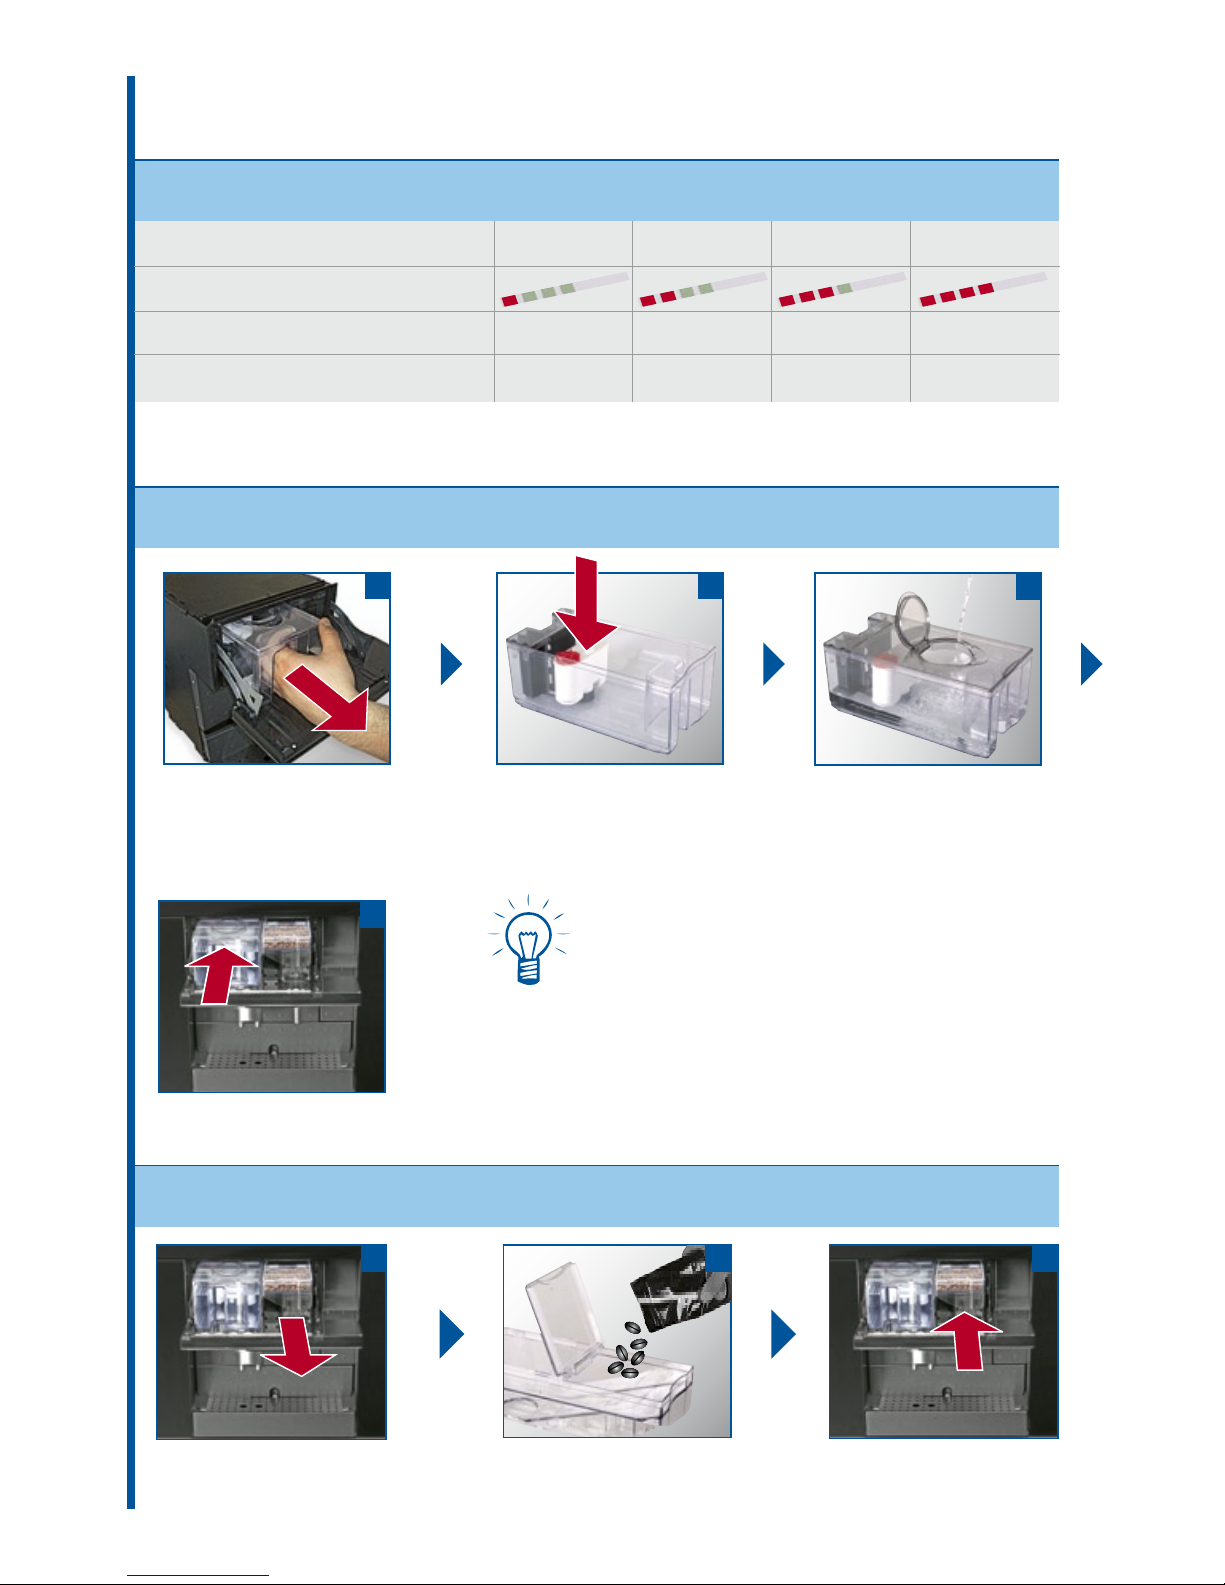
Initial Operation
Filling the watertank
Filling coffee beans
Ñ
Open operating panel by
pressing on rod handle
Ñ
Remove watertank
Ñ
Insert waterfilter
according to instructions
in package
Ñ
Fill with fresh water
(max. 1.7 l)
Ñ
Insert watertank
The appliance can also be used without a waterfilter, though this requires more frequent descaling. Using the waterfilter improves the quality of
the coffee, and places less strain on the parts of
the appliance.
Ñ
To program waterfilter, see User Settings/
Programming.
Ñ
Remove bean container
Ñ
Fill with coffee beans
(max. 300 g)
Ñ
Insert bean container
Range/User settings
Degree of hardness 1 Degree of hardness 2 Degree of hardness 3 Degree of hardness 4
Water-hardness test strip
corresponds to German degree of hardness [˚dH]
0–7 7–14 14–21 above 21
corresponds to French degree of hardness [˚fH]
0–12.5 12.5–25 25–37.5 above 37.5
Water hardness
To test for water hardness: hold strip under water for one second. Take a reading after 1
minute. To set water hardness, see User Settings/Programming.
Page 9

1 2
1
2
3
9
Initial Operation
Switching on the appliance
Venting the system
Ñ
Switch on appliance at
main switch
Ñ
Close operating panel. «Ventilate»
appears on plain text display
Ñ
Place a tall vessel
under nozzle
Ñ
Press key and draw hot water until
a steady jet of water is produced
Ñ
Press key again to interrupt fl ow of hot
water. «Select product» and «Ready for
use» appear on the plain text display
Ñ
For language settings, see User Settings/Programming.
Select product
Ready for use
Hot water
Dispensing...
Page 10

2 31
10
User Settings/Programming
Start P Function Settings
Cancel by pressing «ESC» Select Confi rm Select Confi rm Cancel
Standby
The appliance switches over to energy-saving mode.
Waterfi lter
Make this setting only when inserting waterfi lter for the fi rst time. Important: reset after
each change of fi lter!
Water hardness
The appliance should be adapted to the degree of water hardness (see Descaling).
Illumination
On-off switching of illumination.
Contrast
Adjusting contrast for the plain text display.
Language
Selecting language for plain text display.
The following languages can be select: German, French, English, Spanish, Dutch, Italian,
Russian and Turkish.
Rinsing
Circuit is automatically cleaned upon switching on.
Coffee is prepared using fresh water.
Temperature
Selecting the temperature for preparing coffee.
The * symbol blinking on the plain text display denotes the user setting
selected.
or
Ñ Ñ Ñ
Energy saving
Waterfilter On - Off - Reset
Water hardness Hardness 1 - … 2 - … 3 - … 4
Illumination On - Off
Contrast 10 20 30 40 50 60 70 80 90 100
Language Deutsch - Français - …
Rinsing On - Off
Temperature low - medium - high
Page 11

1 2 3
11
User Settings/Programming
Start P Function Settings
Pre-brewing
The coffee is moisturized fi rst of all. This is the best way of bringing out the taste.
If setting is «large», the coffee is pre-brewed for 4 seconds.
Total coffee
The total number of coffee portions served is displayed.
Timer
Selection of duration according to which the appliance is set to «Standby» (can be preset 3 hours).
Automatic switch
Cleaning cycle
The cleaning cycle is for degreasing the brewing group.
Factory settings
Reinstate all settings existing at time of delivery.
Aroma of espresso
Selecting the amount of ground coffee for espresso.
Aroma of coffee
Selecting the amount of ground coffee for coffee.
Aroma of large coffee
Selecting the amount of ground coffee for large coffee.
Cancel by pressing «ESC» Select Confi rm Select Confi rm Cancel
or
Setting whether or not on-off switching times are activated.
Schaltuhr
Setting of clock time.
Setting of on-off switching times.
Schaltuhr
Setting whether or not clock time is displayed.
Ñ Ñ Ñ
Exit
Exit from program mode
Prebrewing Off - On - long
Total coffees
Timer Standby after x:xx
Clock
Automatic On/Off - Clock time
On/Off time - Show clock time
Rinsing cycle
Factory settings Yes - No
Aroma espresso
Mild - Normal - Strong
Aroma coffee Mild - Normal - Strong
Aroma large coffee
Mild - Normal - Strong
Automatic On/Off Yes - No
Clock time XX:XX
On/Off time
On time XX:XX
Show clock time Off - On
Off time XX:XX
Yes - No
Exit
Page 12
A
B
C
C
12
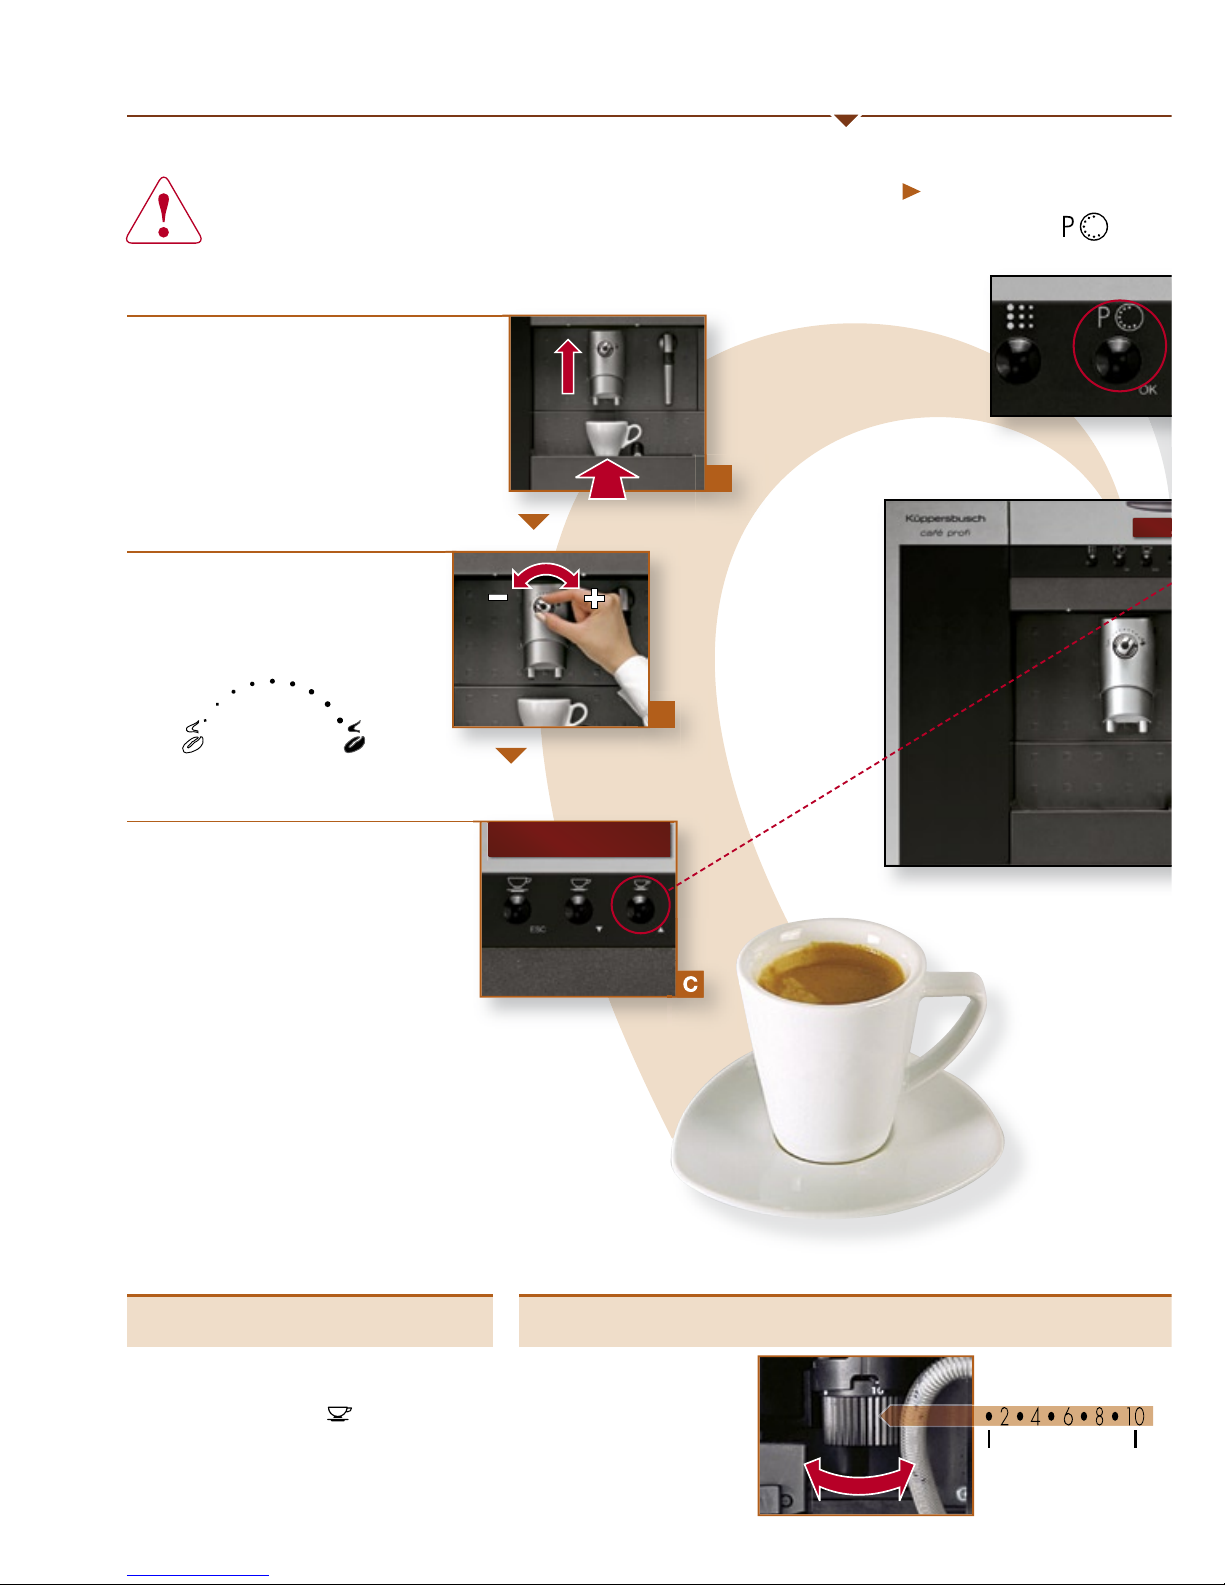
Preparing coffee
Hot water and steam can scald! Point nozzle at drip tray!
Place 1 or 2 cups below spout
Ñ
Preheat cups
Ñ
For large cups: push coffee
spout up
Start preparation
Ñ
Press required key:
■ 1 cup = once
■ 2 cups = twice
AromaControl
Strength of coffee is adjustable
on continuously sliding scale.
Espresso
Settings
Espresso
Energy saving
Can be cancelled by
pressing key
Amount to be fi lled Grinder setting
Ñ
Place cup below spout
Ñ
Hold down key until the
required quantity is reached.
■
The quantity remains stored in
the memory
CoarseFine
Mild coffee Strong coffee
No coffee beans
should be in the
grinder when changing
the grinder setting
1 e spres so
Dis pensi ng...
Select product
Ready for use
Page 13

A
B
C
D
13
Cappuccino
After starting the steam operation, some
condensed water will be produced at fi rst.
Cappuccino
Amount for grinding Cleaning the nozzle
This can be selected before preparation, see User
Settings/Programming.
■ Aroma of espresso
■ Aroma of coffee
■ Aroma of large coffee
Clean nozzle immediately after use with a damp
cloth
Caution: hot part. There is a danger of
burning yourself!
For cappuccino, pour coffee directly
into the milk froth.
Put the milk into a suitable
vessel.
■ Cold milk froths better
■ Fill vessel no more than one third
Start steam
Ñ
Point nozzle at drip tray
Caution: steam spray!
Frothing the milk
Ñ
Rotate vessel when frothing
the milk
Ñ
Stop the steam by pressing
key
Ñ
Remove vessel
Ñ
Prepare coffee
As soon as there is enough froth
Steam
Dispensing...
Page 14
14
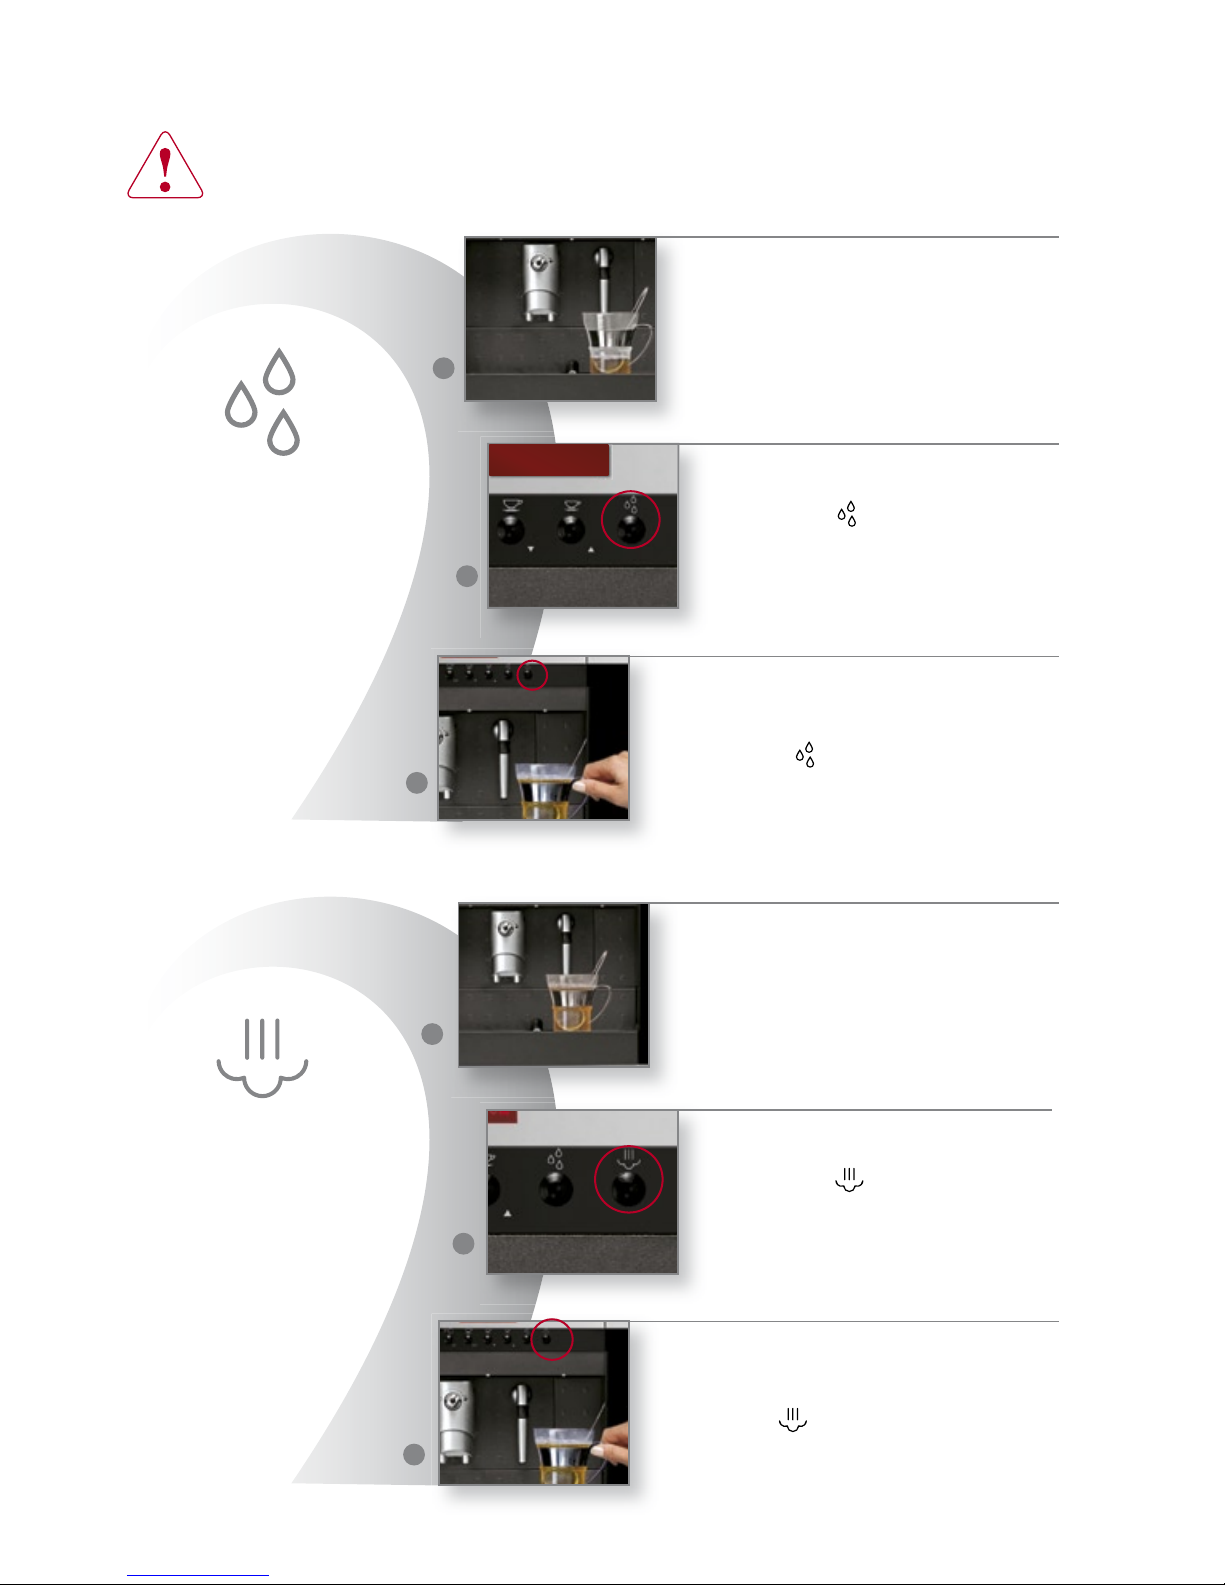
Drawing hot water/steam
Hot water
Steam
Danger: hot water and steam can scald.
Point nozzle at drip tray.
Ñ
Place cup under nozzle
Drawing hot water
Ñ
Press key
Ñ
Press key
Starting the steam
Ñ
Press key
Ñ
Warm the drink by rotating
vessel
Ñ
Place cup under nozzle
After steam function has started, some
condensed water is produced at fi rst.
As soon as the required temperature is
reached
Ñ
Press key
As soon as the required quantity has been
reached
a
b
c
a
b
c
Hot water
Dispensing...
Page 15

1 2
3 4
1 2
3
15
Care and maintenance
Watertank/Bean container
Drip tray/Strainer
Clean appliance, brewing group and accessories weekly without detergent
under the tap. Never wash appliance parts in the dishwasher, and never dry
them in the oven or in the microwave.
Ñ
Switch off appliance
Ñ
Remove tank/container
Ñ
Clean tank
(including strainers)
Ñ
Empty/Clean the bean container
Ñ
Remove drip tray
Ñ
Remove coffee-grounds container
Ñ
Clean coffee-grounds container
Page 16

1
2
3
1
2
16
Care and maintenance
Brewing group
Ñ
Push top button and pull
coffee spout forwards.
Clean without detergent
under the tap.
Ñ
Push coffee spout onto
holder until it rests in.
Ñ
Pull lower part of nozzle
downwards
Ñ
Clean under the tap without detergent
Coffee spout
Ñ
Push drip guard to
AromaControl position
Ñ
Remove drip tray
Ñ
Open service door
(pushbutton behind cover)
Ñ
Press PUSH
and pull brewing group
forwards
Ñ
Insert key, turn anti-clockwise
and remove the top strainer
Ñ
Clean/dry everything
Do not press PUSH
when assembling
Ñ
Reassemble strainer
and brewing group in
reverse sequence.
Ñ
Close service door of
brewing group.
Nozzle
Ñ
Push back coffee spout,
push drip guard to
AromaControl position.
Ñ
Open service door (push
button is behind cover).
Ñ
Remove drip tray
Proceed with care
when using the key.
Page 17

1
2
4
3
6 5
17
Descaling
Whenever plain text display shows or as required.
Under no circumstances use vinegar, as appliance will otherwise be damaged.
Use commercially available descaling agents that are suitable for this appliance.
If the appliance is switched off during descaling, then descaling will continue after the appliance
is switched on again. Descaling lasts approx. 30 minutes.
Ñ
Remove waterfi lter
Ñ
Fill descaling agent in accordance with
manufacturer‘s instructions and dilute
with water (min. 1 litre) to ensure correct
descaling. Re-insert watertank.
Ñ
Place large vessel below
spout
Ñ
Press key
Press key ,
select
Press key ,
this starts the descaling
Rinsing intervals are at
1-minute intervals until
message
is displayed. For further
information, see «Rinsing».
Ñ
Ñ
Preparation
Starting descaling
Suitable descaling agents
Decalcify
Rinse machine
Fill watertank
Yes
Descaling
Yes
Machine is descaling
Page 18

7
8
9
10
11
12
18
Descaling
Rinsing
Finishing descaling
Ñ
Thoroughly rinse water
tank
Ñ
Press key ,
Rinsing begins
Ñ
Fill with fresh water
Press key to cancel and
continue the procedure
Rinsing is complete as
soon as the plain text
display indicates
Ñ
Press key
Ñ
Thoroughly rinse water
tank
Ñ
Put back waterfi lter
Ñ
Fill with fresh water
Ñ
Draw hot water until a steady
jet of water is produced
Ñ
Insert watertank
Ñ
Press key . Venting begins
Ñ
Press key to fi nish
Rinsing fi nished
Press water key
Rinse machine
Press water key
Page 19

1
2 3
4
5 6
19
Cleaning cycle
Ñ
Add coffee-oil solvent
to the brewing group
Ñ
Insert brewing group
Ñ
Fill watertank
Ñ
Insert watertank
Ñ Press key
Ñ
Select
by pressing key
Ñ
Confi rm by pressing
key
Ñ
Select
by pressing key
Ñ
Confi rm by pressing
key
Ñ
Approx. 8.5 dl water
is pumped off in approx.
7 minutes.
Ñ
Place vessel below coffee
spout
Before starting cleaning cycle, empty drip tray and have a spare vessel handy. Large
amounts of water will be produced (approx. 8.5 dl), therefore watch vessel closely.
Clean your appliance every fortnight or after every 250 cups to ensure
trouble-free operation.
Once started, a cleaning cycle cannot be interrupted.
For optimum cleaning, we recommend the coffee-oil solvent manufactured by Saeco.
This can be obtained from our Customer Service or through specialist dealers.
If other products are used, damage may result, for which no
responsibility can be accepted.
Rinsing cycle
Energy saving
Rinsing
Rinsing cycle
Factory settings
Yes
Yes
Page 20

20
Rectifying faults yourself
■ Brewing group cannot be
removed for cleaning
■ Heating up takes a long
time
■ No hot water or steam
produced
■ Coffee is not hot enough
■ No illumination
■
Coffee produced is too little,
or none is produced at
all
■ Appliance does not switch
on
see
Page
Ñ
Turn on main switch 9
Ñ
Check power connection
Ñ
Check fuse in interior installation of building
Ñ
Preheat cups with hot water 14
Ñ
Set brewing temperature correctly 10
Problem Remedy
Ñ
Switch off appliance! 16
Ñ
Clean nozzle
Ñ
Descale appliance 17
Ñ
Close service door
Ñ
Switch on appliance (brewing group is initialised)
Ñ
Check grinder setting and AromaControl 12
Ñ
Switch on main switch 9
Ñ
Adjust illumination 10
Ñ
Press key
Ñ
Descale appliance
Ñ
Fill watertank with fresh drinking water
Ñ
Fill bean container
Ñ
Open service door, empty coffee-grounds container, appliance is reset.
Ñ
Close the operating panel
Ñ
Insert the Brewunit in it‘s place.
■ Brewing group cannot be
reinstalled after cleaning
Ñ
Press PUSH so that locking/unlocking
lever rests in
Message Remedy
Energy saving
Decalcify
Fill watertank
Coffee beans empty
Dregdrawer full
Close control panel
Brewunit missing
Page 21

21
Rectifying faults yourself
Ñ
Insert brewing group correctly
Ñ
Insert drip tray/coffee-grounds container correctly
Ñ
Close service door
Ñ
Vent system (during initial use). Press key
Ñ
Call Customer Service
Ñ
Call Customer Service
Ñ
Call Customer Service
Message Remedy
Technical specifi cations
Voltage, current and power rating
Weight
Watertank (with waterfi lter)
Capacity of bean container
Capacity of coffee-grounds container
Capacity of drip tray
Pump output
Grinder
Height adjustment of coffee spout
Illumination
n
230 V ~50 Hz, 10 A, 1250 W
n
approx. 13 kg
n
1.8 l (1.7 l) – removable
n
300 g
n
12 Stk.
n
0.8 l
n
15 bar
n
rotary ceramic grinder
n
80–105 mm, at rear 155 mm
n
3 LEDS
Brewunit blocked
Dregdrawer missing
Close door
Ventilate
Brewunit blocked
Grinder blocked
Fault on
water system
Page 22

22
Disposal
Packaging
n The packaging material (card, polyethylene plastic film and expanded polystyrene) is
labelled, and if possible should be recycled and disposed of in an environmentally friendly
manner.
Uninstalling
n Isolate appliance from mains. Where the appliance is immovably fixed, this must be under
taken by a certified electrician!
Safety
n To prevent accidents through improper use, especially where children are playing, the
appliance should be made unusable.
n Remove plug from socket, or have the connection dismantled by an electrician. The mains
cable must then be severed at the appliance.
Disposal
n The used appliance is not worthless refuse. Proper disposal will result in reutilisation of the
raw materials.
n The symbol is depicted on the type plate of the appliance. This means that disposal
along with normal household refuse is not permitted.
n Disposal of the appliance must be in accordance with local regulations on refuse disposal.
Please contact your local authorities, the local recycling depot for household refuse or the
dealer from whom you obtained this appliance. They should provide you with further
information about handling, utilisation and re-utilisation of this product.
Page 23

23
Please note:
For our Customer Service to be able to make careful preparation for repairs and to provide
the necessary spares, we will require the following information should you have any claim on
Customer Services:
1. Your full address
2. Your telephone number and, if applicable, your fax number
3. When Customer Service personnel can visit you?
4. Exact designation of appliance: model and serial no. (refer to the type plate and/or purchase
receipt)
5. Date of purchase
6. Exact description of the problem or your service request.
Also, please keep your purchase receipt handy.
This will help us save a lot of time and expense, and also provide a more efficient service for you.
Professional kitchens
Küppersbusch Customer Service
Telephone service for professional kitchens
For Germany:
Fault rectification:
Headquarters: 0180 - 5 25 12 03
Order department for spares service:
Küppersbusch Grossküchentechnik GmbH
Fürstinnenstr. 2
45883 Gelsenkirchen
Fax 0209 - 40 17 16
Fax 0209 - 40 17 66
Outside Germany:
Please enter the number of your customer
service department here:
Küppersbusch Grossküchentechnik GmbH
Küppersbuschstr. 16
D-45883 Gelsenkirchen (Germany)
Export
Fax: +49 - 209 - 40 17 35
Küppersbusch Customer Service
Page 24

J301.033-0
KÜPPERSBUSCH HAUSGERÄTE AG
Postfach 10 01 32, D-45801 Gelsenkirchen, Küppersbuschstr. 16, D-45883 Gelsenkirchen
Phone: (02 09) 4 01-0, Fax: (02 09) 4 01-3 03
www.kueppersbusch.de
Küppersbusch Ges.m.b.H.
Eitnergasse 13, 1230 Wien, Phone: 01/8 66 80-0, Fax: 01/8 66 80 72
www.kueppersbusch.at • e-Mail: verkauf@kueppersbusch.at
Household appliances
Headquarters for requesting customer services and spares
Germany
Küppersbusch Hausgeräte AG
Küppersbuschstrasse 16
D-45883 Gelsenkirchen
Phone: 01 80 - 5 25 65 65
Fax: (02 09) 4 01 - 7 14/7 15
Austria
Küppersbusch Ges.m.b.H.
Eitnergasse 13
A-1230 Wien
Phone: (01) 8 66 80 - 15
Fax: (01) 8 66 80 - 50
Outsourced customer service
August-Horch-Strasse 14
D-56070 Koblenz
Headquaters phone: (02 61) 8 90 90
Customer service phone: (02 61) 8 90 91 73
Industriestrasse
D-55543 Bad Kreuznach
Headquaters phone: (06 71) 79 40
Customer service phone: (06 71) 79 43 311
We are open
Monday to Thursday from 7.30 to 18.00
Friday from 7.30 to 17.00
Saturday from 9.00 to 13.00
Outside office hours please forward your
requirements to us by fax.
We are open
Monday to Friday from 8.00 to 17.00
Outside office hours please forward your
requirements to us by fax.
Zinzinger Strasse 13
D-66117 Saarbrücken
Headquaters phone: (06 81) 50 08 50
Customer service phone: (06 81) 5 00 85 22
 Loading...