

Page 1
KÖNIG & MEYER GmbH & Co. KG
Kiesweg 2, 97877 Wertheim, www.k-m.de
19774-300-55 Rev.05 03-80-096-00 4/17
TECHNISCHE DATEN / SPEZIFIKATION
BENUTZERHINWEISE
AUFSTELLANLEITUNG
19774 iPad Air Stativ
- Ihr iPad Air / iPad (2017) wird wunderbar in Szene gesetzt.
- Gleichermaßen geeignet für Bühne, Heim und Studio.
- Einfaches Einrasten in die speziell angepasste Platte
- Der Neigungswinkel kann mittels ergonomischer Klemmelemente stufenlos eingestellt werden.
- Sehr praktisch: mit einem Handgriff kann das iPad quer oder hochkant präsentiert werden.
- Stufenlos höhenverstellbar von 700 - 1550 mm.
SICHERHEITSHINWEISE
Vielen Dank, dass Sie sich für dieses Produkt entschieden haben.
Diese Anleitung informiert Sie über alle wich tigen Schritte bei Aufbau
und Handhabung. Wir empfehlen, sie auch für den späteren
Gebrauch aufzubewahren.
FEHLERSUCHE (F) und BESEITIGUNG (B)
F: Halterung wackelt
F: B: Verschraubung mit Stativ prüfen, ggf. neu verschrauben s.4-6
F: B: Flügelmutter 7 fest anziehen
F: iPad sitzt nicht gut
F: B: iPad korrekt einlegen und dabei hörbar einrasten lassen.
F: B: ACHTUNG! Nur für iPad Air oder iPad (2017) geeignet.
F: B: Nicht für andere Versionen.
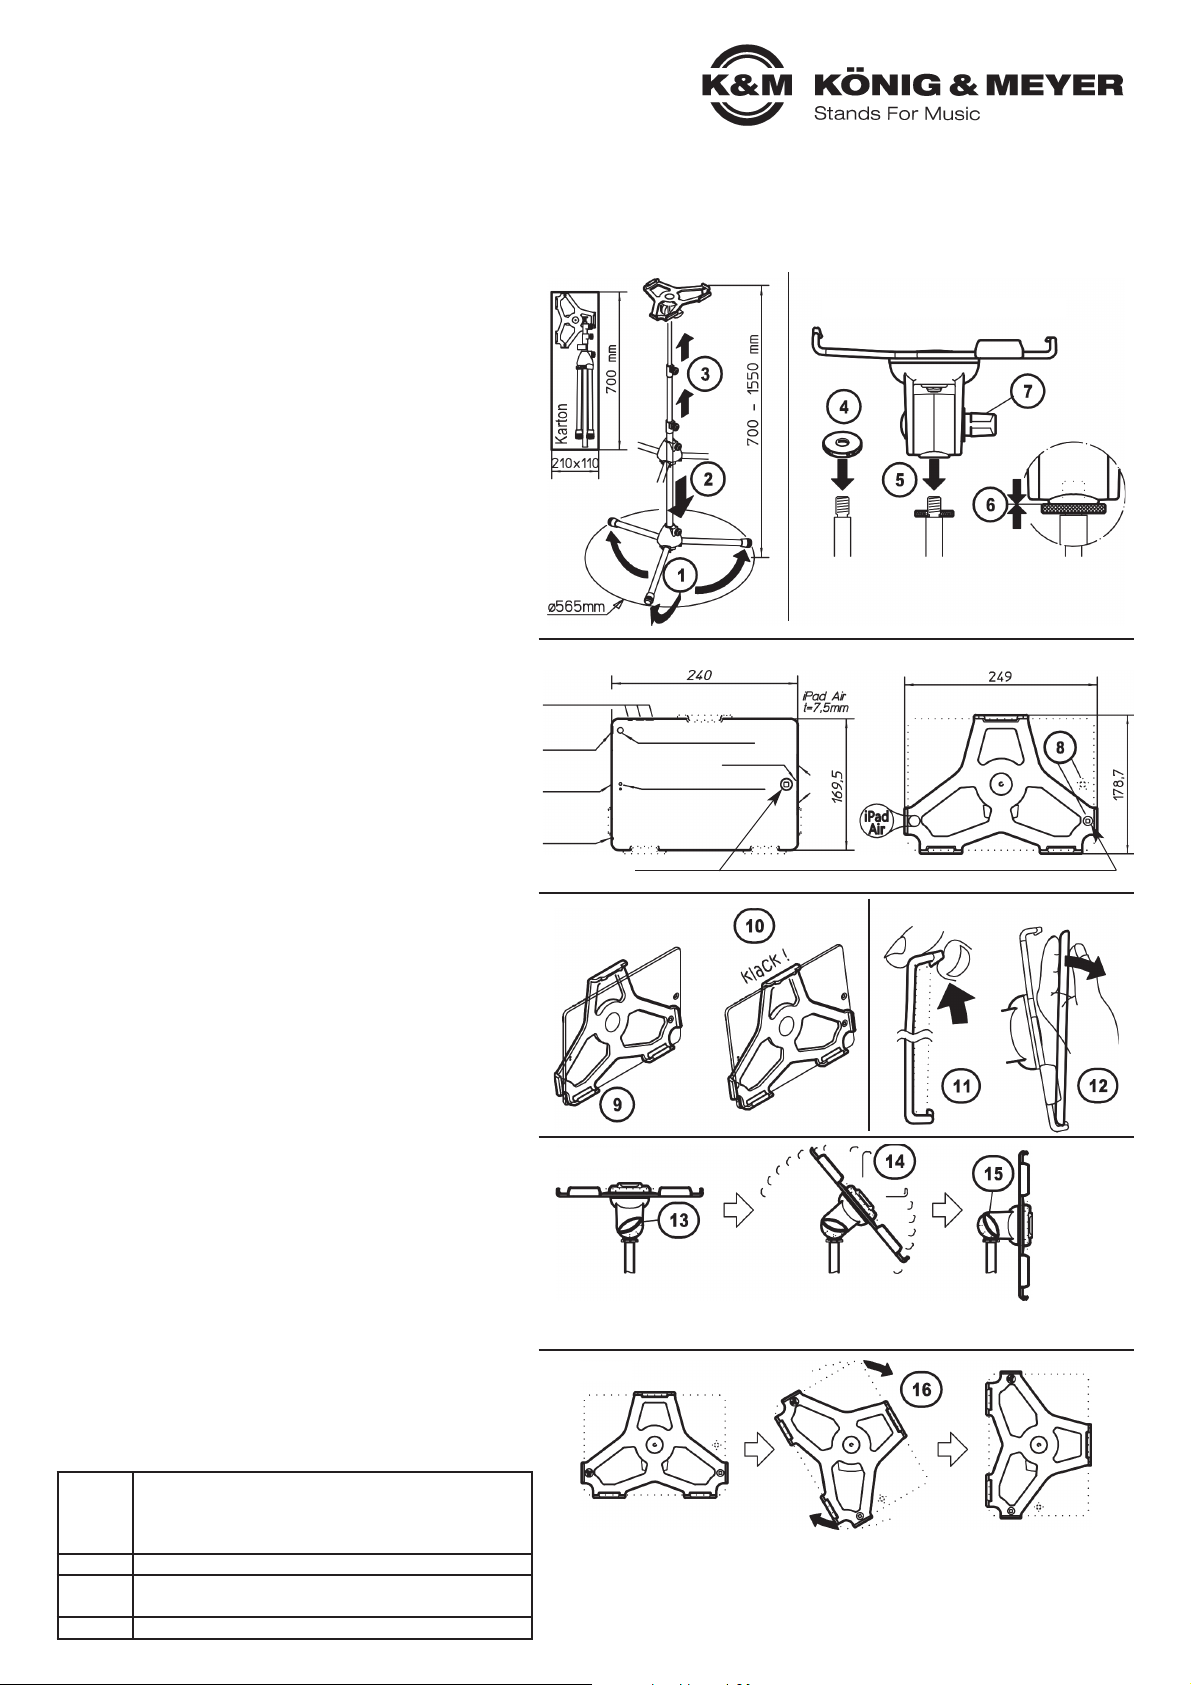
AUSRICHTEN des iPad
8 iPad so einlegen, dass sich die HOME-Button-Symbole
8 des Tablets und der Halteplatte auf der gleichen Seite befinden.
EINLEGEN des iPad
19 iPad erst unten EINLEGEN...
10 ...danach oben EINRASTEN
ENTNEHMEN des iPad
11 iPad festhalten und oberen Haken ANHEBEN
12 iPad herausklappen und ENTNEHMEN
Die iPad Air-Halteplatte kann in Neigung und Format verstellt
werden. Zu diesem Zweck muss das Tablet nicht aus der
Halteplatte entnommen werden.
NEIGUNG
Das iPad kann zwischen senkrechter und waagerechter
Endstellung in jeder Position fixiert werden.
13 iPad halten und Flügelmutter etwas lösen
14 iPad neigen wie gewünscht und
15 Flügelmutter wieder festziehen
FORMAT
Die Halterung verfügt über eine 90°-Verdrehfunktion.
Dadurch kann das iPad hochkant oder quer präsentiert werden.
16 Aufnahmeplatte nehmen und ins Quer- bzw.
16 Hochformat drehen - oder in die Schräge!
16 Anschläge in der Halterung begrenzen die Verdrehung.
1 Füße auseinander klappen
2 Sockelschraube lösen und Sockel bis zum Anschlag
2 nach unten fahren; Sockelschraube wieder anziehen
3 Spannschellen lösen, Auszüge auf gewünschte Höhe
3 bringen und Spannschellen wieder klemmen
4 Rändelscheibe bis zum Anschlag festdrehen
5 iPad Air-Halterung auf Gewindebolzen schrauben
6 Rändelscheibe mit der Halterung verspannen
7 Flügelmutter festziehen
a. Last: - Passend für iPad Air oder iPad (2017)
- iPad sorgfältig in die Aufnahmeplatte einclipsen
- und auf sicheren Sitz prüfen
- Halterung umsichtig handhaben; v.a. beim ändern
- der Einstellungen (Neigung, Format)
b. Boden: - muss geeignet sein, d.h. ebener und tragfähiger
- Untergrund ist Voraussetzung
c. Installation: Klemmschrauben stets handfest anziehen
d. Äußere Einflüsse: Schutz vor Wind, Regen, Stößen etc.
Material
Rohre, Schrauben: Stahl, schwarz gepulvert, verzinkt
Spannschellen: Zink, schwarz gepulvert
Sockel, Gelenke, Klemmen, Griffe, Aufnahmeplatte: PA-6
Parkettschoner: TPE
Traglast iPad Air oder iPad (2017)
Maße
Halter: 249 x 94 x 178,7 mm
Stativ: ø 565 x 700/1550 mm
Gewicht netto: 1,66 kg, brutto: 2,24 kg
NEIGUNG
FORMAT
AUSRICHTEN des iPad
HALTEPLATTE MONTIEREN
STATIV AUFSTELLEN
EINLEGEN des iPad ENTNEHMEN des iPad
Lautstärkeregler
Kamera (Rückseite)
Kamera (Vorderseite)
Lautsprecher
Lightning Connector
Ein-AusSchalter
Mikrofon
3,5 mm
Buchse
unten
EINLEGEN
Endstellung:
- waagerecht
- am Anschlag
Zwischenposition:
- schräg (0-90°)
- frei wählbar (Pos. sichern durch
- festes Anziehen der Flügelmutter)
Endstellung:
- senkrecht
- am Anschlag
Endstellung eingerastet:
- Querformat (landscape)
Zwischenstellung nicht eingerastet,
sie behält jedoch die gewählte
Einstellung
Endstellung eingerastet:
- Hochformat
Haken
anheben
entnehmen
oben
EINRASTEN
Home-Button (eine Prägung in der Halterung gibt die AUSRICHTUNG des iPad Air vor)
(falsche Ausrichtung führt zu verdeckten Bedienelementen! Bitte beachten)
Page 2

TECHNICAL DATA / SPECIFICATIONS
USER NOTES
SETUP INSTRUCTIONS
19774 iPad Air stand
- Long-lived and stable! Your iPad Air / iPad (2017) is wonderfully presented.
- Equally suitable for stage, home and studio.
- The iPad is simply attached to the specially adjusted adapter plate.
- The inclination angle can be adjusted smoothly by ergonomic clamp screws.
- Very practical: the handle can be used to present the iPad horizontally or vertically.
- Smoothly adjustable from 700 - 1550 mm.
SAFETY NOTES
Thank you for choosing this product. This instruction manual informs
you about the important steps to set up and handle the product.
We recommend to keep the manual in a separate place for a possible
later use.
ORIENTATION of the iPad
8 Place the iPad according to the HOME-Button-Symbol
8 (consult the embossing on the holding plate).
PLACEMENT of the iPad
19 First PLACE the iPad into the bottom area and...
10 ...then CLIP it into the top.
REMOVAL of the iPad
11 Hold the iPad and LIFT UP the hook.
12 Hold the iPad and REMOVE it.
The iPad Air holder can be adjusted according to the
position and format. The iPad does not have to be
removed from the holding plate to make the adjustments.
POSITION
The iPad can be placed in any vertical / horizontal
position, the final position can be set. To do this:
13 Hold the iPad and loosen the wing nut somewhat
14 Pick the position (vertical / horizontal) and
15 Re-tighten the wing nut.
FORMAT
The holder is equipped with a 90°-turning function. This allows the
presentation of the iPad Air in the portrait and landscape positions.
16 Turn the holding plate either in the portrait or landscape
16 position - or it can be tilted.
16 Hitches within the mount limit how far the holder can be turned.
1 Fold feet apart
2 Loosen base screw and move base down to the stop;
2 tighten base screw again
3 Loosen clamps, adjust extensions to the desired height
3 and tighten clamps again
4 Tighten knurled screw to the stop
5 Screw iPad Air holder to the threaded pin
6 Clamp knurled screw to the holder
7 Tighten wing nut
Material
Pipes, screws: Steel, black powder-coated, zinc-plated
Clamps: zinc, black powder-coated
Base, joints, clamps, grip, adapter plate: PA-6
Parquet protection: TPE
Load capacity iPad Air or iPad (2017)
Dimensions
Holder: 249 x 94 x 178,7 mm
Stand: ø 565 x 700/1550 mm
Weight net: 1.66 kg, gross: 2.24 kg
a. Load: - Suitable for iPad Air or iPad (2017)
- Carefully attach iPad Air to the adapter plate
- and check for secure fit.
- Handle the holder with care, in particular when
- changing settings (inclination, format).
b. Bottom: - Must be slanted, i.e. level underground with carrying
- capacity is a requirement
c. Installation: Always hand-tighten clamp screws.
d. Outer influences: Protection from wind, rain, impact, etc.
KÖNIG & MEYER GmbH & Co. KG
Kiesweg 2, 97877 Wertheim, www.k-m.de
19774-300-55 Rev.05 03-80-096-00 4/17
HOLDER ASSEMBLY
STAND ASSEMBLY
POSITION
FORMAT
ORIENTATION of the iPad
PLACEMENT
of the iPad
REMOVAL of the iPad
Volume Control
Camera (Back)
Camera (Front)
Speaker
Lightning Connector
On / Off
Switch
Microphone
3.5 mm
connector
bottom
PLACE
Final Position
- horizontal
- as far as it goes
Incline Position
- tilted (0-90°)
- select any position (Secure position
- by tightening the wing nut)
Final Position
- vertical
- as far as it goes
Final Position
- landscape
- click into place
Incline Position, cannot be clicked
into place, however it does stay in
the selected position
Final Position
- portrait
- click into place
LIFT UP
the hook
REMOVE
top
CLIP ON
Home-Button (the holder is embossed with information on where the iPad Air is to be placed)
(false placement results in the embossed user elements being covered up! Please note)
FAULT FINDING (FF) and REPAIR (R)
FF: Holder wobbles
FF: R: Check screw connection to stand, attach again if required s.4-6
FF: R: Tighten wing nut 7 firmly
FF: iPad is not positioned in the holder properly
FF: R: Place the iPad into the holder correctly (so you can hear the click)
FF: R: ATTENTION! Suitable only for iPad Air or iPad (2017).
F: B: Not for other iPad Generations.
 Loading...