

Page 1

KÖNIG & MEYER GmbH & Co. KG
Kiesweg 2, 97877 Wertheim, www.k-m.de
19723-000-55 Rev.5 03-80-107-00 6/13
TECHNISCHE DATEN / SPEZIFIKATION
Material
Schwenkgelenk: Polyamid PA-6
Halteplatte: PP
Schrauben, Muttern, Scheiben, Federn: Stahl, verz.
Klammer: Aluminiumprofil
Traglast iPad mini
Maße
208,7 x 89,6 x 143,7 mm / Rohr ø 7-30 mm
Karton: 300 x 102 x 230 mm
Gewicht netto 0,75 kg, brutto 1,1 kg
BENUTZERHINWEISE
AUFSTELLANLEITUNG
19723 iPad mini-Halter
- Flexibel und sicher! Ihr iPad mini wird wunderbar in Szene gesetzt.
- Die Halterung garantiert eine effektive und sichere Montage des iPad mini.
- Gleichermaßen geeignet für Bühne, Heim und Studio.
- Mit großzügig dimensionierter Klemmung für sicheren Halt an
- Rohren bis zu ø 30 mm.
- Das iPad mini wird ganz einfach in die speziell angepasste
- Halteplatte eingeclipst.
- Mit Verstellmöglichkeiten die keine Wünsche
- offenlassen: Neigung, Richtung, Hoch/Quer-
- format sind stufenlos einstellbar
SICHERHEITSHINWEISE
Vielen Dank, dass Sie sich für dieses Produkt entschieden
haben. Diese Anleitung informiert Sie über alle wich tigen
Schritte bei Aufbau und Handhabung. Wir empfehlen, sie
auch für den späteren Gebrauch aufzubewahren.
FEHLERSUCHE (F) und BESEITIGUNG (B)
F: Halterung wackelt
F: B: Verschraubung prüfen, ggf. nachziehen
F: iPad mini sitzt nicht richtig
F: B: iPad korrekt einlegen und hörbar einrasten lassen
Die iPad mini-Halterung kann in Format und Neigung verstellt
werden. Zu diesem Zweck muss das iPad mini nicht aus der
Halteplatte entnommen werden.
NEIGUNG
Das iPad mini kann zwischen senkrechter und waagerechter
Endstellung in jeder Position fixiert werden. Dazu:
18 iPad mini halten und Flügelmutter etwas lösen
19 iPad mini neigen wie gewünscht und
10 Flügelmutter wieder festziehen
AUSRICHTUNG
11 a. Flügelschraube leicht lösen, iPad mini Halterung drehen,
11 a. Flügelschraube wieder festdrehen
12 b. Halterung festhalten, Klemmschraube lösen, Haltearm in
12 b. Wunschrichtung drehen, Klemmschraube wieder
12 b. festziehen.
FORMAT
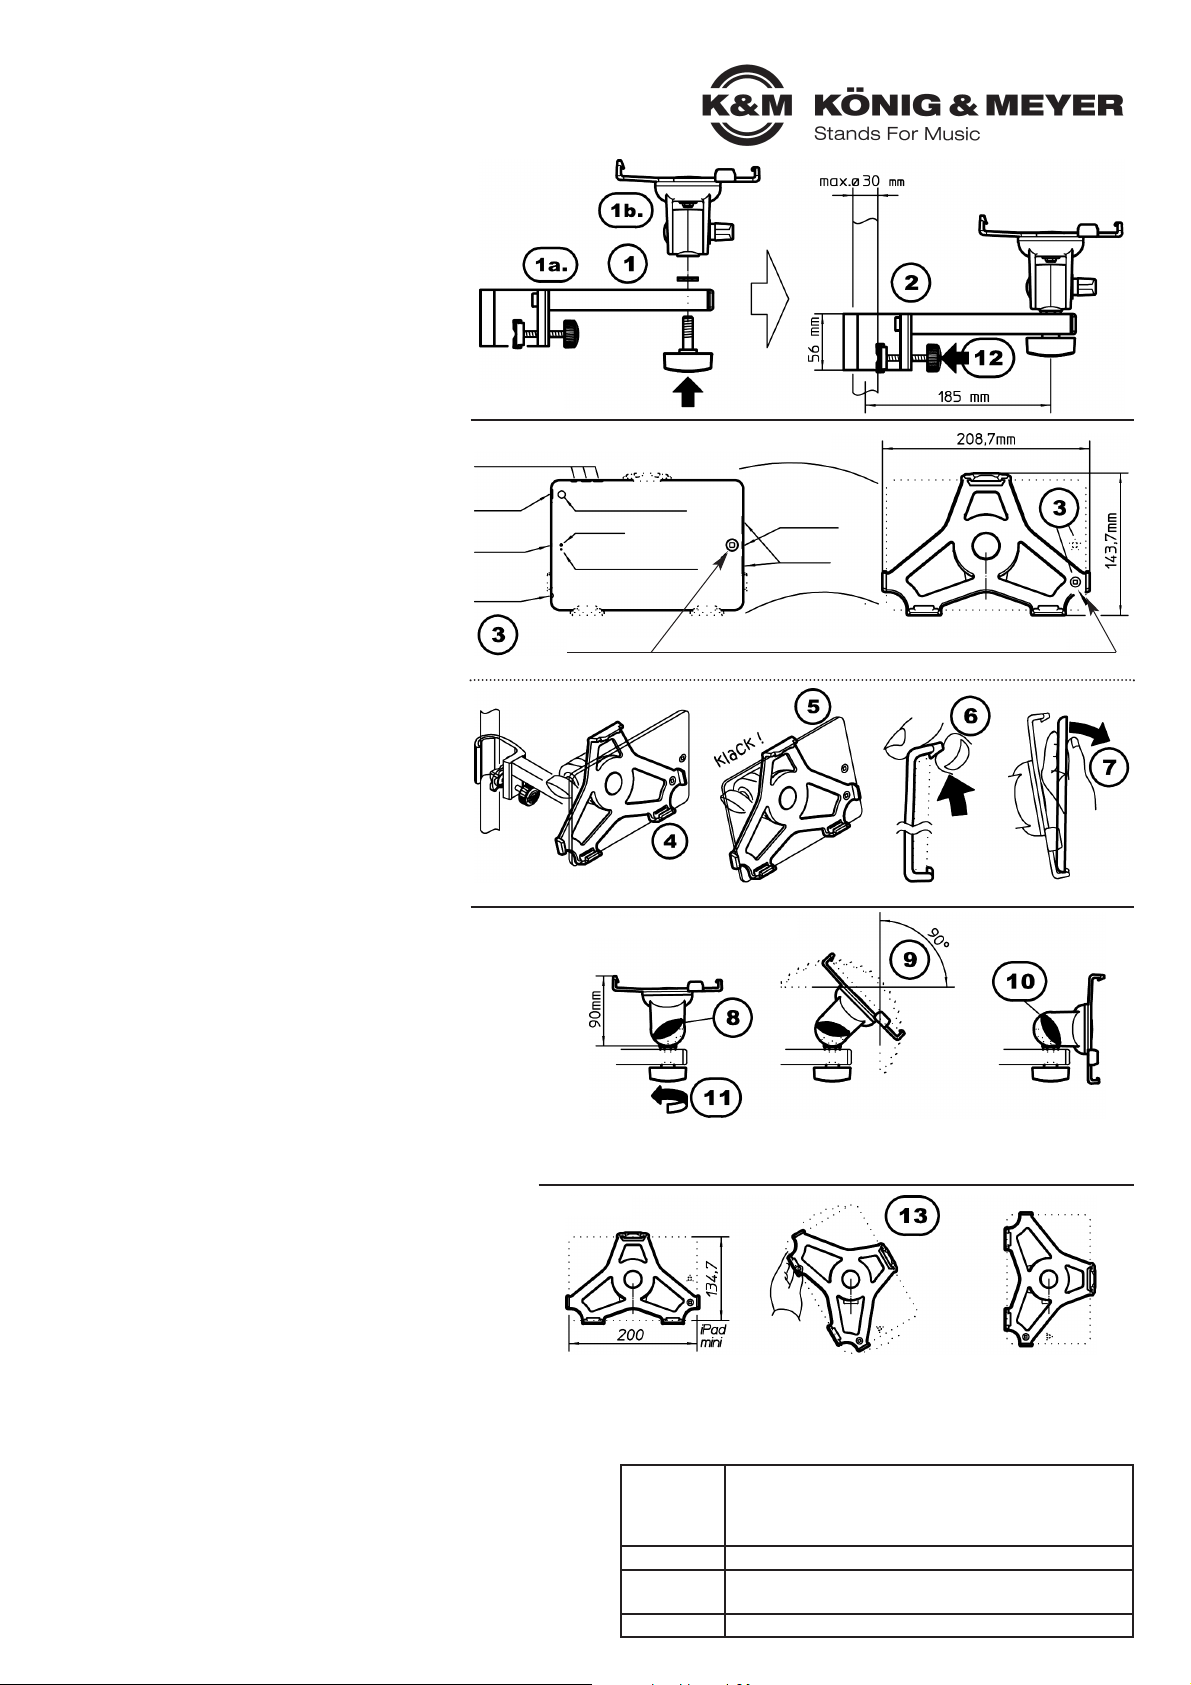
Die Halterung verfügt über eine 90°-Verdrehfunktion (hochkant/quer)
13 Halteplatte nehmen und in entsprechende Position drehen
- Unsichtbare Anschläge in der Halterung begrenzen die Verdrehung.
- Zudem rastet die Halteplatte in den beiden Endstellungen ein.
MONTAGE
1 Die Halterung besteht aus zwei Baugruppen:
1 a. Haltearm mit der Klammer,
1 b. iPad mini Halteplatte mit Gelenkverbindung.
1 Beide Teile werden mittels Flügelschraube
1 miteinander verbunden
2 Die Klammer wird um das Rohr gelegt und
2 dann mit der Schraube 12 fixiert
EINLEGEN des IPAD MINI
3 iPad mini nach dem HOME-Button-Symbol
3 AUSRICHTEN (s.Prägung auf der Halteplatte).
4 iPad mini erst unten EINLEGEN und dann...
5 ...oben EINCLIPSEN.
ENTNEHMEN des IPAD MINI
6 iPad mini halten und oberen Haken anheben
7 iPad mini herausklappen und entnehmen
- geeignete Stative verwenden - das setzt voraus:
- Standfestigkeit, Tragkraft, Rohr-ø bis max. 30 mm
- z.B. K&M-Stative 118/1, 11888, 11889, 199, 200,
- 21020, 21090, 210/6, 210/8 etc.
- das iPad mini sorgfältig in die Aufnahmeplatte
- einclipsen und auf sicheren Sitz prüfen
- umsichtige Handhabung;
- insbes. bei Änderungen der Einstellungen (Neigung,
- Format und Ausrichtung) ist auf sicheren Halt des iPad
- mini zu achten
MONTAGE
NEIGUNG und AUSRICHTUNG
FORMAT
EINLEGEN und ENTNEHMEN des iPad mini
Lautstärkeregler
Kamera (Rückseite)
Kamera (Vorderseite)
Lautsprecher
Lightning
Connector
Mikrofon
Ein-AusSchalter
Mikrofon
3,5 mm
Buchse
unten
EINLEGEN
Endstellung:
- waagerecht
- am Anschlag
Zwischenposition:
- schräg (0-90°)
- frei wählbar (Pos. sichern durch
- festes Anziehen der Flügelmutter)
Endstellung:
-senkrecht
-am Anschlag
Endstellung:
- quer (landscape)
- eingerastet
Zwischenposition:
- schräg
- nicht eingerastet,behält jedoch die
- gewählte Einstellung
Endstellung:
- hoch (portrait)
- eingerastet
Haken
anheben
entnehmen
oben
EINCLIPSEN
Home-Button (eine Prägung in der Halterung gibt die AUSRICHTUNG des iPad mini vor)
(falsche Ausrichtung führt zu verdeckten Bedienelementen! Bitte beachten)
Page 2
KÖNIG & MEYER GmbH & Co. KG
Kiesweg 2, 97877 Wertheim, www.k-m.de
19723-000-55 Rev.5 03-80-107-00 6/13
TECHNICAL DATA
Material
Swivel Bearing: Polyamid PA-6
Holding Plate: PP
Screws, nuts, washers, springs: steel galvanized
Clamp: aluminum profile
Max. load iPad mini
Dimensions
208,7 x 89,6 x 143,7 mm / Tube ø 7-30 mm
Box: 300 x 102 x 230 mm
Weight net 0.75 kg, gross 1.1 kg
USAGE NOTES
SET UP INSTRUCTIONS
19723 iPad mini holder
- Flexible and secure! The best way to present your iPad
- The holder guarantees effective and secure setup of the iPad mini holder:
- At the same time it is suitable for the stage, home and studio.
- It is secured with a large clamp to tubes up to ø 30 mm
- Easy to clip the iPad mini onto the specially adapted holding
- plate
- Provides any number of adjustments - so you can
- position the iPad just the way you want it.
- Position, Direction, Vertical/Horizontal can be
- used to position the iPad.
SAFETY NOTES
Thank you for choosing this product.
The instructions provide directions to all of the important set
up and handling steps. We recommend you keep these
instructions for future reference.
FAULT FINDING (F) & REPAIR (R)
F: Holder is unstable
F: R: Check screws, if needed tighten screws
F: iPad mini is not firmly in place
F: R: Place the iPad into the holder correctly (so you can hear the click)
The iPad mini holder can be adjusted according to the
position and format. The iPad mini does
not have to be removed from the holding plate
to make the adjustments.
POSITION
The iPad mini can be placed in any vertical / horizontal position,
the final position can be set. To do this:
18 Hold the iPad mini and loosen the wing nut somewhat
19 Pick the position (vertical / horizontal) and
10 re-tighten the wing nut
ORIENTATION
11 a. Loosen the finger screws, and turn the iPad mini holder,
11 a. re-tighten the finger screws.
12 b. Hold on to the holder, loosen the clamp screw, place the
12 b. holding arm in the desired direction , re-tighten the clamp screw.
FORMAT
The holder is equipped with a 90°-turning function (vertical/horizontal)
13 Take the holding plate and place it in the corresponding position
- Hitches within the mount limit how far the holder can be turned.
- In addition, the holding plate clicks into place.
ASSEMBLY
1 The holder consists of two component groups:
1 a. Holding arm with a clamp,
1 b. iPad mini holding plate with a joint-connection.
1 Both parts are connected using wing screws.
2 The clamp is placed around the tube and
2 affixed with a screw 12
PLACEMENT of the IPAD MINI
3 Place the iPad mini according to the HOME-Button-Symbol
3 Orientation (consult the embossing on the holding plate).
4 First PLACE the iPad mini into the bottom area and then...
5 ... CLIP it into the top.
REMOVAL of the IPAD MINI
6 Hold the iPad mini and lift the upper hook and
7 remove the iPad mini
- Only use suitable stands - the prerequisites are:
- Stability, load bearing, tube ø up to max. 30 mm
- e.g. K&M-Stands 118/1, 11888, 11889, 199, 200, 21020,
- 21090, 210/6, 210/8 etc.
- Carefully clip the iPad mini into the holding plate and
- ensure that the iPad mini's fit is secure
- Careful handling
- Be sure to hold the iPad mini firmly, in particular when
- (Position, Format, Portrait/Landscape Vertical/Horizontal)
- repositioning and adjusting the iPad mini.
MONTAGE
POSITION & ORIENTATION
FORMAT
PLACEMENT & REMOVAL of the IPAD MINI
Volume Control
Camera (Back)
Camera (Front)
Speakers
Lightning
connector
Microphone
On / Off
Switch
Microphone
3.5 mmConnector
bottom
PLACE
Final Position
- horizontal
- as far as it goes
Incline Position:
- tilted (0-90°)
- select any position (Secure position
- by tightening the wing nut
Final Position
- vertical
- as far as it goes
Final Position
- landscape
- click into place
Incline Position:
- tilted
- cannot be clicked into place, however
- it does stay in the selected position
Final Position
- portrait
- click into place
Lift up
the hook
Remove
top
CLIP ON
Home-Button (the holder is embossed with information on where the iPad mini is to be placed)
(false placement results in the embossed user elements being covered up! Please note)
 Loading...