

Page 1
BENUTZERHINWEISE / FUNKTIONEN
SICHERHEITSHINWEISE
- Max. Belastbarkeit 50 kg.
- Auf geeigneten, d.h. tragfähigen und ebenen Untergrund achten.
- Die Möglichkeit das Produkt zusammenzuklappen und zu verstellen, birgt naturgemäß Einklemmgefahren.
- Umsichtige und aufmerksame Handhabung bei Aufbau, Betrieb und Abbau sind daher unverzichtbar.
- Vor dem Aufbringen des Instruments sicherstellen, dass sich die Zahnscheiben im Eingriff befinden
- und die Exzenterspannhebel an das Rohr angelehnt ist.
- Das Stativ ist zentrisch zu belasten; ebenso ist eine angemessene Aufstellbreite zu wählen (s.Kapitel: TIPPS)
- Die Parkettschoner sind aus hochwertigem Material und so weit wie möglich frei von Weichmachern.
- Zum Schutz von ganz besonders empfindlichen Böden (z.B. bestimmte Parkettsorten) sollte ggf. eine
- rutschfeste Unterlage verwendet werden.
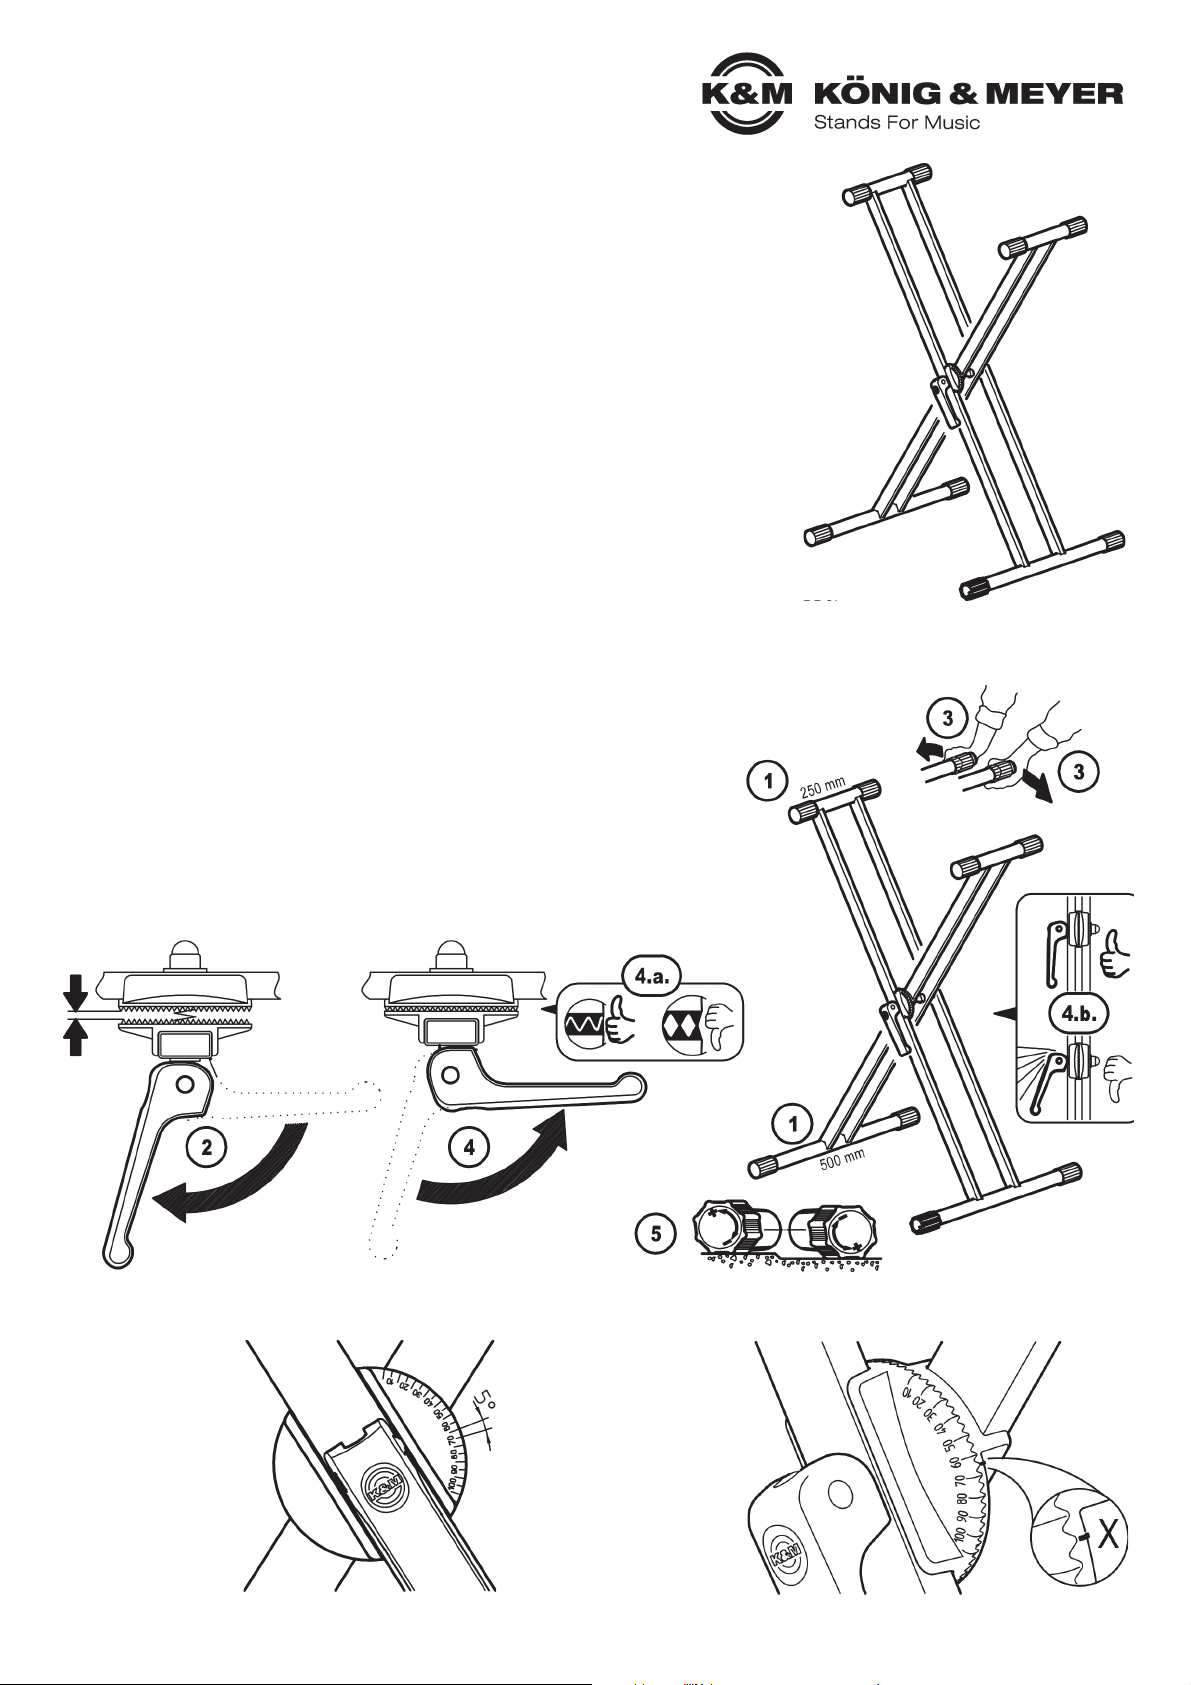
1 Ständer so aufstellen, dass sich die Auflagerohre (250 mm) oben und die Fußrohre (500 mm) unten befinden.
2 Exzenterspannhebel hochklappen, so dass die Verzahnung sich nicht mehr im Eingriff befindet.
3 Auflagerohre auseinanderziehen bis gewünschte Höhe/Breite erreicht ist.
4 Spannhebel wieder runterklappen, so dass sich die Verzahnung erneut im Eingriff befindet.
4 BEACHTE:
4a Die Zahnspitzen dürfen nicht aufeinander gepresst werden. Gegebenenfalls die Gelenke etwas
4a gegeneinander verdrehen.
4b Der Spannhebel muss über den Exzenterpunkt hinaus bis zum Anschlag an das Standrohr geklappt werden.
4b Diese Stellung ist stets obligatorisch, insbesondere während des Betriebes unter Last, aber auch bei
4b Transport und Lagerung. Ein abstehender Klemmhebel ist nur beim Auf- oder Zuklappen des Stativs
4b erlaubt. Ansonsten signalisiert dies eine Fehlstellung.
5 Bei Bodenunebenheiten den Ausgleichparkettschoner entsprechend verdrehen (+/-).
VERSTELLUNGEN
DIe Scheiben sind
rundum fein verzahnt
in Schritten zu 5°.
Das ermöglicht die
Positionierung der
beiden Auflagen in bis
zu 30 verschiedenen
Varianten.
AUFSTELLANLEITUNG
SKALA
Anhand der Skala und
einer Kennzeichnung X auf der
gegenüber liegenden Scheibe
kann jede Aufstell variante
exakt bestimmt werden. Auf
diese Weise kann eine
bevorzugte Aufstellvariante
schnell wieder gefunden
werden.
18993 Keyboardständer »Rick 20«
- Hochwertiger X-Ständer - komfortabel und extrem stabil
- Dank neuer Doppelstrebe jetzt noch robuster, verwindungssteifer und sicherer
- Die Auflagentiefe von 250 mm ist ideal abgestimmt für alle gängigen Stagepianos
- Der ergonomische Klemmhebel sorgt für ein unkompliziertes Aufstellen bzw.
- Zusammenklappen und das im Handumdrehen
- Das robuste Metallgelenk ist mit 5° Schritten sehr fein verzahnt und erlaubt so
- eine Vielzahl von verschiedenen Positionierungen
- Anhand einer Skala kann man seine bevorzugte Aufstellvariante schnell wieder finden
- Mit typischen K&M-Qualitätsmerkmalen wie:
- solide Verarbeitung, Leichtgängigkeit, Transportfreundlichkeit, hochwertiger Oberflächen-
- schutz, rutschfeste Gummiauflagen, Ausgleichsparkettschoner für Bodenunebenheiten
- Höhe/Breite sind universell einstellbar, Fußrohre: ø 30 x 500 mm, Auflagerohre: ø 30 x 250 mm, 5,6 kg
KÖNIG & MEYER GmbH & Co. KG
Kiesweg 2, 97877 Wertheim, www.k-m.de
18993-015-55 Rev.07 / 18993-015-76 Rev.06 03-80-688-00 2/17
Page 2
BENUTZERHINWEISE / FUNKTIONEN
PRÜFEN, INSTANDHALTEN, REINIGEN
Bei Wartungsarbeiten auf evtl. Gefährdungen achten (Einklemmen,
Anstoßen). Zur Reinigung am besten ein leicht feuchtes Tuch und ein
nicht scheuerndes Reinigungsmittel benutzen.
FEHLERSUCHE (F) und BESEITIGUNG (B)
F: Stativ wackelt auf dem Boden:
F: B: Ausgleichparkettschoner einstellen, Boden prüfen.
F: Höhe/Breite des Stativs passt nicht:
F: B: Anderen Winkel am Zahngelenk einstellen.
F: Stagepiano wackelt auf Stativ:
F: B: Unterseite des Stagepianos auf Unebenheiten überprüfen.
F: B: Breite des Stativs verändern.
F: Stagepiano liegt nicht auf Gummis auf:
F: B: Stagepiano entsprechend ausrichten.
AUFSTELLVARIANTEN
Auswahl
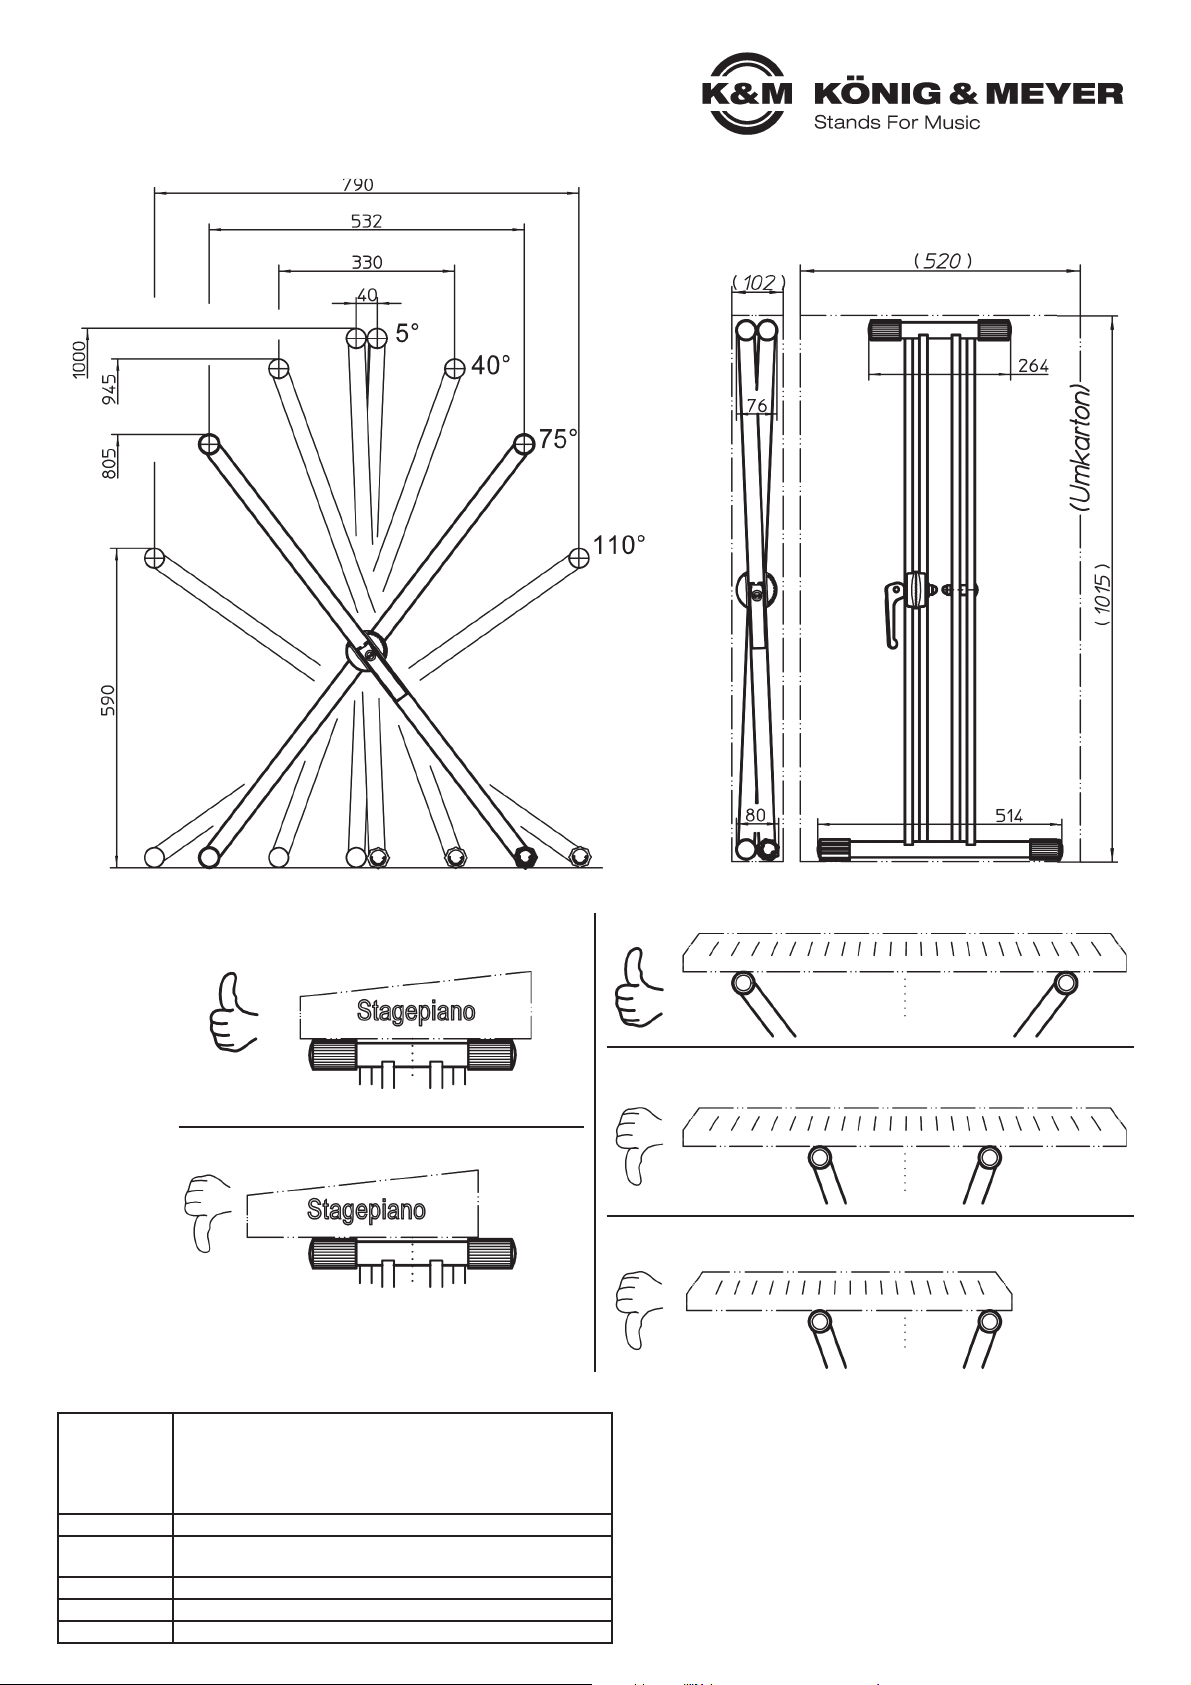
ABMESSUNGEN
Transportstellung - (Umkarton)
TECHNISCHE DATEN / SPEZIFIKATIONEN
Material
Rohre und Streben: Stahl, pulverbeschichtet, Farbe schwarz
Schrauben, Muttern, Bolzen: verzinkt, vernickelt
Zahngelenk: Zink-Guß, pulverbeschichtet, schwarz
Parkettschoner, Gummiauflagen: TPE, Shore 59A schwarz
Exzenterspannhebel: POM, schwarz
Traglast max. 50 kg
Abmessungen
Beispiel: Höhe 590 mm x Breite 790 mm
Auflagerohr: ø 30 x 250 mm; Fußrohr: ø 30 x 500 mm
Verpackung Karton: 1015 x 520 x 105 mm
Gewicht 5,6 kg
Zubehör Tasche 18959-000-00
OK:
Überstand
angemessen
OK:
Zentrisch
NICHT OK:
Überstand zu groß
NICHT OK:
Überstand zu groß
OK:
Zentrisch
OK:
- zentrische
- Platzierung
- angemessene
- Überstände
NICHT OK:
- Überstände
- zu gerine bzw.
- zu groß
- außermittige
- Platzierung
TIPPS für sicheren Sitz des Keyboards
Page 3

USAGE NOTES / FUNCTION
SAFETY NOTES
- Maximum Load 50 kg.
- Be sure that the surface will bear the load and is suitable and level.
- The fact that the product is collapsible and adjustable, can result in the risk of pinching/wedging.
- Careful and attentive handling during setup, operation, and disassembly is indispensable.
- Prior to placing the instrument on the stand ensure that the mesh teeth of the adjustable locking clamp
- are properly meshed and the excenter clamp lever is in a locked position (parallel to the tube).
- Ensure that the weight on the stand is centered and select the proper setting width (refer to Section TIPS)
- The end caps are made of high quality material and to the extent possible free of softening agents.
- To protect particularly delicate floors (e.g. certain wood floor types) a slip resistant pad should be used, if needed.
1 Setup the stand such that the support arms (250 mm) are on the top and the base tubes (500 mm) are on the bottom.
2 Open the excenter clamp lever so that the teeth are in an un-locked position.
3. Position the top tubes such that the desired height/width is attained.
4 Close the excenter clamp lever so that the teeth are in a locked position.
4 NOTE:
4a The teeth points should not be pressing against each other. If this is the case adjust
4a so that the teeth line up properly.
4b The lever must go past the excenter point as far as it will go and be parallel to the stand tube.
4b This position is mandatory, in particular when it is being used with a load, but also when it is being
4b transported or stored. The lever may only be in an open position when the stand is being setup or taken
4b down. Otherwise, it is in an improper position.
5 In the case of an uneven surface adjust the balance end caps accordingly (+/-).
ADJUSTMENTS
The discs are
intermeshed in
5° intervals.
The provides the options
to position both
bases in 30 different
positions.
SETUP INSTRUCTIONS
SCALE
Based on a scale and
a marking (X)
on the disk that is located on
the other
side, the stand can
be adjusted to exact
specifications.
As such the preferred
specifications
can be easily found each time
the stand is setup.
18990 Keyboard stand »Rick 20«
- Premium X stand - comfortable and extremely sturdy
- Thanks to the new assignment of the double brace stand tubes, which provide for robust stability and safety
- The depth of 250 mm of this keyboard stand is perfect for all common stage pianos
- The ergonomic clamp lever makes it easy to setup the keyboard stand and
- collapse it in a flash
- The robust metal joint is intermeshed in 5° steps and provides a multitude of
- different positions
- The scale provides the user with the option to always select their preferred setting
- With typical K&M quality features such as:
- solid workmanship, high quality surface coating, anti-slip rubber rests
- and practical balancing end caps for uneven surfaces
- Height/width are universally adjustable, base tube: ø 30 x 500 mm, top tubes ø 30 x 250 mm
- Weight: 5.6 kg
Thank you for choosing this product. The instructions provide directions to all of the important set up and
handling steps. We recommend you keep these instructions for future reference.
KÖNIG & MEYER GmbH & Co. KG
Kiesweg 2, 97877 Wertheim, www.k-m.de
18993-015-55 Rev.07 / 18993-015-76 Rev.06 03-80-688-00 2/17
Page 4

USAGE NOTES / FUNCTIONS
CHECK, MAINTENANCE, CLEANING
In the event of workstation maintenance pay attention to possible risks
(the stand is bumped into, pinching/ wedging). To care for the product
use a damp cloth and a non-abrasive cleaning agent.
FAULT FINDING (F) & REMEDY (R)
F: Stand is not stable:
F: B: Adjust balance end caps, check surface.
F: Height/width of the stand does not fit:
F: B: Select a different mesh teeth position.
F: Stage piano is not firmly placed on the stand (unstable):
F: B: Check the bottom of the stage piano for uneven surfaces.
F: B: Adjust the width of the stand.
F: The stage piano is not placed on the rubber rests:
F: B: Set the stage piano on the rubber rests properly.
SETUP VARIATIONS
Select
DIMENSIONS
Transportation setting (cardboard packaging)
TECHNICAL DATA
Material
Tubes, struts: Steel, powder coated black
Screws, nuts, bolts: Galvanized, nickel plated
Mesh teeth joint: Zinc die-cast, powder coated black
End caps, rubber rests/top:TPE, shore 59A
Excenter clamp lever, POM, black
Load max. 50 kg
Dimensions
Example: Height 590 x width 790 mm
Support tubes: ø 30 x 250 mm; Base tubes: ø 30 x 500 mm
Packaging Box: 1015 x 520 x 105 mm
Weight 5.6 kg
Accessories Carrying Case 18959-000-00
NOT OK:
Overlaps too much
NOT OK:
does not overlap
enough
NOT OK:
Not centered
OK:
Overlap
adequate
OK:
Overlap
adequate
OK:
Centered
NOT OK:
Overlaps too much
NOT OK:
Overlaps too much
OK:
Centered
OK:
- centered
- adequate
- overlap
NOT OK:
- does not
- overlap enough
- overlaps too much
- not centered
TIPS on how to secure the keyboard
 Loading...