

Page 1
17620 Gitarrenständer »Double«
- durch die Aufbewahrung am Hals auch für ungewöhnliche und asymmetrische Korpusformen geeignet
- ebenfalls geeignet für Gitarren und Bässe unterschiedlicher Länge
- sehr instrumentenschonend dank:
- a. gummiummanteltem Hals-Einhängebügel b. dickem Schaumstoffpolster für den Korpus
- Die Einhängebügel sind effektiv und bedienungsfreundlich:
- - die unabhängig voneinander beweglichen Bügel passen sich
--beim Einhängen allen gängigen Gitarren mit Kopfplatte perfekt an
- - Endnocken an den Bügeln schützen das Instrument vor Verdrehung
- - bequemes Einhängen der Gitarre, da sich beide Bügel nach Entnahme
--des Instruments automatisch wieder öffnen
- zusammenlegbar, d.h. sehr transportfreundlich
- einfache Handhabung in Aufbau und Betrieb;
- keine Werkzeuge zur Montage notwendig
SICHERHEITSHINWEISE
- Auf geeigneten, tragfähigen und ebenen Untergrund achten
- Maximale Standfestigkeit erreicht das Stativ bei waagerecht eingestellten Fußstreben (siehe 3)
- Die Möglichkeit das Produkt zusammenzuklappen oder zu verstellen, birgt naturgemäß Einklemm-
- gefahren; die umsichtige Handhabung bei Aufbau, Betrieb und Abbau ist daher unverzichtbar
- Erfahrungsgemäß eignet sich der Einhängebügel für fast alle Kopfformen. Aufgrund der
- Vielzahl der Gitarrenmodelle kann es jedoch Ausnahmen geben.
- Eine Prüfung vorab ist deshalb unerlässlich (siehe F)
- Grundsätzlich soll das Instrument mit Bedacht eingehängt werden.
- Auf guten Sitz im Bügel und richtige Position des Polsters ist zu achten.
- Schutzüberzüge an den Einhängebügeln bestehen aus gummiartigem Kunststoff hoher
- Güte und sind bis auf einen sehr geringen, technisch unverzichtbaren Anteil, frei von
- Weichmachern. Chemische Reaktionen mit den z.T. recht empfindlichen Gitarrenlacken
- sind uns auch nach intensiven Untersuchungen eines unabhängigen Instituts nicht
- bekannt geworden.
- Mechanische Abnutzung, d.h. Kratzer oder Abdrücke im Gitarrenlack hängen ab von der Qualität
- eben jenes Lackes. Insbesondere lösungsmittelhaltige Lacke auf Nitrozellulosebasis sind ver-
- gleichsweise weich, so dass Abdrücke an der Auflage der puren Schwerkraft geschuldet sind.
- Bedenken Sie:
- eine Gitarre ist zum Spielen da und wird im Laufe der Zeit die ypischen Gebrauchsspuren aufweisen.
- Andere Lasten als Gitarren sind nicht zulässig (z.B. Kleidungsstücke).
- Nur für Innenräume geeignet
AUFSTELLANLEITUNG
TECHNISCHE DATEN / SPEZIFIKATIONEN
Vielen Dank, dass Sie sich für dieses Produkt entschieden haben. Diese Anleitung informiert Sie
über alle wichtigen Schritte bei Aufbau und Handhabung. Wir empfehlen, sie auch für den
späteren Gebrauch aufzubewahren.
Material
Rohre, Blechteile, Schrauben - Stahl, schwarz
Griffe, Führungen - Polyamid (PA), schwarz
Parkettschoner, Bügelpolster - TPE, schwarz
Polsterrolle - PU-Schaumstoffstück, grau
Maße
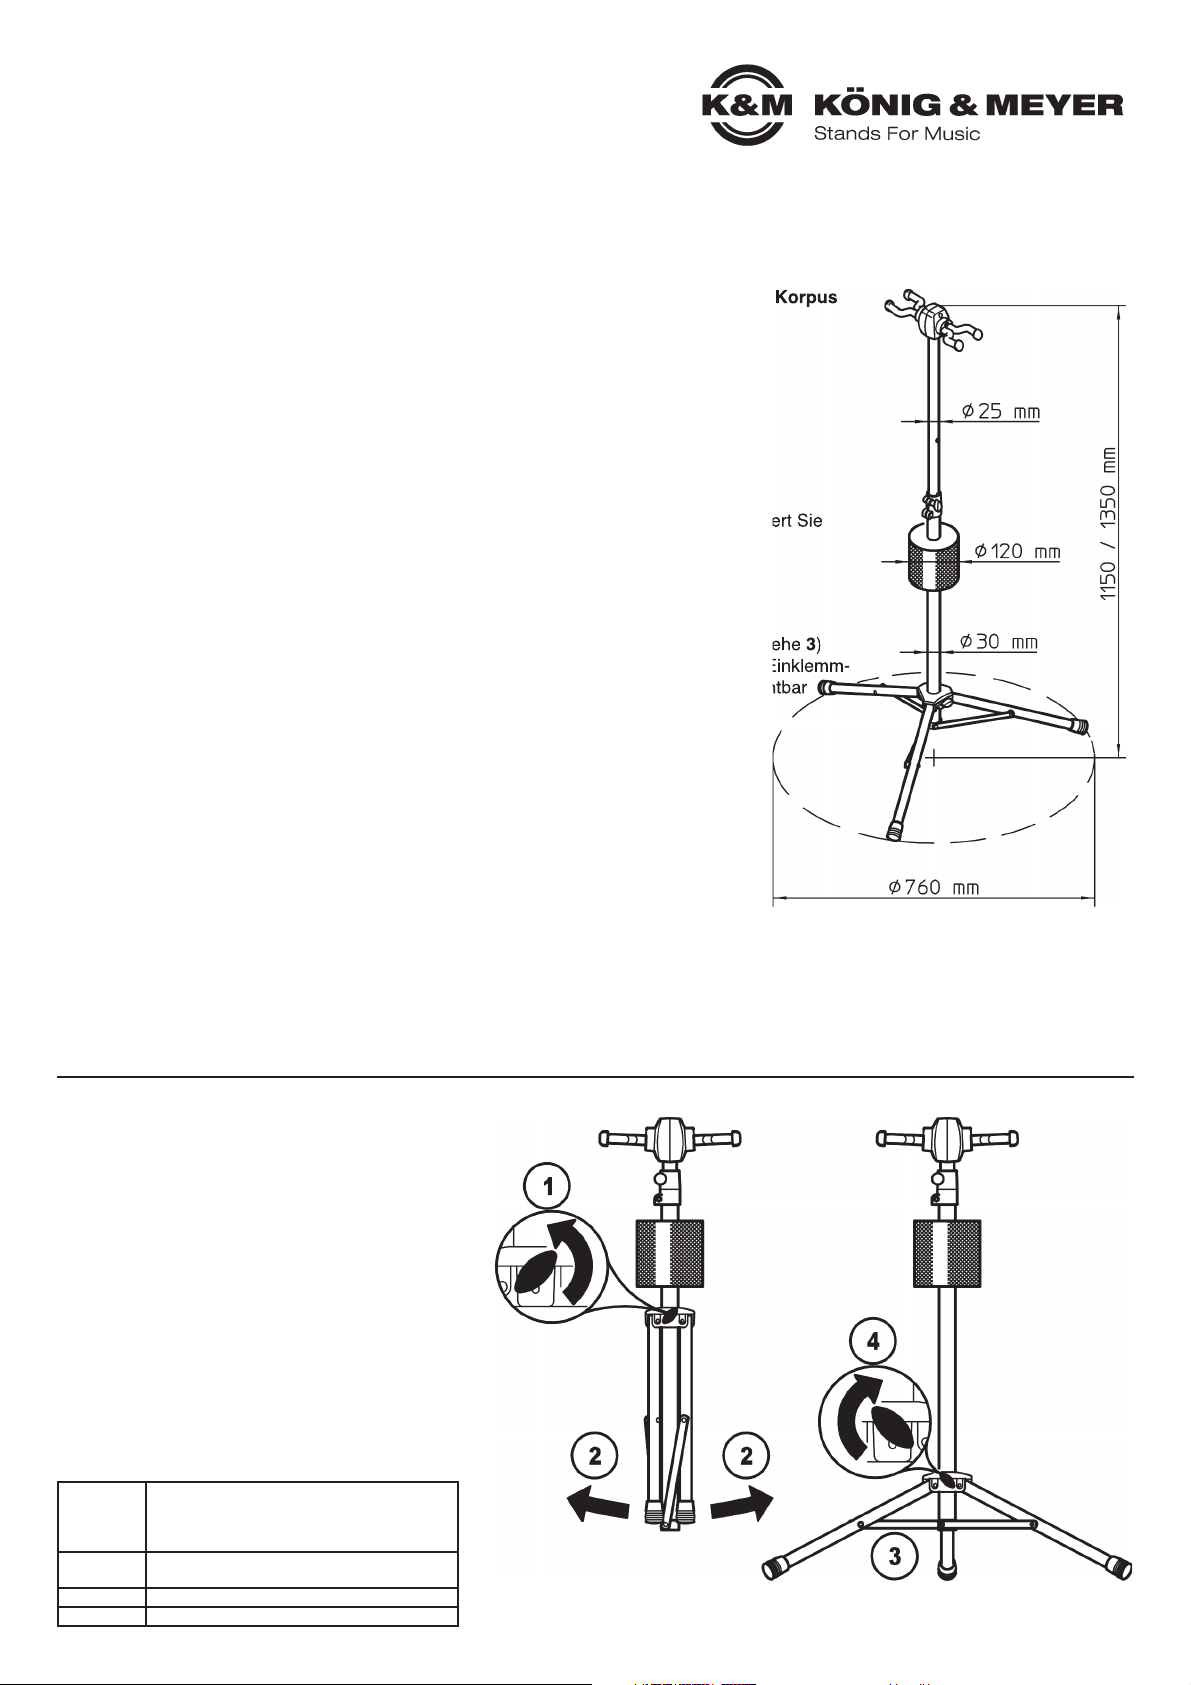
Aufstellhöhe: 1150 - 1350 mm
Fußkreisdurchmesser/Platzbedarf: ø 760 mm
Verpackung Karton
Gewicht 2,1 kg
A. ABMESSUNGEN
B. STATIV AUFSTELLEN
Der Aufbau dieses Ständers erfolgt ohne Werkzeug und
ist einfach. Er ist vormontiert und muss lediglich noch
in Position gebracht werden.
1 Klemmschraube etwas lösen,
2 Füße auseinanderziehen bis...
3 ...die Streben waagerecht stehen.
4 Klemmschraube wieder anziehen.
4 BEACHTE:
4 Handkraft genügt; überfestes Anziehen
4 belastet die Bauteile und ist zu vermeiden.
Die Demontage erfolgt in umgekehrter Reihenfolge.
A. ABMESSUNGEN
B. STATIV AUFSTELLEN
Page 2
KÖNIG & MEYER GmbH & Co. KG
Kiesweg 2, 97877 Wertheim, www.k-m.de
17620-000-55 Rev.01 9/16
BENUTZERHINWEISE / FUNKTIONEN
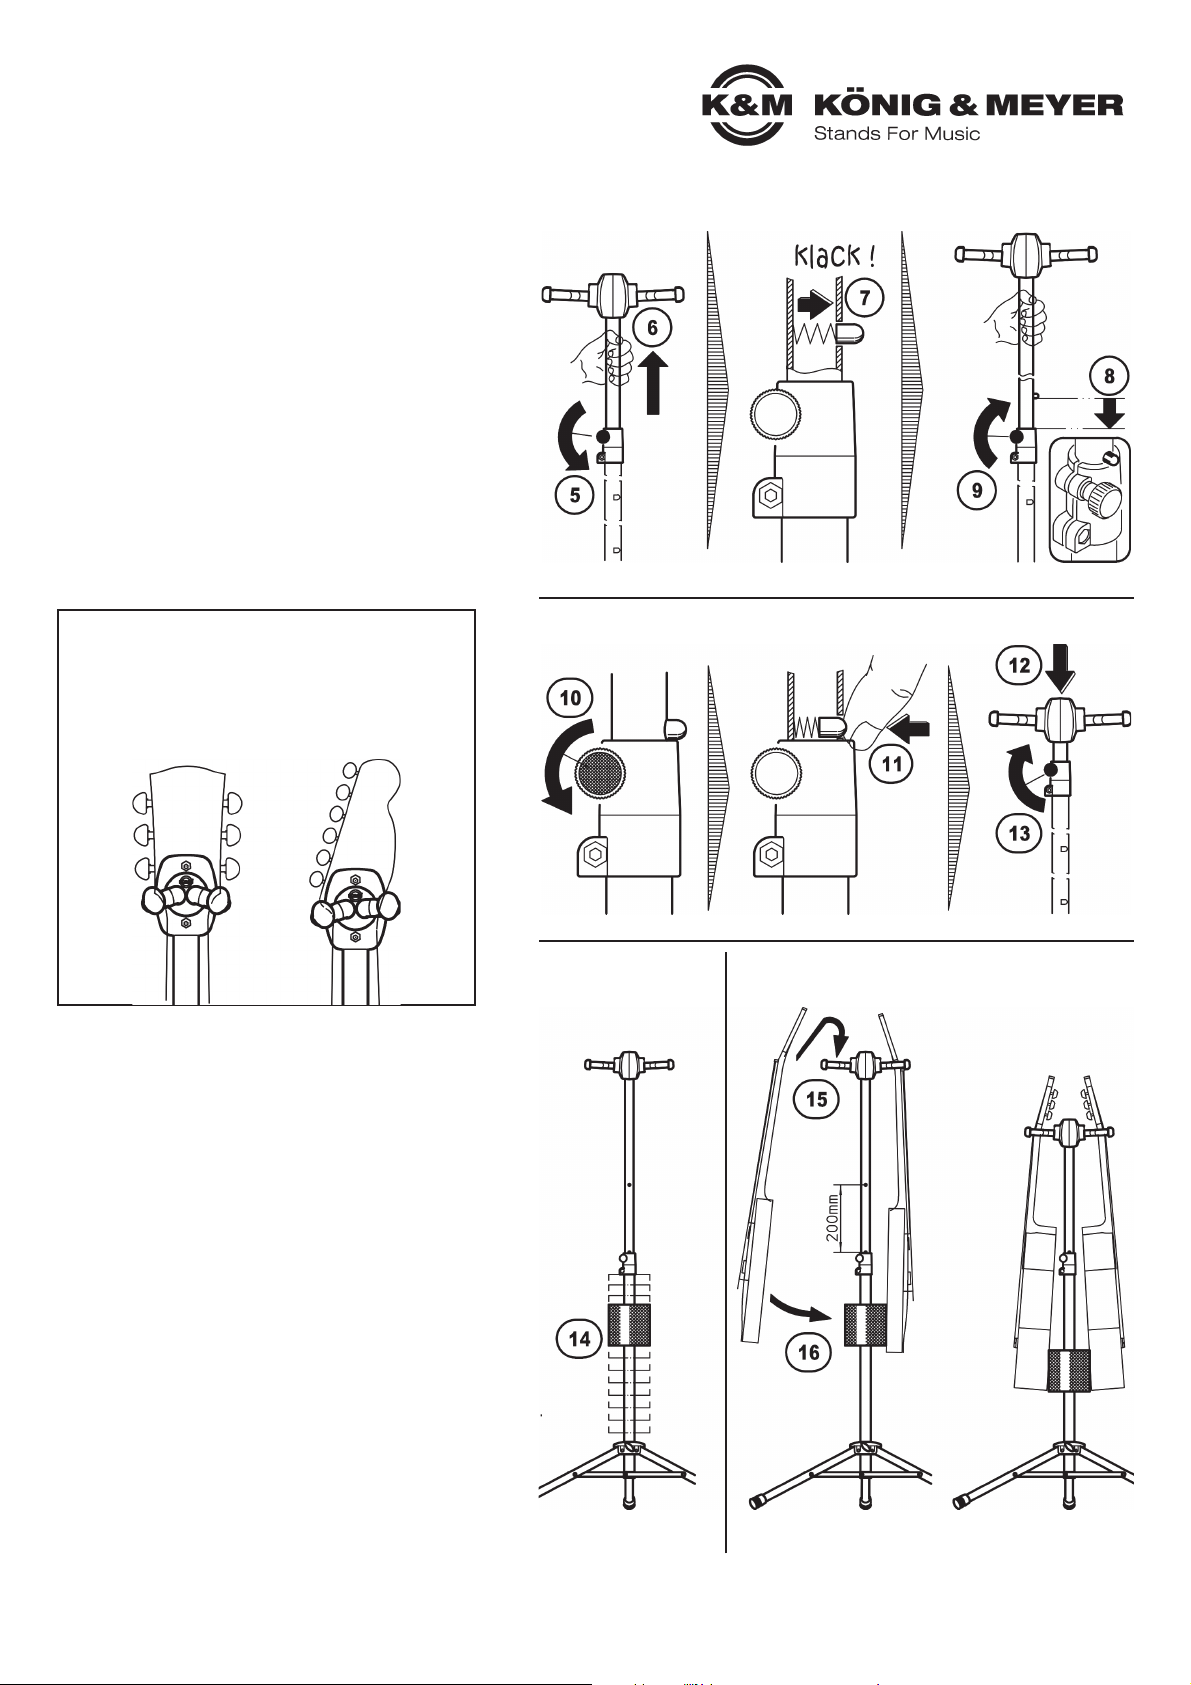
C. AUSZUGROHR AUSFAHREN (stets ohne Instrument)
C. bzw. HÖHE der EINHÄNGEBÜGEL EINSTELLEN
C. Zwei Varianten:
C. a. für Gitarren - vorwiegend die untere Einstellung
C. b. für Bässe - vorwiegend die obere Einstellung
C. 5 Rändelmutter lösen,
C.6 Auszugrohr nach oben ziehen bis der...
C. 7 ...erste bzw. zweite Rastbolzen sichtbar wird.
C. 8 Auszugrohr zurückgleiten lassen bis der
C. 8 Rastbolzen auf der Schelle aufliegt.
C. 9 Rändelmutter wieder festdrehen
D. AUSZUGROHR EINFAHREN (stets ohne Instrument)
D. 10 Rändelmutter lösen,
D. 11 Rastbolzen eindrücken
D. 12 Auszugrohr einfahren
D. 13 Rändelmutter wieder festdrehen
E. KORPUSPOLSTER PLATZIEREN
E. 14 Das Korpuspolster in gewünschte Höhe schieben.
E. 14 Hinweis: das Polster verbleibt ohne zusätzliche
E. 14 Hinweis: Klemmung in der gewählten Position
G. INSTRUMENT EINHÄNGEN
G. Für E/A-Gitarren und Bässe mit geeigneter Kopfform
G. 15 Gitarre am Hals in den Bügel einhängen,
G. 16 anschließend den Korpus sanft an das
G. 16 Schaumstoffpolster anlehnen.
H. STATIV ZUSAMMENLEGEN
H. Zunächst Instrumente entnehmen
H. 10 Rändelmutter lösen,
H. 11 Rastbolzen drücken - ggf. zweimal...
H. 12 ...bis das Rohr kpl. eingefahren werden kann.
H. 13 Rändelmutter wieder anziehen
H. Fußrohre einklappen (siehe Kap. B: Demontage)
F. FUNKTION der EINHÄNGEBÜGEL
F. a. Einzeln bewegliche Einhängebügel passen
F. a. sich der jeweiligen Kopfform an.
F. b. Verdickte Bügelenden gegen Verdrehung.
F. c. Automatische Rückstellfunktion für
F. c. bedienerfreundliches Einhängen der Gitarre.
- Bei Wartungsarbeiten auf etwaige Gefährdungen achten
- (Einklemmen, Anstoßen)
- Zur Reinigung und Pflege am besten ein leicht feuchtes
- Tuch und ein nicht scheuerndes Reinigungsmittel benutzen.
PRÜFEN, INSTANDHALTEN, REINIGEN
F: Stativ wackelt B: Boden prüfen
B: Verschraubungen kontrollieren
F: Höhe passt nicht
F: B: Auszugrohr einstellen (2 mögliche Höhen, siehe C, D, E, G)
F: Auszugrohr wackelt
F: B: Prüfen ob Bolzen eingerastet ist und Rändelmutter 9 festziehen
FEHLERSUCHE (F) und BESEITIGUNG (B)
C. AUSZUGROHR AUSFAHREN
D. AUSZUGROHR EINFAHREN
E. KORPUSPOLSTER
E. PLATZIEREN
G. INSTRUMENT EINHÄNGEN
Page 3

17620 Guitar Stand »Double«
- ideally secures headstocks using support arms and is ideally suited for uncommon and asymmetrical instrument forms
- also suited for guitars and base guitars of differing lengths
- protects instruments thanks to: a. rubberized headstock support arms
- b. thick foam cushioning for the body of the instrument.
- The support arms are effective and easy to use:
- - the support arms move independently of each other and adjust perfectly to all
--common guitars with headstocks
- - lobes at the end of the support arms protect the instrument from shifting
- - the guitar is easy to hang on the support arms, due to the fact that both support arms automatically
--remain in the open position once the instrument has been taken from the stand
- collapsible, i.e. very transport friendly
- easy to use, easy to setup and operate
- tools are not required for assembly
SAFETY NOTES
- Be sure that the surface is suitable, sturdy and level
- Maximum stability is given when the base struts of the stand are level (refer to 3).
- The fact that the product is collapsible and adjustable, can result in the risk of pinching/wedging,
- careful and attentive handling during setup, operation, and disassembly is indispensable.
- The support arms are suitable for almost all headstocks.
- Due to the large range of guitar models - exceptions - can - however exist.
- A pre-check is indispensable (refer to F)
- The instrument must always be placed into the support arms with due care.
- Please ensure that the guitar is in the proper position - that the support arms and the
- cushioning are in the correct positions.
- The protective covers on the support arms are made of high quality rubberized plastic
- and to the extent technically possible free of softening agents. An independent institute
- tested the product and found that chemical reactions with the, in part, very sensitive
- guitar coatings were not identified.
- Mechanical wear and tear, i.e. scratches or marks in the guitar coating depend on the coating quality.
- In particular, solvent-containing coatings that contain nitrocellulose are relatively soft, any resulting
- marks from the supports are purely a result of gravity.
- Please consider:
- A guitar is there to be played and over the course of time it will show typical signs of usage.
- Other objects than guitars are not permitted (e.g. clothing).
- Only suitable for indoor use
SETUP INSTRUCTIONS
TECHNICAL DATA
Thank you for choosing this product. This instruction manual informs you about the important
steps to set up and handle the product. We recommend to keep the manual in a separate place
for a possible later use.
Material
Tubes, sheet metal parts, screws - Steel, black
Handles, guides - Polyamid (PA), black
End caps, support arm cushioning - TPE, black
Cushioning - PU-Foam material, gray
Dimensions
Setup height: 1150 - 1350 mm
Base diameter / Required space ø 760 mm
Packaging
Box
Weight
2.1 kg
A. DIMENSIONS
B. SETUP THE STAND
The stand is setup without needing tools and is easy
to setup. It is pre-assembled and only has to be
put in position.
1 Loosen the clamp screw a bit,
2 Expand the legs until...
3 ...the connecting struts are level.
4 Re-tighten the lower clamping screw.
4 NOTE:
4 Manual strength is enough; Over-tightening can negatively
4 affect the components and should be avoided.
Disassembly is performed in the reverse order.
A. DIMENSIONS
B. SETUP THE STAND
Page 4

KÖNIG & MEYER GmbH & Co. KG
Kiesweg 2, 97877 Wertheim, www.k-m.de
17620-000-55 Rev.01 9/16
USAGE NOTES / FUNCTION
C. EXTEND THE EXTENSION TUBE (always without the
C. Instrument) i.e. ADJUST THE HEIGHT OF THE
C. SUPPORT ARMS
C. Two Options:
C. a. for guitars - primarily the lower setting
C. b. for base guitars - primarily for the upper setting
C. 5 Loosen the knurled nut,
C.6 Pull the extension tube upwards until the...
C. 7 ...the first or second locking pin can be seen.
C. 8 Let the extension tube retract until the locking pin
C. 8 locks into the bracket.
C. 9 Re-tighten the knurled nut
D. RETRACT EXTENSION TUBE (always without the
Instrument)
D. 10 Loosen the knurled nut,
D. 11 Press the locking pin
D. 12 Retract the extension tube
D. 13 Re-tighten the knurled nut
E. PLACEMENT OF THE BODY CUSHION
E. 14 Place the instrument body cushion in the desired
E. 14 position. Note: the cushion stays in the desired
E. 14 position without having to attach it otherwise
G. PLACEMENT of the INSTRUMENT
G. For electric/acoustic guitars and base guitars with the
G. suited headstock
G. 15 Place the neck of the guitar in the support arms,
G. 16 then carefully lean the guitar against the cushioning.
H. COLLAPSE THE STAND
H. First remove the instrument
H. 10 Loosen the knurled nut,
H. 11 Press the locking pin - if needed twice...
H. 12 ...until the extension tube retracts into the outer tube.
H. 13 Re-tighten the lower knurled nut
H. Retract the legs (refer to Section B: Disassembly)
F. SUPPORT ARM FUNCTION
F. a. Each of the movable support arms adjust to
F. a. the respective headstock.
F. b. Keeps thick headstocks in position.
F. c. Support arms are automatically open for user
F. c. friendly placement of the guitar into the support
F. c. arms.
- In the event of workstation maintenance pay attention to
- possible risks (wedging, knocking over)
- To care for the product use a damp cloth and a non-
- abrasive cleaning agent
CHECK, MAINTENANCE, CLEANING
F: Stand is not stable B: Check the surface
B: Check the screws
F: Height of the stand needs to be adjusted
F: B: Adjust the extension tube and cushion (2 possible heights > C, D, E, G)
F: Extension tube is not stable
F: B: Check if the locking pin has clicked into position and tighten the knurled nut 9
FAULT-FINDING (F) and REPAIR (R)
C. EXTEND THE EXTENSION TUBE
D. RETRACT EXTENSION TUBE
E. PLACEMENT OF
E. THE BODY
E. CUSHION
G. PLACEMENT of the INSTRUMENT
 Loading...