

Page 1

KÖNIG & MEYER GmbH & Co. KG
Kiesweg 2, 97877 Wertheim, www.k-m.de
23910-000-55 Rev.9 03-79-115-00 3/16
TECHNISCHE DATEN / SPEZIFIKATION
Material
Metallteile: Aluminium, schwarz
Kunststoffteile: PA / Kautschuk, schwarz
Traglast
Mikrofone oder anderes Zubehör mit
passendem Anschlussgewinde;
siehe auch Bestimmungen der Mikrofonstative
Abmessungen Außenmaße: 32 x 26,5 x 51,5 mm
Gewicht 0,05 kg
Zubehör (opt.)
Mikroklammern 85035/50/55/60,
Reduziergewinde 215, 217, 219, 85040 etc.
HANDHABUNG
3/8"-5/8" REDUZIERGEWINDE
PRÜFEN, INSTANDHALTEN, REINIGEN
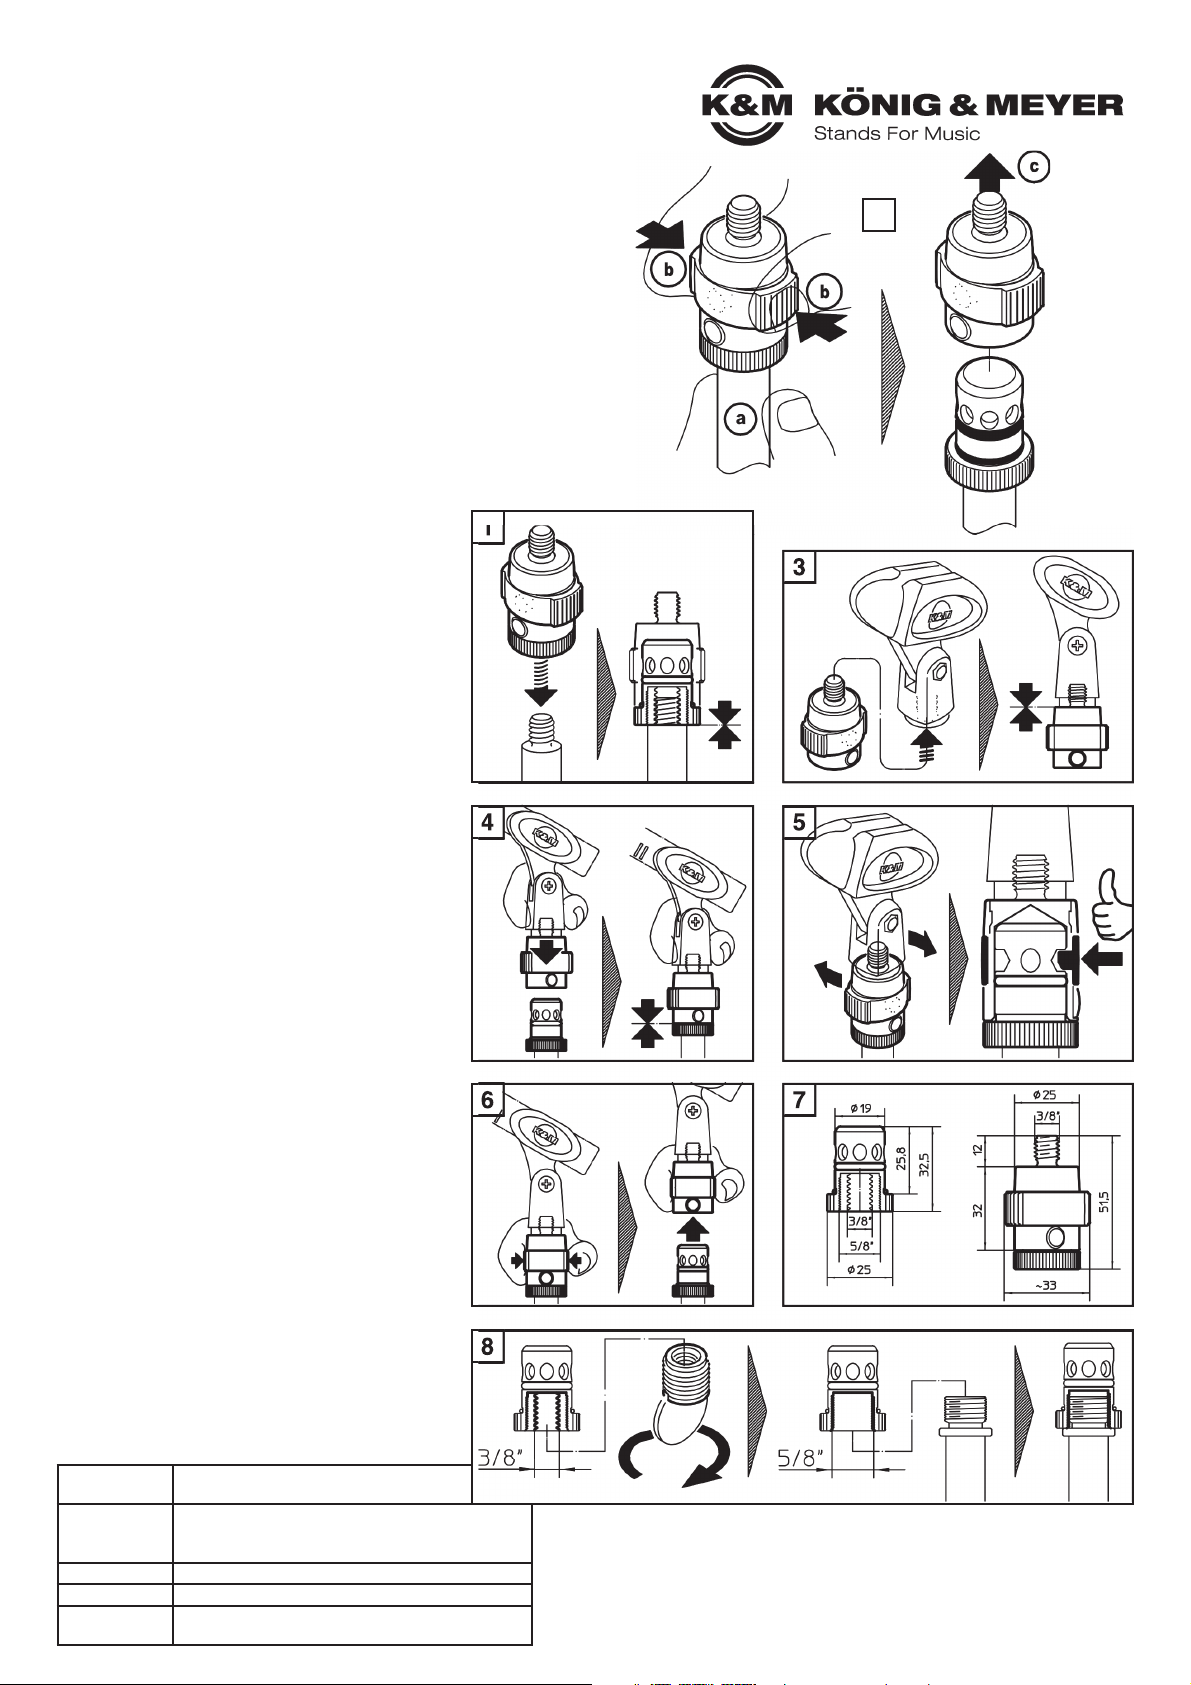
23910 Quick-Release Adapter
Die Handhabung ist sehr einfach:
- Adapter entfernen: Riffel zusammendrücken und Oberteil abziehen
- Adapter aufbringen: Oberteil über Zapfen schieben und leicht verdrehen
- kein langes Drehen am Gewinde, sobald der Adapter einmal montiert ist
- keine Werkzeuge
- mit Reduzierung für 3/8" und 5/8"
SICHERHEITSHINWEISE
Vielen Dank, dass Sie sich für dieses Produkt entschieden haben. Diese Anlei tung informiert Sie über alle wich tigen Schritte bei Aufbau und Handhabung. Wir
empfehlen, sie auch für den späteren Gebrauch aufzubewahren.
MONTAGE
1 Innengewinde des Unterteils bis zum Anschlag auf das
1 Anschlussgewinde des Mikrofonstativs fest aufdrehen.
2 Nun das Oberteil vom Unterteil trennen. Dazu:
2 a. Rohr des Mikrostativs festhalten,
2 b. Riffelflächen des Oberteils beidseitig
2 b. zusammendrücken...
2 c. ...und Oberteil vom Unterteil abziehen.
3 Das Oberteil wird nun an ein Mikrofon oder eine
3 Mikroklammer oder ein anderes Accessoire mit 3/8"-
3 Anschluß geschraubt.
Für gewöhnlich verbleibt nun auf Dauer das Unterteil auf
dem Stativ und das Oberteil am Mikro. Statt auf- und
abschrauben wird nur noch gesteckt.
4 Jetzt wird das Oberteil (mitsamt Mikro etc.) über das
4 Unterteil geschoben - ebenfalls bis zum Anschlag.
5 Anschließend das Oberteil im Uhrzeigersinn leicht
5 verdrehen. So wird sichergestellt, dass der Bolzen in
5 eine der acht Bohrungen einrastet und beide Teile fest
5 miteinander verbunden sind.
DEMONTAGE wenn Ober- und Unterteil am Mikro bzw.
Stativ verbleiben sollen. Beachte: Traglast ggf. sichern.
6 Riffelflächen beidseitig zusammendrücken und das
6 Oberteil (mitsamt Mikro) vom Unterteil abziehen.
3 Traglast (Mikro) vom Oberteil abschrauben.
2 Unterteils vom Stativ abschrauben.
1 Ober- u. Unterteil zusammenstecken (durch Verdrehung
1 sichern).
7 ABMESSUNGEN
- Gewinde sind vor dem Einschrauben auf Beschädigungen hin zu überprüfen
- Unterteil vor dem Aufschrauben erst vom Oberteil trennen:siehe 1
- Unterteil (Zapfen) bis zum Anschlag auf Mikrofonstativ schrauben
- Oberteil (Gewindehülse) stets ins Unterteil einrasten lassen: siehe 5
- Die Sicherheitshinweise der verwendeten Mikrofonstative beachten
Oberteil
(Gewinde hülse)
Unterteil
(Zapfen)
Das Unterteil ist vom Werk aus mit einem Reduziergewinde (3/8"-5/8") ausgestattet.
8 Mithilfe einer Münze kann diese Reduzierung heraus-
8 geschraubt werden. Der Quick-Release-Adapter passt
8 dann auf ein Stativ mit 5/8"-Anschlussgewindebolzen.
Für abweichende Mikrofon-Anschlussgewinde (z.B. 1/2")
empfehlen wir einen Blick ins K&M-Programm,
www.k-m.de, Suche: Reduziergewinde
- Zur Reinigung und Pflege am besten ein leicht feuchtes
- Tuch und ein nicht scheuerndes Reinigungsmittel benutzen
1
4 5
6 7
8
2
3
Page 2
Material
Metal parts: Aluminum, black
Plastic parts: PA, rubber, black
Components
microphone or other accessories with the proper
connector threads;
please refer to the microphone stand information
Dimensions External Dimensions: 32 x 26.5 x 51.5 mm
Weight 0.05 kg
Accessories
(optional)
Microphone clamps 85035/50/55/60
Thread adapter 215, 217, 219, 85040 etc.
KÖNIG & MEYER GmbH & Co. KG
Kiesweg 2, 97877 Wertheim, www.k-m.de
23910-000-55 Rev.9 03-79-115-00 3/16
upper
section
lower
section
1
4 5
6 7
8
2
3
TECHNICAL DATA / SPECIFICATIONS
USE
3/8"-5/8" REDUCING THREAD ADAPTER
CHECK, MAINTENANCE, CLEANING
23910 Quick-Release Adapter
It’s very easy to use:
- Remove the adapter: Squeeze the quick release button and remove the upper section
- Mount the adapter: Slide the upper section onto the lower section
- The adapter does not have to be tightened after it has been mounted
- No tools required
- 3/8" and 5/8" threads are available
SAFETY NOTES
Thank you for choosing this product.
The instructions provide directions to all of the important set up and handling
steps. We recommend you keep these instructions for future reference.
ASSEMBLY
1 Screw the adapter onto the threaded end of the mic. stand
2 First remove the upper from the lower section. To do this:
2 a. Hold the microphone stand tube,
2 b. Squeeze the knurled quick release buttons and...
2 c. ...remove the upper section.
3 The upper section is now screwed onto a microphone
3 ora microphone clamp or a different accessory with a
3 3/8" connection.
Generally the lower section stays on the microphone stand
and the upper section on the microphone. Instead of screwing the parts on and off, the parts are placed on the pin.
4 Now the upper section (with the microphone etc.) is slid
4 onto the lower section.
5 Then turn the upper section clockwise to lock it into
5 place. This ensures that the pin locks into one of the
5 eight holes thus securely connecting the upper and
5 lower sections.
DIASSEMBLY if the upper and lower sections are to
remain on the microphone i.e. stand. NOTE: Ensure that
the stand can bear the weight Stativ verbleiben sollen.
6 Squeeze the knurled quick release buttons on both
6 sides and pull the upper section (including microphone)
6 from the lower section.
3 Unscrew the microphone from the upper section.
2 Unscrew the lower section from the stand.
1 Stick the upper and lower sections together (secure by
1 turning).
7 DIMENSIONS
- Please inspect the threads for damage prior to use
- Prior to screwing on the assembly remove the upper section: see 1
- Screw the lower section onto the threaded end of the microphone stand
- Lock the upper section (threaded sleeve) into the lower section: see 5
- Please read the microphone stand safety notes
The lower section comes with a reducing thread adapter
(3/8"-5/8").
8 The reducing thread adapter can be removed using a
8 coin The Quick-Release-Adapter then fits onto a stand
8 equipped with a 5/8"-threaded connector.
For other microphone connector sizes (e.g. 1/2") we
recommend that you take a look at our K&M Product Line,
www.k-m.de Search: reducing thread adapter
- To care for the product use a damp cloth and a
- non-abrasive cleaning agent
 Loading...