

Page 1
KÖNIG & MEYER GmbH & Co. KG
Kiesweg 2, 97877 Wertheim, www.k-m.de
12185-000-55 Rev.05 03-79-102-00 1/17
TECHNISCHE DATEN / SPEZIFIKATION
AUFSTELLANLEITUNG
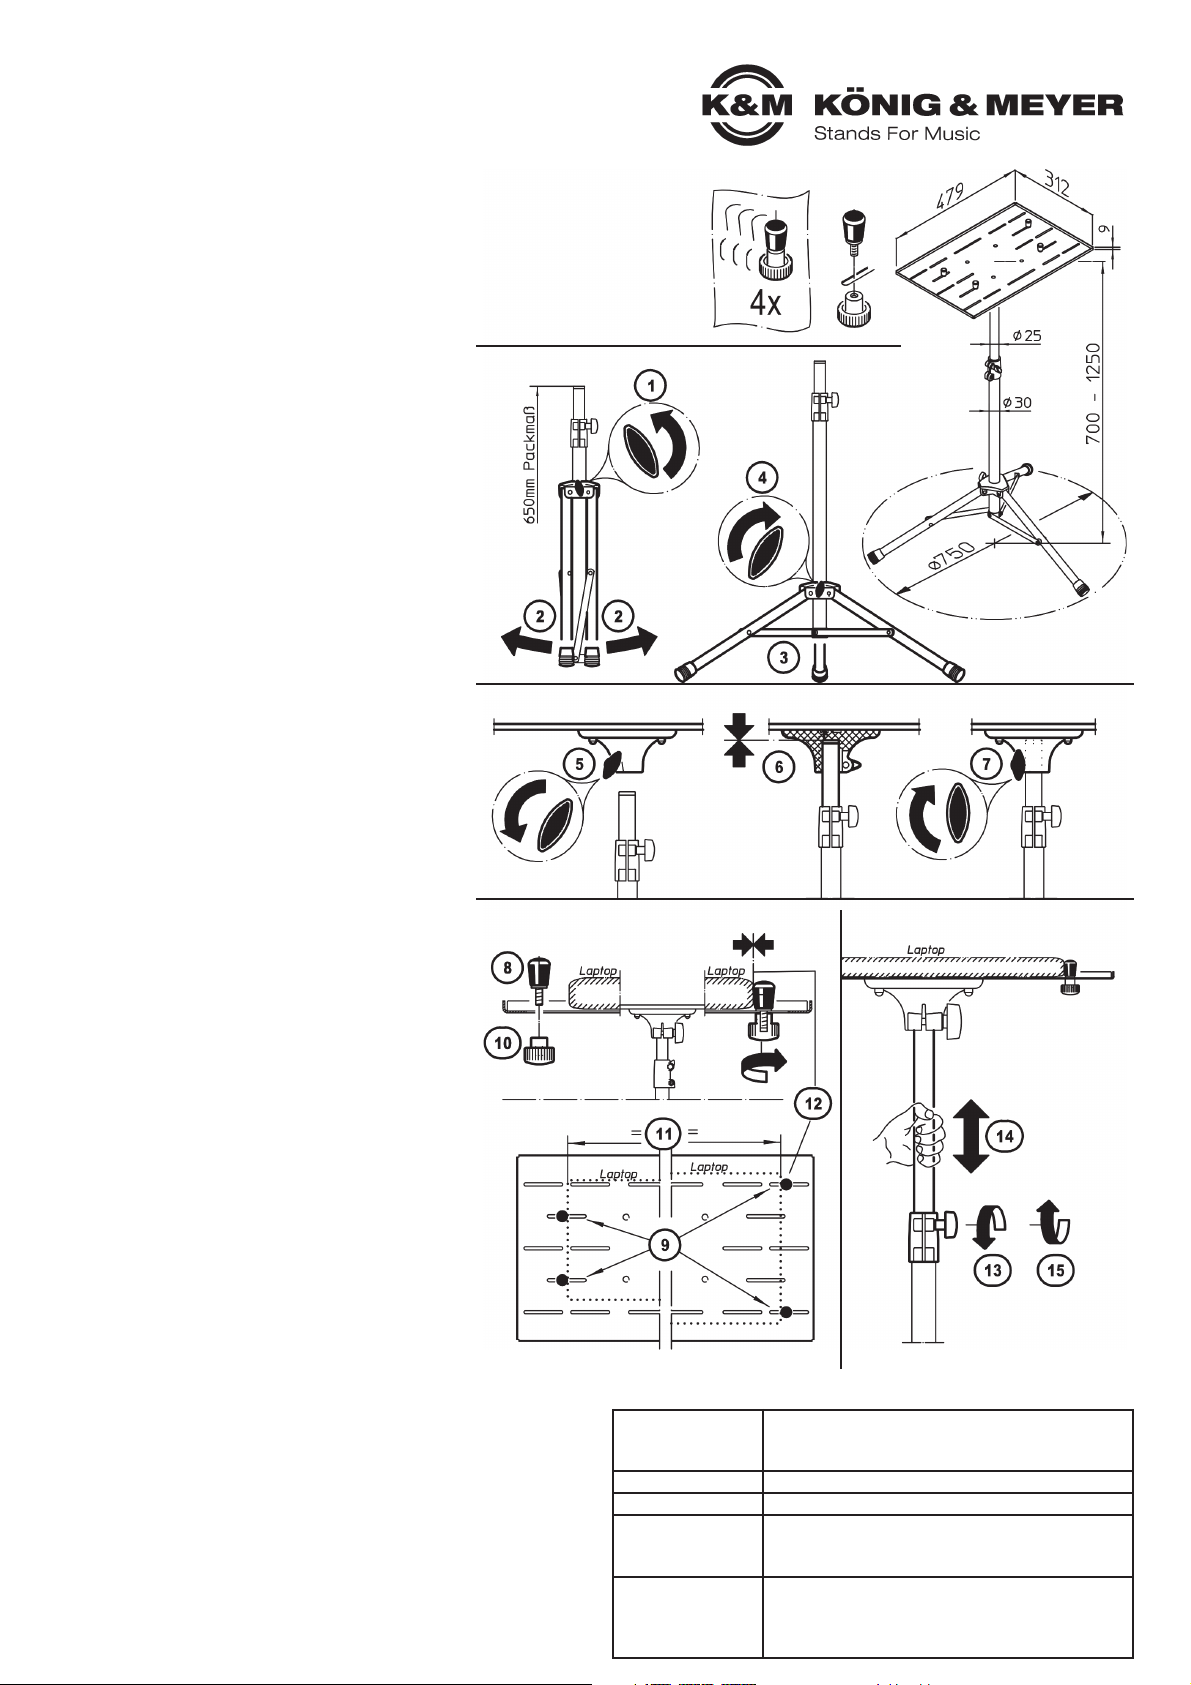
12185 Laptop-Ständer
- standfest und tragfähig
- vielseitige und großzügig bemessene Auflageplatte mit verstellbaren Anschlägen
- handliche Bedienelemente für die Einstellung der Stativhöhe
- umklappbare Füße für platzsparenden Transport
- schnelles Auf- und Abbauen ohne Einsatz von Werkzeugen
- Dimensionen: Höhe 700-1250 mm, Platte 482 x 315 x 9 mm, Gewicht: 3,9 kg
SICHERHEITSHINWEISE
Vielen Dank, dass Sie sich für dieses Produkt entschieden haben. Diese Anleitung informiert
Sie über alle wich tigen Schritte bei Aufbau und Handhabung.Wir empfehlen, sie auch für den
späteren Gebrauch aufzubewahren.
FUNKTIONEN
HÖHENVERSTELLUNG
BEACHTE:
Vor dem Lösen der Klemmschraube 13 stets das
Auszugrohr mit einer Hand festhalten.
13 Klemmschraube der Spannschelle lösen;
14 Auszugrohr in gewünschte Höhe bringen
15 Klemmschraube wieder festdrehen.
ABLAGEPLATTE
Die Ablageplatte (innen: 479 x 312 mm) ist sehr großzügig
bemessen und bietet somit Platz für Laptops jedweder
Größe. In vielen Fällen dürfte auch Platz sein für weitere
Gadgets.
LAPTOP FIXIEREN - siehe (8-12)
Bei Bedarf können zu den vier vorhandenen Klemmbolzen
weitere nachbestellt werden.
Artikel-Nr.: 6-12185-2-55 (1 Klemmbolzen).
STATIV
1 Feststellschraube etwas lösen,
2 Beine auseinanderziehen bis...
3 ...Fußstreben waagerecht stehen.
4 Feststellschraube wieder anziehen.
4 BEACHTE: Handkraft genügt völlig,
4 überfestes Anziehen belastet die Bauteile.
ABLAGEPLATTE
5 Flügelmutter am Unterteller der Platte lösen,
6 Unterteller bis zum Anschlag auf das Auszugrohr stecken
7 Flügelmutter mehr oder weniger fest anziehen:
7 so kann die Drehbewegung der Ablageplatte von
7 leichtgängig bis zäh eingestellt werden.
KLEMMBOLZEN (4x)
18 Klemmbolzen auseinanderschrauben
19 Geeigneten Schlitz wählen (siehe BEISPIELE)
10 Klemmbolzen wieder lose verbinden
11 Laptop möglichst mittig ausrichten und...
12 ...Klemmbolzen im Schlitz verschieben bis die Gummi-
12 kappen das Laptop fixieren und die Rändelmutter
12 festdrehen
- Der Untergrund muss tragfähig und eben sein
- Sicherheit der Installation:
- - Traglast mittig ausrichten
- - Füße maximal auseinanderziehen (=waagerechte Streben)
- - Sorge tragen, dass die Ablageplatte stets bis zum Anschlag
--auf dem Auszugrohr aufliegt: v.a. nach Positionswechsel
- die Möglichkeit das Produkt zusammenzuklappen birgt
- naturgemäß Einklemmgefahren: umsichtige Handhabung bei
Aufbau, Betrieb und Abbau sind daher unverzichtbar
- BEACHTE: das Anlegen der Klemmbolzen (siehe 8-12)
- sichert die Position des Laptops während des Betriebes.
- Jedoch, die Klemmbolzen dienen KEINESFALLS als
- Transportsicherung, insb. wenn die Platte dabei geneigt wird.
- In diesem Fall muss die Traglast(en) entnommen oder
- anderweitig gesichert werden.
Material
Rohre, Streben, Ablageplatte: Stahl
Schellen, Griffe, Unterteller: Polyamid (PA)
Parkettschoner, Klemmkappen: TPE
Traglast Laptop, Gadgets
Packmaß, Gewicht 700 x 120 x 380 mm; 3,9 kg
Abmessungen
Rohrkombination: ø 30/25 mm
Höhe: 700-1250mm (bei max. Fußkreis ø 750 mm)
Ablageplatte: innen 479 x 312 x 7,5 mm, t=1,5mm
Zubehör
(optional)
Tragetasche 11450
Notenablagen 122a, 12218, 131
Brillenablage 16050 u.a.
Magnete 11560, 11580
KLEMMBOLZEN - LAPTOP FIXIEREN
ABLAGEPLATTE
STATIV
BEISPIELE
HÖHENVERSTELLUNG
Page 2

KÖNIG & MEYER GmbH & Co. KG
Kiesweg 2, 97877 Wertheim, www.k-m.de
12185-000-55 Rev.05 03-79-102-00 1/17
TECHNICAL DATA
SETUP INSTRUCTIONS
12185 Laptop stand
- sturdy and load bearing
- versatile and generously sized music desk with adjustable stops
- handy operation elements for the setting of the stand height
- folding legs for compact transportation
- quick setup and break down without the use of tools
- dimensions: height 700-1250 mm, music desk 482 x 315 x 9 mm, weight: 3.9 kg
SAFETY NOTES
Thank you for choosing this product. The instructions provide directions to the important setup
and handling steps. We recommend you keep these instructions for future reference.
FUNCTIONS
HEIGHT ADJUSTMENT
NOTE:
Prior to loosening the clamp screw 13 hold the extension
tube in one hand.
13 Loosen the clamping screw of the clamp/bracket;
14 adjust the extension tube to the desired height
15 re-tighten the clamp screw.
TRAY
The tray (internal: 479 x 312 mm) is very generous in size
and offers space for laptops of any size. In many cases,
there should also be enough space for other gadgets.
HOLD LAPTOP IN PLACE - refer to (8-12)
If needed, in addition to the four clamping bolts that come
with the stand, additional clamping bolts can be ordered.
Order-No.: 6-12185-2-55 (1 Clamp bolt).
STAND
1 Loosen the adjustment screw a bit,
2 expand the legs until...
3 ...the connecting struts are level.
4 Re-tighten the clamping screw.
4 NOTE: Manual strength is enough; Do not over-tighten
4 the screws it can negatively affect the components.
TRAY
5 Remove the wing nut from the lower plate of the tray,
6 Place the lower plate into the extension tube as far as
6 it will go
7 Tighten the wing nut more or less: so that the tray
7 movement can be set so that it can be moved easily or
7 that it is held tightly in place.
CLAMPING BOLTS (4x)
18 Unscrew the clamping bolts
19 select the desired slit (refer to the EXAMPLES)
10 connect the clamping bolts
11 center the laptop as best as possible and...
12 ...move the clamping bolts in the slit until the rubber caps
12 hold the laptop in place and then tighten the wing nuts
- The floor must be load bearing and even.
- Installation safety:
- - Center the laptop (weight bearing load)
- - Pull the legs apart (= horizontal struts)
- - Ensure that the music desk is firmly placed on the
--extension tube as far as it goes: particularly after the
--position has been changed.
- The fact that the product is collapsible and adjustable,
- can result in pinching and wedging of fingers and hands.
- Careful and attentive handling during setup, operation
- and disassembly is indispensable.
- NOTE: the use of the clamping bolts (refer to 8-12)
- ensures that the laptop maintains its position during use.
- However, the clamping bolts are NEVER to be used to
- secure anything for transportation or while moving the
- stand, in particular when the music desk is at an angle.
- In this case the load bearing weight (laptop, music sheets
- etc.) must be removed or secured otherwise.
Material
Tubes, struts, tray: Steel
Brackets, handles, lower plate: Polyamid (PA)
End caps, clamp caps: TPE
Load Laptop, Gadgets
Pack size, weight 700 x 120 x 380 mm; 3.9 kg
Dimensions
Tube Combination: ø 30/25 mm
Height: 700-1250mm (max. base-ø 750 mm)
Tray: internal 479 x 312 x 7,5 mm, t=1,5mm
Accessories
(optional)
Carrying case 11450
Sheet music trays 122a, 12218, 131
Eye glass holder 16050 among others
Magnets 11560, 11580
CLAMPING BOLTS - HOLD LAPTOP IN PLACE
TRAY
STAND
SAMPLE
HEIGHT ADJUSTMENT
 Loading...