

Page 1
SEC-PH360
MANUAL (p. 2)
Video Door Phone System
MODE D’EMPLOI (p. 12)
Interphone-visiophone
MANUALE (p. 22)
Sistema di videocitofono
HASZNÁLATI ÚTMUTATÓ (o. 32.)
Videós ajtótelefon rendszer
BRUKSANVISNING (s. 42)
Telefonsystem med video på dörren
MANUAL DE UTILIZARE (p. 52)
Interfon video
BRUGERVEJLEDNING (s. 62)
Video Dørtelefon System
ANLEITUNG (S. 7)
Video-Türsprechsystem
GEBRUIKSAANWIJZING (p. 17)
Deur video-telefoonsysteem
MANUAL DE USO (p. 27)
Sistema intercomunicador de vídeo
KÄYTTÖOHJE (s. 37)
Video-ovipuhelin
NÁVOD K POUŽITÍ (s. 47)
Dveřní videotelefon
ΕΓΧΕΙΡΙΔΙΟ XPHΣHΣ (σελ. 57)
Σύστημα Θυροτηλεόρασης
VEILEDNING (s. 67)
Video dørtelefonsystem
Page 2

ENGLISH
Video Door Phone System
Introduction:
Make sure you don’t get caught by surprise when someone’s at the door with this smart video intercom
system. The outdoor unit consists of a doorbell with pinhole camera, night view, loudspeaker and
microphone. With the super thin 7” display, only 1,8 cm, you can see who’s at the door and speak with
this visitor without the need of picking up a receiver. Just push the button to open the connection.
Furthermore, it’s hands free.
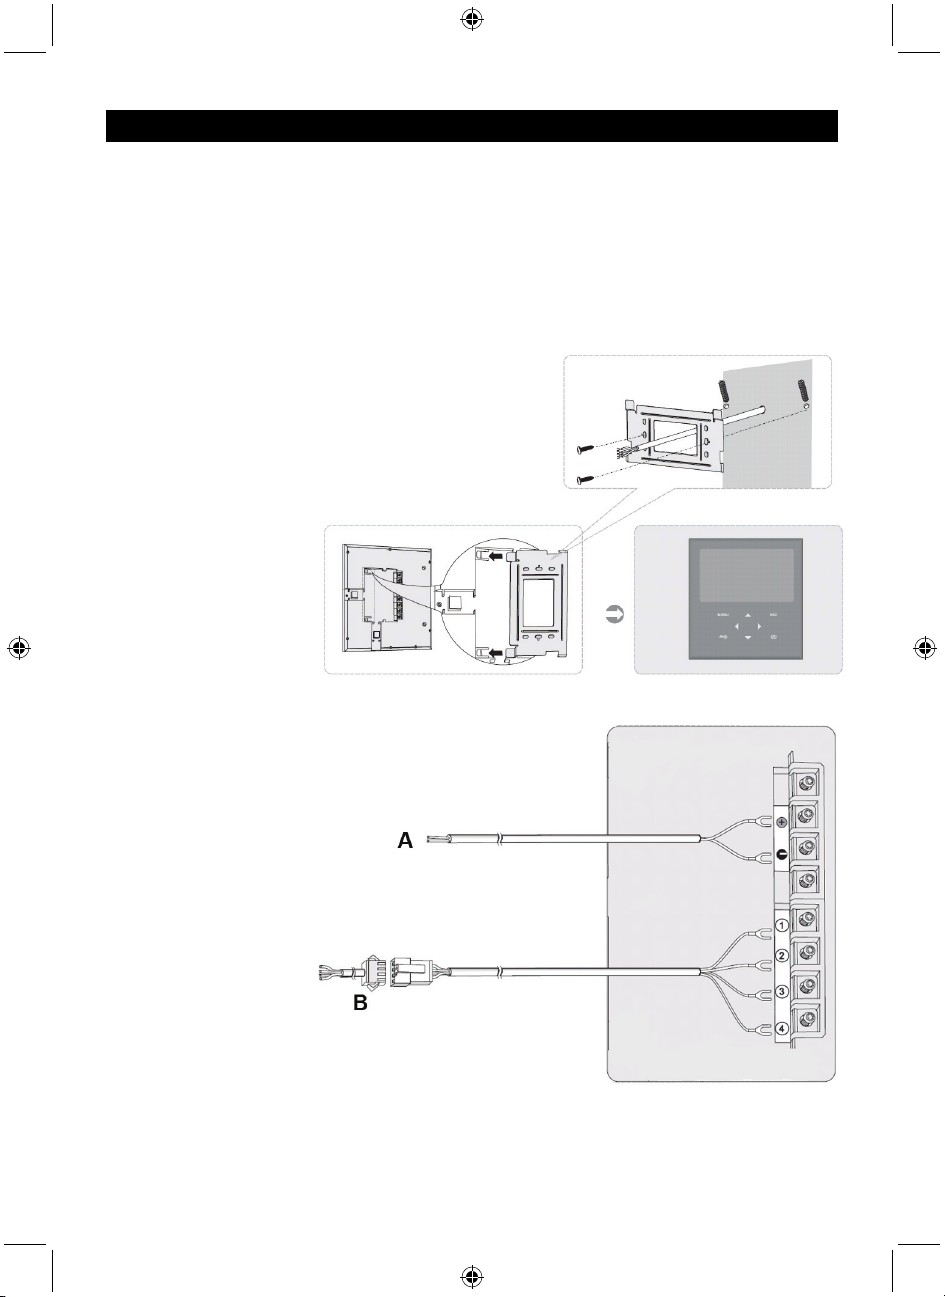
Installation of the indoor monitor:
1. Determine the position for
the monitor.
2. Mount the bracket by
drilling holes in the wall.
3. Make an extra hole for the
cable to pass through.
4. Connect the wires as
shown in the image
below.
5. Place the monitor on the
bracket with the slots at
the backside of the
monitor
1. White (AUDIO)
2. Red (VDD)
3. Black (GND)
4. Yellow (VIDEO)
A. Power 15 V DC
B. Connection to outdoor
unit
2
Page 3

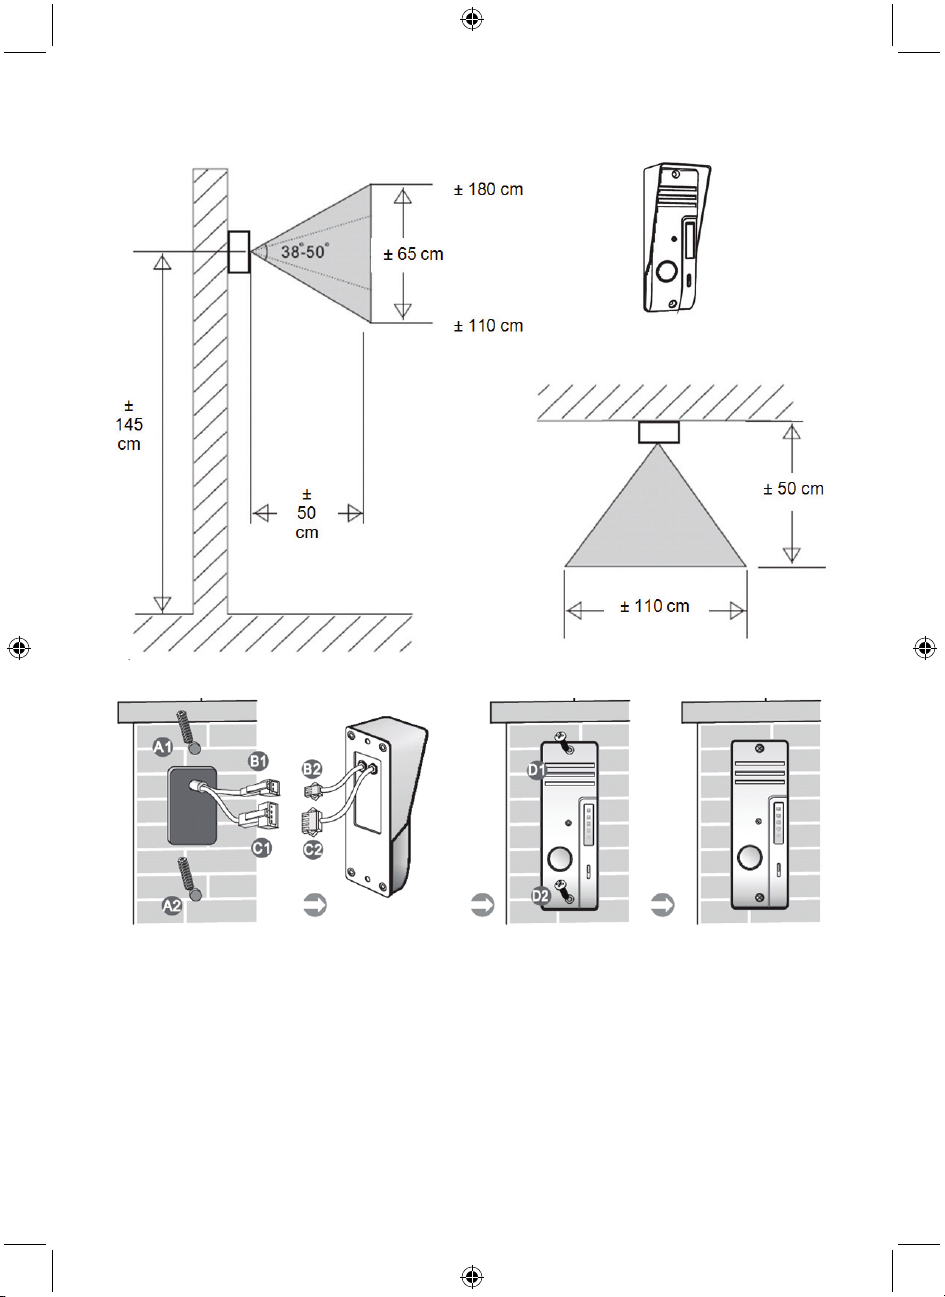
Installation of the outdoor unit:
1. Drill holes in the wall or other material A1/A2 to mount the outdoor unit and pass the cable through.
2. Connect connector B1 to B2 (for electronic lock 12 V, 1 A if installed)
3. Connect connector C1 to C2
4. Tighten the screws D1 and D2
Note: the connectors B1/B2 and C1/C2 need to be behind the wall or other material and not between
the outdoor unit and wall or other material.
3
Page 4

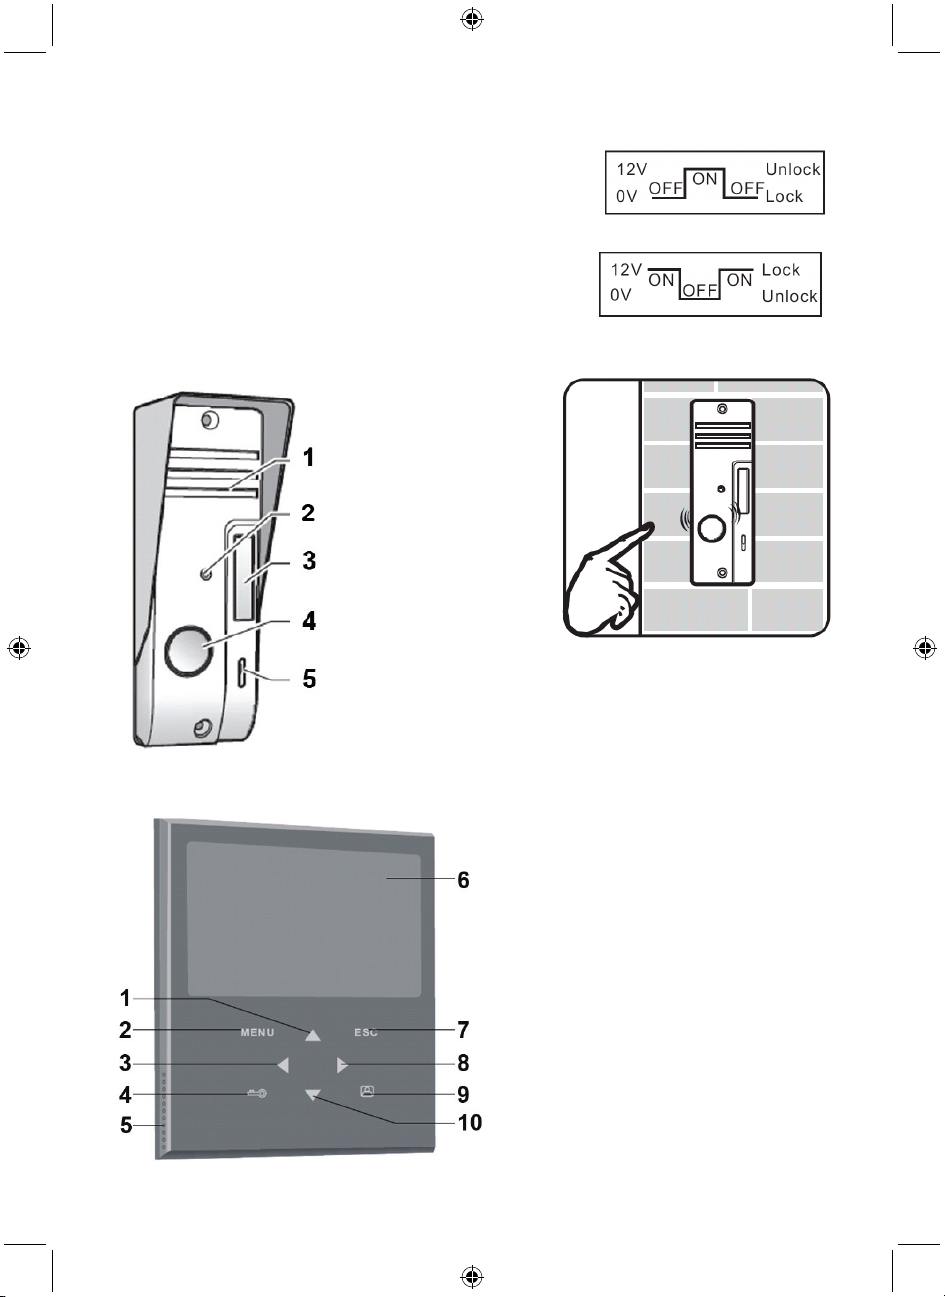
Connection of electronic lock:
Lock without adapter, power supplied via outdoor unit. When the
door is closed, the circuit voltage is 0 V. By unlocking the door the
circuit voltage 12 V. Delay is 4~7 seconds.
Lock without adapter, power supplied via outdoor unit. When the
door is closed, the circuit voltage is 12 V. By unlocking the door the
circuit voltage 0 V. Delay is 4~7 seconds.
Description and operation of the outdoor unit:
1. Loudspeaker
2. Camera
IR LED for night view
3.
4. Call button
5. Microphone
• Press the call button
• The indoor monitor will give a ding
dong sound and activate the monitor
screen
Description of the indoor monitor:
1. Cursor button UP
2. MENU button
3. Cursor button LEFT
4. UNLOCK button
5. Speaker
6. Screen
7. ESC button
8. Cursor button RIGHT
9. MONITOR button
10. Cursor button DOWN
4
Page 5

Operation of the indoor monitor:
Intercom
When a visitor presses the call button of the outdoor unit, the indoor monitor will give a ding dong sound
and activate the monitor screen. The indoor monitor screen will automatically display a picture of the
visitor. Press the monitor button and speak to the visitor. When you have finished speaking to the visitor,
press the monitor button again to switch off the screen. Or push the unlock button to open the door. The
screen will also switch off automatically when a button is not pushed.
Monitor
Press the monitor button. The screen will automatically display a picture with a view of the outside of
your front door. Press the button again to switch off the monitor or the monitor will switch off
automatically after a while.
Menu
Press the menu button to enter the main menu. Use the UP and DOWN cursor buttons to select a
setting and use the LEFT and RIGHT button to adjust the value of the setting. Press the ESC button to
leave the menu.
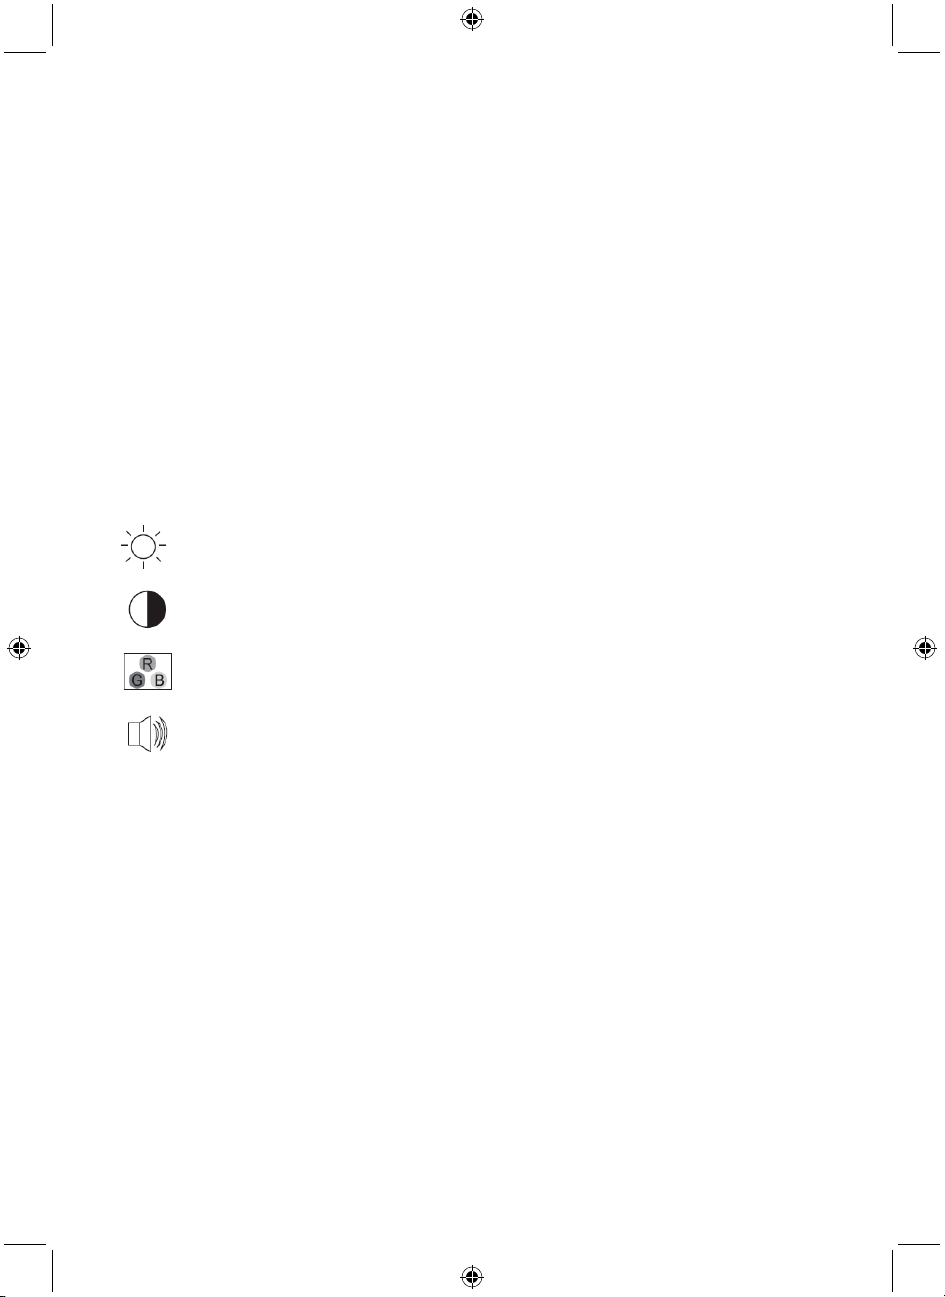
Brightness: adjust the brightness of the picture
Contrast: adjust the contrast of the picture
Colour: adjust the colour of the picture
Volume: adjust the volume (also for the ding dong sound)
Specifications:
Outdoor unit:
• Operating voltage: By answering unit
• Communication system: Semi duplex
• Picture sensor: 1/4” CMOS colour 640x480
• IR LEDs: 4x IR LED, 1x EDS
• Lens: F4.5mm (H:40°, V:45°)
• Water/dust protection: IP44
• Operation temperature: -20°C ~ +50°C
• Weight: 100 g
• Dimensions: 127 x 47 x 37 mm
5
Page 6

Indoor monitor:
• Operating voltage: 15 V DC with door open function
• Communication system: Semi duplex
• Screen: 7” TFT/LCD colour
• Resolution: 480 x 234
• Weight: 489 g
• Dimensions: 197 x 187 x 18 mm
The connection between the answering unit and the outdoor unit is made via a 4-wire cable and can be
extended to 50 m with copper/0.75 mm cable.
Safety precautions:
To reduce risk of electric shock, this product should ONLY be
opened by an authorized technician when service is required.
Disconnect the product from mains and other equipment if a
problem should occur. Do not expose the product to water or
moisture.
Maintenance:
Clean only with a dry cloth. Do not use cleaning solvents or abrasives.
Warranty:
No guarantee or liability can be accepted for any changes and modifications of the product or damage
caused due to incorrect use of this product.
General:
Designs and specifications are subject to change without notice.
All logos brands and product names are trademarks or registered trademarks of their respective
holders and are hereby recognized as such.
Keep this manual and packaging for future reference.
Attention:
This product is marked with this symbol. It means that used electrical and electronic products
should not be mixed with general household waste. There is a separate collections system for
these products.
6
Page 7

DEUTSCH
Video-Türsprechsystem
Einführung:
Mit dieser Video-Türsprechanlage können Sie sicherstellen, dass Sie niemand an der Tür überraschen
kann. Die Außeneinheit besteht aus einer Türklingel mit nachtsichtfähiger Lochkamera, einem
Lautsprecher und einem Mikrofon. Mit dem 17,8 cm LCD-Bildschirm, nur 1,8 cm dick, können Sie
sehen wer an der Tür ist. Durch die Freisprechfunktion können Sie dann mit dem Besucher sprechen,
ohne einen Hörer in die Hand nehmen zu müssen. Drücken Sie einfach die Bildschirmtaste um das
Gespräch zu beginnen.
Montage der Inneneinheit (Monitor):
1. Legen Sie den
Anbringungssort für den
Bildschirm fest
2. Befestigen Sie den Halter
indem Sie Löcher in die
Wand bohren
3. Bohren Sie ein extra Loch
für die Kabeldurchführung
4. Schließen Sie das Kabel
an wie im Bild unten
gezeigt
5. Setzen Sie den Bildschirm
in den Halter mit den
Schlitzen zur Rückseite
des Bildschirmes
1. Weiss (AUDIO)
2. Rot (VDD)
3. Schwarz (GND)
4. Gelb (VIDEO)
A. Stomversorgung 15V
Gleichstrom
B. Verbindung zur
Ausseneinheit
7
Page 8
Montage der Ausseneinheit:
1. Bohren Sie Löcher in die Wand oder in andere Materialien A1/A2 um die Ausseneinheit zu
installieren. Führen Sie das Kabel durch das entsprechende Loch
2. Schließen Sie den Stecker B1 an die Buchse B2 (für das elektrische Türschloss 12V, 1A, sofern
installiert)
3. Verbinden Sie Stecker C1 mit Buchse C2
4. Ziehen Sie die Schrauben D1 und D2 fest
ANMERKUNG: Die Anschlüsse B1/B2 sowie C1/C2 müssen in der Wand oder dem jeweiligen
Befestigungsuntergrund liegen und nicht zwischen der Ausseneinheit und der Wand oder dem
jeweiligen Befestigungsuntergrund.
8
Page 9
Anschließen des elektrischen Schlosses:
Schloss ohne Adapter: der elektrische Anschluss erfolgt über die
Ausseneinheit. Wenn die Tür geschlossen ist, liegt die Spannung
auf 0 Volt. Zum Türöffnen wird der Stromkeis auf 12 V geschaltet.
Die Zeitverzögerung beträgt zwischen 4 und 7 Sekunden.
Schloss ohne Adapter: der elektrische Anschluss erfolgt über die
Ausseneinheit. Wenn die Tür geschlossen ist, liegt die Spannung
auf 12 Volt. Zum Türöffnen wird der Stromkeis auf 0 V geschaltet.
Die Zeitverzögerung beträgt zwischen 4 und 7 Sekunden.
Beschreibung und Arbeitsweise der Ausseneinheit
1. Lautsprecher
2. Kamera
3. IR LED für Nacht
4. Klingeltaste
5. Mikrofon
sicht
• Drücken der Klingeltaste.
• In der Inneneinheit ertönt ein
Klockensignal und der Bildschirm
wird eingeschaltet.
Beschreibung der Inneneinheit mit Bildschirm:
1. Zeigertaste AUF
2. Menütaste
3. Zeigertaste LINKS
4. Türöffnertaste
5. Lautsprecher
6. Bildschirm (Monitor)
7. Abbruchtaste
8. Zeigertaste RECHTS
9. Bildschirmtaste
10. Zeigertaste AB
9
Page 10

Arbeisweise der Inneneinheit mit Bildschirm:
Gegensprechanlage
Wenn ein Besucher die Klingeltaste an der Ausseneinheit drückt, ertönt in der Inneneinheit ein
Klockensignal und der Bildschirm schaltet sich ein. Das Bild des Besuchers erscheint automatisch.
Wenn Sie nun die Bildschirmtaste drücken, können Sie mit dem Besucher sprechen. Nach Beendigung
des Gespräches drücken Sie nochmals die Bildschirmtaste um den Bildschirm abzuschalten. Oder Sie
drücken die Taste des Türöffners um das Türschloss zu entriegeln. Der Bildschirm wird dann
automatisch abgeschaltet auch wenn Sie die Bildschirmtaste nicht drücken.
Bildschirm
Drücken Sie die Bildschirmtaste. Der Bildschirm zeigt dann automatisch ein Bild der Aussicht vor der
Ausseneinheit. Wenn Sie die Bildschirmtaste nochmals drücken, schaltet sich der Bildschirm aus, oder
automatisch nach einer einiger Zeit.
Menü
Um in das Hauptmenü zu gelangen, drücken Sie die Menütaste. Um die einzelnen Menüpunkte
anzuwählen, drücken Sie die AUF - oder AB - Taste. Um die Einstellungen zu verändern, benutzen Sie
die LINKS oder RECHTS Tasten. Drücken Sie die ESC - Taste (Abbruchtaste) um den Vorgang
abzuschliessen
Helligkeit: Stellt die Helligkeit des Bildes ein
Kontrast: Stellt den Bildkontrast ein
Farbe: Verändert die entsprechenden Bildschirmfarben
Lautstärke: Verändert die Lautstärke (Auch für das Glockensignal)
Spezifikationen:
Ausseneinheit:
• Arbeitsspannung Je nach Inneneinheit
• Kommunikationssystem Halb - Duplex
• Bildsensor 1/4” CMOS farbig 640x480
• IR LED’s: 4x IR LED, 1x EDS
• Objektiv F4,5mm (H:40°, V:45°)
• Wasser- / Staubschutz IP44
• Arbeitsstemperatur -20°C bis +50°C
• Gewicht 100 g
• Abmessungen 127 x 47 x 37 mm
10
Page 11
Inneneinheit (Bildschirm):
• Arbeitsspannung 15 V Gleichstrom mit Türöffnerfunktion
• Kommunikationssystem Halb-Duplex
• Bildschirm (Bildschirm ) 7” TFT/LCD farbig
• Auflösung 480 x 234
• Gewicht 489 g
• Abmessungen 197 x 187 x 18 mm
Die Verbindung zwischen der Innen- und der Ausseneinheit wird über ein vieradriges Kabel hergestellt,
welches auf bis zu 50 Meter verlängert werden kann. Der Leitungsquerschnitt für Kupferdraht muss
mindesten 0,75 mm² betragen.
Sicherheitsvorkehrungen:
Um das Risiko eines elektrischen Schlags zu verringern, sollte
dieses Produkt AUSSCHLIESSLICH von einem autorisierten
Techniker geöffnet werden. Bei Problemen trennen Sie das
Gerät bitte von der Spannungsversorgung und von anderen
Geräten ab. Stellen Sie sicher, dass das Gerät nicht mit
Wasser oder Feuchtigkeit in Berührung kommt.
Wartung:
Nur mit einem trockenen Tuch säubern. Keine Reinigungs- oder Scheuermittel verwenden.
Garantie:
Es kann keine Garantie oder Haftung für irgendwelche Änderungen oder Modifikationen des Produkts
oder für Schäden übernommen werden, die aufgrund einer nicht ordnungsgemäßen Anwendung des
Produkts entstanden sind.
Allgemeines:
Design und technische Daten können ohne vorherige Ankündigung geändert werden.
Alle Logos, Marken und Produktnamen sind Marken oder eingetragene Marken ihrer jeweiligen
Eigentümer und werden hiermit als solche anerkannt.
Bitte bewahren Sie Bedienungsanleitung und Verpackung für spätere Verwendung auf.
Achtung:
Dieses Produkt ist mit diesem Symbol gekennzeichnet. Es bedeutet, dass die ausgedienten
elektrischen und elektronischen Produkte nicht mit dem allgemeinen Haushaltsmüll entsorgt
werden dürfen. Für diese Produkte stehen gesonderte Sammelsysteme zur Verfügung.
11
Page 12

FRANÇAIS
Interphone-visiophone
Introduction :
Cet interphone-visiophone intelligent vous évite d'être pris par surprise par quelqu’un à la porte. L’unité
extérieure se compose d'une sonnette, caméra tête d'épingle, lumière pour visibilité nocturne,
haut-parleur et microphone. Avec l’écran super mince de 1,8cm7”, seulement, vous pouvez voir qui est
à la porte et de parler avec le visiteur, sans la nécessité de tenir un récepteur. Il suffit d'appuyer sur le
bouton pour ouvrir la connexion. En outre, il fonctionne en mains libres.
Installation du moniteur intérieur :
1. Déterminer
l'emplacement du
moniteur.
2. Fixez le support en
perçant des trous dans le
mur.
3. Faites un trou
supplémentaire pour faire
passer le câble.
4. Connectez les fils comme
illustré dans l'image
ci-dessous.
5. Placez le moniteur sur le
support à l'aide des fentes
situées l'arrière du
moniteur
1. Blanc (audio)
2. Rouge (VDD)
3. Noir (GND [terre])
4. Jaune (vidéo)
A. Alimentation 15V CC
B. Connexion à une unité
extérieure
12
Page 13

Installation de l’unité extérieure :
1. Percez des trous A1/A2 dans le mur ou autre matériau pour fixer l'unité extérieure et passer le câble.
2. Branchez le connecteur B1 dans B2 (pour serrure électronique 12V, 1A si est installée)
3. Branchez le connecteur C1 dans C2
4. Serrez les vis D1 et D2
Remarque : les connecteurs B1/B2 et C1/C2 doivent être derrière le mur ou tout autre matériau et non
pas entre l'unité extérieure et le mur ou autre matériau.
13
Page 14

Raccordement de la serrure électronique :
Serrure sans adaptateur, l’alimentation est fournie par l’unité
extérieure. Lorsque la porte est fermée, la tension du circuit est de
0V. En déverrouillant la porte, la tension du circuit devient 12V. Le
délai est de 4 à 7 secondes.
Serrure sans adaptateur, l'alimentation est fournie par l'unité
extérieure. Lorsque la porte est fermée, la tension du circuit est de
12V. En dérouillant la porte, la tension du circuit devient 0V. Le
délai est de 4 à 7 secondes.
Description du fonctionnement de l’unité extérieure :
1. Haut - parleur
2. Caméra
Témoins IR pour
3.
visibilité nocturne
4. Touche d'appel
5. Microphone
• Appuyez sur la touche d’appel.
• Le moniteur intérieur donne un son
ding dong et active l'écran
Description du moniteur intérieur :
1. Touche de déplacement Haut
2. Touche Menu
3. Touche de déplacement Gauche
4. Touche Verrouiller
5. Haut-parleur
6. Écran
7. Touche ESC
8. Touche de déplacement Droite
9. Touche Moniteur
10. Touche de déplacement Bas
14
Page 15

Fonctionnement du moniteur intérieur :
Interphone
Lorsqu’un visiteur appuie sur la touche d’appel de l'unité extérieure, le moniteur intérieur donne un son
ding dong et active l'écran du moniteur. L’écran intérieur affiche automatiquement l'image du visiteur.
Appuyez sur la touche Moniteur et parlez avec le visiteur. Lorsque vous aurez terminé de parler au
visiteur, appuyez de nouveau sur la touche moniteur pour éteindre l’écran. Ou appuyez sur la touche
déverrouiller pour ouvrir la porte. L’écran s'éteint automatiquement lorsque la touche n'est pas
appuyée.
Moniteur
Appuyez sur la touche Moniteur L’écran affiche automatiquement une vue de l’extérieur de votre porte
d'entrée. Appuyez de nouveau sur la touche pour éteindre le moniteur, autrement le moniteur s'éteint
automatiquement après un certain temps.
Menu
Appuyez sur la touche Menu pour accéder au menu principal. Utilisez les touches de déplacement
Haut et Bas pour sélectionner un paramètre, et utilisez les touches Gauche et Droite pour ajuster la
valeur du paramètre. Appuyez sur la touche ESC pour quitter le menu.
Luminosité : Permet de régler la luminosité de l'image
Contraste : Permet de régler le contraste de l'image
Couleur : Pour régler la couleur de l'image
Volume : Pour régler le volume (aussi pour le son ding dong)
Spécifications :
Unité extérieure :
• Tension de fonctionnement : par le répondeur
• Système de communication : Semi duplex
• Image du capteur : CMOS 1/4” couleur 640x480
• Témoin IR : 4 x IR LED, 1 x EDS
• Objectif : F4,5mm (H :40°, V :45°)
• Protection contre l'eau/poussière : IP44
• Température de fonctionnement : -20°C ~ +50°C
• Poids : 100 g
• Dimensions : 127 x 47 x 37 mm
15
Page 16
Moniteur intérieur :
• Tension de fonctionnement : 15 V CC avec fonction ouverture de porte
• Système de communication : Semi duplex
• Écran : TFT/LCD couleur 7”
• Résolution : 480 x 234
• Poids : 489 g
• Dimensions : 197 x 187 x 18 mm
La connexion entre le répondeur et l’unité extérieure se fait via un câble à 4 fils et peut être atteindre 50
m avec un câble de cuivre / 0,75 mm.
Consignes de sécurité :
Pour réduire le risque de choc électrique, ce produit ne doit être
ouvert que par un technicien qualifié si une réparation s’impose.
Débranchez l’appareil et les autres équipements du secteur s’il
y a un problème. Ne pas exposer l’appareil à l’eau ni à
l’humidité.
Entretien :
Ne nettoyez l’appareil qu’avec un chiffon sec. N’utilisez pas de solvants ou de produits abrasifs.
Garantie :
Aucune garantie ou responsabilité ne sera acceptée en cas de modification et/ou de transformation du
produit ou en cas de dommages provoqués par une utilisation incorrecte de l’appareil.
Généralités :
Le design et les caractéristiques techniques sont sujets à modification sans notification préalable.
Tous les logos de marques et noms de produits sont des marques déposées ou immatriculées dont
leurs détenteurs sont les propriétaires et sont donc reconnues comme telles dans ce documents.
Conservez ce manuel et l’emballage pour toute référence ultérieure.
Attention :
Ce symbole figure sur l’appareil. Il signifie que les produits électriques et électroniques ne
doivent pas être jetés avec les déchets domestiques. Le système de collecte est différent pour
ce genre de produits.
16
Page 17
NEDERLANDS
Deur video-telefoonsysteem
Inleiding
Zorg ervoor dat u niet per ongeluk verrast wordt wanneer iemand voor de deur staat met dit slimme
video - intercomsysteem. De buitenunit bestaat uit een deurbel met een pengatcamera, nachtzicht en
microfoon. Met de superdunne 7 inch display, slechts 1.8 cm, kunt u zien wie voor de deur staat en met
deze bezoeker spreken zonder de ontvanger te hoeven opnemen. Druk gewoon op de knop om de
verbinding te openen. Bovendien, is het handsfree.
Installatie van de binnenmonitor:
1. Bepaal de locatie voor de
monitor.
2. Bevestig de beugel door
een gat in de muur te
boren.
3. Boor een extra gat om de
kabel door te voeren.
4. Verbind de draden zoals
weergegeven in de
afbeelding hieronder.
5. Plaats de monitor met de
sleuven op de achterkant
van de monitor in de
beugel.
1. Wit (AUDIO)
2. Rood (VDD)
3. Zwart (Aarde)
4. Geel (VIDEO)
A. Voeding 15 V DC
B. Aansluiting naar de
buitenunit
17
Page 18

Installatie van de buitenunit:
1. Boor gaten in de muur of ander materiaal A1/A2 om de buitunit te bevestigen en de kabel door te
voeren.
2. Sluit connector B1 op B2 aan (voor elektronische vergrendeling 12 V, 1 A, indien geïnstalleerd).
3. Sluit connector C1 op C2 aan.
4. Draai de schroeven D1 en D2 vast.
Opmerking: de connectoren B1/B2 en C1/C2 moeten achter de muur of ander materiaal worden
geplaatst en niet tussen de buitenunit en de muur of ander materiaal.
18
Page 19

Aansluiten van een elektronische vergrendeling:
Vergrendeling zonder adapter, gevoed via de buitenunit. Wanneer
de deur is gesloten, is de circuitspanning 0 V. Door de deur te
ontgrendelen wordt de circuitspanning 12 V. De vertraging bedraagt
4~7 seconden.
Vergrendeling zonder adapter, gevoed via de buitenunit. Wanneer
de deur is gesloten, is de circuitspanning 0 V. Door de deur te
ontgrendelen wordt de circuitspanning 12 V. De vertraging bedraagt
4~7 seconden.
Beschrijving en bediening van de buitenunit:
1. Luidspreker
2. Camera
3. IR-LED
4. Oproeptoets
5. Microfoon
voor
nachtzicht
• Druk op de oproeptoets.
• De binnenmonitor zal een
dingdongtoon afgeven en het
scherm van de monitor activeren.
Beschrijving van de binnenmonitor:
1. Cursortoets OMHOOG
2. MENU-toets
3. Cursortoets LINKS
4. ONTGRENDELING-toets
5. Luidspreker
6. Scherm
7. ESC-toets
8. Cursortoets RECHTS
9. MONITOR-toets
10. Cursortoets OMLAAG
19
Page 20
Beschrijving van de binnenmonitor:
Intercom
Wanneer een bezoeker op de “OPROEP”-toets van de buitenunit drukt, zal de binnenmonitor een
dingdongtoon afgeven en het scherm van de monitor activeren. De binnenmonitor zal een afbeelding
van de bezoeker weergeven. Druk op de “MONITOR”-toets en praat met de bezoeker. Wanneer u klaar
bent met praten tegen de bezoeker, druk opnieuw op de “MONITOR”-toets om het scherm uit te
schakelen. Of druk op de “ONTGRENDELING”-toets om de deur te openen. Het scherm zal ook
automatisch uitschakelen wanneer geen toets wordt ingedrukt.
Monitor
Druk opnieuw op de “MONITOR”-toets. Het scherm zal automatisch een afbeelding weergeven met
een blik vanuit uw deur. Druk opnieuw op de toets om de monitor uit te schakelen, of de monitor zal na
een tijd automatisch uitschakelen.
Menu
Druk op de “MENU”-toets om het hoofdmenu te openen. Gebruik de “OMHOOG”- en
“OMLAAG”-cursortoetsen om een instelling te selecteren en gebruik de “LINKS”- en
“RECHTS”-cursortoetsen om de waarde van de instelling aan te passen. Druk op de “ESC”-toets om
het menu te verlaten.
Helderheid: Pas de helderheid van het beeld aan.
Contrast: Pas het contrast van het beeld aan.
Kleur: Pas de kleur van het beeld aan.
Volume: Pas het volume aan (ook voor de dingdongtoon)
Specificaties:
Buitenunit:
• Bedrijfsspanning: Door de unit te beantwoorden.
• Communicatiesysteem: Semi duplex
• Beeldsensor: 1/4” CMOS kleur 640x480
• IR- LED’s: 4x IR-LED, 1x EDS
• Lens: F4,5 mm (H:40°, V:45°)
• Water-/stofbescherming: IP44
• Bedrijfstemperatuur: -20 °C ~ 50 °C
• Gewicht: 100 g
• Afmetingen: 127 x 47 x 37 mm
20
Page 21
Binnenmonitor:
• Bedrijfsspanning: 15 VDC met deur open-functie
• Communicatiesysteem: Semi duplex
• Scherm 7” TFT/LCD-kleurenscherm
• Resolutie: 480 x 234
• Gewicht: 489 g
•Afmetingen: 197 x 187 x 18 mm
De verbinding tussen de antwoordeenheid en de buitenunit wordt via een 4-aderige kabel gemaakt en
kan met koper/0,75 mm kabel tot 50 m uitgebreid worden.
Veiligheidsvoorzorgsmaatregelen:
Om het risico op elektrische schokken te voorkomen mag dit
product ALLEEN worden geopend door een erkende technicus
wanneer er onderhoud nodig is. Koppel het product los van de
elektrische voeding en van andere apparatuur als zich
problemen voordoen. Stel het product niet bloot aan water of
vocht.
Onderhoud:
Uitsluitend reinigen met een droge doek. Gebruik geen reinigingsmiddelen of schuurmiddelen.
Garantie:
Voor wijzigingen en veranderingen aan het product of schade veroorzaakt door een verkeerd gebruik
van dit product, kan geen aansprakelijkheid worden geaccepteerd. Tevens vervalt daardoor de
garantie.
Algemeen:
Wijziging van ontwerp en specificaties zonder voorafgaande mededeling onder voorbehoud.
Alle logo’s, merken en productnamen zijn handelsmerken of geregistreerde handelsmerken van de
respectievelijke eigenaren en worden hierbij als zodanig erkend.
Bewaar deze gebruiksaanwijzing voor latere raadpleging.
Let op:
Dit product is voorzien van dit symbool. Dit symbool geeft aan dat afgedankte elektrische en
elektronische producten niet met het gewone huisafval verwijderd mogen worden. Voor dit soort
producten zijn er speciale inzamelingspunten.
21
Page 22

ITALIANO
Sistema di videocitofono
Introduzione:
Con questo videocitofono a mani libere, non sarete mai più colti di sorpresa, saprete sempre chi è alla
vostra porta. L’unità esterna è costituita da un pulsante (campanello) con una micro videocamera a
visione notturna, altoparlante e microfono. Grazie al display LCD super sottile da 7 pollici di soli 1,8 cm
di spessore, è possibile vedere chi è alla porta e parlare con il visitatore, senza la necessità di alzare il
ricevitore. Basterà premere un pulsante per aprire la connessione.
Installazione del monitor interno:
1. Determinare la posizione
del monitor.
2. Montare la staffa
trapanando i buchi nella
parete.
3. Eseguire un foro
supplementare per far
passare il cavo.
4. Collegare i cavi come
mostrato nell'illustrazione
di seguito.
5. Posizionare il monitor
sulla staffa con le
aperture sulla parte
posteriore del monitor
1. Bianco (AUDIO)
2. Rosso (VDD)
3. Nero (GND)
4. vGiallo (VIDEO)
A. Alimentazione DC 15V
B. Collegamento all'unità
esterna
22
Page 23

Installazione dell’unità esterna:
1. Eseguire i fori A1/A2 sulla parete murale per mondare l’unità esterna e far passare il cavo.
2. Collegare il connettore B1 al B2 (per l'apriporta elettrico a 12V, 1A se installato)
3. Collegare il connettore C1 al C2
4. Stringere le viti D1 e D2
Nota: I connettore B1/B2 e C1/C2 devono stare dentro il muro e non tra l'unità esterna ed il muro.
23
Page 24

Collegamento dell’apriporta elettrico:
Blocco senza alimentatore, l’energia è fornita tramite l’unità
esterna. Quando la porta è chiusa, il voltaggio del circuito è di 0V.
Sbloccando la porta il circuito è di 12V di voltaggio. Il ritardo è di
circa 4~7 secondi.
Blocco senza alimentatore, l'energia è fornita tramite l'unità
esterna. Quando la porta è chiusa, il voltaggio del circuito è di 12V.
Sbloccando la porta il circuito è di 0V di voltaggio. Il ritardo è di
circa 4~7 secondi.
Descrizione e funzionamento dell’unità esterna:
1. Vivavoce
ideocamera
2. V
3. LED IR per visione
notturna
4. Pulsante di chiamata
5. Microfono
• Premere il pulsante di chiamata
• Il monitor interno darà un ding dong
ed attiverà lo schermo
Descrizione del monitor interno:
1. Pulsante cursore SU
2. Pulsante MENU
3. Pulsante cursore SINISTRO
4. Pulsante di SBLOCCO (Apriporta)
5. Copertura pannello
6. Schermo
7. Pulsante USCITA
8. Pulsante cursore DESTRO
9. Pulsante MONITOR
10. Pulsante cursore GIU
24
Page 25

Funzionamento del monitor interno:
Intercomunicante
Quando un visitatore preme il pulsante di chiamata dell’unità esterna, il monitor interno darà un ding
dong ed attiverà lo schermo. Lo schermo del monitor interno mostrerà automaticamente l'immagine del
visitatore. Premere il pulsante del monitor e parlare al visitatore. Quando avete finito di parlare con il
visitatore, premete il pulsante monitor nuovamente per spegnere lo schermo. Oppure premere il
pulsante apriporta (sblocco) per aprire la porta. Lo schermo si spegnerà comunque automaticamente
anche se non viene premuto nessun pulsante.
Monitor
Premete il pulsante monitor. Lo schermo mostrerà automaticamente un immagine con la vista esterna
della vostra porta. Premere il pulsante nuovamente per spegnere il monitor o lo stesso si spegnerà
automaticamente dopo un po’.
Menu
Premere il pulsante menu per accedere al menu principale. Utilizzare i pulsanti cursore SU e GIU per
selezionare le impostazioni ed utilizzare i pulsanti SINISTRO e DESTRO per impostare il valore di tale
impostazione. Premere il pulsante ESC per uscire dal menu.
Luminosità: regola la luminosità dell’immagine
Contrasto: Regola il contrasto dell’immagine
Colore. Regola il contrasto dell’immagine
Volume regola il volume (anche per il suono del ding dong)
Caratteristiche:
Unità esterna:
• Voltaggio di funzionamento: Prelevato dall’unità interna
• Sistema di comunicazione: Semi duplex
• Sensore immagine: 1/4” CMOS colori 640x480
• LED IR: 4x IR LED, 1x EDS
• Lenti: F4.5mm (H:40°, V:45°)
• Protezione da polvere/acqua: IP44
• Temperatura di funzionamento: -20°C ~ +50°C
• Peso: 100 g
• Dimensioni: 127 x 47 x 37 mm
25
Page 26

Monitor interno:
• Voltaggio di funzionamento: 15 VDC con funzione apri-porta
• Sistema di comunicazione: Semi duplex
• Schermo: 7” TFT/LCD colori
• Risoluzione: 480 x 234
• Peso: 489 g
• Dimensioni: 197 x 187 x 18 mm
La connessione tra l’unità interna e l’unità esterna è eseguita tramite un cavo a 4 vie e può essere
estesa fino a 50 m con cavo di rame da 0.75 mm.
Precauzioni di sicurezza:
Per ridurre il rischio di shock elettrico, questo prodotto
dovrebbe essere aperto SOLO da un tecnico autorizzato
quando è necessario ripararlo. Scollegare il prodotto
dall’alimentazione e da altri apparecchi se dovesse esserci un
problema. Non esporre il prodotto ad acqua o umidità.
Manutenzione:
Pulire solo con un panno asciutto. Non utilizzare solventi detergenti o abrasivi.
Garanzia:
Non sarà accettata alcuna garanzia o responsabilità in relazione a cambiamenti e modifiche del
prodotto o a danni determinati dall’uso non corretto del prodotto stesso.
Generalità:
Il design e le caratteristiche tecniche sono soggetti a modifica senza necessità di preavviso.
Tutti i marchi a logo e i nomi di prodotto sono marchi commerciali o registrati dei rispettivi titolari e sono
riconosciuti come tali in questo documento.
Tenere questo manuale e la confezione per riferimento futuro.
Attenzione:
Il prodotto è contrassegnato con questo simbolo, con il quale si indica che i prodotti elettrici ed
elettronici non devono essere gettati insieme ai rifiuti domestici. Per questi prodotti esiste un
sistema di raccolta differenziata.
26
Page 27

ESPAÑOL
Sistema intercomunicador de vídeo
Introducción:
Asegúrese con este sistema de intercomunicación de vídeo inteligente de que no lo tomen por
sorpresa cuando alguien llame a la puerta. La unidad que se coloca en el exterior se compone de un
timbre con cámara estenopéica, visión de noche, altavoz y micrófono. Tiene una pantalla súper
delgada de 7” (solamente 1.8 cm), que le permite ver quién está en la puerta y hablar con el visitante
sin necesidad de levantar un receptor. Basta con presionar el botón para establecer la conexión.
Además, es manos libres.
Cómo instalar el monitor interior:
1. Decida la posición del
monitor.
2. Monte el soporte en la
pared haciendo los
orificios necesarios.
3. Haga un orificio adicional
para permitir que pase el
cable.
4. Conecte los cables como
se muestra en la figura.
5. Coloque el monitor en el
soporte utilizando las
ranuras en la parte
posterior del monitor.
1. Blanco (AUDIO)
2. Rojo (POSITIVO)
3. Negro (A TIERRA)
4. Amarillo (VIDEO)
A. Alimentación CC 15V
B. Conexión a la unidad
exterior
27
Page 28

Cómo instalar la unidad exterior:
1. Haga los orificios en la pared, u otro material indicados en A1 y A2, para montar la unidad exterior y
pasar el cable.
2. Conecte el conector B1 al B2 (12V para el seguro electrónico,1A si está instalado)
3. Conecte el conector C1 al C2
4. Apriete los tornillos D1 y D2
Nota: los conectores B1/B2 y C1/C2 tienen que estar detrás de la pared u otro material y no entre la
unidad exterior y la pared u otro material.
28
Page 29

Cómo conectar el seguro electrónico:
El seguro no requiere un adaptador, ya que lo alimenta la unidad
exterior. Cuando la puerta está cerrada, el voltaje del circuito es 0V.
Al abrir la puerta, el voltaje del circuito es 12V. El espacio de tiempo
para abrir es de 4~7 segundos.
El seguro no requiere un adaptador, ya que lo alimenta la unidad
exterior. Cuando la puerta está cerrada, el voltaje del circuito es 0V.
Al abrir la puerta, el voltaje del circuito es 12V. El espacio de tiempo
para abrir es de 4~7 segundos.
Descripción y funcionamiento de la unidad exterior:
1. Altavoz
2. Cámara
Luz infrarroja LED
3.
para visión nocturna
4. Timbre
5. Micrófono
• Presione el timbre
• El monitor interior emitirá un sonido
ding dong y activará la pantalla del
monitor
Descripción del monitor interior:
1. Botón flecha hacia ARRIBA
2. Botón MENU
3. Botón flecha hacia la IZQUIERDA
4. Botón ABRIR LA PUERTA
5. Altavoz
6. Pantalla
7. Botón ESC
8. Botón flecha hacia la DERECHA
9. Botón del MONITOR
10. Botón flecha hacia ABAJO
29
Page 30

Cómo operar el monitor interior:
Intercomunicador
Cuando una visita toca el timbre en la unidad exterior, el monitor interior emitirá un sonido ding dong y
se activará la pantalla del monitor. En la pantalla del monitor interior inmediatamente aparecerá la
imagen de la visita. Presione el botón del monitor y hable con la visita. Cuando haya terminado de
hablar con la visita, vuelva a presionar el botón del monitor para apagar la pantalla o presione el
seguro electrónico para abrir la puerta. La pantalla también se apaga automáticamente si no presiona
el botón.
Monitor
Presione el botón del monitor. En la pantalla, aparecerá automáticamente una imagen con la vista del
exterior alrededor de su puerta principal. Vuelva a presionar el botón para apagar el monitor. Si no lo
hace, el monitor se apagará automáticamente después de un rato.
Menú
Presione el botón del menú para ingresar al menú principal. Use los botones con las flechas hacia
arriba o hacia abajo para seleccionar un programa y los botones con las flechas a la derecha y a la
izquierda para programar la selección deseada. Presione el botón ESC para salir del menú.
Brillo: ajuste el brillo de la imagen
Contraste: ajuste el contraste de la imagen
Color: ajuste el color de la imagen
Volumen: ajuste el volumen (también el volumen del sonido ding dong)
Especificaciones:
Unidad exterior:
• Voltaje de operación: por unidad contestadora
• Sistema de comunicación: Semi duplex
• Sensor de imagen: 1/4” CMOS color 640x480
• Infrarrojo LED 4x IR LED, 1x EDS
• Lente: F4.5mm (H:40°, V:45°)
• Protección contra agua/polvo: IP44
• Rango temperatura operación: -20°C ~ +50°C
• Peso: 100 g
• Dimensiones: 127 x 47 x 37 mm
30
Page 31

Monitor interior:
• Voltaje de operación: 15 VCD con función para abrir la puerta
• Sistema de comunicación: Semi duplex
• Pantalla: 7” TFT/LCD color
• Resolución: 480 x 234
• Peso: 489 g
• Dimensiones: 197 x 187 x 18 mm
La conexión entre la unidad contestadora y la unidad exterior se realiza mediante un cable de 4 hilos y
se puede extender a 50m con un cable de cobre de 0.75 mm.
Medidas de seguridad:
Para reducir el peligro de descarga eléctrica, este producto
SÓLO lo debería abrir un técnico autorizado cuando necesite
reparación. Desconecte el producto de la toma de corriente y
de los otros equipos si ocurriera algún problema. No exponga
el producto al agua ni a la humedad.
Mantenimiento:
Límpielo sólo con un paño seco. No utilice disolventes de limpieza ni productos abrasivos.
Garantía:
No se aceptará ninguna garantía o responsabilidad derivada de cualquier cambio o modificaciones
realizadas al producto o daños provocados por un uso incorrecto del producto.
General:
Las ilustraciones y las especificaciones podrán sufrir cambios sin previo aviso.
Todas las marcas de logotipos y nombres de productos constituyen patentes o marcas registradas a
nombre de sus titulares correspondientes, reconocidos como tal.
Conserve este manual y el embalaje en caso de futura necesidad.
Atención:
Este producto está señalizado con este símbolo. Esto significa que los productos eléctricos y
electrónicos usados no deberán mezclarse con los desechos domésticos generales. Existe un
sistema de recogida individual para este tipo de productos.
31
Page 32

MAGYAR
Videós ajtótelefon rendszer
Bevezetés:
Ezzel az okos videós ajtótelefonnal nem éri meglepetés az ajtónyitáskor. A kültéri egység
csengőgombból és a beleépített gomblyukkamerából, éjjellátóból, hangszóróból és mikrofonból áll. A
csupán 1,8 cm vastag, 7 hüvelykes képernyőn látja, hogy ki áll az ajtó előtt, és kézibeszélő nélkül
beszélhet is vele. Elég megnyomni egy gombot a képtelefonáláshoz. Utána mindkét keze szabad
marad.
A beltéri monitor telepítése:
1. Jelölje ki a monitor helyét.
2. Tiplikkel és csavarokkal
rögzítse a tartókeretét a
falra.
3. Készítsen egy átmenő
furatot is, a kábel
számára.
4. Kösse be a vezetékeket
az alábbi ábra szerint.
5. Helyezze a tartókeretre a
monitort, a hátoldali
réseinél fogva
1. Fehér (HANG)
2. Piros (VDD)
3. Fekete (FÖLD)
4. Sárga (VIDEO)
A. 15 V-os tápfeszültség
B. Csatlakozás a kültéri
egységhez
32
Page 33

A kültéri egység telepítése:
1. Készítse el a kültéri egység A1/A2 felerősítő furatát és a kábel átmenő furatát.
2. Kösse össze a B1 és B2 csatlakozót (az 1A, 12 V-os elektronikus zárhoz, ha van)
3. Kösse össze a C1 és C2 csatlakozót
4. Húzza meg a D1 és D2 csavart
Megjegyzés: a B1/B2 és C1/C2 csatlakozónak a fal (vagy más tartóelem) mögött kell lennie, nem pedig
a kültéri egység és a fal (vagy más tartóelem) között.
33
Page 34

Az elektronikus zár bekötése:
A zárhoz nem kell külön tápegység, mert a kültéri egységtől kapja a
táplálást. Az ajtó zárt helyzetében az áramkör feszültsége 0 V. Az
ajtó nyitásakor az áramkör feszültsége 12 V. A késleltetés 4-7
másodperc.
A zárhoz nem kell külön tápegység, mert a kültéri egységtől kapja a
táplálást. Az ajtó zárt helyzetében az áramkör feszültsége 12 V. Az
ajtó nyitásakor az áramkör feszültsége 0 V. A késleltetés 4-7
másodperc.
A kültéri egység leírása és használata:
1. Hangszóró
2. Kamera
Infra LED, az éjszakai
3.
látáshoz
4. Hívógomb
5. Mikrofon
• Nyomja meg a hívógombot
• A beltéri monitor bimm-bamm
hangot ad és bekapcsolja a monitor
képernyőjét
A beltéri monitor leírása:
1. Kurzorgomb, FEL
2. MENÜ gomb
3. Kurzorgomb, BALRA
4. NYIT gomb
5. Hangszóró
6. Képernyő
7. ESC gomb
8. Kurzorgomb, JOBBRA
9. MONITOR gomb
10. Kurzorgomb, LE
34
Page 35

A beltéri monitor használata:
Házitelefon
Amikor a látogató megnyomja a kültéri egység hívógombját, a beltéri monitor bimm-bamm hangot ad
és bekapcsolja a képernyőt. A beltéri képernyőn automatikusan megjelenik a látogató képe. Nyomja
meg a monitor gombját és beszéljen a látogatóval. Ha befejezte a beszélgetést, a monitor gombjának
megnyomásával kikapcsolhatja a képernyőt. Másik megoldásként kinyithatja az ajtót az ajtónyitó gomb
megnyomásával. A képernyő akkor is automatikusan kikapcsol, ha egy ideig nem nyúl a gombokhoz.
A monitor
Nyomja meg a monitor gombját. A képernyőn automatikusan megjelenik a bejárati ajtó előtti tér képe. A
monitor kikapcsolásához nyomja meg ismét a gombot. A monitor egy idő után automatikusan kikapcsol,
ha nem nyúl a gombokhoz.
Menü
A főmenü megnyitásához nyomja meg a menü gombot. Beállítandó paramétert a FEL és LE gombbal
választhat, a paraméter értékét a BAL és JOBB gombbal választhatja ki. A menüből az ESC gombbal
léphet ki.
Fényerősség: a kép világosságát állítja
Kontraszt: a kép kontrasztosságát állítja
Szín: a kép színeit állítja
Hangerő: a beszélgetés és a bimm-bamm csengő hangerejét állítja
Műszaki adatok:
Kültéri egység:
• Tápfeszültség: a válaszolóegységtől
• Kommunikációs mód: félduplex
• Képérzékelő: 1/4” CMOS, színes, 640x480
• IR LED-ek: 4 db infra LED, 1 db EDS
• Objektív: F4,5mm (vízsz.:40°, függ.:45°)
• Védettség: IP44
• Üzemi hőmérséklettartomány: -20°C – +50°C
• Tömeg: 100 g
• Méretek: 127 x 47 x 37 mm
35
Page 36

Beltéri monitor:
• Tápfeszültség: 15 V=, ajtónyitó funkcióval
• Kommunikációs mód: félduplex
• Képernyő: 7” TFT/LCD, színes
• Felbontás: 480 x 234
• Tömeg: 489 g
• Méretek: 197 x 187 x 18 mm
A válaszolóegység és a kültéri egység négyeres kábellel kapcsolódik egymáshoz, amely 0,75 mm-es
rézeres kábel használata esetén legfeljebb 50 m hosszú lehet.
Biztonsági óvintézkedések:
Az áramütés veszélyének csökkentése érdekében ezt a
terméket KIZÁRÓLAG a márkaszerviz képviselője nyithatja fel.
Hiba esetén húzza ki a termék csatlakozóját a konnektorból,
és kösse le más berendezésekről. Vigyázzon, hogy ne érje a
terméket víz vagy nedvesség.
Karbantartás:
Csak száraz ronggyal tisztítsa. Tisztító- és súrolószerek használatát mellőzze.
Jótállás:
Nem vállalunk jótállást és felelősséget a terméken végzett változtatás vagy módosítás vagy a termék
helytelen használata miatt bekövetkező károkért.
Általános tudnivalók:
A kivitel és a műszaki jellemzők előzetes értesítés nélkül is módosulhatnak.
Minden logó, terméknév és márkanév a tulajdonosának márkaneve vagy bejegyzett márkaneve,
azokat ennek tiszteletben tartásával említjük.
Őrizze meg ezt az útmutatót és a csomagolást.
Figyelem:
Ezt a terméket ezzel a jelölésel láttuk el. Azt jelenti, hogy az elhasznált elektromos és
elektronikus termékeket tilos az általános háztartási hulladékhoz keverni. Begyűjtésüket külön
begyűjtő létesítmények végzik.
36
Page 37

SUOMI
Video-ovipuhelin
Esittely:
Tämän älykkään sisäpuhelimen avulla varmistat, ettei sinua yllätetä ulko-ovellasi. Ulkoyksikkö koostuu
ovikellosta, jossa on neulanreikäkamera, yönäkö, kaiutin ja mikrofoni. Äärimmäisen ohut 7” näyttö, vain
1,8 cm paksu, voit nähdä kuka on ovella ja puhua vierailijan kanssa luuria nostamatta. Painat vain
painiketta avataksesi yhteys.
Sisämonitorin asennus:
1. Päätä monitorin paikka.
2. Kiinnitä pidike poraamalla
seinään reiät.
3. Tee lisäreikä, josta kaapeli
pujotetaan läpi.
4. Yhdistä johdot alla olevan
kuvan osoittamalla
tavalla.
5. Sijoita monitori
telineeseen monitorin
takapuolella olevien
aukkojen avulla.
1. Valkoinen (AUDIO)
2. Punainen (VDD)
3. Musta (GND)
4. Keltainen (VIDEO)
A. Virta DC 15V
B. Liitäntä ulkoyksikköön
37
Page 38

Ulkoyksikön asennus:
1. Poraa reiät seinään tai muuhun pintaan A1/A2 kiinnittääksesi ulkoyksikkö ja vie kaapeli läpi.
2. Yhdistä liitin B1 liittimeen B2 (sähkölukkoa varten 12V, 1A jos asennettu)
3. Yhdistä liitin C1 liittimeen C2
4. Kiristä ruuvit D1 ja D2
Huomautus: liittimien B1/B2 ja C1/C2 tulee olla seinän tai muun pinnan takana eikä ulkoyksikön ja
seinän välissä.
38
Page 39

Sähkölukon liitäntä:
Lukko ilman adapteria, virta tulee ulkoyksikön kautta. Kun ovi on
kiinni, jännite on 0V. Oven lukitsemisen jälkeen jännite 12V. Viive
on 4-7 sekuntia.
Lukko ilman adapteria, virta tulee ulkoyksikön kautta. Kun ovi on
kiinni, jännite on 12V. Oven lukitsemisen jälkeen jännite 0V. Viive
on 4-7 sekuntia.
Ulkoyksikön kuvaus ja käyttö:
1. Kaiutin
2. Kamera
IR LED yönäköä
3.
varten
4. Soittopainike
5. Mikrofoni
• Paina soittopainiketta
• Sisämonitori antaa ding
dong -äänen ja aktivoi monitorin
näytön
Sisämonitorin asennus:
1. Kursoripainike YLÖS
2. MENU-painike
3. Kursoripainike VASEN
4. LUKITUKSEN AVAUS -painike
5. Kaiutin
6. Näyttö
7. ESC-painike
8. Kursoripainike OIKEA
9. MONITORIpainike
10. Kursoripainike ALAS
39
Page 40

Sisämonitorin käyttö:
Sisäpuhelin
Kun vierailija painaa soittopainiketta ulkoyksikössä, sisämonitori antaa ding dong -äänen ja monitorin
näyttö aktivoituu. Sisämonitorin näyttö näyttää automaattisesti vierailijan kuvan. Paina
monitoripainiketta ja puhu vierailijalle. Kun olet lopettanut vierailijalle puhumisen, paina
monitoripainiketta uudelleen kytkeäksesi monitori pois päältä. Tai paina lukituksen avaus-painiketta
(unlock) avataksesi ovi. Näyttö kytkeytyy pois päältä automaattisesti, jos painikkeita ei paineta.
Näyttö
Paina monitoripainiketta. Näytölle ilmestyy automaattisesti näkymä etuovesi ulkopuolelta. Paina
painiketta uudelleen kytkeäksesi monitori pois päältä tai monitori kytkeytyy pois päältä automaattisesti
hetken kuluttua.
Valikko
Paina valikkopainiketta (menu) siirtyäksesi päävalikkoon. Käytä YLÖS ja ALAS -kursoripainikkeita
valitaksesi asetus ja käytä painikkeita OIKEA ja VASEN säätämän asetuksen arvoja. Paina painiketta
ESC siirtyäksesi pois valikosta.
Kirkkaus: säätää kuvan kirkkautta
Kontrasti: säätää kuvan kontrastia
Väri: säätää kuvan väriä
Äänenvoimakkuus: säätää äänenvoimakkuutta (myös ding dong -ääntä)
Tekniset tiedot:
Ulkoyksikkö:
• Käyttöjännite: Vastausyksiköllä
• Viestintäjärjestelmä: Semidupleksi
• Kuvan sensori: 1/4” CMOS väri 640x480
• IR LEDit: 4x IR LED, 1x EDS
• Linssi: F4.5mm (H:40°, V:45°)
• Vesi/pölysuoja: IP44
• Käyttölämpötila: -20°C ~ +50°C
• Paino: 100 g
• Mitat: 127 x 47 x 37 mm
40
Page 41

Sisämonitori:
• Käyttöjännite: 15 VDC ovenavaustoiminnolla
• Viestintäjärjestelmä: Semidupleksi
• Näyttö: 7” TFT/LCD väri
• Resoluutio: 480 x 234
• Paino: 489 g
• Mitat: 197 x 187 x 18 mm
Liitäntä vastausyksikön ja ulkoyksikön välillä tehdään nelijohdinkaapelilla ja sitä voidaan pidentää 50
metriin kuparikaapelilla/0.75 mm.
Turvallisuuteen liittyvät varoitukset:
Sähköiskun riskin pienentämiseksi, AINOASTAAN valtuutettu
huoltohenkilö saa avata tämän laitteen huoltoa varten. Jos
ongelmia ilmenee, irrota laite verkkovirrasta ja muista laitteista.
Älä altista laitetta vedelle äläkä kosteudelle.
Huolto:
Puhdista ainoastaan kuivalla kankaalla. Älä käytä liuottimia tai hankausaineita.
Takuu:
Takuu ja vastuuvelvollisuus mitätöityvät, jos tuote vaurioituu siihen tehtyjen muutoksien tai sen
väärinkäytön takia.
Yleistä:
Muutoksia malliin ja teknisiin ominaisuuksiin voidaan tehdä ilmoituksetta.
Kaikki logot, merkit ja tuotenimet ovat niiden vastaavien omistajien tuotemerkkejä tai rekisteröityjä
tuotemerkkejä ja niitä on käsiteltävä sellaisina.
Säilytä käyttöohjeet ja pakkaus myöhempää käyttötarvetta varten.
Huomio:
Tuote on varustettu tällä merkillä. Se merkitsee, ettei käytettyjä sähkö- tai elektronisia tuotteita
saa hävittää kotitalousjätteen mukana. Kyseisille tuotteille on olemassa erillinen
keräysjärjestelmä.
41
Page 42

SVENSKA
Telefonsystem med video på dörren
Introduktion:
Se till att inte bli tagen på sängen när någon står vid dörren med denna smarta video
snabbtelefonsystem. Utomhusenheten består av en ringklocka med hålkamera, nattvisning, högtalare
och mikrofon. Med den super slimmade 7 tums display, endast 1,8 cm, kan du se vem som står vid
dörren och tala med besökaren utan att behöva plocka upp en mottagare. Tryck bara på knappen för
att öppna förbindelsen. Dessutom är den Hands-free.
Installation av inomhusmonitorn:
1. Bestäm positionen för
skärmen.
2. Montera fästet genom att
borra hål i väggen.
3. Gör ett extra hål för
kabeln att trä igenom.
4. Anslut kabelledningarna
som visas i bilden nedan.
5. Placera bildskärmen på
fästet med hålen på
baksidan av skärmen
1. Vit (AUDIO)
2. RÖD (VDD)
3. SVART (GND)
4. Gul (VIDEO)
A. Växelström 15V
B. Anslutning till
utomhusenheten
42
Page 43

Installation av utomhusenheten:
1. Borra hål i väggen eller annat material A1/A2 för att montera utomhusenheten och föra kabeln
igenom.
2. Anslut kontakten B1 till B2 (för elektroniskt lås 12V, 1A om installerad)
3. Anslut kontakten C1 till C2
4. Dra åt skruvarna D1 och D2
Notera: anslutningarna B1/B2 och C1/C2 måste vara bakom väggen eller annat material och inte
mellan utomhusenheten och väggen eller annat material.
43
Page 44

Anslutning av elektroniskt lås:
Låsa utan adapter, erhålls ström via utomhusenheten. När dörren
är stängd är kretsspänningen 0V. Genom att låsa upp dörren är
kretsspänningen 12V. Fördröjningen är 4 ~ 7 sekunder.
Låsa utan adapter, erhålls ström via utomhusenheten. När dörren
är stängd, är kretsspänningen 12V. Genom att låsa upp dörren är
kretsspänningen 0V. Fördröjningen är 4 ~ 7 sekunder.
Beskrivning och drift av utomhusenheten:
1. Högtalare
2. Kamera
Infraröd (IR) LED för
3.
nattvisning
4. Anropsknappen
5. Mikrofon
• Tryck på anropsknappen
• Bildskärmen inomhus kommer att
ge ett ding dång ljud och aktivera
skärmen
Beskrivning av bildskärmen inomhus:
1. Markörknappen upp
2. Menyknappen
3. Markörknappen vänster
4. LÅS UPP - knappen
5. Högtalare
6. Skärm
7. ESC knappen
8. Markörknappen till höger
9. Knapp till monitor
10. Markörknappen NER
44
Page 45

Drift av bildskärmen inomhus:
Snabbtelefon
När en besökare trycker på anropsknappen till utomhusenheten, kommer bildskärmen inomhus att ge
ett ding dång ljud och aktivera skärmen. Bildskärmen inomhus kommer automatiskt att visa en bild på
besökaren. Tryck på bildskärmsknappen och prata med besökaren. När du har slutat prata med
besökaren tryck bildskärmsknappen igen för att stänga av den. Eller tryck på knappen för att låsa upp
och öppna dörren. Skärmen kommer också att stängas av automatiskt när en knapp inte är intryckt.
Bildskärm
Tryck på knappen bildskärm. Skärmen kommer automatiskt visa en bild med en bildvinkel på utsidan
av dörren. Tryck på knappen igen för att stänga av skärmen annars kommer skärmen att stängas av
automatiskt efter ett tag.
Meny
Tryck på menyknappen för att öppna huvudmenyn. Använd UP(UPP) och DOWN (NER)
markörknapparna för att välja en inställning och använd LEFT(VÄNSTER) och RIGHT(HÖGER)
knappen för att justera inställningsvärdena. Tryck på ESC knappen för att lämna menyn.
Ljusstyrka: justera ljusstyrkan i bilden
Kontrast: Justera kontrasten i bilden
Färg: justera färgen på bilden
Volym: justera volymen (även för ding dång ljudet)
Specifikationer:
Utomhusenhet:
• Driftspänning: genom en svarsenhet
• Kommunikationssystem: Semi duplex
• Bildsensor: 1/4” CMOS färg 640x480
• Infraröd lysdioder: 4x IR LED, 1x EDS
• Lins: F4.5mm (H:40°, V:45°)
• Vatten-/dammskydd: IP44
• Drifttemperatur: – 20°C ~ +50°C
• Vikt: 100 gram
• Mått: 127 x 47 x 37 mm
45
Page 46

Inomhus monitor:
• Driftspänning: 15 VDC med dörröppningsfunktion
• Kommunikationssystem: Semi duplex
• Skärm: 7” TFT/LCD färg
• Upplösning: 480 x 234
• Vikt: 489 gram
• Mått: 197 x 187 x 18 mm
Förbindelsen mellan svarsenheten och utomhusenheten sker via en 4-wire kabel och kan förlängas
upp till 50 m med en kopparkabel på 0,075 mm.
Säkerhetsanvisningar:
För att minska risken för elektriska stötar bör denna produkt
ENDAST öppnas av behörig tekniker när service behövs. Dra
ut strömkabeln från eluttaget och koppla ur all annan
utrustning om något problem skulle uppstå. Utsätt inte
produkten för vatten eller fukt.
Underhåll:
Rengör endast med torr trasa. Använd inga rengöringsmedel som innehåller lösningsmedel eller
slipmedel.
Garanti:
Ingen garanti gäller vid ändringar eller modifieringar av produkten eller för skador som har uppstått på
grund av felaktig användning av denna produkt.
Allmänt:
Utseende och specifikationer kan komma att ändras utan föregående meddelande.
Alla logotyper och produktnamn är varumärken eller registrerade varumärken som tillhör sina ägare
och är härmed erkända som sådana.
Behåll bruksanvisningen och förpackningen för eventuellt framtida behov.
Obs!
Produkten är märkt med denna symbol som betyder att använda elektriska eller elektroniska
produkter inte får slängas bland vanliga hushållssopor. Det finns särskilda återvinningssystem
för dessa produkter.
46
Page 47

ČESKY
Dveřní videotelefon
Úvod:
Nenechte se zaskočit nečekanou návštěvou za dveřmi s tímto inteligentním systémem interkomu s
přenosem obrazu. Venkovní jednotka se skládá ze zvonku s miniaturní kamerou s možností nočního
vidění, reproduktoru a mikrofonu. Díky super tenkému 7” displeji, pouhých 1,8 cm, můžete vidět, kdo je
za dveřmi a mluvit s návštěvníkem bez nutnosti zvedání sluchátka. Stačí pouze stisknout tlačítko pro
navázání spojení prostřednictvím tohoto hands-free systému.
Instalace zobrazovací jednotky:
1. Vyberte správné umístění
pro zobrazovací jednotku.
2. Přišroubujte držák do
vyvrtaných otvorů ve zdi.
3. Vyvrtejte extra otvor pro
vývod kabelů.
4. Zapojte kabely tak, jak je
ukázáno na obrázku níže.
5. Umístěte jednotku na
držák pomocí drážek na
zadní straně zobrazovací
jednotky
1. Bílý (AUDIO)
2. Červený (VDD)
3. Černý (GND)
4. Žlutý (VIDEO)
A. Síť DC 15V
B. Zapojení venkovní
jednotky
47
Page 48

Instalace venkovní jednotky:
1. Vyvrtejte díry do zdi či jiného materiálu A1/A2 pro upevnění venkovní jednotky a protáhněte kabely
skrz.
2. Zapojte konektor B1 do B2 (pro elektrický zámek 12V, 1A, pokud je nainstalován)
3. Zapojte konektor C1 do C2
4. Utáhněte šrouby D1 a D2
Poznámka: konektory B1/B2 a C1/C2 je třeba umístit až za zeď nebo jinou montážní stěnu a ne mezi
venkovní jednotku a zeď.
48
Page 49

Zapojení elektrického zámku:
Zámek bez napájecího adaptéru je napájen venkovní jednotkou.
Pokud jsou dveře zavřené, napětí je 0V. Při odemknutí dveří je
napětí 12V. Prodleva je 4~7 vteřiny.
Zámek bez napájecího adaptéru je napájen venkovní jednotkou.
Pokud jsou dveře zavřené, napětí je 12V. Při odemknutí dveří je
napětí 0V. Prodleva je 4~7 vteřiny.
Popis a ovládání venkovní jednotky:
1. Reproduktor
2. Kamera
IR LED pro noční
3.
vidění
4. Tlačítko zvonku
5. Mikrofon
• Stiskněte tlačítko zvonku
• Automaticky se aktivuje akustický
signál zvonku a přenos obrazu na
zobrazovací jednotce.
Popis zobrazovací jednotky:
1. Tlačítko NAHORU
2. Tlačítko pro MENU
3. Tlačítko VLEVO
4. Tlačítko ODEMKNOUT
5. Reproduktor
6. Obrazovka
7. Tlačítko ESC
8. Tlačítko VPRAVO
9. Tlačítko MONITOR
10. Tlačítko DOLU
49
Page 50

Ovládání zobrazovací jednotky:
Interkom
V okamžiku, kdy návštěvník stiskne zvonkové tlačítko na venkovní jednotce, na vnitřní jednotce je
spuštěn gong a na displeji je automaticky aktivován obraz. Stiskněte tlačítko MONITOR pro zahájení
hovoru s návštěvníkem. Po ukončení hovoru opět stiskněte tlačítko MONITOR pro vypnutí obrazovky.
Můžete stisknout tlačítko ODEMKNOUT pro otevřní dveří. Obrazovka se také automaticky vypne,
pokud není stisknuto žádné tlačítko.
Monitorování
Stiskněte tlačítko MONITOR. Na obrazovce se automaticky zobrazí obraz prostoru přede dveřmi.
Znovu stiskněte tlačítko pro vypnutí monitoru, zobrazovací jednotka po chvíli vypne automaticky sama.
Nabídka
Stiskněte tlačítko MENU pro vstup do hlavní nabídky. Použijte směrová tlačítka NAHORU a DOLU pro
výběr nastavení a tlačítka VLEVO a VPRAVO pro nastavení hodnot. Stiskněte tlačítko ESC pro odchod
z nabídky.
Jas: nastavení jasu obrazu
Kontrast: nastavení kontrastu obrazu
Barva: nastavení barev obrazu
Hlasitost: nastavení hlasitosti (také pro akustický signál zvonku)
Specifikace:
Venkovní jednotka:
• Provozní napětí: Dle odpovídající jednotky
• Komunikační systém: Obousměrný
• Zobrazovací senzor: 1/4” CMOS barevný 640x480
• IR LED: 4x IR LED, 1x EDS
• Objektiv: F4.5mm (H:40°, V:45°)
• Ochrana proti vodě/prachu: IP44
• Pracovní teplota: -20°C ~ +50°C
• Hmotnost: 100 g
• Rozměry: 127 x 47 x 37 mm
50
Page 51

Zobrazovací jednotka:
• Provozní napětí: 15 VDC s funkcí otevírání dveří
• Komunikační systém: Obousměrný
• Obrazovka: 7” TFT/LCD barevný
• Rozlišení: 480 x 234
• Hmotnost: 489 g
• Rozměry: 197 x 187 x 18 mm
Vnitřní a venkovní jednotka je propojena 4-drátovým kabelem a vedení může být prodlouženo na 50 m
měděným 0.75 mm kabelem.
Bezpečnostní opatření:
Abyste snížili riziko úrazu elektrickým šokem, měl by být tento
výrobek otevřen POUZE autorizovaným technikem, je-li to
nezbytné. V případě, že dojde k závadě, odpojte výrobek ze
sítě a od jiných zařízení. Výrobek nevystavujte vodě nebo
vlhkosti.
Údržba:
K čištění používejte pouze suchý hadřík. Nepoužívejte čisticí rozpouštědla ani abrazivní prostředky.
Záruka:
Jakékoli změny, modifikace nebo poškození zařízení v důsledku nesprávného zacházení se zařízením
ruší platnost záruční smlouvy.
Obecné upozornění:
Design a specifikace výrobku mohou být změněny bez předchozího upozornění.
Všechna loga a obchodní názvy jsou registrované obchodní značky příslušných vlastníků a jsou
chráněny zákonem.
Pro budoucí použití uschovejte tento návod a obal.
Upozornění:
Tento výrobek je označen tímto symbolem. To znamená, že se s výrobkem musí zacházet jako s
nebezpečným elektrickým a elektronickým odpadem a nelze jej po skončení životnosti
vyhazovat s běžným domácím odpadem. Pro likvidaci těchto výrobků existují zvláštní sběrná
střediska.
51
Page 52

ROMÂNĂ
Interfon video
Introducere:
Acest sistem inteligent de comunicare video vă oferă posibilitatea de a nu fi luat prin surprindere când
cineva vine în vizită. Ansamblul din exterior al interfonului este alcătuit dintr-o sonerie pentru uşă cu
cameră video, sistem de vedere nocturn, difuzor şi microfon. Prin intermediul unui ecran de 7” foarte
subţire, de doar 1,8 cm, puteţi vedea cine este la uşă şi puteţi vorbi cu vizitatorul respectiv fără a fi
nevoit să ridicaţi un receptor. Este suficient să apăsaţi butonul pentru a începe comunicarea. De
asemenea, este hands-free.
Instalarea monitorului din interior:
1. Identificaţi poziţia pentru
monitor.
2. Montaţi suportul făcând
găuri în perete.
3. Faceţi o gaură în plus
pentru introducerea
cablului.
4. Conectaţi firele după cum
este indicat în imaginea
de mai jos.
5. Amplasaţi monitorul pe
suport astfel încât fantele
să fie orientate către
partea din spate a
monitorului
1. Alb (AUDIO)
2. Roşu (VDD)
3. Negru (GND)
4. Galben (VIDEO)
A. Alimentare CC 15V
B. Conectarea la ansamblul
exterior
52
Page 53

Instalarea ansamblului exterior:
1. Faceţi găurile A1/A2 în perete sau alt material pentru a monta ansamblul exterior şi pentru a
introduce cablul.
2. Racordaţi conectorul B1 cu B2 (pentru încuietoare electronică de 12V, 1A dacă este instalată)
3. Racordaţi conectorul C1 cu C2
4. Strângeţi şuruburile D1 şi D2
Observaţie: conectoarele B1/B2 şi C1/C2 trebuie să fie în spatele peretelui sau al altui material şi nu
între ansamblul exterior şi perete sau alt material.
53
Page 54

Conectarea încuietorii electronice:
Încuietoare fără adaptor, energie furnizată prin ansamblul exterior.
Când uşa este închisă, tensiunea circuitului este 0 V. Când se
descuie uşa, tensiunea în circuit este de 12 V. Decalajul este de
4~7 secunde.
Încuietoare fără adaptor, energie furnizată prin ansamblul exterior.
Când uşa este închisă, tensiunea circuitului este 12 V. Când se
descuie uşa, tensiunea în circuit este de 0 V. Decalajul este de
4~7 secunde.
Descrierea şi funcţionarea ansamblului exterior:
1. Difuzor
2. Cameră video
LED-uri IR pentru
3.
vedere nocturnă
4. Buton apelare
5. Microfon
• Apăsaţi butonul de apelare
• Monitorul din interior va genera un
semnal sonor şi va activa ecranul
monitorului
Instalarea monitorului din interior:
1. Buton direcţionare cursor ÎN SUS
2. Buton MENIU
3. Buton direcţionare cursor STÂNGA
4. Buton DESCUIERE
5. Difuzor
6. Ecran
7. Buton ESC
8. Buton direcţionare cursor DREAPTA
9. Buton MONITOR
10. Buton direcţionare cursor ÎN JOS
54
Page 55

Funcţionarea monitorului din interior:
Intercomunicarea
Când un vizitator apasă butonul apelare al ansamblului din exterior, monitorul din interior va genera un
semnal sonor şi va activa ecranul monitorului. Ecranul monitorului din interior va afişa în mod automat
o imagine a vizitatorului. Apăsaţi butonul Monitor şi vorbiţi cu vizitatorul. Când aţi încheiat convorbirea
cu vizitatorul, apăsaţi din nou butonul Monitor pentru a închide ecranul. Sau apăsaţi butonul
descuiere pentru a deschide uşa. De asemenea, ecranul se va închide automat dacă niciun buton nu
este acţionat.
Monitorul
Apăsaţi butonul Monitor. Ecranul va afişa în mod automat o fotografie a planului exterior uşii de la
intrare. Apăsaţi încă o dată butonul pentru a închide monitorul sau monitorul se va închide automat
după un timp.
Meniu
Apăsaţi butonul Meniu pentru a intra în meniul principal. Folosiţi cursoarele direcţionale ÎN SUS şi ÎN
JOS pentru a selecta o poziţie şi folosiţi butoanele STÂNGA şi DREAPTA pentru a modifica parametrii
poziţiei. Apăsaţi butonul ESC pentru a părăsi meniul.
Luminozitate: reglarea luminozităţii imaginii
Contrast: reglarea contrastului imaginii
Culoare: reglarea culorii imaginii
Nivel sonor: reglarea volumului sonor (şi pentru semnalul sonor)
Date tehnice:
Ansamblul exterior:
Tensiune de funcţionare: în funcţie de tipul ansamblului receptor
• Sistemul de comunicare: Semi-duplex
• Senzor de fotografiere: 1/4” CMOS 640x480 color
• LED-uri IR: 4x LED IR, 1x EDS
• Obiectiv: F4.5mm (H:40°, V:45°)
• Protecţie apă/praf: IP44
• Temperatură de funcţionare: -20°C ~ +50°C
• Greutate: 100 g
• Dimensiuni: 127 x 47 x 37 mm
55
Page 56

Monitorul din interior:
A
• Tensiune de funcţionare: 15 VCC cu funcţia de deschidere a uşii
• Sistem de comunicare: Semi-duplex
• Ecran: 7” TFT/LCD color
• Rezoluţie: 480 x 234
• Greutate: 489 g
• Dimensiuni: 197 x 187 x 18 mm
Conectarea dintre ansamblul receptor şi cel din exterior este realizată prin intermediul unui cablu cu 4
fire şi poate fi extins până la 50 m cu un cablu de cupru/de 0,75 mm.
Măsuri de siguranţă:
Pentru a se reduce pericolul de electrocutare, acest produs va
fi desfăcut NUMAI de către un tehnician avizat, când este
necesară depanarea. Deconectaţi produsul de la priza de
reţea sau alte echipamente în cazul apariţiei unei probleme.
Nu expuneţi produsul apei sau umezelii.
Întreţinere:
Curăţarea trebuie făcută cu o cârpă uscată. Nu folosiţi solvenţi sau agenţi de curăţare abrazivi.
Garanţie:
Nu oferim nicio garanţie şi nu ne asumăm niciun fel de responsabilitate în cazul schimbărilor sau
modificărilor aduse acestui produs sau în cazul deteriorării cauzate de utilizarea incorectă a produsului.
Generalităţi:
Designul şi specificaţiile produsului pot fi modificate fără o notificare prealabilă.
Toate siglele mărcilor şi denumirile produselor sunt mărci comerciale sau mărci comerciale înregistrate
ale proprietarilor de drept şi prin prezenta sunt recunoscute ca atare.
Păstraţi acest manual şi ambalajul pentru consultări ulterioare.
Atenţie:
Pe acest produs se află acest marcaj. Acesta semnifică faptul că produsele electrice şi
electronice nu trebuie eliminate odată cu gunoiul menajer.
de colectare.
ceste produse au un sistem separat
56
Page 57

ΕΛΛΗΝΙΚA
Σύστημα Θυροτηλεόρασης
Εισαγωγή:
Mε αυτό το έξυπνο σύστημα ενδοεπικοινωνίας με βίντεο είστε βέβαιοι ότι δεν θα βρεθείτε προ
εκπλήξεως εάν κάποιος είναι στην πόρτα σας. Η εξωτερική μονάδα αποτελείται από ένα κουδούνι με
πολύ μικρή κάμερα, νυχτερινή προβολή, μεγάφωνο και μικρόφωνο. Με την πολύ λεπτή οθόνη 7”, μόνο
1,8 cm, μπορείτε να δείτε ποιος είναι στην πόρ
να χρησιμοποιήσετε κάποιον δέκτη. Απλά πιέστε το πλήκτρο για να ανοίξει η σύνδεση. Επιπλέον, είναι
τα χέρια σας ελεύθερα.
Εγκατάσταση της εσωτερικής οθόνης:
1. Καθορίστε τη θέση για την
οθόνη.
2. Τοποθετήστε τη βάση με
τρύπες στον τοίχο.
3. Κάντε μια επιπλέον τρύπα
για να περάσει από μέσα
το καλώδιο.
4. Συνδέστε τα καλώδια
όπως φαίνεται στην
παρακάτω εικόνα.
5. Τοποθετήστε την οθόνη
στη βάση με τις υποδοχές
στο πίσω μέρος της
οθόνης.
1. Λευκό (AUDIO)
2. Κόκκινο (VDD)
3. Μαύρο (GND)
4. Κίτρινο (VIDEO)
A. Ισχύς DC 15V
B. Σύνδεση με την εξωτερική
μονάδα
τα και να μιλήσετε με τον επισκέπτη χωρίς να χρειάζεται
57
Page 58

Εγκατάσταση της εξωτερικής μονάδας:
1. Ανοίξτε τρύπες στον τοίχο ή σε άλλο υλικό A1/A2 για να τοποθετήσετε την εξωτερική μονάδα και για
να περάσετε από μέσα τα καλώδια.
2. Συνδέστε το βύσμα B1 στο B2 (για ηλεκτρονική κλειδαριά 12V, 1A αν είναι εγκατεστημένη)
3. Συνδέστε το βύσμα C1 στο C2
4. Σφίξτε τις βίδες D1 και D2
Σημείωση: τα βύσματα B1/B2 και C1/C2 πρέπει να είναι πίσω από το
ανάμεσα στην εξωτερική μονάδα και στον τοίχο ή άλλο υλικό.
58
ν τοίχο ή άλλο υλικό και όχι
Page 59

Σύνδεση για ηλεκτρονική κλειδαριά:
Κλείδωμα χωρίς μετασχηματιστή, η ισχύς παρέχεται μέσω της
εξωτερικής μονάδας. Όταν η πόρτα είναι κλειστή, η τάση του
κυκλώματος είναι 0V. Ξεκλειδώνοντας την πόρτα η τάση του
κυκλώματος είναι 12V. Η καθυστέρηση είναι 4~7 δευτερόλεπτα.
Κλείδωμα χωρίς μετασχηματιστή, η ισχύς παρέχεται μέσω της
εξωτερικής μονάδας. . Όταν η πόρτα είναι κλειστή, η τάση του
κυκλώματος είναι 12V. Ξεκλειδώνοντας την πόρτα η τάση του
κυκλώματος είναι 0V. Η καθυστέρηση είναι 4~7 δευτερόλεπτα.
Περιγραφή και λειτουργία της εξωτερικής μονάδας:
1. Μεγάφωνο
μερα
2. Κά
3. IR LED για νυχτερινή
προβολή
4. Πλήκτρο κλήσης
5. Μικρόφωνο
• Πιέστε το πλήκτρο κλήσης
• Η εσωτερική οθόνη θα δώσει έναν
ήχο ντιν ντον και θα ενεργοποιήσει
την οθόνη
Περιγραφή της εσωτερικής οθόνης:
1. Πλήκτρο κέρσορα ΠΑΝΩ
2. Πλήκτρο ΜΕΝΟΥ
3. Πλήκτρο κέρσορα ΑΡΙΣΤΕΡΑ
4. Πλήκτρο ΞΕΚΛΕΙΔΩΜΑΤΟΣ
5. Μεγάφωνο
6. Οθόνη
7. Πλήκτρο ESC
8. Πλήκτρο κέρσορα ΔΕΞΙΑ
9. Πλήκτρο ΟΘΟΝΗΣ
10. Πλήκτρο κέρσορα ΚΑΤΩ
59
Page 60

Λειτουργία της εσωτερικής οθόνης:
Ενδοεπικοινωνία
Όταν ο επισκέπτης πιέσει το πλήκτρο κλήσης της εξωτερικής μονάδας, στην εσωτερική οθόνη θα
ακουστεί ένα ήχος ντιν ντον και θα ενεργοποιηθεί η οθόνη. Η εσωτερική οθόνη θα εμφανίσει αυτόματα
την εικόνα του επισκέπτη. Πιέστε το πλήκτρο της οθόνης και μιλήστε στον επισκέπτη. Όταν τελειώσετε
τη συνομιλίας σας με τον επισκέπτη, πιέστε το πλήκτρο της οθόνης πά
οθόνη. Ή πιέστε το πλήκτρο ξεκλειδώματος για να ανοίξει η πόρτα. Η οθόνη επίσης θα
απενεργοποιηθεί αυτόματα αν δεν πιεστεί κανένα πλήκτρο.
Οθόνη
Πιέστε το πλήκτρο οθόνης. Η οθόνη θα εμφανίσει αυτόματα την εικόνα του εξωτερικού σας χώρου της
μπροστινής σας πόρ
οθόνη θα απενεργοποιηθεί αυτόματα μετά από λίγο.
Μενού
Πιέστε το πλήκτρο μενού για να μπείτε στο κυρίως μενού. Χρησιμοποιήστε τα πλήκτρα κέρσορα UP
(ΠΑΝΩ) και DOWN (ΚΑΤΩ) για να επιλέξετε τη ρύθμιση και χρησιμοποιήστε τα πλήκτρα LEFT
(ΑΡΙΣΤΕΡΑ) κα
βγείτε από το μενού.
Φωτεινότητα: ρυθμίστε τη φωτεινότητα της εικόνας
Αντίθεση: ρυθμίστε την αντίθεση της εικόνας
Χρώμα: ρυθμίστε το χρώμα της εικόνας
τας. Πιέστε το πλήκτρο ξανά για να απενεργοποιήσετε την οθόνη ή αλλιώς η
ι RIGHT (ΔΕΞΙΑ) για να ρυθμίσετε την τιμή της ρύθμισης. Πιέστε το πλήκτρο ESC για να
λι για να απενεργοποιήσετε την
Ένταση: ρυθμίστε την ένταση (και επίσης τον ήχο ντιν ντον)
Χαρακτηριστικά:
Εξωτερική μονάδα:
• Τάση: από την απαντητική μονάδα
• Σύστημα επικοινωνίας: Ημαμφίδρομο
• Αισθητήρας εικόνας: 1/4” CMOS έγχρωμο 640x480
• IR LED's: 4x IR LED, 1x EDS
• Φακός: F4.5mm (H:40°, V:45°)
• Προστασία από νερό/σκόνη: IP44
• Θερμοκρασία λειτουργίας: -20°C ~ +50°C
• Βάρος: 100 g
• Διαστάσεις: 127 x 47 x 37 mm
60
Page 61

Εσωτερική οθόνη:
• Τάση: 15 VDC με λειτουργία ανοίγματος της πόρτας
• Σύστημα επικοινωνίας: Ημαμφίδρομο
• Οθόνη: 7” TFT/LCD έγχρωμη
• Ανάλυση: 480 x 234
• Βάρος: 489 g
• Διαστάσεις: 197 x 187 x 18 mm
Η σύνδεση ανάμεσα στην απαντητική μονάδα και την εξωτερική μονάδα γίνεται μέσω ενός καλωδίου 4
συρμάτων και μπορεί να επεκταθεί ως 50 m με χαλκό/0.75 mm καλώδιο.
Οδηγίες ασφαλείας:
Για να μειώσετε τον κίνδυνο ηλεκτροπληξίας, το προϊόν αυτό
θα πρέπει να ανοιχθεί ΜΟΝΟ από εξουσιοδοτημένο τεχνικό
όταν απαιτείται συντήρηση (σέρβις). Αποσυνδέστε το προϊόν
από την πρίζα και άλλο εξοπλισμό αν παρουσιαστεί πρόβλημα.
Μην εκθέτετε το προϊόν σε νερό ή υγρασία.
Συντήρηση:
Καθαρίστε μόνο με ένα στεγνό πανί. Μη χρησιμοποιείτε διαλύτες ή λειαντικά.
Εγγύηση:
Ουδεμία εγγύηση ή ευθύνη δεν είναι αποδεκτή σε περίπτωση αλλαγής ή μετατροπής του προϊόντος ή
βλάβης που προκλήθηκε λόγω εσφαλμένης χρήσης του προϊόντος.
Γενικά:
Το σχέδιο και τα χαρακτηριστικά μπορούν να αλλάξουν χωρίς καμία προειδοποίηση.
Όλα τα λογότυπα, οι επωνυμίες και οι ονομασίες προϊόντων είναι εμπορικά σήματα ή σήματα
κατατεθέντα των αντίστοιχων κατόχων και δια του παρόντος αναγνωρίζονται ως τέτοια.
Φυλάξτε το παρόν εγχειρίδιο και τη συσκευασία για μελλοντική αναφορά.
Προσοχή:
Το συγκεκριμένο προϊόν έχει επισημανθεί με αυτό το σύμβολο. Αυτό σημαίνει ότι οι
μεταχειρισμένες ηλεκτρικές και ηλεκτρονικές συσκευές δεν πρέπει να αναμειγνύονται με τα κοινά
οικιακά απορρίμματα. Υπάρχει ξεχωριστό σύστημα συλλογής για αυτά τα αντικείμενα.
61
Page 62

DANSK
Video Dørtelefon System
Indledning:
Sørg for at du ikke bliver overrasket, når der er nogen ved døren, med dette smarte video
samtaleanlæg system. Udendørsenheden består af en dørklokke med knaphulkamera, nattesyn,
højtaler og mikrofon. Med den supertynde 7” skærm, kun 1,8 cm, kan du se hvem der er ved døren og
tale med denne gæst uden at tage røret. Tryk bare på knappen for at åbne linjen. Det kan bruges
håndfrit.
Installation af den indendørs skærm:
1. Bestem hvor skærmen
skal være.
2. Monter beslaget ved at
bore huller i væggen.
3. Lav et ekstra hul hvor
ledningen kan gå
igennem.
4. Sæt ledningerne til som
det er vist på billedet
nedenfor.
5. Sæt skærmen på
beslaget med rillerne bag
på skærmen.
1. Hvid (LYD)
2. Rød (VDD)
3. Sort (GND)
4. Gul (VIDEO)
A. Strøm DC 15V
B. Forbindelse til enheden
uden for døren
62
Page 63

Installation af enheden uden for døren:
1. Bor huller i væggen eller andet materiale A1/A2 til at montere enheden uden for døren og føre
ledningen igennem.
2. Tilslut forbindelse B1 til B2 (til elektronick lås 12V, 1A hvis den er installeret)
3. Tilslut forbindelse C1 til C2
4. Stram skruerne D1 og D2
Bemærk: forbindelser B1/B2 og C1/C2 skal være bag ved væggen eller andet materiale og ikke mellem
enheden uden for døren og væggen eller andet material.
63
Page 64

Tilslutning af elektronisk lås:
Lås uden adapter, den får strøm fra enheden uden for døren. Når
døren er lukket, er spændingen 0V. Ved at låse døren op bliver
spændingen 12V. Forsinkelse er 4~7 sekunder.
Lås uden adapter, den får strøm fra enheden uden for døren. Når
døren er lukket, er spændingen 12V. Ved at låse døren op bliver
spændingen 0V. Forsinkelse er 4~7 sekunder.
Beskrivelse af brug af enheden uden for døren:
1. Højtaler
2. Kamera
3.
IR LED til nattesyn
4. Kaldeknap
5. Mikrofon
• Tryk på kaldeknappen
• Den indendørs skærm giver en ding
dong lyd og aktiverer skærmen
Beskrivelse af den indendørs skærm:
1. Markørknap OP
2. MENU knap
3. Markørknap VENSTRE
4. LÅS OP knap
5. Højtaler
6. Skærm
7. ESC knap
8. Markørknap HØJRE
9. SKÆRM knap
10. Markørknap NED
64
Page 65

Brug af den indendørs skærm:
Samtaleanlæg
Når en gæst trykker på kaldeknappen på enheden uden for døren, vil enheden inden for døren give en
ding dong lyd og aktivere skærmen. Skærmen indendørs vil automatisk vise et billede af gæsten. Tryk
på skærmknappen og tal med gæsten. Når du er færdig med at tale med gæsten, tryk på
skærmknappen igen for at slukke for skærmen. Eller tryk på luk op knappen for at åbne døren.
Skærmen vil også slukke automatisk hvis der ikke trykkes på nogen knap.
Skærm
Tryk på skærmknappen. Skærmen vil automatisk vise et billede af området uden for din dør. Tryk på
knappen igen for at slukke skærmen eller skærmen slukker automatisk efter et stykke tid.
Menu
Tryk på menuknappen for at komme til hovedmenuen. Brug OP og NED markørknapperne for at vælge
en indstilling og brug VENSTRE og HØJRE knappen for at justere indstillingen. Tryk på ESC knappen
for at forlade menuen.
Lysstyrke: juster lysstyrken på billedet
Kontrast: juster kontrasten på billedet
Farve: juster farven på billedet
Lydstyrke: juster lydstyrken (også for ding dong lyden)
Specifikationer:
Enheden uden for døren:
• Spænding: når der svares
• Samtaleanlæg: Semi duplex
• Billede sensor: 1/4” CMOS farve 640x480
• IR LEDer: 4x IR LED, 1x EDS
• Linse: F4.5mm (H:40°, V:45°)
• Vand/støvbeskyttelse: IP44
• Driftstemperatur: -20°C ~ +50°C
• Vægt: 100 g
• Dimensioner: 127 x 47 x 37 mm
65
Page 66

Indendørs skærm:
• Spænding: 15 VDC med døråbningsfunktion
• Samtaleanlæg: Semi duplex
• Skærm: 7” TFT/LCD farve
• Opløsning: 480 x 234
• Vægt: 489 g
• Dimensioner: 197 x 187 x 18 mm
Forbindelsen mellem svareenheden og enheden uden for døren er gennem et 4-lednings kabel og kan
forlænges til 50 m med kobber/0.75 mm kabel.
Sikkerhedsforholdsregler:
For at nedsætte risikoen for elektrisk stød, må dette produkt,
f.eks. når der kræves service, KUN åbnes af en autoriseret
tekniker. Frakobl produktet stikkontakten og andet udstyr, hvis
der opstår et problem. Udsæt ikke produktet for vand eller fugt.
Vedligeholdelse:
Rengør kun med en tør klud. Brug ikke opløsningsmidler eller slibende rengøringsmidler.
Garanti:
Ingen garanti og ikke noget ansvar kan påtages for ændringer af produktet eller for skade på grund af
forkert brug af dette produkt.
Generelt:
Design og specifikationer kan ændres uden varsel.
Alle bomærker og produktnavne er varemærker eller registrerede varemærker tilhørende deres
respektive ejere og anses herved som sådan.
Gem brugervejledningen og emballagen til senere brug.
Bemærk:
Dette produkt er mærket med dette symbol. Det betyder, at brugt elektrisk og elektronisk udstyr
ikke må bortskaffes sammen med almindeligt husholdningsaffald. Der findes særlige
indsamlingssystemer for disse produkter.
66
Page 67

NORSK
Video dørtelefonsystem
Introduksjon:
Du kan forsikre deg om at du ikke blir overrasket hjemme med dette smarte videodørtelefonsystemet
Utendørsenheten består av en dørklokke med et kikkhullskamera, nattsyn, høyttaler og mikrofon. Den
supertynne 7 tommers LCD-skjermen er bare 1,8 mm tykk, og gjør at du kan se hvem som er utenfor
uten bruk av en mottaker. Trykk knappen for å starte samtalen. Den er hånd-fri
Installering av monitoren:
1. Bestem plasseringen av
monitoren.
2. Fest braketten ved å bore
hull I veggen.
3. Lag et ekstra hull hvor
kablene kan går gjennom.
4. Koble til ledningene som
vist på bildet nedenfor.
5. Plasser monitoren på
braketten med sporene
på baksiden av
monitoren.
1. Hvit (AUDIO)
2. Rød (VDD)
3. Svart (GND)
4. Gul(VIDEO)
A. Strøm DC 15V
B. Oppkobling mot
utendørsenhet
67
Page 68

Installering av utendørsenhet:
1. Drill hull i veggen eller annet materiale A1/A2 for montering av utendørsenheten og kabelen.
2. Koble koblingen B1 til B2 (for elektronisk lås av 12V, 1A hvis installert)
3. Koble til koblingen C1 til C2
4. Skru til skruenD1 og D2
Merk: Koblingene B1/B2 og C1/C2 må befinne seg bak veggen eller annet materiale, og ikke mellom
utendørsenheten og veggen eller annet materiale.
68
Page 69

Montering av den elektroniske låsen:
Lås uten adapter, oppkobling via utendørsenhet. Når døra er lukket
er kretsspenningen på 0V. Når døra låses opp, er spenningen på
12V. Forsinkelsen er på 4-7 sekunder.
Lås uten adapter, oppkobling via utendørsenhet. Når døra er lukket
er kretsspenningen på 12V. Når døra låses opp, er spenningen på
0V. Forsinkelsen er på 4-7 sekunder.
Beskrivelse og bruk av utendørsenhet:
1. Høyttaler
2. Kamera
IR LED for nattsyn
3.
4. Ringeknapp
5. Mikrofon
• Trykk på ringeknappen
• Innendørsmonitoren vil gi fra seg en
ding dong-lyd og aktivere skjermen.
Beskrivelse av innendørsmonitoren:
1. Pilknapp OPP
2. MENY knapp
3. Pilknapp VENSTRE
4. LÅS OPP knapp
5. Høyttaler
6. Skjerm
7. ESC knapp
8. Pilknapp HØYRE
9. MONTOR knapp
10. Pilknapp NED
69
Page 70

Bruk av innendørsmonitoren:
Interkom
Når en besøkende trykker på ringeknappen på utendørsenheten vil innendørsmonitoren gi fra seg en
ding dong-lyd og aktivere monitorskjermen. Innendørsmonitorskjermen vil automatisk vise et bilde av
den besøkende. Trykk på monitorknappen for å snakke med den besøkende. Når du er ferdig med å
snakke med den besøkende, trykk på monitorknappen en gang til for å skru av skjermen. Eller trykk på
lås-opp knappen for å åpne døra. Skjermen vil også skru seg av når knappen ikke trykkes.
Monitor
Trykk på monitorknappen Skjermen vil automatisk vise et bilde av utsiden av døra di. Trykk på knappen
igjen for å skru av monitoren, eller så vil monitoren skru seg av på egen hånd.
Meny:
Trykk på monitorknappen for å komme til hovedmenyen. Bruk OPP eller NED piltastene for å velge
innstilling, og bruk VENSTRE og HØYRE for å justere innstillingene. Trykk ESC-knappen for å gå ut av
menyen.
Klarhet: Juster lysstyrken på bildet
Kontrast Juster kontrasten på bildet
Farge: Juster fargeinnstillingene på bildet
Volum: Juster voluminnstillingene (også ringelyden)
Spesifikasjoner:
Utendørsenhet:
Operasjonsspenning På svarenhet
• Kommunikasjonssystem: Semiduplex
• Picture sensor: 1/4” CMOS farge 640x480
• IR LED: 4x IR LED, 1x EDS
• Linse: F4.5mm (H:40°, V:45°)
• Vann/støvbeskyttelse: IP44
• Virketemperatur: -20°C ~ +50°C
• Vekt: 100 g
• Dimensjoner: 127 x 47 x 37 mm
70
Page 71

Innendørs Monitor
• Operasjonsspenning 15 VDC med døråpningsfunksjon
• Kommunikasjonssystem: Semiduplex
• Skjerm 7” TFT/LCD farge
• Oppløsning: 480 x 234
• Vekt: 489 g
• Dimensjoner: 197 x 187 x 18 mm
Koblingen mellom svarenheten og utendørsenheten skjer via en 4-wire kabel og kan utvides inntil 50 m
med en kobber/0,75mm kabel
Sikkerhetsforholdsregler:
For å redusere faren for strømstøt, skal dette produktet BARE
åpnes av en autorisert tekniker når vedlikehold er nødvendig.
Koble produktet fra strømmen og annet utstyr dersom et
problem oppstår. Ikke utsett produktet for vann eller fuktighet.
Vedlikehold:
Rens bare med en tørr klut. Ikke bruk rensemidler eller skuremidler.
Garanti:
Ingen garanti eller erstatningsansvar aksepteres ved endringer og modifiseringer av produktet eller
skade forårsaket av uriktig bruk av dette produktet.
Generelt:
Utforming og spesifikasjoner kan endres uten forhåndsvarsel.
Alle logoer, merker og produktnavn er varemerker eller registrerte varemerker til de respektive eierne,
og skal behandles som dette.
Behold denne veiledningen og innpakningen for fremtidig referanse.
Forsiktig:
Dette produktet er markert med dette symbolet. Det betyr at brukte elektriske og elektroniske
produkter ikke må blandes med vanlig husholdningsavfall. Det finnes egne innsamlingssystem
for slike produkter.
Declaration of conformity / Konformitätserklärung / Déclaration de conformité /
Conformiteitsverklaring / Dichiarazione di conformità / Declaración de conformidad /
Megfelelőségi nyilatkozat / Yhdenmukaisuusvakuutus / Överensstämmelseförklaring /
Prohlášení o shodě / Declaraţie de conformitate / Δήλωση συμφωνίας /
We, / Wir, / Nous, / Wij, / Questa società, / La empresa infrascrita, / Mi, / Me, / Vi, / Společnost, / Noi, /
Εμείς
Nedis B.V., De Tweeling 28, 5215MC, ’s-Hertogenbosch
The Netherlands / Niederlande / Pays Bas / Nederland / Paesi Bassi / Países Bajos / Hollandia /
Alankomaat / Holland / Nizozemí / Olanda / Ολλανδία
Tel. / Tél / Puh / Τηλ . : 0031 73 5991055
Email / Couriel / Sähköposti / e-post: info@nedis.com
Overensstemmelse erklæring / Overensstemmelse forklaring
71
Page 72

Declare that product: / erklären, dass das Produkt: / Déclarons que le produit: / verklaren dat het
/
product: / Dichiara che il prodotto: / Declara que el producto: / Kijelentjük, hogy a termék, amelynek: /
Vakuutamme, että: / Intygar att produkten: / prohlašuje, že výrobek: / Declarăm că acest produs: /
Δηλώνουμε ότι το προϊόν: / Erklærer at produktet: / Forsikrer at produktet:
Brand: / Marke: / Marque: / Merknaam: / Marca: / Márkája: / Merkki: / Märke: / Značka: / Μάρκα: /
Mærke: / Merke: KÖNIG ELECTRONIC
Model: / Modell: / Modèle: / Modello: / Modelo: / Típusa: / Malli: / Μοντέλο: SEC-PH360
Description: Video Door Phone System Kuvaus: Video-ovipuhelin
Beschreibung: Video-Türsprechsystem Beskrivning: Telefonsystem med video på
dörren
Description : Interphone-visiophone Popis: Dveřní videotelefon
Omschrijving: Deur video-telefoonsysteem Descriere: Interfon video
Descrizione: Sistema di videocitofono Περιγραφή: Σύστημα Θυροτηλεόρασης
Descripción: Sistema intercomunicador de
Beskrivelse: Video Dørtelefon System
vídeo
Megnevezése: Videós ajtótelefon rendszer Beskrivelse: Video dørtelefonsystem
Is in conformity with the following standards: / den folgenden Standards entspricht: / est conforme aux
normes suivantes: / in overeenstemming met de volgende normen is: / è conforme ai seguenti standard:
/ es conforme a las siguientes normas: / Megfelel az alábbi szabványoknak: / Täyttää seuraavat
standardit: / Överensstämmer med följande standarder: / splňuje následující normy: / Este în
conformitate cu următoarele standarde: / Συμμορφώνεται με τις ακόλουθες προδιαγραφές: /
Overensstemmelse med følgende standarder: / Overensstemmer med følgende standarder:
EN 55022:2006 + A1:2001, EN 55024:1998 + A1:2001 + A2:2003 EN 60950-1:2006
EU Directive(s) / EG-Richtlinie(n) / Directive(s) EU / EU richtlijn(en) / Direttiva(e) EU / Directiva(s) UE /
EU direktívák / EU Toimintaohje(et) / Eu Direktiv(en) / Směrnice EU / Directiva(e) UE / Οδηγία(ες) της
ΕΕ / EU direktiv(er) / EU-direktiv(ene): 2004/108/EC, 2006/95/EC
‘s-Hertogenbosch, 10-03-2011
Mrs. / Mme. / Mevr. / Sig.ra / D. / Fru / Paní / Κα : J. Gilad
Purchase Director / Einkaufsleiterin / Directrice des
Achats /
Directeur inkoop / Direttore agli acquisti / Director de compras /
értékesítési igazgató / Ostojohtaja / Inköpsansvarig / Obchodní ředitelka
Director achiziţii / Διευθυντής αγορών / Indkøbschef / Innkjøpssjef
Copyright ©
72
 Loading...