

Page 1
MANUAL
SAS-IPCAM115
SAS-IPCAM116
IP CAMERA
Page 2

ENGLISH
Table of contents
• Introduction:
• Safety precautions:
• Packaging content:
• System requirements:
• Product description:
• User instructions:
• Maintenance:
• Warranty:
• Disclaimer:
• Disposal:
Introduction:
The plug-and-play IP camera enables people to watch over their properties. It is easy to set
up and requires no complex conguration. The free uCare Cam app, available on Google Play
and the Apple App Store, facilitates remote viewing on smartphones or other mobile devices
anytime, anywhere. If it detects any motion, it will send out an e-mail or app notication.
Footage can be played back at all times.
• We recommend that you read this manual before installing/using this product.
• Keep this manual in a safe place for future reference.
Safety precautions:
This product should ONLY be opened by an authorized technician when service is required.
Disconnect the product from mains and other equipment if a problem should occur. Do not
expose the product to water or moisture.
Packaging content:
1x IP camera
1x Camera mount
1x AC/DC adapter
1x Quick start guide
1x CD with complete manual
System requirements:
• Device running on iOS 5.0 and above
• Device running on Android 4.0 and above
• WiFi Router
2
Page 3
Product description:
ENGLISH
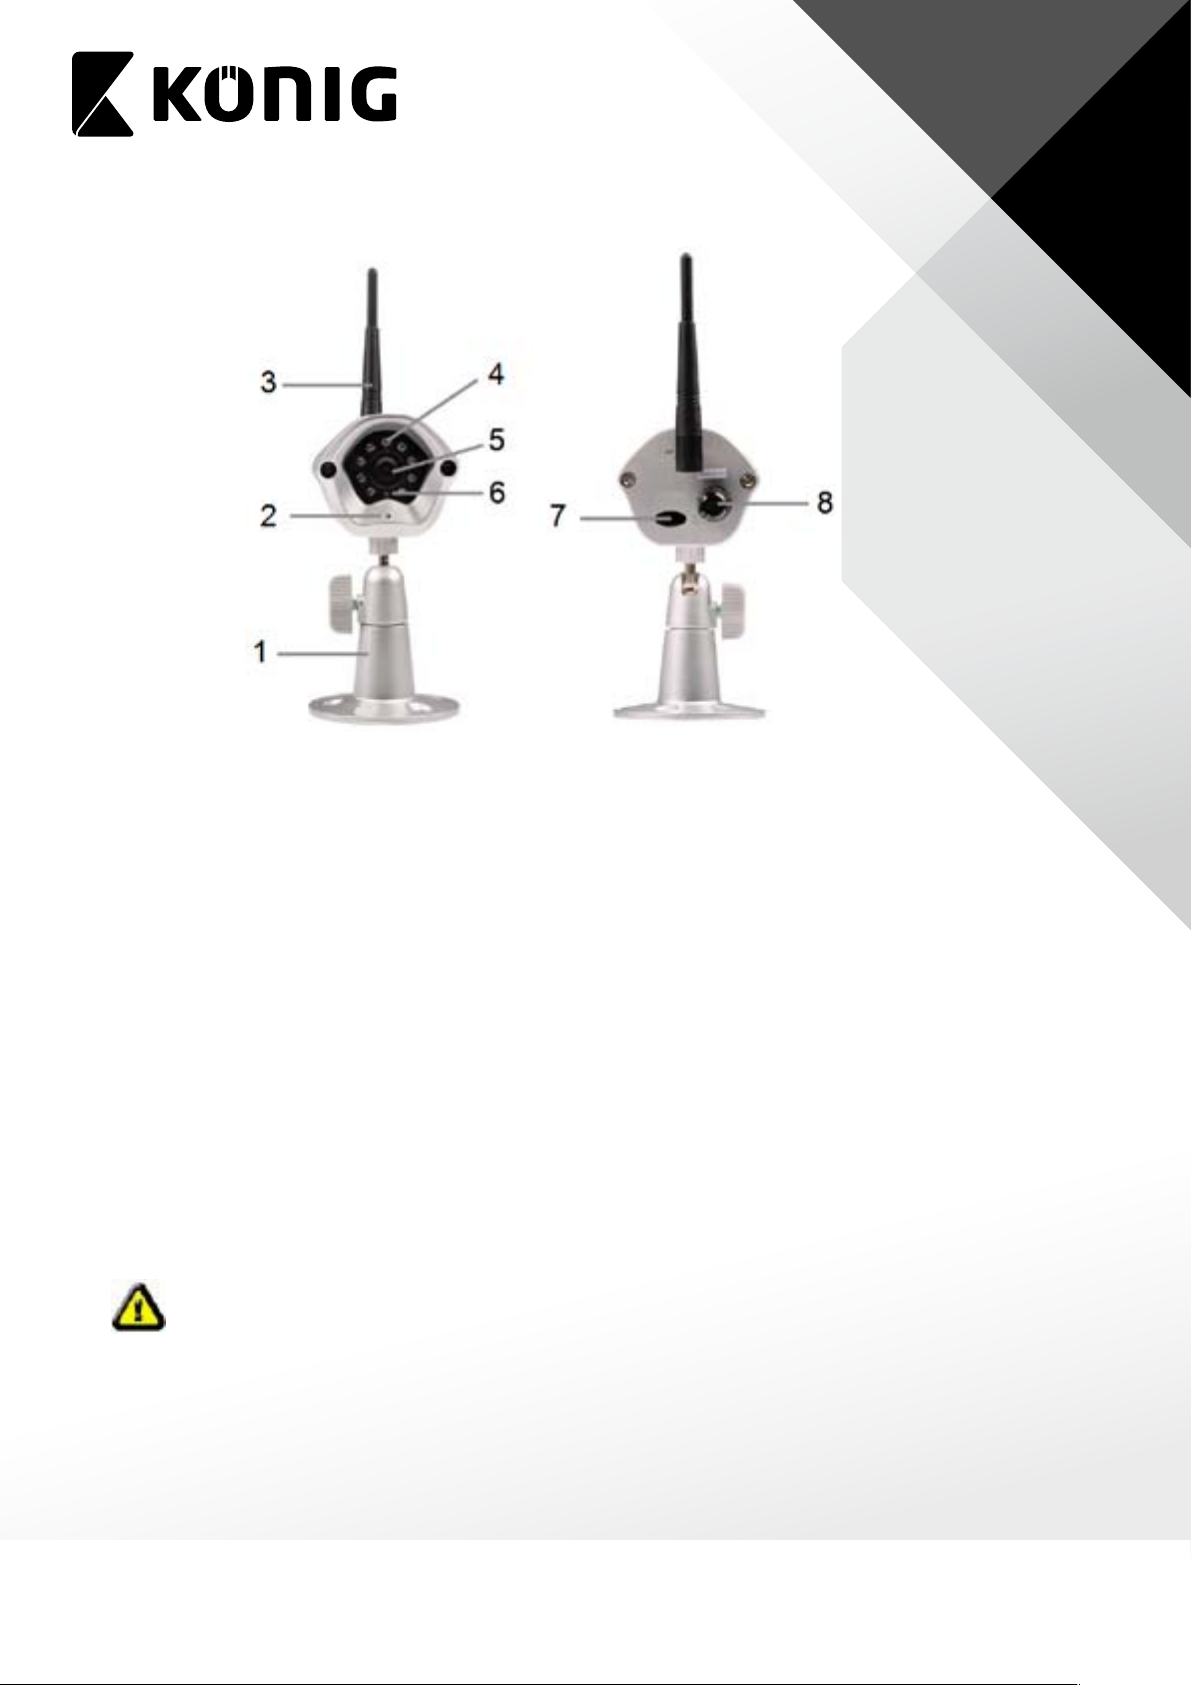
1. Mount
2. Microphone
3. Antenna
4. IR LED for night vision
5. Camera lens
6. Light intensity sensor
7. WPS/RESET button (behind rubber cover)
8. 12V power cord
User instructions:
A. Hardware Installation
1. Please nd a location to install uCare Cam that is within good WiFi signal reach of your
home Router.
2. If you plan to hang the uCare Cam, you can use the included mounting kit found in inside
box.
3. If the included power cable does not have sucient length to reach power outlet, please
purchase an extender cable from your local electronics store.
4. Connect the camera power adapter.
Warning:
Please use the power adapter included with your camera to avoid damage to
the camera.
When the camera powers up, the status LED will be Green for about 15 seconds before
ashing Red. If there is no Red LED ashing, please unplug the power cord, wait 5 seconds,
then re-connect the power again. It will take about 60 seconds for the uCare Cam to nish
starting up. The status LED should alternate between Red and Green. If the status LED does
not ash Red and Green, please press the WPS/REST button at the back of uCare Cam for
10seconds.
3
Page 4
B. Hardware Installation
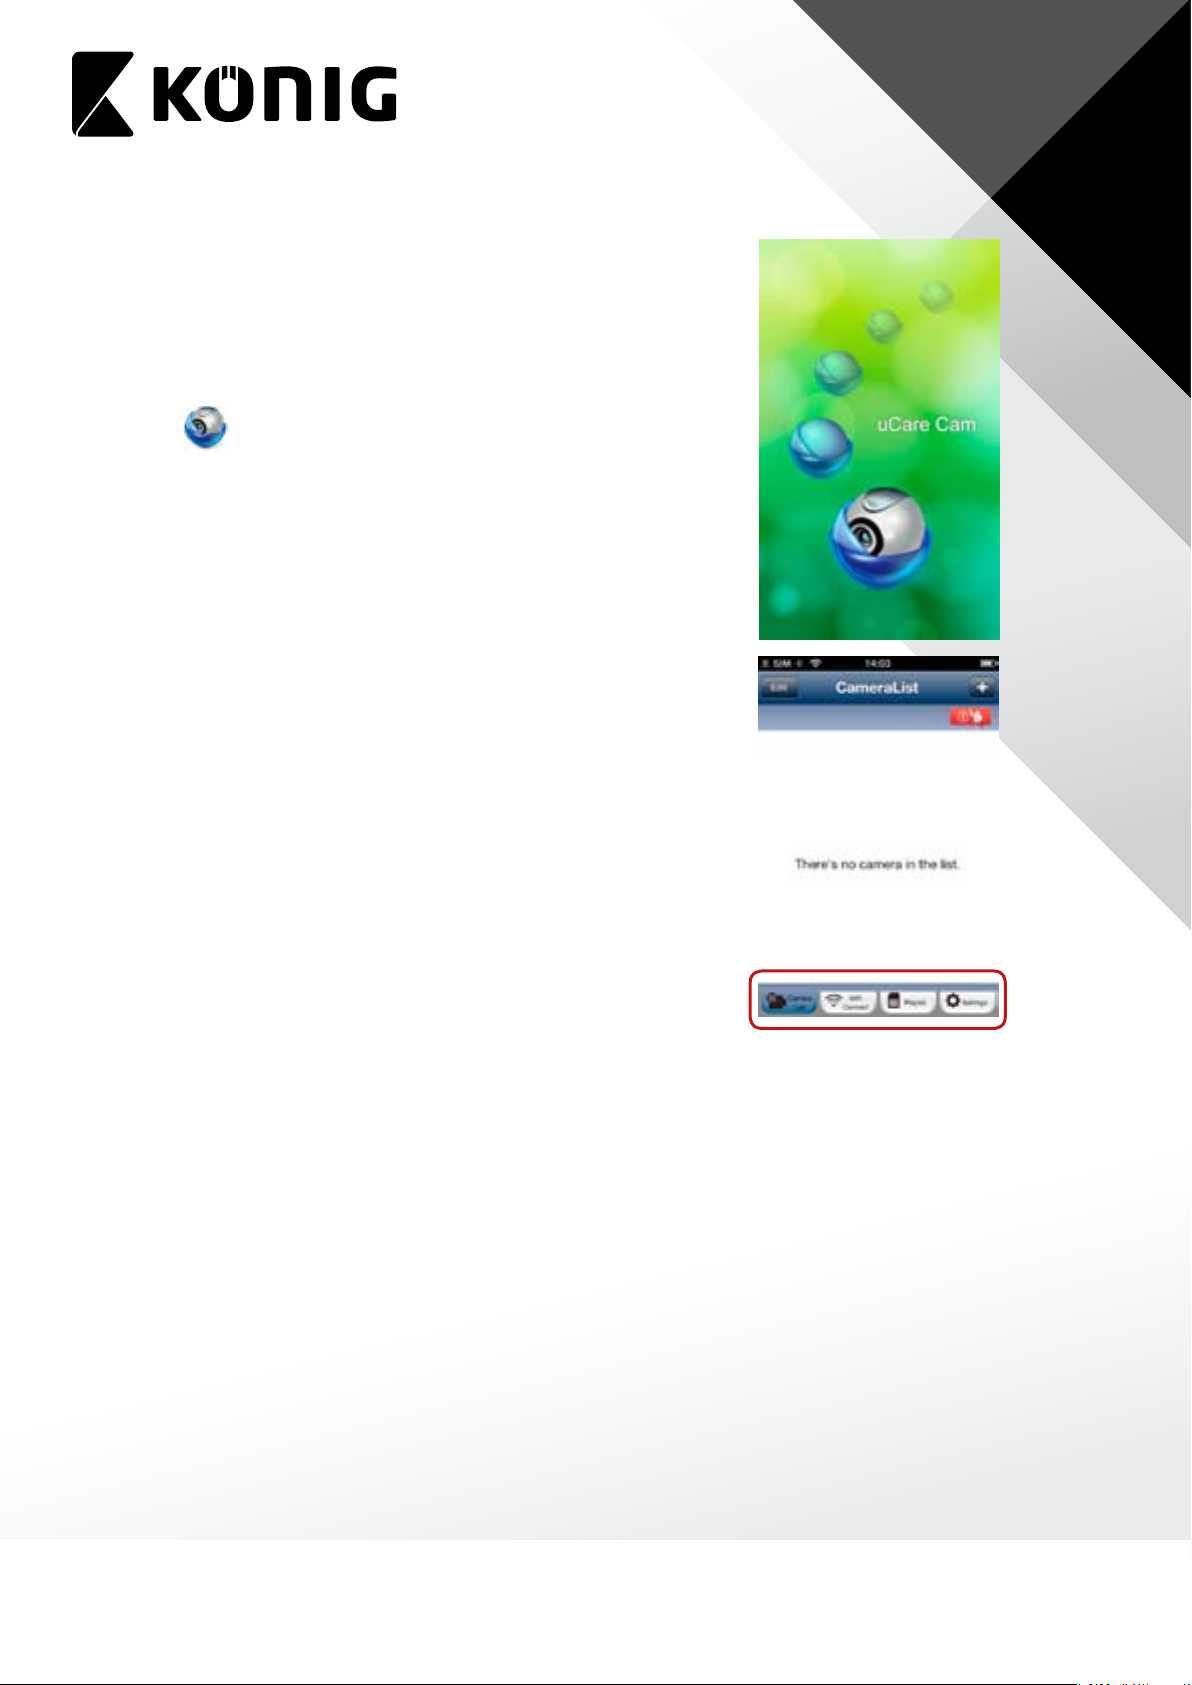
1. Download the Smartphone APP “uCare Cam” from App
store(iOS) or Play Store (Android).
2. Search for APP name “uCare Cam”, then download and install
it into Smartphone.
3. After the software installation is complete, the icon will
ENGLISH
appear
Click on this to run the APP.
C. uCare Cam APP Overview
Default camera password: 0000 or 00000000
Default manager name: admin
Default manager password: 0000
.
There are 4 major function Tabs at the bottom of the APP main screen.
Camera List Tab
This is the main APP screen. In this Tab, all the cameras which have been added will be listed.
WiFi Setting or WiFi Connect Tab
Please go to this Tab to congure uCare Cam WiFi settings.
There are two methods to install a new uCare Cam and connect it to a WiFi Router.
1. Router Mode
2. WPS (WiFi Protect Setup) Mode (Requires a Router with WPS function using WPA/WPA2
encryption - WEP encryption will not work)
Play List Tab
Go to this Tab to view all Pictures taken by User via Smartphone. The Pictures will be listed by
camera.
Setting Tab
Congure uCare Cam settings and playback remote microSD Card video.
4
Page 5

ENGLISH
User will need to input a management ID and Password to enter this Tab.
Default management ID: admin
Default Password: 0000
If you forget your password, you can reset the uCare Cam by pressing the WPS/REST button at
the back of the camera for 10 seconds. This will restore uCare Cam to factory settings. You will
need to set up the WiFi connection again after you reset the camera.
D. iOS – Setup uCare Cam WiFi
Method 1: Use WPS (WiFi Protected Setup)
Available if your WiFi Router supports WPS and it is set to use WPA or WPA2 security
encryption. WEP security encryption is not supported in WPS mode. An easy way to check if
your Router supports WPS is to look for a button that says “WPS” on the Router. It may also be
called “AOSS” or “QSS”.
1. Press and hold the WPS/REST button for 10 seconds at the back of the camera. It will reset
and restart the uCare Cam. After about 60 seconds, the LED color should ash Green and
Red.
2. Press “WPS” button on WiFi Router
3. Press the WPS/REST Button on the back of the uCare Cam for 2 seconds.
If uCare Cam has entered the WPS connection mode, the status LED color will turn a fast
blinking Green.
4. uCare Cam will try for up to 2 minutes to connect to the WiFi Router using WPS.
5. If the LED color changes to Orange, your uCare Cam has successfully connected to your
Router. If the LED does not change to Orange, the setup has failed. Please make sure
the uCare Cam is within WiFi distance of your Router, press the WPS/REST button for
10seconds to reset uCare Cam, and try the setup again.
6. Use Smartphone APP to add uCare Cam into Camera list. See instruction manual –
“iOS-Add uCare Cam (already connected to Router) to APP”.
Method 2: Use Router Mode
You will rst need to connect to the Router that is available inside uCare Cam, congure the
WiFi settings for your home Router, then uCare Cam will restart and connect to your home
Router.
Write down or have handy, the SSID of your WiFi Router and your WiFi Password. For
example, the SSID may be something like “TP-Link-XXXXX” or “NETGEAR”. You will need
both the SSID and the Password during this process.
5
Page 6
1. Make sure the status LED on uCare Cam is blinking Red and
Green. If the status LED is not blinking Red and Green, please
press and hold the WPS/REST button for 10 seconds to reset
uCare Cam. Wait for 1-2 minutes for it to restart and the LED
should become Red and Green.
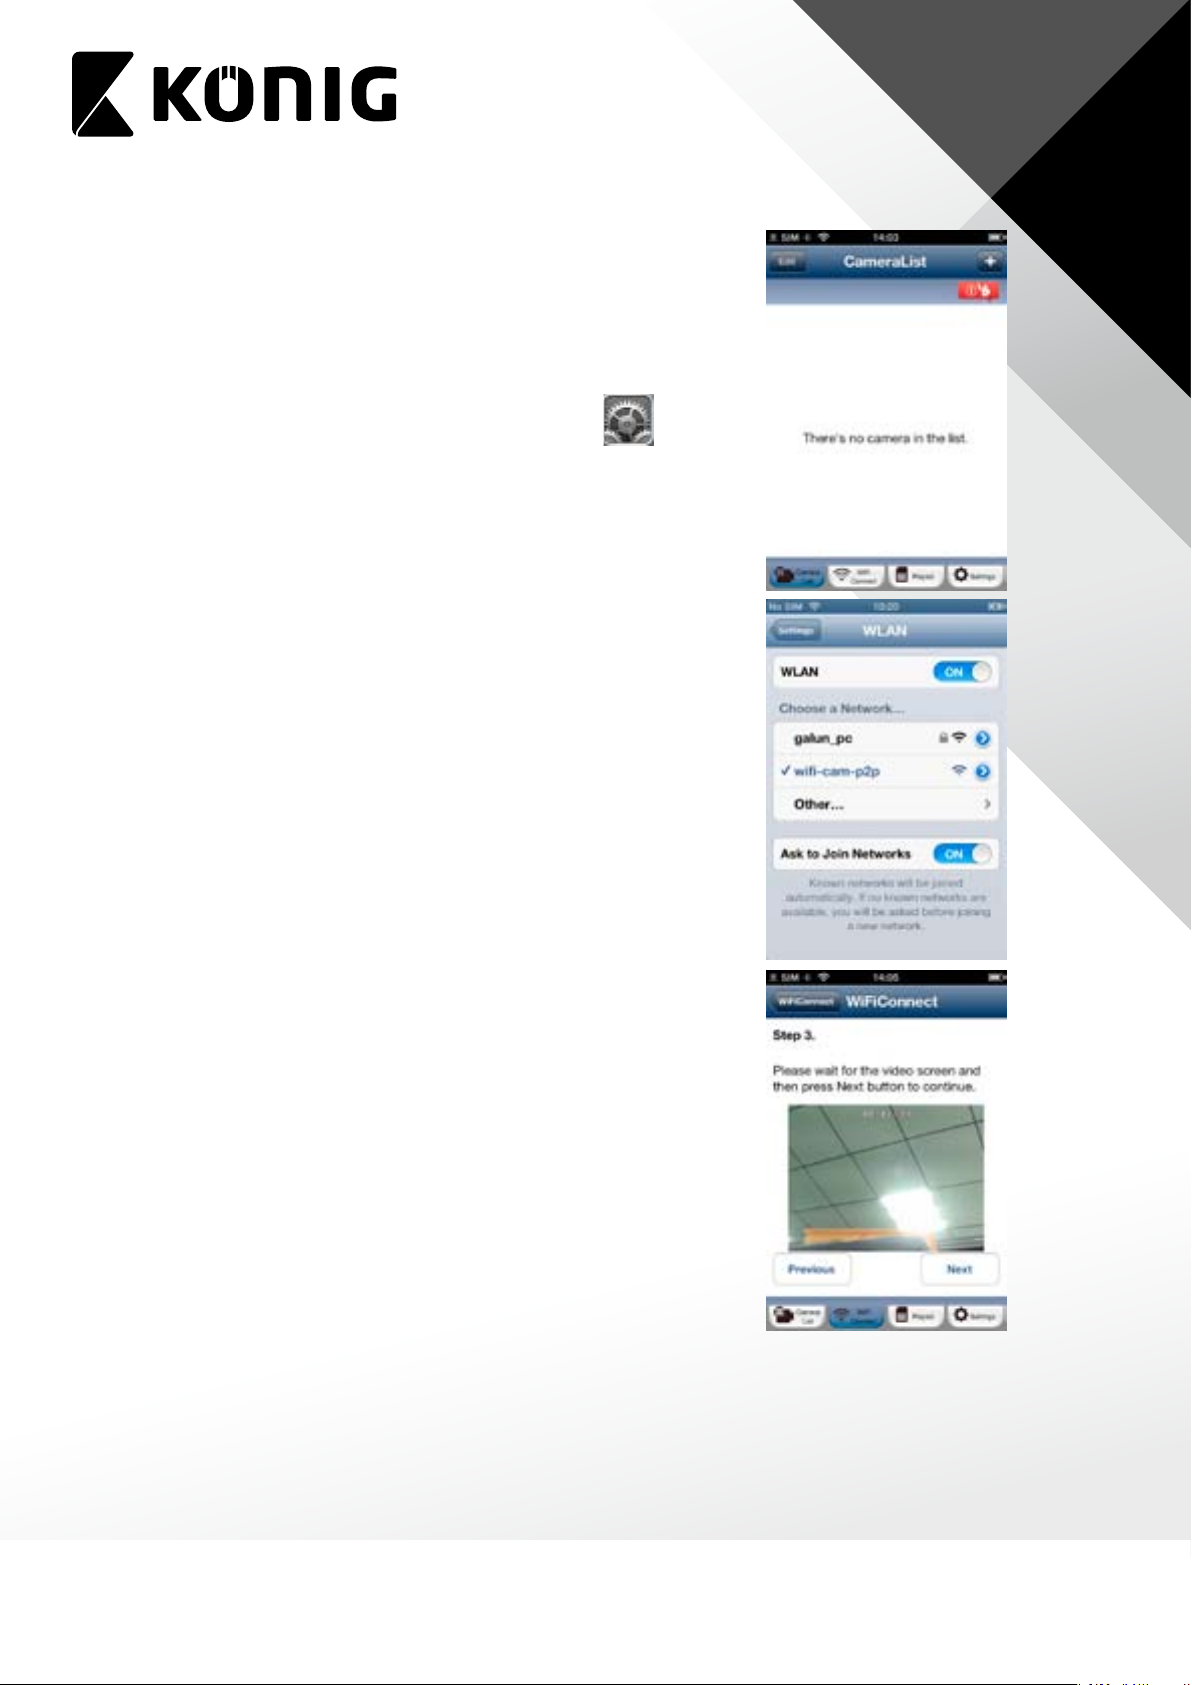
2. Connect your iOS device to the router inside uCare Cam. To
ENGLISH
connect to uCare Cam router, open up “Settings”
“Wi-Fi” and let it search for network. The network will be “wi-
cam-p2p”. Click on “wi-cam-p2p” to connect.
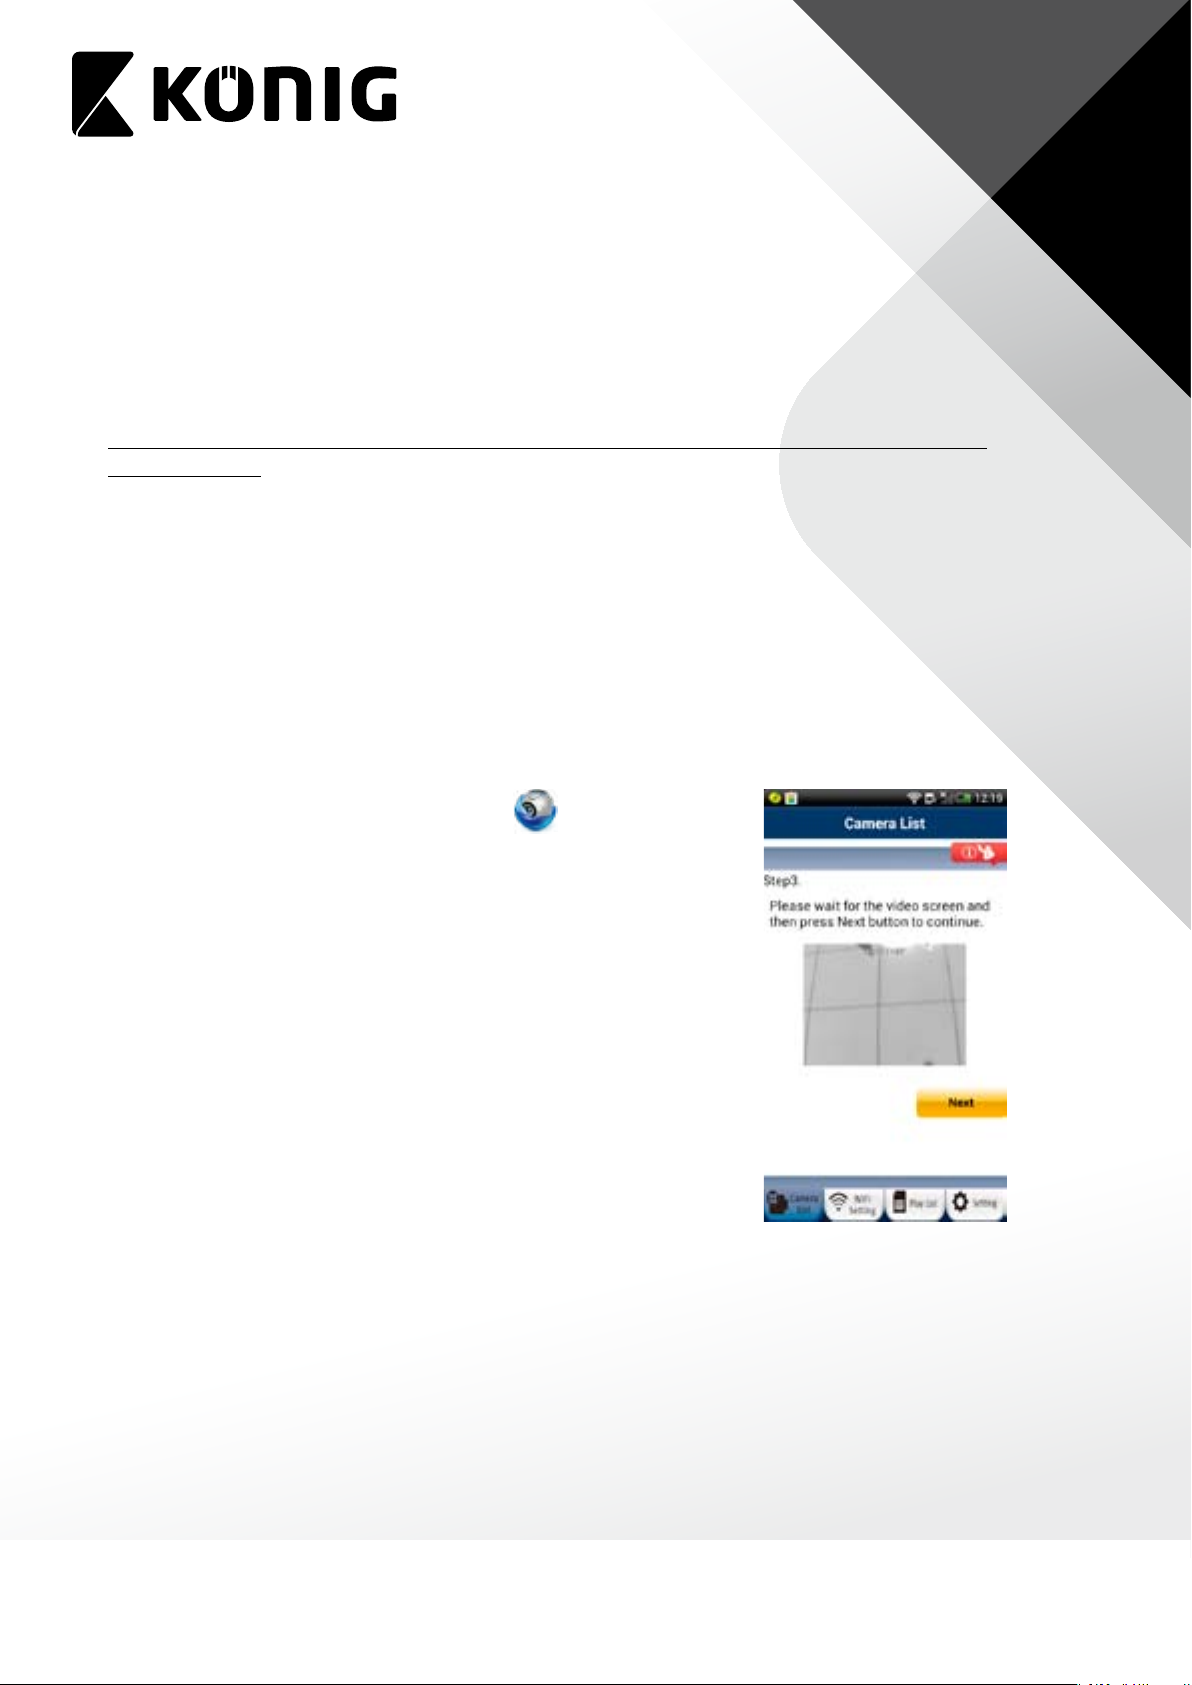
3. Now, open the Smartphone APP “uCare Cam” and click on the
Tab at the bottom of the screen that says “WiFi Connect”.
Click on “Router mode”, then “Next”. You will see live video.
4. Enter the WiFi router SSID and password for your home
router. Click on “Next” button and again, on the next screen,
the “Next” button.
5. Please enter a Camera name (2 to 20 characters) and default
password “0000”. You are encouraged to change the default
password after setup for security purposes. Then click “Finish”.
6. After uCare Cam receives this information, it will restart.
Please wait for it to start up and connect to your home router.
When it successfully connects, the status LED color will turn
Orange. It may take up to 10 minutes. If the status LED color
does not turn Orange, please check your router and make
sure uCare Cam is within the signal area of your WiFi router.
Then try setup again, starting from Step3.
7. Your iOS device should have disconnected from “wi-cam-
p2p” and reconnected to your home Router. Please check
that your iOS device has connected to your home Router now,
via “Settings” -> “Wi-Fi”. If it has not, please connect your
Smartphone to your home Router WiFi.
8. Open “uCare Cam” Smartphone App, you can click on the
camera name in Camera List view to connect.
, then
E. Android – Setup uCare Cam WiFi
There are two methods to setup uCare Cam to connect to a new WiFi Router.
Method 1: Use WPS (WiFi Protected Setup)
Available if your WiFi Router supports WPS and it is set to use WPA or WPA2 security
encryption. WEP security encryption is not supported for WPS mode. An easy way to check if
6
Page 7
ENGLISH
your Router supports WPS is to look for a button that says “WPS” on the Router. It may also be
called “AOSS” or “QSS”.
1. Press and hold the WPS/REST button for 10 seconds at the back of the camera. It will reset
and restart the uCare Cam. After about 60 seconds, the LED color should ash Green and
Red.
2. Press “WPS” button on WiFi Router.
3. Press the WPS/REST Button on the back of the uCare Cam for 2 seconds.
If uCare Cam has entered the WPS connection mode, the status LED color will turn a fast
blinking Green.
4. uCare Cam will try for up to 2 minutes to connect to the WiFi Router using WPS.
5. If the LED color changes to Orange, your uCare Cam has successfully connected to your
Router. If the LED does not change to Orange, the setup has failed. Please make sure
the uCare Cam is within WiFi distance of your Router, press the WPS/REST button for 10
seconds to reset uCare Cam, and try the setup again.
6. Use Smartphone APP to add uCare Cam into Camera list. See instruction manual –
“Android - Add uCare Cam (already connected to Router) to APP”.
Method 2: Use Router Mode
Please have your WiFi password readily available as you will need it in this process.
1. Open the Smartphone APP “uCare Cam”
Tab at the bottom of the screen that says “WiFi Setting”.
2. Click on “Router mode”.
3. Make sure the status LED on uCare Cam is blinking Red and
Green. If the status LED is not blinking Red and Green, please
press and hold the WPS/REST button for 10 seconds to reset
uCare Cam. Wait for 1-2 minutes for it to restart and the LED
should become Red and Green.
4. Click “Next”. Your Smartphone will start to search for uCare
Cam. Once it nds it, you will see live video. Click on “Next”
button.
5. Your Smartphone will search for nearby WiFi signals. Once
they are found, you will see a list of Routers.
6. Click on your Router name and enter your WiFi password in
the pop-up screen.
and click on the
7
Page 8

ENGLISH
7.
Please enter a Camera name (2 to 20 characters) and default
password “0000” or "00000000". You are encouraged to
change the default password after setup for security
purposes. Then click “OK” in
8. The camera will restart and the Smartphone App will
automatically connect to the camera in Live View.
9. When uCare Cam successfully connects to your Router,
the status LED color will turn Orange. It may take up to 10
minutes. If the status LED color does not turn Orange, please
check your Router and make sure uCare Cam is within the
signal area of your WiFi Router. Then try the setup again.
10. If the setup is successful, the uCare Cam will be automatically added to your Camera List
window and you can click on the camera name to view Live Video.
the top right corner.
F. iOS – Add uCare Cam (already connected to Router) to APP
There are three ways to add a uCare Cam to the Camera List view if the uCare Cam is already
connected to the internet. You can:
• Scan for uCare Cam in local intranet
• Scan QR code at back of uCare Cam
• Type in 20 digit code
Method 1: Scan for uCare Cam in local intranet
1. Make sure your Smartphone is connected to the same Router
as your uCare Cam. Open up the Smartphone APP “uCare
Cam”
2. Click on “Scan Camera’s UID in intranet”.
3. You will see a list of UID’s that were found on your local
intranet.
4. Click on the UID you would like to add.
5. Please enter a Camera name (2 to 20 characters) and the
camera password. Default password is 0000 or 00000000.
Click “Done” on
6. You will see the Camera name now in Camera List view. It
should indicate that the Camera is “Online”. To connect to
the Camera, please click on Camera name. If the Camera is
not “Online”, you may need to force Reconnect. To force
Reconnect, click on the right arrow and click on “Reconnect”.
Click on Camera name once it shows “Online”.
and click on the “+” at the top right of the screen.
top right of window.
8
Page 9

ENGLISH
Method 2: Scan QR Code at back of uCare Cam
1. Make sure your Smartphone is connected to the internet. Open up the Smartphone APP
“uCare Cam”
2. Click on “Scan camera QR code”.
3. You will see your Smartphone camera live view. Face your Smartphone camera towards
the QR code found on the back of uCare Cam. Please make sure the QR code is clear and
fully viewable in the screen. Once the QR code has been detected, the APP will display the
UID in the APP window.
4. Please enter a Camera name (2 to 20 characters) and the camera password. Default
password is 0000. Click “Done” on upper right of the screen.
5. You will see the Camera name now in Camera List view. It should indicate that the Camera
is “Online”. To connect to the Camera, please click on Camera name. If the Camera is not
“Online”, you may need to force Reconnect. To force Reconnect, click on the right arrow
and click on “Reconnect”. Click on Camera name once it shows “Online”.
Method 3: Type in 20 digit QR code
1. Make sure your Smartphone is connected to the internet. Open up the Smartphone APP
“uCare Cam”
2. Click in the “UID” eld to enter typing mode.
3. Type in 20 digit code exactly as printed underneath the QR code in back of uCare Cam.
4. Please enter a Camera name (2 to 20 characters) and the camera password. Default
password is 0000 or 00000000 (depending on model). Click “Done
5. You will see the Camera name now in Camera List view. It should indicate that the Camera
is “Online”. To connect to the Camera, please click on Camera name. If the Camera is not
“Online”, you may need to force Reconnect. To force Reconnect, click on the right arrow
and click on “Reconnect”. Click on Camera name once it shows “Online”.
and click on the “+” at the top right of the screen.
and click on the “+” at the top right of the screen.
” on upper right of the screen.
G. Android – Add uCare Cam (already connected to Router) to APP
There are three ways to add a uCare Cam to the Camera List view if the uCare Cam is already
connected to the internet. You can:
• Scan for uCare Cam in local intranet
• Scan QR code at back of uCare Cam
• Type in 20 digit code
9
Page 10

Method 1: Scan for uCare Cam in local intranet
1. Make sure your Smartphone is connected to the same Router
as your uCare Cam. Open up the Smartphone APP “uCare
ENGLISH
Cam”
WiFiCam” at the top of the screen.
2. Click on “Search”.
3. You will see a list of UID’s that were found on your local
intranet (Figure XX).
4. Click on the UID you would like to add.
5. Please enter a Camera name (2 to 20 characters) and the
camera password. Default password is 0000. Click “OK” on the
bottom of the screen.
6. You will see the Camera name now in Camera List view. It
should indicate that the Camera is “Online”. To connect to
the Camera, please click on Camera name. If the Camera is
not “Online”, you may need to force Reconnect. To force
Reconnect, click and hold on Camera name. A pop-up window
will give you options to Reconnect, Edit, and Remove Camera.
Click on “Reconnect” then click on Camera name once it
shows “Online”.
Method 2: Scan QR Code at back of uCare Cam
1. Make sure your Smartphone is connected to the internet. Open up the Smartphone APP
and click on the “Click here to import installed
“uCare Cam”
the screen.
2. Click on “QRCode”. \You are required to have a QR code reader installed on your Android
phone. A popular QR code reader might be “QR Droid”.
3. You will see your Smartphone camera live view. Face your Smartphone camera towards
the QR code found on the back of uCare Cam. Please make sure the QR code is clear and
fully viewable in the screen. Once the QR code has been detected, the APP will display the
UID in the APP window.
4. Please enter a Camera name (2 to 20 characters) and the camera password. Default
password is 0000. Click “OK” on the bottom of the screen.
5. You will see the Camera name now in Camera List view. It should indicate that the Camera
is “Online”. To connect to the Camera, please click on Camera name. If the Camera is not
“Online”, you may need to force Reconnect. To force Reconnect, click and hold on Camera
name. A pop-up window will give you options to Reconnect, Edit, and Remove Camera.
Click on “Reconnect” then click on Camera name once it shows “Online”.
Method 3: Type in 20 digit QR code
1. Make sure your Smartphone is connected to the internet. Open up the Smartphone APP
“uCare Cam”
the screen.
and click on the “Click here to import installed WiFiCam” at the top of
and click on the “Click here to import installed WiFiCam” at the top of
10
Page 11

ENGLISH
2. Click in the “UID” eld to enter typing mode.
3. Type in 20 digit code exactly as printed underneath the QR code in back of uCare Cam.
4. Please enter a Camera name (2 to 20 characters) and the camera password. Default
password is 0000 or 00000000. Click “OK” on the bottom of the screen.
5. You will see the Camera name now in Camera List view. It should indicate that the Camera
is “Online”. To connect to the Camera, please click on Camera name. If the Camera is not
“Online”, you may need to force Reconnect. To force Reconnect, click and hold on Camera
name. A pop-up window will give you options to Reconnect, Edit, and Remove Camera.
Click on “Reconnect” then click on Camera name once it shows “Online”.
H. Live Video Window & Network Connection Type
When you connect to your uCare Cam, you will see the below
Live Video screen. At the top of the screen, there will be some
information listed to help you understand the performance of
your internet connection.
• Online / P2P: Connection type - there are three types, LAN, P2P, and Relay. Connection
type shown is P2P
•
640x480
• FPS is current frames per second
• OnLine Nm: number of users currently connected to this uCare Cam
• Frame Ratio 0 / 499: rst number is packet loss number, second number is packet receive
number. If the rst number is too high compared to the second number, it means that your
internet connection speed is slow or unsteady.
Connection Types
There are three types of network connection types possible between uCare Cam and your
Smartphone APP.
1) Local Area Network (LAN) Mode
Both uCare Cam and your Smartphone are connected to the same WiFi Router.
Typical frame rate will be around VGA 640x480 15~20fps.
2) Point to Point (P2P) Mode
uCare Cam will establish a point to point network connection directly with the
Smartphone.
is the video resolution. uCare Cam supports several resolutions
11
Page 12

Typical scenario will be that the uCare Cam is installed at home or in the oce and the
Smartphone has a 3G/3.5G/4G internet connection. Typical frame rate will be around VGA
640x480 10~15fps.
3) Relay Mode
uCare Cam and Smartphone cannot establish a point to point network connection link.
uCare Cam must send Audio/Video data to a Relay Server and the Smartphone will retrieve
data from the Relay server. In Relay mode, there will be a limit on the Video download
frame rate.
Typical scenario will be that the uCare Cam is installed at home or in the oce and the
Smartphone is using a WiFi connection.
Remark:
• When using 3G/3.5G/4G to connect to uCare Cam, the APP will use P2P mode. If the
Smartphone download speed is too slow, the APP will switch to Relay mode. The user
can force the APP to reconnect to uCare Cam and it will try P2P mode again. To force
reconnect, press and hold the camera name on Camera list. A pop-up menu will appear
with the option to “Reconnect”. Please click “Reconnect”.
ENGLISH
I. Using the uCare Cam APP
The uCare Cam has a lot of functions possible through the Smartphone APP. Please see below
for some of the key functions.
Camera List
Add Camera that has
already setup WiFi
Edit Camera Info
Camera On-Line
12
Page 13

Connection Status
Information
ENGLISH
Take Photo
Playlist
User can view, delete, and copy picture les.
Camera le folder
File list per
camera
13
Page 14

Photo view
ENGLISH
File delete
Settings
Manage uCare Cam (Default manager name: admin , Default Password: 0000 )
Only one User can manage a camera that is online and connected to Smartphone APP at
any one time.
Here, User can:
• Check Camera Info
• Change WiFi Router
• Change Alarm Settings – “Warning
& Notify Setting”
• Set Real time video
• Check SD Card Recording
• Play SD Card Video
• Set Password
• Change Date & Time
14
Page 15

1) Change WiFi Router
User can remotely switch the camera to connect to a dierent WiFi Router.
ENGLISH
2) Alert & Notify Setting / Warning & Notify Setting
The camera has a number of hardware alarm detection possibilities.
User can set the desired trigger and notication. When a new event is generated, the APP
will notify the User either through email or through a Phone Push Message.
15
Page 16

ENGLISH
Set Email Alerts
To setup your email to receive motion/sound/etc. alerts, please login to the “Settings” page
with Manager name and password (default: admin / 0000).
1) Click on “Alert & Notify Setting” or “Warning & Notify Setting”.
2) Click on “Email snapshot alert”
3) You will see a variety of options. You can touch and scroll down the page to see more
options.
• Email snapshot alert – Turn email on/o
• Motion detection enabled – Turn motion detection on/o
• Sensitivity – Motion detection sensitivity (High, Medium, Low)
• Sound detection enabled – Turn sound detection on/o
• SD card remove detection – Send alert if SD card is removed
• SD card out of space alert – Send alert if SD card is full
• Notication subject – Note to be added to email alert (less than 10 characters)
• Receiver Email – email address to send alert to
16
Page 17

ENGLISH
• SMTP Mail Settings – only either SMTP or Gmail mail settings can be set. Please enter your
email provider’s SMTP server settings. You may need to contact your email provider for the
server settings. Please enter your email address and email password. This account will be
used as the “Sender” or “From” for the email alerts.
• Gmail Mail Settings – only either SMTP or Gmail mail settings can be set. For convenience,
we have already entered Gmail’s SMTP server settings. Please enter your Gmail account
email and Gmail password. This account will be used as the “Sender” or “From” for the
email alerts.
3) Real time video setting
User can adjust the video quality settings based on the status of the network connection.
If User does not have adequate video performance, please turn o motion detection and
reduce the resolution.
1) Frames: The default is motion image detection
2) Resolution: The default is 640x480
17
Page 18

4) SD Card Recording Setting
User can insert a microSD card into the camera to enable the
recording function.
Trigger Recording:
The camera will automatically start recording when a trigger
event (motion, sound, and other events) have occurred.
The camera will record for 60 seconds. If another trigger
event occurs, the camera will record for another 60 seconds;
otherwise it will stop recording.
Continuous Recording:
User can setup uCare Cam to constantly record. A video le
will be saved every two minutes.
When the microSD card is full, if “SDCard Overwrite” is
checked, the program will remove the oldest video les
and continue to record. Otherwise, it will stop recording.
“HQ” means high quality recording. “LQ” means low quality
recording.
ENGLISH
5) Play SD Card Video
Click on the Video le to play.
18
Page 19

6)
Password Setting
The two-level password management system allows the user
to safely and eectively manage the camera.
First layer: Camera password – able to view the camera.
Default value is 0000 (SAS-IPCAM115) or 00000000 (SAS-
IPCAM116
Second layer: Manager’s Name and Password – able to view
and set uCare Cam settings.
Default value : admin / 0000
ENGLISH
7) Date & Time
User can only adjust the Time Zone. The Date and Time will
be set from the factory and User can not change.
APP Info
In the APP Info page, User can see options related to the APP, not specic to a camera. To go
to APP Info page, please click on
User can:
• Switch the APP user interface skin to a dierent color template
• See the Quick Installation Guide
• See this Detailed Instruction Manual
• See the APP version number
• See the memory usage of uCare Cam APP on Smartphone.
on top right hand of screen. Inside APP Info page,
19
Page 20

ENGLISH
J. Update your uCare Cam rmware
1. Download rmware and un-compress the le.
2. Copy “update.bin” to microSD Card top folder, for example H:\
3. Turn o power to uCare Cam and insert microSD card into uCare Cam microSD slot in back
of uCare Cam.
4. Turn power on to uCare Cam.
5. uCare Cam will start reading data from microSD card and upgrade the rmware. LED color
will blink Red and Green during this process. It will take about 3 minutes to upgrade the
rmware.
Don’t power o the camera or remove the microSD Card during the upgrade process.
6. After rmware upgrade is successful, uCare Cam will automatically reboot and reset all
settings.
7. User will now need to reinstall uCare Cam.
FAQ:
1) uCare Cam status LED is Orange.
Why can’t my Smartphone connect to uCare Cam?
a. Does the camera status in Camera List view show “Online”?
i. Yes -> Check Smartphone internet connection speed
ii. No -> Try to force Reconnect.
1. To force Reconnect on iOS, click on the right arrow and click on “Reconnect”.
Click on Camera name once it shows “Online”.
2. To force Reconnect in Android, click and hold on Camera name. A pop-up
window will give you options to Reconnect. Click on “Reconnect” then click on
Camera name once it shows “Online”.
20
Page 21

2) The live video stream is very slow.
uCare cam will automatic adjust video streaming speed according to smartphone’s
internet connection. It will start sending video from a low frame rate and gradually increase
the frame rate. It may take 1-2 minutes for the frame rate to stabilize. If performance is still
not satisfactory –
a. Please ensure motion detection is turned o. “Settings” -> “Alert & Notify Setting” ->
“Email snapshot alert” -> “Motion detection enabled” is NOT checked.
b. Please reduce the video quality. “Settings” -> “Real time video Setting” -> “Video
quality settings”
3) What does the LED color stand for?
LED Color Description
ENGLISH
Power on Green
Power on Green Red ashing
Red and Green lit alternatively Router Mode
Fast Green lit WPS Mode
Green Slow Flashing Searching and Connecting to WiFi Router
Orange Connected to WiFi Router
Red Fast ashing WPS pairing failed
4) My uCare Cam does not connect to the Router
It’s possible that there are too many WiFi routers nearby using the same channel and
interfere with each other.
a. Please move the uCare Cam closer to the Router to ensure a good WiFi signal.
b. You may consider to change your WiFi channel number, for example Ch1, Ch6, Ch11.
c. Please turn o power to uCare Cam, wait 5 seconds, then turn power on to uCare Cam.
d. Please wait ~1 minute, then press WPS/REST key in back of uCare Cam.
e. Please wait ~1-2 minutes. The status LED should be ashing Red and Green. Please try
setup again following instructions.
f. If status LED does not ash Red & Green, please contact Customer Support.
IPCam booting (15 seconds)
IPCam loading program (15 seconds)
(uCare Cam will reboot automatically every
one hour in this status)
5) How to check your WiFi signal and coverage by Android App -- WiFi Analyzer
Ans: There is a free android app “WiFi Analyzer” that can scan and show all WiFi SSID’s
around. User can change their WiFi channel to avoid interference and get better signal and
coverage.
https://play.google.com/store/apps/details?id=com.farproc.wi.analyzer&feature=search_
result
6)
What is the default account name and password?
Ans: Default password for IPCam is “0000”(SAS-IPCAM115) or "00000000"(SAS-IPCAM116),
default manager account is “admin”, password is “0000”
21
Page 22

7) Why can’t uCare Cam connect with WiFi Router using WPS Mode?
a. Make sure Router’s WPS function is enabled.
b. Please try Router model if WPS mode setup failed.
8) What is the frequency of email alert and smartphone notify alert?
Ans: Once motion or sound detection is triggered, then uCare Cam will send email and
phone notify immediately. If the trigger event continually happens, then the email and
phone notify will send out on a three minute interval.
The trigger event ends after 10 seconds if there is no continual motion or sound.
The minimum interval for email and phone notify will be 11 seconds.
9) What is the estimate recording size of video per hour (video format AVI)
VGA 640x480 Continuous HQ (20fps) Continuous LQ (10fps)
Frame Rate Priority 4GB / Hour 2GB / Hour
Image Quality Priority 8GB / Hour 4GB / Hour
ENGLISH
10) In iOS, I can not see the uCare Cam Router “wi-cam-p2p”.
After some time, the uCare Cam Router will no longer broadcast the SSID “wi-cam-p2p”.
Please reset uCare Cam by pressing the WPS/REST button for ~10 seconds. Then please
take note of the LED color. When the LED turns green/red, then you should see the SSID
being broadcast again.
22
Page 23

ENGLISH
Maintenance:
Clean the product only with a dry cloth.
Do not use cleaning solvents or abrasives.
Warranty:
Any changes and/or modications to the product will void the warranty. We cannot accept any liability for damage caused by incorrect use
of this product.
Disclaimer:
Designs and specications are subject to change without notice. All logos, brands and product names are trademarks or registered
trademarks of their respective holders and are hereby recognized as such.
Disposal:
• This product is designated for separate collection at an appropriate collection point.
Do not dispose of this product with household waste.
• For more information, contact the retailer or the local authority responsible for waste management.
This product has been manufactured and supplied in compliance with all relevant regulations and directives, valid for all member states of
the European Union. It also complies to all applicable specications and regulations in the country of sales.
Formal documentation is available upon request. This includes, but is not limited to: Declaration of Conformity (and product identity),
Material Safety Data Sheet, product test report.
Please contact our customer service desk for support:
via website: http://www.nedis.com/en-us/contact/contact-form.htm
via e-mail:
via telephone:
service@nedis.com
+31 (0)73-5991055 (during office hours)
NEDIS B.V., De Tweeling 28, 5215 MC ’s-Hertogenbosch, THE NETHERLANDS
23
 Loading...