

Page 1
SEC-TRANS50
SEC-TRCAM30
MANUAL (p. 2)
Wireless camera system
ANLEITUNG (S. 19)
Funk-Kamerasystem
MODE D’EMPLOI (p. 36)
Système de caméra sans fil
GEBRUIKSAANWIJZING (p. 54)
Draadloos camerasysteem
MANUALE (p. 72)
Sistema telecamera wireless
MANUAL DE USO (p. 90)
Sistema de cámaras inalámbrico
HASZNÁLATI ÚTMUTATÓ (o. 108.)
Vezeték nélküli kamerarendszer
KÄYTTÖOHJE (s. 126)
Langaton kamerajärjestelmä
BRUKSANVISNING (s. 144)
Trådlöst kamerasystem
NÁVOD K POUŽITÍ (s. 161)
Bezdrátový kamerový systém
MANUAL DE UTILIZARE (p. 178)
Sistem video wireless
ΕΓΧΕΙΡΙΔΙΟ XPHΣHΣ (σελ. 196)
Ασύρματο σύστημα κάμερας
BRUGERVEJLEDNING (s. 215)
Trådløst kamerasystem
2012-06-13
VEILEDNING (s. 233)
Trådløst kamerasystem
Page 2

ENGLISH
Wireless camera system
Introduction:
Watch over your properties with this new 2.4 GHz digital wireless security camera. The camera offers a
very sharp and stable image, and the technology used improves the image quality even further. The
system uses digital wireless technology and is equipped with advanced frequency signal encryption
capabilities, which reduce interference caused by other applications using the 2.4 GHz frequency band.
This digital technology ensures your privacy and allows you to use it over an extra long distance.
The receiver and camera are already paired by factory default. When adding the additional
SEC-TRCAM30 camera (4 cameras max.) to the system, please refer to the section PAIRING for
adding cameras.
• We recommend that you read this manual before installing/using the camera system.
• Keep this manual in a safe place for future reference.
Packaging content SEC-TRANS50: Packaging content SEC-TRCAM30:
1x Camera with bracket 1x Camera with bracket
1x Receiver 1x Antenna
1x Remote control (battery included) 1x AC/DC adapter
1x Antenna for camera
1x Video playback software PC (CD ROM)
1x RCA Audio/video connection cable
2x AC/DC adapter
Technical specifications:
Camera:
Transmitting frequency: 2.408-2.474 GHz Digital
Modulation: FHSS
Range: Indoor ±50 m, open area ±150 m (depending on local conditions)
Image chip: CMOS with IR cut switch
Lens: 3.6mm
View angle: H: 60±3º / V: 43±3º
Infrared illumination (LED): 5 M
Protection: IP66
Microphone: mono
Working temperature: -10°C ~ 50°C
Voltage: 5 V DC/1A
Dimensions: 130x61x67 mm
Weight: 365 g (included cable)
Receiver:
Receiving frequency: 2.408-2.474 GHz Digital
Channels: 4
SD card: up to 32 GB (not included)
Video frame rate: 25 fps (max.), 16 fps (4x cameras)
Recording frame rate: 25 fps per channel
Video resolution: QVGA
Video format: ASF
Video output level: 1.2±0.2 Vp-p/75 Ohm
Audio output level: 1 Vp-p/600 Ohm, mono
Audio/video output connector: 3.5 mm Phone jack
Range: Indoor ±50 m, open area ±150 m (depending on local conditions)
Operating temperature: -10°C to +50°C
Voltage: 5 V DC/1A
2
Page 3
Dimensions: 122x122x26 mm
Weight: 395 g
Safety precautions:
• Do not open the camera or receiver in the event of a malfunction. These products should only be
opened by a qualified engineer.
• Do not submerge the camera in liquid.
• Do not expose the receiver to water or humidity.
• Do not expose the receiver or camera to high temperatures (see technical specifications)
• Do not install the system close to strong magnetic fields, such as a speaker. This may affect the
quality.
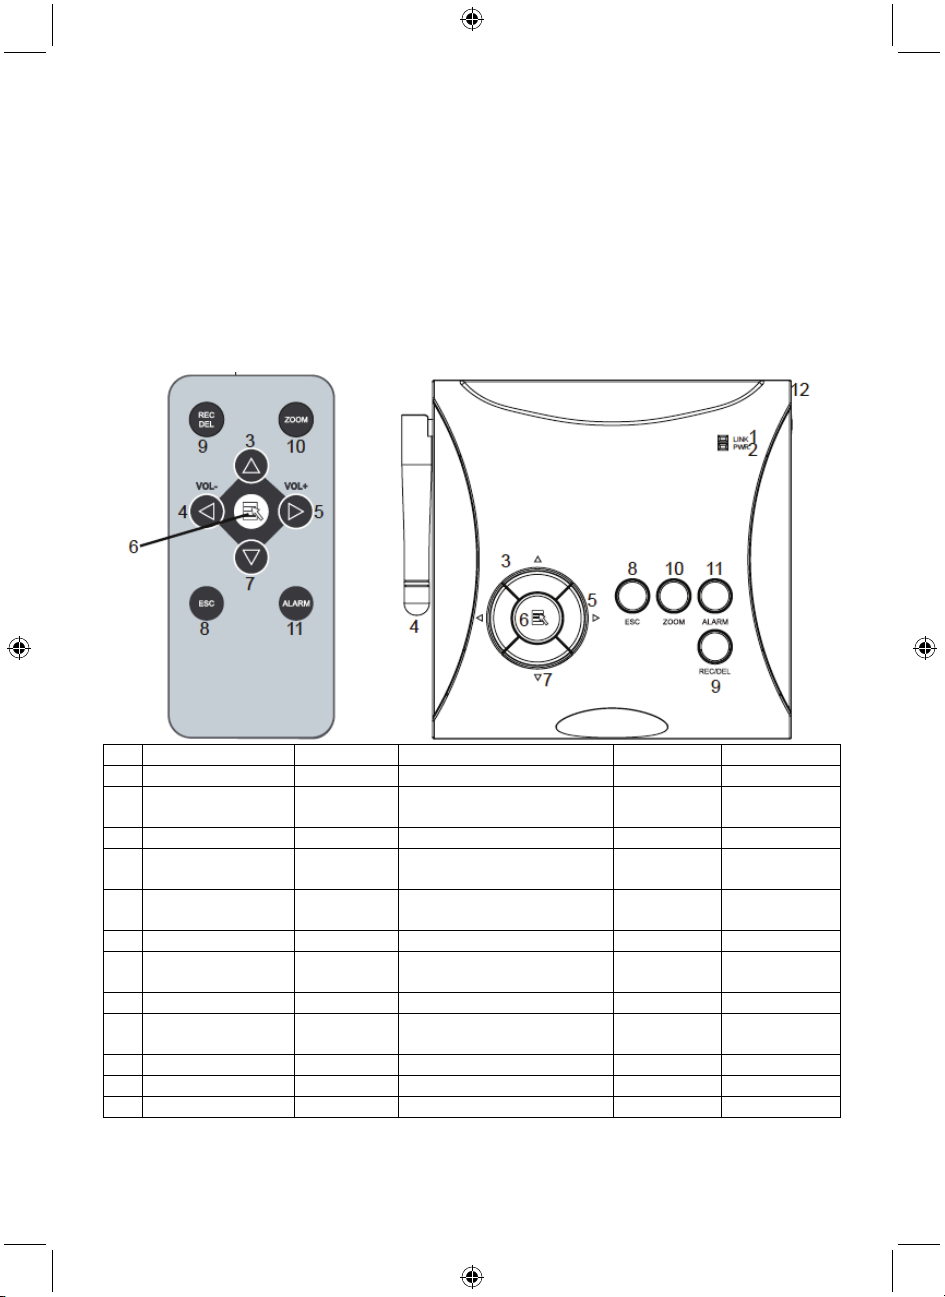
Product description:
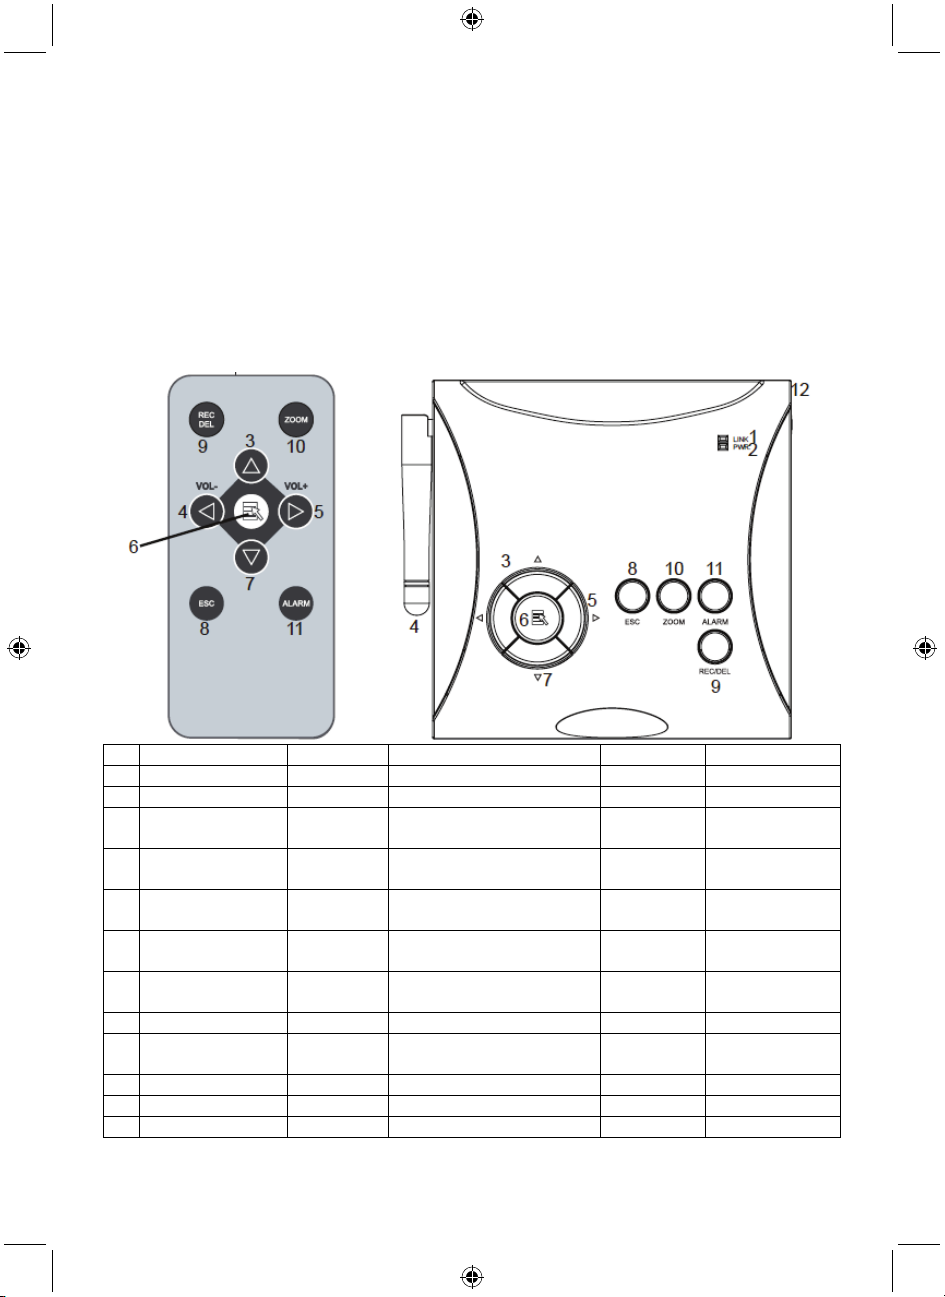
Remote control Receiver
Monitor Menu Playback REC mode Other
1 LINK indicator
2
3 Switch CHANNEL Cursor UP Fast FORWARD
4 Volume DOWN Cursor LEFT
5 Volume UP
6 MENU OK / ENTER PLAY / PAUSE
7 Switch CHANNEL
8 ESCAPE EXIT PREVIOUS
RECORDING /
9
10 ZOOM NEXT
11 ALARM
12 POWER on/off
STOP
Cursor
RIGHT
Cursor
DOWN
DELETE STOP
Volume DOWN / Switch
display CHANNEL
Volume UP / Switch display
CHANNEL
Fast BACKWARD
3
POWER
indicator
Page 4
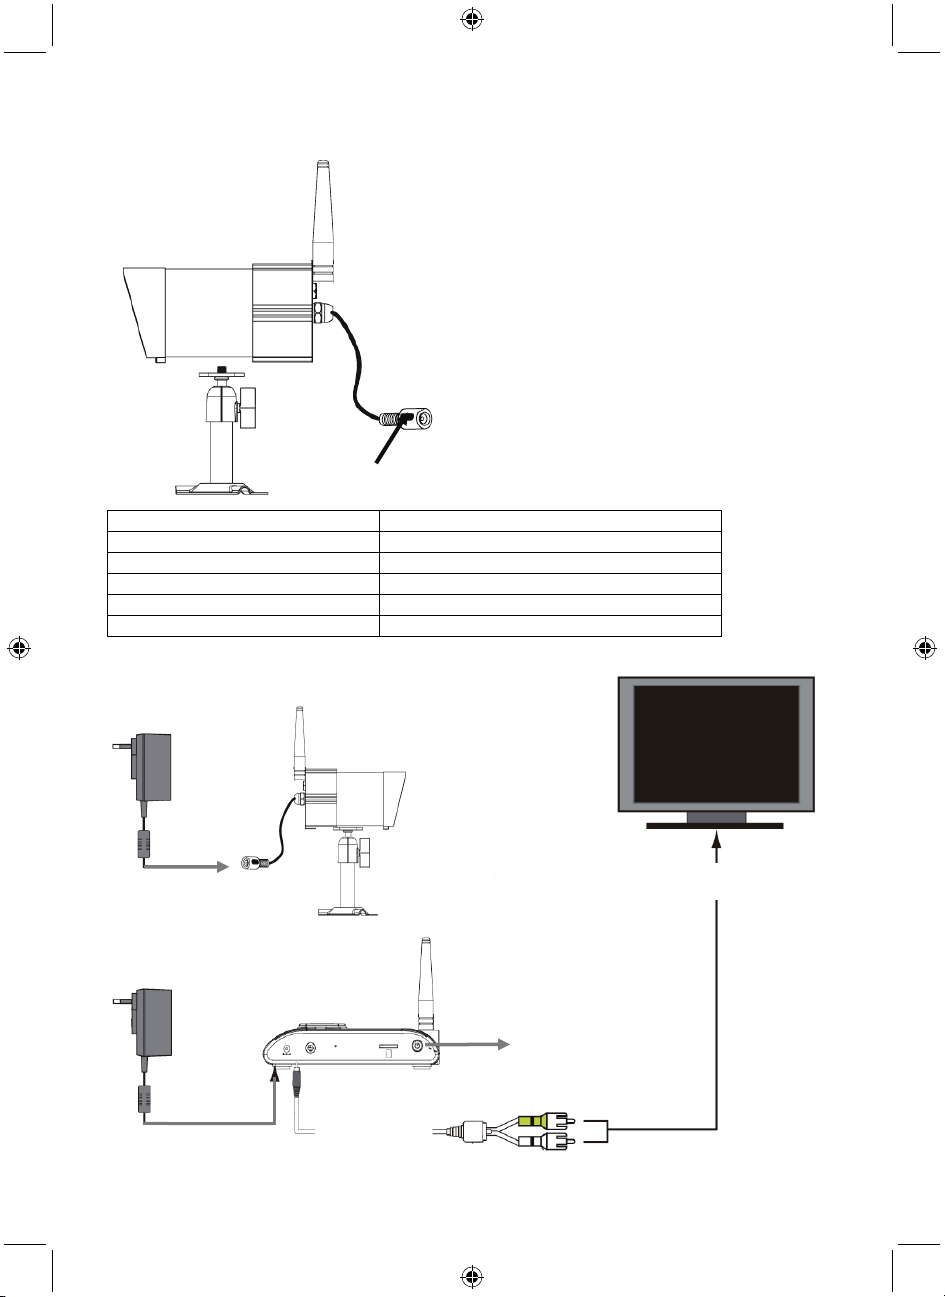
Camera:
1
3
2
4
1 Antenna
2 Camera bracket
3 5V DC power input
4 Pairing button
On front of the camera RED LED power ON
On front of the camera GREEN LED linked with receiver
Installation instructions:
To composite VIDEO input
Power ON
VIDEO output
cable
4
Page 5
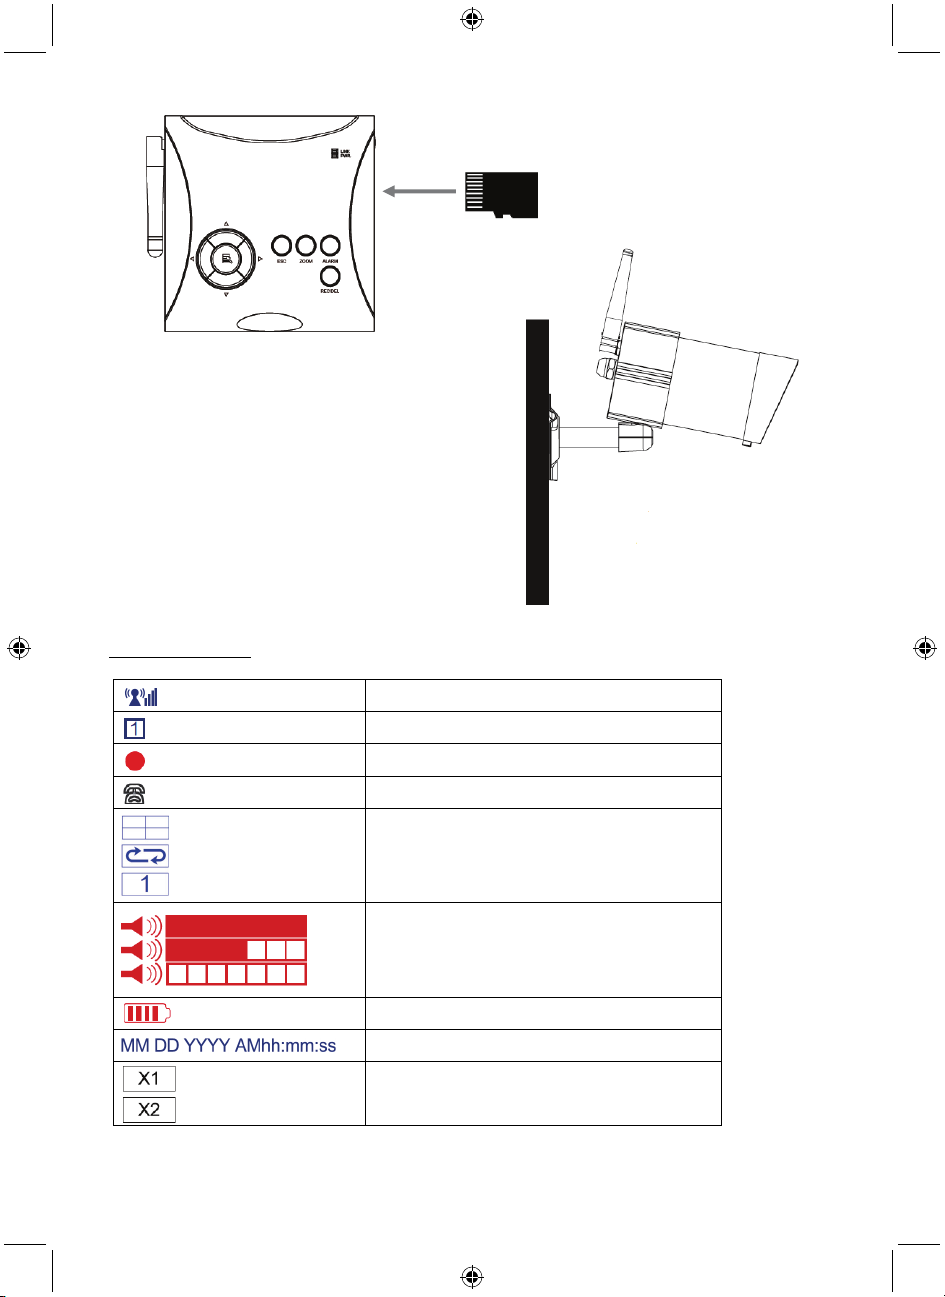
Mount the camera to a wall (or ceiling).
Drill a hole of 15mm for the cable to
pass through
User instructions:
On Screen Display
The following OSD icons will/can be visible in the image.
Signal indicator
Channel indicator
Recording indicator
Audio channel indicator
Quad display
Scan display
Single display
Full volume
1/2 volume
Mute
Power
System time
1x Zoom
2x Zoom
Option: insert a Micro SD card.
Insert only when the receiver is
powered OFF
5
Page 6

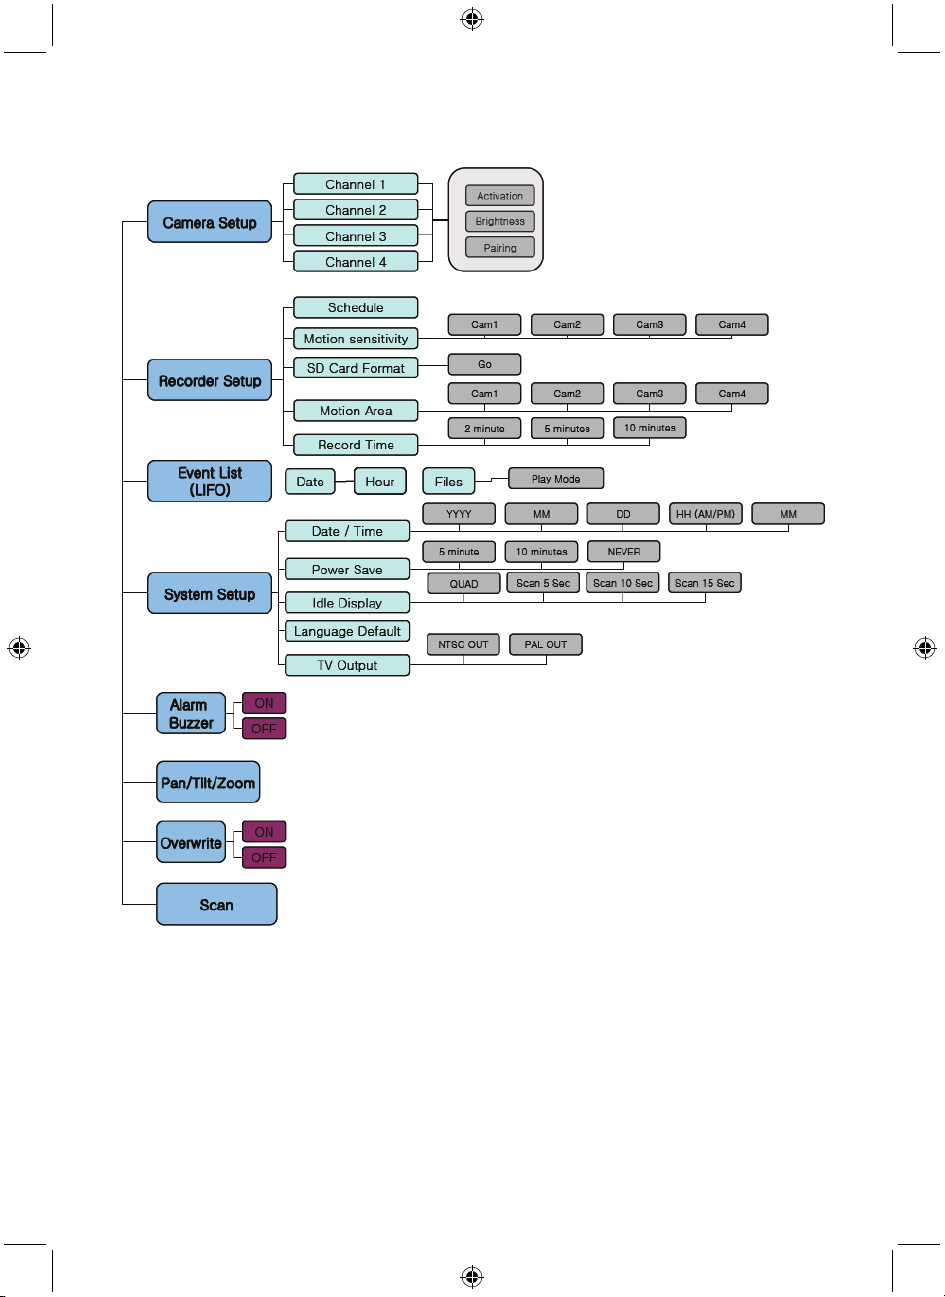
Overview menu
The following diagram shows the total overview of the system menu
6
Page 7
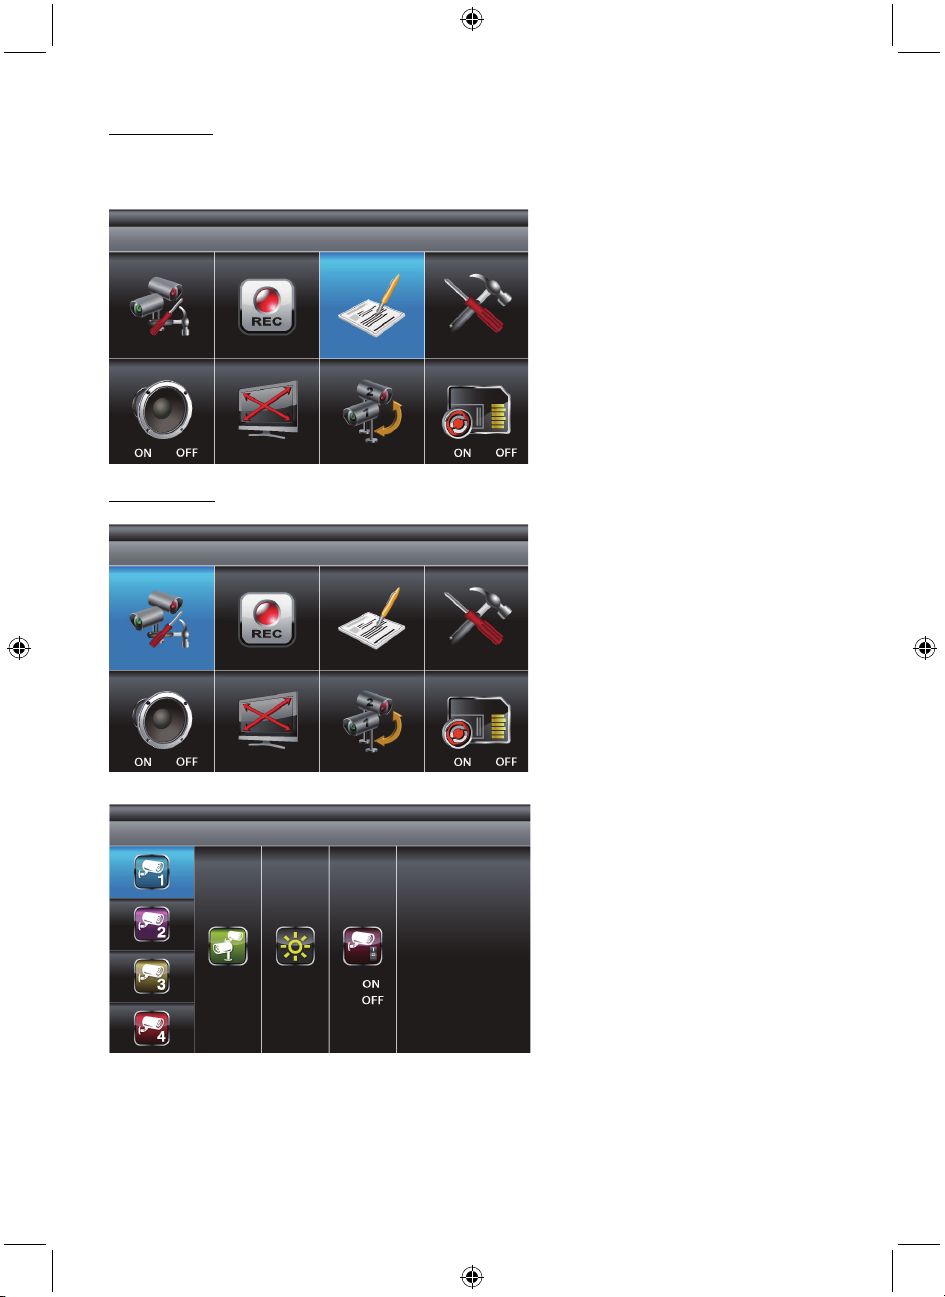
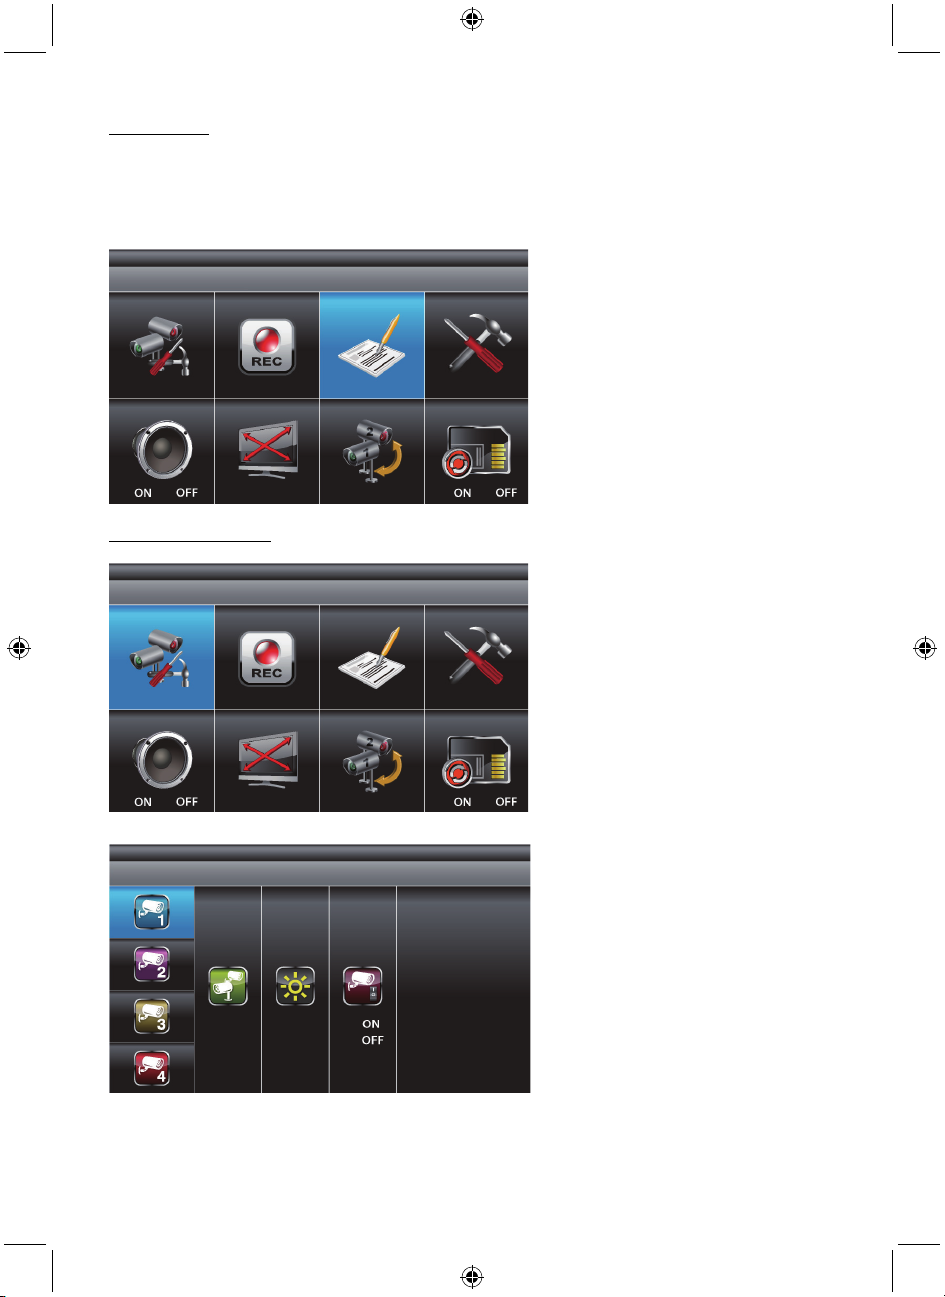
System menu
Press MENU to enter the main menu. After entering the [MAIN MENU] system, EVENT LIST will be
highlighted by default. The system will idle in [MAIN MENU] for 2 minutes before exiting [MAIN MENU].
Use ▲▼◄► to select, Press MENU to confirm selection and to enter the sub-menu.
Camera setup
Select CAMERA SETUP, press MENU key once to enter the sub-menu.
Use ▼▲ to select the camera to set up (1-4).
Use ◄► to select [PAIRING] [BRIGHTNESS] [CAMERA ON/OFF].
7
Page 8

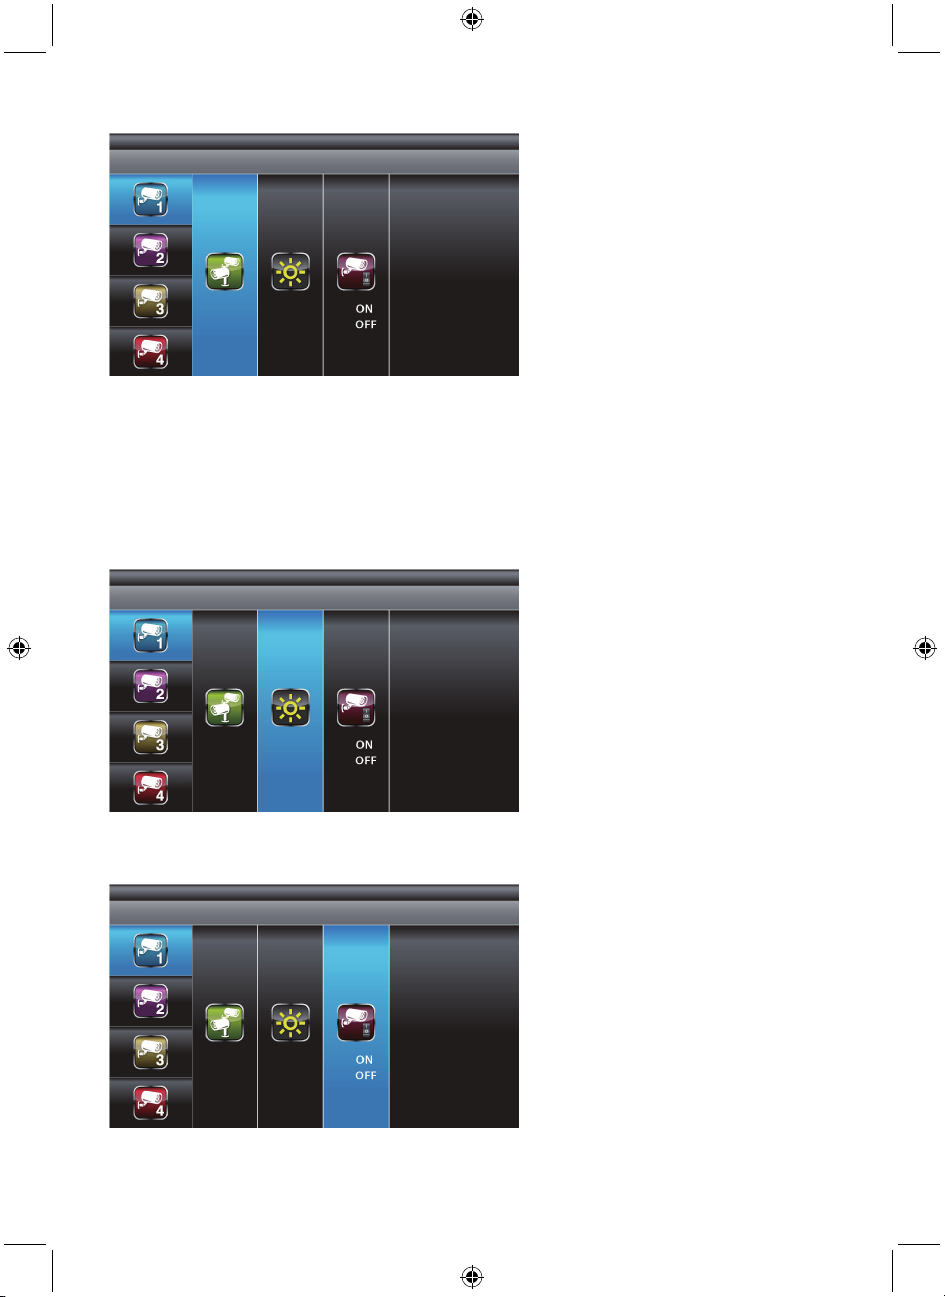
Pairing:
With the PAIRING section highlighted, press MENU key once to begin camera pairing. Pair and the
LED on camera will blink once, followiedby the LED blinking continuously, indicating data transmission
is in process.
System will confirm that the pairing process is successful with “PAIRED” displaying onscreen.
System will indicate that the pairing process failed with “PAIRING FAIL” displaying onscreen.
Press ESC to return to the main menu.
Note: the camera is paired by factory default. The pairing procedure must be followed when adding
additional cameras (SEC-TRCAM30).
Brightness:
With the BRIGHTNESS section highlighted, use ▼▲ to adjust camera brightness.
Press ESC to return to the main menu.
Activation:
With the ACTIVATION section highlighted, use ▼▲ to enable or disable a camera.
Press ESC to return to the main menu.
8
Page 9
Note: ensure the cameras are paired to the receiver for SCAN or QUAD to function properly. Camera
“ON” can only be selected when a camera has been paired to the system.
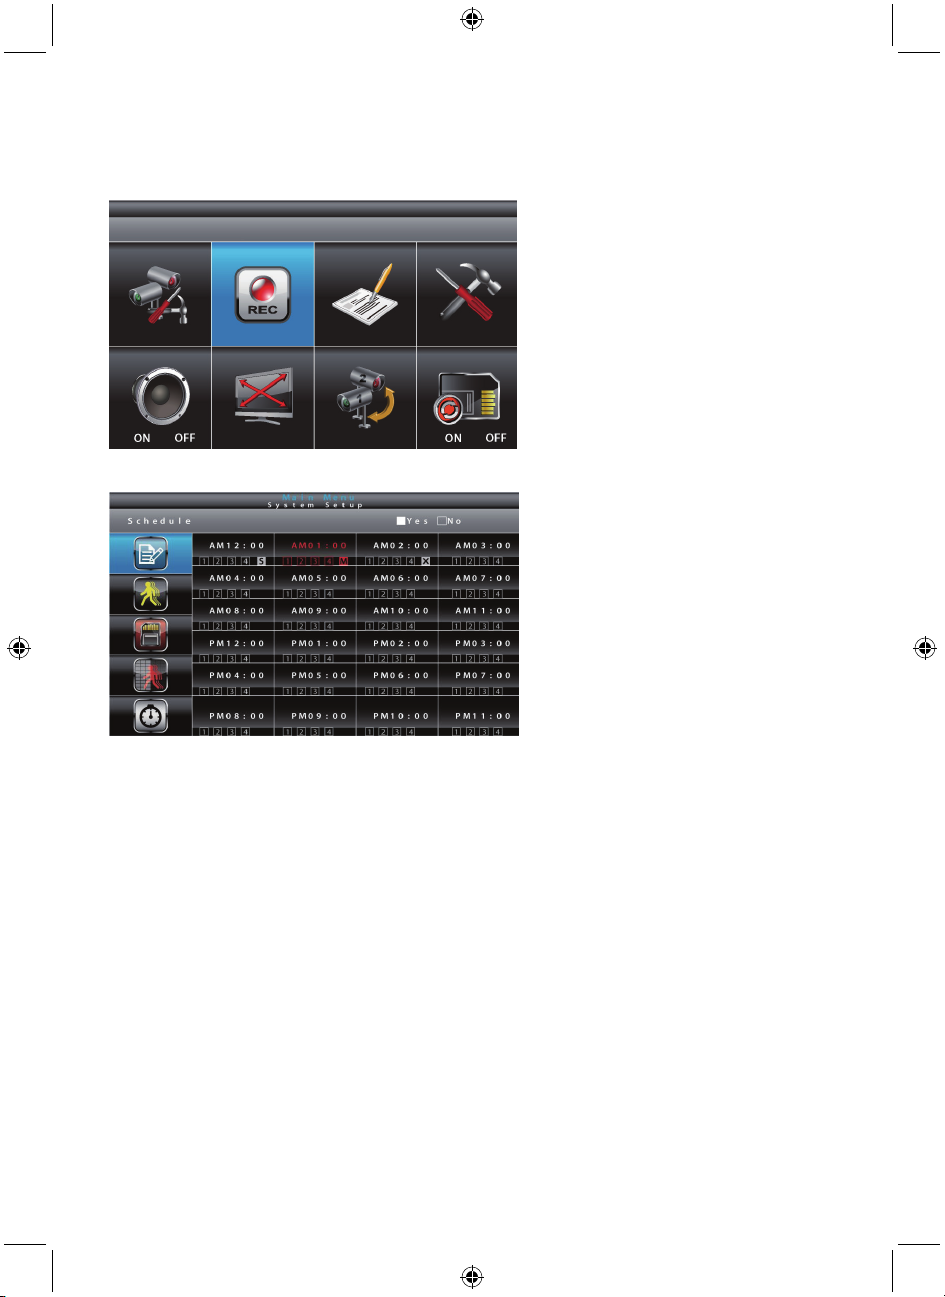
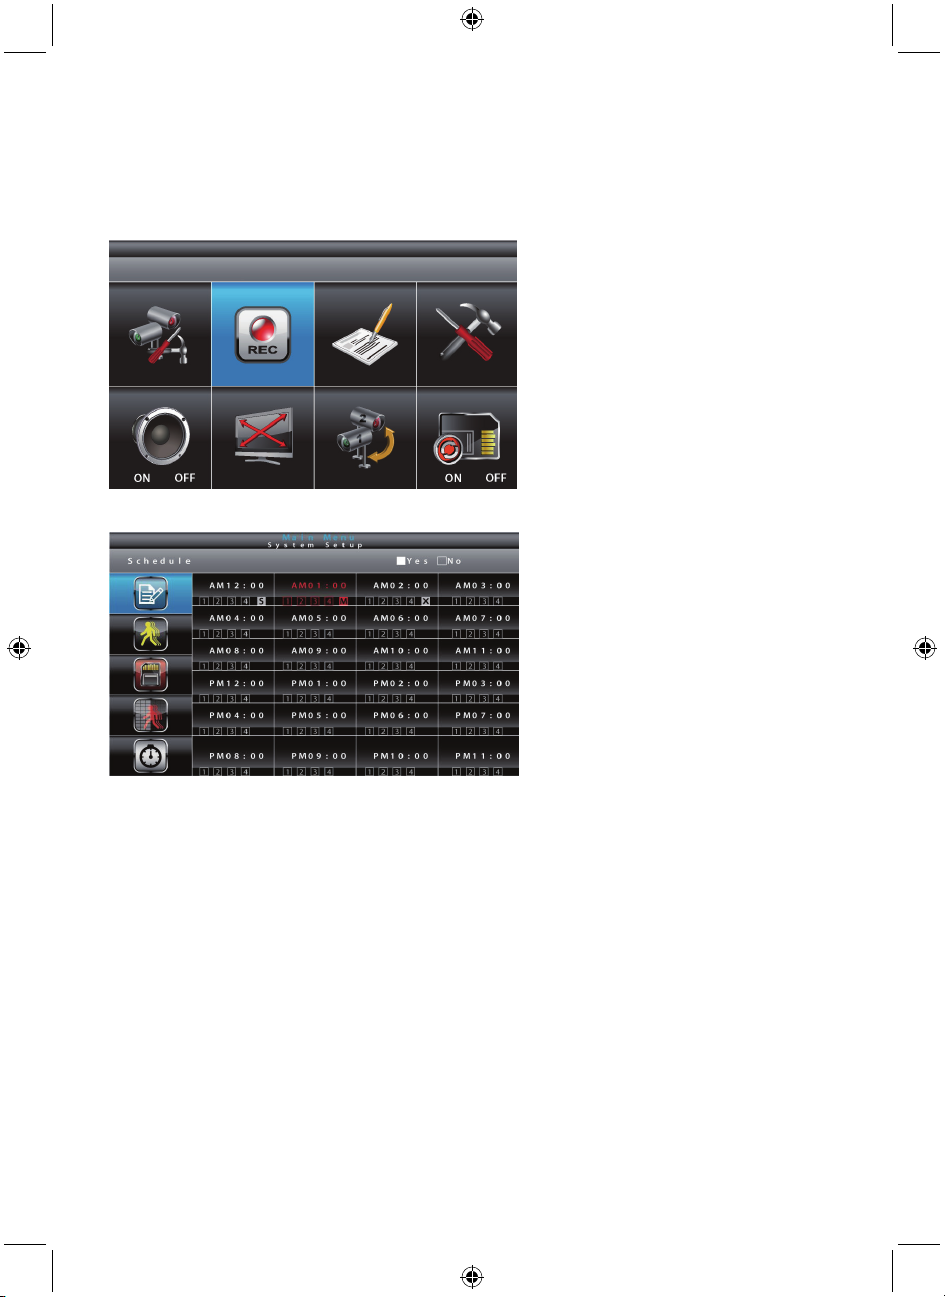
Recorder setup
Select RECORDER SETUP, press MENU key once to enter the sub-menu.
Schedule:
Use ▲▼◄► to select. There are three different recording options available to choose from. First
highlight the time period and press the MENU key to switch between different recording modes.
M: MOTION (REC only when motion is detected)
S: SCHEDULE (continuous REC)
X: MANUAL (manual REC)
The system will record video from all 4 channels simultaneously with MOTION, SCHEDULE and
MANUAL record modes. One of the four channels will have audio available. When the system
performes MOTION record, audio will automatically switch to the channel triggered by motion.
Recording cannot be stopped until 30 seconds after recording has started. This system operation is
designed to prolong the overall life of the memory card. To stop recording, press REC/DEL once. To
remove the memory card, please power off the system first.
If under SCHEDULE record mode, the system will automatically resume recording 60 seconds after
recording has been manually stopped. If under MOTION record mode, the system will resume motion
detection function 60 seconds after recording has been manually stopped. Recording must be stopped
before the user can enter the system main menu and the system will resume QUAD mode after idling
for two minutes.
Press ESC to exit.
9
Page 10
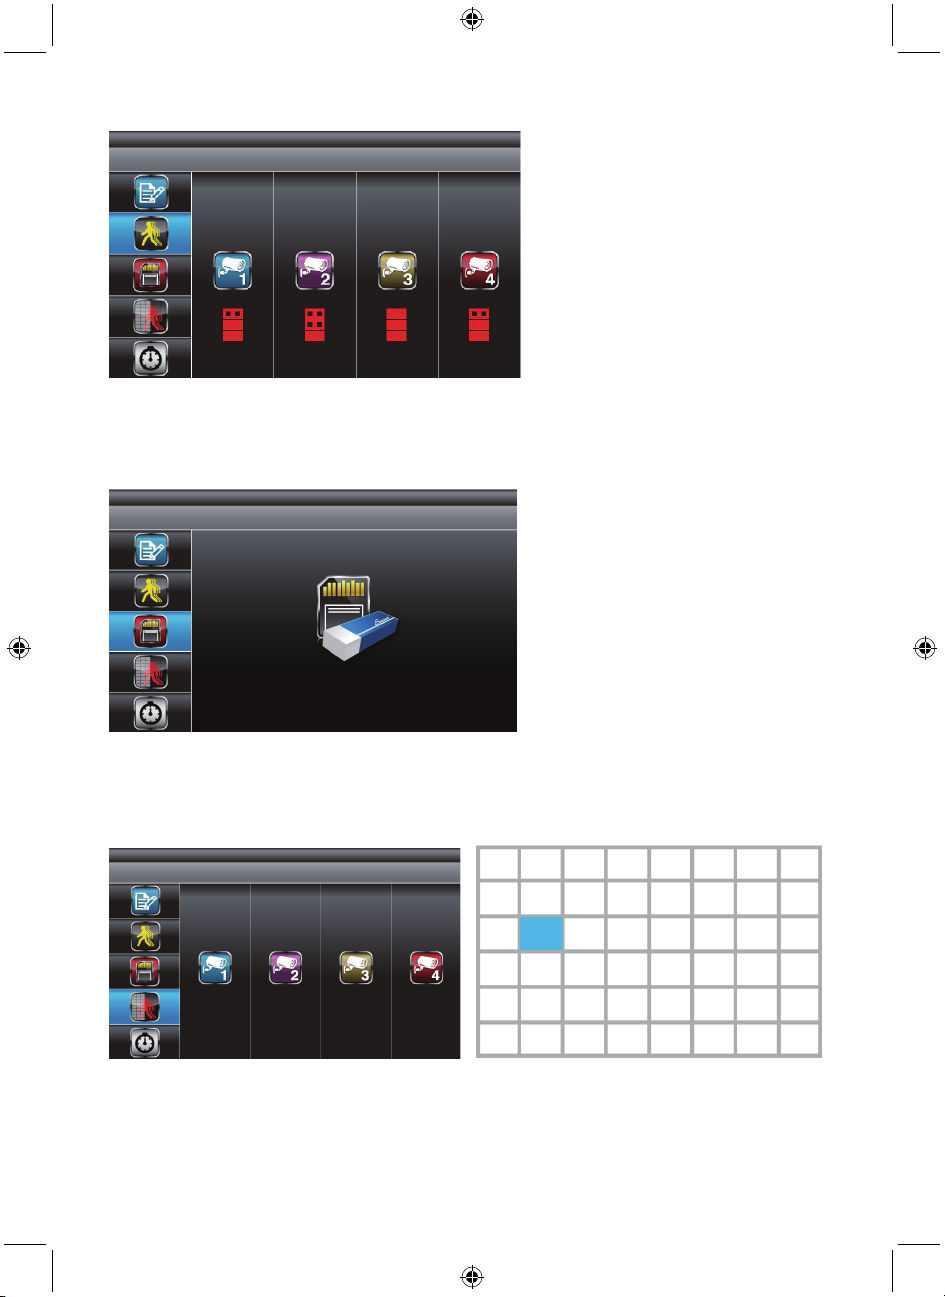
Motion detection sensitivity:
Use ▲▼ to select MOTION DETECTION SENSITIVITY section.
Use ◄► to highlight the camera for setup.
Use ▲▼ to adjust the sensitivity level: OFF / LV1 / LV2 / LV3 (LV3 is most sensitive).
Press ESC to exit.
Format memory card:
Use ▲▼ to select FORMAT STORAGE, press MENU to enter. Press MENU again to confirm and
begin formatting the memory card.
Note: If a new memory card is used then it must be formatted here first, before use.
Press ESC to exit.
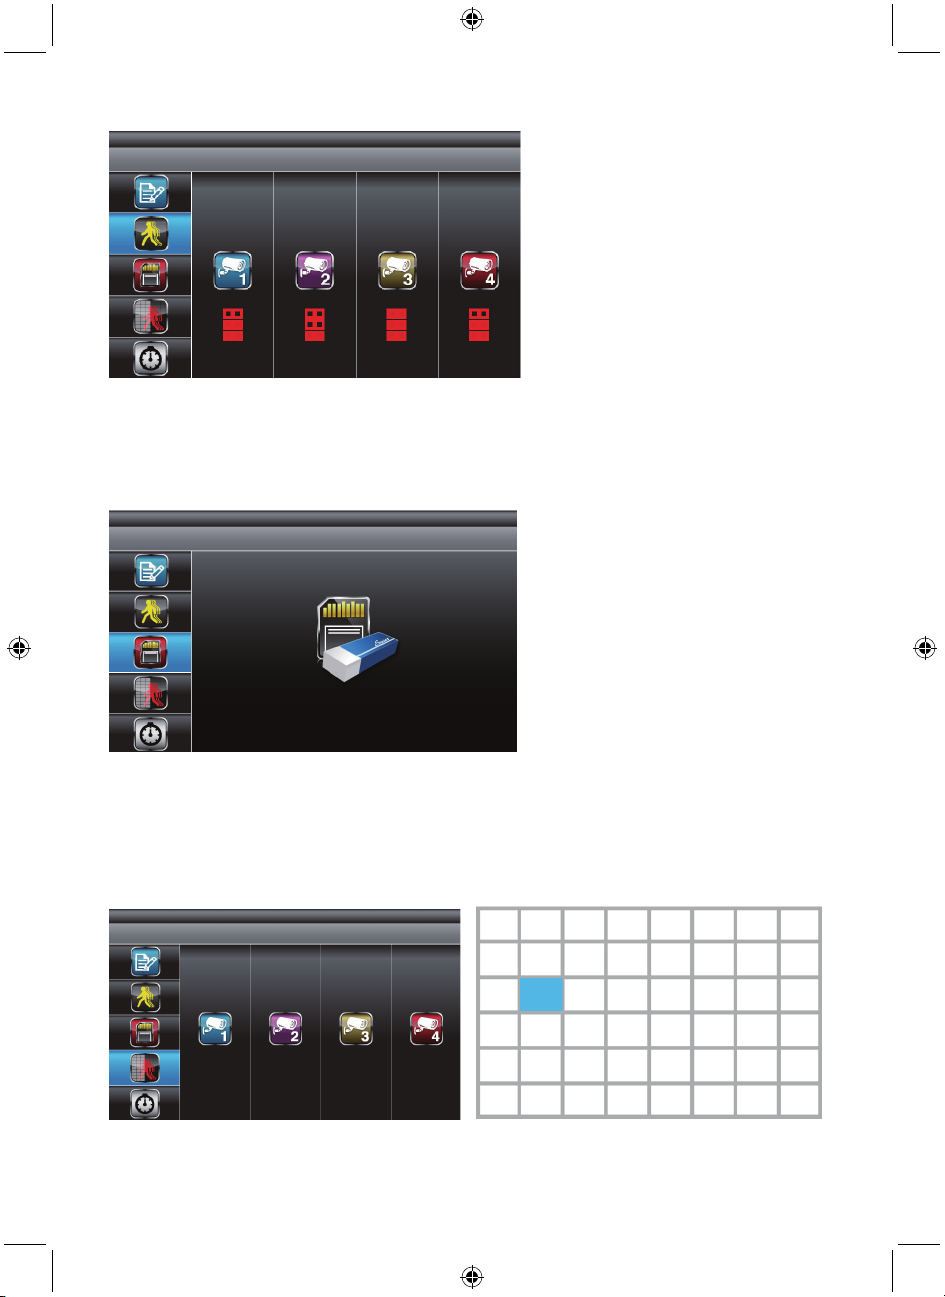
Masking area:
Use ▲▼ to select MASKING AREA section.
Use ◄► to highlight the camera for setup, press MENU to enter.
Use ◄► ▲▼ to highlight the grid for no motion detection in this area.
Use MENU key to mask/unmask grid(s). Movements taking place inside the masked area will be
ignored.
Use ◄►▲▼ to select another grid for setup or press ESC to exit.
10
Page 11

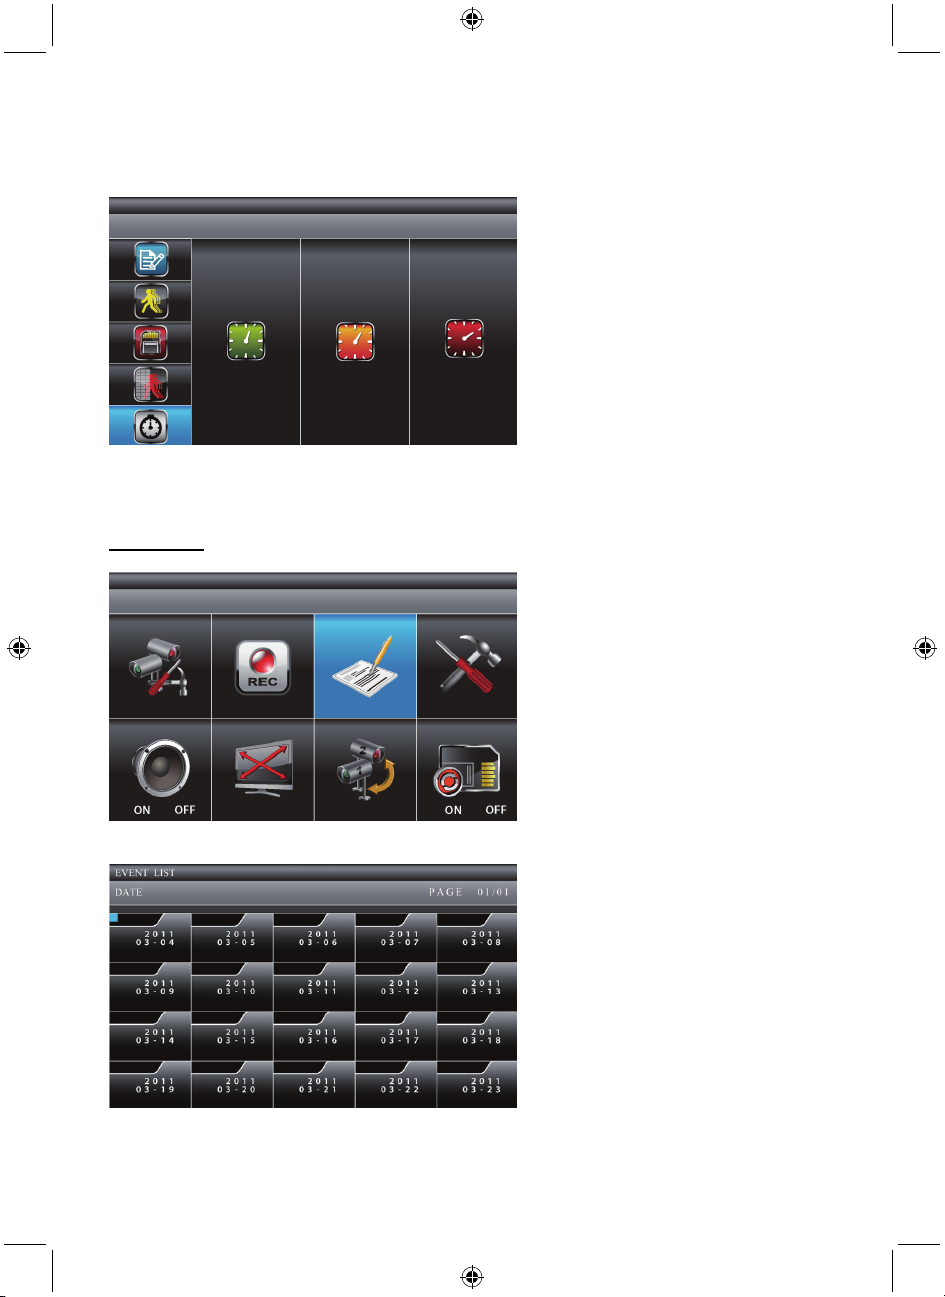
Record time:
Use ▲▼ to select RECORD TIME section.
Use ◄► to highlight the recording period: 2 Min / 5 Min / 10 MIN, press MENU to confirm.
Press ESC to exit.
Event list
Select EVENT LIST, press MENU key once to enter the sub-menu.
Playback:
Use ◄►▲▼ to highlight the desired DATE index for playback. Press MENU to confirm the selection
and enter the selected folder.
11
Page 12
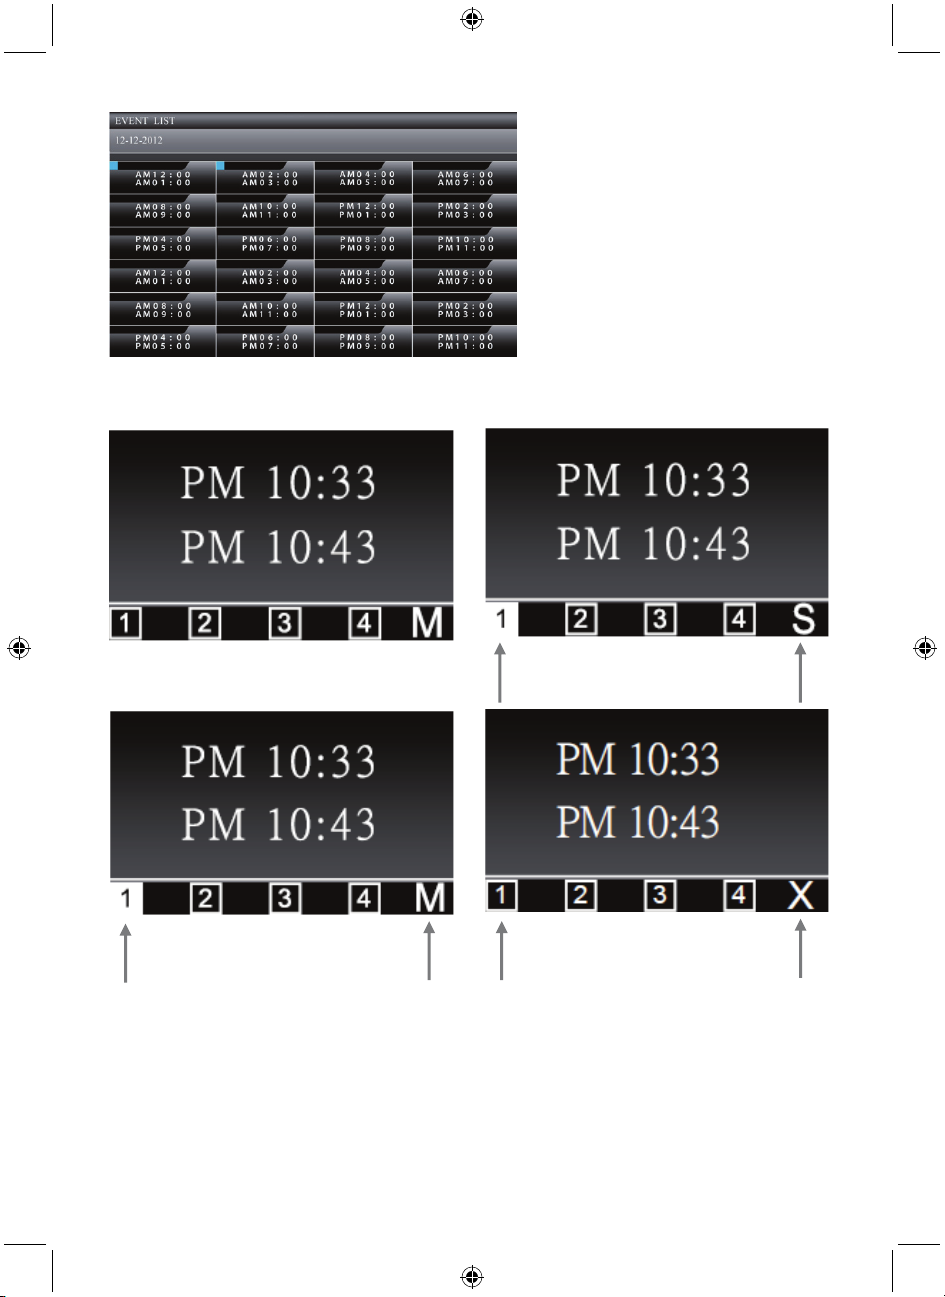
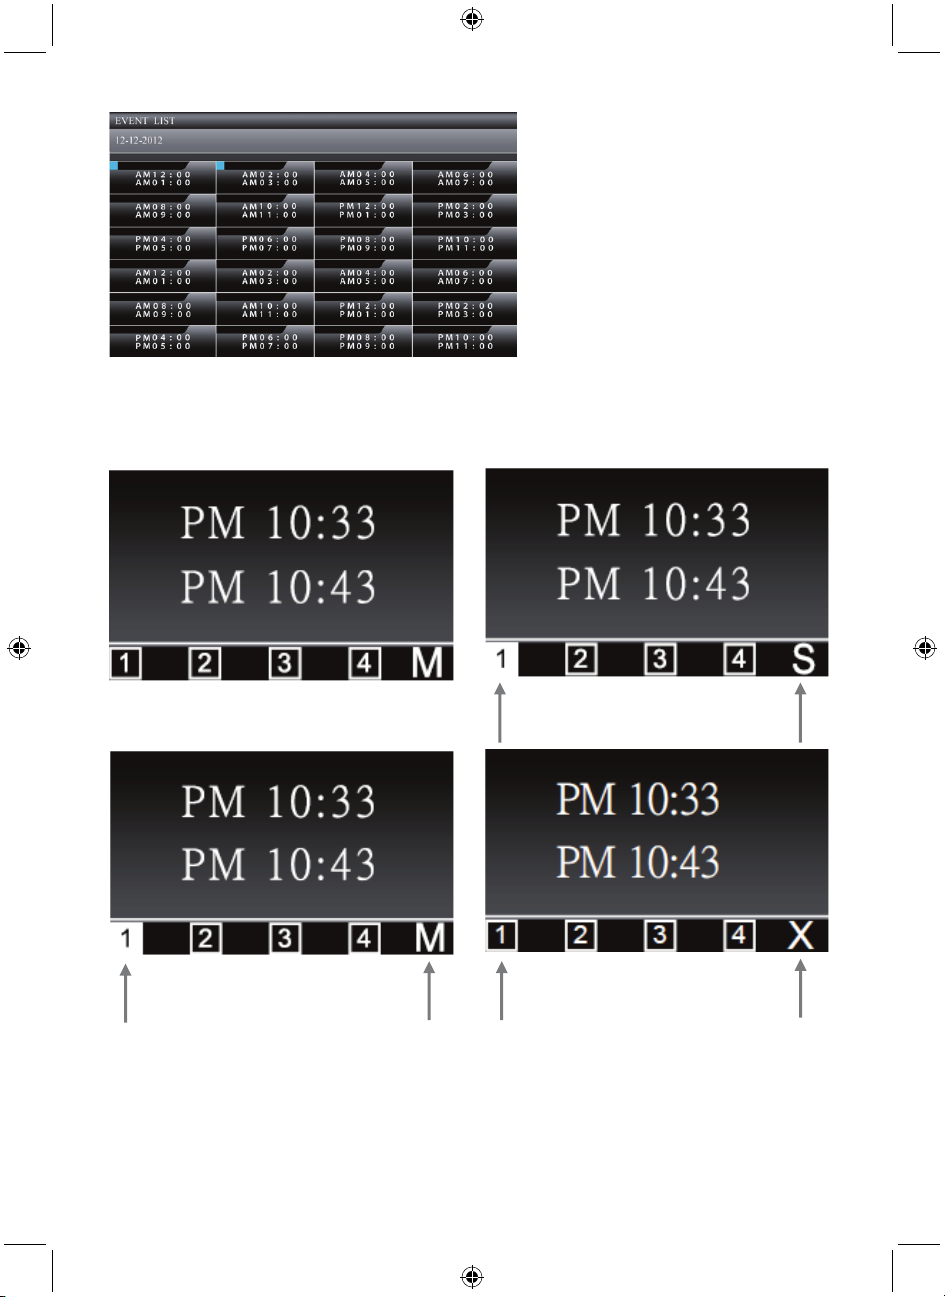
Press ◄►▲▼ to select the Hour (each block represents one hour of time). Press MENU to enter.
Use ◄►▲▼ to highlight the desired file for playback. Press MENU to start playback.
Each RECORDED FILE folder is indicated with file start / end time and the type of file recorded.
Start Time = PM10:33
End Time = PM10:43
Channel 1 is SCHEDULE recorded file
Channel 1 is MOTION recorded file
Channel 1, 2, 3 and 4 are MANUAL
(C = Continuous) recorded files
Note: By default, playback display will be QUAD (displaying images from all of the cameras paired to
the monitor). ■田 □1 □2 □3 □4 is all channel playback.
For single camera display, press MENU once after playback has started to PAUSE. Use ◄► to select
from channel to channel. Channel indicator (bottom left screen) will indicate the channel number
selected.
□田 ■1 □2 □3 □4 is channel 1 playback in full screen
□田 □1 ■2 □3 □4 is channel 2 playback in full screen
□田 □1 □2 ■3 □4 is channel 3 playback in full screen
□田 □1 □2 □3 ■4 is channel 4 playback in full screen
12
Page 13
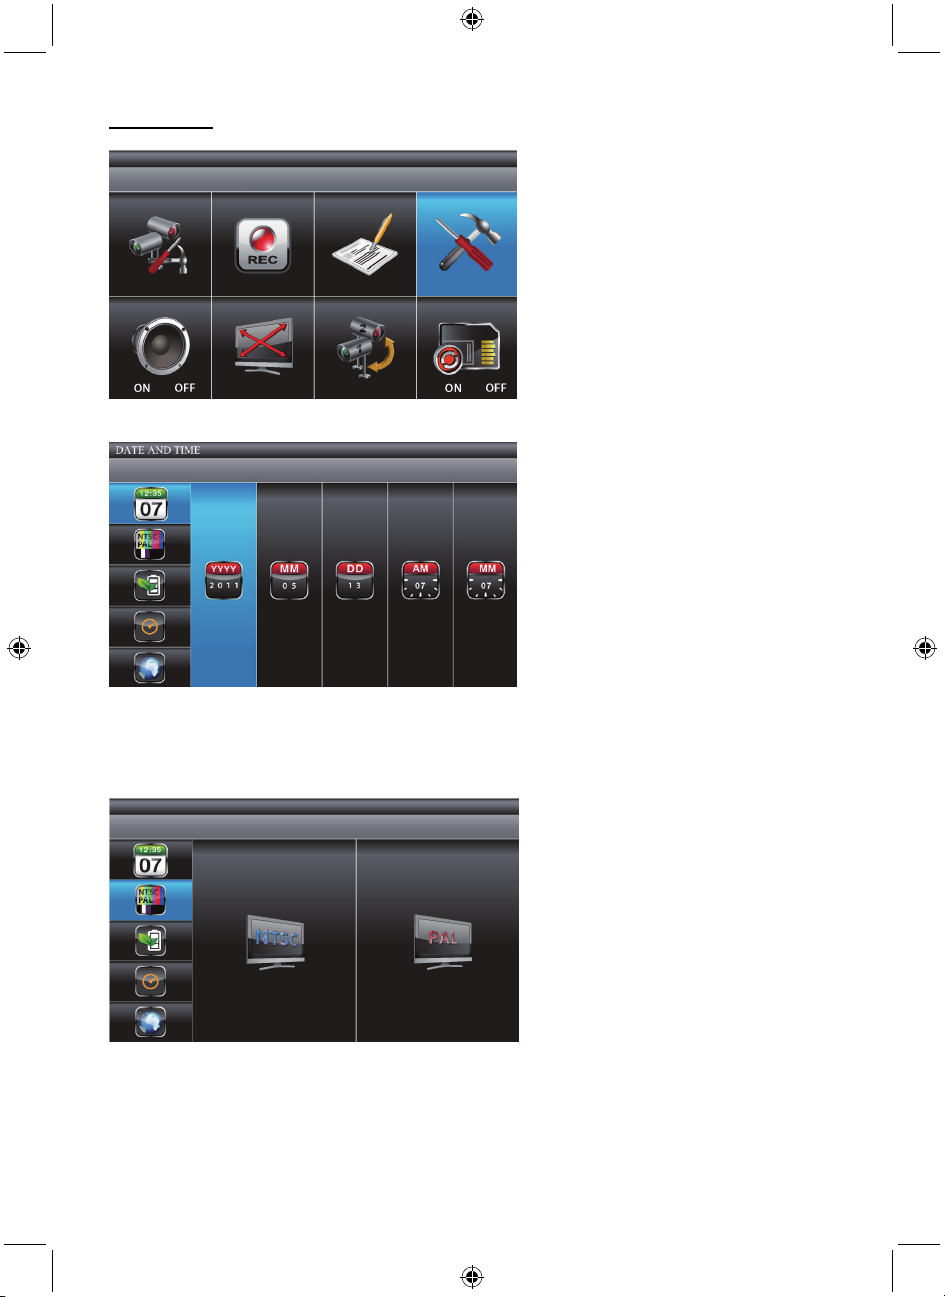
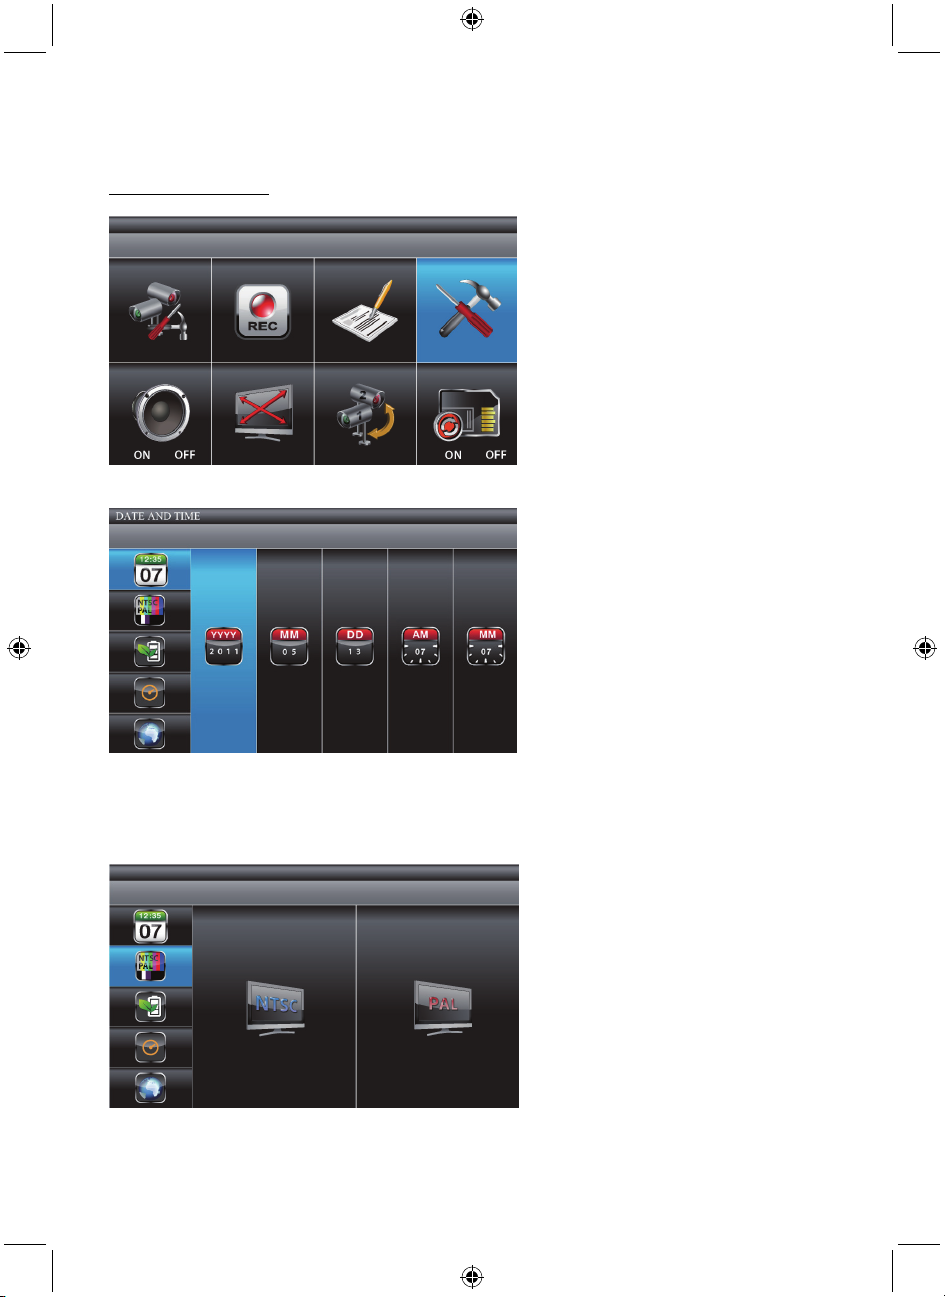
System setup
Select SYSTEM SETUP, press MENU key once to enter the sub-menu.
Date and time:
Use ▲▼ to highlight DATE AND TIME, press MENU to enter.
Use ◄► to highlight adjust: YEAR / MONTH / DATE / HOUR / MINUTE.
Use ▲▼ to adjust each section and press MENU to confirm the adjustment.
Press ESC to exit.
TV output:
Use ▲▼ to select TV OUTPUT. Press MENU to enter.
Use ◄► to highlight NTSC or PAL (for Europe), press MENU to confirm the selection.
Press ESC to exit.
Note: changing the TV system output may affect the image scale displayed.
13
Page 14
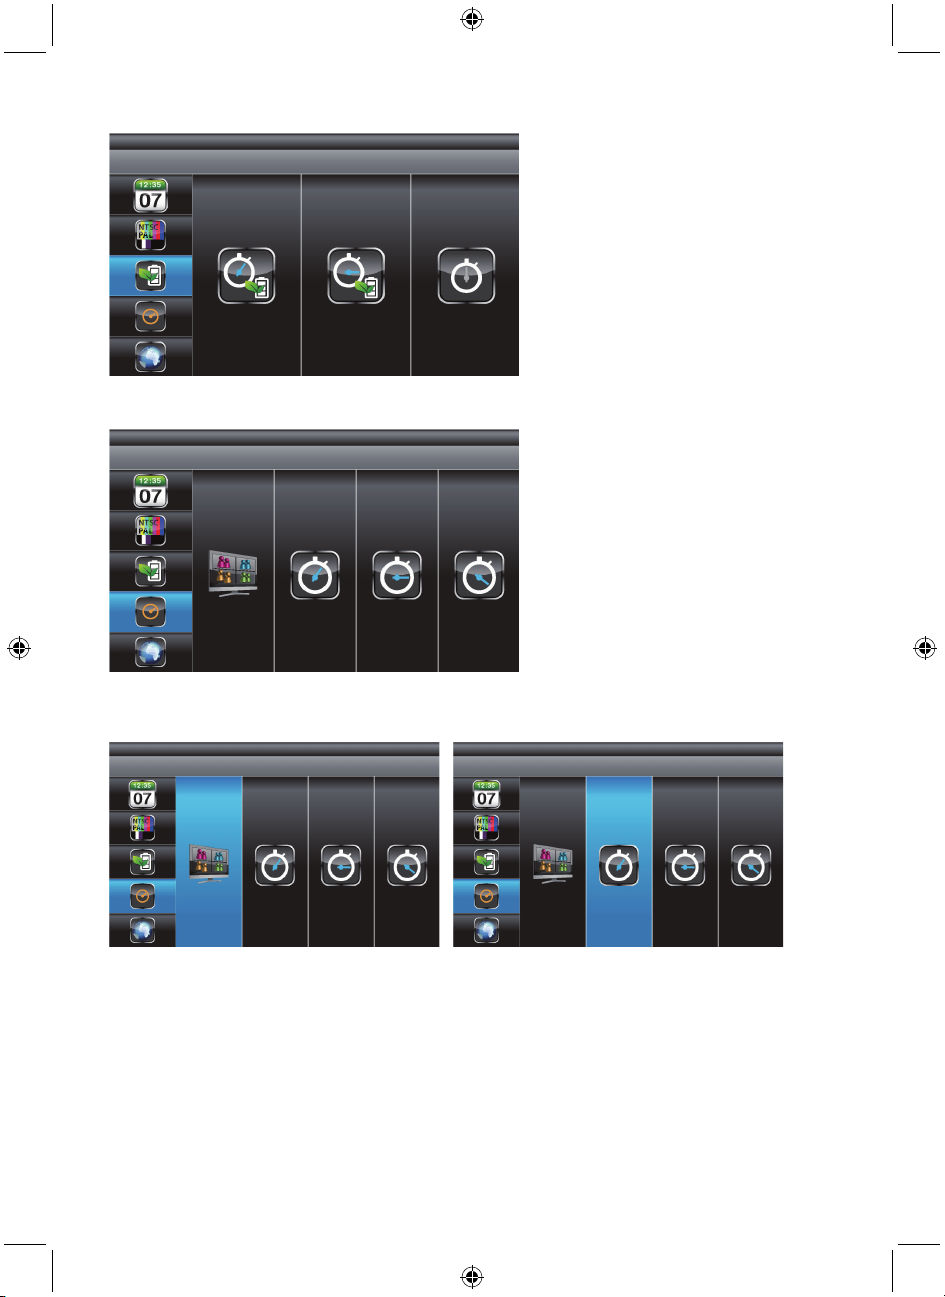
Power saving:
Not relevant for this model (only for LCD monitor).
Multi channels idle display:
Use ▲▼ to select MULTI CHANNELS IDLE DISPLAY. Press MENU to enter.
Use ◄► to select: DISPLAY QUAD DURING IDLE / AT 5 SEC INTERVAL / AT 10 SEC INTERVAL / AT
15 SEC INTERVAL, press MENU to confirm the selection and to exit.
Display QUAD mode 5 second interval
14
Page 15
10 second interval 15 second interval
Note:
1. Camera ON/OFF setting in CAMERA SETUP section will affect which camera(s) can be displayed
during IDLE DISPLAY.
2. Audio (single channel at anytime) will be available during QUAD mode (by default on channel 1 or
the next available channel with a camera paired to the system), single FULL screen mode (auto
switch to channel viewing at the time), or the channel triggered by motion.
3. Audio channel will stay connected until the channel is switched.
4. If set to 5/10/15 sec. interval then select SCAN ACTIVATED CAMERAS to achieve this display
mode.
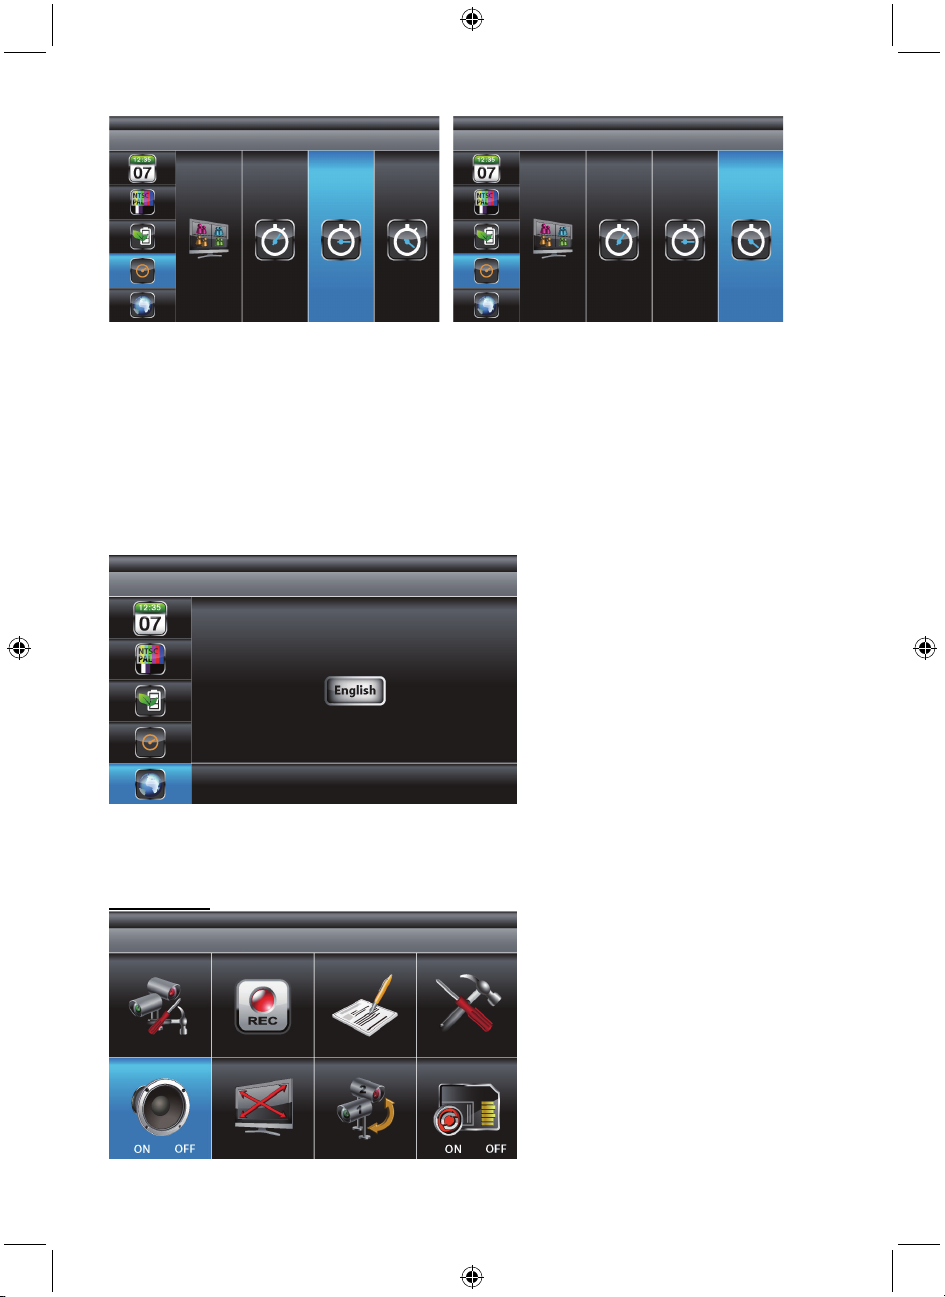
Default:
Use ▲▼ to select DEFAULT. Press MENU to enter.
Use ◄► to select the system language for SYSTEM RESTORE, press MENU to confirm the selection
and the system will restore to factory default (only ENGLISH AVAILABLE).
Press ESC to exit.
Alarm buzzer
15
Page 16
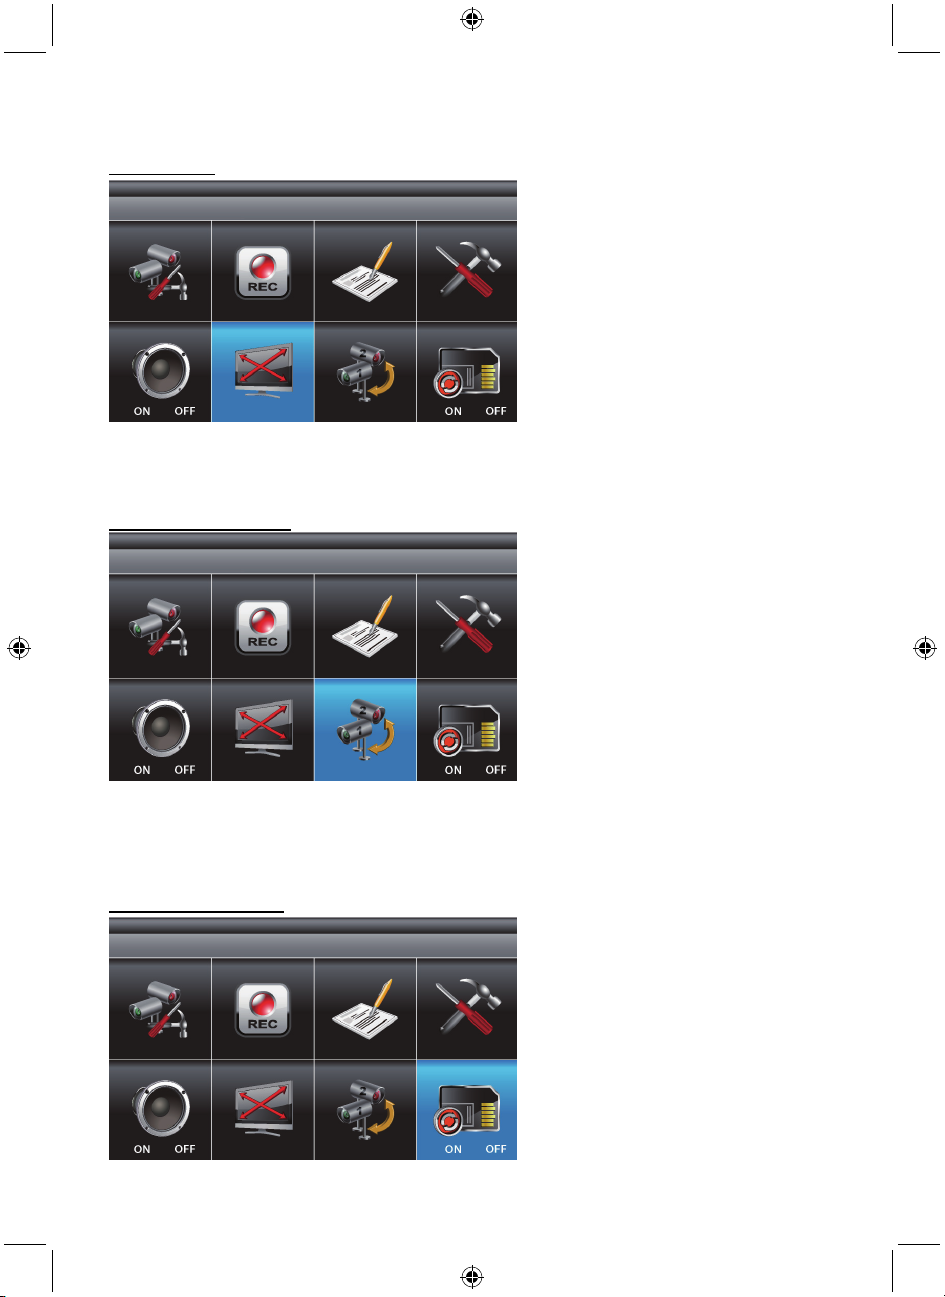
Select ALARM BUZZER, press MENU to turn the buzzer ON or OFF. When motion is detected by a
camera, then a buzzer will sound via the loudspeaker of the monitor.
Pan Tilt Zoom
Select PAN TILT ZOOM, press MENU once to enter ZOOM mode, press MENU again to zoom in (2X).
When zooming in, use ▲▼◄► to select various view areas. Press MENU to zoom out.
In zoom out (1X), use ▲▼to change the available channel.
Press ESC to exit.
Scan activated cameras
Select SCAN ACTIVATED CAMERAS, press MENU once to begin camera scan mode.
Note:
1. Camera ON/OFF setting in CAMERA SETUP section will affect which camera(s) can be displayed
during IDLE DISPLAY. See Multi channels idle display interval setup.
2. The system will automatically activate QUAD display if the recording function is activated.
Memory card overwrite
16
Page 17
Select MEMORY CARD OVERWRITE, press MENU once to activate the overwrite function and press
MENU again to de-activate.
NOTE:
1. One of the following examples will appear on the display screen.
A. 1.89GB - space available on the memory card.
B. ERROR - either memory card is missing, locked or damaged.
2. When the memory card is full, the system will display “MEMORY FULL PLEASE FORMAT” on the
preview screen, if overwrite is not selected.
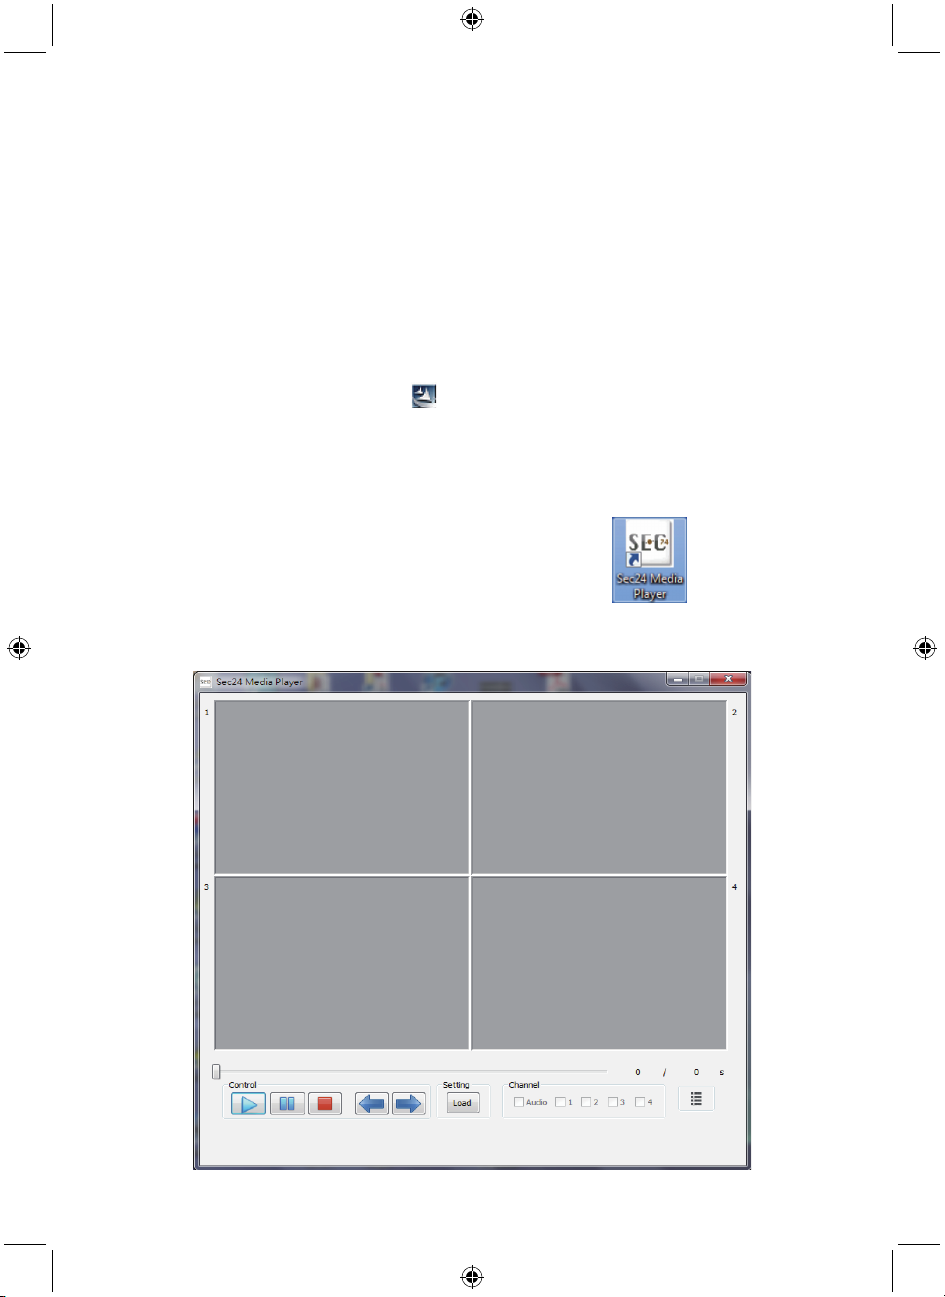
Playback software:
Sec24 Media Player is developed to play back recorded files from your wireless camera system.
Insert the CD ROM included in the packaging on your PC or notebook. A pop-up screen will appear
automatically.
Open the folder and click on the .exe icon
In case the pop-up screen does not appear, then click on MY COMPUTER, and double-click on the
drive where the CD-ROM assigned is by the PC or notebook (for example: E:)
Double-click to open and select Sec24 media player. Double-click to start the installation.
Follow the installation procedure for the complete installation of the software.
After installation you will find the shortcut icon on your desktop:
Note: others cannot playback recorded files without
Sec24 Media Player; this is for your privacy protection.
Double-click on the shortcut to open the Sec24 Media Player.
The following screen will appear.
1
34
5
678 9
10
2
11
17
12
Page 18
1. Channel 1 Playback Screen 7. Pause
2. Channel 2 Playback Screen 8. Stop
3. Channel 3 Playback Screen 9. Fast Rewind
4. Channel 4 Playback Screen 10. Fast Forward
5. Playback Progress Bar 11. Load Recorded File(s)
6. Play 12. Channel Enable / Disable Select
For playback of the recorded files, click on “Load” to import the recorded files (SNX files).
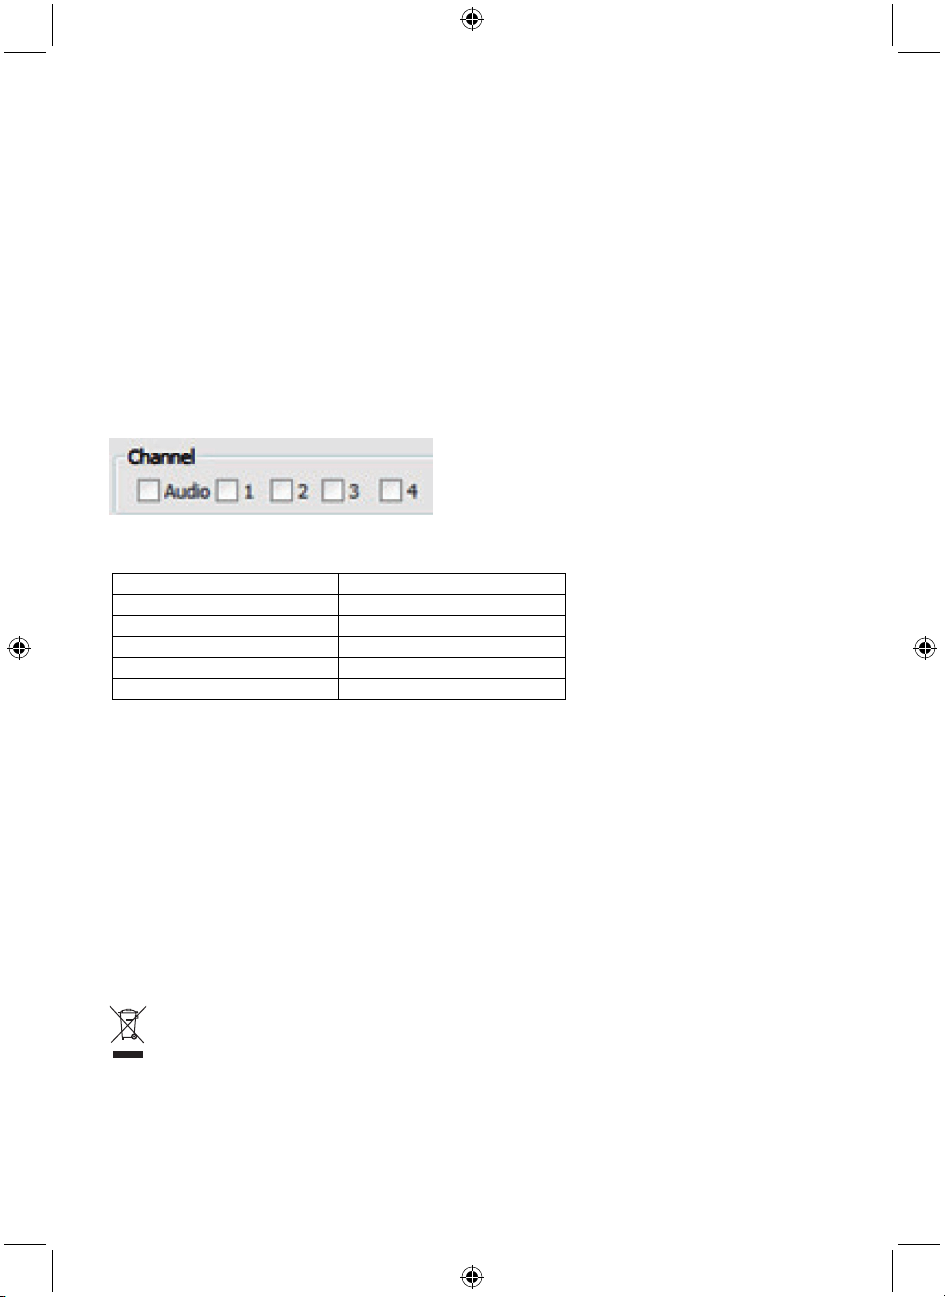
During playback, all four channels will playback at once. For privacy concerns, the user is able to
manually disable audio channel(s) and/or video channel(s).
Select Audio to turn off the sound.
Select 1 to turn off the video image from channel 1.
Select 2 to turn off the video image from channel 2.
Select 3 to turn off the video image from channel 3.
Select 4 to turn off the video image from channel 4.
Note: insert the Micro SD card in your PC or notebook before starting up the Sec24 Media Player.
Total recording time for memory cards:
Micro SD Card capacity 640x480 (VGA)
1G 60 minutes
2G 110 minutes
8G 400 minutes
16G 950 minutes
32G 1880 minutes
Maintenance:
Clean only with a dry cloth. Do not use cleaning solvents or abrasives.
Warranty:
No guarantee or liability can be accepted for any changes and modifications of the product or damage
caused due to incorrect use of this product.
Disclaimer:
- Designs and specifications are subject to change without notice.
- All logos brands and product names are trademarks or registered trademarks of their respective
holders and are hereby recognized as such.
- This manual was produced with care. However, no rights can be derived. König Electronic can not
accept liability for any errors in this manual or their consequences.
- Keep this manual and packaging for future reference.
Disposal:
• This product is designated for separate collection at an appropriate collection point. Do not
dispose of this product with household waste.
• For more information, contact the retailer or the local authority responsible for waste
management.
18
Page 19

DEUTSCH
Funk-Kamerasystem
Einführung:
Überwachen Sie Ihr Eigentum mit dieser neuen digitalen Funkkamera. Die Kamera bietet ein sehr
scharfes, stabiles Bild und die eingesetzte Technologie verbessert die Bildqualität noch weiter. Das
System nutzt digitale Funktechnik und ist mit modernster Signalverschlüsselung ausgestattet, die
Störungen durch andere Anwendungen im 2,4 GHz-Frequenzband reduziert. Die digitale Technologie
sichert Ihre Privatsphäre und kann über größere Entfernungen eingesetzt werden.
Empfänger und Kamera sind bereits ab Werk verbunden. Um das System mit einer zusätzlichen
SEC-TRCAM30 Kamera (max. 4 Kameras) zu erweitern, lesen Sie bitte den Abschnitt: KAMERA
VERBINDEN.
• Lesen Sie dieses Benutzerhandbuch vor der Installation / dem Gebrauch dieses Kamerasystems.
• Bewahren Sie das Benutzerhandbuch für zukünftige Verwendungszwecke gut auf.
Verpackungsinhalt SEC-TRANS50: Verp
1x Kamera mit Halterung 1x Kamera mit Halterung
1x Empfänger 1x Antenne
1x Fernbedienung (inklusive Batterie)
1x Antenne für die Kamera
1x PC-Software für Videowiedergabe (CD ROM)
1x RCA Audio-/ Videokabel
2x AC/DC Adapter
1x AC/DC Adapter
Technische Daten:
Kamera:
Übertragungsfrequenz: 2,408-2,474 GHz Digital
Modulation: FHSS
Reichweite: Innen ±50 m, freie Sicht ±150 m (je nach Umgebungsbedingungen)
Bildsensor: CMOS mit IR-Cut-Filter
Objektiv: 3,6 mm
Bildwinkel: H: 60±3º / V: 43±3º
Infrarotbeleuchtung (LED): 5 m
Schutzart: IP66
Mikrofon: Mono
Betriebstemperatur: -10°C bis 50°C
Spannungsversorgung: 5 V DC/1A
Abmessungen: 130 x 61 x 67 mm
Gewicht: 365 g (einschließlich Kabel)
Empfänger:
Empfängerfrequenz: 2,408-2,474 GHz Digital
Kanäle: 4
SD-Karte: bis zu 32 GB (nicht mitgeliefert)
Bildfrequenz Video: 25 fps (max.), 16 fps (4x Kameras)
Bildfrequenz Aufnahme: 25 fps pro Kanal
Videoauflösung: QVGA
Videoformat: ASF
Videoausgabe: 1,2 ± 0,2 Vss/75 Ohm
Audioausgabe: 1 Vss/600 Ohm, Mono
Anschluss Audio-/Videoausgabe: 3,5 mm Kopfhörerbuchse
Reichweite: Innen ±50 m, freie Sicht ±150 m (je nachUmgebungsbedingungen)
Betriebstemperatur: -10°C bis +50°C
Spannungsversorgung: 5 V DC/1A
ackungsinhalt SEC-TRCAM30:
19
Page 20
Abmessungen: 122 x 122 x 26 mm
Gewicht: 395 g
Sicherheitshinweise:
• Kamera oder Empfänger bei Fehlfunktion nicht öffnen. Diese Geräte dürfen nur von qualifizierten
Technikern geöffnet werden.
• Kamera nicht in Flüssigkeiten tauchen.
• Empfänger vor Wasser und Feuchtigkeit schützen.
• Empfänger und Kamera vor hohen Temperaturen schützen (siehe technische Daten).
• System nicht in der Nähe von starken Magnetfeldern, wie z.B. Lautsprechern, installieren. Dies
könnte die Qualität beeinträchtigen.
Aufbau des Systems:
Fernbedienung Empfänger
Bildschirm Menü Wiedergabe Aufnahme Andere
1 LINK-Anzeige
2 POWER-Anzeige
3
4
5
6 MENÜ
7
8 ESCAPE BEENDEN ZURÜCK
9
10 ZOOM WEITER
11 ALARM
12 BETRIEB an/aus
KANAL
umschalten
Lautstärke
REDUZIEREN
Lautstärke
ERHÖHEN
KANAL
umschalten
AUFNEHMEN /
STOPP
Cursor
HOCH
Cursor
LINKS
Cursor
RECHTS
OK /
ENTER
Cursor
RUNTER
LÖSCHEN STOPP
VORSPULEN
Lautstärke REDUZIEREN /
Anderen KANAL anzeigen
Lautstärke ERHÖHEN /
Anderen KANAL anzeigen
WIEDERGABE / PAUSE
ZURÜCKSPULEN
20
Page 21

Kamera:
2
1 Antenne
2 Kamerahalterung
3 5V DC Spannungseingang
4 Verbinden-Taste
Vorderseite ROTE LED Betrieb EIN
Vorderseite GRÜNE LED mit Empfänger verbunden
Installationsanleitungen:
1
3
4
Zum Composite VIDEO-Eingang
Betrieb EIN
VIDEO-
Ausgangskabel
21
Page 22

Option: Micro SD-Karte einlegen.
Nur einlegen, wenn Empfänger
AUS ist.
Kamera an der Wand (oder Decke)
befestigen. Bohren Sie ein Loch von
15 mm für die Kabeldurchführung
Gebrauchsanleitungen:
Bildschirmanzeige
Folgende Symbole werden/können auf dem Bildschirm angezeigt werden.
Signalstärke
Kanalnummer
Aufnahmesymbol
Audiokanal
Quad Anzeige
Scan-Anzeige
Einzelanzeige
Volle Lautstärke
1/2 Lautstärke
Stumm
Strom
Systemzeit
1x Zoom
2x Zoom
22
Page 23
Übersicht Menü
Die nachfolgende Abbildung zeigt eine Gesamtübersicht des Systemmenüs
23
Page 24
Systemmenü
Drücken Sie MENU zum Öffnen des Hauptmenüs. Nach dem Öffnen des Menüs [MAIN MENU] ist die
Option EVENT LIST per Werkseinstellung markiert. Das System verbleibt 2 Minuten lang im [MAIN
MENU] und verlässt anschließend das [MAIN MENU].
Nehmen Sie Ihre Auswahl mit den Tasten ▲▼◄► vor; mit MENU bestätigen Sie Ihre Auswahl und
öffnen das Untermenü.
Kameraeinstellungen
Wählen Sie CAMERA SETUP und drücken Sie einmal auf MENU zum Öffnen des Untermenüs.
Wählen Sie mit ▼▲ die Kamera (1-4), an der Einstellungen geändert werden sollen.
Wählen Sie mit ◄► [PAIRING] [BRIGHTNESS] [CAMERA ON/OFF].
24
Page 25
Kamera verbinden:
Drücken Sie, wenn die Option PAIRING markiert ist, einmal die Taste MENU, um die Kamera zu
verbinden. Die LED auf der Kamera blinkt einmal. Wenn die LED fortlaufend blinkt, erfolgt die
Datenübertragung.
Wenn die Verbindung der Kamera erfolgreich war, erscheint die Bildschirmanzeige „PAIRED“.
Ist die Verbindung der Kamera fehlgeschlagen, erscheint die Bildschirmanzeige „PAIRING FAIL“.
Drücken Sie auf ESC, um zum Hauptmenü zurückzukehren.
Hinweis: Die Kamera ist per Werkseinstellung bereits verbunden. Die Verbindung nach Anleitung muss
vorgenommen werden, wenn weitere Kameras (SEC-TRCAM30) hinzugefügt werden sollen.
Helligkeit:
Wenn das Feld BRIGHTNESS markiert ist, können Sie mit ▼▲ die Helligkeit der Kamera einstellen.
Drücken Sie auf ESC, um zum Hauptmenü zurückzukehren.
Aktivierung:
Wenn das Feld ACTIVATION markiert ist, können Sie mit den Tasten ▼▲ eine Kamera aktivieren oder
deaktivieren.
25
Page 26
Drücken Sie auf ESC, um zum Hauptmenü zurückzukehren.
Hinweis: Kameras müssen mit dem Empfänger verbunden sein, damit die Anzeige in den Modi SCAN
und QUAD ordnungsgemäß funktioniert. Die Option „ON“ kann nur ausgewählt werden, wenn eine
Kamera mit dem System verbunden ist.
Aufnahmeeinstellungen
Wählen Sie RECORDER SETUP und drücken Sie einmal MENU zum Öffnen des Untermenüs.
Zeitplan:
Nehmen Sie mit ▲▼◄► eine Auswahl vor. Es gibt 3 verschiedene Aufnahmeoptionen. Markieren Sie
zunächst den Zeitabschnitt und drücken Sie dann MENU, um zwischen den Aufnahmemodis
umzuschalten.
M: MOTION (AUFNAHME nur bei Bewegungserkennung)
S: SCHEDULE (fortlaufende AUFNAHME)
X: MANUAL (manuelle Aufnahme)
Das System nimmt gleichzeitig auf allen 4 Kanälen Videos in den Modi MOTION, SCHEDULE und
MANUAL auf. Für einen der Kanäle ist Audio verfügbar. Wenn das System Aufnahmen im Modus
MOTION macht, dann wird dem Kanal Audio zugewiesen, an dem die Bewegung registriert wurde.
Aufnahmen können erst 30 Sekunden nach Beginn der Aufnahme beendet werden. Der Systembetrieb
wurde so entwickelt, dass die allgemeine Nutzungsdauer der Speicherkarte verlängert wird. Drücken
Sie zum Beenden der Aufnahme einmal REC/DEL. Schalten Sie das Gerät aus, bevor Sie die
Speicherkarte entnehmen.
Im Modus SCHEDULE wird die Aufnahme 60 Sekunden nach der manuellen Beendigung der
Aufnahme fortgesetzt. Im Modus MOTION wird die Bewegungserkennung 60 Sekunden nach der
manuellen Beendigung der Aufnahme wieder aktiviert. Vor dem Öffnen des Hauptmenüs muss die
Aufnahme beendet werden; nach 2 Minuten ohne Funktion erscheint auf dem Bildschirm wieder der
Anzeigemodus QUAD.
Drücken Sie auf ESC zum Beenden.
26
Page 27
Empfindlichkeit der Bewegungserkennung:
Wählen Sie mit ▲▼ das Feld MOTION DETECTION SENSITIVITY.
Markieren Sie mit ◄► die Kamera, die eingestellt werden soll.
Ändern Sie mit ▲▼ die Empfindlichkeitseinstellung: OFF / LV1 / LV2 / LV3 (LV3 entspricht der
höchsten Empfindlichkeit).
Drücken Sie auf ESC zum Beenden.
Speicherkarte formatieren:
Wählen Sie mit ▲▼ das Feld FORMAT STORAGE; drücken Sie auf MENU zum Öffnen des Menüs.
Drücken Sie erneut auf MENU, um die Funktion zu bestätigen und mit der Formatierung der
Speicherkarte zu beginnen.
Hinweis: Falls Sie eine neue Speicherkarte verwenden, müssen Sie diese hier am Gerät vor deren
Gebrauch formatieren.
Drücken Sie auf ESC zum Beenden.
Bereiche ausblenden:
Wählen Sie mit ▲▼ das Feld MASKING AREA.
Markieren Sie mit ◄► die Kamera, die eingestellt werden soll; öffnen Sie das Menü mit MENU.
Markieren Sie mit ◄►▲▼ das Gitter, in dessen Bereich keine Bewegungen registriert werden sollen.
27
Page 28
Mit der Taste MENU können Sie Gitter aus- und wieder einblenden. Bewegungen in den
ausgeblendeten Bereichen werden nicht registriert.
Wählen Sie mit ◄►▲▼ ein anderes Gitter oder drücken Sie auf ESC zum Beenden.
Aufnahmedauer:
Wählen Sie mit ▲▼ das Feld RECORD TIME.
Markieren Sie mit ◄► die entsprechende Aufnahmedauer: 2 Min / 5 Min / 10 Min ; drücken Sie auf
MENU zum Bestätigen.
Drücken Sie auf ESC zum Beenden.
Ereignisliste
Wählen Sie die Option EVENT LIST und drücken Sie einmal auf MENU, um das Untermenü zu öffnen.
Wiedergabe:
Markieren Sie mit ◄►▲▼ das gewünschte DATUM für die Wiedergabe. Drücken Sie auf MENU zum
Bestätigen der Auswahl und um den dazugehörigen Ordner zu öffnen.
28
Page 29
Wählen Sie mit ◄►▲▼ die Stunde (jedes Feld entspricht einer Stunde). Bestätigen Sie mit MENU.
g
Wählen Sie mit ◄►▲▼ die gewünschte Wiedergabedatei. Drücken Sie auf MENU, um die
Wiedergabe zu starten.
Jeder Ordner einer AUFGENOMMENEN DATEI ist mit Startzeit / Endzeit und dem Typ der
aufgenommenen Datei gekennzeichnet.
Startzeit = PM10:33
Endzeit = PM10:43
Kanal 1 ist eine im Modus MOTION
auf
enommene Datei
Kanal 1 ist eine im Modus SCHEDULE
aufgenommene Datei
Kanäle 1, 2, 3 und 4 sind im Modus MANUAL
(C = Fortlaufend) aufgenommene Dateien
Hinweis: Per Werkseinstellung erfolgt die Wiedergabe im viergeteilten Anzeigemodus QUAD
(Bildanzeige von allen mit dem Bildschirm verbundenen Kameras). ■田 □1 □2 □3 □4 symbolisiert
die Wiedergabe aller Kanäle.
Um nur eine Kamera wiederzugeben, drücken Sie nach dem Start der Wiedergabe einmal auf MENU,
um die Wiedergabe ANZUHALTEN. Schalten Sie mit ◄► zwischen den Kanälen um. Die
Kanalanzeige (unten links im Bildschirm) symbolisiert den aktuell gewählten Kanal.
□田 ■1 □2 □3 □4 Wiedergabe von Kanal 1 im Vollbildmodus
29
Page 30
□田 □1 ■2 □3 □4 Wiedergabe von Kanal 2 im Vollbildmodus
□田 □1 □2 ■3 □4 Wiedergabe von Kanal 3 im Vollbildmodus
□田 □1 □2 □3 ■4 Wiedergabe von Kanal 4 im Vollbildmodus
Systemeinstellungen
Wählen Sie SYSTEM SETUP und drücken Sie auf MENU zum Öffnen des Untermenüs.
Datum und Uhrzeit:
Markieren Sie mit ▲▼ die Felder DATE UND TIME; bestätigen Sie mit MENU.
Wählen Sie mit ◄► die Optionen: YEAR / MONTH / DATE / HOUR / MINUTE.
Stellen Sie mit ▲▼ jede Option entsprechend ein und bestätigen Sie mit MENU.
Drücken Sie auf ESC zum Beenden.
TV-Ausgabe:
Wählen Sie mit ▲▼ das Feld TV OUTPUT und bestätigen Sie mit MENU.
Markieren Sie mit ◄► die Option NTSC oder PAL (für Europa), und bestätigen Sie Ihre Auswahl mit
MENU.
30
Page 31

Drücken Sie auf ESC zum Beenden.
Hinweis: Durch Änderung der TV-Ausgabe kann sich das Seitenverhältnis des angezeigten Bildes
verändern.
Energiesparmodus:
Für dieses Modell nicht zutreffend (nur bei LCD-Bildschirmen).
Multi-Kanal Display bei Leerlauf
Wählen Sie mit ▲▼ das Feld MULTI CHANNELS IDLE DISPLAY und bestätigen Sie mit MENU.
Wählen Sie mit ◄► eine Option: DISPLAY QUAD DURING IDLE (Quadanzeige bei Leerlauf)/ AT 5
SEC INTERVAL / AT 10 SEC INTERVAL / AT 15 SEC INTERVAL; drücken Sie auf MENU zum
Bestätigen und Beenden.
Anzeigemodus QUAD 5 Sekunden Intervall
31
Page 32

10 Sekunden Intervall 15 Sekunden Intervall
Hinweis:
1. Die Einstellung ON/OFF unter CAMERA SETUP hat eine Auswirkung darauf, welche Kameras
während IDLE DISPLAY angezeigt werden können.
2. Audio (jederzeit ein Kanal) ist im Modus QUAD verfügbar (per Werkseinstellung für Kanal 1 oder den
nächsten Kanal mit einer mit dem System verbundenen Kamera), im VOLLBILDMODUS
(automatische Kanalanzeige) oder für den Kanal, an dem eine Bewegung registriert wurde.
3. Der Audiokanal bleibt verbunden, bis der Kanal gewechselt wird.
4. Falls ein Intervall von 5/10/15 Sekunden eingestellt ist, wählen Sie SCAN ACTIVATED CAMERAS
zum Aktivieren dieses Anzeigemodus.
Werkseinstellung:
Wählen Sie mit ▲▼ das Feld DEFAULT und bestätigen Sie mit MENU.
Wählen Sie mit ◄► die Systemsprache für SYSTEM RESTORE. Bestätigen Sie die Auswahl mit
MENU; das System wird auf die Werkseinstellungen zurückgesetzt (nur ENGLISCH VERFÜGBAR).
Drücken Sie auf ESC zum Beenden.
Alarmbenachrichtigung
32
Page 33

Wählen Sie ALARM BUZZER und drücken Sie auf MENU, um den Buzzer auf ON oder OFF zu stellen.
Sobald eine Kamera eine Bewegung registriert, dann ertönt über den Lautsprecher des Bildschirms der
Buzzer.
Schwenk Neigung Zoom
Wählen Sie PAN TILT ZOOM und drücken Sie einmal auf MENU, um den Modus ZOOM zu öffnen;
drücken Sie MENU erneut, um das Bild zu vergrößern (2X).
Im vergrößerten Bild können Sie mit ▲▼◄► bestimmte Sichtbereiche auswählen. Drücken Sie auf
MENU, um das Bild wieder zu verkleinern.
Im verkleinerten Bild (1X) können Sie mit ▲▼einen anderen verfügbaren Kanal einschalten.
Drücken Sie auf ESC zum Beenden.
Aktivierte Kameras scannen
Wählen Sie SCAN ACTIVATED CAMERAS und drücken Sie einmal auf MENU, um Kameras zu
scannen.
Hinweis:
1. Die Einstellung ON/OFF unter CAMERA SETUP hat eine Auswirkung darauf, welche Kameras
während IDLE DISPLAY angezeigt werden können. Siehe Abschnitt zur Einstellung des Intervalls für
die Anzeige von mehreren Kanälen ohne Funktion.
2. Sofern die Aufnahmefunktion aktiviert ist, aktiviert das System automatisch den Anzeigemodus
QUAD.
33
Page 34

Speicherkarte überschreiben
Wählen Sie MEMORY CARD OVERWRITE und drücken Sie einmal auf MENU, um die Funktion zum
Überschreiben zu aktivieren. Drücken Sie erneut auf MENU, um die Funktion wieder zu deaktivieren.
HINWEIS:
1. Eine der nachfolgenden Beispiele wird angezeigt.
A. 1,89GB – verfügbarer Speicherplatz auf der Speicherkarte.
B. ERROR – die Speicherkarte fehlt, ist gesperrt oder beschädigt.
2. Wenn die Speicherkarte voll ist, erscheint in der Vorschau die Anzeige „MEMORY FULL PLEASE
FORMAT“, falls die Funktion zum Überschreiben nicht aktiviert ist.
Software für die Wiedergabe:
Sec24 Media Player wurde für die Wiedergabe der aufgenommenen Dateien Ihres FunkKamerasystems entwickelt.
Legen Sie die mitgelieferte CD-ROM in Ihren PC oder Ihr Notebook ein. Auf dem Bildschirm erscheint
dann automatisch ein Dialogfenster.
Öffnen Sie den Ordner und klicken Sie auf das .exe Symbol
Falls das Dialogfenster nicht geöffnet wird, dann doppelklicken Sie unter COMPUTER auf das von
Ihrem PC oder Notebook zugewiesene Laufwerk der CD-ROM (z.B. E:).
Öffnen Sie durch Doppelklick und wählen Sie den Sec24 Media Player. Starten Sie die Installation
durch Doppelklick.
Folgen Sie den Anleitungen für die vollständige Installation der Software.
Nach der Installation finden Sie auf Ihrem Desktop die Verknüpfung:
Hinweis: Dritte können die aufgenommenen Dateien ohne Sec24 Media Player nicht
wiedergeben; dies dient Ihrer Sicherheit.
Doppelklicken Sie auf die Verknüpfung, um den Sec24 Media Player zu starten.
Folgende Anzeige erscheint.
34
Page 35

1
34
5
2
678 9
1. Wiedergabeanzeige Kanal 1 7. Pause
2. Wiedergabeanzeige Kanal 2 8. Stopp
3. Wiedergabeanzeige Kanal 3 9. Zurückspulen
4. Wiedergabeanzeige Kanal 4 10. Vorspulen
5. Fortschrittsanzeige der Wiedergabe 11. Aufgenommene Datei(en) laden
6. Wiedergabe 12. Kanal aktivieren / deaktivieren
Klicken Sie für die Wiedergabe aufgenommener Dateien auf „Load“, um aufgenommene Dateien
(SNX-Dateien) zu importieren.
Während der Wiedergabe werden alle vier Kanäle gleichzeitig abgespielt. Aus Datenschutzgründen
kann der Benutzer Audiokanäle und/oder Videokanäle manuell deaktivieren.
Wählen Sie Audio, um den Ton auszuschalten
Wählen Sie 1, um die Videowiedergabe von Kanal 1 auszuschalten.
Wählen Sie 2, um die Videowiedergabe von Kanal 2 auszuschalten.
Wählen Sie 3, um die Videowiedergabe von Kanal 3 auszuschalten.
Wählen Sie 4, um die Videowiedergabe von Kanal 4 auszuschalten.
Hinweis: Legen Sie vor dem Start von Sec24 Media Player die Micro SD-Karte in Ihren PC oder Ihr
Notebook ein.
10
11
12
Gesamtaufnahmezeit von Speicherkarten:
Kapazität Micro SD-Karte 640x480 (VGA)
1G 60 Minuten
2G 110 Minuten
35
Page 36

8G 400 Minuten
16G 950 Minuten
32G 1880 Minuten
Wartung:
Nur mit einem trockenen Tuch säubern. Keine Reinigungs- oder Scheuermittel verwenden.
Garantie:
Es kann keine Garantie oder Haftung für irgendwelche Änderungen oder Modifikationen des Produkts
oder für Schäden übernommen werden, die aufgrund einer nicht ordnungsgemäßen Anwendung des
Produkts entstanden sind.
Haftungsausschluss:
- Design und technische Daten können ohne vorherige Ankündigung geändert werden.
- Alle Logos, Marken und Produktnamen sind Marken oder eingetragene Marken ihrer jeweiligen
Eigentümer und werden hiermit als solche anerkannt.
- Diese Bedienungsanleitung wurde sorgfältig verfasst. Dennoch können daraus keine Rechte und
Pflichten hergeleitet werden. König Electronic haftet nicht für mögliche Fehler in dieser
Bedienungsanleitung oder deren Folgen.
- Bitte bewahren Sie Bedienungsanleitung und Verpackung für spätere Verwendung auf.
Entsorgung:
• Dieses Produkt muss an einem entsprechenden Sammelpunkt zur Entsorgung abgegeben
werden. Entsorgen Sie dieses Produkt nicht mit dem Haushaltsmüll.
• Weitere Informationen erhalten Sie beim Verkäufer oder der für die Abfallwirtschaft
verantwortlichen örtlichen Behörde.
FRANÇAIS
Système de caméra sans fil
Introduction :
Observez au-delà de votre propriété avec cette nouvelle caméra numérique sans fil à 2,4 Ghz. La
caméra offre une image d'une grande stabilité et d’une grande clarté, et la technologie utilisée améliore
la qualité d'image ultérieurement. Le système utilise une technologie numérique sans fil et il est muni
d'une option avancée de cryptage du signal de la fréquence, qui réduit les interférences produites par
d’autres appareils utilisant la bande de fréquence à 2,4 GHz. La technologie numérique garantit votre
vie privée et vous permet de l'utiliser sur une très grande longue distance.
Le récepteur et la caméra sont déjà associés par défaut en usine. Si vous ajoutez la caméra
SEC-TRCAM30 supplémentaire (max. 4 caméras) au système, veuillez consulter la section
ASSOCIATION pour l'ajout.
• Nous vous recommandons de lire ce manuel avant d'utiliser et d'installer le système de caméra.
• Conservez ce manuel à un endroit sûr pour une consultation future.
Contenu de l'emballage SEC-TRANS50: Contenu de l'emballage SEC-TRCAM3
1 x Caméra avec son support 1 x Caméra avec son support
1 x Récepteur 1 x Antenne
Télécommande (piles incluses) 1 x adaptateur AC/DC
1 x
1 x Antenne pour la caméra
1 x Logiciel de lecture vidéo pour ordinateur PC (CD-ROM)
1 x Câble de connexion audio/vidéo RCA
2 x Adaptateurs AC/DC
0:
36
Page 37

Spécifications techniques :
Caméra :
Fréquence d'émission: 2,408 à 2,474 GHz numérique
Modulation: Étalement de spectre par saut de fréquence (FHSS)
Portée: Circuit intégré d'image: CMOS avec commutateur de coupure IR
Objectif: 3,6 mm
Angle de vue: H: 60±3º / V: 43±3º
Éclairage infrarouge (DEL): 5 m
Protection: IP66
Microphone: mono
Température de fonctionnement : De -10°C à environ 50°C
Tension: 5 V DC / 1A
Dimensions: 130 x 61 x 67 mm
Poids : 365 g (câble inclus)
Récepteur :
Fréquence de réception 2,408 à 2,474 GHz numérique
Canaux: 4
Carte mémoire SD: jusqu'à 32 Go (non inclus)
Vitesse d'image vidéo: 25 images/s (max.), 16 images/s (pour 4 caméras)
Vitesse d'image d'enregistrement: 25 images/s par voie
Résolution Vidéo: QVGA
Format Vidéo: ASF
Niveau de sortie vidéo: 1,2 ± 0,2 Vp-p / 75 Ohm
Niveau de sortie audio: 1 Vp-p / 600 Ohm, mono
Connecteur de sortie audio/vidéo: Prise de casque à écouteurs de 3,5 mm
Portée: Intérieur ±50 m, espace dégagé ±150 m
Température de fonctionnement : De -10 à +50°C
Tension: 5 V DC / 1A
Dimensions: 122 x 122 x 26 mm
Poids : 395 g
(selon les conditions locales)
Précautions d'emploi:
• Ne pas ouvrir la caméra ou le récepteur en cas de mauvais fonctionnement. Cet appareil doit être
ouvert uniquement par un technicien qualifié.
• Ne pas plonger la caméra dans des liquides.
• Ne pas exposer le récepteur à l'eau ou à l'humidité.
• Ne pas exposer le récepteur ou la caméra à des températures élevées (voir spécifications
techniques)
• Ne pas installer le système au voisinage de champs magnétiques forts, comme un haut-parleur. La
qualité de l'image peut en être affectée.
37
Page 38

Description du produit:
Télécommande Récepteur
Moniteur MENU Lecture Mode REC Autre
1
2
3 Changer CANAL
4 Abaisser volume
5 Augmenter volume
6 MENU
7 Changer CANAL
8 SORTIR QUITTER PRÉCÉDENT
ENREGISTRER /
9
10 ZOOM SUIVANT
11 ALARME
12
STOP
ALIMENTATION
Curseur en
HAUT
Curseur à
GAUCHE
Curseur à
DROITE
OK /
ENTRER
Curseur en
BAS
EFFACER STOP
AVANCE rapide
Abaisser volume /
Changer CANAL affiché
Augmenter volume /
Changer CANAL affiché
LECTURE / PAUSE
RETOUR rapide
Indicateur de
liaison
Indicateur
d'ALIMENTATION
On/Off
38
Page 39

Caméra :
1
3
2
4
1 Antenne
2 Support de caméra
3 Entrée d'alimentation 5 V DC
4 Bouton d'association
Sur la face avant de la caméra Voyant ROUGE d'alimentation ON
Sur la face avant de la caméra Voyant VERT liaison établie avec le récepteur
Instructions d'installation:
Vers l'entrée VIDÉO
composite
Mise sous tension
Câble de sortie
VIDÉO
39
Page 40

Fixez la caméra à un mur (ou au
plafond). Percez un trou de 15 mm
pour le passage du câble
Mode d'emploi:
Affichage à l'écran (OSD)
Les icônes suivantes seront/pourront être présentes sur l'image.
Indicateur de signal
Indicateur de canal
Indicateur d'enregistrement
Indicateur de canal audio
Affichage des 4 canaux à l'écran (QUAD)
Affichage en défilé (SCAN)
Affichage simple (SINGLE)
Plein volume
Volume de moitié
Muet
Niveau des batteries
Heure du système
Facteur de zoom 1x
Facteur de zoom 2x
En option: insérez une carte Micro
SD. Insérez-la uniquement quand
le récepteur est éteint
40
Page 41

Menu général
Le diagramme suivant montre la vue d'ensemble générale du menu du système
41
Page 42

Menu du système
Appuyer sur MENU pour entrer dans le menu principal. Après être entré dans le [MAIN MENU] du
système, la section EVENT LIST sera mise en surbrillance par défaut. Le système restera dans le
[MAIN MENU] pendant 2 minutes avant de quitter le [MAIN MENU].
Utilisez les touches ▲▼◄► pour sélectionner, appuyez sur MENU pour valider la sélection et entrer
dans le sous-menu.
Configuration de caméra
Sélectionnez CAMERA SETUP, appuyez une fois la touche MENU pour entrer dans le sous-menu.
Utilisez les touches ▼▲ pour sélectionner la caméra à configurer (1 à 4).
Utilisez les touches ◄► pour sélectionner [PAIRING] [BRIGHTNESS] [CAMERA ON/OFF].
(Association, Luminosité, Caméra Marche/Arrêt)
42
Page 43

Association (Pairing):
Lorsque la section PAIRING est en surbrillance, appuyez une fois la touche MENU pour débuter
l'association de la caméra. Le symbole d'association et le voyant de la caméra clignoteront une seule fois,
par la suite le clignotement devient continu, indiquant que la transmission des données est en cours.
Le système validera que le processus d'association est réussi en affichant à l'écran "PAIRED"
(Associé).
Il indiquera que l'association a échoué en affichant à l'écran "PAIRING FAIL" (Échec Association).
Appuyer sur ESC pour retourner au menu principal.
Remarque: la caméra est associée par défaut en usine. La procédure d'association doit être exécutée
à chaque ajout de caméra (SEC-TRCAM30).
Luminosité :
Avec la section BRIGHTNESS en surbrillance, utilisez les touches ▼▲ pour régler la luminosité de la
caméra.
Appuyer sur ESC pour retourner au menu principal.
Activation :
43
Page 44

Avec la section ACTIVATION en surbrillance, utilisez les touches ▼▲ pour activer ou désactiver une
caméra. Appuyer sur ESC pour retourner au menu principal.
Remarque : vérifiez que les caméras sont associées avec le récepteur pour que les fonctions
d'affichage en défilé (SCAN) ou des 4 canaux (QUAD) à l'écran fonctionnent correctement. L'option de
la caméra “ON” peut uniquement être sélectionnée si une caméra a été associée au système.
Configuration de l'enregistrement
Sélectionnez RECORDER SETUP, appuyez une fois la touche MENU pour entrer dans le sous-menu.
Programmation :
Utilisez les touches▲▼◄► pour la sélection. Trois options différentes d'enregistrement sont possibles.
D'abord, mettez en surbrillance l'intervalle de temps et appuyez la touche MENU pour faire défiler les
différents modes d'enregistrement.
M: MOTION = MOUVEMENT (Enregistrer uniquement quand un mouvement est détecté)
S: SCHEDULE = PROGRAMMATION (Enregistrer en continu)
X: MANUAL = MANUEL (Enregistrer manuellement)
Le système enregistrera la vidéo des 4 canaux simultanément avec les modes d'enregistrement
MOTION, SCHEDULE et MANUAL. Un des quatre canaux aura un signal audio disponible. Quand le
système enregistre en mode MOTION, l'audio est celui du canal en détection de mouvement.
L'enregistrement ne peut pas être arrêté pendant les 30 secondes après le démarrage de
l'enregistrement. Ce fonctionnement du système est conçu pour prolonger la durée de vie générale de
la carte mémoire. Pour arrêter l'enregistrement, appuyez une fois la touche REC/DEL. Pour retirer la
carte mémoire, veuillez éteindre d'abord le système.
En mode d'enregistrement SCHEDULE, le système reprendra automatiquement l'enregistrement 60 s
après l'arrêt manuel de l'enregistrement. En mode d'enregistrement MOTION, le système reprendra
automatiquement la fonction de détection de mouvement 60 s après l'arrêt manuel de l'enregistrement.
L'enregistrement doit être arrêté avant que l'utilisateur n’entre dans le menu principal du système et le
système reprendra le mode d'affichage QUAD après 2 mn d'inactivité. Appuyez sur ESC pour quitter.
44
Page 45

Sensibilité de la détection de mouvement:
Utilisez les touches ▲▼ pour sélectionner la section MOTION DETECTION SENSITIVITY.
Utilisez les touches ◄► pour mettre en surbrillance la caméra à configurer.
Utilisez les touches ▲▼ pour régler la sensibilité: OFF / LV1 / LV2 / LV3 (LV3 est le niveau le plus
sensible). Appuyez sur ESC pour quitter.
Formatage de carte mémoire :
Utilisez les touches ▲▼ pour sélectionner FORMAT STORAGE, appuyez la touche MENU pour entrer.
Appuyez à nouveau la touche MENU pour confirmer et commencer le formatage de la carte mémoire.
Remarque: Si une nouvelle carte mémoire est utilisée, elle doit d’abord être formatée avant de l'utiliser.
Appuyez sur ESC pour quitter.
Zone de masque :
Utilisez les touches ▲▼ pour sélectionner la section MASKING AREA.
Utilisez les touches ◄► pour mettre en surbrillance la caméra à configurer, appuyez MENU pour
entrer.
Utilisez les touches ◄►▲▼ pour mettre en surbrillance la grille d'annulation de la détection de
mouvement dans cette zone.
45
Page 46

Utilisez la touche MENU pour masquer/révéler les grille(s). Les mouvements détectés dans la zone
masquée seront ignorés. Utilisez les touches ◄►▲▼ pour sélectionner une autre grille à configurer
ou appuyez sur ESC pour quitter.
Heure d'enregistrement :
Utilisez les touches ▲▼ pour sélectionner la section RECORD TIME.
Utilisez les touches ◄► pour mettre en surbrillance l'intervalle d'enregistrement: 2 mn / 5 mn / 10 mn.
Appuyez la touche MENU pour valider.
Appuyez sur ESC pour quitter.
Liste des événements
Sélectionnez EVENT LIST, appuyez une fois la touche MENU pour entrer dans le sous-menu.
Lecture :
Utilisez les touches ◄►▲▼ pour mettre en surbrillance l'index de la DATE désirée pour la lecture.
Appuyez la touche MENU pour confirmer la sélection et entrer dans le dossier sélectionné.
46
Page 47

Appuyez les touches ◄►▲▼ pour sélectionner l'heure (chaque bloc représente une période d'une
heure). Appuyez la touche MENU pour entrer.
Utilisez les touches ◄►▲▼ pour choisir le fichier. Appuyez la touche MENU pour lancer la lecture.
Chaque dossier de fichier enregistré est indiqué avec l'heure de départ et de fin et le type de fichier.
Heure de départ = 10:33 PM
Heure de fin = 10:43 PM
Le canal 1 est un fichier enregistré de type MOTION
Le canal 1 est un fichier enregistré de type
SCHEDULE
Les canaux 1, 2, 3 et 4 sont des fichiers enregistrés
de type MANUAL (C = Continu)
Remarque : par défaut, le mode d'affichage sera de 4 canaux (QUAD), les images affichées sont celles
de toutes les caméras associées au moniteur). ■田 □1 □2 □3 □4 indique que tous les canaux sont
lus.
Pour afficher une seule caméra, appuyez une fois la touche MENU après avoir lancé la lecture pour
mettre en PAUSE. Utilisez les touches◄► pour passer de canal en canal. L'indicateur de canal (en
bas à gauche sur l'écran) indiquera le numéro de canal choisi.
□田 ■1 □2 □3 □4 indique que le canal 1 est en lecture en plein écran
□田 □1 ■2 □3 □4 indique que le canal 2 est en lecture en plein écran
47
Page 48

□田 □1 □2 ■3 □4 indique que le canal 3 est en lecture en plein écran
□田 □1 □2 □3 ■4 indique que le canal 4 est en lecture en plein écran
Configuration du système
Sélectionnez SYSTEM SETUP, appuyez une fois la touche MENU pour entrer dans le sous-menu.
Date et heure :
Utilisez les touches ▲▼ pour mettre en surbrillance DATE ET TIME, appuyez MENU pour entrer.
Utilisez les touches ◄► pour mette en surbrillance le réglage: YEAR / MONTH / DATE / HOUR /
MINUTE (ANNÉE / MOIS / JOUR / HEURE / MINUTE).
Utilisez les touches ▲▼ pour régler chaque section et appuyez la touche MENU pour valider le
réglage.
Appuyez sur ESC pour quitter.
Sortie TV :
Utilisez les touches ▲▼ pour sélectionner TV OUTPUT. Appuyez la touche MENU pour entrer.
48
Page 49

Utilisez les touches ◄► pour mettre en surbrillance NTSC ou PAL (pour l'Europe), appuyez la touche
MENU pour valider la sélection. Appuyez sur ESC pour quitter.
Remarque : modifier la sorti du système TV peut affecter l'échelle de l'image affichée.
Économie d'énergie:
Ne s'applique pas à ce modèle (uniquement pour les moniteurs à cristaux liquides LCD)
Affichage multiple des canaux en inactivité :
Utilisez les touches ▲▼ pour sélectionner MULTI CHANNELS IDLE DISPLAY. Appuyez la touche
MENU pour entrer.
Utilisez les touches ◄► pour sélectionner: DISPLAY QUAD DURING IDLE / AT 5 SEC INTERVAL / AT
10 SEC INTERVAL / AT 15 SEC INTERVAL, appuyez la touche MENU pour valider la sélection et
quitter.
Affichage en mode QUAD 5 secondes d'intervalle
49
Page 50

10 secondes d'intervalle 15 secondes d'intervalle
Remarque:
1. L'option de réglage de caméra ON/OFF dans la section CAMERA SETUP affectera les caméras
affichées lors de l'affichage d'inactivité IDLE DISPLAY.
2. L'audio (un canal à chaque fois) sera disponible lors du mode QUAD (par défaut sur le canal 1 ou sur
le prochain canal disponible d’une caméra associée au système), lors du mode plein écran simple
(passage automatique au canal visualisé) ou pour le canal déclenché par détection de mouvement.
3. Le canal audio restera disponible jusqu'à ce que le canal soit changé.
4. Si l'intervalle est réglé sur 5/10/15 s, sélectionnez SCAN ACTIVATED CAMERAS pour obtenir ce
mode d'affichage.
Valeur par défaut :
Utilisez les touches ▲▼ pour sélectionner DEFAULT. Appuyez la touche MENU pour entrer.
Utilisez les touche ◄► pour sélectionner la langue du système pour SYSTEM RESTORE (Restaurer
le système), appuyez la touche MENU pour valider la sélection et le système sera restauré aux valeurs
par défaut d'usine (ANGLAIS uniquement DISPONIBLE). Appuyez sur ESC pour quitter.
Avertisseur sonore d'alarme
50
Page 51

Sélectionnez l'avertisseur ALARM BUZZER, appuyez la touche MENU pour l'activer ON ou le
désactiver OFF. À la détection de mouvement, un signal sonore est reproduit par le haut-parleur interne
du moniteur.
Zoom Panoramique et Inclinaison
Sélectionnez la section PAN TILT ZOOM, appuyez une fois la touche MENU pour entrer en mode
ZOOM, appuyez à nouveau la touche MENU pour effectuer un zoom avec un facteur d’agrandissement
de 2X.
Lors du zoom, utilisez les touches ▲▼◄► pour sélectionner les diverses zones de vue. Appuyez la
touche MENU pour revenir à l'échelle normale.
À l'échelle normale (1X), utilisez les touches ▲▼ pour changer de canal. Appuyez sur ESC pour
quitter.
Caméras activées pour le défilement
Sélectionnez SCAN ACTIVATED CAMERAS, appuyez une fois MENU pour faire défiler les caméras.
Remarque:
1. L'option de réglage de caméra ON/OFF dans la section CAMERA SETUP affectera les caméras
affichées lors de l'affichage d'inactivité IDLE DISPLAY. Voir la configuration de l'intervalle d'affichage
multiple des canaux en inactivité.
2. Le système activera automatiquement le mode QUAD, si la fonction d'enregistrement est activée.
51
Page 52

Réécriture de la carte mémoire
Sélectionnez la section MEMORY CARD OVERWRITE, appuyez une fois la touche MENU pour activer
la fonction de réécriture et appuyez à nouveau la touche MENU pour la désactiver.
REMARQUE :
1. Un des exemples suivants apparaîtra sur l'écran d'affichage.
A. 1,89 Go - espace disponible sur la carte mémoire.
B. ERREUR - soit la carte mémoire est absente, soit verrouillée ou encore endommagée.
2. Quand la carte mémoire est pleine, le système affichera le message “MEMORY FULL PLEASE
FORMAT” sur l'écran de l'aperçu, si la réécriture n'est pas active.
Logiciel de lecture:
Le lecteur multimédia Sec24 a été développé pour lire les fichiers du système de caméra sans fil.
Insérez le CD-ROM inclus avec le coffret dans votre ordinateur personnel ou portable. Un écran avec
une fenêtre autonome apparaîtra automatiquement.
Ouvrez le dossier et cliquez sur l'icône .exe
Si la fenêtre autonome n'apparaît pas, alors cliquez sur "MY COMPUTER" (Mon ordinateur) et
double-cliquez sur le lecteur assigné au CD-ROM de votre ordinateur personnel ou portable (par ex.:
E:)
Double-cliquez pour ouvrir et choisir le lecteur multimédia Sec24. Double-cliquez pour installer.
Suivez la procédure d'installation pour compléter l'installation du logiciel.
Après l'installation, un raccourci est présent sur le bureau:
Remarque: d'autres personnes ne pourront pas lire les fichiers
enregistrés sans le lecteur, pour des raisons de respect
de la vie privée.
Double-cliquez sur le raccourci pour ouvrir le lecteur multimédia Sec24.
L'écran suivant apparaîtra.
52
Page 53

1
34
5
2
678 9
1. Écran de visualisation du canal 1 7. Pause
2. Écran de visualisation du canal 2 8. Arrêt
3. Écran de visualisation du canal 3 9. Retour rapide
4. Écran de visualisation du canal 4 10. Avance rapide
5. Bar de progression de la lecture 11. Charger le(s) fichier(s) enregistré(s)
6. LECTURE 12. Sélection de l'activation / désactivation du canal
Pour lire les fichiers enregistrés, cliquez sur “Load” pour importer les enregistrements (fichiers SNX).
Lors de la lecture, tous les quatre canaux seront lus en une seule fois. Pour des raisons de respect de
la vie privée, l'utilisateur est en mesure de désactiver manuellement les canaux audio et/ou les canaux
vidéo.
Sélectionnez la case Audio pour couper le son.
Sélectionnez la case 1 pour couper l'image vidéo du canal 1.
Sélectionnez la case 2 pour couper l'image vidéo du canal 2.
Sélectionnez la case 3 pour couper l'image vidéo du canal 3.
Sélectionnez la case 4 pour couper l'image vidéo du canal 4.
Remarque : insérez une carte de mémoire Micro SD dans votre ordinateur personnel ou portable avant
d'exécuter le lecteur de média Sec24.
10
11
12
Temps d'enregistrement total des cartes mémoires:
Capacité de la carte mémoire Micro SD. 640 x 480 (VGA)
1 Go 60 minutes
2 Go 110 minutes
53
Page 54

8 Go 400 minutes
16 Go 950 minutes
32 Go 1880 minutes
Entretien :
Ne nettoyez l’appareil qu’avec un chiffon sec. N’utilisez pas de solvants ou de produits abrasifs.
Garantie :
Aucune garantie ou responsabilité ne sera acceptée en cas de modification et/ou de transformation du
produit ou en cas de dommages provoqués par une utilisation incorrecte de l’appareil.
Avis de non responsabilité :
- Le design et les caractéristiques techniques sont sujets à modification sans notification préalable.
- Tous les logos de marques et noms de produits sont des marques déposées ou immatriculées dont
leurs détenteurs sont les propriétaires et sont donc reconnues comme telles dans ce documents.
- Ce manuel a été produit avec soin. Toutefois, aucun droit ne peut en dériver. König Electronic ne peut
être tenu responsable pour des erreurs de ce manuel ou de leurs conséquences.
- Conservez ce manuel et l’emballage pour toute référence ultérieure.
Elimination :
• Ce produit doit être jeté séparément des ordures ménagères dans un point de collecte
approprié. Ne jetez pas ce produit avec les ordures ménagères ordinaires.
• Pour plus d'informations, contactez le distributeur ou l'autorité locale responsable de la
gestion des déchets.
NEDERLANDS
Draadloos camerasysteem
Inleiding:
Waak over uw eigendommen met de nieuwe 2,4 GHz digitale draadloze beveiligingscamera. De
camera biedt een zeer scherp en stabiel beeld en de gebruikte technologie verbetert de beeldkwaliteit
zelfs verder. Het systeem maakt gebruik van digitale draadloze technologie en is uitgerust met
geavanceerde frequentie signaal encryptietechnieken, die storing , veroorzaakt door andere applicaties
die de 2,4 GHz-frequentieband gebruiken, vermindert. Deze digitale technologie garandeert uw privacy
en stelt u in staat om het over extra lange afstanden te gebruiken.
De ontvanger en de camera zijn al in de fabriek standaard gekoppeld. Wanneer u de extra
SEC-TRCAM30 camera (max. 4 camera's) aan het systeem toevoegt, raadpleeg het hoofdstuk
“Koppelen” voor het toevoegen van camera's.
• We adviseren u deze handleiding te lezen voordat u het camerasysteem gebruikt.
• Bewaar deze handleiding op een veilige plek voor toekomstig gebruik.
Inhoud van de verpakking SEC-TRANS50 : Inhoud van de verpakking SEC-TRCAM30 :
1x Camera met beugel 1x Camera met beugel
1x Ontvanger
1x Afst
1x Antenne voor camera
1x Video afspeelsoftware PC (CD ROM)
1x RCA Audio/videoaansluitkabel
2x AC/DC-adapter
Technische specificaties:
Camera:
Zendfrequentie: 2,408-2,474 GHz digitaal
Modulatie: FHSS
1x Antenne
andsbediening (inclusief batterij) 1x AC/DC-adapter
54
Page 55

Bereik: Binnenshuis ±50 m, open ruimte ±150 m (afhankelijk van lokale
Beeldchip: CMOS met IR-breekschakelaar
Lens: 3,6 mm
Kijkhoek: H: 60±3º / V: 43±3º
Infrarood verlichting (LED): 5 m
Bescherming: IP66
Microfoon: mono
Bedrijfstemperatuur: -10 °C ~ 50 °C
Spanning: 5 V DC/1 A
Afmetingen: 130 x 61 x 67 mm
Gewicht: 365 g (inclusief kabel)
Ontvanger:
Ontvangstfrequentie: 2,408-2,474 GHz digitaal
Kanalen: 4
SD-kaart maximaal 32 GB (niet inbegrepen)
Video-framesnelheid: 25 fps (max.), 16 fps (4 x camera's)
Opname-framesnelheid: 25 fps per kanaal
Videoresolutie: QVGA
Bestandsformaat video: ASF
Video-uitgangsniveau: 1,2 ±0,2 Vp-p/75 Ohm
Audio-uitgangsniveau: 1 Vp-p/600 Ohm, mono
Audio/video -uitgangsconnector 3,5 mm hoofdtelefoonaansluiting
Bereik: Binnenshuis ±50 m, open ruimte ±150 m (afhankelijk van lokale
Bedrijfstemperatuur: -10 °C tot +50 °C
Spanning: 5 V DC/1 A
Afmetingen: 122 x 122 x 26 mm
Gewicht: 395 g
omstandigheden)
omstandigheden)
Veiligheidsmaatregelen:
• Open de camera of ontvanger niet in het geval van een storing. Deze producten mogen alleen door
een gekwalificeerde technicus worden geopend.
• Dompel de camera niet in vloeistof onder.
• Stel de ontvanger niet aan water of vochtigheid bloot.
• Stel de ontvanger of camera niet aan hoge temperaturen bloot (zie technische specificaties).
• Installeer het systeem niet dicht bij te sterke magnetische velden, zoals een luidspreker. Dit kan
invloed op de kwaliteit hebben.
55
Page 56

Productbeschrijving:
Afstandsbediening Ontvanger
Monitor Menu Afspelen REC-modus Overig
1 LINK-indicator
2 POWER-indicator
3 Schakel KANAAL over
4 Volume OMLAAG
5 Volume OMHOOG
6 MENU OK/ENTER AFSPELEN/PAUZE
7 Schakel KANAAL over
8 ESCAPE AFSLUITEN VORIGE
9 OPNEMEN/STOPPEN VERWIJDEREN STOP
10 ZOOMEN VOLGENDE
11 ALARM
12 VOEDING aan/uit
Cursor
OMHOOG
Cursor
LINKS
Cursor
RECHTS
Cursor
OMLAAG
Snel VOORUIT
Volume
OMLAAG/Schakel
weergave KANAAL over
Volume
OMHOOG/Schakel
weergave KANAAL over
Snel ACHTERUIT
56
Page 57

Camera:
1
3
2
4
1 Antenne
2 Camerabeugel
3 5 V DC voedingsingang
4 Koppelknop
Op de voorzijde van de camera RODE LED voeding AAN
Op de voorzijde van de camera GROENE LED gekoppeld met ontvanger
Instructies voor installatie:
Naar composiet
Inschakelen
VIDEO-uitgang
skabel
57
Page 58

Optie: Plaats een micro SD-kaart.
Plaats alleen wanneer de
ontvanger is uitgeschakeld.
Monteer de camera tegen een muur
(of plafond). Boor een gat van 15 mm
om de kabel door te voeren.
Gebruiksaanwijzing:
In-beeld weergave
De volgende OSD-pictogrammen zullen/kunnen in beeld zichtbaar worden.
Signaalindicator
Kanaalindicator
Opname-indicator
Audio-kanaalindicator
Quad-weergave
Scan-weergave
Enkele weergave
Vol volume
1/2 volume
Dempen (Mute)
Voeding
Systeemtijd
1x Zoomen
2x Zoomen
58
Page 59

Overzicht menu
Het volgende diagram toont het totale overzicht van het systeemmenu
59
Page 60

Systeemmenu
Druk op “MENU” om het hoofdmenu te openen. Na het openen van het [MAIN MENU]-systeem, zal
“EVENT LIST” standaard gemarkeerd worden. Het systeem zal 2 minuten in [MAIN MENU] inactief zijn
alvorens [MAIN MENU] af te sluiten.
Gebruik “▲▼◄►” om te selecteren, druk op “MENU” om de keuze te bevestigen en het submenu te
openen.
Camera instellen
Selecteer “CAMERA SETUP”, druk één keer op de “MENU”-toets om het submenu te openen.
Gebruik “▼▲” om het instellen (1-4) van de camera te selecteren.
Gebruik “◄►” om [PAIRING], [BRIGHTNESS], [CAMERA ON/OFF ] te selecteren.
60
Page 61

Koppelen:
Met de “PAIRING”-sectie gemarkeerd, druk één keer op de “MENU”-toets om met het koppelen van de
camera te beginnen. Koppel en de LED op de camera zal één keer knipperen, gevolgd door het continu
knipperen van de LED, waarmee aangegeven wordt dat gegevensoverdracht plaatsvindt.
Het systeem zal met "PAIRED" op het scherm weergegeven, bevestigen dat het koppelproces
succesvol is.
Het systeem zal met “PAIRING FAIL” op het scherm weergegeven, aangeven dat het koppelproces
mislukt is.
Druk op “ESC” om naar het hoofdmenu terug te keren.
Opmerking: de camera is in de fabriek standaard gekoppeld. De koppelprocedure moet bij het
toevoegen van extra camera's (SEC-TRCAM30) worden gevolgd.
Helderheid:
Met de “BRIGHTNESS”- sectie gemarkeerd, gebruik “▼▲” om de helderheid van de camera aan te
passen.
Druk op “ESC” om naar het hoofdmenu terug te keren.
Activering:
61
Page 62

Met de “ACTIVATION”-sectie gemarkeerd, gebruik “▼▲” om een camera in of uit te schakelen.
Druk op “ESC” om naar het hoofdmenu terug te keren.
Opmerking: zorg ervoor dat de camera's aan de ontvanger zijn gekoppeld om SCAN of QUAD goed te
kunnen functioneren. Camera "ON" kan alleen worden geselecteerd als een camera aan het systeem
is gekoppeld.
Recorder Instellen
Selecteer “RECORDER SETUP ”, druk één keer op de “MENU”-toets om het submenu te openen.
Schema:
Gebruik “ ▲▼◄► ” om te selecteren: Er zijn drie verschillende opname-opties beschikbaar om uit te
kiezen. Markeer eerst de tijdsperiode en druk op de “MENU”-toets om tussen de verschillende
opnamemodi te schakelen.
M: BEWEGING (neemt alleen op wanneer beweging wordt gedetecteerd)
S: SCHEMA (continu opnemen)
X: HANDMATIG (handmatig opnemen)
Het systeem zal met de "MOTION”-, “SCHEDULE”- en “MANUAL”-opname modi vanaf alle 4 kanalen
gelijktijdig video opnemen. Eén van de vier kanalen zal audio beschikbaar hebben. Wanneer het
systeem “MOTION”-opname uitvoert, zal audio automatisch naar het kanaal overschakelen dat door
beweging geactiveerd werd.
Het opnemen kan niet eerder worden gestopt, dan 30 seconden nadat de opname is gestart. Deze
werking van het systeem is ontworpen om de totale levensduur van de geheugenkaart te verlengen.
Om het opnemen te stoppen, druk één keer op “REC/DEL”. Om de geheugenkaart te verwijderen,
schakel eerst het systeem uit.
Indien in de “SCHEDULE”-opnamemodus, zal het systeem automatisch het opnemen na 60 seconden
hervatten nadat het opnemen handmatig is gestopt. Indien in de “MOTION”-opnamemodus, zal het
systeem bewegingsdetectie na 60 seconden hervatten nadat het opnemen handmatig is gestopt. Het
62
Page 63

opnemen moet worden gestopt voordat de gebruiker het hoofdmenu van het systeem kan openen en
zal het systeem na twee minuten inactiviteit de QUAD-modus hervatten.
Druk op “ESC” om af te sluiten.
Gevoeligheid bewegingsdetectie
Gebruik “▲▼” om de “MOTION DETECTION SENSITIVITY”-sectie te selecteren.
Gebruik “◄►” om de camera voor het instellen te markeren.
Gebruik “▲▼” om het gevoeligheidsniveau aan te passen. OFF/LV1/LV2/LV3 (LV3 is het meest
gevoelig).
Druk op “ESC” om af te sluiten.
De geheugenkaart formatteren
Gebruik “▲▼” om “FORMAT STORAGE” te selecteren, druk op “MENU” om te openen. Druk opnieuw
op “MENU” om te bevestigen en het formatteren van de geheugenkaart te starten.
Opmerking: Als een nieuwe geheugenkaart wordt gebruikt, dan moet het vóór gebruik eerst worden
geformatteerd.
Druk op “ESC” om af te sluiten.
Maskeergebied:
63
Page 64

Gebruik “▲▼” om de “MASKING AREA”-sectie te selecteren.
Gebruik “◄►” om de camera voor het instellen te markeren, druk op “MENU” om te openen.
Gebruik “◄►▲▼” om het raster voor geen bewegingsdetectie in dit gebied te markeren.
Gebruik de “MENU”-toets om rasters te maskeren/demaskeren. Bewegingen die binnen het
gemaskeerde gebied plaatsvinden, zullen worden genegeerd.
Gebruik “◄►▲▼” om een ander raster voor het instellen te selecteren of druk op “ESC” om af te
sluiten.
Opnametijd:
Gebruik “▲▼” om de “RECORD TIME”-sectie te selecteren.
Gebruik “◄►” om de opnameperiode te markeren: 2 minuten/5 minuten/10 minuten, druk op “MENU”
om te bevestigen.
Druk op “ESC” om af te sluiten.
Gebeurtenissenlijst
Selecteer “EVENT LIST”, druk één keer op de “MENU”-toets om het submenu te openen.
Afspelen:
64
Page 65

Gebruik “◄►▲▼” om de gewenste datum-index voor het afspelen te markeren. Druk op “MENU” om
de selectie te bevestigen en de geselecteerde map te openen.
Druk op “◄►▲▼” om het uur (elk blok vertegenwoordigt één uur tijd) te selecteren. Druk op “MENU"
om te openen.
Gebruik “◄►▲▼” om het gewenste bestand voor het afspelen te markeren. Druk op “MENU” om het
afspelen te starten.
Elke map van het opgenomen bestand wordt met de start/eindtijd van het bestand en het type van het
opgenomen bestand aangegeven.
Starttijd = PM10:33
Eindtijd = PM10:43
Kanaal 1 is een BEWEGING opgenomen bestand
Kanaal 1 is een volgens SCHEMA opgenomen
Kanaal 1, 2, 3 en 4 zijn HANDMATIG
(C = Continu) opgenomen bestanden
Opmerking: Standaard zal de afspeelweergave QUAD zijn (weergeven van beelden vanaf alle
camera's gekoppeld aan de monitor). ■田 □1 □2 □3 □4 is het afspelen van alle kanalen .
65
Page 66

Voor één cameraweergave, druk op “MENU” om te pauzeren nadat het afspelen is gestart. Gebruik
“◄►” om van kanaal tot kanaal te selecteren. De kanaalindicator (linker onderscherm) zal het
geselecteerde kanaalnummer aangeven.
□田 ■1 □2 □3 □4 is kanaal 1 in volledig scherm afspelen
□田 □1 ■2 □3 □4 is kanaal 2 in volledig scherm afspelen
□田 □1 □2 ■3 □4 is kanaal 3 in volledig scherm afspelen
□田 □1 □2 □3 ■4 is kanaal 4 in volledig scherm afspelen
Systeem instellen
Selecteer “SYSTEM SETUP”, druk één keer op de “MENU”-toets om het submenu te openen.
Datum en tijd:
Gebruik “▲▼” om “DATE” en “TIME” te markeren, druk op MENU om te openen.
Gebruik “ ◄► ”om het gemarkeerde aan te passen: YEAR/MONTH/DATE/HOUR/MINUTE.
Gebruik “▲▼” om elke sectie aan te passen en druk op “MENU” om de aanpassing te bevestigen.
Druk op “ESC” om af te sluiten.
TV-uitgang:
66
Page 67

Gebruik “▲▼” om “TV OUTPUT” te selecteren. Druk op “MENU" om te openen.
Gebruik “◄►” om “NTSC” of “PAL” (voor Europa) te markeren, druk op “MENU” om de selectie te
bevestigen.
Druk op “ESC” om af te sluiten.
Opmerking: het wijzigen van het TV-systeem kan invloed op de weergegeven schaal van het beeld
hebben.
Energiebesparing:
Niet relevant voor dit model (alleen voor LCD-monitor).
Multi-kanalen standby-weergave:
Gebruik “▲▼” om “MULTI CHANNELS IDLE DISPLAY” te selecteren. Druk op “MENU" om te openen.
Gebruik “ ◄► ” om te selecteren: “DISPLAY QUAD DURING IDLE”/“AT 5 SEC INTERVAL”/“AT 10 SEC
INTERVAL/AT 15 SEC INTERVAL” , druk op “MENU” om de selectie te bevestigen en af te sluiten.
Toon QUAD-modus 5 seconden interval
67
Page 68

10 seconden interval 15 seconden interval
Opmerking:
1. De “ON/OFF”-instelling van de camera in de “CAMERA SETUP”- sectie zal invloed hebben op welke
camera('s) tijdens “IDLE DISPLAY ” kunnen worden weergegeven.
2. Audio (enkel kanaal op elk moment) zal beschikbaar zijn tijdens de QUAD-modus (standaard op
kanaal 1 of het volgende beschikbare kanaal met een camera aan het systeem gekoppeld), één
“FULL”-schermmodus (automatisch overschakelen naar het bekijken van één kanaal tegelijk) of het
kanaal door beweging geactiveerd.
3. Het audiokanaal zal aangesloten blijven totdat het kanaal wordt overgeschakeld.
4. Als op 5/10/15 sec. interval wordt ingesteld, selecteer vervolgens “SCAN ACTIVATED CAMERAS ”
om deze weergavemodus tot stand te brengen.
Standaard:
Gebruik “ ▲▼” om “DEFAULT” te selecteren: Druk op “MENU" om te openen.
Gebruik “◄►” om de systeemtaal voor “SYSTEM RESTORE” te selecteren, druk op “MENU” om de
selectie te bevestigen en het systeem zal naar fabrieksinstellingen herstellen (alleen ENGELS
BESCHIKBAAR).
Druk op “ESC” om af te sluiten.
68
Page 69

Alarmzoemer
Selecteer “ALARM-BUZZER”, druk op “MENU” om de zoemer “ON” of “OFF” te schakelen. Wanneer
door een camera beweging wordt gedetecteerd, zal vervolgens een zoemer via de luidspreker van de
monitor te horen zijn.
Pan/Tilt-zoomen
Selecteer “PAN TILT ZOOM”, druk één keer op “MENU” om de zoommodus te openen, druk op
“MENU” om weer in te zoomen (2x).
Bij het inzoomen, gebruik “▲▼◄►” om verschillende gebieden van de weergave te selecteren. Druk
op “MENU” om uit te zoomen.
In uitzoomen (1x), gebruik “▲▼” om het beschikbare kanaal te veranderen.
Druk op “ESC” om af te sluiten.
Scan de geactiveerde camera's
Selecteer “SCAN ACTIVATED CAMERAS”, druk één keer op “MENU” om de scanmodus van de
camera te starten.
69
Page 70

Opmerking:
1. De “ON/OFF”-instelling van de camera in de “CAMERA SETUP”- sectie zal invloed hebben op welke
camera('s) tijdens “IDLE DISPLAY ” kunnen worden weergegeven. Zie “Multi-kanalen
standby-weergave” interval instellen.
2. Het systeem zal automatisch de QUAD-weergave activeren als de opnamefunctie wordt
geactiveerd.
Geheugenkaart overschrijven
Selecteer “MEMORY CARD OVERWRITE”, druk één keer op “MENU” om de overschrijffunctie te
activeren en druk weer op “MENU” om te deactiveren.
OPMERKING:
1. Eén van de volgende voorbeelden zal op het weergavescherm verschijnen.
A 1,89 GB - beschikbare ruimte op de geheugenkaart.
B FOUT - geheugenkaart ontbreekt, is vergrendeld of beschadigd.
2. Als de geheugenkaart vol is, zal het systeem "MEMORY FULL PLEASE FORMAT " op het
preview-scherm weergegeven, als overschrijven niet is geselecteerd.
Software voor het afspelen:
Sec24 Media Player is ontwikkeld om opgenomen bestanden van uw draadloze camerasysteem af te
spelen.
Plaats de CD-ROM in de verpakking op uw PC of notebook meegeleverd. Een pop-up-scherm
verschijnt automatisch.
Open de map en klik op het “.exe”-pictogram
In het geval dat het pop-up-scherm niet verschijnt, klik op “MIJN COMPUTER” en dubbelklik op het
station waar de CD-ROM door de PC of notebook aan toegewezen is (bijvoorbeeld: E:).
Dubbelklik om te openen en selecteer “Sec24 media player”. Dubbelklik om de installatie te starten.
Volg de installatieprocedure voor de volledige installatie van de software.
Na installatie vindt u het pictogram van de snelkoppeling op het bureaublad:
Opmerking: anderen kunnen geen opgenomen bestanden afspelen zonder “Sec24
media player”; dit is voor uw privacybescherming.
Dubbelklik op de snelkoppeling om de “Sec24 Media Player” te openen.
Het volgende scherm zal verschijnen.
.
70
Page 71

1
34
5
2
678 9
1. Kanaal 1 afspeelscherm 7. Pauze
2. Kanaal 2 afspeelscherm 8. Stoppen
3. Kanaal 3 afspeelscherm 9. Snel terugspoelen
4. Kanaal 4 afspeelscherm 10. Snel vooruit
5. Voortgangsbalk voor het afspelen 11. Opgenomen bestand(en) laden
6. Afspelen 12. Kanaal inschakelen/uitschakelen selecteren
Voor het afspelen van de opgenomen bestanden, klik op “Load” om de opgenomen bestanden (SNX
bestanden) te importeren.
Tijdens het afspelen kunnen alle vier kanalen tegelijk worden afgespeeld. Voor de privacy, kan de
gebruiker audiokanalen en/of videokanalen handmatig uitschakelen.
Selecteer “Audio” om het geluid uit te schakelen.
Selecteer 1 om het videobeeld van kanaal 1 uit te schakelen.
Selecteer 2 om het videobeeld van kanaal 2 uit te schakelen.
Selecteer 3 om het videobeeld van kanaal 3 uit te schakelen.
Selecteer 4 om het videobeeld van kanaal 4 uit te schakelen.
Opmerking: plaats de Micro SD-kaart in uw PC of notebook alvorens de “Sec24 Media Player” te
starten.
10
11
12
Totale opnametijd voor geheugenkaarten:
Capaciteit micro SD-kaart 640x480 (VGA)
1G 60 minuten
2G 110 minuten
71
Page 72

8G 400 minuten
16G 950 minuten
32G 1880 minuten
Onderhoud:
Uitsluitend reinigen met een droge doek. Gebruik geen reinigingsmiddelen of schuurmiddelen.
Garantie:
Voor wijzigingen en veranderingen aan het product of schade veroorzaakt door een verkeerd gebruik
van dit product, kan geen aansprakelijkheid worden geaccepteerd. Tevens vervalt daardoor de
garantie.
Disclaimer:
- Wijziging van ontwerp en specificaties zonder voorafgaande mededeling onder voorbehoud.
- Alle logo’s, merken en productnamen zijn handelsmerken of geregistreerde handelsmerken van de
respectievelijke eigenaren en worden hierbij als zodanig erkend.
- Deze handleiding is met zorg samengesteld. Er kunnen echter geen rechten aan worden ontleend.
König Electronic kan geen aansprakelijkheid aanvaarden voor eventuele fouten in deze handleiding
of de gevolgen daarvan.
- Bewaar deze gebruiksaanwijzing voor latere raadpleging.
Afvoer:
• Dit product is bestemd voor gescheiden inzameling bij een daartoe aangewezen
verzamelpunt. Gooi dit product niet weg bij het huishoudelijk afval.
• Neem voor meer informatie contact op met de detailhandelaar of de lokale overheid die
verantwoordelijk is voor het afvalbeheer.
ITALIANO
Sistema telecamera wireless
Introduzione:
Sorvegliate le vostre proprietà con questa nuova telecamera di sicurezza wireless digitale a 2,4 GHz.
La telecamera offre un'immagine molto nitida e stabile, e la tecnologia utilizzata migliora ulteriormente
la qualità dell'immagine. Il sistema usa una tecnologia wireless digitale ed è dotato di un'avanzata
capacità di criptatura del segnale che riduce le interferenze causate da altre applicazioni che utilizzano
la banda di frequenza a 2,4 GHz. Questa tecnologia digitale assicura la vostra privacy e vi consente di
utilizzarla su maggiori distanze.
Il ricevitore e la telecamera sono già accoppiati con impostazioni di fabbrica. Quando si aggiunge
un'ulteriore telecamera SEC-TRCAM30 (max. 4 telecamere) al sistema, fare riferimento alla sezione
ACCOPPIAMENTO per aggiungere telecamere.
• Raccomandiamo di leggere questo manuale prima dell'installazione/utilizzo del sistema telecamera.
• Conservare questo manuale in un posto sicuro per futura consultazione.
Contenuto confezione SEC-TRANS50: Contenuto confezione SEC-TRCAM30:
1x Telecamera con staffa 1x Telecamera con staffa
1x Ricevitore 1x Antenna
1x Telecomando (batteria inclusa) 1x Alimentatore AC/DC
1x Antenna per telecamera
1x Software riproduzione video per PC (CD ROM)
1x Cavo di collegamento audio/video RCA
2x Alimentatore AC/DC
Specifiche tecniche:
Telecamera:
Frequenza di trasmissione: 2,408-2,474 GHz digitale
72
Page 73

Modulazione: FHSS
Copertura: Interno ±50 m, area aperta ±150 m (a seconda della
Chip immagine: CMOS con commutazione IR
Obiettivo: 3,6mm
Angolo di visione: H: 60±3º / V: 43±3º
Illuminazione a infrarossi (LED): 5 M
Protezione: IP66
Microfono: mono
Temperatura operativa: -10°C ~ 50°C
Tensione: 5 V CC/1A
Dimensioni: 130x61x67 mm
Peso: 365 g (cavo incluso)
Ricevitore:
Frequenza di ricezione: 2,408-2,474 GHz digitale
Canali: 4
Scheda SD: fino a 32 GB (non incluso nella confezione)
Velocità fotogramma video: 25 fps (max.), 16 fps (4x telecamere)
Velocità fotogramma in registrazione: 25 fps per canale
Risoluzione video: QVGA
Formato video: ASF
Livello uscita video: 1.2±0.2 Vp-p/75 Ohm
Livello uscita audio: 1 Vp-p/600 Ohm, mono
Connettore uscita audio/video: jack telefono da 3,5 mm
Copertura: Interno ±50 m, area aperta ±150 m (a seconda della
Temperatura di funzionamento: da -10° a +50°.
Tensione: 5 V CC/1A
Dimensioni: 122x122x26 mm
Peso: 395 g
condizioni locali)
condizioni locali)
Precauzioni di sicurezza:
• Non aprire la telecamera o il ricevitore in caso di malfunzionamento. Questi prodotti devono essere
aperti solo da un tecnico qualificato.
• Non immergere la telecamera in liquidi.
• Non esporre il ricevitore all'acqua o all'umidità.
• Non esporre il ricevitore o la telecamera a temperatura elevate (si vedano le specifiche tecniche)
• Non installare il sistema accanto a campi magnetici forti, quali un altoparlante. Ciò può influenzare la
qualità.
73
Page 74

Descrizione prodotto:
Telecomando Ricevitore
Monitor Menu Riproduzione
1 Indicatore LINK
2 Indicatore POWER
Interruttore
3
CHANNEL
4 Volume GIÙ
5 Volume SU
6 MENU
Interruttore
7
CHANNEL
8 ESC ESCI INDIETRO
REGISTRAZIONE
9
10 ZOOM AVANTI
11 ALLARME
12 Accensione/Spegnimento
/ STOP
Cursore
SU
Cursore
SINISTRA
Cursore
DESTRA
OK /
ENTER
Cursore
GIÙ
AVANZAMENTO veloce
Volume GIÙ / Interruttore
display CHANNEL
Volume SU / Interruttore
display CHANNEL
PL AY / PA USE
RIAVVOLGIMENTO
rapido
ELIMINA STOP
Modalità
REC
Altro
74
Page 75

Telecamera:
1
3
2
4
1 Antenna
2 Staffa telecamera
3 Ingresso alimentazione 5V CC
4 Pulsante Accoppiamento
Sul lato anteriore della telecamera LED ROSSO alimentazione ON
Sul lato anteriore della telecamera LED VERDE collegato al ricevitore
Istruzioni per l'installazione:
All'ingresso VIDEO
composite
Accensione
Cavo uscita
VIDEO
75
Page 76

Montare la telecamera a parete
(o soffitto). Fare un foro di 15 mm per
far passare il cavo
Istruzioni per l’utente:
OSD (On Screen Display)
Le seguenti icone OSD saranno visibili nell'immagine.
Indicatore segnale
Indicatore canale
Indicatore registrazione
Indicatore canale audio
Display quad.
Display scansione
Display singolo
Volume massimo
1/2 volume
Disattiva audio
Alimentazione
Orario sistema
1x Zoom
2x Zoom
Opzione: inserire una scheda
Micro SD. Inserire solo quando il
ricevitore è spento
76
Page 77

Panoramica menu
Il diagramma seguente mostra la panoramica totale del menu di sistema
77
Page 78

Menu di sistema
Premere MENU per accedere al menu principale. Dopo l'accesso al sistema [MAIN MENU], EVENT
LIST sarà visualizzato come predefinito. Il sistema resta in [MAIN MENU] per 2 minuti prima di uscire
dal [MAIN MENU].
Utilizzare ▲▼◄► per selezionare, premere MENU per confermare la scelta e accedere al sottomenu.
Configurazione telecamera
Selezionare CAMERA SETUP, premere il tasto MENU una volta per accedere al sottomenu.
Utilizzare ▼▲ per selezionare la telecamera da configurare (1-4).
Utilizzare ◄► per selezionare [PAIRING] [BRIGHTNESS] [CAMERA ON/OFF].
78
Page 79

Accoppiamento:
Con la sezione PAIRING evidenziata, premere il tasto MENU una volta per iniziare l'accoppiamento
della telecamera. Accoppiare e il LED sulla telecamera lampeggia una volta, seguito dal lampeggio
continuo del LED, indicando che la trasmissione dei dati è in corso.
Il sistema conferma che il processo di accoppiamento è avvenuto con successo con “PAIRED”
visualizzato sullo schermo.
Il sistema indica che il processo di accoppiamento è fallito con “PAIRING FAIL” visualizzato sullo
schermo.
Premere ESC per tornare al menu principale.
Nota: la telecamera è accoppiata per impostazione di fabbrica. La procedura di accoppiamento deve
essere osservata quando si aggiungono telecamere (SEC-TRCAM30).
Luminosità:
Con la sezione BRIGHTNESS evidenziata, utilizzare ▼▲ per regolare la luminosità della telecamera.
Premere ESC per tornare al menu principale.
Attivazione:
79
Page 80

Con la sezione ACTIVATION evidenziata, utilizzare ▼▲ per abilitare o disabilitare una telecamera.
Premere ESC per tornare al menu principale.
Nota: assicurarsi che le telecamere siano accoppiate al ricevitore affinché SCAN o QUAD funzionino
correttamente. Telecamera “ON” può essere selezionata solo quando una telecamera è stata
accoppiata al sistema.
Configurazione registratore
Selezionare RECORDER SETUP, premere il tasto MENU una volta per accedere al sottomenu.
Programmazione:
Utilizzare ▲▼◄► per selezionare. Sono disponibili tre diverse opzioni di registrazione tra cui
scegliere. Prima evidenziare il periodo di tempo e premere il tasto MENU per spostarsi tra le diverse
modalità di registrazione.
M: MOTION (REC solo quando è rilevato movimento)
S: SCHEDULE (REC continuo)
X: MANUAL (REC manuale)
Il sistema registrerà video simultaneamente da 4 canali con le modalità di registrazione MOTION,
SCHEDULE e MANUAL. Uno dei quattro canali avrà l'audio disponibile. Quando il sistema effettua la
registrazione MOTION, l'audio passerà automaticamente al canale attivato dal movimento.
La registrazione non può essere interrotta fino a 30 secondi dall'inizio della registrazione. Questa
operazione di sistema è concepita per prolungare la vita totale della scheda di memoria. Per
interrompere la registrazione, premere REC/DEL una volta. Per rimuovere la scheda di memoria,
spegnere prima il sistema.
Se in modalità di registrazione SCHEDULE, il sistema riprenderà automaticamente la registrazione 60
secondi dopo l'interruzione manuale della registrazione. Se in modalità di registrazione MOTION, il
sistema riprenderà la funzione di rilevamento del movimento 60 secondi dopo che la registrazione è
stata interrotta manualmente. La registrazione deve essere interrotta prima che l'utente possa
80
Page 81

accedere al menu principale del sistema e il sistema riprenderà la modalità QUAD dopo una pausa di
due minuti.
Premere ESC per uscire.
Sensibilità rilevamento di movimento:
Utilizzare ▲▼ per selezionare la sezione MOTION DETECTION SENSITIVITY.
Utilizzare ◄► per evidenziare la telecamera per la configurazione.
Utilizzare ▲▼ per regolare il livello di sensibilità: OFF / LV1 / LV2 / LV3 (LV3 è la più sensibile).
Premere ESC per uscire.
Formato scheda di memoria
Utilizzare ▲▼ per selezionare FORMAT STORAGE, premere MENU per accedere. Premere MENU
nuovamente per confermare e iniziare la formattazione della scheda di memoria.
Nota: Se è utilizzata una nuova scheda di memoria, essa deve essere formattata prima dell'uso.
Premere ESC per uscire.
Area mascheramento:
Utilizzare ▲▼ per selezionare la sezione MASKING AREA.
Utilizzare ◄► per evidenziare la telecamera per la configurazione, premere MENU per accedere.
Utilizzare ◄► ▲▼ per evidenziare la griglia per nessun rilevamento di movimento in quest'area.
81
Page 82

Utilizzare il tasto MENU per mascherare/smascherare la griglia. Movimenti che hanno luogo all'interno
dell'area mascherata saranno ignorati.
Utilizzare ◄►▲▼ per selezionare un'altra griglia per la configurazione o premere ESC per uscire.
Tempo registrazione:
Utilizzare ▲▼ per selezionare la sezione RECORD TIME.
Utilizzare ◄► per evidenziare il periodo di registrazione: 2 Min / 5 Min / 10 MIN, premere MENU per
confermare.
Premere ESC per uscire.
Lista eventi
Selezionare EVENT LIST, premere il tasto MENU una volta per accedere al sottomenu.
Riproduzione:
Utilizzare ◄►▲▼ per evidenziare l'indice DATE desiderato per la riproduzione. Premere MENU per
confermare la scelta e accedere alla cartella selezionata.
82
Page 83

Premere ◄►▲▼ per selezionare le Ore (ciascun blocco rappresenta un'ora di tempo). Premere
MENU per accedere.
Utilizzare ◄►▲▼ per evidenziare il file desiderato per la riproduzione. Premere MENU per avviare la
riproduzione.
Ogni cartella RECORDED FILE è indicata con il tempo di inizio / fine e il tipo di file registrato.
Orario d'inizio = PM10:33
Orario fine = PM10:43
Canale 1 è un file registrato MOTION
Canale 1 è un file registrato
PROGRAMMATO
Canale 1, 2, 3 e 4 sono file registrati
manuali (C = Continuo)
Nota: Come impostazione predefinita, il display di riproduzione sarà QUAD (immagine visualizzata da
tutte le telecamere accoppiate al monitor). ■田 □1 □2 □3 □4 è la riproduzione di tutti i canali.
Per display telecamera singola, premere MENU una volta dopo che la riproduzione è passata a PAUSE.
Utilizzare ◄► per selezionare da canale a canale. L'indicatore di canale (schermo in basso a sinistra)
indicherà il numero di canale selezionato.
□田 ■1 □2 □3 □4 è la riproduzione del canale 1 a schermo intero
□田 □1 ■2 □3 □4 è la riproduzione del canale 2 a schermo intero
83
Page 84

□田 □1 □2 ■3 □4 è la riproduzione del canale 3 a schermo intero
□田 □1 □2 □3 ■4 è la riproduzione del canale 4 a schermo intero
Impostazione sistema
Selezionare SYSTEM SETUP, premere il tasto MENU una volta per accedere al sottomenu.
Data e ora:
Utilizzare ▲▼ per evidenziare DATE e TIME, premere MENU per accedere.
Utilizzare ◄► per evidenziare la regolazione: YEAR / MONTH / DATE / HOUR / MINUTE.
Utilizzare ▲▼ per regolare ciascuna sezione e premere MENU per confermare la regolazione.
Premere ESC per uscire.
Uscita TV:
Utilizzare ▲▼ per selezionare TV OUTPUT. Premere MENU per accedere.
Utilizzare ◄► per evidenziare NTSC o PAL (per l'Europa), premere MENU per confermare la selezione.
Premere ESC per uscire.
Nota: la modifica dell'uscita del sistema TV può influenzare la scala di immagine visualizzata.
84
Page 85

Risparmio energetico:
Non rilevante per questo modello (solo per monitor LCD).
Display arresto multicanale:
Utilizzare ▲▼ per selezionare MULTI CHANNELS IDLE DISPLAY. Premere MENU per accedere.
Utilizzare ◄► per selezionare: DISPLAY QUAD DURANTE LA SOSTA / A 5 SEC INTERVALLO / A 10
SEC INTERVALLO / A 15 SEC INTERVALLO, premere MENU per confermare la scelta e uscire.
Modalità di visualizzazione QUAD Intervallo 5 secondi
85
Page 86

Intervallo 10 secondi Intervallo 15 secondi
Nota:
1. L'impostazione della telecamera ON/OFF nella sezione CAMERA SETUP influenzerà quale canale
può essere visualizzato durante IDLE DISPLAY.
2. Audio (canale singolo in qualsiasi momento) sarà disponibile durante la modalità QUAD (come
predefinita sul canale 1 o il successivo canale disponibile con una telecamera accoppiata al sistema),
modalità schermo intero (interruttore automatico per la visualizzazione dei canali), o il canale
azionato dal movimento.
3. Il canale audio resterà collegato finché il canale è attivato.
4. Se si imposta un intervallo di 5/10/15 sec., selezionare SCAN ACTIVATED CAMERAS per ottenere
questa modalità di visualizzazione.
Valore predefinito:
Utilizzare ▲▼ per selezionare DEFAULT. Premere MENU per accedere.
Utilizzare ◄► per selezionare la lingua di sistema per SYSTEM RESTORE, premere MENU per
confermare la selezione e il sistema sarà ripristinato alle impostazioni di fabbrica (solo INGLESE
DISPONIBILE).
Premere ESC per uscire.
86
Page 87

Allarme acustico
Selezionare ALARM BUZZER, premere MENU per ACCENDERE o SPEGNERE il buzzer. Quando è
rilevato movimento da una telecamera, un buzzer suonerà attraverso l'altoparlante del monitor.
Panoramica/inclinazione/zoom
Selezionare PAN TILT ZOOM, premere MENU nuovamente per accedere alla modalità ZOOM,
premere MENU nuovamente per accedere nuovamente allo zoom (2X).
Quando si zooma, utilizzare ▲▼◄► per selezionare varie aree di visualizzazione. Premere MENU
per ridurre.
In riduzione (1X), utilizzare ▲▼ per cambiare il canale disponibile.
Premere ESC per uscire.
Telecamere attivate da scansione
Selezionare SCAN ACTIVATED CAMERAS, premere MENU una volta per iniziare in modalità di
scansione della telecamera.
87
Page 88

Nota:
1. L'impostazione della telecamera ON/OFF nella sezione CAMERA SETUP influenzerà quale canale
può essere visualizzato durante IDLE DISPLAY. Si veda Configurazione intervallo di visualizzazione
arresto multicanale.
2. Il sistema attiva automaticamente la schermata QUAD se la funzione di registrazione è attivata.
Sovrascrivere la scheda di memoria
Selezionare MEMORY CARD OVERWRITE, premere MENU una volta per attivare la funzione di
sovrascrittura e premere MENU nuovamente per disattivare.
NOTA:
1. Uno dei seguenti esempi apparirà sul display.
A. 1.89GB - spazio disponibile sulla scheda di memoria.
B. ERROR - la scheda di memoria è mancante, bloccata o danneggiata.
2. Se la scheda di memoria è piena, il sistema visualizzerà “MEMORY FULL PLEASE FORMAT” sulla
schermata di anteprima, se la sovrascrittura non è selezionata.
Software riproduzione:
Sec24 Media Player è sviluppato per riprodurre i file registrati dal proprio sistema di telecamera
wireless.
Inserire il CD-ROM incluso nella confezione nel proprio PC o notebook. Apparirà automaticamente una
finestra di pop-up.
Aprire la cartella e fare clic sull'icona .exe
Se la finestra di pop-up non appare, fare clic su RISORSE DEL COMPUTER, e doppio clic sull'unità
assegnata al CD-ROM dal PC o dal notebook (ad es.: E:)
Fare doppio clic per aprire e selezionare Sec24 media player. Fare doppio clic per avviare
l'installazione.
Seguire la procedura di installazione per la completa installazione del software.
Al termine dell'installazione, viene visualizzata un'icona di collegamento sul desktop:
Nota: altri non possono riprodurre i file registrati senza
Sec24 Media Player; è per la protezione della propria privacy.
Fare doppio clic sul collegamento per aprire Sec24 Media Player.
Appare la seguente schermata.
88
Page 89

1
34
5
2
678 9
1. Schermata riproduzione canale 1 7. Pausa
2. Schermata riproduzione canale 2 8. Stop
3. Schermata riproduzione canale 3 9. Riavvolgimento rapido
4. Schermata riproduzione canale 4 10. Avanzamento rapido
5. Barra di avanzamento riproduzione 11. Carica file registrato
6. Riproduzione 12. Selezione abilita/disabilita canale
Per la riproduzione dei file registrati, fare clic su “Load” per importare i file registrati (file SNX).
Durante la riproduzione, tutti e quattro i canali saranno riprodotti una volta. Per questioni di privacy,
l'utente è in grado di disabilitare manualmente i canali audio e/o video.
Selezionare Audio per disattivare il suono.
Selezionare 1 per disattivare l'immagine video dal canale 1.
Selezionare 2 per disattivare l'immagine video dal canale 2.
Selezionare 3 per disattivare l'immagine video dal canale 3.
Selezionare 4 per disattivare l'immagine video dal canale 4.
Nota: inserire la scheda Micro SD nel proprio PC o notebook prima di avviare il Sec24 Media Player.
10
11
12
Tempo di registrazione totale per schede di memoria:
Capacità scheda Micro SD 640x480 (VGA)
1G 60 minuti
2G 110 minuti
8G 400 minuti
16G 950 minuti
32G 1880 minuti
89
Page 90

Manutenzione:
Pulire solo con un panno asciutto. Non utilizzare solventi detergenti o abrasivi.
Garanzia:
Non sarà accettata alcuna garanzia o responsabilità in relazione a cambiamenti e modifiche del
prodotto o a danni determinati dall’uso non corretto del prodotto stesso.
Disclaimer:
- Il design e le caratteristiche tecniche sono soggetti a modifica senza necessità di preavviso.
- Tutti i marchi a logo e i nomi di prodotto sono marchi commerciali o registrati dei rispettivi titolari e
sono riconosciuti come tali in questo documento.
- Questo manuale è stato redatto con cura. Tuttavia da esse non possono essere avanzati diritti. König
Electronic non può accettare responsabilità per errori in questo manuale nè per eventuali
conseguenze.
- Tenere questo manuale e la confezione per riferimento futuro.
Smaltimento:
• Questo prodotto è progettato per la raccolta differenziata nei punti di raccolta appropriati.
Non smaltite il prodotto con la spazzatura domestica.
• Per maggiori informazioni, contattate il rivenditore o l'autorità locale responsabile per la
gestione dei rifiuti.
ESPAÑOL
Sistema de cámaras inalámbrico
Introducción:
Vigile sus propiedades con esta nueva cámara de seguridad digital inalámbrica de 2.4 GHz. La cámara
ofrece una imagen estable y muy nítida, y la tecnología que incorpora mejora aún más la calidad de la
imagen. El sistema utiliza tecnología inalámbrica digital y está equipado con unas capacidades muy
avanzadas de encriptación de la señal de frecuencia, que reducen las interferencias causadas por
otros aparatos que utilicen la banda de frecuencia de 2.4 GHz. Esta tecnología digital garantiza su
privacidad y le permite utilizarla a una distancia extra-larga.
El receptor y la cámara ya están emparejados de fábrica. Cuando añada una cámara adicional
SEC-TRCAM30 (4 cámaras máximo) al sistema, por favor consulte la sección EMPAREJAR para
añadir las cámaras.
• Le recomendamos que lea este manual antes de instalar/utilizar el sistema de cámaras.
• Guarde este manual en lugar seguro para futuras consultas.
Contenido del embalaje SEC-TRANS50: Conteni
1 Cámara con soporte 1 Cámar
1 Receptor 1 Antena
1 Mando a distancia (pila incluida) 1 Adaptador CA/CC
1 Antena para la cámara
1 Software para PC de reproducción de vídeo (CD-ROM)
1 Cable de conexión RCA Audio/Vídeo
2 Adaptadores CA/CC
Especificaciones técnicas:
Cámara:
Frecuencia de transmisión: 2.408-2.474 GHz Digital
Modulación: FHSS
Rango: Interiores ±50 m, Áreas abiertas ±150 m (dependiendo de las
condiciones locales)
Chip de imagen: CMOS con Interruptor de paso de IR
Lente: 3,6mm
do del embalaje SEC-TRCAM30:
a con soporte
90
Page 91

Ángulo de visión: H: 60±3º / V: 43±3º
Iluminación de infrarrojos (LED): 5 M
Protección: IP66
Micrófono: mono
Temperatura de funcionamiento: -10℃ ~ 50℃
Tensión: 5 V CC/1A
Dimensiones: 130x61x67 mm
Peso: 365 g (cable incluido)
Receptor:
Frecuencia de recepción: 2.408-2.474 GHz Digital
Canales: 4
Tarjeta SD: hasta 32 GB (no incluida)
Velocidad de fotogramas del vídeo: 25 fps (máx.), 16 fps (4 cámaras)
Velocidad de fotogramas de grabación: 25 fps por canal
Resolución de vídeo: QVGA
Formato de Vídeo: ASF
Nivel de salida de vídeo: 1.2±0.2 Vp-p/75 Ohm
Nivel de salida de audio: 1 Vp-p/600 Ohm, mono
Conector de salida audio/vídeo: Conector telefónico de 3.5 mm
Rango: Interiores ±50 m, Áreas abiertas ±150 m (dependiendo de las
Temperatura de funcionamiento: -10℃ a +50℃
Tensión: 5 V CC/1A
Dimensiones: 122x122x26 mm
Peso: 395 g
condiciones locales)
Precauciones de seguridad:
• En caso de mal funcionamiento, no abra la cámara ni el receptor. Estos productos sólo deben
abrirse por un ingeniero cualificado.
• No sumerja la cámara en líquido.
• No exponga el receptor al agua ni a la humedad.
• No exponga el receptor ni la cámara a altas temperaturas (vea las especificaciones técnicas)
• No instale el sistema cerca de fuertes campos magnéticos, como un altavoz. Esto puede afectar a la
calidad.
91
Page 92

Descripción del producto:
Mando a distancia Receptor
Monitor Menú Reproducción
1 Indicador de ENLACE
2
Interruptor de
3
CANAL
4 BAJAR Volumen
5 SUBIR Volumen
6 MENÚ
Interruptor de
7
CANAL
8 ESCAPE SALIR ANTERIOR
GRABAR /
9
DETENER
10 ZOOM SIGUIENTE
11 ALARMA
12 ENCENDIDO/APAGADO
Cursor
ARRIBA
Cursor
IZQUIERDA
Cursor
DERECHA
ACEPTAR /
ENTRAR
Cursor
ABAJO
BORRAR DETENER
AVANCE RÁPIDO
BAJAR Volumen /
Cambiar el CANAL de la
pantalla
SUBIR Volumen /
Cambiar el CANAL de la
pantalla
REPRODUCIR / PAUSA
RETROCESO rápido
Modo
grabación
Otros
Indicador de
ENCENDIDO
92
Page 93

Cámara:
1
3
2
4
1 Antena
2 Soporte de la Cámara
3 Entrada de alimentación 5V CC
4 Botón de emparejamiento
En el frente de la cámara LED ROJO de ENCENDIDO
En el frente de la cámara LED VERDE de enlace con el receptor
Instrucciones de instalación:
Hacia entrada de Video Compuesto
Encendido
Cable de salida
de Vídeo
93
Page 94

Monte la cámara en una pared (o el
techo). Realice un taladro de 15mm
para que lo atraviese el cable
Instrucciones para el Usuario:
Indicaciones en la Pantalla
Los siguientes iconos OSD se podrán ver en la imagen.
Indicador de señal
Indicador de canal
Indicador de grabación
Indicador de canal de audio
Pantalla Quad (4 imágenes)
Escáner de pantalla
Pantalla única
Volumen completo
Volumen medio
Silencio
Energía
Hora del sistema
Zoom x1
Zoom x2
Opcional: Inserte una tarjeta Micro
SD. Insértela sólo con el receptor
Apagado
94
Page 95

Vista general del menú
El siguiente diagrama muestra una visión general completa del menú del sistema
95
Page 96

Menú del sistema
Pulse MENU para acceder al menú principal. Tras entrar al sistema [MAIN MENU], por defecto
aparecerá destacado EVENT LIST. El sistema quedará inactivo en [MAIN MENU] durante 2 minutos
antes de salir de [MAIN MENU].
Utilice ▲▼◄►para seleccionar. Pulse MENU para confirmar la selección y acceder al sub-menú.
Configurar la cámara
Seleccione CAMERA SETUP, pulse una vez la tecla MENU para acceder al sub-menú.
Utilice ▼▲ para seleccionar la cámara a configurar (1-4).
Utilice ◄► para seleccionar [PAIRING] [BRIGHTNESS] [CAMERA ON/OFF].
96
Page 97

Emparejar:
Con la sección PAIRING destacada, pulse una vez la tecla MENU para comenzar el emparejamiento
de la cámara. Empareje y el LED de la cámara parpadeará una vez, después parpadeará
continuamente, indicando que la transmisión de datos está en proceso.
El sistema confirmará que el proceso de emparejamiento ha tenido éxito indicando “PAIRED” en la
pantalla.
El sistema indicará que el proceso de emparejamiento ha fallado mostrando “PAIRING FAIL” en la
pantalla.
Pulse ESC para volver al menú principal.
Nota: la cámara está emparejada de fábrica por defecto. El proceso de emparejamiento debe seguirse
cuando se añadan cámaras adicionales (SEC-TRCAM30).
Brillo:
Con la sección BRIGHTNESS destacada, utilice ▼▲ para ajustar el brillo de la cámara.
Pulse ESC para volver al menú principal.
Activación:
97
Page 98

Con la sección ACTIVATION destacada, utilice ▼▲ para habilitar o deshabilitar una cámara.
Pulse ESC para volver al menú principal.
Nota: asegúrese de que las cámaras estén emparejadas con el receptor para que SCAN o QUAD
funcionen correctamente. Cámara “ON” sólo puede seleccionarse cuando la cámara ha sido
emparejada con el sistema.
Configurar el grabador
Seleccione RECORDER SETUP, pulse una vez la tecla MENU para acceder al sub-menú.
Horario:
Utilice ▲▼◄► para seleccionar. Hay tres opciones de grabación diferentes disponibles para escoger.
Primero destaque el período de tiempo y pulse la tecla MENU para alternar entre los distintos modos
de grabación.
M: MOTION (Sólo graba cuando detecta movimiento)
S: SCHEDULE (Grabación continua)
X: MANUAL (Grabación manual)
El sistema grabará vídeo simultáneamente desde los 4 canales con los modos de grabación MOTION,
SCHEDULE y MANUAL. Uno de los cuatro canales tendrá disponible el audio. Cuando el sistema
realice grabación MOTION, el audio pasará automáticamente al canal disparado por el movimiento.
La grabación no puede detenerse hasta 30 segundos después de haber comenzado. El
funcionamiento de este sistema está diseñado para prolongar la vida de la tarjeta de memoria. Para
detener la grabación pulse una vez REC/DEL. Para extraer la tarjeta de memoria, por favor apague
primero el sistema.
Si se encuentra en modo de grabación SCHEDULE, el sistema retomará la grabación
automáticamente 60 segundos tras haberse detenido manualmente. Si se encuentra en modo de
grabación MOTION, el sistema retomará la detección de movimiento 60 segundos tras haberse
detenido manualmente. La grabación debe detenerse antes de que el usuario pueda acceder al menú
principal del sistema, y el sistema retomará el modo QUAD tras estar inactivo durante dos minutos.
98
Page 99

Pulse ESC para salir.
Sensibilidad de la detección de movimiento:
Utilice ▲▼para seleccionar la sección MOTION DETECTION SENSITIVITY.
Utilice ◄► para destacar la cámara a configurar.
Utilice ▲▼ para ajustar el nivel de sensibilidad: OFF / LV1 / LV2 / LV3 (LV3 es el más sensible).
Pulse ESC para salir.
Formatear la tarjeta de memoria:
Utilice ▲▼ para seleccionar FORMAT STORAGE, pulse MENU para acceder. Pulse de nuevo MENU
para conformar y comenzar el formateo de la tarjeta de memoria.
Nota: Si se utiliza una tarjeta de memoria nueva, deberá formatearse antes del uso.
Pulse ESC para salir.
Ocultar un área:
Utilice ▲▼ para seleccionar la sección MASKING AREA.
Utilice ◄► para destacar la cámara a configurar, pulse MENU para acceder.
Utilice ◄► ▲▼ para destacar la cuadrícula en cuya área no se detectará movimiento.
99
Page 100

Utilice la tecla MENU para ocultar/descubrir cuadrícula(s). Los movimientos que tengan lugar en el
interior del área ocultada serán ignorados.
Utilice ◄►▲▼ para seleccionar otra cuadrícula a configurar o pulse ESC para salir.
Tiempo de grabación:
Utilice ▲▼ para seleccionar la sección RECORD TIME.
Utilice ◄► para destacar el período de grabación: 2 Min / 5 Min / 10 MINS, pulse MENU para
confirmar.
Pulse ESC para salir.
Lista de eventos
Seleccione EVENT LIST, pulse una vez la tecla MENU para acceder al sub-menú.
Reproducción:
Utilice ◄►▲▼ para destacar el índice de fecha deseado para la reproducción. Pulse MENU para
confirmar la selección y entrar a la carpeta seleccionada.
100
 Loading...