

Page 1
SAS-TRANS60/U
SAS-TRCAM40/U
MANUAL (p. 2)
ANLEITUNG (S. 14)
MODE D’EMPLOI (p. 27)
GEBRUIKSAANWIJZING (p. 40)
MANUALE (p. 53)
MANUAL DE USO (p. 66)
MANUAL (p. 79)
HASZNÁLATI ÚTMUTATÓ (o. 92)
KÄYTTÖOHJE (s. 105)
BRUKSANVISNING (s. 117)
NÁVOD K POUŽITÍ (s. 130)
MANUAL DE UTILIZARE (p. 142)
ΕΓΧΕΙΡΙΔΙΟ XPHΣHΣ (σελ. 155)
BRUGERVEJLEDNING (s. 168)
VEILEDNING (s. 181)
ИНСТРУКЦИЯ (193 стр.)
KILAVUZ (s. 206)
KASUTUSJUHEND (lk. 219)
NÁVOD (s. 232)
ROKASGRĀMATA (lpp. 245)
NAUDOJIMO VADOVAS (258 p.)
PRIRUČNIK (str. 271)
РЪКОВОДСТВО (p. 284)
INSTRUKCJA OBSŁUGI (str. 297)
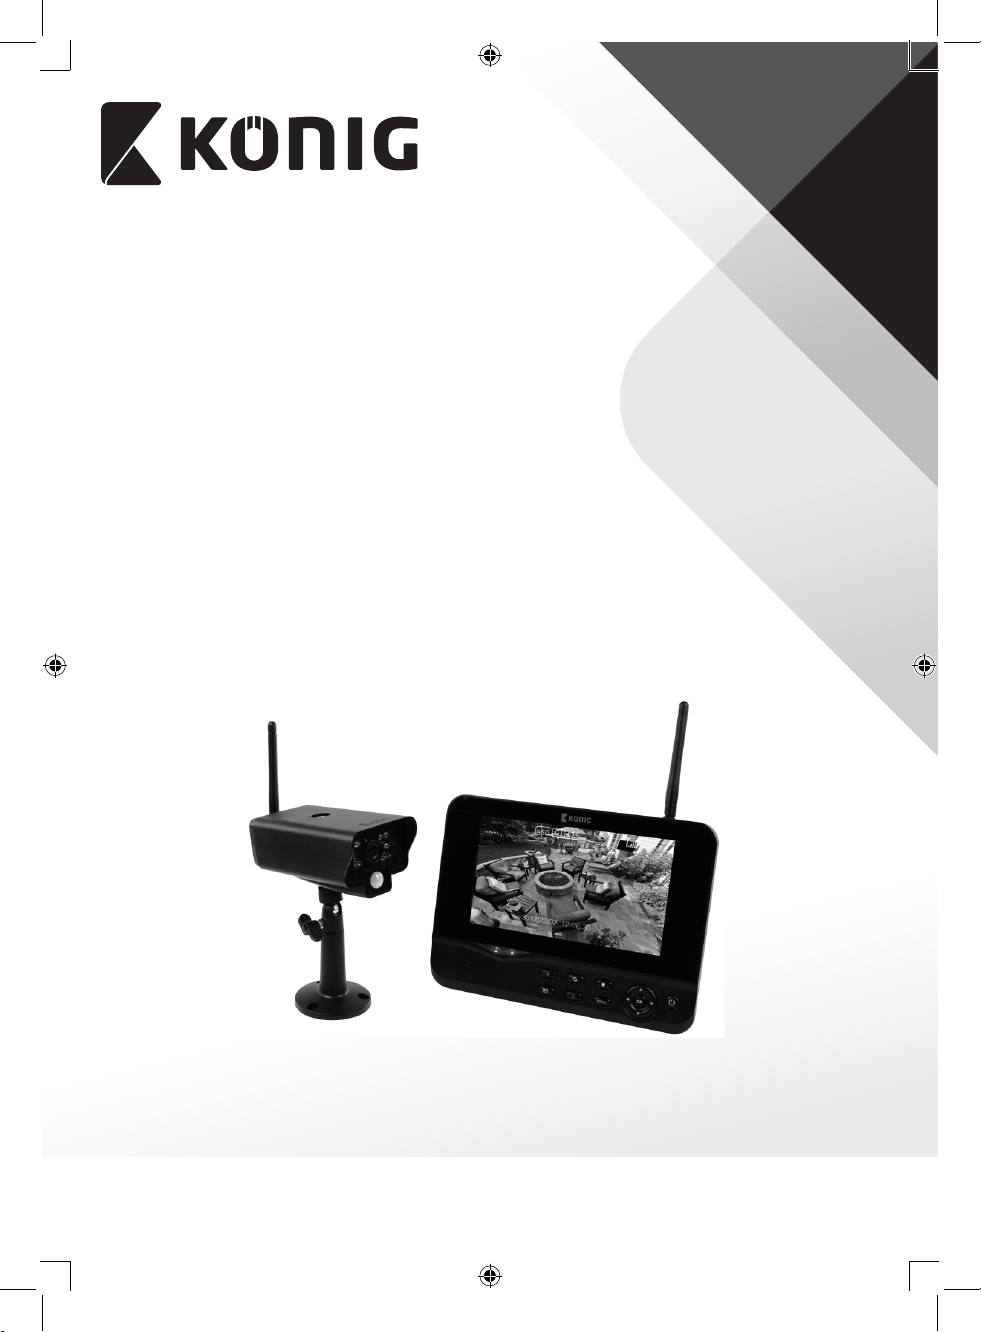
Wireless Camera System
Page 2

ENGLISH
Introduction:
Watch over your properties with this new 2.4 GHz digital wireless security camera system. The
7” LCD monitor can support up to 4 cameras and has an integrated digital video recorder.
The camera oers a very sharp and stable image with night vision and the technology used
improves the image quality even further. The system uses digital wireless technology and is
equipped with advanced frequency signal encryption capabilities, which reduce interference
caused by other applications using the 2.4 GHz frequency band. This digital technology
ensures your privacy and allows you to use it over an extra long distance. THE BEST THAT
WIRELESS HAS TO OFFER.
The monitor and camera are paired by factory default already. When adding the additional
camera SAS-TRCAM40/U (4 cameras max.) to the system, please refer to the section PAIRING
for adding cameras.
• We recommend that you read this manual before installing/using the camera system.
• Keep this manual in a safe place for future reference.
Packaging content:
1x camera with bracket
1x 7” monitor
2x antenna
1x AV output cable
2x AC/DC power supply
Technical specications:
Camera:
Transmitting frequency: 2.4-2.4835 GHz Digital
Modulation: 16QAM, QPSK, BPSK
Range: Indoor ±50 m, open area ±150 m (depending on local
conditions)
Image chip: 1/4” CMOS
Lens: 2.0mm
View angle: 73°
Infrared illumination (LED): 5 M
Protection: IP54
Microphone: mono
Working temperature: -10°C ~ 50°C
Voltage: 5 V DC/400 mA
Dimensions: 132x64x57mm (without bracket)
Weight: 287 g (included cable)
LCD monitor:
Receiving frequency: 2.4-2.4835 GHz Digital
Channels: 4
2
Page 3

Size: 7” TFT/LCD
Max. resolution: 800 RGB (H)* 480 (V) pixels
SD card: up to 32 GB (not included)
Video frame rate: 25 fps (max.) 10 fps (4x cameras)
Recording frame rate: 25 fps per channel
Video resolution: CIF/VGA
Video format: AVI
USB: 2.0
Menu language: English, German, French and Dutch
Video output level: 1 Vp-p/75 Ohm
Audio output level: 2Vrms@600ohm mono
Audio/video output
connector: 2.5mm jack (2.5mm cable to 3 x RCA included)
Range: Indoor ±50 m, open area ±150 m
(depending on local conditions)
Operating temperature: 0°C to +40°C
Voltage: 5 V DC/650 mA
Dimensions: 214x157x26 mm
Weight: 488 g
ENGLISH
Safety precautions:
• Do not open the camera or monitor in the event of a malfunction. These products should
only be opened by a qualied engineer.
• Do not submerge the camera in liquid.
• Do not expose the monitor to water or humidity.
• Do not expose the monitor or camera to high temperatures (see technical specications).
• Do not install the system close to strong magnetic elds, such as a speaker. This may aect
the quality.
3
Page 4
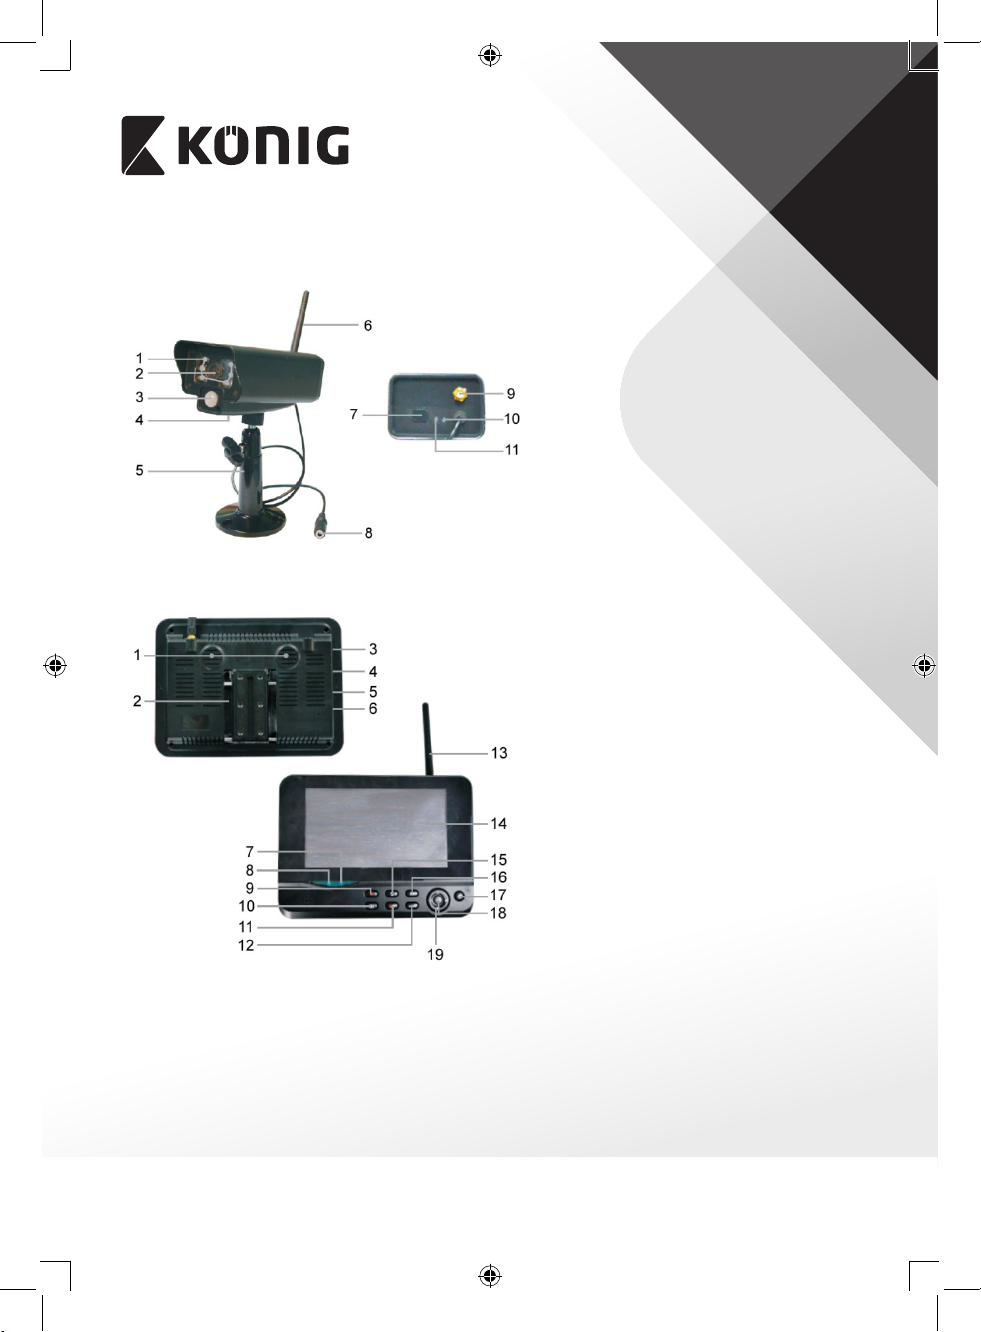
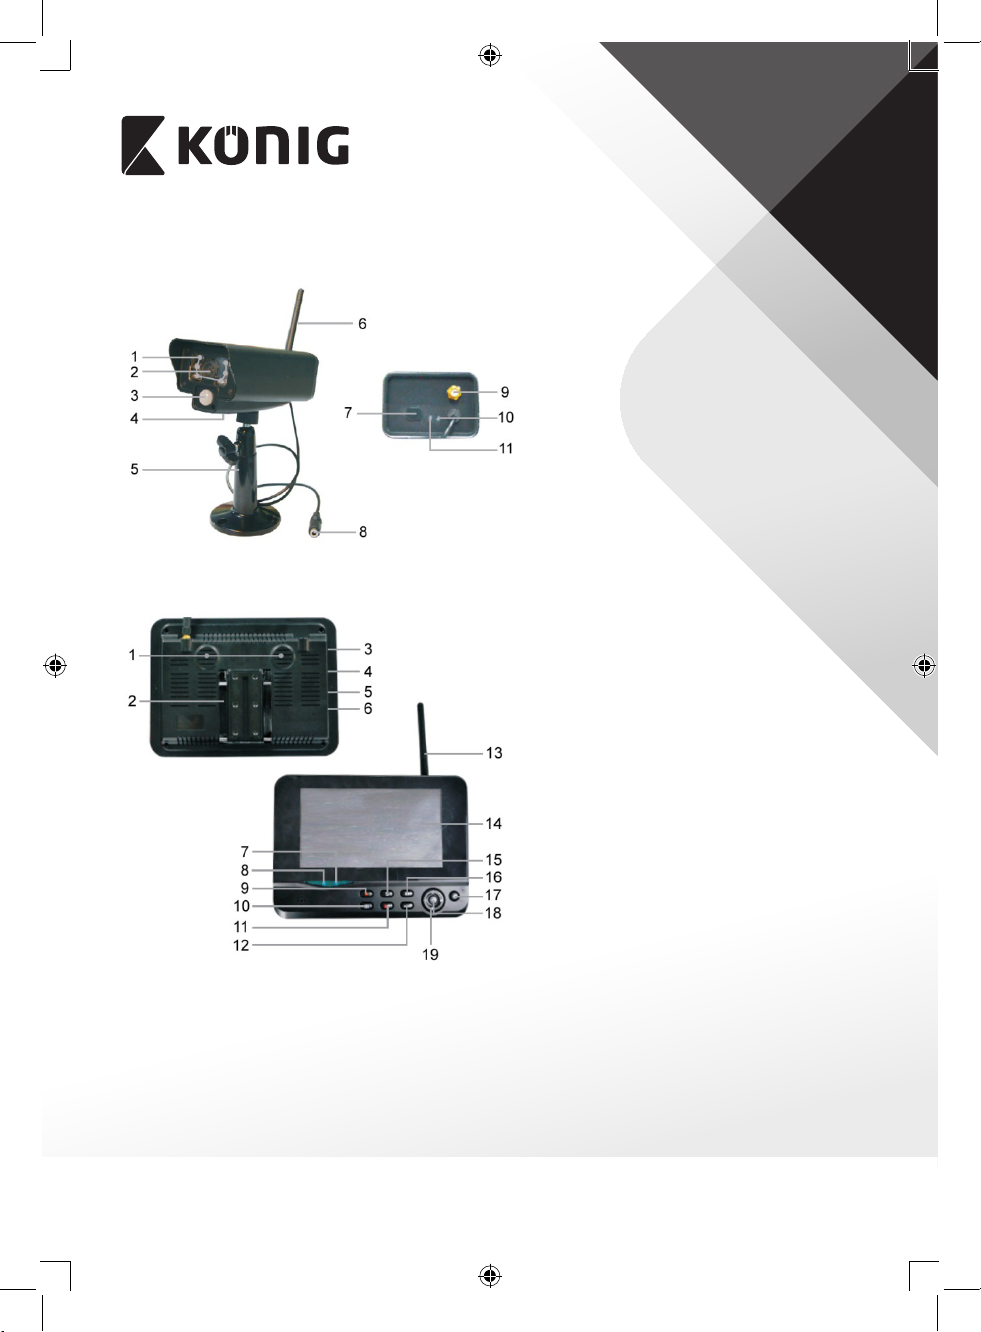
Product description:
Camera:
Monitor:
ENGLISH
1. Infrared LEDs
2. Lens
3. PIR infrared sensor
4. Microphone
5. Bracket
6. Antenna
7. Pair Button
8. Power Input
9. Antenna Socket
10. Link Indicator
11. Power Indicator
1. Speaker
2. Bracket
3. USB Port
4. SD Card Slot
5. AV Output
6. Power Port
7. Link Indicator
8. Power Indicator
9. Record/stop Video
10. Quarter Display Button
11. Delete le/LCD, TV Switch
12. Menu
13. Antenna
14. 7” TFT-LCD
15. Display Mode
16. Playback Video
17. Power on/o
18. OK Button
19. Navigate Button
4
Page 5

ENGLISH
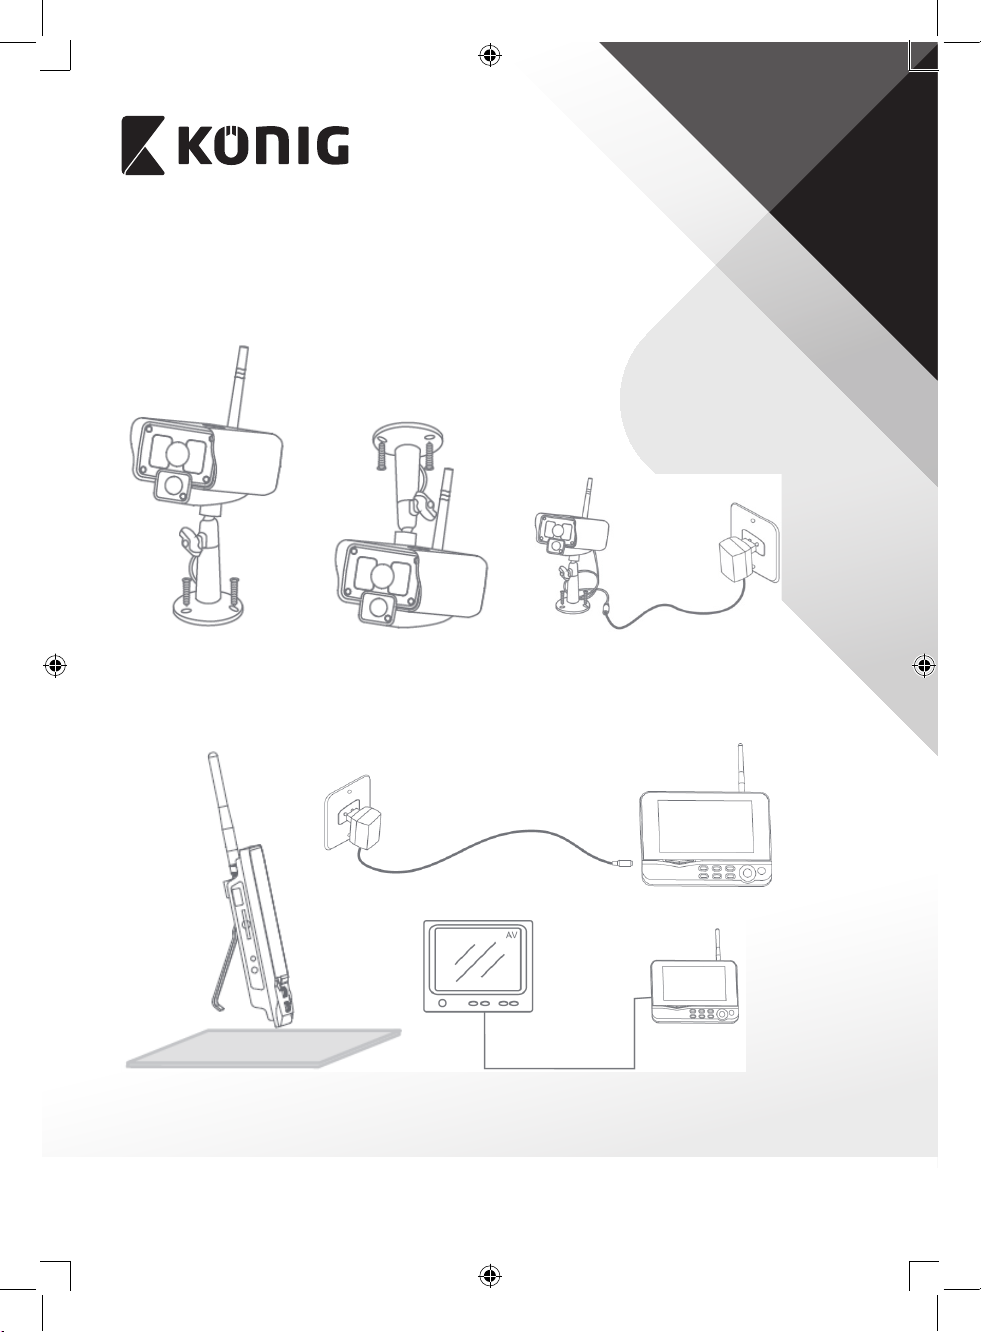
Installation instructions:
Camera:
The camera can be mounted in dierent ways. For ceiling mounting use the screw thread
on top of the camera. After mounting the camera connect the AC/DC power supply to the
camera and a wall outlet.
Monitor:
The monitor can be placed on a at surface or mounted to the wall. After placing the monitor
connect the AC/DC power supply to the monitor and a wall outlet. The camera is powered
on automatically after connecting the AC/DC power supply. Optional: the monitor can be
connected to a monitor with the video output of the monitor.
Video Cable
5
Page 6

ENGLISH
User instructions:
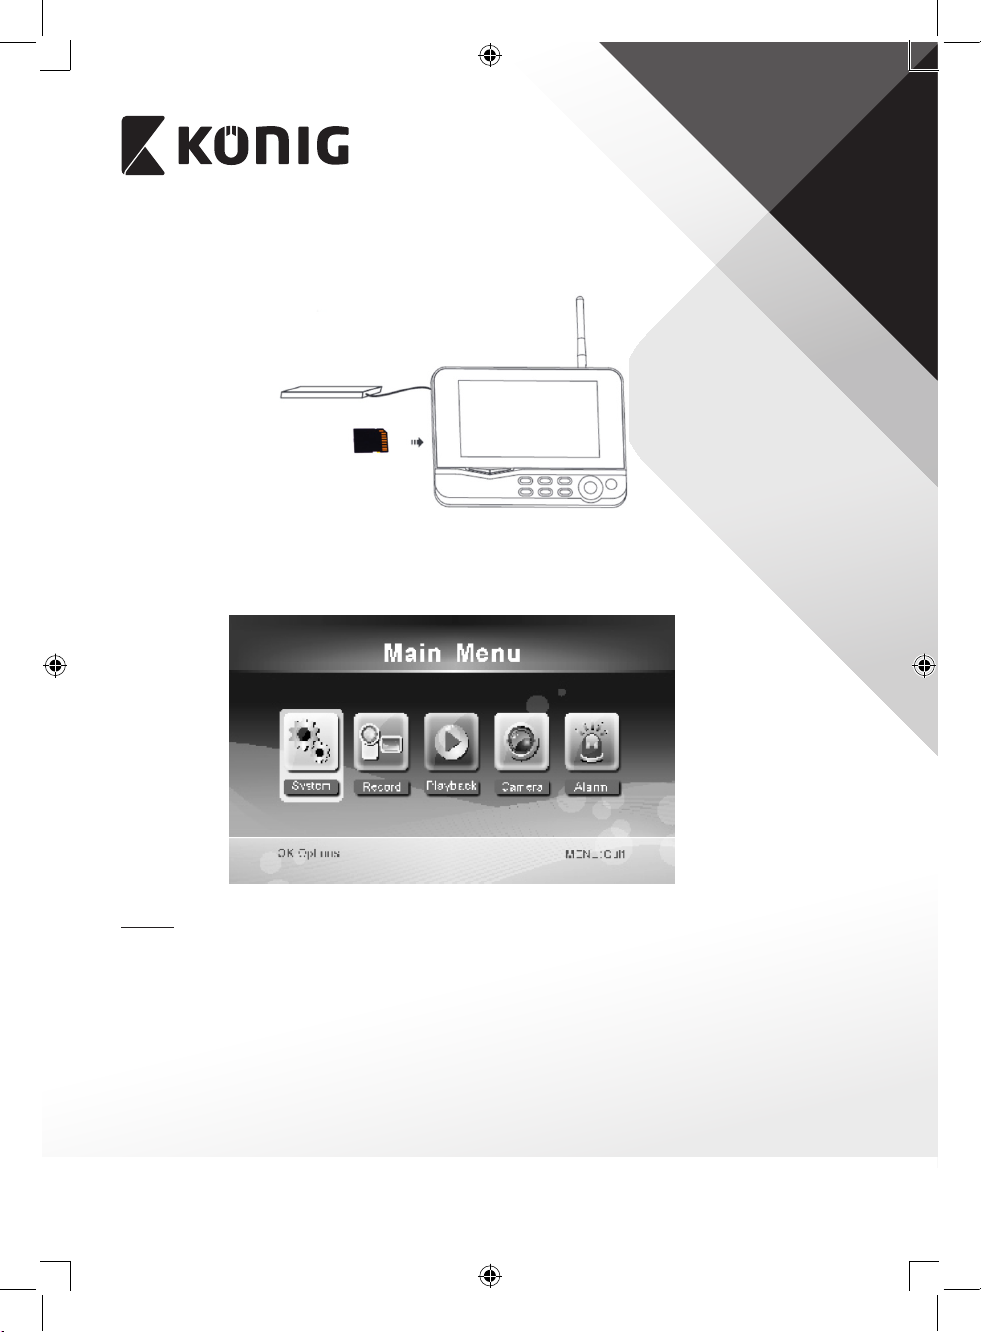
1. Insert an SD card in the SD card slot of the monitor. Or connect an external hard disk
drive to the USB port of the monitor.
2. Press the power on/o button for about 2 seconds to power on the monitor. The power
indicator should light up and the picture appear.
3. For systems settings press the menu button to open the main menu. The following
screen should appear. Use the navigate, OK and menu buttons to navigate through the
menu.
System
1. Press OK to enter the system settings. The system oers the following options:
Date/Time Set the time and date.
Language Set the language.
Record Mode Set to stop recording or overwrite the rst video record when
the storage medium is full.
Format SD/USB Set to format the storage medium.
Storage for Recording Set the storage medium.
Display Items Set to display RSSI, Time, SD/USB status and camera on the
screen and the recorded video.
6
Page 7

ENGLISH
TV System Select a TV system (PAL for Europe).
System Information Shows the system information.
Scan Mode Period Set the cyclic display interval of the monitoring picture on the
camera.
Mute Turns on/o the speaker on the monitor.
Load Default Reset the factory default settings.
Record Date/Time Set to display the current recording time and date on the
recorded video.
Brightness Adjust brightness of the picture.
Volume Adjust the volume.
2. Select date/time with the navigate button and press OK to enter the date/time setting.
• Press the left or right arrow button to select.
• Press the up or down arrow button to adjust.
• Press the OK button to conrm.
• Press the MENU button to exit.
3. Select language with the navigate button and press OK to enter the language setting.
• Press the down or up arrow button to select language.
• Press the OK button to conrm and exit.
4. Select record mode with the navigate button and press OK to enter the record mode
setting.
• Press the up or down arrow button to select “Normal” or “Overwrite”.
• Press the OK button to conrm and exit.
Remarks:
Normal: When the SD card or the mobile hard disk is full, the system stops recording
automatically.
Overwrite: When the SD card or the mobile hard disk is full, the system automatically deletes
the rst video and reserves sucient storage space to guarantee latest recording.
5. Select format SD/USB with the navigate button and press OK to enter the format SD/USB
setting.
• Press the up or down arrow button to select “Cancel”, “SD Card” or “USB Device”.
- Cancel: cancels formatting.
- SD Card: formats the SD card.
- USB Device: formats the external hard disk drive (if connected).
• Press the OK button to format.
• After formatting, the system shows “Format Successfully”, indicating that formatting
succeeds.
• Press the OK button to conrm and exit.
6. Select storage for recording with the navigate button and press OK to enter the storage
for recording setting.
• Press the up or down button to select “SD Card” or “USB Device”.
• Press the OK button to conrm and exit.
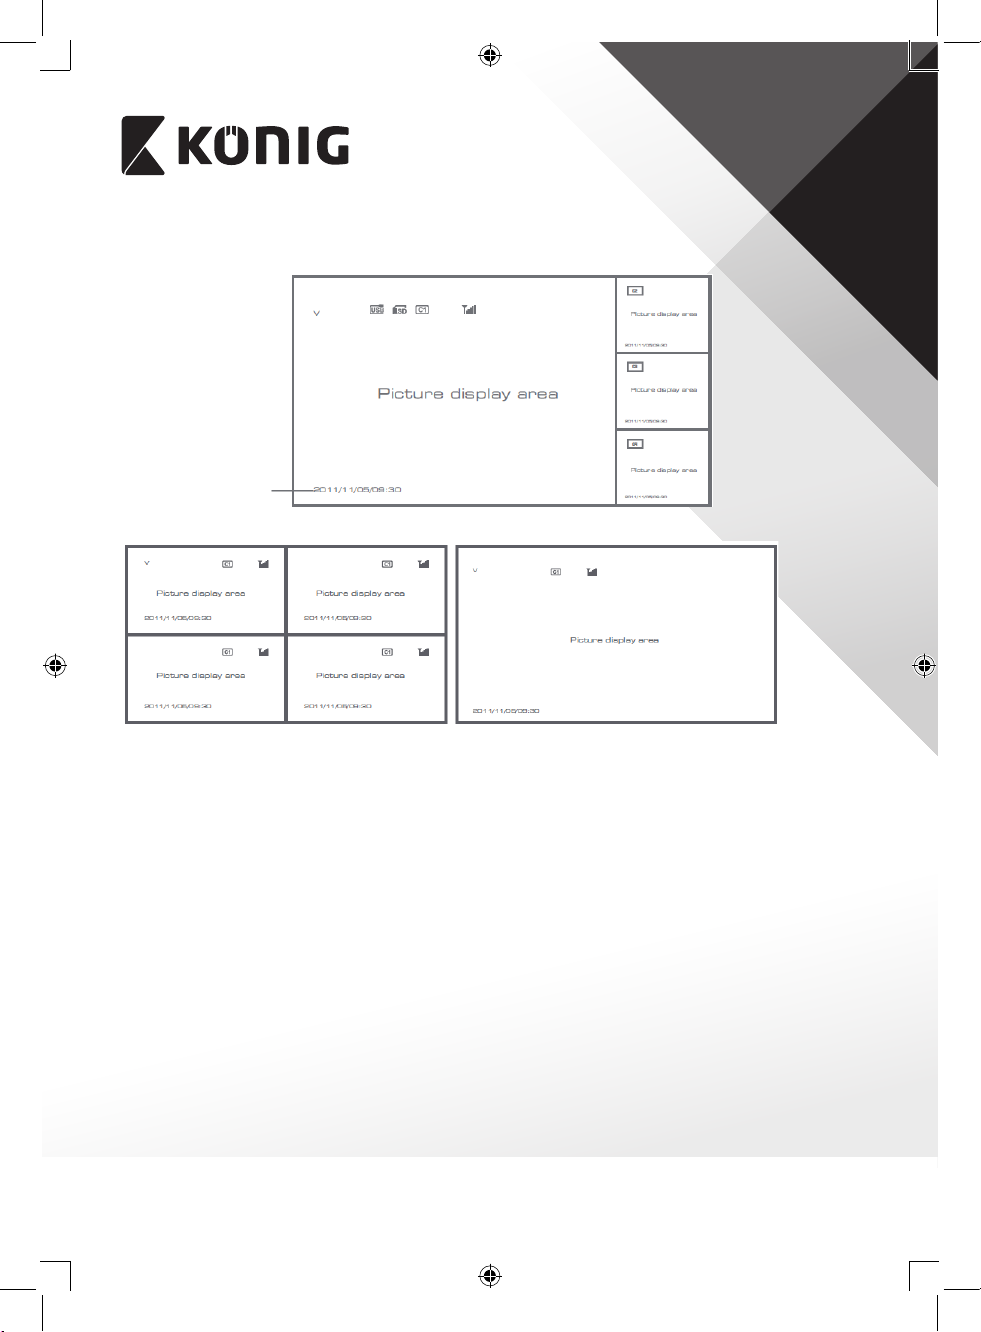
7. Select display items with the navigate button and press OK to enter the display items
setting.
7
Page 8

ENGLISH
• Press the up or down arrow button to select.
• Click the OK button to conrm the display items in the picture.
- RSSI: Signal intensity icon
- SD USB status: Whether the SD card or mobile hard disk is inserted
- Camera: Camera name icons
• After setting, press the MENU button to conrm and exit.
8. Select TV system with the navigate button and press OK to enter the TV system setting.
• Press the up or down button to select NTSC or PAL (PAL for Europe).
• Press OK button to conrm and exit.
9. Select system information with the navigate button and press OK to enter the system
information setting.
• Press OK to see the information about the system.
• Press the menu button to exit.
10. Select system upgrade with the navigate button and press OK to enter the system
upgrade setting.
• Press the up or down arrow button to select.
• Press OK.
• Press the record/stop video button to conrm.
11. Select scan mode period with the navigate button and press OK to enter the scan mode
period setting.
• Press the up or down arrow button to select the period for scanning the connected
cameras.
• Press the OK button again to conrm and exit.
12. Select mute with the navigate button and press OK to enter the mute setting.
• Press the up or down arrow button to select “On” or “O”.
• Press the OK button again to conrm and exit.
13. Select load default with the navigate button and press OK to enter the load default
setting.
• Press the up or down button to select “Cancel” or “OK”.
- Cancel: Cancels option default settings.
- OK: Resets default settings.
• Press the OK button to conrm and exit.
14. Select brightness with the navigate button and press OK to enter the brightness setting.
• Press the left or right arrow button to adjust the brightness.
• Press the OK button to conrm and exit.
15. Select volume with the navigate button and press OK to enter the volume setting.
• Press the left or right arrow button to adjust the volume.
• Press the OK button to conrm and exit.
Note: The volume can also be adjusted with the up or down arrow in live view monitoring.
16. Press menu to return to the main menu.
Record
Press the right arrow button in the main menu to select the record settings and press OK.
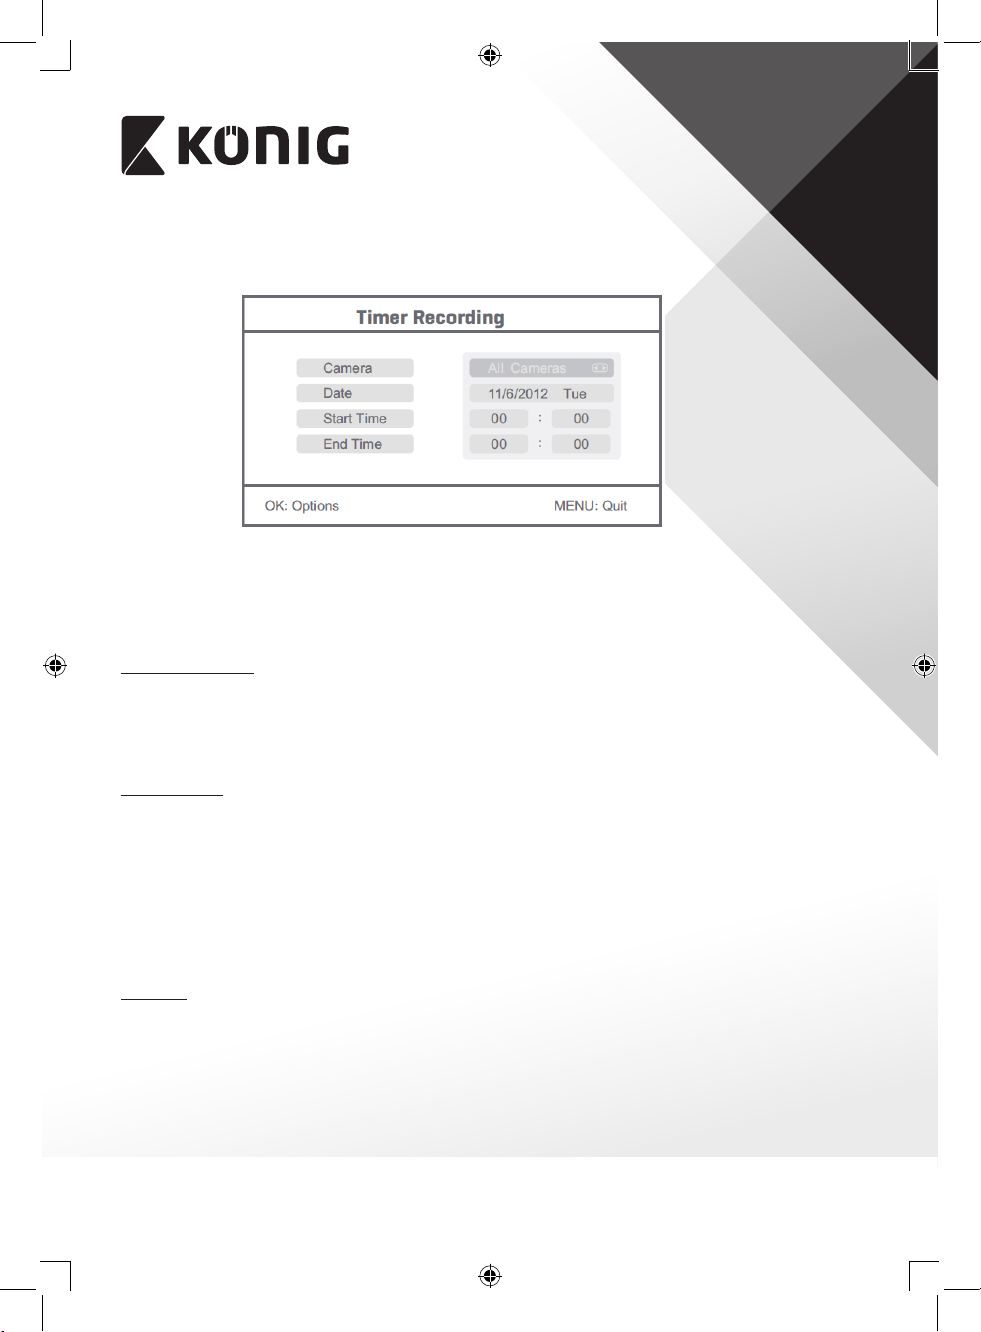
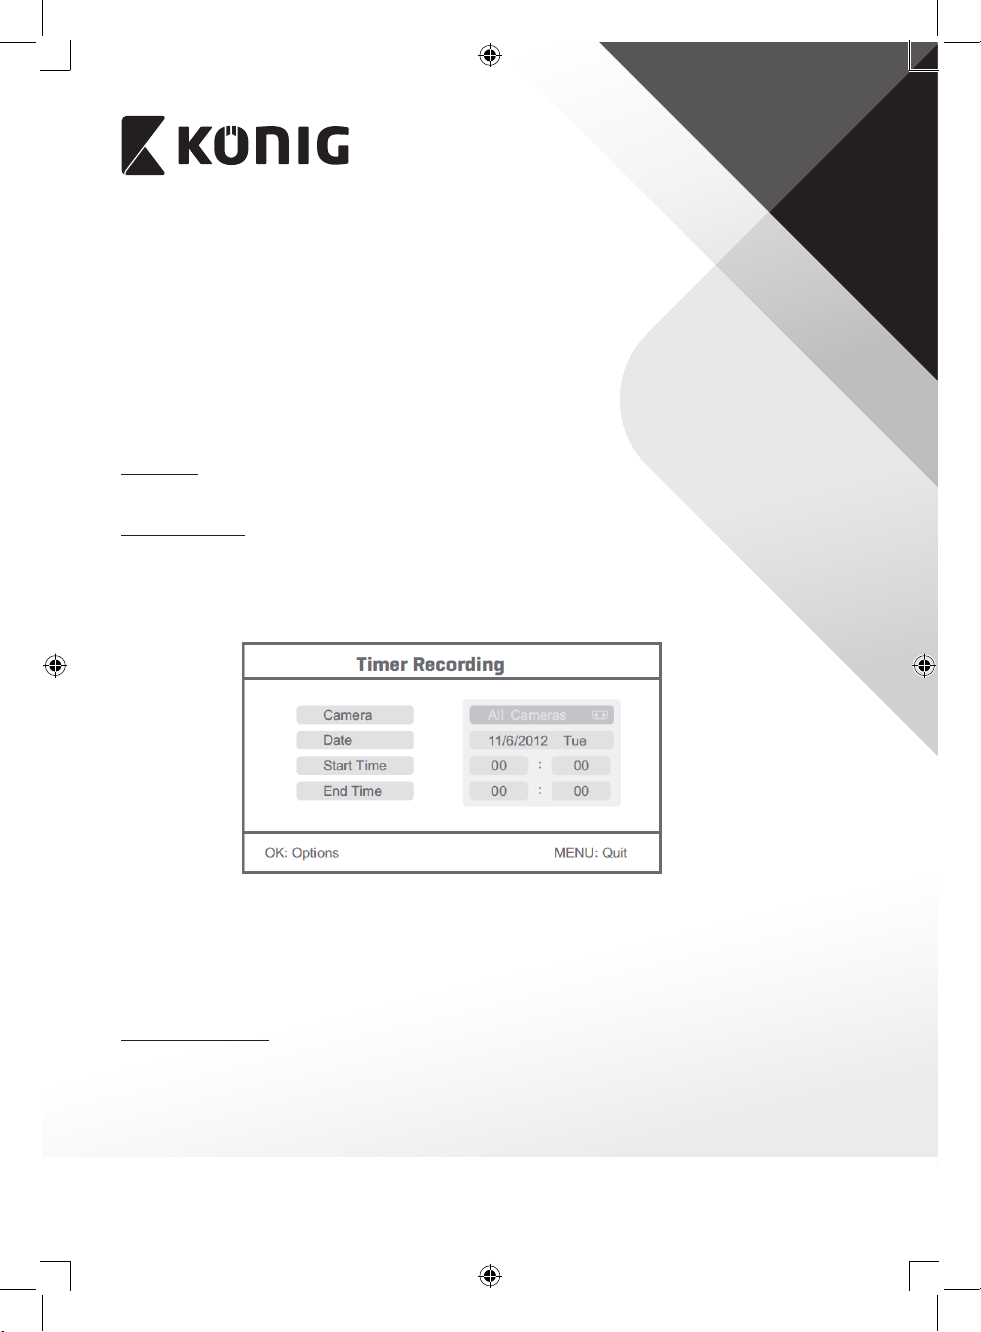
Timer Recording:
Set the recording start/stop time through the “Timer Recording” menu. The device
automatically records according the set start/stop time.
8
Page 9
ENGLISH
1. Select timer recording with the navigate button and press OK to enter a new schedule
setting.
• Press OK to enter the timer recording menu.
• Press the up or down arrow button to select.
• Press the left or right button to adjust.
• Press the OK button to conrm and exit.
2. After setting, the device automatically records according to the set start/stop time.
3. If you press the record/stop video button on the device during the recording process, set
by timer recording, the recording stops.
Manual Recording:
1. In live view monitoring, press the left and right arrow buttons to select the camera for
video recording.
2. Press the record/stop video button on the device. The recording icon is displayed on the
screen, indicating that recording is starting.
3. Press the button on the device again to stop recording.
PIR Recording:
PIR Recording: If there is human motion detected by any accessed camera, recording can be
triggered.
1. Select PIR recording with the navigate button and press OK to enter the PIR recording
setting.
• Press the up or down button to select the camera.
• Press the left or right arrow button to select “On”.
• Press the OK button to conrm and exit.
Note: when “O” is set, the motion detection function is turned o. The infrared sensing
distance of PIR is 5m. If the distance exceeds 5m, sensing may fail.
Playback
Press the right arrow button in the main menu to select the playback settings and press OK.
Note: for playback functions it’s necessary that an SD card is inserted or an external hard disk
drive is connected.
The playback function can also be accessed in live view monitoring by pressing the playback
video button.
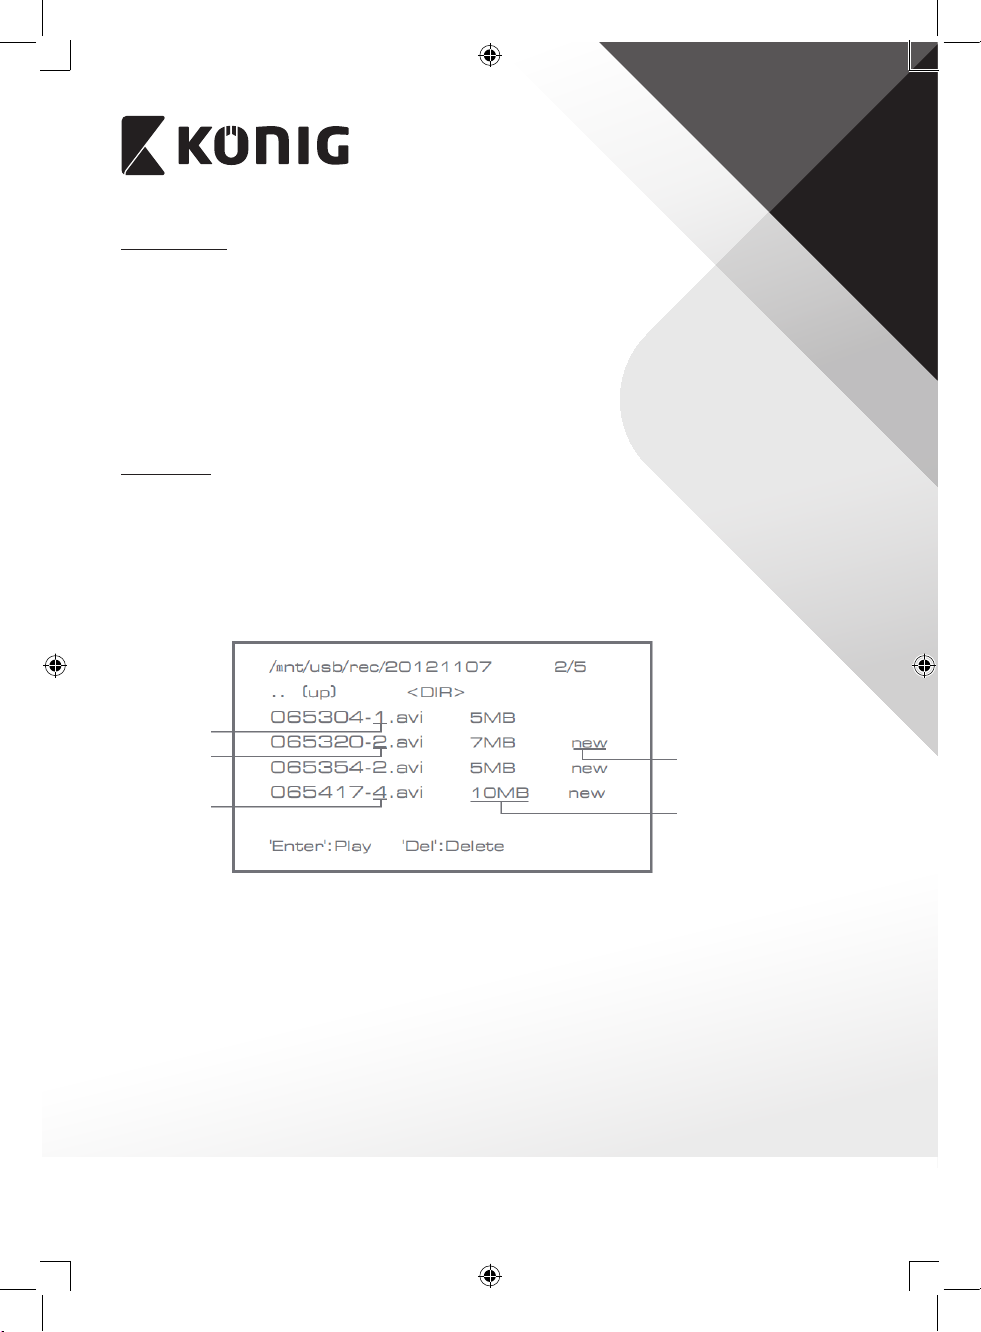
1. Press the up or down arrow button to select the folder.
2. Press the OK button to conrm and enter.
9
Page 10

Camera 1
Camera 2
ENGLISH
Not browsed
Camera 4
3. Press the up or down arrow button to select the video le.
4. Press the OK button for playback.
5. Press the left or right arrow button to go backward/forward in fastforward.
6. Press the OK button again to pause.
7. Press the MENU button to quit the playback.
Delete video
In video playback mode, press the up or down arrow button to select the video or video
folder to be deleted.
• Press the delete le/LCD button on the monitor to delete it.
Note: only an empty folder can be deleted as folder.
Camera
When adding the additional camera SAS-TRCAM40/U (max. 4) the camera needs to be paired
to the system for the system to recognize the camera.
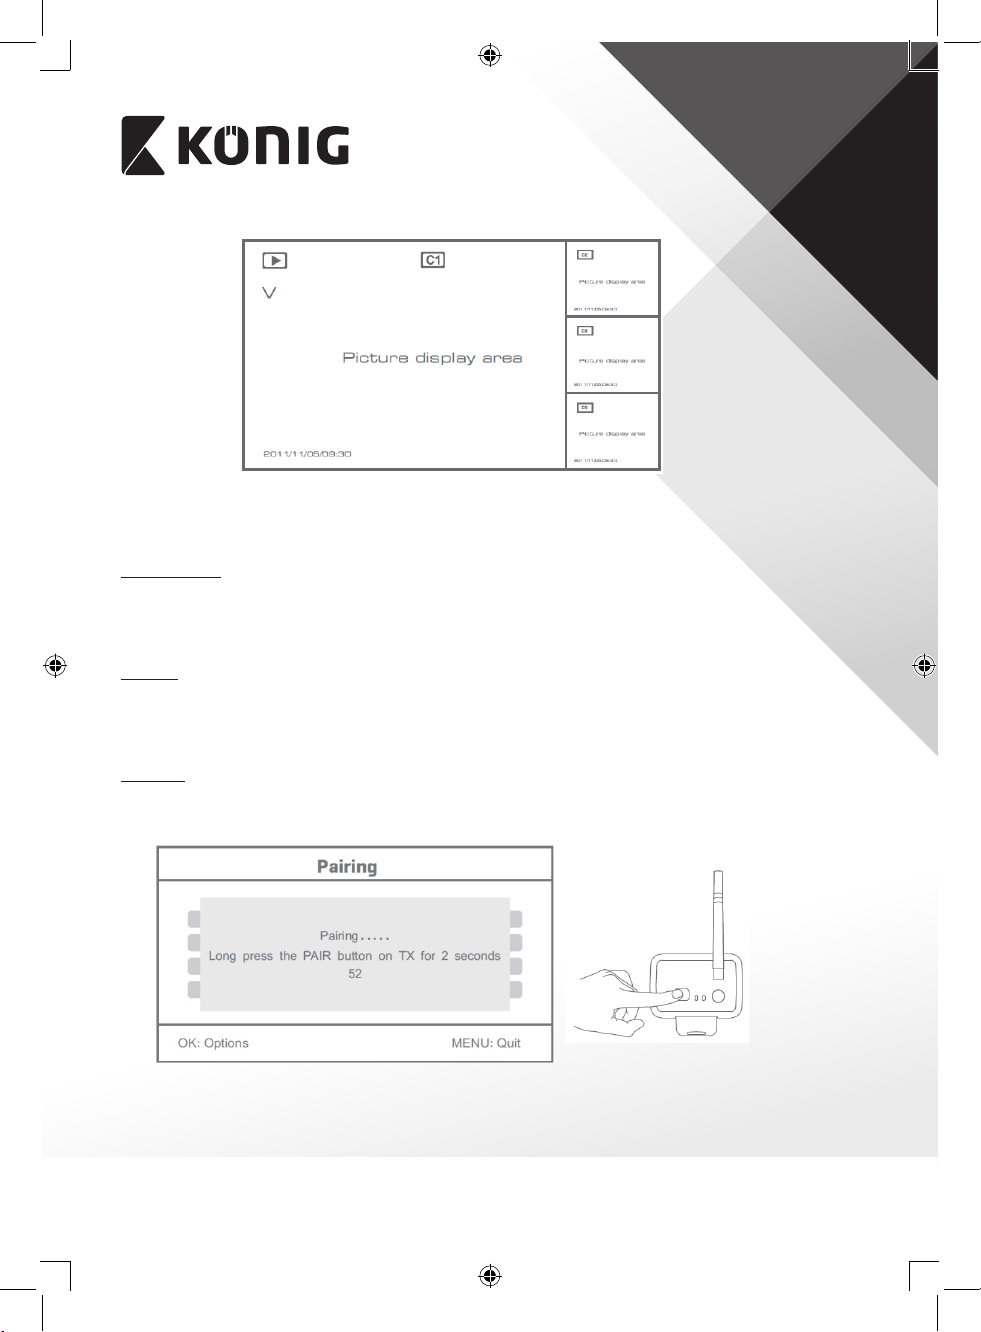
Press the right arrow button in the main menu to select the camera settings and press OK.
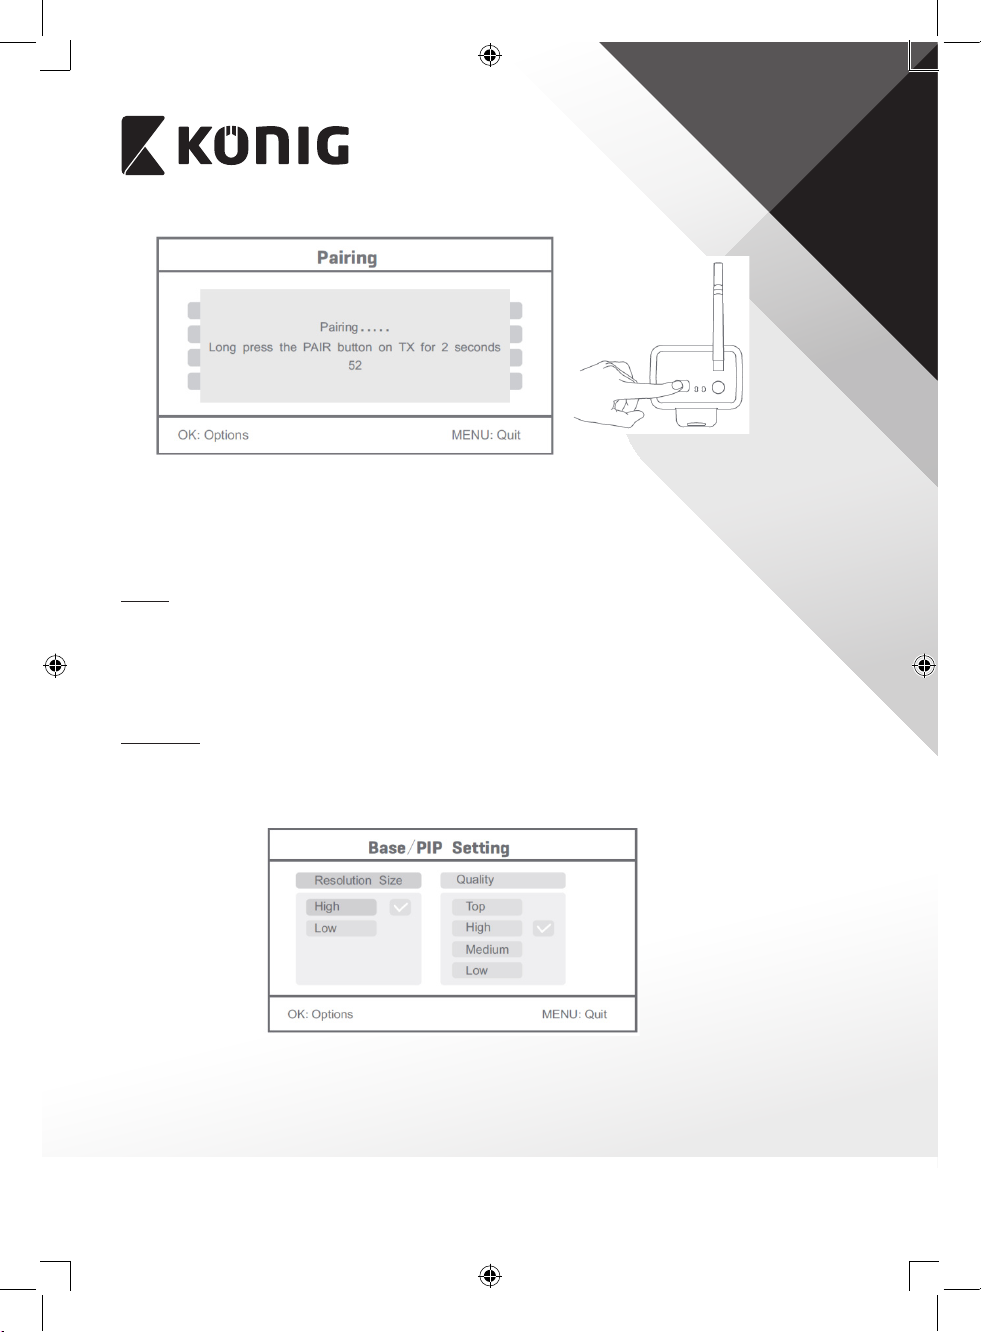
Pairing:
1. Press OK to enter the pairing menu.
2. Select the camera with the up and down arrow buttons.
3. Press OK, and the following screen will appear.
File size
10
Page 11
ENGLISH
4. Press the pair button within 60 seconds for 2 seconds on the backside of the camera.
5. After the successful pairing of the camera and the monitor, the monitor shows PAIRING
OK.
6. Press the menu button to return to the camera menu.
Note: if pairing fails, retry the above steps and be sure that the monitor and camera are not
further away than 2 metres for pairing procedure.
Active:
1. Select active with the down arrow button and press OK.
2. Press the up or down arrow button to select the camera.
3. Press the left or right arrow button to select “On” or “O”.
4. Press the OK button to conrm and exit.
Note: only paired cameras can be set to active or not active. When a camera is set to o, it
cannot be seen in live view, recorded, etc.
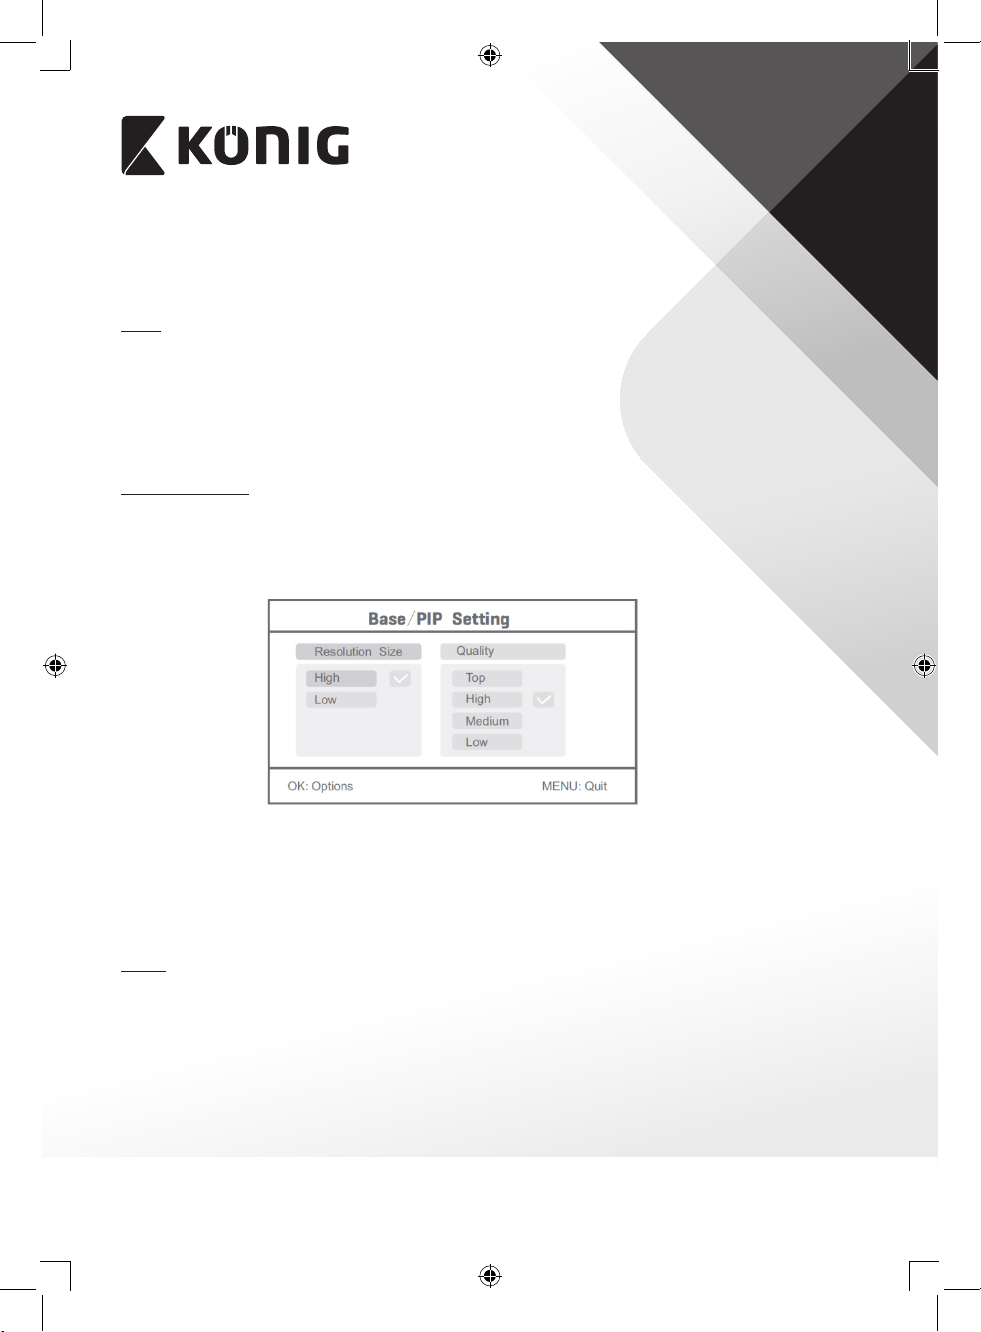
PIP setting:
Set the picture resolution size and recording quality.
1. Select PIP setting with the up and down arrow buttons and press OK.
2. Select the camera with the up and down arrow buttons and press OK. The following
screen appears.
3. Press the left or right arrow button to select “Resolution Size” or “Quality”.
4. Press the up or down arrow button to select “Top”, “High”, “Medium” or “Low”.
5. Press the OK button to adjust.
6. Press the MENU button to conrm and exit.
Note: the high resolution size is VGA and low is CIF.
11
Page 12

Alarm
When PIR detection is set to on, the system will give an alarm when motion is detected.
1. Select alarm in the main menu and press OK.
2. The screen shows PIR detection, press OK.
3. Press “On” or “O” with the up and down arrow button.
4. Press OK to conrm and exit.
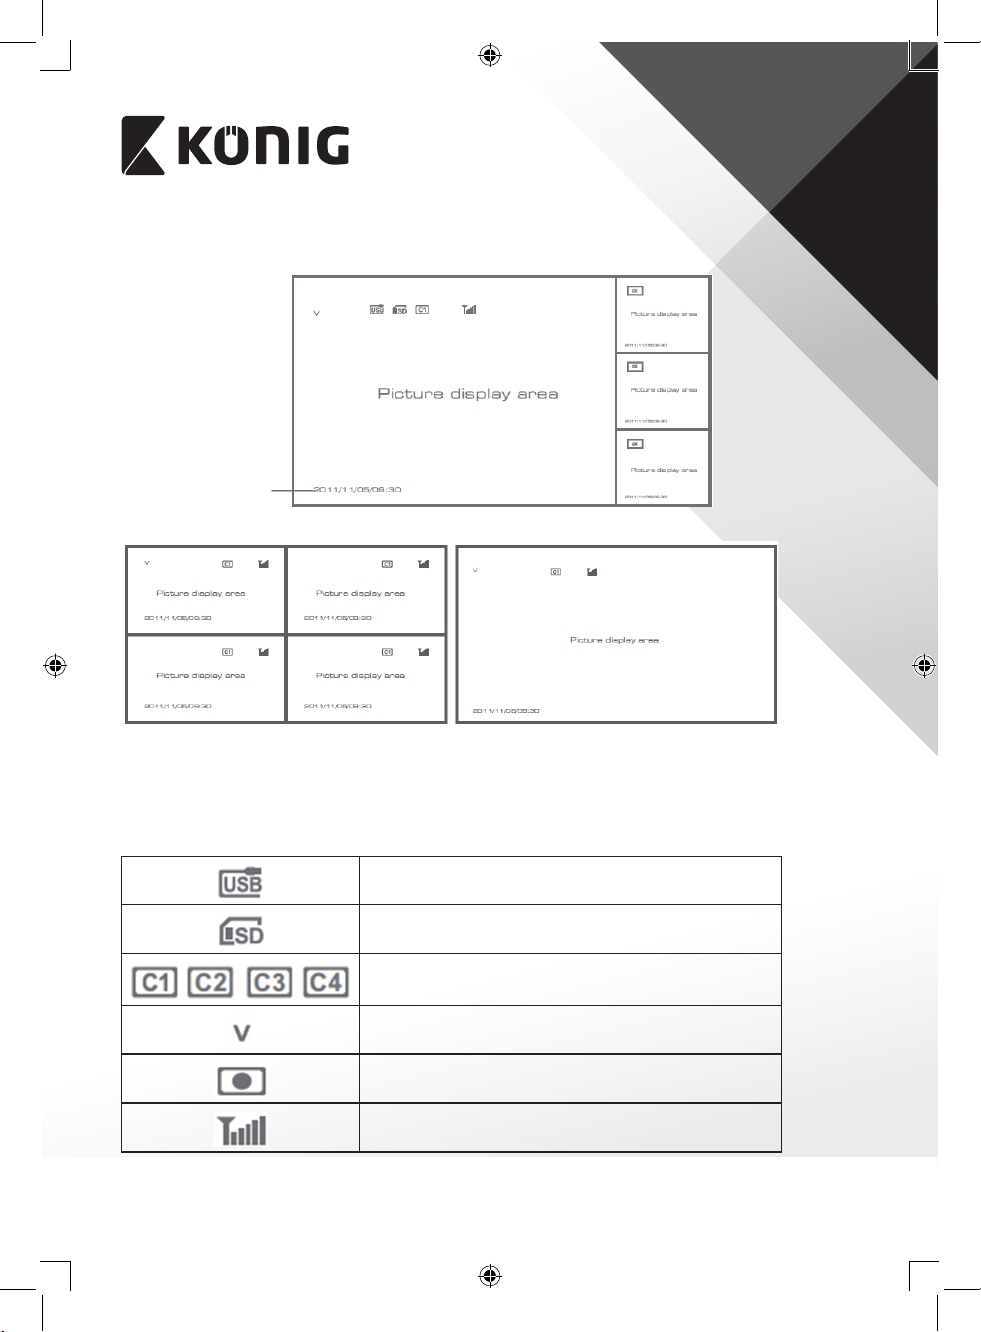
Live view:
Press the quarter display button to select the type of view.
Time stamp
Picture in picture view
ENGLISH
Quad view Full screen view
Note: use the left and right arrow button to select a camera.
Press the display mode button to enter cyclic mode view. Five cyclic intervals are available:
5s, 10s, 15s, 20s, and 30s and can be set under System > Scan Mode Period in the main menu.
12
Page 13
ENGLISH
Mobile hard disk inserted successfully
SD card inserted successfully
Camera name
Current camera
Recording status
Signal intensity
Maintenance:
Clean the product only with a dry cloth.
Do not use cleaning solvents or abrasives.
Warranty:
Any changes and/or modications to the product will void the warranty. We cannot accept any liability for damage caused by
incorrect use of this product.
Disclaimer:
Designs and specications are subject to change without notice. All logos, brands and product names are trademarks or registered
trademarks of their respective holders and are hereby recognized as such.
Disposal:
• This product is designated for separate collection at an appropriate collection point.
Do not dispose of this product with household waste.
• For more information, contact the retailer or the local authority responsible for waste management.
This product has been manufactured and supplied in compliance with all relevant regulations and directives, valid for all member
states of the European Union. It also complies to all applicable specications and regulations in the country of sales.
Formal documentation is available upon request. This includes, but is not limited to: Declaration of Conformity (and product
identity), Material Safety Data Sheet, product test report.
Please contact our customer service desk for support:
via website: http://www.nedis.com/en-us/contact/contact-form.htm
via e-mail: service@nedis.com
via telephone: +31 (0)73-5993965 (during oce hours)
NEDIS B.V., De Tweeling 28, 5215 MC ’s-Hertogenbosch, THE NETHERLANDS
13
Page 14

DEUTSCH
Einführung:
Überwachen Sie Ihr Eigentum mit diesem neuen 2,4 GHz digitalen FunkÜberwachungskamerasystem. Der 18 cm (7") LCD-Monitor kann bis zu 4 Kameras
unterstützen und verfügt über einen integrierten digitalen Videorekorder. Die Kamera bietet
ein sehr scharfes und stabiles Bild mit Nachtsicht, und die verwendete Technologie verbessert
die Bildqualität noch weiter. Das System verwendet digitale Funktechnologie und ist mit
modernsten Frequenzsignal-Verschlüsselungsfunktionen ausgestattet, die die Störungen
auf Grund von anderen Anwendungen unter Verwendung des 2,4 GHz-Frequenzbandes
verringern. Diese digitale Technologie sorgt für Ihre Privatsphäre und ermöglicht Ihnen die
Verwendung auf einer extra langen Strecke. DAS BESTE, WAS FUNK ZU BIETEN HAT.
Der Monitor und die Kamera sind bereits werkseitig standardmäßig gekoppelt. Sollte eine
zusätzliche Kamera SAS-TRCAM40/U (4 Kameras max.) zu dem System hinzugefügt werden,
lesen Sie den Abschnitt: KOPPELN und weitere Kameras hinzufügen.
• Wir empfehlen Ihnen, dieses Handbuch zu lesen, bevor das Kamerasystem installiert/
verwendet wird.
• Bitte bewahren Sie dieses Handbuch für den späteren Gebrauch sicher auf.
Packungsinhalt:
1x Kamera mit Halterung
1x 18 cm (7") Monitor
2x Antenne
1x AV Ausgangskabel
2x AC/DC Netzteil
Technische Daten:
Kamera:
Sendefrequenz: 2,4 - 2,4835 GHz digital
Modulation: 16QAM, QPSK, BPSK
Reichweite: Innenbereich ±50 m, feie Sicht ±150 m (je nach
örtlichen Gegebenheiten)
Bildchip: 1/4" CMOS
Linse: 2,0mm
Betrachtungswinkel: 73°
Infrarotbeleuchtung (LED): 5 M
Schutzklasse: IP54
Mikrofon: Mono
Betriebstemperatur: -10°C bis 50°C
Spannung: 5 V DC/400 mA
Abmessungen: 132x64x57 mm (ohne Halterung)
Gewicht: 287 g (einschließlich des Kabels)
14
Page 15

LCD-Monitor:
Empfangsfrequenz: 2,4 - 2,4835 GHz digital
Kanäle: 4
Größe: 18 cm (7") TFT/LCD
Max. Auösung: 800 RGB (H)* 480 (V) Pixel
SD-Karte: bis zu 32 GB (nicht enthalten)
Video-Bildfrequenz: 25 fps (max.) 10 fps (4x Kameras)
Aufnahme-Bildfrequenz: 25 fps pro Kanal
Videoauösung: CIF/VGA
Videoformat: AVI
USB: 2,0
Menüsprache: Englisch, Deutsch, Französisch und Niederländisch
Videoausgangspegel: 1 Vss/75 Ohm
Audioausgangspegel: 2Vrms@600 Ohm Mono
Audio-/Videoausgangsbuchse: 2,5 mm Klinkenstecker (2,5 mm-Kabel mit 3 x Cinch im
Lieferumfang enthalten)
Reichweite: Innenbereich ±50 m, feie Sicht ±150 m (je nach
örtlichen Gegebenheiten)
Betriebstemperatur: 0°C bis +40°C
Spannung: 5 V DC/650 mA
Abmessungen: 214x157x26 mm
Gewicht: 488 g
DEUTSCH
Sicherheitshinweise:
• Önen Sie nicht die Kamera oder Monitor im Falle einer Störung. Diese Produkte sollen nur
vom qualizierten Fachpersonal geönet werden.
• Tauchen Sie die Kamera nicht in Flüssigkeiten.
• Setzen Sie den Monitor nicht Wasser oder Feuchtigkeit aus.
• Setzen Sie den Monitor oder die Kamera nicht den hohen Temperaturen aus (siehe
technische Daten).
• Installieren Sie das System nicht in die Nähe starker magnetischer Felder wie z. B.
Lautsprecher. Dies kann Auswirkungen auf die Qualität haben.
15
Page 16
Beschreibung des Produkts:
Kamera:
Monitor:
DEUTSCH
1. Infrarot LEDs
2. Objektiv
3. PIR-Infrarotsensor
4. Mikrofon
5. Halterung
6. Antenne
7. Kopplungs-Taste
8. Spannungsversorgung
9. Antennenbuchse
10. Verbindungsanzeige
11. Betriebsanzeige
1. Lautsprecher
2. Halterung
3. USB-Anschluss
4. SD-Kartensteckplatz
5. AV-Ausgang
6. Stromanschluss
7. Verbindungsanzeige
8. Betriebsanzeige
9. Video aufnehmen/beenden
10. Quarter-Anzeigetaste
11. Datei löschen /LCD, TVSchalter
12. Menü
13. Antenne
14. 18 cm (7") TFT-LCD
15. Anzeigemodus
16. Videowiedergabe
17. Ein-/Aus-Taste
18. OK-Taste
19. Navigationstaste
16
Page 17

DEUTSCH
Installationsanleitung:
Kamera:
Die Kamera kann auf verschiedene Arten befestigt werden. Für die Deckenmontage
verwenden Sie das Schraubengewinde auf der Kameraoberseite. Nach der Kameramontage
schließen Sie das AC / DC-Netzteil an die Kamera und eine Steckdose an.
Monitor:
Der Monitor kann auf eine ebene Fläche aufgestellt oder an die Wand befestigt werden.
Nach der Monitorbefestigung schließen Sie das AC / DC-Netzteil an den Monitor und eine
Steckdose an. Die Kamera wird automatisch nach dem Anschließen des AC / DC-Netzteils mit
Spannung versorgt. Optional: der Monitor kann an einen Monitor mit dem Videoausgang des
Monitors angeschlossen werden.
17
Videokabel
Page 18
DEUTSCH
Gebrauchsanweisung:
1. Legen Sie eine SD-Karte in den SD-Kartensteckplatz des Monitors. Oder schließen Sie eine
externe Festplatte an den USB-Anschluss des Monitors an.
2. Drücken Sie die Ein-/Aus-Taste für ca. 2 Sekunden, um den Monitor einzuschalten. Die
Betriebsanzeige leuchtet auf und, das Bild erscheint.
3. Für die Systemeinstellungen drücken Sie die Menütaste, um das Hauptmenü zu önen.
Das folgende Fenster sollte erscheinen. Verwenden Sie die Navigations-, OK- und MenüTasten zum Navigieren durch das Menü.
System
1. Drücken Sie OK, um die Systemeinstellungen einzugeben. Das System bietet die
folgenden Optionen:
Datum / Uhrzeit Stellen Sie die Uhrzeit und das Datum ein.
Sprache Stellen Sie die Sprache ein.
Aufnahmemodus Einstellen, um die Aufnahme zu stoppen oder die erste
Videoaufnahme zu überschreiben, wenn das Speichermedium
voll ist.
SD/USB-Format Einstellen, um das Speichermedium zu formatieren.
Aufnahmespeicher Stellen Sie das Speichermedium ein.
18
Page 19

DEUTSCH
Display-Artikel Einstellen, um RSSI, Zeit, SD / USB-Status und die Kamera auf
dem Bildschirm und das aufgenommene Video anzuzeigen.
TV-System Wählen Sie ein TV-System (PAL für Europa).
Systeminformationen Zeigt die Systeminformationen.
Scanmodus-Zeitintervall Stellen Sie das zyklische Anzeigeintervall des Kontrollbildes
auf der Kamera.
Stummschalten Schaltet den Lautsprecher auf dem Monitor ein/aus.
Laden von Vorgaben Setzen Sie die Standardwerkseinstellungen zurück.
Aufnahmedatum/-uhrzeit Einstellen, um die aktuelle Aufnahmeuhrzeit und das -datum
auf dem aufgenommenen Video anzuzeigen.
Helligkeit Stellen Sie die Helligkeit des Bildes ein.
Lautstärke Stellen Sie die Lautstärke ein.
2. Wählen Sie das Datum/die Uhrzeit mit der Navigationstaste und drücken Sie OK, um die
Datum-/Uhrzeit-Einstellungen einzugeben.
• Drücken Sie die linke oder rechte Pfeiltaste, um auszuwählen.
• Drücken Sie die Aufwärts- oder Abwärtspfeiltaste, um einzustellen.
• Drücken Sie die OK-Taste zur Bestätigung.
• Drücken Sie die MENU-Taste, um zu beenden.
3. Wählen Sie die Sprache mit der Navigationstaste und drücken Sie OK, um die
Spracheinstellungen einzugeben.
• Drücken Sie die Aufwärts- oder Abwärtspfeiltaste, um die Sprache auszuwählen.
• Drücken Sie die OK-Taste, um zu bestätigen und beenden.
4. Wählen Sie den Aufnahmemodus mit der Navigationstaste und drücken Sie OK, um den
Aufnahmemodus einzugeben.
• Drücken Sie die Aufwärts- oder Abwärtspfeiltaste, um „Normal“ oder „Overwrite“
(Überschreiben) auszuwählen.
• Drücken Sie die OK-Taste, um zu bestätigen und beenden.
Anmerkungen:
Normal: Wenn die SD-Karte oder die mobile Festplatte voll ist, stoppt das System die
Aufnahme automatisch.
Überschreiben: Ist die SD-Karte oder die mobile Festplatte voll, löscht das System
automatisch das erste Video und behält sich ausreichenden Speicherplatz, um letzte
Aufnahme zu gewährleisten.
5. Wählen Sie das SD-/USB-Format mit der Navigationstaste und drücken Sie OK, um die
SD-/USB-Formateinstellungen einzugeben.
• Drücken Sie die Aufwärts- oder Abwärtspfeiltaste, um „Cancel“ (Abbrechen), „SD Card“
(SD-Karte) oder „USB Device“ (USB-Gerät )auszuwählen;
- Abbrechen: Bricht die Formatierung ab.
- SD-Karte: formatiert die SD-Karte.
- USB-Gerät: formatiert die externe Festplatte (sofern angeschlossen)
• Drücken Sie die OK–Taste zum Formatieren.
19
Page 20

DEUTSCH
• Nach der Formatierung zeigt das System „Format Successfully“, was darauf hindeutet,
dass die Formatierung erfolgreich ist.
• Drücken Sie die OK-Taste, um zu bestätigen und beenden.
6. Wählen Sie den Speicher für die Aufnahme mit der Navigationstaste und drücken Sie OK,
um die Speichereinstellungen für die Aufnahme einzugeben.
• Drücken Sie die Aufwärts- oder Abwärtspfeiltaste, um „SD Card“ (SD-Karte) oder „USB
Device“ (USB-Gerät) auszuwählen.
• Drücken Sie die OK-Taste, um zu bestätigen und beenden.
7. Wählen Sie die Display-Artikel mit der Navigationstaste und drücken Sie OK, um die
Einstellungen der Display-Artikel einzugeben.
• Drücken Sie die Aufwärts- oder Abwärtspfeiltaste, um auszuwählen.
• Klicken Sie die OK-Taste, um die Display-Artikel im Bild zu bestätigen.
- RSSI: Signalstärke-Symbol.
- SD/USB-Status: Ob die SD-Karte oder mobile Festplatte eingesetzt wird.
- Kamera: Namen der Kamerasymbole.
• Nach der Einstellung drücken Sie die MENU-Taste, um zu bestätigen und beenden.
8. Wählen Sie das TV-System mit der Navigationstaste und drücken Sie OK, um die
Einstellungen des TV-Systems einzugeben.
• Drücken Sie die Aufwärts- oder Abwärtspfeiltaste, um NTSC oder PAL (PAL für Europa)
auszuwählen.
• Drücken Sie die OK-Taste, um zu bestätigen und beenden.
9. Wählen Sie die Systeminformationen mit der Navigationstaste und drücken Sie OK, um
die Einstellungen der Systeminformationen einzugeben.
• Drücken Sie OK, um die Informationen über das System zu sehen.
• Drücken Sie die menu-Taste, um zu beenden.
10. Wählen Sie das System-Upgrade mit der Navigationstaste und drücken Sie OK, um die
System-Upgrade-Einstellungen einzugeben.
• Drücken Sie die Aufwärts- oder Abwärtspfeiltaste, um auszuwählen.
• Drücken Sie OK.
• Drücken Sie die Aufnahme-/ Stopp-Video-Taste zur Bestätigung.
11. Wählen Sie den Scanmodus mit der Navigationstaste und drücken Sie OK, um die
Einstellungen des Scanmodus-Zeitintervalls einzugeben.
• Drücken Sie die Aufwärts- oder Abwärtspfeiltaste, um die Zeit für das Scannen der
angeschlossenen Kameras auszuwählen.
• Drücken Sie die OK-Taste erneut, um zu bestätigen und beenden.
12. Wählen Sie das Stummschalten mit der Navigationstaste und drücken Sie OK, um die
Stummschalten-Einstellungen einzugeben.
• Drücken Sie die Aufwärts- oder Abwärtspfeiltaste, um „On“ oder „O“ auszuwählen.
• Drücken Sie die OK-Taste erneut, um zu bestätigen und beenden.
13. Wählen Sie das Laden von Vorgaben mit der Navigationstaste und drücken Sie OK, um
das Laden der Standardeinstellungen einzugeben.
• Drücken Sie die Aufwärts- oder Abwärtspfeiltaste, um „Cancel“ oder „OK“ auszuwählen.
- Cancel: Bricht die Option der Standardeinstellungen ab.
- OK: Setzt die Standardeinstellungen zurück.
• Drücken Sie die OK-Taste, um zu bestätigen und beenden.
20
Page 21
DEUTSCH
14. Wählen Sie die Helligkeit mit der Navigationstaste und drücken Sie OK, um die
Helligkeitseinstellungen einzugeben.
• Drücken Sie die Aufwärts- oder Abwärtspfeiltaste, um die Helligkeit einzustellen.
• Drücken Sie die OK-Taste, um zu bestätigen und beenden.
15. Wählen Sie die Lautstärke mit der Navigationstaste und drücken Sie OK, um die
Einstellungen für die Lautstärke einzugeben.
• Drücken Sie die Aufwärts- oder Abwärtspfeiltaste, um die Lautstärke einzustellen.
• Drücken Sie die OK-Taste, um zu bestätigen und beenden.
Hinweis: Die Lautstärke kann auch mit dem Pfeil nach oben oder unten in der LiveÜberwachungsansicht eingestellt werden.
16. Drücken Sie Menü, um zum Hauptmenü zurückzukehren.
Aufnahme
Drücken Sie die rechte Pfeiltaste im Hauptmenü, um die Aufnahmeeinstellungen
auszuwählen, und drücken Sie OK.
Timer-Aufnahme:
Stellen Sie die Start-/Stopp-Aufnahmezeit durch das „Timer Recording“-Menü ein. Das Gerät
zeichnet automatisch nach der eingestellten Start-/Stopp-Zeit.
1. Wählen Sie die Timer-Aufnahme mit der Navigationstaste und drücken Sie OK, um die
Einstellungen für einen neuen Zeitplan einzugeben.
• Drücken Sie OK, um das Timer-Aufnahmemenü aufzurufen.
• Drücken Sie die Aufwärts- oder Abwärtspfeiltaste, um auszuwählen.
• Drücken Sie die linke oder rechte Taste, um zu regulieren.
• Drücken Sie die OK-Taste, um zu bestätigen und beenden.
2. Nach der Einstellung zeichnet das Gerät automatisch nach der eingestellten Start-/StoppZeit.
3. Wenn Sie die Aufnahme-/Stopp-Video-Taste am Gerät während der Aufnahme drücken,
die durch die Timer-Aufnahme eingestellt wird, wird die Aufnahme angehalten.
Manuelle Aufnahme:
1. In der Live-Überwachungsansicht drücken Sie die linken und rechten Pfeiltasten, um die
Kamera für die Videoaufnahme auszuwählen.
2. Drücken Sie die Aufnahme-/Stopp-Video-Taste am Gerät. Das Aufnahme-Symbol wird auf
dem Bildschirm angezeigt, was darauf hinweist, dass die Aufnahme gestartet wird.
3. Drücken Sie die Taste am Gerät erneut, um die Aufnahme zu stoppen.
21
Page 22
DEUTSCH
PIR-Aufnahme:
PIR-Aufnahme: Wenn die menschliche Bewegung von jeder abgerufen Kamera erkannt wird,
kann die Aufnahme ausgelöst werden.
1. Wählen Sie die PIR-Aufnahme mit der Navigationstaste aus und drücken Sie OK, um die
PIR-Aufnahmeeinstellungen einzugeben.
• Drücken Sie die Taste nach oben oder unten, um die Kamera auszuwählen.
• Drücken Sie die linke oder rechte Taste, um „On“ auszuwählen.
• Drücken Sie die OK-Taste, um zu bestätigen und beenden.
Hinweis: wenn „O“ eingestellt ist, wird die Funktion der Bewegungserkennung
ausgeschaltet. Die Infrarot-Reichweite von PIR ist 5m. Wenn der Abstand größer als 5m ist,
könnte Erfassen fehlschlagen.
Wiedergabe
Drücken Sie die rechte Pfeiltaste im Hauptmenü, um die Wiedergabe-Einstellungen
auszuwählen, und drücken Sie OK.
Hinweis: für die Wiedergabe-Funktionen ist es notwendig, dass eine SD-Karte eingesteckt
wird oder eine externe Festplatte angeschlossen ist.
Die Wiedergabe-Funktion ist auch in der Live-Überwachungsansicht verfügbar, indem Sie die
Videowiedergabe-Taste drücken.
1. Drücken Sie die Aufwärts- oder Abwärtspfeiltaste, um den Ordner auszuwählen.
2. Drücken Sie die OK-Taste, um zu bestätigen und einzugeben.
Kamera 1
Kamera 2
Kamera 4
3. Drücken Sie die Aufwärts-oder Abwärtspfeiltaste, um die Videodatei auszuwählen.
4. Drücken Sie die OK-Taste für die Wiedergabe.
22
Nicht
durchsucht
Dateigröße
Page 23
DEUTSCH
5. Drücken Sie die linke oder rechte Pfeiltaste, um rückwärts/vorwärts im Schnellvorlauf zu
gehen.
6. Drücken Sie die Taste OK erneut, um zu unterbrechen.
7. Drücken Sie die MENU–Taste, um die Wiedergabe zu beenden.
Video löschen
Im Videowiedergabe-Modus drücken Sie die Aufwärts- oder Abwärtspfeiltaste, um das Video
oder den Video-Ordner zum Löschen auszuwählen.
• Drücken Sie die Datei löschen/LCD-Taste auf dem Monitor, um sie zu löschen.
Hinweis: nur ein leerer Ordner kann als Ordner gelöscht werden.
Kamera
Wenn Sie die zusätzliche Kamera SAS-TRCAM40/U (max. 4) hinzufügen möchten, muss die
Kamera mit dem System zur Erkennung der Kamera gekoppelt werden.
Drücken Sie die rechte Pfeiltaste im Hauptmenü, um die Kameraeinstellungen auszuwählen,
und drücken Sie OK.
Koppeln:
1. Drücken Sie OK, um das Kopplungs-Menü aufzurufen.
2. Wählen Sie die Kamera mit den Aufwärts- oder Abwärtspfeiltasten aus.
3. Drücken Sie OK, und der folgende Bildschirm erscheint.
4. Drücken Sie die Kopplungs-Taste innerhalb von 60 Sekunden für 2 Sekunden auf der
Rückseite der Kamera.
5. Nach dem erfolgreichen Koppeln der Kamera und des Monitors zeigt der Monitor
PAIRING OK.
23
Page 24
DEUTSCH
6. Drücken Sie die Menütaste, um zum Kamera-Menü zurückzukehren.
Hinweis: Wenn das Koppeln fehlgeschlagen ist, wiederholen Sie die oben genannten Schritte
und achten Sie darauf, dass der Monitor und die Kamera für das Koppeln nicht weiter als
2meter entfernt sind.
Aktiv:
1. Wählen Sie aktiv mit der Abwärtspfeiltaste und drücken Sie OK.
2. Drücken Sie die Aufwärts- oder Abwärtspfeiltaste, um die Kamera auszuwählen.
3. Drücken Sie die linke oder rechte Pfeiltaste, um „On“ oder „O“ auszuwählen.
4. Drücken Sie die OK-Taste, um zu bestätigen und beenden.
Hinweis: nur gekoppelte Kameras können aktiv oder nicht aktiv eingestellt werden. Wenn
eine Kamera ausgeschaltet ist, kann sie nicht in der Live-Ansicht gesehen, aufgezeichnet
werden usw.
PIP-Einstellungen:
Stellen Sie die Größe der Bildauösung und Aufnahmequalität ein.
1. Wählen Sie die PIP-Einstellungen mit den Aufwärts- oder Abwärtspfeiltasten aus und
drücken Sie OK.
2. Wählen Sie die Kamera mit den Aufwärts- oder Abwärtspfeiltasten aus und drücken Sie
OK. Der folgende Bildschirm erscheint.
3. Drücken Sie die linke oder rechte Pfeiltaste, um „Resolution Size“ oder „Quality“
auszuwählen.
4. Drücken Sie die linke oder rechte Pfeiltaste, um „Top“, „High“, „Medium“ oder „Low“
auszuwählen.
5. Drücken Sie die OK-Taste, um einzustellen.
6. Drücken Sie die MENU-Taste, um zu bestätigen und beenden.
Hinweis: die hohe Auösung ist VGA, und die niedrige ist CIF.
Alarm
Wenn PIR-Erkennung eingeschaltet ist, wird das System einen Alarm auslösen, wenn eine
Bewegung erkannt wird.
1. Wählen Sie den Alarm im Hauptmenü aus und drücken Sie OK.
2. Der Bildschirm zeigt die PIR-Erkennung, drücken Sie OK.
3. Drücken Sie „On“ oder „O“ mit den Aufwärts- oder Abwärtspfeiltasten.
4. Drücken Sie die OK-Taste, um zu bestätigen und beenden.
24
Page 25
Live-Ansicht:
Drücken Sie die Quarter-Anzeigetaste, um die Art der Ansicht auszuwählen.
Zeitstempel
Bild im Bild Ansicht
DEUTSCH
Quad Anzeige Vollbildansicht
Hinweis: benutzen Sie die linke und rechte Pfeiltaste, um eine Kamera auszuwählen.
Drücken Sie die Anzeigemodus-Taste, um den zyklischen Ansichtsmodus zu önen. Fünf
zyklischen Intervalle stehen Ihnen zur Verfügung: 5s, 10s, 15s, 20s und 30s, und sie können
unter dem „System“ > Scanmodus-Zeitintervall im Hauptmenü eingestellt werden.
Mobile Festplatte erfolgreich eingesetzt
SD-Karte erfolgreich eingesetzt
Kameraname
Aktuelle Kamera
Aufnahmestatus
Signalintensität
25
Page 26

DEUTSCH
Wartung:
Reinigen Sie das Gerät nur mit einem trockenen Tuch.
Keine Reinigungs- oder Scheuermittel verwenden.
Garantie:
Alle Änderungen und/oder Modizierungen an dem Produkt haben ein Erlöschen der Garantie zur Folge. Wir übernehmen keine
Haftung für Schäden durch unsachgemäße Verwendung dieses Produkts.
Haftungsausschluss:
Design und technische Daten können ohne vorherige Ankündigung geändert werden. Alle Logos, Marken und Produktnamen sind
Marken oder eingetragene Marken ihrer jeweiligen Eigentümer und werden hiermit als solche anerkannt.
Entsorgung:
• Dieses Produkt muss an einem entsprechenden Sammelpunkt zur Entsorgung abgegeben werden.
Entsorgen Sie dieses Produkt nicht mit dem Haushaltsmüll.
• Weitere Informationen erhalten Sie beim Verkäufer oder der für die Abfallwirtschaft verantwortlichen örtlichen
Behörde.
Dieses Produkt wurde hergestellt und geliefert in Übereinstimmung mit allen geltenden Vorschriften und Richtlinien, die für alle
Mitgliedsstaaten der Europäischen Union gültig sind. Es entspricht allen geltenden Vorschriften und Bestimmungen im Land des
Vertriebs.
Eine formale Dokumentation ist auf Anfrage erhältlich. Diese beinhaltet unter anderem, jedoch nicht ausschließlich:
Konformitätserklärung (und Produktidentität), Sicherheitsdatenblatt, Testreport des Produkts.
Wenden Sie sich bei Fragen bitte an unseren Kundendienst:
per Internet: http://www.nedis.de/de-de/kontakt/kontaktformular.htm
per E-Mail: service@nedis.com
per Telefon: Niederlande +31 (0)73-5993965 (während der Geschäftszeiten)
NEDIS B.V., De Tweeling 28, 5215 MC ’s-Hertogenbosch, NIEDERLANDE
26
Page 27

FRANÇAIS
Introduction :
Surveillez vos biens avec ce nouveau système de caméras de sécurité sans l 2,4 GHz. L'écran
LCD 7" peut supporter jusqu'à 4 caméras et dispose d'un enregistreur vidéo numérique
intégré. La caméra ore une image très nette et stable avec vision nocturne et la technologie
utilisée améliore davantage la qualité d'image. Le système utilise la technologie numérique
sans l et est doté de fonctionnalités avancées de cryptage de fréquence du signal, ce qui
réduit les interférences causées par d'autres appareils utilisant la bande de fréquence 2,4 GHz.
Cette technologie numérique vous permet de sécuriser vos biens tout en l'utilisant à des très
longues distances. LE MEILLEUR QUE LE SANS FIL PEUT OFFRIR.
L'écran et la caméra sont en principe couplés en usine. Reportez-vous à la section COUPLAGE
lors de l'ajout d'une caméra supplémentaire SAS-TRCAM40/U (4 caméras max.) au système.
• Nous vous recommandons de lire attentivement ce manuel avant d'installer le système de
caméras.
• Conservez ce manuel dans un endroit sûr pour toute consultation future.
Contenu de la confection :
1 Caméra avec support
1 Ecran 7"
2 Antennes
1 Câble de sortie AV
2 Adaptateurs secteur
Spécications techniques :
Caméra :
Fréquence de transmission : Numérique de 2,4 à 2,4835 GHz
Modulation : 16QAM, QPSK, BPSK
Portée : Intérieur ± 50 m, plein air ± 150 m (en fonction des
conditionslocales)
Capteur d'images : CMOS 1/4"
Objectif : 2,0 mm
Angle de visualisation : 73°
Eclairage infrarouge (LED) : 5 M
Protection : IP54
Microphone : Mono
Température de
fonctionnement : -10°C ~ 50°C
Tension : 5 V CC/400 mA
Dimensions : 132x64x57 mm (sans support)
Poids : 287 g (câble inclus)
27
Page 28

Ecran LCD:
Fréquence de réception : Numérique de 2,4 à 2,4835 GHz
Canaux : 4
Dimensions : TFT/LCD 7"
Max. Résolution: 800 RGB (H)* 480 (V) pixels
Carte SD: Jusqu'à 32 Go (non incluse)
Taux d'images vidéo: 25 ips (max.) 10 ips (4 cameras)
Fréquence d’image
d'enregistrement:
Résolution vidéo : CIF/VGA
Formats vidéo : AVI
USB : 2,0
Langue des menus : Anglais, allemand, français et néerlandais
Niveau de sortie vidéo : 1 Vp-p/75 Ohms
Niveau de sortie audio: 2Vrms@600 ohms mono
Connecteurs de sortie audio/
vidéo:
Portée : Intérieur ± 50 m, plein air ± 150 m (en fonction des
Température de
fonctionnement :
Tension : 5 V CC/650 mA
Dimensions : 214x157x26 mm
Poids : 488 g
25 ips par canal
2,5 mm (câble 2,5 mm à 3 connecteurs RCA inclus)
conditionslocales)
0°C ~ +40°C
FRANÇAIS
Consignes de sécurité :
• N’ouvrez pas la caméra ou le moniteur en cas de dysfonctionnement. Ces appareils ne
doivent être ouverts que par un technicien qualié.
• Ne faites pas tomber la caméra dans un liquide.
• N’exposez pas le moniteur à l'eau ou à l'humidité.
• N’exposez pas le moniteur ou les caméras à des températures élevées (voir spécications
techniques).
• N’installez pas le système à proximité de forts champs magnétiques, tels que des hautparleurs. Cela peut aecter la qualité.
28
Page 29

Description du produit :
Caméra :
Ecran :
FRANÇAIS
1. LED infrarouge
2. Lentille
3. Capteur infrarouge PIR
4. Microphone
5. Support
6. Antenne
7. Bouton de couplage
8. Entrée alimentation
9. Prise d'antenne
10. Voyant de connexion
11. Voyant alimentation
1. Haut-parleur
2. Support
3. Port USB
4. Slot pour carte SD
5. Sortie AV
6. Prise d'alimentation
7. Voyant de connexion
8. Voyant alimentation
9. Enregistrer/arrêter vidéo
10. Touche achage de quart
11. Supprimer chier/LCD,
commutateur TV
12. Menu
13. Antenne
14. TFT-LCD 7"
15. Mode d'achage
16. Lecture vidéo
17. Marche/arrêt
18. Touche OK
19. Touche navigation
29
Page 30
FRANÇAIS
Instructions d'installation:
Caméra :
La caméra peut être installée de diérentes manières. Pour un accrochage au plafond,
utilisez la vis letée située au dessus de la caméra. Une fois les caméras installées, branchez
l’adaptateur secteur à la caméra et à une prise murale.
Ecran :
L’écran peut être placé sur une surface plane ou accroché au mur. Une fois l'écran installé,
branchez l’adaptateur secteur à l'écran et à une prise murale. La caméra est alimentée
automatiquement dès que l’adaptateur secteur est branché. En option : L’écran peut être
connecté à un autre écran vidéo via sa sortie écran.
30
Câble vidéo
Page 31

FRANÇAIS
Mode d'emploi :
1. Insérez une carte SD dans le slot pour carte SD de l'écran. Ou connectez un disque dur
externe au port USB de l'écran.
2. Maintenez appuyée la touche marche/arrêt pendant environ 2 secondes pour allumer
l’écran. Le voyant alimentation doit s'allumer et l'image apparaît.
3. Pour les réglages des systèmes appuyez sur la touche menu pour ouvrir le menu
principal. L'écran suivant doit apparaître. Utilisez les touches navigation, OK et menu pour
naviguer dans le menu.
Système
1. Appuyez sur OK pour accéder aux paramètres du système. Le système ore les options
suivantes :
Date et Heure Pour régler l'heure et la date.
Langue Pour choisir la langue.
Mode Enregistrement Dénir s’il faut arrêter l'enregistrement ou remplacer
le premier enregistrement vidéo lorsque le support de
stockage est plein.
Format SD/USB Pour dénir le format du support de stockage.
Stockage des enregistrements Pour dénir le support de stockage.
31
Page 32

FRANÇAIS
Éléments d’achage Pour dénir RSSI, Temps, l’état SD/USB et caméra sur
l'écran et la vidéo enregistrée.
Système TV Pour sélectionner un système TV (PAL pour l'Europe).
Informations système Ache les informations système.
Période du mode de balayage Pour dénir l'intervalle d'achage cyclique de l'image
de surveillance de la caméra.
Muet Pour activer/désactiver du haut-parleur de l'écran.
Charger les paramètres par défaut Pour rétablir les paramètres par défaut.
Date et Heure d’enregistrement Pour dénir l’achage du temps et la date
d'enregistrement actuel sur la vidéo enregistrée.
Luminosité Pour dénir la luminosité de l'image.
Volume Pour régler le volume.
2. Sélectionnez date/heure avec la touche navigation et appuyez sur OK pour accéder au
réglage.
• Appuyez sur la touche échée gauche ou droite pour sélectionner.
• Appuyez sur la touche échée haut ou bas pour régler.
• Appuyez sur la touche OK pour conrmer.
• Appuyez sur la touche MENU pour quitter.
3. Sélectionnez langue avec la touche navigation et appuyez sur OK pour accéder au choix
de la langue.
• Appuyez sur la touche échée haut ou bas pour choisir la langue.
• Appuyez sur la touche OK pour conrmer et quitter.
4. Sélectionnez le mode d'enregistrement avec la touche navigation et appuyez sur OK pour
accéder au réglage.
• Appuyez sur la touche échée haut ou bas pour choisir «Normal» ou «Remplacer».
• Appuyez sur la touche OK pour conrmer et quitter.
Remarque :
Normal: Lorsque la carte SD ou le disque dur externe est plein, le système arrête
automatiquement l'enregistrement.
Remplacer: Lorsque la carte SD ou le disque dur externe est plein, le système supprime
automatiquement la première vidéo et réserve susamment d'espace de stockage pour le
dernier enregistrement.
5. Sélectionnez Formatage SD/USB avec la touche Navigation et appuyez sur OK pour
accéder au réglage.
• Appuyez sur la touche échée haut ou bas pour sélectionner «Cancel», «SD Card» ou
«USB Device»
- Cancel : annule le formatage.
- Carte SD: formater la carte SD.
- Périphériques USB : formater le disque dur externe (s'il est connecté).
• Appuyez sur OK pour formater:
32
Page 33

FRANÇAIS
• Une fois le formatage terminé, le système ache «Format Successfully», indiquant que
le formatage est réussi.
• Appuyez sur la touche OK pour conrmer et quitter.
6. Sélectionnez Stockage pour enregistrement avec la touche navigation et appuyez sur OK
pour accéder au réglage.
• Appuyez sur la touche échée haut ou bas pour sélectionner «SD Card» ou «USB
Device».
• Appuyez sur la touche OK pour conrmer et quitter.
7. Sélectionnez Éléments d’achage avec la touche navigation et appuyez sur OK pour
accéder au réglage.
• Appuyez sur la touche échée haut ou bas pour sélectionner.
• Cliquez sur la touche OK pour conrmer les éléments d'achage de l'image.
- RSSI : icône d’intensité du signal.
- État SD USB : Qu’une carte SD ou un disque dur externe est inséré.
- Caméra : Icônes des noms des caméras.
• Une fois le réglage terminé, appuyez sur la touche MENU pour conrmer et quitter.
8. Sélectionnez Système TV avec la touche navigation et appuyez sur OK pour accéder au
réglage.
• Appuyez sur la touche haut ou bas pour sélectionner NTSC ou PAL (PAL pour l'Europe).
• Appuyez sur OK pour conrmer et quitter.
9. Sélectionnez Informations système avec la touche navigation et appuyez sur OK pour
accéder au réglage.
• Appuyez sur OK pour acher les informations sur le système.
• Appuyez sur la touche MENU pour quitter.
10. Sélectionnez Mise à niveau du système avec la touche navigation et appuyez sur OK pour
accéder au réglage.
• Appuyez sur la touche échée haut ou bas pour sélectionner.
• Appuyez sur OK.
• Appuyez sur la touche enregistrer/arrêter la vidéo pour conrmer.
11. Sélectionnez Période du mode balayage avec la touche navigation et appuyez sur OK
pour accéder au réglage.
• Appuyez sur la touche échée haut ou bas pour sélectionner la période de balayage
des caméras connectées.
• Appuyez de nouveau sur la touche OK pour conrmer et quitter.
12. Sélectionnez Muet avec la touche navigation et appuyez sur OK pour accéder au réglage.
• Appuyez sur la touche échée haut ou bas pour choisir «On» ou «O».
• Appuyez de nouveau sur la touche OK pour conrmer et quitter.
13. Sélectionnez Rétablir les paramètres par défaut avec la touche navigation et appuyez sur
OK pour accéder au réglage.
• Appuyez sur la touche échée haut ou bas pour choisir «Cancel» ou «OK».
- Cancel : Annule Rétablit les paramètres par défaut.
- OK : Rétablit les paramètres par défaut.
• Appuyez sur la touche OK pour conrmer et quitter.
33
Page 34

FRANÇAIS
14. Sélectionnez Luminosité avec la touche navigation et appuyez sur OK pour accéder au
réglage.
• Appuyez sur la touche échée gauche ou droite pour régler la luminosité.
• Appuyez sur la touche OK pour conrmer et quitter.
15. Sélectionnez Volume avec la touche navigation et appuyez sur OK pour accéder au
réglage.
• Appuyez sur la touche échée gauche ou droite pour régler le volume.
• Appuyez sur la touche OK pour conrmer et quitter.
Remarque : Le volume peut également être réglé avec la touche échée haut ou le bas dans
la vue surveillance en direct.
16. Appuyez sur menu pour retourner au menu principal.
Enregistrer
Appuyez sur la touche échée droite dans le menu principal pour sélectionner les paramètres
d'enregistrement puis appuyez sur OK.
Enregistrement programmé :
Pour dénir le démarrage/arrêt de l'enregistrement via le menu «Timer Recording».
L'appareil enregistre automatiquement en fonction des temps de démarrage/arrêt dénis.
1. Sélectionnez Enregistrement programme avec la touche navigation et appuyez sur OK
pour accéder au réglage.
• Appuyez sur OK pour entrer dans le menu Enregistrement programmé.
• Appuyez sur la touche échée haut ou bas pour sélectionner.
• Appuyez sur la touche gauche/droite pour régler.
• Appuyez sur la touche OK pour conrmer et quitter.
2. Une fois le réglage terminé, l'appareil se met à enregistrer automatiquement en fonction
des temps de démarrage/arrêt dénis.
3. Si vous appuyez sur la touche enregistrer/arrêter vidéo de l'appareil au cours de
l'enregistrement, déni par l'enregistrement programmé, l'enregistrement s'arrête.
Enregistrement manuel :
1. Dans la vue surveillance en direct, appuyez sur les touches échées gauche et droite pour
sélectionner la caméra de l'enregistrement vidéo.
2. Appuyez sur la touche enregistrer/arrêter la vidéo pour conrmer. L'icône
d'enregistrement s’ache à l'écran, indiquant que l'enregistrement est lancé.
3. Appuyez de nouveau sur la touche pour arrêter l’enregistrement.
34
Page 35

FRANÇAIS
Enregistrement PIR :
Enregistrement PIR : L'enregistrement peut être déclenché si mouvement humain est détecté
par une caméra accessible.
1. Sélectionnez Enregistrement PIR avec la touche navigation et appuyez sur OK pour
accéder au réglage.
• Appuyez sur la touche haut/bas pour sélectionner une caméra.
• Appuyez sur la touche échée gauche ou droite pour sélectionner «On».
• Appuyez sur la touche OK pour conrmer et quitter.
Remarque : lorsque «O» est sélectionné, la fonction détection de mouvement est désactivée.
La distance de détection à infrarouge de PIR est de 5m. La détection peut échouer si la
distance est supérieure à 5m.
Lecture
Appuyez sur la touche échée droite dans le menu principal pour sélectionner les paramètres
de lecture puis appuyez sur OK.
Remarque : Pour pouvoir lire, il est nécessaire qu'une carte SD soit insérée ou un disque dur
externe connecté.
Vous pouvez également visualiser la vidéo dans la vue visualisation en direct, en appuyant
sur la touche de lecture vidéo.
1. Appuyez sur la touche échée haut ou bas pour sélectionner un dossier.
2. Appuyez sur la touche OK pour conrmer et accéder.
Caméra 1
Caméra 2
Caméra 4
3. Appuyez sur la touche échée haut ou bas pour sélectionner un chier vidéo.
4. Appuyez sur la touche OK pour lire.
35
Non visualisé
Taille du
chier
Page 36

FRANÇAIS
5. Appuyez sur la touche échée haut ou bas pour eectuer un retour/avance rapide.
6. Appuyez de nouveau sur la touche OK pour suspendre la lecture.
7. Appuyez sur le bouton Menu pour quitter la lecture.
Supprimer une vidéo
En mode de lecture vidéo, appuyez sur la touche échée haut ou bas pour sélectionner la
vidéo ou le dossier vidéo à supprimer.
• Appuyez sur la touche supprimer chier/LCD de l’écran pour le supprimer.
Remarque : On ne peut supprimer qu’un dossier vide.
Caméra
Lors de l'ajout d'une caméra supplémentaire SAS-TRCAM40/U (max. 4) celle-ci doit être
couplée avec le système pour qu’il la reconnaisse.
Appuyez sur la touche échée droite dans le menu principal pour sélectionner paramètres de
la caméra puis appuyez sur OK.
Couplage :
1. Appuyez sur OK pour accéder au menu Couplage.
2. Utilisez les touches échées haut et bas pour sélectionner une caméra.
3. Appuyez sur OK; l'écran suivant apparaît.
4. Maintenez appuyée la touche Couplage à l’arrière de la caméra, dans les 60 secondes,
pendant 2secondes.
5. Une fois le couplage de la caméra et l’écran terminé avec succès, l’écran ache PAIRING
OK.
6. Appuyez sur la touche Menu pour quitter le menu caméra.
36
Page 37

FRANÇAIS
Remarque : Si le couplage échoue, recommencez les étapes ci-dessus et veillez à ce que
l’écran et la caméra ne soient pas à plus de 2 mètres pendant la procédure de couplage.
Activer:
1. Sélectionnez activer avec la touche échée bas et appuyez sur OK.
2. Appuyez sur la touche échée haut/bas pour sélectionner une caméra.
3. Appuyez sur la touche échée gauche ou droite pour sélectionner «On» ou «O».
4. Appuyez sur la touche OK pour conrmer et quitter.
Remarque : Seules les caméras couplées peuvent être activées ou désactivées. Lorsqu’une
caméra est désactivée, elle ne peut pas être visualisée en direct, enregistrée, etc.
Paramètre PIP:
Pour dénir la taille, la résolution de l'image et la qualité d'enregistrement.
1. Sélectionnez le paramètre PIP avec les touches échées haut et bas et appuyez sur OK.
2. Utilisez les touches échées haut et bas pour sélectionner une caméra puis appuyez sur
OK. L'écran suivant doit apparaître.
3. Appuyez sur la touche échée gauche ou droite pour sélectionner «Resolution Size» ou
«Quality».
4. Appuyez sur la touche échée gauche ou droite pour sélectionner «Top», «High»,
«Medium» ou «Low».
5. Appuyez sur la touche OK pour régler.
6. Appuyez sur la touche MENU pour conrmer et quitter.
Remarque : la haute résolution est VGA et la faible est CIF.
Alarme
Lorsque la détection PIR est activée, le système déclenche une alarme lorsqu'un mouvement
est détecté.
1. Sélectionnez Alarme dans le menu principal puis appuyez sur OK.
2. L'écran ache la détection PIR; appuyez sur OK.
3. Appuyez sur «On» ou «O» avec la touche échée haut et bas.
4. Appuyez sur OK pour conrmer et quitter.
37
Page 38
Vue Live :
Appuyez sur la touche achage de quart pour sélectionner le type de vue.
Horodatage
Vue Image dans l'image
FRANÇAIS
Vue Quadruple Achage plein écran
Remarque : utilisez la touche échée gauche et droite pour sélectionner une caméra
Appuyez sur la touche mode d'achage pour accéder au mode vue cyclique. Cinq intervalles
cycliques sont disponibles : 5s, 10s, 15s, 20s et 30s peut être choisi dans System > Scan Mode
Period dans le menu mean.
38
Page 39

FRANÇAIS
Disque dur externe inséré avec succès
Carte SD insérée avec succès
Nom de la caméra
Caméra en cours
Etat d’enregistrement
Intensité du signal
Entretien :
Nettoyez uniquement le produit avec un chion sec.
N'utilisez pas de solvants ni des produits abrasifs.
Garantie :
Toutes altérations et/ou modications du produit annuleront la garantie. Nous ne serons tenus responsables d'aucune responsabilité
pour les dommages dus à une utilisation incorrecte du produit.
Avis de non responsabilité :
Le design et les caractéristiques techniques sont sujets à modication sans notication préalable. Tous les logos de marques et
noms de produits sont des marques déposées ou immatriculées dont leurs détenteurs sont les propriétaires et sont donc reconnues
comme telles dans ce document.
Élimination des déchets:
• Ce produit doit être jeté séparément des ordures ménagères dans un point de collecte approprié.
Ne jetez pas ce produit avec les ordures ménagères ordinaires.
• Pour plus d’informations, contactez le distributeur ou l’autorité locale responsable de la gestion des déchets.
Ce produit est fabriqué et délivré en conformité avec toutes les directives et règlements applicables et en vigueur dans tous les états
membre de l'Union Européenne. Il est également conforme aux spécications et à la réglementation en vigueur dans le pays de
vente.
La documentation ocielle est disponible sur demande. Cela inclut mais ne se limite pas à : La déclaration de conformité (et à
l'identication du produit), la che technique concernant la sécurité des matériaux, les rapports de test du produit.
Veuillez contacter notre centre de service à la clientèle pour plus d'assistance :
via le site Web : http://www.nedis.fr/fr-fr/contact/formulaire-de-contact.htm
via courriel : service@nedis.com
via téléphone : +31 (0)73-5993965 (aux heures de bureau)
NEDIS B.V., De Tweeling 28, 5215 MC ’s-Hertogenbosch, PAYS-BAS
39
Page 40

NEDERLANDS
Inleiding:
Waak over uw eigendommen met dit nieuwe 2,4 GHz digitale draadloze
beveiligingscamerasysteem. Het 7" lcd-beeldscherm ondersteund tot 4 camera's en beschikt
over een geïntegreerde digitale videorecorder. De camera biedt een haarscherp en stabiel
beeld met nachtzicht, en met de gebruikte technologie wordt de beeldkwaliteit nog verder
verbeterd. Het systeem maakt gebruik van digitale draadloze technologie en is uitgerust
met geavanceerde encryptietoepassingen met frequentiesignaal, voor het verminderen van
interferentie veroorzaakt door andere toepassingen met de 2,4 GHz frequentieband. Deze
digitale technologie waarborgt uw privacy en stelt u in staat om het te gebruiken over een
extra lange afstand. HET ALLERBESTE DAT DRAADLOOS TE BIEDEN HEEFT.
Het beeldscherm en de camera worden standaard door de fabrikant gekoppeld geleverd.
Raadpleeg de paragraaf 'KOPPELEN voor het toevoegen van camera's' wanneer u de extra
camera SAS-TRCAM40/U (max. 4 camera's) aan het systeem toevoegt.
• Wij adviseren dat u deze handleiding doorleest vóór ingebruikname/installatie van het
camerasysteem.
• Bewaar deze handleiding op een veilige plaats voor toekomstig gebruik.
Inhoud van de verpakking:
1x camera met steun
1x 7" beeldscherm
2x antenne
1x AV-uitgangskabel
2x AC/DC-netvoeding
Technische specicaties:
Camera:
Uitzendfrequentie: 2,4-2,4835 GHz digitaal
Modulatie: 16QAM, QPSK, BPSK
Bereik: Binnen ± 50 m, open ruimte ± 150 m (afhankelijk van
plaatselijke omstandigheden)
Beeldchip: 1/4" CMOS
Lens: 2,0 mm
Kijkhoek: 73°
Infrarood verlichting (LED) : 5 M
Bescherming: IP54
Microfoon: mono
Bedrijfstemperatuur: -10°C ~ 50°C
Spanning: 5 V DC/400 mA
Afmeting: 132x64x57 mm (zonder steun)
Gewicht: 287 g (met kabel)
40
Page 41

NEDERLANDS
LCD-beeldscherm:
Ontvangstfrequentie: 2,4-2,4835 GHz digitaal
Kanalen: 4
Afmeting: 7" TFT/LCD
Max. resolutie: 800 RGB (H)* 480 (V) pixels
SD-kaart: tot maximaal 32 GB (niet inbegrepen)
Video beeldsnelheid: 25 fps (max.) 10 fps (4x camera's)
Opnamebeeldsnelheid: 25 fps per kanaal
Videoresolutie: CIF/VGA
Videoformaat: AVI
USB: 2,0
Menutaal: Engels, Duits, Frans en Nederlands
Video-uitgangsniveau: 1 Vp-p/75 Ohm
Audio-uitgangsniveau: 2Vrms@600ohm mono
Audio/video-
uitgangsconnector:
Bereik: Binnen ± 50 m, open ruimte ± 150 m (afhankelijk van
Bedrijfstemperatuur: 0°C tot +40°C
Spanning: 5 V DC/650 mA
Afmeting: 214x157x26 mm
Gewicht: 488 g
2,5 mm aansluiting (met 2,5 mm kabel tot 3 x RCA)
plaatselijke omstandigheden)
Veiligheidsmaatregelen:
• Open in het geval van een storing niet de camera of het beeldscherm. Deze producten
mogen uitsluitend worden geopend door een erkend technicus.
• Dompel de camera niet onder in vloeistof.
• Stel het beeldscherm niet bloot aan water of vocht.
• Stel het beeldscherm of de camera niet bloot aan hoge temperaturen (zie technische
specicaties).
• Installeer het systeem niet in de buurt van sterke magnetische velden, zoals een
luidsprekersysteem. Dit kan de kwaliteit nadelig beïnvloeden.
41
Page 42

Productbeschrijving:
Camera:
Beeldscherm:
NEDERLANDS
1. Infrarood led's
2. Lens
3. PIR infrarood sensorl
4. Microfoon
5. Steun
6. Antenne
7. Koppelknop
8. Voedingsingang
9. Antenne-aansluiting
10. Link-indicator
11. Voedingsindicator
1. Luidspreker
2. Steun
3. USB-poort
4. SD-kaartsleuf
5. AV-uitgang
6. Voedingspoort
7. Link-indicator
8. Voedingsindicator
9. Video opnemen/stoppen
10. Quarter-weergaveknop
11. Bestand/LCD verwijderen,
tv-schakelaar
12. Menu
13. Antenne
14. 7" TFT-LCD
15. Weergavemodus
16. Video afspelen
17. Aan/uit-knop
18. OK-knop
19. Navigatieknop
42
Page 43

NEDERLANDS
Installatiehandleiding:
Camera:
De camera kan op verschillende manieren worden bevestigd. Gebruik voor
plafondbevestiging het schroefdraad bovenop de camera. Sluit na het bevestigen van de
camera de AC/DC-voeding aan op de camera en een stopcontact.
Beeldscherm:
Het beeldscherm kan op een vlakke ondergrond of aan de muur worden bevestigd. Sluit
na het plaatsen van het beeldscherm de AC/DC-voeding aan op het beeldscherm en een
stopcontact. Na het aansluiten van de AC/DC-voeding wordt de camera automatisch
ingeschakeld. Optioneel: het beeldscherm kan met de video-uitgang van de beeldscherm
aangesloten worden op een beeldscherm.
43
Videokabel
Page 44

NEDERLANDS
Gebruiksaanwijzing:
1. Plaats een SD-kaart in de SD-kaartsleuf van het beeldscherm. Of sluit een externe harde
schijf aan op de USB-poort van het beeldscherm.
2. Houd de aan/uit-knop ongeveer 2 seconden ingedrukt om het beeldscherm aan te
zetten. De voedingsindicator moet oplichten en het beeld verschijnen.
3. Voor systeeminstellingen drukt u op de menuknop om het hoofdmenu te openen. Het
volgende scherm wordt weergegeven. Navigeer door het menu met de navigatie-, OKen menu-knoppen.
Systeem
1. Druk op OK voor toegang tot de systeeminstellingen. Het systeem biedt de volgende
opties:
Datum / Tijd Stel datum en tijd in.
Taal Stel de taal in.
Opnamemodus Instellen om de opname stoppen of om de eerst opgenomen
video over te schrijven zodra het opslagmedium vol is.
SD/USB formatteren Instellen om het opslagmedium te formatteren.
Opslag voor opname Instellen van het opslagmedium.
44
Page 45

NEDERLANDS
Items weergeven Instellen om RSSI, Tijd, SD/USB-status en camera op het
scherm en de opgenomen video weer te geven.
Tv-systeem Selecteer een tv-systeem (PAL voor Europa).
Systeeminformatie Geeft de systeeminformatie weer.
Periode scanmodus Instellen van de cyclische weergavetijd van het
bewakingsbeeld op de camera.
Mute In-/uitschakelen van de luidspreker op het beeldscherm.
Standaard laden Terugzetten naar de standaard fabrieksinstellingen.
Opnamedatum/-tijd Instellen om de huidige opnametijd en -datum op de
opgenomen video weer te geven.
Helderheid Pas de helderheid van het beeld aan.
Volume Pas het volume aan.
2. Selecteer datum/tijd met de navigatieknop en druk op OK voor toegang tot de datum-/
tijdinstelling.
• Druk op de linker- of rechterpijlknop om te selecteren.
• Druk op de omhoog- of omlaagpijlknop om aan te passen.
• Druk op de OK-knop om te bevestigen.
• Druk op de MENU-knop om te verlaten.
3. Selecteer taal met de navigatieknop en druk op OK voor toegang tot de taalinstelling.
• Druk op de omhoog- of omlaagpijlknop om taal te selecteren.
• Druk op de OK-knop om te bevestigen en te verlaten.
4. Selecteer opnamemodus met de navigatieknop en druk op OK voor toegang tot de
opnamemodus-instelling.
• Druk op de omhoog- of omlaagpijlknop om “Normal” of “Overwrite” te selecteren.
• Druk op de OK-knop om te bevestigen en te verlaten.
Opmerkingen:
Normaal: Wanneer de SD-kaart of de mobiele harde schijf vol zijn, stopt het systeem
automatisch met opnemen.
Overschrijven: Wanneer de SD-kaart of de mobiele harde schijf vol is, verwijdert het systeem
automatisch de eerste video en reserveert voldoende opslagruimte voor opname van de
laatste opname.
5. Selecteer formaat SD/USB met de navigatieknop en druk op OK voor toegang tot de
formaat SD/USB-instelling.
• Druk op de omhoog- of omlaagpijlknop om “Cancel”, “SD Card” of “USB Device”; te
selecteren.
- Annuleren: annuleert het formatteren.
- SD-kaart: formateert de SD-kaart.
- USB-apparaat: formatteert de externe harde schijf (indien aangesloten)
• Druk op de OK-knop om te formatteren:
• Na het formatteren verschijnt op het systeem “Format Successfully”, om aan te geven
dat het formatteren succesvol is voltooid.
• Druk op de OK-knop om te bevestigen en te verlaten.
45
Page 46

NEDERLANDS
6. Selecteer opslag voor opname met de navigatieknop en druk op OK voor toegang tot de
opslag voor opname-instelling.
• Druk op de omhoog- of omlaagknop om “SD Card” of “USB Device” te selecteren.
• Druk op de OK-knop om te bevestigen en te verlaten.
7. Selecteer items weergeven met de navigatieknop en druk op OK voor toegang tot de
items weergeven-instelling.
• Druk op de omhoog- of omlaagpijlknop om te selecteren.
• Klik op de OK-knop om items weergeven in het beeld te bevestigen.
- RSSI: Intensiteit van het signaal-pictogram,
- SD USB-status: Of nu de SD-kaart of de mobiele harde schijf is geplaatst,
- Camera: Naam-pictogrammen van de camera,
• Druk na het instellen op de OK-knop om te bevestigen en te verlaten.
8. Selecteer tv-systeem met de navigatieknop en druk op OK voor toegang tot de tvsysteem-instelling.
• Druk op de omhoog- of omlaagknop om NTSC of PAL (PAL voor Europa) te selecteren.
• Druk op de OK-knop om te bevestigen en te verlaten.
9. Selecteer systeeminformatie met de navigatieknop en druk op OK voor toegang tot de
systeeminformatie-instelling.
• Druk op OK om de informatie over het systeem te bekijken.
• Druk op de menu-knop om te verlaten.
10. Selecteer systeemupgrade met de navigatieknop en druk op OK voor toegang tot de
systeemupgrade-instelling.
• Druk op de omhoog- of omlaagpijlknop om te selecteren.
• Druk op OK.
• Druk op de video opname/stop-knop om te bevestigen.
11. Selecteer periode scanmodus met de navigatieknop en druk op OK voor toegang tot de
periode scanmodus-instelling.
• Druk op de omhoog- of omlaagpijlknop om de periode voor het scannen van de
aangesloten camera's te selecteren.
• Druk nogmaals op de OK-knop om te bevestigen en te verlaten.
12. Selecteer mute met de navigatieknop en druk op OK voor toegang tot de mute-instelling.
• Druk op de omhoog- of omlaagpijlknop om “On” of “O” te selecteren.
• Druk nogmaals op de OK-knop om te bevestigen en te verlaten.
13. Selecteer standaard laden met de navigatieknop en druk op OK voor toegang tot de
standaard laden-instelling.
• Druk op de omhoog- of omlaagpijlknop om “Cancel” of “OK” te selecteren.
- Cancel: Annuleert de optie standaardinstellingen.
- OK: Stelt terug naar de standaardinstellingen.
• Druk op de OK-knop om te bevestigen en te verlaten.
14. Selecteer helderheid met de navigatieknop en druk op OK voor toegang tot de
helderheid-instelling.
• Druk op de linker- of rechterpijlknop om de helderheid aan te passen.
• Druk op de OK-knop om te bevestigen en te verlaten.
15. Selecteer volume met de navigatieknop en druk op OK voor toegang tot de volumeinstelling.
46
Page 47

NEDERLANDS
• Druk op de linker- of rechterpijlknop om de volume aan te passen.
• Druk op de OK-knop om te bevestigen en te verlaten.
Opmerking: Het volume kan ook worden aangepast met de omhoog- of omlaagpijl in livebewaking.
16. Druk op menu om terug te keren naar het hoofdmenu.
Opnemen
Druk de rechterpijlknop in het hoofdmenu om de opname-instellingen te selecteren en druk
op OK.
Timeropname:
Stel de opname start-/stoptijd in via het menu “Timer Recording”. Het apparaat neemt
automatisch op volgens de ingestelde start-/stoptijd.
1. Selecteer timeropname met de navigatieknop en druk op OK voor toegang tot de nieuwe
planningsinstelling.
• Druk op OK voor toegang tot het menu timeropname.
• Druk op de omhoog- of omlaagpijlknop om te selecteren.
• Druk op de linker- of rechterknop om aan te passen.
• Druk op de OK-knop om te bevestigen en te verlaten.
2. Na het instellen neemt het apparaat automatisch op volgens de ingestelde start-/stoptijd.
3. De opname stopt als u op het apparaat tijdens het opnameproces, ingesteld door
timeropname, drukt op de video-opname/stopknop.
Handmatige opname:
1. Druk in live-bewaking op op de linker- en rechterpijlknoppen om de camera voor videoopname te selecteren.
2. Druk op het apparaat op de video-opname/stopknop. Het opnamepictogram wordt op
het scherm weergegeven, om aan te geven dat de opname is begonnen.
3. Druk op het apparaat nogmaals op de knop om de opname te stoppen.
PIR-opname:
PIR-opname: Zodra er menselijke beweging door een camera gedetecteerd wordt, kan
opname worden geactiveerd.
1. Selecteer RIR-opname met de navigatieknop en druk op OK voor toegang tot de PIRopname-instelling.
• Druk op de omhoog- of omlaagpijlknop om de camera te selecteren.
47
Page 48

NEDERLANDS
• Druk op de linker- of rechterpijlknop om “On” te selecteren.
• Druk op de OK-knop om te bevestigen en te verlaten.
Opmerking: wanneer “O” is ingesteld, is de bewegingsdetectie-functie uitgeschakeld. De
afstand van de infraroodsensor van PIR is 5 m. Als de afstand groter is dan 5 meter, kan de
detectie mislukken.
Afspelen
Druk de rechterpijlknop in het hoofdmenu om de afspeel-instellingen te selecteren en druk
op OK.
Opmerking: voor de afspeelfuncties is het noodzakelijk dat een SD-kaart is geplaatst of een
externe harde schijf is aangesloten.
De afspeelfunctie is ook toegankelijk via live-bewaking door te drukken op de videoafspeelknop.
1. Druk op de omhoog- of omlaagpijlknop om de map te selecteren.
2. Druk op de OK-knop om te bevestigen en voor toegang.
Camera 1
Camera 2
Niet geopend
Camera 4
3. Druk op de omhoog- of omlaagpijlknop om het videobestand te selecteren.
4. Druk op de OK-knop om af te spelen.
5. Druk op de linker- of rechterpijlknop om snel vooruit of achteruit te spoelen.
6. Druk nogmaals op de OK-knop om te pauzeren.
7. Druk op de MENU-knop om te stoppen met afspelen.
48
Bestandsgrootte
Page 49

NEDERLANDS
Video verwijderen
Druk in de video-aspeelmodus op de omhoog- of omlaagpijlknop om de te verwijderen
video of videomap te selecteren.
• Druk op de bestand verwijderen-knop of op de LCD-knop op het beeldscherm om het
te verwijderen.
Opmerking: alleen een lege map kan als map worden verwijderd.
Camera
Voor het qatoevoegen van de extra camera SAS-TRCAM40/U (max. 4), moet de camera aan
het systeem worden gekoppeld om door het systeem te worden herkend.
Druk de rechterpijlknop in het hoofdmenu om de camera-instellingen te selecteren en druk
op OK.
Koppelen:
1. Druk op OK voor toegang tot het koppelmenu.
2. Selecteer het camera met de omhoog- en omlaagpijlknoppen.
3. Druk op OK waarna het volgende scherm wordt weergegeven.
4. Druk binnen 60 seconden zo'n 2 seconden op de koppelknop op de achterzijde van de
camera.
5. Na het succesvol koppelen van de camera en het beeldscherm, wordt op het
beeldscherm PAIRING OK weergegeven.
6. Druk op de menuknop om terug te keren naar het cameramenu.
Opmerking: als de koppeling mislukt, herhaalt u de bovenstaande stappen en zorg
dat het beeldscherm en de camera niet meer dan 2 meter van elkaar af staan voor de
koppelingsprocedure.
Actief:
1. Selecteer actief met de omhoog- en omlaagpijlknop en druk op OK.
2. Druk op de omhoog- of omlaagpijlknop om de camera te selecteren.
3. Druk op de omhoog- of omlaagpijlknop om “On” of “O” te selecteren.
4. Druk op de OK-knop om te bevestigen en te verlaten.
Opmerking: alleen gekoppeld camera's kunnen op actief of inactief worden ingesteld.
Wanneer een camera is uitgeschakeld, kan het niet opgenomen worden, ingelezen worden
door live-bewaking, enz.
49
Page 50

NEDERLANDS
PIP-instelling:
Stel de grootte van de beeldresolutie en de opnamekwaliteit in.
1. Selecteer PIP-instelling met de omhoog- en omlaagpijlknoppen en druk op OK.
2. Selecteer de camera met de omhoog- en omlaagpijlknoppen en druk op OK. Het
volgende scherm wordt weergegeven.
3. Druk op de omhoog- of omlaagpijlknop om “Resolution Size” of “Quality” te selecteren.
4. Druk op de omhoog- of omlaagpijlknop om “Top”, “High”, “Medium” of “Low” te selecteren.
5. Druk op de OK-knop om aan te passen.
6. Druk op de MENU-knop om te bevestigen en te verlaten.
Opmerking: het hoge-resolutieformaat is VGA en de lage is CIF.
Alarm
Wanneer PIR-detectie is ingeschakeld, gaat het alarmsysteem af zodra beweging wordt
gedetecteerd.
1. Selecteer alarm in het hoofdmenu en druk op OK.
2. Het scherm geeft PIR-detectie weer, druk op OK.
3. Druk op “On” of “O” met de omhoog- en omlaagpijlknop.
4. Druk op OK om te bevestigen en te verlaten.
Live-weergave:
Druk op de quarter-weergaveknop om het type weergave te selecteren.
Tijdstempel
Beeld in beeldweergave
50
Page 51

NEDERLANDS
Quad-weergave Volledige schermweergave
Opmerking: gebruik de linker- en rechterpijlknop om de camera te selecteren
Druk op de weergavemodus voor toegang tot de cyclische modusweergave. Er zijn vijf
cyclische intervallen verkrijgbaar: 5s, 10s, 15s, 20s en 30s en kan worden ingesteld onder
System > Periode scanmodus in het hoofdmenu.
Mobiele harde schijf met succes geplaatst
SD-kaart met succes geplaatst
Cameranaam
Actuele camera
Opnamestatus
Signaalsterkte
51
Page 52

NEDERLANDS
Onderhoud:
Reinig het product alleen met een droge doek.
Gebruik geen reinigingsmiddelen of schuurmiddelen.
Garantie:
Eventuele wijzigingen en/of aanpassingen aan het product zullen de garantie ongeldig maken. Wij aanvaarden geen
aansprakelijkheid voor schade veroorzaakt door onjuist gebruik van dit product.
Disclaimer:
Ontwerpen en specicaties kunnen zonder kennisgeving worden gewijzigd. Alle logo’s, merken en productnamen zijn
handelsmerken of geregistreerde handelsmerken van de respectievelijke eigenaren en worden hierbij als zodanig erkend.
Afvoer:
• Dit product is bestemd voor gescheiden inzameling bij een daartoe aangewezen verzamelpunt.
Gooi dit product niet weg bij het huishoudelijk afval.
• Neem voor meer informatie contact op met de detailhandelaar of de lokale overheid die verantwoordelijk is voor het
afvalbeheer.
Dit product is vervaardigd en geleverd in overeenstemming met de relevante reglementen en richtlijnen die voor alle lidstaten van
de Europese Unie gelden. Het voldoet ook aan alle toepasselijke specicaties en reglementen van het land van verkoop.
Op aanvraag is ociële documentatie verkrijgbaar. Inclusief, maar niet uitsluitend: Conformiteitsverklaring (en productidentiteit),
materiaalveiligheidsinformatie en producttestrapport.
Wend u tot onze klantenservice voor ondersteuning:
via de website: http://www.nedis.nl/nl-nl/contact/contact-formulier.htm
via e-mail: ser vice@nedis.nl
telefonisch: +31 (0)73-5993965 (tijdens kantooruren)
NEDIS B.V., De Tweeling 28, 5215 MC ’s-Hertogenbosch, NEDERLAND
52
Page 53

ITALIANO
Introduzione:
Controllate la vostra proprietà con questo nuovo sistema di videosorveglianza wireless
digitale a 2.4GHz. Il monitor LCD da 7" può supportare no a 4 videocamere e possiede un
registratore video digitale incorporato. La videocamera ore un'immagine molto stabile
e nitida con visione notturna e la tecnologia utilizzata accresce ulteriormente la qualità
dell'immagine. Il sistema usa tecnologia wireless digitale ed è dotato con funzionalità di
codica del segnale di frequenza, che riducono l'interferenza causata da altre applicazioni
che utilizzano la banda di frequenza a 2.4 GHz. Questa tecnologia digitale garantisce la
vostra privacy e vi permette di utilizzarla anche a grande distanza. IL MEGLIO CHE RIESCE AD
OFFRIRE LA TECNOLOGIA WIRELESS.
Il monitor e la videocamera sono già abbinati come impostazioni di fabbrica. Quando si
aggiunge una camera addizionale SAS-TRCAM40/U (massimo 4 videocamere) al sistema, vi
preghiamo di fare riferimento alla sezione ABBINAMENTO per aggiungere le videocamere.
• Vi raccomandiamo di leggere questo manuale prima di installare/utilizzare il sistema di
videocamera.
• Tenete questo manuale in un posto sicuro per referenze future.
Contenuto della confezione:
1x camera con staa
1x monitor da 7"
2x antenne
1x Cavo di uscita AV
2x Alimentatori AC/DC
Speciche tecniche:
Videocamera:
Frequenza di trasmissione: Digitale a 2.4-2.4835 GHz
Modulazione: 16QAM, QPSK, BPSK
Portata: All'interno, ±50 m; in spazi aperti ±150 m (a seconda
delle condizioni locali)
Processore d'immagine: 1/4” CMOS
Obiettivo: 2.0 mm
Angolo di visione: 73°
Illuminazione infrarossi (LED): 5 M
Protezione: IP54
Microfono: mono
Temperatura di esercizio: -10°C ~ 50°C
Voltaggio: 5 V DC/400 mA
Dimensioni: 132x64x57 mm (Senza staa)
Peso: 287 g (incluso il cavo)
53
Page 54

Monitor LCD:
Frequenza di ricezione: Digitale a 2.4-2.4835 GHz
Canali: 4
Dimensione: 7" TFT/LCD
Risoluzione massima: 800 RGB (H)* 480 (V) pixel
Card SD: no a 32 GB (non inclusa)
Velocità di fotogrammi: 25 fps (max.) 10 fps (4x videocamere)
Velocità di fotogrammi di
registrazioni: 25 fps per canale
Risoluzione video: CIF/VGA
Formato Video: AVI
USB: 2.0
Lingua menu: Inglese, Tedesco, Francese e Olandese
Livello uscita video: 1 Vp-p/75 Ohm
Livello uscita audio: 2Vrms@600ohm mono
Connettore uscita Audio/Video: 2.5 mm jack (2.5 mm cavo a 3 x RCA incluso)
Portata: All'interno, ±50 m; in spazi aperti ±150 m
(a seconda delle condizioni locali)
Temperatura di funzionamento: 0°C a +40°C
Voltaggio: 5 V DC/650 mA
Dimensioni: 214x157x26 mm
Peso: 488 g
ITALIANO
Precauzioni per la sicurezza:
• Non aprire la videocamera o il monitor nel caso di malfunzionamento. Questi prodotti
dovrebbero essere aperti solo da tecnici qualicati.
• Non immergere la videocamera in un liquido.
• Non esporre il monitor all'acqua o umidità.
• Non esporre il monitor o la videocamera ad alte temperature (vedi speciche tecniche).
• Non installare il sistema vicino a forti campi magnetici, come delle casse acustiche. Ciò
potrebbe comprometterne la qualità.
54
Page 55

Descrizione prodotto:
Videocamera:
Monitor:
ITALIANO
1. LED a infrarossi
2. Lenti
3. Sensore infrarossi PIR
4. Microfono
5. Stae
6. Antenna
7. Pulsante abbinamento
8. Ingresso alimentazione
9. Presa antenna
10. Indicatore di collegamento
11. Indicatore alimentazione
1. Cassa
2. Stae
3. Porta USB
4. Slot per card SD
5. uscita AV
6. Porta alimentazione
7. Indicatore di collegamento
8. Indicatore alimentazione
9. Video Registrazione/Stop
10. Pulsante di Visualizzazione a
Quarto
11. Cancella le / interruttore
LCD, TV
12. Menu
13. Antenna
14. 7" TFT/LCD
15. Modalità di visualizzazione
16. Riproduzione Video
17. Accensione/Spegnimento
18. Pulsante OK
19. Pulsante di navigazione
55
Page 56

ITALIANO
Istruzioni di installazione:
Videocamera:
La videocamera può essere montata in modi diversi. Per il montaggio a sotto utilizzare
il letto sulla cima della telecamera. Dopo aver montato la videocamera connetterla
all'alimentatore AC/DC e connetterlo ad una presa.
Monitor:
Il monitor può essere posizionato su di una supercie piana o montato a parete. Dopo
aver montato il monitor connetterlo all'alimentatore AC/DC e connetterlo ad una presa. La
videocamera si accende automaticamente dopo la connessione all'alimentazione AC/DC.
Opzionale: il monitor può essere connesso ad un altro monitor con l'uscita video del monito
stesso.
56
Cavo Video
Page 57

ITALIANO
Istruzioni utente:
1. Inserire una card SD nello slot SD del monitor. O connettere un disco rigido esterno alla
porta USB del monitor.
2. Premere il pulsante di Accensione/spegnimento per circa 2 secondi per accendere il
monitor. L'indicatore della batteria si accende e l'immagine viene visualizzata.
3. Per le impostazioni di sistema premere il pulsante menu per aprire il menu principale.
Apparirà lo schermo seguente. Utilizzare il pulsanti di navigazione, menu ed OK per
navigare attraverso il menu.
Sistema
1. Premere OK per accedere alle impostazioni di sistema. Il sistema ore le seguenti opzioni:
Data / Ora Impostare la data e l'ora.
Lingua Impostare la lingua.
Modalità di registrazione Impostare per arrestare la registrazione o sovrascrivere il
primo video registrato quando il supporto di archiviazione
è pieno.
Formato SD/USB Impostare per il formato del supporto di archiviazione.
Archiviazione di registrazione Impostare il supporto di archiviazione.
57
Page 58

ITALIANO
Visualizza oggetti Impostare per visualizzare RSSI, Ora, stato SD/USB e la
videocamera sullo schermo ed il video registrato.
Sistema TV Selezionare un sistema TV (PAL per l'Europa).
Informazioni di sistema Mostra l'informazione di sistema.
Tempo di modalità scansione Impostare l'intervallo di visualizzazione ciclica delle
immagini monitor della videocamera.
Muto Accende/spegne la cassa del monitor.
Caricamento dei valori
predeniti Riporta le impostazioni a quelle di fabbrica predenite.
Data / Ora Registrazione Impostare per visualizzare l'ora e la data attuali di
registrazione sul video registrato.
Luminosità Regola la luminosità dell'immagine.
Volume Regola il volume.
2. Selezionare data/ora con il tasto di navigazione e premere il tasto OK per accedere alle
impostazioni della data/ora.
• Premere il tasto freccia sinistro o destro per selezionare.
• Premere il tasto freccia su o giù per regolare.
• Premere il tasto OK per confermare.
• Premere il tasto MENU per uscire.
3. Selezionare lingua con il tasto di navigazione e premere il tasto OK per accedere alle
impostazioni della lingua.
• Premere il tasto freccia su o giù per selezionare la lingua.
• Premere il tasto OK per confermare ed uscire.
4. Selezionare modalità registrazione con il tasto di navigazione e premere il tasto OK per
accedere alle impostazioni della modalità di registrazione.
• Premere il tasto freccia su o giù per selezionare “Normal” o “Overwrite”.
• Premere il tasto OK per confermare ed uscire.
Note:
Normale: Quando la card SD o il disco rigido portatile sono pieni, il sistema arresta
automaticamente la registrazione.
Sovrascrittura: Quando la card SD o il disco rigido portatile sono pieni, il sistema cancella
automaticamente il primo video e si riserva spazio suciente per garantire l'ultima
registrazione.
5. Selezionare formato SD/USB con il tasto di navigazione e premere il tasto OK per
accedere alle impostazioni del formato SD/USB .
• Premere il tasto freccia su o giù per selezionare “Cancel”, “SD Card” o “USB Device”;
- Cancella: cancella la formattazione.
- Card SD: formatta la card SD.
- Dispositivo USB: formatta il disco rigido esterno (se connesso)
• Premere il tasto OK per confermare.
58
Page 59

ITALIANO
• Dopo la formattazione, il sistema mostra “Format Successfully”, indicando che la
formattazione ha avuto successo.
• Premere il tasto OK per confermare ed uscire.
6. Selezionare archivio di registrazione con il tasto di navigazione e premere il tasto OK per
accedere alle impostazioni dell'archiviazione per la registrazione.
• Premere il tasto freccia su o giù per selezionare “SD Card” o “USB Device”.
• Premere il tasto OK per confermare ed uscire.
7. Selezionare visualizza oggetti con il tasto di navigazione e premere il tasto OK per
accedere alle impostazioni della visualizzazione oggetti.
• Premere il tasto freccia su o giù per regolare.
• Cliccare il tasto OK per confermare gli oggetti di visualizzazione nell'immagine.
- RSSI: Icona di intensità segnale.
- Stato SD USB: Se è inserita una card SD oppure un disco rigido portatile.
- Videocamera: Icone nome Videocamera.
• Dopo le impostazioni premere il tasto MENU per confermare ed uscire.
8. Selezionare sistema TV con il tasto di navigazione e premere il tasto OK per accedere alle
impostazioni del sistema TV.
• Premere i tasti su o giù per selezionare NTSC o PAL (PAL per Europe).
• Premere il tasto OK per confermare ed uscire.
9. Selezionare informazioni di sistema con il tasto di navigazione e premere il tasto OK per
accedere alle informazioni di sistema.
• Premere OK per vedere le informazioni riguardo al sistema.
• Premere il tasto MENU per uscire.
10. Selezionare aggiornamento di sistema con il tasto di navigazione e premere il tasto OK
per accedere all'aggiornamento di sistema.
• Premere il tasto freccia su o giù per regolare.
• Premere OK.
• Premere il pulsante registra/interrompi video per confermare.
11. Selezionare modalità di scansione con il tasto di navigazione e premere il tasto OK per
accedere alle impostazioni della modalità di scansione.
• Premere i tasti freccia su o giù per selezionare il tempo di scansione delle videocamere
connesse.
• Premere il tasto OK per confermare ed uscire.
12. Selezionare muto con il tasto di navigazione e premere il tasto OK per accedere alle
impostazioni del muto.
• Premere il tasto freccia su o giù per selezionare “On” o “O”.
• Premere il tasto OK per confermare ed uscire.
13. Selezionare carica predeniti con il tasto di navigazione e premere il tasto OK per
accedere alle impostazioni di caricamento dei predeniti.
• Premere il tasto freccia su o giù per selezionare “Cancel” o “OK”.
- Cancella: Cancella l'opzione dell'impostazioni predenite.
- OK: Riporta alle impostazioni predenite.
• Premere il tasto OK per confermare ed uscire.
14. Selezionare luminosità con il tasto di navigazione e premere il tasto OK per accedere alle
impostazioni della luminosità.
59
Page 60

ITALIANO
• Premere il tasto freccia su o giù per regolare la luminosità.
• Premere il tasto OK per confermare ed uscire.
15. Selezionare volume con il tasto di navigazione e premere il tasto OK per accedere alle
impostazioni del volume.
• Premere il tasto freccia destra e sinistra per regolare il volume.
• Premere il tasto OK per confermare ed uscire.
Nota: Il volume può essere anche regolato con la freccia su o giù in monitoraggio di visione
live.
16. Premere il tasto menu per ritornare al menu principale.
Registrazione
Premere il tasto freccia destra e sinistra nel menu principale per selezionare le impostazioni di
registrazione e premere OK.
Registrazione temporizzata:
Impostare il tempo di avvio/arresto attraverso il meno di “Timer Recording”. Il dispositivo
registra automaticamente in accordo al tempo di avvio/arresto impostato.
1. Selezionare registrazione temporizzata con il tasto di navigazione e premere il tasto OK
per accedere alle impostazioni della registrazione temporizzata.
• Premere OK per accedere al menu della registrazione temporizzata.
• Premere il tasto freccia su o giù per regolare.
• Premere il tasto freccia sinistro o destro per regolare.
• Premere il tasto OK per confermare ed uscire.
2. Dopo aver impostato, il dispositivo registra automaticamente a seconda del tempo di
avvio/arresto impostato.
3. Se premete il tasto di avvio/arresto video sul dispositivo durante il processo di
registrazione, impostato dalla registrazione temporizzata, la registrazione si interrompe.
Registrazione manuale:
1. In monitoraggio a vista in diretta, premere tasto freccia sinistro o destro per selezionare la
videocamera per la video registrazione.
2. Premere il pulsante di registrazione/arresto video sul dispositivo. L'icona di registrazione è
visualizzata sullo schermo, indicando che la registrazione si sta avviando.
3. Premere il pulsante sul dispositivo nuovamente per interrompere la registrazione.
60
Page 61

ITALIANO
Registrazione PIR:
Registrazione PIR: Se vi è un movimento umano rilevato da una videocamera attivata, viene
attivata la registrazione.
1. Selezionare registrazione PIR con il tasto di navigazione e premere il tasto OK per
accedere alle impostazioni della registrazione PIR.
• Premere il tasto freccia su o giù per selezionare la videocamera.
• Premere il tasto freccia sinistro o destro per selezionare “On”.
• Premere il tasto OK per confermare ed uscire.
Nota: quanto è impostato “O”, la funzione di rilevamento del movimento è spenta. La
distanza di rilevamento ad infrarossi del PIR è 5m. Se la distanza eccede i 5m, il sensore
potrebbe non funzionare.
Riproduzione
Premere il tasto freccia destra e sinistra nel menu principale per selezionare le impostazioni di
riproduzione e premere OK.
Nota: per le funzioni di riproduzione è necessario che la Card SD o un disco rigido esterno
siano inseriti e connessi.
La funzione di riproduzione può essere controllata in monitoraggio a vista diretta premendo
il pulsante di riproduzione video.
1. Premere il tasto freccia su o giù per selezionare la cartella.
2. Premere il tasto OK per confermare ed accedere.
Camera 1
Camera 2
Camera 4
3. Premere il tasto freccia su o giù per selezionare il le video.
4. Premere il pulsante OK per la riproduzione.
61
Non sfogliato
Dimensione
le
Page 62

ITALIANO
5. Premere il pulsante freccia sinistra o destra per andare avanti/indietro velocemente.
6. Premere il pulsante OK nuovamente per mettere in pausa.
7. Premere il pulsante MENU per uscire dalla riproduzione.
Cancellazione video
In modalità di riproduzione video, premere il pulsante freccia su o già per selezionare il video
o la cartella video da cancellare.
• Premere il pulsante di cancellazione le/LCD sul monitor per cancellarli.
Note: solo una cartella vuota può essere cancellata come cartella.
Videocamera
Quando si aggiunge una camera addizionale SAS-TRCAM40/U (max. 4) la videocamera
necessita di essere abbinata al sistema perchè il sistema la riconosca.
Premere il tasto freccia destra e sinistra nel menu principale per selezionare le impostazioni
della videocamera e premere OK.
Abbinamento:
1. Premere OK per accedere al menu di abbinamento.
2. Selezionare la videocamere con i pulsanti freccia su e giù.
3. Premere OK, ed apparirà il seguente schermo.
4. Premere il pulsante di abbinamento entro 60 secondi per 2 secondi sul retro della
videocamera.
5. Dopo l'abbinamento avvenuto con successo tra videocamera e monitor, il monitor
mostra PAIRING OK.
6. Premere il pulsante menu per ritornare al menu della videocamera.
62
Page 63

ITALIANO
Note: se l'abbinamento fallisce, ri-eseguire i passi di cui sopra ed assicurarsi che il monito e la
videocamera non sono più lontani di 2 metri durante la procedura di abbinamento.
Attivo:
1. Selezionare attivo con il pulsante freccia già e premere OK.
2. Premere il tasto freccia su o giù per selezionare la videocamera.
3. Premere il tasto freccia sinistro o destro per selezionare.“On” o “O”.
4. Premere il tasto OK per confermare ed uscire.
Note: solo le videocamere abbinate possono essere settate come attive o non attive. Quando
una videocamera è su o essa non può essere vista in visione in diretta, registrata ecc.
Impostazioni PIP:
Impostare la dimensione della risoluzione dell'immagine e la qualità di registrazione.
1. Selezionare le impostazioni PIP con i pulsanti freccia su e giù e premere OK.
2. Selezionare la videocamere con i pulsanti freccia su e giù e premere OK. La nestra
seguente appare.
3. Premere il tasto freccia sinistro o destro per selezionare.“Resolution Size” o “Quality”.
4. Premere il tasto freccia sinistro o destro per selezionare.“Top”, “High”, “Medium” o “Low”.
5. Premere il pulsante OK per la regolazione.
6. Premere il tasto MENU per confermare ed uscire.
Note: la dimensione di risoluzione alta è VGA e bassa CIF.
Allarme
Quando il rilevamento PIR è impostato su on, il sistema darà un allarme quando il movimento
è rilevato.
1. Selezionare allarme nel menu principale e premere OK.
2. Lo schermo mostra il rilevamento PIR, premer OK.
3. Premere “On” o “O” con il pulsante su e giù.
4. Premere OK per confermare ed uscire.
Vista in diretta:
Premere il pulsante di visualizzazione a quarti per selezionare il tipo di vista.
63
Page 64

ITALIANO
Indicazione
del tempo
Immagine è in visione immagine
Visione ad un quarto Visione a schermo intero
Note: utilizzare il pulsante freccia sinistra e destra per selezionare la videocamera.
Premere il pulsante di modalità di visualizzazione per accedere alla visualizzazione in
modalità ciclica. Sono disponibili cinque intervalli ciclici: 5s, 10s, 15s, 20s, e 30s e possono
essere impostati sotto “System” > Periodo Modalità Scansione nel menu principale.
Disco rigido mobile inserito con successo
Card SD inserita con successo
Nome Videocamera
Videocamera attuale
Stato di registrazione
Intensità segnale
64
Page 65

ITALIANO
Manutenzione:
Pulire il prodotto solo con un panno asciutto.
Non utilizzare solventi detergenti o abrasivi.
Garanzia:
Qualsiasi modica e/o manomissione al prodotto annullerà la garanzia. Non si accettano responsabilità per danni causati da un uso
non corretto di questo prodotto.
Scarico di Responsabilità:
Il design e le caratteristiche tecniche sono soggetti a modica senza necessità di preavviso. Tutti i marchi, loghi e nomi dei prodotti
sono marchi commerciali o registrati dei rispettivi titolari e sono riconosciuti come tali in questo documento.
Smaltimento:
• Questo prodotto è soggetto a raccolta dierenziata nei punti di raccolta appropriati.
Non smaltite il prodotto con la spazzatura domestica.
• Per maggiori informazioni, contattare il rivenditore o le autorità locali responsabili per la gestione dei riuti.
Il presente prodotto è stato realizzato e fornito in conformità a tutte le norme e le direttive vigenti, con validità in tutti gli stati
membri della Comunità Europea. Inoltre è conforme alle speciche e alle normative applicabili nel paese in cui è stato venduto.
La documentazione uciale è disponibile su richiesta. Essa include a titolo esemplicativo ma non limitativo: Dichiarazione di
conformità (e di identità del prodotto), scheda di sicurezza dei materiali, rapporto di prova del prodotto.
Contattare il nostro servizio clienti per assistenza:
tramite il nostro sito web: http://www.nedis.it/it-it/contatti/modulo-contatto.htm
tramite e-mail: service@nedis.com
tramite telefono: +31 (0)73-5993965 (in orario di ucio)
NEDIS B.V., De Tweeling 28, 5215 MC ’s-Hertogenbosch, Paesi Bassi
65
Page 66

ESPAÑOL
Introducción:
Vigile sus bienes con este nuevo sistema de cámaras de seguridad inalámbricas digitales de
2,4 GHz. El monitor LCD de 7” puede soportar hasta 4 cámaras y tiene un grabador de vídeo
digital integrado. La cámara ofrece una imagen muy nítida y estable, con visión nocturna,
y la tecnología utilizada mejora la calidad de imagen aún más. El sistema utiliza tecnología
digital inalámbrica y está equipado con funciones avanzadas de encriptación de señales
de frecuencia que reducen la interferencia causada por otras aplicaciones que usan la
banda de frecuencia de 2,4 GHz. Esta tecnología digital asegura su privacidad y le permite
usarla a través de una distancia extremadamente larga. LO MEJOR QUE LA TECNOLOGÍA
INALÁMBRICA TIENE PARA OFRECER.
El monitor y la cámara ya están acoplados de fábrica por defecto. Al agregar la cámara
adicional SAS-TRCAM40/U (4 cámaras como máximo) al sistema, remítase a la sección
ACOPLAMIENTO para agregar cámaras.
• Recomendamos que lea este manual antes de instalar/utilizar el sistema de cámaras.
• Conserve este manual en un lugar seguro para futura referencia.
Contenido del paquete:
1 cámara con soporte
1 monitor de 7”
2 antenas
1 cable de salida de AV
2 fuentes de alimentación de CA/CC
Especicaciones técnicas:
Cámara:
Frecuencia de transmisión: 2,4 – 2,4835 GHz Digital
Modulación: 16QAM, QPSK, BPSK
Rango: En interiores ±50 m, en un área abierta ±150 m
(depende de las condiciones locales)
Chip de imagen: 1/4" CMOS
Lentes: 2,0 mm
Ángulo de visualización: 73°
Iluminación infrarroja (LED): 5 M
Protección: IP54
Micrófono: mono
Temperatura de operación: -10°C ~ 50°C
Tensión: 5 V CC/400 mA
Dimensiones: 132 x 64 x 57 mm (sin soporte)
Peso: 287 g (cable incluido)
66
Page 67

Monitor LCD:
Frecuencia de recepción: 2,4 – 2,4835 GHz Digital
Canales: 4
Tamaño: TFT/LCD de 7”
Resolución máx.: 800 RGB (H) * 480 (V) píxeles
Tarjeta SD: hasta 32 GB (no incluida)
Velocidad de cuadro de vídeo: 25 fps (máx.) 10 fps (4 cámaras)
Velocidad de cuadro de
grabación:
Resolución de vídeo: CIF/VGA
Formato de vídeo: AVI
USB: 2,0
Idioma de menú: inglés, alemán, francés y holandés
Nivel de salida de vídeo: 1 Vp-p/75 Ohm
Nivel de salida de audio: 2 Vrms a 600ohm mono
Conector de salida de audio/
vídeo:
Rango: En interiores ±50 m, en un área abierta ±150 m
Temperatura de operación: 0°C a +40°C
Tensión: 5 V CC/650 mA
Dimensiones: 214x157x26 mm
Peso: 488 g
25 fps por canal
cha de 2,5 mm (cable de 2,5 mm a 3 RCA incluido)
(depende de las condiciones locales)
ESPAÑOL
Precauciones de seguridad:
• No abra la cámara o el monitor en caso de mal funcionamiento. Estos productos sólo
pueden ser abiertos por un técnico calicado.
• No sumerja la cámara en líquido.
• No exponga el monitor a agua o a humedad.
• No exponga el monitor o la cámara a altas temperaturas (consulte las especicaciones
técnicas).
• No instale el sistema cerca de campos magnéticos fuertes, tales como un altavoz. Esto
puede afectar la calidad.
67
Page 68

Descripción del producto:
Cámara:
Monitor:
ESPAÑOL
1. LEDs infrarrojos
2. Lente
3. Sensor infrarrojo PIR
4. Micrófono
5. Soporte
6. Antena
7. Botón de acoplamiento
8. Entrada de alimentación
9. Conexión de antena
10. Indicador de enlace
11. Indicador de alimentación
1. Altavoz
2. Soporte
3. Puerto USB
4. Ranura para tarjeta SD
5. Salida de AV
6. Puerto de alimentación
7. Indicador de enlace
8. Indicador de alimentación
9. Grabar/detener vídeo
10. Botón de visualización de
cuartos
11. Borrar archivo/LCD, interruptor
de TV
12. Menú
13. Antena
14. TFT-LCD de 7”
15. Modo de visualización
16. Reproducción de vídeo
17. Encendido/Apagado
18. Botón OK
19. Botón de navegación
68
Page 69

ESPAÑOL
Instrucciones de instalación:
Cámara:
La cámara puede montarse de diferentes maneras: Para montaje en cielo raso, utilice la rosca
de tornillo sobre la parte superior de la cámara. Después de montar la cámara, conecte la
fuente de alimentación CA/CC a la cámara y a un tomacorriente.
Monitor:
El monitor puede colocarse sobre una supercie plana o montado en la pared. Después de
colocar el monitor, conecte la fuente de alimentación CA/CC al monitor y a un tomacorriente.
La cámara se enciende automáticamente después de conectar la fuente de alimentación CA/
CC. Opcional: el monitor puede conectarse a un monitor con su salida de vídeo.
Cable de vídeo
69
Page 70

ESPAÑOL
Instrucciones para el usuario:
1. Inserte una tarjeta SD en la ranura para tarjeta SD del monitor. O conecte una unidad de
disco duro externo al puerto USB del monitor.
2. Pulse el botón de encendido/apagado durante aproximadamente 2 segundos para
encender el monitor. El indicador de alimentación se iluminará, y la imagen aparecerá.
3. Para ajustes de sistema, pulse el botón de menú para abrir el menú principal. La siguiente
pantalla debe aparecer. Utilice los botones de navegación, OK y menú para navegar a
través del menú.
Sistema
1. Pulse OK para ingresar en los ajustes de sistema. El sistema ofrece las siguientes opciones:
Fecha/Hora Ajuste la hora y la fecha.
Idioma Ajuste el idioma.
Modo grabación Ajuste para detener la grabación o para sobrescribir el
primer vídeo grabado cuando el medio de almacenamiento
esté lleno.
Formato SD/USB Ajuste para formatear el medio de almacenamiento.
Almacenamiento para
grabación Ajuste el medio de almacenamiento.
70
Page 71

ESPAÑOL
Visualización de opciones Ajuste para visualizar RSSI, Hora, estado de SD/USB y cámara
en la pantalla y en el vídeo grabado.
Sistema de TV Seleccione un sistema de TV (PAL para Europa).
Información de sistema Muestra la información de sistema.
Período de modo de
búsqueda
Silencio Enciende/apaga el altavoz en el monitor.
Carga de ajustes por defecto Reinicia los ajustes de fábrica por defecto.
Grabación de Fecha/Hora Ajuste para visualizar la hora y la fecha de grabación actual
Brillo Ajuste el brillo de la imagen.
Volumen Ajuste el volumen.
2. Seleccione fecha/hora con el botón de navegación y pulse OK para ingresar en el ajuste
de fecha/hora.
• Pulse el botón con la echa izquierda o derecha para seleccionar.
• Pulse el botón con la echa arriba o abajo para ajustar.
• Pulse el botón OK para conrmar.
• Pulse el botón MENU para salir.
3. Seleccione el idioma con el botón de navegación y pulse OK para ingresar en el ajuste de
idioma.
• Pulse el botón con la echa arriba o abajo para seleccionar el idioma.
• Pulse el botón OK para conrmar y para salir.
4. Seleccione el modo de grabación con el botón de navegación y pulse OK para ingresar en
el ajuste de modo de grabación.
• Pulse el botón con la echa arriba o abajo para seleccionar “Normal” u “Overwrite”.
• Pulse el botón OK para conrmar y para salir.
Comentarios:
Normal: Cuando la tarjeta SD o el disco duro portátil estén llenos, el sistema detiene la
grabación automáticamente.
Sobrescribir: Cuando la tarjeta SD o el disco duro portátil estén llenos, el sistema
automáticamente borra el primer vídeo y reserva espacio de almacenamiento suciente para
garantizar la última grabación.
5. Seleccione formato SD/USB con el botón de navegación y pulse OK para ingresar en el
ajuste de formato SD/USB.
• Pulse el botón con la echa arriba o abajo para seleccionar “Cancel”, “SD Card” o “USB
Device”;
- Cancel: cancela el formateo.
- SD Card: formatea la tarjeta SD.
- USB Device: formatea la unidad del disco duro externo (si está conectada).
• Pulse el botón OK para formatear.
• Luego de formatear, el sistema muestra “Format Successfully”, e indica que el formateo
se realizó con éxito.
Ajuste el intervalo de visualización cíclica de la imagen de
supervisión de la cámara.
en el vídeo grabado.
71
Page 72

ESPAÑOL
• Pulse el botón OK para conrmar y para salir.
6. Seleccione almacenamiento de grabación con el botón de navegación y pulse OK para
ingresar en el ajuste de almacenamiento de grabación.
• Pulse el botón con la echa arriba o abajo para seleccionar “SD Card” o “USB Device”.
• Pulse el botón OK para conrmar y para salir.
7. Seleccione visualización de opciones con el botón de navegación y pulse OK para
ingresar en el ajuste de visualización de opciones.
• Pulse el botón con la echa arriba o abajo para seleccionar.
• Haga clic en el botón OK para conrmar la visualización de opciones en la imagen.
- RSSI: Ícono de intensidad de señal.
- Estado de SD/USB: Si está insertada la tarjeta SD o el disco duro portátil.
- Cámara: Íconos de nombre de cámaras.
• Después de realizar los ajustes, pulse el botón MENU para conrmar y para salir.
8. Seleccione sistema de TV con el botón de navegación y pulse OK para ingresar en el
ajuste de sistema de TV.
• Pulse el botón con la echa arriba o abajo para seleccionar NTSC o PAL (PAL para
Europa).
• Pulse el botón OK para conrmar y para salir.
9. Seleccione información del sistema con el botón de navegación y pulse OK para ingresar
en el ajuste de información del sistema.
• Pulse OK para ver la información sobre el sistema.
• Pulse el botón menu para salir.
10. Seleccione actualización del sistema con el botón de navegación y pulse OK para ingresar
en el ajuste de actualización del sistema.
• Pulse el botón con la echa arriba o abajo para seleccionar.
• Pulse OK.
• Pulse el botón grabar/detener vídeo para conrmar.
11. Seleccione período de modo de búsqueda con el botón de navegación y pulse OK para
ingresar en el ajuste de período de modo de búsqueda.
• Pulse el botón con la echa arriba o abajo para seleccionar el período para buscar las
cámaras conectadas.
• Pulse el botón OK otra vez para conrmar y para salir.
12. Seleccione silencio con el botón de navegación y pulse OK para ingresar en el ajuste de
silencio.
• Pulse el botón con la echa arriba o abajo para seleccionar “On” u “O”.
• Pulse el botón OK otra vez para conrmar y para salir.
13. Seleccione carga de ajustes por defecto con el botón de navegación y pulse OK para
ingresar en el ajuste de carga de ajustes por defecto.
• Pulse el botón arriba o abajo para seleccionar “Cancel” u “OK”.
- Cancel: Cancela la opción ajustes por defecto.
- OK: Reinicia los ajustes por defecto.
• Pulse el botón OK para conrmar y para salir.
14. Seleccione brillo con el botón de navegación y pulse OK para ingresar en el ajuste de
brillo.
• Pulse el botón con la echa izquierda o derecha para ajustar el brillo.
72
Page 73
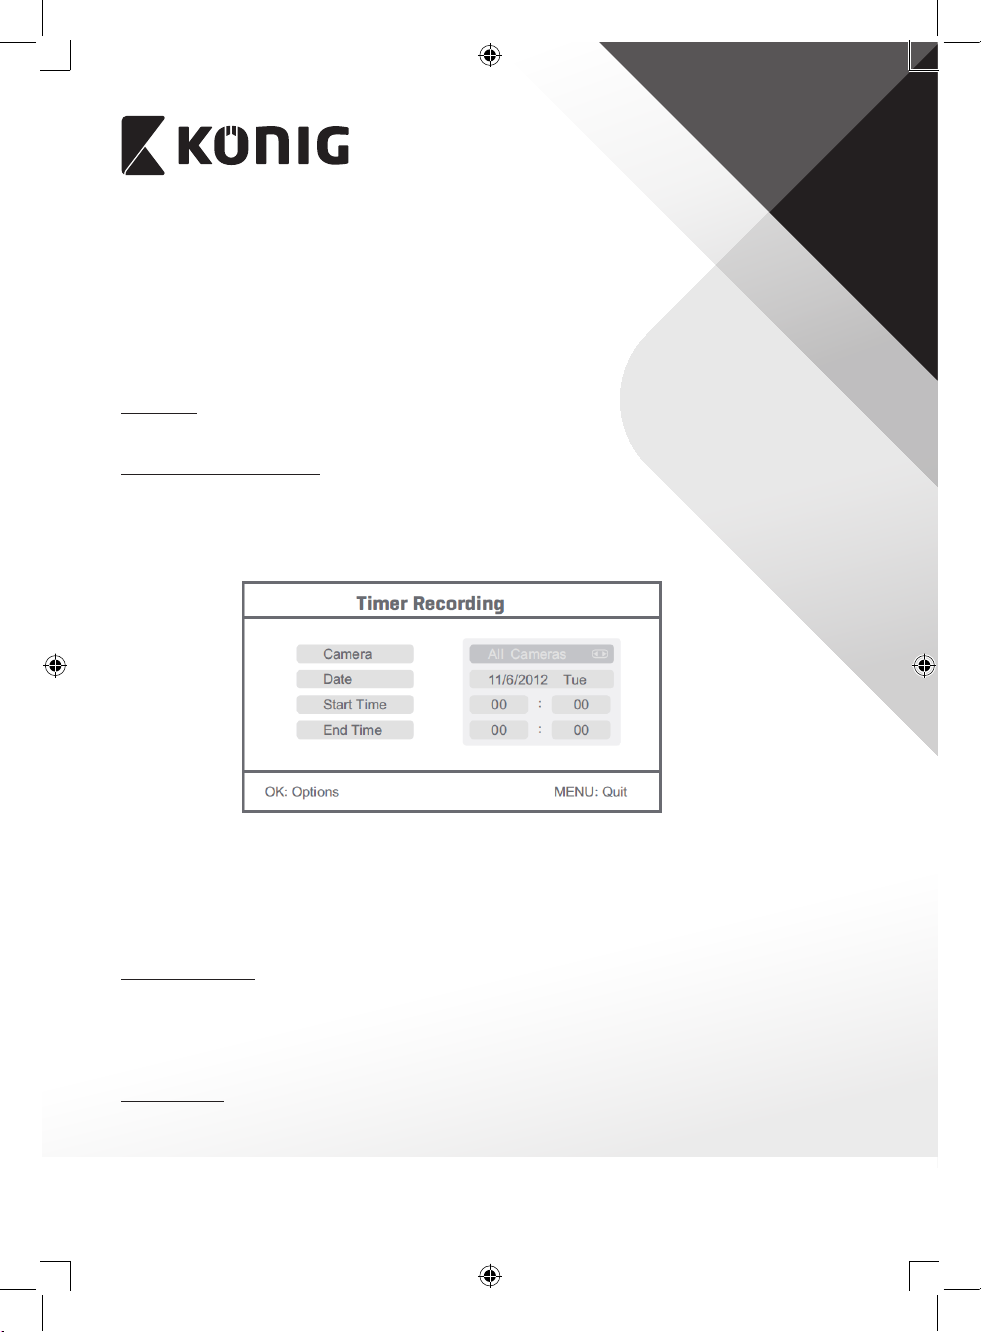
ESPAÑOL
• Pulse el botón OK para conrmar y para salir.
15. Seleccione volumen con el botón de navegación y pulse OK para ingresar en el ajuste de
volumen.
• Pulse el botón con la echa izquierda o derecha para ajustar el volumen.
• Pulse el botón OK para conrmar y para salir.
Nota: El volumen también puede ajustarse con la echa arriba o abajo en supervisión de vista
en vivo.
16. Pulse menú para volver al menú principal.
Grabación
Pulse el botón con la echa derecha en el menú principal para seleccionar los ajustes de
grabación y pulse OK.
Temporizador de grabación:
Ajuste la hora de comienzo/detención de grabación por medio del menú “Timer Recording”.
El dispositivo automáticamente graba según la hora de comienzo/detención jada.
1. Seleccione temporizador de grabación con el botón de navegación y pulse OK para
ingresar un nuevo ajuste de cronograma.
• Pulse OK para ingresar en el menú del temporizador de grabación.
• Pulse el botón con la echa arriba o abajo para seleccionar.
• Pulse el botón con la echa izquierda o derecha para ajustar.
• Pulse el botón OK para conrmar y para salir.
2. Después de realizar el ajuste, el dispositivo automáticamente graba según la hora de
comienzo/detención jada.
3. Si pulsa el botón grabar/detener vídeo en el dispositivo durante el proceso de grabación,
ajustado por el temporizador de grabación, la grabación se detiene.
Grabación manual:
1. En la supervisión de vista en vivo, pulse los botones con las echas izquierda y derecha
para seleccionar la cámara para grabar vídeos.
2. Pulse el botón grabar/detener vídeo en el dispositivo. El ícono de grabación se muestra
en la pantalla, lo que indica que la grabación ha comenzado.
3. Pulse el botón en el dispositivo otra vez para detener la grabación.
Grabación PIR:
Grabación PIR: Si cualquier cámara a la que se tenga acceso detecta movimiento humano, la
grabación se puede activar.
73
Page 74

ESPAÑOL
1. Seleccione grabación PIR con el botón de navegación y pulse OK para ingresar en el
ajuste de grabación PIR.
• Pulse el botón con la echa arriba o abajo para seleccionar la cámara.
• Pulse el botón con la echa izquierda o derecha para seleccionar “On”.
• Pulse el botón OK para conrmar y para salir.
Nota: cuando se ajusta “O”, la función de detección de movimiento se apaga. La distancia
del sensor infrarrojo de PIR es 5 m. Si la distancia es mayor a 5 m, la detección puede fallar.
Reproducción
Pulse el botón con la echa derecha en el menú principal para seleccionar los ajustes de
reproducción y pulse OK.
Nota: para funciones de reproducción, es necesario que se inserte una tarjeta SD o que se
conecte una unidad de disco duro externo.
Se puede acceder a la función de reproducción también en supervisión de vista en vivo,
pulsando el botón de reproducción de vídeo.
1. Pulse el botón con la echa arriba o abajo para seleccionar la carpeta.
2. Pulse el botón OK para conrmar y para ingresar.
Cámara 1
Cámara 2
No explorado
Cámara 4
3. Pulse el botón con la echa arriba o abajo para seleccionar el archivo de vídeo.
4. Pulse el botón OK para reproducir.
5. Pulse el botón con la echa izquierda o derecha para ir hacia atrás/adelante rápidamente.
6. Pulse el botón OK otra vez para pausar.
7. Pulse el botón MENU para salir de la reproducción.
74
Tamaño de
archivo
Page 75

ESPAÑOL
Borrar vídeo
En modo de reproducción de vídeo, pulse el botón con echa arriba o abajo para seleccionar
el vídeo o la carpeta de vídeo para borrar.
• Pulse el botón borrar archivo/LCD en el monitor para borrarlo.
Nota: sólo se puede borrar como carpeta una carpeta vacía,
Cámara
Al agregar la cámara adicional SAS-TRCAM40/U (máx. 4), la cámara necesita acoplarse con el
sistema para que éste la reconozca.
Pulse el botón con la echa derecha en el menú principal para seleccionar los ajustes de
cámara y pulse OK.
Acoplamiento:
1. Pulse OK para ingresar en el menú de acoplamiento.
2. Seleccione la cámara con los botones con las echas arriba y abajo.
3. Pulse OK, y aparecerá la siguiente pantalla.
4. Pulse el botón de acoplamiento durante 2 segundos, dentro de los 60 segundos, en la
parte posterior de la cámara.
5. Después del acoplamiento exitoso de la cámara y del monitor, el monitor muestra
PAIRING OK.
6. Pulse el botón de menú para volver al menú de la cámara.
Nota: si el acoplamiento falla, intente nuevamente los pasos anteriores y asegúrese de que el
monitor y la cámara no estén a más de 2 metros para el procedimiento de acoplamiento.
Activo:
1. Seleccione activo con el botón con la echa abajo y pulse OK.
2. Pulse el botón con la echa arriba o abajo para seleccionar la cámara.
3. Pulse el botón con la echa izquierda o derecha para seleccionar “On” u “O”.
4. Pulse el botón OK para conrmar y para salir.
Nota: sólo las cámaras acopladas pueden ajustarse como activas o no activas. Cuando se
ajusta una cámara como apagada, no puede verse en vista en vivo, grabado, etc.
Ajuste PIP:
Ajuste el tamaño de resolución de la imagen y la calidad de grabación.
1. Seleccione ajuste PIP con los botones con las echas arriba y abajo, y pulse OK.
2. Seleccione la cámara con los botones con las echas arriba y abajo, y pulse OK. Aparece la
siguiente pantalla.
75
Page 76

ESPAÑOL
3. Pulse el botón con la echa izquierda o derecha para seleccionar “Resolution Size” o
“Quality”.
4. Pulse el botón con la echa arriba o abajo para seleccionar “Top”, “High”, “Medium” o “Low”.
5. Pulse el botón OK para ajustar.
6. Pulse el botón MENU para conrmar y para salir.
Nota: el tamaño de alta resolución es VGA, y el de baja resolución es CIF.
Alarma
Cuando la detección PIR está encendida, el sistema alertará cuando se detecte movimiento.
1. Seleccione alarma en el menú principal y pulse OK.
2. La pantalla muestra detección PIR, pulse OK.
3. Pulse “On” u “O” con el botón con las echas arriba y abajo.
4. Pulse OK para conrmar y para salir.
Vista en vivo:
Pulse el botón de visualización de cuartos para seleccionar el tipo de vista.
Marca de hora
Vista imagen en imagen
76
Page 77

ESPAÑOL
Vista en cuadrantes Vista de pantalla completa
Nota: use el botón con las echas izquierda y derecha para seleccionar una cámara.
Pulse el botón de modo de visualización para ingresar en la vista de modo cíclico. Hay cinco
intervalos cíclicos disponibles: 5s, 10s, 15s, 20s y 30s, y puede ajustarse bajo “System” >
Período de Modo de Búsqueda en el menú principal.
Disco duro portátil insertado con éxito
Tarjeta SD insertada con éxito
Nombre de cámara
Cámara actual
Estado de grabación
Intensidad de señal
77
Page 78

ESPAÑOL
Mantenimiento:
Limpie el producto solo con un paño seco.
No utilice disolventes de limpieza ni productos abrasivos.
Garantía:
Cualquier cambio y/o modicación del producto anulará la garantía. No podemos asumir ninguna responsabilidad por ningún daño
debido a un uso incorrecto de este producto.
Exención de responsabilidad:
Las ilustraciones y las especicaciones podrán sufrir cambios sin previo aviso. Todas las marcas de logotipos y nombres de productos
constituyen patentes o marcas registradas a nombre de sus titulares correspondientes, reconocidos como tal.
Eliminación:
• Este producto está diseñado para desecharlo por separado en un punto de recogida adecuado.
No se deshaga de este producto con la basura doméstica.
• Para obtener más información, póngase en contacto con el vendedor o la autoridad local responsable de la eliminación
de residuos.
Este producto se ha fabricado y distribuido de conformidad con todas las normativas y directivas relevantes, válidas para todos los
estados de la Unión Europea. También cumple con todas las especicaciones y normativas en el país en el cual se comercializa.
Previa solicitud, podremos proporcionarle la documentación formal. Esta documentación incluye, entre otros: Declaración de
conformidad (e identidad del producto), hoja de datos de seguridad del material, informe sobre las pruebas realizadas al producto.
Póngase en contacto con nuestro servicio de atención al cliente para obtener información adicional:
por medio de nuestro sitio web: http://www.nedis.es/es-es/contacto/formulario-de- contacto.htm
enviando un correo electrónico: service@nedis.com
o llamando por teléfono: +31 (0)73-5993965 (en horario de ocina)
NEDIS B.V., De Tweeling 28, 5215 MC ’s-Hertogenbosch, PAÍSES BAJOS
78
Page 79

PORTUGUÊS
Introdução:
Vigie as suas propriedades com este novo sistema de câmaras de segurança Sem Fios digital
de 2,4 GHz. O monitor LCD de 7" pode suportar até 4 câmaras e possui um gravador de
vídeo digital integrado. A câmara oferece uma imagem bastante nítida e estável com visão
nocturna e a tecnologia utilizada melhora ainda mais a respectiva qualidade. O sistema utiliza
tecnologia sem os digital e está equipada com capacidades avançadas de encriptação de
sinal de frequência, as quais reduzem a interferência causada por outras aplicações que
utilizam a banda de frequência de 2,4 GHz. Esta tecnologia digital garante e permite-lhe
utilizá-la a uma distância extra longa. O MELHOR QUE A TECNOLOGIA SEM FIOS TEM PARA
OFERECER.
O monitor e a camera já se encontram emparelhados por predenição de fábrica. Ao
adicionar a câmara adicional SAS-TRCAM40/U (4 câmaras no máx.) ao sistema, consulte a
secção EMPARELHAR para adicionar câmaras.
• Recomendamos que leia este manual antes de instalar/utilizar o sistema de câmaras.
• Guarde este manual num local seguro para referência futura.
Conteúdo da embalagem:
1x câmara com suporte
1x monitor de 7"
2x antena
1x cabo de saída AV
2x fonte de alimentação CA/CC
Especicações técnicas:
Câmara:
Frequência de transmissão: 2,4-2,4835 GHz Digital
Modulação: 16QAM, QPSK, BPSK
Intervalo: Interior ±50 m, espaço aberto ±150 m
(dependendo das condições do local)
Chip de imagem: CMOS de 1/4"
Objectiva: 2,0 mm
Ângulo de visualização: 73°
Iluminação de infravermelhos (LED): 5 M
Protecção: IP54
Microfone: mono
Temperatura de funcionamento: -10°C ~ 50°C
Tensão: CC de 5 V/400mA
Dimensões: 132 x 64 x 57 mm (sem suporte)
Peso: 287 g (incluindo o cabo)
79
Page 80

Monitor LCD:
Frequência de recepção: 2,4-2,4835 GHz Digital
Canais: 4
Tamanho: TFT/LCD de 7"
Resolução máx.: 800 RGB (H) * 480 (V) pixels
Cartão SD: até 32 GB (não incluído)
Taxa de fotogramas de vídeo: 25 fps (máx.) 10 fps (4x câmaras)
Taxa de fotogramas de gravação: 25 fps por canal
Resolução de vídeo: CIF/VGA
Formato de vídeo: AVI
USB: 2,0
Idioma do menu: Inglês, alemão, francês e holandês
Nível de saída de vídeo: 1 Vp-p/75 Ohm
Nível de saída de áudio: 2Vrms@600ohm mono
Conector de saída de áudio/vídeo: Tomada de 2,5 mm
(cabo de 2,5 mm para 3 x RCA incluído)
Intervalo: Interior ±50 m, espaço aberto ±150 m
(dependendo das condições do local)
Temperatura de funcionamento: 0°C a +40°C
Tensão: CC de 5 V/650 mA
Dimensões: 214 x 157 x 26 mm
Peso: 488 g
PORTUGUÊS
Precauções de segurança:
• Não abra a câmara nem o monitor em caso de mau funcionamento. Estes produtos só
devem ser abertos por um engenheiro qualicado.
• Não mergulhe a câmara em líquido.
• Não exponha o monitor à água nem à humidade.
• Não exponha o monitor nem a câmara a temperaturas altas (consulte as especicações
técnicas).
• Não instale o sistema perto de campos magnéticos fortes, como um altifalante. Isto poderá
afectar a qualidade.
80
Page 81

Descrição do produto:
Câmara:
Monitor:
PORTUGUÊS
1. LEDs Infravermelhos
2. Objectiva
3. Sensor de infravermelhos PIR
4. Microfone
5. Suporte
6. Antena
7. Botão Emparelhar
8. Entrada de Potência
9. Ranhura da Antena
10. Indicador de Ligação
11. Indicador de Potência
1. Altifalante
2. Suporte
3. Porta USB
4. Ranhura para Cartões SD
5. Saída AV
6. Porta de Alimentação
7. Indicador de Ligação
8. Indicador de Potência
9. Gravar/parar Vídeo
10. Botão de Visualização a Um
Quarto
11. Eliminar cheiro/LCD,
Interruptor de TV
12. Menu
13. Antena
14. TFT-LCD de 7"
15. Modo de Visualização
16. Reproduzir Vídeo
17. Ligar/desligar
18. Botão OK
19. Botão de Navegação
81
Page 82

PORTUGUÊS
Instruções de instalação:
Câmara:
A câmara pode ser instalada de formas diferentes. Para instalação no tecto, utilize a rosca na
parte superior da câmara. Depois de instalar a câmara, ligue a fonte de alimentação CA/CC à
mesma e a uma tomada de parede.
Monitor:
O monitor pode ser colocado numa superfície plana ou instalado na parede. Depois de
colocar o monitor, ligue a fonte de alimentação CA/CC ao mesmo e a uma tomada de parede.
A câmara é alimentada automaticamente depois de ligar a fonte de alimentação CA/CC.
Opcional: o monitor pode ser ligado a um monitor com a saída de vídeo do monitor.
Cabo de Vídeo
82
Page 83

PORTUGUÊS
Instruções de utilizador:
1. Insira um cartão SD na ranhura para cartões SD do monitor. Ou, ligue uma unidade de
disco rígido externa à porta USB do monitor.
2. Prima o botão ligar/desligar durante cerca de 2 segundos, para ligar o monitor. O
indicador de potência deverá acender e a imagem deverá ser apresentada.
3. Para as denições de sistemas, prima o botão do menu para abrir o menu principal.
Deverá aparecer o seguinte ecrã. Utilize os botões de navegação, OK e de menu para
navegar pelo menu.
Sistema
1. Prima OK para entrar nas denições do sistema. O sistema oferece as seguintes opções:
Data / Hora Dena a hora e a data.
Idioma Dena o idioma.
Modo de Gravação Dena para parar a gravação ou para substituir a primeira
gravação de vídeo quando o suporte de armazenamento
estiver cheio.
Formate SD/USB Dena para formatar o suporte de armazenamento.
Armazenamento para
Gravação
Dena o suporte de armazenamento.
83
Page 84

PORTUGUÊS
Visualizar Itens Dena para visualizar os estados RSSI, Hora, SD/USB e a
câmara no ecrã, bem como o vídeo gravado.
Sistema de TV Seleccione um sistema de TV (PAL para a Europa).
Informações do Sistema Mostra as informações do sistema.
Período do Modo de
Procura
Desactivação do Som Liga/desliga o altifalante no monitor.
Predenição de
Carregamento Reponha as predenições de fábrica.
Data/Hora da Gravação Dena para apresentar a hora e a data de gravação actual no
Luminosidade Ajuste a luminosidade da imagem.
Volume Ajuste o volume.
2. Seleccione data/hora com o botão de navegação e prima OK para entrar na denição de
data/hora.
• Prima o botão de seta para a esquerda ou para a direita para seleccionar.
• Prima o botão de seta para cima ou para baixo para ajustar.
• Prima o botão OK para conrmar.
• Prima o botão MENU para sair.
3. Seleccione o idioma com o botão de navegação e prima OK para entrar na denição de
idioma.
• Prima o botão de seta para cima ou para baixo para seleccionar o idioma.
• Prima o botão OK para conrmar e sair.
4. Seleccione o modo de registo com o botão de navegação e prima OK para entrar na
denição do modo de gravação.
• Prima o botão de seta para cima ou para baixo para seleccionar “Normal” ou
“Overwrite”.
• Prima o botão OK para conrmar e sair.
Observações:
Normal: Quando o cartão SD ou o disco rígido móvel está cheio, o sistema pára
automaticamente a gravação.
Substituir: Quando o cartão SD ou o disco rígido móvel está cheio, o sistema elimina
automaticamente o primeiro vídeo e reserva espaço de armazenamento suciente para
garantir a última gravação.
5. Seleccione o formato SD/USB com o botão de navegação e prima OK para entrar na
denição de formato SD/USB.
• Prima o botão de seta para cima ou para baixo para seleccionar “Cancel”, “SD Card” ou
“USB Device”;
- Cancelar: cancela a formatação.
- Cartão SD: formata o cartão SD.
- Dispositivo USB: formata a unidade de disco rígido externa (se estiver ligada)
• Prima o botão OK para formatar:
Dena o intervalo de visualização cíclica da imagem de
monitorização na câmara.
vídeo gravado.
84
Page 85

PORTUGUÊS
• Depois de formatar, o sistema apresenta “Format Successfully”, indicando que a
formatação foi bem-sucedida.
• Prima o botão OK para conrmar e sair.
6. Seleccione o armazenamento para a gravação com o botão de navegação e prima OK
para entrar na denição de gravação.
• Prima o botão de seta para cima ou para baixo para seleccionar “SD Card” ou “USB
Device”.
• Prima o botão OK para conrmar e sair.
7. Seleccione os itens para apresentação com o botão de navegação e prima OK para entrar
na denição de itens para visualização.
• Prima o botão de seta para cima ou para baixo para seleccionar.
• Clique no botão OK para conrmar os itens para apresentação na imagem.
- RSSI: Ícone de Intensidade de Sinal
- Estado de SD/USB: Indica se está inserido o cartão SD ou o disco rígido móvel
- Câmara: Ícones de nomes da câmara
• Depois de denir, prima o botão MENU para conrmar e sair.
8. Seleccione o sistema de TV com o botão de navegação e prima OK para entrar na
denição do sistema de TV.
• Prima o botão de seta para cima ou para baixo para seleccionar NTSC ou PAL (PAL para
a Europa).
• Prima o botão OK para conrmar e sair.
9. Seleccione as informações do sistema com o botão de navegação e prima OK para entrar
na denição de informações do sistema.
• Prima OK para ver as informações sobre o sistema.
• Prima o botão MENU para sair.
10. Seleccione a actualização do sistema com o botão de navegação e prima OK para entrar
na denição de actualização do sistema.
• Prima o botão de seta para cima ou para baixo para seleccionar.
• Prima OK.
• Prima o botão gravar/parar vídeo para conrmar.
11. Seleccione o período do modo de procura com o botão de navegação e prima OK para
entrar na denição do período do modo de procura.
• Prima o botão de seta para cima ou para baixo para seleccionar o período de procura
das câmaras ligadas.
• Prima novamente o botão OK para conrmar e sair.
12. Seleccione a desactivação do som com o botão de navegação e prima OK para entrar na
denição de desactivação do som.
• Prima o botão de seta para cima ou para baixo para seleccionar “On” ou “O”.
• Prima novamente o botão OK para conrmar e sair.
13. Seleccione a predenição de carregamento com o botão de navegação e prima OK para
entrar na denição de predenição de carregamento.
• Prima o botão de seta para cima ou para baixo para seleccionar “Cancel” ou “OK”.
- Cancelar: Cancela as predenições de opção.
- OK: Repõe as predenições.
• Prima o botão OK para conrmar e sair.
85
Page 86

PORTUGUÊS
14. Seleccione a luminosidade com o botão de navegação e prima OK para entrar na
denição de luminosidade.
• Prima o botão de seta para a esquerda ou para a direita para ajustar a luminosidade.
• Prima o botão OK para conrmar e sair.
15. Seleccione o volume com o botão de navegação e prima OK para entrar na denição de
volume.
• Prima o botão de seta para a esquerda ou para a direita para ajustar o volume.
• Prima o botão OK para conrmar e sair.
Nota: O volume também pode ser ajustado com o botão de seta para cima ou para baixo na
monitorização dinâmica.
16. Prima menu para regressar ao menu principal.
Gravação
Prima o botão de seta para a direita no menu principal para seleccionar as denições de
gravação e prima OK.
Gravação com Temporizador:
Dena a hora de início/m da gravação através do menu “Gravação com Temporizador”. O
dispositivo grava automaticamente de acordo com o tempo de início/m denido.
1. Seleccione a gravação com temporizador com o botão de navegação e prima OK para
entrar na denição de um novo horário.
• Prima OK para entrar no menu de gravação com temporizador.
• Prima o botão de seta para cima ou para baixo para seleccionar.
• Prima o botão de seta para a esquerda ou para a direita para ajustar;
• Prima o botão OK para conrmar e sair.
2. Depois de denir, o dispositivo grava automaticamente de acordo com o tempo de
início/m denido.
3. Se premir o botão gravar/parar vídeo no dispositivo durante o processo de gravação,
denido como gravação com temporizador, a gravação parará.
Gravação Manual:
1. Na monitorização dinâmica, prima os botões de seta para a esquerda e para a direita para
seleccionar a câmara para a gravação de vídeo.
2. Prima o botão de gravação/paragem do vídeo no dispositivo. O ícone de gravação é
apresentado no ecrã, indicando que a gravação está a começar.
3. Prima novamente o botão no dispositivo para parar a gravação.
86
Page 87

PORTUGUÊS
Gravação PIR:
Gravação PIR: Se for detectada movimentação humana por qualquer câmara acedida, a
gravação poderá ser accionada.
1. Seleccione a gravação PIR com o botão de navegação e prima OK para entrar na denição
de gravação PIR.
• Prima o botão de seta para cima ou para baixo para seleccionar a câmara.
• Prima o botão de seta para a esquerda ou para a direita para seleccionar “On”.
• Prima o botão OK para conrmar e sair.
Nota: quando está denido “O”, a função de detecção de movimento ca desligada. A
distância de detecção de infravermelhos de PIR é 5 m. Se a distância exceder os 5 m, a
detecção poderá falhar.
Reprodução
Prima o botão de seta para a direita no menu principal para seleccionar as denições de
reprodução e prima OK.
Note: for playback functions it’s necessary that an SD card is inserted or an external hard disk
drive is connected.
A função de reprodução também pode ser acedida na monitorização dinâmica premindo o
botão de reprodução de vídeo.
1. Prima o botão de seta para cima ou para baixo para seleccionar a pasta.
2. Prima o botão OK para conrmar e entrar.
Câmara 1
Câmara 2
Câmara 4
3. Prima o botão de seta para cima ou para baixo para seleccionar o cheiro de vídeo.
4. Prima o botão OK para reproduzir.
87
Não
procurado
Tamanho do
cheiro
Page 88

PORTUGUÊS
5. Prima o botão de seta para a esquerda ou para a direita para retroceder/avançar
rapidamente.
6. Prima novamente o botão OK para pausar.
7. Prima o botão MENU para sair da reprodução.
Eliminar vídeo
No modo de reprodução de vídeo, prima o botão de seta para cima ou para baixo para
seleccionar o vídeo ou a pasta de vídeos para eliminação.
• Prima o botão de eliminação do cheiro/LCD no monitor para o eliminar.
Nota: só uma pasta vazia pode ser eliminada como pasta.
Câmara
Ao adicionar a câmara adicional SAS-TRCAM40/U (máx. 4), a câmara necessita de ser
emparelhada no sistema para que este reconheça a câmara.
Prima o botão de seta para a direita no menu principal para seleccionar as denições da
câmara e prima OK.
Emparelhamento:
1. Prima OK para entrar no menu de emparelhamento.
2. Seleccione a câmara com os botões de seta para cima e para baixo.
3. Prima OK para apresentar o seguinte ecrã.
4. Prima o botão de emparelhamento durante 60 segundos e durante 2 segundos na parte
posterior da câmara.
5. Após o emparelhamento com êxito da câmara e do monitor, o monitor apresenta
EMPARELHAMENTO OK.
88
Page 89

PORTUGUÊS
6. Prima o botão de menu para regressar ao menu da câmara.
Nota: se o emparelhamento falhar, repita os passos acima e certique-se de que o monitor
e a câmara não estão mais do que 2 m afastados um do outro durante o procedimento de
emparelhamento.
Activo:
1. Seleccione activo com o botão de seta para cima ou para baixo e prima OK.
2. Prima o botão de seta para cima ou para baixo para seleccionar a câmara.
3. Prima o botão de seta para a esquerda ou para a direita para seleccionar “On” ou “O”.
4. Prima o botão OK para conrmar e sair.
Nota: só é possível denir como activas ou não activas as câmaras emparelhadas. Quando
uma câmara está denida como desligada, não é possível vizualizá-la na vista dinâmica,
gravada, etc.
Denição de PIP:
Dena o tamanho da resolução de imagem e a qualidade da gravação.
1. Seleccione a denição de PIP com os botões de seta para cima e para baixo e prima OK.
2. Seleccione a câmara com os botões de seta para cima e para baixo e prima OK. É
apresentado o seguinte ecrã.
3. Prima o botão de seta para a esquerda ou para a direita para seleccionar “Resolution Size”
ou “Quality”.
4. Prima o botão de seta para cima ou para baixo para seleccionar “Top”, “High”, “Medium” ou
“ Lo w”.
5. Prima o botão OK para ajustar.
6. Prima o botão MENU para conrmar e sair.
Nota: o tamanho da resolução alto é VGA e o baixo é CIF.
Alarme
Quando a detecção PIR está ligada, o sistema emite um alarme sempre que é detectado
movimento.
1. Seleccione o alarme no menu principal e prima OK.
2. Quando o ecrã mostrar a detecção PIR, prima OK.
3. Prima “On” ou “O” com os botões de seta para cima e para baixo.
4. Prima OK para conrmar e sair.
Vista dinâmica:
Prima o botão de visualização a um quarto para seleccionar o tipo de vista.
89
Page 90

PORTUGUÊS
Marca de tempo
Imagem na vista de imagem
Vista Quad Vista de ecrã inteiro
Nota: utilize os botões de seta para a esquerda e para a direita para seleccionar uma câmara
Prima o botão de modo de visualização para entrar no modo de visualização cíclica. Estão
disponíveis cinco intervalos cíclicos: 5s, 10s, 15s, 20s e 30s e podem ser denidos em System
> Período do Modo de Procura no menu principal.
Disco rígido móvel inserido com êxito
Cartão SD inserido com êxito
Nome da câmara
Câmara actual
Estado da gravação
Intensidade do sinal
90
Page 91

PORTUGUÊS
Manutenção:
Limpe o produto com um pano seco.
Não utilizar solventes de limpeza ou produtos abrasivos.
Garantia:
Quaisquer alterações e/ou modicações no produto anularão a garantia. Não nos podemos responsabilizar por qualquer dano
causado pelo uso incorrecto deste produto.
Limitação de Responsabilidade:
Os designs e as especicações estão sujeitos a alteração sem aviso. Todos os logótipos, marcas ou logótipos de marcas e nomes de
produtos são marcas registadas dos respectivos proprietários e são reconhecidas como tal neste documento.
Eliminação:
• Este produto deve ser eliminado separadamente num ponto de recolha apropriado.
Não eliminar este produto juntamente com o lixo doméstico.
• Para obter mais informações, contactar o revendedor ou o organismo local responsável pela gestão de resíduos.
Este produto foi fabricado e fornecido em conformidade com todos os regulamentos e directivas relevantes, válidos para todos os
estados membros da União Europeia. Além disso, está em conformidade com todas as especicações e regulamentos aplicáveis no
país de venda.
Mediante pedido, será disponibilizada documentação formal . Isto inclui, mas não se limita a: Declaração de Conformidade (e
identidade do produto), Ficha de Dados de Segurança de Material e relatório de teste do produto.
Contactar o nosso centro de serviço de apoio ao cliente para obter assistência:
através da página de internet: http://www.nedis.pt/pt-pt/contacto/formulario-de-contacto.htm
através de e-mail: service@nedis.com
através do telefone: +31 (0)73-5993965 (durante o horário normal de expediente)
NEDIS B.V., De Tweeling 28, 5215 MC ’s-Hertogenbosch, HOLANDA
91
Page 92

MAGYAR
Bevezetés:
Szemmel tarthatja tulajdonát ezzel a 2,4 GHz-es digitális vezeték nélküli kamerás biztonsági
rendszerrel. A 7” képátlójú LCD monitor akár 4 kamera képét tudja fogadni és beépített
digitális képmagnót is tartalmaz. A kamera tűéles és stabil képet ad, éjszaka is lát, és
képminőség javító megoldásokkal van felszerelve. A rendszer digitális vezeték nélküli
technológiát alkalmaz, fejlett frekvenciaugrató és titkosító megoldásokkal, amelyek kikerülik
a 2,4 GHz-es frekvenciasávot használó más készülékek zavaró hatását. A digitális technológia
védi adatait, és extra nagytávolságú átvitelt tesz lehetővé. A VEZETÉK NÉKÜLI VILÁG ÖSSZES
ELŐNYE.
A monitor és a kamera gyárilag már össze van párosítva. Ha további SAS-TRCAM40/U kamerát
kíván csatlakoztatni a monitorhoz (egyszerre legfeljebb négyet csatlakoztathat), járjon el a
PÁROSÍTÁS pontban leírtak szerint.
• Kérjük, hogy a kamerás biztonsági rendszer üzembe állítása/használata előtt olvassa el ezt
a használati útmutatót.
• A használati útmutatót tartsa biztonságos helyen, mert a jövőben még szüksége lehet rá.
A csomag tartalma:
1 db kamera, felerősítőtalppal
1 db 7”-es monitor
2 db antenna
1 db AV kimenőkábel
2 db hálózati tápegység
Műszaki adatok:
Kamera:
Adófrekvencia: 2,4 – 2,4835 GHz, digitális
Moduláció: 16 QAM, QPSK, BPSK
Hatótávolság: Beltéri kb. 50 m, szabad téri kb. 150 m (a
körülményektől függ)
Képalkotó chip: 1/4" CMOS
Objektív: 2,0 mm
Látószög: 73°
Infravörös fényvető (LED): 5 M
Védettség: IP54
Mikrofon: monó
Üzemi hőmérséklet: -10°C – +50°C
Tápfeszültség: 5 V= / 400 mA
Méretek: 132x64x57 mm (a felerősítőtalp nélkül)
Tömeg: 287 g (a kábellel együtt)
92
Page 93

LCD monitor:
Vevőfrekvencia: 2,4 – 2,4835 GHz, digitális
Csatornaszám: 4
Méret: 7" TFT/LCD
Max. felbontás: 800 RGB (vízsz.)* 480 (függ.) képpont
SD kártya: max. 32 GB (külön kell megvenni)
Video képsebesség: 25 kép/s (max.) 10 kép/s (4 kamerával)
Felvételi képsebesség: 25 kép/s csatornánként
Video felbontás: CIF/VGA
Videoformátum: AVI
USB: 2,0
A menü nyelve: Angol, német, francia és holland
Video kimenőszint: 1 Vcs-cs/75 Ohm
Hang kimenőszint: 2 Ve/600 Ohm monó
Hang/kép kimenőcsatlakozó: 2,5 mm-es jack (2,5 mm jack – 3 x RCA adapterkábelt
adunk hozzá)
Hatótávolság: Beltéri kb. 50 m, szabad téri kb. 150 m (a
körülményektől függ)
Üzemi hőmérséklet: 0°C – +40°C
Tápfeszültség: 5 V= / 650 mA
Méretek: 214x157x26 mm
Tömeg: 488 g
MAGYAR
Biztonsági óvintézkedések:
• Ne szedje szét a kamerát vagy a monitort, ha elromlik. Ezeket a termékeket csak a
szakszerviz szerelheti szét.
• Ne merítse a kamerát folyadékba.
• Óvja a monitort víztől és nedvességtől.
• Óvja a monitort és a kamerát a magas hőmérséklettől (a műszaki adatok szerint).
• Ne telepítse a rendszert erős mágnesek (például hangszóró) közelébe. Ez ronthatja
működési minőségét.
93
Page 94

A termék leírása:
Kamera:
Monitor:
MAGYAR
1. Infra LEDek
2. Objektív
3. PIR infraérzékelő
4. Mikrofon
5. Felerősítőtalp
6. Antenna
7. Párosító gomb
8. Táp bemenet
9. Antenna csatlakozó
10. Kapcsolatjelző
11. Bekapcsolásjelző
1. Hangszóró
2. Felerősítőtalp
3. USB Port
4. SD kártyahely
5. AV kimenet
6. Tápcsatlakozó
7. Kapcsolatjelző
8. Bekapcsolásjelző
9. Video felvétel/stop gomb
10. Képernyőnegyedelő gomb
11. Fájltörlő/LCD, TV k apcsoló
12. Menü
13. Antenna
14. 7" TFT-LCD
15. Megjelenítési mód
16. Video visszajátszás
17. Be-/kikapcsoló
18. OK gomb
19. Navigáló gomb
94
Page 95

MAGYAR
Üzembe helyezés:
Kamera:
A kamera többféle módon szerelhető fel. Mennyezetre szereléshez használja a kamera tetején
levő menetes csatlakozót. A felszerelés után csatlakoztassa a tápegységet a kamerához és a
konnektorhoz.
Monitor:
A monitor sík felületre fektethető vagy a falra szerelhető. Elhelyezése után csatlakoztassa a
tápegységet a monitorhoz és a konnektorhoz. A kamera automatikusan bekapcsolódik a
tápfeszültség csatlakoztatásakor. Kiegészítő lehetőség: a monitor videokimenetéhez másik
monitor csatlakoztatható.
95
Videokábel
Page 96
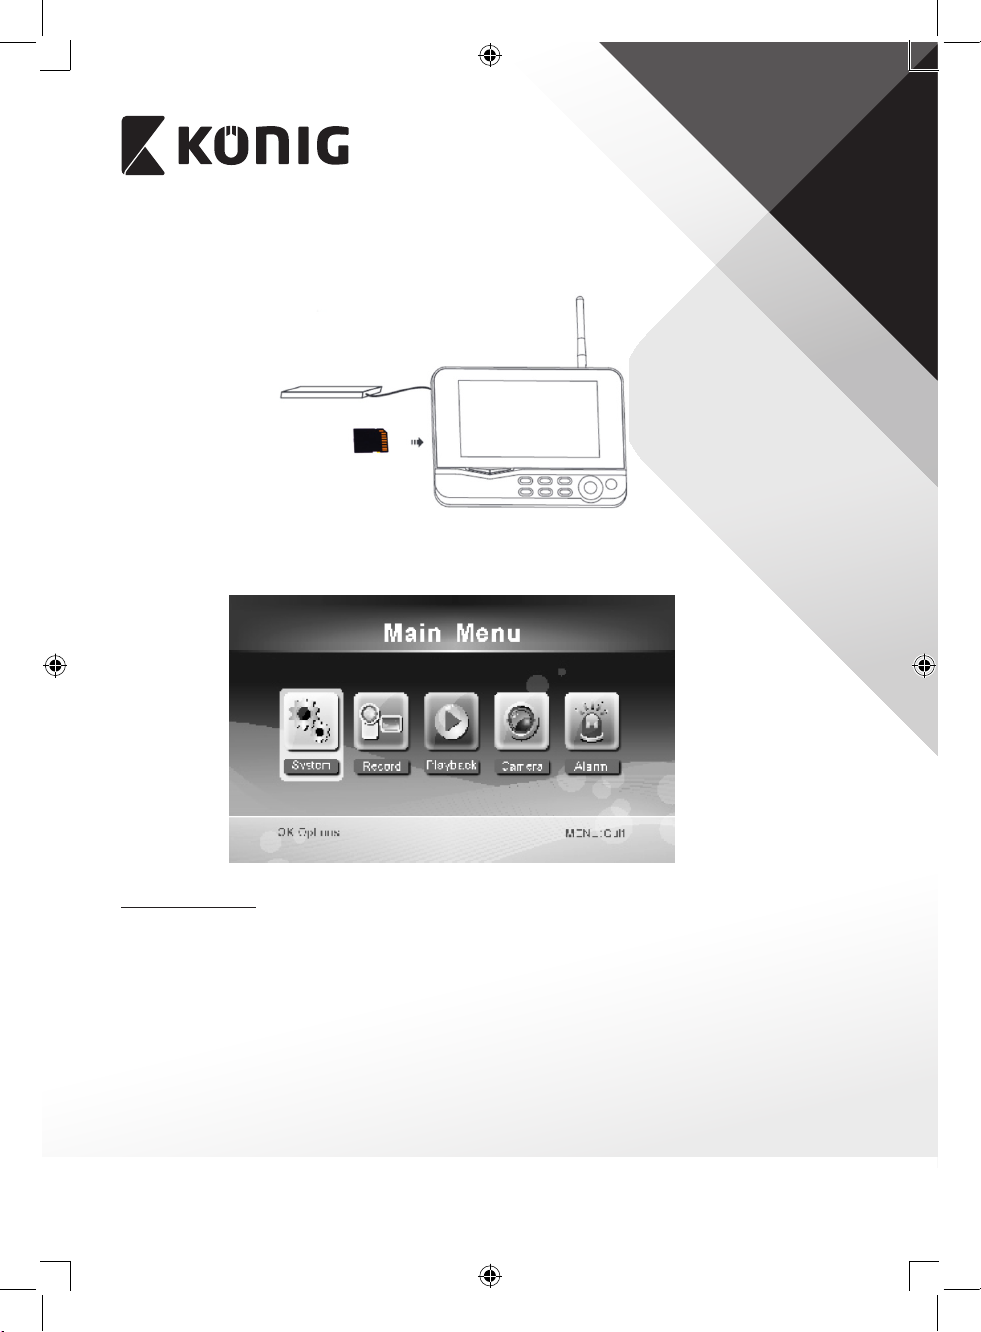
MAGYAR
Használati útmutató:
1. Helyezzen SD-kártyát a monitor SD kártyarekeszébe. Alternatív megoldásként kössön
külső merevlemezt a monitor USB csatlakozójához.
2. Kapcsolja be a monitort be-/kikapcsoló gombja 2 másodperces megnyomásával.
Világítani kezd a bekapcsolásjelző, és megjelenik a kép.
3. A rendszerbeállításokba lépéshez a menü gombbal nyissa meg a főmenüt. Megjelenik az
alábbi képernyő. A navigáló, OK és menü gombokkal navigálhat benne.
System (Rendszer)
1. Az OK gombbal lépjen a rendszerbeállítóba. A rendszer a következő lehetőségeket
kínálja:
Date / Time Itt állíthatja be a dátumot és a pontos időt.
Language Itt választhatja ki a nyelvet.
Record Mode Kiválaszthatja, hogy a tároló megtelésekor leálljon a felvétel
vagy felülírja az első felvételt.
Format SD/USB Megformázza a tároló adathordozót.
Storage for Recording Itt választhatja ki a tároló adathordozót.
Display Items Itt állítható be, hogy mi jelenjen meg a képernyőn: SSI, idő, az
SD/USB állapota, a kamera képe és a rögzített R videó.
96
Page 97

MAGYAR
TV System Itt választhatja ki a TV normát (Európában PAL).
System Information A rendszeradatokat jeleníti meg.
Scan Mode Period A kamerakép megjelenítési időközét állítja.
Mute Némítja/visszakapcsolja a monitor hangszóróját.
Load Default Visszaállítja a gyárilag alapértelmezett beállításokat.
Record Date/Time Felveszi a rögzített videóra a felvétel időpontját és dátumát.
Brightness A kép fényerejét állítja.
Volum e A hangerőt állítja.
2. Válassza ki a dátumot/pontos időt a navigáló gombbal, majd az OK gombbal lépjen a
dátum/pontos idő beállításába.
• A bal-jobb nyíl gombbal választhat.
• A fel-le nyíl gombbal állíthat.
• Nyomja meg az OK gombot a megerősítéshez.
• Lépjen ki a MENU gombbal.
3. Válassza ki a nyelvet a navigáló gombbal, majd az OK gombbal lépjen a nyelv
beállításába.
• A fel-le nyíl gombbal választhatja ki a nyelvet.
• Nyomja meg az OK gombot a megerősítéshez és kilépéshez.
4. Válassza ki a felvételi módot a navigáló gombbal, majd az OK gombbal lépjen felvételi
mód beállításába.
• A fel-le nyíl gombbal válassza ki a „Normal” vagy „Overwrite” lehetőséget.
• Nyomja meg az OK gombot a megerősítéshez és kilépéshez.
Megjegyzések:
Normál: Ha megtelt az SD-kártya vagy a hordozható merevlemez, a rendszer automatikusan
leállítja a felvételkészítést.
Felülírás: Ha megtelt az SD-kártya vagy a hordozható merevlemez, a rendszer automatikusan
letörli az első videót és kellő tárhelyet alakít ki a legújabb felvételhez.
5. Válassza ki az SD/USB formázását a navigáló gombbal, majd az OK gombbal lépjen az SD/
USB formázás beállításába.
• A fel-le nyíl gombbal válassza ki a „Cancel”, „SD Card” vagy „USB Device” lehetőséget.
- Cancel: visszaléptet a formázásból.
- SD Card: megformázza az SD kártyát.
- USB Device: megformázza a külső merevlemezt (ha csatlakoztatva van)
• Nyomja meg az OK gombot a formázás elindításához.
• A formázás végén a rendszer „Format Successfully” üzenettel jelzi, hogy sikerült neki.
• Nyomja meg az OK gombot a megerősítéshez és kilépéshez.
6. Válassza ki a tároló adathordozót a navigáló gombbal, majd az OK gombbal lépjen a
tároló adathordozó beállításába.
• A fel-le nyíl gombbal válassza ki az „SD Card” vagy „USB Device” lehetőséget.
• Nyomja meg az OK gombot a megerősítéshez és kilépéshez.
7. Válassza ki a megjelenítendő elemeket a navigáló gombbal, majd az OK gombbal lépjen a
megjelenítendő elemek beállításába.
97
Page 98

MAGYAR
• A fel-le nyíl gombbal válasszon.
• Nyomja meg az OK gombot a megjelenítendő elemek megerősítéséhez.
- RSSI: Jelerősség ikon.
- SD USB állapot: Csatlakoztatva van-e SD-kártya vagy hordozható meghajtó.
- Kamera: Kameranév ikonok.
• A beállítás végeztével nyomja meg az OK gombot a megerősítéshez és kilépéshez.
8. Válassza ki a TV normát a navigáló gombbal, majd az OK gombbal lépjen a TV norma
beállításába.
• A fel-le nyíl gombbal válassza az NTSC vagy PAL lehetőséget (Európában PAL van).
• Nyomja meg az OK gombot a megerősítéshez és kilépéshez.
9. Válassza ki a rendszeradatokat a navigáló gombbal, majd az OK gombbal lépjen a
rendszeradatok beállításába.
• Az OK jelenítse meg a rendszer adatait.
• Lépjen ki a MENU gombbal.
10. Válassza ki a rendszerfrissítést a navigáló gombbal, majd az OK gombbal lépjen a
rendszerfrissítés beállításába.
• A fel-le nyíl gombbal válasszon.
• Nyomja meg az OK gombot.
• Erősítse meg a video felvétel/stop gombbal.
11. Válassza ki a Scan Mode megjelenítési időközét a navigáló gombbal, majd az OK gombbal
lépjen az időköz beállításába.
• A fel-le nyíl gombbal válassza ki a csatlakoztatott kamerák lekérdezési és megjelenítési
időközét.
• Nyomja meg ismét az OK gombot a megerősítéshez és kilépéshez.
12. Válassza ki a némítást a navigáló gombbal, majd az OK gombbal lépjen a némítás
beállításába.
• A fel-le nyíl gombbal válassza ki az „On” (Be) vagy „O” (Ki) lehetőséget.
• Nyomja meg ismét az OK gombot a megerősítéshez és kilépéshez.
13. Válassza ki az alapértelmezések betöltését a navigáló gombbal, majd az OK gombbal
lépjen az alapértelmezések beállításába.
• A fel-le nyíl gombbal válassza ki a „Cancel” vagy „OK” lehetőséget.
- Cancel: Visszaléptet az alapértelmezések beállításából.
- OK: Visszaállítja a gyári értékeket.
• Nyomja meg az OK gombot a megerősítéshez és kilépéshez.
14. Válassza ki a fényerőt a navigáló gombbal, majd az OK gombbal lépjen a fényerő
beállításába.
• A bal-jobb nyíl gombbal állítsa be a fényerőt.
• Nyomja meg az OK gombot a megerősítéshez és kilépéshez.
15. Válassza ki a hangerőt a navigáló gombbal, majd az OK gombbal lépjen a hangerő
beállításába.
• A bal-jobb nyíl gombbal állítsa be a hangerőt.
• Nyomja meg az OK gombot a megerősítéshez és kilépéshez.
Megjegyzés: A hangerő az élő kép gyelése közben is állítható a fel-le nyíl gombbal.
16. A MENU gombbal lépjen vissza a főmenübe.
98
Page 99

MAGYAR
Felvétel
A főmenüben a jobb nyíl gombbal válassza ki a felvételi beállításokat és nyissa meg az OK
gombbal.
Időzített felvétel:
A „Timer Recording” menüben adja meg a felvétel kezdési (start) és leállítási (stop) időpontját.
A készülék a start/stop beállítás szerint automatikusan felvételt készít.
1. Válassza ki az időzített felvételkészítést a navigáló gombbal, majd az OK gombbal lépjen
az új felvételi időzítés beállításába.
• Az OK gombbal lépjen az időzített felvételkészítés menüjébe.
• A fel-le nyíl gombbal válasszon.
• A bal-jobb nyíl gombbal állítsa be az időértékeket.
• Nyomja meg az OK gombot a megerősítéshez és kilépéshez.
2. A beállítást követően a készülék automatikusan felvételt készít a beállított start/stop idők
szerint.
3. Az időzített felvételkészítés menet közben leállítható a készülék video felvétel/stop
gombjával.
Kézi felvételkészítés:
1. A kamerák képének gyelése közben a bal-jobb nyíl gombbal válassza ki a kamerát,
amely képét rögzíteni kívánja.
2. Nyomja meg a készülék video felvétel/stop gombját. A képernyőn a felvétel ikon
megjelenése jelzi, hogy elindult a felvétel.
3. A rögzítés a video felvétel/stop gomb ismételt megnyomásával állítható le.
PIR felvételkészítés:
PIR felvételkészítés: A készülék beállítható úgy, hogy elindítsa a képrögzítést, ha emberi
mozgást érzékel.
1. Válassza ki a PIR felvételkészítést a navigáló gombbal, majd az OK gombbal lépjen a PIR
felvételkészítés beállításába.
• A fel-le nyíl gombbal válassza ki a kívánt kamerát.
• A bal-jobb nyíl gombbal válassza ki az „On” lehetőséget.
• Nyomja meg az OK gombot a megerősítéshez és kilépéshez.
Megjegyzés: az „O” (Ki) választása kikapcsolja a mozgásérzékelő funkciót. A PIR infra
mozgásérzékelés hatótávolsága 5 m. Ennél nagyobb távolságról nem biztos, hogy érzékeli a
mozgást.
99
Page 100

MAGYAR
Lejátszás
A főmenüben a jobb nyíl gombbal válassza ki a lejátszási beállításokat és nyissa meg az OK
gombbal.
Megjegyzés: a lejátszás funkció csak akkor működik, ha van behelyezett SD-kártya vagy
csatlakoztatott külső merevlemez.
A lejátszás a kamera képének gyelésekor is elindítható a video lejátszás gombbal.
1. A fel-le nyíl gombbal válassza ki a mappát.
2. Nyomja meg az OK gombot a megerősítéshez és belépéshez.
1. kamera
2. kamera
4. kamera
3. A fel-le nyíl gombbal válassza ki a videofájlt.
4. Nyomja meg az OK gombot a lejátszáshoz.
Még nem
tallózták
Fájlméret
5. A bal-jobb nyíl gombbal léptethet vissza vagy előre.
6. A szüneteltetéshez nyomja meg ismét az OK gombot.
7. A MENU léphet ki a lejátszásból.
Felvétel(ek) törlése
Video lejátszási módban a fel-le nyíl gombbal válassza ki a törölni kívánt felvételt vagy
mappát.
• Törléséhez nyomja meg a monitor le/LCD gombját.
Megjegyzés: mappaként csak üres mappa törölhető.
Kamera
További SAS-TRCAM40/U kamerák hozzáadásakor (legfeljebb 4 lehet a rendszerben) az új
kamerát párosítani kell a monitorral, hogy felismerje a rendszer.
100
 Loading...