

Page 1
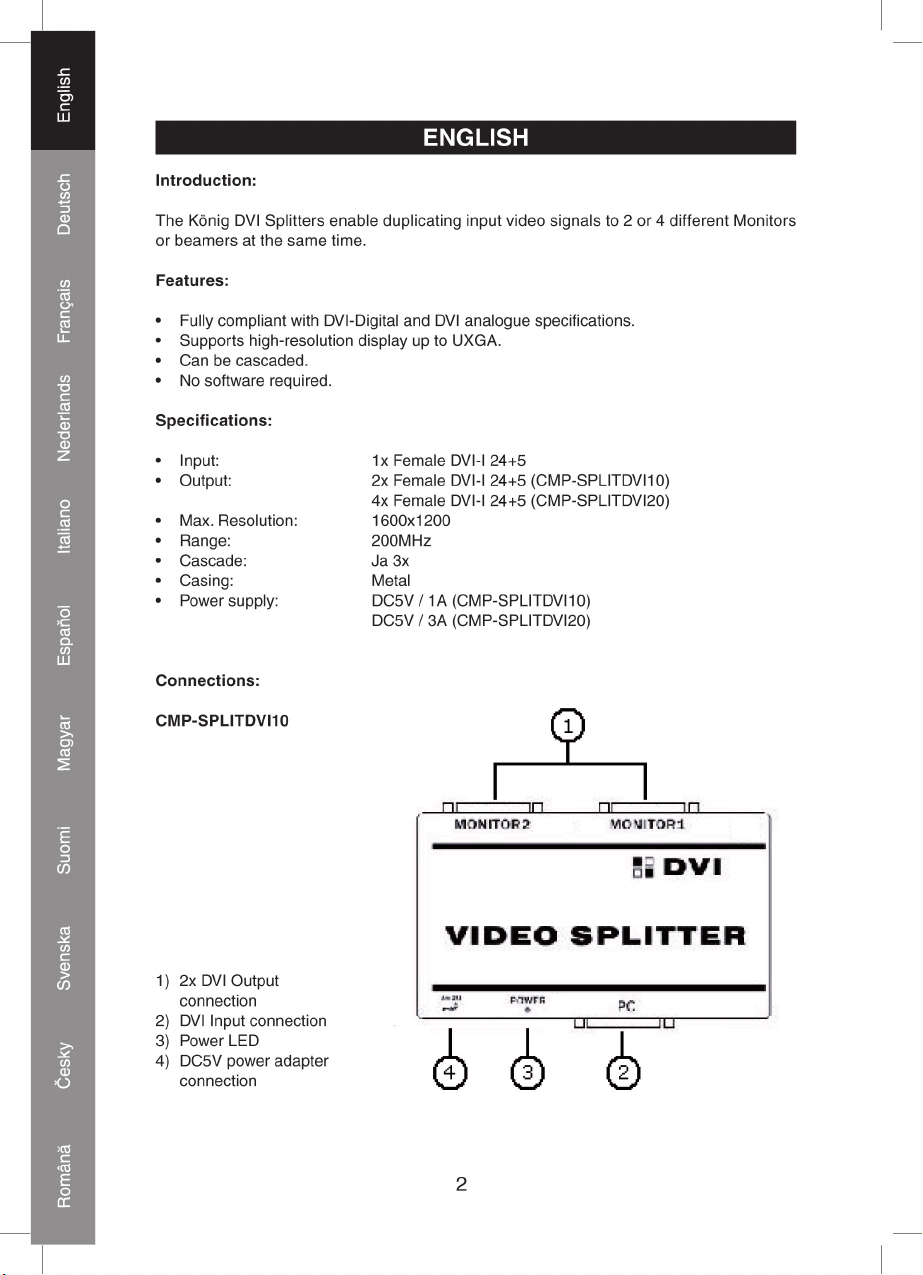
CMP-SPLITDVI10 &
CMP-SPLITDVI20
2
DVI SPLITTER 2 & 4 PORT
10
DOUBLEURS DVI 2 & 4 PORTS
18
SPLITTER DVI A 2 & 4 PORTE
26
DVI ELOSZTÓ, 2 ÉS 4 PORTTAL
34
DVI DELARE 2 & 4 PORTAR
42
SPLITTER DVI CU 2 & 4 PORTURI
6
DVI-SPLITTER MIT 2 & 4 PORTS
14
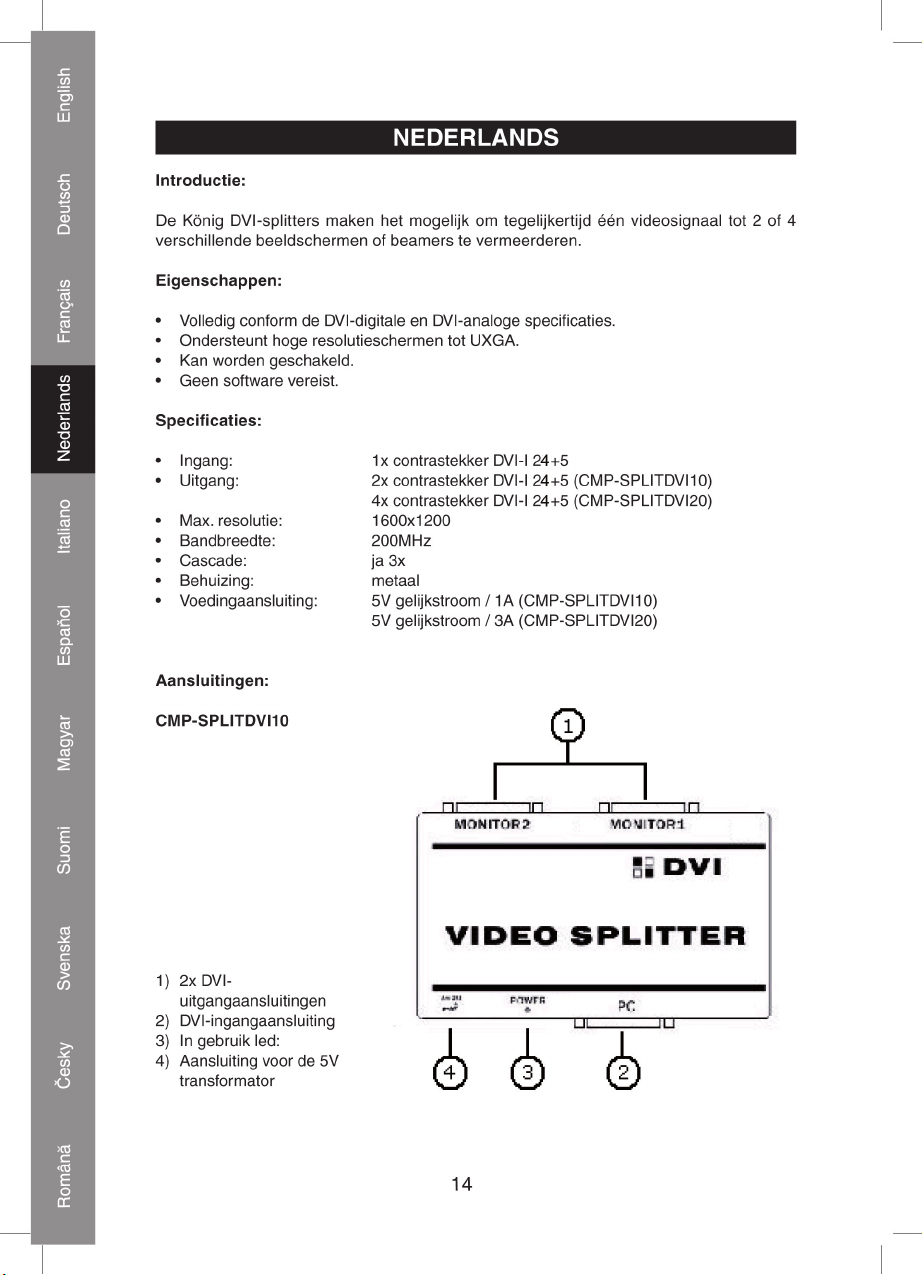
DVI-SPLITTER 2 & 4 POORTEN
22
DIVISOR DVI DE 2 Y 4 PUERTOS
30
DVI-JAKAJA 2 & 4 PORTILLA
38
ROZBOČOVAČ DVI DO 2 A 4 PORTŮ
Page 2
Page 3
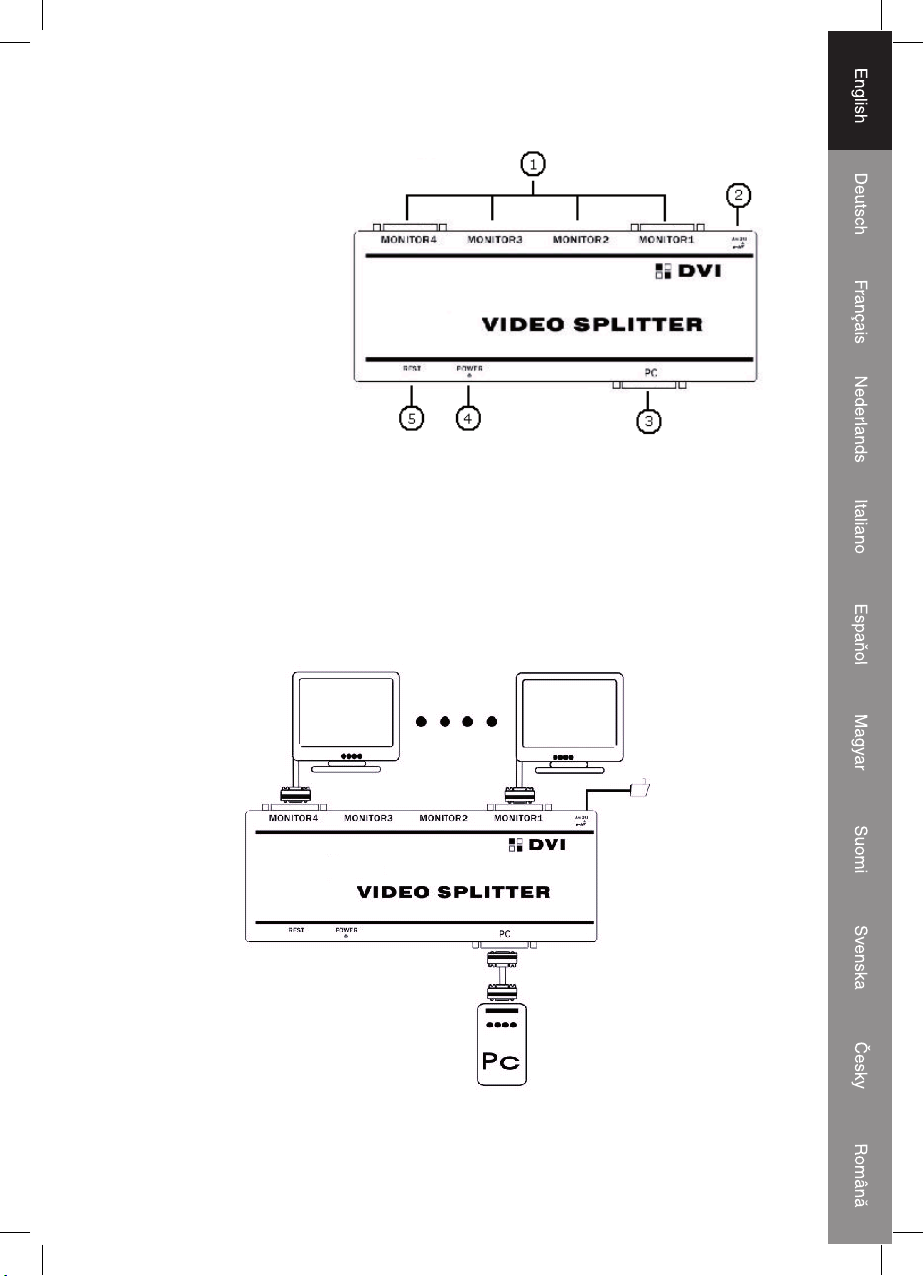
CMP-SPLITDVI20
1) 4x DVI Output
connection
2) DC5V power adapter
connection
3) DVI Input connection
4) Power LED
5) Reset button
Connections en Operation:
Before installation, please make sure all devices you wish to connect have been turned
off.
• Connect the input sources into splitters (Input cables are optional)
• Connect the Monitors into the Output slot in the back of the splitter.
• Insert the DC side of 5V power supply into the converter and then connect the AC side
of the power supply into the wall outlet
3
Page 4
Declaration of conformity
We,
Ned i s B.V.
De Tweeling 28
5215MC ’s-Hertogenbosch
The Netherlands
Tel.: 0031 73 599 1055
Email: info@nedis.com
Declare that product:
Name: CMP-SPLITDVI10 & CMP-SPLITDVI20
Model: 2port DVI splitter & 4 port DVI splitter
Description: KÖNIG DVI SPLITTERS 2 & 4 PORT
Is in conformity with the following standards
EMC: EN 55022(1998+A1:2000+A2:2003)
EN61000-3-2(2006)
EN61000-3-3(1995+A1:2001+A2:2005)
EN55024(1998+A1:2001+A2:2003)
EN61000-4-2(1995+A1:1998+A2:2001) /-3(2002+A1:2002)/
-4(2004)/-5(1995+A1:2001)/-6(1996+A1:2001)/-11(2004)
LVD: IEC 60950-1:2001
Following the provisions of the 2004/108/EC directive.
‘s-Hertogenbosch, 01 July 2008
Mrs. J. Gilad
Purchase Director
4
Page 5
Safety precautions:
CAUTION
RISK OF ELEC TRIC SHOCK
DO NOT OPEN
To reduce risk of electric shock, this product should
ONLY be opened by an authorized technician when
service is required. Disconnect the product from mains
and other equipment if a problem should occur. Do not expose the product to water or
moisture.
Maintenance:
Clean only with a dry cloth. Do not use cleaning solvents or abrasives.
Warranty:
No guarantee or liability can be accepted for any changes and modifi cations of the product
or damage caused due to incorrect use of this product.
General:
Designs and specifi cations are subject to change without notice.
All logos brands and product names are trademarks or registered trademarks of their
respective holders and are hereby recognized as such.
Attention:
This product is marked with this symbol. It means that used electrical and
electronic products should not be mixed with general household waste. There is
a separate collections system for these products.
Copyright ©
5
Page 6
Page 7
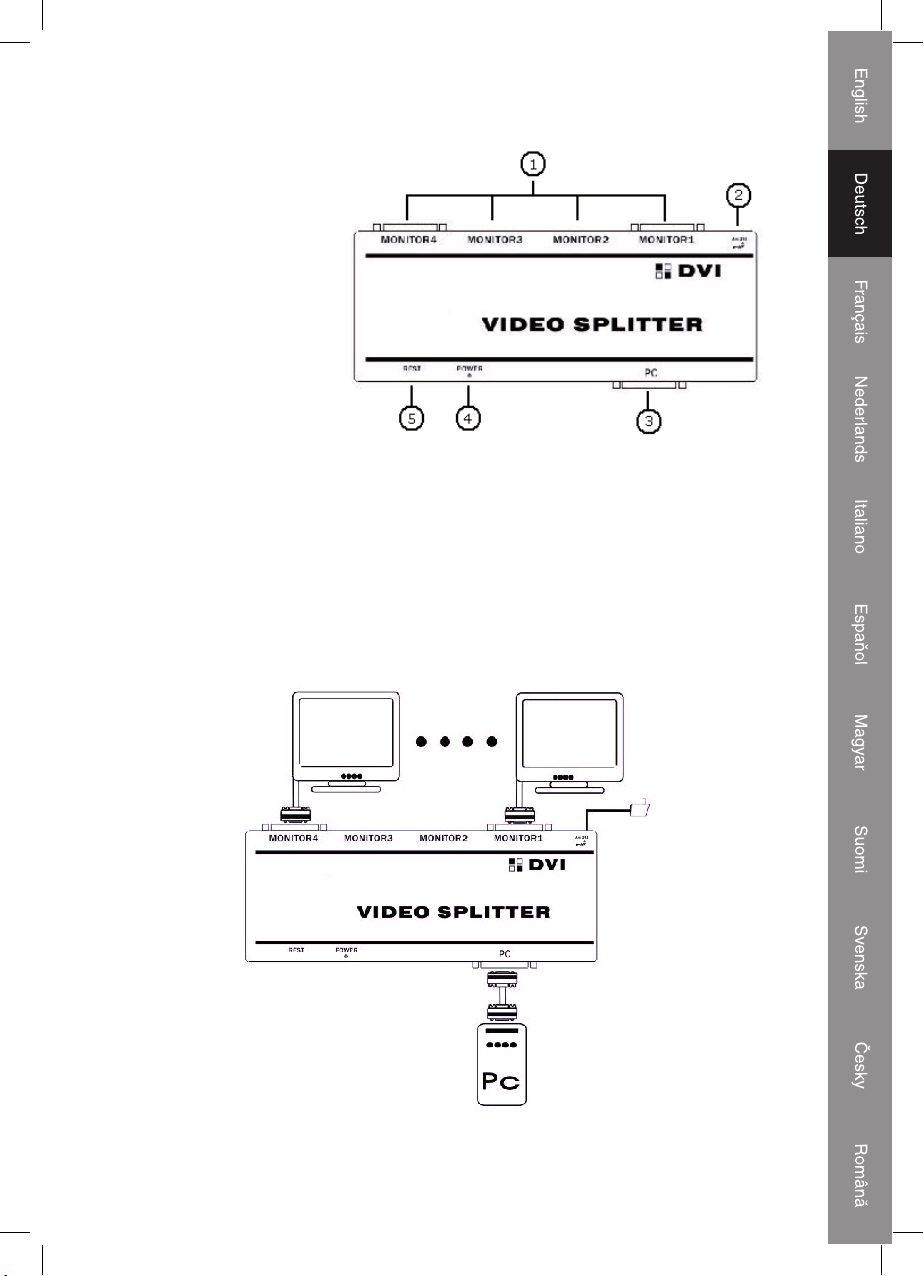
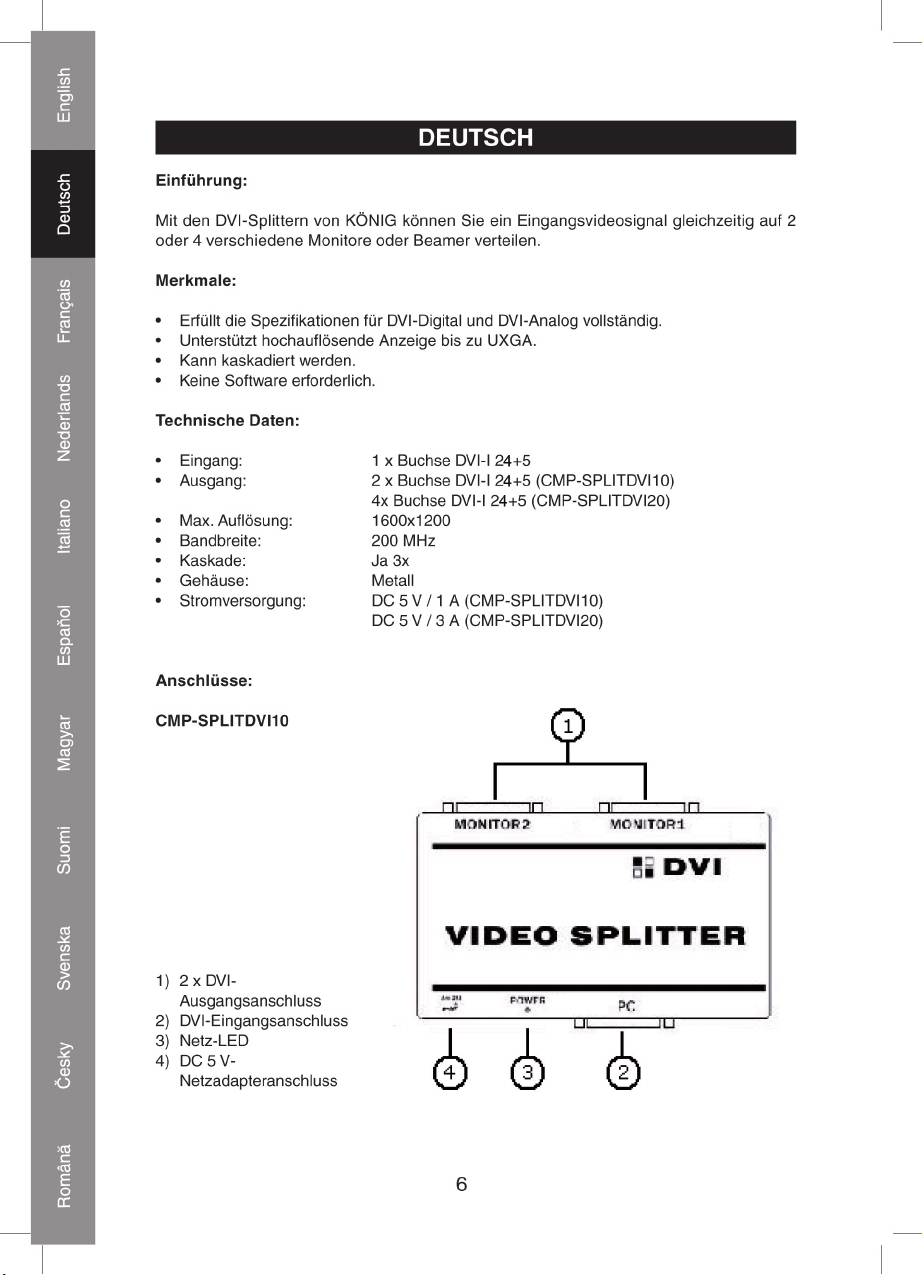
CMP-SPLITDVI20
1) 4 x DVI-
Ausgangsanschluss
2) DC 5 V-
Netzadapteranschluss
3) DVI-Eingangsanschluss
4) Netz-LED
5) Rücksetz-Taste
Anschlüsse und Betrieb:
Achten Sie vor der Installation bitte darauf, dass alle Geräte, die Sie anschließen möchten,
ausgeschaltet sind.
• Schließen Sie die Eingangsquellen an den Splitter an (Eingangskabel sind optional).
• Schließen Sie die Monitore an die Ausgangsbuchse an der Rückseite des Splitters an.
• Stecken Sie die Gleichspannungsseite der 5 V-Stromversorgung in den Splitter,
und schließen Sie dann die Wechselspannungsseite der Stromversorgung an die
Netzsteckdose an.
7
Page 8
KONFORMITÄTSERKLÄRUNG
Wir,
Ned i s B.V.
De Tweeling 28
5215MC ’s-Hertogenbosch
Niederlande
Tel.: 0031 73 599 1055
Email: info@nedis.com
erklären, dass das Produkt:
Name: CMP-SPLITDVI10 & CMP-SPLITDVI20
Modell: 2-Port-DVI-Splitter & 4-Port-DVI-Splitter
Beschreibung: DVI-SPLITTER MIT 2 & 4 PORTS VON KÖNIG
den folgenden Standards entspricht:
EMV: EN 55022(1998+A1:2000+A2:2003)
EN61000-3-2(2006)
EN61000-3-3(1995+A1:2001+A2:2005)
EN55024(1998+A1:2001+A2:2003)
EN61000-4-2(1995+A1:1998+A2:2001) /-3(2002+A1:2002)/
-4(2004)/-5(1995+A1:2001)/-6(1996+A1:2001)/-11(2004)
LVD: IEC 60950-1:2001
Erfüllt die Vorschriften der Direktive 2004/108/EC.
‘s-Hertogenbosch, 01. Juli 2008
J. Gilad
Einkaufsleiterin
8
Page 9
Sicherheitsvorkehrungen:
VORSICHT
STROMSCHLAGGEFAHR
NICHT ÖFFNEN
Um das Risiko eines elektrischen Schlags zu
verringern, sollte dieses Produkt AUSSCHLIESSLICH
von einem autorisierten Techniker geöffnet werden,
wenn eine Reparatur erforderlich ist. Trennen Sie das Produkt vom Stromnetz und anderen
Geräten, wenn ein Problem auftreten sollte. Sorgen Sie dafür, dass das Gerät nicht mit
Wasser oder Feuchtigkeit in Berührung kommt.
Wartung:
Nur mit einem trockenen Tuch säubern. Keine Lösungsmittel oder Schleifmittel
verwenden.
Garantie:
Es kann keine Garantie oder Haftung für irgendwelche Änderungen oder Modifi kationen
des Produkts oder für Schäden übernommen werden, die aufgrund einer nicht
ordnungsgemäßen Anwendung des Produkts entstanden sind.
Allgemeines:
Design und Spezifi kationen können ohne vorherige Ankündigung geändert werden.
Alle Logos, Marken und Produktnamen sind Warenzeichen oder registrierte Warenzeichen
ihrer jeweiligen Eigentümer und werden hiermit als solche anerkannt.
Achtung:
Dieses Produkt ist mit diesem Symbol gekennzeichnet. Es bedeutet, dass die
verwendeten elektrischen und elektronischen Produkte nicht im allgemeinen
Haushaltsmüll entsorgt werden dürfen. Für diese Produkte stehen gesonderte
Sammelsysteme zur Verfügung.
Copyright ©
9
Page 10
Page 11
CMP-SPLITDVI20
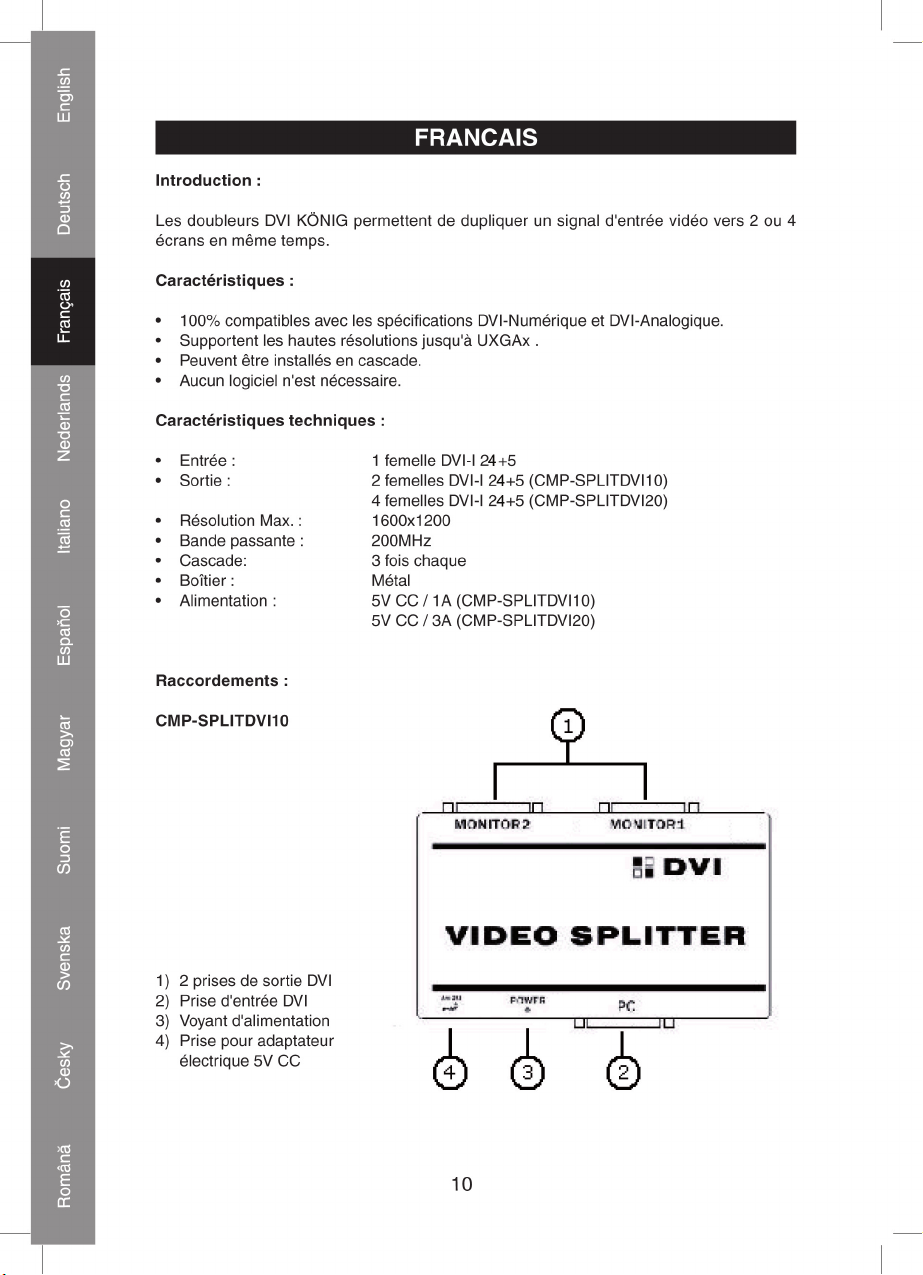
1) 4 prises de sortie DVI
2) Prise pour adaptateur
électrique 5V CC
3) Prise d'entrée DVI
4) Voyant d'alimentation
5) Touche de
Réinitialisation
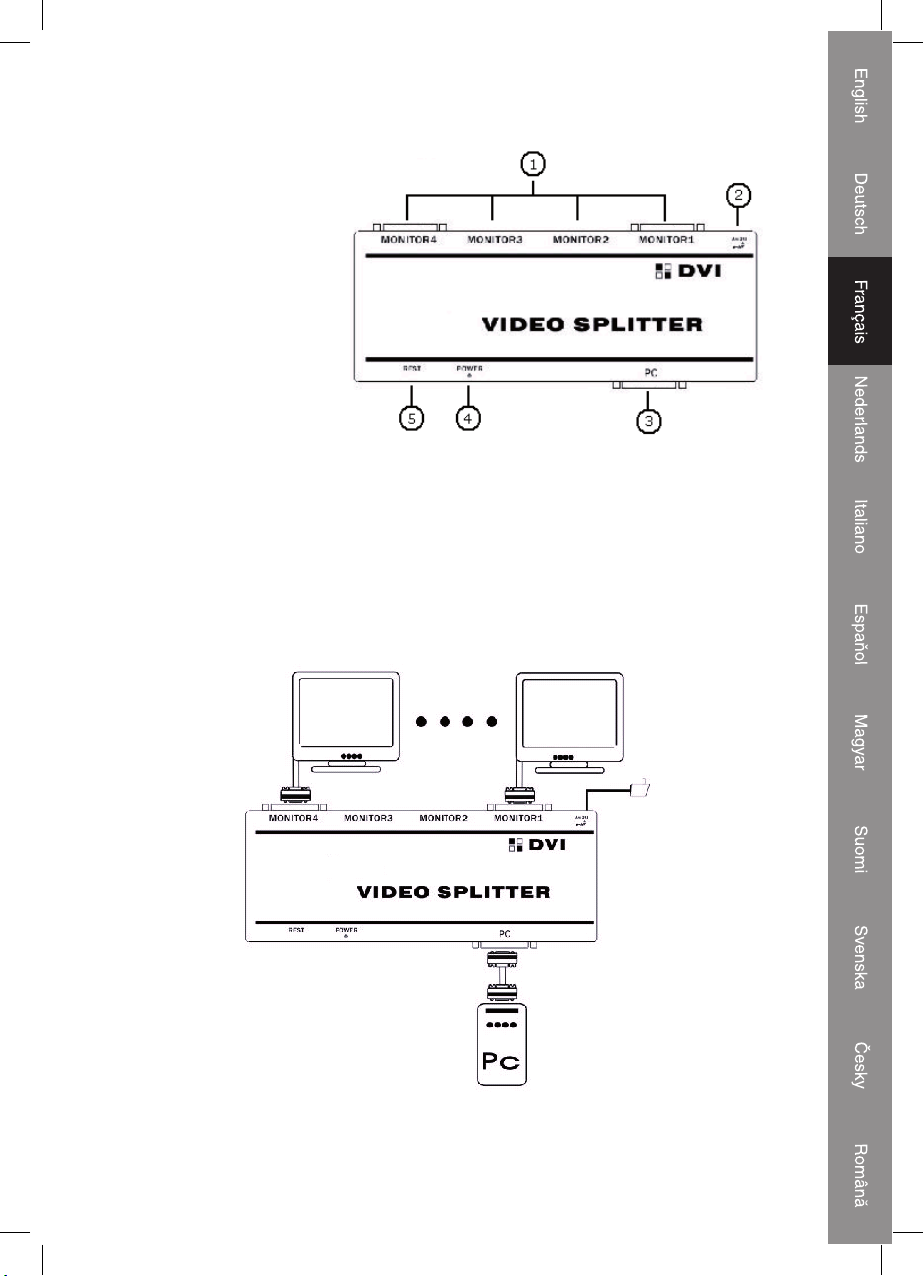
Raccordement et fonctionnement :
Avant l'installation, assurez-vous que tous les appareils que vous voulez raccorder sont
éteints.
• Raccordez les sources d'entrée au doubleur (les câbles d'entrée ne sont pas fournis)
• Raccordez les écrans aux prises de sortie à l'arrière du doubleur.
• Raccordez le côté CC de l'alimentation 5 V au doubleur, puis le côté CA à une prise de
courant murale.
11
Page 12
Déclaration de conformité
Nous,
Ned i s B.V.
De Tweeling 28
5215MC ’s-Hertogenbosch
Pays-Bas
Tél : 0031 73 599 1055
Email : info@nedis.com
Déclarons que les produits :
Nom : CMP-SPLITDVI10 & CMP-SPLITDVI20
Modèles : Doubleur DVI 2 ports & Doubleur DVI 4 ports
Désignation : DOUBLEURS DVI 2 & 4 PORTS KÖNIG
sont conformes aux normes suivantes :
CEM : EN 55022(1998+A1:2000+A2:2003)
EN61000-3-2(2006)
EN61000-3-3(1995+A1:2001+A2:2005)
EN55024(1998+A1:2001+A2:2003)
EN61000-4-2(1995+A1:1998+A2:2001) /-3(2002+A1:2002)/
-4(2004)/-5(1995+A1:2001)/-6(1996+A1:2001)/-11(2004)
DBT : IEC 60950-1:2001
suivant la directive 2004/108/CEE.
‘s-Hertogenbosch, 1er juillet 2008
Mme. J. Gilad
Directrice des Achats
12
Page 13
Consignes de sécurité :
ATT ENT ION
RISQUE DE CHOC ELECTRIQUE
NE PAS OUVRIR
Afi n de réduire les risques de chocs électriques, ce
produit ne doit être ouvert QUE par un technicien
qualifi é agréé en cas de réparation. Débranchez
l'appareil du secteur et des autres équipements en cas de problème. N'exposez jamais
l'appareil à l'eau ou à l'humidité.
Entretien :
Ne nettoyez qu'avec un chiffon sec. N'utilisez pas de solvant ou de produit abrasif.
Garantie :
Aucune garantie ou responsabilité ne sera acceptée en cas de modifi cation et/ou de
transformation du produit ou en cas de dommages provoqués par une utilisation incorrecte
de l'appareil.
Généralités :
Le design et les caractéristiques techniques sont sujets à modifi cation sans notifi cation
préalable.
Tous les logos de marques et noms de produits sont des marques déposées ou
immatriculées dont leurs détenteurs sont les propriétaires et sont donc reconnus comme
telles dans ce document.
Attention :
Ce symbole fi gure sur l'appareil. Il signifi e que les produits électriques et
électroniques ne doivent pas être jetés avec les déchets domestiques. Le
système de collecte est différent pour ce genre de produits.
Copyright ©
13
Page 14
Page 15
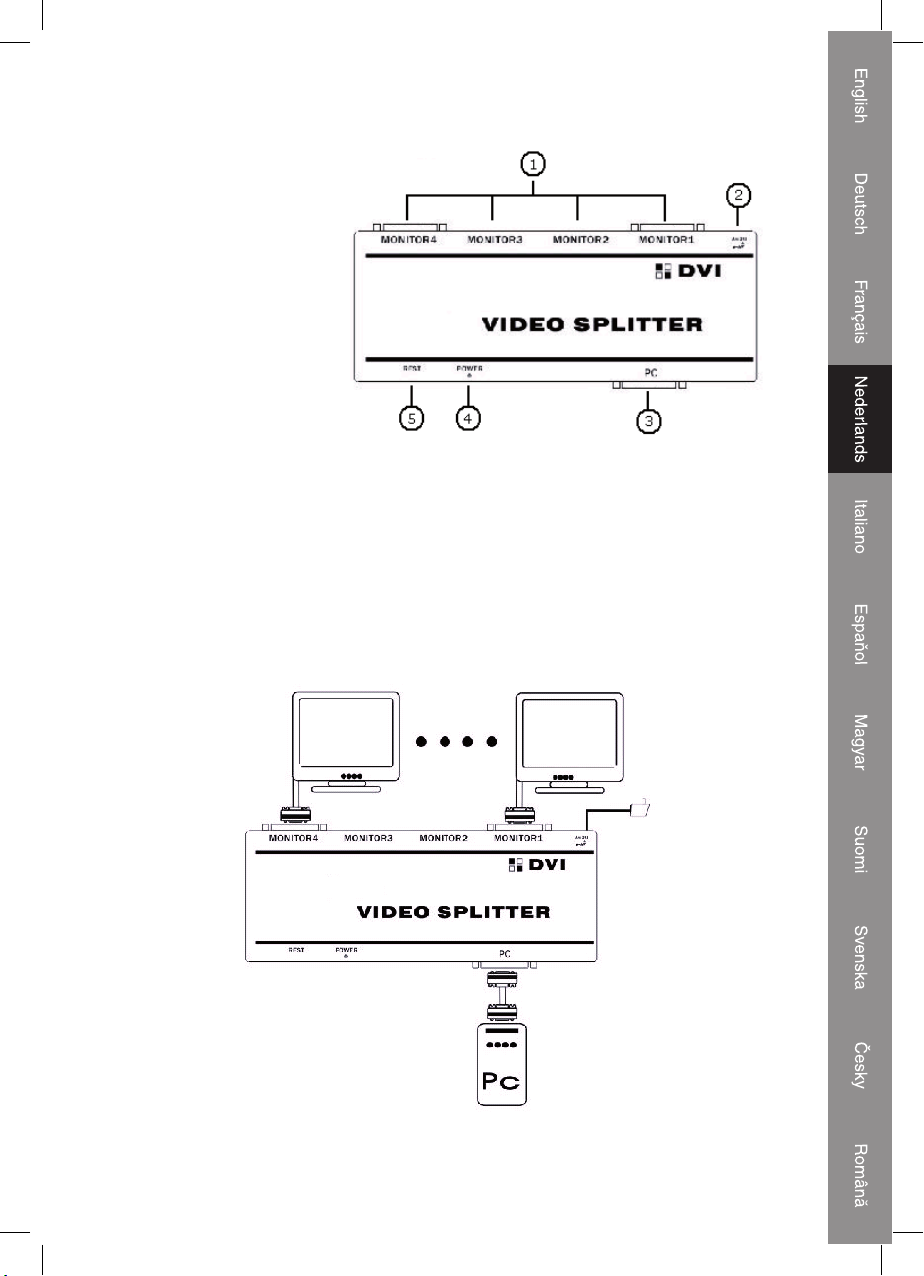
CMP-SPLITDVI20
1) 4x DVI-
uitgangaansluitingen
2) Aansluiting voor de 5V
transformator
3) DVI-ingangaansluiting
4) In gebruik led:
5) Resetknop
Aansluitingen en gebruik:
Controleer of alle apparaten die u wilt gaan aansluiten zijn uitgeschakeld voordat u deze
gaat installeren.
• Verbind de PC met de splitter (ingangkabels zijn optioneel)
• Sluit de beeldschermen aan op de Output (uitgangaansluiting) aan de achterkant van de
splitter.
• Bevestig de gelijkstroomstekker van de 5 V transformator in de omzetter en steek dan de
wisselstroomstekker van de transformator in het wandcontact.
15
Page 16

CONFORMITEITVERKLARING
Wij,
Nedis BV
De Tweeling 28
5215 MC ’s-Hertogenbosch
Nederland
Tel.: 0031 73 599 1055
E-mail: info@nedis.com
Verklaren dat het product:
Naam: CMP-SPLITDVI10 & CMP-SPLITDVI20
Model: 2poort DVI-splitter & 4 poort DVI-splitter
Omschrijving: KÖNIG DVI-SPLITTERS 2 & 4 POORT
in overeenstemming met de volgende normen is
EMC: EN 55022(1998+A1:2000+A2:2003)
EN61000-3-2(2006)
EN61000-3-3(1995+A1:2001+A2:2005)
EN55024(1998+A1:2001+A2:2003)
EN61000-4-2(1995+A1:1998+A2:2001) /-3(2002+A1:2002)/
-4(2004)/-5(1995+A1:2001)/-6(1996+A1:2001)/-11(2004)
LVD: IEC 60950-1:2001
Conform de bepalingen van richtlijn 2004/108/EG.
‘s-Hertogenbosch, 1 juli 2008
Mevr. J. Gilad
Directeur inkoop
16
Page 17

Veiligheidsvoorzorgsmaatregelen:
LET OP:
GEVAAR VOOR
ELEKTRI SCHE SCHOK
NIET OPENEN
Wanneer service of reparatie noodzakelijk is, mag dit
product UITSLUITEND door een geautoriseerde
technicus geopend worden; dit om de kans op het
krijgen van een elektrische schok te voorkomen. Als er een probleem optreedt, koppel het
product dan los van het lichtnet en van andere apparatuur. Stel het apparaat niet bloot aan
water of vocht.
Onderhoud:
Uitsluitend reinigen met een droge doek. Gebruik geen reinigingsmiddelen of
schuurmiddelen.
Garantie:
Voor wijzigingen en veranderingen aan het product of schade veroorzaakt door een
verkeerd gebruik van dit product, kan geen aansprakelijkheid worden geaccepteerd.
Tevens vervalt daardoor de garantie.
Algemeen:
Wijziging van ontwerp en specifi caties zonder voorafgaande mededeling onder
voorbehoud.
Alle logo's, merken en productnamen zijn handelsmerken of geregistreerde handelsmerken
van de respectievelijke eigenaren en worden hierbij als zodanig erkend.
Let op:
Dit product is voorzien van dit symbool. Dit symbool geeft aan dat afgedankte
elektrische en elektronische producten niet met het gewone huisafval verwijderd
mogen worden. Voor dit soort producten zijn er speciale inzamelingspunten.
Copyright ©
17
Page 18

Page 19

CMP-SPLITDVI20
1) Collegamento uscita 4x
DVI
2) Collegamento adattatore
di corrente DC5V
3) Collegamento ingresso
DVI
4) LED di alimentazione
5) Pulsante Azzeramento
Collegamenti e funzionamento:
Prima di procedere all'installazione, verifi care che tutti i dispositivi da collegare siano stati
spenti.
• Collegare le sorgenti in ingresso negli splitter (i cavi di ingresso sono opzionali)
• Collegare i monitor nello slot di uscita nel retro dello splitter.
• Collegare l‘alimentatore da 5 V allo splitter ed inserirlo nella presa di corrente
(220/230 AC)
19
Page 20

DICHIARAZIONE DI CONFORMITÀ
Questa società,
Ned i s B.V.
De Tweeling 28
5215MC ’s-Hertogenbosch
Paesi Bassi
Tel.: 0031 73 599 1055
Email: info@nedis.com
Dichiara che il prodotto:
Nome: CMP-SPLITDVI10 & CMP-SPLITDVI20
Modello: Splitter 2porte DVI & 4 porte DVI
Descrizione: SPLITTER KÖNIG DVI 2 & 4 PORTE
è conforme ai seguenti standard
EMC: EN 55022(1998+A1:2000+A2:2003)
EN61000-3-2(2006)
EN61000-3-3(1995+A1:2001+A2:2005)
EN55024(1998+A1:2001+A2:2003)
EN61000-4-2(1995+A1:1998+A2:2001) /-3(2002+A1:2002)/
-4(2004)/-5(1995+A1:2001)/-6(1996+A1:2001)/-11(2004)
LVD: IEC 60950-1:2001
Secondo le disposizioni della direttiva 2004/108/CE.
‘s-Hertogenbosch, 01 luglio 2008
Sig.ra J. Gilad
Direttore agli acquisti
20
Page 21

Precauzioni di sicurezza:
ATT ENZ IONE
RISCHIO D I SCOSSE ELET TRICHE
NON APRIRE
Per ridurre il rischio di scosse elettriche, questo
prodotto deve essere aperto ESCLUSIVAMENTE da
persona le tecnico speci alizzato, se occorre as sistenza.
Se si dovessero verifi care dei problemi, scollegare il prodotto dall'alimentazione di rete e
da ogni altra apparecchiatura. Non esporre il prodotto ad acqua o umidità.
Manutenzione:
Pulire solo con un panno asciutto. Non utilizzare solventi detergenti o abrasivi.
Garanzia:
Non sarà accettata alcuna garanzia o responsabilità in relazione a cambiamenti e
modifi che del prodotto o a danni determinati dall'uso non corretto del prodotto stesso.
Generalità:
Il design e le caratteristiche tecniche sono soggetti a modifi ca senza necessità di
preavviso.
Tutti i marchi, logo e i nomi di prodotto sono marchi commerciali o marchi registrati
appartenenti ai rispettivi titolari e sono in questo documento riconosciuti come tali.
Attenzione:
Il prodotto è contrassegnato con questo simbolo, con il quale si indica che i
prodotti elettrici ed elettronici usati non devono essere gettati insieme ai rifi uti
domestici. Per questi prodotti esiste un sistema di raccolta differenziata.
Copyright ©
21
Page 22

Page 23

CMP-DIVISORDVI20
1) 4 conexiones de salida
DVI
2) Conexión para
el adaptador de
alimentación DC5V
3) Conexión de entrada
DVI
4) Diodo de indicación de
corriente eléctrica:
5) Botón de reinicio
Conexiones en funcionamiento:
Antes de la instalación, por favor, compruebe que todos los dispositivos que desea
conectar han sido apagados.
• Conecte las fuentes de entrada a los divisores (cables de entrada opcionales)
• Conecte los monitores a la ranura de salida de la parte posterior del divisor.
• Introduzca el lado CC del suministro de alimentación de 5 V al conversor y a continuación,
conecte el lado de CA del suministro de alimentación a la toma de pared.
23
Page 24

Declaración de conformidad
La empresa infraescrita,
Ned i s B.V.
De Tweeling 28
5215MC ’s-Hertogenbosch
Países Bajos
Tel.: 0031 73 599 1055
Email: info@nedis.com
Declara que el producto:
Nombre: CMP-DIVISORDVI10 & CMP-DIVISORDVI20
Modelo: Divisor DVI de 2 puertos y divisor DVI de 4 puertos
Descripción: DIVISORES DVI KÖNIG DVI DE 2 Y 4 PUERTOS
se encuentra conforme a las siguientes normas:
EMC: EN 55022(1998+A1:2000+A2:2003)
EN61000-3-2(2006)
EN61000-3-3(1995+A1:2001+A2:2005)
EN55024(1998+A1:2001+A2:2003)
EN61000-4-2(1995+A1:1998+A2:2001) /-3(2002+A1:2002)/
-4(2004)/-5(1995+A1:2001)/-6(1996+A1:2001)/-11(2004)
LVD: IEC 60950-1:2001
Conforme a las disposiciones de la directiva 2004/108/EEC.
‘s-Hertogenbosch, 01 de julio de 2008
D. J. Gilad
Director de compras
24
Page 25

Medidas de seguridad:
ATE NCIÓN
RIESGO DE E LECTROCUCIÓ N
NO ABRIR
Para reducir los riesgos de electrocución, este
producto deberá ser abierto EXCLUSIVAMENTE por
un técnico habilitado cuando necesite ser reparado.
Desconecte el producto de la red y de cualquier otro equipo si se registra algún problema.
No exponga el producto al agua ni a la humedad.
Mantenimiento:
Limpie sólo con un paño seco. No utilice solventes de limpieza ni abrasivos.
Garantía:
No se aceptará ninguna garantía o responsabilidad derivada de cualquier cambio o
modifi caciones realizadas al producto o daños provocados por un uso incorrecto del
presente producto.
General:
Los diseños y las especifi caciones podrán sufrir cambios sin previo aviso.
Todas las marcas de los logotipos y los nombres de productos constituyen patentes o
marcas registradas de sus titulares correspondientes, reconocidos como tal.
Cuidado:
Este producto está señalizado con este símbolo. Esto signifi ca que los productos
eléctricos y electrónicos gastados no deberán mezclarse con los desechos
domésticos generales. Existen distintos sistemas de recogida individuales para
este tipo de productos.
Copyright ©
25
Page 26

Page 27

CMP-SPLITDVI20
1) 4 db DVI kimeneti
csatlakozás
2) DC 5 V hálózati adapter
csatlakoztatása
3) DVI bemeneti
csatlakozás
4) Bekapcsolt állapotot
jelző LED
5) Reset (Alaphelyzet)
gomb
Csatlakoztatás és kezelés:
Csatlakoztatás előtt bizonyosodjon meg arról, hogy minden csatlakoztatni kívánt készülék
ki van kapcsolva.
• Csatlakoztassa a bemeneti forrásokat az elosztókhoz (bemeneti kábelek külön
beszerezhetők).
• Csatlakoztassa a monitorokat az elosztó hátlapján lévő kimeneti aljzatra.
• A tápegység 5 V-os egyenáramú végét dugaszolja az átalakítóra, váltakozóáramú végét
pedig a konnektorba.
27
Page 28

Megfelelőségi nyilatkozat
Mi,
a Nedis B.V.
De Tweeling 28
5215MC ’s-Hertogenbosch
Hollandia
Tel.: 0031 73 599 1055
E-mail: info@nedis.com
Kijelentjük, hogy a termék, amelynek:
Márkaneve: CMP-SPLITDVI10 és CMP-SPLITDVI20
Típusa: 2-portos DVI-elosztó és 4 portos DVI-elosztó
Megnevezése: KÖNIG DVI ELOSZTÓK, 2 ÉS 4 PORTTAL
Összhangban van az alábbi szabványokkal:
EMC (Elektromágneses összeférhetőségre vonatkozó irányelv):
EN 55022(1998+A1:2000+A2:2003)
EN61000-3-2(2006)
EN61000-3-3(1995+A1:2001+A2:2005)
EN55024(1998+A1:2001+A2:2003)
EN61000-4-2(1995+A1:1998+A2:2001) /-3(2002+A1:2002)/
-4(2004)/-5(1995+A1:2001)/-6(1996+A1:2001)/-11(2004)
LVD (Kisfeszültségű elektromos termékekre vonatkozó irányelv):
IEC 60950-1:2001
A 2004/108/EK irányelv előírásaival összhangban van.
‘s-Hertogenbosch, 2008. július 1.
Mrs. J. Gilad
értékesítési igazgató
Megfelelőségi nyilatkozat.
Egyetértek és elfogadom a Nedis B.V. Hollandia által adott nyilakozatot.
Jacob Gilad
HQ-Nedis kft.
ügyvezető igazgató
28
Page 29

Biztonsági óvintézkedések:
VIGYÁZAT!
ÁRAMÜTÉS VESZÉLYE!
NE NYISSA FEL!
Az áramütés veszélyének csökkentése érdekében ezt
a készüléket CSAK képzett szakember nyithatja fel,
szervi zelés céljáb ól. Ha problém a adódik a készül ékkel,
kapcsolja le az elektromos hálózatról és más készülékről. Víztől és nedvességtől védje.
Karbantartás:
Csak száraz ronggyal tisztítsa. Tisztító- és súrolószereket ne használjon.
Jótállás:
Nem vállalunk felelősséget és jótállást, ha a meghibásodás a készüléken végzett
változtatás vagy módosítás következménye, vagy helytelen használat miatt a készülék
megrongálódott.
Általános tudnivalók:
A kivitel és a műszaki jellemzők előzetes értesítés nélkül is módosulhatnak.
Valamennyi logó, terméknév és márkanév a tulajdonosának márkaneve vagy bejegyzett
márkaneve, és azokat ennek tiszteletben tartásával említjük.
Figyelem:
Ezt a terméket ezzel a jelöléssel láttuk el. Azt jelenti, hogy az elhasznált
elektromos és elektronikus termékek nem keverhetők az általános háztartási
hulladék közé. Erre a célra külön gyűjtőrendszerek állnak rendelkezésre.
Copyright ©
29
Page 30

Page 31

CMP-SPLITDVI20
1) 4x DVI-lähtö
2) DC5V-virtasovittimen
liitäntä
3) DVI-syöttö
4) Virran LED-merkkivalo
5) Palautuspainike
Kytkennät ja käyttö:
Ennen asennusta on varmistettava, että kaikki kytkimeen liitettävät laitteet on kytketty
pois päältä.
• Liitä syöttölähteet jakajaan (syöttökaapelien käyttö valinnaista).
• Liitä monitorit jakajan takana olevaan lähtöön.
• Aseta 5 V teholähteen DC-puoli muuntimeen ja liitä sen jälkeen teholähteen AC-puoli
pistorasiaan.
31
Page 32

VAATIMUSTENMUKAISUUSVAKUUTUS
Me,
Ned i s B.V.
De Tweeling 28
5215MC ’s-Hertogenbosch
Alankomaat
Puh: 0031 73 599 1055
Sähköposti: info@nedis.com
Vakuutamme, että tuote:
Nimi: CMP-SPLITDVI10 & CMP-SPLITDVI20
Malli: 2-portin DVI-jakaja & 4-portin DVI-jakaja
Kuvaus: KÖNIG DVI-JAKAJAT 2 & 4 PORTILLA
Täyttää seuraavat standardit:
EMC: EN 55022(1998+A1:2000+A2:2003)
EN61000-3-2(2006)
EN61000-3-3(1995+A1:2001+A2:2005)
EN55024(1998+A1:2001+A2:2003)
EN61000-4-2(1995+A1:1998+A2:2001) /-3(2002+A1:2002)/
-4(2004)/-5(1995+A1:2001)/-6(1996+A1:2001)/-11(2004)
LVD: IEC 60950-1:2001
Direktiivin 2004/108/ETY mukaisesti.
‘s-Hertogenbosch, 1. heinäkuuta 2008
Mrs. J. Gilad
Hankintajohtaja
32
Page 33

Turvallisuuteen liittyvät varoitukset:
HUOMIO
SÄHKÖISKUVAARA
ÄLÄ AVAA
Sähköiskuvaaran välttämiseksi tämän laitteen saa
avata huollon yhteydessä VAIN valtuutettu teknikko.
Kytke laite pois verkkovirrasta ja muista laitteista, jos
ongelmia esiintyy. Älä altista tuotetta vedelle tai kosteudelle.
Huolto:
Puhdista ainoastaan kuivalla kankaalla. Älä käytä liuottimia tai hioma-aineita.
Takuu:
Takuu ja vastuuvelvollisuus mitätöityvät, jos tuote vaurioituu siihen tehtyjen muutoksien
tai sen väärinkäytön takia.
Yleistä:
Muutoksia malliin ja teknisiin ominaisuuksiin voidaan tehdä ilmoituksetta.
Kaikki logot, merkit ja tuotenimet ovat niiden vastaavien omistajien tuotemerkkejä tai
rekisteröityjä tuotemerkkejä ja niitä on käsiteltävä sellaisina.
Huomio:
Tuote on varustettu tällä merkillä. Se merkitsee, ettei käytettyjä sähkö- tai
elektronisia tuotteita saa hävittää kotitalousjätteen mukana. Kyseisille tuotteille
on olemassa erillinen keräysjärjestelmä.
Copyright ©
33
Page 34

Page 35

CMP-SPLITDVI20
1) 4x DVI Utgångskoppling
2) Koppling för DC5V
strömadapter
3) DVI Ingångskoppling
4) Ström LED
5) Återställningsknapp
Anslutningar vid drift:
Innan installation, se till att alla apparater som du vill ansluta har stängts av.
• Koppla ingångskällorna till delaren (Ingångskablar är extra tillbehör)
• Koppla särmarna till Utgångskontakten bak på delaren
• Sätt i energitillförselsidan för 5 V likström i konvertern och anslut energitillförselsidan för
växelström till vägguttaget.
35
Page 36

ÖVERENSSTÄMMELSEFÖRKLARING
Vi,
Ned i s B.V.
De Tweeling 28
5215MC ’s-Hertogenbosch
Holland
Tel.: 0031 73 599 1055
Email: info@nedis.com
Intygar att produkten:
Namn: CMP-SPLITDVI10 & CMP-SPLITDVI20
Modell: 2ports DVI delare & 4 ports DVI delare
Beskrivning: KÖNIG DVI Delare 2 & 4 portar
Överensstämmer med följande standarder:
Överensstämmer med följande standarder:
EMC: EN 55022(1998+A1:2000+A2:2003)
EN61000-3-2(2006)
EN61000-3-3(1995+A1:2001+A2:2005)
EN55024(1998+A1:2001+A2:2003)
EN61000-4-2(1995+A1:1998+A2:2001) /-3(2002+A1:2002)/
-4(2004)/-5(1995+A1:2001)/-6(1996+A1:2001)/-11(2004)
LVD: IEC 60950-1:2001
Uppfyller villkoren för direktiv 2004/108/EEC.
‘s-Hertogenbosch, 01 Juli 2008
Mrs. J. Gilad
Inköpsansvarig
36
Page 37

Säkerhetsanvisningar:
OBS
RISK FÖR EL STÖT
ÖPPNA INTE
För att undvika elstötar får produkten endast öppnas
av behörig tekniker när service behövs. Koppla bort
produkten från nätuttaget och från annan utrustning
om problem uppstår. Utsätt inte produkten för vatten eller fukt.
Underhåll:
Rengör endast med torr trasa. Använd inga rengöringsmedel eller frätande medel.
Garanti:
Ingen garanti kan accepteras för ändringar som har utförts på produkten eller skador som
har uppstått som en följd av felaktig användning av produkten.
Allmänt:
Utseende och specifi kationer kan komma att ändras utan föregående meddelande.
Alla logotyper och produktnamn är varumärken eller registrerade varumärken som tillhör
sina ägare och är härmed erkända som sådana.
Obs!
Produkten är märkt med denna symbol. Det innebär att använda elektriska eller
elektroniska produkter inte får slängas bland vanliga hushållssopor. Det fi nns
särskilda återvinningssystem för dessa produkter.
Copyright ©
37
Page 38

Page 39

CMP-SPLITDVI20
1. 4x výstupní konektor DVI
2. Konektor pro připojení
síťového adaptéru
3. Vstupní konektor DVI
4. LED indikátor napájení
5. Tlačítko Reset
(Obnovení)
Zapojení a obsluha převaděče:
Před instalací si ověřte, jsou-li všechna zařízení určená k připojení vypnuta.
• Vstupní zařízení připojte k rozbočovači (propojovací kabely lze objednat zvlášť).
• Připojte monitory do výstupních konektorů na zadní straně přístroje.
• Nejdříve připojte stejnosměrný konec kabelu od 5V napájecího zdroje k rozbočovači a
pak teprve zapojte síťový adaptér do zásuvky s 220 V.
39
Page 40

Prohlášení o shodě
Společnost
Ned i s B.V.
De Tweeling 28
5215MC ’s-Hertogenbosch
Nizozemí
Tel.: 0031 73 599 1055
E-mail: info@nedis.com
prohlašuje, že výrobek:
Značka: CMP-SPLITDVI10 a CMP-SPLITDVI20
Model: 2 a 4násobný rozbočovač DVI
Popis: 2 a 4násobné rozbočovače DVI fi rmy KÖNIG
splňuje následující normy:
Elektromagnetická kompatibilita:
EN 55022(1998+A1:2000+A2:2003)
EN61000-3-2(2006)
EN61000-3-3(1995+A1:2001+A2:2005)
EN55024(1998+A1:2001+A2:2003)
EN61000-4-2(1995+A1:1998+A2:2001) /-3(2002+A1:2002)/
-4(2004)/-5(1995+A1:2001)/-6(1996+A1:2001)/-11(2004)
Elektronická zařízení napájená ze sítě:
IEC 60950-1:2001
a odpovídá ustanovením směrnice 2004/108/EEC.
‘s-Hertogenbosch, 01 červenec 2008
Mrs. J. Gilad
Obchodní ředitel
40
Page 41

Bezpečnostní opatření:
UPOZORNĚNÍ
NEBEZPEČÍ ÚRAZU
ELEKTRI CKÝM PROUDEM
NEOTEVÍRAT
Abyste zabránili nebezpečí úrazu elektrickým
proudem, svěřte opravu zařízení POUZE
kvalifi kovanému servisnímu technikovi/středisku. Při
výskytu problému vždy odpojte zařízení od přívodu elektrické energie a od dalších
zařízení, která mohou být s vaším zařízením propojena. Nevystavujte výrobek působení
vody nebo vlhkosti.
Údržba:
K čištění používejte pouze suchý hadřík. Nepoužívejte rozpouštědla ani abrazivní
materiály.
Záruka:
Jakékoli změny, modifi kace nebo poškození zařízení v důsledku nesprávného zacházení
se zařízením ruší platnost záruční smlouvy.
Obecné upozornění:
Design a specifi kace výrobku mohou být změněny bez předchozího upozornění.
Všechna loga a názvy výrobků jsou obchodní značky nebo registrované obchodní značky
příslušných vlastníků a jsou chráněny příslušnými zákony.
Upozornění:
Tento výrobek je označen následujícím symbolem. To znamená, že s výrobkem
je nutné zacházet jako s nebezpečným elektrickým a elektronickým odpadem a
nelze jej po skončení životnosti vhazovat do běžného domácího odpadu. Existují
zvláštní sběrná střediska pro likvidaci těchto produktů.
Copyright © (Autorská práva)
41
Page 42

Page 43

CMP-SPLITDVI20
1) 4 conexiuni de ieşire DVI
2) Conectarea adaptorului
DC 5 V
3) Conexiune de intrare
DVI
4) LED-ul alimentării
electrice
5) Butonul de resetare
Conexiuni:
Înainte de instalare, vă rugăm să vă asiguraţi că toate dispozitivele pe care doriţi să le
conectaţi sunt oprite.
• Conectaţi sursele de intrare la splitter (cablurile de intrare sunt opţionale).
• Conectaţi monitoarele la slotul de ieşire de pe spatele splitterului.
• Introduceţi capătul DC de 5 V al sursei în splitter, după care conectaţi capătul AC al
sursei în priza de perete.
43
Page 44

Declaraţie de conformitate
Noi,
Ned i s B.V.
De Tweeling 28
5215MC ’s-Hertogenbosch
Olanda
Tel.: 0031 73 599 1055
Email: info@nedis.com
Declarăm că acest produs:
Denumire: CMP-SPLITDVI10 & CMP-SPLITDVI20
Model: Splitter DVI cu 2 porturi & Splitter DVI cu 4 porturi
Descriere: SPLITTERE DVI KÖNIG CU 2 & 4 PORTURI
Este în conformitate cu următoarele standarde:
EMC: EN 55022 (1998 +A1:2000 +A2:2003)
EN 61000-3-2 (2006)
EN 61000-3-3 (1995 +A1:2001 +A2:2005)
EN 55024(1998 +A1:2001 +A2:2003)
EN 61000-4-2 (1995 +A1:1998 +A2:2001) /-3 (2002 +A1:2002)/
-4(2004)/-5(1995 +A1:2001)/-6(1996 +A1:2001)/-11(2004)
LVD: IEC 60950-1:2001
În conformitate cu prevederile directivei 2004/108/EC.
‘s-Hertogenbosch, 01.07.2008
J. Gilad
Director achiziţii
44
Page 45

Măsuri de siguranţă:
ATE NŢIE!
PERICOL DE E LECTROCUTARE
NU-L DESCHIDEŢI!
Dacă apare necesitatea serviceului, pentru a evita
riscul de electrocutare, acest produs trebuie deschis
NUMAI de către un tehnician autorizat. Dacă în timpul
funcţionării a apărut o problemă, deconectaţi aparatul de la reţea, precum şi de la celelalte
aparate. Feriţi produsul de apă şi de umezeală.
Întreţinere:
Curăţarea trebuie făcută cu o cârpă uscată. Nu folosiţi solvenţi sau agenţi de curăţare
abrazivi.
Garanţie:
Nu oferim nicio garanţie şi nu ne asumăm niciun fel de responsabilitate în cazul
schimbărilor sau modifi cărilor aduse acestui produs sau în cazul deteriorării cauzate de
utilizarea incorectă a produsului.
Generalităţi:
Designul şi specifi caţiile produsului pot fi modifi cate fără o notifi care prealabilă.
Toate siglele mărcilor şi numele produselor sunt mărci comerciale sau mărci comerciale
înregistrate ale proprietarilor de drept şi aici sunt recunoscute ca atare.
Atenţie:
Acest produs este marcat cu acest simbol. Acesta indică faptul că produsele
electrice şi electronice uzate nu trebuie aruncate în gunoiul menajer. Aceste
produse au un sistem separat de colectare.
Copyright ©
45
Page 46

464748
Page 47

Page 48

 Loading...