

Page 1
KN-RL60
2014-07-29
Page 2
MANUAL (p. 3)
Ring Light
MODE D’EMPLOI (p. 5)
Projecteur annulaire
MANUALE (p. 8)
Luce ad anello
MANUAL (p. 11)
Luz anelar
KÄYTTÖOHJE (s. 13)
Rengasvalo
NÁVOD K POUŽITÍ (s. 16)
Světelný kroužek
ΕΓΧΕΙΡΙ∆ΙΟ XPHΣHΣ (σελ. 18)
Λυχνία κουδουνιού
VEILEDNING (s. 21)
Ringlys
KILAVUZ (s. 24)
Halka Işık
NÁVOD (s. 26)
Prstencové svetlo
NAUDOJIMO VADOVAS (29 p.)
Žiedinė lempa
РЪКОВОДСТВО (p. 31)
Пръстеновидно осветление
PRIROČNIK (str. 34)
Krožna makro lučka
ANLEITUNG (S. 4)
Ringleuchte
GEBRUIKSAANWIJZING (p. 7)
Ringverlichting
MANUAL DE USO (p. 9)
Luz anular
HASZNÁLATI ÚTMUTATÓ (o. 12.)
Reflektorgyűrű
BRUKSANVISNING (s. 15)
Ljusring
MANUAL DE UTILIZARE (p. 17)
Bliţ inel
BRUGERVEJLEDNING (s. 20)
Ringlampe
ИНСТРУКЦИЯ (22 стр.)
Кольцевой светильник
KASUTUSJUHEND (lk. 25)
Rõngasvalgusti
ROKASGRĀMATA (lpp. 28)
Gredzenveida lampa
PRIRUČNIK (str. 30)
Prstenasto svjetlo
INSTRUKCJA OBSŁUGI (str. 33)
Lampa Pierścieniowa
2
Page 3
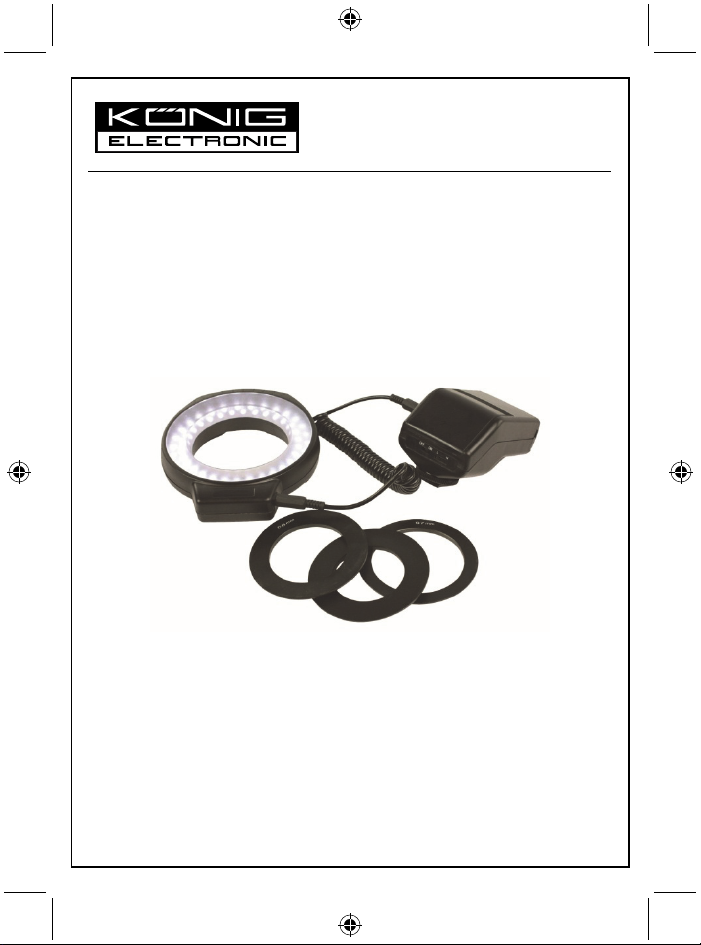
Ring Light
ENGLISH
1. Insert 4 AA batteries into the power pack. Batteries are not included. Use Alkaline or NiMH
rechargeable batteries. Be sure batteries are installed according to the diagram shown inside the
battery compartment.
2. Mount the power pack onto the accessory show of the camera.
3. Select the correct mounting ring and slide into the grooves on the back of the ring light until it snaps
into position.
4. Screw the ring light assembly onto the filter threads of your lens. Adjust to horizontal.
5. Install the power cord from the power pack to the ring light.
6. Use the dimmer control on the power pack to adjust the light intensity.
To remove from the lens, first remove the power cord and then unscrew the ring light.
Specifications:
60 Daylight Balanced LED lights.
Designed for close up photography up to 4 ft.
Vignetting may occur if using your lens on the wide angle setting.
Also may be used as a fill-in light.
Dimmable control.
Uses 4 AA batteries, Alkaline or NiMH rechargeable (not included).
Safety precautions:
Maintenance:
Clean only with a dry cloth. Do not use cleaning solvents or abrasives.
Warranty:
No guarantee or liability can be accepted for any changes and modifications of the product or damage
caused due to incorrect use of this product.
General:
- Designs and specifications are subject to change without notice.
- All logos brands and product names are trademarks or registered trademarks of their respective
holders and are hereby recognized as such.
- This manual was produced with care. However, no rights can be derived. König Electronic can not
accept liability for any errors in this manual or their consequences.
- Keep this manual and packaging for future reference.
Attention:
This product is marked with this symbol. It means that used electrical and electronic products
should not be mixed with general household waste. There is a separate collections system for
these products.
To reduce risk of electric shock, this product should ONLY be
opened by an authorized technician when service is required.
Disconnect the product from mains and other equipment if a
problem should occur. Do not expose the product to water or
moisture.
3
Page 4
This product has been manufactured and supplied in compliance with all relevant regulations and
directives, valid for all member states of the European Union. It also complies with all applicable
specifications and regulations in the country of sales.
Formal documentation is available upon request. This includes, but is not limited to: Declaration of
Conformity (and product identity), Material Safety Data Sheet and product test report.
Please contact our customer service desk for support:
via website: http://www.nedis.com/en-us/contact/contact-form.htm
via e-mail: service@nedis.com
via telephone: +31 (0)73-5993965 (during office hours)
NEDIS B.V., De Tweeling 28, 5215 MC ’s-Hertogenbosch, THE NETHERLANDS
DEUTSCH
Ringleuchte
1. Legen Sie vier AA-Batterien in das Netzteil ein. Die Batterien sind nicht im Lieferumfang enthalten.
Benutzen Sie Alkaline-Batterien oder wiederaufladbare NiMH-Akkus. Legen Sie die Batterien, wie
auf der Abbildung im Batteriefach angezeigt, ein.
2. Befestigen Sie das Netzteil an der Kamera.
3. Wählen Sie den richtigen Befestigungsring und schieben Sie diesen in die Kerbe auf der Rückseite
der Ringleuchte, bis er einrastet.
4. Schrauben Sie die Ringleuchte auf das Filtergewinde Ihres Objektivs. Horizontal ausrichten.
5. Verbinden Sie das Kabel vom Netzteil mit der Ringleuchte.
6. Verwenden Sie den Dimmer auf dem Netzteil, um die Beleuchtungsstärke anzupassen.
Um die Ringleuchte vom Objektiv zu entfernen, entfernen Sie zunächst das Netzkabel und schrauben
Sie dann die Ringleuchte ab.
Technische Daten:
60 Tageslicht-LEDs.
Für Nahaufnahmen bis zu 1,2 m.
Bei Nutzung eines Weitwinkelobjektivs ist eine Vignettierung (Randabschattung) möglich.
Kann auch als Aufhelllicht benutzt werden.
Dimmerfunktion.
Benötigt vier Alkaline-Batterien oder NiMH-Akkus der Größe AA (nicht im Lieferumfang enthalten).
Sicherheitsvorkehrungen:
Wartung:
Nur mit einem trockenen Tuch säubern. Keine Reinigungs- oder Scheuermittel verwenden.
Garantie:
Es kann keine Garantie oder Haftung für irgendwelche Änderungen oder Modifikationen des Produkts
oder für Schäden übernommen werden, die aufgrund einer nicht ordnungsgemäßen Anwendung des
Produkts entstanden sind.
Um das Risiko eines elektrischen Schlags zu verringern, sollte
dieses Produkt AUSSCHLIESSLICH von einem autorisierten
Techniker geöffnet werden. Bei Problemen trennen Sie das
Gerät bitte von der Spannungsversorgung und von anderen
Geräten ab. Stellen Sie sicher, dass das Gerät nicht mit
Wasser oder Feuchtigkeit in Berührung kommt.
4
Page 5
Allgemeines:
- Design und technische Daten können ohne vorherige Ankündigung geändert werden.
- Alle Logos, Marken und Produktnamen sind Marken oder eingetragene Marken ihrer jeweiligen
Eigentümer und werden hiermit als solche anerkannt.
- Diese Bedienungsanleitung wurde sorgfältig verfasst. Dennoch können daraus keine Rechte und
Pflichten hergeleitet werden. König Electronic haftet nicht für mögliche Fehler in dieser
Bedienungsanleitung oder deren Folgen.
- Bitte bewahren Sie Bedienungsanleitung und Verpackung für spätere Verwendung auf.
Achtung:
Dieses Produkt ist mit diesem Symbol gekennzeichnet. Es bedeutet, dass die ausgedienten
elektrischen und elektronischen Produkte nicht mit dem allgemeinen Haushaltsmüll entsorgt
werden dürfen. Für diese Produkte stehen gesonderte Sammelsysteme zur Verfügung.
Dieses Produkt wurde hergestellt und geliefert in Übereinstimmung mit allen geltenden Vorschriften
und Richtlinien, die für alle Mitgliedsstaaten der Europäischen Union gültig sind. Es entspricht allen
geltenden Vorschriften und Bestimmungen im Land des Vertriebs.
Eine formale Dokumentation ist auf Anfrage erhältlich. Diese beinhaltet unter anderem, jedoch nicht
ausschließlich: Konformitätserklärung (und Produktidentität), Sicherheitsdatenblatt, Testreport des
Produkts.
Wenden Sie sich bei Fragen bitte an unseren Kundendienst:
per Internet: http://www.nedis.de/de-de/kontakt/kontaktformular.htm
per E-Mail: service@nedis.com
per Telefon: Niederlande +31 (0)73-5993965 (während der Geschäftszeiten)
NEDIS B.V., De Tweeling 28, 5215 MC ’s-Hertogenbosch, NIEDERLANDE
FRANÇAIS
Projecteur annulaire
1. Insérer 4 piles de type AA dans le bloc d'alimentation. Les piles sont non incluses. Utilisez des piles
alcalines ou rechargeables NiMH. Assurez-vous que les piles sont installées selon le schéma
présent dans le compartiment des piles.
2. Fixez le bloc d'alimentation sur la griffe porte-accessoire de la caméra.
3. Sélectionnez la bague de montage adéquate et faites-la glisser dans les rainures sur l'arrière du
projecteur annulaire jusqu'à qu'elle s'enclenche.
4. Vissez l'ensemble du projecteur annulaire sur le filetage des filtres de votre objectif. Réglez-le à
l'horizontale.
5. Fixez le cordon d'alimentation du bloc d'alimentation sur le projecteur annulaire.
6. Utilisez le gradateur de commande du bloc d'alimentation pour régler l'intensité de lumière.
Pour le retirer de l'objectif, débranchez d'abord le cordon d'alimentation et ensuite dévissez le
projecteur annulaire.
Spécifications :
60 diodes lumineuses à diffusion de lumière du jour.
Conçu pour la macrophotographie jusqu'à 1,2 m.
5
Page 6
Des effets de vignettage peuvent survenir lors de l'utilisation de votre objectif sur une position de
grand angle.
Possibilité d'utilisation comme un éclairage d'appoint.
À gradateur de commande.
Fonctionne avec 4 piles de type AA, alcaline ou rechargeable NiMH (non incluses).
Consignes de sécurité :
Pour réduire le risque de choc électrique, ce produit ne doit
être ouvert que par un technicien qualifié si une réparation
s’impose. Débranchez l’appareil et les autres équipements
du secteur s’il y a un problème. Ne pas exposer l’appareil à
l’eau ni à l’humidité.
Entretien :
Ne nettoyez l’appareil qu’avec un chiffon sec. N’utilisez pas de solvants ou de produits abrasifs.
Garantie :
Aucune garantie ou responsabilité ne sera acceptée en cas de modification et/ou de transformation du
produit ou en cas de dommages provoqués par une utilisation incorrecte de l’appareil.
Généralités :
- Le design et les caractéristiques techniques sont sujets à modification sans notification préalable.
- Tous les logos de marques et noms de produits sont des marques déposées ou immatriculées dont
leurs détenteurs sont les propriétaires et sont donc reconnues comme telles dans ce documents.
- Ce manuel a été produit avec soin. Toutefois, aucun droit ne peut en dériver. König Electronic ne
peut être tenu responsable pour des erreurs de ce manuel ou de leurs conséquences.
- Conservez ce manuel et l’emballage pour toute référence ultérieure.
Attention :
Ce symbole figure sur l’appareil. Il signifie que les produits électriques et électroniques ne
doivent pas être jetés avec les déchets domestiques. Le système de collecte est différent pour
ce genre de produits.
Ce produit est fabriqué et délivré en conformité avec toutes les directives et règlements applicables et
en vigueur dans tous les états membre de l'Union Européenne. Il est également conforme aux
spécifications et à la réglementation en vigueur dans le pays de vente.
La documentation officielle est disponible sur demande. Cela inclut mais ne se limite pas à : La
déclaration de conformité (et à l'identification du produit), la fiche technique concernant la sécurité des
matériaux, les rapports de test du produit.
Veuillez contacter notre centre de service à la clientèle pour plus d'assistance :
via le site Web : http://www.nedis.fr/fr-fr/contact/formulaire-de-contact.htm
via courriel : service@nedis.com
via téléphone : +31 (0)73-5993965 (aux heures de bureau)
NEDIS B.V., De Tweeling 28, 5215 MC ’s-Hertogenbosch, PAYS-BAS
6
Page 7
Ringverlichting
NEDERLANDS
1. Plaats 4 AA-batterijen in het batterijpakket. Batterijen zijn niet inbegrepen. Gebruik Alkaline of
NiMH oplaadbare batterijen. Zorg ervoor dat de batterijen worden geïnstalleerd volgens het
schema aangegeven in het batterijvak.
2. Monteer het batterijpakket op de accessoirebevestiging van de camera.
3. Selecteer de juiste montagering en schuif in de groeven op de achterkant van de ringverlichting
totdat deze op zijn plaats vastklikt.
4. Schroef de ringverlichtingassemblage op de filterschroefdraad van uw lens. Pas de horizontale
positie aan.
5. Sluit het voedingsnoer vanaf het batterijpakket op de ringverlichting aan.
6. Gebruik de dimmerregelaar op het batterijpakket om de lichtintensiteit aan te passen.
Om de verlichting van de lens te verwijderen, verwijder eerst het voedingsnoer en schroef vervolgens
de ringverlichting los.
Specificaties:
60 Daglichtgebalanceerde LED-lampen.
Ontworpen voor close-up fotografie tot maximaal 1,2 meter.
Vignettering kan optreden als u uw lens op de groothoekinstelling gebruikt.
Kan ook gebruikt worden als aanvullende verlichting.
Dimbare regeling.
Gebruikt 4 AA-batterijen, Alkaline of NiMH oplaadbare batterijen (niet inbegrepen).
Veiligheidsvoorzorgsmaatregelen:
Onderhoud:
Uitsluitend reinigen met een droge doek. Gebruik geen reinigingsmiddelen of schuurmiddelen.
Garantie:
Voor wijzigingen en veranderingen aan het product of schade veroorzaakt door een verkeerd gebruik
van dit product, kan geen aansprakelijkheid worden geaccepteerd. Tevens vervalt daardoor de
garantie.
Algemeen:
- Wijziging van ontwerp en specificaties zonder voorafgaande mededeling onder voorbehoud.
- Alle logo’s, merken en productnamen zijn handelsmerken of geregistreerde handelsmerken van de
respectievelijke eigenaren en worden hierbij als zodanig erkend.
- Deze handleiding is met zorg samengesteld. Er kunnen echter geen rechten aan worden ontleend.
König Electronic kan geen aansprakelijkheid aanvaarden voor eventuele fouten in deze handleiding
of de gevolgen daarvan.
- Bewaar deze gebruiksaanwijzing voor latere raadpleging.
Om het risico op elektrische schokken te voorkomen mag dit
product ALLEEN worden geopend door een erkende
technicus wanneer er onderhoud nodig is. Koppel het
product los van de elektrische voeding en van andere
apparatuur als zich problemen voordoen. Stel het product
niet bloot aan water of vocht.
7
Page 8
Let op:
Dit product is voorzien van dit symbool. Dit symbool geeft aan dat afgedankte elektrische en
elektronische producten niet met het gewone huisafval verwijderd mogen worden. Voor dit
soort producten zijn er speciale inzamelingspunten.
Dit product is vervaardigd en geleverd in overeenstemming met de relevante reglementen en
richtlijnen die voor alle lidstaten van de Europese Unie gelden. Het voldoet ook aan alle toepasselijke
specificaties en reglementen van het land van verkoop.
Op aanvraag is officiële documentatie verkrijgbaar. Inclusief, maar niet uitsluitend:
Conformiteitsverklaring (en productidentiteit), materiaalveiligheidsinformatie en producttestrapport.
Wend u tot onze klantenservice voor ondersteuning:
via de website: http://www.nedis.nl/nl-nl/contact/contact-formulier.htm
via e-mail: service@nedis.nl
telefonisch: +31 (0)73-5993965 (tijdens kantooruren)
NEDIS B.V., De Tweeling 28, 5215 MC ’s-Hertogenbosch, NEDERLAND
ITALIANO
Luce ad anello
1. Inserite 4 batterie AA nell'alloggiamento batteria. Le batterie non sono incluse. Utilizzare pile
Alcaline o NiMH ricaricabili. Assicuratevi che le batterie siano installate rispettando il diagramma
mostrato dentro il comparto batterie.
2. Montare il gruppo energia sul supporto accessorio della videocamera.
3. Selezionare l'anello di montaggio corretto e farlo scivolare all'interno delle scanalature della luce
ad anello fino a che si incastri in posizione.
4. Avvitare il gruppo luce ad anello sul filetto per filtri delle vostre lenti. Regolatene l'orizzonte.
5. Installate il cavo di alimentazione dal gruppo energia alla luce ad anello.
6. Utilizzate il controllo di luminosità sul gruppo energia per regolare l'intensità della luce.
Per rimuoverlo dalla lente, prima rimuovete il cavo di alimentazione quindi svitate la luce ad anello.
Caratteristiche:
60 luci a LED bilanciate per luce diurna.
Progettate per primi piani fino a circa 1,2 m.
Potrebbe verificarsi una vignettatura se applicate le vostre lenti con impostazione di grand'angolo.
Può inoltre essere utilizzata come luce di riempimento.
Controllo luminosità.
Utilizza 4 batterie AA, Alcaline o NiMH ricaricabili (non incluse).
Precauzioni di sicurezza:
Manutenzione:
Pulire solo con un panno asciutto. Non utilizzare solventi detergenti o abrasivi.
Per ridurre il rischio di shock elettrico, questo prodotto
dovrebbe essere aperto SOLO da un tecnico autorizzato
quando è necessario ripararlo. Scollegare il prodotto
dall’alimentazione e da altri apparecchi se dovesse esserci
un problema. Non esporre il prodotto ad acqua o umidità.
8
Page 9
Garanzia:
Non sarà accettata alcuna garanzia o responsabilità in relazione a cambiamenti e modifiche del
prodotto o a danni determinati dall’uso non corretto del prodotto stesso.
Generalità:
- Il design e le caratteristiche tecniche sono soggetti a modifica senza necessità di preavviso.
- Tutti i marchi a logo e i nomi di prodotto sono marchi commerciali o registrati dei rispettivi titolari e
sono riconosciuti come tali in questo documento.
- Questo manuale è stato redatto con cura. Tuttavia da esse non possono essere avanzati diritti.
König Electronic non può accettare responsabilità per errori in questo manuale nè per eventuali
conseguenze.
- Tenere questo manuale e la confezione per riferimento futuro.
Attenzione:
Il prodotto è contrassegnato con questo simbolo, con il quale si indica che i prodotti elettrici ed
elettronici non devono essere gettati insieme ai rifiuti domestici. Per questi prodotti esiste un
sistema di raccolta differenziata.
Il presente prodotto è stato realizzato e fornito in conformità a tutte le norme e le direttive vigenti, con
validità in tutti gli stati membri della Comunità Europea. Inoltre è conforme alle specifiche e alle
normative applicabili nel paese in cui è stato venduto.
La documentazione ufficiale è disponibile su richiesta. Essa include a titolo esemplificativo ma non
limitativo: Dichiarazione di conformità (e di identità del prodotto), scheda di sicurezza dei materiali,
rapporto di prova del prodotto.
Contattare il nostro servizio clienti per assistenza:
tramite il nostro sito web: http://www.nedis.it/it-it/contatti/modulo-contatto.htm
tramite e-mail: service@nedis.com
tramite telefono: +31 (0)73-5993965 (in orario di ufficio)
NEDIS B.V., De Tweeling 28, 5215 MC ’s-Hertogenbosch, Paesi Bassi
ESPAÑOL
Luz anular
1. Introduzca 4 pilas AA en la batería. Las pilas no están incluidas. Use pilas alcalinas o recargables
NiHM. Asegúrese de instalar las pilas siguiendo el diagrama que se muestra en el compartimento
de pilas.
2. Monte la batería en la base de accesorios de la cámara.
3. Seleccione el anillo de adaptación correcto e introdúzcalo en las guías de la parte posterior de la
luz anular hasta que quede ajustado.
4. Atornille la luz anular montada a los agujeros para filtro de su lente. Ajuste horizontalmente.
5. Instale el cable de alimentación de la batería en la luz anular.
6. Use el control de intensidad de la batería para ajustar la intensidad de luz.
Para extraer la lente, extraiga en primer lugar el cable de alimentación y, a continuación, la luz anular.
Especificaciones
60 luces LED con ajuste de luz diurna.
Diseñado para fotografía con una separación de hasta 1,2 m.
9
Page 10
Se puede generar oscurecimiento de los bordes si usa su lente con un ajuste de gran angular.
También se puede usar como luz de relleno.
Control de intensidad.
Precisa 4 pilas AA, alcalinas o recargables NiMH (no incluidas).
Medidas de seguridad:
Para reducir el peligro de descarga eléctrica, este producto
SÓLO lo debería abrir un técnico autorizado cuando
necesite reparación. Desconecte el producto de la toma de
corriente y de los otros equipos si ocurriera algún problema.
No exponga el producto al agua ni a la humedad.
Mantenimiento:
Límpielo sólo con un paño seco. No utilice disolventes de limpieza ni productos abrasivos.
Garantía:
No se aceptará ninguna garantía o responsabilidad derivada de cualquier cambio o modificaciones
realizadas al producto o daños provocados por un uso incorrecto del producto.
General:
- Las ilustraciones y las especificaciones podrán sufrir cambios sin previo aviso.
- Todas las marcas de logotipos y nombres de productos constituyen patentes o marcas registradas a
nombre de sus titulares correspondientes, reconocidos como tal.
- Este manual se ha redactado con sumo cuidado. Aún así, no se ofrece ninguna garantía. König
Electronic no será responsable de los errores de este manual o de las consecuencias derivadas de
los mismos.
- Conserve este manual y el embalaje en caso de futura necesidad.
Atención:
Este producto está señalizado con este símbolo. Esto significa que los productos eléctricos y
electrónicos usados no deberán mezclarse con los desechos domésticos generales. Existe un
sistema de recogida individual para este tipo de productos.
Este producto se ha fabricado y distribuido de conformidad con todas las normativas y directivas
relevantes, válidas para todos los estados de la Unión Europea. También cumple con todas las
especificaciones y normativas en el país en el cual se comercializa.
Previa solicitud, podremos proporcionarle la documentación formal. Esta documentación incluye,
entre otros: Declaración de conformidad (e identidad del producto), hoja de datos de seguridad del
material, informe sobre las pruebas realizadas al producto.
Póngase en contacto con nuestro servicio de atención al cliente para obtener información adicional:
por medio de nuestro sitio web: http://www.nedis.es/es-es/contacto/formulario-de-contacto.htm
enviando un correo electrónico: service@nedis.com
o llamando por teléfono: +31 (0)73-5993965 (en horario de oficina)
NEDIS B.V., De Tweeling 28, 5215 MC ’s-Hertogenbosch, PAÍSES BAJOS
10
Page 11
Luz anelar
PORTUGUÊS
1. Introduzir 4 baterias AA na fonte de alimentação. As baterias não estão incluídas. Utilizar baterias
recarregáveis de NiMH ou alcalinas. Certificar-se de que as baterias são instaladas de acordo com
o diagrama contido no interior do compartimento das baterias.
2. Instalar a fonte de alimentação na direcção da lente da câmara.
3. Seleccionar o anel de montagem correcto e deslizá-lo na direcção das ranhuras localizadas na
parte lateral da luz anelar até que o anel de montagem fique encaixado correctamente.
4. Aparafusar a montagem da luz anelar na direcção das roscas do filtro da lente da câmara. Ajustar
para a horizontal.
5. Instalar o cabo de energia da fonte de alimentação na luz anelar.
6. Utilizar o controlo regulável localizado na fonte de alimentação para ajustar a intensidade da luz.
Para remover a luz anelar, primeiro retirar o cabo de energia e, de seguida, desaparafusar a luz
anelar.
Especificações:
60 lâmpadas LED equilibradas pela luz diurna.
Concebido para fotografia de proximidade até aos 1,2 m.
Poderá ocorrer uma diminuição da luminosidade ou saturação da imagem na periferia comparada
com o centro da imagem, se a lente for utilizada numa definição de ângulo de grande abertura.
A luz anelar também poderá ser utilizada como luz de preenchimento.
Controlo regulável.
Utilizar 4 baterias recarregáveis AA, alcalinas ou de NiMH (não incluídas).
Precauções de segurança:
CUIDADO
RISCO DE CHOQUE ELÉCTRICO
NÃO ABRIR
Manutenção:
Limpar apenas com um pano seco. Não utilizar solventes de limpeza ou produtos abrasivos.
Garantia:
Não é aceitável qualquer garantia ou responsabilidade devidas a alterações e modificações no
produto ou de danos causados pela utilização incorrecta deste produto.
Geral:
- Os designs e as especificações estão sujeitos a alteração sem aviso.
- Todas as marcas dos logotipos e nomes de produtos são marcas registadas dos respectivos
proprietários e são reconhecidos como tal no presente documento.
- Este manual foi cuidadosamente elaborado. No entanto, não podem ser derivados quaisquer
direitos. A König Electronic não se responsabiliza por quaisquer erros neste manual nem pelas
respectivas consequências.
- Guardar este manual e embalagem para consulta futura.
Quando necessitar de reparação e para reduzir o risco de
choque eléctrico, este produto deve APENAS ser aberto
por um técnico autorizado. Desligar o produto da tomada
de alimentação e outro equipamento se ocorrer um
problema. Não expor o produto à água ou humidade.
11
Page 12

Atenção:
Este produto encontra-se marcado com este símbolo. Significa que os produtos eléctricos e
electrónicos usados não devem ser misturados com o lixo doméstico geral. Existe um sistema
de recolha separado para estes produtos.
Este produto foi fabricado e fornecido em conformidade com todos os regulamentos e directivas
relevantes, válidos para todos os estados membros da União Europeia. Além disso, está em
conformidade com todas as especificações e regulamentos aplicáveis no país de venda.
Mediante pedido, será disponibilizada documentação formal. Isto inclui, mas não se limita a:
Declaração d e conformidade (e identidade do produto), ficha de dados de segurança do material
relatório de teste do produto.
Contactar o nosso centro de serviço de apoio ao cliente para obter assistência:
através do Website: http://www.nedis.pt/pt-pt/contacto/formulario-de-contacto.htm
através de e-mail: service@nedis.com
através do telefone: +31 (0)73-5993965 (durante o horário normal de expediente)
NEDIS B.V., De Tweeling 28, 5215 MC ’s-Hertogenbosch, HOLANDA
MAGYAR
Reflektorgyűrű
1. Helyezze be a 4 db AA elemet a teleptartóba. Az elemeket külön kell megvásárolni. Alkáli vagy
tölthető NiMH elemeket használjon. Az elemeket a teleptartóban feltüntetett polaritással helyezze
be.
2. Erősítse a teleptartót a kamera tartozékrögzítőjéhez.
3. Válassza ki a megfelelő felerősítőgyűrűt, és csúsztassa a gyűrű hátoldali hornyaiba, amíg a
helyére nem kattan.
4. Csavarja a reflektorgyűrű szerelvényt az objektív menetes szűrőcsatlakozójára. Állítsa
vízszintesre.
5. Kösse a teleptartó tápkábelét a reflektorgyűrűre.
6. A teleptartó fényerőszabályzójával állítsa be a kívánt fényerősséget.
Az objektívról való levételhez először kösse le a teleptartó tápkábelét, s csak utána csavarja le a
reflektorgyűrűt.
Műszaki adatok:
60 db nappali fényhőmérsékletre állított LED.
Közelfelvételekhez, legfeljebb 1,2 m távolságból.
Az objektív nagy látószögű beállításakor vignettálás (peremsötétedés, a kép sarkainak fényhiány
miatti sötétedése) léphet fel.
Derítőlámpaként is használható.
Szabályozható fényerősség.
4 db alkáli vagy tölthető NiMH elemmel működik (külön kell megvásárolni őket).
12
Page 13

Biztonsági óvintézkedések:
Az áramütés veszélyének csökkentése érdekében ezt a
terméket KIZÁRÓLAG a márkaszerviz képviselője nyithatja
fel. Hiba esetén húzza ki a termék csatlakozóját a
konnektorból, és kösse le más berendezésekről. Vigyázzon,
hogy ne érje a terméket víz vagy nedvesség.
Karbantartás:
Csak száraz ronggyal tisztítsa. Tisztító- és súrolószerek használatát mellőzze.
Jótállás:
Nem vállalunk jótállást és felelősséget a terméken végzett változtatás vagy módosítás vagy a termék
helytelen használata miatt bekövetkező károkért.
Általános tudnivalók:
- A kivitel és a műszaki jellemzők előzetes értesítés nélkül is módosulhatnak.
- Minden logó, terméknév és márkanév a tulajdonosának márkaneve vagy bejegyzett márkaneve,
azokat ennek tiszteletben tartásával említjük.
- Jelen útmutató nagy gonddal készült. Ennek ellenére abból jogok nem származnak. A König
Electronic nem felelős az útmutató hibáiért, vagy azok következményeiért.
- Őrizze meg ezt az útmutatót és a csomagolást.
Figyelem:
Ezt a terméket ezzel a jelölésel láttuk el. Azt jelenti, hogy az elhasznált elektromos és
elektronikus termékeket tilos az általános háztartási hulladékhoz keverni. Begyűjtésüket külön
begyűjtő létesítmények végzik.
Ez a termék az Európai Unió minden tagállamában érvényes vonatkozó rendelkezések és irányelvek
betartásával készült és került forgalomba. Megfelel az értékesítési országban rá vonatkozó minden
előírásnak és rendelkezésnek.
Kérésre hivatalos dokumentációt is rendelkezésre bocsátunk. A dokumentáció a teljesség igénye
nélkül a következőket tartalmazza: Megfelelőségi (és termékazonossági) Nyilatkozat, anyagbiztonsági
adatlap, a termék vizsgálati jegyzőkönyve.
Támogatással kapcsolatos ügyekben keresse ügyfélszolgálatunkat:
webhely: http://www.nedis.com/en-us/contact/contact-form.htm
e-mail: rendeles@hqnedis.hu
telefon: +31 (0)73-5993965 (munkaidőben)
NEDIS B.V., De Tweeling 28, 5215 MC ’s-Hertogenbosch, HOLLANDIA
SUOMI
Rengasvalo
1. Aseta 4 AA-paristoa paristoyksikköön. Paristot eivät kuulu toimitukseen. Voit käyttää alkali- tai
uudelleenladattavia NiMH-akkuja. Varmista, että paristot tulevat asetetuksi paristolokeron sisällä
olevan kuvion mukaisesti.
2. Aseta paristoyksikkö kameran lisälaitteille tarkoitettuun kiinnityskenkään.
3. Valitse oikeanlainen asennusrengas ja liu'uta rengasvalon takana oleviin uriin, kunnes se
napsahtaa paikalleen.
13
Page 14

4. Kierrä rengasvalo linssisi suodinkierteisiin. Säädä horisontaaliseksi.
5. Kytke virtajohto paristoyksiköstä rengasvaloon.
6. Käytä paristoyksikössä olevaa himmenninsäätöä säätämään valon voimakkuutta.
Irrottaaksesi laite linssistä, irrota ensin virtajohto ja kierrä sitten rengasvalo irti.
Tekniset tiedot:
60 päivänvalolle balansoitua LED-valoa.
Suunniteltu lähikuvaamiseen 1,2 m saakka.
Reunojen varjostumista saattaa ilmetä, jos kameraa käytetään laajakulma-asetuksella.
Voidaan käyttää myös täytevalona.
Himmennyssäätö.
Toimii 4 AA-paristoilla, alkali- tai uudelleenladattavilla NiMH-akuilla (eivät kuulu toimitukseen).
Turvallisuuteen liittyvät varoitukset:
Sähköiskun riskin pienentämiseksi, AINOASTAAN
valtuutettu huoltohenkilö saa avata tämän laitteen huoltoa
varten. Jos ongelmia ilmenee, irrota laite verkkovirrasta ja
muista laitteista. Älä altista laitetta vedelle äläkä kosteudelle.
Huolto:
Puhdista ainoastaan kuivalla kankaalla. Älä käytä liuottimia tai hankausaineita.
Takuu:
Takuu ja vastuuvelvollisuus mitätöityvät, jos tuote vaurioituu siihen tehtyjen muutoksien tai sen
väärinkäytön takia.
Yleistä:
- Muutoksia malliin ja teknisiin ominaisuuksiin voidaan tehdä ilmoituksetta.
- Kaikki logot, merkit ja tuotenimet ovat niiden vastaavien omistajien tuotemerkkejä tai rekisteröityjä
tuotemerkkejä ja niitä on käsiteltävä sellaisina.
- Kaikki oikeudet pidätetään. König Electronic ei ole vastuussa mistään tämän käyttöohjeen
sisältämistä virheistä tai niiden seurauksista.
- Säilytä käyttöohjeet ja pakkaus myöhempää käyttötarvetta varten.
Huomio:
Tuote on varustettu tällä merkillä. Se merkitsee, ettei käytettyjä sähkö- tai elektronisia tuotteita
saa hävittää kotitalousjätteen mukana. Kyseisille tuotteille on olemassa erillinen
keräysjärjestelmä.
Tämä tuote on valmistettu ja toimitettu noudattaen kaikkia sitä koskevia asetuksia ja direktiivejä, jotka
ovat voimassa kaikissa Euroopan unionin jäsenvaltioissa. Se täyttää myös kaikki myyntimaassa
sovellettavat vaatimukset ja määräykset.
Viralliset asiakirjat ovat saatavilla pyynnöstä. Asiakirjoihin sisältyvät seuraavat, mutta näihin
rajoittumatta: Vaatimustenmukaisuusvakuutus (ja tuotteen tunniste), käyttöturvallisuustiedote, tuotteen
testiraportti.
Saat neuvoja ottamalla yhteyttä asiakaspalveluumme:
verkkosivun kautta: http://www.nedis.fi/fi-fi/ota-yhteytta/yhteyslomake.htm
sähköpostilla: service@nedis.com
puhelimitse: +31 (0)73-5993965 (toimistoaikoina)
NEDIS B.V., De Tweeling 28, 5215 MC ’s-Hertogenbosch, ALANKOMAAT
14
Page 15

Ljusring
SVENSKA
1. Sätt i 4 AA batterier i energienheten. Batterier medföljer inte. Använd alkalin eller NiMH
laddningsbara batterier. Se till att batterierna installeras i enlighet med diagrammet inuti
batterifacket.
2. Montera energipaketet på tillbehöret på kameran
3. Välj rätt monteringsring och skjut in i falsen på baksidan av ljusringen tills den hakar fast i läge.
4. Skruva ljusringsenheten på filtergängan på ditt objektiv. Justera horisontellt.
5. Installera strömsladden från enegipaketet till ljusringen.
6. Använd dimmerkontrollen på energienheten för att justera ljusintensiteten.
För att ta bort från objektivet, ta först bort strömsladden och skruva sedan av ljusringen.
Specifikationer:
60 dagsljus balanserade ljusdioder.
Designad för närfotografering upp till 1,2 m.
Vinjettring kan uppstå om du använder ditt objektiv med vidvinkel inställning.
Kan också användas som ett utfyllnadsljus.
Dimmerkontroll.
Kräver 4 AA batterier, alkalin eller NiMH laddningsbara (medföljer inte).
Säkerhetsanvisningar:
Underhåll:
Rengör endast med torr trasa. Använd inga rengöringsmedel som innehåller lösningsmedel eller
slipmedel.
Garanti:
Ingen garanti gäller vid ändringar eller modifieringar av produkten eller för skador som har uppstått på
grund av felaktig användning av denna produkt.
Allmänt:
- Utseende och specifikationer kan komma att ändras utan föregående meddelande.
- Alla logotyper och produktnamn är varumärken eller registrerade varumärken som tillhör sina ägare
och är härmed erkända som sådana.
- Den här bruksanvisningen producerades med omsorg. Dock kan inga rättigheter härröra. König
Electronic kan inte acceptera ansvar för några felaktigheter i denna manual eller dess
konsekvenser.
- Behåll bruksanvisningen och förpackningen för eventuellt framtida behov.
Obs!
Produkten är märkt med denna symbol som betyder att använda elektriska eller elektroniska
produkter inte får slängas bland vanliga hushållssopor. Det finns särskilda återvinningssystem
för dessa produkter.
För att minska risken för elektriska stötar bör denna produkt
ENDAST öppnas av behörig tekniker när service behövs.
Dra ut strömkabeln från eluttaget och koppla ur all annan
utrustning om något problem skulle uppstå. Utsätt inte
produkten för vatten eller fukt.
15
Page 16

Den här produkten har tillverkats och levereras i enlighet med alla relevanta regler och direktiv som
gäller för alla medlemsstater inom Europeiska Unionen. Den efterlever även alla tillämpliga
specifikationer och regler i försäljningslandet.
Formell dokumentation finns att beställa på begäran. Detta omfattar, men är inte begränsat till:
Deklaration om överensstämmelse (och produktidentitet), materialsäkerhetsdatablad,
produkttestrapport.
Kontakta vår kundtjänst för att få hjälp:
via webbplatsen: http://www.nedis.com/en-us/contact/contact-form.htm
via e-post: service@nedis.com
via telefon: +31 (0)73-5993965 (under kontorstid)
NEDIS B.V., De Tweeling 28, 5215 MC ’s-Hertogenbosch, NEDERLÄNDERNA
ČESKY
Světelný kroužek
1. Vložte do napájecího zdroje 4 ks baterií typu AA. Baterie nejsou součástí přístroje. Používejte
dobíjitelné alkalické nebo NiMH baterie Ujistěte se, že jsou baterie vloženy podle schématu uvnitř
prostoru pro baterie.
2. Upevněte napájecí zdroj na příslušenství kamery.
3. Vyberte správný upevňovací kroužek a zasuňte ho do drážek v zadní části světelného kroužku,
dokud nezapadne do své pozice.
4. Zašroubujte jednotku světelného kroužku do závitů filtru vašeho objektivu. Nastavte ho
horizontálně.
5. Zasuňte napájecí kabel z napájecího zdroje do světelného kroužku.
6. Použijte ovladač intenzity světla napájecího zdroje k nastavení intenzity osvětlení.
K vyjmutí světelného kroužku nejprve odpojte napájecí kabel a poté vyšroubujte světelný kroužek.
Technické specifikace:
60 vyvážených denních LED světel.
Určeno pro záběry zblízka do 1,2 m.
Může se objevit vignetování objektivu jestliže ho použijete u nastavení širokého úhlu.
Výrobek lze také použít jako doplňkové světlo.
Ovladač intenzity světla.
K napájení slouží 4 ks dobíjitelných baterií typu AA alkalických nebo NiMH (nejsou součástí přístroje).
Bezpečnostní opatření:
Údržba:
K čištění používejte pouze suchý hadřík. Nepoužívejte čisticí rozpouštědla ani abrazivní prostředky.
Záruka:
Jakékoli změny, modifikace nebo poškození zařízení v důsledku nesprávného zacházení se zařízením
ruší platnost záruční smlouvy.
Abyste snížili riziko úrazu elektrickým šokem, měl by být
tento výrobek otevřen POUZE autorizovaným technikem, je-li
to nezbytné. V případě, že dojde k závadě, odpojte výrobek
ze sítě a od jiných zařízení. Výrobek nevystavujte vodě nebo
vlhkosti.
16
Page 17

Obecné upozornění:
- Design a specifikace výrobku mohou být změněny bez předchozího upozornění.
- Všechna loga a obchodní názvy jsou registrované obchodní značky příslušných vlastníků a jsou
chráněny zákonem.
- Prestože manuál byl zpracován s maximalní péčí, tiskové chyby nejsou vyloučeny. Konig Electronic
nepřebírá zodpovědnost za za škody vzniklé v souvislosti s chybami v manuálu.
- Pro budoucí použití uschovejte tento návod a obal.
Upozornění:
Tento výrobek je označen tímto symbolem. To znamená, že se s výrobkem musí zacházet jako
s nebezpečným elektrickým a elektronickým odpadem a nelze jej po skončení životnosti
vyhazovat s běžným domácím odpadem. Pro likvidaci těchto výrobků existují zvláštní sběrná
střediska.
Tento produkt byl vyroben a je dodáván v souladu se všemi příslušnými nařízeními a směrnicemi
platnými ve všech členských státech Evropské Unie. Splňuje také veškeré relevantní specifikace a
předpisy v zemi prodeje.
Oficiální dokumentaci lze získat na vyžádání. Patří sem např: Prohlášení o shodě (a identifikace
produktu), materiálový bezpečnostní list, zpráva o testování produktu.
V případě dotazů kontaktujte naše oddělení služeb zákazníkům:
Webové stránky: http://www.nedis.com/en-us/contact/contact-form.htm
E-mail: service@nedis.com
Telefon: +31 (0)73-5993965 (během otevírací doby)
NEDIS B.V., De Tweeling 28, 5215 MC ’s-Hertogenbosch, NIZOZEMSKO
ROMÂNĂ
Bliţ inel
1. Introduceţi 4 baterii AA în blocul electric. Baterii nu sunt incluse. Utilizaţi baterii reîncărcabile
alcaline sau NiMH. Nu omiteţi să instalaţi bateriile conform schemei prezentate în compartimentul
bateriilor.
2. Montaţi blocul electric pe suportul de accesorii al aparatului.
3. Selectaţi inelul de montare corect şi culisaţi-l în şanţurile de pe spatele bliţului inel până ce se
angrenează în poziţie.
4. Înşurubaţi ansamblul bliţului inelar pe filetele obiectivului. Reglaţi pe orizontală.
5. Instalaţi cablul de alimentare de la blocul electric la bliţul inel.
6. Folosiţi controlul cu variator de pe blocul electric pentru a regla intensitatea luminoasă.
Pentru a scoate din obiectiv, mai întâi deconectaţi cablul de alimentare şi apoi deşurubaţi bliţul inel.
Date tehnice:
60 leduri lumină de zi.
Conceput pentru fotografiere din prim-plan, până la 1,2 m distanţă.
Este posibil să se producă vinietarea dacă obiectivul este utilizat pe setarea de unghi larg.
Poate fi utilizat şi pentru contra-iluminare.
Variator.
Utilizează 4 baterii AA, alcaline sau NiMH, reîncărcabile (neincluse).
17
Page 18

Măsuri de siguranţă:
Pentru a se reduce pericolul de electrocutare, acest produs
va fi desfăcut NUMAI de către un tehnician avizat, când este
necesară depanarea. Deconectaţi produsul de la priza de
reţea sau alte echipamente în cazul apariţiei unei probleme.
Nu expuneţi produsul apei sau umezelii.
Întreţinere:
Curăţarea trebuie făcută cu o cârpă uscată. Nu folosiţi solvenţi sau agenţi de curăţare abrazivi.
Garanţie:
Nu oferim nicio garanţie şi nu ne asumăm niciun fel de responsabilitate în cazul schimbărilor sau
modificărilor aduse acestui produs sau în cazul deteriorării cauzate de utilizarea incorectă a
produsului.
Generalităţi:
- Designul şi specificaţiile produsului pot fi modificate fără o notificare prealabilă.
- Toate siglele mărcilor şi denumirile produselor sunt mărci comerciale sau mărci comerciale
înregistrate ale proprietarilor de drept şi prin prezenta sunt recunoscute ca atare.
- Acest manual a fost conceput cu atenţie. Cu toate acestea, nu se pot oferi drepturi pe baza sa.
König Electronic nu acceptă răspunderea pentru nicio eroare din acest manual sau consecinţele ce
decurg din acestea.
- Păstraţi acest manual şi ambalajul pentru consultări ulterioare.
Atenţie:
Pe acest produs se află acest marcaj. Acesta semnifică faptul că produsele electrice şi
electronice nu trebuie eliminate odată cu gunoiul menajer. Aceste produse au un sistem
separat de colectare.
Acest produs a fost fabricat şi furnizat în conformitate cu toate reglementările şi directivele relevante,
valabile în toate statele membre ale Uniunii Europene. Acesta este, de asemenea, conform cu toate
specificaţiile şi reglementările aplicabile în toate ţările în care se vinde.
Documentaţia originală este disponibilă la cerere. Aceasta include, fără a se limita la acestea,
următoarele: Declaraţia de Conformitate (şi identitatea produsului), Fişa de date pentru Siguranţa
Materialului, raportul de testare a produsului.
Vă rugăm să contactaţi biroul nostru de asistenţă clienţi:
de pe site: http://www.nedis.com/en-us/contact/contact-form.htm
prin e-mail: service@nedis.com
Prin telefon: +31 (0)73-5993965 (în timpul orelor de lucru)
NEDIS B.V., De Tweeling 28, 5215 MC ’s-Hertogenbosch, Olanda
ΕΛΛΗΝΙΚA
Λυχνία κουδουνιού
1. Τοποθετήστε 4 μπαταρίες AA στο κουτί. ∆εν περιλαμβάνονται μπαταρίες. Χρησιμοποιήστε
αλκαλικές ή επαναφορτιζόμενες μπαταρίες NiMH. Βεβαιωθείτε ότι έχουν τοποθετηθεί σύμφωνα με
το διάγραμμα που εμφανίζεται στο εσωτερικό της θήκης μπαταριών.
2. Τοποθετήστε το κουτί στο εξάρτημα της κάμερας.
18
Page 19

3. Επιλέξτε τον σωστό δακτύλιο τοποθέτησης και σύρετέ τον στις αυλακώσεις στο πίσω μέρος της
λυχνίας έως ότου ασφαλίσει στη θέση του.
4. Βιδώστε το εξάρτημα της λυχνίας του κουδουνιού στα σπειρώματα φίλτρου του φακού. Ρυθμίστε
στην οριζόντια θέση.
5. Τοποθετήστε το καλώδιο ισχύος από το κουτί στη λυχνία του κουδουνιού.
6. Χρησιμοποιήστε το κουμπί ελέγχου του ρεοστάτη για να ρυθμίσετε την ένταση του φωτός.
Για να το ν αφαιρέσετε από τον φακό, αφαιρέστε πρώτα το καλώδιο ισχ ύος και στη συνέχεια, ξεβιδώστε
τη λυχνία του κουδουνιού.
Προδιαγραφές:
60 λυχνίες LED εξισορρόπησης ενέργειας.
Σχεδιασμένο για κοντινές φωτογραφίες μέχρι 1,2 m.
Μπορεί να θολώσει η εικόνα αν χρησιμοποιήσετε τη ρύθμιση ευρείας γωνίας φακού.
Μπορείτε να χρησιμοποιήσετε επίσης λυχνία γεμίσματος.
Κουμπί ελέγχου με δυνατότητα εξασθένισης.
Χρησιμοποιεί 4 αλκαλικές ή επαναφορτιζόμενες μπαταρίες AA (δεν περιλαμβάνονται).
Οδηγίες ασφαλείας:
Για να μειώσετε τον κίνδυνο ηλεκτροπληξίας, το προϊόν αυτό
θα πρέπει να ανοιχθεί ΜΟΝΟ από εξουσιοδοτημένο τεχνικό
όταν απαιτείται συντήρηση (σέρβις). Αποσυνδέστε το προϊόν
από την πρίζα και άλλο εξοπλισμό αν παρουσιαστεί
πρόβλημα. Μην εκθέτετε το προϊόν σε νερό ή υγρασία.
Συντήρηση:
Καθαρίστε μόνο με ένα στεγνό πανί. Μη χρησιμοποιείτε διαλύτες ή λειαντικά.
Εγγύηση:
Ουδεμία εγγύηση ή ευθύνη δεν είναι αποδεκτή σε περίπτωση αλλαγής ή μετατροπής του προϊόντος ή
βλάβης που προκλήθηκε λόγω εσφαλμένης χρήσης του προϊόντος.
Γενικά:
- Το σχέδιο και τα χαρακτηριστικά μπορούν να αλλάξουν χωρίς καμία προειδοποίηση.
- Όλα τα λογότυπα, οι επωνυμίες και οι ονομασίες προϊόντων είναι εμπορικά σήματα ή σήματα
κατατεθέντα των αντίστοιχων κατόχων και δια του παρόντος αναγνωρίζονται ως τέτοια.
- Αυτό το εγχειρίδιο συντάχτηκε με προσοχή. Ωστόσο, δεν προκύπτουν δικαιώματα. Η König
Electronic δεν φέρει καμία ευθύνη για σφάλμα σε αυτό το εγχειρίδιο ή στις συνέπειές τους.
- Φυλάξτε το παρόν εγχειρίδιο και τη συσκευασία για μελλοντική αναφορά.
Προσοχή:
Το συγκεκριμένο προϊόν έχει επισημανθεί με αυτό το σύμβολο. Αυτό σημαίνει ότι οι
μεταχειρισμένες ηλεκτρικές και ηλεκτρονικές συσκευές δεν πρέπει να αναμειγνύονται με τα
κοινά οικιακά απορρίμματα. Υπάρχει ξεχωριστό σύστημα συλλογής για αυτά τα αντικείμενα.
Το προϊόν αυτό κατασκευάστηκε και παρέχεται σε συμμόρφωση με το σύνολο των αντίστοιχων
κανονισμών και οδηγιών που ισχύουν για τα κράτη μέλη της Ευρωπαϊκής Ένωσης. Επίσης,
συμμορφώνεται με το σύνολο των ισχυουσών προδιαγραφών και κανονισμών της χώρας διάθεσης.
Επίσημη τεκμηρίωση διατίθεται κατόπιν αιτήματος. Η τεκμηρίωση περιλαμβάνει, χωρίς περιορισμό, τα
εξής: ∆ήλωση Συμμόρφωσης (και ταυτότητα προϊόντος), ∆ελτίο ∆εδομένων Ασφάλειας Υλικού, έκθεση
δοκιμής προϊόντος.
19
Page 20

Επικοινωνήστε με το τμήμα εξυπηρέτησης πελατών μας για υποστήριξη:
Μέσω της ιστοσελίδας: http://www.nedis.com/en-us/contact/contact-form.htm
Μέσω e-mail: service@nedis.com
Τηλεφωνικά: +31 (0)73-5993965 (κατά τη διάρκεια των ωρών εργασίας)
NEDIS B.V., De Tweeling 28, 5215 MC ’s-Hertogenbosch, ΟΛΛΑΝ∆ΙΑ
DANSK
Ringlampe
1. Læg 4 stk. AA-batterier i strømforsyningen. Batterier medfølger ikke. Brug Alkaline eller
genopladelige NiMH batterier. Kontrollér, at batterierne vender i overensstemmelse med
markeringerne i batterirummet.
2. Montér strømforsyningen i kameraets blitzsko.
3. Vælg den korrekte monteringsring og lad den glide ind i rillerne på bagsiden af ringlampen, indtil
den klikker på plads.
4. Skru ringlampen på linsen, som du ville skrue et filter på. Justér til vandret.
5. Forbind strømledningen fra strømforsyningen og til ringlampen.
6. Brug lysdæmperen på strømforsyningen, hvis du vil skrue ned for lysstyrken.
Når du vil afmontere ringlampen, skal du først fjerne strømledningen og dernæst skrue ringlampen af.
Specifikationer:
60 dagslysbalancerede LED-dioder.
Designet for næroptagelser op til 1,2 m.
Vignettering kan forekomme, hvis din linse er indstillet til vidvinkel.
Kan også anvendes som opblødningslys.
Kan lysdæmpes.
Anvender 4 stk. AA-batterier, Alkaline eller genopladelige NiMH (medfølger ikke).
Sikkerhedsforholdsregler:
Vedligeholdelse:
Rengør kun med en tør klud. Brug ikke opløsningsmidler eller slibende rengøringsmidler.
Garanti:
Ingen garanti og ikke noget ansvar kan påtages for ændringer af produktet eller for skade på grund af
forkert brug af dette produkt.
Generelt:
- Design og specifikationer kan ændres uden varsel.
- Alle bomærker og produktnavne er varemærker eller registrerede varemærker tilhørende deres
respektive ejere og anses herved som sådan.
- Denne vejledning blev udført omhyggeligt. Imidlertid kan der ikke afledes nogen rettigheder. König
Electronic kan ikke holdes ansvarlig for eventuelle fejl i denne vejledning eller deres konsekvenser.
- Gem brugervejledningen og emballagen til senere brug.
For at nedsætte risikoen for elektrisk stød, må dette produkt,
f.eks. når der kræves service, KUN åbnes af en autoriseret
tekniker. Frakobl produktet stikkontakten og andet udstyr,
hvis der opstår et problem. Udsæt ikke produktet for vand
eller fugt.
20
Page 21

Bemærk:
Dette produkt er mærket med dette symbol. Det betyder, at brugt elektrisk og elektronisk udstyr
ikke må bortskaffes sammen med almindeligt husholdningsaffald. Der findes særlige
indsamlingssystemer for disse produkter.
Dette produkt er fremstillet og leveres i overensstemmelse med alle relevante forordninger og
direktiver, der er gældende for alle EUs medlemsstater. Produktet overholder ligeledes alle gældende
specifikationer og forskrifter i de lande, hvor produktet sælges.
Formel dokumentation kan fremlægges på forlangende. Dette omfatter, men er ikke begrænset til:
Overensstemmelseserklæring (og produkt-ID), Sikkerhedsdatablad, testrapport for produktet.
Kontakt venligst vores kundeservice for support:
via vores website: http://www.nedis.dk/da-dk/kontakt/kontaktformular.htm
via e-mail: service@nedis.com
via telefon: +31 (0)73-5993965 (i kontortiden)
NEDIS B.V., De Tweeling 28, 5215 MC ’s-Hertogenbosch, NEDERLANDENE
NORSK
Ringlys
1. Sett inn de 4 AA batteriene inn i lommen. Batterier er ikke inkludert Bruk Alkaline eller NiMH
oppladbare batterier Vær sikker på at batteriene er satt inn i henhold til diagrammet vist på
innsiden av batteriluken.
2. Fest batterilommen på tilbehørsvisningen på kameraet.
3. Velg riktig monteringsring og før den inn i sporene på baksiden av ringlyset til den klikker på plass.
4. Skru ringlysanordningen ned over filterringene på linsen. Juster til horisontal.
5. Sett kabelen fra batterilommen inn i baksiden av ringlyset.
6. Bruk dimmerkontrollen på batterilommen til å justere lysstyrken.
For å fjerne den fra linsen, ta først ut kabelen og skru deretter løs ringlyset.
Spesifikasjoner:
60 dagslysbalanserte LED lys.
Ment for nærfotografering opp til 1,2 m.
Vignettering kan forekomme hvis du bruker linsen som vidvinkel.
Kan også brukes som fyllys.
Dimmekontroll.
Bruker 4 AA batterier, Alkaline eller NiHM oppladbare (ikke inkludert).
Sikkerhetsforholdsregler:
Vedlikehold:
Rens bare med en tørr klut. Ikke bruk rensemidler eller skuremidler.
For å redusere faren for strømstøt, skal dette produktet
BARE åpnes av en autorisert tekniker når vedlikehold er
nødvendig. Koble produktet fra strømmen og annet utstyr
dersom et problem oppstår. Ikke utsett produktet for vann
eller fuktighet.
21
Page 22

Garanti:
Ingen garanti eller erstatningsansvar aksepteres ved endringer og modifiseringer av produktet eller
skade forårsaket av uriktig bruk av dette produktet.
Generelt:
- Utforming og spesifikasjoner kan endres uten forhåndsvarsel.
- Alle logoer, merker og produktnavn er varemerker eller registrerte varemerker til de respektive
eierne, og skal behandles som dette.
- Denne manualen ble laget med omhu. Imidlertid kan ingen rettigheter utledes. König Electronic kan
ikke ta ansvar for eventuelle feil i denne manualen eller konsekvenser som følger.
- Behold denne veiledningen og innpakningen for fremtidig referanse.
Forsiktig:
Dette produktet er markert med dette symbolet. Det betyr at brukte elektriske og elektroniske
produkter ikke må blandes med vanlig husholdningsavfall. Det finnes egne innsamlingssystem
for slike produkter.
Dette produktet har blitt produsert og levert i henhold til alle relevante bestemmelser og direktiver,
gyldig for alle medlemsstater i EU. Det overholder også alle gjeldende spesifikasjoner og
bestemmelser i landet det selges i.
Formell dokumentasjon er tilgjengelig på forespørsel. Dette inkluderer, men begrenser seg ikke til:
Samsvarserklæring (og produktidentitet) dataark for materialsikkerhet produkttestrapport.
Vennligst kontakt kundeservice for hjelp:
på nettsiden: http://www.nedis.com/en-us/contact/contact-form.htm
via e-post: service@nedis.com
via telefon: +31 (0)73-5993965 (i kontortiden)
NEDIS B.V., De Tweeling 28, 5215 MC ’s-Hertogenbosch, THE NETHERLANDS
РУССКИЙ
Кольцевой светильник
1. Вставьте 4 батарейки типа АА в блок питания. Батарейки в комплект не входят.
Рекомендуется использовать щелочные или никель-металлгидридные аккумуляторные
батарейки. Убедитесь, что батарейки установлены, как показано на схеме внутри
батарейного отсека.
2. Ус та но ви те блок питания на место для крепления дополнительной вспышки.
3. Выберите нужно монтажное кольцо и установите его в пазы на задней стороне кольцевого
светильника, оно должно зафиксироваться со щелчком.
4. Навинтите кольцевой светильник на резьбу объектива для светофильтров. Отрегулируйте
горизонтальное положение.
5. Подключите кабель питания от блока питания к кольцевому светильнику.
6. Отрегулируйте силу света с помощью регулятора на блок е питания.
При снятии сначала необходимо отключить провод, а затем свинтить светильник с
объектива.
22
Page 23

Технические характеристики:
Д
60 сбалансированных светодиодов дневного света.
Предназначено для съемки крупным планом на расстоянии до 1,2 м.
При широкоугольной съемке могут появляться виньетки.
Устройство также может создавать заполняющий свет.
Регулятор.
Устройство работает от 4 аккумуляторных щелочных или никель-металлгидридных батареек
типа АА (в комплект не входят).
Меры безопасности:
ля снижения риска поражения электрическим током
вскрытие устройства для его обслуживания и ремонта
могут выполнять ТОЛЬКО уполномоченные технические
специалисты. При возникновении неполадок отключите
устройство от сети и другого оборудования. Не
допускайте воздействия воды или влаги.
Техническое обслуживание:
Очищайте только сухой тканью. Не пытайтесь очистить устройство растворителями или
абразивными веществами.
Условия гаранти:
В случае попытки изменения или модификации устройства, а равно в случае повреждения
устройства вследствие его неправильного использования гарантийные обязательства
производителя теряют свою силу.
Общие положения:
- Дизайн и технические характеристики могут быть изменены без предварительного
уведомления.
- Все логотипы, торговые марки и названия продуктов являются торговыми марками или
зарегистрированными торговыми марками соответствующих владельцев и следовательно
признаются таковыми.
- Настоящее руководство было составлено тщательным образом. Тем не менее, оно не
наделяет читателя какими-либо правами. König Electronic не несет ответственности за
возможные ошибки в данном руководстве и их последствия.
- Сохраните настоящее руководство и упаковку для дальнейшего использования.
Внимание:
Данный продукт отмечен этим символом. Это означает, что такие электрические или
электронные изделия не должны выбрасываться вместе с бытовыми отходами. Для таких
продуктов существует отдельная система утилизации.
Данное изделие было изготовлено и поставлено в соответствии со всеми применимыми
положениями и директивами, действующими для всех стран-членов Европейского Союза. Оно
также соответствует всем нормами и правилами, действующим в стране продажи.
Официальная документация предоставляется по запросу. Эта документация включает в себя
(не ограничиваясь) следующее: Декларация соответствия (и изделий), паспорт безопасности,
отчет по проверке продукта.
Для получения помощи обратитесь в нашу службу поддержки клиентов:
23
Page 24

через веб-сайт: http://www.nedis.com/en-us/contact/contact-form.htm
по эл. почте: service@nedis.com
по телефону: +31 (0)73-5993965 (в рабочие часы)
NEDIS B.V., De Tweeling 28, 5215 MC ’s-Hertogenbosch, THE NETHERLANDS (НИДЕРЛАНДЫ)
TÜRKÇE
Halka Işık
1. Güç kutusuna 4 adet AA pil koyun. Piller dahil değildir. Alkalin veya NiMH şarj edilebilir pilleri
kullanın. Pillerin, pil yuvasının iç kısmında gösterilen şemaya uygun olarak takıldığından emin olun.
2. Güç kutusunu kameranın aksesuar görünümüne takın.
3. Doğru montaj halkasını seçin ve yerine oturana kadar halka ışığın arka tarafındaki kanalın içine
kaydırın.
4. Halka ışık düzeneğini lensinizin filtre dişlisine vidalayın. Yataya ayarlayın.
5. Güç kablosunu güç kutusundan halka ışığa takın.
6. Işık yoğunluğunu ayarlamak için güç kutusunun üzerinde bulunan ayarlı kısıcı kumandasını
kullanın.
Lensten çıkarmak için önce güç kablosunu çıkarın ve ardından halka ışığı çıkarın.
Özellikler:
60 Gün Işığı dengeli LED ışıklar.
1,2 metreye kadar yakın çekim fotoğrafçılığı için tasarlanmıştır.
Lensinizi geniş açı ayarında kullanıyorsanız çevre parlaklığı azalması meydana gelebilir.
Ayrıca yedek ışık olarak de kullanılabilir.
Kısılabilir kontrol.
4 adet Alkalin veya NiMH şark edilebilir AA pil kullanın (dahil değildir).
Güvenlik önlemleri:
DİKKAT
ELEKTRİK ÇARPMA RİSKİ
AÇMAYIN
Koruyucu Bakım:
Ürünü sadece kuru bir bezle temizleyin. Temizlik solventleri veya aşındırıcılar kullanmayın.
Garanti:
Ürün üzerindeki değişiklikler veya modifikasyonlar ya da ürünün hatalı kullanılmasından kaynaklanan
ürün hasarlarında garanti geçersizdir veya sorumluluk Kabul edilmez.
Genel:
- Tasarımlar ve özellikler önceden haber verilmeksizin değiştirilebilir.
- Tüm logolar, markalar ve ürün adları ticari markalardır veya ilgili sahiplerinin kayıtlı ticari markalarıdır
ve bundan dolayı böyle geçerlidir.
- Bu kılavuz dikkatle hazırlanmıştır. Ancak haklar elde edilmez. König Electronic, bu kılavuzdaki veya
sonuçlarındaki hiç bir hatadan dolayı sorumluluk kabul etmez.
- Daha sonra kullanmak üzere bu kılavuzu ve ambalajı saklayın.
Elektrik çarpma riskini azaltmak için servis gerekli olduğunda
bu ürün SADECE uzman bir teknisyen tarafından açılmalıdır.
Bir sorun meydana geldiğinde ürünün elektrik ve diğer
aygıtlarla olan bağlantısını kesin. Ürünü su veya neme maruz
bırakmayın.
24
Page 25

Dikkat:
Bu ürün bu işaretle işaretlenmiştir. Bu, eski elektrikli ve elektronik ürünlerin genel evsel atıklarla
karıştırılmaması gerektiği anlamına gelmektedir. Bu ürünler için ayrı bir toplama sistemi
mevcuttur.
Bu ürün tüm Avrupa Birliği üye ülkeleri için geçerli olan ilgili tüm yönetmelikler ve yönergelere uygun
olarak üretilmiş ve tedarik edilmiştir. Ayrıca satıldığı ülkedeki tüm geçerli şartnameler ve
yönetmeliklere uygundur.
Talep edilmesi durumunda resmi belgelendirme sağlanabilir. Bu aşağıdakileri içerir ancak bunlarla
sınırlı değildir: Uygunluk Beyanı (ve ürün kimliği), Malzeme Güvenliği Veri Sayfası, ürün test raporu.
Lütfen destek için müşteri hizmetleri masamızla irtibat kurun:
web sitesi aracılığıyla: http://www.nedis.com/en-us/contact/contact-form.htm
e-posta aracılığıyla: service@nedis.com
telefonla: +31 (0)73-5993965 (mesai saatlerinde)
NEDIS B.V., De Tweeling 28, 5215 MC ’s-Hertogenbosch, THE NETHERLANDS (HOLLANDA)
EESTI
Rõngasvalgusti
1. Sisestage toiteplokki 4 AA patareid. Patareid ei ole kaasas. Kasutage leelis- või NiMH laaditavaid
patareisid. Veenduge, et patareid oleks paigaldatud vastavalt patareikambri sisemuses toodud
diagrammile.
2. Paigaldage toiteplokk kaamera tarvikukinnitusele.
3. Valige õige paigaldusrõngas ja libistage see rõngasvalgusti taga asuvatesse soontesse kuni see
paigale klõpsatub.
4. Kruvige rõngasvalgusti koost oma objektiivi filtrikeermetele. Reguleerige horisontaalseks.
5. Paigaldage toitekaabel toiteplokist rõngasvalgustile.
6. Kasutage toiteploki hämardi juhikut valguse intensiivsuse reguleerimiseks.
Objektiivilt eemaldamiseks eemaldage esmalt toitekaabel ning seejärel keerake maha rõngasvalgusti.
Tehnilised andmed:
60 päevavalgusega tasakaalustatud dioodvalgustit.
Loodud lähifotograafiaks kaugusel kuni 1,2 m.
Objektiivi lainurkseadistusel kasutamisel võib esineda vinjettimist.
Kasutatav ka täitevalgusena.
Hämardav juhtimine.
Kasutab 4 AA patareid, leelis- või NiMH laaditavad (pole kaasas).
Ohutusabinõud:
ETTEVAATUST
ELEKTRILÖÖGI OHT
MITTE AVADA
Hooldus:
Puhastage ainult kuiva lapiga. Ärge kasutage lahustavaid ega abrasiivseid puhastusvahendeid.
Elektrilöögi ohu tõttu võib toodet selle hooldusvajaduse korral
avada AINULT pädev elektrik. Rikke korral ühendage seade
toitevõrgust ja teistest seadmetest lahti. Ärge laske tootel
kokku puutuda vee ega niiskusega.
25
Page 26

Garantii:
Tootja ei anna garantiid toote mistahes muudatuste või teisenduste ega käesoleva toote valest
kasutamisest tuleneva kahju korral.
Üldist:
- Disain ja tehnilised andmed võivad muutuda ilma ette teatamiseta.
- Kõik logod, kaubamärgid ja tootenimed on nende vastavate omanike kaubamärgid või registreeritud
kaubamärgid ning neid tunnustatakse sellistena.
- Juhend on koostatud hoolikalt. Siiski ei ole sellest võimalik tuletada mingeid õigusi. König Electronic
ei vastuta võimalike käesolevas kasutusjuhendis olevate vigade ega nende tagajärgede eest.
- Hoidke kasutusjuhend ja pakend hilisemaks alles.
Tähelepanu:
Toode on tähistatud järgneva märgistusega. See tähendab, et kasutatud elektri- ja
elektroonikaseadmeid ei tohi panna olmeprügi hulka. Nende toodete jaoks on olemas eraldi
jäätmekäitluse kord.
Toode on valmistatud ja tarnitud kooskõlas kõigi asjaomaste määruste ja direktiividega, mis kehtivad
kõigis Euroopa Liidu liikmesriikides. Samuti vastab see kõigile asjakohastele spetsifikatsioonidele ja
eeskirjadele, mis kehtivad riigis, kus see osteti.
Ametlik dokumentatsioon on saadaval nõudmisel. See sisaldab järgnevat (kuid ei piirdu sellega):
Vastavusdeklaratsioon (ja toote identiteet), ohutuskaart ja toote katsearuanne.
Palun võtke küsimuste korral ühendust meie klienditeenindusega:
kodulehel: http://www.nedis.com/en-us/contact/contact-form.htm
e-postiga: service@nedis.com
telefonitsi: +31 (0)73-5993965 (tööajal)
NEDIS B.V., De Tweeling 28, 5215 MC ’s-Hertogenbosch, HOLLAND
SLOVENSKY
Prstencové svetlo
1. Vložte 4 batérie typu AA do napájacej jednotky. Batérie nie sú súčasťou balenia. Použite alkalické
alebo nabíjateľné NiMH batérie. Batérie vždy vkladajte podľa schémy vyobrazenej vnútri priečinka
na batérie.
2. Namontujte napájaciu jednotku do zariadenia vyobrazenom na kamere.
3. Vyberte vhodný montážny prstenec a zasúvajte ho do drážok v zadnej časti prstencového svetla,
kým nezacvakne na svoje miesto.
4. Naskrutkujte jednotku svetelného prstenca na závity filtrov objektívu. Zarovnajte do vodorovnej
polohy.
5. Namontujte napájací kábel z napájacej jednotky do prstencového svetla.
6. Pomocou ovládača stmievača napájacej jednotky nastavte intenzitu svetla.
Demontáž z objektívu – najskôr demontujte napájací kábel a potom odskrutkujte prstencové svetlo.
Parametre:
60 LED svetielok s vyváženou bielou s denným svetlom.
Určené na fotografovanie blízkych objektov do 1,2 m.
Pri použití objektívu na širokouhlé nastavenie môže dochádzať ku vignetácii.
26
Page 27

Možno ho používať aj ako výplňové osvetlenie.
Stmievateľné ovládanie.
Využíva 4 batérie typu AA, alkalické alebo nabíjateľné NiMH (nie sú súčasťou balenia).
Bezpečnostné opatrenia:
V rámci zníženia rizika úrazu elektrickým prúdom môže
tento výrobok otvárať VÝHRADNE poverený technik, ak je
potrebný servisný zásah. Ak sa vyskytne nejaký problém,
odpojte výrobok a ostatné zariadenia z elektrickej siete.
Nevystavujte výrobok pôsobeniu vody alebo vlhkosti.
Údržba:
Čisťte len suchou tkaninou. Nepoužívajte čistiace prostriedky ani brúsne materiály.
Záruka:
V prípade akýchkoľvek úprav výrobku alebo poškodenia spôsobeného nesprávnym používaním
výrobku sa neposkytuje žiadna záruka ani spoločnosť nepreberá žiadnu zodpovednosť.
Všeobecné:
- Vzhľad a technické údaje môžu byť bez oznámenia zmenené.
- Všetky logá, značky a názvy výrobkov sú ochranné známky alebo registrované ochranné známky
príslušných vlastníkov a ako také ich uznávame.
- Tvorbe tohto návodu bola venovaná veľká pozornosť. Žiadne nároky však z toho nevyplývajú.
Spoločnosť König Electronic nenesie žiadnu zodpovednosť za prípadné chyby v tomto návode ani
ich následky.
- Tento návod a obal výrobku si uschovajte.
Upozornenie:
Výrobok je označený týmto symbolom. Znamená to, že použité elektrické alebo elektronické
výrobky nesmú byť zamiešané do bežného odpadu z domácností. Pre tieto výrobky existuje
systém separovaného zberu.
Tento výrobok bol vyrobený a dodaný v súlade so všetkými príslušnými predpismi a smernicami
platnými pre všetky členské štáty Európskej únie. Je tiež v súlade so všetkými normami a predpismi
platnými v krajine, kde sa predáva.
Formálna dokumentácia je k dispozícii na vyžiadanie. Okrem iného sem patrí: Vyhlásenie o zhode (a
identite výrobku), Bezpečnostný materiálový list a správa o testovaní výrobku.
So žiadosťou o podporu sa obráťte na zákaznícku službu:
cez webovú stránku: http://www.nedis.com/en-us/contact/contact-form.htm
e-mailom: service@nedis.com
telefonicky: +31 (0)73-5993965 (v pracovnom čase)
NEDIS B.V., De Tweeling 28, 5215 MC ’s-Hertogenbosch, THE NETHERLANDS
27
Page 28

Gredzenveida lampa
LATVIEŠU
1. Ievietojiet 4 AA akumulatorus tiem paredzētajā nodalījumā. Akumulatori nav iekļauti komplektā.
Izmantojiet sārma vai NiMH atkārtoti uzlādējamus akumulatorus. Pārliecinieties, ka akumulatori
tiek ievietoti atbilstoši akumulatoru nodalījumā norādītajai shēmai.
2. Uzstādiet barošanas bloku uz kameras piederumu pieslēgvietas.
3. Izvēlieties atbilstošo montāžas gredzenu un iebīdiet to gropēs gredzenveida lampas aizmugurē,
līdz tas tiek nofiksēts.
4. Uzskrūvējiet gredzenveida lampu uz objektīva filtra vītnēm. Noregulējiet horizontāli.
5. Uzstādiet barošanas vadu no barošanas bloka uz gredzenveida lampu.
6. Izmantojiet gaismmaiņa vadīklu uz barošanas bloka, lai noregulētu gaismas intensitāti.
Lai noņemtu no objektīva, vispirms noņemiet barošanas vadu un pēc tam noskrūvējiet gredzenveida
lampu.
Specifikācijas:
60 dienasgaismas LED lampas.
Paredzēts tuvplāna fotogrāfijām līdz 1,2 metru attālumā.
Izmantojot objektīvu platleņķa iestatījumā, iespējama vinjetēšana.
Var izmantot arī kā aizpildošo gaismu.
Gaismmaiņa vadīkla.
Izmanto 4 AA sārma vai NiMH atkārtoti uzlādējamus akumulatorus (nav iekļauti komplektā).
Drošības pasākumi:
Apkope:
Tīriet tikai ar sausu drānu. Tīrīšanas nolūkos nelietojiet šķīdinātājus un abrazīvus līdzekļus.
Garantija:
Izstrādājuma nepareizas lietošanas gadījumā garantija uz izstrādājuma izmaiņām neattiecas.
Vispārīgi:
- Dizains un specifikācijas var tikt mainīti bez paziņojuma.
- Visi logotipi, zīmoli, zīmolu logotipi un izstrādājumu nosaukumi ir to attiecīgo turētāju prečzīmes vai
reģistrētas prečzīmes un tiek atzīti kā tādi.
- Šī rokasgrāmata ir rūpīgi izstrādāta. Tomēr nekādas tiesības nevar tikt iegūtas. König Electronic
nevar uzņemties atbildību par jebkādām kļūdām šajā rokasgrāmatā vai to sekām.
- Saglabājiet šo rokasgrāmatu un iepakojumu turpmākai uzziņai.
Uzmanību:
Šis izstrādājums ir apzīmēts ar šādu simbolu. Tas nozīmē, ka nolietotas elektroierīces un
elektroniskās ierīces nedrīkst jaukt ar vispārīgiem sadzīves atkritumiem. Pastāv atsevišķa šo
izstrādājumu savākšanas sistēma.
Ja nepieciešama apkope, šo izstrādājumu drīkst atvērt
TIKAI pilnvarots speciālists, lai mazinātu elektriskās strāvas
trieciena risku. Ja radusies problēma, atvienojiet
izstrādājumu no strāvas un cita aprīkojuma. Nepakļaujiet
izstrādājumu ūdens un mitruma iedarbībai.
28
Page 29

Šis izstrādājums ir izgatavots un tiek piegādāts atbilstoši attiecīgajām regulām un direktīvām, kas ir
spēkā visās Eiropas Savienības dalībvalstīs. Tas atbilst arī visiem piemērojamajiem noteikumiem un
tehniskajiem noteikumiem pārdošanas valstī.
Oficiāli dokumenti ir pieejami pēc pieprasījuma. Tas ietver, bet ne tikai, šādus dokumentus: Atbilstības
(un izstrādājuma identiskuma) deklarācija , materiālu drošības datu lapa un izstrādājuma pārbaudes
atskaite.
Lai saņemtu atbalstu, sazinieties ar mūsu klientu apkalpošanas dienestu:
tīmekļa vietne: http://www.nedis.com/en-us/contact/contact-form.htm
e-pasts: service@nedis.com
tālrunis: +31 (0)73-5993965 (darba laikā)
NEDIS B.V., De Tweeling 28, 5215 MC ’s-Hertogenbosch, THE NETHERLANDS
LIETUVIŠKAI
Žiedinė lempa
1. Į maitinimo bloką įdėkite 4 AA tipo elementus. Maitinimo elementų pakuotėje nėra. Naudokite
šarminius arba pakartotinai įkraunamus NiMH elementus. Elementai turi būti įdėti pagal elementų
skyriuje pavaizduotą diagramą.
2. Maitinimo bloką pritvirtinkite ant kameros priedo.
3. Pasirinkite tinkamą montavimo žiedą ir stumkite į griovelius užpakalinėje žiedinės lempos pusėje,
kol pasigirs spragtelėjimas.
4. Žiedinės lempos mazgą prisukite prie objektyvo filtro sriegių. Pareguliuokite iki horizontalios
padėties.
5. Prie žiedinės lempos pritvirtinkite maitinimo laidą.
6. Šviesos intensyvumą reguliuokite ryškumo reguliatoriumi ant maitinimo bloko.
Norėdami nuimti nuo objektyvo, pirma atjunkite maitinimo laidą, paskui atsukite žiedinę lempą.
Specifikacijos:
60 subalansuotų dienos šviesos LED lempučių.
Skirta fotografuoti iš arti, iki 1,2 m atstumu.
Jei objektyvą naudojate su plačiakampe nuostata, gali atsirasti vinjetavimas.
Taip pat galima naudoti kaip pagalbinę lempą.
Ryškumo reguliavimas.
Naudojami 4 AA tipo elementai: šarminiai arba pakartotinai įkraunami NiMH (pakuotėje nėra).
Saugos priemonės:
Techninė priežiūra:
Valyti tik sausa šluoste. Nenaudokite valymo tirpiklių arba abrazyvių valiklių.
Garantija:
Garantija nesuteikiama, taip pat neprisiimama atsakomybė, jei buvo atlikti įrenginio pakeitimai ar
modifikacijos arba jis buvo sugadintas netinkamai naudojant.
Siekiant išvengti elektros smūgio, šį gaminį, esant poreikiui jį
taisyti, atidaryti gali TIK įgaliotasis specialistas. Iškilus
nesklandumams, įrenginį atjunkite nuo maitinimo šaltinio ir
kitų įrenginių. Saugokite gaminį nuo vandens ar drėgmės
poveikio.
29
Page 30

Bendroji informacija:
- Konstrukcija ir techniniai duomenys gali būti keičiami be įspėjimo.
- Visi logotipai, ženklai arba ženklų logotipai ir gaminių vardai yra juos turinčių savininkų prekių ženklai
arba registruotieji prekių ženklai ir šiame dokumente pripažįstami tokiais.
- Šis gaminys buvo gaminamas atidžiai. Tačiau teisių įgyti negalima. „König Electronic“ negali prisiimti
atsakomybės už šiame naudojimo vadove padarytas klaidas arba jų pasekmes.
- Saugokite šį naudojimo vadovą ir pakuotę, jei prireiktų ateityje.
Dėmesio:
Gaminys pažymėtas šiuo ženklu. Tai reiškia, kad naudoti elektros ir elektroniniai gaminiai negali
būti išmetami kartu su bendromis namų ūkio atliekomis. Šiems gaminiams surinkti yra atskira
sistema.
Šis gaminys gaminamas ir tiekiamas laikantis atitinkamų visose Europos Sąjungos valstybėse narėse
galiojančių įstatymų ir reglamentų. Jis taip pat atitinka visas pardavimo šalyje taikomas specifikacijas ir
taisykles.
Oficialius dokumentus galima gauti paprašius. Jie apima, bet neapsiriboja: Atitikties deklaracija (ir
gaminio identifikacija), medžiagų saugos duomenų lapas ir gaminio bandymo ataskaita.
Jei reikia pagalbos, kreipkitės į mūsų klientų aptarnavimo skyrių:
per svetainę: http://www.nedis.com/en-us/contact/contact-form.htm
elektroniniu paštu: service@nedis.com
telefonu: +31 (0)73-5993965 (darbo valandomis)
NEDIS B.V., De Tweeling 28, 5215 MC ’s-Hertogenbosch, THE NETHERLANDS
HRVATSKI
Prstenasto svjetlo
1. Postavite 4 AA baterije u kućište napajanja. Baterije nisu uključene. Koristite alkalne ili NiMH
punjive baterije. Provjerite da li su baterije postavljene u skladu s dijagramom koji se nalazi unutar
kućišta napajanja.
2. Montirajte kućište napajanja na priključak dodatne opreme kamere.
3. Odaberite odgovarajući montažni prsten i postavite ga na utore na stražnnjoj strani prstenastog
svjetla sve dok ne sjedne u svoj položaj.
4. Sklop prstenastog svjetla zategnite na navoj filtera na leći. Izvršite vodoravnu prilagodbu.
5. Montirajte kabel napajanja iz kućišta napajanja na prstenasto svjetlo.
6. Koristite dimer na kućištu napajanja da bi prilagodili intenzitet svjetlosti.
Za uklanjanje leće najprije otklonite kabel napajanja, a zatim otpustite prstenasto svjetlo.
Specifikacije:
60 dnevnih balansiranih LED žarulja.
Namijenjeno za fotografiranje krupnih kadrova do blizine od 1,2 metra.
Korištenjem leće s postavkama za širokokutno fotografiranje može uzrokovati vinjetiranje.
Može se koristiti i kao nadopuna u osvjetljavanju.
Regulacija jačine svjetlosti (dimer).
Korist 4 AA baterije, alkalne ili NiMH punjive (nisu uključene).
30
Page 31

Sigurnosne mjere opreza:
OPREZ
OPASNOST OD
ELEKTRIČNOG UDARA
NE OTVARAJTE
Da smanjite opasnost od električnog udara, prepustite
otvaranje ovog proizvoda isključivo ovlaštenom stručnjaku
kada je nužan servis. Isključite proizvod i ostalu opremu iz
mrežnog napajanja u slučaju pojave problema. Ne izlažite
proizvod vodi ili vlagi.
Održavanje:
Čistite samo suhom krpom. Ne koristite otapala ili abrazivna sredstva za čišćenje.
Jamstvo:
Jamstvo ili odgovornost neće biti prihvaćeni u slučaju promjena i izmjena proizvoda ili oštećenja
nastalih uslijed nepravilne uporabe ovog proizvoda.
Općenito:
- Dizajn i specifikacije podložni su izmjenama bez prethodne najave.
- Svi logotipi, marke i nazivi proizvoda zaštitni su (registrirani) znakovi odgovarajućih vlasnika i ovime
se priznaju kao takvi.
- Ove upute za uporabu su pažljivo sastavljene. Međutim, iz njih ne proizlaze nikakva prava. König
Electronic ne preuzima odgovornost za bilo kakve pogreške u ovim uputama ni za njihove
posljedice.
- Sačuvajte upute i ambalažu za buduću uporabu.
Pozor:
Proizvod je označen ovim simbolom. On označava da iskorištene električne i elektroničke
proizvode ne treba miješati s općim komunalnim otpadom. Postoje zasebni sustavi za
prikupljanje ovih proizvoda.
Ovaj proizvod je proizveden i isporučen u skladu sa svim relevantnim propisima i direktivama koje
vrijede za sve države članice Europske Unije. Također je u skladu sa svim važećim specifikacija i
propisima zemlje u kojoj se prodaje.
Službena dokumentacija dostupna je na zahtjev. Ovo uključuje ali bez ograničenja na: Izjavu o
sukladnosti (i osobinama proizvoda), listu sa podacima o sigurnosti materijala i izvješće o testiranju
proizvoda.
Molimo, obratite se našoj službi za korisničku podršku:
putem web-mjesta: http://www.nedis.com/en-us/contact/contact-form.htm
putem e-pošte: service@nedis.com
putem telefona: +31 (0)73-5993965 (za vrijeme radnog vremena ureda)
NEDIS B.V., De Tweeling 28, 5215 MC ’s-Hertogenbosch, NIZOZEMSKA
БЪЛГАРСКИ
Пръстеновидно осветление
1. Поставете 4 батерии AA в захранващия бло к. Батериите не се включват. Използвайте
алкални или NiMH презареждащи се батерии. Уверете се, че батериите са поставени според
схемата в отделението за батерии.
2. Монтирайте захранващия блок в мястото за аксесори на камерата.
3. Изберете правилния монтажен пръстен и го плъзнете в отворите от задната страна на
пръстеновидното осветление докато щракне на място.
31
Page 32

4. Завийте пръстеновидното осветление върху резбата на филтъра на обектива. Регулирайте
д
по хоризонтала.
5. Монтирайте захранващия кабел от батерията към пръстеновидното осветление.
6. Използвайте управлението за намаляване на светлината на захранващия блок, за да
регулирате интензивността на осветяване.
За да отстраните аксесоара от обектива, първо отстранете захранващия кабел и след
това развийте пръстеновидното осветление.
Спецификации:
60 балансирани за дневна светлина LED.
Създадено за снимки от близк о разстояние до 1,2 m.
Може да се получи винетиране, ако използвате обектива при настройка за широк ъгъл.
Може да се използва и за запълваща светлина.
Управление на интензивността на осветяване.
Използва 4 батерии AA с презареждане - алкални или NiMH (не се включват в доставката).
Предохранителни мерки:
ВНИМАНИЕ
РИСК ОТ ТОКОВ УДАР
НЕ ОТВАРЯЙТЕ
За да се намали риска от токов удар, продуктът трябва
а се отваря САМО от упълномощени техници при нужда
от сервиз. Изключете продукта от захранването и
останалото оборудване, ако възникне проблем. Не
излагайте продукта на влиянията на времето или на
влага.
Поддръжка:
Почиствайте само със суха кърпа. Не използвайте за почистване разтворители или абразиви.
Гаранция:
Не се поемат гаранции и отговорност за каквито и да е промени или модификации на продукта
или щети, причинени поради неправилното му използване.
Общи положения:
- Дизайнът и спецификациите подлежат на промяна без предизвестие.
- Всички лога и имена на продукти са търговски марки или регистрирани търговски марки на
съответните им притежатели и с настоящото се признават като такива.
- Тов а ръководство е написано със съответното внимание. Въпреки това не могат да бъдат
дадени никакви гаранции. König Electronic не поема отговорност за грешки в това ръководство
или техните последствия.
- Запазете ръководството и опаковката за справки в бъдеще.
Внимание:
Продуктът е обозначен с този символ. То ва означава, че електрическите и електронни
продукти не трябва да се смесват с обикновените домакински отпадъци. За тези продукти
съществува друга система за събиране на отпадъци.
Продуктът е произведен и доставен в съответствие с всички приложими разпоредби и
директиви, валидни за всички страни-членки на Европейския съюз. Освен това съответства на
всички приложими спецификации и разпоредби в страните, в които се предлага.
32
Page 33

Можете да получите официалната документация при поискване. Тя включва, но не се
ограничава до: Декларация за съответствие (и идентичност на продукта), паспорт за
безопасност на веществата и доклад от тестовете на продукта.
Свържете с с бюрото за обслужване на клиенти за допълнителна информация:
чрез мрежата: http://www.nedis.com/en-us/contact/contact-form.htm
чрез имейл: service@nedis.com
по телефона: +31 (0)73-5993965 (през работно време)
NEDIS B.V., De Tweeling 28, 5215 MC ’s-Hertogenbosch, ХОЛАНДИЯ
POLSKI
Lampa Pierścieniowa
1. Włożyć 4 baterie AA do zespołu zasilacza. Baterie nie są dołączone. Stosować baterie alkaliczne
lub NiMH wielokrotnego ładowania. Upewnić się, że baterie się włożone zgodnie ze schematem
podanym w komorze baterii.
2. Zamontować zespół zasilacza w zestawie akcesoriów aparatu.
3. Wybrać prawidłowy pierścień montażowy i wsunąć go w rowki z tyłu lampy pierścieniowej, aż
zatrzaśnie się we właściwej pozycji.
4. Wkręcić zespół lampy pierścieniowej w gwinty filtra obiektywu. Wyrównać w poziomie.
5. Podłączyć przewód zasilania zespołu zasilacza do lampy pierścieniowej.
6. Regulatorem przyciemnienia na zespole zasilacza można regulować natężenie światła.
Aby zdjąć z obiektywu, najpierw należy wyjąć przewód zasilania, a następnie odkręcić lampę
pierścieniową.
Specyfikacje:
60 lamp LED światła dziennego.
Przeznaczony do fotografii w zbliżeniach do 1,2 m.
W przypadku stosowania obiektywu przy ustawieniu szerokiego kąta może pojawić się efekt
winietowania.
Można stosować również jako funkcja fill-in-light.
Regulacja przyciemniania.
Stosuje się 4 baterie AA, alkaliczne lub NiMH wielokrotnego ładowania (nie są dołączone).
Wskazówki dotyczące bezpieczeństwa:
OSTRZEŻENIE
RYZYKO PORAŻENIA
PRĄDEM ELEKTRYCZNYM
NIE OTWIERAĆ
Konserwacja:
Czyścić wyłącznie suchą szmatką. Nie stosować płynów do czyszczenia ani środków ściernych.
Gwarancja:
Producent nie udziela żadnych gwarancji ani nie ponosi odpowiedzialności za żadne zmiany i
modyfikacje produktu ani za uszkodzenia spowodowane nieprawidłowym użyciem niniejszego
produktu.
Aby zmniejszyć ryzyko porażenia prądem elektrycznym,
produkt ten mogą otwierać WYŁĄCZNIE upoważnieni
technicy, gdy konieczne jest przeprowadzenie prac
serwisowych. W przypadku napotkania problemu należy
odłączyć produkt od zasilania oraz od innych urządzeń. Nie
wystawiać produktu na działanie wody i wilgoci.
33
Page 34

Informacje ogólne:
- Projekty i specyfikacje mogą się zmieniać bez powiadomienia.
- Wszystkie logotypy i nazwy produktów są znakami towarowymi lub zarejestrowanymi znakami
towarowymi poszczególnych właścicieli i są za takie uznawane.
- Niniejsza instrukcja została opracowana z zachowaniem staranności. Nie ma jednak możliwości
dochodzenia praw. König Electronic nie ponosi odpowiedzialności za błędy w niniejszej instrukcji lub
ich konsekwencje.
- Instrukcję i opakowanie należy zachować do późniejszego wykorzystania.
Uwaga:
Produkt ten jest oznaczony następującym symbolem. Oznacza to, że zużytego sprzętu
elektrycznego i elektronicznego nie można mieszać z innymi odpadami domowymi. Istnieje
oddzielny system zbierania takich produktów.
Produkt ten został wyprodukowany i dostarczony zgodnie z przepisami i dyrektywami obowiązującymi
we wszystkich państwach członkowskich Unii Europejskiej. Produkt jest również zgodny ze wszystkimi
obowiązującymi specyfikacjami i przepisami krajów, w których jest sprzedawany.
Oficjalna dokumentacja dostępna jest na żądanie. Dokumentacja ta obejmuje, ale nie ogranicza się do:
Deklaracji zgodności (i tożsamości produktu), Karty charakterystyki substancji niebezpiecznej oraz
raportu z testów produktu.
Prosimy o kontakt z naszym działem obsługi klienta w celu uzyskania pomocy:
na stronie internetowej: http://www.nedis.com/en-us/contact/contact-form.htm
wysyłając wiadomość e-mail: service@nedis.com
telefonicznie: +31 (0)73-5993965 (w godzinach pracy biura)
NEDIS B.V., De Tweeling 28, 5215 MC ’s-Hertogenbosch, HOLANDIA
SLOVENSKI
Krožna makro lučka
1. Vstavite 4 AA baterije v napajalnik. Baterije niso priložene. Uporabite alkalne ali NiMH baterije, ki
se polnijo. Prepričjate se, da so baterije vstavljene pravilno in v skladu s skico v notranjosti predela
za baterije.
2. Namestite napajalnik na dodatek na fotoaparatu.
3. Izberite pravilni montažni obroč in lučko vstavite v nastavek na zadnji hrbtni strani, dokler se le-ta
ne zaskoči.
4. Zatesnite krožno lučko na navoje na vašem objektivu. Prilagodite vodoravno.
5. Namestite napajačni kabel iz napajalnika v krožno lučko.
6. Jakost lučke nastavite s pomočjo zatemnjevalnika na napajalniku.
Za odstranjevanje iz objektiva, najprej izključite napajalni kabel in nato odvijte krožno lučko.
Specifikacije:
60 Dnevnih, uravnovešenih LED lučk.
Namenjeno za makro fotografijo do 1,2 metra.
Če objektiv uporabljate na nastavitvi širokega kota, lahko pride do vinjetiranja.
34
Page 35

Lahko se uporablja tudi kot dopolnilna lučka.
Nadzor zatemnitve.
Uporablja 4 AA baterije, alkalne ali NiMH baterije, ki se polnijo (niso vključene).
Varnostna opozorila:
PREVIDNO
NEVARNOST
ELEKTRIČNEGA UDARA
NE ODPIRAJTE
Da se izognete nevarnosti električnega udara, naj napravo
servisira SAMO pooblaščeno servisno osebje. Če se pojavi
napaka v napravi, prekinite omrežno napajanje in jo odklopite
od drugih naprav. Naprave ne izpostavljajte vodi ali vlagi.
Vzdrževanje:
Čistite le s suho krpo. Ne uporabljajte abrazivnih čistil ali čistil na solventni osnovi.
Garancija:
Ne sprejemamo nobenega jamstva ali odgovornosti za kakršnekoli spremembe in modifikacije izdelka
oz. škodo, ki je povzročena zaradi nepravilne uporabe tega izdelka.
Splošno:
- Oblika in tehnični podatki se lahko spremenijo brez vnaprejšnjega obvestila.
- Vsi logotipi in imena izdelkov so prodajne ali registrirane prodajne znamke lastnikov in so tudi tako
označene.
- Ta priročnik je bil skrbno pripravljen. Kljub temu iz tega ne izhajajo nobene pravice. König Electronic
ne sprejema odgovornosti za kakršnekoli napake v tem priročniku ali za posledice teh napak.
- Priročnik in embalažo shranite za poznejšo uporabo.
Opozorilo:
Ta izdelek je označen s tem simbolom. To pomeni, da se dotrajani električni in elektronski
izdelki ne smejo mešati z običajnimi gospodinjskimi odpadki. Za ta izdelek obstaja posebni
zbirni center za odlaganje odpadkov.
Ta izdelek je bil izdelan in dobavljen v skladu z vsemi ustreznimi predpisi in direktivami, ki veljajo za
vse države članice Evropske unije. Prav tako je v skladu z vsemi veljavnimi zahtevami in predpisi v
državi, kjer se izdelek prodaja.
Dokumentacija je na voljo na vašo zahtevo. To vključuje, vendar ni omejeno na: Izjavo o skladnosti (in
identiteta izdelka), Varnostni list in Poročilo o preskusu izdelka.
Obrnite se na službo za pomoč strankam:
prek spletne strani: http://www.nedis.com/en-us/contact/contact-form.htm
prek e-pošte: service@nedis.com
ali na tel. št.: +31 (0)73-5993965 (med delovnim časom)
NEDIS B.V., De Tweeling 28, 5215 MC ’s-Hertogenbosch, THE NETHERLANDS
35
 Loading...