

Page 1

HAV-SB500
USER MANUAL (EN)
GEBRUIKSAANWIJZING (NL)
BEDIENUNGSANLEITUNG (DE)
MANUAL DE USUARIO (ES)
MANUEL DE L’UTILISATEUR (FR)
MANUALE PER L’UTENTE (IT)
MANUAL DO UTILIZADOR (PT)
BRUGSVEJLEDNING (DA)
BRUKERVEILEDNING (NO)
BRUKSANVISNING (SV)
KÄYTTÖOPAS (FI)
(ET)
VARTOTOJO VADOVAS (LT)
MANUAL DE UTILIZARE (RO)
KULLANIM KILAVUZU (TR)
Soundbar
Page 2
5 6
HDMI IN 1 HDMI IN 2 HDMI OUT
AUX2 AUX1 OPTICAL 1
DC IN
1
OFF
OPTICAL 2
14
22
21
ON
19
29
27
26
23
RESET
+
VOL
BASS-
VOL
-
SOURCE
TREB- TREB+
HDMI1
AUX1 OPTICAL2
AUX2
MUSIC NIGHT
MOVIE
BASS+
OPTICAL1HDMI2
15
16
20
17
18
28
25
24
237 74
13
POWER OPTICAL2 AUX2 AUX1 OPTICAL1
8 11 11 12
9 10
A3C
HDMI 1
HDMI 2
2
Page 3
B
Page 4

English
HAV-SB500
Soundbar
Package contents
1. Soundbar
2. Remote control (incl. AAA batteries)
3. Power adapter
4. Power cable (EU)
5. Power cable (UK)
6. AUX cable
7. RCA cable
8. HDMI cable
9. Optical SPDIF cable
10. Wall mount
11. Wall screws (3x) / Wall plugs (3x)
12. Screws (wall mount / soundbar) (2x)
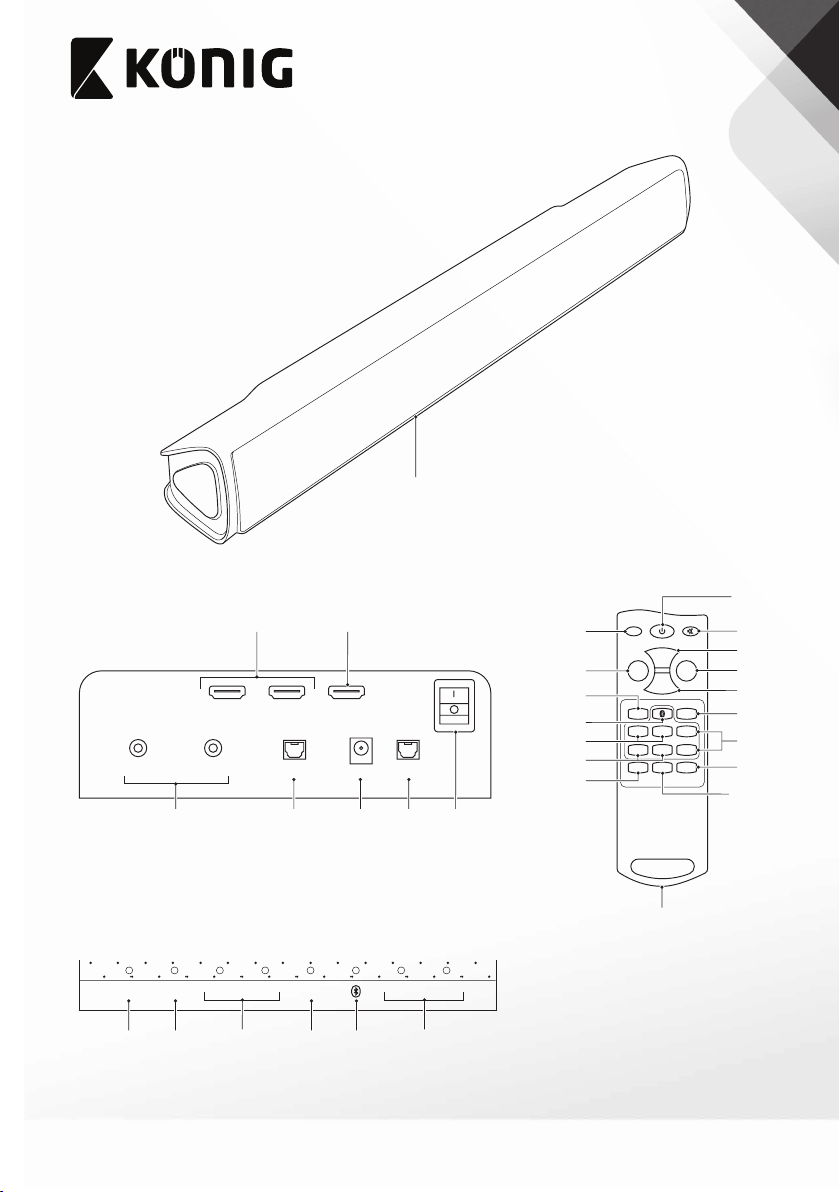
Description (g. A)
The soundbar is a device with multiple built-in
speakers that generates stereo sound from a single
cabinet, dramatically improving the sound quality
without requiring loads of wires.
1. Soundbar
• To switch on the device, set
the on/o switch to the on
2. On/o switch
3. DC input
4. Audio input
5. HDMI input
6. HDMI output
7. Optical digital audio input
8. Power indicator
9. Audio input indicator
10. HDMI input indicator
position.
• To switch o the device, set
the on/o switch to the o
position.
• Connect the power adapter
to the DC input.
• Connect the mains cable to
the mains.
• Connect an audio cable or
an AV cable to the audio
input.
• Connect an HDMI cable to
the HDMI input.
• Connect an HDMI cable to
the HDMI output.
• Connect an optical digital
audio cable to the optical
digital audio input.
• The indicator comes on
when the device is switched
on.
• The indicator comes on
when an audio cable or an
AV cable is used between
devices.
• The indicator comes on
when an HDMI cable is used
between devices.
11. Optical digital audio input
indicator
12. Bluetooth indicator
13. Remote control
14. On/standby button
15. Mute button
16. Volume + button
17. Volume - button
18. Treble + button
19. Treble - button
20. Bass + button
21. Bass - button
22. Reset button
23. Sound button: Music
24. Sound button: Movie
25. Sound button: Night
26. Source button: Audio input
27. Source button: HDMI input
28. Source button: Optical
digital audio input
29. Source button: Bluetooth
• The indicator comes on
when an optical digital
audio cable is used
between devices.
• The indicator comes on
when Bluetooth is used
between devices.
• Press the button to switch
on the device.
• Press the button again to
set the device to standby
mode.
• Press the button to mute
the sound.
• Press the button again to
unmute the sound.
• Press the button to increase
the volume.
• Press the button to
decrease the volume.
• Press the button to increase
the treble.
• Press the button to
decrease the treble.
• Press the button to increase
the bass.
• Press the button to
decrease the bass.
• Press the button to reset
treble and bass back to the
default setting.
• Press the button to set the
sound to music mode.
• Press the button to set the
sound to movie mode.
• Press the button to set the
sound to night mode.
• Press the button to set the
source to audio input.
• Press the button to set the
source to HDMI input.
• Press the button to set the
source to optical digital
audio input.
• Press the button to set the
source to Bluetooth.
44
Page 5

English
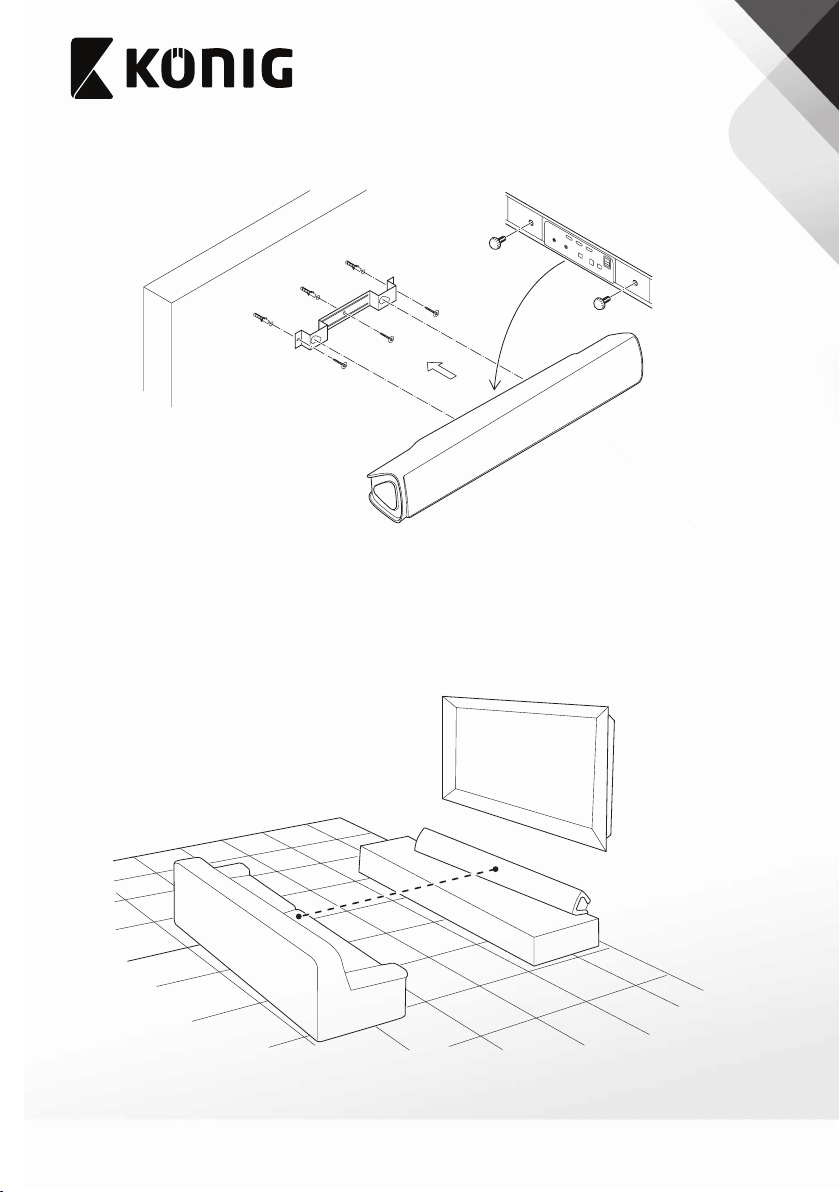
Installation (g. B & C)
• Refer to the illustrations to install the device
correctly.
Bluetooth pairing
Automatic pairing
1. Switch on the soundbar.
2. Connect the Bluetooth device.
Note: Make sure that your Bluetooth device is
the last connected device.
3. Switch on the Bluetooth device.
4. Set the source to Bluetooth. The Bluetooth
device will be paired with the soundbar. The
Bluetooth indicator lights continuously.
Manual pairing
1. Switch on the soundbar.
2. Set the source to Bluetooth.
3. When the Bluetooth indicator ashes, the
soundbar is in pairing mode.
4. Connect the Bluetooth device.
5. Switch on the Bluetooth device. The
Bluetooth device will search for the Bluetooth
ID of the soundbar: “HAV-SB500“.
6. If the password window shows, enter the
password: “0000“. The Bluetooth device will
be paired with the soundbar. The Bluetooth
indicator lights continuously.
NOTE: Remove connector protection caps from
bundled optical and HDMI™ cable before usage
Safety
General safety
• Read the manual carefully before use. Keep the
manual for future reference.
• Only use the device for its intended purposes.
Do not use the device for other purposes than
described in the manual.
• Do not use the device if any part is damaged or
defective. If the device is damaged or defective,
replace the device immediately.
• Do not expose the device to water or moisture.
• Do not block the ventilation openings.
Electrical safety
• To reduce risk of electric shock, this product
should only be opened by an authorized
technician when service is required.
• Disconnect the product from the mains and
other equipment if a problem should occur.
Battery safety
• Use only the batteries mentioned in the manual.
• Do not use old and new batteries together.
• Do not use batteries of dierent types or brands.
• Do not install batteries in reverse polarity.
• Do not short-circuit or disassemble the
batteries.
• Do not expose the batteries to water.
• Do not expose the batteries to re or excessive
heat.
• Batteries are prone to leakage when fully
discharged. To avoid damage to the product,
remove the batteries when leaving the product
unattended for longer periods of time.
• If liquid from the batteries comes into contact
with skin or clothing, immediately rinse with
fresh water.
55
Page 6

Warranty
Any changes and/or modications to the product
will void the warranty. We cannot accept any
liability for damage caused by incorrect use of the
product.
Disposal
• The product is designated for separate
collection at an appropriate collection point.
Do not dispose of the product with household
waste.
• For more information, contact the retailer
or the local authority responsible for waste
management.
Documentation
The product has been manufactured and supplied
in compliance with all relevant regulations and
directives, valid for all member states of the
European Union. The product complies with all
applicable specications and regulations in the
country of sales.
Formal documentation is available upon request.
The formal documentation includes, but is not
limited to the Declaration of Conformity, the
Material Safety Data Sheet and the product test
report.
English
Disclaimer
Designs and specications are subject to change
without notice. All logos, brands and product
names are trademarks or registered trademarks of
their respective holders and are hereby recognized
as such.
66
Page 7

Nederlands
HAV-SB500
Soundbar
Verpakkingsinhoud
1. Soundbar
2. Afstandsbediening (incl. AAA-batterijen)
3. Voedingsadapter
4. Voedingskabel (EU)
5. Voedingskabel (VK)
6. AUX-kabel
7. RCA-kabel
8. HDMI-kabel
9. Optische SPDIF-kabel
10. Muurbevestiging
11. Muurschroeven (3x) / Muurpluggen (3x)
12. Schroeven (muurbevestiging / soundbar) (2x)
Beschrijving (g. A)
De soundbar is een apparaat met meerdere
ingebouwde luidsprekers dat stereogeluid
genereert uit een enkele kast, waarbij de
geluidskwaliteit aanzienlijk verbetert zonder dat
veel draden nodig zijn.
1. Soundbar
• Zet de aan/uit-schakelaar
in de aan-stand om het
2. Aan/uit-schakelaar
3. DC-ingang
4. Audio-ingang
5. HDMI-ingang
6. HDMI-uitgang
7. Optische digitale audioingang
8. Stroomindicator
9. Audio-ingangsindicator
10. HDMI-ingangsindicator
apparaat in te schakelen.
• Zet de aan/uit-schakelaar
in de uit-stand om het
apparaat uit te schakelen.
• Sluit de stroomadapter aan
op de DC-ingang.
• Sluit het netsnoer aan op
het stopcontact.
• Sluit een audiok abel of een
AV-kabel aan op de audioingang.
• Sluit een HDMI-k abel aan
op de HDMI-ingang.
• Sluit een HDMI-k abel aan
op de HDMI-uitgang.
• Sluit een optische digitale
audiokabel aan op de
optische digitale audioingang.
• De indicator gaat branden
wanneer het apparaat
wordt ingeschakeld.
• De indicator gaat branden
wanneer een audiokabel
of een AV-kabel wordt
gebruikt tussen apparaten.
• De indicator gaat branden
wanneer een HDMI-kabel
wordt gebruikt tussen
apparaten.
11. Optische digitale audioingangsindicator
12. Bluetooth-indicator
13. Afstandsbediening
14. Aan/standby-knop
15. Dempknop
16. Volume + knop
17. Volume - knop
18. Treble + knop
19. Treble - knop
20. Bass + knop
21. Bass - knop
22. Resetknop
23. Geluidsknop: Muziek
24. Geluidsknop: Film
25. Geluidsknop: Nacht
26. Bronknop: Audio-ingang
27. Bronknop: HDMI-ingang
28. Bronknop: Optische digitale
audio-ingang
29. Bronknop: Bluetooth
• De indicator gaat branden
wanneer een optische
digitale audiokabel wordt
gebruikt tussen apparaten.
• De indicator gaat branden
wanneer Bluetooth wordt
gebruikt tussen apparaten.
• Druk op de knop om het
apparaat in te schakelen.
• Druk nogmaals op de
knop om het apparaat in
standby-modus te zetten.
• Druk op de knop om het
geluid te dempen.
• Druk nogmaals op de knop
om het geluid weer in te
schakelen.
• Druk op de knop om het
volume te verhogen.
• Druk op de knop om het
volume te verlagen.
• Druk op de knop om de
hoge tonen te verhogen.
• Druk op de knop om de
hoge tonen te verlagen.
• Druk op de knop om de
lage tonen te verhogen.
• Druk op de knop om de
lage tonen te verlagen.
• Druk op de knop om de
hoge en lage tonen terug
naar de standaardinstelling
te zetten.
• Druk op de knop om het
geluid in muziekmodus te
zetten.
• Druk op de knop om het
geluid in lmmodus te
zetten.
• Druk op de knop om het
geluid in nachtmodus te
zetten.
• Druk op de knop om de
audio-ingang als bron in
te stellen.
• Druk op de knop om de
HDMI-ingang als bron in
te stellen.
• Druk op de knop om de
optische digitale audioingang als bron in te stellen.
• Druk op de knop om
Bluetooth als bron in te
stellen.
77
Page 8

Nederlands
Installatie (g. B & C)
• Raadpleeg de illustraties om het apparaat op de
juiste wijze te installeren.
Bluetooth koppelen
Automatisch koppelen
1. Schakel de soundbar in.
2. Sluit het Bluetooth-apparaat aan.
Opmerking: Zorg ervoor dat uw Bluetoothapparaat het laatst aangesloten apparaat is.
3. Schakel het Bluetooth-apparaat in.
4. Stel Bluetooth als bron in. Het Bluetooth-
apparaat wordt aan de soundbar gekoppeld.
De Bluetooth-indicator brandt continu.
Handmatig koppelen
1. Schakel de soundbar in.
2. Stel Bluetooth als bron in.
3. Als de Bluetooth-indicator knippert, is de
soundbar in koppelingsmodus.
4. Sluit het Bluetooth-apparaat aan.
5. Schakel het Bluetooth-apparaat in. Het
Bluetooth-apparaat zoekt naar de BluetoothID van de soundbar: “HAV-SB500“.
6. Voer na het verschijnen van het
wachtwoordvenster het wachtwoord in:
“0000“. Het Bluetooth-apparaat wordt aan de
soundbar gekoppeld. De Bluetooth-indicator
brandt continu.
LET OP: Verwijder vóór gebruik de
connectorbeschermkapjes van de gebundelde,
optische kabel en van de HDMI™-kabel.
Veiligheid
Algemene veiligheid
• Lees de handleiding voor gebruik aandachtig door.
Bewaar de handleiding voor latere raadpleging.
• Gebruik het apparaat uitsluitend voor de
beoogde doeleinden. Gebruik het apparaat niet
voor andere doeleinden dan beschreven in de
handleiding.
• Gebruik het apparaat niet als een onderdeel
beschadigd of defect is. Vervang een beschadigd
of defect apparaat onmiddellijk.
• Stel het apparaat niet bloot aan water of vocht.
• Blokkeer de ventilatieopeningen niet.
Elektrische veiligheid
• Dit product mag voor onderhoud alleen worden
geopend door een erkend technicus om het
risico op elektrische schokken te verkleinen.
• Koppel het product los van het stopcontact en
van andere apparatuur als er zich problemen
voordoen.
Batterijveiligheid
• Gebruik alleen de in de handleiding vermelde
batterijen.
• Combineer geen oude en nieuwe batterijen.
• Gebruik geen batterijen van verschillende typen
of merken.
• Installeer batterijen niet met omgekeerde polariteit.
• Veroorzaak geen kortsluiting van de batterijen.
Haal de batterijen niet uit elkaar.
• Stel de batterijen niet bloot aan water.
• Stel de batterijen niet bloot aan vuur of extreme
hitte.
• Batterijen kunnen gaan lekken wanneer deze
volledig zijn ontladen. Verwijder de batterijen
wanneer u het product gedurende langere
tijd onbeheerd achterlaat om schade aan het
product te voorkomen.
• Indien vloeistof uit de batterij in contact komt
met de huid of kleding, onmiddellijk spoelen
met vers water.
88
Page 9

Garantie
Eventuele wijzigingen en/of aanpassingen aan het
product zullen de garantie ongeldig maken. Wij
aanvaarden geen aansprakelijkheid voor schade
veroorzaakt door onjuist gebruik van het product.
Afdanken
• Het product is bestemd voor gescheiden
inzameling bij een hiertoe aangewezen
verzamelpunt. Werp het product niet weg bij
het huishoudelijk afval.
• Neem voor meer informatie contact op met
de detailhandelaar of de lokale overheid die
verantwoordelijk is voor het afvalbeheer.
Documentatie
Het product is vervaardigd en geleverd in
overeenstemming met de relevante reglementen
en richtlijnen die voor alle lidstaten van de Europese
Unie gelden. Het product voldoet aan alle van
toepassing zijnde specicaties en reglementen in
het land van verkoop.
Ociële documentatie is op aanvraag verkrijgbaar.
De ociële documentatie omvat, maar is niet
beperkt tot de Verklaring van Overeenstemming, de
Material Safety Data Sheet en het producttestrapport.
Nederlands
Disclaimer
Ontwerpen en specicaties kunnen zonder
kennisgeving worden gewijzigd. Alle logo’s,
merken en productnamen zijn handelsmerken
of geregistreerde handelsmerken van de
respectievelijke eigenaren en worden hierbij als
zodanig erkend.
99
Page 10

Deutsch
HAV-SB500
Soundbar
Verpackungsinhalt
1. Soundbar
2. Fernbedienung (inkl. AAA Batterien)
3. Netztadapter
4. Netzkabel (EU)
5. Netzkabel (UK)
6. AUX-Kabel
7. RCA-Kabel
8. HDMI-Kabel
9. Optisches SPDIF-Kabel
10. Wandhalter
11. Wandschrauben (3x) / Wanddübel (3x)
12. Schrauben (Wandhalter / Soundbar) (2x)
Beschreibung (Abb. A)
Die Soundbar ist ein Gerät mit mehreren
eingebauten Lautsprechern, das Stereosound
aus einem einzigen Gehäuse erzeugt und die
Klangqualität erheblich verbessert, ohne dass
Unmengen von Kabeln verlegt werden müssen.
1. Soundbar
2. Ein-/Aus-Schalter
3. Gleichstromeingang
4. Audioeingang
5. HDMI-Eingang
6. HDMI-Ausgang
7. Optischer digitaler
Audioeingang
8. Betriebsanzeige
9. Audioeingangsanzeige
• Um das Gerät einzuschalten,
stellen Sie den Ein-/AusSchalter auf die Ein-Position.
• Um das Gerät auszuschalten,
stellen Sie den Ein-/AusSchalter auf die Aus-Position.
• Verbinden Sie den
Netzadapter mit dem
Gleichstromeingang.
• Verbinden Sie das Netzkabel
mit dem Netz.
• Verbinden Sie ein Audiokabel
oder AV-Kabel mit dem
Audioeingang.
• Verbinden Sie ein HDMI-Kabel
mit dem HDMI-Eingang.
• Verbinden Sie ein HDMI-Kabel
mit dem HDMI-Ausgang.
• Verbinden Sie ein optisches
digitales Audiokabel mit
dem optischen digitalen
Audioeingang.
• Die Anzeige leuchtet
auf, wenn das Gerät
eingeschaltet wird.
• Die Anzeige leuchtet auf,
wenn ein Audiokabel oder
ein AV-Kabel zwischen den
Geräten verwendet wird.
10. HDMI-Eingangsanzeige
11. Anzeige für optischen
digitalen Audioeingang
12. Bluetooth-Anzeige
13. Fernbedienung
14. Ein-/Standby-Taste
15. Stummschalttaste
16. Lautstärke + Taste
17. Lautstärke - Taste
18. Höhen + Taste
19. Höhen - Taste
20. Bässe + Taste
21. Bässe - Taste
22. Reset-Taste
23. Sound-Taste: Musik
24. Sound-Taste: Film
25. Sound-Taste: Nacht
26. Quellentaste: Audioeingang
27. Quellentaste: HDMI-Eingang
28. Quellentaste: Optischer
digitaler Audioeingang
29. Quellentaste: Bluetooth
• Die Anzeige leuchtet auf,
wenn ein HDMI-Kabel
zwischen den Geräten
verwendet wird.
• Die Anzeige leuchtet auf,
wenn ein optisches digitales
Audiokabel zwischen den
Geräten verwendet wird.
• Die Anzeige leuchtet auf,
wenn Bluetooth zwischen
den Geräten verwendet wird.
• Drücken Sie zum Einschalten
des Geräts auf die Taste.
• Drücken Sie erneut auf die
Taste, um das Gerät in den
Standby-Modus zu versetzen.
• Drücken Sie auf die Taste, um
den Ton stummzuschalten.
• Drücken Sie erneut auf die
Taste, um den Ton wieder
einzuschalten.
• Drücken Sie auf die Taste, um
die Lautstärke zu erhöhen.
• Drücken Sie auf die Taste, um
die Lautstärke zu verringern.
• Drücken Sie auf die Taste,
um die Höhen zu erhöhen.
• Drücken Sie auf die Taste, um
die Höhen zu verringern.
• Drücken Sie auf die Taste,
um die Bässe zu erhöhen.
• Drücken Sie auf die Taste,
um die Bässe zu verringern.
• Drücken Sie auf die Taste,
um die Höhen und Bässe
wieder auf die Voreinstellung
zurückzusetzen.
• Drücken Sie auf die Taste,
um den Sound auf den
Musikmodus einzustellen.
• Drücken Sie auf die Taste,
um den Sound auf den
Filmmodus einzustellen.
• Drücken Sie auf die Taste,
um den Sound auf den
Nachtmodus einzustellen.
• Drücken Sie auf die Taste,
um die Quelle auf den
Audioeingang einzustellen.
• Drücken Sie auf die Taste,
um die Quelle auf den
HDMI-Eingang einzustellen.
• Drücken Sie auf die
Taste, um die Quelle auf
den optischen digitalen
Audioeingang einzustellen.
• Drücken Sie auf die Taste,
um die Quelle auf Bluetooth
einzustellen.
1010
Page 11

Deutsch
Installation (Abb. B & C)
• Halten Sie sich zur richtigen Installation des
Geräts an die Abbildungen.
Bluetooth-Verbindung
Automatische Verbindung
1. Schalten Sie die Soundbar ein.
2. Verbinden Sie das Bluetooth-Gerät.
Hinweis: Stellen Sie sicher, dass Ihr BluetoothGerät das als letztes verbundene Gerät ist.
3. Schalten Sie das Bluetooth-Gerät ein.
4. Schalten Sie die Quelle auf Bluetooth. Das
Bluetooth-Gerät wird mit der Soundbar
verbunden. Die Bluetooth-Anzeige leuchtet
kontinuierlich.
Manuelle Verbindung
1. Schalten Sie die Soundbar ein.
2. Schalten Sie die Quelle auf Bluetooth.
3. Wenn die Bluetooth-Anzeige blinkt, bendet
sich die Soundbar im Verbindungsmodus.
4. Verbinden Sie das Bluetooth-Gerät.
5. Schalten Sie das Bluetooth-Gerät ein. Das
Bluetooth-Gerät sucht nach der Bluetooth-ID
der S oundbar: “HAV-SB500“.
6. Wenn das Passwortfenster erscheint, geben
Sie folgendes Passwort ein: “0000“. Das
Bluetooth-Gerät wird mit der Soundbar
verbunden. Die Bluetooth-Anzeige leuchtet
kontinuierlich.
HINWEIS: Entfernen Sie vor der Verwendung die
Schutzabdeckungen des verzweigten Optik- und
HDMI-Kabels.
Sicherheit
Allgemeine Sicherheit
• Lesen Sie die Bedienungsanleitung vor dem
Gebrauch genau durch. Bitte bewahren Sie die
Bedienungsanleitung zur späteren Bezugnahme
auf.
• Verwenden Sie das Gerät nur bestimmungsgemäß.
Verwenden Sie das Gerät nur für den in dieser
Bedienungsanleitung beschriebenen Zweck.
• Verwenden Sie das Gerät nicht, falls ein Teil
beschädigt oder defekt ist. Ist das Gerät beschädigt
oder defekt, erneuern Sie es unverzüglich.
• Setzen Sie das Gerät keinem Wasser und keiner
Feuchtigkeit aus.
• Blockieren Sie nicht die Lüftungsönungen.
Elektrische Sicherheit
• Um die Gefahr eines elektrischen Schlags
zu verringern, sollte dieses Produkt bei
erforderlichen Servicearbeiten ausschließlich von
einem autorisierten Techniker geönet werden.
• Bei Problemen trennen Sie das Gerät bitte von der
Spannungsversorgung und von anderen Geräten.
Batteriesicherheit
• Verwenden Sie ausschließlich die in dieser
Anleitung genannten Batterien.
• Verwenden Sie keine alten und neuen Batterien
zusammen.
• Verwenden Sie nicht Batterien unterschiedlicher
Typen oder Marken.
• Setzen Sie die Batterien nicht mit vertauschter
Polarität ein.
• Schließen Sie die Batterien nicht kurz und
zerlegen Sie sie nicht.
• Setzen Sie die Batterien keinem Wasser aus.
• Setzen Sie die Batterien keinem Feuer oder
übermäßiger Hitze aus.
• Batterien neigen dazu, auszulaufen, wenn
Sie vollständig entladen sind. Um eine
Beschädigung des Produkts zu vermeiden,
entfernen Sie die Batterien, wenn das Produkt
längere Zeit nicht benutzt wird.
• Falls Batterieüssigkeit mit der Haut oder
Kleidung in Berührung kommt, spülen Sie die
Flüssigkeit sofort mit frischem Wasser fort.
1111
Page 12

Garantie
Alle Änderungen und/oder Modizierungen an
dem Produkt haben ein Erlöschen der Garantie zur
Folge. Wir übernehmen keine Haftung für Schäden
durch unsachgemäße Verwendung des Produkts.
Entsorgung
• Dieses Produkt muss an einer entsprechenden
Sammelstelle zur Entsorgung abgegeben
werden. Entsorgen Sie das Produkt nicht mit dem
Haushaltsabfall.
• Weitere Informationen erhalten Sie beim
Verkäufer oder der für die Abfallwirtschaft
verantwortlichen örtlichen Behörde.
Dokumentation
Dieses Produkt wurde in Übereinstimmung mit
allen geltenden Vorschriften und Richtlinien
hergestellt und geliefert, die für alle Mitgliedsstaaten
der Europäischen Union gültig sind. Das Produkt
entspricht allen geltenden Spezikationen und
Bestimmungen im Land des Vertriebs.
Eine formale Dokumentation ist auf Anfrage
erhältlich. Die formale Dokumentation beinhaltet
die Konformitätserklärung, das Datenblatt zur
Materialsicherheit und den Produktprüfbericht,
ohne jedoch darauf beschränkt zu sein.
Deutsch
Haftungsausschluss
Design und technische Daten unterliegen
unangekündigten Änderungen. Alle Logos,
Marken und Produktnamen sind Marken oder
eingetragene Marken ihrer jeweiligen Eigentümer
und werden hiermit als solche anerkannt.
1212
Page 13

Español
HAV-SB500
Barra de sonido
Contenido del paquete
1. Barra de sonido
2. Mando a distancia (incl. pilas AAA)
3. Adaptador de alimentación
4. Cable de alimentación (UE)
5. Cable de alimentación (Reino Unido)
6. Cable AUX
7. Cable RCA
8. Cable HDMI
9. Cable SPDIF óptico
10. Soporte de pared
11. Tornillos de pared (3x) / Tacos de pared (3x)
12. Tornillos (soporte de pared / barra de sonido) (2x)
Descripción (g. A)
La barra de sonido es un dispositivo con varios
altavoces integrados que genera sonido estéreo
desde una única carcasa, mejorando drásticamente
la calidad de sonido sin necesidad de muchos cables.
1. Barra de sonido
• Para encender el dispositivo,
sitúe el interruptor de
2. Interruptor de encendido/
apagado
3. Entrada CC
4. Entrada de audio
5. Entrada HDMI
6. Salida HDMI
7. Entrada de audio digital
óptico
8. Indicador de corriente
9. Indicador de entrada de
audio
10. Indicador de entrada HDMI
encendido/apagado en la
posición de encendido.
• Para apagar el dispositivo,
sitúe el interruptor de
encendido/apagado en la
posición de apagado.
• Conecte el adaptador de
alimentación en la entrada CC.
• Conecte el cable de red
a la red.
• Conecte un cable de audio
o un cable AV en la entrada
de audio.
• Conecte un cable HDMI en
la entrada HDMI.
• Conecte un cable HDMI en
la salida HDMI.
• Conecte un cable de audio
digital óptico en la entrada
de audio digital óptico.
• El indicador se enciende
cuando el dispositivo se
enciende.
• El indicador se enciende
cuando se utiliza un cable
de audio o un cable AV
entre dispositivos.
• El indicador se enciende
cuando se utiliza un cable
HDMI entre dispositivos.
11. Indicador de entrada de
audio digital óptico
12. Indicador Bluetooth
13. Mando a distancia
14. Botón de encendido/espera
15. Botón Silencio
16. Botón de volumen +
17. Botón de volumen -
18. Botón de agudos +
19. Botón de agudos -
20. Botón de graves +
21. Botón de graves -
22. Botón de reinicio
23. Botón de sonido: Música
24. Botón de sonido: Película
25. Botón de sonido: Noche
26. Botón de fuente: Entrada
de audio
27. Botón de fuente: Entrada
HDMI
28. Botón de fuente: Entrada de
audio digital óptico
29. Botón de fuente: Bluetooth
• El indicador se enciende
cuando se utiliza un cable
de audio digital óptico
entre dispositivos.
• El indicador se enciende
cuando se utiliza Bluetooth
entre dispositivos.
• Pulse el botón para encender
el dispositivo.
• Pulse de nuevo el botón
para poner el dispositivo en
modo en espera.
• Pulse el botón para silenciar
el sonido.
• Pulse de nuevo el botón para
volver a activar el sonido.
• Pulse el botón para aumentar
el volumen.
• Pulse el botón para disminuir
el volumen.
• Pulse el botón para aumentar
los agudos.
• Pulse el botón para disminuir
los agudos.
• Pulse el botón para aumentar
los graves.
• Pulse el botón para disminuir
los graves.
• Pulse el botón para ajustar
los agudos y los graves a la
conguración por defecto.
• Pulse el botón para ajustar el
sonido al modo de música.
• Pulse el botón para ajustar el
sonido al modo de película.
• Pulse el botón para ajustar
el sonido al modo de noche.
• Pulse el botón para ajustar la
fuente a entrada de audio.
• Pulse el botón para ajustar
la fuente a entrada HDMI.
• Pulse el botón para ajustar
la fuente a entrada de audio
digital óptico.
• Pulse el botón para ajustar
la fuente a Bluetooth.
1313
Page 14

Español
Instalación (g. B & C)
• Consulte las ilustraciones para instalar el
dispositivo correctamente.
Emparejamiento Bluetooth
Emparejamiento automático
1. Encienda la barra de sonido.
2. Conecte el dispositivo Bluetooth.
Nota: Asegúrese de que su dispositivo
Bluetooth sea el último dispositivo conectado.
3. Encienda el dispositivo Bluetooth.
4. Ajuste la fuente a Bluetooth. El dispositivo
Bluetooth se emparejará con la barra de
sonido. El indicador Bluetooth se enciende de
forma continua.
Emparejamiento manual
1. Encienda la barra de sonido.
2. Ajuste la fuente a Bluetooth.
3. Cuando el indicador Bluetooth parpadee, la
barra de sonido se encuentra en el modo de
emparejamiento.
4. Conecte el dispositivo Bluetooth.
5. Encienda el dispositivo Bluetooth. El dispositivo
Bluetooth buscará la ID Bluetooth de la barra
de sonido: “HAV-SB500“.
6. Si aparece la pantalla de contraseña,
introduzca la contraseña: “0000“. El dispositivo
Bluetooth se emparejará con la barra de sonido.
El indicador Bluetooth se enciende de forma
continua.
NOTA: Retire las tapas de protección del conector
del cable óptico revestido y del cable HDMI antes
de su uso.
Seguridad
Seguridad general
• Lea el manual detenidamente antes del uso.
Conserve el manual en caso de futura necesidad.
• Utilice el dispositivo únicamente para su uso
previsto. No utilice el dispositivo con una
nalidad distinta a la descrita en el manual.
• No utilice el dispositivo si alguna pieza ha sufrido
daños o tiene un defecto. Si el dispositivo ha
sufrido daños o tiene un defecto, sustitúyalo
inmediatamente.
• No exponga el dispositivo al agua ni a la humedad.
• No bloquee las aberturas de ventilación.
Seguridad eléctrica
• Para reducir el peligro de descarga eléctrica,
este producto sólo debería abrirlo un técnico
autorizado cuando necesite reparación.
• Desconecte el producto de la toma de corriente
y de los otros equipos si ocurriera algún problema.
Seguridad de las pilas
• Utilice únicamente las pilas mencionadas en el
manual.
• No use conjuntamente pilas nuevas y usadas.
• No utilice pilas de distintos tipo o marcas.
• No instale las pilas con la polaridad invertida.
• No cortocircuite ni desmonte las pilas.
• No exponga las pilas al agua.
• No exponga las pilas al fuego ni a un calor excesivo.
• Las pilas tienden a tener fugas cuando están
totalmente descargadas. Para evitar daños
en el producto, saque las pilas cuando no
vaya a utilizar el producto durante periodos
prolongados de tiempo.
• Si el líquido de las pilas entra en contacto con la
piel o la ropa, lave inmediatamente con agua.
1414
Page 15

Garantía
Cualquier cambio y/o modicación del producto
anulará la garantía. No podemos asumir ninguna
responsabilidad por ningún daño debido a un uso
incorrecto del producto.
Eliminación
• El producto está diseñado para desecharlo por
separado en un punto de recogida adecuado.
No se deshaga del producto con la basura
doméstica.
• Para obtener más información, póngase en
contacto con el vendedor o la autoridad local
responsable de la eliminación de residuos.
Documentación
El producto se ha fabricado y distribuido de
conformidad con todas las normativas y directivas
relevantes, válidas para todos los estados de la
Unión Europea. El producto también cumple con
todas las especicaciones y normativas en el país
en el cual se comercializa.
Previa solicitud, podremos proporcionarle la
documentación formal. La documentación
formal incluye, sin limitación, la declaración de
conformidad, la hoja de datos de seguridad del
material y el informe sobre las pruebas realizadas
al producto.
Español
Renuncia de responsabilidad legal
Las ilustraciones y las especicaciones podrán
sufrir cambios sin previo aviso. Todos los logotipos,
marcas y nombres de productos son marcas
comerciales o marcas comerciales registradas de
sus respectivos propietarios, reconocidos como tal.
1515
Page 16

Français
HAV-SB500
Barre audio
Contenu de l'emballage
1. Barre audio
2. Télécommande (piles AAA incluses)
3. Adaptateur d’alimentation
4. Câble d'alimentation (UE)
5. Câble d'alimentation (Royaume-Uni)
6. Câble AUX
7. Câble RCA
8. Câble HDMI
9. Câble SPDIF optique
10. Support mural
11. Vis murales (3x) / Chevilles murales (3x)
12. Vis (support mural / barre audio) (2x)
Description (g. A)
La barre audio est un appareil intégrant plusieurs
hauts-parleurs générant un son stéréo depuis une
enceinte unique, améliorant spectaculairement la
qualité sonore sans nécessiter une foule de ls.
1. Barre audio
• Pour allumer l'appareil,
positionnez l'interrupteur
2. Interrupteur marche/arrêt
3. Entrée CC
4. Entrée audio
5. Entrée HDMI
6. Sortie HDMI
7. Entrée audio numérique
optique
8. Témoin de mise sous
tension
9. Témoin d'entrée audio
10. Témoin d'entrée HDMI
11. Témoin d'entrée audio
numérique optique
marche/arrêt sur “ON“.
• Pour éteindre l'appareil,
positionnez l'interrupteur
marche/arrêt sur “OFF“.
• Connectez l'adaptateur
d'alimentation à l'entrée CC.
• Connectez le cordon
d'alimentation au secteur.
• Connectez un câble audio
ou AV à l'entrée audio.
• Connectez un câble HDMI à
l'entrée HDMI.
• Connectez un câble HDMI à
la sortie HDMI.
• Connectez un câble audio
numérique optique à l'entrée
audio numérique optique.
• Le témoin s'allume lorsque
l'appareil est sous tension.
• Le témoin s'allume lorsqu'un
câble audio ou AV est
employé entre les appareils.
• Le témoin s'allume
lorsqu'un câble HDMI est
employé entre les appareils.
• Le témoin s'allume lorsqu'un
câble audio numérique
optique est employé entre
les appareils.
12. Témoin Bluetooth
13. Télécommande
14. Bouton marche/veille
15. Bouton silence
16. Bouton de volume +
17. Bouton de volume -
18. Bouton Aigus +
19. Bouton Aigus -
20. Bouton Graves +
21. Bouton Graves -
22. Bouton de réinitialisation
23. Bouton son : Musique
24. Bouton son : Film
25. Bouton son : Nuit
26. Bouton source : Entrée
audio
27. Bouton source : Entrée
HDMI
28. Bouton source : Entrée
audio numérique optique
29. Bouton source : Bluetooth
• Le témoin s'allume lorsque
le Bluetooth est employé
entre les appareils.
• Appuyez sur le bouton pour
allumer l'appareil.
• Appuyez à nouveau sur
le bouton pour mettre
l'appareil en mode veille.
• Appuyez sur le bouton pour
couper le son.
• Appuyez à nouveau sur le
bouton pour remettre le son.
• Appuyez sur le bouton pour
augmenter le volume.
• Appuyez sur le bouton pour
réduire le volume.
• Appuyez sur le bouton pour
augmenter les aigus.
• Appuyez sur le bouton pour
réduire les aigus.
• Appuyez sur le bouton pour
augmenter les graves.
• Appuyez sur le bouton pour
réduire les graves.
• Appuyez sur le bouton pour
restaurer les réglages par
défauts des aigus et des
graves.
• Appuyez à nouveau sur le
bouton pour régler le son
en mode musique.
• Appuyez à nouveau sur le
bouton pour régler le son
en mode lm.
• Appuyez sur le bouton pour
régler le son en mode nuit.
• Appuyez sur le bouton pour
régler la source sur l'entrée
audio.
• Appuyez sur le bouton pour
régler la source sur l'entrée
HDMI.
• Appuyez sur le bouton pour
régler la source sur l'entrée
audio numérique optique.
• Appuyez sur le bouton
pour régler la source sur
Bluetooth.
1616
Page 17

Français
Installation (g. B & C)
• Consultez les illustrations pour installer
correctement l'appareil.
Appariement Bluetooth
Appariement automatique
1. Allumez la barre audio.
2. Connectez l'appareil Bluetooth.
Remarque: Assurez-vous que votre appareil
Bluetooth est le dernier appareil connecté.
3. Allumez l'appareil Bluetooth.
4. Réglez la source sur Bluetooth. L'appareil
Bluetooth est associé avec la barre audio.
Le témoin Bluetooth s'allume en continu.
Appariement manuel
1. Allumez la barre audio.
2. Réglez la source sur Bluetooth.
3. Lorsque le témoin Bluetooth clignote, la barre
audio est en mode appariement.
4. Connectez l'appareil Bluetooth.
5. Allumez l'appareil Bluetooth. L'appareil
Bluetooth recherche l'identiant Bluetooth de
la barre audio : “HAV-SB500“.
6. Si la fenêtre de mot de passe s'ache,
saisissez le mot de passe : “0000“. L'appareil
Bluetooth est associé avec la barre audio.
Le témoin Bluetooth s'allume en continu.
Remarque : retirez les capuchons de protection
des connecteurs des câbles optiques et HDMI
avant utilisation.
Sécurité
Sécurité générale
• Lisez attentivement le manuel avant usage.
Conservez le manuel pour toute référence
ultérieure.
• Utilisez l'appareil uniquement pour son usage
prévu. N'utilisez pas l'appareil à d'autres ns que
celles décrites dans le manuel.
• N'utilisez pas l'appareil si une pièce quelconque
est endommagée ou défectueuse. Si l'appareil
est endommagé ou défectueux, remplacez-le
immédiatement.
• N'exposez pas l'appareil à l'eau ou à l'humidité.
• Ne bloquez aucune des ouvertures de ventilation.
Sécurité électrique
• Pour réduire le risque de choc électrique, cet
appareil doit être ouvert uniquement par un
technicien qualié si une réparation s’impose.
• Débranchez l'appareil et les autres équipements
du secteur s'il y a un problème.
Sécurité des piles
• Utilisez uniquement les piles mentionnées dans
le manuel.
• N'utilisez jamais des piles usées avec des piles
neuves.
• N'utilisez pas des piles de marques ou de types
diérents.
• N'installez pas les piles selon une polarité inversée.
• Ne court-circuitez et ne démontez pas les piles.
• N'exposez pas les piles à l'eau.
• N'exposez pas les piles au feu ou à une chaleur
excessive.
• Les piles chargées à fond ont tendance à fuir.
Pour éviter d'endommager l'appareil, retirez les
piles si vous laissez l'appareil sans surveillance
pendant des périodes prolongées.
• Si du liquide s'échappant des piles entre en
contact avec la peau ou les vêtements, rincez
immédiatement à l'eau claire.
1717
Page 18

Garantie
Toute altération ou modication du produit annule
la garantie. Nous déclinons toute responsabilité
envers les dommages dus à une utilisation incorrecte
du produit.
Mise au rebut
• Le produit doit être jeté séparément des ordures
ménagères dans un point de collecte approprié.
Ne jetez pas le produit avec les ordures ménagères
ordinaires.
• Pour plus d'informations, contactez le distributeur
ou l'autorité locale responsable de la gestion des
déchets.
Documentation
Le produit a été fabriqué et fourni en conformité
avec toutes les directives et règlements applicables
et en vigueur dans tous les États membres de
l'Union Européenne. Le produit est conforme aux
spécications et à la réglementation en vigueur
dans le pays de vente.
La documentation ocielle est disponible sur
demande. La documentation ocielle inclut
notamment la Déclaration de conformité, la che
technique de sécurité et le rapport de test de produit.
Français
Avertissement
Le design et les caractéristiques techniques sont
sujets à modication sans notication préalable.
Tous les logos, marques et noms de produits sont
des marques commerciales, déposées ou non, de
leurs détenteurs respectifs et sont ici reconnus
comme tels.
1818
Page 19

Italiano
HAV-SB500
Soundbar
Contenuto della confezione
1. Soundbar
2. Telecomando (incl. batterie AAA)
3. Adattatore di alimentazione
4. Cavo di alimentazione (UE)
5. Cavo di alimentazione (Regno Unito)
6. Cavo AUX
7. Cavo RCA
8. Cavo HDMI
9. Cavo ottico SPDIF
10. Supporto a parete
11. Viti da muro (3x) / Tasselli da muro (3x)
12. Viti (supporto a parete / soundbar) (2x)
Descrizione (g. A)
La soundbar è un dispositivo dotato di più altoparlanti
integrati in grado di generare suono stereofonico da
un'unica cassa, migliorandone straordinariamente la
qualità senza necessità di ulteriori cavi.
1. Soundbar
• Per accendere il dispositivo,
posizionare l'interruttore
2. Interruttore on/o
3. Ingresso CC
4. Ingresso audio
5. Ingresso HDMI
6. Uscita HDMI.
7. Ingresso audio ottico digitale
8. Spia di accensione
9. Spia di ingresso audio
10. Spia di ingresso HDMI
11. Spia di ingresso audio
ottico digitale
on/o su ON.
• Per spegnere il dispositivo,
posizionare l'interruttore
on/o su OFF.
• Collegare l'adattatore di
alimentazione all'ingresso CC.
• Collegare il cavo di
alimentazione alla rete di
alimentazione.
• Collegare un cavo audio o un
cavo AV all'ingresso audio.
• Collegare un cavo HDMI
all'ingresso HDMI.
• Collegare un cavo HDMI
all'uscita HDMI.
• Collegare un cavo audio
ottico digitale all'ingresso
audio ottico digitale.
• L'indicatore si accende
all'accensione del dispositivo.
• La spia si accende quando
tra dispositivi viene utilizzato
un cavo audio o un cavo AV.
• La spia si accende quando
tra dispositivi viene
utilizzato un cavo HDMI.
• La spia si accende quando
tra dispositivi viene utilizzato
un cavo audio ottico digitale.
12. Spia Bluetooth
13. Telecomando
14. Pulsante di accensione/
standby
15. Pulsante muto
16. Pulsante volume +
17. Pulsante volume -
18. Pulsante acuti +
19. Pulsante acuti -
20. Pulsante bassi +
21. Pulsante bassi -
22. Pulsante di reset
23. Pulsante dell'audio: Musica
24. Pulsante dell'audio: Filmato
25. Pulsante dell'audio: Notte
26. Pulsante sorgente: Ingresso
audio
27. Pulsante sorgente: Ingresso
HDMI
28. Pulsante sorgente: Ingresso
audio ottico digitale
29. Pulsante sorgente: Bluetooth
• La spia si accende quando
tra dispositivi viene
utilizzata la modalità
Bluetooth.
• Premere questo pulsante
per accendere il dispositivo.
• Premere nuovamente il
pulsante per impostare il
dispositivo sulla modalità
standby.
• Premere questo pulsante
per silenziare l'audio.
• Premere nuovamente questo
pulsante per riattivare l'audio.
• Premere questo pulsante
per aumentare il volume.
• Premere questo pulsante
per diminuire il volume.
• Premere questo pulsante
per aumentare gli acuti.
• Premere questo pulsante
per diminuire gli acuti.
• Premere questo pulsante
per aumentare i bassi.
• Premere questo pulsante
per diminuire i bassi.
• Premere questo pulsante
per ripristinare le
impostazioni predenite
per acuti e bassi.
• Premere questo pulsante
per impostare l'audio in
modalità musica.
• Premere questo pulsante
per impostare l'audio in
modalità lmato.
• Premere questo pulsante
per impostare l'audio in
modalità notte.
• Premere questo pulsante
per impostare la sorgente
sull'ingresso audio.
• Premere questo pulsante
per impostare la sorgente
sull'ingresso HDMI.
• Premere questo pulsante
per impostare la sorgente
sull'ingresso audio ottico
digitale.
• Premere questo pulsante
per impostare la sorgente
su Bluetooth.
1919
Page 20

Italiano
Installazione (g. B & C)
• Per installare il dispositivo correttamente fare
riferimento alle illustrazioni.
Accoppiamento Bluetooth
Accoppiamento automatico
1. Accendere la soundbar.
2. Collegare il dispositivo Bluetooth.
Nota: Vericare che il dispositivo Bluetooth sia
l'ultimo dispositivo collegato.
3. Accendere il dispositivo Bluetooth.
4. Impostare la sorgente su Bluetooth. Il
dispositivo Bluetooth verrà accoppiato con la
soundbar. La spia Bluetooth si accende ssa.
Accoppiamento manuale
1. Accendere la soundbar.
2. Impostare la sorgente su Bluetooth.
3. Quando la spia Bluetooth lampeggia, la
soundbar è in modalità di accoppiamento.
4. Collegare il dispositivo Bluetooth.
5. Accendere il dispositivo Bluetooth. Il dispositivo
Bluetooth ricerca l'ID Bluetooth della soundbar:
“HAV-SB500“.
6. Se viene visualizzata la nestra di inserimento
della password, immettere la password: “0000“.
Il dispositivo Bluetooth verrà accoppiato con la
soundbar. La spia Bluetooth si accende ssa.
NOTA: rimuovere i cappucci di protezione del
connettore dal cavo ottico e HDMI in dotazione
prima dell'utilizzo.
Sicurezza
Istruzioni generali
• Leggere il manuale con attenzione prima dell'uso.
Conservare il manuale per riferimenti futuri.
• Utilizzare il dispositivo solo per gli scopi previsti.
Non utilizzare il dispositivo per scopi diversi da
quelli descritti nel manuale.
• Non utilizzare il dispositivo se presenta parti
difettose. Se il dispositivo è danneggiato o
difettoso, sostituirlo immediatamente.
• Non esporre il dispositivo ad acqua o umidità.
• Non ostruire i fori per la ventilazione.
Sicurezza elettrica
• Per ridurre il rischio di scosse elettriche, il presente
prodotto deve essere aperto solo da un tecnico
autorizzato, nel caso sia necessario ripararlo.
• Scollegare il prodotto dall’alimentazione e da
altri apparecchi se dovesse esserci un problema.
Sicurezza relativa alla batteria
• Utilizzare esclusivamente le batterie indicate nel
manuale.
• Non mischiare batterie nuove e vecchie.
• Non utilizzare batterie di tipi o marchi diversi.
• Non installare le batterie invertendo la polarità.
• Non mettere in corto circuito o disassemblare
le batterie.
• Non esporre le batterie all'acqua.
• Non esporre le batterie a amme o calore eccessivo.
• Le batterie sono soggette a perdite quando
sono completamente scariche. Per evitare di
danneggiare il prodotto, rimuovere le batterie
quando viene lasciato incustodito per periodi
prolungati.
• Nel caso di contatto del liquido delle batterie con
pelle o indumenti, sciacquare immediatamente
con acqua fresca.
2020
Page 21

Garanzia
Qualsiasi modica e/o cambiamento al prodotto
annullerà la garanzia. Si declina ogni responsabilità
per danni causati da un uso non corretto di questo
prodotto.
Smaltimento
• Questo prodotto è soggetto a raccolta
dierenziata nei punti di raccolta appropriati.
Non smaltire il prodotto con i riuti domestici.
• Per maggiori informazioni, contattare il
rivenditore o le autorità locali responsabili per la
gestione dei riuti.
Documentazione
Il presente prodotto è stato realizzato e fornito in
conformità a tutte le norme e le direttive vigenti,
con validità in tutti gli stati membri della Comunità
Europea. Il presente prodotto è conforme alle
speciche e alle normative applicabili nel paese in
cui è stato venduto.
La documentazione uciale è disponibile su richiesta.
Detta documentazione uciale comprende, a titolo
esemplicativo, la Dichiarazione di conformità,
la scheda tecnica di sicurezza dei materiali e il
rapporto dei collaudi del prodotto.
Italiano
Clausola esonerativa di responsabilità
Il design e le caratteristiche tecniche sono soggetti
a modica senza necessità di preavviso. Tutti i
marchi, loghi e nomi dei prodotti sono marchi
commerciali o registrati dei rispettivi titolari e sono
riconosciuti come tali in questo documento.
2121
Page 22

Português
HAV-SB500
Soundbar
Conteúdo da embalagem
1. Soundbar
2. Controlo remoto (incl. pilhas AAA)
3. Adaptador de corrente
4. Cabo de alimentação (UE)
5. Cabo de alimentação (Reino Unido)
6. Cabo AUX
7. Cabo RCA
8. Cabo HDMI
9. Cabo SPDIF óptico
10. Montagem na parede
11. Parafusos de parede (3x) / Buchas (3x)
12. Parafusos (montagem na parede / soundbar)
(2x)
Descrição (g. A)
Soundbar é um dispositivo com vários altifalantes
incorporados que gera som estéreo a partir de
uma única caixa, melhorando dramaticamente a
qualidade do som sem necessitar de uma grande
quantidade de os.
1. Soundbar
• Para ligar o dispositivo,
coloque o interruptor de
ligar/desligar na posição
2. Interruptor ligar/desligar
3. Entrada CC
4. Entrada de áudio
5. Entrada HDMI
6. Saída HDMI
7. Entrada de áudio óptico
digital
8. Indicador de ligação
9. Indicador de entrada de
áudio
de ligar.
• Para desligar o dispositivo,
coloque o interruptor de
ligar/desligar na posição de
desligar.
• Ligue o adaptador de
corrente à entrada CC.
• Ligue o cabo de alimentação
à rede eléctrica.
• Ligue um cabo de áudio
ou um cabo AV à entrada
de áudio.
• Ligue um cabo HDMI à
entrada HDMI.
• Ligue um cabo HDMI à
saída HDMI.
• Ligue um cabo de áudio
óptico digital à entrada de
áudio óptica digital.
• O indicador acende-se
quando o dispositivo é ligado.
• O indicador acende -se
quando um cabo de áudio
ou um cabo AV é utilizado
entre dispositivos.
10. Indicador de entrada HDMI
11. Indicador de entrada de
áudio óptico digital
12. Indicador Bluetooth
13. Comando
14. Botão ligar/espera
15. Botão de desactivação
do som
16. Botão volume +
17. Botão volume -
18. Botão agudos +
19. Botão agudos -
20. Botão graves +
21. Botão graves -
22. Botão repor
23. Botão de som: Música
24. Botão de som: Filme
25. Botão de som: Noite
26. Botão de fonte: Entrada
de áudio
27. Botão origem: Entrada
HDMI
28. Botão origem: Entrada de
áudio óptica digital
29. Botão origem: Bluetooth
• O indicador acende -se
quando um cabo HDMI é
utilizado entre dispositivos.
• O indicador acende -se
quando um cabo de áudio
óptico digital é utilizado
entre dispositivos.
• O indicador acende -se
quando um cabo Bluetooth
é utilizado entre dispositivos.
• Prima o botão para ligar o
dispositivo.
• Prima o botão novamente
para denir o dispositivo
para o modo de espera.
• Prima o botão para
desactivar o som.
• Prima o botão novamente
para activar o som.
• Prima o botão para aumentar
o volume.
• Prima o botão para reduzir
o volume.
• Prima o botão para aumentar
os agudos.
• Prima o botão para reduzir
os agudos.
• Prima o botão para aumentar
os graves.
• Prima o botão para reduzir
os graves.
• Prima o botão para repor
agudos e graves para as
predenições.
• Prima o botão para colocar
o som no modo de música.
• Prima o botão para colocar
o som no modo de lme.
• Prima o botão para colocar
o som no modo noite.
• Prima o botão para denir a
fonte para a entrada de áudio.
• Prima o botão para denir a
fonte para a entrada HDMI.
• Prima o botão para denir
a fonte para a entrada de
áudio óptico digital.
• Prima o botão para denir a
fonte para Bluetooth.
2222
Page 23

Português
Instalação (g. B & C)
• Consulte as imagens para instalar
correctamente o dispositivo.
Emparelhamento Bluetooth
Emparelhamento automático
1. Ligue a soundbar.
2. Ligue o dispositivo Bluetooth à corrente
eléctrica.
Nota: Certique-se de que o dispositivo
Bluetooth é o último dispositivo ligado.
3. Ligue o dispositivo Bluetooth.
4. Dena a fonte para Bluetooth. O dispositivo
Bluetooth será emparelhado com a soundbar.
Oindicador Bluetooth acende continuamente.
Emparelhamento manual
1. Ligue a soundbar.
2. Dena a fonte para Bluetooth.
3. Quando o indicador Bluetooth piscar,
a soundbar encontra-se no modo de
emparelhamento.
4. Ligue o dispositivo Bluetooth à corrente
eléctrica.
5. Ligue o dispositivo Bluetooth. O dispositivo
Bluetooth irá procurar a ID Bluetooth da
soundbar: "HAV-SB500".
6. Se for apresentada a janela da palavra-
passe, introduza a palavra-passe: "0000".
Odispositivo Bluetooth será emparelhado
com a soundbar. O indicador Bluetooth
acende continuamente.
NOTA: remova as tampas protetoras dos
conectores dos cabos óticos e do cabo HDMI
fornecidos, antes da utilização.
Segurança
Segurança geral
• Leia atentamente o manual de instruções antes
de utilizar. Guarde o manual para consulta futura.
• Utilize o dispositivo apenas para a nalidade
a que se destina. Não utilize o dispositivo para
outras nalidades além das descritas no manual.
• Não utilize o dispositivo caso tenha alguma
peça danicada ou com defeito. Se o dispositivo
estiver danicado ou tenha defeito, substitua
imediatamente o dispositivo.
• Não exponha o dispositivo a água ou humidade.
• Não bloqueie as aberturas de ventilação.
Segurança eléctrica
• Quando necessitar de reparação e para reduzir
o risco de choque eléctrico, este produto deve
apenas ser aberto por um técnico autorizado.
• Desligue o produto da tomada de alimentação e
outro equipamento se ocorrer um problema.
Segurança das pilhas
• Utilize apenas as pilhas indicadas neste manual.
• Não misture pilhas usadas e novas.
• Não utilize pilhas de tipos ou marcas diferentes.
• Não instale as pilhas com polaridade invertida.
• Não coloque as pilhas em curto-circuito nem as
desmonte.
• Não exponha as pilhas a água.
• Não exponha as pilhas a fogo ou calor excessivo.
• As pilhas facilmente apresentam fugas quando
totalmente descarregadas. Para evitar danos
ao produto, retire as pilhas sempre que não for
utilizar o produto durante longos períodos de
tempo.
• Se o líquido das pilhas entrar em contacto com
a pele ou vestuário, lave imediatamente com
água corrente.
2323
Page 24

Garantia
Quaisquer alterações e/ou modicações no
produto anularão a garantia. Não nos podemos
responsabilizar por qualquer dano causado pelo
uso incorrecto do produto.
Eliminação
• O produto deve ser eliminado separadamente
num ponto de recolha apropriado. Não elimine
este produto juntamente com o lixo doméstico.
• Para obter mais informações, contacte o
revendedor ou o organismo local responsável
pela gestão de resíduos.
Documentação
O produto foi fabricado e fornecido em conformidade
com todos os regulamentos e directivas relevantes,
válidos para todos os Estados-Membros da União
Europeia. Além disso, está em conformidade com
todas as especicações e regulamentos aplicáveis
no país de venda.
Mediante pedido, será disponibilizada documentação
formal. A documentação formal inclui, entre outros,
a Declaração de Conformidade, a Ficha de Dados
de Segurança e o relatório de teste do produto.
Português
Limitação de responsabilidade
Os designs e as especicações estão sujeitos a
alteração sem aviso. Todos os logótipos, marcas
ou logótipos de marcas e nomes de produtos são
marcas registadas dos respectivos proprietários e
são reconhecidas como tal neste documento.
2424
Page 25

Dansk
HAV-SB500
Soundbar
Pakkens indhold
1. Soundbar
2. Fjernbetjening (inkl. AAA batterier)
3. Strømadapter
4. Strømkabel (EU)
5. Strømkabel (Storbritannien)
6. AUX-kabel
7. RCA-kabel
8. HDMI-kabel
9. Optisk SPDIF-kabel
10. Vægmontering
11. Vægskruer (3x) / Vægstik (3x)
12. Skruer (vægmontering / soundbar) (2x)
Beskrivelse (g. A)
Denne soundbar er et apparat med ere indbyggere
højttalere, som afgiver stereolyd fra et enkelt
kabinet, hvilket forbedrer lydkvaliteten betydeligt,
uden behov for en masse ledninger.
1. Soundbar
• Tænd for apparatet ved at
sætte tænd/sluk-kontakten
2. Tænd/sluk-kontakt
3. DC-indgang
4. Audio-indgang
5. HDMI-indgang
6. HDMI-udgang
7. Optisk digital audioindgang
8. Power-indikator
9. Audio-indgangsindikator
10. HDMI-indgangsindikator
11. Optisk digital audioindgangsindikator
ipositionen on.
• Sluk for apparatet ved at
sætte tænd/sluk-kontakten
ipositionen o.
• Tilslut strømadapteren til
DC-indgangen.
• Tilslut forsyningskablet til
lysnettet.
• Tilslut et audio-kabel eller et
AV-kabel til audio-indgangen.
• Tilslut et HDMI-kabel til
HDMI-indgangen.
• Tilslut et HDMI-kabel til
HDMI-udgangen.
• Tilslut et optisk digitalt
audio-kabel til den optiske
digitale audio-indgang.
• Indik atoren tændes, når
apparatet er tændt.
• Indik atoren tænder når et
audio-kabel eller et AV-kabel
bruges mellem apparater.
• Indik atoren tænder når et
HDMI-kabel bruges mellem
apparater.
• Indik atoren tænder når et
optisk digitalt audio-kabel
bruges mellem apparater.
12. Bluetooth indikator
13. Fjernbetjening
14. Tænd/standby-knap
15. Lydløs-knap
16. Lydstyrke + knap
17. Lydstyrke - knap
18. Diskant + knap
19. Diskant - knap
20. Bas + knap
21. Bas - knap
22. Nulstillingsknap
23. Lydknap: Musik
24. Lydknap: Film
25. Lydknap: Nat
26. Kildeknap: Audio-indgang
27. Kildeknap: HDMI-indgang
28. Kildeknap: Optisk digital
audio-indgang
29. Kildeknap: Bluetooth
• Indik atoren tænder når
Bluetooth bruges mellem
apparater.
• Tryk på knappen for at
tænde for apparatet.
• Tryk på knappen igen for at
indstille apparatet i standby
tilstand.
• Tryk på knappen for at
aktivere lydløs.
• Tryk på knappen for at
deaktivere lydløs.
• Tryk på knappen for at øge
lydstyrken.
• Tryk på knappen for at sænke
lydstyrken.
• Tryk på knappen for at øge
diskanten.
• Tryk på knappen for at sænke
diskanten.
• Tryk på knappen for at øge
bassen.
• Tryk på knappen for at sænke
bassen.
• Tryk på knappen for at
nulstille diskant og bas til
standard indstilling.
• Tryk på knappen for
at indstille lyden til
musiktilstand.
• Tryk på knappen for
at indstille lyden til
lmtilstand.
• Tryk på knappen for
at indstille lyden til
nattetilstand.
• Tryk på knappen for at
indstille kilden til audioindgang.
• Tryk på knappen for at
indstille kilden til HDMIindgang.
• Tryk på knappen for at
indstille kilden til optisk
digital audio-indgang.
• Tryk på knappen for at
indstille kilden til Bluetooth.
2525
Page 26

Dansk
Installation (g. B & C)
• Se illustrationen for detaljer vedr. apparatets
korrekte installation.
Bluetooth parring
Automatisk parring
1. Tænd for soundbar.
2. Tilslut Bluetooth-apparat.
Bemærk: Sørg for at dit Bluetooth-apparat er
det sidste apparat der tilsluttes.
3. Tænd for Bluetooth-apparat.
4. Indstil kilden til Bluetooth. Bluetooth-
apparatet skal parres med soundbar.
Bluetooth-indikatoren lyser vedvarende.
Manuel parring
1. Tænd for soundbar.
2. Indstil kilden til Bluetooth.
3. Når Bluetooth-indikatoren blinker, er
soundbar i parringstilstand.
4. Tilslut Bluetooth-apparat.
5. Tænd for Bluetooth-apparat. Bluetooth-
apparatet søger efter Bluetooth ID for
soundbar: “HAV-SB500“.
6. Hvis feltet til adgangskoden viser, indtast
adgangskoden: “0000“. Bluetooth-apparatet
skal parres med soundbar. Bluetoothindikatoren lyser vedvarende.
BEMÆRK: Inden brug skal du fjerne
beskyttelseshætterne fra stikkene på det
sammenrullede optiske kabel og HDMI-kabel.
Sikkerhed
Generel sikkerhed
• Læs vejledningen omhyggeligt inden apparatet
tages i brug. Gem vejledningen til fremtidig brug.
• Brug kun apparatet til de tilsigtede formål. Brug
ikke apparatet til andre formål end dem, som er
beskrevet i vejledningen.
• Brug ikke apparatet, hvis det har beskadigede
eller defekte dele. Hvis apparatet er beskadiget
eller defekt, skal det omgående udskiftes.
• Udsæt ikke apparatet for vand eller fugt.
• Bloker ikke ventilationshullerne.
Elektrisk sikkerhed
• For at nedsætte risikoen for elektrisk stød,
må dette produkt kun åbnes af en autoriseret
tekniker, når service er nødvendig.
• Frakobl produktet stikkontakten og andet udstyr,
hvis der opstår et problem.
Batterisikkerhed
• Brug kun de batterier, som er nævnt i vejledningen.
• Brug ikke gamle og nye batterier sammen.
• Brug ikke batterier af anden type eller mærker.
• Installer ikke batterierne med omvendt polaritet.
• Kortslut eller afmonter ikke batterierne.
• Udsæt ikke batterierne for vand.
• Udsæt ikke batterierne for ild eller overdreven
varme.
• Batterier kan lække, når de er fuldt aadede. For
at undgå skade på produktet skal batterierne
ernes, når de produktet efterlades uden opsyn
i et længere tidsrum.
• Hvis batterivæsken kommer i kontakt med hud
eller tøj skylles omgående med frisk vand.
2626
Page 27

Garanti
Ændringer og/eller modikationer af produktet
vil medføre bortfald af garantien. Vi fralægger os
ethvert ansvar for skader forårsaget på grund af
forkert brug af produktet.
Bortskaelse
• Produktet skal aeveres på et passende
indsamlingspunkt. Bortskaf ikke produktet
sammen med husholdningsaald.
• For mere information, kontakt forhandleren
eller den lokale myndighed der er ansvarlig for
kontrol af aald.
Dokumentation
Produktet er fremstillet og leveres i overensstemmelse
med alle relevante forordninger og direktiver, der
er gældende for alle EUs medlemsstater. Produktet
overholder alle gældende specikationer og
forskrifter i de lande, hvor produktet sælges.
Formel dokumentation kan fremlægges på
forlangende. Den formelle dokumentation omfatter,
men er ikke begrænset til, konformitetserklæringen,
sikkerhedsdatablad for materialet og rapporten fra
produkttesten.
Dansk
Ansvarsfraskrivelse
Design og specikationer kan ændres uden varsel.
Alle bomærker, mærker og produktnavne er
varemærker eller registrerede varemærker tilhørende
deres respektive ejere og anses herved som sådan.
2727
Page 28

Norsk
HAV-SB500
Lydplanke
Pakkens innhold
1. Lydplanke
2. Fjernkontroll (inkl. AAA-batterier)
3. Strømadapter
4. Strømkabel (EU)
5. Strømkabel (Storbritannia)
6. AUX-kabel
7. RCA-kabel
8. HDMI-kabel
9. Optisk SPDIF-kabel
10. Veggfeste
11. Veggskruer (3x) / Veggplugger (3x)
12. Skruer (veggfeste / lydplanke) (2x)
Beskrivelse (g. A)
Lydplanken er en enhet med ere innebygde
høyttalere som avgir stereolyd fra ett enkelt
kabinett, og forbedrer lydkvaliteten i vesentlig
grad uten bruk av en masse ledninger.
1. Lydplanke
• For å slå på enheten, sett
2. På/av-bryter
3. DC-inngang
4. Lydinngang
5. HDMI-inngang
6. HDMI-utgang
7. Optisk digital lydinngang
8. Strømindikator
9. Lydinngangsindikator
10. HDMI-inngangsindikator
11. Optisk digital
lydinngangsindikator
12. Bluetooth-indikator
på/av-bryteren til på.
• For å slå av enheten, sett
på/av-bryteren til av.
• Koble strømadapteren til
DC-inngangen.
• Koble strømkabelen til
stikkontakten.
• Koble en lydkabel eller AVkabel til lydinngangen.
• Koble en HDMI-k abel til
HDMI-inngangen.
• Koble en HDMI-k abel til
HDMI-utgangen.
• Koble en optisk digital
lydkabel til den optiske
digitale lydinngangen.
• Strømindikatoren lyser når
enheten er slått på.
• Indik atoren lyser når en
lydkabel eller en AV-kabel
brukes mellom enhetene.
• Indik atoren lyser når en
HDMI-kabel brukes mellom
enhetene.
• Indik atoren lyser når en
optisk digital lydkabel
brukes mellom enhetene.
• Indik atoren lyser når
enhetene er koblet sammen
med Bluetooth.
13. Fjernkontroll
14. På/standby-knapp
15. Demperknapp
16. Volum + knapp
17. Volum - knapp
18. Diskant + knapp
19. Diskant - knapp
20. Bass + knapp
21. Bass - knapp
22. Nullstillingsknapp
23. Lydknapp: Musikk
24. Lydknapp: Film
25. Lydknapp: Natt
26. Kildeknapp: Lydinngang
27. Kildeknapp: HDMI-inngang
28. Kildeknapp: Optisk digital
lydinngang
29. Kildeknapp: Bluetooth
• Trykk på knappen for å slå
på enheten.
• Trykk på knappen igjen for
å sette enheten i standbymodus.
• Trykk på knappen for å
dempe lyden.
• Trykk på knappen igjen for
å slå på igjen lyden.
• Trykk på knappen for å øke
volumet.
• Trykk på knappen for å
redusere volumet.
• Trykk på knappen for å øke
diskanten.
• Trykk på knappen for å
redusere diskanten.
• Trykk på knappen for å øke
bassen.
• Trykk på knappen for å
redusere bassen.
• Trykk på knappen for å
nullstille diskant og bass til
standardinnstillinger.
• Trykk på knappen for å sette
lyden til musikkmodus.
• Trykk på knappen for å sette
lyden til lmmodus.
• Trykk på knappen for å sette
lyden til nattmodus.
• Trykk på knappen for å sette
kilden til lydinngang.
• Trykk på knappen for å sette
kilden til HDMI-inngang.
• Trykk på k nappen for å sette
kilden til optisk digital
lydinngang.
• Trykk på knappen for å sette
kilden til Bluetooth.
2828
Page 29

Norsk
Installasjon (g. B & C)
• Se gurene for å montere enheten på riktig måte.
Bluetooth-paring
Automatisk parkobling
1. Slå på lydplanken.
2. Koble til Bluetooth-enheten.
Merk: Sjekk at Bluetooth-enheten er den siste
tilkoblede enheten.
3. Slå på Bluetooth-enheten.
4. Velg Bluetooth som kilde. Bluetooth-enheten
vil parkobles med lydplanken. Bluetoothindikatoren lyser konstant.
Manuell parkobling
1. Slå på lydplanken.
2. Velg Bluetooth som kilde.
3. Når Bluetooth-indikatoren blinker, er lydplanken
i parkoblingsmodus.
4. Koble til Bluetooth-enheten.
5. Slå på Bluetooth-enheten. Bluetooth-enheten
vil søke etter lydplankens Bluetooth-ID:
“HAV-SB500“.
6. Hvis du må skrive inn passord: “0000“. Bluetoothenheten vil parkobles med lydplanken.
Bluetooth-indikatoren lyser konstant.
MERK: Fjern beskyttelseshettene på kontakten på
den buntede optiske kabelen og HDMI-kabelen før
bruk.
Sikkerhet
Generell sikkerhet
• Les bruksanvisningen nøye før bruk. Oppbevar
bruksanvisningen for fremtidig bruk.
• Bruk bare enheten for det tiltenkte formålet.
Ikke bruk enheten til andre formål enn det som
er beskrevet i bruksanvisningen.
• Ikke bruk enheten hvis noen del er skadet eller
defekt. Enheten må erstattes umiddelbart hvis
den er skadet eller defekt.
• Ikke utsett enheten for vann eller fuktighet.
• Ikke blokker ventilasjonsåpningene.
Elektrisk sikkerhet
• For å redusere faren for strømstøt, skal dette
produktet bare åpnes av en autorisert tekniker
når vedlikehold er nødvendig.
• Koble produktet fra strømmen og annet utstyr
dersom et problem oppstår.
Batterisikkerhet
• Bruk bare batteriene som er nevnt i denne
veiledningen.
• Ikke bland gamle og nye batterier.
• Ikke bruk batterier av ulike typer eller merker.
• Ikke sett inn batterier i omvendt polaritet.
• Ikke kortslutt eller demonter batteriene.
• Ikke utsett batteriene for vann.
• Ikke utsett batteriene for brann eller overdreven
varme.
• Batterier er mer utsatt for lekkasje når de helt
utladet. For å unngå skader på produktet, ta ut
batteriene når du forlater produktet uten tilsyn
ilengre perioder.
• Hvis væske fra batteriene kommer i kontakt
med hud eller klær, må du skylle med friskt vann
umiddelbart.
2929
Page 30

Garanti
Eventuelle endringer og/eller modikasjoner av
produkter opphever garantien. Vi tar ikke ansvar for
skade som forårsakes av ukorrekt bruk av produktet.
Avhending
• Produktet må avhendes på egnede
oppsamlingssteder. Du må ikke avhende
produktet som husholdningsavfall.
• Ta kontakt med leverandøren eller lokale
myndigheter hvis du ønsker mer informasjon
om avhending.
Dokumentasjon
Produktet har blitt produsert og levert i henhold til
alle relevante bestemmelser og direktiver, gyldig for
alle medlemsstater i EU. Produktet overholder også
alle gjeldende spesikasjoner og bestemmelser
ilandet det selges i.
Formell dokumentasjon er tilgjengelig på forespørsel.
Den formelle dokumentasjon inkluderer, men er ikke
begrenset til samsvarserklæringen, HMS-databladet
og produkttestrapporten.
Norsk
Ansvarsfraskrivelse
Utforming og spesikasjoner kan endres uten
forhåndsvarsel. Alle logoer, merker og produktnavn
er varemerker eller registrerte varemerker til de
respektive eierne, og skal behandles som dette.
3030
Page 31

Svenska
HAV-SB500
Soundbar
Förpackningens innehåll
1. Soundbar
2. Fjärrkontroll (inkl. AAA batterier)
3. Strömadapter
4. Strömkabel (EU)
5. Strömkabel (Storbritannien)
6. AUX-kabel
7. RCA-kabel
8. HDMI-kabel
9. Optisk SPDIF-kabel
10. Vägmontering
11. Väggskruvar (3x) / Väggpluggar (3x)
12. Skruvar (väggmontering / soundbar) (2x)
Beskrivning (g. A)
Soundbaren är en enhet med era inbyggda
högtalare som genererar stereoljud från ett och
samma kabinett, vilket förbättrar ljudkvaliteten
drastiskt utan en massa sladdar.
1. Soundbar
• För att slå på enheten, sätt
2. På/av-brytare
3. Likströmsingång
4. Ljudingång
5. HDMI-ingång
6. HDMI-utgång
7. Optisk digital ljudingång
8. Strömindikator
9. Indikator för ljudingång
10. Indikator för HDMI-ingång
11. Indikator för Optisk digital
ljudingång
12. Indikator för Bluetooth
på/av-brytaren i på-läget.
• För att slå av enheten, sätt
på/av-brytaren i av-läget.
• Anslut strömadaptern till
likströmsingången.
• Anslut huvudkabeln till
huvudingångarna.
• Anslut en ljudkabel eller en
AV-kabel till ljudingången.
• Anslut en HDMI-kabel till
HDMI-ingången.
• Anslut en HDMI-kabel till
HDMI-utgången.
• Anslut en optisk digital
ljudkabel till den optiska
digitala ljudingången.
• I ndikatorn tänds när enheten
är påslagen.
• Indik atorn tänds när en
ljudkabel eller en AV-kabel
används mellan enheter.
• Indik atorn tänds när en
HDMI-kabel används mellan
enheter.
• Indik atorn tänds när en
HDMI-kabel används mellan
enheter.
• Indik atorn tänds när
Bluetooth används mellan
enheter.
13. Fjärrkontroll
14. På/standby-knapp
15. Mute-knappen.
16. Volym + knapp
17. Volym - knapp
18. Diskant + knapp
19. Diskant - knapp
20. Bas + knapp
21. Bas - knapp
22. Återställningsknapp
23. Ljudknapp: Musik
24. Ljudknapp: Film
25. Ljudknapp: Natt
26. Källa-knapp: Ljudingång
27. Källa-knapp: HDMI-ingång
28. Källa-knapp: Optisk digital
ljudingång
29. Källa-knapp: Bluetooth
• Tryck på knappen för att
sätta på enheten.
• Tryck på knappen igen för att
sätta enheten i standby-läge.
• Tryck på knappen för att gå
till tyst läge.
• Tryck på knappen för att
återgå till ljud-läge.
• Tryck på knappen för att
öka volymen.
• Tryck på knappen för att
minska volymen.
• Tryck på knappen för att
öka diskanten.
• Tryck på knappen för att
minska diskanten.
• Tryck på knappen för att
öka basen.
• Tryck på knappen för att
minska basen.
• Tryck på knappen för att
återställa diskant och bas till
stanardvärden.
• Tryck på knappen för att
sätta ljudet till musik-läge.
• Tryck på knappen för att
sätta ljudet till lm-läge.
• Tryck på knappen för att
sätta ljudet till natt-läge.
• Tryck på knappen för att
sätta källa till ljudingång.
• Tryck på knappen för att
sätta källa till HDMI-ingång.
• Tryck på knappen för att
sätta källa till ingång för
optisk digital ljudingång.
• Tryck på knappen för att
sätta källa till Bluetooth.
3131
Page 32

Svenska
Installation (g. B & C)
• Se illustrationerna för korrekt installation av
enheten.
Bluetooth-parning
Automatisk parning
1. Sätt på soundbaren.
2. Anslut Bluetooth-enheten.
Obs! Se till att din Bluetooth-enhet är den
senast anslutna enheten.
3. Sätt på Bluetooth-enheten.
4. Sätt källa till Bluetooth. Bluetooth-enheten
kommer att paras med ljudbaren. Indikatorn
för Bluetooth lyser fast.
Manuell parning
1. Sätt på soundbaren.
2. Sätt källa till Bluetooth.
3. När indikatorn för Bluetooth blinkar är
soundbaren i parningsläge.
4. Anslut Bluetooth-enheten.
5. Sätt på Bluetooth-enheten. Bluetooth-
enheten kommer att söka efter soundbarens
Bluetooth-ID. “HAV-SB500“.
6. Om lösenordsskärmen visas, skriv i lösenordet:
“0000“. Bluetooth-enheten kommer att paras
med ljudbaren. Indikatorn för Bluetooth lyser
fast.
OBS! Ta bort kontaktens skyddslock från
medföljande optiska kablar och HDMI-kablar
innan användning.
Säkerhet
Allmän säkerhet
• Läs bruksanvisningen noga innan användning.
Behåll bruksanvisningen för att kunna använda
den igen.
• Använd endast enheten för dess avsedda syfte.
Använd inte enheten till andra ändamål än dem
som beskrivs i denna bruksanvisning.
• Använd inte enheten om någon del är skadad
eller felaktig. Om enheten är skadad eller felaktig
ska den bytas ut omedelbart.
• Utsätt inte enheten för vatten eller fukt.
• Blockera inte ventilationsöppningarna.
Elsäkerhet
• För att minska risken för elektriska stötar bör
denna produkt endast öppnas av behörig tekniker
när service behövs.
• Dra ut strömkabeln från eluttaget och koppla ur
all annan utrustning om något problem skulle
uppstå.
Batterisäkerhet
• Använd endast de batterier som omnämns
idenna bruksanvisning.
• Blanda inte gamla och nya batterier.
• Använd inte batterier av olika typ eller märke.
• Montera inte batterierna med polerna felvända.
• Kortslut eller öppna inte batterierna.
• Utsätt inte batterierna för vatten.
• Utsätt inte batterierna för eld eller kraftig värme.
• Det nns risk för att batterierna läcker när de
är helt urladdade. Undvik skada på produkten
genom att avlägsna batterierna när produkten
inte används under längre perioder.
• Skölj omedelbart med vatten om vätska från
batterierna kommer i kontakt med skinn eller
kläder.
3232
Page 33

Garanti
Alla ändringar och/eller modieringar på produkten
gör garantin ogiltig. Vi kan inte ta något ansvar
för skador som orsakats av felaktig användning av
denna produkt.
Kassering
• Produkten är avsedd för separat insamling vid
en lämplig återvinningscentral. Släng inte denna
produkt bland vanligt hushållsavfall.
• För mer information, kontakta återförsäljaren eller
lokal myndighet med ansvar för avfallshantering.
Dokumentation
Produkten har tillverkats och levereras i enlighet
med alla relevanta regler och direktiv som gäller
för alla medlemsstater inom Europeiska unionen.
Den uppfyller även alla tillämpliga specikationer
och regler i försäljningslandet.
Formell dokumentation nns att beställa på begäran.
Den formella dokumentationen inbegriper, men är
inte begränsad till, försäkran om överensstämmelse,
säkerhetsdatablad och testrapporten.
Svenska
Friskrivningsklausul
Utseende och specikationer kan komma att ändras
utan föregående meddelande. Alla logotyper och
produktnamn är varumärken eller registrerade
varumärken som tillhör sina ägare och är härmed
erkända som sådana.
3333
Page 34

Suomi
HAV-SB500
Soundbar-kaiutin
Pakkauksen sisältö
1. Soundbar-kaiutin
2. Kauko-ohjain (sis. AAA-paristot)
3. Verkkolaite
4. Virtajohto (EU)
5. Virtajohto (UK)
6. AUX-kaapeli
7. RCA-kaapeli
8. HDMI-kaapeli
9. Optinen SPDIF-kaapeli
10. Seinäkiinnike
11. Seinäruuvit (3x) / Seinäproput (3x)
12. Ruuvit (seinäkiinnike / soundbar-kaiutin) (2x)
Kuvaus (kuva A)
Soundbar-kaiutin on laite, jossa on useita kiinteitä
kaiuttimia, joka tuottaa stereoääntä yhdessä
kotelossa ja parantaa äänenlaatua merkittävästi
vaatimatta lukuisia johtoja.
1. Soundbar-kaiutin
• Laite kytketään päälle
kytkemällä virtakytkin on-
2. Virtakytkin
3. DC-tulo
4. Äänentulo
5. HDMI-tulo
6. HDMI-lähtö
7. Optisen digitaalisen äänen
tulo.
8. Virran merkkivalo
9. Äänitulon merkkivalo
10. HDMI-tulon merkkivalo
11. Optisen digitaalisen äänen
tulon merkkivalo
asentoon.
• Laite sammutetaan
kytkemällä virtakytkin oasentoon.
• Kytke verkkolaite
tasavirtatuloon.
• Kytke virtajohto pistorasiaan.
• Kytke äänijohto tai AV-kaapeli
äänituloon.
• Kytke HDMI-kaapeli HDMItuloon.
• Kytke HDMI-kaapeli HDMIlähtöön.
• Kytke optinsen digitaalisen
äänen kaapeli optisen
digitaalisen äänen tuloon.
• Merk kivalo syttyy, kun laite
on päällä.
• Merk kivalo palaa, kun
laitteiden välillä käytetään
äänijohtoa tai AV-kaapelia.
• Merk kivalo palaa, kun
laitteiden välillä käytetään
HDMI-kaapelia.
• Merk kivalo palaa, kun
laitteiden välillä käytetään
optisen digitaalisen äänen
kaapelia.
12. Bluetooth-merkkivalo
13. Kaukosäädin
14. Päällä/valmiuspainike
15. Mykistyspainike
16. Äänenvoimakkuus ylös
-painike
17. Äänenvoimakkuus alas
-painike
18. Diskantit ylös -painike
19. Diskantit alas -painike
20. Basso ylös -painike
21. Basso alas -painike
22. Nollauspainike
23. Äänipainike: Musiikki
24. Äänipainike: Elokuva
25. Äänipainike: Yö
26. Lähdepainike: Äänentulo
27. Lähdepainike: HDMI-tulo
28. Lähdepainike: Optisen
digitaalisen äänen tulo.
29. Lähdepainike: Bluetooth
• Merk kivalo palaa, kun
laitteiden välillä käytetään
Bluetooth-yhteyttä.
• Kytke laitteeseen virta
painamalla tätä painiketta.
• Paina painiketta uudelleen
siirtääksesi laitteen
valmiustilaan.
• Paina painketta mykistääksesi
äänen.
• Paina painketta uudelleen
kumotaksesi mykistyksen.
• Paina painketta lisätäksesi
äänenvoimakkuutta.
• Paina painketta pienentääksesi
äänenvoimakkuutta.
• Paina painketta lisätäksesi
diskantteja.
• Paina painketta vähentääksesi
diskantteja.
• Paina painketta lisätäksesi
bassoa.
• Paina painketta vähentääksesi
bassoa.
• Tällä painikkeella voit
palauttaa diskantit ja
basson oletusasetuksiinsa.
• Paina painiketta siirtääksesi
laitteen musiikkitilaan.
• Paina painiketta siirtääksesi
laitteen elokuvatilaan.
• Aseta ääni yötilaan painamalla
painiketta.
• Paina painiketta valitaksesi
äänitulon lähteen.
• Paina painiketta valitaksesi
HDMI-tulon.
• Paina painiketta valitaksesi
optisen digitaalisen äänen
tulon.
• Paina painiketta valitaksesi
Bluetooth.
3434
Page 35

Suomi
Asennus (kuva B & C)
• Asenna laite kuvien mukaisesti.
Bluetooth-parinmuodostus
Automaattinen parinmuodostus
1. Kytke soundbar-kaiutin päälle.
2. Kytke Bluetooth-laite.
Huomaa: Varmista, että Bluetooth-laite on
viimeinen kytkettävä laite.
3. Kytke Bluetooth-laite päälle.
4. Valitse lähteeksi Bluetooth. Bluetooth-laite
muodostaa laiteparin soundbar-kaiuttimien
kanssa. Bluetooth-merkkivalo palaa tasaisesti.
Manuaalinen parinmuodostus
1. Kytke soundbar-kaiutin päälle.
2. Valitse lähteeksi Bluetooth.
3. Kun Bluetooth-merkkivalo vilkkuu, soundbarkaiutin on parinmuodostustilassa.
4. Kytke Bluetooth-laite.
5. Kytke Bluetooth-laite päälle. Bluetoothlaite etsiin soundbar-kaiuttimen Bluetoothtunnusta: “HAV-SB500“.
6. Jos näyttöön tulee salasanaikkuna, kirjoita
salasana “0000“. Bluetooth-laite muodostaa
laiteparin soundbar-kaiuttimien kanssa.
Bluetooth-merkkivalo palaa tasaisesti.
HUOMAUTUS: Poista liittimien suojukset optisesta
kaapelista ja HDMI-kaapelista ennen
käyttöönottoa.
Turvallisuus
Yleinen turvallisuus
• Lue käyttöopas huolella ennen käyttöä. Säilytä
käyttöopas tulevaa käyttöä varten.
• Käytä laitetta vain sille tarkoitettuun
käyttötarkoitukseen. Älä käytä laitetta muuhun
kuin käyttöoppaassa kuvattuun tarkoitukseen.
• Älä käytä laitetta, jos jokin sen osa on vioittunut
tai viallinen. Jos laite on vioittunut tai viallinen,
vaihda laite välittömästi.
• Älä altista laitetta vedelle ja kosteudelle.
• Älä tuki tuuletusaukkoja.
Sähköturvallisuus
• Sähköiskun riskin pienentämiseksi, ainoastaan
valtuutettu huoltohenkilö saa avata tämän
laitteen huoltoa varten.
• Jos ongelmia ilmenee, irrota laite verkkovirrasta
ja muista laitteista.
Paristoturvallisuus
• Käytä vain käsikirjassa mainittuja paristoja.
• Älä käytä vanhoja ja uusia paristoja yhdessä.
• Älä käytä eri tyyppisiä tai eri merkkisiä paristoja.
• Älä asenna paristoja väärin päin.
• Älä aiheuta paristoissa oikosulkua tai pura niitä.
• Älä altista paristoja vedelle.
• Älä altista paristoja tulelle tai liialliselle kuumuudelle.
• Akut saattavat vuotaa, kun ne ovat täysin tyhjät.
Jotta tuote ei vaurioidu, poista paristot jättäessäsi
tuotteen valvomatta pitemmäksi aikaa.
• Jos paristoista vuotava neste joutuu kosketuksiin
ihon tai vaatteiden kanssa, huuhtele välittömästi
raikkaalla vedellä.
3535
Page 36

Takuu
Takuu mitätöityy, mikäli laitteeseen tehdään mitä
tahansa muutoksia. Emme ole myöskään vastuussa
vahingoista, jotka johtuvat tämän tuotteen
virheellisestä käytöstä.
Hävittäminen
• Tämä tuote tulee toimittaa hävitettäväksi
asianmukaiseen keräyspisteeseen. Tuotetta ei
saa hävittää kotitalousjätteen mukana.
• Lisätietoja antaa jälleenmyyjä tai paikallinen
jätehuollosta vastaava viranomainen.
Asiakirjat
Tämä tuote on valmistettu ja toimitettu noudattaen
kaikkia sitä koskevia asetuksia ja direktiivejä,
jotka ovat voimassa kaikissa Euroopan unionin
jäsenvaltioissa. Se täyttää kaikki myyntimaassa
sovellettavat vaatimukset ja määräykset.
Viralliset asiakirjat ovat saatavilla pyynnöstä. Viralliset
asiakirjat sisältävät mm. yhdenmukaisuusvakuutuksen,
käyttöturvallisuustiedotteen ja tuotteen testausraportin.
Suomi
Vastuuvapauslauseke
Muutoksia malliin ja teknisiin ominaisuuksiin
voidaan tehdä ilmoituksetta. Kaikki logot, merkit
ja tuotenimet ovat niiden vastaavien omistajien
tuotemerkkejä tai rekisteröityjä tuotemerkkejä ja
niitä on käsiteltävä sellaisina.
3636
Page 37

Ελληνικά
HAV-SB500
Soundbar
Περιεχόμενα συσκευασίας
1. Soundbar
2. Τηλεχειριστήριο (συμπ. μπαταρίες AAA)
3. Αντάπτορ ισχύος
4. Καλώδιο ρεύματος (ΕΕ)
5. Καλώδιο ρεύματος (ΗΒ)
6. Καλώδιο AUX
7. Καλώδιο RCA
8. Καλώδιο HDMI
9. Οπτικό καλώδιο SPDIF
10. Βάση τοίχου
11. Βίδες τοίχου (3x) / Βύσματα τοίχου (3x)
12. Βίδες (βάση τοίχου / soundbar) (2x)
Περιγραφή (εικ. A)
Το soundbar είναι μια συσκευή με πολλαπλά
ενσωματωμένα ηχεία και δημιουργεί ήχο στέρεο
από έναν και μόνο θάλαμο, βελτιώνοντας
σημαντικά την ποιότητα ήχου χωρίς να απαιτούνται
πολλά καλώδια.
1. Soundbar
• Για να ενεργοποιήσετε τη
συσκευή, θέστε το διακόπτη
2. Διακόπτης on/o
3. Είσοδος DC
4. Είσοδος ήχου
5. Είσοδος HDMI
6. Έξοδος HDMI
7. Οπτική ψηφιακή είσοδος
ήχου
8. Ενδεικτική λυχνία ισχύος
9. Ένδειξη εισόδου ήχου
10. Ένδειξη εισόδου HDMI
on/o στη θέση on.
• Για να απενεργοποιήσετε τη
συσκευή, θέστε το διακόπτη
on/o στη θέση o.
• Συνδέστε τον αντάπτορα
ισχύος στην είσοδο DC.
• Συνδέστε το καλώδιο
ρεύματος στο ρεύμα.
• Συνδέστε ένα καλώδιο ήχου
ή ένα καλώδιο AV στην
είσοδο ήχου.
• Συνδέστε ένα καλώδιο
HDMI στην είσοδο HDMI.
• Συνδέστε ένα καλώδιο
HDMI στην έξοδο HDMI.
• Συνδέσ τε ένα οπτικό
ψηφιακό καλώδιο ήχου στην
οπτική ψηφιακή είσοδο ήχου.
• Η ένδειξη ε νεργοποιείται
όταν η συσκευή είναι
ενεργοποιημένη.
• Η ένδειξη ανάβει όταν
χρησιμοποιείται ένα
καλώδιο ήχου ή ένα καλώδιο
AV μεταξύ συσκευών.
• Η ένδει ξη ανάβει όταν
χρησιμοποιείται ένα καλώδιο
HDMI μεταξύ συσκευών.
11. Ένδειξη οπτικής ψηφιακής
εισόδου ήχου
12. Ένδειξη Bluetooth
13. Τηλεχειριστήριο
14. Κουμπί Ενεργό/Αναμονή
15. Κουμπί σίγασης
16. Κουμπί έντασης +
17. Κουμπί έντασης -
18. Κουμπί πρίμα +
19. Κουμπί πρίμα -
20. Κουμπί μπάσα +
21. Κουμπί μπάσα -
22. Κουμπί επανεκκίνησης
23. Κουμπί ήχου: Μουσική
24. Κουμπί ήχου: Ταινία
25. Κουμπί ήχου: Νύχτα
26. Κουμπί πηγής: Είσοδος
ήχου
27. Κουμπί πηγής: Είσοδος
HDMI
28. Κουμπί πηγής: Οπτική
ψηφιακή είσοδος ήχου
29. Κουμπί πηγής: Bluetooth
• Η ένδειξη ανάβει όταν
χρησιμοποιείται ένα οπτικό
ψηφιακό καλώδιο ήχου
μεταξύ συσκευών.
• Η ένδειξη ανάβει όταν
χρησιμοποιείται Bluetooth
μεταξύ συσκευών.
• Πιέσ τε το κουμπί για να
ενεργοποιήσετε τη συσκευή.
• Πατήσ τε το κουμπί εκ νέου
για να ρυθμίσετε τη συσκευή
στη λειτουργία αναμονής.
• Πιέσ τε το κουμπί για σίγαση
του ήχου.
• Πιέσ τε το κουμπί εκ νέου
για ακύρωση της σίγασης
του ήχου.
• Πιέσ τε το κουμπί για να
αυξήσετε την ένταση.
• Πιέσ τε το κουμπί για να
μειώσετε την ένταση.
• Πιέσ τε το κουμπί για να
αυξήσετε τα πρίμα.
• Πιέσ τε το κουμπί για να
μειώσετε τα πρίμα.
• Πιέσ τε το κουμπί για να
αυξήσετε τα μπάσα.
• Πιέσ τε το κουμπί για να
μειώσετε τα μπάσα.
• Πατήσ τε το κουμπί για
την επαναφορά των
πρίμων και μπάσων στην
προεπιλεγμένη ρύθμιση.
• Πατήσ τε το κουμπί για να
ρυθμίσετε τον ήχο στη
λειτουργία μουσικής.
• Πατήσ τε το κουμπί για να
ρυθμίσετε τον ήχο στη
λειτουργία ταινίας.
• Πατήσ τε το κουμπί για να
ρυθμίσετε τον ήχο στη
λειτουργία νύχτας.
• Πατήσ τε το κουμπί για να
ρυθμίσετε την πηγή στην
είσοδο ήχου.
• Πατήσ τε το κουμπί για να
ρυθμίσετε την πηγή στην
είσοδο HDMI.
• Πατήσ τε το κουμπί για να
ρυθμίσετε την πηγή στην
οπτική ψηφιακή είσοδο ήχου.
• Πατήσ τε το κουμπί για να
ρυθμίσετε την πηγή στη
Bluetooth.
3737
Page 38

Ελληνικά
Εγκατάσταση (εικ. B & C)
• Ανατρέξτε στις απεικονίσεις για να
εγκαταστήσετε σωστά τη συσκευή.
Ζεύξη Bluetooth
Αυτόματη ζεύξη
1. Ενεργοποιήστε το soundbar.
2. Συνδέστε τη συσκευή Bluetooth.
Σημείωση: Εξασφαλίστε ότι η συσκευή
Bluetooth είναι η τελευταία συνδεδεμένη
συσκευή.
3. Ενεργοποιήστε τη συσκευή Bluetooth.
4. Ρυθμίστε την πηγή στη Bluetooth. Η συσκευή
Bluetooth θα συζευχθεί με το soundbar.
Ηένδειξη Bluetooth ανάβει συνεχώς.
Χειροκίνητη ζεύξη
1. Ενεργοποιήστε το soundbar.
2. Ρυθμίστε την πηγή στη Bluetooth.
3. Όταν ανάβει η ένδειξη Bluetooth, το soundbar
βρίσκεται στη λειτουργία ζεύξης.
4. Συνδέστε τη συσκευή Bluetooth.
5. Ενεργοποιήστε τη συσκευή Bluetooth.
Η συσκευή Bluetooth θα αναζητήσει το
αναγνωριστικό Bluetooth του soundbar:
“HAV-SB500“.
6. Εάν εμφανιστεί το παράθυρο κωδικού
πρόσβασης, καταχωρήστε τον κωδικό
πρόσβασης: “0000“. Η συσκευή Bluetooth
θα συζευχθεί με το soundbar. Η ένδειξη
Bluetooth ανάβει συνεχώς.
ΣΗΜΕΙΩΣΗ: Αφαιρέστε τα προστατευτικά
καλύμματα βυσμάτων από το παρεχόμενο οπτικό
καλώδιο και το καλώδιο HDMI πριν από τη χρήση.
Ασφάλεια
Γενική ασφάλεια
• Διαβάστε το εγχειρίδιο προσεκτικά πριν από τη
χρήση. Φυλάξτε το εγχειρίδιο για μελλοντική
αναφορά.
• Χρησιμοποιείτε τη συσκευή μόνο για τους
προοριζόμενους σκοπούς. Μη χρησιμοποιείτε
τη συσκευή για διαφορετικούς σκοπούς από
τους περιγραφόμενους στο εγχειρίδιο.
• Μη χρησιμοποιείτε τη συσκευή, εάν οποιοδήποτε
τμήμα της έχει ζημιά ή ελάττωμα. Εάν η συσκευή
έχει ζημιά ή ελάττωμα, αντικαταστήστε την αμέσως.
• Μην εκθέτετε τη συσκευή σε νερό ή υγρασία.
• Μην φράζετε τις οπές αερισμού.
Ηλεκτρική ασφάλεια
• Για να μειώσετε τον κίνδυνο ηλεκτροπληξίας,
το προϊόν αυτό θα πρέπει να ανοιχθεί μόνο
από εξουσιοδοτημένο τεχνικό όταν απαιτείται
συντήρηση (σέρβις).
• Αποσυνδέστε το προϊόν από την πρίζα και άλλο
εξοπλισμό αν παρουσιαστεί πρόβλημα.
Ασφάλεια μπαταριών
• Χρησιμοποιείτε μόνο τις μπαταρίες που
αναφέρονται στο παρόν εγχειρίδιο.
• Μην χρησιμοποιείτε μαζί παλιές και νέες μπαταρίες.
• Μην χρησιμοποιείτε μπαταρίες διαφορετικού
τύπου ή μάρκας.
• Μην εγκαθιστάτε μπαταρίες με αντίστροφη
πολικότητα.
• Μην βραχυκυκλώνετε ή αποσυναρμολογείτε τις
μπαταρίες.
• Μην εκθέτετε τις μπαταρίες σε νερό.
• Μην εκθέτετε τις μπαταρίες σε φωτιά ή υπερβολική
θερμότητα.
• Υπάρχει μεγάλη πιθανότητα διαρροής των
μπαταριών εάν αποφορτιστούν πλήρως. Προς
αποφυγή ζημιάς στο προϊόν, αφαιρέστε τις
μπαταρίες όταν αφήνετε το προϊόν ανεπιτήρητο
για μεγαλύτερες χρονικές περιόδους.
• Εάν υγρό των μπαταριών έρθει σε επαφή με
το δέρμα ή το ρουχισμό, ξεπλύνετε αμέσως με
καθαρό νερό.
3838
Page 39

Εγγύηση
Η εφαρμογή αλλαγών ή/και τροποποιήσεων στο
προϊόν συνεπάγεται ακύρωση της εγγύησης. Δεν
φέρουμε καμία ευθύνη για πιθανές βλάβες που
ενδέχεται να προκληθούν από την ακατάλληλη
χρήση του προϊόντος.
Απόρριψη
• Το προϊόν προορίζεται για ξεχωριστή συλλογή σε
κατάλληλο σημείο συλλογής. Μην απορρίπτετε
το προϊόν μαζί με τα οικιακά απόβλητα.
• Για περισσότερες πληροφορίες επικοινωνήστε
με τον αντιπρόσωπό σας ή τις τοπικές αρχές
διαχείρισης αποβλήτων.
Τεκμηρίωση
Το προϊόν αυτό κατασκευάστηκε και παρέχεται
σε συμμόρφωση με το σύνολο των αντίστοιχων
κανονισμών και οδηγιών που ισχύουν για τα
κράτη μέλη της Ευρωπαϊκής Ένωσης. Επίσης,
συμμορφώνεται με το σύνολο των ισχυουσών
προδιαγραφών και κανονισμών της χώρας διάθεσης.
Επίσημη τεκμηρίωση διατίθεται κατόπιν αιτήματος.
Η επίσημη τεκμηρίωση περιλαμβάνει, χωρίς
περιορισμό, τη Δήλωση Συμμόρφωσης, το Δελτίο
Δεδομένων Ασφάλειας Υλικού και την έκθεση
δοκιμής προϊόντος.
Ελληνικά
Δήλωση αποποίησης ευθύνης
Το σχέδιο και τα χαρακτηριστικά μπορούν να
αλλάξουν χωρίς καμία προειδοποίηση. Όλα
τα λογότυπα, οι επωνυμίες και οι ονομασίες
προϊόντων είναι εμπορικά σήματα ή σήματα
κατατεθέντα των αντίστοιχων κατόχων και δια του
παρόντος αναγνωρίζονται ως τέτοια.
3939
Page 40

Polski
HAV-SB500
Soundbar
Zawartość opakowania
1. Soundbar
2. Pilot (oraz baterie typu AAA)
3. Zasilacz sieciowy
4. Kabel zasilania (UE)
5. Kabel zasilania (Wielka Brytania)
6. Kabel AUX
7. Kabel RCA
8. Kabel HDMI
9. Kabel optyczny SPDIF
10. Uchwyt do montażu ściennego
11. Śruby do ściany (3x) / Kołki rozporowe (3x)
12. Śruby (uchwyt do montażu ściennego / soundbar)
(2x)
Opis (rys. A)
Soundbar to urządzenie z wieloma wbudowanymi
głośnikami wytwarzające dźwięk stereo z jednego
elementu, dzięki któremu można odczuć ogromną
różnicę w jakości dźwięku bez podłączania zbędnych
kabli.
1. Soundbar
• Aby włączyć urządzanie,
ustaw przełącznik
2. Przełącznik włączania/
wyłączania
3. Wejście DC
4. Wejście audio
5. Wejście HDMI
6. Wyjście HDMI
7. Optyczne, cyfrowe wejście
audio
8. Wskaźnik zasilania
9. Wskaźnik wejścia audio
10. Wskaźnik wejścia HDMI
włączania/wyłączania
wpozycję włączenia.
• Aby wyłącz yć urządzanie,
ustaw przełącznik
włączania/wyłączania
wpozycję wyłączenia.
• Podłącz zasilacz sieciowy do
wejścia DC.
• Podłącz kabel zasilający do
zasilania.
• Podłącz kabel audio lub
kabel AV do wejścia audio.
• Podłącz kabel HDMI do
wejścia HDMI.
• Podłącz kabel HDMI do
wyjścia HDMI.
• Podłącz optyczny, cyfrowy
kabel audio do optycznego,
cyfrowego wejścia audio.
• Po włączeniu urządzenia
włączy się wskaźnik.
• Wskaźnik zaświeci się po
podłączeniu urządzeń za
pomocą kabla audio lub
kabla AV.
• Wskaźnik zaświeci się po
podłączeniu urządzeń za
pomocą kabla HDMI.
11. Wskaźnik optycznego,
cyfrowego wejścia audio
12. Wskaźnik Bluetooth
13. Pilot
14. Przycisk wł./stanu
oczekiwania
15. Przycisk wyciszenia
16. Przycisk Głośność +
17. Przycisk Głośność -
18. Przycisk Tony wysokie +
19. Przycisk Tony wysokie -
20. Przycisk Tony niskie +
21. Przycisk Tony niskie -
22. Przycisk resetowania
23. Przycisk dźwięku: Muz yka
24. Przycisk dźwięku: Film
25. Przycisk dźwięku: Noc
26. Przycisk wyboru źródła:
Wejście audio
27. Przycisk wyboru źródła:
Wejście HDMI
28. Przycisk wyboru źródła:
Optyczne, cyfrowe wejście
audio
29. Przycisk wyboru źródła:
Bluetooth
• Wskaźnik zaświeci się po
podłączeniu urządzeń
za pomocą optycznego,
cyfrowego kabla audio.
• Wskaźnik zaświeci się po
podłączeniu urządzeń
za pomocą technologii
Bluetooth.
• Naciśnij prz ycisk w celu
włączenia urządzenia.
• Naciśnij prz ycisk ponownie,
aby przełączyć urządzenie
w tryb oczekiwania.
• Naciśnij prz ycisk, aby
wyciszyć dźwięk.
• Naciśnij prz ycisk ponownie,
aby wyłączyć wyciszenie.
• Naciśnij prz ycisk, aby
zwiększyć głośność.
• Naciśnij prz ycisk, aby
zmniejszyć głośność.
• Naciśnij prz ycisk, aby
zwiększyć tony wysokie.
• Naciśnij prz ycisk, aby
zmniejszyć tony wysokie.
• Naciśnij prz ycisk, aby
zwiększyć tony niskie.
• Naciśnij prz ycisk, aby
zmniejszyć tony niskie.
• Naciśnij przycisk w celu
zresetowania tonów wysokich
i niskich z powrotem do
ustawień domyślnych.
• Naciśnij prz ycisk, aby ustawić
dźwięk w trybie muzyki.
• Naciśnij prz ycisk, aby ustawić
dźwięk w trybie lmowym.
• Naciśnij prz ycisk, aby ustawić
dźwięk w trybie nocnym.
• Naciśnij prz ycisk, aby ustawić
źródło na wejście audio.
• Naciśnij prz ycisk, aby ustawić
źródło na wejście HDMI.
• Naciśnij prz ycisk, aby
ustawić źródło na optyczne,
cyfrowe wejście audio.
• Naciśnij prz ycisk, aby
ustawić źródło na Bluetooth.
4040
Page 41

Polski
Montaż (rys. B & C)
• W celu poprawnego zamontowania urządzenia
postępuj zgodnie z ilustracjami.
Parowanie Bluetooth
Automatyczne parowanie
1. Włącz soundbar.
2. Podłącz urządzenie Bluetooth.
Uwaga: Sprawdź, czy urządzenie Bluetooth
jest ostatnim podłączonym urządzeniem.
3. Włącz urządzenie Bluetooth.
4. Ustaw źródło na Bluetooth. Urządzenie
Bluetooth zostanie sparowane z soundbarem.
Wskaźnik Bluetooth świeci się nieprzerwanie.
Manualne parowanie
1. Włącz soundbar.
2. Ustaw źródło na Bluetooth.
3. Kiedy wskaźnik Bluetooth miga, soundbar jest
w trybie parowania.
4. Podłącz urządzenie Bluetooth.
5. Włącz urządzenie Bluetooth. Urządzenie
Bluetooth zacznie wyszukiwać identykator
Bluetooth soundbara: „HAV-SB500”.
6. Jeśli pojawi się okno hasła, wpisz następujące
hasło: „0000”. Urządzenie Bluetooth zostanie
sparowane z soundbarem. Wskaźnik
Bluetooth świeci się nieprzerwanie.
UWAGA: przed użytkowaniem należy zdjąć
kapturki ochronne złączy z końców kabli
światłowodowych i HDMI.
Bezpieczeństwo
Ogólne zasady bezpieczeństwa
• Przed rozpoczęciem korzystania z urządzenia
należy dokładnie przeczytać instrukcję. Zachowaj
instrukcję do wykorzystania w przyszłości.
• Urządzenie powinno być używane zgodnie
ze swoim przeznaczeniem. Nie należy używać
urządzenia w celach innych niż określono w
instrukcji.
• Nie wolno korzystać z urządzenia, jeśli jakakolwiek
część jest uszkodzona lub wadliwa. Jeśli
urządzenie jest uszkodzone lub wadliwe, należy
niezwłocznie wymienić urządzenie.
• Nie wystawiać urządzenia na działanie wody lub
wilgoci.
• Nie blokować otworów wentylacyjnych.
Bezpieczeństwo elektryczne
• W celu zmniejszenia ryzyka porażenia prądem
elektrycznym, niniejsze urządzenie powinno
być otwierane wyłącznie przez osobę z
odpowiednimi uprawnieniami, kiedy wymagane
jest przeprowadzenie przeglądu.
• W przypadku wystąpienia problemu odłączyć
urządzenie od sieci i innego sprzętu.
Bezpieczne korzystanie z baterii
• Używać wyłącznie baterii wskazanych w instrukcji.
• Nie używać razem starych i nowych baterii.
• Nie używać baterii różnych typów lub marek.
• Nie zakładać baterii w odwrotnej biegunowości.
• Nie powodować zwarcia baterii ani ich nie
demontować.
• Nie wystawiać baterii na działanie wody.
• Nie wystawiać baterii na działanie ognia lub
zbyt wysokiej temperatury.
• Przy całkowitym rozładowaniu baterii może
dojść do ich wycieku. Aby uniknąć uszkodzenia
urządzenia, należy wyjąć z niego baterie, jeśli
nie jest ono używane przez dłuższy okres czasu.
• Jeśli płyn z baterii wejdzie w styczność ze skórą
lub ubraniem, należy niezwłocznie przepłukać
czystą wodą.
4141
Page 42

Gwarancja
Wszelkie zmiany i/lub modykacje produktu
spowodują unieważnienie gwarancji. Nie możemy
ponosić odpowiedzialności za uszkodzenia
spowodowane przez nieprawidłowe korzystanie z
produktu.
Utylizacja
• Produkt jest przeznaczony do oddzielnej zbiórki
w odpowiednim punkcie odbioru. Nie należy
pozbywać się produktu razem z odpadami
gospodarstwa domowego.
• Aby uzyskać więcej informacji, należy skontaktować
się ze sprzedawcą lub lokalnym urzędem
odpowiedzialnym za gospodarkę odpadami.
Dokumentacja
Produkt został wyprodukowany i dostarczony
zgodnie z wszelkimi odpowiednimi przepisami
iwytycznymi, obowiązującymi wszystkie państwa
członkowskie Unii Europejskiej. Produkt jest
zgodny z wszystkimi specykacjami i przepisami
obowiązującymi w kraju sprzedaży.
Formalna dokumentacja jest dostępna na życzenie.
Formalna dokumentacja zawiera między innymi
deklarację zgodności, kartę charakterystyki i raport
z badań produktu.
Polski
Zastrzeżenia
Wzory i specykacje mogą ulec zmianie bez
powiadomienia. Wszystkie logo, marki i nazwy
produktów są znakami towarowymi lub
zarejestrowanymi znakami towarowymi ich
właścicieli i niniejszym są uznane za takie.
4242
Page 43

Česky
HAV-SB500
Zvuková lišta
Obsah balení
1. Zvuková lišta
2. Dálkové ovládání (včetně AAA baterií)
3. Napájecí adaptér
4. Napájecí kabel (EU)
5. Napájecí kabel (Spojené Království)
6. Kabel AUX
7. Kabel RCA
8. Kabel HDMI
9. Optický kabel SPDIF
10. Úchyt na zeď
11. Šrouby do zdi (3x) / Zásuvky do zdi (3x)
12. Šrouby (úchyt na zeď / zvuková lišta) (2x)
Popis (obr. A)
Zvuková lišta je zařízení s několika zabudovanými
reproduktory, které vytvářejí stereo zvuk z jediné
skříně, což dramaticky zvyšuje kvalitu zvuku bez
mnoha kabelů.
1. Zvuková lišta
• Pro zapnutí zařízení nastavte
2. Vypínač
3. Vstupní konektor DC
4. Audio vstup
5. Vstup HDMI
6. Výstup HDMI
7. Optický digitální audio
vstup
8. Ukazatel napájení
9. Ukazatel audio vstupu
10. Ukazatel HDMI vstupu
11. Ukazatel optického
digitálního audio vstupu
12. Ukazatel Bluetooth
vypínač do polohy zapnuto.
• Pro vypnutí zařízení nastavte
vypínač do polohy vypnuto.
• Ke vstupu DC zapojte
napájecí adaptér.
• Připojte napájecí kabel do
zásuvky:
• Audio kabel nebo AV kabel
zapojte do audio vstupu.
• HDMI k abel zapojte do
vstupu HDMI.
• HDMI k abel zapojte do
výstupu HDMI.
• Optický digitální audio
kabel zapojte do optického
digitálního audio vstupu.
• Uk azatel se rozsvítí, když se
zařízení zapne.
• Uk azatel se rozsvítí, pokud
se mezi zařízeními používá
audio kabel nebo AV kabel.
• Uk azatel se rozsvítí, pokud
se mezi zařízeními používá
HDMI kabel.
• Uk azatel se rozsvítí, pokud
se mezi zařízeními používá
optický digitální audio kabel.
• Uk azatel se rozsvítí, pokud
se mezi zařízeními používá
kabel Bluetooth.
13. Dálkové ovládání
14. Tlačítko zapnutí/
pohotovostního režimu
15. Tlačítko vypnutí zvuku
16. Tlačítko hlasitosti +
17. Tlačítko hlasitosti -
18. Tlačítko výšky +
19. Tlačítko výšky -
20. Tlačítko bas +
21. Tlačítko bas -
22. Tlačítko reset
23. Tlačítko zvuku: Hudba
24. Tlačítko zvuku: Film
25. Tlačítko zvuku: Noc
26. Tlačítko zdroje: Audio vstup
27. Tlačítko zdroje: Vstup HDMI
28. Tlačítko zdroje: Optický
digitální audio vstup
29. Tlačítko zdroje: Bluetooth
• Stisknutím tlačítk a zařízení
zapnete.
• Pro přechod zařízení do
pohotovostního režimu
znovu stiskněte tlačítko.
• Stisknutím tlačítk a vypnete
zvuk.
• Opakovaným stisknutím
tlačítka zvuk zapnete.
• Stisknutím tlačítk a zvýšíte
hlasitost.
• Stisknutím tlačítk a snížíte
hlasitost.
• Stisknutím tlačítk a dojde
kzesílení výšek.
• Stisknutím tlačítk a dojde
kzeslabení výšek.
• Stisknutím tlačítk a dojde
kzesílení basů.
• Stisknutím tlačítk a dojde
kzeslabení basů
• Stisknutím tlačítk a
resetujete výšky i bas zpět
do výchozího nastavení.
• Tlačítko stiskněte pro
nastavení zvuku do režimu
hudby.
• Tlačítko stiskněte pro
nastavení zvuku do režimu
videa.
• Tlačítko stiskněte pro
nastavení zvuku do nočního
režimu.
• Stisknutím tlačítk a nastavíte
jako zdroj signálu audio
vstup.
• Stisknutím tlačítk a nastavíte
jako zdroj signálu HDMI
vstup.
• Stisknutím tlačítk a nastavíte
jako zdroj signálu optický
audio vstup.
• Stisknutím tlačítk a nastavíte
jako zdroj signálu zařízení
Bluetooth.
4343
Page 44

Česky
Instalace (obr. B & C)
• Postup instalace naleznete na instruktážních
obrázcích.
Párování Bluetooth
Automatické párování
1. Zvukovou lištu zapněte.
2. Připojte zařízení Bluetooth.
Poznámka: Zajistěte, aby zařízení Bluetooth
bylo připojeno jako poslední.
3. Zařízení Bluetooth zapněte.
4. Nastavte zdroj Bluetooth. Zařízení Bluetooth
se spáruje se zvukovou lištou. Kontrolka
ukazatele Bluetooth soustavně svítí.
Manuální párování
1. Zvukovou lištu zapněte.
2. Nastavte zdroj Bluetooth.
3. Pokud kontrolka ukazatele Bluetooth bliká,
jezvuková lišta v režimu párování.
4. Připojte zařízení Bluetooth.
5. Zařízení Bluetooth zapněte. Zařízení
Bluetooth vyhledá ID Bluetooth zvukové lišty:
„HAV-SB500”.
6. Pokud se zobrazí okno hesla, zadejte heslo:
„0000”. Zařízení Bluetooth se spáruje se
zvukovou lištou. Kontrolka ukazatele Bluetooth
soustavně svítí.
POZNÁMKA: Před použitím sejměte ochranné
kryty konektorů přiloženého optického a HDMI
kabelu.
Bezpečnost
Všeobecné bezpečnostní pokyny
• Před použitím si pozorně přečtěte příručku.
Příručku uschovejte pro pozdější použití.
• Zařízení používejte pouze k jeho zamýšleným
účelům. Nepoužívejte zařízení k jiným účelům,
než je popsáno v příručce.
• Nepoužívejte zařízení, pokud je jakákoli část
poškozená nebo vadná. Pokud je zařízení
poškozené nebo vadné, okamžitě jej vyměňte.
• Nevystavujte zařízení působení vody ani vlhkosti.
• Nezakrývejte ventilační otvory.
Pokyny pro používání elektrických zařízení
• Abyste snížili riziko úrazu elektrickým proudem,
měl by být vpřípadě potřeby tento výrobek
otevřen pouze autorizovaným technikem.
• Dojde-li k závadě, odpojte výrobek ze sítě a od
jiných zařízení.
Pokyny pro použití baterií
• Používejte pouze baterie uvedené v návodu.
• Nevkládejte zároveň staré a nové baterie.
• Nepoužívejte baterie jiného typu ani značky.
• Baterie neinstalujte s obrácenou polaritou.
• Baterie nezkratujte ani nedemontujte.
• Nevystavujte baterie působení vody.
• Nevystavujte baterie působení ohně či
nadměrného tepla.
• Při úplném vybití mají baterie tendence vytékat.
Abyste zabránili poškození produktu, vyjměte
baterie, pokud necháváte produkt na delší dobu
bez dozoru.
• Pokud se kapalina z baterie dostane do styku
s pokožkou nebo oblečením, okamžitě je
opláchněte čistou vodou.
4444
Page 45

Záruka
Provedením jakýchkoli změn a/nebo modikací
výrobku záruka zaniká. Při nesprávném používání
tohoto produktu výrobce nenese odpovědnost za
vzniklé škody.
Likvidace
• Likvidaci tohoto produktu provádějte
vpříslušné sběrně. Nevyhazujte tento výrobek
skomunálním odpadem.
• Pro více informací se obraťte na prodejce nebo
místní orgány odpovědné za nakládání sodpady.
Dokumentace
Tento produkt byl vyroben a je dodáván v souladu
se všemi příslušnými nařízeními a směrnicemi
platnými ve všech členských státech Evropské Unie.
Splňuje také veškeré relevantní specikace a předpisy
v zemi prodeje.
Ociální dokumentaci lze získat na vyžádání. Ociální
dokumentace zahrnuje také (avšak nejenom)
Prohlášení o shodě, Bezpečnostní technické listy
materiálu a správu o testování produktu.
Česky
Vyloučení zodpovědnosti
Design a specikace výrobku mohou být změněny
bez předchozího upozornění. Všechna loga a
obchodní názvy jsou registrované obchodní značky
příslušných vlastníků a jsou chráněny zákonem.
4545
Page 46

Slovenčina
HAV-SB500
Reproduktorová lišta
Obsah balenia
1. Reproduktorová lišta
2. Diaľkové ovládanie (vrátane batérií typu AAA)
3. Napájací adaptér
4. Napájací kábel (EÚ)
5. Napájací kábel (Spojené Kráľovstvo)
6. AUX kábel
7. RCA kábel
8. HDMI kábel
9. Optický SPDIF kábel
10. Nástenný držiak
11. Skrutky do steny (3x) / Rozperky do steny (3x)
12. Skrutky (nástenný držiak / reproduktorová lišta)
(2x)
Opis (obr. A)
Reproduktorová lišta je zariadenie s viacerými
zabudovanými reproduktormi, ktorý produkuje
stereo zvuk z jednej skrinky a výrazne zlepšuje
kvalitu zvuku bez potreby množstva káblov.
1. Reproduktorová lišta
• Na zapnutie výrobku prepnite
2. Vypínač
3. DC vstup
4. Zvukový vstup
5. HDMI vstup
6. HDMI výstup
7. Optický digitálny zvukový
vstup
8. Indikátor napájania
9. Indikátor zvukového vstupu
10. Indikátor HDMI vstupu
11. Indikátor optického
digitálneho zvukového
vstupu
vypínač do polohy zapnuté.
• Na vypnutie výrobku prepnite
vypínač do polohy vypnuté.
• Pripojte napájací adaptér
do DC vstupu.
• Napájací k ábel zapojte do
elektrickej zástrčky.
• Pripojte audio kábel alebo AV
kábel do zvukového vstupu.
• Pripojte HDMI kábel do
HDMI vstupu.
• Pripojte HDMI kábel do
HDMI výstupu.
• Pripojte optický digitálny
zvukový kábel do optického
digitálneho zvukového
vstupu.
• Indik átor svieti, keď je
zariadenie zapnuté.
• Indikátor svieti, keď sa medzi
zariadeniami používa zvukový
kábel alebo AV kábel.
• Indik átor svieti, keď sa
medzi zariadeniami používa
HDMI kábel.
• Indik átor svieti, keď sa
medzi zariadeniami používa
optický digitálny zvukový
kábel.
12. Indikátor Bluetooth
13. Diaľkové ovládanie
14. Tlačidlo zapnutia/
pohotovostného režimu
15. Tlačidlo stlmenia
16. Tlačidlo zvýšenia hlasitosti
17. Tlačidlo zníženia hlasitosti
18. Tlačidlo zvýšenia výšok
19. Tlačidlo zníženia výšok
20. Tlačidlo zvýšenia basov
21. Tlačidlo zníženia basov
22. Tlačidlo reset
23. Tlačidlo zvuku: Hudba
24. Tlačidlo zvuku: Film
25. Tlačidlo zvuku: Noc
26. Tlačidlo zdroja: Zvukový
vstup
27. Tlačidlo zdroja: HDMI vstup
28. Tlačidlo zdroja: Optický
digitálny zvukový vstup
29. Tlačidlo zdroja: Bluetooth
• Indik átor svieti, keď sa
medzi zariadeniami používa
Bluetooth.
• Stlačením tlačidla zariadenie
zapnete.
• Opätovným stlačením
tlačidla prepnete zariadenie
do pohotovostného režimu.
• Stlačením tlačidla stlmíte
zvuk.
• Opätovným stlačením
tlačidla zrušíte stlmenie
zvuku.
• Stlačením tlačidla zv ýšite
hlasitosť.
• Stlačením tlačidla znížite
hlasnosť.
• Stlačením tlačidla zv ýšite
výš ky.
• Stlačením tlačidla znížite
výš ky.
• Stlačením tlačidla zv ýšite
basy.
• Stlačením tlačidla znížite
basy.
• Stlačením tlačidla obnovíte
východiskové natavenie
výšok a basov.
• Stlačením tlačidla nastavíte
zvuk na režim hudby.
• Stlačením tlačidla nastavíte
zvuk na režim lmu.
• Stlačením tlačidla nastavíte
zvuk na nočný režim.
• Stlačením tlačidla nastavíte
zdroj na zvukový vstup.
• Stlačením tlačidla nastavíte
zdroj na HDMI vstup.
• Stlačením tlačidla nastavíte
zdroj na optický digitálny
zvukový vstup.
• Stlačením tlačidla nastavíte
zdroj na Bluetooth.
4646
Page 47

Slovenčina
Inštalácia (obr. B & C)
• Správny postup inštalácie nájdete na obrázkoch.
Spárovanie Bluetooth zariadenia
Automatické spárovanie
1. Zapnite reproduktorovú lištu.
2. Pripojte Bluetooth zariadenie.
Poznámka: Uistite sa, že vaše Bluetooth
zariadenie je posledným pripojeným
zariadením.
3. Zapnite Bluetooth zariadenie.
4. Nastavte zdroj na Bluetooth. Bluetooth
zariadenie sa spáruje s reproduktorovou lištou.
Indikátor Bluetooth bude nepretržite svietiť.
Manuálne spárovanie
1. Zapnite reproduktorovú lištu.
2. Nastavte zdroj na Bluetooth.
3. Keď indikátor Bluetooth bliká, reproduktorová
lišta je v režime párovania.
4. Pripojte Bluetooth zariadenie.
5. Zapnite Bluetooth zariadenie. Bluetooth
zariadenie vyhľadá ID Bluetooth pripojenia
reproduktorovej lišty : „HAV-SB500“.
6. Ak sa zobrazí okno s heslom, zadajte heslo:
„0000“. Bluetooth zariadenie sa spáruje s
reproduktorovou lištou. Indikátor Bluetooth
bude nepretržite svietiť.
POZNÁMKA: Pred použitím odstráňte z optického
zväzkového kábla a kábla HDMI ochranné kryty
konektorov..
Bezpečnosť
Všeobecné bezpečnostné informácie
• Pred použitím si pozorne prečítajte príručku.
Príručku uschovajte pre neskoršie použitie.
• Zariadenie používajte len na účely, na ktoré je
určené. Nepoužívajte zariadenie na iné účely,
než je opísané v príručke.
• Nepoužívajte zariadenie, ak je akákoľvek časť
poškodená alebo chybná. Ak je zariadenie
poškodené alebo chybné, ihneď ho vymeňte.
• Nevystavujte zariadenie pôsobeniu vody ani
vlhkosti.
• Nezakrývajte ventilačné otvory.
Elektrická bezpečnosť
• Na obmedzenie rizika poranenia elektrickým
prúdom smie tento výrobok otvárať iba
oprávnený technik v prípade potreby servisu.
• Pokiaľ sa vyskytne problém, výrobok odpojte z
elektrickej siete a od ostatných zariadení.
Bezpečnosť batérie
• Používajte iba batérie uvedené v tejto príručke.
• Nepoužívajte staré a nové batérie spoločne.
• Nepoužívajte batérie rôznych typov či značiek.
• Neinštalujte batérie s obrátenou polaritou.
• Batérie neskratujte ani nedemontujte.
• Nevystavujte batérie pôsobeniu vody.
• Nevystavujte batérie pôsobeniu ohňa ani
nadmerného tepla.
• Pokiaľ sa batérie úplne vybijú, majú tendenciu
vytekať. Aby ste zabránili poškodeniu výrobku,
vyberte batérie vždy, keď výrobok nechávate na
dlhší čas bez dozoru.
• Pokiaľ sa tekutina z batérie dostane do styku
s pokožkou či oblečením, okamžite miesto
opláchnite tečúcou vodou.
4747
Page 48

Záruka
Pri zmenách a/alebo modikáciách výrobku zanikne
záruka. Pri nesprávnom používaní tohto výrobku
výrobca nenesie zodpovednosť za vzniknuté škody.
Likvidácia
• Likvidáciu tohto produktu zverte príslušnej zberni.
Nevyhadzujte tento výrobok s komunálnym
odpadom.
• Ďalšie informácie získate od predajcu alebo
miestnych orgánov zodpovedných za nakladanie
s odpadmi.
Dokumentácia
Tento produkt bol vyrobený a je dodávaný v súlade
so všetkými príslušnými nariadeniami a smernicami
platnými vo všetkých členských krajinách Európskej
únie. Spĺňa tiež všetky relevantné špecikácie a
predpisy v krajine predaja.
Ociálna dokumentácia je k dispozícii na požiadanie.
Ociálna dokumentácia zahŕňa aj (ale nielen)
Vyhlásenie o zhode, Bezpečnostný technický list
materiálu a správu o testovaní produktu.
Slovenčina
Vylúčenie zodpovednosti
Dizajn a špecikácia výrobku sa môžu zmeniť bez
predchádzajúceho upozornenia. Všetky logá a
obchodné názvy sú registrované obchodné značky
príslušných vlastníkov a sú chránené zákonom.
4848
Page 49

Magyar
HAV-SB500
Hangprojektor
A csomag tartalma
1. Hangprojektor
2. Távirányító (AAA elemekkel)
3. Tápegység
4. Tápkábel (EU)
5. Tápkábel (Egyesült Királyság)
6. AUX kábel
7. RCA kábel
8. HDMI kábel
9. Optikai SPDIF kábel
10. Fali tartókonzol
11. Fali rögzítőcsavarok (3x) / Fali dugók (3x)
12. Csavarok (fali tartókonzol / hangprojektor) (2x)
Leírás (A ábra)
A hangprojektor több beépített hangszóróval
rendelkező eszköz, amely egyetlen készülékből sztereó
hangzást képes sugározni, ez jelentősen javítja a
hangminőséget rengeteg vezeték használata nélkül.
1. Hangprojektor
• A készülék bek apcsolásához
állítsa a be-/kikapcsoló
2. Be-/kikapcsoló gomb
3. DC bemenet
4. Hangbemenet
5. HDMI bemenet
6. HDMI kimenet
7. Optikai digitális
hangbemenet
8. Tápfeszültségjelző
9. Hangbemenet-visszajelző
10. HDMI bemenet-visszajelző
gombot „be” helyzetbe.
• A készülék kik apcsolásához
állítsa a be-/kikapcsoló
gombot „ki” helyzetbe.
• Csatlakoztassa az tápegységet
a DC bemenethez.
• A hálózati kábelt
csatlakoztassa a konnektorba.
• A hangk ábelt vagy az AV
kábelt csatlakoztassa a
hangbemenethez.
• Csatlakoztassa a HDMI
kábelt a HDMI bemenethez.
• Csatlakoztassa a HDMI
kábelt a HDMI kimenethez.
• Csatlakoztassa az optikai
digitális hangkábelt
az optikai digitális
hangbemenethez.
• Amikor a készüléket
bekapcsolja, a jelzőfény
világítani kezd.
• A jelzőfény világítani kezd,
amikor hangkábelt vagy AV
kábelt használ az eszközök
között.
• A jelzőfény világítani kezd,
amikor HDMI kábelt használ
az eszközök között.
11. Optikai digitális
hangbemenet-visszajelző
12. Bluetooth visszajelző
13. Távirányító
14. Bekapcsoló / készenlét gomb
15. Némító gomb
16. Hangerő + gomb
17. Hangerő - gomb
18. Magas hangok + gomb
19. Magas hangok - gomb
20. Mély hangok + gomb
21. Mély hangok - gomb
22. Visszaállító gomb
23. Hangjelző gomb: Zene
24. Hangjelző gomb: Film
25. Hangjelző gomb: Éjszaka
26. Forrás gomb: Hangbemenet
27. Forrás gomb: HDMI
bemenet
28. Forrás gomb: Optikai
digitális hangbemenet
29. Forrás gomb: Bluetooth
• A jelzőfény világítani kezd,
amikor optikai digitális
hangkábelt használ az
eszközök között.
• A jelzőfény világítani kezd,
amikor Bluetooth-t használ
az eszközök között.
• Nyomja meg a gombot a
készülék bekapcsolásához.
• Nyomja meg újra a gombot
az eszköz készenléti módba
állításához.
• Nyomja meg a gombot a
hang kikapcsolásához.
• Nyomja meg újra a gombot,
ha a hangot vissza akarja
kapcsolni.
• Nyomja meg a gombot a
hangerő növeléséhez.
• Nyomja meg a gombot a
hangerő csökkentéséhez.
• Nyomja meg a gombot a
magas hangok növeléséhez.
• Nyomja meg a gombot
a magas hangok
csökkentéséhez.
• Nyomja meg a gombot a
mély hangok növeléséhez.
• Nyomja meg a gombot
a mély hangok
csökkentéséhez..
• Nyomja meg a gombot
magas és mély hangok
alapértelmezett beállításra
állításához.
• Nyomja meg a gombot hang
zene módba állításához.
• Nyomja meg a gombot hang
lm módba állításához.
• Nyomja meg a gombot
a hang éjszakai módba
állításához.
• Nyomja meg a gombot a
forrás hangbemenet módba
állításához.
• Nyomja meg a gombot
a forrás HDMI módba
állításához.
• Nyomja meg a gombot
a forrás optikai digitális
hangbemenet módba
állításához.
• Nyomja meg a gombot a
forrás Bluetooth módba
állításához.
4949
Page 50

Magyar
Telepítés (B & C ábra)
• Az eszköz megfelelő telepítéséhez használja az
ábrákat.
Bluetooth párosítása
Automatikus párosítás
1. Kapcsolja be a hangprojektort.
2. Csatlakoztassa a Bluetooth eszközt.
Megjegyzés: Győződjön meg róla, hogy a
Bluetooth eszköz a legutóbb csatlakoztatott
eszköz.
3. Kapcsolja be a Bluetooth eszközt.
4. Állítsa a forrást a Bluetooth opcióra.
ABluetooth eszköz összepárosításra kerül a
hangprojektorral. A Bluetooth visszajelzője
folyamatosan világít.
Kézi párosítás
1. Kapcsolja be a hangprojektort.
2. Állítsa a forrást a Bluetooth opcióra.
3. Amikor a Bluetooth visszajelző villog, a
hangprojektor párosítás módban van.
4. Csatlakoztassa a Bluetooth eszközt.
5. Kapcsolja be a Bluetooth eszközt. A Bluetooth
eszköz megkeresi a hangprojektor Bluetooth
azonosítóját: „HAV-SB500”.
6. Ha a jelszóablak megjelenik, adja meg a jelszót:
„0000”. A Bluetooth eszköz összepárosításra
kerül a hangprojektorral. A Bluetooth
visszajelzője folyamatosan világít.
MEGJEGYZÉS: Használat előtt távolítsa el a
védőkupakokat a kötegelt optikai és HDMI
kábelről.
Biztonság
Általános biztonsági tudnivalók
• A használat előtt gyelmesen olvassa el a
kézikönyvet. Tegye el a kézikönyvet, hogy
szükség esetén belenézhessen.
• Csak rendeltetése szerint használja a készüléket.
Ne használja a készüléket a kézikönyvben
feltüntetettől eltérő célra.
• Ne használja a készüléket, ha valamely része
sérült vagy meghibásodott. A sérült vagy
meghibásodott készüléket azonnal javíttassa
meg, vagy cseréltesse ki.
• Vigyázzon, hogy ne érje a készüléket víz vagy
nedvesség.
• Ne takarja el a szellőzőnyílásokat.
Elektromos biztonság
• Az áramütés veszélyének csökkentése érdekében
ezt a terméket kizárólag a márkaszerviz
képviselője nyithatja fel.
• Hiba esetén húzza ki a termék csatlakozóját a
konnektorból, és kösse le más berendezésekről.
Elemekkel kapcsolatos biztonsági előírások
• Kizárólag az útmutatóban meghatározott
elemeket használja.
• Ne keverje a használt és új elemeket.
• Ne használjon eltérő típusú vagy márkájú elemeket.
• Ne próbálja fordított polaritással behelyezni az
elemeket.
• Ne zárja rövidre és ne szerelje szét az elemeket.
• Vigyázzon, hogy az elemeket ne érje víz.
• Vigyázzon, hogy az elemeket ne érje tűz vagy
túlzott mértékű hő.
• A teljesen kisült elemek hajlamosak elfolyni. A
termék esetleges megrongálódásának elkerülése
érdekében az elemeket ki kell venni, ha a
terméket hosszabb ideig nem kívánja használni.
• Ha az akkumulátorból szivárgó folyadék bőrrel
vagy ruhával érintkezik, akkor a szennyezett
felületet azonnal öblítse le tiszta vízzel.
5050
Page 51

Jótállás
A termék illetéktelen módosítása érvényteleníti
jótállását. Nem vállalunk felelősséget a termék
szakszerűtlen használata miatti károkért.
Leselejtezés
• A terméket elkülönítve, a megfelelő gyűjtőhelyeken
kell leselejtezni. Ne dobja ki a készüléket a háztartási
hulladék közé.
• További információért lépjen kapcsolatba a
forgalmazóval, vagy a hulladékkezelésért felelős
helyi hatósággal.
Dokumentáció
A termék az Európai Unió minden tagállamában
érvényes vonatkozó rendelkezések és irányelvek
betartásával készült és került forgalomba. A termék
megfelel az értékesítési országban rá vonatkozó
minden előírásnak és rendelkezésnek.
Kérésre hivatalos dokumentációt is rendelkezésre
bocsátunk. A formális dokumentáció a teljesség
igénye nélkül a következőket tartalmazza:
megfelelőségi nyilatkozat, anyagbiztonsági adatlap,
a termék vizsgálati jegyzőkönyve.
Magyar
Felelősségelhárító nyilatkozat
A kivitel és a műszaki jellemzők előzetes értesítés
nélkül is módosulhatnak. Minden logó, terméknév
és márkanév a tulajdonosának márkaneve vagy
bejegyzett márkaneve, azokat ennek tiszteletben
tartásával említjük.
5151
Page 52

Eesti
HAV-SB500
Heliriba
Pakendi sisu
1. Heliriba
2. Kaugjuhtimispult (sh AAA-patareid)
3. Toiteadapter
4. Toitekaabel (EL)
5. Toitekaabel (Ühendkuningriik)
6. AUX-kaabel
7. RCA-kaabel
8. HDMI-kaabel
9. Optiline SPDIF-kaabel
10. Seinakinnitus
11. Seinakruvid (3x) / Seinapistikud (3x)
12. Kruvid (seinakinnitus / heliriba) (2x)
Kirjeldus (joon. A)
Heliriba on mitme sisseehitatud kõlariga seade, mis
tekitab vaid ühest korpusest stereoheli, täiustades
märgatavalt heli kvaliteeti ning vähendades juhtmete
hulka.
1. Heliriba
• Seadme sisselülitamiseks
pange sisse-/väljalülitamise
2. Sisse-/väljalülitamise lüliti
3. DC-sisend
4. Audiosisend
5. HDMI-sisend
6. HDMI-väljund
7. Optiline digitaalne
audiosisend
8. Toitenäidik
9. Audiosisendi näidik
10. HDMI-sisendi näidik
11. Optilise digitaalse
audiosisendi näidik
lüliti sees-asendisse.
• Seadme väljalülitamiseks
pange sisse-/väljalülitamise
lüliti välja-asendisse.
• Ühendage toiteadapter
DC-sisendiga.
• Ühendage toitekaabel
toitevõrku.
• Ühendage audiok aabel või
AV-kaabel audiosisendiga.
• Ühendage HDMI-k aabel
HDMI-sisendiga.
• Ühendage HDMI-k aabel
HDMI-väljundiga.
• Ühendage optiline digitaalne
audiokaabel optilise
digitaalse audiosisendiga.
• Näidik lülitub sisse, seade
on sisse lülitatud.
• Näidik lülitub sisse, kui
audiokaablit või AV-kaablit
kasutatakse kahe seadmega.
• Näidik lülitub sisse, kui
HDMI-kaablit kasutatakse
kahe seadmega.
• Näidik lülitub sisse, kui optilist
digitaalset audiokaablit
kasutatakse kahe seadmega.
12. Bluetooth-näidik
13. Kaugjuhtimispult
14. Sisselülitamise/ooterežiimi
nupp
15. Vaigistamise nupp
16. Helitugevuse suurendamise
nupp
17. Helitugevuse vähendamise
nupp
18. Kõrgete helide
suurendamise nupp
19. Kõrgete helide
vähendamise nupp
20. Bassi suurendamise nupp
21. Bassi vähendamise nupp
22. Lähtestamise nupp
23. Helinupp: Muusika
24. Helinupp: Film
25. Helinupp: Öö
26. Sisendi nupp: Audiosisend
27. Sisendi nupp: HDMI-sisend
28. Sisendi nupp: Optiline
digitaalne audiosisend
29. Sisendi nupp: Bluetooth
• Näidik lülitub sisse, kui
Bluetoothi kasutatakse kahe
seadmega.
• Seadme sisselülitamiseks
vajutage nuppu.
• Seadme ooterežiimi viimiseks
vajutage nuppu uuesti.
• Vajutage nuppu heli
vaigistamiseks.
• Vajutage nuppu uuesti
vaigistamise tühistamiseks.
• Vajutage nuppu helitugevuse
suurendamiseks.
• Vajutage nuppu helitugevuse
vähendamiseks.
• Vajutage nuppu kõrgete
helide suurendamiseks.
• Vajutage nuppu kõrgete
helide vähendamiseks.
• Vajutage nuppu bassi
suurendamiseks.
• Vajutage nuppu bassi
vähendamiseks.
• Vajutage nuppu, et
lähtestada kõrged helid ja
bass vaikeseadetele.
• Vajutage nuppu heli
muusikarežiimi viimiseks.
• Vajutage nuppu heli
lmirežiimi viimiseks.
• Vajutage nuppu heli
öörežiimi aktiveerimiseks.
• Vajutage nuppu, et seadistada
sisendiks audiosisend.
• Vajutage nuppu, et seadistada
sisendiks HDMI-sisend.
• Vajutage nuppu, et
seadistada sisendiks optiline
digitaalne audiosisend.
• Vajutage nuppu, et seadistada
sisendiks Bluetooth.
5252
Page 53

Eesti
Paigaldamine (joon. B & C)
• Seadme õigesti paigaldamiseks vaadake joonist.
Bluetoothiga sidumine
Automaatne sidumine
1. Lülitage heliriba sisse.
2. Ühendage Bluetooth-seade
Märkus: Veenduge, et teie Bluetooth-seade on
viimati ühendatud seade.
3. Lülitage Bluetooth-seade sisse.
4. Valige sisendiks Bluetooth. Bluetooth-seade
seotakse heliribaga. Bluetooth-näidik põleb
püsivalt.
Käsitsi sidumine
1. Lülitage heliriba sisse.
2. Valige sisendiks Bluetooth.
3. Kui Bluetooth-näidik vilgub, on heliriba
sidumisrežiimis.
4. Ühendage Bluetooth-seade
5. Lülitage Bluetooth-seade sisse. Bluetoothseade otsib heliriba Bluetoothi ID-d:
„HAV-SB500”.
6. Kui kuvatakse parooli aken, sisestage parool:
„0000”. Bluetooth-seade seotakse heliribaga.
Bluetooth-näidik põleb püsivalt.
MÄRKUS. Enne kasutamist eemaldage konnektori
kaitsekatted optilise ja HDMI-kaabli kimpudelt.
Ohutus
Üldised ohutusnõuded
• Lugege kasutusjuhend enne seadme kasutamist
hoolikalt läbi. Hoidke kasutusjuhend hilisemaks
kasutamiseks alles.
• Kasutage seadet ainult sihtotstarbeliselt. Ärge
kasutage seadet eesmärkidel, mida pole toodud
käesolevas kasutusjuhendis.
• Ärge kasutage seadet, kui selle mis tahes
osa on kahjustatud või vigane. Kui seade on
kahjustatud või vigane, vahetage see kohe välja.
• Ärge jätke seadet vihma või niiskuse kätte.
• Ärge blokeerige ventilatsiooniavasid.
Elektriohutus
• Elektrilöögi ohu vähendamiseks tohib toodet
hooldamiseks avada ainult volitatud tehnik.
• Probleemi tekkimisel eemaldage toode
vooluvõrgust ja teistest seadmetest.
Aku ohutus
• Kasutage ainult käesolevas kasutusjuhendis
mainitud akusid.
• Ärge kasutage samal ajal vanu ja uusi akusid.
• Ärge kasutage erinevat tüüpi või mudelit akusid.
• Paigaldage akud õige polaarsusega.
• Ärge lühistage ega demonteerige akusid.
• Ärge jätke akusid vihma kätte.
• Ärge jätke akusid tule või liigse kuumuse kätte.
• Kui akud on täiesti tühjad, võivad need lekkima
hakata. Toote kahjustamise vältimiseks eemaldage
akud, kui jätate toote pikemaks ajaks seisma.
• Kui akudest tulev vedeliku puutub kokku naha
või riietega, loputage kohe värske veega.
5353
Page 54

Garantii
Seadmele tehtud muudatused muudavad garantii
kehtetuks. Me ei võta enda peale vastutust
kahjustuste eest, mille on põhjustanud seadme
vale kasutamine.
Utiliseerimine
• Toode tuleb viia sobiva kogumispunkti vastavasse
alasse. Ärge visake toodet olmejäätmete hulka.
• Lisateabe saamiseks võtke ühendust edasimüüja
või kohaliku jäätmekäitlusspetsialistiga.
Dokumentatsioon
Toode on toodetud ja tarnitud kooskõlas kõigi
asjakohaste määruste ja direktiividega, mis
kehtivad kõigis Euroopa Liidu liikmesriikides.
Toode on kooskõlas müügiriigi kõigi tehniliste
tingimuste ja määrustega.
Ametlik dokumentatsioon on saadaval soovi
korral. Ametliku dokumentatsiooni hulka kuuluvad
muu hulgas vastavusdeklaratsioon, materjali
ohutuskaart ja toote katseprotokoll.
Eesti
Lahtiütlus
Kujundused ja tehnilised andmed võivad muutuda
ette teatamata. Kõik logod, kaubamärgid ja
tootenimed on vastavate omanike kaubamärgid
või registreeritud kaubamärgid ja neid
tunnustatakse siinkohal sellistena.
5454
Page 55

Latviešu
HAV-SB500
Skaņas panelis
Komplekta saturs
1. Skaņas panelis
2. Tālvadības pults (iekļautas AAA baterijas)
3. Strāvas adapters
4. Strāvas kabelis (ES)
5. Strāvas kabelis (Apvienotā Karaliste)
6. AUX kabelis
7. RCA kabelis
8. HDMI kabelis
9. Optiskais SPDIF kabelis
10. Sienas stiprinājums
11. Sienas skrūves (3x) / Sienas tapas (3x)
12. Skrūves (Sienas stiprinājums / skaņas panelis)
(2x)
Apraksts (Aatt.)
Skaņas panelis ir iekārta ar vairākiem iebūvētiem
skaļruņiem, kas rada stereo skaņu no vienas
iekārtas, dramatiski uzlabojot skaņas kvalitāti bez
liela vadu daudzuma.
1. Skaņas panelis
• Lai ieslēgtu ierīci, iestatiet
slēdzi ieslēgt/izslēgt pozīcijā
2. Slēdzis ieslēgt/izslēgt
3. Līdzstrāvas ieeja
4. Audio ieeja
5. HDMI ieeja
6. HDMI izeja
7. Optiskā digitālā audio ieeja
8. Ieslēgšanas indikators
9. Audio ieejas indikators
10. HDMI ieejas indikators
11. Optiskā digitālā audio ieejas
indikators
"o n ".
• Lai ieslēgtu ierīci, iestatiet
slēdzi ieslēgt/izslēgt pozīcijā
"o ".
• Savienojiet strāvas adapteri
ar līdzstrāvas ieeju.
• Savienojiet strāvas kabeli
ar strāvu.
• Savienojiet audio kabeli vai
AV kabeli ar audio ieeju.
• Savienojiet HDMI kabeli ar
HDMI ieeju.
• Savienojiet HDMI kabeli ar
HDMI izeju.
• Savienojiet optisko digitālo
audio kabeli ar optisko
digitālo audio ieeju.
• Indik ators iedegas, kad
ierīce tiek ieslēgta.
• Indik ators iedegas, kad
iekārtas ir savienotas ar
audio vai AV kabeli.
• Indik ators iedegas, kad
iekārtas ir savienotas ar
HDMI kabeli.
• Indik ators iedegas, kad
iekārtas ir savienotas ar
optisko digitālo audio kabeli.
12. Bluetooth indikators
13. Tālvadība
14. Ieslēgšanas/gaidstāves
poga
15. Skaņas izslēgšanas poga
16. Skaņa + poga
17. Skaņa - poga
18. Diskants + poga
19. Diskants - poga
20. Bass + poga
21. Bass - poga
22. Atiestatīšanas poga
23. Skaņas poga: Mūzika
24. Skaņas poga: Filma
25. Skaņas poga: Nakts
26. Avota poga: Audio ieeja
27. Avota poga: HDMI ieeja
28. Avota poga: Optiskā
digitālā audio ieeja
29. Avota poga: Bluetooth
• Indik ators iedegas, kad
iekārtas ir savienotas ar
Bluetooth.
• Nospiediet pogu, lai ieslēgtu
ierīci.
• Nospiediet pogu atkār toti,
lai iekārta uzsāktu gaidstāvi.
• Nospiediet pogu, lai izslēgtu
skaņu.
• Nospiediet pogu atkār toti,
lai ieslēgtu skaņu.
• Nospiediet pogu, lai
palielinātu skaļumu.
• Nospiediet pogu, lai
samazinātu skaļumu.
• Nospiediet pogu, lai
palielinātu diskanta līmeni.
• Nospiediet pogu, lai
samazinātu diskanta līmeni.
• Nospiediet pogu, lai
palielinātu basa līmeni.
• Nospiediet pogu, lai
samazinātu basa līmeni.
• Nospiediet pogu, lai
atiestatītu diskanta un basa
līmeņus uz noklusētajiem
uzstādījumiem.
• Nospiediet pogu, lai iestatītu
skaņu mūzikas režīmā.
• Nospiediet pogu, lai iestatītu
skaņu lmas režīmā.
• Nospiediet pogu, lai
iestatītu skaņu nakts režīmā.
• Nospiediet pogu, lai iestatītu
audio ieeju kā avotu.
• Nospiediet pogu, lai iestatītu
HDMI ieeju kā avotu.
• Nospiediet pogu, lai
iestatītu optisko digitālo
audio ieeju kā avotu.
• Nospiediet pogu, lai
iestatītu Bluetooth kā avotu.
5555
Page 56

Latviešu
Uzstādīšana (B & C att.)
• Skatiet attēlus, lai pareizi uzstādītu ierīci.
Bluetooth savienošana
Automātiskā savienošana
1. Ieslēdziet skaņas paneli.
2. Savienojiet Bluetooth iekārtu.
Piezīme: Pārliecinieties, ka Bluetooth iekārta ir
pēdējā pievienotā iekārta.
3. Ieslēdziet Bluetooth ierīci.
4. Uzstādiet avotu uz Bluetooth. Bluetooth
iekārta tiks savienota ar skaņas paneli.
Bluetooth indikators nepārtraukti mirgos.
Manuāla savienošana
1. Ieslēdziet skaņas paneli.
2. Uzstādiet avotu uz Bluetooth.
3. Kad Bluetooth indikātors sāk mirgot, skaņas
panelis ir savienošanas režimā.
4. Savienojiet Bluetooth iekārtu.
5. Ieslēdziet Bluetooth ierīci. Bluetooth iekārta
meklēs skaņas paneļa Bluetooth ID:
“HAV-SB500“.
6. Ja tiek pieprasīta parole, ievadiet paroli:
“0000“. Bluetooth iekārta tiks savienota
ar skaņas paneli. Bluetooth indikators
nepārtraukti mirgos.
PIEZĪME: pirms lietošanas noņemiet satītā optiskā
un HDMI kabeļa savienotāja aizsargvāciņus.
Drošība
Vispārīgie drošības noteikumi
• Pirms lietošanas rūpīgi izlasiet lietošanas
rokasgrāmatu. Saglabājiet rokasgrāmatu
turpmākai lietošanai.
• Izmantojiet ierīci tikai tai paredzētiem nolūkiem.
Neizmantojiet ierīci citiem nolūkiem, kas atšķiras
no rokasgrāmatā aprakstītajiem nolūkiem.
• Neizmantojiet ierīci, ja kāda tās detaļa ir bojāta
vai nepilnīga. Nekavējoties aizvietojiet ierīci, ja
tā ir bojāta vai nepilnīga.
• Nepakļaujiet ierīci ūdens vai mitruma iedarbībai.
• Nebloķējiet ventilācijas atveres.
Elektrodrošība
• Lai mazinātu elektrotrieciena risku, ierīce jāatver
tikai pilnvarotam speciālistam, ja nepieciešama
tehniska apkalpošana.
• Atvienojiet ierīci no strāvas un cita aprīkojuma,
ja radusies problēma.
Bateriju drošība
• Lietojiet tikai rokasgrāmatā norādītās baterijas.
• Nelietojiet kopā jaunas un vecas baterijas.
• Nelietojiet dažādu veidu vai prečzīmju baterijas.
• Neievietojiet baterijas pretējā polaritātē.
• Neradiet īssavienojumu vai neizjauciet baterijas.
• Nepakļaujiet baterijas ūdens iedarbībai.
• Nepakļaujiet baterijas uguns vai pārmērīga
siltuma iedarbībai.
• Pilnīgi izlādētas baterijas var noplūst. Lai novērstu
ierīces bojājumu, izņemiet baterijas, ja atstājat
ierīci bez uzraudzības ilgākā laika periodā.
• Ja bateriju šķidrums nonāk uz ādas vai apģērba,
rūpīgi noskalojiet to ar ūdeni.
5656
Page 57

Garantija
Jebkuras ierīces izmaiņas un/vai pārveidojumi
anulēs garantiju. Mēs nenesam atbildību par
bojājumiem, kurus izraisījusi nepareiza ierīces
lietošana.
Likvidēšana
• Ierīce ir paredzēta speciālai savākšanai piemērotā
savākšanas vietā. Neizmetiet ierīci kopā ar
mājturības atkritumiem.
• Papildus informācijai sazinieties ar mazumtirgotāju
vai vietējo pašvaldību, kas ir atbildīga par
atkritumu apsaimniekošanu.
Dokumentācija
Prece tika ražota un piegādāta saskaņā ar visiem
vajadzīgajiem noteikumiem un norādījumiem, kas
derīgi visiem Eiropas Savienības valstu pārstāvjiem.
Prece atbilst visām piemērojamām instrukcijām un
noteikumiem pārdošanas valstī.
Ociālie dokumenti ir pieejami pēc pieprasījuma.
Ociālajos dokumentos ietilpst (bet ar to
neaprobežojas) Atbilstības deklarācija, Materiālu
drošības datu lapa un produkta izmēģinājuma
atskaite.
Latviešu
Atteikšanās
Dizaini un instrukcijas var mainīties bez brīdinājuma.
Visi logo, prečzīmes un produktu nosaukumi
ir tirdzniecības zīmes vai to atbilstošo turētāju
reģistrētas tirdzniecības zīmes un līdz ar to šādi arī
atpazīstamas.
5757
Page 58

Lietuvių
HAV-SB500
„Soundbar“ kolonėlė
Pakuotės turinys
1. "Soundbar" kolonėlės
2. Nuotolinio valdymo pultas (su AAA baterijomis)
3. Maitinimo adapteris
4. Maitinimo kabelis (ES)
5. Maitinimo kabelis (Jungtinė Karalystė)
6. AUX kabelis
7. RCA kabelis
8. HDMI kabelis
9. Optinis SPDIF kabelis
10. Tvirtinimo prie sienos įranga
11. Varžtai tvirtinimui prie sienos (3x) / Sienos
kištukai (3x)
12. Varžtai (tvirtinimo prie sienos įranga /
"Soundbar" kolonėlei) (2x)
Aprašas (A pav.)
"Soundbar" kolonėlės tai įrenginys su keliais
integruotais garsiakalbiais, kurie sukuria stereo
garsą iš vienintelio įtaiso taip ypač pagerindami
garso kokybę be jokių papildomų laidų.
1. "Soundbar" kolonėlės
• Norėdami įjungti prietaisą,
2. Įjungimo / išjungimo
jungiklis
3. DC įvestis
4. Garso įvestis
5. HDMI įvestis
6. HDMI išvestis
7. Optinė skaitmeninė garso
įvestis
8. Energijos tiekimo
indikatorius
9. Garso įvesties indikatorius
10. HDMI įvesties indikatorius
nustatykite įjungimo /
išjungimo jungiklį į padėtį „I“.
• Norėdami išjungti prietaisą,
nustatykite įjungimo /
išjungimo jungiklį į padėtį „O“.
• Įjunk ite maitinimo adapterį
į DC įvestį.
• Maitinimo tink lo kabelį
įkiškite į maitinimo tinklą.
• Įjunk ite garso kabelį arba
AV kabelį į garso įvestį.
• Įjunk ite HDMI kabelį į HDMI
įvestį.
• Įjunk ite HDMI kabelį į HDMI
išvestį.
• Įjunk ite optinį skaitmeninį
garso kabelį į optinę
skaitmeninę garso įvestį.
• Indik atorius įsižiebia, kai
prietaisas yra įjungtas.
• Indik atorius įsižiebia, kai
prietaisai yra sujungti garso
arba AV kabeliu.
• Indik atorius įsižiebia, kai
prietaisai yra sujungti HDMI
kabeliu.
11. Optinės skaitmeninės garso
įvesties indikatorius
12. "Bluetooth" indikatorius
13. Nuotolinio valdymo pultas
14. Įjungimo/paleidimo delsos
mygtukas
15. Nutildymo mygtukas
16. Garso reguliavimo +
mygtukas
17. Garso reguliavimo mygtukas
18. Diskanto + mygtukas
19. Diskanto - mygtukas
20. Žemų dažnių + mygtukas
21. Žemų dažnių - mygtukas
22. Atstatos mygtukas
23. Garso mygtukas: Muzikos
24. Garso mygtukas: Filmo
25. Garso mygtukas: Naktis
26. Šaltinio mygtukas: Garso
įvestis
27. Šaltinio mygtukas: HDMI
įvestis
28. Šaltinio mygtukas: Optinė
skaitmeninė garso įvestis
29. Šaltinio mygtukas:
"Bluetooth"
• Indik atorius įsižiebia, kai
prietaisai yra sujungti
optiniu skaitmeniniu garso
kabeliu.
• Indik atorius įsižiebia, kai
prietaisai yra sujungti
"Bluetooth" jungtimi.
• Paspauskite mygtuką, kad
įjungtumėte prietaisą.
• Vėl paspauskite mygtuką,
jei norite nustatyti prietaisą
į paleidimo delsos režimą.
• Paspauskite mygtuką, kad
nutildytumėte garsą.
• Norėdami vėl grąžinti garsą,
paspauskite mygtuką dar
kartą.
• Paspauskite mygtuką, kad
padidintumėte garsumą.
• Paspauskite mygtuką, kad
sumažintumėte garsumą.
• Paspauskite mygtuką
norėdami padidinti diskantą.
• Paspauskite mygtuką
norėdami sumažinti diskantą.
• Paspauskite mygtuką
norėdami padidinti žemų
dažnių garsumą.
• Paspauskite mygtuką
norėdami sumažinti žemų
dažnių garsumą.
• Paspauskite šį mygtuką,
jeigu norite grąžinti
diskanto ir žemų dažnių
nustatymus į gamyklinius.
• Paspauskite šį mygtuką
norėdami nustatyti garsą į
muzikos rėžimą.
• Paspauskite šį mygtuką
norėdami nustatyti garsą į
lmo rėžimą.
• Paspauskite šį mygtuką
norėdami nustatyti garsą
nakties režimu.
• Paspauskite šį mygtuką
norėdami nustatyti šaltinį į
garso įvestį.
• Paspauskite šį mygtuką
norėdami nustatyti šaltinį į
HDMI įvestį.
• Paspauskite šį mygtuką
norėdami nustatyti šaltinį
į optinę skaitmeninę garso
įvestį.
• Paspauskite šį mygtuką
norėdami nustatyti šaltinį į
"Bluetooth".
5858
Page 59

Lietuvių
Montavimas (B & C pav.)
• Norėdami teisingai sumontuoti prietaisą,
vadovaukitės iliustracijomis.
Suporavimas naudojantis „Bluetooth“
Automatinis suporavimas
1. Įjunkite "Soundbar" įrenginį.
2. Prijunkite "Bluetooth" įrenginį.
Atkreipkite dėmesį: Įsitikinkite, kad jūsų
"Bluetooth" įrenginys yra paskutinis prijungtas
įrenginys.
3. Įjunkite "Bluetooth" įrenginį.
4. Nustatykite šaltinį į "Bluetooth". "Bluetooth"
įrenginys bus suporuotas su "Soundbar"
kolonėle. Užsižiebs "Bluetooth" indikatoriaus
lemputė.
Rankinis suporavimas
1. Įjunkite "Soundbar" įrenginį.
2. Nustatykite šaltinį į "Bluetooth".
3. Užsižiebus "Bluetooth" indikatoriaus lemputei,
"Soundbar" kolonėlės bus nustatytos į
suporavimo rėžimą.
4. Prijunkite "Bluetooth" įrenginį.
5. Įjunkite "Bluetooth" įrenginį. "Bluetooth"
įrenginys "Soundbar" kolonėlėse susiras
"Bluetooth" identik atorių: “HAV-SB500“.
6. Jeigu įsijungs slaptažodžio langas, įveskite
slaptažodį: “0000“. "Bluetooth" įrenginys bus
suporuotas su "Soundbar" kolonėle. Užsižiebs
"Bluetooth" indikatoriaus lemputė.
PASTABA: prieš naudodami, nuo surišto optinio ir
HDMI kabelio nuimkite jungčių apsauginius
dangtelius.
Sauga
Bendroji sauga
• Prieš naudodami atidžiai perskaitykite naudotojo
vadovą. Išsaugokite vadovą ateičiai.
• Prietaisą naudokite tik pagal numatytąją paskirtį.
Nenaudokite prietaiso kitiems tikslams,
nenurodytiems naudotojo vadove.
• Nenaudokite prietaiso, jei kuri nors jo dalis
sugadinta ar prastai veikia. Jei prietaisas sugedęs
ar veikia netinkamai, nedelsdami jį pakeiskite.
• Saugokite prietaisą nuo vandens ir drėgmės.
• Neuždenkite vėdinimo angų.
Elektros sauga
• Siekiant sumažinti elektros smūgio riziką, šį
gaminį atidaryti, kai reikia atlikti jo techninę
priežiūrą, turėtų tik įgaliotas technikas.
• Jei kiltų problemų, atjunkite prietaisą nuo
maitinimo tinklo ir kitos įrangos.
Maitinimo elementų sauga
• Naudokite tik vadove nurodytus maitinimo
elementus.
• Nenaudokite kartu senų ir naujų maitinimo
elementų.
• Nenaudokite skirtingų tipų ar prekių ženklų
maitinimo elementų.
• Maitinimo elementus dėkite atsižvelgdami į jų
poliškumą.
• Neatlikite maitinimo elementų trumpojo
jungimo ir jų neardykite.
• Saugokite maitinimo elementus nuo vandens.
• Saugokite maitinimo elementus nuo ugnies ir
didelio karščio.
• Visiškai išeikvoti maitinimo elementai gali imti
pratekėti. Kad nesugadintumėte gaminio, prieš
palikdami jį nenaudojamą ilgesniam laikui,
išimkite maitinimo elementus.
• Jei skysčio iš maitinimo elementų patektų ant
odos ar drabužių, nedelsdami nuplaukite švariu
vandeniu.
5959
Page 60

Garantija
Bet kokie gaminio pakeitimai ir (arba) modikacijos
anuliuos garantiją. Neprisiimame jokios atsakomybės
už žalą, kilusią netinkamai naudojant gaminį.
Išmetimas
• Išmetamą gaminį reikia atiduoti į atitinkamą
atliekų surinkimo vietą. Neišmeskite gaminio su
buitinėmis atliekomis.
• Jei reikėtų daugiau informacijos, susisiekite
su mažmeninės prekybos pardavėju ar vietine
valdžios institucija, atsakinga už atliekų tvarkymą.
Dokumentacija
Šis gaminys buvo pagamintas ir pateiktas į rinką
kaip atitinkantis visus taikytinus reglamentus ir
direktyvas, galiojančias visose Europos Sąjungos
valstybėse narėse. Gaminys atitinka visas pardavimo
šalyje taikytinas specikacijas ir taisykles.
Ocialią dokumentaciją galima gauti pateikus
prašymą. Ociali dokumentacija apima,
neapsiribojant, atitikties deklaraciją, medžiagų
saugos duomenų lapą ir gaminio bandymo
ataskaitą.
Lietuvių
Atsisakymas
Dizainas ir specikacijos gali būti keičiami be
įspėjimo. Visi logotipai, prekių ženklai ir gaminių
pavadinimai yra jų atitinkamų savininkų prekių
ženklai arba registruotieji prekių ženklai ir čia yra
pripažįstami kaip tokie.
6060
Page 61

SIovenščina
HAV-SB500
Zvočnik soundbar
Vsebina paketa
1. Zvočnik soundbar
2. Daljinski upravljalnik (vklj. z AAA baterijami)
3. Napajalni adapter
4. Napajalni kabel (EU)
5. Napajalni kabel (Združeno Kraljestvo)
6. Kabel AUX
7. Kabel RCA
8. Kabel HDMI
9. Optični kabel SPDIF
10. Stenski nosilec
11. Stenski vijaki (3x) / Stenski mozniki (3x)
12. Vijaki (stenski nosilec / zvočnik zoundbar) (2x)
Opis (sl. A)
Zvočnik soundbar je naprava z več vgrajenimi
zvočniki, ki ustvarjajo stereo zvok iz enojnega
ohišja, ter s tem dramatično izboljšajo kakovost
zvoka brez ogromno kablov.
1. Zvočnik soundbar
• Za vklop naprave nastavite
stikalo za vklop/izklop
2. Stikalo za vklop/izklop
3. DC vhod
4. Avdio vhod
5. HDMI vhod
6. HDMI izhod
7. Optični digitalni avdio vhod
8. Indikator napajanja
9. Pokazatelj avdio vhoda
10. Pokazatelj vhoda HDMI
11. Pokazatelj optičnega
digitalnega avdio vhoda
vpoložaj vklopa.
• Za izklop naprave nastavite
stikalo za vklop/izklop
vpoložaj izklopa.
• Povežite napajalni adapter
zDC vhodom.
• Povežite napajalni kabel
znapajanjem.
• Povežite avdio kabel ali
kabel AV z avdio vhodom.
• Povežite kabel HDMI
zvhodom HDMI.
• Povežite kabel HDMI
zizhodom HDMI.
• Povežite optični digitalni
avdio kabel z optičnim
digitalnim avdio vhodom.
• Pokazatelj se vklopi, ko
napravo vklopite.
• Pokazatelj se vklopi, ko
med napravami uporabljate
avdio kabel ali kabel AV.
• Pokazatelj se vklopi, ko
med napravami uporabljate
kabel HDMI.
• Pokazatelj se vklopi, ko
med napravami uporabljate
optični digitalni avdio kabel.
12. Pokazatelj Bluetooth
13. Daljinski upravljalnik
14. Gumb vklop/stanje
pripravljenosti
15. Gumb za utišanje
16. Tipka Glasnost +
17. Tipka Glasnost -
18. Tipka visoki toni +
19. Tipka visoki toni -
20. Tipka globoki toni +
21. Tipka globoki toni -
22. Gumb za resetiranje
23. Gumb za zvok: Glasba
24. Gumb za zvok: Film
25. Gumb za zvok: Noč
26. Gumb za vir: Avdio vhod
27. Gumb za vir: HDMI vhod
28. Gumb za vir: Optični
digitalni avdio vhod
29. Gumb za vir: Bluetooth
• Pokazatelj se vklopi, ko
med napravami uporabljate
Bluetooth.
• Pritisnite to tipko za vklop
naprave.
• Pritisnite gumb ponovno,
da napravo preklopite
vnačin pripravljenosti.
• Pritisnite tipko, da utišate
zvok.
• Pritisnite tipko, da znova
vklopite zvok.
• Pritisnite tipko za povišanje
glasnosti.
• Pritisnite tipko za zmanjšanje
glasnosti.
• Pritisnite tipko za povišanje
visokih tonov.
• Pritisnite tipko za zmanjšanje
visokih tonov.
• Pritisnite tipko za povišanje
globokih tonov.
• Pritisnite tipko za zmanjšanje
globokih tonov.
• Pritisnite gumb, da ponastavite
visoke in globoke tone
nazaj na privzeto nastavitev.
• Pritisnite gumb, da nastavite
zvok na način glasba.
• Pritisnite gumb, da nastavite
zvok na lmski način.
• Pritisnite gumb, da nastavite
zvok na nočni način.
• Pritisnite gumb, da nastavite
vir avdio vhoda.
• Pritisnite gumb, da nastavite
vir HDMI vhoda.
• Pritisnite gumb, da nastavite
vir na optični digitalni avdio
vhod.
• Pritisnite gumb, da nastavite
vir na Bluetooth.
6161
Page 62

SIovenščina
Namestitev (sl. B & C)
• Glejte slike, da boste napravo pravilno namestili.
Bluetooth združevanje
Samodejno združevanje
1. Vklopite zvočnik soundbar.
2. Povežite napravo Bluetooth.
Opomba: Zagotovite, da je vaša naprava
Bluetooth zadnja povezana naprava.
3. Vklopite napravo Bluetooth.
4. Nastavite vir na Bluetooth. Naprava Bluetooth
se bo združila z zvočnikom soundbar.
Pokazatelj Bluetooth neprekinjeno sveti.
Ročno združevanje
1. Vklopite zvočnik soundbar.
2. Nastavite vir na Bluetooth.
3. Ko pokazatelj Bluetooth utripa, je zvočnik
soundbar v načinu združevanja.
4. Povežite napravo Bluetooth.
5. Vklopite napravo Bluetooth. Naprava Bluetooth
bo poiskala Bluetooth ID zvočnika soundbar:
“HAV-SB500“.
6. Če se odpre okno z geslom, vnesite geslo:
“0000“. Naprava Bluetooth se bo združila z
zvočnikom soundbar. Pokazatelj Bluetooth
neprekinjeno sveti.
OPOMBA: Pred uporabo odstranite zaščitne
pokrovčke konektorjev iz priloženega optičnega
kabla in kabla HDMI.
Varnost
Splošna varnost
• Pred uporabo pozorno preberite priročnik.
Shranite ta priročnik za prihodnji ogled.
• Napravo uporabljajte le v njen namen. Naprave
ne uporabite za druge namene kot pa so opisani
v priročniku.
• Ne uporabljajte naprave, če je poškodovan
ali pokvarjen kateri koli del. Če je naprava
poškodovana ali pokvarjena, jo nemudoma
zamenjajte.
• Naprave ne izpostavljajte vodi ali vlagi.
• Ne blokirajte odprtin za prezračevanje.
Električna varnost
• Da zmanjšate tveganje za električni udar, lahko
ta izdelek odpre le pooblaščen tehnik, ko je
potreben servis.
• Če se pojavijo težave, odklopite izdelek iz
omrežnega napajanja in druge opreme.
Varnost pri rokovanju z baterijami
• Uporabljajte le baterije navedene v tem
priročniku.
• Ne uporabljajte starih baterij z novimi.
• Ne uporabljajte baterij različnih proizvajalcev.
• Ne namestite baterij z obrnjeno polarnostjo.
• Baterij ne razstavljajte in ne naredite kratkega stika.
• Baterij ne izpostavljajte vodi.
• Baterij ne izpostavljajte ognju ali prekomerni
vročini.
• Ko so baterije popolnoma izpraznjene, lahko
puščajo. Da preprečite poškodbe izdelka,
odstranite baterije, ko izdelek pustite nenadzorovan
za daljša časovna obdobja.
• Če tekočina iz baterij pride v stik s kožo ali oblačili,
nemudoma sperite s svežo vodo.
6262
Page 63

Jamstvo
Vse spremembe in/ali modikacije izdelka izničijo
garancijo. Se sprejemamo odgovornosti za
poškodbe, ki jih povzroči nepravilna uporaba izdelka.
Varstvo okolja
• Izdelek je zasnovan za ločeno zbiranje na
ustreznem zbirnem mestu. Ne odlagajte ta
izdelek skupaj z gospodinjskimi odpadki.
• Za več informacij se obrnite na trgovca ali lokalno
upravo odgovorno za upravljanje z odpadki.
Dokumentacija
Izdelek je proizveden in dobavljen v skladu z vsemi
zadevnimi predpisi in direktivami, ki veljajo za države
članice Evropske skupnosti. Izdelek je skladen z vsemi
specikacijami in predpisi v državi prodaje.
Uradno dokumentacijo lahko dobite po
povpraševanju. Uradna dokumentacija vključuje,
a ni omejena na, izjavo o skladnosti, podatkovni
varnostnim listom materiala in poročilom o
preskusu izdelka.
SIovenščina
Zavrnitev odgovornosti
Oblika in specikacije se lahko spremenijo brez
predhodnega obvestila. Vsi logotipi, blagovne
znamke in imena izdelka so blagovne znamke ali
registrirane blagovne znamke zadevnih lastnikov
in so prepoznavne kot takšne.
6363
Page 64

Hrvatski
HAV-SB500
Soundbar zvučnik
Sadržaj paketa
1. Soundbar zvučnik
2. Daljinski upravljač (uključujući baterije AAA)
3. Adapter za napajanje
4. Kabel za napajanje (EU)
5. Kabel za napajanje (Ujedinjeno Kraljevstvo)
6. Kabel AUX
7. Kabel RCA
8. Kabel HDMI
9. Optički kabel SPDIF
10. Zidna montaža
11. Vijci za zid (3x) / Zidni utikači (3x)
12. Vijci (zidni nosač / soundbar zvučnik) (2x)
Opis (sl. A)
Soundbar zvučnik uređaj je s više ugrađenih
zvučnika koji proizvode stereo zvuk iz jednog
kućišta povećavajući tako značajno kvalitetu zvuka
bez hrpe žica.
1. Soundbar zvučnik
• Za uključivanje uređaja
postavite prekidač za
2. Prekidač za uključivanje/
isključivanje
3. DC ulaz
4. Audio ulaz
5. HDMI ulaz
6. HDMI izlaz
7. Optički digitalni audio ulaz
8. Indikator napajanja
9. Indikator audio ulaza
10. Indikator HDMI ulaza
11. Indikator za optički digitalni
audio ulaz
uključivanje/isključivanje u
uključeni položaj.
• Za isključivanje uređaja
postavite prekidač za
uključivanje/isključivanje u
isključeni položaj.
• Spojite adapter za napajanje
na DC ulaz.
• Kabel napajanja spojite na
dovod.
• Spojite audio kabel ili AV
kabel na audio ulaz.
• Spojite HDMI kabel na
HDMI ulaz.
• Spojite HDMI kabel na
HDMI izlaz.
• Spojite optički digitalni
audio kabel na optički
digitalni audio ulaz.
• Indik ator se uključuje kad se
uključi uređaj.
• Indik ator se uključuje kad
se između uređaja koristi
audio kabel ili AV kabel.
• Indik ator se uključuje kad
se između uređaja koristi
HDMI kabel.
• Indik ator se uključuje kad
se između uređaja koristi
optički digitalni audio kabel.
12. Indikator za Bluetooth
13. Daljinski upravljač
14. Gumb uključivanje/stanje
mirovanja
15. Gumb za utišavanje
16. Gumb Jačina zvuka +
17. Gumb Jačina zvuka -
18. Gumb Visoki tonovi +
19. Gumb Visoki tonovi -
20. Gumb Niski tonovi +
21. Gumb Niski tonovi -
22. Gumb za resetiranje
23. Gumb za zvuk: Glazba
24. Gumb za zvuk: Film
25. Gumb za zvuk: Noć
26. Gumb za izvor: Audio ulaz
27. Gumb za izvor: HDMI ulaz
28. Gumb za izvor: Optički
digitalni audio ulaz
29. Gumb za izvor: Bluetooth
• Indik ator se uključuje kad
se između uređaja koristi
Bluetooth.
• Pritisnite gumb kako biste
uključili uređaj.
• Ponovno pritisnite gumb
kako biste uređaj prebacili u
stanje mirovanja.
• Pritisnite gumb da
privremeno potpuno
utišate zvuk.
• Ponovno pritisnite gumb da
vratite zvuk.
• Pritisnite gumb kako biste
pojačali glasnoću.
• Pritisnite gumb kako biste
smanjili glasnoću.
• Pritisnite gumb kako biste
pojačali visoke tonove.
• Pritisnite gumb kako biste
smanjili visoke tonove.
• Pritisnite gumb kako biste
pojačali niske tonove.
• Pritisnite gumb kako biste
smanjili niske tonove.
• Pritisnite gumb za ponovno
podešavanje visokih i niskih
tonova na zadane postavke.
• Pritisnite gumb kako biste
postavili zvuk u način za
glazbu.
• Pritisnite gumb kako biste
postavili zvuk u način
za lm.
• Pritisnite gumb kako biste
postavili zvuk u noćni način.
• Pritisnite gumb kako biste
postavili izvor na audio ulaz.
• Pritisnite gumb kako biste
postavili izvor na HDMI ulaz.
• Pritisnite gumb kako biste
postavili izvor na optički
digitalni audio ulaz.
• Pritisnite gumb kako biste
postavili izvor na Bluetooth.
6464
Page 65

Hrvatski
Instalacija (sl. B & C)
• Pogledajte slike kako biste ispravno postavili
uređaj.
Uparivanje putem Bluetootha
Automatsko uparivanje
1. Uključite soundbar zvučnik.
2. Spojite Bluetooth uređaj.
Napomena: Pazite da je Bluetooth uređaj
zadnji spojeni uređaj.
3. Uključite Bluetooth uređaj.
4. Postavite izvor na Bluetooth. Bluetooth uređaj
uparit će se sa soundbar zvučnikom. Indikator
za Bluetooth neprestano svijetli.
Ručno uparivanje
1. Uključite soundbar zvučnik.
2. Postavite izvor na Bluetooth.
3. Kad indikator za Bluetooth bljeska, soundbar
zvučnik je u načinu za uparivanje.
4. Spojite Bluetooth uređaj.
5. Uključite Bluetooth uređaj. Bluetooth uređaj
zatražit će Bluetooth ID soundbar zvučnika:
“HAV-SB500“.
6. Ako se prikaže prozor za zaporku, unesite
zaporku: “0000“. Bluetooth uređaj uparit
će se sa soundbar zvučnikom. Indikator za
Bluetooth neprestano svijetli.
NAPOMENA: prije upotrebe skinite zaštitne
poklopce s višežilnog optičkog i HDMI kabela.
Sigurnost
Opća sigurnost
• Pročitajte pažljivo priručnik prije korištenja.
Pohranite ovaj priručnik radi korištenja u
budućnosti.
• Uređaj koristite samo u svrhu za koju je
namijenjen. Nemojte koristiti ovaj uređaj za druge
namjene, osim one opisane u ovom priručniku.
• Ne koristite ovaj uređaj ako mu je bilo koji dio
oštećen ili pokvaren. Ako je uređaj oštećen ili
popravljen odmah ga zamijenite.
• Uređaj nemojte izlagati vodi ili vlazi.
• Ne blokirajte ventilacijske otvore.
Električna sigurnost
• Kako biste smanjili opasnost od strujnog udara,
ovaj bi proizvod u slučaju potrebe za servisiranjem
trebali otvarati samo ovlašteni servisni tehničari.
• U slučaju problema iskopčajte uređaj s napajanja
i s druge opreme.
Sigurnost baterije
• Koristite isključivo baterije opisane u priručniku.
• Ne miješajte stare baterije s novima.
• Nemojte koristiti baterije različite vrste ili marke.
• Nemojte umetati baterije suprotnim polaritetom.
• Nemojte rastavljati baterije niti ih spajati ukratko.
• Ne izlažite baterije vodi.
• Baterije nemojte izlagati vatri niti visokoj
temperaturi.
• Baterije su sklone curenju kad su potpuno
ispražnjene. Kako biste izbjegli oštećenje
proizvoda, izvadite baterije ako proizvod
ostavljate bez nadzora dulje vrijeme.
• Ako tekućina iz baterija dođe u doticaj s kožom
ili odjećom, odmah isperite svježom vodom.
6565
Page 66

Jamstvo
Svaka izmjena i/ili modikacija na proizvodu
poništava jamstvo. Ne možemo prihvatiti nikakvu
odgovornost za oštećenja nastala zbog nepravilne
uporabe proizvoda.
Odlaganje u otpad
• Proizvod je namijenjen odvojenom prikupljanju
na odgovarajućim točkama za prikupljanje. Ne
odlažite ovaj proizvod zajedno s otpadom iz
domaćinstva.
• Za više informacija se obratite prodavatelju ili
lokalnom tijelu odgovornom za gospodarenje
otpadom.
Dokumentacija
Proizvod je proizveden i isporučen u skladu
sa svim relevantnim odredbama i direktivama
koje vrijede za sve države članice Europske
Unije. Proizvod je sukladan sa svim relevantnim
specikacijama i odredbama u zemlji prodaje.
Formalna dokumentacija dostupna je na zahtjev.
Formalna dokumentacija uključuje, bez ograničenja,
izjavu o sukladnosti, list s podacima o sigurnosti
materijala i izvješće o testiranju proizvoda.
Hrvatski
Odricanje od odgovornosti
Dizajn i specikacije mogu se mijenjati bez
prethodne najave. Svi logotipi, robne marke i nazivi
proizvoda su zaštitni znakovi ili registrirani zaštitni
znakovi njihovih vlasnika i ovdje se spominju kao
takvi.
6666
Page 67

Română
HAV-SB500
Difuzor tip bară
Pachetul conţine
1. Difuzor tip bară
2. Telecomandă (incl. baterii AAA)
3. Adaptor alimentare
4. Cablu alimentare (UE)
5. Cablu alimentare (Regatul Unit)
6. Cablu AUX
7. Cablu RCA
8. Cablu HDMI
9. Cablu SPDIF optic
10. Suport perete
11. Şuruburi perete (3x) / Dibluri (3x)
12. Şuruburi (suport perete / difuzor tip bară) (2x)
Descriere (g. A)
Difuzorul tip bară este un dispozitiv cu mai multe
boxe încorporate care generează sunet stereo
dintr-o singură carcasă, îmbunătăţind substanţial
calitatea sunetului fără a necesare mai multe re.
1. Difuzor tip bară
• Pentru a porni dispozitivul,
aduceţi întrerupătorul de
pornire/oprire în poziţia
2. Întrerupător pornire/oprire
3. Intrare c.c.
4. Intrare audio
5. Intrare HDMI
6. Ieşire HDMI
7. Intrare audio digitală optică
8. Indicator de alimentare
9. Indicator intrare audio
10. Indicator intrare HDMI
pornit.
• Pentru a opri dispozitivul,
aduceţi întrerupătorul de
pornire/oprire în poziţia
oprit.
• Conectaţi adaptorul de
alimentare la intrarea c.c.
• Conectaţi cablul electric la
alimentarea de la reţea.
• Conectaţi un cablu audio sau
un cablu AV la intrarea audio.
• Conectaţi cablul HDMI la
intrarea HDMI.
• Conectaţi cablul HDMI la
ieşirea HDMI.
• Conectaţi un cablu audio
digital optic la intrarea
audio digitală optică.
• Indicatorul se aprinde când
dispozitivul este pornit.
• Indicatorul se aprinde când
un cablu audio sau un
cablu AV este utilizat între
dispozitive.
• Indicatorul se aprinde când
un cablu HDMI este utilizat
între dispozitive.
11. Indicator intrare audio
digitală optică
12. Indicator Bluetooth
13. Telecomandă
14. Buton pornire/aşteptare
15. Butonul de anulare a
sunetului
16. Buton volum +
17. Buton volum -
18. Buton înalte +
19. Buton înalte -
20. Buton joase +
21. Buton joase -
22. Buton pentru resetare
23. Buton sunet: Muzică
24. Buton sunet: Film
25. Buton sunet: Noapte
26. Buton sursă: Intrare audio
27. Buton sursă: Intrare HDMI
28. Buton sursă: Intrare audio
digitală optică
29. Buton sursă: Bluetooth
• Indicatorul se aprinde
când un cablu audio digital
optic este utilizat între
dispozitive.
• Indicatorul se aprinde când
se utilizează Bluetooth între
dispozitive.
• Apăsaţi butonul pentru a
porni dispozitivul.
• Apăsaţi butonul din nou
pentru a aduce dispozitivul
în modul de aşteptare.
• Apăsaţi butonul pentru a
anula sunetul.
• Apăsaţi butonul din nou
pentru a reactiva sunetul.
• Apăsaţi butonul pentru a
creşte volumul.
• Apăsaţi butonul pentru a
reduce volumul.
• Apăsaţi butonul pentru a
creşte înaltele.
• Apăsaţi butonul pentru a
reduce înaltele.
• Apăsaţi butonul pentru a
creşte joasele.
• Apăsaţi butonul pentru a
reduce joasele.
• Apăsaţi butonul pentru a
reseta înaltele şi joasele
înapoi la setarea implicită.
• Apăsaţi butonul pentru a seta
sunetul în modul muzică.
• Apăsaţi butonul pentru a seta
sunetul în modul lm.
• Apăsaţi butonul pentru a seta
sunetul în modul noapte.
• Apăsaţi butonul pentru a
seta sursa pe intrarea audio.
• Apăsaţi butonul pentru a
seta sursa pe intrarea HDMI.
• Apăsaţi butonul pentru a
seta sursa pe intrarea audio
digitală optică.
• Apăsaţi butonul pentru a
seta sursa pe Bluetooth.
6767
Page 68

Română
Instalare (g. B & C)
• Consultaţi ilustraţiile pentru a instala corect
dispozitivul.
Asociere Bluetooth
Asociere automată
1. Porniţi difuzorul tip bară.
2. Conectaţi dispozitivul Bluetooth.
Notă: Asiguraţi-vă că dispozitivul Bluetooth
este ultimul dispozitiv conectat.
3. Porniţi dispozitivul Bluetooth.
4. Setaţi sursa pe Bluetooth. Dispozitivul
Bluetooth va asociat cu difuzorul tip bară.
Indicatorul Bluetooth luminează constant.
Asociere manuală
1. Porniţi difuzorul tip bară.
2. Setaţi sursa pe Bluetooth.
3. Când indicatorul Bluetooth clipeşte, difuzorul
tip bară se aă în modul de asociere.
4. Conectaţi dispozitivul Bluetooth.
5. Porniţi dispozitivul Bluetooth. Dispozitivul
Bluetooth va căuta ID-ul Bluetooth al
difuzorului tip bară: „HAV-SB500”.
6. Dacă apare fereastra de introducere a parolei,
introduceţi parola: „0000”. Dispozitivul
Bluetooth va asociat cu difuzorul tip bară.
Indicatorul Bluetooth luminează constant.
NOTĂ: Înainte de utilizare, eliminaţi capacele de
protecţie ale conectorului cablului optic şi HDMI
conectat.
Siguranţă
Instrucţiuni generale de siguranţă
• Citiţi manualul cu atenţie înainte de utilizare.
Păstraţi manualul pentru consultări ulterioare.
• Utilizaţi dispozitivul numai în scopurile
prevăzute. Nu utilizaţi dispozitivul în alte scopuri
decât cele descrise în manual.
• Nu utilizaţi dispozitivul dacă are piese deteriorate
sau defecte. Dacă dispozitivul este deteriorat sau
defect, înlocuiţi imediat dispozitivul.
• Nu expuneţi dispozitivul apei sau umezelii.
• Nu blocaţi gurile de aerisire.
Instrucţiuni de siguranţă electrică
• Pentru a se reduce pericolul de electrocutare,
acest produs va desfăcut numai de către un
tehnician avizat, când este necesară depanarea.
• Deconectaţi produsul de la priza de reţea
sau alte echipamente în cazul apariţiei unei
probleme.
Instrucţiuni de siguranţă privind bateriile
• Folosiţi numai bateriile indicate în manual.
• Nu utilizaţi baterii noi şi vechi împreună.
• Nu utilizaţi baterii de tipuri sau mărci diferite.
• Nu instalaţi bateriile cu polaritatea inversată.
• Nu scurtcircuitaţi şi nu dezasamblaţi bateriile.
• Nu expuneţi bateriile la acţiunea apei.
• Nu expuneţi bateriile la acţiunea focului sau a
căldurii intense.
• Bateriile sunt predispuse la scurgeri când sunt
complet descărcate. Pentru a evita deteriorarea
produsului, scoateţi bateriile dacă lăsaţi produsul
nesupravegheat pe perioade mai lungi de timp.
• Dacă lichidul din baterii intră în contact cu pielea
sau îmbrăcămintea, clătiţi imediat cu apă curată.
6868
Page 69

Garanţie
Orice schimbări şi/sau modicări ale produsului
vor anula garanţia. Nu putem accepta
responsabilitatea pentru daunele provocate de
utilizarea incorectă a produsului.
Eliminare
• Produsul a fost creat pentru colectare separată
la un punct de colectare adecvat. Nu eliminaţi
produsul odată cu deşeurile menajere.
• Pentru mai multe informaţii, contactaţi
magazinul sau autoritatea locală responsabilă
pentru gestionarea deşeurilor.
Documentaţie
Produsul a fost fabricat şi furnizat în conformitate
cu toate reglementările şi directivele relevante,
valabile în toate statele membre ale Uniunii
Europene. Produsul este conform cu toate
specicaţiile şi reglementările aplicabile în toate
ţările în care se vinde.
Documentaţia ocială este disponibilă la cerere.
Documentaţia ocială include, fără limitare,
Declaraţia de Conformitate, Fişa cu Date de
Securitate şi raportul de testare a produsului.
Română
Renunţarea la răspundere
Designul şi specicaţiile produsului pot modicate
fără o noticare prealabilă. Toate siglele mărcilor şi
denumirile produselor sunt mărci comerciale sau
mărci comerciale înregistrate ale proprietarilor de
drept şi prin prezenta sunt recunoscute ca atare.
6969
Page 70

Български
HAV-SB500
Саундбар
Съдържание на пакета
1. Саундбар
2. Дистанционно управление (вкл. батерии ААА)
3. Адаптер за захранване
4. Захранващ кабел (ЕС)
5. Захранващ кабел (Великобритания)
6. AUX кабел (помощен)
7. RCA кабел
8. HDMI кабел
9. Оптичен SPDIF кабел
10. Стойка за стена
11. Винтове за монтиране на стена (3x) /
Дюбели (3x)
12. Винтове (стойката за стена / саундбар) (2x)
Описание (фиг. A)
Саундбарът е устройство с няколко вградени
високоговорителя, което генерира стерео
звук от една единствена кутия, значително
подобрявайки качеството на звука без да налага
използването на множество жици.
1. Саундбар
2. Бутон за включване/
изключване
3. Вход за постоянен ток
4. Аудио вход
5. HDMI вход
6. HDMI изход
7. Оптичен цифров аудио
вход
8. Индикатор за включване
9. Индикатор за аудио вход
• За да вк лючите
устройството, поставете
бутона за включване/
изключване в позиция
"включено".
• За да изк лючите
устройството, поставете
бутона за включване/
изключване в позиция
"изключено".
• Свържете адаптера за
захранване ток към входа
за постоянен ток.
• Свържете захранващия
кабел към електрозахранващата мрежа.
• Свържете аудио кабел или
AV (аудио и видео) кабел
към аудио входа.
• Свържете HDMI кабел към
HDMI входа.
• Свържете HDMI кабел към
HDMI изхода.
• Свържете оптичен цифров
аудио кабел към оптичния
цифров аудио вход.
• Индикаторът светва,
когато устройството бъде
включено.
• Индикаторът светва, когато
се използва аудио кабел
или AV кабел за връзка
между устройствата.
10. Индикатор за HDMI вход
11. Индикатор за оптичен
цифров аудио вход
12. Индикатор за Bluetooth
13. Дистанционно управление
14. Бутон за включване/
готовност
15. Бутон за изключване на
звука
16. Звук + бутон
17. Звук - бутон
18. Високи честоти + бутон
19. Високи честоти - бутон
20. Басове + бутон
21. Басове - бутон
22. Бутон за връщане на
фабричните настройки
23. Бутон за звук: Музика
24. Бутон за звук: Филм
25. Бутон за звук: Нощен
26. Бутон за източник: Входен
аудио сигнал
27. Бутон за източник: Входен
HDMI сигнал
28. Бутон за източник: Входен
оптичен цифров аудио
сигнал
29. Бутон за източник:
Bluetooth
• Индик аторът светва, когато
се използва HDMI кабел за
връзка между устройствата.
• Индик аторът светва когато
оптичен цифров аудио
кабел се използва за връзка
между устройствата.
• Индикаторът светва, когато
се използва Bluetooth за
връзка между устройствата.
• Натиснете бутона, за да
включите устройството.
• Натиснете бутона отново, за
да оставите устройството в
режим на готовност.
• Натиснете бутона, за да
изключите звука.
• Натиснете отново бутона,
за да включите звука.
• Натиснете бутона, за да
увеличите звука.
• Натиснете бутона, за да
намалите звука.
• Натиснете бутона, за да
увеличите високите честоти.
• Натиснете бутона, за да
намалите високите честоти.
• Натиснете бутона, за да
увеличите басовете.
• Натиснете бутона, за да
намалите басовете.
• Натиснете бутона, за да
възстановите настройките
по подразбиране на
високите честоти и басовете.
• Натиснете бутона, за да
зададете музикален режим
на звука.
• Натиснете бутона, за да
зададете филмов режим
на звука.
• Натиснете бутона, за да
активирате Нощен режим
на звука.
• Натиснете бутона, за да
зададете входен аудио
сигнал като източник.
• Натиснете бутона, за да
зададете входен HDMI
сигнал като източник.
• Натиснете бутона, за да
зададете входен оптичен
цифров аудио сигнал като
източник.
• Натиснете бутона, за да
зададете Bluetooth сигнал
като източник.
7070
Page 71

Български
Инсталация (фиг. B & C)
• Вижте илюстрациите, за да инсталирате
устройството правилно.
Bluetooth сдвояване
Автоматично сдвояване
1. Включете саундбара.
2. Свържете Bluetooth устройството.
Забележка: Уверете се, че Bluetooth
устройството е последното свързано
устройство.
3. Включете Bluetooth устройството.
4. Задайте Bluetooth сигнал като източник.
Bluetooth устройството ще бъде сдвоено
със саундбара. Индикаторът за Bluetooth
свети непрекъснато.
Ръчно сдвояване
1. Включете саундбара.
2. Задайте Bluetooth сигнал като източник.
3. Когато индикаторът за Bluetooth входа
примигва, саундбарът е в режим на
сдвояване.
4. Свържете Bluetooth устройството.
5. Включете Bluetooth устройството.
Bluetooth устройството ще търси Bluetooth
идентификатора на саундбара. “HAV-SB500“.
6. Ако се появи прозорец за въвеждане на
парола, въведете следната парола: “0000“.
Bluetooth устройството ще бъде сдвоено
със саундбара. Индикаторът за Bluetooth
свети непрекъснато.
ЗАБЕЛЕЖКА: Преди употреба премахнете
предпазните капачки от конекторите на
оптичния и HDMI кабела.
Безопасност
Общи мерки за безопасност
• Внимателно прочетете ръководството преди
употреба. Запазете ръководството за справки
в бъдеще.
• Използвайте устройството само за цели,
за които е предназначено. Не използвайте
устройството за други цели, различни от
указаните в ръководството.
• Не използвайте устройството, ако някоя част
е повредена или дефектна. Ако устройството
е повредено или дефектно, сменете
устройството веднага.
• Не излагайте устройството под въздействие
на вода или влага.
• Не запушвайте вентилационните отвори.
Електрическа безопасност
• За да намалите риска от токов удар в случая,
ако продуктът се нуждае от сервиз, той трябва
да се отваря само от оторизиран техник.
• Изключете устройството от електрическата
мрежа и друго оборудване, ако има вероятност
да възникне проблем.
Безопасна работа с батерията
• Използвайте само батериите, посочени в
ръководството.
• Не използвайте стари и нови батерии заедно.
• Не използвайте батерии от различни видове
или марки.
• Не поставяйте батериите в обратна полярност.
• Не съединявайте на късо и не разглобявайте
батериите.
• Не подлагайте батериите под въздействие на
вода.
• Не подлагайте батериите под въздействие на
огън или прекомерна топлина.
• Батериите са податливи на течове, когато
са напълно изтощени. За да се избегне
повреждането на продукта, извадете
батериите при оставянето на продукта без
надзор за по-дълъг период от време.
• Ако течност от батериите влезе в контакт с
кожата или дрехите, веднага ги изплакнете с вода.
7171
Page 72

Гаранция
Каквито и да е промени и/или модификации на
продукта, ще анулират гаранцията. Ние не можем
да носим отговорност за щети, причинени от
неправилно използване на продукта.
Изхвърляне
• Продуктът е предназначен за разделно
събиране на съответния пункт за събиране.
Не изхвърляйте продукта с битовите отпадъци.
• За повече информация се свържете с търговеца
или местните власти, които отговарят за
управлението на отпадъците.
Документация
Продуктът е произведен и доставен в съответствие
с всички приложими разпоредби и директиви,
валидни за всички държави членки на Европейския
съюз. Продуктът отговаря на всички приложими
изисквания и разпоредби в страната на продажба.
Официална документация е на разположение
при поискване. Официалната документация
включва, но не се ограничава само с това,
Декларацията за съответствие, Информационния
лист за безопасност на материала и протокола от
изпитването на продукта.
Български
Отказ от отговорност
Дизайнът и спецификациите подлежат на промяна
без предизвестие. Всички лога, търговски марки
и имена на продукти са търговски марки или
регистрирани търговски марки на съответните
им притежатели и с настоящото се признават като
такива.
7272
Page 73

Русский
HAV-SB500
Звуковая панель
Содержимое упаковки
1. Звуковая панель
2. Пульт дистанционного управления
(вкл. батарейки ААА)
3. Адаптер питания
4. Кабель питания (ЕС)
5. Кабель питания (Великобритания)
6. Кабель AUX
7. Кабель RCA
8. Кабель HDMI
9. Оптический кабель SPDIF
10. Настенное крепление
11. Анкерные болты (3x) / Дюбеля (3x)
12. Винты (настенного крепления / звуковой
панели) (2x)
Описание (рис. A)
Звуковая панель представляет собой устройство
с несколькими встроенными в один корпус
динамиками, которое генерирует стереозвук, значительно улучшая качество звука без
необходимости прокладки множества проводов.
1. Звуковая панель
2. Выключатель (вкл./выкл.)
3. Вход постоянного тока
4. Аудиовход
5. Вход HDMI
6. Выход HDMI
7. Оптический цифровой
аудио вход
8. Индикатор включения
питания
9. Индикатор аудио входа
10. Индикатор входа HDMI
• Дл я включения устройства
переведите выключатель в
положение "вкл".
• Для выключения устройства
переведите выключатель в
положение "вык л".
• Подк лючите адаптер
питания к входу
постоянного тока.
• Подключите сетевой кабель
к сети электропитания.
• Подк лючите аудио кабель
или аудио-видео кабель к
аудио входу.
• Подк лючите кабель HDMI к
входу HDMI.
• Подк лючите кабель HDMI к
выходу HDMI.
• Подк лючите оптический
цифровой аудио кабель к
оптическому цифровому
аудио входу.
• Индикатор загорается при
включении устройства.
• Индикатор загорается,
когда устройства
соединены аудио кабелем
или аудио видео кабелем.
• Индикатор загорается,
когда устройства
соединены кабелем HDMI.
11. Индикатор оптического
цифрового аудио входа
12. Индикатор Bluetooth
13. Пульт дистанционного
управления
14. Кнопка вкл./режима
ожидания
15. Кнопка отключения звука
16. Кнопка увеличения
громкости
17. Кнопка уменьшения
громкости
18. Кнопка увеличения уровня
верхних частот
19. Кнопка уменьшения
уровня верхних частот
20. Кнопка увеличения уровня
низких частот
21. Кнопка уменьшения
уровня низких частот
22. Кнопка сброса
23. Кнопка зуммера: Музыка
24. Кнопка зуммера: Кино
25. Кнопка зуммера: Ночь
26. Кнопка источника:
Аудиовход
27. Кнопка источника: Вход
HDMI
28. Кнопка источника:
Оптический цифровой
аудио вход
29. Кнопка источника:
Bluetooth
• Индикатор загорается,
когда устройства
соединены оптическим
цифровым аудио кабелем.
• Индикатор загорается,
когда устройства
соединены по Bluetooth.
• Нажмите эту кнопку для
включения устройства.
• Дл я установки режима
ожидания нажмите кнопку
еще раз.
• Нажмите эту кнопку, чтобы
выключить звук.
• Нажмите эту кнопку, чтобы
включить звук снова.
• Нажмите эту кнопку для
увеличения громкости.
• Нажмите эту кнопку для
уменьшения громкости.
• Нажмите эту кнопку
для увеличения уровня
верхних звуковых частот.
• Нажмите эту кнопку для
уменьшения уровня
верхних звуковых частот.
• Нажмите эту кнопку для
увеличения уровня низких
звуковых частот.
• Нажмите эту кнопку для
уровня низких звуковых
частот.
• Нажмите эту кнопку, чтобы
сбросить параметры
низких и высоких частот до
заводских настроек.
• Нажмите кнопку, чтобы
звук воспроизводился в
режиме "Музык а".
• Нажмите кнопку, чтобы
звук воспроизводился в
режиме "Кино".
• Нажмите эту кнопку для
воспроизведения звука в
ночном режиме.
• Нажмите кнопку, чтобы
установить источник
сигнала аудио входа.
• Нажмите кнопку, чтобы
установить источник
сигнала входа HDMI.
• Нажмите кнопку, чтобы
установить источник
сигнала оптического
цифрового аудио входа.
• Нажмите кнопку, чтобы
установить источник
сигнала Bluetooth.
7373
Page 74

Русский
Установка (рис. B & C)
• На рисунках показан способ правильной
установки устройства.
Сопряжение по Bluetooth
Автоматическое сопряжение
1. Включите звуковую панель.
2. Подсоедините устройство Bluetooth.
Примечание: Убедитесь, что ваше устройство
Bluetooth – последнее подключаемое
устройство.
3. Включите устройство Bluetooth.
4. Установите источник сигнала для Bluetooth.
Устройство Bluetooth будет подсоединено
к звуковой панели. Индикатор Bluetooth
будет непрерывно гореть.
Установка сопряжения вручную
1. Включите звуковую панель.
2. Установите источник сигнала для Bluetooth.
3. Когда мигает индикатор Bluetooth, звуковая
панель находится в режиме сопряжения.
4. Подсоедините устройство Bluetooth.
5. Включите устройство Bluetooth. Устройство
Bluetooth будет искать идентификатор
Bluetooth звуковой панели: “HAV-SB500“.
6. Когда появится окно для ввода пароля,
введите пароль: “0000“. Устройство Bluetooth
будет подсоединено к звуковой панели.
Индикатор Bluetooth будет непрерывно
гореть.
ПРИМЕЧАНИЕ. Снимите защитный колпачок
разъема жгута оптического кабеля и HDMIкабеля перед использованием.
Требования безопасности
Общие требования
• Перед началом работы внимательно
прочитайте руководство. Сохраните
руководство для будущего использования.
• Используйте устройство строго по назначению.
Устройство должно использоваться только
по прямому назначению в соответствии с
руководством по эксплуатации.
• Запрещается использовать устройство
с поврежденными или неисправными
компонентами. Немедленно замените
поврежденное или неисправное устройство.
• Не допускайте воздействия на устройство
воды или влаги.
• Запрещается закрывать вентиляционные
отверстия.
Требования электробезопасности
• В целях предотвращения поражения
электрическим током следует открывать
устройство только для проведения
обслуживания и только силами авторизованного
персонала.
• При возникновении неполадок отключите
устройство от сети и другого.
Безопасность при работе с аккумулятором.
• Применяйте только указанные в руководстве
батареи.
• Не используйте старые и новые батареи
одновременно.
• Не используйте батареи различных типов и
различных марок.
• Не устанавливайте батареи в обратной
полярности.
• Не замыкайте контакты батарей и не
разбирайте их.
• Не подвергайте батареи воздействию воды.
• Не подвергайте батареи воздействию
пламени или высокой температуры.
• Полностью разряженные батареи могут
протекать. Во избежание повреждения изделия
при долгом хранении извлекайте батареи.
• При попадании жидкости из батареи на кожу
или одежду немедленно промойте пятно
пресной водой.
7474
Page 75

Гарантия
Любые изменения и / или модификации
устройства приведут к аннулированию прав
пользователя на гарантийное обслуживание.
Мы не несем ответственности за ущерб,
понесенный вследствие неправильного
использования этого продукта.
Утилизация
• Это устройство предназначено для
раздельного сбора в соответствующем
пункте сбора отходов. Не выбрасывайте это
устройство вместе с бытовыми отходами.
• Для получения дополнительной информации
обратитесь к продавцу или в местный орган
власти, ответственный за утилизацию отходов.
Документация
Устройство изготовлено и поставлено
в соответствии со всеми применимыми
положениями и директивами, действующими
для всех стран-членов Европейского Союза.
Оно также соответствует всем нормами и
правилами, действующим в стране продажи.
Официальная документация предоставляется
по запросу. Официальная документация
включает декларацию соответствия, паспорт
безопасности и отчет по проверке продукта, но
не ограничивается данным перечнем.
Русский
Оговорки
Дизайн и технические характеристики
могут быть изменены без предварительного
уведомления. Все логотипы брендов и названия
продуктов являются товарными знаками или
зарегистрированными торговыми марками их
соответствующих владельцев и следовательно
признаются таковыми.
7575
Page 76

Türkçe
HAV-SB500
Soundbar
Ambalaj içeriği
1. Soundbar
2. Uzaktan kumanda (AAA piller dâhil)
3. Güç adaptörü
4. Güç kablosu (AB)
5. Güç kablosu (Birleşik Krallık)
6. AUX kablosu
7. RCA kablosu
8. HDMI kablosu
9. Optik SPDIF kablosu
10. Duvar askısı
11. Duvar vidaları (3x) / Dübeller (3x)
12. Vidalar (duvar askısı / soundbar) (2x)
Açıklama (şek. A)
Soundbar, çok sayıda yerleşik hoparlörden oluşan
bir cihazdır ve bir kablo yığını gerektirmeden, ses
kalitesini çarpıcı bir biçimde iyileştirerek, tek bir
kabinden stereo ses üretir.
1. Soundbar
• Cihazı açmak için, on/o
düğmesini on konumuna
2. Aç/kapat düğmesi
3. DC girişi
4. Ses girişi
5. HDMI girişi
6. HDMI çıkışı
7. Optik dijital ses girişi
8. Güç göstergesi
9. Ses girişi göstergesi
10. HDMI girişi göstergesi
getirin.
• Cihazı kapatmak için, on/o
düğmesini o konumuna
getirin.
• Güç adaptörünü DC girişine
bağlayın.
• Şebeke k ablosunu şebekeye
bağlayın.
• Ses girişine, bir ses kablosu
veya bir AV kablosu
bağlayın.
• HDMI girişine, bir HDMI
kablosu bağlayın.
• HDMI çıkışına, bir HDMI
kablosu bağlayın.
• Optik dijital ses girişine,
bir optik dijital ses kablosu
bağlayın.
• Cihaz açıldığında, gösterge
yanar.
• Cihazlar arasında bir ses
kablosu veya bir AV kablosu
kullanıldığında, gösterge
yanar.
• Cihazlar arasında bir HDMI
kablosu kullanıldığında,
gösterge yanar.
11. Optik dijital ses girişi
göstergesi
12. Bluetooth göstergesi
13. Uzaktan kumanda
14. Aç/beklet düğmesi
15. Sessize alma düğmesi
16. Volume + düğmesi
17. Volume - düğmesi
18. Treble + düğmesi
19. Treble - düğmesi
20. Bass + düğmesi
21. Bass - düğmesi
22. Sıfırlama düğmesi
23. Ses düğmesi: Müzik
24. Ses düğmesi: Film
25. Ses düğmesi: Gece
26. Kaynak düğmesi: Ses girişi
27. Kaynak düğmesi: HDMI
girişi
28. Kaynak düğmesi: Optik
dijital ses girişi
29. Kaynak düğmesi: Bluetooth
• Cihazlar arasında bir
optik dijital ses kablosu
kullanıldığında, gösterge
yanar.
• Cihazlar arasında Bluetooth
kullanıldığında, gösterge
yanar.
• Cihazı açmak için düğmeye
basın.
• Cihazı bekleme moduna
almak için, düğmeye tekrar
basın.
• Sesi k apatmak için düğmeye
basın.
• Sesi açmak için, düğmeye
tekrar basın.
• Sesi yükseltmek için
düğmeye basın.
• Sesi k ısmak için düğmeye
basın.
• Tizliği arttırmak için düğmeye
basın.
• Tizliği azaltmak için düğmeye
basın.
• Bası ar ttırmak için düğmeye
basın.
• Bası azaltmak için düğmeye
basın.
• Tizlik ve bas ayarlarını
varsayılan değerlere sıfırlamak
için düğmeye basın.
• Sesi müzik moduna ayarlamak
için düğmeye basın.
• Sesi lm moduna ayarlamak
için düğmeye basın.
• Sesi gece moduna ayarlamak
için düğmeye basın.
• Kaynağı ses girişine ayarlamak
için düğmeye basın.
• Kaynağı HDMI girişine
ayarlamak için düğmeye basın.
• Kaynağı optik dijital ses
girişine ayarlamak için
düğmeye basın.
• K aynağı Bluetooth ayarlamak
için düğmeye basın.
7676
Page 77

Türkçe
Kurulum (şek. B & C)
• Cihazı doğru şekilde kurmak için resimlere bakın.
Bluetooth eşleştirme
Otomatik eşleştirme
1. Soundbar'ı açın.
2. Bluetooth cihazını bağlayın.
Not: Bluetooth cihazınızın, bağlanan son cihaz
olduğundan emin olun.
3. Bluetooth cihazını açın.
4. Kaynağı Bluetooth ayarlayın. Bluetooth
cihazı, soundbar ile eşleşecektir. Bluetooth
göstergesi sürekli olarak yanar.
Manuel eşleştirme
1. Soundbar'ı açın.
2. Kaynağı Bluetooth ayarlayın.
3. Bluetooth göstergesi yanıp sönerken,
soundbar eşleştirme modundadır.
4. Bluetooth cihazını bağlayın.
5. Bluetooth cihazını açın. Bluetooth cihazı,
soundbar'ın Bluetooth kodunu arayacaktır:
“HAV-SB500“.
6. Eğer şifre pencereleri açılırsa, şifreyi girin:
“0000“. Bluetooth cihazı, soundbar ile
eşleşecektir. Bluetooth göstergesi sürekli
olarak yanar.
NOT: Kullanmadan önce konektör koruma
kapaklarını optik ve HDMI kablo demetinden
çıkarın.
Güvenlik
Genel güvenlik
• Kullanmadan önce kılavuzu dikkatli bir şekilde
okuyun. Kılavuzu daha sonra başvurmak için
saklayın.
• Cihazı sadece tasarlanan amacı için kullanın.
Cihazı kılavuzda açıklanan amaçların dışındaki
amaçlar için kullanmayın.
• Herhangi bir parçası hasarlı veya kusurlu ise
cihazı kullanmayın. Cihaz hasarlı veya kusurlu ise
cihazı derhal değiştirin.
• Cihazı su veya neme maruz bırakmayın.
• Havalandırma deliklerini kapatmayın.
Elektrik güvenliği
• Elektrik çarpma riskini azaltmak için servis
gerekli olduğunda bu ürün sadece yetkili bir
teknisyen tarafından açılmalıdır.
• Bir sorun meydana geldiğinde ürünün elektrikle
ve diğer aygıtlarla olan bağlantısını kesin.
Pil güvenliği
• Yalnızca bu kılavuzda belirtilen pilleri kullanın.
• Eski ve yeni pilleri bir arada kullanmayın.
• Farklı tür ve markalardaki pilleri kullanmayın.
• Pilleri ters kutuplarda takmayın.
• Pilleri kısa devre yapmayın veya demonte etmeyin.
• Pilleri suya maruz bırakmayın.
• Cihazı ateşe veya aşırı ısıya maruz bırakmayın.
• Piller, tam olarak boşaldığında sızıntı gerçekleşebilir.
Ürüne zarar gelmemesi için uzun süre kullanım dışı
kalacağı zaman piller çıkarılmalıdır.
• Pillerden akan sıvı deriyle veya giysilerle temas
ettiğinde hemen temiz suyla yıkanmalıdır.
7777
Page 78

Garanti
Ürün üzerindeki tüm değişikliler ve/veya
modikasyonlar garantiyi geçersiz kılar. Ürünün
hatalı kullanımından kaynaklanan hasarlar için
şirketimiz tarafından hiçbir sorumluluk kabul
edilmemektedir.
Elden çıkarma
• Ürün, uygun bir toplama noktasında ayrı olarak
toplanmak üzere belirlenmiştir. Ürünü evsel
artıklarla birlikte atmayın.
• Daha fazla bilgi için satıcınızla veya atık
yönetiminden sorumlu yerel makamlarla
iletişime geçin.
Belgeler
Ürün tüm Avrupa Birliği üye ülkeleri için geçerli
olan ilgili tüm yönetmelikler ve yönergelere uygun
olarak üretilmiş ve tedarik edilmiştir. Ürün satıldığı
ülkedeki tüm geçerli şartnameler ve yönetmeliklere
uygundur.
Talep edilmesi durumunda resmi belgeler sunulabilir.
Resmi belgeler arasında örneğin Uygunluk Beyanı,
Malzeme Güvenliği Veri Sayfası ve ürün test raporu
yer almaktadır.
Türkçe
Feragatname
Tasarımlar ve özellikler önceden bildirimde
bulunulmaksızın değiştirilebilir. Tüm
logolar, markalar ve ürün adları ticari markalardır
veya ilgili sahiplerinin kayıtlı ticari markalarıdır ve
bu şekilde ele alınmaktadır.
7878
Page 79

T: +31 (0)73-5993965
E: service@nedis.com
W: http://www.nedis.com/en-us/contact/contact-form.htm
NEDIS B.V.
De Tweeling 28
5215 MC ’s-Hertogenbosch
THE NETHERLANDS
 Loading...