

Page 1
Register
your product
www.kaercher.com/welcome
T 9/1 Bp
001
Deutsch 4
English 10
Français 16
Italiano 22
Nederlands 28
Español 34
Português 40
Dansk 46
Norsk 52
Svenska 58
Suomi 64
Ελληνικά 70
Türkçe 77
Русский 83
Magyar 90
Čeština 96
Slovenščina 102
Polski 108
Româneşte 114
Slovenčina 120
Hrvatski 126
Srpski 132
Български 138
Eesti 145
Latviešu 151
Lietuviškai 157
Українська 163
59669540 12/18
Page 2
3
1
2
6
6
7
102
11
14
15
21
22
8
23
13
4
24
18
19
5
9
12
20
17
16
+
2
Page 3

1
“Click”
2
1
2
3
“Click”
4
5
6
7
3
Page 4
Lesen Sie vor der ersten Benut-
zung Ihres Gerätes diese Originalbetriebsanleitung, handeln Sie danach
und bewahren Sie diese für späteren Gebrauch oder für Nachbesitzer auf.
– Vor erster Inbetriebnahme Sicherheits-
hinweise Nr. 5.956-249.0 unbedingt lesen!
– Bei Nichtbeachtung der Betriebsanlei-
tung und der Sicherheitshinweise können Schäden am Gerät und Gefahren
für den Bediener und andere Personen
entstehen.
– Bei Transportschaden sofort Händler
informieren.
– Prüfen Sie beim Auspacken den Pa-
ckungsinhalt auf fehlendes Zubehör
oder Beschädigungen.
Inhaltsverzeichnis
Umweltschutz . . . . . . . . . . . . . DE 1
Gefahrenstufen . . . . . . . . . . . . DE 1
Bestimmungsgemäße Verwen-
dung . . . . . . . . . . . . . . . . . . . . DE 1
Geräteelemente . . . . . . . . . . . DE 2
Symbole auf dem Gerät . . . . . DE 2
Sicherheitshinweise . . . . . . . . DE 2
Inbetriebnahme. . . . . . . . . . . . DE 3
Bedienung. . . . . . . . . . . . . . . . DE 3
Transport. . . . . . . . . . . . . . . . . DE 4
Lagerung. . . . . . . . . . . . . . . . . DE 4
Pflege und Wartung . . . . . . . . DE 4
Hilfe bei Störungen . . . . . . . . . DE 4
Garantie . . . . . . . . . . . . . . . . . DE 5
Zubehör und Ersatzteile . . . . . DE 5
EU-Konformitätserklärung. . . . DE 5
Technische Daten . . . . . . . . . . DE 6
Umweltschutz
Die Verpackungsmaterialien
sind recyclebar. Bitte werfen Sie
die Verpackungen nicht in den
Hausmüll, sondern führen Sie
diese einer Wiederverwertung
zu.
Altgeräte enthalten wertvolle recyclingfähige Materialien, die einer Verwertung zugeführt werden sollten. Batterien und Akkus
enthalten Stoffe, die nicht in die
Umwelt gelangen dürfen. Bitte
entsorgen Sie Altgeräte, Batterien und Akkus deshalb über geeignete Sammelsysteme.
Hinweise zu Inhaltsstoffen (REACH)
Aktuelle Informationen zu Inhaltsstoffen finden Sie unter:
www.kaercher.de/REACH
Gefahrenstufen
GEFAHR
Hinweis auf eine unmittelbar drohende Gefahr, die zu schweren Körperverletzungen
oder zum Tod führt.
몇 WARNUNG
Hinweis auf eine möglicherweise gefährliche Situation, die zu schweren Körperverletzungen oder zum Tod führen kann.
몇 VORSICHT
Hinweis auf eine möglicherweise gefährliche Situation, die zu leichten Verletzungen
führen kann.
ACHTUNG
Hinweis auf eine möglicherweise gefährliche Situation, die zu Sachschäden führen
kann.
Bestimmungsgemäße
Verwendung
몇 WARNUNG
Das Gerät ist nicht für die Absaugung gesundheitsschädlicher Stäube geeignet.
ACHTUNG
Dieses Gerät ist nur für den Gebrauch in Innenräumen bestimmt.
– Dieser Universalsauger ist zur Trocken-
reinigung von Boden- und Wandflächen
bestimmt.
– Dieses Gerät ist für den gewerblichen
Gebrauch geeignet, z.B. in Hotels,
Schulen, Krankenhäusern, Fabriken,
Läden, Büros und Vermietergeschäften.
4 DE
– 1
Page 5

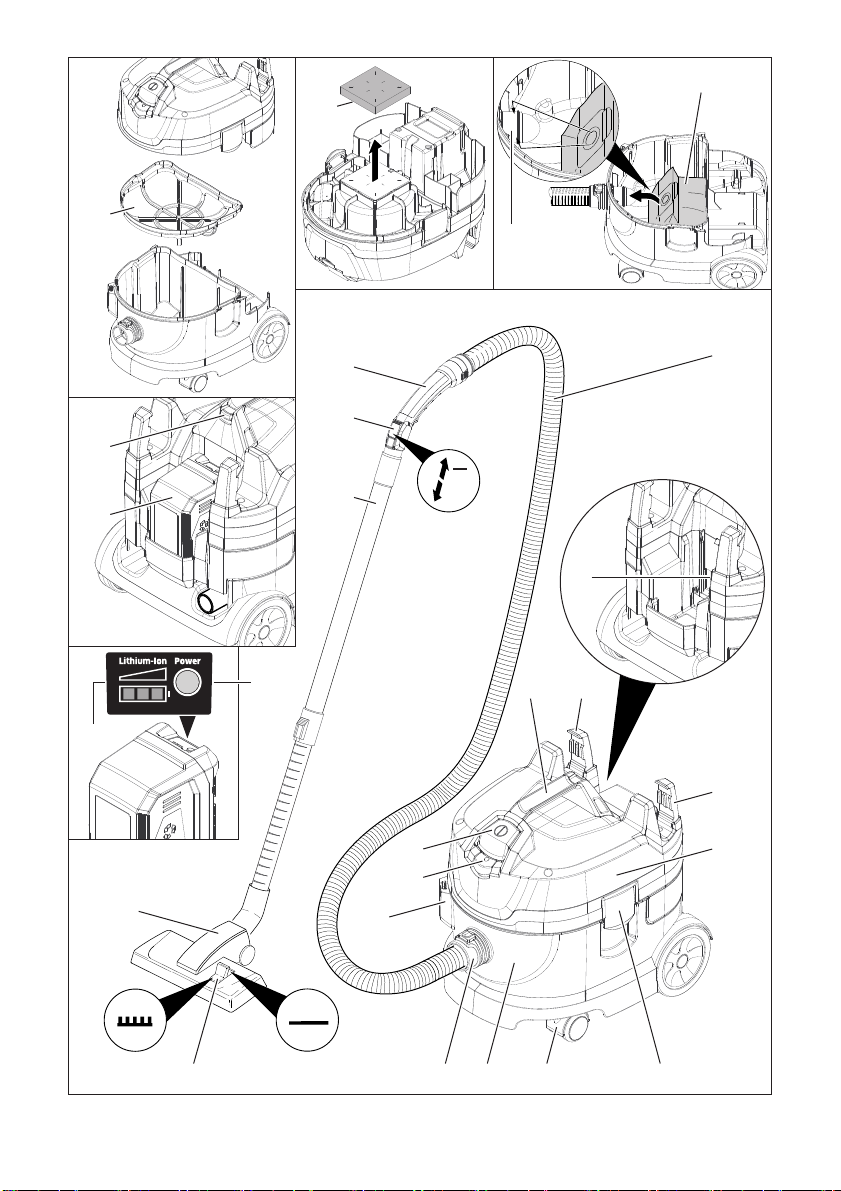
Geräteelemente
1 Vliesfiltertüte
2 Saugstutzen
3 Saugschlauch
4 Typenschild
5 Tragegriff
6 Schlauchhalter
7 Saugkopf
8 Verriegelung des Saugkopfs
9 Lenkrolle
10 Schmutzbehälter
11 Aufnahme für Bodendüse
12 Eco-Schalter (Energiesparmodus)
13 Hauptschalter
14 Umschalter Hartfläche/Teppichboden
15 Bodendüse
16 Ladekontrollanzeige
17 Taste für Ladekontrollanzeige
18 Akku
19 Entriegelungstaste
20 Teleskopsaugrohr
21 Saugkraftregler (stufenlos)
22 Krümmer
23 Hauptfilterkorb
24 Motorschutzfilter
Symbole auf dem Gerät
Keine feuchten oder flüssigen
Substanzen aufsaugen.
Sicherheitshinweise
Neben den Hinweisen in der Betriebsanleitung müssen die allgemeinen Sicherheitsund Unfallverhütungs-Vorschriften des Gesetzgebers berücksichtigt werden.
GEFAHR
Verletzungsgefahr! Vor allen Pflege-, Wartungs- und Reparaturarbeiten am Gerät,
Akku entnehmen.
Akku/Ladegerät
GEFAHR
– Das Laden des Akkus ist nur mit beilie-
gendem Originalladegerät oder den von
KÄRCHER zugelassenen Ladegeräten
erlaubt.
– Vor jeder Benutzung Ladegerät und Ak-
kupack auf Beschädigung kontrollieren.
Beschädigte Geräte nicht mehr verwenden und beschädigte Teile nur von
Fachpersonal instand setzen lassen.
– Ladegerät nicht in verschmutztem oder
nassem Zustand benutzen.
– Die Netzspannung muss mit der auf
dem Typenschild des Ladegerätes angegebenen Spannung übereinstimmen.
– Ladegerät nicht in explosionsgefährde-
ter Umgebung betreiben.
– An die Kontakte des Adapters dürfen
keine Metallteile gelangen, Kurzschlussgefahr.
– Ladegerät nur zum Laden zugelasse-
ner Akkupacks verwenden.
– Nur saubere und trockene Akkupacks
auf das Ladegerät stecken.
– Keine Batterien (Primärzellen) aufla-
den, Explosionsgefahr.
– Keine beschädigten Akkupacks aufla-
den. Beschädigte Akkupacks ersetzen.
– Akkupacks nicht zusammen mit Metall-
gegenständen aufbewahren, Kurzschlussgefahr.
– Akkupacks nicht ins Feuer oder in den
Hausmüll werfen.
– Kontakt mit aus defekten Akkus austre-
tender Flüssigkeit vermeiden. Bei zufälligem Kontakt Flüssigkeit mit Wasser
abspülen. Bei Kontakt mit den Augen
zusätzlich einen Arzt konsultieren.
– 2
5DE
Page 6

Inbetriebnahme
Kontrolle, ob Hauptfilterkorb im Gerät
eingesetzt ist.
Betriebsarten
1 Betrieb mit Vliesfiltertüte oder Papierfil-
tertüte (Sonderzubehör)
2 Betrieb ohne Filtertüte
Einbau der Filtertüte
Saugkopf entriegeln und abnehmen.
Hauptfilterkorb entnehmen.
Vliesfiltertüte oder Papierfiltertüte (Son-
derzubehör) aufstecken.
Hauptfilterkorb einsetzen.
Saugkopf aufsetzen und verriegeln.
Akku einsetzen
Akku in Akkuhalter einschieben und
einrasten.
Akku aufladen
Hinweis: Betriebsanleitung des Ladege-
rätherstellers lesen und insbesondere die
Sicherheitshinweise beachten!
Der Akku ist bei Auslieferung teilgeladen.
Vor Inbetriebnahme und bei Bedarf aufladen.
Hinweis: Das Laden des Akkus kann nur in
entnommenem Zustand erfolgen.
Entriegelungstaste drücken und Akku
entnehmen.
Ladegerät in einer ordnungsgemäßen
Steckdose einstecken.
Akku in Ladegerät stecken.
Ladezeit bei leerem Akku
Schnell-Ladegerät BC 1/7 min 60
Bedienung
Ladekontrollanzeige
Taste für Ladekontrollanzeige am Akku
betätigen. Die Ladekontrollanzeige
leuchtet 1 Minute lang.
Ladekontrollanzeige wurde 60 Minuten
lang nicht aktiviert (Schlafmodus):
Taste für Ladekontrollanzeige am Akku
2x betätigen. Die Ladekontrollanzeige
leuchtet 1 Minute lang.
Gerät einschalten
Gerät am Hauptschalter einschalten.
Eco-Modus
Eco-Modus (Energiesparmodus): Das Gerät arbeitet mit reduzierter Saugleistung.
Die Akkulaufzeit verlängert sich.
Eco-Modus einschalten: Eco-Schalter
betätigen. Kontrolllampe im Schalter
leuchtet grün.
Eco-Modus ausschalten: Eco-Schalter
wiederholt betätigen. Kontrolllampe im
Schalter erlischt.
Reinigungsbetrieb
Hinweis: Bei der Grundreinigung textiler
Beläge verkürzt sich aufgrund erhöhter
Reinigungsleistung die Akkulaufzeit.
Umschalter der Bodendüse auf Hartflä-
che oder Teppichboden stellen.
Saugkraft am Saugkraftregler regulie-
ren (stufenlos).
Reinigung durchführen.
Gerät ausschalten
Gerät am Hauptschalter ausschalten.
Nach jedem Betrieb
Behälter entleeren.
Gerät innen und außen durch Absau-
gen und Abwischen mit einem feuchten
Tuch reinigen.
6 DE
– 3
Page 7

Transport
몇 VORSICHT
Verletzungs- und Beschädigungsgefahr!
Gewicht des Gerätes beim Transport beachten.
Beim Transport in Fahrzeugen Gerät
nach den jeweils gültigen Richtlinien
gegen Rutschen und Kippen sichern.
Lagerung
몇 VORSICHT
Verletzungs- und Beschädigungsgefahr!
Gewicht des Gerätes bei Lagerung beachten.
Entriegelungstaste drücken und Akku
entnehmen, um eine Entladung zu ver-
meiden.
Dieses Gerät darf nur in Innenräumen gelagert werden.
Pflege und Wartung
GEFAHR
Vor allen Arbeiten am Gerät, Gerät ausschalten und Akku entnehmen.
Hauptfilterkorb reinigen
Hauptfilterkorb (auswaschbar) bei Be-
darf unter fließendem Wasser reinigen.
ACHTUNG
Beschädigungsgefahr! Hauptfilterkorb nie
nass einsetzen.
Motorschutzfilter austauschen
Saugkopf entriegeln und abnehmen.
Motorschutzfilter entnehmen.
Neuen Motorschutzfilter einsetzen.
Saugkopf aufsetzen und verriegeln.
Hilfe bei Störungen
GEFAHR
Vor allen Arbeiten am Gerät, Gerät ausschalten und Akku entnehmen.
Gerät schaltet während des
Betriebs ab
– Motor-Thermoprotektor hat angespro-
chen.
Vliesfiltertüte oder Papierfiltertüte (Son-
derzubehör) wechseln.
Motorschutzfilter austauschen.
Alle Teile auf Verstopfungen kontrollie-
ren.
Wiedereinschaltung nach Abkühlen der
Motorturbine nach ca. 60 Minuten.
Saugkraft lässt nach
Verstopfungen aus Saugdüse, Saug-
rohr oder Saugschlauch entfernen.
Vliesfiltertüte oder Papierfiltertüte (Son-
derzubehör) wechseln.
Hauptfilterkorb unter fließendem Was-
ser reinigen und trocknen.
Saugkopf richtig aufsetzen/verriegeln.
Defekten Saugschlauch austauschen.
Motorschutzfilter austauschen.
Staubaustritt beim Saugen
Vliesfiltertüte oder Papierfiltertüte (Son-
derzubehör) wechseln.
Sitz der Vliesfiltertüte oder Papierfilter-
tüte (Sonderzubehör) kontrollieren.
Saugkopf richtig aufsetzen/verriegeln.
Unbeschädigten Hauptfilterkorb einset-
zen.
Motorschutzfilter richtig einsetzen.
Gerät läuft nicht
Gerät einschalten.
– Platine überhitzt
Hinweis: Akkubetrieb ist nach Abkühlung
der Platine wieder möglich.
– Akku leer
Akku aufladen.
– Kein Akku eingesetzt
Akku einsetzen.
– 4
7DE
Page 8

Kundendienst
Chairman of the Board of Management
Director Regulatory Affairs & Certification
Kann die Störung nicht behoben werden, muss das Gerät vom Kundendienst
überprüft werden.
Garantie
In jedem Land gelten die von unserer zuständigen Vertriebsgesellschaft herausgegebenen Garantiebedingungen. Etwaige
Störungen an Ihrem Gerät beseitigen wir
innerhalb der Garantiefrist kostenlos, sofern ein Material- oder Herstellungsfehler
die Ursache sein sollte. Im Garantiefall
wenden Sie sich bitte mit Kaufbeleg an Ihren Händler oder die nächste autorisierte
Kundendienststelle.
Zubehör und Ersatzteile
Nur Original-Zubehör und Original-Ersatzteile verwenden, sie bieten die Gewähr für
einen sicheren und störungsfreien Betrieb
des Gerätes.
Informationen über Zubehör und Ersatzteile finden Sie unter www.kaercher.com.
Bezeichnung Bestell-Nr.
Wechselakku 4.654-016.0
Schnell-Ladegerät BC 1/7
EU 6.654-354.0
GB 6.654-355.0
AU 6.654-356.0
EU-Konformitätserklärung
Hiermit erklären wir, dass die nachfolgend
bezeichnete Maschine aufgrund ihrer Konzipierung und Bauart sowie in der von uns
in Verkehr gebrachten Ausführung den einschlägigen grundlegenden Sicherheitsund Gesundheitsanforderungen der EURichtlinien entspricht. Bei einer nicht mit
uns abgestimmten Änderung der Maschine
verliert diese Erklärung ihre Gültigkeit.
Produkt: Trockensauger
Typ: 1.528-xxx
Einschlägige EU-Richtlinien
2006/42/EG (+2009/127/EG)
2014/30/EU
2011/65/EU
2009/125/EG
Angewandte harmonisierte Normen
EN 55014–1: 2006+A1: 2009+A2: 2011
EN 55014–2: 2015
EN 60335–1
EN 60335–2–69
EN 61000–3–2: 2014
EN 61000–3–3: 2013
EN 62233: 2008
EN 50581
EN 60312-1: 2017
Angewandte nationale Normen
-
5.957-783
Die Unterzeichnenden handeln im Auftrag
und mit Vollmacht des Vorstands.
8 DE
Dokumentationsbevollmächtigter:
S. Reiser
Alfred Kärcher SE & Co. KG
Alfred-Kärcher-Straße 28-40
71364 Winnenden (Germany)
Tel.: +49 7195 14-0
Fax: +49 7195 14-2212
Winnenden, 2018/10/01
– 5
Page 9

Technische Daten
T 9/1 Bp
Akkuspannung V 36 DC
Max. Leistung W 730
Nennleistung W 650
Behälterinhalt l 9
Luftmenge (max.) l/s 46
Unterdruck (max.) kPa (mbar) 20,7 (207)
Schutzklasse III
Saugschlauchanschluss (C-DN/C-ID) mm 35
Länge x Breite x Höhe mm 420 x 325 x 380
Typisches Betriebsgewicht kg 7,5
Umgebungstemperatur °C 0/+40
Betriebszeit bei voller Akkuladung
– Normalbetrieb
– Eco-Modus
Ermittelte Werte gemäß EN 60335-2-69
Schalldruckpegel L
Unsicherheit K
pA
pA
Hand-Arm Vibrationswert m/s
Unsicherheit K m/s
min
min
24
46
dB(A) 62
dB(A) 2
2
2
<2,5
0,2
– 6
9DE
Page 10
Please read and comply with
these original instructions prior
to the initial operation of your appliance and
store them for later use or subsequent owners.
– Before first start-up it is definitely nec-
essary to read the safety indications Nr.
5.956-249.0!
– The non-compliance of the operating
and safety instructions may lead to
damages of the appliance and to dangers for the operator and other persons.
– In case of transport damage inform ven-
dor immediately.
– When unpacking the product, make
sure that no accessories are missing
and that none of the package contents
have been damaged.
Contents
Environmental protection . . . . EN 1
Danger or hazard levels . . . . . EN 1
Proper use . . . . . . . . . . . . . . . EN 1
Device elements . . . . . . . . . . . EN 2
Symbols on the machine. . . . . EN 2
Safety instructions. . . . . . . . . . EN 2
Start up . . . . . . . . . . . . . . . . . . EN 3
Operation . . . . . . . . . . . . . . . . EN 3
Transport. . . . . . . . . . . . . . . . . EN 4
Storage . . . . . . . . . . . . . . . . . . EN 4
Care and maintenance . . . . . . EN 4
Troubleshooting . . . . . . . . . . . EN 4
Warranty . . . . . . . . . . . . . . . . . EN 5
Accessories and Spare Parts . EN 5
EU Declaration of Conformity . EN 5
Technical specifications . . . . . EN 6
Environmental protection
The packaging material can be
recycled. Please do not throw
the packaging material into
household waste; please send it
for recycling.
Old appliances contain valuable
materials that can be recycled;
these should be sent for recycling. Batteries and accumulators contain substances that
must not enter the environment.
Please dispose off old devices,
batteries and rechargeable batteries through suitable waste
collection systems.
Notes about the ingredients (REACH)
You will find current information about the
ingredients at:
www.kaercher.com/REACH
Danger or hazard levels
DANGER
Pointer to immediate danger, which leads
to severe injuries or death.
몇 WARNING
Pointer to a possibly dangerous situation,
which can lead to severe injuries or death.
몇 CAUTION
Pointer to a possibly dangerous situation,
which can lead to minor injuries.
ATTENTION
Pointer to a possibly dangerous situation,
which can lead to property damage.
Proper use
몇 WARNING
The appliance is not suitable for vacuuming
dust which endangers health.
ATTENTION
This unit is only to be used indoors.
– This universal vacuum cleaner is in-
tended for dry cleaning of floor and wall
surfaces.
– This appliance is suited for the commer-
cial use, e.g. in hotels, schools, hospitals, factories, shops, offices, and rental
companies.
10 EN
– 1
Page 11
Device elements
1 Fleece filter bag
2 Suction support
3 Suction hose
4 Nameplate
5 Carrying handle
6 Hose holder
7 Suction head
8 Suction head lock
9 Steering roller
10 Dirt receptacle
11 Pickup for floor nozzle
12 Eco switch (energy saver mode)
13 Main switch
14 Switch between hard surface/carpet
15 Floor nozzle
16 Charging indicator
17 Button for charging indicator
18 Battery
19 Unlocking button
20 Telescopic suction pipe
21 Suction force regulator (continuous)
22 Bender
23 Main filter basket
24 Motor protection filter
Symbols on the machine
Do not suck in moist or fluid substances.
Safety instructions
In addition to the information contained in
the operating instructions, all statutory
safety and accident prevention regulations
must be observed.
DANGER
Risk of injury! Please remove the battery
prior to performing any maintenance, service or repair work on the appliance.
Battery/charger
DANGER
– You may recharge the battery using
only the original charger provided with
the appliance or a charger approved by
KÄRCHER.
– Check charger, mains cable and battery
pack for damages before every use. Do
not use damaged devices and get the
damaged parts repaired only by experts.
– Do not use the charger if dirty or wet.
– The mains voltage must match the volt-
age mentioned on the type plate of the
charger.
– Do not operate the charger in explosive
environment.
– Ensure that no metal pieces reach the
contacts of the adapter, else there will
be a short circuit.
– Use the charger only to charge ap-
proved battery packs.
– Insert only clean and dry battery packs
on the adapter of the charger.
– Do not charge batteries (primary cells);
risk of explosion.
– Do not charge damaged battery packs.
Replace damaged battery packs.
– Do not store battery packs along with
metal objects; risk of short circuit.
– Do not dispose off battery packs by
throwing them into fire or into household garbage.
– Avoid contact with liquids oozing out of
defective battery packs. Rinse thoroughly if you accidentally come in contact with the fluid. Also consult a doctor
if the fluid comes in contact with your
eyes.
– 2
11EN
Page 12

Start up
Check whether main filter basket has
been inserted into the appliance.
Operating modes
1 Operation with fleece filter bag or paper
filter bag (option)
2 Operation without filter bag
Installation of the filter bag
Release and remove the suction head.
Remove the main filter basket.
Install the fleece filter bag or the paper
filter bag (option).
Insert main filter basket.
Insert and lock the suction head.
Insert the battery
Push in the battery into the battery com-
partment and snap it in place.
Charge the battery
Note: Please read the operating instruc-
tions of the charger manufacturer, especially the chapters on safety instructions!
The battery is partially charged at the time
of delivery. Charge it before appliance
startup and then as and when required.
Note: The battery can be charged only
when it is removed out of the appliance.
Press the unlocking key and remove
the battery.
Insert the charger delivered with the ap-
pliance into a proper socket.
Insert the battery in the charger.
Charging time for empty battery
Quick charger BC 1/7 min 60
Operation
Charging indicator
Press the button for charging indicator
at the battery. The charging indicator
glows 1 minute.
Charging indicator has not activated for 60
minutes (sleep mode):
Press the button for charging indicator
at the battery twice. The charging indi-
cator glows 1 minute.
Turning on the Appliance
Switch on the appliance at the main
switch.
Eco mode
Eco mode (energy saver mode): The appliance works with reduced suction performance. The battery life will extend.
To switch on eco mode: Press the eco
switch. Indicator lamp in the switch
glows green.
To switch off eco mode: Press the eco
switch again. Indicator lamp in the
switch goes off.
Cleaning operations
Note: The battery life will shorten because
of increased cleaning performance while
cleaning textile covering.
Set the selection switch of the floor noz-
zle to hard surface or carpet.
Regulate the suction force on the suc-
tion force regulator (continuous).
Perform the cleaning operation.
Turn off the appliance
Switch off the appliance at the main
switch.
After each operation
Empty the container.
Vacuum and wipe the appliance inside
and outside with a damp cloth.
12 EN
– 3
Page 13

Transport
몇 CAUTION
Risk of injury and damage! Observe the
weight of the appliance when you transport
it.
When transporting in vehicles, secure
the appliance according to the guidelines from slipping and tipping over.
Storage
몇 CAUTION
Risk of injury and damage! Note the weight
of the appliance in case of storage.
Press the unlocking key and remove
the battery to avoid discharge.
This appliance must only be stored in interior rooms.
Care and maintenance
DANGER
Turn the appliance off and remove the battery before carrying out any tasks on the
machine.
Clean main filter basket
Main filter basket (washable), clean it
under running water if necessary.
ATTENTION
Risk of damage! Never insert the main filter
basket while wet.
Replace motor protection filter
Release and remove the suction head.
Remove the motor protection filter.
Insert new motor protection filter.
Insert and lock the suction head.
Troubleshooting
DANGER
Turn the appliance off and remove the battery before carrying out any tasks on the
machine.
The appliance shuts off during the
operation
– Motor thermal protector has responded.
Replace the fleece filter bag or paper fil-
ter bag (option).
Replace motor protection filter.
Check all parts for plugging.
Switching back on after the motor turbine
has cooled off, after approx. 60 minutes.
Suction capacity decreases
Remove choking of suction nozzle, suc-
tion tube or suction hose.
Replace the fleece filter bag or paper fil-
ter bag (option).
Clean the main filter basket under run-
ning water and dry it.
Insert/lock the suction head correctly.
Replace defective suction hose.
Replace motor protection filter.
Dust comes out while vacuuming
Replace the fleece filter bag or paper fil-
ter bag (option).
Check the fleece filter bag or paper filter
bag (option).
Insert/lock the suction head correctly.
Insert undamaged main filter basket.
Reinsert motor protection filter correct-
ly.
Appliance is not running
Turn on the appliance.
– PCB overheated
Note: The appliance can be operated in
battery mode after the PCB has cooled
down.
– Battery empty
Charge the battery.
– No battery is inserted
Insert the battery.
– 4
13EN
Page 14
Customer Service
Chairman of the Board of Management
Director Regulatory Affairs & Certification
If malfunction can not be fixed, the device must be checked by customer service.
Warranty
The warranty terms published by the relevant sales company are applicable in each
country. We will repair potential failures of
your appliance within the warranty period
free of charge, provided that such failure is
caused by faulty material or defects in manufacturing. In the event of a warranty claim
please contact your dealer or the nearest
authorized Customer Service centre.
Please submit the proof of purchase.
Accessories and Spare Parts
Only use original accessories and spare
parts, they ensure the safe and trouble-free
operation of the device.
For information about accessories and
spare parts, please visit www.kaercher.com.
Description Order No.
Spare battery 4.654-016.0
Quick charger BC 1/7
EU 6.654-354.0
GB 6.654-355.0
AU 6.654-356.0
EU Declaration of Conformity
We hereby declare that the machine described below complies with the relevant
basic safety and health requirements of the
EU Directives, both in its basic design and
construction as well as in the version put
into circulation by us. This declaration shall
cease to be valid if the machine is modified
without our prior approval.
Product: Dry vacuum cleaner
Type: 1.528-xxx
Relevant EU Directives
2006/42/EC (+2009/127/EC)
2014/30/EU
2011/65/EU
2009/125/EC
Applied harmonized standards
EN 55014–1: 2006+A1: 2009+A2: 2011
EN 55014–2: 2015
EN 60335–1
EN 60335–2–69
EN 61000–3–2: 2014
EN 61000–3–3: 2013
EN 62233: 2008
EN 50581
EN 60312-1: 2017
Applied national standards
-
5.957-783
The signatories act on behalf of and with
the authority of the company management.
14 EN
Documentation supervisor:
S. Reiser
Alfred Kärcher SE & Co. KG
Alfred-Kärcher-Straße 28-40
71364 Winnenden (Germany)
Tel.: +49 7195 14-0
Fax: +49 7195 14-2212
Winnenden, 2018/10/01
– 5
Page 15
Technical specifications
T 9/1 Bp
Battery voltage V 36 DC
Max. performance W 730
Rated power W 650
Container capacity l 9
Air volume (max.) l/s 46
Negative pressure (max.) kPa (mbar) 20,7 (207)
Protective class III
Suction hose connection (C-DN/C-ID) mm 35
Length x width x height mm 420 x 325 x 380
Typical operating weight kg 7,5
Ambient temperature °C 0/+40
Operating time with full charge
– Normal operation
– Eco mode
Values determined to EN 60335-2-69
Sound pressure level L
Uncertainty K
pA
pA
Hand-arm vibration value m/s
Uncertainty K m/s
min
min
24
46
dB(A) 62
dB(A) 2
2
2
<2,5
0,2
– 6
15EN
Page 16
Lire ce manuel d'utilisation origi-
nal avant la première utilisation
de votre appareil, le respecter et le conserver pour une utilisation ultérieure ou pour le
futur propriétaire.
– Avant la première mise en service, vous
devez impérativement avoir lu les
consignes de sécurité N° 5.956-249.0 !
– En cas de non-respect des instructions
de service et des consignes de sécurité, l'appareil risque de subir des dommages matériels et l'utilisateur ainsi
que toute tierce personne sont exposés
à des dangers potentiels.
– Contactez immédiatement le revendeur
en cas d'avarie de transport.
– Contrôler le matériel lors du déballage
pour constater des accessoires manquants ou des dommages.
Table des matières
Protection de l’environnement FR 1
Niveaux de danger . . . . . . . . . FR 1
Utilisation conforme . . . . . . . . FR 1
Éléments de l'appareil. . . . . . . FR 2
Symboles sur l'appareil. . . . . . FR 2
Consignes de sécurité . . . . . . FR 2
Mise en service. . . . . . . . . . . . FR 3
Utilisation . . . . . . . . . . . . . . . . FR 3
Transport. . . . . . . . . . . . . . . . . FR 4
Entreposage . . . . . . . . . . . . . . FR 4
Entretien et maintenance . . . . FR 4
Assistance en cas de panne . . FR 4
Garantie . . . . . . . . . . . . . . . . . FR 5
Accessoires et pièces de re-
change . . . . . . . . . . . . . . . . . . FR 5
Déclaration UE de conformité . FR 5
Caractéristiques techniques . . FR 6
Protection de
l’environnement
Les matériaux constitutifs de
l’emballage sont recyclables. Ne
pas jeter les emballages dans
les ordures ménagères, mais les
remettre à un système de recyclage.
16 FR
Les appareils usés contiennent
des matériaux précieux recyclables lesquels doivent être apportés à un système de recyclage. Les batteries et les accumulateurs contiennent des substances ne devant pas être tout
simplement jetées. Pour cette raison, utiliser des systèmes de collecte adéquats afin d'éliminer les
batteries et les accumulateurs.
Instructions relatives aux ingrédients
(REACH)
Les informations actuelles relatives aux ingrédients se trouvent sous :
www.kaercher.com/REACH
Niveaux de danger
DANGER
Signale la présence d'un danger imminent
entraînant de graves blessures corporelles
et pouvant avoir une issue mortelle.
몇 AVERTISSEMENT
Signale la présence d'une situation éventuellement dangereuse pouvant entraîner
de graves blessures corporelles et même
avoir une issue mortelle.
몇 PRÉCAUTION
Remarque relative à une situation potentiellement dangereuse pouvant entraîner
des blessures légères.
ATTENTION
Remarque relative à une situation éventuellement dangereuse pouvant entraîner
des dommages matériels.
Utilisation conforme
몇 AVERTISSEMENT
Cet appareil n'est pas conçu pour aspirer
des poussières nocives.
ATTENTION
Le présent appareil n'est destiné qu'à un
usage intérieur.
– Cet aspirateur universel est destiné au
nettoyage à sec des sols et des murs.
– Cet appareil convient à un usage indus-
triel, par exemple dans le cadre d'hôtels, d'écoles, d'hôpitaux, d'usines, de
magasins, de bureaux et d'agences de
location.
– 1
Page 17
Éléments de l'appareil
1 Sachet filtre en tissu non tissé
2 Raccord d'aspiration
3 Flexible d’aspiration
4 Plaque signalétique
5 Poignée de transport
6 Porte-tuyau
7 Tête d'aspiration
8 Verrouillage de la tête d'aspiration
9 Roues directionnelles
10 Récipient collecteur
11 Rangement pour la buse de sol
12 Interrupteur Eco (mode économie
d'énergie)
13 Interrupteur principal
14 Commutateur surface dure/moquette
15 Buse pour sol
16 Témoin lumineux de chargement
17 Touche du témoin lumineux de charge-
ment
18 Accumulateur
19 Touche de déverrouillage
20 Tuyau télescopique
21 Régulateur de puissance d'aspiration
(continu)
22 Coude
23 Sac filtrant principal
24 Filtre protecteur du moteur
Symboles sur l'appareil
Ne pas aspirer des substances
humides ou liquides.
Consignes de sécurité
Outre les instructions figurant dans le mode
d'emploi, il est important de prendre en
considération les consignes générales de
sécurité et de prévention contre les accidents imposées par la loi.
DANGER
Risque de blessure ! Retirer la batterie
avant tous les travaux d'entretien, de maintenance et de réparation sur l'appareil.
Batterie/chargeur
DANGER
– Le chargement de l'accumulateur n'est
permis que avec l'appareil de charge
original ci-joint ou avec l'appareil de
charge autorisé par Kärcher
– Controller l'état de l'appareil de charge
et du groupe d'accumulateur avant
chaque utilisation. Ne plus utiliser des
appareil endommagés et pour faire réparar des pièces endommagées
s'adresse uniquement à des spécialistes.
– Ne pas utiliser l'appareil de charge en
état sale ou mouillé.
– La tension de réseau doit correspondre
à la tension indiqué sur la plaque signalétique de l'appareil de charge.
– Ne pas utiliser l'appareil de charge dans
un environnement où il y a un risque de
explosion.
– Des pièces de métal ne peuvent pas
touchés l'adaptateur, risque de courtcircuit.
– Ne utiliser l'appareil de charge que pour
le chargement des groupes d'accumulateurs autorisés.
– Indroduire uniquement des groupes
d'accumulateurs propres et secs sur
l'adaptateur de l'appareil de charge.
– Ne pas charger des piles (cellule pri-
maire), risque d'explosion.
– Ne pas charger des groupes d'accumu-
lateurs endommagés. Remplacer des
groupes d'accumulateurs endommagés.
– Ne pas garder des groupes d'accumu-
lateurs avec des objets de métal, risque
de court-circuit.
– Ne pas jeter des groupes d'accumula-
teurs dans le feu ou dans le déchet domestique.
– Eviter le contact avec le liquide qui sort
des accumulateurs en panne. En cas
d'un contact par hazard, ringer le liquide
avec l'eau. En cas d'un contacte avec
les yeux, consulter en plus un médecin.
®
.
– 2
17FR
Page 18

Mise en service
Contrôle pour voir si le sac filtrant prin-
cipal est installé dans l'appareil.
Modes de fonctionnement
1 Fonctionnement avec sachet filtre en
tissu non tissé ou sachet filtre en papier
(accessoires spéciaux)
2 Fonctionnement sans sachet filtre
Montage du sac filtrant
Déverrouiller et retirer la tête d'aspira-
tion.
Retirer le sac filtrant principal.
Mettre le sac filtrant en tissu non tissé
ou en papier (accessoire spécial) en
place.
Insérer le sac filtrant principal.
Positionner la tête d'aspiration et la ver-
rouiller.
Mettre l'accumulateur
Introduire la batterie dans son compar-
timent jusqu'à ce qu'elle s'encliquète.
Charger l'accumulateur
Remarque :Lire le mode d'emploi du fabri-
cant du chargeur et en particulier respecter
les consignes de sécurité !
A la livraison, l'accumulateur est chargé en
partie. Charger complètement avant la
mise en service et en cas de besoin.
Remarque : Le chargement de l'accu ne
peut se faire qu'à l'état demonté.
Appuyer sur la touche de déverrouillage
et retirer la batterie.
Brancher le chargeur dans une prise de
courant réglementairement.
Mettre l'accumulateur dans le chargeur.
Temps de charge d'un accumulateur vide
Chargeur rapide BC 1/7 min 60
Utilisation
Témoin lumineux de chargement
Appuyer sur la touche du témoin lumi-
neux de chargement au niveau de la
batterie. Le témoin lumineux de charge-
ment s'allume pendant une minute.
Le témoin lumineux de chargement n'a pas
été activé pendant 60 minutes (mode
veille) :
appuyer deux fois sur la touche du té-
moin lumineux de chargement sur la
batterie. Le témoin lumineux de charge-
ment s'allume pendant une minute.
Mettre l'appareil en marche
Mettre l'appareil en service au niveau
de l'interrupteur principal.
Mode Eco
Mode Eco (mode écononomie d'énergie) :
l'appareil travaille avec une puissance d'aspiration réduite. L'autonomie de la batterie
augmente en conséquence.
Activer le mode Eco : actionner l'inter-
rupteur Eco. Le témoin lumineux dans
l'interrupteur s'allume en vert.
Désactiver le mode Eco : rappuyer sur
l'interrupteur Eco. Le témoin lumineux
s'éteint dans l'interrupteur.
Fonctionnement de nettoyage
Remarque : pour le nettoyage de fond de
revêtements textiles, l'autonomie de la batterie diminue considérablement en raison
d'une puissance de nettoyage plus importante.
Régler le commutateur de la buse de
sol sur surface dure ou sur moquette.
Régler la puissance d'aspiration sur le
régulateur de puissance d'aspiration
(continu).
Procéder au nettoyage.
Mise hors service de l'appareil
Mettre l'appareil hors service au niveau
de l'interrupteur principal.
18 FR
– 3
Page 19

Après chaque mise en service
Vider le réservoir.
Nettoyer la partie intérieure et exté-
rieure de l'appareil en l'aspirant et en
l'essuyant avec un chiffon humide.
Transport
몇 PRÉCAUTION
Risque de blessure et d'endommagement !
Respecter le poids de l'appareil lors du
transport.
Sécuriser l'appareil contre les glisse-
ments ou les basculements selon les directives en vigueur lors du transport
dans des véhicules.
Entreposage
몇 PRÉCAUTION
Risque de blessure et d'endommagement !
Prendre en compte le poids de l'appareil à
l'entreposage.
Appuyer sur la touche de déverrouillage
et retirer la batterie pour éviter qu'elle
ne se décharge.
Cet appareil doit uniquement être entreposé en intérieur.
Entretien et maintenance
DANGER
Avant d'effectuer tout type de travaux sur
l'appareil, l'éteindre et retirer la batterie.
Nettoyer le sac filtrant principal
Nettoyer la cartouche filtrante principale
(lavable), le cas échéant à l'eau cou-
rante.
ATTENTION
Risque d'endommagement ! Ne jamais installer le sac filtrant principal mouillé.
Remplacement du filtre protecteur
du moteur
Déverrouiller et retirer la tête d'aspiration.
Retirer le filtre protecteur du moteur.
Insérer le nouveau filtre protecteur de
moteur.
Positionner la tête d'aspiration et la ver-
rouiller.
Assistance en cas de panne
DANGER
Avant d'effectuer tout type de travaux sur
l'appareil, l'éteindre et retirer la batterie.
L'appareil s'éteint en cours
d'utilisation
– La protection thermique du moteur a
réagi.
Changer le sachet filtre en tissu non tis-
sé ou en papier (accessoires spéciaux).
Remplacement du filtre protecteur du
moteur.
Contrôler toutes les pièces pour voir si
elles sont bouchées.
Réactivation après refroidissement de la
turbine du moteur après environ 60 minutes.
La force d'aspiration diminue
Déboucher la buse d'aspiration, le
tuyau d'aspiration ou le flexible d'aspi-
ration.
Changer le sachet filtre en tissu non tis-
sé ou en papier (accessoires spéciaux).
Nettoyer le panier de filtrage principal à
l'eau courante puis le sécher.
Mettre la tête d'aspiration correctement
en place/la verrouiller.
Remplacer le flexible d'aspiration dé-
faillant.
Remplacement du filtre protecteur du
moteur.
De la poussière s'échappe lors de
l'aspiration
Changer le sachet filtre en tissu non tis-
sé ou en papier (accessoires spéciaux).
Contrôler la fixation du sachet filtre en
tissu non tissé ou en papier (acces-
soires spéciaux) défectueux.
Mettre la tête d'aspiration correctement
en place/la verrouiller.
Insérer le sac filtrant principal non en-
dommagé.
Insérer correctement le filtre protecteur
du moteur.
– 4
19FR
Page 20

L'appareil ne fonctionne pas
Chairman of the Board of Management
Director Regulatory Affairs & Certification
Allumer l’appareil.
– La platine est surchauffée
Remarque : Le mode accu est de nouveau
possible après le refroidissement de la platine.
– Accumulateur vide
Charger l'accumulateur.
– Aucun accumulateur est mis
Mettre un accumulateur.
Service après-vente
Si la panne ne peut être réparée, l'appareil doit être contrôlé par le service
après-vente.
Garantie
Dans chaque pays, les conditions de garantie en vigueur sont celles publiées par
notre société de distribution responsable.
Les éventuelles pannes sur l’appareil sont
réparées gratuitement dans le délai de validité de la garantie, dans la mesure où
celles-ci relèvent d'un défaut matériel ou
d'un vice de fabrication. En cas de recours
en garantie, adressez-vous à votre revendeur ou au service après-vente agréé le
plus proche munis de votre preuve d'achat.
Accessoires et pièces de
rechange
N'utiliser que des accessoires et pièces de
rechange d'origine, ils garantissent le bon
fonctionnement de l'appareil.
Vous trouverez des informations relatives
aux accessoires et pièces de rechange sur
www.kaercher.com.
Désignation N° de réf.
Accumulateur de change 4.654-016.0
Chargeur rapide BC 1/7
EU 6.654-354.0
GB 6.654-355.0
AU 6.654-356.0
Déclaration UE de conformité
Nous certifions par la présente que la machine spécifiée ci-après répond de par sa
conception et son type de construction ainsi que de par la version que nous avons
mise sur le marché aux prescriptions fondamentales stipulées en matière de sécurité et d’hygiène par les directives européennes en vigueur. Toute modification apportée à la machine sans notre accord rend
cette déclaration invalide.
Produit : Aspirateur à sec
Type : 1.528-xxx
Directives européennes en vigueur :
2006/42/CE (+2009/127/CE)
2014/30/UE
2011/65/UE
2009/125/CE
Normes harmonisées appliquées :
EN 55014–1: 2006+A1: 2009+A2: 2011
EN 55014–2: 2015
EN 60335–1
EN 60335–2–69
EN 61000–3–2: 2014
EN 61000–3–3: 2013
EN 62233: 2008
EN 50581
EN 60312-1: 2017
Normes nationales appliquées :
-
5.957-783
Les signataires agissent sous ordre et avec
le pouvoir de la direction.
Responsable de la documentation :
S. Reiser
Alfred Kärcher SE & Co. KG
Alfred-Kärcher-Straße 28-40
71364 Winnenden (Germany)
Tel.: +49 7195 14-0
Fax: +49 7195 14-2212
20 FR
Winnenden, 2018/10/01
– 5
Page 21

Caractéristiques techniques
T 9/1 Bp
Tension d'accu V 36 DC
Puissance maximale W 730
Puissance nominale W 650
Capacité de la cuve l 9
Débit d'air (max.) l/s 46
Dépression (max.) kPa (mbar) 20,7 (207)
Classe de protection III
Raccord du flexible d'aspiration (C-DN/C-ID) mm 35
Longueur x largeur x hauteur mm 420 x 325 x 380
Poids de fonctionnement typique kg 7,5
Température ambiante °C 0/+40
Durée de service avec charge d'accumulateur totale
– Régime normal
– Mode Eco
Valeurs définies selon EN 60335-2-69
Niveau de pression acoustique L
Incertitude K
pA
pA
Valeur de vibrations bras-main m/s
Incertitude K m/s
min
min
24
46
dB(A) 62
dB(A) 2
2
2
<2,5
0,2
– 6
21FR
Page 22
Prima di utilizzare l'apparecchio
per la prima volta, leggere le
presenti istruzioni originali, seguirle e conservarle per un uso futuro o in caso di rivendita dell'apparecchio.
– Prima di procedere alla prima messa in
funzione leggere tassativamente le norma di sicurezza n. 5.956-249.0!
– La mancata osservanza delle istruzioni
d'uso e delle norme di sicurezza può
causare danni all'apparecchio e presentare pericoli per l'utilizzatore e le altre persone.
– Eventuali danni da trasporto vanno co-
municati immediatamente al proprio rivenditore.
– Durante il disimballaggio controllare
l'eventuale mancanza di accessori o la
presenza di danni del contenuto.
Indice
Protezione dell’ambiente. . . . . IT 1
Livelli di pericolo . . . . . . . . . . . IT 1
Uso conforme a destinazione . IT 1
Parti dell'apparecchio . . . . . . . IT 2
Simboli riportati sull’apparecchioIT 2
Norme di sicurezza . . . . . . . . . IT 2
Messa in funzione. . . . . . . . . . IT 3
Uso . . . . . . . . . . . . . . . . . . . . . IT 3
Trasporto. . . . . . . . . . . . . . . . . IT 4
Supporto . . . . . . . . . . . . . . . . . IT 4
Cura e manutenzione . . . . . . . IT 4
Guida alla risoluzione dei guastiIT 4
Garanzia . . . . . . . . . . . . . . . . . IT 5
Accessori e ricambi. . . . . . . . . IT 5
Dichiarazione di conformità UE IT 5
Dati tecnici . . . . . . . . . . . . . . . IT 6
Protezione dell’ambiente
Tutti gli imballaggi sono riciclabili. Gli imballaggi non vanno gettati nei rifiuti domestici, ma consegnati ai relativi centri di raccolta.
Gli apparecchi dismessi contengono materiali riciclabili preziosi
e vanno consegnati ai relativi
centri di raccolta. Sia le batterie
che gli accumulatori contengono
sostanze che non devono essere disperse nell’ambiente. Si
prega quindi di smaltire gli apparecchi dismessi, le batterie e gli
accumulatori mediante i sistemi
di raccolta differenziata.
Avvertenze sui contenuti (REACH)
Informazioni aggiornate sui contenuti sono
disponibili all'indirizzo:
www.kaercher.com/REACH
Livelli di pericolo
PERICOLO
Indica un pericolo imminente che determina lesioni gravi o la morte.
몇 AVVERTIMENTO
Indica una probabile situazione pericolosa
che potrebbe determinare lesioni gravi o la
morte.
몇 PRUDENZA
Indica una probabile situazione pericolosa
che potrebbe causare lesioni leggere.
ATTENZIONE
Indica una probabile situazione pericolosa
che potrebbe determinare danni alle cose.
Uso conforme a destinazione
몇 AVVERTIMENTO
L'apparecchio non si adatta all'aspirazione
di polveri dannose alla salute.
ATTENZIONE
Questo apparecchio è destinato esclusivamente per l'uso in ambienti interni.
– Questo aspiratore universale è indicato
per la pulizia a secco di pavimenti e pareti.
– Questo apparecchio si adatta all'uso
professionale, ad esempio in alberghi,
scuole, ospedali, fabbriche, negozi e uffici.
22 IT
– 1
Page 23
Parti dell'apparecchio
1 Sacchetto filtro plissettato
2 Raccordo di aspirazione
3 Tubo flessibile di aspirazione
4 Targhetta
5 Maniglia trasporto
6 Portatubo
7 Testa aspirante
8 Dispositivo di blocco della testa di aspi-
razione
9 Ruota pivottante
10 Contenitore sporcizia
11 Alloggiamento bocchetta per pavimenti
12 Interruttore Eco (modalità di risparmio
energetico)
13 Interruttore principale
14 Commutatore superficie dura/tappeti
15 Bocchetta pavimenti
16 Indicazione di controllo di caricamento
17 Tasto per indicazione di controllo di ca-
ricamento
18 Accumulatore
19 Pulsante di sblocco
20 Tubo telescopico
21 Regolatore di potenza aspirazione
(continuo)
22 Gomito
23 Cesto per filtro principale
24 Filtro protezione motore
Simboli riportati
sull’apparecchio
Non aspirare sostanze umide o liquide.
Norme di sicurezza
Oltre alle indicazioni del manuale d’uso è
necessario osservare le norme di sicurezza
e antinfortunistiche generali vigenti.
PERICOLO
Pericolo di lesioni! Prima di effettuare qualsiasi lavoro di cura, manutenzione e di riparazione sull'apparecchio, rimuovere la batteria.
Caricabatterie
PERICOLO
– La carica dell'accumulatore è consenti-
ta solo con l'utilizzo del caricabatterie
originale o con caricabatterie autorizzati
dalla KÄRCHER.
– Prima di ogni utilizzo verificare che il ca-
ricabatterie e l'unità accumulatore non
siano danneggiati. Non mettere in funzione apparecchi danneggiati e far riparare parti che risultano difettose solo da
personale qualificato.
– Non utilizzare il caricabatterie sporco o
bagnato.
– La tensione indicata sulla targhetta del
caricabatterie deve corrispondere alla
tensione di rete.
– Non utilizzare il caricabatterie in am-
bienti a rischio d'esplosione.
– I contatti dell'adattatore non devono
toccare parti in metallo. Pericolo di corto circuito.
– Utilizzare il caricabatterie solo per cari-
care unità accumulatore autorizzate.
– Le unità accumulatore devono essere
pulite e asciutte al momento dell'inserimento nell'adattatore.
– Non caricare batterie (celle primarie).
Pericolo di esplosioni.
– Non caricare unità accumulatore dan-
neggiate. Sostituire le unità accumulatore danneggiate.
– Le unità accumulatore devono essere
depositate lontano da oggetti in metallo.
Pericolo di corto circuito.
– Non gettare le unità accumulatore nel
fuoco o nei rifiuti domestici.
– Evitare il contato con il liquido che fuori-
esce da accumulatori danneggiati.
Sciacquare eventualmente con acqua il
liquido toccato accidentalmente. In
caso di contatto con gli occhi ricorrere
inoltre all’assistenza di un medico.
– 2
23IT
Page 24

Messa in funzione
Verificare se il cesto del filtro principale
sia inserito nell'apparechio.
Modalità operative
1 Funzionamento con sacchetto filtro plis-
settato o sacchetto filtro di carta (acces-
sorio optional)
2 Funzionamento senza sacchetto filtro
Montaggio del sacchetto filtro
Sbloccare e staccare la testa aspirante.
Rimuovere il cesto del filtro principale.
Inserire il sacchetto filtro plissettato o il
sacchetto di carta (accessorio optional).
Inserire il cesto del filtro principale.
Rimettere la testa aspirante e bloccarla.
Inserire l'accumulatore
Inserire la batteria nell'apposito suppor-
to fino allo scatto in posizione.
Caricare l'accumulatore
Nota: Leggere il manuale d'uso del produt-
tore del caricabatterie e in particolare osservare le avvertenze di sicurezza!
L'accumulatore è parzialmente carico al
momento della consegna. Caricarlo prima
della messa in funzione e non appena è
scarico.
Nota: L'accumulatore può essere caricato
solo quando si trova all'esterno della sede.
Premere il tasto di sblocco e rimuovere
la batteria.
Inserire l'accumulatore in una presa
conforme alle normative vigenti.
Inserire l'accumulatore nel caricabatte-
rie.
Tempo di carica, accumulatore scarico
Caricabatterie rapido BC 1/7 min 60
Uso
Indicazione di controllo di
caricamento
Azionare il tasto per indicazione di con-
trollo di caricamento della batteria. L'indicazione di controllo di caricamento si
accende per un minuto.
L'indicazione di controllo di caricamento
non è stata attivata per 60 minuti (modalità
dormiente):
azionare due volte il tasto per indicazio-
ne di controllo di caricamento della bat-
teria. L'indicazione di controllo di cari-
camento si accende per un minuto.
Accendere l’apparecchio
Attivare l'apparecchio dall'interruttore
principale.
Modalità Eco
Modalità Eco (modalità di risparmio energetico): L'apparecchio lavora con potenza
di aspirazione ridotta. Il tempo di funzionamento batteria si prolunga.
Attivare la modalità Eco: premere l'in-
terruttore Eco. La spia di controllo
nell'interruttore è verde.
Disattivare la modalità Eco: premere ri-
petutamente l'interruttore Eco. La spia
di controllo nell'interruttore si spegne.
Modalità pulizia
Avvertenza: durante la pulizia di fondo dei
rivestimenti in tessuto, il tempo di funzionamento batteria si riduce a causa della maggiore potenza di pulizia.
Impostare il commutatore della boc-
chetta per pavimenti su Superficie dura
o Tappeto.
Regolare la forza di aspirazione sul re-
golatore di potenza aspirazione (conti-
nuo).
Eseguire la pulizia.
Spegnere l’apparecchio
Disattivare l'apparecchio dall'interrutto-
re principale.
24 IT
– 3
Page 25

A lavoro ultimato
Svuotare il serbatoio.
Pulire l’apparecchio all’interno e
all’esterno aspirando e passando la superficie con un panno umido.
Trasporto
몇 PRUDENZA
Pericolo di lesioni e di danneggiamento! Rispettare il peso dell'apparecchio durante il
trasporto.
Per il trasporto in veicoli, assicurare
l'apparecchio secondo le direttive in vigore affinché non possa scivolare e ribaltarsi.
Supporto
몇 PRUDENZA
Pericolo di lesioni e di danneggiamento! Rispettare il peso dell'apparecchio durante la
conservazione.
Premere il tasto di sblocco e rimuovere
la batteria per evitare che questa si sca-
richi.
Questo apparecchio può essere conservato solo in ambienti interni.
Cura e manutenzione
PERICOLO
Prima di eseguire qualsiasi lavoro, spegnere l'apparecchio e rimuovere la batteria.
Pulire il cesto del filtro principale
Pulire il cesto del filtro principale (lava-
bile) all'occorrenza sotto acqua corren-
te.
ATTENZIONE
Rischio di danneggiamento. Il cesto del filtro principale non deve essere inserito mai
bagnato.
Sostituire il filtro protezione motore
Sbloccare e staccare la testa aspirante.
Rimuovere il filtro di protezione motore.
inserire un nuovo filtro protezione moto-
re.
Rimettere la testa aspirante e bloccarla.
Guida alla risoluzione dei
guasti
PERICOLO
Prima di eseguire qualsiasi lavoro, spegnere l'apparecchio e rimuovere la batteria.
L'apparecchio si spegne durante il
funzionamento
– È scattato il termoprotettore del motore.
Sostituire il sacchetto filtro plissettato o
il sacchetto di carta (accessorio optional).
Sostituire il filtro protezione motore.
Verificare che tutti i componenti siano li-
beri da otturazioni.
Il riavvio è possibile dopo il raffreddamento
della turbina del motore dopo ca. 60 minuti.
La forza aspirante diminuisce
Rimuovere eventuali otturazioni dalla
bocchetta di aspirazione, dal tubo rigido
di aspirazione o dal tubo flessibile di
aspirazione.
Sostituire il sacchetto filtro plissettato o
il sacchetto di carta (accessorio optio-
nal).
Pulire il cesto del filtro principale sotto
acqua corrente e asciugarlo.
Rimettere/Bloccare correttamente la te-
sta aspirante.
Sostituire il tubo flessibile di aspirazione
difettoso.
Sostituire il filtro protezione motore.
Fuoriuscita di polvere durante
l'aspirazione
Sostituire il sacchetto filtro plissettato o
il sacchetto di carta (accessorio optio-
nal).
Controllare la posizione del sacchetto
filtro plissettato o del sacchetto di carta
(accessorio optional).
Rimettere/Bloccare correttamente la te-
sta aspirante.
Inserire un cesto del filtro principale non
danneggiato.
Inserire correttamente il filtro di prote-
zione motore.
– 4
25IT
Page 26
L'apparecchio non funziona
Chairman of the Board of Management
Director Regulatory Affairs & Certification
Accendere l’apparecchio.
– Scheda surriscaldata
Nota: È possibile alimentare l'apparecchio
con l'accumulatore dopo che la scheda si è
raffreddata.
– Accumulatore scarico
Caricare l'accumulatore.
– Nessun accumulatore inserito
Inserire l'accumulatore.
Servizio assistenza
Se il guasto persiste, rivolgersi al servizio di assistenza clienti per un controllo.
Garanzia
Le condizioni di garanzia valgono nel rispettivo paese di pubblicazione da parte
della nostra società di vendita competente.
Entro il termine di garanzia eliminiamo gratuitamente eventuali guasti all’apparecchio,
se causati da difetto di materiale o di produzione. Nei casi previsti dalla garanzia si
prega di rivolgersi al proprio rivenditore, oppure al più vicino centro di assistenza autorizzato, esibendo lo scontrino di acquisto.
Accessori e ricambi
Utilizzando solamente accessori e ricambi
originali, si garantisce un funzionamento sicuro e privo di disturbi dell'apparecchio.
Si possono trovare informazioni riguardo
ad accessori e ricambi su
www.kaercher.com.
Denominazione Codice N°
Accumulatore di ricambio 4.654-016.0
Caricabatterie rapido BC 1/7
EU 6.654-354.0
GB 6.654-355.0
AU 6.654-356.0
Dichiarazione di conformità
UE
Con la presente si dichiara che la macchina
qui di seguito indicata, in base alla sua concezione, al tipo di costruzione e nella versione da noi introdotta sul mercato, è conforme ai requisiti fondamentali di sicurezza
e di sanità delle direttive UE. In caso di modifiche apportate alla macchina senza il nostro consenso, la presente dichiarazione
perde ogni validità.
Prodotto: Aspiratore a secco
Modello: 1.528-xxx
Direttive UE pertinenti
2006/42/CE (+2009/127/CE)
2014/30/UE
2011/65/UE
2009/125/CE
Norme armonizzate applicate
EN 55014–1: 2006+A1: 2009+A2: 2011
EN 55014–2: 2015
EN 60335–1
EN 60335–2–69
EN 61000–3–2: 2014
EN 61000–3–3: 2013
EN 62233: 2008
EN 50581
EN 60312-1: 2017
Norme nazionali applicate
-
5.957-783
I firmatari agiscono per incarico e con delega della direzione.
Responsabile della documentazione:
S. Reiser
Alfred Kärcher SE & Co. KG
Alfred-Kärcher-Straße 28-40
71364 Winnenden (Germany)
Tel.: +49 7195 14-0
Fax: +49 7195 14-2212
26 IT
Winnenden, 2018/10/01
– 5
Page 27

Dati tecnici
T 9/1 Bp
Tensione batteria V 36 CC
Potenza max. W 730
Potenza nominale W 650
Capacità serbatoio l 9
Quantità d'aria (max.) l/s 46
Sotto pressione (max.) kPa (mbar) 20,7 (207)
Grado di protezione III
Attacco per tubo di aspirazione (C-DN/C-ID) mm 35
Lunghezza x larghezza x Altezza mm 420 x 325 x 380
Peso d'esercizio tipico kg 7,5
Temperatura ambiente °C 0/+40
Tempo di funzionamento a carica massima
– Funzionamento normale
– Modalità Eco
Valori rilevati secondo EN 60335-2-69
Pressione acustica L
Dubbio K
pA
pA
Valore di vibrazione mano-braccio m/s
Dubbio K m/s
min
min
24
46
dB(A) 62
dB(A) 2
2
2
<2,5
0,2
– 6
27IT
Page 28
Lees vóór het eerste gebruik
van uw apparaat deze originele
gebruiksaanwijzing, ga navenant te werk
en bewaar hem voor later gebruik of voor
een latere eigenaar.
– Voor de eerste inbedrijfstelling veilig-
heidsinstructies nr. 5.956-249.0 in elk
geval lezen!
– Bij veronachtzaming van de gebruiks-
aanwijzing en de veiligheidsaanwijzingen kan schade aan het apparaat ontstaan, en gevaar voor gebruikers en andere personen.
– Bij transportschade onmiddellijk de
handelaar op de hoogte brengen.
– Gelieve bij het uitpakken de verpak-
kingsinhoud te controleren op ontbrekende toebehoren of beschadigingen.
Inhoudsopgave
Zorg voor het milieu . . . . . . . . NL 1
Gevarenniveaus . . . . . . . . . . . NL 1
Reglementair gebruik . . . . . . . NL 1
Apparaat-elementen . . . . . . . . NL 2
Symbolen op het toestel . . . . . NL 2
Veiligheidsinstructies. . . . . . . . NL 2
Inbedrijfstelling . . . . . . . . . . . . NL 3
Bediening . . . . . . . . . . . . . . . . NL 3
Vervoer . . . . . . . . . . . . . . . . . . NL 4
Opslag. . . . . . . . . . . . . . . . . . . NL 4
Onderhoud . . . . . . . . . . . . . . . NL 4
Hulp bij storingen . . . . . . . . . . NL 4
Garantie . . . . . . . . . . . . . . . . . NL 5
Toebehoren en reserveonderde-
len . . . . . . . . . . . . . . . . . . . . . . NL 5
EU-conformiteitsverklaring . . . NL 5
Technische gegevens . . . . . . . NL 6
Zorg voor het milieu
Het verpakkingsmateriaal is herbruikbaar. Deponeer het verpakkingsmateriaal niet bij het huishoudelijk afval, maar bied het
aan voor hergebruik.
28 NL
Onbruikbaar geworden apparaten bevatten waardevolle materialen die geschikt zijn voor hergebruik. Lever de apparaten daarom in bij een inzamelpunt voor
herbruikbare materialen. Batterijen en accu's bevatten stoffen die
niet in het milieu mogen terechtkomen. Gelieve oude apparaten,
batterijen en accu's in te leveren
op de geschikte inzamelpunten.
Aanwijzingen betreffende de inhoudsstoffen (REACH)
Huidige informatie over de inhoudsstoffen
vindt u onder:
www.kaercher.com/REACH
Gevarenniveaus
GEVAAR
Verwijzing naar een onmiddellijk dreigend
gevaar dat tot ernstige en zelfs dodelijke lichaamsverwondingen leidt.
몇 WAARSCHUWING
Verwijzing naar een mogelijke gevaarlijke
situatie die tot ernstige en zelfs dodelijke lichaamsverwondingen kan leiden.
몇 VOORZICHTIG
Verwijzing naar een mogelijk gevaarlijke situatie die tot lichte verwondingen kan leiden.
LET OP
Verwijzing naar een mogelijke gevaarlijke
situatie die tot materiele schade kan leiden.
Reglementair gebruik
몇 WAARSCHUWING
Het apparaat is niet geschikt voor het opzuigen van voor de gezondheid schadelijke
stoffen.
LET OP
Dit apparaat is alleen voor het gebruik in
gesloten ruimtes bestemd.
– Deze universele zuiger is bestemd voor
de droge reiniging van vloer- en wandoppervlakken.
– Dit apparaat is geschikt voor industrieel
gebruik, zoals bijvoorbeeld in hotels,
scholen, ziekenhuizen, fabrieken, winkels, kantoorgebouwen en verhuurkantoren.
– 1
Page 29
Apparaat-elementen
1 Filterzak van vlies
2 Luchtinlaatleidingen
3 Zuigslang
4Typeplaatje
5 Handgreep
6 Slanghouder
7 Zuigkop
8 Vergrendeling van de zuigkop
9 Zwenkwiel
10 Vuilreservoir
11 Opname voor vloerspuitkop
12 Eco-schakelaar (energiespaarmodus)
13 Hoofdschakelaar
14 Omschakelaar harde oppervlakken/
vaste vloerbekleding
15 Vloersproeier
16 Ladingsindicatie
17 Toets voor ladingsindicatie
18 Batterij
19 Ontgrendeltoets
20 Telescoopzuigbuis
21 Zuigkrachtregelaar (traploos)
22 Elleboog
23 Hoofdfilterkorf
24 Filter voor bescherming van de motor
Symbolen op het toestel
Geen vochtige of vloeibare stoffen
opzuigen.
Veiligheidsinstructies
Naast de aanwijzingen in de gebruiksaanwijzingen moeten de algemene veiligheidsvoorschriften en voorschriften ter vermijding van ongevallen van de wetgever in
acht genomen worden.
GEVAAR
Verwondingsgevaar! Verwijder de accu
voor alle instandhoudings-, onderhoudsen reparatiewerkzaamheden aan het apparaat.
Accu/oplaadapparaat
GEVAAR
– Het laden van de accu is uitsluitend toe-
gestaan met het meegeleverde originele laadapparaat of met de door KÄRCHER goedgekeurde laadapparaten.
– Voor elk gebruik dient u het laadappa-
raat en het accupack op beschadigingen te controleren. Beschadigde apparaten niet meer gebruiken en beschadigde onderdelen alleen door vaklieden
laten repareren.
– Laadapparaat niet in vervuilde of natte
toestand gebruiken.
– De netspanning moet met de op het
typeplaatje vermelde spanning overeenkomen.
– Laadapparaat niet in explosiegevaarlij-
ke omgeving gebruiken.
– Er mogen geen metalen voorwerpen te-
gen de contacten van de adapter worden aangehouden: gevaar voor kortsluiting.
– Laadapparaat uitsluitend voor het opla-
den van goedgekeurde accupacks gebruiken.
– Uitsluitend schone en droge accupacks
op de adapter van het laadapparaat
steken.
– Geen batterijen (primaire cellen) opla-
den, explosiegevaar.
– Geen beschadigde accupacks opladen.
Beschadigde accupacks vervangen.
– Accupacks niet samen met metalen
voorwerpen bewaren, gevaar voor kortsluiting.
– Accupacks niet in het vuur of in de vuil-
nisbak gooien.
– Vermijd het contact met uit defecte ac-
cu's uitlopende vloeistof. Bij toevallig
contact vloeistof met water afspoelen.
Bij contact met de ogen bovendien een
arts opzoeken.
– 2
29NL
Page 30

Inbedrijfstelling
Controleren, of hoofdfilterkorf in het ap-
paraat aangebracht is.
Bedrijfsmodi
1 Gebruik met filterzak van vlies of filter-
zak van papier (extra accessoire)
2 Gebruik zonder filterzak
Montage van de filterzak
Zuigkop ontgrendelen en wegnemen.
Hoofdfilterkorf eraf nemen.
Vliesfilterzak of papieren filterzak (extra
toebehoren) aanbrengen.
Hoofdfilterkorf erin zetten.
Zuigkop eropzetten en vergrendelen.
Accu plaatsen
Accu in de accuhouder schuiven en
vastklikken.
Accu opladen
Instructie: Gebruiksaanwijzing van de fa-
brikant van het oplaadapparaat lezen en in
het bijzonder de veiligheidsinstructies in
acht nemen!
De batterij is bij levering gedeeltelijk opgeladen. Voor inbedrijfname en naar behoefte
opladen.
Instructie: Het opladen van de batterij kan
alleen in verwijderde toestand gebeuren.
Ontgrendelingsknop indrukken en accu
wegnemen.
Het oplaadapparaat in een geschikt
stopcontact steken.
Batterij in het oplaadapparaat steken.
Oplaadtijd bij lege accu
Accusnellaadapparaat BC 1/7 min 60
Bediening
Ladingsindicatie
Toets voor ladingsindicatie op de accu
indrukken. De ladingsindicatie brandt 1
minuut lang.
Ladingsindicatie werd 60 minuten lang niet
geactiveerd (slaapmodus):
Toets voor ladingsindicatie op de accu
2x indrukken. De ladingsindicatie
brandt 1 minuut lang.
Apparaat inschakelen
Schakel het apparaat aan de hoofd-
schakelaar in.
Eco-modus
Eco-modus (energiespaarmodus): Het apparaat werkt met gereduceerd zuigvermogen.
De looptijd van de accu wordt verhoogd.
Eco-modus inschakelen: Eco-schake-
laar bedienen. Controlelampje in de
schakelaar brandt groen.
Eco-modus uitschakelen: Eco-schake-
laar opnieuw bedienen. Controlelampje
in de schakelaar gaat uit.
Reinigingswerking
Opmerking: Bij de basisreiniging van tex-
tielondergronden wordt de looptijd van de
accu gereduceerd door het verhoogde reinigingsvermogen.
Omschakelaar van de vloersproeier op
harde oppervlakken of vaste vloerbe-
kleding zetten.
Zuigkracht met de zuigkrachtregelaar
regelen (traploos).
Reiniging uitvoeren.
Apparaat uitschakelen
Schakel het apparaat aan de hoofd-
schakelaar uit.
Na elk bedrijf
Reservoir leegmaken.
Apparaat aan de binnen- en buitenkant
reinigen door afzuigen en afvegen met
een vochtige doek.
30 NL
– 3
Page 31

Vervoer
몇 VOORZICHTIG
Gevaar voor letsels en beschadigingen!
Houd bij het transport rekening met het gewicht van het apparaat.
Bij het transport in voertuigen moet het
apparaat conform de geldige richtlijnen
beveiligd worden tegen verschuiven en
kantelen.
Opslag
몇 VOORZICHTIG
Gevaar voor letsel en beschadiging! Het
gewicht van het apparaat bij opbergen in
acht nemen.
Ontgrendelingsknop indrukken en accu
wegnemen om te vermijden dat de accu
ontlaadt.
Het apparaat mag alleen binnen worden
opgeborgen.
Onderhoud
GEVAAR
Voor alle werkzaamheden aan het apparaat, het apparaat uitschakelen en de accu
verwijderen.
Hoofdfilterkorf reinigen
Hoofdfiltermand (wasbaar) indien nodig
onder stromend water reinigen.
LET OP
Gevaar voor beschadiging! Hoofdfilterkorf
nooit nat erin zetten.
Filter om de motor te beschermen
vervangen
Zuigkop ontgrendelen en wegnemen.
Motorbeschermingsfilter eraf nemen.
Plaats een nieuwe filter voor motorbe-
scherming.
Zuigkop eropzetten en vergrendelen.
Hulp bij storingen
GEVAAR
Voor alle werkzaamheden aan het apparaat, het apparaat uitschakelen en de accu
verwijderen.
Apparaat schakelt uit tijdens het
werken
– Motor-thermoprotector heeft gerea-
geerd.
Filterzak van vlies of filterzak van papier
(extra accessoire) vervangen.
Motorbeschermingsfilter vervangen.
Alle delen op verstopping controleren.
Weer inschakelen na afkoeling van de motorturbine na ca. 60 minuten.
Zuigkracht wordt minder
Verstoppingen uit zuigkop, zuigbuis of
zuigslang verwijderen.
Filterzak van vlies of filterzak van papier
(extra accessoire) vervangen.
Hoofdfiltermand onder stromend water
reinigen en drogen.
Zuigkop juist erop zetten/vergrendelen.
Kapotte zuigslang vervangen.
Motorbeschermingsfilter vervangen.
Er ontsnapt stof bij het zuigen
Filterzak van vlies of filterzak van papier
(extra accessoire) vervangen.
Filterzak van vlies of filterzak van papier
(extra accessoire) controleren.
Zuigkop juist erop zetten/vergrendelen.
Onbeschadigde hoofdfilterkorf erin zet-
ten.
Motorbeschermingsfilter juist aanbren-
gen.
Apparaat draait niet
Apparaat inschakelen.
– Plaat oververhit
Instructie: Batterijwerking is opnieuw mogelijk na het afkoelen van de plaat.
– Batterij leeg
Accu opladen.
– Geen batterij geplaatst
Batterij plaatsen
– 4
31NL
Page 32

Klantenservice
Chairman of the Board of Management
Director Regulatory Affairs & Certification
Indien de storing niet kan worden opgelost, moet het toestel door de klantendienst gecontroleerd worden.
Garantie
In ieder land zijn de door ons bevoegde
verkoopkantoor uitgegeven garantiebepalingen van toepassing. Eventuele storingen
aan het apparaat verhelpen wij zonder kosten binnen de garantietermijn, mits een materiaal of fabrieksfout de oorzaak van deze
storing is. Neem bij klachten binnen de garantietermijn contact op met uw leverancier
of de dichtstbijzijnde klantenservicewerkplaats en neem uw aankoopbewijs mee.
Toebehoren en
reserveonderdelen
Gebruik alleen origineel toebehoren en originele reserveonderdelen. Deze garanderen dat het apparaat veilig en zonder storingen functioneert.
Informatie over het toebehoren en de reserveonderdelen vindt u op
www.kaercher.com.
Benaming Bestelnr.
Vervangende accu 4.654-016.0
Accusnellaadapparaat BC 1/7
EU 6.654-354.0
GB 6.654-355.0
AU 6.654-356.0
EU-conformiteitsverklaring
Hierbij verklaren wij dat de hierna vermelde
machine door haar ontwerp en bouwwijze en
in de door ons in de handel gebrachte uitvoering voldoet aan de betreffende fundamentele veiligheids- en gezondheidseisen, zoals
vermeld in de desbetreffende EU-richtlijnen.
Deze verklaring verliest haar geldigheid
wanneer zonder overleg met ons veranderingen aan de machine worden aangebracht.
Product: Stofzuiger voor droge be-
standdelen
Type: 1.528-xxx
Van toepassing zijnde EU-richtlijnen
2006/42/EG (+2009/127/EG)
2014/30/EU
2011/65/EU
2009/125/EG
Toegepaste geharmoniseerde normen
EN 55014–1: 2006+A1: 2009+A2: 2011
EN 55014–2: 2015
EN 60335–1
EN 60335–2–69
EN 61000–3–2: 2014
EN 61000–3–3: 2013
EN 62233: 2008
EN 50581
EN 60312-1: 2017
Toegepaste landelijke normen
-
5.957-783
De ondergetekenden handelen in opdracht
en met volmacht van de directie.
32 NL
Documentatieverantwoordelijke:
S. Reiser
Alfred Kärcher SE & Co. KG
Alfred-Kärcher-Straße 28-40
71364 Winnenden (Germany)
Tel.: +49 7195 14-0
Fax: +49 7195 14-2212
Winnenden, 2018/10/01
– 5
Page 33

Technische gegevens
T 9/1 Bp
Accuspanning V 36 DC
Max. vermogen W 730
Nominaal vermogen W 650
Inhoud reservoir l 9
Luchthoeveelheid (max.) l/s 46
Onderdruk (max.) kPa (mbar) 20,7 (207)
Beschermingsklasse III
Zuigslangaansluiting (C-DN/C-ID) mm 35
Lengte x breedte x hoogte mm 420 x 325 x 380
Typisch bedrijfsgewicht kg 7,5
Omgevingstemperatuur °C 0/+40
Bedrijfstijd bij volle acculading
– Normale werking
– Eco-modus
Bepaalde waarden conform EN 60335-2-69
Geluidsdrukniveau L
Onzekerheid K
pA
pA
Hand-arm vibratiewaarde m/s
Onzekerheid K m/s
min
min
24
46
dB(A) 62
dB(A) 2
2
2
<2,5
0,2
– 6
33NL
Page 34

Antes del primer uso de su apa-
rato, lea este manual original,
actúe de acuerdo a sus indicaciones y
guárdelo para un uso posterior o para otro
propietario posterior.
– ¡Antes de la primera puesta en marcha
lea sin falta las instrucciones de uso y
las instrucciones de seguridad n.°
5.956-249.0!
– El incumplimiento de las instrucciones
de uso y de las indicaciones de seguridad puede provocar daños en el aparato y poner en peligro al usuario y a otras
personas.
– En caso de daños de transporte infor-
me inmediatamente al fabricante.
– Cuando desembale el contenido del pa-
quete, compruebe si faltan accesorios o
si el aparato presenta daños.
Índice de contenidos
Protección del medio ambiente ES 1
Niveles de peligro . . . . . . . . . . ES 1
Uso previsto . . . . . . . . . . . . . . ES 1
Elementos del aparato . . . . . . ES 2
Símbolos en el aparato. . . . . . ES 2
Indicaciones de seguridad . . . ES 2
Puesta en marcha. . . . . . . . . . ES 3
Manejo . . . . . . . . . . . . . . . . . . ES 3
Transporte. . . . . . . . . . . . . . . . ES 4
Almacenamiento . . . . . . . . . . . ES 4
Cuidados y mantenimiento . . . ES 4
Ayuda en caso de avería . . . . ES 4
Garantía . . . . . . . . . . . . . . . . . ES 5
Accesorios y piezas de repuestoES 5
Declaración UE de conformidadES 5
Datos técnicos . . . . . . . . . . . . ES 6
Protección del medio
ambiente
Los materiales empleados para
el embalaje son reciclables y recuperables. No tire el embalaje a
la basura doméstica y entréguelo en los puntos oficiales de recogida para su reciclaje o recuperación.
34 ES
Los aparatos viejos contienen
materiales valiosos reciclables
que deberían ser entregados
para su aprovechamiento posterior. Las baterías y los acumuladores contienen sustancias que
no deben entrar en contacto con
el medio ambiente. Por este motivo, entregue los aparatos usados, las baterías y acumuladores en los puntos de recogida
previstos para su reciclaje.
Indicaciones sobre ingredientes
(REACH)
Encontrará información actual sobre los ingredientes en:
www.kaercher.com/REACH
Niveles de peligro
PELIGRO
Aviso sobre un riesgo de peligro inmediato
que puede provocar lesiones corporales
graves o la muerte.
몇 ADVERTENCIA
Aviso sobre una situación propablemente
peligrosa que puede provocar lesiones corporales graves o la muerte.
몇 PRECAUCIÓN
Indicación sobre una situación que puede
ser peligrosa, que puede acarrear lesiones
leves.
CUIDADO
Aviso sobre una situación probablemente
peligrosa que puede provocar daños materiales.
Uso previsto
몇 ADVERTENCIA
El aparato no es apto para aspirar polvos
nocivos para la salud.
CUIDADO
Este aparato sólo es apto para el uso en interiores.
– Este aspirador universal ha sido dise-
ñado para la limpieza en seco de suelos y paredes.
– Este aparato es apto para el uso en
aplicaciones industriales, como en hoteles, escuelas, hospitales, fábricas,
tiendas, oficinas y negocios de alquiler.
– 1
Page 35

Elementos del aparato
1 Bolsa de filtro de fieltro
2 Tubuladura de aspiración
3 Manguera de aspiración
4 Placa de características
5 Asa de transporte
6 Portamangueras
7 Cabezal de aspiración
8 Bloqueo del cabezal de absorción
9 Rodillo de dirección
10 Recipiente acumulador de suciedad
11 Alojamiento para boquilla para suelos
12 Interruptor Eco (modo de ahorro de
energía)
13 Interruptor principal
14 Conmutador superficie dura/moqueta
15 Boquilla barredora de suelos
16 Indicador de control de carga
17 Tecla del indicador de control de carga
18 Batería
19 Tecla de desbloqueo
20 Tubo de aspiración telescópico
21 Regulador de potencia de aspiración
(graduado)
22 Codo
23 Cesta filtrante principal
24 Filtro protector del motor
Símbolos en el aparato
No aspirar sustancias húmedas o
líquidas.
Indicaciones de seguridad
Además de las indicaciones contenidas en
este manual de instrucciones, deben respetarse las normas generales vigentes de
seguridad y prevención de accidentes.
PELIGRO
Riesgo de lesiones. Quitar las baterías del
equipo antes de realizar trabajos de conservación, mantenimiento y reparación.
Batería/cargador
PELIGRO
– Sólo está permitido cargar la batería
con el cargador original suministrado o
con el cargador autorizado por KÄRCHER.
– Compruebe si el cargador y batería es-
tán dañados antes de usarlo. No vuelva
a usar los aparatos dañados y encargue sólo al personal técnico que repare
las piezas dañadas.
– No utilizar el cargador si está sucio o
húmedo.
– La tensión de red tiene que coincidir
con la indicada en la placa de características del cargador.
– No utilizar el cargador en un ambiente
con peligro de explosión.
– No deben entrar piezas de metal en los
contactos del adaptador, puede provocar un cortocircuito.
– Utilice el cargador sólo para cargar la
batería permitida.
– Insertar sólo baterías limpias y secas
en el adaptador del cargador.
– No cargar baterías (células primarias),
riesgo de explosión.
– No cargar baterías defectuosas. Susti-
tuir las baterías defectuosas.
– No guardar las baterías con objetos
metálicos, puede provocar un cortocircuito.
– No tirar las baterías al fuego ni a la ba-
sura doméstica.
– Evitar entrar en contacto con el líquido
que sale de baterías defectuosas. Si
entra en contacto con el líquido, enjuagar con agua. Si entra en contacto con
los ojos consultar también a un médico.
– 2
35ES
Page 36

Puesta en marcha
Comprobar si la cesta filtrante principal
está colocada en el aparato.
Tipos de servicio
1 Funcionamiento con bolsa de filtro de
fieltro o bolsa de filtro de papel (acceso-
rio especial)
2 Funcionamiento sin bolsa filtrante
Montaje de la bolsa filtrante
Desbloquear y extraer el cabezal de as-
piración.
Extraer la cesta filtrante principal.
Insertar la bolsa filtrante de fieltro o la
bolsa filtrante de papel (accesorio es-
pecial).
Colocar la cesta filtrante principal.
Colocar y bloquear el cabezal de aspi-
ración.
Colocar la batería
Insertar la batería en su soporte y enca-
jar.
Cargar la batería
Indicación: ¡Leer el manual de instruccio-
nes del fabricante del cargador y respetar
especialmente las indicaciones de seguridad!
La batería se suministra cargada parcialmente. Cargar antes de la puesta en marcha y siempre que lo necesite.
Indicación: Se puede cargar la batería
sólo cuando está fuera del aparato.
accionar la tecla de desbloqueo y ex-
traer la batería.
Introducir el cargador en el enchufe de
forma correcta.
Introducir la batería en el cargador.
Tiempo de carga cuando la batería esté
vacía
Cargador rápido BC 1/7 min 60
Manejo
Indicador de control de carga
Accionar la tecla del indicador de con-
trol de carga en la batería. El indicador
de control de carga se ilumina durante
1 minuto.
El indicador de control de carga no debería
activarse durante 60 minutos (modo de reposo):
Accionar dos veces la tecla del indica-
dor de control de carga en la batería. El
indicador de control de carga se ilumina
durante 1 minuto.
Conexión del aparato
Conectar el aparato con el interruptor
principal.
Modo Eco
Modo Eco (modo de ahorro de energía): el
aparato trabaja con potencia de aspiración
reducida. La capacidad de carga de las
acumuladores se prolonga.
Conectar el modo Eco: Accionar el inte-
rruptor Eco. La lámpara de control del
interruptor se ilumina en verde.
Desconectar el modo Eco: Volver a ac-
cionar el interruptor Eco. La lámpara de
control del interruptor se apaga.
Servicio de limpieza
Aviso: durante la limpieza base de los re-
cubrimientos textiles, la capacidad de carga de las acumuladores se reduce debido
al elevado rendimiento de limpieza.
Ajustar el conmutador de la boquilla de
suelo a superficie dura o moqueta.
Regular la potenciad aspiración con el
regulador (graduado)
Llevar a cabo la limpieza.
Desconexión del aparato
Desconectar el aparato con el interrup-
tor principal.
36 ES
– 3
Page 37

Después de cada puesta en marcha
Vacíe el recipiente.
Limpie el aparato por dentro y por fuera
aspirándolo y frotar con un paño húmedo.
Transporte
몇 PRECAUCIÓN
¡Peligro de lesiones y daños! Respetar el
peso del aparato para el transporte.
Al transportar en vehículos, asegurar el
aparato para evitar que resbale y vuelque conforme a las directrices vigentes.
Almacenamiento
몇 PRECAUCIÓN
¡Peligro de lesiones y daños! Respetar el
peso del aparato en el almacenamiento.
Accionar la tecla de desbloqueo y ex-
traer la batería para evitar una descarga.
Este aparato sólo se puede almacenar en
interiores.
Cuidados y mantenimiento
PELIGRO
Antes de realizar trabajos en el equipo,
desconectarlo y quitar las baterías.
Limpiar la cesta filtrante principal
Limpiar la cesta filtrante principal (lava-
ble) con agua corriente si es necesario.
CUIDADO
¡Peligro de daños en la instalación! No colocar nunca la cesta filtrante principal mojada.
Cambiar el filtro protector del motor
Desbloquear y extraer el cabezal de as-
piración.
Extraer el filtro protector del motor.
Coloque el nuevo filtro protector del
motor.
Colocar y bloquear el cabezal de aspi-
ración.
Ayuda en caso de avería
PELIGRO
Antes de realizar trabajos en el equipo,
desconectarlo y quitar las baterías.
El aparato se apaga durante el
funcionamiento
– Ha saltado el termoprotector del motor.
Cambiar la bolsa filtrante de fieltro o la
bolsa filtrante de papel (accesorio especial).
Cambiar el filtro protector del motor.
Comprobar todas las piezas por si estu-
vieran atascadas.
Reconexión tras enfríar la turbina del motor
tras aprox. 60 minutos.
La capacidad de aspiración
disminuye
Eliminar las obstrucciones de la boqui-
lla, tubo o manguera de aspiración.
Cambiar la bolsa filtrante de fieltro o la
bolsa filtrante de papel (accesorio es-
pecial).
Limpiar el cesto de filtro principal con
agua corriente y secarlo.
Colocar/bloquear el cabezal de aspira-
ción correctamente.
Cambiar el tubo de absorción defectuo-
so.
Cambiar el filtro protector del motor.
Pérdida de polvo durante la
aspiración
Cambiar la bolsa filtrante de fieltro o la
bolsa filtrante de papel (accesorio es-
pecial).
Comprobar el ajuste de la bolsa filtrante
de fieltro o la bolsa filtrante de papel
(accesorio especial).
Colocar/bloquear el cabezal de aspira-
ción correctamente.
Colocar la cesta filtrante principal no
dañada.
Colocar correctamente el filtro protector
del motor.
El aparato no funciona
Conexión del aparato
– Platina sobrecalentada
Indicación: Se puede continuar a batería
después de que se enfríe la platina.
– 4
37ES
Page 38

– Batería vacía
Chairman of the Board of Management
Director Regulatory Affairs & Certification
Cargar la batería.
– No se ha colocado batería
Colocar la batería.
Servicio de atención al cliente
Si la avería no se puede solucionar el
aparato debe ser revisado por el servicio técnico.
Garantía
En todos los países rigen las condiciones
de garantía establecidas por nuestra empresa distribuidora. Las averías del aparato
serán subsanadas gratuitamente dentro
del periodo de garantía, siempre que se deban a defectos de material o de fabricación.
En un caso de garantía, le rogamos que se
dirija con el comprobante de compra al distribuidor donde adquirió el aparato o al servicio al cliente autorizado más próximo a su
domicilio.
Accesorios y piezas de
repuesto
Utilice solamente accesorios y recambios
originales, ya que garantizan un funcionamiento correcto y seguro del equipo.
Puede encontrar información acerca de los
accesorios y recambios en
www.kaercher.com.
denominación Nº de pedido
Batería de repuesto 4.654-016.0
Cargador rápido BC 1/7
EU 6.654-354.0
GB 6.654-355.0
AU 6.654-356.0
Declaración UE de
conformidad
Por la presente declaramos que la máquina designada a continuación cumple, tanto
en lo que respecta a su diseño y tipo constructivo como a la versión puesta a la venta
por nosotros, las normas básicas de seguridad y sobre la salud que figuran en las directivas comunitarias correspondientes. La
presente declaración perderá su validez en
caso de que se realicen modificaciones en
la máquina sin nuestro consentimiento explícito.
Producto: Aspirador en seco
Modelo: 1.528-xxx
Directivas comunitarias aplicables
2006/42/CE (+2009/127/CE)
2014/30/UE
2011/65/UE
2009/125/EG
Normas armonizadas aplicadas
EN 55014–1: 2006+A1: 2009+A2: 2011
EN 55014–2: 2015
EN 60335–1
EN 60335–2–69
EN 61000–3–2: 2014
EN 61000–3–3: 2013
EN 62233: 2008
EN 50581
EN 60312-1: 2017
Normas nacionales aplicadas
-
5.957-783
Los abajo firmantes actúan en nombre y
con la autorización de la junta directiva.
Responsable de documentación:
S. Reiser
Alfred Kärcher SE & Co. KG
Alfred-Kärcher-Straße 28-40
71364 Winnenden (Germany)
Tel.: +49 7195 14-0
Fax: +49 7195 14-2212
Winnenden, 2018/10/01
38 ES
– 5
Page 39

Datos técnicos
T 9/1 Bp
Tensión de la batería V 36 CC
Potencia Máx. W 730
Potencial nominal W 650
Capacidad del depósito l 9
Cantidad de aire (máx.) l/s 46
Depresión (máx.) kPa (mbar) 20,7 (207)
Clase de protección III
Toma de tubo flexible de aspiración (C-DN/C-ID) mm 35
Longitud x anchura x altura mm 420 x 325 x 380
Peso de funcionamiento típico kg 7,5
Temperatura ambiente °C 0/+40
Tiempo de servicio con la batería totalmente cargada
– Funcionamiento normal
– Modo Eco
Valores calculados conforme a la norma EN 60335-2-69
Nivel de presión acústica L
Inseguridad K
pA
pA
Valor de vibración mano-brazo m/s
Inseguridad K m/s
min
min
24
46
dB(A) 62
dB(A) 2
2
2
<2,5
0,2
– 6
39ES
Page 40

Leia o manual de manual origi-
nal antes de utilizar o seu aparelho. Proceda conforme as indicações no
manual e guarde o manual para uma consulta posterior ou para terceiros a quem
possa vir a vender o aparelho.
– Antes de colocar em funcionamento
pela primeira vez é imprescindível ler
atentamente as indicações de segurança n.º 5.956-249.0!
– A não-observância deste Manual de
Instruções e dos avisos de segurança
poderá levar a danos no aparelho e perigos tanto para o utilizador como para
terceiros.
– No caso de danos provocados pelo
transporte, informe imediatamente o revendedor.
– Verifique o conteúdo da embalagem a
respeito de acessórios não incluídos ou
danos.
Índice
Proteção do meio-ambiente . . PT 1
Níveis de perigo . . . . . . . . . . . PT 1
Utilização conforme o fim a que
se destina a máquina . . . . . . . PT 1
Elementos do aparelho . . . . . . PT 2
Símbolos no aparelho . . . . . . . PT 2
Avisos de segurança. . . . . . . . PT 2
Colocação em funcionamento PT 3
Manuseamento . . . . . . . . . . . . PT 3
Transporte. . . . . . . . . . . . . . . . PT 4
Armazenamento . . . . . . . . . . . PT 4
Conservação e manutenção . . PT 4
Ajuda em caso de avarias. . . . PT 4
Garantia . . . . . . . . . . . . . . . . . PT 5
Acessórios e peças sobressa-
lentes . . . . . . . . . . . . . . . . . . . PT 5
Declaração UE de conformida-
de . . . . . . . . . . . . . . . . . . . . . . PT 5
Dados técnicos . . . . . . . . . . . . PT 6
Proteção do meio-ambiente
Os materiais da embalagem são
recicláveis. Não coloque as embalagens no lixo doméstico, envie-as para uma unidade de reciclagem.
40 PT
Os aparelhos velhos contêm materiais preciosos e recicláveis e
deverão ser reutilizados. Pilhas e
baterias acumuladoras contêm
materiais que não devem entrar
em contacto com o meio-ambiente. Por isso, elimine os aparelhos velhos, as pilhas e baterias acumuladoras (recarregáveis) através de sistemas de recolha de lixo adequados.
Avisos sobre os ingredientes (REACH)
Informações actuais sobre os ingredientes
podem ser encontradas em:
www.kaercher.com/REACH
Níveis de perigo
PERIGO
Aviso referente a um perigo eminente que
pode conduzir a graves ferimentos ou à
morte.
몇 ATENÇÃO
Aviso referente a uma possível situação
perigosa que pode conduzir a graves ferimentos ou à morte.
몇 CUIDADO
Aviso referente a uma situação potencialmente perigosa que pode causar ferimentos leves.
ADVERTÊNCIA
Aviso referente a uma situação potencialmente perigosa que pode causar danos
materiais.
Utilização conforme o fim a
que se destina a máquina
몇 ATENÇÃO
O aparelho não é apropriado para a aspiração de poeiras nocivas para a saúde.
ADVERTÊNCIA
Este aparelho foi única e exclusivamente
concebido para a utilização em interiores.
– este aspirador universal foi concebido
para limpar superfícies de chão e parede a seco.
– Este aparelho destina-se ao uso indus-
trial, p.ex. em hotéis, escolas, hospitais,
fábricas, lojas, escritórios e lojas à exploração.
– 1
Page 41

Elementos do aparelho
1 Saco filtrante de velo
2 Bocal de aspiração
3 Tubo flexível de aspiração
4 Placa de tipo
5 Pega para portar
6 Suporte para mangueiras
7 Cabeçote de aspiração
8 Bloqueio da cabeça de aspiração
9 Rolo de guia
10 Recipiente de sujidades
11 Encaixe para bocal de chão
12 Interruptor Eco (modo de poupança de
energia)
13 Interruptor principal
14 Comutador "Superfícies duras/carpetes"
15 Bico para o chão
16 Indicação do controlo de carregamento
17 Tecla para indicação do controlo de
carga
18 Bateria acumuladora
19 Tecla de desbloqueio
20 Tubo de aspiração telescópico
21 Regulador da força de aspiração (contí-
nua)
22 Tubo curvado
23 Cesto de filtro principal
24 Filtro de protecção do motor
Símbolos no aparelho
Não aspirar quaisquer substâncias húmidas ou líquidas.
Avisos de segurança
Juntamente com os avisos do manual de
instruções deve respeitar igualmente as regras gerais de segurança e de prevenção
de acidentes em vigor.
PERIGO
Perigo de ferimentos! Retirar as baterias
acumuladoras antes de efectuar quaisquer
trabalhos de conservação, manutenção e
reparação no aparelho.
Bateria acumuladora/Carregador
PERIGO
– O carregamento da bateria acumulado-
ra só é permitido com o carregador original incluído no volume de fornecimento, ou com carregadores devidamente
autorizados pela KÄRCHER.
– Controlar antes de cada utilização o
carregador e a bateria acumuladora
quanto a eventuais danos. Não utilizar
aparelhos danificados e requerer a reparação de aparelhos avariados somente por técnicos especializados devidamente autorizados.
– Não utilizar o carregador em estado hú-
mido ou sujo.
– A tensão de rede deve estar em confor-
midade com a tensão indicada na placa
de características do carregador.
– Não utilizar o carregador em ambientes
potencialmente explosivos.
– Manter afastadas dos contactos do
adaptador quaisquer peças metálicas,
de modo a evitar o risco de um curtocircuito.
– Utilizar o carregador somente para car-
regar as baterias acumuladoras autorizadas.
– Colocar somente baterias limpas e se-
cas no adaptador do carregador.
– Não carregar pilhas (células primárias)
- Perigo de explosão.
– Não carregar baterias acumuladoras
danificadas. Substituir as baterias acumuladoras danificadas.
– Não guardar ou armazenar as baterias
acumuladoras juntamente com objectos metálicos - perigo de curto-circuito.
– Não atirar as baterias acumuladoras
para fogueiras ou eliminá-las no lixo doméstico.
– Evitar o contacto com o líquido prove-
niente de baterias acumuladoras danificadas. Na eventualidade de contacto
com esse líquido deve-se proceder
imediatamente à lavagem da zona
afectada com água. Em caso de contacto com os olhos deve-se consultar
adicionalmente um médico.
– 2
41PT
Page 42

Colocação em funcionamento
Verificar se o cesto do filtro principal
está inserido no aparelho.
Modos operativos
1 Funcionamento com saco filtrante de
velo ou saco filtrante de papel (acessó-
rio especial)
2 Funcionamento sem saco de filtro
Montagem do saco de filtro
Destravar e retirar o cabeçote de aspi-
ração.
Retirar o cesto do filtro principal.
Encaixar o saco filtrante de velo ou o
saco filtrante de papel (acessório espe-
cial).
Inserir o cesto do filtro principal.
Montar e travar o cabeçote de aspira-
ção.
Inserir a bateria acumuladora
Inserir a bateria acumuladora no supor-
te do carregador e encaixá-la.
Carregar a bateria acumuladora
Aviso: Ler o manual de instruções do fabri-
cante do carregador e ter especial atenção
aos avisos de segurança!
A bateria acumuladora está parcialmente
carregada em estado de fornecimento.
Carregar antes da colocação em funcionamento e sempre que necessário.
Aviso: O carregamento da bateria só pode
ser efectuado em estado desmontado.
Premir a tecla de desbloqueio e retirar
a bateria acumuladora.
Ligar o carregador a uma tomada.
Inserir a bateria acumuladora no carre-
gador.
Tempo de carga de uma bateria acumuladora vazia
Carregador rápido BC 1/7 min 60
Manuseamento
Indicação do controlo de carga
Accionar a tecla para indicação do con-
trolo de carga na bateria. A indicação
do controlo de carga acende durante 1
minuto.
A indicação do controlo de carga não foi
activada durante 60 minutos (modo de hibernação):
Accionar duas vezes a tecla para indi-
cação do controlo de carga na bateria.
A indicação do controlo de carga acen-
de durante 1 minuto.
Ligar a máquina
Ligar o aparelho no interruptor principal.
Modo Eco
Modo Eco (modo de poupança de energia):
o aparelho trabalha com reduzida potência
de aspiração. A autonomia das baterias
acumuladoras é prolongada.
Ligar o modo Eco: Accionar o interrup-
tor Eco. A lâmpada de controlo no inter-
ruptor acende a verde.
Desligar o modo Eco: Accionar repeti-
damente o interruptor Eco. A lâmpada
de controlo no interruptor apaga.
Operação de limpeza
Aviso: Na limpeza geral de revestimentos
têxteis, a autonomia das baterias acumuladoras é reduzida devido à potência de limpeza elevada.
Ajustar o comutador do bico de pavi-
mentos para superfícies duras ou para
carpetes.
Regular a força de aspiração do regula-
dor (contínuo).
Efectuar a limpeza.
Desligar o aparelho
Desligar o aparelho no interruptor prin-
cipal.
42 PT
– 3
Page 43

Sempre depois de utilizar a máquina
Esvaziar o recipiente.
Aspirar e esfregar o aparelho por den-
tro e por fora para limpá-lo (pano húmido).
Transporte
몇 CUIDADO
Perigo de ferimentos e de danos! Ter atenção ao peso do aparelho durante o transporte.
Durante o transporte em veículos, pro-
teger o aparelho contra deslizes e tombamentos, de acordo com as directivas
em vigor.
Armazenamento
몇 CUIDADO
Perigo de ferimentos e de danos! Ter atenção ao peso do aparelho durante o armazenamento.
Premir a tecla de desbloqueio e retirar
a bateria acumuladora de forma a evitar
uma descarga.
Este aparelho só pode ser armazenado em
espaços fechados e cobertos.
Conservação e manutenção
PERIGO
Desligar o aparelho e retirar a bateria antes
de efectuar quaisquer trabalhos no aparelho.
Limpar o cesto do filtro principal
Se necessário, limpar o cesto do filtro
principal (lavável) sob água corrente.
ADVERTÊNCIA
Perigo de danos! Nunca aplicar o cesto do
filtro principal em estado húmido.
Substituir o filtro de protecção do
motor
Destravar e retirar o cabeçote de aspi-
ração.
Retirar o filtro de protecção do motor.
Inserir o novo filtro de protecção do mo-
tor.
Montar e travar o cabeçote de aspira-
ção.
Ajuda em caso de avarias
PERIGO
Desligar o aparelho e retirar a bateria antes
de efectuar quaisquer trabalhos no aparelho.
Aparelho desliga durante a
operação
– Disparou o termoprotector do motor.
Substituir o saco filtrante de velo ou o
saco filtrante de papel (acessório especial).
Substituir o filtro de protecção do motor.
Controlar todas as peças relativamente
a entupimento.
Reactivação após o arrefecimento da turbina do motor após aprox. 60 minutos.
A força de aspiração diminui
Desentupir o bocal de aspiração, o tubo
de aspiração ou o tubo flexível de aspi-
ração.
Substituir o saco filtrante de velo ou o
saco filtrante de papel (acessório espe-
cial).
Limpar e secar o cesto de filtro principal
sob água corrente.
Posicionar / bloquear a cabeça de aspi-
ração correctamente.
Substituir tubo de aspiração com defei-
to.
Substituir o filtro de protecção do motor.
Durante a aspiração sai pó
Substituir o saco filtrante de velo ou o
saco filtrante de papel (acessório espe-
cial).
Controlar o encaixe do saco filtrante de
velo ou do saco filtrante de papel (aces-
sório especial).
Posicionar / bloquear a cabeça de aspi-
ração correctamente.
Inserir o cesto do filtro principal não da-
nificado.
Colocar correctamente o filtro de pro-
tecção do motor.
– 4
43PT
Page 44

A máquina não funciona
Chairman of the Board of Management
Director Regulatory Affairs & Certification
Ligar o aparelho.
– Sobreaquecimento da platina
Aviso: A alimentação por bateria acumuladora é novamente possível após o arrefecimento da platina.
– Bateria acumuladora vazia
Carregar a bateria acumuladora.
– Nenhuma bateria acumuladora inserida
Inserir a bateria acumuladora.
Serviço de assistência técnica
Quando o defeito não puder ser consertado, a máquina deverá ser verificada
pelo serviço de assistência técnica.
Garantia
Em cada país vigem as respectivas condições de garantia estabelecidas pelas nossas Empresas de Comercialização. Eventuais avarias no aparelho durante o período de garantia serão reparadas, sem encargos para o cliente, desde que se trate
dum defeito de material ou de fabricação.
Em caso de garantia, dirija-se, munido do
documento de compra, ao seu revendedor
ou ao Serviço Técnico mais próximo.
Acessórios e peças
sobressalentes
Utilizar apenas acessórios e peças sobressalentes originais. Só assim poderá garantir uma operação do aparelho segura e sem
avarias.
Para mais informações sobre acessórios e
peças sobressalentes, consulte
www.kaercher.com.
Denominação N.º de enco-
menda
Bateria acumuladora de
substituição
Carregador rápido BC 1/7
EU 6.654-354.0
GB 6.654-355.0
AU 6.654-356.0
4.654-016.0
Declaração UE de
conformidade
Declaramos que a máquina a seguir designada corresponde às exigências de segurança e de saúde básicas estabelecidas
nas Directivas UE por quanto concerne à
sua concepção e ao tipo de construção assim como na versão lançada no mercado.
Se houver qualquer modificação na máquina sem o nosso consentimento prévio, a
presente declaração perderá a validade.
Produto: Aspirador a seco
Tipo: 1.528-xxx
Respectivas Directrizes da UE
2006/42/CE (+2009/127/CE)
2014/30/UE
2011/65/UE
2009/125/CE
Normas harmonizadas aplicadas
EN 55014–1: 2006+A1: 2009+A2: 2011
EN 55014–2: 2015
EN 60335–1
EN 60335–2–69
EN 61000–3–2: 2014
EN 61000–3–3: 2013
EN 62233: 2008
EN 50581
EN 60312-1: 2017
Normas nacionais aplicadas
-
5.957-783
Os signatários actuam em nome e em procuração do Conselho de Administração.
Responsável pela documentação:
S. Reiser
Alfred Kärcher SE & Co. KG
Alfred-Kärcher-Straße 28-40
71364 Winnenden (Germany)
Tel.: +49 7195 14-0
Fax: +49 7195 14-2212
44 PT
Winnenden, 2018/10/01
– 5
Page 45

Dados técnicos
T 9/1 Bp
Tensão da bateria acumuladora V 36 DC
Potência máx. W 730
Potência nominal W 650
Conteúdo do recipiente l 9
Volume de ar (máx.) l/s 46
Subpressão (máx.) kPa (mbar) 20,7 (207)
Classe de protecção III
Ligação do tubo flexível de aspiração (C-DN/C-ID) mm 35
Comprimento x Largura x Altura mm 420 x 325 x 380
Peso de funcionamento típico kg 7,5
Temperatura ambiente °C 0/+40
Tempo de operação com a bateria cheia
– Funcionamento normal
– Modo Eco
Valores obtidos segundo EN 60335-2-69
Nível de pressão acústica L
Insegurança K
pA
pA
Valor de vibração mão/braço m/s
Insegurança K m/s
min
min
24
46
dB(A) 62
dB(A) 2
2
2
<2,5
0,2
– 6
45PT
Page 46

Læs original brugsanvisning in-
den første brug, følg anvisningerne og opbevar vejledningen til senere
efterlæsning eller til den næste ejer.
– Inden første ibrugtagelse skal betje-
ningsvejledningen og sikkerhedshenvisningerne nr. 5.956-249.0 læses!
– Hvis driftsvejledningen og sikkerheds-
anvisningerne ikke overholdes, kan der
opstå skader på apparatet og risici for
brugeren og andre personer.
– Ved transportskader skal forhandleren
informeres omgående.
– Kontroller pakningens indhold for
manglende tilbehør eller beskadigelser,
når den pakkes ud.
Indholdsfortegnelse
Miljøbeskyttelse . . . . . . . . . . . DA 1
Faregrader . . . . . . . . . . . . . . . DA 1
Bestemmelsesmæssig anven-
delse . . . . . . . . . . . . . . . . . . . . DA 1
Maskinelementer. . . . . . . . . . . DA 2
Symboler på maskinen . . . . . . DA 2
Sikkerhedsanvisninger . . . . . . DA 2
Ibrugtagning . . . . . . . . . . . . . . DA 3
Betjening. . . . . . . . . . . . . . . . . DA 3
Transport. . . . . . . . . . . . . . . . . DA 4
Opbevaring . . . . . . . . . . . . . . . DA 4
Pleje og vedligeholdelse . . . . . DA 4
Hjælp ved fejl . . . . . . . . . . . . . DA 4
Garanti . . . . . . . . . . . . . . . . . . DA 5
Tilbehør og reservedele . . . . . DA 5
EU-overensstemmelseserklæ-
ring . . . . . . . . . . . . . . . . . . . . . DA 5
Tekniske data . . . . . . . . . . . . . DA 6
Miljøbeskyttelse
Emballagen kan genbruges.
Smid ikke emballagen ud sammen med det almindelige husholdningsaffald, men aflever den
til genbrug.
Udtjente apparater indeholder
værdifulde materialer, der kan
og bør afleveres til genbrug.
Akku'er og batterier indeholder
stoffer, der ikke må komme ud i
naturen. Aflever derfor udtjente
apparater, batterier og akkuer på
en genbrugsstation eller lignende.
Henvisninger til indholdsstoffer
(REACH)
Aktuelle oplysninger til indholdsstoffer finder du på:
www.kaercher.com/REACH
Faregrader
FARE
Henviser til en umiddelbar fare, der fører til
alvorlige kvæstelser eller til døden
몇 ADVARSEL
Henviser til en mulig farlig situation, der kan
føre til alvorlige kvæstelser eller til døden.
몇 FORSIGTIG
Henviser til en mulig farlig situation, der kan
føre til lette personskader.
BEMÆRK
Henviser til en mulig farlig situation, der kan
føre til materiel skade.
Bestemmelsesmæssig
anvendelse
몇 ADVARSEL
Maskinen er ikke egnet til opsugning af
sundhedsskadeligt støv.
BEMÆRK
Maskinen er kun beregnet til brug indendørs.
– Universalsugeren er beregnet til tørren-
gøring af gulv- og vægområder.
– Denne maskine er egnet til erhvervs-
mæssig brug, f.eks. på hoteller, skoler,
sygehuse, fabrikker, butikker, kontorer
og udlejningsvirksomheder.
46 DA
– 1
Page 47

Maskinelementer
1 Filterpose af skind
2 Sugestuds
3 Sugeslange
4Typeskilt
5 Bæregreb
6 Slangeholder
7 Sugehoved
8 Sugehovedets låsemekanisme
9 Styringsrulle
10 Snavsbeholder
11 Holder til gulvduysen
12 Eco-kontakt (energisparefunktion)
13 Hovedafbryder
14 Omstilling hårde overflader/ gulvtæpper
15 Gulvmundstykke
16 Visning af opladningskontrol
17 Knap for opladningskontrolindikator
18 Akku
19 Udløserknap
20 Teleskopsugerør
21 Sugeeffektregulering (trinløs)
22 Bøjet rørstykke
23 Hovedfilterkurv
24 Motorbeskyttelsesfilter
Symboler på maskinen
Opsug ingen fugtige eller våde
stoffer.
Sikkerhedsanvisninger
Ud over anvisningerne i denne brugsanvisning skal lovens generelle sikkerheds- og
ulykkesforebyggelsesforskrifter overholdes.
FARE
Fare for tilskadekomst! Fjern batterierne før
der gennemføres service, vedligeholdelses- eller reparationsarbejde på apparatet.
Batteri/oplader
FARE
– Opladningen af akkuer er kun tilladt
med vedlagte original oplader eller opladere som er blevet godkendt af KÄRCHER.
– Kontroller opladeapparatet og akkuer
før hver brug med hensyn til skader.
Brug ingen apparater der har skader og
lad parter med skader kun sætte i stand
fra kvalificeret personale.
– Brug opladeapparatet ikke i en tilsmud-
set eller våd tilstand.
– Netspændingen skal svare til den
spænding som angives på opladeapparatets mærkeskilt.
– Brug opladeapparatet ikke i områder
der er eksplosionstruet.
– Adapteren må ikke komme i kontakt
med metalgenstande, kortslutningsfare.
– Brug opladeapparatet kun til opladning
af godkendte akkuer.
– Sæt kun rene og tørre akkuer på opla-
deapparatets adapter.
– Oplad ingen batterier (primærceller),
eksplosionsfare.
– Oplad ingen akkuer der har skader.
Skift beskadigede akkuer ud.
– Opbevar akkuer ikke sammen med me-
talgenstande, kortslutningsfare.
– Kast ingen akkuer ind i ild eller i hus-
holdningsaffald.
– Undgå kontakt med væsker som slipper
ud af beskadigede akkuer. Skyld væsken af med med vand ved tilfældig
kontakt. Ved kontakt med øjnene kontakt yderligere en læge.
– 2
47DA
Page 48

Ibrugtagning
Kontroller, om hovedfilterkurvet er sat
ind i maskinen.
Funktionsmåder
1 Drift med filterpose af skind eller papir-
filterpose (ekstratilbehør)
2 Drift uden filterpose
Isætning af filterposen
Tag sugehovedet ud af indgreb og tag
det af.
Fjerne hovedfilterkurvet.
Sætte filterposen af skind eller papirfil-
terposen (ekstratilbehør) på.
Isætte hovedfilterkurvet.
Sæt sugehovedet på og lås det fast.
Isæt akku
Skub batteriet ind i akkuholderen, og
lad det gå i hak.
Oplade akkuer
Bemærk: Læs driftsvejledningen fra opla-
derens producent og overhold især sikkerhedsanvisningerne!
Akkuer er kun til dels opladet ved leveringen. Oplad før ibrugtagningen eller efter
behov.
Bemærk: Akkuer kan kun oplades i udtaget tilstand.
Tryk på åbningstasten og fjern batteriet.
Stik det vedlagte opladeapparat i en
stikdåse.
Stik akkuet ind i opladeapparatet.
Opladetid ved tomt akku
Hurtig-oplader BC 1/7 min 60
Betjening
Opladningskontrolindikator
Tryk på knappen for opladningskontrol-
indikatoren på batteriet. Opladnings-
kontrolindikatoren lyser i 1 minut.
Opladningskontrolindikatoren er ikke blevet
aktiveret i 60 minutter (hvilemodus):
Tryk 2 gange på knappen for oplad-
ningskontrolindikatoren på batteriet.
Opladningskontrolindikatoren lyser i 1
minut.
Tænd for maskinen
Tænd maskinen med hovedafbryderen.
Eco-modus
Eco-modus (energisparefunktion): Apparatet arbejder med nedsat sugeeffekt. Batteriets løbetid forlænges.
Aktivering af eco-modus: Tryk på eco-
kontakten. Kontrollampen i kontakten
lyser grønt.
Deaktivering af eco-modus: Tryk igen
på eco-kontakten. Kontrollampen i kon-
takten slukkes.
Rengøringsdrift
Bemærk: Ved hovedrengøring af tekstile
gulvbelægninger forkortes batteriets løbetid på grund af øget rengøringseffekt.
Sæt gulvdysens omstiller til hårde over-
flader eller gulvtæppe.
Reguler sugeeffekten på sugeeffektre-
guleringen (trinløs).
Gennemfør rengøringen.
Sluk for maskinen
Sluk maskinen med hovedafbryderen.
Efter hver brug
Tøm beholderen
Maskinen rengøres indvendigt og ud-
vendigt ved at støvsuge den og tørre
den af med en fugtet klud.
48 DA
– 3
Page 49

Transport
몇 FORSIGTIG
Fare for person- og materialeskader! Hold
øje med maskinens vægt ved transporten.
Ved transport i biler skal renseren fast-
spændes i.h.t. gældende love.
Opbevaring
몇 FORSIGTIG
Fare for person- og materialeskader! Hold
øje med maskinens vægt ved opbevaring.
Tryk på åbningstasten, og fjern batteriet
for at undgå en afladning.
Denne maskine må kun opbevares indendørs.
Pleje og vedligeholdelse
FARE
Sluk maskinen, og tag batterierne ud, inden
der arbejdes på maskinen.
Rense hovedfilterkurvet
Hovedfilterkurven (kan vaskes ud) efter
behov renses den under flydende vand.
BEMÆRK
Risiko for beskadigelse! Hovedfilterkurvet
må aldrig isættes i våd tilstand.
Udskifte motorbeskyttelsesfilteret
Tag sugehovedet ud af indgreb og tag
det af.
Fjerne motorbeskyttelsesfiltret.
Sæt et nyt motorbeskyttelsesfilter i.
Sæt sugehovedet på og lås det fast.
Hjælp ved fejl
FARE
Sluk maskinen, og tag batterierne ud, inden
der arbejdes på maskinen.
Maskinen afbrydes under driften
– Motorens termiske protektor blev udløst.
Skifte filterposen af skind eller papirfil-
terposen (ekstratilbehør).
Udskifte motorbeskyttelsesfilteret.
Kontroller alle komponenter for tilstop-
ning.
Genstart efter motorturbines nedkøling efter ca. 60 minutter.
Nedsat sugeevne
Fjern forstoppelser fra dysen, sugerør
eller sugeslangen.
Skifte filterposen af skind eller papirfil-
terposen (ekstratilbehør).
Hovedfilterkurven renses under rinden-
de vand og tørres.
Korrekt påsætning/lukning af sugeho-
vedet.
Udskifte defekt sugeslange.
Udskifte motorbeskyttelsesfilteret.
Der strømmer støv ud under
sugning
Skifte filterposen af skind eller papirfil-
terposen (ekstratilbehør).
Kontroller, om filterposerne (ekstratilbe-
hør) sidder korrekt.
Korrekt påsætning/lukning af sugeho-
vedet.
Isætte ubeskadiget hovedfilterkurv.
Sæt motorbeskyttelsesfiltret korrekt
ind.
Maskinen kører ikke
Tænd for maskinen.
– Platinet er overophedet
Bemærk: Brug med akku er muligt igen
hvis platinet er afkølet.
– Akku tomt
Oplade akkuer
– Ingen akku sat i
Isæt akku
– 4
49DA
Page 50

Kundeservice
Chairman of the Board of Management
Director Regulatory Affairs & Certification
Hvis fejlen ikke kan fjernes skal maskinen kontrolleres fra kundeservice.
Garanti
I de enkelte lande gælder de af vore forhandlere fastlagte garantibetingelser.
Eventuelle fejl på apparatet afhjælpes gratis inden for garantien, såfremt fejlen kan tilskrives en materiale- eller produktionsfejl.
Hvis De ønsker at gøre garantien gældende, bedes De henvende Dem til Deres forhandler eller nærmeste kundeservice medbringende kvittering for købet.
Tilbehør og reservedele
Anvend kun originaltilbehør og -reservedele. De er en garanti for en sikker og fejlfri
drift af maskinen.
Informationer om tilbehør og reservedele
findes www.kaercher.com
Navn Bestil-
lingsnr.
Skifteakku 4.654-016.0
Hurtig-oplader BC 1/7
EU 6.654-354.0
GB 6.654-355.0
AU 6.654-356.0
EU-
overensstemmelseserklæring
Hermed erklærer vi, at den nedenfor nævnte maskine i design og konstruktion og i den
af os i handlen bragte udgave overholder
de gældende grundlæggende sikkerhedsog sundhedskrav i EU-direktiverne. Ved
ændringer af maskinen, der foretages uden
forudgående aftale med os, mister denne
erklæring sin gyldighed.
Produkt: Tørsuger
Type: 1.528-xxx
Gældende EU-direktiver
2006/42/EF (+2009/127/EF)
2014/30/EU
2011/65/EU
2009/125/EF
Anvendte harmoniserede standarder
EN 55014–1: 2006+A1: 2009+A2: 2011
EN 55014–2: 2015
EN 60335–1
EN 60335–2–69
EN 61000–3–2: 2014
EN 61000–3–3: 2013
EN 62233: 2008
EN 50581
EN 60312-1: 2017
Anvendte tyske standarder
-
5.957-783
50 DA
Underskriverne handler på bestyrelsens
vegne og med dennes fuldmagt.
Dokumentationsbefuldmægtiget:
S. Reiser
Alfred Kärcher SE & Co. KG
Alfred-Kärcher-Straße 28-40
71364 Winnenden (Germany)
Tel.: +49 7195 14-0
Fax: +49 7195 14-2212
Winnenden, 2018/10/01
– 5
Page 51

Tekniske data
T 9/1 Bp
Akkumulatorspænding V 36 DC
Max. effekt W 730
Nominel ydelse W 650
Beholderindhold l 9
Luftmængde (max.) l/s 46
Undertryk (max.) kPa (mbar) 20,7 (207)
Beskyttelsesklasse III
Sugeslangetilslutning (C-DN/C-ID) mm 35
Længde x bredde x højde mm 420 x 325 x 380
Typisk driftsvægt kg 7.5
Omgivelsestemperatur °C 0/+40
Driftstid ved fuldt batteri
– Normalfunktion
– Eco-modus
Oplyste værdier ifølge EN 60335-2-69
Lydtryksniveau L
Usikkerhed K
pA
pA
Hånd-arm vibrationsværdi m/s
Usikkerhed K m/s
min
min
24
46
dB(A) 62
dB(A) 2
2
2
<2,5
0,2
– 6
51DA
Page 52

Før første gangs bruk av appa-
ratet, les denne originale bruksanvisningen, følg den og oppbevar den for
senere bruk eller for overlevering til neste
eier.
– Det er tvingende nødvendig å lese sik-
kerhetsinstruksene nr. 5.956-249.0 før
maskinen settes i drift!
– Hvis bruksanvisningen og sikkerhets-
anvisningene ikke følges, kan dette
medføre skader på apparatet og fare for
brukeren og andre personer.
– Informer straks forhandleren ved trans-
portskader.
– Kontroller ved utpakkingen at innholdet
i pakken er komplett og uskadd.
Innholdsfortegnelse
Miljøvern . . . . . . . . . . . . . . . . . NO 1
Risikotrinn . . . . . . . . . . . . . . . . NO 1
Forskriftsmessig bruk . . . . . . . NO 1
Maskinorganer . . . . . . . . . . . . NO 2
Symboler på maskinen . . . . . . NO 2
Sikkerhetsanvisninger. . . . . . . NO 2
Ta i bruk . . . . . . . . . . . . . . . . . NO 3
Betjening. . . . . . . . . . . . . . . . . NO 3
Transport. . . . . . . . . . . . . . . . . NO 4
Lagring . . . . . . . . . . . . . . . . . . NO 4
Pleie og vedlikehold . . . . . . . . NO 4
Feilretting . . . . . . . . . . . . . . . . NO 4
Garanti . . . . . . . . . . . . . . . . . . NO 5
Tilbehør og reservedeler. . . . . NO 5
EU-samsvarserklæring . . . . . . NO 5
Tekniske data . . . . . . . . . . . . . NO 6
Miljøvern
Materialet i emballasjen kan resirkuleres. Ikke kast emballasjen
i husholdningsavfallet, men lever den inn til resirkulering.
Gamlle apparater inneholder
verdifulle materialer som kan
gjenbrukes og som bør sendest
til gjenbruk. Akkumulatorene
inneholder stoffer som ikke må
komme ut i miljøet. Gamle apparater, batterier og akkumulatorer
skal derfor avhendes i egnede
innsamlingssystemer.
Anvisninger om innhold (REACH)
Aktuell informasjon om stoffene i innholdet
finner du under:
www.kaercher.com/REACH
Risikotrinn
FARE
Anvisning om en umiddelbar truende fare
som kan føre til store personskader eller til
død.
몇 ADVARSEL
Anvisning om en mulig farlig situasjon som
kan føre til store personskader eller til død.
몇 FORSIKTIG
Anvisning om en mulig farlig situasjon som
kan føre til mindre personskader.
OBS
Anvisning om en mulig farlig situasjon som
kan føre til materielle skader.
Forskriftsmessig bruk
몇 ADVARSEL
Maskinen er ikke egnet til oppsuging av
helsefarlig støv.
OBS
Dette apparatet er kun ment for bruk innendørs.
– Denne universalstøvsugeren er ment
for tørr rengjøring av gulv- og veggflater.
– Denne maskinen egner seg til industri-
elt bruk, f.eks. i hoteller, skoler, sykehus, fabrikker, butikker, kontorer og utleiefirmaer.
52 NO
– 1
Page 53

Maskinorganer
1 Filterpose av fleece
2 Sugestusser
3 Sugeslange
4Typeskilt
5 Bærehåndtak
6 Slangeholder
7 Sugehode
8 Låsing av sugehode
9 Styrerulle
10 Smussbeholder
11 Holder for gulvdyse
12 Eco-bryter (Energisparemodus)
13 Hovedbryter
14 Omkobler harde flater/teppegulv
15 Gulvmunnstykke
16 Ladekontrollindikator
17 Tast til ladekontrollindikator
18 Batteri
19 Åpneknapp
20 Teleskopsugerør
21 Sugekraftregulator (trinnløst)
22 Bøyd rørstykke
23 Hovedfilterkurv
24 Motorvernfilter
Symboler på maskinen
Ikke sug opp fuktige eller flytende
stoffer.
Sikkerhetsanvisninger
I tillegg til anvisningene i bruksveiledningen
må det tas hensyn til lokale, generelle forskrifter vedrørende sikkerhet og forebygging av ulykker.
FARE
Fare for personskader! Før alle pleie-, vedlikeholds- og reparasjonsareider på apparatet, må du ta ut batteriet.
Batteri/batterilader
FARE
– Lading av batteriene skal kun gjøres
med vedlagte originale ladeapparat eller annet ladeapparat godkjent av KÄRCHER.
– Før all bruk skal ladeapparat og batteri-
pakke kontrolleres for skader. Skadede
apparater skal ikke brukes, skadede
deler skal bare repareres av fagfolk.
– Bruk ikke ladeapparat i skitten eller våt
tilstand.
– Nettspenningen må stemme overens
med angitt spenning på typeskiltet på
ladeapparatet.
– Ladeapparatet skal ikke brukes i ek-
splosjonsfarlige omgivelser.
– Det skal ikke komme metalldeler bort i
kontakten på batteriholderen, fare for
kortslutning.
– Ladeapparatet skal bare brukes til la-
ding av godkjente batteripakker.
– Sett bare rene og tørre batteripakker
inn i adapteren på ladeapparatet.
– Ikke lad opp vanlige batterier (primær-
celler), fare for eksplosjon.
– Ikke lad skadede batteripakker. Skift ut
skadede batteripakker.
– Ikke oppbevar batteripakker sammen
med metalldeler, fare for kortslutning.
– Kast ikke batteripakker i ilden eller i
husholdningsavfall.
– Unngå kontakt med væske som komm-
mer ut av defekte batterier. Ved ufrivillig
kontakt må du straks skylle bort væsken ved hjelp av vann. Ved kontakt med
øynene skal du kontakte lege.
– 2
53NO
Page 54

Ta i bruk
Kontroller om hovedfilterkurven er satt
inn i apparatet.
Driftsmoduser
1 Brukes med filterpose av fleece eller
papir (spesialtilbehør)
2 Bruk uten filterpose
Montering av filterpose
Avlås og ta av sugehodet.
Ta ut hovedfilterkurv.
Ta ut filterpose av fleece eller papir
(spesialtilbehør).
Sett inn hovedfilterkurv.
Sett på sugehodet og lås det.
Sette inn batteri
Skyv batteriet inn i batteriholderen til
det går i lås.
Lade opp batteri
Merk: Følg bruksanvisningen fra produ-
senten av ladeapparatet, spesielt sikkerhetsanvisningene!
Batteriet er bare ladet delvisn opp ved levering. Skal lades før bruk og ved behov.
Merk: Lading av batteriet kan bare gjøres
med batteriet tatt ut.
Trykk på frigjøringstasten og ta ut batte-
riet.
Ladeapparatet settes inn i en vanlig
stikkontakt.
Sett batteriet inn i ladeapparatet.
Ladetid ved tomt batteri
Hurtigladeapparat BC 1/7 min 60
Betjening
Ladekontrollindikator
Betjen tast for ladekontrollindikator på
batteri. Ladekontrollindikator lyser i 1
minutt.
Ladekontrollindikator er ikke blitt aktivert på
60 minutter (hvilemodus):
Betjen tasten til ladekontrollindikatoren
på batteriet 2x. Ladekontrollindikator ly-
ser i 1 minutt.
Slå apparatet på
Slå på apparatet ved hjelp av hovedbry-
ter.
Eco-modus
Eco-modus (energisparing): Apparatet arbeider med redusert sugeeffekt. Batteriet
varer lenger.
Slå på Eco-modus: Betjen Eco-bryte-
ren. Kontrollampe i bryteren lyser
grønn.
Slå av Eco-modus: Betjen Eco-bryteren
igjen. Kontrollampe i bryteren slukkes.
Rengjøringsdrift
Obs: Ved hovedrengjøring av tekstilbelegg
varer batteriet kortere på grunn av økt rengjøringseffekt.
Still inn omkobler mellom harde flater
og teppegulv.
Reguler sugekraften på sugekraftregu-
latoren (trinnløst).
Gjennomføre rengjøring.
Slå maskinen av
Slå av apparatet ved hjelp av hovedbry-
ter.
Etter hver bruk
Tøm beholderen.
Rengjør maskinen innvendig og utven-
dig ved å tørke av den med en fuktig
klut, og ved å bruke sugefunksjonen.
54 NO
– 3
Page 55

Transport
몇 FORSIKTIG
Fare for personskader og materielle skader! Pass på vekten av apparatet ved transport.
Ved transport i kjøretøyer skal appara-
tet sikres mot å skli eller velte etter de til
enhver tid gjeldende regler.
Lagring
몇 FORSIKTIG
Fare for personskader og materielle skader! Pass på vekten av apparatet ved lagring.
Trykk på frigjøringstasten og ta ut batte-
riet for å unngå utlading.
Dette apparatet skal kun lagres innendørs.
Pleie og vedlikehold
FARE
Før noe arbeid utføres på apparatet, skal
apparatet slås av og det oppladbare batteriet tas ut.
Rengjøre hovedfilterkurv
Bank ut hovedfilterkurv (vaskbart), skyll
under rennende vann ved behov.
OBS
Fare for skade! Ikke sett inn igjen hovedfilterkurven når den er våt.
Skifte motorvernfilter
Avlås og ta av sugehodet.
Ta ut motorvernfilter.
Sett inn nytt motorvernfilter.
Sett på sugehodet og lås det.
Feilretting
FARE
Før noe arbeid utføres på apparatet, skal
apparatet slås av og det oppladbare batteriet tas ut.
Apparatet slår seg av under bruk
– Motor temperaturvernbryter er utløst.
Skift filterpose av fleece eller papir
(spesialtilbehør).
Skifte motorvernfilter.
Kontroller alle deler for tilstoppinger.
Slå på igjen etter at motorviften har kjølt
seg ned i ca. 60 minutter.
Sugekraften avtar
Fjern blokkeringer fra børstehodet, su-
gerøret eller sugeslangen.
Skift filterpose av fleece eller papir
(spesialtilbehør).
Rengjør hovedfilterkurven under flyten-
de vann og tørk den.
Sett sugehodet riktig på eller lås det.
Skift defekt sugeslange.
Skifte motorvernfilter.
Støvutslipp ved suging
Skift filterpose av fleece eller papir
(spesialtilbehør).
Kontroller at filterpose av fleece eller
papir (spesialtilbehør) sitter korrekt.
Sett sugehodet riktig på eller lås det.
Sett inn hovedfilterkurv uten skader.
Sett motorvernfilteret inn riktig.
Apparatet går ikke
Slå apparatet på.
– Kretskort overoppvarmet
Merk: Batteridrift er mulig igjen etter at
kretskortet er avkjølt igjen.
– Batteri tomt
Lad opp batteriet.
– Ingen batteri satt inn
Sette inn batteri.
Kundetjeneste
Dersom feilen ikke kan rettes opp, må
apparatet kontrolleres av kundeservice.
– 4
55NO
Page 56

Garanti
Chairman of the Board of Management
Director Regulatory Affairs & Certification
Vår ansvarlige salgsorganisasjon for det
enkelte land har utgitt garantibetingelsene
som gjelder i det aktuelle landet. Eventuelle
feil på maskinen blir reparert gratis i garantitiden dersom disse kan føres tilbake til
material- eller produksjonsfeil. Ved behov
for garantireparasjoner, vennligst henvend
deg med kjøpskvitteringen til din forhandler
eller nærmeste autoriserte kundeservice.
Tilbehør og reservedeler
Bruk bare originalt tilbehør og originale reservedeler; de garanterer for en sikker og
problemfri drift av maskinen.
Informasjon om tilbehør og reservedeler
finner du på www.kaercher.com.
Betegnelse Bestillings-
nr.
Reservebatteri 4.654-016.0
Hurtigladeapparat BC 1/7
EU 6.654-354.0
GB 6.654-355.0
AU 6.654-356.0
EU-samsvarserklæring
Vi erklærer hermed at maskinen angitt nedenfor oppfyller de grunnleggende sikkerhets- og helsekravene i de relevante EU-direktivene, med hensyn til både design, konstruksjon og type markedsført av oss. Ved
endringer på maskinen som er utført uten
vårt samtykke, mister denne erklæringen
sin gyldighet.
Produkt: Tørrsuger
Type: 1.528-xxx
Relevante EU-direktiver
2006/42/EF (+2009/127/EF)
2014/30/EU
2011/65/EU
2009/125/EU
Anvendte overensstemmende normer
EN 55014–1: 2006+A1: 2009+A2: 2011
EN 55014–2: 2015
EN 60335–1
EN 60335–2–69
EN 61000–3–2: 2014
EN 61000–3–3: 2013
EN 62233: 2008
EN 50581
EN 60312-1: 2017
Anvendte nasjonale normer
-
5.957-783
56 NO
Undertegnede handler på vegne av og med
fullmakt fra styret.
Ansvarlig for dokumentasjon:
S. Reiser
Alfred Kärcher SE & Co. KG
Alfred-Kärcher-Straße 28-40
71364 Winnenden (Germany)
Tel.: +49 7195 14-0
Fax: +49 7195 14-2212
Winnenden, 2018/10/01
– 5
Page 57

Tekniske data
T 9/1 Bp
Batterispenning V 36 DC
Maks. effekt W 730
Nominell effekt W 650
Beholderinnhold l 9
Luftmengde (maks.) l/sek. 46
Undertrykk (maks.) kPa (mbar) 20,7 (207)
Beskyttelsesklasse III
Sugeslangekobling (C-DN/C-ID) mm 35
Lengde x bredde x høyde mm 420 x 325 x 380
Typisk driftsvekt kg 7,5
Omgivelsestemperatur °C 0/+40
Driftstid ved fullt ladet batteri
–Normaldrift
– Eco-modus
Registrerte verdier etter EN 60335-2-69
Støytrykksnivå L
Usikkerhet K
pA
pA
Hånd-arm vibrasjonsverdi m/s
Usikkerhet K m/s
min
min
24
46
dB(A) 62
dB(A) 2
2
2
<2,5
0,2
– 6
57NO
Page 58

Läs bruksanvisning i original
innan aggregatet används första
gången, följ anvisningarna och spara driftsanvisningen för framtida behov, eller för
nästa ägare.
– Före första ibruktagning måste Säker-
hetsanvisningar nr. 5.956-249.0 läsas!
– Om bruksanvisningen och säkerhets-
anvisningarna inte följs kan apparaten
skadas och faror uppstå för användaren
och andra personer.
– Informera inköpsstället omgående vid
transportskador.
– Kontrollera vid uppackningen att inga
tillbehör saknas eller är skadade.
Innehållsförteckning
Miljöskydd . . . . . . . . . . . . . . . . SV 1
Risknivåer . . . . . . . . . . . . . . . . SV 1
Ändamålsenlig användning. . . SV 1
Aggregatelement. . . . . . . . . . . SV 2
Symboler på aggregatet . . . . . SV 2
Säkerhetsanvisningar . . . . . . . SV 2
Idrifttagning . . . . . . . . . . . . . . . SV 3
Handhavande . . . . . . . . . . . . . SV 3
Transport. . . . . . . . . . . . . . . . . SV 4
Förvaring. . . . . . . . . . . . . . . . . SV 4
Skötsel och underhåll . . . . . . . SV 4
Åtgärder vid störningar . . . . . . SV 4
Garanti . . . . . . . . . . . . . . . . . . SV 5
Tillbehör och reservdelar. . . . . SV 5
EU-försäkran om överensstäm-
melse . . . . . . . . . . . . . . . . . . . SV 5
Tekniska data . . . . . . . . . . . . . SV 6
Miljöskydd
Emballagematerialen kan återvinnas. Kasta inte emballaget i
hushållssoporna utan lämna det
till återvinning.
Förbrukade apparater innehåller
delar som kan återvinnas, de bör
därför föras till recycling. Batterier, engångs och uppladdningsbara, innehåller ämnen, som inte
får komma ut i miljön. Överlämna därför kasserade apparater
och batterier till lämpligt återvinningssystem.
Upplysningar om ingredienser (REACH)
Aktuell information om ingredienser finns
på:
www.kaercher.com/REACH
Risknivåer
FARA
Varnar om en omedelbart överhängande
fara som kan leda till svåra personskador
eller dödsfall.
몇 VARNING
Varnar om en möjligen farlig situation som
kan leda till svåra personskador eller döden.
몇 FÖRSIKTIGHET
Varnar om en möjligen farlig situation som
kan leda till lättare personskador.
OBSERVERA
Varnar om en möjligen farlig situation som
kan leda till materiella skador.
Ändamålsenlig användning
몇 VARNING
Maskinen är inte lämplig för uppsugning av
hälsovådligt damm.
OBSERVERA
Denna maskin är endast avsedd för användning inomhus.
– Denna universaldammsugare är av-
sedd för torrengöring av golv- och väggytor.
– Denna maskin är lämpad för yrkesmäs-
sig användning, t.ex. på hotell, i skolor,
på sjukhus och fabriker, i butiker, på
kontor och av uthyrningsfirmor.
58 SV
– 1
Page 59

Aggregatelement
1 Filterdukspåse
2 Sugfästen
3 Sugslang
4 Typskylt
5 Bärhandtag
6 Slanghållare
7 Sughuvud
8 Spärr av sughuvud
9 Styrrulle
10 Smutsbehållare
11 Fäste för golvborste
12 Eco-knapp (energisparläge)
13 Huvudströmbrytare
14 Omkopplare hård yta/mattor
15 Golvmunstycke
16 Laddningskontrollindikering
17 Knapp för laddningskontroll
18 Uppladdningsbart batteri
19 Avreglingsknapp
20 Teleskoprör
21 Sugkraftinställning (steglös)
22 Krök
23 Huvudfilterkorg
24 Motorskyddsfilter
Symboler på aggregatet
Suga ej upp fuktiga substanser eller vätska.
Säkerhetsanvisningar
Förutom anvisningarna i bruksanvisningen
ska gällande allmänna säkerhets- och
olycksfallsföreskrifter beaktas.
FARA
Skaderisk! Ta alltid ur det uppladdningsbara batteriet innan du utför skötsel-, underhålls- eller reparationsarbeten på maskinen.
Batteri/laddare
FARA
– Laddning av batteriet får endast ske
med medföljande originalladdare eller
av KÄRCHER godkända laddare.
– Före varje användning kontrolleras lad-
dare och uppladdningsbart batteri så att
dessa är felfria. Använd inte skadade
apparater och låt endast fackpersonal
reparera skadade delar.
– Använd inte laddaren när den är smut-
sig eller fuktig.
– Nätspänningen måste överensstämma
med på laddarens typskylt angiven
spänning.
– Använd inte laddaren på platser där det
finns risk för explosion.
– Inga metalldelar får hamna på adap-
terns kontakter, risk för kortslutning.
– Laddaren får endast användas för ladd-
ning av godkända, uppladdningsbara
batterier.
– Lägg endast rena och torra batterier i
laddarens adapter.
– Ladda inte engångsbatterier (primär-
batterier), risk för explosion.
– Ladda inte skadade, uppladdningsbara
batterier. Byt ut skadade batterier.
– Förvara inte batterier tillsammans med
metallföremål, risk för kortslutning.
– Kasta inte batterierna i eld eller hus-
hållssopor.
– Undvik kontakt med vätska som kom-
mer ur defekta batterier. Spola bort
vätskan med vatten vid oavsiktlig kontakt. Kontakta läkare om vätska hamnar
i ögonen.
– 2
59SV
Page 60

Idrifttagning
Kontroll om huvudfilterkorgen är insatt i
apparaten.
Driftslägen
1 Användning med filterdukspåse eller
pappersfilterpåse (specialtillbehör)
2 Använding utan filterpåse
Isättning av filterpåse
Lossa spärr på sughuvudet och ta av
det.
Ta ur huvudfilterkorg.
Trä på filterpåse eller pappersfilterpåse
(specialtillbehör).
Sätt i huvudfilterkorgen.
Sätt på sughuvudet och lås fast.
Lägg i batteri
Skjut in batteriet i hållaren och haka
fast.
Ladda det uppladdningsbara
batteriet
Observera: Läs igenom bruksanvisningen
från laddningsaggregattillverkaren noga
och beakta framför allt säkerhetshänvisningarna!
Det uppladdningsbara batteriet är till en
viss del laddat vid leveransen. Ladda före
ibruktagning och vid behov.
Observera: Batteriet kan bara laddas när
det är urtaget..
Tryck och håll inne upplåsningsknap-
pen och ta ut batteriet.
Anslut medföljande laddare till ett god-
känt vägguttag.
Sätt i det uppladdningsbara batteriet i
laddaren.
Laddtid vid tomt batteri
Snabbladdare BC 1/7 min 60
Handhavande
Laddningskontrollindikering
Tryck på knappen för laddningskontroll
på batteriet. Laddningskontrollen lyser i
1 minut.
Laddningskontrollen aktiverades inte under
60 minuter (viloläge):
Tryck på knappen för laddningskontroll
på batteriet 2 gånger. Laddningskon-
trollen lyser i 1 minut.
Koppla till aggregatet
Starta maskinen med huvudbrytaren.
Eco-läge
Eco-läge (energisparläge): Maskinen arbetar med reducerad sugeffekt. Batteriets
hållbarhet förlängs.
Koppla in Eco-läge: Bekräfta Eco-läge.
Kontrollampan i reglaget lyser grönt.
Koppla ur Eco-läge: Tryck upprepade
gånger på Eco-knappen. Kontrollam-
pan i reglaget slocknar.
Rengöringsdrift
Information: Vid grundrengöring av textil-
beläggningar förkortas batteriets hållbarhet
på grund av den förhöjda rengöringskapaciteten.
Ställ omkopplaren på hård yta eller mat-
ta.
Reglera sugkraften med inställningen
för sugkraften (steglös).
Genomför rengöringsarbetet.
Koppla från aggregatet
Stäng av maskinen med huvudbryta-
ren.
Efter varje användning
Töm behållaren.
Rengör apparaten invändigt och utvän-
digt genom uppsugning och torka med
en fuktig trasa.
60 SV
– 3
Page 61

Transport
몇 FÖRSIKTIGHET
Risk för person och egendomsskada! Observera vid transport maskinens vikt.
Vid transport i fordon ska maskinen
säkras enligt respektive gällande bestämmelser så den inte kan tippa eller
glida.
Förvaring
몇 FÖRSIKTIGHET
Risk för person och egendomsskada! Observera maskinens vikt vid lagring.
Tryck in upplåsningsknappen och ta ut
batteriet för att undvika urladdning.
Denna maskin får endast lagras inomhus.
Skötsel och underhåll
FARA
Stäng alltid av maskinen och ta ur batteriet
innan arbeten utförs på den.
Rengör huvudfilterkorg
Slå ur smutsen ut huvudfilterkorgen (ur-
tvättbar) och rengör vid behov under
rinnande vatten.
OBSERVERA
Fara för skada! Sätt aldrig i huvudfilterkorgen när den är blöt.
Byta motorskyddsfilter
Lossa spärr på sughuvudet och ta av
det.
Ta ur motorskyddsfilter.
Sätt i nytt motorskyddsfilter.
Sätt på sughuvudet och lås fast.
Åtgärder vid störningar
FARA
Stäng alltid av maskinen och ta ur batteriet
innan arbeten utförs på den.
Apparaten slår av under
användning
– Motor-Termoprotektor har trätt i funk-
tion.
Byt filterdukspåse eller pappersfilterpå-
se (specialtillbehör)
Byt motorskyddsfilter.
Kontrollera alla delar avseende tilltäpp-
ning.
Återstart efter avkylning av motorturbinen
efter ca 60 minuter.
Sugkraften nedsatt
Avlägsna stopp i sugmunstycke, sugrör
eller sugslang.
Byt filterdukspåse eller pappersfilterpå-
se (specialtillbehör)
Rengör huvudfilterkorgen under rinnan-
de vatten och låt den torka.
Sätt på sughuvudet/spärra ordentligt.
Byt ut defekt sugslang.
Byt motorskyddsfilter.
Damm tränger ut under sugning
Byt filterdukspåse eller pappersfilterpå-
se (specialtillbehör)
Kontrollera läget på filterdukspåsen el-
ler pappersfilterpåsen (specialtillbehör).
Sätt på sughuvudet/spärra ordentligt.
Sätt i oskadad huvudfilterkorg.
Sätt i motorskyddsfiltret riktigt.
Apparaten arbetar inte
Slå på apparaten.
– Kretskort överhettat
Observera: Batteridrift är möjlig igen när
kretskortet har svalnat.
– Batteri urladdat
Ladda det uppladdningsbara batteriet.
– Inget batteri isatt
Lägg i ett batteri.
– 4
61SV
Page 62

Kundservice
Chairman of the Board of Management
Director Regulatory Affairs & Certification
Kan störningen inte åtgärdas måste apparaten kontrolleras av kundservice.
Garanti
I respektive land gäller de garantivillkor
som publicerats av våra auktoriserade distributörer. Eventuella fel på aggregatet repareras utan kostnad under förutsättning
att det orsakats av ett material- eller tillverkningsfel. I frågor som gäller garantin ska du
vända dig med kvitto till inköpsstället eller
närmaste auktoriserade serviceverkstad.
Tillbehör och reservdelar
Använd endast originaltillbehör och originalreservdelar, så att en säker och störningsfri drift av maskinen är garanterad.
Information om tillbehör och reservdelar
finns på www.kaercher.com.
Beteckning Beställ-
ningsnr.
Utbytesbatteri 4.654-016.0
Snabbladdare BC 1/7
EU 6.654-354.0
GB 6.654-355.0
AU 6.654-356.0
EU-försäkran om
överensstämmelse
Härmed försäkrar vi att nedanstående betecknade maskin i ändamål och konstruktion samt i den av oss levererade versionen
motsvarar EU-direktivens tillämpliga grundläggande säkerhets- och hälsokrav. Vid
ändringar på maskinen som inte har godkänts av oss blir denna överensstämmelseförklaring ogiltig.
Produkt: Torrsug
Typ: 1.528-xxx
Tillämpliga EU-direktiv
2006/42/EG (+2009/127/EG)
2014/30/EU
2011/65/EU
2009/125/EG
Tillämpade harmoniserade normer
EN 55014–1: 2006+A1: 2009+A2: 2011
EN 55014–2: 2015
EN 60335–1
EN 60335–2–69
EN 61000–3–2: 2014
EN 61000–3–3: 2013
EN 62233: 2008
EN 50581
EN 60312-1: 2017
Tillämpade nationella normer
–
5.957-783
62 SV
Undertecknande agerar på uppdrag av och
med styrelsens godkännande.
Dokumentationsbefullmäktigad:
S. Reiser
Alfred Kärcher SE & Co. KG
Alfred-Kärcher-Straße 28-40
71364 Winnenden (Germany)
Tel.: +49 7195 14-0
Fax: +49 7195 14-2212
Winnenden, 2018/10/01
– 5
Page 63

Tekniska data
T 9/1 Bp
Batterispänning V 36 DC
Max. effekt W 730
Normeffekt W 650
Behållarvolym l 9
Luftmängd (max.) l/s 46
Undertryck (max.) kPa (mbar) 20,7 (207)
Skyddsklass III
Sugslanganslutning (C-DN/C-ID) mm 35
Längd x Bredd x Höjd mm 420 x 325 x 380
Typisk driftvikt kg 7,5
Omgivande temperatur °C 0/+40
Arbetstid med full batteriladdning
–Normaldrift
– Eco-läge
Beräknade värden enligt EN 60335-2-69
Ljudtrycksnivå L
Osäkerhet K
pA
pA
Hand-Arm Vibrationsvärde m/s
Osäkerhet K m/s
min
min
24
46
dB(A) 62
dB(A) 2
2
2
<2,5
0,2
– 6
63SV
Page 64

Lue tämä alkuperäisiä ohjeita
ennen laitteesi käyttämistä, säilytä käyttöohje myöhempää käyttöä tai
mahdollista myöhempää omistajaa varten.
– Turvaohje nro 5.956-249.0 on ehdotto-
masti luettava ennen laitteen ensimmäistä käyttökertaa!
– Käyttöohjeen ja turvaohjeiden huomiot-
ta jättäminen voi aiheuttaa vaurioita laitteeseen ja vaaroja käyttäjälle ja muille
henkilöille.
– Jos havaitset kuljetusvaurioita, ota välit-
tömästi yhteys jälleenmyyjään.
– Tarkasta purkaessasi pakkauksesta,
ovatko kaikki varusteet olemassa ja
ovatko osat vaurioituneet
Sisällysluettelo
Ympäristönsuojelu . . . . . . . . . FI 1
Vaarallisuusasteet. . . . . . . . . . FI 1
Käyttötarkoitus . . . . . . . . . . . . FI 1
Laitteen osat . . . . . . . . . . . . . . FI 2
Laitteessa olevat symbolit. . . . FI 2
Turvaohjeet . . . . . . . . . . . . . . . FI 2
Käyttöönotto . . . . . . . . . . . . . . FI 3
Käyttö . . . . . . . . . . . . . . . . . . . FI 3
Kuljetus . . . . . . . . . . . . . . . . . . FI 4
Säilytys . . . . . . . . . . . . . . . . . . FI 4
Hoito ja huolto. . . . . . . . . . . . . FI 4
Häiriöapu. . . . . . . . . . . . . . . . . FI 4
Takuu . . . . . . . . . . . . . . . . . . . FI 5
Varusteet ja varaosat . . . . . . . FI 5
EY-vaatimusten-mukaisuusva-
kuutus . . . . . . . . . . . . . . . . . . . FI 5
Tekniset tiedot. . . . . . . . . . . . . FI 6
Ympäristönsuojelu
Pakkausmateriaalit ovat kierrätettäviä. Älä käsittelee pakkauksia kotitalousjätteenä, vaan toimita ne jätteiden kierrätykseen.
Käytetyt laitteet sisältävät arvokkaita kierrätettäviä materiaaleja,
jotka tulisi toimittaa kierrätykseen. Paristot ja akut sisältävät
aineita, joita ei saa päästää ympäristöön. Toimita tästä syystä
vanhat laitteet, paristot ja akut
vastaaviin keräilylaitoksiin.
Huomautuksia materiaaleista (REACH)
Ajantasaisia tietoja ainesosista löytyy osoitteesta:
www.kaercher.com/REACH
Vaarallisuusasteet
VAARA
Huomautus välittömästi uhkaavasta vaarasta, joka voi aiheuttaa vakavan ruumiinvamman tai johtaa kuolemaan.
몇 VAROITUS
Huomautus mahdollisesta vaarallisesta tilanteesta, joka voi aiheuttaa vakavan ruumiinvamman tai voi johtaa kuolemaan.
몇 VARO
Huomautus mahdollisesta vaarallisesta tilanteesta, joka voi aiheuttaa vähäisiä vammoja.
HUOMIO
Huomautus mahdollisesta vaarallisesta tilanteesta, joka voi aiheuttaa aineellisia vahinkoja.
Käyttötarkoitus
몇 VAROITUS
Laite ei sovellu terveydelle haitallisten pölyjen imurointiin.
HUOMIO
Tämä laite on tarkoitettu käytettäväksi vain
sisätiloissa.
– Tämä yleisimuri on tarkoitettu lattia- ja
seinäpintojen kuivapuhdistamiseen.
– Tämä laite soveltuu ammattimaiseen
käyttöön, esim. hotelleissa, kouluissa,
sairaaloissa, tehtaissa, kaupoissa, toimistoissa ja välittäjäliikkeissä.
64 FI
– 1
Page 65

Laitteen osat
1 Kuitumattosuodatinpussi
2 Imukaulus
3Imuletku
4 Tyyppikilpi
5 Kantokahva
6 Letkunpidin
7Imupää
8 Imupään lukitus
9 Ohjausrulla
10 Pölysäiliö
11 Lattiasuuttimen pidike
12 Eco-kytkin (energiansäästötila)
13 Pääkytkin
14 Vaihtokytkin kova pinta/kokolattiamatto
15 Lattiasuutin
16 Latausvalvonnan näyttö
17 Lataustilan näytön painike
18 Akku
19 Lukituksen vapautuspainike
20 Teleskooppi-imuputki
21 Imuvoimasäädin (portaaton)
22 Kahva
23 Pääsuodatinkori
24 Moottorin suojasuodatin
Laitteessa olevat symbolit
Älä imuroi kosteita tai nestemäisiä
aineita.
Turvaohjeet
Tämän käyttöohjeen ohjeiden ohella on
noudatettava lainmukaisia yleisiä turvallisuus- ja tapaturmantorjuntamääräyksiä.
VAARA
Loukkaantumisvaara! Poista akku ennen
kaikkia laitteeseen kohdistuvia hoito-, huolto- ja korjaustöitä.
Akku/latauslaite
VAARA
– Akun lataaminen laitteessa on sallittua
vain toimituksessa mukana seuraavalla
latauslaitteella tai KÄRCHERin hyväksymällä latauslaitteella.
– Tarkasta ennen jokaista käyttökertaa,
että latauslaite ja akkupakkaus eivät ole
vahingoittuneita. Älä käytä vahingoittuneita laitteita ja korjauta vialliset osat
ammattilaisella.
– Älä käytä latauslaitetta, jos se on likai-
nen tai märkä.
– Latauslaitteen tyyppikilvessä ilmoitetun
jännitteen on oltava sama kuin käytettävä verkkojännite.
– Älä käytä latauslaitetta räjähdysalttiissa
tiloissa.
– Sovittimen kosketinpintoja ei saa kos-
kettaa metalliosilla oikosulkuvaaran
vuoksi.
– Käytä latauslaitetta vain hyväksyttyjen
akkupakkausten lataamiseen.
– Työnnä vain puhtaat ja kuivat akkupak-
kaukset latauslaitteen sovittimeen.
– Älä lataa paristoja (ensiöpareja) räjäh-
dysvaaran vuoksi.
– Älä lataa vahingoittuneita akkupakka-
uksia. Vaihda vahingoittuneet akkupakkaukset.
– Älä säilytä akkupakkauksia yhdessä
metalliesineiden kanssa oikosulkuvaaran vuoksi.
– Älä heitä akkupakkauksia tuleen tai ko-
titalousjätteiden sekaan.
– Vältä koskettamasta viallisiin, akkunes-
tettä vuotaviin akkuihin. Jos vahingossa
joudut kosketuksiin nesteen kanssa,
huuhdo vedellä. Jos nestettä pääsee
kosketuksiin silmiisi, ota yhteys lääkäriin.
– 2
65FI
Page 66

Käyttöönotto
Tarkasta, onko pääsuodatinkori lait-
teessa.
Käyttötavat
1 Käyttö kuitumatto- tai paperisuodatin-
pussia käyttäen
2 Käyttö ilman suodatinpussia
Suodatinpussin asetus paikalleen
Vapauta imupää lukituksesta, poista
imupää.
Poista pääsuodatinkori.
Pistä kuitusuodatin- tai paperisuodatin-
pussi (erikoisvaruste) paikalleen.
Aseta pääsuodatinkori paikalleen.
Aseta imupää paikalleen ja lukitse se.
Akun asettaminen paikoilleen
Työnnä akku akunpitimeen ja lukitse
se.
Akun lataaminen
Huomautus: Lue latauslaitteen valmista-
jan käyttöohje ja noudata erityisesti turvallisuussohjeita!
Akku on toimitettaessa osittain ladattu. Lataa akku ennen käyttöönottoa ja tarvittaessa.
Huomautus: Akku voidaan ladata ainoastaan irrallisena.
Paina lukituksen vapautuspainiketta ja
irrota akku.
Työnnä latauslaite asianmukaiseen pis-
torasiaan.
Aseta akku latauslaitteeseen.
Tyhjän akun latausaika
Pikalatauslaite BC 1/7 min 60
Käyttö
Lataustilan näyttö
Paina akussa olevaa lataustilan näytön
painiketta. Lataustilan näyttö palaa 1
minuutin ajan.
Lataustilan näyttöä ei ole otettu käyttöön 60
minuutin kuluessa (lepotila):
Paina akussa olevaa lataustilan näytön
painiketta 2 kertaa. Lataustilan näyttö
palaa 1 minuutin ajan.
Laitteen käynnistys
Kytke laite pääkytkimellä päälle.
Eco-moodi
Eco-moodi (energiansäästötila): Laite toimii pienennetyllä imuteholla. Akun toiminta-aika pitenee.
Eco-tilan ottaminen käyttöön: Paina
Eco-kytkintä. Kytkimessä palaa vihreä
merkkivalo.
Eco-tilan poistaminen käytöstä: Paina
Eco-kytkintä useita kertoja. Kytkimen
merkkivalo sammuu.
Puhdistaminen
Ohje: Suoritettaessa tekstiilipinnoitteiden
peruspuhdistusta akun toiminta-aika lyhenee korotetun puhdistustehon vuoksi.
Aseta lattiasuulakkeen vaihtokytkin
asentoon kova pinta tai kokolattiamatto.
Säädä imuteho imuvoimasäätimellä
(portaaton).
Suorita puhdistus.
Laitteen kytkeminen pois päältä
Kytke laite pääkytkimellä pois päältä.
Jokaisen käyttökerran jälkeen
Tyhjennä säiliö.
Puhdista laite sisältä ja ulkoa imuroi-
malla ja kostealla liinalla pyyhkimällä.
66 FI
– 3
Page 67

Kuljetus
몇 VARO
Loukkaantumis- ja vahingoittumisvaaravaara! Huomioi kuljetettaessa laitteen paino.
Kun kuljetat laitetta ajoneuvoissa, var-
mista laite liukumisen ja kaatumisen varalta kulloinkin voimassa olevien ohjesääntöjen mukaisesti.
Säilytys
몇 VARO
Loukkaantumis- ja vahingoittumisvaaravaara! Huomioi säilytettäessä laitteen paino.
Paina lukituksen vapautuspainiketta ja
irrota akku tyhjäksipurkautumisen estämiseksi.
Tätä laitetta saa säilyttää vain sisätiloissa.
Hoito ja huolto
VAARA
Akku on poistettava ja laite on kytkettävä
pois päältä ennen kaikkia laitteeseen kohdistuvia töitä.
Pääsuodatinkorin puhdistus
Puhdista pääsuodatinkori (pestävä) tar-
vittaessa virtaavassa vedessä.
HUOMIO
Vaurioitumisvaara! Älä koskaan aseta pääsuodatinkoria märkänä paikalleen.
Moottorin suojasuodattimen vaihto
Vapauta imupää lukituksesta, poista
imupää.
Poista moottorinsuojasuodatin.
Aseta uusi moottorin suojasuodatin pai-
kalleen.
Aseta imupää paikalleen ja lukitse se.
Häiriöapu
VAARA
Akku on poistettava ja laite on kytkettävä
pois päältä ennen kaikkia laitteeseen kohdistuvia töitä.
Laite kytkeytyy käytön aikana pois
päältä
– Moottorin lämpösuoja on lauennut.
Vaihda kuitumatto- tai paperisuodatin-
pussi (erikoisvaruste).
Vaihda moottorinsuojasuodatin.
Takasta kaikki osat tukkeutumien varal-
ta.
Käynnistä laite uudelleen, kun moottoriturbiini on jäähtynyt n. 60 minuutin ajan.
Imuvoima vähenee
Poista tukokset imusuulakkeesta, imu-
putkesta tai imuletkusta.
Vaihda kuitumatto- tai paperisuodatin-
pussi (erikoisvaruste).
Puhdista pääsuodatinkori juoksevalla
vedellä ja anna kuivua.
Aseta/lukitse imupää oikein paikalleen.
Vaihda vioittunut imuletku.
Vaihda moottorinsuojasuodatin.
Pöly pääsee ulos imuvaiheessa
Vaihda kuitumatto- tai paperisuodatin-
pussi (erikoisvaruste).
Tarkasta kuitumatto- tai paperisuoda-
tinpussin (erikoisvaruste) tiivis istuvuus.
Aseta/lukitse imupää oikein paikalleen.
Vaihda tilalle ehjä pääsuodatinkori.
Aseta moottorinsuojasuodatin oikein
paikalleen.
Laite ei toimi
Kytke laite päälle.
– Piirilevy ylikuumentunut
Huomautus: Kun piirilevy on jäähtynyt, akkukäyttö on taas mahdollista.
– Akku on tyhjä
Lataa akku.
– Yhtään akkua ei ole paikallaan
Aseta akku paikalleen
– 4
67FI
Page 68

Asiakaspalvelu
Chairman of the Board of Management
Director Regulatory Affairs & Certification
Jos häiriötä ei voida poistaa, laite täytyy
tarkastuttaa asiakaspalvelussa.
Takuu
Kussakin maassa ovat voimassa valtuuttamamme myyntiorganisaation julkaisemat
takuuehdot. Materiaali- ja valmistusvirheistä aiheutuvat virheet laitteessa korjaamme
takuuaikana maksutta. Takuutapauksessa
ota yhteys ostotositteen kanssa jälleenmyyjään tai lähimpään valtuutettuun huoltoon.
Varusteet ja varaosat
Käytä vain alkuperäisiä tarvikkeita ja varaosia. Ne takaavat laitteen turvallisen ja häiriöttömän toiminnan.
Tietoja tarvikkeista ja varaosista on sivustolla www.kaercher.com.
Nimike Tilausnro
Vaihtoakku 4.654-016.0
Pikalatauslaite BC 1/7
EU 6.654-354.0
GB 6.654-355.0
AU 6.654-356.0
EY-vaatimusten-
mukaisuusvakuutus
Vakuutamme, että alla mainitut tuotteet
vastaavat suunnittelultaan ja rakenteeltaan
sekä valmistustavaltaan EU-direktiivien asianomaisia turvallisuus- ja terveysvaatimuksia. Jos tuotteeseen/tuotteisiin tehdään
muutoksia, joista ei ole sovittu kanssamme,
tämä vakuutus ei ole enää voimassa.
Tuote: Kuivaimuri
Tyyppi: 1.528-xxx
Yksiselitteiset EU-direktiivit
2006/42/EY (+2009/127/EY)
2014/30/EU
2011/65/EU
2009/125/EY
Sovelletut harmonisoidut standardit
EN 55014–1: 2006+A1: 2009+A2: 2011
EN 55014–2: 2015
EN 60335–1
EN 60335–2–69
EN 61000–3–2: 2014
EN 61000–3–3: 2013
EN 62233: 2008
EN 50581
EN 60312-1: 2017
Sovelletut kansalliset standardit
-
5.957-783
68 FI
Allekirjoittaneet toimivat yrityksen johtokunnan puolesta ja sen valtakirjalla.
Dokumentointivastaava:
S. Reiser
Alfred Kärcher SE & Co. KG
Alfred-Kärcher-Straße 28-40
71364 Winnenden (Germany)
Tel.: +49 7195 14-0
Fax: +49 7195 14-2212
Winnenden, 2018/10/01
– 5
Page 69

Tekniset tiedot
T 9/1 Bp
Akkujännite V 36 DC
Maks. teho W 730
Nimellisteho W 650
Säiliön tilavuus l 9
Ilmamäärä (maks.) l/s 46
Alipaine (maks.) kPa (mbar) 20,7 (207)
Kotelointiluokka III
Imuletkuliitin (C-DN/C-ID) mm 35
Pituus x leveys x korkeus mm 420 x 325 x 380
Tyypillinen käyttöpaino kg 7,5
Ulkoilman lämpötila °C 0/+40
Käyttöaika täydellä akkulatauksella
– Normaalikäyttö
– Eco-moodi
Mitatut arvot EN 60335-2-69 mukaisesti
Äänenpainetaso L
Epävarmuus K
pA
pA
Käsi-käsivarsi tärinäarvo m/s
Epävarmuus K m/s
min
min
24
46
dB(A) 62
dB(A) 2
2
2
< 2,5
0,2
– 6
69FI
Page 70

Πριν χρησιμοποιήσετε τη συ-
σκευή σας για πρώτη φορά, διαβάστε αυτές τις πρωτότυπες οδηγίες χρήσης, ενεργήστε σύμφωνα με αυτές και κρατήστε τις για μελλοντική χρήση ή για τον
επόμενο ιδιοκτήτη.
– Πριν από την πρώτη χρήση διαβάστε
οπωσδήποτε τις υποδείξεις ασφαλείας
αρ. 5.956-249.0!
– Η μη τήρηση των οδηγιών χρήσης, κα-
θώς και των υποδείξεων ασφαλείας,
μπορεί να προκαλέσει βλάβες στη συσκευή ή κινδύνους για τον χρήστη ή
άλλα άτομα.
– Σε περίπτωση βλαβών κατά τη μεταφο-
ρά ειδοποιήστε αμέσως τον αντιπρόσωπό σας.
– Κατά το άνοιγμα της συσκευασίας,
ελέγξτε το περιεχόμενο για τυχόν ελλείψεις σε εξαρτήματα ή για βλάβες.
Πίνακας περιεχομένων
Προστασία περιβάλλοντος . . . EL 1
Διαβάθμιση κινδύνων . . . . . . . EL 1
Χρήση σύμφωνα με τους κανο-
νισμούς . . . . . . . . . . . . . . . . . . EL 1
Στοιχεία συσκευής. . . . . . . . . . EL 2
Σύμβολα στη συσκευή. . . . . . . EL 2
Υποδείξεις ασφαλείας . . . . . . . EL 2
Έναρξη λειτουργίας. . . . . . . . . EL 3
Χειρισμός . . . . . . . . . . . . . . . . EL 3
Μεταφορά . . . . . . . . . . . . . . . . EL 4
Αποθήκευση . . . . . . . . . . . . . . EL 4
Φροντίδα και συντήρηση. . . . . EL 4
Αντιμετώπιση βλαβών. . . . . . . EL 4
Εγγύηση . . . . . . . . . . . . . . . . . EL 5
Εξαρτήματα και ανταλλακτικά . EL 5
Δήλωση Συμμόρφωσης των ΕEEL 6
Τεχνικά χαρακτηριστικά. . . . . . EL 7
Προστασία περιβάλλοντος
Τα υλικά συσκευασίας είναι ανακυκλώσιμα. Μην πετάτε τις συσκευασίες στα οικιακά απορρίμματα, αλλά σε ειδικό σύστημα
επαναχρησιμοποίησης.
Οι παλιές συσκευές περιέχουν
χρήσιμα ανακυκλώσιμα υλικά,
τα οποία θα πρέπει να παραδίδονται προς επαναχρησιμοποίηση. Οι μπαταρίες και οι συσσωρευτές περιέχουν υλικά, τα
οποία δεν επιτρέπεται να καταλήξουν στο περιβάλλον. Για τον
λόγο αυτόν, διαθέστε τις άχρηστες σ υσ κευ ές , τι ς μπα τα ρίε ς κ αι
τους συσσωρευτές μέσω του κατάλληλου συστήματος διαχείρισης απορριμμάτων.
Υποδείξεις για τα συστατικά (REACH)
Ενημερωμένες πληροφορίες για τα συστατικά μπορείτε να βρείτε στη διεύθυνση:
www.kaercher.com/REACH
Διαβάθμιση κινδύνων
ΚΙΝΔΥΝΟΣ
Υποδείξεις για άμεσα επαπειλούμενο κίνδυνο, ο οποίος μπορεί να έχει ως συνέπεια
σοβαρό ή θανάσιμο τραυματισμό.
몇 ΠΡΟΕΙΔΟΠΟΙΗΣΗ
Υποδείξεις για μια δυνητικά επικίνδυνη κατάσταση, η οποία μπορεί να έχει ως συνέπεια σοβαρό ή
몇 ΠΡΟΣΟΧΗ
Υπόδειξη για μια ενδεχομένως επικίνδυνη
κατάσταση, η οποία μπορεί να οδηγήσει σε
ελαφρό τραυματισμό.
ΠΡΟΣΟΧΗ
Υπόδειξη για μια δυνητικά επικίνδυνη κατάσταση, η οποία μπορεί να έχει ως συνέπεια
υλικές ζημίες.
θανάσιμο τραυματισμό.
Χρήση σύμφωνα με τους
κανονισμούς
몇 ΠΡΟΕΙΔΟΠΟΙΗΣΗ
Η συσκευή δεν ενδείκνυται για την αναρρόφηση επιβλαβών για την υγεία σκονών.
ΠΡΟΣΟΧΗ
Η συσκευή αυτή προορίζεται
αποκλειστικά σε εσωτερικούς χώρους.
– Αυτή ηλεκτρική σκούπα γενικής χρήσης
προορίζεται για τον ξηρό καθαρισμό
επιφανειών δαπέδων και τοίχων.
για χρήση
70 EL
– 1
Page 71

– Η συσκευή αυτή προορίζεται για επαγ-
γελματική χρήση, π.χ. σε ξενοδοχεία,
σχολεία, νοσοκομεία, εργοστάσια, καταστήματα, γραφεία και εταιρείες ενοικιάσεως.
Στοιχεία συσκευής
1 Σακούλα φίλτρου τύπου fleece
2Στόμιο αναρρόφησης
3 Εύκαμπτος σωλήνας αναρρόφησης
4 Πινακίδα τύπου
5 Λαβή μεταφοράς
6 Στήριγμα ελαστικού σωλήνα
7 Κεφαλή αναρρόφησης
8 Ασφάλιση της κεφαλής αναρρόφησης
9 Τροχίσκος οδήγησης
10 Δοχείο ρύπων
11 Υποδοχή ακροφυσίου δαπέδου
12 Διακόπτης Eco (εξοικονόμηση ενέργει-
ας)
13 Κύριος διακόπτης
14 Διακόπτης επιλογής για σκληρές επιφά-
νειες/μοκέτες
15 Μπεκ δαπέδου
16 Ενδεικτική λυχνία φόρτισης
17 Πλήκτρο για ένδειξη φόρτισης
18 Συσσωρευτής
19 Πλήκτρο απασφάλισης
20 Τηλεσκοπικός σωλήνας αναρρόφησης
21 Ρυθμιστής αναρροφητικής ισχύος (χω-
ρίς διαβαθμίσεις)
22 Γωνία σωλήνα
23 Καλάθι κύριου φίλτρου
24 Φίλτρο προστασίας κινητήρα
Σύμβολα στη συσκευή
Δεν επιτρέπεται η αναρρόφηση
υγρών ή ρευστών υλικών.
Υποδείξεις ασφαλείας
Εκτός από τις υποδείξεις στο εγχειρίδιο λειτουργίας, λάβετε παράλληλα υπόψη τους
γενικούς κανονισμούς ασφάλειας και πρόληψης ατυχημάτων που προβλέπει ο νομοθέτης.
ΚΙΝΔΥΝΟΣ
Κίνδυνος τραυματισμού! Πριν από κάθε εργασία φροντίδας, συντήρησης και επιδιόρθωσης της συσκευής αφαιρείτε την μπαταρία.
Συσσωρευτής/φορτιστής
ΚΙΝΔΥΝΟΣ
– Η φόρτιση του συσσωρευτή επιτρέπεται
μόνο με τον γνήσιο φορτιστή που συνο-
την συσκευή ή με τους εγκεκριμέ-
δεύει
νους από την KARCHER φορτιστές.
– Πριν από κάθε χρήση, ελέγξτε τον φορ-
τιστή και τον συσσωρευτή για ενδεχόμενες βλάβες. Μην χρησιμοποιείτε συσκευές που παρουσιάζουν βλάβες και
αναθέστε την επιδιόρθωση σε ένα εξειδικευμένο συνεργείο.
– Μην χρησιμοποιείτε τον φορτιστή, εάν
είναι λερωμένος ή υγρός
– Η τάση του δικτύου πρέπει να είναι ταυ-
τόσημη με την τάση που αναγράφεται
στην πινακίδα στοιχείων του φορτιστή.
– Μην χρησιμοποιείτε τον φορτιστή σε
χώρους, όπου υπάρχει κίνδυνος έκρηξης.
– Στις επαφές του προσαρμογέα δεν πρέ-
πει να εισέρχονται μεταλλικά αντικείμενα. Κίνδυνος βραχυκυκλώματος.
– Χρησιμοποιήστε τον φορτιστή αποκλει-
στικά για την φόρτιση των εγκεκριμένων
τύπων συσσωρευτή.
– Εισάγετε στον προσαρμογέα του φορτι-
στή μόνο καθαρούς και στεγνούς συσσωρευτές.
– Μην φορτίζετε μπαταρίες (πρωτεύοντα
στοιχεία). Κίνδυνος έκρηξης.
– Μην φορτίζετε συσσωρευτές που πα-
ρουσιάζουν βλάβη. Αντικαταστήστε
τους συσσωρευτές που παρουσιάζουν
βλάβη.
– Μην φυλάγετε τους συσσωρευτές μαζί
με μεταλλικά αντικείμενα. Κίνδυνος
χυκυκλώματος.
– Μην πετάτε τους συσσωρευτές στην
φωτιά ή στα οικιακά απορρίμματα.
.
βρα-
– 2
71EL
Page 72

– Αποφύγετε την επαφή με τα υγρά που
διαρρέουν από χαλασμένους συσσω-
ρευτές. Σε περίπτωση τυχαίας επαφής
με παρόμοια υγρά, ξεπλύνετε με νερό.
Εάν τα υγρά έρθουν σε επαφή με τα μά-
τια, συμβουλευτείτε επιπλέον τον γιατρό
σας.
Έναρξη λειτουργίας
Έλεγχος, εάν έχει τοποθετηθεί το καλά-
θι του κύριου φίλτρου στη συσκευή.
Τύποι λειτουργίας
1 Λειτουργία με σακούλα φίλτρου τύπου
fleece ή με σακούλα χάρτινου φίλτρου
(ειδικός εξοπλισμός)
2 Λειτουργία χωρίς σακούλα φίλτρου
Τοποθέτηση της σακούλας φίλτρου
Απασφαλίστε και αφαιρέστε την κεφαλή
αναρρόφησης.
Αφαιρέστε το καλάθι του κύριου φίλ-
τρου.
Τοποθετήστε την υφασμάτινη ή χάρτινη
σακούλα φίλτρου (ειδικό εξάρτημα).
Τοποθετήστε το καλάθι του κύριου φίλ-
τρου.
Τοποθετήστε και ασφαλίστε και πάλι
την κεφαλή αναρρόφησης.
Τοποθέτηση του συσσωρευτή
Εισάγετε την μπαταρία στην υποδοχή
και ασφαλίστε την.
Φόρτιση του συσσωρευτή
Υπόδειξη: Διαβάστε τις οδηγίες χρήσης
του φορτιστή και λάβετε ιδιαίτερα υπόψη τις
υποδείξεις ασφαλείας!
Ο συσσωρευτής είναι εν μέρει φορτισμένος
κατά την παράδοση. Εάν είναι απαραίτητο,
φορτίστε τον πριν τον χρησιμοποιήσετε.
Υπόδειξη: Η φόρτιση του συσσωρευτή είναι δυνατή μόνο όταν αφαιρεθεί ο συσσωρευτής.
Πιέστε το πλήκτρο απασφάλισης και
αφαιρέστε την μπαταρία.
Συνδέστε το φορτιστή με μια κατάλληλη
πρίζα.
Εισάγετε τον συσσωρευτή στον φορτι-
στή.
Διάρκεια φόρτισης άδειου συσσωρευτή
Ταχυφορτιστής BC 1/7 ελάχ 60
Χειρισμός
Ενδεικτική λυχνία φόρτισης
Πατήστε το πλήκτρο ενδεικτικής λυχνί-
ας φόρτισης στην μπαταρία. Η ενδεικτι-
κή λυχνία φόρτισης ανάβει για 1 λεπτό.
Η ενδεικτική λυχνία φόρτισης δεν ενεργοποιήθηκε για 60 λεπτά (κατάσταση αδράνειας):
Πατήστε 2 φορές το πλήκτρο ενδεικτι-
κής λυχνίας φόρτισης στην μπαταρία. Η
ενδεικτική λυχνία φόρτισης ανάβει για 1
λεπτό.
Ενεργοποίηση της μηχανής
Θέστε τη συσκευή σε λειτουργία από το
γενικό διακόπτη.
Λειτουργία Eco
Λειτουργία Eco (εξοικονόμηση ενέργειας):
Η συσκευή λειτουργεί με μειωμένη αναρροφητική ισχύ. Η διάρκεια ζωής της μπαταρίας παρατείνεται.
Ενεργοποίηση λειτουργίας Eco: Πατή-
στε τον διακόπτη Eco. Η ενδεικτική λυ-
χνία του διακόπτη ανάβει πράσινη.
Απενεργοποίηση λειτουργίας Eco: Πα-
τήστε επανειλημμένα τον διακόπτη
Eco. Η ενδεικτική λυχνία του διακόπτη
σβήνει.
Λειτουργία καθαρισμού
Υπόδειξη: Κατά τον βασικό καθαρισμό
υφασμάτινων επιστρώσεων συντομεύεται
η διάρκεια της μπαταρίας λόγω αυξημένης
ισχύος καθαρισμού.
Ρυθμίστε το διακόπτη επιλογής του
ακροφυσίου δαπέδου στη θέση για
σκληρές επιφάνειες ή μοκέτες.
Ρυθμίστε την αναρροφητική ισχύ (χω-
ρίς διαβαθμίσεις).
Εκτελέστε τον καθαρισμό.
72 EL
– 3
Page 73

Απενεργοποίηση της μηχανής
Απενεργοποιήστε τη συσκευή από το
γενικό διακόπτη.
Έπειτα από κάθε λειτουργία
Αδειάστε τον κάδο.
Καθαρίστε τη συσκευή εσωτερικά και
εξωτερικά με αναρρόφηση και σκούπισμα με ένα υγρό πανί.
Μεταφορά
몇 ΠΡΟΣΟΧΗ
Κίνδυνος τραυματισμού και βλάβης! Κατά
τη μεταφορά λάβετε υπόψη το βάρος της
συσκευής.
Κατά τη μεταφορά με οχήματα, ασφαλί-
στε τη συσκευή έναντι ενδεχόμενης ολίσθησης και ανατροπής, σύμφωνα με τις
εκάστοτε ισχύουσες κατευθυντήριες
οδηγίες.
Αποθήκευση
몇 ΠΡΟΣΟΧΗ
Κίνδυνος τραυματισμού και βλάβης! Κατά
την αποθήκευση λάβετε υπόψη το βάρος
της συσκευής.
Προς αποφυγή της αποφόρτισης πιέ-
στε το πλήκτρο απασφάλισης και αφαι-
ρέστε την μπαταρία.
Η συσκευή αυτή μπορεί να αποθηκεύεται
μόνο σε εσωτερικούς χώρους.
Φροντίδα και συντήρηση
ΚΙΝΔΥΝΟΣ
Πριν από κάθε εργασία στη συσκευή, απενεργοποιείτε τη συσκευή
μπαταρία.
Καθαρίστε το καλάθι του κύριου
φίλτρου
Εάν είναι απαραίτητο, καθαρίστε το κα-
λάθι του κύριου φίλτρου (πλενόμενο) με
τρεχούμενο νερό.
ΠΡΟΣΟΧΗ
Κίνδυνος βλάβης! Μην τοποθετείτε ποτέ το
καλάθι του κύριου φίλτρου εάν αυτό είναι
βρεγμένο.
και αφαιρείτε την
Αντικατάσταση του φίλτρου
προστασίας του κινητήρα
Απασφαλίστε και αφαιρέστε την κεφαλή
αναρρόφησης.
Αφαιρέστε το φίλτρο προστασίας του κι-
νητήρα.
Τοποθετήστε ένα νέο φίλτρο προστασί-
ας του κινητήρα.
Τοποθετήστε και ασφαλίστε και πάλι
την κεφαλή αναρρόφησης.
Αντιμετώπιση βλαβών
ΚΙΝΔΥΝΟΣ
Πριν από κάθε εργασία στη συσκευή, απενεργοποιείτε τη συσκευή και αφαιρείτε την
μπαταρία.
Η συσκευή απενεργοποιείται στη
διάρκεια της λειτουργίας της
– Ενεργοποιήθηκε η προστασία υπερ-
θέρμανσης του κινητήρα.
Αλλάξτε τη σακούλα φίλτρου τύπου
fleece ή τη σακούλα του χάρτινου φίλτρου (ειδικός εξοπλισμός).
Αντικατάσταση του φίλτρου προστασί-
ας του κινητήρα
Ελέγξτε όλα τα εξαρτήματα για τυχόν
βουλώματα.
Επανενεργοποίηση μετά την περίοδο ψύξης του στρόβιλου του κινητήρα, δηλ. μετά
από περ. 60 λεπτά.
Η αναρροφητική ισχύς μειώνεται
Αντιμετωπίστε την απόφραξη στο
ακροφύσιο αναρρόφησης, στο σωλήνα
αναρρόφησης ή στον ελαστικό σωλήνα
αναρρόφησης.
Αλλάξτε τη σακούλα φίλτρου τύπου
fleece ή τη σακούλα του χάρτινου φίλ-
τρου (ειδικός εξοπλισμός).
Καθαρίστε την κεφαλή κύριου φίλτρου
με τρεχούμενο νερό και στεγνώστε την.
Τοποθετήστε/ασφαλίστε σωστά την κε-
φαλή αναρρόφησης.
Αντικαταστήστε τον ελαττωματικό ελα-
στικό σωλήνα αναρρόφησης.
Αντικατάσταση του φίλτρου προστασί-
ας του κινητήρα
– 4
73EL
Page 74

Διαρροή σκόνης κατά την
αναρρόφηση
Αλλάξτε τη σακούλα φίλτρου τύπου
fleece ή τη σακούλα του χάρτινου φίλτρου (ειδικός εξοπλισμός).
Ελέγξτε τη θέση της σακούλας φίλτρου
τύπου fleece ή τη θέση της σακούλας
χάρτινου φίλτρου (ειδικός εξοπλισμός).
Τοποθετήστε/ασφαλίστε σωστά την κε-
φαλή αναρρόφησης.
Τοποθετήστε το άθικτο καλάθι του κύρι-
ου φίλτρου.
Τοποθετήστε σωστά το φιλτρο προστα-
σίας του κινητήρα.
Η συσκευή δεν λειτουργεί
Θέστε τη συσκευή σε λειτουργία.
– Υπερφόρτωση πλατίνας
Υπόδειξη: Η λειτουργία με συσσωρευτή
καθίσταται ξανά δυνατή μετά την ψύξη της
πλατίνας.
– Αποφορτισμένος συσσωρευτής
Φορτίστε τον συσσωρευτή.
– Δεν υπάρχει τοποθετημένος συσσω-
ρευτής
Τοποθετήστε τον συσσωρευτή.
Υπηρεσία εξυπηρέτησης πελατών
Αν δεν διορθωθεί η βλάβη, πρέπει να γίνει έλεγχος της συσκευής από την υπηρεσία εξυπηρέτησης πελατών.
Εξαρτήματα και ανταλλακτικά
Χρησιμοποιείτε μόνο γνήσια παρελκόμενα
και ανταλλακτικά τα οποία διασφαλίζουν
την ασφαλή και απρόσκοπτη λειτουργία
της συσκευής.
Πληροφορίες για παρελκόμενα και ανταλλακτικά θα βρείτε στη διεύθυνση
www.kaercher.com.
Περιγραφή Κωδ. πα-
ραγγελίας
Συσσωρευτής, ανταλλακτι-κό4.654-016.0
Ταχυφορτιστής BC 1/7
EU 6.654-354.0
GB 6.654-355.0
AU 6.654-356.0
Εγγύηση
Σε κάθε χώρα ισχύουν οι όροι εγγύησης
που εκδόθηκαν από την αρμόδια εταιρία
μας προώθησης πωλήσεων. Αναλαμβάνουμε τη δωρεάν αποκατάσταση οποιασδήποτε βλάβης στη συσκευή σας, εφόσον
οφείλεται σε αστοχία υλικού ή κατασκευαστικό σφάλμα, εντός της προθεσμίας που
ορίζεται στην εγγύηση. Σε περίπτωση που
επιθυμείτε να κάνετε χρήση της εγγύησης,
παρακαλούμε απευθυνθείτε με την απόδειξη αγοράς στο κατάστημα από το οποίο
προμηθευτήκατε τη συσκευή ή στην πλησιέστερη εξουσιοδοτημένη υπηρεσία τεχνικής εξυπηρέτησης πελατών μας.
74 EL
– 5
Page 75

Δήλωση Συμμόρφωσης των
Chairman of the Board of Management
Director Regulatory Affairs & Certification
ΕE
Δια της παρούσης δηλώνουμε ότι το μηχάνημα που χαρακτηρίζεται παρακάτω, με
βάση τη σχεδίαση και την κατασκευή του,
υπό τη μορφή που διατίθεται στην αγορά,
πληροί στις σχετικές βασικές απαιτήσεις
ασφαλείας και υγιεινής των οδηγιών της
ΕE . Η παρούσα δήλ ωση παύε ι να ισχύ ει σ ε
περίπτωση τροποποιήσεων του μηχανήματος χωρίς προηγούμενη συνεννόηση
μαζί μας.
Προϊόν: Ηλεκτρική σκούπα ξηρών
ρύπων
Τύπος: 1.528-xxx
Σχετικές οδηγίες των ΕE
2006/42/EK (+2009/127/EK)
2014/30/EE
2011/65/EE
2009/125/EΚ
Εφαρμοσθέντα εναρμονισμένα πρότυπα
EN 55014–1: 2006+A1: 2009+A2: 2011
EN 55014–2: 2015
EN 60335–1
EN 60335–2–69
EN 61000–3–2: 2014
EN 61000–3–3: 2013
EN 62233: 2008
EN 50581
EN 60312-1: 2017
Εφαρμοσθέντα εθνικά πρότυπα
-
5.957-783
Alfred Kärcher SE & Co. KG
Alfred-Kärcher-Straße 28-40
71364 Winnenden (Germany)
Tel.: +49 7195 14-0
Fax: +49 7195 14-2212
Winnenden, 2018/10/01
Οι υπογράφοντες ενεργούν κατ’ εντολή και
με πληρεξούσιο από το διοικητικό συμβούλιο.
Υπεύθυνος εγγράφων τεκμηρίωσης:
S. Reiser
– 6
75EL
Page 76

Τεχνικά χαρακτηριστικά
T 9/1 Bp
Τάση συσσωρευτή V 36 DC
Μέγ. ισχύς W 730
Ονομαστική ισχύς W 650
Χωρητικότητα κάδου l 9
Ποσότητα αέρα (μέγ.) l/s 46
Υποπίεση (μέγ.) kPa (mbar) 20,7 (207)
Κατηγορία προστασίας III
Σύνδεση ελαστικού σωλήνα αναρρόφησης (C-DN/C-
mm 35
ID)
Μήκος x Πλάτος x Ύψος mm 420 x 325 x 380
Τυπικό βάρος λειτουργίας kg 7,5
Θερμοκρασία περιβάλλοντος °C 0/+40
Διάρκεια λειτουργίας με πλήρως φορτισμένο συσσω-
ρευτή
– Κανονική λειτουργία
– Λειτουργία Eco
ελάχ
ελάχ
24
46
Μετρούμενες τιμές κατά EN 60335-2-69
Επιτρεπόμενη στάθμη ηχητικής ισχύος L
Αβεβαιότητα K
pA
pA
Κραδασμοί στο χέρι/στο βραχίονα m/s
Αβεβαιότητα K m/s
dB(A) 62
dB(A) 2
2
2
<2,5
0,2
76 EL
– 7
Page 77

Cihazın ilk kullanımından önce
bu orijinal kullanma kılavuzunu
okuyun, bu kılavuza göre davranın ve daha
sonra kullanım veya cihazın sonraki sahiplerine vermek için bu kılavuzu saklayın.
– İlk kullanımdan önce, 5.956-249.0 nu-
maralı güvenlik uyarılarını mutlaka okuyun!
– Kullanım kılavuzunun ve emniyet uyarı-
larının dikkate alınmaması halinde cihazda hasar, kullanıcıda ve diğer kişilerde tehlike oluşabilir.
– Nakliye hasarlarını hemen yetkili satıcı-
ya bildirin.
– Ambalajı çıkartırken, ambalaj içeriğinde
eksik aksesuar veya hasar kontrolü yapın.
İçindekiler
Çevre koruma . . . . . . . . . . . . . TR 1
Tehlike kademeleri . . . . . . . . . TR 1
Kurallara uygun kullanım . . . . TR 1
Cihaz elemanları. . . . . . . . . . . TR 2
Cihazdaki semboller . . . . . . . . TR 2
Güvenlik uyarıları . . . . . . . . . . TR 2
İşletime alma. . . . . . . . . . . . . . TR 3
Kullanımı. . . . . . . . . . . . . . . . . TR 3
Taşıma . . . . . . . . . . . . . . . . . . TR 4
Depolama . . . . . . . . . . . . . . . . TR 4
Koruma ve Bakım . . . . . . . . . . TR 4
Arızalarda yardım . . . . . . . . . . TR 4
Garanti . . . . . . . . . . . . . . . . . . TR 5
Aksesuarlar ve yedek parçalar TR 5
AB uygunluk bildirisi . . . . . . . . TR 5
Teknik Bilgiler . . . . . . . . . . . . . TR 6
Çevre koruma
Ambalaj malzemeleri geri dönüştürülebilir. Ambalaj malzemelerini evinizin çöpüne atmak
yerine lütfen tekrar kullanılabilecekleri yerlere gönderin.
Eski cihazlarda, yeniden değerlendirme işlemine tabi tutulması
gereken değerli geri dönüşüm
malzemeleri bulunmaktadır. Piller ve aküler çevreye yayılmaması gereken, zararlı maddeler
içerir. Bu nedenle eski cihazlar,
piller ve aküleri lütfen uygun toplama sistemleri aracılığıyla imha
edin.
İçindekiler hakkında uyarılar (REACH)
İçindekiler hakkında ayrıntılı bilgileri bulabileceğiniz adres:
www.kaercher.com/REACH
Tehlike kademeleri
TEHLIKE
Ağır bedensel yaralanmalar ya da ölüme
neden olan direkt bir tehlikeye yönelik uyarı.
몇 UYARI
Ağır bedensel yaralanmalar ya da ölüme
neden olabilecek olası tehlikeli bir duruma
yönelik uyarı.
몇 TEDBIR
Hafif yaralanmalara neden olabilecek olası
tehlikeli bir duruma yönelik uyarı.
DIKKAT
Maddi hasarlara neden olabilecek olası
tehlikeli bir duruma yönelik uyarı.
Kurallara uygun kullanım
몇 UYARI
Cihaz, zararlı tozların emilmesi için uygun
değildir.
DIKKAT
Bu cihaz, sadece iç mekanlarda kullanım
için üretilmiştir.
– Bu üniversal süpürge, zemin ve duvar
yüzeylerinin kuru temizlenmesi için belirlenmiştir.
– Bu cihaz, Örn; oteller, okullar, hastane-
ler, fabrikalar, mağazalar, bürolar ve kiralık mağazalarda mesleki kullanım için
uygundur.
– 1
77TR
Page 78

Cihaz elemanları
1 Elyaf filtre torbası
2 Emme ağzı
3 Emme hortumu
4 Tip levhası
5 Taşıma kolu
6 Hortum desteği
7 Emme başlığı
8 Süpürge kafasının kilidi
9 Yönlendirme makarası
10 Zbiornik na zanieczyszczenia
11 Taban memesinin yuvası
12 Eco şalteri (enerji tasarruf modu)
13 Ana şalter
14 Sert yüzey/halı zemin değiştiricisi
15 Taban memesi
16 Şarj kontrolü göstergesi
17 Şarj kontrol göstergesi tuşu
18 Akü
19 Kilit açma düğmesi
20 Teleskop emme borusu
21 Süpürme kuvveti ayarlayıcısı (kademe-
siz)
22 Manifold
23 Ana filtre sepeti
24 Motor koruma filtresi
Cihazdaki semboller
Nemli ya da sıvı çözeltileri emmeyin.
Güvenlik uyarıları
Kullanım kılavuzundaki uyarıların yanında,
yerel yönetimin belirlediği güvenlik ve kaza
önleme talimatları dikkate alınmalıdır.
TEHLIKE
Yaralanma tehlikesi! Cihazdaki tüm temizlik, bakım ve onarım çalışmalarından önce
aküyü çıkartın.
Akü/şarj cihazı
TEHLIKE
– Sadece birlikte teslim edilen orijinal şarj
cihazı ya da KÄRCHER tarafından
onaylanmış şarj cihazlarıyla akülerin
şarj edilmesine izin verilmiştir.
– Her kullanımdan önce şarj cihazı ve akü
grubuna hasar kontrolü yapın. Hasarlı
cihazları kullanmayın ve hasarlı parçaları sadece teknik personelin onarması-
nı sağlayın.
– Şarj cihazını kirli ve
lanmayın.
– Şebeke gerilimi, şarj cihazının tip etike-
tinde belirtilen gerilimle aynı olmalıdır.
– Şarj cihazını patlama tehlikesi bulunan
ortamlarda çalıştırmayın.
– Adaptörün kontaklarına metal parçalar
girmemelidir; kısa devre tehlikesi.
– Şarj cihazını, sadece izin verilen akü
gruplarının şarj edilmesi için kullanın.
– Sadece temiz ve kuru akü gruplarını
şarj cihazının akü tutucusuna takın.
– Pilleri şarj etmeyin (birincil hücreli); pat-
lama tehlikesi.
– Hasarlı akü gruplarını şarj etmeyin. Ha-
sarlı akü gruplarını değiştirin.
– Akü gruplar
saklamayın; kısa devre tehlikesi.
– Akü gruplarını ateş ya da ev çöpüne at-
mayın.
– Arızalı akülerden çıkan sıvıyla teması
önleyin. Sıvıyla temas etmeniz durumunda, temas eden yerleri suyla yıka-
yın. Gözlerle temas olması durumunda,
ek olarak bir doktora muayene olun.
ını, metal cisimlerle birlikte
ıslak durumda kul-
78 TR
– 2
Page 79

İşletime alma
Ana filtre sepetinin cihaza yerleştirilmiş
olup olmadığının kontrolü.
Mod türleri
1 Elyaf filtre torbası ya da kağıt filtre tor-
bası (özel aksesuar) ile çalışma
2 Filtre torbası olmadan çalışma
Filtre torbasının takılması
Emme kafasının kilidini açın ve kafayı
çıkartın.
Ana filtre sepetini çıkartın.
Elyaf filtre torbası ya da kağıt filtre tor-
basını (özel aksesuar) takın.
Ana filtre sepetini yerleştirin.
Emme kafasını yerleştirin ve kilitleyin.
Akünün yerleştirilmesi
Aküyü akü tutucusuna yerleştirin ve ki-
litleyin.
Akünün şarj edilmesi
Not: Şarj cihazı üreticisinin kullanım kılavu-
zunu okuyun ve özellikle güvenlik uyarılarına dikkat edin!
Akü, teslimat sırasında kısmen doludur. İşletime almadan önce ve ihtiyaç anında şarj
edin.
Not: Aküler,sadece çıkartılmış durumda
şarj edilebilir.
Kilit açma tuşuna basın ve aküyü çıka-
rın.
Şarj cihazını kurallara uygun bir prize
takın.
Aküyü şarj cihazına takın.
Akü boşken şarj süresi
Hızlı şarj cihazı BC 1/7 min 60
Kullanımı
Şarj kontrol göstergesi
Aküdeki şarj kontrol göstergesi tuşuna
basın. Şarj kontrol göstergesi 1 dakika
boyunca yanar.
Şarj kontrol göstergesi 60 dakika boyunca
etkinleştirilmesi (uyku modu):
Aküdeki şarj kontrol göstergesi tuşuna
2 kez basın. Şarj kontrol göstergesi 1
dakika boyunca yanar.
Cihazı açın
Cihazı ana şalterden açın.
Eco modu
Eco modu (enerji tasarruf modu): Cihaz,
azaltılmış süpürme gücüyle çalışır. Akü çalışma süresi uzar.
Eco modunu devreye alın: Eco şalterine
basın. Şalterdeki kontrol lambası yeşil
olarak yanar.
Eco modunu devreden çıkarın: Eco şal-
terine tekrar basın. Şalterdeki kontrol
lambası söner.
Temizleme modu
Uyarı: Tekstil dolguların temel temizliğin-
de, yüksek temizleme gücü nedeniyle akü
çalışma süresi kısalır.
Taban memesi değiştiricisini sert yüzey
veya halı zemine ayarlayın.
Süpürme kuvvetini süpürme kuvveti
ayarlayıcısından ayarlayın (kademe-
siz).
Temizliği yapın.
Cihazın kapatılması
Cihazı ana şalterden kapatın.
Her çalışmadan sonra
Kabı boşaltın.
Cihazın dışını ve içini tozunu alarak ve
silerek nemli bir bezle temizleyin.
– 3
79TR
Page 80

Taşıma
몇 TEDBIR
Yaralanma ve hasar tehlikesi! Taşıma sırasında cihazın ağırlığına dikkat edin.
Araçlarda taşıma sırasında, cihazı ge-
çerli yönetmeliklere göre kaymaya ve
devrilmeye karşı emniyete alın.
Depolama
몇 TEDBIR
Yaralanma ve hasar tehlikesi! Depolama
sırasında cihazın ağırlığına dikkat edin.
Deşarj olmasını önlemek için kilit açma
tuşuna basın ve aküyü çıkarın.
Bu cihaz sadece iç mekanlarda depolanmalıdır.
Koruma ve Bakım
TEHLIKE
Cihazdaki tüm çalışmalardan önce cihazı
kapatın ve aküyü çıkartın.
Ana filtre sepetinin temizlenmesi
Ana filtre sepetini (yıkanabilir) gerekirse
akar su altında temizleyin.
DIKKAT
Hasar tehlikesi! Ana filtre sepetini kesinlikle
ıslak şekilde yerleştirmeyin.
Motor koruma filtresinin
değiştirilmesi
Emme kafasının kilidini açın ve kafayı
çıkartın.
Motor koruma filtresini çıkartın.
Yeni motor koruma filtresini yerleştirin.
Emme kafasını yerleştirin ve kilitleyin.
Arızalarda yardım
TEHLIKE
Cihazdaki tüm çalışmalardan önce cihazı
kapatın ve aküyü çıkartın.
Cihaz çalışma sırasında kapanıyor
– Motor termik korucusu tepki verdi
Elyaf filtre torbası ya da kağıt filtre tor-
basını (özel aksesuar) değiştirin.
Motor koruma filtresini değiştirin.
Tüm parçalara tıkanma kontrolü yapın.
Motor türbini soğuduktan yaklaşık 60 dakika sonra tekrar çalıştırın.
Emme gücü dü
Süpürme memesi, süpürme borusu
veya süpürme hortumundaki tıkanmaları giderin.
Elyaf filtre torbası ya da kağıt filtre tor-
basını (özel aksesuar) değiştirin.
Ana filtre sepetini akar su altında temiz-
leyin ve kurutun.
Süpürme kafasını doğru şekilde otur-
tun/kilitleyin.
Arızalı süpürme hortumunu değiştirin.
Motor koruma filtresini değiştirin.
Emme sırasında dışarı toz çıkıyor
Elyaf filtre torbası ya da kağıt filtre tor-
basını (özel aksesuar) değiştirin.
Elyaf filtre torbası ya da kağıt filtre tor-
basının (özel aksesuar) oturmasını kontrol edin.
Süpürme kafasını doğru şekilde otur-
tun/kilitleyin.
Hasar görmemiş ana filtre sepetini yer-
leştirin.
Motor koruma filtresini doğru şekilde
yerleştirin.
Cihaz çalışmıyor
Cihazı açın.
– Platin aşırı ısınmış
Not: Platinin soğumasından sonra akü
modu tekrar mümkündür.
– Akü boş
Aküyü şarj edin.
– Hiçbir akü yerleştirilmemiş
Aküyü yerleştirin.
80 TR
– 4
Page 81

Müşteri hizmeti
Chairman of the Board of Management
Director Regulatory Affairs & Certification
Arızanın giderilememesi durumunda, cihaz müşteri hizmetleri tarafından kontrol edilmelidir.
Garanti
Her ülkede yetkili distribütörümüz tarafından verilmiş garanti şartları geçerlidir. Garanti süresi içinde cihazınızda oluşan muhtemel hasarları, arızanın kaynağı üretim
veya malzeme hatası olduğu sürece ücretsiz olarak karşılıyoruz. Garanti hakkınızdan
yararlanmanızı gerektiren bir durum olduğu
zaman, ilgili faturanız ile birlikte satıcınıza
veya size en yakın yetkili servisimize başvurunuz.
Aksesuarlar ve yedek
parçalar
Sadece orijinal aksesuarlar ve orijinal yedek parçalar kullanın; cihazın güvenli şekilde ve arızasız işletilmesini garantilerler.
Aksesuarlar ve yedek parçalar hakkında
bilgi için sitemizi ziyaret edin:
www.kaercher.com.
Tanımlama Sipariş No.
Değişim aküsü 4.654-016.0
Hızlı şarj cihazı BC 1/7
EU 6.654-354.0
GB 6.654-355.0
AU 6.654-356.0
AB uygunluk bildirisi
İşbu belge ile aşağıda tanımlanan makinenin konsepti ve tasarımı ve tarafımızdan piyasaya sürülen modeliyle AB yönetmeliklerinin temel teşkil eden ilgili güvenlik ve sağlık yükümlülüklerine uygun olduğunu bildiririz. Onayımız olmadan cihazda herhangi
bir değişiklik yapılması durumunda bu beyan geçerliliğini yitirir.
Ürün: Kuru süpürge
Tip: 1.528-xxx
İlgili AB yönetmelikleri
2006/42/EG (+2009/127/EG)
2014/30/EU
2011/65/EU
2009/125/EG
Kullanılmış olan uyumlu standartlar
EN 55014–1: 2006+A1: 2009+A2: 2011
EN 55014–2: 2015
EN 60335–1
EN 60335–2–69
EN 61000–3–2: 2014
EN 61000–3–3: 2013
EN 62233: 2008
EN 50581
EN 60312-1: 2017
Kullanılmış ulusal standartlar
-
5.957-783
Aşağıda imzası olan kişiler, yönetim kurulu
adına ve yönetim kurulunun yetkisine sahip
olarak hareket eder.
Dokümantasyon sorumlusu:
S. Reiser
Alfred Kärcher SE & Co. KG
Alfred-Kärcher-Straße 28-40
71364 Winnenden (Germany)
Tel.: +49 7195 14-0
Fax: +49 7195 14-2212
Winnenden, 2018/10/01
– 5
81TR
Page 82

Teknik Bilgiler
T 9/1 Bp
Akü gerilimi V 36 DC
Maks. güç W 730
Nominal güç W 650
Kap içeriği l 9
Hava miktarı (maks.) l/s 46
Vakum (maks.) kPa (mbar) 20,7 (207)
Koruma sınıfı III
Süpürme hortumu bağlantısı (C-DN/C-ID) mm 35
Uzunluk x Genişlik x Yükseklik mm 420 x 325 x 380
Tipik çalışma ağırlığı kg 7,5
Çevre sıcaklığı °C 0/+40
Akü tam şarjlıyken çalışma süresi
– Normal mod
– Eco modu
60335-2-69'a göre belirlenen değerler
Ses basıncı seviyesi L
Güvensizlik K
pA
pA
El-kol titreşim değeri m/s
Güvensizlik K m/s
min
min
24
46
dB(A) 62
dB(A) 2
2
2
<2,5
0,2
82 TR
– 6
Page 83

Перед первым применением
вашего прибора прочитайте
эту оригинальную инструкцию по эксплуатации, после этого действуйте соответственно и сохраните ее для дальнейшего пользования или для следующего
владельца.
– Перед первым вводом в эксплуата-
цию обязательно прочтите указания
по технике безопасности № 5.956-
249.0!
– При несоблюдении инструкции и ука-
заний по технике безопасности пылесос может выйти из строя, а для оператора и других лиц возникает риск
получения травмы.
– При повреждениях, полученных во
время транспортировки, немедленно
свяжитесь с продавцом.
– При распаковке прибора проверьте
его комплектность, а также его целостность.
Оглавление
Защита окружающей среды . RU 1
Степень опасности . . . . . . . . RU 1
Использование по назначе-
нию . . . . . . . . . . . . . . . . . . . . . RU 2
Элементы прибора . . . . . . . . RU 2
Символы на приборе . . . . . . RU 2
Указания по технике безопа-
сности. . . . . . . . . . . . . . . . . . . RU 2
Начало работы . . . . . . . . . . . RU 3
Управление . . . . . . . . . . . . . . RU 3
Транспортировка . . . . . . . . . . RU 4
Хранение . . . . . . . . . . . . . . . . RU 4
Уход и техническое обслужи-
вание . . . . . . . . . . . . . . . . . . . RU 4
Помощь в случае неполадок RU 4
Гарантия. . . . . . . . . . . . . . . . . RU 5
Принадлежности и запасные
детали . . . . . . . . . . . . . . . . . . RU 6
Заявление о соответствии ЕU RU 6
Технические данные . . . . . . . RU 7
Защита окружающей среды
Упаковочные материалы пригодны для вторичной переработки. Пожалуйста, не выбрасывайте упаковку вместе с бытовыми отходами, а сдайте ее
в один из пунктов приема вторичного сырья.
Старые приборы содержат
ценные перерабатываемые
материалы, подлежащие передаче в пункты приемки вторичного сырья. Батареи и аккумуляторы содержат вещества, которые не должны попасть в окружающую среду.
Пожалуйста, утилизируйте
старые приборы и аккумуляторы через соответствующие системы приемки отходов.
Инструкции по применению компонентов (REACH)
Актуальные сведения о компонентах
приведены на веб-узле по следующему
адресу:
www.kaercher.com/REACH
Степень опасности
ОПАСНОСТЬ
Указание относительно непосредственно грозящей опасности, которая
приводит к тяжелым увечьям или к
смерти.
몇 ПРЕДУПРЕЖДЕНИЕ
Указание относительно возможной потенциально опасной ситуации, которая может привести к тяжелым увечьям или к смерти.
몇 ОСТОРОЖНО
Указание на
туацию, которая может привести к
получению легких травм.
ВНИМАНИЕ
Указание относительно возможной потенциально опасной ситуации, которая может повлечь материальный
ущерб.
потенциально опасную си-
– 1
83RU
Page 84

Использование по
назначению
몇 ПРЕДУПРЕЖДЕНИЕ
Прибор не предназначен для сбора
вредной для здоровья пыли.
ВНИМАНИЕ
Этот прибор предназначен только для
использования внутри помещений.
– Этот универсальный пылесос пред-
назначен для сухой очистки поверхностей полов и стен.
– Этот прибор предназначен для про-
фессионального использования, т.е.
в гостиницах, школах, больницах, на
промышленных предприятиях, в магазинах, офисах и в арендуемых помещениях.
Элементы прибора
1 Фильтровальный пакет из нетканого
материала
2 Всасывающий патрубок
3Всасывающий шланг
4 Заводская табличка с данными
5 рукоятка для ношения прибора
6Держатель шланга
7 Всасывающая головка
8 Блокировка всасывающей головки
9 Направляющий ролик
10 Мусорный бак
11 Крепление насадки для пола
12 Выключатель режима Eco (режим
экономии энергии)
13 Главный выключатель
14 Переключатель для твердых повер-
хностей/ковровых покрытий
15 Форсунка для чистки пола
16 Индикатор контроля заряда аккуму-
лятора
17 Кнопка индикатора контроля заряда
аккумулятора
18 Аккумулятор
19 Кнопка деблокировки
20 Телескопическая всасывающая тру-
ба
21 Регулятор мощности всасывания
(бесступенчато)
22 Колено
23 Фильтрующий элемент.
24 Фильтр защиты мотора
Символы на приборе
Не высасывать мокрые предметы или жидкости.
Указания по технике
безопасности
Наряду с указаниями по технике безопасности, содержащимися в руководстве
по эксплуатации, необходимо также соблюдать общие положения законодательства по технике безопасности и предотвращению несчастных случаев.
ОПАСНОСТЬ
Опасность травмирования! Перед проведением любых работ по уходу, техническому обслуживанию и ремонту
устройства следует снять аккумулятор.
Аккумулятор/Зарядное
устройство
ОПАСНОСТЬ
– Зарядка аккумуляторов разрешена
только с помощью прилагаемого
оригинального зарядного устройства или допущенных фирмой
KARCHER зарядных устройств.
– Перед каждым использованием про-
верять зарядное устройство и акумуляторный блок на повреждения.
Поврежденные приспособления
больше не использовать, а поврежденные части ремонтировать
только с помощью специализированного персонала.
– Не использовать зарядное устрой-
ство в грязном или мокром состоянии.
– Напряжение, указанное на заводской
табличке зарядного устройства,
должно соответствовать напряжению сети.
– Не эксплуатировать зарядное
устройство во взрывоопасной среде.
84 RU
– 2
Page 85

– В контакты адаптера не должны
попасть металлические предметы,
опасность короткого замыкания.
– Зарядное устройство использо-
вать только для зарядки разрешен-
ных видов аккумуляторных блоков.
– В адартер зарядного устройства
вставлять только сухие и чистые
аккумуляторные блоки.
– Не заряжать батареи (одноячей-
ные), взрывоопасность.
– Не заряжать поврежденные аккуму-
ляторные блоки. Поврежденные ак
кумуляторные блоки заменить.
– Аккумуляторные блоки не хранить
вместе с металлическими предме-
тами, опасность короткого замы-
кания.
– Не бросать аккумуляторные блоки
в огонь и не выбрасывать в быто-
вые отходы.
– Избегать контакта с жидкостью,
которая вытекает из поврежден-
ных аккумуляторов. При случайном
контакте смыть жидкость водой.
При контакте с глазами
тельно проконсультироваться с
врачом.
дополни-
Начало работы
Проверить, вставлен ли в прибор
фильтрующий элемент главного
фильтра.
Режимы
1 Работа с фильтровальным пакетом
из нетканого материала или бумаж-
ным фильтровальным пакетом (спе-
циальные принадлежности).
2 Работа без фильтровального пакета
Установка фильтровального
пакета
Разблокировать и снять всасываю-
щий элемент.
Вынуть фильтрующий элемент глав-
ного фильтра.
Надеть фильтровальный пакет из не-
тканого материала или бумажный
фильтровальный пакет (специальные принадлежности)
Установить фильтрующий элемент
главного фильтра.
Надеть и зафиксировать всасываю-
щий элемент.
Установить аккумулятор
Вставить аккумулятор в держатель
аккумулятора и защелкнуть.
-
Зарядить аккумулятор
Указание: Ознакомиться с руководст-
вом по эксплуатации производителя
прибора, уделяя особое внимание указаниям по технике безопасности.
При поставке аккумулятор частично заряжен. Перед началом эксплуатации и
по необходимости зарядить.
Указание: Возможна зарядка только
снятого аккумулятора.
Нажать кнопку разблокировки и вы-
нуть аккумулятор.
Зарядное устройство подключить к
соответствующей требованиям розетке.
Установить аккумулятор в зарядное
устройство.
Время зарядки разряженного аккумулятора
Устройство быстрой зарядки
BC 1/7
Управление
Индикатор контроля заряда
аккумулятора
Нажать кнопку индикатора контроля
заряда аккумулятора на аккумулято-
ре. Индикатор светится 1 минуту.
Индикатор контроля заряда аккумулятора был неактивен 60 минут (спящий режим):
Дважды нажать кнопку индикатора
контроля заряда аккумулятора на ак-
кумуляторе. Индикатор контроля за-
ряда аккумулятора светится 1 минуту.
– 3
мин 60
85RU
Page 86

Включение прибора
Прибор отключается при помощи
главного выключателя.
Режим Eco
Режим Eco (режим экономии энергии):
устройство работает со сниженной мощностью всасывания. Время работы аккумулятора увеличивается.
Включение режима Eco: нажать вы-
ключатель режима Eco. Контрольная
лампочка на выключателе светится
зеленым светом.
Выключение режима Eco: повторно
нажать выключатель Eco. Контрольная лампочка на выключателе погаснет.
Режим очистки
Примечание: При проведении основной
чистки текстильных покрытий время работы аккумулятора сокращается ввиду
повышенной мощности очистки.
Установить форсунку для пола на ре-
жим твердых поверхностей/ковровых
покрытий.
Отрегулировать всасывающую мощ-
ность пегулятором мощности всасывания (бесступенчато)
Произвести очистку.
Выключение прибора
Выключить прибор при помощи глав-
ного выключателя.
После каждой эксплуатации
Опустошить бак.
Очистить прибор снаружи и внутри
пылесосом и протереть его влажным
полотенцем.
Транспортировка
몇 ОСТОРОЖНО
Опасность получения травм и повреждений! При транспортировке следует обратить внимание на вес устройства.
При перевозке аппарата в транспор-
тных средствах следует учитывать
действующие местные государствен-
ные нормы, направленные на защиту
от скольжения и опрокидывания.
Хранение
몇 ОСТОРОЖНО
Опасность получения травм и повреждений! При хранении
тить внимание на вес устройства.
Нажать кнопку разблокировки и вы-
нуть аккумулятор, чтобы предотвра-
тить его разрядку.
Это устройство разрешается хранить
только во внутренних помещениях.
следует обра-
Уход и техническое
обслуживание
ОПАСНОСТЬ
Перед проведением любых работ следует выключить устройство и извлечь аккумулятор.
Очистка фильтрующего элемента
главного фильтра
При необходимости промыть филь-
трующий элемент главного фильтра
(моющийся изнутри) проточной водой.
ВНИМАНИЕ
Опасность повреждения! Никогда не
вставлять мокрый фильтрующий элемент главного фильтра.
Замена фильтра защиты патрона
Разблокировать и снять всасываю-
щий элемент.
Вынуть фильтр защиты мотора.
Вставить новый фильтр защиты дви-
гателя.
Надеть и зафиксировать всасываю-
щий элемент.
Помощь в случае неполадок
ОПАСНОСТЬ
Перед проведением любых работ сле-
выключить устройство и из-
дует
влечь аккумулятор.
86 RU
– 4
Page 87

Прибор отключается во время
эксплуатации
– Сработал термопротектор мотора.
Заменить фильтровальный пакет из
нетканого материала или бумажный
фильтровальный пакет (специальные принадлежности).
Заменить фильтр защиты мотора.
Проверьте все детали на наличие за-
сора.
Заново включить после охлаждения турбины мотора через 60 минут.
Мощность всасывания упала
Удалить мусор из всасывающего со-
пла, всасывающей трубки или всасы-
вающего шланга.
Заменить фильтровальный пакет из
нетканого материала или бумажный
фильтровальный пакет (специаль-
ные принадлежности).
Промыть фильтрующий элемент
главного фильтра проточной водой и
просушить.
Правильно надеть/зафиксировать
всасывающую головку.
Заменить поврежденный всасываю-
щий шланг.
Заменить фильтр защиты мотора.
Во время чистки из прибора
выделяется пыль
Заменить фильтровальный пакет из
нетканого материала или бумажный
фильтровальный пакет (специаль-
ные принадлежности).
Проверить положение фильтроваль-
ного пакета из нетканого материала
или бумажного фильтровального па-
кета (специальные принадлежности).
Правильно надеть/зафиксировать
всасывающую головку.
Установить целый фильтрующий
элемент главного фильтра.
Правильно установить фильтр защи-
ты мотора.
Прибор не работает
Включить аппарат.
– Плата перегрета
Указание: После охлаждения платы
возможно возобновление режима питания от аккумуляторов.
– Аккумулятор разряжен
Зарядить аккумулятор.
– Аккумулятор не установлен
Установить аккумулятор.
Сервисная служба
Если неисправность не удается
устранить, прибор необходимо отправить на проверку в сервисную
службу.
Гарантия
В каждой стране действуют соответственно гарантийные условия, изданные
уполномоченной организацией сбыта
нашей продукции в данной стране. Возможные неисправности прибора в течение гарантийного срока мы устраняем
бесплатно, если причина заключается в
дефектах материалов или ошибках при
изготовлении. В случае возникновения
претензий в течение гарантийного срока
просьба обращаться, имея при себе чек
о покупке, в торговую организацию, продавшую вам прибор или в ближайшую
уполномоченную службу сервисного обслуживания.
– 5
87RU
Page 88

Принадлежности и
Chairman of the Board of Management
Director Regulatory Affairs & Certification
запасные детали
Используйте оригинальные принадлежности и запчасти — только они гарантируют безопасную и бесперебойную работу устройства.
Информацию о принадлежностях и запчастях вы можете найти на сайте
www.kaercher.com.
Обозначение № заказа:
Сменный аккумулятор 4.654-016.0
Устройство быстрой зарядки BC 1/7
EU 6.654-354.0
GB 6.654-355.0
AU 6.654-356.0
Заявление о соответствии
ЕU
Настоящим мы заявляем, что нижеуказанный прибор по своей концепции и конструкции, а также в осуществленном и
допущенном нами к продаже исполнении
отвечает соответствующим основным
требованиям по безопасности и здоровью согласно директивам ЕU. При внесении изменений, не согласованных с нами,
данное заявление теряет свою силу.
Продукт электропылесос для сухой
уборки
Тип: 1.528-xxx
Основные директивы ЕU
2006/42/EC (+2009/127/EC)
2014/30/EU
2011/65/ЕC
2009/125/ЕС
Примененные гармонизированные
нормы
EN 55014–1: 2006+A1: 2009+A2: 2011
EN 55014–2: 2015
EN 60335–1
EN 60335–2–69
EN 61000–3–2: 2014
EN 61000–3–3: 2013
EN 62233: 2008
EN 50581
EN 60312-1: 2017
Примененные внутригосударственные нормы
-
5.957-783
Нижеподписавшиеся лица действуют от
имени и по доверенности Правления.
Уполномоченный сотрудник по ведению
документооборота:
S. Reiser
Alfred Kärcher SE & Co. KG
Alfred-Kärcher-Straße 28-40
71364 Winnenden (Germany)
Tel.: +49 7195 14-0
Fax: +49 7195 14-2212
Winnenden, 2018/10/01
88 RU
– 6
Page 89

Технические данные
T 9/1 Bp
Напряжение аккумулятора В 36 пост. тока
Макс. мощность Вт 730
Номинальная мощность Вт 650
Емкость бака л 9
Количество воздуха (макс.) л/с 46
Нижнее давление (макс.) кПа (мбар) 20,7 (207)
Класс защиты III
Гнездо для подключения шланга (C-DN/C-ID) мм 35
Длина х ширина х высота мм 420 x 325 x 380
Типичный рабочий вес кг 7,5
Окружающая температура °C 0/+40
Время работы при полной зарядке аккумулятора
– Обычный режим работы
–Режим Эко
Значение установлено согласно стандарту EN 60335-2-69
Уровень шума дб
Опасность K
а
pA
Значение вибрации рука-плечо м/с
Опасность K м/с
мин
мин
24
46
дБ(А) 62
дБ(А) 2
2
2
<2,5
0,2
– 7
89RU
Page 90

A készülék első használata előtt
olvassa el ezt az eredeti használati utasítást, ez alapján járjon el és tartsa meg a későbbi használatra vagy a következő tulajdonos számára.
– Az első üzembevétel előtt mindenkép-
pen olvassa el az 5.956-249.0 sz. biztonsági utasításokat!
– A gépkönyv és a biztonságtechnikai
utasítások be nem tartása esetén a készülék megrongálódhat és veszélybe
kerülhet annak kezelője, illetve más
személyek.
– Szállítási sérülések esetén azonnal tá-
jékoztassa a kereskedőt.
– Kicsomagoláskor ellenőrizze, a cso-
mag tartalmát, hogy nem hiányoznak-e
tartozékok vagy nincs-e megsérülve.
Tartalomjegyzék
Környezetvédelem . . . . . . . . . HU 1
Veszély fokozatok. . . . . . . . . . HU 1
Rendeltetésszerű használat . . HU 1
Készülék elemek. . . . . . . . . . . HU 2
Szimbólumok a készüléken . . HU 2
Biztonsági tanácsok . . . . . . . . HU 2
Üzembevétel. . . . . . . . . . . . . . HU 3
Használat . . . . . . . . . . . . . . . . HU 3
Szállítás . . . . . . . . . . . . . . . . . HU 4
Tárolás . . . . . . . . . . . . . . . . . . HU 4
Ápolás és karbantartás . . . . . . HU 4
Segítség üzemzavar esetén . . HU 4
Garancia . . . . . . . . . . . . . . . . . HU 5
Tartozékok és alkatrészek. . . . HU 5
EU konformitási nyiltakozat. . . HU 5
Műszaki adatok. . . . . . . . . . . . HU 6
Környezetvédelem
A csomagolási anyagok újrahasznosíthatók. Kérjük, ne dobja a csomagolást a házi szemétbe, hanem vigye el egy újrahasznosító helyre.
90 HU
A használt készülékek értékes
újrahasznosítható anyagokat tartalmaznak, amelyeket újrahasznosító helyen kell elhelyezni. Az
elemek és az akkuk olyan anyagokat tartalmaznak, amelyeknek
nem szabad a környezetbe kerülni. Ezért kérjük, a használt készülékeket, elemeket és akkukat
megfelelő gyűjtőrendszeren keresztül távolítsa el.
Megjegyzések a tartalmazott anyagokkal kapcsolatban (REACH)
Aktuális információkat a tartalmazott anyagokkal kapcsolatosan a következő címen
talál:
www.kaercher.com/REACH
Veszély fokozatok
VESZÉLY
Közvetlenül fenyegető veszélyre való figyelmeztetés, amely súlyos testi sérüléshez vagy halálhoz vezet.
몇 FIGYELMEZTETÉS
Lehetséges veszélyes helyzetre való figyelmeztetés, amely súlyos testi sérüléshez vagy halálhoz vezethet.
몇 VIGYÁZAT
Figyelmeztetés esetlegesen veszélyes
helyzetre, amely könnyű sérüléshez vezethet.
FIGYELEM
Lehetséges veszélyes helyzetre való figyelmeztetés, amely anyagi kárhoz vezethet.
Rendeltetésszerű használat
몇 FIGYELMEZTETÉS
A készülék nem alkalmas egészségre káros por felszívására.
FIGYELEM
Ezt a készüléket csak beltéri helyiségben
történő használatra tervezték.
– Ez az univerzális porszívó padló- és fal-
felületek száraz tisztítására szolgál.
– Ez a készülék ipari használatra alkal-
mas, pl. szállodákban, iskolákban, kórházakban, üzemekben, boltokban, irodákban és kölcsönző üzletekben.
– 1
Page 91

Készülék elemek
1 Textil porzsák
2 Szívótámasztékok
3 Szívótömlő
4 Típustábla
5 Fogantyú
6 Tömlő tartó
7 Szívófej
8 Szívófej zárja
9 Kormánygörgő
10 Hulladéktartály
11 A padlószívófej befogója
12 Eco kapcsoló (energiatakarékos üzem-
mód)
13 Főkapcsoló
14 Kemény felület/szőnyegpadló átkap-
csoló
15 Padló szórófej
16 Töltés-ellenőrzőkijelző
17 Töltés kontroll kijelző gombja
18 Akkumulátor
19 Kibiztosító gomb
20 Teleszkópos szívócső
21 Szíváserősség szabályozója (fokozat-
mentes)
22 Könyökcső
23 Fő szűrőkosár
24 Motorvédő szűrő
Szimbólumok a készüléken
Ne szívjon fel nedves vagy folyékony anyagokat.
Biztonsági tanácsok
Az üzemeltetési útmutatóban szereplő
megjegyzések mellett a törvényhozó általános biztonsági- és baleset elhárítási előírásait is figyelembe kell venni.
VESZÉLY
Sérülésveszély! A készüléken történő ápolási, karbantartási és javítási munkálatok
előtt mindig vegye ki az akkumulátort.
Akkumulátor/Töltőkészülék
VESZÉLY
– Az akkut tölteni csak a mellékelt eredeti
töltő készülékkel vagy a KÄRCHER által engedélyezett töltő készülékkel szabad.
– Minden használat előtt ellenőrízze a töl-
tő készüléket és az akku csomagot
esetleges sérülésekre. Sérült készülékeket ne használjon tovább és a sérült
részeket csak szakember által hozassa
rendbe.
– A töltő készüléket ne használja piszkos
vagy nedves állapotban.
– A hálózati feszültségnek meg kell
egyezni a töltő készülék típustábláján
megadott feszültséggel.
– A töltő készüléket ne üzemeltesse rob-
banásveszélyes környezetben.
– Az adapter érintkezéseire nem kerülhet
fém darab, rövidzárlat veszély.
– A töltő készüléket csak az engedélye-
zett akku csomagok töltésére használja.
– Csak tiszta és száraz akku csomagot
toljon rá a töltő készülék akku tartójára.
– Ne töltsön fel elemet (primer elemek),
robbanásveszély.
– Ne töltsön fel sérült akku csomagot. A
sérült akku csomagot cserélje ki.
– Az akku csomagot ne tárolja együtt fém
tárgyakkal, rövidzárlat veszély.
Az akku csomagot ne dobja tűzbe vagy
–
a házi szemétbe.
– Kerülje az érintkezést a hibás akkuból
kifolyó folyadékkal. A folyadékkal való
véletlen érintkezés esetén vízzel mossa
le. Szembe kerülés esetén ezen felül
konzultáljon orvossal.
– 2
91HU
Page 92

Üzembevétel
Kontroll, hogy a fő szűrőkosár a készü-
lékbe be van-e helyezve.
Üzem típusok
1 Üzem textil porzsákkal vagy papír por-
zsákkal (különleges tartozék)
2 Porzsák nélküli üzem
Szűrőtasak behelyezése
Oldja ki és vegye le szívófejet.
Vegye ki a fő szűrőkosarat.
A textil porzsákot vagy a papír porzsá-
kot (különleges tartozék) felhelyezni.
Helyezze be a fő szűrőkosarat.
Helyezze vissza és biztosítsa a szívófe-
jet.
Akku behelyezése
Az akkumulátort tolja be és kattintsa be
az akkumulátortartóba.
Akku feltöltése
Megjegyzés: Olvassa el a töltő készülék
gyártójának üzemeltetési útmutatóját és
fordítson különös figyelmet a biztonsági tanácsokra!
Az akku szállításkor részben van feltöltve.
Üzembe helyezés előtt és igény szerint töltse fel.
Megjegyzés: Az akku feltöltése csak kivett
állapotban történhet.
Nyomja meg a kioldógombot, és vegye
ki az akkumulátort.
A töltő készüléket dugja be egy rendel-
tetésszerű konnektorba.
Helyezze az akkut a töltő készülékbe.
Töltési idő üres akkunál
Gyors-töltő készülék BC 1/7 min 60
Használat
Töltés kontroll kijelző
Nyomja meg az akkumulátoron a töltés
kontroll kijelző gombját. A töltés kontroll
kijelző 1 percig világít.
A töltés kontroll kijelzőt 60 percig nem aktiválták (alvó üzemmód).
Nyomja meg 2x az akkumulátoron a töl-
tés kontroll kijelző gombját. A töltés
kontroll kijelző 1 percig világít.
A készülék bekapcsolása
A készüléket a főkapcsolón keresztül
bekapcsolni.
Eco üzemmód
Eco üzemmód (energiatakarékos üzemmód): A készülék csökkentett szívóteljesítménnyel dolgozik. Az akkumulátor élettartama meghosszabbodik.
Eco üzemmód bekapcsolása: Nyomja
meg az Eco kapcsolót. A kontroll lámpa
a kapcsolóban zölden világít.
Eco üzemmód kikapcsolása: Nyomja
meg újra az Eco kapcsolót. A kontroll
lámpa a kapcsolóban elalszik.
Tisztítási üzemmód
Megjegyzés: Textil padlózatok alaptisztítá-
sa esetén a magasabb tisztítási teljesítmény miatt az akkumulátor élettartama
csökken.
A szívófej átkapcsolóját kemény felület-
re vagy szőnyegpadlóra állítani.
A szívóerőt a szívásszabályozón ke-
resztül beállítani (fokozatmentes).
Tisztítás elvégzése.
A készülék kikapcsolása
A készüléket a főkapcsolón keresztül
kikapcsolni.
Minden üzem után
Ürítse ki a tartályt.
A készüléket kívül-belül porszívóval és
nedves ronggyal kell megtisztítani.
92 HU
– 3
Page 93

Szállítás
몇 VIGYÁZAT
Sérülés- és rongálódásveszély! Szállítás
esetén vegye figyelembe a készülék súlyát.
Járművel történő szállítás esetén a ké-
szüléket az adott irányelveknek megfelelően kell csúszás és borulás ellen biztosítani.
Tárolás
몇 VIGYÁZAT
Sérülés- és rongálódásveszély! Tárolás
esetén vegye figyelembe a készülék súlyát.
Nyomja meg a kioldógombot és vegye
ki az akkumulátort a lemerülés elkerülé-
se érdekében.
Ezt a készüléket csak beltéri helyiségben
szabad tárolni.
Ápolás és karbantartás
VESZÉLY
A készüléken történő bármiféle munka előtt
kapcsolja ki a készüléket, és vegye ki az
akkumulátort.
Fő szűrőkosár tisztítása
A fő szűrőkosarat (mosható) szükség
esetén folyóvíz alatt tisztítani.
FIGYELEM
Sérülésveszély! A fő szűrőkosarat soha ne
helyezze be nedvesen.
Motorvédő szűrő cseréje
Oldja ki és vegye le szívófejet.
Vegye ki a motorvédő szűrőjét.
Az új motorvédő szűrőt behelyezni.
Helyezze vissza és biztosítsa a szívófe-
jet.
Segítség üzemzavar esetén
VESZÉLY
A készüléken történő bármiféle munka előtt
kapcsolja ki a készüléket, és vegye ki az
akkumulátort.
Készülék üzemelés alatt lekapcsol
– A motor hővédő eleme működésbe lé-
pett.
A textil porzsákot vagy a papír porzsá-
kot (különleges tartozék) kicserélni.
Motorvédő szűrőt kicserélni.
Ellenőrizze az összes alkatrészt, hogy
nem dugultak-e el.
Újra bekapcsolás a motorturbina kihűlése
után kb. 60 perc múlva.
Szívóerő alábbhagy
Távolítsa el a dugulásokat a szívófej-
ből, a szívócsőből, vagy a szívótömlő-
ből.
A textil porzsákot vagy a papír porzsá-
kot (különleges tartozék) kicserélni.
A fő szűrőkosarat folyóvíz alatt tisztítsa
meg, majd szárítsa meg.
A szívófejet helyesen felhelyezni/lezár-
ni.
Cserélje ki a hibás szívótömlőt.
Motorvédő szűrőt kicserélni.
Porszívózásnál por áramlik ki
A textil porzsákot vagy a papír porzsá-
kot (különleges tartozék) kicserélni.
Ellenőrizze a textil porzsák vagy papír
porzsák (különleges tartozék) helyes il-
leszkedését.
A szívófejet helyesen felhelyezni/lezár-
ni.
Helyezze be a nem rongálódott fő szű-
rőkosarat.
Helyezze be megfelelően a motorvédő
szűrőt.
A készülék nem megy
Kapcsolja be a készüléket.
– a platina túlmelegedett
Megjegyzés: Akku üzem a platina lehűlése
után ismét lehetséges.
– Akku üres
Akku feltöltése.
– Akku nincs behelyezve
Helyezze be az akkut.
– 4
93HU
Page 94

Szerviz
Chairman of the Board of Management
Director Regulatory Affairs & Certification
Ha a hibát nem lehet elhárítani, akkor a
készüléket a szervizzel kell ellenőriztetni.
Garancia
Minden országban az illetékes forgalmazónk által kiadott garancia feltételek érvényesek. Az esetleges üzemzavarokat az
Ön készülékén a garancia lejártáig költségmentesen elhárítjuk, amennyiben anyagvagy gyártási hiba az oka. Garanciális esetben kérjük, forduljon a vásárlást igazoló bizonylattal kereskedőjéhez vagy a legközelebbi hivatalos szakszervizhez.
Tartozékok és alkatrészek
Kizárólag eredeti tartozékokat és eredeti
pótalkatrészeket alkalmazzon, mivel ezek
szavatolják a készülék biztonságos és zavarmentes üzemét.
A tartozékokkal és pótalkatrészekkel kapcsolatos információkat a www.kaercher.com
oldalon olvashatja.
Megnevezés Megrendelé-
si szám
Csere akku 4.654-016.0
Gyors-töltő készülék BC 1/7
EU 6.654-354.0
GB 6.654-355.0
AU 6.654-356.0
EU konformitási nyiltakozat
Ezennel tanúsítjuk, hogy az alábbiakban
megnevezett gép tervezése és építési
módja alapján az általunk forgalomba hozott kivitelben megfelel az EU irányelvek
vonatkozó, alapvető biztonsági és egészségügyi követelményeinek. A gép jóváhagyásunk nélkül történő módosítása esetén
ez a nyilatkozat elveszti érvényességet. A
készülék megfelel az EU-ban és Magyarországon (HU) harmonizált szabványoknak.
Termék: Száraz porszívó
Típus: 1.528-xxx
Vonatkozó európai közösségi irányelvek:
2006/42/EK (+2009/127/EK)
2014/30/EU
2011/65/ЕU
2009/125/EG
Alkalmazott harmonizált szabványok:
EN 55014–1: 2006+A1: 2009+A2: 2011
EN 55014–2: 2015
EN 60335–1
EN 60335–2–69
EN 61000–3–2: 2014
EN 61000–3–3: 2013
EN 62233: 2008
EN 50581
EN 60312-1: 2017
Alkalmazott összehangolt normák:
-
5.957-783
Az aláírók az igazgatóság megbízásából és
teljes körű meghatalmazásával járnak el.
94 HU
A dokumentáció összeállításáért felelős:
S. Reiser
Alfred Kärcher SE & Co. KG
Alfred-Kärcher-Straße 28-40
71364 Winnenden (Germany)
Tel.: +49 7195 14-0
Fax: +49 7195 14-2212
Winnenden, 2018/10/01
– 5
Page 95

Műszaki adatok
T 9/1 Bp
Akkumulátor feszültség V 36 DC
Max. teljesítmény W 730
Névleges teljesítmény W 650
Tartály űrtartalom l 9
Légmennyiség (max.) l/s 46
Nyomáshiány (max.) kPa (mbar) 20,7 (207)
Védelmi osztály III
Szívótömlő csatlakozása (C-DN/C-ID) mm 35
hosszúság x szélesség x magasság mm 420 x 325 x 380
Tipikus üzemi súly kg 7,5
Környezeti hőmérséklet °C 0/+40
Üzemidő teljes akkufeltöltés esetén
– Normál üzem
– Eco üzemmód
Az EN 60335-2-69 szerint megállapított értékek
Hangnyomás szint L
Bizonytalanság K
pA
pA
Kéz-kar vibrációs kibocsátási érték m/s
Bizonytalanság K m/s
min
min
24
46
dB(A) 62
dB(A) 2
2
2
<2,5
0,2
– 6
95HU
Page 96

Před prvním použitím svého za-
řízení si přečtěte tento původní
návod k používání, řiďte se jím a uložte jej
pro pozdější použití nebo pro dalšího majitele.
– Před prvním uvedením do provozu bez-
podmínečně čtěte bezpečnostní pokyny č. 5.956-249.0!
– V případě nedodržování provozních a
bezpečnostních pokynů mohou vzniknout škody na přístroji a může dojít k
ohrožení osob přístroj obsluhujících i
ostatních.
– Při přepravních škodách ihned infor-
mujte obchodníka.
– Při vybalení zkontrolujte obsah zásilky,
zda nechybí příslušenství či zda dodaný přístroj není poškozen.
Obsah
Ochrana životního prostředí . . CS 1
Stupně nebezpečí . . . . . . . . . . CS 1
Používání v souladu s určením CS 1
Prvky přístroje. . . . . . . . . . . . . CS 2
Symboly na zařízení . . . . . . . . CS 2
Bezpečnostní pokyny . . . . . . . CS 2
Uvedení do provozu . . . . . . . . CS 3
Obsluha. . . . . . . . . . . . . . . . . . CS 3
Přeprava . . . . . . . . . . . . . . . . . CS 4
Ukládání . . . . . . . . . . . . . . . . . CS 4
Ošetřování a údržba . . . . . . . . CS 4
Pomoc při poruchách . . . . . . . CS 4
Záruka. . . . . . . . . . . . . . . . . . . CS 5
Příslušenství a náhradní díly. . CS 5
EU prohlášení o shodě . . . . . . CS 5
Technické údaje . . . . . . . . . . . CS 6
Ochrana životního prostředí
Obalové materiály jsou recyklovatelné. Obal nezahazujte do
domovního odpadu, ale odevzdejte jej k opětovnému zužitkování.
96 CS
Přístroj je vyroben z hodnotných
recyklovatelných materiálů, které se dají dobře znovu využít.
Baterie a akumulátory obsahují
látky, které se nesmí dostat do
životního prostředí. Likvidujte
proto staré přístroje, baterie a
akumulátory ve sběrnách k tomuto účelu určených.
Informace o obsažených látkách (REACH)
Aktuální informace o obsažených látkách
naleznete na adrese:
www.kaercher.com/REACH
Stupně nebezpečí
NEBEZPEČÍ
Upozornění na bezprostředně hrozící nebezpečí, které vede k těžkým fyzickým zraněním nebo k usmrcení.
몇 VAROVÁNÍ
Upozornění na potencionálně nebezpeč-
nou situaci, která by mohla vést k těžkým
fyzickým zraněním nebo usmrcení.
몇 UPOZORNĚNÍ
Upozornění na případnou nebezpečnou situaci, která může vést k lehkým fyzickým
zraněním.
POZOR
Upozornění na potenciálně nebezpečnou
situaci, která může mít za následek poškození majetku.
Používání v souladu s
určením
몇 VAROVÁNÍ
Zařízení není vhodné k odsávání prachů
škodících zdraví.
POZOR
Tento přístroj je ur
ve vnitřních prostorách.
– Tento univerzální vysavač je určen k
suchému čištění podlahových a stěnových ploch.
– Přístroj je vhodný k použití v průmyslo-
vých i jiných velkých zařízeních, např. v
hotelech, školách, nemocnicích, v továrnách, obchodech, úřadech a půjčovnách.
– 1
čen pouze k používání
Page 97

Prvky přístroje
1 Filtrační sáček z netkané textilie
2 Sací hrdlo
3 Sací hadice
4 typový štítek
5 Držadlo
6 držák hadice
7 Vysávací hlavice
8 Uzamčení sací hlavy
9 Řídicí válec
10 Nádoba na nečistoty
11 Vybrání na podlahovou hubici
12 Tlačítko Eco (režim úspory energie)
13 Hlavní spínač
14 Přepínání pevná podlaha/koberce
15 Hubice na čištění podlah
16 Kontrolní indikace nabíjení
17 Tlačítko kontrolní indikace nabíjení
18 Akumulátor
19 Tlačítko na odjištění (odblokování)
20 Teleskopická sací trubka
21 Regulátor sací síly (plynule regulovatel-
né)
22 Násadka
23 Hlavní filtrační koš
24 Ochranný filtr motoru
Symboly na zařízení
Nepoužívejte k nasávání vlhkých
nebo kapalných látek.
Bezpečnostní pokyny
Kromě pokynů uvedených v návodu na použití je nutné dodržovat všeobecné bezpečnostní právní předpisy.
NEBEZPEČÍ
Nebezpečí úrazu! Před prováděním veškerých činností ošetřování, údržby a oprav,
vyjměte akumulátor.
Akumulátor/Nabíječka
NEBEZPEČÍ
– Akumulátor se smí nabíjet pouze přilo-
ženou originální nabíječkou nebo nabíječkou schválenou společností
KÄRCHER.
– Před každým použitím zkontrolujte, zda
nejsou akumulátory a nabíječka poškozené. Poškozená zařízení dále nepoužívejte a poškozené součásti nechte
opravovat jen odborníkům.
– Nabíječku nepoužívejte znečištěnou
ani mokrou.
– Napětí sítě musí odpovídat napětí uve-
denému na identifikačním štítku nabíječky.
– Nabíje
– Ke kontaktům adaptéru se nesmějí do-
– Nabíječku používejte pouze k nabíjení
– Na adaptér nabíječky dávejte jen čisté a
– Nenabíjejte baterie (primární články), ji-
– Nenabíjejte poškozené akumulátory.
– Akumulátory neskladujte společně s ko-
– Akumulátory nevhazujte do ohně ani do
– Zamezte styk s tekutinou vytékající z
čku nepoužívejte v prostředí s
nebezpečím výbuchu.
stat kovové předměty, jinak hrozí zkrat.
schválených akumulátorů.
suché akumulátory.
nak hrozí výbuch.
Poškozené akumulátory vyměňte.
vovými předměty, jinak hrozí zkrat.
domovního odpadu.
poškozených akumulátorů. Při náhodném styku s touto tekutinou příslušné
místo opláchněte vodou. Při zasažení
očí ještě vyhledejte lékařskou pomoc.
– 2
97CS
Page 98

Uvedení do provozu
Zkontrolujte, zda je hlavní filtrační koš
nasazen v zařízení.
Provozní režimy
1 Provoz s filtračním sáčkem z netkané
textilie nebo z papíru (zvláštní příslu-
šenství)
2 Provoz bez filtračního sáčku
Montáž filtračního sáčku
Odjistěte vysávací hlavici a sejměte ji.
Vyjměte hlavní filtrační koš.
Nasaďte filtrační sáček z netkané texti-
lie nebo z papíru (zvláštní příslušen-
ství).
Nasaďte hlavní filtrační koš.
Nasaďte vysávací hlavici a zajistěte ji.
Nasazení akumulátoru
Akumulátor zasuňte do držáku a za-
klapněte.
Nabíjení akumulátoru
Upozornění: Čtěte návod k obsluze od vý-
robce přístroje, především bezpečnostní
pokyny!
Dodaný akumulátor je pouze částečně nabitý. Před uvedením do provozu a podle potřeby ho dobijte.
Upozornění: Akumulátor lze nabíjet jen vyjmutý.
Stiskněte uvolňovací tlačítko a vyjměte
akumulátor.
Nabíječku zapojte do vhodné zásuvky.
Akumulátor zapojte do nabíječky.
Doba nabíjení vybitého akumulátoru
Rychlonabíječka BC 1/7 min 60
Obsluha
Kontrolní indikace nabíjení
Stiskněte tlačítko kontrolní indikace na-
bíjení na akumulátoru. Kontrolní indika-
ce nabíjení svítí 1 minutu.
Kontrolní indikace nabíjení nebyla 60 minut
aktivována (režim spánku):
Stiskněte 2x tlačítko kontrolní indikace
nabíjení na akumulátoru. Kontrolní indi-
kace nabíjení svítí 1 minutu.
Zapnutí přístroje
Zapněte přístroj hlavním spínačem.
Režim Eco
Režim Eco (režim úspory energie): Přístroj
pracuje se sníženým sacím výkonem.
Doba chodu na akumulátor se prodlouží.
Zapnutí režimu Eco: Stiskněte
spínač Eco. Světelná kontrolka ve spí-
nači svítí zeleně.
Vypnutí režimu Eco: Stiskněte znovu
spínač Eco. Světelná kontrolka ve spí-
nači zhasne.
Čisticí provoz
Upozornění: Při důkladném čištění textil-
ních podlahových krytin se z důvodu zvýšeného čisticího výkonu zkracuje doba
chodu na akumulátor.
Přepínání podlahové hubice nastavte
na pevnou podlahu nebo koberec.
Regulujte sací sílu pomocí příslušného
regulátoru (plynule nastavitelného)
Provést čištění.
Vypnutí zařízení
Vypněte přístroj hlavním spínačem.
Po každém použití
Nádobu vyprázdněte
Přístroj odsajte a utřete uvnitř i vně vlh-
kým hadrem.
98 CS
– 3
Page 99

Přeprava
몇 UPOZORNĚNÍ
Nebezpečí úrazu a nebezpečí poškození!
Dbejte na hmotnost přístroje při přepravě.
Při přepravě v dopravních prostředcích
zajistěte zařízení proti skluzu a překlopení podle platných předpisů.
Ukládání
몇 UPOZORNĚNÍ
Nebezpečí úrazu a nebezpečí poškození!
Dbejte na hmotnost přístroje při jeho
uskladnění.
Stiskněte uvolňovací tlačítko a vyjměte
akumulátor, abyste zabránili vybíjení.
Toto zařízení smí být uskladněno pouze v
uzavřených prostorách.
Ošetřování a údržba
NEBEZPEČÍ
Před zahájením jakýchkoliv prací na přístroji, jej vypněte a vyjměte akumulátor.
Čištění hlavního filtračního koše
Hlavní filtrační koš (omyvatelný) dle po-
třeby očistěte pod tekoucí vodou.
POZOR
Nebezpečí poškození! Hlavní filtrační koš
nenasazujte nikdy mokrý.
Výměna ochranného filtru motoru
Odjistěte vysávací hlavici a sejměte ji.
Vyjměte ochranný filtr motoru.
Nasaďte nový ochranný filtr motoru.
Nasaďte vysávací hlavici a zajistěte ji.
Pomoc při poruchách
NEBEZPEČÍ
Před zahájením jakýchkoliv prací na přístroji, jej vypněte a vyjměte akumulátor.
Zařízení vypíná za provozu
– Sepnula tepelná pojistka motoru.
Vyměňte filtrační sáček z netkané texti-
lie nebo z papíru (zvláštní příslušenství).
Vyměňte ochranný filtr motoru.
Zkontrolujte všechny díly, zda nejsou
zanesené.
Opakované zapnutí po vychladnutí turbíny
motoru po cca 60 minutách.
Sací síla slábne
Odstraňte případná ucpání ze sací hu-
bice, sací trubky nebo sací hadice.
Vyměňte filtrační sáček z netkané texti-
lie nebo z papíru (zvláštní příslušenství).
Hlavní filtrační koš vyčistěte pod tekou-
cí vodou a nechte jej vyschnout.
Správně nasaďte/zajistěte sací hlavu.
Vyměňte poškozenou sací hadici.
Vyměňte ochranný filtr motoru.
Při vysávání dochází k emisi prachu
Vyměňte filtrační sáček z netkané texti-
lie nebo z papíru (zvláštní příslušenství).
Zkontrolujte usazení filtračního sáčku z
netkané textilie nebo z papíru (zvláštní
příslušenství).
Správně nasaďte/zajistěte sací hlavu.
Nasaďte nepoškozený hlavní filtrační
koš.
Nasaďte ochranný filtr motoru správně.
Přístroj neběží
Přístroj zapněte.
– Přehřátá deska
Upozornění: Provoz akumulátoru je po
zchlazení platiny zase možný
– Prázdný akumulátor
Nabijte akumulátor.
– Není použitý žádný akumulátor
Nasaďte akumulátor.
– 4
99CS
Page 100

Oddělení služeb zákazníkům
Chairman of the Board of Management
Director Regulatory Affairs & Certification
Pokud poruchu nelze odstranit, musí
přístroj zkontrolovat zákaznická služba.
Záruka
V každé zemi platí záruční podmínky vydané příslušnou distribuční společností. Případné poruchy zařízení odstraníme během
záruční lhůty bezplatně, pokud byl jejich
příčinou vadný materiál nebo výrobní závady. V případě uplatňování nároku na záruku se s dokladem o zakoupení obraťte na
prodejce nebo na nejbližší oddělení služeb
zákazníkům.
Příslušenství a náhradní díly
Používejte pouze originální příslušenství a
originální náhradní díly, ty poskytují záruku
bezpečného a bezporuchového provozu
přístroje.
Informace o příslušenství a náhradních dílech naleznete na adrese
www.kaercher.com.
Označení Objednací č.
Náhradní akumulátor 4.654-016.0
Rychlonabíječka BC 1/7
EU 6.654-354.0
GB 6.654-355.0
AU 6.654-356.0
EU prohlášení o shodě
Tímto prohlašujeme, že níže označené
stroje odpovídají jejich základní koncepcí a
konstrukčním provedením, stejně jako námi
do provozu uvedenými konkrétními provedeními, příslušným zásadním požadavkům
o bezpečnosti a ochraně zdraví směrnic
EU. Při jakýchkoli na stroji provedených
změnách, které nebyly námi odsouhlaseny,
pozbývá toto prohlášení svou platnost.
Výrobek: Vysávání za sucha
Typ: 1.528-xxx
Příslušné směrnice EU:
2006/42/ES (+2009/127/ES)
2014/30/EU
2011/65/EU
2009/125/ES
Použité harmonizační normy
EN 55014–1: 2006+A1: 2009+A2: 2011
EN 55014–2: 2015
EN 60335–1
EN 60335–2–69
EN 61000–3–2: 2014
EN 61000–3–3: 2013
EN 62233: 2008
EN 50581
EN 60312-1: 2017
Použité národní normy
-
5.957-783
100 CS
Níže podepsaní jednají z pověření a se zplnomocněním představenstva společnosti.
Zplnomocněná osoba pro sestavení dokumentace:
S. Reiser
Alfred Kärcher SE & Co. KG
Alfred-Kärcher-Straße 28-40
71364 Winnenden (Germany)
Tel.: +49 7195 14-0
Fax: +49 7195 14-2212
Winnenden, 2018/10/01
– 5
 Loading...