

Page 1
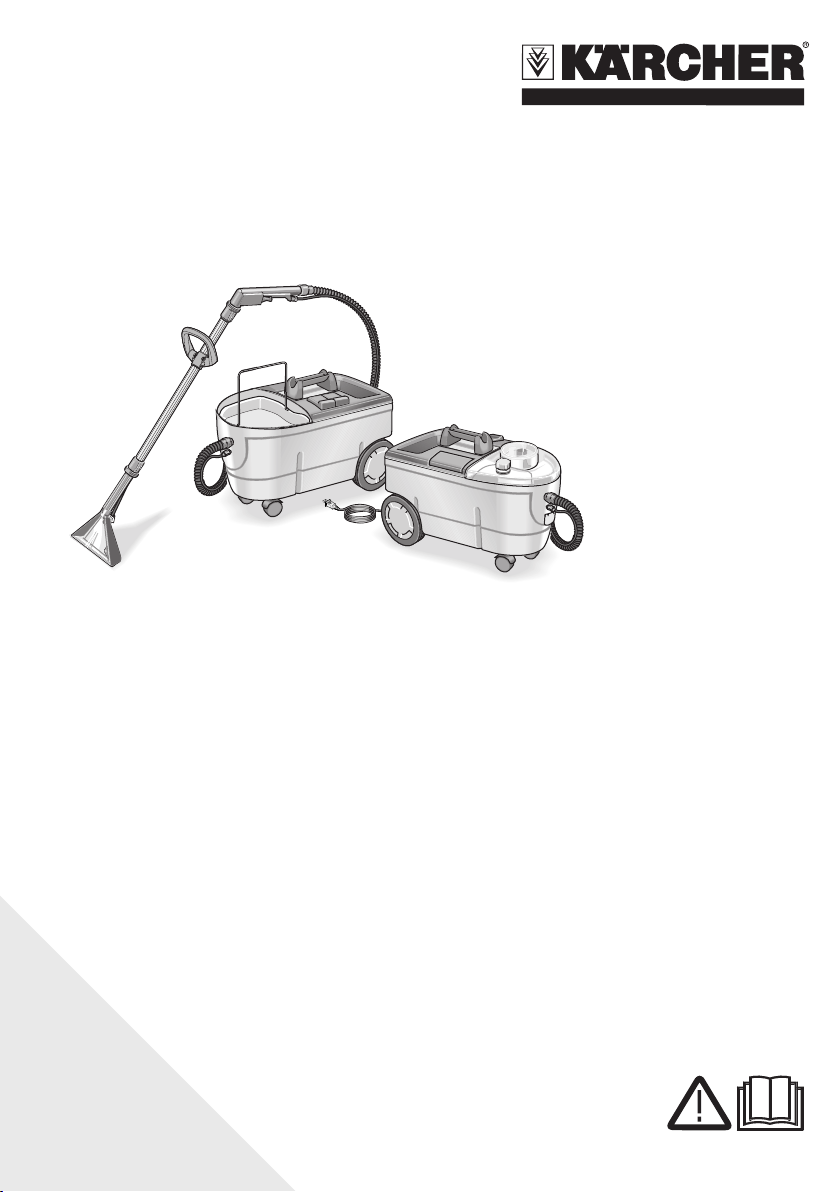
Puzzi 100
Puzzi 200
English 3
Français 11
Español 19
Register and win!
www.kaercher.com
59650230 03/13
Page 2
2
Page 3

IMPORTANT SAFETY
INSTRUCTIONS
READ ALL INSTRUCTIONS BEFORE
USING THIS MACHINE
Inform your dealer immediately if there
is any shipping damage.
Completely remove the accessories
from the box.
The machine is not suitable for sucking
up hazardous dusts as asbestos.
Please consult your Kärcher branch or
your Kärcher dealer with regard to such
applications.
Only operate the appliance from a
grounded outlet. Refer to the Technical
data for the necessary main fuse.
When using an electrical machine, basic
precautions should always be followed, including the following: This appliance is intended for commercial use.
1 DISCONNECT APPLIANCE FROM
POWER CIRCUIT before removing the
cover, performing maintenance work,
and when not in use.
2 DO NOT LEAVE the machine unattend-
ed when plugged in.
3 ALWAYS CHECK THE POWER SUP-
PLY CORD for damage or signs of any
aging before each use.
4 DO NOT PULL OR CARRY APPLI-
ANCE BY CORD. Do not use cord as a
handle. Keep cord away from heated
surfaces or fire. Do not close door on
cord or pull cord around sharp edges.
5 KEEP CORD AWAY FROM HEAT AND
OIL. Do not leave cord lying around after job is complete. It can become a tripping hazard.
6 DO NOT RUN MACHINE OVER
CORD.
7 TURN SWITCH TO OFF before unplug-
ging power supply cord.
8 DO NOT UNPLUG BY PULLING
CORD. To unplug, grasp plug, not cord.
9 DO NOT GRASP PLUG WITH WET
HANDS.
10 A DAMAGED CORD OR PLUG should
only be replaced by an authorized service center representative. DO NOT ATTEMPT TO REPAIR POWER CORD.
11 TO AVOID SHOCK, do not expose to
rain. Store indoors.
12 USE ONLY AS RECOMMENDED BY
THIS MANUAL. Use only with recommended attachments.
13 KEEP HAIR, CLOTHING, LOOSE
JEWELRY, FINGERS and all parts of
the body away from openings and moving parts.
14 DO NOT BLOCK OR OBSTRUCT
OPENINGS. Keep openings free of lint,
hair, dust, and anything that restricts air
flow.
15 DO NOT PICK UP ANYTHING THAT IS
BURNING, smoldering, or smoking such
as matches, cigarettes, or hot ashes.
16 DO NOT USE TO VACUUM COMBUS-
TIBLE EXPLOSIVE MATERIALS, such
as coal, grain, and other finely divided
combustible material.
17 DO NOT USE TO VACUUM COMBUS-
TIBLE, hazardous, toxic, or carcinogenic materials, including gasoline, diesel
fuel, acetone, paint thinner, heating oils,
undiluted acids and solvents, pesticide,
and asbestos.
18 DO NOT ALLOW THE APPLIANCE TO
BE USED AS A TOY. Keep children
away.
19 DO NOT LEAVE UNATTENDED while
Machine is running.
20 DO NOT USE IF CORD, PLUG OR MA-
CHINE IS IN POOR CONDITION. If the
Appliance has been dropped, damaged, exposed to weather, or dropped
into water; have it checked by an authorized service.
21 ALWAYS USE EYE PROTECTION
when operating the machine.
22 USE EXTRA CAUTION when operating
on stairs.
23 STAY ALERT! Do not use the machine
when you are tired or under the influence of drugs, alcohol or medication.
3EN
Page 4

SAVE THESE INSTRUCTIONS
This appliance is intended for
commercial use.
SAFETY INSTRUCTIONS
Servicing of double-insulated machines
In a double-insulated machine, two systems of insulation are provided instead of
grounding. No grounding means is provided on a double-insulated machine, nor
should a means for grounding be added to
the machine. Servicing a double-insulated
machine requires extreme care and knowledge of the system, and should be done
only by qualified service personnel. Replacement parts for a double-insulated machine must be identical to the parts they
replace.
4 EN
Page 5
Please read and comply with
these original instructions prior
to the initial operation of your appliance and
store them for later use or subsequent owners.
– The non-compliance of the operating
and safety instructions may lead to
damages of the appliance and to dangers for the operator and other persons.
– In case of transport damage inform ven-
dor immediately
Contents
Environmental protection . . EN . . .1
Symbols in the operating in-
structions . . . . . . . . . . . . . . EN . . .1
Proper use . . . . . . . . . . . . . EN . . .1
Device elements. . . . . . . . . EN . . .2
Start up. . . . . . . . . . . . . . . . EN . . .2
Operation . . . . . . . . . . . . . . EN . . .2
Cleaning methods . . . . . . . EN . . .3
Shutting down . . . . . . . . . . EN . . .4
Transport . . . . . . . . . . . . . . EN . . . 4
Storage. . . . . . . . . . . . . . . . EN . . .4
Maintenance and care . . . . EN . . .4
Troubleshooting . . . . . . . . . EN . . .5
Accessories and Spare Parts EN . . .5
Warranty. . . . . . . . . . . . . . . EN . . .5
Technical specifications . . . EN . . .6
Environmental protection
The packaging material can be
recycled. Please do not throw
the packaging material into
household waste; please send it
for recycling.
Old appliances contain valuable
materials that can be recycled;
these should be sent for recycling. Batteries, oil, and similar
substances must not enter the
environment. Please dispose of
your old appliances using appropriate collection systems.
Notes about the ingredients (REACH)
You will find current information about the
ingredients at:
www.kaercher.com/REACH
Symbols in the operating in-
structions
Danger
Immediate danger that can cause severe
injury or even death.
몇 Warning
Possible hazardous situation that could
lead to severe injury or even death.
Caution
Possible hazardous situation that could
lead to mild injury to persons or damage to
property.
Proper use
This device is intended for commercial use
as a wet cleaning device for carpets as depicted in these operating instructions as
well as in the descriptions and safety notes
in the enclosed brochure "Safety indications for brush cleaning devices and spray
extraction devices".
– 1
5EN
Page 6
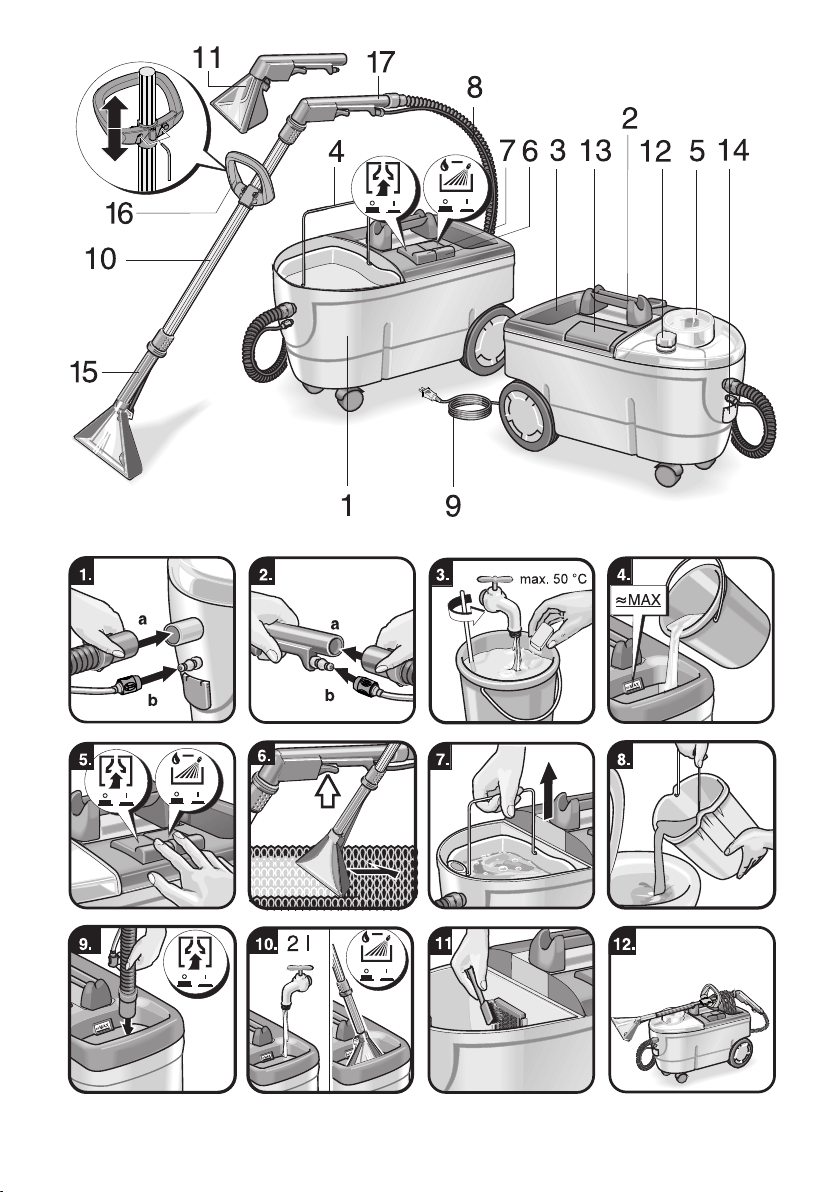
Device elements
Illustrations on Page 2
1 Casing
2 Carrying handle
3 Fresh water tank with sieve
4 Dirt water reservoir, removable
5 Cover
6 Switch for spraying
7 Switch for vacuuming
8 Spray/suction hose
9 Power cord
10 Suction pipe
11 Manual nozzle for upholstery cleaning
(option)
12 Container for defoamer (Puzzi 200)
13 Storage container for detergent tabs
(Puzzi 200)
14 Additional socket for professional PW
10
15 Floor nozzle for carpet cleaning
16 Handle
17 Bender
Start up
Place suction pipe over floor nozzle and
tighten union joint on the floor nozzle
fingertight (left thread).
Caution
While connecting make sure that the spray
tubes meet in the suction pipe and the floor
nozzle.
If needed, slide handle onto suction
pipe and attach in the desired position
using the enclosed hexagon socket
wrench.
Place the elbow over the suction pipe
and tighten the union joint on the elbow
fingertight.
Caution
While connecting make sure that the spray
tubes meet in the suction pipe and the elbow.
Illustrations on Page 2
Insert the suction hose into the suction
hose connection on the appliance.
Insert the coupling of the fresh water
hose into the fresh water connection of
the appliance and lock into place.
see Figure 1
Connect the suction hose to bender of
the manual nozzle.
Connect the coupling of the fresh water
hose to the bender and lock into place.
see Figure 2
The manual nozzle for upholstery cleaning
(not included) is attached directly to the
suction hose without the use of an elbow.
Selecting the nozzle
Carpeting Floor nozzle
(9.1 in/230 mm)
Upholstery, wall rugs,
automobile interior
cleaning
Stairs Carpet nozzle *
* not included in the delivery
Manual nozzle
(4.3 in/110 mm) *
Operation
Illustrations on Page 2
Mix fresh water and detergent in a clean
container (use the concentration recommended for the detergent).
see Figure 3
몇 Warning
Health risk, risk of damage. Observe all indications on the detergent used.
Note: Warm water (max. 122°F/50°C) will
increase the cleaning effect.
Note: For considerate treatment of the environment use detergent economically.
Fill detergent solution into the fresh wa-
ter reservoir. The fill level must not exceed the "MAX" mark.
see Figure 4
Insert dirt water reservoir into the appli-
ance and attach lid.
Plug in the main plug.
6 EN
– 2
Page 7

Press the suction switch to turn on the
suction turbine.
Press the spray switch to turn on the de-
tergent pump.
see Figure 5
몇 Warning
Risk of damage. Check the object to be
cleaned prior to using the appliance in an
inconspicuous place for colour fastness
and water resistance.
Use the lever on the bender to spray on
detergent solution.
Run across the surface to be cleaned in
overlapping paths. Pull the nozzle back-
wards (do not push).
see Figure 6
In case of work interruptions, the floor
nozzle can be stored in the handle.
see Figure 12
Empty the dirt water reservoir.
If the dirt water reservoir is full, switch
off the suction and spray switches.
Remove the lid.
Remove the dirt water reservoir from
the appliance and empty it.
see figures 7 and 8
Cleaning methods
Normal soiling
Spray and suction off detergent solution
in one work cycle.
Note: Repeated suctioning without spray-
ing will shorten the drying time.
Strong soiling or stains
Apply detergent solution with suction
turbine turned off and soak for 10 to 15
minutes.
Clean the surface just like with normal
soiling.
In order to further improve the cleaning
result, the surface can be recleaned us-
ing clear, warm water.
Cleaning tips
– Highly soiled spots should be pre-
soaked and the detergent solution
should soak 5 to 10 minutes.
– Always work from the light to the shade
(from the window to the door).
– Always work from the cleaned to the un-
cleaned surface.
– The more sensitive the surface (oriental
rugs, berbers, upholstery material) the
lower the cleaning solution concentration should be.
– Rugs with jute backing can shrink if too
much water is used and can bleed colours.
– Brush high-fiber rugs in the direction of
the weave after cleaning (using a fiber
brush or a scrubber).
– Water-proofing the fabric using Care
Tex RM 762 after the wet cleaning prevents a quick resoiling of the textile surface.
– Do not step on cleaned surfaces until
they have dried and do not place furniture on them to avoid pressure spots or
rust stains.
– When cleaning previously shampooed
carpets, foam will be generated in the
dirt water reservoir. In such a case add
Foam ex RM 761 to the dirt water reservoir.
Detergent
Carpet and upholstery
cleaning
Defoaming RM 760
Waterproofing carpets RM 762
Mite removal RM 765 Mitex
If you require further information please request the product information sheet and the
DIN safety data sheet for the respective
cleaning agent.
RM 760 powder
RM 760 tabs
RM 764 liquid
– 3
7EN
Page 8

Shutting down
Transport
Empty the fresh water reservoir
Switch off the spray and suction switch-
es.
Shortly activate the lever on bender to
decrease the pressure.
Separate bender from the spray/suction
hose.
Remove the lid.
Insert the suction hose into the fresh
water reservoir.
see Figure 9
Press the suction switch to turn on the
suction turbine.
Empty the fresh water reservoir and
switch the appliance off.
Remove the dirt water reservoir from
the appliance and empty it.
Cleaning the device
Connect the bender (with suction pipe
and nozzle) to the suction hose.
Connect the coupling of the fresh water
hose to the bender and lock into place.
Fill approx. 0.5 gal (2 litres) of fresh wa-
ter into the fresh water reservoir.
Do not add any detergents.
Place nozzle into the dirt water reser-
voir.
Press the spray switch to turn on the de-
tergent pump.
see Figure 10
Activate lever on bender and flush the
appliance for appr. 1 to 2 minutes.
Turn off the appliance.
Disconnect the mains plug from the
socket.
Remove the dirt water reservoir from
the appliance and empty it.
Clean the external surfaces of the appli-
ance.
Caution
Risk of injury and damage! Observe the
weight of the appliance when you transport
it.
For transport, place suction pipe on the
carrying handle and attach spray/suction hose to hook.
When transporting in vehicles, secure
the appliance according to the guidelines from slipping and tipping over.
Storage
Caution
Risk of injury and damage! Note the weight
of the appliance in case of storage.
This appliance must only be stored in interior rooms.
Maintenance and care
Danger
Danger of injury by electric shock.
First pull out the plug from the mains before
carrying out any tasks on the machine.
Check high power cable, extension ca-
bles and hoses for damage every time
before use.
Remove all water from the appliance
prior to longer periods of non-use to
avoid offensive odours.
Clean the sieve in the fresh water reser-
voir and the lint trap next to the dirt water reservoir regularly.
see Figure 11
8 EN
– 4
Page 9

Troubleshooting
Danger
– Danger of injury by electric shock.
First pull out the plug from the mains be-
fore carrying out any tasks on the ma-
chine.
– Get the electrical components checked
and repaired only by authorised cus-
tomer service persons.
– Contact an authorised customer service
person in case of problems not men-
tioned in this chapter or if you are in
doubt or when you have been explicitly
asked to do so.
No water exiting from nozzle
Fill up fresh water reservoir.
Check couplings on the fresh water
hose for proper connection.
Detach nozzle attachment and remove,
clean or replace nozzle.
Clean the sieve in the fresh water reser-
voir.
Detergent pump defective, contact Cus-
tomer Service.
Spray stream one-sided
Clean nozzle mouthpiece.
Insufficient vacuum performance
Check the correct positioning of the lid.
Clean seal on lid and surface on the ap-
pliance.
Clean the fluff filter.
Check suction hose for blockages;
clean if required.
Detergent pump noisy
Fill up fresh water reservoir.
Accessories and Spare Parts
– Only use accessories and spare parts
which have been approved by the manufacturer. The exclusive use of original
accessories and original spare parts
ensures that the appliance can be operated safely and trouble free.
– At the end of the operating instructions
you will find a selected list of spare parts
that are often required.
– For additional information about spare
parts, please go to the Service section
at www.kaercher.com.
Warranty
The warranty terms published by the relevant sales company are applicable in each
country. We will repair potential failures of
your appliance within the warranty period
free of charge, provided that such failure is
caused by faulty material or defects in manufacturing. In the event of a warranty claim
please contact your dealer or the nearest
authorized Customer Service centre.
Please submit the proof of purchase.
– 5
9EN
Page 10
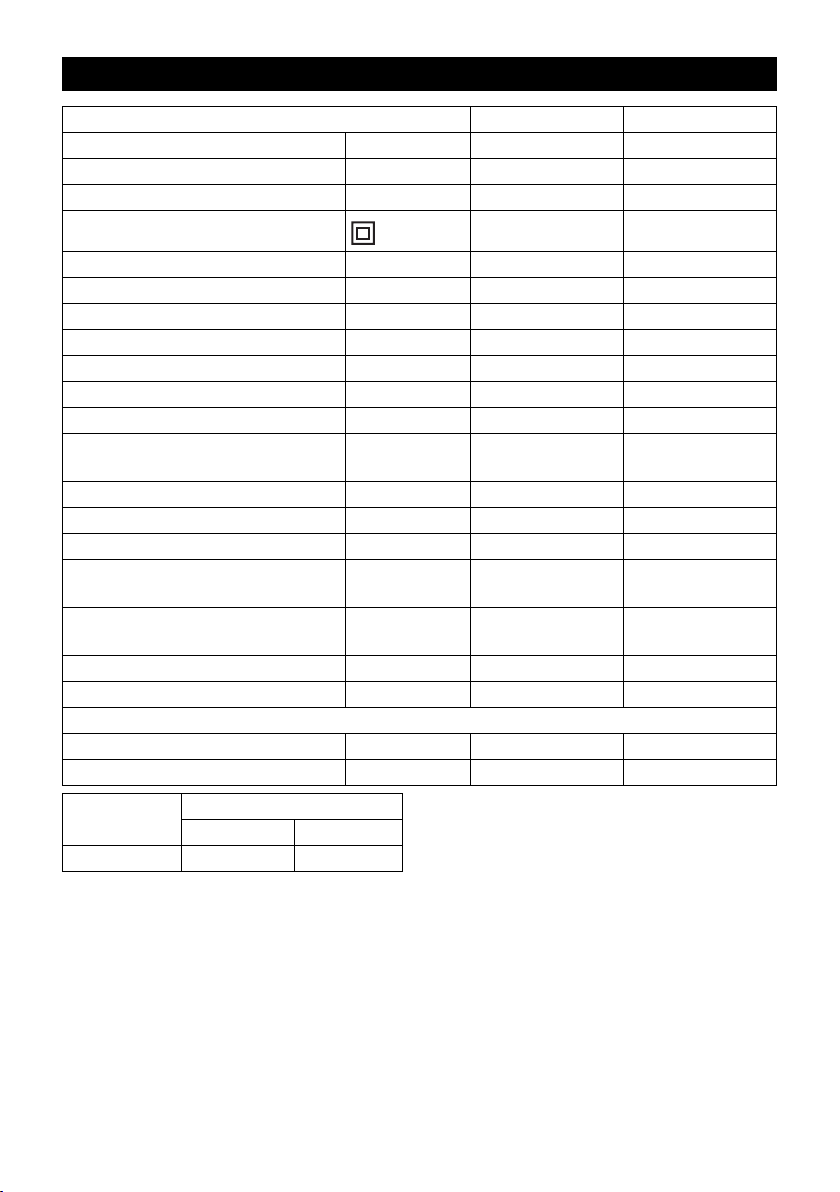
Technical specifications
Puzzi 100 Puzzi 200
Mains voltage V 120 120
Frequency Hz 1~ 50/60 1~ 50/60
Type of protection -- IPX4 IPX4
Protective class II II
Rated current A 9 9
Air volume (max.) CFM (l/s) 114 (54) 114 (54)
Negative pressure (max.) mm (kPa) 2240 (22.0) 2240 (22.0)
Spray pump performance W 40 80
Spray pressure psi (MPa) 14.5 (0.1) 29.0 (0.2)
Spray pressure (max.) psi (MPa) 43.5 (0.3) 43.5 (0.3)
Spray volume gal/min (l/min) 0.26 (1) 0.53 (2)
Temperature of the cleaning solu-
tion (max.)
Container capacity gal (l) 3.7 (14) 3.7 (14)
Filling quantity of fresh water gal (l) 2.6 (10) 2.6 (10)
Fill volume wastewater gal (l) 2.4 (9) 2.4 (9)
Appliance socket performance
(max)
Length x width x height in (mm) 26.0 x 12.5 x 17.0
Typical operating weight lbs (kg) 22.5 (10.2) 26.5 (12.0)
Max. ambient temperature °F (°C) 104 (+40) 104 (+40)
Values determined to EN 60335-2-68
Sound pressure level L
Uncertainty K
pA
pA
Power cord SJTW 2/16 AWG
Part no.: Cable length
CUL 6.647-967.0 25 ft (7.5 m)
°F (°C) 122 (+50) 122 (+50)
W 250 250
26.0 x 12.5 x 17.0
(665 x 320 x 435)
(665 x 320 x 435)
dB(A) 68 68
dB(A) 1 1
10 EN
– 6
Page 11

CONSIGNES DE SÉCURITÉ
IMPORTANTES
OBSERVEZ LES POINTS SUIVANTS
AVANT LA MISE EN SERVICE DE
L’APPAREIL
En cas de dommages dus au transport,
veuillez en informer immédiament votre
revendeur.
Sortir tous les accessoires du carton.
L’appareil ne convient pas pour aspirer
des poussières nocvives comme p. ex.
l’amiante. Pour de telles applications,
veuillez vous adresser à votre repré-
sentation Kärcher ou à votre revendeur
Kärcher.
N'utiliser l'appareil que s'il est raccordé
à une prise reliée à la terre. Se reporter
aux caractéristiques techniques au su-
jet du fusible principal nécessaire.
Il convient de toujours respecter les
consignes de sécurité de base lors de l'utilisation d'un appareil électrique. En
d'autres termes : Cet appareil est destiné à
une utilisation commerciale.
1 DEBRANCHER L'APPAREIL DE L'ALI-
MENTATION ELECTRIQUE avant de
retirer le cache, effectuer des opéra-
tions d'entretien ou lorsque l'appareil
n'est pas utilisé.
2 Ne laissez pas l’appareil sans surveil-
lance tant qu’il est branché.
3 TOUJOURS VÉRIFIER QUE LE COR-
DON D’ALlMENTATlON n’est ni vieilli,
ni abîmé‚ avant chaque usage.
4 NE PAS TIRER OU PORTER L'APPA-
REIL PAR LE CABLE. Ne pas se servir
du câble comme d'une poignée. Tenir le
cordon à l'écart des surfaces chaudes
ou des flammes. Ne pas fermer de
porte sur le câble, ni le passer autour
des angles saillants.
5 NE PAS METTRE LE CORDON À LA
CHALEUR OU DANS DE L’HUILE. Ne
pas laisser le cordon traîner par terre
après la fin du travail. Il pourrait provo-
quer une chute.
6 NE PAS ECRASER LE CABLE AVEC
LES ROUES D'UNE MACHINE.
7 METTRE L’INTERRUPTEUR SUR
avant de débrancher l’appareil.
8 NE PASTIRER SUR LE CORDON
POUR DÈBRANCHER l’appareil. Tirer
sur la prise.
9 NE PAS SAISIR LA PRISE AVEC DES
MAINS MOUILLÉES.
10 SI LE CORDON OU LA PRISE EST
ABÎMÉ, le faire remplacer par un agent
d’un centre de service agréé uniquement. NE PAS ESSAYER DE RÉPARER SOI-MÊME.
11 POUR ÉVITER TOUT CHOC ÉLEC-
TRIQUE, ne pas laisser l’appareil sous
la pluie. Le stocker à l’intérieur.
12 N'UTILISER L'APPAREIL QUE
COMME IL EST CONSEILLÉ DANS
CE MODE D’EMPLOI. Utiliser exclusivement les accessoires recommandés.
13 ÉLOIGNER LES CHEVEUX, LES VÊ-
TEMENTS, LES BIJOUX FLOTTANTS,
LES DOIGTS et toutes les parties du
corps des ouvertures et des pièces mobiles.
14 NE PAS FERMER OU OBSTRUER
LES OUVERTURES. Enlever les peluches, cheveux, poussières et tout ce
qui pourrait gêner le passage de l’air.
15 NE PAS AGRÉER D’OBJETS EN FEU,
rougissants ou dégageant de la fumée
tels que des allumettes, des cigarettes
ou des cendres chaudes.
16 NE PAS ASPIRER DE MATÉRIAUX
COMBUSTIBLES EXPLOSIFS, tels
que charbon, grains et autres matériaux
combustibles finement divisés.
17 NE PAS ASPIRER DE MATÉRIAUX
COMBUSTIBLES, dangereux, toxiques
ou cancérigènes comme l’essence, le
gas-oil, l’acétone, les diluants à peinture, le fuel domestique, les acides et
les solvants non dilués, les pesticides et
l’amiante.
18 NE PAS LAISSER D'ENFANTS
JOUER AVEC L'APPAREIL. Tenir les
enfants à l'écart.
11FR
Page 12

19 NE PAS LAISSER SANS SURVEIL-
LANCE tant que la machine fonctionne.
20 NE PAS UTILISER SI LE CABLE, LA
FICHE OU LA MACHINE SONT EN-
DOMMAGES. Si l'appareil est tombé, a
été endommagé, exposé aux intempé-
ries ou immergé dans l'eau, le faire vé-
rifier par un service autorisé.
21 OUJOURS UTILISER DES PROTEC-
TIONS OCULAIRES lors de l'utilisation
de la machine.
22 REDOUBLER DE PRUDENCE pour
l’utilisation dans un escalier.
23 RESTER VIGILANT ! Ne pas utiliser la
machine en état de fatigue ou sous l'in-
fluence de drogues, d'alcool ou de mé-
dicaments.
CONSERVER CES CONSIGNES
Cet appareil est destiné à une utilisation
commerciale.
CONSIGNES DE SÉCURITÉ
Entretien des appareils à doubleisolation
Dans un appareil à double isolation, deux
isolations distinctes remplacement la mise
à la terre. L’appareil à double isolation n’est
pourvu d’aucun dispositif de mise à la terre
et un tel dispositif ne doit pas être ajouté.
L’entretien d’un appareil à double isolation
dermande beaucoup de soins ainsi qu’une
bonne connaissance du système et net devrait être effectué que par un technicien
d’entretien qualifié. Les pièces de rechange d’un appareil à double isolation
doivent être identiques aux pièces originales.
12 FR
Page 13

Lire ces notice originale avant la
première utilisation de votre appareil, se comporter selon ce qu'elles requièrent et les conserver pour une
utilisation ultérieure ou pour le propriétaire
futur.
– En cas de non-respect des instructions
de service et des consignes de sécurité, l'appareil risque de subir des dommages matériel et l'utilisateur ainsi que
toute tierce personne sont exposés à
des dangers potentiels.
– Contactez immédiatement le revendeur
en cas d'avarie de transport.
Table des matières
Protection de l’environnement FR . . .1
Symboles utilisés dans le mode
d'emploi . . . . . . . . . . . . . . . FR . . .1
Utilisation conforme . . . . . . FR . . . 1
Éléments de l'appareil . . . . FR . . .2
Mise en service . . . . . . . . . FR . . .2
Utilisation . . . . . . . . . . . . . . FR . . . 2
Méthodes de nettoyage . . . FR . . .3
Mise hors service . . . . . . . . FR . . .4
Transport . . . . . . . . . . . . . . FR . . .4
Entreposage. . . . . . . . . . . . FR . . .4
Entretien et maintenance . . FR . . .4
Assistance en cas de panne FR . . .5
Accessoires et pièces de re-
change . . . . . . . . . . . . . . . . FR . . .5
Garantie . . . . . . . . . . . . . . . FR . . .5
Caractéristiques techniques FR . . .6
Protection de l’environne-
ment
Les matériaux constitutifs de
l’emballage sont recyclables.
Ne pas jeter les emballages
dans les ordures ménagères,
mais les remettre à un système
de recyclage.
Les appareils usés contiennent
des matériaux précieux recyclables lesquels doivent être apportés à un système de
recyclage. Il est interdit de jeter
les batteries, l'huile et les substances similaires dans l'environnement. Pour cette raison,
utiliser des systèmes de collecte
adéquats afin d'éliminer les appareils hors d'usage.
Instructions relatives aux ingrédients
(REACH)
Les informations actuelles relatives aux ingrédients se trouvent sous :
www.kaercher.com/REACH
Symboles utilisés dans le
mode d'emploi
Danger
Pour un danger immédiat qui peut avoir
pour conséquence la mort ou des blessures corporelles graves.
몇 Avertissement
Pour une situation potentiellement dangereuse qui peut avoir pour conséquence des
blessures corporelles graves ou la mort.
Attention
Pour une situation potentiellement dangereuse qui peut avoir pour conséquence des
blessures légères ou des dommages matériels.
Utilisation conforme
Cet appareil d'extraction par pulvérisation
est destiné à une utilisation professionnelle
en tant qu'appareil de lavage humide pour
les moquettes, conformément aux descriptions et consignes de sécurité des présentes instructions de service et des
consignes de sécurité pour les appareils de
nettoyage à brosse et les appareils d'extraction par pulvérisation.
– 1
13FR
Page 14

Éléments de l'appareil
Illustrations voir page 2
1 Boîtier
2 Poignée de transport
3 Réservoir d'eau propre avec tamis
4 Réservoir d'eau sale, amovible
5 Capot
6 Commutateur vaporiser
7 Commutateur aspirer
8 Flexible de pulvérisation / aspiration
9 Câble d’alimentation
10 Tuyau d'aspiration
11 Buse manuelle pour le nettoyage de
meubles capitonnés (option)
12 Réservoir pour produit de démoussage
(Puzzi 200)
13 Compartiment de rangement pour dé-
tergent en pastilles (Puzzi 200)
14 Prise de courant supplémentaire pour
tête de lavage professionnelle PW 10
15 Buse de sol pour le nettoyage de tapis
16 Poignée
17 Coude
Mise en service
Enficher le tube d'apiration et serrer
l'écrou-raccord sur la buse de sol à la
main (filetage vers la gauche).
Attention
Lors de l'enfichage, veiller que la conduite
de pulvérisation dans le tube d'aspiration et
dans la buse de sol coïncident.
Si nécessaire, pousser la poignée sur le
tube d'aspiration et la visser dans la po-
sition souhaitée avec la clé à six pans
creux jointe.
Enficher le coude sur le tube d'aspira-
tion et serrer l'écrou-raccord sur le
coude à la main.
Attention
Lors de l'enfichage, veiller que la conduite
de pulvérisation dans le tube d'aspiration et
dans le coude coïncident.
Illustrations voir page 2
Enficher le flexible d'aspiration sur le
raccord de flexible d'aspiration de l'appareil.
Enficher et enclencher l'accouplement
du flexible d'eau propre sur le raccord
d'eau propre de l'appareil.
voir la figure 1
Connecter le flexible d'aspiration avec
le coude de la buse manuelle.
Connecter et enclencher l'accouple-
ment du flexible d'eau propre avec le
coude.
cf. Illustration 2
La buse manuelle pour le nettoyage de
meubles capitonnés (ne faisant pas partie
de la fourniture) directement connectée
sans couce au flexible d'aspiration.
Sélection de l'injecteur
Moquette Buse pour sol
(9.1 in/230 mm)
Rembourrage, tapis
muraux, nettoyage intérieur voiture
Escaliers Buse d'Escalier *
* pas comprise dans l'étendue de livraison
Buse manuelle
(4.3 in/110 mm) *
Utilisation
Illustrations voir page 2
Mélanger l'eau fraîche et le détergent
dans un récipient propre (concentration
selon les indications pour le détergent).
cf. figure 3
몇 Avertissement
Risque sanitaire, risque d'endommagement. Toutes les instructions qui sont
jointes aux détergents utilisés doivent être
respectées.
Remarque : L'eau chaude (maximum
122°F/50°C) augmente l'efficacité du nettoyage.
Remarque : Respecter l'environnement en
utilisant le détergent avec parcimonie.
14 FR
– 2
Page 15

Remplir la solution de nettoyage dans
le réservoir d'eau propre. Le niveau de
remplissage ne doit pas dépasser le re-
père "MAX".
cf. figure 4
Déposer le réservoir d'eau sale dans
l'appareil et mettre le couvercle en
place.
Brancher la fiche secteur.
Appuyer sur le commutateur Aspirer
pour la mise en service de la turbine.
Appuyer sur le commutateur Vaporiser
pour la mise en service de la pompe à
détergent.
cf. figure 5
몇 Avertissement
Risque d'endommagement. Contrôler l'objet à nettoyer avant la mise en oeuvre de
l'appareil à un endroit discret à la résistance de la couleur et la résistance à l'eau.
Actionner le levier sur le coude pour va-
poriser la solution de nettoyage.
Parcourir la surface à nettoyer en
bandes qui se chevauchent. Tirer ce
faisant la buse vers l'arrière (ne pas
pousser).
cf. figure 6
En cas d'interruptions du travail, la buse
de sol peut être posée dans la poignée.
voir la figure 12
Vider le réservoir d'eau sale
Si le réservoir d'eau sale est plein, cou-
per le commutateur Aspirer et le com-
mutateur Vaporiser.
Retirer le couvercle.
Sortir le réservoir d'eau chaude l'appa-
reil et le vider.
voir les figures 7 et 8
Méthodes de nettoyage
Salissures normales
Vaporiser la solution de nettoyage et
l'aspirer dans une étape de travail.
Remarque : Une aspiration ultérieure renouvelée sans vaporisation raccourcit la
durée de séchage.
Forte salissure ou tâches
Appliquer la solution de nettoyage avec
turbine hors service et laisser agir pendant 10 à 15 minutes.
Nettoyer la surface comme avec la sa-
leté normale.
Pour encore améliorer le résultat du
nettoyage, si nécessaire, rincer une
nouvelle fois la surface à l'eau claire
chaude.
Conseils de nettoyage
– Vaporiser sur les endroits fortement sa-
lis au préalable et laisser agir la solution
de nettoyage 5 à 10 minutes.
– Travailler toujours de la lumière vers
l'ombre (de la fenêtre vers la porte).
– Toujours travailler de la surface net-
toyée vers la surface à nettoyer.
– Plus le revêtement est sensible (ponts
orientaux, berbère, tissu de rembourrage), plus les concentrations de détergent doivent être faibles.
– La moquette avec chanvre peut se ré-
tracter avec le travail humide et laisser
s'écouler de la teinte.
– Brosser les tapis à poils longs dans le
sens du poil après le nettoyage en état
humide (par ex. avec un balai-brosse
ou un balai à tapis).
– Une imprégnation avec Care Tex RM
762 après le nettoyage humide empêche une nouvelle salissure rapide du
revêtement textile.
– Ne parcourir ou disposer des meubles
sur la surface nettoyée qu'après le séchage pour empêcher les points d'appui ou les tâches de rouille.
– Lors du nettoyage des moquettes
shampouinées au préalable, de la
mousse apparaît dans le réservoir
d'eau sale. Dans ce cas, ajouter de la
mousse ex RM 761 dans le réservoir
d'eau sale.
– 3
15FR
Page 16

Produit détergent
Nettoyage des tapis et
rembourrages
Démoussage RM 760
Imprégnation du tapis RM 762
Destruction des aca-
riens
Pour de plus amples informations, veuillez
demander le formulaire d'information produit et la fiche technique de sécurité DIN du
détergent concerné.
Poudre RM 760
RM 760 Tabs
Remplir avec du
RM 764 fluide
RM 765 Mitex
Mise hors service
Vider le réservoir d'eau propre
Couper le commutateur vaporiser et le
commutateur aspirer.
Actionner brièvement le levier sur le
coude pour réduire la pression.
Séparer le coude du flexible de vapori-
sation / aspiration.
Retirer le couvercle.
Accrocher le flexible d'aspiration dans
le réservoir d'eau propre.
cf. figure 9
Appuyer sur le commutateur Aspirer
pour la mise en service de la turbine.
Vider le réservoir d'eau propre par aspi-
ration et mettre l'appareil hors service.
Sortir le réservoir d'eau chaude l'appa-
reil et le vider.
Nettoyage de l’appareil
Connecter le coude (avec flexible d'as-
piration et la buse) avec le flexible d'as-
piration
Connecter et enclencher l'accouple-
ment du flexible d'eau propre avec le
coude.
Remplir environ 0.5 gal (2 litres) d'eau
du robinet dans le réservoir d'eau
propre.
Ne pas ajouter de détergent.
16 FR
Disposer la buse dans le réservoir
d'eau sale.
Appuyer sur le commutateur Vaporiser
pour la mise en service de la pompe à
détergent.
voir la figure 10
Actionner le levier suz le coude et rincer
l'appareil pendant 1 à 2 minutes.
Mettre l’appareil hors tension.
Retirer la fiche secteur de la prise de
courant.
Sortir le réservoir d'eau chaude l'appa-
reil et le vider.
Nettoyer l'appareil à l'extérieur.
Transport
Attention
Risque de blessure et d'endommagement !
Respecter le poids de l'appareil lors du
transport.
Pour le transport, poser le flexible d'as-
piration sur la poignée et insérer le
tuyau d'aspiration / de vaporisation
dans le crochet.
Sécuriser l'appareil contre les glisse-
ments ou les basculements selon les directives en vigueur lors du transport
dans des véhicules.
Entreposage
Attention
Risque de blessure et d'endommagement !
Prendre en compte le poids de l'appareil à
l'entreposage.
Cet appareil doit uniquement être entreposé en intérieur.
Entretien et maintenance
Danger
Risque d'électrocution.
Avant d'effectuer tout type de travaux sur
l'appareil, le mettre hors service et débrancher la fiche électrique.
Contrôler un éventuel endommage-
ment du câble d'alimentation, de la rallonge et des flexibles avant chaque
mise en service.
– 4
Page 17

Pour éviter les gênes par émission
d'odeur avant des périodes d'immobili-
sation prolongée, retirer la totalité de
l'eau de l'appareil.
Nettoyer régulièrement le filtre dans le
réservoir d'eau propre et le filtre à pe-
luches à côté du réservoir d'eau sale.
cf. Illustration 11
Assistance en cas de panne
Danger
– Risque d'électrocution.
Avant d'effectuer tout type de travaux
sur l'appareil, le mettre hors service et
débrancher la fiche électrique.
– Seul le service après-vente autorisé est
habilité à contrôler et réparer les com-
posants électriques.
– S'il se produit des défauts qui ne sont
pas répertoriés dans ce chapitre, en
cas de doute ou si cela est explicite-
ment indiqué, s'adresser à un service
après-vente autorisé.
Il ne sort pas d'eau à la buse
Remplir le réservoir d'eau propre.
Contrôler le bon serrage des em-
brayages sur le flexible d'eau propre.
Débloquer la fixation de la buse et la
sortir, nettoyer la buse ou la remplacer.
Nettoyer le filtre dans le réservoir d'eau
propre.
Pompe à détergent défectueuse, se
rendre au service après-vente.
Acier de vaporisation d'un côté
Nettoyer le nez de buse.
Puissance d'aspiration insuffisante
Vérifier le positionnement correct du
couvercle.
Nettoyer le joint sur le couvercle et la
surface d'appui sur l'appareil.
Nettoyer le tamis à peluches.
Contrôler si les flexibles d'aspiration
sont bouchés, en cas de besoin net-
toyer.
Pompe à détergent faisant du bruit
Remettre le réservoir d'eau propre à ni-
veau.
Accessoires et pièces de re-
change
– Utiliser uniquement des accessoires et
des pièces de rechange autorisés par le
fabricant. Des accessoires et des
pièces de rechange d’origine garantissent un fonctionnement sûr et parfait
de l’appareil.
– Une sélection des pièces de rechange
utilisées le plus se trouve à la fin du
mode d'emploi.
– Plus information sur les pièces de re-
change vous les trouverez sous
www.kaercher.com sous le menu Service.
Garantie
Dans chaque pays, les conditions de garantie en vigueur sont celles publiées par
notre société de distribution responsable.
Les éventuelles pannes sur l’appareil sont
réparées gratuitement dans le délai de validité de la garantie, dans la mesure où
celles-ci relèvent d'un défaut matériel ou
d'un vice de fabrication. En cas de recours
en garantie, adressez-vous à votre revendeur ou au service après-vente agréé le
plus proche munis de votre preuve d'achat.
– 5
17FR
Page 18

Caractéristiques techniques
Puzzi 100 Puzzi 200
Tension du secteur V 120 120
Fréquence Hz 1~ 50/60 1~ 50/60
Type de protection -- IPX4 IPX4
Classe de protection II II
Courant nominal A 9 9
Débit d'air (maxi) CFM (l/s) 114 (54) 114 (54)
Dépression (maxi) mm (kPa) 2240 (22.0) 2240 (22.0)
Puissance de la pompe de vapori-
sation
Pression de vaporisation psi (MPa) 14.5 (0.1) 29.0 (0.2)
Pression de vaporisation (maxi.) psi (MPa) 43.5 (0.3) 43.5 (0.3)
Débit de vaporisation gal/min (l/min) 0.26 (1) 0.53 (2)
Température de la solution de net-
toyage (maxi)
Capacité de la cuve gal (l) 3.7 (14) 3.7 (14)
Plein d'eau propre gal (l) 2.6 (10) 2.6 (10)
Plein d'eau sale gal (l) 2.4 (9) 2.4 (9)
Puissance de la prise de l'appareil
(maxi)
Longueur x largeur x hauteur in (mm) 26.0 x 12.5 x 17.0
Poids de fonctionnement typique lbs (kg) 22.5 (10.2) 26.5 (12.0)
Température ambiante (maxi) °F (°C) 104 (+40) 104 (+40)
Valeurs définies selon EN 60335-2-68
Niveau de pression sonore L
Incertitude K
Câble d’alimentation
pA
SJTW 2/16 AWG
Référence Longueur de
CUL 6.647-967.0 25 ft (7.5 m)
W40 80
°F (°C) 122 (+50) 122 (+50)
W 250 250
26.0 x 12.5 x 17.0
(665 x 320 x 435)
dB(A) 68 68
pA
(665 x 320 x 435)
dB(A) 1 1
câble
18 FR
– 6
Page 19

INSTRUCCIONES
IMPORTANTES DE
SEGURIDAD
ANTES DE LA PRIMERA PUESTA EN
MARCHA DEL APARATO DEBERÁN
OBSERVARSE LOS SIGUIENTES
PUNTOS
Si al desembalar el aparato comproba-
ra Vd. algún daño o desperfecto en el
mismo atribuible al transporte, rogamos
se dirija inmediatamente al distribuidor
en donde adquirió el aparato.
Extraiga la totalidad de las piezas y ac-
cessorios del aparato que se encuen-
tran en el recipiente del mismo o en la
caja de cartón del embalaje.
El aparato no es aspropiado para la as-
piración de polvos nocivos para la sa-
lud, como por ejemplo amianto. Para
este tipo de aplicaciones deberá poner-
se en contacto con su Distribuidor o la
Delegación Nacional de Kärcher.
Operar el dispositivo solo con un en-
chufe de toma a tierra. Consultar los
datos técnicos para el fusible principal
necesario.
Al utilizar esta máquina eléctrica es impres-
cindible observar algunas precauciones
básicas, incluidas las siguientes: Este dispositivo está diseñado para uso comercial.
1 DESCONECTAR EL DISPOSITIVO DE
LA CORRIENTE antes de quitar la cu-
bierta, realizar trabajo de mantenimien-
to y cuando no esté en uso.
2 NO DEJAR EL APARATO sin vigilan-
cia, mientras esté enchufado.
3 SIEMPRE VERIFIQUE QUE EL CA-
BLE ELECTRICO no esté dañado o
desperfecto antes de usar el aparato.
4 NO TIRAR DEL CABLE PARA TRANS-
PORTAR EL DISPOSITIVO. No usar el
cable como asa. Mantener el cable ale-
jado de superficies calientes o fuego.
No cerrar la puerta con el cable o pasar
el cable por esquinas afiladas.
5 NO EXPONGA EL CABLE A LO CA-
LIENTE NI A ACEITES. Para prevenir
un tropiezo, no deje el cable suelto después de usarlo.
6 NO PASAR LA MÁQUINA POR ENCI-
MA DEL CABLE.
7 PONGA EL SELECTOR EN LA POSI-
CION DE <<OFF>> antes de desenchufar el aparato.
8 NO DESENCHUFE EL CABLE DE UN
TIRON (Jalón). Para desenchufarle
agarre la clavija (enchufe) no el cable.
9 NO AGARRE LA CLAVIJA (ENCHUFE)
CON LAS MANOS MOJADAS.
10 EL CABLE ELECTRICO (O LA CLAVI-
JA) sólo debe ser reemplazado por un
representante de un Centro de Servicio
Autorizado. SE NINGUNA MANERA
DEBE INTENTAR LA REPARACION
DEL CABLE ELECTRICO.
11 PARA PREVENIR CHOQUES ELEC-
TRICOS, no exponga la herramienta a
la lluvia. Guárdela en un luger seco.
12 SOLO USE EL APARATO COMO
ESTA RECOMENDADO EN ESTE MANUAL. También use únicamente los accesorios recomendados.
13 MANTENGA ALEJADOS EL CABE-
LLO (PELO), ROPA, ALHAJAS SUELTAS, DEDOS o cualquier otra parte del
cuerpo, de las aberturas y partes móviles de la máquina.
14 NO CUBRA NI OBSTRUYA LAS
ABERTURAS. Mantenga las aberturas
libres de pelusa, pelo, polvo y cualquier
cosa que limite la circulación del aire.
15 NO ACOGE NINGUNA COSA QUE SE
ESTE QUEMANDO, ardiendo sin llama
o echando humo, tal como cigarrillos
(cigarros), fósforos (cerillos) o cenizas
calientes.
16 NO ASPIRE MATERIALES COMBUS-
TIBLES O EXPLOSIVOS, tal como carbón de piedra, cereales (o su polvo) u
otra sustancia fina y combustible.
19ES
Page 20

17 NO ASPIRE MATERIALES COMBUS-
TIBLES, peligrosos, tóxicos o carcinó-
genos por ejemplo: gasolina, gasoil
(petróleo para diesel), acetona, diluente
para pintura, aceite combustible, ácidos
y disolventes no diluidos, pesticidas y
amianto (asbesto).
18 NO PERMITA QUE EL APARATO SE
USE COMO JUGUETE. Mantener ale-
jado de los niños.
19 NO DEJAR LA MÁQUINA SIN SUPER-
VISIÓN cuando esté en funcionamien-
to.
20 NO USAR SI EL CABLE; EL ENCHUFE
O LA MÁQUINA ESTÁN EN MAL ES-
TADO. Si el aparato se ha caído, daña-
do, dejado al aire libre o caído al agua,
solicite a un servicio autorizado que lo
examine.
21 USAR SIEMPRE GAFAS DE SEGURI-
DAD cuando se opere la máquina.
22 USE EXTREMA PRECAUCION al lim-
piar escaleras.
23 ¡ESTAR ATENTO! No usar la máquina
si está cansado o bajo la influencia de
alcohol, drogas o medicación.
CONSERVE ESTAS INSTRUCCIONES
Mantenimiento del aparato dotados de
doble aislamiento
Un aparato dotado de doble aislamiento incorpora dos sistemas de aislamiento en lugar de la puesta a tierra. Es decir, el
aparato dotado de doble aislamiento no incorporan ningún conductor ni dispositivo
de puesta a tierra ni hay que acoplar a dicionalmente a los mismos una puesta a tierra. Los trabajos de mantenimiento de un
aparato dotado de un sistema de doble aislamiento requieren unos conocimientos
particularmente amplios y completos de dicho dispositivo y del aparato en cuestión,
debiendo ser ejecutados exclusivamente
por personal especializado del Servicio
Técnico Postventa Oficial. En caso de tener que sustituir piezas o componentes defectuosos del aparato de doble
aislamiento, las piezas de repuesto deberán ser idénticas a las piezas defectuosas.
Este dispositivo está diseñado para uso
comercial.
INSTRUCCIONES DE SEGURIDAD
20 ES
Page 21

Antes del primer uso de su apa-
rato, lea este manual original,
actúe de acuerdo a sus indicaciones y
guárdelo para un uso posterior o para otro
propietario posterior.
– El incumplimiento de las instrucciones
de uso y de las indicaciones de seguridad puede provocar daños en el aparato y poner en peligro al usuario y a otras
personas.
– En caso de daños de transporte infor-
me inmediatamente al fabricante.
Índice de contenidos
Protección del medio ambiente ES . . .1
Símbolos del manual de ins-
trucciones. . . . . . . . . . . . . . ES . . .1
Uso previsto . . . . . . . . . . . . ES . . .1
Elementos del aparato . . . . ES . . .2
Puesta en marcha . . . . . . . ES . . .2
Manejo . . . . . . . . . . . . . . . . ES . . .2
Métodos de limpieza . . . . . ES . . .3
Puesta fuera de servicio. . . ES . . .4
Transporte . . . . . . . . . . . . . ES . . .4
Almacenamiento . . . . . . . . ES . . .4
Cuidados y mantenimiento. ES . . .4
Ayuda en caso de avería . . ES . . .5
Accesorios y piezas de repues-
to . . . . . . . . . . . . . . . . . . . . ES . . .5
Garantía . . . . . . . . . . . . . . . ES . . .5
Datos técnicos . . . . . . . . . . ES . . .6
Protección del medio ambien-
te
Los materiales empleados para
el embalaje son reciclables y recuperables. No tire el embalaje
a la basura doméstica y entréguelo en los puntos oficiales de
recogida para su reciclaje o recuperación.
Los aparatos viejos contienen
materiales valiosos reciclables
que deberían ser entregados
para su aprovechamiento posterior. Evite el contacto de baterías, aceites y materias
semejantes con el medio ambiente. Por este motivo, entregue los aparatos usados en los
puntos de recogida previstos
para su reciclaje.
Indicaciones sobre ingredientes
(REACH)
Encontrará información actual sobre los ingredientes en:
www.kaercher.com/REACH
Símbolos del manual de ins-
trucciones
Peligro
Para un peligro inminente que acarrea lesiones de gravedad o la muerte.
몇 Advertencia
Para una situación que puede ser peligrosa, que puede acarrear lesiones de gravedad o la muerte.
Precaución
Para una situación que puede ser peligrosa, que puede acarrear lesiones leves o
daños materiales.
Uso previsto
Este aparato de extracción por pulverización está diseñado para el uso comercial
como dispositivo de limpieza en húmedo
para moquetas, de acuerdo con este manual de instrucciones así como en las indicaciones de seguridad para dispositivos de
limpieza con cepillos y dispositivos pulverizadores.
– 1
21ES
Page 22

Elementos del aparato
Ilustraciones, véase la página 2
1 Carcasa
2 Asa de transporte
3 Depósito de agua limpia con filtro
4 Depósito de agua sucia, extraíble
5 Tapa
6 Interruptor pulverizar
7 Interruptor aspirar
8 Manguera pulverizadora/de aspiración
9 Cable de conexión a la red
10 Tubo de aspiración
11 Boquilla manual para la limpieza de ta-
picería (opcional)
12 Recipiente para el producto de quitar la
espuma (Puzzi 200)
13 Guantera de almacenamiento para las
pastillas de detergente (Puzzi 200)
14 Clavija adicional para el cabezal de la-
vado profesional PW 10
15 Boquilla para suelos para la limpieza de
moquetas
16 Mango
17 Codo
Puesta en marcha
Insertar el tubo de absorción en la bo-
quilla para suelos y apretar con la mano
la tuerca de racor de la boquilla para
suelos (rosca izquierda).
Precaución
Al insertar se debe procurar que el conducto de pulverización coincida en el tubo de
absorción y la boquilla para suelos.
Si es necesario, deslice el mango en el
tubo de absorción y atorníllelo en la po-
sición deseada con la llave Allen inclui-
da.
Colocar el codo en el tubo de absorción
y apretar con la mano la tuerca de racor
del codo.
Precaución
Al insertar se debe procurar que el conducto de pulverización coincida en el tubo de
absorción y el codo.
Ilustraciones, véase la página 2
Insertar la manguera de aspiración en
la toma para manguera de aspiración
del aparato.
Insertar el acoplamiento de la manguera de agua limpia en la toma de agua
limpia del aparato y encajarlo.
véase la figura 1
Conectar la manguera de aspiración
con el codo de la boquilla manual.
Conectar el acoplamiento de la man-
guera de agua limpia con el codo y encajarlo.
véase la figura 2
La boquilla manual para limpiar tapicerías
(no viene incluida) se conecta sin codo directamente con la manguera de absorción.
Selección de boquilla
Moquetas Boquilla barredo-
ra de suelos
(9.1 in/230 mm)
Limpieza de tapicería,
tapices de paredes y
tapicería de coches
Escaleras Boquilla para es-
* no incluido en el volumen de suministro
Boquilla para tapicerías y limpieza
manual (4.3 in/
110 mm) *
caleras *
Manejo
Ilustraciones, véase la página 2
Mezclar agua limpia y detergente en un
recipiente limpio (concentración de
acuerdo con las indicaciones para el
detergente).
véase la figura 3
몇 Advertencia
Peligro para la salud, peligro de daños. Se
deben respetar todas las indicaciones que
incluyen los detergentes.
Indicación: El agua caliente aumenta
(máx. 122°F/50°C) el efecto de limpieza.
Indicación: Utilice los detergentes con
moderación para no perjudicar el medio
ambiente.
22 ES
– 2
Page 23

Introducir la solución con detergente en
el depósito de agua limpia. El nivel no
debe superar la marca "MAX".
véase la figura 4
Colocar el depósito de agua sucia en el
aparato y colocar la tapa.
Enchufe la clavija de red.
Pulsar el interruptor aspirar para conec-
tar la turbina de aspiración.
Pulsar el interruptor pulverizar para co-
nectar la bomba de detergente.
véase la figura 5
몇 Advertencia
Peligro de daños en la instalación. Controlar el objeto a limpiar antes de utilizar el
aparato para ver si el color resiste y si es
resistente al agua.
Para pulverizar solución de detergente,
activar la palanca del codo.
Pasar por la zona a limpiar en tramos
que se solapen. Al hacerlo no tire de la
boquilla hacia atrás (no deslizar).
véase la figura 6
Durante las interrupciones de trabajo
se puede colocar la boquilla para sue-
los en el asa.
véase la figura 12
Vaciar el depósito para agua sucia
Si el depósito de agua sucia está lelno,
desconectar el interruptor aspirar y el
interruptor pulverizar.
Quitar la tapa.
Sacar el depósito para agua sucia del
aparato y vaciarlo.
véase las ilustraciones 7 y 8
Métodos de limpieza
Suciedad normal
Pulverizar solución con detergente y
aspirarla en un sólo paso.
Indicación: Una nueva aspiración reduce
el tiempo de secado.
Gran suciedad o manchas
Aplicar la solución de limpieza con la
turbina de aspiración desconectada y
dejar actuar de 10 a 15 minutos.
Limpiar la superficie como si la sucie-
dad fuese normal.
Para mejorar el resultado de limpieza,
volver a limpiar la superficie con agua
limpia y caliente.
Consejos de limpieza
– Pulverizar primero las zonas que estén
muy sucias y dejar actuar la solución de
detergente de 5 a 10 minutos.
– Trabajar siempre desde la luz a la som-
bra (desde la ventana a la puerta).
– Trabajar siempre de la zona limpia a la
sucia.
– Cuanto más delicado sea el pavimento
(puentes orientales, berebere, tapicería), menor debe ser la concetración de
detergente.
– Las moquetas con yute pueden enco-
ger al trabajar en húmedo y decolorar.
– Las alfombras de pelo alto se deben ce-
pillar en la dirección del pelo en estado
húmedo (p.ej. con una escoba para
pelo o un frotador).
– Si se impregna con Care Tex RM 762
después de la limpieza en húmedo se
evita que se vuelva a ensuciar rápidamente el tejido.
– Pasar por encima de la superficie que
ha sido limpiada o poner muebles encima cuando esté seca para evitar puntos de presión o manchas de óxido.
– Al limpiar moquetas que hayan sido tra-
tadas con champú previamente, se forma espuma en el depósito de agua
sucia. En este caso, introducir la espuma ex RM 761 en el depósito de agua
sucia.
– 3
23ES
Page 24

Detergente
Limpieza de moquetas y
tapicerías
Quitar la espuma RM 760
Impregnación de mo-
quetas
Eliminación de ácaros RM 765 Mitex
Para obtener más información, solicitar la
hoja de información del producto y la hoja
de datos de seguridad según DIN del detergente correspondiente.
RM 760 Polvo
RM 760 Tabs
RM 764 líquido
RM 762
Puesta fuera de servicio
Vaciar el depósito de agua limpia
Desconectar los interruptores pulveri-
zar y aspirar.
Activar brevemente la palanca del codo
para disminuir la presión.
Separar el codo de la manguera de pul-
verizar/aspirar.
Quitar la tapa.
Colgar la manguera de aspiración en el
depósito de agua limpia.
véase la figura 9
Pulsar el interruptor aspirar para conec-
tar la turbina de aspiración.
Aspirar el depósito de agua limpia has-
ta que esté vacio y desconectar el apa-
rato.
Sacar el depósito para agua sucia del
aparato y vaciarlo.
Limpieza del aparato
Conectar el codo con la manguera de
aspiración (con tubo de aspiración y bo-
quilla).
Conectar el acoplamiento de la man-
guera de agua limpia con el codo y en-
cajarlo.
Rellenar el depósito de agua fresca con
aprox. 0.5 gal (2 litros) de agua limpia.
No añadir detergente.
Colocar la boquilla en el depósito de
agua sucia.
Pulsar el interruptor pulverizar para co-
nectar la bomba de detergente.
véase la figura 10
Activar la palanca del codo y enjuagar
el aparato de 1 a 2 minutos.
Desconexión del aparato
Saque el enchufe de la toma de corrien-
te.
Sacar el depósito para agua sucia del
aparato y vaciarlo.
Limpiar el exterior del aparato.
Transporte
Precaución
¡Peligro de lesiones y daños! Respetar el
peso del aparato para el transporte.
Para transportar colocar el tubo de as-
piración sobre la empuñadura y colocar
la manguera de pulverización/aspiración en el gancho.
Al transportar en vehículos, asegurar el
aparato para evitar que resbale y vuelque conforme a las directrices vigentes.
Almacenamiento
Precaución
¡Peligro de lesiones y daños! Respetar el
peso del aparato en el almacenamiento.
Este aparato sólo se puede almacenar en
interiores.
Cuidados y mantenimiento
Peligro
Peligro de lesiones por descarga eléctrica.
Antes de efectuar cualquier trabajo en el
aparato, hay que desconectar de la red
eléctrica.
Comprobar si tienen daños el cable de
alimentación, cable alargador y mangueras antes de cada puesta en marcha.
Para evitar los olores, vaciar toda el
agua del aparato antes de largas paradas.
24 ES
– 4
Page 25

Limpiar regularmente el tamiz del depó-
sito de agua limpia y el de pelusas junto
al depósito de agua sucia.
véase la figura 11
Ayuda en caso de avería
Peligro
– Peligro de lesiones por descarga eléc-
trica.
Antes de efectuar cualquier trabajo en
el aparato, hay que desconectar de la
red eléctrica.
– En caso de avería, la reparación de las
piezas eléctricas sólo debe efectuarla
el servicio técnico autorizado.
– En caso de averías que no se mencio-
nen en este capítulo, consulte al servi-
cio técnico oficial en caso de duda y si
se indica explícitamente.
No sale agua de la boquilla
Llenar el depósito de agua limpia.
Comprobar que los acoplamientos de la
manguera de agua limpia está bien co-
locados.
Desencajar y extraer la fijación de la
boquilla, limpiar o cambiar la boquilla.
Limpie el tamiz del depósito de agua
limpia.
Bomba de detergente defectuosa, lla-
mar al servicio técnico.
Chorro de pulverización por un solo
lado
Limpiar el orificio de la boquilla.
Potencia de aspiración insuficiente
Comprobar si la tapa está bien coloca-
da.
Limpiar la junta de la tapa y superficie
de apoyo del aparato.
Limpiar el filtro de pelusas.
Comprobar si los tubos de aspiración
están atascados, si es necesario lim-
piar.
Bomba de detergente muy ruidosa
Rellenar el depósito de agua limpia.
Accesorios y piezas de re-
puesto
– Sólo deben emplearse accesorios y
piezas de repuesto originales o autorizados por el fabricante. Los accesorios
y piezas de repuesto originales garantizan el funcionamiento seguro y sin averías del aparato.
– Podrá encontrar una selección de las
piezas de repuesto usadas con más
frecuencia al final de las instrucciones
de uso.
– En el área de servicios de www.kaer-
cher.com encontrará más información
sobre piezas de repuesto.
Garantía
En todos los países rigen las condiciones
de garantía establecidas por nuestra empresa distribuidora. Las averías del aparato
serán subsanadas gratuitamente dentro
del periodo de garantía, siempre que se deban a defectos de material o de fabricación.
En un caso de garantía, le rogamos que se
dirija con el comprobante de compra al distribuidor donde adquirió el aparato o al servicio al cliente autorizado más próximo a su
domicilio.
– 5
25ES
Page 26

Datos técnicos
Puzzi 100 Puzzi 200
Tensión de red V 120 120
Frecuencia Hz 1~ 50/60 1~ 50/60
Categoria de protección -- IPX4 IPX4
Clase de protección II II
Corriente nominal A 9 9
Cantidad de aire (máx.) CFM (l/s) 114 (54) 114 (54)
Depresión (máx.) mm (kPa) 2240 (22.0) 2240 (22.0)
Potencia de la bomba pulverizado-raW40 80
Presión de pulverización psi (MPa) 14.5 (0.1) 29.0 (0.2)
Presión de pulverización (max.) psi (MPa) 43.5 (0.3) 43.5 (0.3)
Cantidad de pulverización gal/min (l/min) 0.26 (1) 0.53 (2)
Temperatura de la solución de lim-
pieza (máx.)
Capacidad del depósito gal (l) 3.7 (14) 3.7 (14)
Cantidad de llenado de agua lim-
pia
Cantidad de llenado de agua sucia gal (l) 2.4 (9) 2.4 (9)
Potencia del enchufe del aparato
(máx)
Longitud x anchura x altura in (mm) 26.0 x 12.5 x 17.0
Peso de funcionamiento típico lbs (kg) 22.5 (10.2) 26.5 (12.0)
Temperatura ambiente (máx.) °F (°C) 104 (+40) 104 (+40)
Valores calculados conforme a la norma EN 60335-2-68
Nivel de presión acústica L
Inseguridad K
Cable de conexión a la
pA
SJTW 2/16 AWG
No. de pieza Longitud del
pA
red
CUL 6.647-967.0 25 ft (7.5 m)
°F (°C) 122 (+50) 122 (+50)
gal (l) 2.6 (10) 2.6 (10)
W 250 250
(665 x 320 x 435)
dB(A) 68 68
dB(A) 1 1
cable
26.0 x 12.5 x 17.0
(665 x 320 x 435)
26 ES
– 6
Page 27

Puzzi 100 - Puzzi 200
27
Page 28

Puzzi 100 - Puzzi 200
28
Page 29

Page 30

Page 31

Page 32

http://www.kaercher.com/dealersearch
 Loading...