

Page 1
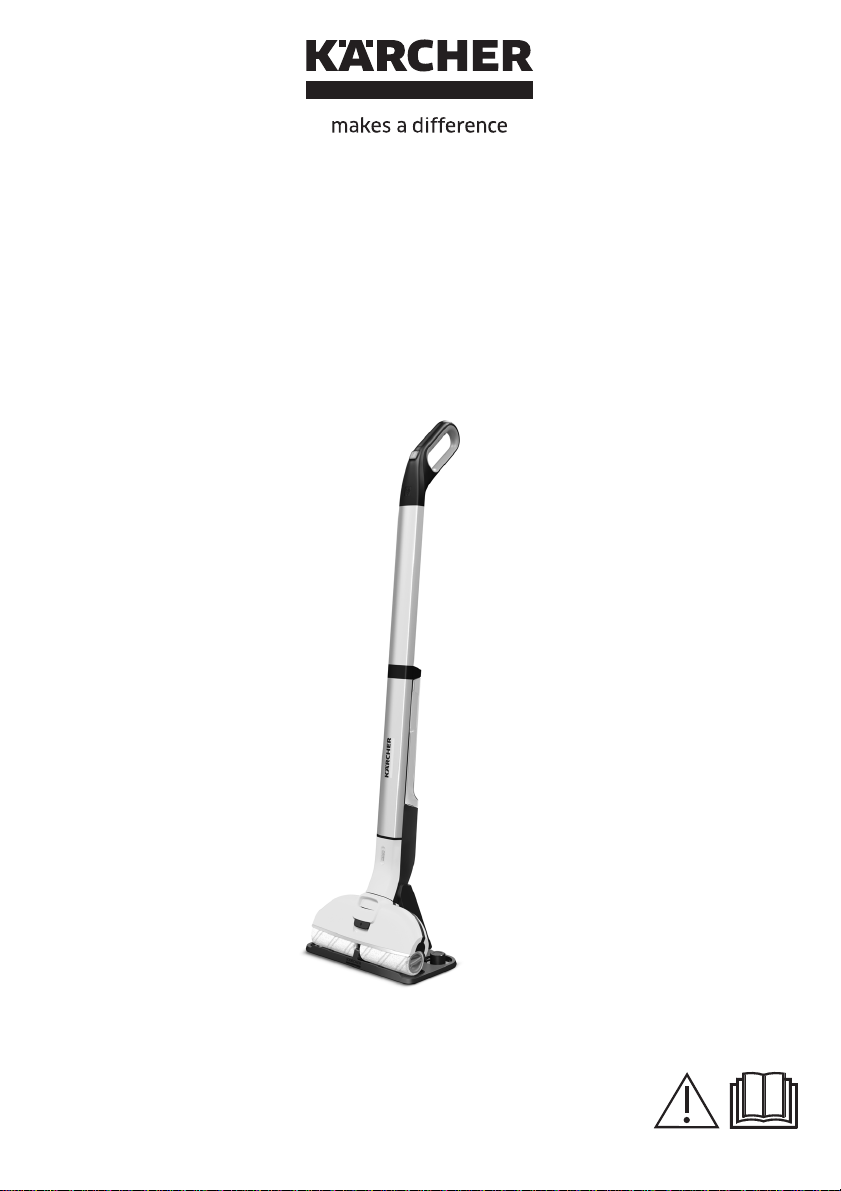
FC 3 Cordless
FC 3 Cordless Premium
59687970 (10/19)
Opera
ting Instructions
Please read the operating instructions
carefully before using the unit.
Page 2
1
.
2.
ON
1.
2.
OFF
3.
1
1.
2.
2
2
.
1.
3
1.
2.
4
4 h
5
1.
2.
6
7
1.
2.
3.
8 9
10
~ 2
Min.
1211
2
Page 3
.
13
.
1.
2.
14
15
2
2.
1.
3.
16 17
19 20
2.
22
2.
23 24
1.
18
2
21
1.
3
Page 4

25
26
1/2 x
(
ฬ 1 ml)
Shake well
1.
2.
27
俺
✓
FoamStop:
29
✓
29
28
俺
4
Page 5
10
11
9
9
17
6
7
12
13
14
15
18
RM
536
RM
534
16
RM
536
19
Foam
Stop
5
Page 6

– 6
Before using your appliance for the
first time, read these original operating
instructions, act in compliance with
them, and keep them for later use or
for subsequent owners.
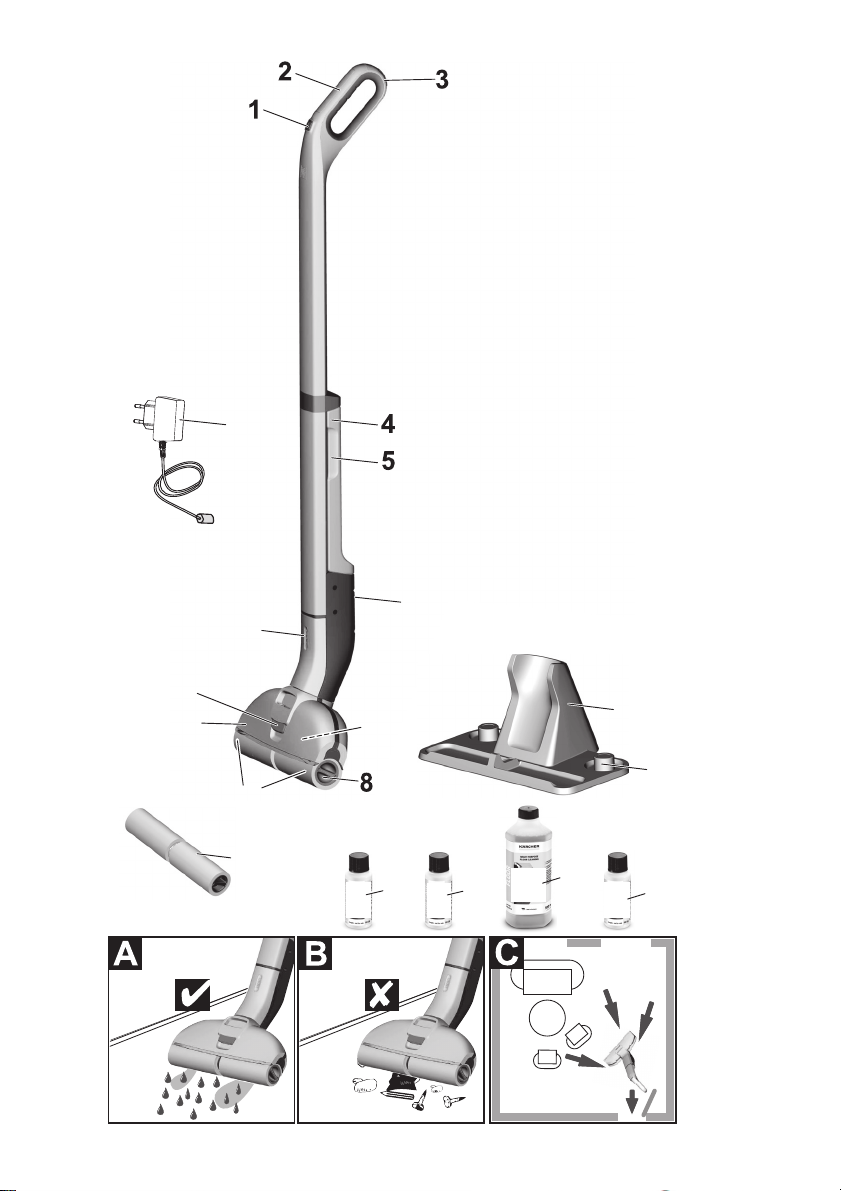
Use the floor cleaner exclusively for cleaning hard floors
in your private household and only on waterproof hard
floors.
Do not clean water-sensitive floor coverings such as untreated cork floors (the moisture could penetrate and
damage the floor).
The device is suitable for cleaning PVC, linoleum, tiled,
stone, oiled and waxed parquet, laminate and all waterresistant floor coverings.
The packaging material can be recycled. Please
do not place the packaging into the ordinary refuse for disposal, but arrange for the proper re-
cycling.
Old appliance contain valuable recyclable materials and substances that must not be released
into the environment. Thus, the appliance and
the accumulator contained must not be disposed of via the domestic waste. The disposal can take
place via locally available return and collection systems
free of charge.
Notes about the ingredients (REACH)
You will find current information about the ingredients
at:
www.kaercher.com/REACH
The scope of delivery of your appliance is illustrated on
the packaging. Check the contents of the appliance for
completeness when unpacking.
In the event of missing accessories or any transport
damage, please contact your dealer.
Only use original accessories and spare parts, they ensure the safe and trouble-free operation of the device.
For information about accessories and spare parts,
please visit www.kaercher.com.
The warranty terms published by the relevant sales
company are applicable in each country. We will repair
potential failures of your appliance within the warranty
period free of charge, provided that such failure is
caused by faulty material or defects in manufacturing. In
the event of a warranty claim please contact your dealer
or the nearest authorized Customer Service centre.
Please submit the proof of purchase.
(See address on the reverse)
– Apart from the notes con-
tained herein the general
safety provisions and rules
for the prevention of accidents of the legislator must be
observed.
– Warnings and notes that are
attached on the appliance
provide important notes for
the safe operation.
Contents
General information EN 6
Safety instructions EN 6
Description of the Appliance EN 10
Assembly EN 10
Commissioning EN 10
Operation EN 10
Care and maintenance EN 11
Troubleshooting EN 12
Technical specifications EN 14
Customer Service EN 14
General information
Proper use
Environmental protection
Scope of delivery
Spare parts
Warranty
Safety instructions
Symbols on the machine
DANGER
The device contains electrical
components and must therefore
never be held under running water or immersed in a container
containing water - even for
cleaning the device.
ATTENTION
Please adhere to the following procedure
for filling the fresh water tank during cleaning work:
1.
First empty the waste water tank.
2.
Then fill the fresh water tank.
6 EN
Page 7

– 7
DANGER
Pointer to immediate danger,
which leads to severe injuries or
death.
몇 WARNING
Pointer to a possibly dangerous
situation, which can lead to severe injuries or death.
몇 CAUTION
Pointer to a possibly dangerous
situation, which can lead to minor injuries.
ATTENTION
Pointer to a possibly dangerous
situation, which can lead to
property damage.
DANGER
Do not immerse the device
into water.
Check the faultless condition
of the appliance and the accessories before using it.
Otherwise, the appliance
must not be used.
Immediately replace the
charger with the charging cable in case of visible damage.
Turn off the appliance and re-
move the mains plug prior to
any care and maintenance
work.
Repair works may only be
performed by the authorized
customer service.
The appliance contains elec-
trical components - do not
clean under running water.
Do not insert conductive ob-
jects (such as screwdrivers or
the like) into the charging
socket.
Do not touch contacts or
wires.
The voltage indicated on the
type plate must correspond to
the supply voltage.
Do not scrape the power cord
across sharp edges and ensure that it does not get
pressed.
몇 WARNING
The appliance may only be
connected to an electric supply that has been installed by
an electrician in accordance
with IEC 60364.
The appliance may only be
connected to alternating current. The voltage must correspond with the type plate of
the appliance.
For safety reasons, we rec-
ommend that you operate the
appliance only via a earthleakage circuit breaker (max.
30 mA).
DANGER
Risk of electric shock.
Never touch the mains plug
and the socket with wet
hands.
Do not use the charger if dirty
or wet.
Do not operate the charger in
explosive environment.
Do not carry the charger by
holding the mains cable.
Hazard levels
Electric components
Charger
7EN
Page 8

– 8
Store and use the charger in
dry rooms only.
Protect the mains cable
against heat, sharp edges, oil
and moving parts of the machine.
Avoid using extension wires
with multiple sockets and simultaneous operation of multiple devices.
Do not pull the plug from the
socket by pulling the mains
cable.
Do not cover the charger and
keep the air vents of the
charger open.
Do not open the charger. Get
repairs done only by authorised experts.
Use the charger only to
charge approved battery
packs.
Immediately replace the
charger with the charging cable in case of visible damage.
DANGER
Risk of electric shock.
Do not expose the battery to
direct sunlight, heat or fire.
몇 WARNING
Charge the battery with the
enclosed original charger or a
charger approved by
KÄRCHER only.
Use the following adaptor:
Do not open the battery, as
there is a risk of an electrical
shock; also, irritating or caustic vapors can escape.
DANGER
The user must use the appli-
ance as intended. The person
must consider the local conditions and must pay attention
to other persons in the vicinity
when working with the appliance.
The appliance may not be op-
erated in explosive atmospheres.
If the appliance is used in
hazardous areas the corresponding safety provisions
must be observed.
Do not use the appliance if it
fell down, is visibly damaged
or leaking.
Keep packaging films away
from children, there is a risk of
suffocation!
몇 WARNING
The appliance must not be
operated by children or persons who have not been instructed accordingly.
This appliance is not intended
for use by persons with limited physical, sensory or mental capacities or lacking experience and/or skills, unless
such persons are accompanied and supervised by a person in charge of their safety
or they have received precise
instructions on the use of this
appliance and have understood the resulting risks.
Battery
PS02
Safe handling
8 EN
Page 9

– 9
Children must not play with
this appliance.
Supervise children to prevent
them from playing with the
appliance.
Keep appliance out of reach
of children as long as it is
switched on or hasn't cooled
down.
Cleaning and user mainte-
nance must not be performed
by children without supervision.
Operate or store the appli-
ance only in accordance with
the description or illustration!
몇 CAUTION
Create stability for the appli-
ance prior to any work on or
with the appliance to prevent
accidents or damage.
Never fill solvents, solvent-
containing liquids or undiluted
acids (e.g. detergents, petrol,
paint thinner, and acetone)
into the water reservoir as
these substances corrode the
materials used in the appliance.
Never leave the appliance
unattended as long as it is in
operation.
Keep parts of the body (e.g.
hair, fingers) away from the
rotating cleaning rollers.
Protect your hands when
cleaning the floor head due to
a danger of injury from sharp
objects (e.g. splinters).
Keep connection cable away
from heat, sharp edges, oil
and moving parts.
ATTENTION
Only switch on the appliance
when the fresh water tank
and waste water tank are fitted.
The device may not be used
for vacuuming sharp objects
or large objects (e.g. glass
shards, gravel, toy parts).
Do not fill the fresh water con-
tainer with vinegar, decalcification agents, essential oils
or similar substances. Also
take care to ensure that these
substances are not vacuumed.
Only use this appliance on
hard floors with waterproof
coatings (e. g. varnished parquet, enamelled tiles, Linoleum).
Do not use the appliance for
cleaning of carpets or carpeted floors.
Do not use the appliance over
the floor grilles of convector
heaters. The appliance is not
able to take in the water discharged when used above
grilles.
In case of longer breaks in
operation and after use,
switch off the device at the
main switch / device switch
and pull the charger’s mains
plug.
Do not operate the appliance
at temperatures below 0 °C.
9EN
Page 10

Protect the unit from rain. Do
not store outside.
Description of the Appliance
1 ON/OFF switch
2 Handle
3 Wall anti-slip handle
4 Fresh water tank
5 Fresh water tank recessed grip
6 Charging socket
7 Waste water tank
8 Recessed grip cleaning roller
9 Cleaning rollers
10 Floor head cover
11 Floor head cover lock
12 Battery indicator
13 Charger with charging cable
14 Parking station
15 Roller storage
16 * Detergent RM 536 30 ml
17 ** Detergent RM 534 30 ml
18 ** Detergent RM 536 500 ml
19 Defoamer FoamStop 30 ml
9 ** Cleaning rollers 2x
* FC 3 Cordless
** FC 3 Cordless Premium
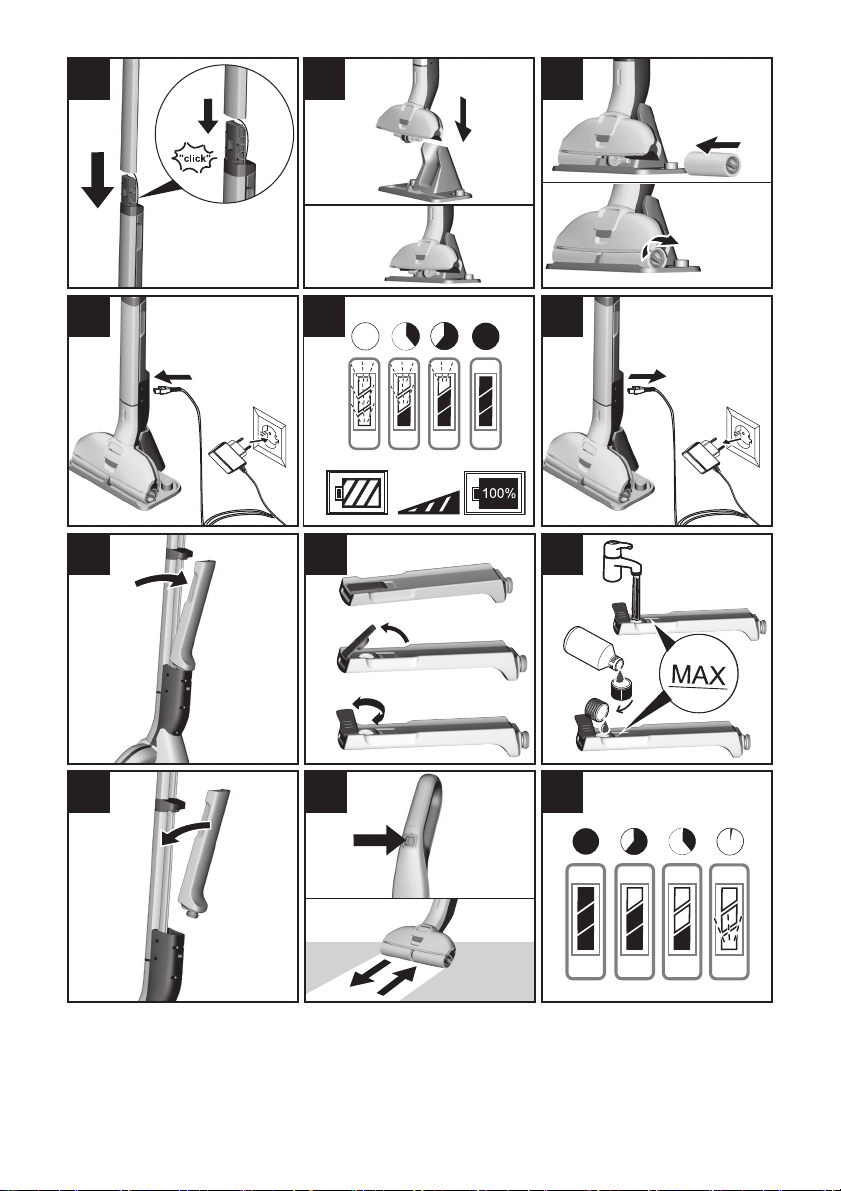
Assembly
ATTENTION
Take care to ensure that the power cable lies fully in the
guide rail before fitting the handle bar.
Illustration
Insert handle into the basic unit as far as it goes un-
til it engages audibly.
The handle must sit snugly into the appliance.
Commissioning
Illustration
Place the device in the parking station for safe stor-
age.
Installing the rollers
Illustration
Screw the cleaning rollers onto the threaded rod up
to the mechanical stop.
Pay attention to the colour-codes on the inside of
the roller and roller holder on the appliance (e.g.
blue should match up with blue).
After the installation, check to ensure that the
cleaning rollers sit snugly.
Charging process
Illustration
Plug the charging cable of the charger into the
charging socket on the device.
Plug the mains plug of the charger into a power out-
let.
Illustration
The LED indicator lights display the battery's cur-
rent charging state.
All 3 LED indicator lights flash from bottom to top
when charging a completely empty battery.
The lowermost LED lights up continuously when
the battery is 1/3 charged, the two upper LEDs continue to flash.
When the battery is 2/3 charged, the two lower
LEDs light up continuously, the uppermost LED
continues to flash.
After the battery has been fully charged, the 3 LED
indicator lights will continue to light constantly for
60 minutes. After this time, the LED indicator lights
go out.
Illustration
Once the battery is charged, pull the mains plug out
of the socket and the charging cable out of the
charging socket.
Fill fresh water reservoir
Illustration
Place the device in the parking station.
Illustration
Grasp the fresh water tank by the recessed grip
and remove it from the device.
Illustration
Open the tank cap and turn it to the side.
Illustration
Fill the fresh water tank with cold or lukewarm tap
water.
KÄRCHER detergents/care agents can also be
added to the fresh water tank as required.*
Do not exceed the "MAX" marking when filling.
Close tank lock.
Illustration
Insert the fresh water container into the appliance.
The fresh water tank must sit snugly into the appli-
ance.
ATTENTION
*Follow the recommended dosage instructions on the
detergent/care agent.
Operation
General information on the
operation
ATTENTION
Illustration
The device can only vacuum dried dirt and liquids (max.
140 ml).
Illustration
Brush or vacuum the floor before starting work. This removes dirt and loose particles from the floor before the
wet cleaning commences.
Before use, check the floor for water consistency at suspect areas. Do not clean water-sensitive coatings, such
as untreated cork floors (moisture ingress is possible
which may damage the floor).
Illustration
To avoid fresh footprints on the freshly-wiped floor, work
backwards towards the door.
Clean the floor by moving the appliance back and
forth at a similar speed as if you were vacuum
cleaning.
If the floor is especially dirty, let the appliance glide
slowly across the floor.
Pressure does not need to be exerted on the de-
vice.
10 EN
– 10
Page 11

For scope of delivery of the roller pads in grey and
yellow: Both roller pads have the same functionality, they can be used for different areas of application (colour distinction, e.g. for kitchen and bathroom).
Start working
ATTENTION
After switching on the appliance, the cleaning rollers will
begin to rotate. Hold the handle tight to prevent the appliance from moving forwards by itself.
Make sure the fresh water tank is filled with water and
the waste water tank is fitted in the appliance.
Illustration
To switch on the appliance press the on/off switch.
Move the unit back and forth several times until the
rollers are sufficiently moistened.
Battery service life
Illustration
– 3 LEDs illuminated - 3/3 battery run time (full run
time).
– 2 LEDs illuminated - 2/3 battery run time.
– 1 LEDs illuminated - 1/3 battery run time.
The lowermost LED starts to flash approx. 2 min-
utes before the battery has to be charged.
The last LED flashes quicker for 60 seconds when the
battery is empty and the device has switched off.
Refill detergent
ATTENTION
Before filling the fresh water tank, please empty the
waste water tank. In this way you can avoid overflowing
of the waste water tank.
See chapter "Filling the fresh water tank".
See Chapter "Emptying the waste water tank".
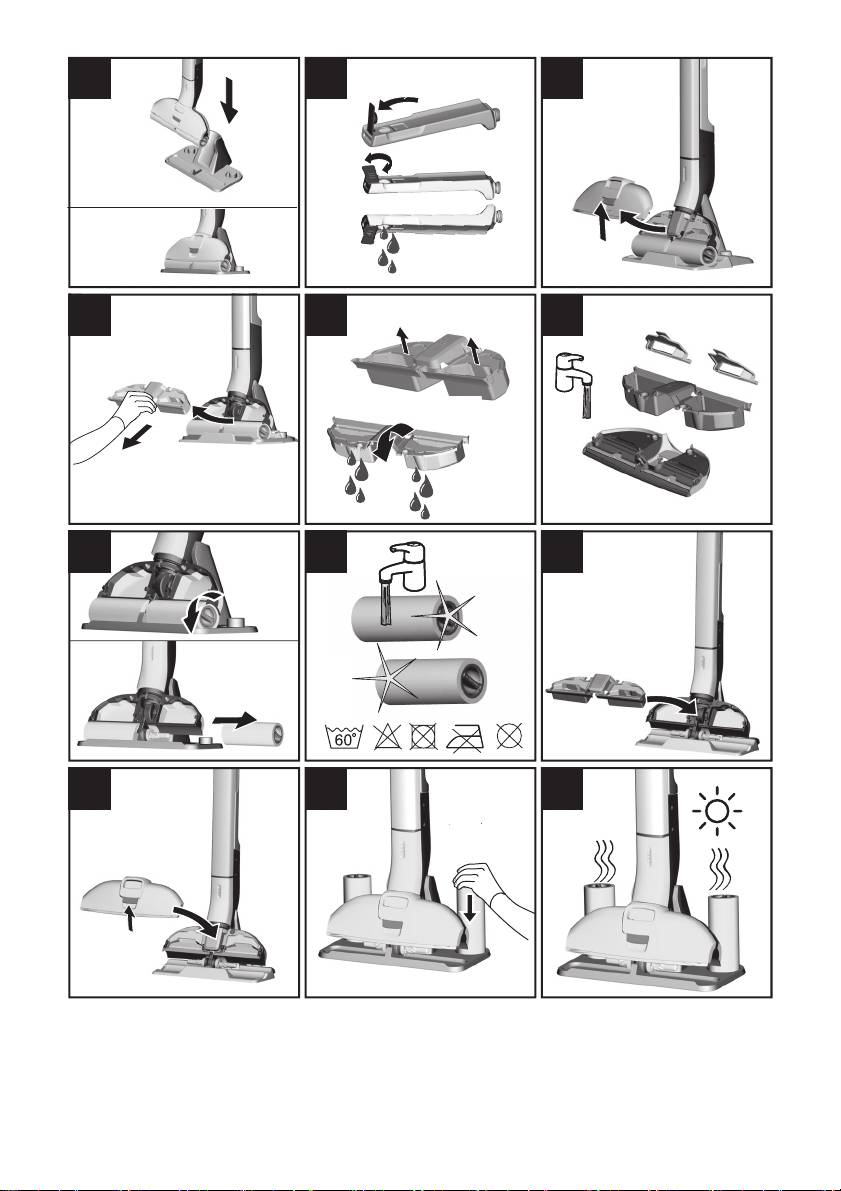
Emptying the waste Water tank
Illustration
Place the device in the parking station.
Illustration
Actuate the floor head cover latch.
Remove the floor head cover.
Illustration
Remove the waste water tank from the floor head.
Illustration
Fold the flaps over the two waste water tank cham-
bers.
Empty the waste water tank.
Illustration
Clean the floor head cover and waste water tank
with tap water, depending on the degree of soiling.
The flaps of the two waste water tank chambers
can be removed and cleaned separately.
Re-insert and close the flaps of the two waste water
tank chambers.
Illustration
Insert the waste water tank into the floor head.
Illustration
Actuate the latch on the floor head cover, fit the
cover onto the floor head and then release the
latch.
The waste water tank and floor head cover must sit
firmly in and on the device.
Interrupting operation
ATTENTION
To prevent damage to sensitive floors through wet rollers, we recommend placing the device in the parking
station during longer work breaks.
Illustration
Switch off the appliance; press the on/off button to
do so.
Illustration
Place the device in the parking station.
Turning Off the Appliance
Illustration
Switch off the appliance; press the on/off button to
do so.
Illustration
Place the device in the parking station.
ATTENTION
Clean the device after completing the work.
Illustration
Drain any water remaining in the fresh water tank.
Figure to
Clean the waste water tank, floor head cover and
cleaning rollers.
See chapter "Cleaning the waste water tank".
See chapter "Cleaning the floor head".
See chapter "Cleaning the rollers".
Storing the Appliance
ATTENTION
To prevent odours developing, the fresh water and
waste water tank must be completely emptied prior to
storing the appliance.
Allow wet rollers to dry in the air (e.g. on the parking station), do not place wet rollers in closed cupboards to dry.
Illustration
Place the device in the parking station.
Illustration
Place the wet rollers on the parking station to dry.
Store the appliance in a dry room.
Care and maintenance
DANGER
Illustration
The device contains electrical
components and must therefore
never be held under running water or immersed in a container
containing water - even for
cleaning the device.
ATTENTION
Illustration
To clean the device, remove the individual components
(floor head cover, fresh water tank, waste water tank
and rollers) and clean them separately. Wipe down the
rest of the device with a moist cloth.
Clean the waste water tank
ATTENTION
The waste water tank must be cleaned regularly to ensure that dirt does not accumulate in the tank.
ATTENTION
Do not clean the floor head cover in a dishwasher: The
basic function of the device can be impaired if the floor
head cover is distorted by the dishwasher and the wiper
edge no longer presses correctly onto the rollers. This
will produce a worse cleaning result.
– 11
11EN
Page 12

Illustration
Switch off the appliance; press the on/off button to
do so.
Illustration
Place the device in the parking station.
Figure to
Remove the waste water tank from the appliance.
See Chapter "Emptying the waste water tank".
Clean the floor head cover, waste water tank and
waste water tank flaps with tap water.
The flaps of the two waste water tank chambers
can be removed and cleaned separately.
Alternatively, the waste water tank and waste water
tank flaps can be cleaned in a dishwasher.
Note
The rubber inlays of the waste water tank flaps can become sticky when washed in a dishwasher. This does
not affect their sealing ability.
Figure to
Also clean the rollers if the device is not going to be
used further.
See chapter "Cleaning the rollers".
Figure to
After cleaning, fit the waste water tank with flaps
and floor head cover back into the device.
Cleaning the floor head
ATTENTION
Clean the floor head if dirty.
ATTENTION
Do not clean the floor head cover in a dishwasher: The
basic function of the device can be impaired if the floor
head cover is distorted by the dishwasher and the wiper
edge no longer presses correctly onto the rollers. This
will produce a worse cleaning result.
Illustration
Switch off the appliance; press the on/off button to
do so.
Illustration
Place the device in the parking station.
Illustration
Actuate the floor head cover latch.
Remove the floor head cover.
Illustration
Rinse off the floor head cover under running water.
Clean the waste water tank and rollers.
See chapter "Cleaning the waste water tank".
See chapter "Cleaning the rollers".
Clean the roller drive with a moist cloth.
Illustration
Insert the floor head cover into the floor head.
Cleaning the rollers
ATTENTION
The rollers should be washed under a tap or cleaned in
a washing machine after each use to prevent accumulation of detergent residues in the rollers that can lead
to the formation of foam over time.
The fresh water tank and waste water tank must be
emptied if the device is laid on the floor in order to remove the rollers. This prevents liquids from escaping
from the tanks while the device is lying on the floor.
Illustration
Switch off the appliance; press the on/off button to
do so.
Illustration
Place the device in the parking station.
Illustration
Twist out the cleaning rollers from the recessed
grip.
Illustration
Clean the cleaning rollers under running water.
or
Wash the cleaning rollers in the washing machine
up to 60°C.
ATTENTION
Do not use any soft detergents when cleaning in the
washing machine. This avoids causing damage to the
microfibres. It also preserves the high performance levels of the cleaning rollers.
The cleaning rollers are not suitable for the tumble dryer.
Figure to
Once cleaned, place the rollers on the cleaning sta-
tion storage and leave them to air dry.
Drying time can be minimized by wringing out the
rollers beforehand.
Also clean the floor head cover and waste water
tank if the device is not going to be used further.
Clean the roller drive with a moist cloth.
Detergents and care products
ATTENTION
The use of unsuitable cleaning and disinfecting agents
can damage the appliance and will void the warranty.
Note
Add cleaning or disinfecting agent as required.
When dosing the detergent and care product, fol-
low the manufacturer's dosage instructions.
To prevent foaming, first fill the fresh water tank
with water then cleaning or disinfecting agent.
To avoid exceeding the "MAX" fill level on the fresh
water tank, leave room for the cleaning or disinfect-
ing agent when filling with water.
Troubleshooting
Often, failures have simple causes and you can do the
troubleshooting yourself using the following overview. If
you are in doubt or if the failure is not listed here please
contact the authorized customer service.
Battery is not charging
Charging plug/mains plug not correctly connected.
Connect charging plug/mains plug correctly.
The device cannot be switched on
Battery is empty.
Charge the device.
Check whether the charging cable is still plugged
into the device.
Take out charging cable, operation is not possible
while charging cable is plugged in.
LED fault display
Lowermost LED flashes when the device is switched on
and does not start.
Battery is empty.
Charge the device.
All LEDs flash quickly simultaneously.
The device has a motor blockage (e.g. due to ex-
cessive pressure on the rollers or through move-
ment into a wall/corner).
Switch on/off the appliance again.
12 EN
– 12
Page 13

or
Use of wrong or defective mains plug.
Use original mains plug/replace defective mains
plug.
The three LEDs light up sequentially in a 1-second cycle.
Device too hot during use (e.g. when operating in
high ambient temperatures).
Take a break and let the device cool down.
If the device also switches off:
Take a break and let the device cool down.
The device can only be switched on again once it
has cooled down enough.
Rollers are too dry
Rollers are not being sufficiently moistened.
Moisten the rollers by moving back and forth over
the same position.
The filter under the fresh water tank is incorrectly fitted
or not fitted at all.
Ensure that the filter under the fresh water tank is
correctly fitted in the device. The foam with the yel-
low pin in the middle must point upwards.
Note
If the filter is not present, it can be ordered as a spare
part.
For information about accessories and spare parts,
please visit www.kaercher.com.
Appliance is not sucking up dirt
No water in the fresh water tank.
Refill water
Fresh water tank does not fit properly in the device.
Insert the fresh water tank so that it sits snugly in
the appliance.
Cleaning rollers missing or not fitted correctly.
Fit the cleaning rollers or turn them onto the roller
holder up to the mechanical stop.
Cleaning rollers are contaminated or worn.
Clean the cleaning rollers.
or
Replace the cleaning rollers.
The detergent has been forgotten, an incorrect dosage
is being used or the incorrect detergent is being used
Use only KÄRCHER detergent and be sure to use
the correct dosage.
Floor head cover not installed correctly
Check that the floor head cover is correctly seated.
For this, remove the cover and then fit it back in
place.
Formation of foam in the floor head and on
the floor
Note
Slight foam formation in the floor head during operation
is normal and does not impair functionality. Further
measures are only necessary when there is excessive
foam formation (e.g. streaks of foam on the floor).
Incorrect detergent or incorrect dosage.
Use only KÄRCHER detergent and be sure to use
the correct dosage.
Device operation is based on the cleaning rollers removing dirt. Dirt and detergent residues from floor coverings collect in the waste water tank. This can lead to
foam formation under some circumstances.
Remove all dirt and detergent residues from the
rollers using water.
Illustration
Illustration
Illustration
In the event of excessive foam formation, add
FoamStop to the empty waste water tank before
starting cleaning. Please observe the dosage instructions on the bottle label.
Poor cleaning result
The rollers are dirty.
Clean the rollers.
Rollers are not being sufficiently moistened.
Moisten the rollers by moving back and forth over
the same position.
Incorrect detergent or incorrect dosage.
Use only KÄRCHER detergent and be sure to use
the correct dosage.
Foreign detergents are present on the floor.
Remove all detergent residues from the rollers us-
ing water.
Clean the floor several times using the device and
clean rollers, without using detergent. This re-
moves detergent residues from the floor
Rollers do not turn
Rollers are blocked.
Remove rollers and check if an object has become
stuck in the rollers.
Check that the rollers are screwed in as far as they
will go onto the roller holder.
Check that the floor head cover is correctly seated.
For this, remove the cover and then fit it back in
place.
Water vacuuming not optimum
Floor head cover not installed correctly
Check that the floor head cover is correctly seated.
For this, remove the cover and then fit it back in
place.
The rollers are worn out.
Replace the rollers.
Appliance is leaking waste water.
Waste water tank is overfilled.
Empty the waste water tank right away.
Waste water tank does not fit properly in the appliance.
Check that the floor head cover is firmly seated on
the waste water tank.
Check that the waste water tank flaps are correctly
closed.
Removing the handle from the basic unit
ATTENTION
Do not remove the handle from the basic unit once it has
been assembled.
The handle may only be removed from the basic unit if
the unit is sent out for service purposes.
Illustration
See illustration at the end of the operating instructions
Insert screwdriver at a 90 degree angle in the small
opening at the rear side of the handle and remove
handle.
ATTENTION
Please ensure that the connection cable between the
basic unit and the handle are not damaged.
Pull carefully to avoid damaging the device.
– 13
13EN
Page 14

– 14
Subject to technical modifications!
Australia
KÄRCHER Pty. Ltd.
385 Ferntree Gully Road,
Mount Waverley, Victoria, AU. 3149
1800 675 714 (Free Call)
www.karcher.com.au
New Zealand
Karcher Ltd.
66 Allens Road,
East Tamaki, Aukland
(09) 274-4603
www.karcher.co.nz
Technical specifications
Electrical connection
Voltage 100-240 V
1~50-60 Hz
Protection class IPX4
Device
Protective class III
Charger protection class II
Rated power of appliance 40 W
Nominal battery voltage 7,2 V
Battery type Li-Ion
Operating time with full charge 20 min
Charging time for empty battery 4 h
Charger initial voltage: 9,5 V
Output current, charger 0,6 A
Performance data
Roller revolutions per minute 500 rpm
Filling quantity
Fresh water tank 360 ml
waste water tank 140 ml
Dimensions
Weight (without accessories and
cleaning fluids)
2,4 kg
Length 305 mm
Width 226 mm
Height 1220 mm
Cable length
Charger 1800 mm
Customer Service
14 EN
Page 15

30
2.
1.
Page 16

www.kaercher.com/dealersearch
Alfred Kärcher SE
Alfred-Kärcher-Str. 28-40
71364 Winnenden (Germany)
Tel.: +49 7195 14-0
Fax: +49 7195 14-2212
& Co. KG
 Loading...