


April 2011
®
Woodloc
Float-In Installation 7mm, 10mm, 14mm, 15mm
Table of Contents
Jobsite
Subfloor Preparation . . . . . . . . . . . . . . . . . . . . . . . . . . . . . . . . . . . . . . . . . . . . . . . 2 - 5
Underlayments . . . . . . . . . . . . . . . . . . . . . . . . . . . . . . . . . . . . . . . . . . . . . . . . . . . 6
Layout
Calculation Worksheet for Min. Board Width (U.S. Std.) . . . . . . . . . . . . . . . . . . . . . . 7
Calculation Worksheet for Min. Board Width (Metric) . . . . . . . . . . . . . . . . . . . . . . . . 8
Required Expansion Reference Chart (Metric) . . . . . . . . . . . . . . . . . . . . . . . . . . . . . 9
Required Expansion Reference Chart (U.S. Std.) . . . . . . . . . . . . . . . . . . . . . . . . . . . 10
Tools & Techniques
Important Installation Notes . . . . . . . . . . . . . . . . . . . . . . . . . . . . . . . . . . . . . . . . . .11
Kährs Product Key . . . . . . . . . . . . . . . . . . . . . . . . . . . . . . . . . . . . . . . . . . . . . . . . 12-13
Woodloc® Float-In Installation 7mm, 10mm, 14mm, 15mm . . . . . . . . . . . . . . . . . . . 14-18
Note: for Radiant Heat applications, see Radiant Heat Special Instructions at www.kahrs.
com
Follow Up
Recoating Your Floor. . . . . . . . . . . . . . . . . . . . . . . . . . . . . . . . . . . . . . . . . . . . . . . 19
Approved Commercial Uses
Kährs flooring may be used as a floor covering in public or private business, educational or
religious buildings and offices.
Installation in any and all areas where food or drinks are consumed, or areas contiguous to outside
entrances must be coated with a compatible wood finish urethane, in accordance with the finish
manufacturers application procedures. Kährs recommends Bona Kemi or Bona Traffic in these
cases. Contact Bona Kemi for details (www.bona.com).
Kährs does not warranty the performance of any site-applied finish. Please contact the finish
manufacturer for suitable products, precedures, and warranty.
Maintenance
See Kährs Commercial Flooring Maintenance Procedures (Kährs Commercial Warranty) for
maintenance details (available at www.kahrs.com).
For prefinished oiled floors, please refer to Natural Oiled Floors Maintenance and Rennovation
Procedures at www.kahrs.com
Technical Support 1-800-ASK-KAHRS www.kahrs.com

Jobsite
April 2011
Subfloor Preparation
Note: Warranty coverage may be lost due to failure to strictly follow all installation instructions and
recommendations and/or the use of improper materials or tools.
READ ALL INSTRUCTIONS CAREFULLY!
Subfloor Specifications
A. The surface of the subfloor must be level to within 1/8” in an 8ft. radius. Check this by using the
edge of a Kährs or Linnea plank to find high/low spots. To fill excessive voids or variations in the
subfloor, use leveling compounds approved for your application. Consult the compound manufacturer
to be sure it is appropriate. Allow the compound to dry thoroughly before beginning wood floor
installation.
Fifteen-pound felt or roofing paper is also appropriate to level a floor for a float-in installation. Cut small
pieces to fit the shape of the depression and then stack as many sheets as necessary to level the area.
DO NOT us this method to correct extensive variations in concrete subfloors.
B. You must test concrete subfloors prior to installation by one of the following methods. Concrete subfloors
must not contain more than 3 lbs. moisture on a dry-weight basis (calcium chloride test). Subfloor must read
4.5 or less with Tramex meter. Follow ASTM2170 - subfloor relative humidity not to exceed 75% with in-situ
probe. Moisture content of wood subfloors must be less than 12% Moisture Content (MC). Document and
keep ALL test results. Subsequent excessive moisture after pre-installation documented testing is evidence
of moisture intrusion and will not be covered under Kährs warranty.
C. The subfloor must be clean.
D. Relative humidity at the job site must be, and remain, minimum 30%, maximum 60%. Temperature
setting must be, and remain, within 15º F of normal operating range.
Evaluation
Before installing a Kährs floor, inspect the job site thoroughly. With the help of the Installation
Environment Chart determine if grade, subfloor, and subfloor conditions are acceptable for the installa tion method you plan to use.
Exterior: Carefully inspect the outside surroundings for improper drainage and predictable or obvious
sources of moisture. The yard should be graded (at least 6” in 10 ft.) to slope away from the foundation.
Be sure that gutters and eaves sufficiently prevent rain from penetrating the foundation.
Under the house: In homes with crawl space or pier-beam foundations, foundation vents must provide
cross-ventilation with no dead air space. Vents should be located throughout the foundation with opening
area equal to 1-1/2% of the square-foot area within the crawl space (eg. a 1000sq. ft. crawl space must
have 15 sq. ft. of vents that remain open all year). If excessive moisture exists underneath the house,
you must lay a 6 mil black polyethylene moisture barrier on the ground in the crawl space
below the installation area.
Interior: Check the moisture content of the subfloor. See item “B” above as well as “Moisture” at the end
of this section. Room conditions can also indicate high moisture and relative humidity. Look for water
stains, peeled paint near windows and doors, and rusty metal, especially nails.
Preparation
Wood Subfloors: Moisture Content (MC) must be less than 12%. To prepare the subfloor for installation,
renail any loose areas with squeaks. Sand or plane any high spots and fill any low areas. The subloor should
not vary more than 1/8” in an 8’ radius. Check this by using the edge of a Kährs or Linnea plank to find any
high or low spots. See Installation Environmental Chart for Approved Subfloors.
Technical Support 1-800-ASK-KAHRS www.kahrs.com
2

Jobsite
April 2011
Subfloor Preparation
Preparation (con’t.)
Preferred Subflooring: 3/4” (23/32”, 18.3 mm) CDX grade plywood subfloor/underlayment (Exposure 1)
4’ x 8’ sheets OR 3/4” (23/32” 18.3mm) OSB subfloor/underlayment grade, with joint spacing 19.2”
(475mm) on center joint construction or less. Direct Glue-Down installations: 2 layers 1/2” (11.9mm)
CDX plywood.
Minimum Subflooring: 5/8” (19/32”, 15.2mm) CDX plywood subfloor/underlayment (Exposure 1) 4’ x 8’
sheets, maximum 16” (400mm) on center joint construction. Direct Glue-Down installations: 2 layers 3/8”
(10mm) CDX plywood.
Follow panel manufacturer recommendations for spacing and fastening. Typical panel spacing for joint
systems is 1/8” (3.2mm) around perimeter and fastened every 6” (150mm) on bearing edges and every
12” (300mm) along intermediate supports.
Door casings should be notched or undercut to avoid difficult scribe cuts.
If nailing the floor, (Kährs 14, 15, 20 mm Traditional Tongue & Groove only) we suggest you cover the sub
floor with 15 lbs. or higher asphalt felt or rosin paper to retard moisture and to help alleviate variations in
the subfloor.
Concrete Subfloors: Lightweight (float-in only) and standard-density (float-in and glue-down) concrete
subfloors are ideal applications for a Kährs floor. Concrete subfloors are generally acceptable for float-in
installation if the subfloor appears to be dry (i.e. no standing water or discoloration of concrete) and
Kährs Combo System Underlayment is used and installed properly. Be sure that, as a minimum, any
concrete subfloor is at least 50-60 days old before installing a wood floor over it.
Moisture
To curb the adverse effects moisture will have on a Kährs wood floor and to determine the
source of moisture problems, use the following checklist:
1. Inspect the gutters, drains, and down spouts outside the house. Clear out any clogs caused by
leaves, dirt, or other substances. Down spouts are designed to transport water away from a
foundation.
2. Check the landscaping surrounding the home to be sure the yard is sloped away from the foundation
(at least 6” in 10 ft.).
3. Check windows and doors for proper drainage and waterproof caulking.
4. Inspect concrete subfloor for cracks or buckling. Sometimes the water table (water beneath the sur
face) may rise and force water up through the concrete floor with hydrostatic pressure.
5. Check the ventilation system in the crawl space, basement, and attic. Moisture will collect on walls
and floors if dead air (i.e. little or no ventilation) is present. As a rule, ventilation per sq. ft. should
equal 1-1/2% of the sq. ft. of the area in question.
6. Inspect pipes, water heater tank, dishwasher, and any other plumbing fixtures in the affected area.
7. Remember to take seasonal changes in relative humidity into consideration when installing a Kährs
floor.
8. Signs that the moisture content is too high include discolored (darker) concrete and evidence of
actual water droplets.
Technical Support 1-800-ASK-KAHRS www.kahrs.com
3

Jobsite
April 2011
Subfloor Preparation
Moisture (con’t.)
Required moisture testing for ALL Kährs radiant heat installations and direct glue-down flooring:
Calcium Chloride test with a reading of 3 lbs. or less on a dry weight basis (2 lbs. or less for Radiant
Heat Installations). Testing kits are generally available through your distributor or call the NWFA at 800 422-4556 (or 800-848-8824 in Canada) for the source nearest you. Follow test kit manufacturer’s
instructions for conducting test and measuring results. If calcium chloride results read over 3 lbs. but
does not exceed 8 lbs. (and no obvious source of the moisture can be eliminated) you must use either
of the following approved moisture sealers before installing the floor for the Kährs Moisture Protection
Warranty to apply:
• DriTac MCS 7000 when used with DriTac 7600 or 7500 Adhesive (call 800-394-9310 for source
nearest to you).
• Dependable Cutdown (call 800-227-3434 for the source nearest you).
• Concrete Moisture Barrier System*
* If moisture is present an alternative is a barrier of inexpensive sheet vinyl or “slip sheet” (PVC). Use
the manufacturers recommended adhesive for a full spread application to completely adhere the vinyl
to the subfloor. Since Kährs cannot guarantee the bond of the vinyl to the subfloor, or subsequent per formance of the vinyl, a patch test is strongly advised. Install several 3” x 3” pieces of vinyl in different
areas of the installation. Wait 72 hours. Remove the vinyl. If the backing remains attached to the con-
crete, the subfloor should be acceptable for full spread vinyl installation.
Note: These concrete sealers are NOT approved for Radiant Heat installations.
All concrete sealer/vinyl manufacturer testing, documentation, and installation requirements MUST be
followed for Kährs Limited Warranty to apply.
Other Subfloors: Kährs floors can be installed directly over some existing floors (i.e. vinyl
and rubber tile, steel plates, terrazzo, and existing wood floors). The subfloor or existing floor must meet
the requirements listed in “Subfloor Specifications.” A Kährs floor installed over existing floors
must be installed with the float-in method.
Installation Environment Chart
I. Grade Type Glue** Nail* Float
A. Above Grade yes yes yes
B. On Grade yes yes yes
C. Below Grade no no yes
D. Over Radiant Subfloor no no yes
II. Subfloor Type Glue** Nail* Float
A. Concrete (701 lbs. cu. ft. density or higher) yes no yes
B. Light-weight concrete no no yes
C. Association-grade underlayment plywood yes yes yes
D. Association-grade underlayment particle board yes no yes
E. Stamped Underlayment Grade OSB (Oriented Strand Board) yes yes yes
F. Old wood floors - above grade only no no yes
(next page)
Technical Support 1-800-ASK-KAHRS www.kahrs.com
4

Jobsite
April 2011
Subfloor Preparation
Installation Environment Chart
II. Subfloor Type (con’t.) Glue Nail* Float
G. Asphalt tile no no yes
H. Inlaid linoleum *** no yes
I. Vinyl asbestos tile no no yes
J. Cushion vinyl no no yes
K. Rubber tile no no yes
L. Solid vinyl tile no no yes
M. Steel no no yes
N. Marble no no yes
O. Ceramic no no yes
P. Carpet no no no
*14mm, 15mm , 20mm T & G only
*** Check Kährs Technical Services Department: 1-800-ASK-KAHR
Technical Support 1-800-ASK-KAHRS www.kahrs.com
5

Jobsite
Underlayments
• Kährs Combo-System Underlayment
• Kährs QuietStride
April 2011
Combo Foam Underlayment System with Overlap:
The width of a row of Kährs Combo-System Underlayment
is comprised of 40” of underlayment plus an 8” overlap
flap. The overlap flap guards the flooring from moisture at
the seams, where the rows of underlayment are laid side
by side. The overlap flap has a peel and stick strip to aid
the installation process.
1. Layout 1st row of underlayment (logo side down,
blue side up) with the overlap flap facing the
starting wall. Allow the underlayment to wrap up
the wall, on the ends, approx. 2”.
2. Reach under and grab the overlap flap and pull
it up so it lies against the starting wall. Trim this
over lap flap back to leave approx. 2” of plastic
up the wall. (Use this cut off section to repair
damage in the underlayment as needed*, see
note below).
3. Lay 2nd row of underlayment flush to first. Make
sure the overlap flap is next to 1st row, and the
ends wrap up the walls. (If flooring installation
has already begun, make sure to stop the floor
ing approx. 8 inches from the side of the under-
layment to allow for the installation of the overlap
flap.)
4. Again, reach under and grab the overlap flap.
Pull the flap up and fold it back to expose the
peel and stick strip. Remove the white protective
cover from the adhesive strip. Lay overlap flap
across the 1st row of underlayment and press
into place.
5. Continue this procedure row by row until the
entire floor area is covered.
* Note: When connecting a new roll of underlayment to
the end of the roll you are working on, or for repairing
any tears or cuts in the underlayment; overlay the butt
joints or the damaged area with a spare piece of overlap
plastic. This spare piece should overlay by approx. 8”.
Hold the spare piece in place with tape. Do NOT overlap
underlayment. Overlap flap only.
Cover the entire floor area and run the underlayment up
the perimeter walls approximately 2”. This provides a
secure enclosure for the flooring. After the floor is installed
and before the installation of the baseboards, the excess
underlayment should be trimmed to the height of the
floor surface using a fine trimming blade. The use of the
Combo-System Underlayment is also approved for Radiant
Heat applications.
Kährs QuietStride:
Quiet Stride can be installed three different ways as a Kährs underlayment.
1. Float-in Installations: First install 6 mil polyethylene
plastic loose-laid, seams overlapped 8”. Run plastic up
the wall 2” (trim excess after installation, before
installing trim). Loose-lay QuietStride on top of plastic,
wall to wall, and butt all seams together (taping seams
preferred). Use of QuietStride with polyethylene plastic
is approved for float-in Radiant Heat applications.
2. Direct Glue-Down: Install QuietStride wall to wall, butt
all seams together (do not tape seams), directly adher-
ing to subfloor with QuietStride Adhesive* or a premium
multi-purpose adhesive. Fully adhere Kährs flooring to
underlayment using approved adhesive and trowel (see
Glue-Down Installation for details). Note: an approved
concrete sealer must be used if calcium chloride test
exceeds 3lbs. for Kährs Moisture Protection Warrany to
apply.
3. Direct Glue-Down over “float-in” underlayment: First
install 6 mil polyethylene plastic loose-laid, seams over lapped 8”. Run plastic up wall 2” (trim excess after
installation, before installing trim). Loose-lay QuietStride
on top of plastic, wall to wall, butt all seams together (do
not tape seams). Fully adhere Kährs flooring to under-
layment using approved adhesive and trowel (see Glue-
Down Installation for details). Note: an approved con-
crete sealer must be used if calcium chloride test
exceeds 3lbs. for Kährs Moisture Protection Warranty to
apply.
* QuietStride Adhesive has been developed for adhering
QuietStride Underlayment directly to the subfloor for use in
"double-stick" installations. The adhesive is a quick, inex pensive technique for affixing QuietStride Underlayment
to the subfloor, then gluing the Kährs flooring to the
QuietStride Underlayment with one of the approved Kährs
wood flooring adhesives.
• QuietStride Adhesive product ID #710248
• Sold in 1gallon pails
Important:
Kährs does not guarantee the performance of any nonKährs branded underlayment.
Technical Support 1-800-ASK-KAHRS www.kahrs.com
6

Layout
April 2011
Calculation Worksheet for Min. Board Width - (U.S. Std.)
Purpose: To ensure last board of the installation (or long board at an obstruction) is not too narrow.
General Rule: Kährs requires that no board have a width less than 3” or .38” of a full board width.
Notes on Equation: This rule applies to boards with an original thickness of 5/8” x 3-strip wide. This equation should
be used when a board 4’ or more in length meets an obstruction.
WORKSHEET
Step 1
Measure width of connected area* from starting wall to finish
wall or obstruction, in inches. Round to the nearest 1/4”.
Step 1
Measure width of connected area* from starting wall to finish
wall or obstruction, in inches. Round to the nearest 1/4”.
EXAMPLE
Connected Area Width in inches
with fraction: __________________
Step 2
Convert “inches with Fraction” to “Inches with Decimal”. Use
conversion chart below.
Connected Area Width in inches
with decimal: __________________
Step 3
Multiply “Required Expansion Space” by 2. Use chart below.
Total Expansion Needed from above: __________________
Connected Area Width Expansion Total
(from Step 2) Space
Under 144” 1/4” x 2 = .50”
144” - 288” 1/2” x 2 = 1.0”
288” - 480” 3/4” x 2 = 1.5”
Step 4
Subtract Total Expansion Needed from Connected Area Width
to determine Actual Floor Width.
Total from Step 2: _____________._____”
Total from Step 3: - _____________._____”
Actual Floor Width in inches
with decimal: = _____________._____”
Step 5
Determine total # of rows of flooring needed.
Actual Floor Width (Step 4): _____________._____”
Board Width in Decimal - measure board and use chart below
to convert: ÷ _____________._____”
Total Rows of Flooring: = _____________.__rows
Step 6
If the result in Step 6 contains a decimal less than .38”, you
must rip the starting row in half to ensure proper width of the
last row.
Connected Area Width in inches
with fraction: 325-1/4”
Step 2
Convert “inches with Fraction” to “Inches with Decimal”. Use
conversion chart below.
Connected Area Width in inches
with decimal: 325.25”
Step 3
Multiply Required Expansion Space by 2. Use chart below.
Total Expansion Needed from above: 1.5”
Connected Area Width Expansion Total
(from Step 2) Space
Under 144” 1/4” x 2 = .50”
144” - 288” 1/2” x 2 = 1.0”
288” - 480” 3/4” x 2 = 1.5”
Step 4
Subtract Total Expansion Needed from Connected Area Width to
determine Actual Floor Width.
Total from Step 2: 325.25”
Total from Step 3: - 1.50”
Actual Floor Width in inches
with decimal: = 323.75”
Step 5
Determine total # of rows of flooring needed.
Actual Floor Width (Step 4): 323.75”
Board Width in Decimal - measure board and use chart below
to convert: ÷ 7.875”
Total Rows of Flooring: = 41.11 rows*
* The first board in this installation would be cut in half.
Step 6
If the result in Step 6 contains a decimal less than .38”, you
must rip the starting row in half to ensure proper width of the
last row. Ripping the starting row in half will increase the last board
width by .50 of a board. In this case the last board will end up being
.61 of a board or approx. 5”, instead of .11 or 1” wide.
*From Step 1 - Connected Area is defined as all areas connected without a break. If Room A and Room B both are to have flooring
installed and are directly connected, or connected by a hallway, without a t-molding, the connected area is the width of both Room A and
Room B, and the hallway (if applicable). Obstructions can include cabinets, islands, and the wall opposite the starting wall in the same
room, if the flooring continues to another room without a break. Multiple calculations may need to be made to best determine the amount
cut from the starting row.
Fraction to Decimal Conversion Chart
Fraction Decimal Equivalent
1/4” .25”
1/2” .50”
3/4” .75”
Board Width Decimal Eqivalent Chart
Board Width Decimal Equivalent
7-7/8" 7.875"
8-1/10" 8.100"
Technical Support 1-800-ASK-KAHRS www.kahrs.com
7

Layout
April 2011
Calculation Worksheet for Minimum Board Width - (Metric)
Purpose: To ensure last board of the installation (or long board at an obstruction) is not too narrow.
General Rule: Kährs requires that no board have a width less than 76mm or .38” of a full board width.
Notes on Equation: This rule applies to boards with an original thickness of 15mm x 3-strip wide. This equation
should be used when a board 120cm or more in length meets an obstruction.
WORKSHEET
Step 1
Measure width of connected area* from starting wall to finish
wall or obstruction, in inches. Round to the nearest 1/4”.
Total Area Width in mm: __________________
Step 2
Multiply Required Expansion Space by 2. Use chart below.
Required Expansion Space: ________________mm
X 2
Total Expansion = ________________mm
Step 3
Subtract Total Expansion from Total Area Width to determine
Actual Floor Width.
Total from Step 1: _____________.___mm
Total from Step 2: - _____________.___mm
Actual Floor Width: = _____________.___mm
Step 4
Determine total # of rows of flooring needed.
Actual Floor Width (Step 3): _____________.___mm
Board Width. Measure board. It will be
either 200 or 205mm. ÷ _____________.___mm
Total Rows of Flooring: = _____________.__rows
Step 5
If the result in Step 6 contains a decimal less than .38”, you
must rip the starting row in half to ensure proper width of the
last row.
EXAMPLE
Step 1
Measure width of connected area* from starting wall to finish
wall or obstruction, in inches. Round to the nearest 1/4”.
Total Area Width in mm: 8262mm
Step 2
Multiply Required Expansion Space by 2. Use chart below.
Required Expansion Space: 20mm
X 2
Total Expansion = 40mm
Step 3
Subtract Total Expansion from Total Area Width to determine
Actual Floor Width.
Total from Step 1: 8262mm
Total from Step 2: - 40mm
Actual Floor Width: = 8222mm
Step 4
Determine total # of rows of flooring needed.
Actual Floor Width (Step 3): 8222mm
Board Width. Measure board. It will be
either 200 or 205mm. ÷ 200mm
Total Rows of Flooring: = 41.11 rows*
*The first board in this installation would be ripped in half.
Step 5
If the result in Step 6 contains a decimal less than .38”, you
must rip the starting row in half to ensure proper width of the
last row. Ripping the starting row in half will increase the last board
width by .50 of a board. In this case the last board will end up being
.61 of a board or approx. 120mm, instead of .11 or 22mm wide.
* From Step 1 - Connected Area is defined as all areas connected without a break. If Room A and Room B both are to have flooring
installed and are directly connected, or connected by a hallway, without a t-molding, the connected area is the width of both Room A and
Room B, and the hallway (if applicable). Obstructions can include cabinets, islands, and the wall opposite the starting wall in the same
room, if the flooring continues to another room without a break. Multiple calculations may need to be made to best determine the amount
cut from the starting row.
Technical Support 1-800-ASK-KAHRS www.kahrs.com
8

Layout
April 2011
Required Expansion Reference Chart - (Metric)
Purpose: To ensure proper expansion space around all walls, doors and obstructions for 7mm, 10mm, 14mm and
15mm flooring.
Required Expansion
Rules: (1) Kährs requires 1.5mm of expansion space for every 1m of Connected Area width or 2.5m of
Connected Area length (whichever is greater). This expansion space must be left around all
walls, doors and obstructions. Minimum expansion requirement is 12mm.
(2) No connected flooring can span greater than 12m in width or 36m in length.
Notes: (1) Connected area is defined as all areas connected without a break. If Room A and Room B
both are to have flooring installed and are directly connected, or connected by a hallway, with-
out a t-molding, the Connected Area is the width of both Room A and Room B, and the hall
way (if applicable). Obstructions can include cabinets, islands, and the wall opposite the start-
ing wall in the same room, if the flooring continues to another room without a break. Multiple
calculations may need to be made to best determine the amount cut from the starting row.
(2) The direction of the flooring must be determined prior to calculating the required expansion
space. The Connected Area width is parallel to the board width. The Connected Area length is
parallel to the board length.
Required Expansion Reference Chart
Connected Area Required Expansion Connected Area Required Expansion
Width Space* Length Space*
up to 750cm 12mm up to 2250cm 12mm
750cm-1200cm 20mm 2250cm-3600cm 20mm
* Determine the required expansion space for both width and length, then use the larger of the 2 on all
sides, and around all obstructions.
Technical Support 1-800-ASK-KAHRS www.kahrs.com
9

Layout
April 2011
Required Expansion Reference Chart - (U.S. Standard)
Purpose: To ensure proper expansion space around all walls, doors and obstructions.
Required Expansion
Rules: (1) Kährs requires 1/16” of expansion space for every 3’ of Connected Area width or 9’ of
Connected Area length (whichever is greater). This expansion space must be left around all
walls, doors and obstructions. Minimum expansion requirement is 1/2”.
(2) No connected flooring can span greater than 40’ in width or 120’ in length.
Notes: (1) Connected area is defined as all areas connected without a break. If Room A and Room B
both are to have flooring installed and are directly connected, or connected by a hallway, with-
out a t-molding, the connected area is the width of both Room A and Room B, and the hall
way (if applicable). Obstructions can include cabinets, islands, and the wall opposite the start-
ing wall in the same room, if the flooring continues to another room without a break. Multiple
calculations may need to be made to best determine the amount cut from the starting row.
(2) The direction of the flooring must be determined prior to calculating the required expansion
space. The Connected Area width is parallel to the board width. The Connected Area length is
parallel to the board length.
Required Expansion Reference Chart
Connected Area Required Expansion Connected Area Required Expansion
Width Space* Length Space*
up to 24’ 1/2” up to 72’ 1/2”
24’-40’ 3/4” 72’-120’ 3/4”
* Determine the required expansion space for both width and length, then use the larger of the 2 on all
sides, and around all obstructions.
Technical Support 1-800-ASK-KAHRS www.kahrs.com
10

Tools & Techniques
April 2011
Important Installation Notes
Please see our website - www.kahrs.com for Kahrs Floor Care Guide and Lifetime Guarantee.
Installation
Floating:
Maximum room dimensions for a floating floor are 40ft. across the boards or 120 ft. lengthwise. Floors exceeding
either of these dimensions require use of “T-Molding.”
A minimum of one butt seam is required in every row, regardless of width (e.g. hallways).
Never attach any permanent object through the flooring, affixing it to the subfloor. A float-in floor must be free to
expand and contract in all directions.
Glue down:
Installing Kährs floors with the Glue down method requires no expansion breaks in the floor and is not
limited in size. A 1/2” gap at perimeter walls is required to allow engagement of last boards.
Adhesive Tape on Kahrs Floors
The use of adhesive tape on any Kährs floor for any reason (i.e. to fasten temporary protection) is not recommend ed and is not covered in our warranty.
Kahrs Flooring is approved for installations in ½ bathrooms only (no bathrooms including showers or bath tubs)
Expansion in Large Areas
You may be able to attain the necessary added expansion by trimming the wallboard (i.e. sheetrock) or raising
baseboards before installing floor. This will allow the floor to expand underneath the wall. For complete information
please refer to Required Expansion Reference Charts on pages 8 and 9 in the Layout section of this Guide. A Kährs
floor requires 1/16” expansion for every 3’ across width and 1/16” expansion for every 9’ along length. For
example, a 28’ x 28’ space requires an expansion gap of 9/16” around the edge of the flooring.
Additional Finish Coating
For additional wear protection, a waterborne urethane finish is compatible with Kährs factory finishes. The following
products from Bona Kemi are recommended:
• Pacific Strong
• Traffic
Contact Bona Kemi USA, Inc. (1-800-574-4674). Follow manufacturers instructions for recoating a prefinished
wood floor. Kährs International, Inc. does not guarantee the performance and/or durability of these products.
Technical Support 1-800-ASK-KAHRS www.kahrs.com
11

Tools & Techniques
April 2011
Installation
Do you have the tools and products you need to install a Kahrs floor?
Never start a job unprepared! Each installation method requires different tools and products. Use the chart below to
be sure you are fully prepared to begin your installation. For your convenience, product codes (SKU’s) are listed next
to each Kährs product name. Where appropriate, square footage and other important information is included as well.
KAHRS PRODUCT KEY
(LISTED BY INSTALLATION METHOD)
Product/Material SKU Float In Radiant Heat Glue Down Nail Down
Kàhrs 20mm Flooring - Tongue & Groove Various Yes Yes Yes Yes
Kährs 15mm Flooring - Woodloc Various Yes Yes Yes No
Kährs 15mm Flooring - Tongue & Groove Various Yes Yes Yes Yes
Kährs 14mm Flooring - Tongue & Groove Various Yes Yes Yes Yes
Kährs 14mm Flooring - Woodloc Various Yes Yes Yes No
Kährs 11mm Flooring - Tongue & Groove Various No No Yes Yes
Kährs 10mm Flooring - Woodloc Various Yes Yes Yes No
Kährs 7mm Flooring - Woodloc Various Yes Yes Yes No
Combo System Underlayment (subfloor) 710730CSU Yes Yes No Tar/Roofing
QuietStride Underlayment 710113 Yes Yes Yes No
QuietStride Adhesive 710248 No No Yes No
Prefinished Moldings Various Yes Yes Yes Yes
Landobond Adhesive; 239 sq.ft. per bottle 710225 Yes Yes Yes Yes
Woodloc 5S Lock/Unlock Tool 710559 Yes Yes Yes Yes
Knocking Block, T & G Float-In and Nail-Down, 14, 15mm 710202 Yes Yes No Yes
Knocking Block, T&G, Woodloc Glue-Down 14mm &15mm 710281 No No Yes No
Knocking Block, Glue Down 11mm 710290 No No Yes No
Woodloc Hand Block (Woodloc only) 710266 Yes Yes No No
Woodloc Installation Wedge (Woodloc only) 710267 Yes Yes No No
Last Board Puller (Jemmy) 710203 Yes Yes Yes Yes
Nail Plate Adapter 15mm for use with Bostitch Mach III 710268 No No No Yes
Nail Plate Adapter 14, 15mm for use with Bostitch Mach III 710269 No No No Yes
Expansion Shims 710283 Yes Yes Yes Yes
Recommended Mastic*** Taylor 2071, Dri Tac, Stauf Various No No Yes No
(continued next page)
* Tongue & Groove only
** Contact Kährs Customer Service
*** Alternative: any moisture cured urethane wood flooring adhesive. See Glue-Down sections for details.
Technical Support 1-800-ASK-KAHRS www.kahrs.com
12

Tools & Techniques
April 2011
KAHRS PRODUCT KEY
(LISTED BY INSTALLATION METHOD)
Product/Material SKU Float In Radiant Heat Glue Down Nail Down
Spline - Kährs 11, 14, 15, 20 mm only - to change directions ** Yes Yes Yes Yes
Router Bit Kährs 11mm 710291S Yes Yes Yes Yes
Router Bit Kährs 14, 15mm 710291 Yes Yes Yes Yes
Kährs Wood Cleaner 710280 Yes Yes Yes Yes
Peel & Stick Floor Protectors 710287 Yes Yes Yes Yes
Touch Up Kits 710273-79 Yes Yes Yes Yes
Technical Support 1-800-ASK-KAHRS www.kahrs.com
13

Tools & Techniques
April 2011
Float-In Installation for Woodloc
®
Notes:
• For subfloor and environmental specifications and requirements, see
Jobsite / Subfloor Preparation section. Floating installation requires the use of
Kährs Approved Underlayment Systems. Refer to Underlayment section of this
Guide.
• Kährs flooring is covered by a Limited Lifetime Warranty. However, Warranty
coverage may be lost due to failure to strictly follow all installation instructions
and recommendations or the use of improper materials or tools. READ ALL
INSTRUCTIONS CAREFULLY.
IMPORTANT!
• Do not open packages until ready to begin installation! Inspect boards as you go.
Kährs flooring is sealed at the factory with a 7% moisture content. Opening cartons to
acclimate the flooring (as with some solid strip flooring) could result in a difficult
installation.
• As an installer, it is your responsibility to be aware of the grade, Relative Humidity of the
room, and moisture content of the subfloor. You should check that each plank is free of
damage or manufacturing defects. Any unusable boards should be set aside for later
replacement.
Tools and Materials Required
• Tape Measure
• Chalk Line
• Last Board Puller
• Hammer
• Woodloc
TM
Knocking Block
• WoodlocTM Installation Wedge
• Expansion Shims
• Floor Protectors
For SKU numbers see Kährs Product
Key in Tools & Techniques, page 12,
this Guide.
Step 1
Start in corner and lay first row with
tongue sides toward wall (Fig 1). Proper
expansion space can be achieved by
pulling floor away from wall once first
three rows have been installed (reference
Step 9). For proper expansion refer to
Calculation Worksheet, pages 9-10.
Technical Support 1-800-ASK-KAHRS www.kahrs.com
14

Tools & Techniques
April 2011
Float-In Installation for Woodloc
Step 2
Hold next board against first board at approx. 45º angle and lay flat on floor (Fig. 2).
Continue in this manner for entire first row.
Step 3
Cut end board in first row to correct length and start second row with left-over piece
(if possible) as shown in Fig 4. End joints must be staggered by at least 12” for 7mm
and 10mm flooring, and 20” for 14mm and 15mm flooring. Butt seam must be placed in each
row regardless of width, e.g. hallways.
Step 4
Hold board at approx. 45º angle to board in front. Press forward to engage joint and lay
flat on floor (Fig. 4)
®
Step 5
Push in Kährs Wedge under short end of last board installed, as shown in Fig. 5.
Step 6
Engage short end of new board as in Step 2. Lay flat keeping long side in line with groove
of adjacent board (Fig. 6).
Technical Support 1-800-ASK-KAHRS www.kahrs.com
15
Tools & Techniques
April 2011
Float-In Installation for Woodloc
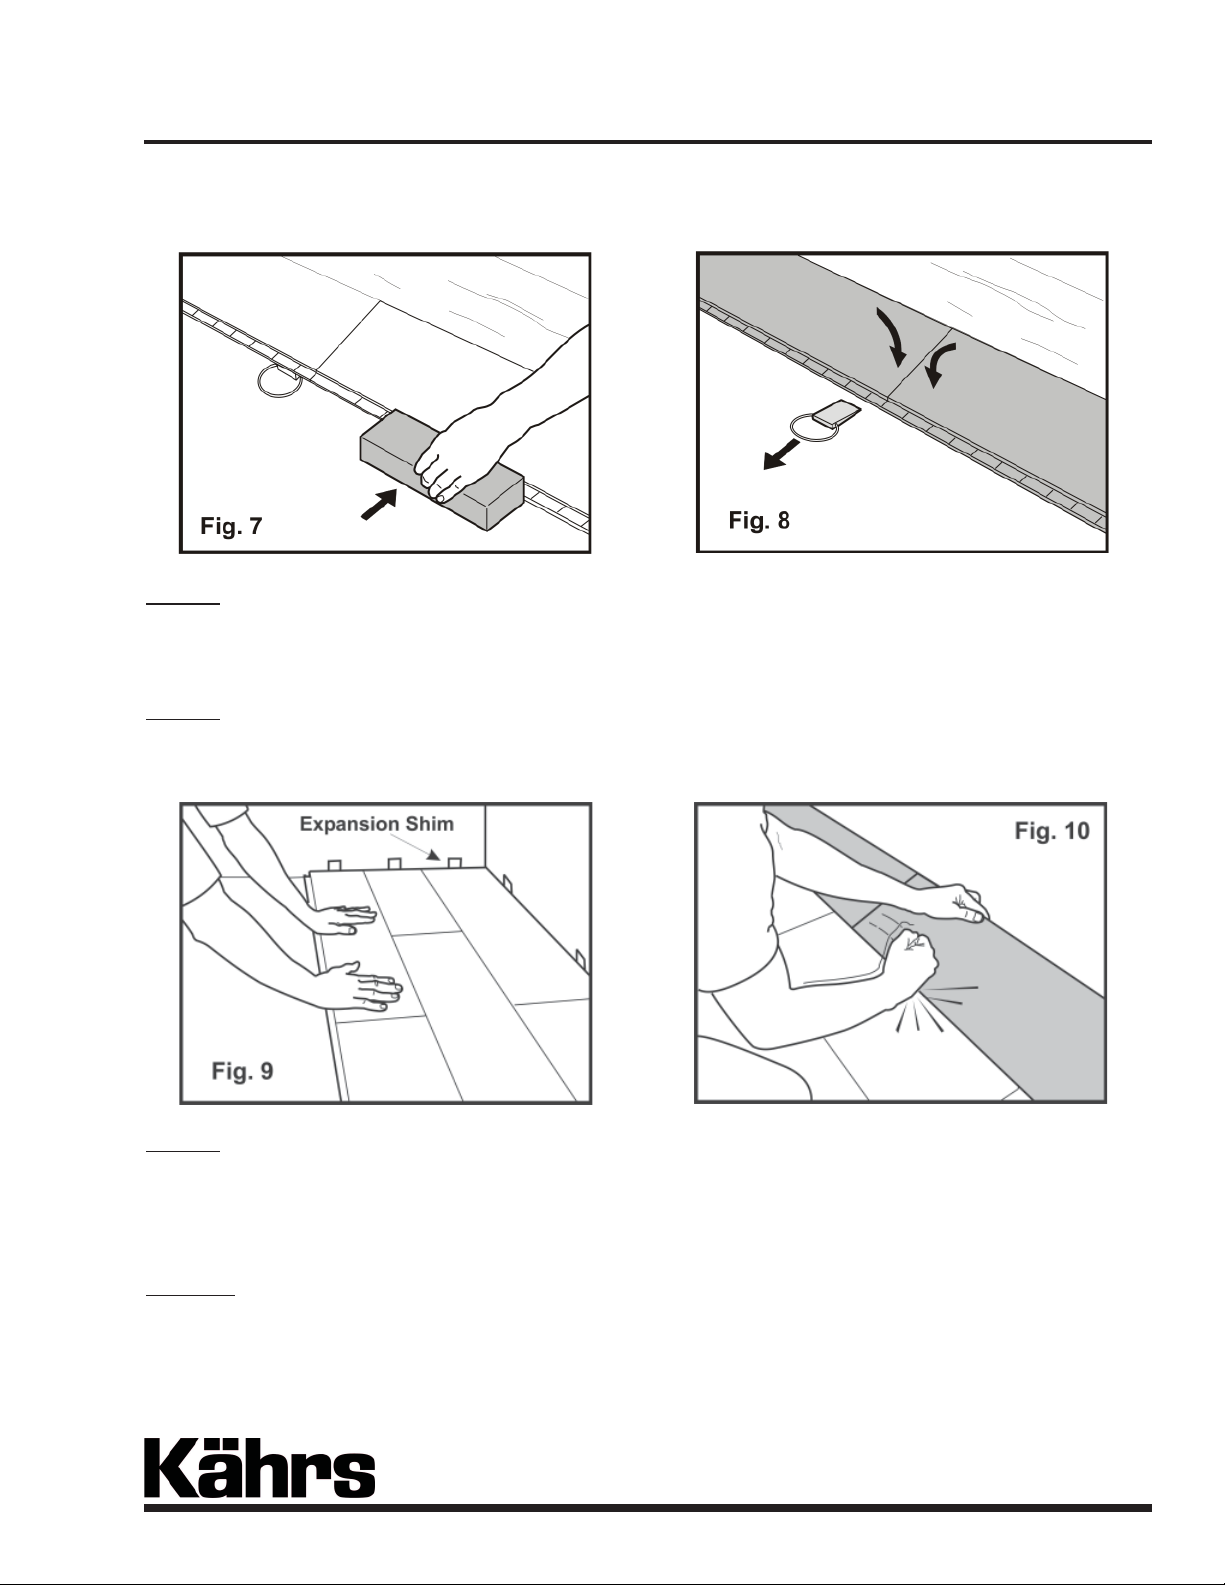
Step 7
Using Kährs knocking block, carefully tap long edges together until they are closed. DO
NOT tap too hard or over-engage (Fig.7). Never tap directly against wearlayer.
Step 8
Remove wedge and gently tap with knocking block along open long seam while applying
pressure downward, until board lays flat (Fig. 8). Board should fall easily into place.
®
Step 9
When three rows have been laid, pull floor away from starting wall until there is
proper amount of expansion space. Place shims between floor and wall to maintain
this space (Fig. 9).
Step 10
If first row must be cut to match crooked wall, trace shape of wall on flooring,
making sure space is allowed for expansion (see Fig. 13). Disengage boards of first row
by gripping long side and pulling upward while simultaneously giving long joint a light
tap (Fig. 10). Saw to shape.
Technical Support 1-800-ASK-KAHRS www.kahrs.com
16
Tools & Techniques
April 2011
Float-In Installation for Woodloc
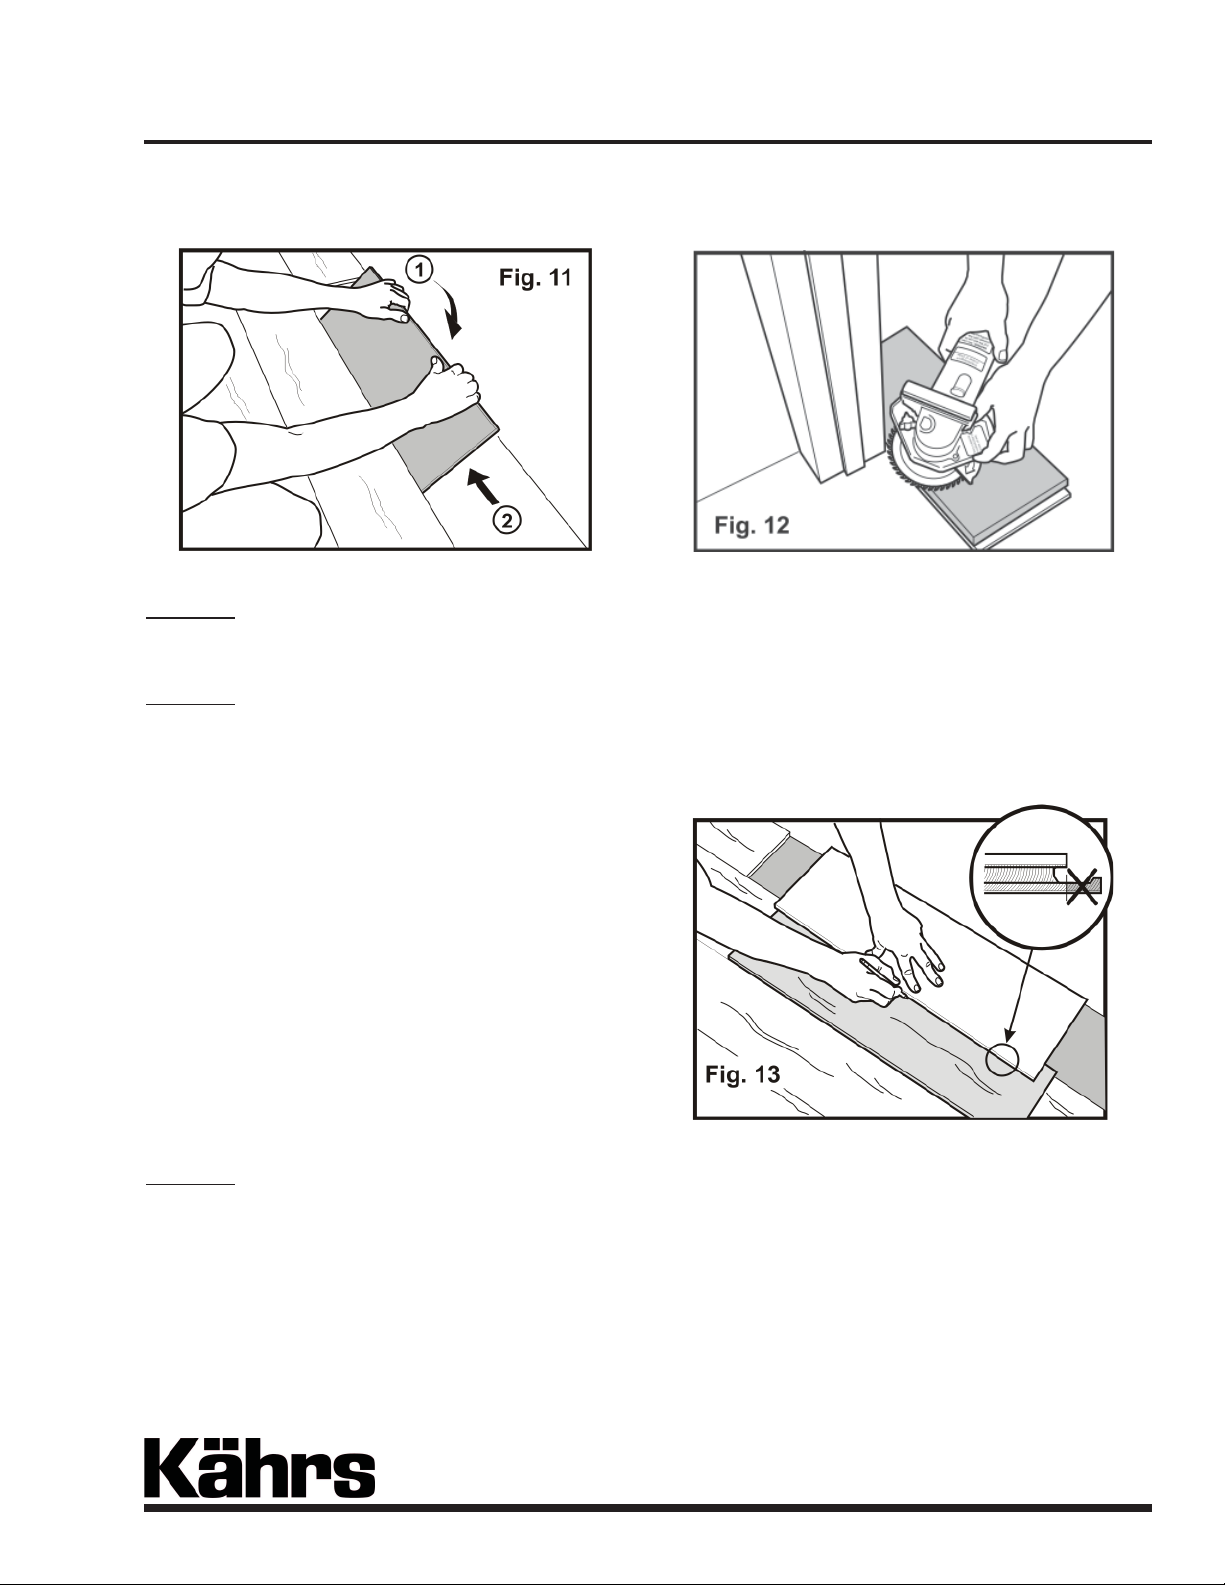
Step 11
Re-lay cut boards in first row and re-install 2nd and 3rd rows. Continue installation in
manner described above. Put shims between floor and wall (Fig. 11).
Step 12
If doorjamb (or similar) needs to be cut, use piece of board and piece of Combo
Underlayment to obtain correct height (Fig. 12). If new board must be tapped into place,
be sure to protect edges with scrap of wood before tapping with handblock.
®
Step 13
Saw last board to correct width. Place last board on top of second-to-last board. Mark
board with help of piece of board without locking edge (Fig. 13). No board should be less
than 3” in width (see Layout / Calculation Worksheet).
Technical Support 1-800-ASK-KAHRS www.kahrs.com
17

Tools & Techniques
April 2011
Float-In Installation for Woodloc
®
Step 14
Boards can be laid from all directions if
necessary. Woodloc® dismantles easily. This enables easier planning for
difficult installation areas. If boards cannot be easily angled under door frame
(or similar), do the following: cut away locking edge as shown in Fig. 14a. Then apply
LandobondTM Adhesive (sku 710225) and install board (Fig. 14b).
After Installation
• Remove expansion shims and use required Kährs moldings and/or trim pieces to cover
expansion space (Fig. 15). Always nail moldings to wall, never to flooring!
Clean Up
• Immediately clean any Landobond
TM
adhesive spilled on wood flooring during installation.
Maintenance
• Clean floor using dry dust mop or damp (lightly misted or well rung out) mop or cloth.
Regularly use Kährs Wood Floor Cleaner for best results. Do not use oil soap or
water-emulsion, self polishing waxes. NEVER wet mop floor. Place Peel & Stick Floor
Protectors on furniture legs to prevent damage. See Kährs Floor Care Guide & Lifetime
Guarantee for full details (available at
www.kahrs.com).
For prefinished oiled floors, please refer to
Natural Oiled Floors Maintenance and Rennovation
Procedures at www.kahrs.com
Fig. 15
Technical Support 1-800-ASK-KAHRS www.kahrs.com
18

Follow Up
April 2011
Recoating your Kährs Floor
Kährs floors can be renewed without removing the factory finish. As a floor ages, normal wear and tear will
cause a floor to lose its luster. This is natural - it happens to all wood floors. To renew the luster and extend
the wear layer of the Kährs floor, recoat with water based urethane coating.
Recoating should be done when necessary. Don’t wait until the finish has worn down. Call your
professional flooring contractor for recommendations as soon as you see a wear pattern developing.
Preparation:
Whether coating a floor upon installation or at a later date when it begins to show wear, the
following recoating procedures are recommended:
1. Kahrs recommends the BonaTech® Prep chemical bonding system for recoating all Kahrs floor.
Please contact Bona Kemi USA @ 1-800-574-4674 for product information, directions, and
qualified professionals in your area.
2. Do not use water based urethane over a floor that has been waxed or oiled. If unsure, wipe a
small section of the floor with a white rag dampened with mineral spirits to test for wax or coat a
test area to check adhesion prior to coating the entire floor. It is imperative, regardless of the age
of the floor, to test for adhesion.
Application:
Application of a waterborne finish should be done according to instructions on the product label.
Important factors to consider with any urethane are:
• Shake or Stir Bottle: There will also be a sitting time to consider before using.
• Coverage/Feet per Gallon : This will dictate how heavy or thin the finish is designed to be applied.
• Dry Time: Average time before a finish can be recoated.
• Curing Time: This includes time before a floor is walked on, time before normal use, and
complete cure time.
Note: To achieve a uniform look, coat the worn traffic areas first, followed by a coat over the entire
floor.
Recommended finishes from Bona Kemi:
• Pacific Strong
• Traffic
Call Kahrs Technical Line (1-800-ASK-KAHR) for other compatible floor finishes.
Note: For prefinished oiled floors please refer to Natural Oiled Floors Maintenance and
Rennovation Procedures at www.kahrs.com
Technical Support 1-800-ASK-KAHRS www.kahrs.com
19
 Loading...