

KZ RV Sportsmen 2020, Connect SE 2020, Connect 2020 Owner's Manual

Owner’s
MANUAL
GUIDEBOOK TO ENJOYMENT
OF YOUR KZRV
RECREATIONAL VEHICLE
SPORTSMEN
CONNECT
CONNECT SE
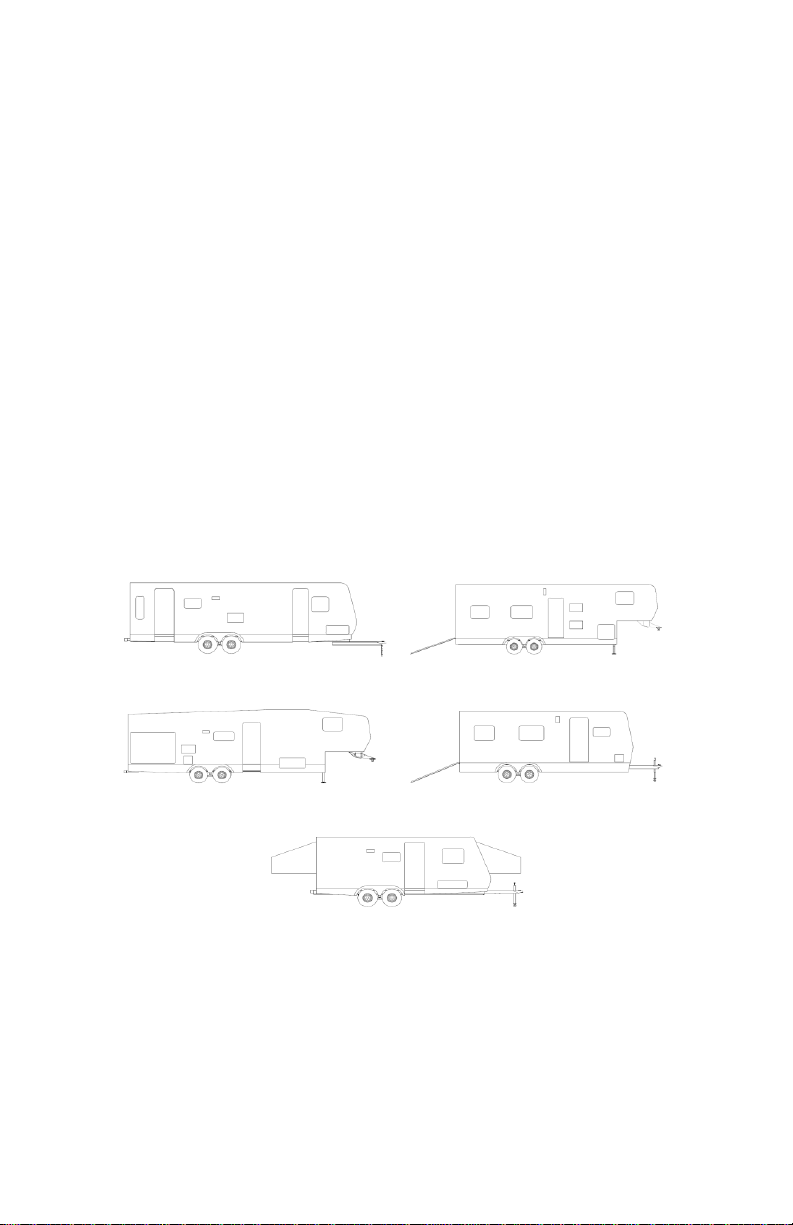
Conventional Travel Trailer
Travel Trailer Toy Hauler
Conventional Fifth Wheel
Fifth Wheel Toy Hauler
Hybrid Travel Trailer
© 2020 KZRV
LITHO U.S.A.
11-2019
THE PURPOSE OF THIS OWNER’S MANUAL IS TO PROVIDE THE
MOST CURRENT INFORMATION AVAILABLE FOR YOUR
RECREATIONAL VEHICLE CONCERNING CARE AND USAGE.
MINOR MAINTENANCE AND CRITICAL SAFETY WARNINGS ARE
INCLUDED AND MUST BE READ AND OBEYED.
ADDITIONAL MAINTENANCE INFORMATION IS FOUND IN THE
“MAINTENANCE MANUAL”, SUPPLIED WITH YOUR RECREATIONAL
VEHICLE. FAILURE TO PROVIDE PROPER CARE FOR YOUR RV
COULD RESULT IN LOSS OF WARRANTY COVERAGE.
ADDITIONAL MANUALS MAY BE SUPPLIED AND AVAILABLE BY THE
MANUFACTURER OF THE COMPONENT AND/OR APPLIANCE. SEE
THE INFORMATION PACKET IN YOUR COACH.
2

TABLE OF CONTENTS
Chapter 1 – Information to RV Ownership ................................... 7
Safety Considerations .............................................................. 8
Reporting Safety Defects ................................................... 8
Safety When Emergency Stopping .................................... 9
Additional Safety Considerations ....................................... 9
Extended or Cold Weather Use ................................ ............... 9
Condensation .......................................................................... 10
Causes ............................................................................... 10
Solutions ............................................................................ 10
Interior Ventilation .................................................................... 10
Chapter 2 – Service Procedures ................................................... 12
Basic Service Procedures ........................................................ 12
Dealer ................................................................................ 12
Factory ............................................................................... 13
Parts .................................................................................. 13
Owner’s Responsibility ....................................................... 13
Seasonal Sites ................................................................... 14
Towable Limited Warranty ....................................................... 14
Chapter 3 – Using your RV ............................................................ 17
Equipment ............................................................................... 17
Tow Vehicle ....................................................................... 17
Hitches – Travel Trailer ...................................................... 17
Hitches – Fifth Wheel ......................................................... 18
Hitch Height Specifications – Travel Trailer ....................... 18
Hitch Height Specifications – Fifth Wheel .......................... 18
Hook up – Travel Trailer .................................................... 18
Hook up – Fifth Wheel ....................................................... 19
Safety Chains – Travel Trailer ............................................ 19
Front Landing Jacks ........................................................... 19
Traveling .................................................................................. 20
Weights .............................................................................. 20
Weighing Vehicle - Loaded or Unloaded ............................ 20
Loading Procedures ........................................................... 21
Tires ................................................................................... 22
Understanding Tire Pressure and Load Limits ................ 23
Tire Size .......................................................................... 24
Tire Tread ....................................................................... 24
Tire Balance and Wheel Alignment ................................. 24
Tire Repair ...................................................................... 24
Tire Fundamentals .......................................................... 24
Tire Speed Rating ........................................................... 25
Cargo Capacities ............................................................... 25
How Overloading Affects your RV and Tires ...................... 25
How to Change a Tire ........................................................ 26
Wheel Bearings .................................................................. 26
Wheel Lugs ........................................................................ 26
3

Brakes – Electrical ............................................................. 27
Breakaway Switch .............................................................. 28
Towing ............................................................................... 28
Setting Up and using you Recreational Vehicle ....................... 29
Travel Trailer Un-Hook ....................................................... 29
Fifth Wheel Un-Hook .......................................................... 30
General Detector Information .................................................. 31
Safety Detectors ................................................................ 31
Fire Extinguisher ............................................................. 31
Propane/Carbon Monoxide Detector ............................... 31
What is Carbon Monoxide? ............................................. 31
Dual Sensor Technology ................................................. 32
Operation ........................................................................ 32
Gas Alarm ....................................................................... 32
Simultaneous CO and Gas Alarm ................................... 32
Lower Power Options ...................................................... 32
Visual and Audible Alarm Signals ................................... 33
CO Alarm ........................................................................ 33
Propane Gas Alarm ........................................................ 33
Malfunction Service Signal .............................................. 33
End of Life Signal ............................................................ 34
Smoke Alarm .................................................................. 34
Operation ........................................................................ 34
Testing ................................................................ ............ 34
Steps ....................................................................................... 35
Windows .................................................................................. 36
Doors ....................................................................................... 36
TV Antenna (nonmoving) ......................................................... 37
Slideouts .................................................................................. 38
Trailer Set-up Requirements – General ............................. 38
Below Floor Slide System .................................................. 38
Above Floor Slideout (All Brands and Types) .................... 39
Bedroom Slideout .............................................................. 39
Power for Operation ........................................................... 39
Operational Switch ............................................................. 40
Electrical Components ....................................................... 40
Manual Override ...................................................................... 41
Below Floor Slideout .......................................................... 41
Above Floor Slideout .......................................................... 41
Bedroom Slideout ................................ ................................ .... 41
Schwintec Wall Slide ............................................................... 41
Blinds ....................................................................................... 42
Ladder, Exterior ....................................................................... 42
Murphy Bed ............................................................................. 43
Chapter 4 – Systems ...................................................................... 45
Water and Drainage Plumbing ................................................. 45
Fresh Water System ................................................................ 45
Tanks ................................................................................. 45
4

Filling Fresh Water System ................................................ 45
12-volt Demand Pump ....................................................... 46
Faucets .............................................................................. 47
Bath and Shower ............................................................... 47
Outside Shower ................................................................. 47
Fresh Water Lines .............................................................. 48
Low Point Drains ................................................................ 48
Sanitizing and Filling the Potable Water System ................ 49
Drainage (Fresh Water) ..................................................... 49
Sanitation System .................................................................... 50
Toilets ................................................................................ 50
Using Toilets and Tank System ......................................... 50
Vent ................................................................................... 50
Holding Tanks .................................................................... 51
Draining the Tanks ............................................................. 51
Flush System ..................................................................... 52
Maintenance for Holding Tanks ......................................... 52
Heated Holding Tanks ....................................................... 53
Winterizing your Recreational Vehicle ............................... 53
Bypass Kit .......................................................................... 54
Propane Fuel System .............................................................. 54
Propane Container ............................................................. 55
Servicing and Filling Propane Containers .......................... 55
Installing Propane Containers ............................................ 57
Regulator ........................................................................... 59
High Pressure Hoses with Acme Connectors .................... 60
Main Supply – Low Pressure ............................................. 60
Operation ........................................................................... 60
Checking for Leaks ............................................................ 61
Propane Gas Consumption ................................................ 62
Electrical System ..................................................................... 63
General Information ........................................................... 63
Changes and Modifications ................................................ 63
120-volt System ................................................................. 63
Power Cord – 30 Amp or 50 Amp ................................... 63
Circuit Breakers and Box ................................................ 64
50 Amp (Optional) ........................................................... 64
DP/DT Switch .................................................................. 66
GFCI Protection .............................................................. 67
12-volt System ................................................................... 67
Converter ........................................................................ 67
Auxiliary Battery (Optional) ............................................. 68
Battery Cut-Off Switch..................................................... 69
Circuit Breakers and Fuses (12-volt) ............................... 69
Exterior Light and Connector, 12-volt .............................. 70
Porch Lights .................................................................... 70
Brake Wiring ................................................................... 70
Solar Panel Receptacle................................................... 71
5

Chapter 5 – Appliances .................................................................. 72
Furnace ................................................................................... 72
Thermostat (with Air Conditioner) ...................................... 73
Thermostat (without Air Conditioner) ................................. 73
Operating Instructions ........................................................ 73
To Turn Appliances Off ...................................................... 74
External Vents .................................................................... 74
Ducting ............................................................................... 74
Range and Oven Top Burner ................................................... 75
Operating Instructions ........................................................ 75
Top Burners .................................................................... 75
Match Lighting .............................................................. 75
Electronic Lighting ........................................................ 75
Oven Burner .................................................................... 76
Match Lighting .............................................................. 76
Electronic Lighting ........................................................ 76
Water Heater ........................................................................... 77
DSI Model .......................................................................... 77
Operating Instructions – Propane ...................................... 77
Operating Instructions – DSI .............................................. 78
Operating Instructions – Electric Element .......................... 78
To Turn off Water Heater ................................................... 78
Winterizing your Water Heater ........................................... 79
Refrigerator ................................ ................................ .............. 79
Leveling.............................................................................. 80
Venting ............................................................................... 80
Door Seal ........................................................................... 81
Door Latch ......................................................................... 81
Operation in Transit ........................................................... 81
Defrosting and Cleaning the Refrigerator Interior ............... 81
Operating the Refrigerator Controls ................................... 81
Monitor Panel .......................................................................... 82
Outside Kitchen ....................................................................... 83
Back Up Camera ..................................................................... 83
6

CHAPTER 1
INTRODUCTION TO RV OWNERSHIP
Welcome to the growing family of new KZRV owners and the world of
recreational vehicle travel. The purchase of your KZRV product allows
you to enter this type of camping and leisure travel. Your coach has been
designed and engineered to offer many comforts of home. KZ
Recreational Vehicles are designed and constructed to be used as
temporary living quarters for camping and travel uses. The coaches are
not intended for hauling cargo.
This owner’s manual was prepared to assist you in understanding the
proper use and operation of various containment systems, servicing and
maintenance of component parts, and explanation of your warranty
protection. If this is your first RV travel coach, you will want to acquaint
yourself with all aspects and information found in this manual plus
manuals supplied by component manufacturers.
These materials will reflect the most current information available for the
user. Some components and items may not be in your coach as they may
be options on different models.
Keep this owner’s manual in your recreational vehicle for handy
reference. Get to know your new recreational vehicle and how it operates.
You should carefully read and understand these instructions, as well as
information supplied by the manufacturers of separately warranted
products, since they contain important operating, safety, and
maintenance instructions. If you have questions that are not adequately
answered by this manual or other booklets, consult your dealer. If he
cannot satisfactorily answer your questions, he will call our staff for
additional information.
Every effort has been made to provide you with a safe and dependable
product. Your recreational vehicle complies with applicable requirements
of Federal Motor Vehicle Safety Standards, State Regulations, Canadian
Standards Associations (CSA), where applicable, and complies with
requirements of ANSI Standard 1192, the nationally recognized
“Standard for Recreational Vehicles – Installation of Plumbing, Heating
and Electrical Systems.” The Recreational Vehicle Industry Association
(RVIA) and Canadian Standards Association (CSA) periodically inspect
our production lines and assist us in maintaining strict compliance with
installation and safety standards for those systems. Your follow-up with
periodic safety inspections and a program of preventive maintenance is
important for the continuation of safe and trouble-free operation.
7

Camping is a great way to relax and enjoy the outdoors with your friends
and family. Please remember to tread lightly on our beautiful land and
leave only your footprints so that others may enjoy nature as much as
you did.
Safety Considerations
The terms NOTE, CAUTION, WARNING, and DANGER have specific
meanings in this manual as well as component manuals.
A NOTE provides additional information to make a step or procedure
easier or clearer. Disregarding a NOTE could cause inconvenience, but
would not be likely to cause damage or personal injury.
A CAUTION emphasizes areas where equipment damage could result.
Disregarding a CAUTION could cause permanent mechanical damage.
However, personal injury is unlikely.
A WARNING is giving notice to user that potential injuries may occur to a
person from equipment and mechanical failure. Disregarding a
WARNING may result in serious physical injury to occupant.
A DANGER alerts areas where safety measures MUST be strictly
adhered to, as such failures can be dangerous. Disregarding a DANGER
could cause serious injury and possible loss of life.
Reporting Safety Defects
If you believe that your vehicle has a defect which could cause a crash or
could cause injury or death, you should immediately inform the National
Highway Traffic Safety Administration (NHTSA) in addition to notifying
KZRV.
If NHTSA, in addition, receives similar complaints, it may open an
investigation. If it finds that a safety defect exists in a group of recreational
vehicles, it may order a recall and remedy campaign. However, NHTSA
cannot become involved in individual problems between you, your dealer
or KZRV.
To contact NHTSA, you may either call the Auto Safety Hotline toll-free
at 1-800-424-9393 or write to:
NHTSA
US Department of Transportation
Washington, DC 20590
You can also obtain other information about motor vehicle safety from the
Hotline.
8

Safety When Emergency Stopping
It is wise to carry road flags and/or triangular warning devices to be used
when necessary. When pulling off a highway, use your four way hazard
lights as warning flashers, even if only to change drivers. Pull off the
roadway completely, if at all possible, to change flat tires or any
emergency need.
Additional Safety Considerations
1. Sanitize the fresh water supply system periodically (see
sanitizing instructions).
2. Keep water connection fittings from coming in contact with the
ground or drain hose to reduce chance of contamination.
3. Enlist services of a Qualified RV Technician to test, repair or
replace any electrical or propane appliances in your RV
systems.
4. Always have a serviceable fire extinguisher placed in an easily
accessible location.
5. Insure that tires on your R.V. are in good condition and properly
inflated. Watch tire inflation closely. Under-inflated tires will
overheat. Check the tire pressure before each trip while the tires
are cold.
6. Check and tighten the wheel lugs regularly (every 50 miles when
new until 200 miles are reached, and then check the lugs every
500 miles).
7. Test the brake operation BEFORE entering or traveling on a
busy highway.
8. Always block the trailer wheels solidly before unhitching.
9. Before leaving a camp area with a trailer in tow, insure:
a. The safety pin or locking lever is seated.
b. The breakaway wire is attached to the tow vehicle.
c. All jacks are raised so that they cannot touch the ground.
d. The 110-volt electrical cord is properly stored.
e. The safety chains are connected.
f. All interior lights are off.
10. Observe and obey the warning labels attached to your vehicle
concerning propane, water, electricity and loading.
11. Extinguish all campfires before leaving your campsite.
Extended Use or Cold Weather Use
Your KZ recreational vehicle has been built for enjoyment in a
recreational manner. This recreational vehicle is not intended to be used
as full-time living quarters. Nor is this a four season unit. Using this unit
in freezing conditions is not recommended. However, if unit is used in
freezing weather, the following are guidelines to follow. Any problems
resulting from freezing are not covered under warranty.
1. For winter use in freezing conditions, more protection may be
required. Use skirting and/or insulation below floor level to
provide additional protection.
9

2. Remember, water freezes at 32o Fahrenheit whether fresh or
drainage. Proper care must be used to protect any system at
32oF or lower. Local recreational vehicle dealers and
campground personnel may be able to advise you on needed
protection.
3. Energy requirements, such as propane and electrical supplies,
must be adequate. Protect your propane regulator from freezeups.
4. During cold weather, you will experience more condensation
than normal. Using ventilation or a dehumidifier may be needed.
Condensation
Condensation is not a warranty issue.
Causes:
A. It occurs when warm moist air comes into contact with a cold
surface. Rain touching the window or roof vents with people
breathing warm moist air inside, due to normal breathing, will
cause condensation.
B. When cooking food or taking a shower, warm moist air circulates
throughout the coach attaching itself to cooler surfaces, forming
beads and running down walls or windows.
C. Normal breathing will emit approximately 1/2 pint of moisture
into the air per person, per day. The more occupants, the greater
quantity of condensation you may find.
Solutions:
1. When taking a shower, open bath roof vent approximately ½
inch allowing moisture to escape.
2. Use the power vent over range when cooking.
3. If condensation is found in cabinets or closets, open the door
slightly to equalize temperature and provide ventilation.
4. Opening windows and roof vents, when possible, allowing warm
moist air to escape is the best way to reduce condensation.
5. Under extreme conditions, you may need to use a dehumidifier
to remove moist air conditions.
Uncontrolled condensation will cause dampness, mildew, etc., inside
your RV. Be sure to make strong efforts to control condensation.
Interior Ventilation
A new coach always has a peculiar aroma, due to all the components
used to build it, such as paneling, plywood, carpet and fabrics.
Allowing fresh air to move and circulate throughout a new recreational
vehicle is very valuable for several reasons.
10

1. Components used to build RVs always have a “new” smell to
Continuous living in your recreational vehicle could cause
them, possibly irritating the respiratory system of the human
body on warm days.
2. Fresh air is always good for the human body unless allergies are
a factor.
accelerated wear to components.
Numerous ways are provided to circulate air in coaches:
1. Open windows on non-rainy days, allowing air circulation
between inside and outside.
2. The power hood vent, above cooking stove, will send heat and
food smells outside.
3. Roof vents. There are numerous types:
a. Standard air flow using gravity flow method.
b. Power (12V or 110V) vents will move air faster.
c. Hi-volume power vents, operating with 12-volt power, can
circulate air in a coach in several minutes, if windows are
open accordingly. If there is a fan in the rear, open
window(s) in front.
Different brands/models have different features, such as remote control,
rain sensor, variable speed control switch, etc.
Read carefully, the operating instructions which are provided by the
manufacturer and can be found in your coach.
11

CHAPTER 2
SERVICE PROCEDURES
Basic Service Procedures
KZRV and your KZRV Dealer have a strong and dedicated interest in
maintaining the highest quality customer relations with its owners. Your
satisfaction with your KZ recreational vehicle and your KZRV dealer is
our primary concern. In addition to producing high quality products, we
want to assure our customers of our support with parts and service
availability. Our dealer network is the first choice to serve and supply
your needs for your recreational vehicle. Our authorized dealers will
pleasantly assist in providing service maintenance needs plus parts,
options, and information concerning your recreational vehicle.
Should you experience a problem with service availability, please follow
the steps in the order listed below.
1. Contact your selling dealer’s service department for an
appointment. Describe to the best of your knowledge the nature
of the problem. Please keep appointments to establish a good,
workable relationship.
2. Contact the owner or general manager of the dealership should
the initial attempt fail with the service department.
3. Contact: Customer Relations Department
KZRV
0985N 900W
Shipshewana, IN 46565
Phone: (866) 472-5460
Hours: (8am-5pm E.S.T.)
E-mail: kz@kz-rv.com
Website: http://www.kz-rv.com
Give all the above information as requested along with the serial
number of the coach in question. We will make every attempt to
resolve your problem.
Please bear in mind that most problems arise from misunderstandings
concerning warranty coverage and service. In most instances, you will
be referred to the dealer level and your concerns will be resolved with the
dealer’s facilities and personnel.
Dealer
Your authorized KZRV dealer has performed a PDI (pre-delivery
inspection) on your recreational vehicle. Since your dealer is authorized
to sell KZRV products, they are also there to supply parts, optional
equipment, and provide service repairs, warranty or otherwise, as
needed.
12

First choice for warranty repairs is your selling KZRV dealer. Other
dealers can be used, however, prior approval is required.
Some recreational vehicle dealers may be authorized service centers for
certain manufacturers of products warranted separately, such as
appliances. Check with your dealer before contacting anyone else to
reduce delays. If the dealer is not an authorized service center for the
product in question, he can assist you in obtaining authorized service.
Factory
Service repairs can be performed at the manufacturing facility in
Shipshewana, Indiana. Should your KZRV product be in need of major
repairs and your dealer recommends factory repairs, please follow the
steps listed below.
1. Your dealer must make an appointment with service personnel
at the factory PRIOR to your arrival.
2. Any freight costs are the responsibility of the owner, as listed in
the warranty coverage schedule.
Parts
Stocking of parts varies from dealer to dealer. Any authorized dealer can
order any required part to be shipped to their dealership. All parts are
obtained through authorized KZRV dealers only.
Owner’s Responsibility
When owning and using a recreational vehicle, it is important to perform
regular and normal maintenance. This is recommended twice a year,
spring and fall, to prevent undesired deterioration of your coach. Weather
elements play an important function on sealants and other components
requiring normal maintenance.
As an owner and operator, it is your responsibility and obligation to
inspect and return your coach to an authorized dealer for repairs as
required. Your authorized selling dealer is always your first choice and
they certainly will have continued interest in your satisfaction. As your
manufacturer, we recommend that inspection and service be performed
by your selling dealership.
If you are traveling and are unable to locate an authorized KZ dealer, or
an authorized dealer for the component needing service, please call our
customer service office at (866)472-5460. Service at a non-authorized
dealer MUST have prior authorization. You may be asked to return any
mechanical parts replaced before reimbursement consideration is made.
Unauthorized or improper repairs may void the warranty of that
component. Always keep your owner’s manual along with a copy of your
warranty registration with you when traveling.
13

Seasonal Site
When placing your unit on a camp site in the spring and returning it in the
fall to your home, it’s classified as a “seasonal site”.
Performing repair work on such a site is not recommended for numerous
reasons; available parts, tools, space, weather conditions, etc.
Any service repairs which require a service technician also requires the
unit to be taken to a service facility, preferably your selling dealer.
Warranty coverage does not include trip or service call costs for such a
trip. It is the owners’ responsibility to provide for such costs.
TOWABLE LIMITED WARRANTY
Two Year Limited Warranty
SUMMARY OF WARRANTY: KZRV warrants the structure of every towable recreational
vehicle or truck camper purchased from an authorized KZRV dealer to the first retail consumer
for a period of two (2) years, to be free from substantial defects in materials and workmanship
when used for its intended purpose. The warranty period begins on the date of purchase or
the date the unit is first placed in service, whichever is earlier. For purposes of this Towable
Limited Warranty (“TLW”), the term “structure” includes the interior and exterior sidewalls, floor,
roof, and frame.
EXCLUSIONS FROM WARRANTY: Excluded from coverage under the TLW are: (1) items
added, changed, or modified after the unit has left the possession of KZRV; (2) units used for
any commercial purpose; (3) units used for full-time residential use or more than occasional
recreational use; (4) wear and tear caused by normal usage by the consumer, including but
not limited to fading or discoloration of soft goods (e.g. Tents, upholstery, drapes, carpet, vinyl,
screens, cushions, and mattresses), fading or discoloration of exterior or fiberglass
components, tears, punctures, soiling, mildew, mold and the effects of moisture condensation
inside the unit; (5) the effects of alteration, tampering, mishandling, neglect, abuse, misuse,
weather, acts of nature, acts of God, or corrosive atmospheres that promote rusting, oxidation,
or pitting; (6) minor imperfections that do not interfere or affect the suitability of the unit for its
intended use; (7) the effects of consumer’s or transferee’s failure to perform normal and routine
maintenance (e.g. Inspections, lubrication, adjustments, tightening of screws and bolts,
tightening of lug nuts and wheels, sealing, rotating, cleaning, or other damages resulting from
failing to follow the maintenance schedule and procedures in the owner’s manual; (8) damages
resulting from misalignment or adjustments to axles or spindles caused by improper
maintenance, modification, loading, unloading, road hazards, road defects, off road travel, or
tire failure; (9) damages caused by the negligent or intentional use or misuse of the unit by the
consumer or transferee, including, but not limited to, occurrences while towing the unit; (10)
claims made for alignment or adjustment of patio doors (Note: any unit with a patio door is not
intended to be towed like a travel trailer, and must be permanently parked on a lot. If such a
unit is towed, this TLW is voided in regard to the patio door and the surrounding structures);
(11) loss or damage caused by a person or business as a result of transporting the unit after
sale to the consumer, delivering the unit, or parking the unit; (12) loss of damage to the
14

plumbing system caused by freezing; (13) claims for personal injuries of any type; (14) costs
of transportation of the unit for repairs; and (15) components that are warranted separately by
another manufacturer (the warranty provided by a component manufacturer is the sole
responsibility of that manufacturer, and KZRV does not warrant those components. Please
refer to the warranties issued by the component manufacturers for the terms and conditions of
such warranties).
TO OBTAIN WARRANTY SERVICE: Warranty service may be performed only at KZRV, or at
KZRV authorized dealers and service centers. Contact KZRV for a list of authorized dealers
and service centers. REPAIRS OR REPLACEMENTS BY UNAUTHORIZED DEALERS OR
SERVICE CENTERS WILL VOID THIS TLW. If the consumer believes that a claimed defect
is covered by this TLW, contact must be made with an authorized dealer or service center
WITHIN THE WARRANTY PERIOD. Sufficient information must be given to attempt to resolve
the claimed problem. Should KZRV determine that repair or replacement is appropriate, the
consumer must deliver the unit to the dealer or service center as directed. Delivery shall occur
no later than thirty (30) days after the authorization for repair or replacement. Do not deliver
your unit to KZRV, an authorized dealer or service center without prior authorization. All costs
incurred by the consumer for transportation for warranty service shall be the sole responsibility
of the consumer. The dealer or service center shall repair or replace any warranted defect
within a reasonable time, but no later than ninety (90) days after delivery by the consumer.
Should the unit not be repaired or replaced within said period of time, the consumer must
contact KZRV by CERTIFIED MAIL with a written description of the claimed warranted defect
and the efforts to remedy it. FAILURE TO SO NOTIFY KZRV IN THIS REGARD SHALL
RENDER THIS TLW VOID AS TO THE CLAIMED DEFECT. After receipt of such notice,
KZRV shall repair or replace such warrantied defect within a reasonable time, but not later
than ninety (90) days after delivery by the consumer. The scheduling of warranty work at an
authorized dealer or service center is not controlled by KZRV and delays may be experienced.
KZRV is not responsible for loss of use of the unit, expenses for fuel, telephone, food, lodging,
travel, loss of income or revenue, or loss of or damage to personal property.
DISCLAIMER AND LIMITATIONS OF WARRANTIES: NEITHER KZRV NOR ITS DEALERS
SHALL BE LIABLE FOR INCIDENTAL, CONSEQUENTIAL, INDIRECT, SPECIAL, OR
PUNITIVE DAMAGES OF ANY KIND OR ANY OTHER FINANCIAL LOSS ARISING OUT OF
OR IN CONNECTION WITH THE SALE OR USE OF THIS PRODUCT, WHETHER BASED
IN CONTRACT, TORT, STRICT LIABILITY, EQUITY, OR ANY OTHER THEORY, EVEN IF
KZRV HAS BEEN ADVISED OF THE POSSIBILITY OF SUCH DAMAGES. KZRV’S ENTIRE
LIABILITY SHALL BE LIMITED TO REPAIR OR REPLACEMENT, AT KZRV’S SOLE
OPTION.
THE UNITED NATIONS CONVENTION ON CONTRACTS FOR THE INTERNATIONAL SALE
OF GOODS IS HEREBY EXCLUDED IN ITS ENTIRETY FROM APPLICATION TO THIS
TLW.
THIS TLW, AND THE REMEDIES HERENDER, ARE EXCLUSIVE AND IN LIEU OF ALL
OTHER WARRANTIES, EXPRESS OR IMPLIED, INCLUDING WARRANTIES OR
MERCHANABILITY. FITNESS FOR A PARTICULAR PURPOSE. CORRESPONDENCE
WITH DESCRIPTION, AND NON-INFRIGMENT, ALL OF WHICH ARE EXPRESSLY
DISCLAIMED BY KZRV. THIS TLW GIVES YOU SPECIFIC LEGAL RIGHTS AND YOU MAY
ALSO HAVE OTHER RIGHTS THAT VARY DEPENDING ON LOCAL LAW. SOME STATES
LIMIT OR PROHIBIT LIMITATIONS OF WARRANTIES, SO THE ABOVE MAY NOT APPLY
TO YOU. YOU SHOULD CONSULT AN ATTORNEY FOR LEGAL ADVICE.
MISCELLANEOUS: No repair or replacement effected shall cause any extension or renewal
of the warranty period. KZRV may make parts and/or design changes from time to time without
notice and repairs or replacements may be made with new or different parts. KZRV reserves
the right to make changes in the design or material of its products without incurring any
obligation to incorporate such changes in any product previously manufactured. At KZRV’s
sole option, any dispute concerning any warranted defect may be resolved through mediation
15

or arbitration. This TLW shall be governed by the laws of the State of Indiana, and any legal
action shall be brought only in the Circuit or Superior Court of LaGrange County, Indiana.
WARRANTY REGISTRATION AND CONTACT INFORMATION: The warranty registrations
for component parts should be completed and delivered in accordance with the instructions
contained therein. The TLW registration must be completed and returned to KZRV within
fifteen (15) days of delivery of the unit to the consumer. Failure to do so can void this TLW or
cause delays in obtaining benefits. The TLW registration, and all inquiries, must be directed
to: KZRV, L.P., Warranty Department, 0985 N 900W, Shipshewana, Indiana 46565,
Telephone: (260) 768-4016.
I HERBY ACKNOWLEGE THAT I HAVE RECEIVED, READ, AND UNDERSTAND THIS
TOWABLE LIMITED WARRANTY, AND THAT I HAVE INSPECTED THE UNIT AND FIND IT
IN THE CONDITION REPRESENTED.
Date: ____________________ _________________________________
Purchaser
16

CHAPTER 3
USING YOUR RV
In this chapter, you will find three areas of useful information to assist you
with equipment, traveling, and finally, actually using your recreational
vehicle.
Equipment
Tow Vehicle
Begin your camping experiences by obtaining a tow vehicle which will
adequately transport your recreational vehicle to and from your chosen
destinations. Your most important measuring tool is the GVWR, Gross
Vehicle Weight Rating, to cross match the capability of your selected tow
vehicle.
Most auto and truck manufacturers provide trailer towing guides for their
products. Ask your local automotive dealer for a copy or call the factory’s
direct lines for information. Many tow vehicles, including mini-vans, have
special towing package options available for small travel trailers.
A second factor is GCWR, Gross Combined Weight Rating, which refers
to the total weight of the tow vehicle and any vehicle in tow as a
“combined” weight. This information, supplied by the tow vehicle
manufacturer, is related to the capability of the tow vehicle.
The condition of the suspension in your tow vehicle is also an important
factor. Make sure your tow vehicle is in good operating condition and
follow the factory recommended maintenance guidelines.
Hitches – Travel Trailer
After obtaining your tow vehicle, it is very important to choose, and have
installed, a correct hitch system with weight distributing bars to
accommodate your coach, if so required. This selection and installation
should be done by a professional hitch service center, which may or may
not be your selling dealer. Sway controls may be needed based on size
and weight of the coach, plus capability of your tow vehicle.
Weight distributing hitches apply leverage between the tow vehicle and
trailer. This assists in equalizing the weight between vehicles, resulting
in both vehicles traveling level. The condition of the tow vehicle’s
suspension system will affect the towing performance capability of your
equipment.
17
18-22” off ground
FRAME &
COUPLER
Trailers with tandem axles needs to travel as level as
possible, avoiding different weights on each axle plus
handling conditions.
Using an oversized or undersized hitch can cause damage to
the frame of your travel trailer or tow vehicle.
Hitches – Fifth Wheel
The best type of hitch is one that is bolted thru the truck bed floor and has
brackets to attach to main frame members on truck.
Before installing your hitch be aware of the clearance needed between
the truck cab and center of hitch pin. This is very important on short bed
trucks.
Gooseneck hitch adapter is not permitted, due to additional stress it
places on the bulkhead frame. Should you desire a gooseneck adapter,
it MUST be preordered with changes in the front end of the frame, before
coach is built. By installing your own after coach is built, will void warranty
on the front end of your coach.
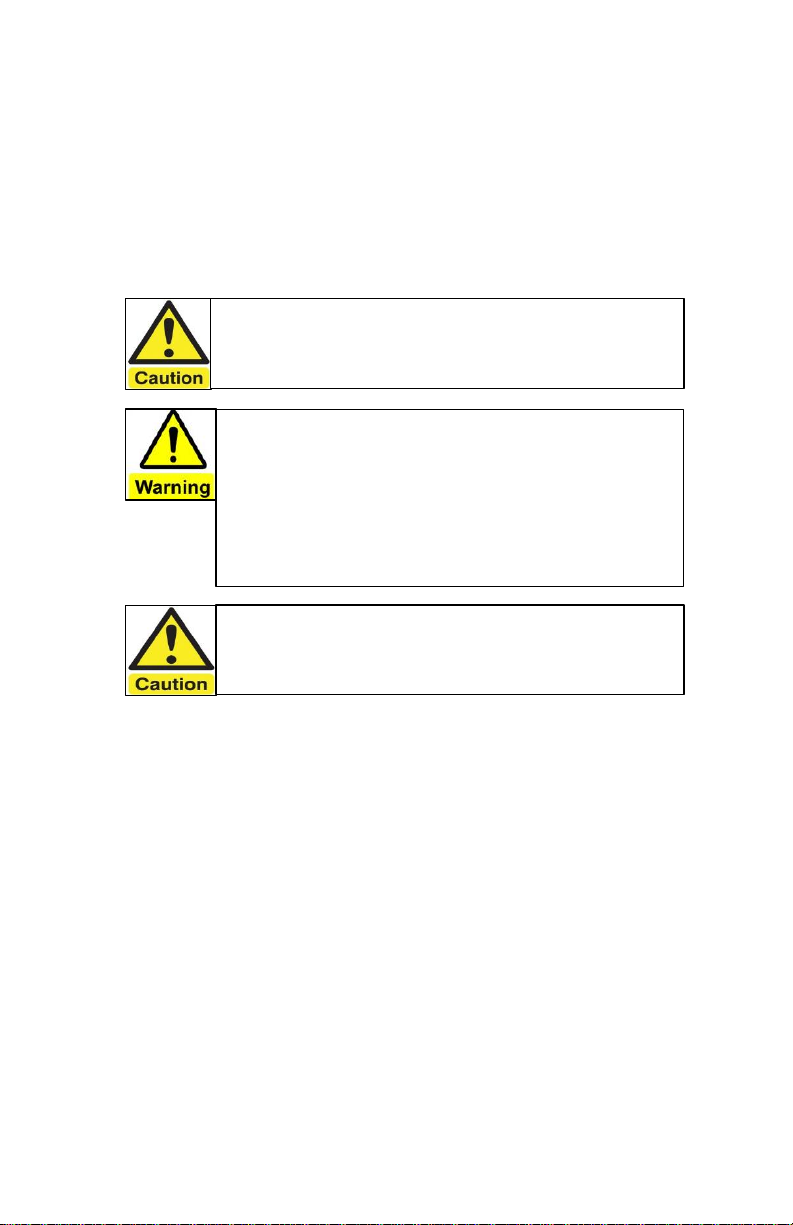
Hitch Height Specifications – Travel Trailer
Due to axle bars being either straight or drop bars,
the ball height will vary. To find the correct height
for the ball hitch, set your trailer on a flat surface in
level position. Measure from the inside of the ball
socket to the ground, approximately 18 to 22 inches
as shown, for correct spacing. You may wish to add
1 to 2 inches to this amount to compensate for sag
of suspension of the tow vehicles when hooked to
the trailer.
Hitch Height Specifications – Fifth Wheel
There is no recommended hitch height for fifth wheels. The pin box is
adjustable at two inch intervals for variance in trucks and their suspension
systems.
Hookup – Travel Trailer
Hooking up your travel trailer is not difficult and gets easier with practice.
The following procedure will help you until you become more
experienced.
1. Raise the tongue of the trailer above the hitch ball on the hitch
by turning the crank on the jack or operate with 12-volt power
jack.
18

2. Open the coupler latch.
Remember – always have the safety chains attached to tow
3. Back the tow vehicle into proper position.
4. Turn the crank on the jack to lower the coupler onto the ball
hitch.
5. Close the coupler latch after completely seated and insert a pin
with a lock key or lock.
6. Install weight distributing bars (equalizer), when required, as
recommended by hitch supplier.
7. Retract the tongue jack as far as possible.
8. Attach the cable for the breakaway switch to the tow vehicle.
9. Attach safety chains as per your state laws. See page 18.
10. Plug in your 12-volt, 7-way electrical connector from the tow
vehicle to the trailer connector.
The Safety Chain – Travel Trailer
Safety chain requirements will vary from state to state. The chain
supplied with your coach meets SAE requirements for maximum gross
trailer weight.
1. Cross the left chain under the coupler and attach chain to the
right ring on the hitch receiver of tow vehicle.
2. Now take right chain under the coupler and attach to left ring on
hitch receiver of tow vehicle.
vehicle, as required in your state.
Hook up – Fifth Wheel
1. Place tow vehicle close to pin box.
2. Raise or lower front end of RV as needed.
3. Back your tow vehicle against pin carefully.
4. Lower pin box until it touches hitch.
5. Release latch to lock pin to hitch. BE SURE it is locked to avoid
a drop on tow vehicle.
6. Raise front landing jacks and adjust feet so they clear any
objects.
7. Plug in your 7-way electrical cord from the tow vehicle to the
trailer connector.
Front Landing Jacks
Front landing jacks on fifth wheel campers are available in two different
types. Mechanical gear driven jacks are operated with a hand crank
(manual) or optional 12-volt motor attached to gear box. Power is
supplied by “on board” battery or by tow vehicle while attached with 7–
way connector. A switch is mounted on front wall, spring loaded to raise
or lower jacks. Don’t forget to block the wheels before you release the
19

latch, raise pin box, and pull tow vehicle away. An inline 30 amp fuse is
MANUFACTURED BY/FABRIQUE: KZRV DATE: 03/2012
GVWR/PNBV: 2727 KG (6000) SHIPSHEWANA, IN ST205/75R14 C
GAWR (EACH AXLE)/PNBE (CHAQUE ESSIEU): 1591 KG (3500 LB) TIRE/PNEU RIM/JANTE: 14X5.5JJ
COLD INFL. PRESS/PRESS. DE GONFL. A FROID: 345KPA (50PSI/LPC)
THIS VEHICLE CONFORMS TO ALL APPLICABLE U.S. FEDERAL MOTOR VEHICLE SAFETY
STANDARDS IN EFFECT ON THE DATE OF MANUFACTURE SHOWN ABOVE. THIS VEHICLE
CONFORMS TO ALL APPLICABLE STANDARDS PRESCRIBED UNDER THE CANADIAN MOTOR
VEHICLE SAFETY REGULATORS IN EFFECT ON THE DATE OF MANUFACTURE – CE VEHICULE
EST CONFORMS A TOUTES LES NORMES QUI LUI SONT APPLICABLES EN VERTU DU
REGLEMENT SUR LA SECURITE DES
VEHICULES AUTOMOBILES DU CANADA EN VIGUER A LA DATE DE SA FABRICATION.
V.I.N./N.I.V.: 4EZTS2420C5036114 TYPE/TYPE DE VEICULE: TRAILER TRA/REM TRA
located near the motor.
Now raise or lower front pin to level your unit as needed.
Traveling
Weights
For safety reasons and federal regulations KZRV provides accurate
weight specifications to owners. On the exterior left front corner of the
coach you will find the Federal “Vehicle Identification Number” sticker, as
required by the federal government. This tag supplies information
concerning your coach, such as: VIN number, date/month of
manufacture, tire size rating, plus information about weights as described
in this manual.
Gross Axle Weight Rating (GAWR) is the value specified as the load
carrying capacity of a single axle system, as measured at the tire-ground
interfaces. Effective September 2017, the tires will be rated 10% higher
or more than axle, becoming the GAWR rating.
Gross Vehicle Weight Rating (GVWR) is the maximum permissible weight
of this trailer when fully loaded. It includes all weight at the trailer axle(s)
and tongue or pin on Fifth Wheel. This includes ALL cargo, options and
liquids.
Unloaded Vehicle Weight (UVW) is the weight of this trailer as
manufactured at the factory and options ordered at the manufacturing
time. It includes all weight at the trailer axle(s) and tongue or pin. If
applicable, it also includes full generator fluids, including fuel, engine oil
and coolants.
Cargo Carrying Capacity (CCC) is equal to the GVWR minus each of the
following: UVW, full fresh (potable) water weight (including water heater,
and full propane weight).
Weighing Vehicle (Loaded or Unloaded)
The proper method to weigh the coach is to use a truck scale. Place the
coach axles (tires) and tongue jack or landing jacks with front supports,
12” to 18” from the edge of the scale. Unhook the tow vehicle and move
20

forward 6” to 8”. Now record total weight. Re-hook the tow vehicle and
A load of water equals _____kg/____lbs of cargo @
remove the weight from the front support. Be sure no part of tow vehicle
is on the scale. Now record the axle weight only. The difference between
the two weights is the hitch weight.
KZRV suggests you also weigh each side (2 tires) separate to find
balance of pounds per side. It’s possible to have 1 side correct and the
other side over-loaded. Often the slideout side or refrigerator side will be
slightly heavier than the other.
The second sticker is about the weight of cargo placed in your coach.
Location is on the inside of your coach, on the screen door, or inside of a
cabinet door. It provides listed total allowable weight of cargo minus
liquids allowed, water and propane.
RECREATIONAL VEHICLE TRAILER CARRYING CARGO CAPACITY
VIN #: ____________________________________
The weight of cargo should never exceed kg _______ lbs ________
____kg/____lbs per gallon.
Loading Procedures
Your recreational vehicle has been engineered to make maximum use of
the available space for living and storage areas. The equipment and
supplies you take along while traveling can be carried safely, provided
the additional weight is distributed properly. Proper weight distribution
within your trailer is an important factor in safety and efficiency of your
trailer brakes, hitching, and how your tow vehicle will pull the trailer. DO
NOT put excessive weight in the rear area. Excessive weight in the rear
lightens the hitch weight, which tends to magnify any sway from passing
trucks or gusty winds, and reduce your control of coach when towing.
Lightweight and bulky items such as paper products, bedding, clothing,
etc., should be stored in overhead cabinets and closets. Heavy items
such as cooking utensils should be placed in lower cabinets. Canned
goods need to be in a pantry, if so equipped, or in lower cabinets. Also,
heavy items should be secured to avoid shifting during travel.
A reasonable principle in loading your coach is for every two pounds of
weight loaded in front of the axle, one pound of weight must be loaded
behind the axle. Also remember, improper side-to-side loading affects
spring condition and sway.
21
Uncalculated weight can and will affect your road performance.
Any damages caused by improper loading or installing
The rear bumper on the frame will only carry 100lbs, therefore,
during travel, which could result in an accident.
DO NOT overload your unit. Please follow the GVWR when
Several floor plans have a rear storage section built into the trailer. Be
very cautious how you load this area. Failure to abide by the weight limits
can cause erratic performance while towing.
When using a weight distributing hitch and equalizer bars, you may
move/transfer hitch weight from coach to tow vehicle assisting with level
towing and easier travel.
additional equipment is NOT covered by KZRV Limited
Warranty.
only the spare tire carrier and spare tire can be added to the
bumper. Do not add any other components to the bumper
such as bike racks, generators, cargo containers, etc. Such
items could cause fatigue and weld stress, which is not
covered under warranty. Any such failures could damage
your property and endanger vehicles following your camper
loading your KZ recreational vehicle, to avoid damages.
Tires
All KZRV towable coaches are equipped with appropriately rated tires for
recreational vehicles. Tires are rated to carry weight as listed to GVWR.
Tires are radial in design using components to offer excellent strength
and mileage in all kinds of weather conditions.
Tires on your vehicle(s) are one of the most important components of the
towing package. Without inflated tires you will not be moving anywhere.
Taking care of your tires during travel is very important. Top of the list is
maintaining correct air pressure and secondly is NOT overloading your
RV.
With proper care, the performance of fuel economy and handling on the
road will be better. Safety on the road is very important in avoiding road
hazards which can damage your tires plus obeying the speed limits.
22

On the left front exterior corner of your coach, you will find the (VIN) label
It is recommended that the tire pressure be checked at the
along with a placard supplying information on tires such as tire size and
amount of air pressure (maximum).
Due to weather elements, labels may fade over time. You may wish to
record this information and keep it inside the coach, perhaps with owner’s
manual.
TIRE SIZE COLD TIRE PRESSURE
PNUE DIMENSIONS PRESSIONDES
PREUS A FROID
FRONT
AVANT
REAR
ARRIERE
SPARE
DESESCOURS
Understanding Tire Pressure and Load Limits
Tire inflation pressure is the level of air in the tire that provides it with load
carrying capacity and affects the overall performance of the vehicle. The
tire inflation pressure is a number that indicates the amount of air
pressure - measured in pounds per square inch (psi) - a tire requires to
be properly inflated. (You will also find this number on the vehicle
information placard expressed in kilopascals (kPa), which is the metric
measurement used internationally.)
The listed amount is for maximum load capacity. When traveling with less
than full weight, you may wish to reduce air pressure slightly for a
smoother ride.
While driving, your tires will get warmer, causing air pressure to increase.
To get an accurate pressure reading, you must allow tires to cool down
for three or more hours.
For your convenience, purchase a tire pressure gauge to keep in your
RV. Gauges can be purchased at tire dealerships, auto supply stores and
other retail stores.
beginning of each journey. And at least once per week to
obtain the maximum life of the tires.
23

Tire Size
To maintain tire safety, purchase new tires that are the same size as the
vehicle’s original tires or another size recommended by the manufacturer.
Look at the tire information placards, or the sidewall of the tire you are
replacing to find this information. If you have any doubt about the correct
size to choose, consult with the tire dealer. NEVER replace a tire with a
smaller size or a lower weight rating.
Tire Tread
The tire tread provides the gripping action and traction that prevent your
vehicle from slipping or sliding, especially when the road is wet or icy. In
general, tires are not safe and should be replaced when the tread is worn
down to 1/16 of an inch. Tires have built-in tread wear indicators that let
you know when it is time to replace your tires. These indicators are raised
sections spaced intermittently in the bottom of the tread grooves. When
they appear “even” with the outside of the tread, it is time to replace your
tires.
Tire Balance and Wheel Alignment
Tires are not balanced on your unit, nor is it required. You may choose to
balance the tires on your unit, however this will not be covered under
warranty.
Wheel alignments may be needed periodically due to road hazards, such
as pot holes, etc. This also is not covered under warranty, due to being
an uncontrollable element. Wheel alignments will assist with getting the
maximum life from your tires. Alignments require special equipment, and
should be performed by a qualified technician.
Tire Repair
The proper repair of a punctured tire requires a plug for the hole and a
patch for the area inside the tire that surrounds the puncture hole.
Punctures through the tread can be repaired if they are not too large, but
punctures to the sidewall should not be repaired. Tires must be removed
from the rim to be properly inspected before being plugged and patched.
Tire Fundamentals
Federal law requires tire manufacturers to place standardized information
on the sidewall of all tires. This information identifies and describes the
fundamental characteristics of the tire and also provides a tire
identification number for safety standard certification and in case of a
recall.
Considerable quantity of information is built into the sidewall of tire, such
as size, weight capacity, air pressure allowed, serial number, and where
it was built.
The letters “ST” refer to “service trailer” tires used on most RVs,
manufactured for that purpose and not for automotive.
24

Tire Speed Rating
Each original tire installed on KZRV recreational vehicles have a speed
rating of 75 MPH or greater. Please note maximum load rating, tire
pressure and speed rating as imprinted on the sidewall of tire.
Tires will have NITROGEN in them instead of air. The green caps on
valve stems indicate contents are nitrogen. Air may be used if nitrogen is
not available.
Cargo Capacities
Cargo can be added to the vehicle, up to the maximum weight specified
on the placard. The combined weight of the cargo is provided as a single
number. In any case, remember, the total weight of a fully loaded vehicle
cannot exceed the stated GVWR.
Water and propane also need to be considered. The weight of fully filled
propane containers is considered part of the weight of the RV before it is
loaded with cargo and is not considered part of the disposable cargo load.
Water however is a cargo weight to be disposed. Remember water
weighs 8 pounds per gallon. Reducing water quantity allows more cargo
pounds. Understanding this flexibility will allow you, the owner, to make
choices that fit your travel and camping needs.
When loading your cargo, be sure it is distributed evenly to prevent
overloading front to back and side to side. Heavy items should be placed
low and as close to the axle positions as reasonable. Too many items on
one side may overload a tire. The best way to know the actual weight of
the vehicle is to weigh it at a public scale. Talk to your RV dealer to
discuss the weighing methods needed to capture the various weights
related to the RV. This would include weights for the following: axles,
wheels, hitch or pin (in the case of a fifth wheel) and total weight.
How Overloading Affects Your RV and Tires
The results of overloading can have serious consequences for passenger
safety. Too much weight on your vehicle’s suspension system can cause
spring, shock absorber, or brake failure, handling or steering problems,
irregular tire wear, tire failure or other damages.
An overloaded vehicle is hard to drive and hard to stop. In cases of
serious overloading, brakes can fail completely, particularly on steep hills.
The load a tire will carry safely is a combination of the size of tire, its load
range, and corresponding inflation pressure.
It is the air pressure that enables a tire to support the load, so proper
inflation is critical. Since RVs can be configured and loaded in many
ways, air pressures must be determined from actual loads (determined
by weighing) and taken from the load and inflation tables provided by the
tire manufacturer. These air pressures may differ from those found on
25

the certification label. However, they should never exceed the tire
limitation for load or air pressure. If you discover that your tires cannot
support the actual weights, the load will need to be lightened.
NOTE: Tires are warranted by the manufacturer of their respective brand
and are to be serviced and warranted by a service center. Contact your
dealer for information on service centers for tires.
How to Change a Tire
1. Place blocking under main rail of frame with hydraulic jack on
top of blocking in front of front spring hanger, ALWAYS on main
rail.
2. Break lug nuts loose before raising coach. DO NOT REMOVE
lug nuts.
3. Raise coach with jack, until wheel is off the ground.
4. Place additional blocking under frame for security support. DO
NOT depend fully on jack.
5. Be sure coach is solid and will not move with wheel and tire off.
6. Remove lug nuts when tire is off the ground.
7. Replace with spare tire and wheel onto hub.
8. Reinstall lug nuts and tighten firmly.
9. Drop tire and wheel onto ground after removing supports.
10. Now fully tighten and torque lug nuts at 90 to 120 pounds.
11. Place all equipment into coach or tow vehicle.
12. Re-torque lug nuts after traveling 100 miles.
Wheel Bearings
ALL wheel bearings are pre-lubricated during assembly of axle and
brakes.
Your coach may have “ULTRA LUBE”, a method of having a grease fitting
in the end of the axle. Remove rubber cap on the end of axle and using
a standard grease gun, you may place 6 to 8 shots of grease into the
bearings, (if you forgot to repack bearings), before leaving on a trip. Don’t
forget to correctly repack bearings as per maintenance manual when you
return home, using wheel bearing grease.
Wheel Lugs
When the wheels are installed on your recreational vehicle, the lug nuts
must be tightened at 90-120 foot pounds of torque. Powder coat painted
wheels may require more torque attempts due to thickness of paint. You
must re-torque the wheel lugs at 50 and 200 miles. A decal on the wheel
may require checking torque earlier.
After your first trip, check the wheel lugs periodically for safety. The wheel
lugs should then be checked after winter storage, before starting a trip or
following extensive braking. The size of bolt head or nuts is 13/16 inch
standard and 3/4” for chrome nut. Over torqueing will damage
components, especially if torque wheel lugs goes over 150 pounds.
26

Normally the “nut” fails first however the embossing on the wheel
can also be flattened, and then fail to keep wheel tight.
Brakes – Electrical
Electric brakes on your recreational vehicle are designed to work in
conjunction with the hydraulic brakes on your tow vehicle. This means to
have the best brake performance on both systems, the trailer and the tow
vehicle must perform and operate together. Any attempt to use either
brake system alone, tow vehicle or trailer will cause accelerated wear and
damage or possibly an accident.
A brake control must be installed in your tow vehicle, mounted under dash
to activate the electric brakes with 12-volt power either manually or by
foot brake pedal. Electronic type is used most widely. Each brand has
their own operating instructions.
Battery in the tow vehicle is the primary source of power to operate the
brake system in towable trailer. Keep battery and charging system in
good working condition to ensure available power when required.
Wiring to operate your brakes must be sized in both vehicles, a minimum
of 14 gauge is required. Your camper has 14 gauge from front end to
brakes. Brake assemblies are wired in parallel, never in series. Being
parallel, there will be equal voltage and amperage at each brake
assembly for equal braking capability and/or performance. 12 gauge may
be desired in your tow vehicle, if installing accessories.
Use the foot pedal control for general operation for combined use of both
brake systems. Manual control is to be used only in special situations,
such as slow movement or icy road conditions. In open position, electrical
current will flow to brake assemblies activating them.
Power from the battery is sent to the controller. Its the “switch” to provide
the correct amount of current to brake assemblies on the coach. As you
press harder on the brake pedal, more current will flow, applying brakes
more, increasing braking capability.
When applying brakes to stop the trailer, begin pressing slowly to avoid
quick and sudden stops, or possible “jack-knife” when wet or slippery.
Use lower gear ranges to minimize the need of brakes during extended
or steep downgrades.
WHEN YOUR COACH IS NEW IT IS IMPOSSIBLE TO ADJUST
THE BRAKE SHOES PRECISELY. WITH THE SELF-ADUSTING
BRAKE SYSTEM, THEY WILL SEAT THEMSELVES MUCH SOONER
THAN NON-SELF ADUSTING SYSTEM. This is why KZRV has chosen
to place self-adjusting brakes on your coach.
27
 Loading...