

Kyowa Medex Co., Ltd. HM-JACK Series, HM-JACKarc Operation Manual

l
i
Fully Automated FOB analyzer: HM-JACK series
FECAL OCCULT BLOOD TEST ANALYZER
For Professional Use only
Operation Manual(Rev.4)
Kyowa Medex Co., Ltd.
IVD

HM-JACKarc Operation Manual
Revision Record
ii
Rev.4
Revision Record
Manual Title : Fecal Occult Blood Analyzer HM-JACKarc Operation Manual
Edition
Printed Date
Revised Pages
Description
Rev.1
Dec. 2011 Newly Released
Rev.2
Jun. 2014
-
Wholly Revised
Updated to Main Program Ver.3.01
Rev.3
Feb.2016
6.3
Added some description to
“List of the Last three Digits of Error Codes”
Rev.4
Oct.2017
7.1
Added an item to specifications of Power supply
Fully Automatic Human Fecal Occult Blood Hemoglobin Analyzer HM-JACKarc Operation Manual
First edition published: December 2011
Written and edited by: Medical Instrument Department, Kyowa Medex Co., Ltd.
Published by: Kyowa Medex Co., Ltd.
1-8-10 Harumi, Chuo-ku, Tokyo 104-6004

HM-JACKarc Operation Manual
Contents
iii
Rev.4
Contents
1 Introduction ........................................................................................ 1-1
Warranty ................................................................................................................... 1-1
Disclaimers ............................................................................................................... 1-1
Applicable laws and standards ................................................................................. 1-2
Caution ..................................................................................................................... 1-2
Restrictions .............................................................................................................. 1-2
Prohibition of Modification ........................................................................................ 1-3
Contact ..................................................................................................................... 1-3
Other manuals .......................................................................................................... 1-3
Conventions employed in this Manual ..................................................................... 1-4
Ministry of Health and Welfare Guidelines on Medical Instruments .... 1-5
2 Safety Precautions ............................................................................ 2-1
2.1 Explanation of Alerting Symbol ...................................................................................... 2-1
2.2 Explanation of Warnings ................................................................................................ 2-1
2.3 Explanation of Warning Labels Affixed to the Analyzer ................................................. 2-2
2.4 Safety Precautions for Operators .................................................................................. 2-3
2.5 Safety Precautions for Maintenance .............................................................................. 2-5
2.6 Waste Materials Precautions. ........................................................................................ 2-6
2.7 Instrument Safety Device. ........................................................................................... 2-7
2.8 Noise Level of the Analyzer. ...................................................................................... 2-7
2.9 Note for Supplied Water and Detergent. ................................................................... 2-7
3 Outline of Analyzer ............................................................................ 3-1
3.1 Characteristics of the Analyzer ...................................................................................... 3-1
3.1.1 Outline .............................................................................................................. 3-1
3.1.2 Principles of Operation ....................................................................................... 3-2
3.1.3 Stool Samplers and Reagents ............................................................................ 3-4
3.2 Part Names .................................................................................................................... 3-5
Top ........................................................................................................................... 3-5
Right side ................................................................................................................ 3-5
Left side ................................................................................................................... 3-6
Back ........................................................................................................................ 3-6
3.3 Materials Required ....................................................................................................... 3-7

HM-JACKarc Operation Manual
Contents
iv
Rev.4
4 Function of Each Screen ................................................................ 4-1
4.1 Display and Operation Screen ................................................................................... 4-1
4.1.1 Startup screen (initial screen) ......................................................................... 4-1
4.1.2 Main Menu screen .......................................................................................... 4-1
4.1.3 Order .............................................................................................................. 4-4
4.1.4 Analysis .......................................................................................................... 4-7
4.1.5 Cell set .......................................................................................................... 4-10
4.1.6 Calibration .................................................................................................... 4-12
4.1.7 Result ........................................................................................................... 4-14
4.1.8 Reaction Data ............................................................................................... 4-16
4.1.9 QC ................................................................................................................ 4-17
4.2 System Menu Screen ............................................................................................ 4-19
4.3 Maintenance Menu Screen .................................................................................... 4-20
5 Analysis Operations ....................................................................... 5-1
5.1 Flow of Analysis Operations ....................................................................................... 5-1
5.2 Preparations for Starting Analysis .............................................................................. 5-2
5.2.1 Turning on the Analyzer ................................................................................. 5-2
Turning on manually ................................................................................ 5-2
Turning on automatically (from Sleep Mode) .......................................... 5-2
Logging in to the Analyzer ....................................................................... 5-3
5.2.2 Preparing Detergent in the Detergent Tank .................................................... 5-4
5.2.3 Preparing the Waste Tank .............................................................................. 5-5
5.2.4 Preparing the Reagent ................................................................................... 5-6
Setting the Reagent in place ................................................................... 5-6
Setting Reagent volume .......................................................................... 5-7
5.2.5 Preparing the Buffer ....................................................................................... 5-9
5.2.6 Preparing the Reaction Cell ......................................................................... 5-12
5.2.7 Registration of Master Curve and Calibration Card ..................................... 5-14
5.2.8 Preparation of Samples ................................................................................ 5-15
Definition of Racks ................................................................................ 5-15
Preparation of Calibrator ....................................................................... 5-15
Preparation of Control ........................................................................... 5-16
Preparation of Patient Sample .............................................................. 5-17
5.2.9 Loading the Racks to the Analyzer ............................................................... 5-19
Rack Orientation .................................................................................... 5-19
Loading Racks to the Analyzer .............................................................. 5-19
5.3 Analysis .................................................................................................................... 5-21
Adding samples during analysis ............................................................ 5-21
Next batch analysis ............................................................................... 5-21
Handling Results ................................................................................... 5-22
5.4 Shut Down Procedure ............................................................................................ 5-23

HM-JACKarc Operation Manual
Contents
v
Rev.4
5.4.1 Clearing up after completing analysis .......................................................... 5-23
5.4.2 Sleep Mode/Switch off.................................................................................. 5-24
■ Sleep Mode ........................................................................................... 5-24
Switching off .......................................................................................... 5-24
5.5 Supplemental Operations ........................................................................................ 5-25
5.5.1 Reading Barcodes with Handheld Scanner ................................................ 5-25
5.5.2 Inputting information and data manually..................................................... 5-26
■ Clearing input protect ............................................................................ 5-26
Inputting data for Calibrator ................................................................... 5-27
Inputting I.S.T of Master Curve ............................................................. 5-27
Inputting Expiration information of Master Curve .................................. 5-28
Inputting Lot information of Master Curve ............................................. 5-28
5.5.3 Setting the first position of picking up the Cell ............................................ 5-30
5.5.4 Setting Printer Paper .................................................................................. 5-31
5.5.5 Actions for Recovery from Emergency STOP ............................................ 5-33
6 Error Messages .............................................................................. 6-1
6.1 Structure of the Codes ............................................................................................... 6-1
6.2 List of the First Two Digits .......................................................................................... 6-2
6.3 List of the Last Three Digits of Error Codes ............................................................... 6-3
6.4 Trouble Shooting Actions (for trained personnel only) ............................................... 6-7
7 Miscellanea .................................................................................... 7-1
7.1 Specifications of the Analyzer .................................................................................... 7-1
7.2 Outline Dimensional Drawing..................................................................................... 7-2
7.3 Communication Specification ..................................................................................... 7-3
7.4 Tube Connection Diagram ....................................................................................... 7-4
7.5 Wiring Connection Diagram ....................................................................................... 7-5

HM-JACKarc Operation Manual
Introduction
1 - 1 Rev.4
1 Introduction
Thank you for choosing the Fully Automatic Human Fecal Occult Blood
Hemoglobin Analyzer HM-JACKarc (referred to below as the Analyzer
or HM-JACKarc).
The Operation Manual (referred to below as the Manual) is intended for
use by those who will operate and maintain the Analyzer.
Those intended should read the Manual thoroughly, and not perform
analysis operation and/or maintenance management of the Analyzer
until they fully understand its content.
Keep this Manual near the Analyzer. If you are unsure of the analysis
operation method for this Analyzer, read the Manual thoroughly before
proceeding with any operation or analysis.
Store this Manual carefully.
Warranty This Manual should be kept where it will be readily available to those
who use the Analyzer.
The content of the Manual and software is subject to change without
notice.
Warranty period Refer to local distributor.
Warranty coverage During the warranty period, all malfunctions due to manufacturing or
design faults will be repaired free of charge.
Exemptions The following are not covered by warranty even if they occur within the
warranty period.
1. Malfunctions due to disassembly or modifications not connected with
Kyowa Medex.
2. Malfunctions caused by operating methods not described in this
Manual.
3. Accidents caused by fire, lightning strike, earthquakes, wind, flooding,
riots, crime, war, or other force majeure.
4. Malfunctions caused by using parts or software not connected with
Kyowa Medex.
5. Malfunctions of consumable parts or using parts outside their period
of validity.
Disclaimers Kyowa Medex bears no liability in the event of losses to the customer or
any third party through the use of this Analyzer, or losses to the
customer or any third party through defects in this Analyzer that could
not be foreseen by the company.

HM-JACKarc Operation Manual
Introduction
1 - 2 Rev.4
Applicable laws and standards
This Analyzer falls under a medical analyzer as specified by the
Pharmaceutical Affairs Act of Japan.
Medical instrument manufacturing license number: 22B3X00004
With regard to the electrical safety test, this is a Class I device of Type
B as specified by JIS T1001 and IEC 61010-1, 2.
Caution This Manual should be kept where it will be readily available to those
who use this Analyzer.
The content of this Manual and software is subject to change without
notice.
In the event of any inconsistencies between this document and the
software, the software is to take precedence.
All other company names and product names used in this Manual
are trademarks or registered trademarks of their respective
companies.
Reproduction of all or part of this Manual without prior consent is
prohibited.
The content of this Manual is subject to change without notice.
While we have taken all possible precautions to ensure quality in the
content of this Manual, please contact your dealership or contact Kyowa
Medex Co., Ltd. if you find anything unclear, or any apparent errors or
omissions. Our contact details are stated on the last page of this
Manual.
This Manual is copyrighted by Kyowa Medex Co., Ltd.
2005 Kyowa Medex Co., Ltd. All Rights Reserved
Restrictions Copying of the HM-JACKarc application software without prior
consent is prohibited.
We do not warrant the functionality of the HM-JACKarc control
computer when used for other purposes.
Do not install any other application software on the HM-JACKarc
control computer. We do not warrant the functionality of the PC if any
other applications are installed.
Do not start any other application while the HM-JACKarc application
is running. We do not warrant the functionality if any other
application is running at the same time.
We do not warrant measurement data that is accidentally deleted.
Password-based restriction is provided for functions that are not
required in normal operation.

HM-JACKarc Operation Manual
Introduction
1 - 3 Rev.4
Prohibition of Modification For the safety of the operator, and to protect the Analyzer, handle the
Analyzer according to the instructions regarding safety precautions in
this Manual.
And please refrain from modifying this Analyzer.
Contact Kyowa Medex Co., Ltd.
1-8-10 Harumi, Chuo-ku, Tokyo Japan 104-6004
Tel: +(81)-3-6219-7605 Fax: +(81)-3-6219-7614 mxinter@kyowa-kirin.co.jp
Obelis S.A.
Boulevard Général Wahis 53, Brussels, BELGIUM 1030
Tel +(32)2.732.59.54 Fax +(32)2.732.60.03 e-mail: mail@obelis.net
Other manuals Other than this Manual read the following operation manuals thoroughly
and be sure to understand the information before performing analysis
operations or handling the reagent and other materials.
Keep the Manual near the Analyzer. If you are unsure of the analysis
operation method for this Analyzer, read this Manual thoroughly before
going on with operation and analysis.
Store this Manual carefully.
Operation Manuals packed with this Analyzer
CCD Touch Scanner FFTA10A Operation Manual
Corresponding codes: CODE39, ITF, Industrial 2 of 5, COOP2 of 5,
NW-7, CODE128, JAN
Instructions packed with other supplies indispensable
EXTEL HEMO・AUTO HS Instructions for Use
EXTEL HEMO・AUTO HS Calibrator Instructions for Use
EXTEL HEMO・AUTO MC Collection Picker Instructions for Use

HM-JACKarc Operation Manual
Introduction
1 - 4 Rev.4
Conventions employed in this Manual
Handling precautions: This Manual indicates information on precautions for handling the
Instrument as "Handling Precautions".
Carefully read the information following "Handling Precautions", and
handle the Analyzer accordingly.
: This Manual indicates information that the user should be particularly
aware of when performing analysis operation or maintenance
management tasks as "Request".
: Indicates section to reference in this Manual.
* : Provides supplementary information.
1. Numbers in italics in the text indicate the step numbers in procedures
and the sequences of operations. Perform operations and tasks
according to these numbers.
Request

HM-JACKarc Operation Manual
Introduction
1 - 5 Rev.4
Ministry of Health and Welfare Guidelines
on Medical Instruments
The attachment of this document, Precautions for the Use of Medical Electronic Instruments (for
Safety and Risk Prevention), to medical electronic instruments is required under Notification No. 495
from the Head of Pharmaceutical Affairs Bureau (June 1st, 1972). These precautions should be
observed to handle the Instrument correctly when it is in use.
Precautions for the Use of Medical Electronic Instruments
(for Safety and Risk Prevention)
1. Only the experienced staff are permitted to use the Instrument.
2. The following points must be observed when installing the Instrument.
(1) Install the Instrument in a location where it is not exposed to water.
(2) Install the Instrument in a location where there is no risk of adverse influence from
atmospheric pressure, temperature, humidity, drafts, sunlight, dust, air containing
substances such as salinity, sulfur, etc. or other environmental factors.
(3) Make sure the Instrument is safe from tilting, vibration and impact (including that during
movement).
(4) Do not install the Instrument in a location where chemical substances are stored or where
gas is generated.
(5) Pay close attention to the voltage and frequency of the power supply, and to the allowable
current (or consumption power).
(6) If battery-based power supply is used, check the status of the battery (depth of discharge
and polarity), etc.
(7) The Instrument must be correctly grounded.
3. The following points must be observed before using the Instrument.
(1) Check that the Instrument functions correctly.
(2) Check that all cables are connected correctly and securely.
(3) Be careful of using the equipment in combination with other instruments that can induce
errors in correct diagnoses and cause hazards.
(4) Check the battery power supply, if one is used.

HM-JACKarc Operation Manual
Introduction
1 - 6 Rev.4
4. The following points must be observed after using the Instrument.
(1) Follow the set procedure to return all control switches, dials to the same positions they
had before the Instrument was used, and then turn off the power.
(2) When you disconnect any cables, do not apply any excessive or inappropriate forces on
them, such as pulling them by the cable rather than by the plug.
(3) Pay attention to the following points regarding the storage location.
i) Store the Instrument in a location where it is not exposed to water.
ii) Store the Instrument in a location where there is no risk of adverse influence from
atmospheric pressure, temperature, humidity, drafts, sunlight, dust, air containing
salinity and/or sulfur or other environmental factors.
iii) Make sure the Instrument is safe from tilting, vibration and impact (including that
during movement).
iV) Do not store the Instrument in a location where chemical substances are stored or
where gas is generated.
(4) Clean the accessories, cables and probes.
(5) Be sure to keep the Instrument clean.
5. If the Instrument breaks down, do not attempt to fix it. Label it appropriately as "out of service" and
contact a specialist for repair.
6. Do not modify the Instrument.
7. Maintenance and inspections
(1) Inspect the Instrument and its components regularly.
(2) Before resuming use of the Instrument that has not been used for some time, be sure to
check that it operates correctly and safely.
8. In addition
The Instrument must be operated correctly, in accordance with the operation manuals.
HM-JACKarc Operation Manual
Safety Precautions
2 - 1 Rev.4
2 Safety Precautions
2.1 Explanation about Alert Symbols
The alert symbol on the left is used on this Instrument and in this
Manual to indicate potential dangers. This symbol represents
unspecified general risks and provides warnings and cautions. The
precautions stated after this symbol should be notified for safety
reasons.
The alert symbol on the left used on the Instrument and in this Manual
indicates potential dangers. This symbol represents infectious risk and
provides warnings and cautions. The precautions stated after this
symbol should be notified for safety reasons.
2.2 Explanation of Warnings
Two types of warning legends are used on the Instrument and in this
Manual. These warnings are used separately as described below to
indicate the degree (magnitude) of personal injury and property damage
which could occur.
This signal and the legend is used in situations in which
incorrect handling could result in serious injury to the user.
This signal and the legend is used in situations in which incorrect
handling could result in minor injury to the user.
Classifications and categories of damage and injury severity
The degrees of damage and injury used above are classified as follows:
Severe Injury: Loss of vision, wounds, burns (high or low
temperature), electric shock, bone fracture, poisoning,
infection etc. resulting in permanent after effects, or
requiring medical care involving hospitalization or
prolonged outpatient treatment.
Light injury: Injury other than the above, not requiring medical care
involving hospitalization or prolonged outpatient
treatment.
Warning
Caution
HM-JACKarc Operation Manual
Safety Precautions
2 - 2 Rev.4
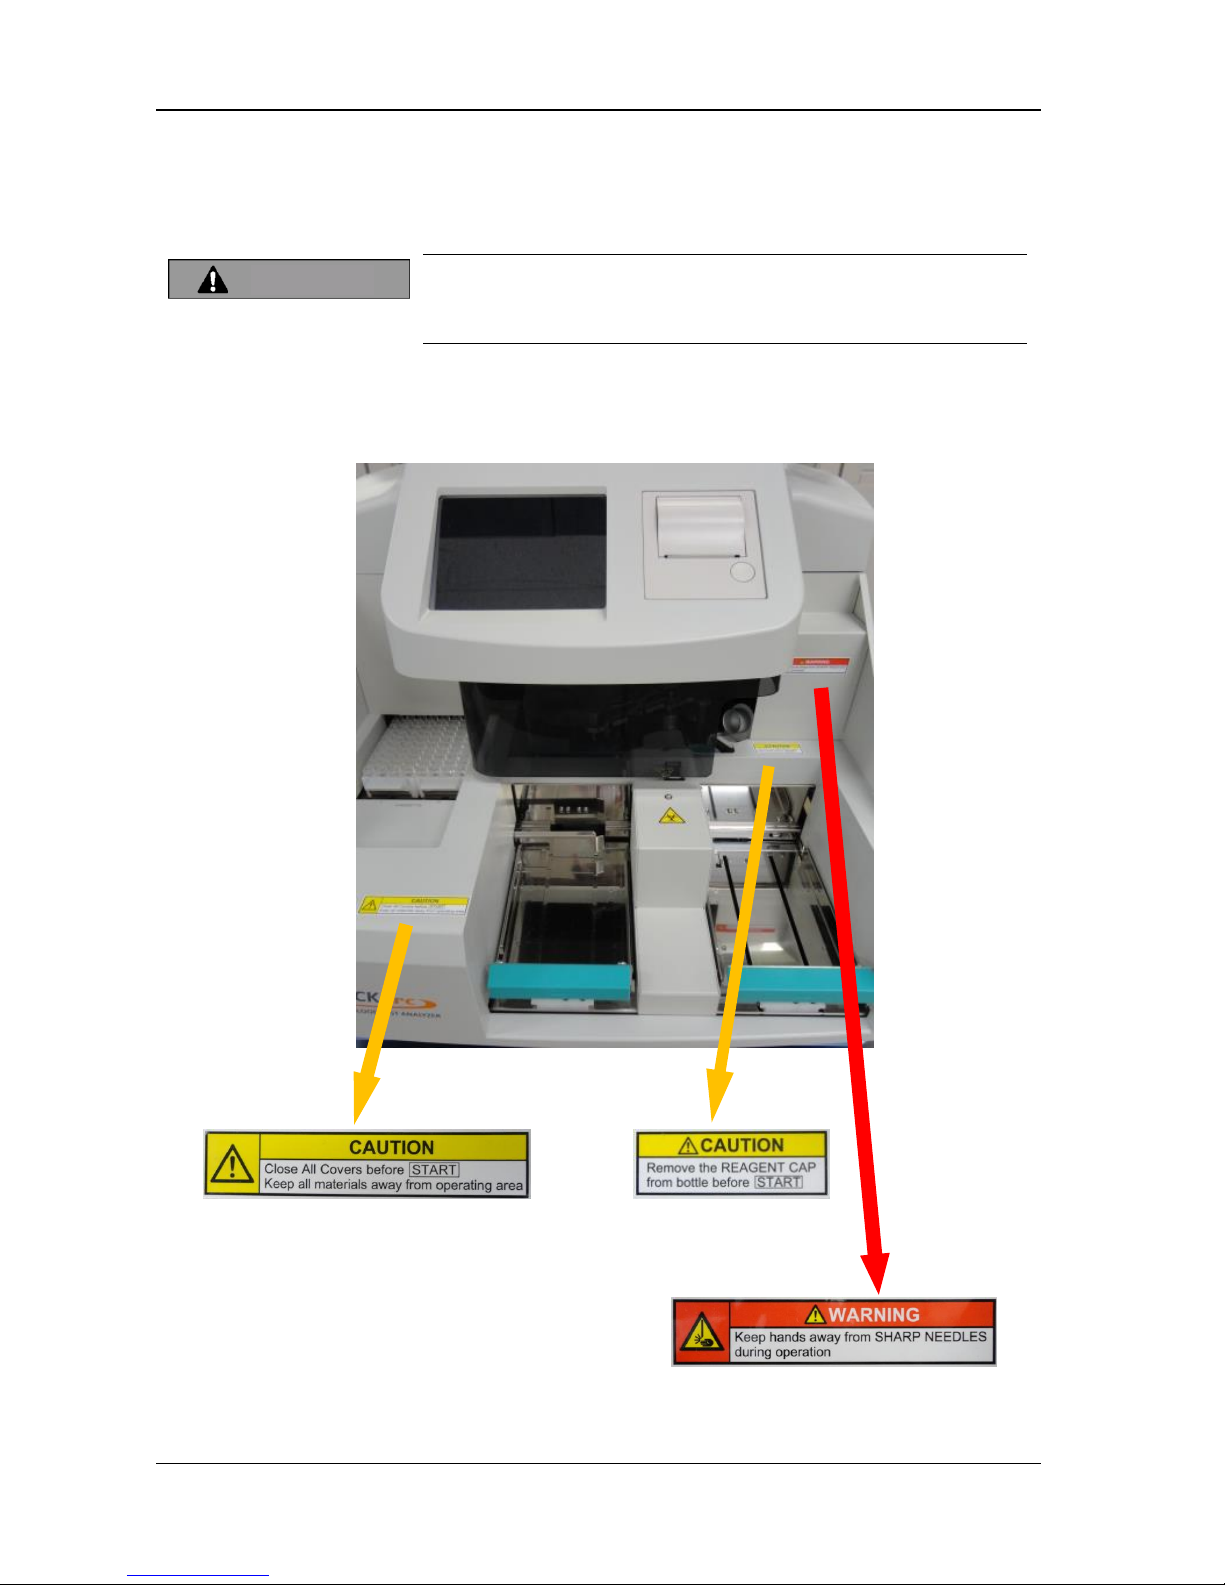
2.3 Explanation of Warning Labels Affixed to
the Analyzer
Make sure that warning labels are legible at all times. If a label peels
off, contact local distributor immediately.
Never peel warning labels off or modify them.
The warning labels shown below are affixed to warn operators of
potential hazards.
Caution

HM-JACKarc Operation Manual
Safety Precautions
2 - 3 Rev.4
2.4 Safety Precautions for Operators
Before using this Instrument, make sure that the Instrument
was installed by authorized personnel.
If the Instrument is not installed correctly, it could break down
or cause fire, electric shock or injury.
Check the following points before starting operation. These
checks are necessary in order to prevent accidents and injuries.
the warning labels are legible
the ground connection is fully secured
A broken power cable could result in electric shock, fire, and
short circuit. Observe the following points.
the cable is not twisted
the cable is not caught by pressure between the Instrument
and the wall.
the cable is not bent too tight
nothing is put on the cable
the cable is not tied in a bundle
the cable is not modified
the cable is kept away from any heater.
the plug itself, not the cable, is gripped when unplugging the
cable
Dust accumulated on the power plug can start a fire. Check the
plug regularly and remove dust.
Insert the power plug firmly into the socket. Poor contact could
cause overheating, burn injuries and fires.
Do not get the power cable or plug wet, or electrical shock and
short circuit may result.
Never touch the power plug with wet hands, or electric shock
may result.
Using the power cable plug (plugging it in and unplugging it) to
turn the power on and off may cause the plug to overheat.
Always use the power switch (or the Main Breaker).
Warning
HM-JACKarc Operation Manual
Safety Precautions
2 - 4 Rev.4
Only use consumables and replacement parts (including
screws) that are specified by Kyowa Medex Co., Ltd.
Before cleaning the Instrument, turn the power off and be
sure to remove the power plug from the socket.
In the event of any malfunction of the Instrument, turn the
power switch off immediately and remove the power plug
from the socket. Leaving faults unattended can cause
accidents and fires.
Do not turn the power switch off and on repeatedly.
The Mixing Spatula, Sample Pipette and Reagent Pipette
attached to the injection assembly are sharp and could
cause injury.
The ends of the Mixing Spatula, Sample Pipette and Reagent
Pipette attached to the injection assembly come into direct
contact with Samples (stool samples) and Reagent. Incorrect
handling of those parts could cause infection with
pathogens or poisoning with Reagent. Wear medical rubber
gloves while working, and take extra care to avoid infection.
Warning
HM-JACKarc Operation Manual
Safety Precautions
2 - 5 Rev.4
2.5 Safety Precautions for Maintenance
Do not modify the Instrument without permission. Modification
could cause unexpected hazards.
Use consumables and replacement parts (including screws)
only specified by Kyowa Medex Co., Ltd.
Before servicing the Instrument or removing any of its parts
(fixing faults, replacing parts, inspecting, repairing, etc.), turn
the power switch off and be sure to disconnect the power plug
from the socket to avoid getting electric shock.
When disconnecting the power plug from the socket, always
grip and pull on the plug itself, not on the cable.
Use fuses of the only specified type. Use of non-specified fuses
could cause the Instrument to malfunction or, in some cases,
start a fire.
Using the power cable plug (plugging it in and unplugging it) to
turn the power on and off may cause the plug to overheat.
Always use the power switch (or the Main Breaker).
This Instrument weighs approximately 56 kg. Handle it with
extra care when moving. Note that moving the Instrument
should be done by two or more people.
The ends of the Mixing Spatula, Sample Pipette and Reagent
Pipette attached to the injection assembly are sharp and could
cause injury.
The ends of the Mixing Spatula, Sample Pipette and Reagent
Pipette attached to the injection assembly come into direct
contact with Samples (stool samples) and Reagents, so
incorrect handling of those parts could cause infection with
pathogens or poisoning with reagents. Wear medical rubber
gloves while working, and take extra care to avoid infection.
Warning
HM-JACKarc Operation Manual
Safety Precautions
2 - 6 Rev.4
2.6 Waste Materials Precautions
Samples could be contaminated with pathogens etc., so take
extra care to avoid infection when handling them, by wearing
medical rubber gloves etc.
Before handling sample containers, reagents and buffer, read
and understand the Instructions for Use. Handle them with care
to avoid accidents.
Any Mixing Spatula, Sample Pipette and Reagent Pipette which
has been detached or removed is sharp and dangerous. Handle
them with extra care.
The ends of the Mixing Spatula, Sample Pipette and Reagent
Pipette attached to the injection assembly come into direct
contact with samples (stool samples) and reagents. Incorrect
handling of those parts could cause infection with pathogens or
poisoning with reagents. Wear medical rubber gloves at all
times while working, and take extra care to avoid infection.
Here below is a list of Waste materials generated by regular analysis.
They should be handled as medical waste and disposed of by a
specialist contractor.
Liquid waste
Used cells
Reagents and reagent bottles
Buffer and buffer fluid bottles
Used stool sample containers
Hemoglobin standards before and after preparation
Hemoglobin standard containers
Used sample cups
Control samples before and after preparation
Control sample containers
The Instrument contains lithium battery. The local restriction or WEEE
should be applied when battery is wasted. Ask for local distributor for
more information.
Warning
Caution
Caution

HM-JACKarc Operation Manual
Safety Precautions
2 - 7 Rev.4
2.7 Instrument Safety Device
Overcurrent Protection
2 or more ampere of current (input voltage 220v) will be interrupted
immediately by internal breaker and the power will be shut down.
Transformer Secondary Fuses
A fuse is installed to protect Control PCBs (Main PCB, Power PCB) from
overcurrent.
Thetransformer is protected from overheating by a thermal fuse.
A fuse is installed to protect the lamp from overcurrent.
Outer Cover Opening Check Sensor
If the outer cover is open, the Analyzer does not start motion. If the outer
cover is opened while the Analyzer is in motion, an error occurs and the
Analyzer will stop sampling. There are 2 switches to secure the function.
2.8 Noise Level of the Analyzer
The maximum noise level is 70db.
2.9 Note for Supplied Water and Detergent
Temperature of supplied water
The temperature of supplied water for this Instrument should be in
20-30 ℃ . Lower temperature of water may cause malfunction of
instrument wash, and higher one may damage the tubing and lead to
leakage of water.
Amount of use of Detergent
The amount of use of Detergent (water include 0.1% of detergent) is
approximately 4.5mL per a test. It is also used in priming and wash. It is
necessary to keep enough amount of prepared Detergent during the run.

HM-JACKarc Operation Manual
Outline of Instrument
3 - 1 Rev.4
3 Outline of Analyzer
3.1 Characteristics of the Analyzer
3.1.1 Outline
This Analyzer measures the amount of human hemoglobin present in
a stool sample.
Compact and light analyzer designed for installation in a small space.
Barcode reading input is applied to register Sample ID, Calibration
Master Curve and Calibrator Information to make the operation easier
for operators.
A two-point calibration method is adopted to simplify the measurement
operation.
The measurement method is Latex Agglutination, which is quick and
achieves superior sensitivity.
Superior detection sensitivity realizes smaller volume of stool sample
and less smell.
The sample loading capacity of the Analyzer is 80.
Reaction Cells are replaced after use automatically.
The Sample Collection Picker achieves superior stability for human
hemoglobin, reduces the decline in the amount of human hemoglobin
and enables more accurate measurement.
Analysis results can be checked on the screen and printout. Also,
connection to a host computer enables data to be exported.

HM-JACKarc Operation Manual
Outline of Instrument
3 - 2 Rev.4
3.1.2 Principles of Operation
The Reagent Pipette aspirates the Latex Reagent, which then move to a
Cell on the Reaction Table, where it is dispensed together with the Buffer.
Next, the Reaction Table Rotates and the Cell containing the Reagent
moves to the sampling position. The Sample Pipette aspirates a Sample,
which is then dispensed to the Cell. The Mixing Spatula then turns
counterclockwise to mix the Reagent and the Sample together.
The Cell containing the Reagent and the Sample moves to the detection
position after a period of time set under the measurement conditions, and
the first photometric measurement (ISTT1) is performed. After another set
period of time, the second photometric measurement (ISTT2) is
performed.
The amount of change in the Integrating Sphere Turbidity of the two
photometric measurements (ΔIST=IST
T2
-ISTT1) is calculated by the
computer according to the calibration curve to output the measurement
result.
This series of actions is repeated to measure all samples placed in the
sample rack.
IST: Integrating Sphere Turbidity
HM-JACKarc Operation Manual
Outline of Instrument
3 - 3 Rev.4
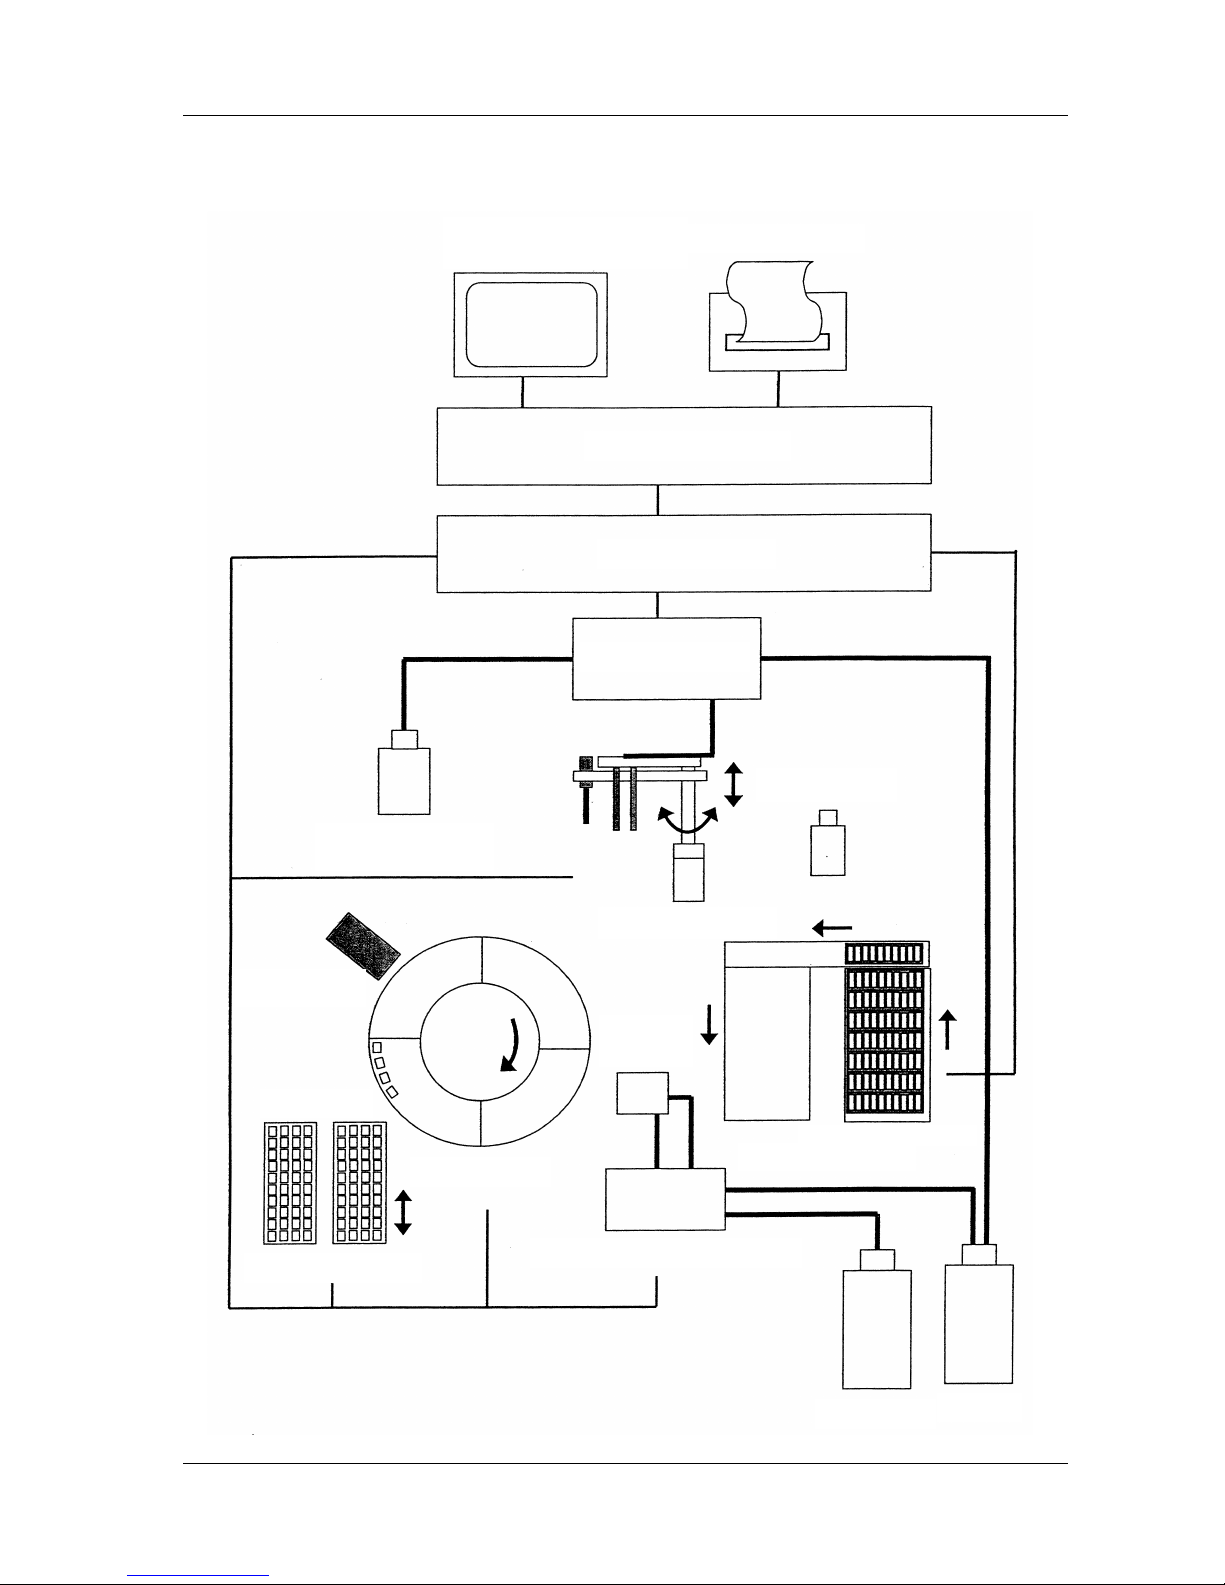
Operating Principle Diagram (Block Diagram)
Operation and Display Panel
(backlight color LCD panel)
Printer Paper
Microcomputer
Interface
Injector
Buffer Fluid
Latex Reagent
Injection Arm
Wash
Station
Turbidity Meter
Cell Cassette
Reaction Table
Cell Transportation
Supply and Waste Water Pump
Waste Liquid
Detergent
Sample Transportation
Sample Rack
HM-JACKarc Operation Manual
Outline of Instrument
3 - 4 Rev.4
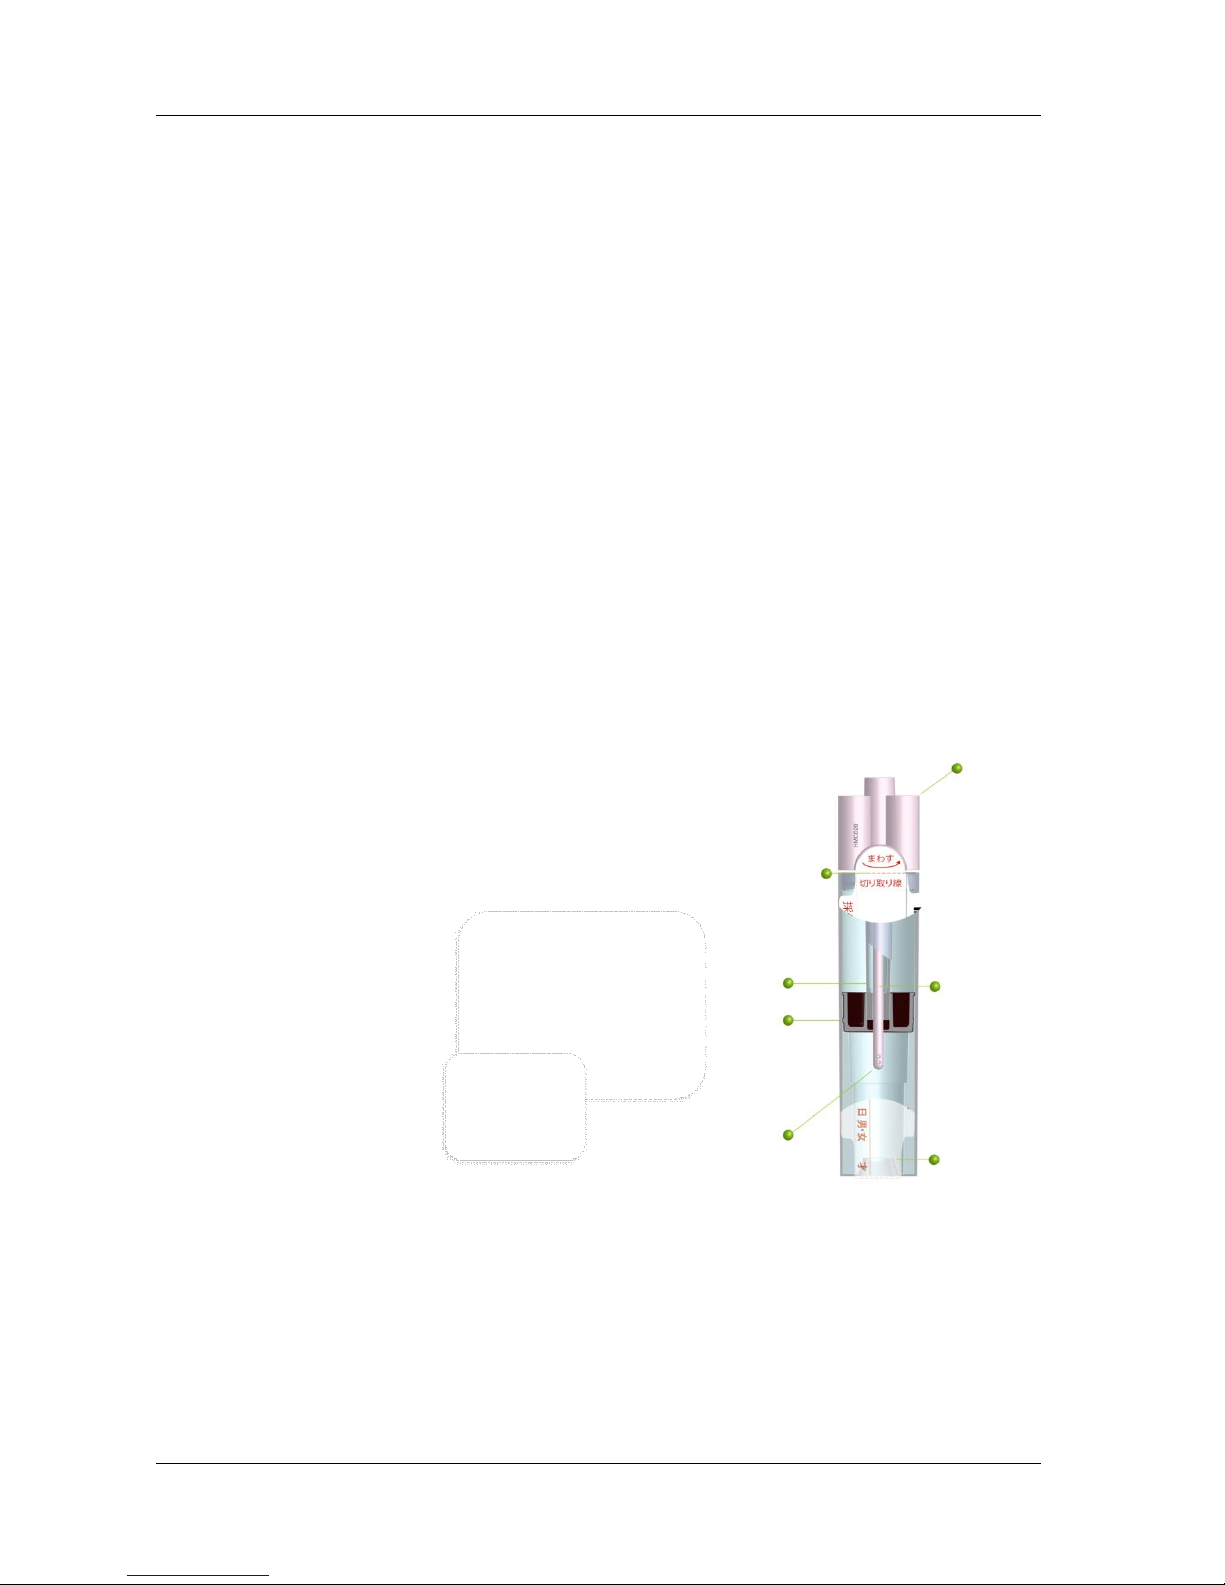
3.1.3 Stool Samplers and Reagents
This Analyzer uses EXTEL HEMO・ AUTO HS as the measurement
reagent, together with the HEMO・ AUTO MC Collection Picker and
achieves:
Major improvement in reproducibility in range close to the cut-off
Large improvement in low-value reproducibility
By developing the HEMO・AUTO MC Collection Picker (patent applied
for), with the optimum reagent concentration to make the most of the
characteristics of the integrating sphere photometer, we have
achieved:
Optimization of the volume of stool sample by the two-step rotary
scraping method
Adoption of hexagonal stool sampling holes that improves both stool
holding and solubility
One-way collection of excess stool and easy check of whether stool
has been sampled
Time-saving by adopting integrated multifunction seals.
The features mentioned above enhance operability, accelerate
processing speed, and improves reproducibility of this Instrument.
Piercer
Blending
Section
Stool
Collection
Rod
Tip of stool
collection rod
Separator
Stool
Collector
HEMO・AUTO
MC
Collection Picker
HM-JACKarc Operation Manual
Outline of Instrument
3 - 5 Rev.4
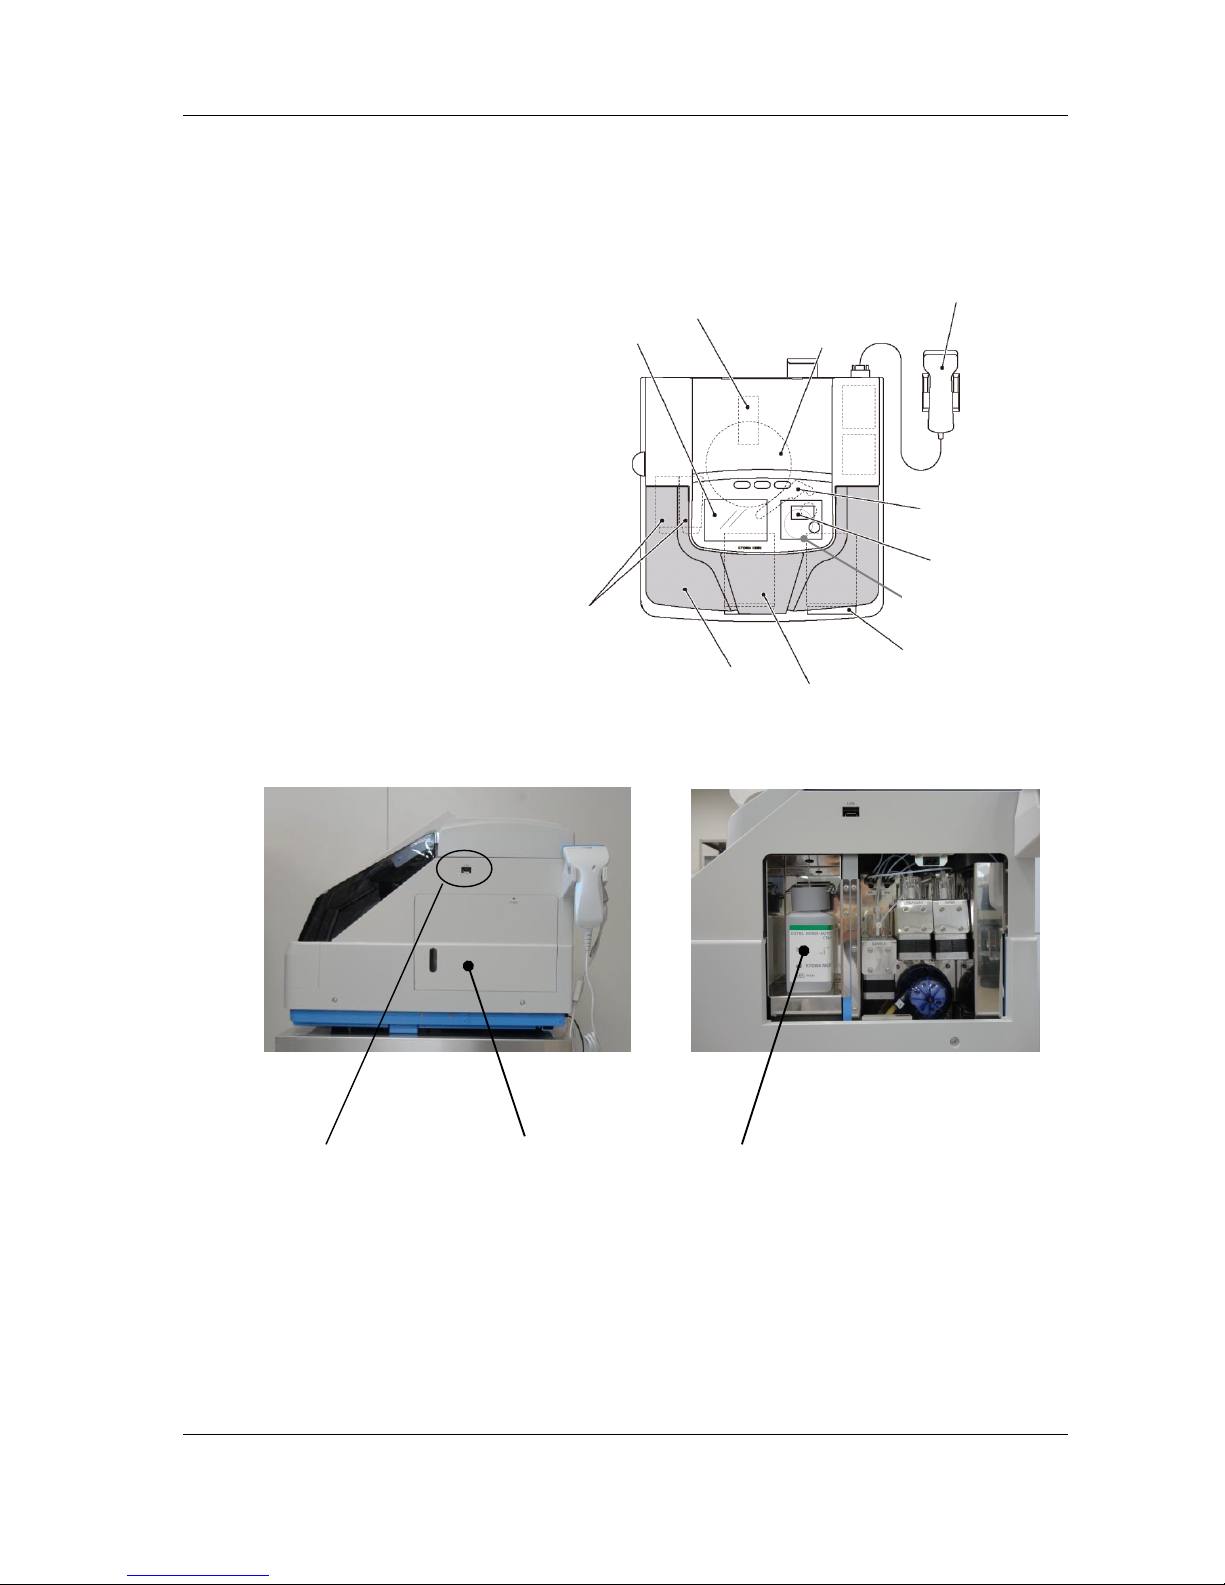
3.2 Part Names
The names of the parts of this Instrument are as follows:
Top
Right side
Display
Cell Cassette
(40 Reaction Cellsx2 (L, R))
Outer Cover
Sample Tray (eject)
Sample Tray (load)
Printer
Injection Arm
Handheld Scanner
Reaction Table
(Reaction Cell)
Integrating Sphere
Turbidity Meter
Buffer Reagent Cover
Latex
Buffer bottle
Inside the Cover
USB Slot
HM-JACKarc Operation Manual
Outline of Instrument
3 - 6 Rev.4
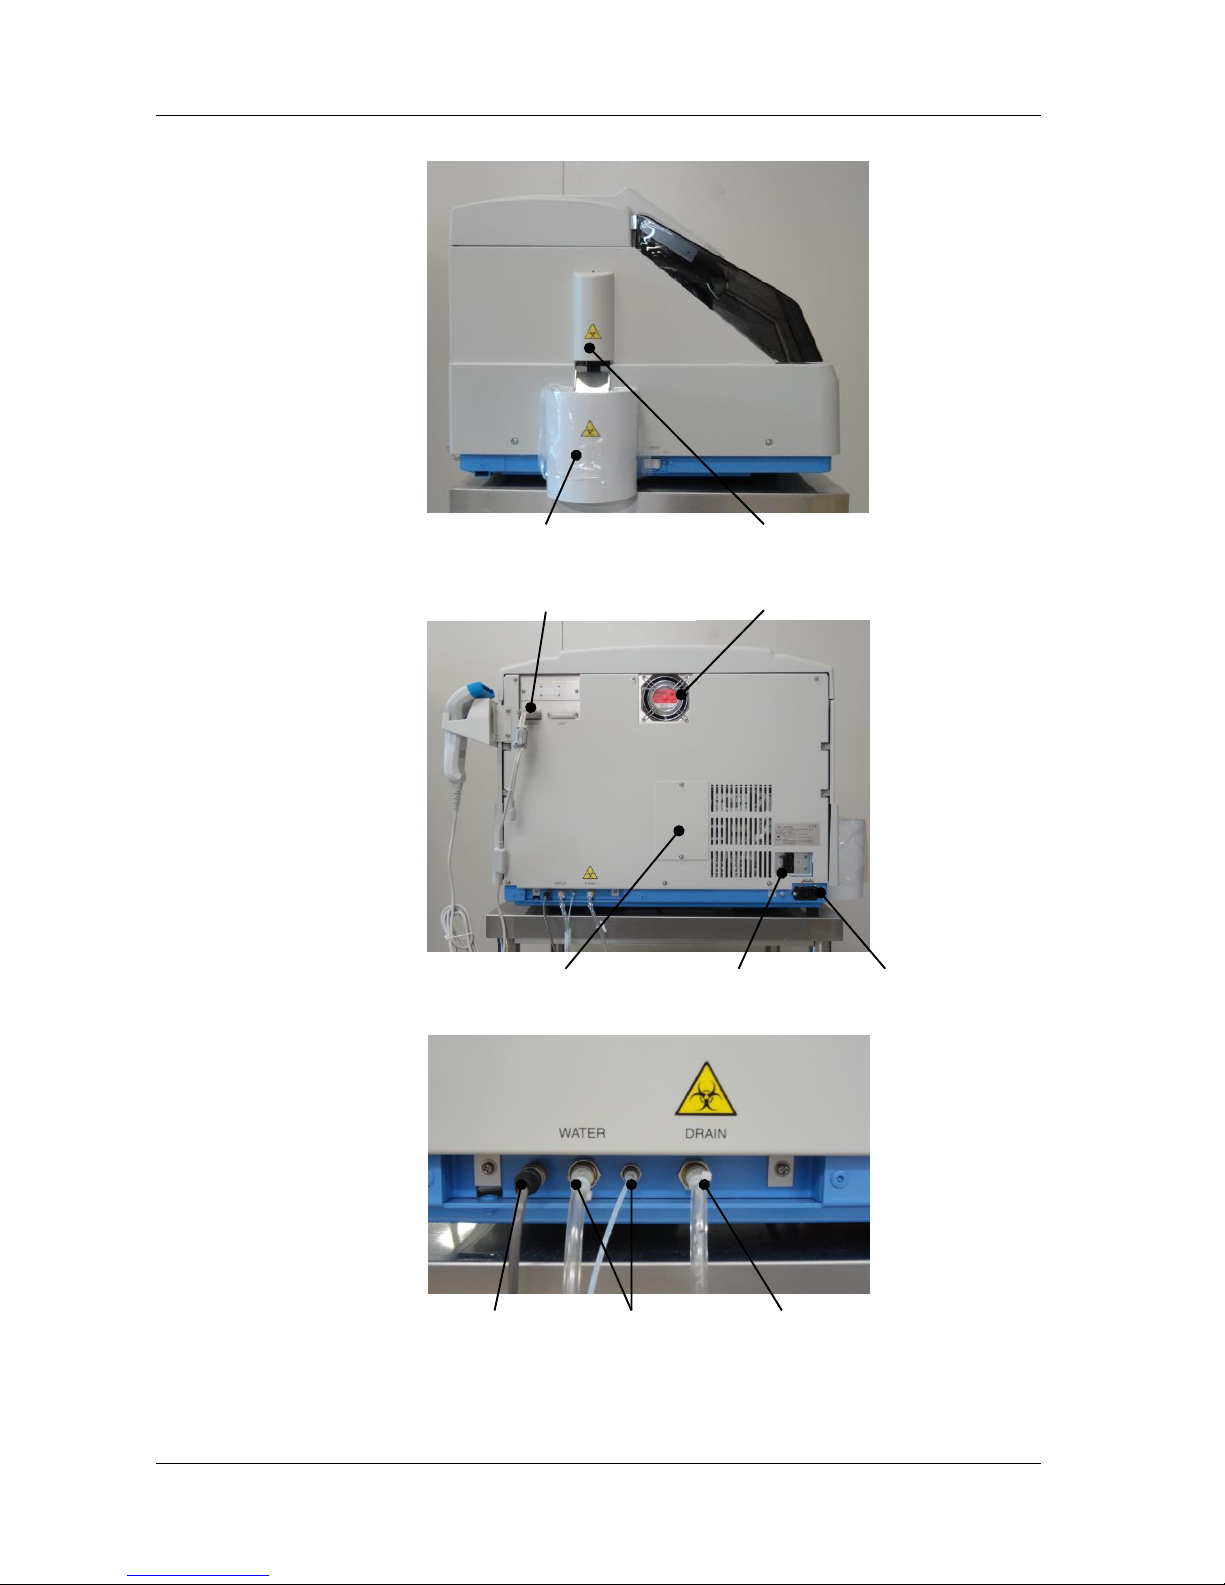
Left side
Back
Cell Waste Box
Cell Hand Cover
Handheld Scanner Connector
Cooling Fan
Lamp Replacement Panel
Breaker Switch
Power Cable Plug
Detergent sensor
Detergent tube
Waste tube
Connectors

HM-JACKarc Operation Manual
Outline of Instrument
3 - 7 Rev.4
3.3 Materials Required
Here below is the list of required materials other than parts provided with
the Analyzer.
EXTEL HEMO・AUTO HS Latex
EXTEL HEMO・AUTO Buffer
EXTEL HEMO・AUTO HS Calibrator
EXTEL HEMO・AUTO HS Control
EXTEL HEMO・AUTO MC Collection Picker
EXTEL HEMO・AUTO Reaction Cell
Please contact your local supplier to order the products.
HM-JACKarc Operation Manual
Functions of Each Screen
4 - 1 Rev.4
4 Functions of Each Screen
4.1 Display and Operation Screens
The names and functions of the various icons on the operation screen
are as follows:
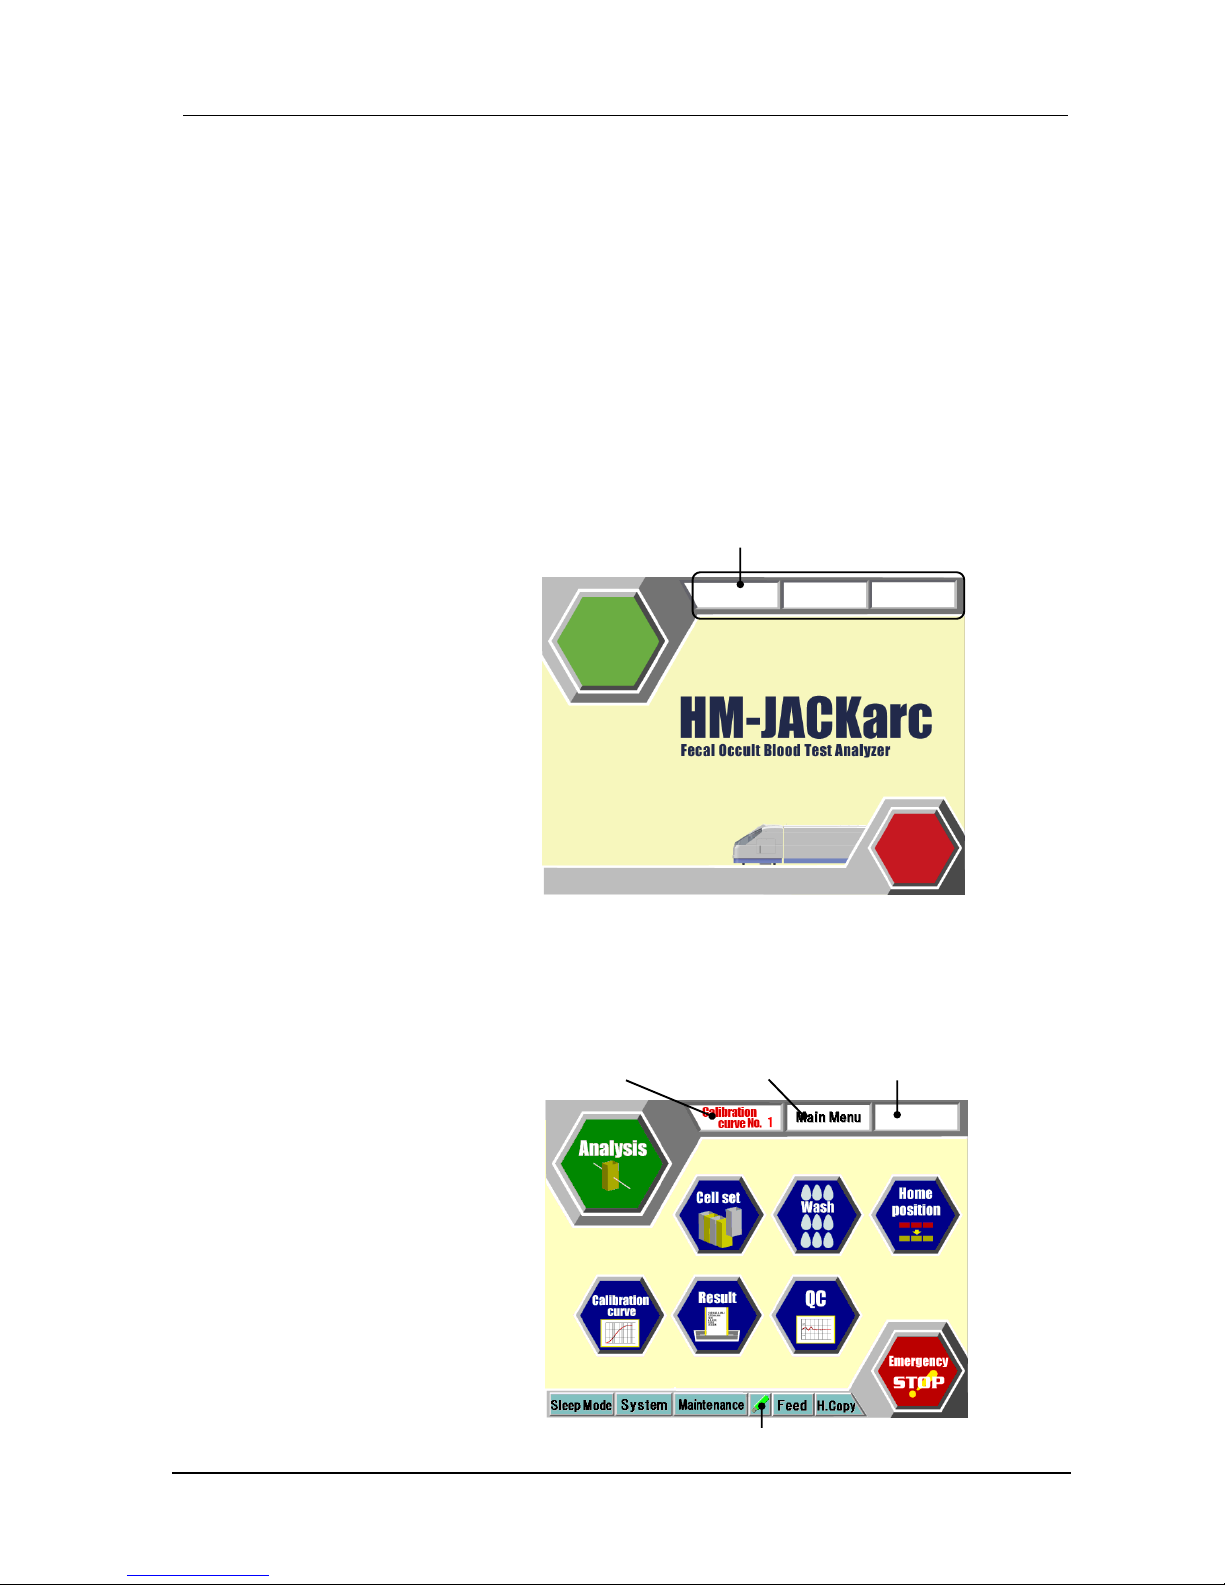
4.1.1 Startup screen (Initial Screen)
This screen is displayed after the power is turned on.
Touch the screen to move to the Main Menu screen.
4.1.2 Main Menu screen
This screen is main screen to start operations. Touching any RETURN
key on each screen several times finally returns to this screen.
Applied Calibration
curve Number
Name of current
screen
Supplementary name of
current screen
Current versions of programs
(Main, Control and Detect)
USB Mark (if connected)

HM-JACKarc Operation Manual
Functions of Each Screen
4 - 2 Rev.4
Analysis icon
Touch this icon to go to Order screen to start preparations for
measurement. See 4.1.3 Order for details.
Cell Set icon
Touch this icon to move to the Cell Set screen to display the status for
Cells on the Reaction Table. See 4.1.5 “Cell Set” for details.
Wash icon
Touch this icon to run a wash or prime the system.
After the initialization of the Injection Arm, the system performs priming to
fill the tube between the Sample Pipette and the Sample Syringe with
Detergent, and the tube between the Reagent Pipette and the Reagent
Syringe with the Buffer. Then the Analyzer stops.
When the Buffer or Detergent have been replaced or replenished, touch
this Wash icon to run a wash/prime cycle.
Home position icon
Touch this icon to return all moving parts to their home positions.
Calibration curve icon
Touch this icon to go to Calibration screen. Master Curve/Calibrator
registration are available from the screen.
See 4.1.5 “Calibration” for details.
Results icon
Touch this icon to display analysis results. The Results screen can be
used to display or print results, or send them to the host computer. To
display real time results, touch this icon during operation.
See 4.1.7 “Result” for details.
QC icon
Touch this icon to display analysis results for quality control.
X-R control diagrams and histograms are available from the menu.
See 4.1.8 QC for details.
Emergency STOP icon
Touch this icon to stop all movement immediately. Using this function
wastes all the processing measurement.
For actions after an emergency stop, refer to page 5-28 “Actions for
Recovery from Emergency STOP”.
Applied Calibration curve Number
The currently applied Calibration curve Number (No. 1 in this case) is
displayed.

HM-JACKarc Operation Manual
Functions of Each Screen
4 - 3 Rev.4
Name of current screen
The name of the current screen is displayed.
Supplementary name of current screen
The current operation status is displayed.
Sleep Mode button
Touch this button to go to screen to set up the date and time of the next
startup. See “Set Sleep Mode” on page 5-24 for details.
System button
From the menu various system parameters can be modified, but it is not
allowed to modify the parameters without permission.
Maintenance button
Touch this button to go to the Maintenance Menu screen.
Refer to the Service Manual for details.
USB Mark(if connected)
When a USB is inserted to the USB slot and recognized by the system,
the mark on the left appears. Touching this icon allows the USB stick to
be removed safely.
Feed button
Touch this icon to feed the printer paper.
H.Copy button
Touch this icon to print out the hardcopy of the screen.
 Loading...