

Page 1
Before beginning assembly, please read these instructions thoroughly.
Anleitung vor Inbetriebnahme aufmerksam lesen!
Veuillez attentivement lire les instructions avant lÕemploi.
Minit-z I/B
Lea este manual de instrucciones antes de utilizar su modelo
※ご使用前にこの説明書を良くお読みになり十分に理解してください。
MR-02
Instruction Manual /
Manuel d'instructions /
組立/取扱説明書
Bedienungsanleitung
Manual de Instrucciones
THE FINEST RADIO CONTROL MODELS
Index / Inhaltsverzeichnis / Index / Indice
1.
Safety Precautions / Sicherheitshinweise
/ Pr cautions d'emploi / Consejos de Seguridad / 安全のための注意事項
2.
Items included / Inhalt
/ Contenu de votre valisette / Contenido / セット内容
3.
Required Additional / Erforderliches Werkzeug
/ Outils necessaires (non inclus!) / Herramientas necesarias / セットの他に必要な物
4.
Glossary of Main Parts / †bersicht der Hauptteile
/ Glossaire. / Indice de piezas / 各部の名称
5.
Before Operating / Bevor Sie beginnen
/ Avant de commencer. / Antes de rodar / 走行の準備
6.
Let's Drive! / Die Inbetriebnahme des Modells
/ En piste! / Funcionamiento / 走行させましょう
7.
Operating Tips / Hinweise zur Bedienung
/ Conseils d'utilisation. / Consejos pr‡cticos / 上手な走行テクニック
8.
Changing Parts / Der Austausch von Teilen am Modell
/ Changement de pieces / Cambio de piezas / 各部の交換
●
Exploded View / Explosionszeichnung
/ Eclat / Despiece / 分解図
●Spare Parts
/ Pieces detachees. / Repuestos / スペアパーツ
●京商スペアパーツ・オプションパーツの購入方法
●組立や、操作上で不明な点のお問い合わせ方法
●TroubleShooting
*Hereby, KYOSHO CORPORATION, declares that this product is in compliance with
the essential requirements and other relevant provisions of Directive 1999/5/EC.
*Hiermit erklŠrt die KYOSHO Corporation, dass dieses Produkt in †bereinstimmung
mit der Richtlinie 1999/5/EC ist und ihr in allen relevanten Punkten entspricht.
*Specifications are subject to be changed without prior notice! *Technische nderungen sind jederzeit mšglich! *Les sp cifications peuvent changer sans pr avis!
*El fabricante se reserva el derecho de introducir modificaciones en los kits sin previo aviso!
© 2003 KYOSHO CORPORATION/禁無断転載複製
/ Ersatzteile
/ 故障かな・・!?
/ 目次
*Par la pr sente, KYOSHO CORPORATION d clare que cet
quipement est conforme aux exigences essentielles et aux autres
dispositions de la directive 1999/5/CE qui lui sont applicables.
*Por medio de la presente KYOSHO declara que este producto cumple con los
requisitos esenciales y cualesquiera otras disposiciones aplicables o
exigibles de la Directiva 1999/5/CE.
※製品改良のため、予告なく仕様を変更する場合があります。
R
2~5
6
7
8~9
10~12
13~16
17~18
19~23
24~25
25
26
27
28
Page 2
SAFETY PRECAUTIONS / Sicherheitshinweise
1
/ PRECAUTIONS D'EMPLOIS / PRECAUCIONES DE SEGURIDAD /安全のための注意事項
Please read carefully before assembling and operating your model.
Lesen Sie die Anleitung aufmerksam durch, bevor Sie das Modell in Betrieb nehmen.
Lire attentivement cette notice avant de commencer l'assemblage de votre modèle.
Lea cuidadosamente este manual antes de montar y rodar su modelo.
組立て・走行の前に必ずお読みください。
WARNING!
ACHTUNG!
ATTENTION!
AVISO!
警告マーク
PROHIBITED
BITTE NIEMALS
NE PAS FAIRE
PROHIBIDO
禁止マーク
●First-time builders should seek the advice of experienced modellers before beginning assembly and if they do not
fully understand any part of the construction.
●Befolgen Sie exakt die Anweisungen in dieser Anleitung.
●Si vous êtes débutant dans le modèle réduit, prenez conseils auprès de modélistes con-firmés afin d’utiliser votre
modèle dans des conditions optimales.
●Los modelistas sin experiencia deben pedir consejo a expertos antes de rodar.
●この商品は高い性能を発揮するように設計されています。組立てに不慣れな方は、模型を良く知っている人にアド
バイスを受け確実に組立ててください。
●Assemble this kit only in places out of children’s reach!
●Nicht in Kinderhände gelangen lassen.
●Assemblez ce kit en dehors de la portée de jeunes enfants!
●Realice el montaje fuera del alcance de menores .
●小さい部品があるので、組立て作業は幼児の手がとどかない所で必ずおこなってください。
●Take enough safety precautions prior to operating this model. You are responsible for this model’s assembly and safe
operation!
●Lassen Sie das Modell niemals auf öffentlichen Straßen fahren.
●Prenez des précautions lors de l’utilisation. Vous seul êtes responsable des évolutions de votre modèle. La société
KYOSHO ou son distributeur ne peuvent en aucun cas être tenus responsables des accidents pouvant survenir lors
de l’utilisation de ce modèle!
●Tome las precauciones necesarias antes de empezar. Usted es el responsable del montaje y funcionamiento seguro
de este modelo.
●動かして楽しむ場所は、万一の事故を考えて安全を確認してから、責任をもってお楽しみください。
●
This model is not a toy. It is designed for users over 14 years of age.
Dieses Modell ist kein Spielzeug, geeignet für Modellsportler ab 14 Jahren.
●
CE MODELE N'EST PAS UN JOUET. IL EST DESTINE AUX ENFANTS DE PLUS DE 14 ANS.
●
Ce modèle est destiné à une utilisation exclusive en intérieur. Sa puissance n'est pas suffisante pour
interférer avec d'autres fréquences.
●
Este modelo no es un juguete. Ha sido diseñado para ser utilizado por mayores de 14 años.
●この商品は14才以上を対象に設計してます。玩具ではありません。
Ni-Cd
:This symbol indicates where caution is essential to avoid injury to yourself or others.
:Dieses Symbol warnt vor Verletzungen!
:Ce symbole vous indique un danger physique éventuel
:Este signo le indica cuando hay que prestar especial atención para evitar daños a
personas y propiedades.
:生命や身体に重大な被害が発生する可能性がある危険を示します。
:This symbol points out actions that you should
:Dieses Symbol warnt vor Handlungen, die das Produkt beschädigen können!
:Ce symbole vous informe de ce que "VOUS NE DEVEZ PAS FAIRE".
:Este signo le indica acciones que NO debe realizar para evitar posibles accidentes.
NOT do to avoid possible damage or accidents.
:事故や故障の原因となるため、やってはいけないことを示します。
・The product you have purchased is powered by a rechargeable battery. The battery is recyclable. At the end of its useful life,
under various national / state and local laws, it may be illegal to dispose of this battery into the municipal waste stream. Check
with your local solid waste officials for details in your area for recycling options or proper disposal.
・Dieses Modell wird von einem Nickel-Cadmium Akkumulator betrieben. Er ist wieder aufladbar. Entsorgen Sie einen
verbrauchten Akku fachgerecht an entsprechender Stelle.
・Ce modèle est alimenté par un accu Ni-Cad. Il est rechergeable. Notez qu’à la fin de sa vie utile, l’accu doit être traité comme
déchet apart
・Este kit utiliza una bateria NiCd recargable, la cual es reciclable. No la arroje a la basura. Devuelvala a la tienda donde la adquirio
cuando se estropee.
・不要になったニカドバッテリーは、貴重な資源を守るために廃棄しないでリサイクル協力店へお持ちください。
2
Page 3
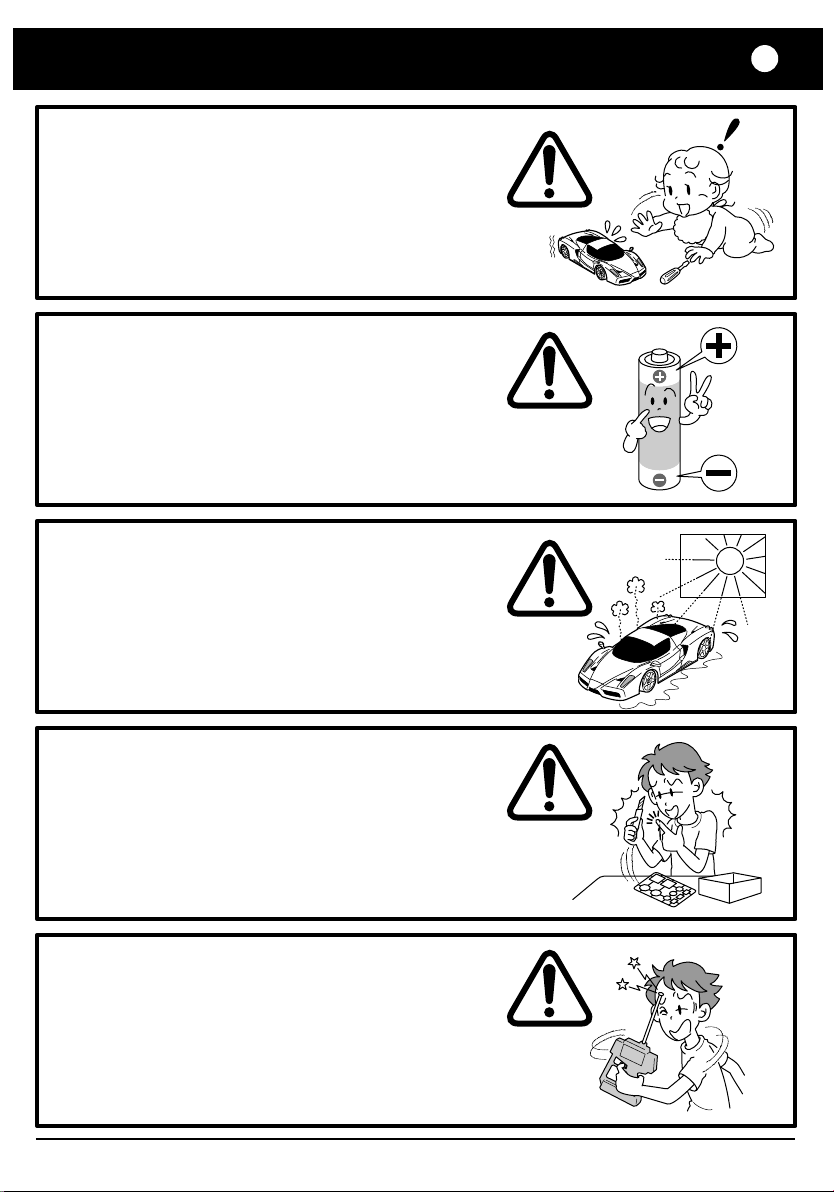
As the product includes small and sharp parts, assemble and
store this product only in places out of the reach of children.
Nicht in Kinderhände gelangen lassen!
L'assemblage de votre MINI-Z RACER doit être fait à l'écart des jeunes enfants.
Garder hors de porté des enfants les pièces de votre MINI-Z RACER.
Este modelo deber ser guardado fuera del alcance de los niños.
小さな部品や、とがった部品がありますので、十分注意してください。
また、小さなお子様のいる場所での作業・保管はさけてください。
Never disassemble the polarity required for installation.
This may lead to damage and leakage.
Batterien / Akkus nicht verpolt einsetzen!
Ne jamais ouvrir les batteries ou inverser les connecteurs sous
peine de court-circuit pouvant entraîner de sérieux dommages.
Nunca intente desmontar ni modificar baterias ya que podria sufrir un accidente.
電池は指定の電池を使用し、逆接続・分解は絶対にしないでください。
発熱や破損の原因となり大変危険です。
Do not store this model in a high-temperature/humidity area or in
direct sunlight.
Modell nicht direkter Sonneneinstrahlung aussetzen!
Ne pas exposer votre MINI-Z RACER à l'humidité ou une source
de chaleur trop importante.
Guarde su modelo en un lugar alejado de fuentes de calor
o humedad.
故障や破損、変型の原因となるため高温・多湿の場所での長期保管は
しないでください。
1
Cutters, shrars and screwdrivers need careful handling.
Vorsicht im Umgang mit Werkzeug!
Utiliser avec précaution cutters, ciseaux, tournevis ou poinçons
dans les phases de montage ou d'entretien de votre
MINI-Z RACER.
Maneje todas las herramientas con mucha precaución,
especialmente los cutters y destornilladores.
ケガの恐れがありますのでカッターやニッパー、ドライバーなどの工具
の取り扱いには十分注意してください。
As the front end of the antenna may be dangerous, do not aim
it toward faces.
Vorsicht mit der Antennenspitze, Verletzungsgefahr!
Faire attention à ce que l'antenne de votre radio ne blesse personne.
Tenga cuidado con la antena de la emisora.
アンテナの先端でケガをする恐れがあります。顔に付近けたり、
振り回したりしないでください。
3
Page 4
SAFETY PRECAUTIONS / Sicherheitshinweise
1
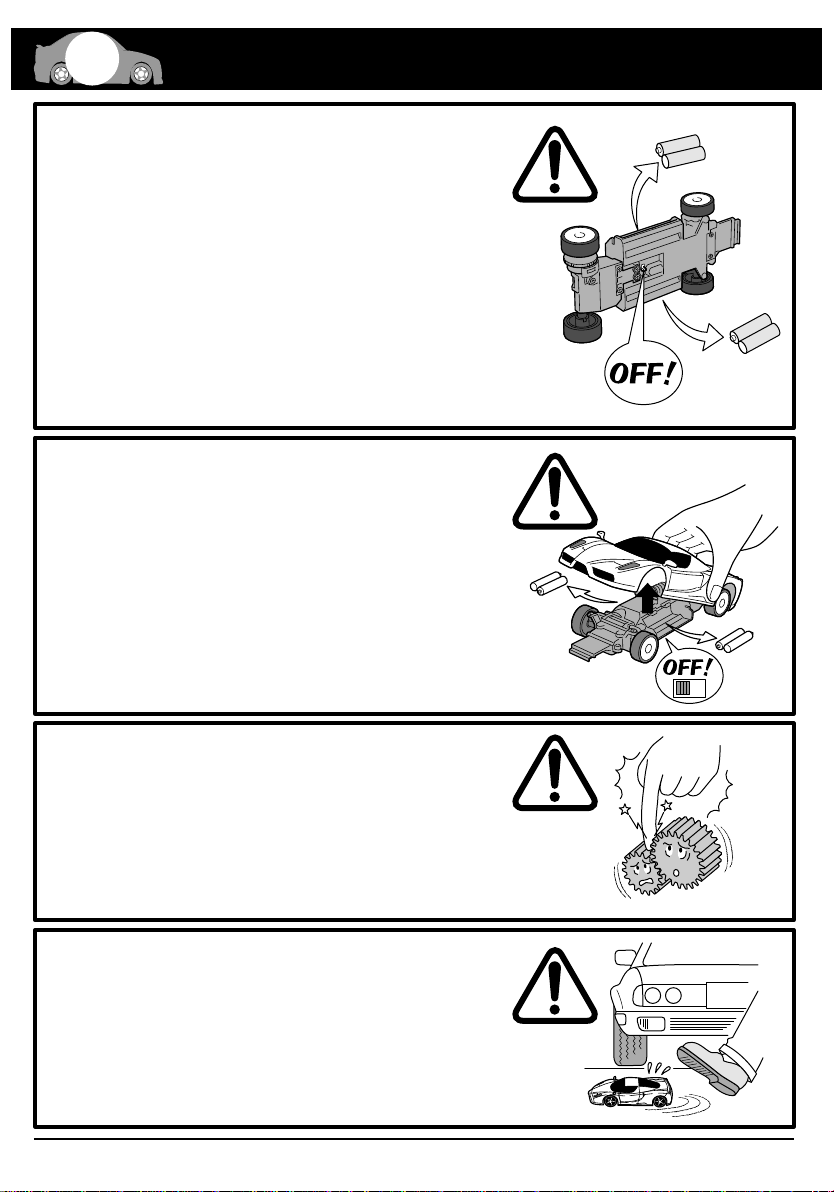
When not using the model, always switch off the receiver and
transmitter. Furthermore, disconnect the batteries and remove
them from the model and the transmitter. The batteries might
otherwise overheat or leak and damage your model.
Nach dem Fahrbetrieb die Batterien / Akkus aus Sender und
Modell entfernen!
Lorsque vous n'utilisez plus votre MINI-Z RACER éteindre le
récepteur puis le l'émetteur. Retirer ensuite les batteries de votre
radio et de votre MINI-Z RACER puis les entreposer à l'écart des
enfants et de toutes sources de chaleur ou d'humidité.
Cuando no vaya a utilizar el modelo, desconecte el receptor y la
emisora. Desconecte tambien la batería y retirela del modelo,
retire las baterías de la emisora.
走行後や走行させない時は必ず電源スイッチをOFFにし、すべての電池を外して
ください。誤動作や電池の発熱・液漏れなどの危険があります。
Always turn the power switch OFF when removing the body.
Do not touch the circuit board or battery terminals.
Modell ausschalten, bevor die Karosserie entfernt wird. Teile der
Elektronik nicht mit den Fingern berühren.
Toujours mettre l'interrupteur en position "OFF" lorsque vous retirez la carrosserie.
Ne jamais toucher le circuit imprimé ou les connections batteries.
Desconecte siempre el interruptor y retire las baterías al desmontar la
carrocería. Nunca toque el circuito eléctrico ni los terminales de la batería.
ボディを外す時は必ず電源スイッチをOFFにし車体の電池を外してください。
基板や端子に触れると大変危険です。
/ PRECAUTIONS D'EMPLOIS / PRECAUCIONES DE SEGURIDAD /安全のための注意事項
Do not touch moving gears. They can cause injury.
Nicht während des Betriebs in das Getriebe fassen - Verletzungsgefahr!
Ne jamais toucher les pièces en mouvement !
Nunca toque las piezas mecánicas móviles ya que podrían causarle daños.
ケガの恐れがありますのでギヤ等の回転部分に指や手をはさまないでください。
Do not operate the model on public roads, in crowded places
or near infants. It may cause accidents or Injury.
Lassen Sie das Modell niemals auf öffentlichen Straßen fahren.
Utiliser votre MINI-Z RACER à l'écart du public et de la circulation automobile.
No ruede su modelo en calles ni carreteras, lugares donde se
congregue gente, parques, etc.
車の走っている所や幼児が近くにいる所、人ごみでは走行させないでください。
事故の原因となり危険です。
4
Page 5
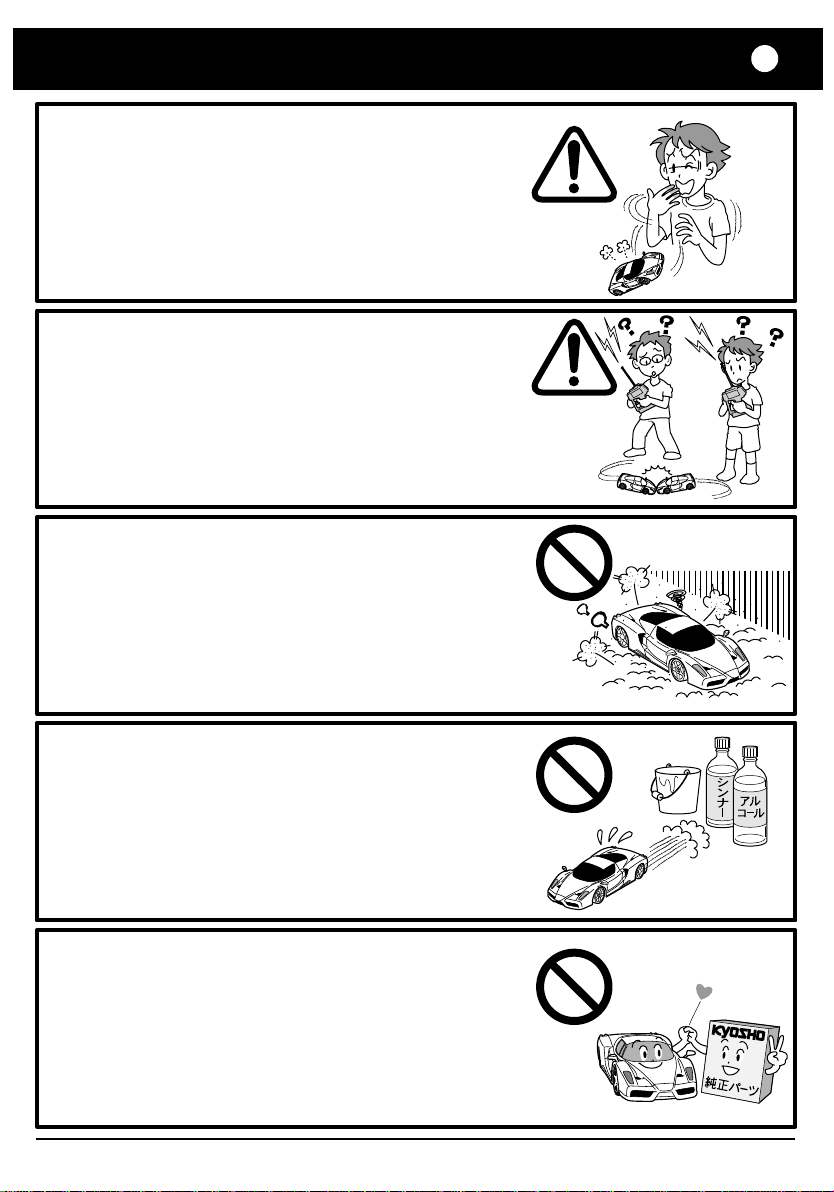
During and after operation, the motor and batteries will be hot.
Do not touch them until they have had time to cool down.
Der Motor und die Batterien erwärmen sich beim Betrieb des
Modells - Teile nicht berühren!
Pendant et après utilisation, le moteur et les batteries chauffent.
Laisser refroidir avant toutes manipulations.
Durante y después del funcionamiento, el motor y las baterías se calientan.
No los toque hasta que se hayan enfriado.
走行中や走行後は乾電池やモーターが発熱することがあります。危険ですので十分冷えてから
触るようにしてください。
Please do not operate on the same band (frequency) as other models close
by as loss of cotrol will result.
Sprechen Sie Ihre Frequenzen mit anderen Piloten ab!
Toujours se renseigner sur les fréquences radios utiliser par les autres
utilisateurs afin d'éviter tout incident.
Asegúrese siempre antes de rodar que ningun otro modelista este utilizando la misma
frecuencia que usted ya que las ondas podrian causar interferencias perdiendo el
control de su modelo y causando un serio accidente.
同じバンド(周波数)の車の近くでは走行させないでください。コントロール不能で暴走の
原因になります。
Do NOT run your car in sandy, dusty, or wet conditions, or on thick/soft
carpet. Such surfaces can damage its operating parts.
Das Modell niemals auf sandigen, staubigen oder nassen Pisten, sowie
dicken Teppichen betreiben - Beschädigungsgefahr der Antriebs- und
Elektronikteile.
Ne jamais utiliser votre modèle dans du sable, de la poussière, sur une surface
humide ou une moquette trop épaisse ou trop souple.
NO ruede su modelo en terrenos arenosos, polvorientos ni húmedos ni en moqueta
muy dura ó muy blanda ya que podrían resultar dañados algunos componentes.
砂やホコリ、水のたまっている所、毛足の長いじゅうたんでは走行させないでください。故障の原因となります。
1
Do NOT use water, alcohol, or thinner to clean your car's body.
Simply wipe it down with a clean, soft cloth.
Verwenden Sie niemals scharfe Lösungsmittel zur Reinigung Ihres Modells!
Ne jamais utiliser d'eau, d'alcool ou de diluant pour nettoyer votre carrosserie.
Utiliser simplement un chiffon sec.
Nunca utilice agua, alcohol ni otros productos abrasivos para limpiar la carrocería.
Utilice un paño suave y limpio.
ボディの汚れは軽く拭き取る程度にしてください。水やシンナー・アルコールでは
絶対に洗わないでください。
Do NOT install any option parts not made by Kyosho for this model.
To avoid causing irreparable damage, do NOT attempt any modifications.
Verwenden Sie aus Gründen der Produkthaftung ausschließlich Original
KYOSHO Tuning- und Ersatzteile!
Ne jamais utiliser d'autres options que celles fabriquées par Kyosho.
Vous risquerez d'endommager irrémédiablement votre modèle et aucune
garantie ne serait possible.
NO instale ninguna pieza opcional que no sea fabricada por Kyosho.
Para evitar daños irreparables, NUNCA intente realizar ninguna modificación.
純正オプションパーツ以外の組み込みや車体の改造はしないでください。故障の原因となります
5
Page 6
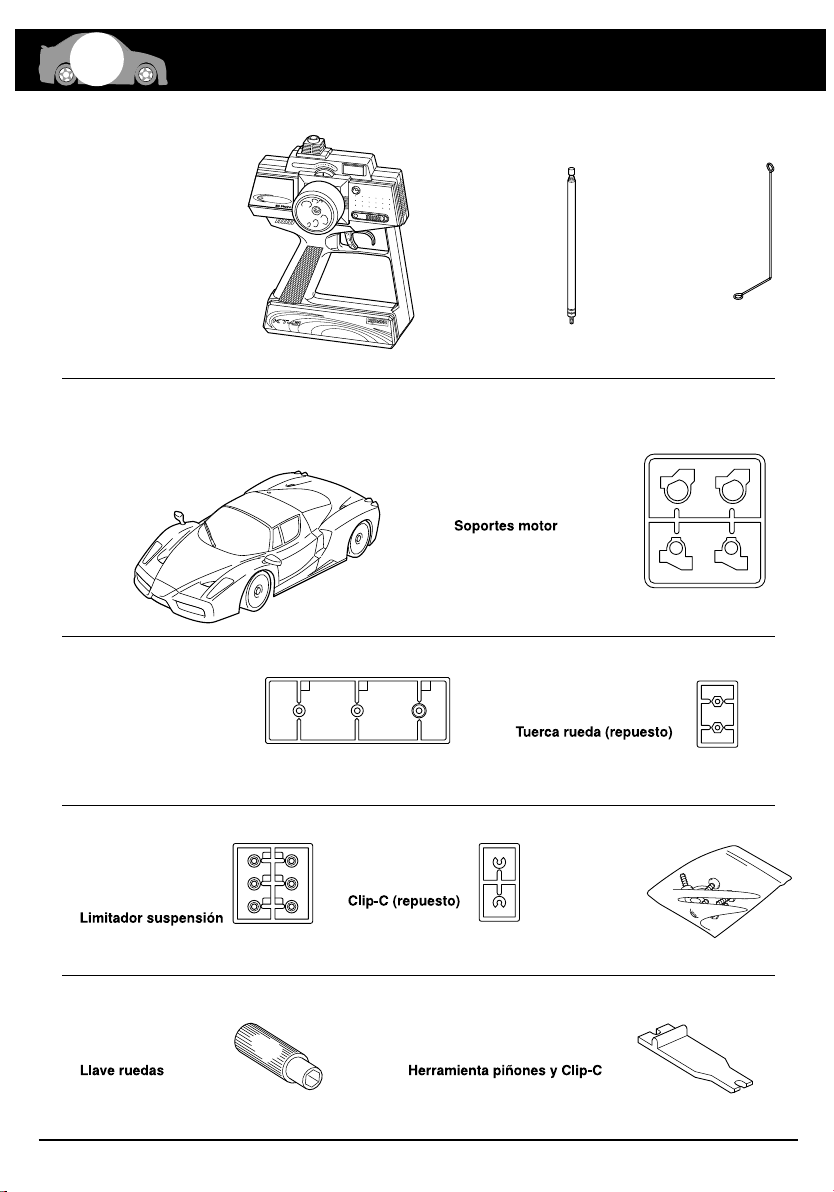
ITEM INCLUDED / Inhalt
2
*PERFEX KT-5 Transmitter
(Controller)
*Perfex Fernsteuerung KT-5
*
PERFEX KT-5 Radiocommande
2 voies
*Emisora PERFEX KT-5
*PERFEX KT-5 送信機
(コントローラー)
*Mini-z Racer
*ミニッツレーサー
/
CONTENU DE VOTRE VALISETTE
/ Contenido
*
M
O
D
E
L
S
Transmitter Antenna
*Senderantenne
*Antenne radio
*Antena emisora
*送信機用アンテナ
S
T
E
E
RING
T
RIM
F
R
M
IN
M
AX
T
H.T
RIM
S
T
.D/
R
T
K
U
T
-
N
5
I
T
N
U
G
N
I
PA
N
G
N
PA
E
L
N
E
L
D
E
S
I
GN
E
D
B
Y
DI
GI
TAL
P
R
OP
OR
T
PER
F
EX
P
O
WE
R
O
F
F
O
N
I
ONAL
RADI
O
CONT
R
OL
S
Y
S
T
E
M
T
H
E
F
I
N
E
S
T
R
A
D
I
O
C
O
N
T
R
O
L
/ セット内容
*Receiver Antenna
*EmpfŠngerantenne
*Antenne de r ception
*Antena receptor
*受信アンテナ
*Motor Guide Set
*Motorhalterung
*
CALES DE SUPPORT MOTEUR
*
*モーターガイドセット
*Pinion Gear Set
(for replacement)
*Ersatz-ZahnrŠder
*Kit de pignon moteur
*Engranajes suplementarios
*交換用ピニオンギヤセット
*Suspension Limiter
*Federwegsbegrenzer
*BAGUE DE REGLAGE
DE GARDE AU SOL
*
*C-Ring (Spare)
*C-Ring
*CLIPS EN C
*
*Cリング(スペア)
*Wheel Nut (Spare)
*Radmutter
*ECROU DE ROUES
*
*ホイールナット(スペア)
*Screw Set
*Schraubensatz
*Visserie
*Tornillos
*ビスセット
*サスリミッター
*Wheel Wrench
*MutternschlŸssel
*CLE DE ROUES
*
*Pinion & C-Ring Tool
*Montagewerkzeug
*CLE DE PIGNONS & CLIPS EN C
*
*ホイールレンチ *ピニオン&Cリング用ツール
6
Page 7
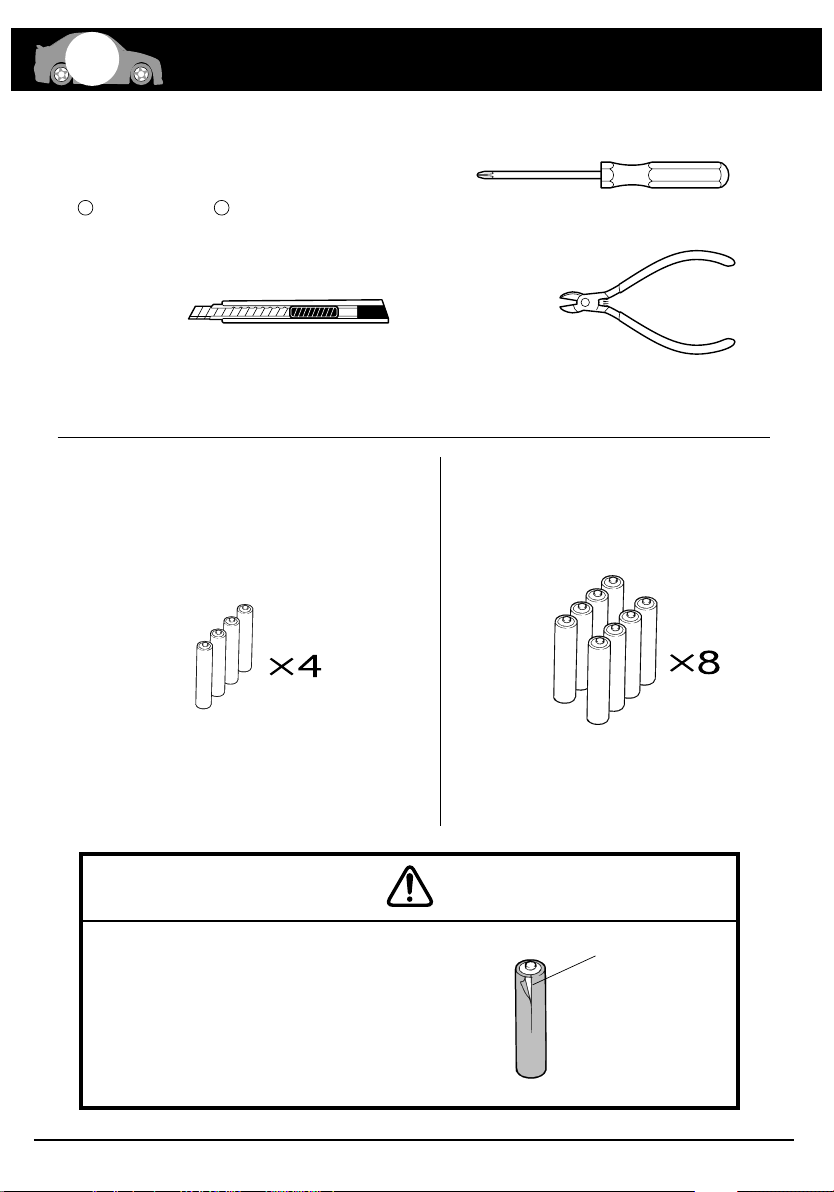
Required Additional / Erforderliches Werkzeug
3
*A Phillips Screwdriver (Precision type or a small sized)
*Kreuzschlitzschraubendreher
*Tournevis cruciforme (petit mod le)
*Destornillador Phillips
精密ドライバーか、 ドライバー(小)
* + +
/
OUTILS NECESSAIRES (NON INCLUS!)
/ Herramientas necesarias
/ セットの他に必要な物
*Cutter/X-Acto Knife
*Bastelmesser
*Cutter
*Cutter
*カッター
*4-AAA sized Alkaline Dry Batteries or UM-4 sized
NiMH (Nickel-Metal Hydride) Batteries 4 pieces
*4 St. AAA Trockenbatterien oder UM-4 NiMH Akkus
*4 batteries de type type R3 pour votre MINI-Z RACER
*4 UM-4 Alcalinas * UM-4 NiMH
*単4アルカリ乾電池又は
*単4型ニッケル水素バッテリー………4本
AAA
UM‑4
単4型
走行には、より高性能なNo.71991単4型ニッケル
水素バッテリー/家庭用急速充・放電器セット(別売)
¥5800が経済的です。
*Nippers
*Seitenschneider
*Pince coupante
*Alicates cortacables
*ニッパー
*AA Alkaline Dry Batteries 8 pieces
*8 St. AA Trockenbatterien
*8 batteries de type R6 pour votre radiocommande
*8 Baterias Secas UM-3
*単3乾電池………8本
AA
UM‑3
単3型
Do not use any damaged batteries.
Keine beschŠdigten Akkus verwenden!
Ne pas utiliser de batteries endommag es
No utilice nunca baterias en mal estado
カバーが破れている電池や種類の違う電池を
まぜて使わないでください。
7
Damaged
beschŠdigt
Endommag es
Estropeada
カバーの破れ
Page 8
A PO
S
IT
IO
N
B PO
S
IT
IO
N
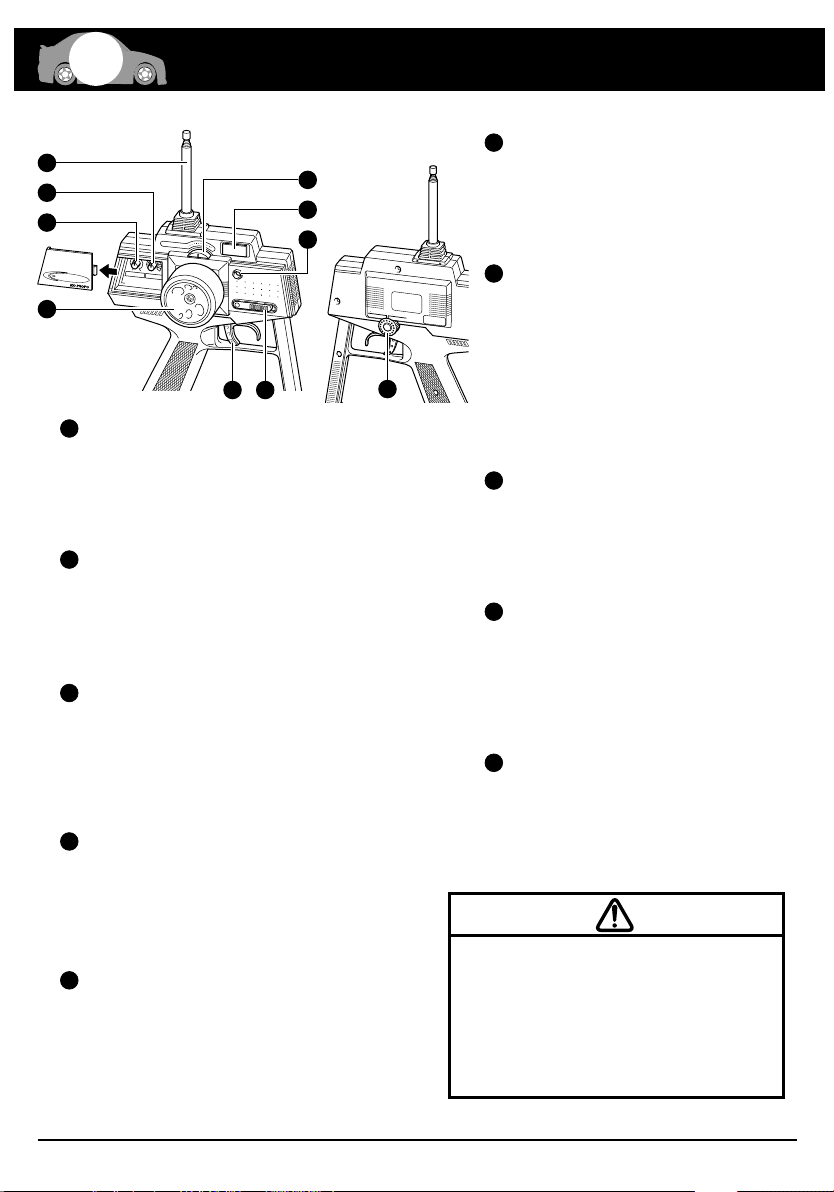
GLOSSARY OF MAIN PARTS / Übersicht der Hauptteile
4
Transmitter / Sender /
1
8
6
T
U
N
I
N
G
P
A
N
E
L
D
E
S
I
G
N
E
D
B
Y
3
1
Transmitter Antenna / Senderantenne
/ L'antenne radio / Antena
/ 送信機用アンテナ
To transmit radio waves
Zur Abstrahlung der Sendeleistung
Permet l'émission des commandes vers le récepteurs
Emite las ondas
電波を発信します。
2
Power Switch / Schalter
/ Intérupteur ON/ OFF / Interruptor
/ 電源スイッチ
To switch ON/OFF the Power
Ein- / Ausschalter für Sender
Permet d'éteindre et d'allumer votre radio
Conecta y desconecta
電源のON, OFFをします。
3
Steering Wheel / Lenkrad
/ Volant de direction / Volante
/ ステアリングホイール
To control steering right/left directions
Zur Steuerung der Lenkung,
Permet le contrôle de direction
droite/gauche de votre modèle.
Permite controlar la dirección
左右のコントロールをします。
4
Throttle Trigger / Gashebel
/ Gachette de gaz / frein / Gatillo de Gas
/ スロットルトリガー
To control forward speed and reverse speed.
Zur Steuerung des Elektromotors
Permet le contrôle de la vitesse (avant/arrière)
Permite controlar la velocidad y marcha atrás
前進・後進のコントロールをします。
5
Steering Trim /
/ Trim de direction / Trim Dirección
/ ステアリングトリム
To precisely adjust the neutral position
Zur Justierung der Neutrallage
Permet d'ajuster avec précision la position du neutre
Permite un ajuste mas preciso del punto neutral
ニュートラル位置の微調整をします。
/ GLOSSAIRE / INDICE DE PIEZAS
Radiocommande /
S
TE
E
RING
TRI
M
F
R
M
I
N
M
AX
TH
.
TR
IM
ST
.
D
/R
K
T
-5
T
U
N
I
N
G
P
A
N
E
L
DIG
ITA
L
P
RO
P
O
RT
I
O
NAL
PER
FEX
Trimmung für Lenkung
POW
ER
O
FF
O
N
2
4
RA
DI
O
CO
NT
RO
L
S
Y
S
T
E
M
T
H
E
F
I
NE
S
T
RAD
I
O
/ 各部の名称
Emisora /
5
9
7
10
CO
N
T
RO
L
M
O
DE
L
S
送信機
6
Throttle Trim / Trimmung für Gas
/ Trim de gaz / frein / Trim Gas
/ スロットルトリム
To precisely adjust the neutral position
Zur Justierung der Neutrallage
Permet d'ajuster avec précision la position du neutre
Permite un ajuste mas preciso del punto neutral
ニュートラル位置の微調整をします。
7
LED Indicator / LED Anzeige
/ Indicateur de batterie / Indicador LED
/ LEDインジケーター
This shows you remaining amount of the battery
capacity with the Power Switch turned ON.
Anzeige der Spannung des Senderakkus,
A=voll; B=halb entladen; C=leer,
Betrieb einstellen Akkus laden!
L'indicateur de batterie vous informe sur l'état de charge
de vos piles ou batteries.
Indica el estado de carga de las baterias cuando la
emisora esta conectada.
電源スイッチがONの時に、電池の残量を表示します。
8
Steering D/R Adjuster / Dual Rate für Lenkung
/ Dual Rate / Dual Rate direccion
/ ステアリングD/Rアジャスター
To adjust Steering Angle
Zur Justierung des maximalen Lenkausschlags
Permet d'ajuster le débattement de la direction
Permite ajustar el angulo de la dirección
ステアリングの舵角を調整します。
9
Crystal for Transmitter / Quarz
/ Quartz / Cristal emisora
/ 送信機用クリスタル
To replace Crystal for changing Radio Frequency
Steckquarz zur Bestimmung der Sendefrequenz
Détermine la fréquence d'émission et de réception de
votre radio.
Puede cambiarse para variar la frecuencia
周波数の変更をするときに交換します。
10
Neutral Position Adjuster / Justierung für Neutrallage
Réglage du neutre / Ajusta de la posicion neutral
/ ニュートラルポジションアジャスター
(Not operative)
(nicht verfügbar bei diesem Gerät)
(Ne pas utiliser)
(No operativo)
(操作しません。)
For operating Mini-Z Racer, be sure to use the transmitter
included with this product. Do not use the other transmitters.
Verwenden Sie ausschließlich die beiliegende Fernsteuerung
zur Steuerung des Mini-Z Racers.
Utiliser votre MINI-Z RACER uniquement avec la radio fournie
dans la valisette.
Utilice siempre la emisora incluida con su Mini-Z Racer.
No intente utilizar otro tipo de emisora.
付属の送信機以外はご使用になれません。
8
Page 9
4
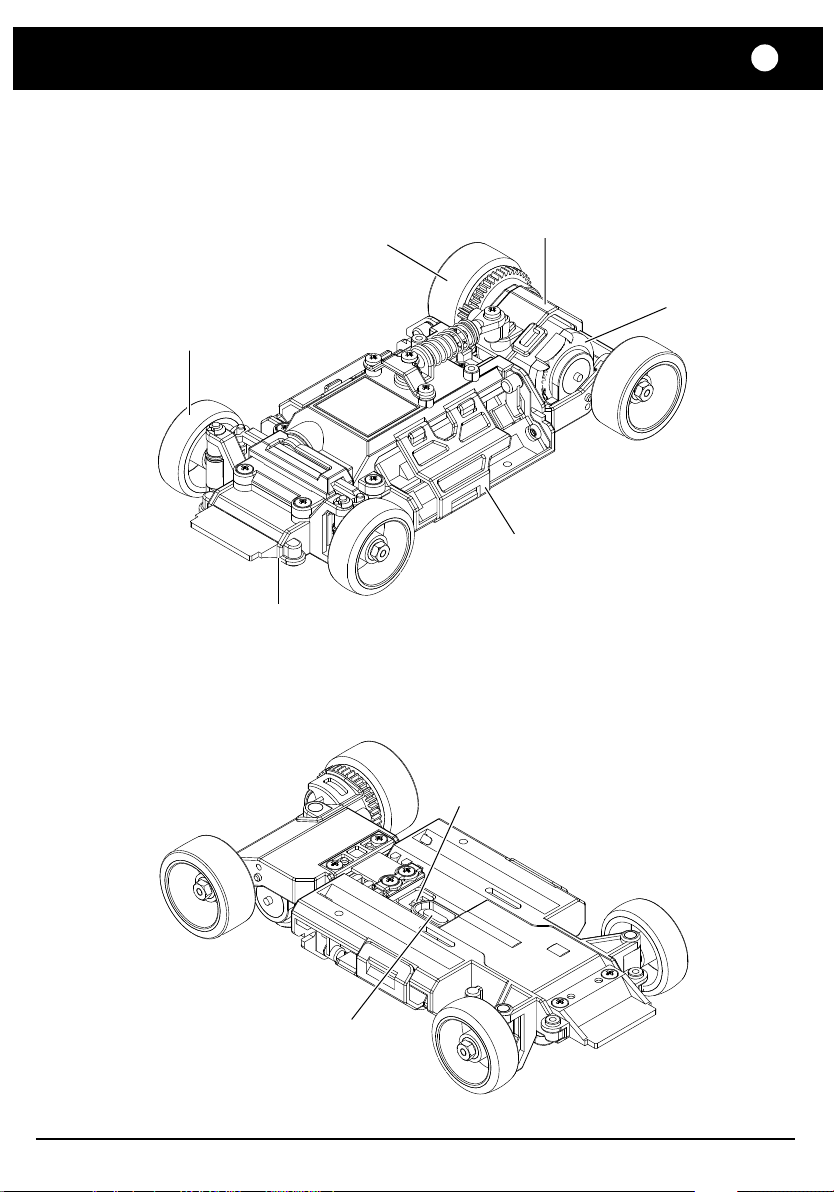
Chassis / Das Chassis / Chassis / Chasis /
Rear Tire
Reifen, hinten
Pneu arrière
Neumático trasero
リヤタイヤ
Front Tire
Reifen, vorn
Pneu avant
Neumático delantero
フロントタイヤ
Chassis
Das Chassis
Chassis
Chasis
シャシー
シャシー
Power Unit
Antriebseinheit
Unité de propulsion
Tren trasero
パワーユニット
Battery Holder
Akkuhalterung
Support de batterie
Soporte baterias
バッテリーホルダー
Motor
Motor
Moteur
Motor
モーター
Crystal for Receiver
Empfängerquarz
Quartz d'récepteur
Cristal receptor
受信機用クリスタル
Power Switch
Schalter
Intérupteur ON/OFF
Interruptor
電源スイッチ
9
Page 10
BEFORE OPERATING / BEVOR SIE BEGINNEN
5
/ AVANT DE COMMENCER. / ANTES DE RODAR
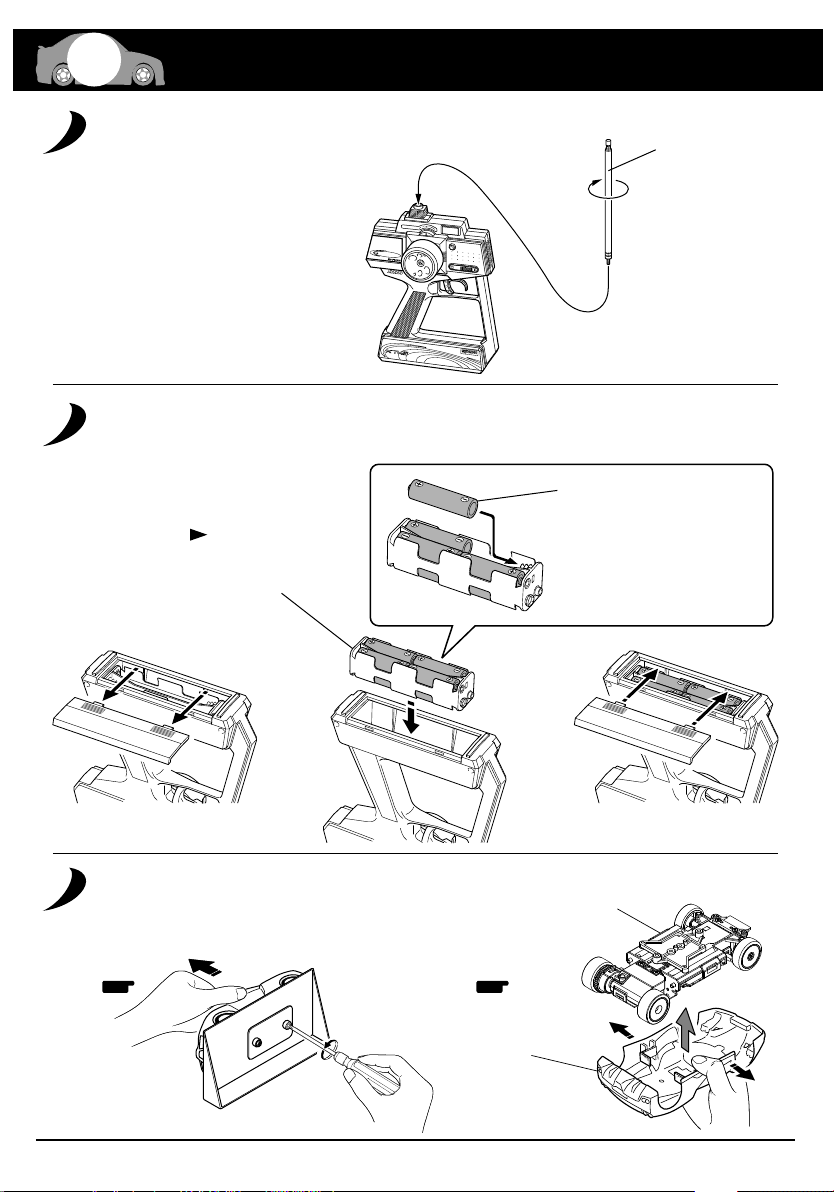
Installation of Antenna / Montage der Antenne
/ Installation de l'antenne / Instalación de la antena
/ 送信機用アンテナ取付け
ST
E
ERI
NG
T
RI
M
F
R
M
I
N
M
A
X
T
H
.
T
R
I
M
S
T
.
D
/
TUN
K
T
-
5
I
TU
N
G
N
I
P
N
A
G
N
P
E
AN
L
E
D
ESI
G
N
ED
B
Y
D
IG
IT
A
L P
PERF
EX
POW
R
L
R
OP
OR
ER
OF
F
ON
TION
AL R
A
D
IO
C
O
N
TRO
L S
YS
TEM
TH
E
FI
N
E
ST
R
A
D
I
O
C
O
N
TR
O
L
M
O
D
E
L
S
Loading Battery / DasLaden der Akkus
/ Batteries radio /
Instalación de las baterías
/ 電池の入れ方
Note the direction.
Einbaurichtung beachten.
Notez le sens.
Fíjese en el dibujo.
向きに注意。
/ 走行の準備
Transmitter Antenna
Senderantenne
Antenne d'émission
Antena emisora
送信機用アンテナ
AA Alkaline Dry Batteries 8 pieces
8 St. AA Trockenbatterien
8 batteries de type R6 pour
votre radiocommande
8 Baterias Secas UM-3
単3乾電池………8本
Assembly of Chassis / Die Montage des Chassis
/ MONTAGE DU CHASSIS / Montaje del Chasis
/ シャシーの組立て
1 2
Body
Karosserie
Carrosserie
Carrocería
ボディ
10
Chassis
Chassis
Chassis
Chasis
シャシー
Page 11

5
3
4
2 x 6mm TP Screw
LK Treibschraube
Vis TP 2x6mm
Tornillo 2x6mm TP
TPビス
Install the receiver antenna as illustrated.
Empfängerantenne montieren, wie dargestellt.
Monter l'antenne comme illustré.
Instale la antena tal y como indica el dibujo.
受信アンテナは図の向きに取りつける。
Receiver Antenna /
Antenne de réception /
Empfängerantenne
Antena receptor
Antenna Cord
Antennenkabel
Fil d'antenne
Cable antena
アンテナコード
1
2mm Washer
Scheibe
Rondelle 2mm
Arandela 2mm
ワッシャー
/ 受信アンテナ
2x6mm
2mm
Receiver Antenna
Empfängerantenne
Antenne de réception
1
Antena receptor
受信アンテナ
Caution.
Do not screw-in too much.
Achtung,
Schraube nicht zu stark anziehen!
Attention!
Ne pas visser excessivement.
Cuidado-No apretar
demasiado.
ビスのしめすぎに注意。
11
Page 12
BEFORE OPERATING / BEVOR SIE BEGINNEN
5
/ AVANT DE COMMENCER. / ANTES DE RODAR
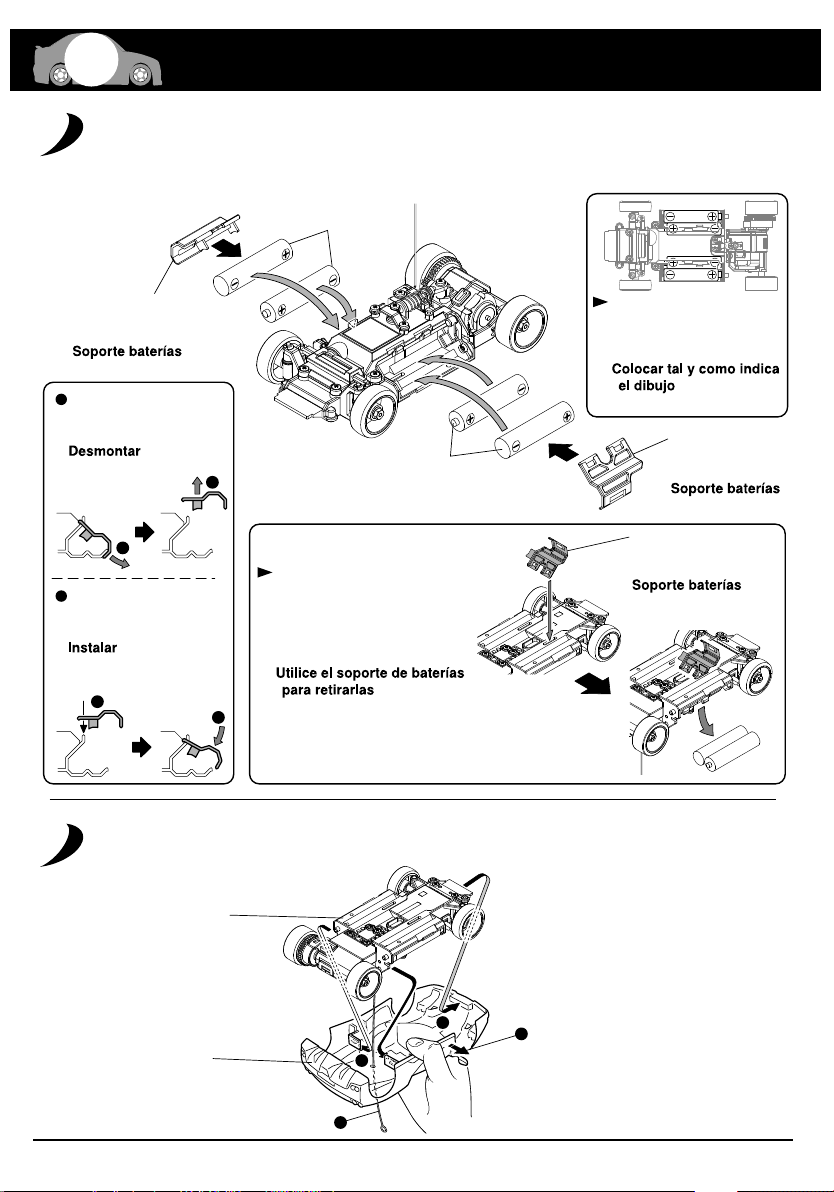
Loading Battery / DasLaden der Akkus
/ Batteries radio /
Instalación de las baterías
/ 電池の入れ方
*
/ 走行の準備
AAA Batteries, Notice the polarity to be installed.
*
AAA Batterien / Akkus, auf korrekte Polung achten!
Placer les batteries en respectant les polarités.
Baterías UM-4, respete la polaridad
単4アルカリ乾電池(4本)
Battery Holder
Batteriehalter
SUPPORT BATTERIE
バッテリーホルダー
Remove.
Entfernen
RETIRER.
取り外し
1
Install.
Montieren, wie dargestellt.
ASSEMBLER
取り付け
1
2
Use the Battery Holder to
remove batteries.
Verwenden Sie die Halterung,
um die Batterien auszubauen.
UTILISER LE SUPPORT BATTERIES
POUR RETIRER LES BATTERIES.
2
電池を外す時は、バッテリー
ホルダーを使用する。
*
Body Mounting / Die Karosseriehalterung
/ Support carrosserie / Montaje de la carrocería
/ ボディの取付
Install as shown in the drawing.
Montieren, wie dargestellt!
SUIVRE LE SCHEMA DE
MONTAGE
図の向きに入れる
Battery Holder
Batteriehalter
SUPPORT BATTERIE
バッテリーホルダー
Battery Holder
Batteriehalter
SUPPORT BATTERIE
バッテリーホルダー
Chassis
Chassis
Chassis
Chasis
シャシー
Body
Karosserie
Carrosserie
Carrocería
ボディ
2
4
1
3
Carefully spread the sides of the
body over the chassis mounts.
Karosserie vorsichtig über das Chassis ziehen
Ecarter avec précaution les côtés de
la carrosserie pour fixer le chassis.
Abra con los dedos
ボディを指で広げる
12
Page 13
POWER
ONOFF
POWER
ONOFF
LET'S DRIVE! / DIE INBETRIEBNAHME DES MODELLS
6
/ EN PISTE ! / FUNCIONAMIENTO.
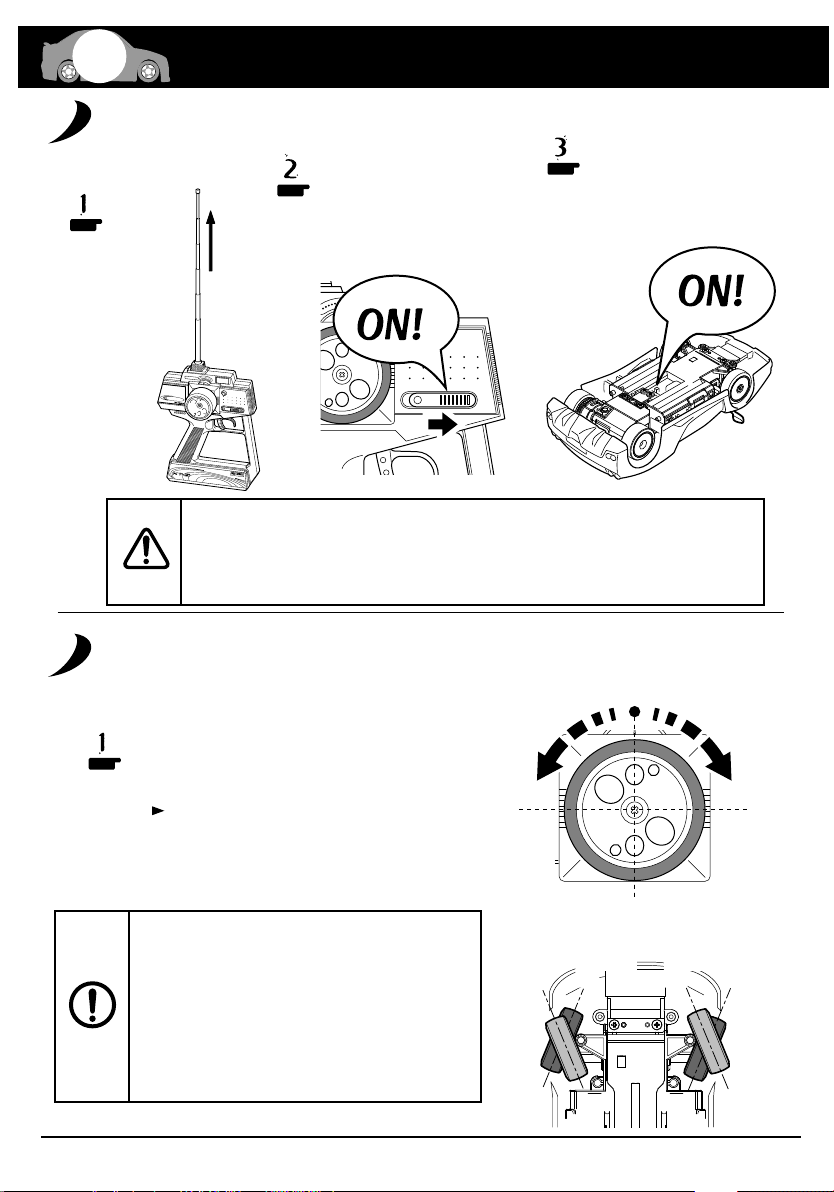
Turn the Power Switch ON. / Modell einschalten
/ Mettre l'interrupteur en position "ON". / Interruptores
/ 電源の入れ方
Antenna
Antenne
Antenne
Antena
アンテナを
のばす。
S
T
EE
R
I
N
G
T
R
I
M
F
R
M
I
N
M
A
X
TH
.
TR
I
M
S
T
.
D
/
R
T
K
UN
T
-
5
IN
T
U
G
N
PA
I
N
G
N
P
E
A
L
N
E
L
D
E
S
I
G
N
E
D
B
Y
D
I
G
I
T
A
L
PRO
PO
RT
I
O
N
A
L
R
A
D
I
O
C
O
N
T
RO
L
S
PER
F
EX
P
O
W
E
R
O
F
F
O
N
YS
T
E
M
T
H
E
F
I
N
E
S
T
R
A
D
I
O
C
O
N
T
R
O
L
M
O
D
E
L
S
Transmitter (Switch)
Schalter für Fernsteuerung
Radiocommande
Emisora (Interruptor) Conectar
送信機の電源スイッチを入れる。
/ 走行させましょう
Chassis (Switch)
Schalter für Modell
Chassis
Chasis (Interruptor) Conectar
車体の電源スイッチを入れる。
Always turn the transmitter's power switch ON first!
Schalten Sie zuerst den Sender ein!
Toujours allumer la radiocommande en premier !
Siempre conecte el interruptor de la emisora en primer lugar.
電源をいれるときは必ず送信機からスイッチを入れてください。
How to Control Your Model. / Die Steuerung des Modells
/ Comment piloter votre modèle. / Manejo del modelo.
/ 操縦のしかた
Steering Wheel / Lenkrad
/ Volant de direction / Volante
/ ステアリングホイール
Basic Controls
Die Lenkung
Fonctions élémentaires
Controles básicos.
基本的な操縦のしかたです。
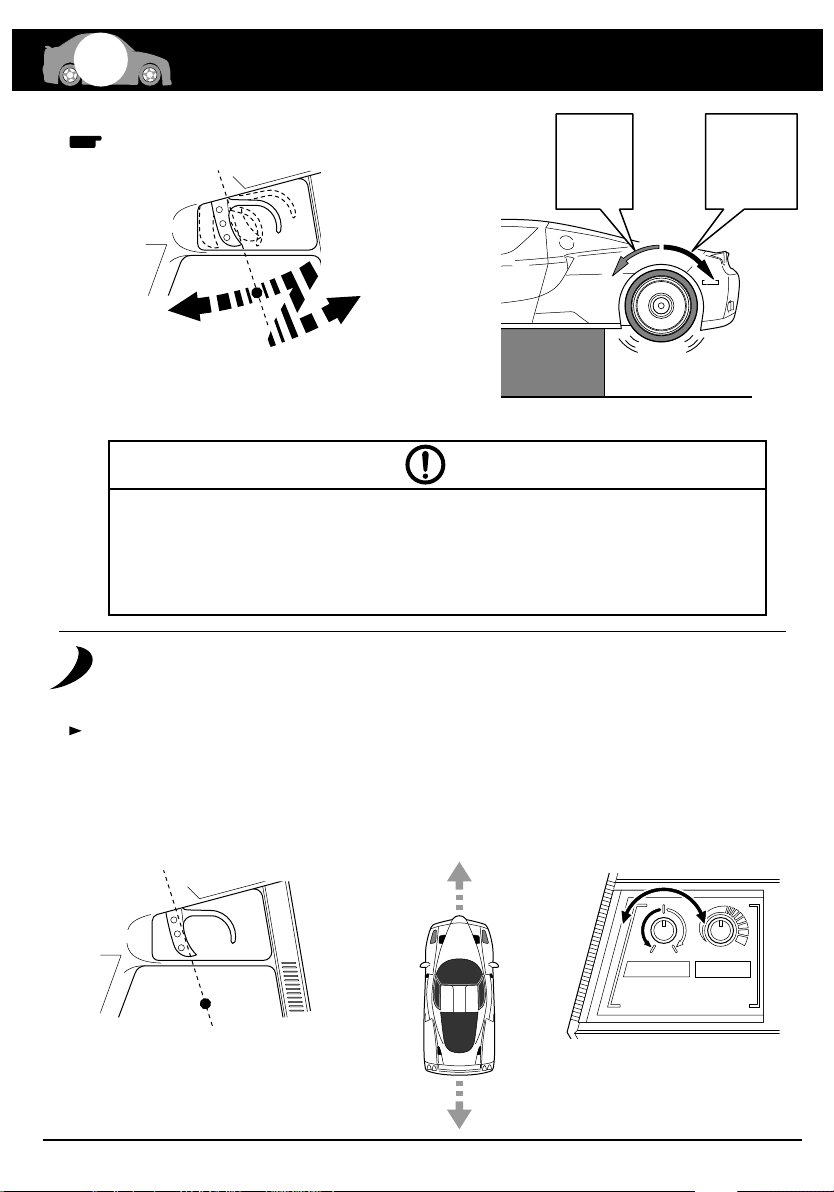
Raise the tires off the ground and check
that all controls are responding.
Modell vom Boden anheben und alle
Funktionen überprüfen.
Sans que la voiture touche le sol, vérifier
le bon fonctionnement de la direction.
Levante las ruedas del suelo y compruebe
que la dirección responde correctamente.
全てのタイヤを浮かせた状態で操作と動きを確認してください。
13
Neutral
neutral
Left
links
Gauche
Izquierda
Neutre
Posición Neutral
中立
Right
rechts
Droite
Derecha
左折 右折
Right
rechts
Droite
Derecha
Left
links
Gauche
Izquierda
Right
rechts
Droite
Derecha
Left
links
Gauche
Izquierda
左左右 右
Page 14
TH.TRIM
KT-5 TUNING PANEL
ST.D/R
F R MIN MAX
POWER
ONOFF
LET'S DRIVE! / DIE INBETRIEBNAHME DES MODELLS
POWER
ONOFF
6
Throttle Trigger / Gashebel
2
/ Gachette de gaz / frein / Gatillo de Gas
/ スロットルトリガー
/ EN PISTE ! / FUNCIONAMIENTO.
Brake
Bremse
Frein.
Freno
ブレーキ
Reverse
Forward
vorwärts
Avant
Adelante
前進
Neutral
neutral
Neutre
Neutro
rückwärts
Arrière
Marcha atrás
後進
中立
Raise the tires off the ground and check that all controls are responding.
Modell vom Boden anheben und alle Funktionen überprüfen.
Sans que la voiture touche le sol, vérifier le bon fonctionnement de la motricité.
Levante las ruedas del suelo y compruebe que el gas/freno y la marcha atrás responden correctamente.
全てのタイヤを浮かせた状態で操作と動きを確認してください。
/ 走行させましょう
Forward
vorwärts
Avant
Adelante
前進 後進
Reverse
rückwärts
Arrière
Marcha atrás
Bringing the Car to a Complete Stop / Die Neutrallage der Gasfunktion
/ Mettre la voiture à l'arrêt total. / Para que el modelo no avance.
/ 車体を完全に停止させる
Move the throttle trigger to Neutral position. Then, adjust the throttle trim until the car comes to a complete stop.
Continue adjusting the throttle trim until the car makes no sound.
Senderhebel für die Gasfunktion auf neutral stellen. Mit der Trimmung das Gas so justieren, daß der Motor völlig ruhig ist.
Placer la commande de gaz au neutre. Ajuster le trim de gaz jusqu'à ce que la voiture soit totalement à l'arrêt.
Continuer d'ajuster le trim jusqu'à ce que vous n'entendiez plus le ronronnement du moteur.
Coloque el gatillo de gas en la posición neutral. Ahora ajuste el trim de gas hasta que el modelo no se mueva.
Continúe con el ajuste hasta que no emita ruido ninguno.
スロットルトリガーを中立に保ち、車体が止まるようスロットルトリムを回して調整します。車体から音が出
ている時はさらに調整します。
Throttle Trigger / Gashebel
/ Gachette de gaz / frein / Gatillo de Gas
/ スロットルトリガー
Neutral
neutral
Neutre
Posición Neutral
中立
Throttle Trim / Trimmung für Gas
/ Trim de gaz / frein / Trim Gas
/ スロットルトリム
14
Page 15
POWER
STEERING TRIM
POWER
ONOFF
TH.TRIM
ST.D/R
F R MIN MAX
POWER
STEERING TRIM
6
Running in a Straight Line / Die Neutrallage der Lenkung
/ Rouler tout droit. / Para rodar en línea recta.
/ まっすぐ走らせるために
Bring the steering wheel to Neutral position. Then, adjust the steering trim until the car moves in a straight line.
Senderhebel für die Lenkfunktion auf neutral stellen. Mit der Trimmung die Lenkung so justieren, daß das Modell
exakt geradeaus läuft.
Mettre le volant de direction en position neutre. Ajuster le trim de direction jusqu'à ce que la voiture roule parfaitement droit.
Coloque el volante de dirección en la posición neutral. Ahora ajuste el trim de dirección hasta que el modelo ruede en línea recta.
ステアリングホイールを中立に保ち、まっすぐ走るようステアリングトリムを回して調整します。
Neutral / neutral
Neutre / Neutro
/ 中立
L R
RL
Steering Wheel / Lenkrad
/ Volant de direction / Volante
/ ステアリングホイール
Steering Trim /
/ Trim de direction / Trim Dirección
/ ステアリングトリム
Trimmung für Lenkung
Adjusting Steering Response / Die Justierung des Lenkausschlags
/ Ajuster le temps de réponse de la direction. / Ajuste del D/R de dirección
/ ステアリングの切れる量を調整する
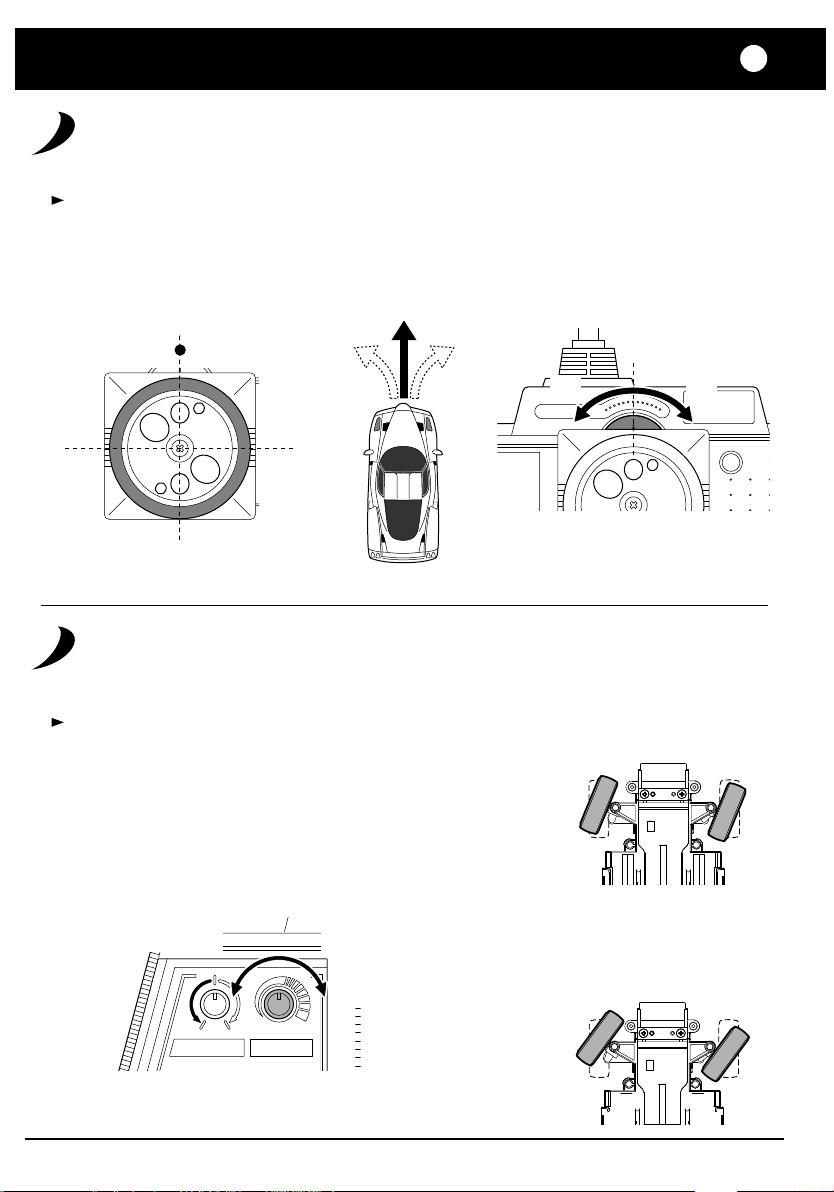
You can adjust the steering angle (the degree to which tires turn) to your liking.
Der maximale Lenkausschlag kann auf die eigenen Bedürfnisse angepaßt werden.
Vous pouvez ajuster l'angle de direction.
Realice el ajuste según sus características de conducción.
ステアリングの舵角(タイヤの切れる量)を好みに合わせ調整します。
Steering angle will give
you less steering.
Ausschlag kleiner
L'angle de direction
vous procure moins de
débattement à la direction.
Angulo menor
あまり切れない
Steering D/R Adjuster / Dual Rate Justierung am Sender
Réglage du débattement de la direction. / D/R Dirección
ステアリングD/Rアジャスター
Steering angle will give
you more steering.
Ausschlag größer
L'angle de direction
vous procure plus de
débattement à la direction.
Angulo mayor
よく切れる
15
Steering angle is less
Kleiner Lenkausschlag
Le débattement est moins important.
Menor ángulo de dirección
舵角が少なくなる
Steering angle is more
Großer Lenkausschlag
Angle de direction important.
Mayor ángulo de dirección
舵角が多くなる
Page 16
POWER
ONOFF
LET'S DRIVE! / DIE INBETRIEBNAHME DES MODELLS
6
/ EN PISTE ! / FUNCIONAMIENTO.
Changing Batteries / Das Wechseln der Batterien
/ Changer les batteries. / Cambio de baterías
/ 乾電池の交換時期
/ 走行させましょう
Transmitter
Sender
Radiocommande
Emisora
送信機
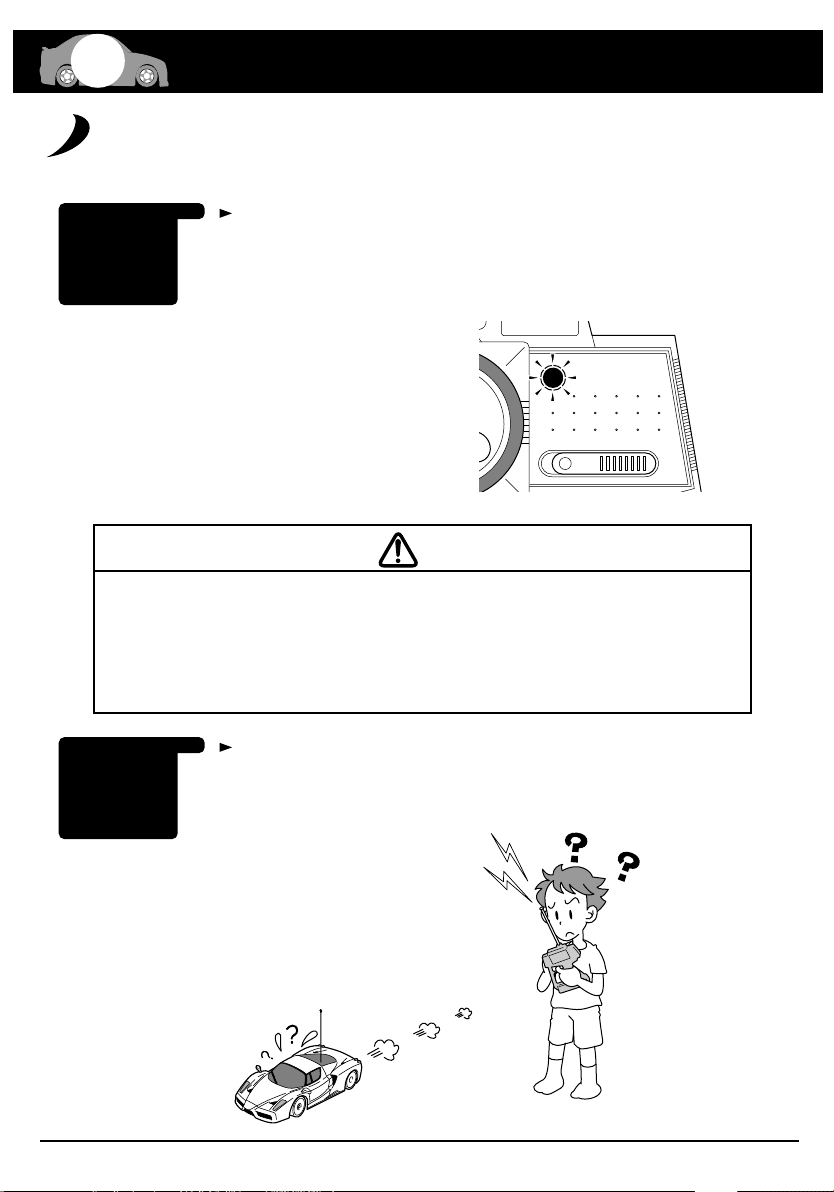
Replace the batteries when the yellow indicator light glows.
Wechseln Sie die Batterien, wenn die gelbe LED am Sender leuchtet.
Remplacer les piles lorsque l'indicateur de charge est JAUNE.
Cambie las baterías cuando el indicador muestre el color amarillo.
インジケーターが点滅したら直ちに電池を交換してください。
LED Indicator / LED Anzeige
/ Indicateur de batterie / Indicador LED
LEDインジケーター
Do NOT allow the transmitter batteries to go "dead" or all model control will be lost.
Beim Aufleuchten der roten LED am Sender muß der Modellbetrieb sofort eingestellt werden!
Ne jamais attendre que les piles de la radio soit complètement vide pour les changer.
Nunca deje que las baterías se descarguen completamente ya que podría perder el control de su modelo.
送信機の電池が無くなるとコントロールが不能になり大変危険です。
Chassis
Das Chassis
Chassis
Chasis
シャシー
When speed drops noticeably, replace the batteries.
Wenn die Fahrgeschwindigkeit des Modells stark nachläßt, Batterien im Modell tauschen.
Lorsque vous n'avez plus de puissance moteur, remplacer ou recharger les batteries.
Reemplace las baterías cuando observe que la velocidad de su modelo se reduce notablemente.
スピードが遅くなったと感じたら電池を交換してください。
16
Page 17
POWER
ONOFF
STEERING TRIM
OPERATING TIPS / HINWEISE ZUR BEDIENUNG
7
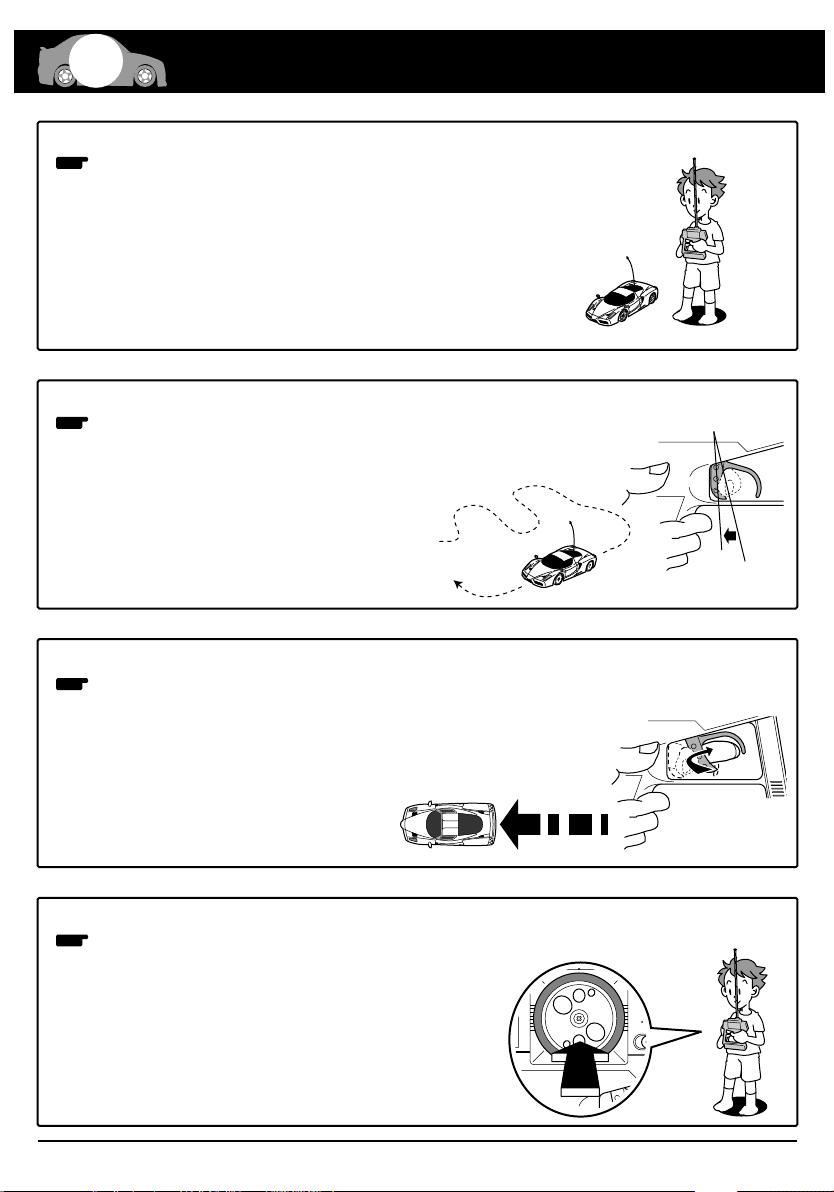
Hold your elbows in and keep the transmitter antenna pointing straight up.
1
Lassen Sie die Arme leicht angewinkelt und halten Sie die Senderantenne
etwa senkrecht nach oben.
Toujours faire attention à garder l'antenne radio pointée vers le haut.
Sujete bien la emisora con la antena posicionada verticalmente.
ワキをしめて送信機のアンテナを立てましょう。
Squeeze the throttle trigger gently and steer the car to the left and right.
2
Geben Sie langsam Gas und gewöhnen Sie sich an das Lenkverhalten Ihres Modells.
Accélérez doucement et effectuez des virages gauche/droite.
Apriete suavemente el gatillo de gas y mueva el volante hacia
la derecha y la izquierda.
少しだけスロットルトリガーをにぎって、
左右に車体を動かしてみましょう。
/
CONSEILS D'UTILISATION.
/
CONSEJOS PRACTICOS
/ 上手な走行テクニック
Squeeze the throttle trigger gently and release. Repeat this motion to control speed.
3
Geben Sie stoßweise Gas, um sich an die Beschleunigung des Modells zu gewöhnen.
Effectuez à répétition pour vous entraînez des accélérations et freinages.
Empuje suavemente el gatillo de gas y suéltelo. Repita este ejercicio varias veces
スロットルトリガーを軽くにぎってパッとはなす作業
をくり返し、スピードをコントロールしてみましょう。
If you are of unsure of the steering direction, practice with the transmitter facing towards you.
4
Gewöhnen Sie sich an die Lenkrichtung am Sender, wenn das Modell auf Sie zu fährt.
Si vous rencontrez des problèmes pour utiliser le volant
radio, essayez de positionner le volant face à vous.
Coloque la emisora tal y como muestra el dibujo
hasta que adquiera confianza.
ステアリングの方向がわかりにくいときは
送信機を正面に持って練習しましょう。
17
Page 18
F R MIN MAX
STEERING TRIM
7
OPERATING TIPS / HINWEISE ZUR BEDIENUNG
/
CONSEILS D'UTILISATION.
/
CONSEJOS PRACTICOS
/ 上手な走行テクニック
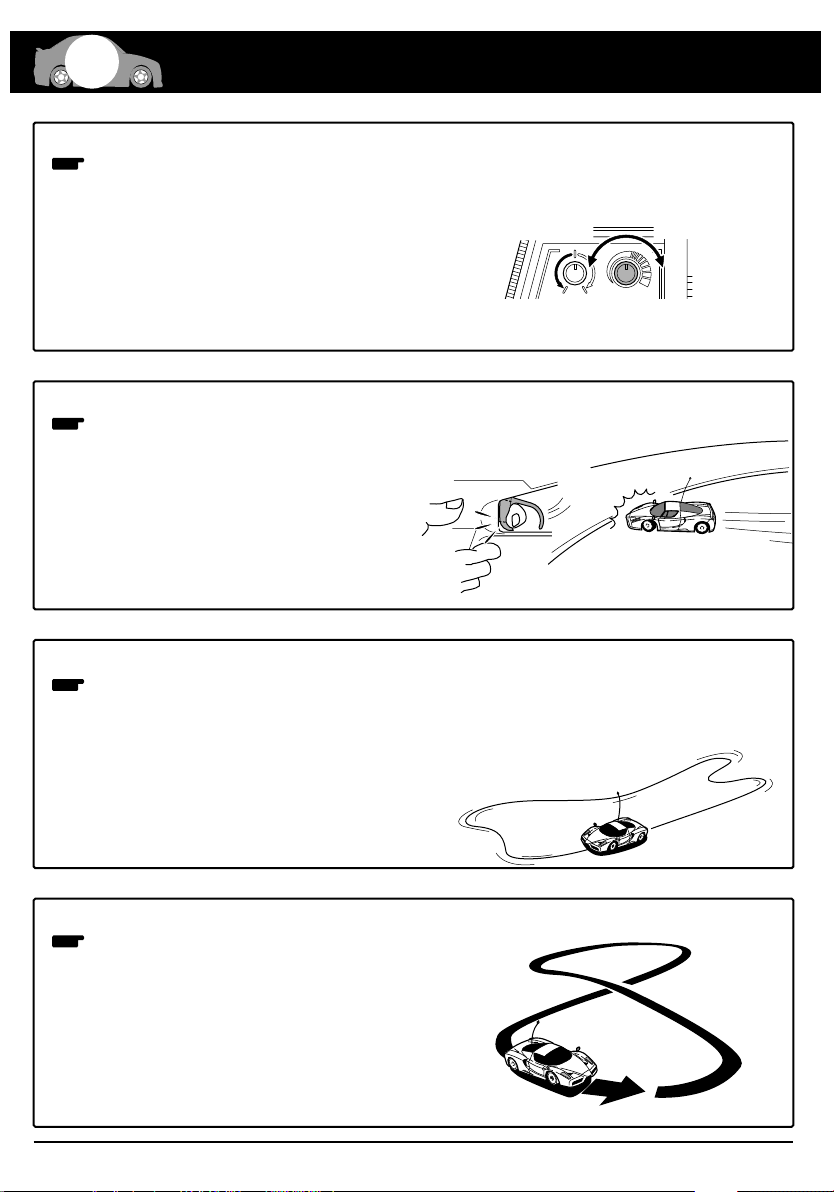
At first, set the Steering D/R Adjuster for less response, as shown.
5
Stellen Sie den Lenkausschlag zunächst so gering wie möglich ein,
um das Modell besser zu beherrschen.
Tout d'abord, règlez le Dual Rate en position lente comme indiqué.
Ajuste el D/R de dirección en la posición de ángulo menor.
Steering angle will give
you less steering.
Ausschlag kleiner
L'angle de direction
vous procure moins de
débattement à la direction.
Angulo menor
あまり切れない
Steering angle will give
you more steering.
Ausschlag größer
L'angle de direction
vous procure plus de
débattement à la direction.
Angulo mayor
よく切れる
最初はあまりステアリングが切れない様、
ステアリングD/Rアジャスターで調整して
みましょう。
Steering D/R Adjuster / Dual Rate Justierung am Sender
Réglage du débattement de la direction. / D/R Dirección
ステアリングD/Rアジャスター
Be careful not to squeeze the throttle trigger abruptly while steering.
6
Geben Sie nicht Vollgas, während Sie gleichzeitig vollen Lenkausschlag geben.
Attention à ne pas accélérer ou ralentir trop brutalement lorsque vous tournez.
No apriete bruscamente el gatillo de gas.
ステアリングを操作すると、ついスロット
ルトリガーをにぎってしまうことがあるの
で注意しましょう。
After you become used to the controls, experiment with the high performance possible at full throttle and full steering.
7
Geben Sie nach einiger Zeit mehr Gas und gewöhnen Sie sich an die volle Performance des Modells.
Une fois que vous avez une bonne prise en main des commandes radio, essayez d'aller de plus en plus vite tout en
restant maître de votre voiture .
Una vez adquiera mayor práctica, puede empezar a aplicar máximo gas y a realizar giros más complicados.
少しなれたら、フルスロットル/フルステアリングで高性能マシンの限界を
体感してみてください。
Practice doing figure 8s.
8
Fahren Sie Achten, um sich an das Einlenkverhalten des
Modells zu gewöhnen.
Effectuez des tours en 8 (voir schéma) pour vous entraîner .
Practique realizando figuras en 8.
8の字走行で練習を積みましょう。
18
Page 19
T
H
.TR
I
M
K
T
-5
T
U
N
I
N
G
P
A
N
EL
ST.D
/
R
F
R
MIN
MA
X
P
O
W
E
R
O
F
F
O
N
S
T
E
E
RI
NG T
RI
M
DE
S
I
G
NE
D
BY
TU
N
I
N
G
P
A
N
E
L
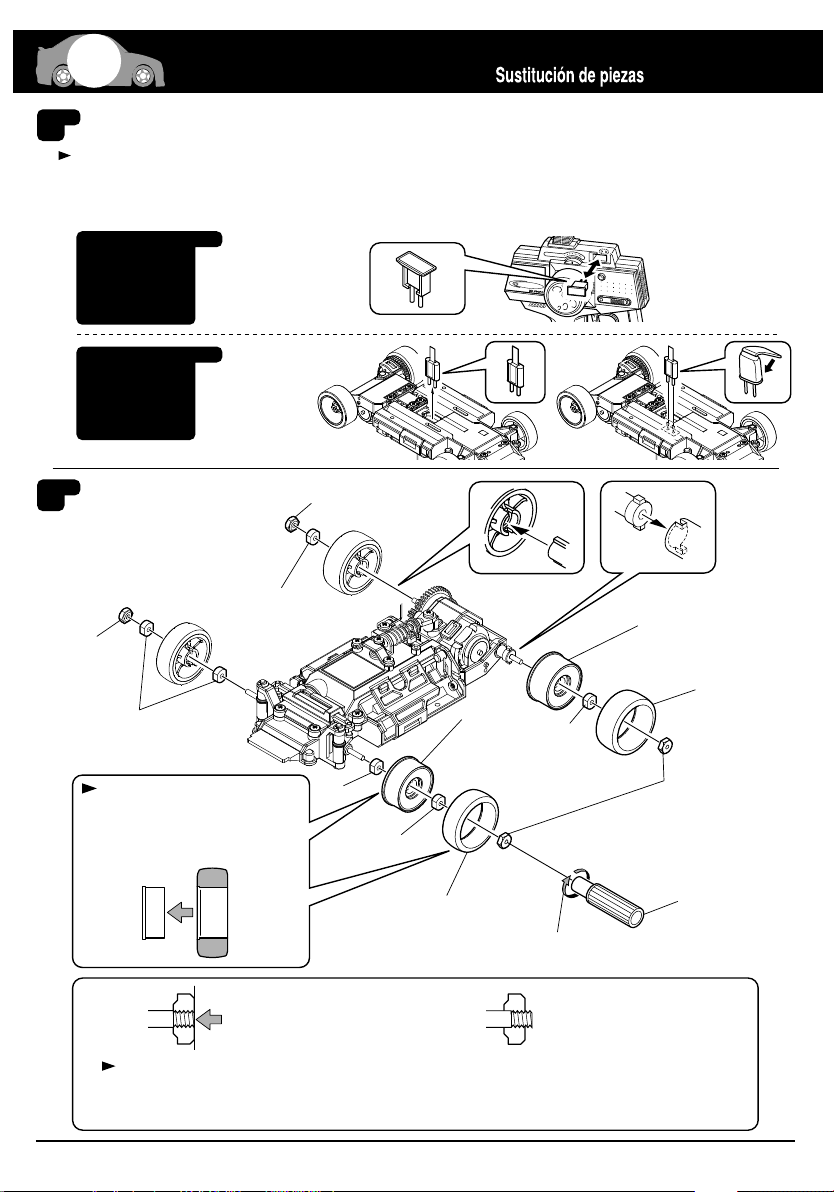
Replacement for each part. / Austausch einzelner Baugruppen
8
Changing Crystal / Quarzwechsel
Changer sa fréquence / Cambio de cristales / クリスタル交換
By using the optional Crystal Set, you can run two or more Mini-Z cars at the same time.
Durch den Einsatz unterschiedlicher Quarze, können mehrere Modelle gleichzeitig betrieben werden.
En utilisant des fréquences différentes, vous pouvez rouler à plusieurs Mini-Z en même temps.
Al utilizar los Cristales Opcionales, podrá competir con varios modelos al mismo tiempo.
オプションパーツのクリスタルセットを使用することで、2台以上のミニッツレーサーを同時に走行させることができます。
Transmitter
Sender
Radiocommande
Emisora
送信機
/
REMONTAGE DE CHACUNE DES PIECES.
Crystal for Transmitter
Senderquarz
Quartz d'émission
Cristal emisora
送信機用クリスタル
/
/ 各部の交換
*
Wheel Nut
Radmutter
Ecrous de roue
Tuerca rueda
ホイールナット
Chassis
Das Chassis
Chassis
Chasis
シャシー
Tires / Die Räder / Pneus
Neumático
2mm Plastic Bushing
Kunststofflager
Ecrou plastique 2mm
Casquillo Plástico 2mm
2mmプラメタル
*
Install the tire as illustrated.
Räder montieren, wie dargestellt
Monter les pneus comme indiqués sur le schéma.
Coloque el neumático tal y como
muestra el dibujo.
タイヤを図の向きに入れる。
Wheel
Felge
Llanta
Llanta
After the wheel nut is installed, do not over tighten. If the tire can not easily rotate, loosen the wheel nut slightly.
Radmuttern nicht überdrehen. Das Rad muß sich nach der Montage leichtgängig drehen, ggf. die Mutter geringfügig lösen!
Serrez les écrous de roue en faisant attention à ce que les roues tournent librement.
Una vez apretada la tuerca de rueda, compruebe que la rueda gira suavemente. Afloje la tuerca si fuera necesario.
ホイールナットをしめ込んだ後にタイヤがうまく回転しないときはホイールナットを少しゆるめる。
Crystal for Receiver
Empfängerquarz
Quartz d'récepteur
Cristal receptor
受信機用クリスタル
/ タイヤ
Wheel Nut / Radmutter
Ecrous de roue / Tuerca rueda
ホイールナット
3mm Plastic Bushing
Kunststofflager
Ecrou plastique 3mm
Casquillo Plástico 3mm
3mmプラメタル
*
Tire
Reifen
Pneus
Neumático
タイヤホイール
Tighten to this point.
Bis zu diesem Punkt festziehen
Serrez comme indiqué sur le schéma.
Apriete hasta este punto
ここまでしめる
*
Front Tire
Reifen, vorn
Pneu avant
Neumático delantero
フロントタイヤ
19
Front Wheel
Felge, vorn
Roue avant
Llanta delantera
フロントホイ−ル
*
Tighten / festziehen
Serrer / Aprieta
しまる
Over tighten.
zu stark angezogen
Trop serré
Demasiado apretada
しめ過ぎ
Rear Wheel
Felge, hinten
Roue arrière
Llanta trasera
リヤホイ−ル
Wheel Nut
Radmutter
Ecrous de roue
Tuerca rueda
ホイールナット
Wheel Wrench
Radschlüssel
Clé Mini-Z
Llave de ruedas
ホイールレンチ
Rear Tire
Reifen, hinten
Pneu arrière
Neumático trasero
リヤタイヤ
Page 20
Replacement for each part. / Austausch einzelner Baugruppen
8208
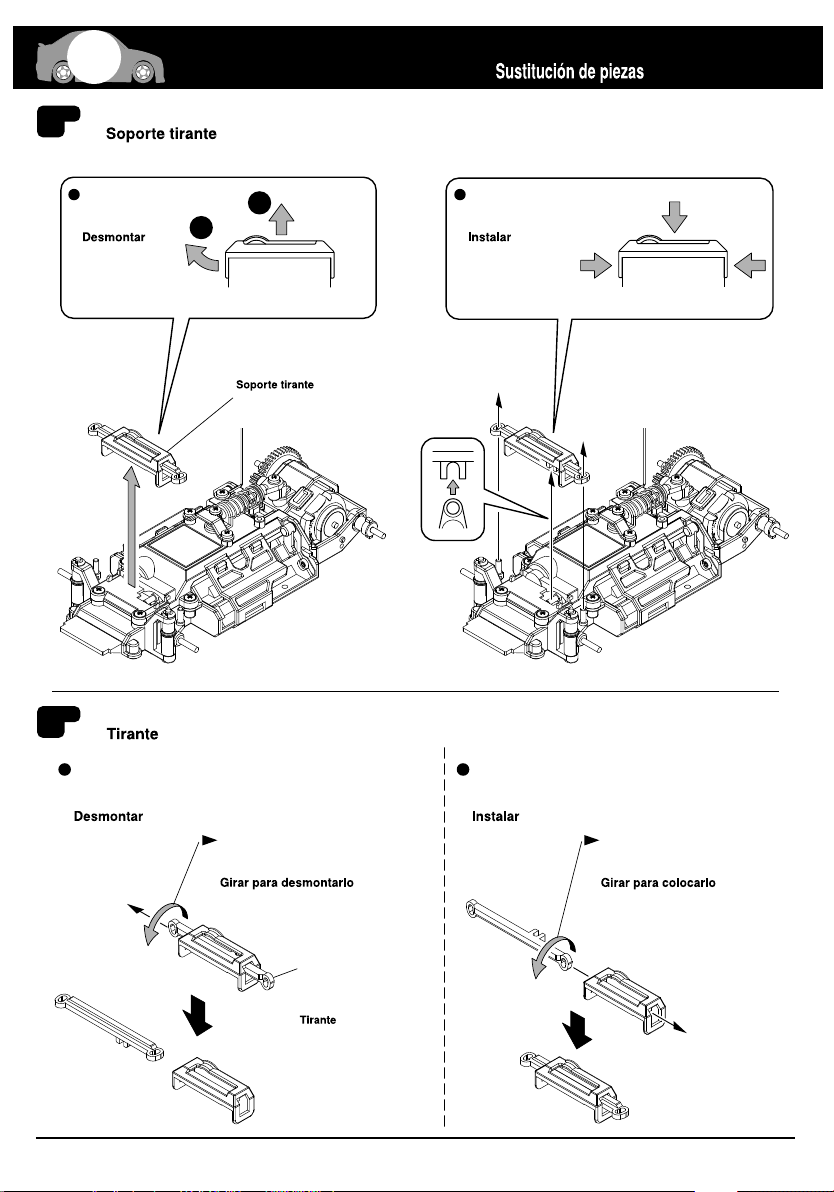
Tie-Rod Holder / Spurstangenhalterung / SUPPORT DE BIELLETTES DE DIRECTION.
/
/
REMONTAGE DE CHACUNE DES PIECES.
/ タイロッドホルダー
/
/ 各部の交換
Remove.
Entfernen
RETIRER.
取り外し
2
1
Tie-Rod Holder
Spurstangenhalterung
SUPPORT DE BIELLETTES
DE DIRECTION.
タイロッドホルダー
Tie-Rod / Spurstangen / BIELLETTES DE DIRECTION
/
Remove.
Entfernen
RETIRER.
取り外し
/ タイロッド
To remove, rotate and pull out.
Drehen und herausziehen
RETIRER EN PIVOTANT.
タイロッドを回しながら引き抜く。 タイロッドを回しながら差し込む。
Install.
Montieren, wie dargestellt.
ASSEMBLER
取り付け
Install.
Montieren, wie dargestellt.
ASSEMBLER
取り付け
To install, rotate and push in.
Drehen und hineinschieben
INTRODUIRE EN PIVOTANT.
Tie-Rod
Spurstangen
BIELLETTES DE
DIRECTION
タイロッド
Page 21
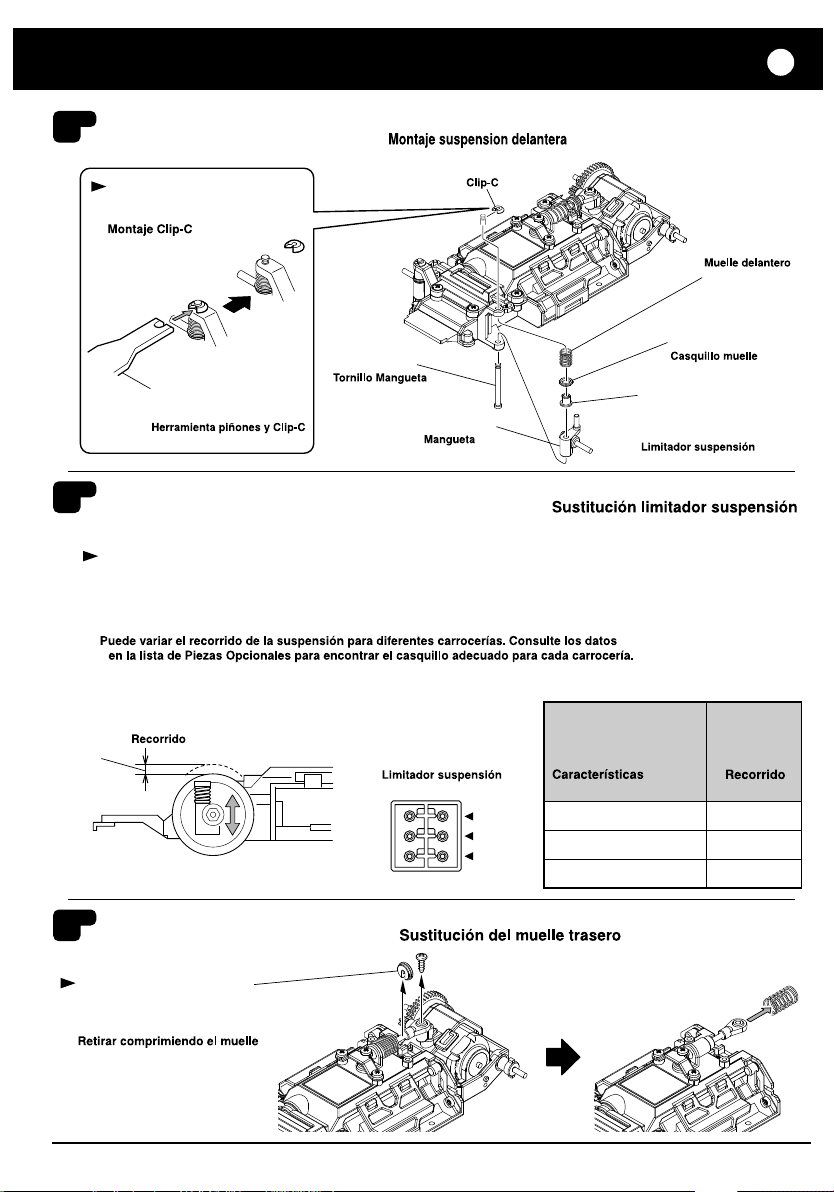
Disassembling the Front Suspension / Demontage der Vorderradaufhängung
/
DEMONTAGE DE LA SUSPENSION AVANT.
How to remove the C-Ring.
So entfernen Sie den C-Ring!
COMMENT RETIRER LE CLIPS EN C
Cリングの外し方
Pinion & C-Ring Tool
Montagewerkzeug
CLE DE PIGNONS & CLIPS EN C
ピニオン&Cリング用ツール
/ /
C-Ring / C-Ring
/ CLIPS EN C /
/ Cリング
King Pin
Lenkhebelträger
AXE DE FUSEE
キングピン
Knuckle Arm / Lenkhebel
/ FUSEE /
/ ナックルアーム
フロントサスペンションの分解
Front Spring
Feder, vorn
RESSORT AVANT
フロントスプリング
Spring Spacer
Distanzstück
BAGUE DE PRECONTRAINTE
スプリングスペーサー
Suspension Limiter
Federwegsbegrenzer
BAGUE DE REGLAGE DE
GARDE AU SOL
サスリミッター
Replacing Suspension Limiter / Austausch des Federwegsbegrenzers
/
REMPLACEMENT DE LA BAGUE DE REGLAGE DE GARDE AU SOL
/
/ サスリミッターの交換
The front suspension stroke can be adjusted for each different body shell.
To find the right front spacer for each body, refer to the separate Option Parts List.
Je nach Karosserie, kann der Federweg an der Vorderachse justiert werden.
Die korrekten Werte für die einzelnen Karosserien, finden Sie in der Option Part Liste.
POUR CHACUNE DES CARROSSERIES LE DEBATTEMENT DE SUSPENSION PEUT-ETRE AJUSTER.
SE REFERER AUX DONNEES DE LA LISTE DES PIECES OPTIONS AFIN DE TROUVER L'ENTRETOISE ADAPTEE A LA CARROSSERIE.
8
ボディの種類に合わせてフロントサスペンションの動作量を調整することができます。
別紙オプションパーツリストのデータ表を参照してボディに合ったサスリミッターを取り付けてください。
Stroke / Federweg
/ COURSE /
動作量
Suspension Limiter
Federwegsbegrenzer
BAGUE DE REGLAGE
DE GARDE AU SOL
サスリミッター
4 4
4
4.5 4.5
4.5
5 5
5
Description of Front Suspension Spacer
Federwegsbegrenzer
DESCRIPTION DU DEBATTEMENT
DE SUSPENSION
サスリミッターの種類
How to remove Rear Spring. / So tauschen Sie die hinteren Federn aus!
/
COMMENT RETIRER LE RESSORT ARRIERE.
Pull out by compressing the spring.
Feder zusammendrücken und
Teil herausziehen
RETIRER EN PRESSANT LE RESSORT.
リヤスプリングを縮めて抜き取る。
/ /
21
Stroke
Federweg
COURSE
動作量
4
4.5
5
2.0mm
1.5mm
1.0mm
リヤスプリングの取り外し
Page 22
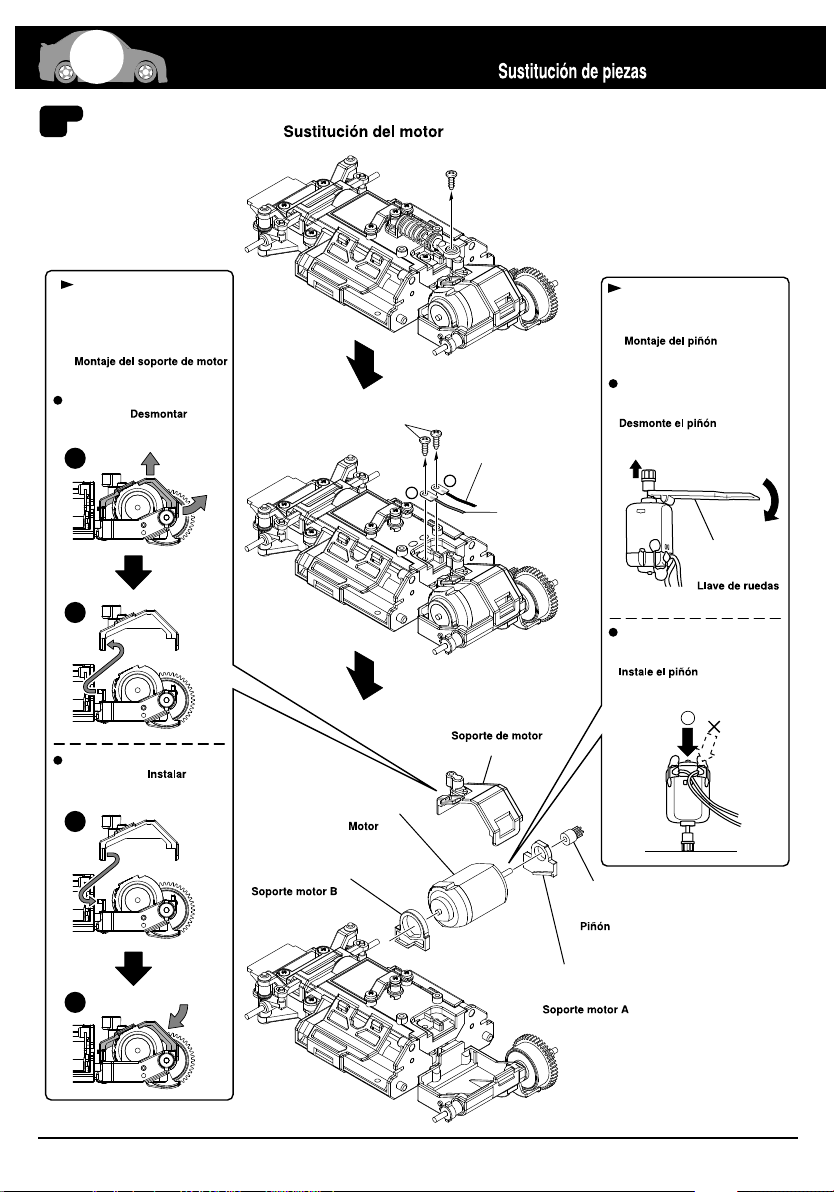
Replacement for each part. / Austausch einzelner Baugruppen
8
Remove a Motor / Der Ausbau des Motors
/ RETIRER LE MOTEUR / / モーターの交換
/
REMONTAGE DE CHACUNE DES PIECES.
/
/ 各部の交換
How to remove & install
the Motor Holder.
Der Ein- und Ausbau
der Motorhalterung
COMMENT RETIRER & INSTALLER
LE SUPPORT MOTEUR.
モーターホルダーの脱着
Remove. / Entfernen
/ RETIRER. /
/取り外し
1
2
Install. /
Montieren, wie dargestellt.
/ ASSEMBLER /
/取り付け
1
2
Motor Guide B
Motorhalterung B
GUIDE MOTEUR B
モーターガイドB
2x5mm
Motor
Motor
MOTEUR
モーター
−
+
–
+
Motor Holder
Motorhalterung
SUPPORT MOTEUR
モーターホルダー
Negative is Black
schwarz = Minuspol
Négatif - Cable Noir
Negro es negativo
モーターコード黒
Positive is Red
rot = Pluspol
Positif - Cable Rouge
Rojo es positivo
モーターコード赤
Remove the Pinion Gear.
Der Ausbau des Motorritzels
RETIRER LE PIGNON MOTEUR.
ピニオンギヤをぬく
Install the Pinion Gear.
Die Montage des Motorritzels
INSTALLER LE PIGNON MOTEUR.
ピニオンギヤを入れる
Pinion Gear
Motorritzel
PIGNON MOTEUR
ピニオンギヤ
Motor Guide A
Motorhalterung A
GUIDE MOTEUR A
モーターガイドA
How to remove & install the Pinion Gear.
Der Ein- und Ausbau des Motorritzels
COMMENT RETIRER & INSTALLER
LE PIGNON MOTEUR.
ピニオンギヤの脱着
Wheel Wrench
Mutternschlüssel
CLE DE ROUE
ホイールレンチ
22
Page 23
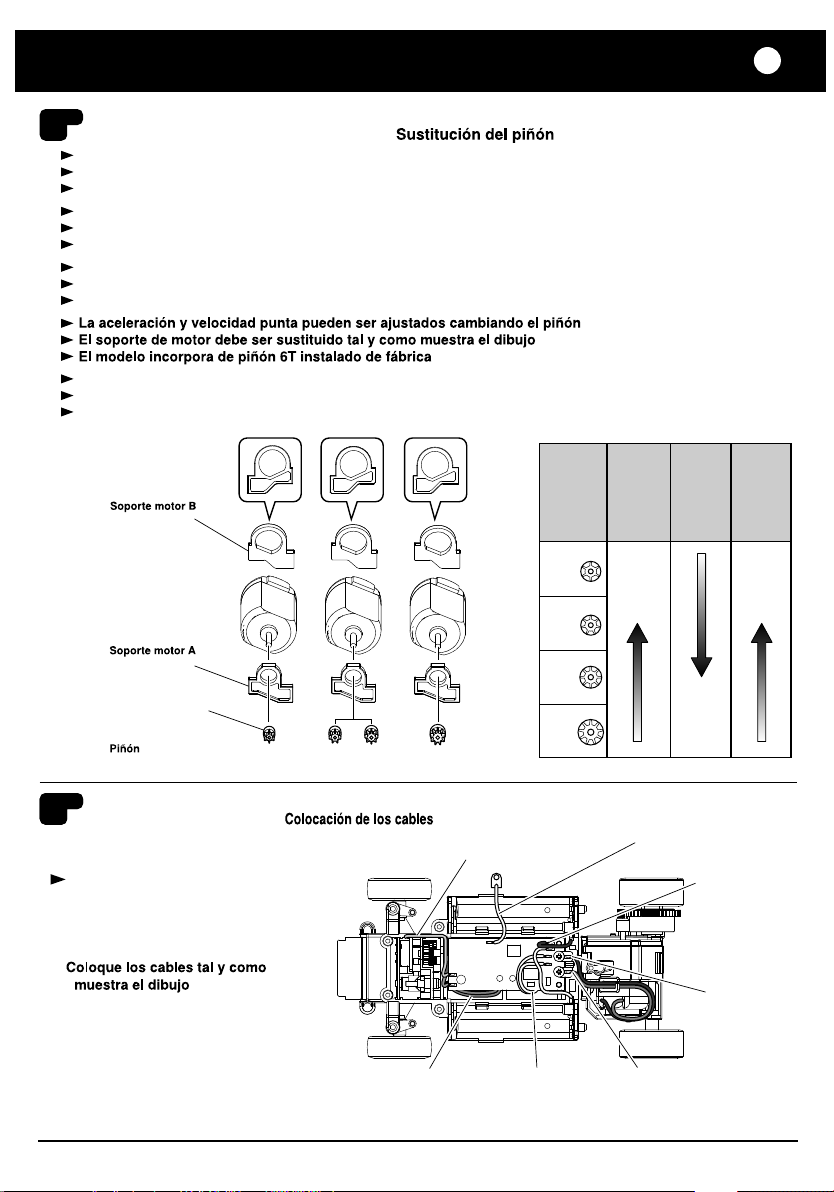
8
Replacement of the Pinion Gear. / Der Wechsel des Motorritzels
/ CHANGEMENT DU PIGNON MOTEUR. / / ピニオンギヤの交換
Acceleration and Top Speed can be adjusted by replacing the Pinion Gear
The Motor Guide also must be changed as shown in the drawing.
The 6T Pinion Gear is installed at the factory.
Geschwindigkeit und Beschleunigung können durch das Motorritzel variiert werden.
Wechseln Sie auch die Motorhalterung, gemäß der Zeichnungen.
Serienmäßig ist das Motorritzel mit 6 Zähnen montiert
L'ACCELERATION ET LA VITESSE DE POINTE PEUVENT ETRE AJUSTEES PAR LE CHANGEMENT DU PIGNON MOTEUR.
LE GUIDE MOTEUR PEUT ETRE AUSSI CHANGE. POUR CELA SUIVRE LE SCHEMA SUIVANT.
UN PIGNON MOTEUR DE 6 DENTS EQUIPE D'ORIGINE LA MR02.
ピニオンギヤを交換することで加速や最高速を調整することができます。
図を参考にしてモーターガイドも交換してください。
工場出荷時は6Tピニオンギヤが付いています。
Motor Guide B
Motorhalterung B
GUIDE MOTEUR B
モーターガイドB
Motor Guide A
Motorhalterung A
GUIDE MOTEUR A
モーターガイドA
Pinion Gear
Motorritzel
PIGNON MOTEUR
ピニオンギヤ
6T 7T 9T
6T 7T
6T
7T 8T
How to complete the wiring. / Die Verkabelung
/
COMMENT CABLER LA MR02.
/
/ コードの取り回し
Connect the wires as shown in the drawing.
Stellen Sie die Kabelverbindungen
her, wie dargestellt.
SUIVRE SCRUPULEUSEMENT
LE SCHEMA DE CABLAGE.
コードは図のように収納してください。
9T
9T
Steering Servo Volume Wires
Kabel des Lenkservos
Cables de servo de direction.
Cables servo dirección
ステアリングサーボボリューム配線
Steering Servo Motor Wires
Kabel des Lenkservos
Cables de servo de direction.
Cables motor servo de dirección
ステアリングサーボモーター配線
Pinion Gear
Motorritzel
Pignon
Engranaje
ピニオンギヤ
6T
7T
8T
9T
Switch Wires
Schalterkabel
Cables d'interrupteur
Cables interruptor
スイッチ配線
Acceleration
Beschleunigung
Accélération
Aceleración
Max. Speed
max. Speed
Vitesse Max.
Velocidad
Máxima
最高速加速
Good
besser
Bonne
Buena
良い
Antenna Wire
Antenne
Fil d'antenne
Cable antena
アンテナ配線
Positive is Red
rot = Pluspol
Positif - Cable Rouge
Rojo es positivo
モーターコード赤
Running Time
Fahrzeit
Autonomie
Tiempo de
Funcionamiento
走行時間
länger
Mayor
Fast
schnell
Rapide
Rápida
速い
Power Wires for
Circuit Board
Anschlußkabel
Cables d'unité de
réception.
Cables circuito interno
基板用電源配線
Negative is Black
schwarz = Minuspol
Négatif - Cable Noir
Negro es negativo
モーターコード黒
Long
Long
長い
23
Page 24
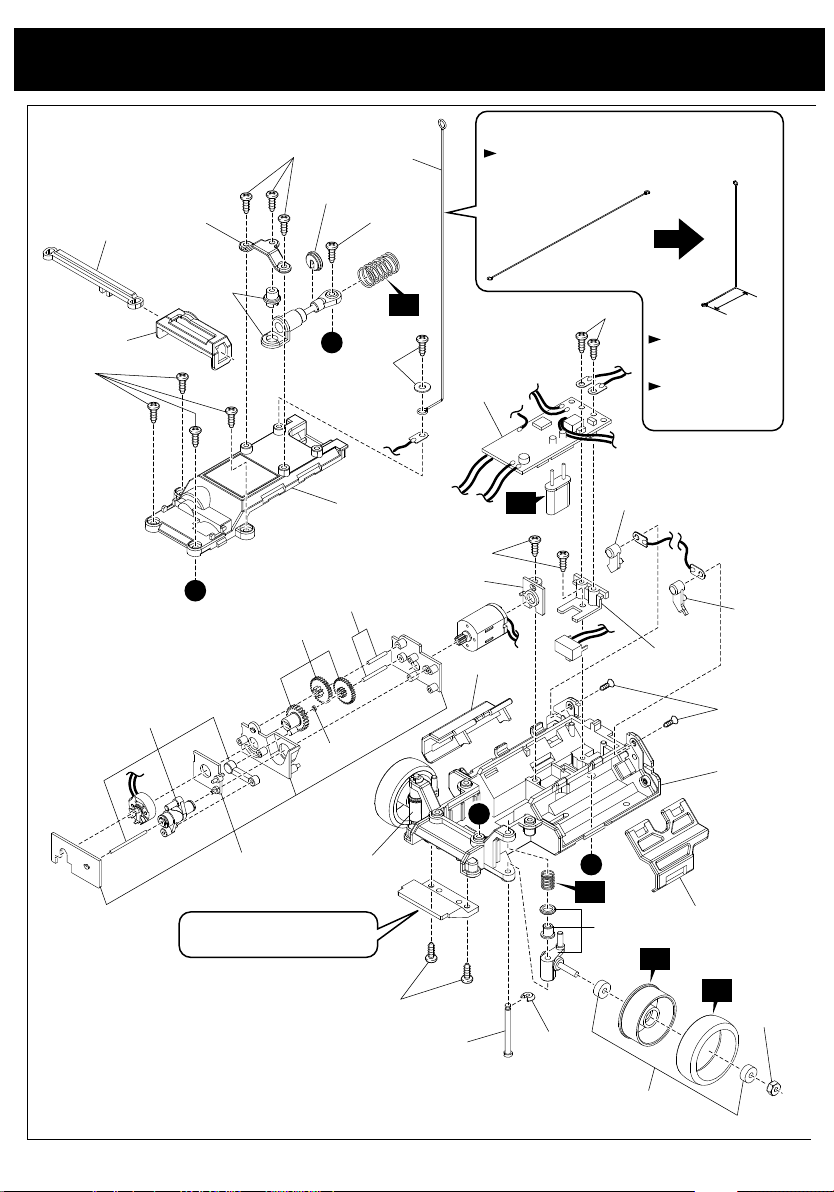
EXPLODED VIEW / EXPLOSIONSZEICHNUNG
/ ECLATƒ
MZ203
/ DESPIECE /
MZ208
MZ206
MZ206
分解図
MZ10
MZ208
When using Spare Parts MZ-10,
bend it as illustrated and then install.
スペアパーツMZ-10を使用する場合
は、図のように曲げてシャーシに取
り付けてください。
MZ208
MZ202
MZ205
MZ206
B
MZ208
MZ202
A
MZ202
It is attached to the body set.
ボディセットに付属しています。
MZ8-3
MZ8-1
MZ8-3
MZ203
MZ208
OP
MZ208
MZ202
MZ203
MZ209
MZ202
A
OP
MZ203
MZ208
C
OP
MZ203
MZ202
OP
D mm
Refer to the data table
of the attached optional
parts list for D size.
D寸法は別紙オプション
パーツリストのデータ表
を参照してください。
MZ202
MZ202
MZ208
MZ201
MZ202
OP
MZ203
© 2003 KYOSHO CORPORATION /禁無断転載複製
MZ6BK
24
Page 25
B
MZ206
メーカー指定の純正部品を使用して
安全にR/Cを楽しみましょう。
MZ203
OP
MZ6BK
OP
MZ6BK
MZ204
MZ207
C
MZ204
MZ208
MZ208
MZ6BK
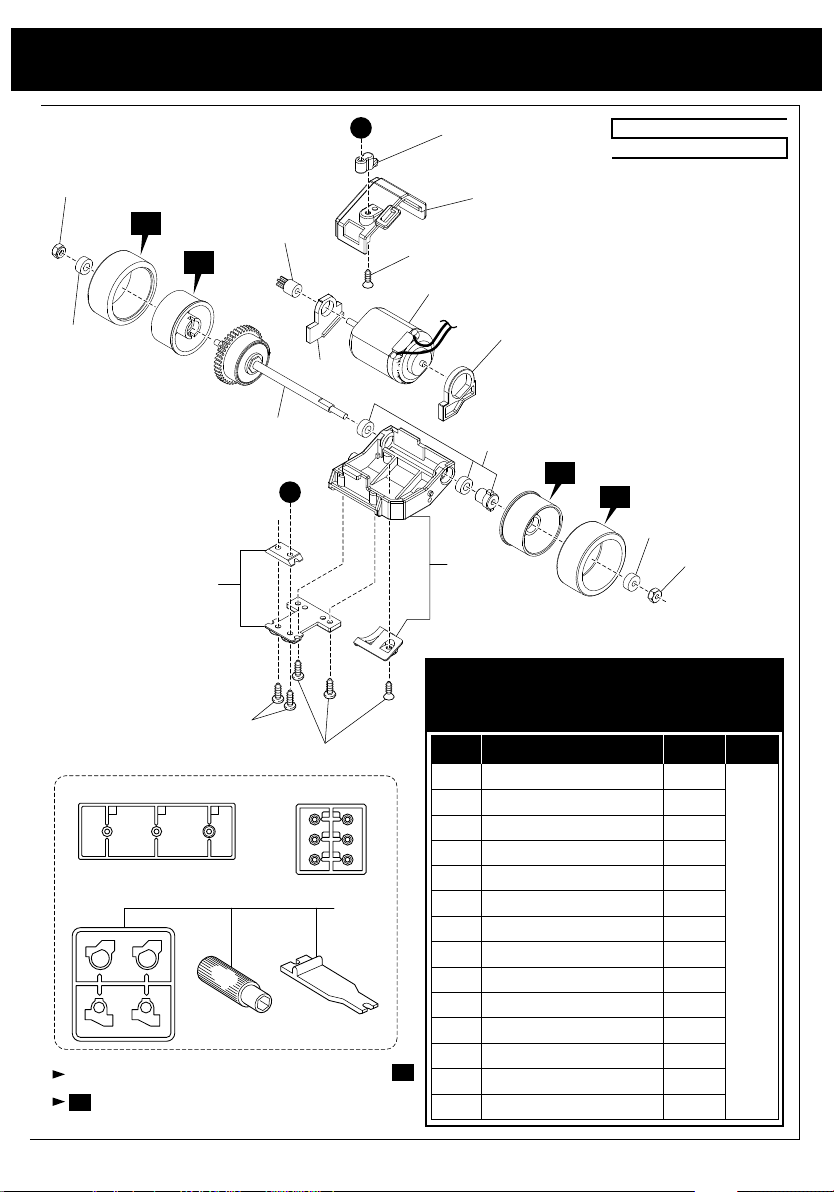
The optional parts should be used for the parts marked with .
の印が付いたパーツはオプションパーツをご利用ください。
OP
MZ203
MZ204
MZ204
MZ208
MZ9
MZ204
MZ6BK
OP
MZ204
Spare Parts / Ersatzteile
/ Pieces detachees. / Repuestos
/スペアパーツ
No. Description
品番 パーツ名
Main Chassis Set
MZ201
メインシャシーセット
Small Parts For Chassis
MZ202
シャシー小物セット
Front Suspension Parts Set
MZ203
フロントサスペンションパーツセット
Motor Case Set
MZ204
モーターケースセット
Servo Saver Assembly
MZ205
サーボセイバーアッセンブリー
Rear Shock Set
MZ206
リヤダンパーセット
Differential Gear Assembly
MZ207
デフギヤアッセンブリー
Screw Set
MZ208
ビスセット
R/C Unit Set
MZ209
R/Cユニットセット
Pinion Gear Set (Black)
MZ6BK
ピニオンギヤセット(ブラック)
Servo Gear Set
MZ8-1
サーボギヤセット
Servo Gear Shaft Set
MZ8-3
OP
サーボギヤシャフトセット
Motor Set
MZ9
モーターセット
Antenna Set
MZ10
アンテナセット
OP
MZ6BK
MZ203
定価
600
450
500
450
600
600
900
450
8000
500
400
350
900
350
発送
手数料
200
(一律)
25
Page 26
*発送手数料、消費税率は平成15年7月1日現在のものです。
"Kyosho Direct-Mail-Parts-Order-System" is available only for Japanese market.
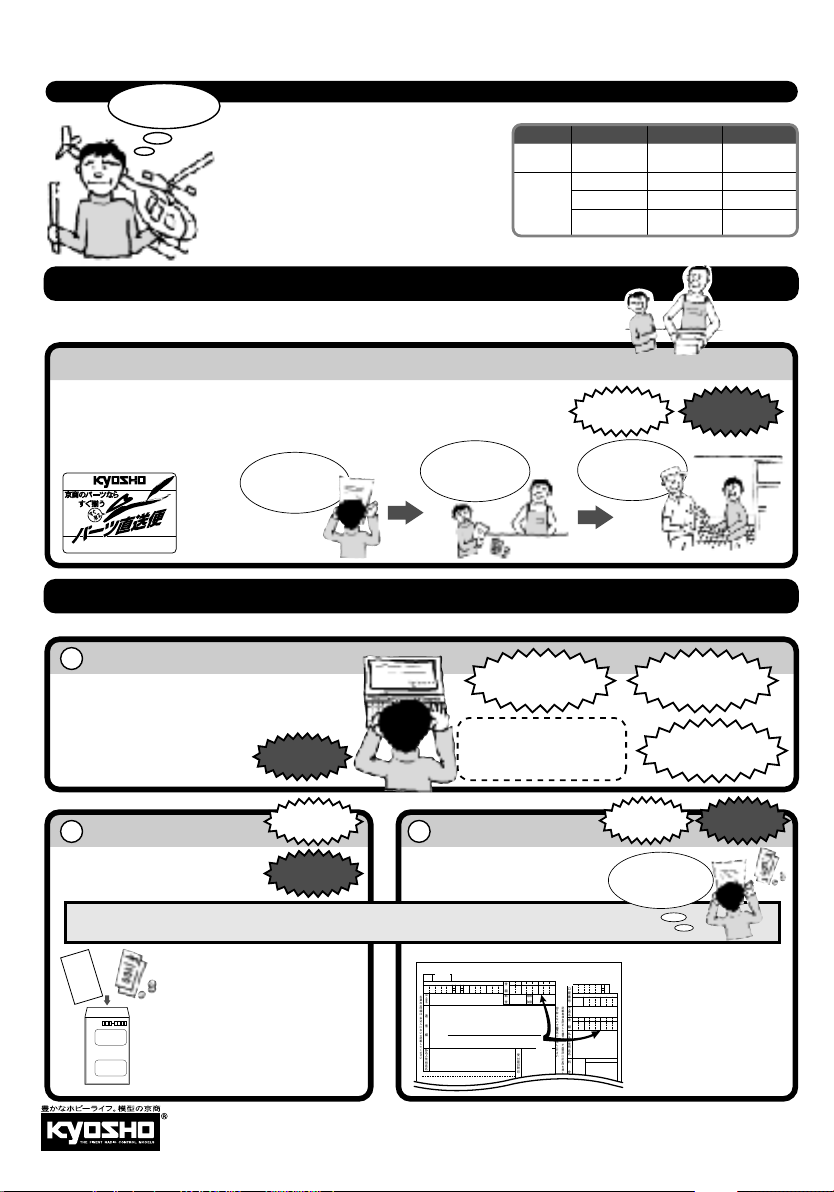
京商スペアパーツ・オプションパーツの購入方法
部品を
こわしちゃった
●部品をこわしたり、なくしてしまった場合で
もスペ アパー ツ や オプ ション パーツ を購入
し、元どおりに直す事ができます。
●
パー ツ は お店で 直 接 購入 し て いただ く か 、お
店に 行けな い場合 は、イ ンターネットか郵便を
利用して京商から通信販売で購入できます。
※電話での直接のご注文は取り扱っておりませ
んので予めご了承ください。
1.まずはお店でお求めください。
まずは、お近くのお店か、この商品をお買い求めいただいたお店にご来店ください。ご希望のパーツの在庫が
あれば即購入できます。その際に組立/取扱説明書をお持ちになると購入がスムーズになります。
お店で在庫切れの場合でも京商の『パーツ直送便』
お店でご希望のパーツがたまたま品切れだった場合でも、京商の『パーツ直送便』※を利用すればその場で注文でき
ます。『パーツ直送便』は、お店に備え付けのパーツ直送便注文用紙にご希望のパーツの品番や数量等、必要事項
をご記入の上、お店に代金をお支払いいただければ結構です。3〜4日でお客様のご自宅か、お店にお届けします。
発送手数料が不要で早く着くお得なシステムです。
※一部取り扱っていないお店もございます。
パーツ直送便取り扱い店は
このステッカーが目印
お店でパーツ直送便
注文用紙に『品番』
と必要数を記入。
これらの購入方法は日本国内に限らせていただきます
購入方法による手数料、お届け日数のめやす。
購入方法 発送手数料
お店に在庫がない場合は
お店で
パーツ直送便で
お店に
行けない場合
※お届け予定日数 は夏・冬期休業また は交通事情等運送上 の理由により。
遅れる場合がございますのでご了承ください。
※
でお店から京商へ申し込めます
現金書留で
郵便振込で
インターネットで
発送手数料は
不要
円
200
円
200
お支払い方法により
異なります。
お届けまで
不要
パーツ直送便の
注文用紙といっしょに
代金をお店の人に
支払う!
3〜4日でお客様の
ご自宅かお店に
お届けします。
お届け予定日数
3〜4
6〜7
10〜12
3〜4
日
3〜4
日
日
日
日
2.お店に行けない場合は
次の3つの方法で京商から通信販売で購入できます。
お店に行けない場合は、京商ホームページ(http://www.kyosho.co.jp/)内のパーツオンラインショップからお申し込みいただくか、郵便局からお申し込みいただくようになります。
1
インターネットで京商へ申し込む
京商ホームページ(http://www.kyosho.co.jp/)内のインデックス
WEBSHOP→パーツオンラインショップをクリックしてください
から
。
パーツオンラインショップ(インターネット)でお申し込みの
場
合は、右側の3種類(KYOSHOカード、
各社クレジットカード、代引支払い)から
2
現金書留で京商へ申し込む
必要事項を記入した用紙と代金を現金書留
にて京商までご送金ください。代金は次の
とおりとなります。
●代金は、スペアパーツの定価の他に発送手数料(一律200円)と消費税がかかります。
●代金の計算方法は、代金=(パーツの定価の合計+発送手数料200円)×消費税1.05(1円未満は四捨五入)
(1)メモ用紙に氏名・電話番号・郵便番号
住所(電話番号は登 録・発送をスムー
ズにするためのものです。必ずご記入
ください)と注文するパーツ名
注文数を必ず記入してください。
(2)お間違えのないよう代金といっしょ
に郵便局よりご送金ください。
《現金書留の宛先》
〒243‑0034神奈川県厚木市船子153
京商株式会社ユーザー相談室
電話046‑229‑4115
京商株式会社〒243‑0034神奈川県厚木市船子153
●お問い合わせはユーザー相談室まで電話
(1)
名
氏
(2)
号
番
話
電
号
番
便
郵
所
住
名
ツ
ー
パ
番
品
量
数
243 0034
神奈川県厚木市船子153
京商株式会社
ユーザー相談室
電話046‑229‑4115
お届けまで
3〜4
発送手数料
200
お届けまで
6〜7
日
円
日
・品番・
3
郵便局で払込用紙に必要事項をご記入のう
え、代金を郵便振込にて京商までご送金く
ださい。代金は次のとおりとなります。
・
046‑229‑4115
00
※ ※
0 0 2 1 0 4 4 7 2 7 1
加
各
※
入
票
者
名
の
※
印
※
欄
は
通
払
込
人
信
に
お
い
(例)
欄
て
記
載
し
て
払
く
込
だ
(郵便番号 )
さ
※
人
い
住
所
氏
名
KYOSHOカードで
お支払いの場合
発送代引手数料
特典満載KYOSHOオフィシャルカード
お申し込みが、京商ホームページ
(http://www.kyosho.co.jp/)
でもOK!!
不要
郵便振込で京商へ申し込む
《払込用紙の記入例》
(1)
払 込 取 扱 票 払込票兼受領証
口座番号 (右詰めにご記入ください)
京商株式会社
品番 パーツ名 数量
(3)
1901 ベアリング 2
発送手数料
消費税
(部品+発送手数料合計金額x5%)
合計
(2)
(電話番号 ‑ ‑ )
裏面の注意事項をお読みください。(郵政省)
(1)
金
千 百 十 万 千 百 十 円
額
料
金
※
口
0 0 2 1 0 4
1 6 8 0
座
殊
特
番
右詰めにご記入ください
※
号
扱
取
加
切
記
※
入
り
載
者
取
事
京商株式会社
名
ら
項
な
を
金
千 百 十 万 千 百 十 円
1,400
い
訂
※
で
正
額
200
郵
し
便
た
局
場
※
払
80
に
合
込
お
は
人
1,680
出
住
し
そ
所
く
の
氏
箇
だ
所
さ
名
(4)
受
に
い
付
訂
正
料
局
(消費税込み)
印
日
を
附
押
金
印
し
円
て
く
だ
さ
特殊取扱
い
受付時間:月〜金曜(祝祭日を除く)10:00〜18:00
各社クレジットカードで
お支払いの場合
発送手数料
の
代引にてお支払いの場合
発送及び
代引手数料
発送手数料
円
200
郵便振込のほうが
現金書留より郵便料金が
安いね。
(1)口座番号:00210‑4‑47271
加入者名:京商株式会社
(2)あなたの 氏名・電話番号・郵便
番号
4 7 2 7 1
だ さい。(電話番号は登録
を スムーズにするためのもの
1 6 8 0
です。 必ずご記入ください)
(3) 注文 する、 品番・パーツ 名・注
(2)
受付局日附印
文数を必ず記入してください。
(4)お間違えのないよう合計金額
を記入のうえ、ご送金ください。
円
200
円
1000
お届けまで
10〜12
・
住所 を必ず記入してく
日
・
発送
Page 27
The service mentioned below is available only for Japanese market.
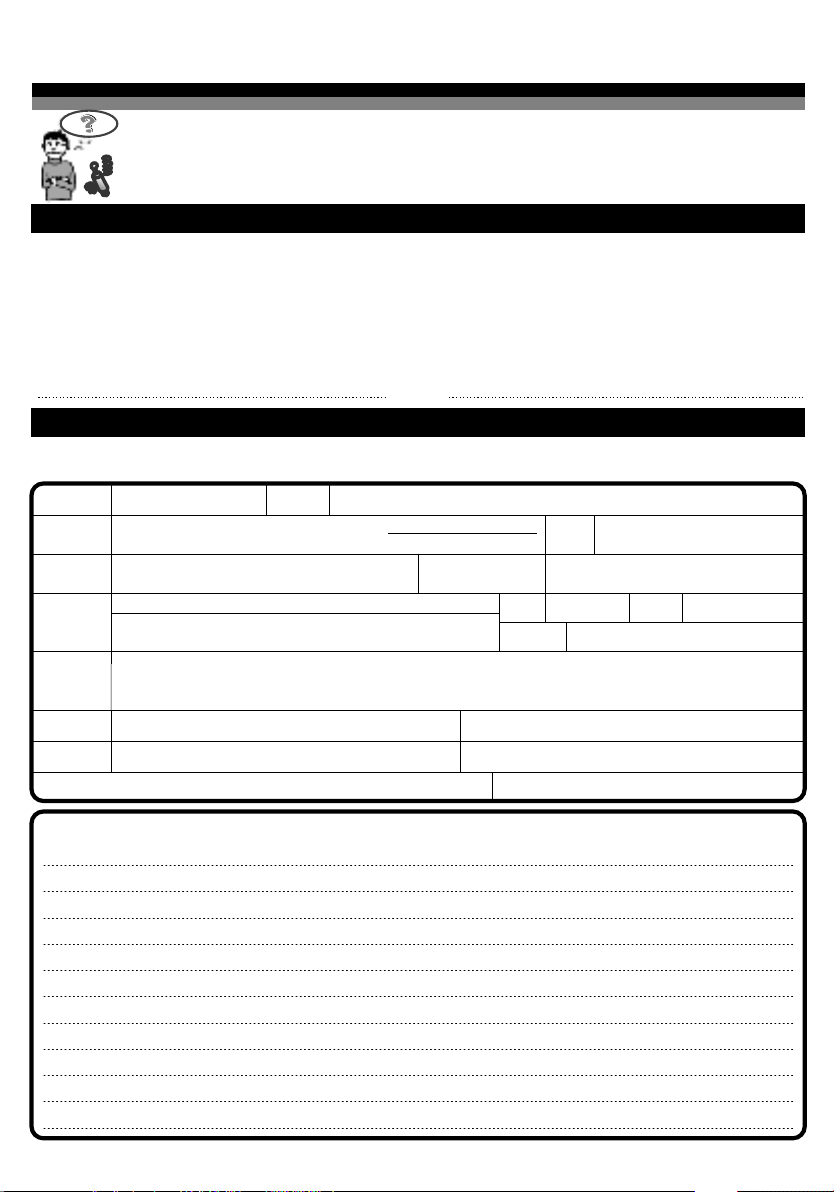
組立や、操作上で不明な点のお問い合わせ方法
これらのサービスは日本国内に限らせて頂きます
組立てたり、操作してみて上手くいかない点などございましたら、ご購入いただいた
販売店または、京商ユーザー相談室へお問い合わせください。
京商ユーザー相談室へお問い合わせの際は、お電話いただくか、下記のお問い合わせ
用紙に必要事項をご記入のうえ、
京商へのお問い合わせ先→「京商ユーザー相談室」
京商にお問い合わせの際は、「京商ユーザー相談室」にご連絡ください。
お問い合わせの際は、お手元に商品や組立/取扱説明書をご用意のうえ、組立/取扱説明書のページ数,行程番号,部品番
号を用いるなど、なるべく具体的にお知らせください。
電話でのお問い合わせ:
ファックス
でのお問い合わせ:
郵便でのお問い合わせ:
046‑229‑4115
046‑229‑1501
〒243‑0034神奈川県厚木市船子153京商株式会社ユーザー相談室
お問い合わせ用紙
お問い合わせ用紙は、フ ァ ッ ク ス または郵便でお送りください。回答方法は、京商で検討のうえ考慮させて頂きます。
郵送の場合は、お問い合わせ用紙のコピーを保管してください。
品番
ご購入店
ご使用
プロポ
ご氏名
ご自宅
住所
ご自宅の
連絡先
平日の昼間に
可能な連絡先
月曜〜金曜(祝祭日を除く)10:00〜18:00で電話連絡可能な時間帯: 頃
No.XXXXX
店名
メーカー名 商品名
フリガナ
〒___−____
電話 ( )
電話 ( )
商品名
()電話
都道
府県
ファックス
電話でのお問い合わせは、月曜〜金曜(祝祭日を除く)10:00〜18:00。
ファックスでは、24時間お問い合わせの受付をして居ります。回答は、翌営業日
以降となる場合があります。営業日:月曜〜金曜(祝祭日を除く)
キリトリ線
または郵便でお送りください。
ご使用の
XXXXXXXXXX
都道府県
モーター
ファックス
ファックス
XXXXXXXXXXXXXXX
ご購入
年月日
性別
男/女
生年月日
( )
( )
受付No.(京商記入欄)
大正/昭和/平成
平成 年 月 日
R/C歴
約年
年月日
お問い合わせご記入欄:
組立/取扱説明書のページ数や部品番号(キーNo.)を用いるなど、なるべく具体的にご記入ください。
 Loading...